18
3Dsimo Kit Device: 3Dsimo Kit Rev. 1.00 Page 1/18 3Dsimo Kit Revision table Revision Description Date Author 1.00 Initial version of the document xx. xx. 2016 Created by: Ondřej Nentvich
3Dsimo Kit Device: 3Dsimo Kit Rev. 1.00 Page 1/18
3Dsimo Kit Revision table
Revision Description Date Author
1.00 Initial version of the document xx. xx. 2016
Created by: Ondřej Nentvich

3Dsimo Kit Device: 3Dsimo Kit Rev. 1.00 Page 2/18
1 Table of contents 1 Table of contents 2 Main chapter 3 Next headings
3.1 Part 1 3.2 Part 2

3Dsimo Kit Device: 3Dsimo Kit Rev. 1.00 Page 3/18
2 Introduction The construction set 3Dsimo Kit is an open source project, which intends to familiarize people with a wide range of possibilities when drawing with a 3D pen and give an opportunity to the user to modify and expand functions of the pen according to their preferences. Considering that the base version of code is available through GitHub https://github.com/3dsimo, anyone with minimal programming skills can modify it. The heart of the Kit a is slightly modified Arduino Nano-like board, which controls the whole board and functions like material extrusion after heating up the heating element to the temperature set precisely by a PID regulator or displaying the status information on the OLED display. Out of the box, two pre-set profiles can be set for ABS and PLA and more user material profiles can be added to the code.
3Dsimo Kit Device: 3Dsimo Kit Rev. 1.00 Page 4/18
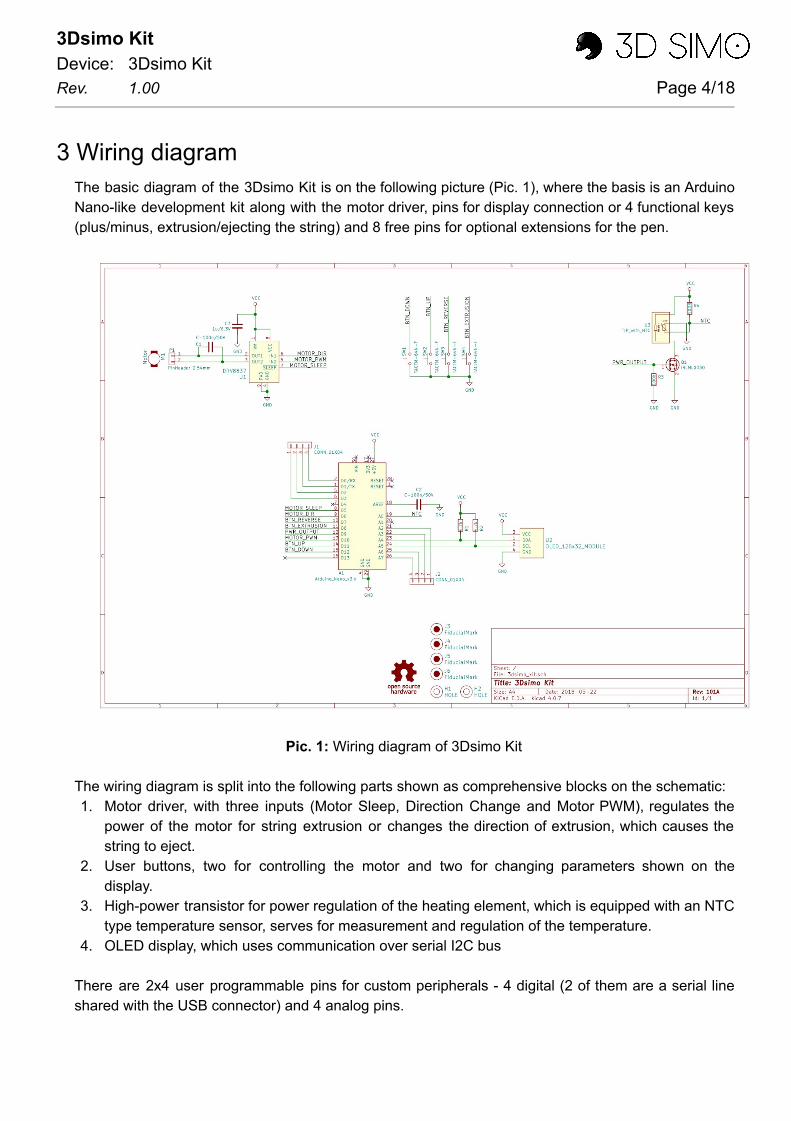
3 Wiring diagram The basic diagram of the 3Dsimo Kit is on the following picture (Pic. 1), where the basis is an Arduino Nano-like development kit along with the motor driver, pins for display connection or 4 functional keys (plus/minus, extrusion/ejecting the string) and 8 free pins for optional extensions for the pen.
Pic. 1: Wiring diagram of 3Dsimo Kit
The wiring diagram is split into the following parts shown as comprehensive blocks on the schematic: 1. Motor driver, with three inputs (Motor Sleep, Direction Change and Motor PWM), regulates the
power of the motor for string extrusion or changes the direction of extrusion, which causes the string to eject.
2. User buttons, two for controlling the motor and two for changing parameters shown on the display.
3. High-power transistor for power regulation of the heating element, which is equipped with an NTC type temperature sensor, serves for measurement and regulation of the temperature.
4. OLED display, which uses communication over serial I2C bus
There are 2x4 user programmable pins for custom peripherals - 4 digital (2 of them are a serial line shared with the USB connector) and 4 analog pins.

3Dsimo Kit Device: 3Dsimo Kit Rev. 1.00 Page 5/18
The extension board shown in Pic. 1 is made in KiCAD, which can be downloaded for free on kicad-pcb.org for a variety of operating systems. All production materials, schematics and the PCB can be found on https://github.com/3dsimo/3dsimo_kit .
3.1 Modification of Arduino Nano-like board To allow heating of the nozzle with enough power, the diode at the miniUSB input must be replaced with interconnect (0 Ohm resistor). The placement of the diode is shown (red) in the following picture. If this modification is not performed, the diode will overload and burn and the device would become non-functional. The board, which is included in the 3Dsimo Kit, already has this modification.
Pic. 2: Placement of the input diode, shown already replaced with a 0 Ohm resistor

3Dsimo Kit Device: 3Dsimo Kit Rev. 1.00 Page 6/18
4 Code for 3Dsimo Kit The code for 3Dsimo Kit is written in the Arduino environment, which can be downloaded for free on arduino.cc in the Software section. It is a C/C++ programming language in which the whole program is written. The base version of the program is already programed in the microcontroller and its source codes are available on our github.com .
4.1 Preparation and installation The base version of the code for Arduino Nano is written in a C/C++ language and the Arduino IDE environment. The development environment can be downloaded for free on arduino.cc in the software section. During the installation process you are asked to install the driver as well, it is recommended to do so. Otherwise you need to install it later. After the installation you still need to add 2 plugins called “SSD1306” and “EveryTimer” for a correct compilation of the code. You can add plugins in Sketch => Include Library => Manage Libraries , where a dialog window pops up, as shown in Pic. 3. Write SSD1306 in the search box on the top right and the appropriate library will be selected which is highlighted red in Pic. 3. Select the latest version and press “Install”. “EveryTimer” is installed in the same manner.
Pic. 3: Adding ssd1306 plugin into the Arduino IDE

3Dsimo Kit Device: 3Dsimo Kit Rev. 1.00 Page 7/18
4.2 Setting up the IDE Before the first compilation, it is necessary to choose the right development board - Arduino Nano at Tools => Board => Arduino Nano , as shown in Pic. 4. The next step is choosing the right processor. Our board is shipped with ATmega168, which you have to choose as in Pic. 5. After selecting the right board, you need to select the appropriate port, COM3 in our case as seen on Pic. 6.
Pic. 4: Choice of the development kit(Arduino Nano)
Pic. 5: Choice of the right processor(ATmega168)

3Dsimo Kit Device: 3Dsimo Kit Rev. 1.00 Page 8/18
Pic. 6: Choice of the communication port(COM3)
4.3 First compilation You can find base code on github.com or down below, it can be modified without restrictions (although, it must fit inside the device’s memory). After downloading, run Arduino IDE and open the file using File => Open, choose 3DsimoKit.ino on your disc and press open. After that the code shows up in the editor, which is structured into several sections and the executive part is then split into several functions. The button which is labeled as “1” in Pic. 7 checks if the program is written correctly. The user can see information of how much memory is taken, as shown on the status bar. Button “2” uploads the successfully compiled program to the microcontroller. The upload takes between 10-20s.

3Dsimo Kit Device: 3Dsimo Kit Rev. 1.00 Page 9/18
Pic. 7: Verification (1) and compilation of the code (2)
4.4 Base code # include "ssd1306.h" # include "nano_gfx.h" # include <EveryTimer.h> /* * define Input/Outputs */ # define LED_NANO 13 // LED placed on Arduino Nano board # define BTN_UP 11 // controlling button UP/PLUS # define BTN_DOWN 12 // controlling button DOWN/MINUS # define BTN_EXT 8 // button for material extrusion # define BTN_REV 7 // button for material reverse # define MOTOR_DIR 6 // motor direction output # define MOTOR_PWM 10 // motor PWM output for power driving # define MOTOR_SLEEP 5 # define HEATER_EN 9 // heater/power output

3Dsimo Kit Device: 3Dsimo Kit Rev. 1.00 Page 10/18
# define TEMP_IN A0 // temperature measure ADC input /* * define heating states */ enum { STATE_HEATING, STATE_COOLING, STATE_READY, } STATE_e; enum { MOTOR_STOP, MOTOR_EXTRUSION, MOTOR_REVERSE, MOTOR_CONTINUOUS, MOTOR_REVERSE_AFTER_EXTRUSION } MOTOR_STATE_e; /* * define structure for the material list */ typedef struct { int temperature; int motorSpeed; char * materialName; } profile_t ; /* * define material profiles */ const profile_t materials[] PROGMEM = { // {temperature (deg. C), motorSpeed (%), materialName} { 225 , 25 , "ABS"}, { 210 , 40 , "PLA"} }; /* * define number of materials in list and variables */ # define MATERIAL_COUNT 2 int materialID = 0 ; // chosen material profile int setTemperature = 225 ; // set heater temperature int setMotorSpeed = 60 ; // set motor speed in % /*

3Dsimo Kit Device: 3Dsimo Kit Rev. 1.00 Page 11/18
* create timer for main loop */ EveryTimer timer; /* * function for measuring temperature of the tip */ int getTemperature (){ // get temperature in deg. Celsius from ADU value // set reference for ADC to power supply (5V) analogReference (DEFAULT); int avgTemp = 0 ; for ( int i = 0 ; i< 16 ; i++){ avgTemp += analogRead (TEMP_IN); } // read averaged analog value of temperature long tempADU = avgTemp >> 4 ; // convert ADU into temperature // constants could slightly change for different ceramic tip tempADU -= 1692 ; // increase this value when temperature is too high and vice versa tempADU <<= 7 ; tempADU /= (- 557 ); return tempADU; } /* * load actual material profile */ void loadMaterial ( int id){ profile_t profile; char text[ 10 ]; // load material profile from PROGMEM and assign variables memcpy_P (&profile, &materials[id], sizeof ( profile_t )); setTemperature = profile.temperature; setMotorSpeed = profile.motorSpeed; // clear display and show all information sprintf (text, "%d %%", setMotorSpeed); ssd1306_clearScreen (); ssd1306_setFixedFont (ssd1306xled_font6x8); ssd1306_printFixedN ( 0 , 0 , profile.materialName, STYLE_NORMAL, FONT_SIZE_2X); ssd1306_printFixedN ( 80 , 0 , text, STYLE_NORMAL, FONT_SIZE_2X); }

3Dsimo Kit Device: 3Dsimo Kit Rev. 1.00 Page 12/18
/* * PID variables and constants for tuning */ float Kp= 15 , Ki= 1 , Kd= 1.0 , dT = 0.1 , Hz= 10 ; /* * basic PID routine to get output value */ int getPIDoutput ( int setPoint, int actualValue, int maxValue, int minValue){ static float sumE = 0 ; static int16_t error, previousError = 0 ; float outputValue; static int pidAvg[ 4 ] = { 0 , 0 , 0 , 0 }; static int pidAvgIndex = 0 ; // reset sumE when actualValue exceed setPoint by 5 static int noWaitCycles = 0 ; if (actualValue > setPoint + 5 ){ ++noWaitCycles; if (noWaitCycles >= 30 ){ sumE = 100 ; noWaitCycles = 0 ; } } else { noWaitCycles = 0 ; } // PID implementation error = setPoint - actualValue; sumE += ( float ) error * dT; outputValue = Kp*error + Ki*sumE + Kd*(error - previousError)/dT; previousError = error; // restrict output PID value into range between minValue and maxValue if (outputValue > maxValue) outputValue = maxValue; else if (outputValue < minValue) outputValue = minValue; // store n output values for averaging pidAvg[pidAvgIndex] = outputValue; ++pidAvgIndex; if (pidAvgIndex >= 4 ) pidAvgIndex = 0 ;

3Dsimo Kit Device: 3Dsimo Kit Rev. 1.00 Page 13/18
// average last n output values int sumPIDavg = 0 ; for (int i = 0 ; i< 4 ; i++){ sumPIDavg += pidAvg[i]; } sumPIDavg >>= 2 ; return sumPIDavg; } # define NO_AVERAGES_VALUES 64 /* * heating function for heater driving by PID regulator */ int heating (){ static int tempAvg[NO_AVERAGES_VALUES]; // temperature array for averaging it static int tempAvgIter = 0 ; // current index in temperature array static char firstTime = 0 ; // if is 1, this function ran at least one time char text[ 30 ]; // buffer for text // variables initialization if (!firstTime){ memset(tempAvg, 0 , sizeof (tempAvg)* sizeof ( int )); firstTime = 1 ; } // resolve PID value for heater PWM int temperature = getTemperature (); int valuePID = getPIDoutput (setTemperature, temperature, 255 , 0 ); analogWrite (HEATER_EN, valuePID); // save actual temperature for averaging tempAvg[tempAvgIter] = temperature; if (++tempAvgIter>=NO_AVERAGES_VALUES) tempAvgIter = 0 ; // make temperature average from NO_AVERAGES_VALUES int sumTemp = 0 ; for ( int i = 0; i<NO_AVERAGES_VALUES; i++){ sumTemp += tempAvg[i]; } sumTemp /= NO_AVERAGES_VALUES; // show on display actual and preset temperature

3Dsimo Kit Device: 3Dsimo Kit Rev. 1.00 Page 14/18
sprintf (text, "%3d/%3dC", sumTemp, setTemperature); ssd1306_setFixedFont (ssd1306xled_font6x8); ssd1306_printFixedN ( 0 , 16 , text, STYLE_NORMAL, FONT_SIZE_2X); /* * debug output into display and to serial */ /* sprintf(text, "PID=%03d", valuePID); ssd1306_printFixed(0, 0, text, STYLE_NORMAL); sprintf(text, "%3d;%3d", valuePID, sumTemp); Serial.println(text); */ return sumTemp; } /* * call every 50ms timer for buttons action and heating * execute buttons function according to heating state * change material profile */ void timerAction (){ static int elapsedTime = 0 ; static char statusHeating = STATE_HEATING; static char stateMotor = MOTOR_STOP, lastMotorState = MOTOR_STOP; static int timeMotorReverse = 0 ; // decide temperature state (heating, cooling, ready) and show it on display if (++elapsedTime== 2 ){ // 100ms elapsedTime = 0 ; int actualTemperature = heating (); // tolerant zone where temperature is ABOVE preset temperature, // but it is possible to do extrusion/reverse if (actualTemperature > setTemperature + 10 ){ statusHeating = STATE_COOLING; ssd1306_printFixedN ( 116 , 16 , "C", STYLE_NORMAL, FONT_SIZE_2X); } // tolerant zone where temperature is OK for extrusion/reverse else if (actualTemperature > setTemperature - 10 ){ statusHeating = STATE_READY; ssd1306_printFixedN ( 116 , 16 , "R", STYLE_NORMAL, FONT_SIZE_2X); digitalWrite (LED_NANO, HIGH); // turn the LED on (HIGH is the voltage level) }

3Dsimo Kit Device: 3Dsimo Kit Rev. 1.00 Page 15/18
// tolerant zone where temperature is LOW for extrusion/reverse else { statusHeating = STATE_HEATING; ssd1306_printFixedN ( 116 , 16 , "H", STYLE_NORMAL, FONT_SIZE_2X);
digitalWrite (LED_NANO, !digitalRead(LED_NANO)); // turn the LED on (HIGH is the voltage level) } } // assign functions according to heating state (mainly button function) switch (statusHeating){ case STATE_COOLING: case STATE_READY:{ // button EXTRUSION is pressed, extrude material if (! digitalRead (BTN_EXT) && digitalRead (BTN_REV)){ stateMotor = MOTOR_EXTRUSION; } // button REVERSE is pressed, retract material else if ( digitalRead (BTN_EXT) && ! digitalRead (BTN_REV)){ stateMotor = MOTOR_REVERSE; timeMotorReverse = 400 ; // reverse time is 50ms * timeMotorReverse (400 = 20s) } // both buttons are pressed, motor stopped else if (! digitalRead (BTN_EXT) && ! digitalRead (BTN_REV)){ stateMotor = MOTOR_STOP; } // not buttons are pressed else { if (lastMotorState == MOTOR_EXTRUSION){ stateMotor = MOTOR_REVERSE_AFTER_EXTRUSION; timeMotorReverse = 20 ; // reverse time is 50ms * timeMotorReverse (20 = 1s) } } break ; } case STATE_HEATING: // if happened that heater has so low temperature, motor stop digitalWrite (MOTOR_DIR, LOW); analogWrite (MOTOR_PWM, 0 ); stateMotor = MOTOR_STOP; break ; }
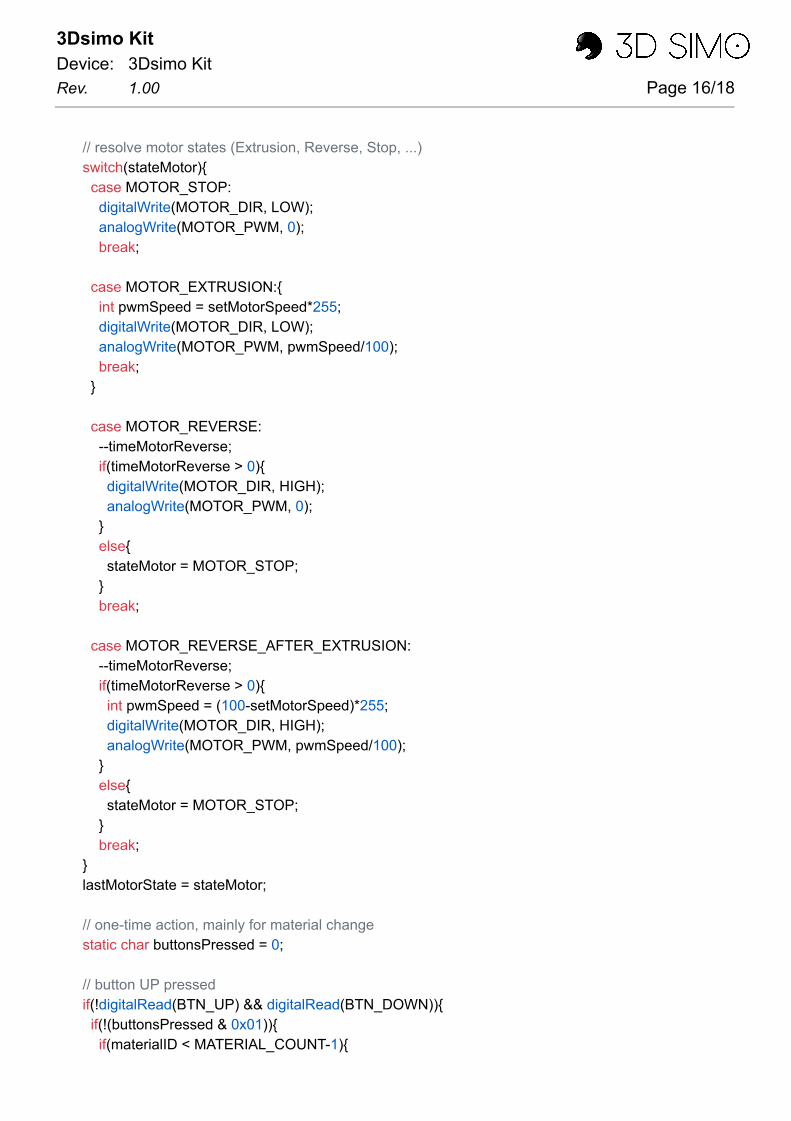
3Dsimo Kit Device: 3Dsimo Kit Rev. 1.00 Page 16/18
// resolve motor states (Extrusion, Reverse, Stop, ...) switch (stateMotor){ case MOTOR_STOP: digitalWrite (MOTOR_DIR, LOW); analogWrite (MOTOR_PWM, 0 ); break ; case MOTOR_EXTRUSION:{ int pwmSpeed = setMotorSpeed* 255 ; digitalWrite (MOTOR_DIR, LOW); analogWrite (MOTOR_PWM, pwmSpeed/ 100 ); break ; } case MOTOR_REVERSE: --timeMotorReverse; if (timeMotorReverse > 0 ){ digitalWrite (MOTOR_DIR, HIGH); analogWrite (MOTOR_PWM, 0 ); } else { stateMotor = MOTOR_STOP; } break ; case MOTOR_REVERSE_AFTER_EXTRUSION: --timeMotorReverse; if (timeMotorReverse > 0 ){ int pwmSpeed = ( 100 -setMotorSpeed)* 255 ; digitalWrite (MOTOR_DIR, HIGH); analogWrite (MOTOR_PWM, pwmSpeed/ 100 ); } else { stateMotor = MOTOR_STOP; } break ; } lastMotorState = stateMotor; // one-time action, mainly for material change static char buttonsPressed = 0 ; // button UP pressed if (! digitalRead (BTN_UP) && digitalRead (BTN_DOWN)){ if (!(buttonsPressed & 0x01 )){ if (materialID < MATERIAL_COUNT- 1 ){

3Dsimo Kit Device: 3Dsimo Kit Rev. 1.00 Page 17/18
++materialID; } else { materialID = 0 ; } loadMaterial (materialID); } // save that this button UP was already pressed and used buttonsPressed |= 0x01 ; } else { // save that this button UP was released buttonsPressed &= 0xFE ; } // button DOWN pressed if ( digitalRead (BTN_UP) && ! digitalRead (BTN_DOWN)){ if (!(buttonsPressed & 0x02 )){ if (materialID > 0 ){ --materialID; } else { materialID = MATERIAL_COUNT- 1 ; } loadMaterial(materialID); } // save that this button DOWN was already pressed and used buttonsPressed |= 0x02 ; } else { // save that this button DOWN was released buttonsPressed &= 0xFD ; } } /* * GPIO, OLED initialize * load material profile * preset timer */ void setup () { // initialize OLED display ssd1306_128x32_i2c_init (); ssd1306_clearScreen ();
3Dsimo Kit Device: 3Dsimo Kit Rev. 1.00 Page 18/18
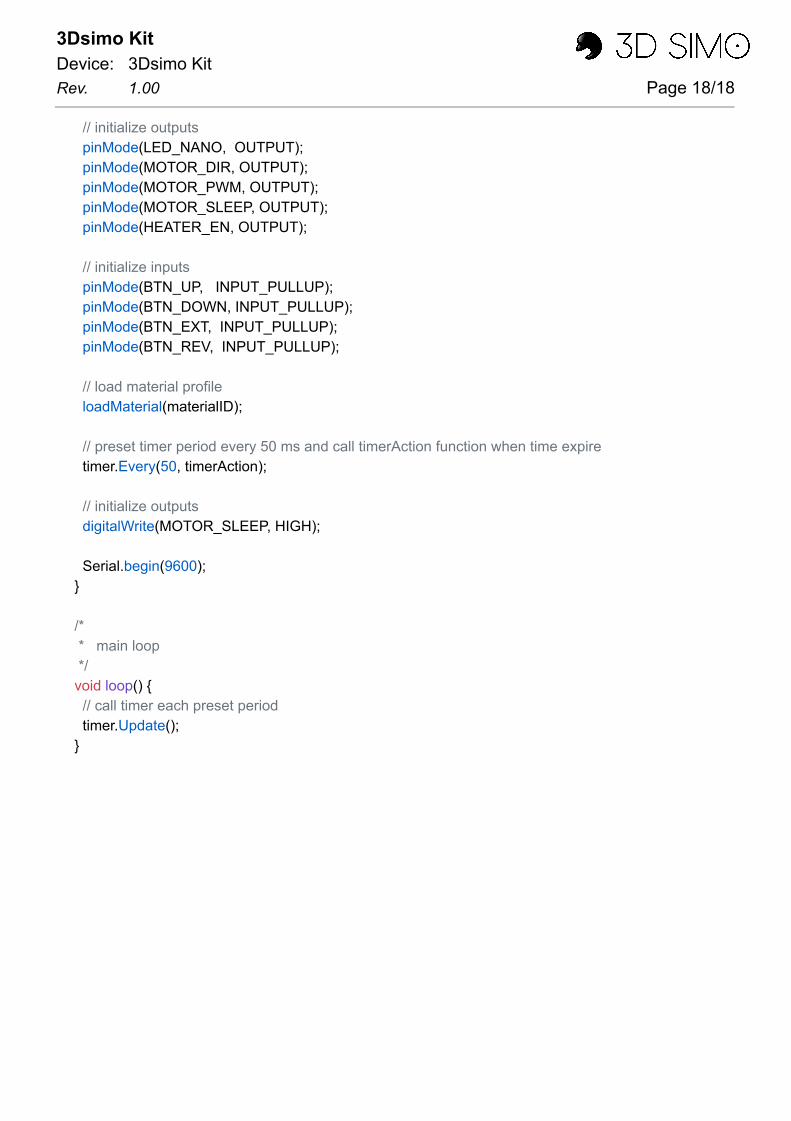
// initialize outputs pinMode (LED_NANO, OUTPUT); pinMode (MOTOR_DIR, OUTPUT); pinMode (MOTOR_PWM, OUTPUT); pinMode (MOTOR_SLEEP, OUTPUT); pinMode (HEATER_EN, OUTPUT); // initialize inputs pinMode (BTN_UP, INPUT_PULLUP); pinMode (BTN_DOWN, INPUT_PULLUP); pinMode (BTN_EXT, INPUT_PULLUP); pinMode (BTN_REV, INPUT_PULLUP); // load material profile loadMaterial (materialID); // preset timer period every 50 ms and call timerAction function when time expire timer. Every ( 50 , timerAction); // initialize outputs digitalWrite (MOTOR_SLEEP, HIGH); Serial. begin ( 9600 ); } /* * main loop */ void loop () { // call timer each preset period timer. Update (); }


![Atmel-ICE (USER GUIDE) - cdn-reichelt.de · Atmel-ICE [USER GUIDE] 42330A-MCU-07/2014 6 2. Getting Started with the Atmel-ICE 2.1 Full Kit Contents The Atmel-ICE full kit contains](https://static.documents.pub/doc/80x56/5e15ed0a41d34769f84a95f1/atmel-ice-user-guide-cdn-atmel-ice-user-guide-42330a-mcu-072014-6-2-getting.jpg)

![Untitled-1 [cdn-reichelt.de]€¦ · Title: Untitled-1 Author: Marek Cyrankowski Created Date: 4/17/2015 2:00:50 PM](https://static.documents.pub/doc/80x56/5f0745577e708231d41c2844/untitled-1-cdn-title-untitled-1-author-marek-cyrankowski-created-date-4172015.jpg)


