36
3 Filtek ™ P60 Posterior Restorative System Technical Product Profile

13
Filtek ™ P60Posterior Restorative System
Technical Product Profile

2

3Table of Contents
Background .................................................................................................................5
The Development Process...........................................................................................7
Chemistry .............................................................................................................7
Filler .....................................................................................................................9
Final Specifications............................................................................................10
Product Description................................................................................................... 11
Indications for Use ....................................................................................................12
Technique Guides ......................................................................................................13
Customer Evaluations ...............................................................................................16
Global Simulated Operatory ..............................................................................16
Field Evaluation .................................................................................................17
Physical Properties ....................................................................................................18
Materials.............................................................................................................18
Volumetric Shrinkage.........................................................................................18
Post-Gel Shrinkage Strain..................................................................................19
Fracture Toughness ............................................................................................20
Flexural Modulus ...............................................................................................20
Flexural Strength................................................................................................21
Compressive and Diametral Tensile Strength ...................................................21
Wear ...................................................................................................................22
Particle Size Distribution ...................................................................................23
Technique ..................................................................................................................25
Cure Depth .........................................................................................................25
ISO 4049 Testing ...............................................................................................25
Barcol Hardness .................................................................................................26
Bond Strength ....................................................................................................27
Cure Depth Summary ........................................................................................27
Technique Comparison ......................................................................................28
Instructions For Use ..................................................................................................31

4

5BackgroundThe market for filling materials continues to proceed through an evolutionary processthat is fueled by a combination of factors including:
• the desire for new materials by dentists
• the inability of dental materials to provide consistent, esthetic restorations
• the efforts of dental manufacturers to optimize composite properties mostdesired by dentists
• the dentists’ increased understanding of the materials’ performancecharacteristics
• the changes in the industry environment including reimbursement changesand patient demands.
Composite materials have been used in dental practices to restore teeth since 3M firstintroduced a composite to the dental market in 1964. The early materials were chemicallycured. These tooth-colored materials provided better esthetics than amalgam. Howevermuch had to be learned about the physical properties that were required to survive in theoral environment. High wear, color changes, and lack of bonding to tooth surfaces weresome of the issues associated with these early materials.
Significant advances have been made since these early materials which have improvedupon many of the early materials’ weaknesses. Adhesive systems have been developedthat adhere well not only to enamel (with acid etching), but to moist dentin even whenplaced in a humid environment. Composites have been made stronger, more wear resis-tant and more color stable. Both types of materials (composites and adhesives) weremade curable on demand with high intensity lights that emit light in the wavelengthrange of 400-500 nm.
Prior to the late 1980’s composites were developed that were specific to restoration type,i.e. materials were designed for anterior or posterior use. The main distinction betweenthese materials was the high esthetic requirements for anterior use vs. the high strengthrequirement for posterior use. One material was not available that offered both. The gapbetween the two types of materials was very wide.
One of 3M’s first entries in the posterior composite marketplace was P-10™ Resin BondedCeramic (RBC). This material reflected the state of the art in self-cured (auto-cured) com-posites. In 1984 3M introduced a light-cured posterior composite, P-30™ Light Cure ResinBonded Ceramic (RBC). P-30 RBC restorative also utilized resin bonded ceramic technol-ogy to produce a material that was more esthetic than amalgam, strong, and wear resis-tant. Many P-10 RBC and P-30 RBC restorations are still functioning clinically. P-50™
Light Cure Resin Bonded Ceramic became available in 1987 replacing P-30 RBC restor-ative. It employed a high filler loading of a proprietary synthetic filler. P-50 RBC offereda strong, wear resistant, moderately esthetic composite to dentists. The clinical success ofP-50 RBC has been documented with posterior clinical studies that supported its receiptof the ADA Seal of Acceptance.

6In the late 1980’s composite materials were developed to be used both for anterior andposterior restorations. These materials narrowed the gaps between esthetics and strength.Dentists were now able to use one composite material for all of their composite restor-ative use. The reduction in inventory (one set of shades) and ease of material selectionwere additional benefits realized by the dental practitioner.
3M entered this “universal composite” marketplace in 1992 with 3M™ Z100™ Restorative.Z100 restorative provided dentists with a material that provided very good esthetics,strength and wear resistance. Three clinical studies have documented the clinical success.Two of the studies, conducted at Creighton University and the University of Manitoba,examined the overall clinical performance over a 4-year period. Both of these studiesconcluded that Z100 restorative is a viable and clinically acceptable material for use inposterior restorations.
The third study, conducted at Catholic University at Leuven, closely examined the wearof the material using a computerized measuring technique accurate to within 1 micron.The 4-year clinical results of contact-free occlusal areas and occlusal contact areas dem-onstrated this material has wear similar to amalgam. Additionally, the wear rate of Z100restorative on enamel in occlusal contact areas is comparable to the occlusal contact wearfor enamel on enamel. In an ideal situation, the wear of material from a composite restor-ative should match that of enamel.
Other studies by independent research organizations (who use a wide variety of practitio-ners to conduct their studies) have confirmed the favorable results for posterior restora-tions of the controlled clinical studies. Anterior 5-year clinical results were also reportedby one of these organizations. Again the results indicated the high level of patient anddentist satisfaction with the performance of Z100 restorative (The Dental Advisor,August, 1998, Vol. 15, No. 6).
The current market is beginning to demand separate materials for the anterior and theposterior. Some dentists are demanding better esthetics in anterior restorations than iscurrently provided by many universal materials. In the last two years, composites havebeen introduced that claim to help the dentist with some of the problem areas associatedwith placing posterior composites, e.g., formation of interproximal contacts and easeof placement. Hence, the development and introduction of 3M™ Filtek™ P60 PosteriorRestorative.

7The Development ProcessThree years ago, a survey was sent to 3M™ Z100™ Restorative users. The participantswere asked to rank 10 attributes for a material used for posterior restorations. The resultswere not surprising and confirmed previously known restorative requirements forposterior use.
For posterior applications, durability and wear resistance were considered the most impor-tant, followed by handling and shrinkage. The other attributes could be grouped in onefinal category.
In subsequent research, dentists using Z100 restorative were asked what improvementscould be made to Z100 to enhance the clinical performance. The top four responses werereduced shrinkage, better initial and sustained polish, improved marginal integrity andreduced post-operative sensitivity.
Chemistry
Examination of the Z100 composition established the belief that modifying the resinsystem could result in enhanced properties. TheZ100 resin system consists of BIS-GMA(Bisphenol A diglycidyl ether dimethacrylate) andTEGDMA (tri[ethylene glycol] dimethacrylate).
The high concentration of a low molecular weight component, TEGDMA resulted in asystem that offered the following advantages:
• The resultant high number of double bondsper unit of weight on a flexible backboneafforded the opportunity to have a highconversion of double bonds during polymer-ization.
• The low viscosity permits higher filler loading than with BIS-GMA alone.
• The high degree of crosslinking and compact molecule creates a very hardresin matrix.
O O
OH
O
OO
OH
O
bis-GMA
O
O
O
O
OO
TEGDMA
Wear Resistance
Shrinkage
Polish
Multiple Opacities
Low Modulus
Handling
Fluoride Release
Esthetics
Durability
Dual Cure
0 1 2 3 4 5 6 7 8 9 101 is most important; 10 is least important
Figure 1.Importance

8However, the high TEGDMA concentration also allows for some opportunities forimprovements.
• The relatively low molecular weight of TEGDMA contributes to the aging ofan uncured composite.
• The low molecular weight and resultant high number of double bonds per unit ofweight creates a high degree of crosslinking creating a very rigid, stiff compositewith a relatively high level of shrinkage.
• TEGDMA is somewhat hydrophilic. Fluctuations in the moisture content of the pastecan contribute to thickening and softening of the uncured paste. These fluctuationsdepend on the moisture content of the surrounding air under extreme conditions.
The new resin system of 3M™ Filtek™ P60 Posterior Restorative consists of 3 major com-ponents. In Filtek P60 restorative, the majority of TEGDMA has been replaced with ablend of UDMA (urethane dimethacrylate) and Bis-EMA(6 )1 (Bisphenol A polyetheyleneglycol diether dimethacrylate). Both of theseresins are higher molecular weight and thereforehave fewer double bonds per unit of weight. Thehigh molecular weight materials also impact themeasurable viscosity. The higher molecular weight of the resin results in less shrinkage,reduced aging and a slightly softer resin matrix. Additionally these resins impart a greaterhydrophobicity and are less sensitive to changes in atmospheric moisture.
The final resin composition was determined on the basis of physical properties, includingcompressive and diametral tensile strengths, shrinkage, wear resistance and customerhandling preferences. A Simulated Operatory (handling evaluation in heated typodonts)was conducted to determine which resin system produced the most acceptable handling.By combining the data from all tests, a resin composition which optimized the propertycombination was chosen.
The reduction in shrinkage due to the new resin system was demonstrated using a mer-cury dilatometer. The actual volumetric shrinkage is measured via this method. In thistest, a disc of uncured composite is placed on a glass stopper. This assembly is insertedinto a mercury-filled chamber and polymerized through a window with a curing light.The curing light intensity is also measured through the window to determine the intensityof light reaching the sample. The volume change is recorded electronically over time.The final volume is measured and then the per cent volumetric shrinkage is calculated.
In this example, the samples wereexposed for 40 seconds to a lightwith an intensity of approxi-mately 400mW/cm2. Filtek P60restorative exhibited approxi-mately 25% reduction of totalvolumetric shrinkage when com-pared to Z100 restorative at both 5and 30 minutes.
OO
ONH
O
OO
O
NH
O
UDMA
OOO
O
OO O
O
OO
bis-EMA6
Filtek P60 Z1000
1
2
3
%
5 Minutes
30 Minutes
Figure 2.Volumetric Shrinkage
1 Bis-EMA(6) contains, on average, 6 ethylene oxide groups per Bisphenol A grouping.
bis-EMA(6)

9Filler
The filler in 3M™ Filtek™ P60 Posterior Restorative remains essentially the same as the3M™ Z100™ Restorative filler. There have, however, been significant processing changesto maximize filler consistency. The particle size distribution is 0.01µm to 3.5µm with anaverage particle size of 0.6µm.
Using a Coulter® LS Particle Size Analyzer the filler distributions of Z100 restorativeand Filtek P60 restorative were measured. The data was reported based on the numberof particles or the volume the particles occupy at each particle diameter. Both provide adifferent insight into the distribution. The number of particles per diameter indicates thefrequency a large particle may be encountered. One large particle can have the same vol-ume of numerous small particles. Both charts report cumulative data, that is, the numberor volume of particles at or below a specific diameter.
The data shows that the particle size distribution for Filtek P60 restorative contains alarger number of finer particles than found in Z100 restorative. The photos below weregenerated using scanning electron microscopy. Cured composite samples were photo-graphed at 2500× magnification. However, even at this magnification the very small fillerparticles cannot be seen. Observation of the photos confirms the similarities between thesize and shapes of Filtek P60 and Z100 restoratives.
Figure 3.Cumulative Particle
Size Distribution
Filtek P60
Z100
Particle Diameter (µm)
Filtek P60
Z100
Particle Diameter (µm)

10
Final Specifications
A global Simulated Operatory was conducted to determine final handling specificationsfor 3M™ Filtek™ P60 Posterior Restorative. One hundred seventeen dentists participatedin a blind study that included three experimental pastes along with SureFil™ (Caulk/Dentsply) and Solitaire™ (Heraeus Kulzer). The dentists participating in this study werescreened on the basis of their universal product usage. During the Simulated Operatorydentists were asked about their awareness and usage of the new posterior products i.e.,SureFil, ALERT™ (Jeneric/Pentron), Solitaire, Definite (Degussa) or Ariston pHc™ (IvoclarVivadent). Forty-two out of the 117 dentists in this research had tried these new productsand 23 out of the 117 are continuing to use these products.
The participants evaluated three of the five pastes placing them in a posterior restorationin a heated mannequin (the dentists were unaware as to which materials they were actu-ally handling). Handling acceptance was determined by simply asking the participants ifthey “liked” or disliked” the handling after placing the material.
In the charts below, the group of bars marked All indicates the results of all of the partici-pants. The group of bars labeled Tried is the results from dentists who have actually triedthe new posterior materials. The bar grouping labeled Use are only the dentists who arecontinuing to use the new posterior materials.
In the chart below, the experimental product formulations are indicated with the numbers246, 247 and 248. The viscosity of the experimental material increases with increasing lotnumber. All lots of the experimental material displayed a very high acceptance. The com-parative handling acceptability generally increases as the population is segmented fromuniversal composite users (All) to dentists that have tried the new posterior products(Try) to those dentists that are continuing to use the new posterior products (Use).
Figure 4.Cross Section SEMs
Figure 5.Handling Acceptance
246 247 248 Solitaire SureFil0
10
20
30
40
50
60
70
80
90
100
% Like
All (117)
Try (42)
Use (23)
Z100 RestorativeFiltek P60 Posterior Restorative

11
All (117) Try (42) Use (23)0
10
20
30
40
50
60
70
% Preferred
Filtek P60
Solitaire
SureFil
Figure 6.Handling Preference
After handling all three materials, dentists were asked which paste was preferred as aposterior restorative material (selecting one out of the three pastes handled). Althoughthere were three experimental products involved in the study, the data presented belowreflects only the experimental materials that are representative of 3M™ Filtek™ P60 Poste-rior Restorative. Examination of the groups of data (All, Try, Use) clearly demonstratesthe presence of the segment of the population that has a predilection for this type of com-posite handling. Additionally, the data shows Filtek P60 restorative is strongly preferredover SureFil™ or Solitaire™ in this segment.
Product DescriptionFiltek P60 posterior restorative is an esthetic light cured, radiopaque composite specifi-cally designed for use in posterior direct or indirect restorations. Bonding to the toothstructure is accomplished by using a dental adhesive system, such as 3M™ Single Bondor 3M™ Scotchbond™ Multi-Purpose Adhesive Systems.
Filtek P60 restorative is packaged in bulk (multi-dose) syringes. Filtek P60 restorativeis available in three of the most frequently requested shades for posterior use that corre-spond to the most commonly used shading system: A3, B2, C2.
The material is incrementally placed and cured in the cavity. The maximum incrementthickness is 2.5mm. Each layer should be cured for 20 seconds.
Figure 7.Adhesion
Scotchbond Multi-Purpose Single Bond0
10
20
30
40
MPa
Dentin
Enamel

12Indications for Use3M™ Filtek™ P60 Posterior Restorative is indicated for use in the following typesof restorations.
• Direct posterior restorations
• Sandwich technique with glass ionomer resin material
• Cusp buildup
• Core buildup
• Splinting
• Indirect posterior restorations including inlays and onlays

13Technique Guides
Direct Posterior Restorations
3M™ Vitrebond™ Light Cure Glass Ionomer Liner/Base3M™ Single Bond Dental Adhesive System3M™ Filtek™ P60 Posterior Restorative
Prepare Tooth and Isolate.Apply liner/base if desired:• Mix a level scoop of Vitrebond powder and
a drop of Vitrebond liquid on a mixing pad.• Apply a thin layer of the liner/base to
dentin surfaces using a ball applicator.• Light cure for 30 seconds.
Etch:• Apply 3M™ Scotchbond™ etchant to enamel
and dentin. Wait 15 seconds. Etchant onVitrebond base is not deleterious.
• Rinse.• Blot excess water, leaving tooth moist.
Bond:• Using a fully saturated brush tip for each
coat, apply 2 consecutive coats of 3MSingle Bond adhesive to enamel and dentin.
• Dry gently for 2-5 seconds.• Light cure for 10 seconds.
Place Restorative:• Place 3M Filtek P60 restorative in incre-
ments less than 2.5mm.• Light cure each increment for 20 seconds.
Finish and Polish:• Finish occlusal surface using an appropriate
finishing instrument.• Finish interproximal surfaces with 3M™
Sof-Lex™ Pop-on™ (extra-thin discs andSof-Lex strips.
Check Occlusion:• Check lateral and centric occlusion.• Adjust if necessary.
Please refer to instructions for more detailed informationas well as precautionary and warranty information.3M Customer Hotline 1-800-634-2249 © 1998 3M

14
3M™ Vitremer™ Core Buildup/Restorative3M™ Single Bond Dental Adhesive System3M™ Filtek™ P60 Posterior Restorative
IndicationsDirect posterior restorations where the benefits of glass ionomers and composite are desired.
Prepare/Prime:Note that this technique is indicated where cavity design allows for a minimum compositerestorative thickness of 2mm on the occlusal surface.
Glass Ionomer/Composite Laminate/Sandwich
• Conservatively prepare the tooth; place matrixbands and wedges.
• Apply Vitremer primer for 30 seconds to alldentin surfaces; air dry.
• Light cure for 20 seconds.
Apply Glass Ionomer:• Mix Vitremer powder and liquid according to
product instructions; back load into delivery tip.• Syringe Vitremer restorative into the prepara-
tion, extending no further than apical to theproximal contact point.
• Light cure for 40 seconds.
Freshen Preparation Margins/Etch:• Using a rotary instrument, remove excess
Vitremer restorative material from enamelmargins and cavity walls that will be bonded.
• Apply 3M™ Scotchbond™ etchant to enameland exposed dentin; wait 15 seconds, thenrinse. Blot excess water, leaving tooth moist.
Bond:• Using a fully saturated brush tip for each coat,
apply 2 consecutive coats of Single Bondadhesive to enamel, dentin and Vitremerrestorative base increment.
• Dry gently for 2-5 seconds.• Light cure for 10 seconds.
Place Restorative:• Place 3M Filtek P60 restorative in increments
less than 2.5mm.• Light cure each increment for 20 seconds.
Finish and Polish:• Finish occlusal surface using an appropriate
finishing instrument.• Finish interproximal surfaces with 3M™ Sof-
Lex™ Pop-on™ extra-thin discs and Sof-Lexstrips.
Check Occlusion:• Check lateral and centric occlusion.• Adjust if necessary.
Please refer to instructions for more detailed informationas well as precautionary and warranty information.3M Customer Hotline 1-800-634-2249 © 1998 3M
15
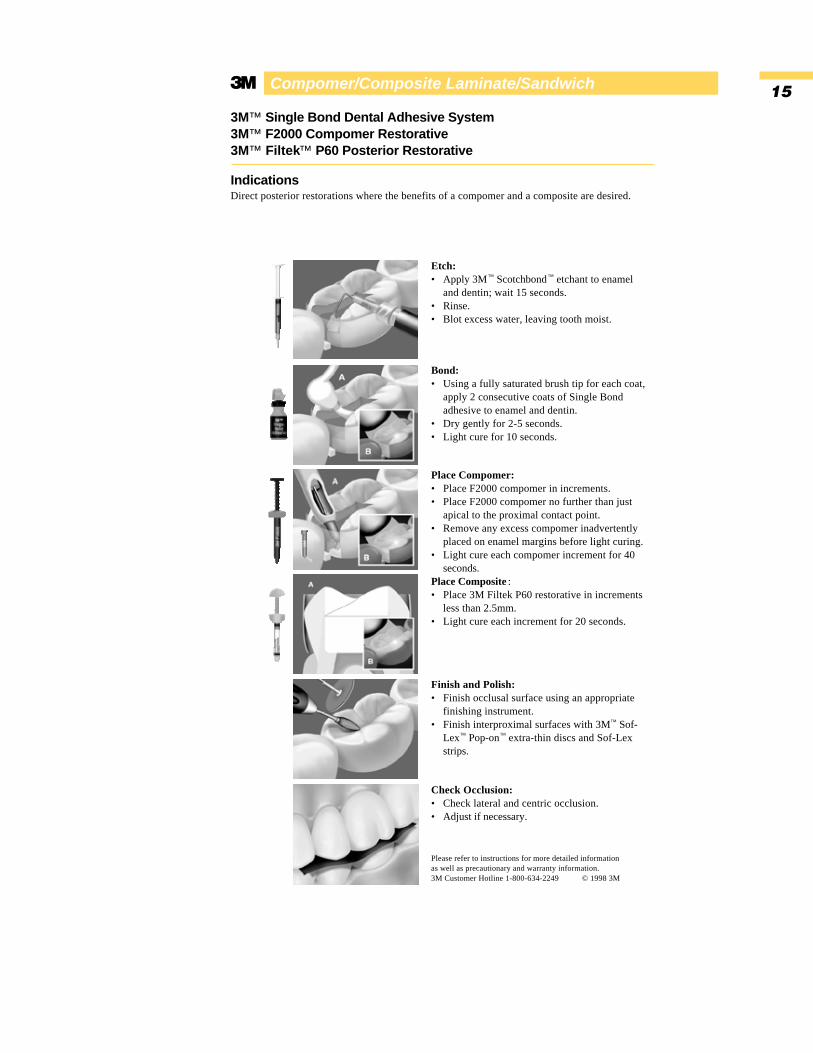
3M™ Single Bond Dental Adhesive System3M™ F2000 Compomer Restorative3M™ Filtek™ P60 Posterior Restorative
IndicationsDirect posterior restorations where the benefits of a compomer and a composite are desired.
Compomer/Composite Laminate/Sandwich
Etch:• Apply 3M™ Scotchbond™ etchant to enamel
and dentin; wait 15 seconds.• Rinse.• Blot excess water, leaving tooth moist.
Bond:• Using a fully saturated brush tip for each coat,
apply 2 consecutive coats of Single Bondadhesive to enamel and dentin.
• Dry gently for 2-5 seconds.• Light cure for 10 seconds.
Place Compomer:• Place F2000 compomer in increments.• Place F2000 compomer no further than just
apical to the proximal contact point.• Remove any excess compomer inadvertently
placed on enamel margins before light curing.• Light cure each compomer increment for 40
seconds.Place Composite :• Place 3M Filtek P60 restorative in increments
less than 2.5mm.• Light cure each increment for 20 seconds.
Finish and Polish:• Finish occlusal surface using an appropriate
finishing instrument.• Finish interproximal surfaces with 3M™ Sof-
Lex™ Pop-on™ extra-thin discs and Sof-Lexstrips.
Check Occlusion:• Check lateral and centric occlusion.• Adjust if necessary.
Please refer to instructions for more detailed informationas well as precautionary and warranty information.3M Customer Hotline 1-800-634-2249 © 1998 3M

16Customer EvaluationsGlobal Simulated Operatory
In the Global Sim Op previously described, the ratings for specific handling attributesfor posterior restorations were also determined. All attributes were rated on a seven-pointscale as seen below.
Stickiness to instrumentNot Sticky Enough 1 2 3 4 5 6 7 Too sticky
Cavity/marginal adaptationDoes not adapt 1 2 3 4 5 6 7 Adapts easily
Ease of contouring or shapingDifficult 1 2 3 4 5 6 7 Easy
PackableDoes not pack 1 2 3 4 5 6 7 Very packable
The ideal stickiness would be a rating of 4. For the other attributes the rating of an idealmaterial would be 7. The graphs below show the average ratings for the three groupingsof dentists (see Final Specification discussion). The average ratings for stickiness, cavityand marginal adaptation for all materials were similar. While the differences between theaverage for ease of shaping and packability may not be statistically significant, the over-all trend (focusing on the segment of the participants desiring this type of handling)indicates that 3M™ Filtek™ P60 Posterior Restorative was rated slightly higher thanSureFil™ and Solitaire™.
Figure 8.Posterior Handling
Sticky Cavity & Marginal
Adaptation
Ease of Shaping
Pack0
1
2
3
4
5
6
7Filtek P60
Solitaire
SureFil
Sticky Cavity & Marginal
Adaptation
Ease of Shaping
Pack0
1
2
3
4
5
6
7
Sticky Cavity & Marginal
Adaptation
Ease of Shaping
Pack0
1
2
3
4
5
6
7
All
Try
Use

17Field Evaluation
This page intentionally left blank.

18Physical PropertiesMaterials
Designation Product Manufacturer
Solitaire Solitaire™ Heraeus Kulzer
SureFil SureFil™ Caulk/Dentsply
ALERT ALERT™ Jeneric/Pentron
Z100 Z100™ Restorative 3M
P60 Filtek™ P60 Posterior Restorative 3M
Shrinkage
Shrinkage of composite is measured in a variety of methods. Some methods measure thetotal amount of shrinkage volumetrically or linearly. The dilatometer method was dis-cussed earlier. Another method measures a portion of the shrinkage that occurs after thecomposite has lost the ability to flow (post-gel).
Volumetric Shrinkage
Another method for determining polymerization shrinkage was described by Watts andCash (Meas. Sci. Technol. 2(1991) 788-794). In this method, a disc shaped test specimenis sandwiched between two glass plates and light cured through the lower rigid plate. Theflexible upper plate is deflected during the polymerization of the test specimen. The lessthe flexible plate bends, the lower the shrink-age. Deflection is measured and recorded asa function of time. Although this processactually measures linear shrinkage, volumet-ric shrinkage was closely approximated dueto the fact that the dimensional changes werelimited to the thickness dimension. Thelower the value, the less the shrinkage.
Transducer
Flexible SlideRigid Slide
Light Source
Deflection
Filtek P60 SureFil0
1
2
3
%
5 minutes
30 minutes
Figure 9.Volumetric Shrinkage
(Dilatometer)
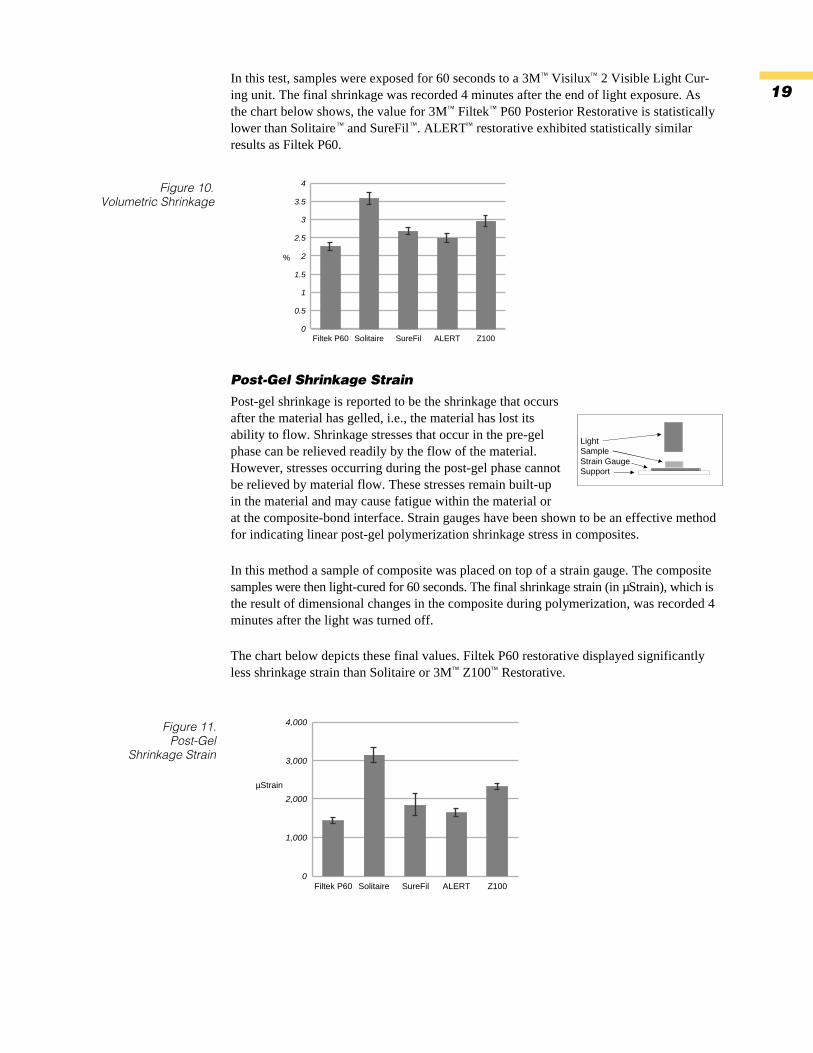
19In this test, samples were exposed for 60 seconds to a 3M™ Visilux™ 2 Visible Light Cur-ing unit. The final shrinkage was recorded 4 minutes after the end of light exposure. Asthe chart below shows, the value for 3M™ Filtek™ P60 Posterior Restorative is statisticallylower than Solitaire™ and SureFil™. ALERT™ restorative exhibited statistically similarresults as Filtek P60.
Post-Gel Shrinkage Strain
Post-gel shrinkage is reported to be the shrinkage that occursafter the material has gelled, i.e., the material has lost itsability to flow. Shrinkage stresses that occur in the pre-gelphase can be relieved readily by the flow of the material.However, stresses occurring during the post-gel phase cannotbe relieved by material flow. These stresses remain built-upin the material and may cause fatigue within the material orat the composite-bond interface. Strain gauges have been shown to be an effective methodfor indicating linear post-gel polymerization shrinkage stress in composites.
In this method a sample of composite was placed on top of a strain gauge. The compositesamples were then light-cured for 60 seconds. The final shrinkage strain (in µStrain), which isthe result of dimensional changes in the composite during polymerization, was recorded 4minutes after the light was turned off.
The chart below depicts these final values. Filtek P60 restorative displayed significantlyless shrinkage strain than Solitaire or 3M™ Z100™ Restorative.
Filtek P60 Solitaire SureFil ALERT Z1000
1,000
2,000
3,000
4,000
µStrain
Figure 11.Post-Gel
Shrinkage Strain
Filtek P60 Solitaire SureFil ALERT Z1000
0.5
1
1.5
2
2.5
3
3.5
4
%
Figure 10.Volumetric Shrinkage
LightSampleStrain GaugeSupport

20Fracture Toughness
The values reported for fracture toughness (KIC
) are relatedto the energy required to propagate a crack. In this test ashort rod of material is cured. A chevron or notch is cut intothe cylinder and the parts on either side of the chevron arepulled apart.
Below are the 24-hour values for wet fracture toughness. The wet fracture toughness for3M™ Filtek™ P60 Posterior Restorative was determined to be significantly higher thanSureFil™ and Solitaire™. The value for Filtek P60 restorative was statistically similar to3M™ Z100™ Restorative and statistically lower than ALERT™.
Flexural Modulus
Flexural modulus is a method of defining a material’s stiff-ness. A low modulus indicates a flexible material. The flexuralmodulus is measured by applying a load to a material speci-men that is supported at each end.
The flexural modulus value for Filtek P60 restorative wasintermediate. It was statistically lower than the flexural modulus for ALERTand Z100 restorative but was statistically higher than the flexural modulusfor Solitaire.
Filtek P60 Solitaire SureFil ALERT Z1000
5
10
15
20
25
GPa
Figure 13.Flexural Modulus
Filtek P60 Solitaire SureFil ALERT Z1000
0.25
0.5
0.75
1
1.25
1.5
1.75
2
MN/m1.5
Figure 12.Fracture Toughness

21Flexural Strength
Flexural strength is determined in the same test as flexuralmodulus. Flexural strength is the value obtained when thesample breaks. This test combines the forces found incompression and tension. As shown in the graph belowthe flexural strength of 3M™ Filtek™ P60 Posterior Restor-ative was statistically higher than the value for ALERT™.The flexural strength values of the other materials testedwere not significantly different from Filtek P60 restorative.
Compressive and Diametral Tensile Strength
Compressive strength is particularly important because of chewingforces. Rods are made of the material and simultaneous forces areapplied to the opposite ends of the sample length. The sample failureis a result of shear and tensile forces.
The compressive strengths of various materials are shown below.The value obtained for Filtek P60 restorative was not statistically differentfrom SureFil™ or Solitaire™. However it was significantly higher than ALERT.
Filtek P60 Solitaire SureFil ALERT Z1000
50
100
150
200
250
300
350
400
450
500
MPa
Figure 15.Compressive Strength
Filtek P60 Solitaire SureFil ALERT Z1000
20
40
60
80
100
120
140
160
180
200
MPa
Figure 14.Flexural Strength

22Diametral Tensile strength is measured using a similar set up. Compres-sive forces are applied to the sides of the sample, not the ends, untilfracture occurs.
The diametral tensile strength of 3M™ Filtek™ P60 Posterior Restorativewas significantly higher than Solitaire™. The value for Filtek P60 restor-ative was not statistically different from ALERT ™ or SureFil™. Thesedata are reported in the chart below.
Wear
The wear rate was determined by an in-vitro 3-body wear test. In this test, composite(1st body) is loaded onto a wheel (shaded slots in the diagram) which contacts anotherwheel which acts as an “antagonistic cusp” (2nd body). Thetwo wheels counter-rotate against one another dragging anabrasive slurry (3rd body) between them. Dimensional lossduring 156,000 cycles is determined by profilometry atregular intervals (i.e., after every 39,000 cycles). As thewear in this method typically follows a linear pattern, thedata is plotted using linear regression. The wear rates, i.e.,the slope of the lines, are determined. The comparison ofrates reduces some of the variability in the test due to sample preparationand can be predictive of anticipated wear beyond the length of the actual test.
The wear rate data shown below indicates the wear rate of Filtek P60 restorativeis intermediate amongst the other materials tested.
Figure 17.Wear
Filtek P60 Solitaire SureFil ALERT Z1000
1
2
3
4
5
µLoss/39,000 cycles
Filtek P60 Solitaire SureFil ALERT Z1000
20
40
60
80
100
120
MPa
Figure 16.Diametral
Tensile Strength

23Cross Section SEMIn this column are SEMs (scanning electronmicrographs) of cured universal compositesin cross section. Observations of the particlesize distributions and shapes can be made bycomparing these photos. All samples aremagnified at 2500×. However, even at thismagnification, the very small filler particlesare not visible.
Surface SEM After Wear Wheel AbrasionIn this column are SEMs (2500× magnifica-tion) of the surface of a composite sampleafter 156,000 cycles of a 3-body wear test.See Wear Wheel Section, if desired, for moredetailed description of the test methodology.Samples were not obtained from the samewheel. These photos may be indicative of thepolish retention of restored occlusal surfaces.
Filtek P60Restorative
Particle Size Distribution
The 3M™ Filtek™ P60 Restorative filler consists of thesame proprietary manufactured, rounded zirconia/silicaparticles as 3M™ Z100™ Restorative. The particle sizedistribution of Filtek P60 restorative is 0.01 to 3.5 µm.The average particle size is 0.6µm.
The surface of the Filtek P60 sample is irregular butnot ditched or pitted from filler particle loss.
The manufactured proprietary Z100 restorative filler iscomposed of rounded zirconia/silica particles. Theparticle size distribution of Z100 restorative is 0.01 to3.3µm. The average particle size is 0.6µm. The whitesplotches are artifiacts of the sample preparation.
The SEM of the sample surface after wear wheelabrasion of Z100 restorative confirms the similaritiesin the filler distribution between Z100 restorative andFiltek Z250.
Z100 Restorative

24
The filler in ALERT™ consists of a wide range ofparticle sizes and relatively large glass fibers. The glassfibers are irregularly shaped and some are over75 µm long. the filler loading is claimed to be 84% byweight.
The surface of the ALERT sample after abrasive wearshows the effect of the filler composition. The jagged,irregular surface is indicative of filler particle (pits),fiber loss (divots) and fiber breakage during the test.
ALERT Restorative
Solitaire Restorative
SureFil Restorative
The product literature for Solitaire™ claims the fillerloading (by weight) is 65%. The filler particle sizerange is from 2-20µm. the filler is proprietary and isclaimed to be porous. The SEM shows the wide sizerange of filler particles.
The surface of Solitaire after abrasive wear isremarkably smooth given the particle size range. Itappears that both resin matrix and filler are lost ata somewhat similar rate.
The filler particles in SureFil™ are similar in shape(jagged edges and irregular shaped) to TPH-Spectrum™ which is indicative of ground glass. Someof the particles are in excess of 10µm. The filler iscomposed of barium boron fluoroaluminosilicate glassand fumed silica. The filler loading is claimed to be82% by weight.
The surface of SureFil after abrasive wear shows theeffect of resin matrix and filler particle loss (pits anddivots).

25TechniqueCure Depth
As in any procedure, there is a strong desire by dentists to decrease the amount of timeneeded to place a composite restoration. Tedious curing techniques are often a disadvan-tage cited during posterior composite discussions. Light intensity, cure time and compos-ite material (e.g., resin, filler, opacity, and shade) impact depth of cure.
There are two logical paths composite manufacturers can examine to try to reduce curetime. The first is to increase the increment depth. The second is to shorten the time that isrequired to cure an increment. Extensive testing was conducted to determine which pathwould provide the most benefit to the dentist. Much of this testing used the C2 shade of3M™ Filtek™ P60 Posterior Restorative, as this is the most challenging shade to cure.
ISO 4049 Testing
For some dental materials, there are standards that manufacturers must meet to sell thesematerials globally. These standards document a list of test protocols and results requiredto be considered a viable material. The general standard that applies to composites isISO 4049.
Current ISO/DIS 4049:1988E Depth of CureThis current standard details the following protocol to establish the depth of cure. A com-posite is packed into a metal cylinder. Top surface is exposed to a visible light source forthe recommended length of time. After exposure, the composite is removed from the moldand uncured material is scraped away using a plastic instrument. The remaining cylinderis measured and the value recorded as the depth of cure.
The chart below shows the results of this test when using a light with a high (670mWatts/cm2) or an adequate intensity (430mWatts/cm2). All materials tested exhibited a greaterthan 4mm depth of cure.
Draft ISO/DIS 4049:1998 Depth of CureThis draft standard (scheduled to go into effect soon) has increased many of the require-ments for composites, including depth of cure. The method used to test depth ofcure in this draft standard is similar to the current standard with one notable exception.The value recorded is 1/2 of the length of the remaining cylinder of composite.
Filtek P60 C2
SureFil ASureFil BSureFil CALERT A2
ALERT C2
Z100 C20
1
2
3
4
5
6
mm
430 mW
670 mW
Figure 18.Depth of Cure
ISO/DIS 4049: 1988E

26The chart below depicts the results of the new draft proposal. Note the values are roughly1/2 the values obtained by following the current standard. No material tested, even usinga high intensity light obtained a reportable depth of cure greater than 3mm.
Barcol Hardness
A cylinder of composite of a specific depth is light cured from the top of the sample. ABarcol Hardness tester is used to measure the sample hardness on the top and the bottom.If the material isn’t cured completely, the two values will differ. In general, the greater thedifference between the top and bottom Barcol values, the more incomplete the cure ofthe composite.
Samples 5mm thick were prepared of all of the materials except 3M™ Z100™ Restorative.A 2.5mm sample of Z100 restorative was used as a control in this study. All materialswere cured for 40 seconds. Barcol Hardness was measured after 5 minutes. The chartbelow shows the differences in top vs. bottom Barcol Hardness values using visible-light curing units at acceptable but different intensities. As expected, the greatest differ-ences occurred with the C2 shade (more yellow pigments) using an adequate intensity light.
Bond Strength
If material at the bottom of the increment was undercured (not adequately polymerized),the bond strength might be affected. Shear bond strength to dentin was measured using alight with an adequate light intensity (430mW/cm2). For comparison purposes samples of3M™ Filtek™ P60 Restorative were also cured with a high intensity light (>600mW/cm2).
Figure 20.Barcol Hardness
(5mm) Light Intensity430 mWatts/cm2
Figure 19.Depth of CureDraft ISO/DIS
4049:1998
Filtek P60 C2
SureFil A SureFil B SureFil C ALERT A2 ALERT C2 Z100 C20
0.5
1
1.5
2
2.5
3
mm
430 mW
670 mW
Z100 C2 (2.5mm)
Filtek P60 C2
SureFil A SureFil B SureFil C ALERT A2 ALERT C20
10
20
30
40
50
60
70
80
90
100
Top
Bottom
Z100 C2 (2.5mm)
Filtek P60 C2
SureFil A SureFil B SureFil C ALERT A2ALERT C20
10
20
30
40
50
60
70
80
90
100
Top
Bottom
Figure 21.Barcol Hardness
(5mm) Light Intensity660 mWatts/cm2

27Samples were bonded to bovine dentin following manufacturer’s instructions for bondingagent and composite placement technique. 3M™ Z100™ Restorative with 3M ™ SingleBond Dental Adhesive System was used as a control. 3M™ Filtek™ P60 Posterior Restorativewas bonded using Single Bond adhesive, ALERT™ with BOND-1® and SureFil™ was bondedwith Prime & Bond 2.1™.
The bond strength of Filtek P60 restorative decreased by almost 50% when a 5mm incre-ment was placed vs. a 2.5mm increment regardless of light intensity. The bond strengthsof a 5mm increment of ALERT (A2 and C2 shades) and SureFil A shade were below10MPa. Additionally, the bonds failed adhesively more often than the sample failed cohe-sively (the preferred method) when curing 5mm thick increments regardless of material tested.
Cure Depth Summary
The data from all of these test procedures indicate light penetration to the base of thethick increments is inadequate to properly polymerize the composite.
• There is a significant drop in Barcol Hardness values when comparing the top andbottom values for 5mm thick materials even with an adequate light intensity.
• The bond strengths of composites (i.e., SureFil and ALERT) cured at a 5mm depthwere low.
– This could be the result of the light not crosslinking the adhesive/compositeinterface, or
– Partially polymerized and therefore weakened composite at the interface creatinga weak area for bond failure to occur.
• Bond failure occurs adhesively using a 5mm increment of ALERT and SureFil. Bondfailure occurs cohesively with a 2.5mm increment of Z100 restorative or Filtek P60restorative bonded with Single Bond adhesive.
All of these data support the need for incremental placement and curing of current com-posite materials. Placing and curing two 2.5mm increments of Filtek P60 restorative requirethe same amount of cure time as a 5mm layer of ALERT or SureFil.
Z100 C2 Filtek P60 Low
Filtek P60 High
SureFil A SureFil C ALERT A2
ALERT C2
0
5
10
15
20
25
30
MPa
2.5mm
5.0mm
Figure 22.Bond Strength
to Dentin
Z100 C2 (2.5)
Filtek P60
2.5mm High
Filtek P60
2.5mm Low
Filtek P60
5.0mm High
Filtek P60
5.0mm Low
SureFil ASureFil C ALERT A2
ALERT C2
0
20
40
60
80
100
%
Cohesive
Combination
Adhesive
Figure 23.Bond Failure Mode

28Technique Comparison
An additional technique comparison of 3M™ Filtek™ P60 Posterior Restorative, ALERT™,Solitaire™, SureFil™ and Ariston™ demonstrates that the relative speed of placing FiltekP60 restorative is actually faster than that for the other materials.
The placement techniques for posterior restorative materials are detailed in the tablesbelow. In each case, manufacturers’ instructions and recommendations were followed.
Filtek P60
Pulp Protection
Adhesive Etch 15
Rinse 10
Blot 2
Apply 1st Coat Adhesive 5
Apply 2nd Coat Adhesive 5
Dry 2
Light Cure 10
Composite for 5mm Depth Increment & Light Cure 20
Increment & Light Cure 20
Finish & Polish
Total Time 89
CaOH if pulp exposure.3M Vitrebond Liner/Baserecommended in deepareas of cavity.
SECONDS
SECONDS
Pulp Protection
Adhesive Etch 20
Rinse 10
Dry 2
Apply Adhesive 5
Apply Adhesive 5
Dry 10
Light Cure 10
Liner Apply 5
Light Cure 40
Composite for 5mm Depth Increment & Light Cure 40
Seal Etch 20
Rinse 15
Dry 10
Apply Seal 5
Air Thin 5
Light Cure 20
Finish & Polish
Total Time 222
5 mm increment
"Apply 0.5-1.0 mm Flow-It FlowableComposite to walls and floor ofpreparation…"
Not addressed
"Acid etch ALERT CondensableComposite surfaces with…etchantand extend out to cover approximately2mm of enamel adjacent torestoration margin."
"Apply PROTECT-IT! CompositeSurface Sealant with applicatorprovided. Be sure to cover entirerestoration surface and the etchedmarginal area."
"Finishing/Polishing isusually unnecessary."
ALERT

29SECONDS
Pulp Protection
Adhesive Etch 15
Rinse 15
Blot 2
Apply Adhesive 20
Dry 5
Light Cure 10
Apply Adhesive 5
Dry 5
Composite for 5mm Depth Increment & Light Cure 40
Light Cure 30
Finish & Polish
Total Time 147
"In close proximity to the pulp, less than1mm remaining dentin thickness, placea calcium hydroxide liner…"
"The surface should remain fully wetfor 20 seconds and may necessitateadditional applications of Prime & Bond2.1 Adhesive."
"Apply second application of Prime &Bond 2.1 Adhesive to all cavity surfaces.Immediately air dry 5 seconds toevaporate solvent, then place SureFil overthe uncured Prime & Bond 2.1 Adhesive."
5mm Increment:"It is strongly recommended that theinstrument used to contour cavosurfacemargins (occlusal and proximal) should belubricated from time to time with a thin coatof residual Prime & Bond 2.1 to ensureoptimal adaptation…Be sure the instrumentis well lubricated with residual Prime & Bond2.1 during the carving and contour process."
"The composite should be additionallyexposed to the curing unit through theproximal, lingual and buccal enamelwalls following metal matrix removal."
SureFil
SECONDS
Pulp Protection
Adhesive Etch 15
Rinse 15
Dry 2
Primer 30
Dry 2
Apply Adhesive 5
Dry 2
Light Cure 40
Composite for 5mm Depth Increment & Light Cure 40
Increment & Light Cure 40
Increment & Light Cure 40
Finish & Polish
Total Time 231
"In profound cavities, dentinin proximity to pulp should beprotected with an appropriatesubfilling (e.g., calciumhydroxide compound andglass ionomer cement).
"Apply Solid bond P,massaging it into thedentin…for 30 seconds"Used on exposed dentin.
"Introduce Solid bond Sinto the cavity…applyinga uniform, thin layer to theetched enamel areas."
Increment depth of 2 mm.
Increment depth of 2 mm.
Increment depth of 2 mm.
SECONDS
Pulp Protection Apply & Wait 25
Air Thin 5
Light Cure 20
Composite for 5mm Depth Increment & Light Cure 40
Increment & Light Cure 40
Increment & Light Cure
Finish & Polish
Total Time 130
3-4 mm increment.Recommended maximumincrement depth is 4 mm.
Indicated for "Class I and II restorationsin deciduous and permanent teeth withretentive cavity preparations" and"Amalgam substitute"
"Ariston Liner is used to seal the enameland dentin and to generate a bond to theAriston pHc restorative material."
"It is advisable to use at least twolayers to restore cavities with proximalboxes. The first layer, which is placedon the bottom of the proximal box,should be at least 1-2 mm thick."
Ariston
Solitaire

30Summary
Filtek™ P60 Z100™ ALERT™ SureFil™ Solitaire™ Ariston™
Pulp Protection 50
Liner
Adhesive 49 49 62 77 111
Liner 45
Composite for 5mm depth 40 80 40 70 120 80
Seal 75
Finish & Polish
Total Time (seconds) 89 129 222 147 231 130

31Instructions For Use3M™ Filtek™ P60 Posterior Restorative
General3M Filtek P60 Restorative material is a visible-light activated, radiopaque, restorativecomposite. It is designed for use in posterior restorations. The filler in Filtek P60 restor-ative is zirconia/silica. The inorganic filler loading is 61% by volume (without silanetreatment) with a particle size range of 0.01 to 3.5 microns. Filtek P60 restorative containsBIS-GMA, UDMA and BIS-EMA resins. A 3M dental adhesive is used to permanentlybond the restoration to the tooth structure. The restorative is available in a variety ofshades. It is packaged in traditional syringes.
IndicationsFiltek P60 restorative is indicated for use in:
• Direct posterior restorations
• Core Build-ups
• Splinting
• Indirect restorations including inlays, onlays and veneers
PrecautionsFiltek P60 restorative contains methacrylates A small percentage of the population isknown to have an allergic response to acrylate resins. To reduce the risk of allergic re-sponse, minimize exposure to these materials. In particular, exposure to uncured resinshould be avoided. Use of protective gloves and a no-touch technique is recommended.If restorative material contacts skin, wash immediately with soap and water. Acrylatesmay penetrate commonly used gloves. If restorative contacts glove, remove and discardglove, wash hands immediately with soap and water and then reglove. If accidental con-tact with eyes or prolonged contact with oral soft tissues occurs, flush immediately withlarge amounts of water.
Instructions for UseI. Preliminary
A. Prophy: Teeth should be cleaned with pumice and water to remove surface stains.
B. Shade Selection: Before isolating the tooth, select the appropriate shade(s) ofrestorative material.
C. Isolation: A rubber dam is the preferred method of isolation. Cotton rolls plusan evacuator can also be used.
II. Posterior Restorations
A. Cavity Preparation: Prepare the cavity. Line and point angles should berounded. No residual amalgam or other base material should be left in the inter-nal form of the preparation that would interfere with light transmission and there-fore, the hardening of the restorative material.
B. Pulp Protection: If a pulp exposure has occurred and if the situation warrants adirect pulp capping procedure, place a minimum amount of calcium hydroxideon the exposure followed by an application of 3M™ Vitrebond™ Light Cure GlassIonomer Liner/Base. Vitrebond liner/base may also be used to base areas of deepcavity excavation. See Vitrebond liner/base instructions for details.
32C. Placement of Matrix: Place a thin dead-soft metal, or a precontoured mylar or
a precontoured metal matrix band and insert wedges firmly. Burnish the matrixband to establish proximal contour and contact area. Adapt the band to seal thegingival area to avoid overhangs.
D. Adhesive System: Follow the manufacturer’s instructions regarding etching,priming, adhesive application and curing.
E. Dispensing the Composite: Dispense the necessary amount of restorative mate-rial from the syringe onto the mix pad by turning the handle slowly in a clock-wise manner. To prevent oozing of the restorative when dispensing is completed,turn the handle counterclockwise a half turn to stop paste flow. Immediatelyreplace syringe cap. If not used immediately, the dispensed material should beprotected from light.
F. Placement:
1. Using a nonmetallic placement instrument, place restorative into thecavity in increments no thicker than 2.5mm.Placement hints:
a) To aid in adaptation, the first 1mm layer may be placed and adaptedto the proximal box.
b) Avoid intense light in the working field.
c) A condensing instrument (or similar device) can be used to adaptthe material to all of the internal cavity aspects.
2. Light cure each increment 20 seconds by exposing its entire surface to ahigh intensity visible light source, such as a 3M curing light. Hold the lightguide tip as close to the restorative as possible during light exposure.
3. Slightly overfill the cavity to permit extension of composite beyond cavitymargins. Contour and shape with appropriate composite instruments.
G. Finishing: Contour restoration surfaces with fine finishing diamonds, burs orstones. Contour proximal surfaces with 3M Finishing Strips.
H. Adjust Occlusion: Check occlusion with thin articulating paper. Centric andlateral excursion contacts should be examined. Carefully adjust occlusion byremoving material with a fine polishing diamond or stone.
I. Polishing: Polish with Sof-Lcx Discs and Strips or with white stones and rubberpoints where discs are not suitable.
III. 3M™ Filtek™ P60 Restorative Indirect Procedure for Inlays, Onlays Or Veneers
A. Dental Operatory Procedure
1. Shade selection: Choose the appropriate shade(s) of Filtek P60Posterior Restorative prior to isolation.
2. Preparation: Prepare the tooth.
3. Impressioning: After preparation is complete, make an impression ofthe prepared tooth by following the manufacturer’s instructions of theimpressioning material chosen. Any 3M impressioning system may be used.
B. Laboratory Procedure
1. Pour the impression of the preparation with die stone. Place pins at thepreparation site at this time if a “triple tray” type of impression was used.
332. Separate the cast from the impression after 45 to 60 minutes. Place pins in
die and base the cast as for a typical crown and bridge procedure. Mount orarticulate the cast to its counter model to an adequate articulator.
3. If a second impression was not sent, pour a second cast using the same im-pression registration. This is to be used as a working cast.
4. Section out the preparation with a laboratory saw and trim away excess or,expose the margins so they can be easily worked. Mark the margins with ared pencil if needed. Add a spacer at this time if one is being used.
5. Soak the die in water, then with a brush, apply a very thin coat of separatingmedium to the preparation, let it dry somewhat, then add another thin layer.
6. Add the first third of composite to the floor of the preparation, stay short ofthe margins, light cure for 20 seconds.
7. Add second third of composite. Allow for the last third (incisal) to includethe contact areas, light cure for 20 seconds.
8. Place the die back into the articulated arch add the last third of composite tothe occlusal surface. Overfill very slightly mesially, distally, and occlusally.This will allow for the mesiodistal contacts and the proper occlusal contactwhen the opposing arch is brought into occlusion with the uncured incisalincrement. Light cure for only ten seconds, then remove the die to preventadhering to adjacent surfaces. Finish the curing process.
9. With the occlusal contacts already established, begin removing the excesscomposite from around the points of contact. Develop the inclines and ridgesas per remaining occlusal anatomy.
10. Care must be taken when removing the prosthesis from the die. Break offsmall amounts of the die from around the restoration, the die stone shouldbreak away cleanly from the cured restoration, until all of the restoration isrecovered.
11. Using the master die, check the restoration for flash, undercuts, and fit.Adjust as necessary, then polish.
C. Dental Operatory Procedure
1. Roughen the interior surfaces of the indirect restoration.
2. Clean the prosthesis in a soap solution in an ultrasonic bath. Rinse thor-oughly.
3. Cementation: Cement the prosthesis using a 3M resin cement systemby following manufacturer’s instructions.
IV. Storage and Use:
A. Do not expose restorative materials to elevated temperatures or intense light.
B. Unopened kits should be refrigerated (40oF or 4oC) to extend shelf life. Allowto come to room temperature for use.
C. Do not store materials in proximity to eugenol-containing products.
D. The composite pastes are designed for use at room temperature of approximately21o-24oC or 70o-75oF. Shelf life at room temperature is 3 years.

34V. Warranty
3M will replace product that is proven to be defective. 3M does not accept liability forany loss or damage, direct or consequential, arising out of the use or the inability touse these products. Before using, the user shall determine the suitability of the productfor its intended use and user assumes all risk and liability whatsoever in connection therewith.

35

Dental Products Laboratory
3M Center, Building 260-2B-13St. Paul, MN 55144-1000
Printed in U. S. A.
©1998 3M 70-2009-2055-4
Trademarks Cited
Coulter® is a trademark of Coulter Corporation. Ariston pHc™, Caulk®, Prime & Bond 2.1™, SureFil™ andDentsply® are trademarks of Dentsply International. Charisma® and Solitaire ™ are trademarks of HeraeusKulzer, Inc. ALERT™, BOND-1®, Jeneric®, and Pentron ® are trademarks of Jeneric Pentron. 3M™, Filtek™,P-10™, P-30™, P-50™, Scotchbond ™, Visilux™, Vitrebond™ and Z100™ are trademarks of 3M.


![SIMPLICITY In 1 SHADE Fusion x-tra€¦ · 6 5 4 3 2 0.5 1 1.5 2 2.5 Filtek™ Bulk Fill Posterior Tetric® EvoCeram Bulk Fill Filtek™ Supreme Ultra Shrinkage stress [MPa] Tetric®](https://static.documents.pub/doc/80x56/5f7d5a4cc651f228822e81a2/simplicity-in-1-shade-fusion-x-tra-6-5-4-3-2-05-1-15-2-25-filteka-bulk-fill.jpg)


