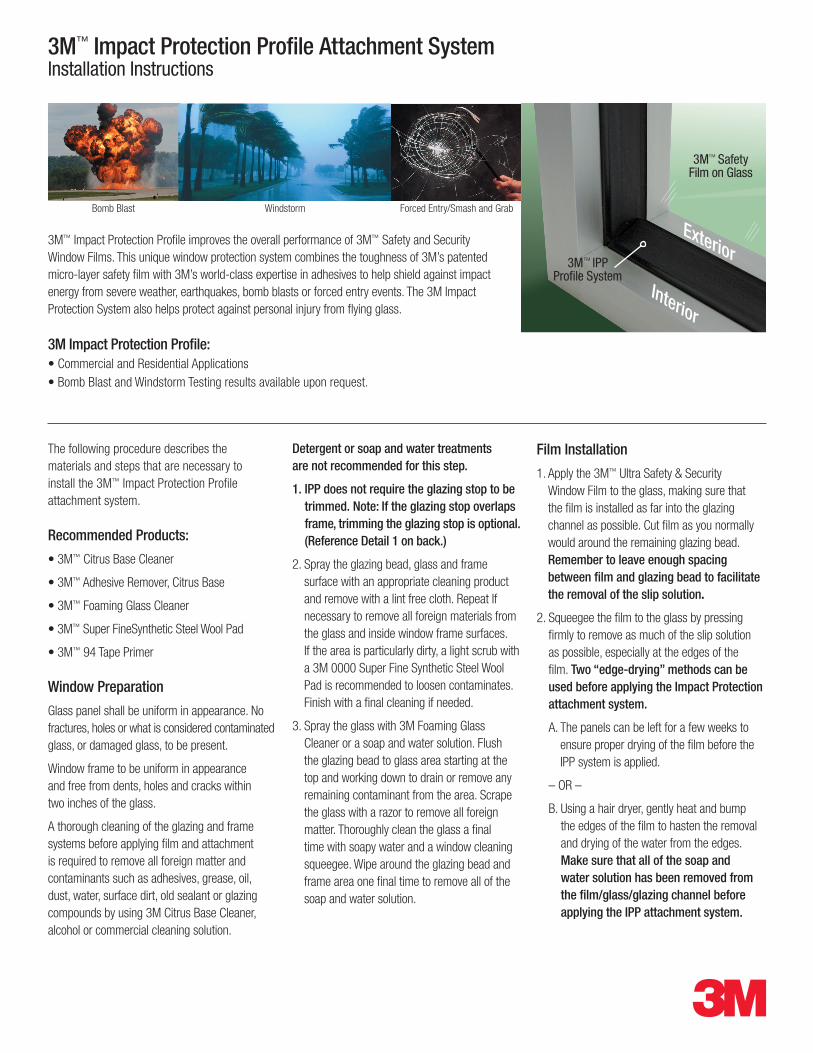
3M ™ Impact Protection Profile Attachment System Installation Instructions 3M ™ Impact Protection Profile improves the overall performance of 3M ™ Safety and Security Window Films. This unique window protection system combines the toughness of 3M’s patented micro-layer safety film with 3M’s world-class expertise in adhesives to help shield against impact energy from severe weather, earthquakes, bomb blasts or forced entry events. The 3M Impact Protection System also helps protect against personal injury from flying glass. 3M Impact Protection Profile: • Commercial and Residential Applications • Bomb Blast and Windstorm Testing results available upon request. Bomb Blast Forced Entry/Smash and Grab Windstorm The following procedure describes the materials and steps that are necessary to install the 3M ™ Impact Protection Profile attachment system. Recommended Products: • 3M ™ Citrus Base Cleaner • 3M ™ Adhesive Remover, Citrus Base • 3M ™ Foaming Glass Cleaner • 3M ™ Super FineSynthetic Steel Wool Pad • 3M ™ 94 Tape Primer Window Preparation Glass panel shall be uniform in appearance. No fractures, holes or what is considered contaminated glass, or damaged glass, to be present. Window frame to be uniform in appearance and free from dents, holes and cracks within two inches of the glass. A thorough cleaning of the glazing and frame systems before applying film and attachment is required to remove all foreign matter and contaminants such as adhesives, grease, oil, dust, water, surface dirt, old sealant or glazing compounds by using 3M Citrus Base Cleaner, alcohol or commercial cleaning solution. Detergent or soap and water treatments are not recommended for this step. 1. IPP does not require the glazing stop to be trimmed. Note: If the glazing stop overlaps frame, trimming the glazing stop is optional. (Reference Detail 1 on back.) 2. Spray the glazing bead, glass and frame surface with an appropriate cleaning product and remove with a lint free cloth. Repeat If necessary to remove all foreign materials from the glass and inside window frame surfaces. If the area is particularly dirty, a light scrub with a 3M 0000 Super Fine Synthetic Steel Wool Pad is recommended to loosen contaminates. Finish with a final cleaning if needed. 3. Spray the glass with 3M Foaming Glass Cleaner or a soap and water solution. Flush the glazing bead to glass area starting at the top and working down to drain or remove any remaining contaminant from the area. Scrape the glass with a razor to remove all foreign matter. Thoroughly clean the glass a final time with soapy water and a window cleaning squeegee. Wipe around the glazing bead and frame area one final time to remove all of the soap and water solution. Film Installation 1. Apply the 3M ™ Ultra Safety & Security Window Film to the glass, making sure that the film is installed as far into the glazing channel as possible. Cut film as you normally would around the remaining glazing bead. Remember to leave enough spacing between film and glazing bead to facilitate the removal of the slip solution. 2. Squeegee the film to the glass by pressing firmly to remove as much of the slip solution as possible, especially at the edges of the film. Two “edge-drying” methods can be used before applying the Impact Protection attachment system. A. The panels can be left for a few weeks to ensure proper drying of the film before the IPP system is applied. – OR – B. Using a hair dryer, gently heat and bump the edges of the film to hasten the removal and drying of the water from the edges. Make sure that all of the soap and water solution has been removed from the film/glass/glazing channel before applying the IPP attachment system. 3M ™ IPP Profile System 3M ™ Safety Film on Glass Interior Exterior
3M™ Impact Protection Profile improves the overall performance of 3M™ Safety and Security Window Films. This unique window protection system combines the toughness of 3M’s patented micro-layer safety film with 3M’s world-class expertise in adhesives to help shield against impact energy from severe weather, earthquakes, bomb blasts or forced entry events. The 3M Impact Protection System also helps protect against personal injury from flying glass.
3M Impact Protection Profile:• Commercial and Residential Applications• Bomb Blast and Windstorm Testing results available upon request.
Bomb Blast Forced Entry/Smash and GrabWindstorm
The following procedure describes the materials and steps that are necessary to install the 3M™ Impact Protection Profile attachment system.
Recommended Products:
• 3M™ Citrus Base Cleaner
• 3M™ Adhesive Remover, Citrus Base
• 3M™ Foaming Glass Cleaner
• 3M™ Super FineSynthetic Steel Wool Pad
• 3M™ 94 Tape Primer
Window Preparation
Glass panel shall be uniform in appearance. No fractures, holes or what is considered contaminated glass, or damaged glass, to be present.
Window frame to be uniform in appearance and free from dents, holes and cracks within two inches of the glass.
A thorough cleaning of the glazing and frame systems before applying film and attachment is required to remove all foreign matter and contaminants such as adhesives, grease, oil, dust, water, surface dirt, old sealant or glazing compounds by using 3M Citrus Base Cleaner, alcohol or commercial cleaning solution.
Detergent or soap and water treatments are not recommended for this step.
1. IPP does not require the glazing stop to be trimmed. Note: If the glazing stop overlaps frame, trimming the glazing stop is optional. (Reference Detail 1 on back.)
2. Spray the glazing bead, glass and frame surface with an appropriate cleaning product and remove with a lint free cloth. Repeat If necessary to remove all foreign materials from the glass and inside window frame surfaces. If the area is particularly dirty, a light scrub with a 3M 0000 Super Fine Synthetic Steel Wool Pad is recommended to loosen contaminates. Finish with a final cleaning if needed.
3. Spray the glass with 3M Foaming Glass Cleaner or a soap and water solution. Flush the glazing bead to glass area starting at the top and working down to drain or remove any remaining contaminant from the area. Scrape the glass with a razor to remove all foreign matter. Thoroughly clean the glass a final time with soapy water and a window cleaning squeegee. Wipe around the glazing bead and frame area one final time to remove all of the soap and water solution.
Film Installation
1. Apply the 3M™ Ultra Safety & Security Window Film to the glass, making sure that the film is installed as far into the glazing channel as possible. Cut film as you normally would around the remaining glazing bead. Remember to leave enough spacing between film and glazing bead to facilitate the removal of the slip solution.
2. Squeegee the film to the glass by pressing firmly to remove as much of the slip solution as possible, especially at the edges of the film. Two “edge-drying” methods can be used before applying the Impact Protection attachment system.
A. The panels can be left for a few weeks to ensure proper drying of the film before the IPP system is applied.
– OR –
B. Using a hair dryer, gently heat and bump the edges of the film to hasten the removal and drying of the water from the edges. Make sure that all of the soap and water solution has been removed from the film/glass/glazing channel before applying the IPP attachment system.
Building and Commercial Services Division3M Center, Building 223-2N-21 St. Paul, MN 55144-1000 www.3M.com/windowfilm
For more information, please call 1-800-480-1704 or visit us at www.3M.com/windowfilm
IMPORTANT NOTICE: 3M MAKES NO PERFORMANCE PROMISES OR OTHER REPRESENTATIONS ABOUT THE EFFECTIVENESS OF THE IPP ATTACHMENT SYSTEM FOR USE WITH 3M WINDOW FILM IN A PARTICULAR APPLICATION. All statements, technical information and recommendations contained in these IPP Attachment System installation instructions are based on tests believed to be reliable. However, many factors beyond the control of 3M can affect the use and performance of the 3M products in particular applications. Because these factors are uniquely within the user’s knowledge and control, it is essential that the user evaluates and determines whether the 3M Ultra Safety & Security Window Film and/or 3M Impact Protection Profile Attachment System are appropriate for the particular application.
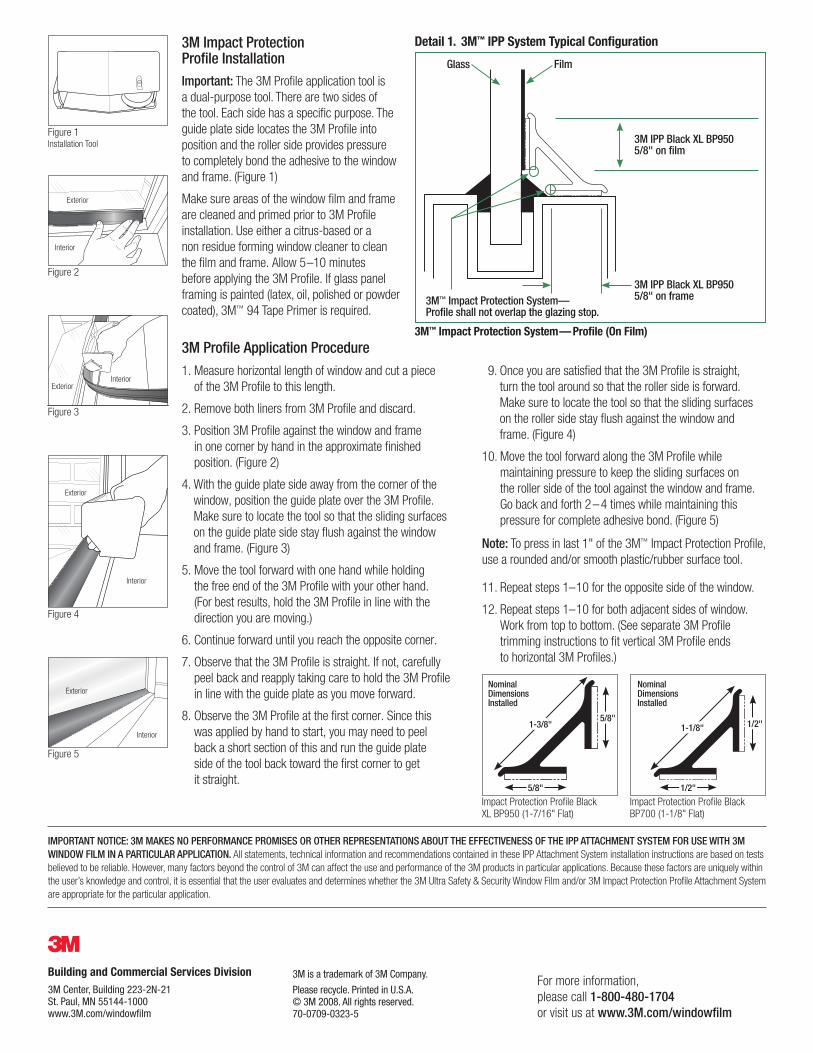
3M Impact Protection Profile InstallationImportant: The 3M Profile application tool is a dual-purpose tool. There are two sides of the tool. Each side has a specific purpose. The guide plate side locates the 3M Profile into position and the roller side provides pressure to completely bond the adhesive to the window and frame. (Figure 1)
Make sure areas of the window film and frame are cleaned and primed prior to 3M Profile installation. Use either a citrus-based or a non residue forming window cleaner to clean the film and frame. Allow 5–10 minutes before applying the 3M Profile. If glass panel framing is painted (latex, oil, polished or powder coated), 3M™ 94 Tape Primer is required.
Interior
Exterior
Figure 2
Figure 1 Installation Tool
InteriorExterior
Figure 3
Interior
Exterior
Figure 4
Interior
Exterior
Figure 5
1. Measure horizontal length of window and cut a piece of the 3M Profile to this length.
2. Remove both liners from 3M Profile and discard.
3. Position 3M Profile against the window and frame in one corner by hand in the approximate finished position. (Figure 2)
4. With the guide plate side away from the corner of the window, position the guide plate over the 3M Profile. Make sure to locate the tool so that the sliding surfaces on the guide plate side stay flush against the window and frame. (Figure 3)
5. Move the tool forward with one hand while holding the free end of the 3M Profile with your other hand. (For best results, hold the 3M Profile in line with the direction you are moving.)
6. Continue forward until you reach the opposite corner.
7. Observe that the 3M Profile is straight. If not, carefully peel back and reapply taking care to hold the 3M Profile in line with the guide plate as you move forward.
8. Observe the 3M Profile at the first corner. Since this was applied by hand to start, you may need to peel back a short section of this and run the guide plate side of the tool back toward the first corner to get it straight.
9. Once you are satisfied that the 3M Profile is straight, turn the tool around so that the roller side is forward. Make sure to locate the tool so that the sliding surfaces on the roller side stay flush against the window and frame. (Figure 4)
10. Move the tool forward along the 3M Profile while maintaining pressure to keep the sliding surfaces on the roller side of the tool against the window and frame. Go back and forth 2–4 times while maintaining this pressure for complete adhesive bond. (Figure 5)
Note: To press in last 1" of the 3M™ Impact Protection Profile, use a rounded and/or smooth plastic/rubber surface tool.
11. Repeat steps 1–10 for the opposite side of the window.
12. Repeat steps 1–10 for both adjacent sides of window. Work from top to bottom. (See separate 3M Profile trimming instructions to fit vertical 3M Profile ends to horizontal 3M Profiles.)
3M Profile Application Procedure3M™ Impact Protection System— Profile (On Film)
Impact Protection Profile Black XL BP950 (1-7/16" Flat)
Impact Protection Profile Black BP700 (1-1/8" Flat)
Nominal Dimensions Installed
Nominal Dimensions Installed
1-3/8"5/8"
5/8"
1-1/8" 1/2"
1/2"
Detail 1. 3M™ IPP System Typical Configuration
Glass Film
3M IPP Black XL BP950 5/8" on frame3M™ Impact Protection System—