1998-2014. VirtualPBX.com, Inc. All rights reserved. Virtual PBX, TrueACD, and ProSIP are ® trademarks of VirtualPBX.com, Inc. VirtualPBX.com | 111 N. Market St., Suite 1000, San Jose, CA 95113 | Toll Free: 800.914.VPBX | Fax: 888.825.0800 3rd Party VoIP Phone Setup Guide (Panasonic UT113-123) We are changing how we add 3rd party VoIP phones to accounts. Going forward, you can simply add a 3rd Party Softphone and use those credentials to provision your VoIP phone. Adding Softphone credentials to your VirtualPBX account allows you to: • Quickly add a 3rd party VoIP phone to your system • Use a softphone application on your laptop or mobile device Softphones are billed based on your current service plan. You can check your current plan information in the billing portal or by chatting with an Account Services representative. Softphone credentials may be used on more than one device. For example, both your laptop and mobile phone can be used. Please note that the same credentials cannot be used simultaneously, i.e. only one device can be on at a time, others must be off. 1. Login to your VirtualPBX account as an Admin 2. Click on the Admin Tab 3. Click on the VoIP Phones menu option on the left hand side
Transcript
1998-2014. VirtualPBX.com, Inc. All rights reserved. Virtual PBX, TrueACD, and ProSIP are ® trademarks of VirtualPBX.com, Inc.
VirtualPBX.com | 111 N. Market St., Suite 1000, San Jose, CA 95113 | Toll Free: 800.914.VPBX | Fax: 888.825.0800
3rd Party VoIP Phone Setup Guide (Panasonic UT113-123) We are changing how we add 3rd party VoIP phones to accounts. Going forward, you can simply add a 3rd Party Softphone and use those credentials to provision your VoIP phone.
Adding Softphone credentials to your VirtualPBX account allows you to: • Quickly add a 3rd party VoIP phone to your system • Use a softphone application on your laptop or mobile device
Softphones are billed based on your current service plan. You can check your current plan information in the billing portal or by chatting with an Account Services representative.
Softphone credentials may be used on more than one device. For example, both your laptop and mobile phone can be used. Please note that the same credentials cannot be used simultaneously, i.e. only one device can be on at a time, others must be off.
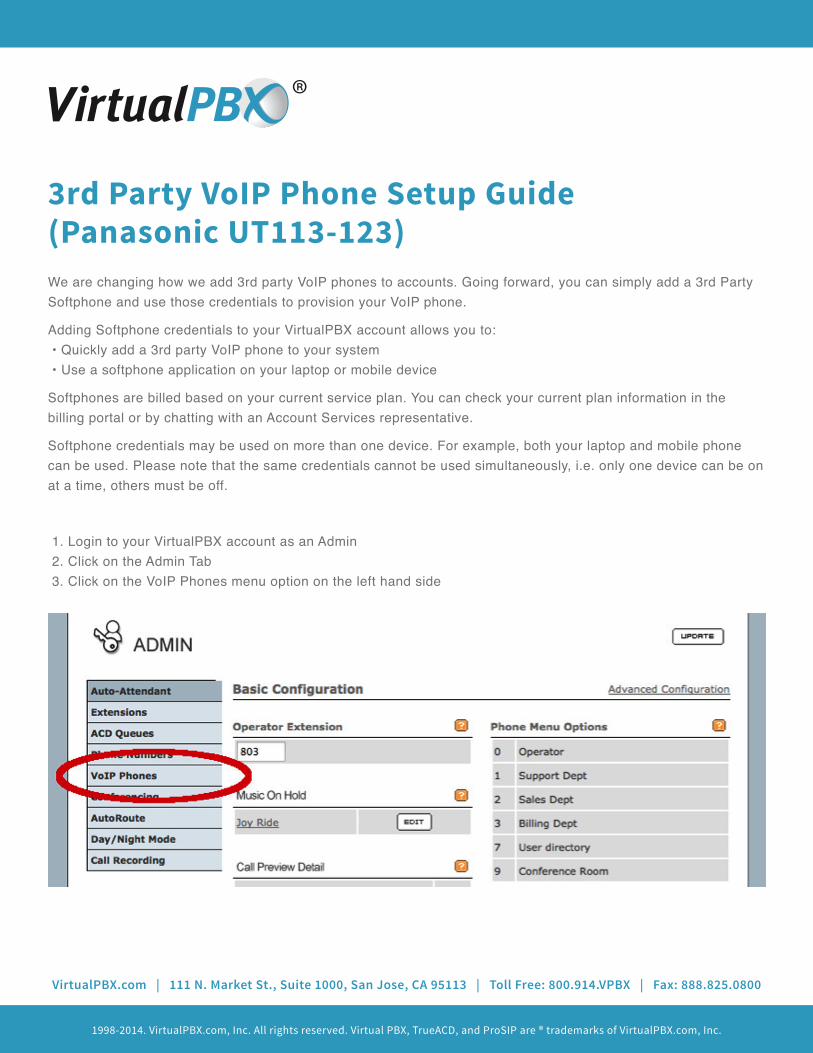
1. Login to your VirtualPBX account as an Admin 2. Click on the Admin Tab 3. Click on the VoIP Phones menu option on the left hand side
1998-2014. VirtualPBX.com, Inc. All rights reserved. Virtual PBX, TrueACD, and ProSIP are ® trademarks of VirtualPBX.com, Inc.
VirtualPBX.com | 111 N. Market St., Suite 1000, San Jose, CA 95113 | Toll Free: 800.914.VPBX | Fax: 888.825.0800
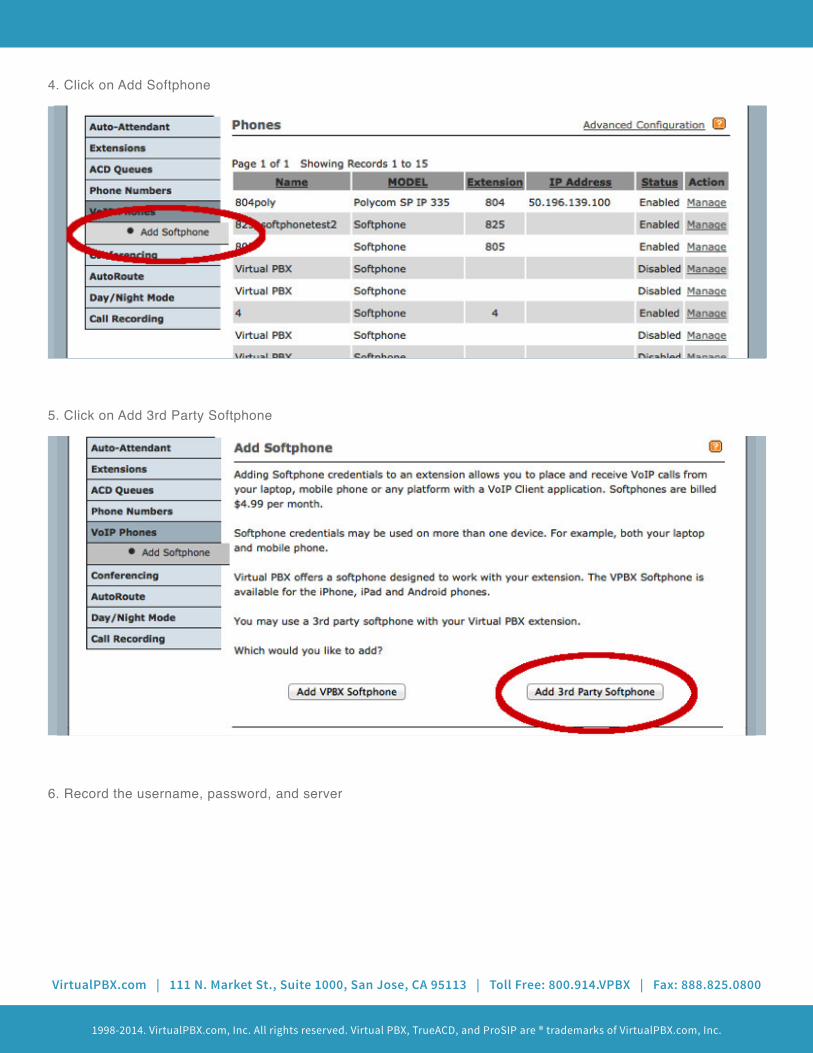
4. Click on Add Softphone
5. Click on Add 3rd Party Softphone
6. Record the username, password, and server
1998-2014. VirtualPBX.com, Inc. All rights reserved. Virtual PBX, TrueACD, and ProSIP are ® trademarks of VirtualPBX.com, Inc.
VirtualPBX.com | 111 N. Market St., Suite 1000, San Jose, CA 95113 | Toll Free: 800.914.VPBX | Fax: 888.825.0800
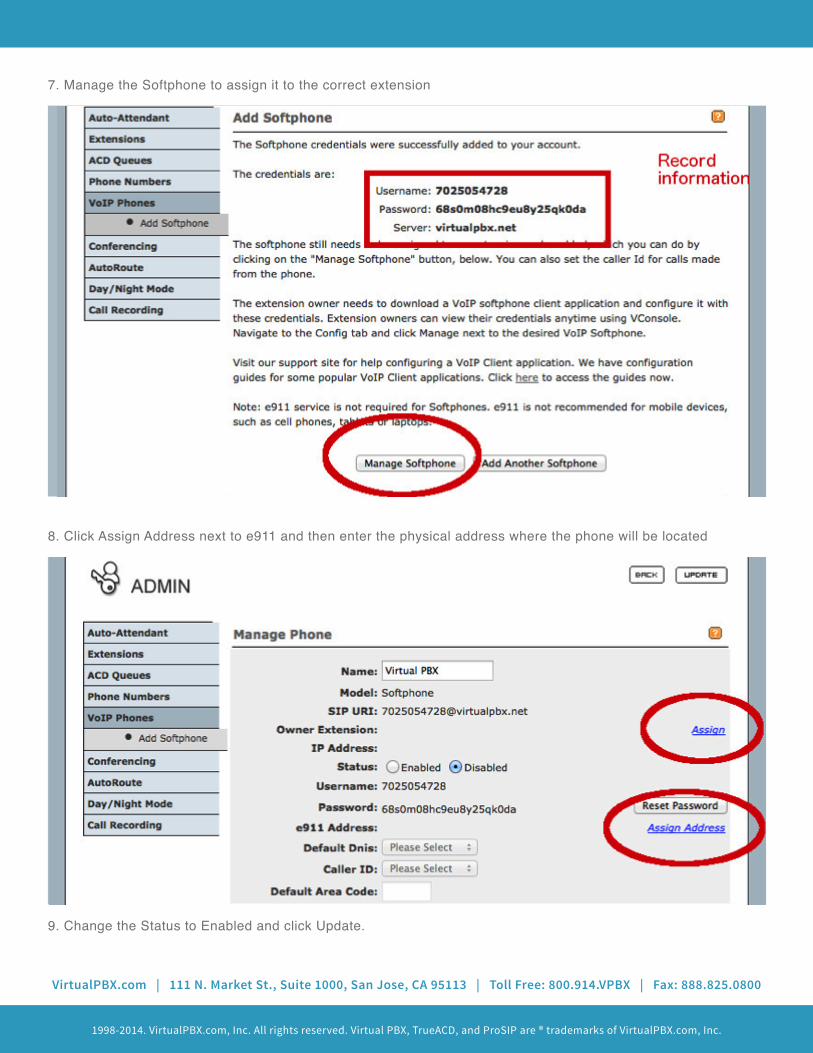
7. Manage the Softphone to assign it to the correct extension
8. Click Assign Address next to e911 and then enter the physical address where the phone will be located
9. Change the Status to Enabled and click Update.
1998-2014. VirtualPBX.com, Inc. All rights reserved. Virtual PBX, TrueACD, and ProSIP are ® trademarks of VirtualPBX.com, Inc.
VirtualPBX.com | 111 N. Market St., Suite 1000, San Jose, CA 95113 | Toll Free: 800.914.VPBX | Fax: 888.825.0800
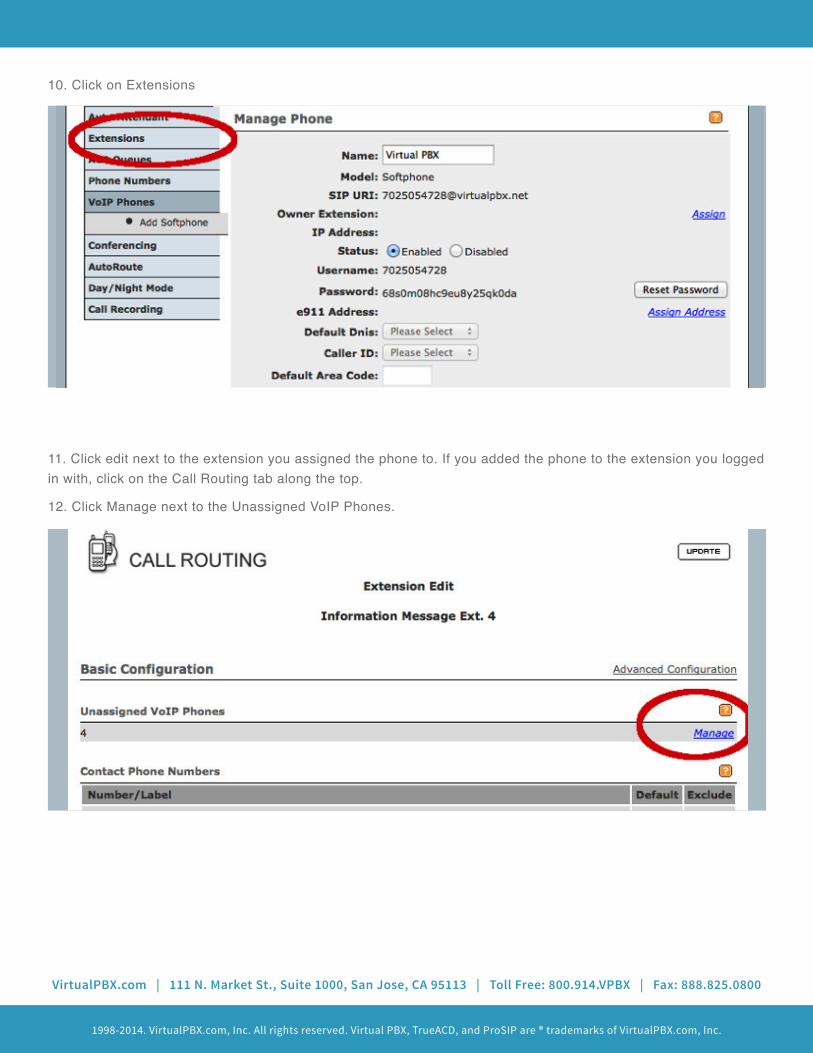
10. Click on Extensions
11. Click edit next to the extension you assigned the phone to. If you added the phone to the extension you logged in with, click on the Call Routing tab along the top.
12. Click Manage next to the Unassigned VoIP Phones.
1998-2014. VirtualPBX.com, Inc. All rights reserved. Virtual PBX, TrueACD, and ProSIP are ® trademarks of VirtualPBX.com, Inc.
VirtualPBX.com | 111 N. Market St., Suite 1000, San Jose, CA 95113 | Toll Free: 800.914.VPBX | Fax: 888.825.0800
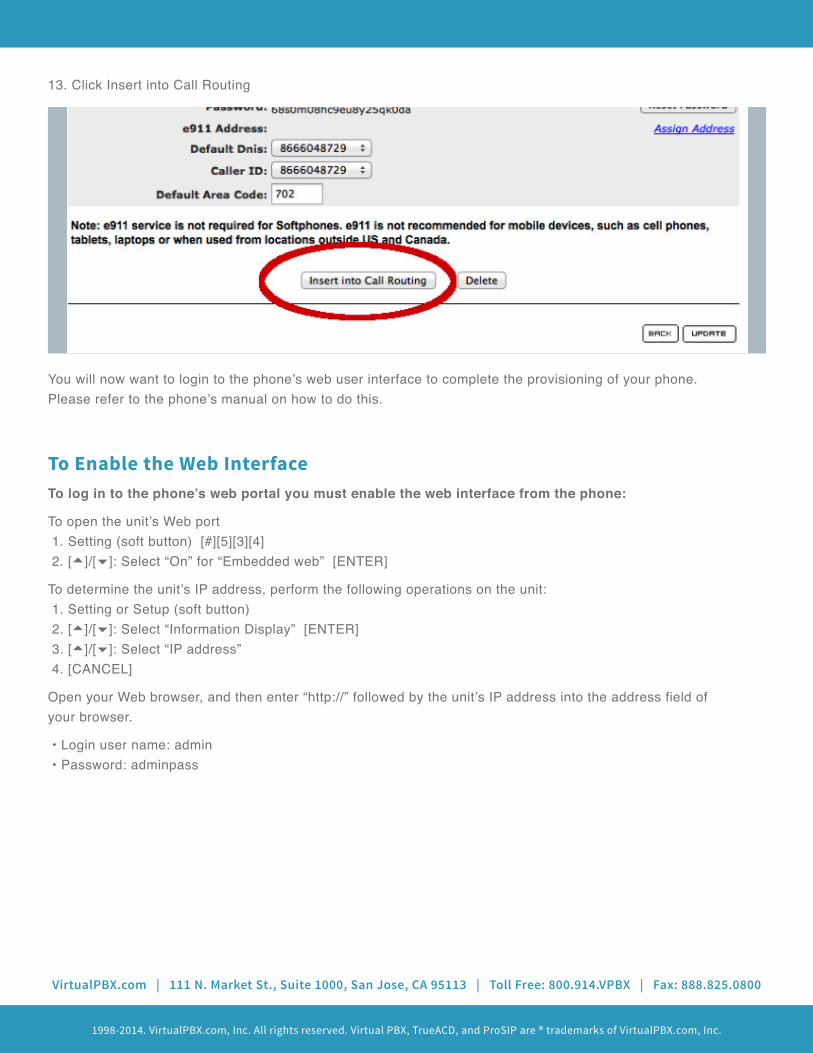
13. Click Insert into Call Routing
You will now want to login to the phone’s web user interface to complete the provisioning of your phone. Please refer to the phone’s manual on how to do this.
To Enable the Web InterfaceTo log in to the phone’s web portal you must enable the web interface from the phone:
To open the unit’s Web port 1. Setting (soft button) [#][5][3][4] 2. [~]/[�]: Select “On” for “Embedded web” [ENTER]
To determine the unit’s IP address, perform the following operations on the unit: 1. Setting or Setup (soft button) 2. [~]/[�]: Select “Information Display” [ENTER] 3. [~]/[�]: Select “IP address” 4. [CANCEL]
Open your Web browser, and then enter “http://” followed by the unit’s IP address into the address field of your browser.
• Login user name: admin • Password: adminpass
1998-2014. VirtualPBX.com, Inc. All rights reserved. Virtual PBX, TrueACD, and ProSIP are ® trademarks of VirtualPBX.com, Inc.
VirtualPBX.com | 111 N. Market St., Suite 1000, San Jose, CA 95113 | Toll Free: 800.914.VPBX | Fax: 888.825.0800
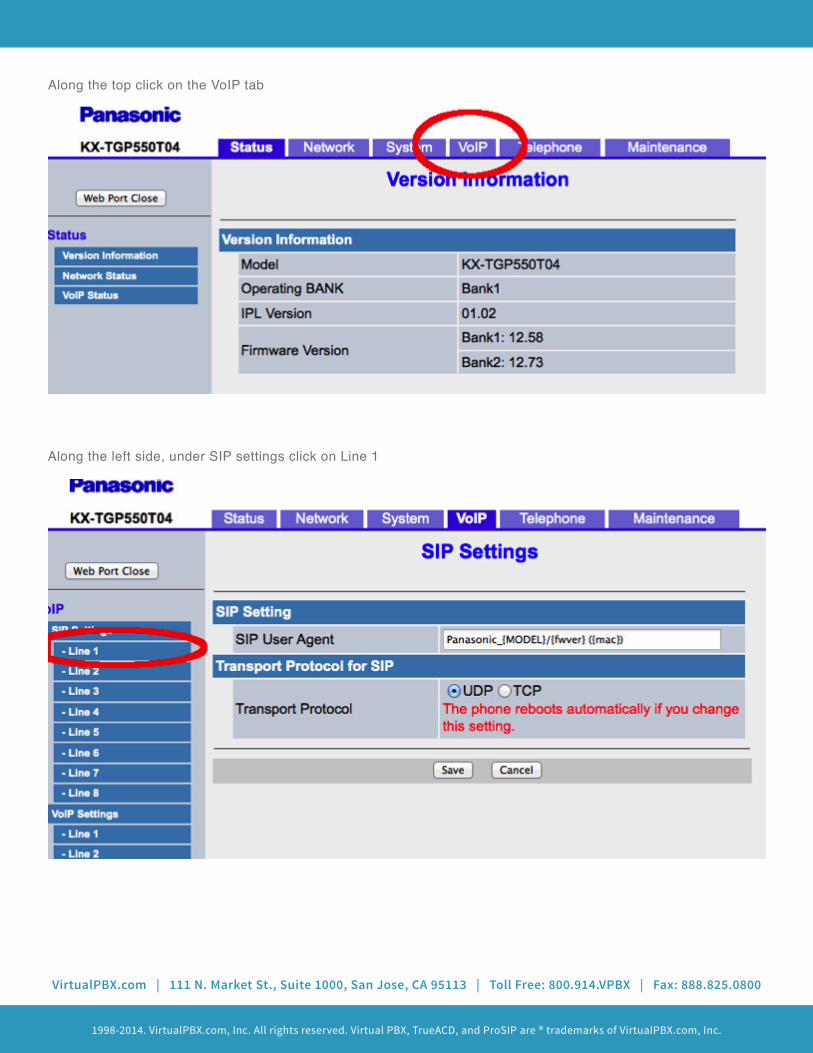
Along the left side, under SIP settings click on Line 1
Along the top click on the VoIP tab
1998-2014. VirtualPBX.com, Inc. All rights reserved. Virtual PBX, TrueACD, and ProSIP are ® trademarks of VirtualPBX.com, Inc.
VirtualPBX.com | 111 N. Market St., Suite 1000, San Jose, CA 95113 | Toll Free: 800.914.VPBX | Fax: 888.825.0800
Move G722, PCMU and G729 to the Enable Codecs section. Codecs are used in order starting from the top.
Click Confirm
You have now successfully added your Yealink phone to your VirtualPBX account.
1998-2014. VirtualPBX.com, Inc. All rights reserved. Virtual PBX, TrueACD, and ProSIP are ® trademarks of VirtualPBX.com, Inc.
VirtualPBX.com | 111 N. Market St., Suite 1000, San Jose, CA 95113 | Toll Free: 800.914.VPBX | Fax: 888.825.0800
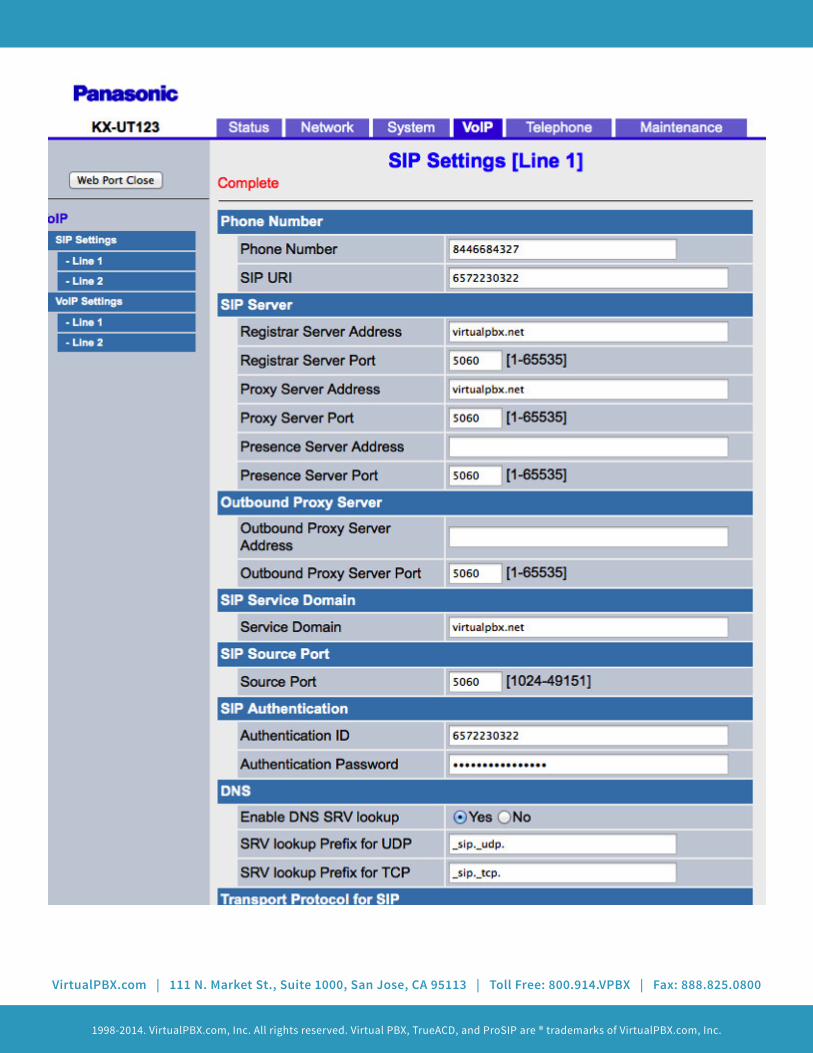
Phone Number • Phone Number – enter your virtual PBX telephone number • SIP URI- enter the User ID sent to you for the extension you want to set up
SIP Server • Registrar Server Address - virtualpbx.net • Registrar Server Port – 5060 • Proxy Server Address – virtualpbx.net • Registrar Server Port – 5060 • Presence Server Address – Leave this field blank
Outbound Proxy Server • Outbound Proxy Server Address – leave this field blank
SIP Service Domain • Service Domain – virtualpbx.net
SIP Source Port • Source Port – 5060 (additional handset will increase the by 10)
SIP Authentication • Authentication ID – enter the User ID of the softphone • Authentication Password – enter the password of the softphone
Keep Alive • Keep Alive Interval – 30
Click Save to save changes
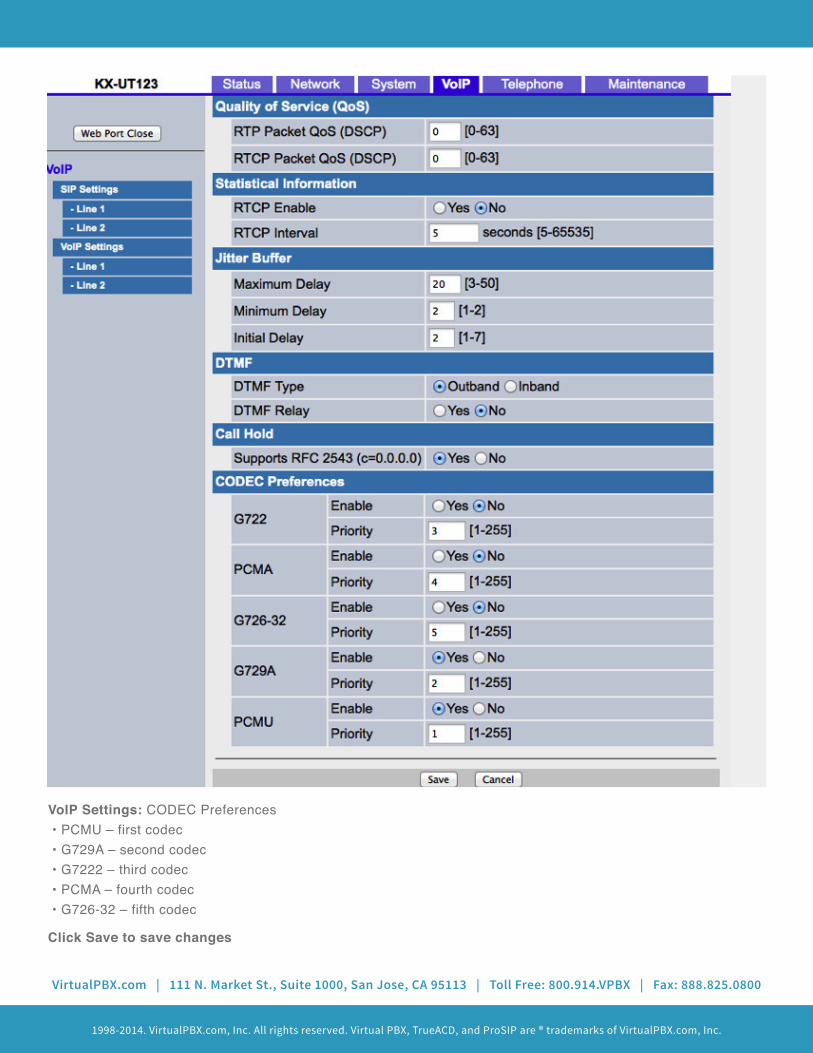
On the left hand side under VoIP Settings click on Line 1
1998-2014. VirtualPBX.com, Inc. All rights reserved. Virtual PBX, TrueACD, and ProSIP are ® trademarks of VirtualPBX.com, Inc.
VirtualPBX.com | 111 N. Market St., Suite 1000, San Jose, CA 95113 | Toll Free: 800.914.VPBX | Fax: 888.825.0800
VoIP Settings: CODEC Preferences • PCMU – first codec • G729A – second codec • G7222 – third codec • PCMA – fourth codec • G726-32 – fifth codec