32
43" UHD LED SMART TV 49" UHD LED SMART TV 50" UHD LED SMART TV 55" UHD LED SMART TV

43" UHD LED SMART TV
49" UHD LED SMART TV
50" UHD LED SMART TV
55" UHD LED SMART TV


1
Contents
Important Safety Instructions. . . . . . . . . . . . . . . . . . . . . . . . . . . . . . . . . . . . . . . . . . . . . . . . .
Safety Information. . . . . . . . . . . . . . . . . . . . . . . . . . . . . . . . . . . . . . . . . . . . . . . . . . . . . . . . . . .
Front/Back View. . . . . . . . . . . . . . . . . . . . . . . . . . . . . . . . . . . . . . . . . . . . . . . . . . . . . . .
Button Functions. . . . . . . . . . . . . . . . . . . . . . . . . . . . . . . . . . . . . . . . . . . . . . . . . . . . . . .
Remote Control . . . . . . . . . . . . . . . . . . . . . . . . . . . . . . . . . . . . . . . . . . . . . . . . . . . . . . . . . . . . .
Install the Batteries . . . . . . . . . . . . . . . . . . . . . . . . . . . . . . . . . . . . . . . . . . . . . . . . . . . . .
Connecting to External Devices. . . . . . . . . . . . . . . . . . . . . . . . . . . . . . . . . . . . . . . . . . . . . . . .
Connecting external devices to your LED TV . . . . . . . . . . . . . . . . . . . . . . . . . . . . . . . . . .
What is Included/TV Placement Setup. . . . . . . . . . . . . . . . . . . . . . . . . . . . . . . . . . . . . . . . . . .
TV Stand Installation/Removal. . . . . . . . . . . . . . . . . . . . . . . . . . . . . . . . . . . . . . . . . . . . .
Unit and Accessories. . . . . . . . . . . . . . . . . . . . . . . . . . . . . . . . . . . . . . . . . . . . . . . . . . . .
Wall Mounting. . . . . . . . . . . . . . . . . . . . . . . . . . . . . . . . . . . . . . . . . . . . . . . . . . . . . . . . .
Troubleshooting . . . . . . . . . . . . . . . . . . . . . . . . . . . . . . . . . . . . . . . . . . . . . . . . . . . . . . . . . . . .
Specifications. . . . . . . . . . . . . . . . . . . . . . . . . . . . . . . . . . . . . . . . . . . . . . . . . . . . . . . . . . . . . .
Basic Operations. . . . . . . . . . . . . . . . . . . . . . . . . . . . . . . . . . . . . . . . . . . . . . . . . . . . . . . . . . . .
Function . . . . . . . . . . . . . . . . . . . . . . . . . . . . . . . . . . . . . . . . . . . . . . . . . . . . . . . . . .
Setup Wizard. . . . . . . . . . . . . . . . . . . . . . . . . . . . . . . . . . . . . . . . . . . . . . . . . . . . . . .
Time . . . . . . . . . . . . . . . . . . . . . . . . . . . . . . . . . . . . . . . . . . . . . . . . . . . . . . . . . . . . .
Options. . . . . . . . . . . . . . . . . . . . . . . . . . . . . . . . . . . . . . . . . . . . . . . . . . . . . . . . . . . .
Menu Operation. . . . . . . . . . . . . . . . . . . . . . . . . . . . . . . . . . . . . . . . . . . . . . . . . . . . . . . .
Sound . . . . . . . . . . . . . . . . . . . . . . . . . . . . . . . . . . . . . . . . . . . . . . . . . . . . . . . . . . . .
Channel. . . . . . . . . . . . . . . . . . . . . . . . . . . . . . . . . . . . . . . . . . . . . . . . . . . . . . . . . . . .
Picture . . . . . . . . . . . . . . . . . . . . . . . . . . . . . . . . . . . . . . . . . . . . . . . . . . . . . . . . . . . .
2
3
4
4
4
4
7
7
8
8
9
10
11
11
11
14
15
16
17
18
19
22
USB Operation . . . . . . . . . . . . . . . . . . . . . . . . . . . . . . . . . . . . . . . . . . . . . . . . . . . . . 26
27
29
Input Setup. . . . . . . . . . . . . . . . . . . . . . . . . . . . . . . . . . . . . . . . . . . . . . . . . . . . . . . . .

WARNING: This equipment has been tested and found to comply with the limits for a Class B digital device, pursuant to Part 15 of the FCC Rules. These limits are designed to provide reasonable protection against harmful interference in a residential installation. This equipment generates, uses and can radiate radio frequency energy and, if not installed and used in accordance with the instructions,may cause harmful interference to radio communications. However, there is no guarantee that interference will not occur in a particular installation. If this equipment does cause harmful interference to radio or television reception, which can be determined by turning the equipment off and on, the user is encouraged to try to correct the interference by one or more of the following measures:
CAUTION: Changes or modifications not expressly approved by the party responsible for compliance with the FCC Rules could void the user's authority to operate this equipment.
- Reorient or relocate the receiving antenna. - Increase the separation between the equipment and receiver. - Connect the equipment into an outlet on a circuit different from that to which the receiver is connected. - Consult the dealer or an experienced radio/TV technician for help.
Important Safety Instructions• Read these instructions – All the safety and operating instructions should be read
before this product is operated. • Keep these instructions – The safety and operating instructions should be retained
for future reference. • Heed all warnings – All warnings on the appliance and in the operating instructions
should be adhered to. • Follow all instructions – All operating and use instructions should be followed. • Do not use this apparatus near water – The appliance should not be used near water
or moisture – for example, in a wet basement or near a swimming pool, and the like.• Clean only with dry cloth.• Do not block any ventilation openings. Install in accordance with the manufacture’s
instructions.• Do not install near any heat sources such as radiators, heat registers, stoves, or other
apparatus (including amplifiers) that produce heat. • Do not defeat the safety purpose of the polarized or grounding plug. A polarized
plug has two blades with one wider than the other. A grounding plug has two blades and a third grounding prong. The wide blade or the third prong is provided for your safety. If the provided plug does not fit into your outlet, consult an electrician for replacement of the obsolete outlet.
• Protect the power cord from being walked on or pinched particularly at the plugs, convenience receptacles, and at the point where they exit from the apparatus.
• Only use attachments/accessories specified by the manufacturer.• Use only with the cart, stand, tripod, bracket, or table specified
by the manufacturer, or sold with the apparatus. When a cart or rack is used, use caution when moving the cart/apparatus combination to avoid injury from tip-over.
• Unplug the apparatus during lightning storms or when unused for long periods of time.
• Refer all servicing to qualified personnel. Servicing is required when the apparatus has been damaged in any way, such as power supply cord or plug is damaged, liquid has been spilled or objects have fallen into the apparatus has been exposed to rain or moisture, does not operate normally, or has been dropped.
• Please keep the unit in a well-ventilated environment. • This equipment is a Class II or double insulated electrical appliance. It does not
require a grounded connection.
2

3
Safety InformationTo ensure reliable and safe operation of this equipment, please read carefully all the instructions in this user guide, especially the safety information below.
Electrical safety
• The TV set should only be connected to a main power supply with voltage that matches the label at the rear of the product.
• To prevent overload, do not share the same power supply socket with too many other electronic components.
• Do not place any connecting wires where they may be stepped on or tripped over.
• Do not place heavy items on them, which may damage the leads.• Hold the main plug, not the wires, when removing from a socket.• During a thunderstorm or when not using the television for long periods, turn off
the power switch on the back of the television.• Do not allow water or moisture to enter the TV or power adapter. Do not use in
wet, moist areas, such as bathrooms, steamy kitchens or near swimming pools.• Pull the plug out immediately, and seek professional help if the main plug or
cable is damaged, liquid has spilt onto the set, if accidentally exposed to water or moisture, if anything accidentally penetrates the ventilation slots or if the set does not work normally.
• Do not remove the safety covers. There are no user serviceable parts inside. Trying to service the unit yourself is dangerous and may invalidate the product’s warranty. Only qualified personnel should service this apparatus.
• To avoid battery leakage, remove exhausted batteries from the remote control, or when not using for a long period.
• Do not break open or throw exhausted batteries in a fire.
Physical safety
• Do not block ventilation slots in the back cover. You may place the TV in a cabinet, but ensure at least 5 cm (2”) clearance all around.
• Do not tap or shake the TV screen, this may damage the internal circuits. Take good care of the remote control.
• To clean the TV use a soft dry cloth. Do not use solvents or petroleum based fluids.
• Do not install near any heat sources such as radiators, heat registers, stoves or other apparatus (including amplifiers) that produce heat.
• Do not defeat the safety purpose of the polarized or grounding-type plug. A polarized plug has two blades with one wider than the other. A grounding type plug has two blades and a third grounding prong, the wide blade, or the third prong is provided for your safety. If the provided plug does not fit into your outlet, consult an electrician for replacement of the obsolete outlet.
• Protect the power cord from being walked on or pinched particularly at plugs.• Unplug the apparatus during lightning storms or when unused for long periods.• Refer all servicing to a qualified service personnel. Servicing is required when
the apparatus has been damaged in any way, such as power-supply cord or plug is damaged, liquid has been spilled, or objects have fallen into the apparatus, has been exposed to rain or moisture, does not operate normally, or has been dropped.

What is Included/TV Placement Setup
TV Stand Installation /Removal
Unit and Accessories
User’s ManualTV SetRemote Control
with Batteries
4
Wall Mounting
The TV is provided with mounting holes for a VESA approved wall mounting bracket (NOT SUPPLIED). The VESA mounting pattern is 200 x 200 mm. Remove the screws holding the base to the base bracket and lift the base away (do not remove the base mounting brackets). Mount the VESA bracket using 4 x M6 x 20 isometric threaded screws (not supplied). Do not use screws longer than 20 mm; damage will occur to the internal components.
Caution: Your new TV is heavy; please consult with a professional wall mount installer to perform this installation.
Four mounting holes(size M6 screw)
200mm
200mm
Screws(2)4*18 BMH
Screws(2)4*18 BMH
Input
1 2 3
4 5 6
7 8
0
9
Q.MENU
ENTER
Menu
Back
VOL
TTS
List
MTS/AudioINFO
CC
CH
Exit
43" UHD LED SMART TV
49" UHD LED SMART TV
50" UHD LED SMART TV
55" UHD LED SMART TV
Base Stand
6 Screws
4 Screws
49” 50” 55”
43”
43T7U
5
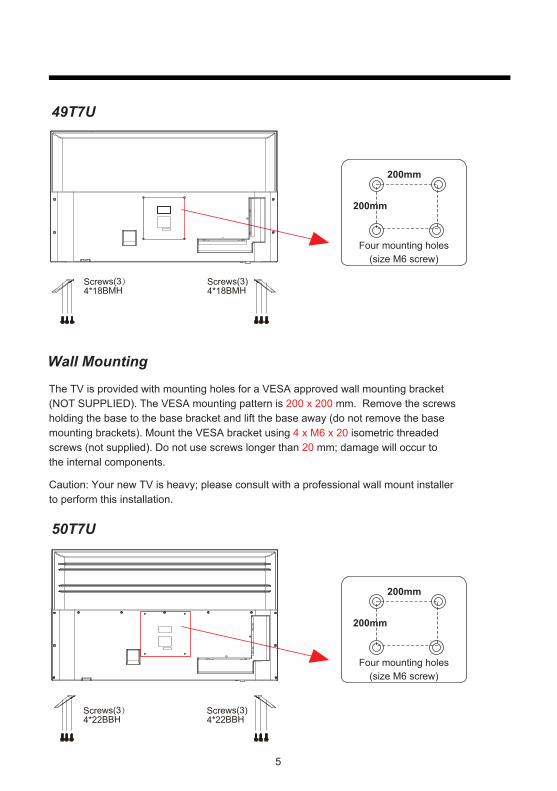
Wall Mounting
The TV is provided with mounting holes for a VESA approved wall mounting bracket (NOT SUPPLIED). The VESA mounting pattern is 200 x 200 mm. Remove the screws holding the base to the base bracket and lift the base away (do not remove the base mounting brackets). Mount the VESA bracket using 4 x M6 x 20 isometric threaded screws (not supplied). Do not use screws longer than 20 mm; damage will occur to the internal components.
Caution: Your new TV is heavy; please consult with a professional wall mount installer to perform this installation.
Four mounting holes(size M6 screw)
200mm
200mm
49T7U
Screws(3)4*18BMH
Screws(3)4*18BMH
Four mounting holes(size M6 screw)
200mm
200mm
50T7U
Screws(3)4*22BBH
Screws(3)4*22BBH

Wall Mounting
The TV is provided with mounting holes for a VESA approved wall mounting bracket (NOT SUPPLIED). The VESA mounting pattern is 200 x 200 mm. Remove the screws holding the base to the base bracket and lift the base away (do not remove the base mounting brackets). Mount the VESA bracket using 4 x M6 x 20 isometric threaded screws (not supplied). Do not use screws longer than 20 mm; damage will occur to the internal components.
Caution: Your new TV is heavy; please consult with a professional wall mount installer to perform this installation.
6
Wall Mounting
The TV is provided with mounting holes for a VESA approved wall mounting bracket (NOT SUPPLIED). The VESA mounting pattern is 400 x 200mm. Remove the screws holding the base to the base bracket and lift the base away (do not remove the base mounting brackets). Mount the VESA bracket using 4 x M6 x 20 isometric threaded screws (not supplied). Do not use screws longer than 20 mm; damage will occur to the internal components.
Caution: Your new TV is heavy; please consult with a professional wall mount installer to perform this installation.
Four mounting holes(size M6 screw)
400mm
200mm
55T7U
Screws(3)4*18 BMH
Screws(3)4*18 BMH

Button Functions1. POWER LED: illuminates green when the TV is turned on. illuminates red when the TV is in
standby mode.
2. IR(Infrared Receiver):
3. POWER ON: Press the middle button.CH+: Push forward to choose the next higher channel in the channel list.CH-: Pull back to choose the next lower channel in the channel list.VOL+: Push right to increase the volume.VOL-: Push left to decrease the volume.QUICK MENU:Press the middle button for 2~5 seconds.MUTE:Press “ ^ ” to select press the middle button to enter.POWER OFF:Press “ ” to select press the middle button to turn off.MENU:Press “ - ” to select press the middle button to enter.INPUT:Press “ + ” to select press the middle button to enter.
7
Receives IR signals from the remote control.DO not put anything near the sensor, as its function may be affected.
^
MUTE
POWER
MENU INPUT
Front/Back View
NOTICE:There is a square glue to protect the IR model,it can be removed after instal the base.

8
Connecting to External Devices
Connecting external devices to your LED TV
RJ45:Network connection port.3.
6. USB
7. YPBPR/AV: Connect to the YPbPr video output terminal of the DVD. Connect video output from a DVD or VCR.
8. AUDIO IN: Audio input.
4. HDMI :Connect to High-Definition(HD) signal output device.(HDMI can support 4K60Hz Signal)
1. HEADPHONES :Connect to the Headphones.
2. OPTICAL:Connect a digital sound system to this jack.
5. RF: Connect to the antenna(75Ω VHF/UHF) socket with the RF coaxial cable.
cable receiver/satellite box
Not suppliedNot suppliedLR G B
R G B
R
L R
R
L
R
G
B
USB1 USB2HDMI1(ARC)
YPbPr/AV
AUDIO IN5V 0.5A5V 0.5A
RJ45 HDMI3 HDMI2 RFOPTICALHeadphone

Input
1 2 3
4 5 6
7 8
0
9
Q.MENU
ENTER
Menu
Back
VOL
TTS
List
MTS/AudioINFO
CC
CH
Exit
9
Remote Control
1. POWER: Turn the TV on and off.
3. Digital Buttons(0-9, -): Directly select channel with digital buttons.
19. YouTube: If network connects, press this key to view YouTube directly.
18. HOME: Press it to go to App home page.
5. NETFLIX: If network connects, press this key to view NETFLIX directly.
7. MENU: Display the main menu or exit the current menu.
9. ENTER: Validation key.
8. Arrow buttons : Use to select on-screen menu items and change menu values.
11. Back: Return.
10. Exit: Exit the menu.
12. COLOR BUTTONS: It's used as it's showed in the EPG or Program Edit menu.
2. Input: This button is used to switch among different sources, Select a source and press ENTER button to confirm.
4. : Switch to the previous program.
15. TTS: Press this button to set TTS on or off.
13. VOL+/-: Press these buttons to adjust the volume.
17.List: Press it to show channel list and favorite list on screen.
6. Q.MENU: Press this key to go to quick menu.
20. DIGITAL MEDIA PLAYER CONTROL BUTTON: Include play/pause, stop, backward, forward is used in USB mode .Please refer to relevnat instructions in the section of multimed player.
22. MTS/AUDIO: In USB mode, press this button to switch audio track when movie is playing. In TV mode, press this button to switch MTS or Audio Language.
21. INFO: Display the program information .
14. CH : Press these buttons to change channel upward or downward.
16. : Press this button to cut off the sound of the TV set temporarily, press again to resume.

10
Install the BatteriesIf the remote control fails to operate the TV functions, replace the batteries in theremote control.
1.Open the battery compartment cover on the back side.2.Insert two 1.5V AAA size batteries incorrect polarity. Don´t mix old or usedbatteries with new ones.3.Closed the cover.
Initial Setup
1. Connecting your TV on the poweroutlet;2. Press the POWER button on the remote to turn on the TV in green for the LED light.CAUTION:Always disconnect the TV from the power outlet when the TV will not be used for a long period of time. The POWER button on the front panel is only used for switching the TV into standby, it does not disconnect the device from the main voltage. To completely disconnect the main voltage, please remove the power plug from the socket. 3. Press the key▼/▲/◄ / ►and following the picture as bellow to operate the subject.
NOTE:The picture is for reference only.
23. VUDU: Press this button to select VUDU application.
24. pandora: Press this button to select pandora application.
25. CC: Press this button to adjust CC mode.

11
Basic Operations
Setup Wizard
Select OSD LanguagePress ▼ / ▲ button to select the language to be used for menus and message.Press ENTER button to enter the next menu.
OSD languageconfig Menu language
English
Español
French
SelectENTER
DATA COLLECTION AND FIRMWARE UPDATES NOTICE
Press ◄ / ► button to select.Press ENTER button to enter the next menu.Note: Select the “VIEW ADDITIONAL DETAILS” for more information.
Menu Operation

12
ClockSet the clock
Auto
Manual
SelectENTER
Time ZoneSelect the time Zone
Pacific
Central
Eastern
SelectENTER ReturnBACK
Select ClockPress ▼ / ▲ button to select the clock .Press ENTER button to enter the next menu.
Select Home or RetailSet the TV Mode to Home or Retail display use.Press ▼ / ▲ button to select(Home Mode / Retail).Press ENTER button to enter the sub-menu.
Select Time ZonePress ▼ / ▲ button to select the Time Zone.Press ENTER button to enter the next menu.

13
DSTSelect Daylight saving time
Off
On
SelectENTER ReturnBACK
Network ConfigurationDo you want to Network?
YES
Skip
SelectENTER ReturnBACK
NetworkDo you want to Network?
WIFI
LAN
SelectENTER ReturnBACK
Auto SearchDo you want to scan the channels?
YES
Skip
SelectENTER ReturnBACK
Auto SearchATV/DTV
DTV
ATV
Start
Start
Start
Cannel
Select ExitEXIT ReturnMENUEnterENTER
Select DSTPress ▼ / ▲ button to select the Select Daylight saving time.Press ENTER button to enter the next menu.
Select Network ConfigurationPress ▼ / ▲ button to select Network Configuration.Select YES to enter the Network Configuration,More details please see the page 24~26.
Select Auto SearchPress ▼ / ▲ button to select Auto Search.Sleect YES to enter the Auto Search,More details please see the page 22.

14
Current Channel Information
Press “INFO” key on the remote control to view currentchannel information, the indications of channel information are listed in the following table.
Press “EXIT” key on the remote control to exit this OSD.
Input Setup
Press input key on the remote control to enter "INPUT SOURCE" menu. There are theseoptions for you to select: "TV", "AV","Component", "HDMI1", “HDMI2",“HDMI3", “USB".
Use /key to select a input source and press Enter key to confirm.
00:00 01/01/1970

15
Menu system instruction
Picture1. Press Menu key to display the main menu on the screen.2. Press ▲/▼ key to select "Picture" option.3. Press key to enter "Picture" submenu.
Picture Mode
Your TV has four picture settings (Dynamic, Standard,Movie,Game,Power Saving,User) that are preset at the factory. Only "User" mode can be set to your preference by adjusting particular items such as Contrast, Brightness, Color, Sharpness.1. Press ▲/▼ key to select "Picture Mode" option.2. Press ▲/▼ key to select one picture mode.
User settings for PICTURE(Contrast, Brightness, Color, Sharpness,Tint)
Your set has several settings which allow you to control picture quality.1. Press ▲/▼ key to select a particular item.2. Press / key to decrease or increase the value of a particular item.Note: The adjusted values are stored according to the selected particular item.
Contrast: Adjusts the lightness and darkness between objects and the background.
Color: Adjusts the colors, making them lighter or darker.Sharpness: Adjusts the outline of objects to either sharpen them or
make them more dull.Tint: Adjusts the Tint of the picture.
BacklightYou can Change the brightness of the entire screen according to your preference.1. Press ▲/▼key to select "Backlight" option.2. Press / key to increace or decreace the backlight value.
Backlight: Adjusts the brightness of the whole screen.
Color TemperatureYou can change the color of the entire screen according to your preference.1. Press ▲/▼ key to select "Color Temperature" option.2. Press / key to select one color temp.
Cool: Makes whites bluish.Neutral: Makes whites nature Warm: Makes whites reddish.
Brightness: Adjusts the brightness of the picture.
Picture Mode
Contrast
Bridhtness
Color
Tint
Backlight
Color Temperature
6060
50
50
0
43
Sharpness

16
Sound1. Press Menu key to display the main menu on the screen.2. Press / key to select "Sound" option.3. Press key to enter "Sound" submenu.
Sound Mode
You can select the type of the special sound effectto be used when watching a given broadcast.Your TV has five sound settings (“Standard”, “Music”,“Movie”,“Sports”,“User”) that are preset at the factory.1. Press / key to select "Sound Mode" option. Press ENTER or to enter.2. Press / key to select one sound mode. Standard: Selects the normal sound mode. Music: Provides clear and live sound for music. Movie: Provides live and full sound for movies. Sports: Emphasizes bass over other sounds. User: Selects your custom sound settings.
BalanceIf the volumes of the left speaker and the right speaker are not the same, you can adjustthe "Balance" to suit your personal preference.1. Press / key to select "Balance" option.2. Press / key to decrease or increase the value of the item.
AVLEach broadcasting station has its own signal conditions, and it is inconvenient to adjust thevolume every time the channel is changed. “AVL” automatically adjusts the volume of thedesired channel by lowering the sound output when the modulation signal is high or byraising the sound output whenthe modulation signal is low.1. Press / key to select “AVL” option.2. Press / key to select “On” or “Off”.
1. Press / key to select "Surround sound” option. 2. Press / key to select “Surround” or “Off”.
Surround soundThis is used to turn on surround sound to gain better sound effect.
Sound Mode
Balance
AVL
Surround Sound
Digital Audio Output
Audio Languages
DAP
HDMI-ARC
0
Video Description
Video Description1. Press / key to select "Video Description” option.2. Press / key to select “On” or “Off”.

17
Digital Audio Output
This is used to set digital audio output1. Press /key to select "Digital Audio Output” option.2. Press / key to select “Auto” or “PCM”.
Audio LanguagesYou can set the first and secondary language for audio.
DAP
HDMI ARCTurn on or turn off the HDMI ARC function.
This is used to set DAP. 1. Press / key to select "DAP” option.2. Press key to enter “DAP” submenu.
DAP
DAP Enable
DAP Mode
Surround Virtualizer
Dialog Enhancer
Auto Volume Control
Off
Standard
High
Low
Off
Function1. Press Menu key to display the main menu on the screen.2. Press/key to select “Function” option.3. Press key to enter “Function” submenu.
Noise ReductionPress / key to select the Noise Reduction mode.You can select the right mode to match the pictures.
MPEG Noise ReductionPress / key to select the mode: off/low/middle/high.The picture will be better when it is in “high” mode.
Aspect Ratio1. Press / key to select “Aspect Ratio” option.2. Press / key to change the size of the pictureon the size of the picture on the screen.
Noise Reduction
MPEG Noise Reduction
Aspect Ratio
CEC Link Setup
HDMI EDID
Netflix Deactive
Netflix ESN
Netflix Version
TTS

18
CEC Link Setup1. Press / key to select “Link Setup” option.2. Press ENTER or key to enter “Link Setup”submenu.
Enable Link: Press / to turn on/off the link setup.
Auto Power On: When this option is “On” and theTV is in standby mode. To turn on the DVD can alsoturn the TV at the same time.
Auto Standby: When this Option is “On” and the TVis on, to turn off TV can also turn the DVD into standby mode.
CEC Link Setup
Enable CEC link
Auto Power On
Auto Standby
On
Off
Off
HDMI EDIDThis function is only used in HDMI mode.1. Press / key to select “ HDMI EDID” option.2. Press / key to select “ 1.4” or “ 2.0”.
Netflix Deactive1. Press “/" key to select “Netflix Deactive" option.2. Press “” or "ENTER" key to confirm.3. Press "Yes" to confirm again, the Netflix will be activated.
Netflix ESNDisplay the Netflix Esn information.
Netflix VersionDisplay the Netflix version.
Time1. Press Menu key to display the main menu on the screen.2. Press / key to select "Time" option.3. Press key to enter "Time" submenu.
Off TimeIn "Off Time” item, press button or ENTER button to enter the submenu, set the day & time to turn off the TV set.
Off Time
On Time
Sleep Timer
Auto Sleep
Auto Sync
Clock --:--
Time Zone
The HDMI jacks on your TV are Ultra HD (UHD) jacks.Depending on the HDMI device youconnect to the HDMI jack or the streaming content you watch, youmay need to adjustthe timing.
1.4
2.0
For FHD compatible HDMI device.Supportstiming limit on 3840 x 2160@60Hz,YCbCr 420
For UHD compatible HDMI device.Supportstiming limit on 3840 x 2160@60Hz, YCbCr 444/422/420

19
On TimeIn "On Time” item, press button or ENTER button to enter the submenu, set the time to turn on the TV set, when the TV set is in the standby mode. You can also choose which day to control you TV set in a week.
Sleep Timer1. Press / key to select "Sleep Timer" option.2. Press / key repeatedly until the desired time appears (Off, 10mins, 20mins, 30mins,60mins, 90mins, 120mins, 180mins, 240mins).Notes: The sleep timer you have set will be cancelled when the TV turns off or if a powerfailure occurs.Notes: When the time is less than 60 seconds, remind information will be displayed on the screen. Press any key button to cancel timer function.
Auto SleepPress / key to select whether to open the Nosignal Power off features. If this function isopened, the TV will power off in ten minutes when there is no signal.
Auto SyncYou can modify the time of your TV set in Manual mode. In Auto mode, the “clock” isdecided by the DTV signal.
Clock --:--When Auto Sync is on, the clock is got from DTV streams; Set the clock when Auto Sync is off.
Time ZoneYou can choose it to modify your time zone in the TV set.1. Press / key to select "Time Zone" option.2. Press / key to select time zone.
Options
1. Press Menu key to display the main menu on the screen.2. Press / key to select "Option" option.3. Press key to enter “Option" submenu.
OSD Language1. Press / key to select “OSD Language " option.2. Press ENTER or key to select a proper language for OSD.
OSD TimeSet the preferred amount of timefor the OSD to be displayed on the screen.
OSD Language
OSD Time
Closed Caption
Reset
Network Configuration
Software Update(USB)
View End-User License
Internet Update Check
Network Update Information

20
Closed Caption1. Press / key to select “Closed Caption" option.2. Press / key to select CC mode.
Reset1.Press “/" key to select "Reset" option.2.Press “ " or "ENTER" key to confirm.3.Press "Yes" to confirm again, TV will turn off automaticly and change all setting to factory setting.
Network ConfigurationPlease refer to "Network setting"behind.
Software Update(USB)When the TV need to be updated, please copy the new software to a USB storage andinset the USB storage to TV, then operating by following steps.1.Press “/" key to select "Software Update" option.2.Press “” or "ENTER" key to confirm.3.Press "Yes" to confirm again, the TV will update by USB, Please wait a few minutesand don't turn off the power, it will turn off automaticly when updating is finish.
View End-User LicensePress “” or "ENTER" key to confirm.
Internet Update CheckThis can update TV through internet.
Network Update InformationDisplay the Network Update Information .
Parent ControlThe "Parent Control " feature automatically locks out programming that is deemed inappropriate for children. The user must first enter a Password before any of the lock restrictions can be set up or changed.1. Press / key to select “Parent Control" option. 2. Press ENTER or key to enter “Parent Control" submenu, "Enter Password" menu will appear,enter your 4-digit password to enter “Parent Control” submenu (the\ default password is 0000 and the universal password is 1470)
Parent ControlSet the Lock function on or off.1. Press / key to select “Parent Control " option. 2. Press/key to select "On" or "Off".
Please Enter Password

21
Set Password
1. Press / key to select "Set Password" option. 2. Enter your 4-digit password to enter"Set Password" submenu. Choose any 4-digits for your new password and enter them. As soon as the 4 digits are entered, the cursor skipped to “Confirm Password” item, re-enter the same 4 digits, and your new password has been memorized.When the programs is locked, you can also press the menukey, Info key and so on. Then you can press / key to callback the input-password window.
USA TV1. Press / key to select "USA TV" option.2. Press ENTER key to open USA TV menu.
USA MPAA1. Press / key to select "USA MPAA" option.2. Press ENTER key to open USA MPAA menu.
Canada English1. Press / key to select "Canada English" option.2. Press ENTER key to open Canada English menu.
Canada French1. Press / key to select "Canada French" option.2. Press ENTER key to open Canada French menu.
RRT Setting1. Press / key to select "RRT Setting" option.2. Press ENTER key to open RRT Setting menu.
RRT Reset1. Press / key to select "RRT Reset" option. 2. Press ENTER key to open RRT Reset menu.
Block Unrated TV1. Press / key to select "Block Unrated TV" option.2. Press / key to select “On” or “Off ”.
Parent Control
Set Password
USA TVUSA MPAA
Canada English
Canada French
RRT SettingRRT ResetBlock Unrated TV

22
ChannelBefore your television can begin memorizing theavailable channels, you must specify the type ofsignal source that is connected to the TV (i.e. anantenna or a cable system).1. Press Menu key to display the main menu on the screen.2. Press / key to select "Channel" option.3. Press ENTER or key to enter "Channel" submenu.
Antenna Mode1.Press / key to select "Antenna" option.2.Press / key to select "Antenna" or "CABLE".
Auto Search1. Press / key to select "Auto Search" option.2. Press or ENTER key to confirm. then a noticewindow will be displayed on the screen.Select "Start" to start search or "Cancel" to cancel it.When searching, press EXIT key to exit tuning at anymoment. Press Menu key to skip DTV tuning whensearching DTV, skip ATV tuning when searching ATV,skip CATV tuning when searching CATV.3. After all the available channels are stored,the searching menu will exit.
Program EditAfter the program is searched, select “Program Edit”in the “Channel” menu, press “enter” button,program can be edited such as delete or skipaccording to the user's habit.
Skip (Blue) ButtonThis function can help shield certain program. Program skipswhen selecting program by the "/" button on the TV orremote control.1. Select the program to be shielded in the“Program Edit”.2. Press “Skip” (Blue) button, the skip mark is displayed at the left side of theprogram and this program is shielded.3. To cancel the Skip function, enter the channel edit menu, select the shieldedprogram and press “Skip” (Blue) button, the skip mark at the left side of the programdisappears then program is recovered.
Delete (Red) ButtonThis function can help delete program.1. Select the program to be deleted in the "Program Edit".2. Press "Delete"(Red) button, the program will be deleted.
Antenna Mode
Auto Seach
DTV Manual Search
ATV Manual Search
Signal Information
Program Edit
Program Edit
5.1 G lobo HD
5.2 G lobo HD
12
Delete ReturnMENU
Skip Fav

23
Favorite(Yellow) buttonThis function can help store the favorite program then these programs can be quicklyselected.1. Select the program which is favorite.2. Press “Fav”(Yellow) Button, the favorite mark is displayed at the left side of the programand this program is store into the Favorites.3.To cancel the Favorite function, enter the program edit menu, select the program andpress “Fav”(Yellow) button, the favorite mark at the left side of the program disappears.
DTV Manual SearchEnter digital number and press “ENTER” toselect DTV Channel.
ATV Manual Search1. Press / key to select "ATV Manual Search"option.2. Press or ENTER key to enter submenu.
Current CH1. Press / key to select the second item.2. Press / key to select current channel.
Fine-Tune1. Press / key to select the third item.2. Press / key to select a better frequency forcurrent channel.
Signal Information(Used only in DTV)1. Press / key to select"Signal Information" option.2. Press “ENTER”or key ,you can see the information of the DTV channel.
Channel 7
Name ENCORE
Modulation ATSC -VSB
Quality 0Strength 0
DTV Manual Search
UHF CH 40
ENTER Search
Bad Normal Good
DTV 0
No Signal
Return
ATV Manual Search
Current CH 12
Fine-Tune
Save Return
Frequency 205.25 MHz
MENU
MENU

24
OSD Language
OSD Time
Reset
Network Configuration
Software Update(USB)
View End-User License
Internet Update Check
Closed Caption
Network Setting
1.Press the “ Menu ” to enter, then pitch on the ”Options”,and press “ENTER” or click theright button to enter the submenu.
2.Pitch on the "Network Configuration",and press "ENTER" or click right button toenter the "Network Configuration".
3.When the wired network is used, if select dynamic IP address setting, pitch on the"DHCP" in the "Network Configuration", then click the "Setting", and press the "ENTER"button to enter.If select static IP address setting,pitch on the "Static" in the "Network configuration",then setting up the IP,Nemask,Gateway and DNS in sequence.When the settingcomplete,pitch on the "setting" and press the"Enter".

25
4.If shows "Success",the "WLAN" on the bottom right corner will turn to green from red, and it means the network connect successfully; If shows "Fail",it means the network can not connect, please check whether the net wire and router connect successfully or not.
5. Select the "WIFI" in the Network Configuration before using WIFI connecting.

26
Pitch on the "Setting",press the "ENTER" to confirm.If shows "Success", the "WIFI" on the bottom rightcorner will turn to green from red, and it means thenetwork connect successfully; If shows "Fail",it means the network can not connect, please checkwhether the wireless router connects successfully ornot.
USB OperationNote: Before operating USB menu,Plug in USB device, then press INPUT button to set theInput Source to USB .Press ◄ / ► button to select USB in the Source menu, then press ENTER button to enter.
Select Picture in the main menu, then press Enter button to enter.Press Exit button to return to the previous menu and exit menu to quit.
Picture Menu
Image Photo Resolution(width x height)
Remark
JPEG Base-line
Progressive
15360x8640(1920x8 x 1080x8)
1024x768
The limitation of max resolution depends on DRAM size
The limitation of max resolution depends on DRAM size
USB version 2.0

27
Troubleshooting
If the device performance fails, check whether the detected problem is in the following table. If your device still fails, contact customer service.
SYMPTOM POSSIBLE CAUSE REMEDY
TV – No signal input connected, loose or disconnected.
Signal cable is loose or not connected.
Ensure signal cable is not loose or disconnected. Reattach and try again.
Remote ControlDistance is short, no control.
Receiver of remote control is covered.
Ensure the remote receiver is not obstructed.
The battery energy of the remote control is too low.
Change the batteries.
TVDisplay is faint.
Adjustment is incorrect. Use auto-adjustment function.
Display mode is incorrect. Use recommended mode.
TVDisplay image does not fill the screen.
Adjustment is incorrect. Use auto-adjustment function.
Enter PICTURE to adjust the horizontal and vertical position.
Display mode is incorrect. Use recommended mode.
TVUnable to operate the TV
Exterior influence, for example lighting, static electricity and so on, which might disturb the normal operation of the TV.
Press the button to tum off electrical source, then press the
button to turn on the TV again after 1-2 minutes.
Static and sound noise.
Antenna cable connector is loose, cable is damaged.
Check the antenna cable connector plug for secure connection and any damage.
Antenna cable type is not correct.
Check antenna cable type (VHF/UHF).
Direction or position of antenna is incorrect.
Adjust the direction or position of antenna.
Signal is weak. Attempt to use signal amplifier.
TV image is better, but has noise .
Antenna cable connector is loose, cable is damaged.
Check the antenna cable connector plug for secure connection and any damage.
No image. No sound. Power plug is loose, power cord does not connect well.
Check to ensure power cord is connected.
Press POWER on panel or remote control.
Check if the button is on.
TV image has stripes.
Signal is exposed to interference, such as a car, neon light, electric blower, etc.
Do not use an electric blower around unit.
Adjust antenna cable direction to reduce interference.
TV image has shadows.
TV signal is reflected by valley or building.
Use a high-directional antenna.
Direction of antenna is incorrect. Adjust direction of the antenna.
TV has no sound.Volume setting is too low. Adjust volume to proper level.
Sound is muted. Press MUTE to deactivate mute.
CAUTION: Do not allow your TV screen to display the same image for an extended period of time. Please set up a screen protection procedure. If a high-contrast picture remains on the TV screen fora long time, this picture could burn the image onto the screen. Usually the burnt image will disappear gradually when you turn off the TV’s power. However, this damage cannot be repaired.

28
Specifications
Specifications
TV System
Model
NTSC
43T7U
Resolution
Wireless LAN IEEE 802.11b/g/n 2.4-2.5 GHz ISM Band
3840x2160
Power Consumption 85W
Power Supply AC 100-120V~50/60Hz
Connectivity HDMl input x 3
YPbPr/AV
Headphones OutputRJ45
OPTICAL Output
AUDIO IN
RF Antenna Input
TV System
Model
NTSC
49T7U
Resolution
Wireless LAN IEEE 802.11b/g/n 2.4-2.5 GHz ISM Band
3840x2160
Power Consumption 138W
Power Supply AC 100-120V~50/60Hz
Connectivity HDMl input x 3
YPbPr/AV
Headphones OutputRJ45
OPTICAL Output
AUDIO IN
RF Antenna Input

Remote ControlSignal Type Infrared
Control Distance 8 meters
Control Angle 30° (Horizontal)
Power Supply AAA 1.5V x 2
29
TV System
Model
NTSC
50T7U
Resolution
Wireless LAN IEEE 802.11b/g/n 2.4-2.5 GHz ISM Band
3840x2160
Power Consumption 138W
Power Supply AC 100-120V~50/60Hz
Connectivity HDMl input x 3
YPbPr/AV
Headphones OutputRJ45
OPTICAL Output
AUDIO IN
RF Antenna Input
TV System
Model
NTSC
55T7U
Resolution
Wireless LAN IEEE 802.11b/g/n 2.4-2.5 GHz ISM Band
3840x2160
Power Consumption 168W
Power Supply AC 100-120V~50/60Hz
Connectivity HDMl input x 3
YPbPr/AV
Headphones OutputRJ45
OPTICAL Output
AUDIO IN
RF Antenna Input


