Form No. 3414-171 Rev B 46cm Lawn Mower Model No. CODE610A—Serial No. 610A400000000 and Up Model No. CODE611A—Serial No. 611A400000000 and Up Register at . Original Instructions (EN) *3414-171* B
Transcript
Form No. 3414-171 Rev B
46cm Lawn MowerModel No. CODE610A—Serial No. 610A400000000 and UpModel No. CODE611A—Serial No. 611A400000000 and Up
Register at .Original Instructions (EN) *3414-171* B
Net Torque: The gross or net torque of this enginewas laboratory rated by the engine manufacturer inaccordance with the Society of Automotive Engineers(SAE) J1940. As configured to meet safety, emission,and operating requirements, the actual engine torqueon this class of mower will be significantly lower. Goto www.hayter.co.uk to view specifications on yourmower model.
IntroductionThis rotary-blade, walk-behind lawn mower is intendedto be used by residential homeowners. It is designedprimarily for cutting grass on well-maintained lawnson residential properties. It is not designed for cuttingbrush or for agricultural uses.
Read this information carefully to learn how to operateand maintain your product properly and to avoidinjury and product damage. You are responsible foroperating the product properly and safely.
You may contact Hayter directly at www.hayter.co.ukfor product and accessory information, help finding adealer, or to register your product.
Whenever you need service, genuine Hayter parts, oradditional information, contact an Authorized ServiceDealer or Hayter Customer Service and have themodel and serial numbers of your product ready.Figure 1 identifies the location of the model and serialnumbers on the product.
g199776
Figure 1
1. Model and serial number plate
Write the product model and serial numbers in thespace below:
Model No.
Serial No.
This manual identifies potential hazards and hassafety messages identified by the safety-alert symbol(Figure 2), which signals a hazard that may causeserious injury or death if you do not follow therecommended precautions.
g000502
Figure 2
1. Safety-alert symbol
This manual uses 2 words to highlight information.Important calls attention to special mechanicalinformation and Note emphasizes general informationworthy of special attention.
Before Operation ................................................... 7Before Operation Safety ..................................... 7Filling the Fuel Tank............................................ 8Checking the Engine-Oil Level............................ 8Adjusting the Cutting Height ............................... 9
During Operation ................................................. 10During Operating Safety ................................... 10Starting the Engine ............................................11Using the Self-Propel Drive................................11Shutting Off the Engine......................................11Mulching the Grass Clippings ............................11Bagging the Grass Clippings ............................ 12Rear-Discharging theGrass Clippings.............. 13Operating Tips ................................................. 13
After Operation .................................................... 13After Operating Safety ...................................... 13Cleaning under the Machine ............................. 14Folding the Handle ........................................... 14
Maintenance ........................................................... 15RecommendedMaintenance Schedule(s) ........... 15Maintenance Safety.......................................... 15Preparing for Maintenance ............................... 15Replacing the Spark Plug ................................. 16Servicing the Air Filter....................................... 16Changing the Engine Oil ................................... 16Replacing the Blade.......................................... 17Lubricating the Wheels ..................................... 18
SafetyThis machine has been designed in accordance withEN ISO 5395:2013.
General SafetyThis product is capable of amputating hands andfeet and of throwing objects. Always follow all safetyinstructions to avoid serious personal injury.
Using this product for purposes other than its intendeduse could prove dangerous to you and bystanders.• Read and understand the contents of this
Operator’s Manual before starting the engine.• Do not put your hands or feet near moving
components of the machine.• Do not operate the machine without all guards
and other safety protective devices in place andworking on the machine.
• Keep clear of any discharge opening. Keepbystanders a safe distance away from themachine.
• Keep children out of the operating area. Neverallow children to operate the machine.
• Stop the machine and shut off the engine beforeservicing, fueling, or unclogging the machine.
Improperly using or maintaining this machine canresult in injury. To reduce the potential for injury,comply with these safety instructions and always payattention to the safety-alert symbol, which meansCaution, Warning, or Danger—personal safetyinstruction. Failure to comply with these instructionsmay result in personal injury or death.
You can find additional items of safety information intheir respective sections throughout this manual.
3
Safety and Instructional DecalsSafety decals and instructions are easily visible to the operator and are located near any areaof potential danger. Replace any decal that is damaged or missing.
decal111-9937
111-9937
1. Easy-wash port
decal134-0084
134-0084
1. Warning—read the Operator's Manual. 4. Thrown object hazard—keep bystanders away from themachine.
2. Cutting hazard—keep away from moving parts; keep allguards and shields in place.
5. Cutting hazard—do not mow up a slope; always mow fromside to side; ensure that the blade is stopped and the engineis shut off before picking up nearby debris; always look behindyou when backing up with the machine.
3. Cutting hazard—disconnect the spark plug and read theOperator's Manual before performing maintenance.
decalh295159
H295159
1. Engine stop
4
Setup
1Assembling the HandleNo Parts Required
Procedure1. Attach the lower handle to the mower housing
3. Insert the cables into the cable clamp and attachthe cable clip to the handle as shown in Figure 5.
g189081
Figure 5
1. Cable clip
2Installing the Recoil-StarterRope in the Rope GuideNo Parts Required
ProcedureImportant: To start the engine safely and easilywhenever you use the machine, install therecoil-starter rope in the rope guide.
Hold the blade-control bar to the upper handle (Figure9) and pull the recoil-starter rope through the ropeguide on the handle (Figure 6).
g003251
Figure 6
1. Recoil-starter rope 2. Rope guide
5
3Filling the Engine with OilNo Parts Required
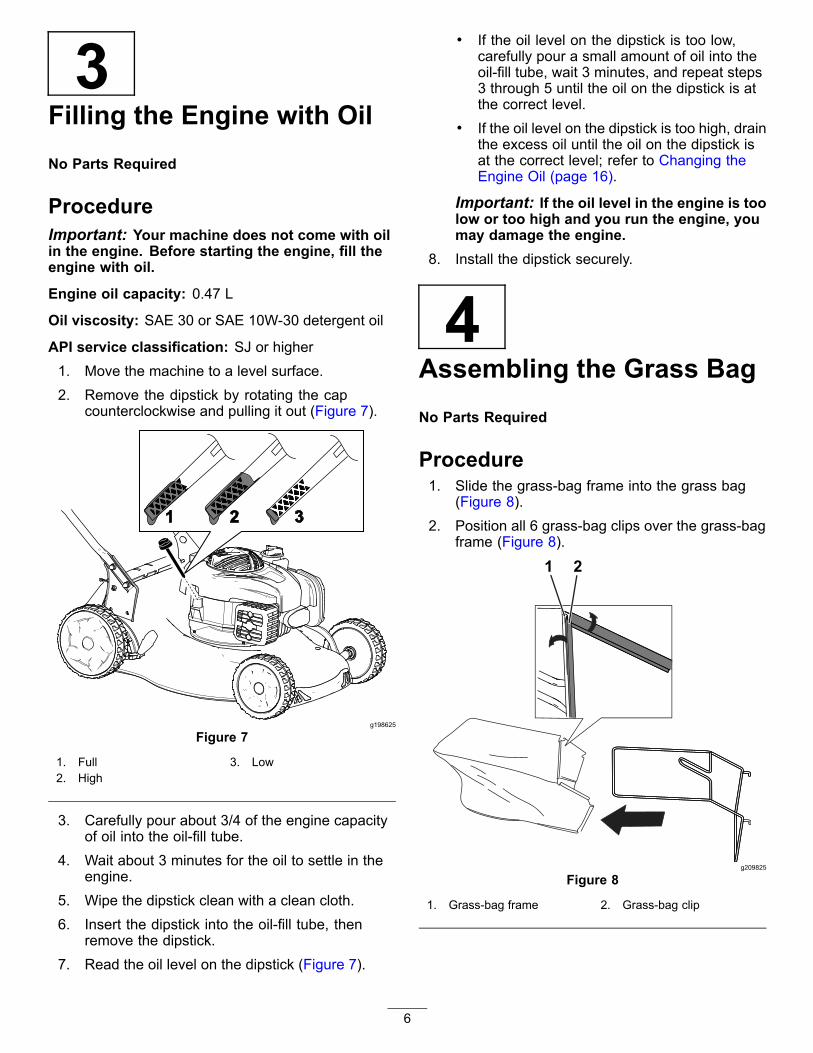
ProcedureImportant: Your machine does not come with oilin the engine. Before starting the engine, fill theengine with oil.
Engine oil capacity: 0.47 L
Oil viscosity: SAE 30 or SAE 10W-30 detergent oil
API service classification: SJ or higher1. Move the machine to a level surface.2. Remove the dipstick by rotating the cap
counterclockwise and pulling it out (Figure 7).
g198625
Figure 7
1. Full 3. Low2. High
3. Carefully pour about 3/4 of the engine capacityof oil into the oil-fill tube.
4. Wait about 3 minutes for the oil to settle in theengine.
5. Wipe the dipstick clean with a clean cloth.6. Insert the dipstick into the oil-fill tube, then
remove the dipstick.7. Read the oil level on the dipstick (Figure 7).
• If the oil level on the dipstick is too low,carefully pour a small amount of oil into theoil-fill tube, wait 3 minutes, and repeat steps3 through 5 until the oil on the dipstick is atthe correct level.
• If the oil level on the dipstick is too high, drainthe excess oil until the oil on the dipstick isat the correct level; refer to Changing theEngine Oil (page 16).
Important: If the oil level in the engine is toolow or too high and you run the engine, youmay damage the engine.
8. Install the dipstick securely.
4Assembling the Grass BagNo Parts Required
Procedure1. Slide the grass-bag frame into the grass bag
(Figure 8).2. Position all 6 grass-bag clips over the grass-bag
frame (Figure 8).
g209825
Figure 8
1. Grass-bag frame 2. Grass-bag clip
6
Product Overview
g198628
Figure 9
1. Self-propel bar 6. Spark plug2. Handle 7. Cutting-height lever3. Blade-control bar 8. Grass bag4. Handle knob 9. Recoil-start handle5. Air filter
SpecificationsModel Weight Length Width Cutting
Width Height
610 26 kg
611 29 kg140 cm 53 cm 46 cm 105 cm
OperationBefore OperationBefore Operation SafetyGeneral Safety• Become familiar with the safe operation of the
equipment, operator controls, and safety signs.• Check that all guards and safety devices, such
as doors and/or grass catchers, are in place andworking properly.
• Always inspect the machine to ensure that theblades, blade bolts, and cutting assembly are notworn or damaged.
• Inspect the area where you will use the machineand remove all objects that the machine couldthrow.
• Adjusting the cutting height may bring you intocontact with the moving blade, causing seriousinjury.– Shut off the engine and wait for all moving
parts to stop.– Do not put your fingers under the housing
when adjusting the cutting height.
Fuel Safety
DANGERFuel is extremely flammable and highlyexplosive. A fire or explosion from fuelcan burn you and others and can damageproperty.• To prevent a static charge from igniting the
fuel, place the container and/or machinedirectly on the ground before filling, not ina vehicle or on an object.
• Fill the fuel tank outdoors, in an open area,when the engine is cold. Wipe up any fuelthat spills.
• Do not handle fuel when smoking oraround an open flame or sparks.
• Store fuel in an approved container andkeep it out of the reach of children.
7
WARNINGFuel is harmful or fatal if swallowed.Long-term exposure to vapors can causeserious injury and illness.• Avoid prolonged breathing of vapors.• Keep your hands and face away from the
nozzle and the fuel-tank opening.• Keep fuel away from your eyes and skin.
Filling the Fuel Tank• For best results, use only clean, fresh, unleaded
gasoline with an octane rating of 87 or higher((R+M)/2 rating method).
• ETHANOL: Gasoline with up to 10% ethanol(gasohol) or 15% MTBE (methyl tertiary butylether) by volume is acceptable. Ethanol andMTBE are not the same. Gasoline with 15%ethanol (E15) by volume is not approved for use.Never use gasoline that contains more than 10%ethanol by volume, such as E15 (contains 15%ethanol), E20 (contains 20% ethanol), or E85(contains up to 85% ethanol ). Using unapprovedgasoline may cause performance problems and/orengine damage. Using unapproved gasoline is notcovered under the product warranty.
• Do not use gasoline containing methanol.• Do not store fuel either in the fuel tank or in fuel
containers over the winter unless fuel stabilizerhas been added to the fuel.
• Do not add oil to gasoline.
Important: To reduce starting problems, add fuelstabilizer to the fuel all season, mixing it withgasoline less than 30 days old.
g198630
Figure 10
Checking the Engine-OilLevelService Interval: Before each use or daily1. Move the machine to a level surface.2. Remove the dipstick by rotating the cap
counterclockwise and pulling it out (Figure 11).
g198625
Figure 11
1. Full 3. Low2. High
3. Wipe the dipstick clean with a clean cloth.4. Insert the dipstick into the oil-fill tube, then
remove the dipstick.5. Read the oil level on the dipstick (Figure 11).
• If the oil level on the dipstick is too low,slowly pour a small amount of oil into theoil-fill tube, wait 3 minutes, and then repeatsteps 3 through 5 until the oil on the dipstickis at the correct level.
• If the oil level on the dipstick is too high, drainthe excess oil until the oil on the dipstick isat the correct level. To drain the excess oil,refer to Changing the Engine Oil (page 16).
Important: If the oil level in the crankcaseis too low or too high and you run theengine, you may damage the engine.
6. Install the dipstick into the oil-fill tube securely.
8
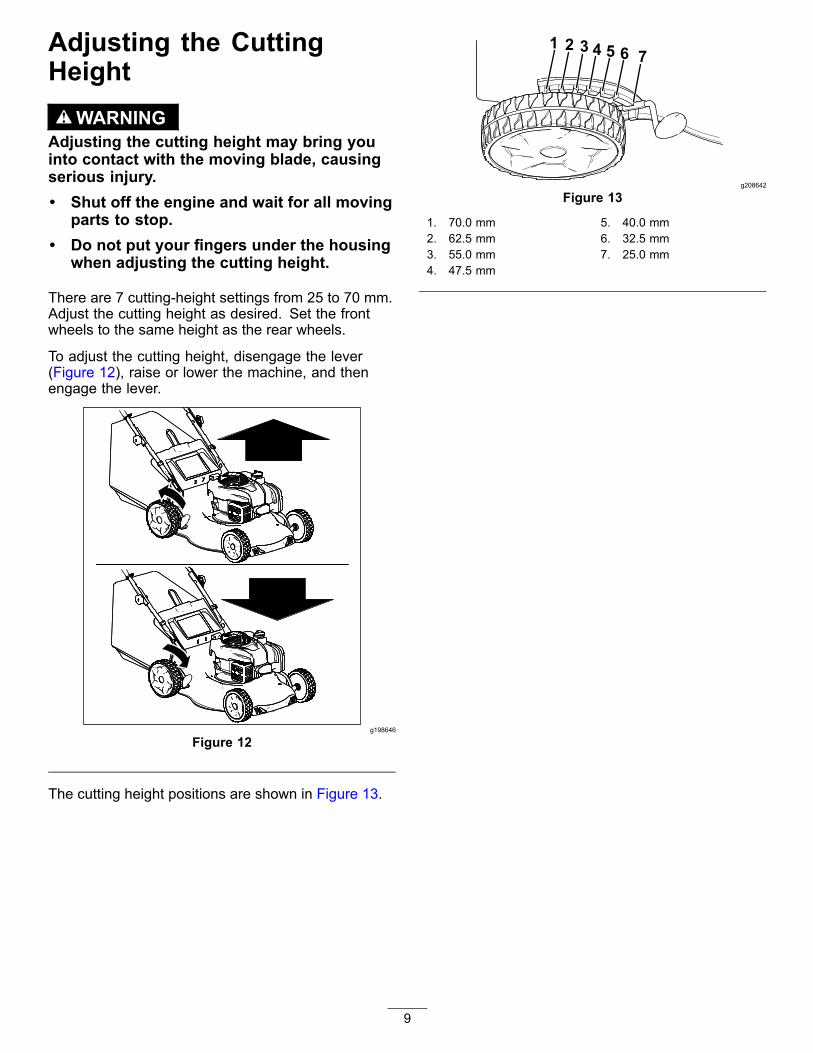
Adjusting the CuttingHeight
WARNINGAdjusting the cutting height may bring youinto contact with the moving blade, causingserious injury.• Shut off the engine and wait for all moving
parts to stop.• Do not put your fingers under the housing
when adjusting the cutting height.
There are 7 cutting-height settings from 25 to 70 mm.Adjust the cutting height as desired. Set the frontwheels to the same height as the rear wheels.
To adjust the cutting height, disengage the lever(Figure 12), raise or lower the machine, and thenengage the lever.
g198646
Figure 12
The cutting height positions are shown in Figure 13.
g208642
Figure 13
1. 70.0 mm 5. 40.0 mm2. 62.5 mm 6. 32.5 mm3. 55.0 mm 7. 25.0 mm4. 47.5 mm
9
During OperationDuring Operating SafetyGeneral Safety• Wear appropriate clothing, including eye
protection; slip-resistant, substantial footwear; andhearing protection. Tie back long hair, secureloose clothing, and do not wear jewelry.
• Do not operate the machine while ill, tired, orunder the influence of alcohol or drugs.
• The blade is sharp; contacting the blade can resultin serious personal injury. Shut off the engine andwait for all moving parts to stop before leaving theoperating position.
• When you release the blade-control bar, theengine should shut off and the blade should stopwithin 3 seconds. If not, stop using your machineimmediately and contact an Authorized ServiceDealer.
• Operate the machine only in good visibility andappropriate weather conditions. Do not operatethe machine when there is the risk of lightning.
• Wet grass or leaves can cause serious injury ifyou slip and contact the blade. Avoid mowing inwet conditions.
• Use extreme care when approaching blindcorners, shrubs, trees, or other objects that mayblock your view.
• Watch for holes, ruts, bumps, rocks, or otherhidden objects. Uneven terrain could cause aslip-and-fall accident.
• Stop the machine and inspect the blades afterstriking an object or if there is an abnormalvibration in the machine. Make all necessaryrepairs before resuming operation.
• Before leaving the operating position, shut off theengine, and wait for all moving parts to stop.
• If the engine has been running the muffler will behot and can severely burn you. Keep away fromthe hot muffler.
• Check the grass catcher components and thedischarge guard frequently and replace them withthe manufacturer’s recommended parts whennecessary.
Slope Safety• Mow across the face of slopes; never up and
down. Use extreme caution when changingdirection on slopes.
• Do not mow on excessively steep slopes. Poorfooting could cause a slip-and-fall accident.
• Mow with caution near drop-offs, ditches, orembankments.
10
Starting the EngineImportant: This machine comes with a rubberboot over the end of the spark plug. Ensure thatthe metal loop on the end of the spark-plug wire(inside the rubber boot) is fastened securely onthe metal tip on the spark plug.1. Press the primer bulb 3 to 5 times (Figure 14).
g198648
Figure 14
2. Hold the blade-control bar against the handle(Figure 15A).
g188344
Figure 15
1. Blade-control bar
3. Pull the recoil-start handle lightly until you feelresistance, then pull it sharply (Figure 15B).When the engine starts, allow the rope to returnto the handle slowly.
Using the Self-Propel DriveTo operate the self-propel drive, squeeze theself-propel-drive bar (Figure 16) toward the handleand hold it.
g188340
Figure 16
1. Self-propel-drive bar
Note: The machine has a fixed maximum speed ofapproximately 3.0 km/h.
To disengage the self-propel drive, release theself-propel-drive bar.
Shutting Off the EngineTo shut off the engine, release the blade-control bar.
Note: Disconnect and ground the spark-plug wirebefore you leave the machine to prevent someonefrom accidently starting the engine.
Mulching the GrassClippings
WARNINGThe blade is sharp; contacting the blade canresult in serious personal injury.• Ensure that the mulching plug is in place
before you mulch the clippings.• Never engage the blade without the
mulching plug in place, the grass baginstalled, or the rear door down.
If the grass bag is on the machine, remove it; refer toRemoving the Grass Bag (page 12).1. Raise and hold up the rear door (Figure 17).
11
g198649
Figure 17
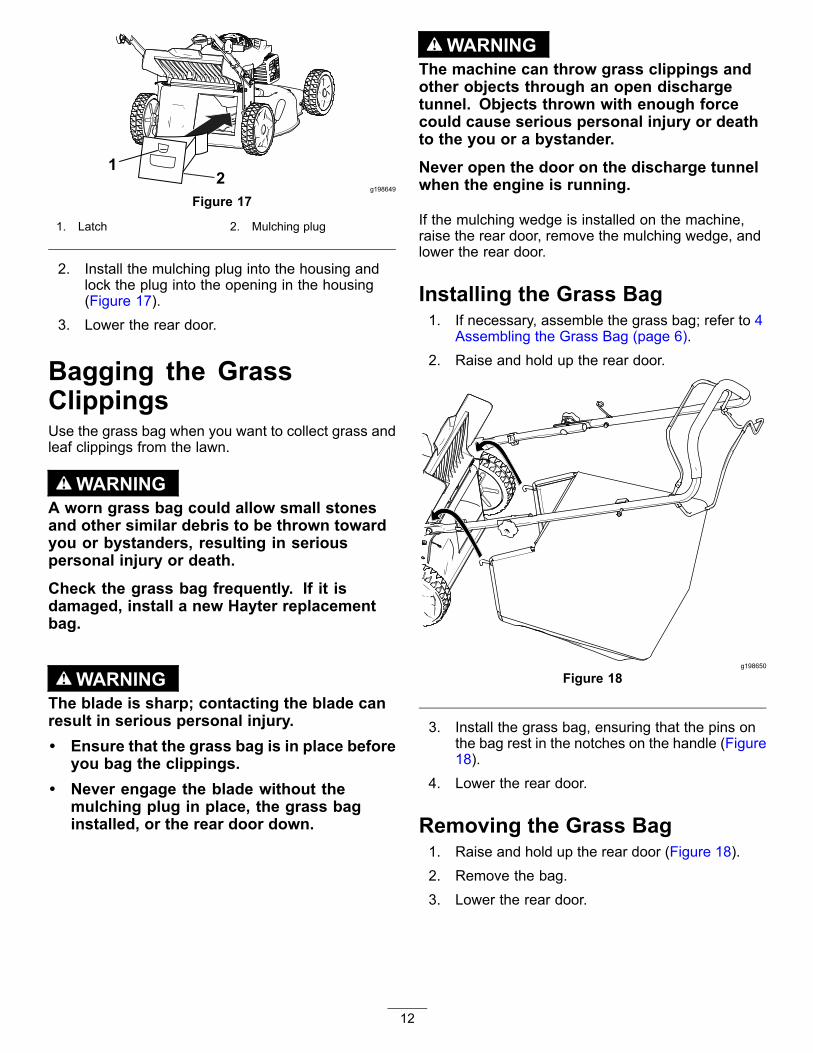
1. Latch 2. Mulching plug
2. Install the mulching plug into the housing andlock the plug into the opening in the housing(Figure 17).
3. Lower the rear door.
Bagging the GrassClippingsUse the grass bag when you want to collect grass andleaf clippings from the lawn.
WARNINGA worn grass bag could allow small stonesand other similar debris to be thrown towardyou or bystanders, resulting in seriouspersonal injury or death.
Check the grass bag frequently. If it isdamaged, install a new Hayter replacementbag.
WARNINGThe blade is sharp; contacting the blade canresult in serious personal injury.• Ensure that the grass bag is in place before
you bag the clippings.• Never engage the blade without the
mulching plug in place, the grass baginstalled, or the rear door down.
WARNINGThe machine can throw grass clippings andother objects through an open dischargetunnel. Objects thrown with enough forcecould cause serious personal injury or deathto the you or a bystander.
Never open the door on the discharge tunnelwhen the engine is running.
If the mulching wedge is installed on the machine,raise the rear door, remove the mulching wedge, andlower the rear door.
Installing the Grass Bag1. If necessary, assemble the grass bag; refer to 4
Assembling the Grass Bag (page 6).2. Raise and hold up the rear door.
g198650
Figure 18
3. Install the grass bag, ensuring that the pins onthe bag rest in the notches on the handle (Figure18).
4. Lower the rear door.
Removing the Grass Bag1. Raise and hold up the rear door (Figure 18).2. Remove the bag.3. Lower the rear door.
12
Rear-Discharging the GrassClippings1. If the grass bag is on the machine, remove it
before rear-discharging the clippings; refer toRemoving the Grass Bag (page 12).
2. If the mulching wedge is installed on themachine, raise the rear door, remove themulching wedge, and lower the rear door.
WARNINGThe blade is sharp; contacting the blade canresult in serious personal injury.• Ensure that the rear door is down before
rear-discharging the grass clippings.• Never engage the blade without the
mulching plug in place, the grass baginstalled, or the rear door down.
Operating TipsGeneral Mowing Tips• Inspect the area where you will use the machine
and remove all objects that the machine couldthrow.
• Avoid striking solid objects with the blade. Neverdeliberately mow over any object.
• If the machine strikes an object or starts to vibrate,immediately shut off the engine, disconnectthe wire from the spark plug, and examine themachine for damage.
• For best performance, install a new blade beforethe cutting season begins.
• Replace the blade when necessary with a Hayterreplacement blade.
Cutting Grass• Cut only about a third of the grass blade at a time.
Do not cut below 51 mm (2 inches) unless thegrass is sparse or it is late fall when grass growthbegins to slow down.
• When cutting grass over 15 cm (6 inches) tall,mow at the highest cutting height setting and walkslower; then mow again at a lower setting for thebest lawn appearance. If the grass is too long, themachine may plug and cause the engine to stall.
• Wet grass and leaves tend to clump on the yardand can cause the machine to plug or the engineto stall. Avoid mowing in wet conditions.
• Be aware of a potential fire hazard in very dryconditions, follow all local fire warnings, and keepthe machine free of dry grass and leaf debris.
• Alternate the mowing direction. This helpsdisperse the clippings over the lawn for evenfertilization.
• If the finished lawn appearance is unsatisfactory,try 1 or more of the following:– Replace the blade or have it sharpened.– Walk at a slower pace while mowing.– Raise the cutting height on your machine.– Cut the grass more frequently.– Overlap cutting swaths instead of cutting a full
swath with each pass.
Cutting Leaves• After cutting the lawn, ensure that half of the lawn
shows through the cut leaf cover. You may needto make more than a single pass over the leaves.
• If there are more than 13 cm of leaves on the lawn,mow at a higher cutting height and then again atthe desired cutting height.
• Slow down your mowing speed if the machinedoes not cut the leaves finely enough.
After OperationAfter Operating SafetyGeneral Safety• Clean grass and debris from the machine to help
prevent fires. Clean up oil or fuel spills.• Allow the engine to cool before storing the machine
in any enclosure.• Never store the machine or fuel container where
there is an open flame, spark, or pilot light, suchas on a water heater or on other appliances.
Hauling Safety• Use care when loading or unloading the machine.• Secure the machine from rolling.
13
Cleaning under the MachineService Interval: Before each use or daily
WARNINGThe machine may dislodge material fromunder the machine.• Wear eye protection.• Stay in the operating position (behind the
handle) when the engine is running.• Do not allow bystanders in the area.
For best results, clean the machine soon after youhave completed mowing.1. Move the machine onto a flat paved surface.2. Shut off the engine and wait for all moving parts
to stop before leaving the operating position.3. Lower the machine to its lowest cutting-height
setting; refer to Adjusting the Cutting Height(page 9).
4. Wash out the area under the rear door where theclippings go from the housing to the grass bag.
Note: Wash out the area with thebag-on-demand in both the fully forward andfully rearward positions.
5. Attach a garden hose that is connected to awater supply to the washout port (Figure 19).
g198651
Figure 19
1. Washout port
6. Turn the water on.7. Start the engine and run it until there are no more
clippings that come out from under the machine.8. Shut off the engine.9. Shut off the water and disconnect the garden
hose from the machine.10. Start the engine and run it for a few minutes to
dry the underside of the machine to prevent itfrom rusting.
11. Allow the engine to cool before storing themachine in an enclosed area.
Folding the HandleWARNING
Folding or unfolding the handle improperlycan damage the cables, causing an unsafeoperating condition.• Do not damage the cables when folding or
unfolding the handle.• If a cable is damaged, contact an
Authorized Service Dealer.
1. Loosen the 2 handle knobs (Figure 20A).
g198652
Figure 20
2. Fold the handle by rotating it forward (Figure20B).
14
MaintenanceNote: Determine the left and right sides of the machine from the normal operating position.
Recommended Maintenance Schedule(s)Maintenance Service
Interval Maintenance Procedure
Before each use or daily • Check the engine-oil level.• Clean grass clippings and dirt from under the machine.
Every 25 hours • Replace the air filter; replace it more frequently in dusty operating conditions.
Every 100 hours • Replace the spark plug.
Yearly• Replace the blade or have it sharpened (more frequently if the edge dulls quickly).• Clean the air-cooling system; clean it more frequently in dusty operating conditions.Refer to your engine manual.
Yearly or before storage • Lubricate the wheels.• Empty the fuel tank before repairs as directed and before yearly storage.
Maintenance Safety• Disconnect the spark-plug wire from the spark plug
before performing any maintenance procedure.• Wear gloves and eye protection when servicing
the machine.• The blade is sharp; contacting the blade can result
in serious personal injury. Wear gloves whenservicing the blade.
• Never tamper with safety devices. Check theirproper operation regularly.
• Tipping the machine may cause the fuel to leak.Fuel is flammable and explosive, and can causepersonal injury. Run the engine dry to remove thefuel with a hand pump; never siphon the fuel.
Preparing for Maintenance1. Shut off the engine and wait for all moving parts
to stop.2. Disconnect the spark-plug wire from the spark
plug (Figure 21).
g198654
Figure 21
3. After performing the maintenance procedure(s),connect the spark-plug wire to the spark plug.
Important: Before tipping the machine tochange the oil or replace the blade, allow thefuel tank to run dry through normal usage. Ifyou must tip the machine prior to runningout of fuel, use a hand fuel pump to removethe fuel. Always tip the machine onto itsside, with the dipstick down.
WARNINGTipping the machine may cause the fuel toleak. Fuel is flammable and explosive and cancause personal injury.
Run the engine dry or remove the fuel with ahand pump; never siphon.
15
Replacing the Spark PlugService Interval: Every 100 hours
Use a Champion QC12YC spark plug or equivalent.1. Shut off the engine and wait for all moving parts
to stop.2. Disconnect the wire from the spark plug.3. Clean around the spark plug.4. Remove the spark plug from the engine.
Important: Replace a cracked, fouled, ordirty spark plug. Do not clean the electrodesbecause grit entering the engine can damagethe engine.
5. Set the gap on the new plug to 0.51 mm asshown in Figure 22.
g189939
Figure 22
1. Center electrode 3. Air gap (not to scale)2. Side electrode
6. Install the spark plug7. Tighten the plug to 20 N∙m.8. Connect the wire to the spark plug.
Servicing the Air FilterService Interval: Every 25 hours1. Unclip the top of the air-filter cover (Figure 23).
g198655
Figure 23
1. Air filter 3. Air-filter element (foam)2. Air-filter cover
2. Remove the air-filter cover (Figure 23).3. Remove the air-filter element.4. Wash the air-filter element in soapy water.
Important: Do not use gasoline to clean theair-filter element.
5. Air dry the air-filter element.6. Add a few drops of engine oil on the air-filter
element and squeeze it tightly to remove anyexcess oil.
7. Install the air-filter element and air-filter cover.
Changing the Engine OilChanging the engine oil is not required, but ifyou desire to change the oil, use the followingprocedure.
Engine oil capacity: 0.47 L
Oil viscosity: SAE 30 or SAE 10W-30 detergent oil
API service classification: SJ or higher
Note: Run the engine a few minutes before changingthe oil to warm it. Warm oil flows better and carriesmore contaminants.1. Move the machine to a level surface.2. Refer to Preparing for Maintenance (page 15).3. Remove the dipstick by rotating the cap
counterclockwise and pulling it out (Figure 24).
16
g198625
Figure 24
1. Full 3. Low2. High
4. Tip the machine onto its side (so that the airfilter is up) to drain the used oil from the oil-filltube (Figure 25).
g198656
Figure 25
5. After draining the used oil, return the machine tothe operating position.
6. Carefully pour about 3/4 of the engine capacityof oil into the oil-fill tube.
7. Wait about 3 minutes for the oil to settle in theengine.
8. Wipe the dipstick clean with a clean cloth.9. Insert the dipstick into the oil-fill tube, then
remove the dipstick.10. Read the oil level on the dipstick (Figure 25).
• If the oil level on the dipstick is too low,carefully pour a small amount of oil into theoil-fill tube, wait 3 minutes, and repeat steps
8 through 10 until the oil on the dipstick is atthe correct level.
• If the oil level on the dipstick is too high, drainthe excess oil until the oil on the dipstick is atthe correct level.
Important: If the oil level in the engine is toolow or too high and you run the engine, youmay damage the engine.
11. Install the dipstick securely.12. Recycle the used oil properly.
Replacing the BladeService Interval: Yearly
Important: You will need a torque wrench toinstall the blade properly. If you do not have atorque wrench or are uncomfortable performingthis procedure, contact an Authorized ServiceDealer.
Examine the blade whenever you run out of fuel. If theblade is damaged or cracked, replace it immediately.If the blade edge is dull or nicked, have it sharpenedand balanced, or replace it.
WARNINGThe blade is sharp; contacting the blade canresult in serious personal injury.Wear gloves when servicing the blade.
1. Refer to Preparing for Maintenance (page 15).2. Tip the machine onto its side with the dipstick
down.3. Use a block of wood to hold the blade steady
(Figure 26).
g188339
Figure 26
17
4. Remove the blade, saving all mounting hardware(Figure 26).
5. Install the new blade and all mounting hardware(Figure 27).
g188330
Figure 27
Important: Position the curved ends of theblade to point toward the mower housing.
6. Use a torque wrench to tighten the blade boltto 45 N∙m.
Important: A bolt torqued to 45 N∙m is verytight. While holding the blade with a block ofwood, put your weight behind the ratchet orwrench and tighten the bolt securely. Thisbolt is very difficult to overtighten.
Lubricating the WheelsService Interval: Yearly or before storage
Apply a few drops of No. 2 lithium grease to the ballbearings on each of the wheels (Figure 28).
g198657
Figure 28
1. Ball bearings
18
StorageStore the machine in a cool, clean, dry place.
Preparing the Machine forStorage1. On the last refueling of the year, add fuel
stabilizer to the fuel.2. Dispose of any unused fuel properly. Recycle
it according to local codes, or use it in yourautomobile.
Note: Old fuel in the fuel tank is the leadingcause of hard starting. Do not store fuel withoutstabilizer more than 30 days, and do not storestabilized fuel more than 90 days.
3. Run the machine until the engine shuts off fromrunning out of fuel.
4. Start the engine again.5. Allow the engine to run until it shuts off.
When you can no longer start the engine, it issufficiently dry.
6. Disconnect the wire from the spark plug.7. Remove the spark plug, add 30 ml of engine
oil through the spark-plug hole, and pull thestarter rope slowly several times to distributeoil throughout the cylinder to prevent cylindercorrosion during the off-season.
8. Loosely install the spark plug.9. Tighten all nuts, bolts, and screws.
Removing the Machinefrom Storage1. Check and tighten all fasteners.2. Remove the spark plug and spin the engine
rapidly by pulling the recoil-start handle to blowthe excess oil from the cylinder.
3. Install the spark plug and tighten it with a torquewrench to 20 N∙m.
4. Perform any maintenance procedures; refer toMaintenance (page 15).
5. Check the engine-oil level; refer to Checking theEngine-Oil Level (page 8).
6. Fill the fuel tank with fresh fuel; refer to Fillingthe Fuel Tank (page 8).
7. Connect the wire to the spark plug.
19
Notes:
Notes:
Notes:
European Privacy NoticeThe Information Toro CollectsToro Warranty Company (Toro) respects your privacy. In order to process your warranty claim and contact you in the event of a product recall, we ask youto share certain personal information with us, either directly or through your local Toro company or dealer.
The Toro warranty system is hosted on servers located within the United States where privacy law may not provide the same protection as appliesin your country.
BY SHARING YOUR PERSONAL INFORMATION WITH US, YOU ARE CONSENTING TO THE PROCESSING OF YOUR PERSONAL INFORMATIONAS DESCRIBED IN THIS PRIVACY NOTICE.
The Way Toro Uses InformationToro may use your personal information to process warranty claims, to contact you in the event of a product recall and for any other purpose which we tellyou about. Toro may share your information with Toro's affiliates, dealers or other business partners in connection with any of these activities. We will notsell your personal information to any other company. We reserve the right to disclose personal information in order to comply with applicable laws andwith requests by the appropriate authorities, to operate our systems properly or for our own protection or that of other users.
Retention of your Personal InformationWe will keep your personal information as long as we need it for the purposes for which it was originally collected or for other legitimate purposes(such as regulatory compliance), or as required by applicable law.
Toro's Commitment to Security of Your Personal InformationWe take reasonable precautions in order to protect the security of your personal information. We also take steps to maintain the accuracy and currentstatus of personal information.
Access and Correction of your Personal InformationIf you would like to review or correct your personal information, please contact us by email at [email protected].
Australian Consumer LawAustralian customers will find details relating to the Australian Consumer Law either inside the box or at your local Toro Dealer.
374-0282 Rev C
2 Year Limited Warranty - Residential30 Day Warranty - Commercial Use
Hayter Limited warrants to the original purchaser that this unit shall be free from defects in material and workmanship, under normal, residential use, for aperiod of two years from the date of purchase. The manufacturers of the engine furnish their own warranty and services are provided through theirauthorised network (Refer to the Engine Manual for the “Engine Warranty Statement”).
To qualify for the 2 year warranty, you must have the machine serviced by an Authorised Hayter Service Dealer* within 12 months of the date of purchase.Please note that these services will be charged at a rate agreed between you and the Dealer. If the machine is not serviced at the end of the twelvemonth period, the warranty will automatically expire.
Commercial UseMachines used commercially are excluded from the above warranty. A warranty period of 30 days applies.
Terms and ConditionsHayter shall, at our option, repair or replace any part covered by warranty during the applicable period.
Your product must be registered within 14 days of purchase to qualify for the full benefit of the product warranty. Please go towww.hayter.co.uk/warranty-registration to complete this process.
This warranty does not apply to any unit that has been tampered with, altered, misused, abused or used for hire, and will become invalid if non genuineHayter parts are fitted. Minor mechanical adjustments are not covered unless they are due to defective material or workmanship. Consult the Owner’sHandbook or a Hayter Authorised Service Dealer for assistance when making these adjustments.
Making a ClaimTo make a warranty claim, return the unit to a Hayter Authorised Service Dealer, along with proof of purchase stating the machine serial number anddate of purchase and the service receipt(s) or stamped service card.
This warranty gives you specific legal rights and are in addition to any statutory rights to which you may be entitled. Your statutory rights are not affectedby this warranty. If you need additional information concerning this written warranty, or assistance in obtaining services, please write to: HAYTERLIMITED, Service Department, Spellbrook, Bishop’s Stortford, Hertfordshire CM23 4BU.
*Details of your local Hayter Authorised Dealer can be found on the Hayter website www.hayter.co.uk or contact: Freephone 0800616298.