Page 1
Article ID: 5035
5 Tips to Fortify your Wireless Network
Objective
Although Wi-Fi networks are convenient for you and your employees, there may be
unwanted clients using up the bandwidth you pay for. In addition, security risks have
been an increasing concern for small business wireless networks. In order to protect
your small business wireless network from intruders, it is recommended that you:
1. Change all default user names and passwords 2. Turn on data encryption 3. Enable user authentication 4. Turn on built-in firewalls 5. Hide your Wi-Fi broadcast
The objective of this document is to show you how to configure the above tips in
order to improve your WLAN security on Cisco Small Business devices.
Note: The information in this document was gathered from Cisco Blogs. The original
post can be found here.
Applicable Devices
Cisco RV Series Wireless Routers Cisco Wireless Access Points Cisco Unified Communications
Note: Every device has a slightly different interface. The appearance of your web
configuration utility and other windows may vary. However, all applicable devices
here have similar tools and navigation.
Page 2
1. Change all default user names and passwords
Change the name of your wireless network—also called the Service Set Identifier
(SSID)—on the router and each access point. The default SSID is often the name of
the device vendor, such as “ciscosb,” and the preset password is typically “password”
or no password at all. This information is common knowledge to hackers and leaves
your network highly vulnerable to attack. Besides changing the default SSID, make
sure to change preset passwords on guest or administrative accounts for all devices.
While having a default SSID isn’t necessarily a security risk, it does act as a beacon to
intruders, pointing the way to a WLAN with weak security. It is recommended to
change the SSID, account names, and passwords to obscure and random
combinations of 10 or more letters and numbers that aren’t tied to the name of your
company.
How to change the device’s SSID and password
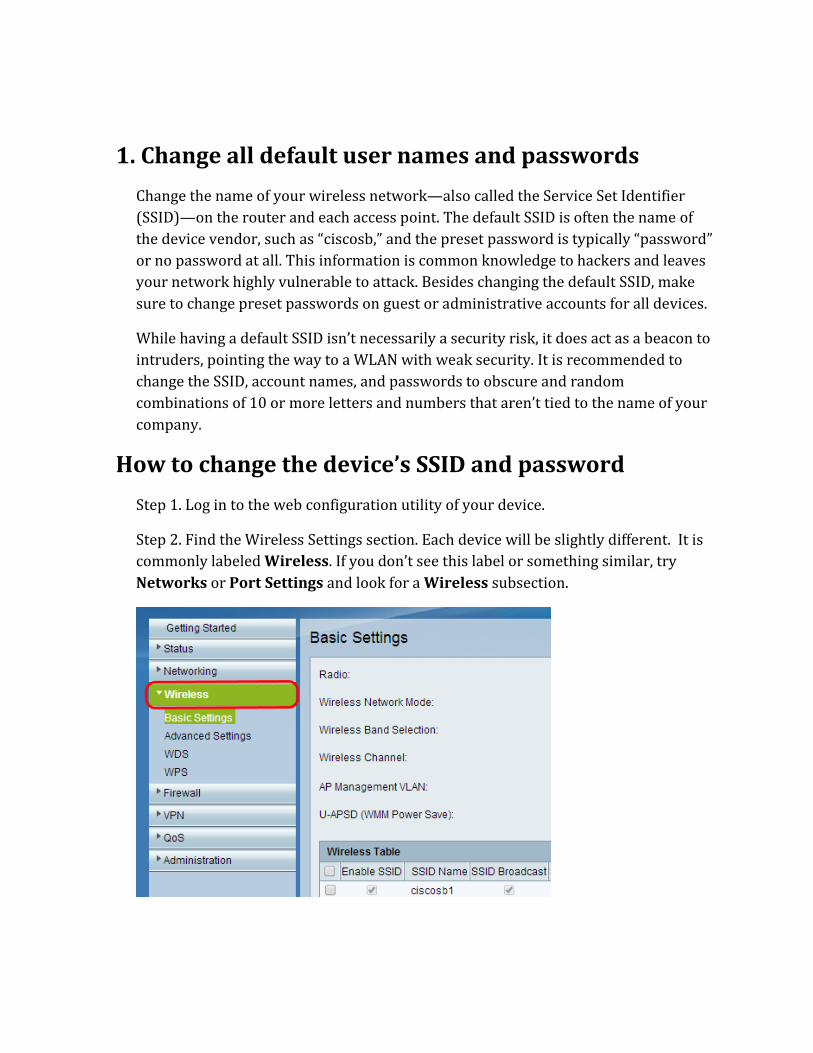
Step 1. Log in to the web configuration utility of your device.
Step 2. Find the Wireless Settings section. Each device will be slightly different. It is
commonly labeled Wireless. If you don’t see this label or something similar, try
Networks or Port Settings and look for a Wireless subsection.
Page 3
Step 3. Find the subsection that displays a table or list of SSIDs. As previously stated,
each device will be slightly different. Common labels for the subsection are Basic
Settings or Networks. Common labels for the table or list are Wireless Table or
Virtual Access Points (SSIDs).
Step 4. Edit the desired entry in the table or list of SSIDs to change the SSID Name.
Some devices may require you to check the checkbox next to an entry and click Edit
in order to enable editing.
Page 4
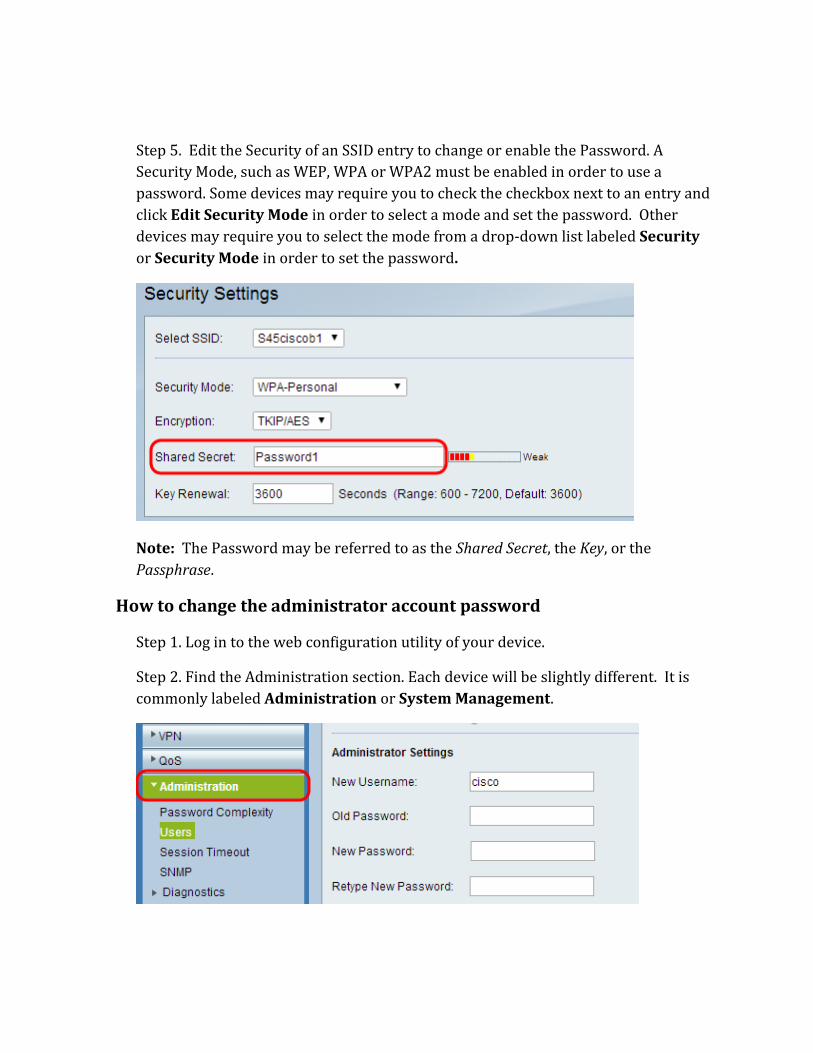
Step 5. Edit the Security of an SSID entry to change or enable the Password. A
Security Mode, such as WEP, WPA or WPA2 must be enabled in order to use a
password. Some devices may require you to check the checkbox next to an entry and
click Edit Security Mode in order to select a mode and set the password. Other
devices may require you to select the mode from a drop-down list labeled Security
or Security Mode in order to set the password.
Note: The Password may be referred to as the Shared Secret, the Key, or the
Passphrase.
How to change the administrator account password
Step 1. Log in to the web configuration utility of your device.
Step 2. Find the Administration section. Each device will be slightly different. It is
commonly labeled Administration or System Management.
Page 5
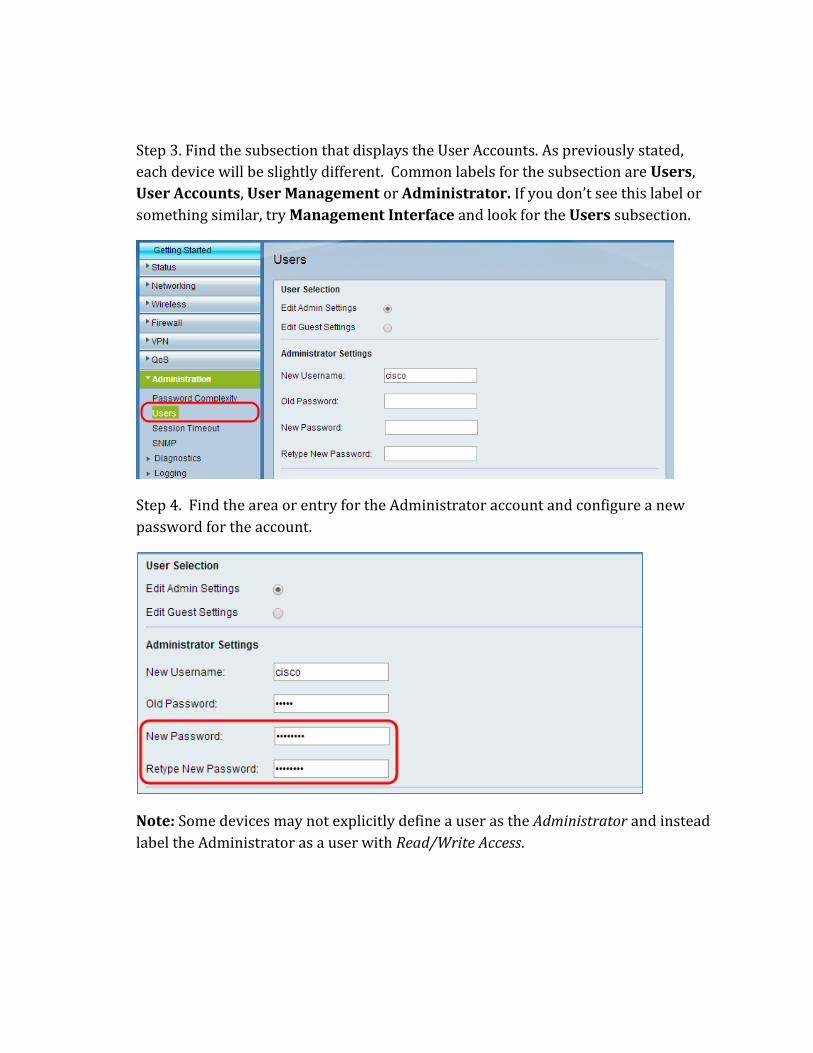
Step 3. Find the subsection that displays the User Accounts. As previously stated,
each device will be slightly different. Common labels for the subsection are Users,
User Accounts, User Management or Administrator. If you don’t see this label or
something similar, try Management Interface and look for the Users subsection.
Step 4. Find the area or entry for the Administrator account and configure a new
password for the account.
Note: Some devices may not explicitly define a user as the Administrator and instead
label the Administrator as a user with Read/Write Access.
Page 6
2. Turn on data encryption
All WLAN gear supports some form of encryption, such as the weak Wired Equivalent
Privacy (WEP) and the stronger Wi-Fi Protected Access (WPA) and WPA2 security
protocols. Whenever possible, use WPA or WPA2 as they use the Advanced
Encryption Standard (AES) that is intended to provide greater encryption. (If your
device gives you AES as an encryption option, always choose that.) Although WEP is
included in most WLAN networking devices, it is easily decrypted by hackers and
should not be relied on for securing your small business network. Note that each
WLAN networking device must be set to the same encryption protocol, so older
devices that aren’t compatible with WPA or WPA2 should be upgraded to support the
stronger protocols.
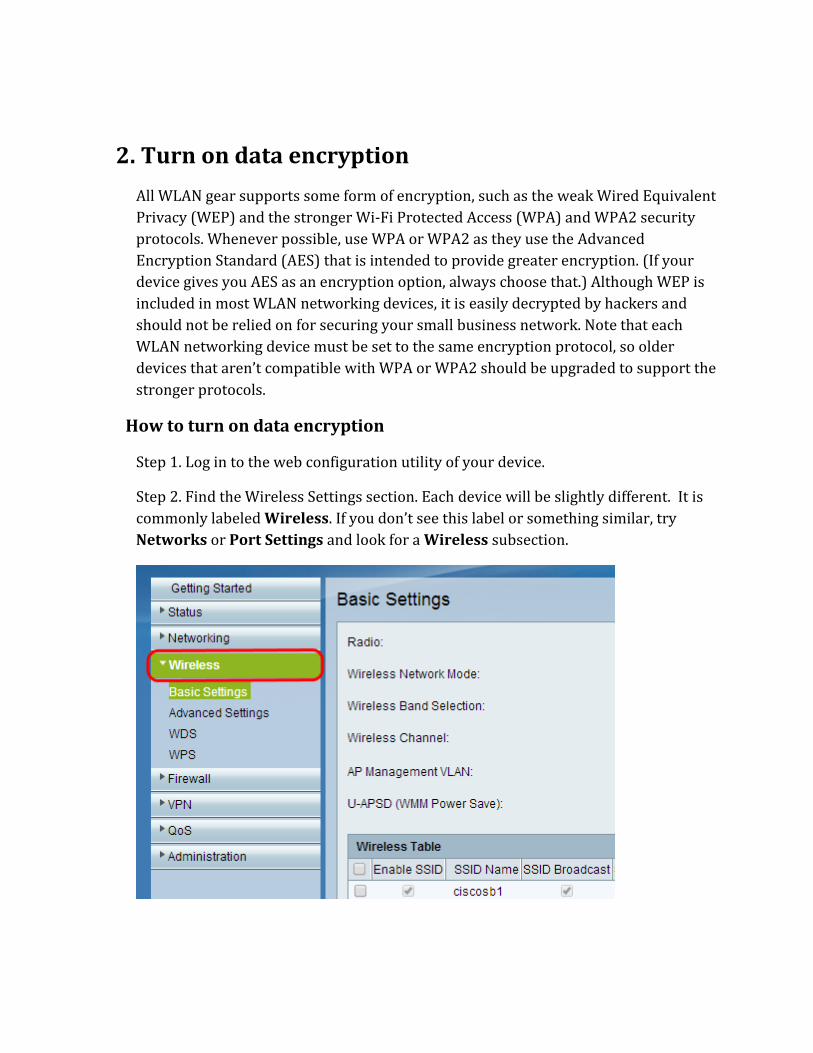
How to turn on data encryption
Step 1. Log in to the web configuration utility of your device.
Step 2. Find the Wireless Settings section. Each device will be slightly different. It is
commonly labeled Wireless. If you don’t see this label or something similar, try
Networks or Port Settings and look for a Wireless subsection.
Page 7
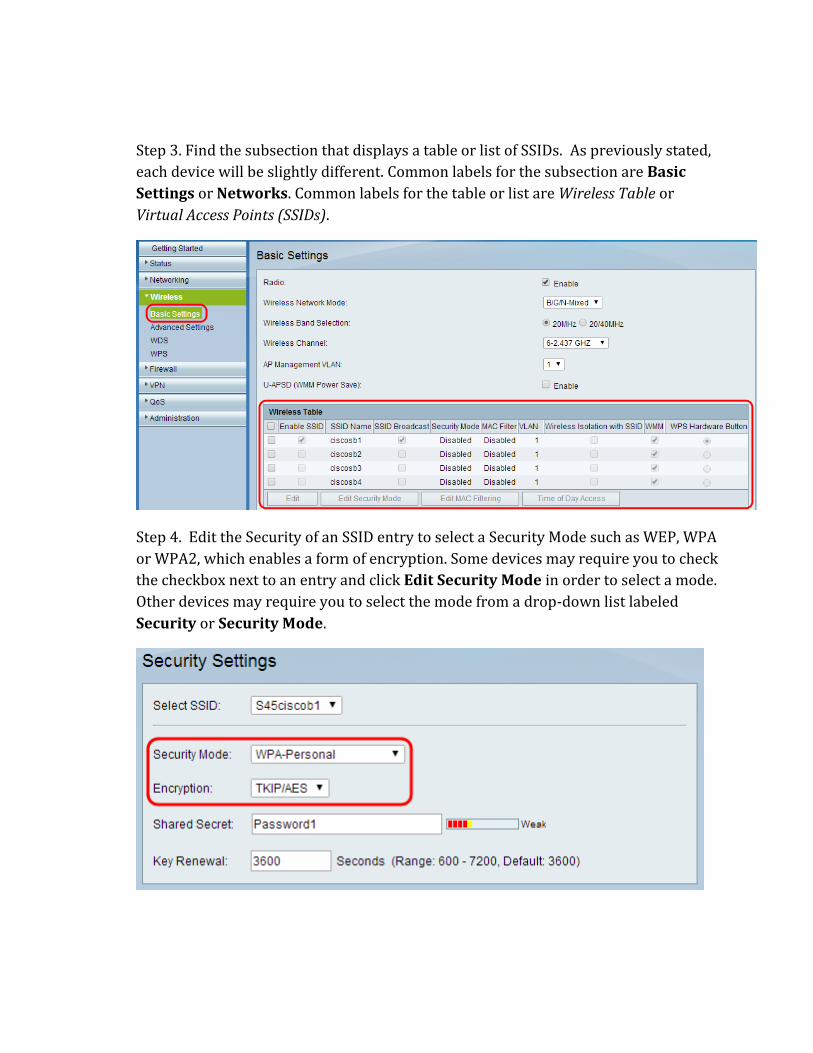
Step 3. Find the subsection that displays a table or list of SSIDs. As previously stated,
each device will be slightly different. Common labels for the subsection are Basic
Settings or Networks. Common labels for the table or list are Wireless Table or
Virtual Access Points (SSIDs).
Step 4. Edit the Security of an SSID entry to select a Security Mode such as WEP, WPA
or WPA2, which enables a form of encryption. Some devices may require you to check
the checkbox next to an entry and click Edit Security Mode in order to select a mode.
Other devices may require you to select the mode from a drop-down list labeled
Security or Security Mode.
Page 8
3. Enable user authentication
With user authentication, your WLAN will only allow access to users who have been
approved to connect to the network. You can enable user authentication in different
ways, depending on the features of your wireless router and access points. If your
wireless networking devices support WPA2, you can provide user authentication
through 802.1X/EAP (Extensible Authentication Protocol). And if your wireless
equipment supports access control lists (ACLs), you can configure the ACLs to filter
the traffic that flows in and out of your wireless router and access points so that only
certain computers on the network are allowed access to the WLAN.
Another way to enable user authentication is through MAC address filtering. Each
wireless device, including laptops, has a unique MAC address, which is tracked by
your router and access points. With MAC address filtering, your WLAN gear will only
allow chosen MAC addresses to access your wireless network. Note, though, that
hackers can easily “spoof” a MAC address to gain access to your network. MAC
address spoofing can’t be entirely prevented, so you shouldn’t rely on MAC address
filtering alone for security.
Also, consider turning off Dynamic Host Configuration Protocol (DHCP) on your
router and access points and use fixed IP addresses instead of dynamic IP addresses.
A range of private IP addresses associated with your WLAN will help prevent
intruders from using IP addresses in your DHCP pool to connect to your network.
How to authenticate users with Access Control Lists
Step 1. Log in to the web configuration utility of your device.
Page 9
Step 2. Find the section that contains an Access Rules subsection. For Routers, go to
the section labeled Firewall. If you don’t see this label or something similar, try
Security. For Wireless Access Point (WAP) devices, go to the section labeled Client
QoS. These sections should have an Access Rules subsection.
Step 3. Find the Access Rules subsection. Each device will be slightly different.
Common labels for the subsection are Access Rules, Access Control or ACL.
Page 10
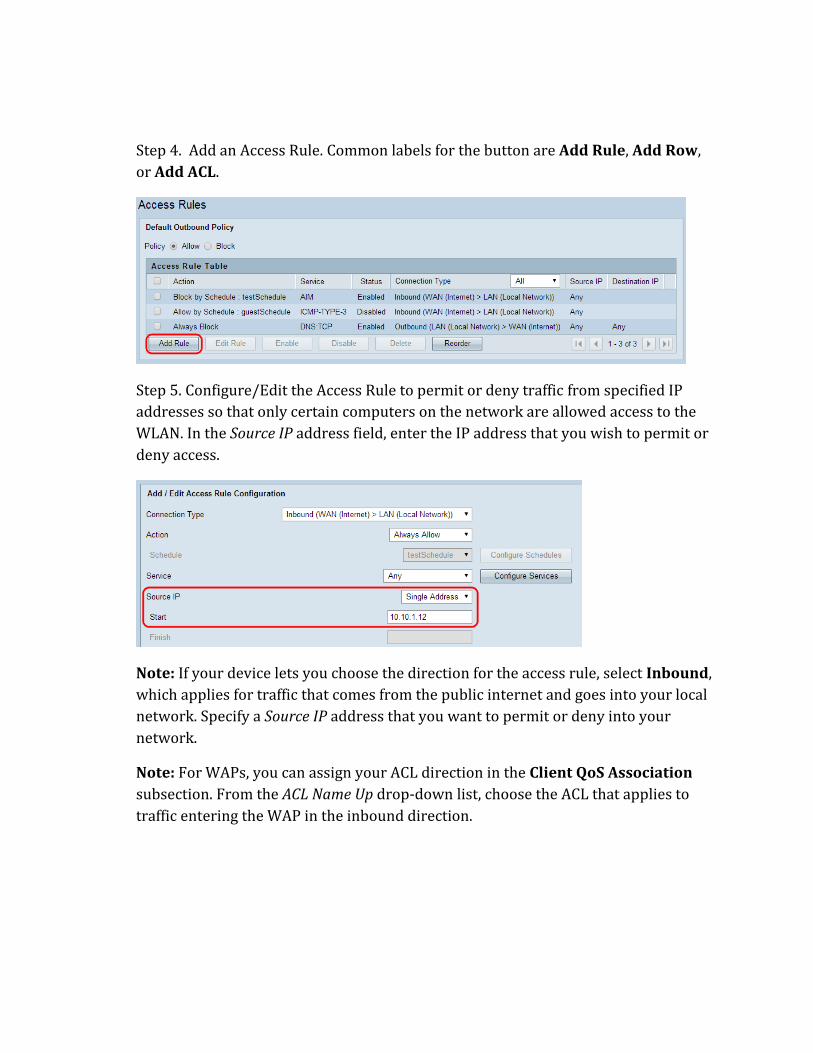
Step 4. Add an Access Rule. Common labels for the button are Add Rule, Add Row,
or Add ACL.
Step 5. Configure/Edit the Access Rule to permit or deny traffic from specified IP
addresses so that only certain computers on the network are allowed access to the
WLAN. In the Source IP address field, enter the IP address that you wish to permit or
deny access.
Note: If your device lets you choose the direction for the access rule, select Inbound,
which applies for traffic that comes from the public internet and goes into your local
network. Specify a Source IP address that you want to permit or deny into your
network.
Note: For WAPs, you can assign your ACL direction in the Client QoS Association
subsection. From the ACL Name Up drop-down list, choose the ACL that applies to
traffic entering the WAP in the inbound direction.
Page 11
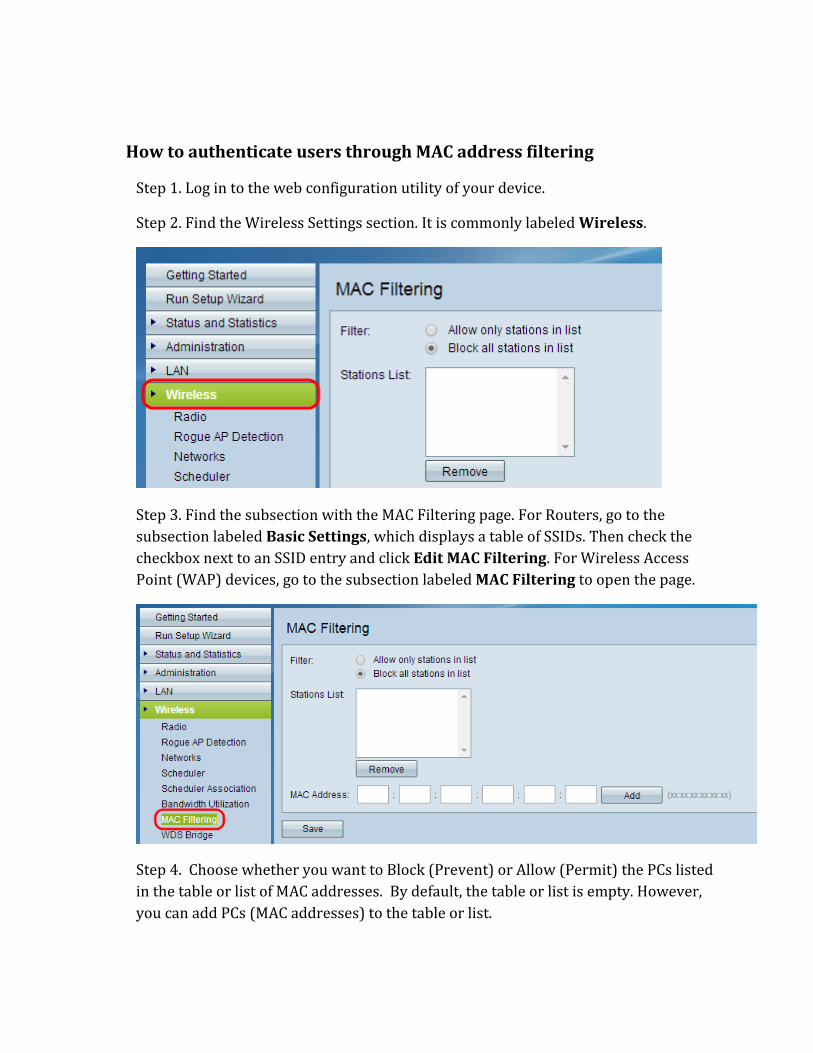
How to authenticate users through MAC address filtering
Step 1. Log in to the web configuration utility of your device.
Step 2. Find the Wireless Settings section. It is commonly labeled Wireless.
Step 3. Find the subsection with the MAC Filtering page. For Routers, go to the
subsection labeled Basic Settings, which displays a table of SSIDs. Then check the
checkbox next to an SSID entry and click Edit MAC Filtering. For Wireless Access
Point (WAP) devices, go to the subsection labeled MAC Filtering to open the page.
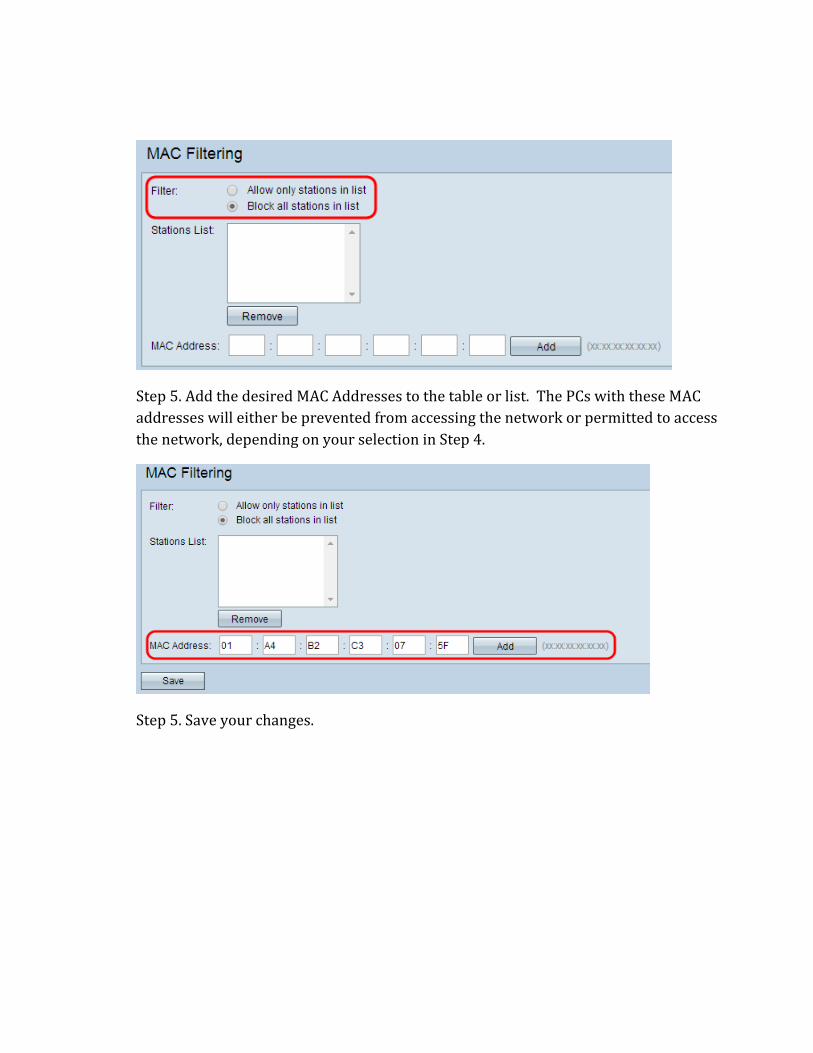
Step 4. Choose whether you want to Block (Prevent) or Allow (Permit) the PCs listed
in the table or list of MAC addresses. By default, the table or list is empty. However,
you can add PCs (MAC addresses) to the table or list.
Page 12
Step 5. Add the desired MAC Addresses to the table or list. The PCs with these MAC
addresses will either be prevented from accessing the network or permitted to access
the network, depending on your selection in Step 4.
Step 5. Save your changes.
Page 13
4. Turn on built-in firewalls
Many wireless routers, such as the Cisco RV130W Wireless-N VPN Firewall Router
have built-in firewalls. These should always be enabled to stop malicious and
dangerous traffic from infiltrating your network.
Note: Wireless Access Points (WAPs) do not have firewall functions.
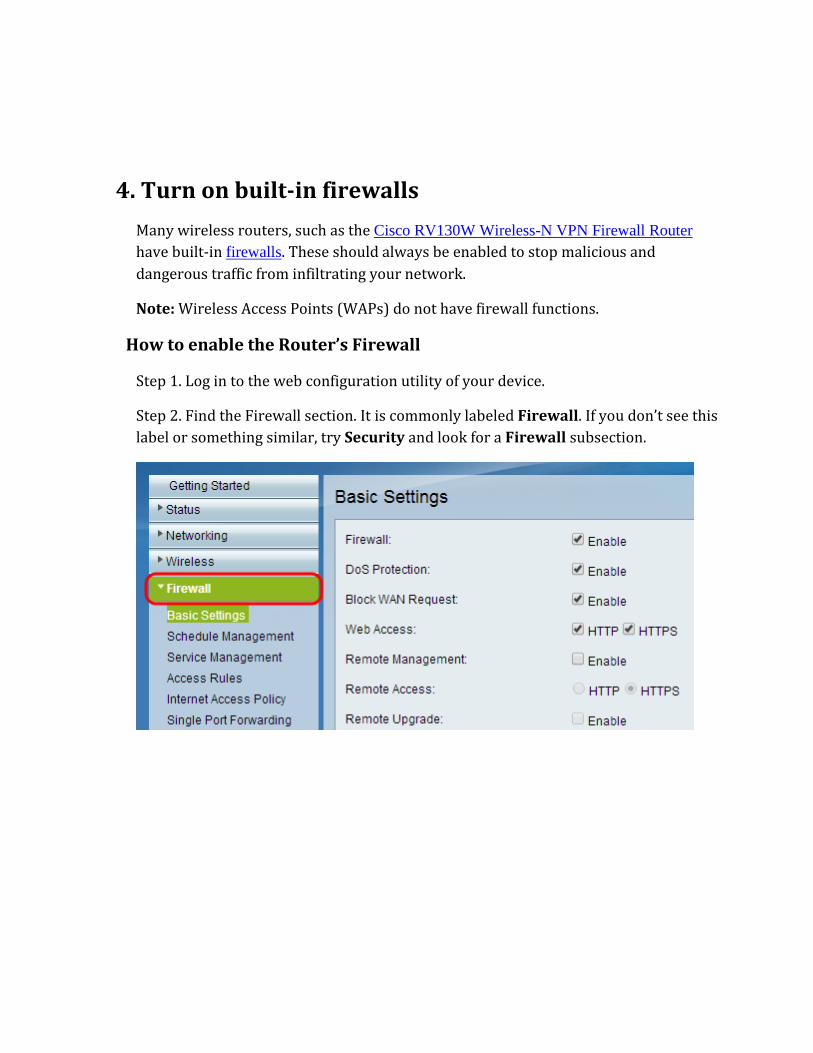
How to enable the Router’s Firewall
Step 1. Log in to the web configuration utility of your device.
Step 2. Find the Firewall section. It is commonly labeled Firewall. If you don’t see this
label or something similar, try Security and look for a Firewall subsection.
Page 14
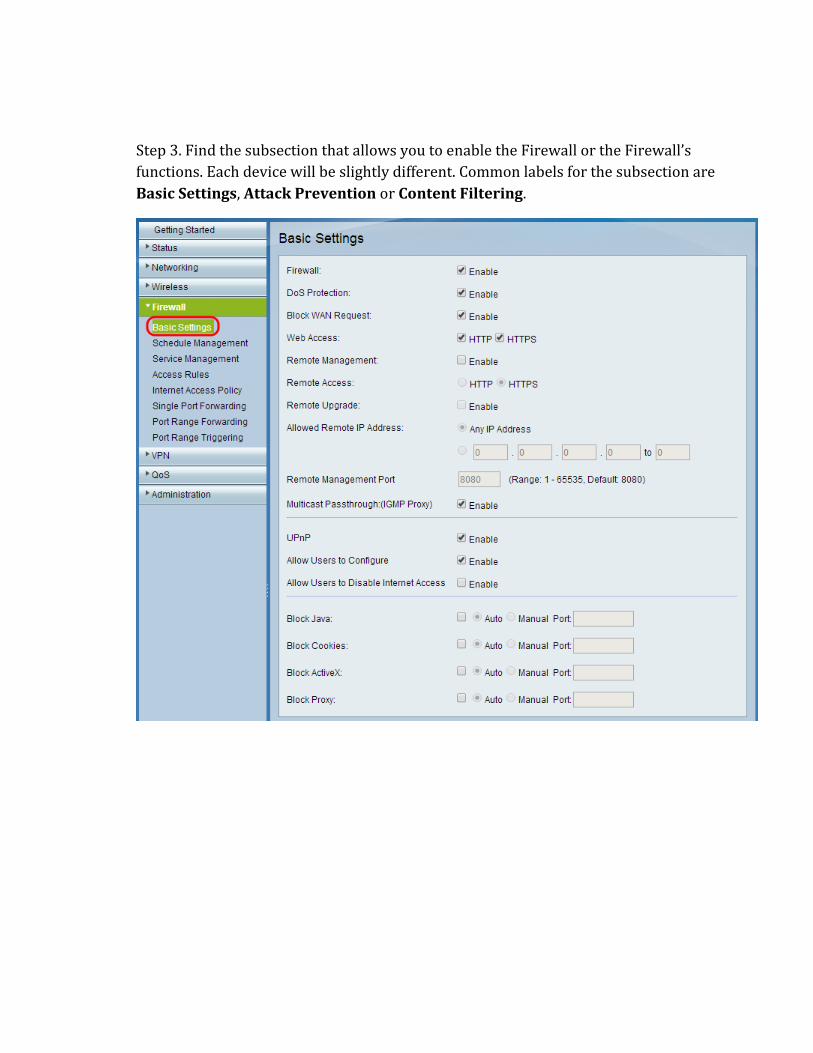
Step 3. Find the subsection that allows you to enable the Firewall or the Firewall’s
functions. Each device will be slightly different. Common labels for the subsection are
Basic Settings, Attack Prevention or Content Filtering.
Page 15
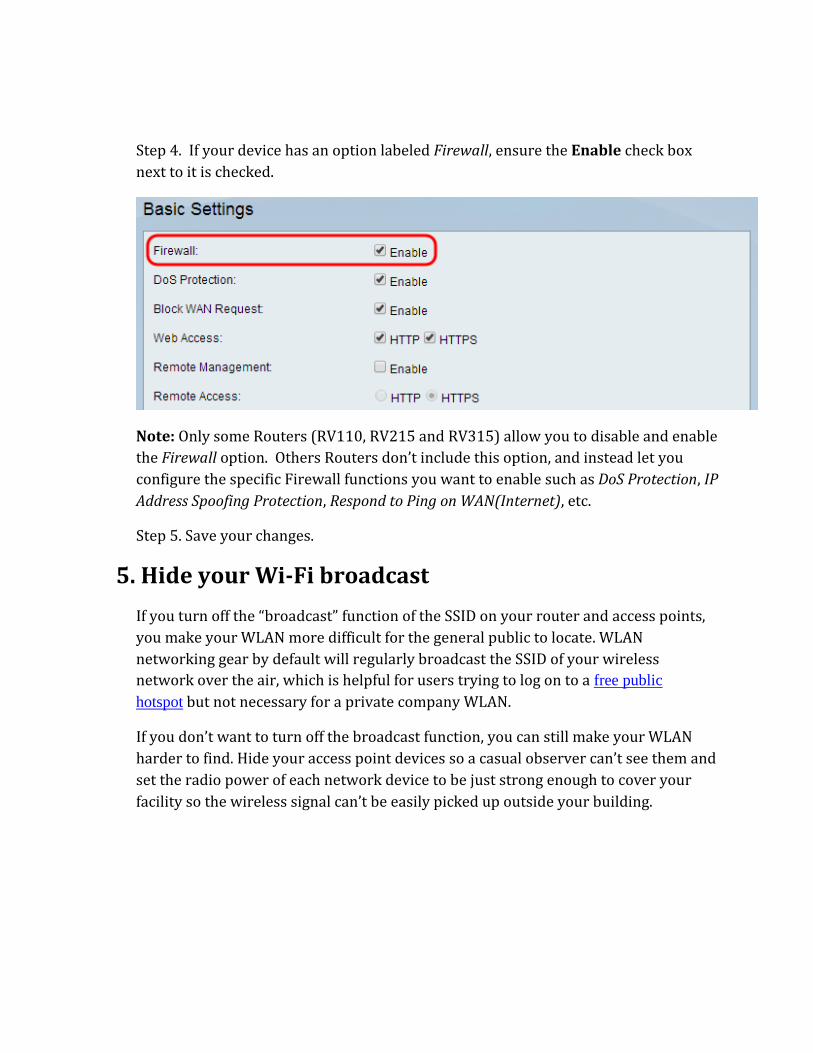
Step 4. If your device has an option labeled Firewall, ensure the Enable check box
next to it is checked.
Note: Only some Routers (RV110, RV215 and RV315) allow you to disable and enable
the Firewall option. Others Routers don’t include this option, and instead let you
configure the specific Firewall functions you want to enable such as DoS Protection, IP
Address Spoofing Protection, Respond to Ping on WAN(Internet), etc.
Step 5. Save your changes.
5. Hide your Wi-Fi broadcast
If you turn off the “broadcast” function of the SSID on your router and access points,
you make your WLAN more difficult for the general public to locate. WLAN
networking gear by default will regularly broadcast the SSID of your wireless
network over the air, which is helpful for users trying to log on to a free public
hotspot but not necessary for a private company WLAN.
If you don’t want to turn off the broadcast function, you can still make your WLAN
harder to find. Hide your access point devices so a casual observer can’t see them and
set the radio power of each network device to be just strong enough to cover your
facility so the wireless signal can’t be easily picked up outside your building.
Page 16
How to disable your SSID Broadcast
Step 1. Log in to the web configuration utility of your device.
Step 2. Find the Wireless Settings section. Each device will be slightly different. It is
commonly labeled Wireless. If you don’t see this label or something similar, try
Networks or Port Settings and look for a Wireless subsection.
Step 3. Find the subsection that displays a table or list of SSIDs. As previously stated,
each device will be slightly different. Common labels for the subsection are Basic
Settings or Networks. Common labels for the table or list are Wireless Table or
Virtual Access Points (SSIDs).
Page 17
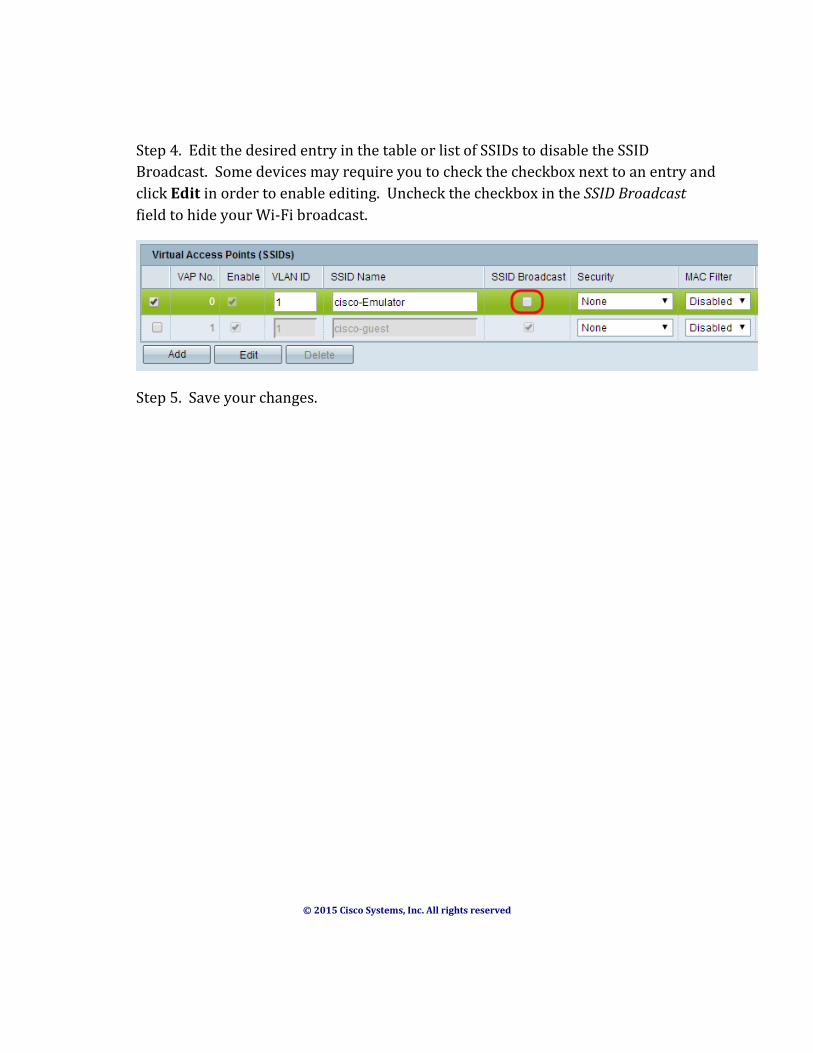
Step 4. Edit the desired entry in the table or list of SSIDs to disable the SSID
Broadcast. Some devices may require you to check the checkbox next to an entry and
click Edit in order to enable editing. Uncheck the checkbox in the SSID Broadcast
field to hide your Wi-Fi broadcast.
Step 5. Save your changes.
© 2015 Cisco Systems, Inc. All rights reserved