HOMEOWNER’S GUIDE TO RETROFITTING SIX WAYS TO PROTECT YOUR HOME FROM FLOODING 5-1 5.0 Elevating Your Home One of the most common retrofitting methods for homes is elevation. When a home is properly elevated, the living area should be above most flood levels. Several elevation techniques are avail- able. In general, they involve lifting the home and building a new foundation or extending the existing foundation below it, or leaving the home in place and either building a new elevated floor system within the home or adding a new upper story and converting the ground level to a compliant enclosure. During the elevation process, most frame, masonry veneer, and masonry homes are separated from their founda- tions, raised on hydraulic jacks, and held by temporary supports while a new or extended foundation is constructed below. The living area is raised so that only the foundation remains exposed to flooding. This technique works well for homes originally built on basement, crawlspace, and open foundations. When homes are lifted with this tech- nique, the new or extended foundation can consist of continuous walls or separate piers, posts, columns, or piles. Masonry homes are more difficult to lift, primarily because of their design, construction, and weight, but lifting these homes is possible. In fact, numerous contractors throughout the United States regularly perform this work. A variation of this technique is used for frame, masonry veneer, and masonry homes built on slab-on-grade foundations. In these homes, the slab forms both the floor of the home and either all or a major part of the foundation. Although elevating these homes with the walls and slab attached and lifting them together may appear easier, this may not be a viable option. A slab-on-grade home should be inspected by a structural engi- neer to determine whether the slab is sufficient to support the house without being continuously supported by the soil it was designed to sit on top of. If the slab isn’t strong enough to be lifted, the walls can be elevated and a new wood floor system constructed. For masonry homes on slab-on-grade foundations, an alternative mitigation technique in which the home is left on its original foundation may be easier. This technique involves removing the roof and raising the living space, either by extending the walls of the home and raising the floor or by abandoning the lower level and moving the living space to an existing or newly constructed upper floor. Another alternative for homes with high ceilings may be to shift the floor system on the upper floors reducing the ceiling height, but creating space above the BFE to construct a new first floor. The abandoned lower enclosed area is then converted to a compliant enclosure that is used only for parking, building access, or storage. See Section 5.2.2 for more information. NOTE Always use a licensed, bonded, and insured contractor for elevation proj- ects. Be sure that your contractor has experience with elevation projects and understands the considerations discussed in Section 5.1. Prior to hiring a contractor, be sure to check references.
Transcript
HOMEOWNER’S GUIDE TO RETROFITTING SIX WAYS TO PROTECT YOUR HOME FROM FLOODING 5-1
5.0 Elevating Your HomeOne of the most common retrofitting methods for homes is elevation. When a home is properly elevated, the living area should be above most flood levels. Several elevation techniques are avail-able. In general, they involve lifting the home and building a new foundation or extending the existing foundation below it, or leaving the home in place and either building a new elevated floor system within the home or adding a new upper story and converting the ground level to a compliant enclosure.
During the elevation process, most frame, masonry veneer, and masonry homes are separated from their founda-tions, raised on hydraulic jacks, and held by temporary supports while a new or extended foundation is constructed below. The living area is raised so that only the foundation remains exposed to flooding. This technique works well for homes originally built on basement, crawlspace, and open foundations. When homes are lifted with this tech-nique, the new or extended foundation can consist of continuous walls or separate piers, posts, columns, or piles. Masonry homes are more difficult to lift, primarily because of their design, construction, and weight, but lifting these homes is possible. In fact, numerous contractors throughout the United States regularly perform this work.
A variation of this technique is used for frame, masonry veneer, and masonry homes built on slab-on-grade foundations. In these homes, the slab forms both the floor of the home and either all or a major part of the foundation. Although elevating these homes with the walls and slab attached and lifting them together may appear easier, this may not be a viable option. A slab-on-grade home should be inspected by a structural engi-neer to determine whether the slab is sufficient to support the house without being continuously supported by the soil it was designed to sit on top of. If the slab isn’t strong enough to be lifted, the walls can be elevated and a new wood floor system constructed.
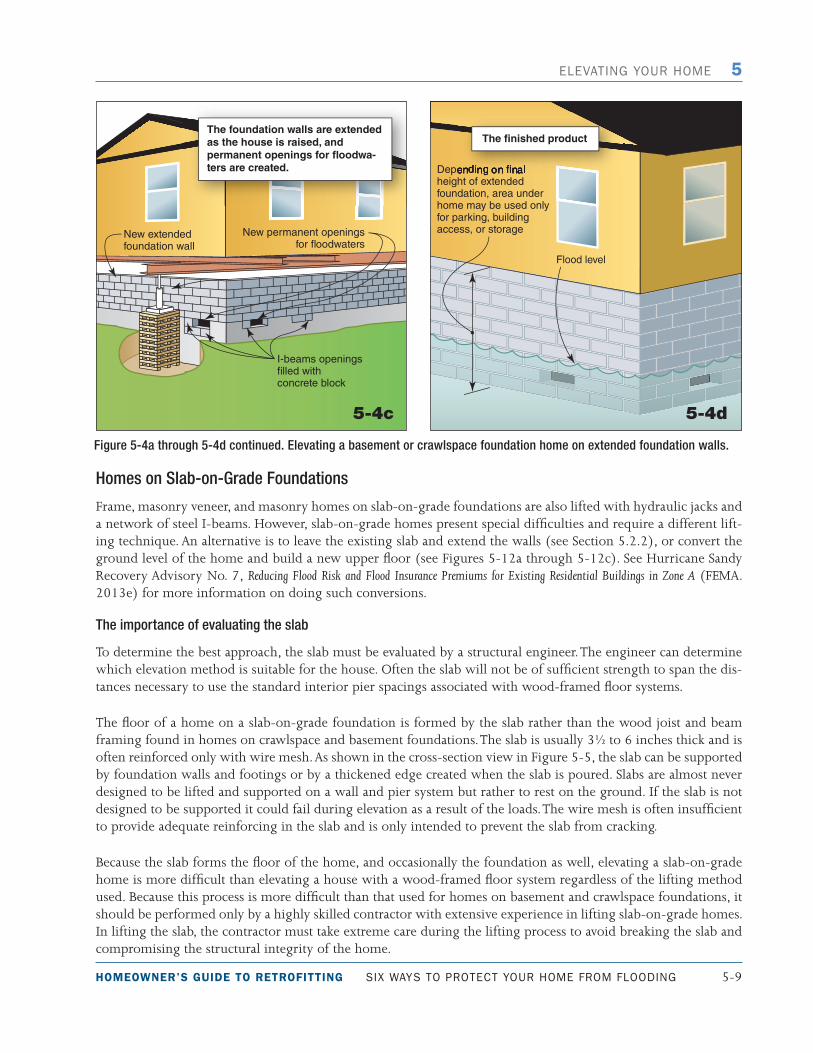
For masonry homes on slab-on-grade foundations, an alternative mitigation technique in which the home is left on its original foundation may be easier. This technique involves removing the roof and raising the living space, either by extending the walls of the home and raising the floor or by abandoning the lower level and moving the living space to an existing or newly constructed upper floor. Another alternative for homes with high ceilings may be to shift the floor system on the upper floors reducing the ceiling height, but creating space above the BFE to construct a new first floor. The abandoned lower enclosed area is then converted to a compliant enclosure that is used only for parking, building access, or storage. See Section 5.2.2 for more information.
NOTE
Always use a licensed, bonded, and insured contractor for elevation proj-ects. Be sure that your contractor has experience with elevation projects and understands the considerations discussed in Section 5.1. Prior to hiring a contractor, be sure to check references.
5-2 SIX WAYS TO PROTECT YOUR HOME FROM FLOODING HOMEOWNER’S GUIDE TO RETROFITTING
5 ELEVATING YOUR HOME
In both of these techniques, portions of the original walls will be below the DFE. This approach is appropriate for masonry construction, but not for frame construction, because of potential code compliance issues and flood in-surance implications for wood-frame foundations.
This chapter describes and illustrates various elevation methods and discusses the most important considerations regarding elevation. Remember, you should never attempt an elevation project without the help of experienced design and construction professionals.
5.1 Considerations Prior to elevating a home, a number of factors, such as how high to elevate, whether to incorporate the existing foundation, other hazards (wind, earthquake, etc.), how access to the house will be accomplished, and which elevation technique is appropriate, should all be considered. Some common factors to consider in elevating your home are described in the sections that follow.
5.1.1 Amount of Elevation The amount of elevation required is determined by the flood protection elevation you have chosen. The minimum elevation should be determined based on various sources of information. Decisions need to be made based on the effective date of the FIRM and whether any additional data, such as changes to the flood source around the building site or flooding events since the FIRM, may make is necessary to elevate higher. Homeowners should also consider that potential future changes to the factors that influence floods may result in higher flood events. Resourc-es such as Hurricane Sandy Recovery Advisory No. 5, Designing for Flood Levels Above the BFE After Hurricane Sandy (FEMA.2013b), may provide some helpful guidance on how to determine your flood protection elevation. Consider whether the locally enforced elevation requirements are sufficient or whether you should consider elevating even higher. For example, if your house is located in Zone A, you may only be required to elevate your home to the BFE so that the top of the lowest floor is at or above that elevation (see Figure 5-1). However, elevating 1 or 2 feet higher will provide increased protection and result in lower annual flood insurance premiums.
As explained previously, if your home is being Substantially Improved or has been Substantially Damaged, your community’s floodplain management ordinance, regulation, or provisions of the building code will require that your lowest floor be elevated to or above the BFE. If Substantial Improvement and Substantial Damage requirements do not apply, you may be able to elevate to any height you wish. Keep in mind that raising your home to an elevation below the BFE not only provides less protection, but will not provide the lower insurance premiums that come with elevation to or above the BFE. If you decide to raise your home to an elevation below the BFE, the community is re-quired to evaluate the cost of all improvements, including the cost to elevate your home to determine whether your proposed project is a Substantial Improvement. Regardless of whether your home is being Substantially Improved or has been Substantially Damaged, you should consider incorporating at least 1 foot of freeboard into your flood protection elevation (as shown in Figure 5-1). Often this will ensure that at a minimum, the floor framing will be elevated above the floodwaters.
NOTE
FEMA HMA grants will only support elevation projects to the flood pro-tection elevation stipulated by the engineering standard ASCE 24, Flood Resistant Design and Construction, or higher. In most instances, the mini-mum elevation will be the BFE plus at least 1 foot of freeboard.
HOMEOWNER’S GUIDE TO RETROFITTING SIX WAYS TO PROTECT YOUR HOME FROM FLOODING 5-3
ELEVATING YOUR HOME 5
Elevating a home to 3 or 4 feet above the existing ground level usually will not have a great effect on its appear-ance and will require only minimal landscaping and regrading. If you plan to elevate more than 4 feet above the existing grade, you should consider elevating your home a full story. Not only will your home be protected against deeper floods, but you can use the space below for parking, building access, or storage (Figure 5-2). If you decide to incorporate parking under a living area, verify that any necessary code requirements have been addressed in the retrofit. This could include providing a fire-rated floor assembly between the parking area and the living area above. Hurricane Isaac Recovery Advisory 1, Minimizing Wind and Water Intrusion by Covering the Underside of Elevated Buildings (FEMA. 2012c), provides some guidance on such assemblies.
Figure 5-1. As shown in the cutaway view, the lowest floor is above the flood level. When at least 1 foot of freeboard is provided, only the foundation is exposed to flooding.
5-4 SIX WAYS TO PROTECT YOUR HOME FROM FLOODING HOMEOWNER’S GUIDE TO RETROFITTING
5 ELEVATING YOUR HOME
WARNING
If your home is being Substantially Improved or has been Substantially Damaged and is in a Coastal High Hazard Area (Zone V, VE, or V1–V30 on the FIRM for your community), your community’s flood-plain management ordinance, regulation, or provisions of the building code requires that the bottom of the lowest horizontal structural member (rather than the lowest floor) be elevated to or above the BFE. In many homes, the lowest horizontal structural member is a beam that supports the framing of the lowest floor. With the exception of Elevating on an Open Foundation (Section 5.2.3), the elevation techniques presented in this guide are not appropriate for homes in Coastal High Hazard Areas. If you have any doubt about the type of flood hazards that may affect your home, check with your local officials.
Figure 5-2. This home in Cedar Falls, IA, was elevated one full story. The garage and storage area are at the home’s original elevation.
5.1.2 Existing Foundation In general, the most economical approach to elevating a home is to use as much of the existing foundation as possible. Although some elevation methods do not allow this approach, most do. If you choose one of the latter, a design professional must evaluate the capacity of your existing foundation to sup-port the loads that will be imposed by the elevated home and, as discussed in the next section, the loads expected to result from flooding and other hazards at the site. If changes must be made to the foundation to increase its strength and stability, they can be made as part of your retrofitting project. A design professional may determine that an older foundation con-structed of mortared rock, masonry, or even poured concrete needs to be completely replaced or the local building code may require that it be replaced.
CROSS REFERENCE
Fill used for structural support and el-evation is prohibited in Coastal High Hazard Areas. Check with your lo-cal officials about State and local requirements considering the use of fill. NFIP Technical Bulletin 5, Free-of-Obstruction Requirements (2008), offers further guidance about using fill in Zone V.
HOMEOWNER’S GUIDE TO RETROFITTING SIX WAYS TO PROTECT YOUR HOME FROM FLOODING 5-5
ELEVATING YOUR HOME 5
The type of foundation on which your home was originally built (basement, crawlspace, slab-on-grade, piers, posts, piles) also can affect the elevation process. This issue is discussed in Section 5.2.3.
5.1.3 Hazards Because so many elevation techniques are available, elevation is practical for most flood situations, but the flooding conditions and other hazards at the home site must be examined so that the most suitable technique can be deter-mined. Regardless of the elevation technique used, the foundation of the elevated home must be able to withstand all the necessary loads (wind, seismic, snow, etc.) on the house, which also should include the expected flood loads from buoyancy, hydrostatic pressure, hydrodynamic pressure, and debris impact. It must also be able to resist undermining by any expected erosion and scour.
If you are elevating a home in an area subject to high winds, earthquakes, or other hazards, a design profes-sional should determine whether the elevated home, including its foundation, will be able to withstand all of the horizontal and vertical forces expected to act on it. In making this determination, the design professional must consider a number of factors, including the structure and condition of the home, the soil conditions at the site, the proposed elevation technique, and the hazards at the site. The conclusion may be that additional modifications must be made during the retrofitting project. In some flooding conditions, another alternative, such as relocation, may be a better option. High wave loads, swift currents, or unstable soil may make relocation necessary. Some-times the condition of the house and the necessary retrofits may also indicate that reconstruction of the entire house is a more cost-effective option.
5.1.4 Access Elevating a home usually requires that new means of access be provided. For example, if your entry doors were originally at ground level, new staircases, elevators, or ramps will have to be built. When an attached garage is elevated, providing access for vehicles may require changes to portions of your lot, such as building a new, el-evated driveway that ties into high ground elsewhere. This solution can be practical when the amount of elevation required is no more than 2 or 3 feet. As noted earlier, when the amount of elevation reaches 4 or more feet, you should consider elevating your home a full story so that you can use the lower level for parking and avoid the need for an elevated driveway. Constructing a means of access can be a considerable cost and should be included in the price for the elevation.
Figure 5-3. With attention to detail and planning, homeowners have created attractive retrofitted homes.
5-6 SIX WAYS TO PROTECT YOUR HOME FROM FLOODING HOMEOWNER’S GUIDE TO RETROFITTING
5 ELEVATING YOUR HOME
The need to provide a new means of access is often the main objection that homeowners have to elevating. But functional and attractive solutions to this problem can usually be developed, as shown in Figures 2-2 and 5-3.
5.1.5 Home Size, Design, and Shape
In general, the larger the home and the more complex its design and shape, the more difficult it will be to lift on jacks. Multistory homes are more difficult to stabilize during the lifting process and, as the dimensions and weight of a home increase, so do the required numbers of jacks and other pieces of lifting equipment. Exterior wall cover-ings such as stucco and brick veneer complicate the lifting process because they must either be removed or braced so that they will stay in place when the home is lifted. Homes with simple square or rectangular shapes are easier to lift than those with attached garages, porches, wings, or additions, which often must be detached and lifted separately, especially if they are built on separate foundations. Features such as chimneys can also add to the cost of lifting a house because they must be either braced or removed during the lifting process. Older properties may also include features such as cisterns, which may create access issues and result in higher lifting costs.
Before a home is lifted, a design professional should inspect it to verify its structural soundness. All the structural members and their connections must be able to withstand the stresses imposed by the lifting process. Lifting an unsound home can lead to potentially expensive damage.
5.1.6 Service Equipment Before your home is elevated, all utility lines (water, sewer, gas, electric, telephone, etc.) must be disconnected. At the end of the project, the lines will be reconnected and any landscaping that may be necessary will be completed. Adjustments may be required for any overhead electrical service lines to ensure they maintain all appropriate vertical and horizontal clearances. If you elevate your home on an open foundation, utility lines that enter the home from below may be exposed to damage from flooding and below-freezing temperatures. Protecting utility lines in these situations usually involves anchoring them secure-ly to vertical foundation members and, if necessary, insulating them. All service equipment outside the home, such as air conditioning and heat pump compressors, and gas and electric meters, must be elevated to or above the flood protection elevation. In homes with basements, any service equipment originally installed in the basement must be raised above the flood protection elevation, which may require relocation to an upper floor or a small addition to house the equipment. Chapter 9 discusses the protection of service equipment. Moving or relocating utility meters, such as natural gas or electric meters, may be at the discretion of the utility service provider. Pro-viders may require meters to stay at elevations below the BFE.
5.2 The Elevation TechniquesThe elevation techniques and their applications to different types of homes are discussed in the following sections.
5.2.1 Elevating on Extended Foundation WallsFrame, masonry veneer, and masonry homes can all be elevated on extended foundation walls. As discussed in the following sections, the technique used for homes on basements, crawlspaces, and open foundations differs from that used for homes on slab-on-grade foundations. The potential for an elevated slab-on-grade foundation to fail
DEFINITION
Service equipment includes util-ity systems, heating and cooling systems, and large appliances in a retrofitted home.
HOMEOWNER’S GUIDE TO RETROFITTING SIX WAYS TO PROTECT YOUR HOME FROM FLOODING 5-7
ELEVATING YOUR HOME 5
either during the lifting process, or even worse once the house is occupied, makes this elevation technique one that should be carefully scrutinized by a design professional familiar with the calculation of building loads and the design of concrete slabs.
Homes on Basement Foundations and Crawlspace Foundations
The elevation process is the same for frame, masonry veneer, and masonry homes on basement and crawlspace foundations. Figures 5-4a through 5-4d illustrate the process.
First, holes are made at intervals in the foundation wall so that a series of steel I-beams can be installed at criti-cal points under the floor framing (Figure 5-4a). If the foundation walls are made of concrete blocks, the lifting contractor can remove individual blocks to create the required holes. If the walls are made of poured concrete, the holes will be cut out. The I-beams are placed so that they run perpendicular to the floor joists. A second set of beams is then placed below and perpendicular to the first set (Figure 5-4a). The two sets of beams extend the width and length of the home and form a cradle that supports the home as it is being raised.
In Figure 5-4a, the foundation walls are shown extending far enough above the ground surface to provide easy access to the area below the floor framing. However, in some homes, the foundation walls will not be this high. To lift such a home, the contractor must first dig trenches at intervals around the foun-dation. The I-beams are then lowered into the trenches and inserted below the floor framing. The contractor may also have to dig holes for the lifting jacks, as shown in the figure. The number of jacks needed will depend on the size, shape, and type of home being lifted.
Once the beams and jacks are in place, the elevation process be-gins. The jacks will extend only so high; so at intervals during the process, the home and jacks are supported temporarily on cribbing while the jacks are raised (Figure 5-4b). After the home is elevated high enough, it is again supported on cribbing while the foundation walls are extended to the desired height with concrete blocks or poured con-crete (Figure 5-4c). The home is then lowered onto the extended foundation walls, the I-beams are removed, and the holes where the beams passed through are filled. An important part of the project is installing flood openings in the foundation walls (your building permit should specify the size and location of these openings), no higher than 1 foot above the ground, so that floodwaters can enter and equalize the internal and external hydrostatic pressures. As shown in Figure 5-4c, the contractor may be able to create these openings by only partially filling the I-beam holes.
CROSS REFERENCE
For more information about openings requirements, refer to FEMA Technical Bulletin 1, Openings in Foundation Walls and Walls of Enclosures (2008), and FEMA P-259, Engineering Prin-ciples and Practices for Retrofitting Flood-Prone Residential Structures (FEMA. 2012a).
5-8 SIX WAYS TO PROTECT YOUR HOME FROM FLOODING HOMEOWNER’S GUIDE TO RETROFITTING
5 ELEVATING YOUR HOME
Figure 5-4a through 5-4d. Elevating a basement or crawlspace foundation home on extended foundation walls.
5-4a
5-4b
HOMEOWNER’S GUIDE TO RETROFITTING SIX WAYS TO PROTECT YOUR HOME FROM FLOODING 5-9
ELEVATING YOUR HOME 5
Figure 5-4a through 5-4d continued. Elevating a basement or crawlspace foundation home on extended foundation walls.
5-4c 5-4d
Homes on Slab-on-Grade Foundations
Frame, masonry veneer, and masonry homes on slab-on-grade foundations are also lifted with hydraulic jacks and a network of steel I-beams. However, slab-on-grade homes present special difficulties and require a different lift-ing technique. An alternative is to leave the existing slab and extend the walls (see Section 5.2.2), or convert the ground level of the home and build a new upper floor (see Figures 5-12a through 5-12c). See Hurricane Sandy Recovery Advisory No. 7, Reducing Flood Risk and Flood Insurance Premiums for Existing Residential Buildings in Zone A (FEMA. 2013e) for more information on doing such conversions.
The importance of evaluating the slab
To determine the best approach, the slab must be evaluated by a structural engineer. The engineer can determine which elevation method is suitable for the house. Often the slab will not be of sufficient strength to span the dis-tances necessary to use the standard interior pier spacings associated with wood-framed floor systems.
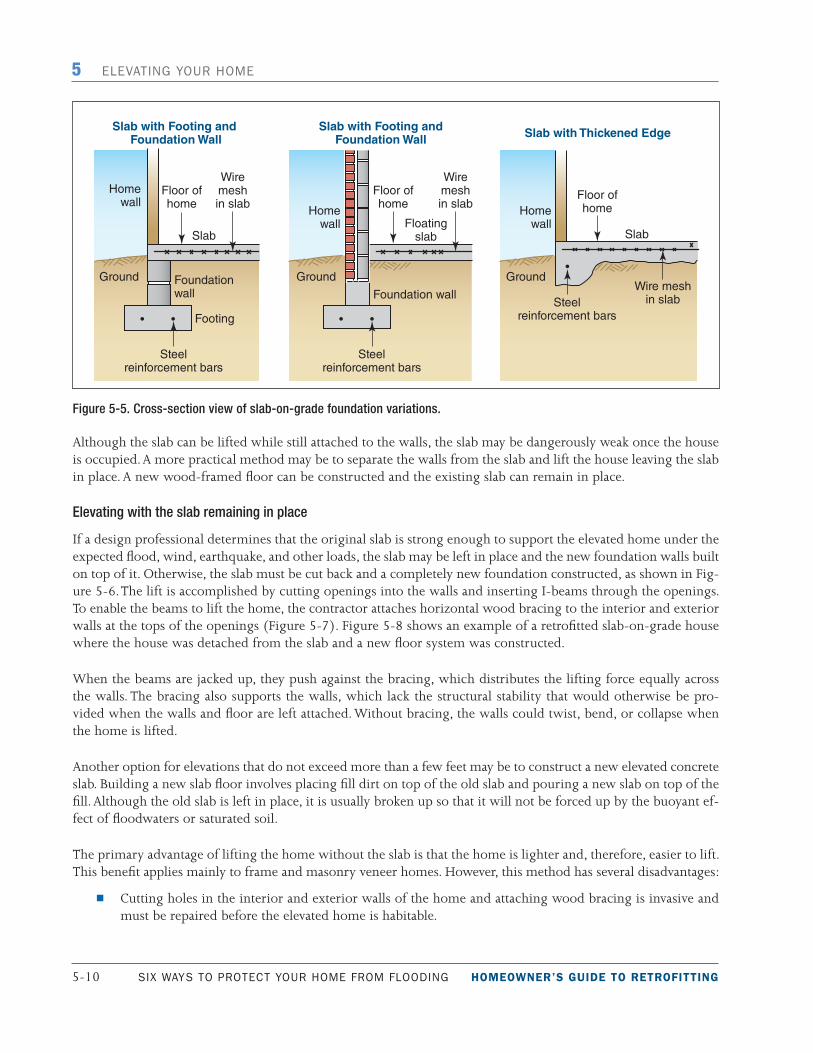
The floor of a home on a slab-on-grade foundation is formed by the slab rather than the wood joist and beam framing found in homes on crawlspace and basement foundations. The slab is usually 3½ to 6 inches thick and is often reinforced only with wire mesh. As shown in the cross-section view in Figure 5-5, the slab can be supported by foundation walls and footings or by a thickened edge created when the slab is poured. Slabs are almost never designed to be lifted and supported on a wall and pier system but rather to rest on the ground. If the slab is not designed to be supported it could fail during elevation as a result of the loads. The wire mesh is often insufficient to provide adequate reinforcing in the slab and is only intended to prevent the slab from cracking.
Because the slab forms the floor of the home, and occasionally the foundation as well, elevating a slab-on-grade home is more difficult than elevating a house with a wood-framed floor system regardless of the lifting method used. Because this process is more difficult than that used for homes on basement and crawlspace foundations, it should be performed only by a highly skilled contractor with extensive experience in lifting slab-on-grade homes. In lifting the slab, the contractor must take extreme care during the lifting process to avoid breaking the slab and compromising the structural integrity of the home.
5-10 SIX WAYS TO PROTECT YOUR HOME FROM FLOODING HOMEOWNER’S GUIDE TO RETROFITTING
5 ELEVATING YOUR HOME
Although the slab can be lifted while still attached to the walls, the slab may be dangerously weak once the house is occupied. A more practical method may be to separate the walls from the slab and lift the house leaving the slab in place. A new wood-framed floor can be constructed and the existing slab can remain in place.
Figure 5-5. Cross-section view of slab-on-grade foundation variations.
Elevating with the slab remaining in place
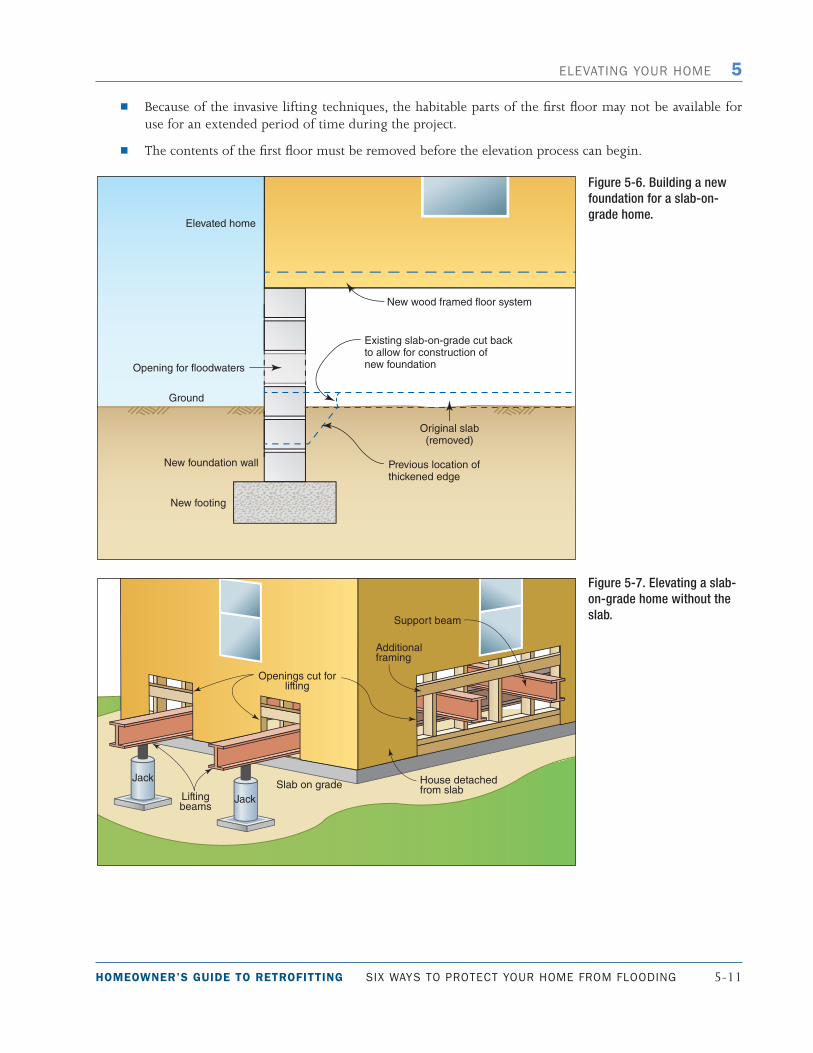
If a design professional determines that the original slab is strong enough to support the elevated home under the expected flood, wind, earthquake, and other loads, the slab may be left in place and the new foundation walls built on top of it. Otherwise, the slab must be cut back and a completely new foundation constructed, as shown in Fig-ure 5-6. The lift is accomplished by cutting openings into the walls and inserting I-beams through the openings. To enable the beams to lift the home, the contractor attaches horizontal wood bracing to the interior and exterior walls at the tops of the openings (Figure 5-7). Figure 5-8 shows an example of a retrofitted slab-on-grade house where the house was detached from the slab and a new floor system was constructed.
When the beams are jacked up, they push against the bracing, which distributes the lifting force equally across the walls. The bracing also supports the walls, which lack the structural stability that would otherwise be pro-vided when the walls and floor are left attached. Without bracing, the walls could twist, bend, or collapse when the home is lifted.
Another option for elevations that do not exceed more than a few feet may be to construct a new elevated concrete slab. Building a new slab floor involves placing fill dirt on top of the old slab and pouring a new slab on top of the fill. Although the old slab is left in place, it is usually broken up so that it will not be forced up by the buoyant ef-fect of floodwaters or saturated soil.
The primary advantage of lifting the home without the slab is that the home is lighter and, therefore, easier to lift. This benefit applies mainly to frame and masonry veneer homes. However, this method has several disadvantages:
n Cutting holes in the interior and exterior walls of the home and attaching wood bracing is invasive and must be repaired before the elevated home is habitable.
HOMEOWNER’S GUIDE TO RETROFITTING SIX WAYS TO PROTECT YOUR HOME FROM FLOODING 5-11
ELEVATING YOUR HOME 5
n Because of the invasive lifting techniques, the habitable parts of the first floor may not be available for use for an extended period of time during the project.
n The contents of the first floor must be removed before the elevation process can begin.
Figure 5-6. Building a new foundation for a slab-on-grade home.
Figure 5-7. Elevating a slab-on-grade home without the slab.
5-12 SIX WAYS TO PROTECT YOUR HOME FROM FLOODING HOMEOWNER’S GUIDE TO RETROFITTING
5 ELEVATING YOUR HOME
Figure 5-8. House in Zone A was detached from its slab foundation (which remains) and elevated on masonry piers. The floor system is supported by new wood joists (Mandeville, LA).
Elevating with the slab attached
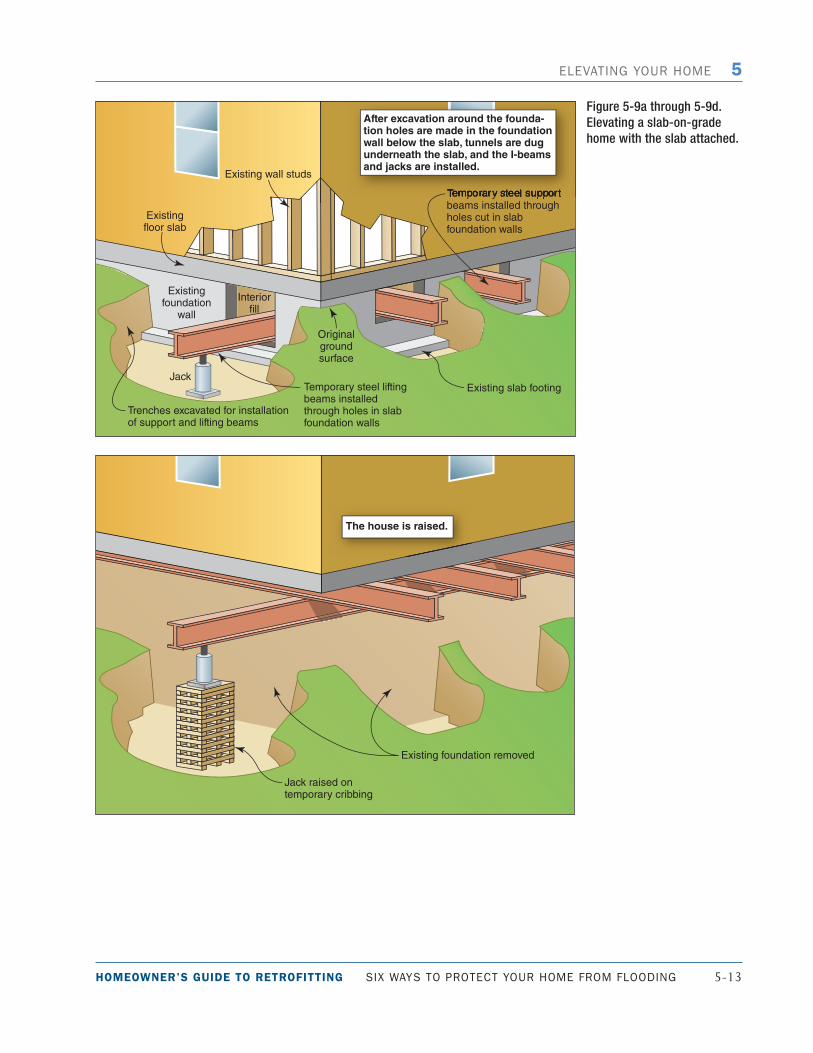
When the slab is determined to be of sufficient thickness and reinforced such that it can be supported on piers, the slab can be lifted while still attached to the walls. The elevation process (Figures 5-9a through 5-9d) is similar to that used for homes on basement and crawlspace foundations, except that the I-beams must be placed below the slab, which is at ground level. Therefore, the contractor must dig trenches at intervals around the foundation, and tunnel under the slab. The I-beams are lowered into the trenches and moved into place beneath the slab through the tunnels (Figure 5-9a).
The contractor must also dig holes for the lifting jacks because they have to be placed below the beams. Once the beams and jacks are in place, the lifting process begins. As shown in Figures 5-9b and 5-9c, the home is lifted and a new foundation is constructed beneath it.
Some slab-on-grade houses are constructed on what are called stemwalls. These systems consist of a concrete foot-ing with a short perimeter wall made of poured concrete or masonry block. If the slab was originally supported by foundation walls and footings (see left and middle illustrations in Figure 5-5), the contractor may be able to leave them in place and extend the existing walls upward. This approach is possible only when a design profes-sional determines that the original foundation walls and footings are strong enough to support the elevated home and slab under the expected flood, wind, earthquake, and other loads. If the slab was originally supported on the ground by its own thickened edge (see right illustration in Figure 5-5), a completely new foundation must be constructed.
In both situations, the contractor must construct not only foundation walls under the perimeter of the slab, but also additional vertical foundation members, such as piers, at several locations under the slab. These additional foundation members are necessary because slabs are designed to rest directly on the ground, not to support the weight of the home.
HOMEOWNER’S GUIDE TO RETROFITTING SIX WAYS TO PROTECT YOUR HOME FROM FLOODING 5-13
ELEVATING YOUR HOME 5
Figure 5-9a through 5-9d. Elevating a slab-on-grade home with the slab attached.
5-9a
5-9b
5-14 SIX WAYS TO PROTECT YOUR HOME FROM FLOODING HOMEOWNER’S GUIDE TO RETROFITTING
5 ELEVATING YOUR HOME
Figure 5-9a through 5-9d continued. Elevating a slab-on-grade home with the slab attached.
5-9c
5-9d
HOMEOWNER’S GUIDE TO RETROFITTING SIX WAYS TO PROTECT YOUR HOME FROM FLOODING 5-15
ELEVATING YOUR HOME 5
The primary advantage of lifting the home with the slab still attached to the walls is that the home can remain intact and many of the contents can remain inside during the lifting process. However, this method has several disadvantages:
n Most slabs were constructed to be continuously supported by the ground underneath them and are minimally reinforced. Insufficiently supporting such a slab can result in cracking or catastrophic failures that could potentially injure the occupants.
n Retrofitting slabs with insufficient thickness or reinforcement can be expensive.
n If the house is not lifted evenly, the slab could crack during the elevation process.
n If uneven settlement occurs, the weight of the elevated slab may exceed the capacity of the masonry piers commonly used for elevation projects.
Do not consider elevating a slab-on-grade house without seeking the help of a structural engineer. Although many elevation contractors have experience elevating slab-on-grade houses, concrete has the potential to catastrophi-cally fail and appropriately assessing the strength of the slab may be difficult for most contractors. Slabs cast on the ground can have wide variations in thickness and the pier spacing may need to be adjusted once the bottom of the slab becomes visible. Structural engineers familiar with the design requirements for slabs can properly ad-dress the risk of a slab failure.
5.2.2 Alternative Elevation Techniques for Masonry Homes on Slab-on-Grade Foundations
Elevating by Extending the Walls of the Home
An alternative technique for elevating a masonry home on a slab-on-grade foundation is to extend the existing walls of the home upward and then build a new raised floor above the old slab. This technique is illustrated in Figures 5-10a through 5-10c.
First the roof framing and roof are removed so that the tops of the walls will be accessible. The contractor can then extend the walls upward with additional courses of either concrete block (as shown in Figure 5-10b) or brick or with wood or metal framing. The choice of materials is based on several considerations, including cost, the final appearance of the home, the strength of the existing foundation, and the design requirements associated with the identified hazards, including high winds and earthquakes.
The final height of the extended walls will depend on how high the lowest floor must be elevated. For example, if the lowest floor must be elevated 3 feet to reach the flood protection elevation, the height of the walls must be increased by the same amount if the original ceiling heights in the home are to be maintained.
The new raised floor can be either a wood-framed floor system or an elevated concrete slab similar to the original slab (referred to as a stemwall). When a new wood-framed floor system is installed, the area below the floor be-comes a crawlspace (as in Figure 5-10c) or other enclosed area that may be used for parking, building access, or storage. Flood openings must be installed in the foundation walls to allow external and internal water pressures to equalize. Additional openings may be needed for ventilation.
For a new elevated slab floor, fill dirt is placed on top of the old slab and compacted as required. Then a new slab is poured on top of the fill. When this method is used, openings in the foundation walls are not required because the entire area under the new slab is completely filled with dirt and is therefore protected from the pressure of floodwaters.
5-16 SIX WAYS TO PROTECT YOUR HOME FROM FLOODING HOMEOWNER’S GUIDE TO RETROFITTING
5 ELEVATING YOUR HOME
5-10a
Figure 5-10a through 5-10c. Elevating by extending the walls of a solid masonry home.
5-10b
5-10c
HOMEOWNER’S GUIDE TO RETROFITTING SIX WAYS TO PROTECT YOUR HOME FROM FLOODING 5-17
ELEVATING YOUR HOME 5
Elevating by Abandoning the Lower Enclosed Area
Another alternative for a masonry home on a slab-on-grade foundation is to abandon the existing lower enclosed area of the home (the area with the slab floor) and allow it to remain be-low the flood protection elevation. This technique requires that the living area be restricted to upper floors of the home and that the lower enclosed area be used only for parking, build-ing access, or storage. Because this technique leaves the original floor and walls below the flood protection elevation exposed to flooding, it is best suited to masonry homes on slab-on-grade foundations. In these homes, both the walls and floor are made of concrete or masonry, which are not easily damaged by con-tact with floodwaters. Only materials resistant to flood damage should be used on portions of the building below the flood pro-tection elevation.
The amount of work required for this technique depends largely on whether the home already has an upper floor that can be used for living space. When an upper floor exists, abandoning the lower enclosed area involves remov-ing any interior finishing materials below the flood protection elevation (including interior wall sheathing and insulation unless required by code) and elevating or relocating vulnerable appliances (such as furnaces, washing machines, and freezers) and utility system components (such as electrical wiring and service boxes). These modi-fications are the same as those required for wet floodproofing, as described in Chapter 7.
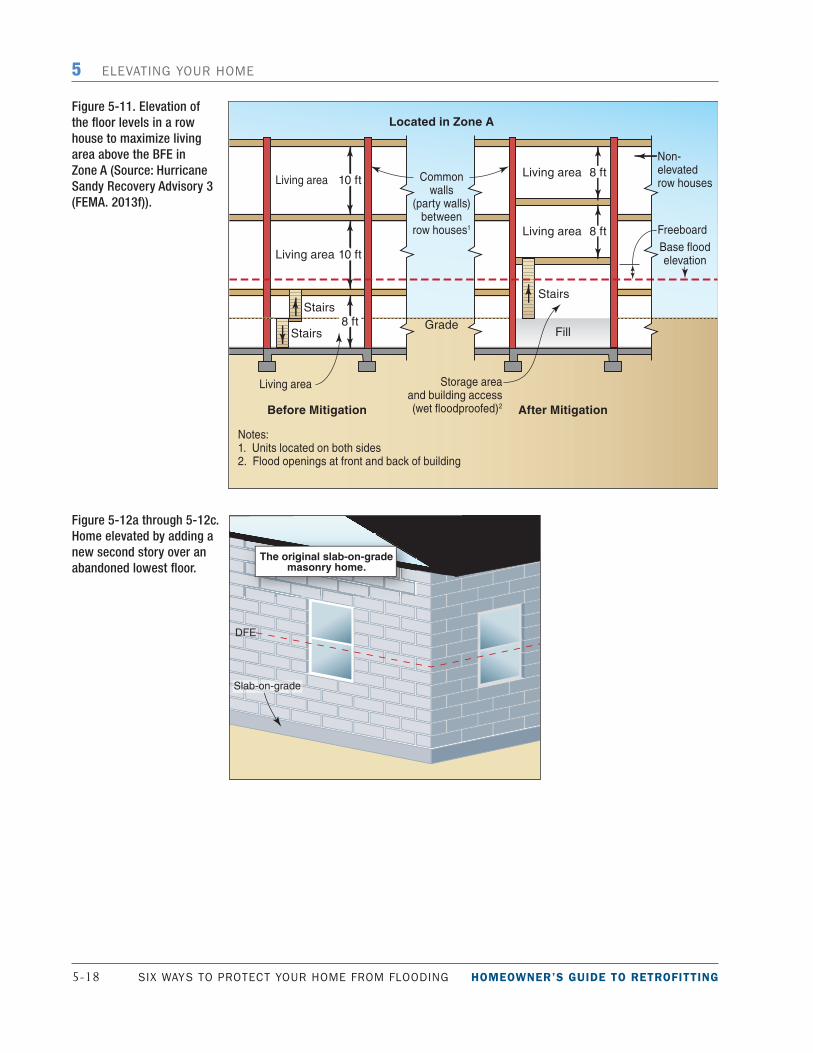
This elevation measure may be the most practical for town houses or row houses. In an attached dwelling at least one wall and usually two are common or “party” walls. These walls make lifting the actual walls impossible. Shifting the elevation of the floor joists may be the only practical solution in these situations. This technique re-quires significant alterations to the front and back walls of the unit or any walls that are not common to the other units. These walls typically have the windows and exterior doors, which must be relocated (shifted up) as the floor framing is shifted. Interior walls also must be removed and replaced with these projects. Although this is an invasive method, the flood risk and potential financial implications of flood insurance premiums may make it a palatable mitigation option. Figure 5-11 illustrates how this could be done for a row house with high ceilings. This method also makes it possible to convert the ground floor to an NFIP-compliant enclosure and make adjust-ments to the upper floors, such as moving utilities and mechanical equipment to higher floors. Uses appropriate for areas below the BFE are described in Chapter 7.
For one-story homes, abandoning the lower enclosed area requires the construction of a new second story as shown in Figures 5-12a through 5-12c. The required steps are similar to those described in Section 5.2.1. The roof and roof framing are removed, a new second story is built on top of the existing walls, the roof and roof framing are replaced, and openings are added for floodwaters. The construction options are the same: frame or masonry. Again, the choice is based primarily on the considerations of cost, final appearance, the strength of the existing foundation, and the need to address other natural hazards, such as high winds and earthquakes.
CROSS REFERENCE
For more information about flood open-ings, refer to FEMA Technical Bulletin 1, Openings in Foundation Walls and Walls of Enclosures (2008), and FEMA P-259, Engineering Principles and Practices for Retrofitting Flood-Prone Residential Structures (FEMA. 2012a).
5-18 SIX WAYS TO PROTECT YOUR HOME FROM FLOODING HOMEOWNER’S GUIDE TO RETROFITTING
5 ELEVATING YOUR HOME
Figure 5-11. Elevation of the floor levels in a row house to maximize living area above the BFE in Zone A (Source: Hurricane Sandy Recovery Advisory 3 (FEMA. 2013f)).
Figure 5-12a through 5-12c. Home elevated by adding a new second story over an abandoned lowest floor.
5-12a
HOMEOWNER’S GUIDE TO RETROFITTING SIX WAYS TO PROTECT YOUR HOME FROM FLOODING 5-19
ELEVATING YOUR HOME 5
Figure 5-12a through 5-12c continued. Home elevated by adding a new second story over an abandoned lowest floor.
5-12b
5-12c
5-20 SIX WAYS TO PROTECT YOUR HOME FROM FLOODING HOMEOWNER’S GUIDE TO RETROFITTING
5 ELEVATING YOUR HOME
Mitigation Reconstruction
Mitigation reconstruction is the construction of an improved, elevated building on the same site where an exist-ing building and/or foundation has been demolished. There may be reasons why elevating your home may not be feasible. If physical or economic obstacles are too great, you may want to consider demolishing your home and rebuilding a code-compliant home that is elevated above the flood level (see Chapter 6).
For FEMA HMA grants, mitigation reconstruction is only permitted if traditional structure elevation cannot be implemented. Activities that result in the construction of new living space at or above the BFE will only be con-sidered when consistent with the mitigation reconstruction requirements.
5.2.3 Elevating on an Open FoundationFrame, masonry veneer, and masonry homes on basement, crawlspace, and slab-on-grade foundations can also be elevat-ed on open foundations consisting of piers, posts, columns, or piles. Homes originally constructed on open foundations can also be elevated this way.
Piers
Figures 5-13a through 5-13d show how a home on a basement or crawlspace foundation can be elevated on masonry piers. The lifting process is the same as that shown in Figure 5-4 for elevat-ing on extended foundation walls. Once the home is lifted high enough, new masonry piers may be built on the existing foundation, if it is adequate. If the existing foundation is not adequate to support the elevated home, it will have to be either modified or removed and replaced by sepa-rate footings for the individual piers.
An existing basement must be filled in with dirt and graded. An old basement slab can be left in place and cov-ered with fill dirt. A basement slab does not need to be removed, but it should be broken up in place so that it will allow water to seep through it and reduce buoyancy forces before being covered with fill dirt. The home in Figure 5-13d has been elevated approximately one full story, and a new concrete slab has been poured at ground level below it. The open area below the home can be used for parking, building access, or storage.
Piers can be constructed of cast-in-place concrete as well as fully grouted masonry blocks. However, regardless of the construction materials used, piers are designed primarily for vertical loading imposed by the weight of the home, including its contents and any exterior loads, such as those imposed by snow. Because the forces associated with flooding, wind, and earthquakes can impose horizontal loads, piers used in retrofitting must be adequately reinforced with properly sized and placed steel bars. The connections between the piers and the original founda-tion and elevated home also must be able to resist the expected horizontal and vertical loads on the home so the home does not shift off the foundation.
NOTE
Open foundations are required for ele-vations in Coastal High Hazard Areas (Zones V, VE, and V1–V30) and are recommended for elevations in river-ine floodplains where flow velocities are greater than 5 fps.
HOMEOWNER’S GUIDE TO RETROFITTING SIX WAYS TO PROTECT YOUR HOME FROM FLOODING 5-21
ELEVATING YOUR HOME 5
Figure 5-13a through 5-13d. Elevating a basement or crawlspace foundation home on piers.
5-13a
5-13b 5-13c
5-13d
5-22 SIX WAYS TO PROTECT YOUR HOME FROM FLOODING HOMEOWNER’S GUIDE TO RETROFITTING
5 ELEVATING YOUR HOME
Posts or Columns
For posts or columns, the home elevation process is the same as that described for piers; however, the existing foundation usually must be removed so that the posts or columns and their concrete encasements or pads can be installed. Posts are usually placed in drilled or excavated holes. Each post or column is either encased in concrete or anchored to a concrete footing.
Figure 5-14 shows a home elevated on two types of post or column foundations. Because an elevated house sits higher off the ground on a slender foundation, the lateral (sideways) loading on the house becomes a more im-portant factor than a house sitting only a few feet off the ground on a continuous foundation. Large lateral loads can be exerted on the house by forces such as wind, earthquakes, or floodwaters. Simple wooden posts will not likely be able to resist these lateral loads and would require a formal design by a structural engineer. Lateral brac-ing can be used to prevent movement of the building for occupant comfort, but it should not be used to provide lateral support to prevent foundation failure. Additionally, bracing in two directions is only recommended in areas of low velocity flooding—areas with high-velocity flooding should only be braced in one direction (as shown in Figure 5-14). Depending on the potential lateral loads that the house must resist, a metal framing system may be a more practical approach than simple wooden posts. This system may also require an extensive concrete footing system so that the loads can be transferred down the posts or columns and into the ground. Although this eleva-tion technique may appear simple, you should retain the services of a structural engineer who understands how loads are transferred.
Figure 5-14. Home elevated on post or column foundations.
HOMEOWNER’S GUIDE TO RETROFITTING SIX WAYS TO PROTECT YOUR HOME FROM FLOODING 5-23
ELEVATING YOUR HOME 5
Piles
Elevating on piles is a more involved process than elevating on piers, posts, and columns. Piles are usually driven or vibrated into the ground or jetted in with a high-pressure stream of water. They are not supported by concrete footings or pads. Unlike the construction of wall, pier, or post or column foundations, the pile-driving operation, which requires bulky, heavy construction machinery, cannot be carried out under a home that has been lifted on jacks. Instead, the home is usually lifted and moved aside until the piles have been installed. Because the existing foundation is not used, it must be removed. Figure 5-15 shows a home elevated on a pile foundation.
More information on elevating homes on open foundations can be found in Hurricane Sandy Fact Sheet No. 2, Foundation Requirements and Recommendations for Elevated Homes (FEMA. 2013c). This fact sheet addresses many of the com-mon issues associated with elevating homes on open foundations, and also addresses elevating a home on an open foundation that is confined by narrow lot lines.