35
501 AR325: Accounts Receivable Approvals Web Based Training Rev 03/20/2017
| Date post: | 04-Apr-2018 |
| Category: |
Documents |
| Upload: | truongdiep |
| View: | 219 times |
| Download: | 4 times |
501 AR325: Accounts
Receivable Approvals
Web Based Training
Rev 03/20/2017

Welcome
Welcome to Cardinal Training!
This course provides employees with the skills and information necessary to use Cardinal. It is not intended to replace
existing Commonwealth and/or agency policies.
This course provides an overview of how to approve deposits, billing adjustments, and item adjustments in the Accounts
Receivable functional area.
These training materials include diagrams, charts, screenshots, etc. that clarify various Cardinal tasks and processes. The
screenshots are taken from Cardinal and show pages that not all users can access. They are included here so you can
see how your specific responsibilities relate to the overall transaction or process being discussed. See your agency’s
Cardinal Security Handbook for a list of all available role descriptions.
2

Course Objectives
After completing this course, you will be able to approve:
• Deposits
• Billing adjustments
• Item adjustments
3
Assessment questions at the end of the lesson will check for your understanding.

Course Topics
This course includes the following lesson:
• Lesson 1: Accounts Receivables Approvals
4

Lesson 1: Account Receivable Approvals
This lesson covers the following topics:
• Accounts Receivable Overview
• Deposit approval process
• Billing adjustment approval process
• Item adjustment approval process
5
Accounts Receivable Overview
6
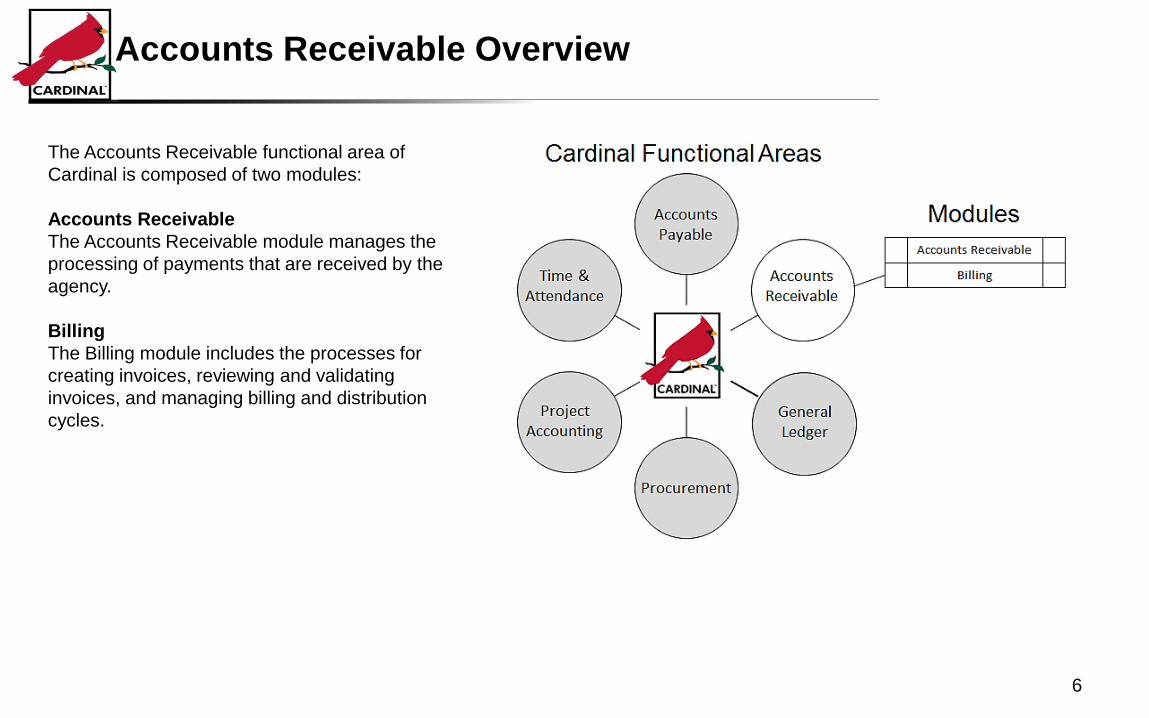
The Accounts Receivable functional area of
Cardinal is composed of two modules:
Accounts Receivable
The Accounts Receivable module manages the
processing of payments that are received by the
agency.
Billing
The Billing module includes the processes for
creating invoices, reviewing and validating
invoices, and managing billing and distribution
cycles.

Creating and Approving a Deposit Certificate
Completed deposits are batched together under a Deposit Certificate before the entries are sent to the General Ledger.
The Deposit Certificate is created on the Approve Deposits page. This page allows you to batch one or more deposits
under a deposit certificate ticket for transmission to the General Ledger and to the Department of Treasury.
The Deposit Certificate Ticket Number is entered directly into Cardinal, and the associated Deposit IDs are selected.
The associated Deposit IDs that are selected contain Direct Journal Payments, Item payments, or a combination of both.
For interfaced transactions, the Deposit Certificate is approved automatically unless manual intervention is required and
the Deposit Certificate is modified online.
7
Creating and Approving a Deposit Certificate (continued)
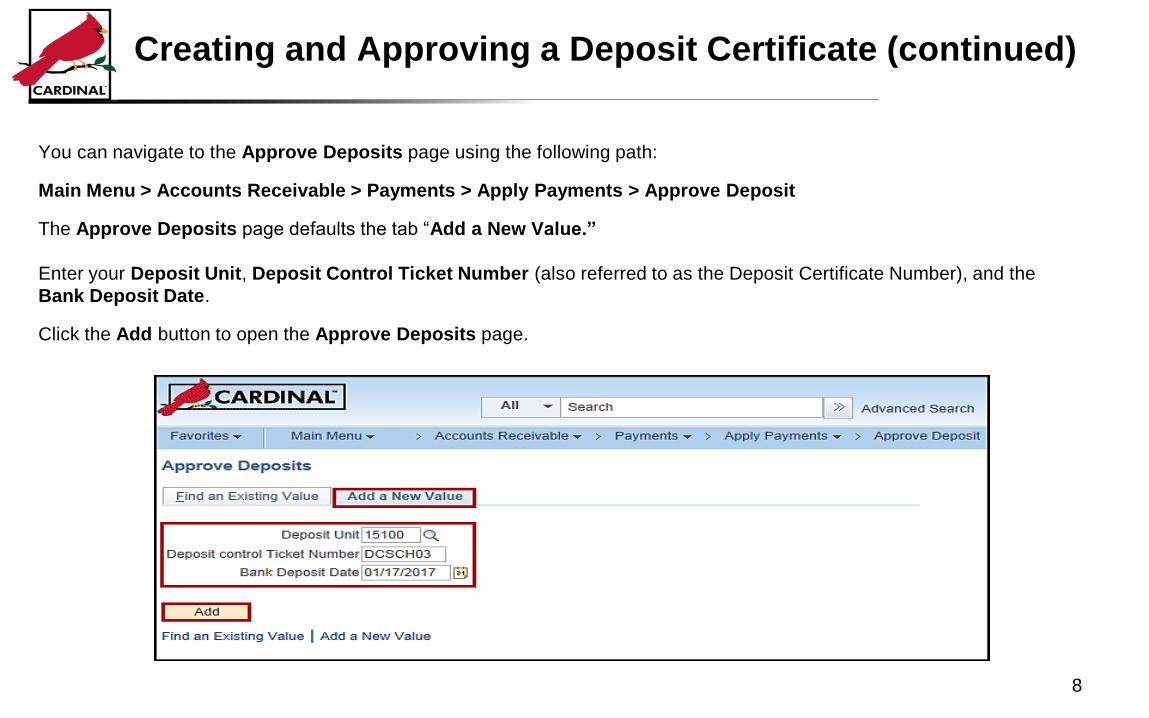
You can navigate to the Approve Deposits page using the following path:
Main Menu > Accounts Receivable > Payments > Apply Payments > Approve Deposit
The Approve Deposits page defaults the tab “Add a New Value.”
Enter your Deposit Unit, Deposit Control Ticket Number (also referred to as the Deposit Certificate Number), and the
Bank Deposit Date.
Click the Add button to open the Approve Deposits page.
8

Creating and Approving a Deposit Certificate (continued)
The Deposit Unit, Deposit Control Ticket
Number, and the Bank Deposit Date default
from values entered on the Add a New Value
tab.
Enter the total sum of all deposits in the
Control Total Amount field and the total
number of deposits in the Control Count field.
Enter the Deposit ID in the Deposit ID field. If
there is more than one deposit, click the plus
sign to enter additional Deposit IDs. The sum
of all Deposit Amounts must equal the
Control Total Amount.
Click the View Detail Status icon to verify the
status of direct journal payments and item
payments.
Once data is entered, click Save. Cardinal
requires that deposits (i.e., both Direct Journal
Payments and Item Payments) have a Status
of Complete in order to Approve. Once
Approved, the deposit data cannot be modified.
9

Creating and Approving a Deposit Certificate (continued)
To approve deposits containing Direct Journal payments, the
Deposit Detail Status values must be:
• Edit Status = Complete
• Budget Check Status = Valid
• Payment Status = Journalled
When clicking the View Detail Status icon, the Deposit Detail Status page displays validation details of the Direct Journal and
Item payments within the Deposit Certificate. The Deposit ID and Bank Code fields also display.
To approve deposits containing Item Payments, the
Deposit Detail Status values must be:
• Edit Status = Complete
• Budget Check Status = Valid
• Payment Status = Complete
A Deposit Certificate can contain one or more Deposit IDs. When there are multiple deposits within a Deposit Certificate, they
must have the same bank code, as shown above.
10

Creating and Approving a Deposit Certificate (continued)
The View Detail Status link opens the Deposit
Detail Status page. The status of the deposit is
displayed.
To research an Error status, click the View
Detail Status link. This opens the Deposit
Detail Status page. The status of the deposit is
displayed. Determine whether the deposit has
edit errors, budget check errors, and/or journal
errors.
The Deposit ID and Bank Code values display
so you can ensure that all the deposits in the
Deposit Certificate have the same bank
account. A deposit must be Complete, Valid,
and Journalled and/or Complete in order to be
approved.
11

Creating and Approving a Deposit Certificate (continued)
The Not Ready Status also means that the Set WS
to Post button becomes active and available for the
next step.
Item payments are payments applied to accounts
receivable items on a Cardinal Payment Worksheet
See the course entitled 501_AR326 Creating and
Maintaining Deposits for more detail.
In order to approve a Deposit Certificate containing
item payments, the data from the Payment
Worksheet must be posted to applicable records.
Click Set WS to Post button:
• The Payment Worksheet status is Posted.
• The Approve button is not yet available for
selection.
For a Deposit Certificate that contains Item Payments, after clicking Save, the Deposit ID will have a status of Not Ready.
The Not Ready status is not an error. Not Ready means that the there is additional online validation and batch processing
required to complete this item’s process cycle.
12
Creating and Approving a Deposit Certificate (continued)
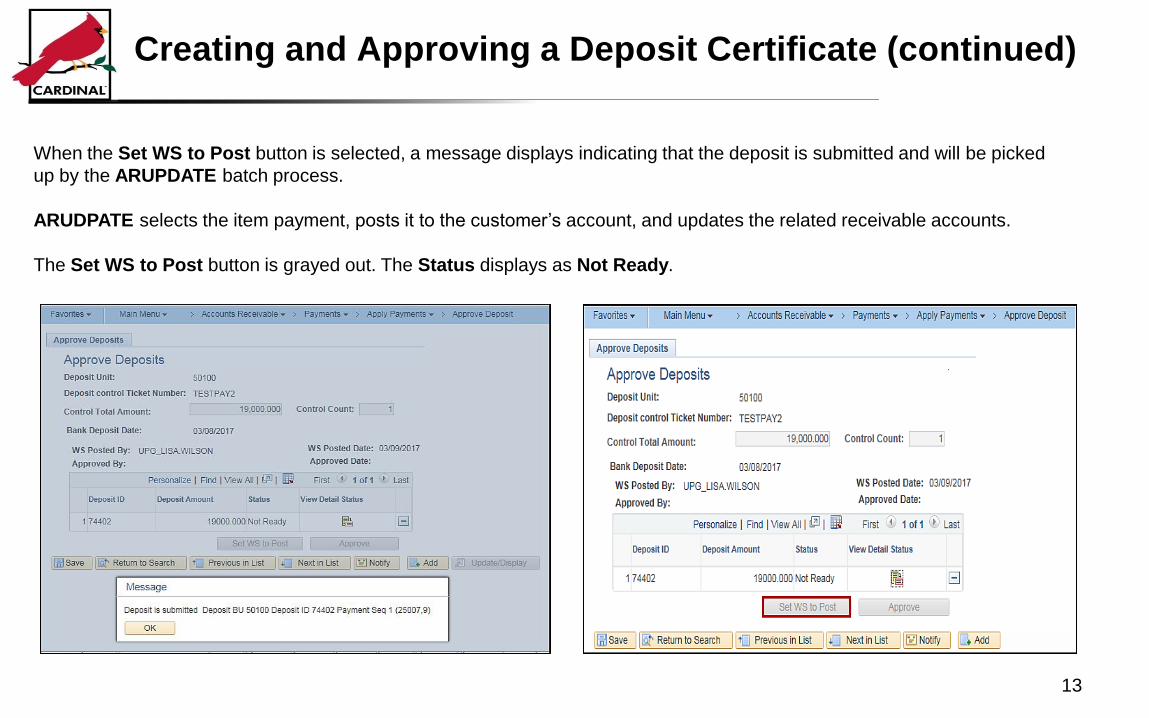
When the Set WS to Post button is selected, a message displays indicating that the deposit is submitted and will be picked
up by the ARUPDATE batch process.
ARUDPATE selects the item payment, posts it to the customer’s account, and updates the related receivable accounts.
The Set WS to Post button is grayed out. The Status displays as Not Ready.
13

Creating and Approving a Deposit Certificate (continued)
The WS Posted By and WS Posted Date fields are
populated when you click the Set WS to Post button.
Once the payment is posted for an item by the
ARUPDATE batch process, the deposit Status
updates from Not Ready to Complete.
The Approve button now becomes available for
selection.
14

Creating and Approving a Deposit Certificate (continued)
The deposit is Complete. Click Approve to finalize.
When clicking Approve, a message displays confirming the status as “Deposit is approved”. Click OK.
15

Creating and Approving a Deposit Certificate (continued)
Once the deposit is complete, click Approve to finalize. The Approved By and Approved Date fields on the page will auto-
populate with your User ID and the current date.
16

Billing Adjustment Approval Process
Once an invoice has been finalized, and the bill status changes from RDY to INV (invoiced), no changes can be made to the
billing data on the invoice.
The Adjust Entire Bill function enables you to adjust (change) billing data by either crediting the entire bill, which acts to
reverse the original invoice, or by crediting the entire bill and rebilling, which reverses the original invoice and creates a new
bill with the adjusted (correct) information.
Navigate to the Adjust Entire Bill page: Main Menu > Billing > Maintain Bills > Adjust Entire Bill.
On the Adjust Entire Bill page, Cardinal has two actions called Credit Entire Bill and Credit & Rebill. When an action is
selected, the radio button for the Rebill Default Action defaults to “Retain Original Value Invoice”. This option ensures
that the rebill will retain the customer information from the original bill. An Adjustment Reason is selected, then the page is
Saved. Two new invoices (a Credit Bill and a Rebill) are created.
The credit and rebill option requires one level of approval for the rebill.
When a processor initiates a credit and rebill, the rebill is saved with a status of New. However, Cardinal does not notify
you when billing adjustments are made and they do not route your worklist. You can identify billing adjustments awaiting
review and approval by running the Adjustments Pending Approval-BI (V_AR_PEND_BI_ADJ) query to identify.
You should run the Adjustments Pending Approval-BI query daily to ensure timely processing of adjustments.
After you access and review the billing adjustment, you can approve it by changing the bill status from New to RDY
(Ready to Invoice). 17
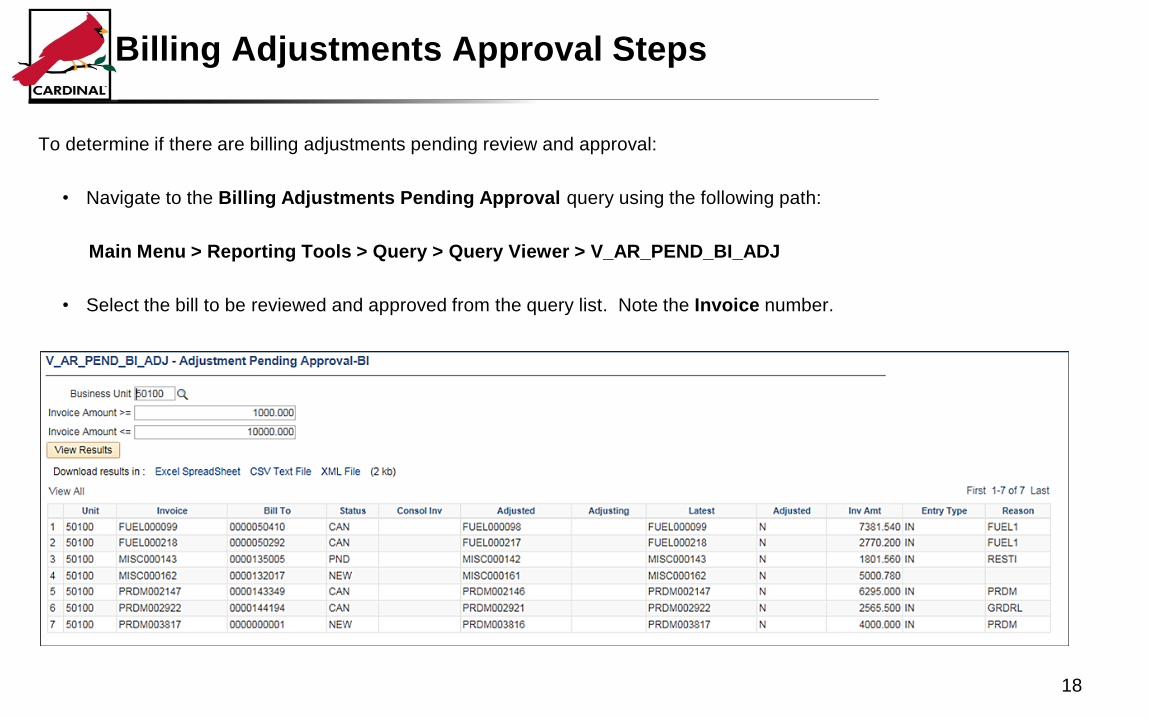
Billing Adjustments Approval Steps
To determine if there are billing adjustments pending review and approval:
• Navigate to the Billing Adjustments Pending Approval query using the following path:
Main Menu > Reporting Tools > Query > Query Viewer > V_AR_PEND_BI_ADJ
• Select the bill to be reviewed and approved from the query list. Note the Invoice number.
18
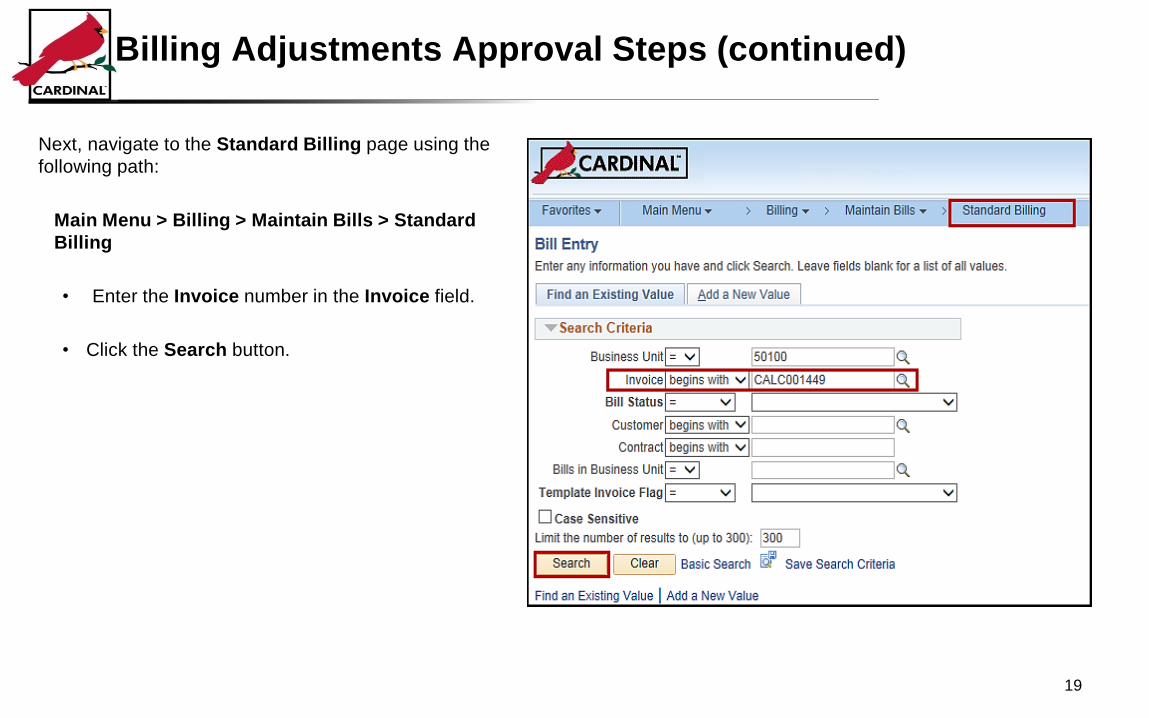
Billing Adjustments Approval Steps (continued)
Next, navigate to the Standard Billing page using the
following path:
Main Menu > Billing > Maintain Bills > Standard
Billing
• Enter the Invoice number in the Invoice field.
• Click the Search button.
19

Billing Adjustments Approval Steps (continued)
• The Standard Billing page displays.
• Review the billing adjustment.
• To approve the adjustment, change the status from New to RDY (Ready to Invoice) by clicking the Status lookup
button and selecting RDY.
20

Billing Adjustments Approval Steps (continued)
Click the Save button to save the bill.
If the adjustment is not approved, you must communicate the reason for denial directly to the processor. The processor
can then edit the adjustment accordingly.
Once the billing adjustment is marked RDY, it processes during the next nightly batch process. The system then changes
the status from RDY to INV.
21

Item Adjustment Approval Process
The bill lines (items) on an invoice with a status of RDY or NEW can be adjusted. (Once an invoice has been finalized,
and the bill status changes from RDY to INV (invoiced), no changes can be made to the billing data).
Item adjustments require one level of approval.
When a processor makes an item adjustment and saves it, the item status is automatically set to Do Not Post. Cardinal
does not notify you when item adjustments are ready for approval, and they do not appear on your worklist. You can
identify item adjustments (debit / credit memos, write-offs, discharges, and refunds) awaiting review and approval by
running the Item Adjustments Pending Approval query (V_AR_PEND_WS_ADJ).
You should run the Item Adjustments Pending Approval query daily to ensure timely processing of adjustments.
When an item for adjustment is identified, you approve it by changing the item status from Do Not Post to Batch Standard
on the Worksheet.
22

Item Adjustment Approval Steps
To approve an item adjustment:
• Access the Item Adjustments Pending Approval query using the following path:
Main Menu > Reporting Tools > Query > Query Viewer > V_AR_PEND_WS_ADJ
• Select the item to be approved from the query list. Note the Worksheet ID.
23

Item Adjustment Approval Steps (continued)
Next, access the Update Worksheet page using the following path:
Main Menu > Accounts Receivable > Receivables Maintenance > Maintenance Worksheet > Update Worksheet
• Enter the Worksheet ID from your query results.
• Click the Search button.
24

Item Adjustment Approval Steps (continued)
• The Worksheet Application page displays.
• Review the item to be adjusted.
25

Item Adjustment Approval Steps (continued)
• Review the item adjustment results.
• To approve the adjustment, click the Worksheet Action link.
26

Item Adjustment Approval Steps (continued)
• In the Accounting Entry Action section, click the Create/Review Entries button to create, view, or edit accounting
entries if necessary.
• Under the Posting Action section, click the drop-down menu to select Batch Standard in the Action field.
• Click the OK button to save.
27

Item Adjustment Approval Steps (continued)
If the adjustment is not approved, you must communicate the reason for denial directly to the processor. The processor
can then edit the adjustment, if applicable.
Once the item adjustment has been approved, it processes during the nightly batch processing.
28
Lesson 1: Checkpoint
Now is your opportunity to check your understanding of the course material. Read the question, select your answer, and
click Submit to see if you chose the correct response.
29
30

31

32
Lesson 1: Summary
In this lesson, you learned:
• To approve a deposit certificate, the approver reviews the Deposits Summary report and processes the approval on the
Approve Deposits page.
• To approve billing adjustments, the approver runs the Billing Adjustments Pending Approval query to identify items
that are Pending, and changes their status to Ready to Invoice.
• To approve item adjustments, the approver runs the Item Adjustments Pending Approval query to identify item
adjustments requiring approval, and uses the Worksheet Action page to approve.
33
Course Summary
In this course you learned how to:
• Approve deposits
• Approve billing adjustments
• Approve item adjustments
34

Congratulations! You successfully completed the 501 AR325: Accounts Receivable Approvals course. Please use the
evaluation link to assess this course.
Once you have completed and submitted the survey, close the survey window. To close the web based training course, click
the ‘X’ button in the upper right corner.
Click here to access the survey
Course Evaluation
35


