110
Release 6.2 Installation Guide Microsoft Windows | BEA Weblogic IBM Maximo
| Date post: | 06-Apr-2018 |
| Category: |
Documents |
| Upload: | fenry-rommel-ferrao |
| View: | 228 times |
| Download: | 0 times |

8/3/2019 62 Mx Install Bea814 Win
http://slidepdf.com/reader/full/62-mx-install-bea814-win 1/110
Release 6.2
Installation Guide
Microsoft Windows | BEA Weblogic
IBM Maximo

8/3/2019 62 Mx Install Bea814 Win
http://slidepdf.com/reader/full/62-mx-install-bea814-win 2/110
First Edition (November 2006)
This edition applies to release 6.2 of IBM Maximo and to all subsequent releases and modifications until
otherwise indicated in new editions.
Third-Party Technology: Certain Maximo products contain technology provided under license from third
parties, as noted in the following table:
Open Source: Maximo contains computer software obtained from the public domain, known as "Open Source"
ownership of which is attributed as follows: Portions © 2002, Steve Souza ([email protected]). Portions ©
2000-2004, Jason Hunter & Brett McLaughlin. Portions © 2004-2005, The Apache Software Foundation
(http://www.apache.org/).
© Copyright International Business Machines Corporation 2006. All rights reserved.
US Government Users Restricted Rights - Use, duplication or disclosure restricted by GSA ADP Schedule
Contract with IBM Corp.
IBM Product Third-Party Information
All Products Portions © 1996-2003 Visual Mining, Inc. Visual Mining™
NetCharts Server provided by Visual Mining, Inc. © 1998-
2005 Centennial Software Limited.
IBM Maximo Portions © 1995-2004 Actuate Corporation. Portions © 2005
BEA Systems, Inc. BEA WebLogic Server® provided by BEA Systems, Inc.
Portions © 1996-2005, i-net software GmbH. J-Integra for
COM® v2.4. © 2004 Intrinsyc Software International, Inc.
Maximo Discovery MSDE Copyright © Microsoft® Corporation.
IBM Maximo Enterprise Asset Navigator Portions © 1993-2002 Snowbound™ Software Corporation.
RasterMaster™ Raster imaging technology provided by
Snowbound Software Corporation.
Portions © 1991 Pegasus Imaging Corp.
IBM Maximo Mobile Portions © 2005 DataMirror, Inc.
Portions © 2000-2005 Zaval Creative Engineering Group.
IBM Maximo Mobile SE Portions © 1996-2005 Syclo, LLC.
Note
Before using this information and the product it supports, read the information in “Notices” on page Notices-1.

8/3/2019 62 Mx Install Bea814 Win
http://slidepdf.com/reader/full/62-mx-install-bea814-win 3/110
© Copyright IBM Corp. 2006 iii
About This Guide . . . . . . . . . . . . . . . . . . . . . . . . . . . . . . . . . . . . . . . . . . . . . . . . . . . . . . . . . . . . . . . . . . . . . . .v
Audience . . . . . . . . . . . . . . . . . . . . . . . . . . . . . . . . . . . . . . . . . . . . . . . . . . . . . . . . . . . . . . . . . . . . . . . . . . . . . v
Related Documentation . . . . . . . . . . . . . . . . . . . . . . . . . . . . . . . . . . . . . . . . . . . . . . . . . . . . . . . . . . . . . . . . . v
Support . . . . . . . . . . . . . . . . . . . . . . . . . . . . . . . . . . . . . . . . . . . . . . . . . . . . . . . . . . . . . . . . . . . . . . . . . . . . . . vi
Chapter 1: Introducing IBM Maximo. . . . . . . . . . . . . . . . . . . . . . . . . . . . . . . . . . . . . . . . . . . . . . . . . . . . 1-1
Overview of Installation. . . . . . . . . . . . . . . . . . . . . . . . . . . . . . . . . . . . . . . . . . . . . . . . . . . . . . . . . . . . . . . . 1-1
Overview of Concepts . . . . . . . . . . . . . . . . . . . . . . . . . . . . . . . . . . . . . . . . . . . . . . . . . . . . . . . . . . . . . . . . . . 1-2
How Does Maximo Run in an Application Server?. . . . . . . . . . . . . . . . . . . . . . . . . . . . . . . . . . . . . . . . . . . 1-3
Single Maximo Application Deployed in a Single Application Server. . . . . . . . . . . . . . . . . . . . . . . . . . . . 1-4
Maximo Components . . . . . . . . . . . . . . . . . . . . . . . . . . . . . . . . . . . . . . . . . . . . . . . . . . . . . . . . . . . . . . . . . . 1-5
Application Server . . . . . . . . . . . . . . . . . . . . . . . . . . . . . . . . . . . . . . . . . . . . . . . . . . . . . . . . . . . . . . . . . 1-5
Actuate Server . . . . . . . . . . . . . . . . . . . . . . . . . . . . . . . . . . . . . . . . . . . . . . . . . . . . . . . . . . . . . . . . . . . . 1-5
Database Server. . . . . . . . . . . . . . . . . . . . . . . . . . . . . . . . . . . . . . . . . . . . . . . . . . . . . . . . . . . . . . . . . . . 1-5
Typical Maximo Configuration Diagram . . . . . . . . . . . . . . . . . . . . . . . . . . . . . . . . . . . . . . . . . . . . . . . . . . 1-6
Hardware and Software Considerations . . . . . . . . . . . . . . . . . . . . . . . . . . . . . . . . . . . . . . . . . . . . . . . . . . . 1-6
Third-Party Product Updates . . . . . . . . . . . . . . . . . . . . . . . . . . . . . . . . . . . . . . . . . . . . . . . . . . . . . . . . 1-8
Java Virtual Machine (JVM). . . . . . . . . . . . . . . . . . . . . . . . . . . . . . . . . . . . . . . . . . . . . . . . . . . . . . . . . 1-8
Chapter 2: Installing BEA WebLogic . . . . . . . . . . . . . . . . . . . . . . . . . . . . . . . . . . . . . . . . . . . . . . . . . . . . 2-1
Installing BEA WebLogic 8.1.4.0. . . . . . . . . . . . . . . . . . . . . . . . . . . . . . . . . . . . . . . . . . . . . . . . . . . . . . . . . 2-1
Configuring the Maximo Application Server . . . . . . . . . . . . . . . . . . . . . . . . . . . . . . . . . . . . . . . . . . . . . . . 2-6
Installing the License Update Program . . . . . . . . . . . . . . . . . . . . . . . . . . . . . . . . . . . . . . . . . . . . . . . . . . 2-14
Post Installation tasks . . . . . . . . . . . . . . . . . . . . . . . . . . . . . . . . . . . . . . . . . . . . . . . . . . . . . . . . . . . . . . . . 2-17
Edit the commEnv File (Oracle Only) . . . . . . . . . . . . . . . . . . . . . . . . . . . . . . . . . . . . . . . . . . . . . . . . 2-17Increasing the Java Heap Parameters . . . . . . . . . . . . . . . . . . . . . . . . . . . . . . . . . . . . . . . . . . . . . . . . 2-18
Verify Settings by Running startWebLogic.cmd . . . . . . . . . . . . . . . . . . . . . . . . . . . . . . . . . . . . . . . . 2-19
Starting the Server Without Being Prompted for Username and Password . . . . . . . . . . . . . . . . . . 2-20
Chapter 3: Installing The Actuate Application . . . . . . . . . . . . . . . . . . . . . . . . . . . . . . . . . . . . . . . . . . . 3-1
Pre-Installation Procedures . . . . . . . . . . . . . . . . . . . . . . . . . . . . . . . . . . . . . . . . . . . . . . . . . . . . . . . . . . . . . 3-1
Oracle Connectivity . . . . . . . . . . . . . . . . . . . . . . . . . . . . . . . . . . . . . . . . . . . . . . . . . . . . . . . . . . . . . . . . 3-1
MS SQL Server Connectivity . . . . . . . . . . . . . . . . . . . . . . . . . . . . . . . . . . . . . . . . . . . . . . . . . . . . . . . . 3-1
Installing Actuate8 iServer . . . . . . . . . . . . . . . . . . . . . . . . . . . . . . . . . . . . . . . . . . . . . . . . . . . . . . . . . . . . . 3-2
Chapter 4: Installing Maximo . . . . . . . . . . . . . . . . . . . . . . . . . . . . . . . . . . . . . . . . . . . . . . . . . . . . . . . . . . 4-1
Starting the Maximo Installation Program . . . . . . . . . . . . . . . . . . . . . . . . . . . . . . . . . . . . . . . . . . . . . . . . 4-2Post Installation Tasks . . . . . . . . . . . . . . . . . . . . . . . . . . . . . . . . . . . . . . . . . . . . . . . . . . . . . . . . . . . . . 4-5
How to Include the oraclethin.jar File . . . . . . . . . . . . . . . . . . . . . . . . . . . . . . . . . . . . . . . . . . . . . . 4-5
How to enable the Application Designer . . . . . . . . . . . . . . . . . . . . . . . . . . . . . . . . . . . . . . . . . . . . 4-5
How to Modify Language-specific JDBC Settings in Maximo for SQL Server Database . . . . . .4-6
Installing the Language Utilities . . . . . . . . . . . . . . . . . . . . . . . . . . . . . . . . . . . . . . . . . . . . . . . . . . . . . . . . 4-8
Installing the Product Enablers . . . . . . . . . . . . . . . . . . . . . . . . . . . . . . . . . . . . . . . . . . . . . . . . . . . . . . . . . 4-9
Chapter 5: Creating the Maximo Schema . . . . . . . . . . . . . . . . . . . . . . . . . . . . . . . . . . . . . . . . . . . . . . . . 5-1
Preparing Microsoft SQL Server Instance . . . . . . . . . . . . . . . . . . . . . . . . . . . . . . . . . . . . . . . . . . . . . . . . . 5-1
Setting up a SQL Server Database for Maximo. . . . . . . . . . . . . . . . . . . . . . . . . . . . . . . . . . . . . . . . . . 5-3
Preparing Oracle Instance . . . . . . . . . . . . . . . . . . . . . . . . . . . . . . . . . . . . . . . . . . . . . . . . . . . . . . . . . . . . . . 5-6
Database Character Set. . . . . . . . . . . . . . . . . . . . . . . . . . . . . . . . . . . . . . . . . . . . . . . . . . . . . . . . . . . . . 5-6
Contents

8/3/2019 62 Mx Install Bea814 Win
http://slidepdf.com/reader/full/62-mx-install-bea814-win 4/110
iv IBM Maximo: Installation Guide
Verifying the Oracle Instance Requirements . . . . . . . . . . . . . . . . . . . . . . . . . . . . . . . . . . . . . . . . . . . . 5-6
Oracle Initialization Parameters . . . . . . . . . . . . . . . . . . . . . . . . . . . . . . . . . . . . . . . . . . . . . . . . . . . . . 5-7
Creating Maximo Tablespace(s) . . . . . . . . . . . . . . . . . . . . . . . . . . . . . . . . . . . . . . . . . . . . . . . . . . . . . . 5-7
Creating the Maximo User . . . . . . . . . . . . . . . . . . . . . . . . . . . . . . . . . . . . . . . . . . . . . . . . . . . . . . . . . . 5-8
Create the Maximo Database Objects . . . . . . . . . . . . . . . . . . . . . . . . . . . . . . . . . . . . . . . . . . . . . . . . . . . . 5-10
Chapter 6: Deploying the EAR Files. . . . . . . . . . . . . . . . . . . . . . . . . . . . . . . . . . . . . . . . . . . . . . . . . . . . . 6-1
Chapter 7: Installing The Actuate Encyclopedia for Maximo . . . . . . . . . . . . . . . . . . . . . . . . . . . . . . 7-1Removing Corrupt Characters from the acserverconfig.xml File . . . . . . . . . . . . . . . . . . . . . . . . . . . . . . . 7-1
Starting the Actuate iServer for Maximo . . . . . . . . . . . . . . . . . . . . . . . . . . . . . . . . . . . . . . . . . . . . . . . . . . 7-2
Installing the Actuate Integration for Maximo . . . . . . . . . . . . . . . . . . . . . . . . . . . . . . . . . . . . . . . . . . . . . 7-3
Post Installation Tasks . . . . . . . . . . . . . . . . . . . . . . . . . . . . . . . . . . . . . . . . . . . . . . . . . . . . . . . . . . . . . 7-4
Importing the Encyclopedia. . . . . . . . . . . . . . . . . . . . . . . . . . . . . . . . . . . . . . . . . . . . . . . . . . . . . . . . . . . . . 7-7
Chapter 8: Logging Into Maximo Start Center . . . . . . . . . . . . . . . . . . . . . . . . . . . . . . . . . . . . . . . . . . . 8-1
Maximo Enterprise Adapter Users . . . . . . . . . . . . . . . . . . . . . . . . . . . . . . . . . . . . . . . . . . . . . . . . . . . . . . . 8-2
Appendix A: System Server Administration. . . . . . . . . . . . . . . . . . . . . . . . . . . . . . . . . . . . . . . . . . . . . . A-1
Creating a Windows Service for the MAXIMOSERVER Server . . . . . . . . . . . . . . . . . . . . . . . . . . . . . . . A-1
Starting and Stopping the MAXIMOSERVER Server . . . . . . . . . . . . . . . . . . . . . . . . . . . . . . . . . . . . . . . A-3
Starting and Stopping the MAXIMOSERVER Service . . . . . . . . . . . . . . . . . . . . . . . . . . . . . . . . . . . A-4
Removing the Application Server as a Service. . . . . . . . . . . . . . . . . . . . . . . . . . . . . . . . . . . . . . . . . . A-4
Starting the Application Server From a Command Prompt . . . . . . . . . . . . . . . . . . . . . . . . . . . . . . . A-4
Stopping the MAXIMOSERVER Server. . . . . . . . . . . . . . . . . . . . . . . . . . . . . . . . . . . . . . . . . . . . . . . A-5
Appendix B: Configuring JMS Options for MEA. . . . . . . . . . . . . . . . . . . . . . . . . . . . . . . . . . . . . . . . . .B-1
Appendix C: Enabling JMS Connection Factory for MEA. . . . . . . . . . . . . . . . . . . . . . . . . . . . . . . . . .C-1
Appendix D: Adding Additional Product Enablers. . . . . . . . . . . . . . . . . . . . . . . . . . . . . . . . . . . . . . . .D-1
Appendix E: Enabling Reports to Run. . . . . . . . . . . . . . . . . . . . . . . . . . . . . . . . . . . . . . . . . . . . . . . . . . . E-1
Notices . . . . . . . . . . . . . . . . . . . . . . . . . . . . . . . . . . . . . . . . . . . . . . . . . . . . . . . . . . . . . . . . . . . . . . . . Notices-1
8/3/2019 62 Mx Install Bea814 Win
http://slidepdf.com/reader/full/62-mx-install-bea814-win 5/110
© Copyright IBM Corp. 2006 v
About This Guide
This section explains how this guide can help you to use IBM
®
Maximo
®
. Italso provides information about other IBM Corporation resources available to
you, such as additional documentation and support.
Audience
This guideis intended for implementation analysts, support personnel, and
system administrators who are installing Maximo for the first time.
Related Documentation
For more information about Maximo, refer to the following documentation:.
Document Description
IBM Maximo Finance Manager’s
Guide
Describes how IBM Maximo
completes financial transactions
and how to set up general ledger
accounts.
IBM Maximo Multisite Administrator’s Guide Describes how to configure IBMMaximo for a Multisite
implementation.
IBM Maximo Online Help Provides step-by-step procedures for
Maximo applications.
IBM Maximo Reconciliation Module
Implementation Guide
Describes how to use the IBM
Maximo Reconciliation module to
reconcile the two types of
information that IBM Maximo
maintains about information
technology (IT) assets: IT asset data
and deployed asset data.
IBM Maximo Report Administration
and Development GuideDescribes how to use Actuate® to
design and administer IBM Maximo
reports.
IBM Maximo System
Administrator’s Guide
Describes database configuration,
security, and other administrative
level applications and tasks.
8/3/2019 62 Mx Install Bea814 Win
http://slidepdf.com/reader/full/62-mx-install-bea814-win 6/110
Support
vi IBM Maximo: Installation Guide
Support
IBM Corporation, users with a valid Annual Customer Support Plan (ACSP)
can obtain product support online at the Support Online Web site:
support.mro.com.
The Support Online Web site includes information about product releases,
software patches, and documentation updates. To find the most current
version of a document, refer to this site’s Knowledge Base.
IBM Maximo User’s Guide Provides an overview of the Maximo
end user applications. It also
describes how the IBM Maximo
applications interact with each
other.
IBM Maximo WorkflowImplementation Guide Provides information about how touse IBM Maximo to plan, design,
build, test, implement, and manage
Workflow processes.
IBM Maximo Enterprise Adapter
(MEA) System Administrator's
Guide
Describes how to configure and use
the IBM MEA.
Document Description

8/3/2019 62 Mx Install Bea814 Win
http://slidepdf.com/reader/full/62-mx-install-bea814-win 7/110
© Copyright IBM Corp. 2006 1-1
Maximo is a comprehensive suite of products all built on a single, common
platform. It combines enhanced Enterprise Asset Management functionality
with new service management capabilities that together improve the
effectiveness of asset management strategies.
Maximo includes advanced IT asset management, service management, and a
full-featured service desk, all based on the IT Infrastructure Library (ITIL)
guidelines. Each product can be implemented separately as a stand-alone
solution or readily deployed together. The solution enhances asset
management and ensures service performance of production, facility,
transportation and IT assets.
Maximo consists of multiple software servers that you can either install on
separate server machines or the same physical server. Preferably, use the
following dedicated servers: Application Server, Actuate Report Server and
Database Server.
Overview of Installation
CAUTION Existing Maximo 6.x customers can overwrite files and data when following
the standard installation procedures. If you are an existing Maximo 6.xcustomer, refer to the IBM Maximo 6.2 Release Notes on the Support Online
Web site for your specific installation instructions.
Use this guide to install Maximo. During this process you will complete the
following tasks in the order that they appear:
1 Install BEA WebLogic® application server.
2 Install the Actuate application server.
3 Install the Maximo system.
4 Install the language utilities program.
5 Install the Product Enablers program.
6 Create the Maximo schema.
7 Deploy the Enterprise Application Archive (EAR) files.
8 Install the Actuate Encyclopedia for Maximo.
9 Log in to the Maximo Start Center.
Introducing IBM Maximo
1

8/3/2019 62 Mx Install Bea814 Win
http://slidepdf.com/reader/full/62-mx-install-bea814-win 8/110
Overview of Concepts
1-2 IBM Maximo: Installation Guide
The following diagram illustrates the software components and the order in
which you must install these components to obtain a successful Maximo
system installation:
Installation Flow
Internet Connectivity
The installation of Maximo and its various components require a valid and
active connection to the Internet. Ensure that you allow the online update of
the MAXIMO Application Server to complete.
Overview of Concepts
Maximo application refers to an instance of Maximo. Enterprise Application
Archive (EAR) files define what constitutes a Maximo application. You can
have multiple Maximo applications, in other words, multiple deployed EARfiles on one application server.
An EAR file represents a Java™ 2 Enterprise Edition (J2EE™) application
that you deploy in an application server. EAR files are standard Java archive
files and have the file extension .ear.
An EAR file can consist of:
! Web Application Archive (WAR) files that contain for example, JSP or
HTML pages
! Java Enterprise Application (JAR) files that contain class files and otherprogramming code modules
! Enterprise Java Bean (EJB) files that contain class files
IBM Corporation uses the term application server to refer to a J2EE container
that provides the infrastructure to run business applications such as Maximo.
BEA WebLogic is a commercial application server supported by Maximo.
When you install Maximo, you create a new application server (in the
container sense) for the Maximo application iteration within BEA WebLogic.
Install BEA WebLogicConfigure the Maximo Application Server
Install the Actuate 8iServer application
Install Maximo and
Create the Maximo
Encyclopedia for
Maximo
Log into Maximo
Start Center
Chapter 2 Chapter 3 Chapter 4
Chapter 5Chapter 6Chapter 7Chapter 8
Perform post-installation tasksrelated software
Schema
Install the ActuateDeploy the EAR
files
8/3/2019 62 Mx Install Bea814 Win
http://slidepdf.com/reader/full/62-mx-install-bea814-win 9/110
How Does Maximo Run in an Application Server?
Introducing IBM Maximo 1-3
Context is the name through which you access a specific web application, such
as Maximo deployed on an Application Server. Maximo has the following
contexts:
! /maximo — Maximo user interface
! /mbo — Maximo business objects
! /maximohelp — Maximo help
! /acweb — Actuate
! /meaweb — MEA
You access Maximo from the browser using the /maximo context.
For example, http://<host name>:<port number>/maximo. The character
string maximo that appears after the port number, is the Maximo context.
How Does Maximo Run in an Application Server?
The following points summarize how Maximo is set up to run in an application
server:
! The EAR files are created from the contents placed on your local drive as
part of the installation process
! The Maximo application consists of the following EAR files:
! maximo.ear – for the Maximo application
! maximohelp.ear – for the Maximo Help application
! acweb.ear – for the IBM Actuate Active Portal Integration application
! In order to run Maximo, you must deploy the Maximo application EAR
files in the application server.
! When Maximo application EAR files are deployed in the Application
Server, the server maintains a copy of the EAR files internally.
! The Maximo installation builds the EAR files based on the information
you provided during the installation. Any configuration changes require
you to rebuild and redeploy the EAR files.
8/3/2019 62 Mx Install Bea814 Win
http://slidepdf.com/reader/full/62-mx-install-bea814-win 10/110
Single Maximo Application Deployed in a Single Application Server
1-4 IBM Maximo: Installation Guide
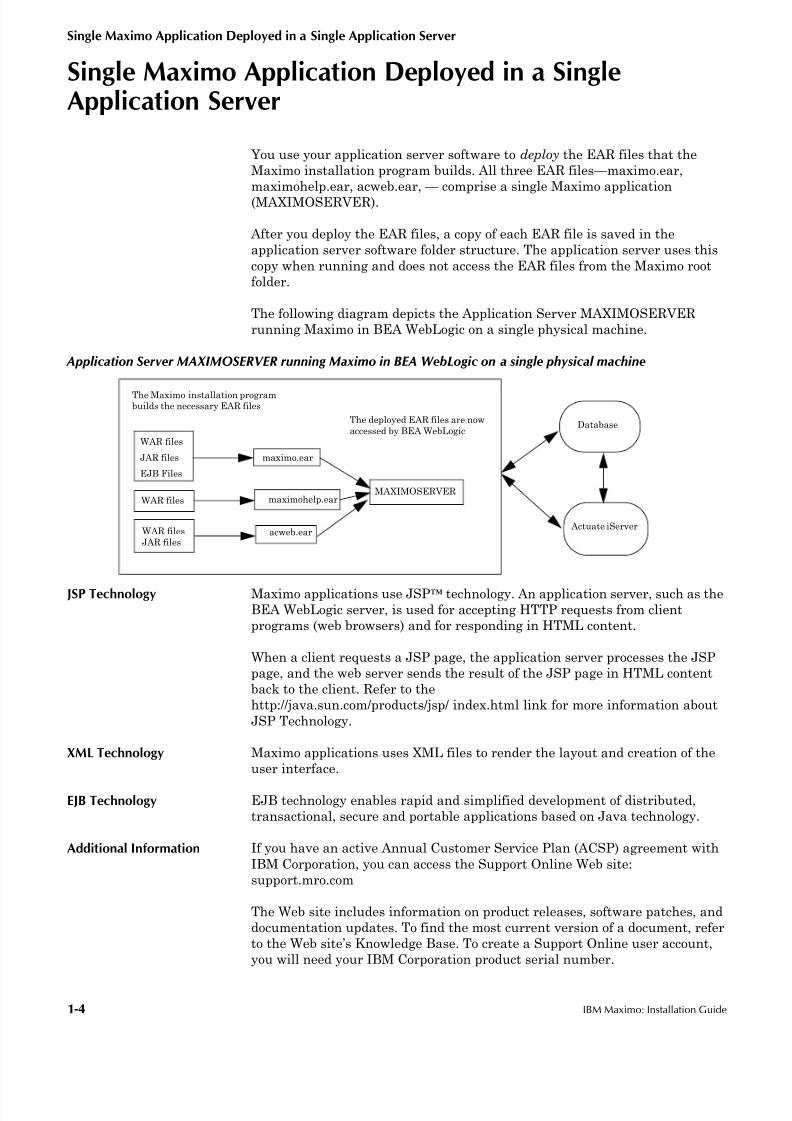
Single Maximo Application Deployed in a SingleApplication Server
You use your application server software to deploy the EAR files that the
Maximo installation program builds. All three EAR files—maximo.ear,
maximohelp.ear, acweb.ear, — comprise a single Maximo application
(MAXIMOSERVER).
After you deploy the EAR files, a copy of each EAR file is saved in the
application server software folder structure. The application server uses this
copy when running and does not access the EAR files from the Maximo root
folder.
The following diagram depicts the Application Server MAXIMOSERVER
running Maximo in BEA WebLogic on a single physical machine.
Application Server MAXIMOSERVER running Maximo in BEA WebLogic on a single physical machine
JSP Technology Maximo applications use JSP™ technology. An application server, such as theBEA WebLogic server, is used for accepting HTTP requests from client
programs (web browsers) and for responding in HTML content.
When a client requests a JSP page, the application server processes the JSP
page, and the web server sends the result of the JSP page in HTML content
back to the client. Refer to the
http://java.sun.com/products/jsp/ index.html link for more information about
JSP Technology.
XML Technology Maximo applications uses XML files to render the layout and creation of the
user interface.
EJB Technology EJB technology enables rapid and simplified development of distributed,
transactional, secure and portable applications based on Java technology.
Additional Information If you have an active Annual Customer Service Plan (ACSP) agreement with
IBM Corporation, you can access the Support Online Web site:
support.mro.com
The Web site includes information on product releases, software patches, and
documentation updates. To find the most current version of a document, refer
to the Web site’s Knowledge Base. To create a Support Online user account,
you will need your IBM Corporation product serial number.
WAR files
JAR files
EJB Files
WAR files
WAR files
JAR files
maximohelp.ear
acweb.ear
maximo.ear
The Maximo installation programbuilds the necessary EAR files
MAXIMOSERVER
The deployed EAR files are now
accessed by BEA WebLogicDatabase
Actuate iServer

8/3/2019 62 Mx Install Bea814 Win
http://slidepdf.com/reader/full/62-mx-install-bea814-win 11/110
Maximo Components
Introducing IBM Maximo 1-5
Maximo Components
The following section describes the server components in a typical Maximo
environment.
Application Server
Maximo is built using J2EE (Java 2 Enterprise Edition) technology, which
requires using a commercial application server. Maximo uses BEA WebLogic
8.1.4 as its application server.
The Application Server consists of Maximo Applications using JavaServer
Pages (JSP), XML, and Maximo application specific business components.
The Maximo Application also installs the Active Portal, which enables you to
use the Web to access reports in your Encyclopedia volume and the
Management Console. This web-based capability further enables you to
deploy and test reports on an Encyclopedia volume. You access reports by
using a Web browser (Internet Explorer) to access the Encyclopedia volume
through Active Portal.
Actuate Server
As part of Maximo, Actuate is offered as the embedded reporting tool.
Actuate’s Information Delivery Solution enables you to create, manage, and
deliver interactive, actionable content.
However, it is your option whether or not to use Actuate as your Maximo
Reporting tool. As you perform the Maximo installation (Chapter 4), if you do
not choose to use Actuate, you simply skip the Actuate references and
continue completing the Maximo installation program.
If you do choose to use Actuate, preferably, install the Actuate iServer on a
separate server on the network. It generates and manages report documents
and provides:
! A server-based system to generate, manage, and deliver interactive,
actionable electronic reports
! Information in multiple formats including DHTML, PDF, XLS
! Open security folder integration to leverage existing e-business platformsecurity service
Database Server
Maximo for BEA WebLogic supports:
! Oracle 9.2.0.6 (9i), or 10.1.0.3 (Standard or Enterprise Edition)
! Microsoft SQL Server 2000 SP3
! Microsoft SQL Server 2005

8/3/2019 62 Mx Install Bea814 Win
http://slidepdf.com/reader/full/62-mx-install-bea814-win 12/110
Typical Maximo Configuration Diagram
1-6 IBM Maximo: Installation Guide
Typical Maximo Configuration Diagram
The following diagram depicts a typical Maximo configuration.
Hardware and Software Considerations
For best performance, adhere to the following configuration:
! Dedicated Application Server! Dedicated Actuate Server
! Dedicated Database Server
The following factors affect server configuration requirements:
! Maximo applications deployed
! Number of connecting client workstations
! Desired performance level
Doug is sending me a diagram
6.0
Maximo end userInternet Explorer 6.0 Browser
Maximo
BEA WebLogic 8.1.4
Administration Workstation
JDBC™ or SQL* Plus®
telnet ftp

8/3/2019 62 Mx Install Bea814 Win
http://slidepdf.com/reader/full/62-mx-install-bea814-win 13/110
Hardware and Software Considerations
Introducing IBM Maximo 1-7
Table 1 lists hardware and software recommendations (server and workstation)
For additional tuning and configuration information, refer to the IBM Maximo
System Administrator’s Guide.
Dedicated Servers Hardware Software
Application
Server: where you
install BEA
WebLogic® Server™
! 2–4 dedicated, Intel® Pentium®
processors
! 2GB RAM per processor
! 1.5GB of disk space
! Microsoft Windows 2000 Server®
! Microsoft Server 2003®
! BEA WebLogic 8.1.4
Database Server: ! Refer to vendor specifications ! 9.2.0.6, or 10.2.0.2 server software
(either Oracle Standard or Enterprise)
! MS SQL Server 2000 SP3
! MS SQL Server 2005
Actuate iServer:
the server you plan to
use for generating
reports
! 1–2 dedicated, Intel Pentium
processor
! 1GB RAM per processor
! 610MB of disk space
! Microsoft Windows 2000 Server
! Microsoft Server 2003
! Actuate 8 iServer
! Database client software:
! Oracle Client Software (Oracle JDBC
drivers, SQL*Plus, Oracle
Networking)
! MS SQL Server 2000/2005 Client
(ODBC)
Administrative
Workstation
where you install
Maximo
Used for application
building, workflow
designer, Application
designer, and other
high-level functions
! Intel Pentium processor
! 512 MB RAM
! SVGA 1024 x 768 resolution; if
used for Application Designer
1280 x 1024 resolution
! Microsoft Windows® 2000/XP
Professional
! Internet Explorer® 6.0
! Maximo
Client Workstation ! Intel Pentium processors
! 512 MB RAM
! SVGA 1024 x 768 resolution
! Microsoft Windows 2000/XP Professional
! Internet Explorer 6.0
8/3/2019 62 Mx Install Bea814 Win
http://slidepdf.com/reader/full/62-mx-install-bea814-win 14/110
Hardware and Software Considerations
1-8 IBM Maximo: Installation Guide
Third-Party Product Updates
IBM Corporation supports Maximo with later product updates as they are
released by third-party vendors. Our policy is to validate products with the
latest third-party product updates at time of release certification. IBM
Corporation has certified the following third-party product updates:
!
Windows 2000 Server/Advanced Server Service Pack 4
! Windows XP Professional Service Pack 2
! Windows 2000 Professional Service Pack 4
! Internet Explorer 6.0: Service Pack 1
! BEA WebLogic 8.1.4
! Oracle 10.2.0.2 (Oracle Standard or Enterprise)
! Oracle 9.2.0.6 (Oracle Standard or Enterprise)
! Microsoft SQL Server 2000: SP3
! Microsoft SQL Server 2005
Java Virtual Machine (JVM)
The Maximo automatic update program used in the product installation,
requires that a Java Virtual Machine (JVM) to be installed and present on
the Maximo server. If no JVM is present, the install appears to start and the
load scroll bar climbs to 100% but the install does not launch. A tested JVM
can be downloaded from http://java.sun.com/products/archive/j2se/1.4.2_07/index.html. Once the JVM is installed, continue with the automatic update
process.

8/3/2019 62 Mx Install Bea814 Win
http://slidepdf.com/reader/full/62-mx-install-bea814-win 15/110
© Copyright IBM Corp. 2006 2-1
This chapter explains how to perform the following tasks:
! Install BEA WebLogic 8.1.4.0
! Configure the Maximo Application Server
! Install the BEA WebLogic License Update program
! Post Installation tasks
Installing BEA WebLogic 8.1.4.0
CAUTION Existing Maximo 6.x customers can overwrite files and data when following
the standard installation procedures. If you are an existing Maximo 6.x
customer, refer to the IBM Maximo 6.2 Release Notes on the Support Online
Web site for your specific installation instructions.
Complete the following steps to install BEA WebLogic 8.1.4.0. For best
performance, install BEA WebLogic Server on a dedicated application server.
1 Insert the BEA WebLogic Application CD-ROM in your CD drive and from
the root CD directory, double click server814_win32.exe .
2 The Preparing the installer dialog box opens, followed by the Welcomedialog box. Click Next.
Installing BEA WebLogic
2

8/3/2019 62 Mx Install Bea814 Win
http://slidepdf.com/reader/full/62-mx-install-bea814-win 16/110
Installing BEA WebLogic 8.1.4.0
2-2 IBM Maximo: Installation Guide
3 Select Yes and click Next.
4 Select Create a new BEA Home option and accept the default BEA
Home Directory (c:\bea). Click Next
8/3/2019 62 Mx Install Bea814 Win
http://slidepdf.com/reader/full/62-mx-install-bea814-win 17/110
Installing BEA WebLogic 8.1.4.0
Installing BEA WebLogic 2-3
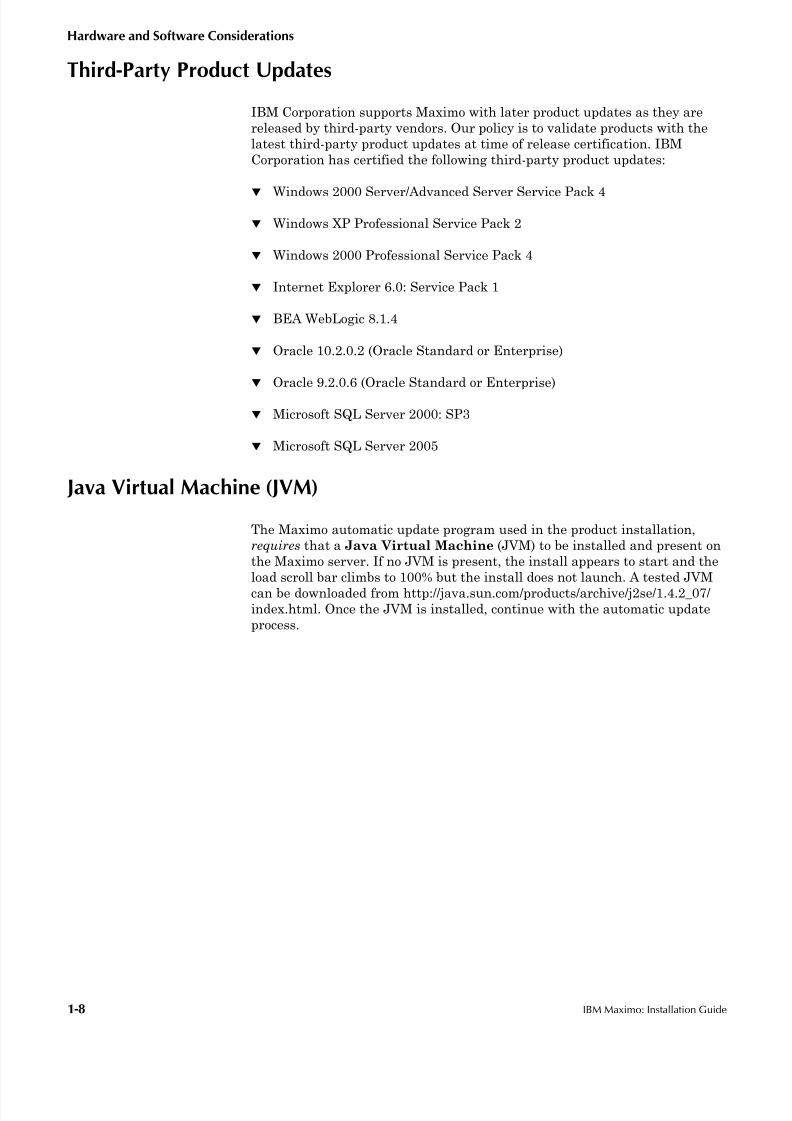
5 Select Custom, as the Install Type and click Next.
6 Select only WebLogic Server (includes Server and Server examples) and
deselect WebLogic Workshop. Click Next.

8/3/2019 62 Mx Install Bea814 Win
http://slidepdf.com/reader/full/62-mx-install-bea814-win 18/110
Installing BEA WebLogic 8.1.4.0
2-4 IBM Maximo: Installation Guide
7 Accept the default (c:\bea\weblogic81) installation location and click
Next.
8 Select No to install the Node Manager as a Service and click Next.
<user_id>

8/3/2019 62 Mx Install Bea814 Win
http://slidepdf.com/reader/full/62-mx-install-bea814-win 19/110
Installing BEA WebLogic 8.1.4.0
Installing BEA WebLogic 2-5
Allow the installation progress bar to complete.
9 Check the Run Quickstart check-box. Click Done.
In a few seconds the QuickStart window opens. Continue with the next section
to configure the Maximo Application Server.

8/3/2019 62 Mx Install Bea814 Win
http://slidepdf.com/reader/full/62-mx-install-bea814-win 20/110
Configuring the Maximo Application Server
2-6 IBM Maximo: Installation Guide
Configuring the Maximo Application Server
You can also invoke the Configuration Wizard from the Windows Start menu:
Start > All Programs > BEA WebLogic Platform 8.1 > Configuration Wizard.
Complete the following steps.
1 Click the Create a new domain configuration link.

8/3/2019 62 Mx Install Bea814 Win
http://slidepdf.com/reader/full/62-mx-install-bea814-win 21/110
Configuring the Maximo Application Server
Installing BEA WebLogic 2-7
2 Select Create a new WebLogic configuration and click Next.
3 From the Configuration Template window, select only Basic WebLogic
Server Domain and click Next.

8/3/2019 62 Mx Install Bea814 Win
http://slidepdf.com/reader/full/62-mx-install-bea814-win 22/110
Configuring the Maximo Application Server
2-8 IBM Maximo: Installation Guide
4 Select Custom and click Next.
5 Type MAXIMOSERVER in the Name field and accept all other default
values and click Next.
By default, the Listen Port number is 7001. You can specify a different
port number or accept the default value.
Record this port number on page 4-1. You will need it during Maximo
installation.
8/3/2019 62 Mx Install Bea814 Win
http://slidepdf.com/reader/full/62-mx-install-bea814-win 23/110
Configuring the Maximo Application Server
Installing BEA WebLogic 2-9
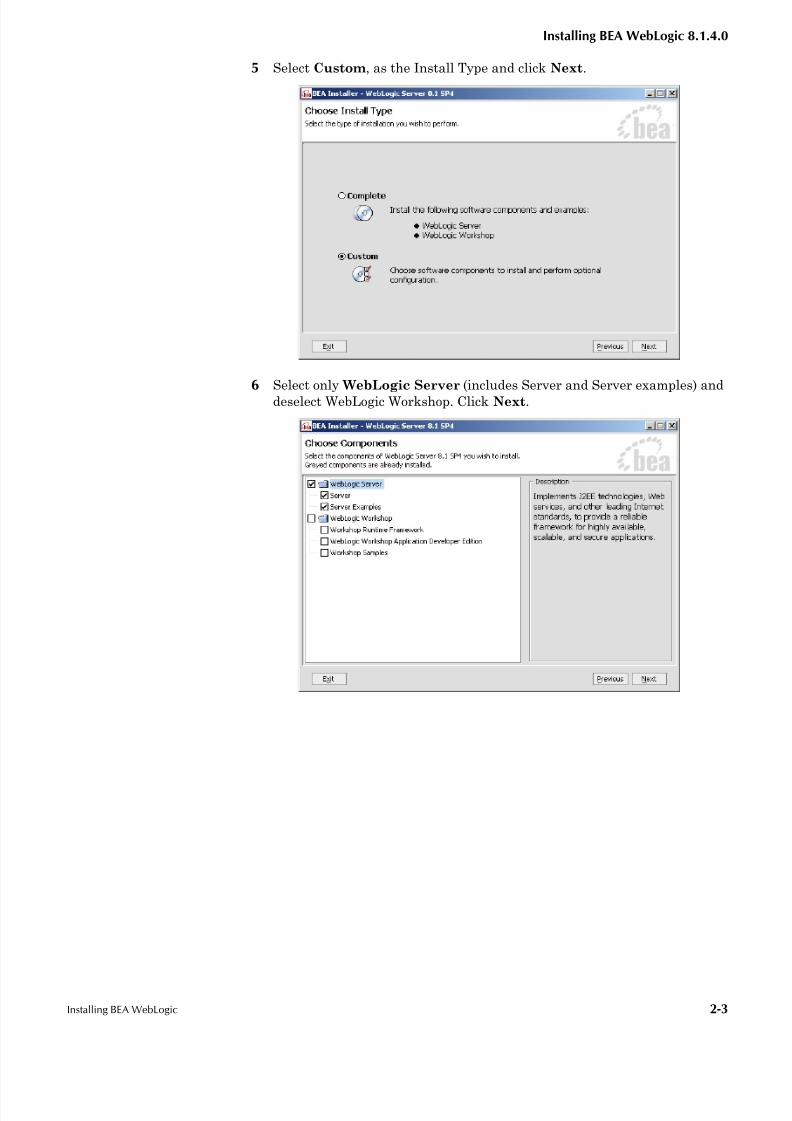
6 Select No in the Managed Servers dialog box and click Next.
Refer to the IBM Maximo System Administrator’s Guide if you want to
distribute your WebLogic configuration across managed servers.
7 Select No in the Database (JDBC) Options dialog box and click Next.

8/3/2019 62 Mx Install Bea814 Win
http://slidepdf.com/reader/full/62-mx-install-bea814-win 24/110
Configuring the Maximo Application Server
2-10 IBM Maximo: Installation Guide
8 Consider the following options before continuing with this step:
If you have received the MEA Product Enabler and plan to implement the
MEA, you need to define the required Java Message Service (JMS)
Options at this time. Select Yes, click Next, and continue with
“Configuring JMS Options for MEA”, on page B-1. Details on the MEA can
be found within the IBM Maximo Enterprise Adapter System
Administrator's Guide.
However, If you have not received the MEA Product Enabler or are not
planning to implement the MEA, select No and click Next to continue
with the next step.
If you are using the MEA option,
select Yes and continue with
Appendix B.
If you are not planning on using
the MEA option, select NO
and continue with the next step.
8/3/2019 62 Mx Install Bea814 Win
http://slidepdf.com/reader/full/62-mx-install-bea814-win 25/110
Configuring the Maximo Application Server
Installing BEA WebLogic 2-11
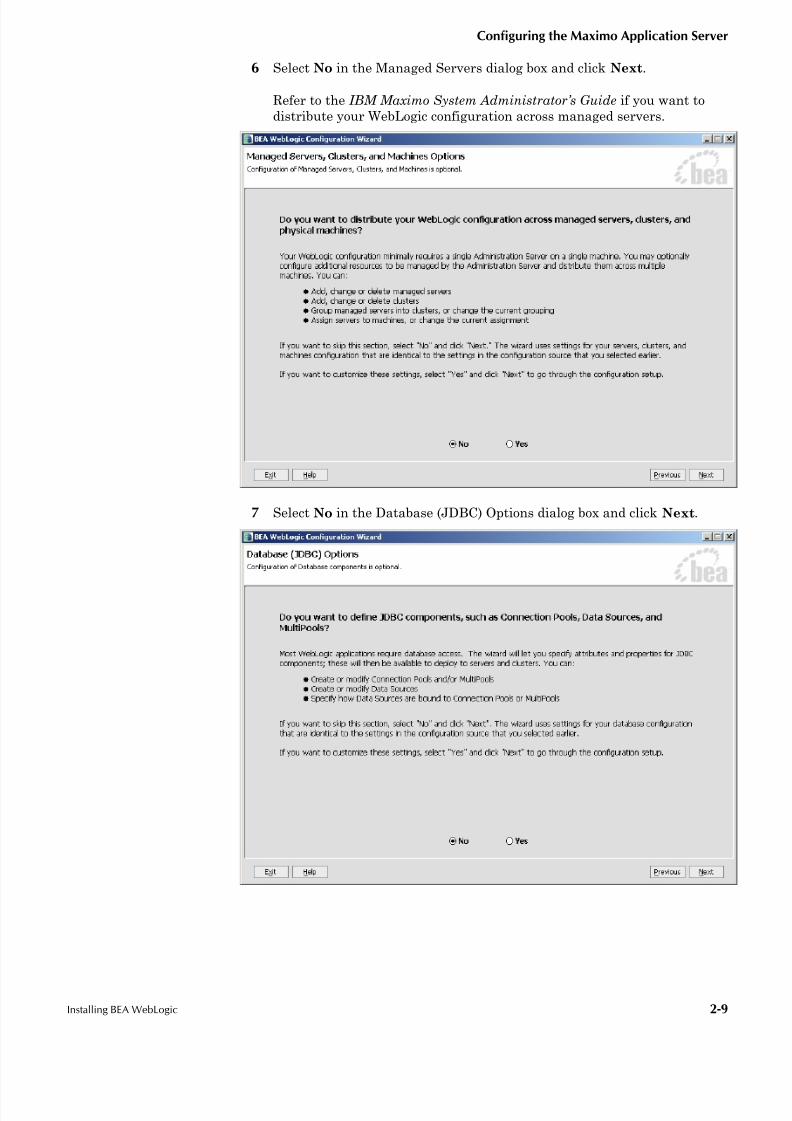
9 Specify a username and a password. The username and password must be
8 characters long. Click Next.
10 Select Yes to create a Start Menu, and No to install the server
(MAXIMOSERVER) as a Windows Service. Click Next.
See Appendix A about creating and running MAXIMOSERVER as a
Windows Service.
12345678

8/3/2019 62 Mx Install Bea814 Win
http://slidepdf.com/reader/full/62-mx-install-bea814-win 26/110
Configuring the Maximo Application Server
2-12 IBM Maximo: Installation Guide
11 Accept the default values that appear in the Build Start Menu Entries and
click Next.
12 Select Production Mode and the Sun SDK 1.4.2_05 and click Next.
Start Server

8/3/2019 62 Mx Install Bea814 Win
http://slidepdf.com/reader/full/62-mx-install-bea814-win 27/110
Configuring the Maximo Application Server
Installing BEA WebLogic 2-13
13 Select MAXIMOSERVER as your template and click Create.
You can specify a different configuration name instead of the default
mydomain. However, this name cannot be the same as the Application
Server name (MAXIMOSERVER).
14 Once the program has completed configuring MAXIMOSERVER, click
Done. Do not check the Start Admin Server check-box at this time.
15 Close the QuickStart window.

8/3/2019 62 Mx Install Bea814 Win
http://slidepdf.com/reader/full/62-mx-install-bea814-win 28/110
Installing the License Update Program
2-14 IBM Maximo: Installation Guide
Congratulations, you have installed and configured your Maximo Application
Server. Continue with the next section to install the BEA WebLogic License
Update program.
Installing the License Update Program
This program creates a valid license file so you can run Maximo with BEA
WebLogic 8.1.4.0. To do so, complete the following steps:
1 From the BEA WebLogic 8.1.4.0 CD root directory, double click
BEA814LicUpd56.exe.
2 Click Next in the Introduction dialog box.

8/3/2019 62 Mx Install Bea814 Win
http://slidepdf.com/reader/full/62-mx-install-bea814-win 29/110
Installing the License Update Program
Installing BEA WebLogic 2-15
3 Accept the default WebLogic installation folder (c:\bea) and click Next.
4 Click Install in the Pre-Installation summary dialog box.
8/3/2019 62 Mx Install Bea814 Win
http://slidepdf.com/reader/full/62-mx-install-bea814-win 30/110
Installing the License Update Program
2-16 IBM Maximo: Installation Guide
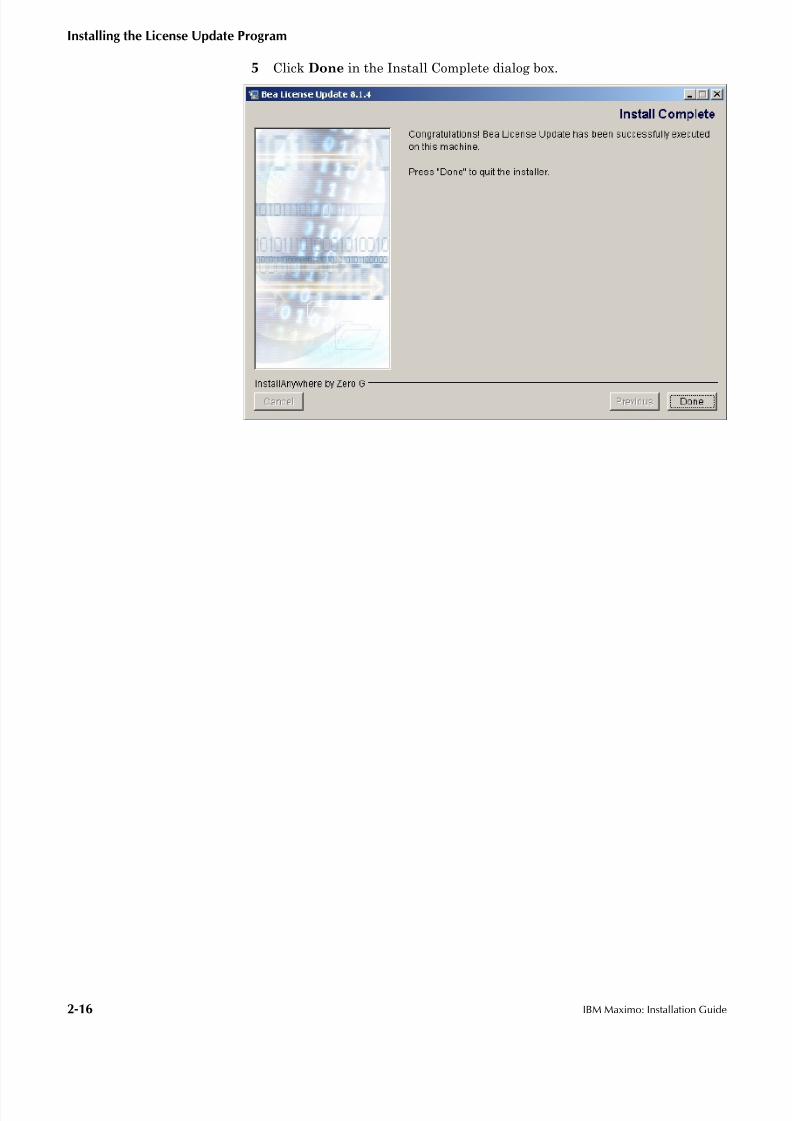
5 Click Done in the Install Complete dialog box.

8/3/2019 62 Mx Install Bea814 Win
http://slidepdf.com/reader/full/62-mx-install-bea814-win 31/110
Post Installation tasks
Installing BEA WebLogic 2-17
Post Installation tasks
Complete the following tasks:
! Edit the commEnv.cmd file (Oracle Only)
! Increase the Java heap parameters.
! Verify settings by running startWeblogic.cmd.
! Include user name and password to start the MAXIMOSERVER
automatically.
Edit the commEnv File (Oracle Only)
You must use the Oracle thin drivers from the Maximo installation to connect
to Oracle 9i and 10g databases. In this section, you edit the commEnv.cmd file
in the /bea folder, where you installed BEA WebLogic. later, in “Post
Installation Tasks”, on page 4-5., after installing Maximo, you will copy the
oraclethin.jar file from the \lib folder in Maximo to the \lib folder in BEA.
Complete the following steps:
1 Using Windows Explorer navigate to:
<drive_letter>:\<bea_installation _location>\weblogic81\common\bin
For example: C:\bea\weblogic81\common\bin
2 Right-click and edit (do not double-click) the commEnv.cmd file as
follows:
3 Using your text editor, search for classpath=%java_home%
4 Type the following after the equal (=) sign:
%WL_HOME%\server\lib\oraclethin.jar;
8/3/2019 62 Mx Install Bea814 Win
http://slidepdf.com/reader/full/62-mx-install-bea814-win 32/110
Post Installation tasks
2-18 IBM Maximo: Installation Guide
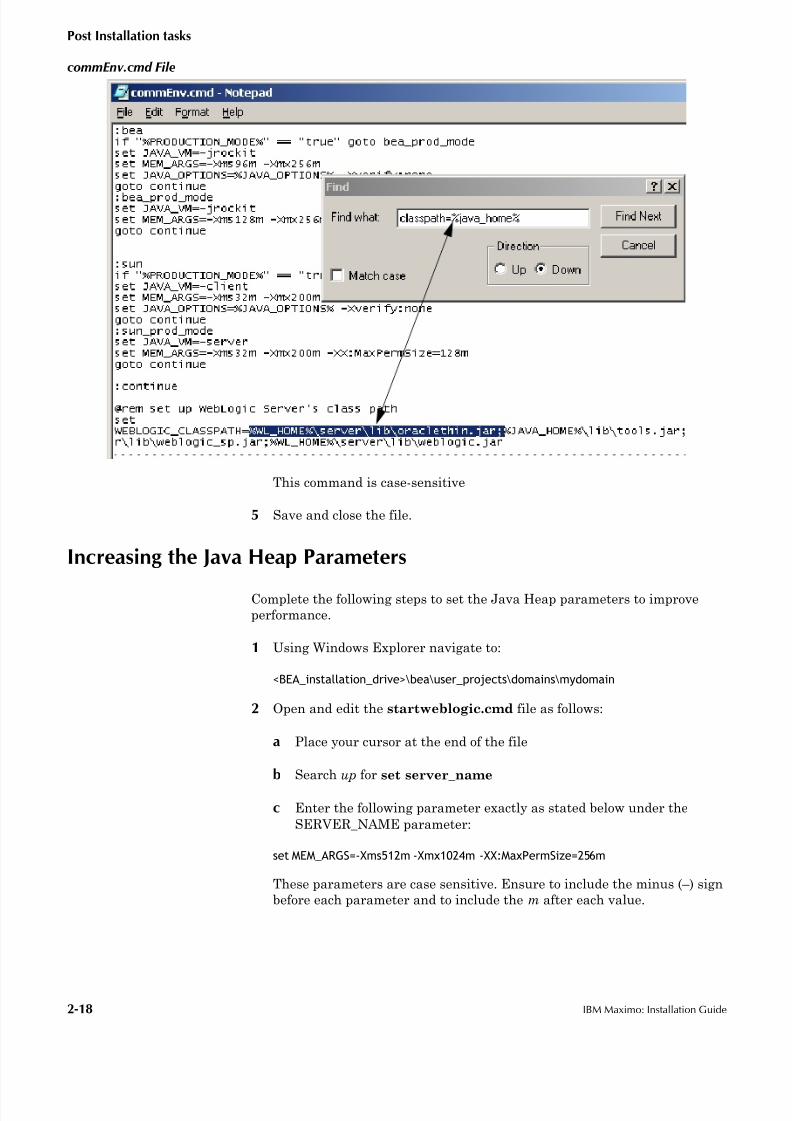
commEnv.cmd File
This command is case-sensitive
5 Save and close the file.
Increasing the Java Heap Parameters
Complete the following steps to set the Java Heap parameters to improve
performance.
1 Using Windows Explorer navigate to:
<BEA_installation_drive>\bea\user_projects\domains\mydomain
2 Open and edit the startweblogic.cmd file as follows:
a Place your cursor at the end of the file
b Search up for set server_name
c Enter the following parameter exactly as stated below under the
SERVER_NAME parameter:
set MEM_ARGS=-Xms512m -Xmx1024m -XX:MaxPermSize=256m
These parameters are case sensitive. Ensure to include the minus (–) sign
before each parameter and to include the m after each value.

8/3/2019 62 Mx Install Bea814 Win
http://slidepdf.com/reader/full/62-mx-install-bea814-win 33/110
Post Installation tasks
Installing BEA WebLogic 2-19
startWeblogic.cmd File
3 Save and close the file.
Verify Settings by Running startWebLogic.cmd
To ensure that the edits that you made to the above mentioned WebLogic files
were accurate, complete the following steps:
1 From a command prompt, change directory path to:
<BEA_installation_drive>\bea\user_projects\domains\mydomain
2 Type startWebLogic.cmd and press Enter.
3 When prompted, type the username and password that you specified in
Step 9 on page 2-11.
Once the phrase:
"<server started in RUNNING Mode>"
displays, the WebLogic Server is running.
Type this parameter exactly256m as it appears

8/3/2019 62 Mx Install Bea814 Win
http://slidepdf.com/reader/full/62-mx-install-bea814-win 34/110
Post Installation tasks
2-20 IBM Maximo: Installation Guide
Starting the Server Without Being Prompted for Username andPassword
If you are working in Production mode and do not want to be prompted for the
WebLogic user name and password, create a boot.properties file. This will
store the username and password in an encrypted format.
Place the following two lines in a text file:
username=<specify an existing username>
password=<specify an existing password>
The username and password values must match an existing user account in
the Authentication provider for the default security realm, and must belong to
a role that has permission to start and stop a server.
These are the same values that you specified in Step 9 on page 2-11.
If you save the file as boot.properties and locate it in the mydomain folder(for example: c:\bea\user_projects\domains\mydomain), the server
automatically uses this file during its subsequent startup cycles.
The first time you use this file to start a server, the server reads the file and
then overwrites it with an encrypted version of the username and password.
For more information, refer to BEA's document web site at:
http://e-docs.bea.com/wls/docs81/ConsoleHelp/
startstop.html#BootIdentityFiles
8/3/2019 62 Mx Install Bea814 Win
http://slidepdf.com/reader/full/62-mx-install-bea814-win 35/110
© Copyright IBM Corp. 2006 3-1
If you are using Actuate for reporting in Maximo, this chapter explains how toinstall the Actuate 8 iServer application. If you are not going to use Actuate,skip to Chapter 4.
Pre-Installation Procedures
The following sections describe the pre-installation procedures.
Oracle Connectivity
You must install the following Oracle Client Software on your Actuate Server
before installing Actuate:
! Oracle JDBC Drivers
! SQL*Plus
! Oracle Networking (in Oracle 9i or 10g)
You must setup and test Oracle Networking connectivity to the Maximo
database.
You must also create a TNS name for your Maximo connect string as you will
need this information in Step 10 on page 4-2.
Please review Oracle installation documentation for further details. Oracle
documentation is available online at http://otn.oracle.com/documentation/
content.html.
MS SQL Server Connectivity
If your Actuate application connects to Microsoft SQL Server, you must install
Microsoft SQL Server client software before installing Actuate.
You must also create a DSN name for your Maximo connect string as you will
need this information in Step 10 on page 4-2.
Install the following products:
! Microsoft SQL Server ODBC Drivers
! SQL Server Client Network Utility.
Installing The Actuate
Application 3

8/3/2019 62 Mx Install Bea814 Win
http://slidepdf.com/reader/full/62-mx-install-bea814-win 36/110
Installing Actuate8 iServer
3-2 IBM Maximo: Installation Guide
Installing Actuate8 iServer
This section describes how to install Actuate 8 iServer. For best performance,
install Actuate iServer on a dedicated server.
1 Log in to Windows as a user with Administrative rights.
2 Insert the Actuate 8 iServer for Windows CD-ROM into the CD drive.
From the \iserver folder on your CD double-click the setup.exe.
3 Click Next in the Welcome dialog box.
4 Accept the terms of the License Agreement and click Next.

8/3/2019 62 Mx Install Bea814 Win
http://slidepdf.com/reader/full/62-mx-install-bea814-win 37/110
Installing Actuate8 iServer
Installing The Actuate Application 3-3
5 Select Custom and read the following warning before clicking Next.
WARNING Default value for the Destination Folder is \Program
Files\Actuate8\iserver; however, you must ensure that the Destination
Folder path does not have any spaces in the path name. For example
c:\Actuate8\iserver. Click Browse to select the new path.
6 Select all components except Sample Volume and click Next.

8/3/2019 62 Mx Install Bea814 Win
http://slidepdf.com/reader/full/62-mx-install-bea814-win 38/110
Installing Actuate8 iServer
3-4 IBM Maximo: Installation Guide
7 Select Stand-alone and click Next.
8 Click the browse button and navigate to the location of the xml file, in this
example: Actuate_key_18802.xml . This file resides under the root CD
folder on your Actuate Release 8 iServer for Windows CD-ROM. Click
Next.
d:\Actuate_key_18802.xml

8/3/2019 62 Mx Install Bea814 Win
http://slidepdf.com/reader/full/62-mx-install-bea814-win 39/110
Installing Actuate8 iServer
Installing The Actuate Application 3-5
9 Accept the default values that appear in your Locale Information dialog
box and click Next.
10 Enter a user that is in the Administrator Group and ensure that both
check-boxes in the Services Profile frame are checked. Click Next.
11 Enter the following values in the Server Configuration dialog box.
PMD Configuration. The Process Management Daemon enables you to
perform Administrative tasks within iServer, but does not connect to the
Maximo Encyclopedia Volume.
a The host name or the IP address of the machine where you are
installing Actuate iServer.
<actuate_user>

8/3/2019 62 Mx Install Bea814 Win
http://slidepdf.com/reader/full/62-mx-install-bea814-win 40/110
Installing Actuate8 iServer
3-6 IBM Maximo: Installation Guide
b Accept the default port number 8100.
c iServer Configuration. The iServer Configuration enables you to
connect to the Maximo Encyclopedia Volume.
d The host name or the IP address of the machine where you are
installing Actuate iServer (same as above).
e Accept the default port number 8000.
f Click Next.
12 Specify a password for your Actuate administrator and click Next.
8/3/2019 62 Mx Install Bea814 Win
http://slidepdf.com/reader/full/62-mx-install-bea814-win 41/110

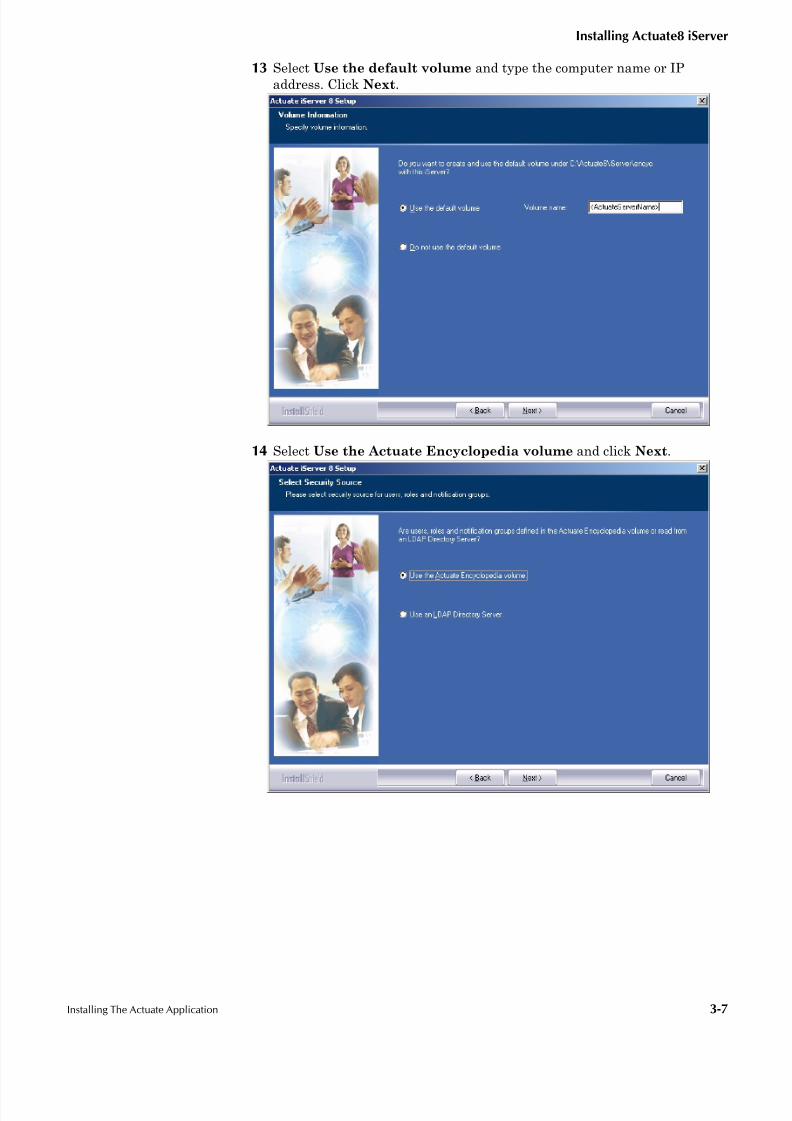
8/3/2019 62 Mx Install Bea814 Win
http://slidepdf.com/reader/full/62-mx-install-bea814-win 42/110
Installing Actuate8 iServer
3-8 IBM Maximo: Installation Guide
15 Enter the computer name where requested and accept the default port
numbers. Click Next.
16 Accept the default HTTP port number (8900), or specify another port
number and click Next.
You open the Actuate Administrative console via a browser, using this
port number. For example: http://<actuate_computer>:8900/acadmin.
<host name>
8/3/2019 62 Mx Install Bea814 Win
http://slidepdf.com/reader/full/62-mx-install-bea814-win 43/110
Installing Actuate8 iServer
Installing The Actuate Application 3-9
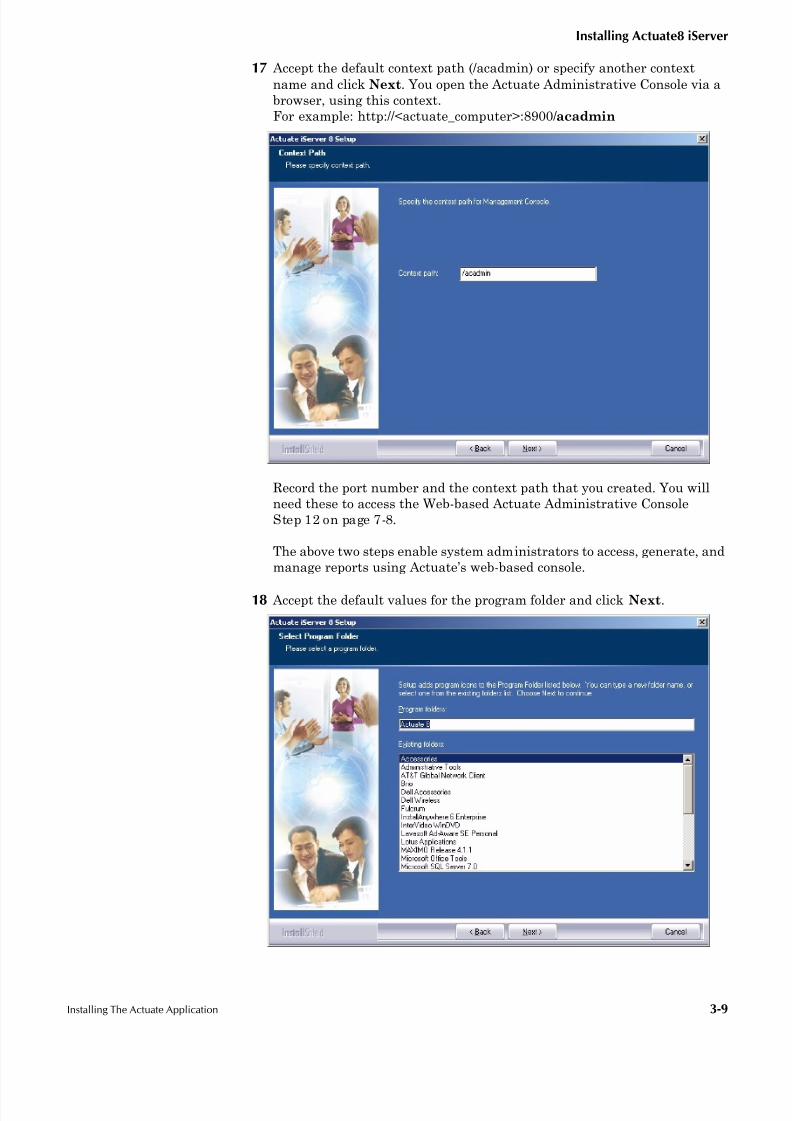
17 Accept the default context path (/acadmin) or specify another context
name and click Next. You open the Actuate Administrative Console via a
browser, using this context.
For example: http://<actuate_computer>:8900/acadmin
Record the port number and the context path that you created. You will
need these to access the Web-based Actuate Administrative Console
Step 12 on page 7-8.
The above two steps enable system administrators to access, generate, and
manage reports using Actuate’s web-based console.
18 Accept the default values for the program folder and click Next.

8/3/2019 62 Mx Install Bea814 Win
http://slidepdf.com/reader/full/62-mx-install-bea814-win 44/110
Installing Actuate8 iServer
3-10 IBM Maximo: Installation Guide
19 Click Next in the Summary dialog box.
20 Allow for the installation program to copy all the files.
21 Close the setup.txt file.
8/3/2019 62 Mx Install Bea814 Win
http://slidepdf.com/reader/full/62-mx-install-bea814-win 45/110
Installing Actuate8 iServer
Installing The Actuate Application 3-11
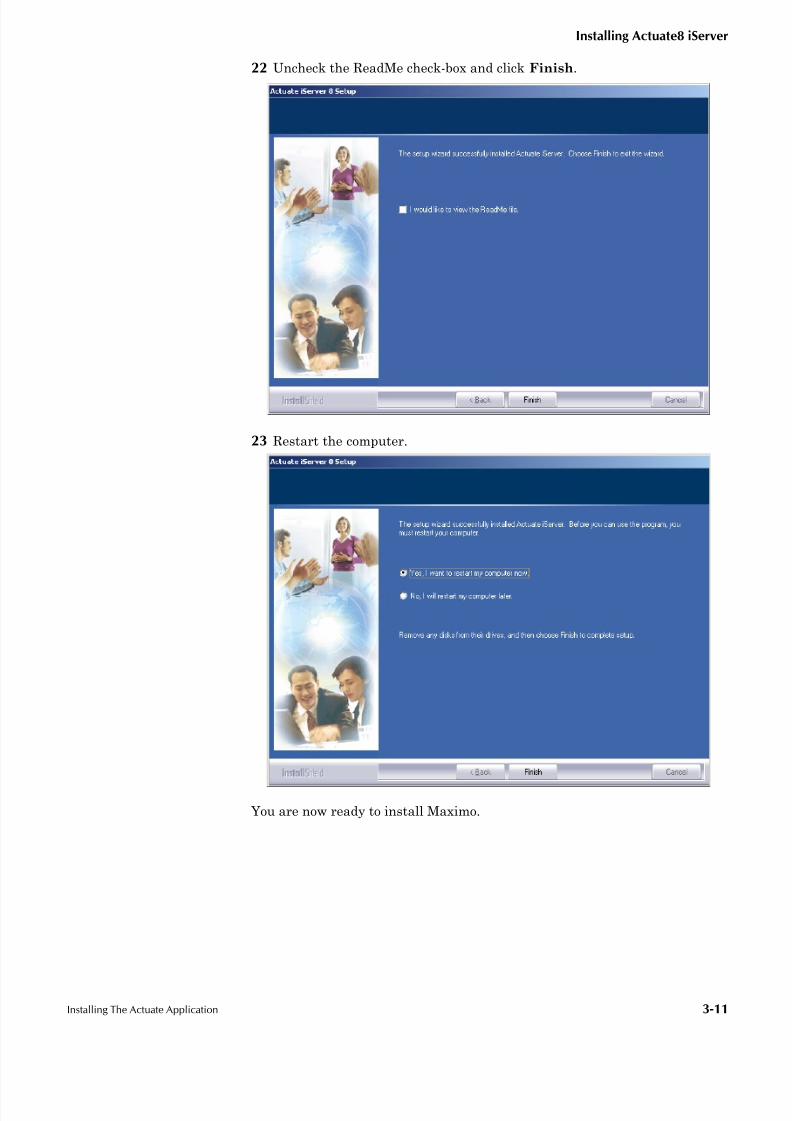
22 Uncheck the ReadMe check-box and click Finish.
23 Restart the computer.
You are now ready to install Maximo.

8/3/2019 62 Mx Install Bea814 Win
http://slidepdf.com/reader/full/62-mx-install-bea814-win 46/110
Installing Actuate8 iServer
3-12 IBM Maximo: Installation Guide
8/3/2019 62 Mx Install Bea814 Win
http://slidepdf.com/reader/full/62-mx-install-bea814-win 47/110
© Copyright IBM Corp. 2006 4-1
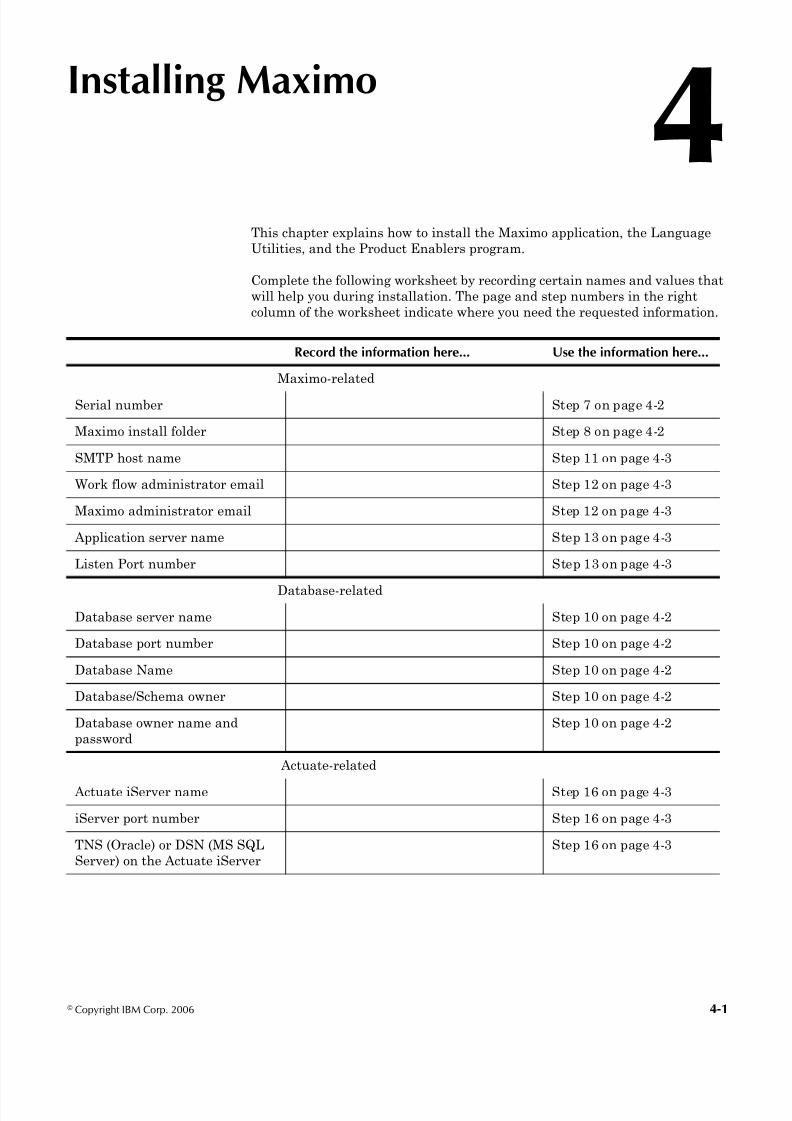
This chapter explains how to install the Maximo application, the Language
Utilities, and the Product Enablers program.
Complete the following worksheet by recording certain names and values that
will help you during installation. The page and step numbers in the right
column of the worksheet indicate where you need the requested information.
Installing Maximo
4
Record the information here... Use the information here...
Maximo-related
Serial number Step 7 on page 4-2
Maximo install folder Step 8 on page 4-2
SMTP host name Step 11 on page 4-3
Work flow administrator email Step 12 on page 4-3
Maximo administrator email Step 12 on page 4-3
Application server name Step 13 on page 4-3
Listen Port number Step 13 on page 4-3
Database-related
Database server name Step 10 on page 4-2
Database port number Step 10 on page 4-2
Database Name Step 10 on page 4-2
Database/Schema owner Step 10 on page 4-2
Database owner name and
password
Step 10 on page 4-2
Actuate-related
Actuate iServer name Step 16 on page 4-3
iServer port number Step 16 on page 4-3
TNS (Oracle) or DSN (MS SQL
Server) on the Actuate iServer
Step 16 on page 4-3

8/3/2019 62 Mx Install Bea814 Win
http://slidepdf.com/reader/full/62-mx-install-bea814-win 48/110
Starting the Maximo Installation Program
4-2 IBM Maximo: Installation Guide
Starting the Maximo Installation Program
You install Maximo onto a Windows workstation designated as the Maximo
Administration Workstation. This is where the Enterprise Archive (EAR) files
are built and subsequently deployed to the application server.
You use the Administration Workstation to install program patches, product
upgrades, or just running Configure Database and similar utilities in which
case you must stop the application server from running.
To install the Maximo Application, complete the following steps:
1 Log in to Windows as Administrator or as a user with administrative
rights.
2 Insert the Maximo installation CD-ROM into the CD drive.
3 From the root CD drive, double-click maximo62.exe.
4 Select the desired language from the drop-down list. Selecting a language
only changes the installation screens into that language but does not affect
the underlying files that get installed.
! If your language is not available from the list, select English, and click
OK.
! If it is Japanese or Chinese you must have those fonts installed on your
system.
! For any selected language other than English, that you are installing
on a SQL Server database, you must perform certain post-installation
tasks as decdribed in Chapter 9. This procedure does not apply if you
are using Oracle database.
5 Click Next in the Welcome dialog box.
6 Select the appropriate application server, in this case, BEA WebLogic.
7 Enter the serial number included in your Maximo license agreement and
click Next.
8 Enter the name of the folder where the installation program will install
Maximo. The default value is C:\Maximo. Click Next.
9 Select the appropriate database and click Next.
10 Depending on your database type, enter the following database-related
information, and click Next.
Oracle SQL Server
Database server name Enter the Oracle host name Enter the SQL Server host name
Port number 1521 (Default) 1433 (default)
Database name Enter the Oracle system identifier Enter the SQL Server database name

8/3/2019 62 Mx Install Bea814 Win
http://slidepdf.com/reader/full/62-mx-install-bea814-win 49/110
Starting the Maximo Installation Program
Installing Maximo 4-3
11 Enter the host name of the machine running the SMTP server. Click
Next.
You must enter this in order to run reports. Contact your Network
Administrator if you don’t know the host name of the machine running the
SMTP server.
12 Enter the following e-mail notification information.
a If you are using Workflow, enter the e-mail address of the Workflow
Administrator, otherwise, leave it blank.
b Enter the e-mail address of the Maximo administrator.
c Click Next.
13 Enter the host name or IP address and the port number of the machine
where your BEA WebLogic Server is installed. Click Next.
Use the port number that you specified in Step 5 on page 2-8 (default
7001).
14 If you have purchased the MEA Product Enabler, then check the Enable
Maximo Enterprise Adapter check-box, otherwise accept default
(unchecked) and click Next.
15 Accept the default Maximo Server name (MXServer) and click Next.
16 If you are using Actuate as your Reporting tool in Maximo, specify the
following information; otherwise, click Next through the following three
steps and complete installing the product.
a iServer Name: enter the Actuate iServer IP address or server name.
b iServer Port Number: accept default, 8000.
c Enter the database name.
d Click Next.
17 Enter the host name of the Actuate iServer. Click Next.
18 Accept the default value that appears in the Actuate Encyclopedia root
name text box (rpt) and click Next.
19 Click Install in the Pre-Installation Summary dialog box.
Database owner Maximo (default) Maximo (default)
Database owner’spassword
Maximo (default) Maximo (default)
Oracle SQL Server

8/3/2019 62 Mx Install Bea814 Win
http://slidepdf.com/reader/full/62-mx-install-bea814-win 50/110
Starting the Maximo Installation Program
4-4 IBM Maximo: Installation Guide
20 Once the installation is complete, click Next in the Install Complete dialog
box.
CAUTION Ensure that you have installed the required JVM as stated in Chapter 1.
21 Check the Update check-box and click Next.
NOTE Since the release of the Maximo 6 product media, product upgrades are
available. These product upgrades contain both code enhancements andsupport for additional platforms.
Ensure that you allow the update process to complete.
a Click Next in the Welcome dialog box.
Allow for the updates to complete.
b Click Next in the Update Available dialog box.
c Click Next in the Updater Retrieved dialog box.
d Check Create a Support Online Account and click Done.
e From the Support Online page, click Sign up and follow the online
instructions
22 Choose the Maximo installation location (default c:\MAXIMO) and click
Install.
23 Click Done.
24 Remove the CD-ROM from its drive.
8/3/2019 62 Mx Install Bea814 Win
http://slidepdf.com/reader/full/62-mx-install-bea814-win 51/110
Starting the Maximo Installation Program
Installing Maximo 4-5
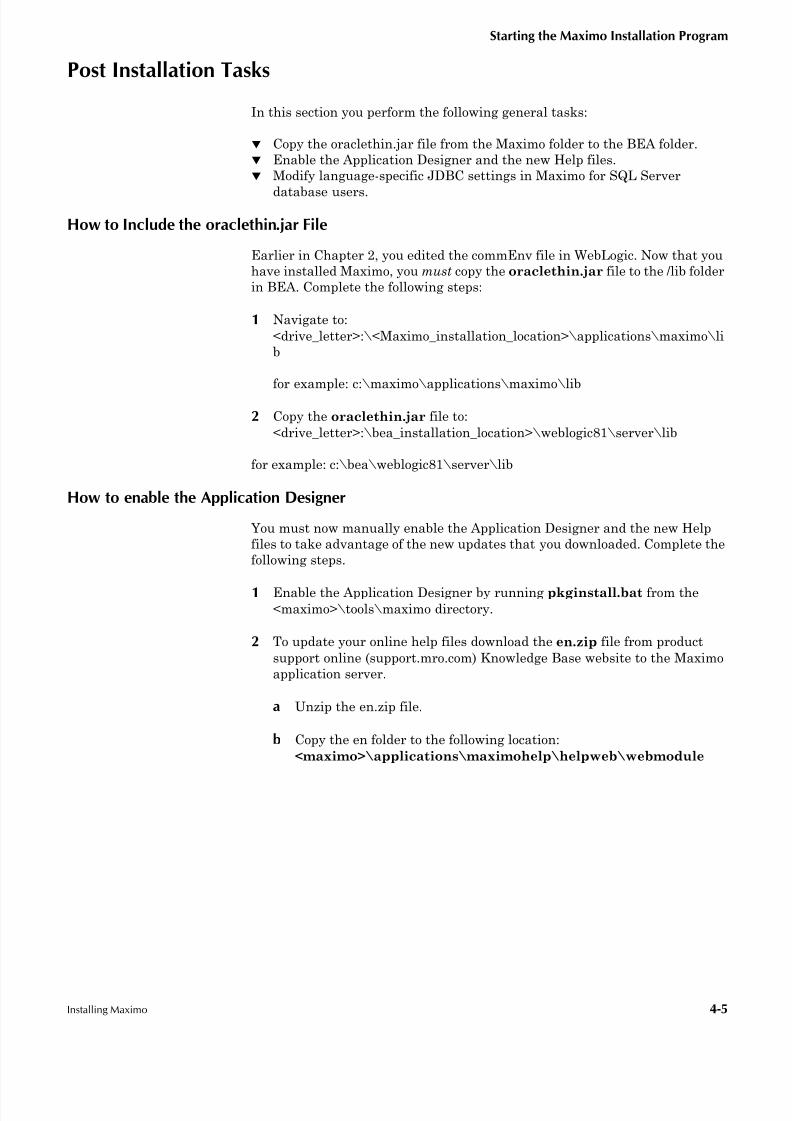
Post Installation Tasks
In this section you perform the following general tasks:
! Copy the oraclethin.jar file from the Maximo folder to the BEA folder.
! Enable the Application Designer and the new Help files.
! Modify language-specific JDBC settings in Maximo for SQL Server
database users.
How to Include the oraclethin.jar File
Earlier in Chapter 2, you edited the commEnv file in WebLogic. Now that you
have installed Maximo, you must copy the oraclethin.jar file to the /lib folder
in BEA. Complete the following steps:
1 Navigate to:
<drive_letter>:\<Maximo_installation_location>\applications\maximo\li
b
for example: c:\maximo\applications\maximo\lib
2 Copy the oraclethin.jar file to:
<drive_letter>:\bea_installation_location>\weblogic81\server\lib
for example: c:\bea\weblogic81\server\lib
How to enable the Application Designer
You must now manually enable the Application Designer and the new Help
files to take advantage of the new updates that you downloaded. Complete the
following steps.
1 Enable the Application Designer by running pkginstall.bat from the<maximo>\tools\maximo directory.
2 To update your online help files download the en.zip file from product
support online (support.mro.com) Knowledge Base website to the Maximo
application server.
a Unzip the en.zip file.
b Copy the en folder to the following location:
<maximo>\applications\maximohelp\helpweb\webmodule
8/3/2019 62 Mx Install Bea814 Win
http://slidepdf.com/reader/full/62-mx-install-bea814-win 52/110
Starting the Maximo Installation Program
4-6 IBM Maximo: Installation Guide
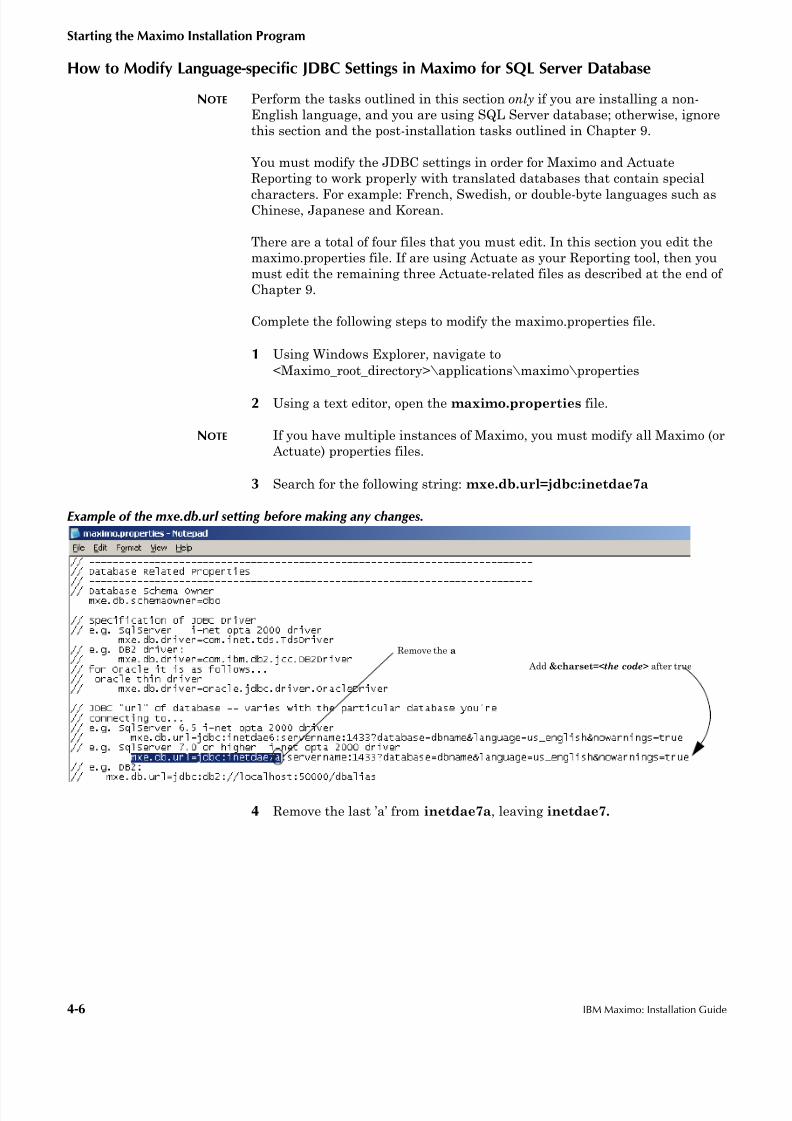
How to Modify Language-specific JDBC Settings in Maximo for SQL Server Database
NOTE Perform the tasks outlined in this section only if you are installing a non-
English language, and you are using SQL Server database; otherwise, ignore
this section and the post-installation tasks outlined in Chapter 9.
You must modify the JDBC settings in order for Maximo and Actuate
Reporting to work properly with translated databases that contain special
characters. For example: French, Swedish, or double-byte languages such asChinese, Japanese and Korean.
There are a total of four files that you must edit. In this section you edit the
maximo.properties file. If are using Actuate as your Reporting tool, then you
must edit the remaining three Actuate-related files as described at the end of
Chapter 9.
Complete the following steps to modify the maximo.properties file.
1 Using Windows Explorer, navigate to
<Maximo_root_directory>\applications\maximo\properties
2 Using a text editor, open the maximo.properties file.
NOTE If you have multiple instances of Maximo, you must modify all Maximo (or
Actuate) properties files.
3 Search for the following string: mxe.db.url=jdbc:inetdae7a
Example of the mxe.db.url setting before making any changes.
4 Remove the last ’a’ from inetdae7a, leaving inetdae7.
Remove the a
Add &charset=<the code> after true

8/3/2019 62 Mx Install Bea814 Win
http://slidepdf.com/reader/full/62-mx-install-bea814-win 53/110
Starting the Maximo Installation Program
Installing Maximo 4-7
5 Add &charset=<charset code> immediately after the
nowarnings=true.
<charset code> is the character set code and depends on the language
that you are using.
Use the following character set codes in the JDBC setting for the primary
languages supported in Maximo:
! Chinese (Simplified) : GBK
! Dutch : 8859_1
! French : 8859_1
! German : 8859_1
! Italian : 8859_1
! Japanese : Shift_JIS
! Korean : euc-kr
! Portuguese : 8859_1
! Spanish : 8859_1
! Swedish : 8859_1
For example if you have a Japanese database, type Shift_JIS for thecharacter set.
6 Save and close the file.
Example of the mxe.db.url setting after making the changes.
Generally, modifying the maximo.properites file (or any *.properties files)
requires that you rebuild and re-deploy the EAR files.
In this case, you do not need to rebuild and redeploy the maximo.ear file. TheProduct Enablers program builds all the necessary EAR files for you and so
the changes that you made to the maximo.properties page in this section is
incorporated in the resulting EAR files. Later in this guide, you are instructed
on how to deploy the EAR files.
However, you must manually rebuild and re-deploy the acweb.ear file becasue
you modify this file after having built and Deployed it. Therefore, any changes
that you make to the actuate-related properties file in “Post Installation
Tasks”, on page 7-4 requires you to manually rebuild and re-deploy the
acweb.ear file.
8/3/2019 62 Mx Install Bea814 Win
http://slidepdf.com/reader/full/62-mx-install-bea814-win 54/110
Installing the Language Utilities
4-8 IBM Maximo: Installation Guide
Installing the Language Utilities
This program installs language-specific Help files and database scripts. You
install the Language Utilities after installing Maximo application.
1 Insert the Maximo Language Utilities CD-ROM into the CD drive.
2 From the root CD drive, double-click maxlangen.exe (or maxlang.exe).
3 Select the desired language from the drop-down list. Selecting a language
only changes the installation screens into that language but does not affect
the underlying files that get installed.
! If your language is not available from the list, select English, and click
OK.
! If it is Japanese or Chinese you must have those fonts installed on your
system.
! For any selected language other than English, that you are installing
on a SQL Server database, you must perform certain post-installation
tasks as decdribed in Chapter 9. This procedure does not apply if you
are using Oracle database.
4 Click Next in the Introduction dialog box.
5 Verify that the default value (c:\Maximo) is the Maximo Home Directory
and click Next.
6 Click Install in the Pre-Installation Summary dialog box.
Allow the installation progress bar to complete.
7 If you are performing the steps in this Chapter because you are adding
additional languages to an existing Maximo installation, check the Build
maximohelp.ear file check-box and click Next, otherwise accept default
(unchecked) and click Next.
8 Click Done.
You are now ready to install the Product Enablers program.

8/3/2019 62 Mx Install Bea814 Win
http://slidepdf.com/reader/full/62-mx-install-bea814-win 55/110
Installing the Product Enablers
Installing Maximo 4-9
Installing the Product Enablers
Product Enablers allow you to access to applications that you are entitled to
use determined by your Maximo license purchase.
The EAR files are built at this time. Complete the following steps:
1 Insert the Product Enablers CD-ROM into the CD drive.
2 From the root CD drive, double-click setup.exe.
3 Select the desired language from the drop-down list. Selecting a language
only changes the installation screens into that language but does not affect
the underlying files that get installed.
! If your language is not available from the list, select English, and click
OK.
! If it is Japanese or Chinese you must have those fonts installed on your
system.
! For any selected language other than English, that you are installing
on a SQL Server database, you must perform certain post-installation
tasks as decdribed in Chapter 9. This procedure does not apply if you
are using Oracle database.
4 Click Next in the Welcome dialog box.
5 Verify that the default value (c:\Maximo) is the Maximo Home Directory
and click Next.
6 Click Install in the Pre-Configuration Message box.
Allow the installation progress bar to complete.
7 If you are installing additional packages, you must at this time select Yes
and the program will exit allowing you to add the other Product Enablers.
See “Adding Additional Product Enablers”, on page D-1
Once all packages are installed select No and click Done.
Three message boxes appear indicating that the EAR files are being built.
Click Done.

8/3/2019 62 Mx Install Bea814 Win
http://slidepdf.com/reader/full/62-mx-install-bea814-win 56/110
Installing the Product Enablers
4-10 IBM Maximo: Installation Guide

8/3/2019 62 Mx Install Bea814 Win
http://slidepdf.com/reader/full/62-mx-install-bea814-win 57/110
© Copyright IBM Corp. 2006 5-1
In this chapter, you prepare an Oracle instance or a Microsoft SQL Server
instance on the server to hold your data. The following commands are
guidelines for configuration changes. For more details on these commands,
refer to your Oracle or SQL Server documentation. The parameters are only
suggestions; you might need to adjust them depending on server disk space
and site requirements.
Preparing Microsoft SQL Server Instance
Full-text Search is a settings that you must install during the installation of
Microsoft SQL Server 2000. To determine if Full-text Search is installed on
your existing MS SQL Server database, perform the following steps:
1 Open SQL Query Analyzer from the Tools menu.
2 Type the following command:
select FULLTEXTSERVICEPROPERTY ( 'IsFulltextInstalled' )
Creating the Maximo
Schema 5
0 = Full-text is not installed (in this example)1 = Full-text is installed
8/3/2019 62 Mx Install Bea814 Win
http://slidepdf.com/reader/full/62-mx-install-bea814-win 58/110
Preparing Microsoft SQL Server Instance
5-2 IBM Maximo: Installation Guide
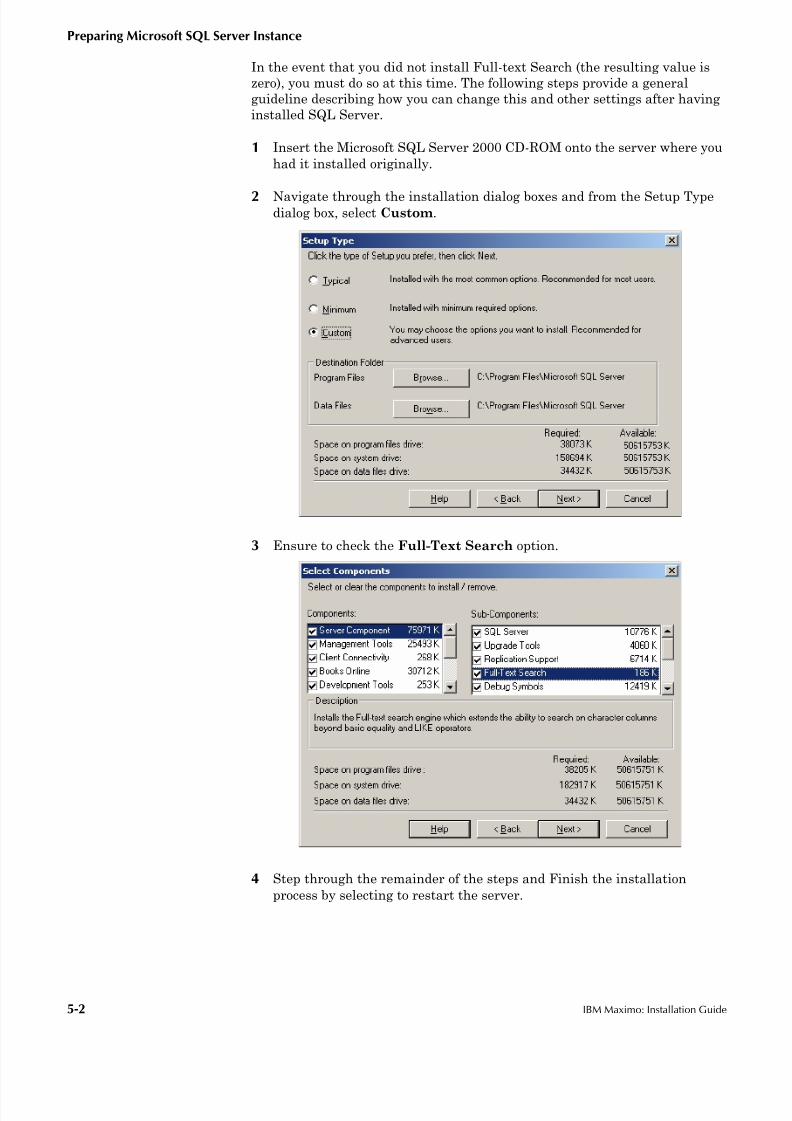
In the event that you did not install Full-text Search (the resulting value is
zero), you must do so at this time. The following steps provide a general
guideline describing how you can change this and other settings after having
installed SQL Server.
1 Insert the Microsoft SQL Server 2000 CD-ROM onto the server where you
had it installed originally.
2 Navigate through the installation dialog boxes and from the Setup Typedialog box, select Custom.
3 Ensure to check the Full-Text Search option.
4 Step through the remainder of the steps and Finish the installation
process by selecting to restart the server.

8/3/2019 62 Mx Install Bea814 Win
http://slidepdf.com/reader/full/62-mx-install-bea814-win 59/110
Preparing Microsoft SQL Server Instance
Creating the Maximo Schema 5-3
Setting up a SQL Server Database for Maximo
Complete the following steps to create a SQL Server Database.
1 Open SQL Server Enterprise Manager (from Program Files >> Microsoft
SQL Server).
2 Right Click the Databases folder from the tree view, and select NewDatabase.
3 In the Database Properties dialog box, in the General tab, specify a unique
database name (for example max602db).

8/3/2019 62 Mx Install Bea814 Win
http://slidepdf.com/reader/full/62-mx-install-bea814-win 60/110
Preparing Microsoft SQL Server Instance
5-4 IBM Maximo: Installation Guide
4 From the Data Files tab, change the Space allocated size to 500 (MB) and
check the Automatically grow file check box.
5 If you prefer, from the Transaction Log tab modify the settings to
accommodate your production environment.
6 Click OK.
8/3/2019 62 Mx Install Bea814 Win
http://slidepdf.com/reader/full/62-mx-install-bea814-win 61/110
Preparing Microsoft SQL Server Instance
Creating the Maximo Schema 5-5
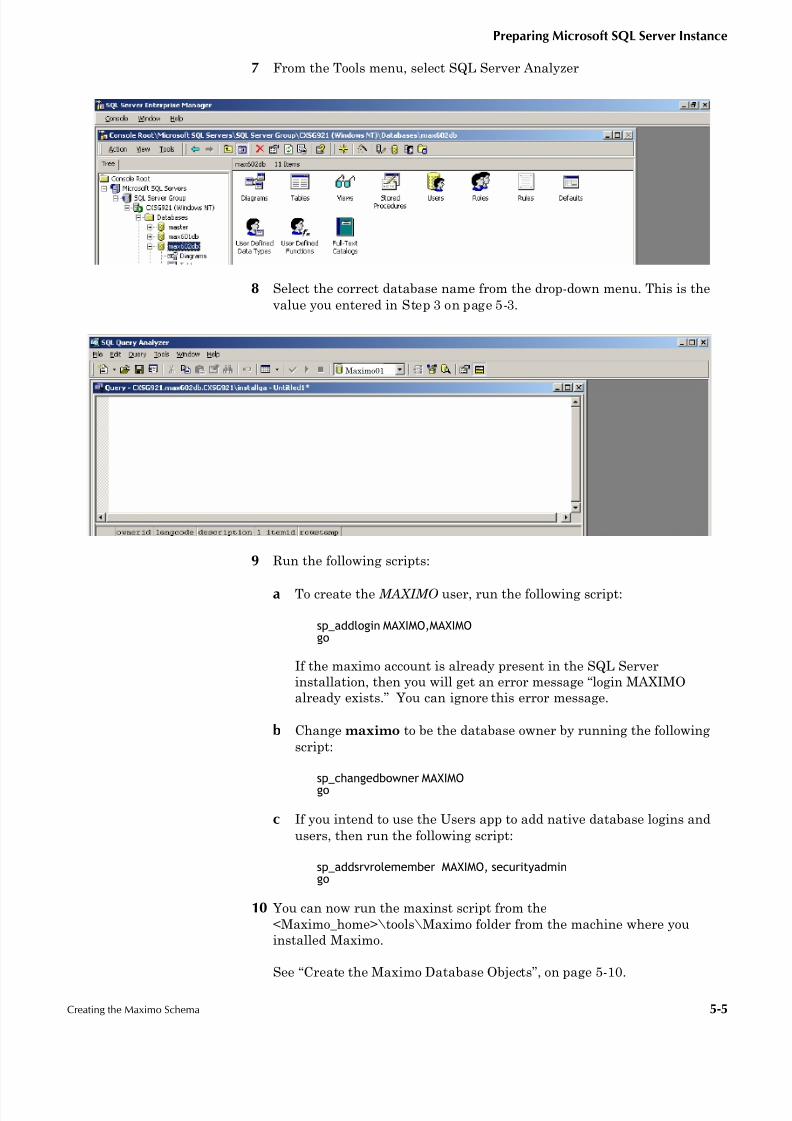
7 From the Tools menu, select SQL Server Analyzer
8 Select the correct database name from the drop-down menu. This is the
value you entered in Step 3 on page 5-3.
9 Run the following scripts:
a To create the MAXIMO user, run the following script:
sp_addlogin MAXIMO,MAXIMOgo
If the maximo account is already present in the SQL Server
installation, then you will get an error message “login MAXIMO
already exists.” You can ignore this error message.
b Change maximo to be the database owner by running the following
script:
sp_changedbowner MAXIMOgo
c If you intend to use the Users app to add native database logins and
users, then run the following script:
sp_addsrvrolemember MAXIMO, securityadmingo
10 You can now run the maxinst script from the
<Maximo_home>\tools\Maximo folder from the machine where you
installed Maximo.
See “Create the Maximo Database Objects”, on page 5-10.
Maximo01
8/3/2019 62 Mx Install Bea814 Win
http://slidepdf.com/reader/full/62-mx-install-bea814-win 62/110
Preparing Oracle Instance
5-6 IBM Maximo: Installation Guide
Preparing Oracle Instance
In this section, you perform the following tasks:
! Verify the Oracle instance requirements.
! Create Maximo Tablespace(s).
! Create the Maximo user.
! Create the Maximo database objects.
Database Character Set
Maximo supports multiple languages within a single schema. The Oracle
instance must be created with the character set that will support all the
languages which you will be using. For example, English, French, German,
Spanish, Dutch, Portuguese, and Italian all use the Oracle character set
WE8ISO8859P1.
If you plan to use a mix of languages that cannot all use a single character set,
such as English, Chinese, and Polish, then you must create the database with
the Unicode character set AL32UTF8. The AL32UTF8 character set is the
only Unicode character set that can be used with MAXIMO.
If you create the database with AL32UTF8 or any multi-byte character set
you must also set the initialization parameter nls_length_semantics=CHAR.
Verifying the Oracle Instance Requirements
The Oracle instance for Maximo must have Oracle Text installed. Maximo
uses Oracle Text for indexes on description fields. You can verify that Oracle
Text is installed by checking for the CTXSYS userid.
From SQL Plus, run the following command:
select username from dba_users where username = ‘CTXSYS’;
If Oracle Text is installed, this command will return the name CTXSYS.
NOTE The instance for Maximo will need at least 100MB of temporary tablespace
and 100MB of undo tablespace.
If Oracle Text is not installed, refer to Oracle installation documentation for
more detail.

8/3/2019 62 Mx Install Bea814 Win
http://slidepdf.com/reader/full/62-mx-install-bea814-win 63/110
Preparing Oracle Instance
Creating the Maximo Schema 5-7
Oracle Initialization Parameters
IBM Corporation does not provide detailed performance settings for MAXIMO
because there are an infinite number of combinations of data sizes, user
counts, module usages, add-on module usages, system configurations, and
customizations possible in an Maximo system. Take advantage of all the
features of Oracle 9.2 and 10g tuning, such as:
! Use locally managed tablespaces for MAXIMO tables and indexes.
! Use the new method of PGA management by setting
WORKAREA_SIZE_POLICY=AUTO and
PGA_AGGREGATE_TARGET=memory value.
! Use the new method of SGA management by setting
SGA_TARGET = memory value.
! Control I/O cache via DB_CACHE_SIZE instead of
DB_BLOCK_BUFFERS.
! Reduce library latch contention by setting CURSOR_SHARING=
SIMILAR or FORCE.
! Make sure OPTIMIZER_FEATURES_ENABLE is set to your current
Oracle version and not an older one.
! OPEN_CURSORS = 1000 estimated; you may need more.
! DBMS_JOBS_PROCESSES = 2 required for job that updates Oracle Text
indexes.
Beyond the above, sizing for SGA, PGA, and so forth, is best determined by
using Oracle Enterprise Manager or a Third-party database monitoring andadministration tool to analyze the database under load and make tuning
recommendations.
CAUTION If you have created the database with AL32UTF8 or any multi-byte character
set, you must also set the initialization parameter
nls_length_semantics=CHAR.
Creating Maximo Tablespace(s)
Complete the following steps to create the Maximo tablespaces. Maximo offers
a multi-schema option. This feature enables the application tables to be ownedby a user other than Maximo, permitting multiple Maximo schemas to reside
in a single Oracle instance.
Maximo tablespaces should be locally managed and not dictionary managed.
These instructions will create a locally managed tablespace by default.
If you do not include a schema owner, the default is Maximo. The expected
size of your database determines the size of a Maximo tablespace.
! If you plan to install the MAXDEMO schema, create a Maximo tablespace
of size 600MB.

8/3/2019 62 Mx Install Bea814 Win
http://slidepdf.com/reader/full/62-mx-install-bea814-win 64/110
Preparing Oracle Instance
5-8 IBM Maximo: Installation Guide
! If you plan to create an empty Maximo schema, use the estimated size of
the database. Refer to Table 7-1: Database Size Guidelines.
To permit growth, you can add another datafile later or use the
AUTOEXTEND option of the CREATE TABLESPACE command.
Use related names for Maximo schemas and tablespaces. For example, to set
up a MAXDEMO database, a production database, and a test copy of the
production database, you might choose MAXDEMO, MAXPROD, andMAXTEST as schema owners and MAXDEMO_DATA, MAXPROD_DATA,
MAXPROD_INDEX, MAXTEST_DATA, and MAXTEST_INDEX as
tablespace names (MAXDEMO has only one tablespace name as splitting a
small demo database has no real advantage). Use the following guidelines to
estimate initial tablespace size:
To create a tablespace, use the following command:
CREATE TABLESPACE <tablespace_name> DATAFILE ‘<file_name>’ SIZE
<file_size> AUTOEXTEND ON MAXSIZE <maximum>;
where:
! <tablespace_name> is the Maximo tablespace’s name.
! <file_name> is the data file’s name.
! <file_size> is the datafile’s initial size from table.
! MAXSIZE <maximum> is the maximum size allotted to the data
file from the above table.
You can express both filesize and maximum as a number of megabytes when
you follow it with the letter M (for example, 1000M). You can customize the
storage parameters for the particular database.
The file name is the full path of the server. It includes the local drive of the
server and path location to the data file, and should be placed inside singlequotes. For example: ‘C:\oracle\oradata\maximo\MAXIMO01.DBF’
Creating the Maximo User
This section describes how to modify createMaximoES.sql file. The multi-
schema feature enables the application tables to be owned by a user other
than MAXIMO, thus permitting multiple schemas to reside in a single Oracle
instance.
Size of Database Tablespace Estimate (MB)
Initial Maximum
Small (1–2 users) 500 2000
Medium (20–100 users) 1000 5000
Large (100+ users) 5000+ 20000+

8/3/2019 62 Mx Install Bea814 Win
http://slidepdf.com/reader/full/62-mx-install-bea814-win 65/110
Preparing Oracle Instance
Creating the Maximo Schema 5-9
To use different schema or tablespace names, you must edit the following
parameters in createMaximoES.sql.
! schema — the schema (userid) to own the tables (same value that you
specified in Step 10 on page 4-2)
! data_ts — the name of the table space to hold the Maximo tables (and
indexes if the optional index table space is not used)
! index_ts — the name of the table space to hold the Maximo tables
An example of createMaximoES.sql is shown below:
NOTE Ensure that the alter user schema temporary tablespace temp line
reflects your temporary tablespace name.
Add the following line if you use a separate index tablespace:
alter user <schema> quota unlimited on <index_ts>;
To create the Maximo user, complete the following steps:
1 Open SQL Plus.
2 Login as system administrator.
3 At the prompt, type:
@”<drive_letter>:\<Maximo_installation_location>\tools\Maximo\e
n\createMaximoES.sql”;
4 Press Enter.
5Exit SQL Plus.
create user maximo identified by maximo;
alter user maximo default tablespace maximo quota unlimited on maximo;
alter user maximo temporary tablespace temp;
grant create trigger to maximo;
grant create session to maximo;
grant create sequence to maximo;
grant create synonym to maximo;
grant create table to maximo;
grant create view to maximo;
grant create procedure to maximo;
grant alter session to maximo;
grant execute on ctxsys.ctx_ddl to maximo;
--To allow Maximo to give Database Access to Maximo Users in Sig. Security, run these:
--grant create user to MAXIMO;
--grant drop user to MAXIMO;
--grant create session to MAXIMO with ADMIN OPTION;
--grant alter user to MAXIMO;
schema namepassword
data_ts tablespace
replace with your temporary
tablespace name
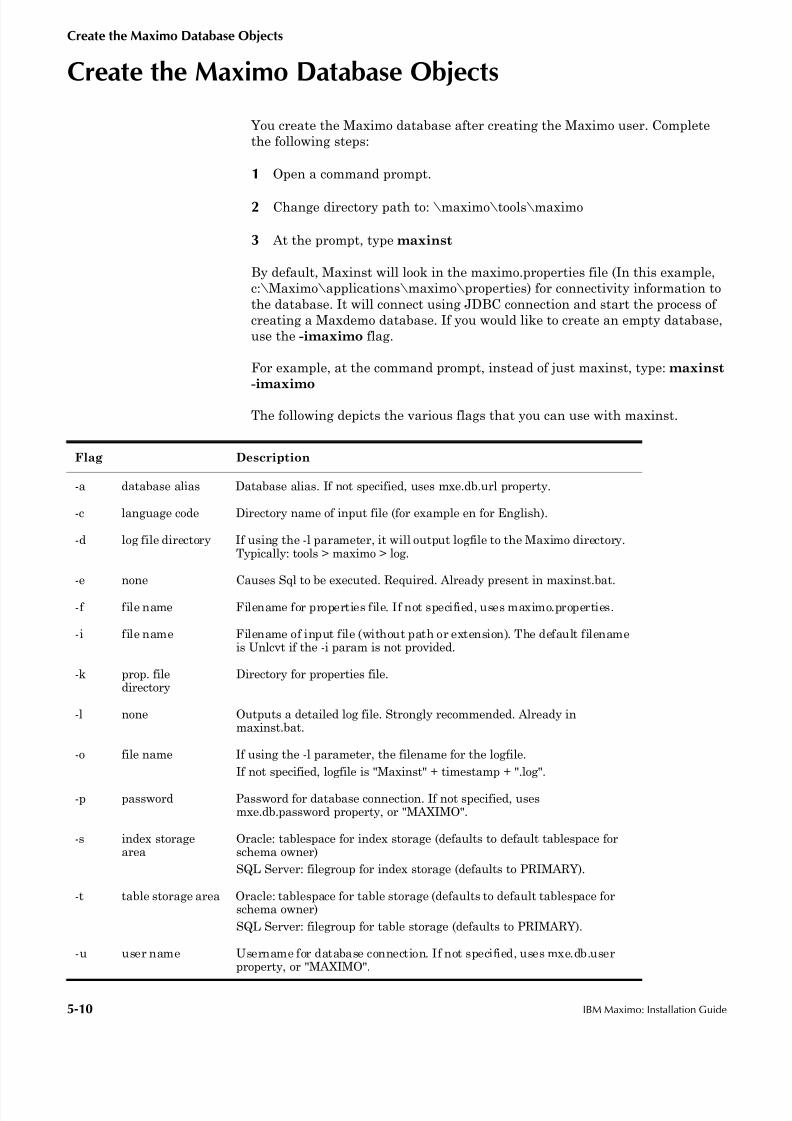
8/3/2019 62 Mx Install Bea814 Win
http://slidepdf.com/reader/full/62-mx-install-bea814-win 66/110
Create the Maximo Database Objects
5-10 IBM Maximo: Installation Guide
Create the Maximo Database Objects
You create the Maximo database after creating the Maximo user. Complete
the following steps:
1 Open a command prompt.
2 Change directory path to: \maximo\tools\maximo
3 At the prompt, type maxinst
By default, Maxinst will look in the maximo.properties file (In this example,
c:\Maximo\applications\maximo\properties) for connectivity information to
the database. It will connect using JDBC connection and start the process of
creating a Maxdemo database. If you would like to create an empty database,
use the -imaximo flag.
For example, at the command prompt, instead of just maxinst, type: maxinst
-imaximo
The following depicts the various flags that you can use with maxinst.
Flag Description
-a database alias Database alias. If not specified, uses mxe.db.url property.
-c language code Directory name of input file (for example en for English).
-d log file directory If using the -l parameter, it will output logfile to the Maximo directory.Typically: tools > maximo > log.
-e none Causes Sql to be executed. Required. Already present in maxinst.bat.
-f file name Filename for properties file. If not specified, uses maximo.properties.
-i file name Filename of input file (without path or extension). The default filenameis Unlcvt if the -i param is not provided.
-k prop. filedirectory
Directory for properties file.
-l none Outputs a detailed log file. Strongly recommended. Already inmaxinst.bat.
-o file name If using the -l parameter, the filename for the logfile.
If not specified, logfile is "Maxinst" + timestamp + ".log".
-p password Password for database connection. If not specified, usesmxe.db.password property, or "MAXIMO".
-s index storagearea
Oracle: tablespace for index storage (defaults to default tablespace forschema owner)
SQL Server: filegroup for index storage (defaults to PRIMARY).
-t table storage area Oracle: tablespace for table storage (defaults to default tablespace forschema owner)
SQL Server: filegroup for table storage (defaults to PRIMARY).
-u user name Username for database connection. If not specified, uses mxe.db.userproperty, or "MAXIMO".
8/3/2019 62 Mx Install Bea814 Win
http://slidepdf.com/reader/full/62-mx-install-bea814-win 67/110
Create the Maximo Database Objects
Creating the Maximo Schema 5-11
CAUTION -S and -T PARAMETERS: Maxinst does not provide a default value for
tablespace.
The -S and the -T PARAMETERS are required. You must always specify the
data and index tablespace names. There is no default value.
CAUTION If MAXINST fails for any reason, you must drop and re-create the MAXIMO
schema before re-running MAXINST.
NOTE Each flag must be followed by the parameters without a space,
for example: -uMAXIMO.

8/3/2019 62 Mx Install Bea814 Win
http://slidepdf.com/reader/full/62-mx-install-bea814-win 68/110
Create the Maximo Database Objects
5-12 IBM Maximo: Installation Guide

8/3/2019 62 Mx Install Bea814 Win
http://slidepdf.com/reader/full/62-mx-install-bea814-win 69/110
© Copyright IBM Corp. 2006 6-1
You are now ready to deploy the EAR files via the BEA WebLogic Console.
Deploying the EAR files starts the Maximo Application Server. If
MAXIMOSERVER is not running, start it from a command prompt.
You also need to install a Java Virtual Machine (JVM) in order to view the
BEA WebLogic Console. Newer versions of Windows may not ship with JVM.
1 From a command prompt, change directory path to:
<drive_letter>:\<BEA_installation_location>\user_projects\domai
ns\mydomain
2 Type startWebLogic.cmd and press Enter.
3 When prompted, type the username and password that you specified in
Step 9 on page 2-11.
Once the phrase:
"<server started in RUNNING Mode>"
displays, the WebLogic Server is running.
4 Start the MAXIMOSERVER Admin Console by typing the following URL
in your browser’s address bar: http://<host name>:7001/console
Deploying the EAR Files 6
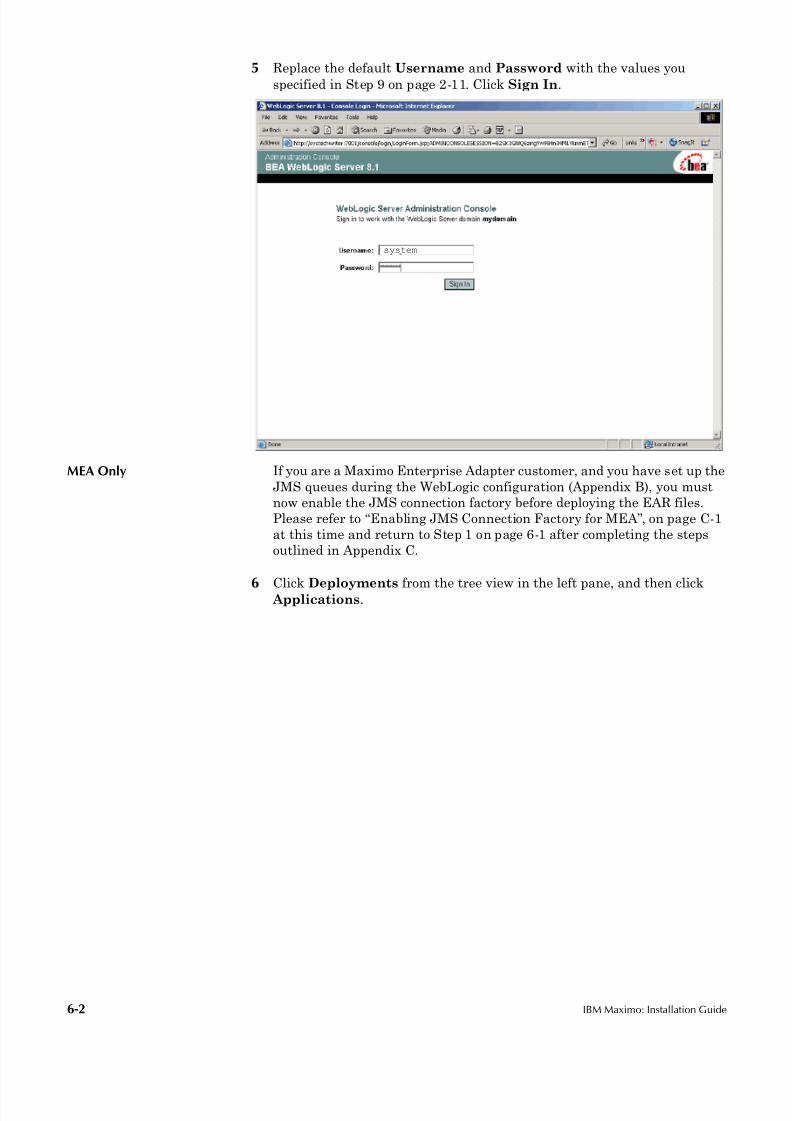
8/3/2019 62 Mx Install Bea814 Win
http://slidepdf.com/reader/full/62-mx-install-bea814-win 70/110
6-2 IBM Maximo: Installation Guide
5 Replace the default Username and Password with the values you
specified in Step 9 on page 2-11. Click Sign In.
MEA Only If you are a Maximo Enterprise Adapter customer, and you have set up the
JMS queues during the WebLogic configuration (Appendix B), you must
now enable the JMS connection factory before deploying the EAR files.
Please refer to “Enabling JMS Connection Factory for MEA”, on page C-1
at this time and return to Step 1 on page 6-1 after completing the steps
outlined in Appendix C.
6 Click Deployments from the tree view in the left pane, and then click Applications.
max01
system

8/3/2019 62 Mx Install Bea814 Win
http://slidepdf.com/reader/full/62-mx-install-bea814-win 71/110
Deploying the EAR Files 6-3
7 From the main window, click Deploy a new Application.
8 Click the root drive where you have installed Maximo (in this example,
c:\) and navigate to c:\Maximo\deployment\default and click
Continue.
max01
max01
From Deployments
click Applications
Click “Deploy a new Application”
Click Configure a new Application
max01:
Root drive letter
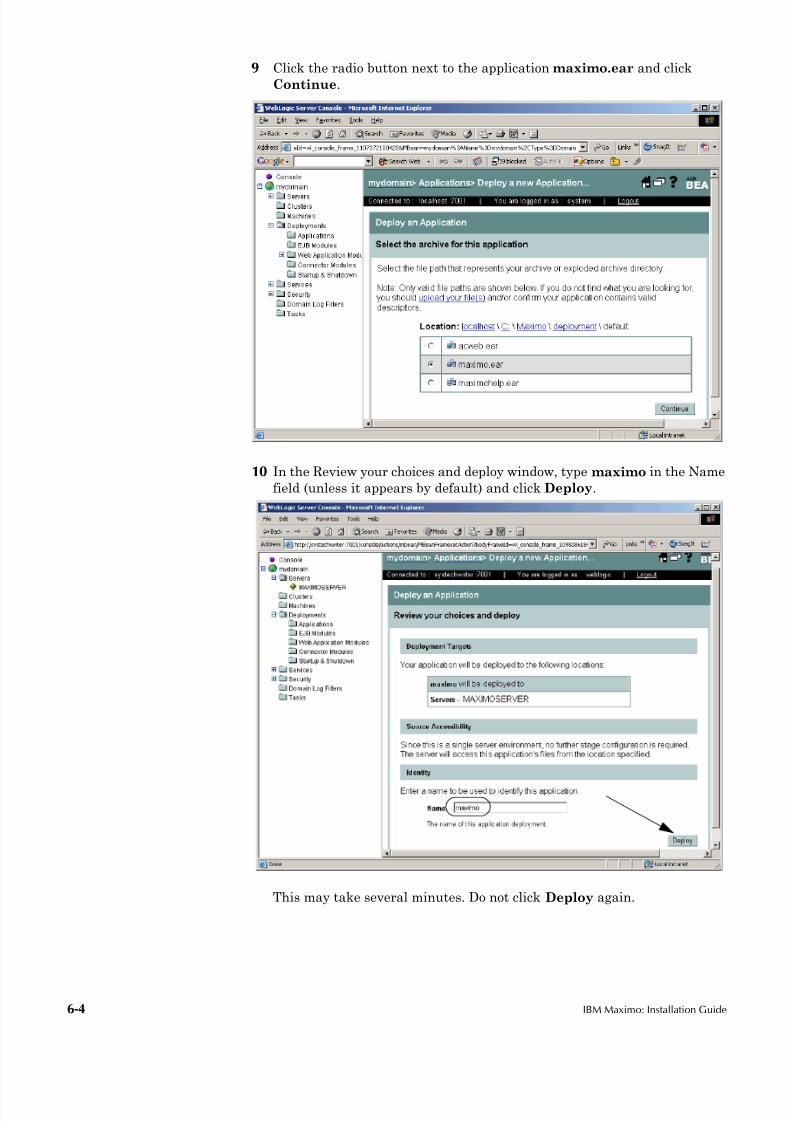
8/3/2019 62 Mx Install Bea814 Win
http://slidepdf.com/reader/full/62-mx-install-bea814-win 72/110
6-4 IBM Maximo: Installation Guide
9 Click the radio button next to the application maximo.ear and click
Continue.
10 In the Review your choices and deploy window, type maximo in the Name
field (unless it appears by default) and click Deploy.
This may take several minutes. Do not click Deploy again.
Open the root Maximo folder.
max01
max01
You only select the EAR
files from this folder
max01:
max01

8/3/2019 62 Mx Install Bea814 Win
http://slidepdf.com/reader/full/62-mx-install-bea814-win 73/110
Deploying the EAR Files 6-5
11 Allow enough time to pass for the EJB modules and the Web Application
modules to indicate Success as Status of Last Action.
12 Repeat Steps 6 through 11 to deploy maximohelp.ear. If you are using
Actuate, repeat Steps 6 through 11 to deploy the acweb.ear file.
As you choose the maximohelp.ear and acweb.ear files to deploy, accept
the default value (maximohelp and acweb respectively) that appear as
application names in Step 10 on page 6-4.
max01:

8/3/2019 62 Mx Install Bea814 Win
http://slidepdf.com/reader/full/62-mx-install-bea814-win 74/110
6-6 IBM Maximo: Installation Guide

8/3/2019 62 Mx Install Bea814 Win
http://slidepdf.com/reader/full/62-mx-install-bea814-win 75/110
© Copyright IBM Corp. 2006 7-1
If you installed Actuate in Chapter 3, then complete the steps outlined in this
chapter to install the Actuate Encyclopedia for Maximo. The reason that you
are installing an Actuate-related component at this time, is that, only now you
can access the Actuate Administrative Console, after having deployed the
acweb.ear file in the previous chapter.
The Encyclopedia is a collection of Maximo-specific reports, user roles, and
user permissions that are copied during installation and placed in the
Actuate8/iServer/encyc folder.
You must install the Actuate Encyclopedia for Maximo on the same machinewhere you installed the Actuate iServer. Before you install the Actuate
Encyclopedia for Maximo, ensure:
! To remove corrupted characters from the acserverconfig.xml file. This
applies only to Chinese, Japanese, and Korean languages.
! That the Actuate iServer application is running.
! That the MAXIMOSERVER application server is running.
! After installing the Actuate Encyclopedia for Maximo, if you selected any
language other than English, and you are connecting to a SQL Serverdatabase, you must modify langauge-specific JDBC settings, similiar to
the procedure at the end of Chapter 4. You must also rebuild and re-deploy
the acweb.ear file before Importing the Encyclopedia.
Removing Corrupt Characters from theacserverconfig.xml File
NOTE This section applies only to systems that use Chinese, Japanese, or Korean
system locale.
If you are installing on systems that use Chinese, Japanese, or Korean system
locale, the acserverconfig.xml file (located in the Actuate iServer directory) is
saved improperly by the Actuate installation program. The file name is
appended with corrupted characters and a question mark at the beginning of
the file. The result is that the Actuate iServer is unable to read the file or to
startup properly. Complete the following steps to remedy this issue:
1 Shut down the Actuate application server.
2 Using a text editor, open the acserverconfig.xml file located in the
<Actuate_iServer_root>\iServer\etc folder.
Installing The Actuate
Encyclopedia for Maximo 7

8/3/2019 62 Mx Install Bea814 Win
http://slidepdf.com/reader/full/62-mx-install-bea814-win 76/110
Starting the Actuate iServer for Maximo
7-2 IBM Maximo: Installation Guide
3 Note the corrupted character and a question mark at the beginning of the
file. Remove them and save the file.
4 Re-start the Actuate application server.
Starting the Actuate iServer for Maximo
By default the Actuate iServer starts automatically when your system
reboots. If you did not choose to start the Actuate iServer automatically, use
the Services panel to start the service. Complete the following steps:
1 From the Control Panel >> Administrative Tools, click Services.
2 Right-click the Actuate Process Management Daemon 8 service name.
3 Click Start.
The Process Management Daemon (PMD) starts automatically after the
Actuate iServer installation. The PMD starts the Report Server services. You
can also start the PMD from the command line.
1 From a command prompt change directory to the C:\ drive (or your root
Actuate installation folder).
2 To start the PMD, type:
net start “Actuate Process Management Daemon 8”

8/3/2019 62 Mx Install Bea814 Win
http://slidepdf.com/reader/full/62-mx-install-bea814-win 77/110
Installing the Actuate Integration for Maximo
Installing The Actuate Encyclopedia for Maximo 7-3
Installing the Actuate Integration for Maximo
You are now ready to install the Actuate Integration for Maximo. Complete
the following steps:
1 Insert the Actuate Reporting Release 8 English Encyclopedia for Windows
CD-ROM into the CD drive.
2 From the root CD drive, double-click actuate.exe.
3 Select the desired language from the drop-down list. Selecting a language
only changes the installation screens into that language but does not affect
the underlying files that get installed.
! If your language is not available from the list, select English, and click
OK.
! If it is Japanese or Chinese you must have those fonts installed on your
system.
! For any selected language other than English, that you are installing
on a SQL Server database, you must perform certain post-installation
tasks as decdribed in this chapter. This procedure does not apply if you
are using Oracle database.
4 Click Next in the Introduction dialog box.
5 Accept the default installation location
(c:\Actuate8\iServer\ActuateIntegration) or select another location. Click
Next.
6 Enter the required information. Ensure that the Administrator’s password
is the same password you specified on Step 12 on page 3-6. Click Next.
7 Select the appropriate database and click Next.
8 Depending on your database type, enter the following database-related
information, and click Next.
9 Enter the necessary information to connect to Maximo. Ensure that the
Maximo Server Name is the same value as that in Step 13 on page 4-3 and
click Next.
10 Click Install.
Oracle SQL Server
Database server name Enter the Oracle host name Enter the SQL Server host name
Port number 1521 (Default) 1433 (default)
Database name Enter the Oracle system identifier Enter the SQL Server database name
Database owner Maximo (default) Maximo (default)
Database owner’spassword
Maximo (default) Maximo (default)

8/3/2019 62 Mx Install Bea814 Win
http://slidepdf.com/reader/full/62-mx-install-bea814-win 78/110
Installing the Actuate Integration for Maximo
7-4 IBM Maximo: Installation Guide
11 Click Next to check for Actuate Updates.
12 Check the check box in the Update dialog box and click Done.
The PowerUpdate wizard opens. The computer where you are performing
this installation from must be connected to the Internet.
13 Click Next in the Welcome to PowerUpdate dialog box.
The PowerUpdate program checks for available updates at this time.
14 There are no updates available for this release of the Actuate
Encyclopedia. Click Done.
Post Installation Tasks
NOTE Perform the tasks outlined in this section only if you are installing a non-
English language, and you are using SQL Server database; otherwise, ignore
this section and the post-installation tasks in Chapter 9.
You must modify the JDBC settings in order for Maximo and Actuate
Reporting to work properly with translated databases that contain special
characters. For example: French, Swedish, or double-byte languages such as
Chinese, Japanese and Korean.
In this section you edit three files: actuatei18ntext.properties , which
resides in two separate locations (One is located in the Maximo directory and
the other is located in the Actuate directory); plus, the
rsse_properties.maximo file located in the Actuate directory structure. You
can modify one of them and copy it to the second location.
Complete the following steps to modify the actuatei18ntext.properties filein the Maximo directory:
1 Using Windows Explorer, navigate to
<Maximo_root_directory>\applications\activeportal\WEB-
INF\classes\com\actuate\ExternalText
2 Using a text editor, open the actuatei18ntext.properties file.
3 Search for the following entry:
actuate.externText.JDBCConnectionURL=jdbc:inetdae7a
Example of the actuate.externalText.JDBCConnectionURL setting before making changes
4 Remove the last ’a’ from inetdae7a, leaving inetdae7.
5 Add &charset=<charset code> immediately after the
nowarnings=true.

8/3/2019 62 Mx Install Bea814 Win
http://slidepdf.com/reader/full/62-mx-install-bea814-win 79/110
Installing the Actuate Integration for Maximo
Installing The Actuate Encyclopedia for Maximo 7-5
<charset code> is the character set code and depends on the language
that you are using.
Use the following character set codes in the JDBC setting for the primary
languages supported in Maximo:
! Chinese (Simplified) : GBK
! Dutch : 8859_1
! French : 8859_1! German : 8859_1
! Italian : 8859_1
! Japanese : Shift_JIS
! Korean : euc-kr
! Portuguese : 8859_1
! Spanish : 8859_1
! Swedish : 8859_1
For example if you have a Japanese database, type Shift_JIS for the
character set.
6 Save the file (do not close it yet).
7 Copy the modified actuatei18ntext.properties file and then paste it in
the following location under the Actuate directory:
<Actuate_root_directory>\iServer\bin\com\actuate\ExternalText
when prompted to replace the existing file, click OK.
NOTE If you have multiple instances of Maximo, complete the steps outlined in this
section for each of the actuatei18ntext_rsseAlias.properties file that you have.
You must now modify the rsse_maximo.properties page, which resides in the
Actuate directory. Complete the following steps:
1 Using Windows Explorer, navigate to
<Actuate_root_directory>\iServer\etc
2 Using a text editor, open the rsse_maximo.properties file.
Search for the following string: jdbc.url=jdbc:inetdae7a

8/3/2019 62 Mx Install Bea814 Win
http://slidepdf.com/reader/full/62-mx-install-bea814-win 80/110
Installing the Actuate Integration for Maximo
7-6 IBM Maximo: Installation Guide
Example of the jdbc.url setting before making any changes.
3 Remove the last ’a’ from inetdae7a, leaving inetdae7.
4 Add &charset=<charset code> immediately after the
nowarnings=true.
<charset code> is the character set code and depends on the language
that you are using.
Use the following character set codes in the JDBC setting for the primary
languages supported in Maximo:
! Chinese (Simplified) : GBK
! Dutch : 8859_1! French : 8859_1
! German : 8859_1
! Italian : 8859_1
! Japanese : Shift_JIS
! Korean : euc-kr
! Portuguese : 8859_1
! Spanish : 8859_1
! Swedish : 8859_1
For example if you have a Japanese database, type Shift_JIS for the
character set.
5 Save and close the file.
NOTE If you have multiple instances of Maximo, complete the steps outlined in
this section for each of the rsse_maximo.properties file that you have.
6 You must now rebuild and re-deploy the acweb.ear file. Refer to the IBM
Maximo System Administrator’s Guide for more details.
7 Restart the Actuate iserver and the Actuate Process Management
Daemon. See “Starting the Actuate iServer for Maximo”, on page 7-2.
Remove the a
Add &charset=<the code> after true
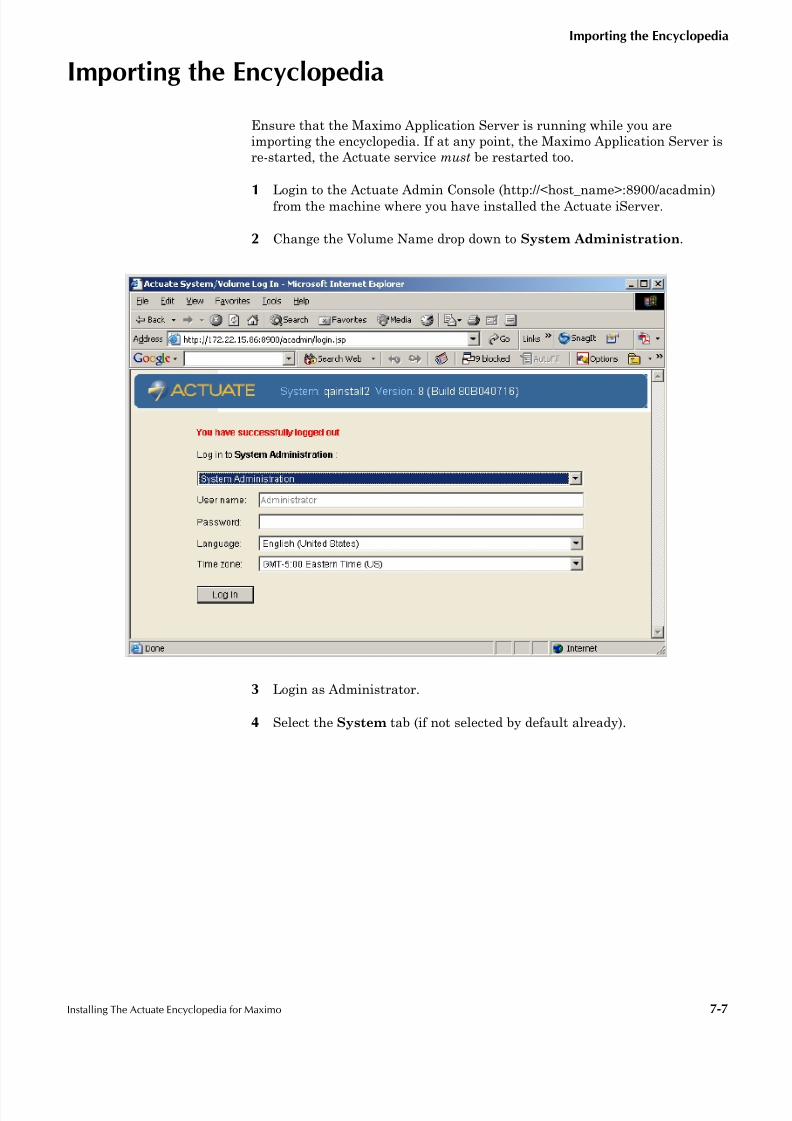
8/3/2019 62 Mx Install Bea814 Win
http://slidepdf.com/reader/full/62-mx-install-bea814-win 81/110
Importing the Encyclopedia
Installing The Actuate Encyclopedia for Maximo 7-7
Importing the Encyclopedia
Ensure that the Maximo Application Server is running while you are
importing the encyclopedia. If at any point, the Maximo Application Server is
re-started, the Actuate service must be restarted too.
1 Login to the Actuate Admin Console (http://<host_name>:8900/acadmin)from the machine where you have installed the Actuate iServer.
2 Change the Volume Name drop down to System Administration.
3 Login as Administrator.
4 Select the System tab (if not selected by default already).

8/3/2019 62 Mx Install Bea814 Win
http://slidepdf.com/reader/full/62-mx-install-bea814-win 82/110
Importing the Encyclopedia
7-8 IBM Maximo: Installation Guide
5 Click the Stop button on the System tab.
6 Click OK in the ensuing message box. Wait 1 to 2 minutes for the Stop to
take effect.
7 Using Windows Explorer, navigate to your Actuate installation location:
<drive_letter>:\Actuate8\iServer.
8 Delete the encyc folder found under the \Actuate8\iServer folder.
9 Open a command prompt and change path to Actuate’s bin directory. For
example: C:\actuate8\iServer\bin
10 Execute the acimport.bat script, and pass in the path to the full
Encyclopedia files.
For example: acimport.bat c:\actuate8\iServer\oracle_export
11 After importing the Encyclopedia, go back to the Actuate Admin Console
and Start the Volume.
12 To launch the Encyclopedia:
a Ensure that the Maximo Application Server is running.
b Open a browser and enter the following URL in the address box:
http://<actuate_server_name>:8900/acadmin
c Log in to Actuate Console as a Maximo user (not the user
administrator).

8/3/2019 62 Mx Install Bea814 Win
http://slidepdf.com/reader/full/62-mx-install-bea814-win 83/110
© Copyright IBM Corp. 2006 8-1
The final step in installing the Maximo system, is opening the Maximo Start
Center window.
Ensure that the Maximo Application Server is running.
1 To open Maximo login page, launch Internet Explorer and in the URL
address bar type: http://<host_name>:<port_number>/maximo
where
! <host_name> is the machine name or IP address of the applicationserver
! <port_number> is the value that you specified on Step 5 on page 2-8.
NOTE The context path (maximo) is case-sensitive.
The Maximo login page opens.
Logging Into Maximo Start
Center 8
:7001/

8/3/2019 62 Mx Install Bea814 Win
http://slidepdf.com/reader/full/62-mx-install-bea814-win 84/110
Maximo Enterprise Adapter Users
8-2 IBM Maximo: Installation Guide
2 Login as maxadmin for both username and password. Newly installed
Maximo databases contain maxadmin as a user ID with unlimited system
access. You cannot use Maximo or SYSADM.
Maximo Enterprise Adapter Users
If you have obtained the MEA Product Enabler, you must complete additional
integration steps that are detailed in Chapter 6 of the IBM Maximo Enterprise
Adapter System Administration Guide.

8/3/2019 62 Mx Install Bea814 Win
http://slidepdf.com/reader/full/62-mx-install-bea814-win 85/110
© Copyright IBM Corp. 2006 A-1
oo
This appendix describes how to start and stop the MAXIMOSERVER,
whether you are running it as a Windows service, or from a command prompt.
Creating a Windows Service for the MAXIMOSERVERServer
Before you create a Windows Service for the MAXIMOSERVER, you must edit
the installService file to include user name, password, and modify the memory
heap size. Complete the following steps:
NOTE If you have already installed the server as a Windows Service, you must
remove the service by running uninstallservice.cmd from the
\mydomain folder.
To edit the installService.cmd file, complete following steps:
1 Using Windows Explorer navigate to:
<bea_installation_drive>\bea_installation_location>
\user_projects\domains\mydomain.
2 Right-click and edit (do not open by double-clicking) the
installService.cmd file.
a Using your text editor Find tool, search for set wls_user twice.
System Server
Administration A
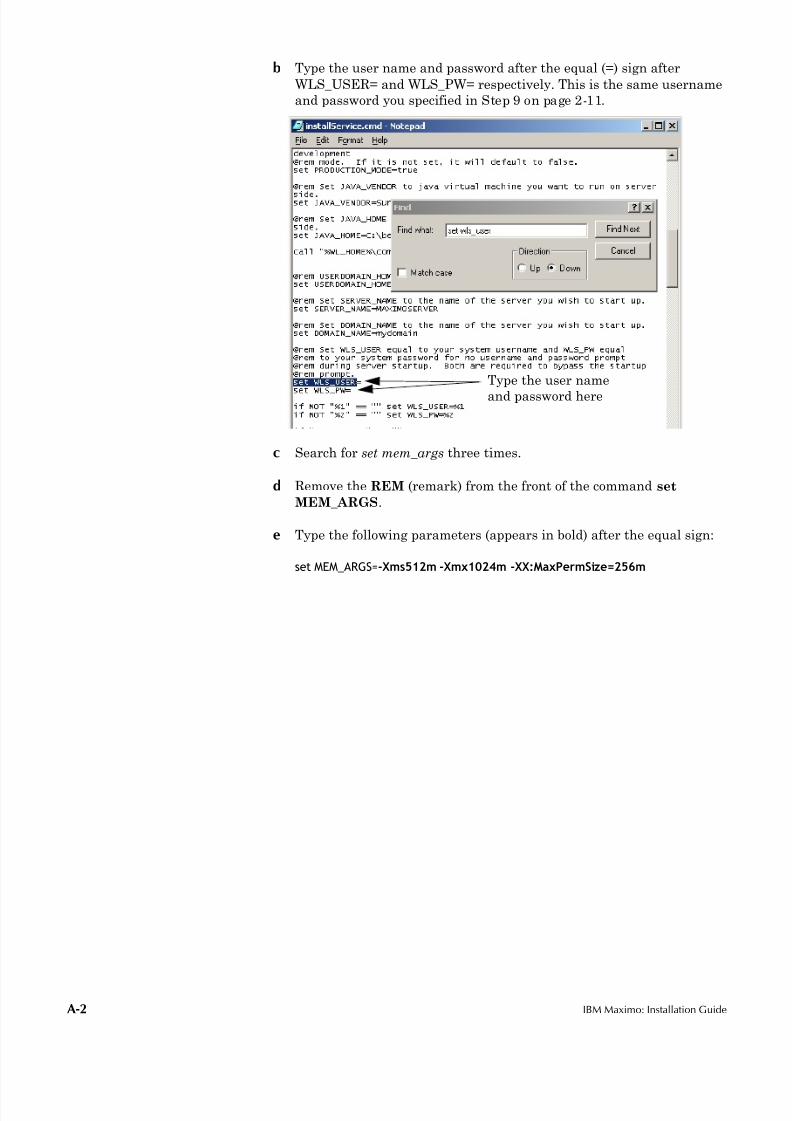
8/3/2019 62 Mx Install Bea814 Win
http://slidepdf.com/reader/full/62-mx-install-bea814-win 86/110
A-2 IBM Maximo: Installation Guide
b Type the user name and password after the equal (=) sign after
WLS_USER= and WLS_PW= respectively. This is the same username
and password you specified in Step 9 on page 2-11.
c Search for set mem_args three times.
d Remove the REM (remark) from the front of the command set
MEM_ARGS.
e Type the following parameters (appears in bold) after the equal sign:
set MEM_ARGS=-Xms512m -Xmx1024m -XX:MaxPermSize=256m
Type the user name
and password here
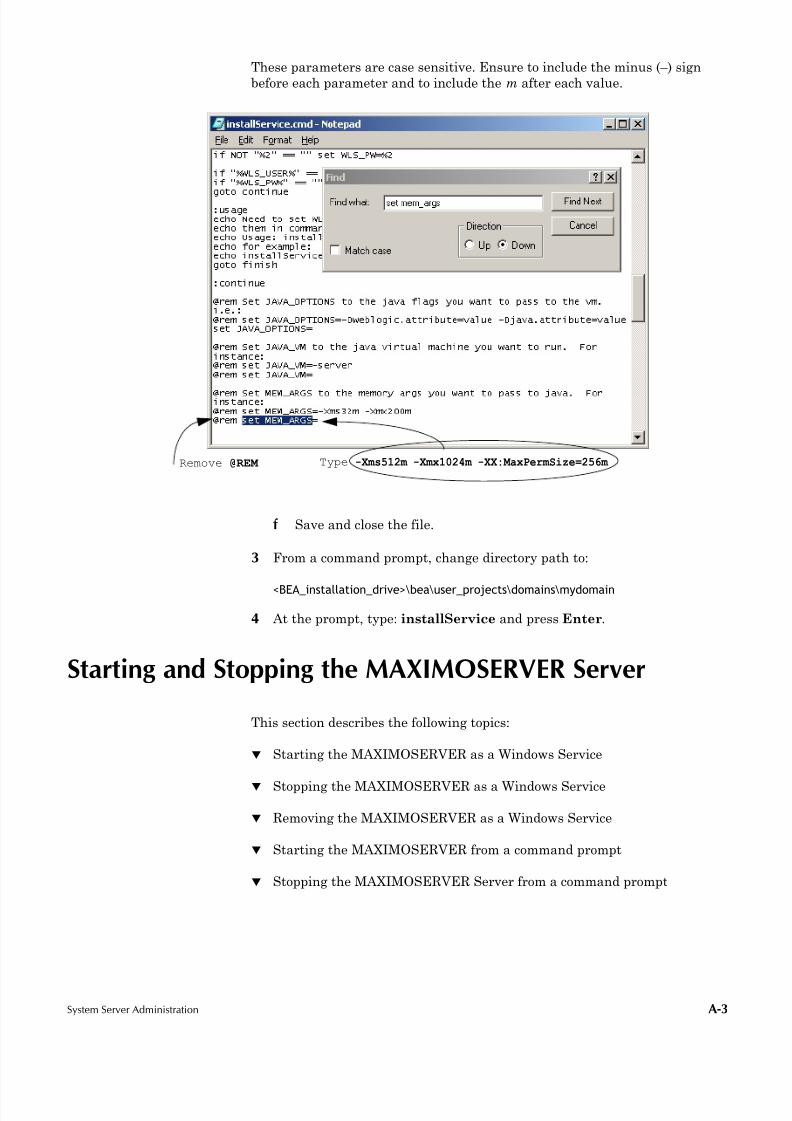
8/3/2019 62 Mx Install Bea814 Win
http://slidepdf.com/reader/full/62-mx-install-bea814-win 87/110
System Server Administration A-3
These parameters are case sensitive. Ensure to include the minus (–) sign
before each parameter and to include the m after each value.
f Save and close the file.
3 From a command prompt, change directory path to:
<BEA_installation_drive>\bea\user_projects\domains\mydomain
4 At the prompt, type: installService and press Enter.
Starting and Stopping the MAXIMOSERVER Server
This section describes the following topics:
! Starting the MAXIMOSERVER as a Windows Service
! Stopping the MAXIMOSERVER as a Windows Service
! Removing the MAXIMOSERVER as a Windows Service
! Starting the MAXIMOSERVER from a command prompt
! Stopping the MAXIMOSERVER Server from a command prompt
Remove @REM Type -Xms512m -Xmx1024m -XX:MaxPermSize=256m

8/3/2019 62 Mx Install Bea814 Win
http://slidepdf.com/reader/full/62-mx-install-bea814-win 88/110
A-4 IBM Maximo: Installation Guide
Starting and Stopping the MAXIMOSERVER Service
You start the MAXIMOSERVER running as a Windows Service, by
completing the following steps:
1 From your Start menu, select Settings >> Control Panel >>
Administrative Tools >> Services.
2 Right-click beasvc mydomain_MAXIMOSERVER
3 To start, select Start from the ensuing menu.
4 To stop, select Stop from the ensuing menu.
Removing the Application Server as a Service
To remove the MAXIMOSERVER server as a Windows Service, perform the
following steps:
1 From a command prompt, change path to:
<BEA_installation_drive>\bea\user_projects\mydomain\
2 Run the uninstall script by typing the following command and then press
Enter.
uninstallService.cmd
Starting the Application Server From a Command Prompt
You start the MAXIMOSERVER Application Server from a command prompt.
1 Open a Command Prompt.
2 In the Command prompt, change directory path to:
<BEA_installation_drive>\bea\user_projects\mydomain\
3 At the prompt type startweblogic and press Enter.
4 When prompted, type the username and password that you specified in
Chapter 2.
Once the phrase:
<server started in RUNNING Mode>"
displays, the WebLogic Server is running.
8/3/2019 62 Mx Install Bea814 Win
http://slidepdf.com/reader/full/62-mx-install-bea814-win 89/110
System Server Administration A-5
Stopping the MAXIMOSERVER Server
You stop the MAXIMOSERVER from running as follows:
1 In the same Command Prompt Window that MAXIMOSERVER server is
running, press <Ctrl> + C.
2 Type Y, and press Enter.
3 Close the Window.

8/3/2019 62 Mx Install Bea814 Win
http://slidepdf.com/reader/full/62-mx-install-bea814-win 90/110
A-6 IBM Maximo: Installation Guide

8/3/2019 62 Mx Install Bea814 Win
http://slidepdf.com/reader/full/62-mx-install-bea814-win 91/110
© Copyright IBM Corp. 2006 B-1
In the event that you selected Yes in Step 8 on page 2-10, complete the steps
outlined in this Appendix and return to Chapter 2, Step 9 on page 2-11 to
complete your BEA WebLogic installation and configuration.
1 Select Yes to define JMS components and click Next.
2 In the Configure JMS Connections Factories window:
a Click Add
b In the Name field type: MEA connectionfactory
c In the JNDI name field type: jms/mro/int/qcf/intqcf
d In the Default delivery mode: select Persistent
e Accept the default values that appear in the Default priority field (4)
and the Acknowledge policy field (All)
Configuring JMS Options
for MEA B

8/3/2019 62 Mx Install Bea814 Win
http://slidepdf.com/reader/full/62-mx-install-bea814-win 92/110
B-2 IBM Maximo: Installation Guide
f Click Next.
3 In the Configure JMS Destination Key(s) window, click Next.
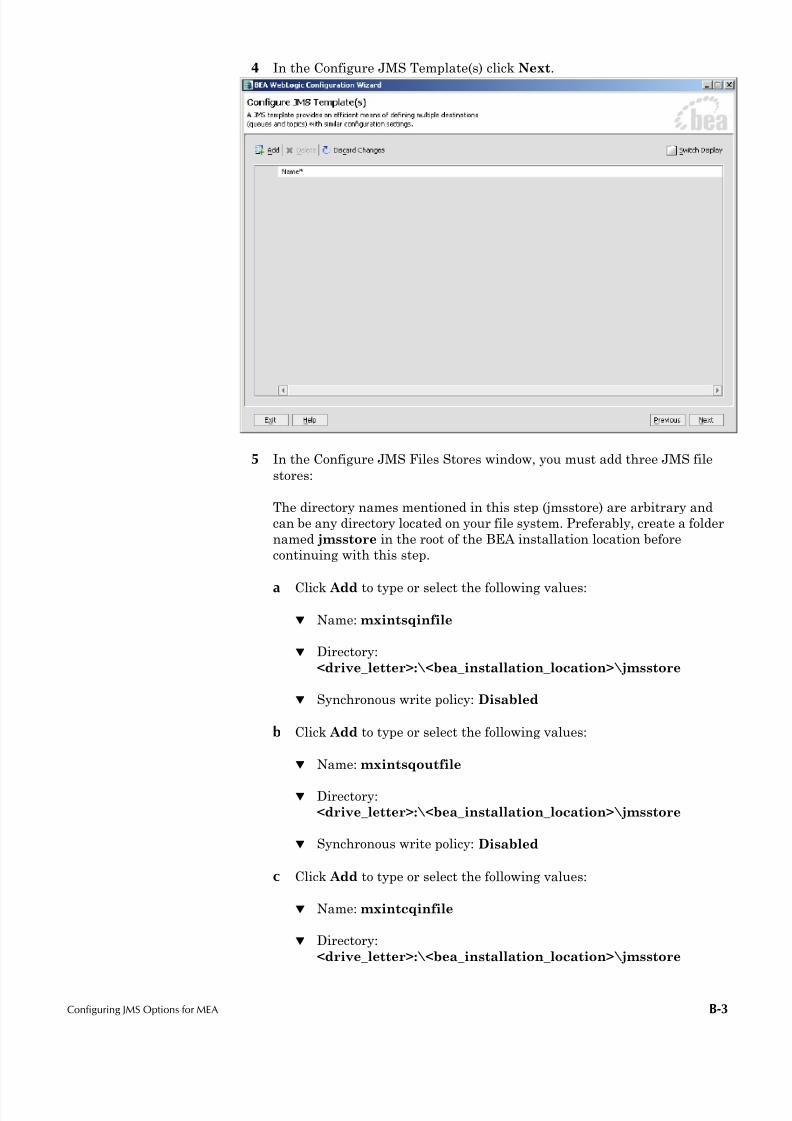
8/3/2019 62 Mx Install Bea814 Win
http://slidepdf.com/reader/full/62-mx-install-bea814-win 93/110
Configuring JMS Options for MEA B-3
4 In the Configure JMS Template(s) click Next.
5 In the Configure JMS Files Stores window, you must add three JMS file
stores:
The directory names mentioned in this step (jmsstore) are arbitrary and
can be any directory located on your file system. Preferably, create a folder
named jmsstore in the root of the BEA installation location before
continuing with this step.
a Click Add to type or select the following values:
! Name: mxintsqinfile
! Directory:
<drive_letter>:\<bea_installation_location>\jmsstore
! Synchronous write policy: Disabled
b Click Add to type or select the following values:
! Name: mxintsqoutfile
! Directory:
<drive_letter>:\<bea_installation_location>\jmsstore
! Synchronous write policy: Disabled
c Click Add to type or select the following values:
! Name: mxintcqinfile
! Directory:
<drive_letter>:\<bea_installation_location>\jmsstore

8/3/2019 62 Mx Install Bea814 Win
http://slidepdf.com/reader/full/62-mx-install-bea814-win 94/110
B-4 IBM Maximo: Installation Guide
! Synchronous write policy: Disabled.
d Click Next.
Refer to Chapter 2 Step 4 on page 2-2 for the exact BEA installation
location.
6 In the Configure JMS Servers window, you must add three JMS Servers:
a Click Add to type or select the following values:
! Name: mxintsqinserver
! Store: mxintsqinfile
! Paging store: Unspecified (default)
! Temporary template: Unspecified (default)
! Expiration scan interval 30 (default)
b Click Add to type or select the following values:
! Name: mxintsqoutserver
! Store: mxintsqoutfile
! Paging store: Unspecified (default)
! Temporary template: Unspecified (default)
! Expiration scan interval 30 (default)
In this example <drive_letter> is c:\
also <bea_installation_location> is bea.

8/3/2019 62 Mx Install Bea814 Win
http://slidepdf.com/reader/full/62-mx-install-bea814-win 95/110
Configuring JMS Options for MEA B-5
c Click Add to type or select the following values:
! Name: mxintcqinserver
! Store: mxintcqinfile
! Paging store: Unspecified (default)
! Temporary template: Unspecified (default)
! Expiration scan interval 30 (default)
d Click Next
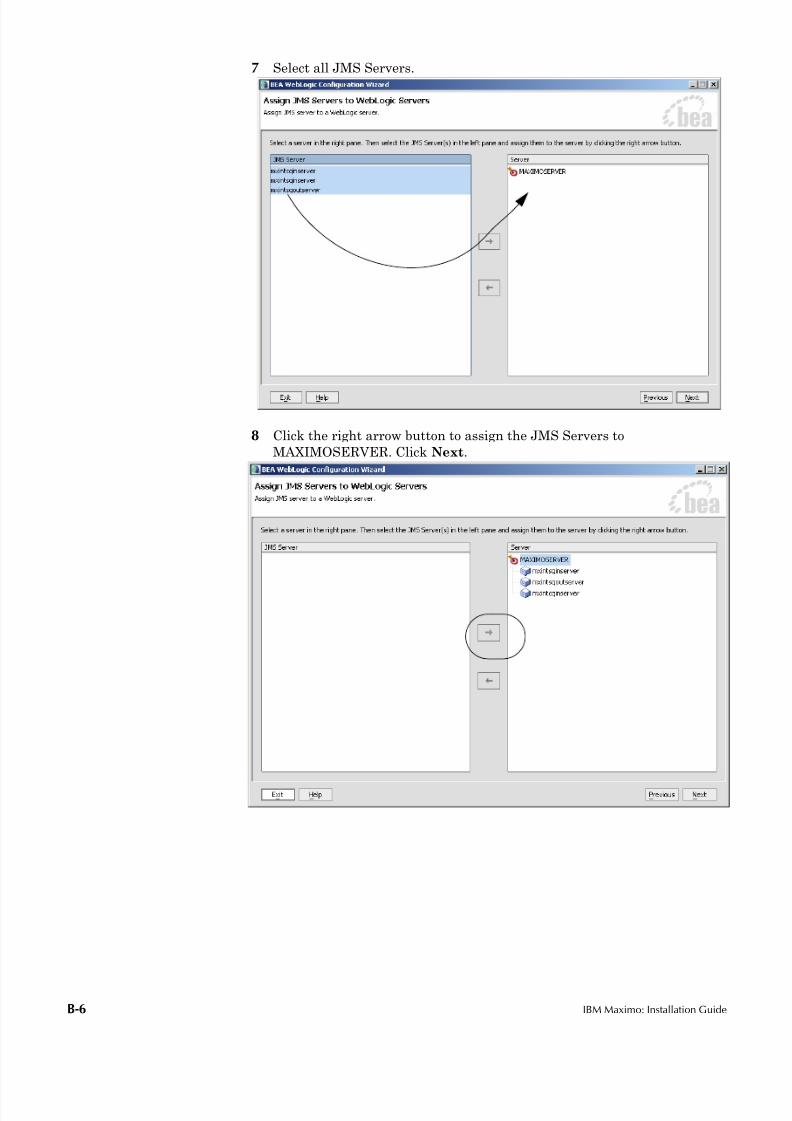
8/3/2019 62 Mx Install Bea814 Win
http://slidepdf.com/reader/full/62-mx-install-bea814-win 96/110
B-6 IBM Maximo: Installation Guide
7 Select all JMS Servers.
8 Click the right arrow button to assign the JMS Servers to
MAXIMOSERVER. Click Next.
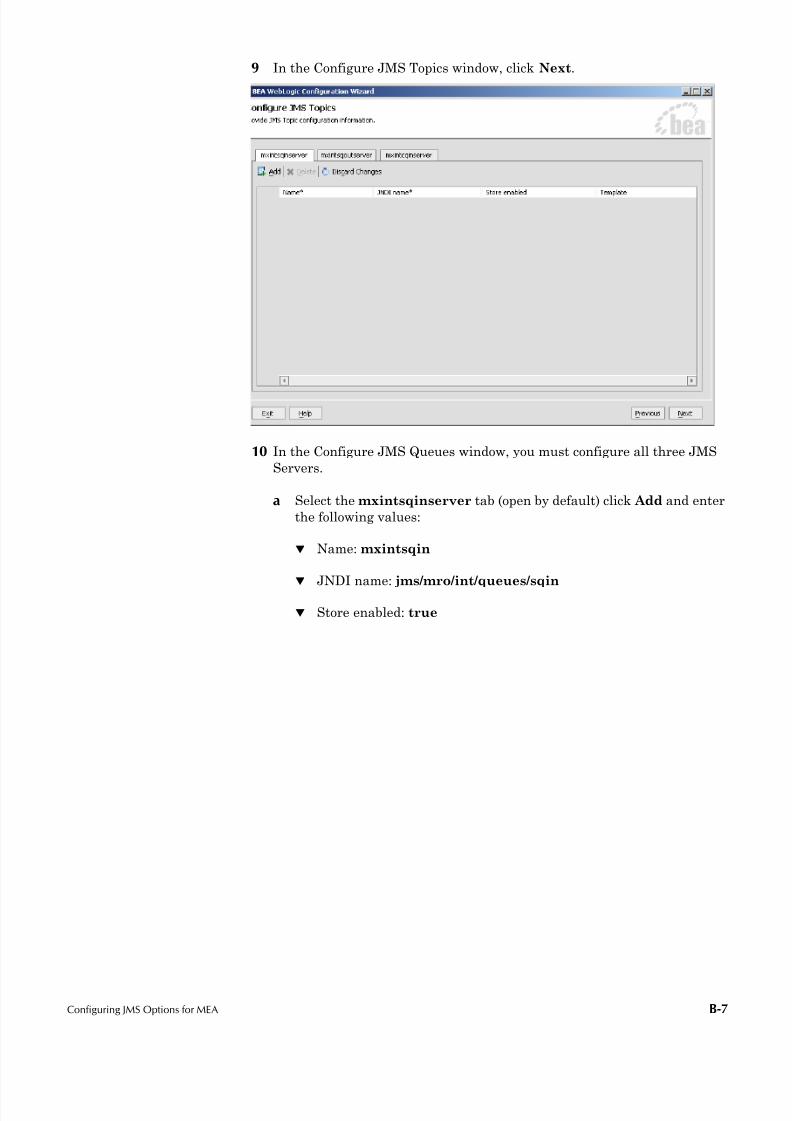
8/3/2019 62 Mx Install Bea814 Win
http://slidepdf.com/reader/full/62-mx-install-bea814-win 97/110
Configuring JMS Options for MEA B-7
9 In the Configure JMS Topics window, click Next.
10 In the Configure JMS Queues window, you must configure all three JMS
Servers.
a Select the mxintsqinserver tab (open by default) click Add and enter
the following values:
! Name: mxintsqin
! JNDI name: jms/mro/int/queues/sqin
! Store enabled: true

8/3/2019 62 Mx Install Bea814 Win
http://slidepdf.com/reader/full/62-mx-install-bea814-win 98/110
B-8 IBM Maximo: Installation Guide
! Template: Unspecified (default).
b Select the mxintsqoutserver tab click Add and enter the following
values:
! Name: mxintsqout
! JNDI name: jms/mro/int/queues/sqout
! Store enabled: true
! Template: Unspecified (default)

8/3/2019 62 Mx Install Bea814 Win
http://slidepdf.com/reader/full/62-mx-install-bea814-win 99/110
Configuring JMS Options for MEA B-9
c Select the mxintcqinserver tab click Add and enter the following
values:
! Name: mxintcqin
! JNDI name: jms/mro/int/queues/cqin
! Store enabled: default
! Template: Unspecified (default)
d Click Next.

8/3/2019 62 Mx Install Bea814 Win
http://slidepdf.com/reader/full/62-mx-install-bea814-win 100/110
B-10 IBM Maximo: Installation Guide
11 In the Applications and Services Targeting Options, select Yes and click
Next.
12 In the Target Services to Servers or Clusters check all services and select
(highlight) the MAXIMOSERVER from the left pane. Click Next.
13 Refer back to Chapter 2 and continue with Step 9 on page 2-11.
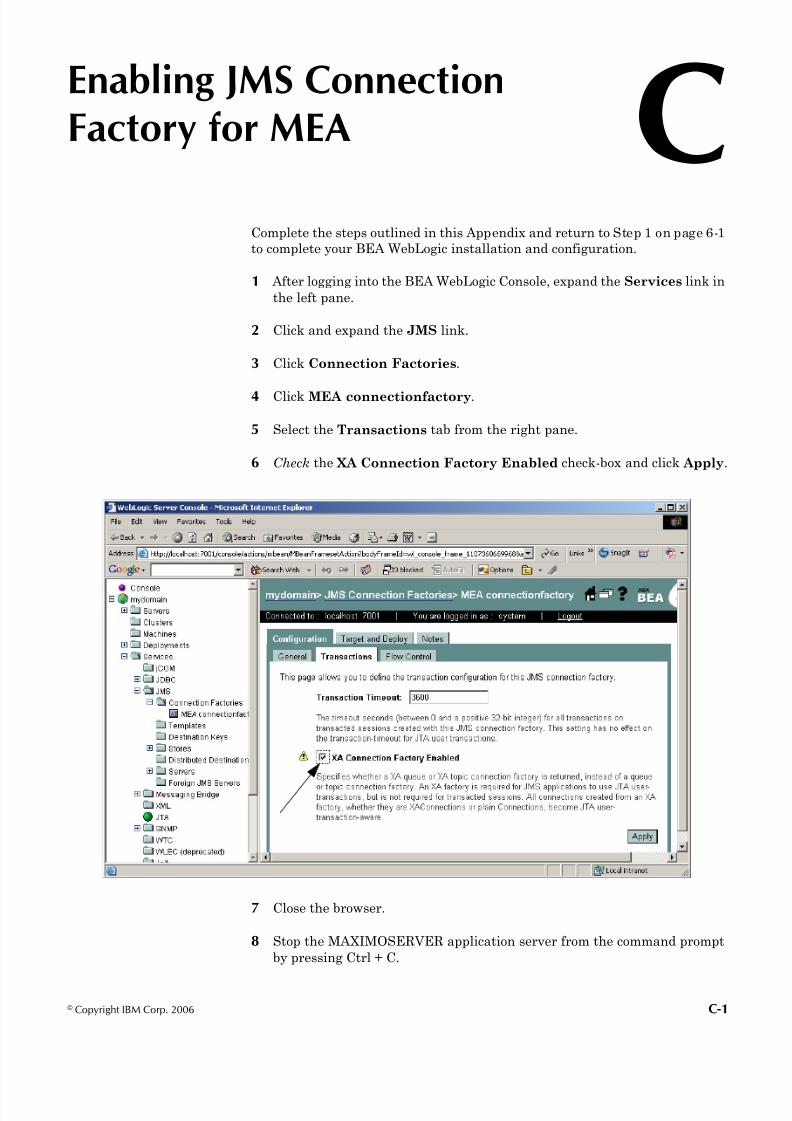
8/3/2019 62 Mx Install Bea814 Win
http://slidepdf.com/reader/full/62-mx-install-bea814-win 101/110
© Copyright IBM Corp. 2006 C-1
Complete the steps outlined in this Appendix and return to Step 1 on page 6-1
to complete your BEA WebLogic installation and configuration.
1 After logging into the BEA WebLogic Console, expand the Services link in
the left pane.
2 Click and expand the JMS link.
3 Click Connection Factories.
4 Click MEA connectionfactory.
5 Select the Transactions tab from the right pane.
6 Check the XA Connection Factory Enabled check-box and click Apply.
7 Close the browser.
8 Stop the MAXIMOSERVER application server from the command prompt
by pressing Ctrl + C.
Enabling JMS Connection
Factory for MEA C
8/3/2019 62 Mx Install Bea814 Win
http://slidepdf.com/reader/full/62-mx-install-bea814-win 102/110
C-2 IBM Maximo: Installation Guide
9 Refer back to “Deploying the EAR Files” on page 6-1, to restart the
MAXIMOSERVER Application Server.
8/3/2019 62 Mx Install Bea814 Win
http://slidepdf.com/reader/full/62-mx-install-bea814-win 103/110
© Copyright IBM Corp. 2006 D-1
Ensure that Maximo is not running. At this time you must install the
additional Product Enablers program you received. The EAR files are built at
this time. Complete the following steps.
1 Stop the Maximo Application Server (MAXIMOSERVER) process.
2 Insert the Product Enablers CD-ROM into the CD drive.
3 From the root CD drive, double-click setup.exe.
4 Select the desired language from the drop-down list. Selecting a languageonly changes the installation screens into that language but does not affect
the underlying files that get installed.
! If your language is not available from the list, select English, and click
OK.
! If it is Japanese or Chinese you must have those fonts installed on your
system.
! For any selected language other than English, that you are installing
on a SQL Server database, you must perform certain post-installation
tasks as decdribed in Chapter 9. This procedure does not apply if you
are using Oracle database.
5 Click Next in the Welcome dialog box.
6 Verify that the default value (c:\Maximo) is the Maximo Home Directory
and click Next.
7 Click Install in the Pre-Configuration Message dialog box.
Allow the installation progress bar to complete.
8 If you are installing additional Product Enablers, select Yes and the
program exits. You must now insert other Product Enabler CD-ROM(s)
that you may have obtained, otherwise select No and click Done.
Three message boxes appear indicating that the EAR files are being built.
9 Click Done in the Install Complete dialog box.
Each time that EAR files are re-built, delete the temporary BEA files.
Complete the following steps:
10 Navigate to
c:\bea\user_projects\domains\mydomain\MAXIMOSERVER directory.
Adding Additional Product
Enablers D

8/3/2019 62 Mx Install Bea814 Win
http://slidepdf.com/reader/full/62-mx-install-bea814-win 104/110
D-2 IBM Maximo: Installation Guide
11 Delete all files and folders under this directory except for the Upload
folder. Do not delete the upload folder.

8/3/2019 62 Mx Install Bea814 Win
http://slidepdf.com/reader/full/62-mx-install-bea814-win 105/110

8/3/2019 62 Mx Install Bea814 Win
http://slidepdf.com/reader/full/62-mx-install-bea814-win 106/110
E-2 IBM Maximo: Installation Guide
8/3/2019 62 Mx Install Bea814 Win
http://slidepdf.com/reader/full/62-mx-install-bea814-win 107/110
© Copyright IBM Corp. 2006 Notices-1
Notices
This information was developed for products and services offered in the U.S.A.
IBM may not offer the products, services, or features discussed in this
document in other countries. Consult your local IBM representative for
information on the products and services currently available in your area. Any
reference to an IBM product, program, or service is not intended to state or
imply that only that IBM product, program, or service may be used. Any
functionally equivalent product, program, or service that does not infringe any
IBM intellectual property right may be used instead. However, it is the user's
responsibility to evaluate and verify the operation of any non-IBM product,
program, or service.
IBM may have patents or pending patent applications covering subject matter
described in this document. The furnishing of this document does not grantyou any license to these patents. You can send license inquiries, in writing, to:
IBM Director of Licensing
IBM Corporation
North Castle Drive
Armonk, NY 10504-1785
U.S.A.
For license inquiries regarding double-byte (DBCS) information, contact the
IBM Intellectual Property Department in your country or send inquiries, in
writing, to:
IBM World Trade Asia Corporation
Licensing
2-31 Roppongi 3-chome, Minato-ku
Tokyo 106-0032, Japan
The following paragraph does not apply to the United Kingdom or any other
country where such provisions are inconsistent with local law:
INTERNATIONAL BUSINESS MACHINES CORPORATION PROVIDES
THIS PUBLICATION "AS IS" WITHOUT WARRANTY OF ANY KIND,
EITHER EXPRESS OR IMPLIED, INCLUDING, BUT NOT LIMITED TO,
THE IMPLIED WARRANTIES OF NON-INFRINGEMENT,
MERCHANTABILITY OR FITNESS FOR A PARTICULAR PURPOSE. Somestates do not allow disclaimer of express or implied warranties in certain
transactions, therefore, this statement may not apply to you.
This information could include technical inaccuracies or typographical errors.
Changes are periodically made to the information herein; these changes will
be incorporated in new editions of the publication. IBM may make
improvements and/or changes in the product(s) and/or the program(s)
described in this publication at any time without notice.
Any references in this information to non-IBM Web sites are provided for
convenience only and do not in any manner serve as an endorsement of those

8/3/2019 62 Mx Install Bea814 Win
http://slidepdf.com/reader/full/62-mx-install-bea814-win 108/110
Notices-2 IBM Maximo: Installation Guide
Web sites. The materials at those Web sites are not part of the materials for
this IBM product and use of those Web sites is at your own risk.
IBM may use or distribute any of the information you supply in any way it
believes appropriate without incurring any obligation to you.
Licensees of this program who wish to have information about it for the
purpose of enabling: (i) the exchange of information between independently
created programs and other programs (including this one) and (ii) the mutualuse of the information which has been exchanged, should contact:
IBM Corporation
2Z4A/101
11400 Burnet Road
Austin, TX 78758 U.S.A.
Such information may be available, subject to appropriate terms and
conditions, including in some cases, payment of a fee.
The licensed program described in this document and all licensed material
available for it are provided by IBM under terms of the IBM Customer
Agreement, IBM International Program License Agreement or any equivalent
agreement between us.
Information concerning non-IBM products was obtained from the suppliers of
those products, their published announcements or other publicly available
sources. IBM has not tested those products and cannot confirm the accuracy of
performance, compatibility or any other claims related to non-IBM products.
Questions on the capabilities of non-IBM products should be addressed to the
suppliers of those products.
All statements regarding IBM's future direction or intent are subject to
change or withdrawal without notice, and represent goals and objectives only.
This information contains examples of data and reports used in daily business
operations. To illustrate them as completely as possible, the examples include
the names of individuals, companies, brands, and products. All of these names
are fictitious and any similarity to the names and addresses used by an actual
business enterprise is entirely coincidental.
If you are viewing this information softcopy, the photographs and color
illustrations may not appear.
Trademarks
AIX, IBM, IBM Corporation, the IBM logo, Tivoli, and WebSphere are
registered trademarks of the International Business Machines Corporation in
the United States, other countries, or both.
Intel, the Intel logo, and Pentium are registered trademarks of the Intel
Corporation in the United States, other countries, or both.
Microsoft, Windows, and Internet Explorer are registered trademarks of
Microsoft Corporation in the United States, other countries, or both.

8/3/2019 62 Mx Install Bea814 Win
http://slidepdf.com/reader/full/62-mx-install-bea814-win 109/110
Notices-3
Java and all Java-based trademarks and logos are trademarks or registered
trademarks of Sun Microsystems, Inc. in the United States, other countries, or
both.
Sun, Sun Microsystems, the Sun logo, and Solaris are trademarks of Sun
Microsystems, Inc.
Linux is a trademark of Linus Torvalds in the United States, other countries,
or both.
UNIX is a registered trademark of The Open Group in the United States and
other countries.
Other company, product, and service names may be trademarks or service
marks of others.

8/3/2019 62 Mx Install Bea814 Win
http://slidepdf.com/reader/full/62-mx-install-bea814-win 110/110


