62
Blackbaud FundWare Bank Reconciliation Guide V ERSION 7.60, SEPTEMBER 2009
Blackbaud FundWareBank Reconciliation Guide
VERSION 7.60, SEPTEMBER 2009
BLackbaud FundWare Bank Reconciliation Guide
ii
USER GUIDE HISTORY
© Copyright 2009, Blackbaud FundWare, Inc. All rights reserved. The Blackbaud FundWare logos, among others, are registered trademarks and/or registered service marks of Blackbaud Fundware, Inc. in the United States and other countries. Other parties’ trademarks or service marks are the property of their respective owners and should be treated as such.
Date Changes
May 2001 7.15 Edition A
June 2001 7.15 Edition 1
January 2002 7.16—Includes edits correcting minor typographical errors.
July 2002 7.17—Includes edits correcting minor typographical errors.
December 2002 7.20—Includes edits correcting minor typographical errors.
September 2003 7.20 Service Pack 3—Includes minor modifications to the program and edits to the guide to clarify text and correct errors.
May 2004 7.30—Text rewritten to reflect a new interface.
December 2004 7.31—The guide has been edited to reflect new company information.
December 2004 7.40—The guide has been updated with minor corrections.
July 2008 7.50—The guide has been updated with minor corrections and new company information.
September 2009 7.60—The guide has been updated to incorporate 7.60 functionality and to reflect new company information.
TABLE OF CONTENTS
Chapter 1—Introduction . . . . . . . . . . . . . . . . . . . . . . . . . . . . . . . . . . . . . . . . 1The Reconciliation Process . . . . . . . . . . . . . . . . . . . . . . . . . . . . . . . . . . . . . . . . . 1Bank Reconciliation Main Window. . . . . . . . . . . . . . . . . . . . . . . . . . . . . . . . . . . 2Toolbar Folders . . . . . . . . . . . . . . . . . . . . . . . . . . . . . . . . . . . . . . . . . . . . . . . . . . 3
Getting Support . . . . . . . . . . . . . . . . . . . . . . . . . . . . . . . . . . . . . . . . . . . . . . . 3
Chapter 2—Configuring Bank Reconciliation. . . . . . . . . . . . . . . . . . . . . . . 7Setting Security for Bank Reconciliation. . . . . . . . . . . . . . . . . . . . . . . . . . . . . . . 7Opening the Bank Reconciliation Module. . . . . . . . . . . . . . . . . . . . . . . . . . . . . . 8
Closing Bank Reconciliation. . . . . . . . . . . . . . . . . . . . . . . . . . . . . . . . . . . . . 8Existing Customers—Refresh Your Data First . . . . . . . . . . . . . . . . . . . . . . . . . . 9Refreshing the FIA Information. . . . . . . . . . . . . . . . . . . . . . . . . . . . . . . . . . . . . 12Opening an FIA . . . . . . . . . . . . . . . . . . . . . . . . . . . . . . . . . . . . . . . . . . . . . . . . . 13
Setting a Default GL Cash Account . . . . . . . . . . . . . . . . . . . . . . . . . . . . . . 13Posting Reconciliation Information . . . . . . . . . . . . . . . . . . . . . . . . . . . . . . . . . . 15
Posting Service Charges . . . . . . . . . . . . . . . . . . . . . . . . . . . . . . . . . . . . . . . 16Posting Interest Earned . . . . . . . . . . . . . . . . . . . . . . . . . . . . . . . . . . . . . . . . 18
Viewing the FIA Information . . . . . . . . . . . . . . . . . . . . . . . . . . . . . . . . . . . . . . 20Deleting the FIA Information . . . . . . . . . . . . . . . . . . . . . . . . . . . . . . . . . . . . . . 20Refreshing the Reconciliation Data . . . . . . . . . . . . . . . . . . . . . . . . . . . . . . . . . . 21Default Printer Information . . . . . . . . . . . . . . . . . . . . . . . . . . . . . . . . . . . . . . . . 21Backing Up Your Information . . . . . . . . . . . . . . . . . . . . . . . . . . . . . . . . . . . . . . 22
Chapter 3—Transaction Register . . . . . . . . . . . . . . . . . . . . . . . . . . . . . . . . 23Viewing the Transaction Register . . . . . . . . . . . . . . . . . . . . . . . . . . . . . . . . . . . 23
Keys to the Transaction Register. . . . . . . . . . . . . . . . . . . . . . . . . . . . . . . . . 24Viewing a Transaction . . . . . . . . . . . . . . . . . . . . . . . . . . . . . . . . . . . . . . . . . . . . 25Printing the Transaction Register. . . . . . . . . . . . . . . . . . . . . . . . . . . . . . . . . . . . 26
Keys to Previewing a Report . . . . . . . . . . . . . . . . . . . . . . . . . . . . . . . . . . . . 28Deleting a Transaction . . . . . . . . . . . . . . . . . . . . . . . . . . . . . . . . . . . . . . . . . . . . 29
Blackbaud, Inc. iii
Blackbaud FundWare Bank Reconciliation Guide
iv
Chapter 4—Reconciling Your Accounts . . . . . . . . . . . . . . . . . . . . . . . . . . .31Importing Your General Ledger Data in Blackbaud FundWare . . . . . . . . . . . . 31Refreshing Your Data in Bank Reconciliation . . . . . . . . . . . . . . . . . . . . . . . . . . 34Reconciling Your Accounts . . . . . . . . . . . . . . . . . . . . . . . . . . . . . . . . . . . . . . . . 36
Selecting a Check Range . . . . . . . . . . . . . . . . . . . . . . . . . . . . . . . . . . . . . . . 39Saving a Reconciliation . . . . . . . . . . . . . . . . . . . . . . . . . . . . . . . . . . . . . . . . 40Re-Opening a Saved Reconciliation . . . . . . . . . . . . . . . . . . . . . . . . . . . . . . 41
Importing Electronic Bank Information . . . . . . . . . . . . . . . . . . . . . . . . . . . . . . . 41Reconciling Electronic Fund Transfers . . . . . . . . . . . . . . . . . . . . . . . . . . . . . . . 47Viewing a Completed Reconciliation. . . . . . . . . . . . . . . . . . . . . . . . . . . . . . . . . 49Printing Reconciliation Information. . . . . . . . . . . . . . . . . . . . . . . . . . . . . . . . . . 50Deleting a Reconciliation . . . . . . . . . . . . . . . . . . . . . . . . . . . . . . . . . . . . . . . . . . 52Voiding a Transaction . . . . . . . . . . . . . . . . . . . . . . . . . . . . . . . . . . . . . . . . . . . . 53
What Happens When You Void. . . . . . . . . . . . . . . . . . . . . . . . . . . . . . . . . . 53The Reconciliation Report . . . . . . . . . . . . . . . . . . . . . . . . . . . . . . . . . . . . . . . . . 54
Index . . . . . . . . . . . . . . . . . . . . . . . . . . . . . . . . . . . . . . . . . . . . . . . . . . . . . . . .55
C H A P T E R 1
INTRODUCTION
The Blackbaud FundWare™ Bank Reconciliation (BR) module has been jointly developed with Twenty Pines Resources, Inc. to provide you with the ability to reconcile your bank statements (e.g., monthly, quarterly) with your Financial Institution Accounts (FIAs).
A chapter discussing Financial Institutions appears in each of the guides for modules that this feature. Please turn to the Accounts Payable, Accounts Receivable, Cash Receipts, or Payroll/Personnel guide for more information on the Financial Institutions feature.
The Bank Reconciliation module allows you to reconcile your bank statements with your FundWare FIAs, allowing you to keep your FIA accounts accurate and up-to-date. BR can interface with Accounts Payable, Cash Receipts/Accounts Receivable, Payroll/Personnel, and General Ledger–Project/Grant, depending on your use of these modules. When you have completed a reconciliation, your checks in the source module will reflect the reconciliation.Because the module runs independently from FundWare, you will have to update the BR data before you will be able to reconcile the accounts. Once FundWare and BR are in agreement, you can reconcile the FIA information to your bank statement.
THE RECONCILIATION PROCESSThe bulleted list below provides a view into a typical bank reconciliation process, from setup through reconciliation. The components of this process are found throughout this guide.
• Set up your FIAs.• Refresh your information from Accounts Payable, Cash Receipts/Accounts
Receivable, Payroll/Personnel, and/or General Ledger–Project/Grant.• Reconcile the transactions or import electronic bank information to reconcile
the transactions.
Blackbaud, Inc. 1
Blackbaud FundWare Bank Reconciliation Guide
2
• Save and re-open a partially completed reconciliation (if necessary).• Print reports.• Update reconciliation information in the source modules.
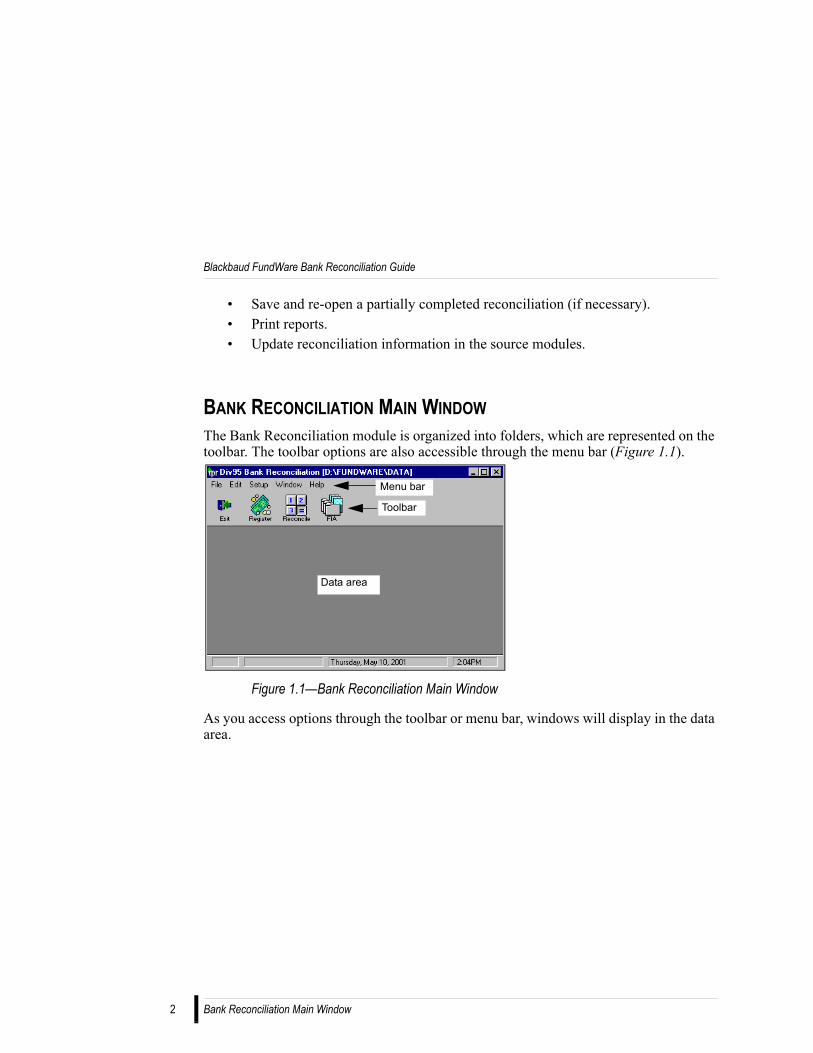
BANK RECONCILIATION MAIN WINDOWThe Bank Reconciliation module is organized into folders, which are represented on the toolbar. The toolbar options are also accessible through the menu bar (Figure 1.1).
Figure 1.1—Bank Reconciliation Main Window
As you access options through the toolbar or menu bar, windows will display in the data area.
Data area
Menu bar
Toolbar
Bank Reconciliation Main Window
Chapter 1—Introduction
ff
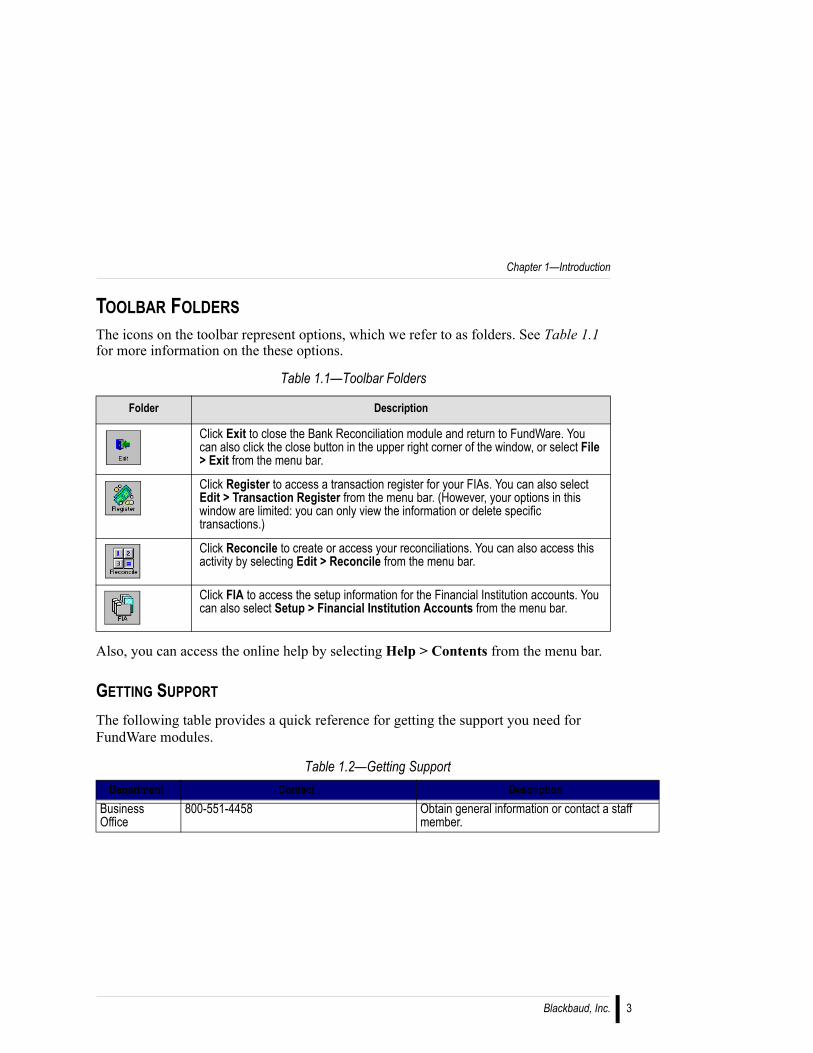
TOOLBAR FOLDERSThe icons on the toolbar represent options, which we refer to as folders. See Table 1.1 for more information on the these options.
Also, you can access the online help by selecting Help > Contents from the menu bar.
GETTING SUPPORT
The following table provides a quick reference for getting the support you need for FundWare modules.
Table 1.1—Toolbar Folders
Folder Description
Click Exit to close the Bank Reconciliation module and return to FundWare. You can also click the close button in the upper right corner of the window, or select File > Exit from the menu bar.
Click Register to access a transaction register for your FIAs. You can also select Edit > Transaction Register from the menu bar. (However, your options in this window are limited: you can only view the information or delete specific transactions.)
Click Reconcile to create or access your reconciliations. You can also access this activity by selecting Edit > Reconcile from the menu bar.
Click FIA to access the setup information for the Financial Institution accounts. You can also select Setup > Financial Institution Accounts from the menu bar.
Table 1.2—Getting SupportDepartment Contact Description
Business Office
800-551-4458 Obtain general information or contact a stamember.
Blackbaud, Inc. 3
Blackbaud FundWare Bank Reconciliation Guide
4
tion
e
baud
ning
fered
ur e
ent are.
,
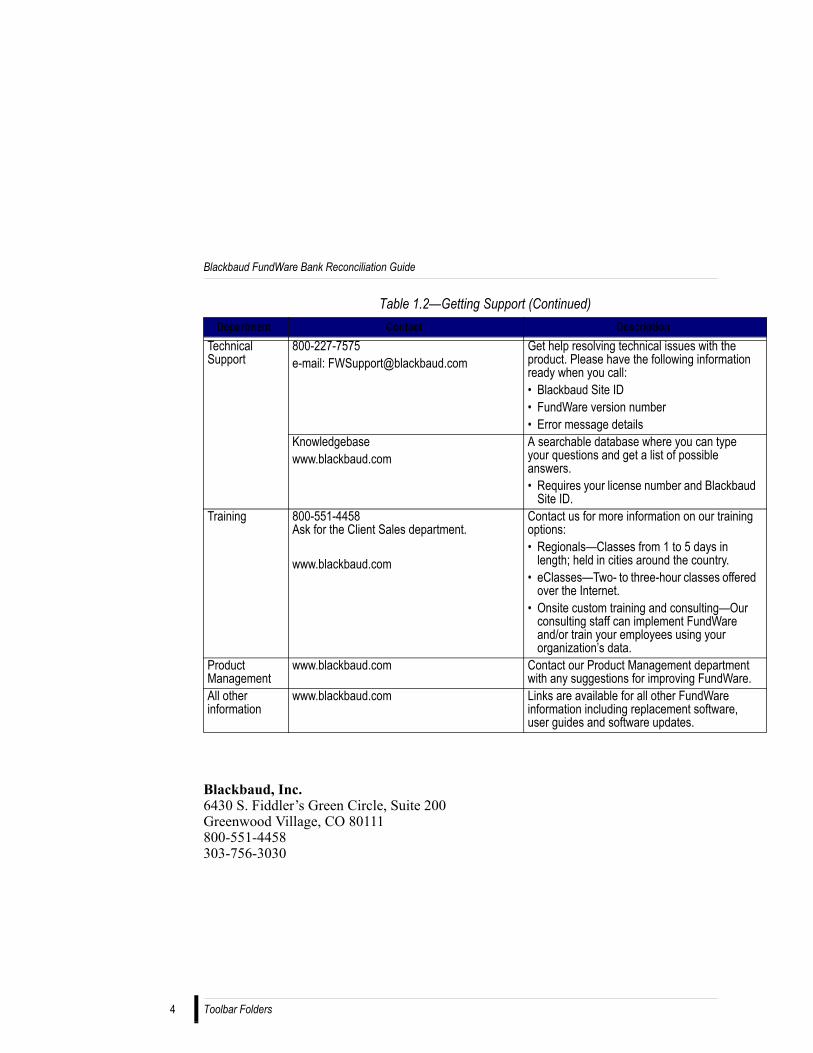
Technical Support
800-227-7575e-mail: [email protected]
Get help resolving technical issues with theproduct. Please have the following informaready when you call:• Blackbaud Site ID• FundWare version number• Error message details
Knowledgebasewww.blackbaud.com
A searchable database where you can typyour questions and get a list of possible answers.• Requires your license number and Black
Site ID.Training 800-551-4458
Ask for the Client Sales department.
www.blackbaud.com
Contact us for more information on our traioptions:• Regionals—Classes from 1 to 5 days in
length; held in cities around the country.• eClasses—Two- to three-hour classes of
over the Internet.• Onsite custom training and consulting—O
consulting staff can implement FundWarand/or train your employees using your organization’s data.
Product Management
www.blackbaud.com Contact our Product Management departmwith any suggestions for improving FundW
All other information
www.blackbaud.com Links are available for all other FundWare information including replacement softwareuser guides and software updates.
Blackbaud, Inc.6430 S. Fiddler’s Green Circle, Suite 200Greenwood Village, CO 80111800-551-4458303-756-3030
Table 1.2—Getting Support (Continued)Department Contact Description
Toolbar Folders

Chapter 1—Introduction
Blackbaud, Inc. 5
Blackbaud FundWare Bank Reconciliation Guide
6
Toolbar Folders
C H A P T E R 2
CONFIGURING BANK RECONCILIATION
Before you can begin to work in the Bank Reconciliation (BR) module, you must give your users access. Once you have access to the module, you can begin to configure the settings.Because the basic information for BR is drawn from the Financial Institutions feature of FundWare, there are only a few configuration issues to be addressed when you first open BR. Once you refresh the Financial Institution Account (FIA) information from the source modules, you can decide if you want to use the BR posting options:
• Posting any bank service charges to a General Ledger account, and/or• Posting any interest earned to a General Ledger account.
You can also set the default GL cash account, or edit the BR posting options.
SETTING SECURITY FOR BANK RECONCILIATIONYou will set your security restrictions for Bank Reconciliation through FundWare security settings (accessed from the System Administration area of the program). However, individual tasks are not identified. If you give a user or group access to Bank Reconciliation, they have access to all the Bank Reconciliation tasks. Please see the Blackbaud FundWare System Administration Guide for more information on setting your security rights.
Blackbaud, Inc. 7
Blackbaud FundWare Bank Reconciliation Guide
8
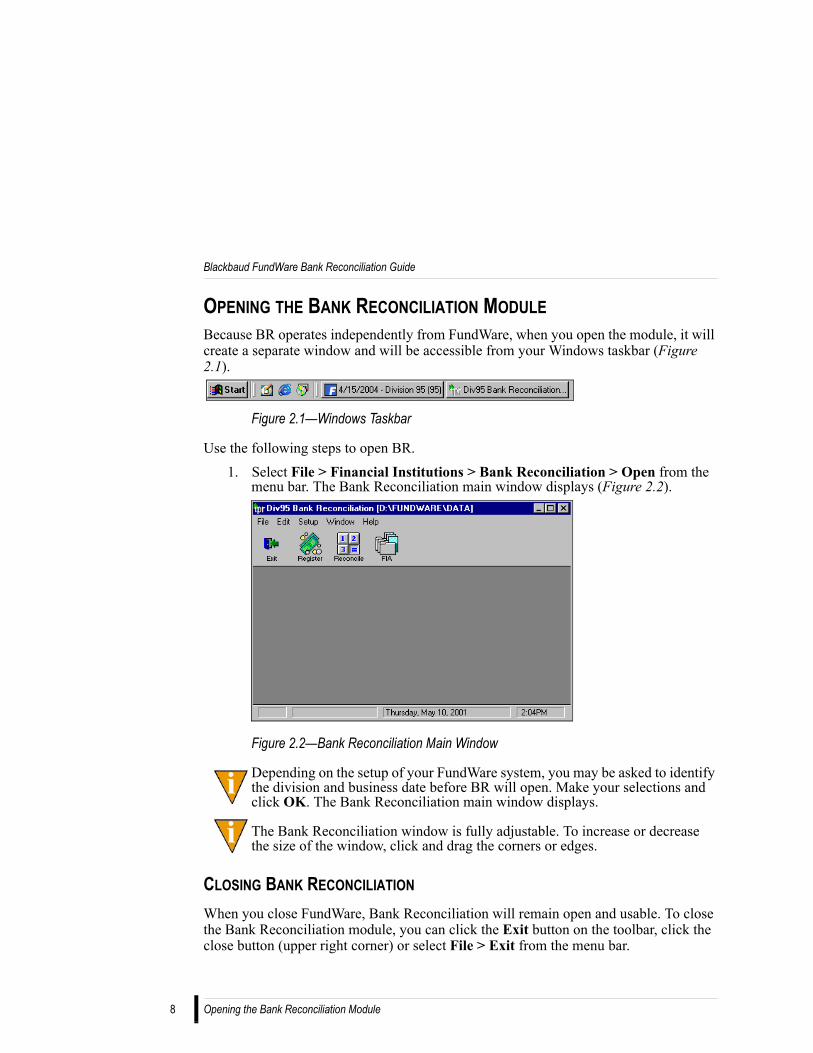
OPENING THE BANK RECONCILIATION MODULEBecause BR operates independently from FundWare, when you open the module, it will create a separate window and will be accessible from your Windows taskbar (Figure 2.1).
Figure 2.1—Windows Taskbar
Use the following steps to open BR.1. Select File > Financial Institutions > Bank Reconciliation > Open from the
menu bar. The Bank Reconciliation main window displays (Figure 2.2).
Figure 2.2—Bank Reconciliation Main Window
Depending on the setup of your FundWare system, you may be asked to identify the division and business date before BR will open. Make your selections and click OK. The Bank Reconciliation main window displays.
The Bank Reconciliation window is fully adjustable. To increase or decrease the size of the window, click and drag the corners or edges.
CLOSING BANK RECONCILIATION
When you close FundWare, Bank Reconciliation will remain open and usable. To close the Bank Reconciliation module, you can click the Exit button on the toolbar, click the close button (upper right corner) or select File > Exit from the menu bar.
Opening the Bank Reconciliation Module
Chapter 2—Configuring Bank Reconciliation
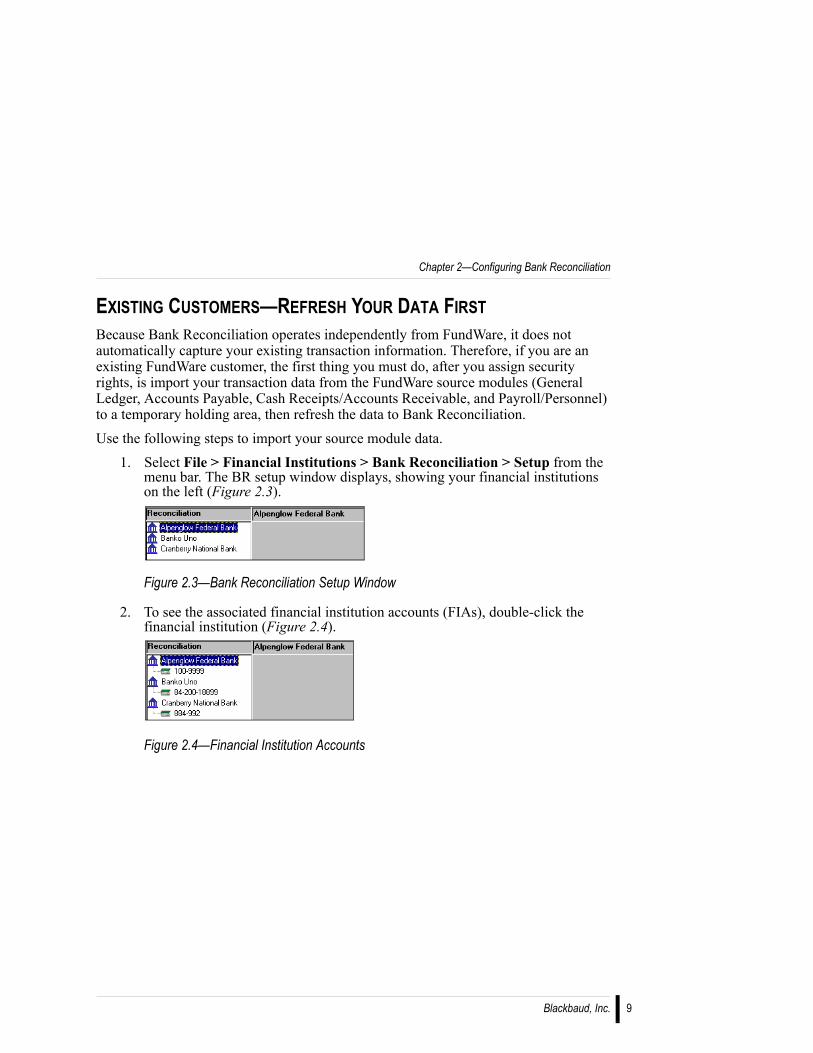
EXISTING CUSTOMERS—REFRESH YOUR DATA FIRSTBecause Bank Reconciliation operates independently from FundWare, it does not automatically capture your existing transaction information. Therefore, if you are an existing FundWare customer, the first thing you must do, after you assign security rights, is import your transaction data from the FundWare source modules (General Ledger, Accounts Payable, Cash Receipts/Accounts Receivable, and Payroll/Personnel) to a temporary holding area, then refresh the data to Bank Reconciliation.
Use the following steps to import your source module data.1. Select File > Financial Institutions > Bank Reconciliation > Setup from the
menu bar. The BR setup window displays, showing your financial institutions on the left (Figure 2.3).
Figure 2.3—Bank Reconciliation Setup Window
2. To see the associated financial institution accounts (FIAs), double-click the financial institution (Figure 2.4).
Figure 2.4—Financial Institution Accounts
Blackbaud, Inc. 9
Blackbaud FundWare Bank Reconciliation Guide
10
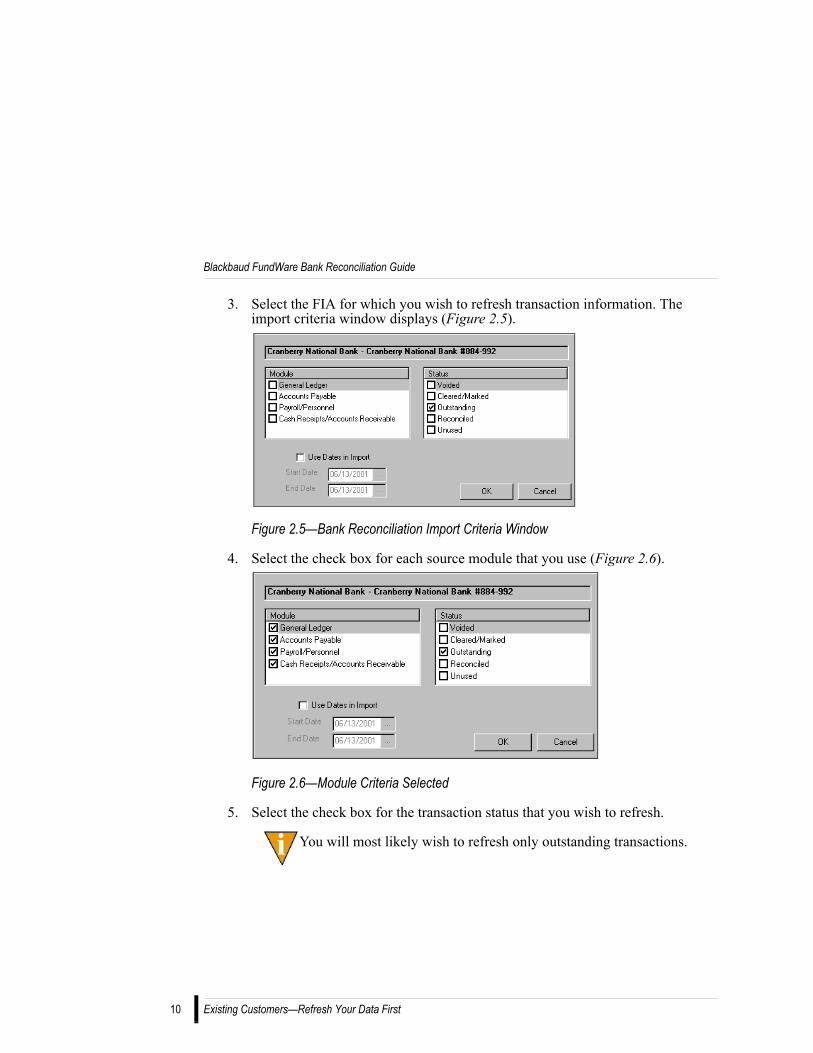
3. Select the FIA for which you wish to refresh transaction information. The import criteria window displays (Figure 2.5).
Figure 2.5—Bank Reconciliation Import Criteria Window
4. Select the check box for each source module that you use (Figure 2.6).
Figure 2.6—Module Criteria Selected
5. Select the check box for the transaction status that you wish to refresh.
You will most likely wish to refresh only outstanding transactions.
Existing Customers—Refresh Your Data First
Chapter 2—Configuring Bank Reconciliation
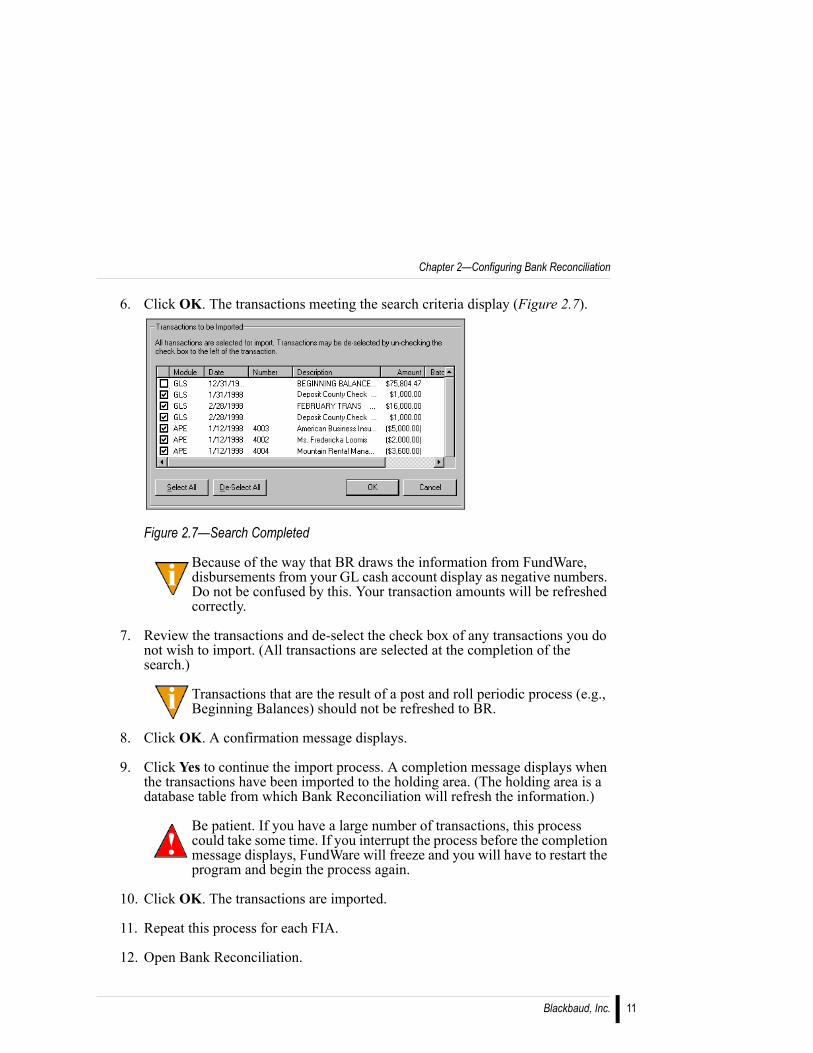
6. Click OK. The transactions meeting the search criteria display (Figure 2.7).
Figure 2.7—Search Completed
Because of the way that BR draws the information from FundWare, disbursements from your GL cash account display as negative numbers. Do not be confused by this. Your transaction amounts will be refreshed correctly.
7. Review the transactions and de-select the check box of any transactions you do not wish to import. (All transactions are selected at the completion of the search.)
Transactions that are the result of a post and roll periodic process (e.g., Beginning Balances) should not be refreshed to BR.
8. Click OK. A confirmation message displays.
9. Click Yes to continue the import process. A completion message displays when the transactions have been imported to the holding area. (The holding area is a database table from which Bank Reconciliation will refresh the information.)
Be patient. If you have a large number of transactions, this process could take some time. If you interrupt the process before the completion message displays, FundWare will freeze and you will have to restart the program and begin the process again.
10. Click OK. The transactions are imported.
11. Repeat this process for each FIA.
12. Open Bank Reconciliation.
Blackbaud, Inc. 11
Blackbaud FundWare Bank Reconciliation Guide
12
13. Access the Browse Transaction Register or Browse Reconciliations window.
14. Click Refresh. Your transactions have now been refreshed to the Bank Reconciliation module. (For more information on refreshing your data in Bank Reconciliation, see Refreshing Your Data in Bank Reconciliation on page 34.)
REFRESHING THE FIA INFORMATIONWhen you access the FIA window, you will see the name of the FIA and the default GL cash account from the Accounts tab of the Financial Institutions feature. When you open BR, this information is automatically refreshed. However, you can also refresh the information while the program is open (e.g., you or someone else updates the Financial Institutions feature while BR is open). Use the following steps to refresh your FIA information.
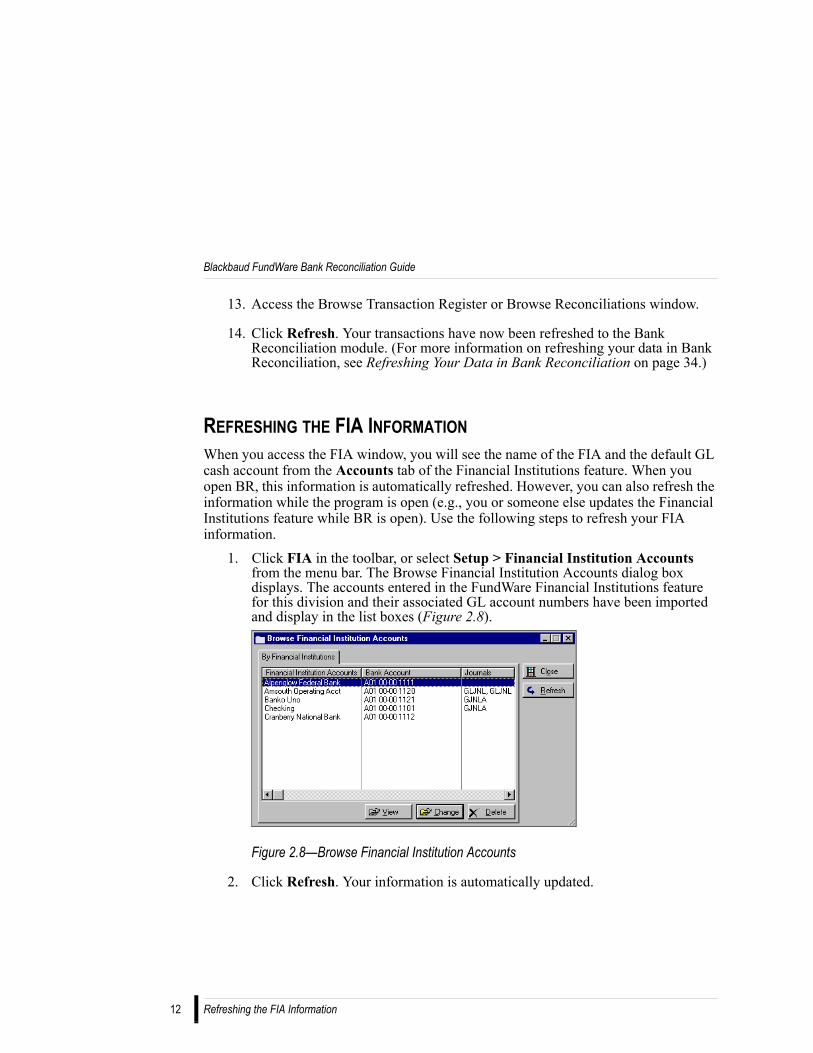
1. Click FIA in the toolbar, or select Setup > Financial Institution Accounts from the menu bar. The Browse Financial Institution Accounts dialog box displays. The accounts entered in the FundWare Financial Institutions feature for this division and their associated GL account numbers have been imported and display in the list boxes (Figure 2.8).
Figure 2.8—Browse Financial Institution Accounts
2. Click Refresh. Your information is automatically updated.
Refreshing the FIA Information
Chapter 2—Configuring Bank Reconciliation
OPENING AN FIAUse the following steps to open an FIA.
1. Click FIA in the toolbar, or select Setup > Financial Institution Accounts from the menu bar.
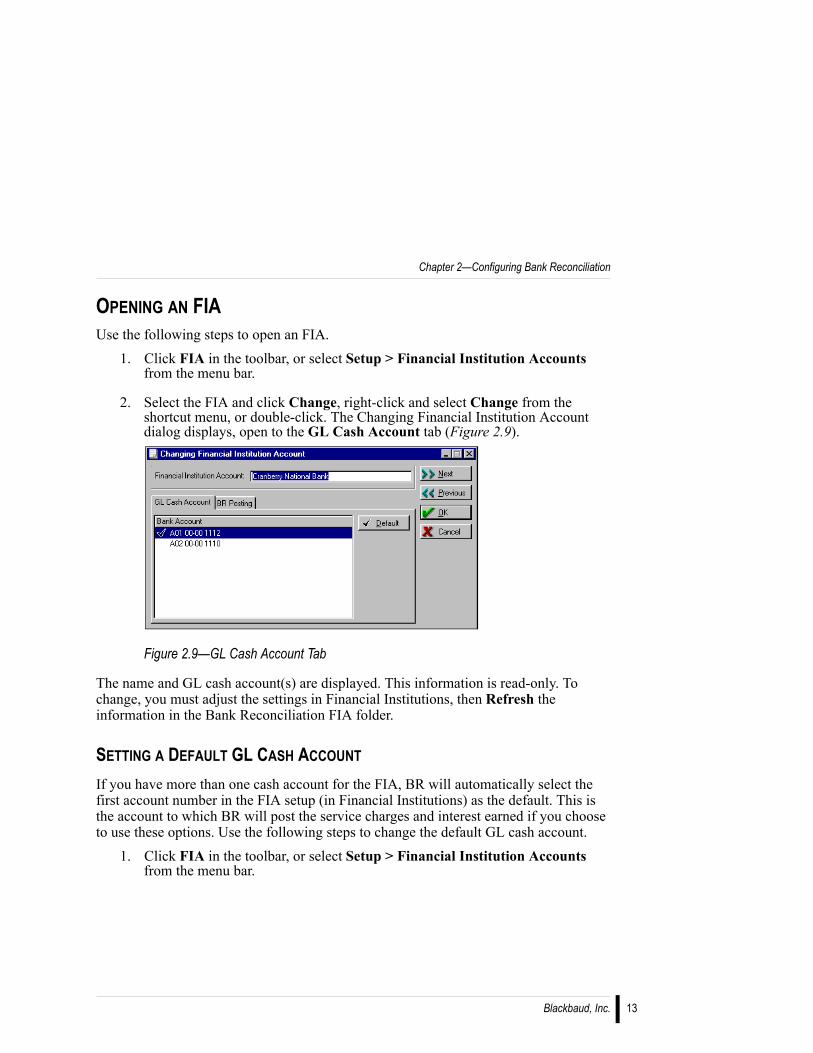
2. Select the FIA and click Change, right-click and select Change from the shortcut menu, or double-click. The Changing Financial Institution Account dialog displays, open to the GL Cash Account tab (Figure 2.9).
Figure 2.9—GL Cash Account Tab
The name and GL cash account(s) are displayed. This information is read-only. To change, you must adjust the settings in Financial Institutions, then Refresh the information in the Bank Reconciliation FIA folder.
SETTING A DEFAULT GL CASH ACCOUNT
If you have more than one cash account for the FIA, BR will automatically select the first account number in the FIA setup (in Financial Institutions) as the default. This is the account to which BR will post the service charges and interest earned if you choose to use these options. Use the following steps to change the default GL cash account.
1. Click FIA in the toolbar, or select Setup > Financial Institution Accounts from the menu bar.
Blackbaud, Inc. 13
Blackbaud FundWare Bank Reconciliation Guide
14
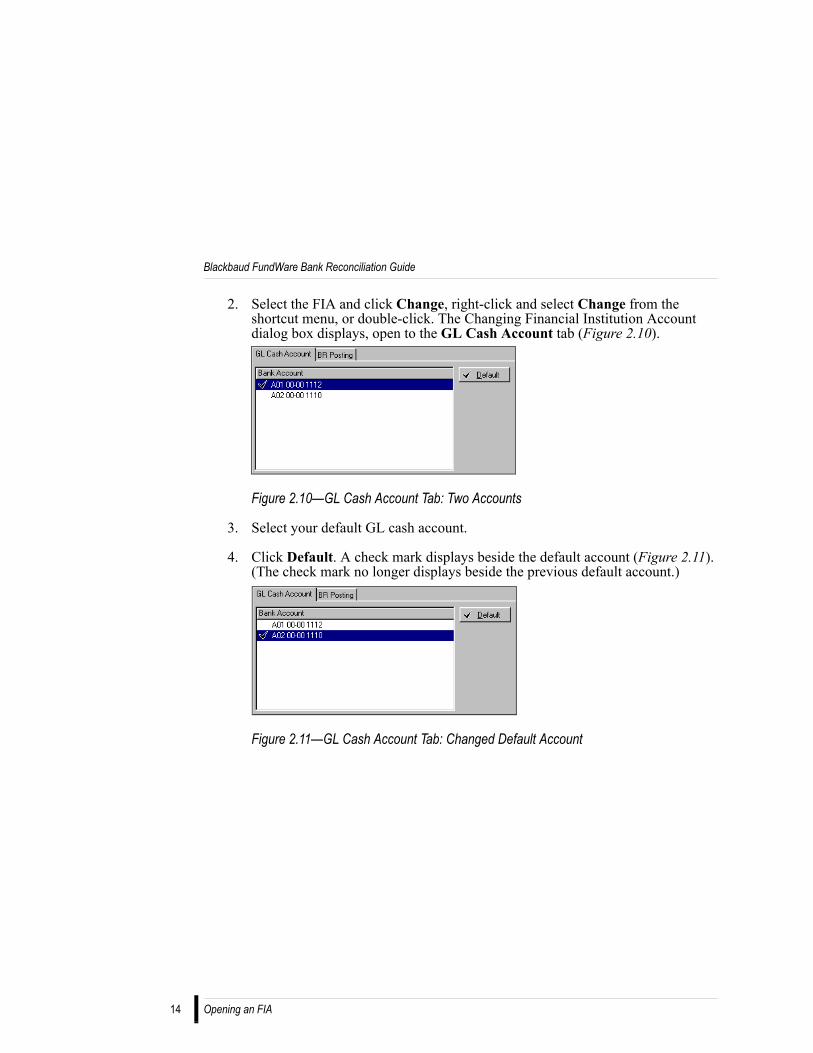
2. Select the FIA and click Change, right-click and select Change from the shortcut menu, or double-click. The Changing Financial Institution Account dialog box displays, open to the GL Cash Account tab (Figure 2.10).
Figure 2.10—GL Cash Account Tab: Two Accounts
3. Select your default GL cash account.
4. Click Default. A check mark displays beside the default account (Figure 2.11). (The check mark no longer displays beside the previous default account.)
Figure 2.11—GL Cash Account Tab: Changed Default Account
Opening an FIA
Chapter 2—Configuring Bank Reconciliation
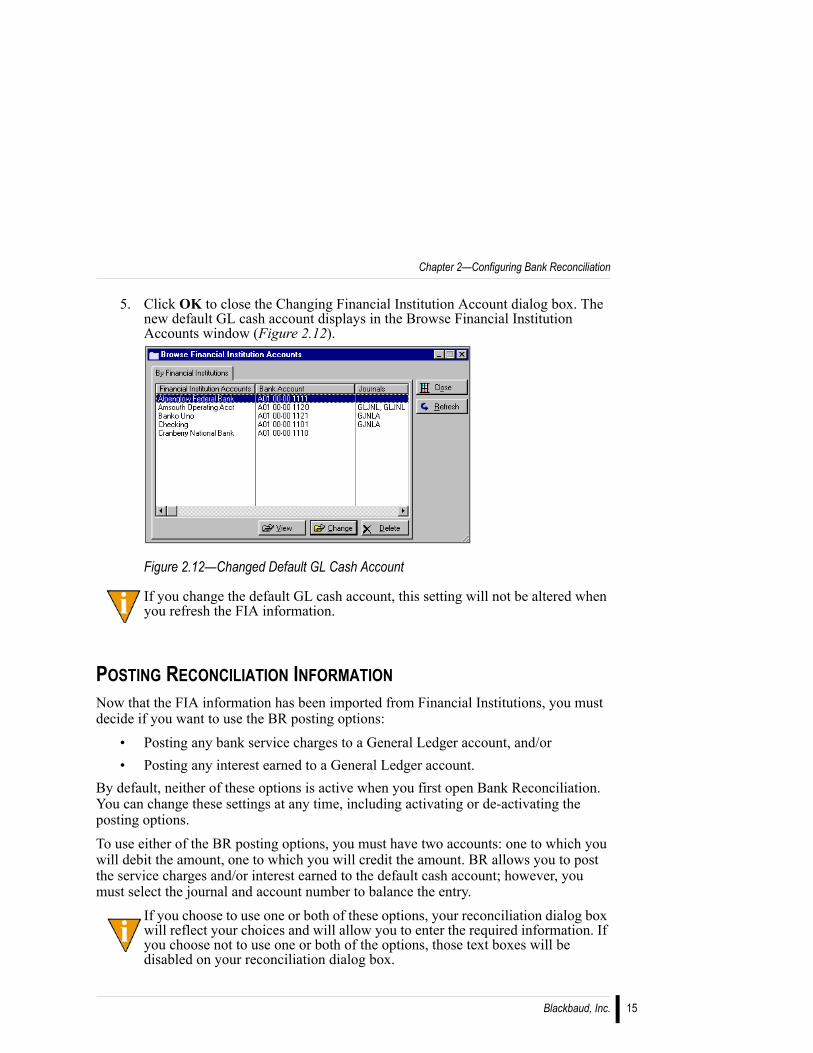
5. Click OK to close the Changing Financial Institution Account dialog box. The new default GL cash account displays in the Browse Financial Institution Accounts window (Figure 2.12).
Figure 2.12—Changed Default GL Cash Account
If you change the default GL cash account, this setting will not be altered when you refresh the FIA information.
POSTING RECONCILIATION INFORMATIONNow that the FIA information has been imported from Financial Institutions, you must decide if you want to use the BR posting options:
• Posting any bank service charges to a General Ledger account, and/or• Posting any interest earned to a General Ledger account.
By default, neither of these options is active when you first open Bank Reconciliation. You can change these settings at any time, including activating or de-activating the posting options. To use either of the BR posting options, you must have two accounts: one to which you will debit the amount, one to which you will credit the amount. BR allows you to post the service charges and/or interest earned to the default cash account; however, you must select the journal and account number to balance the entry.
If you choose to use one or both of these options, your reconciliation dialog box will reflect your choices and will allow you to enter the required information. If you choose not to use one or both of the options, those text boxes will be disabled on your reconciliation dialog box.
Blackbaud, Inc. 15

Blackbaud FundWare Bank Reconciliation Guide
16
POSTING SERVICE CHARGES
To use this feature, you must choose the journal and account number to which you will debit the services charges. The default GL cash account is the account to which you will credit the service charges. These transactions will then post to GL.Use the following steps to access the BR posting information.
1. Click FIA in the toolbar, or select Setup > Financial Institution Accounts from the menu bar.
2. Select the FIA and click Change or double-click. The Changing Financial Institution Account dialog displays, open to the GL Cash Account tab.
3. Click the BR Posting tab (Figure 2.13).
Figure 2.13—BR Posting Tab
Posting Reconciliation Information
Chapter 2—Configuring Bank Reconciliation
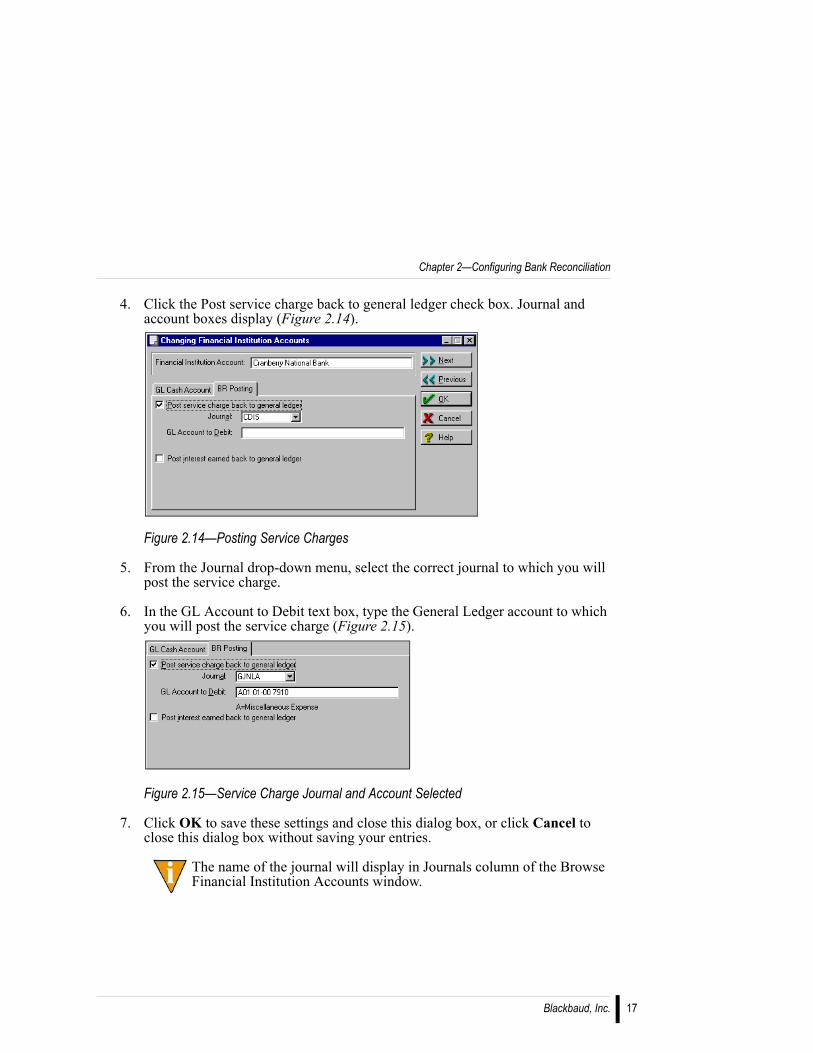
4. Click the Post service charge back to general ledger check box. Journal and account boxes display (Figure 2.14).
Figure 2.14—Posting Service Charges
5. From the Journal drop-down menu, select the correct journal to which you will post the service charge.
6. In the GL Account to Debit text box, type the General Ledger account to which you will post the service charge (Figure 2.15).
Figure 2.15—Service Charge Journal and Account Selected
7. Click OK to save these settings and close this dialog box, or click Cancel to close this dialog box without saving your entries.
The name of the journal will display in Journals column of the Browse Financial Institution Accounts window.
Blackbaud, Inc. 17
Blackbaud FundWare Bank Reconciliation Guide
18
POSTING INTEREST EARNED
To use this feature, you must choose the journal and account number to which you will credit the interest earned. The default GL cash account is the account to which you will debit the interest earned. These transactions will then post to GL.Use the following steps to access the BR posting information.
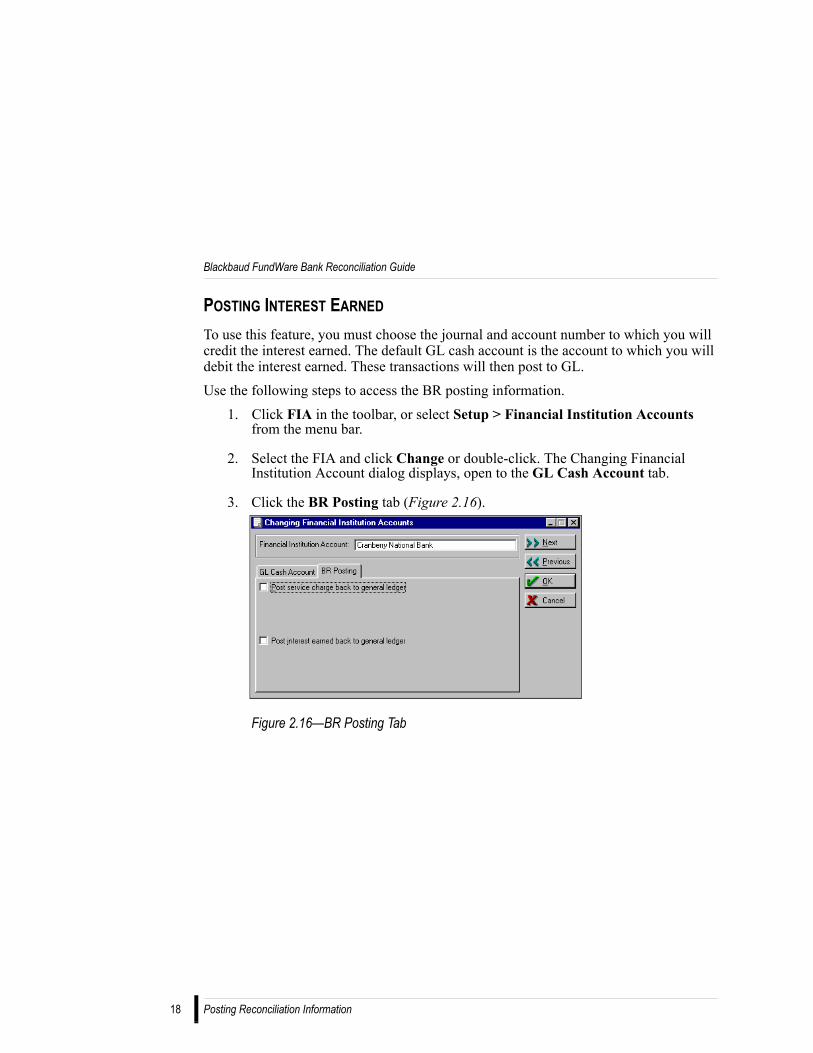
1. Click FIA in the toolbar, or select Setup > Financial Institution Accounts from the menu bar.
2. Select the FIA and click Change or double-click. The Changing Financial Institution Account dialog displays, open to the GL Cash Account tab.
3. Click the BR Posting tab (Figure 2.16).
Figure 2.16—BR Posting Tab
Posting Reconciliation Information
Chapter 2—Configuring Bank Reconciliation
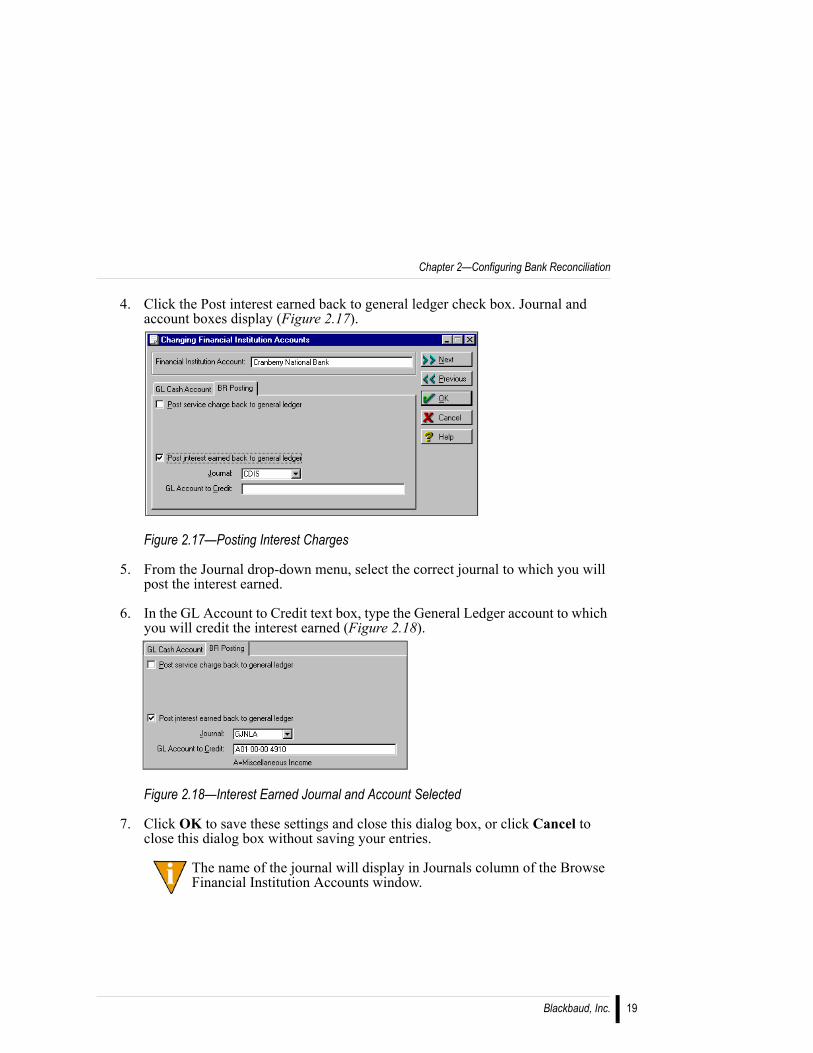
4. Click the Post interest earned back to general ledger check box. Journal and account boxes display (Figure 2.17).
Figure 2.17—Posting Interest Charges
5. From the Journal drop-down menu, select the correct journal to which you will post the interest earned.
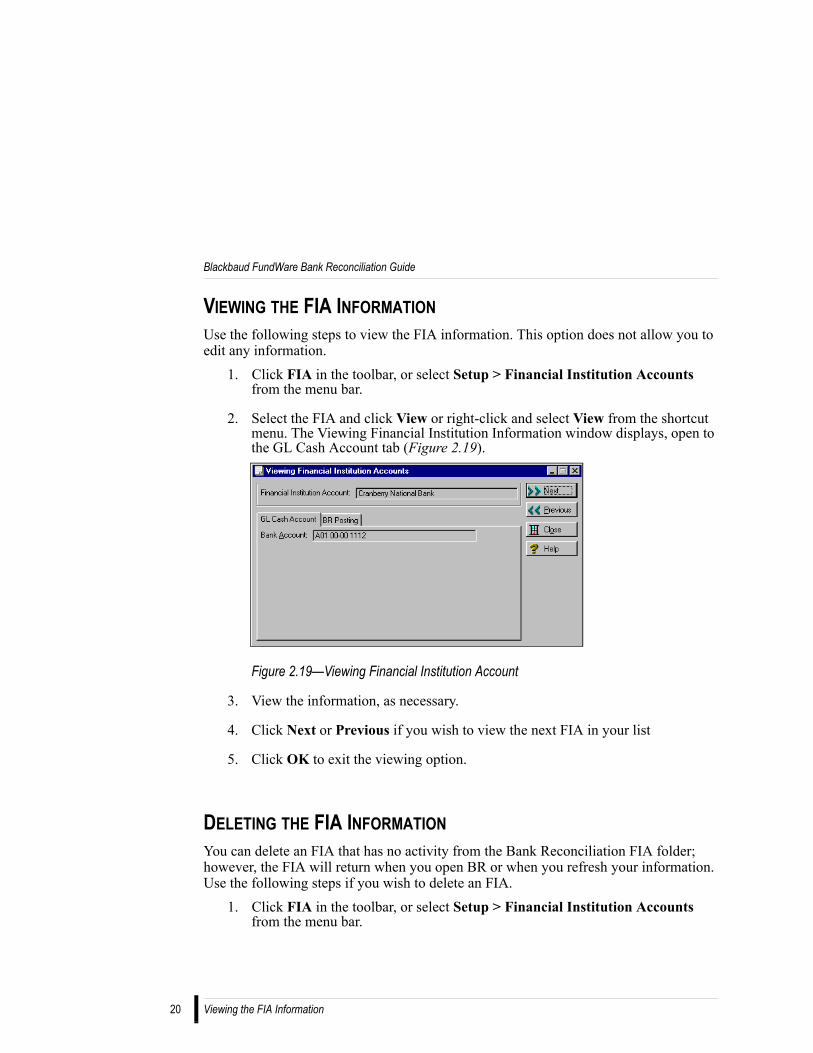
6. In the GL Account to Credit text box, type the General Ledger account to which you will credit the interest earned (Figure 2.18).
Figure 2.18—Interest Earned Journal and Account Selected
7. Click OK to save these settings and close this dialog box, or click Cancel to close this dialog box without saving your entries.
The name of the journal will display in Journals column of the Browse Financial Institution Accounts window.
Blackbaud, Inc. 19
Blackbaud FundWare Bank Reconciliation Guide
20
VIEWING THE FIA INFORMATIONUse the following steps to view the FIA information. This option does not allow you to edit any information.
1. Click FIA in the toolbar, or select Setup > Financial Institution Accounts from the menu bar.
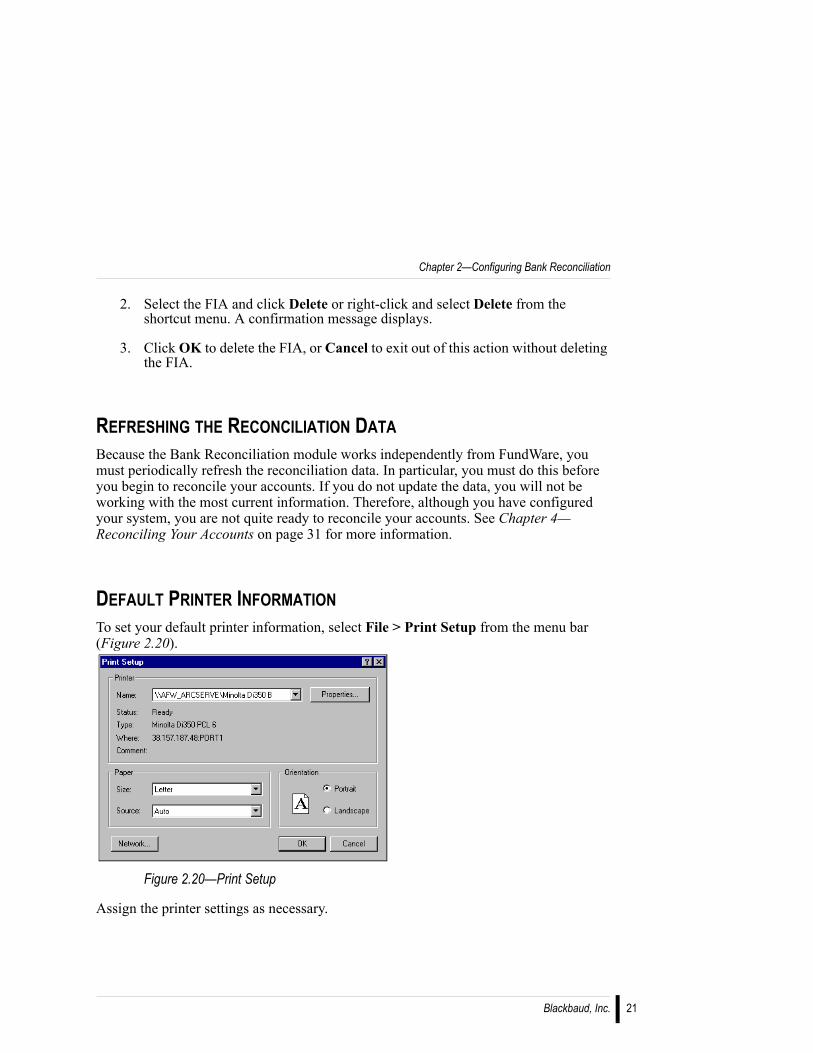
2. Select the FIA and click View or right-click and select View from the shortcut menu. The Viewing Financial Institution Information window displays, open to the GL Cash Account tab (Figure 2.19).
Figure 2.19—Viewing Financial Institution Account
3. View the information, as necessary.
4. Click Next or Previous if you wish to view the next FIA in your list
5. Click OK to exit the viewing option.
DELETING THE FIA INFORMATIONYou can delete an FIA that has no activity from the Bank Reconciliation FIA folder; however, the FIA will return when you open BR or when you refresh your information. Use the following steps if you wish to delete an FIA.
1. Click FIA in the toolbar, or select Setup > Financial Institution Accounts from the menu bar.
Viewing the FIA Information
Chapter 2—Configuring Bank Reconciliation
2. Select the FIA and click Delete or right-click and select Delete from the shortcut menu. A confirmation message displays.
3. Click OK to delete the FIA, or Cancel to exit out of this action without deleting the FIA.
REFRESHING THE RECONCILIATION DATABecause the Bank Reconciliation module works independently from FundWare, you must periodically refresh the reconciliation data. In particular, you must do this before you begin to reconcile your accounts. If you do not update the data, you will not be working with the most current information. Therefore, although you have configured your system, you are not quite ready to reconcile your accounts. See Chapter 4—Reconciling Your Accounts on page 31 for more information.
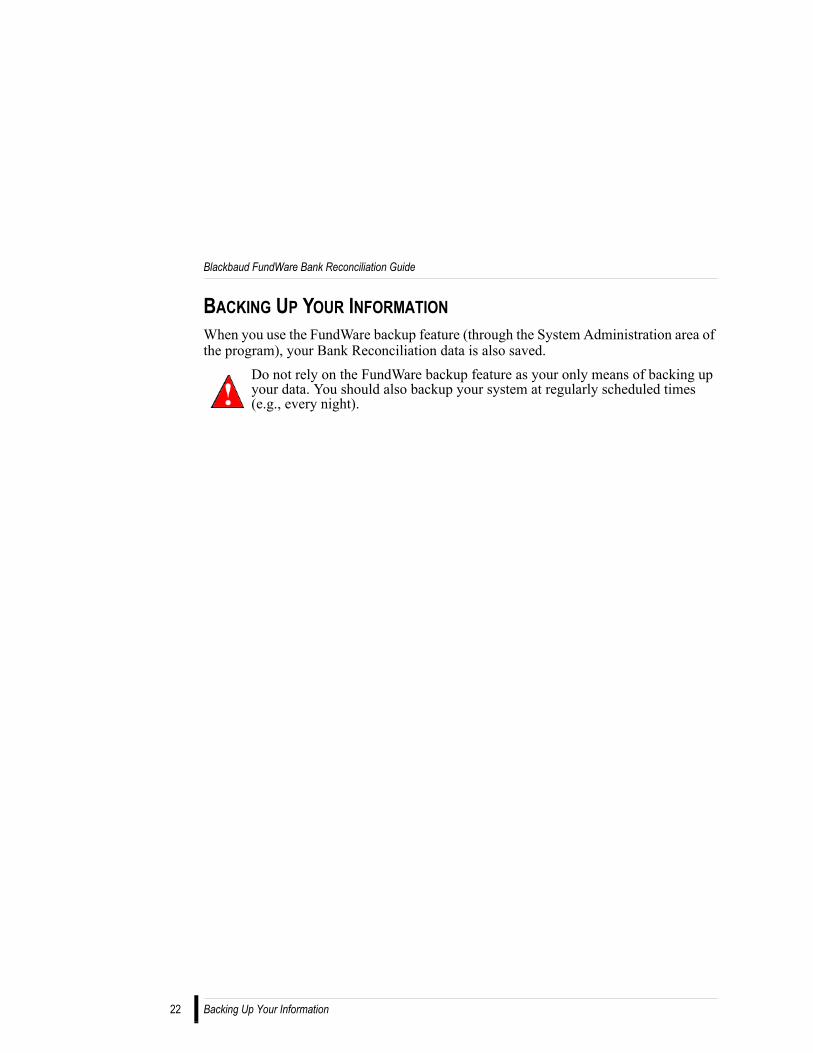
DEFAULT PRINTER INFORMATIONTo set your default printer information, select File > Print Setup from the menu bar (Figure 2.20).
Figure 2.20—Print Setup
Assign the printer settings as necessary.
Blackbaud, Inc. 21
Blackbaud FundWare Bank Reconciliation Guide
22
BACKING UP YOUR INFORMATIONWhen you use the FundWare backup feature (through the System Administration area of the program), your Bank Reconciliation data is also saved.
Do not rely on the FundWare backup feature as your only means of backing up your data. You should also backup your system at regularly scheduled times (e.g., every night).
Backing Up Your Information
C H A P T E R 3
TRANSACTION REGISTER
The transaction register allows you to view all the transactions for each FIA. The two-line entries provide information about each transaction, including the date written, type of transaction, amount, and reconciliation status.From the transaction register, you can view the transaction information for any of your FIAs or view a specific check (these are view-only options; you cannot edit the transaction information). You can also delete a specific transaction.
VIEWING THE TRANSACTION REGISTERUse the following steps to view the transaction register:
1. From the Bank Reconciliation main window, click Register or select Edit > Transaction Register from the menu bar. The Browse Transaction Register window displays.
Blackbaud, Inc. 23
Blackbaud FundWare Bank Reconciliation Guide
24
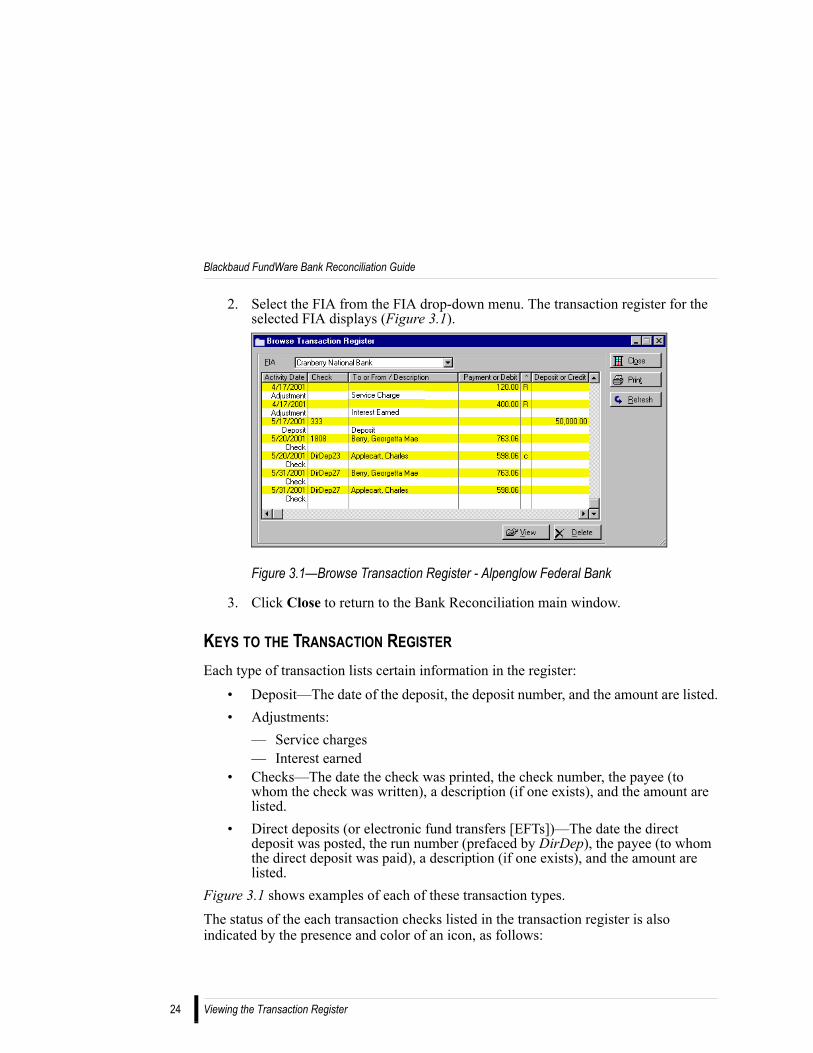
2. Select the FIA from the FIA drop-down menu. The transaction register for the selected FIA displays (Figure 3.1).
Figure 3.1—Browse Transaction Register - Alpenglow Federal Bank
3. Click Close to return to the Bank Reconciliation main window.
KEYS TO THE TRANSACTION REGISTER
Each type of transaction lists certain information in the register:
• Deposit—The date of the deposit, the deposit number, and the amount are listed.• Adjustments:
— Service charges— Interest earned
• Checks—The date the check was printed, the check number, the payee (to whom the check was written), a description (if one exists), and the amount are listed.
• Direct deposits (or electronic fund transfers [EFTs])—The date the direct deposit was posted, the run number (prefaced by DirDep), the payee (to whom the direct deposit was paid), a description (if one exists), and the amount are listed.
Figure 3.1 shows examples of each of these transaction types. The status of the each transaction checks listed in the transaction register is also indicated by the presence and color of an icon, as follows:
Viewing the Transaction Register
Chapter 3—Transaction Register
• No letter—The transaction has been refreshed from FundWare; however, it has not been reconciled.
• Letter “c”—The transaction has been reconciled in Bank Reconciliation, but the reconciliation process is not complete. Therefore, the reconciliation information has not been updated in FundWare (as appropriate).
• Letter “R”—The transaction has been reconciled, and the reconciliation is complete. Therefore, the reconciliation information has been updated in FundWare (as appropriate).
Figure 3.1 also shows examples of these transaction statuses.
VIEWING A TRANSACTIONYou can also view transactions from the register; however, this is a view-only option (i.e., you cannot edit the information contained on the check). Use the following steps to view a specific transaction.
1. From the Browse Transaction Register window, select the transaction that you wish to view.
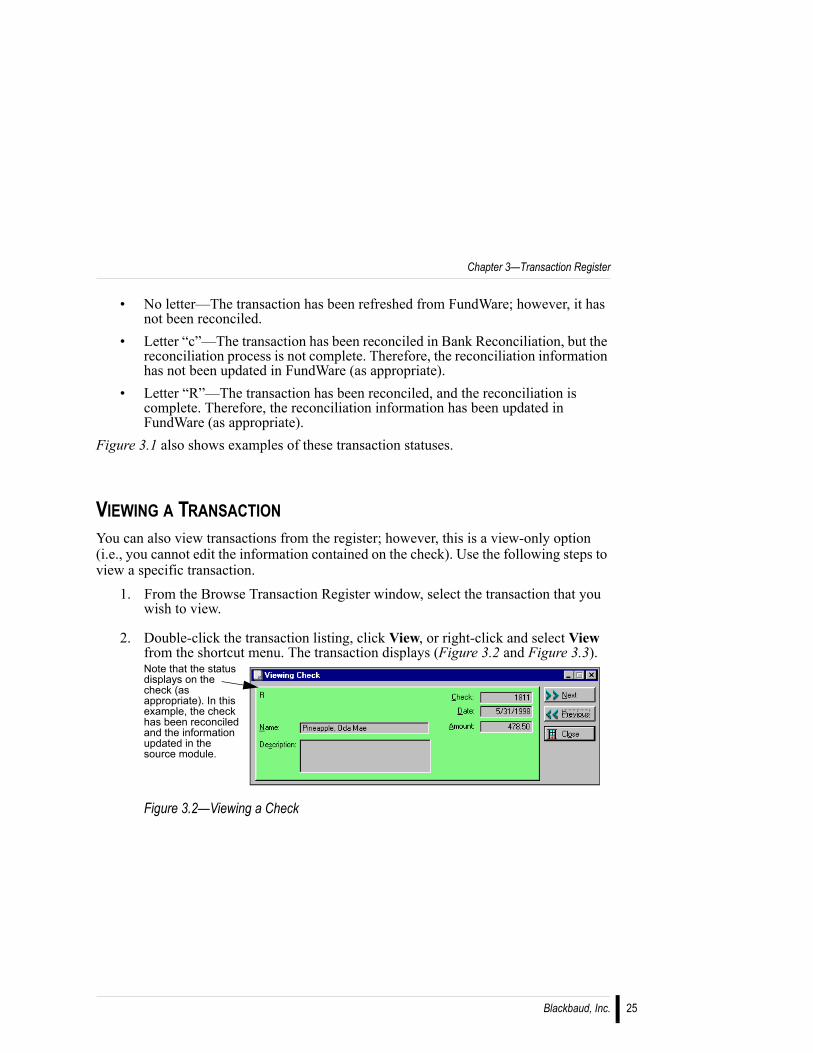
2. Double-click the transaction listing, click View, or right-click and select View from the shortcut menu. The transaction displays (Figure 3.2 and Figure 3.3).
Figure 3.2—Viewing a Check
Note that the status displays on the check (as appropriate). In this example, the check has been reconciled and the information updated in the source module.
Blackbaud, Inc. 25
Blackbaud FundWare Bank Reconciliation Guide
26
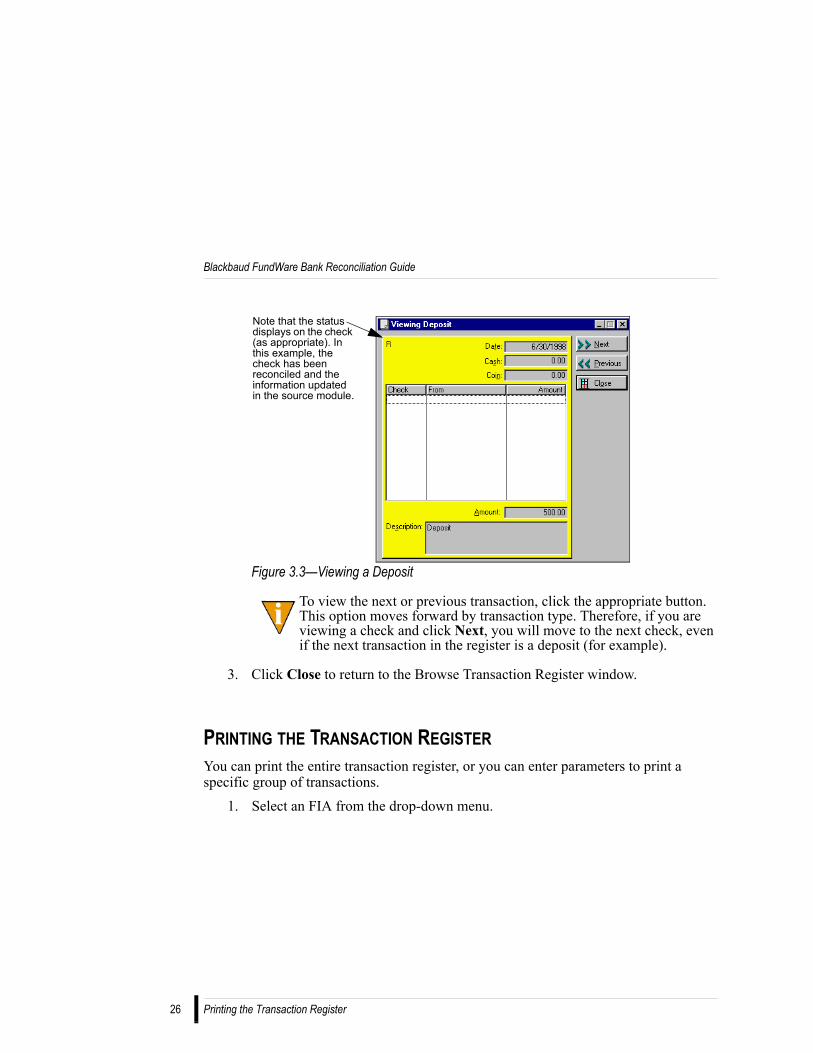
Figure 3.3—Viewing a Deposit
To view the next or previous transaction, click the appropriate button. This option moves forward by transaction type. Therefore, if you are viewing a check and click Next, you will move to the next check, even if the next transaction in the register is a deposit (for example).
3. Click Close to return to the Browse Transaction Register window.
PRINTING THE TRANSACTION REGISTERYou can print the entire transaction register, or you can enter parameters to print a specific group of transactions.
1. Select an FIA from the drop-down menu.
Note that the status displays on the check (as appropriate). In this example, the check has been reconciled and the information updated in the source module.
Printing the Transaction Register
Chapter 3—Transaction Register
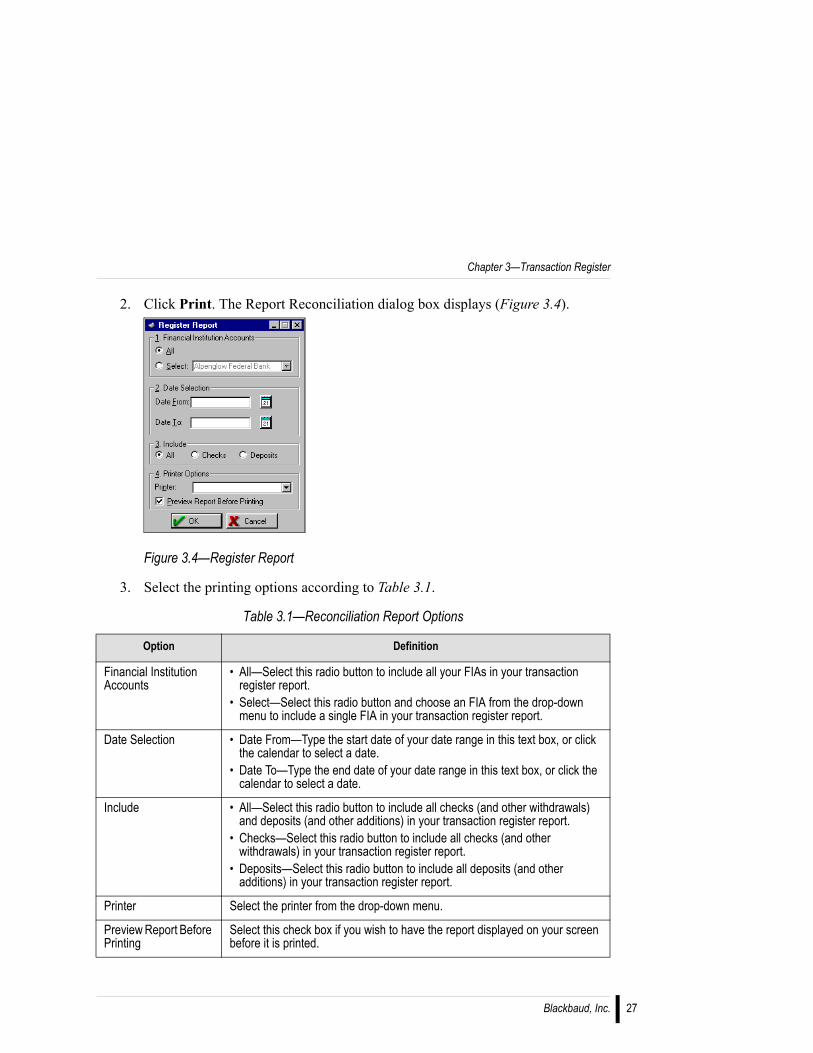
2. Click Print. The Report Reconciliation dialog box displays (Figure 3.4).
Figure 3.4—Register Report
3. Select the printing options according to Table 3.1.
Table 3.1—Reconciliation Report Options
Option Definition
Financial Institution Accounts
• All—Select this radio button to include all your FIAs in your transaction register report.
• Select—Select this radio button and choose an FIA from the drop-down menu to include a single FIA in your transaction register report.
Date Selection • Date From—Type the start date of your date range in this text box, or click the calendar to select a date.
• Date To—Type the end date of your date range in this text box, or click the calendar to select a date.
Include • All—Select this radio button to include all checks (and other withdrawals) and deposits (and other additions) in your transaction register report.
• Checks—Select this radio button to include all checks (and other withdrawals) in your transaction register report.
• Deposits—Select this radio button to include all deposits (and other additions) in your transaction register report.
Printer Select the printer from the drop-down menu.
Preview Report Before Printing
Select this check box if you wish to have the report displayed on your screen before it is printed.
Blackbaud, Inc. 27
Blackbaud FundWare Bank Reconciliation Guide
28
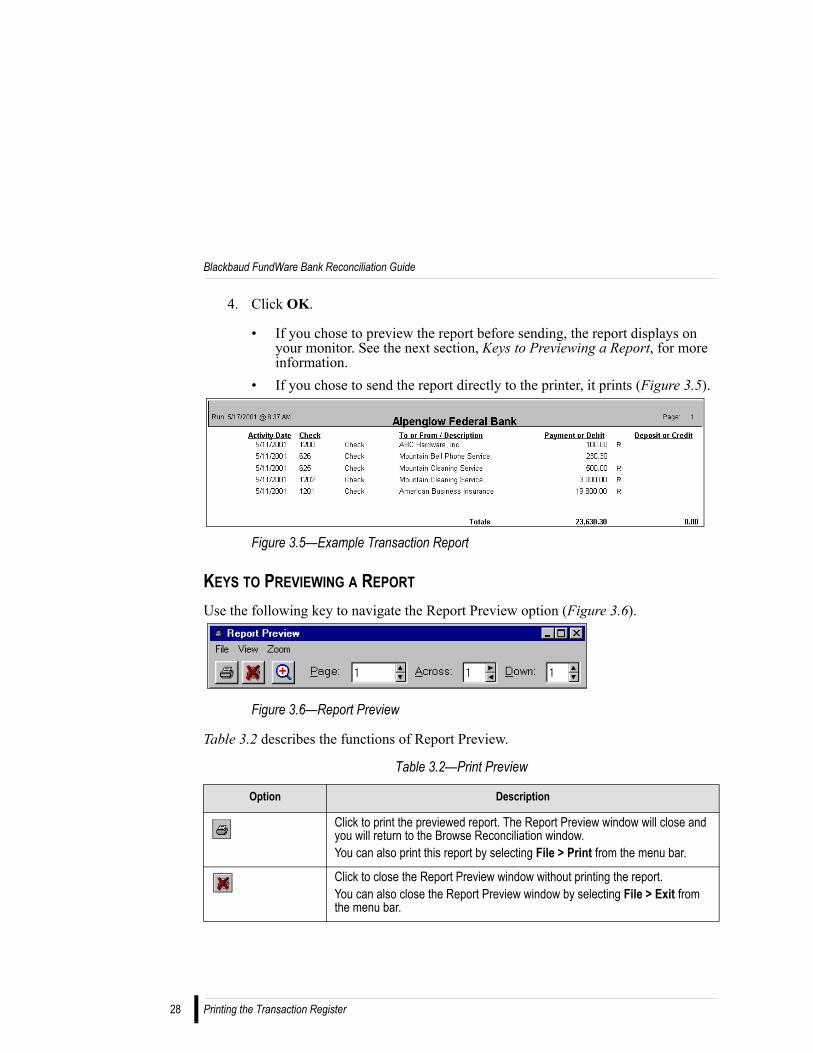
4. Click OK.
• If you chose to preview the report before sending, the report displays on your monitor. See the next section, Keys to Previewing a Report, for more information.
• If you chose to send the report directly to the printer, it prints (Figure 3.5).
Figure 3.5—Example Transaction Report
KEYS TO PREVIEWING A REPORT
Use the following key to navigate the Report Preview option (Figure 3.6).
Figure 3.6—Report Preview
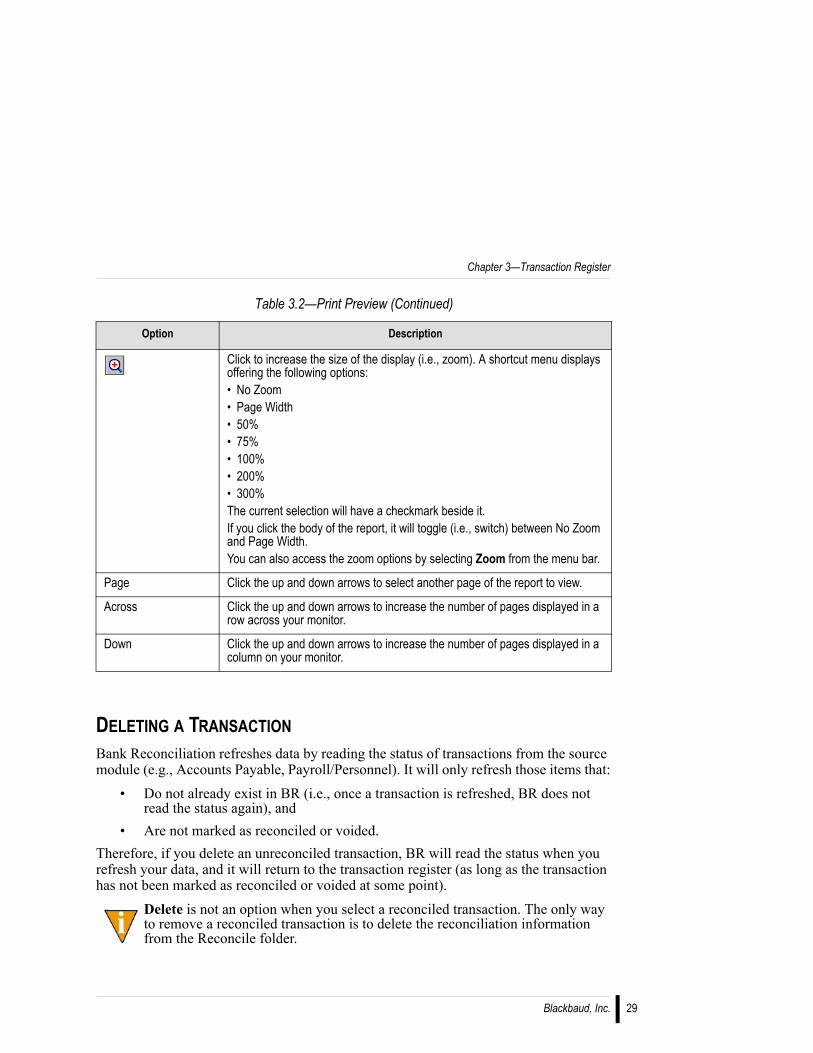
Table 3.2 describes the functions of Report Preview.
Table 3.2—Print Preview
Option Description
Click to print the previewed report. The Report Preview window will close and you will return to the Browse Reconciliation window.You can also print this report by selecting File > Print from the menu bar.
Click to close the Report Preview window without printing the report.You can also close the Report Preview window by selecting File > Exit from the menu bar.
Printing the Transaction Register
Chapter 3—Transaction Register
DELETING A TRANSACTIONBank Reconciliation refreshes data by reading the status of transactions from the source module (e.g., Accounts Payable, Payroll/Personnel). It will only refresh those items that:
• Do not already exist in BR (i.e., once a transaction is refreshed, BR does not read the status again), and
• Are not marked as reconciled or voided. Therefore, if you delete an unreconciled transaction, BR will read the status when you refresh your data, and it will return to the transaction register (as long as the transaction has not been marked as reconciled or voided at some point).
Delete is not an option when you select a reconciled transaction. The only way to remove a reconciled transaction is to delete the reconciliation information from the Reconcile folder.
Click to increase the size of the display (i.e., zoom). A shortcut menu displays offering the following options:• No Zoom• Page Width• 50%• 75%• 100%• 200%• 300%The current selection will have a checkmark beside it.If you click the body of the report, it will toggle (i.e., switch) between No Zoom and Page Width.You can also access the zoom options by selecting Zoom from the menu bar.
Page Click the up and down arrows to select another page of the report to view.
Across Click the up and down arrows to increase the number of pages displayed in a row across your monitor.
Down Click the up and down arrows to increase the number of pages displayed in a column on your monitor.
Table 3.2—Print Preview (Continued)
Option Description
Blackbaud, Inc. 29
Blackbaud FundWare Bank Reconciliation Guide
30
Use the following steps if you wish to delete a transaction.1. From the Browse Transaction Register window, select the check that you wish
to view.
2. Click Delete or right-click and select Delete from the shortcut menu. A confirmation message displays.
3. Click OK to delete the transaction. The transaction is removed from BR and no longer displays in the register.
Deleting a Transaction

C H A P T E R 4
RECONCILING YOUR ACCOUNTS
Because the Bank Reconciliation module works independently from FundWare, you must periodically refresh the reconciliation data. In particular, you must do this before you begin to reconcile your accounts. If you do not update the data, you will not be working with the most current information.
“Refreshing” is the act of updating the data in the Bank Reconciliation module with the most current information from your FundWare source modules (i.e., Accounts Payable, Cash Receipts/Accounts Receivable, Payroll/Personnel, and General Ledger–Project/Grant).
Upon completing the reconciliation, the status of the transactions is updated in Accounts Payable and Payroll/Personnel. In other words, reconciled checks and obligations are moved to the appropriate reconciled stage, while unreconciled transactions remain in the paid folders.Also at this time, service charges and/or interest are posted to General Ledger–Project/Grant, if you chose to use these options when you configured your FIAs.
IMPORTING YOUR GENERAL LEDGER DATA IN BLACKBAUD FUND-WAREBank Reconciliation will not automatically capture your General Ledger transaction information. Therefore, you must import your GL transaction data to a temporary holding area, then refresh the data to Bank Reconciliation.Use the following steps to import your source module data.
Blackbaud, Inc. 31
Blackbaud FundWare Bank Reconciliation Guide
32
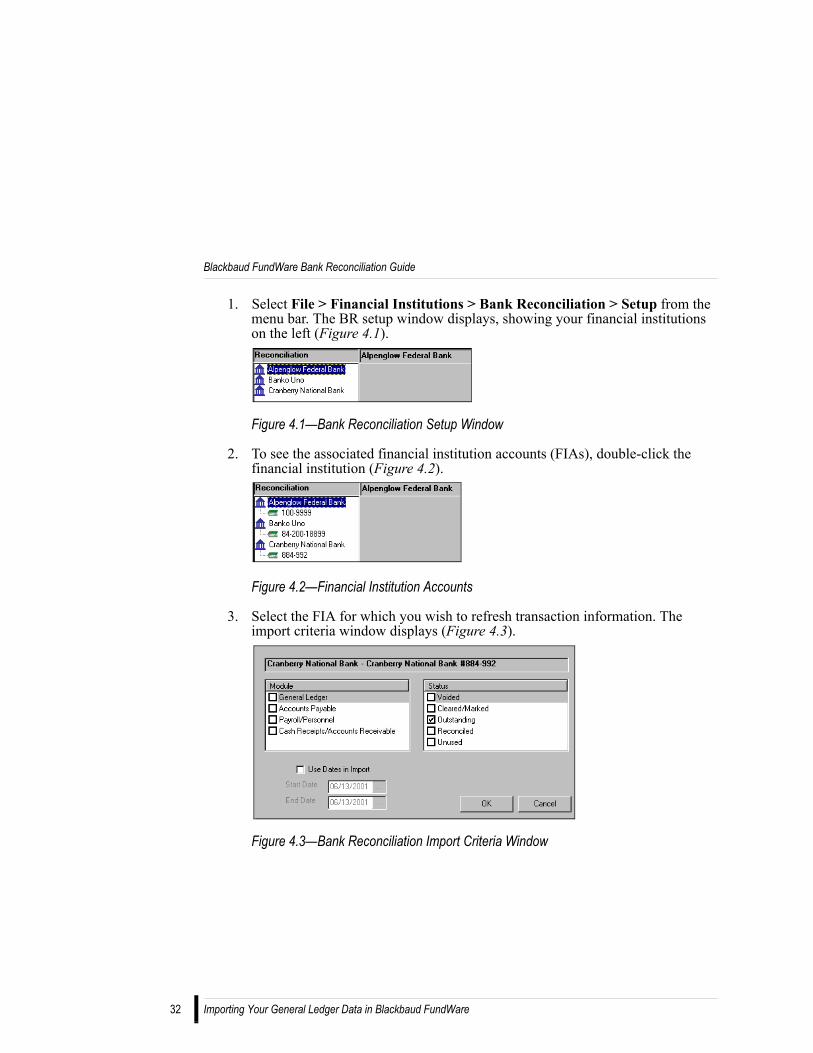
1. Select File > Financial Institutions > Bank Reconciliation > Setup from the menu bar. The BR setup window displays, showing your financial institutions on the left (Figure 4.1).
Figure 4.1—Bank Reconciliation Setup Window
2. To see the associated financial institution accounts (FIAs), double-click the financial institution (Figure 4.2).
Figure 4.2—Financial Institution Accounts
3. Select the FIA for which you wish to refresh transaction information. The import criteria window displays (Figure 4.3).
Figure 4.3—Bank Reconciliation Import Criteria Window
Importing Your General Ledger Data in Blackbaud FundWare
Chapter 4—Reconciling Your Accounts
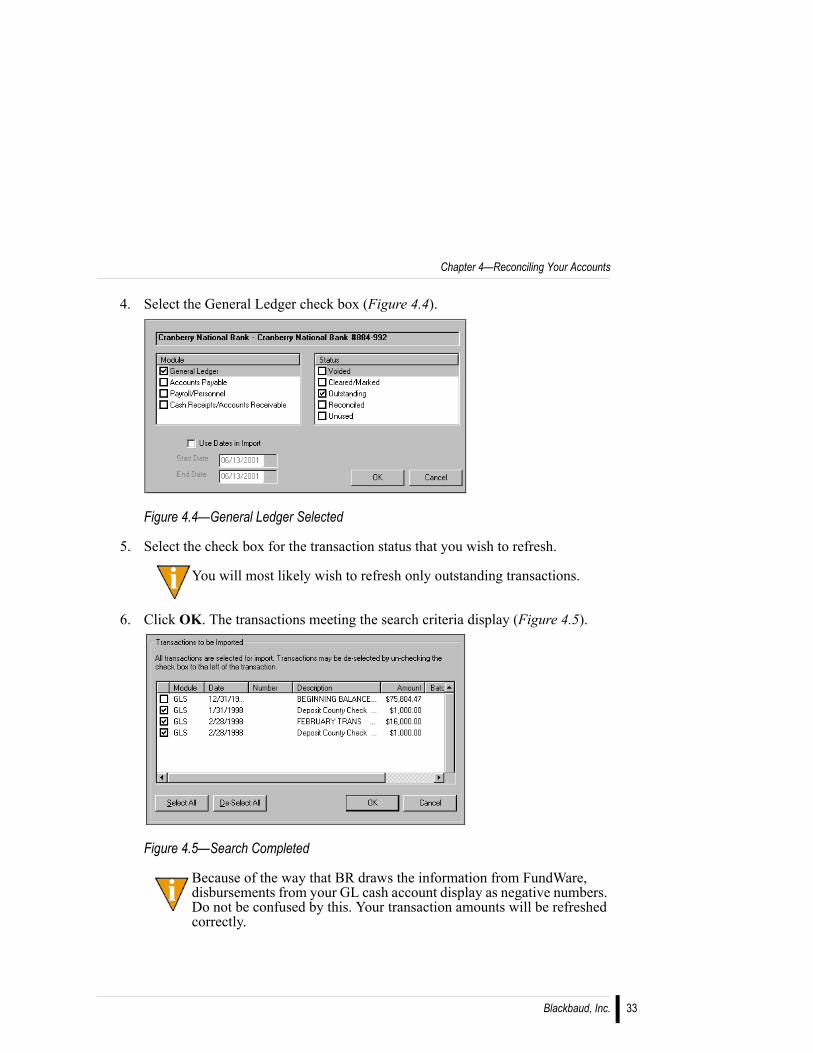
4. Select the General Ledger check box (Figure 4.4).
Figure 4.4—General Ledger Selected
5. Select the check box for the transaction status that you wish to refresh.
You will most likely wish to refresh only outstanding transactions.
6. Click OK. The transactions meeting the search criteria display (Figure 4.5).
Figure 4.5—Search Completed
Because of the way that BR draws the information from FundWare, disbursements from your GL cash account display as negative numbers. Do not be confused by this. Your transaction amounts will be refreshed correctly.
Blackbaud, Inc. 33
Blackbaud FundWare Bank Reconciliation Guide
34
7. Review the transactions and de-select the check box of any transactions you do not wish to import. (All transactions are selected at the completion of the search.)
Transactions that are the result of a post and roll periodic process (e.g., Beginning Balances) should not be refreshed to BR.
8. Click OK. A confirmation message displays.
9. Click Yes to continue the import process. A completion message displays when the transactions have been imported to the holding area. (The holding area is a database table from which Bank Reconciliation will refresh the information.)
Be patient. If you have a large number of transactions, this process could take some time. If you interrupt the process before the completion message displays, FundWare will freeze and you will have to restart the program and begin the process again.
10. Click OK. The transactions are imported.
11. Repeat this process for each FIA.
12. Open Bank Reconciliation.
13. Access the Browse Transaction Register or Browse Reconciliations window.
14. Click Refresh. Your transactions have now been refreshed to the Bank Reconciliation module. (For more information on refreshing your data in Bank Reconciliation, see Refreshing Your Data in Bank Reconciliation on page 34.)
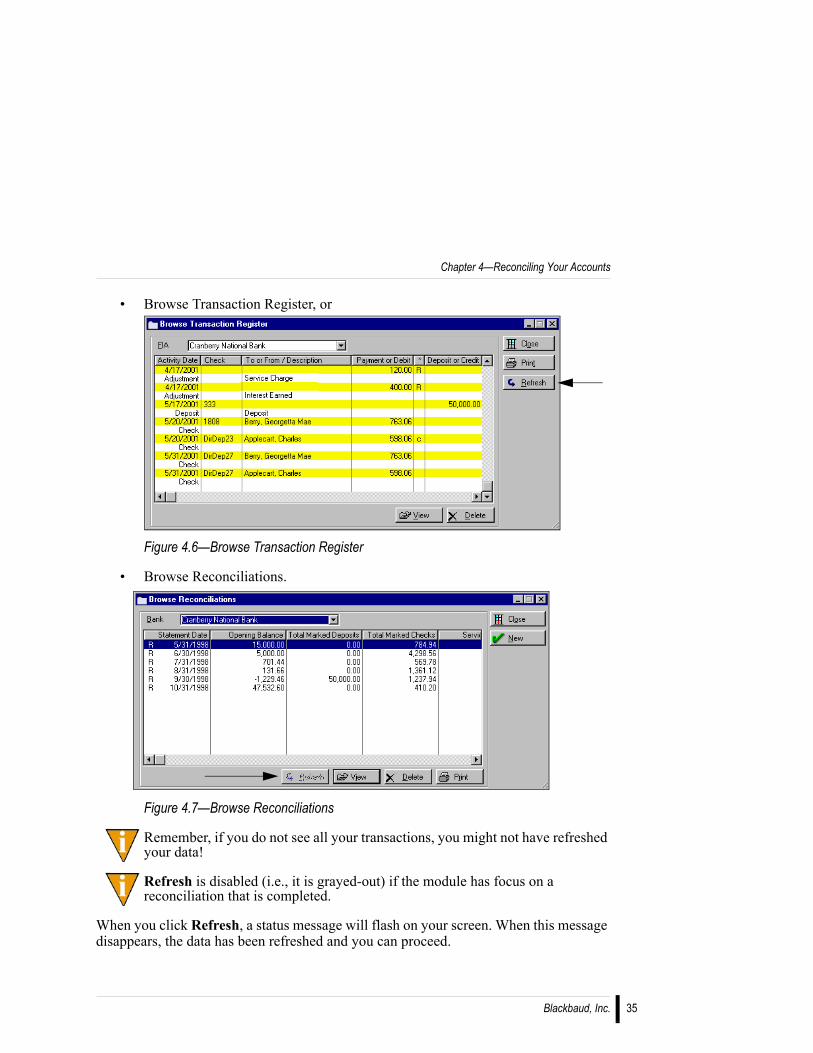
REFRESHING YOUR DATA IN BANK RECONCILIATIONUpdate your transaction data from Bank Reconciliation by clicking Refresh on any of the following windows (Figure 4.6 and Figure 4.7):
Refreshing Your Data in Bank Reconciliation
Chapter 4—Reconciling Your Accounts
• Browse Transaction Register, or
Figure 4.6—Browse Transaction Register
• Browse Reconciliations.
Figure 4.7—Browse Reconciliations
Remember, if you do not see all your transactions, you might not have refreshed your data!
Refresh is disabled (i.e., it is grayed-out) if the module has focus on a reconciliation that is completed.
When you click Refresh, a status message will flash on your screen. When this message disappears, the data has been refreshed and you can proceed.
Blackbaud, Inc. 35
Blackbaud FundWare Bank Reconciliation Guide
36
RECONCILING YOUR ACCOUNTSOnce you have refreshed BR with the most current information from the source modules, you are ready to reconcile your FIAs to your bank statement. BR will use the closing balance from the previous reconciliation, the closing balance for this reconciliation, and the reconciled credits and debits to reconcile your statement.
Remember, if you do not see all your transactions, you might not have refreshed your data!
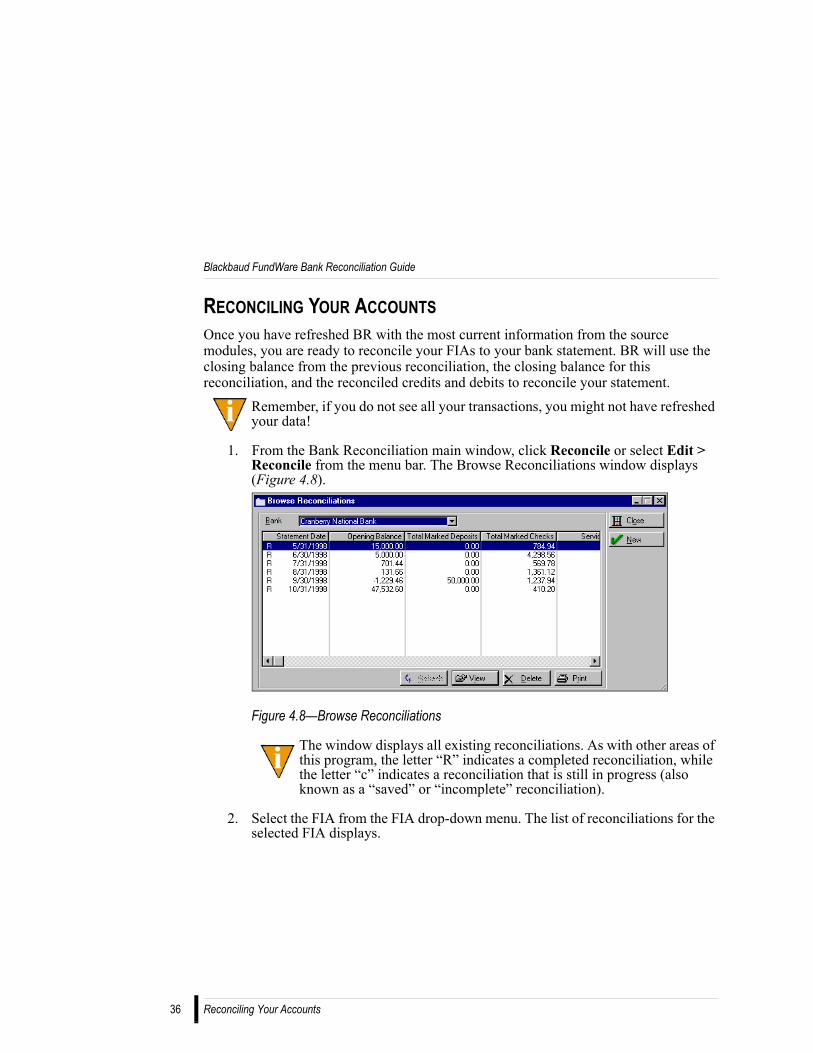
1. From the Bank Reconciliation main window, click Reconcile or select Edit > Reconcile from the menu bar. The Browse Reconciliations window displays (Figure 4.8).
Figure 4.8—Browse Reconciliations
The window displays all existing reconciliations. As with other areas of this program, the letter “R” indicates a completed reconciliation, while the letter “c” indicates a reconciliation that is still in progress (also known as a “saved” or “incomplete” reconciliation).
2. Select the FIA from the FIA drop-down menu. The list of reconciliations for the selected FIA displays.
Reconciling Your Accounts
Chapter 4—Reconciling Your Accounts
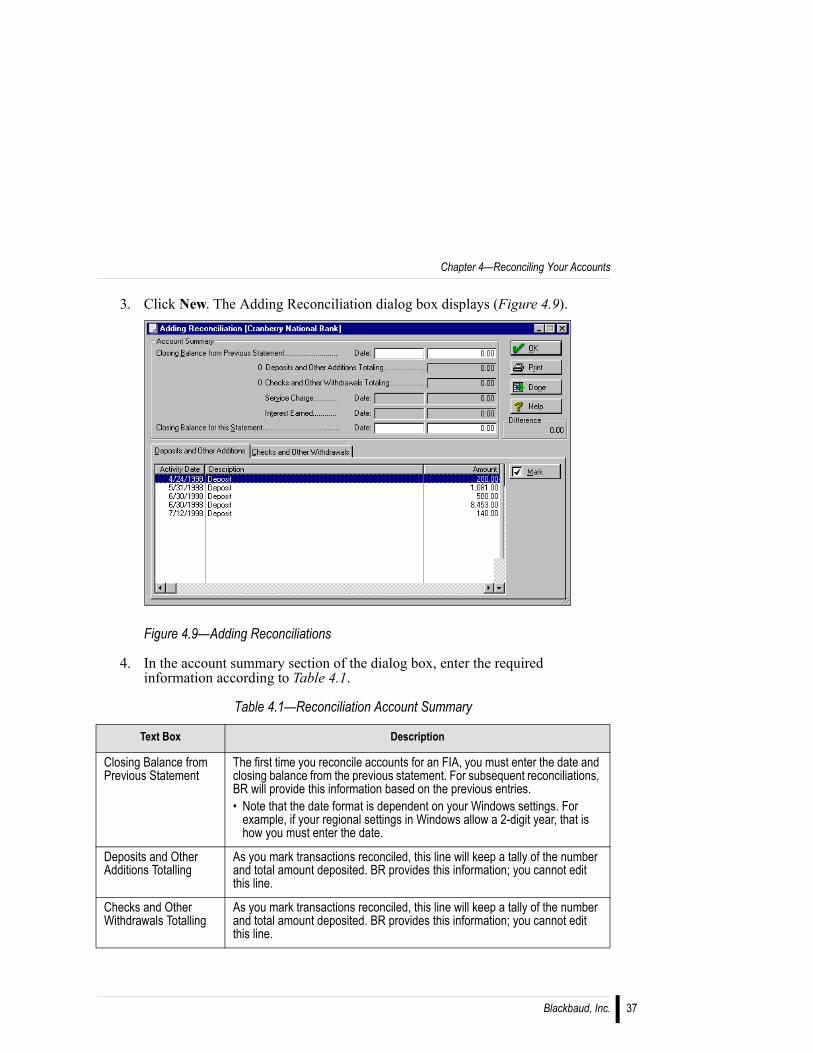
3. Click New. The Adding Reconciliation dialog box displays (Figure 4.9).
Figure 4.9—Adding Reconciliations
4. In the account summary section of the dialog box, enter the required information according to Table 4.1.
Table 4.1—Reconciliation Account Summary
Text Box Description
Closing Balance from Previous Statement
The first time you reconcile accounts for an FIA, you must enter the date and closing balance from the previous statement. For subsequent reconciliations, BR will provide this information based on the previous entries.• Note that the date format is dependent on your Windows settings. For
example, if your regional settings in Windows allow a 2-digit year, that is how you must enter the date.
Deposits and Other Additions Totalling
As you mark transactions reconciled, this line will keep a tally of the number and total amount deposited. BR provides this information; you cannot edit this line.
Checks and Other Withdrawals Totalling
As you mark transactions reconciled, this line will keep a tally of the number and total amount deposited. BR provides this information; you cannot edit this line.
Blackbaud, Inc. 37
Blackbaud FundWare Bank Reconciliation Guide
38
Note that for all but the first time you reconcile accounts for each FIA, you will need to enter information for services charges (if you use this option), interest earned (if you use this option), and the statement’s closing balance.
5. On the Deposits and Other Additions tab, select the transaction to be reconciled and click Mark. The letter “c” displays beside the transaction.
If you accidentally marked a transaction reconciled, you can reverse the status by selecting the entry and clicking Unmark. (Mark changes to Unmark when you select a marked transaction.)
6. Repeat these steps until all the appropriate deposits and credits have been marked as reconciled.
7. Click the Checks and Other Withdrawals tab.
8. Select the transaction to be reconciled and click Mark. The letter “c” displays beside the transaction.
9. Repeat these steps until all the appropriate checks and withdrawals have been marked as reconciled.
Service Charge Enter any bank service charges in this text box. If you did not choose to post service charges to General Ledger in the FIA BR Posting options setup, this text box will be disabled.• If you enter a negative number, the system will treat this as a reversal of
service charges.
Interest Earned Enter any interest earned during this period in this text box. If you did not choose to post earned interest to General Ledger in the FIA BR Posting options setup, this text box will be disabled.
Closing Balance for this Statement
Enter the date and ending balance from the bank statement.• Note that the date format is dependent on your Windows settings. For
example, if your regional settings in Windows allow a 2-digit year, that is how you must enter the date.
Difference This box displays the remaining amount that must be marked as reconciled before the reconciliation can be complete. (This information is based on the previous and current closing balances, and the transactions already marked as reconciled.) You cannot edit the information in this box.
Table 4.1—Reconciliation Account Summary (Continued)
Text Box Description
Reconciling Your Accounts

Chapter 4—Reconciling Your Accounts
You can alternate between tabs, reconciling the transactions in whatever order you want. The reconciliation process does not rely on the order in which you mark the transactions, only on the final product.
When the amount displayed in the difference box reaches 0.00 and all the transactions on your statement have been marked, your reconciliation is complete and Done is enabled.
10. Click Done to update the reconciliation information to FundWare. Click OK to save the reconciliation information but not update the reconciliation information to FundWare. A confirmation message displays.
11. Click Yes. A status bar displays briefly, then closes and you return to the Browse Reconciliations window. The reconciliation information is updated to the appropriate FundWare source modules.
SELECTING A CHECK RANGE
To save time, you can mark or unmark all checks in a series with one easy step. The series can include a mix of checks. This feature will set all the checks in the range to the status you select (i.e., marked or unmarked).Use the following steps to select a range of checks to be marked or unmarked.
1. In the Checks and Other Withdrawals tab of the reconciliation dialog box, click Range. The Mark Range of Checks dialog box displays (Figure 4.10).
Figure 4.10—Mark Range of Checks
2. Enter the beginning and ending check number of the range to be marked. By default the Mark all checks in range check box is selected (i.e., activated). This means all checks in the range will be marked (i.e., unmarked checks will become marked, while checks that are already marked will remain marked).
If you would like to reverse this process (i.e., marked checks will become unmarked, while checks that are already unmarked will remain unmarked), select the Mark all checks in range check box.
Blackbaud, Inc. 39
Blackbaud FundWare Bank Reconciliation Guide
40
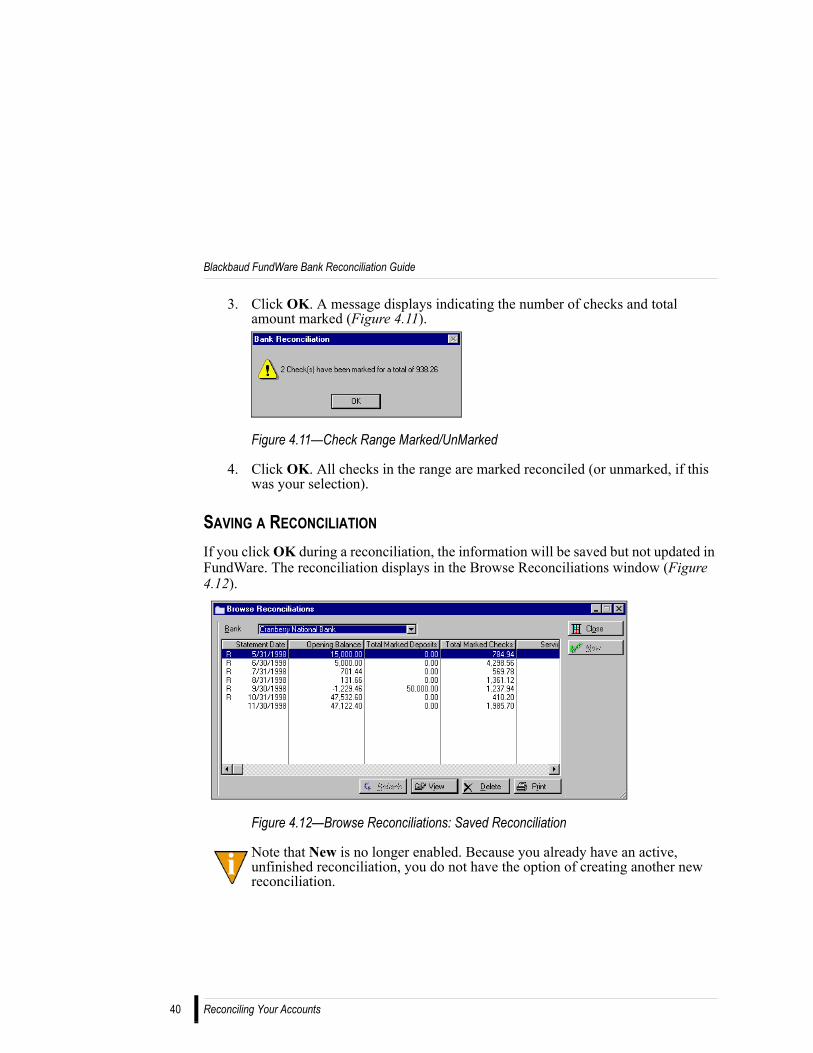
3. Click OK. A message displays indicating the number of checks and total amount marked (Figure 4.11).
Figure 4.11—Check Range Marked/UnMarked
4. Click OK. All checks in the range are marked reconciled (or unmarked, if this was your selection).
SAVING A RECONCILIATION
If you click OK during a reconciliation, the information will be saved but not updated in FundWare. The reconciliation displays in the Browse Reconciliations window (Figure 4.12).
Figure 4.12—Browse Reconciliations: Saved Reconciliation
Note that New is no longer enabled. Because you already have an active, unfinished reconciliation, you do not have the option of creating another new reconciliation.
Reconciling Your Accounts
Chapter 4—Reconciling Your Accounts
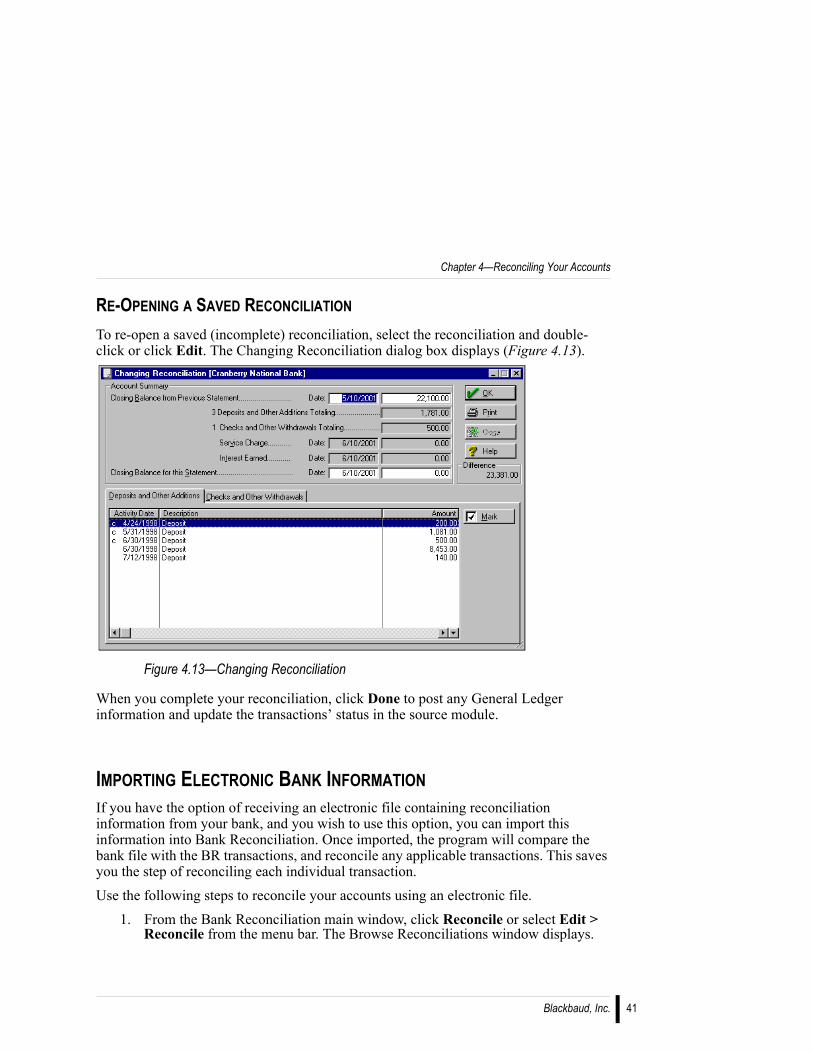
RE-OPENING A SAVED RECONCILIATION
To re-open a saved (incomplete) reconciliation, select the reconciliation and double-click or click Edit. The Changing Reconciliation dialog box displays (Figure 4.13).
Figure 4.13—Changing Reconciliation
When you complete your reconciliation, click Done to post any General Ledger information and update the transactions’ status in the source module.
IMPORTING ELECTRONIC BANK INFORMATIONIf you have the option of receiving an electronic file containing reconciliation information from your bank, and you wish to use this option, you can import this information into Bank Reconciliation. Once imported, the program will compare the bank file with the BR transactions, and reconcile any applicable transactions. This saves you the step of reconciling each individual transaction.Use the following steps to reconcile your accounts using an electronic file.
1. From the Bank Reconciliation main window, click Reconcile or select Edit > Reconcile from the menu bar. The Browse Reconciliations window displays.
Blackbaud, Inc. 41
Blackbaud FundWare Bank Reconciliation Guide
42
2. Select the FIA from the FIA drop-down menu. The list of reconciliations for the selected FIA displays.
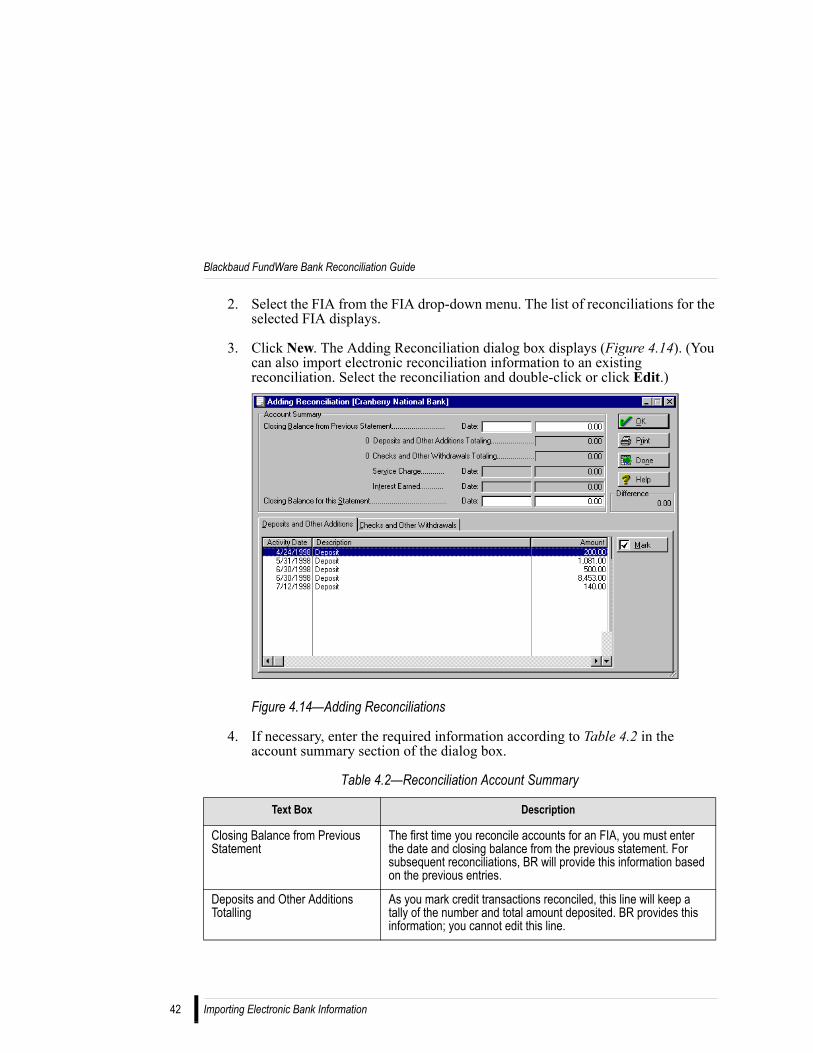
3. Click New. The Adding Reconciliation dialog box displays (Figure 4.14). (You can also import electronic reconciliation information to an existing reconciliation. Select the reconciliation and double-click or click Edit.)
Figure 4.14—Adding Reconciliations
4. If necessary, enter the required information according to Table 4.2 in the account summary section of the dialog box.
Table 4.2—Reconciliation Account Summary
Text Box Description
Closing Balance from Previous Statement
The first time you reconcile accounts for an FIA, you must enter the date and closing balance from the previous statement. For subsequent reconciliations, BR will provide this information based on the previous entries.
Deposits and Other Additions Totalling
As you mark credit transactions reconciled, this line will keep a tally of the number and total amount deposited. BR provides this information; you cannot edit this line.
Importing Electronic Bank Information
Chapter 4—Reconciling Your Accounts
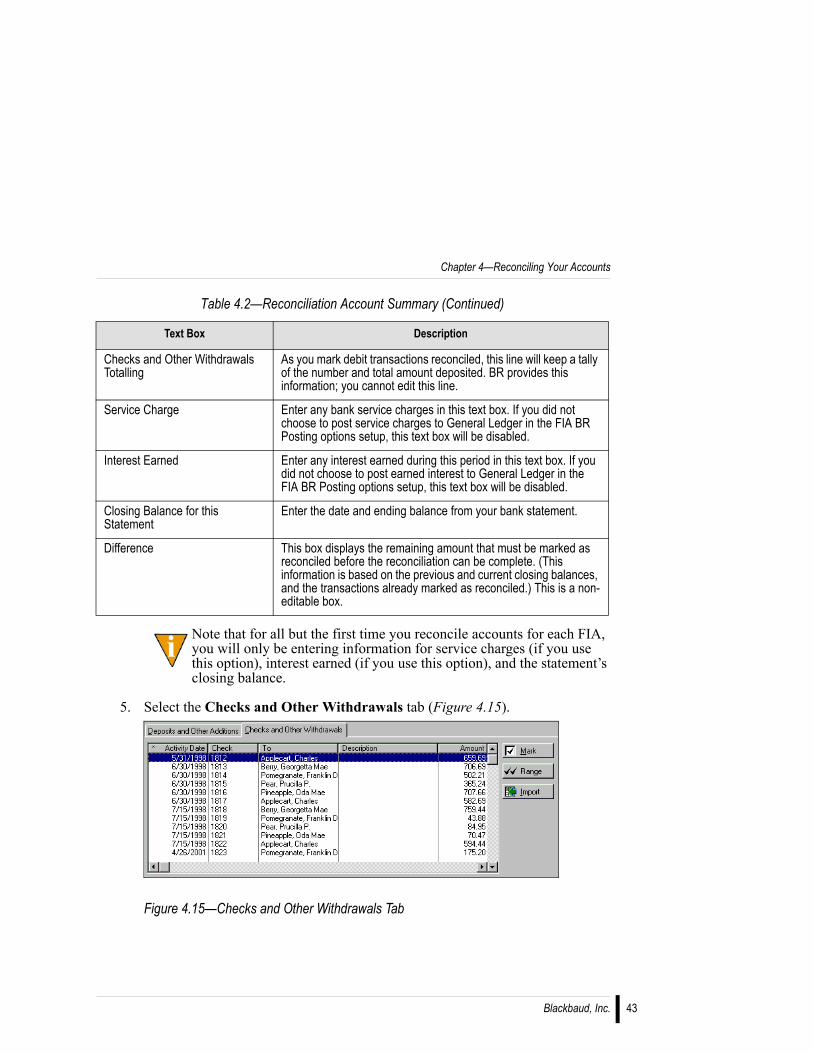
Note that for all but the first time you reconcile accounts for each FIA, you will only be entering information for service charges (if you use this option), interest earned (if you use this option), and the statement’s closing balance.
5. Select the Checks and Other Withdrawals tab (Figure 4.15).
Figure 4.15—Checks and Other Withdrawals Tab
Checks and Other Withdrawals Totalling
As you mark debit transactions reconciled, this line will keep a tally of the number and total amount deposited. BR provides this information; you cannot edit this line.
Service Charge Enter any bank service charges in this text box. If you did not choose to post service charges to General Ledger in the FIA BR Posting options setup, this text box will be disabled.
Interest Earned Enter any interest earned during this period in this text box. If you did not choose to post earned interest to General Ledger in the FIA BR Posting options setup, this text box will be disabled.
Closing Balance for this Statement
Enter the date and ending balance from your bank statement.
Difference This box displays the remaining amount that must be marked as reconciled before the reconciliation can be complete. (This information is based on the previous and current closing balances, and the transactions already marked as reconciled.) This is a non-editable box.
Table 4.2—Reconciliation Account Summary (Continued)
Text Box Description
Blackbaud, Inc. 43
Blackbaud FundWare Bank Reconciliation Guide
44
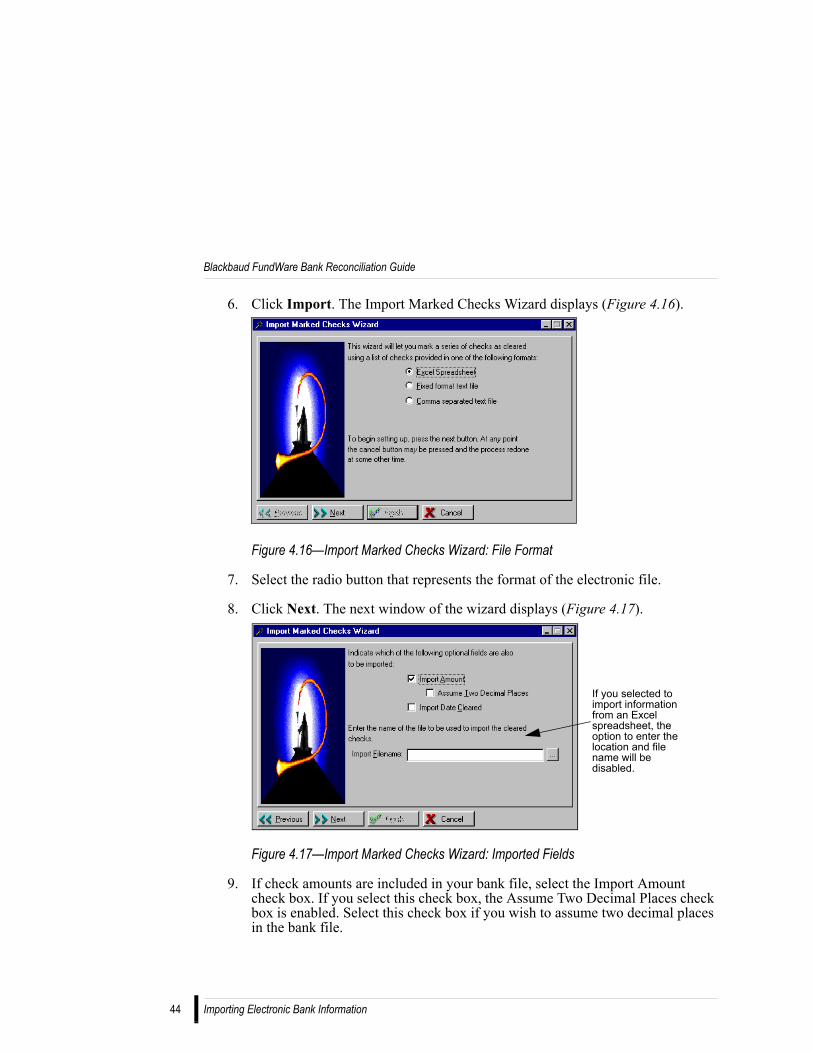
6. Click Import. The Import Marked Checks Wizard displays (Figure 4.16).
Figure 4.16—Import Marked Checks Wizard: File Format
7. Select the radio button that represents the format of the electronic file.
8. Click Next. The next window of the wizard displays (Figure 4.17).
Figure 4.17—Import Marked Checks Wizard: Imported Fields
9. If check amounts are included in your bank file, select the Import Amount check box. If you select this check box, the Assume Two Decimal Places check box is enabled. Select this check box if you wish to assume two decimal places in the bank file.
If you selected to import information from an Excel spreadsheet, the option to enter the location and file name will be disabled.
Importing Electronic Bank Information
Chapter 4—Reconciling Your Accounts
10. If the date that the checks were processed by the bank are included in your bank file, select the Import Date Cleared check box.
11. Enter the directory and file name, or click the browse button to find the file.
This option will not be enabled if you selected to import an Excel file. Your Excel file should already be open on your computer.
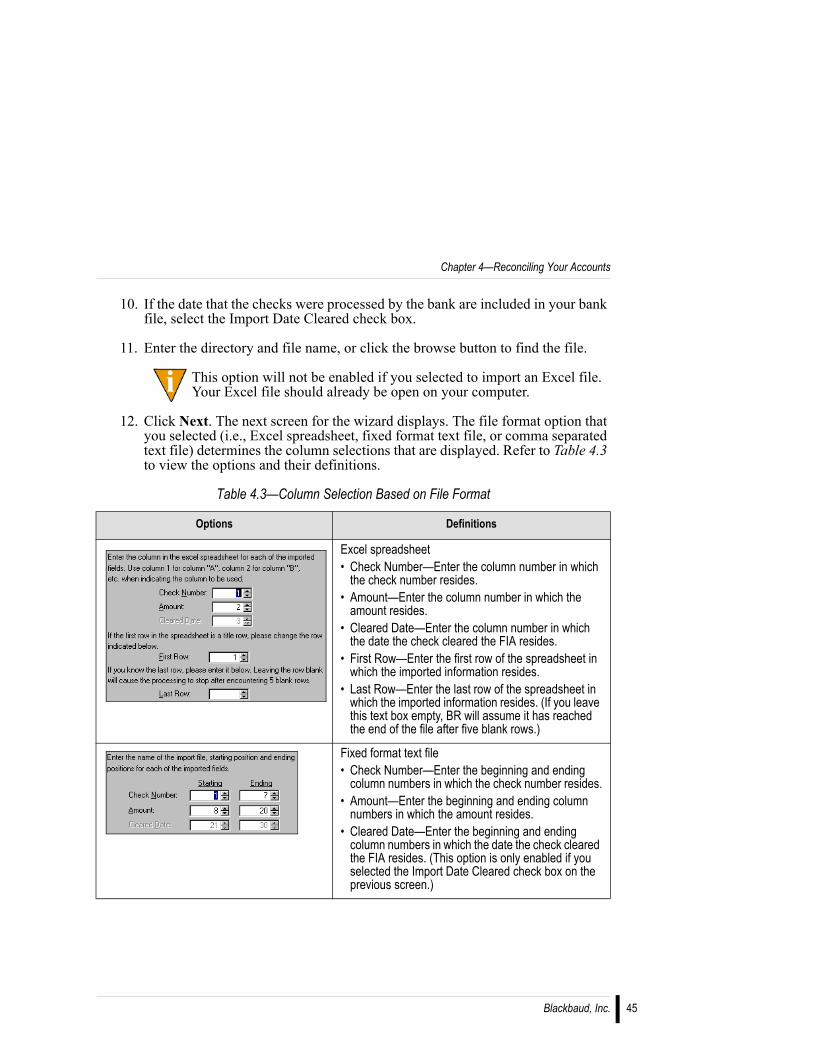
12. Click Next. The next screen for the wizard displays. The file format option that you selected (i.e., Excel spreadsheet, fixed format text file, or comma separated text file) determines the column selections that are displayed. Refer to Table 4.3 to view the options and their definitions.
Table 4.3—Column Selection Based on File Format
Options Definitions
Excel spreadsheet• Check Number—Enter the column number in which
the check number resides.• Amount—Enter the column number in which the
amount resides.• Cleared Date—Enter the column number in which
the date the check cleared the FIA resides.• First Row—Enter the first row of the spreadsheet in
which the imported information resides.• Last Row—Enter the last row of the spreadsheet in
which the imported information resides. (If you leave this text box empty, BR will assume it has reached the end of the file after five blank rows.)
Fixed format text file• Check Number—Enter the beginning and ending
column numbers in which the check number resides.• Amount—Enter the beginning and ending column
numbers in which the amount resides.• Cleared Date—Enter the beginning and ending
column numbers in which the date the check cleared the FIA resides. (This option is only enabled if you selected the Import Date Cleared check box on the previous screen.)
Blackbaud, Inc. 45
Blackbaud FundWare Bank Reconciliation Guide
46
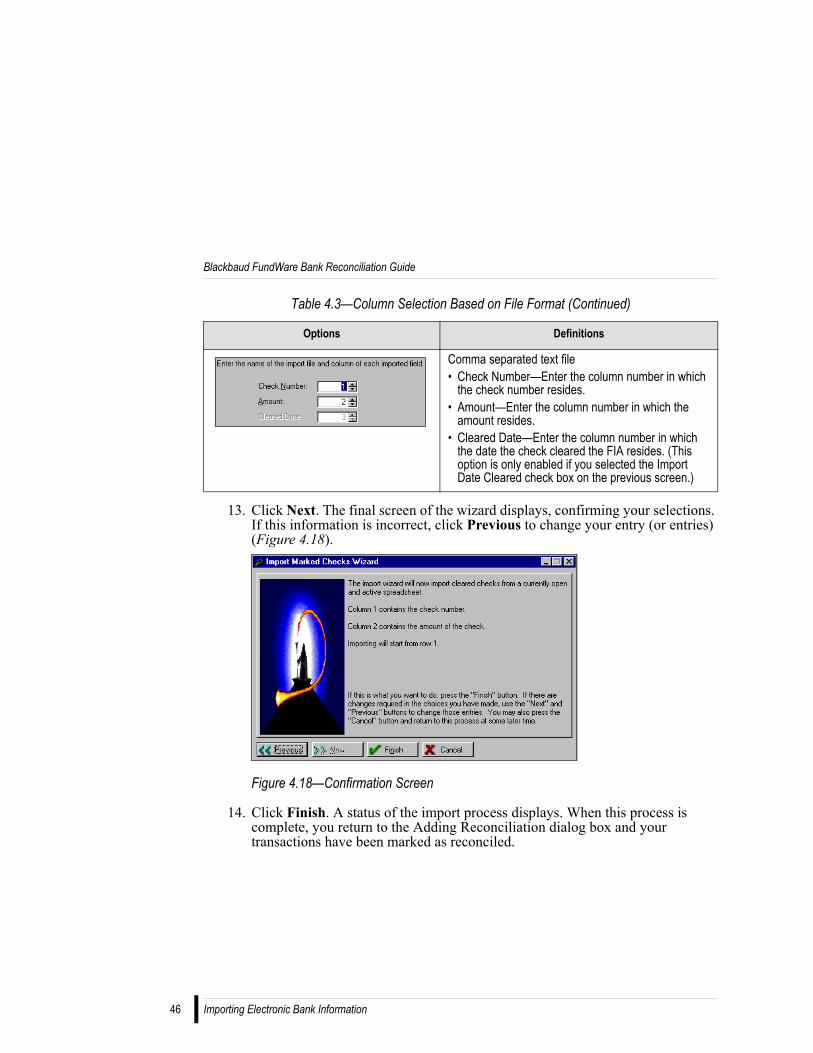
13. Click Next. The final screen of the wizard displays, confirming your selections. If this information is incorrect, click Previous to change your entry (or entries) (Figure 4.18).
Figure 4.18—Confirmation Screen
14. Click Finish. A status of the import process displays. When this process is complete, you return to the Adding Reconciliation dialog box and your transactions have been marked as reconciled.
Comma separated text file• Check Number—Enter the column number in which
the check number resides.• Amount—Enter the column number in which the
amount resides.• Cleared Date—Enter the column number in which
the date the check cleared the FIA resides. (This option is only enabled if you selected the Import Date Cleared check box on the previous screen.)
Table 4.3—Column Selection Based on File Format (Continued)
Options Definitions
Importing Electronic Bank Information
Chapter 4—Reconciling Your Accounts
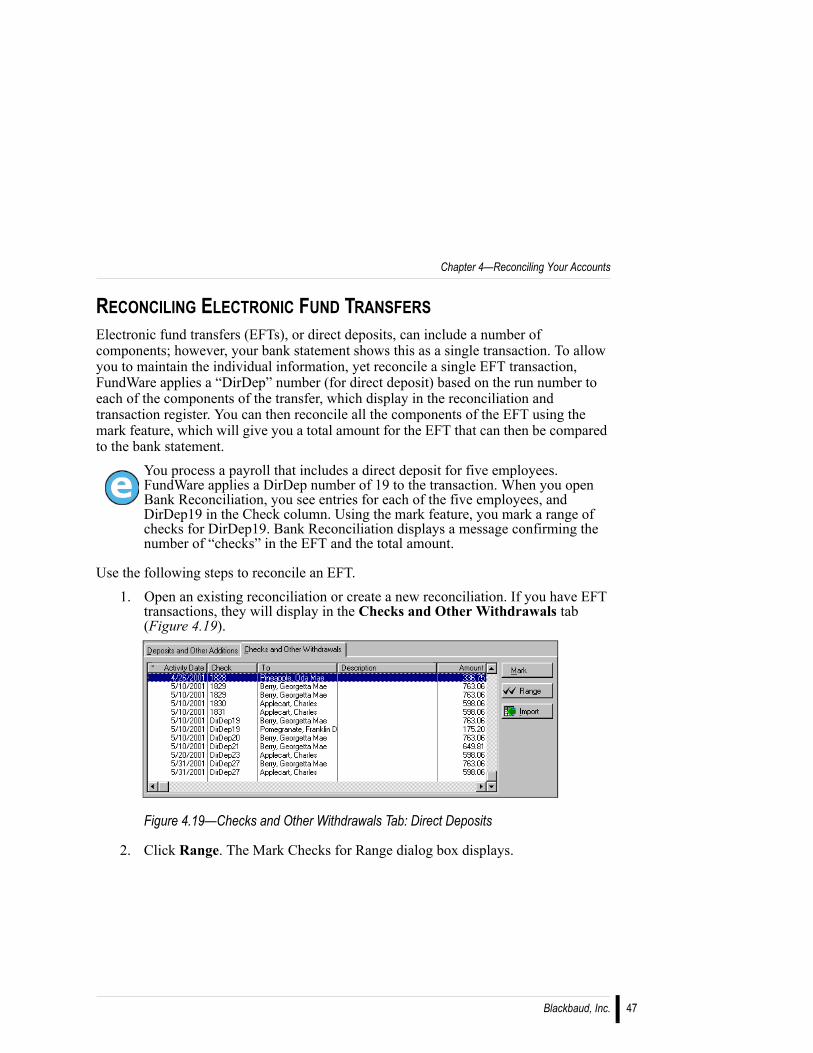
RECONCILING ELECTRONIC FUND TRANSFERSElectronic fund transfers (EFTs), or direct deposits, can include a number of components; however, your bank statement shows this as a single transaction. To allow you to maintain the individual information, yet reconcile a single EFT transaction, FundWare applies a “DirDep” number (for direct deposit) based on the run number to each of the components of the transfer, which display in the reconciliation and transaction register. You can then reconcile all the components of the EFT using the mark feature, which will give you a total amount for the EFT that can then be compared to the bank statement.
You process a payroll that includes a direct deposit for five employees. FundWare applies a DirDep number of 19 to the transaction. When you open Bank Reconciliation, you see entries for each of the five employees, and DirDep19 in the Check column. Using the mark feature, you mark a range of checks for DirDep19. Bank Reconciliation displays a message confirming the number of “checks” in the EFT and the total amount.
Use the following steps to reconcile an EFT.1. Open an existing reconciliation or create a new reconciliation. If you have EFT
transactions, they will display in the Checks and Other Withdrawals tab (Figure 4.19).
Figure 4.19—Checks and Other Withdrawals Tab: Direct Deposits
2. Click Range. The Mark Checks for Range dialog box displays.
Blackbaud, Inc. 47
Blackbaud FundWare Bank Reconciliation Guide
48
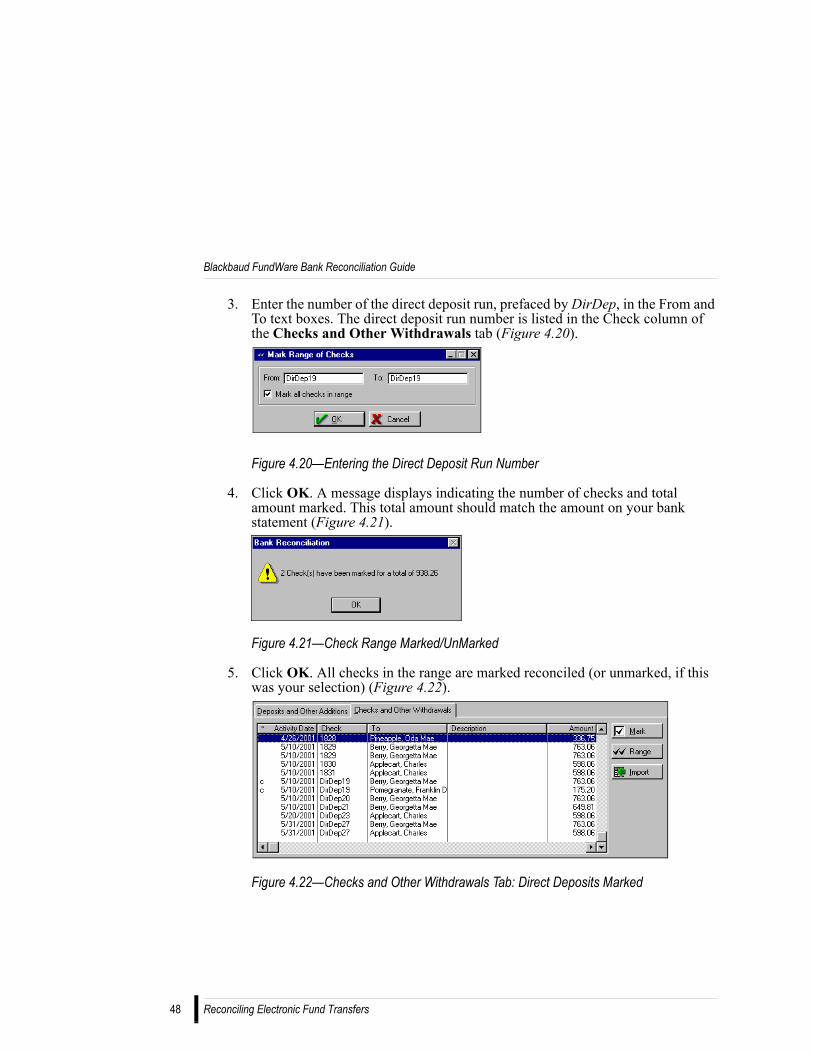
3. Enter the number of the direct deposit run, prefaced by DirDep, in the From and To text boxes. The direct deposit run number is listed in the Check column of the Checks and Other Withdrawals tab (Figure 4.20).
Figure 4.20—Entering the Direct Deposit Run Number
4. Click OK. A message displays indicating the number of checks and total amount marked. This total amount should match the amount on your bank statement (Figure 4.21).
Figure 4.21—Check Range Marked/UnMarked
5. Click OK. All checks in the range are marked reconciled (or unmarked, if this was your selection) (Figure 4.22).
Figure 4.22—Checks and Other Withdrawals Tab: Direct Deposits Marked
Reconciling Electronic Fund Transfers
Chapter 4—Reconciling Your Accounts
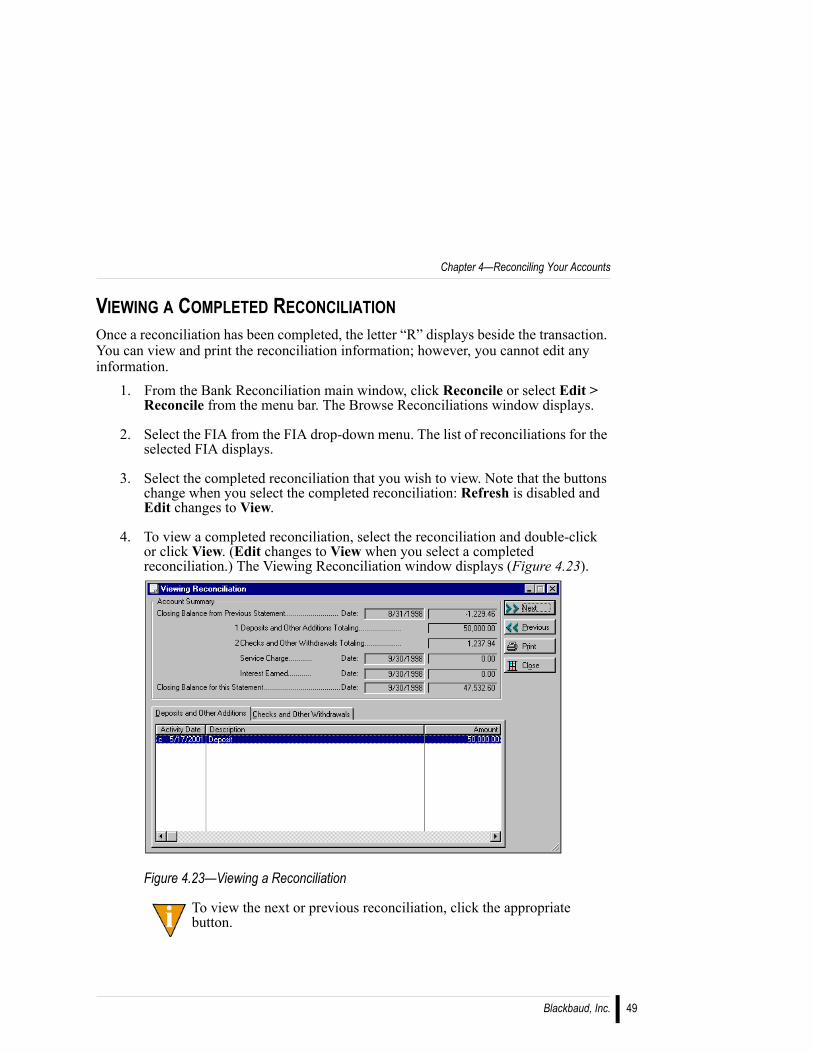
VIEWING A COMPLETED RECONCILIATIONOnce a reconciliation has been completed, the letter “R” displays beside the transaction. You can view and print the reconciliation information; however, you cannot edit any information.
1. From the Bank Reconciliation main window, click Reconcile or select Edit > Reconcile from the menu bar. The Browse Reconciliations window displays.
2. Select the FIA from the FIA drop-down menu. The list of reconciliations for the selected FIA displays.
3. Select the completed reconciliation that you wish to view. Note that the buttons change when you select the completed reconciliation: Refresh is disabled and Edit changes to View.
4. To view a completed reconciliation, select the reconciliation and double-click or click View. (Edit changes to View when you select a completed reconciliation.) The Viewing Reconciliation window displays (Figure 4.23).
Figure 4.23—Viewing a Reconciliation
To view the next or previous reconciliation, click the appropriate button.
Blackbaud, Inc. 49
Blackbaud FundWare Bank Reconciliation Guide
50
Note that the Mark/Unmark, Range, and Import buttons do not display because these options are not available for a completed reconciliation.
5. Click Close to return to the Browse Reconciliations window.
PRINTING RECONCILIATION INFORMATIONYou can print the details of any single reconciliation (i.e., incomplete or complete) according to specific parameters.
1. From the Bank Reconciliation main window, click Reconcile or select Edit > Reconcile from the menu bar. The Browse Reconciliations window displays.
2. Select the FIA from the FIA drop-down menu. The list of reconciliations for the selected FIA displays.
3. Select the specific reconciliation to be printed.
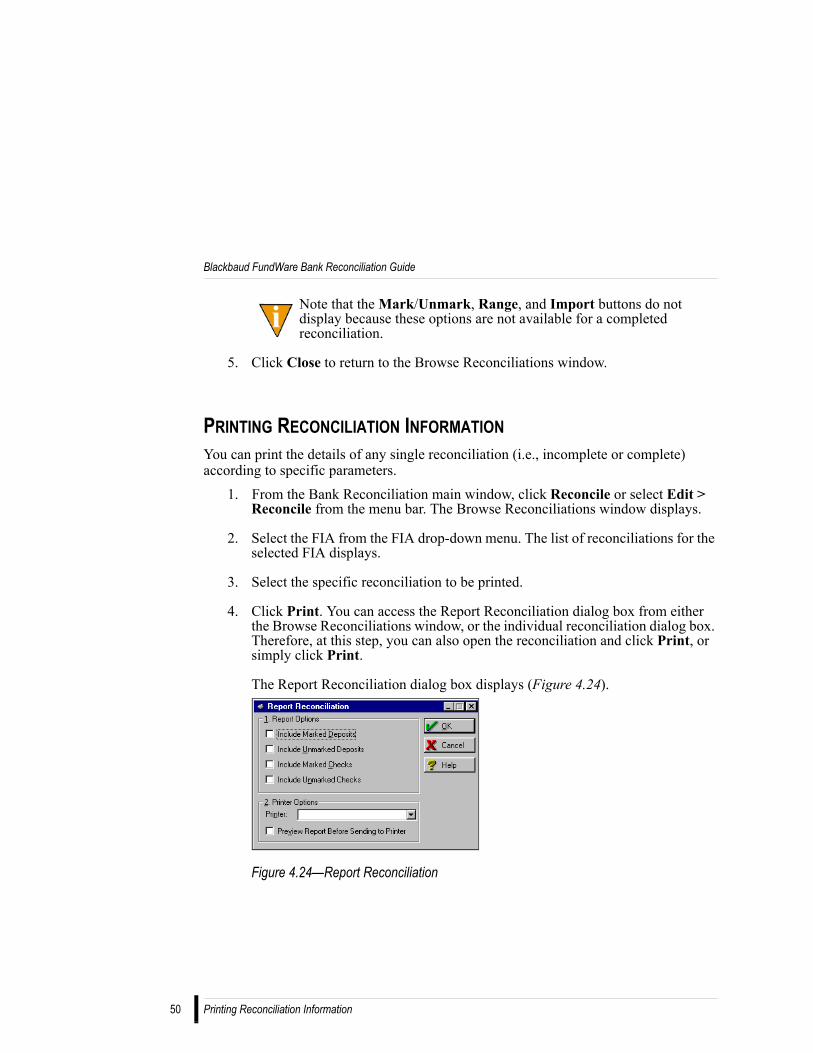
4. Click Print. You can access the Report Reconciliation dialog box from either the Browse Reconciliations window, or the individual reconciliation dialog box. Therefore, at this step, you can also open the reconciliation and click Print, or simply click Print.
The Report Reconciliation dialog box displays (Figure 4.24).
Figure 4.24—Report Reconciliation
Printing Reconciliation Information
Chapter 4—Reconciling Your Accounts
5. Select the printing options according to Table 4.4.
6. Click OK.
• If you chose to preview the report before sending, the report displays on your monitor. See the Keys to Previewing a Report on page 28 for more information.
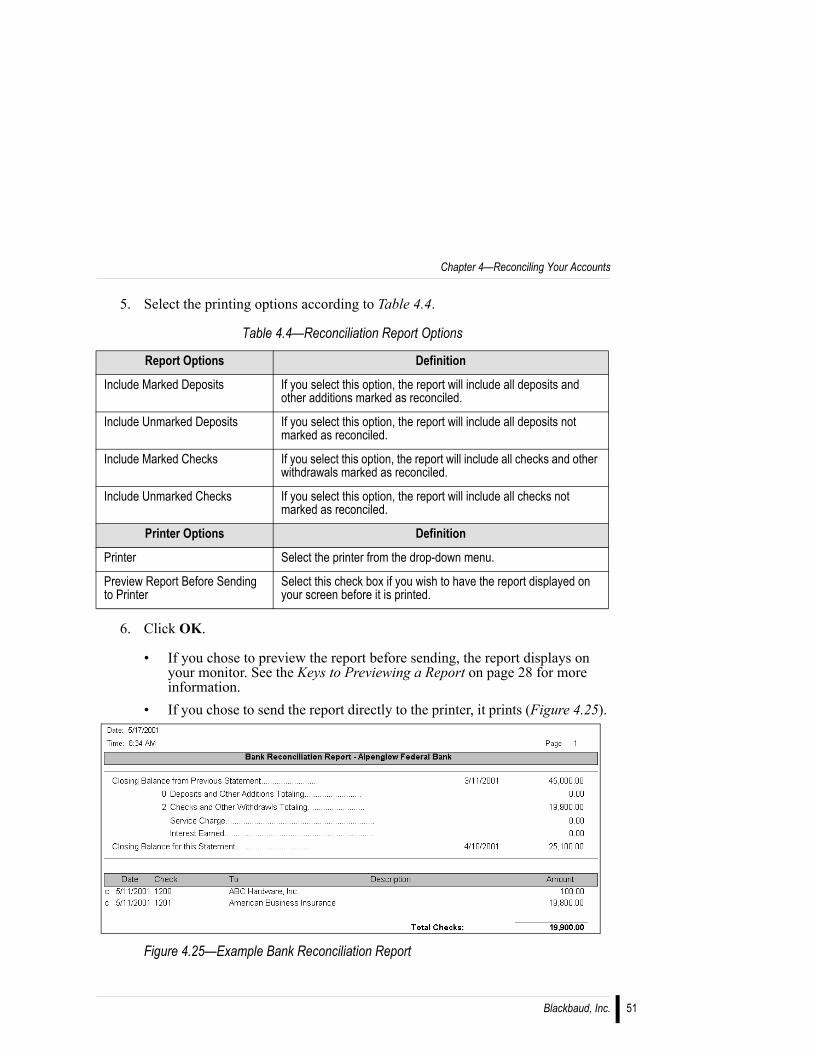
• If you chose to send the report directly to the printer, it prints (Figure 4.25).
Figure 4.25—Example Bank Reconciliation Report
Table 4.4—Reconciliation Report Options
Report Options Definition
Include Marked Deposits If you select this option, the report will include all deposits and other additions marked as reconciled.
Include Unmarked Deposits If you select this option, the report will include all deposits not marked as reconciled.
Include Marked Checks If you select this option, the report will include all checks and other withdrawals marked as reconciled.
Include Unmarked Checks If you select this option, the report will include all checks not marked as reconciled.
Printer Options Definition
Printer Select the printer from the drop-down menu.
Preview Report Before Sending to Printer
Select this check box if you wish to have the report displayed on your screen before it is printed.
Blackbaud, Inc. 51
Blackbaud FundWare Bank Reconciliation Guide
52
DELETING A RECONCILIATIONYou can delete both complete and incomplete (or “in-process”) reconciliations; however, the following rules apply:
• When you delete a completed reconciliation, the entry in the Reconcile folder is removed and the associated transactions are removed from the transaction register. However, this does not impact the status of these transactions in the FundWare source modules.
As the number of reconciliations and transactions grows in Bank Reconciliation, you will probably want to delete old reconciliations. This allows you to have a more manageable number of transactions in the module.
• When you delete an incomplete reconciliation, the entry in the Reconcile folder is removed. The associated transactions remain in the transaction register and retain their “cleared but not updated” status.
Before you delete a reconciliation, print a copy of the reconciliation information. Once deleted, you cannot recover this information. Use the following steps to delete a reconciliation.
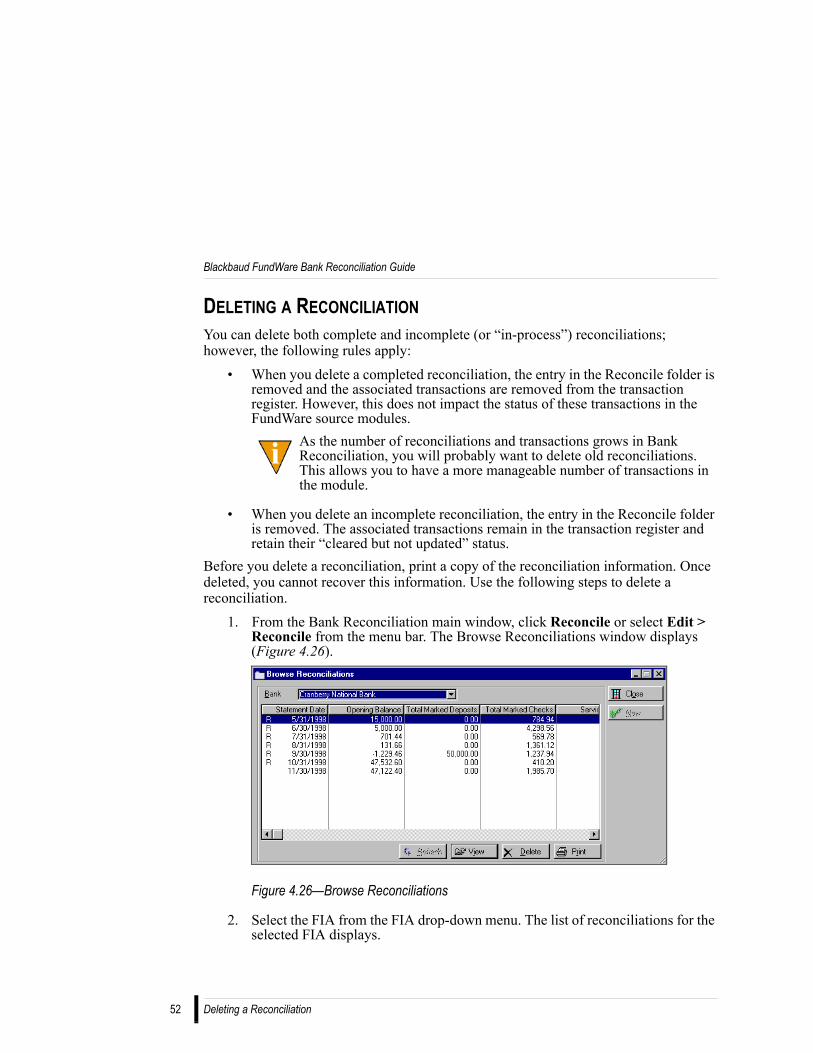
1. From the Bank Reconciliation main window, click Reconcile or select Edit > Reconcile from the menu bar. The Browse Reconciliations window displays (Figure 4.26).
Figure 4.26—Browse Reconciliations
2. Select the FIA from the FIA drop-down menu. The list of reconciliations for the selected FIA displays.
Deleting a Reconciliation
Chapter 4—Reconciling Your Accounts
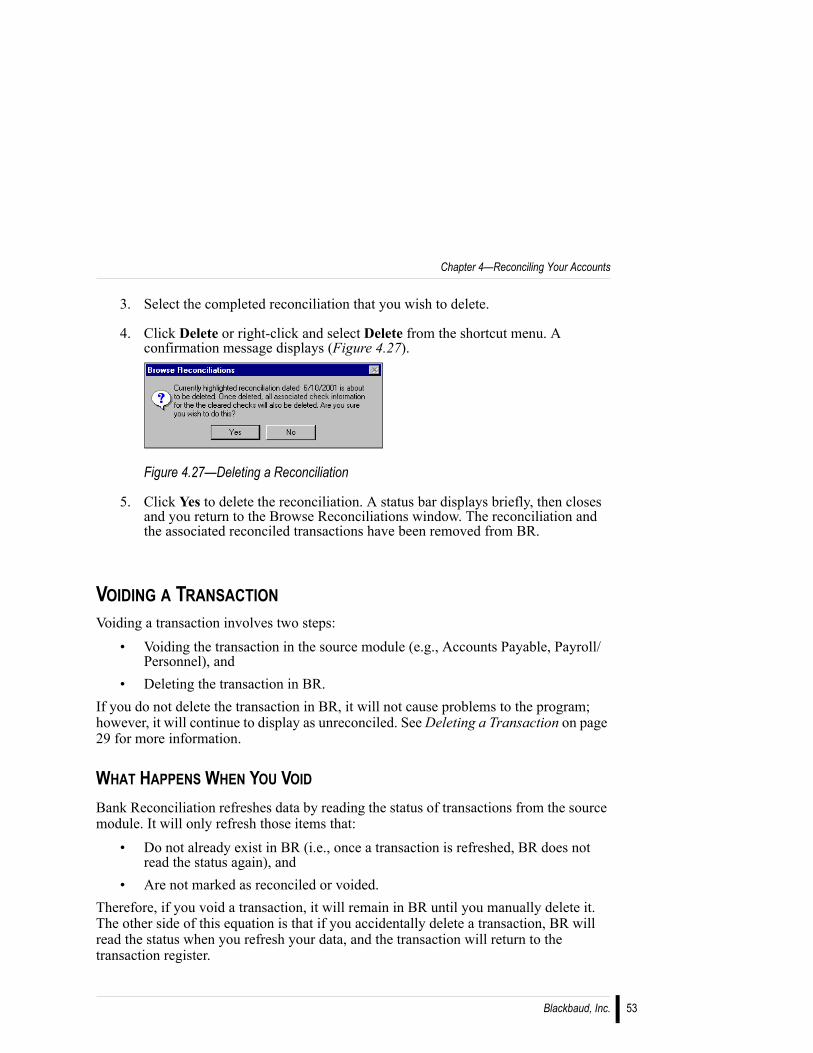
3. Select the completed reconciliation that you wish to delete.
4. Click Delete or right-click and select Delete from the shortcut menu. A confirmation message displays (Figure 4.27).
Figure 4.27—Deleting a Reconciliation
5. Click Yes to delete the reconciliation. A status bar displays briefly, then closes and you return to the Browse Reconciliations window. The reconciliation and the associated reconciled transactions have been removed from BR.
VOIDING A TRANSACTIONVoiding a transaction involves two steps:
• Voiding the transaction in the source module (e.g., Accounts Payable, Payroll/Personnel), and
• Deleting the transaction in BR.If you do not delete the transaction in BR, it will not cause problems to the program; however, it will continue to display as unreconciled. See Deleting a Transaction on page 29 for more information.
WHAT HAPPENS WHEN YOU VOID
Bank Reconciliation refreshes data by reading the status of transactions from the source module. It will only refresh those items that:
• Do not already exist in BR (i.e., once a transaction is refreshed, BR does not read the status again), and
• Are not marked as reconciled or voided. Therefore, if you void a transaction, it will remain in BR until you manually delete it. The other side of this equation is that if you accidentally delete a transaction, BR will read the status when you refresh your data, and the transaction will return to the transaction register.
Blackbaud, Inc. 53
Blackbaud FundWare Bank Reconciliation Guide
54
THE RECONCILIATION REPORTWhen you complete your first reconciliation for an Accounts Payable FIA, Bank Reconciliation creates a reconciliation report (OCRCHK.L##, where ## is your division number), accessible through Print Manager.
Each file will contain all the information for the specific division, including multiple FIAs, if appropriate.
For each subsequent reconciliation, BR will append the reconciliation information to the existing report. This allows you to have a history of your reconciliations. If you are reconciling a number of transactions, this file can quickly grow out of control. Therefore, we recommend that you preview, print, then delete this report after each reconciliation.
The Reconciliation Report
INDEX
AAccounts Payable . . . . . . . . . . . . . . . . 1
Refreshing data . . . . . . . . . . . . . . 34Accounts Receivable . . . . . . . . . . . . . . 1
Refreshing data . . . . . . . . . . . . . . 34
BBack up . . . . . . . . . . . . . . . . . . . . . . . 22Bank Reconciliation
Closing . . . . . . . . . . . . . . . . . . . . . 8Main window . . . . . . . . . . . . . . . . 2Modules . . . . . . . . . . . . . . . . . . . . . 1Process . . . . . . . . . . . . . . . . . . . . . 1Toolbar folders . . . . . . . . . . . . . . . 3
Business Office . . . . . . . . . . . . . . . . . . 3
CCash Receipts . . . . . . . . . . . . . . . . . . . 1
Refreshing data . . . . . . . . . . . . . . 34Check range . . . . . . . . . . . . . . . . . . . . 39Checks
Marking range . . . . . . . . . . . . . . . 39Reconciling . . . . . . . . . . . . . . . . . 38Viewing . . . . . . . . . . . . . . . . . . . . 25
Checks and other withdrawalsReconciling . . . . . . . . . . . . . . . . . 38Totalling . . . . . . . . . . . . . . . . . . . 37
Closing balance . . . . . . . . . . . . . . 37, 38Closing Bank Reconciliation . . . . . . . . 8
DData
Back up . . . . . . . . . . . . . . . . . . . . 22
DefaultGL cash account . . . . . . . . . . . . . 13
DeletingFIA information . . . . . . . . . . . . . . 20Reconciliation . . . . . . . . . . . . . . . 52Transaction . . . . . . . . . . . . . . . . . 53
Deposits and other additionsReconciling . . . . . . . . . . . . . . . . . 38Totalling . . . . . . . . . . . . . . . . . . . 37
EEFTs
Reconciling . . . . . . . . . . . . . . . . . 47Electronic bank information
Importing . . . . . . . . . . . . . . . . . . . 41Electronic fund transfer
Reconciling . . . . . . . . . . . . . . . . . 47Existing FundWare customers . . . . . . . 9
FFIA
Opening . . . . . . . . . . . . . . . . . . . . 13FIA information . . . . . . . . . . . . . . . . . . 8
Deleting . . . . . . . . . . . . . . . . . . . . 20Refreshing . . . . . . . . . . . . . . . . . . 12Viewing . . . . . . . . . . . . . . . . . . . . 20
Financial InstitutionsFIA information . . . . . . . . . . . . . . . 8Refreshing FIA information . . . . 12
Folders . . . . . . . . . . . . . . . . . . . . . . . . . 3
GGeneral Ledger
Blackbaud, Inc. 55
Blackbaud FundWare Bank Reconciliation Guide
56
Cash account . . . . . . . . . . . . . . . .13Importinging data . . . . . . . . . . . .31Journals . . . . . . . . . . 16, 17, 18, 19Refreshing data . . . . . . . . . . . . . .34
General Ledger–Project/Grant . . . . . . .1Getting . . . . . . . . . . . . . . . . . . . . . . . . .3GL cash account
Setting default . . . . . . . . . . . . . . .13
IImport marked checks wizard . . . . . .44Importing
Electronic bank information . . . .41General Ledger data . . . . . . . . . .31
Interest earned . . . . . . . . . . . . . . . . . . .7Posting . . . . . . . . . . . . . . . . . . . . .18Reconciling . . . . . . . . . . . . . . . . .38
KKey to the transaction register . . . . . .24
LLetter "c" . . . . . . . . . . . . . . . . . . .25, 36Letter "R" . . . . . . . . . . . . . . . . . . .25, 36
MMain BR window . . . . . . . . . . . . . . . . .2Mark range of checks . . . . . . . . . . . . .39
NNext button . . . . . . . . . . . . . . . . . . . . .49
OOCRCHK.L## . . . . . . . . . . . . . . . . . .54Opening
Bank Reconciliation . . . . . . . . . . .8FIA . . . . . . . . . . . . . . . . . . . . . . . .13
PPayroll/Personnel . . . . . . . . . . . . . . . . 1
Reconciling EFTs . . . . . . . . . . . 47Refreshing data . . . . . . . . . . . . . 34
PostingInterest earned . . . . . . . . . . . . . . 18Reconciliation information . . . . 15Service charges . . . . . . . . . . . . . 16
Previous button . . . . . . . . . . . . . . . . . 49Printing
Printer setup . . . . . . . . . . . . . . . . 21Reconciliation information . . . . 50Transaction register . . . . . . . . . . 26
Project/GrantImportinging data . . . . . . . . . . . . 31Refreshing data . . . . . . . . . . . . . 34
RRange
Marking checks . . . . . . . . . . . . . 39Reconciliation
Deleting . . . . . . . . . . . . . . . . . . . 52Posting information . . . . . . . . . . 15Printing . . . . . . . . . . . . . . . . . . . . 50
Reconciling . . . . . . . . . . . . . . . . . . . . 36Check range . . . . . . . . . . . . . . . . 39Checks and other withdrawals . . 38Deposits and other additions . . . 38Difference . . . . . . . . . . . . . . . . . 38Electronic bank information . . . 41Electronic fund tranfers . . . . . . . 47Entering information . . . . . . . . . 38Interest earned . . . . . . . . . . . . . . 38Saving . . . . . . . . . . . . . . . . . . . . 40Service charges . . . . . . . . . . . . . 38Unmarking . . . . . . . . . . . . . . . . . 38
RefreshingFIA information . . . . . . . . . . . . . 12
Index
For existing FundWare customers 9Reconciliation data . . . . . . . . . . . 21Source module data . . . . . . . . . . . 34
ReportsReconciliation information . . . . . 50Reconciliation Report
(OCRCHK.L##) . . . . . . . 54Transaction register . . . . . . . . . . . 26
SSaving
Opening a saved reconciliation . . 41Reconciliation . . . . . . . . . . . . . . . 40
Security . . . . . . . . . . . . . . . . . . . . . . . . 7Service charges . . . . . . . . . . . . . . . . . . 7
Posting . . . . . . . . . . . . . . . . . . . . . 16Reconciling . . . . . . . . . . . . . . . . . 38
SetupPrinter . . . . . . . . . . . . . . . . . . . . . 21
TTechnical support . . . . . . . . . . . . . . . . 4Toolbar folders . . . . . . . . . . . . . . . . . . 3
Training . . . . . . . . . . . . . . . . . . . . . . . . 4Transaction register . . . . . . . . . . . . . . 23
Key . . . . . . . . . . . . . . . . . . . . . . . 24Printing . . . . . . . . . . . . . . . . . . . . 26Viewing . . . . . . . . . . . . . . . . . . . . 23
TransactionsVoiding . . . . . . . . . . . . . . . . . . . . 53
Twenty Pines Resources, Inc. . . . . . . . 1
UUmark . . . . . . . . . . . . . . . . . . . . . . . . 38
VViewing
Checks . . . . . . . . . . . . . . . . . . . . . 25Completed reconciliation . . . . . . 49FIA information . . . . . . . . . . . . . . 20Transaction register . . . . . . . . . . . 23
VoidingTransaction . . . . . . . . . . . . . . . . . 53
WWindows taskbar . . . . . . . . . . . . . . . . . 8
Blackbaud, Inc. 57
Blackbaud FundWare Bank Reconciliation Guide
58


