16
8.25” x 10.75” | Standard | Perfect Binding
8.25” x 10.75” | Standard | Perfect Binding

Instructions forAdobe Photoshop
Learn More: www.adobe.com/photoshop

8.25” x 10.75” | Standard | Perfect Binding
Page Count: 20 pages min, 384 pages max, multiple of 2 | PDF Size: 300MB max
• Thetrimcanvaryslightlyineitherdirection,sofullpageimagesshouldfillthebleedarea,whiletextshouldbekeptinthesafezone(0.25”insidethetrimline).Seeexamplesonthefollowingpagesformoreinformation.
• Forthebestoutput,werecommendusingimagesthatare300dpi.TextshouldbeCMYKwiththefontsembedded.Thereshouldn’tbeanyspotcolorsusedinthefile.
• Don’tincludeprintermarksinyourPDF,anddon’tlockitwithapassword.• ThefirstpageinyourPDFwillbeyourfrontcoverandthelastpagewillbethebackcover.You
willhavetheoptiontouploadaspinefileseparatelyafteryourinitialPDFupload.• A6mm2Dbarcodewillbeaddedtothelowerrighthandcornerofyourbackcover(thelast
pageofthePDF).YoucanseeapreviewofthisafteryouuploadyourPDFtotheMagCloudsite.• Checkoutthe“DesigningforPerfectBinding”postontheMagCloudBlogformoredesigntips.
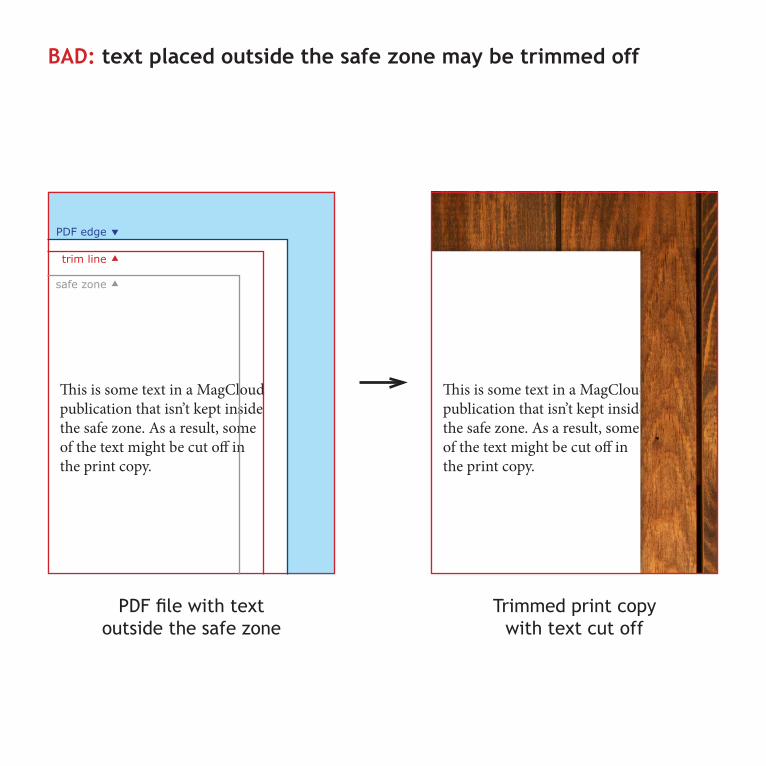
This is some text in a MagCloud publication that isn’t kept inside the safe zone. As a result, some of the text might be cut off in the print copy.
BAD: text placed outside the safe zone may be trimmed off
This is some text in a MagCloud publication that isn’t kept inside the safe zone. As a result, some of the text might be cut off in the print copy.
Trimmed print copy with text cut off
PDF file with text outside the safe zone
PDF edge �
trim line �
safe zone �

This is some text that is kept inside the safe zone. Even if the trim is off, none of the text will be cut off.
This is some text that is kept inside the safe zone. Even if the trim is off, none of the text will be cut off.
GOOD: text kept inside the safe zone will never get trimmed off
Trimmed print copy with no text cut off
PDF file with text inside the safe zone
PDF edge �
trim line �
safe zone �
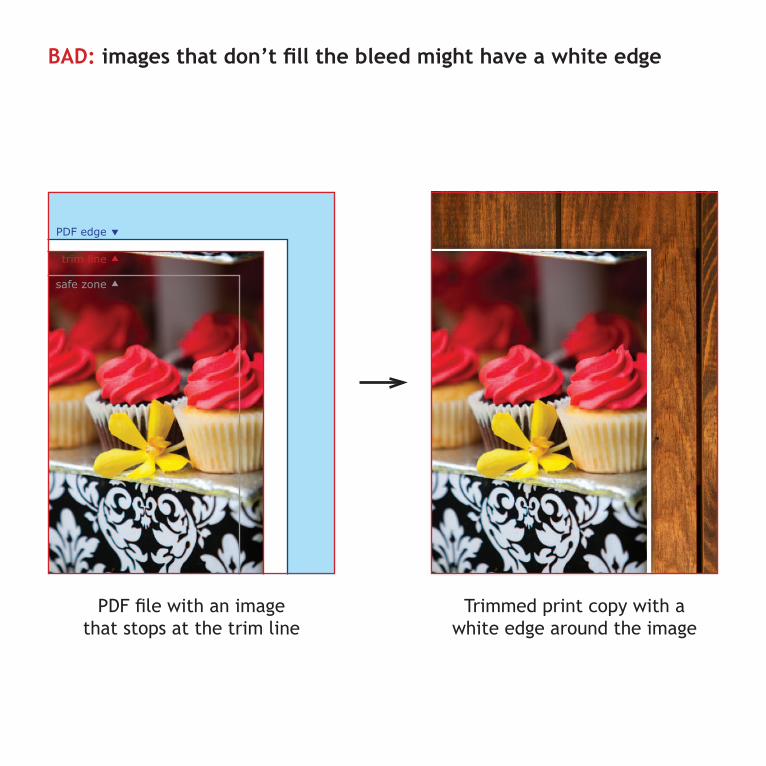
BAD: images that don’t fill the bleed might have a white edge
Trimmed print copy with a white edge around the image
PDF file with an image that stops at the trim line
PDF edge �
trim line �
safe zone �

GOOD: images that fill the bleed will go to the edge of the page
Trimmed print copy with the image to the edge of the page
PDF file with an image that goes to the edge of the PDF
PDF edge �
trim line �
safe zone �
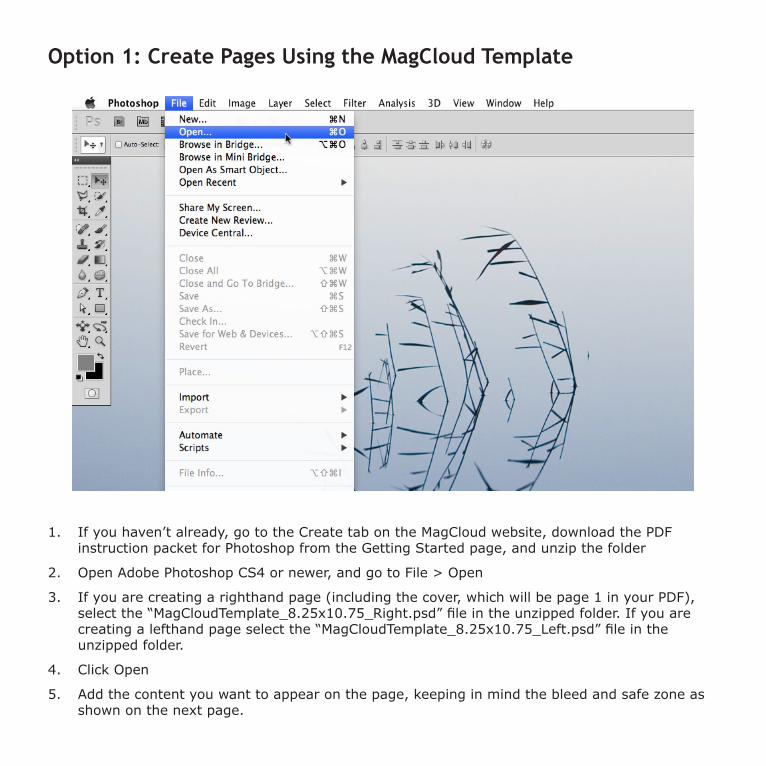
Option 1: Create Pages Using the MagCloud Template
1. Ifyouhaven’talready,gototheCreatetabontheMagCloudwebsite,downloadthePDFinstructionpacketforPhotoshopfromtheGettingStartedpage,andunzipthefolder
2. OpenAdobePhotoshopCS4ornewer,andgotoFile>Open
3. Ifyouarecreatingarighthandpage(includingthecover,whichwillbepage1inyourPDF),selectthe“MagCloudTemplate_8.25x10.75_Right.psd”fileintheunzippedfolder.Ifyouarecreatingalefthandpageselectthe“MagCloudTemplate_8.25x10.75_Left.psd”fileintheunzippedfolder.
4. ClickOpen
5. Addthecontentyouwanttoappearonthepage,keepinginmindthebleedandsafezoneasshownonthenextpage.

Get to Know the Layout of Your Document*:
Theblacklineistheedgeofthe8.5”x11”PDFyouwilluploadtoMagCloud.
Wheretheblueandredshaded areas meet is the 8.25”x10.75”trimlinethatwillbetheedgeofyourprintanddigitalversions.
Theblueshadedareaiscalledthebleed.
Thewhite,non-shadedareaisthesafezone,0.25”insidethetrimline.
IMPORTANT: The trim line can vary slightly in either direction, so all text content shouldbekeptoutoftheshadedareas(ie,insidethesafezone)toavoidgettingtrimmedoff,whileallimagesyouwanttoextendto the edge of the page shouldfilltheblueshadedarea(thebleed).
Thisiswhatarighthandpagewilllooklike.Ifyouare designing a lefthand page,thebleedandtrimlineswillbereversed.
*If your screen doesn’t look like this, make sure the folder called “DELETE BEFORE SAVING” is visible
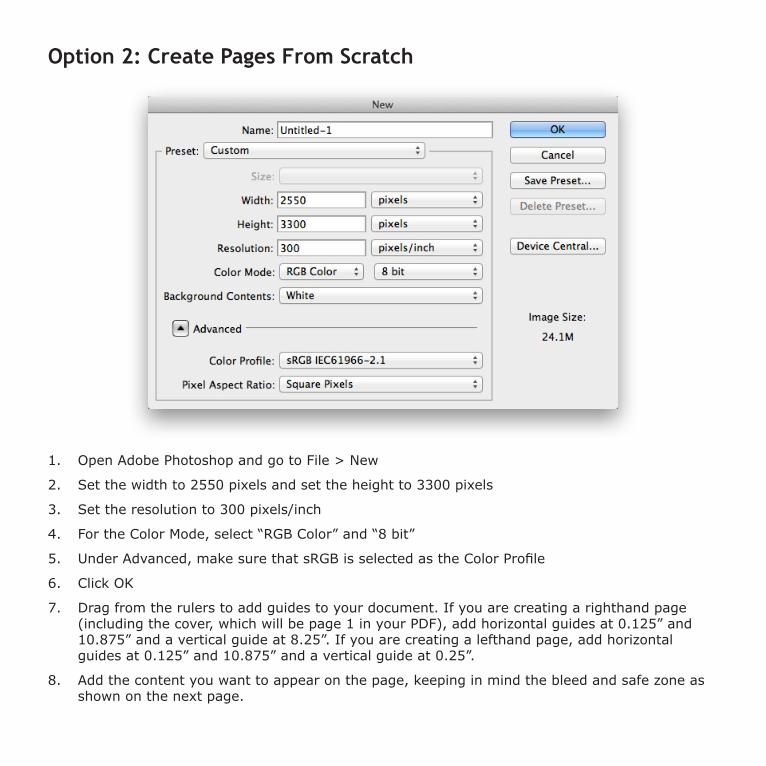
Option 2: Create Pages From Scratch
1. OpenAdobePhotoshopandgotoFile>New
2. Setthewidthto2550pixelsandsettheheightto3300pixels
3. Set the resolution to 300 pixels/inch
4. FortheColorMode,select“RGBColor”and“8bit”
5. UnderAdvanced,makesurethatsRGBisselectedastheColorProfile
6. ClickOK
7. Dragfromtherulerstoaddguidestoyourdocument.Ifyouarecreatingarighthandpage(includingthecover,whichwillbepage1inyourPDF),addhorizontalguidesat0.125”and10.875”andaverticalguideat8.25”.Ifyouarecreatingalefthandpage,addhorizontalguidesat0.125”and10.875”andaverticalguideat0.25”.
8. Addthecontentyouwanttoappearonthepage,keepinginmindthebleedandsafezoneasshownonthenextpage.

Get to Know the Layout of Your Document*:
Theblacklineistheedgeofthe8.5”x11”PDFyouwilluploadtoMagCloud.
Theblueguidelinesarethe8.25”x10.75”trimlinethatwillbetheedgeofyourprintanddigitalversions.
Theareabetweentheblueandblacklinesiscalledthebleed.
IMPORTANT: The trim line can vary slightly in either direction, so all text content shouldbekept0.25”insidethe trim line to avoid gettingtrimmedoff,whileallimagesyouwanttoextend to the edge of the pageshouldfillthebleed.
Thisiswhatarighthandpagewilllooklike.Ifyouare designing a lefthand page,thebleedandtrimlineswillbereversed.
*If your screen doesn’t look like this, go to View > Show and make sure there is a check next to Guides
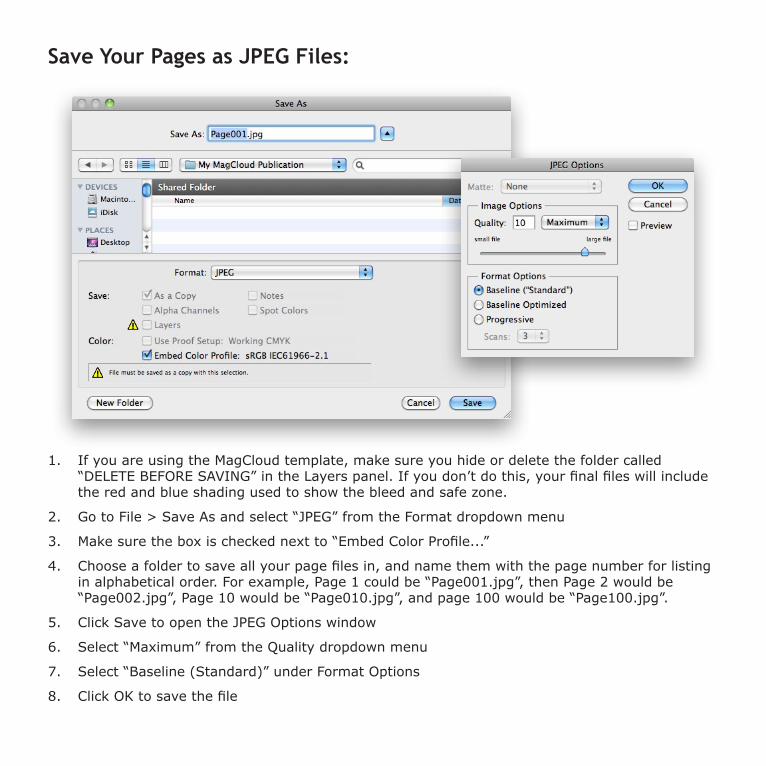
Save Your Pages as JPEG Files:
1. If you are using the MagCloud template, make sure you hide or delete the folder called “DELETE BEFORE SAVING” in the Layers panel. If you don’t do this, your final files will include the red and blue shading used to show the bleed and safe zone.
2. Go to File > Save As and select “JPEG” from the Format dropdown menu
3. Make sure the box is checked next to “Embed Color Profile...”
4. Choose a folder to save all your page files in, and name them with the page number for listing in alphabetical order. For example, Page 1 could be “Page001.jpg”, then Page 2 would be “Page002.jpg”, Page 10 would be “Page010.jpg”, and page 100 would be “Page100.jpg”.
5. Click Save to open the JPEG Options window
6. Select “Maximum” from the Quality dropdown menu
7. Select “Baseline (Standard)” under Format Options
8. Click OK to save the file

Combine JPEGs Using Adobe Acrobat Pro*:
1. When you’ve created all your page files in Photoshop, open Adobe Acrobat Pro
2. Go to File > Create PDF > Merge Files into a Single PDF...
3. Click the “Add Files” button, navigate to your folder of JPEGs, and select them all
4. Click Add Files
5. Sort alphabetically by name to put the pages in numerical order, or select individual file names and use the Move Up/Move Down buttons to manually reorder the pages.
6. When the files are in the correct order, select the largest paper icon next to File Size (the one furthest to the right) and click Combine Files
7. When prompted, select a name for your PDF and choose where you want it to be saved on your computer, then click Save
*IfyouhaveAdobeReaderinsteadofAdobeAcrobatPro,youcanuseAdobe’ssubscription-basedCreatePDFservicetoconvertyourJPEGfilestoPDFsandcombinethemintoasinglemultipagePDF,orseethestepsonthenextpage
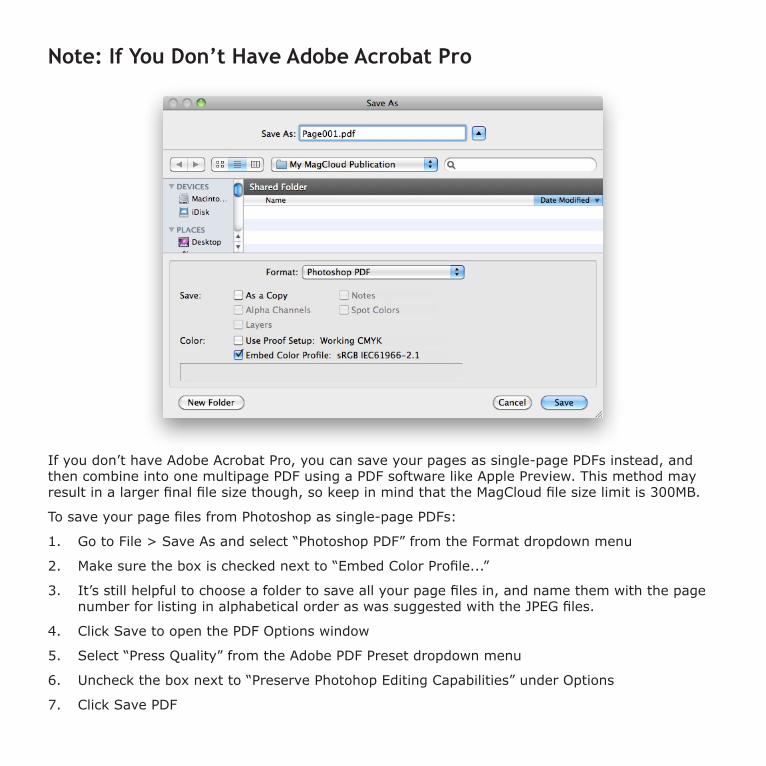
Note: If You Don’t Have Adobe Acrobat Pro
If you don’t have Adobe Acrobat Pro, you can save your pages as single-page PDFs instead, and then combine into one multipage PDF using a PDF software like Apple Preview. This method may result in a larger final file size though, so keep in mind that the MagCloud file size limit is 300MB.
To save your page files from Photoshop as single-page PDFs:
1. Go to File > Save As and select “Photoshop PDF” from the Format dropdown menu
2. Make sure the box is checked next to “Embed Color Profile...”
3. It’s still helpful to choose a folder to save all your page files in, and name them with the page number for listing in alphabetical order as was suggested with the JPEG files.
4. Click Save to open the PDF Options window
5. Select “Press Quality” from the Adobe PDF Preset dropdown menu
6. Uncheck the box next to “Preserve Photohop Editing Capabilities” under Options
7. Click Save PDF

Your PDF is now ready to upload to MagCloud!

www.magcloud.com


