23
88-Key Digital Piano P/N 600043 (without stand)/600044 (with stand) User's Manual

88-Key Digital Piano
P/N 600043 (without stand)/600044 (with stand)
User's Manual

2
SAFETY WARNINGS AND GUIDELINES Please read this entire manual before using this device, paying extra attention to these safety warnings and guidelines. Please keep this manual in a safe place for future reference.
• This device is intended for indoor use only.
• Do not expose this device to water or moisture of any kind. Do not place drinks or other containers with moisture on or near the device. If moisture does get in or on the device, immediately remove it from its power source and allow it to fully dry before reapplying power.
• Do not touch the device, the power cord, or any other connected cables with wet hands.
• Do not install this device on an unstable surface where it could fall and cause either personal injury or damage to the device and/or other equipment.
• Do not expose this device to excessive vibration, extreme force, shock, or fluctuations in temperature or humidity.
• Avoid prolonged exposure to excessive volume levels, which could cause hearing damage.
• Do not expose this device to excessively high temperatures. Do not place it in, on, or near a heat source, such as a fireplace, stove, radiator, etc. Do not leave it in direct sunlight.
• Do not place or install this device in an area where it can be exposed to excessive amounts of dust, humidity, oil, smoke, or combustible vapors.

3
• Prior to operation, check the unit and power cord for physical damage. Do not use if physical damage has occurred.
• Unplug this device from the power source when not in use. • Take care to prevent damage to the power cord. Do not allow it to
become crimped, pinched, walked on, or become tangled with other cords. Ensure that the power cord does not present a tripping hazard.
• Never unplug the unit by pulling on the power cord. Always grasp the connector head or adapter body.
• Ensure that power is turned off and disconnected before making any electrical connections.
• Clean using a soft, dry cloth only. Do not use chemical cleaners, solvents, or detergents. For stubborn deposits, moisten the cloth with warm water.
• This device has no user serviceable parts. Do not attempt to open, service, or modify this device.
CUSTOMER SERVICE The Monoprice Customer Service department is dedicated to ensuring that your ordering, purchasing, and delivery experience is second to none. If you have any problem with your order, please give us an opportunity to make it right. You can contact a Monoprice Customer Service representative through the Live Chat link on our website www.monoprice.com or via email at [email protected]. Check the website for support times and links.

4
PACKAGE CONTENTS Please take an inventory of the package contents to ensure you have all the items listed below. If anything is missing or damaged, please contact Monoprice Customer Service for a replacement.
1x 88-Key Digital Piano
1x Music Sheet Stand
1x Pedal
1x MIDI Cable
1x USB Type-C® Cable
1x AC Power Adapter
1x User's Manual
In addition to the above contents, the 600044 version also includes the following parts for the included Wooden Stand.
2x M5 Screws (1)
2x Angle Iron Bracket (2)
4x M6 Short Screws (3) 4x M6 Hammer Head Nuts (4)
4x M6 Long Screws (5)
4x Plastic Head Screws (6) 1x Iron Box Section (7)
1x Rung (8)
1x Left Baseboard (9)

5
1x Right Baseboard (10)
PRODUCT OVERVIEW Top Panel
Note that when the Power Switch (2) is turned on, the first button in the Timbre (9) section (Grand Piano) illuminates to indicate that power is applied.

6
Rear Panel
27. 12V: DC barrel connector for connecting the included AC power
adapter. 28. PHONES-1: 1/4" TRS stereo headphone jack. When one or more
headphones are connected, the built-in speakers are automatically disabled.
29. PHONES-2: 1/4" TRS stereo headphone jack. When one or more headphones are connected, the built-in speakers are automatically disabled.
30. AUDIO OUT: 1/4" TRS stereo output jack for connecting the piano to an external amplifier or other device.
31. AUDIO IN: 1/4" TRS stereo input jack for connecting an external audio source device, such as an mp3 player or CD player.
32. PEDAL: 3-in-1 pedal connector for attaching a single sustain pedal (included) or a pedal board with soft, sustain, and damper pedals (not included).
33. USB-MIDI: USB Type-B port for connecting the piano to a computer for advanced recording, composing, and editing with software or to input MIDI music from the computer for playback on the piano.
You can also connect the piano to a smartphone or tablet using an On-The-Go™ (OTG™) USB adapter (available separately) for use with a third party music teaching/lessons app (not included).

7
34. UDISK: USB Type-A port for connecting a USB flash drive (up to 32GB capacity) with mp3 files for playback using the built-in Udisk Music Player.
OPERATION Most of the following features use the keyboard keys to perform other operations. Most of these require one button to be held down while a key is pressed. This is documented as Button+Key.
Udisk Music Player
• Plug a USB flash drive with mp3 files (up to 32GB capacity) into the
UDISK port on the rear panel, then press Function+ON/OFF to turn the music player on or off. When turned on, the player will automatically start playing the first mp3 file on the connected flash drive.
• Press Function+ to pause or resume playback.
• Press Function+━ to reduce the volume level. • Press Function+╋ to increase the volume level.
• Press Function+ to skip back to the previous track.

8
• Press Function+ to skip ahead to the next track.
• Press Function+ to cycle through the repeat modes for continuous, random, and single play modes.
Key Tone
• By default, an audible "click" sound plays whenever a key is pressed.
Press Function+Click to turn the "click" sound on or off.

9
Timbre Selection
• The piano includes 140 (000-139) built-in timbres for selection.
• Whenever the piano is turned on, it defaults to the 088 Pad 1 (new age) timbre.
• To change the timbre, press GM Timbre+XXX, where XXX is the three digit code for the new timbre. Alternatively, you can press GM Timber+Y, where Y is either the - or + key, which decrements or increments the currently selected timbre by 1.

10
Play Demo Songs
• The piano includes 16 (00-15) built-in Demo Songs. • Press the Demo button to start or stop playback of the currently
selected Demo Song.
• To change the currently selected Demo Song, press Function+XX, where XX is the two digit code for the new song.
• You can change the timbre while a Demo Song is being played. Note that the percussion and dual timbre options are not available while playing a Demo Song.
Metronome
• Press the Metronome button to turn the built-in metronome on or
off.
• The piano features 10 time signatures for the metronome, from 1/4 to 12/8. To change the time signature of the metronome, press

11
Function+X, where X is the key corresponding to the desired metronome time signature.
Metronome Volume
• The piano features 5 different volume levels for the metronome. To
change the metronome volume level, press Function+X, where X is the key corresponding to the desired metronome volume level.
Tempo
• The piano features 271 different metronome tempos, from 30 to
300 beats per minute (bpm). The default tempo is 120 bpm.
• To change the metronome tempo, press GM Timbre+XXX, where XXX is 030-300, including the leading 0 for values under 100. Alternatively, you can press GM Timber+Y, where Y is either the -

12
or + key, which decrements or increments the currently selected metronome tempo by 1.
• To quickly restore the default 120 bpm tempo, press GM Timber+TAP.
Note Effects
• The piano can add Sustain and/or Vibrato effects to the notes
being played.
• To enable Sustain, press Function+Sustain On. • To disable Sustain, press Function+Sustain Off.
• To enable Vibrato, press Function+Vibrato On.
• To disable Vibrato, press Function+Vibrato Off.
13
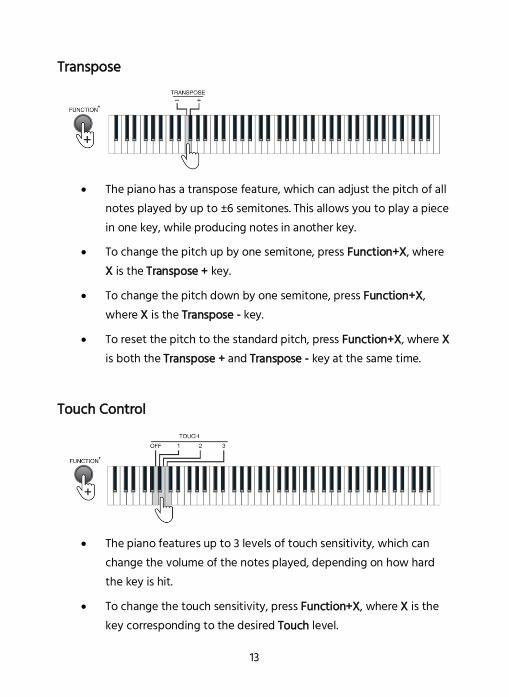
Transpose
• The piano has a transpose feature, which can adjust the pitch of all
notes played by up to ±6 semitones. This allows you to play a piece in one key, while producing notes in another key.
• To change the pitch up by one semitone, press Function+X, where X is the Transpose + key.
• To change the pitch down by one semitone, press Function+X, where X is the Transpose - key.
• To reset the pitch to the standard pitch, press Function+X, where X is both the Transpose + and Transpose - key at the same time.
Touch Control
• The piano features up to 3 levels of touch sensitivity, which can
change the volume of the notes played, depending on how hard the key is hit.
• To change the touch sensitivity, press Function+X, where X is the key corresponding to the desired Touch level.

14
Split
• The keyboard can be split into two zones, allowing you to play
different timbres with each hand.
• When the keyboard is split, the scale of the left-hand zone is increased by one octave, while the scale of the right-hand zone is decreased by one octave.
• To set a split point, press Split+X, where X is the key that you want to be the left most key of the right-hand zone.
• Press the Split button again to disable keyboard splitting.
• When the keyboard is split, both zones will use the timbre that was active when the split was made. You can then use the Timbre Selection function to set a new timbre for the right-hand zone.
• While the split is active, you can change the volume of the left-hand zone by pressing Function+Y, where Y they key corresponding to the desired Split Volume.
15
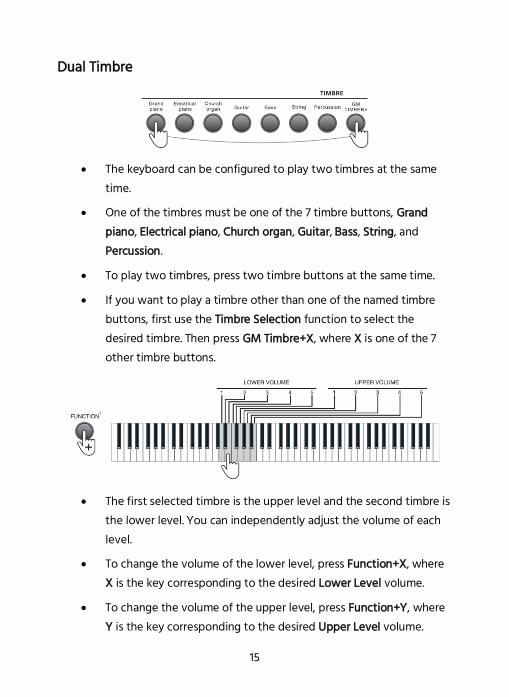
Dual Timbre
• The keyboard can be configured to play two timbres at the same
time. • One of the timbres must be one of the 7 timbre buttons, Grand
piano, Electrical piano, Church organ, Guitar, Bass, String, and Percussion.
• To play two timbres, press two timbre buttons at the same time.
• If you want to play a timbre other than one of the named timbre buttons, first use the Timbre Selection function to select the desired timbre. Then press GM Timbre+X, where X is one of the 7 other timbre buttons.
• The first selected timbre is the upper level and the second timbre is
the lower level. You can independently adjust the volume of each level.
• To change the volume of the lower level, press Function+X, where X is the key corresponding to the desired Lower Level volume.
• To change the volume of the upper level, press Function+Y, where Y is the key corresponding to the desired Upper Level volume.

16
Lesson Mode
• Lesson Mode splits the keyboard into two equal zones with
identical tone and timbre. This makes it easy for a teacher and student to sit side by side and play the same notes at the same time.
• To enable Lesson Mode, press the Lesson button. Press the Lesson button again to disable Lesson Mode.
Octave Control
• While Lesson Mode is active, you can adjust the octave of each
zone by ±2 octaves. • To change the octave, press Function+X, where X is the Octave - or
Octave + key.

17
• To reset the octave to the default setting, press Function+Y, where Y is both the Octave - and Octave + keys at the same time.
Record Mode
• The piano has internal memory, which can store up to 700 notes for
later playback.
• To start recording, press Function+Rec.
• To stop recording, press Function+Rec a second time. • Recording will automatically stop after the internal memory is filled
with 700 notes.
• When recording starts, the metronome is automatically enabled. You can adjust the metronome tempo using the Tempo function.
• To playback the recorded notes, press Function+Play.
• To stop playback of the recorded notes, press Function+Play a second time.

18
STAND ASSEMBLY (600044 only) In addition to the base package contents, P/N 600044 also includes a Wooden Stand. Perform the following steps to assemble the stand.
1. Insert the Iron Box Section (7) into the groove in the bottom of the piano, then secure it in place using 2x M5 Screws (1).
2. Install 1x Angle Iron Bracket (2) to the Left Baseboard (9) using 2x
M6 Short Screws (3), then install 1x Angle Iron Bracket (2) to the Right Baseboard (10) using 2x M6 Short Screws (3).

19
3. Insert 4x Hammer Head Nuts (4) into the holes on the non-front of the Rung (8). Using a flat head screwdriver, adjust the direction of each Hammer Head Nut (4) so that the hole in the nut is aligned with the hole in the side of the Rung (8).
Insert 4x M6 Long Screws (5) through the holes in the Left Baseboard (9) and Right Baseboard (10), into the holes in the sides of the Rung (8), then screw them into the Hammer Head Nuts (4).

20
4. Place the piano assembly onto the Angle Iron Brackets, then secure it in place using 4x Plastic Head Screws (6).

21
SPECIFICATIONS P/N 600043, 600044
Keys 88 semi-weighted, 7/8th DS standard 140mm
Voices Piano, electric piano, bass, guitar, organ, percussion
Timbres 140
Speakers 2x built-in
Metronome Built-in
Pedal Included
Stand 600043: available separately (602220) 600044: included
Connections 2x 1/4" headphones, 1x 1/4" pedal, 1x 1/4" line input, 1x 1/4" line output, 1x USB MIDI, 1x USB Disk
Controls Volume, metronome, voices
Input Power 12 VDC
AC Adapter Input Power 100 ~ 240 VAC, 50/60 Hz
Dimensions 51.0" x 11.0" x 4.5"
Weight 14.7 lbs.

22
TECHNICAL SUPPORT Monoprice is pleased to provide free, live, online technical support to assist you with any questions you may have about installation, setup, troubleshooting, or product recommendations. If you ever need assistance with your new product, please come online to talk to one of our friendly and knowledgeable Tech Support Associates. Technical support is available through the online chat button on our website www.monoprice.com or through email by sending a message to [email protected]. Check the website for support times and links.
To download the latest drivers, firmware, manuals, etc., go to www.monoprice.com and type the P/N into the search bar. If available, support files are linked at the bottom of the product page.
REGULATORY COMPLIANCE Notice for FCC
This device complies with Part 15 of the FCC rules. Operation is subject to the following two conditions: (1) this device may not cause harmful interference, and (2) this device must accept any interference received, including interference that may cause undesired operation.
Modifying the equipment without Monoprice's authorization may result in the equipment no longer complying with FCC requirements for Class B digital devices. In that event, your right to use the equipment may be limited by FCC regulations, and you may be required to correct any interference to radio or television communications at your own expense.

23
This equipment has been tested and found to comply with the limits for a Class B digital device, pursuant to Part 15 of the FCC Rules. These limits are designed to provide reasonable protection against harmful interference in a residential installation. This equipment generates, uses and can radiate radio frequency energy and, if not installed and used in accordance with the instructions, may cause harmful interference to radio communications. However, there is no guarantee that interference will not occur in a particular installation. If this equipment does cause harmful interference to radio or television reception, which can be determined by turning the equipment off and on, the user is encouraged to try to correct the interference by one or more of the following measures:
• Reorient or relocate the receiving antenna.
• Increase the separation between the equipment and receiver.
• Connect the equipment into an outlet on a circuit different from that to which the receiver is connected.
• Consult the dealer or an experienced radio/TV technician for help.
Notice for Industry Canada This Class B digital apparatus complies with Canadian ICES-003.
Cet appareil numérique de la classe B est conforme à la norme NMB-003 du Canada.
Monoprice™ and all Monoprice logos are trademarks of Monoprice Inc. USB Type-C® and USB-C® are registered trademarks of USB Implementers Forum. USB On-The-Go™ and OTG™ are trademarks of USB Implementers Forum.


