15
Virtual Office
| Date post: | 10-May-2018 |
| Category: |
Documents |
| Upload: | vuongkhuong |
| View: | 226 times |
| Download: | 0 times |
Virtual Office

Copyright © 2014, 8x8, Inc. All rights reserved.
This document is provided for information purposes only and the contents hereof are subject to change without notice. This document is not warranted to be error-free, nor subject to any other warranties or conditions, whether expressed orally or implied in law, including implied warranties and conditions of merchantability or fitness for a particular purpose. We specifically disclaim any liability with respect to this document and no contractual obligations are formed either directly or indirectly by this document. This document may not be reproduced or transmitted in any form or by any means, electronic or mechanical, for any purpose, without our prior written permission.
8x8® is a registered trademark of 8x8, Inc.
All other trademarks, service marks, registered trademarks, or registered service marks are the property of their respective owner/s. All other brands and/or product names are the trademarks (or registered trademarks) and property of their respective owner/s.

ii
Contents OBJECTIVE .............................................................................................................................................................. 1
BRANCH OFFICE ...................................................................................................................................................... 1 KEY BENEFITS ................................................................................................................................................................... 1
CALL FLOW FOR A BRANCH OFFICE .......................................................................................................................... 2 RECEPTIONIST TOOLS ....................................................................................................................................................... 3 USE CASE ........................................................................................................................................................................ 4
SETTING UP A BRANCH ............................................................................................................................................ 5 PREPARATION .................................................................................................................................................................. 5 MAIN TASKS FOR SET UP ................................................................................................................................................... 5 STEPS ............................................................................................................................................................................ 6 MANAGING EXTENSIONS IN A BRANCH .................................................................................................................................. 9
AUTO ATTENDANT SEGMENTED BY BRANCH ......................................................................................................... 10
ASSIGNING BRANCH PRIVILEGES ........................................................................................................................... 11
1
Objective
This guide intended for 8x8 iPBX administrators, provides an overview of 8x8 Branch Office and its benefits. The document details the steps involved in setting up a branch office in Account Manager.
Branch Office
Branch Office allows you to segment your 8x8 iPBX into groups of extensions. Each group you create has a central inbound call reception point optionally selected by you - a live receptionist or an auto attendant. Branch Office also facilitates bulk assignment of outbound caller ID name and outbound caller ID telephone number. When all branch extensions have a uniform outbound identity, your customer automatically knows the correct branch call back number. In addition, dialing zero # (pressing 0 # from keypad) on reaching an extension voicemail routes callers to the branch receptionist instead of the company headquarters receptionist.
Using Branch Office, a business with geographically distributed offices or logical groups located in the same building gain the efficiency of branch call flow.
Key Benefits
• Improved inter and intra branch office communication with new call flow controls
o Dedicated receptionist or auto attendant for each branch o Custom branch to branch routing from auto attendant o Zero # (pressing 0 # from keypad) directs from extension voicemail to branch receptionist
• Improve customer communications with matching outbound caller ID on all branch extensions. o The bulk ANI update selection makes this easy
• Maximize receptionist efficiency with new call management tools: o Switchboard Pro o Side Cars o Virtual Receptionist
• Reduce overhead and improve efficiency by directing calls to branch offices via dedicated Virtual Numbers
• Eliminate the expense of purchasing multiple PBXs

2
Call Flow for a Branch Office
Branch call flow begins with a Virtual Number on your PBX and flows to the receptionist at the branch office. The “receptionist” can be a live operator, an auto-attendant, or several live operators assembled in a ring group or call queue. In summary, a receptionist for Branch Office receives inbound calls through one of the following roles:
• Auto Attendant
• Live Attendant (receptionist)
• Multiple receptionists with Call Queue
• Multiple receptionists with Ring Group
Call flow within a branch office may be explained as follows:
1. The branch is assigned a Virtual Number. The Virtual Number points to the receptionist extension that is assigned as the Receptionist of the branch office.
2. Overflow calls to branch office receptionist can go to voice mail, auto-attendant or any forwarding phone number. The receptionists’ extension is where you set call overflow rules, if required.
3. The caller can leave a voicemail or dial “0#” to be directed to the Branch Receptionist to ensure the caller gets a desired response.
A branch office call flow may be represented as shown here.
3
Receptionist Tools
The receptionist receives branch phone calls. 8x8 provides receptionist with tools to distribute calls using:
1. 8x8 Virtual Office Switchboard, is an HTML5 browser-based call management client a. 8x8 Virtual Office Switchboard is an application specially designed for handling inbound
calls, voicemail, chat and notes. Switchboard enables your receptionist to view real-time presence, manage multiple calls (call park, hold, transfer), coordinate with other receptionists and toggle to auto attendant.
b. Switchboard is currently designed to work along-side Polycom desk phones. c. Call Parking is provided three modes: public park, branch park, and extension park.
i. Public Call Parking - parks the call on an extension that is available for anyone on the PBX to pickup the call
ii. Branch Call Parking - parks the call on an extension only available for pickup by an extension defined as part of the affected branch office
iii. Extension or Private Call Parking - parks the call on a specific extension, only allowing pickup from the extension. Example: receptionist parks the call on extension 1101 that belongs to Jane Davis. The parked call can only be picked up from extension 1101, Jane Davis's phone.
2. BLF keys on Polycom desk phone to monitor and transfer calls 3. Paging (over speakerphone or overhead PA system) to announce call park 4. Public Call Parking from desk phone
4
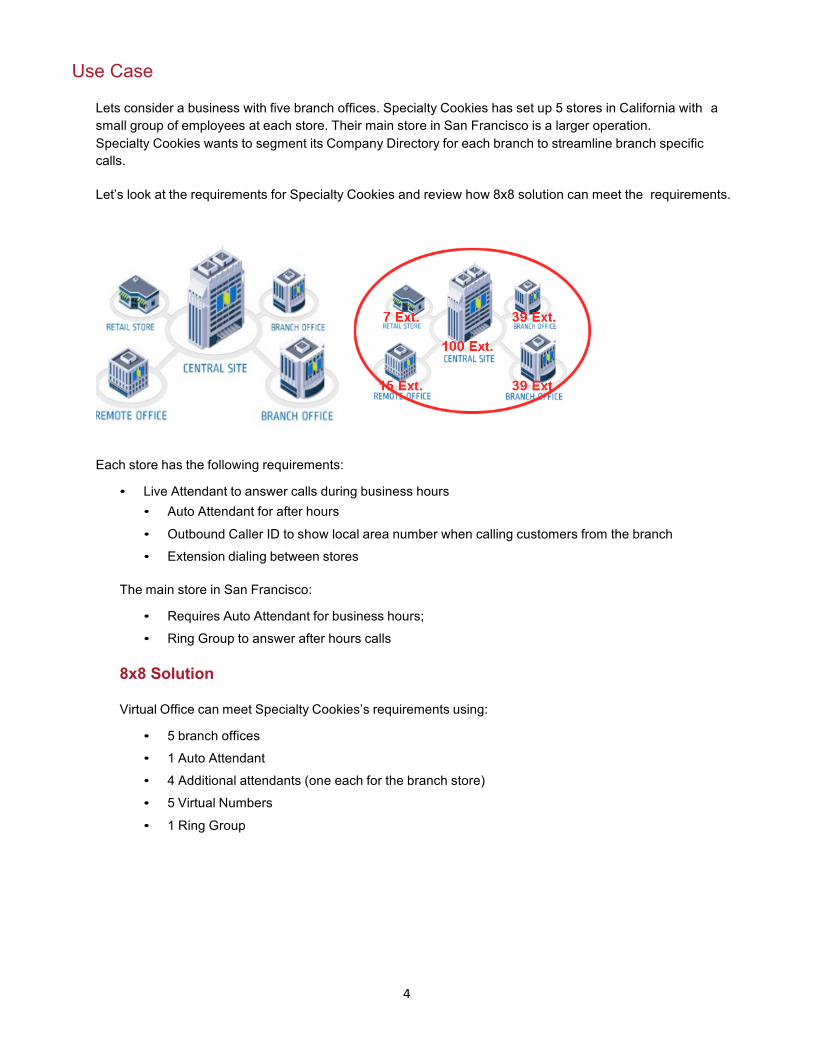
Use Case
Lets consider a business with five branch offices. Specialty Cookies has set up 5 stores in California with a small group of employees at each store. Their main store in San Francisco is a larger operation. Specialty Cookies wants to segment its Company Directory for each branch to streamline branch specific calls.
Let’s look at the requirements for Specialty Cookies and review how 8x8 solution can meet the requirements.
Each store has the following requirements:
• Live Attendant to answer calls during business hours • Auto Attendant for after hours
• Outbound Caller ID to show local area number when calling customers from the branch
• Extension dialing between stores
The main store in San Francisco:
• Requires Auto Attendant for business hours;
• Ring Group to answer after hours calls
8x8 Solution
Virtual Office can meet Specialty Cookies’s requirements using:
• 5 branch offices
• 1 Auto Attendant
• 4 Additional attendants (one each for the branch store)
• 5 Virtual Numbers
• 1 Ring Group
5
Setting up a branch
Setting up a Branch Office requires you to select a branch main number from your pool of virtual numbers, define a branch receptionist, and point the Virtual Number to the branch receptionist.
Preparation
1. Determine a Branch Receptionist for each branch o If Branch Receptionist is a live attendant, gather the extension number o If Branch Receptionist is an auto attendant, define an auto attendant o If Branch Receptionist is a ring group or a call queue, define the desired call queue or ring
group 2. Determine a Virtual Number for each branch 3. Determine the number of extensions for each branch
Main Tasks for Set Up
• Create your call queue or ring group or auto attendant as desired.
• Select a Virtual Number for each branch.
• Specify a Branch Receptionist – If a call reaches voicemail, the caller can either leave a voicemail or dial ‘zero#’ to reach the branch receptionist.
Your receptionist can be: o An extension (Live receptionist) o An auto attendant o A call queue (Multiple live receptionists) o A ring group (Multiple live receptionists)
• Add extensions to the branch
• Point the branch Virtual Number to the branch receptionist
• If a branch Virtual Number points to an Auto Attendant, segment the Auto Attendant options (dial by name, extension, Company Directory) to streamline searching.
6
STEPS
Configuring a branch office involves the following steps.
STEP 1: Login to Account Manager.
1. Login to Account Manager. 2. Click Phone System.
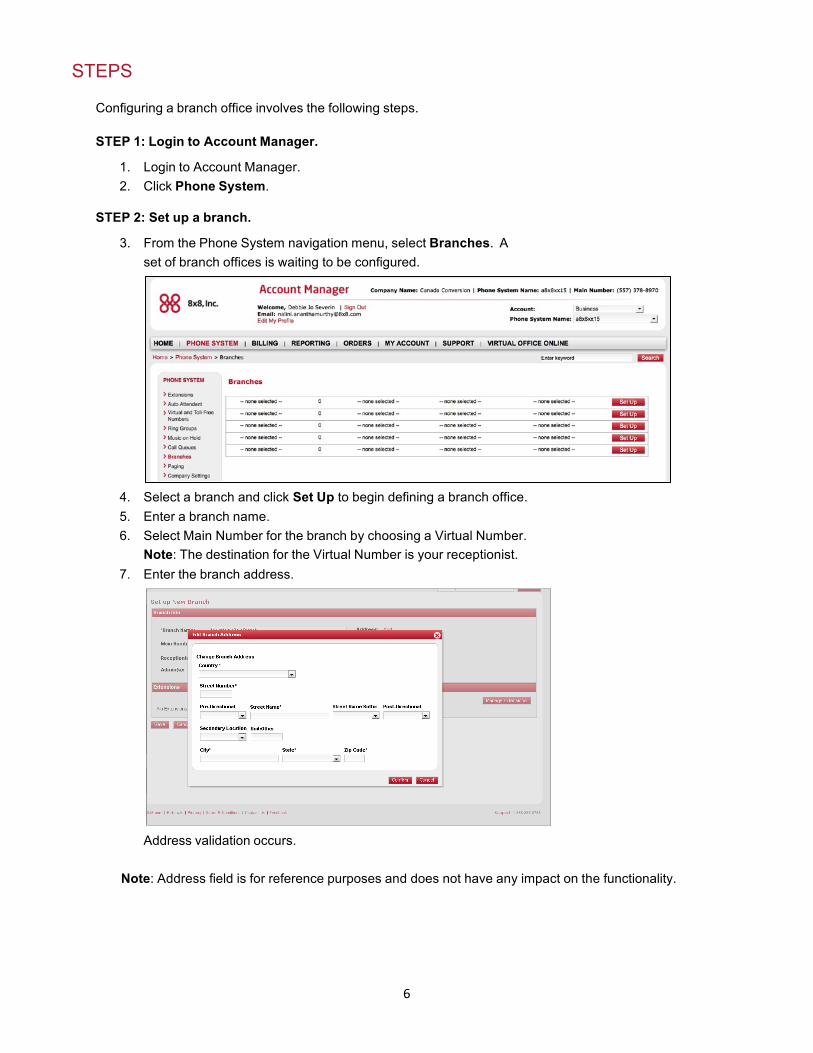
STEP 2: Set up a branch.
3. From the Phone System navigation menu, select Branches. A set of branch offices is waiting to be configured.
4. Select a branch and click Set Up to begin defining a branch office. 5. Enter a branch name. 6. Select Main Number for the branch by choosing a Virtual Number.
Note: The destination for the Virtual Number is your receptionist. 7. Enter the branch address.
Address validation occurs.
Note: Address field is for reference purposes and does not have any impact on the functionality.
7
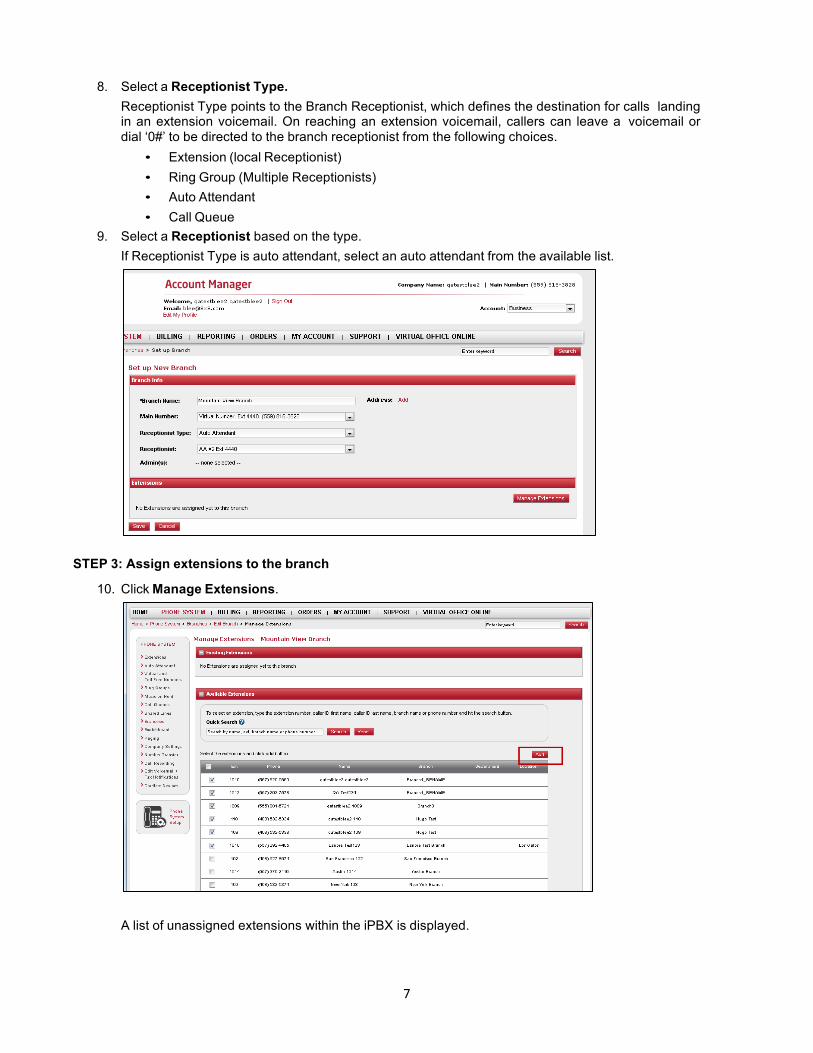
8. Select a Receptionist Type.
Receptionist Type points to the Branch Receptionist, which defines the destination for calls landing in an extension voicemail. On reaching an extension voicemail, callers can leave a voicemail or dial ‘0#’ to be directed to the branch receptionist from the following choices. • Extension (local Receptionist) • Ring Group (Multiple Receptionists) • Auto Attendant • Call Queue
9. Select a Receptionist based on the type. If Receptionist Type is auto attendant, select an auto attendant from the available list.
STEP 3: Assign extensions to the branch
10. Click Manage Extensions.
A list of unassigned extensions within the iPBX is displayed.
8
11. Select the desired extensions and click ADD. The
extensions are now mapped to the branch. 12. Save your settings.
You have now completed defining a branch office. Repeat the set up process to define all other branches in your iPBX.
The next step is to assign a destination for the branch office Virtual Number. If you already assigned the destination, make sure it matches the Receptionist Type defined for the branch office.
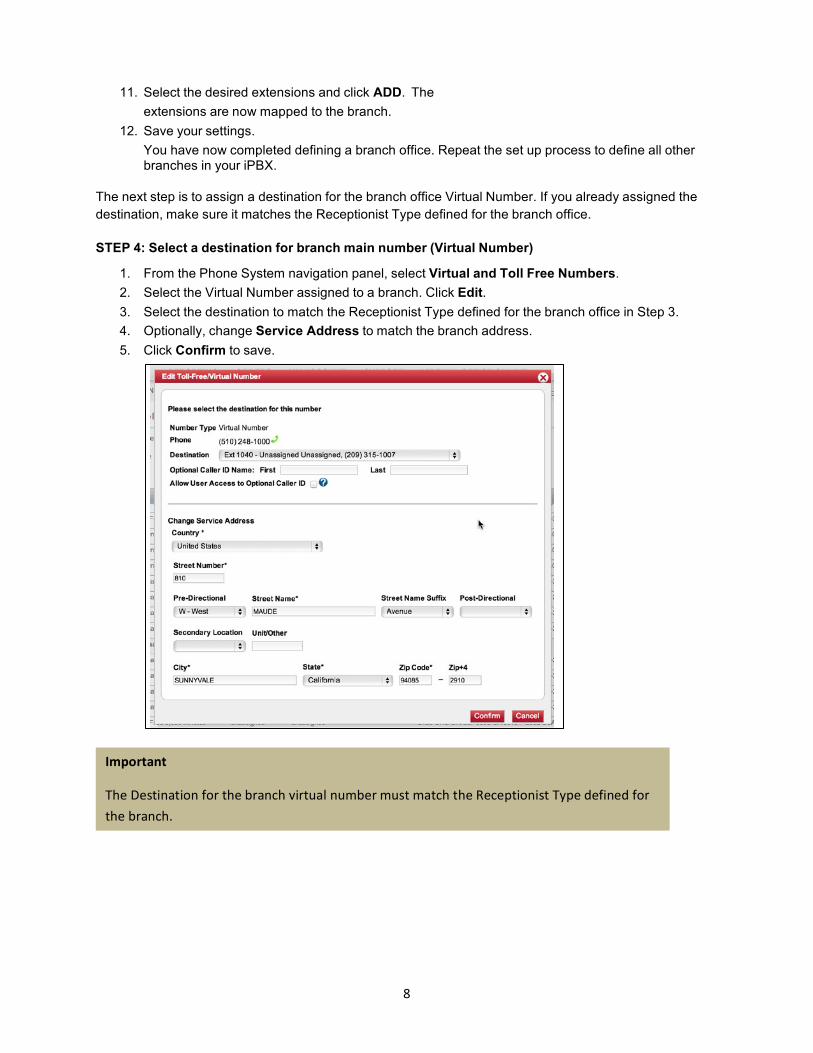
STEP 4: Select a destination for branch main number (Virtual Number)
1. From the Phone System navigation panel, select Virtual and Toll Free Numbers. 2. Select the Virtual Number assigned to a branch. Click Edit. 3. Select the destination to match the Receptionist Type defined for the branch office in Step 3. 4. Optionally, change Service Address to match the branch address. 5. Click Confirm to save.
Important
The Destination for the branch virtual number must match the Receptionist Type defined for the branch.
9
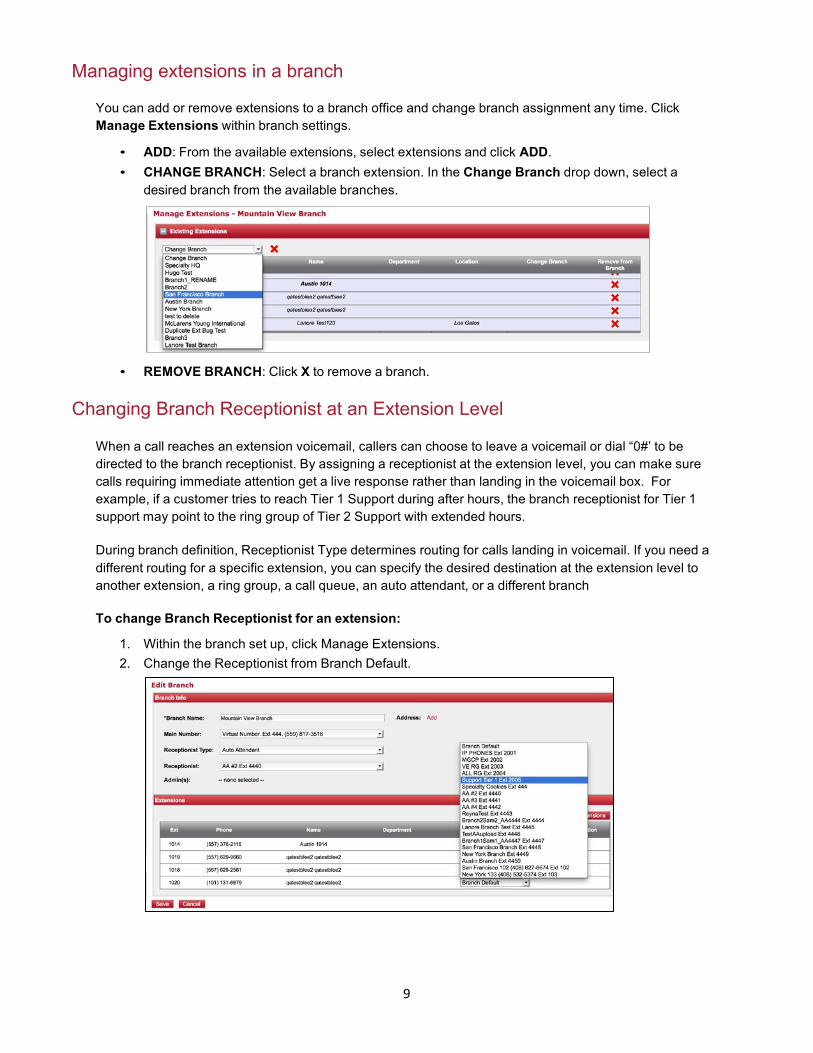
Managing extensions in a branch
You can add or remove extensions to a branch office and change branch assignment any time. Click Manage Extensions within branch settings.
• ADD: From the available extensions, select extensions and click ADD. • CHANGE BRANCH: Select a branch extension. In the Change Branch drop down, select a
desired branch from the available branches.
• REMOVE BRANCH: Click X to remove a branch. Changing Branch Receptionist at an Extension Level
When a call reaches an extension voicemail, callers can choose to leave a voicemail or dial “0#’ to be directed to the branch receptionist. By assigning a receptionist at the extension level, you can make sure calls requiring immediate attention get a live response rather than landing in the voicemail box. For example, if a customer tries to reach Tier 1 Support during after hours, the branch receptionist for Tier 1 support may point to the ring group of Tier 2 Support with extended hours.
During branch definition, Receptionist Type determines routing for calls landing in voicemail. If you need a different routing for a specific extension, you can specify the desired destination at the extension level to another extension, a ring group, a call queue, an auto attendant, or a different branch
To change Branch Receptionist for an extension:
1. Within the branch set up, click Manage Extensions. 2. Change the Receptionist from Branch Default.
10
Auto Attendant Segmented by Branch
Auto Attendant can be customized to your branch office, which saves callers’ time while searching contacts by name, or extension, or company directory. You can customize the following call routing options in an Auto Attendant to point to a specific branch or the whole PBX.
• Dial By Name o Segmented by Branch o Use Case: When you select a branch, the caller who opts to dial by name goes through the
names for the specified branch instead of the whole PBX.
• Dial By Extension o Segmented by Branch
• Play Company Directory o Segmented by Branch
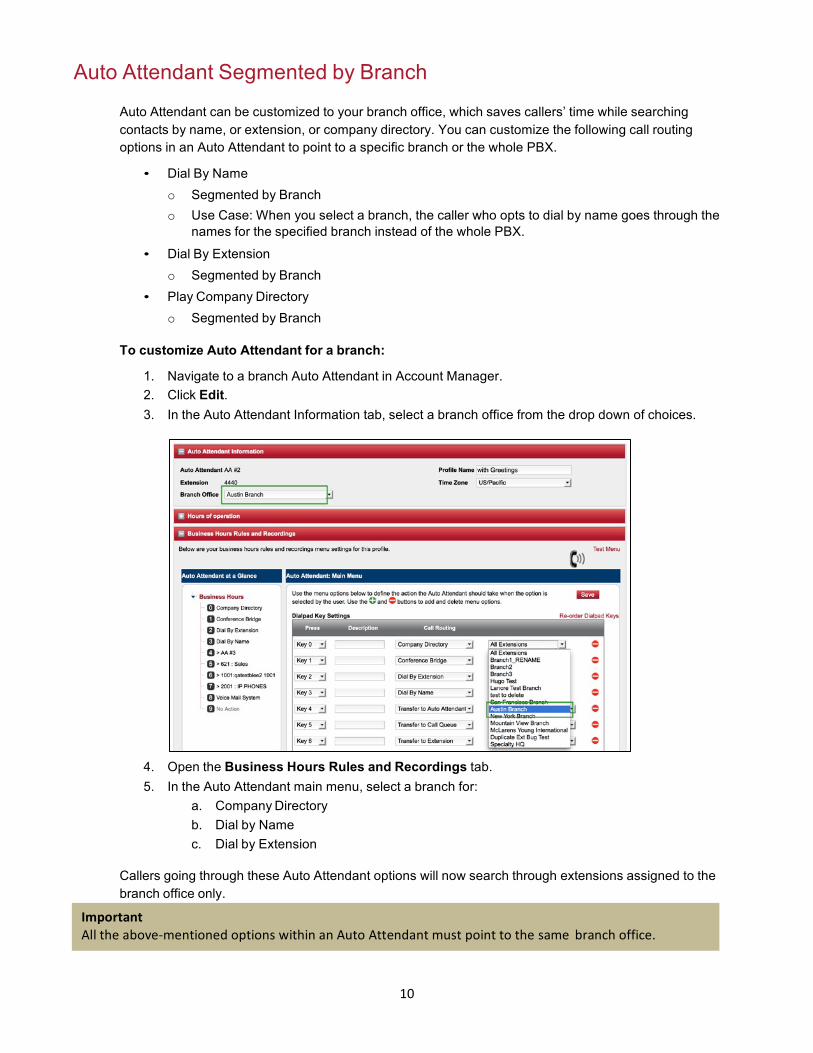
To customize Auto Attendant for a branch:
1. Navigate to a branch Auto Attendant in Account Manager. 2. Click Edit. 3. In the Auto Attendant Information tab, select a branch office from the drop down of choices.
4. Open the Business Hours Rules and Recordings tab. 5. In the Auto Attendant main menu, select a branch for:
a. Company Directory b. Dial by Name c. Dial by Extension
Callers going through these Auto Attendant options will now search through extensions assigned to the branch office only.
Important All the above-‐mentioned options within an Auto Attendant must point to the same branch office.
11
Assigning Branch Privileges
You can grant branch specific privileges to an administrator role. The branch administrator can manage the following branch options:
1. Branch Name 2. Branch Address 3. Branch Main Name 4. Receptionist Type (extension, auto attendant, ring group, call queue) 5. Receptionist Selection 6. Add and remove extensions from branch
Note: Branch administrator can add extensions that are not contained in another branch.
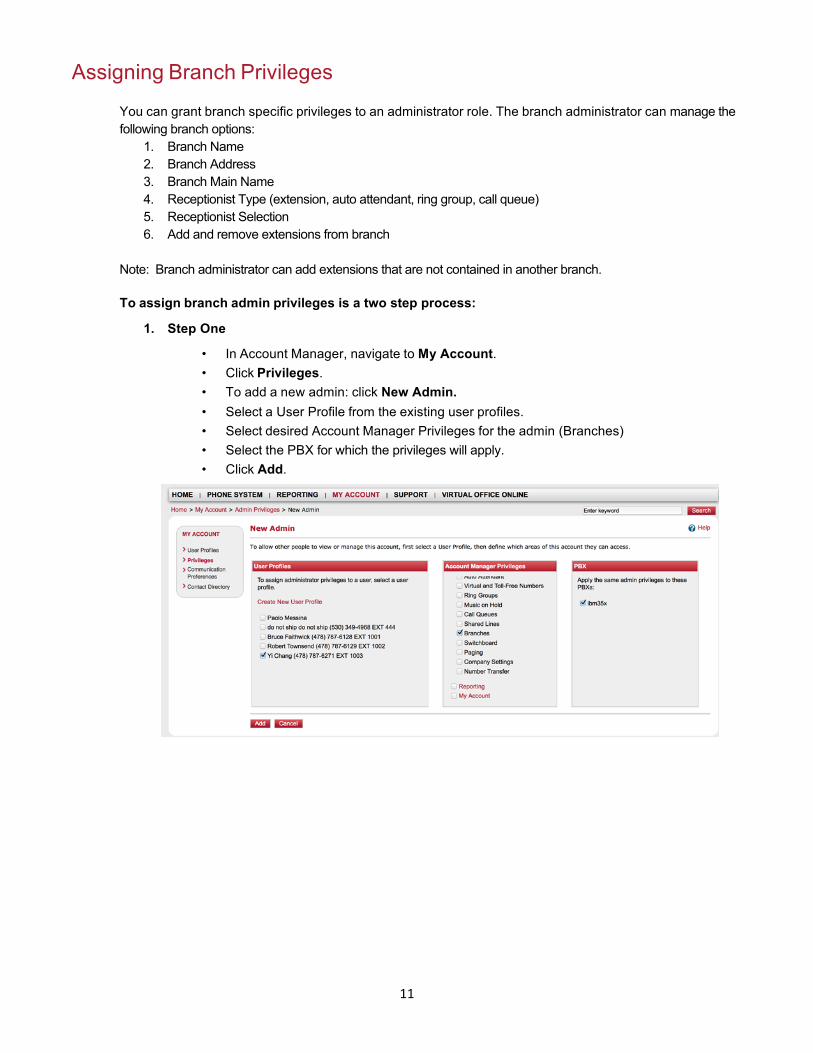
To assign branch admin privileges is a two step process:
1. Step One
• In Account Manager, navigate to My Account. • Click Privileges. • To add a new admin: click New Admin. • Select a User Profile from the existing user profiles. • Select desired Account Manager Privileges for the admin (Branches) • Select the PBX for which the privileges will apply. • Click Add.
12
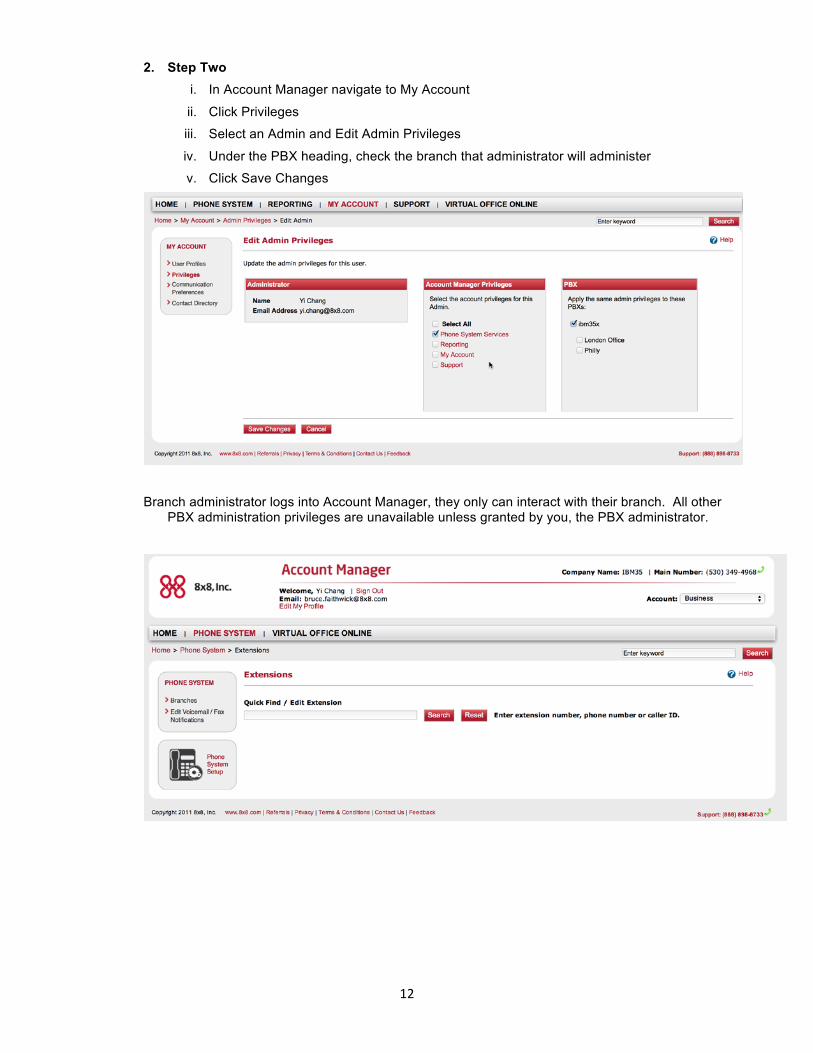
2. Step Two i. In Account Manager navigate to My Account
ii. Click Privileges
iii. Select an Admin and Edit Admin Privileges
iv. Under the PBX heading, check the branch that administrator will administer
v. Click Save Changes
Branch administrator logs into Account Manager, they only can interact with their branch. All other PBX administration privileges are unavailable unless granted by you, the PBX administrator.


