12
911-FPR Installation Guide © Classic Retrofit 2015 911-FPR Fuse Panel Installation Guide

911-FPR Installation Guide © Classic Retrofit 2015
911-FPR Fuse Panel Installation Guide

911-FPR Installation Guide © Classic Retrofit 2015
Thanks!
Thank you for purchasing our fuse panel upgrade for your 911. We hope you like it!
The fuse panel is just one of many products we are developing.
Check out www.classicretrofit.com regularly to see what we're up to!
911-FPR Fuse Panel Upgrade.
The 911-FPR fuse panel is an essential upgrade for all "impact bumper" model Porsche 911s 1974-
1989. The main features are:
Uses standard ATO blade fuses
Integrated relays for improve headlamp performance
LED fuse blow indicators
Simple installation.
No modifications required to existing wiring
No crimping, soldering or special tools required.
911- FPR has 21 fuse ways labelled as per the Porsche numbering system on the fuse box cover. It
also has dedicated relays on the main and dipped headlamp circuits. Typically, the relays improve
the brightness of your headlamps as they relieve the lighting switch from carrying heavy current.
The fuse ways either side of the relay (labeled 1, 2 , 3 and 4) are rated 8A max. They are intended to be used for powering standard filament headlamp bulbs.
All other fuse ways are rated 25A
Before You Start
The installation is straightforward and can be completed comfortably within 1 hour by a competent
person. We do, however, draw your attention to our disclaimer at the end of this document.
There are a few wiring peculiarities with some later models. Please see the sections at the end of
this document, particularly if you have a European 1987 MY Carrera 3.2 or a 'fully loaded' car with
extra electrical equipment.
You will need the following tools:
A flat head medium sized blade screw driver for the screw terminals.
A 'Philips' (crosshead) screw driver for the mounting screws.
Cutters (for cutting cable ties).

911-FPR Installation Guide © Classic Retrofit 2015
We strongly advise to take reference photos of the original fuse box before you start. Pay close
attention to the placement of original external brass links. Take close ups of the wire connections on
the top and bottom rows. Try also to identify any non standard wiring (particularly alarm systems).
The fuse panel is 'plug and play' provided you install all wires in a like for like placement.
If you need to remove an existing relay kit, there is a guide at the end of this document.
Preparing your panel.
Referring to the original fuses, make a note of the ratings of each fuse. Both the old 'bullet' fuses
and the modern blade fuses are colour coded. Confusingly, the colour codes are not the same.
Old style 'bullet' fuses New 'blade' fuses
Blue 25A Clear/Natural 25A
Red 16A Blue 15A
White 8A Brown 7.5A
Yellow 5A Tan 5A
Note: Fuse colours are for guide only - some colours do vary. we note that 'brown' and 'tan' fuses
are easily confused. ATO fuses have the rating printed clearly on the top.
Note: The blade fuses don't have exact matches for rating. We haven't encountered any problems
with using the slightly lower 15A and 7.5A fuses in place of 16A and 8A. We provide enough fuses
for a standard car. If your fuse values have been changed you may have to purchase additional fuse
values. We recommend Littelfuse ATO blade fuses.
Populate your new panel with the fuses provided.
Loosen all the screw terminals on the panel. They may be stiff due to the manufacturing
process.
You are now ready to start the installation.

911-FPR Installation Guide © Classic Retrofit 2015
Installation.
This equipment must be installed by an auto electrician or persons of equivalent level of competence. Failure to follow the installation procedure can result in damage to the vehicle, its wiring harness and injury.
Follow these instructions for a quick and straightforward installation.
1. Disconnect the negative terminal (earth strap) from the battery.
2. If you have an existing relay kit to remove, see the removal instructions further on in this
document.
3. 'Crack' loose all the screw terminals on the original panel in the car and retighten finger tight
Don't take the wires out at this stage. You are just breaking the seal of 30 years or more!
4. Again, 'crack' loose the six screws that hold the original fuse blocks in place. Don't remove
them yet.
5. Using two long cable ties, loosely strap the new panel in front of the original so that you
have access to the bottom row of screw terminals, both on the original and new panels.
Don't worry about the gasket at this stage.
6. Starting at the left hand end (rear of car), transfer each wire from the original screw
terminal to the new one until you have completed the bottom row. Note that in many cases
there are multiple wires in the same terminal. It is vital that you are methodical and take
your time. Complete each terminal fully before moving to the next one.

911-FPR Installation Guide © Classic Retrofit 2015
7. When you have completed the bottom row, remove the cable ties and pull the new panel
away from the old fuses to access the six mounting screws for the original blocks. Set the
screws to one side (you will be reusing them). The old fuse blocks are now just 'hanging' on
the top row wiring.
8. Again, starting at the left hand end, transfer each top row wire across to the new panel.
These are replicated on PCB of the new panel so do not need to be fitted. This time, you will
be able to remove the three original blocks as you go along for improved access.
Note: The (old) photo above shows two red wire links. These do not need to be fitted as all
panels from Issue 1.2 onwards have onboard links. Links between terminals are marked
clearly on the fuse panel with 3 white horizontal lines:
911-FPR Installation Guide © Classic Retrofit 2015
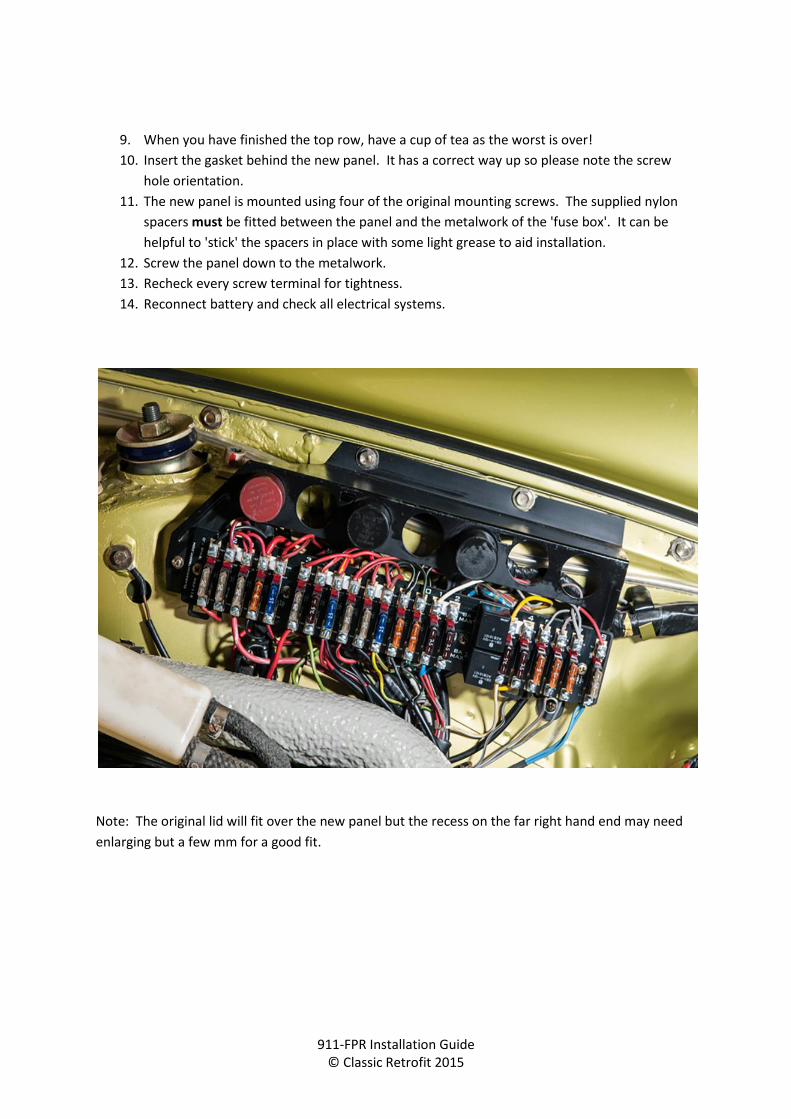
9. When you have finished the top row, have a cup of tea as the worst is over!
10. Insert the gasket behind the new panel. It has a correct way up so please note the screw
hole orientation.
11. The new panel is mounted using four of the original mounting screws. The supplied nylon
spacers must be fitted between the panel and the metalwork of the 'fuse box'. It can be
helpful to 'stick' the spacers in place with some light grease to aid installation.
12. Screw the panel down to the metalwork.
13. Recheck every screw terminal for tightness.
14. Reconnect battery and check all electrical systems.
Note: The original lid will fit over the new panel but the recess on the far right hand end may need
enlarging but a few mm for a good fit.

911-FPR Installation Guide © Classic Retrofit 2015
Led Indicator function.
Your new fuse panel features a red LED on each fuse way. These can serve two purposes.
In normal operation, with fuses fitted, the LED will indicate a blown fuse. Note the LED will only be
lit if the circuit feed is live. For example, if the fuel pump fuse has blown, the LED will only light
when the fuel pump is being 'told' to run.
For diagnostic purposes, the LED can be used to trace faults in the electrical systems of the car.
Simply take the fuse out for the circuit you wish to test. For example, if you suspected your turn
signal switch to be defective, remove that fuse and check for the LED illumination when the switch is
operated.

911-FPR Installation Guide © Classic Retrofit 2015
Removal of an existing headlamp relay kit.
If upgrading to the 911-FPR panel you should remove the existing relay kit before you start. Typically
these kits have six connections and the relays are separate to the fuse panel.
The colours for the wiring in these kits have changed over the years but usually they are:
J West kit Sucro kit Function
Red Red 12v (battery +)
Black Black Ground (chassis / battery -)
White White High beam feed from headlamp switch
Yellow Yellow Low beam feed from headlamp switch
White Blue High beam to headlamp (fuse 1)
Yellow Blue Low beam to headlamp (fuse 3)
Remove the battery negative terminal.
Start by identifying the 12V and Ground wires and removing them.
Remove all four wires from top and bottom fuses 1 and 3 on the right hand fuse block.
The only wires remaining connected should be the two that have been spliced to the original
headlamp switch feed wires. For an impact bumper car the original wires are white and yellow.
remove the splice and reconnect the original white wire to fuse 1 and the yellow wire to fuse 3 on
the right hand fuse block.
Remove the relay kit from the car.
You are now ready to start the installation as per the normal instructions.

911-FPR Installation Guide © Classic Retrofit 2015
Late model UK and Swedish Carrera 3.2
Some European cars from around 1987 model year are fitted with the M062 (Swedish) option. This
provides a dimmed dipped headlamp beam when the light switch is pulled out one stop and the
ignition is on. The idea was to provide a light brighter than the normal parking/sidelight bulbs but
not as bright as the normal dipped beam. This was implemented by using a control unit that
provided a separate feed to the dipped beam circuit. Interestingly, the reason for this feature was
due to legislation that was put forward in Europe in the mid 80's. The legislation was subsequently
scrapped.
If you have a white and a yellow/black wire in the following fuses, your car is fitted with this option
as shown in the following photo.
The M062 control unit sends a signal on the yellow/black wire that can cause the relay to buzz on
911-FPR fuse panels up to and including versions 1.2. If you have this option, please disconnect the
yellow/black wire (tape up the end)
Since the control unit was designed as additional equipment, the removal of the yellow/black wire
only removes the dim dipped 'feature' but normal operation of side and parking lights is still fully
functional.
You may, however, discover that your front parking/sidelight bulbs have not been working for many
years but this fault was 'masked' by the control unit. If you ever wondered why pulling the light
switch one stop with the ignition off only gave you tail lamps, now you know why!
911-FPR Installation Guide © Classic Retrofit 2015
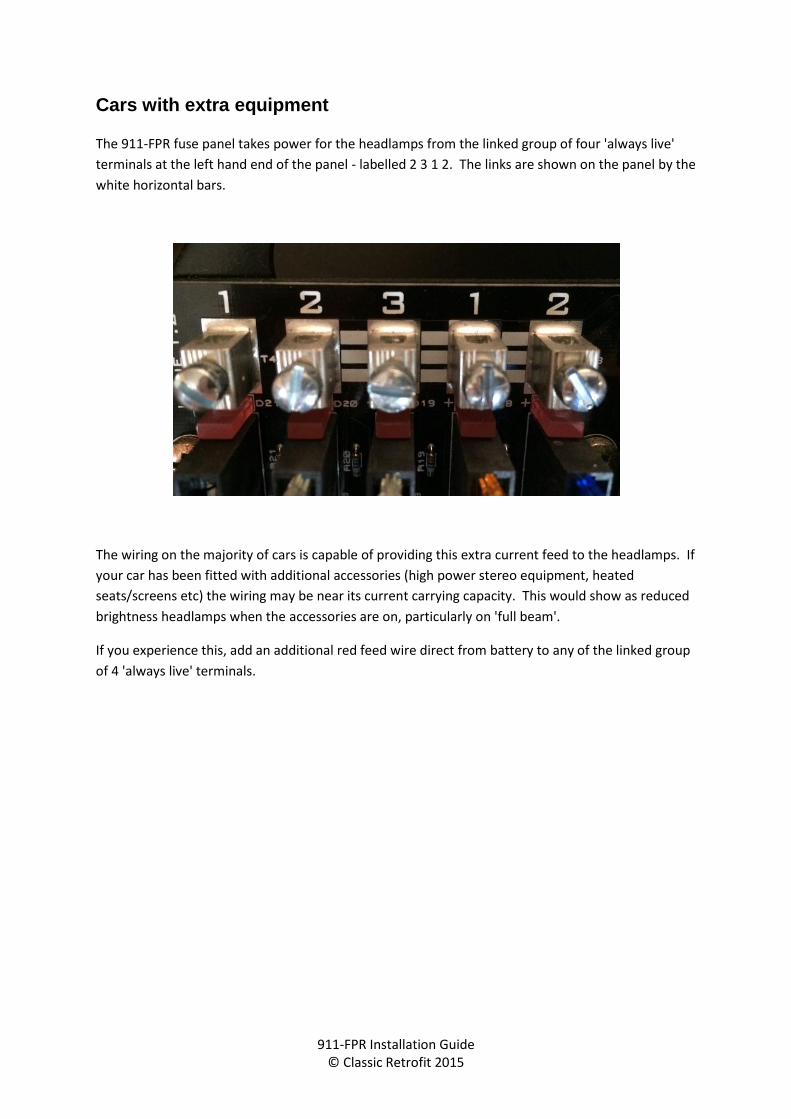
Cars with extra equipment
The 911-FPR fuse panel takes power for the headlamps from the linked group of four 'always live'
terminals at the left hand end of the panel - labelled 2 3 1 2. The links are shown on the panel by the
white horizontal bars.
The wiring on the majority of cars is capable of providing this extra current feed to the headlamps. If
your car has been fitted with additional accessories (high power stereo equipment, heated
seats/screens etc) the wiring may be near its current carrying capacity. This would show as reduced
brightness headlamps when the accessories are on, particularly on 'full beam'.
If you experience this, add an additional red feed wire direct from battery to any of the linked group
of 4 'always live' terminals.

911-FPR Installation Guide © Classic Retrofit 2015
Troubleshooting
Miswiring
All Classic Retrofit kits are electrically tested before shipping. The most likely source of problems
will be failure to connect the wires as per original. It is easy to miss a wire on the bottom row as
they are hard to see. It is also easy to forget to skip a gap as not all terminals are occupied on the
bottom row. Refer back to your reference photos and see if you can spot a mistake
'Foreign' wires
The second most common cause of odd behaviour is likely to be the hornet's nest effect. That is,
you've been fiddling around with wires that haven't been moved in many years. Perhaps you have
found or disturbed 'mystery' wires. Over the years, your car has met a few auto electricians for
stereo, alarm and other accessory installations. It isn't surprising to find that there are odd wires,
splices and -horror- 'scotch locks' in the wiring loom.
Identifying rogue wires is actually pretty easy. All the original Porsche wires that terminate at the
fuse panel have ferrules (small crimps) on the copper part of the wire. If the wire does not have this
it is either a 'foreign' wire or an original wire that has been cut. It is good to trace these wires and
see if they are actually doing anything. Remove if not.
Grounding
The 911-FPR relays use the mounting screw to the left of the relays is a ground. It is important that
the screw has good electrical contact with the new fuse panel and is properly secured into the
metalwork behind. Also the metal panel itself should be grounded to the chassis via the top wing
screws. If you have a meter then the you should be able to 'buzz' between the mounting screw and
chassis (disconnect battery first).

911-FPR Installation Guide © Classic Retrofit 2015
Disclaimer
This equipment must be installed by an auto electrician or persons of equivalent level of competence. Failure to follow the installation procedure can result in damage to the vehicle, its wiring harness and injury.
The 911-FPR fuse panel has been designed and engineered to the best of our best capabilities. It has
been bench and road tested in a 1982 Porsche 911 SC. The fuse panel will in most cases be a
straight swap for the existing bullet fuse blocks in the car. On rare occasions, however, non-
standard wiring or extra equipment may mean that the fuse panel may not function as a plug and
play item. If you are worried about this please email a photo of your panel to
[email protected] before commencing installment.
Classic Retrofit will not accept liability for damage to wiring looms or the vehicle in which the fuse
panel is installed. We will not accept any liability for injury of any kind caused by installation of our
equipment.


