Part 2: Supply Chain Management A Beginners’ Guide To Pegasus Opera 3. Whether you’ve been using Pegasus products for years or are a complete newbie, our Beginners’ Guide to Opera 3 will take you step by step through the key areas of the core financials modules, and help make your day-to- day working life that little bit easier. This guide is perfect for new starters to your business who need to quickly get up to speed with Opera 3 or for anyone needing a walk-through on a routine that isn’t carried out on a regular basis. We hope you find this guide useful, and hope that by using it you’ll be able to get your work done even more quickly than you do already! ACCOUNTS SOFTWARE
Transcript
Part 2: Supply Chain Management
A Beginners’ Guide To Pegasus Opera 3.
Whether you’ve been using Pegasus products for years or are a complete newbie, our Beginners’ Guide to Opera 3 will take you step by step through the key areas of the core financials modules, and help make your day-to-day working life that little bit easier.
This guide is perfect for new starters to your business who need to quickly get up to speed with Opera 3 or for anyone needing a walk-through on a routine that isn’t carried out on a regular basis. We hope you find this guide useful, and hope that by using it you’ll be able to get your work done even more quickly than you do already!
ACCOUNTS SOFTWARE
2
Introduction A Beginners’ Guide To Pegasus Opera 3 - Supply Chain Management | HBP Systems User Guide
A Beginners’ Guide toSupply Chain Management in Pegasus Opera 3Whether you’ve been using Pegasus products for years or are a complete newbie our Guide to Opera 3 will take you step by step through the key areas of the software and help make your day-to-day working life that little bit easier.
This guide is perfect for new starters to your business who need to quickly get up to speed with Opera 3 or for anyone needing a walk-through on a routine that isn’t carried out on a regular basis.
We hope you find this guide useful and hope that by using it you’ll be able to get your work done even quicker than you do already!
3
How To Use This GuideHBP Systems User Guide | A Beginners’ Guide To Pegasus Opera 3 - Supply Chain Management
IntroductionWhat is Pegasus Opera 3?Pegasus Opera 3 is the latest accounting software solution from Pegasus designed for small and medium sized enterprises, offering a completely flexible modular business solution that empowers users to manage finances, payroll, customer relationship management,
supply chains and customer service.
Why does my business use Pegasus Opera 3?To ensure that all data necessary for the vital operation of the business is accessibly stored in a fully integrated system, creating a single view of business activities that can be shared between departments whether the user is in or out of the office.
How do I use this guide?Whether you are an experienced or new user of Pegasus products, start at the beginning of this useful guide to understand how to get started with Pegasus Opera 3. When you feel prepared and ready, progress to core section of the guide expressive details on the core financial processes within Opera 3. Then optimise your knowledge with some top tips for best practices towards the end of the guide. Additional information is also available at the end of this guide outlining resources and support available from the HBP Group.
4
Contents A Beginners’ Guide To Pegasus Opera 3 - Supply Chain Management | HBP Systems User Guide
1.1 General Navigation 51.2 Module Navigation 61.3 Bottom Toolbar 7
2. Stock Processing .........................................................82.1 How Does The Stock Control Application Link To Other Applications in Opera 3? 82.2 The Stock Processing Screen 92.3 Creating A New Stock Item 102.4 Stock Warehouses 11
2.4.1 To Link A New Warehouse 122.5 Stock Movements 13
2.6 Stock Enquiry & Reports. 172.6.1 Running The Stock Take module 17
3. Sales Order Processing/Invoicing ..........................203.1 Sales Order Processing 213.2 Document Creation & Editing 223.3 Order Progression 24
3.3.1 To Progress Transactions In SOP 243.3.2 To Reprint:- 25
3.4 Batch Processing 263.4.1 To Use Batch Processing:- 27
3.5 Allocations 283.5.1 To Batch Allocate Sales Orders 29
3.6 Picking 303.6.1 To Pick Items:- 30
3.7 Repeat Invoicing 313.8 Reports 33
4. Purchase Order Processing ......................................344.1 Purchase Order Processing 344.2 Order Creating And Progression 364.3 Receipting Goods From P.Order Processing 384.4 Invoicing Orders Or Deliveries 39
4.4.1 To Create an Invoice from Orders or Deliveries 394.4.2 To Create A New Invoice 41
4.5 Satisfy 424.6 Action Menu 434.7 Reports 44
5
Installations & AdministrationHBP Systems User Guide | A Beginners’ Guide To Pegasus Opera 3 - Supply Chain Management
1. Installations & AdministrationNavigation is the key when it comes to using Pegasus Opera 3 and once you have the basics, getting to grips with processing and regular tasks becomes much easier.
1.1 General NavigationDouble click on the Opera icon on your desktop. Enter your username and password given
This will load the Opera front screen. You may recognise this as it has been created to look like the 2007 & 2010 office packs where it introduces a ribbon bar across the top. There are 8 sections to the Ribbon Bar all depending on what your company is activated for will depend on what you will see.
Tech Tip
Quick Navigation Pane Tips:
When in a processing screen, if the icon shows in colour, it is available to use. They only relate to the current screen you are in at the time.:
Create New
Delete
Save
Undo / Revert
Next / Previous
Refresh
Help Guide
Search
Print
Date & Company
View Note
//
6
Installations & Administration A Beginners’ Guide To Pegasus Opera 3 - Supply Chain Management | HBP Systems User Guide
The structure of these sections as follows:
1.2 Module NavigationEach module in Opera, generally has the same structure as the example below. This makes it easier to find what it is you require and where.
Example: Supply Chain Management > Stock
Reports
Holds all default reports for the individual module.
Utilities
The administration of the specific modules are carried out i.e. period end / set options.
Maintenance
Where the modules options and choices are configures. I.E. profiles, regions, territories, types all associated with the processing data and options.
Processing
The core transactional processing and data records. This also extends to View, analysis and History which report on the transactional information where the user can set the parameters of the report to build the own report based on the options available.
Financials
Sales
Purchase
Nominals
Cashbook
Fixed Assets
Costing
Payroll & HR
Payroll
Personnel
Supply Chain Management
Sales Order Processing
Purchase Order Processing
Stock
Bill Of Materials
Reporting
Dashboard Manager
Reporter
EC Vat
CRM
Supply Chain Management
Service Management
Helpdesk Management
Administration
System
Import
Upgrade
Document Manager
Document Manager
Favourites
User Defined
Hint:
Start to make a mental note of the areas that you will use more often as we can add them to your favourites later.
7
Navigating The SystemHBP Systems User Guide | A Beginners’ Guide To Pegasus Opera 3 - Supply Chain Management
1.3 Bottom ToolbarBottom Toolbar:
The bottom toolbar is where all the general operations are, such as, create new,/ delete/ search and also the date and time changes
Hint:
Forgetting what each button does?
Hover over each button in turn to get advice on what the button does.
8
Stock Processing A Beginners’ Guide To Pegasus Opera 3 - Supply Chain Management | HBP Systems User Guide
2. Stock ProcessingThe Stock Control application can be used on a stand-alone basis to manage your stock details, receipts, issues, and adjustments or integrated within the Sales Pipeline Modules such as Sales Order processing.It has the ability to raise Goods Received Note to receive your stock in batches and Return to Vendor notes are also available for when stock needs to be returned to your suppliers. Stock can also be set to be traceable Via batch or serial numbers so you can identify each stock item individually. It also have the ability to have multiple warehouses and Stock Take facilities.
2.1 How Does The Stock Control Application Link To Other Applications in Opera 3?
The application can be linked to a number of other applications: Bill of Materials, Costing, Nominal Ledger, Invoicing, Sales Order Processing, Purchase Ledger, Purchase Order Processing, Service Management and Stocktake
. Tech Tip
Only Link to Stock Control:Some applications only link to Stock Control if the respective option is ticked on the System > Maintenance > Company Profiles form:
//
9
Stock ProcessingHBP Systems User Guide | A Beginners’ Guide To Pegasus Opera 3 - Supply Chain Management
2.2 The Stock Processing ScreenOnce the stock module has been initialised and the relevant option assigned, the general processing will begin with creating stock items and then maintaining them either manually or via the linked modules through out the system.
Hint:
Want an overview of the all the modules in the Opera 3 System?Check out the original Beginners’ Guide to Pegasus Opera 3: hbp-group.co.uk/guides
Navigate To: Supply Chain Management > Stock Processing>>
As per all other modules, the key processing is found in the Processing section for the module. This will open up the first stock item alphabetically listed.?
Barcode
You can only assign one barcode as standards in this field.
Sales & Supply Code
When transactions are posted using this stock item which sales / supply code is used as default. This can be changed at the time of posting.
Tech Tip
What’s A Sales Supply Code?These are codes used in the sales and purchase ledger to link to the nominal and can be used to give further analysis on sales and Purchases.
For further information, see the financials beginners guide
//
Profile
profiles are defined in Stock / maintenance / profiles and define the quantity style, decimal places, issue quantity’s, costing types and if the item is stocked. These will be created as part of the setup process however every stock item must have a profile selected and this can not be changed once the item has been used.
Category
This is an option to use to group the stock items together which is useful for global price changes etc. This has to be assigned if the item is a stocked item.
Sell / Cost price
To be defined if required which dependant on the profile, will be used throughout the system.
Description
Further detail on covered by the stock code (the stock code is not available to edit once created).
Search Ref 1/2
References which may be useful to find the stock item i.e. supplier references / nick names. These are search upon as default.
10
Stock Processing A Beginners’ Guide To Pegasus Opera 3 - Supply Chain Management | HBP Systems User Guide
2.3 Creating A New Stock Item
1. Click the New Record Icon on the tool bar or press “Ctrl + N”.
2. In Stock Ref., type a unique code to identify the stock record.
3. In the Options list, click to select whether you want to create a stock item with or without a model. If you choose to create a stock item using a model, click to select an existing stock item to be used in the Model Stock List.
4. Click OK.
5. In the boxes provided, enter the stock item details
6. Options—enter unit weight / volume as required.
7. In Stock Status, make sure that allow s/order and p.order are ticked if required.
8. Price / Discounts—enter appropriate information and default sale and discount prices.
9. ECVat & Supplier—Enter relevant information.
10. Save the Record
11. Click the Memo tab to maintain a notepad of information associated with the stock item.
12. Click the Extended Description tab to maintain additional lines of description
Note:
Relevant forms open automatically for you to complete additional stock record details. You can also gain access to these forms using the Link / Edit Warehouse, Options, Price / Discounts, EC VAT, Supplier, BOM Details and Where Used commands, where applicable, on the Action menu.
Navigate To: Supply Chain Management > Stock Processing>>
As well as creating individual; stock items, you may have additional warehouse locations you wish to display your stock. This can then split the quantity in stock with each location holding it own min/max quantities.
?
Tech Tip
Multiple Locations of Stock.One of the first questions to ask when you create a new item is - Do I have more than one location I will be storing this stock item?.
Stock locations need to be defined separately so stock can be assigned to each.
//
11
Stock ProcessingHBP Systems User Guide | A Beginners’ Guide To Pegasus Opera 3 - Supply Chain Management
2.4 Stock Warehouses
The different stock locations used by your company should already be created. The the purposes of this manual, we will presume we have 3 set and each has its own purpose:-
• Main—Goods ready for sale (can issue, receive, transfer goods)
• Storage—Back ordered goods (Can only Transfer an Receive goods)
• Quarantine—Goods awaiting booking in confirmation (Can only Transfer and receive goods)
When a stock item is created as per the previous point, a warehouse will have been added which would usually default to the first warehouse alphabetically. You can then once the item is created, link the additional warehouses to the item:
This screen then holds the options to define any Min/ Max levels you require for the specific item as well as bin locations, Cost / selling prices, Supplier details. This would then overwrite the options set on the front screen on the stock item.
If warehouses are not used in your company, this section will not apply.>>
Navigate to: Stock Processing > Action > Link Warehouse.>>Tech Tip
Each of the parameters will already be set and these can be viewed and maintained under:
Stock > Maintenance > Warehouses.
//
12
Stock Processing A Beginners’ Guide To Pegasus Opera 3 - Supply Chain Management | HBP Systems User Guide
2.4.1 To Link A New Warehouse
1. Open Stock processing and find the stock item required
2. Select Action > Link Warehouse
3. From the warehouse field, select from the list the warehouse you wish to link.
4. Complete further information if required. (This is not Mandatory)
Now the stock item has been created, you are ready to process transactions.?
13
Stock ProcessingHBP Systems User Guide | A Beginners’ Guide To Pegasus Opera 3 - Supply Chain Management
2.5 Stock MovementsStock transactions can be posted in multiple ways either manually in the stock module or via the linked modules such as P.orders / SOP and Bill of Materials. The main options within the Stock Processing module are
2.5.1 Receipts
Use the Receipts command on the Action menu associated with the Stock form to record details of receipts into the selected stock item. This should only be used for actual receipts and not returns. You can choose to receive the goods against an outstanding purchase order or not. If you choose to receive against a purchase order, the screen displays a list of all outstanding orders for that item to which you can match the receipt. The cost is selected using the cost valuation specified on the stock profile.
2.5.2 Issues
Use the Issues command within the Action menu on the selected stock item to record details of stock issues. If you choose to issue against current allocations, the screen shows details of all stock allocations against which you can record the issue. Issues will be logged in Job costing if the module is used and linked to the stock module.
2.5.3 Returns
Use the Return command to record details of previously issued goods returned to stock. You would normally use this command only where goods are not returned against a credit note — for example, internal return of components originally issued to manufacture a different stock item. A credit Note when posted will ask if the goods should be returned and an automatic return would be created.
2.5.4 Allocations and De-allocations
Use the Allocate command associated with the Action menu on the Stock form to mark stock as allocated. This reserves the stock which is no longer available for issue or transfer. Use the De-allocate command associated with the Action menu on the Stock form to directly reduce the allocated stock balance. This removes a temporary allocation of stock, for example where a customer has not exercised an option to buy. Stock that is deallocated is returned to ‘free stock’ and can be issued or transferred subsequently. Once you have entered details of the quantity to be deallocated, the application displays a list of allocations that you can select to match against the de-allocation.
14
Stock Processing A Beginners’ Guide To Pegasus Opera 3 - Supply Chain Management | HBP Systems User Guide
2.5.5 Adjustments
Use the Adjust command associated with the Action menu on the Stock form to alter the current stock balances. You can enter both positive and negative adjustments. Typically, you would use this to record details of known shrinkages, stock damaged, or to adjust the theoretical figures to the actual ones when a stock take is carried out.
2.5.6 Transfers
Use the Transfer command associated with the Action menu on the Stock form to record details of stock transferred from one warehouse to another. This only applies if you have the multi-warehouses feature activated. When you post a stock transfer, you specify both the source and destination warehouses using the From Ware and To Ware lists. If you leave the To Ware list box blank, you can progress to the Warehouse Distribution form to make transfers to more than one warehouse simultaneously.
2.5.7 Purchase Orders
Use the Purchase Order command associated with the Action menu on the Stock form to add or modify orders for stock replenishment. When goods are received you must use the Receipts command (that is, not the G.R.N. command) to match them against purchase orders entered here. You can then see what balance is outstanding against which purchase orders. If outstanding purchase order records exist for a stock item, you can use the Modify command on the Action menu to change order details, such as quantity, due date and comment, or use the Add command to create additional order records, for example, for other warehouses etc.
2.5.8 Posting Stock Movements
1. Retrieve the stock item record for which you want to post movement details, click Action and then click the command according to the movement type you want to enter.
2. Select from the following:
3. The movement posting form is displayed according to the selection you make on he Action menu.
4. In the boxes provided, enter the Movement Transaction Details.
5. Click OK.
Navigate to: Supply Chain Management > Stock > Processing.>>
• Receipts• Issues• Return• Allocate• De-allocate
• Adjust• Transfer• Purchase Order
15
Stock ProcessingHBP Systems User Guide | A Beginners’ Guide To Pegasus Opera 3 - Supply Chain Management
2.5.9 Posting Goods Received Notes (GRNs)
1. Under the Selection tab, enter the date range that defines the range of goods received transactions to be displayed.
2. Click Display Data.
3. Create a new record and In the boxes provided, complete the carrier, delivery reference, date and user details of the GRN.
As well as the above options for stock movements, there is also the facility in Stock to use the GRN and RTV options. The GRN can be useful as you can receipt in multiple Orders onto one delivery which will save time posing the individual receipt transactions. It can also receive goods into Quarantine for traceability and part receive lines.
?
Navigate to: Supply Chain Management > Stock > G.R.N..>>
If you are creating a new GRN, these dates can be left blank but if searching, the criteria can be used.?
>>
16
Stock Processing A Beginners’ Guide To Pegasus Opera 3 - Supply Chain Management | HBP Systems User Guide
4. Click Action > Details on the Capture Tab.
5. In the boxes provided, complete the GRN details.
6. To store the GRN, click OK.
7. The completed GRN will then show on the selection screen and the receipts will have been posted into stock.
If you use the Purchase Orders application, the prompt ‘Pick From Purchase Orders?’ is displayed Click Yes to select the orders to include on the GRN.The detail lines of the GRN will comprise those selected from the Purchase Order Lines form.
>>
To create an RTV (Return to Vendor), repeat the above process in the RTV Section of Stock. This will then return the specified goods back to stock and print a report to send with the stock if required.
?
17
Stock ProcessingHBP Systems User Guide | A Beginners’ Guide To Pegasus Opera 3 - Supply Chain Management
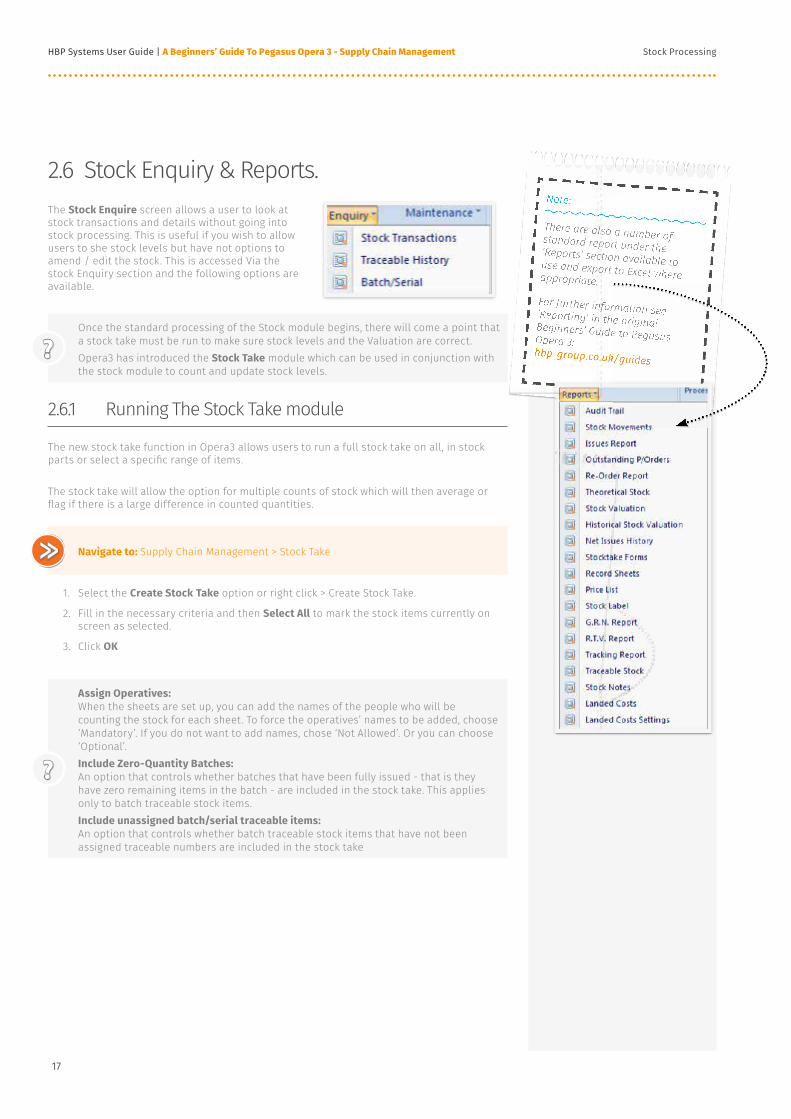
2.6 Stock Enquiry & Reports.The Stock Enquire screen allows a user to look at stock transactions and details without going into stock processing. This is useful if you wish to allow users to she stock levels but have not options to amend / edit the stock. This is accessed Via the stock Enquiry section and the following options are available.
2.6.1 Running The Stock Take module
The new stock take function in Opera3 allows users to run a full stock take on all, in stock parts or select a specific range of items.
The stock take will allow the option for multiple counts of stock which will then average or flag if there is a large difference in counted quantities.
1. Select the Create Stock Take option or right click > Create Stock Take.
2. Fill in the necessary criteria and then Select All to mark the stock items currently on screen as selected.
3. Click OK
Note:
There are also a number of standard report under the ‘Reports’ section available to use and export to Excel where appropriate.
Opera 3: Once the standard processing of the Stock module begins, there will come a point that a stock take must be run to make sure stock levels and the Valuation are correct. Opera3 has introduced the Stock Take module which can be used in conjunction with the stock module to count and update stock levels.
?
Navigate to: Supply Chain Management > Stock Take>>
Assign Operatives: When the sheets are set up, you can add the names of the people who will be counting the stock for each sheet. To force the operatives’ names to be added, choose ‘Mandatory’. If you do not want to add names, chose ‘Not Allowed’. Or you can choose ‘Optional’.Include Zero-Quantity Batches: An option that controls whether batches that have been fully issued - that is they have zero remaining items in the batch - are included in the stock take. This applies only to batch traceable stock items.Include unassigned batch/serial traceable items: An option that controls whether batch traceable stock items that have not been assigned traceable numbers are included in the stock take
?
18
Stock Processing A Beginners’ Guide To Pegasus Opera 3 - Supply Chain Management | HBP Systems User Guide
4. Highlight the new Stock take line that has been created and select ‘items’. This will open a new form allowing you to select the individual items you wish to print to a stock take sheet to be counted. Please select ‘Create sheet’ this will then ask for the number of sheets (prints) to create and for each print creates, the name of the operator who will be counting them.
5. Once a sheet has been created, the count and sheet will be populated which marks how many times the item will be counted (this being the same bin not multiple). Once complete, select close.
6. Once back to the original screen with sheets entered, highlight the stock take line and select ‘sheets’. This will show the number of sheets created and the option to ‘enter quantities’ or physically print the sheet to add counted figures on as a checklist. Highlight the sheet number you wish to enter and then select ‘Enter Quantities’. A new form will be displayed where the actual numbers counted per item can be added.
7. For batch/serial items, each stock item will be show with an option to select ‘Found or not found’ this makes sure each batch/serial item is accounted for or marked as not found. You can also add items using the ‘Discovered items’ open. This will ask for the batch/serial number. Once all quantities have been entered, select ‘ok
19
Stock ProcessingHBP Systems User Guide | A Beginners’ Guide To Pegasus Opera 3 - Supply Chain Management
8. Once the quantities have been entered, the list shown on the ‘Sheets’ option will be flagged as ‘Green’ for ok or pink if there is a discrepancy outside of the allotted margin for difference. This will need to be resolved before they can be posted to Opera3. If the lines are Green. These can be post by going back into ‘Items’ selecting the items to post and then select ‘Update Opera3’. The quantity difference if any will then be posted as an adjustment in the system.
9.
When the adjustments are posted, if the original value is different to the current in stock value at the time of posting, the system will recognise this and make the relevant adjustments.
For exampleOriginal Counted Quantity of item A when the stock take was first created was 100During the stock takes count, a transactions is posted for item A reducing the value to 90 in stock. When the stock item is counted, a value of 102 is entered. At the time of posting the system would believe that an adjustment of +2 is required however it will then recognise that 10 have been issues and ask if the value should be 102 or if it should be 92, taking it account the transactions posted. This means that while you stock take is being run and counted, if any transactions re posted you will be notified and able to make the correct adjustments.
?
20
Sales Order Processing/Invoicing A Beginners’ Guide To Pegasus Opera 3 - Supply Chain Management | HBP Systems User Guide
3. Sales Order Processing/Invoicing
The Sales Order Processing or Invoicing Module caters for the production of all documents required in the sales cycle - quotes, proforma, sales orders, delivery notes, invoices and credit notes. Each document can be progressed to the next stage i.e. Order to Delivery and It is also possible to progress part of a document to the next stage in the sales cycle, for example, goods listed on a delivery note may have different lead times therefore all the goods will not be dispatched at once, separate delivery notes from the same order can be created.
The application also handles the allocation of stock as well as issues and de allocations meaning you have a continual forecast on the stock levels. It also checks the stock levels to flag if there are insufficient stock quantities to fulfil a document.
The application links to the Bill of Materials application to allow a works order to be generated from a sales order. It also links to Purchase Order Processing to allow a purchase order to be generated from a sales order.
If the Stock application is not activated, additional menu items are included in Sales Order Processing so you can create product categories, product profiles and a file containing your product items.
Note:
The Module Links are configured in the System / company profile module. Such options are the use of Warehouses, Traceability and links from SOP to Bill of Materials.
The Sales Order Processing application links to the Sales Ledger, CRM, Costing, Stock, Bill of Materials and Purchase Order Processing applications. The Sales Ledger is automatically linked to SOP and will post invoices directly once progressed.
?
21
Sales Order Processing/InvoicingHBP Systems User Guide | A Beginners’ Guide To Pegasus Opera 3 - Supply Chain Management
3.1 Sales Order ProcessingThe SOP processing screen initially is a split screen View. The top half of the screen is essentially the processing screen on Sales with the functionality to View the Account using the Current Balance Icon. The bottom half of the screen then holds the SOP processing Lines with the centre defining the Stage the Screen is currently Showing
The Stages available in Sales Order Processing are as follows:
Document Used as a template or to create Repeat invoices for such things as Rent or Prepayments etc. This does not effect the current Balance or stock.
Quote Does not effect stock but will allow the system to produce and report the stock prices.
Proforma Does not effect stock and can be progressed to an invoice
Order Allocates stock dependant on settings and can be progressed to delivery or invoice again dependant on settings.
Delivery If option is enabled this will show stock as delivered and can also issue stock at this point.
Invoice Classed as a legal document, can be progressed from the above options or created as a new invoice. Once posted this can issue stock and will also update the Sales ledger with the invoice value.
Credit Classed as a legal document, it can be progressed from invoice only or created as a new credit. This also affects the sales ledger once posted.
Sales Processing
Status
SOP Lines
Tech Tip
Action Buttons:Your company will have decided the process for SOP and what levels they wish to use. Each process can be accessed via the ‘Action’ Button
//
22
Sales Order Processing/Invoicing A Beginners’ Guide To Pegasus Opera 3 - Supply Chain Management | HBP Systems User Guide
3.2 Document Creation & EditingTo create a new document at any of the stages is the same process throughout, as per below.
1. Open the Sales Order Processing or Invoicing Processing
2. Click Action, and then select the type of document that you want to post (Quote, Proforma, Order, Delivery, Invoice, Credit or Document).
3. Click Action again and select New, or press CTRL+N. The Publisher form is normally displayed. Select the required output type and click Publish
4. Enter the details required in the delivery address if this is different to the invoice address. Then continue to populate the references and due dates. There is also room to add comments if needed.
5. Select ok
You can also press F5 for Orders, F6 for Delivery and F7 for Invoice instead of using the Action menu. These are also listed on the accelerator keys.
?
Tech Tip
Accelerator Keys
Use your accelerator keys for easy access to the main stages and options in the action button.
//
23
Sales Order Processing/InvoicingHBP Systems User Guide | A Beginners’ Guide To Pegasus Opera 3 - Supply Chain Management
6. The details screen is then shown. If you wish to add a stock line, in the reference fields start to type the item or select F4 to search through the list. Select an item required and then amend any of the price / discount details where needed. Tab through the rest of the fields until the full line shows at the bottom of the screen.
7. The system will then be ready to continue adding a new line. If you have finished processing, select ‘escape’. Of continue to add the necessary lines. If a stock item does not exist of comments need to be added, a description only line (skip the stock ref and type straight into description) can be added also.
8. Select post when finished to complete and output the created document.
24
Sales Order Processing/Invoicing A Beginners’ Guide To Pegasus Opera 3 - Supply Chain Management | HBP Systems User Guide
3.3 Order Progression
In the top example we created a Document which could be progressed to any stage in the process using the below method.
3.3.1 To Progress Transactions In SOP
1. Open the Sales Order Processing or Invoicing folder and then click Processing.
2. Retrieve the customer record for which you want to progress a document.
3. Click Action, and the select the level according to the type of record you want to create. For example, if you want to progress a document to a sales order, you click ‘Order’.
4. In the list, click to highlight the document you want to progress. Then click Progress under action or the accelerator keys.
5. On the Publisher form, select the output destination for the document.
6. At the prompt ‘Edit Before Posting’, if you want to change the content of the new document before you post it, click Yes. Otherwise, click No.
7. The document will then print the relevant information and the status and references will have changed to the new level.
So for the document we have already created, we would select the ‘Order screen’, highlight the document and select progress. This would then progress to Order and from here can be progressed to delivery and then from delivery to invoice.
Once a document has been progressed, the details and document printed from the original document can not be shown again.
At each stage the Document is sat i.e. Order / Delivery / Invoice, the current document can be reprinted as many times as required.
Once you have created the first level in SOP, you will then need to move it to the next relevant stage. This is mostly used for Order—Delivery—Invoice but stages can be missed depending on how your company operates deliveries etc.
?
Note:
Once a transactions has been progressed, the information relating to the previous stage i.e. print out / references are no long shown.
To view the references use Action—View—Status.
25
Sales Order Processing/InvoicingHBP Systems User Guide | A Beginners’ Guide To Pegasus Opera 3 - Supply Chain Management
3.3.2 To Reprint:-
1.
Highlight the line making sure the status match’s the screen your are in i.e. Order status need to be sat on the Order screen..
2. Select Action—Print
3. Select the Output required such as Screen / Printer / File / Email.
26
Sales Order Processing/Invoicing A Beginners’ Guide To Pegasus Opera 3 - Supply Chain Management | HBP Systems User Guide
3.4 Batch ProcessingUse the Batch Processing command to post the following transactions automatically as part of a batch process. You can omit any one or more of the document stages. For example, you can progress ‘foundation’ documents straight to invoices, or pro forma invoices straight to deliveries (omitting the sales order stage), and so on.
• Documents
• Quotations
• Proforma invoices
• Sales orders
If you ticked the Use Picking Process box on the Set Options form, sales orders are not available for batch deliveries until the picking procedure has been completed, which in turn requires the orders to be allocated.
• Delivery notes
If you have ticked the Consolidate Deliveries box on the Set Options form, multiple source documents i.e. orders can be consolidated into one delivery per customer as long as the header information is identical; for example, they all have the same delivery address. Where consolidation is not used or does not apply, the application creates one delivery document for every source document selected.
• Invoices
if you have ticked the Consolidate Invoices box on the Set Options form, multiple Deliveries or another source can be consolidated into one Invoice per customer as long as the header information is identical; for example, they all have the same delivery address. Where consolidation is not used or does not apply, the application creates Invoice for each Delivery note.
Tech Tip
Acknowledgement Required
Orders are only Printed for those customers where the Acknowledgement Required box is ticked on the customer’s Delivery Details form In Sales Processing / Action / Delivery Details..
//
When using batch processing, the process can specify via the ‘email only’ option to progress all invoice where the options have been defined to email the document type being produced. The routine can then be run again for all remaining document types where the document is required to print rather than email.
?
27
Sales Order Processing/InvoicingHBP Systems User Guide | A Beginners’ Guide To Pegasus Opera 3 - Supply Chain Management
3.4.1 To Use Batch Processing:-
1.
Select Batch processing from SOP
2. Define the sequence in which you wish to run the process i.e. Account / Selection / Route / Warehouse
3. Define the range of selection you wish to include i.e. from Account ‘A’ to Account ‘E’
4. Specify the document range which will find all document with the type specified as ‘From’ and the routine will progress the document to the type specifies as ‘To’.
5. Select Due dates Applicable and if the routine will run as Email only
6. Select Ok
7.
Select the transactions listed via the action menu to specify the item to be progressed. In the ‘Select’ column a ‘Yes’ will be shown automatically if the item is available for progression.
8. Select OK once confirmed
9. All progressed document will then email / print automatically.
Note:
Is there is a * in the ‘Select’ column, this indicates the transaction is not available to progress due to the credit limit of on stop flag.
As well as progressing document from one stage to another, there is also the options before hand which may be an automatic process of allocating the stock you have listed on your orders / deliveries / invoices or it may be a manual process to your company can keep a close eye on what stock it being allocated and then selecting for shipping. The following process outline these procedures
?
28
Sales Order Processing/Invoicing A Beginners’ Guide To Pegasus Opera 3 - Supply Chain Management | HBP Systems User Guide
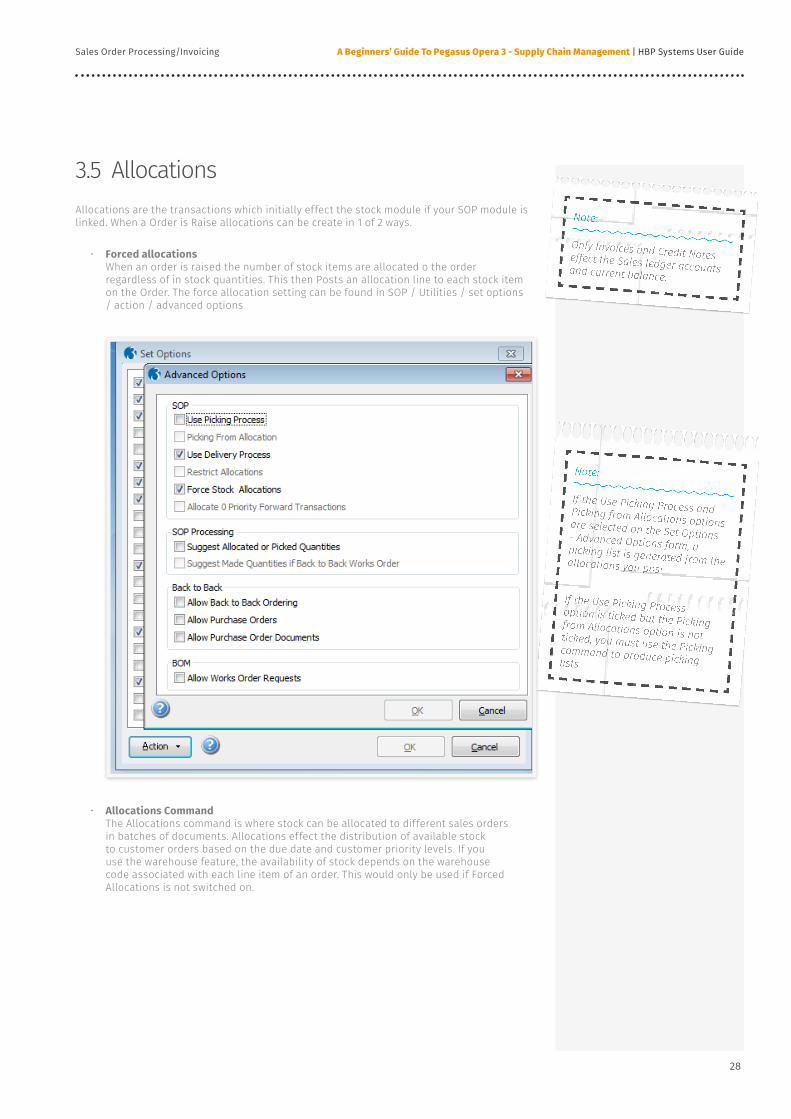
3.5 AllocationsAllocations are the transactions which initially effect the stock module if your SOP module is linked. When a Order is Raise allocations can be create in 1 of 2 ways.
• Forced allocations When an order is raised the number of stock items are allocated o the order regardless of in stock quantities. This then Posts an allocation line to each stock item on the Order. The force allocation setting can be found in SOP / Utilities / set options / action / advanced options
• Allocations Command The Allocations command is where stock can be allocated to different sales orders in batches of documents. Allocations effect the distribution of available stock to customer orders based on the due date and customer priority levels. If you use the warehouse feature, the availability of stock depends on the warehouse code associated with each line item of an order. This would only be used if Forced Allocations is not switched on.
Note:
Only Invoices and Credit Notes effect the Sales ledger accounts and current balance.
Note:
If the Use Picking Process and Picking from Allocations options are selected on the Set Options - Advanced Options form, a picking list is generated from the allocations you post.
If the Use Picking Process option is ticked but the Picking from Allocations option is not ticked, you must use the Picking command to produce picking lists
29
Sales Order Processing/InvoicingHBP Systems User Guide | A Beginners’ Guide To Pegasus Opera 3 - Supply Chain Management
3.5.1 To Batch Allocate Sales Orders
1.
Open the Sales Order Processing folder and then click Allocations
2. On the Allocations options form, update the boxes to determine which order lines are presented for allocation.
3. Click OK. The Allocations form is displayed.
4. Confirm or amend the allocations required.
5. Click OK.
Note:
Use the commands on the Action menu for additional processing options if you use the SOP module. These options are not available if you use Invoicing.
30
Sales Order Processing/Invoicing A Beginners’ Guide To Pegasus Opera 3 - Supply Chain Management | HBP Systems User Guide
3.6 PickingUse the Picking command to list items allocated to orders and confirm or amend the quantities suggested for picking. The picking procedure is not used for the picking of serial or batch numbers for traceable stock.
There are two options on the Advanced Options form that affect how the picking process works.
• Forced Stock Allocations If the option is ticked and the quantity that is picked is less than the quantity allocated, the application de-allocates the unpicked quantity automatically. If the option is not ticked, the stock allocation is not changed if the picked quantity is less than the allocated quantity.
• Picking from Allocations If the option is ticked, when you use the Allocations command, you must produce the picking list before you can use the Allocations command again. If the option is not ticked, you use the Allocations command as often as you want before first producing the picking list.
3.6.1 To Pick Items:-
1. Go to Supply chain management—Picking
2. The Picking form displays all relevant order lines according to the criteria specified and whether they are allocated (for Stock module items only). For any line on the form, you can change the suggested picking quantity in the Quantity Picked box.
3. You can use the Sequence command on the Action menu to change the order in which detail lines are listed. This will toggle between warehouse and stock item order and customer.
Note:
This only applies if the Use Picking Process option on the Advanced Options form is selected. This option is accessed from the Action menu
Tech Tip
Picking Selection
If you do not have the Stock Control application, all products matching the criteria for selection are offered for picking, because you cannot allocate product file items. If you use the Stock Control application, only allocated order lines are offered for picking..
//
Remember—The allocation and Picking process are not Mandatory and it is how the company wish to run the Sales Order process which will define if these are to be used. As long as there are no active Order in Opera, both options can be turned off an Forced allocations used alone.
?
31
Sales Order Processing/InvoicingHBP Systems User Guide | A Beginners’ Guide To Pegasus Opera 3 - Supply Chain Management
3.7 Repeat InvoicingTo create an invoice which will repeat, you first need to create a SOP document which will detail the products / quantities / values for what the repeat invoice will be.
1. Open SOP onto the correct supplier.
2. Select the ‘Document’ screen Via Action—Documents
3. Create New
4. On the Header screen, enter all appropriate information as per the SOP section above on Creating a new document. For a repeat invoice, you all also have the repeat section as per the below example.
5. In the Repeat section, specify the frequency of repeat i.e. Weekly / Monthly / quarterly.
6. In the Contract dates from and to, specify the duration of the invoice to repeat i.e. a 1 year period which would create 12 invoices over the year.
7. Select Ok
8. Complete the details screen as applicable for the items / quantities / values required.
9. Select ‘Post’ when you have completed the document information
10. On the SOP screen, the line will now have a Status of ‘Contract’ indicating this is a repeat invoice.
32
Sales Order Processing/Invoicing A Beginners’ Guide To Pegasus Opera 3 - Supply Chain Management | HBP Systems User Guide
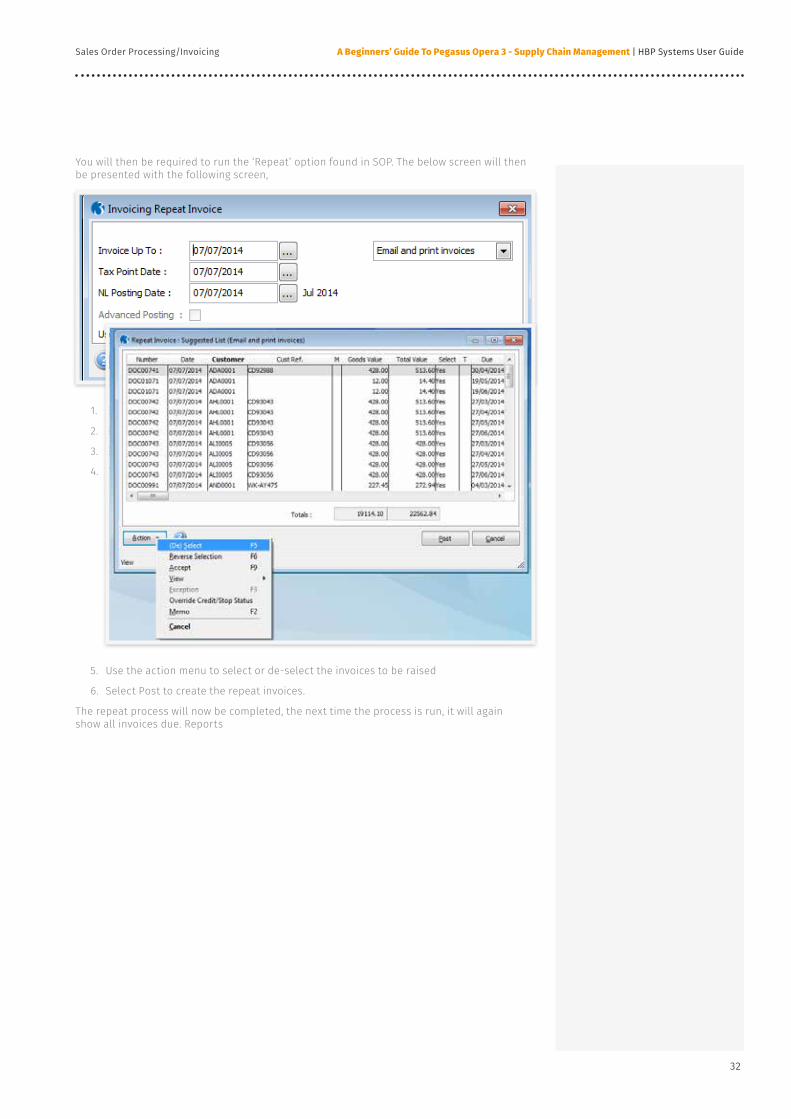
You will then be required to run the ‘Repeat’ option found in SOP. The below screen will then be presented with the following screen,
1. Enter the dates for which repeat invoices will be processed,
2. Select to one use accounts with Print Only / email only or both.
3. Select ok
4. The details screen lists all invoices that are available to run.
5. Use the action menu to select or de-select the invoices to be raised
6. Select Post to create the repeat invoices.
The repeat process will now be completed, the next time the process is run, it will again show all invoices due. Reports
33
Sales Order Processing/InvoicingHBP Systems User Guide | A Beginners’ Guide To Pegasus Opera 3 - Supply Chain Management
3.8 ReportsThere are a number of reports available to run in the reports section and can be run at any point.
These are found under SOP– Reports
34
Purchase Order Processing A Beginners’ Guide To Pegasus Opera 3 - Supply Chain Management | HBP Systems User Guide
4. Purchase Order ProcessingThe Purchase Order module allows the system to create Purchase orders from a supplier and progress through to Invoice. It will create and maintain cost prices for suppliers and stock items when using the stock module. The P. Order module can only be used if the system has the Purchase Ledger and can also be linked to Stock, Costing, Sop and PIR.
4.1 Purchase Order ProcessingUse the Processing command to create and process purchase orders for suppliers accounts. The p.order process allows the system to maintain records of Purchase Orders , Goods received and then Purchase invoices at the same time and then posting through to the PIR module as per the Financial Beginners Guide.
The Module is very much similar to the SOP module in that there is a split screen view detaining Supplier details from the Purchase Ledger and then listings of transactions for the supplier record you have selected.
Note:
When creating purchase order records, you can also print an order to send to your supplier or send it by email. However, emailing or printing of purchase orders can be prevented if required.
Note:
Remember to use the List or search functions to select the supplier account you wish to effect
Purchase Ledger Information
Status (Unlike SOP this will never change)
P.order Transactions Details
35
Purchase Order ProcessingHBP Systems User Guide | A Beginners’ Guide To Pegasus Opera 3 - Supply Chain Management
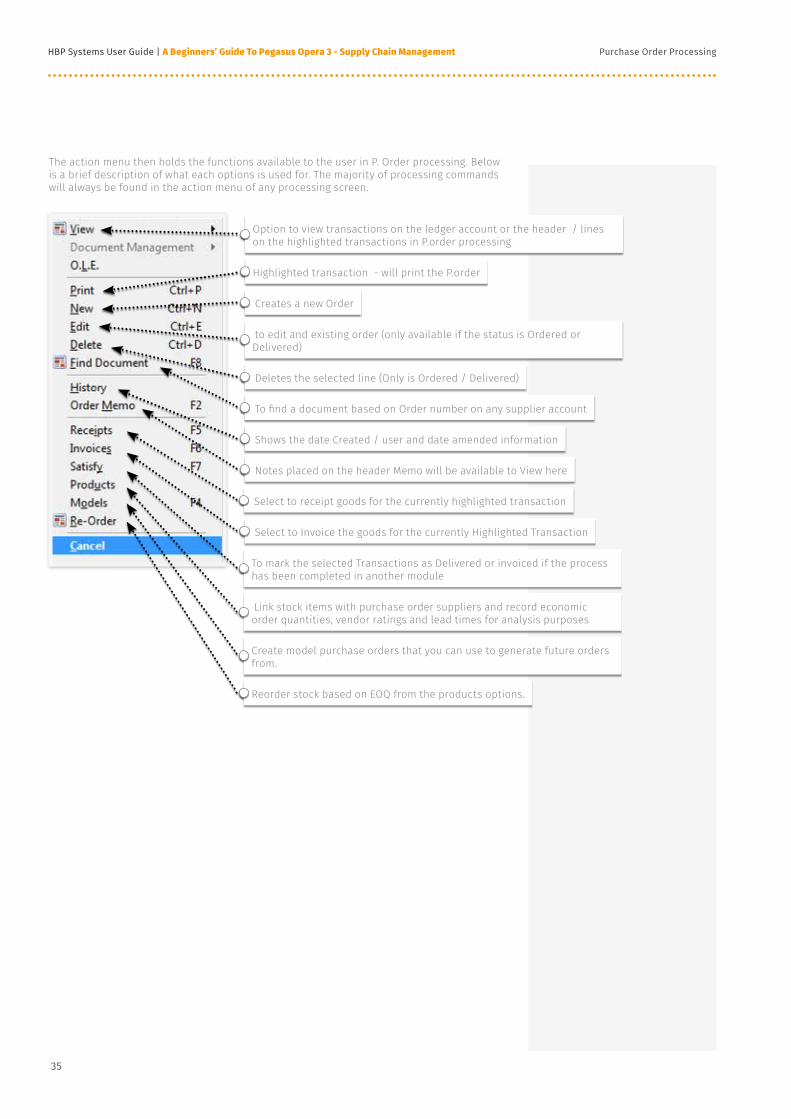
The action menu then holds the functions available to the user in P. Order processing. Below is a brief description of what each options is used for. The majority of processing commands will always be found in the action menu of any processing screen.
Select to Invoice the goods for the currently Highlighted Transaction
to edit and existing order (only available if the status is Ordered or Delivered)
Option to view transactions on the ledger account or the header / lines on the highlighted transactions in P.order processing
Highlighted transaction - will print the P.order
Creates a new Order
Create model purchase orders that you can use to generate future orders from.
Notes placed on the header Memo will be available to View here
Deletes the selected line (Only is Ordered / Delivered)
To find a document based on Order number on any supplier account
Shows the date Created / user and date amended information
Select to receipt goods for the currently highlighted transaction
To mark the selected Transactions as Delivered or invoiced if the process has been completed in another module
Link stock items with purchase order suppliers and record economic order quantities, vendor ratings and lead times for analysis purposes
Reorder stock based on EOQ from the products options.
36
Purchase Order Processing A Beginners’ Guide To Pegasus Opera 3 - Supply Chain Management | HBP Systems User Guide
4.2 Order Creating And ProgressionTo create a new Purchase Order, first selecting the correct supplier account buy selecting search or list.
1. Select Action - New
2. Select the option to Publish the Order (Screen / Print / File / email)
3. Choose whether to create using a Model
4. Select Ok
5. Choose the warehouse the goods will be received into as default. This will only apply if you use Multi warehouses.
6. Change delivery address and contact details as applicable
7. Enter the Suppliers P.order reference in ‘Ref:’
8. If a total order discount has been given, enter the value is O/Disc
9. Enter any further delivery instructions required
10. Select Ok
The detail form will then be displayed?
37
Purchase Order ProcessingHBP Systems User Guide | A Beginners’ Guide To Pegasus Opera 3 - Supply Chain Management
The details form Is where the individual stock items can be listed for order, if you do not use the stock module, these can be description only lines which would mean that stock is not effected.
1. Select the Stock item you wish to Order in the ‘Reference’ Field.
2. If not used Stock, tab out of reference and type the description of the items on order.
3. Enter the Quantity to be ordered and change the warehouse they are due to be received.
4. Price will auto default from the stock item / amend or enter as necessary
5. Enter the date required for the products
6. Specify a Project / department is advanced Nominal is in use.
7. Tab through until the Order lines shows in the bottom half of the screen
8. Repeat the process to add further order lines
9. Once completed select ‘escape’ on your keyboard and OK to post
You will be prompted to select if you wish to Publish the Order, this is so if you do not need a copy printing, you can select No and save the order being printed. The Order will still be created successfully. The Order balance on the supplier account will also be updated and the new transactions will show a status of ‘Ordered’.
Once the Order has been placed, you will then need to receipt the good into stock. If you do not use stock then you may wish to skip this section and move onto Invoicing an order
?
38
Purchase Order Processing A Beginners’ Guide To Pegasus Opera 3 - Supply Chain Management | HBP Systems User Guide
4.3 Receipting Goods From P.Order ProcessingReceipting goods into stock against a Purchase order will update the stock module with the amount received and will also log the cost price used against the stock. This cost price is then used in the Sales Order module when displaying cost prices on order and can not be changed. It is important to make sure your cost prices when receipting goods are correct so that profit is recorded correctly.
To Receipt In A Purchase Order1. Find the correct supplier account in P.Order processing
2. Select Action—Receipts
3. Select the relevant P.order you wish to receipt
4. Enter the warehouse / Reference and shipping ref if required
5. Select Ok
6. On the next screen, enter the qty received into the ‘Received Box.
7. Amend the actual cost price and date if necessary along with any other comment for information available.
8. Tab through each field to move onto the next line.
9. Once Completed, Select ‘OK’
10. Confirm to Post receipts
The Order has now been receipted into stock and the status will change to either ‘Delivered’ or ‘Ord/D’ which means only park of the original Order qty has been received, the rest to be received Later
?
39
Purchase Order ProcessingHBP Systems User Guide | A Beginners’ Guide To Pegasus Opera 3 - Supply Chain Management
4.4 Invoicing Orders Or DeliveriesInvoicing from P. Order Processing can be done from 3 different Stages. You can invoice straight from Order, Invoice from a Delivery or create an invoice from scratch. Creating an invoice from scratch. This is the point at which the P. Order will effect the Purchase Ledger or be pushed through to PIR for authorisation.
4.4.1 To Create an Invoice from Orders or Deliveries
1. Select the Supplier account the Invoice is to be Raised.
2. Select Action / Invoices
3. The Header screen is then displayed requiring an Invoice Reference, Invoice and tax point date, Transaction Value, Assigned to:
4. Select OK once information has been completed.
5. You will then be required to select at which stage you wish to create and invoice from. I.E. P. Orders / Deliveries / New Invoice
6. Selecting Order or Delivery the screen will prompt asking for the selection on the relevant Order or Delivery. This will list all transactions at the requested stage for the selected Supplier
40
Purchase Order Processing A Beginners’ Guide To Pegasus Opera 3 - Supply Chain Management | HBP Systems User Guide
7. You can in the selection screen choose multiple orders or deliveries to progress to Invoice.
8. Select Ok.
9. The next screen will display a list of lines on the selected transactions which can be deselected therefore not included on the invoice. Untick (F7) from the action Menu
10. Select Ok
11. Amend any values or posting details on the following screen making sure the ‘Remaining’ value is £0
12. Select Post
Tech Tip
Reorganise
If running a reorganise of the P.order modules, only completed lines will be removed if they are older then the system is set to keep transactions. This setting is found in P.order – Utilities—Set Options
//If you do not wish to use the Order or delivery stage or wish to simply create ab invoice from scratch, the system will allow the entry of a new invoices, this uses the same screens as the progression from Order or Delivery however they are blank awaiting user input.
?
41
Purchase Order ProcessingHBP Systems User Guide | A Beginners’ Guide To Pegasus Opera 3 - Supply Chain Management
4.4.2 To Create A New Invoice
1. Select the required Supplier from P.order processing
2. Select Action / New
3. Enter the relevant information and Values in the Header screen as per above steps
4. Select Ok
5. Choose the ‘New Invoice’ option from the ‘Create Invoice From:’ screen
6. Select the Relevant stock items or tab straight to ‘Description Only’ to complete the Invoice line item. This again will need to be the correct cost price which can be overridden and also the correct Vat and Nominal posting options.
7. Tab through the fields and continue to create lines until finished
8. Select ‘Escape’ to finish creating new lines
9. Check that the Remaining value is £0
10. Select Post
The Status of the Transaction will then change to Completed if the full order has been invoiced and posted to the ledger. Invoiced if the full transactions has been invoiced but posted ti PIR for authorisation or a combination if the transactions still has items on order. If there are outstanding ordered / delivered items then the invoice process can be repeated for the outstanding transaction lines.
?
42
Purchase Order Processing A Beginners’ Guide To Pegasus Opera 3 - Supply Chain Management | HBP Systems User Guide
4.5 SatisfyIf orders have only been part delivered or invoiced and you do not expect to receive the outstanding amount, the goods can not be invoiced of delivered as it would incorrectly effect the other modules. In this case the transactions can be marked as delivered and invoiced so as to not be included in outstanding reports and show as either fully Delivered / Invoiced instead of Part or fully Completed.
11. To Satisfy a Purchase line:
12. Select the Purchase Supplier within P.Order Processing
13. Select Action / Satisfy
14. The System will show the list of Order on the selected supplier and indicate the stage of each line which has not been completed with an X in the Column for DLV (Delivered) and INV (Invoiced)
15. The Order and details will be listed for each line on the order not completed.
16. Highlight the Line you wish to Satisfy and select Action.
17. (Un) Delivery to mark or unmark the line as Delivered
18. (Un) Invoiced to mark or unmark the line as Invoiced
19. Select OK once complete
Note:
You can not change the satisfy status where the INV column shows ‘PIR’ this is an indication that the invoice has been posted to PIR awaiting authorisation.
43
Purchase Order ProcessingHBP Systems User Guide | A Beginners’ Guide To Pegasus Opera 3 - Supply Chain Management
4.6 Action MenuThe P.Order Processing Action Menu as per the previous section, allows a number of different options to be processed.
As well as the actions we have covered so far, there are also options which allow the company to manager the different products which can be purchased from a supplier and allow reorders based on the Minimum stock quantities and economic Order quantities. This would need to be set up monitored which we would advise are not basic tools and to speak to a manager who has the authority to action those options.
There is also the options to create a Model order for each supplier. If there are orders being raised on the system frequently for the same supplier and products, this could be created a model. This would follow the same screens as the section on creating a new order however this would be launched from Acton—ModeL. This will launch a screen showing all the model created which can be edited, or select the ‘Create New Icon’ on the Opera toolbar to create a new model.
Once created, when creating a new order, the options to ‘Create using a Model’ can be selected which save time when creating a new order.Reports
44
Purchase Order Processing A Beginners’ Guide To Pegasus Opera 3 - Supply Chain Management | HBP Systems User Guide
4.7 ReportsReports submenu provide listings and document printing based on records Created in the Purchase Order Processing module. These include lists of supplier orders, orders and supplier product records maintained through the various forms and transactions generated as a result of purchase order processing. Reports can be used to view information on your computer screen as well as printing. They provide a number of options to determine the criteria, sequence and range of records reported.
These can be run at any time with a number of variations to sequence and dates.
45
Resources & Support InformationHBP Systems User Guide | A Beginners’ Guide To Pegasus Opera 3 - Supply Chain Management
Resources & Support InformationAs a leading Pegasus partner we are fully accredited to provide support for new and existing users of Opera II & Opera 3 including all supporting modules. Our team of expert support and projects staff manage a wide range of businesses using products and can assist with everything from day-to-day issues, through to training and system upgrades.A support contract with HBP Systems includes unlimited telephone and email support as well as free payroll upgrades at year end. We offer a proactive service and on a monthly basis produce Sage helpsheets aimed at tackling common and topical issues for end-users.
To see our full range of Pegasus helpsheets visit www.hbp-group.co.uk/helpsheets
part of the HBP Group
Pegasus Software Helpsheet
page 1 / 19
Helpsheet | Pegasus Opera II & Opera 3
Auto enrolment initial setup steps
1. Ensure Payment Profiles set-up – created as necessary with the AE and pension option
selected when appropriate. Remember, qualifying (auto enrol able) and pensionable are different
and those used to calculate qualifying earnings, may not all be pensionable. Please speak to your
pension provider for confirmation on what they class as pensionable. The TPR website has a defined
list of payments which must be included as qualifying (auto enrol able).
2. In payroll utilities / set options/ default group / options page 2 / select to use ‘advanced
pension processing’
3. Create the pension schemes applicable in Payroll / Maintenance / pension schemes.
i. More than one scheme can be created. If the scheme is to be used for auto
enrolment, the option to use for auto enrolment must be selected.
ii. The information entered will be subject to how your pension provider administers
their pensions for thresholds. Please speak to your pension provider before completing
the information
4. Enter your staging Date in Payroll / utilities / auto enrolment settings
5. Enter the date you have resisted with the pension regulator in Payroll / utilities / auto
enrolment settings
If using Nest pensions and the Add on for Pegasus have been purchased
6. Create the relevant Pension groups found in Payroll / utilities / pension groups.
7. Create the relevant payment sources found in Payroll / utilities / Pension Payment Sources.
Auto Enrolment Steps
in Opera II/3. InstallingXRL. How to install XRL and link to Pegasus Opera II or Opera3. Before installing XRL.
1. Make sure that you are logged in as an Administrator. 2. Ensure Microsoft .net framework 2.0 is installed. 3. If an existing installation exists, backup the LSDATABASE.mdb file (most likely
located on the server in the XRL subfolder of the Opera II or Opera 3 folder. If XRL is a standalone installation, the file will be in C:\Program files).
4. Make sure you have the activation document supplier by HBP if required. Installing XRL
1. Insert the Pegasus XRL CD. The installation window will launch automatically (if
not displayed, run the welcome.exe file located on the CD). 2. Select the release guide and read me notes to view the new features in this release.
3. Select Install XRL to start the installation process. This will then launch the Standard XRL installation wizard.
4. Select ‘Next’ to the installation wizard and allow the installation to process through. If there is an existing installation on XRL already on the machine, a prompt will appear to remove the existing version. Please tick the option to ‘Completely uninstall Data Links and application settings’ and select ‘Remove’. Once removed, ‘Install XRL’ will need to be reselected to begin the installation again.
part of the HBP Group
Pegasus Software Helpsheet
page 1 / 3 Helpsheet | Pegasus Opera II & Opera 3
Repeat invoicing can be useful if on a regular basis, a customer will be invoiced for the same products.
Opera II has the functionality to allow this to occur by setting up a document specifically set as a repeat invoice.
Within SOP processing, select the account you wish to create a repeat invoice for. Next, go to the action menu and select document. This will bring up the screen for document creation on that account. Documents are used mostly as templates and are classed as ‘Foundation Documents’..
Once you are on this screen you can then again select ‘Action’ and ‘New’.
The publisher screen will appear to specify the output and then the header screen will appear. The main, different to the header screen, is the option to choose if this document will be a repeat invoice.
Repeat Invoicing With SOP.
“HBP Systems Ltd was formed in 1991, and we’ve been on quite the journey since then. From our beginnings as a Business Product supplier in the Humber region, to an award winning supplier of business IT networks, accounting software and EPOS solutions, we’ve stayed true to our core skills and are now recognised as a leading provider in Scunthorpe and Hull area. We owe a huge thanks to our dedicated staff and our 600+ customers for joining us on this awesome journey, and we certainly hope that you’ll join us and become part of our story.”
Joanne Dixon
Managing Director
/company/hbp-systems-ltd /hbpsystems /hbpsystems
Choosing software that keeps pace with both your current & future business requirements can be a daunting process. HBP are leading partners for Sage, Pegasus & Exchequer software and, unlike companies who only offer solutions from one software house, we can ensure that the correct option is meets your requirements.