473
p A Guide to QuarkXPress: Interface Overview
| Date post: | 13-Apr-2018 |
| Category: |
Documents |
| Upload: | truongduong |
| View: | 216 times |
| Download: | 2 times |

pA Guide to QuarkXPress: Interface Overview

A Guide to QuarkXPress:
Interface Overview

ACKNOWLEDGMENTS
Quark, Inc., acknowledges with gratitude the efforts and contributions of all theteam members and departments involved in producing QuarkXPress™ softwareand QuarkXPress Passport™ software and documentation, including: ProductManagement, Program Management, Technical Writers, Quality Assurance,Research and Development, Software Configuration Management, CommonComponents, Technical Support and Worldwide Product Services. Quark alsothanks its alpha and beta testing partners for their help in testing QuarkXPressand QuarkXPress Passport.
This manual was produced entirely with QuarkXPress Passport andQuark Publishing System™ (QPS™).
LEGAL NOTICES©2002 by Quark Technology Partnership as to the content and arrangement of thismaterial. All rights reserved.
©1986–2002 by Quark Technology Partnership and its licensors as to the technology.All rights reserved.
Microsoft Reader Technology ©1999–2000 Microsoft Corporation. All rights reserved.
Information in this document is subject to change without notice and does not representa commitment on the part of Quark Technology Partnership or its licensee, Quark, Inc.
Use of the Quark Products is subject to the terms of the end user license agreement orother applicable agreements for such product/service. In the event of a conflict betweensuch agreements and these provisions, the relevant agreements shall control.
Quark Products and materials are subject to the copy right and other intellectual propertyprotection of the United States and foreign countries. Unauthorized use or reproductionwithout Quark’s written consent is prohibited.
Quark, QuarkXPress, QuarkXPress Passport, QuarkXTensions, and XTensions are trade-marks of Quark, Inc. and all applicable affiliated companies, Reg. U.S. Pat. & Tm. Off.and in many other countries. The Quark logo, QuarkCMS, and other Quark relatedmarks which Quark may adopt from time to time are trademarks of Quark, Inc. andall applicable affiliated companies.
QPS and related marks are trademarks or registered trademarks of Quark, Inc., usedunder license by Modulo Systems Corporation. Modulo Systems Corporation is aQuark related company.
FOCOLTONE and FOCOLTONE Colour System are registered trademarks ofFOCOLTONE. The concept, structure, and form of FOCOLTONE material and intellec-tual property are protected by patent and copyright law. Any reproduction in any form,in whole or in part, for private use or for sale, is strictly forbidden. Contact FOCOLTONE,Ltd. for specific patent information.
TRUMATCH, TRUMATCH Swatching System, and TRUMATCH System are trademarksof TRUMATCH, Inc.
Color Data is produced under license from Dainippon Ink and Chemicals, Inc.
ii
Legal Notices
The HASP® system and its documentation are copyrighted by Aladdin KnowledgeSystems Ltd. ©1985 to present. All rights reserved.
Toyo Ink Mfg. Co., Ltd. is the copyright owner of TOYO INK COLOR FINDER™ SYSTEMAND SOFTWARE which is licensed to Quark, Inc. to distribute for use in connectionwith QuarkXPress. TOYO INK COLOR FINDER™ SYSTEM AND SOFTWARE shallnot be copied onto another diskette or into memory unless as part of the execution ofQuarkXPress. TOYO INK COLOR FINDER™ SYSTEM AND SOFTWARE © Toyo InkMfg. Co., Ltd., 1991. COLOR FINDER is registered or in the process of registration asthe registered trademark of Toyo Ink Mfg. Co., Ltd. COLOR FINDER™ computer videosimulation used in the product may not match the COLOR FINDER™ book, and addi-tionally some printer color used in the product may also not match. Please use theCOLOR FINDER™ book to obtain the accurate color.
Quark, Inc. does not warrant, guarantee, or make any representations regarding the use orthe results of the use of any color system included in Quark products. Video simulationsmay not match published color standards. Refer to current materials of the specific colorcompany (i.e., PANTONE, Inc.; FOCOLTONE, Ltd.; TRUMATCH, Inc.; TOYO INK,Mfg. Co., Ltd.; or other companies involved in the process of color reproduction) foraccurate color samples.
Kodak is a trademark of Eastman Kodak Company.
Microsoft is either a registered trademark or trademark of Microsoft Corporation in theUnited States and/or other countries and the Microsoft Reader logo is used under licensefrom Microsoft.
Adobe, Acrobat Reader, and Acrobat are registered trademarks of Adobe SystemsIncorporated in the United States and/or other countries.
Pantone® Colors displayed in the software application or in the user documentation maynot match PANTONE-identified standards. Consult current PANTONE Color Publicationsfor accurate color. PANTONE© and other Pantone, Inc. trademarks are the property ofPantone, Inc. 2002.
Pantone, Inc. is the copyright owner of color data and/or software which are licensedto Quark, Inc. to distribute for use in combination with QuarkXPress. PANTONE ColorData and/or Software shall not be copied onto another disk or into memory unless aspart of the execution of QuarkXPress.
QuickHelp™ is licensed from Altura Software, Inc. End User is prohibited from takingany action to derive source code equivalent of QuickHelp, including reverse assemblyor reverse compilation.
All other trademarks are the properties of their respective owners.
THIRD PARTY XTENSIONS SOFTWARE DISCLAIMERQUARK IS NOT THE MANUFACTURER OF THIRD PARTY XTENSIONS SOFTWAREOR OTHER THIRD PARTY SOFTWARE OR HARDWARE (HEREINAFTER “THIRDPARTY PRODUCTS”) AND SUCH THIRD PARTY PRODUCTS HAVE NOT BEENCREATED, REVIEWED, OR TESTED BY QUARK, THE QUARK AFFILIATED COM-PANIES OR THEIR LICENSORS. (QUARK AFFILIATED COMPANIES SHALL MEANANY PERSON, BRANCH, OR ENTITY CONTROLLING, CONTROLLED BY ORUNDER COMMON CONTROL WITH QUARK OR ITS PARENT OR A MAJORITY OFTHE QUARK SHAREHOLDERS, WHETHER NOW EXISTING OR FORMED IN THE
iii
Legal Notices

FUTURE, TOGETHER WITH ANY PERSON, BRANCH, OR ENTITY WHICH MAYACQUIRE SUCH STATUS IN THE FUTURE.)
QUARK, THE QUARK AFFILIATED COMPANIES AND/OR THEIR LICENSORSMAKE NO WARRANTIES, EITHER EXPRESS OR IMPLIED, REGARDING THEQUARK PRODUCTS/SERVICES AND/OR THIRD PARTY PRODUCTS/SERVICES,THEIR MERCHANTABILITY, OR THEIR FITNESS FOR A PARTICULAR PURPOSE.QUARK, THE QUARK AFFILIATED COMPANIES AND THEIR LICENSORS DIS-CLAIM ALL WARRANTIES RELATING TO THE QUARK PRODUCTS/SERVICESAND ANY THIRD PARTY PRODUCTS/SERVICES. ALL OTHER WARRANTIES ANDCONDITIONS, WHETHER EXPRESS, IMPLIED OR COLLATERAL, AND WHETHEROR NOT, MADE BY DISTRIBUTORS, RETAILERS, XTENSIONS DEVELOPERS OROTHER THIRD PARTIES ARE DISCLAIMED BY QUARK, THE QUARK AFFILIATEDCOMPANIES AND THEIR LICENSORS, INCLUDING WITHOUT LIMITATION,ANY WARRANTY OF NON-INFRINGEMENT, COMPATIBILITY, OR THAT THESOFTWARE IS ERROR-FREE OR THAT ERRORS CAN OR WILL BE CORRECTED.THIRD PARTIES MAY PROVIDE LIMITED WARRANTIES AS TO THEIR OWNPRODUCTS AND/OR SERVICES, AND USERS MUST LOOK TO SAID THIRDPARTIES FOR SUCH WARRANTIES, IF ANY. SOME JURISDICTIONS, STATES ORPROVINCES DO NOT ALLOW LIMITATIONS ON IMPLIED WARRANTIES, SO THEABOVE LIMITATION MAY NOT APPLY TO PARTICULAR USERS.
IN NO EVENT SHALL QUARK, THE QUARK AFFILIATED COMPANIES, AND/ORTHEIR LICENSORS BE LIABLE FOR ANY SPECIAL, INDIRECT, INCIDENTAL,CONSEQUENTIAL OR PUNITIVE DAMAGES, INCLUDING, BUT NOT LIMITEDTO, ANY LOST PROFITS, LOST TIME, LOST SAVINGS, LOST DATA, LOST FEES, OREXPENSES OF ANY KIND ARISING FROM INSTALLATION OR USE OF THE QUARKPRODUCTS/SERVICES, IN ANY MATTER, HOWEVER CAUSED AND ON ANY THE-ORY OF LIABILITY. IF, NOTWITHSTANDING THE FOREGOING, QUARK, THEQUARK AFFILIATED COMPANIES AND/OR THEIR LICENSORS ARE FOUND TOHAVE LIABILITY RELATING TO THE QUARK PRODUCTS/SERVICES OR THIRDPARTY PRODUCTS/SERVICES, SUCH LIABILITY SHALL BE LIMITED TO THEAMOUNT PAID BY THE USER TO QUARK FOR THE SOFTWARE/SERVICES ATISSUE (EXCLUDING THIRD PARTY PRODUCTS/SERVICES), IF ANY, OR THELOWEST AMOUNT UNDER APPLICABLE LAW, WHICHEVER IS LESS. THESELIMITATIONS WILL APPLY EVEN IF QUARK, THE QUARK AFFILIATED COM-PANIES, THEIR LICENSORS AND/OR THEIR AGENTS HAVE BEEN ADVISED OFSUCH POSSIBLE DAMAGES. SOME JURISDICTIONS, STATES OR PROVINCES DONOT ALLOW THE EXCLUSION OR LIMITATION OF INCIDENTAL OR CONSE-QUENTIAL DAMAGES, SO THIS LIMITATION OR EXCLUSION MAY NOT APPLY.ALL OTHER LIMITATIONS PROVIDED UNDER APPLICABLE LAW, INCLUDINGSTATUTES OF LIMITATION, SHALL CONTINUE TO APPLY.
IN THE EVENT ANY OF THESE PROVISIONS ARE OR BECOME UNENFORCEABLEUNDER APPLICABLE LAW, SUCH PROVISION SHALL BE MODIFIED OR LIMITEDIN ITS EFFECT TO THE EXTENT NECESSARY TO CAUSE IT TO BE ENFORCEABLE.
iv
Legal Notices

Introduction
About this Book ix
Other Helpful Publications xi
QuarkXPress Basics xii
The Interface xviii
1 Palettes
Displaying and Arranging Palettes 1
Tools Palette 2
Tool Overview 6
Web Tools Palette W 23
Web Tool Overview W 26
Measurements Palette 30
Document Layout Palette 43
Style Sheets Palette 47
Colors Palette 49
Trap Information Palette P 52
Lists Palette 58
Layers Palette 59
Profile Information Palette P 63
Hyperlinks Palette 65
Index Palette P 68
2 Context Menus
Context Menus 73
v
Table of Contents

3 File Menu
File Menu: Overview 77
Creating and Opening Commands 78
Closing and Saving Commands 85
Importing, Appending, Exporting, and Collecting Commands 88
Document Setup, Page Setup, and Print Commands 105
Quit and Exit Commands 122
4 Edit Menu
Edit Menu: Overview 123
Undoing and Redoing Actions 124
Cut, Copy, Paste, Deletion Commands 125
Subscribe Commands — Mac OS Only 129
Link Commands — Windows Only 130
Show/Hide Clipboard Commands 133
Find/Change Command 133
Preferences Commands 139
Style Sheets Command 183
Colors Command 190
H&Js Command P 201
Lists Command 207
Dashes & Stripes Command 211
Print Styles Command P 216
Meta Tags Command W 219
Menus Command W 224
vi
Table of Contents

5 Style Menu
Style Menu for Text 229
Style Menu for Pictures 258
Style Menu for Lines 269
6 Item Menu
Item Menu: Overview 273
Modify Commands 274
Duplicating and Deleting Items 329
Grouping, Merging, and Locking Commands 331
Stacking Order Commands 335
Shape, Content, Edit Commands 342
Point/Segment and Table Commands 345
Rollover and Hot Areas Commands 351
7 Page Menu
Page Menu: Overview 353
Inserting, Deleting, and Moving Pages 354
Modifying Master Page Attributes and Numbering Sections 358
Navigating Document Pages 365
Displaying Document Pages 366
8 View Menu
View Menu: Overview 367
Document View Commands 368
Show/Hide Commands 370
vii
Table of Contents

9 Utilities Menu
Utilities Menu: Overview 376
Spell Checking Commands 377
Hyphenation Commands 384
Usage Command 386
XTensions Manager 391
Component Status 393
PPD Manager P 396
Profile Manager P 397
Tracking Edit 399
Kerning Edit 401
Build Index P 403
10 Window Menu
Window Menu — Windows only 406
Glossary
Index
viii
Table of Contents

Introduction
From a simple brochure to highly complex corporate communications, QuarkXPress
encourages you to challenge the boundaries of professional publishing, both in print
and on the Web. With superior color capabilities, exceptional picture handling, and
precise typographic controls, QuarkXPress increases your publishing power.
ABOUT THIS BOOK
“A Guide to QuarkXPress: Interface Overview” is not meant to be read cover to cover.The book is designed so that you can look things up quickly, find out what you need toknow, and get on with your work. However, if you need more comprehensive informa-tion about electronic publishing, that is also provided.
WHERE WE’RE COMING FROM
This book assumes you are familiar with your computer and know how to:
• Launch an application
• Open, save, and close files
• Use menus, dialog boxes, and palettes
• Use the mouse, keyboard commands, and modifier keys
If you need help performing any of these tasks, consult the documentationresources (user or reference guides) provided with your computer.
HOW TO USE THIS BOOK
If you stumble on an unfamiliar command, or want more informationabout how to use a tool, check this book. It explains the QuarkXPress interface,including menus, dialog boxes, tools, palettes, and preferences. Commands aredocumented in menu order, starting with the first command in the File menu.
WHAT YOU’RE LOOKING AT
This book uses various conventions (styles) to help you find information quickly:
BOLD TYPE STYLE
The names of QuarkXPress menu commands, dialog boxes, and other controlsare set in bold type. For example: “The Colors palette lets you apply colors orinks to text, pictures, lines, and box backgrounds.”
Introduction
ix
About this Book
REFERENCES AND ARROWS
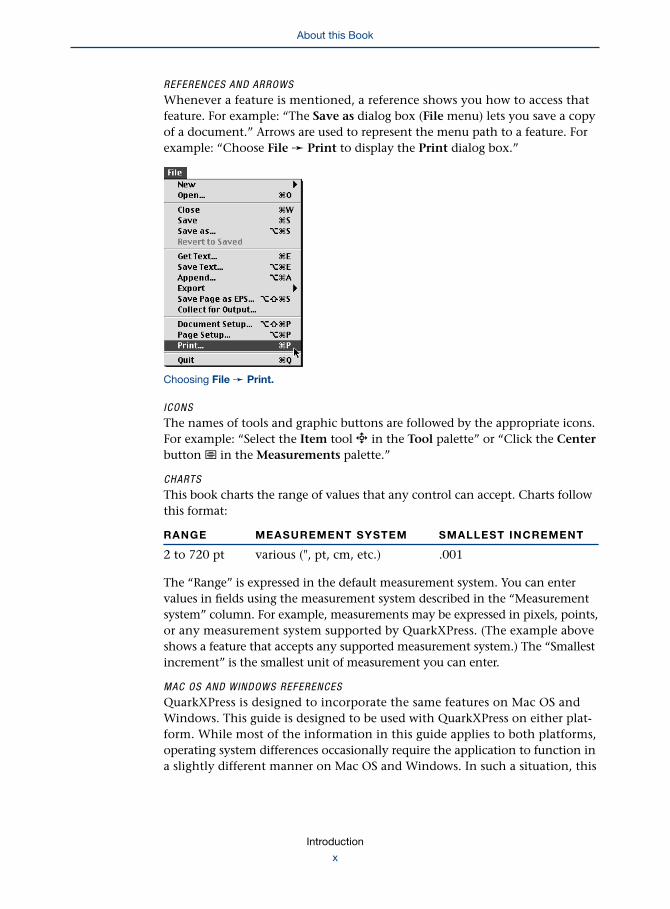
Whenever a feature is mentioned, a reference shows you how to access thatfeature. For example: “The Save as dialog box (File menu) lets you save a copyof a document.” Arrows are used to represent the menu path to a feature. Forexample: “Choose File & Print to display the Print dialog box.”
Choosing File & Print.
ICONS
The names of tools and graphic buttons are followed by the appropriate icons.For example: “Select the Item tool e in the Tool palette” or “Click the Centerbutton } in the Measurements palette.”
CHARTS
This book charts the range of values that any control can accept. Charts followthis format:
RANGE MEASUREMENT SYSTEM SMALLEST INCREMENT
2 to 720 pt various (", pt, cm, etc.) .001
The “Range” is expressed in the default measurement system. You can entervalues in fields using the measurement system described in the “Measurementsystem” column. For example, measurements may be expressed in pixels, points,or any measurement system supported by QuarkXPress. (The example aboveshows a feature that accepts any supported measurement system.) The “Smallestincrement” is the smallest unit of measurement you can enter.
MAC OS AND WINDOWS REFERENCES
QuarkXPress is designed to incorporate the same features on Mac OS andWindows. This guide is designed to be used with QuarkXPress on either plat-form. While most of the information in this guide applies to both platforms,operating system differences occasionally require the application to function ina slightly different manner on Mac OS and Windows. In such a situation, this
Introduction
x
About this Book

guide identifies which functions are unique to Mac OS and which functions areunique to Windows.
PRINT AND WEB MODES
QuarkXPress lets you create documents both for printed output and for theWeb. When you’re working on a print document, QuarkXPress is in print mode;when you’re working on a Web document, QuarkXPress is in Web mode. Themode determines which tools, features, and other user interface elementsare available. In this guide, features that are unique to print documents areidentified with a Picon, and features that are unique to Web documents areidentified with a W icon.
NOTES AND T IPS
∫ Notes provide helpful information about particular features.
å Tips provide extra information about particular features and general techniquesfor electronic publishing.
OTHER HELPFUL PUBLICATIONS
The QuarkXPress product includes various electronic documents to assist you in usingQuarkXPress 5.0. You can find these documents on the QuarkXPress CD-ROM. Quarkalso provides QuarkXPress training on the World Wide Web to help you familiarizeyourself with the various features of QuarkXPress.
A GUIDE TO QUARKXPRESS: USING QUARKXPRESS
Whenever you think to yourself, “I wonder how to do this…,” check thebook A Guide to QuarkXPress: Using QuarkXPress. The file name is “UsingQuarkXPress.pdf” on your QuarkXPress CD-ROM. The detailed table ofcontents at the beginning of the book and the index should help youquickly find the information you need.
Each chapter in A Guide to QuarkXPress: Using QuarkXPress includes a series ofspecific tasks such as “Creating New Documents” or “Importing Pictures.”Instructions for accomplishing tasks are presented in steps or as bulleted lists.Tips with useful information about QuarkXPress are frequently included onthese pages.
CONCEPT BLOCKS
Background information about publishing tasks and concepts are also providedthroughout A Guide to QuarkXPress: Using QuarkXPress. The first word in the titleof a concept block is usually “Understanding,” for example: “UnderstandingPicture File Formats.” You can read concept blocks any time — they’re designed
Introduction
xi
About this Book

to round out your knowledge of electronic publishing without necessarilyrelating to a specific task.
WHAT’S NEW IN QUARKXPRESS 5.0
If you are a proficient QuarkXPress user, start with the file “What’s Newin 5_0.pdf,” found on the QuarkXPress CD-ROM. It provides a brief overview ofthe new features in this version of QuarkXPress to get you started with your newsoftware as quickly as possible.
OTHER PIECES IN THE BOX
Your QuarkXPress product also includes installation and user registrationinstructions, a list of keyboard commands, and documentation for anylate-breaking features.
QUARKXPRESS TRAINING ON THE WEB
QuarkXPress online training is a Web-based tutorial that will take youthrough the process of applying specific QuarkXPress features to sampleQuarkXPress documents.
If you have little or no experience with QuarkXPress and you want to beginlearning about it, these online training exercises will teach you the basicskills necessary to create print and Web documents using this application.Experienced users may also find the lessons useful for learning featuresthat are new to QuarkXPress 5.0, such as layers, tables, and the Webdocument features.
You can find the QuarkXPress online training on the Quark Web site atwww.quark.com. All you need to view the online training is an Internet con-nection with Web browser version 4.0 or later (for example, Microsoft™ InternetExplorer or Netscape Navigator). To perform the training exercises, you needQuarkXPress or a demo version of QuarkXPress.
QUARKXPRESS BASICS
To use QuarkXPress effectively, you need to understand a few basic concepts. Read thissection if you are new to QuarkXPress or if you need a quick refresher. If you are new toQuarkXPress, we recommend that you complete the online training exercises availableon the Quark Web site, www.quark.com, to familiarize yourself with the individualQuarkXPress features.
PRINT AND WEB MODES
QuarkXPress lets you create documents both for print and the Web. Whenyou’re working on a print document, QuarkXPress is in print mode; whenyou’re working on a Web document, QuarkXPress is in Web mode. The mode
Introduction
xii
Other Helpful Publications

determines which tools, features, and other user interface elements are avail-able. In this manual, features that are unique to print documents are identifiedwith a Picon, and features that are unique to Web documents are identifiedwith a Wicon.
∫ Some print features can be used in Web documents. To use print featuresin Web documents, see “The Elements of a Web Document” in Chapter 7,Document Layout,” in A Guide to QuarkXPress: Using QuarkXPress.
PRINT DOCUMENT ENVIRONMENT PA work area called the pasteboard surrounds each page or spread. You usethe pasteboard to store items temporarily or to experiment with somethingbefore you put it on a page. You can have individual pages or multipagespreads, and you can add, move, and delete pages as you work. Pages canbe manipulated using the Document Layout palette or the Page menu,and in Thumbnails view.
WEB DOCUMENT ENVIRONMENT WA page in a Web document has no fixed size; it expands as necessary to makeroom for the items it contains. However, you can use the page width guide asa guideline to make sure the pages you design will fit on your users’ monitors.Gray regions at the bottom and right of the page indicate the page’s trueboundaries, but keep in mind that different Web browsers often display thesame page differently.
There are no pasteboards in a Web document. Pages can be manipulated usingthe Document Layout palette or the Page menu.
BASIC TOOLS
QuarkXPress pages contain items. Items are text boxes, text paths, picture boxes,tables, and lines; they are created in QuarkXPress and manipulated primarilywith the Item tool e. Contents are text and pictures; they are manipulatedprimarily with the Content tool E.
In general, you will use Item menu commands and the left half of the Measure-ments palette when working with items. Likewise, you will use the Style menuand the right half of the Measurements palette when working with contents.
The controls in the Measurements palette change according to the current selection —whether it is a text box, picture box, text path, line, text, or picture.
Introduction
xiii
QuarkXPress Basics

THE BOX CONCEPT
In QuarkXPress, most things go into a box. Text is contained in text boxes andpictures are contained in picture boxes. Text can also be placed on a path. Youhave control over the size, shape, layering, color, and other properties of eachbox or path — and you have similar control over the text or pictures containedin them.
TABLES
A table is a series of rectangular, grouped boxes — called “cells” — that you canuse to present data in a concise format. QuarkXPress lets you create tables, con-vert text to tables, easily edit table data, and add or remove rows and columnsas necessary. The cells can contain text, pictures, or a content of None.
LAYERS
By letting you control which items display on a page, layers make it easier foryou to edit and manipulate documents. The Layers palette lets you place allitems on the same layer or create different layers for different items. You candisplay some layers while hiding others, so you can opt to see only those itemsthat you want to edit at a given time.
WORKING WITH TEXT PA text box or a text path contains text. To create a text box or path, use any ofthe text box creation tools T, Å, ı, Ç, Î, ´, or Ô, or a text path creationtool , Ò, Â, or ˜. Then use the Get Text command (File menu) to importtext files from other sources, including many popular word processors, data-bases, and spreadsheets. To enter your own text into a text box, select thetext box with the Content tool E and begin typing.
When you are working with text, the Style menu provides formatting optionssuch as fonts, type styles, and colors. High-end typographic controls are providedthrough a combination of menu items, keyboard commands, and preferences.To simplify text formatting, you can create paragraph and character style sheets(Edit & Style Sheets) and apply them using a menu command, the Style Sheetspalette, or keyboard commands.
To flow text from one text box to the next (or from one text path to the next),you can create an automatic chain of text. You can also use the Linking u andUnlinking U tools to manually create custom text chains. To create an auto-matic text chain, check Automatic Text Box in the New Document dialog box(File & New & Document).
Introduction
xiv
QuarkXPress Basics

WORKING WITH TEXT IN WEB DOCUMENTS WThe typographic effects available in HTML are more limited than those availablewithin QuarkXPress. You can create text boxes that contain formatted HTMLtext, or you can use the full range of typographic effects by converting textboxes and text paths to graphics at export. If you export a large amount of yourtext as graphics, be aware that this will increase the size of your page and thepage’s downloading time.
PLACING PICTURES
“Picture” is a general term for any type of graphic file in a QuarkXPress docu-ment. Just as text boxes contain text, picture boxes contain pictures. To create apicture box, use any of the picture box creation tools p, x, O, å, 7, ƒ,or ∂. Then, use the Get Picture command (File menu) to import a copy of apicture file. You can also paste a picture that has been copied to the Clipboardinto your document.
When you are working with pictures, the Style menu provides formattingchoices such as contrast, line screen, and colors. Picture formatting options areselectively available depending on the imported picture’s graphic file format.
EXPORTING PICTURES WWhen you export a Web document as an HTML file, all pictures in thatdocument are converted to either JPEG, GIF, or PNG format, regardless oftheir previous format. You can control the format in which each pictureis exported.
Text boxes and paths can also be exported as pictures. You can control theexport format of these items, as well.
SHAPES AND LINES
To create a colored shape, create a picture box with any kind of shape and applya color to the background of the box. Background colors are applied to boxesusing the Colors palette (View menu) or the Box tab of the Modify dialog box(Item menu). The Merge and Shape controls (Item menu) let you create boxeswith multiple contours and combine different boxes.
Create custom line styles using the Dashes & Stripes dialog box (Edit menu);then use line creation tools o, œ, ∞, or § to draw the lines. When a line isselected, the Modify dialog box and the Style menu provide options (such asstyle, width, and arrowheads) for formatting lines.
Introduction
xv
QuarkXPress Basics

ELECTRONIC PASTE-UP
Items can be moved, resized, reshaped, and layered with other items. You candrag items into place by aligning them with rulers and guides, or you can enterprecise X and Y coordinates in the Measurements palette.
Each type of item has its own Modify dialog box (Item menu) that controls thesize, position, background color, position of the contents, and more. To flow textaround pictures, lines, and other items, use the Runaround tab in the Modifydialog box. Other Item menu commands let you group items so they can bemoved together, change the stacking order of items, duplicate items, and spaceselected items evenly.
When you choose Item & Modify, a dialog box specific to the selected item displays.The various tabs in the Modify dialog box provide access to different sets of controls.
FORMS AND IMAGE MAPS WWeb documents can contain forms, which allow readers to send information tothe Web server. Forms let readers enter information about themselves or ordergoods and services over the Internet.
Web documents can also contain image maps. An image map is an HTMLfeature that lets you link to different pages by clicking on different parts ofa picture in a Web page.
Introduction
xvi
QuarkXPress Basics

MASTER PAGES AND TEMPLATES
Items (pictures and text) that recur throughout your document can be placedon master pages. Applying a master page to a document page automaticallyplaces the recurring items. For example, if you are working on a newsletter,you might want a master page for the cover and masthead, one for the insidespreads, and one with mailing information for the back page. Master pagescan be created, edited, and applied using the Document Layout palette. Onceyou’ve established the formatting of a publication, you can save a documentas a reusable template.
CUSTOMIZING QUARKXPRESS
QuarkXPress has many options for customizing how you work, how your textflows, how your tools work, and more. These are called “preferences,” whichyou can customize for your copy of QuarkXPress (application preferences) andfor individual documents (document preferences).
In addition to preferences, you can create custom style sheets, colors, dashes andstripes, lists (which are based on style sheets), and hyphenation and justificationspecifications for use in a document or template. All these specifications arecreated through commands in the Edit menu.
PRINTING PThe Print dialog box (File menu) offers several output options. For convenience,you can combine all these settings and save them as Print Styles (Edit menu).
When you print, QuarkXPress requires all the font and picture files used in thedocument. The Collect for Output (File menu) feature automatically gathersthe document, pictures, and fonts into one folder, and it produces a report ofthe document’s fonts, colors, trapping, and other settings — ready for output.
EXPORTING AS HTML WWhen you export a Web document in HTML format, QuarkXPress exports anynecessary accompanying files (such as picture files), too. You can also exportHTML templates, which let you insert XML content into a page and automati-cally format that content as HTML.
POWER THROUGH PALETTES AND KEYBOARD COMMANDS
As you use QuarkXPress, you will develop your own working style. Perhaps youwill prefer to use the mouse and menu commands for everything; you mightfind that you prefer the quick access to features provided by palettes and exten-sive keyboard commands. In many cases, QuarkXPress offers multiple ways toperform a given task.
Introduction
xvii
QuarkXPress Basics

THE INTERFACE
QuarkXPress menus and dialog boxes adhere to Mac OS and Windows conventions —with a few enhancements. This section provides a quick look at standard interfacecontrols, and highlights features unique to QuarkXPress. If you are new to Mac OS orWindows, we recommend that you consult the documentation resources provided withyour computer for complete information about using the operating system. If you arenew to QuarkXPress, we recommend that you complete the online training exercises,available on the Quark Web site at www.quark.com, to familiarize yourself with theindividual QuarkXPress features.
QUARKXPRESS MENUS
The menu bar displays the menus available in QuarkXPress: File, Edit, Style,Item, Page, View, Utilities, Window (Windows only) and Help. The menu barcan also display menus for QuarkXTensions software and third-party XTensionssoftware. Each menu contains groups of related commands separated by lines.Many menu entries are followed by keyboard shortcuts, displayed using theCommand (C), Option (`), Control (^), and Shift (w) keys on Mac OS, orthe Ctrl, Alt, and Shift keys on Windows.
Like other QuarkXPress menus, the File menu contains groups of related commandsseparated by lines.
Introduction
xviii
The Interface

QuarkXPress menus are context-sensitive, which means that menu items changeaccording to the active item, the current situation, or the selected tool:
• The commands listed under a menu may change. For example, the Style menucommands change depending on whether text, a picture, or a line is active.
• An individual menu command may change. For example, the Undo command(Edit menu) changes to reflect your last action (such as Undo Typing or UndoItem Deletion).
• The availability of menu entries may change. For example, when a picture isselected, the Save Text command (File menu) is not available.
• The availability of entire menus may change. For example, the Style menu itemsfor text are available only when a text box is active and the Content tool Eis selected.
• The function of a menu command may change slightly when you press amodifier key while displaying the menu. For example, on Mac OS, pressingOption while you choose the Item menu changes the Send to Back commandto Send Backward.
CONTEXT MENUS
To save production time while working with documents, QuarkXPress alsoincludes special menus called context menus. Context menus are keyboard-activated and context-sensitive, so they respond dynamically to the taskat hand.
• To display a context menu on Mac OS, press the appropriate keyboardcommand and click the object you want to affect. The default keyboardcommand is Control+click. You can switch this keyboard command withthe Zoom keyboard command (Control+Shift+click) using the buttons inthe Control Key area in the Preferences dialog box Interactive pane(Edit & Preferences & Preferences).
• To display a context menu on Windows, right-click the object you want to affect.
When you display a context menu by clicking empty space on a document page, options thatare relevant to the entire document display in the menu.
Introduction
xix
The Interface
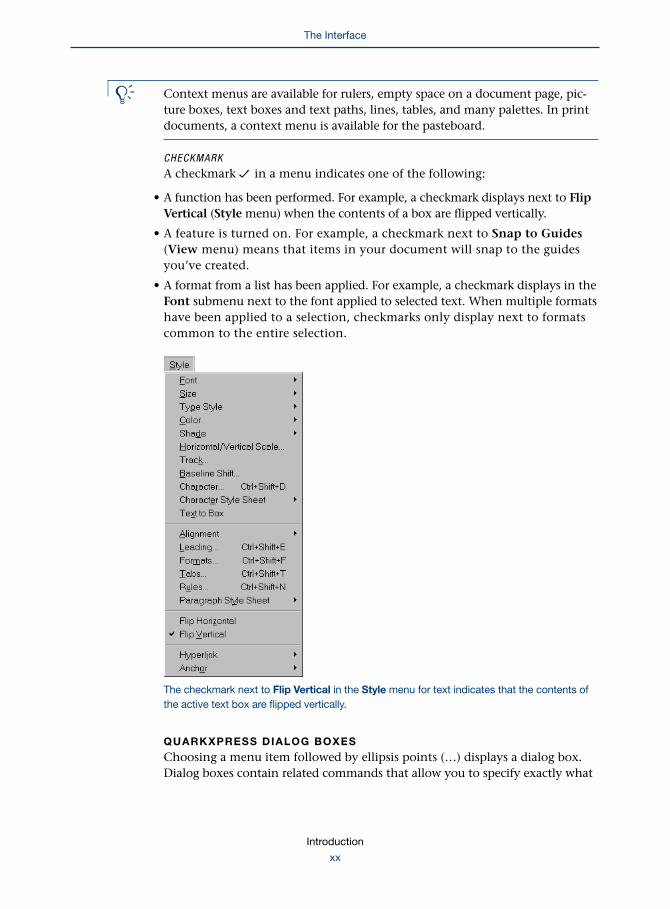
å Context menus are available for rulers, empty space on a document page, pic-ture boxes, text boxes and text paths, lines, tables, and many palettes. In printdocuments, a context menu is available for the pasteboard.
CHECKMARK
A checkmark j in a menu indicates one of the following:
• A function has been performed. For example, a checkmark displays next to FlipVertical (Style menu) when the contents of a box are flipped vertically.
• A feature is turned on. For example, a checkmark next to Snap to Guides(View menu) means that items in your document will snap to the guidesyou’ve created.
• A format from a list has been applied. For example, a checkmark displays in theFont submenu next to the font applied to selected text. When multiple formatshave been applied to a selection, checkmarks only display next to formatscommon to the entire selection.
The checkmark next to Flip Vertical in the Style menu for text indicates that the contents ofthe active text box are flipped vertically.
QUARKXPRESS DIALOG BOXES
Choosing a menu item followed by ellipsis points (…) displays a dialog box.Dialog boxes contain related commands that allow you to specify exactly what
Introduction
xx
The Interface

you want to happen. The context-sensitive controls in QuarkXPress dialog boxesconsist primarily of tabs, areas, fields, pop-up menus, radio buttons, checkboxes, and buttons.
The Modify dialog box (Item menu) includes tabs, areas, fields, pop-up menus, check boxes,and buttons.
TABS
Many dialog boxes provide multiple functions through tabs. By clicking a tabicon, you can display different sets of controls. Pressing C+Option+Tab onMac OS or Ctrl+Tab on Windows takes you to the next tab in a dialog box.
AREA
Related commands within a dialog box or tab are grouped into an “area,” whichis named and surrounded by a border. For example, the Box tab in the Modifydialog box (Item menu) has a Blend area, which lets you specify a custom blendfor a box.
The Box tab of the Modify dialog box (Item menu) includes a bordered Blend area.
Introduction
xxi
The Interface

LISTS
Some dialog boxes include scrollable lists of elements that you can select or edit.For example, the Colors dialog box (Edit menu) displays a list of colors. You cannavigate through lists using the up and down arrow keys. Depending on thetype of list, you may be able to multiple-select items to edit. For example, in theTool pane of the Preferences dialog box (Edit & Preferences & Preferences),you can select multiple tools and edit common attributes. To select a group ofconsecutive elements, click the first element then press Shift while clickingthe last element in the range. To select multiple, nonconsecutive elements,press C (Mac OS) or Ctrl (Windows) while clicking each one.
FIELD
A field is a rectangular box for entering a specific value. For example, in theText tab of the Modify dialog box (Item menu), you can enter the numberof columns for an active text box in the Columns field. Fields have thefollowing characteristics:
• You can enter measurements in any of the supported measurement systems,using the following abbreviations: inches or inches decimal ("), picas (p),points (pt), millimeters (mm), centimeters (cm), ciceros (c), and agates (ag).
• When you are not using the default measurement system, you only need tospecify units of measure with an abbreviation. For example, if your measure-ment preferences are set to inches, and you want to specify an indentation inpoints, you can enter “6 pt” in the field. The measurement will be convertedto inches the next time you open the dialog box.
• The default measurement system is specified in the Horizontal and Verticalpop-up menus in the Measurements pane of the Preferences dialog box(Edit & Preferences & Preferences).
• You can press Tab to select the next field in a dialog box and Shift+Tab to selectthe previous field.
• You can perform mathematical operations in fields using these operators:+ (addition), – (subtraction), * (multiplication), or, / (division). For example,to double the width of a box, you can multiply the width by 2 by entering *2to the right of the current value. You can even perform multiple operations —such as dividing a value by 4, then adding 2.
You can perform mathematical operations in QuarkXPress fields. The formula in the Width fieldmultiplies the width of the box by 2, then adds 1 point. The formula in the Height field dividesthe height of the box by 2, then subtracts .25 inch.
Introduction
xxii
The Interface

∫ QuarkXPress performs multiplication and division first, followed by subtractionand addition, from left to right; you cannot use parentheses when performingmathematical operations in fields. You can add and subtract specific measure-ments, such as 2".
POP-UP MENU
A pop-up menu is a small menu within a dialog box or palette.A pop-up menu contains a list of options and may also have an editable fieldin which you can enter a custom value (such as a percentage) or a word (suchas a font name) rather than choosing an option from the list.
A pop-up menu offers a list of options, and often includes a field where you can enter customvalues. For example, the Width pop-up menu in the Frame tab of the Modify dialog box(Item menu) includes a list of frame widths and a field.
CHECK BOX
A check box lets you turn options on and off . Checking a box mayactivate other controls; checking or unchecking a box may expand a dialogbox to display more controls.
RADIO BUTTON
A radio button lets you select from among mutually exclusive options.For example, in the XTensions pane of the Preferences dialog box (Edit &Preferences & Preferences), you can choose when to display the XTensionsManager dialog box by clicking a radio button.
BUTTON
A button (shaped like this on Mac OS or on Windows), performsan action. If a button has a heavier border around it, such as on Mac OSor on Windows, you can also press Return or Enter (Mac OS) or Enter(Windows) to activate it. On Windows, if a button has a dotted outline aroundthe text , you can also press the space bar to activate the button. A
Introduction
xxiii
The Interface

button may also include a pop-up menu that lets you choose a type ofaction. For example, the New button in the Style Sheets dialog box (Editmenu) lets you create either a character style sheet or a paragraph style sheet.
Many dialog boxes in QuarkXPress include an Apply button so you can previewyour changes before closing the dialog box. For example, the Apply button inthe Paragraph Attributes dialog box (Style & Formats) lets you see how yourchanges affect selected paragraphs.
NAVIGATIONAL DIALOG BOXES
The Open and Save as dialog boxes are used to open, import, export, or savefiles; they include standard Mac OS or Windows controls for navigating throughdisks and folders so you can locate files, or choose where you want to save files.Dialog boxes in QuarkXPress with Open or Save as navigational dialog boxelements include: New Web Document, New Library, New Book, Open, Saveas, Get Text, Save Text, Append, Save Page as EPS, Export HTML, Collect forOutput, and Auxiliary Dictionary.
The Save as dialog box (File menu) is an example of a navigational dialog box. It includesthe current disk name, the Eject, Desktop, New Folder, Cancel, and Save buttons, pop-upmenus for file type and version, a scroll list for navigating through folders, and the IncludePreview check box (Mac OS only).
ALERT DIALOG BOXES
An alert is a dialog box that warns you when there is a problem and often sug-gests a solution. For example, if you enter an invalid value in a field, an alertnotifies you and often provides an acceptable range of values for the field. For alist of alerts you may encounter in QuarkXPress, see the “Alerts” sections ofthe “Appendices,” in A Guide to QuarkXPress: Using QuarkXPress.
Introduction
xxiv
The Interface

Chapter 1: Palettes
Palettes give you complete control over page design, character formatting, color, trap-
ping, and long-document publishing features. Each palette may be hidden or displayed,
and placed anywhere on your monitor, which allows you to fully customize your
workspace. Options in some palettes depend on the tool selected in the Tools palette.
DISPLAYING AND ARRANGING PALETTES
The primary palettes in QuarkXPress include the Tools palette, the Web Tools palette,the Measurements palette, the Document Layout palette, the Style Sheets palette,the Colors palette, the Trap Information palette, the Lists palette, the Layerspalette, and the Hyperlinks palette. Each of these palettes may be displayed usingthe View menu.
Secondary palettes in QuarkXPress are those palettes that are listed in the View menuwhen certain QuarkXTensions™ software are installed. These include the Profile Infor-mation palette, which is available when the QuarkCMS™ QuarkXTensions softwareis loaded, and the Index palette, which is available when the Index QuarkXTensionssoftware is loaded.
The Book palette and the Library palette function differently from the palettes thatare available in the View menu. For more information about the Book and Librarypalettes, see their respective chapters in “A Guide to QuarkXPress: Using QuarkXPress.”
OPENING PALETTES
To open or display a palette, choose View & Show [name of palette]. Palettesalways display in front of other windows, and remain open until you close them.
CLOSING PALETTES
You can close palettes when you do not need them. To close a palette, click theclose box in the upper left (Mac OS) or right (Windows) corner of the palette, orchoose View & Hide [name of palette].
Chapter 1: Palettes
1
Displaying and Arranging Palettes

MOVING PALETTES
Palettes are especially convenient because they can be placed anywhere on yourscreen, allowing you to customize your workspace. Click and drag the bar at thetop of a palette to reposition it.
RESIZING PALETTES
You can resize the Document Layout, Style Sheets, Colors, Lists, Layers,Hyperlinks, and Index palettes by dragging the size box in the lowerright corner of the palettes (Mac OS) or by dragging any edge ofthe palettes (Windows).
TOOLS PALETTE
To perform a task properly, you need the right tool. The Tools palette lets you create andplace boxes, lines, pictures, tables, and text; rotate items; link text boxes so text flowsfrom page to page; and enlarge and reduce the document view. You can customize theTools palette by rearranging and hiding tools, and you can customize many individ-ual tools by using preferences. The selected tool determines which commands inQuarkXPress are available.
An additional tool palette, the Web Tools palette, is available when you are working ina Web document. This section of the “Palettes” chapter covers the basic Tools palette,which is available for both print and Web documents. The next section of this chapterexplains the details of the Web Tools palette.
DISPLAYING THE TOOLS PALETTE
To display the Tools palette, choose View & Show Tools (in a print document)or View & Tools & Show Tools (in a Web document).
Windows only: To change the orientation of the palette from vertical to hori-zontal, press Ctrl and double-click the title bar of the palette.
Chapter 1: Palettes
2
Displaying and Arranging Palettes

CLOSING THE TOOLS PALETTE
To close the Tools palette, choose View & Hide Tools (in a print document) orView & Tools & Hide Tools (in a Web document),or click the close box in theupper left (Mac OS) or right (Windows) corner of the palette
Tools palette
SELECTING A TOOL
To select a tool, click it. Press C+Option+Tab (Mac OS) or Ctrl+Alt+Tab(Windows) to select the tool below the current tool; pressC+Option+Shift+Tab (Mac OS) or Ctrl+Alt+Shift+Tab (Windows) to selectthe tool above the current tool.
TOOL PREFERENCES
You can specify default settings for magnification and item creation through theTools pane of the Preferences dialog box (Edit & Preferences & Preferences).You can also access the Tools pane by double-clicking an item creation tool orthe Zoom tool Z. Tool preferences apply to the active document; if no docu-ments are open, tool preferences become application default preferences.
Chapter 1: Palettes
3
Tools Palette

CUSTOMIZING THE TOOLS PALETTE
QuarkXPress lets you customize the Tools palette by rearranging, hiding, andadding tools. Many tools are condensed under “pop-out” tools, indicated byan arrow next to the tool.
Tools palette and picture box pop-out tools
• To display the pop-out tools, click and hold a tool that displays an arrownext to it.
• To use a pop-out tool, click and drag to select the tool. This replaces the toolin the main Tools palette.
• To add a tool to the main Tools palette, press Control (Mac OS) or Ctrl(Windows) while you click and drag to select a new pop-out tool.
• To hide a tool, press Control (Mac OS) or Ctrl (Windows) while you click thattool. At least one pop-out tool from each category must remain on the palette.
å When you quit QuarkXPress, your current tool arrangement is saved in the“XPress Preferences” file. The next time you launch QuarkXPress, your Toolspalette will be just as you left it.
Chapter 1: Palettes
4
Tools Palette

ç KEYBOARD COMMANDS
Use the following keyboard commands with the Tools palette and tools:
MAC OS WINDOWS
TOOL CHOICE COMMAND COMMAND
Show Tools F8 F8
Hide Tools F8 F8
Show/hide individual tool* Control+ Ctrl+click toolclick tool
Select tool below current tool C+Option Ctrl+Alt+Tab+Tab
Select tool above current tool C+Option+ Ctrl+Alt+Shift+TabShift+Tab
Show Tools pane of Double-click Double-click Preferences dialog box any item any item
creation tool creation tool
Use Page Grabber Hand H Option† Alt†
Use Zoom In pointer M Control+ Ctrl+spaceShift‡
Use Zoom Out pointer m Option+ Ctrl+Alt+spaceControl
*You can only show/hide tools that display in pop-out menus: the text box,picture box, line, text path tools, image map, or form control tools. At least oneof the tools in the category must display in the Tools palette; for example, youcannot hide all the text box tools.
†The Page Grabber Hand H is not accessible when the Zoom tool Z is selected(Mac OS and Windows) or when the Caps Lock key is down (Mac OS only).
‡Mac OS only: The Zoom In keyboard command can be changed to Control in thePreferences dialog box (Edit & Preferences & Preferences & Interactive tab).
∫ If both the Tools and the Web Tools palettes are open in a Web document,pressing F8 hides them both. If only the Tools palette is open, pressing F8 hidesthe Tools palette; you must press F8 again to display the Web Tools palette andthe Tools palette. W
Chapter 1: Palettes
5
Tools Palette

TOOL OVERVIEW
The basic function of each tool in the Tools palette is described below. Completeinformation about how each tool works is covered in the remainder of this section.
DEFAULT TOOLS PALETTE
e ITEM TOOL
Selects, moves, resizes, and reshapes items (boxes, lines, text paths, and groups),and reshapes clipping and runaround paths.
E CONTENT TOOL
Imports and edits text and pictures, and repeats most Item tool functionality.
R ROTATION TOOL
Rotates items manually rather than by entering values in fields.
Z ZOOM TOOL
Enlarges or reduces the document view.
T TEXT BOX TOOL
Creates rectangular text boxes; provides access to other text box tools.
p PICTURE BOX TOOL
Creates rectangle picture boxes; provides access to other picture box tools.
Ï TABLE TOOL
Creates tables.
œ LINE TOOL
Creates straight diagonal lines of any angle; provides access to other line tools.
o ORTHOGONAL L INE TOOL
Creates straight horizontal and vertical lines.
Ò LINE TEXT PATH TOOL
Creates a straight line, of any angle, that contains text; provides access to othertext path tools.
u LINKING TOOL
Establishes text chains to flow text through multiple text boxes.
U UNLINKING TOOL
Breaks links among text boxes.
Chapter 1: Palettes
6
Tool Overview

ITEM TOOL e AND CONTENT TOOL EWhen the Item tool e is selected, you can cut, copy, and paste text or pictureboxes, lines, text paths, groups, form boxes or form controls. When the Contenttool E is selected, you can cut, copy, paste, clear, delete, and edit selected textor pictures. The Item tool e and the Content tool E also have several char-acteristics in common. Use the Item and Content tools interchangeably toselect and manipulate boxes, lines, and text paths — or to import and applystyles to pictures.
When the Item tool e is selected, this additional functionality is available:
• Cut, copy, or paste active items entirely. (This is also possible when any toolexcept the Content tool E is selected.)
• Delete active Bézier points using the Delete key.
• Move active items using arrow keys.
• Activate a group by selecting only one of its items.
• Change the line attributes of an active text path. (This is also possible whenany other tool is selected except the Content tool E.)
When the Content tool E is selected, this additional functionality is available:
CUT, COPY, PASTE, OR CLEAR (MAC OS) OR DELETE (WINDOWS) CONTENTS
When the Content tool E is selected, you can cut, copy, paste, or clear(Mac OS) or delete (Windows) selected text or a picture in an active picturebox. The box itself is unaffected.
IMPORT AND EDIT TEXT
Use the Content tool E to edit and apply attributes to existing text or importnew text into an active text box or text path.
TEXT INSERTION BAR IWhen the Content tool E is selected and the pointer is over a selected textbox, text path, or text button, the Text Insertion bar I displays. Click the pointerto place the Text Insertion bar I where you want to begin importing or editingtext. You cannot place the Text Insertion bar I below existing paragraphs withina text box. To select text, click and drag the Text Insertion bar I. You can cut,copy, clear (Mac OS) or delete (Windows), drag-and-drop, or apply Style menuattributes to selected text.
TEXT INSERTION POINT iWhen you click the Text Insertion bar I in text, the text insertion point idisplays. When you create a new text box, the text insertion point displaysautomatically at the top of the box.
Chapter 1: Palettes
7
Tool Overview
You can enter text at this point by typing or by choosing File & Get Text. Youcan delete text preceding this point by pressing Delete (Mac OS) or Backspace(Windows); you can delete text following this point by pressing forwarddelete Y (Mac OS) or Delete (Windows). To reposition the text insertion point,use the arrow keys on the keyboard or click with the Text Insertion bar I.
PICTURE MOVER POINTER HWhen the Content tool E is selected and the pointer is over an active picturebox or active image button containing a picture, the Picture Mover pointer Hdisplays. To move the picture, click and drag the Picture Mover pointer in anydirection, or use the arrow keys.
You can edit the picture using the Style menu, the Measurements palette, key-board commands, or the Picture tab of the Modify dialog box (Item & Modify).
å “Items” in QuarkXPress are picture boxes, text boxes, lines, text paths, tables,form boxes, form controls, image maps, groups, and multiple-selected items.“Contents” in QuarkXPress are pictures and text.
MARQUEE POINTER oWhen the Item or Content tool is selected, you can access a standard Marqueepointer o for selecting multiple items. Click outside the boundaries of anyitems, then drag the Marquee pointer over items to select them. To add orremove an item from a marqueed selection, press Shift while you click it.
ARROW POINTER aWhen you select the Item or Content tool, the Arrow pointer a displays.To select an item, click it with the Arrow pointer; to select multiple items,Shift+click them.
MOVER POINTER eWhen the Item tool e is selected and the pointer is over the an active item,the Mover pointer e displays. You can access the Mover pointer e when theContent tool E is selected by pressing C (Mac OS) or Ctrl (Windows). Tomove active items, click and drag with the Mover pointer e. To move activeitems horizontally or vertically only, press Shift with the Item tool e selectedor C+Shift (Mac OS) or Ctrl+Shift (Windows) with the Content tool Eselected before you click and drag.
When you click and immediately begin dragging, QuarkXPress displays an out-line of the active items as you drag them. If you prefer to see the contents of theactive items as you reposition them, you can use delayed item dragging. Withthe Item tool e selected, press the mouse button until the resize handles disap-pear, and then start dragging. If Delayed Item Dragging (Edit & Preferences &Preferences & Interactive pane) is set to Show Contents, the item and itemsin front of or behind it will appear semitransparent as you drag; this can helpyou position the item more accurately. If Delayed Item Dragging is set to
Chapter 1: Palettes
8
Tool Overview

Live Refresh, the item will display normally (not semitransparent), and anyrunaround changes caused by repositioning the item will display immediately.
å Before you can display the Mover pointer e for a Bézier line, the line’s boundingbox must be displayed. To display the bounding box for a Bézier line, uncheckItem & Edit & Shape.
RESIZ ING POINTER #Bounding box handles are the small squares that display around the perimeterof a box, or at each end of a line. When the Item or Content tool is selectedand the pointer is over a bounding box handle on an active item, the Resizingpointer # displays. To enlarge or reduce an item, click on a handle and dragthe Resizing pointer.
Bounding box handles
You can simultaneously scale the contents of a box or text path and resize theitem by pressing modifier keys as you drag a handle:
ç KEYBOARD COMMANDS
Use the following keyboard commands with the Tools palette and tools:
RESIZE ITEM MAC OS WINDOWS
AND SCALE CONTENTS COMMAND COMMAND
Scale C+drag Ctrl+drag
Scale and constrain C+Shift+ Ctrl+Shift+to square bounding box drag drag
Scale and C+Option+ Ctrl+Alt+maintain proportions Shift+drag Shift+drag
POINT POINTER ˝When the Item or Content tool is selected and the pointer is over a point on aselected Bézier shape, the Point pointer ˝ displays. To select a point, click withthe Point pointer displayed.
• Press Shift while clicking to select multiple points.
• Double-click a point to select all the points in the shape. Triple-click to selectall the points in a multiple-path item.
• To reshape, click to select one point and drag using the Point pointer. If thepoint is deselected, you can press Shift while selecting and dragging to movethe point in 45° increments only.
Chapter 1: Palettes
9
Tool Overview

• Press Option (Mac OS) or Alt (Windows) to change the Point pointer into aPoint Deletion pointer v, and click to delete the point.
Use the Point pointer ˝ to reshape a Bézier item.
CURVE HANDLE POINTERS Ï , ÓWhen the Item or Content tool is selected and the pointer is over a curvehandle on a selected Bézier shape, one of the two Curve Handle pointers Ï,Ó displays. To reshape a curve, click and drag with the Curve Handle pointerdisplayed. Curve handle angles determine the starting angles for curves. The dis-tance of the curve handles from the point determines the severity of the curve.
• Press Shift while dragging a curve handle to move it in 45° increments fromthe point.
• Press Control+Shift (Mac OS) or Ctrl+Shift (Windows) while dragging a curvehandle to change a smooth point to a corner point, or vice versa.
• Press Option (Mac OS) or Alt (Windows) to change the Curve Handle pointerinto the Retract Curve Handle pointer v, and click to retract the curve handle.
LINE SEGMENT POINTER ˆWhen the Item or Content tool is over a line segment on a selected Béziershape, the Line Segment pointer ˆ displays. To select a line segment (and thetwo points attached to it), click with the Line Segment pointer displayed.
• To reshape a Bézier item, click and drag the Line Segment pointer.
• Press Shift while dragging a line segment to constrain both its curve handlesto 45° increments.
• Press Option (Mac OS) or Alt (Windows) to change the Line Segment pointerinto an Add Point pointer V, and click to add a point.
ROTATION TOOL RUse the Rotation tool R to rotate items manually rather than by enteringvalues in fields.
ARROW POINTER aIf no items are selected when you select the Rotation tool, the Arrow pointer adisplays. To select an item to rotate, click it with the Arrow pointer.
Chapter 1: Palettes
10
Tool Overview

ROTATION POINTER :When the Rotation tool is selected and the pointer is over an active item, theRotation pointer : displays. To establish a point for an item to rotate around,click and hold the Rotation pointer. The rotation point can be within or outsidethe active item.
The rotation point :
ARROWHEAD POINTER ;After you establish the Rotation point, the Arrowhead pointer ; displays. Torotate the item, drag the Arrowhead pointer in a circular motion. A line extendsfrom the center of the rotation point to the Arrowhead pointer, indicating theitem’s angle of rotation.
You can rotate an item from –360° to +360°. As you drag the Arrowheadpointer ;, the r field in the Measurements palette displays the anglechange. Press Shift to constrain rotation to 45° increments.
ROTATING BOXES
When you rotate an item, an outline of the item displays. With the Rotationtool R selected, click and press the mouse button until the pointer flashes,and then start dragging. If Delayed Item Dragging (Edit & Preferences &Preferences & Interactive pane) is set to Show Contents, the item and itemsin front of or behind it will appear semitransparent as you drag; this can helpyou position the item more accurately. If Delayed Item Dragging is set toLive Refresh, the item will display normally (not semitransparent), and anyrunaround changes caused by repositioning the item will display immediately.
ROTATING STRAIGHT L INES AND TEXT PATHS
Lines and text paths created with the Orthogonal Line or Line tools can onlybe rotated with the Rotation tool.
REVERTING TO THE PREVIOUS TOOL
After you rotate an item, the Rotation tool automatically reverts to the last toolselected (the Item tool e or Content tool E). To prevent this, press Option(Mac OS) or Alt (Windows) while selecting the Rotation tool. This allows you torotate multiple items without having to reselect the tool each time you rotate.
Chapter 1: Palettes
11
Tool Overview

ZOOM TOOL ZUse the Zoom tool Z to change the view percent of a document or to view aspecific area.
ZOOM IN POINTER MWhen you select the Zoom tool Z, the Zoom In pointer M displays. To enlargethe document view according to a specified interval, click the Zoom In pointer.To enlarge a specific area of a document to fit in the document window,marquee the area.
Click and drag with the Zoom tool selected to zoom in on the marqueed area.
ZOOM OUT POINTER mWhen the Zoom In pointer is displayed, press Option (Mac OS) or Alt (Windows)to access the Zoom Out pointer m. To reduce the document view, click the ZoomOut pointer. To view a specific area of a document, marquee an area larger thanthe existing view area by clicking and dragging. The area is reduced as necessaryto fit the document window.
ZOOM TOOL PREFERENCES
The Zoom tool enlarges or reduces the document view according to the Mini-mum, Maximum, and Increment settings in the Tools pane of the Preferencesdialog box (Edit & Preferences & Preferences). To quickly access the Toolspane of the Preferences dialog box, double-click the Zoom tool.
Select the Zoom tool in the Tools pane and then click the Modify button toaccess the View dialog box, which allows you to specify attributes for the Zoomtool. The values in the Minimum and Maximum fields indicate the smallestand largest document views you can obtain by clicking the Zoom tool (withinthe 10% to 800% range for Mac OS, or within the range allowed by the DisplayDPI Value you specified in the Display pane of the Preferences dialog box[Edit & Preferences & Preferences & Display pane for Windows]). The valuein the Increment field indicates the percent change in view for each mouse clickof the Zoom In pointer M or Zoom Out pointer m. The default value is 25%.
Chapter 1: Palettes
12
Tool Overview

ACCESSING THE ZOOM TOOL
When any other tool is selected, you can access the Zoom In pointer Mby pressing the appropriate keyboard command (Mac OS) or Ctrl+space(Windows). On Mac OS, the default keyboard command is Control+Shift.You can exchange this with the keyboard command for displaying contextmenus (Control) in the Interactive pane of the Preferences dialog box(Edit & Preferences & Preferences).
You can access the Zoom Out pointer m while any tool is selected by pressingControl+Option (Mac OS) or Ctrl+Alt+space (Windows).
∫ If the pointer is over a Bézier point when you press these keyboard commands,the Zoom tool will not display.
STANDARD-SHAPE TEXT BOX TOOLS T , Å , ı , Ç , ÎUse the standard-shape text box tools to create text boxes (containers for text)in the following predefined shapes:
• Rectangle Text Box tool T for rectangular or square text boxes
• Rounded-corner Text Box tool Å for rectangular text boxes with curved corners
• Concave-corner Text Box tool ı for rectangular text boxes with cornersrounded inward
• Beveled-corner Text Box tool Ç for rectangular text boxes with beveled corners
• Oval Text Box tool Î for oval or circular text boxes
CROSSHAIR POINTER cWhen a standard-shape text box tool is selected, the Crosshair pointer cdisplays. To create a standard-shape text box, click and drag the Crosshairpointer diagonally. To create a square or circular text box, press Shift whileyou click and drag.
Click and drag in any direction to create a text box using a standard-shape text box tool.
Chapter 1: Palettes
13
Tool Overview

å You can change the shape of a selected text box using the Shape submenu ofthe Item menu.
SIZE AND PLACEMENT
As you click and drag the Crosshair pointer c, the X, Y, W, and H fields inthe Measurements palette display the coordinates, width, and height of thetext box. If the rulers are displaying in the document window (View & ShowRulers), dotted lines on the ruler indicate the starting position of the Crosshairpointer and the width and height of the text box.
TEXT BOX TOOL PREFERENCES
New text boxes have the attributes specified in the Tools pane of the Prefer-ences dialog box (Edit & Preferences & Preferences). To quickly access theTools pane of the Preferences dialog box, double-click a text box tool.
Select a standard-shape text box tool in the Tools pane and then click theModify button to access the Modify dialog box, which allows you to specifyattributes for new text boxes such as the background color, number of columns,frame, and runaround. You can also specify Corner Radius (the amount of spacetaken up by the corners) for rounded-corner, concave-corner, and beveled-cornertext boxes.
REVERTING TO THE PREVIOUS TOOL
After you create a text box, the text box tools automatically revert to the lasttool selected (the Item tool e or Content tool E). To prevent this, pressOption (Mac OS) or Alt (Windows) while selecting a text box tool. This allowsyou to draw several text boxes without selecting the tool again.
STANDARD-SHAPE PICTURE BOX TOOLS p , x , ç , å , ∫Use the standard-shape picture box tools to create picture boxes (containers forpictures) in the following predefined shapes:
• Rectangle Picture Box tool p for rectangular or square picture boxes
• Rounded-corner Picture Box tool x for rectangular picture boxes withcurved corners
• Concave-corner Picture Box tool å for rectangular picture boxes withcorners rounded inward
• Beveled-corner Picture Box tool ∫ for rectangular picture boxes withbeveled corners
• Oval Picture Box tool ç for oval or circular picture boxes
å Pictures are imported into picture boxes; you cannot have a picture in adocument that contains no picture boxes.
Chapter 1: Palettes
14
Tool Overview

CROSSHAIR POINTER cWhen a standard-shape picture box tool is selected, the Crosshair pointer cdisplays. To create a standard-shape picture box, click and drag the Crosshairpointer c diagonally. To create a square or circular picture box, press Shiftwhile you click and drag.
Click and drag in any direction to create a picture box using a standard-shape picture box tool.
å You can change the shape of a selected picture box using the Shape submenuof the Item menu.
SIZE AND PLACEMENT
As you click and drag the Crosshair pointer c, the X, Y, W, and H fields inthe Measurements palette display the coordinates, width, and height of thepicture box. If the rulers are displaying in the document window (View &Show Rulers), dotted lines on the ruler indicate the starting position of theCrosshair pointer and the width and height of the picture box.
PICTURE BOX TOOL PREFERENCES
New picture boxes have the attributes specified in the Tools pane of the Prefer-ences dialog box (Edit & Preferences & Preferences). To quickly access theTools pane of the Preferences dialog box, double-click any picture box tool.
Select a standard-shape picture box tool in the Tools pane and then click theModify button to access the Modify dialog box, which allows you to specifyattributes for new picture boxes such as the background color, picture placementwithin the box, frame, and runaround. You can also specify Corner Radius (theamount of space taken up by the corners) for rounded-corner, concave-corner,and beveled-corner picture boxes.
REVERTING TO THE PREVIOUS TOOL
After you create a picture box, the picture box tools automatically revert to thelast tool selected (the Item tool e or Content tool E). To prevent this, pressOption (Mac OS) or Alt (Windows) while selecting a picture box tool. Thisallows you to draw several picture boxes without selecting the tool again.
Chapter 1: Palettes
15
Tool Overview

STRAIGHT LINE TOOLS o , œUse the straight line tools to create horizontal, vertical, and diagonal lines:
• Orthogonal Line tool o for horizontal and vertical lines
• Line tool œ for diagonal lines
CROSSHAIR POINTER cWhen either straight line tool is selected, the Crosshair pointer c displays. Tocreate a straight line, click and drag the Crosshair pointer. To constrain linescreated with the Line tool œ to any 45˚ increment (0˚, 45˚, 90˚, etc.), press Shiftwhile you click and drag.
Click and drag to create a straight line using the Orthogonal Line tool or the Line tool.
SIZE AND POSIT ION
As you click and drag the Crosshair pointer c, the fields in the Measurementspalette change to reflect the position, length, or angle of the line. If the rulers aredisplaying in the document window (View & Show Rulers), dotted lines on theruler indicate the starting and ending position of the Crosshair pointer.
QuarkXPress reports the position of straight lines according to their Endpoints,Left Point, Midpoint, or Right Point. Fields in the Measurements palettechange to report the appropriate values for the selected line mode. The leftpoint is the leftmost point of the line and the right point is the rightmostpoint of the line.
LINE TOOL PREFERENCES
New lines have the attributes specified in the Tools pane of the Preferencesdialog box (Edit & Preferences & Preferences). To quickly access the Toolspane of the Preferences dialog box, double-click one of the line tools.
Select a straight line tool in the Tools pane and then click the Modify buttonto access the Modify dialog box, which allows you to specify attributes for newlines such as the style, width, color, shade, and runaround.
REVERTING TO THE PREVIOUS TOOL
After you create a line, the line tools automatically revert to the last tool selected(the Item tool e or Content tool E). To prevent this, press Option (Mac OS)or Alt (Windows) while selecting a line tool. This allows you to draw severallines without selecting the tool again.
Chapter 1: Palettes
16
Tool Overview

STRAIGHT TEXT PATH TOOLS , ÒUse the straight text path tools to create horizontal, vertical, and diagonal textpaths (lines that support text):
• Orthogonal Text Path tool for horizontal and vertical text paths
• Line Text Path tool Ò for diagonal text paths
CROSSHAIR POINTER cWhen either straight text path tool is selected, the Crosshair pointer c displays.To create a straight text path, click and drag the Crosshair pointer. To constraintext paths created with the Line Text Path tool to any 45˚ increment (0˚, 45˚,90˚, etc.), press Shift while you click and drag.
Click and drag to create a straight text path using the Orthogonal Text Path tool or the LineText Path tool.
SIZE AND POSIT ION
As you click and drag the Crosshair pointer c, the fields in the Measurementspalette change to reflect the position, length, or angle of the text path. Ifthe rulers are displaying in the document window (View & Show Rulers),dotted lines on the ruler indicate the starting and ending position of theCrosshair pointer.
QuarkXPress reports the position of straight text paths according to their End-points, Left Point, Midpoint, or Right Point. Fields in the Measurementspalette change to report the appropriate values for the selected line mode. Theleft point is the endpoint you draw from; the right point is the endpoint createdwhen you release the mouse button.
TEXT PATH TOOL PREFERENCES
New text paths have the attributes specified in the Tools pane of the Prefer-ences dialog box (Edit & Preferences & Preferences). To quickly accessthe Tools pane of the Preferences dialog box, double-click one of the textpath tools.
Select a text path tool in the Tools pane and then click the Modify button toaccess the Modify dialog box, which allows you to specify attributes for newtext paths such as the style, width, color, shade, and runaround for the line, orthe alignment and orientation of text in relation to the line.
REVERTING TO THE PREVIOUS TOOL
After you create a text path, the text path tools automatically revert to the lasttool selected (the Item tool e or Content tool E). To prevent this, press
Chapter 1: Palettes
17
Tool Overview

Option (Mac OS) or Alt (Windows) while selecting a text path tool. This allowsyou to draw several text paths without selecting the tool again.
BÉZIER TOOLS ´ , ∂ , ∞ , ÂUse the Bézier tools to create text boxes, picture boxes, lines, and text paths ofany shape, with point-by-point control.
CROSSHAIR POINTER cWhen a Bézier tool is selected, the Crosshair pointer c displays. To create aBézier item:
• Click to establish the first corner point in the shape, or click and drag toestablish the first smooth point in the shape. If you click and drag, thecurve handles of the smooth point display.
• Release the mouse button and repeat the above step to establish a second point,a third point, and so on. Segments display between each two points. Click whenyou want a corner point; click and drag when you want a smooth point.
Using a Bézier tool, click to create each corner point; click and drag to create smooth pointsthat form seamless transitions between two curved segments.
• When curve handles display, their angles determine the starting angles forcurves. The distance of the curve handles from the point determines the severityof the curve.
• To access the Item tool e to reshape the item before it is completed, press C(Mac OS) or Ctrl (Windows). While C or Ctrl is pressed, the Crosshair pointerchanges to the Arrow pointer a, or to one of the Bézier reshaping pointers(˝, Ï, Ó, ˆ) when placed over a point, segment, or curve handle. PressC+Control (Mac OS) or Ctrl+F1 (Windows) and click a point to change asmooth point to a corner point. For descriptions of the Bézier reshapingpointers, see “Item Tool e and Content Tool E” earlier in this section.
• Complete the new shape by double-clicking to create the last point or byselecting a new tool in the Tools palette. If you have one of the Bézier boxtools selected (´, ∂), you can also complete the shape by clicking the firstpoint in the box. The Crosshair pointer changes to the Close Box pointer Vwhen the pointer is positioned over the first point in a box.
Chapter 1: Palettes
18
Tool Overview

PLACEMENT
As you click and drag using any of the Bézier pointers, the X and Y fields inthe Measurements palette display the pointer’s coordinates. If the rulers aredisplaying in the document window (View & Show Rulers), dotted lines onthe ruler indicate the position of the pointer.
BÉZIER TOOL PREFERENCES
New Bézier items have the attributes specified in the Tools pane of the Prefer-ences dialog box (Edit & Preferences & Preferences). To quickly access theTools pane of the Preferences dialog box, double-click a Bézier tool.
Select a Bézier tool in the Tools pane and then click the Modify button to accessthe Modify dialog box, which allows you to specify attributes for new Bézieritems drawn with the tool.
REVERTING TO THE PREVIOUS TOOL
After you create a Bézier item, the Bézier tools automatically revert to the lasttool selected (the Item tool e or Content tool E). To prevent this, pressOption (Mac OS) or Alt (Windows) while selecting a Bézier tool. This allowsyou to draw several Bézier items without selecting the tool again.
FREEHAND TOOLS Ô , ƒ , § , ˜Use the freehand tools to quickly draw text boxes, picture boxes, lines, and textpaths of any shape.
CROSSHAIR POINTER cWhen a freehand tool is selected, the Crosshair pointer c displays. Click anddrag to draw a shape.
Release the mouse button to complete the shape. If you are using one of thefreehand box tools (Ô, ƒ), the Close Box pointer V is displayed when you dragthe Crosshair pointer over the starting point.
To edit the curves of a completed freehand shape, use the Item tool e orContent tool E, and make sure Item & Edit & Shape is checked.
Using a freehand tool, drag the mouse to create the shape you want.
Chapter 1: Palettes
19
Tool Overview

PLACEMENT
As you click and drag the Crosshair pointer c, the X and Y fields in the Mea-surements palette display the pointer’s coordinates. If the rulers are displayingin the document window (View & Show Rulers), dotted lines on the rulerindicate the position of the Crosshair pointer.
FREEHAND TOOL PREFERENCES
New freehand items have the attributes specified in the Tools pane of the Pref-erences dialog box (Edit & Preferences & Preferences). To quickly access theTools pane of the Preferences dialog box, double-click a freehand tool.
Select a freehand tool in the Tools pane and then click the Modify button toaccess the Modify dialog box, which allows you to specify attributes such as thebackground color, picture angle, frame, and runaround for new freehand items.
REVERTING TO THE PREVIOUS TOOL
After you create a freehand item, the freehand tools automatically revert to thelast tool selected (the Item tool e or Content tool E). To prevent this, pressOption (Mac OS) or Alt (Windows) while selecting a freehand tool. This allowsyou to draw several freehand items without selecting the tool again.
LINKING/UNLINKING TOOLS u , UUse the Linking tool to link text boxes so that text flows from box to box. Thistext is referred to as a “chain” or “story.” Use the Unlinking tool to break thelinks between text boxes.
ARROW POINTER aWhen you first select the Linking tool, the Arrow pointer a displays. To selectthe first text box in a chain, click it with the Arrow pointer a. The text boxdisplays a marquee .
LINKING POINTER /When the first text box in the chain is selected and displays a marquee, theLinking pointer / displays. To link the box to another box, click on a secondbox. Text flows through the boxes in the order in which you link them. Whenthe Linking tool is selected, links for the selected text boxes display as arrows.
å The Automatic Text Box feature and master pages can be used to create anautomatic text chain, instead of manually linking boxes.
Chapter 1: Palettes
20
Tool Overview

REVERTING TO THE PREVIOUS TOOL
After you link two boxes, the Linking tool automatically reverts to the last toolselected (the Item tool e or Content tool E). To prevent this, press Option(Mac OS) or Alt (Windows) while selecting the Linking tool. This allows you tolink multiple boxes without selecting the tool again.
ARROW POINTER aWhen you first select the Unlinking tool, the Arrow pointer a displays.Click any text box within a text chain; the text box links display as arrows.
UNLINKING POINTER ?When a text box within a text chain is selected, the Unlinking pointer ?displays. To break links between boxes, click the arrowhead or the tail feath-ers on the linking arrows.
To remove a text box from a text chain, and reroute the links around it, pressShift while you click the box with the Unlinking tool selected.
REVERTING TO THE PREVIOUS TOOL
After you break the link between two boxes, the Unlinking tool automaticallyreverts to the last tool selected (the Item tool e or Content tool E). To preventthis, press Option (Mac OS) or Alt (Windows) while selecting the Unlinkingtool. This allows you to break the link between several boxes without selectingthe tool again.
TABLE TOOL Ï
Use the Table tool Ï to create tables in both print and Web documents. Tablesconsist of cells, which may contain text or pictures.
CROSSHAIR POINTER cWhen the Table tool Ï is selected, the Crosshair pointer c displays. To create atable, click and drag the Crosshair pointer diagonally. To create a square table,press Shift while you click and drag.
Click and drag in any direction to create a table.
Chapter 1: Palettes
21
Tool Overview

SIZE AND PLACEMENT
As you click and drag the Crosshair pointer c, the X, Y, W, and H fields in theMeasurements palette display the coordinates, width, and height of the table.If the rulers are displaying in the document window (View & Show Rulers),dotted lines on the ruler indicate the starting position of the Crosshair pointerand the width and height of the table.
If Show Creation Dialog is checked in the Modify dialog box Creation tab(Edit & Preferences & Preferences & Tools pane & Table tool & Modify),releasing the mouse button activates the Table Properties dialog box, whereyou can specify the number of rows and columns for the new table, and indi-cate whether the contents of the table cells will be text or pictures.
The Table Properties dialog box
TABLE TOOL PREFERENCES
New tables have the attributes specified in the Tools pane of the Preferencesdialog box (Edit & Preferences & Preferences). To quickly access the Toolspane of the Preferences dialog box, double-click the Table tool.
Select the Table tool in the Tools pane and then click the Modify button toaccess the Modify dialog box, which allows you to specify attributes such asrunaround, background, and cell or border colors for new tables. In Web docu-ments, you can also specify attributes for frames. For more information abouttable preferences, see Chapter 4, “Edit Menu,” and Chapter 6, “Item Menu.”
REVERTING TO THE PREVIOUS TOOL
After you create a table, the Table tool automatically reverts to the last toolselected (the Item tool e or Content tool E). To prevent this, press Option(Mac OS) or Alt (Windows) while selecting the Table tool. This allows you todraw several tables without selecting the tool again.
Chapter 1: Palettes
22
Tool Overview
PAGE GRABBER HAND TOOL HUse the Page Grabber Hand H to scroll a page in any direction. The PageGrabber Hand H allows you to scroll with more precision than the scroll bars,and to scroll horizontally and vertically at the same time.
ACCESS FROM ANY TOOL
You can access the Page Grabber Hand by pressing Option (Mac OS) or Alt(Windows) while any tool except the Zoom tool Z is selected. On Mac OS,make sure the Caps Lock key is not in use. Click and drag in any direction tomove around within a page, spread, or document. When you release the Optionkey (Mac OS) or Alt key (Windows), the previous tool is selected again.
LIVE SCROLL
The Page Grabber Hand is always in Live Scroll mode, regardless of the LiveScroll setting in the Interactive pane of the Preferences dialog box (Edit &Preferences & Preferences). This means the document view is updated asyou scroll, rather than redrawing after you stop.
SPEED SCROLL
Scrolling with the Page Grabber Hand is affected by the Speed Scroll settingin the Interactive pane of the Preferences dialog box (Edit & Preferences &Preferences). Speed Scroll accelerates scrolling by temporarily greeking picturesand blends; when you stop scrolling, the page elements redraw completely.
WEB TOOLS PALETTE W
The Web Tools palette lets you create and place form boxes and form controls in Webdocuments. When the ImageMap QuarkXTensions software is loaded, it also lets youdraw hot areas for image maps. This section describes the various tools in the WebTools palette.
DISPLAYING THE WEB TOOLS PALETTE WThe Web Tools palette displays only when a Web document is active. To displaythe Web Tools palette, choose View & Tools & Show Web Tools.
CLOSING THE WEB TOOLS PALETTE WThe Web Tools palette must be closed manually. To close the Web Tools palette,choose View & Tools & Hide Web Tools or click the Close box.
Chapter 1: Palettes
23
Tool Overview

∫ If both the Tools and the Web Tools palettes are open in a Web document,pressing F8 hides them both. If only the Tools palette is open, pressing F8 hidesthe Tools palette; you must press F8 again to display the Web Tools palette andthe Tools palette.
SELECTING A TOOL WTo select a tool, click it. Press C+Option+Tab (Mac OS) or Ctrl+Alt+Tab(Windows) to select the tool below the current tool; press C+Option+Shift+Tab(Mac OS) or Ctrl+Alt+Shift+Tab (Windows) to select the tool above thecurrent tool.
WEB TOOL PREFERENCES WYou can specify default settings for Web item creation through the Tools pane ofthe Preferences dialog box (Edit & Preferences & Preferences). You can alsoaccess the Tools pane by double-clicking the Image Map tool or the FormBox tool in the Web Tools palette. Tool preferences apply to the activedocument; if no documents are open, tool preferences become applicationdefault preferences.
CUSTOMIZING THE WEB TOOLS PALETTE WQuarkXPress lets you customize the Web Tools palette by rearranging, hiding,and adding tools. Some tools are condensed under “pop-out” tools, indicatedby an arrow next to the tool.
Web Tools palette and image map pop-out tools
• To display the pop-out tools, click and hold a tool that displays an arrownext to it.
Chapter 1: Palettes
24
Web Tools Palette

• To use a pop-out tool, click and drag to select the tool. This replaces the toolin the main Web Tools palette.
• To add a tool to the main Web Tools palette, press Control (Mac OS) or Ctrl(Windows) while you click and drag to select a new pop-out tool.
• To hide a tool, press Control (Mac OS) or Ctrl (Windows) while you click thattool. At least one tool from each pop-out category must remain on the palette.
å When you quit QuarkXPress, your current tool arrangement is saved in the“XPress Preferences” file. The next time you launch QuarkXPress, your WebTools palette will be just as you left it.
ç KEYBOARD COMMANDS
Use the following keyboard commands with the Web Tools palette and tools:
MAC OS WINDOWS
TOOL CHOICE COMMAND COMMAND
Show Web Tools F8 F8
Hide Web Tools F8 F8
Show/hide individual tool* Control+ Ctrl+click toolclick tool
Select tool below current tool C+Option Ctrl+Alt+Tab+Tab
Select tool above current tool C+Option+ Ctrl+Alt+Shift+TabShift+Tab
Show Tools pane of Double-click Double-click Preferences dialog box image map image map
tool or tool or form box tool form box tool
*You can only hide tools that display in pop-out menus: the image map, formbox and file selection tools. At least one of the tools in the category must displayin the Web Tools palette; for example, you cannot hide all the image map tools.
∫ If both the Tools and the Web Tools palettes are open in a Web document,pressing F8 hides them both. If only the Tools palette is open, pressing F8 hidesthe Tools palette; you must press F8 again to display the Web Tools palette andthe Tools palette. W
Chapter 1: Palettes
25
Web Tools Palette

WEB TOOL OVERVIEW W
The basic function of each tool in the Web Tools palette is described below. Completeinformation about how each tool works is covered in the remainder of this chapter.
DEFAULT WEB TOOLS PALETTE WIMAGE MAP TOOL
Creates rectangular image map “hot areas”; provides access to other image maptools. The image map tools are available when the ImageMap QuarkXTensionssoftware is loaded.
FORM BOX TOOL
Creates a form box (to contain form controls).
FILE SELECTION TOOL
Creates a file submission form control. By default, this is a pop-out tool ofthe form box tool.
TEXT F IELD TOOL
Creates a text field form control.
BUTTON TOOL
Creates a button form control.
IMAGE BUTTON TOOL
Creates a button form control that will allow a picture to be imported.
POP-UP MENU TOOL
Creates a pop-up menu form control.
LIST BOX TOOL
Creates a list form control.
RADIO BUTTON TOOL
Creates a radio button form control.
CHECK BOX TOOL
Creates a check box form control.
IMAGE MAP TOOLS , , WThe image map tools are available when the ImageMap QuarkXTensionssoftware is loaded. An image map is an HTML feature that lets you link todifferent Web pages by clicking on different parts of a picture (called “hotareas”) in a Web page. Use the image map tools to create hot areas in an imagemap using the following predefined shapes:
• Rectangle Image Map tool for rectangular and square hot areas
Chapter 1: Palettes
26
Web Tool Overview

• Oval Image Map tool for oval and circular hot areas
• Bézier Image Map tool for Bézier-shaped hot areas
CROSSHAIR POINTER cWhen an image map tool is selected, the Crosshair pointer c displays. To createa hot area, begin within the bounds of a picture and click and drag the Crosshairpointer. The hot area displays as an opaque layer over the picture. To create asquare or circular hot area, press Shift while you click and drag.
Click and drag in any direction to create a hot area using the image map tools.
DISPLAY
To display a hot area, select a picture and then choose View & Show Guides.To hide hot areas, choose View & Hide Guides.
SIZE AND PLACEMENT
You can adjust the size of a hot area by clicking on it, selecting a handle on thehot area’s bounding box, and then dragging the handle to resize.
IMAGE MAP TOOL PREFERENCES
Image map tools have attributes specified in the Tools pane of the Preferencesdialog box (Edit & Preferences & Preferences).
Select an image map tool in the Tools pane and then click Modify to access theImage Map Properties dialog box, which allows you to specify the maximumnumber of points for a Bézier hot area, and the granularity of hot areas.
REVERTING TO THE PREVIOUS TOOL
After you create a hot area, the image map tools automatically revert to thelast tool selected (the Item tool e or Content tool E). To prevent this, pressOption (Mac OS) or Alt (Windows) while selecting an image map tool. Thisallows you to draw several hot areas without selecting the tool again.
FORM BOX TOOL WUse the Form Box tool to create a form box that can contain form controls.Form boxes cannot overlap each other on a page.
Chapter 1: Palettes
27
Web Tool Overview

CROSSHAIR POINTER cWhen the Form Box tool is selected, the Crosshair pointer c displays. Tocreate a form box, click and drag the Crosshair pointer c diagonally. To createa square form box, press Shift while you click and drag.
Click and drag in any direction to create form box using the Form Box tool.
If Show Visual Indicators is chosen in the View menu, a form box visualindicator displays in the upper right corner of the box.
SIZE AND PLACEMENT
As you click and drag the Crosshair pointer c, the X, Y, W, and H fields inthe Measurements palette display the coordinates, width, and height of theform box. If the rulers are displaying in the document window (View &Show Rulers), dotted lines on the ruler indicate the starting position of theCrosshair pointer c and the width and height of the form box.
FORM BOX TOOL PREFERENCES
New form boxes have the attributes specified in the Tools pane of the Prefer-ences dialog box (Edit & Preferences & Preferences). To quickly access theTools pane of the Preferences dialog box, double-click the Form Box tool.
REVERTING TO THE PREVIOUS TOOL
After you create a form box, the Form Box tool automatically reverts to thelast tool selected (the Item tool e or Content tool E). To prevent this,press Option (Mac OS) or Alt (Windows) while selecting the Form Box tool.This allows you to draw several form boxes without selecting the tool again.
FORM CONTROL TOOLS , , , , , , , WUse the form control tools to create Web page forms that allow users to enteror upload their own information, and then submit that information to theWeb server.
Use the following tools to create form controls:
• File Selection tool for controls that let users submit a file
Chapter 1: Palettes
28
Web Tool Overview

• Text Field tool for controls that let users enter plain text or a password in afield, or for hidden fields that can calculate information to be submitted withthe form without displaying on the user’s screen
• Button tool for buttons that users can click to perform an action
• Image Button tool for adding imported pictures to buttons
• Pop-up Menu tool for controls that let users choose from among severaloptions in a pop-up menu
• List Box tool for controls that let users choose from among several optionsin a scrollable list
• Radio Button tool for radio buttons that let users choose from amongmutually exclusive options
• Check Box tool for check boxes that let users turn an option on or off
All form controls must be contained within a form box. If you use one of theform control tools to create a form control outside of an existing form box,QuarkXPress creates a new form box to contain the control. The default size ofthe new form box is determined by settings in the Preferences dialog box.(Choose Edit & Preferences & Preferences. In the Tools pane, choose theForm Box tool and click Modify to make changes to the default size.)
∫ While hidden fields can overlap each other within a form box, visible formcontrols cannot.
CROSSHAIR POINTER cWhen a form control tool is selected, the Crosshair pointer c displays. To createa form control, click and drag the Crosshair pointer diagonally.
Click and drag in any direction to create a form control using one of the form control tools.
Chapter 1: Palettes
29
Web Tool Overview

SIZE AND PLACEMENT
As you click and drag the Crosshair pointer c, the X and Y fields in the Mea-surements palette display the coordinates of the form control. For some formcontrols, the W and H field also indicate the width and height of the control.If the rulers are displaying in the document window (View & Show Rulers),dotted lines on the ruler indicate the starting position of the Crosshairpointer c and the width and height of the form control.
∫ Many form controls have pre-set sizes, and may automatically expand toaccommodate information you enter for the form control in the Modify dialogbox (Item & Modify). For more information about resizing form controls, seeChapter 6, “Item Menu.”
REVERTING TO THE PREVIOUS TOOL
After you create a form control, the Form Control tool automatically reverts tothe last tool selected (the Item tool e or Content tool E). To prevent this,press Option (Mac OS) or Alt (Windows) while selecting the form control tool.This allows you to draw several form controls without selecting the tool again.
MEASUREMENTS PALETTE
The Measurements palette (View & Show Measurements) lets you quickly editseveral commonly used item specifications without choosing Item & Modify or usingthe Style menu. Options in the Measurements palette change to reflect the selectedtool or item. The left side of the palette indicates an item’s position; the right sideindicates an item’s content. This section describes the various components of theMeasurements palette.
OVERVIEW
You can edit any of the values in the Measurements palette (F9). Changes madeto values on the left side of the palette are applied by pressing Return (Mac OS)or Enter (Windows) or exiting the palette; changes made to numerical values onthe right side of the palette are applied by moving to a different field, pressingReturn (Mac OS) or Enter (Windows), or exiting the palette. Clicking a button orchoosing an item from a pop-up menu on the right side of the Measurementspalette applies the change immediately.
Measurements displayed in the Measurements palette are updated when youcreate, move, resize, or modify items, create or move guides, or reposition theruler origin.
Chapter 1: Palettes
30
Web Tool Overview

Click on the Measurements palette to enter it, or press C+Option+M (Mac OS)or Ctrl+Alt+M (Windows) to access the first field in the palette. Press Tab toselect the next field, or press Shift+Tab to select the previous field. Click on thedocument, or press Return or Enter (Mac OS) or Enter (Windows) to applychanges made in the Measurements palette. Press C+. (period) (Mac OS) orEsc (Windows) to exit the Measurements palette without applying changes.
The fields displayed in the Measurements palette correspond to fields that canbe accessed by choosing Item & Modify. Character attributes and paragraphformats are described in “Style Menu for Text” in Chapter 5, “Style Menu.”
MEASUREMENTS PALETTE FOR TEXT BOXES
The Measurements palette as it displays when a text box is selected.
ITEM INFORMATION
When a text box is selected in the document window, the left side of theMeasurements palette lets you view and edit the text box item information.To work with text boxes, see Chapter 7, “Document Layout” and Chapter 9,“Typography,” in A Guide to QuarkXPress: Using QuarkXPress.
• The X and Y fields indicate the horizontal and vertical locations of the origin(upper left corner) of the text box. These fields also display the coordinates ofthe pointer after selecting one of the text box creation tools in the Tools palettebut before clicking the mouse button.
• The W and H fields indicate the width and height of the text box.
• The r field indicates the text box’s angle of rotation.
• The Cols field indicates the number of columns in the text box.
CONTENT INFORMATION
When the Content tool E is selected, the right side of the Measurementspalette lets you edit the contents of the text box.
• The ( button lets you horizontally flip the contents of the text box.
• The ) button lets you vertically flip the contents of the text box.
• The n field indicates paragraph leading. To adjust leading, enter a value inthe field or click the arrows. To specify leading, see “Specifying Leading andParagraph Spacing” in Chapter 9, “Typography,” in A Guide to QuarkXPress:Using QuarkXPress.
• The N field indicates kerning when the text insertion point i is between twocharacters and indicates tracking when a block of text is selected. To adjustkerning and tracking, enter a value in the field or click the arrows. To specifykerning and tracking, see “Specifying Kerning and Tracking” in Chapter 9,“Typography,” in A Guide to QuarkXPress: Using QuarkXPress.
Chapter 1: Palettes
31
Measurements Palette

• The {, }, [, $, and ] buttons indicate left, centered, right, justified, andforced justified alignment of selected paragraphs.
• The Font pop-up menu < indicates the selected font. To change the font,choose a font from the pop-up menu or enter the name of the font in the field.Windows only: To see what the font looks like, press Shift while accessing theFont pop-up menu <.
• The Size pop-up menu < indicates the size of the selected font. To change thefont size, choose a size from the pop-up menu or enter a value in the field.
• The P, B, I, U, W, ?, O, S, K, H, +, _, and M buttons indicate plain, bold,italics, underline, word underline, strike thru, outline, shadow, all caps, smallcaps, superscript, subscript, and superior type styles, respectively. Multiple typestyles may be applied to a single character or group of characters.
∫ The Measurements palette looks slightly different for anchored text boxes.When an anchored text box is active, the Measurements palette indicateswhether the text box aligns with the ascent or baseline of the associated line oftext. Click the ascent 5 or baseline 6 button to change the alignment of ananchored text box. The X and Y fields are not available for anchored text boxes.When the Content tool E is selected, the Measurements palette displays thesame content controls for anchored text boxes as for nonanchored text boxes.
å When an HTML text box is selected, the following settings are unavailable inthe Measurements palette: kerning and tracking arrows; Outline, Shadow,Small Caps, Superior, and Word Underline type style buttons; Flip Horizontaland Flip Vertical buttons; the Box Angle field; and the Justified and Forcedalignment buttons. If you want to use any of these settings in an HTML textbox, choose Item & Modify and check Convert to Graphic on Export toconvert the HTML text box to a raster box. W
MEASUREMENTS PALETTE FOR PICTURE BOXES
The Measurements palette as it displays when a picture box is selected.
ITEM INFORMATION
When a picture box is selected, the left side of the Measurements palette letsyou edit the picture box item information. To modify pictures, see Chapter 11,“Pictures,” in A Guide to QuarkXPress: Using QuarkXPress.
• The X and Y fields indicate the location of the origin (upper left corner) ofthe picture box. These fields also display the coordinates of the pointer afterselecting one of the picture box creation tools in the Tools palette but beforeclicking the mouse button.
Chapter 1: Palettes
32
Measurements Palette

• The W and H fields indicate the width and height of the picture box.
• The r field indicates the picture box’s angle of rotation.
• The = field indicates the radii of the corners of the picture box.
CONTENT INFORMATION
When the Item tool e or the Content tool E is selected, the right side of theMeasurements palette lets you edit the contents of the picture box.
• The ( button lets you horizontally flip the contents of the picture box.
• The ) button lets you vertically flip the contents of the picture box.
• The X% and Y% fields indicate the horizontal and vertical scaling of thecontents of the picture box.
• The X+ and Y+ fields indicate the horizontal and vertical offset of the contentsof the picture box from the picture box’s origin (upper left corner).
• The r field indicates the angle of rotation of the contents of the picture box.
• The S field indicates the skew (slant) of the contents of the picture box.
∫ The Measurements palette looks slightly different for anchored picture boxes.When an anchored picture box is active, the Measurements palette indicateswhether the picture box aligns with the ascent or the baseline of the associatedline of text. Click the ascent 5 or baseline 6 button to change the alignmentof the anchored picture box. The X and Y fields are not available for anchoredpicture boxes. When the Item tool e or Content tool E is selected, theMeasurements palette displays the same content controls for anchored pictureboxes as those for nonanchored text boxes.
MEASUREMENTS PALETTE FOR LINES
Fields displayed in the Measurements palette for non-Bézier lines vary accord-ing to the line description method chosen from the Mode pop-up menu. Linedescription methods available in the Mode pop-up menu include Endpoints,Left Point, Midpoint, and Right Point. To work with lines, see Chapter 5,“Line Basics,” in A Guide to QuarkXPress: Using QuarkXPress.
ENDPOINTS
When Endpoints is chosen from the Mode pop-up menu:
• The X1 and Y1 fields indicate the horizontal and vertical coordinates of theleftmost end-point of the line.
• The X2 and Y2 fields indicate the horizontal and vertical coordinates of therightmost end-point of the line.
Chapter 1: Palettes
33
Measurements Palette
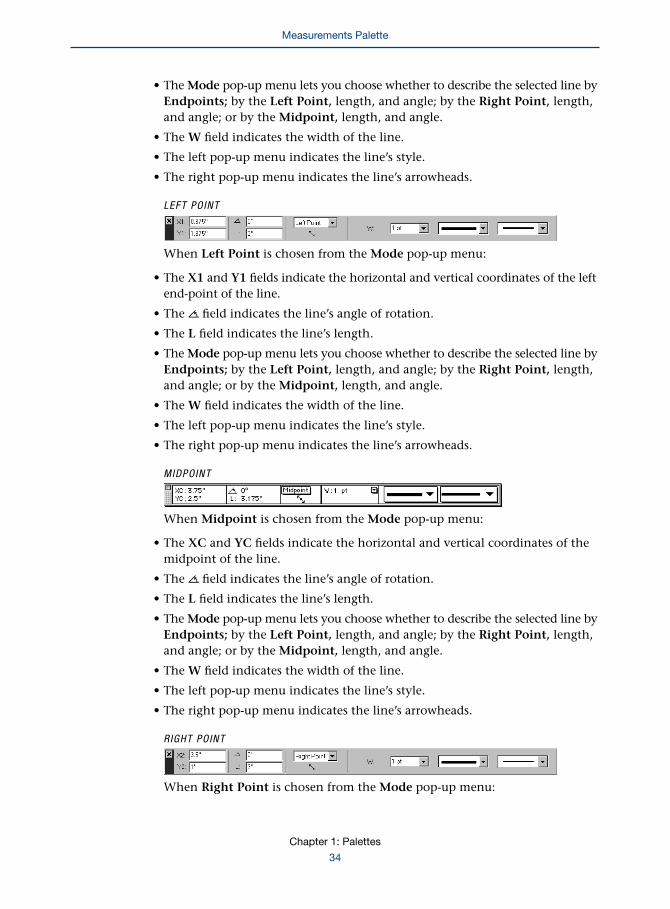
• The Mode pop-up menu lets you choose whether to describe the selected line byEndpoints; by the Left Point, length, and angle; by the Right Point, length,and angle; or by the Midpoint, length, and angle.
• The W field indicates the width of the line.
• The left pop-up menu indicates the line’s style.
• The right pop-up menu indicates the line’s arrowheads.
LEFT POINT
When Left Point is chosen from the Mode pop-up menu:
• The X1 and Y1 fields indicate the horizontal and vertical coordinates of the leftend-point of the line.
• The r field indicates the line’s angle of rotation.
• The L field indicates the line’s length.
• The Mode pop-up menu lets you choose whether to describe the selected line byEndpoints; by the Left Point, length, and angle; by the Right Point, length,and angle; or by the Midpoint, length, and angle.
• The W field indicates the width of the line.
• The left pop-up menu indicates the line’s style.
• The right pop-up menu indicates the line’s arrowheads.
MIDPOINT
When Midpoint is chosen from the Mode pop-up menu:
• The XC and YC fields indicate the horizontal and vertical coordinates of themidpoint of the line.
• The r field indicates the line’s angle of rotation.
• The L field indicates the line’s length.
• The Mode pop-up menu lets you choose whether to describe the selected line byEndpoints; by the Left Point, length, and angle; by the Right Point, length,and angle; or by the Midpoint, length, and angle.
• The W field indicates the width of the line.
• The left pop-up menu indicates the line’s style.
• The right pop-up menu indicates the line’s arrowheads.
RIGHT POINT
When Right Point is chosen from the Mode pop-up menu:
Chapter 1: Palettes
34
Measurements Palette

• The X2 and Y2 fields indicate the horizontal and vertical coordinates of theright end-point of the line.
• The r field indicates the line’s angle of rotation.
• The L field indicates the line’s length.
• The Mode pop-up menu lets you choose whether to describe the selected line byEndpoints; by the Left Point, length, and angle; by the Right Point, length,and angle; or by the Midpoint, length, and angle.
• The W field indicates the width of the line.
• The left pop-up menu indicates the line’s style.
• The right pop-up menu indicates the line’s arrowheads.
MEASUREMENTS PALETTE FOR TEXT PATHS
Fields displayed in the left half of the Measurements palette for text paths arethe same as the fields displayed for lines. Fields displayed in the right half ofthe Measurements palette for text paths are the same as the fields for textboxes. The only exception is that if you flip text on a text path, it flips bothvertically and horizontally; you cannot independently flip text on a textpath vertically or horizontally.
MEASUREMENTS PALETTE FOR GROUPS AND MULTIPLE-
SELECTED ITEMS
When groups of items or multiple items are selected, the Measurements palettelets you edit the origin and angle of the group of items.
• The X and Y fields indicate the location of the origin (upper left corner) of thebounding box containing the group of items.
• The W and H fields indicate the width and height of the bounding box contain-ing the group of items.
• The r field indicates the angle of rotation of the group of items. When an itemis rotated with a group of items, it is rotated relative to the center of the bound-ing box enclosing the group, not to its own origin (upper left corner).
∫ If an HTML text box is part of the group of items; the r field is not available. W
Chapter 1: Palettes
35
Measurements Palette
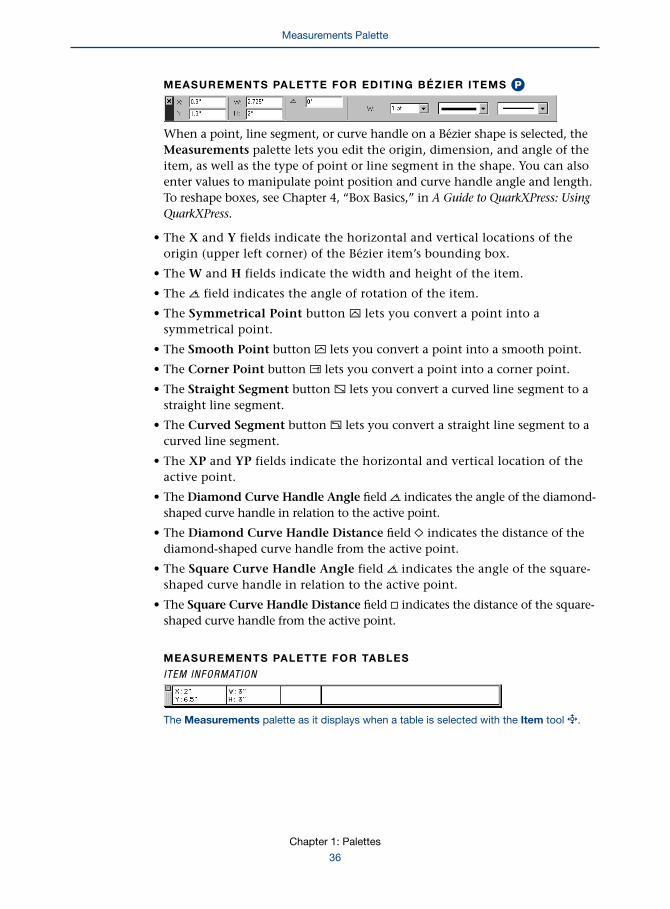
MEASUREMENTS PALETTE FOR EDITING BÉZIER ITEMS P
When a point, line segment, or curve handle on a Bézier shape is selected, theMeasurements palette lets you edit the origin, dimension, and angle of theitem, as well as the type of point or line segment in the shape. You can alsoenter values to manipulate point position and curve handle angle and length.To reshape boxes, see Chapter 4, “Box Basics,” in A Guide to QuarkXPress: UsingQuarkXPress.
• The X and Y fields indicate the horizontal and vertical locations of theorigin (upper left corner) of the Bézier item’s bounding box.
• The W and H fields indicate the width and height of the item.
• The r field indicates the angle of rotation of the item.
• The Symmetrical Point button † lets you convert a point into asymmetrical point.
• The Smooth Point button ¥ lets you convert a point into a smooth point.
• The Corner Point button ® lets you convert a point into a corner point.
• The Straight Segment button œ lets you convert a curved line segment to astraight line segment.
• The Curved Segment button ∑ lets you convert a straight line segment to acurved line segment.
• The XP and YP fields indicate the horizontal and vertical location of theactive point.
• The Diamond Curve Handle Angle field r indicates the angle of the diamond-shaped curve handle in relation to the active point.
• The Diamond Curve Handle Distance field „ indicates the distance of thediamond-shaped curve handle from the active point.
• The Square Curve Handle Angle field r indicates the angle of the square-shaped curve handle in relation to the active point.
• The Square Curve Handle Distance field Œ indicates the distance of the square-shaped curve handle from the active point.
MEASUREMENTS PALETTE FOR TABLES
ITEM INFORMATION
The Measurements palette as it displays when a table is selected with the Item tool e.
Chapter 1: Palettes
36
Measurements Palette

When a table is selected with the Item tool e, the left side of the Measure-ments palette lets you edit the table item information. To work with tables,see Chapter 14, “Tables,” in A Guide to QuarkXPress: Using QuarkXPress.
• The X and Y fields indicate the horizontal and vertical locations of the origin(upper left corner) of the table. These fields also display the coordinates of thepointer after selecting the table creation tool from the Tools palette but beforeclicking the mouse button.
• The W and H fields indicate the width and height of the table.
CONTENT INFORMATION FOR TEXT CELLS
The Measurements palette as it displays when a text cell is selected with the Content tool E.
When a text cell is selected with the Content tool E, the right side of theMeasurements palette lets you edit the contents of the text cell.
• The ( button lets you horizontally flip the contents of the text cell.
• The ) button lets you vertically flip the contents of the text cell.
• The n field indicates paragraph leading. To adjust leading, enter a value inthe field or click the arrows. To specify leading, see “Specifying Leading andParagraph Spacing” in Chapter 9, “Typography,” in A Guide to QuarkXPress:Using QuarkXPress.
• The N field indicates kerning when the text insertion point i is between twocharacters and indicates tracking when a block of text is selected. To adjustkerning and tracking, enter a value in the field or click the arrows. To specifykerning and tracking, see “Specifying Kerning and Tracking” in Chapter 9,“Typography,” in A Guide to QuarkXPress: Using QuarkXPress.
• The {, }, [, $, ] buttons indicate left, centered, right, justified, and forcedjustified alignment of selected paragraphs.
• The Font pop-up menu < indicates the selected font. To change the font,choose a font from the pop-up menu or enter the name of the font in the field.Windows only: To see what the font looks like, press Shift while accessing theFont pop-up menu <.
• The Size pop-up menu < indicates the size of the selected font. To change thefont size, choose a size from the pop-up menu or enter a value in the field.
• The P, B, I, U, W, ?, O, S, K, H, +, _, and M buttons indicate plain, bold,italics, underline, word underline, strike thru, outline, shadow, all caps, smallcaps, superscript, subscript, and superior type styles, respectively. Multiple typestyles may be applied to a single character or group of characters.
Chapter 1: Palettes
37
Measurements Palette

å When a table in a Web document is active, the following settings are disabled inthe Measurements palette if text cells are selected: kerning and tracking arrows;Outline, Shadow, Small Caps, Superior, and Word Underline type style but-tons; Flip Horizontal and Flip Vertical buttons; the Box Angle field; and theJustified and Forced alignment buttons. If you want to use any of these settingsin a table, choose Item & Modify and check Convert Table to Graphic onExport to convert the table’s text cells to raster boxes. W
CONTENT INFORMATION FOR P ICTURE CELLS
The Measurements palette as it displays when a picture cell is selected with theContent tool E.
When a picture cell is selected with the Content tool E, the right side ofthe Measurements palette lets you edit the contents of the picture cell.
• The ( button lets you horizontally flip the contents of the picture cell.
• The ) button lets you vertically flip the contents of the picture cell.
• The X% and Y% fields indicate the horizontal and vertical scaling of thecontents of the picture cell.
• The X+ and Y+ fields indicate the horizontal and vertical offset of the contentsof the picture cell from the picture cell’s origin (upper left corner).
• The r field indicates the angle of rotation of the contents of the picture cell.
• The S field indicates the skew (slant) of the contents of the picture cell.
MEASUREMENTS PALETTE FOR IMAGE MAPS W
• The X and Y fields indicate the horizontal and vertical locations of the origin(upper left corner) of the hot area as you draw it. These also display the coordi-nates of the pointer after selecting one of the image map tools from the Toolspalette but before clicking the mouse button.
• The W and H fields indicate the changing width and height of a rectangular oroval hot area as you draw it.
To work with image maps, see Chapter 21, “Interactive Web Elements,” inA Guide to QuarkXPress: Using QuarkXPress.
Chapter 1: Palettes
38
Measurements Palette

∫ The image map tools are available when the ImageMap QuarkXTensionssoftware is loaded.
Once the image map is drawn and you release the mouse button, the Measure-ments palette changes to reflect picture box settings.
MEASUREMENTS PALETTE FOR FORM BOXES W
• The X and Y fields indicate the horizontal and vertical locations of the origin(upper left corner) of the form box. These fields also display the coordinates ofthe pointer after selecting the Form Box tool from the Web Tools palette butbefore clicking the mouse button.
• The W and H fields indicate the changing width and height of the form box.
To work with form boxes, see Chapter 22, “Forms,” in A Guide to QuarkXPress:Using QuarkXPress.
MEASUREMENTS PALETTE FOR FILE SUBMISSION CONTROLS W
• The X and Y fields indicate the horizontal and vertical locations of the origin(upper left corner) of the file submission control. These fields also displaythe coordinates of the pointer after selecting the File Selection tool from theWeb Tools palette but before clicking the mouse button.
• The W field indicates the changing width of the file submission control.
To work with file submission controls, see Chapter 22, “Forms,” in A Guide toQuarkXPress: Using QuarkXPress.
MEASUREMENTS PALETTE FOR TEXT FIELD FORM CONTROLS W
• The X and Y fields indicate the horizontal and vertical locations of the origin(upper left corner) of the text field form control. These fields also display thecoordinates of the pointer after selecting the Text Field tool from the Web Toolspalette but before clicking the mouse button.
• The W and H fields indicate the changing width and height of the text fieldform control. The H field is available only for multi-line text and hiddenfield form controls.
To work with text field form controls, see Chapter 22, “Forms,” in A Guide toQuarkXPress: Using QuarkXPress.
Chapter 1: Palettes
39
Measurements Palette

MEASUREMENTS PALETTE FOR BUTTON FORM CONTROLS W
• The X and Y fields indicate the horizontal and vertical locations of the origin(upper left corner) of the button form control. These fields also display thecoordinates of the pointer after selecting the Button tool in the Web Toolspalette but before clicking the mouse button.
To work with button form controls, see Chapter 22, “Forms,” in A Guide toQuarkXPress: Using QuarkXPress.
MEASUREMENTS PALETTE FOR IMAGE BUTTON FORM CONTROLS W
• The X and Y fields indicate the horizontal and vertical locations of the origin(upper left corner) of the image button form control. These fields also displaythe coordinates of the pointer after selecting the Image Button tool from theWeb Tools palette but before clicking the mouse button.
• The W and H fields indicate the changing width and height of the imagebutton form control.
• The r field is not available for an image button form control.
• The = field indicates the radii of the corners of the image button form control.
• The ( button lets you horizontally flip the contents of the image buttonform control.
• The ) button lets you vertically flip the contents of the image buttonform control.
• The X% and Y% fields indicate the horizontal and vertical scaling of thecontents of the image button form control.
• The X+ and Y+ fields indicate the horizontal and vertical offset of the contentsof the image button form control from the image button form control’s origin(upper left corner).
• The r field indicates the angle of rotation of the contents of the image buttonform control.
• The S field indicates the skew (slant) of the contents of the image buttonform control.
To work with image button form controls, see Chapter 22, “Forms,” inA Guide to QuarkXPress: Using QuarkXPress.
Chapter 1: Palettes
40
Measurements Palette

MEASUREMENTS PALETTE FOR POP-UP MENU FORM CONTROLS W
• The X and Y fields indicate the horizontal and vertical locations of the origin(upper left corner) of the pop-up menu form control. These fields also displaythe coordinates of the pointer after selecting the Pop-up Menu tool in theWeb Tools palette but before clicking the mouse button.
To work with pop-up menu form controls, see Chapter 22, “Forms” in A Guideto QuarkXPress: Using QuarkXPress.
MEASUREMENTS PALETTE FOR LIST FORM CONTROLS W
• The X and Y fields indicate the horizontal and vertical locations of the origin(upper left corner) of the list form control. These fields also display the coordi-nates of the pointer after selecting the List Box tool in the Web Tools palettebut before clicking the mouse button.
• The H field indicates the changing height of the list form control.
To work with list form controls, see Chapter 22, “Forms,” in A Guide toQuarkXPress: Using QuarkXPress.
MEASUREMENTS PALETTE FOR RADIO BUTTON FORM CONTROLS W
• The X and Y fields indicate the horizontal and vertical locations of the origin(upper left corner) of the radio button form control. These fields also displaythe coordinates of the pointer after selecting the Radio Button tool from theWeb Tools palette but before clicking the mouse button.
• The W and H fields indicate the changing width and height of the radio buttonform control.
When a radio button form control is selected with the Content tool E, theright side of the Measurements palette lets you edit the contents of the text cell.
• The {, }, [, buttons indicate left, centered, and right alignment of selectedparagraphs in the radio button form control.
• The Font pop-up menu < indicates the selected font. To change the font,choose a font from the pop-up menu or enter the name of the font in the field.Windows only: To see what the font looks like, press Shift while accessing theFont pop-up menu <.
Chapter 1: Palettes
41
Measurements Palette

• The Size pop-up menu < indicates the size of the selected font. To change thefont size, choose a size from the pop-up menu or enter a value in the field.
• The P, B, I, U, ?, K, +, _, and buttons indicate plain, bold, italics, underline,strike thru, all caps, superscript, and subscript type styles, respectively. Multipletype styles may be applied to a single character or group of characters.
å When a radio button form control is selected with the Content E tool, the fol-lowing settings will not display in the Measurements palette: leading arrows,kerning and tracking arrows; the r field; the Cols field; Outline, Shadow, SmallCaps, Superior, and Word Underline type style buttons; Flip Horizontal andFlip Vertical buttons; and the Justified and Forced alignment buttons.
To work with radio button form controls, see Chapter 22, “Forms,” in A Guide toQuarkXPress: Using QuarkXPress.
MEASUREMENTS PALETTE FOR CHECK BOX FORM CONTROLS W
• The X and Y fields indicate the horizontal and vertical locations of the origin(upper left corner) of the check box form control. These fields also display thecoordinates of the pointer after selecting the Check Box tool from the WebTools palette but before clicking the mouse button.
• The W and H fields indicate the changing width and height of the checkbox form control.
When a check box form control is selected with the Content tool E, the rightside of the Measurements palette lets you edit the contents of the text cell.
• The {, }, [, buttons indicate left, centered, and right alignment of selectedparagraphs in the check box form control.
• The Font pop-up menu < indicates the selected font. To change the font,choose a font from the pop-up menu or enter the name of the font in the field.Windows only: To see what the font looks like, press Shift while accessing theFont pop-up menu <.
• The Size pop-up menu < indicates the size of the selected font. To change thefont size, choose a size from the pop-up menu or enter a value in the field.
• The P, B, I, U, ?, K, +, _, and buttons indicate plain, bold, italics, underline,strike thru, all caps, superscript, and subscript type styles, respectively. Multipletype styles may be applied to a single character or group of characters.
Chapter 1: Palettes
42
Measurements Palette

å When a check box form control is selected with the Content E tool, thefollowing settings will not display in the Measurements palette: leadingarrows, kerning and tracking arrows; the r field; the Cols field; Outline,Shadow, Small Caps, Superior, and Word Underline type style buttons;Flip Horizontal and Flip Vertical buttons; and the Justified and Forcedalignment buttons.
To work with check box form controls, see Chapter 22, “Forms,” in A Guide toQuarkXPress: Using QuarkXPress.
MEASUREMENTS PALETTE FOR RULER ORIGIN RELOCATION
The X and Y fields indicate the changing origin of the ruler when draggingthe 0,0 origin crosshair out of the ruler origin box.
MEASUREMENTS PALETTE FOR RULER GUIDE PLACEMENT
The X and Y fields indicate the horizontal locations of vertical guides and thevertical positions of horizontal guides as they are dragged from the ruler.
DOCUMENT LAYOUT PALETTE
The Document Layout palette (View & Show Document Layout) lets you add,delete, move, and access document pages and master pages using page icons. Thissection describes the various components of the Document Layout palette.
Document Layout palette
Chapter 1: Palettes
43
Measurements Palette

PAGE INSERT, DUPLICATE, AND DELETE AREA
The four icon buttons at the top of the Document Layout palette (F10 onMac OS, F4 on Windows) let you insert single-sided and facing pages in a printdocument, or Web pages in a Web document. These icons also let you duplicateand delete selected pages.
The icon buttons at the top of the Document Layout palette let you add, duplicate, and deleteselected pages.
• The 0 icon lets you insert blank single-sided document pages into a printlayout, or Web pages into a Web layout. To insert a single-sided page orWeb page, click and drag the 0 icon into the document page area of theDocument Layout palette, move the pointer over the document page iconsto preview the placement of the page, and release the mouse button toplace the page in the layout.
• The 3 icon lets you insert blank facing-page document pages into a print layout.The 3 icon is available only if you have checked Facing Pages either in the NewDocument dialog box (File & New & Document) or in the Document Setupdialog box (File & Document Setup). To insert a blank facing-page documentpage, click and drag the 3 icon into the document page area of the DocumentLayout palette, move the pointer over the document page icons to previewthe placement of the page, and release the mouse button to place the pagein the layout. P
• The 0 and 3 icons also let you create new master pages. To create a new masterpage, click and drag the 0 or 3 icon into the master page area of the DocumentLayout palette and release the mouse button. Releasing the mouse button whenan existing master page is selected replaces the master page with a blank page.The 3 icon is available only in print documents.
• The 22 (Mac OS) or (Windows) icon lets you create new master pages basedon existing master pages. To duplicate a master page, click the master page inthe master page area to select it, then click the 22 (Mac OS) or (Windows)icon. The new master page is placed in the master page area immediately afterthe master page from which it is duplicated.
Chapter 1: Palettes
44
Document Layout Palette

• The L (Mac OS) or Ö (Windows) icon lets you delete selected master pages anddocument pages. To delete a master page, select it in the master page area of theDocument Layout palette, then click the ¬ (Mac OS) or Ö (Windows) icon.To delete a document page, select it in the document page area of the Docu-ment Layout palette, then click the ¬ (Mac OS) or Ö (Windows) icon. An alertasks you to confirm the deletion. You can also press Option (Mac OS) or Alt(Windows) while clicking the delete icon to bypass the confirmation alert.
MASTER PAGES AREA
The master pages area of the Document Layout palette lets you insert, apply,and rename user-defined master pages.
The Document Layout master pages area
• Master page icons (0 or !) let you insert new pages in a document based on amaster page. To insert a page based on a master page, click and drag the masterpage’s icon (0 or !) into the document page area of the Document Layoutpalette, move the pointer over the document page icons to preview the place-ment of the page, and release the mouse button to place the page in the layout.The 3 icon is available only in print documents.
• Master page icons (0 or !) also let you apply master page elements to blankpages. To apply a master page to a blank page, click and drag the master page’sicon on top of the blank page in the document page area of the DocumentLayout palette, and release the mouse button.
• The name fields next to the master page icons (0 or !) let you rename the mas-ter pages. Click (Mac OS) or double-click (Windows) the name field to select it,then enter a name of up to 64 characters for the master page. Each master pagemay have a prefix of up to three characters. When created, new master pages areautomatically assigned prefixes of “A,” “B,” “C,” and so on. To change the prefixof a master page, click (Mac OS) or double-click (Windows) the name field nextto the master page icon (0 or !), and enter the prefix, followed immediatelyby a hyphen and the remainder of the name.
Chapter 1: Palettes
45
Document Layout Palette
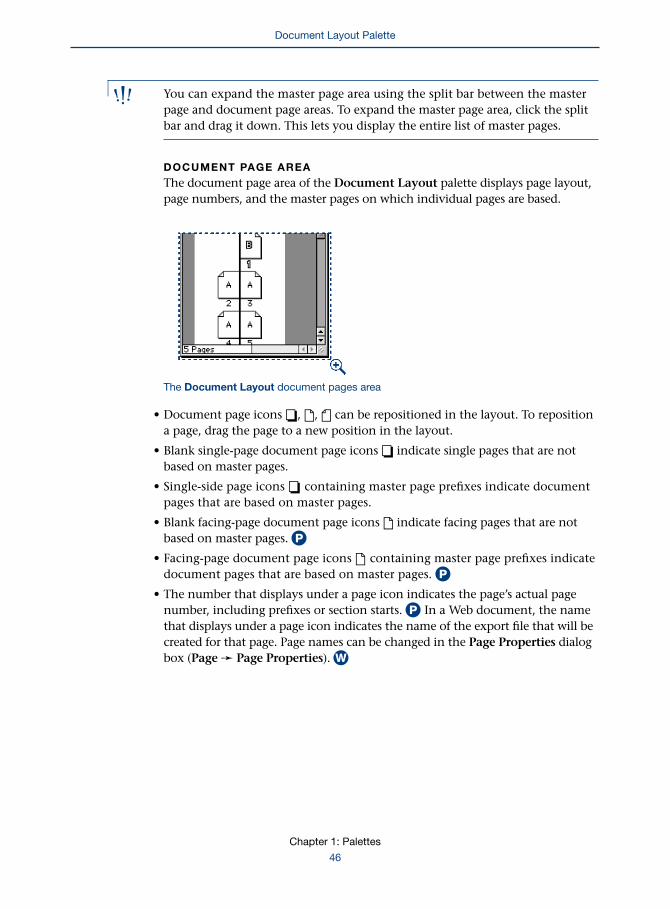
∫ You can expand the master page area using the split bar between the masterpage and document page areas. To expand the master page area, click the splitbar and drag it down. This lets you display the entire list of master pages.
DOCUMENT PAGE AREA
The document page area of the Document Layout palette displays page layout,page numbers, and the master pages on which individual pages are based.
The Document Layout document pages area
• Document page icons 0, 1, 2 can be repositioned in the layout. To repositiona page, drag the page to a new position in the layout.
• Blank single-page document page icons 0 indicate single pages that are notbased on master pages.
• Single-side page icons 0 containing master page prefixes indicate documentpages that are based on master pages.
• Blank facing-page document page icons 1 indicate facing pages that are notbased on master pages. P
• Facing-page document page icons 1 containing master page prefixes indicatedocument pages that are based on master pages. P
• The number that displays under a page icon indicates the page’s actual pagenumber, including prefixes or section starts. PIn a Web document, the namethat displays under a page icon indicates the name of the export file that will becreated for that page. Page names can be changed in the Page Properties dialogbox (Page & Page Properties). W
Chapter 1: Palettes
46
Document Layout Palette
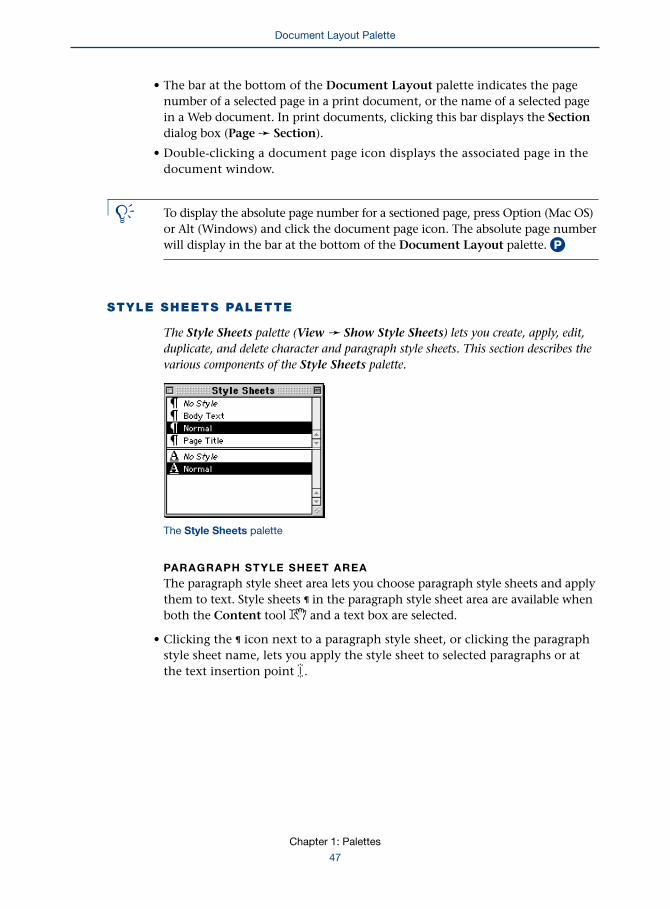
• The bar at the bottom of the Document Layout palette indicates the pagenumber of a selected page in a print document, or the name of a selected pagein a Web document. In print documents, clicking this bar displays the Sectiondialog box (Page & Section).
• Double-clicking a document page icon displays the associated page in thedocument window.
å To display the absolute page number for a sectioned page, press Option (Mac OS)or Alt (Windows) and click the document page icon. The absolute page numberwill display in the bar at the bottom of the Document Layout palette. P
STYLE SHEETS PALETTE
The Style Sheets palette (View & Show Style Sheets) lets you create, apply, edit,duplicate, and delete character and paragraph style sheets. This section describes thevarious components of the Style Sheets palette.
The Style Sheets palette
PARAGRAPH STYLE SHEET AREA
The paragraph style sheet area lets you choose paragraph style sheets and applythem to text. Style sheets π in the paragraph style sheet area are available whenboth the Content tool E and a text box are selected.
• Clicking the π icon next to a paragraph style sheet, or clicking the paragraphstyle sheet name, lets you apply the style sheet to selected paragraphs or atthe text insertion point i .
Chapter 1: Palettes
47
Document Layout Palette
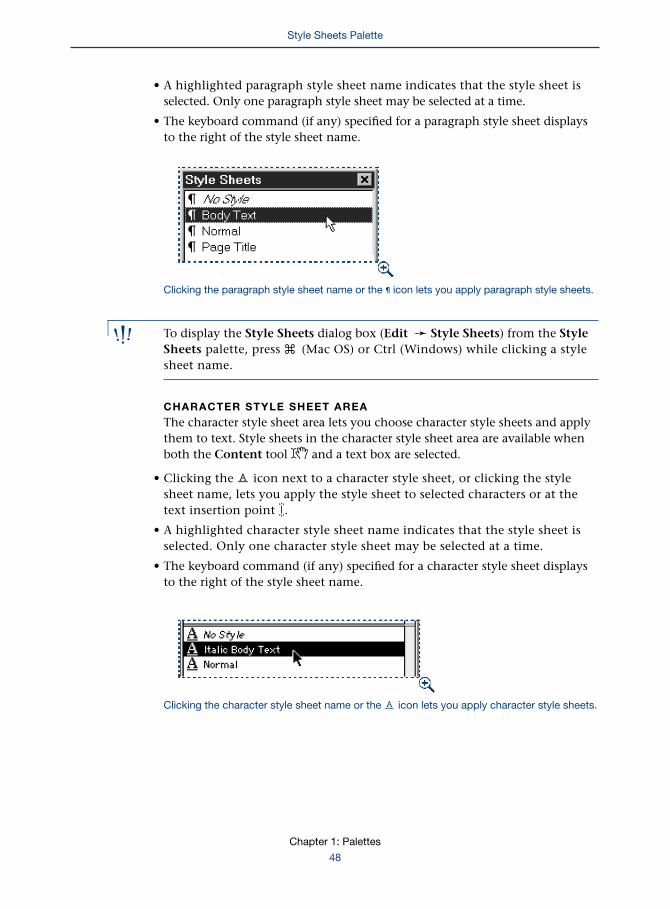
• A highlighted paragraph style sheet name indicates that the style sheet isselected. Only one paragraph style sheet may be selected at a time.
• The keyboard command (if any) specified for a paragraph style sheet displaysto the right of the style sheet name.
Clicking the paragraph style sheet name or the π icon lets you apply paragraph style sheets.
∫ To display the Style Sheets dialog box (Edit & Style Sheets) from the StyleSheets palette, press C (Mac OS) or Ctrl (Windows) while clicking a stylesheet name.
CHARACTER STYLE SHEET AREA
The character style sheet area lets you choose character style sheets and applythem to text. Style sheets in the character style sheet area are available whenboth the Content tool E and a text box are selected.
• Clicking the Ø icon next to a character style sheet, or clicking the stylesheet name, lets you apply the style sheet to selected characters or at thetext insertion point i.
• A highlighted character style sheet name indicates that the style sheet isselected. Only one character style sheet may be selected at a time.
• The keyboard command (if any) specified for a character style sheet displaysto the right of the style sheet name.
Clicking the character style sheet name or the Ø icon lets you apply character style sheets.
Chapter 1: Palettes
48
Style Sheets Palette

∫ The split bar between the paragraph style sheet and character style sheet areaslets you expand the paragraph style sheet area so you can display your entire listof paragraph style sheets. To expand the paragraph style sheet area, click thesplit bar and drag it down.
COLORS PALETTE
The Colors palette (View & Show Colors) lets you add color to selected text, pictures,box backgrounds, lines, and frames. This section describes the various components ofthe Colors palette.
The Colors palette
COLORS PALETTE BUTTONS
The buttons located at the top of the Colors palette (F12) let you apply color toframes, text, lines, or the background of picture boxes and text boxes.
• The J button lets you view and apply the colors to the frame for the selectedtext boxes or picture boxes.
• The œ button lets you view and apply the color to selected lines.
• The T button lets you view and apply the color to selected text or the textinsertion point i.
• The p icon lets you apply color to certain picture formats.
Chapter 1: Palettes
49
Style Sheets Palette

• The Y button lets you view and apply the colors to the background for theselected text boxes, picture boxes, table cells, and groups.
• The Shade pop-up menu indicates the amount of a selected color. To changethe amount of a selected color, choose a value from the pop-up menu, or entera value directly in the field. You can enter values from 0 to 100%, usingincrements as fine as 0.1%.
Buttons at the top of the Colors palette let you apply colors to frames, text, lines,and backgrounds.
BLENDS AREA
The Blends area of the Colors palette lets you apply color blends to thebackgrounds of text boxes, picture boxes, table cells, and groups.
Colors palette blends area
• The Type pop-up menu indicates the type of blend applied to the backgroundsof selected text boxes, picture boxes, cells, or groups. Options in the Typepop-up menu include Solid, Linear Blend, Mid-Linear Blend, RectangularBlend, Diamond Blend, Circular Blend, and Full Circular Blend.
• The #1 and #2 buttons let you choose the beginning and ending colors of ablend when an option other than Solid is chosen from the type pop-up menu.Clicking the #1 button lets you specify the first color in the blend; clicking the#2 button lets you specify the second color.
• The angle field indicates the angle at which a blend fills a box. You can enter avalue from –360˚ to 360˚, using increments as fine as 0.001.̊
Chapter 1: Palettes
50
Colors Palette

Creating a linear blend from 100% blue to 100% yellow.
COLOR SELECTION AREA
The color selection area of the Colors palette lets you apply colors to frames;text; pictures; lines; and backgrounds of text boxes, picture boxes, table cells,and groups. Click a color name to apply it to the selected item.
• Swatches display colors to the left of their names in the list.
• Swatches also let you apply colors to selected lines; frames; and the backgroundsof boxes, table cells, and groups. To apply a color to a line, frame, or back-ground, drag and drop the swatch over the item in the document page.
• A highlighted color name indicates the selected color. If various colors areapplied to multiple-selected items, the Colors palette indicates that Mixed Colorsare applied.
• An icon to the right of a color name indicates whether the color is a processcolor or a spot color . None, White, and Registration are neither spot norprocess colors, so they do not display one of these icons.
Chapter 1: Palettes
51
Colors Palette

Color selection area
∫ Pressing C (Mac OS) or Ctrl (Windows) while clicking a color name displaysthe Colors dialog box (Edit & Colors).
TRAP INFORMATION PALETTE P
The Trap Information palette (View & Show Trap Information) lets you specifytrapping information on an item-by-item basis. This section describes the variouscomponents of the Trap Information palette.
The Trap Information palette
å To specify trapping, see Chapter 13, “Trapping,” in A Guide to QuarkXPress:Using QuarkXPress.
Chapter 1: Palettes
52
Colors Palette

TRAPPING BOXES AND TEXT PThe Trap Information palette (Option+F12 on Mac OS, Ctrl+F12 on Windows)displays the trapping values for a selected box. You can specify trapping for anyQuarkXPress box, its contents (except for some imported pictures), its frames,and its background.
BACKGROUND AND TEXT POP-UP MENUS
The Background and Text pop-up menus indicate the trapping options for theselected box or the selected text:
• The Default option indicates the default values for the Background andText fields using the trapping values specified in the Trap Specificationsdialog box (Edit & Colors & Edit Trap) for the item color against theitem’s background color.
• The Overprint option indicates that QuarkXPress will overprint an active item.Overprint overrides the Overprint Limit value entered in the Trapping pane(Edit & Preferences & Preferences), and overprints the item regardless of theshade of the item and background colors involved.
• The Knockout option indicates that an active item will knock out ofits background.
• The Auto Amount (+) option applies the positive value entered in the AutoAmount field of the Trapping pane (Edit & Preferences & Preferences). Thisvalue displays as a positive number (a spread) to the right of the Backgroundor Text pop-up menu.
• The Auto Amount (–) option applies the negative value entered in the AutoAmount field of the Trapping pane (Edit & Preferences & Preferences). Thisvalue displays as a negative number (a choke) to the right of the Background orText pop-up menu.
• The Custom option specifies a custom choke or spread value for the active item,entered in the field to the right of the pop-up menu.
Values in the Trap Information palette (View & Show Trap Information) control howQuarkXPress traps an active item.
Chapter 1: Palettes
53
Trap Information Palette

TRAPPING FRAMES PA frame for a box always traps to the background color(s) specified for the box,to the color(s) used to color the frame, and to any background color(s) behindthe box. Choosing a trapping type in the pop-up menus specifies trappingvalues for the Frame Inside, Frame Middle, and Frame Outside fields:
• The Frame Inside option indicates trapping applied between the innermostcolor of a frame and the box contents (background color or picture).
• The Frame Middle option indicates trapping applied to colors within a frame.
• The Frame Outside option indicates trapping applied between the outermostcolor of a frame and colors behind the box.
The trapping types contained in the pop-up menus are the same as thosedescribed in “Trapping boxes and text” earlier in this section.
When a framed box is selected, the Background pop-up menu is unavailable in the TrapInformation palette.
TRAPPING LINES PA line always traps to the color(s) used to color it, and to any background colorsbehind the line. Choose a trapping type from the pop-up menu to specifytrapping values for the Line, Line Middle, and Gap fields:
• The Line field indicates trapping applied to the color specified for a line (in rela-tion to an adjacent background color).
• The Line Middle field indicates trapping applied to colors within a line. Thisfield is available when any line style except Solid is applied to the line.
• The Gap field indicates trapping applied to the color specified for a line gap inrelation to an adjacent background color. The Gap field is only available withdashed lines or multi-lines with only one arrowhead.
The trapping types contained in the pop-up menus are the same as thosedescribed in “Trapping boxes and text” earlier in this section.
Chapter 1: Palettes
54
Trap Information Palette
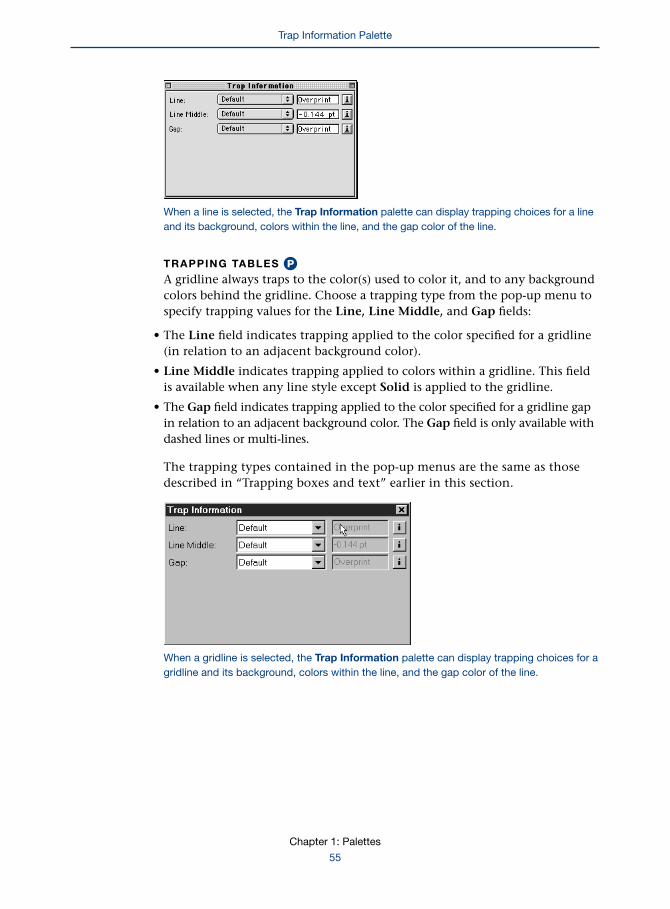
When a line is selected, the Trap Information palette can display trapping choices for a lineand its background, colors within the line, and the gap color of the line.
TRAPPING TABLES PA gridline always traps to the color(s) used to color it, and to any backgroundcolors behind the gridline. Choose a trapping type from the pop-up menu tospecify trapping values for the Line, Line Middle, and Gap fields:
• The Line field indicates trapping applied to the color specified for a gridline(in relation to an adjacent background color).
• Line Middle indicates trapping applied to colors within a gridline. This fieldis available when any line style except Solid is applied to the gridline.
• The Gap field indicates trapping applied to the color specified for a gridline gapin relation to an adjacent background color. The Gap field is only available withdashed lines or multi-lines.
The trapping types contained in the pop-up menus are the same as thosedescribed in “Trapping boxes and text” earlier in this section.
When a gridline is selected, the Trap Information palette can display trapping choices for agridline and its background, colors within the line, and the gap color of the line.
Chapter 1: Palettes
55
Trap Information Palette

DEFAULT TRAP INFORMATION WINDOW PInformation about a Default trap value can be viewed by clicking the iconto the right of the value. The Default Trap information window displaysinformation about the item’s trapping relationship with its background. Tochange default trapping, see “Specifying Default Trapping” in Chapter 13,“Trapping,” in A Guide to QuarkXPress: Using QuarkXPress.
• The Object Color field indicates the color applied to the item.
• The Underneath Color field indicates the color of the item(s) behind the selecteditem. Multiple displays if there are multiple background colors, and there is not aconflict between the choke and spread amount in the Trap Specifications dialogbox (Edit & Colors & Edit Trap). Indeterminate displays if there is a conflictbetween the choke amount and the spread amount. Otherwise, the name of thecolor covering the entire background of the item displays.
The Default Trap information window displays information about active items withDefault selected.
Chapter 1: Palettes
56
Trap Information Palette

SOURCE OF TRAP VALUES AREA PText displayed in this area is unavailable for trap sources that are not being used.
• Edit Trap indicates that the source of trap value is from settings in the TrapSpecifications dialog box (Edit & Colors & Edit Trap). To alter trapping values,see “Specifying Color-Specific Trapping” in Chapter 13, “Trapping,” in A Guide toQuarkXPress: Using QuarkXPress.
• Trap Preferences indicates that the source of the trap value is from settingsin the Trapping pane of the Preferences dialog box (Edit & Preferences &Preferences ). To alter trapping preferences, see “Specifying Default Trapping”in Chapter 13, “Trapping,” in A Guide to QuarkXPress: Using QuarkXPress.
PROPERTIES AREA PText displayed in this area is unavailable for trap properties that are notbeing used.
• Proportional indicates that proportional trapping is applied. Proportionaltrapping uses the calculated trap value multiplied by the difference betweenthe luminance of the item color and background color to calculate thetrapping value.
• Process Trapping indicates that the item color and background color haveprocess trapping applied. Process trapping is not applied if the backgroundbehind the item has more than one color.
• Rich Black indicates that Rich Black is applied to the item color or background,and that Rich Black trapping will be used. To create a rich black, see “Creatingand Using a Rich Black” in Chapter 13, “Trapping,” in A Guide to QuarkXPress:Using QuarkXPress.
• Small Object indicates that trapping for text smaller than 24 points, or for anitem width (such as a stripe or a line narrower than 10 points) will requirespecial trapping if process trapping is on.
• Overprint Limit indicates that the item color was set to overprint thebackground, but the shade of the item was less than the overprint limit inthe Overprint Limit field of the Trapping pane (Edit & Preferences &Preferences).
• Knockout Limit indicates that the color’s luminance is less than or equal tothe knockout limits specified in the Trapping pane (Edit & Preferences &Preferences).
• Smallest Trap Value indicates that multiple colors behind the item have trapsin the same direction (all chokes or all spreads). The smallest trap value of thecolors behind the item is used.
Chapter 1: Palettes
57
Trap Information Palette
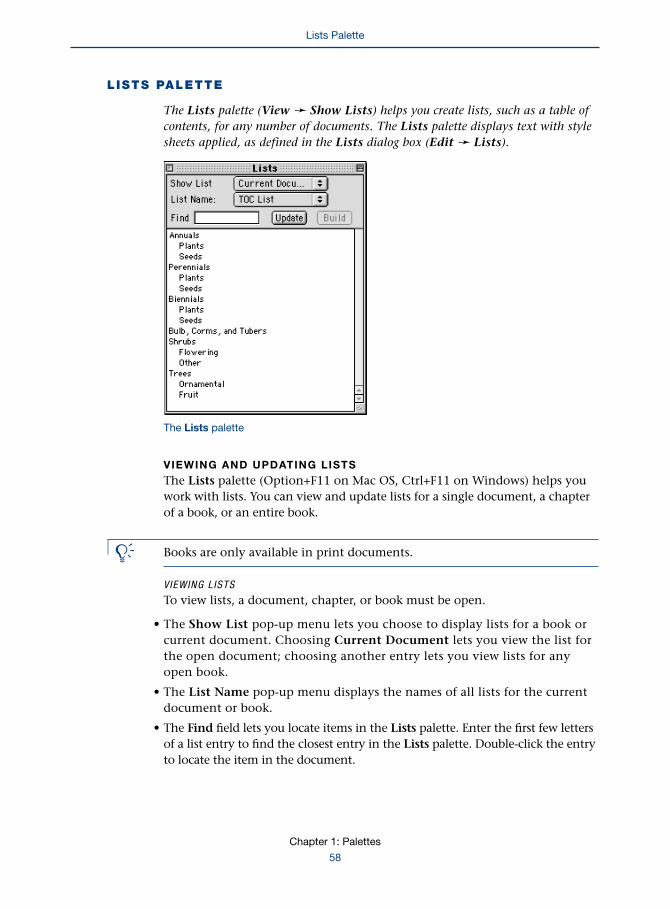
LISTS PALETTE
The Lists palette (View & Show Lists) helps you create lists, such as a table ofcontents, for any number of documents. The Lists palette displays text with stylesheets applied, as defined in the Lists dialog box (Edit & Lists).
The Lists palette
VIEWING AND UPDATING LISTS
The Lists palette (Option+F11 on Mac OS, Ctrl+F11 on Windows) helps youwork with lists. You can view and update lists for a single document, a chapterof a book, or an entire book.
å Books are only available in print documents.
VIEWING L ISTS
To view lists, a document, chapter, or book must be open.
• The Show List pop-up menu lets you choose to display lists for a book orcurrent document. Choosing Current Document lets you view the list forthe open document; choosing another entry lets you view lists for anyopen book.
• The List Name pop-up menu displays the names of all lists for the currentdocument or book.
• The Find field lets you locate items in the Lists palette. Enter the first few lettersof a list entry to find the closest entry in the Lists palette. Double-click the entryto locate the item in the document.
Chapter 1: Palettes
58
Lists Palette

• The Build button lets you copy the current list to an active text box. The FormatAs style sheets (Edit & Lists & Edit) for the list are applied automatically.The Build button is not available unless a text box is active.
UPDATING L ISTS FOR CHAPTERS AND DOCUMENTS
The Lists palette is not automatically updated as you work. If you have madechanges to the text, you must click the Update button to update the list.
Clicking Update scans the document for list items in the current document,so that you can build a list and save it with the document. When the updatingprocess is complete, the list displays in the Lists palette.
UPDATING L ISTS FOR BOOKS PClicking Update lets you update lists for the open book. QuarkXPress readsthe saved list information from the publication file and displays it in the Listspalette. However, you may not have the most recent versions of the lists for eachchapter. Click Update to force QuarkXPress to rescan all chapters in a book andbuild a new list. To build a list for a book, see “Working with Lists in Books” inChapter 17, “Books,” in A Guide to QuarkXPress: Using QuarkXPress.
LAYERS PALETTE
In QuarkXPress, layers are tiers of a document (similar to a traditional printer’s clearplastic overlays). The Layers palette (View & Show Layers) lets you manipulatelayers and provides a menu for performing various layer functions. This sectiondescribes the various components of the Layers palette.
The Layers palette
Chapter 1: Palettes
59
Lists Palette

å To use layers, see Chapter 15, “Layers,” in A Guide to QuarkXPress:Using QuarkXPress.
LAYERS BUTTONS
The buttons on the Layers palette let you add, remove, and merge layers,as well as move items on those layers.
• Clicking the New Layer button " adds a new layer to the active document.You can use the default name for the layer, or you can assign the layer a newname by double-clicking the layer in the palette and entering a new name inthe Attributes dialog box.
• The Move Item to Layer button displays the Move Items dialog box, whichlets you move selected items to other layers.
• The Merge Layers button displays the Merge Layers dialog box, which letsyou combine selected layers and their items into one layer.
• The Delete Layer button (L on Mac OS, Ö on Windows) lets you removeselected layers from the active document.
The buttons in the Layers palette let you add, remove, and merge layers, or move items fromone layer to another.
LAYER SELECTION AREA
The three columns in the lower portion of the Layers palette let you display,lock, and manipulate layers.
The Layer Selection area of the Layers palette lets you rearrange layers, select differentlayers, and move items to other layers.
• The Visible column lets you show and hide the selected layer. Hiddenlayers cannot be printed.
• The Lock column y lets you lock and unlock the items on the selected layer.
• The Layer column displays the names of the layers in the active document.
Chapter 1: Palettes
60
Layers Palette

LAYER COLUMN
The Layer column lets you select layers to edit, duplicate, delete, merge,or rearrange.
• The Edit icon d indicates the active layer.
• The Item icon displays to the right of any layer containing selected items.To move the selected items to another layer, drag the Item icon to thedesired layer.
• The Layer column lets you rearrange layers by Option+dragging (Mac OS) orAlt+dragging (Windows) selected layers to different locations in the palette.
DEFAULT LAYER
Each document has a default layer that is listed in the Layers palette. You canadd and remove items from the Default layer, but the Default layer cannotbe deleted.
Master page items reside on the Default layer on document pages. With regardto layers, master page items have the following characteristics:
• If you apply a master page to a document page, the items on the master pagewill affect only the Default layer of that page.
• Items added to the master page are placed behind any items that have beenadded to the Default layer of the document page.
• Master page items residing on the Default layer may be moved to another layer,but the items will no longer be master page items.
ATTRIBUTES DIALOG BOX
Double-clicking a layer in the Layers palette displays the Attributes dialog box,which lets you change the attributes of that layer.
The Attributes dialog box
Chapter 1: Palettes
61
Layers Palette

• The Name field identifies the layer.
• The Layer Color button displays a selection of colors that may be used to assigna new color to the layer. This color will display in the visual indicator for itemson that layer.
• The Visible check box lets you display and print items on new layers. Layersthat are not visible do not print.
• The Locked check box locks items on new layers. Items are locked into positionon their layers and cannot be inadvertently moved within their layer or toanother layer. However, by changing an item’s Origin Across and Origin Downmeasurements (Item & Modify & Box tab), a locked item can be moved withinits layer.
You can unlock an individual item so you can move or resize it, by selecting theitem and choosing Item & Unlock (F6). However, unlocked items cannot bemoved to another layer as long as their layer is locked.
• The Suppress Printout check box prevents the printing of items on a layer-by-layer basis. However, you can uncheck the Suppress Printout and SuppressPicture Printout controls in the Modify dialog box (Item menu) to overridethis setting and print individual items on a suppressed layer. The SuppressPrintout option is available only for print documents. P
• The Keep Runaround check box maintains runaround so that text on visiblelayers flows around items on hidden layers.
MOVE ITEMS DIALOG BOX
Selecting items and then clicking the Move Item to Layer button displaysthe Move Items dialog box, which lets you move selected items to other layers.To activate the Move Item to Layer button , simply select the items youwant to move.
Move Items dialog box
MERGE LAYERS DIALOG BOX
Selecting two or more layers in the Layers palette and then clicking the MergeLayers button displays the Merge Layers dialog box, which lets you combineselected layers and their items into one layer. To activate the Merge Layersbutton , at least one of the selected layers must contain items.
Chapter 1: Palettes
62
Layers Palette

Merge Layers dialog box
DELETE LAYER DIALOG BOX
Selecting a layer containing items and then clicking the Delete Layer button(L on Mac OS, Ö on Windows) displays the Delete Layer dialog box. TheDelete Layer dialog box lets you specify whether you want to delete the itemson the selected layer or move the items to another layer.
Delete Layer dialog box
PROFILE INFORMATION PALETTE P
The Profile Information palette (View & Show Profile Information) providesuseful information about the active picture and lets you assign it an ICC profileor rendering intent after the picture has been imported. This section describes thevarious components of the Profile Information palette.
∫ The Profile Information palette is available when the Quark CMSQuarkXTensions software is loaded and has been activated in the Color Manage-ment Preferences dialog box (Edit & Preferences & Color Management).
To use QuarkCMS, see “Using Color Management” in Chapter 12, “Color,”in A Guide to QuarkXPress: Using QuarkXPress.
Chapter 1: Palettes
63
Layers Palette

PICTURE TYPE, FILE TYPE, AND COLOR SPACE FIELDS PThe Picture Type, File Type, and Color Space fields provide specific file infor-mation about the picture in the active picture box.
Profile Information palette
CHANGING PROFILE INFORMATION FOR AN IMPORTED PICTURE PThe Profile Information palette lets you specify the profile and rendering intentfor an individual picture.
• The Profile pop-up menu lets you choose a profile that matches the color space(RGB, CMYK, or Hexachrome) in which the picture was saved. If the name ofthe source profile for a picture displays in italics, the profile is not available onyour system. When Default is chosen in the Profile pop-up menu, QuarkCMSassigns the profile indicated for that picture’s color space in the Color Manage-ment Preferences dialog box (Edit & Preferences & Color Management).
• The Rendering Intent pop-up menu lets you choose a rendering intent for thepicture. A rendering intent tells the Color Management Module (CMM) whatcolor properties it should preserve when it translates a color from the sourcedevice gamut to the destination device gamut. Perceptual scales all the colorsin the source gamut so that they all fit within the destination gamut. RelativeColorimetric retains colors that are in both the source gamut and the destinationgamut; the only source colors that are changed are those that are not withinthe destination gamut. Saturation considers the saturation of source colors,and changes them to colors with the same relative saturation in the destinationgamut. Absolute Colorimetric retains colors that are in both the source gamutand the destination gamut; colors that are outside the destination gamut areadjusted in relation to how they would look when printed on white paper.
• When an RGB picture is active, the Color Manage to RGB Destinations checkbox lets you specify whether QuarkCMS will apply color management whenthe color space of the image is the same as the Monitor or Composite Outputprofile color space chosen in the Color Management Preferences dialog box(Edit & Preferences & Color Management).
Chapter 1: Palettes
64
Profile Information Palette
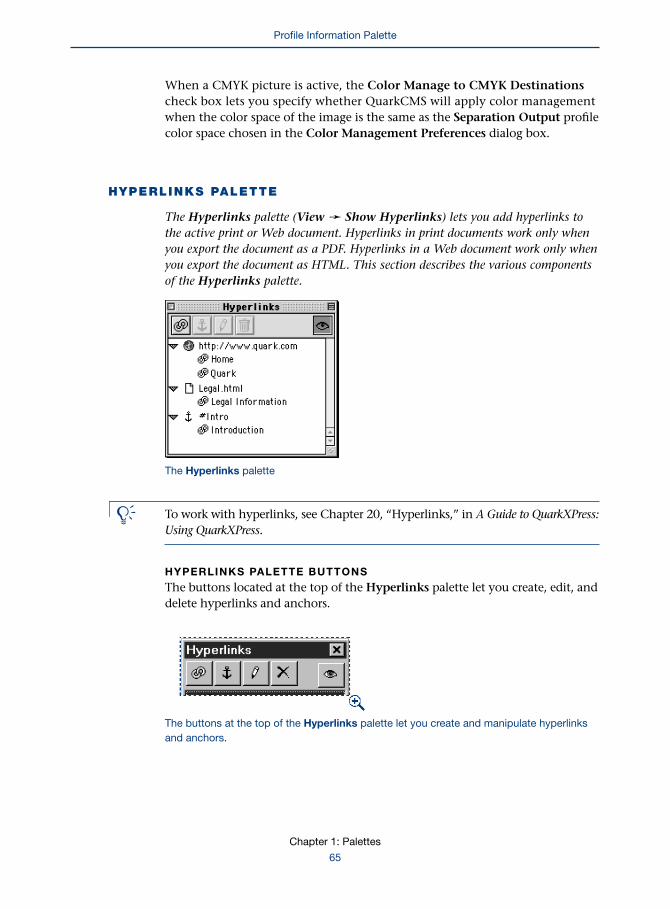
Chapter 1: Palettes
65
Profile Information Palette
When a CMYK picture is active, the Color Manage to CMYK Destinationscheck box lets you specify whether QuarkCMS will apply color managementwhen the color space of the image is the same as the Separation Output profilecolor space chosen in the Color Management Preferences dialog box.
HYPERLINKS PALETTE
The Hyperlinks palette (View & Show Hyperlinks) lets you add hyperlinks tothe active print or Web document. Hyperlinks in print documents work only whenyou export the document as a PDF. Hyperlinks in a Web document work only whenyou export the document as HTML. This section describes the various componentsof the Hyperlinks palette.
The Hyperlinks palette
å To work with hyperlinks, see Chapter 20, “Hyperlinks,” in A Guide to QuarkXPress:Using QuarkXPress.
HYPERLINKS PALETTE BUTTONS
The buttons located at the top of the Hyperlinks palette let you create, edit, anddelete hyperlinks and anchors.
The buttons at the top of the Hyperlinks palette let you create and manipulate hyperlinksand anchors.

NEW HYPERLINK BUTTON
The New Hyperlink button lets you create new destinations and hyper-links:
• If nothing is selected in the active document, this button displays the NewHyperlink dialog box and lets you create destinations that are not yet associatedwith a hyperlink.
• If a range of text or a picture is selected in the active document, this buttondisplays the New Hyperlink dialog box and lets you turn that text or pictureinto a hyperlink.
NEW ANCHOR BUTTON
The New Anchor button lets you create new anchors. If a text box or picturebox is selected in the active document, this button lets you create an anchorthat is associated with a text location, range of text, or picture box.
EDIT BUTTON dThe Edit button d lets you edit the destination or anchor selected in theHyperlinks palette.
DELETE BUTTON ( L ON MAC OS, Ö ON WINDOWS)
The Delete button (L on Mac OS, Ö on Windows) lets you delete the destinationor anchor selected in the Hyperlinks palette. When you delete a destination oranchor that is used by one or more hyperlinks in the active document, an alertdisplays asking you to confirm that you want to delete the destination or anchor.If you click OK, those hyperlinks are then removed from their corresponding textranges or picture boxes.
SHOW/HIDE BUTTON
The Show/Hide button lets you show or hide hyperlinks and anchors in theactive document. When you click this button, it remains pressed until you clickit again. When the Show/Hide button is pressed:
• A text hyperlink in a print document displays as underlined text. The text andthe underline display in the color specified in the General pane of the Prefer-ences dialog box (Edit & Preferences & Preferences). P
• A text anchor displays a small colored arrow at the beginning of the text. Thearrow color is determined by the setting in the General pane of the Preferencesdialog box (Edit & Preferences & Preferences).
Chapter 1: Palettes
66
Hyperlinks Palette

When the Show/Hide button is not pressed, text hyperlinks do not displayunderlined in print documents and text anchors do not display in print or Webdocuments. However, hyperlinks and anchors for picture boxes are not affectedby the Show/Hide button; they can be hidden by choosing View & HideVisual Indicators.
A text anchor in a QuarkXPress document displays as a colored arrow (left); a picture anchordisplays as a visual indicator (right).
HYPERLINKS LIST
The lower portion of the Hyperlinks palette lists all destinations, anchors, andreferences in the active document:
• Destinations display with a or a 1 icon. You can display all the referencesthat use a destination by clicking that destination’s disclosure triangle } (Mac OS)or disclosure box ˇ (Windows) icon.
• Anchors display with a icon. You can display all the references that use ananchor by clicking that anchor’s disclosure triangle } (Mac OS) or disclosurebox ˇ (Windows) icon.
• References (hyperlinks) display with a icon. References display under thedestinations or anchors to which they point.
The Hyperlinks list displays all hyperlinks, destinations, and anchors in the document.
Chapter 1: Palettes
67
Hyperlinks Palette

INDEX PALETTE P
The Index palette (View & Show Index) lets you add words to four different levelsof an index, determine the scope of index references, create cross-references, and editor delete index entries. When the Index palette is open, index markers are displayedaround index entries in a document. Index markers display as colored brackets orsquares. The Index palette is available when the Index QuarkXTensions softwareis loaded.
This section describes the various components of the Index palette.
Index palette
å To work with indexes, see Chapter 18, “Indexes,” in A Guide to QuarkXPress:Using QuarkXPress.
Chapter 1: Palettes
68
Index Palette

ENTRY AREA PAn index entry is an individual item listed in an index. The Entry area lets youenter text for an index entry, determine how to sort an entry alphabetically, anddetermine a level for an index entry.
• The Text field lets you specify index entries by typing in the field, selectingtext in the document, or selecting an existing entry in the entries list. PressingC+Option+I (Mac OS) or Ctrl+Alt+I (Windows) opens the palette and selects theText field. You can enter up to 255 characters in the Text field. When you selecttext in a document, the first 255 characters are automatically entered in the Textfield. For example, if you select the word “QuarkXPress” in a document, it isautomatically entered in the Text field.
• The Sort As field lets you override the alphabetical sorting of an entry in theText field. (Entering a variant spelling in the Sort As field does not affect thespelling of the index entry, only the way it is sorted in the index.) For example,if the entry in the Text field is “20th Century,” you may want it sorted as“Twentieth Century.” To do so, enter “Twentieth Century” in the Sort As field.You can enter up to 255 characters in the Sort As field.
• The Level pop-up menu lets you specify the hierarchy of entries in an index.You can have two levels in a run-in index and up to four levels in a nestedindex. When you choose First Level, the index entry is entered alphabetically inthe Entry list. When you choose Second Level, Third Level, or Fourth Level,you must specify which entry the added entry will fall under. To specify thelocation, click in the left column beside the entry.
You can change an entry’s level by pressing Option (Mac OS) or Alt (Windows),and dragging the entry to a new level.
Level pop-up menu
Chapter 1: Palettes
69
Index Palette

REFERENCE AREA PThe Reference area lets you specify the character style for an index entry’sreferences (usually page numbers), specify the scope an index entry covers,and create cross-references.
• The Style pop-up menu lets you apply a character style sheet to the page num-bers listed for a specific index entry. The style sheet also applies to the text youenter for a cross-reference. You can use different styles to indicate index entriesthat provide more information or certain types of information. For example,you might apply a bold style to a page number that has an illustration.
• The Scope pop-up menu lets you specify the range of text an index entry coversand create cross-references.
Scope pop-up menu
The options in the Scope pop-up menu are as follows:
• Selection Start: Lists the number of the page that contains the index marker’sopen bracket.
• Selection Text: Lists the page numbers from the index marker’s open bracket toits close bracket.
• To Style: Lists the page numbers from the index marker’s open bracket tothe occurrence of a specified paragraph style sheet after the close bracket. Anadjacent pop-up menu lets you choose from the document’s list of paragraphstyle sheets, or you can choose Next. Choosing Next covers all text until anew paragraph style sheet occurs following the close bracket.
• Specified # of ¶s: Lists the page numbers from the index marker’s open bracketthrough a succeeding number of paragraphs beyond the close bracket. A fieldlets you enter the number of paragraphs to include.
• To End Of: Lists the page numbers from the index marker’s open bracket toeither the end of the current story or the end of the document. You can chooseStory or Document from an adjacent pop-up menu.
Chapter 1: Palettes
70
Index Palette

• Suppress Page #: Does not list the page number for an index entry. For example,some of your first-level index entries may not have page numbers becausethey’re broken down into second-level entries with page numbers.
• Cross-Reference: Refers the reader to a cross-referenced entry in the indexrather than, or in addition to, a page number. You can choose See, See also, orSee herein from a pop-up menu, then enter text in the field or click an entry inthe list to automatically fill in the field.
INDEX PALETTE BUTTONS P• The Add button (C+Option+Shift+I on Mac OS, Ctrl+Alt+Shift+I on
Windows) lets you add an index entry or reference to the Entries list accordingto the current settings in the Entry and Reference areas and the location of thearrow fl in the Entries list.
Pressing Option (Mac OS) or Alt (Windows) changes the Add button toAdd Reverse .Clicking Add Reverse adds an entry to the Entries list inreverse order. For example, Jane Doe is added as Doe, Jane when you clickAdd Reverse.
• The Add All button adds all occurrences of the selected text to theEntries list.
Pressing Option (Mac OS) or Alt+Ctrl (Windows) changes the Add All buttonto Add All Reverse . This will add all occurrences of the selected text to theEntries list in reverse order.
• The Find Next Entry button lets you jump from the position of the textinsertion point i to the next occurrence of an indexed word (the next indexmarker) in a story. If a range of text is selected, then clicking the Find NextEntry button will find the next indexed word following the selected text.
Pressing Option (Mac OS) or Alt (Windows) changes the Find Next Entrybutton to Find First Entry . Clicking Find First Entry displays the firstoccurrence of an indexed word in a story.
• The Delete button L (Mac OS) or Ö (Windows) lets you delete an index entryfrom the Entries list. When you delete an entry, all its references, all the entriesnested under it, and all its cross-references are deleted. An alert asks you toconfirm this action.
• The Edit button d lets you edit index entries or index references. When the Editbutton d is selected, the icon displays reversed. You can then select an entryand use the Entry area to change Text, Sort As, and Level information, orthe Reference area to change the Style and Scope information.
∫ You can also double-click an entry to edit it. When you are finished editing,double-click another entry or click the Edit button d again.
Chapter 1: Palettes
71
Index Palette

ENTRIES LIST PThe Entries list displays first-level entries with second-, third-, and fourth-levelentries indented under them. The entries and icons in the list let you dothe following:
• Arrow fl: Click next to an entry to specify a location for a second-level,third-level, or fourth-level index entry.
• Disclosure triangle } (Mac OS) or disclosure box ˇ (Windows) icon: Click todisplay page numbers and cross-references for an index entry.
• Entries column: Click index entries to select them for editing or deleting.
• Page numbers: Page numbers are listed under an entry. Click to select the pagenumbers for editing or deleting. Double-click to enter a temporary edit modeand display the reference’s starting location in a document.
• Cross-references: Cross-references are listed under an entry. Click to select across-reference for editing or deleting. Double-click to enter a temporary editmode and display the references’ starting location in a document.
• The Occurrences column shows the number of times each index entry isindexed in a document.
In this example, the “Palettes” entry has a See also cross-reference to “Using Palettes,”as well as the following second level entries: “Moving,” “Opening,” and “Resizing.”
Chapter 1: Palettes
72
Index Palette

Chapter 2: Context Menus
When you employ a special mouse click, QuarkXPress displays a context menu — a
menu containing commands that are specific to the item you clicked. Because it requires
less mouse movement and menu searching, a context menu can help you save time
while working with documents. Context menus are context-sensitive, so they respond
dynamically to the task at hand.
CONTEXT MENUS
Context menus increase your efficiency and speed. This chapter explains how to accesscontext menus, and what types of options are available in different context menus.
DISPLAYING A CONTEXT MENU
• To display a context menu on Mac OS, press the appropriate keyboard com-mand and click the object you want to affect. The default keyboard commandis Control+click.
In QuarkXPress 4.0 and earlier, Control+click activated the Zoom function onMac OS. If you are accustomed to this workflow and want to continue using it,you can exchange the default context menu keyboard command (Control+click)with the default Zoom keyboard command (Control+Shift+click) by usingthe Control Key area in the Preferences dialog box Interactive pane (Edit &Preferences & Preferences).
• To display a context menu on Windows, right-click the object you wantto affect.
å Context menus are available for rulers, empty space on a document page, pic-ture boxes, text boxes and text paths, lines, tables, form controls, and manypalettes. In print documents, a context menu is available for the pasteboard.
Chapter 2: Context Menus
73
Context Menus

CONTEXT MENUS FOR DOCUMENT PAGE ITEMS
DEFAULT DOCUMENT PAGE CONTEXT MENU FOR A PRINT DOCUMENT PWhen you display the context menu by clicking an empty portion of a page, orthe pasteboard in a print document, the default document page context menudisplays. The available choices in the document page context menu are Fit inWindow, Actual Size, Preferences, Save, Print, and Export. Depending on theselected tool and the contents of the Clipboard, the Paste command may alsobe available.
Default document page context menu for a print document
DEFAULT DOCUMENT PAGE CONTEXT MENU FOR A WEB DOCUMENT WWhen you display the context menu by clicking an empty portion of a pagein a Web document, the default document page context menu displays. Theavailable choices in the document page context menu are Fit in Window,Actual Size, Preferences, Save, Print, and Export. The Paste command mayalso be available, depending on the selected tool and the contents of theClipboard.
Default document page context menu for a Web document
Chapter 2: Context Menus
74
Context Menus

VARIATIONS IN CONTEXT MENUS
Context menus are context-sensitive, meaning menu items change accordingto the active item, the current situation, and the selected tool. The documentpage context menu commands change depending on whether text, a picture,or a line is active, and depending on whether the active item was selected withthe Item tool e or the Content tool E. They can also vary depending onwhether you are working in a print document or a Web document.
For example, in a print document, if a text box or text path is selected with theItem tool e when you display a document page context menu, the menu dis-plays these commands: Fit in Window, Actual Size, Modify, Content, Send andBring, Cut, Copy, and possibly Paste. The Send and Bring submenu allows youto choose Send Backward, Send to Back, Bring Forward, and Bring to Front.
If the same text box is selected with the Content tool E when you display thedocument page context menu, QuarkXPress adds three additional sections tothe menu. The first additional section contains the Get Text and Save Textcommands. The second additional section contains commands that perform thesame functions as commands of the same name in the Style menu: ParagraphStyle Sheet and Character Style Sheet. The third section contains the com-mands Hyperlink and Anchor. When text is selected, the context menualso displays Cut, Copy, Paste, and Convert Text to Table.
QuarkXPress changes these menu sections for an active picture or line so thatit includes commands appropriate to the active item.
Document page context menu for text selected with the Content tool E
Chapter 2: Context Menus
75
Context Menus

QUARKXPRESS PALETTE CONTEXT MENUS
QuarkXPress can display context menus for the Colors, Hyperlinks, Layers,Lists, Style Sheets, and Index palettes, as well as for open Book palettes. Thesemenus are context-sensitive, meaning that menu items change according to thepalette, the active item, the current situation, and the selected tool. For example,when the Item tool e is selected, you cannot display a context menu for theStyle Sheets palette, but when a text box is selected with the Content tool E,you can display the context menu for the Style Sheets palette.
Because of the nature of context menus, there are a number of possibilities forwhat might display in these menus at any given time. You can experiment withdifferent context menus to familiarize yourself with these menus and thevarious choices available for the different QuarkXPress items and palettes.
Chapter 2: Context Menus
76
Context Menus

Chapter 3: File Menu
77
File Menu: Overview
Chapter 3: File Menu
A pocketknife with multiple blades (for example, screwdrivers, corkscrews, and scissors)
allows you to perform basic actions that affect almost any object. The File menu is just
as useful; its multiple commands allow you to perform tasks essential to working with
QuarkXPress documents, such as opening and creating documents, importing and
exporting document content, outputting documents, and saving your publications.
FILE MENU: OVERVIEW
The QuarkXPress File menu lets you manipulate electronic files in a number ofways, including creating, opening, and saving files as well as setting up a documentfor printing. The File menu is divided into five sections.
• The first section lets you create and open documents, libraries, and books.The New and Open commands are available unless too many files are open(over 25 documents and libraries combined, plus an additional 25 books).
• The second section lets you close and save document files and work withrevisions of files. The Close and Save as commands are available when a fileis open. The Save and Revert to Saved commands are available any timeunsaved changes were made to a file.
• The third section lets you import text and pictures into documents, save text ina variety of formats, append sets of document attributes, save document pages asHTML or EPS files, and collect the files required for output into a folder with thedocument. The Append, Export as, Save Page as EPS, and Collect for Outputcommands are available when a document is open. The Get Text and Save Textcommands are available when a text box is selected with the Content tool E;the Get Picture command is available when a picture box is selected with theItem tool e or the Content tool E.
• The fourth section lets you change a document’s size and control the way itprints. The Document Setup, Page Setup, and Print commands are availablewhen a document is active.
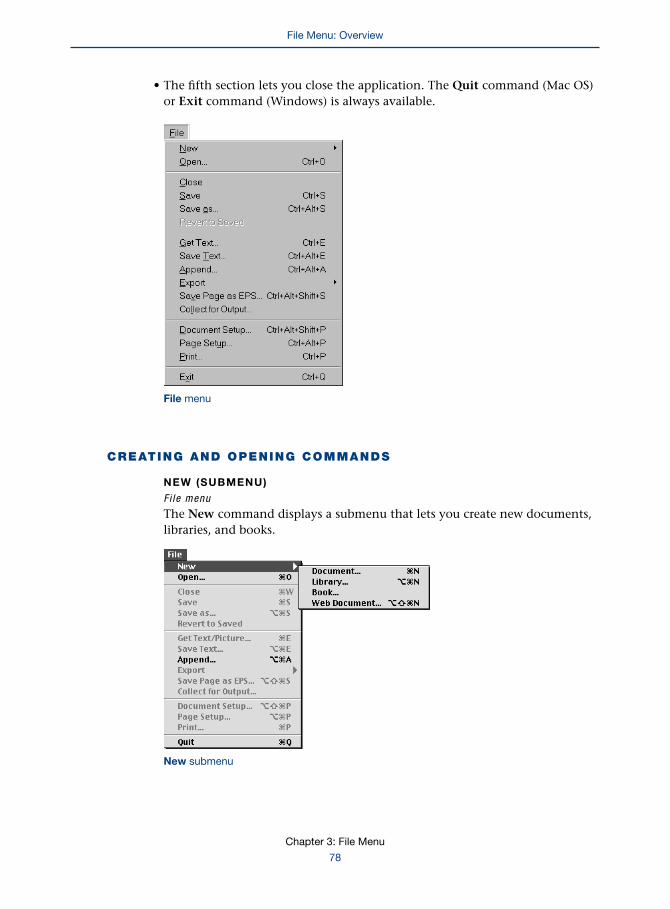
• The fifth section lets you close the application. The Quit command (Mac OS)or Exit command (Windows) is always available.
File menu
CREATING AND OPENING COMMANDS
NEW (SUBMENU)
Fi le menu
The New command displays a submenu that lets you create new documents,libraries, and books.
New submenu
Chapter 3: File Menu
78
File Menu: Overview

DOCUMENT (COMMAND) PFi le & New
The Document command (C+N on Mac OS, Ctrl+N on Windows) displaysthe New Document dialog box, which lets you specify the properties of anew print document.
NEW DOCUMENT (DIALOG BOX) PFi le & New & Document
The New Document dialog box lets you define a print document’s first pageand default master page. (By default, all new documents contain a master page.)These specifications become default application values and are displayed thenext time you open the New Document dialog box.
New Document dialog box
PAGE (AREA) PFi le & New & Document
The Page area lets you specify a standard or custom page size, as well as anorientation for the print document.
• To specify a standard page size, choose an option from the Size pop-up menu.The appropriate dimensions are automatically displayed in the Width andHeight fields.
• To specify a custom page size, enter values in the Width and Height fields. Theminimum page size is .112" × .112"; the maximum is 48" × 48". When you entervalues in the fields, the option in the Size pop-up menu changes to Custom.
Chapter 3: File Menu
79
Creating and Opening Commands

• To change the Orientation option for the document on Mac OS, click theportrait ™ or landscape £ icon. To change the Orientation option for thedocument on Windows, click the Portrait or Landscape button. The valuesin the Width and Height fields change to reflect the new orientation.
MARGIN GUIDES (AREA) PFi le & New & Document
The Margin Guides area lets you specify the position of margin guides on thedefault master page and its document pages. You can also specify whether aprint document contains facing pages or nonfacing pages.
• Enter values in the Top, Bottom, Left, and Right fields to specify the marginsfor the default master page. When Facing Pages is checked, the Left and Rightmargin fields change to Inside and Outside (the Inside margin is nearest thebinding; the Outside margin is on the opposite edge).
• Check Facing Pages to create a document with left and right page formats.If you check Facing Pages, the new document’s original master page, andany additional master pages you create, will be divided into left and rightcomponents to represent the facing-page spread.
∫ If you check Automatic Text Box, the values you enter in the Margin Guidesfields determine the size and location of the automatic text box.
COLUMN GUIDES (AREA) PFi le & New & Document
The Column Guides area lets you specify the position of column guides on thedefault master page.
• Enter a value between 1 and 30 in the Columns field to specify the numberof columns.
• Enter a value from 3 to 288 points (4") in the Gutter Width field to specify theamount of white space between columns.
∫ If you check Automatic Text Box, the values you enter in the Column Guidesfields are used to divide the automatic text box.
Chapter 3: File Menu
80
Creating and Opening Commands

AUTOMATIC TEXT BOX (CHECK BOX) PFi le & New & Document
Check Automatic Text Box to place an automatic text box on the first page ofa new print document. The values in the Margin Guides and Column Guidesfields determine the size, placement, and columns in the automatic text box.
An automatic text box is a text box through which text flows automatically toother pages when pages are inserted into a document. When you check Auto-matic Text Box, this text box is automatically placed on the master page. Thefirst page of the document, if it is based on the default master page, includesthe automatic text box.
LIBRARY (COMMAND)
Fi le & New
A library is a file that displays as a palette and lets you store and retrieveQuarkXPress items. The Library command (C+Option+N on Mac OS,Ctrl+Alt+N on Windows) displays the New Library dialog box, which letsyou create a new library.
NEW LIBRARY (DIALOG BOX)
Fi le & New & Librar y
The New Library dialog box lets you specify a location for the library file andname the library. Enter a name in the Library Name field (Mac OS) or Filename field (Windows) and click Create to display the new library. On Windows,QuarkXPress automatically selects the appropriate extension for a library file(“.qxl”) in the Save as type pop-up menu. To use libraries, see Chapter 16,“Libraries,” in A Guide to QuarkXPress: Using QuarkXPress.
New Library dialog box
Chapter 3: File Menu
81
Creating and Opening Commands

BOOK (COMMAND)
Fi le & New
A book is a file that displays as a palette and helps you manage multiple-document publications. The Book command displays the New Bookdialog box, which lets you create a new book.
NEW BOOK (DIALOG BOX)
Fi le & New & Book
The New Book dialog box lets you specify a location for the book file and namethe book. Enter a name in the Book Name field (Mac OS) or File name field(Windows) and click Create to display the new book. On Windows, QuarkXPressautomatically selects the appropriate extension for a book file (“.qxb”) in theSave as type pop-up menu. For information about using books, see Chapter 19,“Books,” in A Guide to QuarkXPress: Using QuarkXPress.
New Book dialog box
WEB DOCUMENT (COMMAND) WFi le & New & Web Document
The Web Document command (C+Option+Shift+N on Mac OS,Ctrl+Alt+Shift+N on Windows) displays the New Web Document dialogbox, which lets you specify the properties of a new Web document.
NEW WEB DOCUMENT (DIALOG BOX) WFi le & New & Web Document
The New Web Document dialog box lets you define a Web document’s firstpage and default master page. (By default, all new documents contain a masterpage.) These become application default specifications and display the nexttime you open the New Web Document dialog box.
Chapter 3: File Menu
82
Creating and Opening Commands
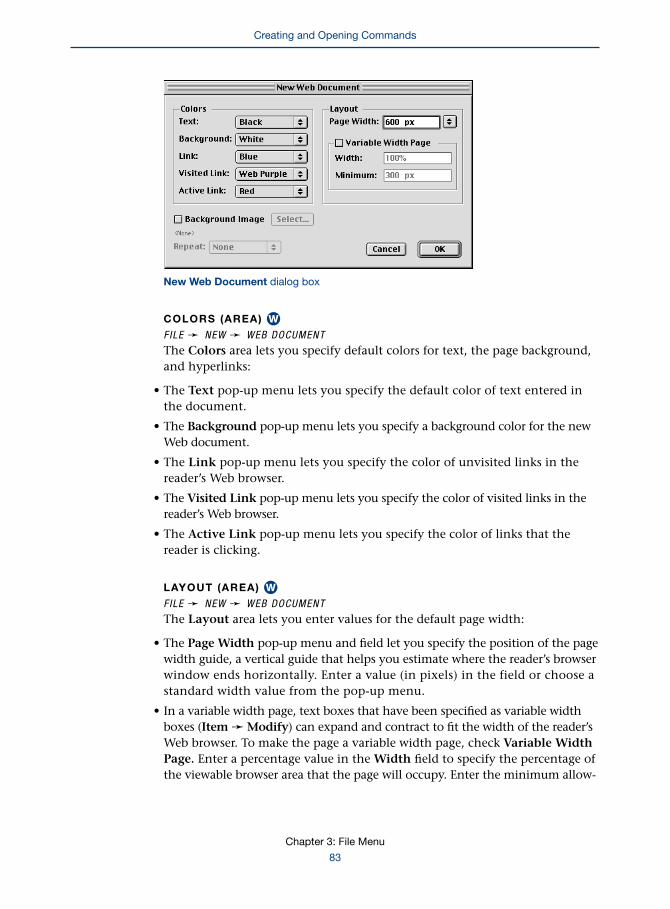
New Web Document dialog box
COLORS (AREA) WFILE & NEW & WEB DOCUMENT
The Colors area lets you specify default colors for text, the page background,and hyperlinks:
• The Text pop-up menu lets you specify the default color of text entered inthe document.
• The Background pop-up menu lets you specify a background color for the newWeb document.
• The Link pop-up menu lets you specify the color of unvisited links in thereader’s Web browser.
• The Visited Link pop-up menu lets you specify the color of visited links in thereader’s Web browser.
• The Active Link pop-up menu lets you specify the color of links that thereader is clicking.
LAYOUT (AREA) WFILE & NEW & WEB DOCUMENT
The Layout area lets you enter values for the default page width:
• The Page Width pop-up menu and field let you specify the position of the pagewidth guide, a vertical guide that helps you estimate where the reader’s browserwindow ends horizontally. Enter a value (in pixels) in the field or choose astandard width value from the pop-up menu.
• In a variable width page, text boxes that have been specified as variable widthboxes (Item & Modify) can expand and contract to fit the width of the reader’sWeb browser. To make the page a variable width page, check Variable WidthPage. Enter a percentage value in the Width field to specify the percentage ofthe viewable browser area that the page will occupy. Enter the minimum allow-
Chapter 3: File Menu
83
Creating and Opening Commands

able width of the variable page (in pixels) in the Minimum field. If the reader’sbrowser window is made smaller than this width, items will stop being resized.
BACKGROUND IMAGE (CHECK BOX) WF ILE & NEW & WEB DOCUMENT
The Background Image check box lets you indicate that you will use a pictureas the default background of the new Web document. To specify a picture, checkBackground Image, and then click Select (Mac OS) or Browse (Windows) tolocate the picture.
REPEAT (POP-UP MENU) WF ILE & NEW & WEB DOCUMENT
When you check Background Image, the Repeat pop-up menu is available,allowing you to choose the number of times that the picture will display:
• The Tile option continuously repeats the picture both horizontallyand vertically.
• The Horizontal option continuously continually repeats the picturehorizontally, but not vertically.
• The Vertical option continuously repeats the picture vertically, butnot horizontally.
• The None option displays the picture only once, in the upper left cornerof the browser window.
å You can reposition the page width reference guide for an individual page orfor all pages based on the same master page using the Page Properties orMaster Page Properties dialog box. For information about page properties,see Chapter 7, “Page Menu.”
OPEN (COMMAND)
Fi le menu
The Open command (C+O on Mac OS, Ctrl+O on Windows) displays the Opendialog box, which lets you open an existing QuarkXPress document, template,library, or book.
OPEN (DIALOG BOX)
Fi le & Open
The Open dialog box displays a list of QuarkXPress files (documents, templates,libraries, and books). Depending on which type of file you have selected, thedialog box displays different information:
• The Document/Web Document/Template/Library/Book Version fielddisplays the version of QuarkXPress used to create and save the selected file.
Chapter 3: File Menu
84
Creating and Opening Commands

• Mac OS only: Check Preview to display a grayscale thumbnail of the selecteddocument. A preview will display only if Include Preview was checked in theSave as dialog box (File menu) when the document was first saved.
• Mac OS only: The Page Size field displays the page size of the selected documentor template below the thumbnail.
Open dialog box
∫ If the Nonmatching Preferences dialog box displays when you open adocument, see “Understanding Nonmatching Preferences” in Chapter 1,“Customizing QuarkXPress,” in A Guide to QuarkXPress: Using QuarkXPress.
CLOSING AND SAVING COMMANDS
CLOSE (COMMAND)
Fi le menu
The Close command (C+W on Mac OS) lets you close the active document. OnMac OS, the keyboard command (C+Option+W) closes all open documents. If adocument contains unsaved changes, an alert dialog box displays to let yousave changes. If a document was not saved previously, the Save as dialog boxdisplays and lets you name the document and save changes.
SAVE (COMMAND)
Fi le menu
The Save command (C+S on Mac OS, Ctrl+S on Windows) lets you retainchanges made to the active document. For documents that have been previ-ously saved, the Save feature retains changes you have made and replaces thedocument with a new version. If you have not yet saved the active document,or if you are working on a template, choosing Save displays the Save as dialogbox, which lets you specify a name and location for the document.
Chapter 3: File Menu
85
Creating and Opening Commands

∫ If you are using the Auto Backup feature, each time you choose Save, a newrevision of the active document is stored in the destination folder. The AutoBackup controls are in the Save pane of the Preferences dialog box (Edit &Preferences & Preferences).
SAVE AS (COMMAND)
Fi le menu
The Save as command (C+Option+S on Mac OS, Ctrl+Alt+S on Windows)displays the Save as dialog box, which lets you specify a name, location, andother attributes for the document. You can use the Save as feature to createanother copy of the active document with a new name or to create a template.
SAVE AS (DIALOG BOX)
Fi le & Save as
The Save as dialog box lets you name the document, specify a location for it,save the document as a template, and save the document in an older version ofQuarkXPress. On Mac OS, you can also include a preview of the document.
Save as dialog box
SAVE CURRENT DOCUMENT AS (FIELD — MAC OS),
FILE NAME (FIELD — WINDOWS)
Fi le & Save as
The Save current document as field (Mac OS) or the File name field (Windows)lets you enter a name for the document.
Chapter 3: File Menu
86
Clos ing and Sav ing Commands

TYPE (POP-UP MENU — MAC OS), SAVE AS TYPE
(POP-UP MENU — WINDOWS)
Fi le & Save as
The Type (Mac OS) or Save as type (Windows) pop-up menu lets you choosewhether to save the file in document or template format. Choose Template Por Web Template Wto save the current document as a reusable pattern fornew documents that may contain the same elements. Templates are pro-tected from overwriting.
INCLUDE PREVIEW (CHECK BOX) — MAC OS ONLY
Fi le & Save as
The Include Preview check box lets you create a small graphic representationof the first page of the document. The preview can be viewed in the Opendialog box (File menu).
VERSION (POP-UP MENU) PFi le & Save as
QuarkXPress lets you open older version documents in QuarkXPress 5.0, andalso lets you downsave 5.0 print documents as 4.0 documents. The first timeyou choose File & Save while working in an earlier version document inQuarkXPress 5.0, the Save as dialog box displays to remind you that the docu-ment is in an earlier version format. After that, QuarkXPress runs a standardSave when you choose File & Save, until you close and reopen the document.
Choose 4.0 from the Version pop-up menu to create a document that can beopened by QuarkXPress 4.0. Items based on features implemented in laterversions of QuarkXPress are altered or removed. P
DOWNSAVING DOCUMENTS AS 4 .0 PWhen you open 4.0 documents in version 5.0, all 4.0 information is retained.However, when you downsave 5.0 documents as 4.0 documents, many 5.0-specific attributes are altered or lost (see the following explanations). You canonly downsave print documents; Web documents cannot be saved in anearlier version of QuarkXPress.
• Editing documents: When you downsave a 5.0 document as 4.0, you can openand edit that document in version 4.0 just like any other 4.0 document. Whenyou downsave a 5.0 document, then reopen it in version 5.0, the documentbehaves like any other document created in 4.0.
• Tables: A table converts to a group of individual boxes with all the usualproperties of QuarkXPress boxes. Once a table is saved in 4.0 format, the tableand cell information cannot be reinstated by reopening the document inQuarkXPress 5.0.
Chapter 3: File Menu
87
Clos ing and Sav ing Commands

• Layers: Layer information is not retained; the stacking order for items in the 4.0document is determined by the stacking order of the layers at the time the docu-ment was downsaved. The layer information cannot be reinstated by reopen-ing the document in QuarkXPress 5.0.
• Hyperlinks: Although style sheets used for hyperlinks are retained, the hyper-link information itself is not retained in the document.
• Text Inset: Text that uses multiple text insets retains the 5.0 insets until youenter a new value in the Text Inset field (Item & Modify & Text tab).
• Books: A book created in QuarkXPress 5.0 cannot be opened in earlier versionsof the application.
• Lists: Lists that are already built are retained. Lists that are not yet built losecharacter style sheet entries.
REVERT TO SAVED (COMMAND)
Fi le menu
The Revert to Saved command lets you discard changes and restore the activedocument to the most recently saved version.
∫ If you are using the Auto Save feature, pressing Option (Mac OS) or Alt(Windows) while you choose Revert to Saved reverts the document to thelast automatically-saved version. The Auto Save controls are in the Save paneof the Preferences dialog box (Edit & Preferences & Preferences).
IMPORTING, APPENDING, EXPORTING, AND
COLLECTING COMMANDS
GET TEXT (COMMAND)
Fi le menu
The Get Text command (C+E on Mac OS, Ctrl+E on Windows) displaysthe Get Text dialog box, which lets you import text files from a variety ofsources. The Get Text command is available when a text box is selected withthe Content tool E. When a picture box is active, Get Picture replaces GetText in the File menu.
Chapter 3: File Menu
88
Clos ing and Sav ing Commands

GET TEXT (DIALOG BOX)
Fi le & Get Tex t
The Get Text dialog box lets you import ASCII text, ASCII text saved with XPressTags, HTML files, and word processing files into the selected text box. Importedtext is inserted at the text insertion point i, or it replaces selected text.
When large text files in most file formats are being imported, the page numberindicator in the lower left corner of the document window changes to indicatethe percentage of the file that has been imported.
Get Text dialog box
• Use the controls in the dialog box to locate the text file you want to import.The Get Text dialog box lists ASCII files, XPress Tags files, HTML files, and filesfrom word processors for which an import/export filter is loaded.
• Select the text file in the list. When you select a file on Mac OS, the Type andSize fields indicate its format and size. When you select a file on Windows, theName, Format, File Size, and Date fields display the appropriate information.
• Check Convert Quotes to convert double hyphens to em dashes, and foot orinch marks to typesetter’s quotation marks, when the text is imported. Foot andinch marks are converted to the quotation marks format you have specifiedin the Quotes area of the Preferences dialog box (Edit & Preferences &Preferences & Interactive pane).
Chapter 3: File Menu
89
Importing, Appending, Exporting, and Collecting Commands

• Check Include Style Sheets to import style sheets from a Microsoft Wordor WordPerfect file to the document’s list of style sheets. To convert XPressTags code contained in imported ASCII text (Mac OS or Windows) or RichText Format text (Windows only) to actual text formatting, also checkInclude Style Sheets.
∫ QuarkXPress includes import/export filters for Microsoft Word and WordPerfect.To import a file created with one of these applications or a file that containsXPress Tag codes, use the XTensions Manager dialog box (Utilities menu) toenable the necessary import/export filter.
GET PICTURE (COMMAND)
Fi le menu
The Get Picture command (C+E on Mac OS, Ctrl+E on Windows) displays theGet Picture dialog box, which lets you import picture files from a variety ofsources. The Get Picture command is available when a picture box is selectedwith the Content tool E or Item tool e. When a text box is active, Get Textreplaces Get Picture in the File menu.
GET PICTURE (DIALOG BOX)
Fi le & Get P ic ture
On Mac OS, the Get Picture dialog box lets you import an EPS, DCS, GIF,JPEG, PDF, PhotoCD, PICT, PNG, TIFF, or Windows bitmap picture file intothe active picture box.
On Windows, the Get Picture dialog box lets you import a BMP, EPS, DCS,GIF, JPEG, PDF, Mac PICT, PhotoCD, PNG, TIFF, or WMF file into the activepicture box.
Use the XTensions Manager dialog box (Utilities menu) to enable theXTensions software necessary to import the following picture file formats:
• To import PhotoCD files, enable the PhotoCD filter.
• To import PNG files, enable the PNG filter.
• To import TIFF files saved with LZW compression, enable the LZW Import filter.
• To import a page from a PDF file, enable the PDF filter.
Chapter 3: File Menu
90
Importing, Appending, Exporting, and Collecting Commands

Use the Get Picture dialog box to import pictures.
If you import a picture into a box that contains a picture, the existing picture isreplaced. When a large TIFF file is being imported, the page number indicator inthe lower left corner of the document window changes to indicate the percent-age of the file that has been imported.
• Use the controls in the dialog box to locate the picture file you want to import.
• Check Preview to display the picture before it is imported.
∫ The Get Picture command places the entire picture in the active picture box,regardless of the size of either the picture or the box.
COLOR MANAGEMENT (AREA) PFi le & Get P ic ture
The Color Management area in the Get Picture dialog box lets you specifyICC profile information for an individual picture upon import. The ColorManagement area is available when the QuarkCMS QuarkXTensions softwareis installed and color management is enabled in the Color ManagementPreferences dialog box (Edit & Preferences & Color Management).
Chapter 3: File Menu
91
Importing, Appending, Exporting, and Collecting Commands

• The Profile pop-up menu lets you choose an International Color Consortium(ICC) profile. The ICC profile matches the device from which the picture wasscanned or the profile used when saving the picture using an image-editingapplication (if that profile still corresponds with the device on which thepicture will be output).
• The Rendering Intent pop-up menu lets you choose a rendering intent forthe picture you are importing. A rendering intent tells the Color ManagementModule (CMM) what color properties it should preserve when it translates acolor from the source device gamut to the destination device gamut: the Percep-tual option scales all the colors in the source gamut so that they all fit withinthe destination gamut. The Relative Colorimetric option retains colors thatare in both the source gamut and the destination gamut; the only source colorsthat are changed are those that are not within the destination gamut. TheSaturation option considers the saturation of source colors, and changesthem to colors with the same relative saturation in the destination gamut.The Absolute Colorimetric option retains colors that are in both the sourcegamut and the destination gamut; colors that are outside the destinationgamut are adjusted in relation to how they would look when printed onwhite paper.
• When an RGB image is selected in the Get Picture dialog box, the ColorManage to RGB Destinations check box lets you specify whether QuarkCMSwill apply color management when the color space of the image is thesame as the Monitor or Composite Output profile color space chosen inthe Color Management Preferences dialog box (Edit & Preferences &Color Management).
• When a CMYK picture is selected in the Get Picture dialog box, the ColorManage to CMYK Destinations check box lets you specify whether QuarkCMSwill apply color management when the color space of the image is the same asthe Separation Output or Composite Output profile color space chosen in theColor Management Preferences dialog box.
Get Picture dialog box Color Management area
Chapter 3: File Menu
92
Importing, Appending, Exporting, and Collecting Commands

SAVE TEXT (COMMAND)
Fi le menu
The Save Text command (C+Option+E on Mac OS, Ctrl+Alt+E on Windows)displays the Save Text dialog box, which lets you export text in a variety of fileformats. The Save Text command is available when a text box is selected withthe Content tool E.
SAVE TEXT (DIALOG BOX)
Fi le & Save Text
The Save Text dialog box lets you export ASCII text, ASCII text saved withXPress Tags, HTML, and word processing files. The Save Text command savesonly text; it does not save pictures, anchored text, or anchored picture boxes.When text is being saved, the page number indicator in the lower left corner ofthe document window changes to indicate the percentage of the text that hasbeen saved.
Save Text dialog box
• Use the controls in the dialog box to specify a location for the text file.
• Enter a name for the text file in the Save text as field (Mac OS) or File namefield (Windows).
• Click Entire Story to export the story containing the text insertion point i; clickSelected Text to export only selected text.
• On Mac OS, choose an option from the Format pop-up menu to specify a fileformat for the exported text. The pop-up menu includes ASCII Text and thenames of any import/export filters you have loaded.
Chapter 3: File Menu
93
Importing, Appending, Exporting, and Collecting Commands

• On Windows, choose an option from the Save as type pop-up menu to specify afile format for the exported text. The pop-up menu includes ASCII Text (*txt),Rich Text Format (*.rtf), and the names of any import/export filters youhave loaded.
• Windows only: When you save text in ASCII format, the default line breakon Windows is indicated by a return character plus a line feed character.On Mac OS, the standard line break is indicated by only a return character.The Mac OS Line Endings check box lets you save ASCII text from Windowswith the Mac OS line endings.
∫ QuarkXPress includes import/export filters for Microsoft Word and WordPerfect.To export a file in one of these formats or a file that contains XPress Tag codes,use the XTensions Manager dialog box (Utilities menu) to enable the necessaryimport/export filter.
APPEND (COMMAND)
Fi le menu
Appending is the process of importing components from other documents intothe existing document. For example, if you want to use several style sheets fromone document in another document, you can append them. The Appendcommand (C+Option+A on Mac OS, Ctrl+Alt+A on Windows) displays theAppend dialog box, which lets you select a document, template, or libraryfrom which to import style sheets, colors, hyphenation and justificationspecifications, lists, and dashes and stripes. In a Web document, you can alsoappend meta tags and menus. Once you choose a document, template, orlibrary to append from, the Append to dialog box is displayed.
APPEND TO (DIALOG BOX)
Fi le & Append
The Append to dialog box lets you selectively import components from theselected source document, template, or library. Click the Style Sheets, Colors,H&Js, Lists, or Dashes & Stripes tab (or the Menu or Meta Tags tab in Webdocuments) to choose from a list of those components. The Available columnlists all the appropriate components in the source file. Select the componentsyou want to import into the target document and double-click them, or clickthe arrow icon ‡ to move them to the Including column. To select a range ofcomponents, click the first components and press Shift while you click thelast component in the range. To select nonconsecutive components, pressC (Mac OS) or Ctrl (Windows) while you click each component.
Chapter 3: File Menu
94
Importing, Appending, Exporting, and Collecting Commands

Append to dialog box
APPEND CONFLICT (DIALOG BOX)
Fi le & Append & OK
The Append Conflict dialog box provides options for handling imported com-ponents (style sheets, colors, hyphenation and justification specifications, lists,and dashes and stripes) that have the same name as existing components, butdifferent specifications. The Existing and New lists display descriptions of thecomponents to help you decide how to handle the conflict.
Append Conflict dialog box
• Click Rename to display a dialog box that lets you rename the appendedcomponent. Enter a new name for the component and click OK.
• Click Auto-Rename to have QuarkXPress place an asterisk in front of theappended component’s name.
Chapter 3: File Menu
95
Importing, Appending, Exporting, and Collecting Commands

• Click Use New to have the appended component overwrite theexisting component.
• Click Use Existing to cancel the append of the component with the samename; the existing component remains unchanged in the document.
If you want all components with conflicting names to be handled the same way,check Repeat For All Conflicts. For example, if you want to rename all conflict-ing components, check Repeat for All Conflicts, and then click Rename.
EXPORT (COMMAND)
Fi le menu
The Export command displays a submenu that lets you choose a format forexporting pages of a document. You can export pages as HTML in a Web docu-ment. The Export submenu also lets you export document pages in conjunctionwith some XTensions software, such as the PDF Filter QuarkXTensions software.
Export command
HTML (COMMAND) WFi le & Expor t
The HTML command displays the Export HTML dialog box, which lets yousave a page or range of pages in the active Web document as an HTML file.
Chapter 3: File Menu
96
Importing, Appending, Exporting, and Collecting Commands
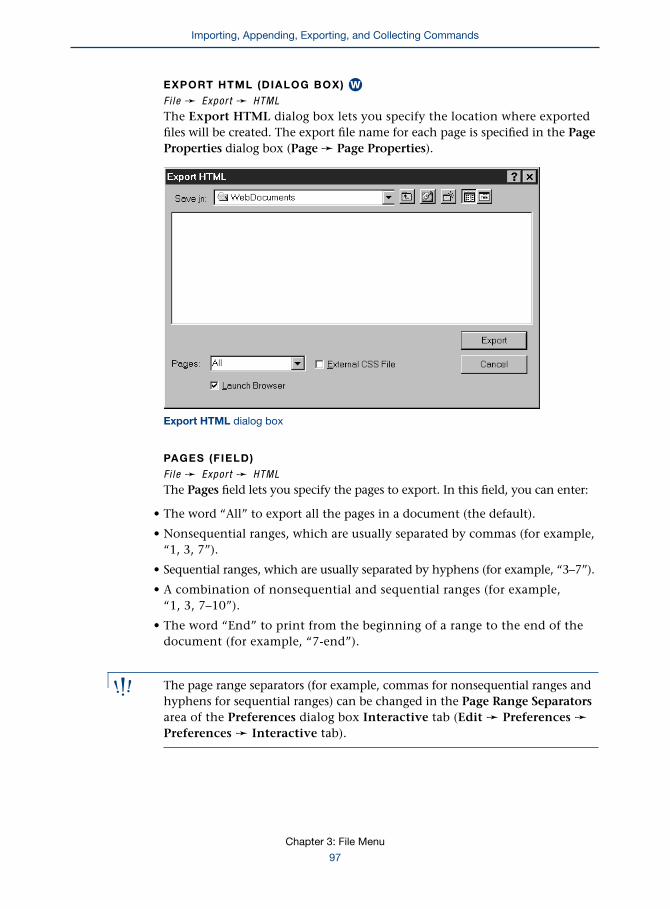
EXPORT HTML (DIALOG BOX) WFi le & Expor t & HTML
The Export HTML dialog box lets you specify the location where exportedfiles will be created. The export file name for each page is specified in the PageProperties dialog box (Page & Page Properties).
Export HTML dialog box
PAGES (FIELD)
Fi le & Expor t & HTML
The Pages field lets you specify the pages to export. In this field, you can enter:
• The word “All” to export all the pages in a document (the default).
• Nonsequential ranges, which are usually separated by commas (for example,“1, 3, 7”).
• Sequential ranges, which are usually separated by hyphens (for example, “3–7”).
• A combination of nonsequential and sequential ranges (for example,“1, 3, 7–10”).
• The word “End” to print from the beginning of a range to the end of thedocument (for example, “7-end”).
∫ The page range separators (for example, commas for nonsequential ranges andhyphens for sequential ranges) can be changed in the Page Range Separatorsarea of the Preferences dialog box Interactive tab (Edit & Preferences &Preferences & Interactive tab).
Chapter 3: File Menu
97
Importing, Appending, Exporting, and Collecting Commands

EXTERNAL CSS FILE AND LAUNCH BROWSER (CHECK BOXES)
Fi le & Expor t & HTML
The External CSS File check box lets you indicate that the style information inthe exported Web document will be stored as a Cascading Style Sheet (CSS) filein the export folder.
The Launch Browser check box lets you display the first exported page in yourdefault browser after you export.
SAVE PAGE AS EPS (COMMAND) PFi le Menu
The Save Page as EPS command (C+Option+Shift+S on Mac OS,Ctrl+Alt+Shift+S on Windows) displays the Save Page as EPS dialog box,which lets you save create an Encapsulated PostScript picture file of a pagein the active document. The EPS file retains and reproduces all text, layout,and pictures on the original page. You can import the EPS file into manyapplications that support the EPS format.
SAVE PAGE AS EPS (DIALOG BOX) PFi le & Save Page as EPS
The Save Page as EPS dialog box lets you specify the page to be saved, as well asthe name, location, scale, and format of the EPS file. To accurately reproduce thepages, QuarkXPress needs access to the necessary PostScript printer fonts andhigh-resolution picture files. You can use a low-resolution preview if you cannotlocate a picture.
Save Page as EPS dialog box
Chapter 3: File Menu
98
Importing, Appending, Exporting, and Collecting Commands

PAGE, SCALE, BLEED (FIELDS), SPREAD, TRANSPARENT PAGE
(CHECK BOXES) PFi le & Save Page as EPS
The lower left corner of the Save Page as EPS dialog box lets you specify thepage to generate the EPS file and its size.
• The Page field lets you specify the page to save as an EPS file. You can also enteran absolute page number, which represents the page’s sequential order in thedocument. To specify an absolute page number, enter a plus sign (+) beforethe number.
• The Scale field lets you enter a percentage value to save a reduced versionof the page.
• The Bleed field lets you enter a value to “expand” the EPS file’s boundaries. Forexample, entering a value of .25" will include .25" of any items that are .25"outside the page boundaries. If the items extend more than .25" beyond thepage boundaries, the items will be cropped at .25".
• Check Spread to generate an EPS file of the entire spread specified in thePage field.
• Check Transparent Page to export the EPS file with a transparent backgroundinstead of the standard white background.
∫ The Bleed field is not available when Custom Bleeds QuarkXTensions software isloaded. For information about Custom Bleeds, see the documentation includedon the QuarkXPress CD-ROM.
FORMAT (POP-UP MENU) PFi le & Save Page as EPS
Choose a picture file format from the Format pop-up menu.
• The Color option generates a color EPS file.
• The B&W option generates a black-and-white EPS file.
• The DCS option generates a preseparated process color EPS file.
• The DCS 2.0 option generates a preseparated EPS that includes process andspot colors.
SPACE (POP-UP MENU) PFi le & Save Page as EPS
The Space pop-up menu lets you choose the color space of the EPS file. ChooseCMYK to create a CMYK EPS file, or choose RGB to create an RGB EPS file.
Chapter 3: File Menu
99
Importing, Appending, Exporting, and Collecting Commands

PREVIEW, DATA (POP-UP MENUS) PFi le & Save Page as EPS
The Preview pop-up menu and Data pop-up menu let you specify how the fileis created so you can use it in a Mac OS or Windows environment.
Choose an option from the Preview pop-up menu to create a preview. OnMac OS, you can choose PICT or TIFF to create a screen preview, or chooseNone to exclude the preview. On Windows, you can choose TIFF to createa screen preview of the EPS file, or choose None to exclude the preview.
If your page contains bitmap (raster) data, choose an option from the Datapop-up menu to control how the data is included in the EPS. Choose ASCII,Binary, or Clean 8-bit.
Although documents print more quickly in binary format, ASCII is moreportable because it is a standard format readable by a wider range of printers andprint spoolers. Clean 8-bit is similar to binary, except it avoids certain patterns ofbinary data that are used to communicate with parallel port printers. This maybe necessary when printing to an output device connected using a parallel port.
OPI (POP-UP MENU) PFi le & Save Page as EPS
The OPI (Open Prepress Interface) method substitutes the high-resolutionversions of color and grayscale bitmap images in a page saved as an EPS file.Choose an option from the OPI pop-up menu if the page contains bitmapimage data in TIFF or EPS file format:
• Use the default setting, Include Images, when you are not using an OPI server.The Include Images option does not embed OPI comments for EPS pictures,and if a high-resolution file cannot be found for printing, the screen previewis substituted.
• QuarkXPress always includes OPI comments with TIFF pictures, regardless ofyour OPI settings. When you choose Omit TIFF while outputting to an OPI pre-press system, the comments are included but the TIFF itself is not described inthe PostScript. (Most OPI systems use this method.) With Omit TIFF chosen fora document containing TIFF and EPS pictures, the EPS pictures are included inthe PostScript, but OPI comments for the EPS pictures are not included.
• Choose Omit TIFF & EPS when you are outputting to an OPI prepress systemthat replaces both TIFF and EPS pictures. The Omit TIFF & EPS option includesOPI comments for both TIFF and EPS pictures in the file.
∫ The OPI pop-up menu is unavailable when the OPI QuarkXTensions softwareis loaded.
Chapter 3: File Menu
100
Importing, Appending, Exporting, and Collecting Commands

PROFILES (DIALOG BOX TAB) PFi le & Save Page as EPS
The Profiles tab lets you specify color management settings whenexporting a page as an EPS. The Profiles tab is available when the QuarkCMSQuarkXTensions software is loaded and color management has been enabledin the Color Management Preferences dialog box (Edit & Preferences &Color Management).
• The Composite pop-up menu lets you choose the ICC profile for the outputdevice you are using to print composite.
• The Separation pop-up menu lets you choose the ICC profile for the outputdevice you are using to print separations.
• When profiles are chosen from both the Separation and Composite pop-upmenus, the Composite Simulates Separation check box lets you print the EPSto a composite printing device, while simulating the separation device profile.
Save Page as EPS dialog box Profiles tab
Chapter 3: File Menu
101
Importing, Appending, Exporting, and Collecting Commands

COLLECT FOR OUTPUT (COMMAND) PFi le menu
The Collect for Output feature prepares a document for delivery to a servicebureau by creating a report file that describes the document, and copying thedocument and its associated pictures, color profiles, and fonts into one folder.The Collect for Output command displays the Collect for Output dialog box,which lets you specify a location for the collected files and name the report file.
∫ If you choose Collect for Output for a document that has not been saved, theSave as dialog box displays. Enter a name in the Save current document asfield (Mac OS) or the File name field (Windows), and click Save. The Collect forOutput dialog box will then display.
COLLECT FOR OUTPUT (DIALOG BOX) PFi le & Col lect for Output
The Collect for Output dialog box provides controls that let you select or createa folder for the document, its imported picture files, its ICC color profiles, itsfonts, and the report file. It also lets you specify which document componentsQuarkXPress will collect.
Collect for Output dialog box
Chapter 3: File Menu
102
Importing, Appending, Exporting, and Collecting Commands

REPORT NAME (FIELD — MAC OS), FILE NAME (FIELD — WINDOWS),
REPORT ONLY (CHECK BOX), AND OUTPUT REQUEST TEMPLATE PFi le & Col lect for Output
The Collect for Output feature generates a report of useful information aboutthe document. The report is a text file, formatted with XPress Tags, that is placedin the same folder as the collected document and picture files.
The Report Name field (Mac OS) or the File name field (Windows) lets youenter a name for the output report file. On Windows, QuarkXPress automati-cally selects the appropriate file extension for XPress Tags (“*.xtg”) in the Save astype pop-up menu. The Report Only check box lets you generate only a report,without collecting any items. The report file includes the following information:
• Document name, date, total pages, width, height
• Version of QuarkXPress, file size
• Required XTensions modules
• Active XTensions modules
• Names of the fonts used
• Graphics used (size, box/picture angle, skew, path name, type, fonts in EPS,location in document)
• Resolution of pictures
• Hyphenation and justification specifications
• Each color created and information required to reproduce custom colors
• Trapping information
• Color plates required for each page
You can import the report file into the “Output Request Template” located inyour QuarkXPress application folder. The template includes space for addinginformation that service bureaus commonly need — your company name,phone number, etc. You can customize the template to suit your specific needs.When you import the file, make sure the XPress Tags filter is loaded and checkInclude Style Sheets in the Get Text dialog box (File menu).
Chapter 3: File Menu
103
Importing, Appending, Exporting, and Collecting Commands

COLLECT (AREA) PFi le & Col lect for Output
The Collect area lets you specify which items QuarkXPress will collectwith the report.
• The Document option copies the document to the specified target folder.
• The Linked Pictures option copies imported picture files that must remainlinked to the document for high-resolution output. These pictures will beplaced in the “Pictures” subfolder within the target collection folder. WhenQuarkXPress collects pictures with the document, the path to each collectedpicture is updated to reflect the new file locations in the “Pictures” folderwithin the target folder.
• The Embedded Pictures option copies pictures that are embedded in thedocument upon import, such as PICT files (Mac OS) or BMP and WMF files(Windows). Including copies of embedded pictures in the collection will notaffect output resolution of the pictures, but you may find it useful to keepcopies of these pictures with the collected document items. These pictureswill be placed in the “Pictures” subfolder within the target folder.
• The Color Profiles option copies any International Color Consortium (ICC)profiles associated with the document or imported pictures. These profileswill be placed in the “Color Profiles” subfolder within the target folder.The Color Profiles check box is available only when the QuarkCMSQuarkXTensions software is loaded.
• Mac OS only: The Screen Fonts option copies any screen fonts required fordisplaying the document. These font files will be placed in the “Fonts”subfolder within the target folder.
• Mac OS only: The Printer Fonts option copies any printer fonts required forprinting the document. These font files will be placed in the “Fonts” subfolderwithin the target folder.
• Windows only: The Fonts option copies any fonts required for printing thedocument. These font files will be placed in the “Fonts” subfolder within thetarget folder.
∫ On Mac OS, TrueType fonts function as both screen fonts and printer fonts. Ifyour document uses only TrueType fonts, QuarkXPress will collect them eitherwhen you check Screen Fonts or when you check Printer Fonts. If yourdocument uses a combination of TrueType and Type 1 fonts, or only usesType 1 fonts, check both Screen Fonts and Printer Fonts to be sure theType 1 fonts are completely collected.
Chapter 3: File Menu
104
Importing, Appending, Exporting, and Collecting Commands

DOCUMENT SETUP, PAGE SETUP, AND PRINT COMMANDS
DOCUMENT SETUP (COMMAND) PFi le menu
The Document Setup command (C+Option+Shift+P on Mac OS,Ctrl+Alt+Shift+P on Windows) displays the Document Setup dialog box,which lets you change the size, orientation, and facing-pages status ofa document.
DOCUMENT SETUP (DIALOG BOX) PFi le & Document Setup
The Document Setup dialog box lets you specify a new size for a documentand change whether or not it has facing pages.
• To change a document’s page size, choose a different page size from the Sizepop-up menu or enter values in the Width or Height fields. To change theOrientation option for the document, click the portrait ™ or landscape £icon on Mac OS, or the Portrait or Landscape button on Windows.
• To change a single-page document to a facing-page document, check FacingPages. To change a facing-page document to a single-page document, uncheckFacing Pages.
Document Setup dialog box
Chapter 3: File Menu
105
Document Setup, Page Setup, and Print Commands

∫ If Facing Pages is checked but unavailable in the Document Setup dialog box,the document contains facing-page master pages. To change from a facing-pageto a single-page document, first change any facing-page master pages to single-page master pages by dragging the 4 icon on top of them in the DocumentLayout palette (all formatting on associated document pages will be lost). Thenchoose File & Document Setup and uncheck Facing Pages.
PAGE SETUP (COMMAND) PFi le menu
In a print document, the Page Setup command (C+Option+P on Mac OS,Ctrl+Alt+P on Windows) displays the Setup tab of the Print dialog box. Forinformation about page setup, see the “Setup (dialog box tab)” section laterin this chapter.
PRINT (COMMAND) WFi le menu
Since the primary destination of Web documents is the World Wide Web,QuarkXPress relies on browser applications when printing Web documents.
In a Web document, the Print command (C+P on Mac OS, Ctrl+P onWindows) launches the default browser specified in the Preferences dialogbox Browsers pane (Edit & Preferences & Preferences), and then displaysthe Print dialog box for that application. The page that prints is the page thatwas displaying when you chose File & Print.
PRINT (DIALOG BOX) PFi le menu
In a print document, the Print command (C+P on Mac OS, Ctrl+P on Windows)displays the Print dialog box, which lets you specify the settings for a docu-ment.
The Print dialog box is divided into two specific areas:
• The fields, pop-up menus, and buttons at the top and bottom of the dialog boxare the static components of the Print dialog box.
Chapter 3: File Menu
106
Document Setup, Page Setup, and Print Commands

• The area in the middle of the Print dialog box consist of five standard tabs:Document, Setup, Output, Options, and Preview. Each tab contains a uniqueset of print-related options.
Standard Print dialog box for a print document on Mac OS (top) and on Windows (bottom)
Additional tabs may display in the Print dialog box, depending on theQuarkXTensions software that is loaded. For example, the Profiles tab displayswhen QuarkCMS QuarkXTensions software is loaded.
Chapter 3: File Menu
107
Document Setup, Page Setup, and Print Commands

PRINTER (POP-UP MENU), PROPERTIES (BUTTON) — WINDOWS ONLY PFi le & Pr in t
The Printer pop-up menu displays all the printers installed on your computer,either through the parallel or serial ports, or across a network. The Propertiesbutton opens a dialog box with controls specific to the selected printer driver.For more information on how to install printers or the options in the Propertiesdialog box, consult the documentation provided with Microsoft Windows.
PRINT STYLE (POP-UP MENU) PFi le & Pr in t
Print styles are sets of predefined output settings that you create in the PrintStyles dialog box (Edit & Print Styles). The Print Style pop-up menu lets youchoose an option from your list of print styles. The Default setting means thatyou have no print style selected. When you choose a print style, all the tabsreflect the settings of that style. If you modify any settings to override the printstyle, a bullet • (Mac OS) or an asterisk * (Windows) is added before the printstyle name in the Print Style pop-up menu.
You can choose an option from the list of print styles when you use a PostScriptor non-PostScript printer. If the print style defines options that are not availablefor non-PostScript printing, an alert will display.
COPIES, PAGES (FIELDS) PFi le & Pr in t
The Copies field lets you specify the number of copies to print. The Pages fieldlets you specify the document pages to print. The Pages field lets you enter:
• The word “All” to print all the pages in a document (the default setting).
• Nonsequential ranges, which are usually separated by commas (for example,“1, 3, 7”).
• Sequential ranges, which are usually separated by hyphens (for example, “3–7”).
• A combination of nonsequential and sequential ranges (for example,“1, 3, 7–10”).
• The word “End” to print from the beginning of a range to the end of thedocument (for example, “7-end”).
∫ The page range separators (for example, commas for nonsequential ranges andhyphens for sequential ranges) can be changed in the Page Range Separatorsarea of the Preferences dialog box Interactive tab (Edit & Preferences &Preferences & Interactive tab).
Chapter 3: File Menu
108
Document Setup, Page Setup, and Print Commands
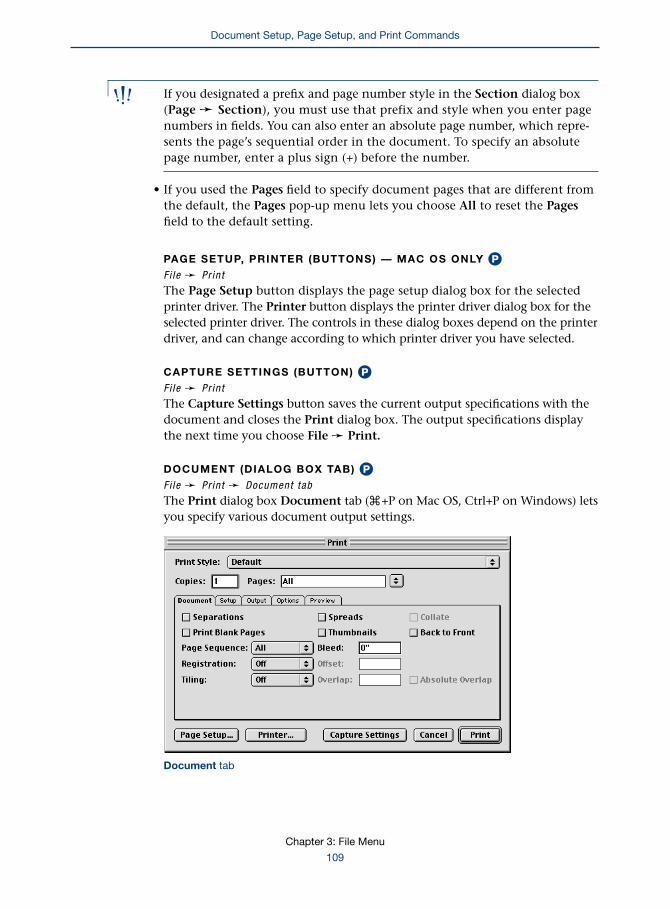
∫ If you designated a prefix and page number style in the Section dialog box(Page & Section), you must use that prefix and style when you enter pagenumbers in fields. You can also enter an absolute page number, which repre-sents the page’s sequential order in the document. To specify an absolutepage number, enter a plus sign (+) before the number.
• If you used the Pages field to specify document pages that are different fromthe default, the Pages pop-up menu lets you choose All to reset the Pagesfield to the default setting.
PAGE SETUP, PRINTER (BUTTONS) — MAC OS ONLY PFi le & Pr in t
The Page Setup button displays the page setup dialog box for the selectedprinter driver. The Printer button displays the printer driver dialog box for theselected printer driver. The controls in these dialog boxes depend on the printerdriver, and can change according to which printer driver you have selected.
CAPTURE SETTINGS (BUTTON) PFi le & Pr in t
The Capture Settings button saves the current output specifications with thedocument and closes the Print dialog box. The output specifications displaythe next time you choose File & Print.
DOCUMENT (DIALOG BOX TAB) PFi le & Pr in t & Document tab
The Print dialog box Document tab (C+P on Mac OS, Ctrl+P on Windows) letsyou specify various document output settings.
Document tab
Chapter 3: File Menu
109
Document Setup, Page Setup, and Print Commands

• The Separations check box lets you print color separations. When Separationsis checked, a plate will be printed for each spot color or process ink as specifiedin the Print column of the Output tab.
• The Spreads check box lets you print two or more adjoining pages side-by-side on the film or paper. To arrange a spread for correct output, place thepages in a horizontal row in the Document Layout palette (View & ShowDocument Layout).
• The Collate check box lets you print more than one copy of a document so thatthey output with all pages in the correct order for binding. If you print threecopies of a document and check Collate, QuarkXPress prints one complete copyof the document before beginning the second copy. If Collate is unchecked,QuarkXPress prints three copies of the first page, then three copies of thesecond page, and so on.
• The Print Blank Pages check box lets you print pages in your document thatare blank. When Separations is unchecked and Print Blank Pages is checked,blank pages will output. When Separations is unchecked and Print BlankPages is unchecked, blank pages will not output.
When Separations is checked, the Print Blank Pages check box changes toPrint Blank Plates. Checking Print Blank Plates will print all plates designatedin the Output tab Plates pop-up menu. When Print Blank Plates is unchecked,blank plates will not output.
• The Thumbnails check box lets you print many pages of a document on onesheet of paper in reduced size. The Thumbnails check box lets you print pagesas thumbnails to non-PostScript printers as well as to PostScript devices.
• The Back to Front check box lets you print a multipage document in reverseorder. The last page in the document will print first.
• The Page Sequence pop-up menu lets you specify the page sequence. All is thedefault option, and choosing it prints all of the related pages. When you chooseOdd, only odd-numbered pages are printed. When you choose Even, onlyeven-numbered pages are printed.
• The Bleed field lets you specify bleed values for a document. A bleed value is thedistance that an item can extend beyond the edge of a page’s final trim size.
Chapter 3: File Menu
110
Document Setup, Page Setup, and Print Commands

∫ The Bleed field is disabled when the Custom Bleeds QuarkXTensions softwareis loaded.
• The Registration pop-up menu lets you specify that crop marks and registrationmarks print on every page. You can choose Centered or Off Center. The Offsetfield lets you enter a value for the distance between the edge of the page and thebeginning of the crop marks when you choose Centered or Off Center in theRegistration area pop-up menu.
Crop marks, also called “cut marks” or “trim marks,” are short, vertical and hori-zontal lines printed outside the page’s final trim size, indicating where to cut thepage. Registration marks are symbols that are used to align overlaying plates.
• To print a large document in sections (tiles), choose an option from the Tilingpop-up menu. When you specify tiling, QuarkXPress prints portions of eachdocument page in two or more overlapping tiles that create the complete pagewhen laid side-by-side. When you choose Manual, you control the way inwhich a page is tiled by positioning the ruler origin. When you choose Auto-matic, QuarkXPress determines the number of tiles that are needed to printeach document page, based on the document size, the printer’s media (paper)size, whether or not Absolute Overlap is checked, and the value you enter inthe Overlap field (the default overlap is 3").
The value entered in the Overlap field is the amount QuarkXPress will use toextend the page as needed to create the tile. When Absolute Overlap is checked,QuarkXPress will use only the value in the Overlap field when extending thepage to create the tile. If Absolute Overlap is unchecked, QuarkXPress will useat least the amount in the Overlap field when creating the tile, but may use alarger amount if necessary. Do not check Absolute Overlap if you want yourdocument centered on the final assembled tiles. QuarkXPress prints tickmarksand location information on each tile to aid you in reassembling them.
SETUP (DIALOG BOX TAB) PFi le & Pr in t & Setup tab
The Print dialog box Setup tab (C+Option+P on Mac OS, Ctrl+Alt+Pon Windows) lets you specify printing information such as printer type,paper size, page orientation, and scale.
Chapter 3: File Menu
111
Document Setup, Page Setup, and Print Commands

Setup tab
• The Printer Description pop-up menu lets you specify the appropriatePostScript Printer Description (PPD) file for your PostScript printer.
When you do this, the Paper Size, Paper Width, and Paper Height fields willautomatically be filled with default information supplied by the PPD. If youchoose a PPD for an imagesetter, the Paper Offset and Page Gap fields will alsobe available; check with your service bureau for information about optimal set-tings. If you do not have the right PPD, choose a similar built-in, generic PPD.
∫ PPDs are created by printer manufacturers and are usually supplied withPostScript printers. Contact the appropriate printer manufacturer formore information.
• The Paper Size pop-up menu lets you specify the media size used by yourprinter. To specify the width and height of custom media supported byyour printer, choose Custom from the Paper Size pop-up menu and entervalues in the Paper Width and Paper Height fields.
• The Reduce or Enlarge field lets you enter a percentage value to specify thatyour document will print smaller or larger than its actual size. The defaultsetting is 100%. The Reduce or Enlarge field lets you scale documents fornon-PostScript printing as well as PostScript output.
Chapter 3: File Menu
112
Document Setup, Page Setup, and Print Commands

• The Page Positioning pop-up menu lets you specify the position of the docu-ment on the selected output media. The default Page Positioning option is LeftEdge, which positions the top left of the document page on the top left of theselected media. The Center option centers the page horizontally and verticallyin the imageable area of the selected output media. The Center Horizontaloption centers the page left-to-right in the imageable area. The Center Verticaloption centers the page top-to-bottom in the imageable area. The PagePositioning pop-up menu lets you position documents for PostScript ornon-PostScript devices.
• The Fit in Print Area check box lets you reduce or enlarge the size of a pagein your document to fit the imageable area of the selected media. The Fit inPrint Area option can be applied when printing to a PostScript printer or anon-PostScript device.
• The Orientation controls let you specify whether to print in portrait or land-scape mode. To specify the orientation of the document on Mac OS, click theportrait ™ or landscape £ icon. To specify the orientation of the documenton Windows, click the Portrait or Landscape button. Portrait orientation is thedefault; however, if your document page is wider than the selected paper size,landscape orientation is selected automatically.
OUTPUT (DIALOG BOX TAB), WITH COLOR SEPARATIONS OFF PFi le & Pr in t & Output tab
The Print dialog box Output tab lets you specify color, resolution, and halftonescreen and value settings. The following Output tab settings for printing areavailable with color separations off (color separations are specified by checkingSeparations in the Document tab):
Output tab (color separations off)
Chapter 3: File Menu
113
Document Setup, Page Setup, and Print Commands

• The Print Colors pop-up menu lets you specify what color space will be usedto print the document.
Black & White prints all document items as black and white (no shades of gray)to a black-and-white printer. For example, box backgrounds will print as black orwhite only; imported pictures may print with shades of gray.
Grayscale prints colors as shades of gray to a black-and-white printer. Forexample, a box with a yellow background will print as a light shade of gray.
Composite CMYK prints composite CMYK color to a color printer when a colorprinter is chosen in the Setup tab Printer Description pop-up menu.
Composite RGB prints composite RGB color to a color printer when a colorprinter is chosen in the Setup tab Printer Description pop-up menu.
If you choose a printer description for a CMYK device in the Setup tab of thePrint dialog box, the Print Colors pop-up menu defaults to Composite CMYK.If you choose a printer description for an RGB device in the Setup tab of thePrint dialog box (File & Page Setup), the Print Colors pop-up menu defaultsto Composite RGB.
∫ If you are using color management and have chosen a composite RGB profile asthe composite output destination (Edit & Preferences & Color Management),the Composite CMYK option is not available in the Print Colors pop-up menu.If you are using color management and have selected a composite CMYK profileas the composite output destination, the Composite RGB option is not availablein the Print Colors pop-up menu.
• The Halftoning pop-up menu lets you choose halftone screen values. TheConventional option uses PPD halftone values, if available; otherwise, it usesQuarkXPress-calculated halftone screen values. The Printer option uses halftonescreen values provided by the selected printer; in this case, QuarkXPress doesnot send halftoning information.
• The default resolution for the printer is entered automatically in the Resolutionfield. To specify a resolution other than the default, enter a dots-per-inch (dpi)value in the Resolution field, or choose an option from the Resolutionpop-up menu.
• The default line frequency for the printer is entered automatically in theFrequency field. To specify a line frequency other than the default, enter alines-per-inch (lpi) value in the Frequency field, or choose an option fromthe Frequency pop-up menu.
• The list at the bottom of the Output tab lists Process Black as the only colorused to print your document when a black-and-white PPD is selected in theDocument tab. If a color PPD is selected, the appropriate color plates displayin the list.
Chapter 3: File Menu
114
Document Setup, Page Setup, and Print Commands

OUTPUT (DIALOG BOX TAB), WITH COLOR SEPARATIONS ON PFi le & Pr in t & Output tab
The Print dialog box Output tab lets you specify color, resolution, and halftonescreen and value settings. The following Output tab settings for printing areavailable with color separations on (color separations are specified by checkingSeparations in the Print dialog box Document tab):
Output tab (color separations on)
• The Plates pop-up menu lets you choose whether to print process or spot col-ors. The Used Process & Spot option prints plates for process and spot colorsused in the document. The Convert to Process option converts all colors inthe file to process colors (at print time only) and prints process plates. TheAll Process & Spot option prints all process and spot color plates.
For information about process and spot colors, see “Understanding Spotand Process Colors” in Chapter 12, “Color,” in A Guide to QuarkXPress:Using QuarkXPress.
• The Halftoning pop-up menu specifies halftone screen values. When Separa-tions is checked in the Document tab, the Conventional option is the onlyoption available in the Halftoning pop-up menu. The Conventional optionuses QuarkXPress-calculated halftone screen values.
• The default resolution for the printer is entered automatically in the Resolutionfield. To specify a resolution other than the default, enter a dots per inch (dpi)value in the Resolution field, or choose an option from the Resolutionpop-up menu.
Chapter 3: File Menu
115
Document Setup, Page Setup, and Print Commands

• The default line frequency for the printer is entered automatically in the Fre-quency field. To specify a line frequency other than the default, enter a lines perinch (lpi) value in the Frequency field, or choose an option from the Frequencypop-up menu.
The list at the bottom of the Output tab lists the plates used in the document,as well as the default Halftone, Frequency, Angle, and Function settings:
• A checkmark in the Print column indicates a plate will be printed: The defaultsetting is checked. To cancel printing for an individual plate, uncheck anycheckmark in the Print column, or select the plate and choose No from thePrint column pop-up menu.
• The Plate column lists spot colors and process inks in the document whenSeparations is checked (File & Print & Document tab). The Plates pop-upmenu at the top of the Output tab specifies which document plates are listed.
• The Halftone pop-up menu lets you assign a different screen angle to a spotcolor. You can choose C, M, Y, or K in the Halftone pop-up menu to producethe current angle, frequency, and dot function for the corresponding processcolor. The default screen values for spot colors are specified in the Halftonepop-up menu in the Edit Colors dialog box (Edit & Colors & New).
• The Frequency column lists the line screen frequency value. This is the lines perinch (lpi) value that will be applied to each of the color plates. If you do notwant to use the Default value for a plate, choose Other from the Frequencypop-up menu to display the Frequency (Mac OS) or Other (Windows) dialogbox. Enter a lines per inch (lpi) value in the Frequency field; then click OK.
The Frequency (Mac OS) or Other (Windows) dialog box lets you enter a custom line screenfrequency value expressed in lines per inch (lpi).
• The Angle column lists the screen angle for each color plate. If you do not wantto use the Default value, choose Other from the Angle pop-up menu to displaythe Angle (Mac OS) or Other (Windows) dialog box. Enter a screen angle valuein the Angle field; then click OK.
Certain screen angle and offset values in two-color spot color blends canproduce moiré patterns. If you have a blend consisting of two spot colorsand you see a moiré pattern, you can change the default screen angle forone of those colors.
Chapter 3: File Menu
116
Document Setup, Page Setup, and Print Commands

COLOR DEFAULT SCREEN ANGLE
Cyan 105.000°
Magenta 75.000°
Yellow 90.000°
Black 45.000°
Spot Colors Corresponds to the default angle for the process color chosenin the Halftone pop-up menu
• The Function column pop-up menu lets you specify alternate dot shapes inprinted screens. The Function pop-up menu displays the available dot shapetypes: Default, Printer Dot, Line, Ellipse, Square, and Tri-Dot.
The default dot shape is a circle, but there may be instances in which you needto use another dot type. If you will be setting up the document to print to file, itis important to know if any special dot settings are needed. Let your professionalprinter be your guide. Depending on their output hardware or presses, they mayhave a preference for particular dot types.
OPTIONS (DIALOG BOX TAB) PFi le & Pr in t & Opt ions tab
The Print dialog box Options tab lets you specify settings that are useful forreporting PostScript errors, making PostScript files, printing negatives, andprinting pictures. Settings in the bottom half of the dialog box let you controlthe way pictures are printed.
Options tab
Chapter 3: File Menu
117
Document Setup, Page Setup, and Print Commands

• The Quark PostScript Error Handler utility provides, in addition to PostScripterror handling, information about where on a page a PostScript error occurs.To receive printed PostScript error reporting from QuarkXPress, check QuarkPostScript Error Handler. If a PostScript error occurs during the printing of aQuarkXPress item (text box, picture box, line, or item created with XTensionssoftware), the utility will print the page containing the QuarkXPress itemshandled successfully up to the point of the error. The utility will then print anerror report containing: (1) The bounding box of the item in which the erroroccurred. This box is identified by a black border and a 50% black background.(2) A message at the top left of the page specifying the type of item causingthe error. Compare the error report to the printed page to isolate the offendingitem. The bounding box on the error report indicates the location of the objectcausing the error.
The Quark PostScript Error Handler is designed only for PostScript printing. TheQuark PostScript Error Handler will append its report to any other PostScripterror reporting utilities you may be using.
• The Page Flip pop-up menu lets you choose from four options: None; Hori-zontal (reverses the printing of page images from left to right); Vertical (printspage images upside down); or Horizontal & Vertical (prints page images fromleft to right, upside down).
• The Negative Print check box lets you print negative page images. WhenNegative Print is checked, flipping a page horizontally or vertically willproduce right-reading, emulsion-down film output, a common standardfor commercial printers in the United States.
• The Output pop-up menu lets you specify how pictures are printed. Normal isthe default, and provides high-resolution output of pictures using the data fromthe pictures’ source files. The Low Resolution option prints pictures at screenpreview resolution. The Rough option suppresses printout of pictures and boxframes and prints a box with an “x” in it, much like an empty picture box on-screen. (If a picture box has a background of None, an “x” will not print in thebox when choosing Rough from the Output pop-up menu.)
• From the Data pop-up menu, choose ASCII, Binary, or Clean 8-bit. Althoughdocuments print more quickly in binary format, ASCII is more portable becauseit is a standard format readable by a wider range of printers and print spoolers.The Clean 8-bit option combines ASCII and binary in a very versatile andportable file format.
If a print job flushes without printing, the Binary setting may be causing anerror; when this occurs, try choosing Clean 8-bit or ASCII instead.
Chapter 3: File Menu
118
Document Setup, Page Setup, and Print Commands

• The OPI pop-up menu lets you control whether TIFF and EPS pictures are outputor OPI (Open Prepress Interface) comments are substituted during output.
Use the default setting, Include Images, when you are not using an OPI server.The Include Images option does not embed OPI comments for EPS pictures,and if a high-resolution file cannot be found for printing, the screen previewis substituted.
QuarkXPress always includes OPI comments with TIFF pictures, regardless ofyour OPI settings. When you choose Omit TIFF while outputting to an OPIprepress system, the comments are included, but the TIFF itself is not describedin the PostScript. (Most OPI systems use this method.) With Omit TIFF chosenfor a document containing TIFF and EPS pictures, the EPS pictures are includedin the PostScript, but OPI comments for the EPS pictures are not included.
Choose Omit TIFF & EPS when you are outputting to an OPI prepress systemthat replaces both TIFF and EPS pictures. The Omit TIFF & EPS option includesOPI comments for both TIFF and EPS pictures in the file.
∫ When OPI QuarkXTensions software is loaded, the OPI pop-up menuis unavailable.
• Full Res of Rotated Objects lets you print rotated TIFF pictures in full resolutionto non-PostScript printers. To enable the Full Res of Rotated Objects check box,you must choose Normal from the Output pop-up menu; additionally, youmust choose a non-PostScript printer from the Chooser (Mac OS Apple menu)or choose a non-PostScript printer from the Print dialog box Printer pop-upmenu (Windows).
∫ The Full Res of Rotated Objects function can be very memory-intensive, andmay require large amounts of hard drive space and RAM.
• The Overprint EPS Black option lets you force all black elements in importedEPS pictures to overprint (regardless of their overprint settings). For informationabout overprinting, see Chapter 13, “Trapping,” in A Guide to QuarkXPress:Using QuarkXPress.
• The Full Resolution TIFF Output option lets you print 1-bit TIFFs at the fullpicture resolution (not to exceed the resolution specified in the Output tab).If Full Resolution TIFF Output is unchecked, images greater than 1-bit willbe subsampled to twice the lpi.
Chapter 3: File Menu
119
Document Setup, Page Setup, and Print Commands

PREVIEW (DIALOG BOX TAB) PFi le & Pr in t & Prev iew tab
The Print dialog box Preview tab lets you view the effect of the settings youmade for a print job before you output it.
Preview tab
Statistical information about the document page is listed on the left half of thePreview tab.
The large page icon on the right is a graphic preview of the document. The pageicon does not display the actual items you included on your document pages;rather, it represents document pages in relation to their placement on the mediaas the document outputs from the printer.
• The blue rectangle represents the document page.
• The green rectangle represents the imageable area for the selected media. Whenyou choose a Tiling option (Print dialog box Document tab), the green rectan-gles indicate the imageable areas of individual pages, which allows you topreview how the tiled pages will overlap at output.
• A black rectangle in the graphic preview represents the media area when a sheet-fed device is chosen in the Printer Description pop-up menu (Print dialog boxSetup tab).
• A gray area surrounding the document represent bleeds when a bleed valueis entered in the Bleed field (Print dialog box Document tab), or when ableed setting is chosen using the Custom Bleeds QuarkXTensions software(Print dialog box Bleed tab).
• If the page size, including crop marks and bleed, is greater than the imageablearea of the print media, a red area indicates portions of the document that areoutside the imageable area, and will therefore be clipped. If the Tiling pop-upmenu is set to Automatic in the Document tab, the red area does not display.
Chapter 3: File Menu
120
Document Setup, Page Setup, and Print Commands

• Registration marks display in black when a Registration option is chosen(Print dialog box Document tab).
• The “R” in the graphic preview illustrates rotation, positive/negative, flip,and reading.
• The arrow Õ to the left of the graphic preview indicates the film or pagefeed direction.
Below the graphic preview are two smaller icons:
• The cut sheet icon à indicates that you have selected a cut sheet output devicein the Printer Description pop-up menu (Print dialog box Setup tab), whilea roll-fed icon À indicates that you have selected a roll-fed output device inthe Printer Description pop-up menu.
• The question mark Á is a pop-up button that displays a legend of the differentcolors used in the graphic preview.
PROFILES (DIALOG BOX TAB) PFi le & Pr in t & Prof i les tab
The Profiles tab of the Print dialog box lets you change the default profiles spec-ified in the Color Management Preferences dialog box (Edit & Preferences &Color Management). The Profiles tab is available when QuarkCMS is loadedand color management has been enabled in the Color Management Prefer-ences dialog box.
Change ICC profiles before printing in the Profiles tab (File & Print & Profiles tab)
Chapter 3: File Menu
121
Document Setup, Page Setup, and Print Commands

• The Separation and Composite pop-up menus override the default profiles youspecified in the Color Management Preferences dialog box.
• The Composite Simulates Separation option lets you print to the chosencomposite printing device, while simulating output to the separation device.This check box is available when a profile is chosen in both the Separationand Composite pop-up menus.
∫ Changes you make in the Print dialog box Profiles tab are reflected in the ColorManagement Preferences dialog box.
QUIT AND EXIT COMMANDS
QUIT (COMMAND) — MAC OS ONLY
Fi le menu
The Quit command (C+Q) lets you close all open files and quit the application.If an open document contains unsaved changes, a Save alert dialog box displaysand lets you save changes.
EXIT (COMMAND) — WINDOWS ONLY
Fi le menu
The Exit command (Ctrl+Q) lets you close all open files and quit the applica-tion. If an open document contains unsaved changes, a Save warning displaysand lets you save changes.
Chapter 3: File Menu
122
Document Setup, Page Setup, and Print Commands

Chapter 4: Edit Menu
Working in a document entails frequent adjustments — perhaps you need to move
some text, delete a picture, or add a new color to your layout. Maybe you need to
change certain default values, or to find and replace text.
The QuarkXPress Edit menu allows you to adjust or change content in a multitude
of ways, set various preferences, and to create or change formatting specifications
such as style sheets, colors, or print styles.
EDIT MENU: OVERVIEW
The QuarkXPress Edit menu lets you use the Clipboard, find and replace text,change QuarkXPress default specifications, and create formatting specificationsfor a document. The Edit menu is divided into six sections.
• The first section lets you reverse or recreate certain actions. If the Undo or Redocommand (C+Z on Mac OS, Ctrl+Z on Windows) is unavailable, the last actionyou performed cannot be undone.
• The second section lets you edit text, pictures, and items. If the Item tool e isselected, you can cut, copy, paste, or delete active items; or you can select allitems on the current page.
If the Content tool E is selected, you can cut, copy, paste, or delete selectedtext or an active picture; or you can select all the text in the active text chain.
• The third section provides controls for accessing third-party applications usedfor editing pictures. On Mac OS, you can automatically import and updatepictures, tables, or charts by using the Mac OS Subscription features. OnWindows, you can use a Microsoft Windows function called Object Linkingand Embedding (OLE) to link and embed pictures from other applications.
• The fourth section lets you display the Clipboard. The Show Clipboardcommand is always available.
• The fifth section lets you find and replace text, style sheets, and characterattributes; customize QuarkXPress with preferences; and create and manipulatestyle sheets, colors, hyphenation and justification specifications (H&Js), lists,and styles for lines and frames (called dashes and stripes). The commands arealways available.
Chapter 4: Edit Menu
123
Edit Menu: Overview

• The sixth section lets you create and manipulate print styles. The Print Stylescommand is always available.
Edit menu
UNDOING AND REDOING ACTIONS
UNDO/REDO (COMMAND)
Edi t menu
The Undo command (C+Z on Mac OS, Ctrl+Z on Windows) identifies the lastaction performed and lets you reverse the action. For example, after you applya style sheet to a paragraph, the menu command reads Undo Style Change.After you choose Undo, the menu command changes to Redo.
The Redo command identifies the last Undo command performed and lets youreimplement that action. For example, if you choose Undo Style Change, themenu command changes to Redo Style Change. After you choose Redo,the menu command changes back to Undo.
∫ The Undo command is not available for every action you perform. An alertusually warns you if an action cannot be undone.
Chapter 4: Edit Menu
124
Edit Menu: Overview

CUT, COPY, PASTE, DELETION COMMANDS
CUT (COMMAND)
Edi t menu
When the Item tool e is selected, the Cut command (C+X on Mac OS, Ctrl+Xon Windows) removes active items and their contents and places them on theClipboard. When the Content tool E is selected, the Cut command removesselected text or a selected picture and places it on the Clipboard.
COPY (COMMAND)
Edi t menu
When the Item tool e is selected, the Copy command (C+C on Mac OS,Ctrl+C on Windows) places a copy of active items and their contents on theClipboard. When the Content tool E is selected, the Copy command places acopy of selected text or a selected picture on the Clipboard. The Copy commanddoes not remove elements from the document.
PASTE (COMMAND)
Edi t menu
The Paste command (C+V on Mac OS, Ctrl+V on Windows) places theClipboard’s contents into a document or into a document item as shown inthe table below. The ability to paste depends on the selected tool, the contentsof the Clipboard, and the active item in the document.
CLIPBOARD PASTE
TOOL CONTENTS LOCATION
e boxes/lines/ center of document windowtext paths/table
E text text insertion point i of selected textbox/path/cell
E picture upper left corner of picture box/cell
E boxes/lines/ center of document windowtext paths/tables
E box, table, or anchored at text insertion point i of selectedno-content text box/path/cellline
∫ If you paste text in a box containing selected text, the selected text is replaced.If you paste a picture in a box containing a picture, the picture is replaced.
Chapter 4: Edit Menu
125
Cut, Copy, Paste, Deletion Commands

PASTE SPECIAL (COMMAND) — WINDOWS ONLY
Edi t menu
The Paste Special command lets you choose the format of an object that youpaste, paste and embed, or paste and link into your document through the useof the Microsoft Windows OLE function. OLE (Object Linking and Embedding)enables a server application to provide an object to a client application. Using aserver application, such as an illustration program, you can copy a picture to theClipboard as an object. You are then able to paste, paste and embed, or pasteand link the object into the client application, QuarkXPress. If you later wantto edit the embedded or linked object, just double-click on it with the Contenttool E and the object’s server application launches and allows you to edit it.The Paste Special command is available for pictures when the Content tool Eis selected, a picture box is active, and the Clipboard contains a picture copiedfrom an OLE server application.
When an object is pasted, no information about the file it came from isincluded. In contrast, embedded and linked objects retain information abouttheir source file. When an object is embedded in QuarkXPress, all pertinent datafrom the source file is included, so the object is able to transfer itself back intothe server application that created it. When an object is linked, all pertinentinformation is retained in the source file, which QuarkXPress accesses whenneeded. The advantage of an embedded object is that it can be opened in theserver application that created it without accessing the source file. The advan-tage of a linked object is that when a linked object’s source file is updated, thelinked object in QuarkXPress is also automatically updated. For informationabout linking and embedding objects, see Paste/Paste Link (buttons) andAs (list) later in this section.
∫ The Paste Special command is part of OLE, not QuarkXPress, and therefore maywork differently with other versions of Windows or OLE. Also, not all Windowsapplications support OLE. For information about a particular application, referto the documentation for that application.
To find out what server applications are available on your computer, select apicture box with the Content tool E and choose Insert Object from the Editmenu. The Object Type list displays the file types that can be created with theavailable server applications.
Chapter 4: Edit Menu
126
Cut, Copy, Paste, Deletion Commands

PASTE SPECIAL (DIALOG BOX) — WINDOWS ONLY
Edi t & Paste Spec ia l
The Paste Special dialog box gives you control over how the object stored onthe Clipboard is pasted. Using the controls, you can paste, paste and embed, orpaste and link the object. You can also choose to display the object as an icon.
Paste Special dialog box
SOURCE (FIELD) — WINDOWS ONLY
Edi t & Paste Spec ia l
The Source field displays different information depending on whether ornot the object on the Clipboard came from a file that was first saved in theserver application. If the file was saved before copying, then the location ofthe file where the object came from is displayed.
PASTE/PASTE LINK (BUTTONS) — WINDOWS ONLY
Edi t & Paste Spec ia l
The Paste and Paste Link buttons are mutually exclusive, which means thatonly one of them can be selected. If Paste is selected, then the object on theClipboard will be pasted, or pasted and embedded, depending on the optionyou select in the As list. If Paste Link is selected, then the object is pastedwith a link to its source file.
∫ When linking objects, always be sure to save the source file in the server appli-cation. If you link an object without saving the source file, QuarkXPress willnot be able to access the appropriate information when you need to edit theobject in the server application later on. For the same reason, do not delete thesource file of a linked object. If you move a source file, use the Links dialogbox (Edit & Links & Change Source button) to update its location.
Chapter 4: Edit Menu
127
Cut, Copy, Paste, Deletion Commands

AS (LIST) — WINDOWS ONLY
Edi t & Paste Spec ia l
The As list displays all the available formats for pasting the object from theclipboard. The selected button determines which options are available:
• When the Paste button is selected, you are able to paste the object as an embed-ded object, a metafile, or a bitmap image. Different variations of these optionsdisplay in the As list. For example, if you copied a chart from Microsoft Excel,“Microsoft Excel Worksheet Object” and “Metafile” would display in the As list.If you created an image with Microsoft Paint, then “Bitmap Image Object,”“Metafile,” and “Device-Independent Bitmap” would display. Choosing theoption with a name ending with “Object” pastes and “ embeds, while choosing“Metafile,” “Bitmap,” or “Device-Independent Bitmap” pastes.
• When Paste Link is selected, only one option relating to the server applicationdisplays in the As list. For example, if you copied a chart from Microsoft Excel,then only “Microsoft Excel Worksheet” would display in the list.
RESULT (AREA) — WINDOWS ONLY
Edi t & Paste Spec ia l
As soon as you select an available format from the As list, the Result areadisplays summary information about how that picture will be pasted.
DISPLAY AS ICON (CHECK BOX) — WINDOWS ONLY
Edi t & Paste Spec ia l
To display the picture as an icon on-screen, check the Display As Icon checkbox. This check box is only available when you embed or link the object. Whenchecked, a preview of the icon displays along with the Change Icon button.
∫ Displaying a picture as an icon is meant solely to speed up screen redraw byfreeing memory that would otherwise be consumed by large picture files. If theDisplay as Icon check box is enabled when you print, your output will containthe icon rather than the picture.
CHANGE ICON (BUTTON AND DIALOG BOX) — WINDOWS ONLY
Edi t & Paste Spec ia l
Clicking the Change Icon button displays the Change Icon dialog box. Use theIcon area to choose between the current and default icons, or locate a new iconwith the From File button and field. If you do not know the exact location ofthe icon file, use the Browse button to search. All the icons in the location youspecify in the From File field display below the field. The text you enter in theLabel field displays below the icon in the picture box to help you rememberwhat picture the icon represents.
Chapter 4: Edit Menu
128
Cut, Copy, Paste, Deletion Commands

CLEAR (COMMAND — MAC OS), DELETE (COMMAND — WINDOWS)
Edi t menu
When the Item tool e is selected, the Clear command (Mac OS) or Delete com-mand (Windows) deletes active items and their contents. When the Contenttool E is selected, choosing Clear (Mac OS) or Delete (Windows) deletes thecontents of an active picture box, or selected text from an active text box. Theitems or contents are not placed on the Clipboard. If you use the Clear or Deletecommand while a linked text box is selected, the text in the original box eitherreflows through subsequent boxes or generates an overflow symbol at the endof the chain.
SELECT ALL (COMMAND)
Edi t menu
When the Item tool e is selected, the Select All command (C+A onMac OS, Ctrl+A on Windows) selects all the items on the current spread and itspasteboard in a print document, or all the items on the current page in a Webdocument. When the Content tool E is selected, the Select All commandselects all the text in the active box or text chain.
The Select All command cannot be used to select all points in a Bézier item.Instead, press C+Shift+A (Mac OS) or Ctrl+Shift+A (Windows) while a Bézierpoint is active, or double-click a Bézier point to select all Bézier points.
SUBSCRIBE COMMANDS — MAC OS ONLY
SUBSCRIBE TO, SUBSCRIBER OPTIONS (COMMANDS) — MAC OS ONLY
Edi t menu
Mac OS software (version 8.x to 9.x) places two commands, Subscribe to andSubscriber Options, in the Edit menu.
Subscribe functions appear in many applications and are often used for automati-cally updating a document whenever imported pictures in the document aremodified in an outside application. However, since QuarkXPress already offersfeatures such as Auto Picture Import (Edit & Preferences & Preferences &General pane) and the Usage dialog box (Utilities menu) to perform thisfunction, QuarkXPress users may find the Subscribe functions useful mostlyfor importing tables or charts from a spreadsheet application that supportspublish and subscribe functions, but does not normally save files as pictures.Using the subscribe functions, these imported tables can then be automati-cally updated as pictures in the QuarkXPress layout whenever they aremodified in the spreadsheet application.
Chapter 4: Edit Menu
129
Cut, Copy, Paste, Deletion Commands

The subscribe functions in QuarkXPress are available for picture boxes. Whena picture box is selected and the Content tool E selected, the Subscribe tocommand is available; this allows you to import EPS or PICT edition files. Editionfiles are the picture files created by an application that supports Publisher func-tions. If given a choice between EPS and PICT, we recommend that you subscribeto EPS edition files. (QuarkXPress cannot subscribe to TIFF edition files.) Forcomplete information about the Subscribe to and Subscriber Optionscommands, please refer to your computer’s documentation.
LINK COMMANDS — WINDOWS ONLY
LINKS (COMMAND) — WINDOWS ONLY
Edi t menu
The Links command displays the Links dialog box, which lets you manipulatelinked objects within the active document. This command is available when atleast one object is linked to the document.
∫ The Links command is part of OLE, not QuarkXPress, and therefore may workdifferently with different versions of Windows or OLE.
LINKS (DIALOG BOX) — WINDOWS ONLY
Edi t & Links
In the Links column of the dialog box, all of the linked objects within the activedocument are shown. If the column is not wide enough to display the entirelocation of the source file, the beginning part of the path will not be visible.View the Source field below the list to see the entire path of the selected sourcefile. The Type column and field display the object type. The Type field may alsospecify the server application used to create the object. The Update columnshows how the object is updated, either automatically or manually, dependingon the option selected in the Update field. To change how the object is updated,select a link in the list by clicking it once, and then click the appropriatebutton in the Update field:
• Choosing Automatic allows QuarkXPress to update the object whenever achange is detected in the source file.
• Choosing Manual updates the object only when you use the Update Nowbutton described below.
To manipulate a linked object, select it in the list and use one of these buttons:
• The Update Now button updates the linked object. When clicked, QuarkXPresslocates the source file and alters the object according to how it was last saved inthe source file. Use this button to update the objects that are set to Manual.
Chapter 4: Edit Menu
130
Subscribe Commands — Mac OS Only

• The Open Source button launches the server application that was used tocreate the object and opens its source file.
• The Change Source button displays the Change Source dialog box, which letsyou relocate a source file that was moved from its original location. It functionslike any Windows Open/Save as dialog box.
• The Break Link button breaks the link between the object and its source file.When pressed, an alert asks you to confirm that you want to break the link.If you break a link, all that remains is the low-resolution picture of the object.Without the link, QuarkXPress will not be able to access the original file andprint the picture at higher resolutions.
The Links dialog box
OBJECT (SUBMENU) — WINDOWS ONLY
Edi t menu
The Object submenu is only available for selected picture boxes that containan embedded or linked object. The Object submenu changes according to theobject within the selected picture box. For example, if you embed an image fromMicrosoft Paint in the selected picture box, then the Object submenu changesto the Bitmap Image Object submenu. Regardless of the submenu title, twooptions are listed in the submenu: Edit and Open. Selecting either option willlaunch the server application and automatically open the object’s source file.
∫ The Edit command differs from the Open command. Choosing Editshould allow the client application to take on the editing functions of theserver application so that the object may be edited solely within the clientapplication. Currently, QuarkXPress does not use this capability and there-fore opens the server application to edit embedded or linked objects.
Chapter 4: Edit Menu
131
Link Commands — Windows Only

INSERT OBJECT (COMMAND) — WINDOWS ONLY
Edi t menu
The Insert Object command displays the Insert Object dialog box, which letsyou create a new object using a server application or retrieve an existing file.This command is available whenever a picture box is selected with eitherthe Content tool E or the Item e tool.
∫ The Insert Object command is part of OLE, not QuarkXPress, and therefore maywork differently with different versions of Windows or OLE.
INSERT OBJECT (DIALOG BOX) — WINDOWS ONLY
Edi t & Inser t Object
The Insert Object dialog box differs depending on which option, Create Newor Create from File, is selected.
• When Create New is selected, the Object Type list displays all the availableserver application object types. Choose one and view the Result field for asummary of how the object will be inserted. Click OK to launch that appli-cation and create an object to place in the picture box. When you do this,QuarkXPress applies the changes you make in the server application to thepicture box. When you are done, choose Exit & Return to <QuarkXPressDocument Name> from the File menu in the server application. If you planto link the object later, make sure you save the file in the server applicationbefore you exit.
The Insert Object dialog box
Chapter 4: Edit Menu
132
Link Commands — Windows Only

∫ When you use the Create New button, the object you are about to create can-not be linked and will therefore be automatically embedded. This is because alinked object must have a source file, and since no source file exists yet, linkingis not possible. Therefore, if you create a new object and want to link it, firstcreate and save the object as described above; then re-insert the object inthe picture box using the Create from File button.
• When Create from File is selected, the File field displays, allowing you to enterthe specific location of a file to insert. If you do not know the exact location andfile name of the object you want to insert, click the Browse button to searchfor the file. Check Link to link the object; otherwise it will be automaticallyembedded. The Result field displays summary information about how thefile will be inserted.
SHOW/HIDE CLIPBOARD COMMANDS
SHOW CLIPBOARD, HIDE CLIPBOARD (COMMAND)
Edi t menu
The Show Clipboard command displays the Clipboard. The Clipboard containsthe last item, text, or picture you cut or copied from any application thatsupports the Clipboard. An item cannot be edited within the Clipboard,and it is erased as soon as another item is copied there.
FIND/CHANGE COMMAND
FIND/CHANGE (COMMAND)
Edi t menu
The Find/Change command (C+F on Mac OS, Ctrl+F on Windows) displaysthe Find/Change palette, which lets you search for and replace text or textattributes (including style sheet, font, size, color, and type style) in the currentstory or document. The Find/Change feature does not work on document andmaster pages simultaneously. To use the Find/Change feature on master pages,first display a master page in the document window (Page & Display).
Chapter 4: Edit Menu
133
Link Commands — Windows Only
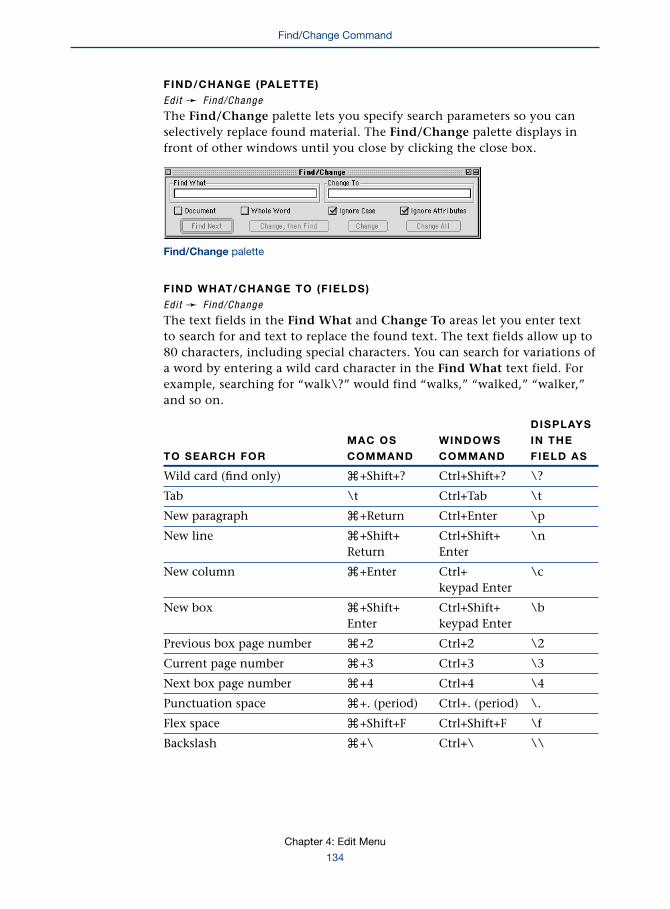
FIND/CHANGE (PALETTE)
Edi t & Find/Change
The Find/Change palette lets you specify search parameters so you canselectively replace found material. The Find/Change palette displays infront of other windows until you close by clicking the close box.
Find/Change palette
FIND WHAT/CHANGE TO (FIELDS)
Edi t & Find/Change
The text fields in the Find What and Change To areas let you enter textto search for and text to replace the found text. The text fields allow up to80 characters, including special characters. You can search for variations ofa word by entering a wild card character in the Find What text field. Forexample, searching for “walk\?” would find “walks,” “walked,” “walker,”and so on.
DISPLAYS
MAC OS WINDOWS IN THE
TO SEARCH FOR COMMAND COMMAND FIELD AS
Wild card (find only) C+Shift+? Ctrl+Shift+? \?
Tab \t Ctrl+Tab \t
New paragraph C+Return Ctrl+Enter \p
New line C+Shift+ Ctrl+Shift+ \nReturn Enter
New column C+Enter Ctrl+ \ckeypad Enter
New box C+Shift+ Ctrl+Shift+ \bEnter keypad Enter
Previous box page number C+2 Ctrl+2 \2
Current page number C+3 Ctrl+3 \3
Next box page number C+4 Ctrl+4 \4
Punctuation space C+. (period) Ctrl+. (period) \.
Flex space C+Shift+F Ctrl+Shift+F \f
Backslash C+\ Ctrl+\ \\
Chapter 4: Edit Menu
134
Find/Change Command
å Mac OS only: QuarkXPress also lets you press C+Tab to enter “\t” in theFind What field; however, Mac OS uses the key combinations C+Tab andC+Shift+Tab to switch between applications. For information about how tochange these key combinations for the Mac OS so that you can use C+Tabto enter “\t” in the Find What field, see the Mac OS help files.
DOCUMENT/MASTERS (CHECK BOX)
Edi t & Find/Change
When Document is checked, QuarkXPress searches the entire document. WhenDocument is unchecked, QuarkXPress searches only the current story. Whenchoosing Find/Change with a master page displayed, the Document check boxchanges to Masters. When Masters is checked, all master pages will be searched;when Masters is unchecked, the selected text box is searched.
WHOLE WORD (CHECK BOX)
Edi t & Find/Change
Checking Whole Word limits the text in the Find What field to instancesbounded by spaces, omitting text buried inside longer words. For example,when Whole Word is checked, a search for “Quark” will only find “Quark.”When it is unchecked, a search for “Quark” will find the word inside“QuarkXPress.”
IGNORE CASE (CHECK BOX)
Edi t & Find/Change
Checking Ignore Case lets you find all uppercase and lowercase variations ofthe text in the Find What field. For example, when Ignore Case is checked, asearch for “Quark” will find “quark” or “QUARK.” When finding and changingwords with Ignore Case checked, QuarkXPress replaces capitalization patternsas follows:
FOUND TEXT IS CHANGED TEXT WILL BE
all lowercase all lowercase
ALL UPPERCASE ALL UPPERCASE
Capitalized (First Character) Capitalized (First Character)
Other capitalization pattern Same case as text in Change To
Uncheck Ignore Case to find words with specific capitalization patterns andreplace them with other capitalization patterns.
Chapter 4: Edit Menu
135
Find/Change Command

IGNORE ATTRIBUTES (CHECK BOX)
Edi t & Find/Change
Check Ignore Attributes to let QuarkXPress find text regardless of its style sheet,font, size, or type style. If Ignore Attributes is unchecked, an expanded palettedisplays additional options.
When Ignore Attributes is unchecked, the expanded Find/Change palette displays.
FIND WHAT (EXPANDED AREA)
Edi t & Find/Change & ( Ignore At t r ibutes unchecked)
The following options display in the Find What area when Ignore Attributesis unchecked:
• Check Text to find and change specific text. When checked, you must enter thetext you want to find, or the search function will not operate. If you want tosearch for only text attributes, uncheck the Text box.
• Check Style Sheet to limit the search to text that has a certain paragraph orcharacter style sheet applied to it. When checked, the search ignores any textthat does not have the specified style sheet applied to it. Text found by stylesheet may vary in appearance if other attributes have been applied locally inthe document. To find text with local formatting, the other text attributecheck boxes can be used in conjunction with the Style Sheet check box, orindependently of it.
• Check Font to limit the search to text of a certain font. When checked, you canenter or choose a font.
• Check Size to limit the search to text of a certain size. When checked, you canenter or choose a type size from the pop-up menu.
Chapter 4: Edit Menu
136
Find/Change Command

• Check Color to limit the search to text of a particular color. When checked,you can choose a color from the pop-up menu.
• Check Type Style to have QuarkXPress use type style as a Find What criterion.Specify the attributes you want to include in the search. If you do not checkType Style, the application does not consider type style in the search, and theType Style area is unavailable.
The Type Style buttons in the Find What area have three states: omitted(white), allowed (gray), and required (black). To omit text of a particular typestyle from the search, make sure the appropriate type style icon remains dese-lected (white). To require a type style to be included in the search, click it twiceto select it; the icon turns black. To allow (but not require) a type style to beincluded in the search, click it once; the icon turns gray. Omitted type stylesmust be absent to cause a match; required type styles must be present to cause amatch. If a type style is allowed, it does not matter if the attribute is present.
CHANGE TO (EXPANDED AREA)
Edi t & Find/Change & ( Ignore At t r ibutes unchecked)
The following options display in the Change To area when Ignore Attributesis unchecked:
Check Text to change found text to the text entered in the Text field. Whenunchecked, text is left as it is. Enter the replacement text (up to 80 characters) inthe Text field. If you do not check Text, the application does not replace textin the Find What area with new text, and the Text field is unavailable.
To delete all instances of the text, check Text but do not enter anything inthe field.
• Check Style Sheet to apply a paragraph or character style sheet to found text.If other options checked in the palette conflict with the attributes of the stylesheet, the style sheet will still be applied, but the other checked attributes willbe applied as well, resulting in local formatting.
• Check Font and enter or choose a font from the pop-up menu to change thefont in found text. When unchecked, fonts are unchanged.
• Check Size and enter or choose a size to change the text size in found text.When unchecked, sizes are left as they are.
Chapter 4: Edit Menu
137
Find/Change Command

• Check Color and choose a color to change the color of found text. Whenunchecked, colors are left as they are.
• Check Type Style to replace the found type style with a different type style.Click the attributes you want to include as replacement type styles. If you do notcheck Type Style, the application does not replace the found type style with anew one, and the Type Style area is unavailable.
The Change To Type Style buttons have three states: deselected (white), allowed(gray), and required (black). Leave a button deselected if you want to strip thatattribute from found text. To allow a type style to remain unchanged in foundtext, click once on a button to select it; the icon turns gray. To apply a style tofound text, click twice on a button to select it; the icon turns black.
FIND NEXT/FIND FIRST (BUTTON)
Edi t & Find/Change
The Find Next button lets you start and continue a search. The search starts atthe text insertion point i. Pressing Option (Mac OS) or Alt (Windows) changesthe Find Next button to the Find First button. The Find First button lets youstart the search from the beginning of the story or document, regardless of thelocation of the text insertion point i.
CHANGE, THEN FIND; CHANGE; CHANGE ALL (BUTTONS)
Edi t & Find/Change
The Change buttons let you selectively replace each instance of found text.Clicking a Change button will replace the selected text with the text in theChange To field.
• Click Change, then Find to replace the found instance using the Change Tospecifications, and then find the next instance.
• Click Change to replace the found instance using the Change To specifications.Click Find Next to continue the search.
• Click Change All to replace all found instances with the Change To specifica-tions without pausing to confirm the changes.
∫ To skip a found instance, ignore the Change buttons and click Find Next.
Chapter 4: Edit Menu
138
Find/Change Command
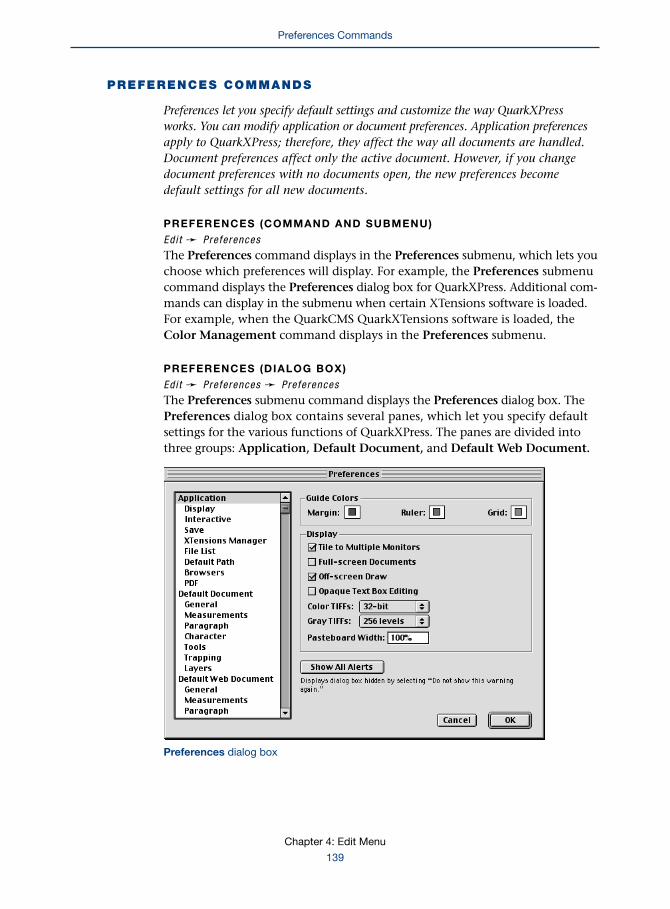
PREFERENCES COMMANDS
Preferences let you specify default settings and customize the way QuarkXPressworks. You can modify application or document preferences. Application preferencesapply to QuarkXPress; therefore, they affect the way all documents are handled.Document preferences affect only the active document. However, if you changedocument preferences with no documents open, the new preferences becomedefault settings for all new documents.
PREFERENCES (COMMAND AND SUBMENU)
Edi t & Preferences
The Preferences command displays in the Preferences submenu, which lets youchoose which preferences will display. For example, the Preferences submenucommand displays the Preferences dialog box for QuarkXPress. Additional com-mands can display in the submenu when certain XTensions software is loaded.For example, when the QuarkCMS QuarkXTensions software is loaded, theColor Management command displays in the Preferences submenu.
PREFERENCES (DIALOG BOX)
Edi t & Preferences & Preferences
The Preferences submenu command displays the Preferences dialog box. ThePreferences dialog box contains several panes, which let you specify defaultsettings for the various functions of QuarkXPress. The panes are divided intothree groups: Application, Default Document, and Default Web Document.
Preferences dialog box
Chapter 4: Edit Menu
139
Preferences Commands

APPLICATION (LIST)
Edi t & Preferences & Preferences
Application preferences let you customize your copy of QuarkXPress. Changesto preferences in the Application group affect all documents. The Applicationpreferences include the Display pane, the Interactive pane, the Save pane,the XTensions Manager pane, and the Browsers pane.
DISPLAY (DIALOG BOX PANE)
Edi t & Preferences & Preferences
The Display pane lets you specify how guides and other elements in theapplication will appear on-screen for all documents.
Preferences dialog box Display pane on Mac OS (top) and on Windows (bottom)
Chapter 4: Edit Menu
140
Preferences Commands

GUIDE COLORS AREA
Edi t & Preferences & Preferences & Disp lay pane
The Guide Colors area lets you specify the color of margin guides, ruler guides,and baseline grid lines displayed on color monitors. These colors are also usedwhen you are working with runaround and clipping paths. The margin guidescolor indicate the items; the ruler guides color indicates runaround, and thebaseline grid color indicates clipping paths. To specify a color for these elements,click the color field next to Margin, Ruler, or Grid. Use the color selectioncontrols to select guide colors.
∫ You can also use the Margin, Ruler, and Grid controls to specify the shade atwhich guides display on grayscale monitors.
The margin guide color is also used for the Page Width Reference Guide inWeb documents.
TILE TO MULTIPLE MONITORS (CHECK BOX) — MAC OS ONLY
Edi t & Preferences & Preferences & Disp lay pane
Tiling resizes document windows so that equal portions of all open documentsdisplay on-screen. Checking Tile to Multiple Monitors lets you use more thanone monitor when you tile documents (View & Windows & Tile Documents).This option is checked by default.
FULL-SCREEN DOCUMENTS (CHECK BOX) — MAC OS ONLY
Edi t & Preferences & Preferences & Disp lay pane
Checking Full-screen Documents maximizes the display of new documents on-screen. Then, when you create, tile, or stack documents, the document windowscover the entire screen except for a small strip along the right side. Full-screenDocuments is effective when opening old documents only if the window posi-tion has not been saved using the Save Document Position check box (Edit &Preferences & Preferences & Save pane). The Full-screen Documents checkbox is unchecked by default.
∫ Mac OS only: Pressing Option when you click a document’s zoom box alsomaximizes document display.
Chapter 4: Edit Menu
141
Preferences Commands

OFF-SCREEN DRAW (CHECK BOX)
Edi t & Preferences & Preferences & Disp lay pane
Checking Off-screen Draw specifies that QuarkXPress redraws the entire screenat once rather than in successive stages. This option is checked by default.
OPAQUE TEXT BOX EDITING (CHECK BOX)
Edi t & Preferences & Preferences & Disp lay pane
If the Opaque Text Box Editing option is checked, text boxes turn temporarilyopaque while you are editing them. If Opaque Text Box Editing is unchecked,text boxes retain their background color — whether it’s a solid color, blend orNone — when you are editing them. This option is unchecked by default.
COLOR TIFFS (POP-UP MENU)
Edi t & Preferences & Preferences & Disp lay pane
The Color TIFFs pop-up menu lets you specify the color depth of screen previewscreated for color TIFFs when they are imported (using the File & Get Picturecommand). The default value is 16-bit on Mac OS and 24-bit on Windows.
• 8-bit creates screen previews with 256 possible colors.
• 16-bit (Mac OS only) creates screen previews with thousands of possible colors.
• 24-bit (Windows only) creates screen previews with thousands of possible colors.
• 32-bit (Mac OS only) creates screen previews with millions of possible colors andlets you print 32-bit color TIFFs in PICT format to a QuickDraw printer.
∫ The Color TIFFs setting only affects the bit depth of screen previews; the bitdepth of the printed picture is not affected.
GRAY TIFFS (POP-UP MENU)
Edi t & Preferences & Preferences & Disp lay pane
The Gray TIFFs pop-up menu lets you specify the resolution of screen previewscreated for grayscale TIFFs when they are imported (using the File &Get Picture command). The default is 256 levels.
• 16 levels: Creates screen previews with 16 levels of gray for faster screen redraw.
• 256 levels: Creates screen previews with 256 levels of gray from picturesscanned at this level.
Chapter 4: Edit Menu
142
Preferences Commands

∫ The Gray TIFFs setting only affects the bit depth of screen previews; the bitdepth of the printed picture is not affected.
DISPLAY DPI VALUE (FIELD) — WINDOWS ONLY
Edi t & Preferences & Preferences & Disp lay pane
The Display DPI Value field lets you adjust your monitor so that it displays thebest representation of your document on-screen. Enter the number of dots perinch (dpi) your monitor displays. You can check the accuracy of the display bymeasuring the horizontal ruler in a QuarkXPress document with a pica pole orruler. If one inch on the horizontal ruler is larger than one inch on the pica poleor ruler, enter a smaller number in the Display DPI Value field. If one inch onthe horizontal ruler is smaller than one inch on the pica pole or ruler, enter alarger number in the Display DPI Value field.
∫ The maximum zoom depends on the value in the Display DPI Value field. Anyvalue greater than 85 dpi will decrease the maximum zoom. For example, at thedefault value of 96 dpi, the maximum zoom is only 692%.
PASTEBOARD WIDTH (FIELD) PEdi t & Preferences & Preferences & Disp lay pane
The Pasteboard Width field lets you specify the width of the pasteboard oneither side of the page or spread in a print document. Pasteboard width is meas-ured as a percentage of the document width. The width of the document plusthe pasteboard cannot exceed 48". The default Pasteboard Width is 100%.At least .5" of pasteboard will always surround document pages.
RANGE MEASUREMENT SYSTEM SMALLEST INCREMENT
0 to 100% percent .1
SHOW ALL ALERTS (BUTTON)
Edi t & Preferences & Preferences & Disp lay pane
If you have clicked Do not show this warning again in any alert dialog boxes,clicking Show All Alerts lets the alert dialog boxes display again.
Chapter 4: Edit Menu
143
Preferences Commands

INTERACTIVE (DIALOG BOX PANE)
Edi t & Preferences & Preferences
The Interactive pane lets you customize how scrolling and other “on-the-fly”actions will behave.
Preferences dialog box Interactive pane
SCROLLING (AREA)
Edi t & Preferences & Preferences & In teract ive pane
The Scrolling area lets you specify how fast you can scroll through documentsand how documents update on-screen.
• Drag the slider between Slow and Fast to specify the speed at which documentsscroll when you press the scroll arrows on a document window.
• Check Speed Scroll to temporarily greek pictures and blends for faster scrolling.(Pictures that are already displayed when you start scrolling through a documentwill not be greeked unless you scroll them out of the document window.) Thisoption is unchecked by default.
• Check Live Scroll to update the document view as you drag the scroll boxesin document window scroll bars. This option is unchecked by default. To turnLive Scroll on and off while you are scrolling, press Option (Mac OS) or Alt(Windows) as you drag a scroll box.
QUOTES (AREA)
Edi t & Preferences & Preferences & In teract ive pane
The Quotes pop-up menu and the Smart Quotes check box let you choose astyle for converting and entering quotation marks.
Chapter 4: Edit Menu
144
Preferences Commands
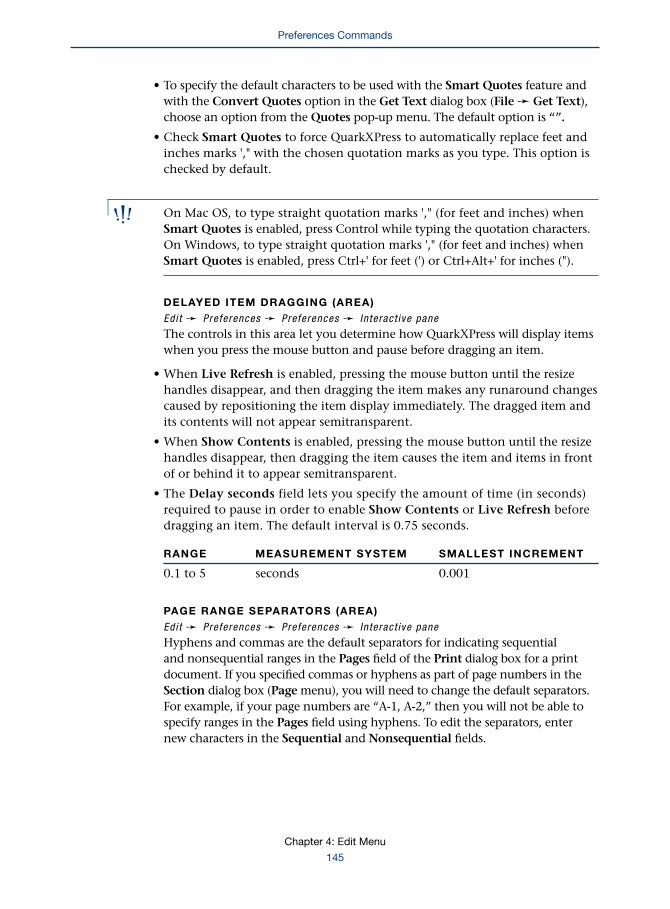
• To specify the default characters to be used with the Smart Quotes feature andwith the Convert Quotes option in the Get Text dialog box (File & Get Text),choose an option from the Quotes pop-up menu. The default option is “”.
• Check Smart Quotes to force QuarkXPress to automatically replace feet andinches marks '," with the chosen quotation marks as you type. This option ischecked by default.
∫ On Mac OS, to type straight quotation marks '," (for feet and inches) whenSmart Quotes is enabled, press Control while typing the quotation characters.On Windows, to type straight quotation marks '," (for feet and inches) whenSmart Quotes is enabled, press Ctrl+' for feet (') or Ctrl+Alt+' for inches (").
DELAYED ITEM DRAGGING (AREA)
Edi t & Preferences & Preferences & In teract ive pane
The controls in this area let you determine how QuarkXPress will display itemswhen you press the mouse button and pause before dragging an item.
• When Live Refresh is enabled, pressing the mouse button until the resizehandles disappear, and then dragging the item makes any runaround changescaused by repositioning the item display immediately. The dragged item andits contents will not appear semitransparent.
• When Show Contents is enabled, pressing the mouse button until the resizehandles disappear, then dragging the item causes the item and items in frontof or behind it to appear semitransparent.
• The Delay seconds field lets you specify the amount of time (in seconds)required to pause in order to enable Show Contents or Live Refresh beforedragging an item. The default interval is 0.75 seconds.
RANGE MEASUREMENT SYSTEM SMALLEST INCREMENT
0.1 to 5 seconds 0.001
PAGE RANGE SEPARATORS (AREA)
Edi t & Preferences & Preferences & In teract ive pane
Hyphens and commas are the default separators for indicating sequentialand nonsequential ranges in the Pages field of the Print dialog box for a printdocument. If you specified commas or hyphens as part of page numbers in theSection dialog box (Page menu), you will need to change the default separators.For example, if your page numbers are “A-1, A-2,” then you will not be able tospecify ranges in the Pages field using hyphens. To edit the separators, enternew characters in the Sequential and Nonsequential fields.
Chapter 4: Edit Menu
145
Preferences Commands

CONTROL KEY (AREA) — MAC OS ONLY
Edi t & Preferences & Preferences & In teract ive pane
The Control Key area lets you choose whether pressing Control+click activatescontext menus or the zoom function. The default option is Contextual Menu.
• Clicking Zoom activates the zoom function for QuarkXPress pages when youpress Control and click the mouse button. When this option is chosen,Control+Shift+click displays context menus.
• Clicking Contextual Menu displays context menus when you press Controland click the mouse button. When this option is chosen, Control+Shift+clickactivates the zoom function.
Control Key area
DRAG AND DROP TEXT (CHECK BOX)
Edi t & Preferences & Preferences & In teract ive pane
Checking Drag and Drop Text lets you cut, copy, and paste text in a storywith the mouse rather than with menu or keyboard commands. The defaultis unchecked.
• To cut and paste, select the text; then drag it to a new location.
• To copy and paste, select the text; then press Shift while you drag it to anew location.
∫ Mac OS only: When Drag and Drop text is unchecked, you can use keyboardcommands to temporarily enable it. To cut and paste text, press C+Controlwhile you click and drag selected text. To copy and paste, press C+Control+Shiftwhile you click and drag selected text. You can’t drag text between stories orbetween documents.
SHOW TOOL TIPS (CHECK BOX)
Edi t & Preferences & Preferences & In teract ive pane
Check Show Tool Tips to make QuarkXPress display the names of tools orpalette icons when you place your pointer over them. This option is checkedby default.
Chapter 4: Edit Menu
146
Preferences Commands

SAVE (DIALOG BOX PANE)
Edi t & Preferences & Preferences
The Save pane provides controls that let you customize how QuarkXPress savesand performs backups of your document.
Preferences dialog box Save pane
AUTO SAVE (AREA)
Edi t & Preferences & Preferences & Save pane
Checking Auto Save protects your work from system or power failure. Whenchecked, QuarkXPress will automatically record document changes to a tempo-rary file in your document folder after a specified time interval. Enter theinterval (in minutes) in the Every minutes field. When Auto Save is checked,the default setting is Every 5 minutes. QuarkXPress will not overwrite theoriginal file until you manually save (File & Save). When you open the doc-ument after a system interruption, QuarkXPress displays an alert indicatingthat the document will be restored to the last auto-saved version.
Chapter 4: Edit Menu
147
Preferences Commands
∫ The Revert to Saved command (File & Revert to Saved) reverts to the lastmanually saved version of a document regardless of your Auto Save settings.Pressing Option (Mac OS) or Alt (Windows) while you choose File & Revert toSaved reverts to the last auto-saved version of a document.
AUTO BACKUP (AREA)
Edi t & Preferences & Preferences & Save pane
Check Auto Backup and enter a value in the Keep revisions field to retain asmany as 100 revisions of a document. Each time you manually save (File &Save), QuarkXPress copies the previous manually-saved version to the Destina-tion folder you specify. The default setting for Auto Backup is unchecked.
• Click Document Folder to store revisions in the same folder with the document.
• Click Other Folder to choose a folder other than the document folder for stor-ing revisions. Click Select (Mac OS) or Browse (Windows) to display the BackupFolder (Mac OS) or Browse for Folder (Windows) dialog box. Then choose orcreate a folder and click Select (Mac OS) or OK (Windows) to close the dialogbox. The name of the selected Folder displays in the Destination area.
Consecutive numbers are added to the name of the original document for eachbackup. When the last revision is created (for example, 5 of 5), the oldest revi-sion in the folder is deleted. To retrieve a backup from the destination folder,open it like any other QuarkXPress document.
AUTO LIBRARY SAVE (CHECK BOX)
Edi t & Preferences & Preferences & Save pane
Checking Auto Library Save saves changes to a QuarkXPress library file when-ever you add an entry to it. This option is checked by default.
SAVE DOCUMENT POSITION (CHECK BOX)
Edi t & Preferences & Preferences & Save pane
Check Save Document Position if you want QuarkXPress to automaticallyremember the size, position, and proportions of your document window.This option is checked by default.
Chapter 4: Edit Menu
148
Preferences Commands

XTENSIONS MANAGER (DIALOG BOX PANE)
Edi t & Preferences & Preferences
The XTensions Manager pane provides controls that let you customize thebuilt-in XTensions Manager.
Preferences dialog box XTensions Manager pane
SHOW XTENSIONS MANAGER AT STARTUP (AREA)
Edi t & Preferences & Preferences & XTens ions pane
This area lets you specify whether the XTensions Manager dialog box displayswhen you launch QuarkXPress, and under what circumstances. The XTensionsManager is a utility that allows you to enable or disable individual XTensionsmodules or sets of XTensions software directly from QuarkXPress. (XTensionsare add-on software modules that customize the feature set of QuarkXPress.)
• Click Always if you want the XTensions Manager dialog box to displayautomatically every time you launch QuarkXPress.
• Click When and check “XTension” folder changes if you want the XTensionsManager dialog box to display during launch only after you have added orremoved XTensions software from your “XTension” folder.
• Click When and check Error loading XTensions occurs if you want theXTensions Manager dialog box to display during launch only whenQuarkXPress encounters a problem loading XTensions software.
Chapter 4: Edit Menu
149
Preferences Commands

BROWSERS (DIALOG BOX PANE) WEdi t & Preferences & Preferences
The Browsers pane allows you to specify which Web browsers you want to use topreview your Web documents or to view HTML files as you export them.
Preferences dialog box Browsers pane
DEFAULT (COLUMN) WEdi t & Preferences & Preferences & Browsers pane
The Default column allows you to specify which browser to use when you donot specify a particular browser for preview. This is also the browser that will beused when Launch Browser is checked in the Export HTML dialog box (File &Export & HTML). Click in the Default column to put a checkmark next to thedesired default browser.
BROWSER (COLUMN) WEdi t & Preferences & Preferences & Browsers pane
The Browser column displays a list of Web browsers that you can use to previewyour Web documents.
Chapter 4: Edit Menu
150
Preferences Commands
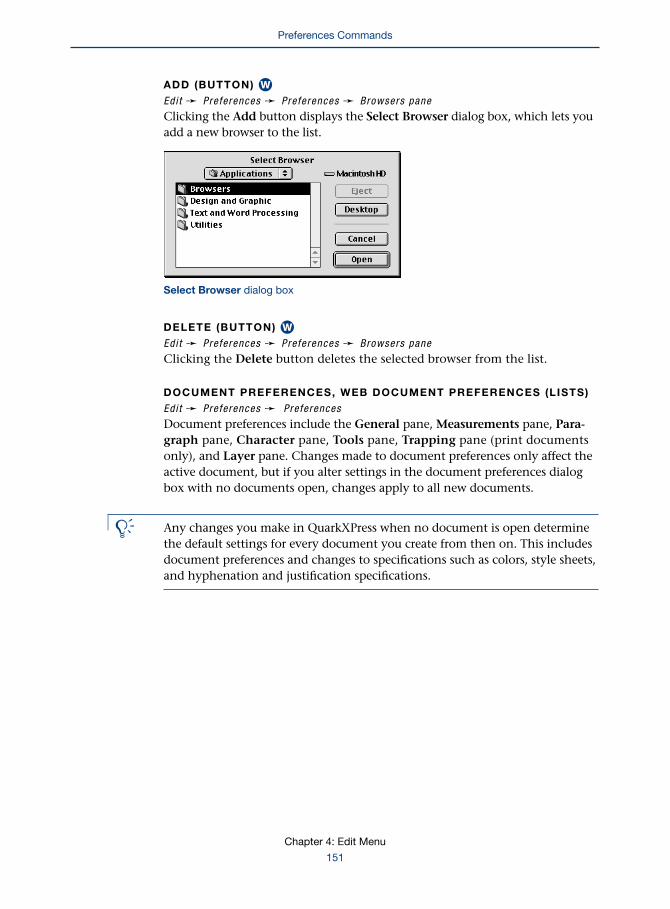
ADD (BUTTON) WEdi t & Preferences & Preferences & Browsers pane
Clicking the Add button displays the Select Browser dialog box, which lets youadd a new browser to the list.
Select Browser dialog box
DELETE (BUTTON) WEdi t & Preferences & Preferences & Browsers pane
Clicking the Delete button deletes the selected browser from the list.
DOCUMENT PREFERENCES, WEB DOCUMENT PREFERENCES (LISTS)
Edi t & Preferences & Preferences
Document preferences include the General pane, Measurements pane, Para-graph pane, Character pane, Tools pane, Trapping pane (print documentsonly), and Layer pane. Changes made to document preferences only affect theactive document, but if you alter settings in the document preferences dialogbox with no documents open, changes apply to all new documents.
å Any changes you make in QuarkXPress when no document is open determinethe default settings for every document you create from then on. This includesdocument preferences and changes to specifications such as colors, style sheets,and hyphenation and justification specifications.
Chapter 4: Edit Menu
151
Preferences Commands
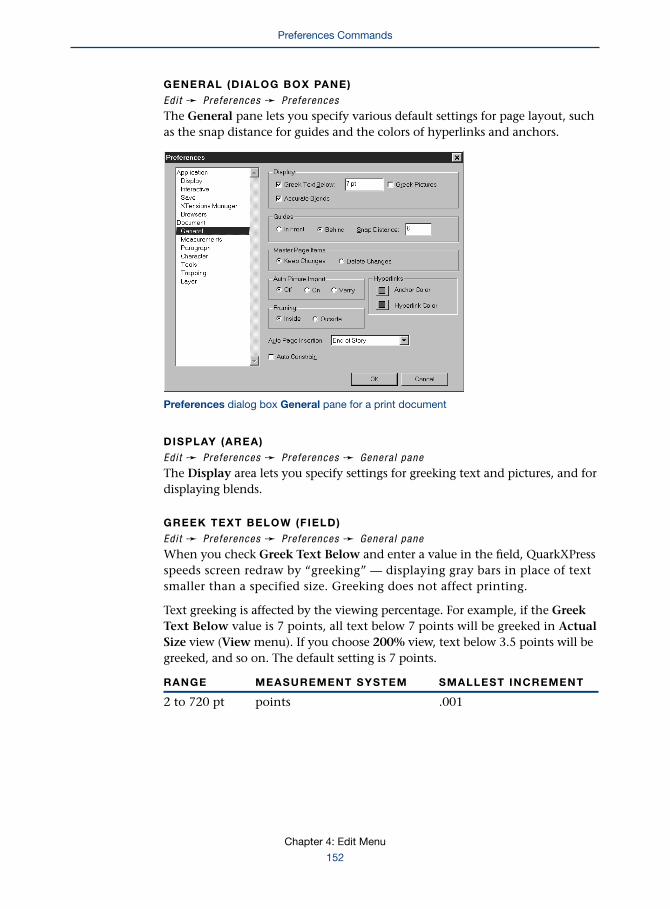
GENERAL (DIALOG BOX PANE)
Edi t & Preferences & Preferences
The General pane lets you specify various default settings for page layout, suchas the snap distance for guides and the colors of hyperlinks and anchors.
Preferences dialog box General pane for a print document
DISPLAY (AREA)
Edi t & Preferences & Preferences & Genera l pane
The Display area lets you specify settings for greeking text and pictures, and fordisplaying blends.
GREEK TEXT BELOW (FIELD)
Edi t & Preferences & Preferences & Genera l pane
When you check Greek Text Below and enter a value in the field, QuarkXPressspeeds screen redraw by “greeking” — displaying gray bars in place of textsmaller than a specified size. Greeking does not affect printing.
Text greeking is affected by the viewing percentage. For example, if the GreekText Below value is 7 points, all text below 7 points will be greeked in ActualSize view (View menu). If you choose 200% view, text below 3.5 points will begreeked, and so on. The default setting is 7 points.
RANGE MEASUREMENT SYSTEM SMALLEST INCREMENT
2 to 720 pt points .001
Chapter 4: Edit Menu
152
Preferences Commands

GREEK PICTURES (CHECK BOX)
Edi t & Preferences & Preferences & Genera l pane
If Greek Pictures is checked, QuarkXPress displays imported pictures as grayboxes. Selecting a box that contains a greeked picture displays the picturenormally. This option is unchecked by default.
ACCURATE BLENDS (CHECK BOX)
Edi t & Preferences & Preferences & Genera l pane
The Accurate Blends check box lets you control the display of two-color blendson 8-bit (256-color) monitor setups. To display blends without banding andwith more accurate colors, check Accurate Blends. For faster display of blends,uncheck Accurate Blends. On monitors driven by 16-bit or 24-bit video boards,blends always display as if Accurate Blends was checked. You create blendsfor box backgrounds using the Colors palette (View menu). This option ischecked by default.
GUIDES (AREA)
Edi t & Preferences & Preferences & Genera l pane
The buttons in the Guides area let you click In Front or Behind to specifywhether ruler guides and page guides are placed in front of or behind all itemson a page. The default option is Behind. The Snap Distance field lets youchange the 6-pixel default distance at which objects snap to page guideswhen Snap to Guides is chosen (View menu).
RANGE MEASUREMENT SYSTEM SMALLEST INCREMENT
1 to 216 pixels 1
MASTER PAGE ITEMS (AREA)
Edi t & Preferences & Preferences & Genera l pane
A master item is an item that is automatically placed on the document pagewhen you apply a master page. When you apply a new master page to a docu-ment page, unmodified master items (placed by the original master page) on thedocument page are deleted, but modified master items may not be deleted.
• Click Keep Changes if you want modified master items on your documentpages to remain when a new master page is applied. The items that are kept areno longer master items. Keep Changes is the default option.
• Click Delete Changes if you want modified master items on your documentpages to be deleted when a new master page is applied.
Chapter 4: Edit Menu
153
Preferences Commands

New master pages are applied to document pages whenever you (1) drag anddrop a master page icon from the master page area in the Document Layoutpalette onto a document page icon in the Document Layout palette (View &Show Document Layout); (2) delete a master page that is applied to documentpages using the Document Layout palette; or (3) add, delete, or move an oddnumber of pages in a facing-page document.
∫ If you change the Master Page Items setting while working on a document,only subsequent applications of new master pages use the new setting.
AUTO PICTURE IMPORT (AREA)
Edi t & Preferences & Preferences & Genera l pane
The Auto Picture Import area controls whether QuarkXPress automaticallyupdates pictures that have been modified since you last opened a document.QuarkXPress can locate pictures for which there is a path between the picturefile and the QuarkXPress document. The default option is Off.
• To enable the Auto Picture Import feature, click On. When you open a docu-ment, QuarkXPress automatically reimports modified pictures into the documentusing the modified files. All your content specifications (scaling, positioning,and so on) are retained. To disable the Auto Picture Import feature, click Off.
• To receive an alert before QuarkXPress imports modified pictures, click Verify.The alert gives you the option of opening the document with or without updat-ing the pictures. If you choose to update the pictures, QuarkXPress displays theMissing/Modified Pictures dialog box. You can use this dialog box to viewthese pictures in the document and to update the pictures selectively.
FRAMING (AREA)
Edi t & Preferences & Preferences & Genera l pane
The Framing area lets you specify whether frames are placed inside or outsidetext and picture boxes.
• When you click Inside, the distance between the text and the frame is deter-mined by the box’s Text Inset values (Item & Modify). When you place a frameinside a picture box, the frame overlaps the picture. Inside is the default option.
• When you click Outside, the frame is placed outside the box, increasing itswidth and height. The frame cannot extend beyond a constraining box orthe pasteboard.
Chapter 4: Edit Menu
154
Preferences Commands

∫ If you change the Framing setting while working in a document, only sub-sequently created boxes use the new setting.
HYPERLINKS (AREA)
Edi t & Preferences & Preferences & Genera l pane
The Hyperlinks area lets you choose the color for anchor icons and hyperlinks.Anchor icon colors are available for print and Web documents, while hyperlinkcolors are available for print documents only.
ANCHOR COLOR, HYPERLINK COLOR (BUTTONS)
Edi t & Preferences & Preferences & Genera l pane
The Anchor Color button lets you choose the color for the anchored hyper-link icon. When you click the Anchor Color button, a color selector displays.Choose a color and then click OK to return to the Preferences dialog box.
The Hyperlink Color button lets you choose the color for hyperlinks in a printdocument that will be exported in Portable Document Format (PDF). The colorsyou choose in the Hyperlinks area display only in QuarkXPress; they have noeffect on how hyperlinks will display in a PDF document that is exported fromQuarkXPress. When you click the Hyperlink Color button, a color selector dis-plays. Choose a color and then click OK to return to the Preferences dialog box.The Hyperlink Color selector is only available in print documents. P
To use anchors and hyperlinks, see Chapter 20, “Hyperlinks,” in A Guide toQuarkXPress: Using QuarkXPress.
∫ To export a document as a PDF file, the PDF Filter QuarkXTensions softwaremust be loaded.
AUTO PAGE INSERTION (POP-UP MENU)
Edi t & Preferences & Preferences & Genera l pane
Auto Page Insertion options let you determine whether pages are insertedautomatically to contain text overflow from an automatic text box or a chainof text boxes (on a page associated with a master page that contains an auto-matic text box). The pop-up menu also lets you determine where any pageswill be inserted.
• Choose Off to disable Auto Page Insertion.
Chapter 4: Edit Menu
155
Preferences Commands
• The End of Story option is the default setting. It places new pages immediatelyafter the page containing the last overflowing text box in the chain. Insertedpages use the master page of the page containing the overflow.
• The End of Section option places new pages at the end of the section in whichthe overflow occurs. Inserted pages use the master page of the last page inthe section.
• The End of Document option places new pages at the end of the document.Inserted pages use the master page of the document’s last page.
∫ Text overflow causes pages to be automatically inserted only if (1) Auto PageInsertion is enabled; (2) the master page that will be used has an automatic textchain (as indicated by the intact chain icon u in the upper left corner ofthe master page); or (3) the overflow is either from the text box defined onthe master page as the automatic text box, or from a chain of at least twotext boxes. If there is no automatic text chain on the applied master page(as indicated by the broken chain icon U), QuarkXPress will not add pagesduring overflow, regardless of the Auto Page Insertion setting.
AUTO CONSTRAIN (CHECK BOX)
Edi t & Preferences & Preferences & Genera l pane
The Auto Constrain check box lets you automatically create hierarchical rela-tionships among newly created items. When you check Auto Constrain, everyitem you create or paste in the document is constrained by the borders of a boxstacked behind it, if those borders surround the borders of the new box. Everybox you create automatically becomes capable of constraining another item.This option is unchecked by default.
• Constraining is a group attribute; checking Auto Constrain means that whenyou create new items, you are creating constrained groups.
• Use the Unconstrain and the Ungroup commands in the Item menu tounconstrain and ungroup items that have been automatically constrainedand grouped.
∫ You cannot resize or move constrained items beyond their constraining boxes,and most actions (such as moving or deleting) that you apply to constrainingboxes affect their constrained items as well.
Chapter 4: Edit Menu
156
Preferences Commands

IMAGE EXPORT DIRECTORY (FIELD) WEdi t & Preferences & Preferences & Genera l pane
The Image Export Directory field lets you specify the name of the folder inwhich all image files will be placed when a Web document is exported. Thefolder will be created at the same level as the exported document (or in the siteroot folder, if one is specified). If you leave this field blank, the image files areplaced in the same folder as the exported document (or in the site root folder, ifone is specified). By default, a folder named “image” will be created at the samelevel as the exported document. Exported images will be placed in the “image”folder. The Image Export Directory field is only available for Web documents.
SITE ROOT DIRECTORY (FIELD) WEdi t & Preferences & Preferences & Genera l pane
The Site Root Directory field lets you specify the name and location of thefolder to be used as the root folder for the exported version of the active Webdocument. Click the Select (Mac OS) or Browse (Windows) button to the rightof the field to locate the site root folder with a dialog box. The Site RootDirectory field is only available in Web documents.
MEASUREMENTS (DIALOG BOX PANE)
Edi t & Preferences & Preferences
The Measurements pane lets you specify default measuring units for documentrulers and the Measurements palette.
Preferences dialog box Measurements pane
Chapter 4: Edit Menu
157
Preferences Commands

HORIZONTAL, VERTICAL (POP-UP MENUS)
Edi t & Preferences & Preferences & Measurements pane
The Horizontal and Vertical pop-up menus let you specify the measurementsystem for the rulers displayed along the top and left of the document window.Horizontal corresponds to the top ruler; Vertical corresponds to the left ruler.
SYSTEM ABBREVIATION MEASUREMENT
Inches in or " inches in eighths
Inches in or " with inches in tenthsdecimal a decimal comma
Picas p 1/6" or 12 points
Points pt 1/72"
Millimeters mm 0.04"
Centimeters cm 0.39"
Ciceros c 0.179"
Agates ag 0.071"
Pixels W px 0.014"
• Several other aspects of the user interface are affected by these two pop-upmenus, including the default X and Y coordinates in the Measurements palette.However, no matter what you choose as the default setting, you can usuallyspecify any measurement system in a field by following the numeric value withone of the abbreviations shown above.
• QuarkXPress automatically converts font size, frame width, and line width topoints, regardless of the measurement system you choose.
∫ The Pixels measurement option is only available in Web documents.
POINTS/INCH (FIELD)
Edi t & Preferences & Preferences & Measurements pane
The Points/Inch field lets you override the default value of 72 points perinch. QuarkXPress uses the value here as the basis for all point and picameasurements, as well as all point- and pica-to-inch conversions. The desktoppublishing standard for points per inch is 72. However, the traditionaltypographic standard used on most metal typographic rulers is usuallyapproximately 72.27 or 72.307 points per inch.
RANGE MEASUREMENT SYSTEM SMALLEST INCREMENT
60 to 80 pt points .001
Chapter 4: Edit Menu
158
Preferences Commands

∫ If you change the number in the Points/Inch field, the physical size of your textand other QuarkXPress elements is not altered. However, to be consistent withthe changed Points/Inch value without altering or reflowing your document,the Measurements palette displays a new numerical value for text size orother values.
CICEROS/CM (FIELD)
Edi t & Preferences & Preferences & Measurements pane
The Ciceros/cm field lets you specify a ciceros-to-centimeter conversion valuedifferent from the standard 2.1967.
RANGE MEASUREMENT SYSTEM SMALLEST INCREMENT
2 to 3 c ciceros .0001
ITEM COORDINATES (BUTTONS) PEdi t & Preferences & Preferences & Measurements pane
The Item Coordinates buttons lets you specify whether the increments ofthe horizontal ruler repeat from zero for each Page or are continuous across aSpread. This setting determines the coordinates of items displayed in fields.The default option is Page. The Item Coordinates buttons are only applicableto print documents.
PARAGRAPH (DIALOG BOX PANE)
Edi t & Preferences & Preferences
The Paragraph pane lets you specify how paragraph formats such as autoleading are calculated in QuarkXPress.
Preferences dialog box Paragraph pane
Chapter 4: Edit Menu
159
Preferences Commands

AUTO LEADING (FIELD)
Edi t & Preferences & Preferences & Paragraph pane
QuarkXPress uses the Auto Leading feature to automatically set line spacing. Itcan be applied to a paragraph by entering “auto” or “0” in the Leading fieldof the Paragraph Attributes dialog box (Style & Leading). Unlike paragraphswith absolute leading (which apply identical line spacing above every line),paragraphs with auto leading may include lines with different leading whenfonts and font sizes are mixed in the same paragraph.
Auto leading starts with a base amount of leading, which QuarkXPress calculatesby examining the ascent and descent values built into the fonts used in anauto-leaded line and the line above it; however, the user-specified text size(Style & Size) plays the largest part in determining this base amount. Finally,a value specified by the user in the Auto Leading field is added to the baseamount to arrive at the total amount of leading.
• To specify percentage-based auto leading, enter a value from 0 to 100% in 1%increments. The default value is 20%. This value determines the amount ofleading between two lines of text as follows: the largest font size in the lineabove is multiplied by the percentage value. This outcome is added to the baseamount of auto leading between the two lines. Although the design of certainfonts complicates the process, here is a simplified example: 10-point text styledconsistently in a “standard” font with Auto Leading set to 20% has 12 pointsof leading (10 pts + [20% of 10] = 12 pts).
• To specify incremental auto leading, enter a value preceded by a plus sign (+)or a minus sign (–) from –63 points to +63 points using any measurementsystem. Entering “+5” will add 5 points of leading to the base amount ofauto leading; entering “+5 mm” will add 5 millimeters.
∫ When you change the value in the Auto Leading field, text baselines inparagraphs with auto leading are automatically re-spaced.
MAINTAIN LEADING (CHECK BOX)
Edi t & Preferences & Preferences & Paragraph pane
The Maintain Leading check box lets you control the placement of a lineof text that falls immediately below an obstruction in a column or box. IfMaintain Leading is checked, the line’s baseline is placed according to itsapplied leading value. If Maintain Leading is unchecked, the ascent of theline will abut the bottom of the obstruction or any applied runaround value(Item & Runaround). This option is checked by default.
Chapter 4: Edit Menu
160
Preferences Commands

MODE (BUTTONS)
Edi t & Preferences & Preferences & Paragraph pane
The Mode buttons let you specify the leading method used to space linesof text.
• Click Typesetting if you want leading to be measured upward from the baselineon one line of text to the baseline of the line above. This is the method preferredby most typesetters and selected by default.
• Click Word Processing if you want leading to be measured downward from thetop of the ascent on one line of text to the top of the ascent on the line below it.
BASELINE GRID (AREA)
Edi t & Preferences & Preferences & Paragraph pane
A baseline grid is a document-wide grid; you can lock the baselines of text inparagraphs to this grid. When you lock text baselines in adjacent columns to thegrid, the baselines align across columns. You can display the baseline grid usingthe Show Baseline Grid command (View menu).
• Enter a value in the Start field to determine how far from the top of the pagethe first line of the grid is placed. The default value is 0.5".
• Enter a value in the Increment field to determine the amount of space betweenthe grid’s baselines. The default value is 12 points.
INCREMENT MEASUREMENT SMALLEST
RANGE SYSTEM INCREMENT
5 to 144 pt points 1
∫ To lock selected paragraphs to the grid, check Lock to Baseline Grid in theFormats tab of the Paragraph Attributes dialog box (Style & Formats).
METHOD (POP-UP MENU)
Edi t & Preferences & Preferences & Paragraph pane & Hyphenat ion area
The Method pop-up menu in the Hyphenation area lets you specify themethod QuarkXPress uses to automatically hyphenate paragraphs when thereis no corresponding entry found in your Hyphenation Exceptions dictionary.The setting you choose affects only paragraphs for which Auto Hyphenation(Edit & H&Js) is enabled.
• Choose Standard to hyphenate using the algorithm built into versions ofQuarkXPress prior to 3.1. Documents created in versions of QuarkXPress priorto 3.1 default to Standard when they are opened in version 3.1 or later.
• Enhanced lets you hyphenate using the algorithm built into QuarkXPress inversion 3.1 and later.
Chapter 4: Edit Menu
161
Preferences Commands

• Expanded, which was added to QuarkXPress in version 4.0, uses the samealgorithm as Enhanced but checks any built-in hyphenation dictionariesbefore resorting to the algorithm. This is the default method for documentscreated in this version of QuarkXPress.
∫ Documents created in previous versions of QuarkXPress maintain their hyphen-ation method (Standard or Enhanced) when opened in a newer version. If youchoose Expanded for these documents, text reflow may occur.
CHARACTER (DIALOG BOX PANE)
Edi t & Preferences & Preferences
The Character pane lets you specify how mathematically calculated typographi-cal styles such as Superscript and Subscript are calculated in QuarkXPress.
Preferences dialog box Character pane
SUPERSCRIPT (AREA)
Edi t & Preferences & Preferences & Character pane
The Superscript area lets you control the placement and scale (size) ofsuperscript characters.
• The Offset value determines how far below the baseline QuarkXPress places asuperscript character. The Offset value is measured as a percentage of font size.The default value is 33%.
• The VScale value determines the vertical size of the character and is a percent-age of font size. The HScale value determines width and is a percentage of the
Chapter 4: Edit Menu
162
Preferences Commands
normal character width (as specified by the font designer). The default value forboth scales is 100%.
RANGE MEASUREMENT SYSTEM SMALLEST INCREMENT
0 to 100% percent .1
SUBSCRIPT (AREA)
Edi t & Preferences & Preferences & Character pane
The Subscript area lets you control the placement and scale (size) ofsubscript characters.
• The Offset value determines how far above the baseline QuarkXPress placesa subscript character. The Offset value is measured as a percentage of fontsize. The default value is 33%.
• The VScale value determines the vertical size of the character and is a percent-age of font size. The HScale value determines width and is a percentage of thenormal character width (as specified by the font designer). The default valuefor both scales is 100%.
RANGE MEASUREMENT SYSTEM SMALLEST INCREMENT
0 to 100% percent .1
SMALL CAPS (AREA)
Edi t & Preferences & Preferences & Character pane
The Small Caps area lets you control the scale of characters with the SmallCaps type style applied to them. The VScale value determines the vertical size ofthe character and is measured as a percentage of font size. The HScale valuedetermines width and is measured as a percentage of the normal character width(as specified by the font designer). The default value for both scales is 75%.
RANGE MEASUREMENT SYSTEM SMALLEST INCREMENT
0 to 100% percent .1
SUPERIOR (AREA)
Edi t & Preferences & Preferences & Character pane
The Superior area lets you control the scale of superior characters. The VScalevalue determines the vertical size of the character and is measured as a percent-age of font size. The HScale value determines width and is measured as apercentage of the normal character width (as specified by the font designer).The default value for both scales is 50%.
RANGE MEASUREMENT SYSTEM SMALLEST INCREMENT
0 to 100% percent .1
Chapter 4: Edit Menu
163
Preferences Commands

LIGATURES (AREA) — MAC OS ONLY
Edi t & Preferences & Preferences & Character pane
The Ligatures controls let you use ligatures built into a font. A ligature is atypographic convention in which certain characters are combined into a singlecharacter. Most fonts designed for the Mac OS contain ligatures for thecharacters “f” followed by “i,” and “f” followed by “l”.
• Check Ligatures to combine all instances of “f” followed by “i” and “f” followedby “l” into ligatures. You can edit and check the spelling of words containingligatures as if the ligatures were separate characters. This option is uncheckedby default.
• When you check Ligatures, the Break Above field lets you specify the kerningor tracking value (measured in 1/200 em space increments) above which characterswill not be combined into ligatures. For example, a headline with a large trackingvalue would probably not contain ligatures. The default value is 1.
RANGE MEASUREMENT SYSTEM SMALLEST INCREMENT
0 to 10 .005 (1/200) em space .001
• To prevent the second two letters in “ffi” and “ffl” (as in office and waffle) frombeing combined into ligatures, check Not “ffi” or “ffl.” Three-character ligaturesfor these combinations, common in traditional typesetting systems, are notstandardized in fonts designed for Mac OS, so some typographers prefer to keepall three letters separate rather than combine only two of them. This option isunchecked by default.
AUTO KERN ABOVE (CHECK BOX AND FIELD)
Edi t & Preferences & Preferences & Character pane
Checking Auto Kern Above lets QuarkXPress use kerning tables, which are builtinto most fonts, to control intercharacter spacing. The Auto Kern Above fieldlets you specify the point size above which automatic kerning should be used.The Auto Kern Above feature also implements custom tracking informationspecified in the Tracking Values dialog box for a selected font (Utilities &Edit Tracking). This option is checked by default, with a 4-point threshold.
RANGE MEASUREMENT SYSTEM SMALLEST INCREMENT
2 to 720 pt various (", pt, cm, etc.) .001
Chapter 4: Edit Menu
164
Preferences Commands

STANDARD EM SPACE (CHECK BOX)
Edi t & Preferences & Preferences & Character pane
An em space is made of two en spaces. You insert an en space in text by pressingOption+space (Mac OS) or Ctrl+Shift+6 (Windows). Checking Standard EmSpace specifies an em space equivalent to the point size of the text (for example,24-point text has a 24-point em space). If Standard Em Space is unchecked,QuarkXPress uses the width of the two zeros in the current font as the em spacewidth. This option is unchecked by default.
FLEX SPACE WIDTH (FIELD)
Edi t & Preferences & Preferences & Character pane
A flexible space is a user-modifiable variation of a standard en space, used whena standard space is not aesthetically pleasing. The Flex Space Width field letsyou change the 50% default width of a flexible space. To create a breakingflexible space, press Option+Shift+space (Mac OS) or Ctrl+Shift+5 (Windows);to create a nonbreaking flexible space, press C+Option+Shift+space (Mac OS)or Ctrl+Alt+Shift+5 (Windows).
The Flex Space Width value is expressed as a percentage of the normal en spacefor a given font and font size.
RANGE MEASUREMENT SYSTEM SMALLEST INCREMENT
0 to 400% percent .1
ACCENTS FOR ALL CAPS (CHECK BOX)
Edi t & Preferences & Preferences & Character pane
The Accents for All Caps check box lets you specify whether to include accentmarks on accented characters with the All Caps type style applied. This optionis checked by default.
∫ The Accents for All Caps feature applies to documents created inQuarkXPress 3.2 or later. To take advantage of improvements such asAccents for All Caps, you can update an earlier document’s text flow bypressing Option (Mac OS) or Alt (Windows) while you click Open in theOpen dialog box.
Chapter 4: Edit Menu
165
Preferences Commands

TOOLS (DIALOG BOX PANE)
Edi t & Preferences & Preferences
The Tools pane lets you specify default characteristics for the Zoom tool Z andfor the items created by the various item creation tools.
∫ You can also access the Tools pane by double-clicking an item creation tool orthe Zoom tool Z in the Tools palette.
The Tools pane for documents
TOOL DEFAULTS (LIST)
Edi t & Preferences & Preferences & Tools pane
Choose the tool or tools whose default settings you want to change by clickingtheir icons in the Tool Defaults list. To choose more than one tool to modify ata time, press C+click (Mac OS) or Ctrl+click (Windows). You can alsoShift+click to select a range of tools.
Chapter 4: Edit Menu
166
Preferences Commands

MODIFY (BUTTON)
Edi t & Preferences & Preferences & Tools pane
Click Modify to change the default attributes for items created by the selecteditem creation tool(s). For example, if you wanted all future text boxes to have a3-point border width, you could specify that by selecting the text box creationtool and clicking Modify.
• All the tools in the Tools list are item creation tools, with the exception of theZoom tool Z.
• Clicking Modify displays the Modify dialog box. This Modify dialog box is thesame one that displays for selected items through the Item menu (Item &Modify); however, some controls (such as those that determine position andsize) are omitted. When you click Modify with more than one tool selected,the Modify dialog box may provide a more limited set of options that arecommon to all selected tools. For information about the Modify dialog box,see Chapter 6, “Item Menu.”
VIEW (DIALOG BOX)
Edi t & Preferences & Preferences & Tools pane & Zoom too l & Modi fy
The View dialog box is available when you click Modify while the Zoom tool Zis selected in the Tools list. The View Scale area lets you control the range andthe increment of the view change when you click on a document with theZoom tool Z.
• The Minimum field determines the smallest document view the Zoom tool Zcan display.
• The Maximum field determines the largest document view the Zoom tool Zcan display.
• The Increment field determines the percent of change in view for each timeyou click the Zoom tool Z. The default value is 25%.
RANGE MEASUREMENT SYSTEM SMALLEST INCREMENT
10 to 800% percent .1
∫ The Form Box tool has significantly different controls than the Modify dialogbox for a form box. Using the Tools pane to modify the default settings for aform box will display the Form Tool Preferences dialog box; enter a value in theWidth and Height fields to set the default size of a form box.
Chapter 4: Edit Menu
167
Preferences Commands
∫ Using the Tools pane to modify the image map default settings displays theImage Map Properties dialog box. Use the Flatten Shape area to reduce thenumber of Bézier points your circular or Bézier image map has; click MaximumPoints and use the field to enter the maximum number of points you want yourimage map to contain. Your circular or Bézier image map can contain 3 to 1000Bézier points. Click Granularity and use the slider to specify how closely thepoints in your image map should match the curve you drew. Setting the slider toCoarse means that the points in your image map will not be very close to thecurve you drew; your image map will have fewer points. Setting the slider toFine means that the points in the image map will be very close or identical tothe curve you drew; your image map will have more points.
SIMILAR TYPES (BUTTON)
Edi t & Preferences & Preferences & Tools pane
To quickly select multiple tools of similar type in the list (for example, all picturebox tools when you have a picture box tool selected, or all line tools when youhave a line tool selected), select a tool from the list, then click Similar Types.Click Modify to edit preferences common to all the selected tools.
SIMILAR SHAPES (BUTTON)
Edi t & Preferences & Preferences & Tools pane
To quickly select two tools of similar shape in the list (for example, both rectan-gular box tools p T), select a tool from the list, then click SimilarShapes. Click Modify to edit preferences common to both tools.
USE DEFAULT PREFS (BUTTON)
Edi t & Preferences & Preferences & Tools pane
If you have modified the preferences for a tool and want to change them back,select the tool(s) from the list and click Use Default Prefs.
DEFAULT TOOL PALETTE (BUTTON)
Edi t & Preferences & Preferences & Tools pane
You can modify the Tools palette by showing and hiding tools. If you havemade modifications to the QuarkXPress Tools palette and you want to restorethe original palette, click Default Tool Palette. This button affects the paletteitself, not the preferences set using the Modify button.
TRAPPING (DIALOG BOX PANE) PEdi t & Preferences & Preferences
The Trapping pane lets you specify default settings for the way QuarkXPresstraps colors and objects when you color separate a print document.
Chapter 4: Edit Menu
168
Preferences Commands

Preferences dialog box Trapping pane
TRAPPING METHOD (AREA)
Edi t & Preferences & Preferences & Trapping pane
The Trapping Method area lets you specify the method QuarkXPressuses to determine the trapping relationship between object colors andbackground colors.
• Click Absolute to trap using the values in the Auto Amount and Indetermi-nate fields according to the object and background colors involved. If the objectcolor is darker, the background chokes the object color by the Auto Amountvalue. If the object color is lighter, the object is spread into the backgroundby the Auto Amount value. Absolute is the default option.
• Click Proportional to trap using the value in the Auto Amount field multipliedby the difference between the luminosity (lightness or brightness) of the objectcolor and background color. Proportional trapping compares the luminosity ofthe object color and background color to determine how different they are, andapplies trapping accordingly.
• Click Knockout All to turn trapping off.
Chapter 4: Edit Menu
169
Preferences Commands

PROCESS TRAPPING (CHECK BOX)
Edi t & Preferences & Preferences & Trapping pane
When Process Trapping is checked, QuarkXPress traps each process separationplate individually when a page contains overlapping process colors. When youprint color separations, QuarkXPress compares the darkness of each processcomponent of an object color to the darkness of the corresponding process com-ponent of the background color, then traps accordingly. For example, the shadeof cyan in an object color is compared to the shade of cyan in the backgroundcolor; similar comparisons are made for the other plates that will be output.This option is checked by default.
• When adjoining process colors have an absolute trapping relationship, andProcess Trapping is checked, QuarkXPress divides the Auto Amount trappingvalue in half, and applies the resulting value to the darker component of thecolor on each plate (as shown in the table). Dividing the value among platescreates a smoother trap while providing the same area of overlap.
ABSOLUTE PROPORTIONAL
COLOR OBJECT BACKGROUND TRAP TRAP
C 70% 30% +1/2 trap Auto Amount
amount (70%–30%)÷2
M 30% 50% –1/2 trap Auto Amountamount (30%–50%)÷2
Y 70% 80% –1/2 trap Auto Amountamount (70%–80%)÷2
K 20% 15% +1/2 trap Auto Amountamount (20%–15%)÷2
• When abutting process colors have a proportional trapping relationship,QuarkXPress multiplies the Auto Amount value specified in the Trapping paneby the difference in darkness between the object color and the backgroundcolor. The resulting trapping value is then applied as explained above for colorswith absolute trapping relationships.
• When Process Trapping is unchecked, QuarkXPress traps all process compo-nents equally using the trapping value associated with the object color relativeto the background color.
Chapter 4: Edit Menu
170
Preferences Commands

∫ For text up to 24 points and small items (dimensions up to 10 points),QuarkXPress attempts to preserve the item’s shape during process trapping bynot allowing automatic spreads or chokes when the item’s shape would becompromised. QuarkXPress does this by comparing the darkness of eachprocess component of an item to the darkness of its entire background. Aspread is applied only when the process components of an item are less than orequal to half the darkness of its background. A choke is applied only when theprocess components of a background are less than or equal to half the darknessof the item in front of it. (Text cannot be choked.)
IGNORE WHITE (CHECK BOX)
Edi t & Preferences & Preferences & Trapping pane
The Ignore White check box lets you specify that an object color in front ofmultiple background colors — including white — will not take white intoaccount when trapping. This option is checked by default.
• When Ignore White is unchecked, all items overprint a white background(overprint is treated as an infinite choke). If an object color is in front of botha white background and a background color against which the object color isspecified to spread, the object color will trap to the indeterminate color.
• If an object color is in front of both a white background and two or more back-ground colors to which the object color is specified to choke, the object colorwill choke (trap) using the smallest choke value.
AUTO AMOUNT (FIELD)
Edi t & Preferences & Preferences & Trapping pane
The Auto Amount field lets you control the amount of trapping thatQuarkXPress applies to object and background colors that have an AutoAmount (+/–) relationship specified in the Trap Specifications dialog box(Edit & Colors & Edit Trap) or Trap Information palette (View & ShowTrap Information). The default amount is .144 point.
RANGE MEASUREMENT SYSTEM SMALLEST INCREMENT
0 to 36 pt points .001
You can also choose Overprint from the field’s pop-up menu. This causes objectand background colors with Auto Amount (+/–) specified in the Trap Specifica-tions dialog box or Trap Information palette to overprint.
Chapter 4: Edit Menu
171
Preferences Commands

INDETERMINATE (FIELD)
Edi t & Preferences & Preferences & Trapping pane
The Indeterminate field lets you specify the amount of trapping QuarkXPressapplies to object colors that are in front of indeterminate backgrounds (multiplecolors with conflicting trapping relationships or imported pictures). The defaultamount is .144 point.
RANGE MEASUREMENT SYSTEM SMALLEST INCREMENT
±36 pt points .001
You can also choose Overprint from the field’s pop-up menu. This causes objectcolors to overprint indeterminate backgrounds.
KNOCKOUT LIMIT (FIELD)
Edi t & Preferences & Preferences & Trapping pane
The Knockout Limit value (expressed as a percentage of luminosity of theobject color compared to the background color) lets you control the point atwhich an object color knocks out a background color. The default value is 0%.
RANGE MEASUREMENT SYSTEM SMALLEST INCREMENT
0 to 100% percent .1
OVERPRINT LIMIT (FIELD)
Edi t & Preferences & Preferences & Trapping pane
The Overprint Limit value controls the following:
• Although the default color Black overprints by default, objects colored blackwith shade values below the Overprint Limit will not overprint.
• Any object that has a color that is set to Overprint (in the Trap Specificationsdialog box) and that has a shade value below the Overprint Limit willnot overprint.
• If the value of the black component of a “rich black” is below the overprintlimit, rich black trapping will not occur. For information about rich black, see“Creating and Using a Rich Black” in Chapter 13, “Trapping,” in A Guide toQuarkXPress: Using QuarkXPress.
For example, if you enter 95% in this field, a 90% shaded object that has a colorset to Overprint a background color (in the Trap Specifications dialog box)will not overprint, but will instead trap according to the Auto Amount valuespecified. The default Overprint Limit is 95%.
RANGE MEASUREMENT SYSTEM SMALLEST INCREMENT
0 to 100% percent .1
Chapter 4: Edit Menu
172
Preferences Commands

LAYER (DIALOG BOX PANE)
Edi t & Preferences & Preferences
The Layer pane lets you specify the settings used when a new layer is created.
Preferences dialog box Layer pane
NEW LAYER SETTINGS (AREA)
Edi t & Preferences & Preferences & Layer pane
The New Layer Settings area lets you modify default layer preferences.
• The Visible check box displays and prints items on new layers. Layers that arenot visible do not print.
• The Suppress Printout check box prevents the printing of items on layers.However, you can use the Suppress Printout and Suppress Picture Printoutcontrols in the Modify dialog box (Item menu) to override this setting andprint individual items on a layer. Suppress Printout is available only for printdocuments. P
• The Locked check box locks items on new layers. Items are locked into positionon their layers and cannot be moved. However, by changing an item’s OriginAcross and Origin Down values (Item & Modify & Box tab), a locked itemcan be moved upon its layer.
• The Keep Runaround check box maintains runaround so that text on visiblelayers flows around items on hidden layers.
Chapter 4: Edit Menu
173
Preferences Commands

COLOR MANAGEMENT (COMMAND) PEdi t & Preferences
The Color Management command displays the Color ManagementPreferences dialog box, which lets you customize settings for QuarkCMSQuarkXTensions software. The Color Management command is availablewhen the QuarkCMS QuarkXTensions software is loaded.
Changes made to Color Management Preferences affect only the open doc-ument, but all new documents will inherit the preferences specified while nodocument is open. To use color management, see Chapter 12, “Color,” in AGuide to QuarkXPress: Using QuarkXPress.
COLOR MANAGEMENT PREFERENCES (DIALOG BOX) PEdi t & Preferences & Color Management
The Color Management Preferences dialog box lets you specify color manage-ment preferences for your monitor and output devices, imported pictures, andany colors you use in QuarkXPress.
Color Management Preferences dialog box
Chapter 4: Edit Menu
174
Preferences Commands
COLOR MANAGEMENT ACTIVE (CHECK BOX) — MAC OS ONLY PEdi t & Preferences & Color Management
The Color Management Active check box lets you enable color manage-ment for QuarkXPress. When Color Management Active is checked, theQuarkCMS QuarkXTensions software is enabled and the other options inthe Color Management Preferences dialog box are available. This optionis unchecked by default.
COLOR MANAGEMENT (POP-UP MENU) — WINDOWS ONLY PEdi t & Preferences & Color Management
The Color Management pop-up menu lets you enable color management forQuarkXPress. When you choose a Color Management Module (CMM) from theColor Management pop-up menu, the QuarkCMS QuarkXTensions software isenabled and the other options in the Color Management Preferences dialogbox are available. The default option is Disabled.
DESTINATION PROFILES (AREA) PEdi t & Preferences & Color Management
The Destination Profiles area lets you choose International Color Consortium(ICC) profiles that correspond to your devices.
• The Monitor pop-up menu lets you choose a profile that corresponds toyour monitor.
• The Composite Output pop-up menu lets you choose a profile that correspondsto the output device you will use to print color composite proofs.
• The Separation Output pop-up menu lets you choose a profile that correspondsto the output device you will use for final separations.
DEFAULT SOURCE PROFILES (AREA) PEdi t & Preferences & Color Management
The Default Source Profiles area lets you define default profiles for the solidcolor and image source for the RGB, CMYK, and Hexachrome color models.The RGB, CMYK, and Hexachrome tabs are similar, but their pop-up menuscontain different options.
RGB (DIALOG BOX TAB) PEdi t & Preferences & Color Management
The pop-up menus in the RGB tab let you define default profiles for solid colorand image sources for the RGB color model. The RGB tab is divided into twoareas, Solid Colors and Images.
Chapter 4: Edit Menu
175
Preferences Commands

RGB tab
SOLID COLORS (AREA) PEdi t & Preferences & Color Management & RGB tab
The Solid Colors area lets you specify RGB color sources for RGB colors cre-ated in QuarkXPress. Use the Profile pop-up menu to choose a profile thatcorresponds to the appropriate RGB color source for RGB colors created inQuarkXPress. Use the Rendering Intent pop-up menu to choose a renderingintent for RGB colors. A rendering intent tells the Color Management Module(CMM) what color properties it should preserve when it translates a colorfrom the source device gamut to the destination device gamut:
• The Perceptual option scales all the colors in the source gamut so that they allfit within the destination gamut.
• The Relative Colorimetric option retains colors that are in both the sourcegamut and the destination gamut. The only source colors that are changed arethose that are not within the destination gamut.
• The Saturation option considers the saturation of source colors, and changesthem to colors with the same relative saturation in the destination gamut.
• The Absolute Colorimetric option retains colors that are in both the sourcegamut and the destination gamut. Colors that are outside the destination gamutare adjusted in relation to how they would look when printed on white paper.
IMAGES (AREA) PEdi t & Preferences & Color Management & RGB tab
If you routinely scan images with a particular RGB scanner, the Images arealets you choose a color source that corresponds to that scanner. Use the Profilepop-up menu to choose a profile that corresponds to the scanner. Use the
Chapter 4: Edit Menu
176
Preferences Commands

Rendering Intent pop-up menu to choose a rendering intent for RGB images.A rendering intent tells the Color Management Module (CMM) what colorproperties it should preserve when it translates a color from the source devicegamut to the destination device gamut:
• The Perceptual option scales all the colors in the source gamut so that they allfit within the destination gamut.
• The Relative Colorimetric option retains colors that are in both the sourcegamut and the destination gamut. The only source colors that are changed arethose that are not within the destination gamut.
• The Saturation option considers the saturation of source colors, and changesthem to colors with the same relative saturation in the destination gamut.
• The Absolute Colorimetric option retains colors that are in both the sourcegamut and the destination gamut. Colors that are outside the destination gamutare adjusted in relation to how they would look when printed on white paper.
COLOR MANAGE RGB SOURCES TO RGB DESTINATIONS (CHECK BOX) PEdi t & Preferences & Color Management & RGB tab
The Color Manage RGB Sources to RGB Destinations check box lets youspecify whether QuarkCMS will apply color management when the colorspace of the color or image is the same as the Monitor or CompositeOutput profile color space.
CMYK (DIALOG BOX TAB) PEdi t & Preferences & Color Management
The pop-up menus in the CMYK tab let you choose profiles that correspond tothe appropriate process CMYK color sources.
CMYK tab
Chapter 4: Edit Menu
177
Preferences Commands
SOLID COLORS (AREA) PEdi t & Preferences & Color Management & CMYK tab
The Solid Colors area lets you define default profiles for color and image sourcesfor the CMYK color model. Use the Profile pop-up menu to choose a profile thatcorresponds to the appropriate CMYK color source for CMYK colors created inQuarkXPress. Use the Rendering Intent pop-up menu to choose a renderingintent for CMYK colors. A rendering intent tells the Color Management Module(CMM) what color properties it should preserve when it translates a color fromthe source device gamut to the destination device gamut:
• The Perceptual option scales all the colors in the source gamut so that they allfit within the destination gamut.
• The Relative Colorimetric option retains colors that are in both the sourcegamut and the destination gamut. The only source colors that are changed arethose that are not within the destination gamut.
• The Saturation option considers the saturation of source colors, and changesthem to colors with the same relative saturation in the destination gamut.
• The Absolute Colorimetric option retains colors that are in both the sourcegamut and the destination gamut. Colors that are outside the destination gamutare adjusted in relation to how they would look when printed on white paper.
IMAGES (AREA) PEdi t & Preferences & Color Management & CMYK tab
If you routinely scan images with a particular CMYK scanner, the Images arealets you choose a color source that corresponds to that scanner. Use the Profilepop-up menu to choose a profile that corresponds to the scanner. Use theRendering Intent pop-up menu to choose a rendering intent for CMYKimages. A rendering intent tells the Color Management Module (CMM)what color properties it should preserve when it translates a color fromthe source device gamut to the destination device gamut:
• The Perceptual option scales all the colors in the source gamut so that they allfit within the destination gamut.
• The Relative Colorimetric option retains colors that are in both the sourcegamut and the destination gamut. The only source colors that are changed arethose that are not within the destination gamut.
• The Saturation option considers the saturation of source colors, and changesthem to colors with the same relative saturation in the destination gamut.
• The Absolute Colorimetric option retains colors that are in both the sourcegamut and the destination gamut. Colors that are outside the destination gamutare adjusted in relation to how they would look when printed on white paper.
Chapter 4: Edit Menu
178
Preferences Commands

COLOR MANAGE CMYK SOURCES TO CMYK DESTINATIONS
(CHECK BOX) PEdi t & Preferences & Color Management & CMYK tab
The Color Manage CMYK Sources to CMYK Destinations check box lets youspecify whether QuarkCMS will apply color management when the color spaceof the color or image is the same as the Separation Output profile color space.
HEXACHROME (DIALOG BOX TAB) PEdi t & Preferences & Color Management
The pop-up menus in the Hexachrome tab let you choose profiles thatcorrespond to the appropriate Hexachrome color sources.
Hexachrome tab
SOLID COLORS (AREA) PEdi t & Preferences & Color Management & Hexachrome tab
The Solid Colors area lets you define default profiles for color and imagesources for the Hexachrome color model. Use the Profile pop-up menu tochoose a profile that corresponds to the appropriate Hexachrome color sourcefor Hexachrome colors created in QuarkXPress. Use the Rendering Intentpop-up menu to choose a rendering intent for Hexachrome colors. A render-ing intent tells the Color Management Module (CMM) what color propertiesit should preserve when it translates a color from the source device gamut tothe destination device gamut:
• The Perceptual option scales all the colors in the source gamut so that they allfit within the destination gamut.
Chapter 4: Edit Menu
179
Preferences Commands
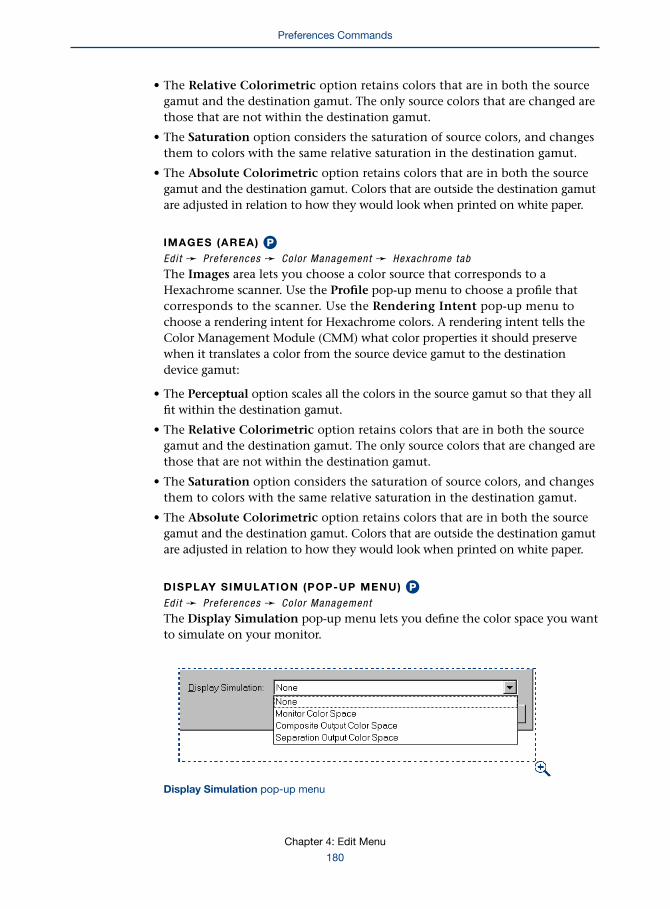
• The Relative Colorimetric option retains colors that are in both the sourcegamut and the destination gamut. The only source colors that are changed arethose that are not within the destination gamut.
• The Saturation option considers the saturation of source colors, and changesthem to colors with the same relative saturation in the destination gamut.
• The Absolute Colorimetric option retains colors that are in both the sourcegamut and the destination gamut. Colors that are outside the destination gamutare adjusted in relation to how they would look when printed on white paper.
IMAGES (AREA) PEdi t & Preferences & Color Management & Hexachrome tab
The Images area lets you choose a color source that corresponds to aHexachrome scanner. Use the Profile pop-up menu to choose a profile thatcorresponds to the scanner. Use the Rendering Intent pop-up menu tochoose a rendering intent for Hexachrome colors. A rendering intent tells theColor Management Module (CMM) what color properties it should preservewhen it translates a color from the source device gamut to the destinationdevice gamut:
• The Perceptual option scales all the colors in the source gamut so that they allfit within the destination gamut.
• The Relative Colorimetric option retains colors that are in both the sourcegamut and the destination gamut. The only source colors that are changed arethose that are not within the destination gamut.
• The Saturation option considers the saturation of source colors, and changesthem to colors with the same relative saturation in the destination gamut.
• The Absolute Colorimetric option retains colors that are in both the sourcegamut and the destination gamut. Colors that are outside the destination gamutare adjusted in relation to how they would look when printed on white paper.
DISPLAY SIMULATION (POP-UP MENU) PEdi t & Preferences & Color Management
The Display Simulation pop-up menu lets you define the color space you wantto simulate on your monitor.
Display Simulation pop-up menu
Chapter 4: Edit Menu
180
Preferences Commands
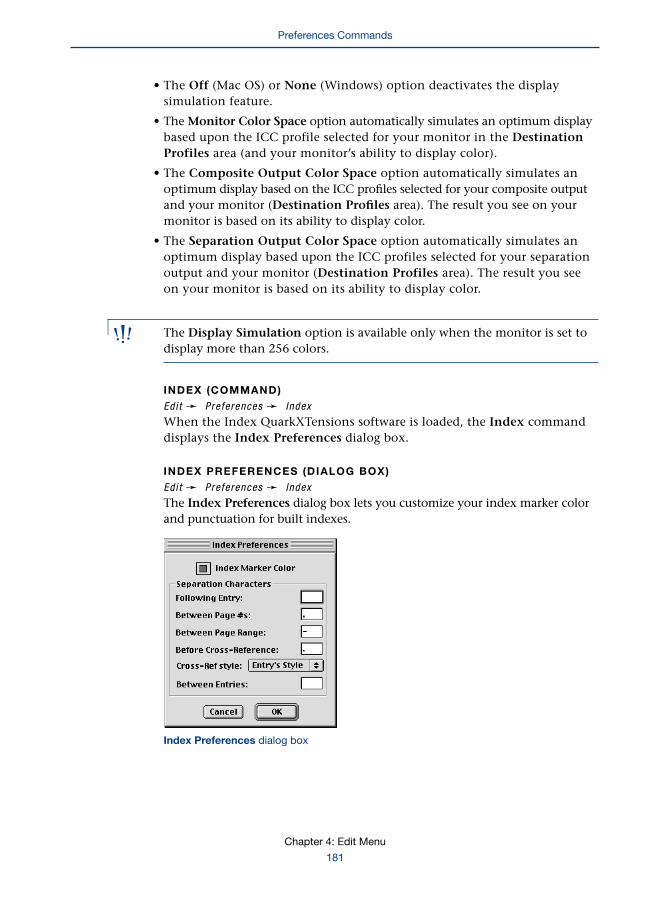
• The Off (Mac OS) or None (Windows) option deactivates the displaysimulation feature.
• The Monitor Color Space option automatically simulates an optimum displaybased upon the ICC profile selected for your monitor in the DestinationProfiles area (and your monitor’s ability to display color).
• The Composite Output Color Space option automatically simulates anoptimum display based on the ICC profiles selected for your composite outputand your monitor (Destination Profiles area). The result you see on yourmonitor is based on its ability to display color.
• The Separation Output Color Space option automatically simulates anoptimum display based upon the ICC profiles selected for your separationoutput and your monitor (Destination Profiles area). The result you seeon your monitor is based on its ability to display color.
∫ The Display Simulation option is available only when the monitor is set todisplay more than 256 colors.
INDEX (COMMAND)
Edi t & Preferences & Index
When the Index QuarkXTensions software is loaded, the Index commanddisplays the Index Preferences dialog box.
INDEX PREFERENCES (DIALOG BOX)
Edi t & Preferences & Index
The Index Preferences dialog box lets you customize your index marker colorand punctuation for built indexes.
Index Preferences dialog box
Chapter 4: Edit Menu
181
Preferences Commands

INDEX MARKER COLOR (BUTTON)
Edi t & Preferences & Index
Clicking the Index Marker Color button displays a color selector. Selecting a newcolor will change the color of the index markers in your QuarkXPress document.
SEPARATION CHARACTERS (AREA)
Edi t & Preferences & Index
The Separation Characters settings affect how your built index is punctuated.
FOLLOWING ENTRY (FIELD)
Edi t & Preferences & Index & Separa t ion Characters area
Enter characters in the Following Entry field to specify the punctuation thatimmediately follows each entry in an index. For example, entering a commaand a space in the Following Entry field would generate an entry such as“QuarkXPress, xii, 15–17, 19” when you build your index.
BETWEEN PAGE #S (FIELD)
Edi t & Preferences & Index & Separa t ion Characters area
Enter characters in the Between Page #s field to specify the words or punctua-tion that separate a list of page numbers in an index. For example, entering acomma and a space in the Between Page #s field would generate an entry suchas “QuarkXPress, xii, 12, 19” when you build your index.
BETWEEN PAGE RANGE (FIELD)
Edi t & Preferences & Index & Separa t ion Characters area
Enter characters in the Between Page Range to specify the words or punctuationthat separate a range of pages in an index. For example, entering an en dash inthe Between Page Range field would generate an entry such as “QuarkXPress,15–17, 19–21” when you build your index.
BEFORE CROSS-REFERENCE (FIELD)
Edi t & Preferences & Index & Separa t ion Characters area
Enter characters in the Before Cross–Reference field to specify the wordsor punctuation that precede a cross-reference (usually a period, semicolon,or space). For example, entering a semicolon and a space in the BeforeCross–Reference field would generate an entry such as “QuarkXPress, xii,15–17, 19; See also Page Layout” when you build your index.
Chapter 4: Edit Menu
182
Preferences Commands

CROSS-REF STYLE (POP-UP MENU)
Edi t & Preferences & Index & Separa t ion Characters area
The Cross-Ref style pop-up menu allows you to select a character style sheetto apply to your cross-references. This style sheet is applied only to “See,” “SeeAlso,” or “See Herein,” not to the entry or the reference. For example, choosinga character style sheet using an italic font would generate an entry such as“QuarkXPress, xii, 15–17, 19; See also Page Layout” when you build your index.
BETWEEN ENTRIES (FIELD)
Edi t & Preferences & Index & Separa t ion Characters area
Enter characters in the Between Entries to specify the words or punctuationinserted between entries in a run-in index or at the end of a paragraph in anested index. For example, entering a semicolon in the Between Entries fieldwould generate an entry such as this when you build your run-in index:“QuarkXPress, xii, 15–17, 19; QuarkXPress Passport, xiii, 25-28, 39.”
STYLE SHEETS COMMAND
Style sheets let you group paragraph formats, character attributes, rules, and tab set-tings so they can be applied collectively with one action. The Style Sheets command(Shift+F11) displays the Style Sheets dialog box, which lets you create and manageparagraph and character style sheets. You apply style sheets to text using theParagraph Style Sheet or Character Style Sheet command in the Style menu,keyboard commands, or the Style Sheets palette (View & Style Sheets).
∫ Style sheets created when no documents are open are included with all sub-sequently created documents; style sheets created when a document is activeare specific to that document.
STYLE SHEETS (DIALOG BOX)
Edi t & Sty le Sheets
The Style Sheets dialog box lets you create, edit, duplicate, and deleteparagraph and character style sheets. You can also append style sheetsfrom another document.
Chapter 4: Edit Menu
183
Preferences Commands

There are two lists. The top list displays a list of style sheets according to theoption you chose from the Show pop-up menu. The bottom list provides alist of the major attributes contained by a style sheet selected in the top list.Paragraph style sheet names are preceded by a π icon, and character stylesheets are preceded by a Ø icon.
Style Sheets dialog box
SHOW (POP-UP MENU)
Edi t & Sty le Sheets
The Show pop-up menu determines which style sheets are displayed in theStyle Sheets dialog box list.
• Choose All Style Sheets to display all the style sheets available to the document.When no document is open, only the default style sheets common to alldocuments are displayed.
• Choose Paragraph Style Sheets to display only paragraph style sheets. Para-graph style sheets are style sheets that contain paragraph formatting and areapplied to an entire paragraph. Each paragraph style sheet also contains onedefault character style sheet.
• Choose Character Style Sheets to display only character style sheets. Characterstyle sheets are style sheets that contain only character formatting and can beapplied exclusively to selected text.
Chapter 4: Edit Menu
184
Style Sheets Command

• Choose Style Sheets In Use to display only those style sheets that have beenapplied to text somewhere in the active document.
• Choose Style Sheets Not Used to display only those style sheets that are notapplied to text in the active document.
∫ The Normal paragraph and character style sheets are always available to alldocuments. QuarkXPress automatically applies the Normal paragraph styleand Normal character style sheet to all newly created text boxes. The Normalparagraph style sheet can only contain the Normal character style sheet.Default paragraph formats and character attributes for newly created textboxes are determined by the specifications in the Normal paragraph andcharacter style sheets. You can edit these attributes at any time. To globallychange the Normal paragraph and character style sheets so that changesapply to all new documents, edit both style sheets with no document open.
NEW (POP-UP BUTTON)
Edi t & Sty le Sheets
The New pop-up button lets you create up to 1,000 default or document-specificstyle sheets. The pop-up button has two options: πParagraph and ØCharacter.
• Choose πParagraph to create a style sheet that contains paragraph attributes.(Paragraph style sheets also contain a default character style sheet.) The EditParagraph Style Sheet dialog box displays.
• Choose ØCharacter to create a style sheet that contains only character attrib-utes. The Edit Character Style Sheet dialog box displays.
EDIT (BUTTON)
Edi t & Sty le Sheets
The Edit button displays the Edit Paragraph Style Sheet dialog box or the EditCharacter Style Sheet dialog box, depending on what type of style sheet youhave selected in the list. When the dialog box displays, it shows the currentDescription for that style sheet. You can also double-click a style sheet in thelist to display the dialog box.
DUPLICATE (BUTTON)
Edi t & Sty le Sheets
The Duplicate button creates an identical copy of the selected style sheet.QuarkXPress automatically opens the Edit Paragraph Style Sheet dialog box orthe Edit Character Style Sheet dialog box so that you can rename and edit theduplicated style sheet.
Chapter 4: Edit Menu
185
Style Sheets Command

DELETE (BUTTON)
Edi t & Sty le Sheets
The Delete button removes the selected style sheet(s) from the active document.If the style sheet was used in the document, an alert lets you choose a replace-ment style sheet. If you choose No Style in the alert dialog box, text to whichthe deleted style sheet was applied will retain the attributes of the deleted stylesheet, but No Style will be checked in the Style Sheet submenu (Style menu)when those paragraphs are selected. If you choose another replacement stylesheet in the alert dialog box, any text that the deleted style sheet was applied towill take on the attributes of the new style sheet, with local formatting retained.You cannot delete the Normal style sheets.
APPEND (BUTTON)
Edi t & Sty le Sheets
The Append button lets you import style sheets from another document.A dialog box lets you choose a QuarkXPress document from which toappend style sheets.
Selecting a document in the dialog box and clicking Open displays the AppendStyle Sheets dialog box. This dialog box offers the same controls as the StyleSheets tab of the Append dialog box (File & Append). For information aboutappending items, see “Append (dialog box)” in Chapter 3, “File Menu.”
SAVE (BUTTON)
Edi t & Sty le Sheets
The Save button saves changes made to any style sheets in the Style Sheetsdialog box. When you click Save, QuarkXPress updates text in the documentto match the new style sheet specifications and closes the dialog box.
EDIT PARAGRAPH STYLE SHEET (DIALOG BOX)
Edi t & Sty le Sheets & New & Paragraph
Clicking New & Paragraph (or clicking Edit or Duplicate when a paragraphstyle sheet is selected) displays the Edit Paragraph Style Sheet dialog box,which lets you create or edit a paragraph style sheet. Default settings for newstyle sheets are taken from the selected text.
Chapter 4: Edit Menu
186
Style Sheets Command

Edit Paragraph Style Sheet dialog box
• The Name field lets you specify a name for a new style sheet or rename anexisting style sheet.
• Below the Name field are four tabs: General, Formats, Tabs, and Rules. TheFormats, Tabs, and Rules tabs let you specify the paragraph formats that willbe automatically applied to text whenever you apply a paragraph style sheet.The controls in these three tabs are the same as those found in the ParagraphAttributes dialog box (Style & Formats). For specific information about thecontrols in the Formats, Tabs, and Rules tabs, see “Formats (dialog box tab),”“Tabs (dialog box tab),” and “Rules (dialog box tab)” in Chapter 5, “Style Menu.”The controls in the General tab are described here.
GENERAL (DIALOG BOX TAB)
Edi t & Sty le Sheets & New & Paragraph & Genera l tab
The Edit Paragraph Style Sheet dialog box General tab lets you specifykeyboard commands and other attributes for a style sheet.
Chapter 4: Edit Menu
187
Style Sheets Command
KEYBOARD EQUIVALENT (FIELD)
Edi t & Sty le Sheets & New & Paragraph & Genera l tab
The Keyboard Equivalent field lets you specify a keyboard command that willautomatically apply the style sheet. On Mac OS, select the Keyboard Equivalentfield and then press any combination of C, Option, Control, Shift, the numericcharacters on the keypad, and the F5–F15 keys on the Apple Extended Keyboard.On Windows, select the Keyboard Equivalent field and then press any combi-nation of Ctrl or Ctrl+Alt and a numeric character on the keypad.
∫ Mac OS only: if you use one of the function keys (F5–F15) for a style sheet key-board command, it overrides the QuarkXPress default keyboard command whenyou are editing text.
BASED ON (POP-UP MENU)
Edi t & Sty le Sheets & New & Paragraph & Genera l tab
The Based On pop-up menu lets you base a new style sheet on an existing stylesheet by choosing a style sheet name. The default option is No Style.
∫ Modifications made to a style sheet upon which another style sheet is basedaffect both style sheets.
NEXT STYLE (POP-UP MENU)
Edi t & Sty le Sheets & New & Paragraph & Genera l tab
The Next Style pop-up menu lets you specify a style sheet to follow the currentstyle sheet when you are entering text. For example, you could specify thata paragraph with a “subheading” style sheet be followed automatically by aparagraph with a “byline” style sheet, which in turn could be followed by aparagraph with a “body copy” style sheet. The style automatically changes tothe style specified in the Next Style pop-up menu after Return (Mac OS) orEnter (Windows) is pressed at the end of the paragraph. Choosing a Next Styleoption does not affect existing text.
• The pop-up menu lists all style sheets in the Style Sheets dialog box for theactive document. When no documents are open, it lists the default style sheets.
• Choose Self from the Next Style pop-up menu to continue using the same stylesheet in the next paragraph.
CHARACTER ATTRIBUTES (AREA)
Edi t & Sty le Sheets & New & Paragraph & Genera l tab
Paragraph style sheets also contain a character style sheet. The character stylesheet is applied to all the characters in the paragraph whenever you apply aparagraph style sheet.
Chapter 4: Edit Menu
188
Style Sheets Command

• The Style pop-up menu contains a list of all the character style sheets availableto the active document and lets you choose the character style used by theparagraph style sheet.
• Click New to create a new character style sheet in the Edit Paragraph StyleSheet dialog box. This displays the Edit Character Style Sheet dialog box. Afteryou make your edits, click OK to return to the Edit Paragraph Style Sheetdialog box. The new style sheet name will automatically display in the Stylepop-up menu.
• Click Edit to edit the character style sheet chosen in the Style pop-up menu.This displays the Edit Character Style Sheet dialog box. After you make youredits, click OK to return to the Edit Paragraph Style Sheet dialog box.
EDIT CHARACTER STYLE SHEET (DIALOG BOX)
Edi t & Sty le Sheets & New & Character
Clicking New & Character (or clicking Edit or Duplicate when a characterstyle sheet is selected) displays the Edit Character Style Sheet dialog box, whichlets you create or edit a character style sheet.
Edit Character Style Sheet dialog box
• The Name field lets you specify a name for a new style sheet or rename anexisting style sheet.
• The Keyboard Equivalent field lets you specify a keyboard command that willautomatically apply the style sheet. On Mac OS, select the Keyboard Equivalentfield and then press any combination of C, Option, Control, Shift, the numericcharacters on the keypad, and the F5–F15 keys on the Apple Extended Keyboard.
Chapter 4: Edit Menu
189
Style Sheets Command

On Windows, select the Keyboard Equivalent field and then press any combi-nation of Ctrl or Ctrl+Alt and a numeric character on the keypad.
• The Based On pop-up menu lets you base a style sheet on an existing stylesheet by choosing a style sheet name. Modifications made to a style sheet uponwhich another style sheet is based affect both style sheets. The default optionis No Style.
• The controls below the Based On pop-up menu in the Edit Character StyleSheet dialog box are the same as those found in the Character Attributes dialogbox (Style & Character). For information about character style, see Chapter 5,“Style Menu.”
∫ Mac OS only: If you use one of the function keys (F5–F15) for a style sheet key-board command, it overrides the QuarkXPress default keyboard command whenyou are editing text.
COLORS COMMAND
The Colors command (Shift+F12) displays the Colors dialog box, which lets you cre-ate and manage colors. You can also change the way a color traps to other colors. Youapply colors to text, items, and box attributes using the Colors palette (View &Show Colors); you can also apply colors to text using style sheets and the Colorsubmenu of the Style menu.
∫ Colors created when no documents are open are included with all subsequentlycreated documents; colors created when a document is active are specific tothat document.
COLORS (DIALOG BOX)
Edi t & Colors
The Colors dialog box lets you create, edit, duplicate, delete, and specify trap-ping for the current colors. You can also append colors from another document.
The top of the dialog box displays a list of colors according to the option youchose from the Show pop-up menu, and the bottom displays the compositionof the selected color.
When no documents are open, the list displays all default colors. When a docu-ment is active, the list only displays colors for the active document. The defaultcolor list includes:
• Red, Green, and Blue: You can edit these colors or delete them from the defaultcolor list.
Chapter 4: Edit Menu
190
Style Sheets Command

• Cyan, Magenta, Yellow, Black, and White: You cannot edit or delete these colors.
• Registration: You can edit the Registration color, but you cannot delete it.Changing the Registration color only changes the way the color displayson-screen.
∫ You should apply the Registration color to lines when creating your own regis-tration or crop marks. Text, pictures, or items to which the Registration color hasbeen applied will print on all separation plates.
Colors dialog box
SHOW (POP-UP MENU)
Edi t & Colors
The Show pop-up menu determines which colors are displayed in the Colorsdialog box list.
• Choose All Colors to display all the colors available to the document.When no document is open, colors that are default colors common to alldocuments display.
• Choose Spot Colors to display only spot colors (which print on their ownseparation plate).
• Choose Process Colors to display only process colors.
• Choose Multi-Ink Colors to display only those colors that you have builtfrom other process inks or spot colors using the Multi-Ink Color option in
Chapter 4: Edit Menu
191
Colors Command

the Model pop-up menu of the Edit Color dialog box. (Click New, Edit, orDuplicate to display.)
• Choose Colors In Use to display only those colors that have been appliedsomewhere in the active document.
• Choose Colors Not Used to display only those colors that are not used inthe active document.
NEW (BUTTON)
Edi t & Colors
The New button displays the Edit Color dialog box, which lets you add,create, or name a new color. You can create up to 1,000 default or document-specific colors.
EDIT (BUTTON)
Edi t & Colors
The Edit button displays the Edit Color dialog box to modify the color selectedin the Colors list. You can also double-click a color to display the Edit Colordialog box. You cannot edit or delete the following default colors: Cyan,Magenta, Yellow, Black, and White.
DUPLICATE (BUTTON)
Edi t & Colors
The Duplicate button creates a new copy of the color selected in the Colors list.QuarkXPress automatically opens the Edit Color dialog box so that you canrename and edit the copied color.
DELETE (BUTTON)
Edi t & Colors
The Delete button removes the selected color(s) from the active document.If the color was used in the active document, an alert lets you choose areplacement color.
APPEND (BUTTON)
Edi t & Colors
The Append button lets you import colors from another QuarkXPress doc-ument. A dialog box lets you choose a QuarkXPress document from whichto append colors.
Selecting a document in the dialog box and clicking Open displays the AppendColors dialog box. This dialog box offers the same controls as the Colors tab ofthe Append dialog box (File & Append). For information about appendingitems, see Chapter 3, “File Menu.”
Chapter 4: Edit Menu
192
Colors Command
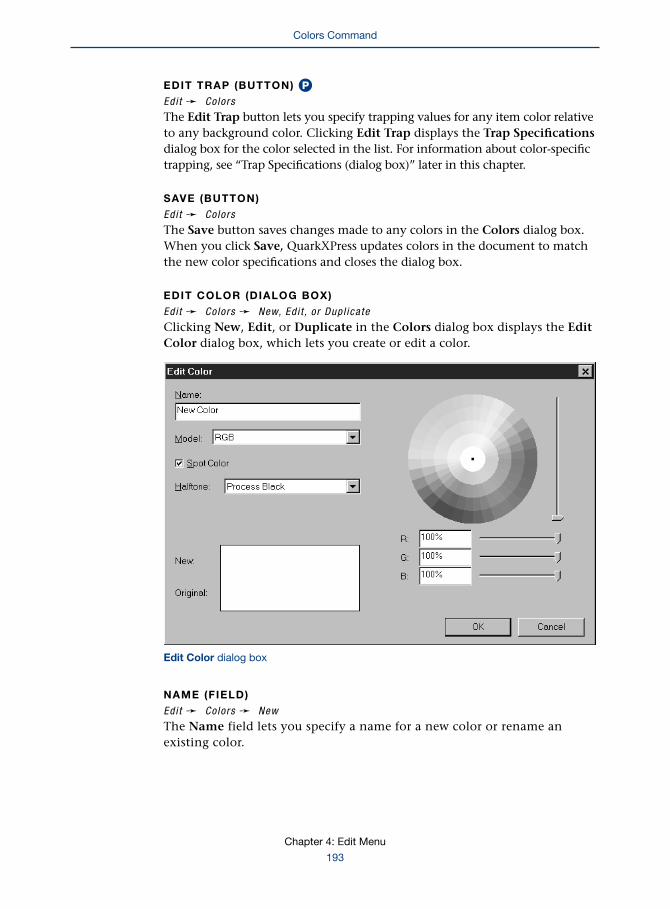
EDIT TRAP (BUTTON) PEdi t & Colors
The Edit Trap button lets you specify trapping values for any item color relativeto any background color. Clicking Edit Trap displays the Trap Specificationsdialog box for the color selected in the list. For information about color-specifictrapping, see “Trap Specifications (dialog box)” later in this chapter.
SAVE (BUTTON)
Edi t & Colors
The Save button saves changes made to any colors in the Colors dialog box.When you click Save, QuarkXPress updates colors in the document to matchthe new color specifications and closes the dialog box.
EDIT COLOR (DIALOG BOX)
Edi t & Colors & New, Edi t , or Dupl ica te
Clicking New, Edit, or Duplicate in the Colors dialog box displays the EditColor dialog box, which lets you create or edit a color.
Edit Color dialog box
NAME (FIELD)
Edi t & Colors & New
The Name field lets you specify a name for a new color or rename anexisting color.
Chapter 4: Edit Menu
193
Colors Command

MODEL (POP-UP MENU)
Edi t & Colors & New
The Model pop-up menu lets you choose among various color models for creat-ing and editing colors at any time. For example, you can modify a color createdin the RGB model by using either the HSB or CMYK model. You can also edit aspot color such as a PANTONE™, TOYO™, or DIC™ color using one of the othercolor definition models, but a spot color edited in this manner will no longermatch the originally selected version.
• RGB, an additive color system, is most often used with slide recorders or colorvideo monitors, and also works well for Web pages. Red, green, and blue light ismixed to represent colors on a video screen.
• HSB resembles the manner in which artists mix colors, using hue, saturation,and brightness. Hue describes color pigment; saturation measures the amountof color pigment; and brightness measures the amount of black in a color.
• LAB, also referred to as “LAB color space” or “CIELAB,” is a standard three-dimensional model for representing colors. LAB is a color space designed to beindependent of differing interpretations imposed by monitor or printer manu-facturers. The LAB model used in QuarkXPress uses the “D50 illuminant” to beconsistent with most usage.
• CMYK, a subtractive color system, is the color model used by professionalprinters. Cyan, magenta, yellow, and black inks combine to “subtract” fromwhite and thus reproduce most colors.
• Multi-Ink is a special model in QuarkXPress that allows you to create a multi-inkcolor based on screen percentages of existing process inks or spot colors. Beforeusing this feature, consult with your printer or service bureau to make sure thatthe percentages you choose will not cause ink-coverage problems.
• Web-safe colors are used for color consistency in Web documents. This colormodel will not display in the Model pop-up menu unless the correspondingColor Library files remain installed in your “Color” folder. For informationabout Web-safe colors, see “Understanding Web-Safe Colors” in Chapter 12,“Color,” in A Guide to QuarkXPress. W
• Web Named Colors is a model that lets you select a Web-safe color using itsassigned color name — for example, “Dark Blue.” Not all Web-safe colors areincluded in the Web Named Colors palette. This color model will not displayin the Model pop-up menu unless the corresponding Color Library files remaininstalled in your “Color” folder. For information about Web-safe colors, see“Understanding Web-Safe Colors” in Chapter 12, “Color,” in A Guide toQuarkXPress. W
Chapter 4: Edit Menu
194
Colors Command
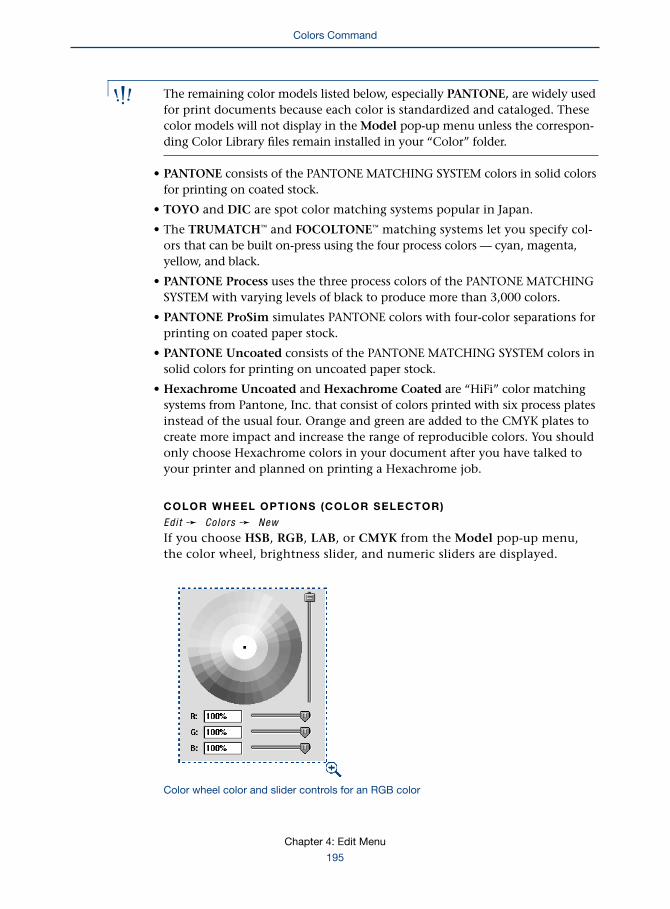
∫ The remaining color models listed below, especially PANTONE, are widely usedfor print documents because each color is standardized and cataloged. Thesecolor models will not display in the Model pop-up menu unless the correspon-ding Color Library files remain installed in your “Color” folder.
• PANTONE consists of the PANTONE MATCHING SYSTEM colors in solid colorsfor printing on coated stock.
• TOYO and DIC are spot color matching systems popular in Japan.
• The TRUMATCH™ and FOCOLTONE™ matching systems let you specify col-ors that can be built on-press using the four process colors — cyan, magenta,yellow, and black.
• PANTONE Process uses the three process colors of the PANTONE MATCHINGSYSTEM with varying levels of black to produce more than 3,000 colors.
• PANTONE ProSim simulates PANTONE colors with four-color separations forprinting on coated paper stock.
• PANTONE Uncoated consists of the PANTONE MATCHING SYSTEM colors insolid colors for printing on uncoated paper stock.
• Hexachrome Uncoated and Hexachrome Coated are “HiFi” color matchingsystems from Pantone, Inc. that consist of colors printed with six process platesinstead of the usual four. Orange and green are added to the CMYK plates tocreate more impact and increase the range of reproducible colors. You shouldonly choose Hexachrome colors in your document after you have talked toyour printer and planned on printing a Hexachrome job.
COLOR WHEEL OPTIONS (COLOR SELECTOR)
Edi t & Colors & New
If you choose HSB, RGB, LAB, or CMYK from the Model pop-up menu,the color wheel, brightness slider, and numeric sliders are displayed.
Color wheel color and slider controls for an RGB color
Chapter 4: Edit Menu
195
Colors Command

• You can use the color wheel to specify a color. Click or drag the pointer insidethe wheel; a small square indicates the location of the active color. The Newfield displays this color. The numeric values for the components of the currentcolor are displayed in the fields below the wheel. You can use the numeric fieldsto make modifications to colors you picked using the color wheel.
• The brightness slider to the right of the color wheel lets you quickly change theamount of black present in the colors accessible through the color wheel. Movethe slider downward to add more black.
• To define colors without using the color wheel (or after clicking the general areaof the color you want), use the sliders or enter values for each color componentin the fields below the wheel.
∫ Black-and-white or grayscale monitors use levels of gray with letters (such asR, G, B) to represent the corresponding color areas of the wheel.
MULTI- INK OPTIONS (COLOR SELECTOR)
Edi t & Colors & New
If you choose Multi-Ink from the Model pop-up menu, a list on the right sideof the dialog box displays all available spot colors, plus the process inks.
Color selector for a multi-ink color
• The Process Inks pop-up menu lets you include either the CMYK processinks or Hexachrome process inks in the list. You should choose Hexachromeonly after you have spoken to your printer and planned to print a six-colorHexachrome job.
• The Shade pop-up menu lets you apply any screen percentage from 0–100% tothe color you select in the list.
Chapter 4: Edit Menu
196
Colors Command

• Specify shades for any number of process inks or spot colors in the list to buildyour own custom multi-ink color.
∫ Before using the Multi-Ink feature, consult with your printer or servicebureau to make sure that the percentages you choose will not cause ink-coverage problems.
SWATCHBOOK OPTIONS (COLOR SELECTOR)
Edi t & Colors & New
If you choose TOYO, DIC, TRUMATCH, FOCOLTONE, HEXACHROME,Web-safe, Web Named Colors, or one of the PANTONE color models fromthe Model pop-up menu, the appropriate color selector displays.
• To specify a color from one of these matching systems, use the scroll bar tomove through the color selector, or enter the catalog number in the field belowthe color selector.
• When you enter a color’s number in the field, the color that corresponds to thatnumber displays in the color selector and in the New field.
• The name of a specified color automatically displays in the Name field in theupper left corner of the dialog box. The “CV” that follows the PANTONE No.field indicates that the selected color is a computer video simulation of theactual PANTONE color.
Color selector containing swatchbook options for the Web-safe color model
Chapter 4: Edit Menu
197
Colors Command
SPOT COLOR (CHECK BOX) PEdi t & Colors & New
When you specify a spot color from one of the color selectors, you can uncheckSpot Color to separate the color into cyan, magenta, yellow, and black plates.When Spot Color is checked, the color will only print as a spot color to its ownseparate printing plate.
∫ Because the gamut of CMYK process color is limited, any spot color that you tryto reproduce using process plates will look different from the actual spot ink thatyou see in a printed swatch book.
HALFTONE (POP-UP MENU) PEdi t & Colors & New
The Halftone pop-up menu lets you quickly specify the sc reen values usedwhen you print a color separation plate that contains a screen for a spot color.A spot color means a color for which Spot Color is checked.
When Spot Color is checked, the Halftone pop-up menu is available.Choose Process Cyan to specify a screen angle of 105˚, Process Magentafor 75˚, Process Yellow for 90˚, and Process Black for 45˚. These values maybe overridden by values built into an imagesetter or printer description file.You can also override them using the Angle pop-up menu in the Output tabof the Print dialog box (File & Print).
NEW/ORIGINAL (AREA)
Edi t & Colors & New
The New/Original area displays colors as you create and edit them. The Newfield displays a new color or an edited version of the chosen color. The Originalfield is used for comparison; it displays the original color when you are editingan existing color.
TRAP SPECIFICATIONS (DIALOG BOX) PEdi t & Colors & Edi t Trap
Clicking Edit Trap in the Colors dialog box displays the Trap Specificationsdialog box for the chosen color. The Trap Specifications dialog box lets youspecify trapping values for any object color relative to any background color. Byspecifying Overprint, Knockout, Auto Amount (+) for spreads, AutoAmount (–) for chokes, or Custom trap values in Trap pop-up menu, you cancontrol the trapping relationships for every color except White and Registration.
Chapter 4: Edit Menu
198
Colors Command

Trap Specifications dialog box
∫ Color-specific trapping values you specify in the Trap Specificationsdialog box directly affect color relationships and override all defaulttrapping preferences.
A spread occurs when items with a lighter color enlarge slightly so that theyoverlap a darker background color. A choke occurs when items with a darkercolor are trapped by a slight reduction in the size of the “knocked out” area ina lighter background color.
BACKGROUND COLOR (COLUMN) PEdi t & Colors & Edi t Trap
The Background Color column displays all the colors defined for the docu-ment, with the exception of White, Registration, and the object color. Whenthe object color is placed against a background of more than one color withwhich the object color has conflicting trapping relationships, or against acolor QuarkXPress is unable to identify, the program traps according to thevalue specified for the Indeterminate background color.
TRAP (POP-UP MENU) PEdi t & Colors & Edi t Trap
The Trap pop-up menu determines the trapping relationship when the selectedBackground Color occurs behind the object color named in the dialog box title.The Trap column displays the current setting. Entries different from the defaultvalues are marked with an asterisk (*).
Chapter 4: Edit Menu
199
Colors Command

• The Default option works like the Auto Amount (+/–) settings, but whenDefault is chosen, a QuarkXPress algorithm determines which colors choke,which colors spread, and which colors overprint or knock out. The amount ofa choke or spread is based on the Auto Amount value specified in the Trap-ping pane of the Preferences dialog box (Edit & Preferences & Preferences).However, when Default is chosen, black always overprints, and white alwaysknocks out.
• The Overprint option specifies that the object color named in the dialog boxtitle will overprint the selected background color in all instances where theshade value of the object color is greater than the percentage entered in theOverprint Limit field of the Trapping pane of the Preferences dialog box(Edit & Preferences & Preferences).
∫ Even with Overprint specified, overprinting will occur only when anobject color has a shade value greater than the Overprint Limit valuespecified in the Trapping pane of the Preferences dialog box (Edit &Preferences & Preferences).
• The Knockout option specifies that the object color named in the dialog boxtitle knocks out the selected background color using no trapping.
• The Auto Amount (+) option assigns the default spread value (the value speci-fied in the Auto Amount field of the Trapping pane of the Preferences dialogbox) to the object color named in the dialog box title.
• The Auto Amount (–) option assigns the default choke value (the negativeof the value specified in the Auto Amount field of the Trapping pane of thePreferences dialog box) to the object color named in the dialog box title.
• The Custom option displays a dialog box that lets you specify a custom trappingvalue for the object and background color. Enter a value and click OK. A neg-ative value causes the background color to choke. A positive value causes theobject color to spread. A value of zero will knock out the object from theselected background color with no trapping.
RANGE MEASUREMENT SYSTEM SMALLEST INCREMENT
±36 pt points .001
∫ If you specify a negative Custom value between the object color named in thedialog box title and the Indeterminate background color, text to which theobject color is applied is not choked, but is instead knocked out of the back-ground without any trapping.
Chapter 4: Edit Menu
200
Colors Command
DEPENDENT/INDEPENDENT (POP-UP MENU) PEdi t & Colors & Edi t Trap
The Dependent/Independent pop-up menu determines whether the Trapand Reverse pop-up menu settings will directly affect each other. The Reversecolumn indicates how trapping will occur when the selected Background Colortakes on the role of object color, and vice versa.
• Choose Dependent Traps if you want QuarkXPress to calculate a reversetrap value automatically.
• Choose Independent Traps to specify a custom reverse trap value.
REVERSE (POP-UP MENU) PEdi t & Colors & Edi t Trap
The Reverse pop-up menu determines how trapping will occur when theselected Background Color takes on the role of object color, and the coloridentified in the name of the dialog box takes on the role of background color.The Reverse value is calculated automatically when Dependent Traps is chosen.If you change the Reverse value when Dependent Traps is chosen, thecorresponding opposite trap will be calculated automatically.
The Reverse column displays the current setting. Entries different from thedefault values are marked with an asterisk (*). The options available in theReverse pop-up menu are the same as in the Trap pop-up menu.
H&JS COMMAND P
Hyphenation and justification specifications (H&Js) are sets of automatic hyphenationrules and justification settings that you can apply to paragraphs. The H&Js command(C+Option+H on Mac OS, Ctrl+Shift+F11 on Windows) displays the H&Js dialog box,which lets you create and manage hyphenation and justification specifications. Youapply hyphenation and justification specifications to selected paragraphs using the H&Jpop-up menu in the Formats tab of the Paragraph Attributes dialog box (Style &Formats). Hyphenation and justification specifications are also included in paragraphstyle sheets.
∫ Hyphenation and justification specifications created when no documents areopen are included with all subsequently created documents; hyphenation andjustification specifications created when a document is active are specific tothat document.
Chapter 4: Edit Menu
201
Colors Command

H&JS (DIALOG BOX) PEdi t & H&Js
The H&Js dialog box lets you create, edit, duplicate, and delete the currenthyphenation and justification specifications. You can also append hyphenationand justification specifications from another document.
The top list displays the available hyphenation and justification specifications,and the bottom displays the specifications for the selected hyphenation andjustification specification.
H&Js dialog box
H&JS (LIST) PEdi t & H&Js
When no documents are open, the H&J list displays all default hyphenation andjustification specifications. When a document is active, the H&J list displayshyphenation and justification specifications set up for the active document.
All documents contain the Standard hyphenation and justification specifica-tion. By default, Standard is the hyphenation and justification specificationspecified for the Normal paragraph style sheet. The default Standardhyphenation and justification specification is defined as follows:
• Auto Hyphenation: checked
• Smallest Word: 6
• Minimum Before: 3
• Minimum After: 2
• Break Capitalized Words: unchecked
Chapter 4: Edit Menu
202
H&Js Command

• Hyphens in a Row: unlimited
• Hyphenation Zone: 0"
• Space: 85% Min., 110% Opt., 250% Max.
• Char: 0% Min., 0% Opt., 4% Max.
• Flush Zone: 0"
• Single Word Justify: checked
NEW (BUTTON) PEdi t & H&Js
The New button displays the Edit Hyphenation & Justification dialog box,which lets you create a new hyphenation and justification specification. You cancreate up to 1,000 default or document-specific hyphenation and justificationspecifications. The Edit Hyphenation & Justification dialog box lets you nameand define a hyphenation and justification specification.
EDIT (BUTTON) PEdi t & H&Js
The Edit button displays the Edit Hyphenation & Justification dialog box forthe hyphenation and justification specification selected in the H&J list. TheEdit Hyphenation & Justification dialog box lets you modify a hyphenationand justification specification’s name and definition. You can also double-click a hyphenation and justification specification to display the EditHyphenation & Justification dialog box.
DUPLICATE (BUTTON) PEdi t & H&Js
The Duplicate button creates a new copy of the hyphenation and justificationspecification selected in the H&J list. QuarkXPress automatically opens the EditHyphenation & Justification dialog box so that you can rename and edit thecopied hyphenation and justification specification.
DELETE (BUTTON) PEdi t & H&Js
The Delete button removes the selected hyphenation and justification speci-fication(s) from the active document. If the hyphenation and justificationspecification was used in the active document, an alert dialog box lets youchoose a replacement hyphenation and justification specification.
APPEND (BUTTON) PEdi t & H&Js
The Append button lets you import hyphenation and justification specifica-tions from another QuarkXPress document. A dialog box lets you choose aQuarkXPress document to append specifications from.
Chapter 4: Edit Menu
203
H&Js Command

Selecting a document in the dialog box and clicking Open displays the AppendH&Js dialog box. This dialog box offers the same controls as the H&Js tab of theAppend dialog box (File & Append). For information about appending items,see Chapter 3, “File Menu.”
SAVE (BUTTON) PEdi t & H&Js
The Save button saves changes made to any hyphenation and justification spec-ifications in the H&Js dialog box. When you click Save, QuarkXPress updatesthe document’s text to match the new specifications and closes the dialog box.
EDIT HYPHENATION & JUSTIFICATION (DIALOG BOX) PEdi t & H&Js & New
Clicking New, Edit, or Duplicate in the H&Js dialog box displays the EditHyphenation & Justification dialog box, which lets you create or edit ahyphenation and justification specification.
Edit Hyphenation & Justification dialog box
NAME (FIELD) PEdi t & H&Js & New
The Name field lets you specify a name for a new hyphenation and justificationspecification or rename an existing hyphenation and justification specification.
AUTO HYPHENATION (AREA) PEdi t & H&Js & New
The Auto Hyphenation area lets you determine the way QuarkXPress performsautomatic hyphenation.
Chapter 4: Edit Menu
204
H&Js Command

• The Auto Hyphenation check box enables automatic hyphenation for para-graphs to which this hyphenation and justification specification is applied.This option is checked by default.
• The Smallest Word field specifies the minimum number of characters aword must contain to be hyphenated. Enter a value from 3 to 20. Thedefault setting is 6.
• The Minimum Before field specifies the smallest number of characters thatmust precede an automatic hyphen. Enter a value from 1 to 6. The defaultsetting is 3.
• The Minimum After field specifies the smallest number of characters thatmust follow an automatic hyphen. Enter a value from 2 to 8. The defaultsetting is 2.
• The Break Capitalized Words check box enables hyphenation for words thatstart with an uppercase character (for example, proper nouns and the first wordsof sentences). This option is unchecked by default.
∫ The Auto Hyphenation controls do not affect manual hyphenation (the use ofmanually inserted hyphens and discretionary hyphens to control word breaksand text flow within documents).
HYPHENS IN A ROW (FIELD) PEdi t & H&Js & New
The Hyphens in a Row field lets you specify the maximum number of con-secutive lines that can end in manually or automatically hyphenated words.You can enter any value from 0 to 7. If you do not want to limit the numberof consecutive lines that end with a hyphen, enter “0” or choose unlimitedfrom the field’s pop-up menu. The default setting is unlimited.
HYPHENATION ZONE (FIELD) PEdi t & H&Js & New
The Hyphenation Zone field lets you specify the area within whichhyphenation (automatic or manual) can occur. To do so, enter a value inthe field. The Hyphenation Zone is measured from the right indentationto the end of a line of text.
• When you specify a Hyphenation Zone greater than 0", QuarkXPress hyphen-ates a word only when: (1) the previous word ends before the HyphenationZone, and (2) an acceptable hyphenation point falls within the HyphenationZone. Hyphenation Zone values apply only to nonjustified text.
• A Hyphenation Zone value of 0" means that there is no Hyphenation Zone.In this case, QuarkXPress either hyphenates a word according to the other
Chapter 4: Edit Menu
205
H&Js Command

hyphenation criteria or wraps it to the next line if it will not fit completely onthe line. This is the default setting.
JUSTIFICATION METHOD (AREA) PEdi t & H&Js & New
Justified lines of text extend from the left to the right indentation within acolumn or box. Lines are justified by adding or removing space between wordsand characters. The values entered in the Space and Char fields determine howword space and characters are adjusted to justify a line. The Opt. (Mac OS) orOptimum (Windows) spacing values apply to nonjustified (left-, right-, andcenter-aligned) text, as well as to justified text.
SPACE (FIELDS) PEdi t & H&Js & New
The Space fields let you specify the amount of space QuarkXPress can add orremove between words in lines of justified text.
• The values in the Min., Opt., and Max. (Mac OS) or Minimum, Optimum, andMaximum (Windows) fields represent a percentage of the normal interwordspace for the font and size in use.
• When justifying lines of text, QuarkXPress first tries to space words accordingto the Opt. (Mac OS) or Optimum (Windows) value. If the program is unableto justify text using the Opt. (Mac OS) or Optimum (Windows) value, it variesword spacing within the range specified in the Min. and Max. (Mac OS) orMinimum and Maximum (Windows) fields.
• QuarkXPress never spaces words closer than the Min. (Mac OS) or Minimum(Windows) value. However, the program may exceed the Max. (Mac OS) orMaximum (Windows) value if there is no other way to justify a line.
• For nonjustified text, QuarkXPress always spaces words according to theOpt. (Mac OS) or Optimum (Windows) value.
CHARACTER (FIELDS) PEdi t & H&Js & New
The Char fields let you specify the amount of space QuarkXPress can add orremove between the characters in lines of justified text.
• The values in the Min., Opt., and Max. (Mac OS) or Minimum, Optimum,and Maximum (Windows) fields represent a percentage of an en space for thecurrent font size.
• When justifying lines of text, QuarkXPress first tries to space charactersaccording to the Opt. (Mac OS) or Optimum (Windows) value. If the programis unable to justify text using the Opt. or Optimum value, it varies characterspacing within the range specified in the Min. and Max. (Mac OS) or Minimumand Maximum (Windows) fields.
Chapter 4: Edit Menu
206
H&Js Command

• QuarkXPress never spaces characters closer than the Min. (Mac OS) or Mini-mum (Windows) value. However, the program may exceed the Max. (Mac OS)or Maximum (Windows) value if there is no other way to justify the line.
• For nonjustified text, QuarkXPress always spaces characters according tothe Opt. (Mac OS) or Optimum (Windows) value.
∫ By default, QuarkXPress defines an en space as the width of a zero in the currentfont. However, if you check Standard Em Space in the Character pane of thePreferences dialog box (Edit & Preferences & Preferences), QuarkXPress useshalf the width of the current font size for the en space (for example, 24-pointtext will have a 12-point en space).
FLUSH ZONE (FIELD) PEdi t & H&Js & New
The Flush Zone field lets you control whether the last line of text in a justifiedparagraph automatically extends to the right indentation. When the last lineof a justified paragraph ends within the Flush Zone, as measured from the rightindentation, space is added between characters and words so that the textextends from the left to the right indentation. If the last line of a paragraphdoes not fall within the specified Flush Zone (the text ends to the left of theFlush Zone), the last line is not justified.
SINGLE WORD JUSTIFY (CHECK BOX) PEdi t & H&Js & New
Checking Single Word Justify specifies that a single word alone on a line in ajustified paragraph extends from the left indentation to the right indentation.When Single Word Justify is unchecked, single words are not justified.
LISTS COMMAND
The Lists command displays the Lists dialog box, which lets you create and managecustom lists. A list is a group of one or more paragraph or character style sheets chosenby the user for the purpose of duplicating all the text of this style at another location.For example, a book publisher could specify a “chapter name” style sheet and a“section name” style sheet as a new list, then use the Lists palette (View & ShowLists) to automatically build a table of contents based on that list.
LISTS (DIALOG BOX)
Edi t & Lis ts
The Lists dialog box lets you create, edit, duplicate, and delete lists. You can alsoappend lists from another document. There are two lists in the dialog box, the
Chapter 4: Edit Menu
207
H&Js Command

top displaying the available lists, and the bottom displaying the specificationsfor the selected list.
Lists dialog box
LISTS (LIST)
Edi t & Lis ts
When no documents are open, Lists displays all default lists. When a documentis active, Lists displays lists available to the active document.
NEW (BUTTON)
Edi t & Lis ts
The New button displays the Edit List dialog box, which lets you create a newlist. You can create up to 1,000 default or document-specific lists, or both. TheEdit List dialog box lets you name and define a list.
EDIT (BUTTON)
Edi t & Lis ts
The Edit button displays the Edit List dialog box for the selected list. The EditList dialog box lets you modify a list’s name and definition. You can also double-click a list to display the Edit List dialog box.
DUPLICATE (BUTTON)
Edi t & Lis ts
The Duplicate button creates a new copy of the selected list. QuarkXPressautomatically opens the Edit List dialog box so that you can rename andedit the copied list.
Chapter 4: Edit Menu
208
Lists Command

DELETE (BUTTON)
Edi t & Lis ts
The Delete button removes the selected list(s) from the active document.
APPEND (BUTTON)
Edi t & Lis ts
The Append button lets you import lists from another QuarkXPress docu-ment. A dialog box lets you choose a QuarkXPress document from which toappend lists.
Selecting a document in the dialog box and clicking Open displays the AppendLists dialog box. This dialog box offers the same controls as the Lists tab of theAppend dialog box (File & Append). For information about appending items,see Chapter 3, “File Menu.”
SAVE (BUTTON)
Edi t & Lis ts
The Save button saves changes made to any lists in the Lists dialog box.When you click Save, QuarkXPress saves the new list specifications andcloses the dialog box.
EDIT LIST (DIALOG BOX)
Edi t & Lis ts & New
Clicking New, Edit, or Duplicate in the Lists dialog box displays the Edit Listdialog box, which lets you create or edit a list.
Edit List dialog box
NAME (FIELD)
Edi t & Lis ts & New
The Name field lets you specify a name for a new list or rename an existing list.
Chapter 4: Edit Menu
209
Lists Command

AVAILABLE STYLES (LIST)
Edi t & Lis ts & New
The Available Styles list displays all the style sheets available to the active docu-ment. To add a style sheet to the list, double-click its name in the list or select itand click the Add ‡ arrow. To remove a style sheet from the list, select its namein Styles in List and click the Remove ° arrow.
STYLES IN LIST (LIST)
Edi t & Lis ts & New
Styles in List displays all the style sheets included in the list. The Level,Numbering, and Format As pop-up menus let you further customize your list.
LEVEL (POP-UP MENU)
Edi t & Lis ts & New
Choose a level from one to eight from the Level pop-up menu to determinehow text with the selected style sheet will be indented in the Lists palette(View & Show Lists). Every level after the first is indented in the Lists paletteso that you can visualize your desired hierarchy. Use lower numbers to rankyour most important style sheets; use higher numbers to rank style sheets oflesser importance.
NUMBERING (POP-UP MENU)
Edi t & Lis ts & New
Choose an option from the Numbering pop-up menu to specify a page number-ing style for text in the selected style sheet. The numbering style you choosedetermines where page numbers will appear in relation to the pieces of text thatare copied into your finished table or list.
• Choose Text only for text to display without a page number.
• Choose Text...Page # for text to be followed by a page number.
• Choose Page #...Text for text to be preceded by a page number.
FORMAT AS (POP-UP MENU)
Edi t & Lis ts & New
The Format As pop-up menu lets you choose a style sheet to define how textwill be styled in the final list. For example, you may want text styled using your“chapter name” style sheet to be reformatted using your “TOC chapter entry”style sheet when you build a table of contents list.
ALPHABETICAL (CHECK BOX)
Edi t & Lis ts & New
Check the Alphabetical check box if you want your list to be generated inalphabetical order rather than in the order in which the list items occur inthe document.
Chapter 4: Edit Menu
210
Lists Command
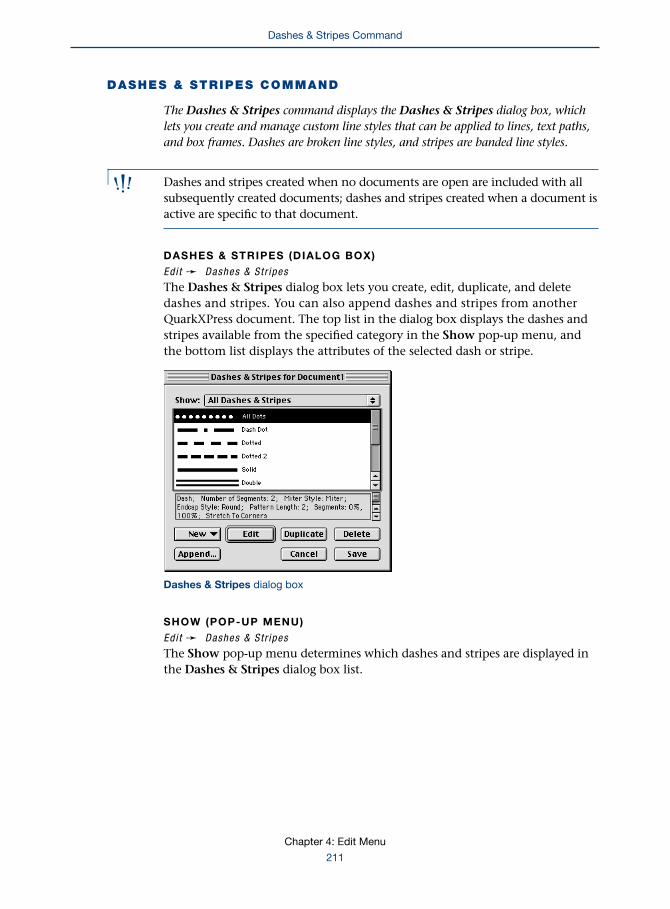
DASHES & STRIPES COMMAND
The Dashes & Stripes command displays the Dashes & Stripes dialog box, whichlets you create and manage custom line styles that can be applied to lines, text paths,and box frames. Dashes are broken line styles, and stripes are banded line styles.
∫ Dashes and stripes created when no documents are open are included with allsubsequently created documents; dashes and stripes created when a document isactive are specific to that document.
DASHES & STRIPES (DIALOG BOX)
Edi t & Dashes & St r ipes
The Dashes & Stripes dialog box lets you create, edit, duplicate, and deletedashes and stripes. You can also append dashes and stripes from anotherQuarkXPress document. The top list in the dialog box displays the dashes andstripes available from the specified category in the Show pop-up menu, andthe bottom list displays the attributes of the selected dash or stripe.
Dashes & Stripes dialog box
SHOW (POP-UP MENU)
Edi t & Dashes & St r ipes
The Show pop-up menu determines which dashes and stripes are displayed inthe Dashes & Stripes dialog box list.
Chapter 4: Edit Menu
211
Dashes & Stripes Command

• Choose All Dashes & Stripes to display all the dashes and stripes available tothe document. When no document is open, only default dashes and stripes thatare common to all documents are displayed.
• Choose Dashes to display only those line styles that are formed using thedashed “broken line” method.
• Choose Stripes to display only those line styles that are formed using the“banded” method.
• Choose Dashes & Stripes In Use to display only those dashes and stripesthat have been applied somewhere in the active document.
• Choose Dashes & Stripes Not Used to display only those dashes and stripesthat are unused in the active document.
NEW (POP-UP BUTTON)
Edi t & Dashes & St r ipes
The New pop-up button lets you create up to 1,000 default or document-specificdashes and stripes. The pop-up button has two options: Dash and Stripe.
• Choose Dash to create a “broken” line style. The Edit Dash dialog box displays.
• Choose Stripe to create a “banded” line style. The Edit Stripe dialogbox displays.
EDIT (BUTTON)
Edi t & Dashes & St r ipes
The Edit button displays the Edit Dash dialog box or the Edit Stripe dialog box,depending on the line style selected in the list. You can also double-click a linestyle in the list to display the dialog box.
DUPLICATE (BUTTON)
Edi t & Dashes & St r ipes
The Duplicate button creates an identical copy of the line style selected in thelist. QuarkXPress automatically opens the Edit Dash dialog box or the EditStripe dialog box so that you can rename and edit the duplicated line style.
DELETE (BUTTON)
Edi t & Dashes & St r ipes
The Delete button removes the selected line style(s) from the active document.If the line style was used in the document, an alert dialog box lets you choose areplacement line style.
Chapter 4: Edit Menu
212
Dashes & Stripes Command

APPEND (BUTTON)
Edi t & Dashes & St r ipes
The Append button lets you import dashes and stripes from another document.A dialog box lets you choose a QuarkXPress document from which to appenddashes and stripes.
Selecting a document in the dialog box and clicking Open displays the AppendDashes & Stripes dialog box. This dialog box offers the same controls asthe Dashes & Stripes tab of the Append dialog box (File & Append). Forinformation about appending items, see Chapter 3, “File Menu.”
SAVE (BUTTON)
Edi t & Dashes & St r ipes
The Save button saves changes made to any dashes and stripes in theDashes & Stripes dialog box. When you click Save, QuarkXPress updatesitems in the document to match the new line style specifications and closesthe dialog box.
EDIT DASH (DIALOG BOX)
Edi t & Dashes & St r ipes & New & Dash
Clicking New & Dash, or clicking Edit or Duplicate in the Dashes & Stripesdialog box when a dashed line style is selected displays the Edit Dash dialogbox, which lets you create or edit a dash.
Edit Dash dialog box
Chapter 4: Edit Menu
213
Dashes & Stripes Command

NAME (FIELD)
Edi t & Dashes & St r ipes & New & Dash
The Name field lets you specify a name for a new dash or rename anexisting dash.
RULER (AREA)
Edi t & Dashes & St r ipes & New & Dash
The ruler area lets you put breaks in your line. Every time you click in the rulerarea, an arrow 3 displays. The arrow 3 indicates where a dash should start or stop.If you create several arrows, spaced apart at different distances, you will create adashed line style with dashes of varying sizes. To make a dash section larger orsmaller, drag an arrow 3. To delete a dash section, drag its arrows 3 off the ruler.
PREVIEW (AREA)
Edi t & Dashes & St r ipes & New & Dash
The Preview area shows what your dash will look like. The Preview area letsyou drag a slider to view the dash at different widths.
DASH ATTRIBUTES (AREA)
Edi t & Dashes & St r ipes & New & Dash
The Dash Attributes area lets you determine how your dashed line style appearswhen applied to a line, text path, or box frame.
• The Repeats Every field and pop-up menu determines whether the length ofthe dash’s repeating pattern will be proportional to the width of the line orframe it is used with, or whether it is absolute. Enter a number in the RepeatsEvery field when times width is chosen from the pop-up menu to create a pro-portional line style. Enter a number in the Repeats Every field when Points ischosen from the pop-up menu to create an absolute line style that uses pointsas the measuring system. The repeating pattern consists of everything dis-played along the ruler area.
• Choose an option from the Miter submenu to determine how corners (includ-ing the corner points in Bézier items with this dash style applied) will look. Youcan choose from Sharp, Rounded, and Beveled.
• Choose an option from the Endcap submenu to determine how the ends ofindividual dashes look. You can choose from Square, Projecting Round,Projecting Square, or Round.
• Check Stretch to Corners to make the dash pattern stretch evenly along a frameso that the corner areas look symmetrical.
Chapter 4: Edit Menu
214
Dashes & Stripes Command
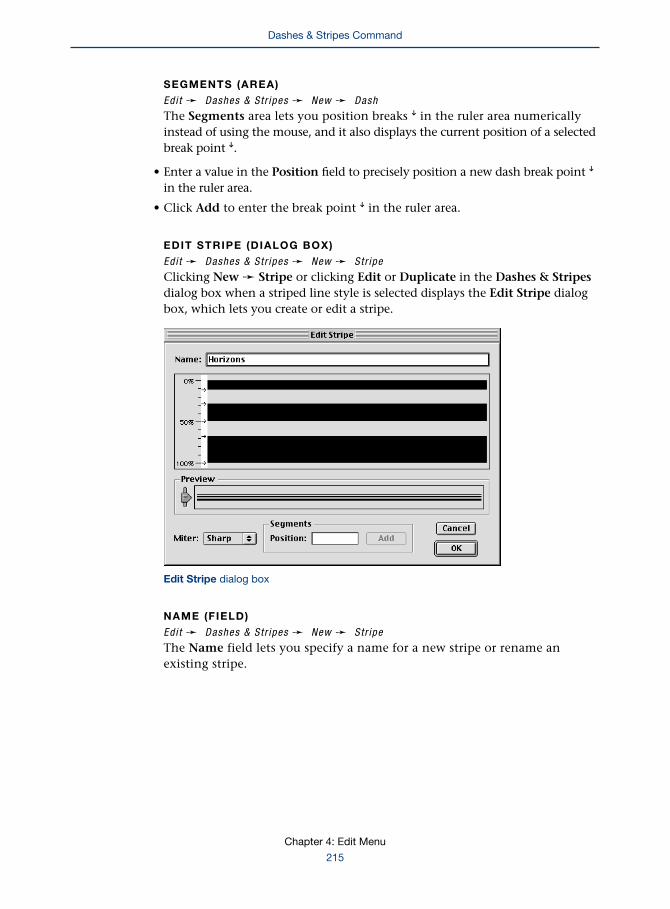
SEGMENTS (AREA)
Edi t & Dashes & St r ipes & New & Dash
The Segments area lets you position breaks 3 in the ruler area numericallyinstead of using the mouse, and it also displays the current position of a selectedbreak point 3.
• Enter a value in the Position field to precisely position a new dash break point 3
in the ruler area.
• Click Add to enter the break point 3 in the ruler area.
EDIT STRIPE (DIALOG BOX)
Edi t & Dashes & St r ipes & New & Str ipe
Clicking New & Stripe or clicking Edit or Duplicate in the Dashes & Stripesdialog box when a striped line style is selected displays the Edit Stripe dialogbox, which lets you create or edit a stripe.
Edit Stripe dialog box
NAME (FIELD)
Edi t & Dashes & St r ipes & New & Str ipe
The Name field lets you specify a name for a new stripe or rename anexisting stripe.
Chapter 4: Edit Menu
215
Dashes & Stripes Command

RULER (AREA)
Edi t & Dashes & St r ipes & New & Str ipe
The ruler area lets you put bands or “stripes” in your line style. Every timeyou click in the ruler area, an arrow . displays. The arrow . indicates where astripe should start or stop. If you create several arrows spaced apart at differ-ent distances, you will create a banded line style with stripes of varying sizes.To make a stripe larger or smaller, drag an arrow .. To delete a stripe, drag itsarrows . off the ruler.
P REVIEW (AREA)
Edi t & Dashes & St r ipes & New & Str ipe
The Preview area shows what your stripe will look like. The Preview lets youdrag a slider to view the stripe at different widths.
MITER (POP-UP MENU)
Edi t & Dashes & St r ipes & New & Str ipe
Choose an option from the Miter submenu to determine how corners (includ-ing the corner points in Bézier items with this stripe style applied) will look.You can choose from Sharp, Rounded, and Beveled.
SEGMENTS (AREA)
Edi t & Dashes & St r ipes & New & Str ipe
The Segments area lets you position breaks . in the ruler area numericallyinstead of using the mouse, and it also displays the current position of aselected break point ..
• Enter a percentage value in the Position field to precisely position a new stripebreak point . in the ruler area.
• Click Add to enter the break point . in the ruler area.
PRINT STYLES COMMAND P
The Print Styles command displays the Print Styles dialog box, which lets you cre-ate and manage custom print styles. A print style is a group of print settings that youimplement by choosing the name of the print style in the Print Style pop-upmenu in the Print dialog box (File & Print). Using print styles eliminates having torecreate complex or frequently-used print settings every time you print. Print styles areavailable when printing a print document to a PostScript or non-PostScript printer.
PRINT STYLES (DIALOG BOX) PEdi t & Pr in t Sty les
The Print Styles dialog box lets you create, edit, duplicate, and delete printstyles. You can also import and export print styles. The top list displays
Chapter 4: Edit Menu
216
Dashes & Stripes Command
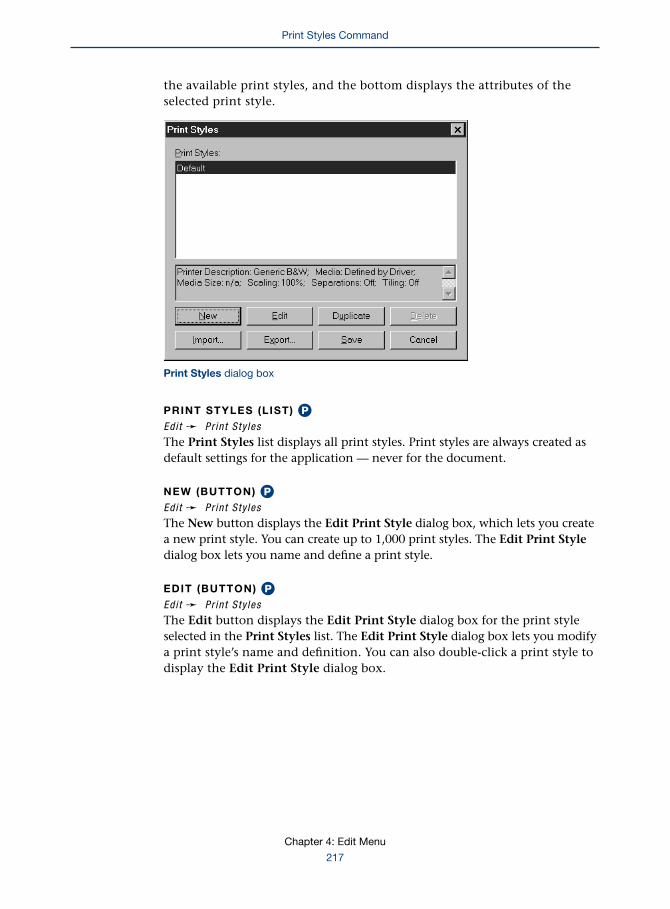
the available print styles, and the bottom displays the attributes of theselected print style.
Print Styles dialog box
PRINT STYLES (LIST) PEdi t & Pr in t Sty les
The Print Styles list displays all print styles. Print styles are always created asdefault settings for the application — never for the document.
NEW (BUTTON) PEdi t & Pr in t Sty les
The New button displays the Edit Print Style dialog box, which lets you createa new print style. You can create up to 1,000 print styles. The Edit Print Styledialog box lets you name and define a print style.
EDIT (BUTTON) PEdi t & Pr in t Sty les
The Edit button displays the Edit Print Style dialog box for the print styleselected in the Print Styles list. The Edit Print Style dialog box lets you modifya print style’s name and definition. You can also double-click a print style todisplay the Edit Print Style dialog box.
Chapter 4: Edit Menu
217
Print Styles Command

DUPLICATE (BUTTON) PEdi t & Pr in t Sty les
The Duplicate button creates a new copy of the print style selected in the PrintStyles list. QuarkXPress automatically opens the Edit Print Style dialog boxso that you can rename and edit the copied print style.
DELETE (BUTTON) PEdi t & Pr in t Sty les
The Delete button removes the selected print style(s) from the active document.You cannot delete the Default print style.
IMPORT (BUTTON) PEdi t & Pr in t Sty les
The Import button lets you import a print style file that you have createdusing the Export button. A dialog box lets you select a print style file to import.Selecting a file in the dialog box and clicking Open immediately imports theprint styles.
EXPORT (BUTTON) PEdi t & Pr in t Sty les
The Export button lets you export the selected print styles to a file that can beused by another QuarkXPress user. An exported print style file can be importedusing the Import button.
To export, select print styles in the Print Styles list and click Export. A dialogbox displays, prompting you to specify the name and the location for the newprint styles file. Click Save to complete the export.
SAVE (BUTTON) PEdi t & Pr in t Sty les
The Save button saves changes made to any print styles in the Print Stylesdialog box and closes the dialog box.
EDIT PRINT STYLE (DIALOG BOX) PEdi t & Pr in t Sty les & New
Clicking New, Edit, or Duplicate in the Print Styles dialog box displays theEdit Print Style dialog box, which lets you create or edit print styles.
Chapter 4: Edit Menu
218
Print Styles Command

Edit Print Style dialog box
• The Name field lets you specify a name for a new print style or rename anexisting print style.
• Below the Name field are four tabs: Document, Setup, Output, and Options.These tabs let you specify the printing settings that will be automatically appliedwhenever you choose the print style in the Print Style pop-up menu in thePrint dialog box (File & Print). The controls in these four tabs are the same asthose found in the Print dialog box (File menu). For specific information aboutcontrols in the Print dialog box, see Chapter 3, “File Menu.”
META TAGS COMMAND W
The Meta Tags command displays the Meta Tags dialog box, which lets you cre-ate and manage sets of custom meta tags for use in Web documents. A meta tagcontains information about an HTML file, but is not displayed in a Web browser.People commonly add meta tags so Web search engines can more easily indextheir Web pages.
å For more information about meta tags, see Chapter 21, “Interactive WebElements” in A Guide to QuarkXPress: Using QuarkXPress.
Chapter 4: Edit Menu
219
Print Styles Command

META TAGS (DIALOG BOX) WEdi t & Meta Tags
The Meta Tags dialog box lets you create, edit, duplicate, and delete sets of metatags. You can also append meta tags from other QuarkXPress Web documents.The top list displays the available meta tag sets, and the bottom displays theselected meta tag set as it will look when the document is exported as HTML.
Meta Tags dialog box
META TAGS (LIST) WEdi t & Meta Tags
The Meta Tags list displays all sets of meta tags for the active Web document.
NEW (BUTTON) WEdi t & Meta Tags
The New button displays the Edit Meta Tag Set dialog box, which lets youcreate a new set of meta tags. The Edit Meta Tag Set dialog box is describedbelow.
EDIT (BUTTON) WEdi t & Meta Tags
The Edit button displays the Edit Meta Tag Set dialog box for the meta tag setselected in the Meta Tags list. The Edit Meta Tag Set dialog box lets you mod-ify a meta tag set. You can also double-click a meta tag set to display the EditMeta Tag Set dialog box. The Edit Meta Tag Set dialog box is described below.
Chapter 4: Edit Menu
220
Meta Tags Command

DUPLICATE (BUTTON) WEdi t & Meta Tags
The Duplicate button creates a new copy of the meta tag selected in the MetaTags list. QuarkXPress automatically opens the Edit Meta Tag Set dialog box sothat you can rename and edit the copied meta tag.
DELETE (BUTTON) WEdi t & Meta Tags
The Delete button removes the selected meta tag(s) or meta tag set(s) fromthe active document. When you delete a set that is used in the active Webdocument, the Delete Meta Tag Set alert displays; this gives you a chanceto choose a replacement set.
Delete Meta Tag Set alert
APPEND (BUTTON) WEdi t & Meta Tags
The Append button lets you import meta tags from another document. ClickingAppend displays the Append dialog box; this lets you choose a QuarkXPressdocument from which to append meta tags. Selecting a file in the Appenddialog box and clicking Open immediately imports the meta tags.
SAVE (BUTTON) WEdi t & Meta Tags
The Save button saves changes made to any menus in the Meta Tags dialog boxand closes the dialog box.
Chapter 4: Edit Menu
221
Meta Tags Command

EDIT META TAG SET (DIALOG BOX) WEdi t & Meta Tags & New or Ed i t
The Edit Meta Tag Set dialog box lets you create and edit a set of meta tags.
Edit Meta Tag Set dialog box
NAME (FIELD) WEdi t & Meta Tags & New or Ed i t
The Name field lets you specify a name for the selected meta tag set.
EDIT META TAG SET (LIST) WEdi t & Meta Tags & New or Ed i t
The Edit Meta Tag Set list displays the tag, name, and content of the metatags in the selected meta tag set.
ADD (BUTTON) WEdi t & Meta Tags & New or Ed i t
The Add button lets you create a meta tag using the New Meta Tagdialog box.
EDIT (BUTTON) WEdi t & Meta Tags & New or Ed i t
The Edit button lets you edit a meta tag using the Edit Meta Tag dialog box.
Chapter 4: Edit Menu
222
Meta Tags Command

DUPLICATE (BUTTON) WEdi t & Meta Tags & New or Ed i t
The Duplicate button creates a new copy of the meta tag selected in theEdit Meta Tag Set list.
DELETE (BUTTON) WEdi t & Meta Tags & New or Ed i t
The Delete button deletes the meta tag selected in the Edit Meta Tag Set list.
NEW META TAG, EDIT META TAG (DIALOG BOXES) WEdi t & Meta Tags & New or Ed i t & Add or Ed i t
The New Meta Tag and Edit Meta Tag dialog boxes let you create and editmeta tags.
Edit Meta Tag dialog box
META TAG (POP-UP MENU AND FIELD) WEdi t & Meta Tags & New or Ed i t & Add or Ed i t
Choose an option from the Meta Tag pop-up menu or enter a value in theMeta Tag field to specify the kind of meta tag you want to create.
NAME (POP-UP MENU AND FIELD) WEdi t & Meta Tags & New or Ed i t & Add or Ed i t
Choose an option from the Name pop-up menu or enter a value in theName field to specify a name for the meta tag .
CONTENT (FIELD) WEdi t & Meta Tags & New or Ed i t & Add or Ed i t
The Content field lets you specify the value of the meta tag. You can enter asingle value or a list of values separated by commas.
Chapter 4: Edit Menu
223
Meta Tags Command

MENUS COMMAND W
The Menus command displays the Menus dialog box, which lets you create andmanage menus for use in list controls and form pop-up menu controls. A menucontains a series of items, and each item may optionally act as a link to a URL.List controls and pop-up menu controls are components that can be used in formsthat are part of Web documents.
å For more information about forms, see Chapter 22, “Forms“ in A Guide toQuarkXPress: Using QuarkXPress.
MENUS (DIALOG BOX) WEdi t & Menus
The Menus dialog box lets you create, edit, duplicate, and delete menus.You can also append menus from other QuarkXPress documents. The toplist displays the available menus, and the bottom displays the contents ofthe selected menu.
Menus dialog box
Chapter 4: Edit Menu
224
Menus Command

Chapter 4: Edit Menu
225
Menus Command
MENUS (LIST) WEdi t & Menus
The Menus list displays all sets of menus for the active Web document.
NEW (BUTTON) WEdi t & Menus
The New button displays the Edit Menu dialog box, which lets you createa new menu.
EDIT (BUTTON) WEdi t & Menus
The Edit button displays the Edit Menu dialog box for the menu selected inthe Menus list. The Edit Menu dialog box lets you modify a menu’s attributes.You can also double-click a menu name to display the Edit Menu dialog box.
DUPLICATE (BUTTON) WEdi t & Menus
The Duplicate button creates a new copy of the menu selected in theMenus list.
DELETE (BUTTON) WEdi t & Menus
The Delete button removes the selected menu(s) from the active document.When you delete a menu that is used in the active Web document, the DeleteMenu alert displays, letting you choose a replacement menu.
Delete Menu alert
APPEND (BUTTON) WEdi t & Menus
The Append button lets you import menus from another QuarkXPress Webdocument. A dialog box lets you select a file to import. Selecting a file inthe dialog box and clicking Open immediately imports the menus.

SAVE (BUTTON) WEdi t & Menus
The Save button saves changes made to any menus in the Menus dialog boxand closes the dialog box.
EDIT MENU (DIALOG BOX) WEdi t & Menu & New or Ed i t
The Edit Menu dialog box lets you create and edit menus.
Edit Menu dialog box
NAME (FIELD) WEdi t & Menu & New or Ed i t
The Name field lets you specify a name for the selected menu.
NAVIGATION MENU (CHECK BOX) WEdi t & Menu & New or Ed i t
The Navigation Menu check box lets you specify that choosing an item fromthe menu causes the reader’s Web browser to open the URL specified in thatitem’s Value field.
Chapter 4: Edit Menu
226
Menus Command

MENU ITEMS (LIST) WEdi t & Menu & New or Ed i t
The Menu Items list displays the name and value of each menu item associatedwith the selected menu. The Default column shows which menu item shouldbe selected by default.
ADD (BUTTON) WEdi t & Menu & New or Ed i t
The Add button lets you create a menu item using the Menu Item dialog box.
EDIT (BUTTON) WEdi t & Menu & New or Ed i t
The Edit button lets you edit a menu item using the Menu Item dialog box.
DUPLICATE (BUTTON) WEdi t & Menu & New or Ed i t
The Duplicate button creates a new copy of the menu item selected in theMenu Items list.
DELETE (BUTTON) WEdi t & Menu & New or Ed i t
The Delete button deletes the menu item selected in the Menu Items list.
MENU ITEM (DIALOG BOX) WEdi t & Menu & New or Ed i t & Add or Ed i t
The Menu Item dialog box lets you create and edit menu items.
Menu Item dialog box
Chapter 4: Edit Menu
227
Menus Command

NAME (FIELD) WEdi t & Menu & New or Ed i t & Add or Ed i t
The Name field lets you specify the name of the selected menu item as it willdisplay in the reader’s Web browser.
VALUE (FIELD) WEdi t & Menu & New or Ed i t & Add or Ed i t
The Value field is displayed when Navigation Menu is unchecked in the EditMenu dialog box. The contents of this field are sent to the target application ifthis menu item is selected when the form is submitted.
LINK (FIELD) WEdi t & Menu & New or Ed i t & Add or Ed i t
The Link field is displayed when Navigation Menu is checked in the EditMenu dialog box. This field should contain the URL to be linked to whenreaders choose this menu item in their Web browsers. You can enter theURL manually or click the Select (Mac OS) or Browse (Windows) buttonand navigate to the file.
USE AS DEFAULT (CHECK BOX) WEdi t & Menu & New or Ed i t & Add or Ed i t
The Use as Default check box lets you specify whether the selected menuitem should be selected by default when the menu is viewed in the reader’sWeb browser.
Chapter 4: Edit Menu
228
Menus Command

Chapter 5: Style Menu
If you want to make your text blue, apply a shade of color to a box, or shorten a line,
the QuarkXPress Style menu allows you to make these and many other modifications
in boxes, text paths, and lines. You can also modify certain types of pictures, apply style
sheets, and flip contents in a box.
STYLE MENU FOR TEXT
When a text box or a text path is active and the Content tool E is selected, the Stylemenu for text is available. The Style menu for text is divided into four sections:
SECTIONS
• The first section lists commands that can change individual characters. Theyapply to selected text or the text insertion point i. These include Font, Size,Type Style, Color, Shade, Horizontal/Vertical Scale, Kern/Track, and BaselineShift. These controls can also be accessed through the Character command.Character attributes that are grouped into style sheets (Edit & Style Sheets) canbe applied through the Character Style Sheet submenu. The Text to Boxcommand is included in the first section, but is used to transform selectedtext rather than apply attributes to it.
• The second section lists paragraph formats, which apply to selected paragraphsor a paragraph containing the text insertion point i: Alignment, Leading,Formats, Tabs, and Rules.
The above commands are also consolidated under the Formats command.Paragraph attributes that are grouped into style sheets (Edit & Style Sheets)can be applied using the Paragraph Style Sheet submenu.
• The third section lists commands that alter all the text in a selected text box ortext path: Flip Horizontal and Flip Vertical.
• The fourth section lists commands that let you create, apply, and delete hyper-links and anchors.
∫ Not all of the options in this menu are available for text in HTML textboxes. For information about HTML text box limitations, see Chapter 7,“Document Layout,” or Chapter 9, “Typography,” in A Guide to QuarkXPress:Using QuarkXPress.
Chapter 5: Style Menu
229
Style Menu for Text

Style menu for text
FONT (SUBMENU)
Sty le menu
A font is a complete set of characters in one typeface, such as Times Roman.The Font submenu lets you choose from a list of fonts that are installed andavailable on your system.
å Windows only: By indicating several font types in the Font submenu, QuarkXPresshelps you determine what types of fonts you have installed. TrueType font namesare preceded by a “TT” icon; Type 1 font names are preceded by a “T1” icon,and OpenType font names are preceded by an “O” icon.
SIZE (SUBMENU)
Sty le menu
The Size submenu lets you choose from a list of common point sizes for text.The Other option displays the Character Attributes dialog box, which lets youenter a font size for text in the Size field.
Chapter 5: Style Menu
230
Style Menu for Text

Although you can enter a size in any supported measurement system, the fontsize will be displayed in points the next time you open the dialog box.
RANGE MEASUREMENT SYSTEM SMALLEST INCREMENT
2 pt to 720 pt various (", pt, cm, etc.) .001
If an automatic drop cap is selected, the font size is displayed as a percentage.
RANGE MEASUREMENT SYSTEM SMALLEST INCREMENT
10% to 400% percent .1
Size submenu
Chapter 5: Style Menu
231
Style Menu for Text

TYPE STYLE (SUBMENU)
Sty le menu
The Type Style submenu lets you choose from a list of type styles builtinto QuarkXPress:
• Choosing Plain automatically deselects all other type styles.
• Choosing Bold accesses the bold version of the current font (if installed) orsimulates bold type.
• Choosing Italic accesses the italic version of the current font (if installed) orsimulates italic.
• Choosing Underline underlines all characters and spaces; does notunderline tabs.
• Choosing Word Underline underlines all characters except spaces (space,en space, half-en space, and punctuation space) and tabs. (Not available inHTML text boxes.)
• Choosing Strike Thru draws a 1-point line through characters; does not strikethrough tabs. The line is placed above the baseline at one third of the ascentheight of the largest character on each line. Some fonts define a custom strike-through position, which overrides the QuarkXPress default position.
• Choosing Outline outlines characters. (This option is not available in HTMLtext boxes.)
• Choosing Shadow creates a drop shadow behind each character that is propor-tional to the size of the type. (This option is not available in HTML text boxes.)
• Choosing All Caps changes all lowercase letters to uppercase letters.
• Choosing Small Caps changes all lowercase letters to smaller versions of upper-case letters. The default scale of small caps characters (75% of normal uppercaseletters) can be modified in the Character pane of the Preferences dialog box(Edit & Preferences & Preferences). (This option is not available in HTMLtext boxes.)
• Choosing Superscript offsets characters above the baseline by the amountspecified in the Character pane of the Preferences dialog box. The defaultoffset amount is 33%. The default scale of superscript characters (100% of thecurrent font size) can be modified in the Character pane of the Preferencesdialog box (Edit & Preferences & Preferences).
Chapter 5: Style Menu
232
Style Menu for Text

• Choosing Subscript offsets characters below the baseline by the amount speci-fied in the Character pane of the Preferences dialog box. The default offsetamount is 33%. The default scale of subscript characters (100% of the currentfont size) can be modified in the Character pane of the Preferences dialog box(Edit & Preferences & Preferences).
• Choosing Superior raises characters so their ascents align with the cap height(the distance between the baseline and the top of a capitalized letter) of the cur-rent font. The default scale of superior characters (50% of the current font size)can be modified in the Character pane of the Preferences dialog box (Edit &Preferences & Preferences). (This option is not available in HTML text boxes.)
Type Style commands on Windows (left) and on Mac OS (right)
∫ You can apply type styles to text in almost any combination. However,Underline and Word Underline, All Caps and Small Caps, and Superscriptand Subscript are mutually exclusive styles, meaning only one of the paircan be applied.
Chapter 5: Style Menu
233
Style Menu for Text

COLOR (SUBMENU)
Sty le menu
The Color submenu lets you choose from a list of colors defined in the Colorsdialog box (Edit & Colors). The list includes custom colors, default colors, andspot colors imported with EPS picture files.
Color submenu for print document
SHADE (SUBMENU)
Sty le menu
The Shade submenu lets you choose a tint value in 10% increments. The Otheroption displays the Character Attributes dialog box, which lets you enter avalue in the selected Shade field.
RANGE MEASUREMENT SYSTEM SMALLEST INCREMENT
0 to 100% percent .1
Chapter 5: Style Menu
234
Style Menu for Text

Shade submenu
HORIZONTAL/VERTICAL SCALE (COMMAND)
Sty le menu
Scaling compresses or expands characters. The Horizontal/Vertical Scalecommand displays the Character Attributes dialog box, which lets you chooseHorizontal or Vertical scaling from the Scale pop-up menu and enter a value inthe Scale field. You can apply either Horizontal or Vertical scaling, but notboth. (Horizontal and vertical scaling are not available for HTML text boxes.)
RANGE MEASUREMENT SYSTEM SMALLEST INCREMENT
25% to 400% percent .1
KERN (COMMAND)
Sty le menu
Kerning adjusts the amount of space between two characters. The Kerncommand displays the Character Attributes dialog box, which lets youenter a value in the selected Kern Amount field. Positive values increase spacebetween characters; negative values decrease it. (Kerning is not available forHTML text boxes.)
∫ The Kern command is available when the text insertion point i is betweentwo characters. When a range of text is selected, Track replaces Kern in theStyle menu.
RANGE MEASUREMENT SYSTEM SMALLEST INCREMENT
±500 .005 (1/200) em space .001
Chapter 5: Style Menu
235
Style Menu for Text

TRACK (COMMAND)
Sty le menu
Tracking adjusts the amount of space to the right of each character in a selectedrange. The Track command displays the Character Attributes dialog box,which lets you enter a value in the selected Track Amount field. Positive valuesincrease space between characters; negative values decrease it. (Tracking is notavailable for HTML text boxes.)
RANGE MEASUREMENT SYSTEM SMALLEST INCREMENT
±500 .005 (1/200) em space .001
∫ The Track command is available when a range of text is selected. When no textis selected, Kern replaces Track in the Style menu.
BASELINE SHIFT (COMMAND)
Sty le menu
Baseline shifting moves selected characters above or below their baselines with-out affecting leading. The Baseline Shift command displays the CharacterAttributes dialog box, which lets you enter a value in the selected Baseline Shiftfield. Positive values shift text up; negative values shift text down. (This optionis not available in HTML text boxes.)
RANGE MEASUREMENT SYSTEM SMALLEST INCREMENT
±3 times various (", pt, cm, etc.) .001font size
CHARACTER (COMMAND)
Sty le menu
The Character command displays the Character Attributes dialog box, whichlets you specify multiple character attributes.
CHARACTER ATTRIBUTES (DIALOG BOX)
Sty le & Character
Each control in the Character Attributes dialog box has the same effect as itscorresponding Style menu command. To use the controls:
• Choose a font from the Font pop-up menu or enter the first few characters ofthe name in the field until the name is recognized.
• Choose a size from the Size pop-up menu or enter a value in the field.
Chapter 5: Style Menu
236
Style Menu for Text

• Choose a color from the Color pop-up menu.
• Choose a shade from the Shade pop-up menu or enter a percentage value inthe field.
• Choose Horizontal or Vertical from the Scale pop-up menu and enter a per-centage value in the field. (This option is not available in HTML text boxes.)
• Enter a value in the Kern Amount field. (Kern Amount is available when thetext insertion point i is between two characters.) (This option is not availablein HTML text boxes).
• Enter a value in the Track Amount field. (Track Amount is available whencharacters are selected.) (This option is not available in HTML text boxes.)
• Enter a value in the Baseline Shift field. (This option is not available in HTMLtext boxes.)
• Check Plain or combinations of the other type style buttons in the Type Stylearea. A gray button indicates that a style has been applied to at least one char-acter, but not all characters, in selected text.
∫ Underline and Word Underline, All Caps and Small Caps, and Superscriptand Subscript are mutually exclusive type styles, meaning only one of the paircan be applied.
Character Attributes dialog box
Chapter 5: Style Menu
237
Style Menu for Text

CHARACTER STYLE SHEET (SUBMENU)
Sty le menu
Character style sheets let you apply multiple character attributes in one step.The Character Style Sheet submenu lets you choose from a list of characterstyle sheets defined for the document.
• No Style is a feature that removes the character style sheet from selected textwhile retaining character attributes. When you apply a new character style sheetafter applying No Style, none of the previous formatting remains.
• Normal is the default character style sheet that is included in all new paragraphstyle sheets. You can edit the Normal character style sheet using the StyleSheets dialog box (Edit & Style Sheets).
• Custom style sheets are any other character style sheets defined in the StyleSheets dialog box (Edit & Style Sheets).
Character Style Sheet submenu
TEXT TO BOX (COMMAND)
Sty le menu
The Text to Box command creates a Bézier picture box shaped just like theselected characters. Text to Box works with PostScript Type 1 fonts (with AdobeType Manager installed), or with TrueType fonts. Large text sizes work best. Youcan import a picture into the new box or even turn the new box into a text boxto have “text within text.”
Chapter 5: Style Menu
238
Style Menu for Text

If you want the box to flow with the surrounding text, press Option (Mac OS) orAlt (Windows) while you choose Style & Text to Box. This replaces the selectedcharacters with an anchored version of your new Bézier box. To reshape Bézierboxes, see “Reshaping Boxes” in Chapter 4, “Box Basics,” in A Guide toQuarkXPress: Using QuarkXPress.
ALIGNMENT (SUBMENU)
Sty le menu
The Alignment submenu lets you choose an alignment for paragraphs:
• Choosing Left aligns paragraphs with the left indentation.
• Choosing Centered centers each line between the left and right indentations.
• Choosing Right aligns paragraphs with the right indentation.
• Choosing Justified aligns paragraphs with the left and right indentations; thelast line may be shorter than the width of the paragraph. (This option is notavailable in HTML text boxes.)
• Choosing Forced aligns all lines in a paragraph, including the last line, with theleft and right indents. (This option is not available in HTML text boxes.)
Alignment submenu
Chapter 5: Style Menu
239
Style Menu for Text
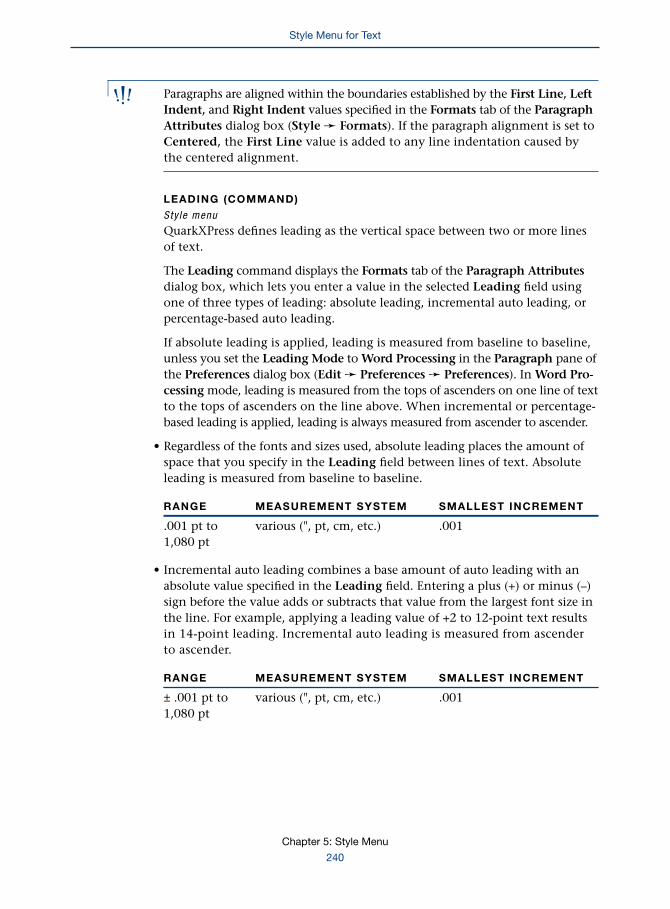
∫ Paragraphs are aligned within the boundaries established by the First Line, LeftIndent, and Right Indent values specified in the Formats tab of the ParagraphAttributes dialog box (Style & Formats). If the paragraph alignment is set toCentered, the First Line value is added to any line indentation caused bythe centered alignment.
LEADING (COMMAND)
Sty le menu
QuarkXPress defines leading as the vertical space between two or more linesof text.
The Leading command displays the Formats tab of the Paragraph Attributesdialog box, which lets you enter a value in the selected Leading field usingone of three types of leading: absolute leading, incremental auto leading, orpercentage-based auto leading.
If absolute leading is applied, leading is measured from baseline to baseline,unless you set the Leading Mode to Word Processing in the Paragraph pane ofthe Preferences dialog box (Edit & Preferences & Preferences). In Word Pro-cessing mode, leading is measured from the tops of ascenders on one line of textto the tops of ascenders on the line above. When incremental or percentage-based leading is applied, leading is always measured from ascender to ascender.
• Regardless of the fonts and sizes used, absolute leading places the amount ofspace that you specify in the Leading field between lines of text. Absoluteleading is measured from baseline to baseline.
RANGE MEASUREMENT SYSTEM SMALLEST INCREMENT
.001 pt to various (", pt, cm, etc.) .0011,080 pt
• Incremental auto leading combines a base amount of auto leading with anabsolute value specified in the Leading field. Entering a plus (+) or minus (–)sign before the value adds or subtracts that value from the largest font size inthe line. For example, applying a leading value of +2 to 12-point text resultsin 14-point leading. Incremental auto leading is measured from ascenderto ascender.
RANGE MEASUREMENT SYSTEM SMALLEST INCREMENT
± .001 pt to various (", pt, cm, etc.) .0011,080 pt
Chapter 5: Style Menu
240
Style Menu for Text

• Entering the word “auto” or a “0” in the Leading field tells QuarkXPress touse the value in the Auto Leading field of the Preferences dialog box (Edit &Preferences & Preferences & Paragraph pane) to decide whether percentage-based or incremental auto leading occurs. The default —percentage-based —uses a fixed percentage of the largest font size in the selected text or activeparagraph. This percentage is added to the base amount of auto leading. Theresulting value is the total amount of leading between an auto-leaded line andthe line above it. The default value for percentage-based auto leading is 20%.Percentage-based auto leading is measured from ascender to ascender.
∫ Auto leading is sometimes called relative leading because it spaces each line sepa-rately according to the design and size of the fonts used. If fonts or font sizes aremixed and matched, an auto-leaded paragraph may have a different amountof space between each line. Auto leading starts with a base amount of leading,which QuarkXPress determines by looking at the user-specified font size, thencalculating the ascent and descent values built into the fonts used in each line.
Leading field
FORMATS (COMMAND)
Sty le menu
The Formats command displays the Formats tab of the Paragraph Attributesdialog box, which lets you specify formats that affect entire paragraphs.
FORMATS (DIALOG BOX TAB)
Sty le & Formats
The Paragraph Attributes dialog box Formats tab lets you specify indentations,line spacing, paragraph spacing, drop caps, and other characteristics for a para-graph or range of paragraphs. Not all of these controls apply to text paths.
Chapter 5: Style Menu
241
Style Menu for Text

Formats tab
LEFT INDENT, FIRST LINE, RIGHT INDENT (FIELDS)
Sty le & Formats
The indentation fields let you indent paragraphs from the left and right edgesof a text box, column, or text path, and create hanging indentations.
• The Left Indent field specifies the distance from the left edge of a column, textbox, or text path to the left edge of a paragraph.
• The First Line field specifies the distance from the Left Indent to the beginningof the first line of a paragraph. Enter a positive value to indent the first line tothe right of the Left Indent. To indent the first line to the left of the Left Indent(a hanging indentation), enter a negative value in this field after entering apositive value in the Left Indent field. If you are specifying formats for a textpath, the field works the same way; however, you cannot have more thanone line of text on a text path.
• The Right Indent field specifies the distance from the right edge of a column,text box, or text path to the right edge of a paragraph.
RANGE MEASUREMENT SYSTEM SMALLEST INCREMENT
column width various (", pt, cm, etc.) .001
Chapter 5: Style Menu
242
Style Menu for Text

∫ The Text Inset value in the Text tab of the Modify dialog box (Item & Modify)is added to the Left Indent and Right Indent values for the edges of a box. TheText Inset value does not affect the inner columns of a text box.
Left Indent, First Line, and Right Indent fields
• Indentations can also be specified visually using the tab ruler that displays atthe top of the active column whenever the Paragraph Attributes dialog box isopen. Drag the icons at the top of the ruler to adjust the Left Indent K, First LineIndent k, or Right Indent J. (If the active item cannot display the tab ruler, thetab ruler is displayed in the Tabs tab of the Paragraph Attributes dialog box.)
LEADING (FIELD)
Sty le & Formats
The Leading field lets you specify the amount of space between lines of text. Forinformation about leading, see “Leading (command)” earlier in this chapter.
Leading field
Chapter 5: Style Menu
243
Style Menu for Text

SPACE BEFORE, SPACE AFTER (FIELDS)
Sty le & Formats
The Space Before and Space After fields let you specify how much space pre-cedes and follows a paragraph. The space between two paragraphs is the sum ofthe Space After the first paragraph and the Space Before the second paragraph.
RANGE MEASUREMENT SYSTEM SMALLEST INCREMENT
0 to 15" various (", pt, cm, etc.) .001
∫ Space Before is not applied when a paragraph falls at the top of a column.Space After is not applied when a paragraph falls at the bottom of a column.Neither are applied on text paths.
ALIGNMENT (POP-UP MENU)
Sty le & Formats
The Alignment pop-up menu works exactly like the Alignment submenu(Style menu), letting you choose an alignment for paragraphs:
• Choosing Left aligns paragraphs with the left indentation.
• Choosing Centered centers each line between the left and right indentations.
• Choosing Right aligns paragraphs with the right indentation.
• Choosing Justified aligns paragraphs with the left and right indentations; thelast line may be shorter than the width of the paragraph. (Justified alignmentis not available in HTML text boxes.)
• Choosing Forced aligns all lines in a paragraph, including the last line,with the left and right indentations. (Forced alignment is not available inHTML text boxes.)
Alignment pop-up menu
Chapter 5: Style Menu
244
Style Menu for Text

∫ Paragraphs are aligned within the bounds established by the First Line, LeftIndent, and Right Indent values specified in the Formats tab of the ParagraphAttributes dialog box (Style menu). If the paragraph alignment is set toCentered, the First Line value is added to any line indentation caused bythe centered alignment.
H&J (POP-UP MENU)
Sty le & Formats
H&Js (hyphenation and justification specifications) are specifications that controlthe hyphenation and spacing of text. The H&J pop-up menu lets you choosefrom a list of specifications defined in the H&Js dialog box (Edit & H&Js).
Hyphenation and justification specifications cannot be applied in HTMLtext boxes.
H&J pop-up menu
DROP CAPS (AREA)
Sty le & Formats
The Drop Caps check box lets you specify an initial cap for a paragraph. Check-ing Drop Caps lets you use the Character Count and Line Count fields.
• Enter a value in the Character Count field to specify the number of drop capcharacters (from 1 to 127).
• Enter a value in the Line Count field to specify the number of lines thecharacter(s) drop (from 2 to 16).
Drop Caps area
Chapter 5: Style Menu
245
Style Menu for Text

KEEP LINES TOGETHER (AREA)
Sty le & Formats
The Keep Lines Together check box lets you prevent widows and orphans byspecifying how paragraphs break at the bottom of columns. (In QuarkXPress, awidow is defined as the last line of a paragraph that falls at the top of a column;an orphan is defined as the first line of a paragraph that falls at the bottom of acolumn.) Checking Keep Lines Together lets you use the All Lines in ¶ andStart/End options.
• Checking All Lines in ¶ specifies that a paragraph will not break at the bottomof a column. If all the lines in a paragraph do not fit in one column, the entireparagraph is carried to the next column.
• The values in the Start and End fields specify the minimum number of linesto remain at the bottom of a column (Start) and the minimum number to becarried over to the next column (End). If there are not enough lines in theparagraph to meet the Start and End criteria, the entire paragraph is carriedto the next column.
Keep Lines Together area
KEEP WITH NEXT ¶ (CHECK BOX)
Sty le & Formats
The Keep with Next ¶ check box lets you force a paragraph to flow with thefollowing paragraph (for example, to ensure that a subheading stays connectedwith the first related paragraph).
Chapter 5: Style Menu
246
Style Menu for Text

LOCK TO BASELINE GRID (CHECK BOX)
Sty le & Formats
Using a baseline grid aligns paragraphs horizontally across columns and textboxes. The Lock to Baseline Grid check box lets you lock selected paragraphsto the grid. (This check box is not available for HTML text boxes.)
∫ The grid is defined in the Baseline Grid area in the Paragraph pane of thePreferences dialog box (Edit & Preferences & Preferences) and displayedusing the Show Baseline Grid command (View menu). To see the baseline gridin an active text box, Guides must be set to In Front in the General pane ofthe Preferences dialog box.
TABS (COMMAND)
Sty le menu
QuarkXPress lets you specify an unlimited number of tab stops per column.By default, each text box contains tab stops that occur every half-inch, startingfrom the farthest-right custom tab stop. If there are no custom tab stops, theinvisible default tab stops start one half-inch into the paragraph and continueacross. The Tabs command displays the Tabs tab of the Paragraph Attributesdialog box. (This option is not available in HTML text boxes.)
TAB RULER (AREA)
Sty le & Tabs
The tab ruler, displayed at the top of the active column whenever the Formatsor Tabs tabs of the Paragraph Attributes dialog box are displayed, lets youspecify indentations and create and move tab stops visually. If the active itemcannot display the tab ruler, the tab ruler is displayed in the Tabs tab of theParagraph Attributes dialog box.
Tab stops are displayed with icons that represent the type of tab stop alignment:Left 1, Center 3, Right 2, Decimal 5, Comma p, or Align On s. You can use theruler to:
• Specify indentations by dragging the icons at the top of the ruler to adjust theLeft Indent K, First Line Indent k, or Right Indent values.
• Create tab stops by clicking on the ruler to create tab stops; the currentalignment button and Fill Characters settings in the Paragraph Attributesdialog box apply to the tab stop.
Chapter 5: Style Menu
247
Style Menu for Text

• Edit tab stops by clicking a tab stop to select it and dragging the selected tabstop to move it. You can also change the alignment button and Fill Characterssettings in the dialog box while the tab stop is selected.
• Delete tab stops by clicking a tab to select it, then dragging it off the ruler.Option+click (Mac OS) or Alt+click (Windows) the ruler to delete all tab stops.
Tab ruler
TABS (DIALOG BOX TAB)
Sty le & Tabs
The Tabs tab of the Paragraph Attributes dialog box lets you specify thealignment, position, and fill character for tab stops.
Tabs tab
Chapter 5: Style Menu
248
Style Menu for Text
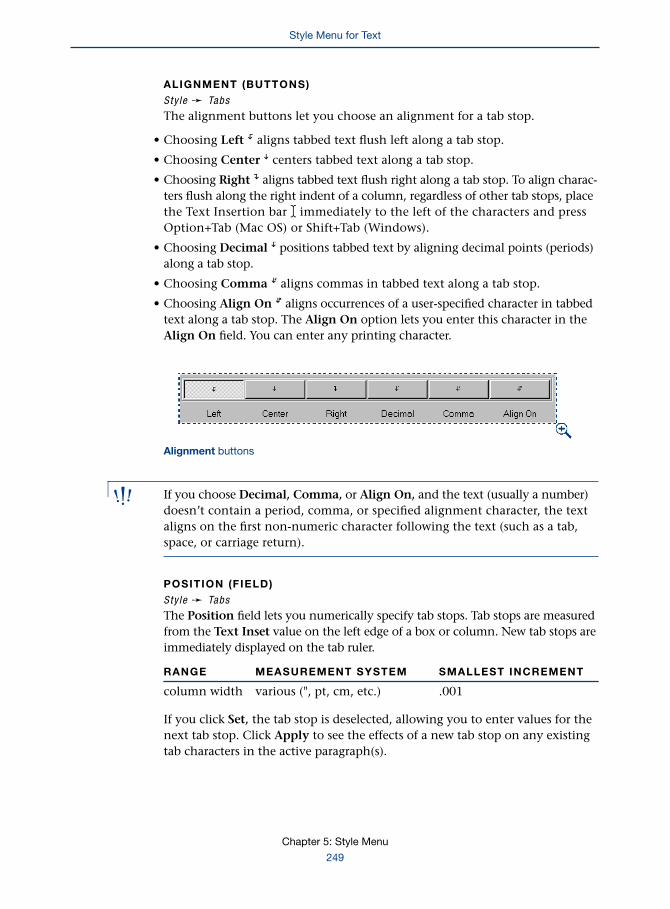
ALIGNMENT (BUTTONS)
Sty le & Tabs
The alignment buttons let you choose an alignment for a tab stop.
• Choosing Left 1 aligns tabbed text flush left along a tab stop.
• Choosing Center 3 centers tabbed text along a tab stop.
• Choosing Right 2 aligns tabbed text flush right along a tab stop. To align charac-ters flush along the right indent of a column, regardless of other tab stops, placethe Text Insertion bar I immediately to the left of the characters and pressOption+Tab (Mac OS) or Shift+Tab (Windows).
• Choosing Decimal 5 positions tabbed text by aligning decimal points (periods)along a tab stop.
• Choosing Comma p aligns commas in tabbed text along a tab stop.
• Choosing Align On s aligns occurrences of a user-specified character in tabbedtext along a tab stop. The Align On option lets you enter this character in theAlign On field. You can enter any printing character.
Alignment buttons
∫ If you choose Decimal, Comma, or Align On, and the text (usually a number)doesn’t contain a period, comma, or specified alignment character, the textaligns on the first non-numeric character following the text (such as a tab,space, or carriage return).
POSITION (FIELD)
Sty le & Tabs
The Position field lets you numerically specify tab stops. Tab stops are measuredfrom the Text Inset value on the left edge of a box or column. New tab stops areimmediately displayed on the tab ruler.
RANGE MEASUREMENT SYSTEM SMALLEST INCREMENT
column width various (", pt, cm, etc.) .001
If you click Set, the tab stop is deselected, allowing you to enter values for thenext tab stop. Click Apply to see the effects of a new tab stop on any existingtab characters in the active paragraph(s).
Chapter 5: Style Menu
249
Style Menu for Text

FILL CHARACTERS (FIELD)
Sty le & Tabs
A fill character, such as a dot leader in a table of contents, “fills” the spacebetween a tab character and the next tab stop. The Fill Characters field lets youspecify any character to be repeated, or any two characters to alternate (oneof the characters can be a space). Fill characters are aligned flush right with thetab stop position. (Fill characters cannot be invisible characters; they must beprinted characters.)
ALIGN ON (FIELD)
Sty le & Tabs
Available when the Align On button is chosen, the Align On field lets you enterany printing character to align tabbed text along.
SET (BUTTON)
Sty le & Tabs
If a tab stop is selected in the tab ruler displayed above the active column, youcan click Set to deselect it. This allows you to move on and enter values for thenext tab stop.
CLEAR ALL (BUTTON)
Sty le & Tabs
The Clear All button deletes all custom tab stops from the active paragraph(s).The invisible default tab stops that QuarkXPress places at half-inch incrementsare reset to their original positions.
RULES (COMMAND)
Sty le menu
The Rules feature lets you place horizontal lines above or below a paragraph sothat the lines always flow with the text. The Rules command displays the Rulestab of the Paragraph Attributes dialog box.
RULES (DIALOG BOX TAB)
Sty le menu
The Rules tab of the Paragraph Attributes dialog box lets you specify thelength, position, style, width, color, and shade of paragraph rules.
RULE ABOVE, RULE BELOW (AREAS)
Sty le & Rules
The Rule Above and Rule Below areas let you specify whether you want hori-zontal lines above or below a paragraph. Checking Rule Above or Rule Belowgives you access to controls for specifying the placement and style of the rules.
Chapter 5: Style Menu
250
Style Menu for Text

Rules tab
LENGTH (POP-UP MENU)
Sty le & Rules & Rule Above, Rule Be low checked
The Length pop-up menu lets you specify whether rules fit within theparagraph indentations or match the length of the text.
• Choosing Indents specifies a rule that extends from the paragraph’s left indenta-tion to its right indentation. Indentations are specified in the Formats tab of theParagraph Attributes dialog box (Style & Formats).
• Choosing Text specifies a rule above that matches the length of the first line oftext in the paragraph and a rule below that matches the length of the last lineof text in the paragraph.
Length pop-up menu
Chapter 5: Style Menu
251
Style Menu for Text

∫ The From Left and From Right values in the Rules tab of the ParagraphAttributes dialog box apply whether you choose Indents or Text.
FROM LEFT, FROM RIGHT (FIELDS)
Sty le & Rules & Rule Above, Rule Be low checked
The From Left and From Right fields let you specify the placement of a rule inrelation to the specified length.
• The From Left field specifies the distance between the left end of a rule andeither the left indentation of the paragraph (Length set to Indents) or the leftend of a line of text (Length set to Text).
• The From Right field specifies the distance between the right end of a rule andeither the right indentation of the paragraph (Length set to Indents) or theright end of a line of text (Length set to Text).
• Larger positive values make a rule shorter. Smaller positive values make arule longer. (You can enter negative values if an indentation is applied tothe paragraph.)
RANGE MEASUREMENT SYSTEM SMALLEST INCREMENT
column width various (", pt, cm, etc.) .001
OFFSET (FIELD)
Sty le & Rules & Rule Above, Rule Be low checked
The Offset field lets you specify the amount of vertical space between a para-graph and a rule. You can enter an absolute value or a percentage. (The Offsetfield is not available in HTML text boxes.)
• Absolute values are measured from the baseline of the first line of a paragraph tothe bottom of a rule above, and from the baseline of the last line of a paragraphto the top of a rule below. Positive values move the rule farther away from thetext. Negative values move the rule closer to the text. Using an absolute negativeoffset value for a rule above, you can overlap white text with a dark-colored ruleto create reverse type.
RANGE MEASUREMENT SYSTEM SMALLEST INCREMENT
0 to 15" or various (", pt, cm, etc.) .001–1⁄2 rule width
• Specifying a percentage in the Offset field makes the rule act like an auto-leadedline of text, which prevents text from overlapping. The 100% value in the Offsetfield is defined by the total distance between paragraphs. For example, a 30%
Chapter 5: Style Menu
252
Style Menu for Text
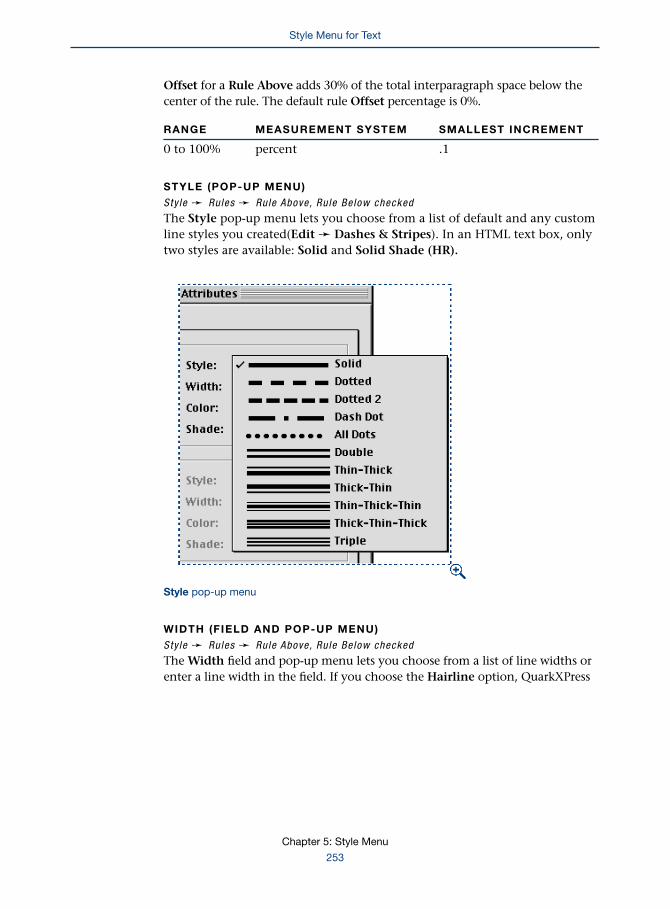
Offset for a Rule Above adds 30% of the total interparagraph space below thecenter of the rule. The default rule Offset percentage is 0%.
RANGE MEASUREMENT SYSTEM SMALLEST INCREMENT
0 to 100% percent .1
STYLE (POP-UP MENU)
Sty le & Rules & Rule Above, Rule Be low checked
The Style pop-up menu lets you choose from a list of default and any customline styles you created(Edit & Dashes & Stripes). In an HTML text box, onlytwo styles are available: Solid and Solid Shade (HR).
Style pop-up menu
WIDTH (FIELD AND POP-UP MENU)
Sty le & Rules & Rule Above, Rule Be low checked
The Width field and pop-up menu lets you choose from a list of line widths orenter a line width in the field. If you choose the Hairline option, QuarkXPress
Chapter 5: Style Menu
253
Style Menu for Text

prints the rule at .125 point to a PostScript imagesetter, but wider on a laserprinter. Entering a “0” in any line width field specifies a Hairline value.
RANGE MEASUREMENT SYSTEM SMALLEST INCREMENT
0 to 864 pt various (", pt, cm, etc.) .001
Width field and pop-up menu
COLOR (POP-UP MENU)
Sty le & Rules & Rule Above, Rule Be low checked
The Color pop-up menu lets you choose from a list of colors defined in theColors dialog box (Edit & Colors). The list includes default colors, customcolors, and spot colors imported with EPS picture files.
SHADE (FIELD)
Sty le & Rules & Rule Above, Rule Be low checked
The Shade field and pop-up menu let you choose a shade value in 10%increments or enter a value in the field.
RANGE MEASUREMENT SYSTEM SMALLEST INCREMENT
0 to 100% percent .1
PARAGRAPH STYLE SHEET (SUBMENU)
Sty le menu
Paragraph style sheets let you apply multiple paragraph attributes in one step.The Paragraph Style Sheet submenu lets you choose from a list of paragraphstyle sheets defined for the document in the Style Sheets dialog box (Edit &Style Sheets).
• No Style is a feature that removes the paragraph style sheet and characterstyle sheet links from a paragraph while retaining the applied paragraphand character attributes. When you apply a new paragraph style sheet afterapplying No Style, all current character attributes and paragraph formatsare stripped from the text.
Chapter 5: Style Menu
254
Style Menu for Text

• Normal is the default paragraph style sheet for all text boxes and text paths.You can edit the Normal paragraph style sheet using the Style Sheets dialogbox (Edit & Style Sheets).
• Custom style sheets are any other paragraph style sheets defined in theStyle Sheets dialog box (Edit & Style Sheets).
Paragraph Style Sheet submenu
FLIP HORIZONTAL, FLIP VERTICAL, FLIP TEXT (COMMANDS)
Sty le menu
• The Flip Horizontal command flips all the text in an active text box from rightto left, creating a mirror image of the original. (The Flip Horizontal commandis not available in HTML text boxes.)
• The Flip Vertical command flips all the text in an active text box from bottomto top, creating an upside-down mirror image of the original. (The Flip Verticalcommand is not available in HTML text boxes.)
• The Flip Text command replaces the Flip Horizontal and Flip Vertical com-mands when a text path is active. Flip Text places text on the opposite sideof the line, starting from the opposite endpoint. For example, if you createa circular text path with text flowing on the outside of the circle, Flip Textpositions text on the inside of the circle. Text alignment is not affected.
Chapter 5: Style Menu
255
Style Menu for Text

HYPERLINK (SUBMENU)
Sty le menu
When you export a document as a PDF or an HTML page, a hyperlinkbecomes a clickable area that takes the reader to a particular destination(usually a different document or a different part of the same document).The Hyperlink submenu lets you choose from a list of destinations definedfor the document in the Hyperlinks palette (View & Show Hyperlinks).The list includes:
• The New command displays the New Hyperlink dialog box. If text is selectedwhen you choose this option, that text becomes a hyperlink pointing to thedestination you specify in the New Hyperlink dialog box. If no text is selectedwhen you choose this option, you can create a destination that may be appliedto text or a picture later.
• The Edit command displays the Edit Hyperlink dialog box and lets you editthe destination associated with the selected text.
• The Delete command removes the destination associated with the selected text.
• The bottom section of the Hyperlink submenu displays all the destinations andanchors defined in the Hyperlink submenu or the Hyperlinks palette (View &Show Hyperlinks).
Hyperlink submenu
Chapter 5: Style Menu
256
Style Menu for Text

ANCHOR (SUBMENU)
Sty le menu
When you export a document as a PDF or an HTML page, an anchor becomesa destination in the document that a hyperlink can point to. The Anchorsubmenu lets you assign one of a list of unused anchor names defined for thedocument in the Hyperlinks palette (View & Show Hyperlinks) to theselected text, the text insertion point i, or selected picture. The list includes:
• The New command displays the New Anchor dialog box. If text is selectedwhen you choose this option, the new anchor is assigned to the selected textrange or the text insertion point.i.
• The Edit command displays the Edit Anchor dialog box and lets you editthe name of the anchor associated with the selected text range or textinsertion point i.
• The Delete command removes the anchor associated with the selected text orpicture box. That anchor can later be assigned to a different range of textor text insertion point i.
• The bottom section of the Anchor submenu displays all the anchors that are notyet associated with a text range or text insertion point i.
Anchor submenu
Chapter 5: Style Menu
257
Style Menu for Text

STYLE MENU FOR PICTURES
When a picture box containing a picture is active and the Content tool E or the Itemtool e is selected, the Style menu for pictures is available. The commands in the Stylemenu for pictures affect the way pictures display and print; they do not affect the actualpicture files. The Style menu for pictures is divided into five sections:
Style menu for pictures
SECTIONS
• The first section lists content attributes, which apply to the picture: Color,Shade, and Negative.
• The second section lets you control the contrast and halftone specifications ofyour picture.
• The third section lists commands for flipping the contents of an active picturebox: Flip Horizontal and Flip Vertical.
• The fourth section lists commands for centering and scaling a picture in thepicture box, as well as a command for resizing the picture to fit within thepicture box.
• The fifth section contains commands that let you create, apply, and deletehyperlinks and anchors.
Chapter 5: Style Menu
258
Style Menu for Pictures

MODIFIABLE PICTURE FILE FORMATS
The availability of the commands in the Style menu for pictures varies depend-ing on the file format of the active picture.
PICTURE
TYPE COLOR SHADE NEGATIVE CONTRAST HALFTONE
EPS/DCS no no no no no
GIF † † yes yes no
JPEG (*.JPG)
Grayscale yes yes yes yes yes
Color † † yes yes no
PhotoCD no no yes yes no
PICT (*.PCT)
1-bit yes yes no no yes
Grayscale yes yes yes yes yes
Color † † yes yes no
TIFF (*.TIF)
1-bit yes yes yes no yes
Grayscale yes yes yes yes yes
Color † † yes yes no
Windows bitmap (*.BMP)
1-bit yes yes yes no yes
Grayscale yes yes yes yes yes
Color † † yes yes no
WMF no no no no no
† Adjustable through the Picture Contrast Specifications dialog box(Style & Contrast).
∫ When a Windows Metafile picture is imported into QuarkXPress for Mac OS,it is transformed into a PICT.
Chapter 5: Style Menu
259
Style Menu for Pictures

COLOR (SUBMENU)
Sty le menu
The Color submenu lets you choose from a list of colors defined in the Colorsdialog box (Edit & Colors). The list includes custom colors, default colors, andspot colors imported with EPS picture files.
Color submenu for a print document
SHADE (SUBMENU)
Sty le menu
The Shade submenu lets you choose a value in 10% increments. The Otheroption displays the Picture tab of the Modify dialog box, which lets you enterthe maximum shade percentage in the selected Shade field.
RANGE MEASUREMENT SYSTEM SMALLEST INCREMENT
0 to 100% percent .1
Shade submenu
Chapter 5: Style Menu
260
Style Menu for Pictures

NEGATIVE (COMMAND)
Sty le menu
The Negative command creates a true negative of a picture’s contrast. Ifyou have made changes to the contrast curve using the Picture ContrastSpecifications dialog box (Style & Contrast), these changes are calculatedbefore the negative effect is applied.
CONTRAST (COMMAND)
Sty le menu
The Contrast command displays the Picture Contrast Specifications dialogbox, which shows the picture’s contrast curve and the tools you can use tomodify the curve.
PICTURE CONTRAST SPECIFICATIONS (DIALOG BOX)
Sty le & Contrast
The Picture Contrast Specifications dialog box lets you modify a picture’scontrast curve. The Model and Color options in the dialog box are notavailable for grayscale pictures.
Picture Contrast Specifications dialog box
CONTRAST CURVE (AREA)
Sty le & Contrast
The Contrast Curve area adjusts a picture’s contrast by changing the relation-ship between input (original) contrast and output (modified) contrast.
• The Input (horizontal) axis is the contrast value of the original picture. In agrayscale picture, the left side of the Input axis represents highlights (lightershades) while the right side represents shadows in the input.
• The Output (vertical) axis is the modified contrast value. In a grayscale picture,the lower portion of the Output axis represents lighter shades while the upperportion represents darker shades.
Chapter 5: Style Menu
261
Style Menu for Pictures

A combination of the two axes results in a graphical curve. For example, a 10%boost to the darkness of a grayscale picture’s highlights appears as a peak at thelower-left part of the curve.
Contrast curve area
∫ When the curve is a 45° line from 0 to 1, input contrast equals output contrast.This is the normal contrast curve, indicating that the picture’s contrast has notbeen modified in QuarkXPress.
CONTRAST TOOLS (AREA)
Sty le & Contrast
The contrast tools let you modify the curve in various ways:
• Use the Hand tool H to drag the entire curve on the contrast graph. When youmove the curve against one of the graph’s edges, it becomes flattened. You canconstrain a curve’s movements horizontally or vertically by pressing Shift whiledragging the curve.
• Use the Pencil tool d to draw a new curve or to modify an existing curve ina freehand manner.
• Use the Line tool L to make linear adjustments to a curve. You can constrainmodifications to a contrast curve to 0°, 45°, or 90° by pressing Shift while usingthe Line tool.
Chapter 5: Style Menu
262
Style Menu for Pictures

• Use the Posterizer tool $ to place handles between the 10% increments markedon the horizontal axis. By dragging the handles up and down, you can increaseor decrease the input-to-output relationship in tonal range increments of 10% .
• Use the Spike tool % to place handles on the 10% increments marked on thehorizontal axis. You can drag the handles up and down to create spikes.
• Use the Normal Contrast tool ^ to reset the curve to the unmodifiedcontrast position.
• Use the High Contrast tool & to apply a high contrast curve to thegraph automatically.
• Use the Posterized tool * to apply a posterized curve to the graphautomatically.
• Use the Inversion tool ( to flip a curve upside down. Clicking the Inversiontool produces a negative of the curve displayed in the graph. (The Inversiontool does not necessarily create a true negative of the original.)
Contrast tools
NEGATIVE (CHECK BOX)
Sty le & Contrast
The Negative check box creates a true negative of the dialog box’s final pictureoutput. When you check Negative, you will not see any change in your contrastcurve, but you will see the picture preview update on-screen when you click OKor Apply. If you have made changes to the contrast curve, these changes arecalculated before the negative effect is applied. Checking this box has thesame effect as choosing Negative from the Style menu.
Chapter 5: Style Menu
263
Style Menu for Pictures

MODEL (POP-UP MENU)
Sty le & Contrast
If the active picture box contains a color picture, the Model and Color areas areavailable. The Model area lets you select a color model to use when modifyingthe contrast of a color picture: HSB, RGB, CMY, or CMYK. For informationabout color models, see “Creating and Editing Colors” in Chapter 12, “Color,” inA Guide to QuarkXPress: Using QuarkXPress.
Model pop-up menu
COLOR (AREA)
Sty le & Contrast
If the active picture box contains a color picture, the Model and Color areasare available. The Color area displays a check box for each component of theselected model. For example, if RGB is selected, Red, Green, and Blue will beavailable as check boxes in the Color area.
The graph displays a curve for each of the selected components. When contrastfor all components is set to normal, the components’ curves are stacked on topof each other. The front (visible) curve represents the first component listed inthe Color area. Checking only one color component lets you modify the curvefor that component independently of the others.
When only one color component is checked, a color spectrum or shade strip dis-plays along the graph’s axes. These strips serve as a visual cue to the distributionof ranges on the graph. The appearance of these strips will change accordingto the selected model and color component.
Color area
Chapter 5: Style Menu
264
Style Menu for Pictures
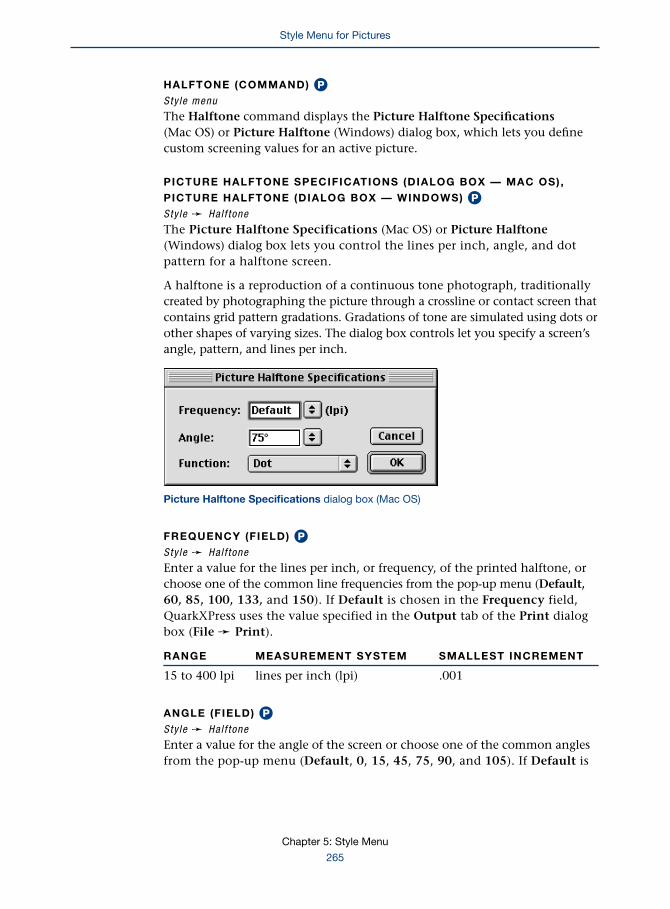
HALFTONE (COMMAND) PSty le menu
The Halftone command displays the Picture Halftone Specifications(Mac OS) or Picture Halftone (Windows) dialog box, which lets you definecustom screening values for an active picture.
PICTURE HALFTONE SPECIFICATIONS (DIALOG BOX — MAC OS),
PICTURE HALFTONE (DIALOG BOX — WINDOWS) PSty le & Hal f tone
The Picture Halftone Specifications (Mac OS) or Picture Halftone(Windows) dialog box lets you control the lines per inch, angle, and dotpattern for a halftone screen.
A halftone is a reproduction of a continuous tone photograph, traditionallycreated by photographing the picture through a crossline or contact screen thatcontains grid pattern gradations. Gradations of tone are simulated using dots orother shapes of varying sizes. The dialog box controls let you specify a screen’sangle, pattern, and lines per inch.
Picture Halftone Specifications dialog box (Mac OS)
FREQUENCY (FIELD) PSty le & Hal f tone
Enter a value for the lines per inch, or frequency, of the printed halftone, orchoose one of the common line frequencies from the pop-up menu (Default,60, 85, 100, 133, and 150). If Default is chosen in the Frequency field,QuarkXPress uses the value specified in the Output tab of the Print dialogbox (File & Print).
RANGE MEASUREMENT SYSTEM SMALLEST INCREMENT
15 to 400 lpi lines per inch (lpi) .001
ANGLE (FIELD) PSty le & Hal f tone
Enter a value for the angle of the screen or choose one of the common anglesfrom the pop-up menu (Default, 0, 15, 45, 75, 90, and 105). If Default is
Chapter 5: Style Menu
265
Style Menu for Pictures

chosen, QuarkXPress uses the value specified in the Output tab of the Printdialog box (File & Print).
RANGE MEASUREMENT SYSTEM SMALLEST INCREMENT
±360° degrees .001
FUNCTION (POP-UP MENU) PSty le & Hal f tone
Choose one of six patterns for the custom halftone screen:
• Choosing Default uses the setting specified in the Output tab of the Printdialog box (File & Print).
• The Dot pattern uses a round spot to create the halftone screen. This pattern isused in most output.
• The Line pattern uses straight lines to create the halftone screen. The width ofthe line varies depending on your Frequency setting. (The Line function is notthe same as the line frequency.)
• The Ellipse pattern uses an oval spot to create the halftone screen.
• The Square pattern uses a square spot to create the halftone screen. This func-tion may look best at very low screen frequencies.
• The Ordered Dither pattern is optimized for printing to a laser printer or whenyou are producing multiple copies by photocopying rather than by printing.
Function pop-up menu
∫ If your output device cannot reproduce screen angles or frequencies that matchyour specifications, it will print halftones at the angle and frequency that areclosest to the values you specify in the Frequency and Angle fields.
Chapter 5: Style Menu
266
Style Menu for Pictures

FLIP HORIZONTAL (COMMAND)
Sty le menu
The Flip Horizontal command flips the picture in the active box from leftto right, creating a mirror image of the original.
FLIP VERTICAL (COMMAND)
Sty le menu
The Flip Vertical command flips the picture in the active box from bottomto top, creating an upside-down mirror image of the original.
CENTER PICTURE (COMMAND)
Sty le menu
The Center Picture command places a picture in the middle of the picture box.
FIT PICTURE TO BOX (COMMAND)
Sty le menu
The Fit Picture To Box command scales the picture so that it extends to eachedge of the picture box.
FIT PICTURE TO BOX (PROPORTIONALLY) (COMMAND)
Sty le menu
The Fit Picture To Box (Proportionally) command scales the picture to the sizeof the box while retaining the picture’s original proportions.
FIT BOX TO PICTURE (COMMAND)
Sty le menu
The Fit Box To Picture command resizes the picture box to the size ofthe picture.
HYPERLINK (SUBMENU)
Sty le menu
When you export a document as a PDF or an HTML page, a hyperlink becomes aclickable area that takes the reader to a particular destination (usually a differentdocument or a different part of the same document). The Hyperlink submenulets you choose from a list of destinations defined for the document in theHyperlinks palette (View & Show Hyperlinks). The list includes:
• The New command displays the New Hyperlink dialog box. The selectedpicture or text becomes a hyperlink pointing to the destination you specifyin the New Hyperlink dialog box.
Chapter 5: Style Menu
267
Style Menu for Pictures

• The Edit command displays the Edit Hyperlink dialog box and lets you edit thedestination associated with the selected picture box.
• The Delete command removes the destination associated with the selectedpicture box.
• The bottom section of the Hyperlink submenu lists all the destinations andanchors defined in the Hyperlinks palette (View & Show Hyperlinks).
Hyperlink submenu
ANCHOR (SUBMENU)
Sty le menu
When you export a document as a PDF or an HTML page, an anchor becomesa destination in the document that a hyperlink can point to. The Anchorsubmenu lets you assign one of a list of unused anchor names defined forthe document in the Hyperlinks palette (View & Hyperlinks) to theselected picture.
• The New command displays the New Anchor dialog box. When you choosethis option, the new anchor is assigned to the selected picture box.
• The Edit command displays the Edit Anchor dialog box and lets you editthe name of the anchor associated with the selected picture box.
• The Delete command removes the anchor associated with the selected picturebox. That anchor can then be assigned to a different picture box later on.
Chapter 5: Style Menu
268
Style Menu for Pictures

• The bottom section of the Anchor submenu displays all the anchors thatare not yet associated with a picture box.
Anchor submenu
STYLE MENU FOR LINES
When a line or text path is active and the Item tool e is selected, the Style menufor lines is available. (If a line contains text — that is, if it is a text path — and theContent tool E is selected, then the Style menu for text is available.) The Stylemenu for lines is also available when a gridline in a table is selected.
MENU ENTRIES
The Style menu for lines includes five menu items that let you modify variousaspects of lines: Line Style, Arrowheads, Width, Color, and Shade. All fivemenu items have submenus that provide a variety of options.
Style menu for lines
Chapter 5: Style Menu
269
Style Menu for Pictures

LINE STYLE (SUBMENU)
Sty le menu
The Line Style submenu lets you choose from a list of predefined line stylesand any custom line styles you create (Edit & Dashes & Stripes).
Line Style submenu
ARROWHEADS (SUBMENU)
Sty le menu
The Arrowheads submenu lets you choose from a list of six predefined endcapstyles (combinations of arrowheads and tail feathers). Arrowheads are notavailable when gridlines in a table are selected.
Arrowheads submenu
WIDTH (SUBMENU)
Sty le menu
The Width submenu lets you choose from a list of default line widths. TheOther option displays the Line tab of the Modify dialog box, which lets youenter a value in the selected Line Width field. You can enter Line Width valuesusing any supported measurement system, but values are displayed in pointswhen the dialog box is reopened.
Chapter 5: Style Menu
270
Style Menu for Lines
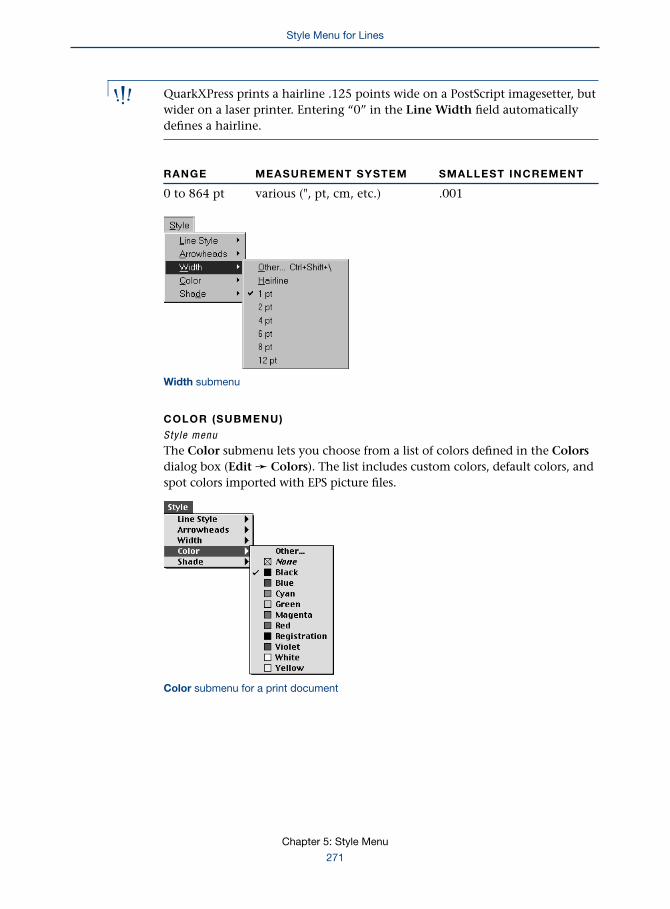
∫ QuarkXPress prints a hairline .125 points wide on a PostScript imagesetter, butwider on a laser printer. Entering “0” in the Line Width field automaticallydefines a hairline.
RANGE MEASUREMENT SYSTEM SMALLEST INCREMENT
0 to 864 pt various (", pt, cm, etc.) .001
Width submenu
COLOR (SUBMENU)
Sty le menu
The Color submenu lets you choose from a list of colors defined in the Colorsdialog box (Edit & Colors). The list includes custom colors, default colors, andspot colors imported with EPS picture files.
Color submenu for a print document
Chapter 5: Style Menu
271
Style Menu for Lines

SHADE (SUBMENU)
Sty le menu
The Shade submenu lets you choose a tint value in 10% increments. The Otheroption displays the Line tab of the Modify dialog box, which lets you enter apercentage value in the selected Shade field.
RANGE MEASUREMENT SYSTEM SMALLEST INCREMENT
0 to 100% percent .1
Shade submenu
Chapter 5: Style Menu
272
Style Menu for Lines

Chapter 6: Item Menu
Even if you’re happy with your initial page layout, you’ll probably want to refine
the position, shape, and other aspects of items. The QuarkXPress Item menu allows
you to adjust item coordinates, colors, content types, and more. The Item menu also
allows you to create groups or constrain items, and to create new shapes with the
Merge commands.
ITEM MENU: OVERVIEW
The QuarkXPress Item menu lets you modify, position, and reshape boxes, lines, textpaths, rollovers, tables, and image maps. The Item menu is divided into seven sections:
• The first section lists commands that display the Modify dialog box, whichcontains a comprehensive set of controls. These include color, shade, position,size, frame, runaround, and clipping path.
• The second section lists fundamental item commands such as Duplicateand Delete. The Step and Repeat command in this section lets you performadvanced duplication.
• The third section lists options that change the way items move, interact, orcombine with other items. For example, you can group items so that theydo not move apart. Using the Merge options, you can even create a newitem based on existing item shapes. Some of these commands are onlyavailable when multiple items are selected.
• The fourth section lists commands that affect the relationship between objects,such as their stacking order and relative positions.
• The fifth section lists options that change the shape of an item, clipping path,or runaround path. You can choose a predefined shape or a Bézier option thatallows the item to be edited interactively using Bézier points. You can alsochoose whether your item contains text, a picture, or nothing.
• The sixth section contains the Point/Segment Type pop-up menu, whichlets you change the way a selected Bézier segment or point behaves and theDelete All Hot Areas command (for image maps). This section also containsthe Convert Text to Table command (when text is selected), the Tablesubmenu and the Gridlines submenu.
Chapter 6: Item Menu
273
Item Menu: Overview
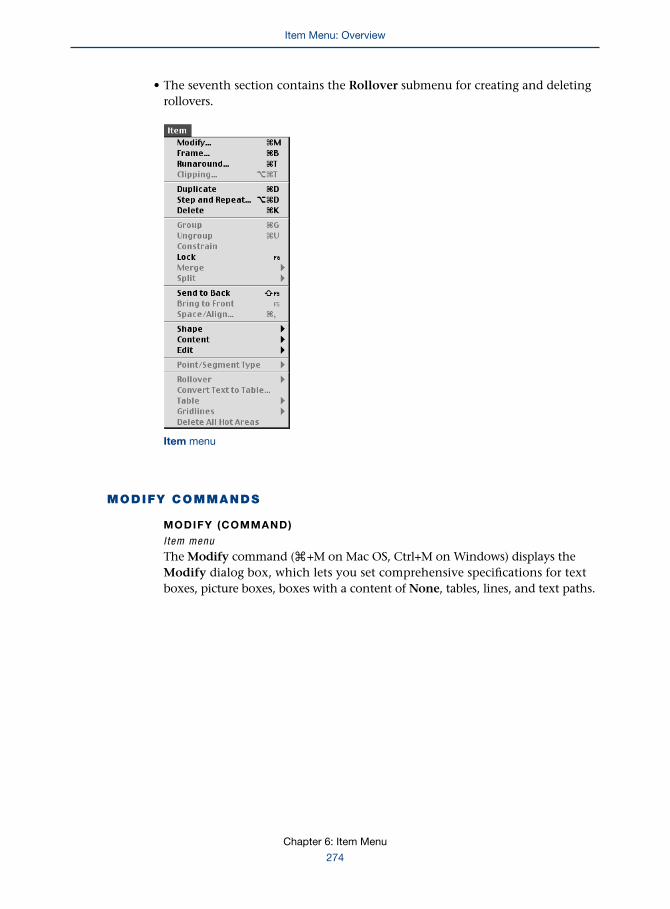
• The seventh section contains the Rollover submenu for creating and deletingrollovers.
Item menu
MODIFY COMMANDS
MODIFY (COMMAND)
I tem menu
The Modify command (C+M on Mac OS, Ctrl+M on Windows) displays theModify dialog box, which lets you set comprehensive specifications for textboxes, picture boxes, boxes with a content of None, tables, lines, and text paths.
Chapter 6: Item Menu
274
Item Menu: Overview

MODIFY (DIALOG BOX)
I tem & Modi fy
The Modify dialog box includes tab options that vary according to the kind ofitem selected:
SELECTED ITEM TAB OPTIONS AVAILABLE
Picture box in a print document Box/Picture/Frame/Clipping/Runaround
Picture box in a Web document Box/Picture/Frame/Runaround/Clipping/Export
Text box in a print document Box/Text/Frame/Runaround
Text box in a Web document Box/Text/Frame/Runaround/Export
Contentless box Box/Frame/Runaround/Export*
Text path Line/Text Path/Runaround/Export*
Line Line/Runaround/Export*
Table (with Item e tool) Table/Runaround/Grid/Frame*/Export*
Text cells in table Table/Cells/Text/Export*
Picture cells in table Table/Cells/Picture/Export*
Form Box/Form/Export
*in Web documents only
Modify dialog box tabs
∫ The same Modify dialog box tab options are available for anchored items,except for the Runaround tab.
Chapter 6: Item Menu
275
Modify Commands

A limited set of options is also available for multiple-selected or grouped itemsin the Modify dialog box. The Group tab has the same basic controls as theBox tab or the Line tab, depending on what is selected.
MULTIPLE-SELECTED ITEMS OR GROUPS TAB OPTIONS AVAILABLE
Picture boxes Group (Box)/Picture/Frame
Text boxes Group (Box)/Text/Frame
Text and picture boxes Group (Box)/Frame
Text paths Group (Line)/Text Path
Lines or lines and text paths Group (Line)
Other combination Group (Box)
∫ The Modify command (C+M on Mac OS, Ctrl+M on Windows) is unavailablewhen a group (Item & Group) is selected along with an item that is not partof that group.
BOX (DIALOG BOX TAB)
I tem & Modi fy & Box tab
The Modify dialog box Box tab is available whenever a box, or a combinationof items that include a box, is selected. The controls in the Box tab let youspecify location, size, rotation, skew, and corner radius. You can also specifya background color or background blend for selected items. Some optionsare unavailable for multiple-selected items.
Box tab
Chapter 6: Item Menu
276
Modify Commands

ORIGIN ACROSS, ORIGIN DOWN (FIELDS)
I tem & Modi fy & Box tab
The Origin Across and Origin Down fields let you specify the location of theitem or group in relation to the upper left corner of the page.
• The Origin Across value specifies the measurement from the zero point on thehorizontal ruler to the left edge of the item’s rectangular bounding box.
• The Origin Down value specifies the measurement from the zero point on thevertical ruler to the top edge of the item’s rectangular bounding box.
RANGE MEASUREMENT SYSTEM SMALLEST INCREMENT
Pasteboard various (", pt, cm, etc.) .001width, height
∫ The origin fields accept positive or negative values, unless the value entered willplace the box off the pasteboard. Origin values entered for a group or multipleselection affect the bounding box surrounding the entire group. The origin fieldsare replaced by the Align with Text area when an anchored item is selected.
ALIGN WITH TEXT (AREA)
I tem & Modi fy & Box tab
The Align with Text area replaces the Origin Across and Origin Down fieldswhen the selected item is an anchored box or line. (To anchor a box or a line toflow with text, copy it to the Clipboard while the Item tool e is selected, andpaste it into a text box or text path while the Content tool E is selected.) TheAlign with Text options let you control how an anchored box or line is placedin relation to its surrounding text.
• Ascent aligns the top of the anchored item with the ascent of the characterimmediately to the right of the anchored item.
• Baseline places the bottom of the anchored item on the text baseline.
• When Baseline is chosen, the Offset field is available. The Offset value is similarto a Baseline Shift applied through the Style menu. A negative value lowersthe anchored item in relation to its baseline, and a positive value places theanchored item higher.
Chapter 6: Item Menu
277
Modify Commands

∫ When positioning anchored items, the Offset field is more suitable than theBaseline Shift feature for two reasons. First, the Offset field preserves the posi-tioning of anchored items when local text attributes are overridden by a stylesheet. Second, when characters are transformed into anchored boxes by usingthe Option+Text to Box (Mac OS) or Alt+Text to Box (Windows) command(Style menu), a value is automatically entered in the Offset field to mimic thebaseline position originally desired by the font designer.
Align with Text area
WIDTH, HEIGHT (FIELDS)
I tem & Modi fy & Box tab
The Width and Height fields let you specify the size of the selected box. Thevalues in these fields do not affect the contents of the box. If the selected box orgroup is nonrectangular, the Width and Height values refer to the size of therectangular bounding box that surrounds it.
RANGE MEASUREMENT SYSTEM SMALLEST INCREMENT
.001 pt to various (", pt, cm, etc.) .001pasteboard edge
∫ The size of the largest box you can specify is limited only by the width andheight of the pasteboard. Changing the size of a box does not change itsorigin values.
ANGLE (FIELD)
I tem & Modi fy & Box tab
The Angle field lets you rotate any item or group of items around the centerof the overall selection. The Angle field accomplishes the same task as theRotate tool R.
RANGE MEASUREMENT SYSTEM SMALLEST INCREMENT
±360° degrees .001
Chapter 6: Item Menu
278
Modify Commands

SKEW (FIELD)
I tem & Modi fy & Box tab
The Skew field lets you tilt the bounding box of an item to create a slantedvisual effect.
RANGE MEASUREMENT SYSTEM SMALLEST INCREMENT
±75° degrees .001
CORNER RADIUS (FIELD)
I tem & Modi fy & Box tab
The Corner Radius field lets you change the size of the corner area for arounded-corner, beveled-corner, or concave-corner box. Rectangle boxes aretreated as Rounded-corner boxes with a Corner Radius of zero. The field is notavailable for elliptical boxes, Bézier boxes, or groups.
RANGE MEASUREMENT SYSTEM SMALLEST INCREMENT
0 to 2" various (", pt, cm, etc.) .001
∫ The maximum Corner Radius value is two inches, or the equivalent amountin any of the various measurement systems.
SUPPRESS PRINTOUT (CHECK BOX) PI tem & Modi fy & Box tab
Checking Suppress Printout in the Box tab prevents an item and its contentsfrom printing with the rest of the page.
BOX (AREA)
I tem & Modi fy & Box tab
The Box area lets you specify background colors and tint percentages forselected items using the Color pop-up menu and Shade field.
Box area
• The Color pop-up menu lets you choose a color for the background of selecteditems from your list of colors defined in the Colors dialog box (Edit & Colors).The list includes custom colors, default colors, and colors imported with EPS
Chapter 6: Item Menu
279
Modify Commands

picture files. Choose None to make the background transparent. If multipleitems with differing colors are selected when you open the dialog box, theColor pop-up menu defaults to Mixed Colors.
• The Shade field lets you enter a tint percentage for the specified color. You canalso choose a percentage from the field’s pop-up menu. When None or Whiteis chosen in the Color pop-up menu, the Shade field is not available.
RANGE MEASUREMENT SYSTEM SMALLEST INCREMENT
0 to 100% percent .1
∫ The Color and Shade pop-up menus are not available for table backgrounds;you can only apply color to individual cells.
If varying item types are multiple-selected when you open the Modify dialogbox, the Box area controls will affect line color as well as box background color.
BLEND (AREA)
I tem & Modi fy & Box tab
The Blend area of the Box tab lets you specify a blend (a two-color gradient) forthe background of the selected box or boxes. You can specify a Style, Angle,Color, and Shade for the blend.
Blend area
• The Style pop-up menu lets you specify a type of blend. The default is Solid,which means the blend feature is turned off. The Linear option produces astandard blend that moves in a straight line from one color to the other. Theother blend choices are Mid-Linear, Rectangular, Diamond, Circular, andFull Circular. The size of the blend is determined by the size of the item towhich it is applied.
• The Angle field lets you specify the rotation of the blend, in degrees. You canalso choose an angle from the field’s pop-up menu.
RANGE MEASUREMENT SYSTEM SMALLEST INCREMENT
±360˚ degrees .1
Chapter 6: Item Menu
280
Modify Commands

• The Color pop-up menu in the Blend area lets you choose the second colorin the blend. (The first color is determined by the Color and Shade settingsin the Box area.)
• The Shade field lets you enter the maximum tint percentage of the second colorin the blend. You can also choose a Shade from the field’s pop-up menu.
RANGE MEASUREMENT SYSTEM SMALLEST INCREMENT
0 to 100% percent .1
∫ You cannot apply a blend to a table background; you can only apply a blend toindividual cells.
A blend applied to multiple-selected boxes will create multiple blends, just as ifeach box had been modified individually.
TABLE (DIALOG BOX TAB)
I tem & Modi fy
The Modify dialog box Table tab is available whenever a table is selected withthe Item e tool. The controls in the Table tab let you specify location, size, andMaintain Geometry settings.
Table tab
Chapter 6: Item Menu
281
Modify Commands
ORIGIN ACROSS, ORIGIN DOWN (FIELDS)
I tem & Modi fy & Table tab
The Origin Across and Origin Down fields let you specify the location of thetable in relation to the upper left corner of the page.
• The Origin Across value specifies the measurement from the zero point on thehorizontal ruler to the left edge of the table’s rectangular bounding box.
• The Origin Down value specifies the measurement from the zero point on thevertical ruler to the top edge of the table’s rectangular bounding box.
RANGE MEASUREMENT SYSTEM SMALLEST INCREMENT
Pasteboard various (", pt, cm, etc.) .001width, height
∫ The origin fields accept positive or negative values, unless the value enteredwould place the table off the pasteboard. Origin values entered for a groupor multiple selection affect the bounding box surrounding the entire group.The origin fields are replaced by the Align with Text area when an anchoreditem is selected.
WIDTH, HEIGHT (FIELDS)
I tem & Modi fy & Table tab
The Width and Height fields let you specify the size of the selected table.The values in these fields do not affect the contents of the table cells.
RANGE MEASUREMENT SYSTEM SMALLEST INCREMENT
.001 pt to various (", pt, cm, etc.) .001pasteboard edge
∫ The size of the largest table you can specify is limited only by the width andheight of the pasteboard. Changing the size of a table does not change its origin.
MAINTAIN GEOMETRY (CHECK BOX)
I tem & Modi fy & Table tab
The Maintain Geometry check box in the Table tab lets you determinewhether the table is resized when you insert or delete rows and columns.When Maintain Geometry is checked, the table’s bounding area remains thesame; rows and columns are resized proportionally to accommodate changes.If Maintain Geometry is unchecked, the table’s bounding area increases ordecreases as you insert or delete rows or columns.
Chapter 6: Item Menu
282
Modify Commands

SUPPRESS PRINTOUT (CHECK BOX) PI tem & Modi fy & Table tab
Checking Suppress Printout in the Table tab prevents a table from printingwith the rest of the page.
LINE (DIALOG BOX TAB)
I tem & Modi fy & Line tab
The Modify dialog box Line tab is available whenever lines, text paths, or acombination of these are selected. The controls in the Line tab let you specifystyle, width, position, arrowheads, color, and shade for selected lines. Someoptions are unavailable for groups, multiple-selected lines, and text paths.
Line tab for straight lines
STYLE (POP-UP MENU)
I tem & Modi fy & Line tab
The Style pop-up menu lets you choose an option (such as Solid or Dotted)from your list of default and custom line styles. You can customize these linestyles using the Dashes & Stripes dialog box (Edit & Dashes & Stripes).
Chapter 6: Item Menu
283
Modify Commands

Style pop-up menu
LINE WIDTH (FIELD)
I tem & Modi fy & Line tab
The Line Width field and pop-up menu let you choose a standard thicknessfor the selected lines — from Hairline to 12 pt — or enter a custom value. Ifyou choose the Hairline option, QuarkXPress prints the rule at .125 point toa PostScript imagesetter, but wider to a laser printer. Entering a 0 in any linewidth field specifies a hairline.
RANGE MEASUREMENT SYSTEM SMALLEST INCREMENT
0 to 864 pt various (", pt, cm, etc.) .001
Line Width field
Chapter 6: Item Menu
284
Modify Commands

ARROWHEADS (POP-UP MENU)
I tem & Modi fy & Line tab
The Arrowheads pop-up menu lets you choose whether your line has an arrow-head attached to it. Five arrowhead options let you determine the directionof the arrow points, whether a tail feather is included, or whether an arrowis attached to both ends.
Arrowheads pop-up menu
∫ Arrowheads cannot be applied to gridlines in a table.
MODE (POP-UP MENU)
I tem & Modi fy & Line tab
The Mode pop-up menu is available when you have a single, straight textpath or line selected. Mode is not available for lines drawn using the Bézierline tool. The Mode pop-up menu lets you choose from one of four strategiesfor positioning, rotating, or resizing a straight line. These include Endpoints,Left Point, Midpoint, and Right Point.
Mode pop-up menu
∫ If your line was converted to a straight line from a Bézier line using the Item &Shape submenu, Left Point refers to the end-point that was closest to the leftside of your page when you converted the line.
Chapter 6: Item Menu
285
Modify Commands

• When Endpoints is chosen, the Left Across, Left Down, Right Across, andRight Down fields are available in the Line tab. The Left Across and Left Downfields specify the distance from the page’s left edge and top edge to the firstpoint of your line. The page coordinates for the second point in your line arespecified in the Right Across and Right Down fields. Angle and length cannotbe directly specified in this mode.
Positioning fields for Endpoints mode
• When Left Point is chosen, the Left Across, Left Down, Angle, and Lengthfields are available in the Line tab. These fields let you rotate the line aroundthe first end-point and precisely specify line length.
• When Midpoint is chosen, the Midpoint Across, Midpoint Down, Angle, andLength fields are available in the Line tab. These fields let you rotate the linearound the midpoint and precisely specify line length.
• When Right Point is chosen, the Right Across, Right Down, Angle, andLength fields are available in the Line tab. These fields let you rotate theline around the second end-point and precisely specify line length.
ORIGIN ACROSS, ORIGIN DOWN, WIDTH, HEIGHT, ANGLE, SKEW (FIELDS)
I tem & Modi fy & Line tab
The Line tab Origin Across, Origin Down, Width, Height, Angle, and Skewfields are available when a Bézier line or Bézier text path is selected. These fieldswork just like those (with the same names) that appear in the Box tab of theModify dialog box when a box is selected. Measurements and coordinates inthese fields refer to the rectangular bounding box of the Bézier line. For infor-mation about box controls, see “Box (dialog box tab)” earlier in this section.
∫ If you resize a Bézier line or Bézier text path using the Width or Height fields,the Line Width or weight is unaffected.
Chapter 6: Item Menu
286
Modify Commands

Bounding box fields for Bézier lines
SUPPRESS PRINTOUT (CHECK BOX) PI tem & Modi fy & Line tab
Checking Suppress Printout in the Line tab prevents the line from printingwith the rest of the page. If the item is a text path, both the path and its textwill be suppressed from printing.
ALIGN WITH TEXT (AREA)
I tem & Modi fy & Line tab
The Align with Text area is available in the Line tab when the selected lineis anchored in text. These controls work just like those (with the same name)that appear in the Box tab of the Modify dialog box when an anchored boxis selected. For specific information about box controls, see “Box (dialog boxtab)” earlier in this section.
∫ Text paths cannot be anchored in text.
LINE (AREA)
I tem & Modi fy & Line tab
The Line area lets you specify colors and tint percentages for selected lines usingthe Color pop-up menu and Shade field.
Line area
Chapter 6: Item Menu
287
Modify Commands

• The Color pop-up menu lets you choose a color for selected lines from the listof colors defined in the Colors dialog box (Edit & Colors). The list includescustom colors, default colors, and spot colors imported with EPS picture files.Choose None to make the line transparent. If multiple lines with differingcolors are selected when you display the dialog box, the Color pop-up menudefaults to Mixed Colors.
• The Shade field lets you enter a tint percentage for the specified color. You canalso choose a percentage from the field’s pop-up menu. The Shade field is notavailable when None or White is chosen from the Color pop-up menu.
RANGE MEASUREMENT SYSTEM SMALLEST INCREMENT
0 to 100% percent .1
GAP (AREA)
I tem & Modi fy & Line tab
The Gap area lets you specify a color and shade for the breaks or gaps in lineswhen a style other than Solid is chosen from the Style pop-up menu.
Gap area
• The Color pop-up menu lets you choose a color for the gap of selected linesfrom the list of colors defined in the Colors dialog box (Edit & Colors). The listincludes custom colors, default colors, and spot colors imported with EPS picturefiles. Choose None to make the gap transparent. If multiple lines of differinggap colors are selected when you open the dialog box, the Color pop-up menudefaults to Mixed Colors.
• The Shade field lets you enter a tint percentage for the specified color. You canalso choose a percentage from the field’s pop-up menu. When None or Whiteis chosen from the Color pop-up menu, the Shade field is not available.
RANGE MEASUREMENT SYSTEM SMALLEST INCREMENT
0 to 100% percent .1
Chapter 6: Item Menu
288
Modify Commands
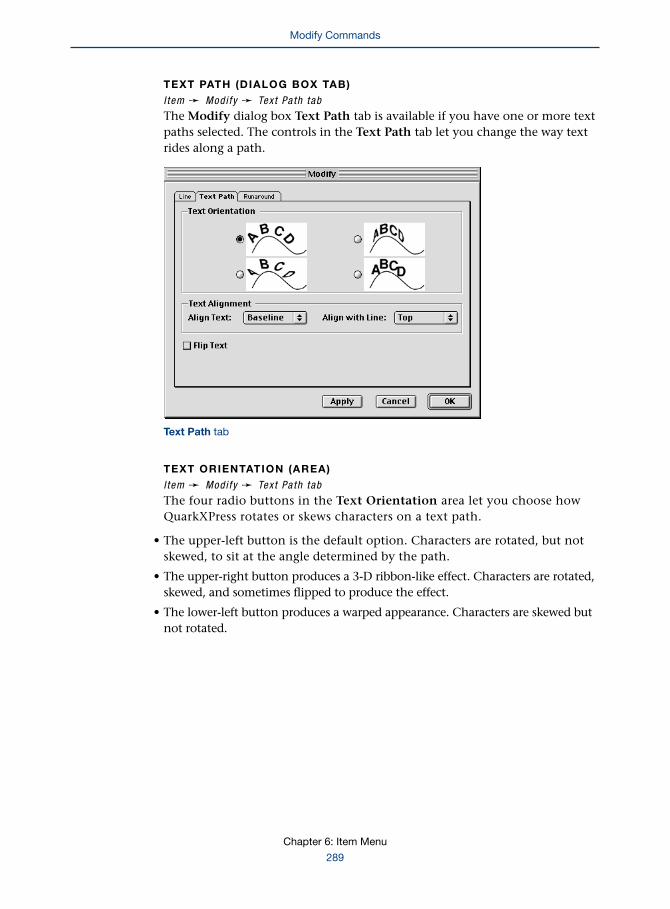
TEXT PATH (DIALOG BOX TAB)
I tem & Modi fy & Text Pa th tab
The Modify dialog box Text Path tab is available if you have one or more textpaths selected. The controls in the Text Path tab let you change the way textrides along a path.
Text Path tab
TEXT ORIENTATION (AREA)
I tem & Modi fy & Text Pa th tab
The four radio buttons in the Text Orientation area let you choose howQuarkXPress rotates or skews characters on a text path.
• The upper-left button is the default option. Characters are rotated, but notskewed, to sit at the angle determined by the path.
• The upper-right button produces a 3-D ribbon-like effect. Characters are rotated,skewed, and sometimes flipped to produce the effect.
• The lower-left button produces a warped appearance. Characters are skewed butnot rotated.
Chapter 6: Item Menu
289
Modify Commands

• The lower-right button produces a stair-step appearance. Characters are neitherrotated nor skewed.
Text Orientation area
TEXT ALIGNMENT (AREA)
I tem & Modi fy & Text Pa th tab
The two pop-up menus in the Text Alignment area let you choose whethertext sits above, below, or directly in front of the line. You can also choosewhich portion of the font is used for alignment.
• The Align Text pop-up menu lets you choose which part of a font is used toposition characters on the line. You can align text using the Ascent, Center,Baseline, or Descent settings.
• The Align with Line pop-up menu lets you choose which part of the line isaligned with the choice in the Align Text pop-up menu. You can choose Top,Center, or Bottom. For example, if Baseline is chosen in the Align Text pop-upmenu, and Center is chosen in the Align with Line pop-up menu, the baselineof each character will sit on the line’s center.
FLIP TEXT (CHECK BOX)
I tem & Modi fy & Text Pa th tab
The Flip Text check box in the Text Path tab places text on the opposite sideof the line, starting from the opposite end-point. For example, if you create acircular text path with text flowing on the outside of the circle, the Flip Textfeature positions text on the inside of the circle. Text alignment is not affected.
Chapter 6: Item Menu
290
Modify Commands

TEXT (DIALOG BOX TAB)
I tem & Modi fy & Text tab
The Modify dialog box Text tab is available whenever one or more text boxesare selected. The controls in the Text tab let you specify the number of columns,the text inset, the vertical alignment, and other text box settings.
Text tab
COLUMNS (FIELD)
I tem & Modi fy & Text tab
The Columns field lets you specify the number of columns contained in a textbox. You can specify up to 30 columns in a text box.
RANGE MEASUREMENT SYSTEM SMALLEST INCREMENT
1 to 30 integers 1
GUTTER WIDTH (FIELD)
I tem & Modi fy & Text tab
The Gutter Width field lets you specify the space between columns in atext box.
RANGE MEASUREMENT SYSTEM SMALLEST INCREMENT
3 to 288 pt various (", pt, cm, etc.) .001
Chapter 6: Item Menu
291
Modify Commands

TEXT ANGLE (FIELD)
I tem & Modi fy & Text tab
The Text Angle field rotates all the text and the columns in a selected text boxaccording to the angle you specify. The box borders are not rotated.
RANGE MEASUREMENT SYSTEM SMALLEST INCREMENT
±360° degrees .001
TEXT SKEW (FIELD)
I tem & Modi fy & Text tab
The Text Skew field tilts all the characters in a selected text box to create aslanted visual effect. The box itself is not affected.
RANGE MEASUREMENT SYSTEM SMALLEST INCREMENT
±75° degrees .001
TEXT INSET (AREA)
I tem & Modi fy & Text tab
The Text Inset area lets you specify the space that extends from the inside edgeof a selected text box to the outside edge of the text. The maximum allowabletext inset varies with the size of the text box. The default value is 1 point. Insetvalues do not affect gutter width.
You can choose to use the same inset value for all four sides of a square text box,or you can specify different inset values for each edge.
Text Inset area and Multiple Insets check box
Chapter 6: Item Menu
292
Modify Commands

MULTIPLE INSETS (CHECK BOX)
I tem & Modi fy & Text tab & Text Inset area
The Multiple Insets check box lets you control text inset. When this box ischecked, you can specify different inset values for each edge of the text box byentering values in the Top, Left, Bottom, and Right fields. When this box isunchecked, you can specify the same inset value for all four sides of a squaretext box by entering a value in the All Edges field.
FIRST BASELINE (AREA)
I tem & Modi fy & Text tab
The Minimum and Offset controls in the First Baseline area let you positionthe first baseline of text in a selected text box.
First Baseline area
The Minimum pop-up menu gives you three options for specifying the mini-mum distance between the first line of text and the top of each column:
Minimum pop-up menu
• The Cap Height option adds the height of a capital letter in the first line’slargest font to the Text Inset value for the top of the column.
Chapter 6: Item Menu
293
Modify Commands

• The Cap + Accent option places the extra space needed for accent marks(above uppercase letters) in the first line’s largest font, adding the space tothe Text Inset value for the top of the column.
• The Ascent option adds the ascent value (specified by the font designer) of thefirst line’s largest font to the Text Inset value for the top of the column. Theresult may resemble one of the previous two settings or may place the line some-where in between, depending on the font design. Ascent is the default option.
The Offset field lets you control the space between the first baseline and the topedge of a text box, using an absolute value that you specify. Regardless of thevalue you enter, the first baseline will never be placed closer to the specifiedText Inset than the Minimum value. The default value is zero.
RANGE MEASUREMENT SYSTEM SMALLEST INCREMENT
First baseline various (", pt, cm, etc.) .001to top of box
VERTICAL ALIGNMENT (AREA)
I tem & Modi fy & Text tab
Selections in the Vertical Alignment area control positioning of all thetext relative to the First Baseline setting and the bottom Text Inset value.The Type pop-up menu lets you choose how to align the text vertically:
Vertical Alignment area
• The Top option places the first line of text on the first baseline, and distributesall the text according to the leading value. This is the default setting.
• The Centered option centers the text top-to-bottom between the First Base-line ascent and the bottom of the text box, distributing lines according tothe leading value.
Chapter 6: Item Menu
294
Modify Commands

• The Bottom option aligns the bottom of the descenders of the last line oftext with the bottom text inset, distributing the lines above according tothe leading value.
• The Justified option places the first line of text on the first baseline, the lastline near the bottom text inset, and evenly distributes all lines in between,overriding the leading value.
The Inter π Max field, which is only available when Justified is selected inthe Type pop-up menu, is used to specify the maximum amount of spaceQuarkXPress can insert between vertically justified paragraphs. If the para-graphs are spaced as far apart as the Inter π Max field allows and text stilldoes not extend from the top of the box to the bottom, QuarkXPress willoverride the specified leading values and insert an equal amount of addi-tional space between lines.
RUN TEXT AROUND ALL SIDES (CHECK BOX)
I tem & Modi fy & Text tab
The Run Text Around All Sides feature lets you surround objects with text onall sides. Check Run Text Around All Sides to cause lines of text to continuefrom the left side to the right side of an item that overlaps the text, withoutstarting a new line. Use this setting to control text that would otherwise beobscured by an overlapping item or items.
∫ Run Text Around All Sides is best used in layouts where readability isnot crucial.
FLIP HORIZONTAL, FLIP VERTICAL (CHECK BOXES)
I tem & Modi fy & Text tab
The Flip Horizontal and Flip Vertical check boxes let you create a mirror imageof all the text in a selected text box. The direction in which text reads is alsoflipped. These check boxes work just like the Flip Horizontal and Flip Verticalcommands in the Style menu.
TEXT (DIALOG BOX TAB), TABLE SELECTED
I tem & Modi fy & Text tab
When text cells in a table are selected, the Modify dialog box Text tab worksthe same way as it does with a text box, with a few exceptions:
• Because text cells cannot contain columns, the Columns and Gutter Widthfields are unavailable.
Chapter 6: Item Menu
295
Modify Commands

• Text Inset values can be set for All Edges, Left, Bottom or Right. The value in the All Edges field will be applied to all sides of the text cell. The MultipleInsets check box activates the Left, Bottom, and Right fields. You canenter different values in each field.
PICTURE (DIALOG BOX TAB)
I tem & Modi fy & Picture tab
The Modify dialog box Picture tab is available whenever one or more pictureboxes (or picture cells in a table) are selected. The controls in the Picture tab letyou specify how a picture is positioned within its box, and how it is angled,scaled, and colored.
Picture tab
OFFSET ACROSS, OFFSET DOWN (FIELDS)
I tem & Modi fy & Picture tab
The Offset Across and Offset Down fields in the Picture tab let you specify theposition of a picture relative to its box. You can enter negative or positive valuesfor either field. The default value for both is zero.
• The Offset Across value specifies the distance between the left edge of therectangular bounding box and the left edge of the picture.
Chapter 6: Item Menu
296
Modify Commands

• The Offset Down value specifies the distance between the top edge of therectangular bounding box and the top edge of the picture.
RANGE MEASUREMENT SYSTEM SMALLEST INCREMENT
– picture size various (", pt, cm, etc.) .001to + box size
SCALE ACROSS, SCALE DOWN (FIELDS)
I tem & Modi fy & Picture tab
The Scale Across and Scale Down fields let you specify proportionate ordisproportionate scaling for a picture within a picture box. The Scale Acrosspercentage scales pictures horizontally; the Scale Down percentage scalesa picture vertically. If you want to maintain existing proportions, enterequivalent values.
RANGE MEASUREMENT SYSTEM SMALLEST INCREMENT
10 to 1,000% percent .1
PICTURE ANGLE, PICTURE SKEW (FIELDS)
I tem & Modi fy & Picture tab
The Picture Angle and Picture Skew fields let you rotate and skew a pictureindependently of the selected picture box that contains it.
• The Picture Angle field specifies the rotation of a picture around its center.
RANGE MEASUREMENT SYSTEM SMALLEST INCREMENT
±360° degrees .001
• The Picture Skew field lets you tilt a picture’s sides to create a slantedvisual effect.
RANGE MEASUREMENT SYSTEM SMALLEST INCREMENT
±75° degrees .001
FLIP HORIZONTAL, FLIP VERTICAL (CHECK BOXES)
I tem & Modi fy & Picture tab
The Flip Horizontal and Flip Vertical check boxes let you create a mirror imageof the picture in a selected picture box. These check boxes work just like the FlipHorizontal and Flip Vertical commands in the Style menu.
Chapter 6: Item Menu
297
Modify Commands

SUPPRESS PICTURE PRINTOUT (CHECK BOX) PI tem & Modi fy & Picture tab
Checking Suppress Picture Printout in the Picture tab prevents the picture ina selected picture box from printing with the rest of the page. Any visible attrib-utes of the box itself (frame, background color, or blend) will print normally.
PICTURE (AREA)
I tem & Modi fy & Picture tab
The Picture area lets you use the Color pop-up menu and Shade field to specifya color and shade for most grayscale or black-and-white pictures. For a list ofpicture file formats compatible with this feature, see “Modifiable Picture FileFormats” in Chapter 5, “Style Menu.”
Picture area
• The Color pop-up menu lets you choose a color to be used in place of black inthe grayscale or black-and-white picture in a selected picture box. You canchoose from the list of colors defined in the Colors dialog box (Edit & Colors).The list includes custom colors, default colors, and spot colors imported withEPS picture files.
• The Shade field lets you enter the maximum tint percentage of the color thatwill be applied to the grayscale or black-and-white picture. You can also choosea percentage from the field’s pop-up menu.
RANGE MEASUREMENT SYSTEM SMALLEST INCREMENT
0 to 100% percent .1
FRAME (COMMAND)
I tem menu
The Frame command (C+B on Mac OS, Ctrl+B on Windows) is available forselected boxes. The command displays the Frame tab of the Modify dialog box,which lets you choose from a variety of line styles to apply to box borders.
Chapter 6: Item Menu
298
Modify Commands

FRAME (DIALOG BOX TAB)
I tem & Frame
The Modify dialog box Frame tab lets you specify width, style, color, andshade for your frame. The dialog box includes a Preview area that displaysa rectangular representation of the specified frame.
Frame tab
∫ A frame applied to a box always resides inside the box borders. However, youcan use the Framing area in the General pane of the Preferences dialog box(Edit & Preferences & Preferences) to specify whether QuarkXPress automati-cally outsets these borders when a frame is applied (click Outside), or whetherQuarkXPress keeps the current box size, forcing the frame to overlap or reflowthe contents (click Inside).
PA frame cannot be applied to a table in a print document. You can applydashes and stripes to the gridlines, but not to the bounding box of a table.
WIDTH (FIELD)
I tem & Frame
The Width field and pop-up menu lets you choose a standard thickness forthe frame of selected boxes — from 0 to 12 pt — or enter a custom value.The default width is zero, which applies no frame.
Chapter 6: Item Menu
299
Modify Commands

RANGE MEASUREMENT SYSTEM SMALLEST INCREMENT
determined various (", pt, cm, etc.) .001by box size
Width field and pop-up menu
STYLE (POP-UP MENU)
I tem & Frame
The Style pop-up menu lets you choose a frame style (such as Solid or Dotted)from the list of default and custom line styles. You can customize these linestyles using the Dashes & Stripes dialog box (Edit menu).
Style pop-up menu for rectangular box
Chapter 6: Item Menu
300
Modify Commands

FRAME (AREA)
I tem & Frame
The Frame area lets you use the Color pop-up menu and Shade field to specifycolors and tint percentages for frames.
Frame area
• The Color pop-up menu lets you choose a frame color from the list of colorsdefined in the Colors dialog box (Edit & Colors).
• The Shade field lets you enter a tint percentage for the specified color. You canalso choose a percentage from the field’s pop-up menu. The Shade field is notavailable when White is chosen in the Color pop-up menu.
RANGE MEASUREMENT SYSTEM SMALLEST INCREMENT
0 to 100% percent .1
GAP (AREA)
I tem & Frame
When a style other than Solid is chosen from the Style pop-up menu, the Gaparea lets you specify a color and shade for the breaks or gaps in frames.
Gap area
• The Color pop-up menu lets you choose a color for the gap area of the framefrom the list of colors defined in the Colors dialog box (Edit & Colors). The listincludes custom colors, default colors, and spot colors imported with EPS picturefiles. Choose None to make the gap transparent.
Chapter 6: Item Menu
301
Modify Commands

• The Shade field lets you enter a screen tint percentage for the specified color.You can also choose a percentage from the field’s pop-up menu. When None orWhite is chosen in the Color pop-up menu, the Shade field is not available.
RANGE MEASUREMENT SYSTEM SMALLEST INCREMENT
0 to 100% percent .1
CLIPPING (COMMAND)
I tem menu
The Clipping command (C+Option+T on Mac OS, Ctrl+Alt+T on Windows) isavailable whenever a picture box containing a picture is selected. The commanddisplays the Clipping tab of the Modify dialog box, which lets you create ormodify a QuarkXPress clipping path.
A clipping path tells QuarkXPress which areas of a picture should be visibleand which areas should be transparent. This is especially useful when you areattempting to isolate the picture’s subject from its surrounding background.
CLIPPING (DIALOG BOX TAB)
I tem & Cl ipp ing
The Modify dialog box Clipping tab lets you create or make simple modifica-tions to a QuarkXPress clipping path. You can base this clipping path on a pathor alpha channel embedded in the original picture, or on the white areas of theimage. Changes made to a picture’s position, scale, angle, rotation, or skew willcause its associated clipping path to update automatically. You can further editclipping paths by checking Clipping Path in the Item & Edit submenu andthen manually reshaping the path.
Clipping tab
Chapter 6: Item Menu
302
Modify Commands

∫ A Guide to QuarkXPress uses the term clipping path to refer to a QuarkXPressclipping path, which is based on the high-resolution image but created andstored with the QuarkXPress document. Clipping paths created in image-editingor illustration programs are referred to as embedded paths. Changes made inQuarkXPress are stored exclusively in the document as a specification for anindividual picture box. Each picture box in a QuarkXPress document maycontain several clipping specifications for the same imported picture.
You do not have to use an embedded path, but since it is stored with the picture,it will always be available.
PREVIEW (AREA)
I tem & Cl ipp ing
The Preview area displays a small-scale representation of how the picturein the selected box will look in the actual document. On color monitors,the picture box border is colored blue by default, and the clipping path iscolored green. On grayscale monitors, the picture box border is a darkershade than the clipping path. Colors can be changed using the Marginand Ruler buttons in the Display pane of the Preferences dialog box(Edit & Preferences & Preferences).
Preview area
RESCAN (BUTTON)
I tem & Cl ipp ing
Clicking Rescan rebuilds the clipping path and its preview using whateverspecifications are currently entered in the pop-up menus, fields, or check boxes
Chapter 6: Item Menu
303
Modify Commands

of the Clipping tab. If a high-resolution picture file can be found, QuarkXPressaccesses it when you click Rescan.
∫ Clicking Rescan undoes the Crop to Box feature.
CROP TO BOX (BUTTON)
I tem & Cl ipp ing
The Crop to Box button cuts portions of a clipping path that fall outside thecurrent box borders. Picture areas outside the clipping path appear transparenton screen and are not rendered at output.
INFORMATION (AREA)
I tem & Cl ipp ing
The Information area displays the number of alpha channels and embeddedpaths in your picture file. The number of Bézier points used in the currentQuarkXPress clipping path is also displayed.
Information area
TYPE (POP-UP MENU)
I tem & Cl ipp ing
The Type pop-up menu lets you choose the source used to create a QuarkXPressclipping path. You can choose Item, Embedded Path, Alpha Channel,Non-White Areas, or Picture Bounds.
Type pop-up menu
Chapter 6: Item Menu
304
Modify Commands

• When Item is chosen, no clipping path is applied. The picture box borders alonedictate which parts of a picture are visible.
• The Embedded Path option creates a new clipping path based on an embeddedclipping path drawn in an image-editing application. When Embedded Pathis chosen, the Path, Outset, and Tolerance controls become available for cus-tomizing the QuarkXPress clipping path. If the picture file contains more thanone embedded path, choose a path from the Embedded Path pop-up menu.
• The Alpha Channel option clips a picture around an alpha channel that isalready embedded in a picture file. If the picture file contains more than oneembedded alpha channel, choose an alpha channel from the Alphapop-up menu.
When Alpha Channel is chosen, the Alpha, Outset, and Tolerance controlsare available for customizing the QuarkXPress clipping path. The Thresholdfield in the Tolerance area determines the amount an alpha channel area maydeviate from black before it falls inside the initial clipping path. A Toleranceof 10% specifies that darkness values of 91% to 100% in the alpha channel willfall outside the initial path, while anything lighter (0–90%) will fall inside.(The values in the picture itself may be entirely different, because an alphachannel possesses its own values.)
• The Non-White Areas option creates a new clipping path based on the picture’ssubject. When Non-White Areas is chosen, the Outset and Tolerance controlsare available for customizing the QuarkXPress clipping path. The Thresholdfield in the Tolerance area determines the amount a picture area may deviatefrom white before it is included inside the initial clipping path. The defaultTolerance of 10% specifies that darkness values of zero to 10% will initially falloutside the path, while anything darker (11%–100%) will be included in theinitial clipping path. When you choose Non-White Areas for a color picture,areas are clipped according to how they would appear if converted to grayscale.
• The Picture Bounds option creates a new clipping path based on the rectangu-lar canvas area of the imported picture file. This includes any white backgroundsaved with your original picture file. When Picture Bounds is chosen, the Top,Left, Bottom, and Right fields are available for changing the size of the clippingpath. These fields are replaced by other controls if you choose a differentclipping path from the Type pop-up menu.
∫ If you make edits to a clipping path using point-by-point Bézier editing, theType pop-up menu displays User-Edited Path the next time you open theModify dialog box. This lets you adjust the outset and other values of youredited path while retaining its basic shape. If you choose a new Type optionwhen User-Edited Path is displays, you must click Cancel to restore theuser-edited path. If you choose a new Type option and click OK, Bézieredits are lost.
Chapter 6: Item Menu
305
Modify Commands

TOP, LEFT, BOTTOM, RIGHT (FIELDS)
I tem & Cl ipp ing
Available when Picture Bounds is chosen, the Top, Left, Bottom, and Rightfields let you specify the distance between the rectangular picture edges and arectangular clipping path’s edges. Negative values place the clipping path edgeswithin the picture bounds.
RANGE MEASUREMENT SYSTEM SMALLEST INCREMENT
±288 pt various (", pt, cm, etc.) .001
PATH, ALPHA (POP-UP MENUS)
I tem & Cl ipp ing
When Embedded Path is chosen in the Type pop-up menu, the Path pop-upmenu lets you choose a path from the picture file. When Alpha Channel ischosen in the Type pop-up menu, the Path pop-up menu is replaced by theAlpha pop-up menu. The Alpha pop-up menu lets you choose an alphachannel to use.
OUTSET (FIELD)
I tem & Cl ipp ing
When you have a nonrectangular clipping path, the Outset field specifies theexact distance (in points) by which you want the current clipping path to growor shrink. A positive value makes the clipping path grow to include more of thepicture; a negative value makes the clipping path shrink to include less.
RANGE MEASUREMENT SYSTEM SMALLEST INCREMENT
±288 pt various (", pt, cm, etc.) .001
TOLERANCE (AREA)
I tem & Cl ipp ing
The Tolerance area is available when Embedded Path, Alpha Channel, orNon-White Areas are chosen in the Type pop-up menu. The Noise, Smooth-ness, and Threshold values in the Tolerance area let you fine-tune yourpicture-based clipping path.
Tolerance area
Chapter 6: Item Menu
306
Modify Commands
• The Noise field specifies the smallest allowable closed path. Any closed path orartifact smaller than the noise value will be deleted. For example, if you aregenerating a clipping path for a picture of the moon and stars and you findthat each star has a tiny path drawn around it, you could choose to specify aNoise value large enough to exclude these small paths but small enough toinclude the path around the moon.
RANGE MEASUREMENT SYSTEM SMALLEST INCREMENT
±288 pt various (", pt, cm, etc.) .001
• The Smoothness field allows you to specify clipping path accuracy. A lowervalue creates a more complex path with a greater number of points because itmoves the path closer to each exact pixel. A higher number creates a simpler(and less accurate) path that is less likely to produce an error on output.
∫ If your clipping path has too many points to output the document, QuarkXPressattempts to decrease the path complexity by automatically raising the Smooth-ness setting during printing.
• The Threshold field is available when Alpha Channel or Non-White Areasis chosen in the Type pop-up menu. When Alpha Channel is chosen, theThreshold value determines the amount that an alpha channel area may devi-ate from black before it falls inside the initial clipping path. Values in the actualpicture are not considered when Alpha Channel is chosen. When Non-WhiteAreas is chosen, the Threshold value determines the amount that an actualpicture area may deviate from white before it is included within the path. Areasin color pictures are clipped according to how they would appear if convertedto grayscale. The initial results of the Threshold setting are further affected bythe other settings in the Clipping tab.
RANGE MEASUREMENT SYSTEM SMALLEST INCREMENT
0 to 100% percent .1
INVERT (CHECK BOX)
I tem & Cl ipp ing
When Embedded Path, Alpha Channel, or Non-White Areas is chosen in theType pop-up menu, the Invert check box is available. Checking Invert swapsthe interior of your clipped path with the exterior.
Chapter 6: Item Menu
307
Modify Commands

OUTSIDE EDGES ONLY (CHECK BOX)
I tem & Cl ipp ing
The Outside Edges Only check box determines whether QuarkXPress willallow paths within paths. For example, if Outside Edges Only is checked,QuarkXPress might create two paths for an apple and a bagel (one path foreach) but it will not clip out the hole within the bagel; only the outside pathsare drawn. In order for paths to be drawn within the larger paths, uncheckOutside Edges Only.
RESTRICT TO BOX (CHECK BOX)
I tem & Cl ipp ing
If Restrict To Box is unchecked in the Clipping tab, unclipped portions of theimage that fall outside the picture box will be visible in the document.
RUNAROUND (COMMAND)
I tem menu
The Runaround command (C+T on Mac OS, Ctrl+T on Windows) is avail-able whenever a nonanchored item is selected. The command displays theRunaround tab of the Modify dialog box, which lets you create or modify aQuarkXPress runaround path for a picture, or change the runaround outsetfor any other item.
Runaround is a term used to describe how text flows around items that areplaced in front of it. Editing an item’s runaround path changes the way textbehaves when the edited item is placed in front of text. Runaround specificationscan be created for an item, or for the picture in a picture box. A picture-basedrunaround path tells QuarkXPress which picture areas push away text positionedbehind it, and which picture areas allow text to flow unimpeded behind the item.
RUNAROUND (DIALOG BOX TAB), PICTURE BOX SELECTED
I tem & Runaround
When a picture box is selected, the Modify dialog box Runaround tab workslike the Clipping tab, but with a few exceptions:
• Paths created in the Runaround tab are called runaround paths. These paths forcetext in text boxes stacked behind the picture box to adjoin and flow around the“included” areas of the path. The areas outside the runaround path allow thetext to flow unimpeded in back. A runaround path does not determine whichareas of a picture are visible.
• On color monitors, the runaround path displays in the Preview area as amagenta path (by default). A series of horizontal gray bars represents the text.
Chapter 6: Item Menu
308
Modify Commands

• When the Runaround tab is displayed, the None option is available in the Typepop-up menu. Although choosing Item from the Type pop-up menu of theClipping tab turns clipping off, you must choose None from the Type pop-upmenu to turn runaround off. Choosing Item in the Runaround tab causes theselected picture box to push away text according to a runaround outset meas-ured from the picture box borders. This outset is specified using the Top, Left,Bottom, and Right fields when a rectangular box is selected, and by the Outsetfield when a nonrectangular box is selected. The Item runaround does notproduce an editable Bézier runaround path.
• The Same As Clipping option is available in the Type pop-up menu when theRunaround tab is displayed. Choose this option if you want text to run aroundthe QuarkXPress clipping path you have specified in the Clipping tab. Althoughyou may specify unique Outset and Smoothness settings when Same AsClipping is chosen, any Bézier edits to the runaround area must be madeto the clipping path.
• To edit an applied runaround path using Béziers, Runaround must be checkedinstead of Clipping Path in the Item & Edit submenu — except when Same AsClipping is chosen in the Type pop-up menu.
• The Restrict To Box check box does not affect picture visibility as it does inthe Clipping tab. When Restrict To Box is checked in the Runaround tab,text ignores any portion of the runaround path that falls outside the picturebox borders. This achieves the same result as clicking Crop to Box in theRunaround tab, but the runaround path itself is not redrawn.
• The default setting in the Type pop-up menu of the Runaround tab is Itemwith a 1-point outset.
Runaround tab for picture boxes
Chapter 6: Item Menu
309
Modify Commands

For detailed descriptions of the controls in the Runaround tab for picture boxes,see “Clipping (dialog box tab)” earlier in this section.
RUNAROUND (DIALOG BOX TAB), TEXT BOX OR BOX WITH A
CONTENT OF NONE SELECTED
I tem & Runaround
When the selected item is a text box (or a box to which Item & Content &None has been applied), the Runaround tab lets you choose None or Item fromthe Type pop-up menu. If you choose None, text in text boxes stacked behindthe selected box will be allowed to flow unimpeded behind the selected textbox. If you choose Item, you can specify a runaround outset as measured fromthe text box borders. This outset is specified using the Top, Left, Bottom, andRight fields when a rectangular box is selected, and by the Outset field when anonrectangular box is selected. These fields accept positive or negative values.Negative values place the runaround area within the text box borders. TheItem runaround does not produce an editable Bézier runaround path.
RANGE MEASUREMENT SYSTEM SMALLEST INCREMENT
±288 pt various (", pt, cm, etc.) .001
Runaround tab for text boxes and boxes with a content of None
Chapter 6: Item Menu
310
Modify Commands

RUNAROUND (DIALOG BOX TAB), LINE OR TEXT PATH SELECTED
I tem & Runaround
When a line or text path is selected, the Runaround tab lets you chooseNone, Item, or Manual from the Type pop-up menu. If you choose None asthe runaround type, text from other text boxes stacked behind the line or textpath will flow unimpeded behind the selected item. The Item runaround doesnot produce an editable Bézier runaround path. Choose Manual to create anew, editable runaround path for the selected line or text path. The runaroundpath can be edited by choosing Item & Edit & Runaround while the itemis selected.
If you choose Item or Manual, you can specify an Outset value as measuredfrom the selected line. This field accepts positive values only.
RANGE MEASUREMENT SYSTEM SMALLEST INCREMENT
0 to 288 pt various (", pt, cm, etc.) .001
Runaround tab for lines and text paths
Chapter 6: Item Menu
311
Modify Commands
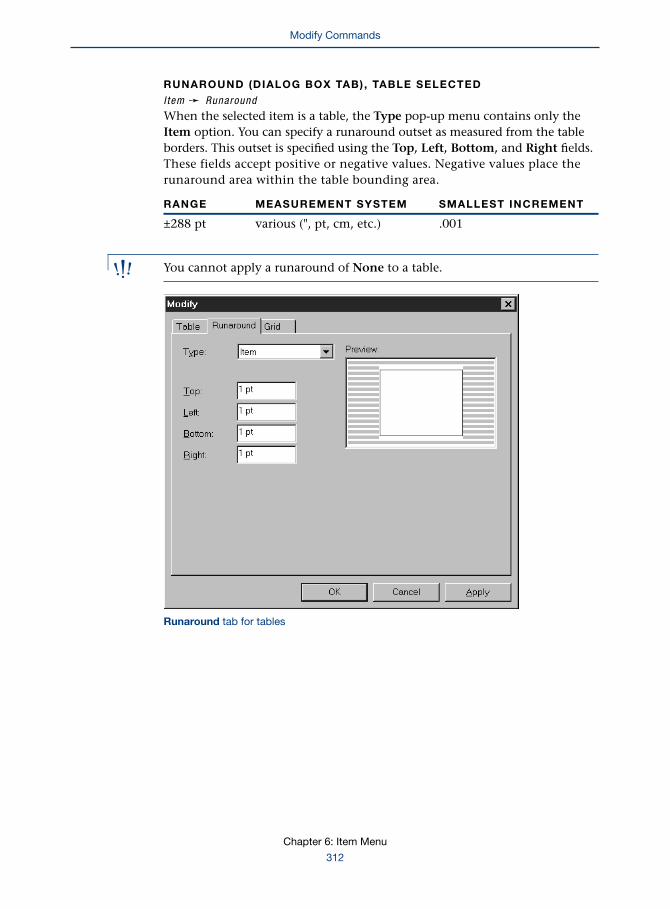
RUNAROUND (DIALOG BOX TAB), TABLE SELECTED
I tem & Runaround
When the selected item is a table, the Type pop-up menu contains only theItem option. You can specify a runaround outset as measured from the tableborders. This outset is specified using the Top, Left, Bottom, and Right fields.These fields accept positive or negative values. Negative values place therunaround area within the table bounding area.
RANGE MEASUREMENT SYSTEM SMALLEST INCREMENT
±288 pt various (", pt, cm, etc.) .001
∫ You cannot apply a runaround of None to a table.
Runaround tab for tables
Chapter 6: Item Menu
312
Modify Commands

CELL (DIALOG BOX TAB)
I tem & Modi fy & Cel l tab
The Modify dialog box Cell tab is available when a table is selected with theContent E tool. The controls in the Cell tab let you specify cell width, height,color, and blend settings.
Cell tab
WIDTH (FIELD)
I tem & Modi fy & Cel l tab
The Width field lets you specify a width for the selected table columns.
DISTRIBUTE EVENLY (BUTTON)
I tem & Modi fy & Cel l tab
The Distribute Evenly button automatically resizes inequal table columnwidths so that each selected column is the same width and all the columnsfit within the width of the table.
HEIGHT (FIELD)
I tem & Modi fy & Cel l tab
The Height field lets you specify a height for the selected rows.
Chapter 6: Item Menu
313
Modify Commands

DISTRIBUTE EVENLY (BUTTON)
I tem & Modi fy & Cel l tab
The Distribute Evenly button automatically resizes inequal row heights so thateach selected row is the same height and all the rows fit within the height ofthe table.
CELL (AREA)
I tem & Modi fy & Cel l tab
The Cell area lets you specify tint percentages of background colors for selectedcells using the Color pop-up menu and Shade field.
Cell area
• The Color pop-up menu lets you choose a color for the background of theselected cell or cells from your list of colors defined in the Colors dialog box(Edit & Colors). The list includes custom colors, default colors, and spot colorsimported with EPS picture files.
∫ Cells cannot have a background color of None.
• The Shade field lets you enter a tint percentage for the specified color. You canalso choose a percentage from the field’s pop-up menu. When White is chosenin the Color pop-up menu, the Shade option is not available.
RANGE MEASUREMENT SYSTEM SMALLEST INCREMENT
0 to 100% percent .1
Chapter 6: Item Menu
314
Modify Commands

BLEND (AREA)
I tem & Modi fy & Cel l tab
The Blend area of the Cell tab lets you specify a blend (a two-color gradient) forthe background of the selected cell or cells. You can specify Style, Angle, Color,and Shade settings for the blend.
Blend area
• The Style pop-up menu lets you specify a type of blend. The default is Solid,which means the blend feature is turned off. The Linear option produces astandard blend that moves in a straight line from one color to the other. Theother blend choices are Mid-Linear, Rectangular, Diamond, Circular, andFull Circular. The size of the blend is determined by the size of the item towhich it is applied.
• The Angle field lets you specify the rotation of the blend in degrees. You canalso choose an angle from the field’s pop-up menu.
RANGE MEASUREMENT SYSTEM SMALLEST INCREMENT
±360˚ degrees .1
• The Color pop-up menu in the Blend area lets you choose the second color inthe blend. (The first color is determined by the Color and Shade settings in theBox area.)
• The Shade field lets you enter the maximum tint percentage for the secondcolor in the blend. You can also choose a shade from the field’s pop-up menu.
RANGE MEASUREMENT SYSTEM SMALLEST INCREMENT
0 to 100% percent .1
Chapter 6: Item Menu
315
Modify Commands
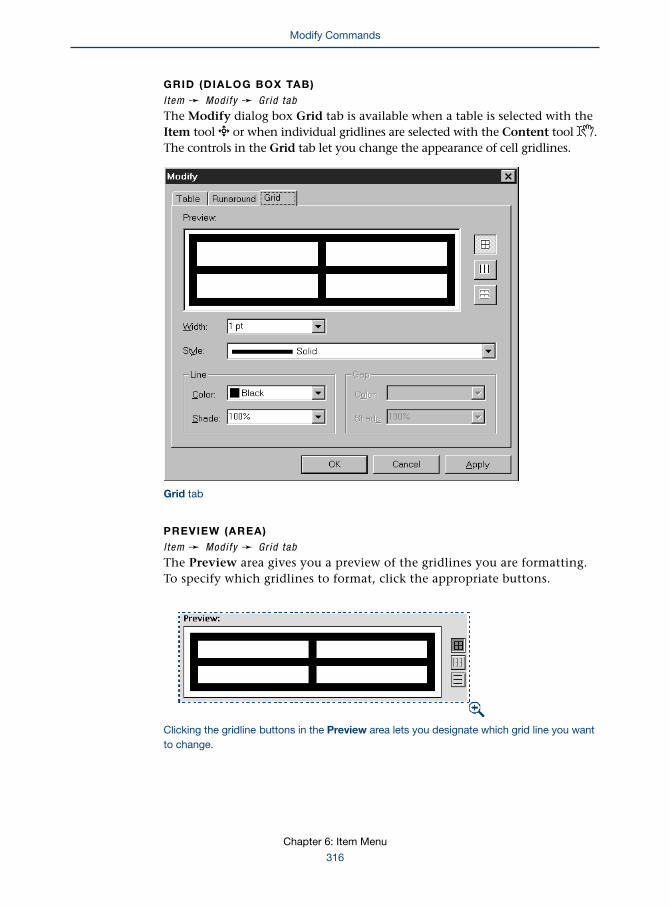
GRID (DIALOG BOX TAB)
I tem & Modi fy & Gr id tab
The Modify dialog box Grid tab is available when a table is selected with theItem tool e or when individual gridlines are selected with the Content tool E.The controls in the Grid tab let you change the appearance of cell gridlines.
Grid tab
PREVIEW (AREA)
I tem & Modi fy & Gr id tab
The Preview area gives you a preview of the gridlines you are formatting.To specify which gridlines to format, click the appropriate buttons.
Clicking the gridline buttons in the Preview area lets you designate which grid line you wantto change.
Chapter 6: Item Menu
316
Modify Commands

The Preview area displays a proxy of the gridlines for the table. To specify whichgridlines to format, click a gridline button. The buttons work as follows:
Horizontal and vertical gridlines
Horizontal gridlines only
Vertical gridlines only
Once the desired button is selected, use the controls in the Grid tab to formatthe gridlines.
WIDTH (FIELD AND POP-UP MENU)
I tem & Modi fy & Gr id tab
Use the Width field and pop-up menu to choose a standard thickness for thegridlines of selected cells. Its range, measurements, and increments are the sameas the Width field for a line.
STYLE (POP-UP MENU)
I tem & Modi fy & Gr id tab
The Style pop-up menu lets you choose a style for the gridlines of selectedcells. Its range, measurements, and increments are the same as the Stylefield for a line.
Style pop-up menu
Chapter 6: Item Menu
317
Modify Commands

LINE (AREA)
I tem & Modi fy & Gr id tab
The Line area works the same way as the Frame area in the Modify dialogbox Frame tab, but the line color and shade are applied to the gridlines ofselected cells.
Line area
GAP (AREA)
I tem & Modi fy & Gr id tab
The Gap area works the same way as the Gap area in the Modify dialogbox Frame tab, but the gap color and shade are applied to the gridlines ofselected cells.
Gap area
EXPORT (DIALOG BOX TAB) WI tem & Modi fy & Expor t tab
The Modify dialog box Export tab is available when a picture box is selected.This tab is also available when a text box, a box with a content of None, a table,or a line is selected and the Convert to Graphic on Export box is checked. Thecontrols in the Export tab let you control the file format and other attributesof the file that will be created for this item when the selected Web documentis exported.
Chapter 6: Item Menu
318
Modify Commands
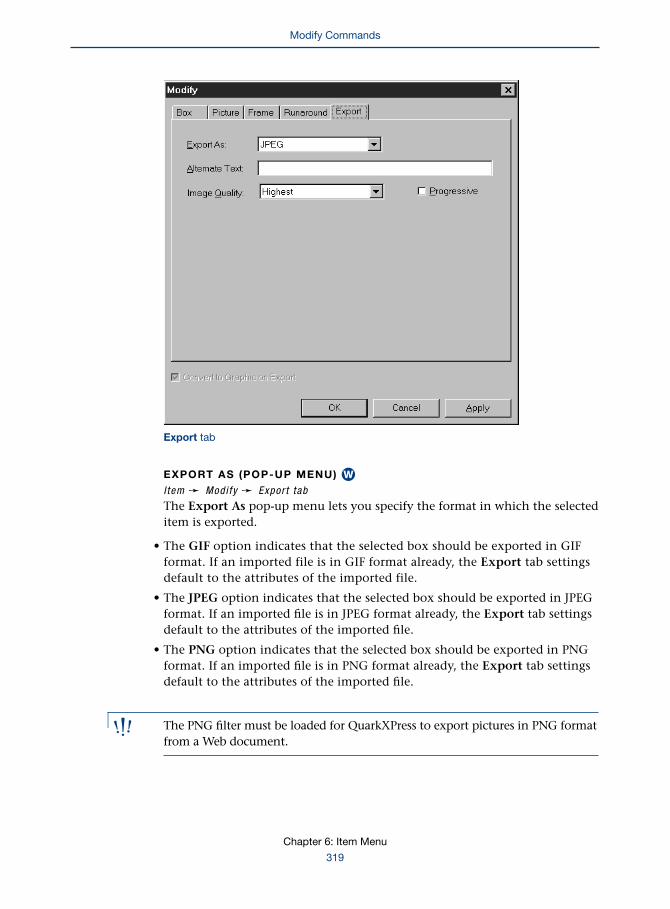
Export tab
EXPORT AS (POP-UP MENU) WI tem & Modi fy & Expor t tab
The Export As pop-up menu lets you specify the format in which the selecteditem is exported.
• The GIF option indicates that the selected box should be exported in GIFformat. If an imported file is in GIF format already, the Export tab settingsdefault to the attributes of the imported file.
• The JPEG option indicates that the selected box should be exported in JPEGformat. If an imported file is in JPEG format already, the Export tab settingsdefault to the attributes of the imported file.
• The PNG option indicates that the selected box should be exported in PNGformat. If an imported file is in PNG format already, the Export tab settingsdefault to the attributes of the imported file.
∫ The PNG filter must be loaded for QuarkXPress to export pictures in PNG formatfrom a Web document.
Chapter 6: Item Menu
319
Modify Commands

ALTERNATE TEXT (FIELD) WI tem & Modi fy & Expor t tab
Windows only: Text in the Alternate Text field will display as a pop-up windowwhen the pointer is moved over the picture. Mac OS and Windows: If the picturescannot be downloaded, the alternate text displays in its place; however, thisbehavior may vary with different browsers or browser versions.
IMAGE QUALITY (POP-UP MENU) WI tem & Modi fy & Expor t tab & Expor t As JPEG
The Image Quality pop-up menu lets you specify the level of quality for theexported picture. The higher the image quality is, the larger the picture filewill be; the lower the image quality is, the smaller the picture file will be.
PROGRESSIVE (CHECK BOX) WI tem & Modi fy & Expor t tab & Expor t As JPEG
The Progressive check box lets you specify that when the exported picture isviewed in a Web browser, it will display quickly in low resolution, with thedetails filling in gradually.
Options for JPEG export format: Alternate Text field, Image Quality pop-up menu, andProgressive check box
USE DITHERING (CHECK BOX) WI tem & Modi fy & Expor t tab & Expor t As G IF
The Use Dithering check box lets you specify that the exported picture shouldsimulate a wider range of colors by dithering, which smooths the edges betweendifferent colors.
∫ Dithered picture files are generally larger than nondithered picture files.
Chapter 6: Item Menu
320
Modify Commands

PALETTE (POP-UP MENU) WI tem & Modi fy & Expor t tab & Expor t As G IF
The Palette pop-up menu lets you choose which color palette to use withthe exported GIF file:
• The Web-safe option will create a picture that displays colors identically onboth Mac OS and Windows Web browsers.
• The Adaptive option will create a picture with high color fidelity, but thatpicture will display properly only if the monitor it is viewed on supports16-bit color or higher.
• The Windows option will create a picture optimized for the Windows colorpalette. Use this option if only Windows users will be viewing the picture.
• The Mac OS option will create a picture optimized for the Mac OS color palette.Use this option if only Mac OS users will be viewing the picture.
USE INTERLACING (CHECK BOX) WI tem & Modi fy & Expor t tab & Expor t As G IF
The Use Interlacing check box lets you specify that when the exported pictureis viewed in a Web browser, it will display quickly in low resolution, with thedetails filling in gradually.
Options for GIF export format: Alternate Text field, Use Dithering check box, Palette pop-upmenu, and Use Interlacing check box.
TRUE COLOR (RADIO BUTTON) WI tem & Modi fy & Expor t tab & Expor t As PNG
The True color radio button lets you specify that the exported PNG shoulduse 24-bit color.
INDEXED COLOR (RADIO BUTTON) WI tem & Modi fy & Expor t tab & Expor t As PNG
The Indexed color radio button lets you specify that the exported pictureshould used indexed color. Pixels in indexed color pictures are assigned an indexnumber, which is compared to a look-up table in the application reading theimage. The values in the look-up table are then used to display the color.
Chapter 6: Item Menu
321
Modify Commands

USE DITHERING (CHECK BOX) WI tem & Modi fy & Expor t tab & Expor t As PNG & Indexed Color se lected
When Indexed color is selected, the Use Dithering check box is available. UseDithering lets you specify that the edges between different colors are smoothed(for a less pixelated appearance).
PALETTE (POP-UP MENU) WI tem & Modi fy & Expor t tab & Expor t As PNG & Indexed co lor se lected
The Palette pop-up menu is available when Indexed color is selected. ThePalette pop-up menu lets you choose which color palette to use with theexported PNG file:
• The Web-safe option will create a graphic that displays colors identically onboth Mac OS and Windows Web browsers.
• The Adaptive option will create a graphic with high color fidelity, but thatgraphic will display properly only if the monitor it is viewed on supports 16-bitcolor or higher.
• The Windows option will create a graphic optimized for the Windows colorpalette. Use this option if only Windows users will be viewing the graphic.
• The Mac OS option will create a graphic optimized for the Mac OS color palette.Use this option if only Mac OS users will be viewing the graphic.
USE INTERLACING (CHECK BOX) WI tem & Modi fy & Expor t tab & Expor t As PNG
The Use Interlacing check box lets you specify that when the exported pictureis viewed in a Web browser, it will display quickly in low resolution, with thedetails filling in gradually.
Options for PNG export format: Alternate Text field, True Color and Indexed Color radiobuttons, Use Dithering check box, Palette pop-up menu, and Use Interlacing check box
Chapter 6: Item Menu
322
Modify Commands

FORM (DIALOG BOX TAB) FOR FORM BOXES WI tem & Modi fy & Form tab wi th form box se lected
When a form box is selected, this version of the Modify dialog box Formtab is available. The controls in this tab let you control the attributes ofthe selected form.
Form tab with form box selected
• The Name field lets you specify the name of the selected form.
• The Type field displays Form Box.
• The Method pop-up menu lets you choose whether the form is submitted aspart of a URL (Get) or separately from the URL (Post).
• The Action field lets you specify the URL to which the form should be submitted.
• The Encoding pop-up menu lets you choose the encryption to be used withthe form. The options are urlencoded, form-data, and plain.
• The Target pop-up menu lets you choose a target frame for the server reply.The options are None, Blank, Self, Parent, and Top.
Chapter 6: Item Menu
323
Modify Commands

FORM VALIDATION (AREA) WI tem & Modi fy & Form tab
The Form Validation area in the Form tab of the Modify dialog box (Item &Modify) lets you specify what happens if a reader tries to submit a formwithout entering information in a required field.
• Choose Error Page to specify that a different HTML page should display; enterthe URL of the page, or click Select (Mac OS) or Browse (Windows) to locatethe page file manually.
• Choose Dialog Message to specify that an alert should be displayed; enter analert message in the text box. To include the name of the first empty requiredfield in the alert, use <missing field>. When the alert displays, this tag will bereplaced with the names of the empty required fields.
To configure forms, see Chapter 22, “Forms,” in A Guide to QuarkXPress:Using QuarkXPress.
å If you’re not sure which settings to use in the Form tab, contact your Webmaster.
FORM (DIALOG BOX TAB) FOR TEXT FIELD FORM CONTROLS WI tem & Modi fy & Form tab wi th text f ie ld form contro l se lected
When a text field form control is selected, this version of the Modify dialog boxForm tab is available. The controls in this tab let you control the attributes ofthe selected form control.
Form tab with text field form control selected
Chapter 6: Item Menu
324
Modify Commands

• The Name field lets you specify the name of the selected text field form control.
• The Type pop-up menu lets you specify which type of text field controlthe selected item is. The options are Text - Single Line, Text - Multi-Line,Password, and Hidden Field.
• The Max Chars field lets you specify the maximum number of characters thatmay be entered in the text field control. This field is not available when HiddenField is chosen in the Type pop-up menu.
• The Wrap Text check box lets you specify whether text wraps automatically inthe text field control. This check box is available only when Text - Multi-Line ischosen in the Type pop-up menu.
• The Read-Only check box lets you specify whether users can enter text in thetext field control. This check box is not available when Hidden Field is chosenin the Type pop-up menu.
• The Required check box lets you specify whether a user must enter a value inthis text field control in order to submit the form. This check box is unavailableif the Read-Only check box is checked. This check box is unavailable whenHidden Field is chosen.
å If you’re not sure which settings to use in the Form tab, contact your Webmaster.
FORM (DIALOG BOX TAB) FOR BUTTON CONTROLS WI tem & Modi fy & Form tab wi th but ton contro l se lected
When a button form control is selected, this version of the Modify dialog boxForm tab is available. The controls in this tab let you control the attributes ofthe selected form control.
Form tab with button control selected
Chapter 6: Item Menu
325
Modify Commands

• The Name field lets you specify the name of the selected form control.
• The Type pop-up menu should be set to Submit for submit button formcontrols or to Reset for reset button form controls.
å If you’re not sure which settings to use in the Form tab, contact your Webmaster.
FORM (DIALOG BOX TAB) FOR MENU FORM CONTROLS WI tem & Modi fy & Form tab wi th menu form contro l se lected
When a menu form control is selected, this version of the Modify dialog boxForm tab is available. The controls in this tab let you control the attributes ofthe selected form control.
Form tab with menu form control selected
• The Name field lets you specify the name of the selected form control.
• The Type pop-up menu lets you choose between a Pop-Up Menu form controland a List form control.
• The Menu pop-up menu lets you choose the list of items to be included in themenu control. The New button next to this field displays the Edit Menu dialogbox, which lets you create lists of items.
• The Allow Multiple Selections check box (available only for list controls)lets you specify whether users can select more than one item at a time inthe list control.
• The Required check box lets you specify whether a user must choose an optionfrom the menu control before they submit the form.
Chapter 6: Item Menu
326
Modify Commands

å If you’re not sure which settings to use in the Form tab, contact your Webmaster.
FORM (DIALOG BOX TAB) FOR CHECK BOX FORM CONTROLS WI tem & Modi fy & Form tab wi th check box form contro l se lected
When a check box form control is selected, this version of the Modify dialogbox Form tab is available. The controls in this tab let you control the attributesof the selected form control.
Form tab with check box form control selected
• The Name field lets you specify the name of the selected check box form control.
• The Type pop-up menu should be set to Check box for check box form controls.
• The Value field lets you specify the value that is submitted for the check boxform control if this particular check box control is selected.
• The Initially Checked check box lets you specify whether the check box isinitially checked when the form displays in a Web browser.
• The Required check box lets you specify whether a user must check this box inorder to submit the form.
å If you’re not sure which settings to use in the Form tab, contact your Webmaster.
Chapter 6: Item Menu
327
Modify Commands

FORM (DIALOG BOX TAB) FOR RADIO BUTTON FORM CONTROLS WI tem & Modi fy & Form tab wi th rad io but ton form contro l se lected
When a radio button form control is selected, this version of the Modify dialogbox Form tab is available. The controls in this tab let you control the attributesof the selected form control.
Form tab with radio button form control selected
• The Group field lets you specify the name of the group that the selectedradio button form control belongs to.
• The Type pop-up menu should be set to Radio button for radio buttonform controls.
• The Value field lets you specify the value that is submitted for the radio buttonform control group if this particular radio button control is selected.
• The Use as Default check box lets you specify that the selected radio buttonform control should be initially selected when the form displays in a Webbrowser. Checking this box for a radio button control unchecks it for all otherradio button controls in the group (that is, all radio button controls with thesame name).
• The Required check box lets you specify whether a user must check one ofthe radio buttons with this name in order to submit the form. Checking thisbox for a radio button control checks it for all other radio button controls inthe group (that is, all radio buttons with the same name).
å If you’re not sure which settings to use in the Form tab, contact your Webmaster.
Chapter 6: Item Menu
328
Modify Commands
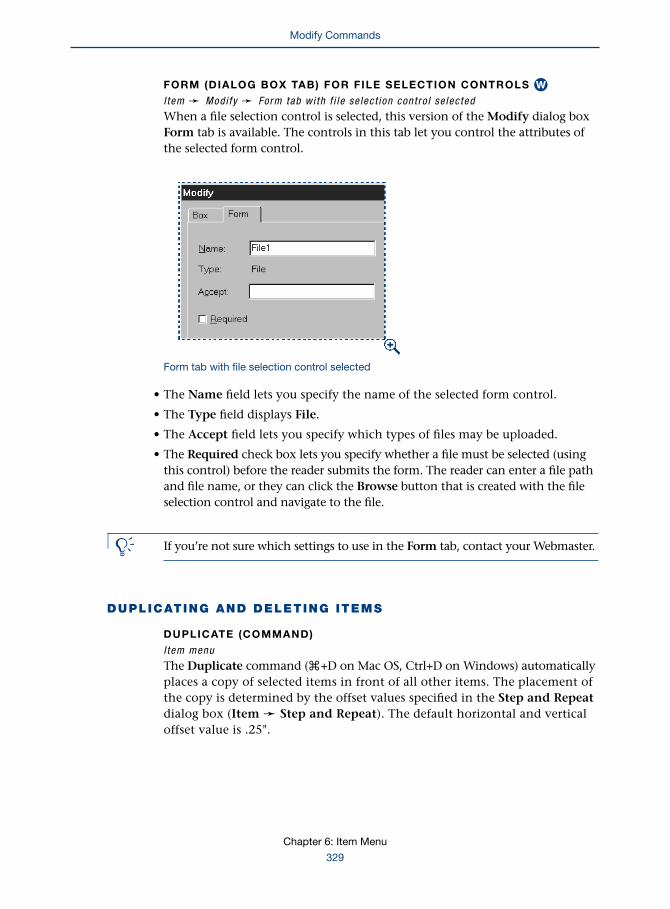
FORM (DIALOG BOX TAB) FOR FILE SELECTION CONTROLS WI tem & Modi fy & Form tab wi th f i le se lect ion contro l se lected
When a file selection control is selected, this version of the Modify dialog boxForm tab is available. The controls in this tab let you control the attributes ofthe selected form control.
Form tab with file selection control selected
• The Name field lets you specify the name of the selected form control.
• The Type field displays File.
• The Accept field lets you specify which types of files may be uploaded.
• The Required check box lets you specify whether a file must be selected (usingthis control) before the reader submits the form. The reader can enter a file pathand file name, or they can click the Browse button that is created with the fileselection control and navigate to the file.
å If you’re not sure which settings to use in the Form tab, contact your Webmaster.
DUPLICATING AND DELETING ITEMS
DUPLICATE (COMMAND)
I tem menu
The Duplicate command (C+D on Mac OS, Ctrl+D on Windows) automaticallyplaces a copy of selected items in front of all other items. The placement ofthe copy is determined by the offset values specified in the Step and Repeatdialog box (Item & Step and Repeat). The default horizontal and verticaloffset value is .25".
Chapter 6: Item Menu
329
Modify Commands

When you duplicate boxes, their contents are duplicated as well. Duplicating alinked text box duplicates the selected box, the text contained by the selectedbox, plus any succeeding text in the text chain. An overflow symbol t dis-plays in the duplicated text box to represent the additional text in the chain.
∫ The Duplicate feature cannot place a copy outside an original item’s constrain-ing box or the pasteboard.
STEP AND REPEAT (COMMAND)
I tem menu
The Step and Repeat command (C+Option+D on Mac OS, Ctrl+Alt+D onWindows) displays the Step and Repeat dialog box, which lets you create mul-tiple copies of selected items and specify where QuarkXPress places the copies.
When you use the Step and Repeat feature with boxes, their contents areduplicated as well. Duplicating a linked text box duplicates the selected box,the text contained by the selected box, plus any succeeding text in the textchain. An overflow symbol t is displayed in the duplicated text box to repre-sent the additional text in the chain.
∫ The Step and Repeat feature cannot place a copy outside an original item’sconstraining box or the pasteboard.
STEP AND REPEAT (DIALOG BOX)
I tem menu
The Step and Repeat dialog box lets you enter values in the Repeat Count, Ver-tical Offset, and Horizontal Offset fields to place duplicates of selected items.
• The Repeat Count field lets you specify the number of duplicates you wantmade of the original item.
RANGE MEASUREMENT SYSTEM SMALLEST INCREMENT
1 to 99 integers 1
• The Horizontal Offset and Vertical Offset fields let you specify where copies areplaced (relative to the original). A positive horizontal value places copies to theright of the original; a negative horizontal value places copies to the left of theoriginal. A positive vertical value places copies below the original; a negative ver-tical value places copies above the original. The values entered in the Step andRepeat dialog box become the default Step and Repeat offset values, as well asthe offset values used by the Duplicate feature, until you quit QuarkXPress.
RANGE MEASUREMENT SYSTEM SMALLEST INCREMENT
±24" various (", pt, cm, etc.) .001
Chapter 6: Item Menu
330
Duplicating and Deleting Items
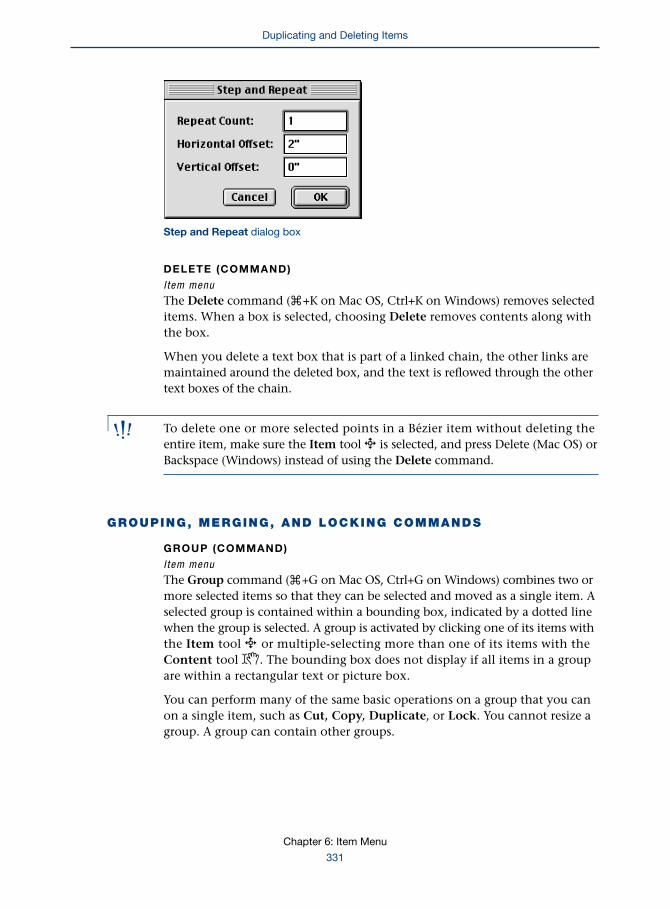
Step and Repeat dialog box
DELETE (COMMAND)
I tem menu
The Delete command (C+K on Mac OS, Ctrl+K on Windows) removes selecteditems. When a box is selected, choosing Delete removes contents along withthe box.
When you delete a text box that is part of a linked chain, the other links aremaintained around the deleted box, and the text is reflowed through the othertext boxes of the chain.
∫ To delete one or more selected points in a Bézier item without deleting theentire item, make sure the Item tool e is selected, and press Delete (Mac OS) orBackspace (Windows) instead of using the Delete command.
GROUPING, MERGING, AND LOCKING COMMANDS
GROUP (COMMAND)
I tem menu
The Group command (C+G on Mac OS, Ctrl+G on Windows) combines two ormore selected items so that they can be selected and moved as a single item. Aselected group is contained within a bounding box, indicated by a dotted linewhen the group is selected. A group is activated by clicking one of its items withthe Item tool e or multiple-selecting more than one of its items with theContent tool E. The bounding box does not display if all items in a groupare within a rectangular text or picture box.
You can perform many of the same basic operations on a group that you canon a single item, such as Cut, Copy, Duplicate, or Lock. You cannot resize agroup. A group can contain other groups.
Chapter 6: Item Menu
331
Duplicating and Deleting Items

∫ When the Content tool E is selected, you can move and resize individualitems within a group. You move items within a group by pressing C (Mac OS)or Ctrl (Windows) while clicking and dragging.
UNGROUP (COMMAND)
I tem menu
The Ungroup command (C+U on Mac OS, Ctrl+U on Windows) dissociatesgrouped items. The Ungroup command is available when a group is selected.A group is activated by clicking one of its items with the Item tool e or bymultiple-selecting more than one of its items with the Content tool E.
When a selected group contains other groups, choosing Ungroup ungroupsonly the most recently established group.
CONSTRAIN/UNCONSTRAIN (COMMAND)
I tem menu
The Constrain command changes a selected group to a constrained group.Items in a constrained group are contained within a constraining box. Itemswithin a constraining box are referred to as “constrained items;” these itemscannot be moved or resized beyond their constraining box. The Constraincommand is available when the back item of a selected group has box bordersthat encompass all the other items in the group.
You can perform most of the same operations on a constrained group that youcan on a group. When the Content tool E is selected, you can move and resizeindividual items within a constrained group. You can move individual itemsby pressing C (Mac OS) or Ctrl (Windows) while clicking and dragging. Youcannot reduce the size of a constraining box so that it can no longer containits constrained items. You also cannot move or resize constrained items beyondtheir constraining box.
When a constrained group is selected, the Unconstrain command is avail-able and replaces the Constrain command in the Item menu. ChoosingUnconstrain removes the constraining relationship among grouped items.
LOCK/UNLOCK (COMMAND)
I tem menu
The Lock command (F6) prevents you from moving, resizing, reshaping, orrotating items with the pointer. The Lock command is available when unlockeditems are selected. You can still move and modify locked items using the Modifydialog box (Item & Modify) or the Measurements palette.
When you move a pointer over a selected, locked item’s resize handles,Bézier points, Bézier segments, or picture contents, the pointer changes tothe Padlock pointer y. The Padlock pointer also displays when you move the
Chapter 6: Item Menu
332
Grouping, Merging, and Locking Commands

Mover pointer e or the Rotation pointer : over any selected locked item.When locked items are selected, the Unlock command is available andreplaces the Lock command in the Item menu.
MERGE (SUBMENU)
I tem menu
The Merge submenu is available when more than one item is selected. Thecommands in the Merge submenu allow you to create complex Bézier shapesmore efficiently than drawing them. The new box replaces the items originallyselected. The shape of the new box is synthesized in various ways from theoriginal item shapes.
Merge submenu
The original items selected may include lines mixed with boxes. Some of theMerge commands require overlap among selected objects. In most cases,the only contents or attributes preserved (such as text, pictures, or back-ground colors) are those of the back item in the stack.
• The Intersection command retains any areas that overlap the shape in back, butcuts out the rest. Choosing Intersection creates one box.
• The Union command combines all the selected item shapes into one shape,retaining all overlapped and nonoverlapped areas. Items need not overlap forthis command to be effective. Any shapes that do not overlap will appear to beseparate boxes, but they are all part of the same box and behave accordingly.
• The Difference command removes all the item shapes except for the item shapeat the back of the stack. Any overlapping areas are cut out. The Difference com-mand is useful for punching holes in an existing item shape, or for deleting orcropping parts of a Bézier illustration. Choosing Difference results in one box.
• The Reverse Difference command deletes all the back items from a group ofstacked item shapes, but retains any items at the very front of the stack, result-ing in one box. Any overlapping areas are cut out. Choosing Reverse Differenceresults in one box.
Chapter 6: Item Menu
333
Grouping, Merging, and Locking Commands

• The Exclusive Or command retains all the item shapes but cuts out any areasthat overlap. If you edit the points surrounding the cut-out area, you will noticethat there are two corner points at every location where two lines originallycrossed. Choosing Exclusive Or may result in several boxes.
• The Combine command is similar to the Exclusive Or command in that itkeeps all selected item shapes and any areas that overlap are cut out; however,no corner points are added anywhere that two lines cross. Choosing Combinemay result in several boxes.
• The Join Endpoints command is unique among Merge commands because itcreates a Bézier line instead of a Bézier box. The Join Endpoints command isavailable only when two lines or text paths are selected. An end-point from oneselected line must overlap an end-point from the other selected line. (End-pointscan also be joined if the distance between them is equal to or less than the SnapDistance specified in the General pane of the Preferences dialog box.) Mid-points cannot be joined. The Join Endpoints feature creates a single Béziercorner point to replace the two overlapping end-points. Choosing JoinEndpoints creates a single Bézier line or text path.
∫ The Join Endpoints feature works best when the two end-points are perfectlyoverlapped. This is easily accomplished by snapping both points to a horizontaland vertical guide pair. If the overlapping points are not perfectly equal inposition, QuarkXPress will still join them, but must interpolate the distancebetween their positions.
å To merge items and to see examples of merged items, see “Merging andSplitting Boxes” in Chapter 4, “Box Basics,” in A Guide to QuarkXPress:Using QuarkXPress.
SPLIT (SUBMENU)
I tem menu
The Split submenu is available only when the selected item is a single boxthat contains more than one closed path or consists of a closed path thatcrosses over itself (for example, a figure eight). The commands in the Splitsubmenu let you break paths in a multiple-path box into two or more boxes.Both of the commands in the Split submenu produce multiple Bézier boxes.The new boxes replace the box that was originally selected. The contents orattributes of the original box (such as text, pictures, or background colors)are reproduced for all the resulting boxes.
• The Outside Paths command splits a box that consists of two or more closedpaths that are separated in space, but does not split closed paths containedwithin these paths. For example, if you choose Outside Paths when a boxshaped like a bagel near an apple is selected, two boxes result — one for the
Chapter 6: Item Menu
334
Grouping, Merging, and Locking Commands

bagel and one for the apple. No box is created for the hole in the bagel. TheOutside Paths feature also works on paths that cross over themselves. A figureeight shape, for example, is split into two boxes.
• The All Paths command splits all closed paths in the selected item, includingpaths contained within other paths. The All Paths feature splits a box shapedlike two bagels into four boxes — two boxes representing the outsides of thebagels, and two boxes representing the holes in the bagels. The All Paths featurealso works on paths that cross over themselves. A figure eight shape, forexample, is split into two boxes.
Split submenu
STACKING ORDER COMMANDS
SEND TO BACK (COMMAND)
I tem menu
The Send to Back command reorders the stacking of items by placing selecteditems at the back of the stack. The Send to Back command is available whenselected items are not at the back of the stack. The stacking order of items affectsthe following:
• Stacking is initially determined by the order in which items are created.The most recently created item is placed in front of previous items.
• Boxes with background colors applied to them always obscure text, pictures, anditems that are behind them. To make a box’s background transparent (so thatitems behind it are visible), apply a box background color of None (Item &Modify & Box tab). The picture or text contents of a box with a backgroundof None may be opaque, but the box background itself will be transparent.
• If the the overlapping items have a runaround type other than None, itemsstacked in front of a box containing text will cause text to reflow.
• A constraining box must remain behind the boxes it constrains. If you chooseSend to Back for a constrained item, it will be placed immediately in front ofits constraining box and behind all other constrained items.
Chapter 6: Item Menu
335
Grouping, Merging, and Locking Commands
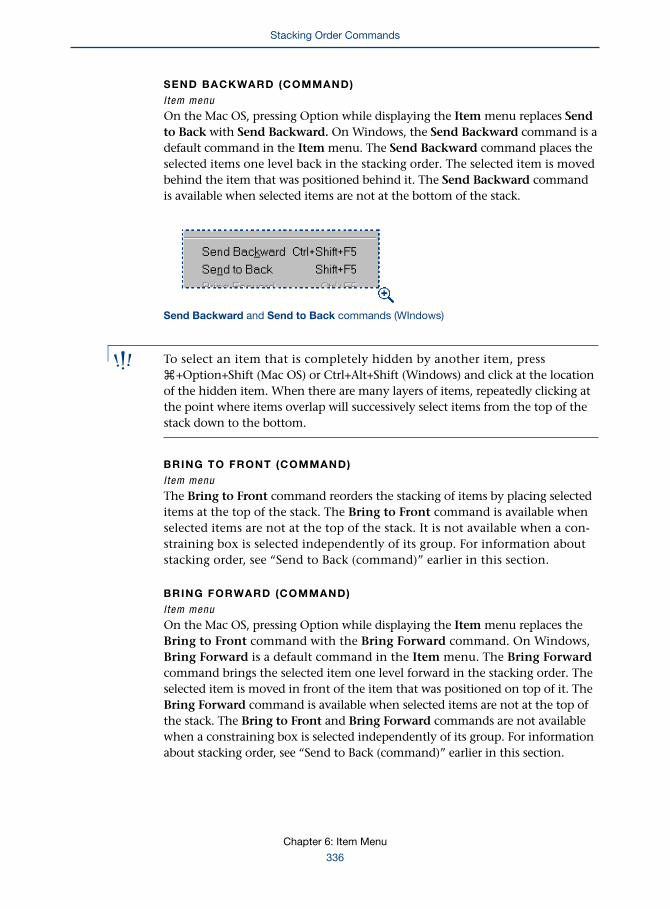
SEND BACKWARD (COMMAND)
I tem menu
On the Mac OS, pressing Option while displaying the Item menu replaces Sendto Back with Send Backward. On Windows, the Send Backward command is adefault command in the Item menu. The Send Backward command places theselected items one level back in the stacking order. The selected item is movedbehind the item that was positioned behind it. The Send Backward commandis available when selected items are not at the bottom of the stack.
Send Backward and Send to Back commands (WIndows)
∫ To select an item that is completely hidden by another item, pressC+Option+Shift (Mac OS) or Ctrl+Alt+Shift (Windows) and click at the locationof the hidden item. When there are many layers of items, repeatedly clicking atthe point where items overlap will successively select items from the top of thestack down to the bottom.
BRING TO FRONT (COMMAND)
I tem menu
The Bring to Front command reorders the stacking of items by placing selecteditems at the top of the stack. The Bring to Front command is available whenselected items are not at the top of the stack. It is not available when a con-straining box is selected independently of its group. For information aboutstacking order, see “Send to Back (command)” earlier in this section.
BRING FORWARD (COMMAND)
I tem menu
On the Mac OS, pressing Option while displaying the Item menu replaces theBring to Front command with the Bring Forward command. On Windows,Bring Forward is a default command in the Item menu. The Bring Forwardcommand brings the selected item one level forward in the stacking order. Theselected item is moved in front of the item that was positioned on top of it. TheBring Forward command is available when selected items are not at the top ofthe stack. The Bring to Front and Bring Forward commands are not availablewhen a constraining box is selected independently of its group. For informationabout stacking order, see “Send to Back (command)” earlier in this section.
Chapter 6: Item Menu
336
Stacking Order Commands

Bring Forward and Bring to Front commands (Windows)
∫ In a document with layers, the layers themselves are in a particular stackingorder; within each layer, each item has its own relationship to the stackingorder. When you use the Send to Back, Send Backward, Bring to Front, andBring Forward commands (Item menu), the stacking order of the items isaltered within the layer. The Send and Bring commands do not move items todifferent layers. To rearrange the stacking order of layers or of items on layers,see Chapter 15, “Layers,” in A Guide to QuarkXPress: Using QuarkXPress.
Form controls always reside on the bottom layer, so if you select a form control,the Send to Back, Send Backward, Bring to Front and Bring Forwardcommands will be unavailable. W
SPACE/ALIGN (COMMAND)
I tem menu
The Space/Align command (C+, (comma) on Mac OS, Ctrl+, (comma) onWindows) displays the Space/Align dialog box, which lets you control theamount of horizontal or vertical space between multiple-selected items. TheSpace/Align command is available when two or more items are selected.
SPACE/ALIGN ITEMS (DIALOG BOX)
I tem & Space/A l ign
The Space/Align Items dialog box consists of the Horizontal and Verticalareas. To enable the controls in either area, check Horizontal or Vertical.You can specify horizontal spacing and alignment alone, vertical spacingand alignment alone, or a combination of the two.
Space/Align Items dialog box
Chapter 6: Item Menu
337
Stacking Order Commands

HORIZONTAL (AREA)
I tem & Space/A l ign
The Horizontal check box lets you control horizontal spacing and alignmentamong the selected items. Checking Horizontal enables the Space, DistributeEvenly, and Between controls in the Horizontal area.
The horizontal space between selected items can be controlled three ways: Youcan specify an absolute amount of space between items; you can specify a per-centage of the space currently between items; or you can distribute space evenlybetween items. By choosing an option from the Between pop-up menu, you canspecify whether QuarkXPress measures the space from the center or from theedge of an item.
Horizontal area
SPACE (RADIO BUTTON)
I tem & Space/A l ign & Hor izonta l checked
When you click Space and enter a value in the Space field in the Horizontalarea, QuarkXPress spaces items relative to the left selected item, which does notmove. The left item is defined as the item with a left bounding box edge (or lineportion including line width and text on a path) that extends closest to the leftside of the pasteboard. If two or more items have the same left edge position,QuarkXPress spaces selected items with respect to the item closest to the top ofthe pasteboard.
• To specify an absolute amount of horizontal space between selected items, entera value from 0 to 10" in the Space field.
RANGE MEASUREMENT SYSTEM SMALLEST INCREMENT
0 to 10" various (", pt, cm, etc.) .001
Chapter 6: Item Menu
338
Stacking Order Commands

• To position selected items according to a percentage of their current horizontalspacing relative to one another, enter a value from 0 to 1,000%. For example, forselected items horizontally spaced 2" apart from center to center, a value of 50%reduces space between centers to 1".
RANGE MEASUREMENT SYSTEM SMALLEST INCREMENT
0 to 1,000% percent .1
DISTRIBUTE EVENLY (RADIO BUTTON)
I tem & Space/A l ign & Hor izonta l checked
To place an equal amount of horizontal space between selected items, clickDistribute Evenly. The Distribute Evenly option is available when three ormore items are selected. When you specify Distribute Evenly, the left andright items do not move. Only items between move. Values entered in theSpace field are ignored when you click Distribute Evenly.
BETWEEN (POP-UP MENU)
I tem & Space/A l ign & Hor izonta l checked
The Between pop-up menu displays four methods for horizontally aligningselected items: Items, Left Edges, Centers, and Right Edges. The method youchoose from the Between pop-up menu determines how QuarkXPress imple-ments the value or percentage you enter in the Space field, or how horizontalspace is distributed evenly.
When horizontally spacing and aligning a rectangular box, QuarkXPressmeasures from the sides of the box. When spacing and aligning a group oran item that is not rectangular, such as an oval or a Bézier box, QuarkXPressmeasures from the group’s or the item’s bounding box. When spacing andaligning a line, QuarkXPress considers all parts of the line, including itswidth and text on a path.
• Choosing Items places the amount of space or percentage entered in the Spacefield between the right edge of one selected item and the left edge of the itemto the right of it, and so on.
• Choosing Left Edges places the amount of space or percentage entered in theSpace field between the left edges of selected items.
• Choosing Centers places the amount of space or percentage entered in theSpace field between the centers of selected items.
• Choosing Right Edges places the amount of space or percentage entered in theSpace field between the right edges of selected items.
Chapter 6: Item Menu
339
Stacking Order Commands
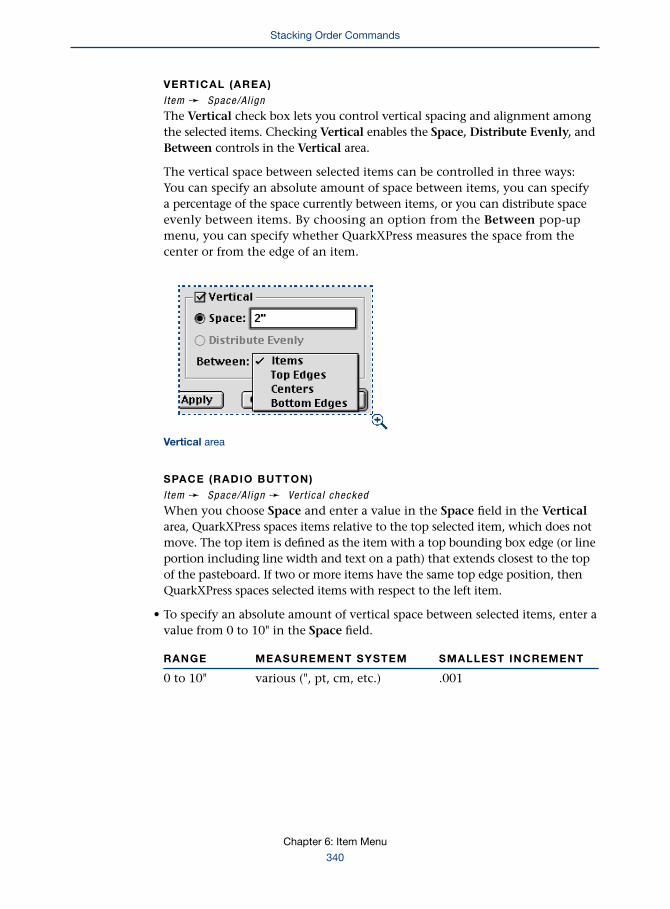
VERTICAL (AREA)
I tem & Space/A l ign
The Vertical check box lets you control vertical spacing and alignment amongthe selected items. Checking Vertical enables the Space, Distribute Evenly, andBetween controls in the Vertical area.
The vertical space between selected items can be controlled in three ways:You can specify an absolute amount of space between items, you can specifya percentage of the space currently between items, or you can distribute spaceevenly between items. By choosing an option from the Between pop-upmenu, you can specify whether QuarkXPress measures the space from thecenter or from the edge of an item.
Vertical area
SPACE (RADIO BUTTON)
I tem & Space/A l ign & Ver t ica l checked
When you choose Space and enter a value in the Space field in the Verticalarea, QuarkXPress spaces items relative to the top selected item, which does notmove. The top item is defined as the item with a top bounding box edge (or lineportion including line width and text on a path) that extends closest to the topof the pasteboard. If two or more items have the same top edge position, thenQuarkXPress spaces selected items with respect to the left item.
• To specify an absolute amount of vertical space between selected items, enter avalue from 0 to 10" in the Space field.
RANGE MEASUREMENT SYSTEM SMALLEST INCREMENT
0 to 10" various (", pt, cm, etc.) .001
Chapter 6: Item Menu
340
Stacking Order Commands

• To position selected items according to a percentage of their current verticalspacing relative to one another, enter a value from 0 to 1,000% in the Spacefield. For example, for selected items vertically spaced 2" from center to center,a value of 50% reduces space between centers to 1".
RANGE MEASUREMENT SYSTEM SMALLEST INCREMENT
0 to 1,000% percent .1
DISTRIBUTE EVENLY (RADIO BUTTON)
I tem & Space/A l ign & Ver t ica l checked
To place an equal amount of vertical space between selected items, click Distrib-ute Evenly. The Distribute Evenly option is available when three or more itemsare selected. When you specify Distribute Evenly, the upper and lower itemsdo not move. Values you enter in the Space field are ignored when you clickDistribute Evenly.
BETWEEN (POP-UP MENU)
I tem & Space/A l ign & Ver t ica l checked
The Between pop-up menu displays four methods for vertically aligningselected items: Items, Top Edges, Centers, and Bottom Edges. The methodyou choose from the Between pop-up menu determines how QuarkXPressimplements the value or percentage you enter in the Space field, or howspace is distributed evenly.
When vertically spacing and aligning a rectangular box, QuarkXPress measuresfrom the top and bottom of the box. When spacing and aligning a group or anitem that is not rectangular, such as an oval or a Bézier box, QuarkXPress meas-ures from the bounding box. When spacing and aligning a line, QuarkXPressconsiders all parts of the line, including its width.
• Choosing Items places the amount of space or percentage entered in the Spacefield between the bottom edge of one selected item and the top edge of the itembeneath it, and so on.
• Choosing Top Edges places the amount of space or percentage entered in theSpace field between the top edges of selected items.
• Choosing Centers places the amount of space or percentage entered in theSpace field between the centers of selected items.
• Choosing Bottom Edges places the amount of space or percentage enteredin the Space field between the bottom edges of selected items.
Chapter 6: Item Menu
341
Stacking Order Commands

SHAPE, CONTENT, EDIT COMMANDS
SHAPE (SUBMENU)
I tem menu
The Shape submenu lets you change the shape type of a selected item. Forexample, you can change a circle into a square or vice versa. You can alsochange the type of item. For instance, lines can be changed into boxes or boxesinto lines. Two of the options in the Shape submenu (® and †) are arbitraryshapes that allow free-form Bézier editing. The Shape submenu is not availablefor multiple-selected items.
• Choosing # changes the selected item into a rectangular box that cannotbe edited using Bézier points.
• Choosing ! changes the selected item into a rounded-corner box that cannotbe edited using Bézier points.
• Choosing ıchanges the selected item into a concave-corner box that cannotbe edited using Bézier points.
• Choosing ∏ changes the selected item into a beveled-corner box that cannotbe edited using Bézier points.
• Choosing @ changes the selected item into an elliptical box that cannot beedited using Bézier points.
• Choosing ® does not visibly change the shape, but does allow interactive Bézierediting whenever Item & Edit & Shape is checked. If you choose the Bézierbox ® option when a line is selected, QuarkXPress traces around the actual linewidth (along with any arrowhead and dash pattern applied to the line) to con-vert the line into an elongated Bézier box. However, if the line is a Bézier line, itmay be preferable to make this transformation by simply joining or connectingthe end-points of the line without tracing around its width. To join or connectthe end-points of a Bézier line to form a Bézier box, press Option (Mac OS) or Alt(Windows) while choosing the Bézier box ® option. If the end-points sit on top(or almost on top) of each other, they are joined into one point. Otherwise, anew line segment is added that connects the two end-points.
• Choosing œ changes the selected item into a straight line (of any angle) thatcannot be edited using Bézier points.
• Choosing ß changes the selected item into a straight line that is only horizontalor vertical, and cannot be edited using Bézier points.
• Choosing † changes the selected item shape into a Bézier line based onthe original box or line shape, and allows interactive Bézier editing wheneverItem & Edit & Shape is checked. If the original shape is a multiple-path box,only one of the paths in the box will be retained when you convert to a line.
∫ A Bézier line † in QuarkXPress is a single open path. If you want an item toinclude closed paths or multiple paths, you must work with Bézier box ® items.
Chapter 6: Item Menu
342
Shape, Content, Edit Commands
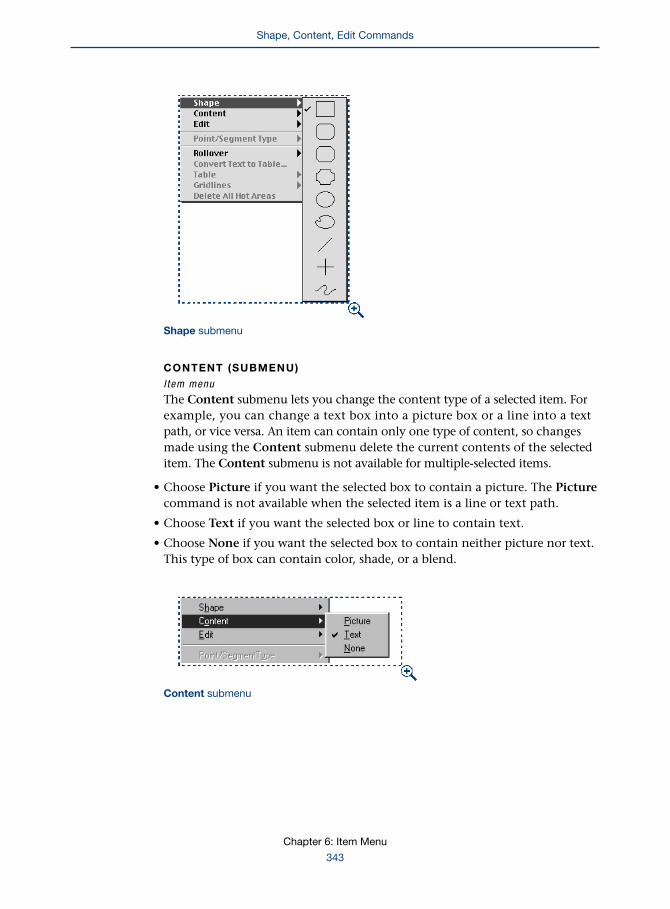
Shape submenu
CONTENT (SUBMENU)
I tem menu
The Content submenu lets you change the content type of a selected item. Forexample, you can change a text box into a picture box or a line into a textpath, or vice versa. An item can contain only one type of content, so changesmade using the Content submenu delete the current contents of the selecteditem. The Content submenu is not available for multiple-selected items.
• Choose Picture if you want the selected box to contain a picture. The Picturecommand is not available when the selected item is a line or text path.
• Choose Text if you want the selected box or line to contain text.
• Choose None if you want the selected box to contain neither picture nor text.This type of box can contain color, shade, or a blend.
Content submenu
Chapter 6: Item Menu
343
Shape, Content, Edit Commands

EDIT (SUBMENU)
I tem menu
The Edit submenu is available when the selected item is a Bézier item or an itemthat contains an editable clipping path or runaround path. The options in theEdit submenu let you choose which aspect of the selected item you can access.The Edit submenu is not available for multiple-selected items.
• When none of the items in the Edit submenu are checked, only the boundingbox of the selected item is accessible. You can resize or move it, but you cannotreshape it.
• When Shape is checked (Shift+F4 on Mac OS, F10 on Windows), the boundingbox of the item is inaccessible. Instead, you have access to the individual Bézierpoints that define the item’s shape. The Shape command is available onlyfor selected Bézier items. To change a box into a Bézier box, choose Item &Shape & ®. To change a line or text path into a Bézier line or text path,choose Item & Shape & †.
∫ When Shape is checked, you can still move a Bézier line without reshaping it.To do so, first select all the points in the selected line by pressing C+Shift+A(Mac OS) or Ctrl+Shift+A (Windows) or by double-clicking any of the Bézierpoints in the line. With all the points selected, drag any point to move theentire line. Make sure that the Point pointer ˝ is displayed before you drag, oryou may accidentally reshape the line by moving a segment or curve handle.
Edit submenu
• The Runaround command is available when a picture-based runaround path —or a manual runaround path for a text path — has been created for the selecteditem using the Runaround tab of the Modify dialog box (Item menu). WhenRunaround is checked (Option+F4 on Mac OS, Ctrl+F10 on Windows), therunaround path displays (the default color is magenta), and can be editedusing Bézier points.
• The Clipping Path command is available when a picture-based clipping pathhas been created for a selected picture box using the Clipping tab of the Modifydialog box. When Clipping Path is checked (Option+Shift+F4 on Mac OS,Ctrl+Shift+F10 on Windows), the clipping path displays (the default coloris green), and can be edited using Bézier points.
Chapter 6: Item Menu
344
Shape, Content, Edit Commands

POINT/SEGMENT AND TABLE COMMANDS
POINT/SEGMENT TYPE (SUBMENU)
I tem menu
The Point/Segment Type submenu lets you convert selected Bézier points andsegments. The top half of the Point/Segment Type submenu lists point types(Corner Point, Smooth Point, and Symmetrical Point). The bottom half ofthe submenu lists segment types (Straight Segment and Curved Segment).To access Bézier points and segments, one of the options in the Item & Editsubmenu must be checked.
A Bézier point is selected by clicking it. You can multiple-select Bézier points byShift+clicking each one. You can select all Bézier points in a selected item bypressing C+Shift+A (Mac OS) or Ctrl+Shift+A (Windows) or by triple-clickingany of the Bézier points in the item. Double-clicking a point suffices if theitem contains only one path. When multiple points are selected, the Pointcommands in the Point/Segment Type submenu affect all selected points,and the Segment commands in the submenu affect all segments betweenadjacent selected points.
Whenever two adjacent points are selected, the segment between them isselected. You can select an individual segment and its two associated pointsby clicking the segment or by clicking both points on either end of it. Whenall points in an item are selected (C+Shift+A on Mac OS, Ctrl+Shift+A onWindows), all segments are selected as well.
Point/Segment Type submenu
CORNER POINT (COMMAND)
I tem & Point /Segment Type
The Corner Point command (Option+F1 on Mac OS, Ctrl+F1 on Windows)changes selected Bézier points into corner points. A corner point is a Bézierpoint that connects two straight lines, a straight line and a curved line, or twononcontinuous curved lines. In the case of curved lines, the corner point’s curvehandles can be manipulated independently of one another, usually to form asharp transition between the two segments.
Chapter 6: Item Menu
345
Point/Segment and Table Commands
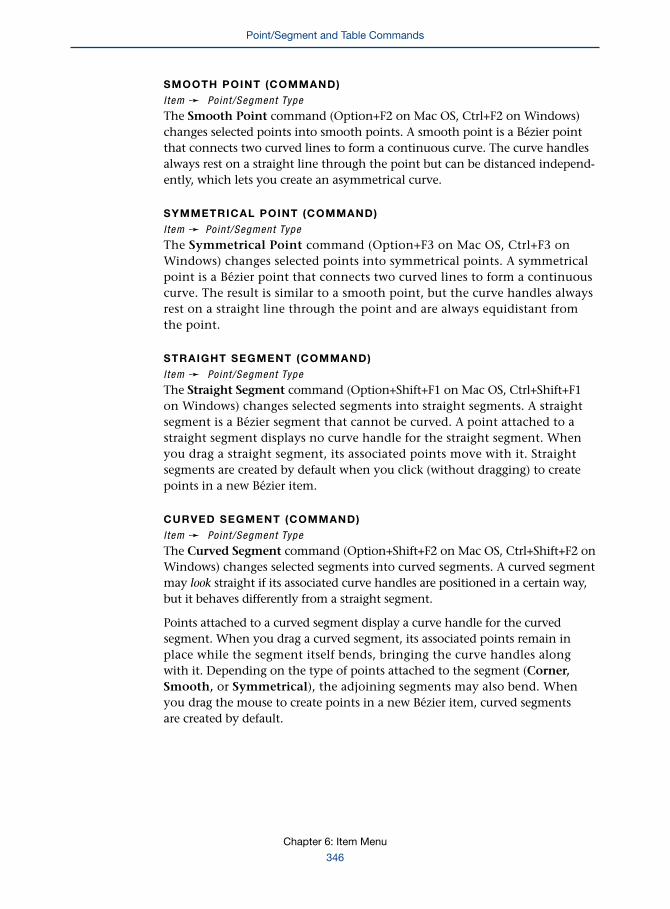
SMOOTH POINT (COMMAND)
I tem & Point /Segment Type
The Smooth Point command (Option+F2 on Mac OS, Ctrl+F2 on Windows)changes selected points into smooth points. A smooth point is a Bézier pointthat connects two curved lines to form a continuous curve. The curve handlesalways rest on a straight line through the point but can be distanced independ-ently, which lets you create an asymmetrical curve.
SYMMETRICAL POINT (COMMAND)
I tem & Point /Segment Type
The Symmetrical Point command (Option+F3 on Mac OS, Ctrl+F3 onWindows) changes selected points into symmetrical points. A symmetricalpoint is a Bézier point that connects two curved lines to form a continuouscurve. The result is similar to a smooth point, but the curve handles alwaysrest on a straight line through the point and are always equidistant fromthe point.
STRAIGHT SEGMENT (COMMAND)
I tem & Point /Segment Type
The Straight Segment command (Option+Shift+F1 on Mac OS, Ctrl+Shift+F1on Windows) changes selected segments into straight segments. A straightsegment is a Bézier segment that cannot be curved. A point attached to astraight segment displays no curve handle for the straight segment. Whenyou drag a straight segment, its associated points move with it. Straightsegments are created by default when you click (without dragging) to createpoints in a new Bézier item.
CURVED SEGMENT (COMMAND)
I tem & Point /Segment Type
The Curved Segment command (Option+Shift+F2 on Mac OS, Ctrl+Shift+F2 onWindows) changes selected segments into curved segments. A curved segmentmay look straight if its associated curve handles are positioned in a certain way,but it behaves differently from a straight segment.
Points attached to a curved segment display a curve handle for the curvedsegment. When you drag a curved segment, its associated points remain inplace while the segment itself bends, bringing the curve handles alongwith it. Depending on the type of points attached to the segment (Corner,Smooth, or Symmetrical), the adjoining segments may also bend. Whenyou drag the mouse to create points in a new Bézier item, curved segmentsare created by default.
Chapter 6: Item Menu
346
Point/Segment and Table Commands

∫ A curved segment in QuarkXPress bends differently depending on which partof it you drag. This lets you shape the segment like a piece of wire, by pushingor pulling on the parts that require adjustment. You do not have to drag curvehandles directly.
CONVERT TEXT TO TABLE (COMMAND)
I tem menu
The Convert Text to Table command converts selected text into a table. Youcan specify the way the text is flowed into the table.
CONVERT TEXT TO TABLE (DIALOG BOX)
I tem & Conver t Text to Table
Choosing Convert Text to Table displays the Convert Text to Table dialog box,which allows you to determine how the selected text is placed in the cells of theresulting table.
Convert Text to Table dialog box
SEPARATE ROWS WITH (POP-UP MENU)
I tem & Conver t Text to Table
Separate Rows with lets you choose whether rows are created at paragraphreturns, tabs, spaces, or commas. By default, rows will be separated byparagraph returns.
SEPARATE COLUMNS WITH (POP-UP MENU)
I tem & Conver t Text to Table
Separate Columns with lets you choose whether columns are created atparagraph returns, tabs, spaces, or commas. By default, columns will beseparated by tabs.
Chapter 6: Item Menu
347
Point/Segment and Table Commands

ROWS (FIELD)
I tem & Conver t Text to Table
The Rows field displays the number of rows your table will have. The defaultvalue is the number of rows that automatically result from the separationcharacters you chose. Entering a value higher than the displayed value willcreate empty rows at the end of the table; entering a value lower than thedisplayed value will create fewer rows than data, thus cutting off the table.
COLUMNS (FIELD)
I tem & Conver t Text to Table
The Columns field displays the number of columns your table will have. Thedefault value is the number of columns that automatically result from the sep-aration characters you chose. Entering a value higher than the displayed valuewill create empty columns at the right side of the table; entering a value lowerthan the displayed value will create fewer columns than data, thus cutting offthe table.
CELL FILL ORDER (POP-UP MENU)
I tem & Conver t Text to Table
The Cell Fill Order pop-up menu determines what order the cells will be filledin. The default order is Left to Right, Top Down. You can also choose Right toLeft, Top Down; Top Down, Left to Right; or Top Down, Right to Left.
TABLE (SUBMENU)
I tem menu
The Table submenu lets you add or remove cells from your table, as well ascombine cells or convert tables to text.
Table submenu
Chapter 6: Item Menu
348
Point/Segment and Table Commands

COMBINE CELLS (COMMAND)
I tem & Table
The Combine Cells command will turn two or more selected cells into onelarger cell. You can only combine adjacent cells; if you Shift+select nonadjacentcells and combine them, the Combine Cells command will be unavailable. TheCombine Cells command changes to Split Cells when you have combinedcells and the combined cells are selected.
SPLIT CELL (COMMAND)
I tem & Table
The Split Cell command will turn a cell that was modified using the CombineCells command into its original separate cells. You can only split cells that werecombined. The Split Cell command changes to Combine Cells when you havesplit cells and the split cells are selected.
INSERT ROWS (COMMAND)
I tem & Table
The Insert Rows command will insert rows into the table. You can specify thenumber of rows and specify whether they should be placed above or below theselected cell.
INSERT COLUMNS (COMMAND)
I tem & Table
The Insert Columns command will insert columns into the table. You canspecify the number of columns and specify whether they should placed to theleft or right of the currently selected cell.
DELETE (COMMAND)
I tem & Table
The Delete command will delete rows or columns from the table. The Deletecommand will change to Delete Row(s) or Delete Column(s) depending onwhether you have rows or columns selected. You must have a row or columnselected to use the Delete command.
CONVERT TABLE TO TEXT (COMMAND)
I tem & Table
The Convert Table to Text command lets you convert a selected table to text.You can specify the way the table data is converted to text.
Chapter 6: Item Menu
349
Point/Segment and Table Commands

CONVERT TABLE TO TEXT (DIALOG BOX)
I tem & Conver t Table to Text
Choosing Convert Table to Text displays the Convert Table to Text dialog box,which allows you to determine how the selected table is arranged when it isconverted to text.
Convert Table to Text dialog box
SEPARATE ROWS WITH (POP-UP MENU)
I tem & Table & Conver t Table to Text
The Separate Rows with pop-up menu lets you choose whether rows areseparated with paragraph returns, tabs, spaces, or commas when the table isconverted to text. By default, rows will be separated with paragraph returns.
SEPARATE COLUMNS WITH (POP-UP MENU)
I tem & Table & Conver t Table to Text
The Separate Columns with pop-up menu lets you choose whether columnsare separated with paragraph returns, tabs, spaces, or commas when the table isconverted to text. By default, columns will be separated with tabs.
TEXT EXTRACTION ORDER (POP-UP MENU)
I tem & Table & Conver t Table to Text
The Text Extraction Order pop-up menu determines what order the cell datawill be arranged in when it is converted to text. The default is Left to Right,Top Down. You can also choose Right to Left, Top Down; Top Down, Leftto Right; or Top Down, Right to Left.
Chapter 6: Item Menu
350
Point/Segment and Table Commands

GRIDLINES (SUBMENU)
I tem & Gr id l ines
When a table is selected with the Content tool E, the Gridlines submenu isavailable. The Gridlines submenu lets you select groups of gridlines to modify.
• The Select Horizontal option selects all horizontal gridlines.
• The Select Vertical option selects all vertical gridlines.
• The Select Borders option selects the four grids that contain the table (not thegridlines of individual cells).
• The Select All Grids option selects all gridlines, including the grids that containthe table.
Once the desired gridlines are selected, you can then choose Item & Modify toformat the gridlines. You can also use the Measurements palette or Colorspalette to format the gridlines.
Gridlines submenu
ROLLOVER AND HOT AREAS COMMANDS
ROLLOVER (SUBMENU) WI tem & Rol lover
The Rollover submenu lets you create and delete rollover items.
CREATE ROLLOVER (COMMAND) WI tem & Rol lover & Crea te Ro l lover
The Create Rollover command displays the Rollover dialog box.
∫ You can also display the Rollover dialog box by choosing Create Rollover fromthe picture box context menu.
Chapter 6: Item Menu
351
Point/Segment and Table Commands

ROLLOVER (DIALOG BOX) WI tem & Rol lover & Crea te Ro l lover
The Rollover dialog box lets you turn the active picture box into a rollover.
The Rollover dialog box (Item & Rollover & Create Rollover) lets you turn theselected picture box into a rollover.
• The Default Image field lets you specify which picture displays in the box whenthe page is initially loaded. Enter the path to the desired picture file or use theSelect button (Mac OS) or Browse button (Windows) to manually locate it.
• The Rollover Image field lets you specify which picture displays in the boxwhen the pointer is over the box. Enter the path to the desired picture file or usethe Select button (Mac OS) or Browse button (Windows) to manually locate it.
• The Hyperlink field and pop-up menu lets you specify a URL to be linked towhen the reader clicks the rollover. The Hyperlink pop-up menu displays alist of hyperlinks already used in the selected Web document; choose one ofthese options, enter a new one in the field, or use the Select button (Mac OS)or Browse button (Windows) to manually locate it.
DELETE ROLLOVER (COMMAND) WI tem & Rol lover & Delete Ro l lover
The Delete Rollover command deletes any rollover attached to the selectedpicture box.
∫ You can also delete a rollover by choosing Delete Rollover from the picture boxcontext menu.
DELETE ALL HOT AREAS (COMMAND) WI tem & Delete A l l Hot Areas
The Delete All Hot Areas command deletes any hot areas attached to theselected picture box.
∫ You can also delete a hot area by selecting the hot area with the Contenttool E and then pressing Delete.
Chapter 6: Item Menu
352
Rollover and Hot Areas Commands

Chapter 7: Page Menu
Every QuarkXPress document uses pages, so controlling their placement and navigating
through them is especially important. The QuarkXPress Page menu lets you perform
these and other page-related tasks.
PAGE MENU: OVERVIEW
The QuarkXPress Page menu gives you options for adding, deleting, arranging, andsectioning pages in a document and for navigating through a document. The Pagemenu is divided into four sections:
SECTIONS
• The first section lets you insert, delete, and move pages within an opendocument. The Insert command is available when a document containsfewer than 2,000 pages. The Delete and Move commands are availablewhen a document contains two or more pages.
• The second section lets you modify the placement of page guides andchange the numbering system for a document or a range of pages in a printdocument, or change the background and other properties on master pagesin a Web document. The Master Guides command is available in a printdocument when a master page is displayed in the document window. ThePage Properties command is available in a Web document when a documentpage is displayed in the document window. (This command changes toMaster Page Properties when a master page is displayed.) Print documentsonly: The Section command is available when a page is displayed.
• The third section lets you navigate through a document. The availability ofspecific commands depends on the number of pages in the document andthe displayed page.
Chapter 7: Page Menu
353
Page Menu: Overview

• The fourth section lets you view master pages or document pages. The Displaycommand is available when a document is active.
Page menu for a print document (left) and a Web document (right)
INSERTING, DELETING, AND MOVING PAGES
INSERT (COMMAND)
Page & Inser t
The Insert command (Page menu) displays the Insert Pages dialog box, whichlets you add pages to a document.
INSERT PAGES (DIALOG BOX)
Page & Inser t
The Insert Pages dialog box lets you specify how many pages to add,where to add them, which master page to base them on, and whether thetext boxes should be linked to current document pages. When you insertpages, QuarkXPress automatically updates page numbers up to the start ofthe next section.
Chapter 7: Page Menu
354
Page Menu: Overview

Insert Pages dialog box and Insert page(s) field
• Insert page(s) field: To specify the number of pages to add to the document,enter a value between 1 and 100. A document can contain up to 2,000 pages.
• Before page, after page, and at end of document radio buttons: Click a buttonto specify where to add the new pages. If you click before page or after page,enter the number of the page that the new pages will precede or follow. (In aWeb document, you can also enter the page name in this field. W) The currentpage number displays by default.
∫ Print documents only: If you designated a prefix and page number style in theSection dialog box (Page & Section), you must use that prefix and style whenyou enter page numbers in fields. You can also enter an absolute page number,which represents the page’s sequential order in the document, regardless of itsnumbering. To specify an absolute page number, enter a plus sign (+) beforethe number. To change page numbers, see “Numbering Pages and SectioningDocuments” in Chapter 7, “Document Layout,” in A Guide to QuarkXPress:Using QuarkXPress.
LINK TO CURRENT TEXT CHAIN (CHECK BOX) PPage & Inser t
The Link to Current Text Chain check box lets you link automatic text boxeson inserted pages to the active text chain in the document. No matter whereyou add the pages, the text boxes on the new pages are linked to the end of theactive text chain.
Chapter 7: Page Menu
355
Inserting, Deleting, and Moving Pages

• The Link to Current Text Chain check box is available if the master pagechosen from the Master Page pop-up menu contains an automatic text box(as indicated by the Intact Chain icon u in the upper left corner of the masterpage) and an automatic text box is active on a document page.
• The Link to Current Text Chain check box is unavailable when there is noactive automatic text box on a document page, or when the Broken Chainicon U is displayed in the upper left corner of the chosen master page.
MASTER PAGE (POP-UP MENU)
Page & Inser t
The Master Page pop-up menu lets you choose which master page will beapplied to the inserted pages. The pop-up menu lists all the master pages estab-lished for the active document, including Blank Single page and Blank Facing Pagemaster pages. Blank Facing Page is unavailable for documents without facingpages, or for Web documents.
Master Page pop-up menu
DELETE (COMMAND)
Page & Delete
The Delete command displays the Delete Pages dialog box, which lets youremove a page or a range of pages from the active document.
DELETE PAGES (DIALOG BOX)
Page & Delete
The Delete Pages dialog box lets you specify a page or range of pages to delete.When you delete pages in a print document, QuarkXPress automatically updatespage numbers up to the start of the next section. You can specify page numbersin four ways:
• Document page number based on automatic page number characters: Enter adocument page number the same way it displays on the document page. Forexample, if the page is numbered “2.1,” you must enter “2.1.”
• Absolute page number representing the page’s sequential order in the document:Enter a plus sign before the page number. For example, the third page in adocument is always page “+3” even if the document page number is “iii.”
Chapter 7: Page Menu
356
Inserting, Deleting, and Moving Pages

• To the end of a document: Enter a page number as described above for thebeginning of the range and then enter “end” in the thru field. All the pagesfrom the beginning of the range to the end of the document will be deleted.
• Document page name: Enter a page name the same way it displays in theDocument Layout palette. W
Delete Pages dialog box
When you delete pages, you can expect these results:
• When there are links between text boxes on deleted pages and text boxes onremaining pages, QuarkXPress does not delete text; the last page containing atext box will display an overflow symbol t. If an entire text chain is containedwithin the deleted pages, the text is deleted. P
• Pictures and other items that are not anchored to text are deleted.
• If Auto Page Insertion is enabled (Edit & Preferences & Preferences &General pane) and the text boxes on remaining pages cannot contain thetext from the deleted pages, QuarkXPress automatically re-inserts the numberof pages necessary to display all the text. If you do not want the program toinsert pages automatically, disable Auto Page Insertion. P
• Automatically inserted pages are based on the master page of the page precedingthem. For example, if you specify auto page insertion At End of Document,newly inserted pages are based on the master page of the last page in the docu-ment. QuarkXPress inserts pages automatically only if the master page chosencontains the automatic text box (as indicated by the Intact Chain icon u inthe upper left corner of the master page). P
MOVE (COMMAND)
Page menu
The Move command displays the Move Pages dialog box, which lets yourearrange pages within your document.
MOVE PAGES (DIALOG BOX)
Page & Move
The Move Pages dialog box lets you rearrange pages in a document. When youmove pages, QuarkXPress automatically updates page numbers if you used theautomatic page number characters (C+2, C+3, or C+4 on Mac OS; Ctrl+2,
Chapter 7: Page Menu
357
Inserting, Deleting, and Moving Pages

Ctrl+3, or Ctrl+4 on Windows). However, QuarkXPress does not change linksbetween text boxes. P
Move Pages dialog box and Move Page(s) fields
• Move page(s) fields: Enter page number(s) for the page(s) to be moved, or pagename(s) in a Web document.
• Before page, after page, and to end of document buttons: Click a radio buttonto specify a new location for the moved pages.
∫ Print documents only: If you designated a prefix and page number style in theSection dialog box (Page & Section), you must use that prefix and style whenyou enter page numbers in fields. You can also enter an absolute page number,which represents the page’s sequential order in the document. To specify anabsolute page number, enter a plus sign (+) before the number. To change pagenumbers, see “Numbering Pages and Sectioning Documents” in Chapter 7,“Document Layout,” in A Guide to QuarkXPress: Using QuarkXPress.
MODIFYING MASTER PAGE ATTRIBUTES AND
NUMBERING SECTIONS
MASTER GUIDES (COMMAND) PPage menu
The Master Guides command, which is available when a master page is dis-played in the document window, displays the Master Guides dialog box, whichlets you change the position of page guides. Page guides are nonprinting linesyou can use to position boxes and other items in QuarkXPress documents.The page guides also control the size, placement, and number of columns ofautomatic text boxes on master pages.
MASTER GUIDES (DIALOG BOX) PPage & Master Guides
The Master Guides dialog box lets you change the positions of page guides forcolumns and margins on the displayed master page. Any changes you make topage guides in the Master Guides dialog box, including changes that affect any
Chapter 7: Page Menu
358
Inserting, Deleting, and Moving Pages
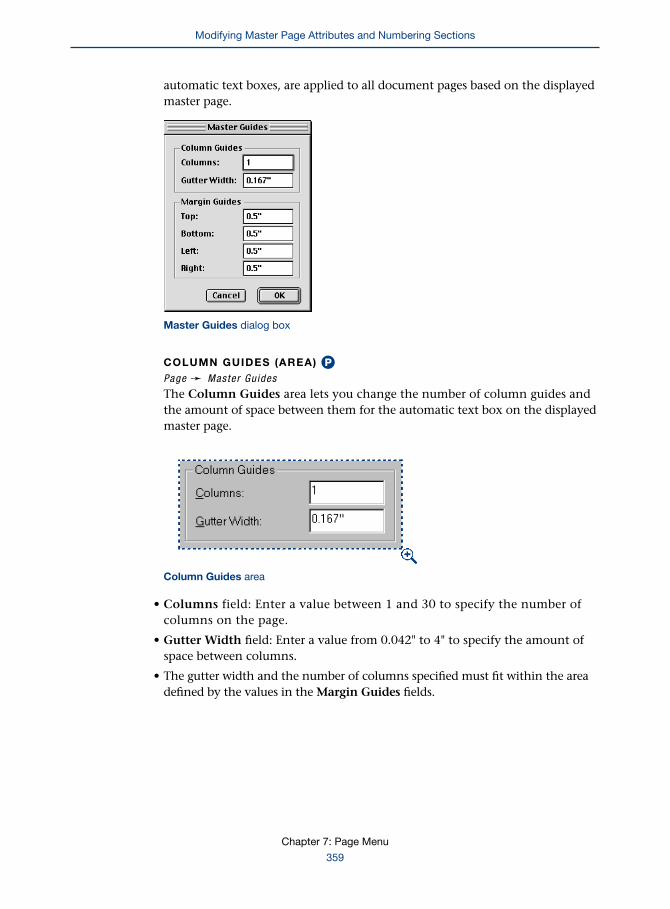
automatic text boxes, are applied to all document pages based on the displayedmaster page.
Master Guides dialog box
COLUMN GUIDES (AREA) PPage & Master Guides
The Column Guides area lets you change the number of column guides andthe amount of space between them for the automatic text box on the displayedmaster page.
Column Guides area
• Columns field: Enter a value between 1 and 30 to specify the number ofcolumns on the page.
• Gutter Width field: Enter a value from 0.042" to 4" to specify the amount ofspace between columns.
• The gutter width and the number of columns specified must fit within the areadefined by the values in the Margin Guides fields.
Chapter 7: Page Menu
359
Modifying Master Page Attributes and Numbering Sections

∫ When you modify the column guides, QuarkXPress divides any automatic textboxes into the specified number of columns and adjusts the gutter width asnecessary (if you have not moved or resized the box).
MARGIN GUIDES (AREA) PPage & Master Guides
The Margin Guides area lets you enter new values for the margin guides for thedisplayed master page, and for document pages based on that master page. Youcan enter values in any supported measurement system in the Top, Bottom,Left, and Right fields. If a facing-page master page is displayed in the documentwindow, the Left and Right margin fields are replaced by Inside and Outside.
Margin Guides area
SECTION (COMMAND) PPage menu
A section is a group of sequentially numbered pages within a document.The Section command displays the Section dialog box, which lets youdivide a document into individually numbered sections.
The page number shown in the lower left corner of the document windowreflects any sectioning and page number format modifications. An asterisk (*)displayed on a document page icon in the Document Layout palette (Viewmenu) indicates the start of a new section.
∫ Print documents only: You can also access the Section dialog box from theDocument Layout palette (View menu); click a page icon, then click thepage number indicator in the lower left corner of the palette.
Chapter 7: Page Menu
360
Modifying Master Page Attributes and Numbering Sections

SECTION (DIALOG BOX) PPage & Sect ion
The Section dialog box lets you designate the current page as the start of asection and specify a prefix for the page numbers, the first page number ofthe section, and the format of the page numbers.
Section dialog box
SECTION START (CHECK BOX) PPage & Sect ion
Checking Section Start lets you define the current page as the first page of asection. The page number displayed in the lower left corner of the documentwindow is the current page.
BOOK CHAPTER START (CHECK BOX) PPage & Sect ion
The Book Chapter Start check box applies to documents that are chapters inan open book (File & New & Book). QuarkXPress places a book chapter start atthe beginning of each chapter. A book chapter start tells a chapter where to startits page numbering. You cannot turn a book chapter start on or off, but you canoverride it by creating a section start.
Chapter 7: Page Menu
361
Modifying Master Page Attributes and Numbering Sections

PAGE NUMBERING (AREA) PPage & Sect ion
The Page Numbering area lets you specify the numbering and style ofpages in a section. Any automatic page numbers placed using the automaticpage number characters (C+2, C+3, or C+4 on Mac OS; Ctrl+2, Ctrl+3, orCtrl+4 on Windows) will reflect the specified section numbering format. Tochange page numbers, see “Numbering Pages and Sectioning Documents”in Chapter 7, “Document Layout,” in A Guide to QuarkXPress:Using QuarkXPress.
• Prefix field: Enter up to four characters to precede page numbers in a section.For example, you might precede the page number of an appendix with theprefix “app-.”
• Number field: Enter the number you want to assign to the first page of a newsection. You must enter Arabic numerals (for example, 1, 2, 3) in the Numberfield, regardless of the Format setting of the section page numbers. For example,if you are using lowercase Roman numerals for the front matter in a book andwant the section to start with v, enter 5 in the Number field.
• Format pop-up menu: Choose a style for page numbers in a section. Optionsinclude numeric (1, 2, 3, 4), uppercase Roman (I, II, III, IV); lowercase Roman(i, ii, iii, iv); uppercase alphabetic (A, B, C, D); and lowercase alphabetic (a, b, c, d).
PAGE PROPERTIES (COMMAND) WPage menu
The Page Properties command displays the Page Properties dialog box, whichlets you configure controls for exported HTML documents that are based on theactive page.
PAGE PROPERTIES (DIALOG BOX) WPage & Page Proper t ies
The Page Properties dialog box lets you control a variety of settings for HTMLdocuments that are exported from the active page. To control these settingsfor pages based on a specific master page, display that master page and choosePage & Master Page Properties. Changes made in the Page Properties dialogbox will override master page settings for that page; to revert to the master pagesettings, reapply the master page to the document page.
Chapter 7: Page Menu
362
Modifying Master Page Attributes and Numbering Sections

Page Properties dialog box
PAGE TITLE (FIELD) WPage & Page Proper t ies
The Page Title field lets you enter a name for the exported HTML document.This name becomes the <TITLE> tag in the exported HTML document’s <HEAD>section, and displays as the name of the Web browser window in which theHTML document displays.
EXPORT FILE NAME (FIELD) WPage & Page Proper t ies
The Export File Name field lets you specify the name of the file that will becreated when you export the active page in HTML format. The suffix “.htm”is automatically added to the end of the file name at export. Because eachpage in a Web document is exported as a separate HTML file, you must nameeach page individually.
META TAG SET (POP-UP MENU) WPage & Page Proper t ies
The Meta Tag Set pop-up menu lets you specify which set of meta tags (if any)you want to include in the exported HTML page. (For information about metatags, see “Working with Meta Tags” in Chapter 21, “Interactive Web Elements,”in A Guide to QuarkXPress: Using QuarkXPress)
Chapter 7: Page Menu
363
Modifying Master Page Attributes and Numbering Sections

COLORS (AREA) WPage & Page Proper t ies
The Colors area lets you specify the default colors for the page background andfor hyperlinks:
• Choose an option from the Background pop-up menu to specify the pagebackground color.
• Choose an option from the Link pop-up menu to specify the default colorof hyperlinks.
• Choose an option from the Visited Link pop-up menu to specify the colorof hyperlinks that have been clicked.
• Choose an option from the Active Link pop-up menu to specify the colorof hyperlinks that the reader clicks.
PAGE WIDTH (POP-UP MENU AND FIELD) WPage & Page Proper t ies
The Page Width pop-up menu and field let you specify the position of the pagewidth guide, a vertical guide that helps you estimate where the reader’s browserwindow ends horizontally.
VARIABLE WIDTH PAGE (AREA) WPage & Page Proper t ies
In a variable width page, text boxes that have been specified as variable-widthboxes (Item & Modify) can expand and contract to fit the width of the reader’sWeb browser. To make the page a variable width page, check Variable WidthPage and then enter values for the following fields:
• The Width field lets you specify the percentage of the viewable browser areathat the page will occupy.
• The Minimum field lets you specify a minimum page width. If the reader’sbrowser window is made smaller than this width, items will stop being resized.
BACKGROUND IMAGE (CHECK BOX) WPage & Page Proper t ies
The Background Image check box lets you choose a background picturefor the Web document. When Background Image is checked, the Selectbutton (Mac OS) or Browse button (Windows) and the Repeat pop-upmenu become available.
SELECT (BUTTON — MAC OS), BROWSE (BUTTON — WINDOWS) WPage & Page Proper t ies
The Select button (Mac OS) or Browse button (Windows) displays a dialog boxthat lets you select a picture file for use as a background image.
Chapter 7: Page Menu
364
Modifying Master Page Attributes and Numbering Sections

REPEAT (POP-UP MENU) WPage & Page Proper t ies
The Repeat pop-up menu lets you specify how the background imageis displayed:
• Choose Tile to continuously repeat the graphic both horizontally and vertically.
• Choose Horizontal to continuously repeat the graphic horizontally butnot vertically.
• Choose Vertical to continuously repeat the graphic vertically but not horizontally.
• Choose None to show the graphic only once, in the upper left corner of thebrowser window.
MASTER PAGE PROPERTIES (COMMAND) WPage menu
The Master Page Properties command displays the Master Page Propertiesdialog box, which lets you configure controls for master pages.
MASTER PAGE PROPERTIES (DIALOG BOX) WPage & Master Page Proper t ies
The Master Page Properties dialog box lets you control a variety of settings formaster pages for HTML documents. To control these settings for specific masterpages, display that master page and choose Page & Master Page Properties. TheMaster Page Properties dialog box is almost identical to the Page Propertiesdialog box; the only exception is that the Master Page Properties dialogbox does not contain the Page Title or Export File Name fields.
NAVIGATING DOCUMENT PAGES
PREVIOUS, NEXT, FIRST, LAST (COMMANDS)
Page menu
The Previous, Next, First, and Last commands let you display the specifiedpage. The Previous and Next commands are relative to the page currentlydisplayed. The First and Last commands display the absolute first and lastpages of the document.
GO TO (COMMAND)
Page menu
The Go to command displays the Go to Page dialog box, which lets you jumpto any page in a document.
Chapter 7: Page Menu
365
Modifying Master Page Attributes and Numbering Sections

GO TO PAGE (DIALOG BOX)
Page & Go to
The Go to Page dialog box lets you enter the number of the page you want todisplay, or the name of the page in a Web document. If two pages in a documenthave the same section or page number, including prefix, QuarkXPress displaysthe first occurrence of that page number. You can also jump to another pageusing the go-to-page pop-up menu in the lower left corner of the documentwindow (click the page pop-up arrow, near the page field in the lower leftcorner of the document window).
Go to Page dialog box
DISPLAYING DOCUMENT PAGES
DISPLAY (SUBMENU)
Page menu
The Display submenu lets you choose a master page to display in the documentwindow. (A master page serves as the basis for document-page formatting.)The submenu lists all the master pages for the document, and the Documentitem lets you return to the page previously displayed in the document.
Display submenu
Chapter 7: Page Menu
366
Navigating Document Pages

Chapter 8: View Menu
Arranging your work environment to suit your needs allows you to work comfortably
and efficiently. The QuarkXPress View menu lets you arrange your on-screen work
environment in whatever way best meets your needs; for example, you can change
your document percentage view and choose which palettes to open.
VIEW MENU: OVERVIEW
The QuarkXPress View menu gives you options for viewing documents, working withrulers and guides, and opening and closing palettes. The View menu is divided intofour sections on Mac OS, and three sections on Windows:
• The first section lets you change the size at which you view the active documenton-screen. The commands in this section are available when a document is open.
• Mac OS only: The next section lets you organize documents on-screen and switchbetween open document windows. The Windows submenu is available when adocument is open.
• The next section lets you use various layout tools such as rulers and guides.With the exception of Snap to Guides, when you choose from a commandfrom this section, it changes from Show to Hide, or vice versa. The commandsin this section are available when a document is active.
• The final section lets you open and close palettes. When you choose a commandfrom this section, it changes from Show to Hide, or vice versa. The commandsin this section are always available.
Chapter 8: View Menu
367
View Menu: Overview
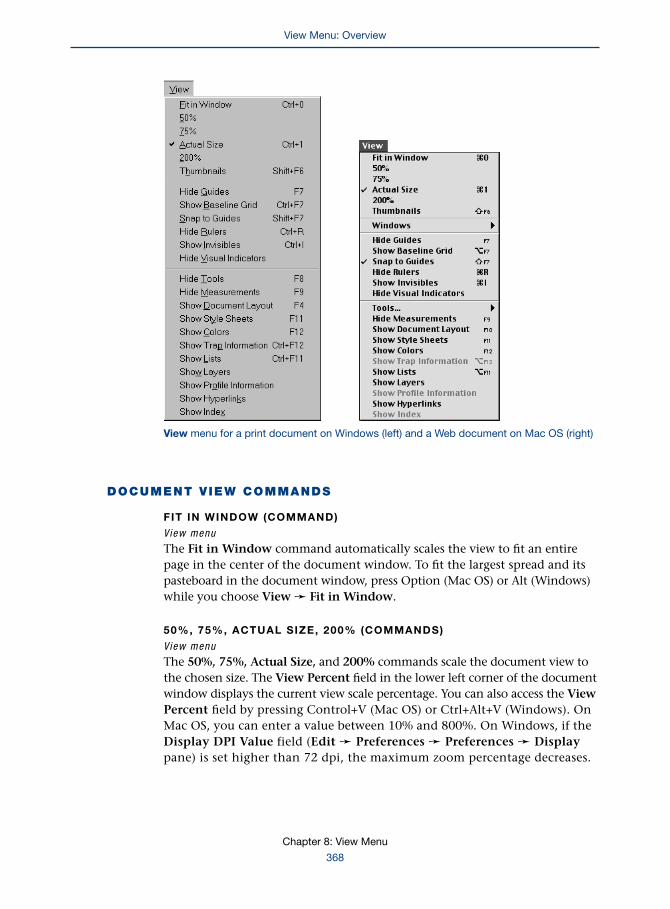
View menu for a print document on Windows (left) and a Web document on Mac OS (right)
DOCUMENT VIEW COMMANDS
FIT IN WINDOW (COMMAND)
View menu
The Fit in Window command automatically scales the view to fit an entirepage in the center of the document window. To fit the largest spread and itspasteboard in the document window, press Option (Mac OS) or Alt (Windows)while you choose View & Fit in Window.
50%, 75%, ACTUAL SIZE, 200% (COMMANDS)
View menu
The 50%, 75%, Actual Size, and 200% commands scale the document view tothe chosen size. The View Percent field in the lower left corner of the documentwindow displays the current view scale percentage. You can also access the ViewPercent field by pressing Control+V (Mac OS) or Ctrl+Alt+V (Windows). OnMac OS, you can enter a value between 10% and 800%. On Windows, if theDisplay DPI Value field (Edit & Preferences & Preferences & Displaypane) is set higher than 72 dpi, the maximum zoom percentage decreases.
Chapter 8: View Menu
368
View Menu: Overview

For example, if your display value is set to 96 dpi, then the maximum zoomis only 711%.
∫ When an item is active, changing the view percentage centers the active item inthe document window if (1) the item is on a page and any part of that page isdisplayed in the document window or (2) the active item is on the pasteboardand any part of the spread containing the active item is displayed in thedocument window.
THUMBNAILS (COMMAND)
View menu
The Thumbnails command displays small representations of document pagesthat you can rearrange and copy between documents. To copy items betweendocuments, see “Copying Items and Pages between Documents” in Chapter 7,“Document Layout,” in A Guide to QuarkXPress: Using QuarkXPress. To change adocument to Thumbnails view, you can also enter a “t” in the View Percentfield in the lower left corner of the document window.
WINDOWS (SUBMENU) — MAC OS ONLY
View menu
The Windows submenu lets you control the way open windows are displayedon-screen. The first section of the submenu lets you specify how open doc-uments are displayed:
Windows submenu (Mac OS only)
Chapter 8: View Menu
369
Document View Commands
• Stack Documents: Layers multiple open documents so a small portion of eachdocument’s menu bar is displayed.
• Tile Documents: Resizes document windows so equal portions of all opendocuments are displayed on-screen. The active document is always displayedin the upper left part of the main monitor; the most recently active docu-ments are displayed from left to right and top to bottom. If Tile to MultipleMonitors is checked in the Display pane of the Preferences dialog box(Edit & Preferences & Preferences), you can use more than one monitorfor tiling documents.
ç KEYBOARD COMMANDS
You can change all documents to the same view when stacking or tilingby pressing a modifier key while you choose View & Windows & StackDocuments or Tile Documents. You must press the modifier key beforeyou click the menu bar to select View.
STACK OR KEYBOARD
TILE TO DOCUMENT VIEW COMMAND
Actual Size Control
Fit in Window CThumbnails Option
∫ Pressing Shift while clicking the active window’s title bar also displays theWindows submenu. You can use the keyboard commands listed abovewhile Shift-clicking a document’s title bar.
The second section of the submenu lists all open documents and lets you choosewhich one to display. You can also display the Clipboard.
SHOW/HIDE COMMANDS
SHOW GUIDES, HIDE GUIDES (COMMAND)
View menu
The Show Guides command displays nonprinting lines used to position itemson pages. Guides include margin guides, the outlines of boxes, the “X” in emptypicture boxes, and ruler guides. The Hide Guides command hides guides so youcan see how your finished document looks. By default, Guides are showing.
When the ImageMap QuarkXTensions software is loaded, the Show Guidescommand displays hot areas associated with picture boxes as semitransparentshapes. For information about image maps, see “Working with Image Maps”
Chapter 8: View Menu
370
Document View Commands

in Chapter 21, “Interactive Web Elements,” in A Guide to QuarkXPress: UsingQuarkXPress. The Hide Guides command hides hot areas.
∫ Guides display In Front of or Behind items on document pages depending onthe Guides setting in the General pane of the Preferences dialog box (Edit &Preferences & Preferences).
The Show Guides and Hide Guides commands also show and hide the pagewidth reference guide in Web documents.
SHOW BASELINE GRID, HIDE BASELINE GRID (COMMAND)
View menu
A baseline grid is a horizontal grid that can be used to align text horizontallyacross columns and text boxes. The Show Baseline Grid command displays thenonprinting grid. The Hide Baseline Grid command hides the grid so you canmore easily view text. By default, the Baseline Grid is hidden.
∫ The spacing for a baseline grid is specified in the Paragraph pane of the Prefer-ences dialog box (Edit & Preferences & Preferences). To make selectedparagraphs conform to a baseline grid, check Lock to Baseline Grid in theParagraph Attributes dialog box (Style & Formats).
SNAP TO GUIDES (COMMAND)
View menu
The Snap to Guides command lets you quickly align items with guides. WhenSnap to Guides is checked and you drag an item near a guide, the item alignsautomatically with the guide. If you’re creating a new item, the tool’s pointerwill snap to the nearest guide. By default, Snap to Guides is checked.
∫ The distance at which an item aligns automatically with a guide is specified inthe Snap Distance field in the General pane of the Preferences dialog box(Edit & Preferences & Preferences).
SHOW RULERS, HIDE RULERS (COMMAND)
View menu
The Show Rulers command displays rulers, which are used to position itemsand guides, along the top and left edges of the document window. To work withrulers and guides, see “Using Rulers and Guides” in Chapter 2, “Layout Tools,”in A Guide to QuarkXPress: Using QuarkXPress. The Hide Rulers command hidesthe rulers so you can see more of the document window. By default, rulersare showing.
Chapter 8: View Menu
371
Show/Hide Commands

∫ In the Measurements pane of the Preferences dialog box (Edit & Preferences &Preferences), use the Horizontal and Vertical pop-up menus to specify themeasurement system displayed on the rulers. In print documents, use the ItemCoordinates buttons in the Measurements pane of the Preferences dialogbox to specify whether the horizontal ruler spans a spread or repeats fromzero at the start of each page on a spread.
SHOW INVISIBLES, HIDE INVISIBLES (COMMAND)
View menu
The Show Invisibles command displays editable, nonprinting characters such asspaces, tabs, and paragraph returns in text. The Hide Invisibles command hidesthe characters so you can more easily view text. Invisible characters are hidden bydefault. Invisible characters are displayed as follows:
INVISIBLE MAC OS WINDOWS DISPLAYS
CHARACTER COMMAND COMMAND AS
Word space space bar space bar .
New paragraph Return Enter ¶
New line Shift+Return Shift+Enter l
New column Enter Keypad Enter 3
New box Shift+Enter Shift+ b
Keypad Enter
Tab Tab Tab .Indent here C+\ Ctrl+\ h
SHOW VISUAL INDICATORS, HIDE VISUAL INDICATORS (COMMAND)
View menu
The Show Visual Indicators command shows visual indicators. The HideVisual Indicators command hides visual indicators. A visual indicator is a smallcolored square that displays on the upper right side of the item. Visual indicatorson layers correspond to the layer color. In other words, if the layer color is red,all items placed on that layer will have a red visual indicator.
Visual indicators are also used in Web documents when you create anon-rectangular HTML text box. The indicator serves to alert you that thenon-rectangular text box will be converted to a rectangular text box whenyou export that page as HTML. (Visual indicators also alert you if a rectangularHTML text box has been set to rasterize at export.)
Chapter 8: View Menu
372
Show/Hide Commands
SHOW TOOLS, HIDE TOOLS (COMMAND)
View menu
The Show Tools command displays the Tools palette, which provides tools forcreating and modifying items. For information about the Tools palette, seeChapter 1, “Palettes.” The Hide Tools command closes the Tools palette.
SHOW WEB TOOLS, HIDE WEB TOOLS (COMMAND)
View menu
The Show Web Tools command displays the Web Tools palette, which providestools for creating and modifying Web document items. For information aboutthe Web Tools palette, see Chapter 1, “Palettes.” The Hide Web Tools commandcloses the Web Tools palette.
SHOW MEASUREMENTS, HIDE MEASUREMENTS (COMMAND)
View menu
The Show Measurements command displays the Measurements palette, whichlets you edit many item and content specifications. The controls available in theMeasurements palette vary according to the active items. For information aboutthe Measurements palette, see “Measurements Palette” in Chapter 1, “Palettes.”The Hide Measurements command closes the Measurements palette.
SHOW DOCUMENT LAYOUT, HIDE DOCUMENT LAYOUT (COMMAND)
View menu
The Show Document Layout command displays the Document Layoutpalette, which lets you manipulate document and master pages. For infor-mation about the Document Layout palette, see “Document Layout Palette”in Chapter 1, “Palettes.” The Hide Document Layout command closes theDocument Layout palette.
SHOW STYLE SHEETS, HIDE STYLE SHEETS (COMMAND)
View menu
The Show Style Sheets command displays the Style Sheets palette, which letsyou apply character and paragraph style sheets. For information about the StyleSheets palette, see “Style Sheets Palette” in Chapter 1, “Palettes.” The Hide StyleSheets command closes the Style Sheets palette.
Chapter 8: View Menu
373
Show/Hide Commands
SHOW COLORS, HIDE COLORS (COMMAND)
View menu
The Show Colors command displays the Colors palette, which lets you applycolors to text, pictures in specific file formats, and items. For information aboutthe Colors palette, see “Colors Palette” in Chapter 1, “Palettes.” The HideColors command closes the Colors palette.
SHOW TRAP INFORMATION, HIDE TRAP INFORMATION (COMMAND) PView menu
The Show Trap Information command displays the Trap Informationpalette, which lets you specify trapping relationships for adjacent colorson an object-by-object basis. For information about the Trap Informationpalette, see “Trap Information Palette” in Chapter 1, “Palettes.” The HideTrap Information command closes the Trap Information palette.
SHOW LISTS, HIDE LISTS (COMMAND) PView menu
The Show Lists command displays the Lists palette, which lets you generateand update lists (based on style sheets) for documents and books. For infor-mation about the Lists palette, see “Lists Palette” in Chapter 1, “Palettes.”The Hide Lists command closes the Lists palette.
SHOW LAYERS, HIDE LAYERS (COMMAND)
View menu
The Show Layers command displays the Layers palette, which lets you createand manipulate layers. The palette provides buttons and a pop-up menu ofoptions for performing various layer functions. For information about theLayers palette, see “Layers Palette” in Chapter 1, “Palettes.” The Hide Layerscommand closes the Layers palette.
SHOW PROFILE INFORMATION, HIDE PROFILE INFORMATION
(COMMAND) PView menu
When the QuarkCMS QuarkXTensions software is loaded, the Show ProfileInformation command displays the Profile Information palette, which letsyou see color management information for the active picture. For informationabout the Profile Information palette, see “Profile Information Palette” inChapter 1, “Palettes.” The Hide Profile Information command closes theProfile Information palette.
Chapter 8: View Menu
374
Show/Hide Commands

SHOW HYPERLINKS, HIDE HYPERLINKS (COMMAND)
View menu
The Show Hyperlinks command displays the Hyperlinks palette, which letsyou create hyperlinks for use in exported PDF and HTML documents. For infor-mation about the Hyperlinks palette, see “Hyperlinks Palette” in Chapter 1,“Palettes.” The Hide Hyperlinks command closes the Hyperlinks palette.
SHOW INDEX, HIDE INDEX (COMMAND) PView menu
When the Index QuarkXTensions software is loaded, the Show Index com-mand displays the Index palette, which lets you generate index entries andbuild an index. For information about the Index palette, see “Index Palette”in Chapter 1, “Palettes.” The Hide Index command closes the Index palette.
Chapter 8: View Menu
375
Show/Hide Commands

Chapter 9: Utilities Menu
Sometimes it’s convenient to verify document elements in groups instead of individually.
For example, reviewing the fonts used in a document is more efficient when you
allow QuarkXPress to provide you with a list of fonts used rather than examining
the specifications for each style sheet. The QuarkXPress Utilities menu lets you
perform document-wide tasks, such as checking spelling, hyphenation, fonts, pictures,
XTensions selection, PPD selection, and kerning and tracking. Some XTensions
software may also be accessed through the Utilities menu.
UTILITIES MENU: OVERVIEW
The Utilities menu lets you check spelling and hyphenation, confirm the fontsand pictures used in a document, control which XTensions and PostScript PrinterDescriptions (PPDs) are used, and customize automatic kerning and tracking controls.The Utilities menu also displays entries for many XTensions modules. The Utilitiesmenu is divided into five sections:
• The first section lets you check spelling or create and edit custom spelling dic-tionaries. The Check Spelling command is available when a document is openand the Content tool E is selected. The Auxiliary Dictionary command isalways available; the Edit Auxiliary command is available when an auxiliarydictionary is open.
• The second section lets you obtain hyphenation suggestions for words andcreate a list of hyphenation exceptions. The Suggested Hyphenation commandis available when the Content tool E is selected and a text box is active. TheHyphenation Exceptions command is always available.
• The third section lets you list and replace all the fonts used in a document,and list and update all pictures used in a document. The Usage command isavailable when a document is open.
• The fourth section lets you create and choose sets of XTensions software andPPDs to use with QuarkXPress. The XTensions Manager command is alwaysavailable. The PPD Manager command is always available in print documents;this command is unavailable in Web documents.
• The last section lets you edit color management profiles, build indexes, and edittracking and kerning information for fonts. The Profile Manager command isavailable when the QuarkCMS QuarkXTensions software is loaded. The BuildIndex features are available when the Index QuarkXTensions software is loaded
Chapter 9: Utilities Menu
376
Utilities Menu: Overview

and the Index palette is displayed. The Tracking Edit and Kerning Editcommands are available when the Kern-Track Editor QuarkXTensionssoftware is loaded.
Utilities menu
SPELL CHECKING COMMANDS
The Check Spelling submenu (Utilities & Check Spelling) lets you choose whetherto check a word, a selection of text, a story, a document, or master pages. When text isselected, the Word command changes to Selection. When a master page is displayed,the Document command changes to Masters. The text is compared with theQuarkXPress dictionary file and any open auxiliary dictionary.
Check Spelling submenu
∫ To check spelling, a copy of the appropriate dictionary file (included withyour QuarkXPress application) must be available in the same folder as theQuarkXPress application.
Chapter 9: Utilities Menu
377
Utilities Menu: Overview

WORD (COMMAND)
Ut i l i t ies & Check Spel l ing
When the text insertion point i is placed within or immediately next to aword, the Word command (C+L on Mac OS, Ctrl+W on Windows) is available.Choosing the Word command displays the Check Word dialog box, which letsyou check the spelling of the word.
CHECK WORD (DIALOG BOX)
Ut i l i t ies & Check Spel l ing & Word
The Check Word dialog box displays the word you are checking (the SuspectWord) and lets you choose from a list of alternative words or enter adifferent word.
Check Word dialog box
• The Replace with field lets you enter the correct spelling of the suspect word.
• A list below the Replace with field displays words similar to the suspect word.If the suspect word matches a word in the QuarkXPress dictionary or any openauxiliary dictionary, the matching word is selected in the list. If the suspectword is not similar to any word in the open dictionaries, QuarkXPress displaysthe message: “No similar words found.” To replace the suspect word with aword from the list, select the word in the list and click Replace or double-clicka word in the list.
• Clicking the Replace button lets you replace the suspect word with the wordentered in the Replace with field, and then closes the Check Word dialog box.
• The Add button (C+A on Mac OS, Alt+A on Windows) lets you add the sus-pect word to the open auxiliary dictionary. The Add button is available when anauxiliary dictionary is open for use with the document. When you click Add,the Check Word dialog box closes.
• The Done button lets you close the Check Word dialog box without changingthe spelling of the suspect word.
Chapter 9: Utilities Menu
378
Spell Checking Commands
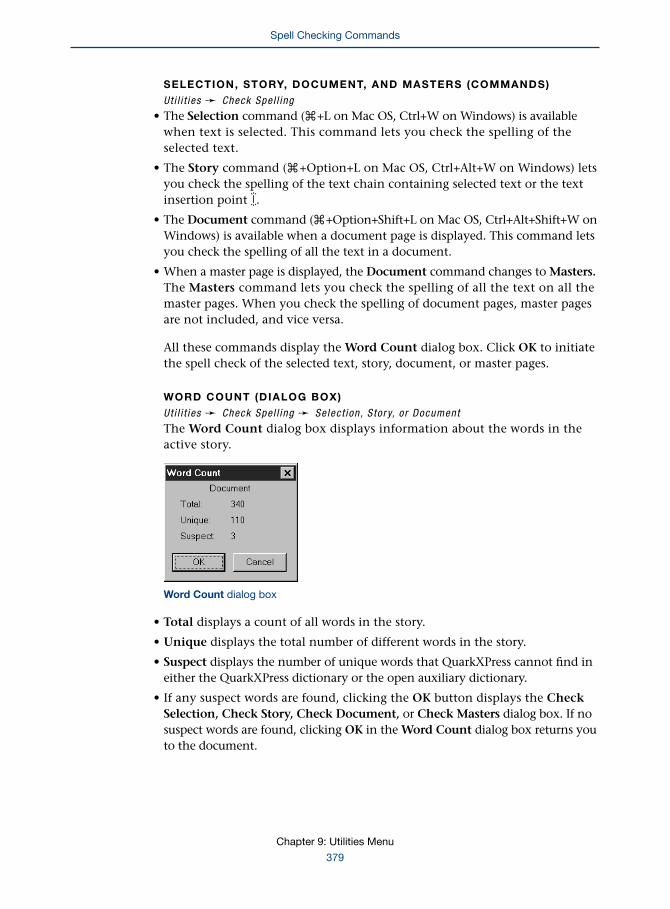
SELECTION, STORY, DOCUMENT, AND MASTERS (COMMANDS)
Ut i l i t ies & Check Spel l ing
• The Selection command (C+L on Mac OS, Ctrl+W on Windows) is availablewhen text is selected. This command lets you check the spelling of theselected text.
• The Story command (C+Option+L on Mac OS, Ctrl+Alt+W on Windows) letsyou check the spelling of the text chain containing selected text or the textinsertion point i.
• The Document command (C+Option+Shift+L on Mac OS, Ctrl+Alt+Shift+W onWindows) is available when a document page is displayed. This command letsyou check the spelling of all the text in a document.
• When a master page is displayed, the Document command changes to Masters.The Masters command lets you check the spelling of all the text on all themaster pages. When you check the spelling of document pages, master pagesare not included, and vice versa.
All these commands display the Word Count dialog box. Click OK to initiatethe spell check of the selected text, story, document, or master pages.
WORD COUNT (DIALOG BOX)
Ut i l i t ies & Check Spel l ing & Select ion, Stor y, or Document
The Word Count dialog box displays information about the words in theactive story.
Word Count dialog box
• Total displays a count of all words in the story.
• Unique displays the total number of different words in the story.
• Suspect displays the number of unique words that QuarkXPress cannot find ineither the QuarkXPress dictionary or the open auxiliary dictionary.
• If any suspect words are found, clicking the OK button displays the CheckSelection, Check Story, Check Document, or Check Masters dialog box. If nosuspect words are found, clicking OK in the Word Count dialog box returns youto the document.
Chapter 9: Utilities Menu
379
Spell Checking Commands

• The Cancel button lets you cancel the spell check and closes the Word Countdialog box.
CHECK SELECTION, CHECK STORY, CHECK DOCUMENT, AND CHECK
MASTERS (DIALOG BOXES)
Ut i l i t ies & Check Spel l ing & Select ion, Stor y, Document , or Masters
If there are suspect words in the story, clicking OK in the Word Count dialogbox displays the Check Selection, Check Story, Check Document, or CheckMasters dialog box. These dialog boxes let you view the suspect words andselectively replace them with words from a dictionary or words that you enter.
Check Story dialog box
• The Suspect Word field displays the suspect words one at a time, in the order inwhich they were found. The number of times the word is used in the documentis displayed in parentheses after the suspect word. The suspect word is automati-cally entered in the Replace with field so you can edit it. Clicking the suspectword also places it in the Replace with field.
• The Look up button (C+L on Mac OS, Alt+L on Windows) lets you checkthe QuarkXPress dictionary and an open auxiliary dictionary for words spelledsimilarly to the word in the Replace with field. QuarkXPress lists similarwords in the dialog box. Click the correctly spelled word in the list to enter it inthe Replace with field.
If QuarkXPress is unable to locate any similar words in the dictionary file oran open auxiliary dictionary when you click Look up, the message “No similarwords found” displays. Proper names and words in other languages often causethis message to display.
Chapter 9: Utilities Menu
380
Spell Checking Commands

• The Replace button lets you replace all instances of the Suspect Word withthe word entered in the Replace with field. QuarkXPress replaces the currentsuspect word with the new word, then displays the next suspect word in theSuspect Word field. When all the suspect words have been displayed, thedialog box closes.
• The Add button (C+A on Mac OS, Alt+A on Windows) lets you add the currentsuspect word to the open auxiliary dictionary. The Add button is active when anauxiliary dictionary is open for use with the document.
• The Skip button (C+S on Mac OS, Alt+S on Windows) lets you proceed to thenext suspect word without changing the spelling of the current one.
• The Done (Mac OS) or Close (Windows) button (C+period on Mac OS) lets youstop the spell check and keep any changes that have already been made.
INSTANCE OF SUSPECT REPLACEMENT WORD
WORD IS WILL BE
All lowercase All lowercase
All uppercase All uppercase
Capitalized (first character) Capitalized (first character)
Other capitalization pattern Same case as text in Replace with field
∫ When spell checking a document or story, QuarkXPress searches all layers in thedocument or selected story for misspellings. If questionable spelling is encoun-tered on a hidden layer, QuarkXPress displays the hidden text box or text pathtemporarily, to allow you to determine if the word needs to be replaced. Formore information about hidden layers, see “Displaying and Selecting Layers” inChapter 15, “Layers,” in A Guide to QuarkXPress: Using QuarkXPress.
AUXILIARY DICTIONARY (COMMAND)
Ut i l i t ies menu
An auxiliary dictionary is a custom spelling dictionary that you create to containwords specific to your needs. The open auxiliary dictionary is used together withthe QuarkXPress dictionary when you use any of the Check Spelling commands.
When no documents are open, the Auxiliary Dictionary command displaysthe Default Auxiliary Dictionary dialog box, which lets you create or open anauxiliary dictionary for all subsequently created documents. When a documentis open, the Auxiliary Dictionary command displays the Auxiliary Dictionarydialog box, which lets you create, open, or close an auxiliary dictionary for theactive document.
Chapter 9: Utilities Menu
381
Spell Checking Commands
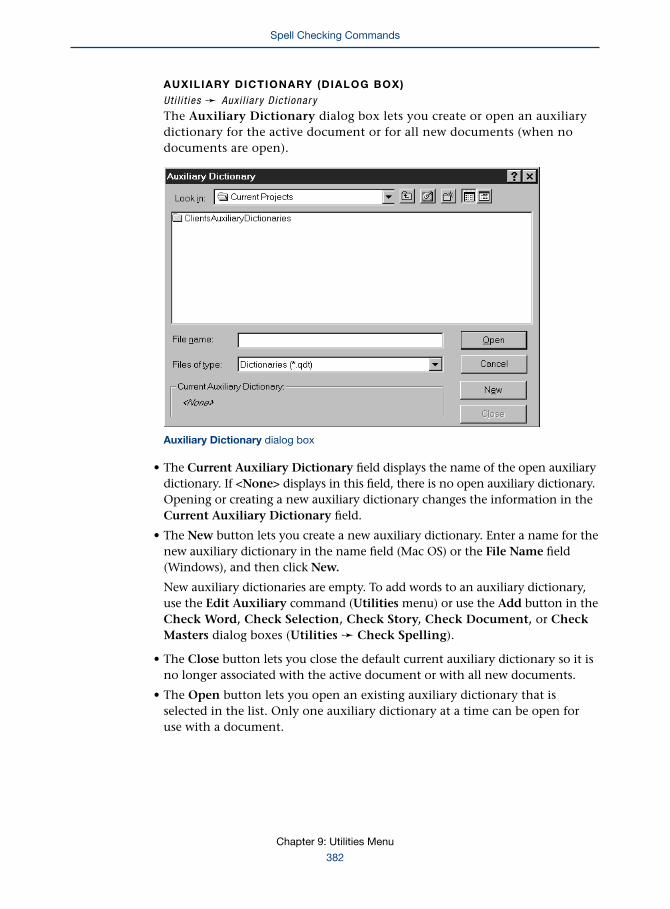
AUXILIARY DICTIONARY (DIALOG BOX)
Ut i l i t ies & Auxi l ia r y D ic t ionary
The Auxiliary Dictionary dialog box lets you create or open an auxiliarydictionary for the active document or for all new documents (when nodocuments are open).
Auxiliary Dictionary dialog box
• The Current Auxiliary Dictionary field displays the name of the open auxiliarydictionary. If <None> displays in this field, there is no open auxiliary dictionary.Opening or creating a new auxiliary dictionary changes the information in theCurrent Auxiliary Dictionary field.
• The New button lets you create a new auxiliary dictionary. Enter a name for thenew auxiliary dictionary in the name field (Mac OS) or the File Name field(Windows), and then click New.
New auxiliary dictionaries are empty. To add words to an auxiliary dictionary,use the Edit Auxiliary command (Utilities menu) or use the Add button in theCheck Word, Check Selection, Check Story, Check Document, or CheckMasters dialog boxes (Utilities & Check Spelling).
• The Close button lets you close the default current auxiliary dictionary so it isno longer associated with the active document or with all new documents.
• The Open button lets you open an existing auxiliary dictionary that isselected in the list. Only one auxiliary dictionary at a time can be open foruse with a document.
Chapter 9: Utilities Menu
382
Spell Checking Commands

∫ Auxiliary dictionaries are saved as separate files on your hard drive. The pathto the auxiliary dictionary is saved with the document. If you move an openauxiliary dictionary to another folder or disk, QuarkXPress will be unable tofind it. To check the spelling of a document associated with a missing auxiliarydictionary, choose Utilities & Auxiliary Dictionary, then locate and openthe auxiliary dictionary. If you cannot locate the auxiliary dictionary, clickClose to break the link to that auxiliary dictionary.
EDIT AUXILIARY (COMMAND)
Ut i l i t ies menu
The Edit Auxiliary command displays the Edit Auxiliary Dictionary dialogbox, which lets you modify the contents of the open auxiliary dictionary.
EDIT AUXILIARY DICTIONARY (DIALOG BOX)
Ut i l i t ies & Edi t Aux i l ia r y
The Edit Auxiliary Dictionary dialog box lets you add words to or delete wordsfrom the auxiliary dictionary.
Edit Auxiliary Dictionary dialog box
• The list displays all the words in the auxiliary dictionary.
• The blank field lets you enter words to add to the auxiliary dictionary; youcannot enter spaces or punctuation.
• The Add button lets you add the word in the field to the auxiliary dictionary.You must enter every variation of a word (for example, the singular and pluralforms) separately.
• The Delete button lets you delete the selected word from the auxiliary dictionary.
• To edit the spelling of a word, delete it and then enter the correct spelling.
• The Save button saves changes made to the auxiliary dictionary.
Chapter 9: Utilities Menu
383
Spell Checking Commands

∫ You can also add words to an auxiliary dictionary by clicking Add in the CheckWord, Check Selection, Check Story, Check Document, or Check Mastersdialog boxes (Utilities & Check Spelling).
HYPHENATION COMMANDS
SUGGESTED HYPHENATION (COMMAND)
If you need to add hyphens to words to change line breaks, QuarkXPress canhelp you break words properly by suggesting hyphenation. The SuggestedHyphenation command (Utilities menu) (C+H on Mac OS, Ctrl+H onWindows) displays the Suggested Hyphenation dialog box, which lets youview syllable breaks for the selected word. To check a word, select the word,place the Text Insertion bar I within it, or place the Text Insertion bar Iimmediately next to the word. If more than one word is selected, theSuggested Hyphenation command displays syllable breaks for the firstword in the selected range.
SUGGESTED HYPHENATION (DIALOG BOX)
Ut i l i t ies menu
Suggested Hyphenation dialog box
The Suggested Hyphenation dialog box displays syllable breaks for the selectedword based on the following:
• First, QuarkXPress checks the paragraph’s hyphenation and justificationspecification to see if the word should be hyphenated at all. For example, if thehyphenation and justification specification Minimum Before (Edit & H&Js &New button) value is 4, the word “multimedia” would not be broken after“mul” in the Suggested Hyphenation dialog box.
• Second, QuarkXPress checks your list of hyphenation exceptions. If the word isin your list, then that hyphenation is displayed.
• Next, QuarkXPress checks its internal dictionary containing preferredhyphenation for thousands of words. If the word is in this dictionary, thenthat hyphenation is displayed. The internal dictionary is checked only whenExpanded is chosen from the Hyphenation Method pop-up menu in the
Chapter 9: Utilities Menu
384
Spell Checking Commands
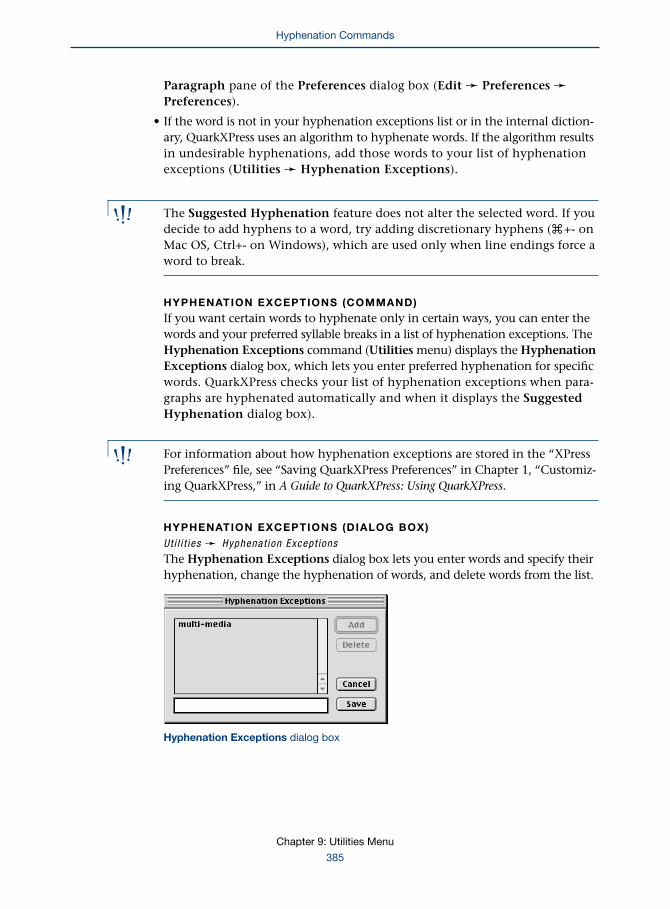
Paragraph pane of the Preferences dialog box (Edit & Preferences &Preferences).
• If the word is not in your hyphenation exceptions list or in the internal diction-ary, QuarkXPress uses an algorithm to hyphenate words. If the algorithm resultsin undesirable hyphenations, add those words to your list of hyphenationexceptions (Utilities & Hyphenation Exceptions).
∫ The Suggested Hyphenation feature does not alter the selected word. If youdecide to add hyphens to a word, try adding discretionary hyphens (C+- onMac OS, Ctrl+- on Windows), which are used only when line endings force aword to break.
HYPHENATION EXCEPTIONS (COMMAND)
If you want certain words to hyphenate only in certain ways, you can enter thewords and your preferred syllable breaks in a list of hyphenation exceptions. TheHyphenation Exceptions command (Utilities menu) displays the HyphenationExceptions dialog box, which lets you enter preferred hyphenation for specificwords. QuarkXPress checks your list of hyphenation exceptions when para-graphs are hyphenated automatically and when it displays the SuggestedHyphenation dialog box).
∫ For information about how hyphenation exceptions are stored in the “XPressPreferences” file, see “Saving QuarkXPress Preferences” in Chapter 1, “Customiz-ing QuarkXPress,” in A Guide to QuarkXPress: Using QuarkXPress.
HYPHENATION EXCEPTIONS (DIALOG BOX)
Ut i l i t ies & Hyphenat ion Except ions
The Hyphenation Exceptions dialog box lets you enter words and specify theirhyphenation, change the hyphenation of words, and delete words from the list.
Hyphenation Exceptions dialog box
Chapter 9: Utilities Menu
385
Hyphenation Commands

• The list displays all the words with hyphenation exceptions.
• The field lets you enter words with hyphens at specific points. You cannot enterspaces or other punctuation. For example, enter “pro-cess-ing” to allow hyphen-ation between the three syllables; enter “pro-cessing” to allow hyphenation onlyafter “pro;” and enter “processing” to prevent automatic hyphenation.
• The Add button lets you add the word in the field to the hyphenationexceptions. You must enter every variation of a word (for example, thesingular and plural forms) separately.
• When you select a word in the list, the Add button changes to Replace,which lets you enter different hyphenation for the word.
• The Delete button lets you remove the selected word from the list ofhyphenation exceptions.
USAGE COMMAND
The Usage command (Utilities menu) displays the Usage dialog box, which includesa Fonts tab and a Pictures tab. The controls in the Usage dialog box let you find andverify the fonts and pictures used in a document.
FONTS (DIALOG BOX TAB)
Ut i l i t ies & Usage & Fonts tab
The Fonts tab of the Usage dialog box lists all the fonts used in a document andlets you replace a font with another font. When you replace the fonts used ondocument pages, master pages are not included, and vice versa.
Usage dialog box Fonts tab
• The Name column lists the menu names of all the fonts used on documentpages or master pages (whichever is displayed in the document window).
Chapter 9: Utilities Menu
386
Hyphenation Commands

• Before you replace a font, you can view the font in the document. The ShowFirst button displays the first use of the selected font. If the document has sub-sequent uses of the font, Show First changes to Show Next. Pressing Option(Mac OS) or Alt (Windows) changes Show Next back to Show First.
• Clicking the Replace button displays the Replace Font dialog box, which letsyou choose a font to replace all uses of the selected font. (You can also double-click a font name to display the Replace Font dialog box.) The ReplacementFont pop-up menu lets you select from all the fonts available to your system;the type style buttons let you choose the appropriate style for the replacementtext. To ensure that a font is not used in a document, check the fonts on boththe document pages and the master pages.
• Checking More Information displays additional information from the font’sheader file, including the font’s file name and type (for example, Type 1,TrueType, or OpenType).
PICTURES (DIALOG BOX TAB)
Ut i l i t ies & Usage & Pictures tab
The Pictures tab of the Usage dialog box lists all the pictures on documentpages, master pages, and the pasteboard. You can determine the status ofpictures, view them, locate their disk files for printing, and control whetherthey print or not.
∫ For documents created in versions of QuarkXPress prior to version 3.0, thePictures tab lists only high-resolution pictures (TIFF, RIFF, and EPS).
Usage dialog box Pictures tab
PRINT (COLUMN)
Ut i l i t ies & Usage & Pictures tab
QuarkXPress lets you prevent an active picture from printing by checkingSuppress Picture Printout in the Picture tab of the Modify dialog box (Itemmenu). You can also prevent a picture and its frame from printing by checking
Chapter 9: Utilities Menu
387
Usage Command

Suppress Printout in the Box tab of the Modify dialog box (Item menu).The Print column and pop-up menu in the Pictures tab of the Usage dialogbox let you change which pictures will print:
• A checkmark indicates that the picture and its frame will print normally (neitherSuppress Picture Printout or Suppress Printout is checked).
• No checkmark indicates that the picture, or the frame and picture, will not print(either Suppress Picture Printout or Suppress Printout is checked).
• To suppress a picture that is set to print, click in the Print column to remove thecheckmark. This will check Suppress Picture Printout for the picture (prevent-ing the picture from printing). You can also click the Print pop-up menu andchoose No.
• To print a picture that is suppressed, click in the Print column to add a check-mark. This will uncheck Suppress Picture Printout and Suppress Printout andprint the picture and its frame normally. You can also click the Print pop-upmenu and choose Yes.
∫ You can multiple-select pictures and change their print status all at once.To select a range of pictures, click the first picture and press Shift while youclick the last picture in the range. To select nonconsecutive pictures, press C(Mac OS) or Ctrl (Windows) while you click each picture.
NAME, PAGE, TYPE (COLUMNS)
Ut i l i t ies & Usage & Pictures tab
The Name, Page, and Type columns help identify picture files.
• The Name column displays the name of the picture file and the path to thepicture file (when the picture was first imported or its last updated location).If you paste a picture into a picture box rather than importing it through theGet Picture dialog box (File menu), the Name is listed as No Disk File(Mac OS) or Static object (Windows).
Windows only: If you create the picture by using the Insert Object command(Edit menu), the Name is listed as Embedded object.
• The Page column displays the number of the page where the picture is located.A dagger † (Mac OS) or “PB” (Windows) indicates that the picture lies entirelyon the pasteboard next to the listed page. P
• The Type column displays the file format of the picture.
Chapter 9: Utilities Menu
388
Usage Command

STATUS (COLUMN)
Ut i l i t ies & Usage & Pictures tab
To print high-resolution pictures, QuarkXPress needs access to the actual picturefiles. The Status column indicates whether QuarkXPress can find the picture fileand whether the picture file has been modified since it was imported.
The status can be:
• OK: The picture file has not been moved or edited
• Modified: The picture file has been edited in another application since it wasimported into QuarkXPress, but it has not been moved
• Missing: The picture file has been renamed or moved
• Wrong Type: The file type has changed, but the picture file was not updated
• No XTension: The picture file was imported using XTensions software that is nolonger enabled or present (for example, the LZW Import filter)
• In Use: The picture file is open in another application
• No Access: The current user does not have privileges to open the file
• Can’t Open: The computer has too many files open
∫ When you print a document that has picture files listed as modified or missing,QuarkXPress prompts you to update them. If you do not update a missingpicture file, QuarkXPress prints the low-resolution picture preview ratherthan the original picture file. If you do not update a modified picture file,QuarkXPress still prints the modified picture file, but it may not match thepreview displayed in the document.
SHOW (BUTTON)
Ut i l i t ies & Usage & Pictures tab
The Show button displays the selected picture to help you determine whetherto update it.
UPDATE (BUTTON)
Ut i l i t ies & Usage & Pictures tab
The Update button lets you update modified pictures and locate missing pictures.If a selected picture is modified, the Update button reimports the picture with anew picture preview. If a selected picture is missing, the Update button displaysthe Find dialog box, which lets you locate and open the missing picture file.
∫ When you update a picture, and other missing picture files are found in thesame location, an alert gives you the option to update those pictures as well.
Chapter 9: Utilities Menu
389
Usage Command

MORE INFORMATION (CHECK BOX)
Ut i l i t ies & Usage & Pictures tab
Checking More Information displays the picture’s full path, file size, modifica-tion date, dimensions, resolution, and colors.
PROFILES (DIALOG BOX TAB) PUt i l i t ies & Usage & Prof i les tab
The Profiles tab of the Usage dialog box provides information about everyprofile used in the active document or specified in the Color ManagementPreferences dialog box (Edit & Preferences & Color Management). It alsolets you replace profiles.
• The Profiles pop-up menu lets you get information about how a profile is usedin the active document.
• The Status field indicates whether the profile chosen in the Profile pop-upmenu is available to QuarkCMS.
• The Color Space field indicates the color space of the profile chosen in theProfile pop-up menu.
• The Object list displays all the properties in the active document that usethe profile chosen in the Profile pop-up menu.
• When checked, the More Information check box displays detailed informationabout the profile chosen in the Profile pop-up menu. It includes informationabout the profile’s preferred Color Management Module (CMM), as well asthe profile’s type and manufacturer.
• The Replace button opens the Replace Profile dialog box, which lets youreplace the profile of a property with another profile that is appropriate forthat property. The Replace button is available when a property is selectedin the Object list.
Usage dialog box Profiles tab
Chapter 9: Utilities Menu
390
Usage Command

XTENSIONS MANAGER
The XTensions Manager command (Utilities menu) displays the XTensionsManager dialog box, which lets you control which XTensions modules load whenyou launch QuarkXPress. XTensions modules that are enabled are stored in your“XTension” folder within your QuarkXPress application folder. When you disable anXTensions module, the XTensions Manager moves it to the “XTension Disabled” folder.
You can display the XTensions Manager dialog box by pressing the space bar whileQuarkXPress is launching. You can also set a preference to display the XTensionsManager dialog box at startup in the XTensions Manager pane of the Preferencesdialog box (Edit & Preferences & Preferences).
XTENSIONS MANAGER (DIALOG BOX)
Ut i l i t ies & XTens ions Manager
The XTensions Manager dialog box lists all the XTensions modules available toQuarkXPress. Using the XTensions Manager dialog box, you can save, import,and export sets of specific XTensions modules, and you can specify whichXTensions modules should load.
XTensions Manager dialog box
Chapter 9: Utilities Menu
391
XTensions Manager

SET (POP-UP MENU)
Ut i l i t ies & XTens ions Manager
A set is a group of specific XTensions modules that load together. For example,you might make sets of third-party XTensions modules that are required only forspecific documents or for certain clients. The Set pop-up menu lets you choosean XTensions set to load:
• All XTensions Enabled loads all your XTensions software
• All XTensions Disabled does not load any XTensions software
• The Set pop-up menu also lets you choose from the XTensions sets you createdusing the Save As button
SAVE AS, DELETE, IMPORT, EXPORT (BUTTONS)
Ut i l i t ies & XTens ions Manager
The Save As, Delete, Import, and Export buttons let you create and manipulateyour XTensions sets.
• The Save As button lets you create a new set from the XTensions modules thatare currently checked in the Enable column. The Save As button displays theSave Set dialog box, which lets you name and save the new XTensions set.XTensions sets are saved in the “XPress Preferences” file.
• The Delete button deletes the set displayed in the Set pop-up menu.
• The Import button displays the Import XTensions Set dialog box, which letsyou import a set from another user.
• The Export button displays the Export XTensions Set dialog box, which letsyou export the set displayed in the Set pop-up menu.
∫ When you create an XTensions set, you create a file that describes whichXTensions modules should load. The XTensions set does not include actualXTensions software. On Windows, XTensions sets are saved with a “*.xts”file extension.
ENABLE (COLUMN)
Ut i l i t ies & XTens ions Manager
The Enable column and pop-up menu let you change which XTensions moduleswill load. Changes take effect the next time you launch QuarkXPress.
• A checkmark indicates that the XTensions software will load. No check markindicates that the XTensions software will not load.
Chapter 9: Utilities Menu
392
XTensions Manager
• To change the status of a specific XTensions module, click in the Enable columnto add or remove a checkmark. You can also click the Enable pop-up menu andchoose Yes or No.
∫ You can multiple-select XTensions modules and change their status all at once.To select a range of XTensions modules, click the first one and press Shift whileyou click the last one in the range. To select nonconsecutive XTensionsmodules, press C (Mac OS) or Ctrl (Windows) while you click each one.
NAME, STATUS (COLUMNS)
Ut i l i t ies & XTens ions Manager
The Name column lists all the XTensions modules in your “XTension” folder oryour “XTension Disabled” folder within your QuarkXPress application folder.The Status column lists whether the XTensions software is Active (currentlyloaded) or Inactive (disabled). If QuarkXPress could not load the XTensionsmodule, the Status is Error.
ABOUT (BUTTON)
Ut i l i t ies & XTens ions Manager
Clicking the About button displays detailed information about the selectedXTensions software.
COMPONENT STATUS
Components are software modules that are required for you to launch QuarkXPressand access all its features. Components reside in the “Required Components” folderin your QuarkXPress application folder. If a component is not loading correctly, theComponent Status dialog box displays to indicate which component is preventingQuarkXPress from launching.
COMPONENT STATUS (COMMAND)
Ut i l i t ies menu
The Component Status command displays the Component Status dialog box,so you can verify the versions of your components.
COMPONENT STATUS (DIALOG BOX)
Ut i l i t ies & Component Sta tus
If QuarkXPress fails to launch as a result of a component that is not loadingcorrectly, the Component Status dialog box displays to indicate which compo-nent is not loading.
Chapter 9: Utilities Menu
393
XTensions Manager

You can access the Component Status dialog box while QuarkXPress is runningto review the versions of the components in your “Required Components” folder.
Component Status dialog box
COMPONENT (COLUMN)
Ut i l i t ies & Component Sta tus
The Component column lists the names of the components in the “RequiredComponents” folder.
CURRENT VERSION (COLUMN)
Ut i l i t ies & Component Sta tus
The Current Version column lists the versions of the components in the“Required Components” folder.
COMPATIBLE VERSIONS (COLUMN)
Ut i l i t ies & Component Sta tus
The Compatible Versions column lists the versions of QuarkXPress that theselected component is compatible with. The component will not work with anyversion of QuarkXPress that is earlier than the version listed in the CompatibleVersions column.
STATUS (COLUMN)
Ut i l i t ies & Component Sta tus
The Status column indicates whether each component in the “RequiredComponents” folder is loading or if QuarkXPress is having trouble loadinga component.
Chapter 9: Utilities Menu
394
Component Status

STATUS DETAILS (AREA)
Ut i l i t ies & Component Sta tus
The Status details area provides extra information about a selected component.
• If a component is loading normally, the Status details area displays the message:“This component is functioning normally.”
• If a component is incompatible with the current version of QuarkXPress, theStatus details area displays one of two messages: “This component can only beused with application versions <version number> and older,” or “This versionof this component is not compatible with this application.”
If there is a problem loading a particular component, the Component Statusdialog box displays when you launch QuarkXPress. You will see one of thefollowing alerts:
• If the component is missing, the Status details area displays the message: “Thiscomponent was not found in the ‘Required Components’ folder.”
• If the component is damaged or cannot be loaded, the Status details areadisplays the message: “This component is damaged or corrupt and couldnot be loaded.”
• If an item in the “Required Components” folder is not a component, the Statusdetails area displays the message: “This component cannot be used with thecurrent application and has been disabled.”
• If a component is incompatible with the current version of QuarkXPress, theStatus details area displays one of two messages: “This component can only beused with application versions <version number> and older,” or “This version ofthis component is not compatible with this application.”
SAVE STATUS TO FILE (BUTTON)
Ut i l i t ies & Component Sta tus
Clicking the Save Status to File button allows you to save the component listand current status as an ASCII text file. The file’s default name is “CompStat”;you can change the name if you prefer. The resulting text file can be used introubleshooting or in determining which components need to be updated.
CLOSE (BUTTON)
Ut i l i t ies & Component Sta tus
Clicking the Close button closes the Component Status dialog box.
Chapter 9: Utilities Menu
395
Component Status

PPD MANAGER P
PostScript Printer Description files (PPDs) are supplied by printer manufacturersto provide access to additional features of PostScript printers. PPDs are accessedthrough the Printer Description pop-up menu in the Setup tab of the Print dialogbox (File menu). Depending on how many PPDs are available to your system, thelist in the Printer Description pop-up menu can be fairly long. The PPD Managercommand (Utilities menu) displays the PPD Manager dialog box, which lets youcontrol which PPDs are displayed in the Printer Description pop-up menu.
PPD MANAGER (DIALOG BOX) PUt i l i t ies & PPD Manager
The PPD Manager dialog box lists all the PPDs available to QuarkXPress andlets you specify which PPDs are listed in the Printer Description pop-up menuin the Setup tab of the Print dialog box (File menu).
PPD Manager dialog box
INCLUDE (COLUMN) PUt i l i t ies & PPD Manager
The Include column and pop-up menu indicate whether a PPD will be listedin the Printer Description pop-up menu and let you change the selectedPPD’s status.
• A checkmark indicates that the PPD will display in the Printer Descriptionpop-up menu. No checkmark indicates that the PPD will not display in thePrinter Description pop-up menu.
• To change the status of a PPD, click in the Include column to add or remove acheckmark. You can also click the Include pop-up menu and choose Yes or No.
Chapter 9: Utilities Menu
396
PPD Manager

∫ You can multiple-select PPDs and change their status all at once. To select arange of PPDs, click the first one and press Shift while you click the last one inthe range. To select nonconsecutive PPDs, press C (Mac OS) or Ctrl (Windows)while you click each PPD.
NAME (COLUMN) PUt i l i t ies & PPD Manager
The Name column lists all the PPDs in the selected system PPD folder. If youhave a PPD folder within your QuarkXPress folder, the Name column displaysthe PPDs in that folder as well.
SYSTEM PPD FOLDER (AREA), SELECT/BROWSE (BUTTON) PUt i l i t ies & PPD Manager
The System PPD Folder area lets you specify the system folder that containsthe PPDs you want to access. On Mac OS, QuarkXPress accesses the “PrinterDescriptions” folder inside the “Extensions” folder within your “System Folder”by default. On Windows 95 or 98, QuarkXPress accesses the “System” folderwithin the “Windows” folder by default.
However, you can change this to any other folder available to your computer.Clicking the Select (Mac OS) or Browse (Windows) button displays the SystemPPD Folder dialog box, which lets you locate another folder.
UPDATE (BUTTON) PUt i l i t ies & PPD Manager
If you add a PPD to your system, the Update button lets you update the list ofPPDs in the Name column without relaunching QuarkXPress.
PROFILE MANAGER P
The Profile Manager command (Utilities menu) displays the Profile Managerdialog box, which lets you check to see which International Color Consortium (ICC)profiles are currently installed on your computer and being used by QuarkCMSQuarkXTensions software. The Profile Manager command is available whenthe QuarkCMS QuarkXTensions software is installed and Color ManagementActive is checked in the Color Management Preferences dialog box (Mac OS)or a Color Management Module (CMM) is chosen in the Color Managementpop-up menu (Windows).
INCLUDE (COLUMN) PUt i l i t ies & Prof i le Manager
The Include column and pop-up menu let you indicate whether QuarkCMSwill use a profile.
Chapter 9: Utilities Menu
397
PPD Manager

• A checkmark indicates Quark CMS will use the profile. No checkmark indicatesthat Quark CMS will not use it. By default, every profile installed is checked.
• To change the status of a profile, click in the Include column to add or remove acheckmark. You can also choose Yes or No from the Include pop-up menu.
∫ You can multiple-select profiles and change their status all at once. To select arange of profiles, click the first one and press Shift while you click the lastone in the range. To select nonconsecutive profiles, press C (Mac OS) or Ctrl(Windows) while you click each one.
NAME (COLUMN) PThe Name column displays a list of ICC profiles installed on your system.
LOCATION (AREA) PThe Location area displays information about a selected profile and where itis installed on the computer.
SELECT/BROWSE, UPDATE (BUTTONS) PThe Select (Mac OS) or Browse (Windows) button lets you locate the auxiliaryprofile folder.
The Update button lets you update the list of profiles to match the availableprofiles in a given folder.
Profile Manager dialog box
Chapter 9: Utilities Menu
398
Profile Manager
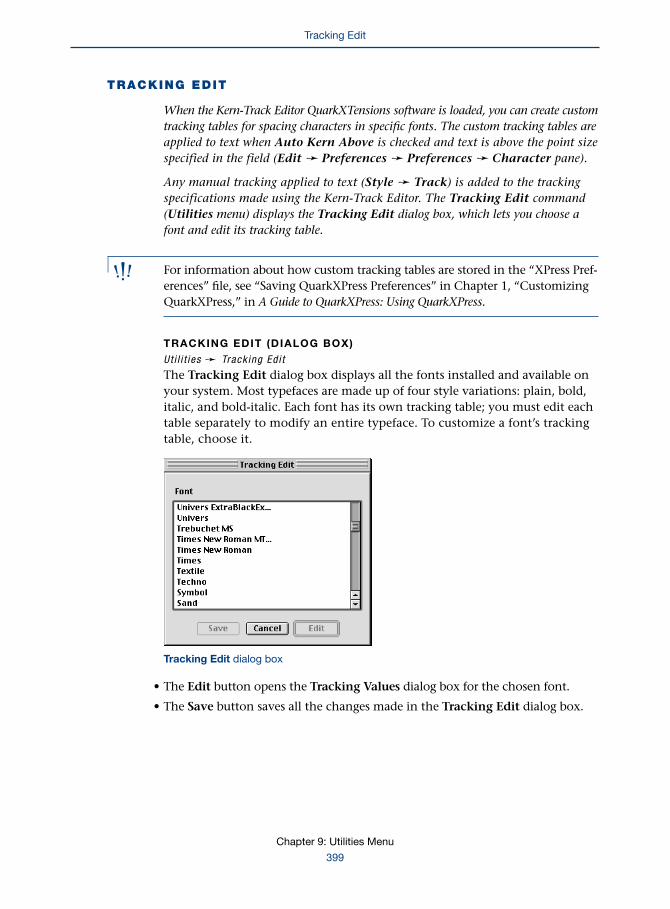
TRACKING EDIT
When the Kern-Track Editor QuarkXTensions software is loaded, you can create customtracking tables for spacing characters in specific fonts. The custom tracking tables areapplied to text when Auto Kern Above is checked and text is above the point sizespecified in the field (Edit & Preferences & Preferences & Character pane).
Any manual tracking applied to text (Style & Track) is added to the trackingspecifications made using the Kern-Track Editor. The Tracking Edit command(Utilities menu) displays the Tracking Edit dialog box, which lets you choose afont and edit its tracking table.
∫ For information about how custom tracking tables are stored in the “XPress Pref-erences” file, see “Saving QuarkXPress Preferences” in Chapter 1, “CustomizingQuarkXPress,” in A Guide to QuarkXPress: Using QuarkXPress.
TRACKING EDIT (DIALOG BOX)
Ut i l i t ies & Track ing Ed i t
The Tracking Edit dialog box displays all the fonts installed and available onyour system. Most typefaces are made up of four style variations: plain, bold,italic, and bold-italic. Each font has its own tracking table; you must edit eachtable separately to modify an entire typeface. To customize a font’s trackingtable, choose it.
Tracking Edit dialog box
• The Edit button opens the Tracking Values dialog box for the chosen font.
• The Save button saves all the changes made in the Tracking Edit dialog box.
Chapter 9: Utilities Menu
399
Tracking Edit

TRACKING VALUES (DIALOG BOX)
Ut i l i t ies & Track ing Ed i t & Edi t but ton
The Tracking Values dialog box lets you specify custom tracking valuesfrom –100⁄200 to 100⁄200 em space for font sizes from 2 to 250 points. The controlsin the dialog box work as follows:
Tracking Values dialog box
• A horizontal line at a Tracking Value of zero means that tracking values havenot been modified for the chosen font.
• To modify the tracking curve, click anywhere on the curve to create a handle.You can place up to four handles on the curve. To remove a handle, pressOption (Mac OS) or Ctrl (Windows) while you click the handle.
• As you drag a handle, tracking and size information for that point on the curvedisplays in the upper right corner of the dialog box.
• Tracking values for font sizes that fall between handles are determined bythe intersection of the font size and the tracking curve. Font sizes largerthan 250 points are tracked at the same value as 250 points.
• The Reset button erases changes made in previous editing sessions and setstracking values to zero for all font sizes.
∫ If you generally track a font when you use it, you may want to edit its trackingtable. For example, if you always use 24-point Futura Extra Bold tracked to –10for headlines, you can place a point on the tracking table at the intersectionof 24 points and the tracking value of –10. You need to edit the tracking tablefor each version of a font (Futura, Futura Book, Future Extra Bold, FuturaExtra Bold Oblique, etc.).
Chapter 9: Utilities Menu
400
Tracking Edit
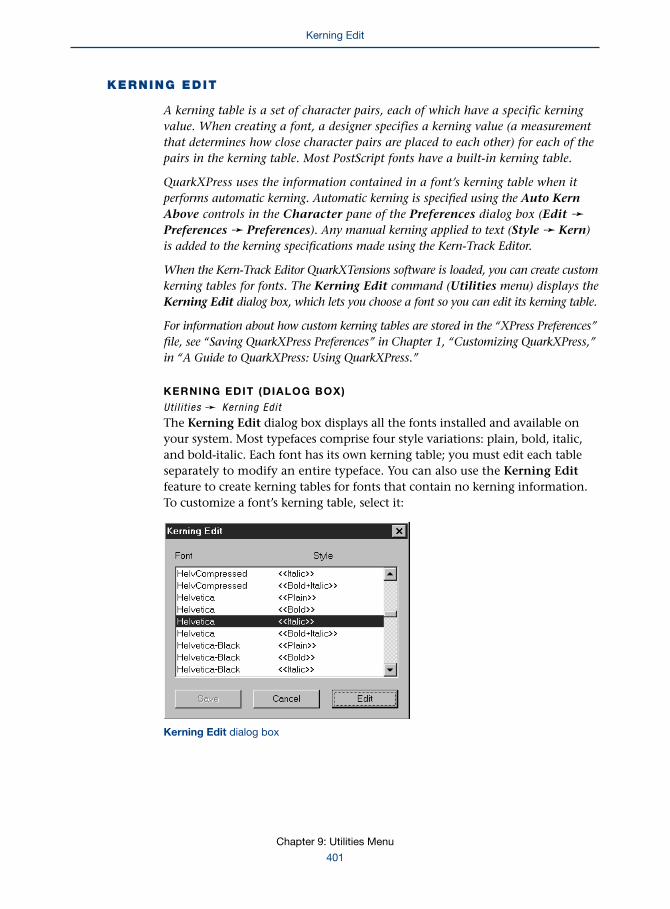
KERNING EDIT
A kerning table is a set of character pairs, each of which have a specific kerningvalue. When creating a font, a designer specifies a kerning value (a measurementthat determines how close character pairs are placed to each other) for each of thepairs in the kerning table. Most PostScript fonts have a built-in kerning table.
QuarkXPress uses the information contained in a font’s kerning table when itperforms automatic kerning. Automatic kerning is specified using the Auto KernAbove controls in the Character pane of the Preferences dialog box (Edit &Preferences & Preferences). Any manual kerning applied to text (Style & Kern)is added to the kerning specifications made using the Kern-Track Editor.
When the Kern-Track Editor QuarkXTensions software is loaded, you can create customkerning tables for fonts. The Kerning Edit command (Utilities menu) displays theKerning Edit dialog box, which lets you choose a font so you can edit its kerning table.
For information about how custom kerning tables are stored in the “XPress Preferences”file, see “Saving QuarkXPress Preferences” in Chapter 1, “Customizing QuarkXPress,”in “A Guide to QuarkXPress: Using QuarkXPress.”
KERNING EDIT (DIALOG BOX)
Ut i l i t ies & Kern ing Ed i t
The Kerning Edit dialog box displays all the fonts installed and available onyour system. Most typefaces comprise four style variations: plain, bold, italic,and bold-italic. Each font has its own kerning table; you must edit each tableseparately to modify an entire typeface. You can also use the Kerning Editfeature to create kerning tables for fonts that contain no kerning information.To customize a font’s kerning table, select it:
Kerning Edit dialog box
Chapter 9: Utilities Menu
401
Kerning Edit

• The Edit button opens the Kerning Values dialog box for the selected font.
• The Save button saves all the changes made in the Kerning Values dialog box.
KERNING VALUES (DIALOG BOX)
Ut i l i t ies & Kern ing Ed i t & Edi t but ton
The Kerning Values dialog box displays the current kerning pairs for the chosenfont and lets you add, modify, and delete kerning pairs. You can specify customkerning values from –100⁄200 to 100⁄200 em space for any kerning pair. Kerning valuesare measured in increments of 1⁄200 em space, so entering a kerning value of –20for a character pair reduces the normal, unkerned character space by 1⁄10 (20
⁄200)em space.
The controls in the dialog box work as follows:
Kerning Values dialog box
• The Kerning Pairs list lets you select from the list of existing kerning pairsto edit one.
• The Preview area displays the selected kerning pair with its current values. Youshould make final decisions about kerning by looking at high-resolution outputrather than the Preview area or text on a page.
• The Pair field lets you enter a new kerning pair. If you select a pair in theKerning Pairs list, it is automatically displayed in the Pair field.
Chapter 9: Utilities Menu
402
Kerning Edit

• The Value field lets you enter a kerning value or click the arrows to specify thekerning value for a pair. The Preview area updates to display the kerning pairwith the new value.
• The Add/Replace button lets you create a kerning pair from the informationin the Pair and Value fields. The new or edited kerning pair is listed in theKerning Pairs list.
• The Delete button lets you remove a kerning pair from the Kerning Pairs list.After you click Delete, the deleted pair is removed from the list but is displayedin the Pair and Value fields.
• The Reset button lets you revert an edited kerning table to the values originallybuilt into the font, even if you have saved edits to the table during a previousediting session. The Reset button is available when you have made changes toa font’s kerning values.
• You can export kerning tables as ASCII text files, then import those kerningtables for use with another font. You can also import kerning tables createdor edited in a text editor. The Import button displays a dialog box that letsyou locate a kerning table to use with the current font. The Export buttongenerates an ASCII text file from the kerning table and lets you name andsave that kerning table.
∫ If you save a table after you have modified it, it will be saved in the “XPressPreferences” file as a user-defined kerning table. Once you delete the “XPressPreferences” file, the kerning table information will be gone. We recommendthat you export the modified kerning table for later use.
BUILD INDEX P
The Build Index command (Utilities menu) displays the Build Index dialog box,which allows you to format and build your index. The Build Index command is onlyavailable when the Index QuarkXTensions software is loaded and the Index palette isdisplayed. For more information about the Index palette, see Chapter 1 “Palettes.”
BUILD INDEX (DIALOG BOX) PUt i l i t ies & Bui ld Index
The Build Index dialog box allows you to organize and build an index after youhave tagged your index entries and adjusted your index preferences. The dialogbox is divided into two areas. The top area lets you specify settings for theentire index, and the bottom area lets you specify style sheets for differententry levels.
Chapter 9: Utilities Menu
403
Kerning Edit

Build Index dialog box
FORMAT (BUTTONS) PUt i l i t ies & Bui ld Index
The Format options let you choose a Nested or Run-in index.
• The Nested option arranges the entries in hierarchical order in separateparagraphs if your index has more than one entry level
• The Run-in option arranges any second-, third-, or fourth-level entries in asingle paragraph following the first-level entry
ENTIRE BOOK (CHECK BOX) PUt i l i t ies & Bui ld Index
If you are working with QuarkXPress books, checking Entire Book builds anindex for the entire book. The Entire Book check box is available when a bookis open.
REPLACE EXISTING INDEX (CHECK BOX) PUt i l i t ies & Bui ld Index
Checking Replace Existing Index replaces any previously built version of theindex with the new version. If Replace Existing Index is unchecked, a newversion of the index will be added after any existing versions.
ADD LETTER HEADINGS (CHECK BOX) PUt i l i t ies & Bui ld Index
Checking Add Letter Headings adds letter headings to each alphabetical areaof the index. For example, if you have entries that start with “a,” “f,” and “t,”the letters A, F, and T will be added just prior to the entries starting withthose letters.
Chapter 9: Utilities Menu
404
Build Index

STYLE (POP-UP MENU) PUt i l i t ies & Bui ld Index & Add Let ter Headings area
When Add Letter Headings is checked, the Style pop-up menu is available. TheStyle pop-up menu lets you select a paragraph style sheet to be applied to yourletter headings.
MASTER PAGE (POP-UP MENU) PUt i l i t ies & Bui ld Index
The Master Page pop-up menu lets you choose the master page for the indexpages. You must use a master page with an automatic text box.
LEVEL STYLES (AREA) PUt i l i t ies & Bui ld Index
The Level Styles area lets you specify the paragraph style sheets used to formateach entry level. If you have selected a Run-in index, only the First Levelpop-up menu is available.
• The First Level pop-up menu lets you choose a style sheet to apply to any indexentries you have designated as first level
• The Second Level pop-up menu lets you choose a style sheet to apply to anyindex entries you have designated as second level
• The Third Level pop-up menu lets you choose a style sheet to apply to anyindex entries you have designated as third level
• The Fourth Level pop-up menu lets you choose a style sheet to apply to anyindex entries you have designated as fourth level
Chapter 9: Utilities Menu
405
Build Index
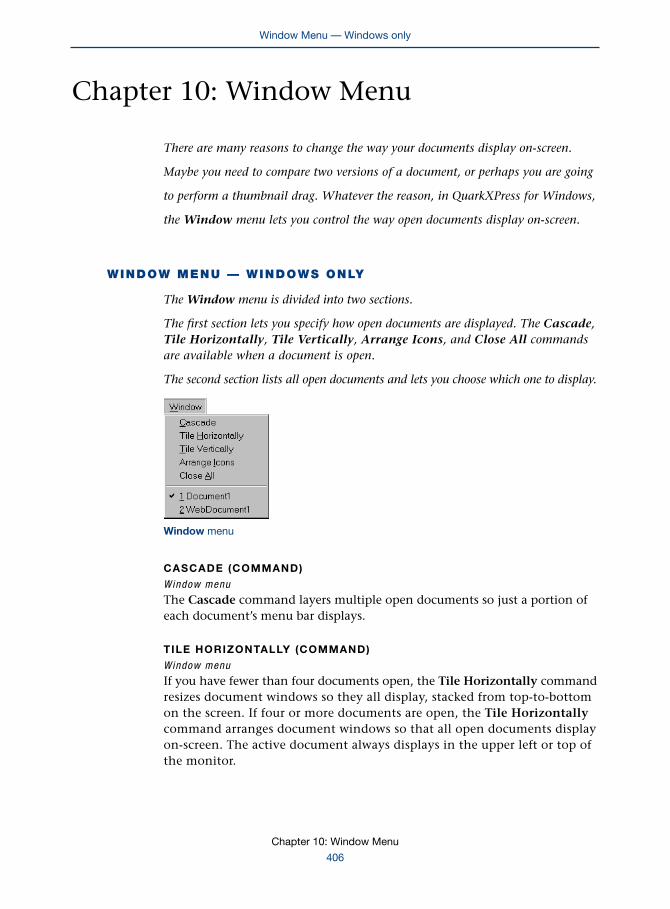
Chapter 10: Window Menu
There are many reasons to change the way your documents display on-screen.
Maybe you need to compare two versions of a document, or perhaps you are going
to perform a thumbnail drag. Whatever the reason, in QuarkXPress for Windows,
the Window menu lets you control the way open documents display on-screen.
WINDOW MENU — WINDOWS ONLY
The Window menu is divided into two sections.
The first section lets you specify how open documents are displayed. The Cascade,Tile Horizontally, Tile Vertically, Arrange Icons, and Close All commandsare available when a document is open.
The second section lists all open documents and lets you choose which one to display.
Window menu
CASCADE (COMMAND)
Window menu
The Cascade command layers multiple open documents so just a portion ofeach document’s menu bar displays.
TILE HORIZONTALLY (COMMAND)
Window menu
If you have fewer than four documents open, the Tile Horizontally commandresizes document windows so they all display, stacked from top-to-bottomon the screen. If four or more documents are open, the Tile Horizontallycommand arranges document windows so that all open documents displayon-screen. The active document always displays in the upper left or top ofthe monitor.
Chapter 10: Window Menu
406
Window Menu — Windows only
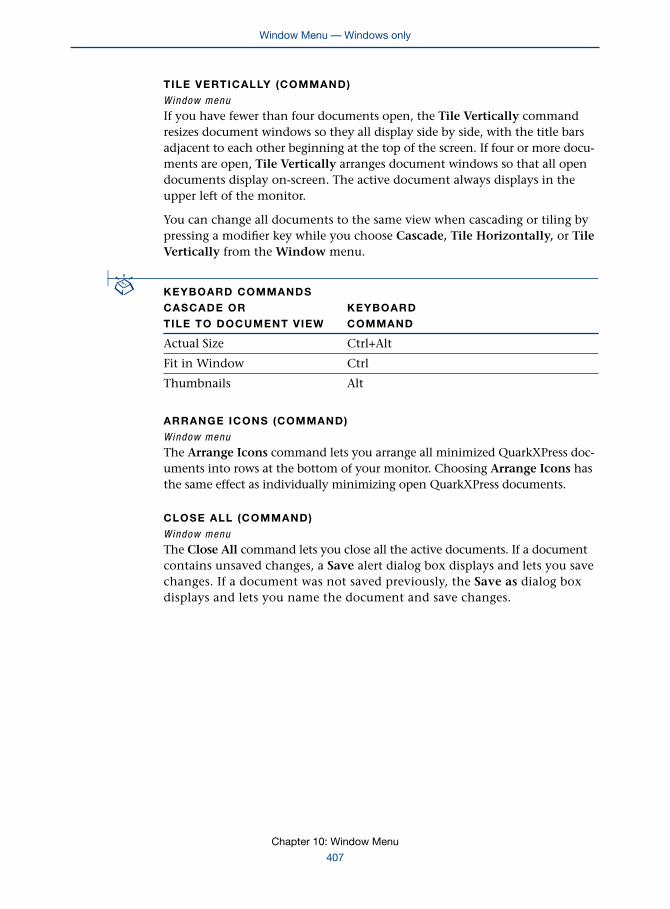
TILE VERTICALLY (COMMAND)
Window menu
If you have fewer than four documents open, the Tile Vertically commandresizes document windows so they all display side by side, with the title barsadjacent to each other beginning at the top of the screen. If four or more docu-ments are open, Tile Vertically arranges document windows so that all opendocuments display on-screen. The active document always displays in theupper left of the monitor.
You can change all documents to the same view when cascading or tiling bypressing a modifier key while you choose Cascade, Tile Horizontally, or TileVertically from the Window menu.
ç KEYBOARD COMMANDS
CASCADE OR KEYBOARD
TILE TO DOCUMENT VIEW COMMAND
Actual Size Ctrl+Alt
Fit in Window Ctrl
Thumbnails Alt
ARRANGE ICONS (COMMAND)
Window menu
The Arrange Icons command lets you arrange all minimized QuarkXPress doc-uments into rows at the bottom of your monitor. Choosing Arrange Icons hasthe same effect as individually minimizing open QuarkXPress documents.
CLOSE ALL (COMMAND)
Window menu
The Close All command lets you close all the active documents. If a documentcontains unsaved changes, a Save alert dialog box displays and lets you savechanges. If a document was not saved previously, the Save as dialog boxdisplays and lets you name the document and save changes.
Chapter 10: Window Menu
407
Window Menu — Windows only
GlossaryABSOLUTE LEADINGAbsolute leading spaces lines of text by a rigidamount, usually measured in points. See also Autoleading, Incremental leading, and Leading.
ABSOLUTE PAGE NUMBERA page’s actual position relative to the first page ofa document, regardless of the way the document isnumbered or sectioned. You can indicate absolutepage numbers in the Go to Page and Printdialog boxes by preceding the numeral with aplus (+) character.
ACTIVATEYou activate items by clicking on them.
ACTIVEQuarkXPress items can be either active or inactive.
Active boxes, text paths, tables, and lines have blackoutlines and handles for resizing or reshaping. Anactive group displays with a dotted-line border; theitems in the group display with black outlines.
In the interface, different menus and choices areavailable depending on the active item. See alsoMultiple-selected items.
ACTIVE PARAGRAPHSee Select.
ADDITIVE COLORA system in which color is produced by adding pri-mary lights together. In an additive color system,the primaries are red, green, and blue. When addedtogether in proper amounts, these colors producewhite. For example, an RGB video monitor uses anadditive color system.
AGATESA measurement system in the Horizontal andVertical Measure pop-up menus in the Measure-ments pane of the Preferences dialog box (Edit &Preferences & Preferences & Document). Agatesare commonly used for measuring vertical columnlength in classified ads.
ALERTA message or dialog box displayed to indicate aproblem. For example, if you try to perform anoperation that cannot be undone, you will usuallybe warned with an alert.
ALIGNMENTQuarkXPress has five paragraph alignments(Style & Alignment): Left, Centered, Right,Justified, and Forced. See also Forced, Justifica-tion, Space/Align, and Vertical alignment.
ALIGN ON TABA tab alignment option in the Paragraph Attributesdialog box Tabs tab (Style & Tabs) that lets youalign the tab stop on any printed character.
ALL CAPSA type style that makes all the characters uppercase.
ALPHA CHANNELAn 8-bit raster image containing masking informa-tion. QuarkXPress uses alpha channels to indicate aclipping area. Alpha channels are created in image-editing applications and are saved with the image.
ANCHOR1.QuarkXPress lets you paste a line, picture box, textbox, or table within text so that the box acts likea character and flows with the text. You can alsoanchor a rule to the top or bottom (or both) of aparagraph using the Rules command (Style menu).
2.Text (or a point in text) that can be linked to bya hyperlink. Anchors let a Web browser jump to aparticular part of a page.
APPENDTo copy a set of specifications (for example, stylesheets, colors, or hyphenation and justificationspecifications) from a document and add it to theset found in the active document.
Absolute leading — Append
Glossary
408

APPLICATION WINDOW — WINDOWS ONLYA window that contains an open application. Thename of the application appears at the top of thewindow. A QuarkXPress application window cancontain up to 25 open documents, templates, orlibraries. See also Document window and Window.
ASCENDERThe portion of a lowercase letter that rises above itsmain body, as in the upright stem on the letters b,d, f, h, k, and t.
ASCENTThe value specified by the font designer to indicatethe amount of space needed to accommodate a fontabove its baseline. Used by QuarkXPress for auto andincremental leading, scaling drop caps, aligninganchored boxes, and for positioning the first line oftext in a text box.
ASCII (AMERICAN STANDARD CODE FOR
INFORMATION INTERCHANGE)ASCII is an industry-standard, text-only file for-mat. QuarkXPress can import and save text inthe ASCII format.
ASPECT RATIOThe ratio of width to height.
ATTRIBUTESee Character attribute.
AUTO LEADINGSpacing between lines of text that occurs automati-cally according to the fonts, font styles, font sizes,and anchored items used. The value you enter inthe Auto Leading field in the Paragraph tab ofthe Preferences dialog box (Edit & Preferences &Preferences) is added to all paragraphs in a docu-ment for which “auto” leading has been specified.
AUTO PAGE INSERTIONThe Auto Page Insertion pop-up menu in the Gen-eral pane of the Preferences dialog box (Edit &Preferences & Preferences) determines whethernew pages are inserted and where they are placedwhen an automatic text chain overflows.
AUTOMATIC HYPHENATIONA QuarkXPress feature that divides words at syllablejunctures by placing a hyphen at the end of a lineof text and carrying the rest of the word to thenext line.
Automatic hyphenation can be used to alleviatelarge gaps between words in paragraphs with jus-tified alignment or to create smoother margins withragged alignments.
AUTOMATIC PAGE NUMBER CHARACTERSQuarkXPress has three automatic page number char-acters: The Previous Box Page Number character(C+2 on Mac OS, Ctrl+2 on Windows), whenentered in a text box, displays the number of thepage containing the previous box in a text chain; theCurrent Page Number character (C+3 on Mac OS,Ctrl+3 on Windows) displays the current page num-ber; and the Next Box Page Number character (C+4on Mac OS, Ctrl+4 on Windows) displays the numberof the page containing the next box in the textchain. See also Continued from line and Contin-ued on line.
AUTOMATIC TEXT BOXThe user-specified text box on a master page and itscorresponding document pages into which textflows when a new page is automatically inserted.
AUTOMATIC TEXT CHAINThe text chain that is defined by the automatic textbox on a master page.
When text overflow occurs in the last box in anautomatic text chain, a new page is automaticallyinserted to receive the overflow if the Auto PageInsertion option is enabled in the General pane ofthe Preferences dialog box (Edit & Preferences &Preferences).
A document can contain only one automatic textchain, but many manual text chains.
Application window — Automatic text chain
Glossary
409

AUXILIARY DICTIONARYA user-defined dictionary used to check spelling inQuarkXPress documents that contain specializedvocabulary.
BACKGROUNDThe space (within the box border) that sits behindthe content of the box.
BACKGROUND COLORThe color applied to the background of a box.
BASELINE GRIDA nonprinting grid that underlies QuarkXPressdocuments and is usually invisible.
When all paragraphs on a page are locked to thebaseline grid, lines of text align from column tocolumn and from box to box.
You define the baseline grid using the Paragraphpane of the Preferences dialog box (Edit &Preferences & Preferences). You display thebaseline grid by choosing Show Baseline Grid(View & Show Baseline Grid).
BASELINESThe invisible lines upon which type or anchoreditems appear to sit in a text box.
BASELINE SHIFTA character attribute command (Style menu) thatlets you raise or lower either text or an anchored boxrelative to its normal baseline position.
BEVELED-CORNER BOXA box that has inclined (beveled) corners.
BÉZIER BOXA box that includes Bézier curves. See Bézier curve.
BÉZIER BOX TOOLSTools that draw text boxes or picture boxes withcurved and straight line segments.
BÉZIER CURVENamed after Pierre Bézier, this mathematicallydefined line or shape uses two handles (called pointsin QuarkXPress) and two curve handles for each ofits segments. Points represent the points at which aBézier line segment begins and ends. The positionof a Bézier line segment’s curve handles in relationto its points dictates its curvature. (See also Cornerpoint, Curve handles, Smooth point, andSymmetrical point.
BITMAP IMAGEAn image (picture) formed by a pattern of pixels.Also called a raster image.
BITMAPPED FONT — MAC OS ONLYA font in which each character consists of a patternof pixels, in contrast to a scalable font in which eachcharacter is described mathematically.
If a corresponding printer font can’t be located whenprinting a document, the font will either be replacedwith a different font, or a lower-quality bitmappedrecreation will print. See also Printer font, Scalablefont, and Screen font.
BLEEDA page element that extends to the trimmed edgeof the finished page.
BLEED RECTANGLEThe area of the bleed beyond the document bound-aries, defined by the bleed values you enter. Forexample, if you use Custom Bleeds QuarkXTensionssoftware to create a symmetric bleed with a value of2 picas, the bleed rectangle encompasses everythingthat is within 2 picas of each page edge.
BLENDIn QuarkXPress, a box background with a gradualtransition between two colors. You can specify back-ground blends using the Colors palette (View &Show Colors).
BODY COPYRefers to the main portion of the text in a publication.Body copy usually falls within 8 to 14 points.
Auxiliary dictionary — Body copy
Glossary
410

BOLDThe heavier style of a typeface, used for headings,subheadings, or for emphasis in body copy.
BOOKA QuarkXPress file that opens as a palette and allowsyou to link to and group multiple QuarkXPress doc-uments. Each document is called a chapter, similarto a chapter in a large-scale publication. Global spec-ifications such as style sheets, colors, and hyphen-ation and justification specifications are determinedby a master chapter in the book. See also Chapter.
BORDERSee Frame.
BOUNDING BOXA rectangular box that fully encloses an item sothat it can be moved or resized. Also called thebounding area.
BOXIn QuarkXPress, the term “box” refers to a container.Boxes can be any shape and fall into three categoriesin QuarkXPress: picture boxes, text boxes, and boxeswith a content of None.
BROWSERAn application that lets you view Web pages.Also referred to as a “Web browser.” Examplesinclude Microsoft Internet Explorer and NetscapeCommunicator.
CALIBRATIONBringing a device such as a printer or monitor to anabsolute standard to ensure consistency over timeand across devices of the same make and model.Calibration makes color displayed on a monitorresemble a color matching system (such as a swatchbook) as closely as possible.
CALL-OUTExplanatory text associated with a pictureor illustration.
CAPAn abbreviation for a capital (or uppercase) letter.It is used in the terms cap height, drop caps, initialcaps, hanging caps, and raised caps.
CAP HEIGHTIn QuarkXPress, the measured height of a 0 (zero) fora given font at a specific size. It is used to approxi-mate the distance from the baseline to the top of anuppercase letter.
CASEA letter can be uppercase (that is, a capital letter)or lowercase.
QuarkXPress Type Style options (Style menu) letyou specify All Caps (uppercase letters) and SmallCaps (reduced uppercase letters).
CASCADING STYLE SHEETS (CSS)A World Wide Web Consortium standard that letsyou easily create and maintain style and formattingfor both HTML and XML.
CELLOne of a series of rectangular, grouped boxes thatmake up a table. Cells can contain text or pictures,or have a content of None.
CENTER-ALIGNED1. Lines of text in a center-aligned paragraph arecentered between the paragraph’s indentations;both the left and right edges of the text are ragged.
2. Lines of text in a text box with Centered chosenas the Vertical Alignment are centered from topto bottom.
CGI (COMMON GATEWAY INTERFACE)A specification that allows the creation of Webserver-based scripts or applications that can receivedata submitted from HTML forms, process that data,and return a result. CGI scripts and applications canbe written in a variety of different programminglanguages.
CHANGE TOThe entries or selections in the Change to area indi-cate the text or attribute QuarkXPress uses to replacethe text or attribute found in a search when theFind/Change command (Edit menu) is used.
CHAPTEROne of a group of QuarkXPress documents organizedin a QuarkXPress book. See also Book.
Bold — Chapter
Glossary
411

CHARACTERA character is a letter, numeral, space, punctuationmark, or symbol.
CHARACTER ATTRIBUTEA specification applied to a character. QuarkXPresscharacter attributes are: Font, Size, Type Style,Color, Shade, Horizontal and Vertical Scale, Kern,Track, and Baseline Shift.
CHARACTER SPACEThe amount of space between characters, basedon values determined by the font designer. You canmodify the spacing values by the Kern and Trackcommands and the justification controls. Also calledintercharacter space or letter space.
CHECK BOXA square-shaped control in a dialog box; you click acheck box to enable or disable a function.
CHOKEA trapping option in which the “knocked-out” areaof the background color is slightly reduced, causingforeground items to slightly overlap it. See alsoKnockout, Spread, and Trapping.
CHOOSEYou choose a menu command by clicking its menutitle, pressing the mouse button while dragging theArrow pointer a over the command, and then releas-ing the mouse button.
CICEROA unit of measurement in the Didot system, com-monly used in Europe. A cicero is slightly larger thana pica and is equal to approximately 4.55 millimeters.
CIE (COMMISSION INTERNATIONALE
DE L’ECLAIRAGE [ INTERNATIONAL
COMMISSION FOR COLOR])An international committee that established colorstandards such as device-independent color spaces.
CIE LAB COLOR SPACEA standard color space recommended by the CIE inwhich colors are specified by a lightness coordinate(L*) and two chrominance coordinates (a* for green-red and b* for blue-yellow). In the CIE LAB colorspace, equal distances represent color differences ofroughly equal visual magnitudes.
CLEAR — MAC OS ONLYAn Edit menu command that removes items with-out copying them to the Clipboard.
When the Content tool E is selected, choosingClear removes the picture or selected text in a box.When the Item tool e is selected, choosing Clearremoves the active box, line, or text path.
CLIPBOARDThe place in the computer’s memory where the lastitem you cut or copied is temporarily stored.
CLIPPING PATHA Bézier outline that tells an application such asQuarkXPress which areas of a picture should beconsidered transparent. If you use an image-editingapplication to create a clipping path, the clippingpath is embedded into the picture file. If you createa clipping path in QuarkXPress, the clipping path isstored only in the QuarkXPress file.
CMM (COLOR MANAGEMENT MODULE)A color transformation engine (“color engine”). TheCMM translates data from one device’s colors toanother’s using a device-independent color space.The CMM uses information from the ICC profilesto accurately transform a color from one device toanother. The result is color that is consistent fromdevice to device.
CMS (COLOR MANAGEMENT SYSTEM)Color management systems commonly use ICCprofiles and CMMs to achieve consistent coloracross different color spaces and devices. See alsoCMM and ICC profile.
Character — CMS (Color Management System)
Glossary
412

CMYK (CYAN, MAGENTA, YELLOW,
AND BLACK)The standard ink colors used in four-color printing.Also called process inks or process colors. See alsoFour-color process and Process color.
COLOR CONVERSIONThe process of accurately converting colors fromone color space to another. Typically used to rendercolor objects in documents accurately to monitorsor printers.
COLOR GAMUTSee Gamut.
COLOR MODELA method of defining or modifying color. Colormodels available in QuarkXPress are HSB, RGB,CMYK, Focoltone, PANTONE (and PANTONEProcess, PANTONE Hexachrome Coated, PANTONEHexachrome Uncoated, PANTONE ProSim, andPANTONE Uncoated), Trumatch, TOYO, and DIC.
In the PANTONE color model, for example, youspecify document colors using on-screen swatchesor PANTONE numbers that correspond to printedcolors in a PANTONE swatchbook.
See also FOCOLTONE COLORS, PANTONECOLORS, TRUMATCH COLORS, TOYO COLORS,AND DIC COLORS.
COLOR SEPARATIONSSeparations print each component of a color on aseparate page, or plate. QuarkXPress lets you printseparations of spot colors and process colors.
Process color separations consist of four separationplates for each page: cyan, magenta, yellow, andblack. QuarkXPress also prints one plate for eachspot color used on a page. See also Spot color andProcess color.
COLOR SPACEA model for representing color in terms of measur-able values, such as the amount of red, green, andblue in an image. QuarkCMS works with threestandard color spaces: RGB, CMYK, and PANTONEHexachrome. See also CMS.
COLORS PALETTEA movable palette that lets you apply colors and inksto text, pictures, frames, lines, tables, and box back-grounds, and create background blends.
COLORSYNC — MAC OS ONLYThe Mac OS Color Management System consists oftwo components: the ColorSync API (ApplicationsProgramming Interface) and the Apple Color Man-agement Module (CMM). This second-generationcolor management system automatically ensurescolor fidelity among input devices, displays,applications, and output devices. See also CMM.
COLUMN1.A vertical division of a text box in QuarkXPress.
2.A vertical series of cells in a table.
COMBINE1.A command in the Merge submenu (Item &Merge) that keeps all selected item shapes. Any areasthat overlap are cut out; no corner points are addedanywhere that two lines cross.
2 A command in the Table submenu (Item &Table) that combines two or more adjacent cellsinto one cell.
COMMENTA comment is text in an HTML file that is not sup-posed to be interpreted by Web browsers. Commentsare enclosed between these tags: <!-- and -->.
COMPA “comprehensive” or detailed dummy showinghow the finished piece will look.
COMPOSITE COLORA representation of colors in a single combined(composite) form, destined for a color proofingdevice. This is the opposite of the output of colorsdestined for separations, where color is broken downinto its separate components.
CONDENSED TYPECharacters with proportionately less width or heightthan normal. You can create condensed type inQuarkXPress using the Horizontal/Vertical Scalecommand (Style menu).
CMYK (Cyan, Magenta, Yellow, and Black) — Condensed type
Glossary
413

CONSTRAINChoosing Constrain (Item menu) prevents groupeditems from being resized or reshaped beyond theborders of the back box in the group. The Constraincommand can be applied only to a group whoseback box’s border completely encompasses the otheritems in the group.
CONTENT CHANGEModifications to text and pictures — that is, theelements QuarkXPress items contain — are contentchanges. See also Item change.
CONTEXT MENUSContext menus contain commands that are specificto the item you clicked. On Mac OS, context menusare accessed by Control+Shift+clicking (or byControl+clicking if you have adjusted your pref-erences). On Windows, context menus can be dis-played by right-clicking in the application window.
CONTINUED FROM LINEA line that shows the page number of the previouslinked text box. See Automatic page numbercharacters.
CONTINUED ON LINEA line that shows the page number of the nextlinked text box. See Automatic page numbercharacters.
CONTRASTDescribes the relationship between a picture’shighlights (light areas), middle tones, and shadows(dark areas).
CONTROLSA generic term that refers to the buttons, checkboxes, fields, menus, lists, and so on, in dialogboxes and palettes.
COPYFITTING1. Determining how much text will fit a given space.
2.Forcing text to fit a space by editing copyor adjusting the kerning, leading, tracking, orcharacter attributes.
CORNER POINTA point that connects two straight lines, a straightline and a curved line, or two noncontinuous curvedlines. In the case of curved lines, the corner point’scurve handles can be manipulated independentlyof one another, usually to form a sharp transitionbetween the two segments. See also Curve handles,Point, Smooth point, and Symmetrical point.
CROPTrimming the edges of a picture or page to make itfit or remove unwanted portions.
CROP MARKSShort vertical and horizontal lines printed outsidethe page’s final trim size. They indicate where to cutthe page. Crop marks are also called cut marks ortrim marks.
CROSSHAIR POINTERWhen you select a tool to create a line or a box, theArrow pointer a changes to the Crosshair pointer cwhen it is over the page or pasteboard.
CSSSee Cascading Style Sheet (CSS).
CURRENT PAGE NUMBER CHARACTERWhen you enter the Current Page Number character(C+3 on Mac OS, Ctrl+3 on Windows) on a docu-ment page, the current page’s number displays.
Pages based on a master page that contains the Cur-rent Page Number character display the appropriatepage number. See also Next Box Page Number char-acter and Previous Box Page Number character.
CURVE HANDLESHandles that extend from either side of a point andcontrol a curve’s shape. See also Corner point, Point,Smooth point, and Symmetrical point.
CUTWhen the Item tool e is selected, choosingCut (Edit menu) removes the active items tothe Clipboard.
When the Content tool E is selected, choosingCut removes an active item’s contents to theClipboard.
Constrain — Cut
Glossary
414

DASHESSee Em dash and En dash.
DASHES & STRIPESUser-created design styles that can be applied tolines, text paths, or box frames. Dashes are brokenline styles, and stripes are line styles made of stackedbars with white or colored space between the bars.
DCS (DESKTOP COLOR SEPARATIONS)A DCS is an EPS picture with pre-separated platesand a master composite image. A DCS can containbitmap and object-oriented information, and allowsbitmap, grayscale, RGB, CMYK, and spot colormodels. See also EPS.
DEACTIVATEYou deactivate active items by clicking outsidethem. See also Activate.
DECIMAL TABA tab alignment option in the Paragraph Attributesdialog box Tabs tab (Style & Tabs) that lets youalign decimal numbers, such as dollar amounts, bytheir decimal points.
DEFAULT VALUEA predetermined setting. For example, preferencesare default values that can be changed by the user.
See Preset default values, Program default values,and User-specified default values.
DEFAULT COLORS AND INKSColors and inks that are included with all newlycreated QuarkXPress documents.
DELETEOn Mac OS, an Item menu command that removesactive items (and their contents) without copyingthem to the Clipboard.
On Windows, a command found in both the Editand Item menus. When used from the Edit menuwith the Item tool e selected, choosing Deleteremoves the active box, line, or text path.(The samebehavior occurs when choosing Item & Delete.)However, when the Content tool E is selected,choosing Delete from the Edit menu removes onlythe picture or selected text within the box.
DESCENDERThe portion of lowercase letters that falls below thebaseline. The letters g, j, p, q, and y have descenders.
DESCENTThe value specified by the font designer to indicatethe amount of space needed to accommodate a fontbelow its baseline. Used by QuarkXPress for autoleading and scaling drop caps.
DESELECTSee Deactivate.
DESTINATION PROFILEIn QuarkCMS, the profile of the device your outputwill be sent to. See also ICC Profile.
DEVICE-DEPENDENT COLORColor that relies on specific colorants to define its colorspace. RGB is one type of device-dependent color.
DEVICE-INDEPENDENT COLORColor that does not rely on specific colorants orcolor models and is not associated with any specificinput or output device. The CIE LAB color space isan example of device-independent color.
DEVICE GAMUTSee Gamut.
DEVICE SIMULATIONUsing one device to predict the results on anotherdevice, usually a printing device. For example, youcould use your color laser printer to simulate theresults of four-color process printing.
DIALOG BOXA box displayed on-screen in response to a com-mand that needs additional specifications.
DIC COLORSA spot color ink matching system from DainipponInk and Chemicals, Inc.
DIDOTA European measurement system. Ciceros are a unitof measurement in the Didot system.
Dashes — Didot
Glossary
415

DIFFERENCEA command in the Merge submenu (Item & Merge)that deletes all the front items from a group ofstacked item shapes, but retains any items at thevery back of the stack, resulting in one box. Anyoverlapping areas are cut out.
DISCRETIONARY HYPHENA manually inserted character (C+hyphen onMac OS, Ctrl+hyphen on Windows) that indicateswhere a word can be broken to fit text on the line.
A discretionary hyphen is visible and prints only ifQuarkXPress hyphenates the word at that point.
DISCRETIONARY NEW LINE CHARACTERLike a discretionary hyphen character, a discretionarynew line character is a manually inserted character(C+Return on Mac OS, Ctrl+Enter on Windows) thatindicates where a word can be broken to fit text onthe line.
A discretionary new line character is not visibleon-screen and is used only if QuarkXPress breaksthe word there. No hyphen is added where theword breaks.
DITHERDithering is the simulation of additional colors orshades by varying the values of adjacent pixels.
DOCUMENT LAYOUT PALETTEA movable palette that lets you create new masterpages or delete master pages; display, insert, delete,and move document pages; create multipagespreads; and apply a new master page format todocument pages.
DOCUMENT WINDOWThe on-screen window that displays the documentname, title bar, zoom and close boxes, scroll bars,view percentage field, go-to-page icons, and so on.
DOT LEADERA period used as a tab fill character, often usedin numerical tables and tables of contents. Seealso Leader.
DOUBLE-CLICKTwo mouse-clicks in rapid succession withoutmoving the mouse. Double-clicking generallyopens a file or a dialog box.
DOWNLOADABLE FONTA font that is not resident in the printer’s memory.A downloadable font must be sent to the printer toprint a document containing the font. Also calleda soft font.
DOWN SAMPLEDown sampling is a particular method of gathering asmaller, but representative, set of data from a largerraster data file. When this smaller set of data is sentto the output device, processing time is reduced, butimage quality is not compromised. When downsampling, QuarkXPress determines the average pixelcolor in an area and replaces the area with a largersingle pixel containing the average color. Seealso Subsample.
DPI (DOTS PER INCH)A general method of measuring resolution whenreferring to printers and monitors. Dpi is also usedto measure the resolution of an image.
DRAGTo move the mouse while pressing the mouse but-ton. Dragging is used for actions like creating items,moving items, and selecting text.
DROP CAPA large initial capital letter that extends below thefirst line of the paragraph it begins.
DROP-SHADOW BOXA box to which color or shade has been applied,then offset and placed behind a text or picture boxto create a shadow effect.
DROP-SHADOW CHARACTERSCharacters to which color or shade has been applied,then offset behind identical characters to create ashadow effect.
Difference — Drop-shadow characters
Glossary
416

DROPPED-OUT TYPESee Reverse type.
ELLIPSIS POINTSThree periods (…) used to indicate an omission ofwords. On Mac OS, pressing Option+; enters ellipsispoints as a single character. On Windows, pressingASCII value Alt+0133 on the keypad enters ellipsispoints as a single character.
ELLIPTICAL BOXAn oval or circular box.
EM DASHA dash the width of two zeros (00)(Option+Shift+hyphen on Mac OS, Ctrl+Shift+=on Windows).
EM SPACEIn traditional typesetting, an em space is asquare with the dimensions of the given pointsize. A 12-point em is a square that measures 12× 12 points. To create an em space in QuarkXPress,you enter two en spaces (Option+space on Mac OS,Ctrl+Shift+6 on Windows).
By default, QuarkXPress defines an em space as thewidth of two zeros (00) in a given font. If you checkStandard Em Space in the Character pane of thePreferences dialog box (Edit & Preferences & Pref-erences), then QuarkXPress defines an em space bythe point size of the text (for example, 24-point texthas a 24 × 24-point em space). See also En space.
EMULSIONThe light-sensitive coating on film or paper.
EN DASHA dash that is wider than a hyphen and half thewidth of an em dash (Option+hyphen on Mac OS,Ctrl+Alt+Shift+hyphen on Windows).
EN SPACEA space that is is half the width of an em space(Option+space on Mac OS, Ctrl+Shift+6 onWindows). See also Em space.
END-OF-LINE CHARACTERSee New line character.
EPS (ENCAPSULATED POSTSCRIPT)A graphic file format that can contain raster orvector data. See also Raster image, Object-oriented image.
EXCLUSIVE ORA command in the Merge submenu (Item & Merge)that keeps all selected item shapes. Any areas thatoverlap are cut out, and corner points are added any-where that two lines cross.
EXPORT1. To use the Save Text command (File menu) to saveQuarkXPress text for other applications or formats.
2. To use the Export command (File menu) to save adocument page as HTML or as an EPS file.
EXTENSIBLE MARKUP LANGUAGESee XML.
FACING PAGESAlternating left and right pages as in books andmagazines. Each spread consists of two facing pages.
Facing-page documents measure inside and outsidemargins, rather than left and right margins.
FIELDAn area (in a dialog box or palette) where you canenter a value.
FIGURE SPACEThe width of a zero in a given font.
FILL CHARACTERA user-specified character that can be automaticallyinserted from the point where a tab is entered, tothe next tab stop. One or two printable characterscan be used as a fill character. See also Leader.
FILTERSee Import/export filter.
FIND WHAT AREAThe options in the Find What area (Find/Changepalette) indicate the text or attribute searched forwhen the Find/Change (Edit menu) commandis used.
Dropped-out type — Find What area
Glossary
417

FINISHED PAGE AREAThe portion of an electronic page that represents thefinal size after printing and trimming. Crop markson the unfinished page indicate where the finishedpage area begins, but the crop marks themselves arenot part of this area. See also Crop marks.
FIRST LINE INDENTATIONThe distance from the left edge of a column or textbox (plus the text inset) to the start of the First Lineof a paragraph. Specified in the Paragraph Attrib-utes dialog box (Style & Formats).
FLEX SPACE WIDTHA user-modifiable percentage of a standard en space,specified in the Character pane of the Preferencesdialog box (Edit & Preferences & Preferences).
To enter a breaking flexible space character in text,press Option+Shift+space (Mac OS) or Ctrl+Shift+5(Windows); to enter a nonbreaking flexible spacecharacter, press C+Option+Shift+space (Mac OS) orCtrl+Alt+Shift+5 (Windows).
FLIPTo change an item so that the result is a mirrorimage of the original. In QuarkXPress, you can flipthe contents of a text box or picture box either hori-zontally (Style & Flip Horizontal) or vertically(Style & Flip Vertical).
FLUSH LEFTSee Left-aligned.
FLUSH RIGHTSee Right-aligned.
FOCOLTONE COLORSFOCOLTONE is a process color matching systemfor specifying process colors. All of the colors in theFOCOLTONE color system can be created by print-ing the specified cyan, magenta, yellow, and blackpercentages under standard printing conditions.
FOLD MARKSDashed lines within the margins of the pagethat indicate where the finished documentshould be folded.
FONTA set of letters, numbers, punctuation marks, andsymbols that share a unified design and a specificsize. The design is called a typeface. A group ofrelated typefaces is called a type family. See alsoTypeface and Type family.
FOOTERText that prints on the bottom of each page of asection or document. For example, a footer mightinclude a page number or a chapter title.
FORCED JUSTIFICATIONJustification in which the last line of the paragraphis forced to stretch all the way to the right marginno matter how great the distance.
FORMATSee Paragraph attribute.
FOUR-COLOR PROCESSA printing process that uses the four basic printinginks — cyan, magenta, yellow, and black. See alsoProcess color.
FPO (FOR POSITION ONLY)A term used to label images and text that are usedas placeholders in lieu of the final output.
FRAMEA decorative border placed around a text box or apicture box. In QuarkXPress, frames are appliedusing the Frame command (Item menu). You canchoose from predefined styles or you can createcustom frames. See also Dashes & Stripes.
FREEHANDA method of drawing boxes, lines, and text pathsby dragging the mouse along an envisioned path.QuarkXPress automatically positions the pointsand curve handles.
GAMMAFor color monitors, the relationship between thespecified color intensities and those colors as theydisplay on a monitor. Adjusting the gamma valueis an important step in calibrating a monitor.
Finished page area — Gamma
Glossary
418

GAMUTA range of colors. For instance, a device gamut is therange of colors that a particular device, such as aprinter, can produce. An image gamut is the rangeof colors in a particular image.
GAPThe space between the dots, dashes, or stripes ofa frame or line that uses a dotted, dashed, orstriped style.
GIF (GRAPHICS INTERCHANGE FORMAT) A compressed, indexed-color graphic file formatoften used in Web documents.
GRAPHICSee Picture.
RASTER TEXT BOXA text box in a Web document for which Convertto Graphic on Export box (Item & Modify) ischecked. When you export a Web document asHTML, raster text boxes are exported as pictures.
GRAYSCALEShades of gray ranging from black to white. In print-ing, grayscale uses only a black halftone plate.
GREEKINGIn QuarkXPress, greeking refers to text or picturesthat display on-screen as gray patterns to speedscreen update.
GRIDSee Baseline grid.
GRID LINESThe borders of a cell. Grid lines can be formattedusing Dashes & Stripes styles.
GROUPIn QuarkXPress, a collection of items that can bemoved (and sometimes manipulated) as a singleitem (Item & Group).
GUIDESSee Page guides.
GUTTERThe blank space between adjacent columns orfacing pages.
H&JS (HYPHENATION AND
JUSTIFICATION SPECIFICATIONS)The H&Js command (Edit menu) lets you spec-ify hyphenation and justification to control theway words are hyphenated in both justified andnonjustified paragraphs, and how space is addedor subtracted between characters and wordsin paragraphs.
HAIRLINEA very thin rule or line. A hairline’s width dependson the output device’s resolution. QuarkXPressprints the line at .125 point to a PostScript image-setter, but prints a thicker line to a 300 dpi printer.
HALFTONEA reproduction of a continuous-tone photograph bysimulating gradations of tone using dots (or othershapes) of varying sizes.
HALFTONE SCREENTraditionally, continuous-tone artwork (such as aphotograph) is reproduced by photographing theoriginal through a crossline or contact screen. Theresulting halftone image is composed of many dots,ellipses, squares, or lines of various sizes that can bereproduced on a printing press.
HANDLESSmall shapes, usually square, displayed on the edgesof boxes, text paths, tables, and lines. Handles areused to resize or reshape items.
HANGING CAPA large initial capital letter that extends to the left ofthe paragraph’s left margin.
HANGING INDENTATIONA paragraph in which the first line extends further tothe left than the other lines. Created by specifying aLeft Indent and a negative First Line indentationvalue in the Formats tab of the Paragraph Attrib-utes dialog box (Style & Formats) or by using anIndent Here character.
Gamut — Hanging indentation
Glossary
419

HEADERText that prints on the top of each page of a sectionor document. For example, a header might includea page number or a chapter title.
HEXACHROMEA six-color (cyan, magenta, yellow, black, orange,and green) high fidelity color system developedby PANTONE. Also known as the PANTONEHEXACHROME Color System.
HIGH FIDELITY COLORAny one of a number of proprietary multi-ink colorsystems designed to provide greater color capabilitythan the traditional four-color process system.
HIGH-RESOLUTION PRINTERSee Imagesetter.
HORIZONTAL/VERTICAL SCALEA Style menu command that lets you condenseand expand character width or height by apercentage value.
HSB (HUE, SATURATION, AND
BRIGHTNESS)A color model used mostly by artists or slide pro-ducers. Hue describes the color pigment; Saturationis a measure of how much of the color pigment ispresent; and Brightness is a measure of the amountof black present in a color.
HTML (HYPERTEXT MARKUP LANGUAGE)A nonproprietary page-description language readby Web browsers. Most of the pages that make upthe World Wide Web are authored in HTML. AnHTML document consists of text, formatting tagsthat indicate how the text should be laid out anddisplayed, and additional tags that point to othermedia, such as pictures, movies, and animations.The HTML specification is governed by the WorldWide Web Consortium (W3C).
HTML FORMSAn HTML convention that lets a Web pageauthor create text fields and buttons that the enduser can use to send information to a CGI scriptor application on the Web server. HTML forms arecommonly used in electronic commerce and togather information. See also CGI.
HUEThe pigment of a color that gives the color itsname — for example, purple, red, orange, or green.
HYPERLINKText, a picture, or a portion of a picture on aWeb page that, when clicked, causes the browserto display a different page or a different part ofthe same page.
HYPHENATIONThe division of a word at the end of a line of text.
HYPHENATION EXCEPTIONSUser-specified hyphenation rules that override theQuarkXPress hyphenation rules. For example, youcan prevent specific words from being hyphenated.
HYPHENATION ZONEThe user-specified distance from the right indenta-tion where QuarkXPress begins hyphenating words.To be hyphenated, a word must have a syllablejuncture within the hyphenation zone.
ICC
( INTERNATIONAL COLOR CONSORTIUM)A group of companies (recognized as leaders in thefields of electronic publishing, software develop-ment, and digital prepress) that formed a committeein 1993 to establish standards for electronic colorpublishing. The ICC standardized color informationbased on the CIE LAB color space, and developedstandardized device profiles that would easilytransfer color information across color spacesand computing platforms.
Header — ICC (International Color Consortium)
Glossary
420
ICC PROFILE1. A cross-platform standard used to define the colorcapabilities of a device.
2. A file describing the color reproduction capabili-ties of a given input, display, or output device. Colormanagement systems use profiles to interpret colordata between devices.
IMAGESee Picture.
IMAGE GAMUTSee Gamut.
IMAGE MAPA picture on a Web page, in which different partsof the picture act as different hyperlinks. Eachsection of a picture that acts as a hyperlink iscalled a hot area.
IMAGESETTERAn output device with a resolution above 1,200 dotsper inch used to prepare high-quality output onfilm, paper, or plate.
IMPORTTo bring a picture or text file into an activeQuarkXPress box using the Get Picture or Get Textcommands (File menu).
IMPORT/EXPORT FILTERA special translation file that lets QuarkXPress sharetext with other programs, bring images into pictureboxes, or import and export HTML.
INCREMENTAL LEADINGThe base amount of auto leading plus (or minus)a user-specified value. See also Auto leadingand Leading.
INCREMENTAL TABSTabs that are a specific distance apart from eachother, created by using mathematical operators.An incremental tab measured in picas might looklike this: p9+p9+p9.
INDENTATIONThe distance from a paragraph’s edge to the left orright sides of the text column or box it occupies(measured from the text inset).
INDENT HERE CHARACTERA manually inserted invisible character (C+\ onMac OS, Ctrl+\ on Windows) that causes all subse-quent lines in the paragraph to be left-indented atthat location.
INDEPENDENT COLOR SPACESee Device-independent color.
INDETERMINATE COLORA QuarkXPress term for a background that has mul-tiple colors (such as a color picture). When a back-ground contains multiple colors, QuarkXPress willtrap an object color in front based on the trap valuespecified in the Indeterminate field of the Trappingpane (Edit & Preferences & Preferences).
INDEX PALETTEA movable palette that lets you tag words in adocument as index entries.
INITIAL CAPSThe first letters of paragraphs that are embellishedas drop caps, hanging caps, or raised caps.
INSERTION POINTSee Text insertion point.
INSTALLED LANGUAGEAny language available in QuarkXPress Passport. Youmake a language available by placing the associatedlanguage dictionary/language file (for example,“Dict_español”) in the QuarkXPress Passport appli-cation folder before launching the application.
ICC profile — Installed language
Glossary
421

INTERACTIVE TEXT RESIZINGResizing of text that occurs by using the mouserather than by typing numbers in a field. You caninteractively resize text in QuarkXPress by pressingC(Mac OS) or Ctrl (Windows) while dragging aresize handle on a text box. (C+Shift dragging onMac OS or Ctrl+Shift dragging on Windows resizesthe text proportionately.)
INTERCHARACTER SPACESee Character space.
INTERSECTIONA command in the Merge submenu (Item & Merge)that retains any areas that overlap the shape in back,but cuts out the rest. Choosing Intersection createsone box.
INVISIBLE CHARACTERSCharacters that can be displayed on-screen but donot print. The Tab, Return, and Space characters areexamples of invisible characters.
ITALICA type style that uses slanted characters for emphasis.
ITEMThere are six kinds of items in QuarkXPress: lines,text boxes, text paths, picture boxes, tables, andboxes with a content of None. Items can be com-bined into groups; a group can be manipulatedas a single item.
ITEM CHANGEModifications to a QuarkXPress item, rather than itscontent. Resizing, repositioning, and rotating itemsare item changes. See also Content change.
JPEG
(JOINT PHOTOGRAPHIC EXPERTS GROUP)A compression-based graphic file format. A JPEGcontains only bitmap information and can begrayscale or color.
JUMP LINESPage number references that guide a reader througha multi-page story. See also Continued on line andContinued from line.
JUSTIFICATION1. To horizontally distribute a line of text by expand-ing or condensing the space between characters andwords. The text fills the width of a column so thatit has uniform (flush) left and right edges. See alsoAlignment and Forced.
2. To vertically distribute lines of text within a textbox, adding space between paragraphs or lines. Thelines of text are spaced to fill the column from topto bottom. See also Center-aligned and Verticalalignment.
KERNINGThe adjustment of space between adjacent char-acters. QuarkXPress supports automatic kerning(based on a font’s built-in kerning table), andmanual kerning (which lets you adjust the spaceat the text insertion point).
KERNING PAIRAny two characters kerned by a certain amountwhen they are next to each other in text. Kerningpairs for a given font can be created or edited usingthe Kerning Table Edit command (Utilities menu).
KERNING TABLEKerning information built into most fonts andapplied to text during automatic kerning.
QuarkXPress also lets you customize a font’s kerningtable values using the Kerning Table Edit command(Utilities menu). This will not alter the font file itself.Kerning table edits are stored with the document(or globally within the “XPress Preferences” file ifno document is open when the edits are made).
KERNING VALUEThe space between two characters, calculated inem units.
KEYBOARD COMMANDA key or combination of keys that you press to per-form a particular function without using the mouse.
KILOBYTEEqual to 1,024 bytes. Kilobyte is often abbreviated as“K” or “KB.”
Interactive text resizing — Kilobyte
Glossary
422

KNOCKOUTThe opposite of overprinting, with no choke and nospread. An object in the foreground cuts its shapeout — straight through — from the printing platesthat make up the background. Trapping values arenot applicable to a knockout. See also Trapping.
LASER PRINTERAn electrostatic printer for moderate-resolutionoutput.
LAYERA “slice” of a QuarkXPress document that containsspecific items. Layers can be arranged in front ofand behind one another.
LEADERA line of dots, dashes, or other characters used to fillspaces between tabs.
LEADINGThe space between lines of text, usually measuredfrom baseline to baseline. In traditional typesetting,thin strips of lead were used to hold type in placeand adjust the space between lines.
See also Absolute leading, Auto leading, Incremen-tal leading, and Percentage-based auto leading.
LEAKSGaps where misregistration between adjoining colorsleave paper or discoloration showing on theprinted job.
LEFT-ALIGNEDA left-aligned paragraph has a straight left edge anda ragged (uneven) right edge. Also called flush left,left-justified, or ragged right.
LEFT INDENTThe distance from the the left edge of a columnor text box (plus the text inset) to the text in theparagraph(s).
LEFT-JUSTIFIEDSee Left-aligned.
LETTER SPACESee Character space.
LIBRARYA QuarkXPress file that can be opened as a movablepalette containing a collection of QuarkXPress items.You can move items from document pages into anopen library, from an open library onto documentpages, and between open libraries.
LIGATURE — MAC OS ONLYA single typographic character that combines multi-ple characters. For example, the ligature for f and i isfi; the ligature for f and l is fl. QuarkXPress can beconfigured to automatically use a font’s ligatures.
LINEIn QuarkXPress, a line is an item drawn with any offour line creation tools and used mostly for decora-tive purposes. See also Rule.
LINE ARTPictures or illustrations that can be printed with-out halftones.
LINE SEGMENTSee Segment.
LINKThe way QuarkXPress joins text boxes so that textautomatically flows from one box to another.
LISTIn QuarkXPress, a list is a group of one or more para-graph style sheets chosen by the user in the Edit Listdialog box (Edit & Lists & New) for the purpose ofcopying and assembling all the text of those stylesinto one location. For instance, a book publishercould specify a “chapter name” style sheet and a“section name” style sheet as a new list, then usethat list as a table of contents.
LISTS PALETTEA movable palette (View & Show Lists) that letsyou use style sheets to automatically build listsfor document and book production.
LOCAL FORMATTINGText formatting or styling applied independently ofa style sheet.
Knockout — Local formatting
Glossary
423

LOCKThe Lock/Unlock command (Item menu) lets youfix an item to a page so that it cannot be moved orresized with the Item tool e.
LPI (LINES PER INCH)Refers to the resolution of a halftone screen in print-ing. Lpi is distinct from dpi (dots per inch), whichrefers to the resolution of a device or picture.
LUMINANCEA term used to define the relative lightness or bright-ness of a color.
MARGINThe space surrounding the written or printed areaon a page.
MARGIN GUIDESNonprinting guidelines in a print document thatindicate the specified margin and define the edgesof an automatic text box.
MASKIn traditional graphic arts production, a maskdescribes any material used to block off portions ofa printed page, protecting that area from changes orfrom printing inks.
MASTER ITEMSItems on document pages that are automaticallyplaced by the associated master page. Master itemscan be moved and modified like other page items.
MASTER PAGEA nonprinting page used to automatically formatdocument pages. A master page can contain masteritems such as headers, footers, page numbers, andother elements that are repeated on multiple pages.
MEASUREMENT SYSTEMQuarkXPress lets you choose among various meas-urement systems for displaying rulers and dialogbox values: inches, inches decimal, picas, points,millimeters, centimeters, ciceros, agates, and pixels(Web documents only).
MEASUREMENTS PALETTEA movable palette that lets you modify item andcontent information. The fields and controls inthe Measurements palette vary depending onthe active item.
MECHANICALA mechanical, or paste-up, is the original documentfrom which printing plates are made. A mechanicalincludes all the design elements (such as text,pictures, or lines) in position and ready to bephotographed for reproduction.
MENUA list of commands that display when you press themouse button while the pointer is over a menu titlein the menu bar.
MENU BARThe horizontal strip that displays at the top of thescreen and contains menu titles.
MENU TITLEThe word in the menu bar that designates onemenu. Clicking a menu title displays its associ-ated menu items.
MERGEA submenu in the Item menu that is available whenmultiple items are selected. The Merge commands(Intersection, Union, Difference, Reverse Differ-ence, Exclusive Or, and Combine) result in one boxsynthesized in various ways from the two or moreitems originally selected.
METAFILE — WINDOWS ONLYA general term for graphic file formats that use acombination of raster and vector data. WindowsMetafile (WMF) is a common metafile format thatQuarkXPress can import.
META TAGSAn HTML tag that lets the designer of a page provideinformation about the page. It is common to usemeta tags that provide the name of the author,the date the page was last modified, and keywordsdescribing the content of the page.
Lock — Meta tags
Glossary
424

MOIRÉ PATTERNAn undesirable grid-like pattern that can result whentwo or more screens are superimposed at conflictingangles when printing.
MULTIPLE-SELECTED ITEMSWith the Item tool e or Content tool E selected,you can activate more than one item at a time bypressing Shift while clicking on the items, or bydrawing an enclosing box called a marquee.
NEW LINE CHARACTERA manually inserted character (Shift+Return onMac OS, Shift+Enter on Windows) that forces a newline of text without ending a paragraph. Also calledan end-of-line character.
NEXT BOX PAGE NUMBER CHARACTERWhen entered in a text box in a multipage linkedtext chain, the C+4 (Mac OS) or Ctrl+4 (Windows)character displays the page number of the nextlinked text box. This can be used for a “Continuedon” line. See also Current Page Number character,and Previous Box Page Number character.
NONBREAKING SPACEA special character placed between two wordsthat prevents the words from being separated bya line break. You can enter a nonbreaking spacein QuarkXPress by pressing C+space (Mac OS) orCtrl+space (Windows).
NONE1. An option in the Runaround tab of the Modifydialog box (Item & Modify) that causes text behindthe active item to flow normally (no runaround).
2.A QuarkXPress Color choice that produces atransparent effect, as in a gap or background.
3.A type of content that a box can contain.
NONPRINTING CHARACTERSSee Invisible characters.
NORMAL STYLE SHEETThe style sheet that is automatically applied to textin newly created text boxes and text paths; its attrib-utes determine the default text formatting.
NO STYLEWhen applied, No Style (Style & Character StyleSheets or Style & Paragraph Style Sheets) detachesany associated style sheet without altering any of thetext’s character or paragraph attributes. After apply-ing No Style, any local character formatting will beoverridden if a new style sheet is applied.
NUDGEMoving active items in 1-point increments bypressing any arrow key 7, 8, 9, 0 with the Itemtool e selected.
With the Content tool E selected, you can use thearrow keys to nudge the contents within an activepicture box, or move multiple selected items. Tomove active items in .1-point increments, pressOption (Mac OS) or Alt (Windows) and an arrowkey simultaneously.
NUMBERING FORMATA section’s numeric, Roman, or alphabetical pagenumbering system (for example, 1, 2, 3; i, ii, iii; ora, b, c). See also Section.
OBJECT COLORThe color of an item in front of a background color.
You can spread an object color against its back-ground color or you can choke the background coloragainst the object color so that, when printed, whiteareas do not occur between the colors. See alsoChoke, Knockout, Spread, and Trapping.
OBJECT-ORIENTED IMAGEAn image (picture) defined by X and Y coordi-nates, or vectors. Also called a vector image.
OFFSET LITHOGRAPHYA printing process that uses printing plates and inkto reproduce multiple copies of a publication.
Moiré pattern — Offset lithography
Glossary
425

OLE (OBJECT LINKING AND
EMBEDDING) — WINDOWS ONLYA method developed by Microsoft that enablesWindows applications to share and manipulate data.For example, you can double-click a picture box tolaunch the application that created the picture.Changes you make to the picture in the originalapplication will also be made to the picturein QuarkXPress.
OPI (OPEN PREPRESS INTERFACE)OPI system is a standards-based specification thatsubstitutes high-resolution images for low-resolutionimages and separates full-color scanned images.
ORIGINSee Ruler origin.
ORPHANA single line of a paragraph left at the bottom ofa column.
OUTLINEA type style with a white body and black borders.
OUTSIDE MARGINSee Facing pages.
OVERFLOWAn overflow occurs when a single unlinked text boxor the last box in a text chain is not large enough tocontain all the text entered into it.
When this occurs, the overflow symbol t displays inthe lower right corner of the box.
OVERPRINTOverprinted objects are printed directly on topof their background objects; no trapping valuesare applied.
PAGE GUIDESNonprinting lines used to position items on a page.Margin guides and ruler guides are examples. Newruler guides can be created by clicking and draggingout from a ruler while Show Guides is chosen inthe View menu.
PAGE WIDTH GUIDESA guide used to indicate the far right edge of thedesign area in a Web document.
PAGE NUMBER CHARACTERSSee Current Page Number character, Next BoxPage Number character, and Previous Box PageNumber character.
PAGE SIZEA document’s Width and Height as specified inthe New Document dialog box (File & New &Document) or in the Document Setup dialog box(File & Document Setup).
PALETTEA movable control window that always displays infront of open documents.
PANELA portion of a printed page, usually defined by folds.
PANTONE COLORSPremixed ink colors that are often specified bygraphic designers for spot color in multicolorprint jobs.
QuarkXPress lets you specify PANTONE colorsthat correspond to printed swatchbooks, and youcan specify most PANTONE colors as either a spotcolor or a process color. See also Spot color andProcess color.
PARAGRAPH ATTRIBUTEA specification applied to a paragraph. QuarkXPressparagraph attributes are: Left Indent, First Line,Right Indent, Leading, Space Before, Space After,Lock to Baseline Grid, Drop Caps, Keep withNext ¶, Keep Lines Together, Alignment, H&Js,Rules, and Tabs.
PARAGRAPH LANGUAGEIn QuarkXPress Passport, a language setting appliedto specific paragraphs using the Formats tab of theParagraph Attributes dialog box (Style & Formats)or using a paragraph attribute defined in a style sheet.
OLE (Object Linking and Embedding) — Paragraph language
Glossary
426

PASTEBOARDThe nonprinting area that surrounds a QuarkXPresspage or multipage spread in a print document.
PASTE-UPSee Mechanical.
PATH1. The location of a picture or other file. The path isthe sequential list of folders and drives that mustbe accessed to reach the picture or other file.
2. A generic term for a clipping or text path. See alsoClipping path and Text path.
PCL (PRINTER CONTROL LANGUAGE) —
WINDOWS ONLYA language developed by Hewlett-Packard. Manylaser printers produced by other printer manufactur-ers can emulate Hewlett-Packard’s PCL. Two majorversions of PCL, called Level 4 and Level 5, arecommonly found in laser printing. QuarkXPressprovides only limited support for PCL devices.
PDF (PORTABLE DOCUMENT FORMAT)A proprietary format developed by Adobe Systems,Inc., to facilitate file transfer. If a document is savedas a PDF file, the person receiving it can view andprint the document without having the applicationthe document was created in.
PERCENTAGE-BASED AUTO LEADINGAutomatically spaces lines of text by the sum of thebase amount of auto leading, plus a user-specifiedpercentage of that amount. See also Auto Leadingand Leading.
PICAA common unit of typographic measurement.There are 6 picas in an inch; 12 points in a pica.See also Point.
PICT (PICTURE)A graphic file format based on the original Mac OSQuickDraw drawing routines. A PICT file can containraster and object-oriented information.
PICTUREIn QuarkXPress, any image that can be pasted orimported into a picture box.
PICTURE BOXA box created with any of the picture box creationtools; these boxes hold imported or pasted pictures.
PNG (PORTABLE NETWORK GRAPHIC)A compression-based graphic file format that alsosupports transparency and interlacing. Sometimesused in Web documents; however, not all Webbrowsers support this format.
POINT1. A common unit of typographic measurement. Apoint is approximately 1⁄72 of an inch. See also Pica.
2. In QuarkXPress Bézier terminology, pointsconnect line segments and define where line seg-ments start and end. Bézier points attached tocurved segments have curve handles to reshape thecurves. QuarkXPress offers three types of points:corner, smooth, and symmetrical. See also Cornerpoint, Curve handles, Smooth point, andSymmetrical point.
POP-UP MENUA type of menu used in dialog boxes. When youclick a pop-up menu <, a list of options displays.You can then choose an option by dragging thearrow pointer a over the option and clicking themouse button.
POSTSCRIPTA page description language developed by AdobeSystems, Inc. that describes fonts, images, andpage layout.
PPD
(POSTSCRIPT PRINTER DESCRIPTION)A PPD informs desktop publishing applicationssuch as QuarkXPress about the capabilities of aparticular output device.
PPI (PIXELS PER INCH)The resolution of an image, measured in pixels.
Pasteboard — PPI (Pixels per inch)
Glossary
427

PREFERENCESThe Preferences (Edit menu) commands displaydialog boxes that let you modify default values andenable or disable various QuarkXPress features.
PREFLIGHTTo prepare a document for final (press) output. Pre-flighting may include updating images, making surefonts are installed, performing color management,and setting trapping.
PRESET DEFAULT VALUESThe preprogrammed specification settings inQuarkXPress. They remain in use until changedby the user. See also Program default values andUser-specified default values.
PREVIOUS BOX PAGE
NUMBER CHARACTERWhen entered in a text box in a multipage linkedtext chain, the C+2 (Mac OS) or Ctrl+2 (Windows)character displays the page number of the previouslinked text box. This can be used for a “Continuedfrom” line. See also Current Page Number charac-ter and Next Box Page Number character.
PRINTER DRIVERA system file that translates information between acomputer and a printer.
PRINTER FONTA font that is resident in the printer or is down-loaded to the printer during printing.
On Mac OS, Type 1 fonts have two components: ascreen font for placement in application font menusand for displaying type on-screen, and an outlinefont for displaying type on-screen through AdobeType Manager (ATM) and for high-quality printing.
On Windows, Type 1 fonts have two components: aPFM file that contains the font’s metrics, and a PFBfile that contains the binary printing, or outlineinformation.
PROCESS COLORColor specified in percentages of cyan, magenta,yellow, and black. When superimposed during thefour-color printing process, their separate platesrecreate a full-color look. See Spot color.
PROCESS COLOR SEPARATIONBreaking down color pages into the four processseparation colors (cyan, magenta, yellow, and black)before four-color printing.
PROFILESee ICC Profile.
PROGRAM DEFAULT VALUESThe specification settings QuarkXPress uses. Youcan change most default values; once you do, therevised settings become the new default values.See also Preset default values and User-specifieddefault values.
PROGRAM LANGUAGEThe language used in QuarkXPress Passport menusand dialog boxes. You can change the program lan-guage at any time using the Program Languagesubmenu (Edit & Program Language).
PROOFAn intermediate stage in the document produc-tion process when pages are checked for errorsand corrected.
PULL QUOTEA sentence or phrase, taken from the body of a storyand used to attract the reader’s attention, break upgray areas, or add length to a story.
PUNCTUATION SPACEA punctuation space is the width of a period in agiven font.
QUARKA subatomic particle proposed as one of the fun-damental building blocks of all matter. (Origin ofthe word is unknown; possibly from James Joyce’sFinnegans Wake.)
RAGGED RIGHTSee Left-aligned.
RAISED CAPA large initial capital letter that sits on the baselineof the first line of a paragraph and rises above theother characters.
Preferences — Raised cap
Glossary
428

RASTER IMAGESee Bitmap image.
RASTER IMAGE PROCESSORSee RIP.
RAM (RANDOM ACCESS MEMORY)The portion of the computer’s memory that tem-porarily stores information while the computer is on.
REFLOWThe repositioning of characters or line breaks. Reflowcan be caused by text editing or by modifications tothe QuarkXPress hyphenation exception list ortracking and kerning tables.
REGISTRATION COLORA default color that you can apply to crop marksor other items to make them print on all colorseparation plates.
REGISTRATION MARK (: )Symbols on camera-ready art, used to align over-laying plates. QuarkXPress can automaticallyprint registration marks.
REMAPThe unexpected replacement of a character with adifferent character, usually in the same font.
RENDERTo reproduce or represent. Documents can berendered on-screen or by an output device.
RENDERING INTENTThe process of adjusting the colors in an object tomaintain the important aspects of that object on acolor output device.
RESIDENT FONTA font stored in a printer’s memory.
RESOLUTIONRefers to the degree of detail. Resolution fordevices and for images is usually measured in dotsper inch (dpi). See also Dpi.
REVERSE DIFFERENCEA command in the Merge submenu (Item & Merge)that deletes all the back items from a group ofstacked item shapes, but retains any items at thevery front of the stack, resulting in one box. Anyoverlapping areas are cut out.
REVERSE TYPEWhite or light type set against a dark background.Also called dropped-out type.
RGB (RED, GREEN, AND BLUE)A color model based on the additive color theory.RGB is used for computer monitors and color videooutput systems.
RICH BLACKA black that incorporates other colors, such ascyan and magenta, to gain visual impact byprinting darker.
RIGHT-ALIGNEDA right-aligned paragraph has a straight right edgeand a ragged (uneven) left edge. Also called flushright, ragged left, or right-justified.
RIGHT-CLICKINGOne mouse click on the right mouse button. Right-clicking generally displays a context menu.
RIGHT INDENTThe distance from the right edge of a columnor text box (plus the text inset) to the text inthe paragraph(s).
RIGHT INDENT TAB CHARACTERA tab character created by pressing Option+Tab(Mac OS) or Shift+Tab (Windows) that places a tabstop flush with the right indentation.
RIGHT JUSTIFIEDSee Right-aligned.
RIGHT-READING, EMULSION-SIDE-DOWNFilm printed so that the type reads correctly (left toright) when the film’s emulsion side is facing down.
Raster image — Right-reading, emulsion-side-down
Glossary
429

RIP (RASTER IMAGE PROCESSOR)Hardware or software that translates electronic filedata into an array of dots (a bitmap) that can beoutput using an imagesetter marking engine.
ROLLOVERA picture (in a Web page) that changes when youmove the mouse pointer over it.
ROUGH1. A QuarkXPress print setting (File & Print &Options tab & Output pop-up menu & Rough )that prevents pictures from printing, whichsaves time when producing drafts. Overall printquality and formatting are not affected by theRough setting.
2.Preliminary versions of a publication that areused for proofing.
ROWA horizontal series of cells in a table.
RTF (RICH TEXT FORMAT) A file exchange format that preserves informationabout the font, font size, and type style, as well asstyle sheet information for those applications thatsupport style sheets.
RULEAn anchored horizontal line placed above or below aparagraph using the Rules command (Style menu).
RULE-BASED TAGGINGAdding QuarkXPress content to an XML documentusing avenue.quark tagging rules.
RULER GUIDESNonprinting lines used to align boxes and otheritems on a page.
RULER ORIGINThe movable zero point of the horizontal andvertical rulers.
RULERSThe horizontal and vertical rulers that display alongthe edges of the document when Show Rulers ischosen (View menu).
RUNAROUNDThe QuarkXPress Runaround command (Itemmenu) lets you control the way text flows arounditems and pictures placed in front of the text.Also called text wrap.
SCALABLE FONTA mathematically described font that prints withoutjagged edges at all sizes. Type 1 and TrueType arecommon scalable font technologies. See alsoBitmapped font, Printer font, and Screen font.
SCALINGThe enlargement or reduction of charactersand pictures.
SCREEN FONT — MAC OS ONLYA bitmapped representation of a Mac OS Type 1font that is used to display characters on-screen(when Adobe Type Manager is not performingthis job) and that makes the font accessiblethrough an application’s font menu.
SCROLL BARSShaded bands at the right and bottom of a docu-ment that let you move your view horizontally andvertically. A scroll bar includes a scroll box and scrollarrows at both ends. Some dialog boxes and palettesalso contain scroll bars to access list items.
SECTIONA group of sequentially numbered pages. A docu-ment can contain many sections with varying page-numbering formats. See also Numbering format.
SECTIONINGDividing a document into groups of pages fororganizational and numbering purposes.
SEGMENTA straight or curved line section between two points.
SELECTTo make active. For example, you select a paragraphby placing the Text Insertion bar I within it. Youselect text by placing the Text Insertion bar I withina paragraph and clicking and dragging across therange of desired text.
RIP (Raster Image Processor) — Select
Glossary
430

SERVICE BUREAUA company that provides output or prepress work(imagesetting, color separation, color correction,and printing, for example) to electronic publishers.
SET SOLIDLines of text are described as set solid when the fontsize equals the leading value, as in 10-point typewith 10 points of leading.
SHADOWA type style with a built-in shadow effect.
SHAPEThe structure of a box, line, or text path. The Shapesubmenu in the Item menu lets you choose amongseveral types of shapes for a selected item.
SHUFFLINGWhen QuarkXPress automatically repositions,renumbers, and reformats pages to maintain theproper left/right facing-page layout as you insert,delete, or move pages.
SIDEBARA selected subtopic or story that is often set apartusing a shaded or framed box.
SKEWSpecifying a skew angle slants the image, text, oritem at that angle.
SMALL CAPSA type style with reduced-size capital letters sub-stituted for lowercase letters.
SMOOTHINGThe adjustment of a bitmapped image by roundingthe jagged pixel edges.
SMOOTH POINTA Bézier point that connects two curved lines toform a continuous curve. The curve handles revolvetogether so that they always rest on a straight linethrough the point, but they can be distanced inde-pendently. See also Corner point, Curve handles,Point, and Symmetrical point.
SOFT FONTSee Downloadable font.
SOURCE DOCUMENTThe document from which you copy items or pageswhen copying between QuarkXPress documents.The document to which you copy items or pages isthe target document. See also Target document.
SOURCE PROFILEThe profile of the device creating or modifying theimages used in your document. See also ICC Profile.
SPACE/ALIGNAn Item menu command that evenly distributesmultiple-selected items.
SPACE BEFORE/SPACE AFTERThese fields in the Formats tab of the ParagraphAttributes dialog box (Style & Formats) control thespacing above and below paragraphs.
SPLIT1.A submenu in the Item menu that becomesavailable when a single box with a complex shapeis selected. The box must include contours thatoverlap or lines that cross. The Split commands(Outside Paths and All Paths) create variousboxes from the original box selected.
2.A command in the Table submenu (Item &Table) that converts combined cells into their origi-nal separate-cell configuration. See also Combine.
SPOT COLORA spot color is one that is not built using processcolor inks (cyan, magenta, yellow, and black).Instead, the color is printed using an ink madeexclusively for that color. When printing separationsin QuarkXPress, each spot color on a page is printedonto its own plate.
SPREAD1. In QuarkXPress, two or more adjoining pages.
2. A trapping option where a color object is slightlyenlarged when printed to overlap the edge of the“knocked-out” area of the background. See alsoChoke, Knockout, and Trapping.
Service bureau — Spread
Glossary
431

STACKING ORDERThe position of an item (such as a box, text path, orline) relative to other items in front of or behind it.
STANDARD H&J SPECIFICATIONThe default hyphenation and justification specifica-tion applied to all new paragraphs.
STORYIn QuarkXPress, a single set of linked text boxes.
STRIKE THRUA type style with a horizontal line throughthe characters, usually to indicate a desired oranticipated deletion.
STYLE SHEETSQuarkXPress has paragraph and character stylesheets. A paragraph style sheet is a saved set ofparagraph formats with an embedded characterstyle sheet. A character style sheet is a saved setof character attributes.
STYLE SHEETS PALETTEA movable palette that displays in front of all opendocuments. The top half of the Style Sheets palette(View menu) lets you apply paragraph style sheetsto selected paragraphs; the lower half lets you applycharacter style sheets to selected text. A plus sign (+)next to a style sheet name indicates that local for-matting exists at the location of the text insertionpoint i or in selected text.
SUBMENUA subordinate menu that displays when you choosea menu command that is followed by the > icon.
SUBSAMPLESubsampling is a particular method of gathering asmaller, but representative, set of data from a largerraster data file. When this smaller set of data is sentto the output device, processing time is reduced, butimage quality is not compromised. When subsam-pling, QuarkXPress selects the center pixel in an areaand enlarges it to replace the area with a single pixel.See also Down sample.
SUBSCRIPTA type style with a reduced size that is loweredbelow its baseline.
SUBTRACTIVE COLORA system in which color is produced by combiningsubtractive colorants such as paint, inks, or dyes.Cyan, magenta, yellow, and black are typical subtrac-tive colorants. When combined, they “subtract”light from the page to produce dark colors.
SUPERIORA type style with a reduced size; when the Superiortype style is applied, the top of text aligns with thecap height of the adjacent text.
SUPERSCRIPTA type style with a reduced size that is raised aboveits baseline.
SWOP (SPECIFICATIONS FOR WEB
OFFSET PUBLICATIONS)The SWOP standard specifies process ink colorsand other printing guidelines necessary to ensurea reasonable color match for periodicals printedat various sites.
SYMMETRICAL POINTA Bézier point that connects two curved lines toform a continuous curve. The curve handles movetogether so that they always rest on a straight linethrough the point and are always equidistant fromthe point. The result is similar to a smooth point,but the curve handles cannot be distanced from thepoint independently. See also Corner point, Curvehandles, Point, and Smooth point.
SYSTEM LANGUAGEThe language of the Mac OS or Windowssystem software.
TAB1. A character entered by pressing the Tab key, whichplaces subsequent text on the line according to thenext tab stop.
2.A panel in a tabbed dialog box.
Stacking order — Tab
Glossary
432
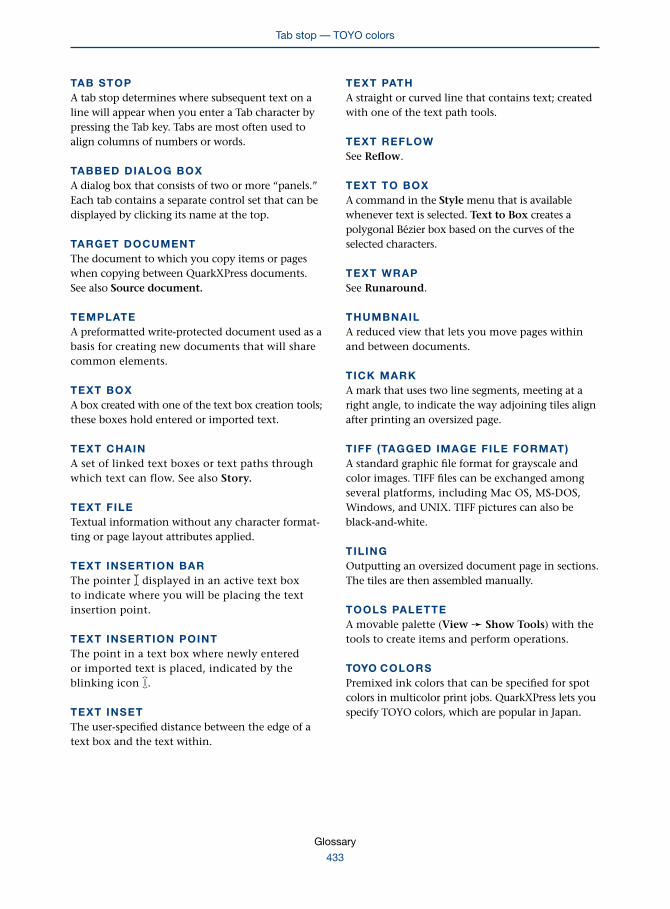
TAB STOPA tab stop determines where subsequent text on aline will appear when you enter a Tab character bypressing the Tab key. Tabs are most often used toalign columns of numbers or words.
TABBED DIALOG BOXA dialog box that consists of two or more “panels.”Each tab contains a separate control set that can bedisplayed by clicking its name at the top.
TARGET DOCUMENTThe document to which you copy items or pageswhen copying between QuarkXPress documents.See also Source document.
TEMPLATEA preformatted write-protected document used as abasis for creating new documents that will sharecommon elements.
TEXT BOXA box created with one of the text box creation tools;these boxes hold entered or imported text.
TEXT CHAINA set of linked text boxes or text paths throughwhich text can flow. See also Story.
TEXT FILETextual information without any character format-ting or page layout attributes applied.
TEXT INSERTION BARThe pointer I displayed in an active text boxto indicate where you will be placing the textinsertion point.
TEXT INSERTION POINTThe point in a text box where newly enteredor imported text is placed, indicated by theblinking icon i.
TEXT INSETThe user-specified distance between the edge of atext box and the text within.
TEXT PATHA straight or curved line that contains text; createdwith one of the text path tools.
TEXT REFLOWSee Reflow.
TEXT TO BOXA command in the Style menu that is availablewhenever text is selected. Text to Box creates apolygonal Bézier box based on the curves of theselected characters.
TEXT WRAPSee Runaround.
THUMBNAILA reduced view that lets you move pages withinand between documents.
TICK MARKA mark that uses two line segments, meeting at aright angle, to indicate the way adjoining tiles alignafter printing an oversized page.
TIFF (TAGGED IMAGE FILE FORMAT)A standard graphic file format for grayscale andcolor images. TIFF files can be exchanged amongseveral platforms, including Mac OS, MS-DOS,Windows, and UNIX. TIFF pictures can also beblack-and-white.
TILINGOutputting an oversized document page in sections.The tiles are then assembled manually.
TOOLS PALETTEA movable palette (View & Show Tools) with thetools to create items and perform operations.
TOYO COLORSPremixed ink colors that can be specified for spotcolors in multicolor print jobs. QuarkXPress lets youspecify TOYO colors, which are popular in Japan.
Tab stop — TOYO colors
Glossary
433

TRACKINGThe adjustment of white space between selectedcharacters and words. By specifying positive or nega-tive tracking values, you can adjust overall characterspacing for selected text.
TRACKING EDITThe Tracking Edit dialog box (Utilities menu) letsyou control the tracking values for a particular font.
TRAP INFORMATION PALETTEA movable palette (View & Show TrapInformation) that lets you specify trapping onan object-by-object basis.
TRAPPINGA slight overlapping that prevents gaps fromappearing along the edges of an object becauseof misalignment or movement on-press.
QuarkXPress trapping values are specified on acolor-by-color or object-by-object basis. See alsoChoke and Spread.
TRIMTo cut press sheets to the finished page size.
TRUE NEGATIVEA negative created from a picture’s original,unmodified contrast.
TRUMATCH COLORSA color matching system for specifying predictablefour-color (CMYK) reproduction of more than 2,000process colors.
TWO-FOLDA publication or brochure design with six panels,three on each side, defined by two folds.
TYPE FAMILYA group of related typefaces. For example, the Futuratype family includes Futura, Futura Book, FuturaCondensed, and Futura Extra Bold.
TYPE STYLEThis character attribute command lets you applyany of 13 styles to selected text: Plain, Bold, Italic,Underline, Word Underline, Strike Thru, Outline,Shadow, All Caps, Small Caps, Superscript,Subscript, and Superior.
TYPEFACEA set of fonts that share a unified design. Forexample, Futura Bold is a typeface in the Futuratype family.
TYPESETTERS’ APOSTROPHES AND
QUOTATION MARKSThe curly apostrophes and quotation marks(“,”,‘, and ’) preferred by traditional typesetters.
TYPOGRAPHYThe art of formatting text so that its appearance aswell as its content conveys a mood or message.
UNDERLINEA type style with a line underneath characters,including spaces.
UNGROUPSee Group.
UNIONA command in the Merge submenu (Item & Merge)that combines all the selected item shapes intoone shape, retaining all overlapped and nonover-lapped areas.
USER-SPECIFIED DEFAULT VALUESProgram default values that have been specified bythe user. See also Preset default values and Programdefault values.
VECTOR IMAGESee Object-oriented image.
VERTICAL ALIGNMENTA command in the Style menu and a pop-up menuin the Formats tab (Style menu) that controls thevertical placement of text in a box.
Tracking — Vertical alignment
Glossary
434
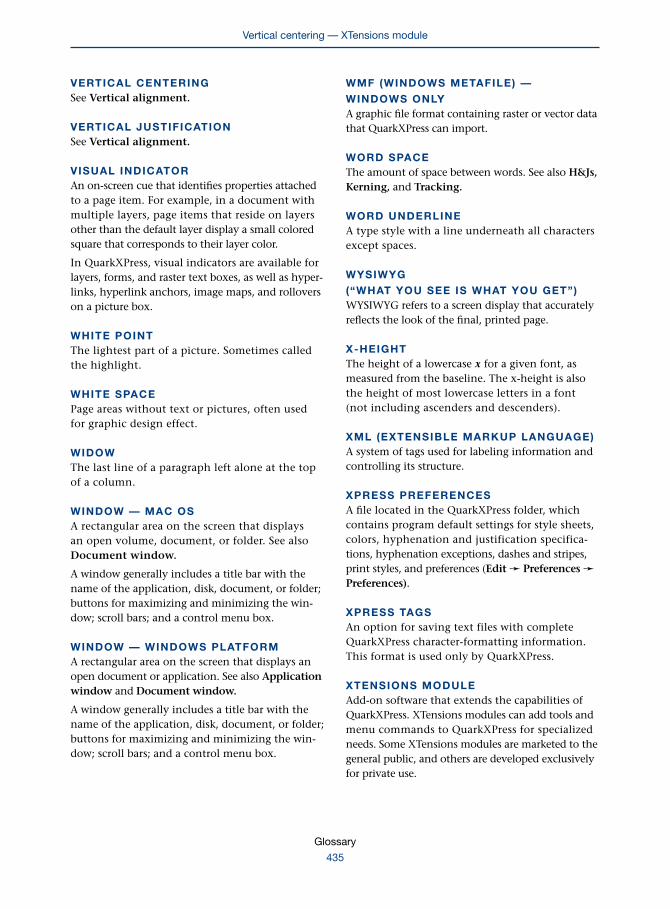
VERTICAL CENTERINGSee Vertical alignment.
VERTICAL JUSTIFICATIONSee Vertical alignment.
VISUAL INDICATORAn on-screen cue that identifies properties attachedto a page item. For example, in a document withmultiple layers, page items that reside on layersother than the default layer display a small coloredsquare that corresponds to their layer color.
In QuarkXPress, visual indicators are available forlayers, forms, and raster text boxes, as well as hyper-links, hyperlink anchors, image maps, and rolloverson a picture box.
WHITE POINTThe lightest part of a picture. Sometimes calledthe highlight.
WHITE SPACEPage areas without text or pictures, often usedfor graphic design effect.
WIDOWThe last line of a paragraph left alone at the topof a column.
WINDOW — MAC OSA rectangular area on the screen that displaysan open volume, document, or folder. See alsoDocument window.
A window generally includes a title bar with thename of the application, disk, document, or folder;buttons for maximizing and minimizing the win-dow; scroll bars; and a control menu box.
WINDOW — WINDOWS PLATFORMA rectangular area on the screen that displays anopen document or application. See also Applicationwindow and Document window.
A window generally includes a title bar with thename of the application, disk, document, or folder;buttons for maximizing and minimizing the win-dow; scroll bars; and a control menu box.
WMF (WINDOWS METAFILE) —
WINDOWS ONLYA graphic file format containing raster or vector datathat QuarkXPress can import.
WORD SPACEThe amount of space between words. See also H&Js,Kerning, and Tracking.
WORD UNDERLINEA type style with a line underneath all charactersexcept spaces.
WYSIWYG
(“WHAT YOU SEE IS WHAT YOU GET”)WYSIWYG refers to a screen display that accuratelyreflects the look of the final, printed page.
X-HEIGHTThe height of a lowercase x for a given font, asmeasured from the baseline. The x-height is alsothe height of most lowercase letters in a font(not including ascenders and descenders).
XML (EXTENSIBLE MARKUP LANGUAGE)A system of tags used for labeling information andcontrolling its structure.
XPRESS PREFERENCESA file located in the QuarkXPress folder, whichcontains program default settings for style sheets,colors, hyphenation and justification specifica-tions, hyphenation exceptions, dashes and stripes,print styles, and preferences (Edit & Preferences &Preferences).
XPRESS TAGSAn option for saving text files with completeQuarkXPress character-formatting information.This format is used only by QuarkXPress.
XTENSIONS MODULEAdd-on software that extends the capabilities ofQuarkXPress. XTensions modules can add tools andmenu commands to QuarkXPress for specializedneeds. Some XTensions modules are marketed to thegeneral public, and others are developed exclusivelyfor private use.
Vertical centering — XTensions module
Glossary
435

Index
A
A Guide to QuarkXPress: Using QuarkXPress, xi–xiiAlignment submenu (Style menu), 239–240Anchor submenu (Style menu), 257, 268–269Anchored rules. See Rules above and below para-
graphsAppend command, 94Append Conflict dialog box, 95–96Append to dialog box, 94–95Apply button, xxivArrange Icons command, 407Arrow pointer, 8, 10, 20Arrowhead pointer, 11Arrowheads submenu (Style menu), 270Attributes dialog box, 61–62Automatic hyphenation, 204–205. See also H&JsAuxiliary dictionary, 381–384
Auxiliary Dictionary dialog box, 382–383Edit Auxiliary Dictionary dialog box, 383–384
B
Baseline shift, 236Beveled-corner Picture Box tool, 14Beveled-corner Text Box tool, 13Bézier items
converting points and segments, 345–346reshaping items before completion, 18
Bézier tools, 18–19Bézier Image Map tool, 27preferences, 19
Blends, 280–281in tables, 315
Book command, 82Box tab (Modify dialog box), 276–281Boxes
aligning anchored boxes with text, 277–278angle, 278changing content of, 343changing shape of, 342–343color, 279–280
Boxes, continuedcorner radius of, 279creating blends in, 280–281creating picture boxes, 14–15creating text boxes, 13–14origin across and down, 277shade, 279–280sizing, 278skew, 279suppressing printout, 279
Bring Forward command, 336–337Bring to Front command, 336Button tool [Web], 26, 29
C
Cascade command, 406Cell tab (Modify dialog box), 313–315Character Attributes dialog box, 236–237Character Style Sheet submenu (Style menu), 238Check Box tool [Web], 26, 29Checking spelling. See Spelling, checkingClear command, 129Clipping paths
choosing an existing path or alpha channel, 306creating, 302–303Crop to Box, 304defined, 302, 303editing, 302–303, 344Invert, 307Noise, 307Outset, 306Outside Edges Only, 308Preview, 303Rescan, 303–304Restrict to Box, 308Smoothness, 307Threshold, 307Tolerance, 306–307types, 304–305
Alpha Channel, 305Embedded Path, 305Item, 305Non-White Areas, 305Picture Bounds, 305
Index
436

Clipping tab (Modify dialog box), 302–308Close All command, 407Close command, 85Collect for Output feature [print], 102–104
collecting fonts, 104generating a report only, 103
Color management [print]and the Get Picture feature, 91–92and the Save Page as EPS feature, 101Display Simulation pop-up menu, 180–181enabling, 175ICC profiles, 175managing color when printing, 121–122preferences, 174–181Profile Information palette, 63–65Profile Manager dialog box, 397–398profile usage information, 390rendering intents, 176–180
Color submenu (Style menu), 234, 260, 271Color(s)
appending, 192creating, 192deleting, 192duplicating, 192editing, 192, 193–198
color models, 194–195process colors, 198saving, 193screen values for, 198specifying trapping values for colors, 198–201spot colors, 198
Colors dialog box, 190–193Colors palette, 49–52
blends area, 50–51color selection area, 51–52Colors palette buttons, 49–50
Component Status dialog box, 393–395Concave-corner Picture Box tool, 14Concave-corner Text Box tool, 13Constrain/Unconstrain command, 332Content submenu (Item menu), 343Content tool, xiii, 6, 7–10Context menus, xix–xx, 73–76
displaying, xix, 73for document page items, 74
Context menus, continuedQuarkXPress palettes and, 76variations in, 75
Conventions in this Guide, ix–xiConvert Table to Text command, 349–350Convert Text to Table command, 347–348Copy command, 125Corner Point command, 345Crosshair pointer, 13–14, 15, 16, 17, 18, 19, 21, 27,
28, 29Curve handle pointers, 10Curved Segment command, 346–347Custom Bleeds QuarkXTensions software [print],
99Cut command, 125
D
Dashes & Stripes feature, 211–216appending, 213creating dashes, 213–215creating stripes, 215–216Dashes & Stripes dialog box, 211–213deleting, 212duplicating, 212editing dashes, 213–216editing stripes, 215–216
Delayed Item Dragging feature, 8–9, 11Delete commands
in the Edit menu (Windows), 129in the Item menu, 331in the Page menu, 356
Delete Layer dialog box, 63Delete Pages dialog box, 356–357Display submenu (Page menu), 366Document Layout palette, 43–47
adding document pages, 44adding master pages, 44applying master pages to document pages, 45deleting pages, 45document page area, 46–47master page area, 45–46page insert, duplicate, and delete area, 44–45renaming master pages, 45repositioning pages, 46
Document Setup dialog box, 105–106
Index
437
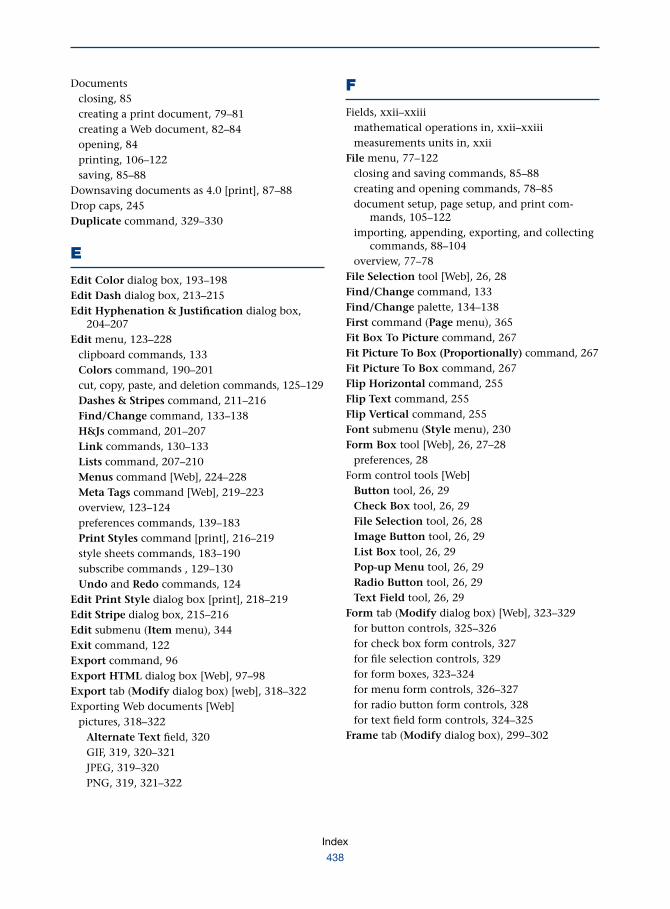
Documentsclosing, 85creating a print document, 79–81creating a Web document, 82–84opening, 84printing, 106–122saving, 85–88
Downsaving documents as 4.0 [print], 87–88Drop caps, 245Duplicate command, 329–330
E
Edit Color dialog box, 193–198Edit Dash dialog box, 213–215Edit Hyphenation & Justification dialog box,
204–207Edit menu, 123–228
clipboard commands, 133Colors command, 190–201cut, copy, paste, and deletion commands, 125–129Dashes & Stripes command, 211–216Find/Change command, 133–138H&Js command, 201–207Link commands, 130–133Lists command, 207–210Menus command [Web], 224–228Meta Tags command [Web], 219–223overview, 123–124preferences commands, 139–183Print Styles command [print], 216–219style sheets commands, 183–190subscribe commands , 129–130Undo and Redo commands, 124
Edit Print Style dialog box [print], 218–219Edit Stripe dialog box, 215–216Edit submenu (Item menu), 344Exit command, 122Export command, 96Export HTML dialog box [Web], 97–98Export tab (Modify dialog box) [web], 318–322Exporting Web documents [Web]
pictures, 318–322Alternate Text field, 320GIF, 319, 320–321JPEG, 319–320PNG, 319, 321–322
F
Fields, xxii–xxiiimathematical operations in, xxii–xxiiimeasurements units in, xxii
File menu, 77–122closing and saving commands, 85–88creating and opening commands, 78–85document setup, page setup, and print com-
mands, 105–122importing, appending, exporting, and collecting
commands, 88–104overview, 77–78
File Selection tool [Web], 26, 28Find/Change command, 133Find/Change palette, 134–138First command (Page menu), 365Fit Box To Picture command, 267Fit Picture To Box (Proportionally) command, 267Fit Picture To Box command, 267Flip Horizontal command, 255Flip Text command, 255Flip Vertical command, 255Font submenu (Style menu), 230Form Box tool [Web], 26, 27–28
preferences, 28Form control tools [Web]
Button tool, 26, 29Check Box tool, 26, 29File Selection tool, 26, 28Image Button tool, 26, 29List Box tool, 26, 29Pop-up Menu tool, 26, 29Radio Button tool, 26, 29Text Field tool, 26, 29
Form tab (Modify dialog box) [Web], 323–329for button controls, 325–326for check box form controls, 327for file selection controls, 329for form boxes, 323–324for menu form controls, 326–327for radio button form controls, 328for text field form controls, 324–325
Frame tab (Modify dialog box), 299–302
Index
438

Framescolor, 301gap, 301–302preferences, 299shade, 301style, 300width, 299–300
Freehand tools, 19–20preferences, 20
G
Gap, 288, 301–302, 318Get Picture feature, 90–92
color management settings [print], 91–92Get Text feature, 88–90
import filters, 90Go to command, 365
Go to Page dialog box, 366Gradients. See BlendsGrid tab (Modify dialog box), 316–318Gridlines submenu (Item menu), 351Group command, 331–332
H
H&Js, 201–207appending, 203–204applying, 245automatic hyphenation, 205creating, 203, 204–207deleting, 203duplicating, 203editing, 203, 204–207flush zone, 207H&Js dialog box, 202–204hyphenation zone, 205–206justification method, 206–207
Hide commandsHide Baseline Grid, 371Hide Clipboard, 133Hide Colors, 374Hide Document Layout, 373Hide Guides, 370–371
Hide commands, continuedHide Hyperlinks, 375Hide Index [print], 375Hide Invisibles, 372Hide Layers, 374Hide Lists, 374Hide Measurements, 373Hide Profile Information [print], 374Hide Rulers, 371–372Hide Style Sheets, 373Hide Tools, 373Hide Trap Information [print], 374Hide Visual Indicators, 372Hide Web Tools [Web], 373
Hot areas. See Image mapsHTML command. See Export HTML dialog box
[web]Hyperlink submenu (Style menu), 256, 267–268Hyperlinks palette, 65–67
Hyperlinks list, 67Hyperlinks palette buttons, 65–67
Delete button, 66Edit button, 66New Anchor button, 66New Hyperlink button, 66Show/Hide button, 66–67
Hyphenation, 384–386. See also H&Jshyphenation exceptions, 385–386suggested hyphenation, 384–385
Hyphenation and justification specifications. SeeH&Js
I
Icons for print and Web documents, xiImage Button tool [Web], 26, 29Image map tools [Web], 26–27
preferences, 27Image maps [Web]
deleting, 352displaying, 27hiding, 27
Import/export filters, 90, 94Indentation fields, 242–243
Index
439

Indexes [print]building, 403–405Index palette, 68–72
Entries list, 72Index palette buttons, 71–72
Add All button, 71Add All Reverse button, 71Add button, 71Add Reverse button, 71Delete button, 71Edit button, 71Find First Entry button, 71Find Next Entry button, 71
Level pop-up menu, 69Scope pop-up menu, 70–71Sort As field, 69Style pop-up menu, 70–71Text field, 69
Index QuarkXTensions software, 181, 375, 403preferences, 181–183
Initial caps. See Drop capsInsert command, 354
Insert Pages dialog box, 354–356Insert Object command, 132Insert Object dialog box, 132–133Interface. See QuarkXPress interfaceInvisible characters, 372Item menu, 273–352
commands for duplicating and deleting items,329–331
grouping, merging, and locking commands,331–335
modify commands, 274–329overview, 273–274point/segment and table commands, 345–351rollover and hot areas commands, 351–352shape, content, edit commands, 342–344stacking order commands, 335–341
Item tool, xiii, 6, 7–10
K
Keep Lines Together feature, 246Kern-Track Editor QuarkXTensions software, 399–403Kerning, 401–403
Kerning Edit dialog box, 401–402Kerning Values dialog box, 402–403
L
Last command (Page menu), 365Layers palette, 59–63
Default layer, 61Delete Layer button, 60, 63Layer Selection area, 60–61Layers palette buttons, 60Merge Layers button, 62–63Move Item to Layer button, 62
Library command, 81Line Segment pointer, 10Line Style submenu (Style menu), 270Line tab (Modify dialog box), 283–288Line Text Path tool, 6, 17Line tool, 6, 16Line tools (Bézier), 18–19
preferences, 19Line tools (straight), 16
preferences, 16Lines
aligning anchored lines with text, 287angle, 286arrowheads, 270, 285changing shape, 342–343changing to different item type, 343color, 271, 288gap, 288Mode pop-up menu, 285–286shade, 272, 288sizing, 286–287skew, 286–287style, 270, 283–284suppressing printout, 287width, 270–271, 284
Linking pointer, 20Linking tool, 6, 20–21Links command, 130Links dialog box, 130–131List Box tool [Web], 26, 29Lists, 58–59, 207–210
appending, 209creating, 208, 209–210deleting, 209duplicating, 208Edit List dialog box, 209–210editing, 208, 209–210
Index
440

Lists, continuedLists dialog box, 207–209Lists palette, 58–59
updating lists for books [print], 59–60updating lists for chapters and documents, 59viewing lists, 58–59
Live Scroll feature, 23Lock to Baseline Grid feature, 247Lock/Unlock command, 332–333
M
Marquee pointer, 8Master Guides command [print], 358
Master Guides dialog box [print], 358–359Master Page Properties command [Web], 365
Master Page Properties dialog box [Web], 365Measurements palette, 30–43
for Bézier items, 36for button form controls [web], 40for check box form controls [web], 42–43for file submission controls [web], 39for form boxes [Web], 39for groups and multiple-selected items, 35for image button form controls [web], 40for image maps [Web], 38–39for lines, 33–35for list form controls [Web], 41for picture boxes, 32–33for pop-up menu form controls [Web], 41for radio button form controls [Web], 41–42for ruler guide placement, 43for ruler origin relocation, 43for tables, 36–38for text boxes, 31–32for text field form controls [Web], 39for text paths, 35overview, 30–31
Measurements units in fields, xxiiMenus (for form controls) [Web], 224–228
creating menu items, 227–228creating menus, 226–227editing menu items, 227–228editing menus, 226–227
Merge commands, 333–334Combine, 334Difference, 333Exclusive Or, 334Intersection, 333Join Endpoints, 334Reverse Difference, 333Union, 333
Merge Layers dialog box, 62–63Merge submenu (Item menu), 333–334Meta tags, meta tag sets [web], 219–223
creating meta tag sets, 222–223creating meta tags, 223editing meta tag sets, 222–223editing meta tags, 223
Modify command, 274Modify dialog box, 275–298
Box tab, 276–281Cell tab, 313–315Clipping tab, 302–308Export tab [Web], 318–322Form tab [Web], 323–329. See also Form tab
(Modify dialog box)Frame tab, 299–302Grid tab, 316–318Line tab, 283–288Picture tab, 296–298Runaround tab, 308–312Table tab, 281–283Text Path tab, 289–290Text tab, 291–296
Move command, 357Move Pages dialog box, 357–358
Move Items dialog box, 62Mover pointer, 8–9
N
New Book dialog box, 82New command, 78New Document dialog box [print], 79–81New Library dialog box, 81New Web Document dialog box [Web], 82–84Next command (Page menu), 365Notes (defined), xi
Index
441

O
Object submenu (Windows Edit menu), 131Open dialog box, 84–85OPI QuarkXTensions software [print], 100Orthogonal Line tool, 6, 16Orthogonal Text Path tool, 17Oval Image Map tool [Web], 27Oval Picture Box tool, 14Oval Text Box tool, 13
P
Page Grabber Hand tool, 23scrolling with, 23
Page menu, 353–366displaying document pages, 366inserting, deleting, and moving pages, 354–358modifying master page attributes and numbering
sections, 358–365navigating document pages, 365–366overview, 353–354
Page Properties command [Web], 362Page Properties dialog box [Web], 362–365
Page Setup command for print documents [print],106
Page Setup command for Web documents [Web],106
Palettesarranging, 1–2closing, 1Colors palette, 49–52displaying, 1–2Document Layout palette, 43–47Hyperlinks palette, 65–67Index palette [print], 68–72Layers palette, 59–63Lists palette, 58–59Measurements palette, 30–43moving, 2opening, 1–2Profile Information palette [print], 63–65resizing, 2Style Sheets palette, 47–49Tools palette, 2–5
Palettes, continuedTrap Information palette [print], 52–57Web Tools palette [Web], 23–25
Paragraph Attributes dialog boxFormats tab, 241–247Rules tab, 250–254Tabs tab, 247–250
Paragraph Style Sheet submenu (Style menu),254–255
Paste command, 125Paste Special command, 126Paste Special dialog box, 127–128Picture box tools
non-standard shape. See Bézier tools, Freehand toolsstandard shape, 6, 14–15
Picture Contrast Specifications dialog box,261–264
Picture Halftone dialog box, 265–266Picture Halftone Specifications dialog box, 265–266Picture Mover pointer, 8Picture tab (Modify dialog box), 296–298Pictures
color, 298color management. See Color management
[print]contrast, 261–264Flip Horizontal, Flip Vertical, 297halftone specifications, 265–266importing. See Get Picture featuremodifiable file formats, 259negative, 261offset values, 296–297picture angle, 297picture skew, 297scaling, 297shade, 298suppressing picture printout, 298
Point pointer, 9–10Point/Segment Type submenu (Item menu),
345–347Pop-up Menu tool [Web], 26, 29PPD Manager dialog box [print], 396–397Preferences. See also Preferences dialog box
for color management [print], 174–181for indexing [print], 181–183
Index
442
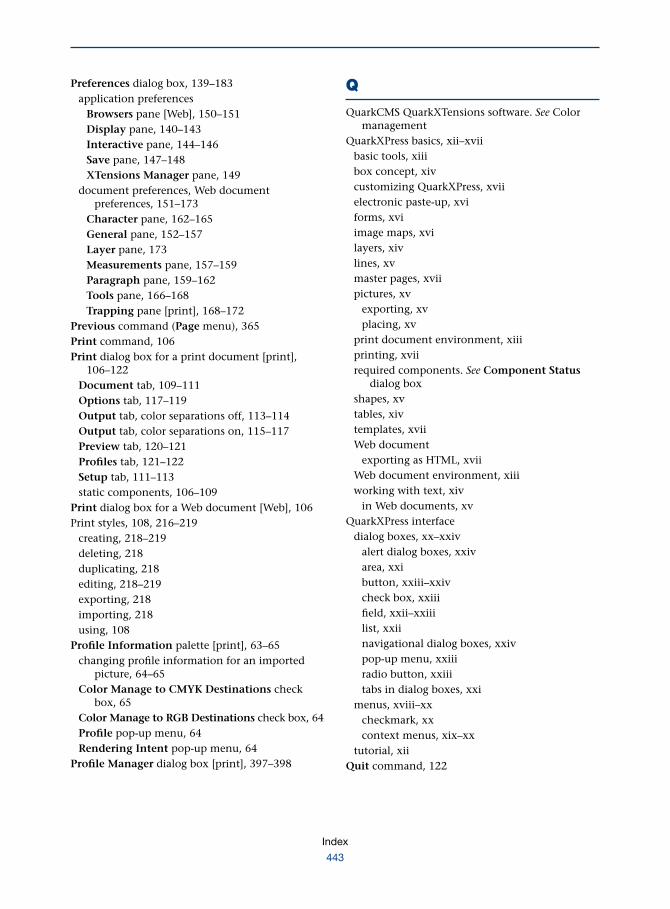
Preferences dialog box, 139–183application preferences
Browsers pane [Web], 150–151Display pane, 140–143Interactive pane, 144–146Save pane, 147–148XTensions Manager pane, 149
document preferences, Web documentpreferences, 151–173
Character pane, 162–165General pane, 152–157Layer pane, 173Measurements pane, 157–159Paragraph pane, 159–162Tools pane, 166–168Trapping pane [print], 168–172
Previous command (Page menu), 365Print command, 106Print dialog box for a print document [print],
106–122Document tab, 109–111Options tab, 117–119Output tab, color separations off, 113–114Output tab, color separations on, 115–117Preview tab, 120–121Profiles tab, 121–122Setup tab, 111–113static components, 106–109
Print dialog box for a Web document [Web], 106Print styles, 108, 216–219
creating, 218–219deleting, 218duplicating, 218editing, 218–219exporting, 218importing, 218using, 108
Profile Information palette [print], 63–65changing profile information for an imported
picture, 64–65Color Manage to CMYK Destinations check
box, 65Color Manage to RGB Destinations check box, 64Profile pop-up menu, 64Rendering Intent pop-up menu, 64
Profile Manager dialog box [print], 397–398
Q
QuarkCMS QuarkXTensions software. See Colormanagement
QuarkXPress basics, xii–xviibasic tools, xiiibox concept, xivcustomizing QuarkXPress, xviielectronic paste-up, xviforms, xviimage maps, xvilayers, xivlines, xvmaster pages, xviipictures, xv
exporting, xvplacing, xv
print document environment, xiiiprinting, xviirequired components. See Component Status
dialog boxshapes, xvtables, xivtemplates, xviiWeb document
exporting as HTML, xviiWeb document environment, xiiiworking with text, xiv
in Web documents, xvQuarkXPress interface
dialog boxes, xx–xxivalert dialog boxes, xxivarea, xxibutton, xxiii–xxivcheck box, xxiiifield, xxii–xxiiilist, xxiinavigational dialog boxes, xxivpop-up menu, xxiiiradio button, xxiiitabs in dialog boxes, xxi
menus, xviii–xxcheckmark, xxcontext menus, xix–xx
tutorial, xiiQuit command, 122
Index
443

R
Radio Button tool [Web], 26, 29Rectangle Image Map tool [Web], 26Rectangle Picture Box tool, 14Rectangle Text Box tool, 13Redo command, 124Required components. See Component Status
dialog boxResizing pointer, 9Revert to Saved command, 88Reverting to the previous tool, 11, 14, 15, 16, 17–18,
19, 20, 21, 22, 27, 28, 30Rollover items [Web]
creating, 351–352deleting, 352
Rollover submenu (Item menu) [Web], 351–352Rotating items, 11Rotation pointer, 11Rotation tool, 6, 10–11Rounded-corner Picture Box tool, 14Rounded-corner Text Box tool, 13Rules above and below paragraphs, 250–254Runaround, 308–312
defined, 308editing a runaround path, 309, 311, 344–345
Runaround tab (Modify dialog box), 308–312with a line or text path selected, 311with a picture box selected, 308–310
Restrict To Box, 309with a table selected, 312with a text box or box with a content of None
selected, 310
S
Save as command, 86Save as dialog box, 86–88Save command, 85–86Save Page as EPS feature, 98–101
Profiles tab [print], 101Save Text feature, 93–94
export filters, 94Section command [print], 360
Section dialog box [print], 361–362
Select All command, 129Send Backward command, 336Send to Back command, 335Shade submenu (Style menu), 234–235, 260, 272Shape submenu (Item menu), 342–343Show commands
Show Baseline Grid, 371Show Clipboard, 133Show Colors, 374Show Document Layout, 373Show Guides, 370–371Show Hyperlinks, 375Show Index [print], 375Show Invisibles, 372Show Layers, 374Show Lists, 374Show Measurements, 373Show Profile Information [print], 374Show Rulers, 371–372Show Style Sheets, 373Show Tools, 373Show Trap Information [print], 374Show Visual Indicators, 372Show Web Tools [Web], 373
Size submenu (Style menu), 230–231Smooth Point command, 346Snap to Guides command, 371Space/Align feature, 337–341Speed Scroll feature, 23Spelling, checking, 377–384
auxiliary dictionary, 381–384spell checking a selection, story, document, or
masters, 379–381spell checking a word, 378Word Count dialog box, 379–380
Split commandsAll Paths, 335Outside Paths, 334–335
Split submenu (Item menu), 334–335Stack Documents command, 370Stacking order, 335–341Step and Repeat feature, 330–331Straight Segment command, 346
Index
444

Style menu, 229–272for lines, 269–272
Arrowheads submenu, 270Color submenu, 271Line Style submenu, 270Shade submenu, 272Width submenu, 270–271
for pictures, 258–269Anchor submenu, 268–269Center Picture command, 267Color submenu, 260Contrast command, 261Fit Box To Picture command, 267Fit Picture To Box (Proportionally)
command, 267Fit Picture To Box command, 267Flip Horizontal command, 267Flip Vertical command, 267Halftone command [print], 265Hyperlink submenu, 267–268Negative command, 261Picture Contrast Specifications dialog box, 261Picture Halftone dialog box, 265–266Picture Halftone Specifications dialog box,
265–266Shade submenu, 260
for text, 229–257Alignment submenu, 239–240Anchor submenu, 257Baseline Shift command, 236Character Attributes dialog box, 236–237Character command, 236Character Style Sheet submenu, 238Color submenu, 234Flip Horizontal, Flip Vertical, Flip Text com-
mands, 255Font submenu, 230Formats command, 241Horizontal/Vertical Scale command, 235Hyperlink submenu, 256Kern command, 235Leading command, 240–241Paragraph Attributes dialog box
Formats tab, 241–242Rules tab, 250Tabs tab, 247
Style menu for text, continuedParagraph Style Sheet submenu, 254–255Rules command, 250Shade submenu, 234–235Size submenu, 230–231Tabs command, 247Text to Box command, 238–239Track command, 236Type Style submenu, 232–233
Style sheetsappending, 186applying character style sheets, 48applying paragraph style sheets, 47character style sheets (defined), 184creating, 185deleting, 186duplicating, 185editing, 185
Edit Character Style Sheet dialog box, 189–190Edit Paragraph Style Sheet dialog box, 186–189
paragraph style sheets (defined), 184saving, 186
Style Sheets dialog box, 183–190Style Sheets palette, 47–49
character style sheet area, 48–49paragraph style sheet area, 47–48
Subscribe to command, 129–130Subscriber Options command, 129–130Symmetrical Point command, 346
T
Table submenu (Item menu) , 348–350Table tab (Modify dialog box), 281–283Table tool, 6, 21–22
preferences, 22Tables, 281
color, 314combining cells, 349converting to text, 349–350creating blends in, 315deleting columns or rows, 349
Index
445

Tables, continuedgridlines
color and shade, 318gap, 318previewing, 316–317selecting groups of, 351style, 317width, 317
inserting columns, 349inserting rows, 349maintaining geometry, 282origin across and down, 282shade, 314Show Creation Dialog check box, 22sizing, 282
specifying column width, 313specifying row height, 313–314
splitting cells, 349suppressing printout, 283Table Properties dialog box, 22text inset, 296
TabsAlign On field, 250alignment, 249fill characters, 250position, 249tab ruler, 247–248
Textalignment, 239–240alignment (vertical), 294–295baseline shift, 236color, 234columns, 291converting to box, 238–239converting to table, 347–348exporting. See Save Text featurefirst baseline, 293–294Flip Horizontal, Flip Vertical, 295font, 230, 236gutter width, 291horizontal/vertical scaling, 235importing. See Get Text featurekerning, 235running text around all sides, 295shade, 234–235size, 230–231, 236text angle, 292
Text, continuedtext inset, 292text skew, 292tracking, 236type styles, 232–233
Text box toolsnon-standard shape. See Bézier tools, Freehand toolsstandard shape, 6, 13–14
Text Field tool [Web], 26, 29Text Insertion bar, 7Text insertion point, 7–8Text Path tab (Modify dialog box), 289–290Text path tools (Bézier), 18–19Text path tools (straight), 17–18
preferences, 17Text paths, 289–290
changing shape of, 342–343changing to different item type, 343flipping text on a path, 290text alignment, 290text orientation, 289–290
Text tab (Modify dialog box), 291–296with a table selected, 295–296
Text to Box command, 238–239Tile Documents command, 370Tile Horizontally command, 406Tile Vertically command, 407Tips (defined), xiTools palette, 2–5
Bézier tools, 18–19closing, 3Content tool, 7–10customizing, 4default Tools palette, 6displaying, 2freehand tools, 19–20Item tool, 7–10keyboard commands for, 5Linking tool, 20–21Page Grabber Hand tool, 23picture box tools (standard shape), 14–15Rotation tool, 10–11selecting a tool, 3straight line tools, 16straight text path tools, 17–18Table tool, 21–22text box tools (standard shape), 13–14
Index
446

Tools palette, continuedtool overview, 6–23tool preferences, 3Unlinking tool, 20–21Zoom tool, 12–13
accessing, 13preferences, 12
Tracking, 399–400Tracking Edit dialog box, 399Tracking Values dialog box, 400
Trap Information palette [print], 52–57Default Trap information window, 56Properties area, 57Source of Trap Values area, 57trapping boxes and text, 53trapping frames, 54trapping lines, 54–55trapping tables, 55
Trap Specifications dialog box [print], 198–201Type Style submenu (Style menu), 232–233
U
Unconstrain command, 332Undo/Redo command, 124Ungroup command, 332Unlinking pointer, 21Unlinking tool, 6, 20–21Unlock command, 333Usage command and dialog box, 386–390
Fonts tab, 386–387Pictures tab, 387–390Profiles tab [print], 390
Utilities menu, 376–405Build Index command [print], 403–405Component Status command, 393–395hyphenation commands, 384–386Kerning Edit command, 401–403overview, 376–377PPD Manager command and dialog box [print],
396–397Profile Manager command and dialog box [print],
397–398spell checking commands, 377–384Tracking Edit command, 399–400Usage command and dialog box, 386XTensions Manager command, 391–393
V
View commands, 368–370200%, 368–36950%, 368–36975%, 368–369Actual Size, 368–369Fit in Window, 368keyboard commands for, 370Thumbnails, 369
View menu, 367–375document view commands, 368–370overview, 367–368Show/Hide commands, 370–375Windows submenu, 369–370
W
Web Tools palette [Web], 23–25closing, 23–24customizing, 24–25default Web Tools palette, 26displaying, 23Form Box tool, 26, 27form control tools, 28–30image map tools, 26–27keyboard commands for, 25selecting a tool, 24Web tool overview, 26–30Web tool preferences, 24
Width submenu (Style menu), 270–271Window menu, 406–407
keyboard commands for, 407overview, 406
Windows submenu (Mac OS View menu), 369–370Word Count dialog box, 379–380
X
XTensions Manager command and dialog box,391–393
Z
Zoom In pointer, 12Zoom Out pointer, 12Zoom tool, 6, 12–13
Index
447


