1 A Signal Analysis Primer for the MATLAB Naïve Nathan Insel (thanks to: Matthijs van der Meer and Rachel Samson for edits and feedback) This document is freely available at http://ninsel.net/signal-analysis-primer I am continuously updating the primer (current version: 1.2, 1/4/13) and welcome suggestions and comments to networksunknown(at)gmail(dot)com Other resources: there are many books on signal analysis and on how to use MATLAB; the Mathworks documentation itself is quite good (http://www.mathworks.com/help/matlab/). In the domain of neuroscience, I also recommend: Signal Processing for Neuroscientists: An Introduction to the Analysis of Physiological Signals by van Drongelen (http://www.amazon.com/Signal-Processing-Neuroscientists-Introduction-Physiological/dp/0123708672# MATLAB for Neuroscientists, Second Edition: An Introduction to Scientific Computing in MATLAB by Wallisch et al. (http://store.elsevier.com/MATLAB-for-Neuroscientists/Pascal-Wallisch/isbn-9780123838377/) Contents 0. About MATLAB 2 1. Fourier transformations and signal generation 3 MATLAB Exercises 1.1) Generating signals that oscillate 5 1.2) Using the Fourier transformation to convert the signals into power spectra 7 1.3) Zero-padding a signal 8 2. Signal filtering and more signal generation 10 MATLAB Exercises 2.1) Filter random noise to 6-10 Hz 12 2.2) Decompose filtered signal with a Fourier transform 13 Chapter 2 Appendix: function filt_LFP 14 3. Time-frequency analysis, wavelets, and the Hilbert transform 15 MATLAB Exercises 3.1) Generate a signal with a 8 to 10 Hz segment followed by a 16 to 20 Hz segment 17 3.2) Apply a sliding-window Fourier analysis 18 3.3) Apply a Morlet and Mexican hat wavelet analysis 19 3.4) Compute the instantaneous phase and amplitude of a signal using the Hilbert 20 4. Coherence and phase synchrony 22 MATLAB Exercises 4.1) Generate two simple signals 24 4.2) Compute the magnitude squared coherence between the two signals 25 4.3) Compute the phase synchrony between the two signals 26 Chapter 4 Appendix: Function LFPSynch 27
Transcript
1
A Signal Analysis Primer for the MATLAB Naïve
Nathan Insel (thanks to: Matthijs van der Meer and
Rachel Samson for edits and feedback) This document is freely available at http://ninsel.net/signal-analysis-primer
I am continuously updating the primer (current version: 1.2, 1/4/13) and welcome suggestions and comments to
networksunknown(at)gmail(dot)com
Other resources: there are many books on signal analysis and on how to use MATLAB; the Mathworks
documentation itself is quite good (http://www.mathworks.com/help/matlab/). In the domain of neuroscience, I
also recommend:
Signal Processing for Neuroscientists: An Introduction to the Analysis of Physiological Signals by van Drongelen
0. About MATLAB 2 1. Fourier transformations and signal generation 3
MATLAB Exercises 1.1) Generating signals that oscillate 5 1.2) Using the Fourier transformation to convert the signals into power spectra 7 1.3) Zero-padding a signal 8
2. Signal filtering and more signal generation 10 MATLAB Exercises 2.1) Filter random noise to 6-10 Hz 12 2.2) Decompose filtered signal with a Fourier transform 13 Chapter 2 Appendix: function filt_LFP 14
3. Time-frequency analysis, wavelets, and the Hilbert transform 15 MATLAB Exercises
3.1) Generate a signal with a 8 to 10 Hz segment followed by a 16 to 20 Hz segment 17 3.2) Apply a sliding-window Fourier analysis 18 3.3) Apply a Morlet and Mexican hat wavelet analysis 19 3.4) Compute the instantaneous phase and amplitude of a signal using the Hilbert 20
4. Coherence and phase synchrony 22 MATLAB Exercises 4.1) Generate two simple signals 24 4.2) Compute the magnitude squared coherence between the two signals 25 4.3) Compute the phase synchrony between the two signals 26
MATLAB stands for “matrix laboratory.” It is a proprietary software package sold by Mathworks
(Natick, MA) with origins at the University of Mexico. It is a command prompt and
programming environment that provides a type of flexible calculator for working with single
numbers, lists of numbers (vectors), and multidimensional number arrays (matrices). It also
handles helpful classes such as cell arrays and structures that enable you to work with non-
number data types, including strings of letters or arrays within structures within structures
within arrays.
MATLAB has several limitations. It is not (originally) designed to do symbolic math unlike, say,
Mathematica (Wolfram Research, Chicago IL; although in recent years symbolic math toolboxes
have been added). MATLAB is also often criticized as being inefficient, both in memory and
time demands, although recent versions have improved upon this by providing more control
over data types and adding the MATLAB Compiler. Computer-savvy users still often opt to use
languages such as C or C++ in which commands are compiled into machine instructions
relatively directly. Finally, because it is proprietary, more frugal or authority-averse users often
prefer the freely-available Python environment. The open-source movement has created a
number of packages in Python that perform many of the same functions as MATLAB (e.g.,
NumPy; see www.scipy.org). For some applications, such as text-based analysis, Python can be
more useful than MATLAB. But, as Python software packages are often built by a distributed
user-base, compromises sometimes have to be made with respect to documentation, quality
control, and compatibility.
This primer assumes no experience with MATLAB. Here are some basics that will be important
for following the tutorials:
- Any time you would like to know more about a function, type “help <function name>” in
the MATLAB command prompt
- Any time I describe something to type in MATLAB, it will follow the command prompt
“>>”
- When I comment on something typed in MATLAB, it will follow the comment symbol
“%” and will be colored green.
- Sometimes, functions will be included in an appendix at the end of the chapter. To
follow each MATLAB exercise, you will need to copy and paste the text of the function
into the MATLAB editor (or other text editor) and save it as a “<function_name>.m” file.
The file must then be stored in a directory that MATLAB has access to, which can be set
by using the “Set Path” option under the file menu or by using the addpath function.
3
1. Fourier transformations and signal generation
For signal processing, the most important thing to know about the Fourier transformation is
that it allows you to decompose an arbitrary signal into a sum of sine and cosine waves.
Since our data is typically discrete (i.e., made-up of individual samples, specifically a series of
numbers) the type of Fourier transform that we use is called a discrete Fourier transform. The
discrete Fourier transform converts a list of equally-spaced samples, in our case sequential data
points in time, into a new series of numbers describing the phases and amplitudes of frequency
components in the signal. The interval between frequencies in the new number series depends
on our original sampling rate and the interval length that is sampled.1
When we run a discrete Fourier transform, the numbers that we get are ‘complex.’ This just
means that each number contains both a real part and an imaginary part, where “imaginary” is
defined as a multiple of the square root of -1. The reason that we get complex numbers is
because we are representing the sum of sine and cosine waves as an exponent, according to
Euler’s formula:
eq. 1.1
You don’t need to know this formula to use a Fourier transform, but it is often cited as the most
elegant equation in mathematics because you can use it to show that . This is a big deal, because it reveals a relationship between arguably the most interesting numbers in the universe: e, pi, i, 1, and 0. But knowing this is not actually important for doing signal analysis!
1 It is more accurately to say that the sampling rate and signal length determine the frequency resolution. While
they also determine the output frequencies, it is often useful to modify the length of the input signal (by adding extra zeros) to best capture the frequencies present. “Zero padding” will be illustrated in the MATLAB exercises below.
4
Figure 1.1
Randall Munroe, http://xkcd.com/179/
To reiterate: the output of a Fourier transform is a series of complex numbers, which can be used to identify the magnitude and the phase of oscillations across different period lengths (period lengths = cycle lengths = the length of one full oscillation).
The magnitude of an oscillation is often computed by squaring the real and imaginary parts of
the Fourier coefficient and adding them together. This is called ‘power.’ If you take the square
root of the power, you have the ‘amplitude’ (in MATLAB, this is equivalent to taking the
absolute value of the Fourier coefficients). You can use either power or amplitude to describe
the strength of frequency components in a signal.
Windowing
When we run a Fourier transform on a signal, we often find that the edges (start and end times)
of the signal can cause an apparent distortion in frequency space. This is particularly apparent
when the signal consists of frequencies with very different amplitudes. One solution is to
perform the Fourier analysis on a signal that is altered so that the amplitude at the edges, and
therefore the accompanying distortion in frequency space, is minimized. To do this, we
multiply the signal by a distribution. The Gaussian (bell curve) is one type of distribution that
can be used. Hanning and Hamming distributions are very similar and, for mathematical
Figure 1.21 A Hamming distribution There are costs to windowing. Altering a signal with these types of distributions also biases for
frequencies components that are more prevalent in the central parts of the signal, minimizing
those that appear near the edges. MATLAB handles this through functions that break-up
signals into smaller, overlapping segments, alters them using a Hamming (or other) distribution,
performs the Fourier transform on each, and then averages the results together.
The Nyquist frequency One more concept that is useful for performing Fourier transformations and other signal analysis procedures is the Nyquist frequency, which is defined as one-half of the sampling frequency. It is important because we are unable to gain accurate knowledge of frequencies that are faster than the Nyquist frequency. This should make some intuitive sense. Say, for example, that we want to know how frequently a bus stops at a particular street corner using only information, from a mobile phone app, about the location of the bus closest to that stop. We can accurately estimate that the bus comes every ten minutes only if we check our phone app at least every five minutes: 10-minute intervals (6 times per hour) is the Nyquist limit of 5 minute intervals (12 times per hour).
MATLAB exercises: 1.1) Generating signals that oscillate 1.2) Using the Fourier transformation to convert the signals into power spectra 1.3) Zero-padding a signal 1.1) Generating signals that oscillate
Since we ultimately want to relate this back to neurophysiological data, we will generate a
signal that can be understood in terms of our data. Let’s start by saying that we are recording a
local field potential (LFP) at 2000 Hz. In other words, we are monitoring and taking a record of
1 For simplicity, the plots displayed in the present text use MATLAB’s default settings. This means they include the
often unnecessary top x-axis and right-side y-axis, which may offend your aesthetic sensibilities. You can remove
this from your own plots by using MATLAB’s box function.
0
0.1
0.2
0.3
0.4
0.5
0.6
0.7
0.8
0.9
1
6
the electrical field in a brain region 2000 times every second, which is the same as saying we
sample every 0.5 ms. Each sample will correspond to a number that indicates the voltage
between our recording electrode and a reference (often, the ground is used as a reference—
literally the ground in the Earth beneath our feet). Let’s also say that we are looking at two
seconds of data. Thus, we will have a series of 4000 numbers, each number corresponds to the
voltage at a moment of time, spaced 0.5 ms apart, during the 2 seconds.
If we want to generate an LFP signal that is completely flat at zero, suggesting that there is no
potential difference between the brain region and the reference, we can create a vector in
Matlab of 4000 zeros.
>> LFPzeros = zeros(1, 4000); % this is the same as writing “[0 0 0 0 . . .“ (until you get to 4000)
Instead of generating something so boring, we will generate a signal with two frequency
components: one at 2 Hz, and one at 8 Hz.
We start by creating a vector of times from 0 to 2 s that increase by 0.5 ms:
>> LFPtime = [0:0.0005:2];
(You may notice that this gives us not 4000 numbers, but 4001 >>length(LFPtime) ans = 4001 This is because we are starting with the “zero-ith” time point, and ending at exactly 2 seconds.) To generate a sine wave, we want to convert the time vector into a series of angles, and then
take the sine wave of those angles. Angles can be written in radians (multiples of “pi”). For
example:
>> LFPslowwave = sin(pi * LFPtime);
If we plot this we get
>> plot(LFPtime, LFPslowwave)
Figure 1.3
This sine wave is 0.5 Hz (one full cycle over the 2 seconds).
0 0.5 1 1.5 2-1
-0.5
0
0.5
1
7
Now, to generate a sine wave of 2 Hz, we simply have to include the fact that a full cycle is 2 Hz,
If we like, we could alternatively create a signal where the amplitude of 8 Hz component varies
with the phase of the 2 Hz component:
>>LFP_2Hz_coupled_8Hz = sin(2*pi*2*LFPtime) + (1+sin(2*pi*2*LFPtime))/2 .* sin(2*pi*8*LFPtime); % the period before the ‘*’ means multiply each element together,
rather than using matrix multiplication >> plot(LFPtime, LFP_2Hz_coupled_8Hz)
Figure 1.6
These patterns still don’t look like physiological signals. They are too orderly, the real world and the signals it generates are complicated and fraught with all kinds of variation. If we were trying to model a signal precisely, we might add variation by introducing randomness. The MATLAB functions “rand” and “random” are useful for this. (How does a computer program like MATLAB generate random numbers? This is an interesting and important topic, but unrelated to the present topic). On the other hand, pure randomness also doesn’t emulate the
0 0.5 1 1.5 2-1
-0.5
0
0.5
1
0 0.5 1 1.5 2-2
-1
0
1
2
0 0.5 1 1.5 2-1
0
1
2
8
world, so generating signals that resemble the system you are studying can become a long and involved process, and will depend on the goals of the project. 1.2) Using the Fourier transformation to decompose fake signals into a power spectrum The most efficient way to run a discrete Fourier transform in MATLAB is by using the function “fft,” which uses the fast Fourier transform (FFT) method.
Remember that the interval between frequencies in our output vector will depend on the
length of our original signal and the sampling frequency. In fact, the FFT algorithm generates a
long list of coefficients (that is, frequency values) from zero up to the Nyquist limit and then
back again. If we are interested only in signals with real values (meaning, signals that do not
have imaginary components) then the output vector will be symmetric, and we only need to
pay attention to the first half.
We can run a FFT on the signal we generated above by combining 2 Hz and 8 Hz sine waves:
>> y = fft(LFP2Hz8Hz)/4001 ; % we divide by the number of samples, 4001. >> f = 2000/2 * linspace(0,1,4001/2 + 1); % 2000 is our sampling frequency, our Nyquist
% limit is therefore 2000/2 % the function “linspace” in this case will generate % 2001 points between 0 and 1
To plot the amplitude of the frequency spectrum up to 20 Hz: >>plot(f(1:40),abs(y(1:40)));
Figure 1.7
This corresponds with the signal we originally generated.
MATLAB has a number of functions that rely on FFT to generate frequency power estimates.
MATLAB additionally has functions to obtain frequency power estimates that do not rely on
FFT. One generalized and flexible function that can be used is “spectrum.” (See MATLAB help
on spectrum.) Often, spectral estimates are computed using mean-square spectrum methods,
including the functions periodogram and pwelch. The term “mean-square spectrum” refers to
0 5 10 15 200
0.1
0.2
0.3
0.4
0.5
9
a particular method used to compute the signal magnitude. The periodogram and pwelch also
apply the windowing methods described above.
1.3) Zero-padding a signal
In the previous example, the signal was two seconds long, so contained exactly 16 periods of
oscillation at 8 Hz and an even 4 at 2 Hz. When the number of periods do not evenly fit the
length of the signal (which is typically the case) the outcome of the FFT transformation is a bit
different. This can be illustrated using a slight modification of the original example, in which
the FFT is performed on only the first 1.75 s of the signal:
In this case we find that the peak at 8 Hz looks the same as above, because the 1.75 s contains
exactly 14 cycles of the 8 Hz oscillation. The peak at 2 Hz, on the other hand, is not perfectly
centered at 2 Hz and also spread across several frequencies. To correct for this, we can
increase the length of our input vector by adding a series of zeros at either end.
>> y_zeropad = fft([zeros(1, 16500) LFP2Hz8Hz(1:3500)])/3500; % by placing 2 row vectors % side-by-side, in this case a series of 16500 % zeros (using zeros(…)) and our 3500- % length LFP vector
Figure 1.9 Note that an identical figure can be generated by providing a secondary input to the fft function that specifies the number of Fourier coefficients to output: >> y_zeropad = fft(LFP2Hz8Hz(1:3500), 20000); The FFT algorithm that MATLAB uses sometimes performs better when the number of coefficients specified is equal to a power of 2 (i.e., 2n, such as 2, 4, 8, 16, 32, 64, etc.). It is easy to find that that number by using the function nextpow2: Note also that Figure 1.9 contains not only primary peaks at 2 Hz and 8 Hz, but also multiple
“side lobe” peaks on either side of the primary peaks. This is commonly called “spectral
leakage,” and can be addressed by using windowing methods discussed above, or by increasing
frequency resolution (i.e., lengthening the signal).
0 5 10 15 200
0.2
0.4
0.6
0.8
11
2. Signal filtering and more signal generation
In the context of neurophysiological analysis, a filter is any process that removes frequencies
from a signal. This is more properly called a linear, continuous-time filter. Even as the data are
collected they are being filtered. The method (analogue or digital) depends on the type of
recording system we are using, the frequency bands we remove depend on the hardware that
is used and on settings determined in the recording software. In this chapter, we will
specifically focus on off-line filtering for studying specific oscillations in our data.
The type of filter we use depends on what we are interested in. If we are interested in higher
frequencies, we use a high-pass filter; for lower frequencies, a low-pass filter. Band-stop filters
remove a range of frequencies. A special case of this, the notch filter, removes only a single
frequency. Notch filters are sometimes used to remove 60 Hz, which is the frequency of the
alternating current coming from the electrical outlets, and which can contaminate our
physiological recordings. For our analyses, we are typically interested in studying a specific
range of frequency components in our data, for which we use a band-pass filter.
As with most topics in signal analysis, and like almost anything in life, it is not necessary to
know the details of how things are working in order to use them appropriately. Here are
several points about building filters that may not be useful for making inferences from filtered
signals:
One method to filter a signal is to perform a Fourier transformation, remove
coefficients within the stop-band, and then reconstruct the signal with the
remaining coefficients. In the strictest sense, this is called a truncation filter.
A common filtering method is to apply a difference equation:
Filters are often divided into two classes: finite impulse response (FIR) and
infinite impulse response (IIR). FIR filters generate the filtered signal based on a
fixed interval of the signal (in the case of the difference equation, eq 2.1, this
means using only the b coefficients). An extremely simple example of an FIR
filter is if we take a normal distribution (a bell curve, or Gaussian) with a width
that corresponds to 120 ms of data and a height between 0 and 1, and then
multiply that Gaussian by our input signal at every sampling point (‘convolving’
the two distributions by taking a ‘sliding average’). The output signal will be
12
strongest at times during which the input signal resemble the Gaussian
distribution, voltage changes that are faster or slower than our 120 ms Gaussian
will be relatively decreased in the filtered signal. This is equivalent to
An IIR filter does not use a fixed interval of input signal to generate the output,
instead the filtered signal is generated according to ongoing state-changes as the
filter slides across samples of the input filter (in the case of the difference
equation, eq 2.1 above, this means including the a coefficients, which can be
considered the feedback components).
There are several band-pass filtering methods available. These vary with respect how sharp the transition is between the frequencies that you want (the passband) and the frequencies you do not want (the stop band), called the “roll-off.” They also vary with respect to how “flat” the stopband or passband are, meaning, how similarly all frequencies within stop- or passband are affected (the “ripple”). Several filters that have alternative approaches to balancing roll-off and ripples include the Butterworth, Chebyshev type I, Chebyshev type 2, and Elliptic filters (Figure 2.1).
An important parameter when setting-up a filter is the filter order. The order refers to the number of coefficients used in determining the filter function (a and b coefficients in the difference equation above). The filter order will determine the balance between time versus frequency resolution. A general rule of thumb is to use filter orders no greater than 5.
Figure 2.1
(Figures modified from http://en.wikipedia.org/wiki/File:Electronic_linear_filters.svg)
2.1) Filter random noise to 6-10 Hz 2.2) Decompose filtered signal with a Fourier transform 2.1) Filter random noise to 6-10 Hz
As in the previous chapter, we will first create a signal, again using 2 seconds of data sampled at
2000 Hz. In this case, we will start with a random signal. Note that generating “random”
numbers is not simple for a computer, because computers are built to be loyal, deterministic
systems. It is worth reading about how MATLAB functions such as rand and randn come-up
with randomness. For illustration purposes (i.e., for reproducibility) we will start here by
“seeding” the random number generator by using the rng function.
>> rng(10) % This will seed the random number generator. Use it to generate an identical % plot as below; to generate an alternative random signal, omit this command.
Now, we construct a filter that will allow us to filter the noise at 6 to 10 Hz
We begin by setting the filter parameters. The first step is to identify the Nyquist frequency
(discussed in Chapter 1).
>> Nyquist_freq = 2000/2; % This Nyquist frequency, half of the sampling frequency, % is the highest frequency the data can accurately represent.
>> lowcut = 6/Nyquist_freq; % “6” is our lower frequency bound >> highcut = 10/Nyquist_freq; % “10” is our upper frequency bound >> filter_order = 3; % Filter order (number of filter exponents). >> passband = [lowcut highcut]; >> [Bc Ac] = butter(filter_order, passband); % this creates our butterworth filter coefficients >> LFP_6to10 = filtfilt(Bc, Ac, noiselfp); %we use “filtfilt” because it runs the same filter in the
% forwards and backwards direction, thus ensuring % there is no phase distortion.
>> plot(linspace(0,2,4001), LFP_6to10)
0 0.5 1 1.5 20
0.5
1
14
Figure 2.3
In addition to filtering a random signal, we have generated a relatively random signal that
oscillates between 6 to 10 Hz. This method can be helpful in cases where we are interested in
creating a simulation of the data.
2.2) Decompose filtered signal with a Fourier transform To confirm that the filter worked, we can use the FFT: >> y = fft(LFP_6to10)/4001 ; % we divide by the number of samples, 4001 >> f = 2000/2 * linspace(0,1,4001/2 + 1); >> plot(f(1:40),abs(y(1:40)));
Figure 2.4
In this example, the amplitude of each frequency between 6 to 10 Hz is surprisingly variable,
most obvious by the dramatic spike between 8.5 to 9 Hz. This is simply due to the short time
period of our sample combined and the chance outcome of our random number generator.
The non-zero values before 6 Hz and after 10 Hz demonstrate one tradeoff in using the
Butterworth filter: there will always be a relatively smooth roll-off in the stopband, with the
advantage that we don’t introduce ripples.
MATLAB functions for filters other than Butterworth include cheby1 (Chebyshev Type I), cheby2
(Chebyshev Type II), and ellip (elliptic).
0 0.5 1 1.5 2-0.1
-0.05
0
0.05
0.1
0 5 10 15 200
2
4
6
8x 10
-3
15
For the purposes of future chapters, we will save the filter we used as an m-file function. To do
this, copy the ‘LFP_filt’ function (Chapter 2 Appendix) into the MATLAb editor or an alternative
text editor to be saved under the name “LFP_filt.m” (note: it is also important that the file is
saved into a folder that is included in MATLAB’s path list).
Chapter 2 Appendix: Function filt_LFP
The function below should be saved as filt_LFP.m in a directory that MATLAB has access to (a folder included in the MATLAB path string; the folder can be added by typing: >> addpath <foldername> Where <foldername> is the name of whichever folder you saved the file to. function fLFP = filt_LFP(sig1, lower_limit, upper_limit, sF) % fLFP = filt_LFP(sig1, lower_limit, upper_limit) % % uses a butterworth filter to bandpass filter the signal between lower and upper limit % % INPUTS: % sig1 = signal to be filtered %lower_limit = lower end of bandpass %upper_limit = upper end of bandpass %sF = sampling frequency (default = 2000 Hz) % % nei sig analysis primer 4/13 % if nargin < 4 % if input variable ‘sF’ is not entered, this provides a default value sF = 2000; end if isempty(sF) % if input variable ‘sF’ is entered as an empty vector, this provides a default sF = 2000; end Nyquist_freq = sF/2; lowcut = lower_limit/Nyquist_freq; highcut = upper_limit/Nyquist_freq; filter_order = 3; % may need to be changed depending on the bandpass limits passband = [lowcut highcut]; [Bc Ac] = butter(filter_order, passband); fLFP = filtfilt(Bc, Ac, sig1);
16
3. Time-frequency analysis, wavelets, and the Hilbert transform
Overview of methods
How does a signal change over time? This question is often answered using one of the
following three methods:
1) Apply a Fourier transform with a sliding window.
2) Use a wavelet transform.
3) Filter the signal and apply a Hilbert transform.
A ‘sliding window’ is exactly as it sounds: a window, or segment of data, within which a
computation (in this case a Fourier transform) is performed, the window is slid (or stepped)
over the data and the computation repeated until the entire signal is covered. A MATLAB
function, spectrogram, performs this operation, and can be used with varying window lengths
and window overlaps.
A wavelet transform can be used as a substitute for a windowed Fourier transform, but
uses a very different algorithm and provides slightly different information. A wavelet transform
computes the similarity between each segment of a signal and a short, wave-like distribution
called a ‘wavelet’. The wavelet—typically a brief oscillation—can be scaled across many widths
to capture different frequencies. The specific wavelet chosen (discussed below) depends on
the specific goals of the time-frequency analysis.
The third method listed above is the Hilbert transform, which is most useful when
applied to a signal that has already been filtered for a particular frequency or frequency band.
Although the math behind the Hilbert transformation is beyond this primer, it can be thought of
as a convolution (i.e., using a distribution to transform the signal) that yields a complex number
at each time point. As with the Fourier transformation, the complex number can be re-
interpreted in terms of phases and amplitudes. Thus, the Hilbert transform can be thought of
as an “instantaneous” Fourier transform. (For more information on the Hilbert transform,
please see http://www.scholarpedia.org/article/Hilbert_transform_for_brain_waves )
Inherent limitations
There are limits to how precisely the frequency spectrum of a signal can be computed,
and that limit is determined by the length (in our case, the amount of time) of the signal. The
trade-off between precision in frequency versus time is known as the uncertainty principle.
You have probably heard of the Heisenberg uncertainty principle, which posits a fundamental
limit on how precisely both the position and momentum of an electron can be known. The
A comparison between Figures 3.2 and 3.3 helps to illustrate a few important principles
for wavelet selection. The Morlet wavelet contains a greater number of cycles, which improves
the detection of signal oscillations relative to transient events. This also means an
improvement in the resolution of frequency at the cost of some small degree of temporal
precision (in accordance with the tradeoff between the two described above).
Many books have been written about wavelets, and the MATLAB Wavelet Toolbox has
helpful documentation that explains different families and how they can be used. Using
wavelets intelligently will require more background than can be provided in this primer.
Words of caution
It is easy for the uninformed novice to wander onto the metaphorical landmine, and
time-frequency analysis is a particularly treacherous field. One frequent error is the
misattribution of signal events as oscillations. This can become particularly costly when the
events are not even biological, but the artifact of some external, electrical occurrence that is
correlated with an experimental variable. Electrical or biological events appearing in the signal
often take the appearance of “spikes,” or fluctuations that peak sharply rather than taking the
smoother shape of a sine wave or Morlet peak. Sharp transitions in the signal are built not of a
single frequency component, but of a vast range of frequencies. Any filter that is applied to the
signal over a spike will give the appearance of a power increase at that moment, and the
strength of the power increase will be related to the size of the spike. Thus, data that is noisy
(where noise is any signal component that is not from the system of interest) can severely
damage the results and interpretation of a time-frequency analysis.
MATLAB Exercises
3.1) Generate a signal with a 8 to 10 Hz segment followed by a 16 to 20 Hz segment 3.2) Apply a sliding-window Fourier analysis 3.3) Apply a Morlet and Mexican hat wavelet analysis 3.4) Compute the instantaneous phase and amplitude of a signal using the Hilbert
3.1 Generate a signal with a 8 to 10 Hz segment followed by a 16 to 20 Hz segment
We begin by using the same technique we used in Chapter 2 to generate a signal that oscillates
at 6-10 Hz:
From 2.1: >> rng(11) % omit this if you are not concerned with generating the identical “random” signals as
% are plotted below
19
>> noiselfp = rand(1,4001); >> LFP_6to10 = filt_LFP(noiselfp, 6, 10, 2000); % function filt_LFP is located in
% Chatper 2 Appendix (above)
We then create a second signal that oscillates at 16-20 Hz, and concatenate (connect end-to-
end) this with the first.
>> rng(12) % again, this is not necessarily except to ensure that your plots are identical to the % plots below
% brackets concatenates them >> plot(linspace(0,4,8002), LFP_6to10_16to20)
Figure 3.4
Here we have generated a signal with a sharp transition from 6 to 10 Hz to 16 to 20 Hz at 2
seconds.
3.2 Apply a sliding-window Fourier analysis >> window = 1000; % the length of 500 ms of signal, which we will use for our window >> noverlap = 800; % the amount of overlap from one window to the next. An overlap of
% 800 samples will mean that the window steps over the data in 100 ms % increments (1000-800 = 200 samples = 100 ms).
>> F = [2:2:40]; % the frequencies we compute the spectral data with >> Fs = 2000; % our sampling frequency >> [S F T] = spectrogram(LFP_6to10_16to20, window, noverlap, F, Fs); % To generate a proper image, of our time-frequency plot, we have to adjust the figure a bit. >> f1 = figure % f1 will be a handle that allows us to modify the figure properties >> tf_image = imagesc(abs(S)); % the absolute value (abs) will give us the signal power >> set(tf_image, ‘XData’, [0 4]); % the x axis spans times between 0 and 4 s
0 0.5 1 1.5 2 2.5 3 3.5 4-0.1
-0.05
0
0.05
0.1
20
>> set(tf_image, ‘YData’, [2 40]); % the y axis spans times between 2 and 40 Hz >> f1a = get(f1, ‘Current Axes’); % now we have a handle for the figure axes >> set(f1a, 'YLim', [1.5 40.5]); % re-align the y-axis to the data >> set(f1a, 'XLim', [0 4]); % re-align the x-axis to the data
Figure 3.5 (Note that I added the color bar manually using the ‘Insert’ title bar in the figure GUI.) In Figure 3.5, the x-axis is time. We set the sliding window to take 1000 samples at a time, with 800 samples of overlap—thus, each bin is centered 100 ms apart. At the center of the figure there is a streak that stretches across the 2 to 40 Hz frequency bands, in spite of the fact that our original signal only consisted of 6-10 Hz and 16-20 Hz frequencies. This demonstrates a point made in the Words of Caution section above. When we concatenated the two signals, a sharp transition was created at the 2-second time point, where the signal takes a virtually 90-degree turn from the horizontal to near-vertical. Although the figure is accurately reflecting the frequencies in the signal, someone who did not know how the signal was generated might interpret this streak as an oscillation, rather than an artifact of concatenation. 3.3 Apply a Morlet and Mexican hat wavelet analysis There are two approaches toward applying wavelet transformations in MATLAB, called discrete and continuous. These differ only according to how the set of frequencies (or wavelet widths) are chosen. I typically use the continuous wavelet transform, which allows the choice to be explicit. When we compute the Morlet wavelet transformation, we will actually use a complex Morlet wavelet, the complex conjugates will allow us to convert our answers into meaningful values of amplitude and phase. >> coefsi = cwt(LFP_6to10_16to20, centfrq('cmor1-1') * Fs./F, 'cmor1-1'); % this gives us our coefficients. Note that we used the same sampling frequency (Fs) and frequencies of interest (F), combined with the complex morlet wavelet’s center wavelet frequency (centfrq function) to generate results that were meaningful in the frequency domain. >> f2 = figure
0 0.5 1 1.5 2 2.5 3 3.5 4
5
10
15
20
25
30
35
40
1
2
3
4
5
6
7
21
>> wm_image = imagesc(abs(coefsi)); % to illustrate the amplitude of the signal across frequencies
Figure 3.6 Now, let’s repeat the process for a Mexican hat wavelet. Note that MATLAB does not provide a complex version of the Mexican hat wavelet, so we will only be detecting upward deflections in the LFP signal at each frequency band. >> coefsi_hat = cwt(LFP_6to10_16to20, centfrq('mexh') * Fs./[2:40], 'mexh'); >> imagesc(abs(coefsi_hat))
Figure 3.7 The absence of a complex conjugate (the “imaginary” component of the transform, as described in Chapter 1) yields only the upward deflections of the signal, and therefore we see stripes where previously we observed smooth transitions across time bins. We also see another difference in this graph: the warmer-colored streaks extend farther across the frequency spectrum, while the resolution appears to be stronger in the temporal domain. This illustrates the uncertainty principle described in the section inherent limitations above. 3.4 Compute the instantaneous phase and amplitude of a signal using the Hilbert transform Usually a Hilbert transform is most useful if we are looking at already filtered data. In this case we will focus on the lower, 6 to 10 Hz band. We will use the same filt_LFP function we created previously to now filter the signal: >> LFP_6to10_post = filt_LFP(LFP_6to10_16to20, 6, 10, 2000);
0 0.5 1 1.5 2 2.5 3 3.5 4
10
20
30
40
0.1
0.2
0.3
0.4
0 0.5 1 1.5 2 2.5 3 3.5 4
10
20
30
40
0.2
0.4
0.6
0.8
22
For illustration purposes, we will plot the filtered signal on the same graph as the amplitude of the Hilbert-transformed signal >> h_LFP6to10_post = hilbert(LFP_6to10_post); %the Hilbert transform >> amp_LFP6to10_post = abs(h_LFP6to10_post); % the amplitude (absolute value) of the
transform >> plot(linspace(0,4,8002), LFP_6to10_post) >> hold on >> plot(linspace(0,4,8002), amp_LFP6to10_post, ‘r:‘, ‘LineWidth’, 2)
Figure 3.8 The dashed red line indicates our instantaneous amplitude, which you can see provides the envelope of the filtered signal. We could alternatively use the complex conjugate to identify the instantaneous phase of the oscillation in the filtered signal. In that case, we would use the following command: >> phs = atan2(imag(h_LFP6to10_post), real(h_LFP6to10_post)); The output vector, phs, will give us a sequence of values for oscillation phase, measured in radians (i.e., ranging from - π to π): >> plotyy(linspace(0,4,8002), LFP_6to10_post, linspace(0,4,8002), phs) %plotyy allows us to
overlay two plots with different axes
Figure 3.9
0 1 2 3 4-0.1
-0.05
0
0.05
0.1
0 0.5 1 1.5 2 2.5 3 3.5 4-0.08
-0.06-0.04-0.02
00.020.040.060.08
0 0.5 1 1.5 2 2.5 3 3.5 4-4
-3-2-101234
23
4. Coherence and phase synchrony
Coherence is one way to describe the similarity of two signals. Two identical sine waves are
perfectly coherent with one-another. If you take one of those sine waves and shift it by, say,
201 degrees, the two waves will still be perfectly coherent with one-another. This is because
coherence is not a measure of how identical the two signals are, but of how consistent their
phase relationships are.
In some cases, authors of neurophysiological papers will replace the term “coherence” with the
term “synchrony” or “phase synchrony.” This is misleading, because synchrony can be defined
in more than one way. Typically it is the consistency of phase relationships that experimenters
are interested in measuring. The reason the authors avoid using the term “coherence” is
because it has come to be synonymous with magnitude squared coherence.
Magnitude squared coherence (mscohere in MATLAB) is a commonly used coherence measure.
It is usually computed by using the Fourier transform to first decompose each of two signals
into a frequency spectrum. Remember from Chapter 1 that a Fourier transformation yields
both real and imaginary components, together describing the phase and amplitude of
oscillations at a given frequency. Normally we are interested in the magnitude of frequency
components—the spectral density of a signal—and compute this by squaring the real and
imaginary components then adding them together (taking the square-root of this value for
amplitude). In contrast, the magnitude squared coherence begins with a computation of the
cross-spectral density: we square the real component of one signal, the imaginary component
of the other, and add them together. We then normalize the cross-spectral density by the
spectral density of each respective signal:
eq. 4.1
Where Gxy is the cross spectral density of signals x and y, Gxx the spectral density of signal x, and
Gyy the spectral density of signal y.
There are advantages and drawbacks for using magnitude squared coherence to compare
neurophysiological signals. Alternative algorithms to assess phase synchronization, described in
more detail below, sometimes require that the signals first be filtered for a particular frequency
band. Thus, magnitude squared coherence is useful in that we don’t have to start with
hypotheses or assumptions about which frequency band is important. One disadvantage is that
it is based on the Fourier transform, and therefore encounters temporal resolution issues raised
in Chapter 1 and Chapter 3 (i.e., the method requires a window of signal that has a particular
length, with the inherent trade-off between frequency and temporal resolution).
24
An alternative method for assessing phase relationships is to filter the two signals and then
compute the moment-to-moment phase differences between them. The first step is to apply a
bandpass filter over the signal (Chapter 2). Next, a Hilbert transformation can be used to
generate time series of instantaneous phase or amplitude (Chapter 3). Subtracting the two
time series of instantaneous phase yields a new time series of phase differences. The
consistency across phases can be computed at each point using a sliding window, the length of
which should be at least larger than one cycle of the frequency. Two (essentially identical)
equations that have been used to compute the synchronization index within a time window
are:
eq. 4.2
Where φlf is the instantaneous phase of one signal, φdf the instantaneous phase of the other,
and n is the number of samples in the sliding window. (Cohen J. (2008). Assessing transient
cross-frequency coupling in EEG data. Journal of Neuroscience Methods. 168, 494-499.)
Or, equivalently,
eq. 4.3
Where φArea1,Area2 is the phase difference between the two signals, N is the number of samples
in the sliding window, and Δt is the time step between samples. (De Clercq, W., Lemmerling,
P., Van Paesschen, W., and Van Huffel, S. (2003). Characterization of interictal and ictal
scalp EEG signals with the Hilbert transform.Conf. Proc. IEEE Eng. Med. Biol. Soc. 1,
2459–2462.)
Interpreting coherence
Mathematically, coherence depends only on phase relationships between the oscillations
that make-up two signals, it is therefore independent of the respective oscillation
amplitudes. But for most natural signals, amplitude and phase are not actually
independent. That is, changes in phase typically accompany changes in amplitude, and
25
vice-versa. This is because natural signals are not generated by indivisible particles
(except when they are, but I don’t expect many particle physicists to be reading this), so
the amplitude of a signal is actually a measure of phase synchronization among the
individual elements that make-up the signal. Likewise, coherence between two signals
might reflect the number of elements in the two signals that are correlated with one-
another. In general, the more that the elements making-up a signal are capable of
behaving independently from one-another, the more coherence between signals will
vary with signal amplitude.1
MATLAB Exercises 4.1 Generate two simple signals 4.2 Compute the magnitude squared coherence between the two signals 4.3 Compute the phase synchrony between the two signals 4.1 Generate two simple signals We will use the sum of two sign waves that we generated in Chapter 1:
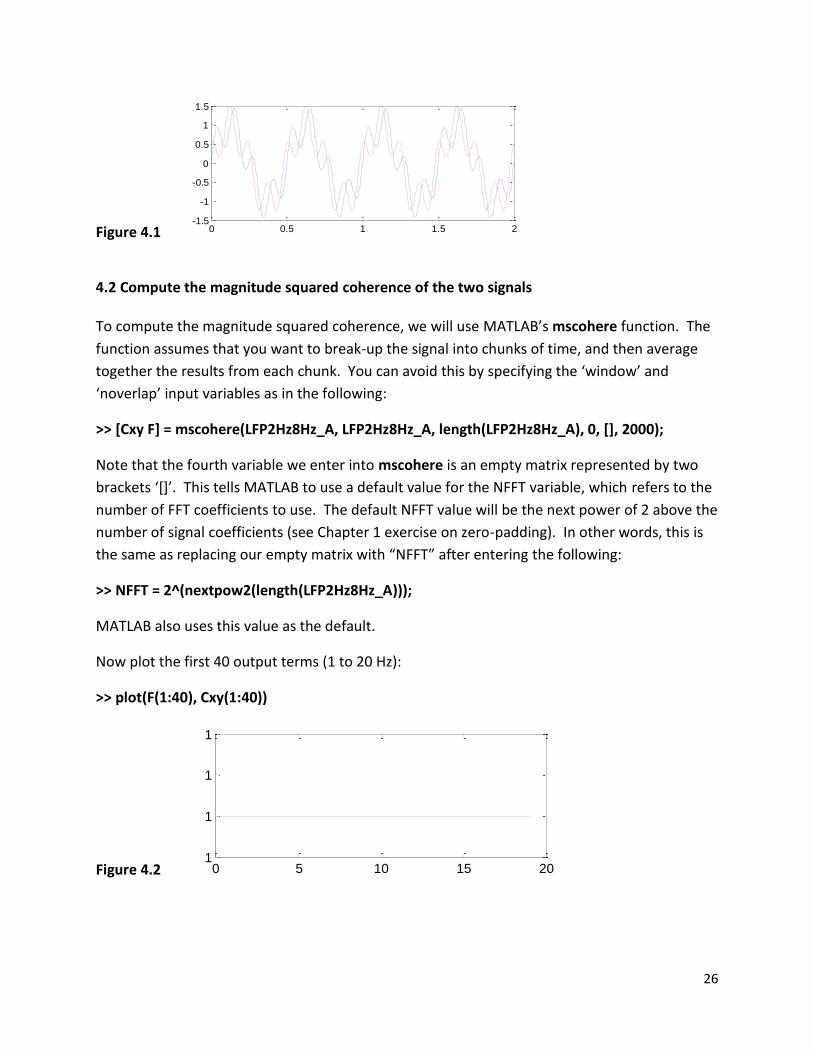
Note that the fourth variable we enter into mscohere is an empty matrix represented by two
brackets ‘[]’. This tells MATLAB to use a default value for the NFFT variable, which refers to the
number of FFT coefficients to use. The default NFFT value will be the next power of 2 above the
number of signal coefficients (see Chapter 1 exercise on zero-padding). In other words, this is
the same as replacing our empty matrix with “NFFT” after entering the following:
>> NFFT = 2^(nextpow2(length(LFP2Hz8Hz_A)));
MATLAB also uses this value as the default.
Now plot the first 40 output terms (1 to 20 Hz):
>> plot(F(1:40), Cxy(1:40))
Figure 4.2
0 0.5 1 1.5 2-1.5
-1
-0.5
0
0.5
1
1.5
0 5 10 15 201
1
1
1
27
The two signals are completely coherent with one-another across all frequency bands, which
we knew already because the two signals are identical, other than a phase shift in the 8 Hz
component.
4.3 Compute the phase synchrony of the two signals To compute phase synchrony, it will be necessary to create a new .m file by copying the
LFPsynch function (Chapter 4 Appendix) into the MATLAB editor or an alternative text editor to
be saved under the name LFPsynch.m (as a reminder, it is also important that the file is saved
into a folder that is included in MATLAB’s path list). In contrast with mean-squared coherence,
phase synchrony measures are computed on a particular frequency band. Thus, the signal must
first be bandpass filtered within the band of interest.
Filter our two signals:
>> f_LFP2Hz8Hz_A = filt_LFP(LFP2Hz8Hz_A, 6, 10); % filt_LFP was defined in Chapter 2 % Appendix (above)
>> f_LFP2Hz8Hz_B = filt_LFP(LFP2Hz8Hz_B, 6, 10); >> plot(linspace(0,2,4001), f_LFP2Hz8Hz_A) >> hold on >> plot(linspace(0,2,4001), f_LFP2Hz8Hz_B, ‘r’)
Figure 4.3 The LFPsynch function listed in Appendix 4 requires input matrices with two column vectors, the first of time (in units of seconds) and the second the data. Note also that the apostrophe can be used in MATLAB to transpose a vector or matrix. Thus: >> LFP_mat_A = [LFPtime' f_LFP2Hz8Hz_A']; >> LFP_mat_B = [LFPtime’ f_LFP2Hz8Hz_B’]; >> [synchAB angleAB] = LFPsynch(LFP_mat_A, LFP_mat_B, 0.25, 0.01); % we set the window
% to 250 ms, and the time step 10 ms) We first plot the synchronization score. Note that the function removes scores computed from a time window that falls-off the edge of signal time, so we lack values prior to 0.25 and after 1.75 s. >> plot(synchAB(:,1), synchAB(:,2))
0 0.5 1 1.5 2-0.8
-0.6
-0.4
-0.2
0
0.2
0.4
0.6
28
Figure 4.4
Although the minimum synchronization score, 0.82, is still very high, we can attribute the lower
scores at the end to filter artifacts at the edge of the signal (as shown by Figure 4.3).
Chapter 4 Appendix: Function LFPsynch
The function below should be saved as LFPsynch.m in a directory that MATLAB has access to (a folder included in the MATLAB path string; the folder can be added by typing: >> addpath <foldername> Where <foldername> is the name of whichever folder you saved the file to.
function [synchscore anglescore] = LFPsynch(sig1, sig2, window_time,
steptime) % [synchscore anglescore] = LFPsynch(sig1, sig2, window_time, steptime) % % computes a synchronization index, % INPUTS: % sig1 is a 2 x n LFP matrix of the FILTERED signal [time_in_sec data] % sig2 is a 2 x n LFP matrix of a different FILTERED signal
% [time_in_sec data] % window_time (units = s) is the total time window around each timestamp
% over which to compute the synchronization index. It should be AT LEAST % one cycle of the frequency being investigated (default is 2 cycle % lengths) % steptime (s) is the step for the sliding window (default is 10 ms) % % equation for synchronization index is the same used in Cohen 2008 (J. Neuro % methods 168, 494-499) % % nei 2/13 %
if nargin < 4 steptime = 0.01; if nargin < 3 window_time = []; % we will correct this in a moment end end
if window_time > 100
0 0.5 1 1.5 20.8
0.85
0.9
0.95
1
29
error('time units are in seconds, >100 s is not permited') end
vectorize the sliding window algorithm to make it fast and efficient B_ead = buffer(exanglediff, window_length, window_length - ms10step);
timevec = nanmean(B_t(:,floor(window_length)/ms10step:end-1)); % we remove
the final sample to keep the time-step consistent EADvec = nanmean(B_ead(:,floor(window_length)/ms10step:end-1));
if ~issorted(timevec) % occasionally, the recording system stalls or fails
to apply the correct timestamps to the data. [a b] = sort(timevec); %since we don't know if it is just a problem with
the timestamps, or the data itself, we eliminate those bins entirely badsamps = find(diff(b) ~= 1); sampnums = setdiff(1:length(timevec), badsamps+1); else sampnums = 1:length(timevec); end