9
USER GUIDE (B-613 & B-355) VERSION 2.0 (2016) 3175, Boul. Choquette, St-Hyacinthe, Qc, J2S 7Z8 Tel: (450) 786-5708 [email protected] Fax: (450) 250-5110
USER GUIDE
(B-613 & B-355)
VERSION 2.0 (2016)
3175, Boul. Choquette, St-Hyacinthe, Qc, J2S 7Z8 Tel: (450) 786-5708
[email protected] Fax: (450) 250-5110

2
TABLE OF CONTENTS
WARRA�TY ����������������������������������������������������������������������������������� 2
WAR�I�G ������������������������������������������������������������������������������������� 3
RATI�G P�ATE ������������������������������������������������������������������������������� 3
�AI� C��P��E�TS ���������������������������������������������������������������������� 4
D��ESTIC �AI�TE�A�CE �������������������������������������������������������������� 5
USE ���������������������������������������������������������������������������������������������� 5
F���R U�F��D ����������������������������������������������������������������������������� 6
SAFETY EDGES ������������������������������������������������������������������������������� 6
BATTERY CHARGER TESTI�G PR�CEDURE ����������������������������������������� 7
�A�UA� ��WERI�G ���������������������������������������������������������������������� 8
TR�UB�ES��TI�G GUIDE ��������������������������������������������������������������� 9
Warranty
The inclined lift AC-105-CH is warranty for a period of one year after
commissioning. This warranty covers parts and labour for any
manufacturing defect or failure under a normal use of the lift. This
does not cover warranty of merchantability for a specific use or need.
Customer and ergo therapist are responsible to ensure this unit suit
the needs of the limited mobility user. Also, Architect and building
engineer are responsible to ensure this unit suit the building code and
structure strength. Always try disable lift before purchasing, any
order is assumed to be in conformity with local building codes and will
be delivered as ordered. Dealers and installers are responsible to
collect all permits before starting the installation.

3
WARNING
• This is not a dumbwaiter
• This is not an amusement ride
• This is not a rollercoaster
• This unit is dedicated to me used only by peoples in a wheelchair
• Never overload this lift
• Do not use in case of emergency
• Do not use in case of flooding
• This unit is not dedicated to be used in a humid place
• Kid should not use this lift unless it is a pediatric dedicated unit
• Never go under the lift
• Never modify the lift without the manufacturer approval
• Any modification on the stair shaft is prohibited after lift
installation
• Never try to repair the lift by yourself
• A biannual maintenance is recommended for a safe use of the
lift.
RATING PLATE

4
MAIN COMPONENTS
1) PLATFORM
2) HAND RAIL
3) VEHICULE COMMANDS
4) SAFETY ARM
5) SAFETY FLAP
6) UNDER PAN
7) GUIDE RAILS
8) EMERGENCY MOVING DEVICE
9) CUT-OFF
10) TOP LANDIN CALL STATION

5
DOMESTIC MAINTENANCE
• Do not attempt mechanical maintenance or modification
• Do not add or remove lubricant on any part of the installation
• Any defect should be reported to the installer
• Clean painted parts with the means of a soft soap and cloth
• It is allowed to use automotive wax and shine on painted
surface
• The best maintenance you can do is to keep your lift clean
• Clean rails as often as possible in order to prevent dust
accumulation on guide wheels.
USE
• Call the lift by using the call station
• Unfold the floor
• Roll on the lift with your wheelchair facing front
• Put your parking brake on your wheelchair
• Unfold safety arms
• Use the commands to reach the other landing
• Hold untill the vehicule has reached the other landing
• Open the safety arm
• Leave the lift
• Flold the floor back to the wall to free the staircase

6
FLOOR UNFOLD (Electrical)
The AC-105-CH is available with an electric action of the floor and
safety arm. Usually the floor and arm must be unfolded manually,
but in some case it is too difficult for the user depending on its
disability. The electrical option is using the same commands for all
operations. Any commands asking for a move beyond the travels
limits will activate the floor and arm.
• A command to the other landing of a folded lift will unfold the
lift for boarding.
• A command to the current landing will fold the floor and arm
along the supporting wall.
SAFETY EDGES
The AC-105-CH is equipped with safety edges sensors. In the event
of a contact with any object along the travel, the lift should stall
this motion and allow for a backward movement of the lift. This
mean the user will be able to free the obstruction. The first thing
to do in the event of an irresponsive lift is to check all safety edges,
and free any obstruction.

7
Battery charger testing procedure
This apparatus is equipped with a charger for each one of the 2
batteries. To check each of the chargers, perform the following
steps:
• Disconnect the 2 chargers from the 120 volts AC outlet;
• Perform 3 to 6 platform cycles in order to partially discharge
the batteries;
• Make sure that each charger is correctly connected to its
corresponding battery: red connector to the positive terminal
and the black connector to the negative battery terminal;
• Connect each charger to the AC outlet. Both chargers should
now have the red indicator light on;
• Connect an ammeter to the red wire of the charger to be
tested, in series with the positive terminal of the battery it is
connected to;
• If the measured current is over 0,5 amps, the charger is
working properly;
• When the battery is fully charged, the indicator light should
remain off.
Red indicator light: Red light on: Charging
Red light flashing: Approching full charge
Red light off: Fully charged
8
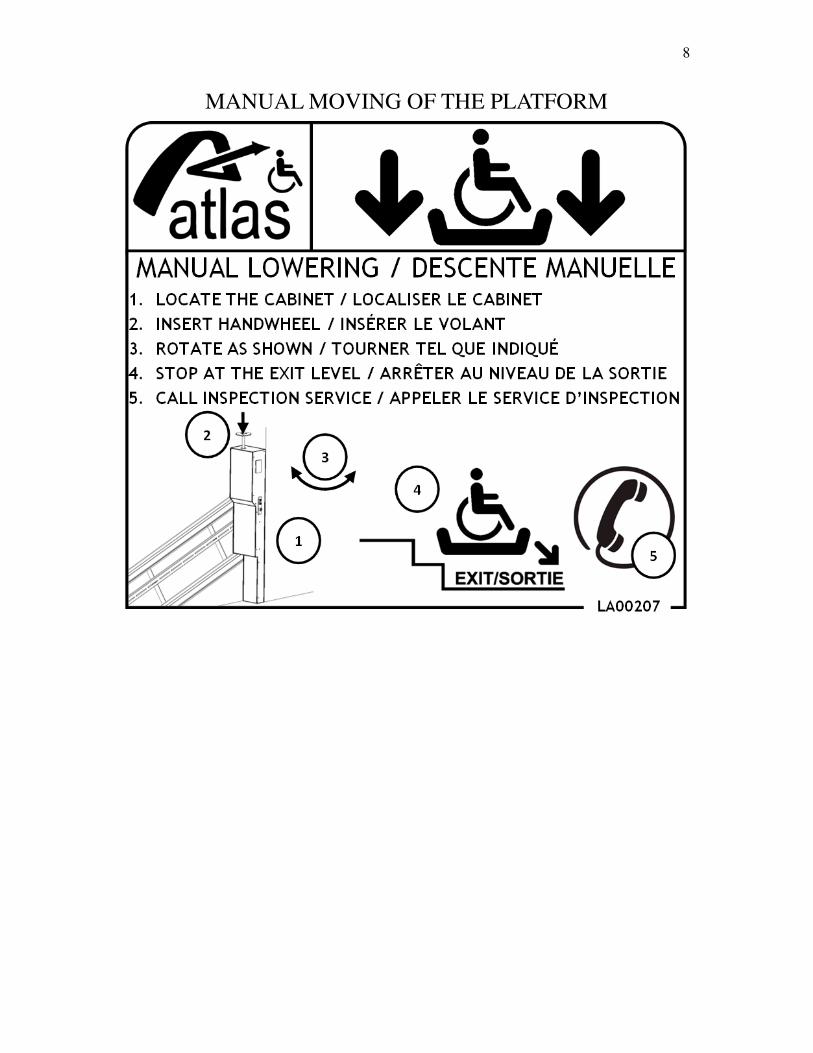
MANUAL MOVING OF THE PLATFORM

9
TROUBLESHOOTING GUIDE
Problem
The elevator platform is not responding to the control buttons.
Verification
In order to troubleshoot your elevator, check the probable causes
listed in the table below and apply the corresponding solution(s). If
none of the provided solutions solve the issue, call the manufacturer
or the distributor of your unit.
CAUSE SOLUTION
Power failure
(batteries discharged, if equipped)
-Wait for power to be restored
Unit is no longer powered by electricity
(batteries discharged)
-Call an electrician
-Recharge the batteries
-Reset the machine using the red button
from disconnect (close, wait a few
minutes and reopen)
The platform is no longer working. -Check the correct position of the protection arm.
-Check if any object(s) are in the path of the device.
The platform control buttons are not
responding (locked).
-Unlock the control buttons using the
provided key.


