Reuse of this document is authorised provided the source is acknowledged The Commissions reuse policy is implemented by Commission Decision 2011833EU of 12 December 2011 on the reuse of Commission documents
Date 21112018
EUROPEAN COMMISSION DIGIT Connecting Europe Facility
Access Point
Administration Guide
Domibus 334
Version [133]
Status [Final]
Domibus 334 Administration Guide
Page 2 134
Document Approver(s)
Approver Name Role
Adrien FERIAL CEF Technical Office
Document Reviewers
Reviewer Name Role
Cosmin BACIU CEF Technical Office
Catalin-Emanuel ENACHE CEF Technical Office
Summary of Changes
Version Date Created by Short Description of Changes
107 09022018 Chaouki BERRAH Caroline AEBY
Update for version 332 Information on MySQL and Oracle deletion scripts added as well as Domibus operational guidelines
133 21112018 Caroline AEBY Added missing line in Pmode about Pull mode
Domibus 334 Administration Guide
Page 3 134
Table of Contents
INTRODUCTION 7
Purpose 7
References 7
CONVENTIONS 9
Example 1 Sample Oracle Statement 9
Example 2 Sample Configuration file 9
PREREQUISITES 10
Binaries repository 10
DOMIBUS DEPLOYMENT 11
Database Configuration 11
411 MySQL and Oracle Deletion scripts 11
412 MySQL configuration 11
413 Oracle configuration 13
Domibus on WebLogic 1213 13
421 Single Server Deployment 14
422 Clustered Deployment 23
Domibus on Tomcat 34
431 Pre-Configured Single Server Deployment 34
432 Single Server Deployment 37
433 Clustered Deployment 39
Domibus on WildFly 41
441 Pre-Configured Single Server Deployment 41
442 Single Server Deployment 46
443 Clustered Deployment 53
DOMIBUS CONFIGURATION 57
Security Configuration 57
511 Security Policies 57
512 Certificates 57
Domibus Properties 58
PLUGIN MANAGEMENT 65
Default Plugins 65
611 JMS Plugin 65
612 WS Plugin 65
6121 Domibus authentication 65
6122 Domibus Authorization 66
6123 Enable the authentication in Domibus 66
613 File System Plugin 66
Domibus 334 Administration Guide
Page 4 134
Custom Plugin 67
621 Plugin registration 67
6211 Tomcat 67
6212 WebLogic 67
6213 WildFly 67
PMODE CONFIGURATION 68
Configuration 68
711 Adding a new participant 68
712 Sample PMode file 69
713 Domibus PMode configuration to ebMS3 PMode Mapping 72
714 Upload new Configuration 77
7141 Upload the PMode file 77
7142 Upload the Truststore 80
SPECIAL SCENARIO SENDER AND RECEIVER ARE THE SAME 82
PMode Configuration 82
Message structure 82
Message ID convention 83
ADMINISTRATION TOOLS 84
Administration Console 84
911 Changing passwords 84
912 User Account Lockout Policy 86
913 Adding new users 88
914 Message Filtering 89
Message Log 92
Application Logging 93
931 Domibus log files 93
932 Logging properties 93
933 Error Log page 94
Queue Monitoring 94
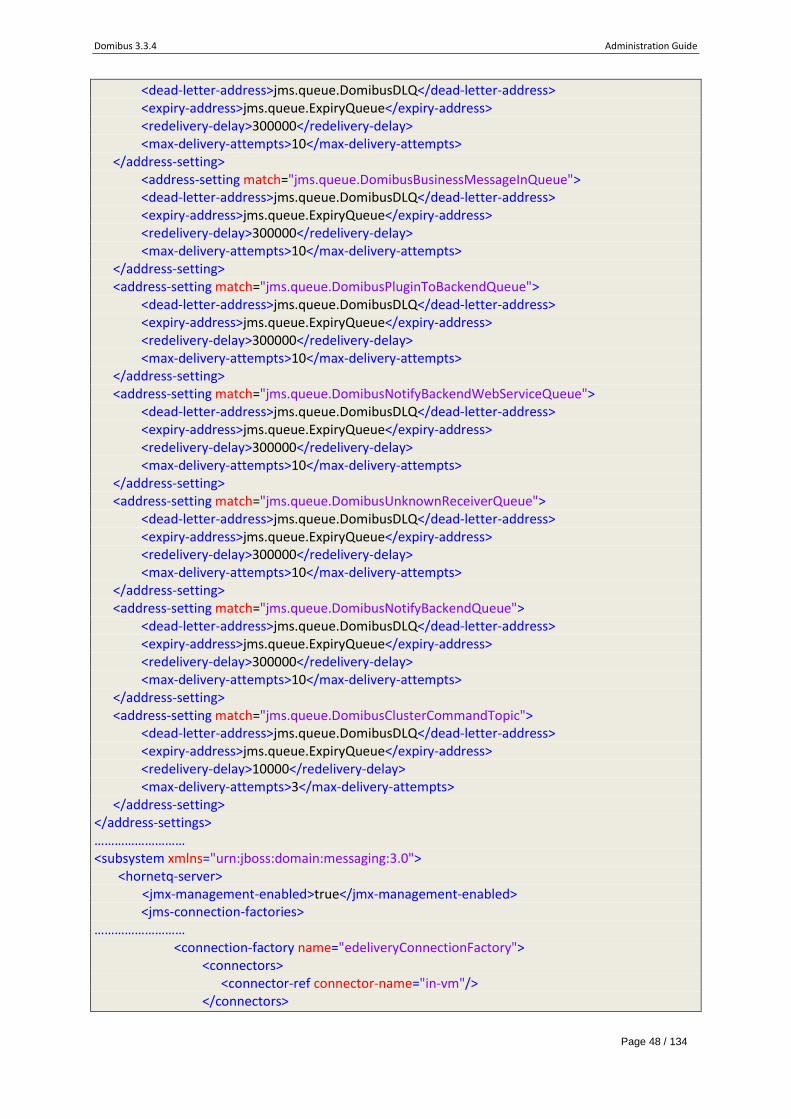
Configuration of the queues 102
951 Tomcat 102
952 WebLogic 103
953 WildFly 103
LARGE FILES SUPPORT 104
DATA ARCHIVING 105
Whats archiving 105
Data Retention Policy 105
Data Extraction 105
NON REPUDIATION 107
Domibus 334 Administration Guide
Page 5 134
TLS CONFIGURATION 108
TLS Configuration 108
1311 Transport Layer Security in Domibus 108
1312 Client side configuration (One Way SSL) 108
1313 Client side configuration (Two Way SSL) 109
1314 Server side configuration 109
13141 Tomcat 8 109
13142 WebLogic 110
13143 Wildfly 9 110
13144 Configure Basic and Certificates authentication in SoapUI 111
13145 PMode update 112
DYNAMIC DISCOVERY OF UNKNOWN PARTICIPANTS 114
Overview 114
Domibus configuration for PEPPOL 114
PMode configuration for PEPPOL 115
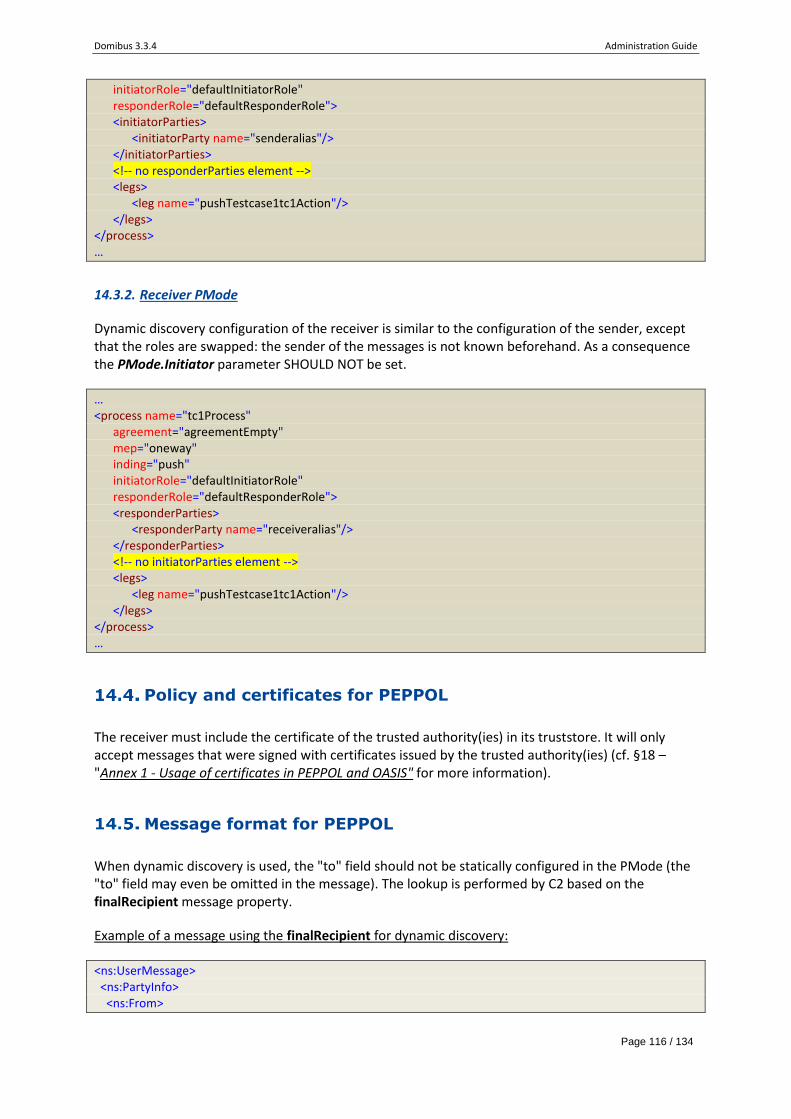
1431 Sender PMode 115
1432 Receiver PMode 116
Policy and certificates for PEPPOL 116
Message format for PEPPOL 116
SMP entry 118
Domibus configuration for OASIS 118
PMode configuration for OASIS 118
1481 Sender PMode 118
1482 Receiver PMode 120
Policy and certificates for OASIS 120
Message format for OASIS 120
MESSAGE PULLING 122
Setup 122
Configuration restriction 122
TROUBLESHOOTING 124
Failed to obtain DB connection from datasource 124
Exception sending context initialized event to listener instance of class 124
Neither the JAVA_HOME nor the JRE_HOME environment variable is defined 125
Cannot access Admin Console 125
Handshake Failure 125
OPERATIONAL GUIDELINES 128
JMS Queue Management 128
Log Management 128
1721 Log Level 128
1722 Log Rotation and Archiving 129
Domibus 334 Administration Guide
Page 6 134
1723 Log Monitoring 129
Capacity Planning 129
1731 JVM Memory Management 129
1732 CPU IO operations and Disk Space Monitoring 129
Database Management 129
1741 Database Monitoring 129
1742 Database Archiving 129
1743 Monitor Message Life Cycle 129
ANNEX 1 - USAGE OF CERTIFICATES IN PEPPOL AND OASIS 131
ANNEX 2 ndash DOCUMENT PARTS 132
LIST OF FIGURES 133
CONTACT INFORMATION 134
Domibus 334 Administration Guide
Page 7 134
INTRODUCTION
This Administration Guide is intended for Server Administrators in charge of installing managing and troubleshooting an eDelivery Access Point
Purpose
The purpose of this guide is to provide detailed information on how to deploy and configure Domibus on WebLogic Tomcat and WildFly with MySQL or Oracle It also provides detailed descriptions of related Security Configurations (Policies Certificates) Message Filtering PMode Configuration Application Monitoring Custom Plugins Registration JMS Monitoring Data Archiving Troubleshooting and TLS Configuration
The commands and configuration files listed in this document usually contain a mix of reserved words (commands instructions and system related special words) and user defined words (chosen by the user) as well as comments and preferred values for certain variables The conventions used in this document to distinguish between them are the followings
To keep this document release agnostic as much as possible the strings x-y-z or xyz are intended to refer to the version of Domibus discussed in this version of the document in the present case Domibus 334
Bold is used for reserved words and commands
Normal italic together with a short description of the argument is used for user-defined names (chosen by you to designate items like users passwords database etc) Normally contains at least 2 words separated by _
Bold and Italic is used for advisable values which can be changed by the user depending on their infrastructure
Comments are sometimes added to describe the purpose of the commands usually enclosed in brackets ()
By default non-OS specific paths will be described using Linux patterns
Example 1 Sample Oracle Statement
create user edelivery_user identified by edelivery_password
grant all privileges to edelivery_user
(Where edelivery_user and edelivery_password are names chosen by the user)
- edelivery_user domibus_schema and edelivery_password are names chosen by the user
- localhost3306 represents hostnameport parameters of the MySQL database)
Domibus 334 Administration Guide
Page 10 134
PREREQUISITES
Please install the following software on the target system For further information and installation details we kindly advise you to refer to the software owners documentation
Java runtime environnement (JRE) version 7 or 8 httpwwworaclecomtechnetworkjavajavasedownloadsindexhtml
One of the supported Database Management Systems
o MySQL 56 or above
o Oracle 10g+
If you dont plan to deploy Domibus according to the Pre-Configured Single Server Deployment method you must also install one of the supported applicationweb servers
o WebLogic 12c
o WildFly 9
o Apache Tomcat 80x
All Domibus installation resources including full distributions and documentation can be found on the Single Web Portal httpseceuropaeucefdigitalwikidisplayCEFDIGITALDomibus
Binaries repository
All the Domibus 334 artefacts can be directly downloaded from the CEF Digital site (cf[REF1])
Domibus 334 Administration Guide
Page 11 134
DOMIBUS DEPLOYMENT
Remark
The variable cef_edelivery_path referring to the folder where the package is installed will be used later in this document
Database Configuration
For this step you will have to use the following resources (see section sect31ndashBinaries repository for the download location)
domibus-distribution-XYZ-sql-scriptszip
411 MySQL and Oracle Deletion scripts
A deletion script for MySQL (mysql5innoDb-334-delete-dbsql) and Oracle (oracle10g-334-delete-dbsql) Domibus DB is available in the domibus-distribution-XYZ-sql-scriptszip
The purpose of the script is to delete all messages within a user defined period to recover disk space The script requires a START_DATE parameter and an END_DATE parameter to be set
The tables affected by the execution of this script are
TB_MESSAGING
TB_ERROR_LOG
TB_PARTY_ID
TB_RECEIPT_DATA
TB_PROPERTY
TB_PART_INFO
TB_RAWENVELOPE_LOG
TB_ERROR
TB_USER_MESSAGE
TB_SIGNAL_MESSAGE
TB_RECEIPT
TB_MESSAGE_INFO
TB_MESSAGE_LOG Any information relevant to a message received or sent during the predefined period will be removed from these tables
In order to execute this script it is advised to use a UI tool such as SQL developer of MySQL workbench Important in order to keep the JMS queues synchronized with the DB data that will be deleted by this script the Domibus Administrator should remove manually the associated JMS messages from the plugin notifications queues
412 MySQL configuration
1 Unzip domibus-distribution-XYZ-sql-scriptszip in cef_edelivery_pathsql-scripts
Domibus 334 Administration Guide
Page 12 134
2 Open a command prompt and navigate to this directory cef_edelivery_pathsql-scripts
3 (Optional) Storing payload messages in a database with size over 30 MB
Domibus can temporarily store the messages in the database They are not deleted before they are successfully transferred to the final recipient (see sect7 ndash PMode Configuration) Therefore it is required to increase the maximum allowed size of packets Update the default properties of myini (Windows) or mycnf (Linux)
o max_allowed_packet property
The maximum size of one packet or any generated or intermediate string or any parameter sent by the mysql_stmt_send_long_data() C API function max_allowed_packet=512M
o innodb_log_file_size property
Size of each log file in a log group You should set the combined size of log files to about 25-100 of your buffer pool size to avoid unneeded buffer pool flush activity on log file overwrite However note that larger logfile size will increase the time needed for the recovery process innodb_log_file_size=5120M
o Restart MySQL service (Windows)
MySQL service
4 (Optional) For storing payload messages in a file system instead of a database see sect52 ndash Domibus Properties)
5 For MySQL 8 and ConnectorJ 80x please set the database timezone One way of setting the timezone is to modify the MySQL myini configuration file by adding the following property with the adjusted timezone It is recommended that the database timezone is the same as the timezone of the machine where Domibus is installed
default-time-zone=+0000
6 Execute the following MySQL commands at the command prompt
Remark
User defined names like root_password domibus_schema etc are in italic as
described in the Convention section
mysql -h localhost -u root_user --password=root_password -e drop schema if exists domibus_schemacreate schema domibus_schemaalter database domibus_schema charset=utf8 collate=utf8_bin create user edelivery_userlocalhost identified by edelivery_passwordgrant all on domibus_schema to edelivery_userlocalhost
Domibus 334 Administration Guide
Page 13 134
The above creates a schema (domibus_schema) and a user (edelivery_user) that have all the privileges on the schema
mysql -h localhost -u root_user --password=root_password domibus_schema lt mysql5innoDb-xyzddl
The above creates the required tables in domibus_schema
Remark
If you are using Windows make sure to have the parent directory of mysqlexe added to your PATH variable
413 Oracle configuration
1 Unzip domibus-distribution-XYZ-sql-scriptszip in cef_edelivery_pathsql-scripts
2 Open a command prompt and navigate to this directory cef_edelivery_pathsql-scripts
3 Open a command line session log in and execute the following commands
sqlplus sys as sysdba (password should be the one assigned during the Oracle installation ) =========================================================================== Once logged in Oracle CREATE USER ltedelivery_usergt IDENTIFIED BY ltedelivery_passwordgt DEFAULT TABLESPACE lttablespacegt QUOTA UNLIMITED ON lttablespacegt GRANT CREATE SESSION TO ltedelivery_usergt GRANT CREATE TABLE TO ltedelivery_usergt GRANT CREATE VIEW TO ltedelivery_usergt GRANT CREATE SEQUENCE TO ltedelivery_usergt GRANT EXECUTE ON DBMS_XA TO ltedelivery_usergt GRANT SELECT ON PENDING_TRANS$ TO ltedelivery_usergt GRANT SELECT ON DBA_2PC_PENDING TO ltedelivery_usergt GRANT SELECT ON DBA_PENDING_TRANSACTIONS TO ltedelivery_usergt CONNECT ltedelivery_usergt SHOW USER (should return edelivery_user) oracle10g-xyzddl EXIT ===========================================================================
Domibus on WebLogic 1213
This section does not include the installation of WebLogic server 1213 It is assumed that the WebLogic Server is installed and a Domain is created Hereafter the domain location will be referred as DOMAIN_HOME (user defined name)
Domibus 334 Administration Guide
Page 14 134
Remark
The Apache CXF library referred by Domibus internally uses the environment variable javaiotmpdir to buffer large attachments received If the property javaiotmpdir is not specified then by default this points to the ltWeblogic_domain_directorygt It is recommended to point this to a local directory _tmp on each managed server and accessible by the Weblogic application server The disk space allocated for _tmp directory would depend on the size of attachments received On production environment it is recommended to provide 100GB for _tmp
421 Single Server Deployment
For this step you will have to use the following resources (see section sect31ndashBinaries repository for the download location)
1 Download and unzip domibus-distribution- XYZ-weblogic-configurationzip in the directory DOMAIN_HOMEconfdomibus
2 Download and unzip domibus-distribution- XYZ-weblogic-warzip in a temporary folder to prepare it for deployment
3 Configure your Keystore based on section sect512 ndash Certificates
4 Add the following lines in
o For Windows DOMAIN_HOMEbinsetDomainEnvcmd
Locate the set DOMAIN_HOME statement and add the following lines after
hellip set DOMAIN_HOME Added for Domibus
Domibus 334 Administration Guide
Page 15 134
set EXTRA_JAVA_PROPERTIES=EXTRA_JAVA_PROPERTIES -Ddomibusconfiglocation=DOMAIN_HOMEconfDomibus -Djavaiotmpdir=ltpath to _tmp directorygt hellip
o For Linux DOMAIN_HOMEbinsetDomainEnvsh
Locate the export DOMAIN_HOME statement and add the following lines after
hellip export DOMAIN_HOME Added for Domibus EXTRA_JAVA_PROPERTIES=$EXTRA_JAVA_PROPERTIES -Ddomibusconfiglocation=$DOMAIN_HOMEconfdomibus -Djavaiotmpdir=ltpath to _tmp directorygt export EXTRA_JAVA_PROPERTIES hellip
5 Run the WebLogic Scripting Tool (WLST) in order to create the JMS resources and the Database datasources from the command line
o Download the WLST Package from following location httpseceuropaeucefdigitalartifactcontentrepositorieseDeliveryeueuropaecdigitipciswslt-api191wslt-api-191zip
o Configure the WSLT API tool
Unzip the wslt-api-191zip
Define the WL_HOME as a system environment variable to point to the WebLogic lsquowlserverrsquo directory as defined in the DOMAIN_HOMEbinsetDomainEnv[cmd|sh]
eg WL_HOME=wls12130wlserver
o Take the script WeblogicSingleServerproperties from domibus-distribution-XYZ-weblogic-configurationzip under the scripts directory and copy the WeblogicSingleServerproperties file into the wslt-api-191 directory and adapt the following properties
Adapt the properties for connecting to the WebLogic domain
MySQL configuration is commented by default To enable MySQL remove the comment () from the lines below Dont forget to add the comment () for Oracle to disable it
o Start the WebLogic domain from within DOMAIN_HOME
For Windows startWebLogiccmd
For Linux startWebLogicsh
o Execute the following command from within the wlstapi-191bin directory
For Windows wlstapicmd scriptsimportpy --property WeblogicSingleServerproperties
For Linux wlstapish scriptsimportpy --property WeblogicSingleServerproperties
Expected result
6 Activate the use of the authorization providers to protect the JMX access
7 The database dialect is pre-configured to use the Oracle database If you are using a MySQL database you should adapt the following properties in ltDOMAIN_HOMEgtconfdomibusdomibusproperties as highlighted in the example below
8 Install the WS Plugin For more details see section sect6212 ndash WebLogic
9 Deploy domibus-distribution-XYZ-weblogicwar
o Click on Install
o Navigate to the location of the war file and click Next
Domibus 334 Administration Guide
Page 20 134
o Choose Install this deployment as an application and click Next
o Accept the default options and click Next
Domibus 334 Administration Guide
Page 21 134
o Select the following option and click Finish
Domibus 334 Administration Guide
Page 22 134
o Here is an overview of the resulting settings you can now click on the Save button
The expected positive response to the deployment request should be the following
10 Verify the installation by navigating with your browser to httplocalhost7001domibus-weblogic if you can access the page it means the deployment was successful
(By default User = admin Password = 123456)
Remark
It is recommended to change the passwords for the default users (See sect91 ndash Administration for further information)
Domibus 334 Administration Guide
Page 23 134
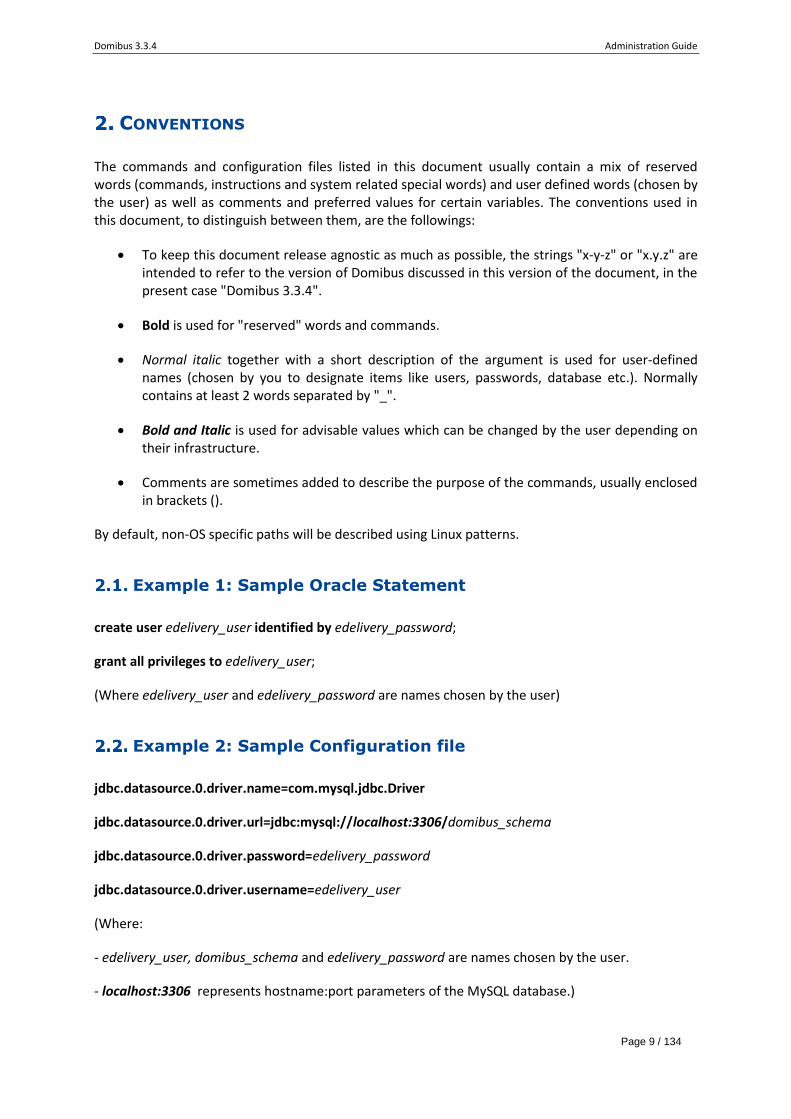
Expected result
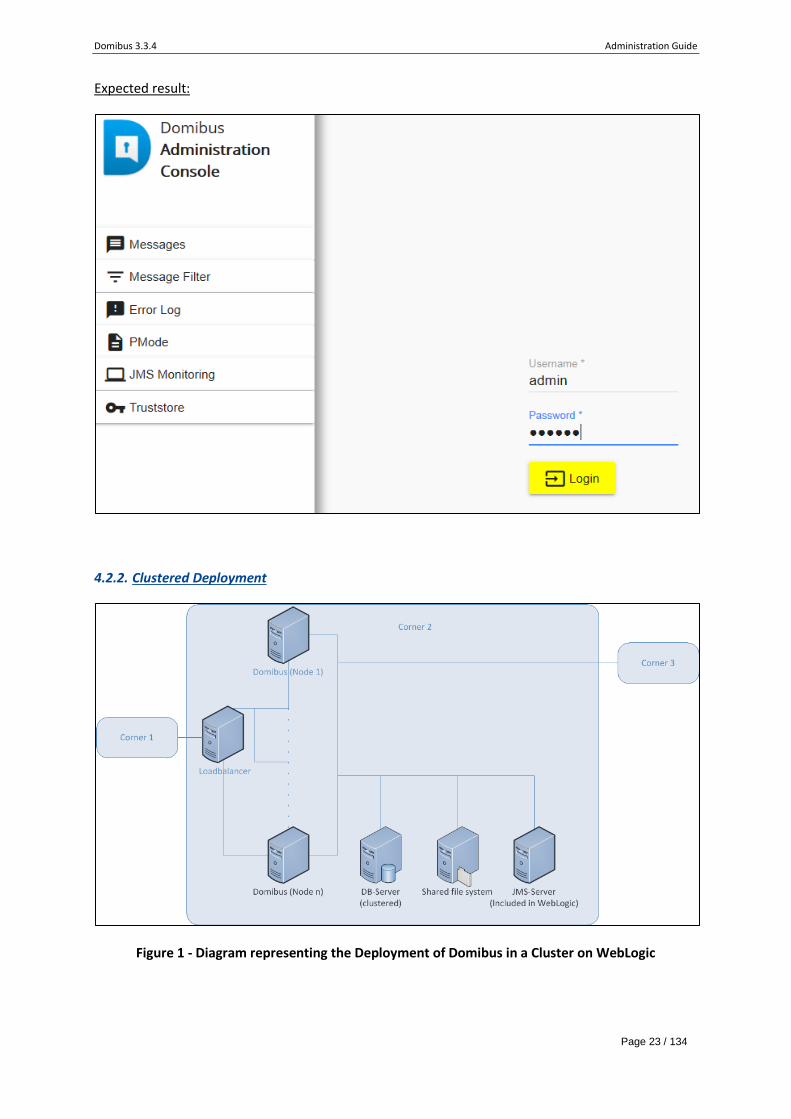
422 Clustered Deployment
Figure 1 - Diagram representing the Deployment of Domibus in a Cluster on WebLogic
Domibus 334 Administration Guide
Page 24 134
Remark
In this section we assume that a Domain and a WebLogic Cluster are already setup
For this step you will have to use the following resources (see section sect31ndashBinaries repository for the download location)
1 Download and unzip domibus-distribution- XYZ-weblogic-configurationzip in in a shared location that is accessible by all the nodes from the cluster We will refer to this directory as cef_shared_edelivery_pathDomibus
2 Download and unzip domibus-distribution- XYZ-weblogic-warzip in a temporary folder to prepare it for deployment
3 Configure your Keystore based on section sect512 ndash Certificates
4 Add the following lines in
o For Windows DOMAIN_HOMEbinsetDomainEnvcmd
Locate the set DOMAIN_HOME statement and add the following lines after
hellip set DOMAIN_HOME Added for Domibus set EXTRA_JAVA_PROPERTIES=EXTRA_JAVA_PROPERTIES -Ddomibusconfiglocation=DOMAIN_HOMEconfDomibus -Djavaiotmpdir=ltpath to _tmp directorygt hellip
o For Linux DOMAIN_HOMEbinsetDomainEnvsh
Locate the export DOMAIN_HOME statement and add the following lines after
hellip export DOMAIN_HOME Added for Domibus EXTRA_JAVA_PROPERTIES=$EXTRA_JAVA_PROPERTIES -Ddomibusconfiglocation=$DOMAIN_HOMEconfdomibus -Djavaiotmpdir=ltpath to _tmp directorygt export EXTRA_JAVA_PROPERTIES
Domibus 334 Administration Guide
Page 25 134
hellip
5 Run the WebLogic Scripting Tool (WLST) in order to create the necessary JMS resources and Database datasources from the command line
o Download the WLST Package from the following location httpseceuropaeucefdigitalartifactcontentrepositorieseDeliveryeueuropaecdigitipciswslt-api191wslt-api-191zip
o Configure the WSLT API tool
Unzip the wslt-api-191zip
Define the WL_HOME (SET or export command depending on your operating system) environment variable to point to the WebLogic wlserver directory
eg WL_HOME=wls12130wlserver
o Take the script WeblogicClusterproperties from domibus-distribution-XYZ-weblogic-configurationzip under the scripts directory and copy the WeblogicClusterproperties file into the wslt-api-191 directory and apply the following changes
Adapt the properties for connecting to the WebLogic domain
MySQL configuration is commented by default To enable MySQL remove the comment () from the lines below Dont forget to add the comment () for Oracle to disable it
6 Activate the use of the authorization providers to protect the JMX access
7 The database dialect is pre-configured to use the Oracle database If you are using the MySQL database you should adapt the dialect as highlighted in the text below in ltDOMAIN_HOMEgtconfdomibusdomibusproperties file
8 Install the WS plugin For more details refer to chapter sect6212 ndash WebLogic
9 Deploy domibus-distribution-XYZ-weblogicwar
Domibus 334 Administration Guide
Page 29 134
o Click Install
o Navigate to location DOMAIN_HOMEconfdomibus where the domibus-distribution-XYZ-weblogicwar file has been previously copied
o Select the domibus-distribution-XYZ-weblogicwar file and click Next
o Choose Install this deployment as an application and click Next
Domibus 334 Administration Guide
Page 30 134
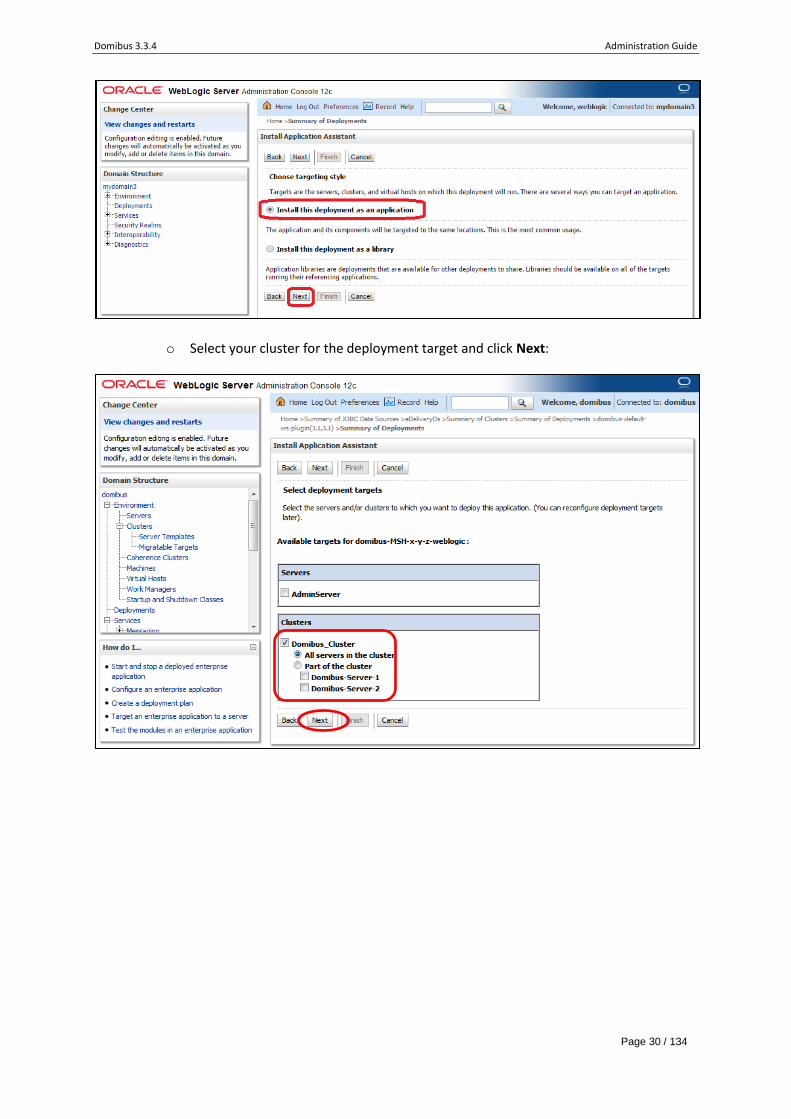
o Select your cluster for the deployment target and click Next
Domibus 334 Administration Guide
Page 31 134
o Select the following options and click Next
Domibus 334 Administration Guide
Page 32 134
o Select the following option and click Finish
o Here is an overview of the resulting settings you can now click on the Save button
The expected positive response to the deployment request should be the following
Domibus 334 Administration Guide
Page 33 134
10 Verify the installation by navigating with your browser to httplocalhost7001domibus-weblogic
If you can access the page it means the deployment was successful
(by default user = admin password = 123456)
Remark
It is recommended to change the passwords for the default users (See sect91 ndash Administration for further information)
Expected result
Domibus 334 Administration Guide
Page 34 134
Domibus on Tomcat
Remarks
As Tomcat is not a full Java EE application server and does not offer JMS capabilities by default Domibus uses ActiveMQ as an in-memory JMS broker when deployed on a Tomcat servlet container The configuration for the ActiveMQ JMS broker can be found in cef_edelivery_pathdomibusinternalactivemqxml
The Apache CXF library referred by Domibus internally uses the environment variable javaiotmpdir to buffer large attachments received If the property javaiotmpdir is not specified then by default this points to the ltCATALINA_BASE directorytempgt It is recommended to point this to a local directory _tmp on each managed server and accessible by the Tomcat server The disk space allocated for _tmp directory would depend on the size of attachments received On production environment it is recommended to provide 100GB for _tmp
431 Pre-Configured Single Server Deployment
For this step you will have to use the following resources (see section sect31ndashBinaries repository for the download location)
domibus-distribution-XYZ-tomcat-fullzip
1 Unzip the archive
o Unzip domibus-distribution-XYZ-tomcat-fullzip to a location on your physical machine cef_edelivery_path
2 Prepare the database
o For MySQL database
Add MySQL JDBC driver (available on MySQL official web site cf [REF2]) in the folder cef_edelivery_pathdomibuslib
Remark
The version of the JDBC driver has to be mysql-connector-java-5140jar or higher
Edit the properties file cef_edelivery_pathconfdomibusdomibusproperties and adjust the highlighted parts in the text below according to your environment The properties associated to the database configuration are pre-configured for the MySQL database
---------------------------------- Database --------------------------------- Database server name domibusdatabaseserverName=localhost
Domibus 334 Administration Guide
Page 35 134
Database port domibusdatabaseport=3306 XA properties domibusdatasourcexapropertyuser=edelivery_user domibusdatasourcexapropertypassword=edelivery_password MySQL domibusdatasourcexapropertyurl=jdbcmysql$domibusdatabaseserverName$domibusdatabaseport domibus_schemapinGlobalTxToPhysicalConnection=true Non-XA Datasource domibusdatasourceurl=jdbcmysql$domibusdatabaseserverName$domibusdatabaseportdomibus_schemauseSSL=false domibusdatasourceuser=edelivery_user domibusdatasourcepassword=edelivery_password
o For Oracle database
Add the Oracle JDBC driver (eg ojdbc7jar) (available on the Oracle official web site cf[REF3]) in the cef_edelivery_pathdomibuslib folder
Edit the properties file cef_edelivery_pathconfdomibusdomibusproperties and adjust the highlighted parts in the text below according to your environment
---------------------------------- Database --------------------------------- Database server name domibusdatabaseserverName=localhost Database port domibusdatabaseport=1521 XA Datasource domibusdatasourcexaxaDataSourceClassName=oraclejdbcxaclientOracleXADataSource XA properties domibusdatasourcexapropertyuser=edelivery_user domibusdatasourcexapropertypassword=edelivery_password domibusdatasourcexapropertyurl=jdbcoraclethin$domibusdatabaseserverName$domibusdatabaseport[SID|Service] Non-XA Datasource domibusdatasourcedriverClassName=oraclejdbcOracleDriver domibusdatasourceURL=jdbcoraclethin$domibusdatabaseserverName$domibusdatabaseport[SID|Service] domibusdatasourceuser=edelivery_user domibusdatasourcepassword=edelivery_password
Remark
Configure the database dialect as it is pre-configured for MySQL by default
3 Configure your Keystore based on section sect512 ndash Certificates
4 Set JVM parameters
Domibus expects a single environment variable domibusconfiglocation pointing towards the cef_edelivery_pathconfdomibus folder
You can do this by editing the first command lines of cef_edelivery_pathdomibusbinsetenvbat (Windows) or cef_edelivery_pathdomibusbinsetenvsh (Linux) Set CATALINA_HOME equal to the absolute path of the installation cef_edelivery_pathdomibus
o For Windows edit cef_edelivery_pathdomibusbinsetenvbat by adding the following
hellip
set CATALINA_HOME=cef_edelivery_pathdomibus set CATALINA_TMPDIR=ltpath to _tmp directorygt set JAVA_OPTS=JAVA_OPTS -Dfileencoding=UTF-8 -Xms128m -Xmx1024m -XXPermSize=64m set JAVA_OPTS=JAVA_OPTS -Ddomibusconfiglocation=CATALINA_HOMEconfdomibus hellip
o For Linux edit cef_edelivery_pathdomibusbinsetenvsh by adding the following
cd cef_edelivery_path domibusbinchmod u+x sh startupsh
6 Display the Domibus home page on your browser httplocalhost8080domibus (By default User = admin Password = 123456)
Remark
It is recommended to change the passwords for the default users See sect91 ndash Administration for further information
If you can access the page it means the deployment was successful
Domibus 334 Administration Guide
Page 37 134
Expected result
432 Single Server Deployment
For this step you will have to use the following resources (see sect31ndash Binaries repository for the download location)
domibus-distribution-XYZ-tomcat-configurationzip
domibus-distribution-XYZ-tomcat-warzip
We assume that an Apache Tomcat 80x is already installed and the installation location is now considered as your cef_edelivery_pathdomibus
1 Download and unzip the artefact domibus-distribution-XYZ-tomcat-configurationzip into the
directory cef_edelivery_pathconfdomibus
2 Configure the MySQL or Oracle datasource as indicated in sect431 ndash Pre-Configured Single Server
Deployment
3 Configure your Keystore based on sect512 ndash Certificates
4 Execute step 4 from sect431 ndash Pre-Configured Single Server Deployment
5 If not already present create a folder and name it temp under cef_edelivery_pathconfDomibus
6 Rename domibus-MSH-XYZ-tomcatwar to domibuswar and deploy it to cef_edelivery_pathdomibus webapps
7 Launch the Domibus application
o For Windows
cd cef_edelivery_pathdomibusbin startupbat
o For Linux
Domibus 334 Administration Guide
Page 38 134
cd cef_edelivery_path domibusbin chmod +x sh startupsh
7 Display the Domibus home page on your browser httplocalhost8080domibus (By default User = admin Password = 123456)
Remark
It is recommended to change the passwords for the default users See sect91 ndash Administration for further information
If you can access the page it means the deployment was successful
Expected result
Domibus 334 Administration Guide
Page 39 134
433 Clustered Deployment
Figure 2 - Diagram representing the Deployment of Domibus in a Cluster on Tomcat
Remark
In this section we assume that a JMS Broker and a Loadbalancer are configured separately (eg httpd)
For this step you will have to use the following resources (see sect31ndash Binaries repository for the download location)
domibus-distribution-XYZ-tomcat-fullzip
domibus-distribution-XYZ-tomcat-warzip
1 Follow steps 1 2 3 4 and 5 from the sect432 ndash Single Server Deployment
2 Set the JVM parameters
Domibus expects a single JVM parameter $domibusconfiglocation pointing towards the cef_edelivery_pathconfdomibus folder
You can do this by editing cef_edelivery_pathdomibusbinsetenvbat (Windows) or cef_edelivery_pathdomibusbinsetenvsh (Linux) Set CATALINA_HOME equal to the absolute path of the installation cef_edelivery_pathDomibus
o For Windows edit cef_edelivery_pathdomibusbinsetenvbat by adding the following
Remark
your_node_id refers to the installed node in the cluster which starts normally at 01(then 02 etc)
hellip
set CATALINA_HOME=cef_edelivery_pathdomibus set CATALINA_TMPDIR=ltpath to _tmp directorygt set JAVA_OPTS=JAVA_OPTS -Dfileencoding=UTF-8 -Xms128m -Xmx1024m -XXPermSize=64m set JAVA_OPTS=JAVA_OPTS -Ddomibusconfiglocation=CATALINA_HOMEconfdomibus
Domibus 334 Administration Guide
Page 40 134
set JAVA_OPTS=JAVA_OPTS -Ddomibusnodeid=your_node_id hellip
o For Linux edit cef_edelivery_pathdomibusbinsetenvsh by adding the following
4 Change the following properties related to the Atomikos configuration in parameters in cef_edelivery_pathconfdomibusdomibusproperties
For clustered deployment
Uncomment the following lines comatomikosicatchoutput_dir=$domibusworklocation$domibusconfiglocationworktransactions$domibusnodeid comatomikosicatchlog_base_dir=$domibusworklocation$domibusconfiglocationworktransactions$domibusnodeidlog Comment the following lines comatomikosicatchoutput_dir=$domibusworklocation$domibusconfiglocationworktransactions comatomikosicatchlog_base_dir=$domibusworklocation$domibusconfiglocationworktransactionslog
5 Follow step 6 and 7 from the sect432 ndash Single Server Deployment
Domibus 334 Administration Guide
Page 41 134
Domibus on WildFly
Remark
The Apache CXF library referred by Domibus internally uses the environment variable javaiotmpdir to buffer large attachments received If the property javaiotmpdir is not specified then this defaults to values provided by the operating system to the JRE On UnixLinux systems this usually defaults to tmp On Windows systems this usually defaults to TEMP folder It is recommended to point this to a local directory _tmp on each managed server and accessible by the Wildfly server The disk space allocated for _tmp directory would depend on the size of attachments received On production environment it is recommended to provide 100GB for _tmp
441 Pre-Configured Single Server Deployment
In this section we assume that WildFly is installed at the location cef_edelivery_pathdomibus
For this step you will have to use the following resources (see section sect31ndash Binaries repository for the download location)
domibus-distribution-XYZ-wildfly-fullzip
1 Download and unzip the domibus-distribution-XYZ-wildfly-fullzip archive in your cef_edelivery_path location
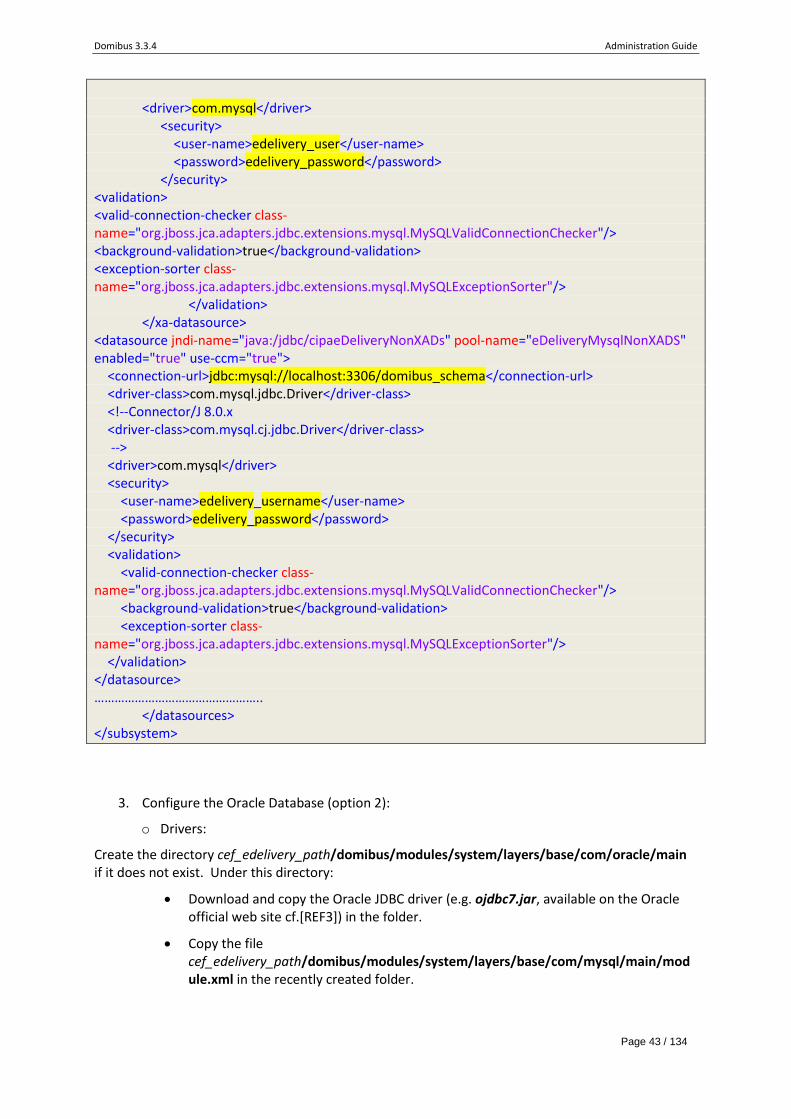
2 Configure the MySQL database (Option 1)
o Drivers
Create the directory cef_edelivery_pathdomibusmodulessystemlayersbasecommysqlmain if it does not exist Under this directory
Download the MySQL JDBC driver available on MySQL official web site (cf[REF2]) and copy it in the folder
Remark
The version of the driver has to be mysql-connector-java-5140jar or higher
Create or edit the file cef_edelivery_pathdomibusmodulessystemlayersbasecommysqlmainmodulexml and copy the following module configuration Make sure to put the name of the driver you are using as an argument of resource-root element eg mysql-connector-java-5140jar
Create the directory cef_edelivery_pathdomibusmodulessystemlayersbasecomoraclemain if it does not exist Under this directory
Download and copy the Oracle JDBC driver (eg ojdbc7jar available on the Oracle official web site cf[REF3]) in the folder
Copy the file cef_edelivery_pathdomibusmodulessystemlayersbasecommysqlmainmodulexml in the recently created folder
Domibus 334 Administration Guide
Page 44 134
Edit modulexml by copying the following module configuration Make sure to put the name of the driver you are using as an argument of resource-root element eg ojdbc7jar
Add your DBMS driver metadata to the Drivers section in cef_edelivery_pathdomibusstandaloneconfigurationstandalone-fullxml (only change the items described below while replacing MYSQL configuration in the process)
4 Configure your Keystore based on sect512 ndash Certificates
5 Run the standalone server
o For Windows under cef_edelivery_pathdomibusbin
o standalonebat --server-config=standalone-fullxml
o For Linux under cef_edelivery_pathdomibusbin
o standalonesh --server-config=standalone-fullxml
6 Display the Domibus home page in your browser httplocalhost8080domibus-wildfly (by default User = admin Password = 123456)
Remark
It is recommended to change the passwords for the default users See sect91 ndash Administration for further information
If you can access the page it means the deployment was successful
Domibus 334 Administration Guide
Page 46 134
Expected result
442 Single Server Deployment
In this section we assume that WildFly is installed at the location cef_edelivery_pathdomibus
For this step you will have to use the following resources (see section sect31-Binaries repository for the download location)
domibus-distribution-XYZ-wildfly-warzip
domibus-distribution-XYZ-wildfly-configurationzip
1 Follow steps 2 (MySQL) or 3 (Oracle) from the sect441 ndash Pre-Configured Single Server Deployment
2 Configure the environment variables
For Windows edit cef_edelivery_pathdomibusbinstandaloneconfbat as follows
hellip set JAVA_OPTS=-Xms128M ndashXmx1024M -XXMaxPermSize=256M set JAVA_OPTS=JAVA_OPTS -DjavanetpreferIPv4Stack=true set JAVA_OPTS=JAVA_OPTS -Ddomibusconfiglocation=JBOSS_HOMEconfdomibus -Djavaiotmpdir=ltpath to _tmp directorygt hellip
For UnixLinux edit cef_edelivery_pathdomibusbinstandaloneconf as follows
3 Download and unzip domibus-distribution-XYZ-wildfly-configurationzip in the directory cef_edelivery_pathconfdomibus
4 Configure your Keystore based on sect512 ndash Certificates
5 Configure the JMS resources
Configure the JMS resources in the configuration file cef_edelivery_pathdomibusstandaloneconfigurationstandalone-fullxml by adding the jms-connection-factories and jms-queues
7 Connect to the Admin Console of WildFly at httplocalhost9990console
8 Click on Deployments in the console menu then click on Add
9 Select Upload a new deployment then click Next
10 Browse to the location of the domibus-distribution-XYZ-wildflywar file select it and click Next
Domibus 334 Administration Guide
Page 53 134
11 The deployment is successful when the name of the war file appears in the Deployment column
Expected result
443 Clustered Deployment
For this step you will have to use the following resources (see section sect31ndashBinaries repository for the download location)
domibus-distribution-XYZ-wildfly-configurationzip
domibus-distribution-XYZ-wildfly-warzip
In this section we assume that the setup of Wildfly 9 in domain mode has already been done and that the cluster has been enabled as described in the official documentation For more details on how to perform an installation of Wildfly 9 in domain mode please refer to the official documentation (cf[REF4])
Domibus 334 Administration Guide
Page 54 134
Figure 3 - Diagram representing the Deployment of Domibus in a Cluster on WildFly
In order to install Domibus in a WildFly cluster please follow the steps below
1 Download and unzip domibus-distribution-XYZ-wildfly-configurationzip in a shared location that is accessible by all the nodes from the cluster We will refer to this directory as cef_shared_edelivery_pathDomibus
2 Follow steps 2 (MySQL) or 3 (Oracle) from the sect441 ndash Pre-Configured Single Server Deployment
Remarks
o This step needs to be performed on all the nodes from the cluster o In the following 2 steps we will edit the profile full-ha from the configuration file
domainconfigurationdomainxml located in the master node
3 Configure the JMS queues and topics as indicated in sect442 point 5 ndash Configure the JMS resources
4 Configure the database dialect as indicated in sect441 point 3 ndash Edit the configuration file cef_edelivery_pathconfdomibusdomibusproperties
5 Configure the environment variables as follows
For Windows edit cef_edelivery_pathbindomainconfbat located in each WildFly node The environment variable setting needs to be performed for every node in the cluster
helliphelliphelliphelliphelliphellip set JAVA_OPTS=-Xms128M ndashXmx1024M -XXMaxPermSize=256M set JAVA_OPTS=JAVA_OPTS -DjavanetpreferIPv4Stack=true set JAVA_OPTS=JAVA_OPTS -Ddomibusconfiglocation=JBOSS_HOMEconfdomibus -Djavaiotmpdir=ltpath to _tmp directorygt helliphelliphelliphelliphelliphellip
Domibus 334 Administration Guide
Page 55 134
For UnixLinux edit cef_edelivery_pathbindomainconf located in each WildFly node The environment variable setting needs to be performed for every node in the cluster
bindomainconf is located in each WildFly node The environment variable setting needs to be performed in every node from the cluster
6 Deploy the domibus-distribution-XYZ-wildflywar to the cluster We will use the Wildfly Administration console for performing the deployment We will deploy the application on the other-server-group cluster which is configured step by step in the official documentation (cf[REF4])
Domibus 334 Administration Guide
Page 56 134
Domibus 334 Administration Guide
Page 57 134
DOMIBUS CONFIGURATION
Domibus exposes the Message Service Handler endpoint as servicesmsh Only this endpoint has to be reachable by the other AS4 Access Points and it is typically exposed on the internet
If the Default WS Plugin (sect612 ndash WS Plugin) is deployed Domibus exposes the Default WS Plugin endpoint as servicesbackend This endpoint should ONLY be exposed to the backend client(s) within the trusted zone and it should not be exposed to the internet
Figure 4 - Message Service Handler diagram
Security Configuration
511 Security Policies
The WS-Security policy used by Domibus when exchanging messages can be specified in the PMode configuration file (sect7 ndash PMode Configuration) The recommended security policy is eSensPolicyv20xml it can be found under cef_edelivery_pathconfdomibuspolicieseSensPolicyv20xml
512 Certificates
The certificates that are used for signing and encrypting the messages when communicating with the other Access Points can be configured in the property file located under cef_edelivery_pathconfdomibusdomibusproperties By default Domibus is pre-configured to use self-signed certificates Please note that self-signed certificates should be used only for testing purposes and are not intended for production use In order to configure Domibus to use custom certificates the following properties need to be modified
Domibus 334 Administration Guide
Page 58 134
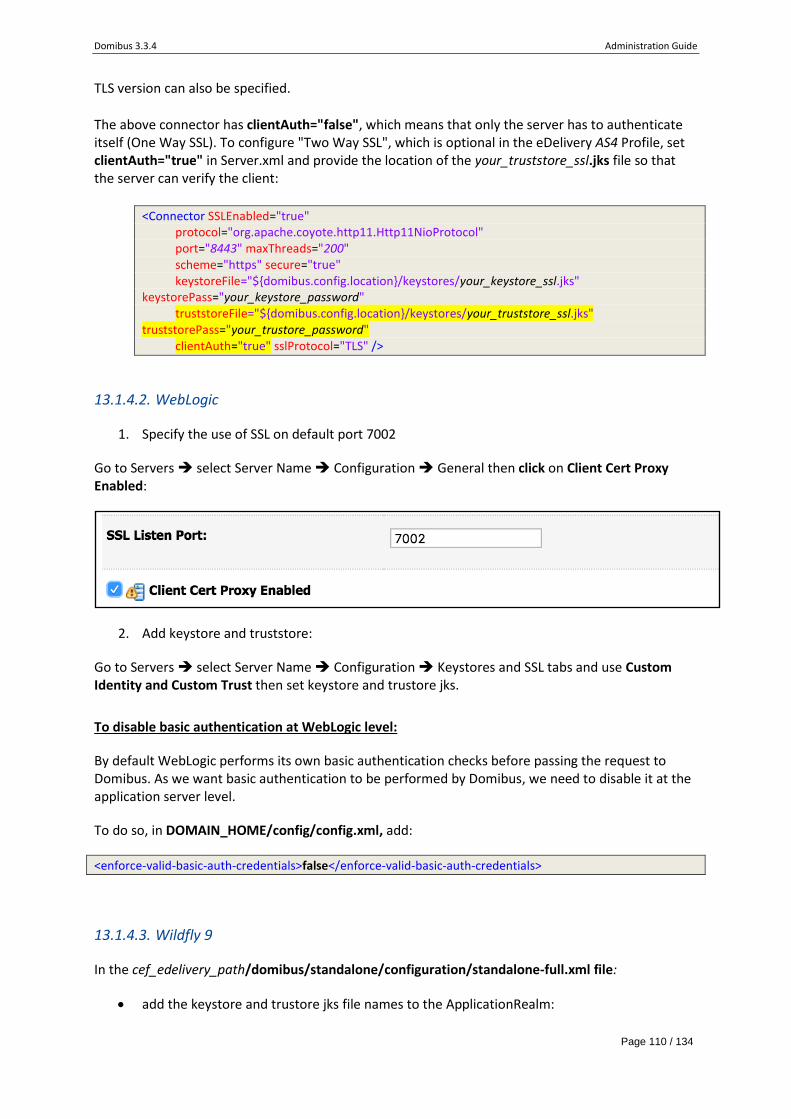
The location of the keystore domibussecuritykeystorelocation=$domibusconfiglocationkeystoresgateway_keystorejks Type of the used keystore domibussecuritykeystoretype=jks The password used to load the keystore domibussecuritykeystorepassword=test123 Private key The alias from the keystore of the private key domibussecuritykeyprivatealias=blue_gw The private key password domibussecuritykeyprivatepassword=test123 Truststore The location of the truststore domibussecuritytruststorelocation=$domibusconfiglocationkeystoresgateway_truststorejks Type of the used truststore domibussecuritytruststoretype=jks The password used to load the trustStore domibussecuritytruststorepassword=test123
1 Create if not present a folder cef_edelivery_pathconfdomibuskeystores
2 Get your key pair from an external provider (Self-signed certificates should only be used for testing purposes not production) If you are interested in using the CEF Public Key Infrastructure Solution (cf[REF5])
3 Create if not present the public and private keys containers (eg truststorejks and keystorejks)
4 Import your private key into your keystore
Remarks
o Your private key and your keystore should always stay secret Please never share them
o The keystore alias has to be the same as the party ID defined in the sect7 ndash PMode Configuration It is strongly recommended to put your key pair (private and public key) and the public key of the other participants you trust in two separate containers
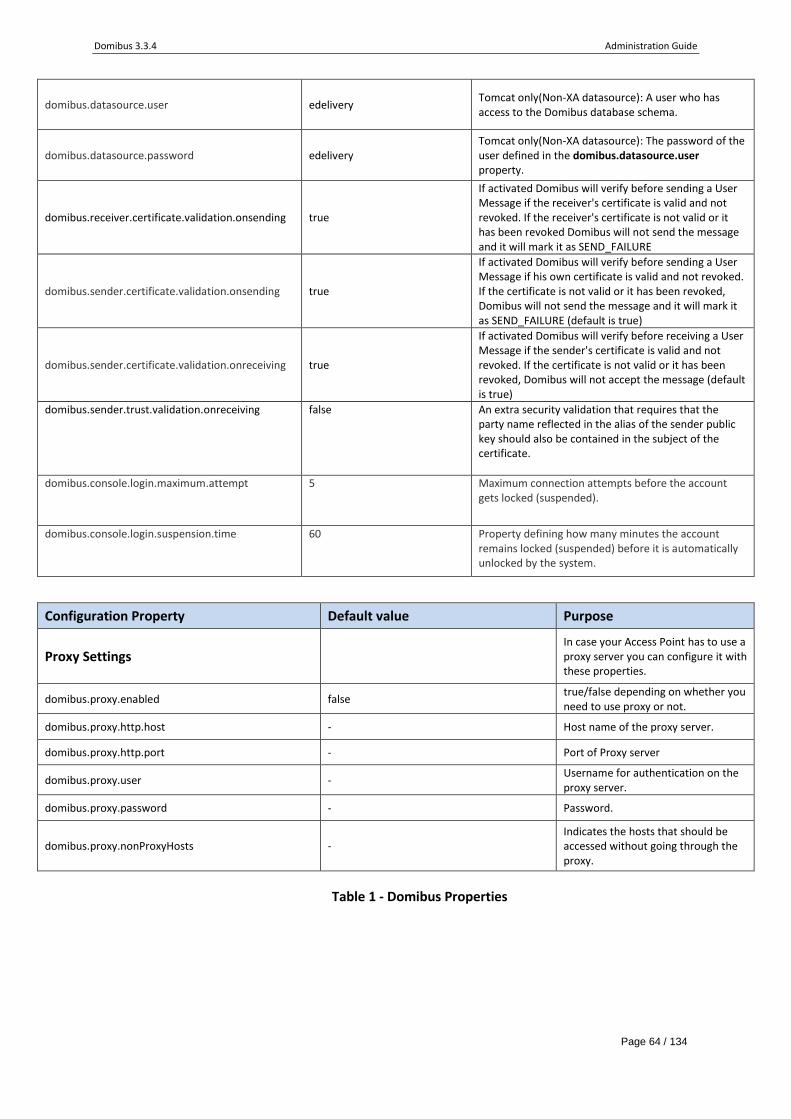
Domibus Properties
The following properties defined in the property file cef_edelivery_pathconfdomibusdomibusproperties can be used to configure Domibus
Configuration Property Default value Purpose
domibusmshmessageidsuffix domibuseu
This Property is used to generate the random Message id with a fixed suffix which is set by default to domibuseu The resulting format will be UUID$domibusmshmessageidsuffix This property is mandatory
domibusmshretrycron 05 It is the retry cron job to send the messages It is set by default to every 5 seconds This property is mandatory
Domibus 334 Administration Guide
Page 59 134
domibusdispatchebmserrorunrecoverableretry true This property should be set to true if Domibus needs to retry sending the failed messages This property is mandatory
domibussmlzone accedeliverytecheceuropaeu Set the SMLZone if Domibus needs to be used under Dynamic discovery model This property is only mandatory if an SML is used
domibusdynamicdiscoveryclientspecification OASIS
The property specifies the dynamic discovery client to be used for the dynamic process Possible values OASIS and PEPPOL
domibusdynamicdiscoverypeppolclientmode TEST
This information is passed to the PEPPOL client that requires to know if the usage is in PRODUCTION or TEST mode
Apart from validating response of signer certificates against the truststore the Oasis Dynamic Discovery Client gives the possibility to add (optional) a regular expression to validate any certificate metadata related to the subject of the signer certificate
Example domibusdynamicdiscoveryoasisclientregexCertificateSubjectValidation=^EHEALTH_SMP$
domibusdynamicdiscoverypartyidresponderrole
The role of the responder PartyId may be defined here (default values are urnfdcpeppoleu2017rolesapas4 for PEPPOL and httpdocsoasis-openorgebxml-msgebmsv30nscore200704responder for OASIS
The type of the PartyId may be defined here (default values are urnfdcpeppoleu2017identifiersap for PEPPOL and urnoasisnamestcebcorepartyid-typeunregistered for OASIS)
domibusbackendjmsInQueue domibusbackendjmsinQueue This queue is the entry point for messages to be sent by the sending MSH This property is only mandatory if the JMS plugin is used
domibusjmsqueuepull domibusinternalpullqueue Domibus internal queue used for dispatching the pull requests
domibusdeploymentclustered false If true the quartz scheduler jobs are clustered This property is mandatory it should be set to true if the deployment of Domibus is done in a cluster
messageFactoryClass
The factory for creating SOAPMessage objects Default values - TomcatWebLogic comsunxmlinternalmessagingsaajsoapver1_2SOAPMessageFactory1_2Impl - WildFly comsunxmlmessagingsaajsoapver1_2SOAPMessageFactory1_2Impl
domibusdispatcherallowChunking true Allows chunking when sending messages to other Access Points
domibusdispatcherchunkingThreshold 104857600
If domibusdispatcherallowChunking is true this property sets the threshold at which messages start getting chunked(in bytes) Messages under this limit do not get chunked Defaults to 100 MB
domibusdispatcherconcurency 5-20
Specify concurrency limits via a lower-upper String eg 5-10 or a simple upper limit String eg 10 (the lower limit will be 1 in this case) when sending messages to other Access Points
Domibus 334 Administration Guide
Page 60 134
domibusmshpullcron 0 0 01 Cron expression used for configuring the message puller scheduling
domibuspullqueueconcurency
1-1 Number of threads used to parallelize the pull requests
domibuspullrequestsendperjobcycle 1 Number of pull requests executed every cron cycle
domibusretentionWorkercronExpression 060 Cron expression used for configuring the retention worker scheduling The retention worker deletes the expired messages (downloaded and not-downloaded)
messageretentiondownloadedmaxdelete 50 This property is used to tweak the maximum downloaded messages to be deleted by the retention worker
messageretentionnot_downloadedmaxdelete 50 This property is used to tweak the maximum not-downloaded messages to be deleted by the retention worker
domibusattachmentstoragelocation -
It is possible to configure Domibus to save the message payloads on the file system instead of the database This setting is recommended when exchanging payloads bigger than 30MB In order to enable the file system storage please add the following property domibusattachmentstoragelocation= your_file_system_location where your_file_system_location is the location on the file system where the payloads will be saved Remark In a cluster configuration the file system storage needs to be accessible by all the nodes from the cluster
domibustaskExecutorthreadCount 50 Tomcat only customize the task executor threads count
domibusjmxuser jmsManager WebLogic specific the user that will be used to access the queues via JMX
domibusjmxpassword jms_Manager1 WebLogic specific the associated password of the configured domibusjmxuser
domibussendMessagemessageIdPattern ^[x20-x7E]$
When an initiator backend client submits messages to Domibus for transmission with the message id field populated then the message id should be RFC2822 compliant The pattern specified here ensures this validation This field is optional In case the existing client does not match this message id pattern during submission then this property can be omitted to skip the validation
Domibus 334 Administration Guide
Page 61 134
domibuslistPendingMessagesmaxCount 500
This property specifies the maximum number of messages that would be served when the listPendingMessages operation is invoked Setting this property is expected to avoid timeouts due to huge resultsets being served A value of 0 would return all the pending messages This property is optional Omitting this property would default the resultset size to 500 Note For Tomcat server the maximum number of shown messages in queue monitoring is defined by the lsquodomibuslistPendingMessagesmaxCountrsquo property
domibusfourcornermodelenabled true
This property affects the GUI search and behaviour If the property is set to false Final Recipient and Original Sender criteria disappear from Messages Filter Messages column picker and from Message details in the GUI The internal SQL queries for User and Signal Message do not use TB_PROPERTYNAME = finalRecipient and originalSender anymore
domibusdispatcherconnectionTimeout 240000
For connection between the access points ndash C2 amp C3 Specifies the amount of time in milliseconds that the consumer will attempt to establish a connection before it times out 0 is infinite
domibusdispatcherreceiveTimeout 240000 For connection between the access points ndash C2 amp C3 Specifies the amount of time in milliseconds that the consumer will wait for a response before it times out 0 is infinite
domibusmshretrytolerance
10800000
Timeout tolerance for retry messages (in miliseconds) Scheduled retries that due to any reason were not performed within this period will be timeout
domibussendMessagefailuredeletepayload
false Whether to delete the message payload or send failure Defaults to false (the admin could put the message back in the send queue)
domibusauthunsecureLoginAllowed true The property specifies if authentication is required or not
domibuspmodedaoimplementation
CachingPModeProvider Internal configuration provider for managing the PMode access
Tomcat only The configuration file of the embedded ActiveMQ broker In case an external broker is used this property is not needed and it should be deleted from the property file
Tomcat only(XA datasource) The fully qualified underlying XADataSource class name
domibusdatasourcexamaxLifetime 60 Tomcat only(XA datasource) Sets the maximum amount of seconds that a connection is kept in the pool before it is destroyed automatically
domibusdatasourcexaminPoolSize 5
Tomcat only(XA datasource) Sets the minimum pool size The amount of pooled connections will not go below this value The pool will open this amount of connections during initialization
domibusdatasourcexamaxPoolSize 100 Tomcat only(XA datasource) Sets the maximum pool size The amount of pooled connections will not go above this value
domibusdatabaseserverName localhost Tomcat only(XA datasource) The host name or the IP address of the database server
domibusdatabaseport 3306 Tomcat only(XA datasource) The port number of the database server
domibusdatasourcexapropertyuser edelivery Tomcat only(XA datasource) A user who has access to the Domibus database schema
domibusdatasourcexapropertypassword edelivery Tomcat only(XA datasource) The password of the user defined in the domibusdatasourcexapropertyuser property
If activated Domibus will verify before sending a User Message if the receivers certificate is valid and not revoked If the receivers certificate is not valid or it has been revoked Domibus will not send the message and it will mark it as SEND_FAILURE
domibussendercertificatevalidationonsending true
If activated Domibus will verify before sending a User Message if his own certificate is valid and not revoked If the certificate is not valid or it has been revoked Domibus will not send the message and it will mark it as SEND_FAILURE (default is true)
If activated Domibus will verify before receiving a User Message if the senders certificate is valid and not revoked If the certificate is not valid or it has been revoked Domibus will not accept the message (default is true)
domibussendertrustvalidationonreceiving false An extra security validation that requires that the party name reflected in the alias of the sender public key should also be contained in the subject of the certificate
domibusconsoleloginmaximumattempt
5 Maximum connection attempts before the account gets locked (suspended)
domibusconsoleloginsuspensiontime 60 Property defining how many minutes the account remains locked (suspended) before it is automatically unlocked by the system
Configuration Property Default value Purpose
Proxy Settings In case your Access Point has to use a proxy server you can configure it with these properties
domibusproxyenabled false truefalse depending on whether you need to use proxy or not
domibusproxyhttphost - Host name of the proxy server
domibusproxyhttpport - Port of Proxy server
domibusproxyuser - Username for authentication on the proxy server
domibusproxypassword - Password
domibusproxynonProxyHosts - Indicates the hosts that should be accessed without going through the proxy
Table 1 - Domibus Properties
Domibus 334 Administration Guide
Page 65 134
PLUGIN MANAGEMENT
This section describes the different types of plugins and their registration process
Default Plugins
Domibus comes with three default plugins The three Interface Control Documents (ICD) describe these three plugins (JMS WS and File System Plugin) (cf[REF6])
611 JMS Plugin
For the JMS plugin you will have to use the following resources (see section sect 31- Binaries repository for the download location)
domibus-distribution-XYZ-default-jms-pluginzip
612 WS Plugin
For the WS plugin you will have to use the following resources (see section sect31-Binaries repository for the download location)
domibus-distribution-XYZ-default-ws-pluginzip
6121 Domibus authentication
The default web service plugin includes an example of how to implement authentication and
authorization By default this feature is disabled to insure backwards compatibility with older
versions of Domibus
The documentation below answers the question how to enable and use the authentication in the
WS plugin
The default WS plugin supports
- Basic Authentication
- X509 Certificates Authentication
- Blue Coat Authentication
Remark
Blue Coat is the name of the reverse proxy at the Commission It forwards the request in HTTP
with the certificate details inside the request (ldquoClient-Certrdquo header key)
When more than one authentication method is used the Basic Authentication takes precedence on
both http and https
When no Basic Authentication is provided X509 certificates are expected on https requests
When no Basic Authentication is provided Blue Coat certificates are expected on http requests
Domibus 334 Administration Guide
Page 66 134
6122 Domibus Authorization
For convenience the WS plugin uses exactly the same database as configured for Domibus core to
store the userspasswords and certificate ids To learn more about authorization (and
authentication) please refer to the plugin cookbook (cf[REF6])
There are two default users already inserted in the database (make sure you already ran the migration scripts)
admin and user both with 123456 as password
admin has the role ROLE_ADMIN and user has the role ROLE_USER
Roles
ROLE_ADMIN has the permission to call
- submitMessage with any value for originalSender property
- retrieveMessage (any message among messages notified to this plugin)
- listPendingMessages will list all pending messages for this plugin
- getStatus and getMessageErrors
ROLE_USER has the permission to call
- submitMessage with originalSender equal to the originalUser
- retrieveMessage only if finalRecipient equals the originalUser
- listPendingMessages only messages with finalRecipient equal to the origi-nalUser
6123 Enable the authentication in Domibus
To enable the authentication at Domibus level the following steps must be configured
1 In confdomibusdomibusproperties set the property
ldquodomibusauthunsecureLoginAllowedrdquo to false
domibusauthunsecureLoginAllowed=false
2 The application server must be configured to allow https requests and pass the
authentication credentials to Domibus
613 File System Plugin
For the File System plugin you will have to use the following resources (see section sect31-Binaries repository for the download location)
domibus-distribution-XYZ-default-fs-pluginzip
Domibus 334 Administration Guide
Page 67 134
Custom Plugin
Users can develop their own plugins Please refer to the plugin cookbook for more details (cf[REF6])
621 Plugin registration
Remark
Please refer to section 914 - Message Filtering for the routing of the specific plugin after registering the plugin on your specific Application Server
6211 Tomcat
In order to install a custom plugin for Tomcat please follow the steps below
1 Stop Tomcat server
2 Copy the custom plugin jar file to the plugins folder CATALINA_HOMEconfdomibuspluginslib
3 Copy the custom plugin XML configuration file to CATALINA_HOMEconfdomibuspluginsconfig
4 Start Tomcat server
Remark
CATALINA_HOME is the folder where the Tomcat is installed
6212 WebLogic
In order to install a custom plugin for WebLogic please follow the steps below
1 Stop the WebLogic server
2 Copy the custom plugin jar file to the plugins folder DOMAIN_HOMEconfdomibuspluginslib
3 Copy the custom plugin XML configuration file to DOMAIN_HOMEconfdomibuspluginsconfig
4 Start the WebLogic server
Remark
DOMAIN_HOME is the folder corresponding to the WebLogic domain
6213 WildFly
In order to install a custom plugin please follow the steps below
1 Stop the WildFly server
2 Copy the custom plugin jar file to the plugins folder cef_edelivery_path confdomibuspluginslib
3 Copy the custom plugin XML configuration file to cef_edelivery_path confdomibuspluginsconfig
4 Start the WildFly server
Domibus 334 Administration Guide
Page 68 134
PMODE CONFIGURATION
Processing Modes (PModes) are used to configure Access Points The PMode parameters are loaded into the Access Point via an XML file
The features described in the PMode file are Security Reliability Transport Business Collaborations Error Reporting Message Exchange Patterns (MEPs) and Message Partition Channels (MPCs)
As different messages may be subject to various types of processing or as different business domains may have several requirements Access Points commonly support several PModes Some PMode parameters are mandatory others are optional For more information please refer to the Access Point Component Offering Document
Configuration
In Domibus PModes are XML files that you can create or edit You can configure the two files given cef_edelivery_pathconfpmodesdomibus-gw-sample-pmode-party_id_name1xml and cef_edelivery_pathconfpmodesdomibus-gw-sample-pmode-party_id_name2xml
The party_id_name1 value must be replaced with your own party name and the party_id_name2 with your corresponding party name
The party_id must match the alias of the certificate in the keystore and the endpoint must be the external access link to your instance
Remark
This step could be managed by a PMode Configuration Manager known to your Business Owner
If a new participants Access Point is joining your network you need to configure your PMode accordingly and re-upload it like mentioned in sect714 ndash Upload new Configuration
Processing modes (PModes) describe how messages are exchanged between AS4 partners (in this case Access Points blue_gw and red_gw) These files contain the identifiers of each AS4 Access Point (identified as parties in the PMode file below)
Sender and Receiver Identifiers represent the organizations that send and receive the business documents They are both used in the authorization process (PMode) Therefore adding modifying or deleting a participant implies modifying the corresponding PMode files
Here is an example of a PMode XML file
Remark
In this setup we have allowed each party (blue_gw or red_gw) to initiate the process If only blue_gw is supposed to send messages then put only blue_gw in ltinitiatorPartiesgt and red_gw in ltresponderPartiesgt
MPCs - Container which defines the different MPCs (Message Partition Channels)
MPC PMode[1]BusinessInfoMPC The value of this parameter is the identifier of the MPC (Message Partition Channel) to which the message is assigned It maps to the attribute Messaging UserMessage
Message Partition Channel allows the partition of the flow of messages from a Sending MSH to a Receiving MSH into several flows each of which is controlled separately An MPC also allows merging flows from several Sending MSHs into a unique flow that will be treated as such by a Receiving MSH The value of this parameter is the identifier of the MPC to which the message is assigned
MessageRetentionDownloaded - Retention interval for messages already delivered to the backend
Domibus 334 Administration Guide
Page 73 134
MessageRetentionUnDownloaded - Retention interval for messages not yet delivered to the backend
Parties - Container which defines the different PartyIdTypes Party and Endpoint
PartyIdTypes maps to the attribute MessagingUserMessage PartyInfo
Message Unit bundling happens when the Messaging element contains multiple child elements or Units (either User Message Units or Signal Message Units)
Party ID maps to the element MessagingUserMessage PartyInfo
The ebCore Party ID type can simply be used as an identifier format and therefore as a convention for values to be used in configuration and ndash as such ndash does not require any specific solution building block
Endpoint maps to PMode[1]ProtocolAddress
The endpoint is a party attribute that contains the link to the MSH The value of this parameter represents the address (endpoint URL) of the Receiver MSH (or Receiver Party) to which Messages under this PMode leg are to be sent Note that a URL generally determines the transport protocol (eg if the endpoint is an email address then the transport protocol must be SMTP if the address scheme is http then the transport protocol must be HTTP)
AS4 - Container
Reliability [Nonrepudiation] [ReplyPattern]
Nonrepudiation maps to PMode[1]SecuritySendReceiptNonRepudiation ReplyPattern maps to PMode[1]SecuritySendReceiptReplyPattern
PMode[1]SecuritySendReceiptNonRepudiation value = lsquotrue (to be used for non-repudiation of receipt) value = false (to be used simply for reception awareness) PMode[1]SecuritySendReceiptReplyPattern value = lsquoResponsersquo (sending receipts on the HTTP response or back-channel) PMode[1]SecuritySendReceiptReplyPattern value = lsquoCallbackrsquo (sending receipts use a separate connection)
retryTimeout maps to PMode[1]ReceptionAwarenessRetry=true PMode[1]ReceptionAwarenessRetryParameters retryCount maps to PMode[1]ReceptionAwarenessRetryParameters strategy maps to PMode[1]ReceptionAwarenessRetryParameters duplicateDetection maps to PMode[1]ReceptionAwarenessDuplicateDetection
These parameters are stored in a composite string bull retryTimeout defines timeout in seconds bull retryCount is the total number of retries bull strategy defines the frequency of retries The only strategy available as of now is CONSTANT bull duplicateDetection allows to check duplicates when receiving twice the same message The only duplicateDetection available as of now is TRUE
Securities - Container
Security - Container
Policy PMode[1]Security NOT including PMode[1]SecurityX509SignatureAlgorithm
The parameter defines the name of a WS-SecurityPolicy file
This parameter is not supported by WS-SecurityPolicy and therefore it is defined separately
BusinessProcessConfiguration - Container
Agreements maps to ebMessaging UserMessage CollaborationInfo AgreementRef
This OPTIONAL element occurs zero times or once The AgreementRef element is a string that identifies the entity or artifact governing the exchange of messages between the parties
Actions - Container
Action maps to Messaging UserMessage CollaborationInfoAction
This REQUIRED element occurs once The element is a string identifying an operation or an activity within a Service that may support several of these
Services - Container
ServiceTypes Type maps to Messaging UserMessage CollaborationInfo Service[type]
This REQUIRED element occurs once It is a string identifying the service that acts on the message and it is specified by the designer of the service
Domibus 334 Administration Guide
Page 75 134
MEP [Legs] - An ebMS MEP defines a typical choreography of ebMS User Messages which are all related through the use of the referencing feature (RefToMessageId) Each message of an MEP Access Point refers to a previous message of the same Access Point unless it is the first one to occur Messages are associated with a label (eg request reply) that precisely identifies their direction between the parties involved and their role in the choreography
Bindings - Container
Binding - The previous definition of ebMS MEP is quite abstract and ignores any binding consideration to the transport protocol This is intentional so that application level MEPs can be mapped to ebMS MEPs independently from the transport protocol to be used
Roles - Container
Role Maps to PModeInitiatorRole or PModeResponderRole depending on where this is used In ebMS3 message this defines the content of the following element bull For Initiator MessagingUserMessagePartyInfoFromRole bull For Responder MessagingUserMessagePartyInfoToRole
The required role element occurs once and identifies the authorized role (fromAuthorizedRole or toAuthorizedRole) of the Party sending the message (when present as a child of the From element) or receiving the message (when present as a child of the To element) The value of the role element is a non-empty string with a default value of httpdocsoasis-openorgebxml-msgebmsv30nscore200704defaultRole Other possible values are subject to partner agreement
Processes - Container
PayloadProfiles - Container
Payloads - Container
Domibus 334 Administration Guide
Page 76 134
Payload maps to PMode[1]BusinessInfoPayloadProfile
This parameter allows specifying some constraint or profile on the payload It specifies a list of payload parts A payload part is a data structure that consists of five properties
1 name (or Content-ID) that
is the part identifier and
can be used as an index in
the notation
PayloadProfile
2 MIME data type (textxml
applicationpdf etc)
3 name of the applicable
XML Schema file if the
MIME data type is
textxml
4 maximum size in kilobytes
5 Boolean string indicating
whether the part is
expected or optional
within the User message
The message payload(s) must match this profile
ErrorHandlings - Container
ErrorHandling - Container
ErrorAsResponse maps to PMode[1]ErrorHandlingReportAsResponse
This Boolean parameter indicates (if true) that errors generated from receiving a message in error are sent over the back-channel of the underlying protocol associated with the message in error If false such errors are not sent over the back-channel
ProcessErrorNotifyProducer maps to PMode[1]ErrorHandlingReportProcessErrorNotifyProducer
This Boolean parameter indicates whether (if true) the Producer (applicationparty) of a User Message matching this PMode should be notified when an error occurs in the Sending MSH during processing of the User Message to be sent
ProcessErrorNotifyConsumer maps to PMode[1]ErrorHandlingReportProcessErrorNotifyProducer
This Boolean parameter indicates whether (if true) the Consumer (applicationparty) of a User Message matching this PMode should be notified when an error occurs in the Receiving MSH during processing of the received User message
Domibus 334 Administration Guide
Page 77 134
DeliveryFailureNotifyProducer maps to PMode[1]ErrorHandlingReportDeliveryFailuresNotifyProducer
When sending a message with this reliability requirement (Submit invocation) one of the two following outcomes shall occur - The Receiving MSH successfully delivers (Deliver invocation) the message to the Consumer - The Sending MSH notifies (Notify invocation) the Producer of a delivery failure
Legs - Container
Leg - Because messages in the same MEP may be subject to different requirements - eg the reliability security and error reporting of a response may not be the same as for a request ndash the PMode will be divided into legs Each user message label in an ebMS MEP is associated with a PMode leg Each PMode leg has a full set of parameters for the six categories above (except for General Parameters) even though in many cases parameters will have the same value across the MEP legs Signal messages that implement transport channel bindings (such as PullRequest) are also controlled by the same categories of parameters except for BusinessInfo group
Process - In Process everything is plugged together
Table 2 - Domibus PMode configuration to ebMS3 mapping
714 Upload new Configuration
7141 Upload the PMode file
Remark In case of a cluster environment the PMode configuration is replicated automatically on all the nodes
1 To update the PMode configuration andor Truststore connect to the Administration Console using the administrators credentials (by default User = admin Password = 123456) to httplocalhost8080domibus
Remark
It is recommended to change the passwords for the default users See sect91 ndash Administration for further information
Domibus 334 Administration Guide
Page 78 134
2 Click on the PMode menu
Domibus 334 Administration Guide
Page 79 134
3 Press the Upload button
4 Press the Choose File button and navigate to the PMode file select it and click on the Open button (or equivalent) in the standard dialog box
Domibus 334 Administration Guide
Page 80 134
5 Once the file has been selected click OK to upload the PMode xml file
Remark
Every time a PMode is updated the truststore is also reloaded from the filesystem
7142 Upload the Truststore
1 Select the Truststore menu and press the Upload button
Domibus 334 Administration Guide
Page 81 134
2 Navigate to the Truststore and select it by clicking on the Open button (or equivalent) of
the standard file open dialog
3 Once the file has been selected enter the keystore password and click on the OK button
to activate the new truststore jks file
Domibus 334 Administration Guide
Page 82 134
SPECIAL SCENARIO SENDER AND RECEIVER ARE THE SAME
In this special scenario the Sender Access Point acts also as the Receiver Access Point Multiple backends can exchange messages via the same Access Point using the same or different plugins
PMode Configuration
A party (eg blue_gw) which is Sender and Receiver must be defined in both the ltinitiatorPartiesgt
A message that is sent to the same Access Point will have to contain the same party id in both From and To sections Below there is an example of a message sent using the Default WS Plugin
Due to some limitations related to the uniqueness of the message identifier a convention has been defined in this scenario The message ID used for the received message is derived from the message ID used for the sent message with the following rule the suffix _1 is added to the sent message id
Example
sent message ID is ae15851e-78fb-4b51-aac8-333c08c450d6domibus
received message ID is ae15851e-78fb-4b51-aac8-333c08c450d6domibus_1
Domibus 334 Administration Guide
Page 84 134
ADMINISTRATION TOOLS
Administration Console
911 Changing passwords
It is recommended to change the passwords for the default users who are allowed to have access to the Domibus Administration Console mainly admin and user
1 In order to change the password for a user navigate to the Users menu entry to obtain the list of
configured users
2 To edit the user details click on the EDIT icon (in RED) DO NOT click on the BIN icon as this
would DELETE the record
Domibus 334 Administration Guide
Page 85 134
3 In the popup window choose a new password using the rules shown
4 Confirm the password
5 Click on OK
Domibus 334 Administration Guide
Page 86 134
6 When done either click on Save to save the new password or Cancel to leave the password
unchanged
912 User Account Lockout Policy
A user account lockout policy has been implemented on Domibus Admin Console By default if a user tries to log to the Admin Console with a wrong password 5 times in a row his account will be suspended (locked)
You can define in domibusproperties (section 52 Domibus Properties) the number of failed attempts after which a userrsquos account will be locked
By default a user remains suspended during one hour before his account is automatically unlocked and the user can try to log again
If the user wants his account to be unlocked without waiting the default one hour he can ask his administrator to unlock the account To unlock the account the administrator must change the userrsquos status on the Admin Console from ldquoSuspendedrdquo to ldquoActiverdquo
Select the suspended user and click on ldquoEditrdquo
Domibus 334 Administration Guide
Page 87 134
Re-activate the user (unlock it) by checking the ldquoActiverdquo status and confirming with OK
Do not forget to click on Save on the next window and then on Yes to confirm the change
Domibus 334 Administration Guide
Page 88 134
913 Adding new users
1 New users can be added to the existing default users (admin and user) by clicking on New
2 For each new user you must enter a username an email a role and a password
Domibus 334 Administration Guide
Page 89 134
3 Click on OK
4 Again once the user has been created do not forget to click on the Save button on the Users
page to register your changes on the system
914 Message Filtering
Domibus allows the routing of messages to different plugins based on some messages attributes
From initial sender (C1)
To final recipient (C4)
Domibus 334 Administration Guide
Page 90 134
Action defined as Leg in the PMode
Service as defined in the PMode
The following rules apply
Domibus considers the ordered list of filters to route all messages The first filter matching the filter criteria will define the target plugin The order of the plugin is therefore important in the routing process
Note 1 if the filters are all mutually exclusive the order would not matter
Note 2 The Persisted column indicates if the plugin filter configuration has already been saved If a plugin filter configuration has not already been saved the Persisted value is unchecked and an error message is shown on the top of the screen In this case it is strongly recommended to review the filters configuration and save it afterwards
One plugin may be applied to multiple filters This is done by the use of the OR criteria (cf backendWebservice in the example below)
Multiple attributes could also be defined in one filter This is done by the use of the AND criteria (cf the first filter in the example below)
One filter may have no criteria meaning that all messages (not matching previous filters) will be routed to the corresponding plugin automatically As a result subsequent filters will therefore not be considered for any incoming message In the example below the last filter routes all remaining messages to plugin backendWebservice
Domibus 334 Administration Guide
Page 91 134
Figure 9 ndash Message Filter Page
Use the New and Delete buttons to create or delete a filter
As the order matters move up and down actions allow placing each filter in the right order
Cf Move Up and Move Down buttons
After some changes have been applied to the filters the Cancel and Save buttons become active
- Press Cancel to cancel the changes
- Press Save to save the changes and activate them immediately
The console will ask the user to confirm the operation before proceeding
Example of message attributes used for routing and matching the first filter used in the example above
Action TC1Leg1
Service bdxnoprocesstc2
From domibus-blueurnoasisnamestcebcorepartyid-typeunregistered
To domibus-redurnoasisnamestcebcorepartyid-typeunregistered
That information can be found in the incoming message received by Domibus (eg see below)
Domibus administration dashboard includes a message logging page that gives the administrator information related to sent messages received messages and their status (SENT RECEIVED FAILED ACKNOWLEDGEDhellip)
The following state machines illustrate the evolution of the processing of messages according to the encountered events
Figure 10 - State machine of Corner 2 (sending access point)
Figure 11 - State machine of Corner 3 (receiving access point)
REJECTED
RECEIVED_WITH_WARNING
RECEIVED
DELETEDDOWNLOADED
[ebMS3 error receipt with severity FAILURE]
[ebMS3 error receipt with severity WARNING]
[ebMS3 receipt SUCCESS]
[Undownloaded retention period expired]
[C4 downloads message] [Download retention period expired]
[C4 downloads message] [Undownloaded retention period expired]
Domibus 334 Administration Guide
Page 93 134
Figure 12 - Domibus Message Log
Remark The administration dashboard is reachable via the following URLs httpyour_serveryour_port_numberdomibus (Tomcat) httpyour_serveryour_port_numberdomibus-wildfly (WildFly) httpyour_serveryour_port_numberdomibus-weblogic (WebLogic)
Application Logging
931 Domibus log files
Domibus has three log files
1 domibus-securitylog this log file contains all the security related information For example you can find information about the clients who connect to the application
2 domibus-businesslog this log file contains all the business related information For example when a message is sent or received etc
3 domibuslog this log file contains both the security and business logs plus miscellaneous logs like debug information logs from one of the framework used by the application etc
932 Logging properties
It is possible to modify the configuration of the logs by editing the logging properties file cef_edelivery_pathconfdomibuslogbackxml
Domibus 334 Administration Guide
Page 94 134
933 Error Log page
To go to the error log page of the Domibus Admin Console click on the Error log menu entry
This option lists all the Message Transfers error logs and includes the ErrorSignalMessageId ErrorDetail and Timestamp You can sort messages by using the up or down arrow to search for a specific message
Figure 13 - Domibus ndash Error Log page
Queue Monitoring
Domibus uses JMS queues to handle the messages
Domibus 334 Administration Guide
Page 95 134
Destination type
JNDI name Comment Description
Queue jmsdomibusinternaldispatchqueue No redelivery because redelivery of MSH messages is handled via ebMS3AS4
This queue is used for scheduling messages for sending via the MSH
Queue jmsdomibusinternalnotificationunknown Notifications about received messages (by the MSH) that do not match any backend routing criteria will be sent to this queue In production environment this queue should be monitored in order to handle those messages manually
Topic jmsdomibusinternalcommand This topic is used for sending commands to all nodes in a cluster For example it is used after a PMode was uploaded in order to notify all nodes to update their PMode cache (in case caching is enabled)
Queue jmsdomibusbackendjmsreplyQueue This queue is used for sending replies back to the sender of a message Replies contain a correlationId ebMS3 messageId (if possible) error messages (if available)
Queue jmsdomibusbackendjmsoutQueue Messages received by the MSH (that match the routing criteria for the JMS plugin) will be sent to this queue
Queue jmsdomibusbackendjmsinQueue This queue is the entry point for messages to be sent by the sending MSH
Queue jmsdomibusbackendjmserrorNotifyConsumer This queue is used to inform the receiver of a message that an error occurred during the processing of a received message
Queue jmsdomibusbackendjmserrorNotifyProducer This queue is used to inform the sender of a message that an error occurred during the processing of a message to be sent
Domibus 334 Administration Guide
Page 96 134
Queue jmsdomibusnotificationjms
Used for sending notifications to the configured JMS plugin
Queue jmsdomibusinternalnotificationqueue
This queue is used to notify the configured plugin about the status of the message to be sent
Queue jmsdomibusnotificationwebservice Used for sending notifications to the configured WS plugin
Queue jmsdomibusDLQ This is the Dead Letter Queue of the application The messages from other queues that reached the retry limit are redirected to this queue
Table 3 - Queue Monitoring
All these queues can be monitored and managed using the JMS Monitoring page which is accessible from the JMS Monitoring menu of the administration console
Warning For Tomcat server the maximum number of shown messages in the queue monitoring is defined by the lsquodomibuslistPendingMessagesmaxCountrsquo property In the Source field we have all the queues listed along with the number of messages pending in each queue
Domibus 334 Administration Guide
Page 97 134
If a queue is used internally by the application core its name will start with [internal] A regular expression is used to identify all the internal queues The value for this regular expression can be adapted in the domibusjmsinternalQueueexpression property from the
In the JMS Monitoring page the following operations can be performed
1 Inspecting and filtering the messages from a queue based on the following fields
a Signal Message id identifier of an error signal message
b Message id identifier of a message
c Error detail text of the error (full)
d AP Role role of the AP
e Error Code structured code of the error
f Source the source queue of the messages
g Error or Notified Time Period time interval that will filter the messages based on the
send dates
h JMS type the JMS header JMSType
i Selector the JMS message selector expression
Remark For more information on the JMS message headers and the JMS message selector please check the official documentation at httpsdocsoraclecomcdE19798-01821-1841bncesindexhtml
Domibus 334 Administration Guide
Page 98 134
2 Move a message
a Move the message from the DLQ to the original queue
- Select the JMS message from the DLQ and press the Move icon (in RED marker)
- Select the original queue from the Destination dropdown list in the dialog box
- Press the Ok button in the dialog and the message will be moved to the original
queue
Note the details of a message can be viewed by selecting it (double-clicking) from the message list
Domibus 334 Administration Guide
Page 99 134
Click Close to exit the dialog box
b Move multiple messages from the DLQ to the original queue
- Select multiple JMS messages from the DLQ and press the Move icon button
- Select the original queue from the Destination dropdown list and click Ok
Domibus 334 Administration Guide
Page 100 134
Remark
Please make sure that all the selected messages came from the same source queue Use the filtering capabilities to ensure this
3 Delete message(s)
a Delete one or more messages from one queue
- Select one or several JMS messages from the source queue and press the Delete
button
Domibus 334 Administration Guide
Page 101 134
- By clicking the Delete button the selected messages are removed from the screen
but you still have to confirm your changes by clicking on the Save button As long as
you have not clicked on the Save button your changes are not taken into account in
the system
- To cancel the changes you made click on the Cancel button instead
Domibus 334 Administration Guide
Page 102 134
Configuration of the queues
Queues should be configured appropriately and according to the backend system needs and re-delivery policy
951 Tomcat
Domibus uses ActiveMQ as JMS broker The various queues are configured in the cef_edelivery_pathconfdomibusinternalactivemqxml file
Please see ActiveMQ redelivery policy and configure the parameters below if needed
Access to the JMS messaging subsystem is protected by a username and a password in clear text defined in the Domibus properties file cef_edelivery_pathconfdomibusdomibusproperties
It is recommended to change the password for the default user
The user (activeMQusername) and the password (activeMQpassword) defined in the domibusproperties file are referenced in the authentication section of the activemqxml file provided
952 WebLogic
Please use the admin console of WebLogic to configure the re-delivery limit and delay if necessary
953 WildFly
Please use the admin console of WildFly to configure the re-delivery limit and delay if necessary
Domibus 334 Administration Guide
Page 104 134
LARGE FILES SUPPORT
Domibus supports transfers between Access Points of files up to 2 GB using Java 8 In order to compute the message signature Domibus loads the whole message into memory using a byte array In Java byte arrays can hold a maximum of 2 GB hence the Domibus limitation of 2 GB
If Domibus is started using Java 7 the limitation is 1 GB due to a limitation in Java 7 version
In order to optimize the sending of such large files HTTP chunking is activated by default in the connection with the receiver Access Points As chunked encoding is useful when sending larger amounts of data but decreases the performance on smaller amounts Domibus uses a threshold to activate the chunking when appropriate only
The following properties are used to configure chunking domibusdispatcherallowChunking and domibusdispatcherchunkingThreshold For more information about these properties please refer to the section 52 Domibus Properties
Domibus 334 Administration Guide
Page 105 134
DATA ARCHIVING
Whats archiving
Data archiving consists of moving messages that have been processed successfully or unsuccessfully by the access point to an external storage location for long-term retention
Archived data consists of older data that have been processed at the communication level by the access points that are still significant to the business and may be needed for future reference They may also be retained for legal constraints
Data archives are indexed and searchable to allow easy retrieval
It is not recommended to use Domibus as an archiving solution Nevertheless if the data really needs to be stored for long periods then it is possible to set the Data Retention Policy to allow it to be extracted from the database through the webservices or through an external archiving tool
Data Retention Policy
A data retention policy is a procedure established by the business for continuous information storage for operational legal or compliance reasons
The data retention policy needs to be defined based on the business needs and constraints
In Domibus the data retention policy can be found in the PMode file
In the above extract of the sample PMode configuration of Domibus the data retention policy is set to 14400 minutes (10 days) if the message is not downloaded This means that if the message is not downloaded it will be deleted and then only the metadata containing the information of the receiver and the acknowledgement will be retained
The data retention policy is set by default to 0 minutes if the message is downloaded This means that the message will be instantaneously deleted as soon as it is downloaded These two parameters retention_downloaded and retention_undownloaded can therefore be modified to meet the needs of the business
Data Extraction
In order to keep the metadata and the payload of the message for a longer period than the one set in the PMode it is recommended to extract it to an external storage As long as the retention worker does not delete it data can be extracted through the webservices or through an external archiving tool
Domibus 334 Administration Guide
Page 106 134
For more information please refer to the Data Model provided in the Domibus Software Architecture Document that can be found on the CEF Digital single web portal [REF6]
Domibus 334 Administration Guide
Page 107 134
NON REPUDIATION
In order to guarantee non-repudiation the sending Access Point (C2) stores the full SignalMessage including the MessageInfo the Receipt (that contains the NonRepudiationInformation for each part) and the signature of the receipt by the receiver Access Point (C3)
This will guarantee that the receiver Access Point (C3) cannot deny having received a message from the sender Access Point (C2) during the sending process However if the initial sender (C1) wants to be sure that the final recipient (C4) cannot deny having received a specific content inside this message then the sender must be able to show the specific content that was used to produce the receiver Access Point (C3) signature
Domibus as a sending Access Point (C2) keeps track of the metadata of the sent messages but does not store the actual message payloads Therefore it is recommended that the initial sender (C1) stores the message payloads safely for the time needed to guarantee non-repudiation of the sent messages
In order to guarantee non-repudiation the receiving Access Point (C3) stores the full UserMessage and the associated signature of the sender (C2)
This will guarantee that the sender Access Point (C2) cannot deny having sent a message to the receiver during the sending process However if the final recipient (C4) wants to be sure that the sender cannot deny having sent a specific content inside this message then the final recipient (C4) must be able to show the specific content that was used to produce the sender Access Point signature (C2)
Domibus as a receiving Access Point (C3) keeps track of the metadata of the received messages and will store the message payloads only for the (limited) duration configured in the retention period (specified in the PMode) Therefore it is recommended that the final recipient (C4) either stores the message payloads safely or aligns the retention period on the receiving Access Point (C3) with the time needed to guarantee non-repudiation of the received messages
Domibus 334 Administration Guide
Page 108 134
TLS CONFIGURATION
TLS Configuration
1311 Transport Layer Security in Domibus
One way of implementing TLS for the eDelivery AS4 profile is to use the TLS in the Domibus Message Handler (MSH) described below otherwise this would have to be handled at a higher level (eg Application Server Proxy etchellip)
To enable secure communication at the transport layer (TLS) between a sending and a receiving MSH (Access Point) both the client and the server need to be configured accordingly
The client is used in the initiator MSH to send the request and is therefore configured via CXF while the server is configured at containerapplication server level
1312 Client side configuration (One Way SSL)
The tlsClientParameters are configured in the cef_edelivery_pathconfdomibusclientauthenticationxml file
Remark your_trustore_ssl is used at the transport layer (SSL) while your_trustore described in sect512 ndash Certificates is used by Domibus to encrypt and sign (WS-Security)
When the clientauthenticationxml file is present and the endpoint of the receiving MSH is https the TLS parameters are added via the CXF framework to the send request
Domibus 334 Administration Guide
Page 109 134
The version of the TLS must be specified by setting secureSocketProtocol=TLSv12
If you use self-signed certificates you need to set disableCNCheck=true
The attribute disableCNCheck specifies whether JSSE should omit checking if the host name specified in the URL matches the host name specified in the Common Name (CN) of the servers certificate The attribute is false by default and must not be set to true during production use (cf[REF7])
Remark
TLSv12 is mandatory for eDelivery AS4 Profile
1313 Client side configuration (Two Way SSL)
The configuration is similar to the one used for One Way SSL except that the tlsClientParameters gets configured with both trustManagers and keystoreManagers The clientauthenticationxml file should look like this
your_trustore_ssl and your_keystore_ssl are used at the transport layer (SSL) while your_trustore and your_keystore described in sect512 ndash Certificates are used by Domibus to encrypt and sign (WS-Security)
Two Way SSL is optional and based on the eDelivery AS4 Profile
1314 Server side configuration
13141 Tomcat 8
In Serverxml add a new connector with the SSLEnabled attribute set to true
The keystore jks location and password must be specified otherwise the default ones will be taken into account
Domibus 334 Administration Guide
Page 110 134
TLS version can also be specified
The above connector has clientAuth=false which means that only the server has to authenticate itself (One Way SSL) To configure Two Way SSL which is optional in the eDelivery AS4 Profile set clientAuth=true in Serverxml and provide the location of the your_truststore_ssljks file so that the server can verify the client
Go to Servers select Server Name Configuration General then click on Client Cert Proxy Enabled
2 Add keystore and truststore
Go to Servers select Server Name Configuration Keystores and SSL tabs and use Custom Identity and Custom Trust then set keystore and trustore jks
To disable basic authentication at WebLogic level
By default WebLogic performs its own basic authentication checks before passing the request to Domibus As we want basic authentication to be performed by Domibus we need to disable it at the application server level
13144 Configure Basic and Certificates authentication in SoapUI
Go to File Preferences HTTP Settings and check the option Adds authentication information to outgoing requests
Domibus 334 Administration Guide
Page 112 134
Go to File Preferences SSL Settings add the KeyStore and KeyStore Password and check the option requires client authentication
To allow Basic Authentication select the Auth tab click Add New Authorization and select Basic Enter user and password (eg Username = admin Password = 123456)
13145 PMode update
If you enable HTTPS then your PMode Configuration Manager needs to make sure that all other endpoint PModes are modified accordingly
With the SSL connector configured as above the MSH endpoint is now httpsyour_domibus_host8443domibusservicesmsh
Domibus 334 Administration Guide
Page 113 134
After the updates upload the PModes via the Admin Console
In a dynamic discovery setup the sender andor the receiver parties and their capabilities are not configured in advance
The sending Access Point will dynamically retrieve the necessary information for setting up an interoperability process from the Service Metadata Publisher (SMP) The SMP stores the interoperability metadata which is a set of information on the recipient or end entity (its identifier supported business documents and processes) and AP (metadata which includes technical configuration information on the receiving endpoint such as the transport protocol and its address) cf[REF8]
The receiving AP registers its metadata in the SMP and configures the PMode to be able to accept messages from trusted senders that are not previously configured in the PMode The receiving AP will have to configure one process in its PMode for each SMP entry
The mapping between the PMode process and the SMP entry is defined in sect143 ndash PMode configuration for PEPPOL and sect148 - ndash PMode configuration for OASIS
Please note that the sender does not have to be registered in the SMP and the receiver merely extracts its identifier from the received message
The following sections describe how to configure Domibus AP in order to use Dynamic Discovery (sect143 ndash PMode configuration for PEPPOL sect144 ndash Policy and certificates for PEPPOL sect148 ndash PMode configuration for OASIS sect149 ndash Policy and certificates for OASIS)
Domibus configuration for PEPPOL
To enable the integration with the SMPSML components Domibus requires some changes in the domibusproperties configuration file which include
1 Adding the following properties to enable the usage of the PEPPOL dynamic discovery client
2 Setting the dynamic discovery client to use certificates to access the SMP These certificates are different in TEST and PRODUCTION therefore we need to specify the Mode used by the dynamic discovery client by setting the following property domibusdynamicdiscoverypeppolclientmodegtTEST
3 Setting the domibussmlzone property
4 Configuring the bean pModeProvider with DynamicDiscoveryPModeProvider
Domibus 334 Administration Guide
Page 115 134
PMode configuration for PEPPOL
1431 Sender PMode
In a dynamic discovery process the receiver of the messages is not known beforehand and therefore the PModeResponder parameter SHOULD NOT be set
The dynamic discovery process must include a leg which maps the configured entry (action service and service type ndash see section 145 ndash Message format for PEPPOL) of the Receiver in the SMP
The security policy to be used in the leg is the following (see section sect511 ndash Security Policies for more information)
initiatorRole=defaultInitiatorRole responderRole=defaultResponderRolegt ltinitiatorPartiesgt ltinitiatorParty name=senderaliasgt ltinitiatorPartiesgt lt-- no responderParties element --gt ltlegsgt ltleg name=pushTestcase1tc1Actiongt ltlegsgt ltprocessgt hellip
1432 Receiver PMode
Dynamic discovery configuration of the receiver is similar to the configuration of the sender except that the roles are swapped the sender of the messages is not known beforehand As a consequence the PModeInitiator parameter SHOULD NOT be set
The receiver must include the certificate of the trusted authority(ies) in its truststore It will only accept messages that were signed with certificates issued by the trusted authority(ies) (cf sect18 ndash Annex 1 - Usage of certificates in PEPPOL and OASIS for more information)
Message format for PEPPOL
When dynamic discovery is used the to field should not be statically configured in the PMode (the to field may even be omitted in the message) The lookup is performed by C2 based on the finalRecipient message property
Example of a message using the finalRecipient for dynamic discovery
The Service Metadata Record also provides the receiving ends certificate This certificate can be used to encrypt the message to be sent to the receiver The certificate can also provide the name of the gateway for this PMode by using the Certificates CNAME as the PMode identifier (cf[REF9])
Domibus configuration for OASIS
To enable the integration with the SMPSML components Domibus requires some changes in the domibusproperties configuration file
1 Add the following properties to enable the usage of the OASIS dynamic discovery client
Note this property is not mandatory as it defaults to the above value
2 Set the property domibussmlzone eg ehealthaccedeliverytecheceuropaeu
3 The bean pModeProvider must be configured with DynamicDiscoveryPModeProvider
PMode configuration for OASIS
1481 Sender PMode
In a dynamic discovery process the receiver of the messages is not known beforehand and therefore the PModeResponder parameter SHOULD NOT be set
Domibus 334 Administration Guide
Page 119 134
The dynamic discovery process must include a leg which maps the configured entry (action service and service type ndash cf 145 ndash Message format for PEPPOL) of the Receiver in the SMP
The security policy to be used in the leg is the following (see sect511 ndash Security Policies for more information)
Schema name should be added to action value Eg ehealth-actorid-qnsurnoasisnamesspecificationublschemaxsdCreditNote-2CreditNoteurnwwwcenbii
1482 Receiver PMode
The dynamic discovery configuration of the receiver is similar to the configuration of the sender except that the roles are swapped the sender of the messages is not known beforehand As a consequence the PModeInitiator parameter SHOULD NOT be set
The receiver must include the certificate of the trusted authority(ies) in its truststore It will only accept messages that were signed with certificates issued by the trusted authority(ies)
The sender truststore must include the SMP public certificate This certificate is used by the AP to validate the identity of the used SMP (cf sect18 ndash Annex 1 - Usage of certificates in PEPPOL and OASIS for more information)
Message format for OASIS
When dynamic discovery is used the to field should not be statically configured in the PMode (the to field may even be omitted in the message) The lookup is performed by C2 based on the finalRecipient message property
Note For OASIS clients in the PMode action value the document scheme must be included with the document ID (for PEPPOL client only document ID is needed)
Domibus 334 Administration Guide
Page 121 134
Example of message using the finalRecipient for dynamic discovery
In order to configure message pulling the process section should be configured with mep set to oneway and binding set to pull as shown in the following example
In the case of a pull process the initiatorParties section contains the party that initiate the pull request The responderParties section contains the parties that can be pulled from
In domibusproperties configuration file adapt the following properties to your needs Note that domibusmshpullcron and domibuspullqueueconcurency are mandatory
Cron expression used for configuring the message puller scheduling
domibusmshpullcron=0 0 01
Number of threads used to parallelize the pull requests
domibuspullqueueconcurency=1-1
Number or pull requests executed every cron cycle
domibuspullrequestsendperjobcycle=1
Configuration restriction
A correctly configured one-way pull process should only contain one party configured in the initiatorParties section
Different legConfiguration with the same defaultMpc (highlighted in red in the following configuration) should not be configured in the same pull process or across different pull processes
Domibus 334 Administration Guide
Page 123 134
If those restrictions are not respected the message will not be exchanged and a warning message will detail the configuration problem
SEVERE Exception sending context initialized event to listener instance of class orgspringframeworkwebcontextContextLoaderListener orgspringframeworkbeansfactoryBeanCreationException Error creating bean with name orgspringframeworkschedulingquartzSchedulerFactoryBean0 defined in ServletContext resource [WEB-INFmsh-configxml] Invocation of init method failed nested exception is orgquartzJobPersistenceException Failed to obtain DB connection from datasource springTxDataSourceorgspringframeworkschedulingquartzSchedulerFactoryBean0 comatomikosjdbcAtomikosSQLException Failed to grow the connection pool [See nested exception comatomikosjdbcAtomikosSQLException Failed to grow the connection pool] at orgspringframeworkbeansfactorysupportAbstractAutowireCapableBeanFactoryinitializeBean(AbstractAutowireCapableBeanFactoryjava1578) at orgspringframeworkbeansfactorysupportAbstractAutowireCapableBeanFactorydoCreateBean(AbstractAutowireCapableBeanFactoryjava545) at orgspringframeworkbeansfactorysupportAbstractAutowireCapableBeanFactorycreateBean(AbstractAutowireCapableBeanFactoryjava482) at orgspringframeworkbeansfactorysupportAbstractBeanFactory$1getObject(AbstractBeanFactoryjava305) at orgspringframeworkbeansfactorysupportDefaultSingletonBeanRegistrygetSingleton(DefaultSingletonBeanRegistryjava230) at orgspringframeworkbeansfactorysupportAbstractBeanFactorydoGetBean(AbstractBeanFactoryjava301) SEVERE One or more listeners failed to start Full details will be found in the appropriate container log file May 11 2016 101243 AM orgapachecatalinautilSessionIdGeneratorBase createSecureRandom INFO Creation of SecureRandom instance for session ID generation using [SHA1PRNG] took [13256] milliseconds May 11 2016 101243 AM orgapachecatalinacoreStandardContext startInternal SEVERE Context [domibus] startup failed due to previous errors May 11 2016 101243 AM orgapachecatalinacoreApplicationContext log INFO Closing Spring root WebApplicationContext May 11 2016 101243 AM orgapachecatalinacoreApplicationContext log INFO Shutting down log4j
Solution Setup the password properly in the domibusproperties
Exception sending context initialized event to listener
instance of class
SEVERE Exception sending context initialized event to listener instance of class orgspringframeworkwebcontextContextLoaderListener orgspringframeworkbeansfactoryBeanCreationException Error creating bean with name entityManagerFactory defined in URL [filehomeedeliverydomibusf1confdomibusdomibus-datasourcesxml] Cannot resolve reference to bean domibusJDBC-XADataSource while setting bean
Domibus 334 Administration Guide
Page 125 134
property dataSource nested exception is orgspringframeworkbeansfactoryBeanCreationException Error creating bean with name domibusJDBC-XADataSource defined in URL [filehomeedeliverydomibusf1confdomibusdomibus-datasourcesxml] Invocation of init method failed nested exception is comatomikosjdbcAtomikosSQLException The class commysqljdbcjdbc2optionalMysqlXADataSource specified by property xaDataSourceClassName could not be found in the classpath Please make sure the spelling is correct and that the required jar(s) are in the classpath
Solution Add MySQL connector in domibuslib folder
Neither the JAVA_HOME nor the JRE_HOME environment
variable is defined
Neither the JAVA_HOME nor the JRE_HOME environment variable is defined At least one of these environment variables is needed to run this program
Solution Set JAVA_HOME variable orand JRE_HOME
Cannot access Admin Console
httpyour_serveryour_port_numberdomibus No SEVER errors in logs but no admin option in browser under
Solution Check if the firewall is open for port_no (eg 8080)
Handshake Failure
Full stack trace below
orgapachecxfinterceptorFault Could not write attachments at orgapachecxfinterceptorAttachmentOutInterceptorhandleMessage(AttachmentOutInterceptorjava74) at orgapachecxfphasePhaseInterceptorChaindoIntercept(PhaseInterceptorChainjava308) at orgapachecxfendpointClientImpldoInvoke(ClientImpljava514) at orgapachecxfendpointClientImplinvoke(ClientImpljava423) at orgapachecxfendpointClientImplinvoke(ClientImpljava324) at orgapachecxfendpointClientImplinvoke(ClientImpljava277) at orgapachecxfendpointClientImplinvokeWrapped(ClientImpljava312) at orgapachecxfjaxwsDispatchImplinvoke(DispatchImpljava327) at orgapachecxfjaxwsDispatchImplinvoke(DispatchImpljava246) at eudomibusebms3senderMSHDispatcherdispatch(MSHDispatcherjava126) at eudomibusebms3senderMSHDispatcher$$FastClassBySpringCGLIB$$105974a1invoke(ltgeneratedgt) at orgspringframeworkcglibproxyMethodProxyinvoke(MethodProxyjava204) at orgspringframeworkaopframeworkCglibAopProxy$CglibMethodInvocationinvokeJoinpoint(CglibAopProxyjava717) at orgspringframeworkaopframeworkReflectiveMethodInvocationproceed(ReflectiveMethodInvocationjava157)
Domibus 334 Administration Guide
Page 126 134
at orgspringframeworktransactioninterceptorTransactionInterceptor$1proceedWithInvocation(TransactionInterceptorjava99) at orgspringframeworktransactioninterceptorTransactionAspectSupportinvokeWithinTransaction(TransactionAspectSupportjava281) at orgspringframeworktransactioninterceptorTransactionInterceptorinvoke(TransactionInterceptorjava96) at orgspringframeworkaopframeworkReflectiveMethodInvocationproceed(ReflectiveMethodInvocationjava179) at orgspringframeworkaopframeworkCglibAopProxy$DynamicAdvisedInterceptorintercept(CglibAopProxyjava653) at eudomibusebms3senderMSHDispatcher$$EnhancerBySpringCGLIB$$da53e95adispatch(ltgeneratedgt) at eudomibusebms3senderMessageSendersendUserMessage(MessageSenderjava116) at eudomibusebms3senderMessageSenderonMessage(MessageSenderjava195) at sunreflectNativeMethodAccessorImplinvoke0(Native Method) at sunreflectNativeMethodAccessorImplinvoke(NativeMethodAccessorImpljava57) at sunreflectDelegatingMethodAccessorImplinvoke(DelegatingMethodAccessorImpljava43) at javalangreflectMethodinvoke(Methodjava606) at orgspringframeworkaopsupportAopUtilsinvokeJoinpointUsingReflection(AopUtilsjava302) at orgspringframeworkaopframeworkReflectiveMethodInvocationinvokeJoinpoint(ReflectiveMethodInvocationjava190) at orgspringframeworkaopframeworkReflectiveMethodInvocationproceed(ReflectiveMethodInvocationjava157) at orgspringframeworktransactioninterceptorTransactionInterceptor$1proceedWithInvocation(TransactionInterceptorjava99) at orgspringframeworktransactioninterceptorTransactionAspectSupportinvokeWithinTransaction(TransactionAspectSupportjava281) at orgspringframeworktransactioninterceptorTransactionInterceptorinvoke(TransactionInterceptorjava96) at orgspringframeworkaopframeworkReflectiveMethodInvocationproceed(ReflectiveMethodInvocationjava179) at orgspringframeworkaopframeworkJdkDynamicAopProxyinvoke(JdkDynamicAopProxyjava207) at comsunproxy$Proxy163onMessage(Unknown Source) at orgspringframeworkjmslistenerAbstractMessageListenerContainerdoInvokeListener(AbstractMessageListenerContainerjava746) at orgspringframeworkjmslistenerAbstractMessageListenerContainerinvokeListener(AbstractMessageListenerContainerjava684) at orgspringframeworkjmslistenerAbstractMessageListenerContainerdoExecuteListener(AbstractMessageListenerContainerjava651) at orgspringframeworkjmslistenerAbstractPollingMessageListenerContainerdoReceiveAndExecute(AbstractPollingMessageListenerContainerjava315) at orgspringframeworkjmslistenerAbstractPollingMessageListenerContainerreceiveAndExecute(AbstractPollingMessageListenerContainerjava233) at orgspringframeworkjmslistenerDefaultMessageListenerContainer$AsyncMessageListenerInvokerinvokeListener(DefaultMessageListenerContainerjava1150)
Domibus 334 Administration Guide
Page 127 134
at orgspringframeworkjmslistenerDefaultMessageListenerContainer$AsyncMessageListenerInvokerexecuteOngoingLoop(DefaultMessageListenerContainerjava1142) at orgspringframeworkjmslistenerDefaultMessageListenerContainer$AsyncMessageListenerInvokerrun(DefaultMessageListenerContainerjava1039) at javalangThreadrun(Threadjava745) Caused by javaxnetsslSSLHandshakeException Received fatal alert handshake_failure at sunsecuritysslAlertsgetSSLException(Alertsjava192) at sunsecuritysslAlertsgetSSLException(Alertsjava154) at sunsecuritysslSSLSocketImplrecvAlert(SSLSocketImpljava1979) at sunsecuritysslSSLSocketImplreadRecord(SSLSocketImpljava1086) at sunsecuritysslSSLSocketImplperformInitialHandshake(SSLSocketImpljava1332) at sunsecuritysslSSLSocketImplstartHandshake(SSLSocketImpljava1359) at sunsecuritysslSSLSocketImplstartHandshake(SSLSocketImpljava1343) at sunnetwwwprotocolhttpsHttpsClientafterConnect(HttpsClientjava563) at sunnetwwwprotocolhttpsAbstractDelegateHttpsURLConnectionconnect(AbstractDelegateHttpsURLConnectionjava185) at sunnetwwwprotocolhttpHttpURLConnectiongetOutputStream(HttpURLConnectionjava1092) at sunnetwwwprotocolhttpsHttpsURLConnectionImplgetOutputStream(HttpsURLConnectionImpljava250) at orgapachecxftransporthttpURLConnectionHTTPConduit$URLConnectionWrappedOutputStreamsetupWrappedStream(URLConnectionHTTPConduitjava236) at orgapachecxftransporthttpHTTPConduit$WrappedOutputStreamhandleHeadersTrustCaching(HTTPConduitjava1302) at orgapachecxftransporthttpHTTPConduit$WrappedOutputStreamonFirstWrite(HTTPConduitjava1262) at orgapachecxftransporthttpURLConnectionHTTPConduit$URLConnectionWrappedOutputStreamonFirstWrite(URLConnectionHTTPConduitjava267) at orgapachecxfioAbstractWrappedOutputStreamwrite(AbstractWrappedOutputStreamjava47) at orgapachecxfioAbstractThresholdOutputStreamwrite(AbstractThresholdOutputStreamjava69) at orgapachecxfioAbstractWrappedOutputStreamwrite(AbstractWrappedOutputStreamjava60) at orgapachecxfioCacheAndWriteOutputStreamwrite(CacheAndWriteOutputStreamjava89) at orgapachecxfattachmentAttachmentSerializerwriteProlog(AttachmentSerializerjava172) at orgapachecxfinterceptorAttachmentOutInterceptorhandleMessage(AttachmentOutInterceptorjava72) 43 more
Solution If you receive this error then itrsquos likely that you configured the client with TLSv11 while the server only accepts TLSv12
Domibus 334 Administration Guide
Page 128 134
OPERATIONAL GUIDELINES
In this section you will find some recommendations on how to administer Domibus in an efficient way The following topics are tackled JMS Queue management log management capacity planning database management and the monitoring of message life cycle
JMS Queue Management
Domibus provides following out of the box features to manage the JMS Queues used in Domibus (see also sect94- Queue Monitoring)
Inspecting and filtering the messages from a queue based on the contents of Source Period
JMS Type or Selector
Move message from the DLQ (Dead Letter Queue) to the original Queue
Delete stuck or pending message(s) from Queues
It is recommended to monitor the Queue size and number of messages in the different Queues If some messages are stuck in any of the Queue then alerts must be sent to the Domibus Administrator
Please pay special attention to the deadletter queue (DLQ) Messages stuck in this queue is a signal that there is some issue in Domibus that needs to be analysed and an alert should be sent to the Domibus Administrator
Important
The lsquoListPendingMessagesrsquo operation on WS Plugin browses the JMS queue Max count is limited to destination MaxBrowsePageSize which can be changed via the lsquodomibuslistPendingMessagesmaxCountrsquo Domibus property
If your received messages are not returned by the webservice listPendingMessages method the you should
1 increase the value of the lsquodomibuslistPendingMessagesmaxCountrsquoproperty 2 delete the messages from the domibusnotificationwebservice queue with selector NOTIFICATION_TYPE=MESSAGE_SEND_SUCCESS using JMX tools httpactivemqapacheorghow-can-i-monitor-activemqhtml
Log Management
1721 Log Level
It is recommended that the log level is correctly set in all the environments
The log level should be set to INFODEBUG in all the test environments for de-bugging purpose
The log level should be set to ERRORWARN in production environment (keeping log level to INFO in production environment will degrade the performance of Domibus)
Domibus 334 Administration Guide
Page 129 134
1722 Log Rotation and Archiving
It is recommended that log rotation and archiving logic is implemented
Domibus provides by default log rotation but Domibus administrator should manage Domibus archiving logic
1723 Log Monitoring
It is recommended to monitor continuously Domibus logs It can be done using an automated script which looks for keywords like ERROR WARNING etc and reports all the errors and warnings to the Domibus administrator
Capacity Planning
1731 JVM Memory Management
Hereafter some recommendations
the JVM memory parameters must first be tested in a test environment with the load
expected in production
the JVM parameters ie heap size must be monitored with the help of automated scripts and
any abnormal hikes in heap size must be reported to the administrator
1732 CPU IO operations and Disk Space Monitoring
CPU IO operations and disk space must be continuously monitored using automated scripts Any abnormal hikes must be reported to Domibus administrator and further investigated
Database Management
1741 Database Monitoring
It is important to monitor the database size
The Payload of the message is deleted from the sending Access Point Only the metadata of the message stays in the table The Payload from the receiving Access Point is deleted based on the retention policy defined in the Pmode settings
Domibus uses approximately 40 MB of table space to store the metadata of 1000 messages
1742 Database Archiving
Since the Database contains AS4 receipts that are used for non-repudiation purposes they should be archived before purging the database
The metadata of the database can be purged if it is no longer required
1743 Monitor Message Life Cycle
It is recommended to monitor the message status in the TB_MessageLog table Automated scripts can be used to count different status in the table
Please pay special attention to the following statuses
Domibus 334 Administration Guide
Page 130 134
WAITING_FOR_RETRY this means that there is some issue between C2 and C3 that must be
resolved
SEND_FAILURE this means that that there is some issue between C2 and C3 that must be
resolved
SEND_ENQUEUED this message status is part of the successful message life cycle however
abnormal increase in the count of messages with this status means that there is an issue
Further investigation is recommended
Domibus 334 Administration Guide
Page 131 134
ANNEX 1 - USAGE OF CERTIFICATES IN PEPPOL AND OASIS
C2 C3
Keystore Truststore Keystore Truststore
PEPPOL
Certificate Senders (issued by CA) Empty Receivers CAs
Note
C2 signs the message with its private key
C2 discover C3s public certificate from the SMP
C3 signs the receipt with its private key
The receiver trusts all senders whos certificate were issue dby these CAs
OASIS
Certificate Senders (issued by CA) SMPs Receivers CAs
Note
C2 signs the message with its private key
C2 discover C3s public certificate from the SMP To trust the SMP the sender needs its public certificate
C3 signs the receipt with its private key
The receiver trusts all senders whos certificate were issue dby these CAs
Domibus 334 Administration Guide
Access Point Page 132 134
ANNEX 2 ndash DOCUMENT PARTS
Domibus 334 Administration Guide
Access Point Page 133 134
LIST OF FIGURES
Figure 1 - Diagram representing the Deployment of Domibus in a Cluster on WebLogic 23 Figure 2 - Diagram representing the Deployment of Domibus in a Cluster on Tomcat 39 Figure 3 - Diagram representing the Deployment of Domibus in a Cluster on WildFly 54 Figure 4 - Message Service Handler diagram 57 Figure 5 - PMode view 68
133 21112018 Caroline AEBY Added missing line in Pmode about Pull mode
Domibus 334 Administration Guide
Page 3 134
Table of Contents
INTRODUCTION 7
Purpose 7
References 7
CONVENTIONS 9
Example 1 Sample Oracle Statement 9
Example 2 Sample Configuration file 9
PREREQUISITES 10
Binaries repository 10
DOMIBUS DEPLOYMENT 11
Database Configuration 11
411 MySQL and Oracle Deletion scripts 11
412 MySQL configuration 11
413 Oracle configuration 13
Domibus on WebLogic 1213 13
421 Single Server Deployment 14
422 Clustered Deployment 23
Domibus on Tomcat 34
431 Pre-Configured Single Server Deployment 34
432 Single Server Deployment 37
433 Clustered Deployment 39
Domibus on WildFly 41
441 Pre-Configured Single Server Deployment 41
442 Single Server Deployment 46
443 Clustered Deployment 53
DOMIBUS CONFIGURATION 57
Security Configuration 57
511 Security Policies 57
512 Certificates 57
Domibus Properties 58
PLUGIN MANAGEMENT 65
Default Plugins 65
611 JMS Plugin 65
612 WS Plugin 65
6121 Domibus authentication 65
6122 Domibus Authorization 66
6123 Enable the authentication in Domibus 66
613 File System Plugin 66
Domibus 334 Administration Guide
Page 4 134
Custom Plugin 67
621 Plugin registration 67
6211 Tomcat 67
6212 WebLogic 67
6213 WildFly 67
PMODE CONFIGURATION 68
Configuration 68
711 Adding a new participant 68
712 Sample PMode file 69
713 Domibus PMode configuration to ebMS3 PMode Mapping 72
714 Upload new Configuration 77
7141 Upload the PMode file 77
7142 Upload the Truststore 80
SPECIAL SCENARIO SENDER AND RECEIVER ARE THE SAME 82
PMode Configuration 82
Message structure 82
Message ID convention 83
ADMINISTRATION TOOLS 84
Administration Console 84
911 Changing passwords 84
912 User Account Lockout Policy 86
913 Adding new users 88
914 Message Filtering 89
Message Log 92
Application Logging 93
931 Domibus log files 93
932 Logging properties 93
933 Error Log page 94
Queue Monitoring 94
Configuration of the queues 102
951 Tomcat 102
952 WebLogic 103
953 WildFly 103
LARGE FILES SUPPORT 104
DATA ARCHIVING 105
Whats archiving 105
Data Retention Policy 105
Data Extraction 105
NON REPUDIATION 107
Domibus 334 Administration Guide
Page 5 134
TLS CONFIGURATION 108
TLS Configuration 108
1311 Transport Layer Security in Domibus 108
1312 Client side configuration (One Way SSL) 108
1313 Client side configuration (Two Way SSL) 109
1314 Server side configuration 109
13141 Tomcat 8 109
13142 WebLogic 110
13143 Wildfly 9 110
13144 Configure Basic and Certificates authentication in SoapUI 111
13145 PMode update 112
DYNAMIC DISCOVERY OF UNKNOWN PARTICIPANTS 114
Overview 114
Domibus configuration for PEPPOL 114
PMode configuration for PEPPOL 115
1431 Sender PMode 115
1432 Receiver PMode 116
Policy and certificates for PEPPOL 116
Message format for PEPPOL 116
SMP entry 118
Domibus configuration for OASIS 118
PMode configuration for OASIS 118
1481 Sender PMode 118
1482 Receiver PMode 120
Policy and certificates for OASIS 120
Message format for OASIS 120
MESSAGE PULLING 122
Setup 122
Configuration restriction 122
TROUBLESHOOTING 124
Failed to obtain DB connection from datasource 124
Exception sending context initialized event to listener instance of class 124
Neither the JAVA_HOME nor the JRE_HOME environment variable is defined 125
Cannot access Admin Console 125
Handshake Failure 125
OPERATIONAL GUIDELINES 128
JMS Queue Management 128
Log Management 128
1721 Log Level 128
1722 Log Rotation and Archiving 129
Domibus 334 Administration Guide
Page 6 134
1723 Log Monitoring 129
Capacity Planning 129
1731 JVM Memory Management 129
1732 CPU IO operations and Disk Space Monitoring 129
Database Management 129
1741 Database Monitoring 129
1742 Database Archiving 129
1743 Monitor Message Life Cycle 129
ANNEX 1 - USAGE OF CERTIFICATES IN PEPPOL AND OASIS 131
ANNEX 2 ndash DOCUMENT PARTS 132
LIST OF FIGURES 133
CONTACT INFORMATION 134
Domibus 334 Administration Guide
Page 7 134
INTRODUCTION
This Administration Guide is intended for Server Administrators in charge of installing managing and troubleshooting an eDelivery Access Point
Purpose
The purpose of this guide is to provide detailed information on how to deploy and configure Domibus on WebLogic Tomcat and WildFly with MySQL or Oracle It also provides detailed descriptions of related Security Configurations (Policies Certificates) Message Filtering PMode Configuration Application Monitoring Custom Plugins Registration JMS Monitoring Data Archiving Troubleshooting and TLS Configuration
The commands and configuration files listed in this document usually contain a mix of reserved words (commands instructions and system related special words) and user defined words (chosen by the user) as well as comments and preferred values for certain variables The conventions used in this document to distinguish between them are the followings
To keep this document release agnostic as much as possible the strings x-y-z or xyz are intended to refer to the version of Domibus discussed in this version of the document in the present case Domibus 334
Bold is used for reserved words and commands
Normal italic together with a short description of the argument is used for user-defined names (chosen by you to designate items like users passwords database etc) Normally contains at least 2 words separated by _
Bold and Italic is used for advisable values which can be changed by the user depending on their infrastructure
Comments are sometimes added to describe the purpose of the commands usually enclosed in brackets ()
By default non-OS specific paths will be described using Linux patterns
Example 1 Sample Oracle Statement
create user edelivery_user identified by edelivery_password
grant all privileges to edelivery_user
(Where edelivery_user and edelivery_password are names chosen by the user)
- edelivery_user domibus_schema and edelivery_password are names chosen by the user
- localhost3306 represents hostnameport parameters of the MySQL database)
Domibus 334 Administration Guide
Page 10 134
PREREQUISITES
Please install the following software on the target system For further information and installation details we kindly advise you to refer to the software owners documentation
Java runtime environnement (JRE) version 7 or 8 httpwwworaclecomtechnetworkjavajavasedownloadsindexhtml
One of the supported Database Management Systems
o MySQL 56 or above
o Oracle 10g+
If you dont plan to deploy Domibus according to the Pre-Configured Single Server Deployment method you must also install one of the supported applicationweb servers
o WebLogic 12c
o WildFly 9
o Apache Tomcat 80x
All Domibus installation resources including full distributions and documentation can be found on the Single Web Portal httpseceuropaeucefdigitalwikidisplayCEFDIGITALDomibus
Binaries repository
All the Domibus 334 artefacts can be directly downloaded from the CEF Digital site (cf[REF1])
Domibus 334 Administration Guide
Page 11 134
DOMIBUS DEPLOYMENT
Remark
The variable cef_edelivery_path referring to the folder where the package is installed will be used later in this document
Database Configuration
For this step you will have to use the following resources (see section sect31ndashBinaries repository for the download location)
domibus-distribution-XYZ-sql-scriptszip
411 MySQL and Oracle Deletion scripts
A deletion script for MySQL (mysql5innoDb-334-delete-dbsql) and Oracle (oracle10g-334-delete-dbsql) Domibus DB is available in the domibus-distribution-XYZ-sql-scriptszip
The purpose of the script is to delete all messages within a user defined period to recover disk space The script requires a START_DATE parameter and an END_DATE parameter to be set
The tables affected by the execution of this script are
TB_MESSAGING
TB_ERROR_LOG
TB_PARTY_ID
TB_RECEIPT_DATA
TB_PROPERTY
TB_PART_INFO
TB_RAWENVELOPE_LOG
TB_ERROR
TB_USER_MESSAGE
TB_SIGNAL_MESSAGE
TB_RECEIPT
TB_MESSAGE_INFO
TB_MESSAGE_LOG Any information relevant to a message received or sent during the predefined period will be removed from these tables
In order to execute this script it is advised to use a UI tool such as SQL developer of MySQL workbench Important in order to keep the JMS queues synchronized with the DB data that will be deleted by this script the Domibus Administrator should remove manually the associated JMS messages from the plugin notifications queues
412 MySQL configuration
1 Unzip domibus-distribution-XYZ-sql-scriptszip in cef_edelivery_pathsql-scripts
Domibus 334 Administration Guide
Page 12 134
2 Open a command prompt and navigate to this directory cef_edelivery_pathsql-scripts
3 (Optional) Storing payload messages in a database with size over 30 MB
Domibus can temporarily store the messages in the database They are not deleted before they are successfully transferred to the final recipient (see sect7 ndash PMode Configuration) Therefore it is required to increase the maximum allowed size of packets Update the default properties of myini (Windows) or mycnf (Linux)
o max_allowed_packet property
The maximum size of one packet or any generated or intermediate string or any parameter sent by the mysql_stmt_send_long_data() C API function max_allowed_packet=512M
o innodb_log_file_size property
Size of each log file in a log group You should set the combined size of log files to about 25-100 of your buffer pool size to avoid unneeded buffer pool flush activity on log file overwrite However note that larger logfile size will increase the time needed for the recovery process innodb_log_file_size=5120M
o Restart MySQL service (Windows)
MySQL service
4 (Optional) For storing payload messages in a file system instead of a database see sect52 ndash Domibus Properties)
5 For MySQL 8 and ConnectorJ 80x please set the database timezone One way of setting the timezone is to modify the MySQL myini configuration file by adding the following property with the adjusted timezone It is recommended that the database timezone is the same as the timezone of the machine where Domibus is installed
default-time-zone=+0000
6 Execute the following MySQL commands at the command prompt
Remark
User defined names like root_password domibus_schema etc are in italic as
described in the Convention section
mysql -h localhost -u root_user --password=root_password -e drop schema if exists domibus_schemacreate schema domibus_schemaalter database domibus_schema charset=utf8 collate=utf8_bin create user edelivery_userlocalhost identified by edelivery_passwordgrant all on domibus_schema to edelivery_userlocalhost
Domibus 334 Administration Guide
Page 13 134
The above creates a schema (domibus_schema) and a user (edelivery_user) that have all the privileges on the schema
mysql -h localhost -u root_user --password=root_password domibus_schema lt mysql5innoDb-xyzddl
The above creates the required tables in domibus_schema
Remark
If you are using Windows make sure to have the parent directory of mysqlexe added to your PATH variable
413 Oracle configuration
1 Unzip domibus-distribution-XYZ-sql-scriptszip in cef_edelivery_pathsql-scripts
2 Open a command prompt and navigate to this directory cef_edelivery_pathsql-scripts
3 Open a command line session log in and execute the following commands
sqlplus sys as sysdba (password should be the one assigned during the Oracle installation ) =========================================================================== Once logged in Oracle CREATE USER ltedelivery_usergt IDENTIFIED BY ltedelivery_passwordgt DEFAULT TABLESPACE lttablespacegt QUOTA UNLIMITED ON lttablespacegt GRANT CREATE SESSION TO ltedelivery_usergt GRANT CREATE TABLE TO ltedelivery_usergt GRANT CREATE VIEW TO ltedelivery_usergt GRANT CREATE SEQUENCE TO ltedelivery_usergt GRANT EXECUTE ON DBMS_XA TO ltedelivery_usergt GRANT SELECT ON PENDING_TRANS$ TO ltedelivery_usergt GRANT SELECT ON DBA_2PC_PENDING TO ltedelivery_usergt GRANT SELECT ON DBA_PENDING_TRANSACTIONS TO ltedelivery_usergt CONNECT ltedelivery_usergt SHOW USER (should return edelivery_user) oracle10g-xyzddl EXIT ===========================================================================
Domibus on WebLogic 1213
This section does not include the installation of WebLogic server 1213 It is assumed that the WebLogic Server is installed and a Domain is created Hereafter the domain location will be referred as DOMAIN_HOME (user defined name)
Domibus 334 Administration Guide
Page 14 134
Remark
The Apache CXF library referred by Domibus internally uses the environment variable javaiotmpdir to buffer large attachments received If the property javaiotmpdir is not specified then by default this points to the ltWeblogic_domain_directorygt It is recommended to point this to a local directory _tmp on each managed server and accessible by the Weblogic application server The disk space allocated for _tmp directory would depend on the size of attachments received On production environment it is recommended to provide 100GB for _tmp
421 Single Server Deployment
For this step you will have to use the following resources (see section sect31ndashBinaries repository for the download location)
1 Download and unzip domibus-distribution- XYZ-weblogic-configurationzip in the directory DOMAIN_HOMEconfdomibus
2 Download and unzip domibus-distribution- XYZ-weblogic-warzip in a temporary folder to prepare it for deployment
3 Configure your Keystore based on section sect512 ndash Certificates
4 Add the following lines in
o For Windows DOMAIN_HOMEbinsetDomainEnvcmd
Locate the set DOMAIN_HOME statement and add the following lines after
hellip set DOMAIN_HOME Added for Domibus
Domibus 334 Administration Guide
Page 15 134
set EXTRA_JAVA_PROPERTIES=EXTRA_JAVA_PROPERTIES -Ddomibusconfiglocation=DOMAIN_HOMEconfDomibus -Djavaiotmpdir=ltpath to _tmp directorygt hellip
o For Linux DOMAIN_HOMEbinsetDomainEnvsh
Locate the export DOMAIN_HOME statement and add the following lines after
hellip export DOMAIN_HOME Added for Domibus EXTRA_JAVA_PROPERTIES=$EXTRA_JAVA_PROPERTIES -Ddomibusconfiglocation=$DOMAIN_HOMEconfdomibus -Djavaiotmpdir=ltpath to _tmp directorygt export EXTRA_JAVA_PROPERTIES hellip
5 Run the WebLogic Scripting Tool (WLST) in order to create the JMS resources and the Database datasources from the command line
o Download the WLST Package from following location httpseceuropaeucefdigitalartifactcontentrepositorieseDeliveryeueuropaecdigitipciswslt-api191wslt-api-191zip
o Configure the WSLT API tool
Unzip the wslt-api-191zip
Define the WL_HOME as a system environment variable to point to the WebLogic lsquowlserverrsquo directory as defined in the DOMAIN_HOMEbinsetDomainEnv[cmd|sh]
eg WL_HOME=wls12130wlserver
o Take the script WeblogicSingleServerproperties from domibus-distribution-XYZ-weblogic-configurationzip under the scripts directory and copy the WeblogicSingleServerproperties file into the wslt-api-191 directory and adapt the following properties
Adapt the properties for connecting to the WebLogic domain
MySQL configuration is commented by default To enable MySQL remove the comment () from the lines below Dont forget to add the comment () for Oracle to disable it
o Start the WebLogic domain from within DOMAIN_HOME
For Windows startWebLogiccmd
For Linux startWebLogicsh
o Execute the following command from within the wlstapi-191bin directory
For Windows wlstapicmd scriptsimportpy --property WeblogicSingleServerproperties
For Linux wlstapish scriptsimportpy --property WeblogicSingleServerproperties
Expected result
6 Activate the use of the authorization providers to protect the JMX access
7 The database dialect is pre-configured to use the Oracle database If you are using a MySQL database you should adapt the following properties in ltDOMAIN_HOMEgtconfdomibusdomibusproperties as highlighted in the example below
8 Install the WS Plugin For more details see section sect6212 ndash WebLogic
9 Deploy domibus-distribution-XYZ-weblogicwar
o Click on Install
o Navigate to the location of the war file and click Next
Domibus 334 Administration Guide
Page 20 134
o Choose Install this deployment as an application and click Next
o Accept the default options and click Next
Domibus 334 Administration Guide
Page 21 134
o Select the following option and click Finish
Domibus 334 Administration Guide
Page 22 134
o Here is an overview of the resulting settings you can now click on the Save button
The expected positive response to the deployment request should be the following
10 Verify the installation by navigating with your browser to httplocalhost7001domibus-weblogic if you can access the page it means the deployment was successful
(By default User = admin Password = 123456)
Remark
It is recommended to change the passwords for the default users (See sect91 ndash Administration for further information)
Domibus 334 Administration Guide
Page 23 134
Expected result
422 Clustered Deployment
Figure 1 - Diagram representing the Deployment of Domibus in a Cluster on WebLogic
Domibus 334 Administration Guide
Page 24 134
Remark
In this section we assume that a Domain and a WebLogic Cluster are already setup
For this step you will have to use the following resources (see section sect31ndashBinaries repository for the download location)
1 Download and unzip domibus-distribution- XYZ-weblogic-configurationzip in in a shared location that is accessible by all the nodes from the cluster We will refer to this directory as cef_shared_edelivery_pathDomibus
2 Download and unzip domibus-distribution- XYZ-weblogic-warzip in a temporary folder to prepare it for deployment
3 Configure your Keystore based on section sect512 ndash Certificates
4 Add the following lines in
o For Windows DOMAIN_HOMEbinsetDomainEnvcmd
Locate the set DOMAIN_HOME statement and add the following lines after
hellip set DOMAIN_HOME Added for Domibus set EXTRA_JAVA_PROPERTIES=EXTRA_JAVA_PROPERTIES -Ddomibusconfiglocation=DOMAIN_HOMEconfDomibus -Djavaiotmpdir=ltpath to _tmp directorygt hellip
o For Linux DOMAIN_HOMEbinsetDomainEnvsh
Locate the export DOMAIN_HOME statement and add the following lines after
hellip export DOMAIN_HOME Added for Domibus EXTRA_JAVA_PROPERTIES=$EXTRA_JAVA_PROPERTIES -Ddomibusconfiglocation=$DOMAIN_HOMEconfdomibus -Djavaiotmpdir=ltpath to _tmp directorygt export EXTRA_JAVA_PROPERTIES
Domibus 334 Administration Guide
Page 25 134
hellip
5 Run the WebLogic Scripting Tool (WLST) in order to create the necessary JMS resources and Database datasources from the command line
o Download the WLST Package from the following location httpseceuropaeucefdigitalartifactcontentrepositorieseDeliveryeueuropaecdigitipciswslt-api191wslt-api-191zip
o Configure the WSLT API tool
Unzip the wslt-api-191zip
Define the WL_HOME (SET or export command depending on your operating system) environment variable to point to the WebLogic wlserver directory
eg WL_HOME=wls12130wlserver
o Take the script WeblogicClusterproperties from domibus-distribution-XYZ-weblogic-configurationzip under the scripts directory and copy the WeblogicClusterproperties file into the wslt-api-191 directory and apply the following changes
Adapt the properties for connecting to the WebLogic domain
MySQL configuration is commented by default To enable MySQL remove the comment () from the lines below Dont forget to add the comment () for Oracle to disable it
6 Activate the use of the authorization providers to protect the JMX access
7 The database dialect is pre-configured to use the Oracle database If you are using the MySQL database you should adapt the dialect as highlighted in the text below in ltDOMAIN_HOMEgtconfdomibusdomibusproperties file
8 Install the WS plugin For more details refer to chapter sect6212 ndash WebLogic
9 Deploy domibus-distribution-XYZ-weblogicwar
Domibus 334 Administration Guide
Page 29 134
o Click Install
o Navigate to location DOMAIN_HOMEconfdomibus where the domibus-distribution-XYZ-weblogicwar file has been previously copied
o Select the domibus-distribution-XYZ-weblogicwar file and click Next
o Choose Install this deployment as an application and click Next
Domibus 334 Administration Guide
Page 30 134
o Select your cluster for the deployment target and click Next
Domibus 334 Administration Guide
Page 31 134
o Select the following options and click Next
Domibus 334 Administration Guide
Page 32 134
o Select the following option and click Finish
o Here is an overview of the resulting settings you can now click on the Save button
The expected positive response to the deployment request should be the following
Domibus 334 Administration Guide
Page 33 134
10 Verify the installation by navigating with your browser to httplocalhost7001domibus-weblogic
If you can access the page it means the deployment was successful
(by default user = admin password = 123456)
Remark
It is recommended to change the passwords for the default users (See sect91 ndash Administration for further information)
Expected result
Domibus 334 Administration Guide
Page 34 134
Domibus on Tomcat
Remarks
As Tomcat is not a full Java EE application server and does not offer JMS capabilities by default Domibus uses ActiveMQ as an in-memory JMS broker when deployed on a Tomcat servlet container The configuration for the ActiveMQ JMS broker can be found in cef_edelivery_pathdomibusinternalactivemqxml
The Apache CXF library referred by Domibus internally uses the environment variable javaiotmpdir to buffer large attachments received If the property javaiotmpdir is not specified then by default this points to the ltCATALINA_BASE directorytempgt It is recommended to point this to a local directory _tmp on each managed server and accessible by the Tomcat server The disk space allocated for _tmp directory would depend on the size of attachments received On production environment it is recommended to provide 100GB for _tmp
431 Pre-Configured Single Server Deployment
For this step you will have to use the following resources (see section sect31ndashBinaries repository for the download location)
domibus-distribution-XYZ-tomcat-fullzip
1 Unzip the archive
o Unzip domibus-distribution-XYZ-tomcat-fullzip to a location on your physical machine cef_edelivery_path
2 Prepare the database
o For MySQL database
Add MySQL JDBC driver (available on MySQL official web site cf [REF2]) in the folder cef_edelivery_pathdomibuslib
Remark
The version of the JDBC driver has to be mysql-connector-java-5140jar or higher
Edit the properties file cef_edelivery_pathconfdomibusdomibusproperties and adjust the highlighted parts in the text below according to your environment The properties associated to the database configuration are pre-configured for the MySQL database
---------------------------------- Database --------------------------------- Database server name domibusdatabaseserverName=localhost
Domibus 334 Administration Guide
Page 35 134
Database port domibusdatabaseport=3306 XA properties domibusdatasourcexapropertyuser=edelivery_user domibusdatasourcexapropertypassword=edelivery_password MySQL domibusdatasourcexapropertyurl=jdbcmysql$domibusdatabaseserverName$domibusdatabaseport domibus_schemapinGlobalTxToPhysicalConnection=true Non-XA Datasource domibusdatasourceurl=jdbcmysql$domibusdatabaseserverName$domibusdatabaseportdomibus_schemauseSSL=false domibusdatasourceuser=edelivery_user domibusdatasourcepassword=edelivery_password
o For Oracle database
Add the Oracle JDBC driver (eg ojdbc7jar) (available on the Oracle official web site cf[REF3]) in the cef_edelivery_pathdomibuslib folder
Edit the properties file cef_edelivery_pathconfdomibusdomibusproperties and adjust the highlighted parts in the text below according to your environment
---------------------------------- Database --------------------------------- Database server name domibusdatabaseserverName=localhost Database port domibusdatabaseport=1521 XA Datasource domibusdatasourcexaxaDataSourceClassName=oraclejdbcxaclientOracleXADataSource XA properties domibusdatasourcexapropertyuser=edelivery_user domibusdatasourcexapropertypassword=edelivery_password domibusdatasourcexapropertyurl=jdbcoraclethin$domibusdatabaseserverName$domibusdatabaseport[SID|Service] Non-XA Datasource domibusdatasourcedriverClassName=oraclejdbcOracleDriver domibusdatasourceURL=jdbcoraclethin$domibusdatabaseserverName$domibusdatabaseport[SID|Service] domibusdatasourceuser=edelivery_user domibusdatasourcepassword=edelivery_password
Remark
Configure the database dialect as it is pre-configured for MySQL by default
3 Configure your Keystore based on section sect512 ndash Certificates
4 Set JVM parameters
Domibus expects a single environment variable domibusconfiglocation pointing towards the cef_edelivery_pathconfdomibus folder
You can do this by editing the first command lines of cef_edelivery_pathdomibusbinsetenvbat (Windows) or cef_edelivery_pathdomibusbinsetenvsh (Linux) Set CATALINA_HOME equal to the absolute path of the installation cef_edelivery_pathdomibus
o For Windows edit cef_edelivery_pathdomibusbinsetenvbat by adding the following
hellip
set CATALINA_HOME=cef_edelivery_pathdomibus set CATALINA_TMPDIR=ltpath to _tmp directorygt set JAVA_OPTS=JAVA_OPTS -Dfileencoding=UTF-8 -Xms128m -Xmx1024m -XXPermSize=64m set JAVA_OPTS=JAVA_OPTS -Ddomibusconfiglocation=CATALINA_HOMEconfdomibus hellip
o For Linux edit cef_edelivery_pathdomibusbinsetenvsh by adding the following
cd cef_edelivery_path domibusbinchmod u+x sh startupsh
6 Display the Domibus home page on your browser httplocalhost8080domibus (By default User = admin Password = 123456)
Remark
It is recommended to change the passwords for the default users See sect91 ndash Administration for further information
If you can access the page it means the deployment was successful
Domibus 334 Administration Guide
Page 37 134
Expected result
432 Single Server Deployment
For this step you will have to use the following resources (see sect31ndash Binaries repository for the download location)
domibus-distribution-XYZ-tomcat-configurationzip
domibus-distribution-XYZ-tomcat-warzip
We assume that an Apache Tomcat 80x is already installed and the installation location is now considered as your cef_edelivery_pathdomibus
1 Download and unzip the artefact domibus-distribution-XYZ-tomcat-configurationzip into the
directory cef_edelivery_pathconfdomibus
2 Configure the MySQL or Oracle datasource as indicated in sect431 ndash Pre-Configured Single Server
Deployment
3 Configure your Keystore based on sect512 ndash Certificates
4 Execute step 4 from sect431 ndash Pre-Configured Single Server Deployment
5 If not already present create a folder and name it temp under cef_edelivery_pathconfDomibus
6 Rename domibus-MSH-XYZ-tomcatwar to domibuswar and deploy it to cef_edelivery_pathdomibus webapps
7 Launch the Domibus application
o For Windows
cd cef_edelivery_pathdomibusbin startupbat
o For Linux
Domibus 334 Administration Guide
Page 38 134
cd cef_edelivery_path domibusbin chmod +x sh startupsh
7 Display the Domibus home page on your browser httplocalhost8080domibus (By default User = admin Password = 123456)
Remark
It is recommended to change the passwords for the default users See sect91 ndash Administration for further information
If you can access the page it means the deployment was successful
Expected result
Domibus 334 Administration Guide
Page 39 134
433 Clustered Deployment
Figure 2 - Diagram representing the Deployment of Domibus in a Cluster on Tomcat
Remark
In this section we assume that a JMS Broker and a Loadbalancer are configured separately (eg httpd)
For this step you will have to use the following resources (see sect31ndash Binaries repository for the download location)
domibus-distribution-XYZ-tomcat-fullzip
domibus-distribution-XYZ-tomcat-warzip
1 Follow steps 1 2 3 4 and 5 from the sect432 ndash Single Server Deployment
2 Set the JVM parameters
Domibus expects a single JVM parameter $domibusconfiglocation pointing towards the cef_edelivery_pathconfdomibus folder
You can do this by editing cef_edelivery_pathdomibusbinsetenvbat (Windows) or cef_edelivery_pathdomibusbinsetenvsh (Linux) Set CATALINA_HOME equal to the absolute path of the installation cef_edelivery_pathDomibus
o For Windows edit cef_edelivery_pathdomibusbinsetenvbat by adding the following
Remark
your_node_id refers to the installed node in the cluster which starts normally at 01(then 02 etc)
hellip
set CATALINA_HOME=cef_edelivery_pathdomibus set CATALINA_TMPDIR=ltpath to _tmp directorygt set JAVA_OPTS=JAVA_OPTS -Dfileencoding=UTF-8 -Xms128m -Xmx1024m -XXPermSize=64m set JAVA_OPTS=JAVA_OPTS -Ddomibusconfiglocation=CATALINA_HOMEconfdomibus
Domibus 334 Administration Guide
Page 40 134
set JAVA_OPTS=JAVA_OPTS -Ddomibusnodeid=your_node_id hellip
o For Linux edit cef_edelivery_pathdomibusbinsetenvsh by adding the following
4 Change the following properties related to the Atomikos configuration in parameters in cef_edelivery_pathconfdomibusdomibusproperties
For clustered deployment
Uncomment the following lines comatomikosicatchoutput_dir=$domibusworklocation$domibusconfiglocationworktransactions$domibusnodeid comatomikosicatchlog_base_dir=$domibusworklocation$domibusconfiglocationworktransactions$domibusnodeidlog Comment the following lines comatomikosicatchoutput_dir=$domibusworklocation$domibusconfiglocationworktransactions comatomikosicatchlog_base_dir=$domibusworklocation$domibusconfiglocationworktransactionslog
5 Follow step 6 and 7 from the sect432 ndash Single Server Deployment
Domibus 334 Administration Guide
Page 41 134
Domibus on WildFly
Remark
The Apache CXF library referred by Domibus internally uses the environment variable javaiotmpdir to buffer large attachments received If the property javaiotmpdir is not specified then this defaults to values provided by the operating system to the JRE On UnixLinux systems this usually defaults to tmp On Windows systems this usually defaults to TEMP folder It is recommended to point this to a local directory _tmp on each managed server and accessible by the Wildfly server The disk space allocated for _tmp directory would depend on the size of attachments received On production environment it is recommended to provide 100GB for _tmp
441 Pre-Configured Single Server Deployment
In this section we assume that WildFly is installed at the location cef_edelivery_pathdomibus
For this step you will have to use the following resources (see section sect31ndash Binaries repository for the download location)
domibus-distribution-XYZ-wildfly-fullzip
1 Download and unzip the domibus-distribution-XYZ-wildfly-fullzip archive in your cef_edelivery_path location
2 Configure the MySQL database (Option 1)
o Drivers
Create the directory cef_edelivery_pathdomibusmodulessystemlayersbasecommysqlmain if it does not exist Under this directory
Download the MySQL JDBC driver available on MySQL official web site (cf[REF2]) and copy it in the folder
Remark
The version of the driver has to be mysql-connector-java-5140jar or higher
Create or edit the file cef_edelivery_pathdomibusmodulessystemlayersbasecommysqlmainmodulexml and copy the following module configuration Make sure to put the name of the driver you are using as an argument of resource-root element eg mysql-connector-java-5140jar
Create the directory cef_edelivery_pathdomibusmodulessystemlayersbasecomoraclemain if it does not exist Under this directory
Download and copy the Oracle JDBC driver (eg ojdbc7jar available on the Oracle official web site cf[REF3]) in the folder
Copy the file cef_edelivery_pathdomibusmodulessystemlayersbasecommysqlmainmodulexml in the recently created folder
Domibus 334 Administration Guide
Page 44 134
Edit modulexml by copying the following module configuration Make sure to put the name of the driver you are using as an argument of resource-root element eg ojdbc7jar
Add your DBMS driver metadata to the Drivers section in cef_edelivery_pathdomibusstandaloneconfigurationstandalone-fullxml (only change the items described below while replacing MYSQL configuration in the process)
4 Configure your Keystore based on sect512 ndash Certificates
5 Run the standalone server
o For Windows under cef_edelivery_pathdomibusbin
o standalonebat --server-config=standalone-fullxml
o For Linux under cef_edelivery_pathdomibusbin
o standalonesh --server-config=standalone-fullxml
6 Display the Domibus home page in your browser httplocalhost8080domibus-wildfly (by default User = admin Password = 123456)
Remark
It is recommended to change the passwords for the default users See sect91 ndash Administration for further information
If you can access the page it means the deployment was successful
Domibus 334 Administration Guide
Page 46 134
Expected result
442 Single Server Deployment
In this section we assume that WildFly is installed at the location cef_edelivery_pathdomibus
For this step you will have to use the following resources (see section sect31-Binaries repository for the download location)
domibus-distribution-XYZ-wildfly-warzip
domibus-distribution-XYZ-wildfly-configurationzip
1 Follow steps 2 (MySQL) or 3 (Oracle) from the sect441 ndash Pre-Configured Single Server Deployment
2 Configure the environment variables
For Windows edit cef_edelivery_pathdomibusbinstandaloneconfbat as follows
hellip set JAVA_OPTS=-Xms128M ndashXmx1024M -XXMaxPermSize=256M set JAVA_OPTS=JAVA_OPTS -DjavanetpreferIPv4Stack=true set JAVA_OPTS=JAVA_OPTS -Ddomibusconfiglocation=JBOSS_HOMEconfdomibus -Djavaiotmpdir=ltpath to _tmp directorygt hellip
For UnixLinux edit cef_edelivery_pathdomibusbinstandaloneconf as follows
3 Download and unzip domibus-distribution-XYZ-wildfly-configurationzip in the directory cef_edelivery_pathconfdomibus
4 Configure your Keystore based on sect512 ndash Certificates
5 Configure the JMS resources
Configure the JMS resources in the configuration file cef_edelivery_pathdomibusstandaloneconfigurationstandalone-fullxml by adding the jms-connection-factories and jms-queues
7 Connect to the Admin Console of WildFly at httplocalhost9990console
8 Click on Deployments in the console menu then click on Add
9 Select Upload a new deployment then click Next
10 Browse to the location of the domibus-distribution-XYZ-wildflywar file select it and click Next
Domibus 334 Administration Guide
Page 53 134
11 The deployment is successful when the name of the war file appears in the Deployment column
Expected result
443 Clustered Deployment
For this step you will have to use the following resources (see section sect31ndashBinaries repository for the download location)
domibus-distribution-XYZ-wildfly-configurationzip
domibus-distribution-XYZ-wildfly-warzip
In this section we assume that the setup of Wildfly 9 in domain mode has already been done and that the cluster has been enabled as described in the official documentation For more details on how to perform an installation of Wildfly 9 in domain mode please refer to the official documentation (cf[REF4])
Domibus 334 Administration Guide
Page 54 134
Figure 3 - Diagram representing the Deployment of Domibus in a Cluster on WildFly
In order to install Domibus in a WildFly cluster please follow the steps below
1 Download and unzip domibus-distribution-XYZ-wildfly-configurationzip in a shared location that is accessible by all the nodes from the cluster We will refer to this directory as cef_shared_edelivery_pathDomibus
2 Follow steps 2 (MySQL) or 3 (Oracle) from the sect441 ndash Pre-Configured Single Server Deployment
Remarks
o This step needs to be performed on all the nodes from the cluster o In the following 2 steps we will edit the profile full-ha from the configuration file
domainconfigurationdomainxml located in the master node
3 Configure the JMS queues and topics as indicated in sect442 point 5 ndash Configure the JMS resources
4 Configure the database dialect as indicated in sect441 point 3 ndash Edit the configuration file cef_edelivery_pathconfdomibusdomibusproperties
5 Configure the environment variables as follows
For Windows edit cef_edelivery_pathbindomainconfbat located in each WildFly node The environment variable setting needs to be performed for every node in the cluster
helliphelliphelliphelliphelliphellip set JAVA_OPTS=-Xms128M ndashXmx1024M -XXMaxPermSize=256M set JAVA_OPTS=JAVA_OPTS -DjavanetpreferIPv4Stack=true set JAVA_OPTS=JAVA_OPTS -Ddomibusconfiglocation=JBOSS_HOMEconfdomibus -Djavaiotmpdir=ltpath to _tmp directorygt helliphelliphelliphelliphelliphellip
Domibus 334 Administration Guide
Page 55 134
For UnixLinux edit cef_edelivery_pathbindomainconf located in each WildFly node The environment variable setting needs to be performed for every node in the cluster
bindomainconf is located in each WildFly node The environment variable setting needs to be performed in every node from the cluster
6 Deploy the domibus-distribution-XYZ-wildflywar to the cluster We will use the Wildfly Administration console for performing the deployment We will deploy the application on the other-server-group cluster which is configured step by step in the official documentation (cf[REF4])
Domibus 334 Administration Guide
Page 56 134
Domibus 334 Administration Guide
Page 57 134
DOMIBUS CONFIGURATION
Domibus exposes the Message Service Handler endpoint as servicesmsh Only this endpoint has to be reachable by the other AS4 Access Points and it is typically exposed on the internet
If the Default WS Plugin (sect612 ndash WS Plugin) is deployed Domibus exposes the Default WS Plugin endpoint as servicesbackend This endpoint should ONLY be exposed to the backend client(s) within the trusted zone and it should not be exposed to the internet
Figure 4 - Message Service Handler diagram
Security Configuration
511 Security Policies
The WS-Security policy used by Domibus when exchanging messages can be specified in the PMode configuration file (sect7 ndash PMode Configuration) The recommended security policy is eSensPolicyv20xml it can be found under cef_edelivery_pathconfdomibuspolicieseSensPolicyv20xml
512 Certificates
The certificates that are used for signing and encrypting the messages when communicating with the other Access Points can be configured in the property file located under cef_edelivery_pathconfdomibusdomibusproperties By default Domibus is pre-configured to use self-signed certificates Please note that self-signed certificates should be used only for testing purposes and are not intended for production use In order to configure Domibus to use custom certificates the following properties need to be modified
Domibus 334 Administration Guide
Page 58 134
The location of the keystore domibussecuritykeystorelocation=$domibusconfiglocationkeystoresgateway_keystorejks Type of the used keystore domibussecuritykeystoretype=jks The password used to load the keystore domibussecuritykeystorepassword=test123 Private key The alias from the keystore of the private key domibussecuritykeyprivatealias=blue_gw The private key password domibussecuritykeyprivatepassword=test123 Truststore The location of the truststore domibussecuritytruststorelocation=$domibusconfiglocationkeystoresgateway_truststorejks Type of the used truststore domibussecuritytruststoretype=jks The password used to load the trustStore domibussecuritytruststorepassword=test123
1 Create if not present a folder cef_edelivery_pathconfdomibuskeystores
2 Get your key pair from an external provider (Self-signed certificates should only be used for testing purposes not production) If you are interested in using the CEF Public Key Infrastructure Solution (cf[REF5])
3 Create if not present the public and private keys containers (eg truststorejks and keystorejks)
4 Import your private key into your keystore
Remarks
o Your private key and your keystore should always stay secret Please never share them
o The keystore alias has to be the same as the party ID defined in the sect7 ndash PMode Configuration It is strongly recommended to put your key pair (private and public key) and the public key of the other participants you trust in two separate containers
Domibus Properties
The following properties defined in the property file cef_edelivery_pathconfdomibusdomibusproperties can be used to configure Domibus
Configuration Property Default value Purpose
domibusmshmessageidsuffix domibuseu
This Property is used to generate the random Message id with a fixed suffix which is set by default to domibuseu The resulting format will be UUID$domibusmshmessageidsuffix This property is mandatory
domibusmshretrycron 05 It is the retry cron job to send the messages It is set by default to every 5 seconds This property is mandatory
Domibus 334 Administration Guide
Page 59 134
domibusdispatchebmserrorunrecoverableretry true This property should be set to true if Domibus needs to retry sending the failed messages This property is mandatory
domibussmlzone accedeliverytecheceuropaeu Set the SMLZone if Domibus needs to be used under Dynamic discovery model This property is only mandatory if an SML is used
domibusdynamicdiscoveryclientspecification OASIS
The property specifies the dynamic discovery client to be used for the dynamic process Possible values OASIS and PEPPOL
domibusdynamicdiscoverypeppolclientmode TEST
This information is passed to the PEPPOL client that requires to know if the usage is in PRODUCTION or TEST mode
Apart from validating response of signer certificates against the truststore the Oasis Dynamic Discovery Client gives the possibility to add (optional) a regular expression to validate any certificate metadata related to the subject of the signer certificate
Example domibusdynamicdiscoveryoasisclientregexCertificateSubjectValidation=^EHEALTH_SMP$
domibusdynamicdiscoverypartyidresponderrole
The role of the responder PartyId may be defined here (default values are urnfdcpeppoleu2017rolesapas4 for PEPPOL and httpdocsoasis-openorgebxml-msgebmsv30nscore200704responder for OASIS
The type of the PartyId may be defined here (default values are urnfdcpeppoleu2017identifiersap for PEPPOL and urnoasisnamestcebcorepartyid-typeunregistered for OASIS)
domibusbackendjmsInQueue domibusbackendjmsinQueue This queue is the entry point for messages to be sent by the sending MSH This property is only mandatory if the JMS plugin is used
domibusjmsqueuepull domibusinternalpullqueue Domibus internal queue used for dispatching the pull requests
domibusdeploymentclustered false If true the quartz scheduler jobs are clustered This property is mandatory it should be set to true if the deployment of Domibus is done in a cluster
messageFactoryClass
The factory for creating SOAPMessage objects Default values - TomcatWebLogic comsunxmlinternalmessagingsaajsoapver1_2SOAPMessageFactory1_2Impl - WildFly comsunxmlmessagingsaajsoapver1_2SOAPMessageFactory1_2Impl
domibusdispatcherallowChunking true Allows chunking when sending messages to other Access Points
domibusdispatcherchunkingThreshold 104857600
If domibusdispatcherallowChunking is true this property sets the threshold at which messages start getting chunked(in bytes) Messages under this limit do not get chunked Defaults to 100 MB
domibusdispatcherconcurency 5-20
Specify concurrency limits via a lower-upper String eg 5-10 or a simple upper limit String eg 10 (the lower limit will be 1 in this case) when sending messages to other Access Points
Domibus 334 Administration Guide
Page 60 134
domibusmshpullcron 0 0 01 Cron expression used for configuring the message puller scheduling
domibuspullqueueconcurency
1-1 Number of threads used to parallelize the pull requests
domibuspullrequestsendperjobcycle 1 Number of pull requests executed every cron cycle
domibusretentionWorkercronExpression 060 Cron expression used for configuring the retention worker scheduling The retention worker deletes the expired messages (downloaded and not-downloaded)
messageretentiondownloadedmaxdelete 50 This property is used to tweak the maximum downloaded messages to be deleted by the retention worker
messageretentionnot_downloadedmaxdelete 50 This property is used to tweak the maximum not-downloaded messages to be deleted by the retention worker
domibusattachmentstoragelocation -
It is possible to configure Domibus to save the message payloads on the file system instead of the database This setting is recommended when exchanging payloads bigger than 30MB In order to enable the file system storage please add the following property domibusattachmentstoragelocation= your_file_system_location where your_file_system_location is the location on the file system where the payloads will be saved Remark In a cluster configuration the file system storage needs to be accessible by all the nodes from the cluster
domibustaskExecutorthreadCount 50 Tomcat only customize the task executor threads count
domibusjmxuser jmsManager WebLogic specific the user that will be used to access the queues via JMX
domibusjmxpassword jms_Manager1 WebLogic specific the associated password of the configured domibusjmxuser
domibussendMessagemessageIdPattern ^[x20-x7E]$
When an initiator backend client submits messages to Domibus for transmission with the message id field populated then the message id should be RFC2822 compliant The pattern specified here ensures this validation This field is optional In case the existing client does not match this message id pattern during submission then this property can be omitted to skip the validation
Domibus 334 Administration Guide
Page 61 134
domibuslistPendingMessagesmaxCount 500
This property specifies the maximum number of messages that would be served when the listPendingMessages operation is invoked Setting this property is expected to avoid timeouts due to huge resultsets being served A value of 0 would return all the pending messages This property is optional Omitting this property would default the resultset size to 500 Note For Tomcat server the maximum number of shown messages in queue monitoring is defined by the lsquodomibuslistPendingMessagesmaxCountrsquo property
domibusfourcornermodelenabled true
This property affects the GUI search and behaviour If the property is set to false Final Recipient and Original Sender criteria disappear from Messages Filter Messages column picker and from Message details in the GUI The internal SQL queries for User and Signal Message do not use TB_PROPERTYNAME = finalRecipient and originalSender anymore
domibusdispatcherconnectionTimeout 240000
For connection between the access points ndash C2 amp C3 Specifies the amount of time in milliseconds that the consumer will attempt to establish a connection before it times out 0 is infinite
domibusdispatcherreceiveTimeout 240000 For connection between the access points ndash C2 amp C3 Specifies the amount of time in milliseconds that the consumer will wait for a response before it times out 0 is infinite
domibusmshretrytolerance
10800000
Timeout tolerance for retry messages (in miliseconds) Scheduled retries that due to any reason were not performed within this period will be timeout
domibussendMessagefailuredeletepayload
false Whether to delete the message payload or send failure Defaults to false (the admin could put the message back in the send queue)
domibusauthunsecureLoginAllowed true The property specifies if authentication is required or not
domibuspmodedaoimplementation
CachingPModeProvider Internal configuration provider for managing the PMode access
Tomcat only The configuration file of the embedded ActiveMQ broker In case an external broker is used this property is not needed and it should be deleted from the property file
Tomcat only(XA datasource) The fully qualified underlying XADataSource class name
domibusdatasourcexamaxLifetime 60 Tomcat only(XA datasource) Sets the maximum amount of seconds that a connection is kept in the pool before it is destroyed automatically
domibusdatasourcexaminPoolSize 5
Tomcat only(XA datasource) Sets the minimum pool size The amount of pooled connections will not go below this value The pool will open this amount of connections during initialization
domibusdatasourcexamaxPoolSize 100 Tomcat only(XA datasource) Sets the maximum pool size The amount of pooled connections will not go above this value
domibusdatabaseserverName localhost Tomcat only(XA datasource) The host name or the IP address of the database server
domibusdatabaseport 3306 Tomcat only(XA datasource) The port number of the database server
domibusdatasourcexapropertyuser edelivery Tomcat only(XA datasource) A user who has access to the Domibus database schema
domibusdatasourcexapropertypassword edelivery Tomcat only(XA datasource) The password of the user defined in the domibusdatasourcexapropertyuser property
If activated Domibus will verify before sending a User Message if the receivers certificate is valid and not revoked If the receivers certificate is not valid or it has been revoked Domibus will not send the message and it will mark it as SEND_FAILURE
domibussendercertificatevalidationonsending true
If activated Domibus will verify before sending a User Message if his own certificate is valid and not revoked If the certificate is not valid or it has been revoked Domibus will not send the message and it will mark it as SEND_FAILURE (default is true)
If activated Domibus will verify before receiving a User Message if the senders certificate is valid and not revoked If the certificate is not valid or it has been revoked Domibus will not accept the message (default is true)
domibussendertrustvalidationonreceiving false An extra security validation that requires that the party name reflected in the alias of the sender public key should also be contained in the subject of the certificate
domibusconsoleloginmaximumattempt
5 Maximum connection attempts before the account gets locked (suspended)
domibusconsoleloginsuspensiontime 60 Property defining how many minutes the account remains locked (suspended) before it is automatically unlocked by the system
Configuration Property Default value Purpose
Proxy Settings In case your Access Point has to use a proxy server you can configure it with these properties
domibusproxyenabled false truefalse depending on whether you need to use proxy or not
domibusproxyhttphost - Host name of the proxy server
domibusproxyhttpport - Port of Proxy server
domibusproxyuser - Username for authentication on the proxy server
domibusproxypassword - Password
domibusproxynonProxyHosts - Indicates the hosts that should be accessed without going through the proxy
Table 1 - Domibus Properties
Domibus 334 Administration Guide
Page 65 134
PLUGIN MANAGEMENT
This section describes the different types of plugins and their registration process
Default Plugins
Domibus comes with three default plugins The three Interface Control Documents (ICD) describe these three plugins (JMS WS and File System Plugin) (cf[REF6])
611 JMS Plugin
For the JMS plugin you will have to use the following resources (see section sect 31- Binaries repository for the download location)
domibus-distribution-XYZ-default-jms-pluginzip
612 WS Plugin
For the WS plugin you will have to use the following resources (see section sect31-Binaries repository for the download location)
domibus-distribution-XYZ-default-ws-pluginzip
6121 Domibus authentication
The default web service plugin includes an example of how to implement authentication and
authorization By default this feature is disabled to insure backwards compatibility with older
versions of Domibus
The documentation below answers the question how to enable and use the authentication in the
WS plugin
The default WS plugin supports
- Basic Authentication
- X509 Certificates Authentication
- Blue Coat Authentication
Remark
Blue Coat is the name of the reverse proxy at the Commission It forwards the request in HTTP
with the certificate details inside the request (ldquoClient-Certrdquo header key)
When more than one authentication method is used the Basic Authentication takes precedence on
both http and https
When no Basic Authentication is provided X509 certificates are expected on https requests
When no Basic Authentication is provided Blue Coat certificates are expected on http requests
Domibus 334 Administration Guide
Page 66 134
6122 Domibus Authorization
For convenience the WS plugin uses exactly the same database as configured for Domibus core to
store the userspasswords and certificate ids To learn more about authorization (and
authentication) please refer to the plugin cookbook (cf[REF6])
There are two default users already inserted in the database (make sure you already ran the migration scripts)
admin and user both with 123456 as password
admin has the role ROLE_ADMIN and user has the role ROLE_USER
Roles
ROLE_ADMIN has the permission to call
- submitMessage with any value for originalSender property
- retrieveMessage (any message among messages notified to this plugin)
- listPendingMessages will list all pending messages for this plugin
- getStatus and getMessageErrors
ROLE_USER has the permission to call
- submitMessage with originalSender equal to the originalUser
- retrieveMessage only if finalRecipient equals the originalUser
- listPendingMessages only messages with finalRecipient equal to the origi-nalUser
6123 Enable the authentication in Domibus
To enable the authentication at Domibus level the following steps must be configured
1 In confdomibusdomibusproperties set the property
ldquodomibusauthunsecureLoginAllowedrdquo to false
domibusauthunsecureLoginAllowed=false
2 The application server must be configured to allow https requests and pass the
authentication credentials to Domibus
613 File System Plugin
For the File System plugin you will have to use the following resources (see section sect31-Binaries repository for the download location)
domibus-distribution-XYZ-default-fs-pluginzip
Domibus 334 Administration Guide
Page 67 134
Custom Plugin
Users can develop their own plugins Please refer to the plugin cookbook for more details (cf[REF6])
621 Plugin registration
Remark
Please refer to section 914 - Message Filtering for the routing of the specific plugin after registering the plugin on your specific Application Server
6211 Tomcat
In order to install a custom plugin for Tomcat please follow the steps below
1 Stop Tomcat server
2 Copy the custom plugin jar file to the plugins folder CATALINA_HOMEconfdomibuspluginslib
3 Copy the custom plugin XML configuration file to CATALINA_HOMEconfdomibuspluginsconfig
4 Start Tomcat server
Remark
CATALINA_HOME is the folder where the Tomcat is installed
6212 WebLogic
In order to install a custom plugin for WebLogic please follow the steps below
1 Stop the WebLogic server
2 Copy the custom plugin jar file to the plugins folder DOMAIN_HOMEconfdomibuspluginslib
3 Copy the custom plugin XML configuration file to DOMAIN_HOMEconfdomibuspluginsconfig
4 Start the WebLogic server
Remark
DOMAIN_HOME is the folder corresponding to the WebLogic domain
6213 WildFly
In order to install a custom plugin please follow the steps below
1 Stop the WildFly server
2 Copy the custom plugin jar file to the plugins folder cef_edelivery_path confdomibuspluginslib
3 Copy the custom plugin XML configuration file to cef_edelivery_path confdomibuspluginsconfig
4 Start the WildFly server
Domibus 334 Administration Guide
Page 68 134
PMODE CONFIGURATION
Processing Modes (PModes) are used to configure Access Points The PMode parameters are loaded into the Access Point via an XML file
The features described in the PMode file are Security Reliability Transport Business Collaborations Error Reporting Message Exchange Patterns (MEPs) and Message Partition Channels (MPCs)
As different messages may be subject to various types of processing or as different business domains may have several requirements Access Points commonly support several PModes Some PMode parameters are mandatory others are optional For more information please refer to the Access Point Component Offering Document
Configuration
In Domibus PModes are XML files that you can create or edit You can configure the two files given cef_edelivery_pathconfpmodesdomibus-gw-sample-pmode-party_id_name1xml and cef_edelivery_pathconfpmodesdomibus-gw-sample-pmode-party_id_name2xml
The party_id_name1 value must be replaced with your own party name and the party_id_name2 with your corresponding party name
The party_id must match the alias of the certificate in the keystore and the endpoint must be the external access link to your instance
Remark
This step could be managed by a PMode Configuration Manager known to your Business Owner
If a new participants Access Point is joining your network you need to configure your PMode accordingly and re-upload it like mentioned in sect714 ndash Upload new Configuration
Processing modes (PModes) describe how messages are exchanged between AS4 partners (in this case Access Points blue_gw and red_gw) These files contain the identifiers of each AS4 Access Point (identified as parties in the PMode file below)
Sender and Receiver Identifiers represent the organizations that send and receive the business documents They are both used in the authorization process (PMode) Therefore adding modifying or deleting a participant implies modifying the corresponding PMode files
Here is an example of a PMode XML file
Remark
In this setup we have allowed each party (blue_gw or red_gw) to initiate the process If only blue_gw is supposed to send messages then put only blue_gw in ltinitiatorPartiesgt and red_gw in ltresponderPartiesgt
MPCs - Container which defines the different MPCs (Message Partition Channels)
MPC PMode[1]BusinessInfoMPC The value of this parameter is the identifier of the MPC (Message Partition Channel) to which the message is assigned It maps to the attribute Messaging UserMessage
Message Partition Channel allows the partition of the flow of messages from a Sending MSH to a Receiving MSH into several flows each of which is controlled separately An MPC also allows merging flows from several Sending MSHs into a unique flow that will be treated as such by a Receiving MSH The value of this parameter is the identifier of the MPC to which the message is assigned
MessageRetentionDownloaded - Retention interval for messages already delivered to the backend
Domibus 334 Administration Guide
Page 73 134
MessageRetentionUnDownloaded - Retention interval for messages not yet delivered to the backend
Parties - Container which defines the different PartyIdTypes Party and Endpoint
PartyIdTypes maps to the attribute MessagingUserMessage PartyInfo
Message Unit bundling happens when the Messaging element contains multiple child elements or Units (either User Message Units or Signal Message Units)
Party ID maps to the element MessagingUserMessage PartyInfo
The ebCore Party ID type can simply be used as an identifier format and therefore as a convention for values to be used in configuration and ndash as such ndash does not require any specific solution building block
Endpoint maps to PMode[1]ProtocolAddress
The endpoint is a party attribute that contains the link to the MSH The value of this parameter represents the address (endpoint URL) of the Receiver MSH (or Receiver Party) to which Messages under this PMode leg are to be sent Note that a URL generally determines the transport protocol (eg if the endpoint is an email address then the transport protocol must be SMTP if the address scheme is http then the transport protocol must be HTTP)
AS4 - Container
Reliability [Nonrepudiation] [ReplyPattern]
Nonrepudiation maps to PMode[1]SecuritySendReceiptNonRepudiation ReplyPattern maps to PMode[1]SecuritySendReceiptReplyPattern
PMode[1]SecuritySendReceiptNonRepudiation value = lsquotrue (to be used for non-repudiation of receipt) value = false (to be used simply for reception awareness) PMode[1]SecuritySendReceiptReplyPattern value = lsquoResponsersquo (sending receipts on the HTTP response or back-channel) PMode[1]SecuritySendReceiptReplyPattern value = lsquoCallbackrsquo (sending receipts use a separate connection)
retryTimeout maps to PMode[1]ReceptionAwarenessRetry=true PMode[1]ReceptionAwarenessRetryParameters retryCount maps to PMode[1]ReceptionAwarenessRetryParameters strategy maps to PMode[1]ReceptionAwarenessRetryParameters duplicateDetection maps to PMode[1]ReceptionAwarenessDuplicateDetection
These parameters are stored in a composite string bull retryTimeout defines timeout in seconds bull retryCount is the total number of retries bull strategy defines the frequency of retries The only strategy available as of now is CONSTANT bull duplicateDetection allows to check duplicates when receiving twice the same message The only duplicateDetection available as of now is TRUE
Securities - Container
Security - Container
Policy PMode[1]Security NOT including PMode[1]SecurityX509SignatureAlgorithm
The parameter defines the name of a WS-SecurityPolicy file
This parameter is not supported by WS-SecurityPolicy and therefore it is defined separately
BusinessProcessConfiguration - Container
Agreements maps to ebMessaging UserMessage CollaborationInfo AgreementRef
This OPTIONAL element occurs zero times or once The AgreementRef element is a string that identifies the entity or artifact governing the exchange of messages between the parties
Actions - Container
Action maps to Messaging UserMessage CollaborationInfoAction
This REQUIRED element occurs once The element is a string identifying an operation or an activity within a Service that may support several of these
Services - Container
ServiceTypes Type maps to Messaging UserMessage CollaborationInfo Service[type]
This REQUIRED element occurs once It is a string identifying the service that acts on the message and it is specified by the designer of the service
Domibus 334 Administration Guide
Page 75 134
MEP [Legs] - An ebMS MEP defines a typical choreography of ebMS User Messages which are all related through the use of the referencing feature (RefToMessageId) Each message of an MEP Access Point refers to a previous message of the same Access Point unless it is the first one to occur Messages are associated with a label (eg request reply) that precisely identifies their direction between the parties involved and their role in the choreography
Bindings - Container
Binding - The previous definition of ebMS MEP is quite abstract and ignores any binding consideration to the transport protocol This is intentional so that application level MEPs can be mapped to ebMS MEPs independently from the transport protocol to be used
Roles - Container
Role Maps to PModeInitiatorRole or PModeResponderRole depending on where this is used In ebMS3 message this defines the content of the following element bull For Initiator MessagingUserMessagePartyInfoFromRole bull For Responder MessagingUserMessagePartyInfoToRole
The required role element occurs once and identifies the authorized role (fromAuthorizedRole or toAuthorizedRole) of the Party sending the message (when present as a child of the From element) or receiving the message (when present as a child of the To element) The value of the role element is a non-empty string with a default value of httpdocsoasis-openorgebxml-msgebmsv30nscore200704defaultRole Other possible values are subject to partner agreement
Processes - Container
PayloadProfiles - Container
Payloads - Container
Domibus 334 Administration Guide
Page 76 134
Payload maps to PMode[1]BusinessInfoPayloadProfile
This parameter allows specifying some constraint or profile on the payload It specifies a list of payload parts A payload part is a data structure that consists of five properties
1 name (or Content-ID) that
is the part identifier and
can be used as an index in
the notation
PayloadProfile
2 MIME data type (textxml
applicationpdf etc)
3 name of the applicable
XML Schema file if the
MIME data type is
textxml
4 maximum size in kilobytes
5 Boolean string indicating
whether the part is
expected or optional
within the User message
The message payload(s) must match this profile
ErrorHandlings - Container
ErrorHandling - Container
ErrorAsResponse maps to PMode[1]ErrorHandlingReportAsResponse
This Boolean parameter indicates (if true) that errors generated from receiving a message in error are sent over the back-channel of the underlying protocol associated with the message in error If false such errors are not sent over the back-channel
ProcessErrorNotifyProducer maps to PMode[1]ErrorHandlingReportProcessErrorNotifyProducer
This Boolean parameter indicates whether (if true) the Producer (applicationparty) of a User Message matching this PMode should be notified when an error occurs in the Sending MSH during processing of the User Message to be sent
ProcessErrorNotifyConsumer maps to PMode[1]ErrorHandlingReportProcessErrorNotifyProducer
This Boolean parameter indicates whether (if true) the Consumer (applicationparty) of a User Message matching this PMode should be notified when an error occurs in the Receiving MSH during processing of the received User message
Domibus 334 Administration Guide
Page 77 134
DeliveryFailureNotifyProducer maps to PMode[1]ErrorHandlingReportDeliveryFailuresNotifyProducer
When sending a message with this reliability requirement (Submit invocation) one of the two following outcomes shall occur - The Receiving MSH successfully delivers (Deliver invocation) the message to the Consumer - The Sending MSH notifies (Notify invocation) the Producer of a delivery failure
Legs - Container
Leg - Because messages in the same MEP may be subject to different requirements - eg the reliability security and error reporting of a response may not be the same as for a request ndash the PMode will be divided into legs Each user message label in an ebMS MEP is associated with a PMode leg Each PMode leg has a full set of parameters for the six categories above (except for General Parameters) even though in many cases parameters will have the same value across the MEP legs Signal messages that implement transport channel bindings (such as PullRequest) are also controlled by the same categories of parameters except for BusinessInfo group
Process - In Process everything is plugged together
Table 2 - Domibus PMode configuration to ebMS3 mapping
714 Upload new Configuration
7141 Upload the PMode file
Remark In case of a cluster environment the PMode configuration is replicated automatically on all the nodes
1 To update the PMode configuration andor Truststore connect to the Administration Console using the administrators credentials (by default User = admin Password = 123456) to httplocalhost8080domibus
Remark
It is recommended to change the passwords for the default users See sect91 ndash Administration for further information
Domibus 334 Administration Guide
Page 78 134
2 Click on the PMode menu
Domibus 334 Administration Guide
Page 79 134
3 Press the Upload button
4 Press the Choose File button and navigate to the PMode file select it and click on the Open button (or equivalent) in the standard dialog box
Domibus 334 Administration Guide
Page 80 134
5 Once the file has been selected click OK to upload the PMode xml file
Remark
Every time a PMode is updated the truststore is also reloaded from the filesystem
7142 Upload the Truststore
1 Select the Truststore menu and press the Upload button
Domibus 334 Administration Guide
Page 81 134
2 Navigate to the Truststore and select it by clicking on the Open button (or equivalent) of
the standard file open dialog
3 Once the file has been selected enter the keystore password and click on the OK button
to activate the new truststore jks file
Domibus 334 Administration Guide
Page 82 134
SPECIAL SCENARIO SENDER AND RECEIVER ARE THE SAME
In this special scenario the Sender Access Point acts also as the Receiver Access Point Multiple backends can exchange messages via the same Access Point using the same or different plugins
PMode Configuration
A party (eg blue_gw) which is Sender and Receiver must be defined in both the ltinitiatorPartiesgt
A message that is sent to the same Access Point will have to contain the same party id in both From and To sections Below there is an example of a message sent using the Default WS Plugin
Due to some limitations related to the uniqueness of the message identifier a convention has been defined in this scenario The message ID used for the received message is derived from the message ID used for the sent message with the following rule the suffix _1 is added to the sent message id
Example
sent message ID is ae15851e-78fb-4b51-aac8-333c08c450d6domibus
received message ID is ae15851e-78fb-4b51-aac8-333c08c450d6domibus_1
Domibus 334 Administration Guide
Page 84 134
ADMINISTRATION TOOLS
Administration Console
911 Changing passwords
It is recommended to change the passwords for the default users who are allowed to have access to the Domibus Administration Console mainly admin and user
1 In order to change the password for a user navigate to the Users menu entry to obtain the list of
configured users
2 To edit the user details click on the EDIT icon (in RED) DO NOT click on the BIN icon as this
would DELETE the record
Domibus 334 Administration Guide
Page 85 134
3 In the popup window choose a new password using the rules shown
4 Confirm the password
5 Click on OK
Domibus 334 Administration Guide
Page 86 134
6 When done either click on Save to save the new password or Cancel to leave the password
unchanged
912 User Account Lockout Policy
A user account lockout policy has been implemented on Domibus Admin Console By default if a user tries to log to the Admin Console with a wrong password 5 times in a row his account will be suspended (locked)
You can define in domibusproperties (section 52 Domibus Properties) the number of failed attempts after which a userrsquos account will be locked
By default a user remains suspended during one hour before his account is automatically unlocked and the user can try to log again
If the user wants his account to be unlocked without waiting the default one hour he can ask his administrator to unlock the account To unlock the account the administrator must change the userrsquos status on the Admin Console from ldquoSuspendedrdquo to ldquoActiverdquo
Select the suspended user and click on ldquoEditrdquo
Domibus 334 Administration Guide
Page 87 134
Re-activate the user (unlock it) by checking the ldquoActiverdquo status and confirming with OK
Do not forget to click on Save on the next window and then on Yes to confirm the change
Domibus 334 Administration Guide
Page 88 134
913 Adding new users
1 New users can be added to the existing default users (admin and user) by clicking on New
2 For each new user you must enter a username an email a role and a password
Domibus 334 Administration Guide
Page 89 134
3 Click on OK
4 Again once the user has been created do not forget to click on the Save button on the Users
page to register your changes on the system
914 Message Filtering
Domibus allows the routing of messages to different plugins based on some messages attributes
From initial sender (C1)
To final recipient (C4)
Domibus 334 Administration Guide
Page 90 134
Action defined as Leg in the PMode
Service as defined in the PMode
The following rules apply
Domibus considers the ordered list of filters to route all messages The first filter matching the filter criteria will define the target plugin The order of the plugin is therefore important in the routing process
Note 1 if the filters are all mutually exclusive the order would not matter
Note 2 The Persisted column indicates if the plugin filter configuration has already been saved If a plugin filter configuration has not already been saved the Persisted value is unchecked and an error message is shown on the top of the screen In this case it is strongly recommended to review the filters configuration and save it afterwards
One plugin may be applied to multiple filters This is done by the use of the OR criteria (cf backendWebservice in the example below)
Multiple attributes could also be defined in one filter This is done by the use of the AND criteria (cf the first filter in the example below)
One filter may have no criteria meaning that all messages (not matching previous filters) will be routed to the corresponding plugin automatically As a result subsequent filters will therefore not be considered for any incoming message In the example below the last filter routes all remaining messages to plugin backendWebservice
Domibus 334 Administration Guide
Page 91 134
Figure 9 ndash Message Filter Page
Use the New and Delete buttons to create or delete a filter
As the order matters move up and down actions allow placing each filter in the right order
Cf Move Up and Move Down buttons
After some changes have been applied to the filters the Cancel and Save buttons become active
- Press Cancel to cancel the changes
- Press Save to save the changes and activate them immediately
The console will ask the user to confirm the operation before proceeding
Example of message attributes used for routing and matching the first filter used in the example above
Action TC1Leg1
Service bdxnoprocesstc2
From domibus-blueurnoasisnamestcebcorepartyid-typeunregistered
To domibus-redurnoasisnamestcebcorepartyid-typeunregistered
That information can be found in the incoming message received by Domibus (eg see below)
Domibus administration dashboard includes a message logging page that gives the administrator information related to sent messages received messages and their status (SENT RECEIVED FAILED ACKNOWLEDGEDhellip)
The following state machines illustrate the evolution of the processing of messages according to the encountered events
Figure 10 - State machine of Corner 2 (sending access point)
Figure 11 - State machine of Corner 3 (receiving access point)
REJECTED
RECEIVED_WITH_WARNING
RECEIVED
DELETEDDOWNLOADED
[ebMS3 error receipt with severity FAILURE]
[ebMS3 error receipt with severity WARNING]
[ebMS3 receipt SUCCESS]
[Undownloaded retention period expired]
[C4 downloads message] [Download retention period expired]
[C4 downloads message] [Undownloaded retention period expired]
Domibus 334 Administration Guide
Page 93 134
Figure 12 - Domibus Message Log
Remark The administration dashboard is reachable via the following URLs httpyour_serveryour_port_numberdomibus (Tomcat) httpyour_serveryour_port_numberdomibus-wildfly (WildFly) httpyour_serveryour_port_numberdomibus-weblogic (WebLogic)
Application Logging
931 Domibus log files
Domibus has three log files
1 domibus-securitylog this log file contains all the security related information For example you can find information about the clients who connect to the application
2 domibus-businesslog this log file contains all the business related information For example when a message is sent or received etc
3 domibuslog this log file contains both the security and business logs plus miscellaneous logs like debug information logs from one of the framework used by the application etc
932 Logging properties
It is possible to modify the configuration of the logs by editing the logging properties file cef_edelivery_pathconfdomibuslogbackxml
Domibus 334 Administration Guide
Page 94 134
933 Error Log page
To go to the error log page of the Domibus Admin Console click on the Error log menu entry
This option lists all the Message Transfers error logs and includes the ErrorSignalMessageId ErrorDetail and Timestamp You can sort messages by using the up or down arrow to search for a specific message
Figure 13 - Domibus ndash Error Log page
Queue Monitoring
Domibus uses JMS queues to handle the messages
Domibus 334 Administration Guide
Page 95 134
Destination type
JNDI name Comment Description
Queue jmsdomibusinternaldispatchqueue No redelivery because redelivery of MSH messages is handled via ebMS3AS4
This queue is used for scheduling messages for sending via the MSH
Queue jmsdomibusinternalnotificationunknown Notifications about received messages (by the MSH) that do not match any backend routing criteria will be sent to this queue In production environment this queue should be monitored in order to handle those messages manually
Topic jmsdomibusinternalcommand This topic is used for sending commands to all nodes in a cluster For example it is used after a PMode was uploaded in order to notify all nodes to update their PMode cache (in case caching is enabled)
Queue jmsdomibusbackendjmsreplyQueue This queue is used for sending replies back to the sender of a message Replies contain a correlationId ebMS3 messageId (if possible) error messages (if available)
Queue jmsdomibusbackendjmsoutQueue Messages received by the MSH (that match the routing criteria for the JMS plugin) will be sent to this queue
Queue jmsdomibusbackendjmsinQueue This queue is the entry point for messages to be sent by the sending MSH
Queue jmsdomibusbackendjmserrorNotifyConsumer This queue is used to inform the receiver of a message that an error occurred during the processing of a received message
Queue jmsdomibusbackendjmserrorNotifyProducer This queue is used to inform the sender of a message that an error occurred during the processing of a message to be sent
Domibus 334 Administration Guide
Page 96 134
Queue jmsdomibusnotificationjms
Used for sending notifications to the configured JMS plugin
Queue jmsdomibusinternalnotificationqueue
This queue is used to notify the configured plugin about the status of the message to be sent
Queue jmsdomibusnotificationwebservice Used for sending notifications to the configured WS plugin
Queue jmsdomibusDLQ This is the Dead Letter Queue of the application The messages from other queues that reached the retry limit are redirected to this queue
Table 3 - Queue Monitoring
All these queues can be monitored and managed using the JMS Monitoring page which is accessible from the JMS Monitoring menu of the administration console
Warning For Tomcat server the maximum number of shown messages in the queue monitoring is defined by the lsquodomibuslistPendingMessagesmaxCountrsquo property In the Source field we have all the queues listed along with the number of messages pending in each queue
Domibus 334 Administration Guide
Page 97 134
If a queue is used internally by the application core its name will start with [internal] A regular expression is used to identify all the internal queues The value for this regular expression can be adapted in the domibusjmsinternalQueueexpression property from the
In the JMS Monitoring page the following operations can be performed
1 Inspecting and filtering the messages from a queue based on the following fields
a Signal Message id identifier of an error signal message
b Message id identifier of a message
c Error detail text of the error (full)
d AP Role role of the AP
e Error Code structured code of the error
f Source the source queue of the messages
g Error or Notified Time Period time interval that will filter the messages based on the
send dates
h JMS type the JMS header JMSType
i Selector the JMS message selector expression
Remark For more information on the JMS message headers and the JMS message selector please check the official documentation at httpsdocsoraclecomcdE19798-01821-1841bncesindexhtml
Domibus 334 Administration Guide
Page 98 134
2 Move a message
a Move the message from the DLQ to the original queue
- Select the JMS message from the DLQ and press the Move icon (in RED marker)
- Select the original queue from the Destination dropdown list in the dialog box
- Press the Ok button in the dialog and the message will be moved to the original
queue
Note the details of a message can be viewed by selecting it (double-clicking) from the message list
Domibus 334 Administration Guide
Page 99 134
Click Close to exit the dialog box
b Move multiple messages from the DLQ to the original queue
- Select multiple JMS messages from the DLQ and press the Move icon button
- Select the original queue from the Destination dropdown list and click Ok
Domibus 334 Administration Guide
Page 100 134
Remark
Please make sure that all the selected messages came from the same source queue Use the filtering capabilities to ensure this
3 Delete message(s)
a Delete one or more messages from one queue
- Select one or several JMS messages from the source queue and press the Delete
button
Domibus 334 Administration Guide
Page 101 134
- By clicking the Delete button the selected messages are removed from the screen
but you still have to confirm your changes by clicking on the Save button As long as
you have not clicked on the Save button your changes are not taken into account in
the system
- To cancel the changes you made click on the Cancel button instead
Domibus 334 Administration Guide
Page 102 134
Configuration of the queues
Queues should be configured appropriately and according to the backend system needs and re-delivery policy
951 Tomcat
Domibus uses ActiveMQ as JMS broker The various queues are configured in the cef_edelivery_pathconfdomibusinternalactivemqxml file
Please see ActiveMQ redelivery policy and configure the parameters below if needed
Access to the JMS messaging subsystem is protected by a username and a password in clear text defined in the Domibus properties file cef_edelivery_pathconfdomibusdomibusproperties
It is recommended to change the password for the default user
The user (activeMQusername) and the password (activeMQpassword) defined in the domibusproperties file are referenced in the authentication section of the activemqxml file provided
952 WebLogic
Please use the admin console of WebLogic to configure the re-delivery limit and delay if necessary
953 WildFly
Please use the admin console of WildFly to configure the re-delivery limit and delay if necessary
Domibus 334 Administration Guide
Page 104 134
LARGE FILES SUPPORT
Domibus supports transfers between Access Points of files up to 2 GB using Java 8 In order to compute the message signature Domibus loads the whole message into memory using a byte array In Java byte arrays can hold a maximum of 2 GB hence the Domibus limitation of 2 GB
If Domibus is started using Java 7 the limitation is 1 GB due to a limitation in Java 7 version
In order to optimize the sending of such large files HTTP chunking is activated by default in the connection with the receiver Access Points As chunked encoding is useful when sending larger amounts of data but decreases the performance on smaller amounts Domibus uses a threshold to activate the chunking when appropriate only
The following properties are used to configure chunking domibusdispatcherallowChunking and domibusdispatcherchunkingThreshold For more information about these properties please refer to the section 52 Domibus Properties
Domibus 334 Administration Guide
Page 105 134
DATA ARCHIVING
Whats archiving
Data archiving consists of moving messages that have been processed successfully or unsuccessfully by the access point to an external storage location for long-term retention
Archived data consists of older data that have been processed at the communication level by the access points that are still significant to the business and may be needed for future reference They may also be retained for legal constraints
Data archives are indexed and searchable to allow easy retrieval
It is not recommended to use Domibus as an archiving solution Nevertheless if the data really needs to be stored for long periods then it is possible to set the Data Retention Policy to allow it to be extracted from the database through the webservices or through an external archiving tool
Data Retention Policy
A data retention policy is a procedure established by the business for continuous information storage for operational legal or compliance reasons
The data retention policy needs to be defined based on the business needs and constraints
In Domibus the data retention policy can be found in the PMode file
In the above extract of the sample PMode configuration of Domibus the data retention policy is set to 14400 minutes (10 days) if the message is not downloaded This means that if the message is not downloaded it will be deleted and then only the metadata containing the information of the receiver and the acknowledgement will be retained
The data retention policy is set by default to 0 minutes if the message is downloaded This means that the message will be instantaneously deleted as soon as it is downloaded These two parameters retention_downloaded and retention_undownloaded can therefore be modified to meet the needs of the business
Data Extraction
In order to keep the metadata and the payload of the message for a longer period than the one set in the PMode it is recommended to extract it to an external storage As long as the retention worker does not delete it data can be extracted through the webservices or through an external archiving tool
Domibus 334 Administration Guide
Page 106 134
For more information please refer to the Data Model provided in the Domibus Software Architecture Document that can be found on the CEF Digital single web portal [REF6]
Domibus 334 Administration Guide
Page 107 134
NON REPUDIATION
In order to guarantee non-repudiation the sending Access Point (C2) stores the full SignalMessage including the MessageInfo the Receipt (that contains the NonRepudiationInformation for each part) and the signature of the receipt by the receiver Access Point (C3)
This will guarantee that the receiver Access Point (C3) cannot deny having received a message from the sender Access Point (C2) during the sending process However if the initial sender (C1) wants to be sure that the final recipient (C4) cannot deny having received a specific content inside this message then the sender must be able to show the specific content that was used to produce the receiver Access Point (C3) signature
Domibus as a sending Access Point (C2) keeps track of the metadata of the sent messages but does not store the actual message payloads Therefore it is recommended that the initial sender (C1) stores the message payloads safely for the time needed to guarantee non-repudiation of the sent messages
In order to guarantee non-repudiation the receiving Access Point (C3) stores the full UserMessage and the associated signature of the sender (C2)
This will guarantee that the sender Access Point (C2) cannot deny having sent a message to the receiver during the sending process However if the final recipient (C4) wants to be sure that the sender cannot deny having sent a specific content inside this message then the final recipient (C4) must be able to show the specific content that was used to produce the sender Access Point signature (C2)
Domibus as a receiving Access Point (C3) keeps track of the metadata of the received messages and will store the message payloads only for the (limited) duration configured in the retention period (specified in the PMode) Therefore it is recommended that the final recipient (C4) either stores the message payloads safely or aligns the retention period on the receiving Access Point (C3) with the time needed to guarantee non-repudiation of the received messages
Domibus 334 Administration Guide
Page 108 134
TLS CONFIGURATION
TLS Configuration
1311 Transport Layer Security in Domibus
One way of implementing TLS for the eDelivery AS4 profile is to use the TLS in the Domibus Message Handler (MSH) described below otherwise this would have to be handled at a higher level (eg Application Server Proxy etchellip)
To enable secure communication at the transport layer (TLS) between a sending and a receiving MSH (Access Point) both the client and the server need to be configured accordingly
The client is used in the initiator MSH to send the request and is therefore configured via CXF while the server is configured at containerapplication server level
1312 Client side configuration (One Way SSL)
The tlsClientParameters are configured in the cef_edelivery_pathconfdomibusclientauthenticationxml file
Remark your_trustore_ssl is used at the transport layer (SSL) while your_trustore described in sect512 ndash Certificates is used by Domibus to encrypt and sign (WS-Security)
When the clientauthenticationxml file is present and the endpoint of the receiving MSH is https the TLS parameters are added via the CXF framework to the send request
Domibus 334 Administration Guide
Page 109 134
The version of the TLS must be specified by setting secureSocketProtocol=TLSv12
If you use self-signed certificates you need to set disableCNCheck=true
The attribute disableCNCheck specifies whether JSSE should omit checking if the host name specified in the URL matches the host name specified in the Common Name (CN) of the servers certificate The attribute is false by default and must not be set to true during production use (cf[REF7])
Remark
TLSv12 is mandatory for eDelivery AS4 Profile
1313 Client side configuration (Two Way SSL)
The configuration is similar to the one used for One Way SSL except that the tlsClientParameters gets configured with both trustManagers and keystoreManagers The clientauthenticationxml file should look like this
your_trustore_ssl and your_keystore_ssl are used at the transport layer (SSL) while your_trustore and your_keystore described in sect512 ndash Certificates are used by Domibus to encrypt and sign (WS-Security)
Two Way SSL is optional and based on the eDelivery AS4 Profile
1314 Server side configuration
13141 Tomcat 8
In Serverxml add a new connector with the SSLEnabled attribute set to true
The keystore jks location and password must be specified otherwise the default ones will be taken into account
Domibus 334 Administration Guide
Page 110 134
TLS version can also be specified
The above connector has clientAuth=false which means that only the server has to authenticate itself (One Way SSL) To configure Two Way SSL which is optional in the eDelivery AS4 Profile set clientAuth=true in Serverxml and provide the location of the your_truststore_ssljks file so that the server can verify the client
Go to Servers select Server Name Configuration General then click on Client Cert Proxy Enabled
2 Add keystore and truststore
Go to Servers select Server Name Configuration Keystores and SSL tabs and use Custom Identity and Custom Trust then set keystore and trustore jks
To disable basic authentication at WebLogic level
By default WebLogic performs its own basic authentication checks before passing the request to Domibus As we want basic authentication to be performed by Domibus we need to disable it at the application server level
13144 Configure Basic and Certificates authentication in SoapUI
Go to File Preferences HTTP Settings and check the option Adds authentication information to outgoing requests
Domibus 334 Administration Guide
Page 112 134
Go to File Preferences SSL Settings add the KeyStore and KeyStore Password and check the option requires client authentication
To allow Basic Authentication select the Auth tab click Add New Authorization and select Basic Enter user and password (eg Username = admin Password = 123456)
13145 PMode update
If you enable HTTPS then your PMode Configuration Manager needs to make sure that all other endpoint PModes are modified accordingly
With the SSL connector configured as above the MSH endpoint is now httpsyour_domibus_host8443domibusservicesmsh
Domibus 334 Administration Guide
Page 113 134
After the updates upload the PModes via the Admin Console
In a dynamic discovery setup the sender andor the receiver parties and their capabilities are not configured in advance
The sending Access Point will dynamically retrieve the necessary information for setting up an interoperability process from the Service Metadata Publisher (SMP) The SMP stores the interoperability metadata which is a set of information on the recipient or end entity (its identifier supported business documents and processes) and AP (metadata which includes technical configuration information on the receiving endpoint such as the transport protocol and its address) cf[REF8]
The receiving AP registers its metadata in the SMP and configures the PMode to be able to accept messages from trusted senders that are not previously configured in the PMode The receiving AP will have to configure one process in its PMode for each SMP entry
The mapping between the PMode process and the SMP entry is defined in sect143 ndash PMode configuration for PEPPOL and sect148 - ndash PMode configuration for OASIS
Please note that the sender does not have to be registered in the SMP and the receiver merely extracts its identifier from the received message
The following sections describe how to configure Domibus AP in order to use Dynamic Discovery (sect143 ndash PMode configuration for PEPPOL sect144 ndash Policy and certificates for PEPPOL sect148 ndash PMode configuration for OASIS sect149 ndash Policy and certificates for OASIS)
Domibus configuration for PEPPOL
To enable the integration with the SMPSML components Domibus requires some changes in the domibusproperties configuration file which include
1 Adding the following properties to enable the usage of the PEPPOL dynamic discovery client
2 Setting the dynamic discovery client to use certificates to access the SMP These certificates are different in TEST and PRODUCTION therefore we need to specify the Mode used by the dynamic discovery client by setting the following property domibusdynamicdiscoverypeppolclientmodegtTEST
3 Setting the domibussmlzone property
4 Configuring the bean pModeProvider with DynamicDiscoveryPModeProvider
Domibus 334 Administration Guide
Page 115 134
PMode configuration for PEPPOL
1431 Sender PMode
In a dynamic discovery process the receiver of the messages is not known beforehand and therefore the PModeResponder parameter SHOULD NOT be set
The dynamic discovery process must include a leg which maps the configured entry (action service and service type ndash see section 145 ndash Message format for PEPPOL) of the Receiver in the SMP
The security policy to be used in the leg is the following (see section sect511 ndash Security Policies for more information)
initiatorRole=defaultInitiatorRole responderRole=defaultResponderRolegt ltinitiatorPartiesgt ltinitiatorParty name=senderaliasgt ltinitiatorPartiesgt lt-- no responderParties element --gt ltlegsgt ltleg name=pushTestcase1tc1Actiongt ltlegsgt ltprocessgt hellip
1432 Receiver PMode
Dynamic discovery configuration of the receiver is similar to the configuration of the sender except that the roles are swapped the sender of the messages is not known beforehand As a consequence the PModeInitiator parameter SHOULD NOT be set
The receiver must include the certificate of the trusted authority(ies) in its truststore It will only accept messages that were signed with certificates issued by the trusted authority(ies) (cf sect18 ndash Annex 1 - Usage of certificates in PEPPOL and OASIS for more information)
Message format for PEPPOL
When dynamic discovery is used the to field should not be statically configured in the PMode (the to field may even be omitted in the message) The lookup is performed by C2 based on the finalRecipient message property
Example of a message using the finalRecipient for dynamic discovery
The Service Metadata Record also provides the receiving ends certificate This certificate can be used to encrypt the message to be sent to the receiver The certificate can also provide the name of the gateway for this PMode by using the Certificates CNAME as the PMode identifier (cf[REF9])
Domibus configuration for OASIS
To enable the integration with the SMPSML components Domibus requires some changes in the domibusproperties configuration file
1 Add the following properties to enable the usage of the OASIS dynamic discovery client
Note this property is not mandatory as it defaults to the above value
2 Set the property domibussmlzone eg ehealthaccedeliverytecheceuropaeu
3 The bean pModeProvider must be configured with DynamicDiscoveryPModeProvider
PMode configuration for OASIS
1481 Sender PMode
In a dynamic discovery process the receiver of the messages is not known beforehand and therefore the PModeResponder parameter SHOULD NOT be set
Domibus 334 Administration Guide
Page 119 134
The dynamic discovery process must include a leg which maps the configured entry (action service and service type ndash cf 145 ndash Message format for PEPPOL) of the Receiver in the SMP
The security policy to be used in the leg is the following (see sect511 ndash Security Policies for more information)
Schema name should be added to action value Eg ehealth-actorid-qnsurnoasisnamesspecificationublschemaxsdCreditNote-2CreditNoteurnwwwcenbii
1482 Receiver PMode
The dynamic discovery configuration of the receiver is similar to the configuration of the sender except that the roles are swapped the sender of the messages is not known beforehand As a consequence the PModeInitiator parameter SHOULD NOT be set
The receiver must include the certificate of the trusted authority(ies) in its truststore It will only accept messages that were signed with certificates issued by the trusted authority(ies)
The sender truststore must include the SMP public certificate This certificate is used by the AP to validate the identity of the used SMP (cf sect18 ndash Annex 1 - Usage of certificates in PEPPOL and OASIS for more information)
Message format for OASIS
When dynamic discovery is used the to field should not be statically configured in the PMode (the to field may even be omitted in the message) The lookup is performed by C2 based on the finalRecipient message property
Note For OASIS clients in the PMode action value the document scheme must be included with the document ID (for PEPPOL client only document ID is needed)
Domibus 334 Administration Guide
Page 121 134
Example of message using the finalRecipient for dynamic discovery
In order to configure message pulling the process section should be configured with mep set to oneway and binding set to pull as shown in the following example
In the case of a pull process the initiatorParties section contains the party that initiate the pull request The responderParties section contains the parties that can be pulled from
In domibusproperties configuration file adapt the following properties to your needs Note that domibusmshpullcron and domibuspullqueueconcurency are mandatory
Cron expression used for configuring the message puller scheduling
domibusmshpullcron=0 0 01
Number of threads used to parallelize the pull requests
domibuspullqueueconcurency=1-1
Number or pull requests executed every cron cycle
domibuspullrequestsendperjobcycle=1
Configuration restriction
A correctly configured one-way pull process should only contain one party configured in the initiatorParties section
Different legConfiguration with the same defaultMpc (highlighted in red in the following configuration) should not be configured in the same pull process or across different pull processes
Domibus 334 Administration Guide
Page 123 134
If those restrictions are not respected the message will not be exchanged and a warning message will detail the configuration problem
SEVERE Exception sending context initialized event to listener instance of class orgspringframeworkwebcontextContextLoaderListener orgspringframeworkbeansfactoryBeanCreationException Error creating bean with name orgspringframeworkschedulingquartzSchedulerFactoryBean0 defined in ServletContext resource [WEB-INFmsh-configxml] Invocation of init method failed nested exception is orgquartzJobPersistenceException Failed to obtain DB connection from datasource springTxDataSourceorgspringframeworkschedulingquartzSchedulerFactoryBean0 comatomikosjdbcAtomikosSQLException Failed to grow the connection pool [See nested exception comatomikosjdbcAtomikosSQLException Failed to grow the connection pool] at orgspringframeworkbeansfactorysupportAbstractAutowireCapableBeanFactoryinitializeBean(AbstractAutowireCapableBeanFactoryjava1578) at orgspringframeworkbeansfactorysupportAbstractAutowireCapableBeanFactorydoCreateBean(AbstractAutowireCapableBeanFactoryjava545) at orgspringframeworkbeansfactorysupportAbstractAutowireCapableBeanFactorycreateBean(AbstractAutowireCapableBeanFactoryjava482) at orgspringframeworkbeansfactorysupportAbstractBeanFactory$1getObject(AbstractBeanFactoryjava305) at orgspringframeworkbeansfactorysupportDefaultSingletonBeanRegistrygetSingleton(DefaultSingletonBeanRegistryjava230) at orgspringframeworkbeansfactorysupportAbstractBeanFactorydoGetBean(AbstractBeanFactoryjava301) SEVERE One or more listeners failed to start Full details will be found in the appropriate container log file May 11 2016 101243 AM orgapachecatalinautilSessionIdGeneratorBase createSecureRandom INFO Creation of SecureRandom instance for session ID generation using [SHA1PRNG] took [13256] milliseconds May 11 2016 101243 AM orgapachecatalinacoreStandardContext startInternal SEVERE Context [domibus] startup failed due to previous errors May 11 2016 101243 AM orgapachecatalinacoreApplicationContext log INFO Closing Spring root WebApplicationContext May 11 2016 101243 AM orgapachecatalinacoreApplicationContext log INFO Shutting down log4j
Solution Setup the password properly in the domibusproperties
Exception sending context initialized event to listener
instance of class
SEVERE Exception sending context initialized event to listener instance of class orgspringframeworkwebcontextContextLoaderListener orgspringframeworkbeansfactoryBeanCreationException Error creating bean with name entityManagerFactory defined in URL [filehomeedeliverydomibusf1confdomibusdomibus-datasourcesxml] Cannot resolve reference to bean domibusJDBC-XADataSource while setting bean
Domibus 334 Administration Guide
Page 125 134
property dataSource nested exception is orgspringframeworkbeansfactoryBeanCreationException Error creating bean with name domibusJDBC-XADataSource defined in URL [filehomeedeliverydomibusf1confdomibusdomibus-datasourcesxml] Invocation of init method failed nested exception is comatomikosjdbcAtomikosSQLException The class commysqljdbcjdbc2optionalMysqlXADataSource specified by property xaDataSourceClassName could not be found in the classpath Please make sure the spelling is correct and that the required jar(s) are in the classpath
Solution Add MySQL connector in domibuslib folder
Neither the JAVA_HOME nor the JRE_HOME environment
variable is defined
Neither the JAVA_HOME nor the JRE_HOME environment variable is defined At least one of these environment variables is needed to run this program
Solution Set JAVA_HOME variable orand JRE_HOME
Cannot access Admin Console
httpyour_serveryour_port_numberdomibus No SEVER errors in logs but no admin option in browser under
Solution Check if the firewall is open for port_no (eg 8080)
Handshake Failure
Full stack trace below
orgapachecxfinterceptorFault Could not write attachments at orgapachecxfinterceptorAttachmentOutInterceptorhandleMessage(AttachmentOutInterceptorjava74) at orgapachecxfphasePhaseInterceptorChaindoIntercept(PhaseInterceptorChainjava308) at orgapachecxfendpointClientImpldoInvoke(ClientImpljava514) at orgapachecxfendpointClientImplinvoke(ClientImpljava423) at orgapachecxfendpointClientImplinvoke(ClientImpljava324) at orgapachecxfendpointClientImplinvoke(ClientImpljava277) at orgapachecxfendpointClientImplinvokeWrapped(ClientImpljava312) at orgapachecxfjaxwsDispatchImplinvoke(DispatchImpljava327) at orgapachecxfjaxwsDispatchImplinvoke(DispatchImpljava246) at eudomibusebms3senderMSHDispatcherdispatch(MSHDispatcherjava126) at eudomibusebms3senderMSHDispatcher$$FastClassBySpringCGLIB$$105974a1invoke(ltgeneratedgt) at orgspringframeworkcglibproxyMethodProxyinvoke(MethodProxyjava204) at orgspringframeworkaopframeworkCglibAopProxy$CglibMethodInvocationinvokeJoinpoint(CglibAopProxyjava717) at orgspringframeworkaopframeworkReflectiveMethodInvocationproceed(ReflectiveMethodInvocationjava157)
Domibus 334 Administration Guide
Page 126 134
at orgspringframeworktransactioninterceptorTransactionInterceptor$1proceedWithInvocation(TransactionInterceptorjava99) at orgspringframeworktransactioninterceptorTransactionAspectSupportinvokeWithinTransaction(TransactionAspectSupportjava281) at orgspringframeworktransactioninterceptorTransactionInterceptorinvoke(TransactionInterceptorjava96) at orgspringframeworkaopframeworkReflectiveMethodInvocationproceed(ReflectiveMethodInvocationjava179) at orgspringframeworkaopframeworkCglibAopProxy$DynamicAdvisedInterceptorintercept(CglibAopProxyjava653) at eudomibusebms3senderMSHDispatcher$$EnhancerBySpringCGLIB$$da53e95adispatch(ltgeneratedgt) at eudomibusebms3senderMessageSendersendUserMessage(MessageSenderjava116) at eudomibusebms3senderMessageSenderonMessage(MessageSenderjava195) at sunreflectNativeMethodAccessorImplinvoke0(Native Method) at sunreflectNativeMethodAccessorImplinvoke(NativeMethodAccessorImpljava57) at sunreflectDelegatingMethodAccessorImplinvoke(DelegatingMethodAccessorImpljava43) at javalangreflectMethodinvoke(Methodjava606) at orgspringframeworkaopsupportAopUtilsinvokeJoinpointUsingReflection(AopUtilsjava302) at orgspringframeworkaopframeworkReflectiveMethodInvocationinvokeJoinpoint(ReflectiveMethodInvocationjava190) at orgspringframeworkaopframeworkReflectiveMethodInvocationproceed(ReflectiveMethodInvocationjava157) at orgspringframeworktransactioninterceptorTransactionInterceptor$1proceedWithInvocation(TransactionInterceptorjava99) at orgspringframeworktransactioninterceptorTransactionAspectSupportinvokeWithinTransaction(TransactionAspectSupportjava281) at orgspringframeworktransactioninterceptorTransactionInterceptorinvoke(TransactionInterceptorjava96) at orgspringframeworkaopframeworkReflectiveMethodInvocationproceed(ReflectiveMethodInvocationjava179) at orgspringframeworkaopframeworkJdkDynamicAopProxyinvoke(JdkDynamicAopProxyjava207) at comsunproxy$Proxy163onMessage(Unknown Source) at orgspringframeworkjmslistenerAbstractMessageListenerContainerdoInvokeListener(AbstractMessageListenerContainerjava746) at orgspringframeworkjmslistenerAbstractMessageListenerContainerinvokeListener(AbstractMessageListenerContainerjava684) at orgspringframeworkjmslistenerAbstractMessageListenerContainerdoExecuteListener(AbstractMessageListenerContainerjava651) at orgspringframeworkjmslistenerAbstractPollingMessageListenerContainerdoReceiveAndExecute(AbstractPollingMessageListenerContainerjava315) at orgspringframeworkjmslistenerAbstractPollingMessageListenerContainerreceiveAndExecute(AbstractPollingMessageListenerContainerjava233) at orgspringframeworkjmslistenerDefaultMessageListenerContainer$AsyncMessageListenerInvokerinvokeListener(DefaultMessageListenerContainerjava1150)
Domibus 334 Administration Guide
Page 127 134
at orgspringframeworkjmslistenerDefaultMessageListenerContainer$AsyncMessageListenerInvokerexecuteOngoingLoop(DefaultMessageListenerContainerjava1142) at orgspringframeworkjmslistenerDefaultMessageListenerContainer$AsyncMessageListenerInvokerrun(DefaultMessageListenerContainerjava1039) at javalangThreadrun(Threadjava745) Caused by javaxnetsslSSLHandshakeException Received fatal alert handshake_failure at sunsecuritysslAlertsgetSSLException(Alertsjava192) at sunsecuritysslAlertsgetSSLException(Alertsjava154) at sunsecuritysslSSLSocketImplrecvAlert(SSLSocketImpljava1979) at sunsecuritysslSSLSocketImplreadRecord(SSLSocketImpljava1086) at sunsecuritysslSSLSocketImplperformInitialHandshake(SSLSocketImpljava1332) at sunsecuritysslSSLSocketImplstartHandshake(SSLSocketImpljava1359) at sunsecuritysslSSLSocketImplstartHandshake(SSLSocketImpljava1343) at sunnetwwwprotocolhttpsHttpsClientafterConnect(HttpsClientjava563) at sunnetwwwprotocolhttpsAbstractDelegateHttpsURLConnectionconnect(AbstractDelegateHttpsURLConnectionjava185) at sunnetwwwprotocolhttpHttpURLConnectiongetOutputStream(HttpURLConnectionjava1092) at sunnetwwwprotocolhttpsHttpsURLConnectionImplgetOutputStream(HttpsURLConnectionImpljava250) at orgapachecxftransporthttpURLConnectionHTTPConduit$URLConnectionWrappedOutputStreamsetupWrappedStream(URLConnectionHTTPConduitjava236) at orgapachecxftransporthttpHTTPConduit$WrappedOutputStreamhandleHeadersTrustCaching(HTTPConduitjava1302) at orgapachecxftransporthttpHTTPConduit$WrappedOutputStreamonFirstWrite(HTTPConduitjava1262) at orgapachecxftransporthttpURLConnectionHTTPConduit$URLConnectionWrappedOutputStreamonFirstWrite(URLConnectionHTTPConduitjava267) at orgapachecxfioAbstractWrappedOutputStreamwrite(AbstractWrappedOutputStreamjava47) at orgapachecxfioAbstractThresholdOutputStreamwrite(AbstractThresholdOutputStreamjava69) at orgapachecxfioAbstractWrappedOutputStreamwrite(AbstractWrappedOutputStreamjava60) at orgapachecxfioCacheAndWriteOutputStreamwrite(CacheAndWriteOutputStreamjava89) at orgapachecxfattachmentAttachmentSerializerwriteProlog(AttachmentSerializerjava172) at orgapachecxfinterceptorAttachmentOutInterceptorhandleMessage(AttachmentOutInterceptorjava72) 43 more
Solution If you receive this error then itrsquos likely that you configured the client with TLSv11 while the server only accepts TLSv12
Domibus 334 Administration Guide
Page 128 134
OPERATIONAL GUIDELINES
In this section you will find some recommendations on how to administer Domibus in an efficient way The following topics are tackled JMS Queue management log management capacity planning database management and the monitoring of message life cycle
JMS Queue Management
Domibus provides following out of the box features to manage the JMS Queues used in Domibus (see also sect94- Queue Monitoring)
Inspecting and filtering the messages from a queue based on the contents of Source Period
JMS Type or Selector
Move message from the DLQ (Dead Letter Queue) to the original Queue
Delete stuck or pending message(s) from Queues
It is recommended to monitor the Queue size and number of messages in the different Queues If some messages are stuck in any of the Queue then alerts must be sent to the Domibus Administrator
Please pay special attention to the deadletter queue (DLQ) Messages stuck in this queue is a signal that there is some issue in Domibus that needs to be analysed and an alert should be sent to the Domibus Administrator
Important
The lsquoListPendingMessagesrsquo operation on WS Plugin browses the JMS queue Max count is limited to destination MaxBrowsePageSize which can be changed via the lsquodomibuslistPendingMessagesmaxCountrsquo Domibus property
If your received messages are not returned by the webservice listPendingMessages method the you should
1 increase the value of the lsquodomibuslistPendingMessagesmaxCountrsquoproperty 2 delete the messages from the domibusnotificationwebservice queue with selector NOTIFICATION_TYPE=MESSAGE_SEND_SUCCESS using JMX tools httpactivemqapacheorghow-can-i-monitor-activemqhtml
Log Management
1721 Log Level
It is recommended that the log level is correctly set in all the environments
The log level should be set to INFODEBUG in all the test environments for de-bugging purpose
The log level should be set to ERRORWARN in production environment (keeping log level to INFO in production environment will degrade the performance of Domibus)
Domibus 334 Administration Guide
Page 129 134
1722 Log Rotation and Archiving
It is recommended that log rotation and archiving logic is implemented
Domibus provides by default log rotation but Domibus administrator should manage Domibus archiving logic
1723 Log Monitoring
It is recommended to monitor continuously Domibus logs It can be done using an automated script which looks for keywords like ERROR WARNING etc and reports all the errors and warnings to the Domibus administrator
Capacity Planning
1731 JVM Memory Management
Hereafter some recommendations
the JVM memory parameters must first be tested in a test environment with the load
expected in production
the JVM parameters ie heap size must be monitored with the help of automated scripts and
any abnormal hikes in heap size must be reported to the administrator
1732 CPU IO operations and Disk Space Monitoring
CPU IO operations and disk space must be continuously monitored using automated scripts Any abnormal hikes must be reported to Domibus administrator and further investigated
Database Management
1741 Database Monitoring
It is important to monitor the database size
The Payload of the message is deleted from the sending Access Point Only the metadata of the message stays in the table The Payload from the receiving Access Point is deleted based on the retention policy defined in the Pmode settings
Domibus uses approximately 40 MB of table space to store the metadata of 1000 messages
1742 Database Archiving
Since the Database contains AS4 receipts that are used for non-repudiation purposes they should be archived before purging the database
The metadata of the database can be purged if it is no longer required
1743 Monitor Message Life Cycle
It is recommended to monitor the message status in the TB_MessageLog table Automated scripts can be used to count different status in the table
Please pay special attention to the following statuses
Domibus 334 Administration Guide
Page 130 134
WAITING_FOR_RETRY this means that there is some issue between C2 and C3 that must be
resolved
SEND_FAILURE this means that that there is some issue between C2 and C3 that must be
resolved
SEND_ENQUEUED this message status is part of the successful message life cycle however
abnormal increase in the count of messages with this status means that there is an issue
Further investigation is recommended
Domibus 334 Administration Guide
Page 131 134
ANNEX 1 - USAGE OF CERTIFICATES IN PEPPOL AND OASIS
C2 C3
Keystore Truststore Keystore Truststore
PEPPOL
Certificate Senders (issued by CA) Empty Receivers CAs
Note
C2 signs the message with its private key
C2 discover C3s public certificate from the SMP
C3 signs the receipt with its private key
The receiver trusts all senders whos certificate were issue dby these CAs
OASIS
Certificate Senders (issued by CA) SMPs Receivers CAs
Note
C2 signs the message with its private key
C2 discover C3s public certificate from the SMP To trust the SMP the sender needs its public certificate
C3 signs the receipt with its private key
The receiver trusts all senders whos certificate were issue dby these CAs
Domibus 334 Administration Guide
Access Point Page 132 134
ANNEX 2 ndash DOCUMENT PARTS
Domibus 334 Administration Guide
Access Point Page 133 134
LIST OF FIGURES
Figure 1 - Diagram representing the Deployment of Domibus in a Cluster on WebLogic 23 Figure 2 - Diagram representing the Deployment of Domibus in a Cluster on Tomcat 39 Figure 3 - Diagram representing the Deployment of Domibus in a Cluster on WildFly 54 Figure 4 - Message Service Handler diagram 57 Figure 5 - PMode view 68
Standard Service 8am to 6pm (Normal EC working Days)
Standby Service 6pm to 8am (Commission and Public Holidays Weekends)
Only for critical and urgent incidents and only by phone
Domibus 334 Administration Guide
Page 7 134
INTRODUCTION
This Administration Guide is intended for Server Administrators in charge of installing managing and troubleshooting an eDelivery Access Point
Purpose
The purpose of this guide is to provide detailed information on how to deploy and configure Domibus on WebLogic Tomcat and WildFly with MySQL or Oracle It also provides detailed descriptions of related Security Configurations (Policies Certificates) Message Filtering PMode Configuration Application Monitoring Custom Plugins Registration JMS Monitoring Data Archiving Troubleshooting and TLS Configuration
The commands and configuration files listed in this document usually contain a mix of reserved words (commands instructions and system related special words) and user defined words (chosen by the user) as well as comments and preferred values for certain variables The conventions used in this document to distinguish between them are the followings
To keep this document release agnostic as much as possible the strings x-y-z or xyz are intended to refer to the version of Domibus discussed in this version of the document in the present case Domibus 334
Bold is used for reserved words and commands
Normal italic together with a short description of the argument is used for user-defined names (chosen by you to designate items like users passwords database etc) Normally contains at least 2 words separated by _
Bold and Italic is used for advisable values which can be changed by the user depending on their infrastructure
Comments are sometimes added to describe the purpose of the commands usually enclosed in brackets ()
By default non-OS specific paths will be described using Linux patterns
Example 1 Sample Oracle Statement
create user edelivery_user identified by edelivery_password
grant all privileges to edelivery_user
(Where edelivery_user and edelivery_password are names chosen by the user)
- edelivery_user domibus_schema and edelivery_password are names chosen by the user
- localhost3306 represents hostnameport parameters of the MySQL database)
Domibus 334 Administration Guide
Page 10 134
PREREQUISITES
Please install the following software on the target system For further information and installation details we kindly advise you to refer to the software owners documentation
Java runtime environnement (JRE) version 7 or 8 httpwwworaclecomtechnetworkjavajavasedownloadsindexhtml
One of the supported Database Management Systems
o MySQL 56 or above
o Oracle 10g+
If you dont plan to deploy Domibus according to the Pre-Configured Single Server Deployment method you must also install one of the supported applicationweb servers
o WebLogic 12c
o WildFly 9
o Apache Tomcat 80x
All Domibus installation resources including full distributions and documentation can be found on the Single Web Portal httpseceuropaeucefdigitalwikidisplayCEFDIGITALDomibus
Binaries repository
All the Domibus 334 artefacts can be directly downloaded from the CEF Digital site (cf[REF1])
Domibus 334 Administration Guide
Page 11 134
DOMIBUS DEPLOYMENT
Remark
The variable cef_edelivery_path referring to the folder where the package is installed will be used later in this document
Database Configuration
For this step you will have to use the following resources (see section sect31ndashBinaries repository for the download location)
domibus-distribution-XYZ-sql-scriptszip
411 MySQL and Oracle Deletion scripts
A deletion script for MySQL (mysql5innoDb-334-delete-dbsql) and Oracle (oracle10g-334-delete-dbsql) Domibus DB is available in the domibus-distribution-XYZ-sql-scriptszip
The purpose of the script is to delete all messages within a user defined period to recover disk space The script requires a START_DATE parameter and an END_DATE parameter to be set
The tables affected by the execution of this script are
TB_MESSAGING
TB_ERROR_LOG
TB_PARTY_ID
TB_RECEIPT_DATA
TB_PROPERTY
TB_PART_INFO
TB_RAWENVELOPE_LOG
TB_ERROR
TB_USER_MESSAGE
TB_SIGNAL_MESSAGE
TB_RECEIPT
TB_MESSAGE_INFO
TB_MESSAGE_LOG Any information relevant to a message received or sent during the predefined period will be removed from these tables
In order to execute this script it is advised to use a UI tool such as SQL developer of MySQL workbench Important in order to keep the JMS queues synchronized with the DB data that will be deleted by this script the Domibus Administrator should remove manually the associated JMS messages from the plugin notifications queues
412 MySQL configuration
1 Unzip domibus-distribution-XYZ-sql-scriptszip in cef_edelivery_pathsql-scripts
Domibus 334 Administration Guide
Page 12 134
2 Open a command prompt and navigate to this directory cef_edelivery_pathsql-scripts
3 (Optional) Storing payload messages in a database with size over 30 MB
Domibus can temporarily store the messages in the database They are not deleted before they are successfully transferred to the final recipient (see sect7 ndash PMode Configuration) Therefore it is required to increase the maximum allowed size of packets Update the default properties of myini (Windows) or mycnf (Linux)
o max_allowed_packet property
The maximum size of one packet or any generated or intermediate string or any parameter sent by the mysql_stmt_send_long_data() C API function max_allowed_packet=512M
o innodb_log_file_size property
Size of each log file in a log group You should set the combined size of log files to about 25-100 of your buffer pool size to avoid unneeded buffer pool flush activity on log file overwrite However note that larger logfile size will increase the time needed for the recovery process innodb_log_file_size=5120M
o Restart MySQL service (Windows)
MySQL service
4 (Optional) For storing payload messages in a file system instead of a database see sect52 ndash Domibus Properties)
5 For MySQL 8 and ConnectorJ 80x please set the database timezone One way of setting the timezone is to modify the MySQL myini configuration file by adding the following property with the adjusted timezone It is recommended that the database timezone is the same as the timezone of the machine where Domibus is installed
default-time-zone=+0000
6 Execute the following MySQL commands at the command prompt
Remark
User defined names like root_password domibus_schema etc are in italic as
described in the Convention section
mysql -h localhost -u root_user --password=root_password -e drop schema if exists domibus_schemacreate schema domibus_schemaalter database domibus_schema charset=utf8 collate=utf8_bin create user edelivery_userlocalhost identified by edelivery_passwordgrant all on domibus_schema to edelivery_userlocalhost
Domibus 334 Administration Guide
Page 13 134
The above creates a schema (domibus_schema) and a user (edelivery_user) that have all the privileges on the schema
mysql -h localhost -u root_user --password=root_password domibus_schema lt mysql5innoDb-xyzddl
The above creates the required tables in domibus_schema
Remark
If you are using Windows make sure to have the parent directory of mysqlexe added to your PATH variable
413 Oracle configuration
1 Unzip domibus-distribution-XYZ-sql-scriptszip in cef_edelivery_pathsql-scripts
2 Open a command prompt and navigate to this directory cef_edelivery_pathsql-scripts
3 Open a command line session log in and execute the following commands
sqlplus sys as sysdba (password should be the one assigned during the Oracle installation ) =========================================================================== Once logged in Oracle CREATE USER ltedelivery_usergt IDENTIFIED BY ltedelivery_passwordgt DEFAULT TABLESPACE lttablespacegt QUOTA UNLIMITED ON lttablespacegt GRANT CREATE SESSION TO ltedelivery_usergt GRANT CREATE TABLE TO ltedelivery_usergt GRANT CREATE VIEW TO ltedelivery_usergt GRANT CREATE SEQUENCE TO ltedelivery_usergt GRANT EXECUTE ON DBMS_XA TO ltedelivery_usergt GRANT SELECT ON PENDING_TRANS$ TO ltedelivery_usergt GRANT SELECT ON DBA_2PC_PENDING TO ltedelivery_usergt GRANT SELECT ON DBA_PENDING_TRANSACTIONS TO ltedelivery_usergt CONNECT ltedelivery_usergt SHOW USER (should return edelivery_user) oracle10g-xyzddl EXIT ===========================================================================
Domibus on WebLogic 1213
This section does not include the installation of WebLogic server 1213 It is assumed that the WebLogic Server is installed and a Domain is created Hereafter the domain location will be referred as DOMAIN_HOME (user defined name)
Domibus 334 Administration Guide
Page 14 134
Remark
The Apache CXF library referred by Domibus internally uses the environment variable javaiotmpdir to buffer large attachments received If the property javaiotmpdir is not specified then by default this points to the ltWeblogic_domain_directorygt It is recommended to point this to a local directory _tmp on each managed server and accessible by the Weblogic application server The disk space allocated for _tmp directory would depend on the size of attachments received On production environment it is recommended to provide 100GB for _tmp
421 Single Server Deployment
For this step you will have to use the following resources (see section sect31ndashBinaries repository for the download location)
1 Download and unzip domibus-distribution- XYZ-weblogic-configurationzip in the directory DOMAIN_HOMEconfdomibus
2 Download and unzip domibus-distribution- XYZ-weblogic-warzip in a temporary folder to prepare it for deployment
3 Configure your Keystore based on section sect512 ndash Certificates
4 Add the following lines in
o For Windows DOMAIN_HOMEbinsetDomainEnvcmd
Locate the set DOMAIN_HOME statement and add the following lines after
hellip set DOMAIN_HOME Added for Domibus
Domibus 334 Administration Guide
Page 15 134
set EXTRA_JAVA_PROPERTIES=EXTRA_JAVA_PROPERTIES -Ddomibusconfiglocation=DOMAIN_HOMEconfDomibus -Djavaiotmpdir=ltpath to _tmp directorygt hellip
o For Linux DOMAIN_HOMEbinsetDomainEnvsh
Locate the export DOMAIN_HOME statement and add the following lines after
hellip export DOMAIN_HOME Added for Domibus EXTRA_JAVA_PROPERTIES=$EXTRA_JAVA_PROPERTIES -Ddomibusconfiglocation=$DOMAIN_HOMEconfdomibus -Djavaiotmpdir=ltpath to _tmp directorygt export EXTRA_JAVA_PROPERTIES hellip
5 Run the WebLogic Scripting Tool (WLST) in order to create the JMS resources and the Database datasources from the command line
o Download the WLST Package from following location httpseceuropaeucefdigitalartifactcontentrepositorieseDeliveryeueuropaecdigitipciswslt-api191wslt-api-191zip
o Configure the WSLT API tool
Unzip the wslt-api-191zip
Define the WL_HOME as a system environment variable to point to the WebLogic lsquowlserverrsquo directory as defined in the DOMAIN_HOMEbinsetDomainEnv[cmd|sh]
eg WL_HOME=wls12130wlserver
o Take the script WeblogicSingleServerproperties from domibus-distribution-XYZ-weblogic-configurationzip under the scripts directory and copy the WeblogicSingleServerproperties file into the wslt-api-191 directory and adapt the following properties
Adapt the properties for connecting to the WebLogic domain
MySQL configuration is commented by default To enable MySQL remove the comment () from the lines below Dont forget to add the comment () for Oracle to disable it
o Start the WebLogic domain from within DOMAIN_HOME
For Windows startWebLogiccmd
For Linux startWebLogicsh
o Execute the following command from within the wlstapi-191bin directory
For Windows wlstapicmd scriptsimportpy --property WeblogicSingleServerproperties
For Linux wlstapish scriptsimportpy --property WeblogicSingleServerproperties
Expected result
6 Activate the use of the authorization providers to protect the JMX access
7 The database dialect is pre-configured to use the Oracle database If you are using a MySQL database you should adapt the following properties in ltDOMAIN_HOMEgtconfdomibusdomibusproperties as highlighted in the example below
8 Install the WS Plugin For more details see section sect6212 ndash WebLogic
9 Deploy domibus-distribution-XYZ-weblogicwar
o Click on Install
o Navigate to the location of the war file and click Next
Domibus 334 Administration Guide
Page 20 134
o Choose Install this deployment as an application and click Next
o Accept the default options and click Next
Domibus 334 Administration Guide
Page 21 134
o Select the following option and click Finish
Domibus 334 Administration Guide
Page 22 134
o Here is an overview of the resulting settings you can now click on the Save button
The expected positive response to the deployment request should be the following
10 Verify the installation by navigating with your browser to httplocalhost7001domibus-weblogic if you can access the page it means the deployment was successful
(By default User = admin Password = 123456)
Remark
It is recommended to change the passwords for the default users (See sect91 ndash Administration for further information)
Domibus 334 Administration Guide
Page 23 134
Expected result
422 Clustered Deployment
Figure 1 - Diagram representing the Deployment of Domibus in a Cluster on WebLogic
Domibus 334 Administration Guide
Page 24 134
Remark
In this section we assume that a Domain and a WebLogic Cluster are already setup
For this step you will have to use the following resources (see section sect31ndashBinaries repository for the download location)
1 Download and unzip domibus-distribution- XYZ-weblogic-configurationzip in in a shared location that is accessible by all the nodes from the cluster We will refer to this directory as cef_shared_edelivery_pathDomibus
2 Download and unzip domibus-distribution- XYZ-weblogic-warzip in a temporary folder to prepare it for deployment
3 Configure your Keystore based on section sect512 ndash Certificates
4 Add the following lines in
o For Windows DOMAIN_HOMEbinsetDomainEnvcmd
Locate the set DOMAIN_HOME statement and add the following lines after
hellip set DOMAIN_HOME Added for Domibus set EXTRA_JAVA_PROPERTIES=EXTRA_JAVA_PROPERTIES -Ddomibusconfiglocation=DOMAIN_HOMEconfDomibus -Djavaiotmpdir=ltpath to _tmp directorygt hellip
o For Linux DOMAIN_HOMEbinsetDomainEnvsh
Locate the export DOMAIN_HOME statement and add the following lines after
hellip export DOMAIN_HOME Added for Domibus EXTRA_JAVA_PROPERTIES=$EXTRA_JAVA_PROPERTIES -Ddomibusconfiglocation=$DOMAIN_HOMEconfdomibus -Djavaiotmpdir=ltpath to _tmp directorygt export EXTRA_JAVA_PROPERTIES
Domibus 334 Administration Guide
Page 25 134
hellip
5 Run the WebLogic Scripting Tool (WLST) in order to create the necessary JMS resources and Database datasources from the command line
o Download the WLST Package from the following location httpseceuropaeucefdigitalartifactcontentrepositorieseDeliveryeueuropaecdigitipciswslt-api191wslt-api-191zip
o Configure the WSLT API tool
Unzip the wslt-api-191zip
Define the WL_HOME (SET or export command depending on your operating system) environment variable to point to the WebLogic wlserver directory
eg WL_HOME=wls12130wlserver
o Take the script WeblogicClusterproperties from domibus-distribution-XYZ-weblogic-configurationzip under the scripts directory and copy the WeblogicClusterproperties file into the wslt-api-191 directory and apply the following changes
Adapt the properties for connecting to the WebLogic domain
MySQL configuration is commented by default To enable MySQL remove the comment () from the lines below Dont forget to add the comment () for Oracle to disable it
6 Activate the use of the authorization providers to protect the JMX access
7 The database dialect is pre-configured to use the Oracle database If you are using the MySQL database you should adapt the dialect as highlighted in the text below in ltDOMAIN_HOMEgtconfdomibusdomibusproperties file
8 Install the WS plugin For more details refer to chapter sect6212 ndash WebLogic
9 Deploy domibus-distribution-XYZ-weblogicwar
Domibus 334 Administration Guide
Page 29 134
o Click Install
o Navigate to location DOMAIN_HOMEconfdomibus where the domibus-distribution-XYZ-weblogicwar file has been previously copied
o Select the domibus-distribution-XYZ-weblogicwar file and click Next
o Choose Install this deployment as an application and click Next
Domibus 334 Administration Guide
Page 30 134
o Select your cluster for the deployment target and click Next
Domibus 334 Administration Guide
Page 31 134
o Select the following options and click Next
Domibus 334 Administration Guide
Page 32 134
o Select the following option and click Finish
o Here is an overview of the resulting settings you can now click on the Save button
The expected positive response to the deployment request should be the following
Domibus 334 Administration Guide
Page 33 134
10 Verify the installation by navigating with your browser to httplocalhost7001domibus-weblogic
If you can access the page it means the deployment was successful
(by default user = admin password = 123456)
Remark
It is recommended to change the passwords for the default users (See sect91 ndash Administration for further information)
Expected result
Domibus 334 Administration Guide
Page 34 134
Domibus on Tomcat
Remarks
As Tomcat is not a full Java EE application server and does not offer JMS capabilities by default Domibus uses ActiveMQ as an in-memory JMS broker when deployed on a Tomcat servlet container The configuration for the ActiveMQ JMS broker can be found in cef_edelivery_pathdomibusinternalactivemqxml
The Apache CXF library referred by Domibus internally uses the environment variable javaiotmpdir to buffer large attachments received If the property javaiotmpdir is not specified then by default this points to the ltCATALINA_BASE directorytempgt It is recommended to point this to a local directory _tmp on each managed server and accessible by the Tomcat server The disk space allocated for _tmp directory would depend on the size of attachments received On production environment it is recommended to provide 100GB for _tmp
431 Pre-Configured Single Server Deployment
For this step you will have to use the following resources (see section sect31ndashBinaries repository for the download location)
domibus-distribution-XYZ-tomcat-fullzip
1 Unzip the archive
o Unzip domibus-distribution-XYZ-tomcat-fullzip to a location on your physical machine cef_edelivery_path
2 Prepare the database
o For MySQL database
Add MySQL JDBC driver (available on MySQL official web site cf [REF2]) in the folder cef_edelivery_pathdomibuslib
Remark
The version of the JDBC driver has to be mysql-connector-java-5140jar or higher
Edit the properties file cef_edelivery_pathconfdomibusdomibusproperties and adjust the highlighted parts in the text below according to your environment The properties associated to the database configuration are pre-configured for the MySQL database
---------------------------------- Database --------------------------------- Database server name domibusdatabaseserverName=localhost
Domibus 334 Administration Guide
Page 35 134
Database port domibusdatabaseport=3306 XA properties domibusdatasourcexapropertyuser=edelivery_user domibusdatasourcexapropertypassword=edelivery_password MySQL domibusdatasourcexapropertyurl=jdbcmysql$domibusdatabaseserverName$domibusdatabaseport domibus_schemapinGlobalTxToPhysicalConnection=true Non-XA Datasource domibusdatasourceurl=jdbcmysql$domibusdatabaseserverName$domibusdatabaseportdomibus_schemauseSSL=false domibusdatasourceuser=edelivery_user domibusdatasourcepassword=edelivery_password
o For Oracle database
Add the Oracle JDBC driver (eg ojdbc7jar) (available on the Oracle official web site cf[REF3]) in the cef_edelivery_pathdomibuslib folder
Edit the properties file cef_edelivery_pathconfdomibusdomibusproperties and adjust the highlighted parts in the text below according to your environment
---------------------------------- Database --------------------------------- Database server name domibusdatabaseserverName=localhost Database port domibusdatabaseport=1521 XA Datasource domibusdatasourcexaxaDataSourceClassName=oraclejdbcxaclientOracleXADataSource XA properties domibusdatasourcexapropertyuser=edelivery_user domibusdatasourcexapropertypassword=edelivery_password domibusdatasourcexapropertyurl=jdbcoraclethin$domibusdatabaseserverName$domibusdatabaseport[SID|Service] Non-XA Datasource domibusdatasourcedriverClassName=oraclejdbcOracleDriver domibusdatasourceURL=jdbcoraclethin$domibusdatabaseserverName$domibusdatabaseport[SID|Service] domibusdatasourceuser=edelivery_user domibusdatasourcepassword=edelivery_password
Remark
Configure the database dialect as it is pre-configured for MySQL by default
3 Configure your Keystore based on section sect512 ndash Certificates
4 Set JVM parameters
Domibus expects a single environment variable domibusconfiglocation pointing towards the cef_edelivery_pathconfdomibus folder
You can do this by editing the first command lines of cef_edelivery_pathdomibusbinsetenvbat (Windows) or cef_edelivery_pathdomibusbinsetenvsh (Linux) Set CATALINA_HOME equal to the absolute path of the installation cef_edelivery_pathdomibus
o For Windows edit cef_edelivery_pathdomibusbinsetenvbat by adding the following
hellip
set CATALINA_HOME=cef_edelivery_pathdomibus set CATALINA_TMPDIR=ltpath to _tmp directorygt set JAVA_OPTS=JAVA_OPTS -Dfileencoding=UTF-8 -Xms128m -Xmx1024m -XXPermSize=64m set JAVA_OPTS=JAVA_OPTS -Ddomibusconfiglocation=CATALINA_HOMEconfdomibus hellip
o For Linux edit cef_edelivery_pathdomibusbinsetenvsh by adding the following
cd cef_edelivery_path domibusbinchmod u+x sh startupsh
6 Display the Domibus home page on your browser httplocalhost8080domibus (By default User = admin Password = 123456)
Remark
It is recommended to change the passwords for the default users See sect91 ndash Administration for further information
If you can access the page it means the deployment was successful
Domibus 334 Administration Guide
Page 37 134
Expected result
432 Single Server Deployment
For this step you will have to use the following resources (see sect31ndash Binaries repository for the download location)
domibus-distribution-XYZ-tomcat-configurationzip
domibus-distribution-XYZ-tomcat-warzip
We assume that an Apache Tomcat 80x is already installed and the installation location is now considered as your cef_edelivery_pathdomibus
1 Download and unzip the artefact domibus-distribution-XYZ-tomcat-configurationzip into the
directory cef_edelivery_pathconfdomibus
2 Configure the MySQL or Oracle datasource as indicated in sect431 ndash Pre-Configured Single Server
Deployment
3 Configure your Keystore based on sect512 ndash Certificates
4 Execute step 4 from sect431 ndash Pre-Configured Single Server Deployment
5 If not already present create a folder and name it temp under cef_edelivery_pathconfDomibus
6 Rename domibus-MSH-XYZ-tomcatwar to domibuswar and deploy it to cef_edelivery_pathdomibus webapps
7 Launch the Domibus application
o For Windows
cd cef_edelivery_pathdomibusbin startupbat
o For Linux
Domibus 334 Administration Guide
Page 38 134
cd cef_edelivery_path domibusbin chmod +x sh startupsh
7 Display the Domibus home page on your browser httplocalhost8080domibus (By default User = admin Password = 123456)
Remark
It is recommended to change the passwords for the default users See sect91 ndash Administration for further information
If you can access the page it means the deployment was successful
Expected result
Domibus 334 Administration Guide
Page 39 134
433 Clustered Deployment
Figure 2 - Diagram representing the Deployment of Domibus in a Cluster on Tomcat
Remark
In this section we assume that a JMS Broker and a Loadbalancer are configured separately (eg httpd)
For this step you will have to use the following resources (see sect31ndash Binaries repository for the download location)
domibus-distribution-XYZ-tomcat-fullzip
domibus-distribution-XYZ-tomcat-warzip
1 Follow steps 1 2 3 4 and 5 from the sect432 ndash Single Server Deployment
2 Set the JVM parameters
Domibus expects a single JVM parameter $domibusconfiglocation pointing towards the cef_edelivery_pathconfdomibus folder
You can do this by editing cef_edelivery_pathdomibusbinsetenvbat (Windows) or cef_edelivery_pathdomibusbinsetenvsh (Linux) Set CATALINA_HOME equal to the absolute path of the installation cef_edelivery_pathDomibus
o For Windows edit cef_edelivery_pathdomibusbinsetenvbat by adding the following
Remark
your_node_id refers to the installed node in the cluster which starts normally at 01(then 02 etc)
hellip
set CATALINA_HOME=cef_edelivery_pathdomibus set CATALINA_TMPDIR=ltpath to _tmp directorygt set JAVA_OPTS=JAVA_OPTS -Dfileencoding=UTF-8 -Xms128m -Xmx1024m -XXPermSize=64m set JAVA_OPTS=JAVA_OPTS -Ddomibusconfiglocation=CATALINA_HOMEconfdomibus
Domibus 334 Administration Guide
Page 40 134
set JAVA_OPTS=JAVA_OPTS -Ddomibusnodeid=your_node_id hellip
o For Linux edit cef_edelivery_pathdomibusbinsetenvsh by adding the following
4 Change the following properties related to the Atomikos configuration in parameters in cef_edelivery_pathconfdomibusdomibusproperties
For clustered deployment
Uncomment the following lines comatomikosicatchoutput_dir=$domibusworklocation$domibusconfiglocationworktransactions$domibusnodeid comatomikosicatchlog_base_dir=$domibusworklocation$domibusconfiglocationworktransactions$domibusnodeidlog Comment the following lines comatomikosicatchoutput_dir=$domibusworklocation$domibusconfiglocationworktransactions comatomikosicatchlog_base_dir=$domibusworklocation$domibusconfiglocationworktransactionslog
5 Follow step 6 and 7 from the sect432 ndash Single Server Deployment
Domibus 334 Administration Guide
Page 41 134
Domibus on WildFly
Remark
The Apache CXF library referred by Domibus internally uses the environment variable javaiotmpdir to buffer large attachments received If the property javaiotmpdir is not specified then this defaults to values provided by the operating system to the JRE On UnixLinux systems this usually defaults to tmp On Windows systems this usually defaults to TEMP folder It is recommended to point this to a local directory _tmp on each managed server and accessible by the Wildfly server The disk space allocated for _tmp directory would depend on the size of attachments received On production environment it is recommended to provide 100GB for _tmp
441 Pre-Configured Single Server Deployment
In this section we assume that WildFly is installed at the location cef_edelivery_pathdomibus
For this step you will have to use the following resources (see section sect31ndash Binaries repository for the download location)
domibus-distribution-XYZ-wildfly-fullzip
1 Download and unzip the domibus-distribution-XYZ-wildfly-fullzip archive in your cef_edelivery_path location
2 Configure the MySQL database (Option 1)
o Drivers
Create the directory cef_edelivery_pathdomibusmodulessystemlayersbasecommysqlmain if it does not exist Under this directory
Download the MySQL JDBC driver available on MySQL official web site (cf[REF2]) and copy it in the folder
Remark
The version of the driver has to be mysql-connector-java-5140jar or higher
Create or edit the file cef_edelivery_pathdomibusmodulessystemlayersbasecommysqlmainmodulexml and copy the following module configuration Make sure to put the name of the driver you are using as an argument of resource-root element eg mysql-connector-java-5140jar
Create the directory cef_edelivery_pathdomibusmodulessystemlayersbasecomoraclemain if it does not exist Under this directory
Download and copy the Oracle JDBC driver (eg ojdbc7jar available on the Oracle official web site cf[REF3]) in the folder
Copy the file cef_edelivery_pathdomibusmodulessystemlayersbasecommysqlmainmodulexml in the recently created folder
Domibus 334 Administration Guide
Page 44 134
Edit modulexml by copying the following module configuration Make sure to put the name of the driver you are using as an argument of resource-root element eg ojdbc7jar
Add your DBMS driver metadata to the Drivers section in cef_edelivery_pathdomibusstandaloneconfigurationstandalone-fullxml (only change the items described below while replacing MYSQL configuration in the process)
4 Configure your Keystore based on sect512 ndash Certificates
5 Run the standalone server
o For Windows under cef_edelivery_pathdomibusbin
o standalonebat --server-config=standalone-fullxml
o For Linux under cef_edelivery_pathdomibusbin
o standalonesh --server-config=standalone-fullxml
6 Display the Domibus home page in your browser httplocalhost8080domibus-wildfly (by default User = admin Password = 123456)
Remark
It is recommended to change the passwords for the default users See sect91 ndash Administration for further information
If you can access the page it means the deployment was successful
Domibus 334 Administration Guide
Page 46 134
Expected result
442 Single Server Deployment
In this section we assume that WildFly is installed at the location cef_edelivery_pathdomibus
For this step you will have to use the following resources (see section sect31-Binaries repository for the download location)
domibus-distribution-XYZ-wildfly-warzip
domibus-distribution-XYZ-wildfly-configurationzip
1 Follow steps 2 (MySQL) or 3 (Oracle) from the sect441 ndash Pre-Configured Single Server Deployment
2 Configure the environment variables
For Windows edit cef_edelivery_pathdomibusbinstandaloneconfbat as follows
hellip set JAVA_OPTS=-Xms128M ndashXmx1024M -XXMaxPermSize=256M set JAVA_OPTS=JAVA_OPTS -DjavanetpreferIPv4Stack=true set JAVA_OPTS=JAVA_OPTS -Ddomibusconfiglocation=JBOSS_HOMEconfdomibus -Djavaiotmpdir=ltpath to _tmp directorygt hellip
For UnixLinux edit cef_edelivery_pathdomibusbinstandaloneconf as follows
3 Download and unzip domibus-distribution-XYZ-wildfly-configurationzip in the directory cef_edelivery_pathconfdomibus
4 Configure your Keystore based on sect512 ndash Certificates
5 Configure the JMS resources
Configure the JMS resources in the configuration file cef_edelivery_pathdomibusstandaloneconfigurationstandalone-fullxml by adding the jms-connection-factories and jms-queues
7 Connect to the Admin Console of WildFly at httplocalhost9990console
8 Click on Deployments in the console menu then click on Add
9 Select Upload a new deployment then click Next
10 Browse to the location of the domibus-distribution-XYZ-wildflywar file select it and click Next
Domibus 334 Administration Guide
Page 53 134
11 The deployment is successful when the name of the war file appears in the Deployment column
Expected result
443 Clustered Deployment
For this step you will have to use the following resources (see section sect31ndashBinaries repository for the download location)
domibus-distribution-XYZ-wildfly-configurationzip
domibus-distribution-XYZ-wildfly-warzip
In this section we assume that the setup of Wildfly 9 in domain mode has already been done and that the cluster has been enabled as described in the official documentation For more details on how to perform an installation of Wildfly 9 in domain mode please refer to the official documentation (cf[REF4])
Domibus 334 Administration Guide
Page 54 134
Figure 3 - Diagram representing the Deployment of Domibus in a Cluster on WildFly
In order to install Domibus in a WildFly cluster please follow the steps below
1 Download and unzip domibus-distribution-XYZ-wildfly-configurationzip in a shared location that is accessible by all the nodes from the cluster We will refer to this directory as cef_shared_edelivery_pathDomibus
2 Follow steps 2 (MySQL) or 3 (Oracle) from the sect441 ndash Pre-Configured Single Server Deployment
Remarks
o This step needs to be performed on all the nodes from the cluster o In the following 2 steps we will edit the profile full-ha from the configuration file
domainconfigurationdomainxml located in the master node
3 Configure the JMS queues and topics as indicated in sect442 point 5 ndash Configure the JMS resources
4 Configure the database dialect as indicated in sect441 point 3 ndash Edit the configuration file cef_edelivery_pathconfdomibusdomibusproperties
5 Configure the environment variables as follows
For Windows edit cef_edelivery_pathbindomainconfbat located in each WildFly node The environment variable setting needs to be performed for every node in the cluster
helliphelliphelliphelliphelliphellip set JAVA_OPTS=-Xms128M ndashXmx1024M -XXMaxPermSize=256M set JAVA_OPTS=JAVA_OPTS -DjavanetpreferIPv4Stack=true set JAVA_OPTS=JAVA_OPTS -Ddomibusconfiglocation=JBOSS_HOMEconfdomibus -Djavaiotmpdir=ltpath to _tmp directorygt helliphelliphelliphelliphelliphellip
Domibus 334 Administration Guide
Page 55 134
For UnixLinux edit cef_edelivery_pathbindomainconf located in each WildFly node The environment variable setting needs to be performed for every node in the cluster
bindomainconf is located in each WildFly node The environment variable setting needs to be performed in every node from the cluster
6 Deploy the domibus-distribution-XYZ-wildflywar to the cluster We will use the Wildfly Administration console for performing the deployment We will deploy the application on the other-server-group cluster which is configured step by step in the official documentation (cf[REF4])
Domibus 334 Administration Guide
Page 56 134
Domibus 334 Administration Guide
Page 57 134
DOMIBUS CONFIGURATION
Domibus exposes the Message Service Handler endpoint as servicesmsh Only this endpoint has to be reachable by the other AS4 Access Points and it is typically exposed on the internet
If the Default WS Plugin (sect612 ndash WS Plugin) is deployed Domibus exposes the Default WS Plugin endpoint as servicesbackend This endpoint should ONLY be exposed to the backend client(s) within the trusted zone and it should not be exposed to the internet
Figure 4 - Message Service Handler diagram
Security Configuration
511 Security Policies
The WS-Security policy used by Domibus when exchanging messages can be specified in the PMode configuration file (sect7 ndash PMode Configuration) The recommended security policy is eSensPolicyv20xml it can be found under cef_edelivery_pathconfdomibuspolicieseSensPolicyv20xml
512 Certificates
The certificates that are used for signing and encrypting the messages when communicating with the other Access Points can be configured in the property file located under cef_edelivery_pathconfdomibusdomibusproperties By default Domibus is pre-configured to use self-signed certificates Please note that self-signed certificates should be used only for testing purposes and are not intended for production use In order to configure Domibus to use custom certificates the following properties need to be modified
Domibus 334 Administration Guide
Page 58 134
The location of the keystore domibussecuritykeystorelocation=$domibusconfiglocationkeystoresgateway_keystorejks Type of the used keystore domibussecuritykeystoretype=jks The password used to load the keystore domibussecuritykeystorepassword=test123 Private key The alias from the keystore of the private key domibussecuritykeyprivatealias=blue_gw The private key password domibussecuritykeyprivatepassword=test123 Truststore The location of the truststore domibussecuritytruststorelocation=$domibusconfiglocationkeystoresgateway_truststorejks Type of the used truststore domibussecuritytruststoretype=jks The password used to load the trustStore domibussecuritytruststorepassword=test123
1 Create if not present a folder cef_edelivery_pathconfdomibuskeystores
2 Get your key pair from an external provider (Self-signed certificates should only be used for testing purposes not production) If you are interested in using the CEF Public Key Infrastructure Solution (cf[REF5])
3 Create if not present the public and private keys containers (eg truststorejks and keystorejks)
4 Import your private key into your keystore
Remarks
o Your private key and your keystore should always stay secret Please never share them
o The keystore alias has to be the same as the party ID defined in the sect7 ndash PMode Configuration It is strongly recommended to put your key pair (private and public key) and the public key of the other participants you trust in two separate containers
Domibus Properties
The following properties defined in the property file cef_edelivery_pathconfdomibusdomibusproperties can be used to configure Domibus
Configuration Property Default value Purpose
domibusmshmessageidsuffix domibuseu
This Property is used to generate the random Message id with a fixed suffix which is set by default to domibuseu The resulting format will be UUID$domibusmshmessageidsuffix This property is mandatory
domibusmshretrycron 05 It is the retry cron job to send the messages It is set by default to every 5 seconds This property is mandatory
Domibus 334 Administration Guide
Page 59 134
domibusdispatchebmserrorunrecoverableretry true This property should be set to true if Domibus needs to retry sending the failed messages This property is mandatory
domibussmlzone accedeliverytecheceuropaeu Set the SMLZone if Domibus needs to be used under Dynamic discovery model This property is only mandatory if an SML is used
domibusdynamicdiscoveryclientspecification OASIS
The property specifies the dynamic discovery client to be used for the dynamic process Possible values OASIS and PEPPOL
domibusdynamicdiscoverypeppolclientmode TEST
This information is passed to the PEPPOL client that requires to know if the usage is in PRODUCTION or TEST mode
Apart from validating response of signer certificates against the truststore the Oasis Dynamic Discovery Client gives the possibility to add (optional) a regular expression to validate any certificate metadata related to the subject of the signer certificate
Example domibusdynamicdiscoveryoasisclientregexCertificateSubjectValidation=^EHEALTH_SMP$
domibusdynamicdiscoverypartyidresponderrole
The role of the responder PartyId may be defined here (default values are urnfdcpeppoleu2017rolesapas4 for PEPPOL and httpdocsoasis-openorgebxml-msgebmsv30nscore200704responder for OASIS
The type of the PartyId may be defined here (default values are urnfdcpeppoleu2017identifiersap for PEPPOL and urnoasisnamestcebcorepartyid-typeunregistered for OASIS)
domibusbackendjmsInQueue domibusbackendjmsinQueue This queue is the entry point for messages to be sent by the sending MSH This property is only mandatory if the JMS plugin is used
domibusjmsqueuepull domibusinternalpullqueue Domibus internal queue used for dispatching the pull requests
domibusdeploymentclustered false If true the quartz scheduler jobs are clustered This property is mandatory it should be set to true if the deployment of Domibus is done in a cluster
messageFactoryClass
The factory for creating SOAPMessage objects Default values - TomcatWebLogic comsunxmlinternalmessagingsaajsoapver1_2SOAPMessageFactory1_2Impl - WildFly comsunxmlmessagingsaajsoapver1_2SOAPMessageFactory1_2Impl
domibusdispatcherallowChunking true Allows chunking when sending messages to other Access Points
domibusdispatcherchunkingThreshold 104857600
If domibusdispatcherallowChunking is true this property sets the threshold at which messages start getting chunked(in bytes) Messages under this limit do not get chunked Defaults to 100 MB
domibusdispatcherconcurency 5-20
Specify concurrency limits via a lower-upper String eg 5-10 or a simple upper limit String eg 10 (the lower limit will be 1 in this case) when sending messages to other Access Points
Domibus 334 Administration Guide
Page 60 134
domibusmshpullcron 0 0 01 Cron expression used for configuring the message puller scheduling
domibuspullqueueconcurency
1-1 Number of threads used to parallelize the pull requests
domibuspullrequestsendperjobcycle 1 Number of pull requests executed every cron cycle
domibusretentionWorkercronExpression 060 Cron expression used for configuring the retention worker scheduling The retention worker deletes the expired messages (downloaded and not-downloaded)
messageretentiondownloadedmaxdelete 50 This property is used to tweak the maximum downloaded messages to be deleted by the retention worker
messageretentionnot_downloadedmaxdelete 50 This property is used to tweak the maximum not-downloaded messages to be deleted by the retention worker
domibusattachmentstoragelocation -
It is possible to configure Domibus to save the message payloads on the file system instead of the database This setting is recommended when exchanging payloads bigger than 30MB In order to enable the file system storage please add the following property domibusattachmentstoragelocation= your_file_system_location where your_file_system_location is the location on the file system where the payloads will be saved Remark In a cluster configuration the file system storage needs to be accessible by all the nodes from the cluster
domibustaskExecutorthreadCount 50 Tomcat only customize the task executor threads count
domibusjmxuser jmsManager WebLogic specific the user that will be used to access the queues via JMX
domibusjmxpassword jms_Manager1 WebLogic specific the associated password of the configured domibusjmxuser
domibussendMessagemessageIdPattern ^[x20-x7E]$
When an initiator backend client submits messages to Domibus for transmission with the message id field populated then the message id should be RFC2822 compliant The pattern specified here ensures this validation This field is optional In case the existing client does not match this message id pattern during submission then this property can be omitted to skip the validation
Domibus 334 Administration Guide
Page 61 134
domibuslistPendingMessagesmaxCount 500
This property specifies the maximum number of messages that would be served when the listPendingMessages operation is invoked Setting this property is expected to avoid timeouts due to huge resultsets being served A value of 0 would return all the pending messages This property is optional Omitting this property would default the resultset size to 500 Note For Tomcat server the maximum number of shown messages in queue monitoring is defined by the lsquodomibuslistPendingMessagesmaxCountrsquo property
domibusfourcornermodelenabled true
This property affects the GUI search and behaviour If the property is set to false Final Recipient and Original Sender criteria disappear from Messages Filter Messages column picker and from Message details in the GUI The internal SQL queries for User and Signal Message do not use TB_PROPERTYNAME = finalRecipient and originalSender anymore
domibusdispatcherconnectionTimeout 240000
For connection between the access points ndash C2 amp C3 Specifies the amount of time in milliseconds that the consumer will attempt to establish a connection before it times out 0 is infinite
domibusdispatcherreceiveTimeout 240000 For connection between the access points ndash C2 amp C3 Specifies the amount of time in milliseconds that the consumer will wait for a response before it times out 0 is infinite
domibusmshretrytolerance
10800000
Timeout tolerance for retry messages (in miliseconds) Scheduled retries that due to any reason were not performed within this period will be timeout
domibussendMessagefailuredeletepayload
false Whether to delete the message payload or send failure Defaults to false (the admin could put the message back in the send queue)
domibusauthunsecureLoginAllowed true The property specifies if authentication is required or not
domibuspmodedaoimplementation
CachingPModeProvider Internal configuration provider for managing the PMode access
Tomcat only The configuration file of the embedded ActiveMQ broker In case an external broker is used this property is not needed and it should be deleted from the property file
Tomcat only(XA datasource) The fully qualified underlying XADataSource class name
domibusdatasourcexamaxLifetime 60 Tomcat only(XA datasource) Sets the maximum amount of seconds that a connection is kept in the pool before it is destroyed automatically
domibusdatasourcexaminPoolSize 5
Tomcat only(XA datasource) Sets the minimum pool size The amount of pooled connections will not go below this value The pool will open this amount of connections during initialization
domibusdatasourcexamaxPoolSize 100 Tomcat only(XA datasource) Sets the maximum pool size The amount of pooled connections will not go above this value
domibusdatabaseserverName localhost Tomcat only(XA datasource) The host name or the IP address of the database server
domibusdatabaseport 3306 Tomcat only(XA datasource) The port number of the database server
domibusdatasourcexapropertyuser edelivery Tomcat only(XA datasource) A user who has access to the Domibus database schema
domibusdatasourcexapropertypassword edelivery Tomcat only(XA datasource) The password of the user defined in the domibusdatasourcexapropertyuser property
If activated Domibus will verify before sending a User Message if the receivers certificate is valid and not revoked If the receivers certificate is not valid or it has been revoked Domibus will not send the message and it will mark it as SEND_FAILURE
domibussendercertificatevalidationonsending true
If activated Domibus will verify before sending a User Message if his own certificate is valid and not revoked If the certificate is not valid or it has been revoked Domibus will not send the message and it will mark it as SEND_FAILURE (default is true)
If activated Domibus will verify before receiving a User Message if the senders certificate is valid and not revoked If the certificate is not valid or it has been revoked Domibus will not accept the message (default is true)
domibussendertrustvalidationonreceiving false An extra security validation that requires that the party name reflected in the alias of the sender public key should also be contained in the subject of the certificate
domibusconsoleloginmaximumattempt
5 Maximum connection attempts before the account gets locked (suspended)
domibusconsoleloginsuspensiontime 60 Property defining how many minutes the account remains locked (suspended) before it is automatically unlocked by the system
Configuration Property Default value Purpose
Proxy Settings In case your Access Point has to use a proxy server you can configure it with these properties
domibusproxyenabled false truefalse depending on whether you need to use proxy or not
domibusproxyhttphost - Host name of the proxy server
domibusproxyhttpport - Port of Proxy server
domibusproxyuser - Username for authentication on the proxy server
domibusproxypassword - Password
domibusproxynonProxyHosts - Indicates the hosts that should be accessed without going through the proxy
Table 1 - Domibus Properties
Domibus 334 Administration Guide
Page 65 134
PLUGIN MANAGEMENT
This section describes the different types of plugins and their registration process
Default Plugins
Domibus comes with three default plugins The three Interface Control Documents (ICD) describe these three plugins (JMS WS and File System Plugin) (cf[REF6])
611 JMS Plugin
For the JMS plugin you will have to use the following resources (see section sect 31- Binaries repository for the download location)
domibus-distribution-XYZ-default-jms-pluginzip
612 WS Plugin
For the WS plugin you will have to use the following resources (see section sect31-Binaries repository for the download location)
domibus-distribution-XYZ-default-ws-pluginzip
6121 Domibus authentication
The default web service plugin includes an example of how to implement authentication and
authorization By default this feature is disabled to insure backwards compatibility with older
versions of Domibus
The documentation below answers the question how to enable and use the authentication in the
WS plugin
The default WS plugin supports
- Basic Authentication
- X509 Certificates Authentication
- Blue Coat Authentication
Remark
Blue Coat is the name of the reverse proxy at the Commission It forwards the request in HTTP
with the certificate details inside the request (ldquoClient-Certrdquo header key)
When more than one authentication method is used the Basic Authentication takes precedence on
both http and https
When no Basic Authentication is provided X509 certificates are expected on https requests
When no Basic Authentication is provided Blue Coat certificates are expected on http requests
Domibus 334 Administration Guide
Page 66 134
6122 Domibus Authorization
For convenience the WS plugin uses exactly the same database as configured for Domibus core to
store the userspasswords and certificate ids To learn more about authorization (and
authentication) please refer to the plugin cookbook (cf[REF6])
There are two default users already inserted in the database (make sure you already ran the migration scripts)
admin and user both with 123456 as password
admin has the role ROLE_ADMIN and user has the role ROLE_USER
Roles
ROLE_ADMIN has the permission to call
- submitMessage with any value for originalSender property
- retrieveMessage (any message among messages notified to this plugin)
- listPendingMessages will list all pending messages for this plugin
- getStatus and getMessageErrors
ROLE_USER has the permission to call
- submitMessage with originalSender equal to the originalUser
- retrieveMessage only if finalRecipient equals the originalUser
- listPendingMessages only messages with finalRecipient equal to the origi-nalUser
6123 Enable the authentication in Domibus
To enable the authentication at Domibus level the following steps must be configured
1 In confdomibusdomibusproperties set the property
ldquodomibusauthunsecureLoginAllowedrdquo to false
domibusauthunsecureLoginAllowed=false
2 The application server must be configured to allow https requests and pass the
authentication credentials to Domibus
613 File System Plugin
For the File System plugin you will have to use the following resources (see section sect31-Binaries repository for the download location)
domibus-distribution-XYZ-default-fs-pluginzip
Domibus 334 Administration Guide
Page 67 134
Custom Plugin
Users can develop their own plugins Please refer to the plugin cookbook for more details (cf[REF6])
621 Plugin registration
Remark
Please refer to section 914 - Message Filtering for the routing of the specific plugin after registering the plugin on your specific Application Server
6211 Tomcat
In order to install a custom plugin for Tomcat please follow the steps below
1 Stop Tomcat server
2 Copy the custom plugin jar file to the plugins folder CATALINA_HOMEconfdomibuspluginslib
3 Copy the custom plugin XML configuration file to CATALINA_HOMEconfdomibuspluginsconfig
4 Start Tomcat server
Remark
CATALINA_HOME is the folder where the Tomcat is installed
6212 WebLogic
In order to install a custom plugin for WebLogic please follow the steps below
1 Stop the WebLogic server
2 Copy the custom plugin jar file to the plugins folder DOMAIN_HOMEconfdomibuspluginslib
3 Copy the custom plugin XML configuration file to DOMAIN_HOMEconfdomibuspluginsconfig
4 Start the WebLogic server
Remark
DOMAIN_HOME is the folder corresponding to the WebLogic domain
6213 WildFly
In order to install a custom plugin please follow the steps below
1 Stop the WildFly server
2 Copy the custom plugin jar file to the plugins folder cef_edelivery_path confdomibuspluginslib
3 Copy the custom plugin XML configuration file to cef_edelivery_path confdomibuspluginsconfig
4 Start the WildFly server
Domibus 334 Administration Guide
Page 68 134
PMODE CONFIGURATION
Processing Modes (PModes) are used to configure Access Points The PMode parameters are loaded into the Access Point via an XML file
The features described in the PMode file are Security Reliability Transport Business Collaborations Error Reporting Message Exchange Patterns (MEPs) and Message Partition Channels (MPCs)
As different messages may be subject to various types of processing or as different business domains may have several requirements Access Points commonly support several PModes Some PMode parameters are mandatory others are optional For more information please refer to the Access Point Component Offering Document
Configuration
In Domibus PModes are XML files that you can create or edit You can configure the two files given cef_edelivery_pathconfpmodesdomibus-gw-sample-pmode-party_id_name1xml and cef_edelivery_pathconfpmodesdomibus-gw-sample-pmode-party_id_name2xml
The party_id_name1 value must be replaced with your own party name and the party_id_name2 with your corresponding party name
The party_id must match the alias of the certificate in the keystore and the endpoint must be the external access link to your instance
Remark
This step could be managed by a PMode Configuration Manager known to your Business Owner
If a new participants Access Point is joining your network you need to configure your PMode accordingly and re-upload it like mentioned in sect714 ndash Upload new Configuration
Processing modes (PModes) describe how messages are exchanged between AS4 partners (in this case Access Points blue_gw and red_gw) These files contain the identifiers of each AS4 Access Point (identified as parties in the PMode file below)
Sender and Receiver Identifiers represent the organizations that send and receive the business documents They are both used in the authorization process (PMode) Therefore adding modifying or deleting a participant implies modifying the corresponding PMode files
Here is an example of a PMode XML file
Remark
In this setup we have allowed each party (blue_gw or red_gw) to initiate the process If only blue_gw is supposed to send messages then put only blue_gw in ltinitiatorPartiesgt and red_gw in ltresponderPartiesgt
MPCs - Container which defines the different MPCs (Message Partition Channels)
MPC PMode[1]BusinessInfoMPC The value of this parameter is the identifier of the MPC (Message Partition Channel) to which the message is assigned It maps to the attribute Messaging UserMessage
Message Partition Channel allows the partition of the flow of messages from a Sending MSH to a Receiving MSH into several flows each of which is controlled separately An MPC also allows merging flows from several Sending MSHs into a unique flow that will be treated as such by a Receiving MSH The value of this parameter is the identifier of the MPC to which the message is assigned
MessageRetentionDownloaded - Retention interval for messages already delivered to the backend
Domibus 334 Administration Guide
Page 73 134
MessageRetentionUnDownloaded - Retention interval for messages not yet delivered to the backend
Parties - Container which defines the different PartyIdTypes Party and Endpoint
PartyIdTypes maps to the attribute MessagingUserMessage PartyInfo
Message Unit bundling happens when the Messaging element contains multiple child elements or Units (either User Message Units or Signal Message Units)
Party ID maps to the element MessagingUserMessage PartyInfo
The ebCore Party ID type can simply be used as an identifier format and therefore as a convention for values to be used in configuration and ndash as such ndash does not require any specific solution building block
Endpoint maps to PMode[1]ProtocolAddress
The endpoint is a party attribute that contains the link to the MSH The value of this parameter represents the address (endpoint URL) of the Receiver MSH (or Receiver Party) to which Messages under this PMode leg are to be sent Note that a URL generally determines the transport protocol (eg if the endpoint is an email address then the transport protocol must be SMTP if the address scheme is http then the transport protocol must be HTTP)
AS4 - Container
Reliability [Nonrepudiation] [ReplyPattern]
Nonrepudiation maps to PMode[1]SecuritySendReceiptNonRepudiation ReplyPattern maps to PMode[1]SecuritySendReceiptReplyPattern
PMode[1]SecuritySendReceiptNonRepudiation value = lsquotrue (to be used for non-repudiation of receipt) value = false (to be used simply for reception awareness) PMode[1]SecuritySendReceiptReplyPattern value = lsquoResponsersquo (sending receipts on the HTTP response or back-channel) PMode[1]SecuritySendReceiptReplyPattern value = lsquoCallbackrsquo (sending receipts use a separate connection)
retryTimeout maps to PMode[1]ReceptionAwarenessRetry=true PMode[1]ReceptionAwarenessRetryParameters retryCount maps to PMode[1]ReceptionAwarenessRetryParameters strategy maps to PMode[1]ReceptionAwarenessRetryParameters duplicateDetection maps to PMode[1]ReceptionAwarenessDuplicateDetection
These parameters are stored in a composite string bull retryTimeout defines timeout in seconds bull retryCount is the total number of retries bull strategy defines the frequency of retries The only strategy available as of now is CONSTANT bull duplicateDetection allows to check duplicates when receiving twice the same message The only duplicateDetection available as of now is TRUE
Securities - Container
Security - Container
Policy PMode[1]Security NOT including PMode[1]SecurityX509SignatureAlgorithm
The parameter defines the name of a WS-SecurityPolicy file
This parameter is not supported by WS-SecurityPolicy and therefore it is defined separately
BusinessProcessConfiguration - Container
Agreements maps to ebMessaging UserMessage CollaborationInfo AgreementRef
This OPTIONAL element occurs zero times or once The AgreementRef element is a string that identifies the entity or artifact governing the exchange of messages between the parties
Actions - Container
Action maps to Messaging UserMessage CollaborationInfoAction
This REQUIRED element occurs once The element is a string identifying an operation or an activity within a Service that may support several of these
Services - Container
ServiceTypes Type maps to Messaging UserMessage CollaborationInfo Service[type]
This REQUIRED element occurs once It is a string identifying the service that acts on the message and it is specified by the designer of the service
Domibus 334 Administration Guide
Page 75 134
MEP [Legs] - An ebMS MEP defines a typical choreography of ebMS User Messages which are all related through the use of the referencing feature (RefToMessageId) Each message of an MEP Access Point refers to a previous message of the same Access Point unless it is the first one to occur Messages are associated with a label (eg request reply) that precisely identifies their direction between the parties involved and their role in the choreography
Bindings - Container
Binding - The previous definition of ebMS MEP is quite abstract and ignores any binding consideration to the transport protocol This is intentional so that application level MEPs can be mapped to ebMS MEPs independently from the transport protocol to be used
Roles - Container
Role Maps to PModeInitiatorRole or PModeResponderRole depending on where this is used In ebMS3 message this defines the content of the following element bull For Initiator MessagingUserMessagePartyInfoFromRole bull For Responder MessagingUserMessagePartyInfoToRole
The required role element occurs once and identifies the authorized role (fromAuthorizedRole or toAuthorizedRole) of the Party sending the message (when present as a child of the From element) or receiving the message (when present as a child of the To element) The value of the role element is a non-empty string with a default value of httpdocsoasis-openorgebxml-msgebmsv30nscore200704defaultRole Other possible values are subject to partner agreement
Processes - Container
PayloadProfiles - Container
Payloads - Container
Domibus 334 Administration Guide
Page 76 134
Payload maps to PMode[1]BusinessInfoPayloadProfile
This parameter allows specifying some constraint or profile on the payload It specifies a list of payload parts A payload part is a data structure that consists of five properties
1 name (or Content-ID) that
is the part identifier and
can be used as an index in
the notation
PayloadProfile
2 MIME data type (textxml
applicationpdf etc)
3 name of the applicable
XML Schema file if the
MIME data type is
textxml
4 maximum size in kilobytes
5 Boolean string indicating
whether the part is
expected or optional
within the User message
The message payload(s) must match this profile
ErrorHandlings - Container
ErrorHandling - Container
ErrorAsResponse maps to PMode[1]ErrorHandlingReportAsResponse
This Boolean parameter indicates (if true) that errors generated from receiving a message in error are sent over the back-channel of the underlying protocol associated with the message in error If false such errors are not sent over the back-channel
ProcessErrorNotifyProducer maps to PMode[1]ErrorHandlingReportProcessErrorNotifyProducer
This Boolean parameter indicates whether (if true) the Producer (applicationparty) of a User Message matching this PMode should be notified when an error occurs in the Sending MSH during processing of the User Message to be sent
ProcessErrorNotifyConsumer maps to PMode[1]ErrorHandlingReportProcessErrorNotifyProducer
This Boolean parameter indicates whether (if true) the Consumer (applicationparty) of a User Message matching this PMode should be notified when an error occurs in the Receiving MSH during processing of the received User message
Domibus 334 Administration Guide
Page 77 134
DeliveryFailureNotifyProducer maps to PMode[1]ErrorHandlingReportDeliveryFailuresNotifyProducer
When sending a message with this reliability requirement (Submit invocation) one of the two following outcomes shall occur - The Receiving MSH successfully delivers (Deliver invocation) the message to the Consumer - The Sending MSH notifies (Notify invocation) the Producer of a delivery failure
Legs - Container
Leg - Because messages in the same MEP may be subject to different requirements - eg the reliability security and error reporting of a response may not be the same as for a request ndash the PMode will be divided into legs Each user message label in an ebMS MEP is associated with a PMode leg Each PMode leg has a full set of parameters for the six categories above (except for General Parameters) even though in many cases parameters will have the same value across the MEP legs Signal messages that implement transport channel bindings (such as PullRequest) are also controlled by the same categories of parameters except for BusinessInfo group
Process - In Process everything is plugged together
Table 2 - Domibus PMode configuration to ebMS3 mapping
714 Upload new Configuration
7141 Upload the PMode file
Remark In case of a cluster environment the PMode configuration is replicated automatically on all the nodes
1 To update the PMode configuration andor Truststore connect to the Administration Console using the administrators credentials (by default User = admin Password = 123456) to httplocalhost8080domibus
Remark
It is recommended to change the passwords for the default users See sect91 ndash Administration for further information
Domibus 334 Administration Guide
Page 78 134
2 Click on the PMode menu
Domibus 334 Administration Guide
Page 79 134
3 Press the Upload button
4 Press the Choose File button and navigate to the PMode file select it and click on the Open button (or equivalent) in the standard dialog box
Domibus 334 Administration Guide
Page 80 134
5 Once the file has been selected click OK to upload the PMode xml file
Remark
Every time a PMode is updated the truststore is also reloaded from the filesystem
7142 Upload the Truststore
1 Select the Truststore menu and press the Upload button
Domibus 334 Administration Guide
Page 81 134
2 Navigate to the Truststore and select it by clicking on the Open button (or equivalent) of
the standard file open dialog
3 Once the file has been selected enter the keystore password and click on the OK button
to activate the new truststore jks file
Domibus 334 Administration Guide
Page 82 134
SPECIAL SCENARIO SENDER AND RECEIVER ARE THE SAME
In this special scenario the Sender Access Point acts also as the Receiver Access Point Multiple backends can exchange messages via the same Access Point using the same or different plugins
PMode Configuration
A party (eg blue_gw) which is Sender and Receiver must be defined in both the ltinitiatorPartiesgt
A message that is sent to the same Access Point will have to contain the same party id in both From and To sections Below there is an example of a message sent using the Default WS Plugin
Due to some limitations related to the uniqueness of the message identifier a convention has been defined in this scenario The message ID used for the received message is derived from the message ID used for the sent message with the following rule the suffix _1 is added to the sent message id
Example
sent message ID is ae15851e-78fb-4b51-aac8-333c08c450d6domibus
received message ID is ae15851e-78fb-4b51-aac8-333c08c450d6domibus_1
Domibus 334 Administration Guide
Page 84 134
ADMINISTRATION TOOLS
Administration Console
911 Changing passwords
It is recommended to change the passwords for the default users who are allowed to have access to the Domibus Administration Console mainly admin and user
1 In order to change the password for a user navigate to the Users menu entry to obtain the list of
configured users
2 To edit the user details click on the EDIT icon (in RED) DO NOT click on the BIN icon as this
would DELETE the record
Domibus 334 Administration Guide
Page 85 134
3 In the popup window choose a new password using the rules shown
4 Confirm the password
5 Click on OK
Domibus 334 Administration Guide
Page 86 134
6 When done either click on Save to save the new password or Cancel to leave the password
unchanged
912 User Account Lockout Policy
A user account lockout policy has been implemented on Domibus Admin Console By default if a user tries to log to the Admin Console with a wrong password 5 times in a row his account will be suspended (locked)
You can define in domibusproperties (section 52 Domibus Properties) the number of failed attempts after which a userrsquos account will be locked
By default a user remains suspended during one hour before his account is automatically unlocked and the user can try to log again
If the user wants his account to be unlocked without waiting the default one hour he can ask his administrator to unlock the account To unlock the account the administrator must change the userrsquos status on the Admin Console from ldquoSuspendedrdquo to ldquoActiverdquo
Select the suspended user and click on ldquoEditrdquo
Domibus 334 Administration Guide
Page 87 134
Re-activate the user (unlock it) by checking the ldquoActiverdquo status and confirming with OK
Do not forget to click on Save on the next window and then on Yes to confirm the change
Domibus 334 Administration Guide
Page 88 134
913 Adding new users
1 New users can be added to the existing default users (admin and user) by clicking on New
2 For each new user you must enter a username an email a role and a password
Domibus 334 Administration Guide
Page 89 134
3 Click on OK
4 Again once the user has been created do not forget to click on the Save button on the Users
page to register your changes on the system
914 Message Filtering
Domibus allows the routing of messages to different plugins based on some messages attributes
From initial sender (C1)
To final recipient (C4)
Domibus 334 Administration Guide
Page 90 134
Action defined as Leg in the PMode
Service as defined in the PMode
The following rules apply
Domibus considers the ordered list of filters to route all messages The first filter matching the filter criteria will define the target plugin The order of the plugin is therefore important in the routing process
Note 1 if the filters are all mutually exclusive the order would not matter
Note 2 The Persisted column indicates if the plugin filter configuration has already been saved If a plugin filter configuration has not already been saved the Persisted value is unchecked and an error message is shown on the top of the screen In this case it is strongly recommended to review the filters configuration and save it afterwards
One plugin may be applied to multiple filters This is done by the use of the OR criteria (cf backendWebservice in the example below)
Multiple attributes could also be defined in one filter This is done by the use of the AND criteria (cf the first filter in the example below)
One filter may have no criteria meaning that all messages (not matching previous filters) will be routed to the corresponding plugin automatically As a result subsequent filters will therefore not be considered for any incoming message In the example below the last filter routes all remaining messages to plugin backendWebservice
Domibus 334 Administration Guide
Page 91 134
Figure 9 ndash Message Filter Page
Use the New and Delete buttons to create or delete a filter
As the order matters move up and down actions allow placing each filter in the right order
Cf Move Up and Move Down buttons
After some changes have been applied to the filters the Cancel and Save buttons become active
- Press Cancel to cancel the changes
- Press Save to save the changes and activate them immediately
The console will ask the user to confirm the operation before proceeding
Example of message attributes used for routing and matching the first filter used in the example above
Action TC1Leg1
Service bdxnoprocesstc2
From domibus-blueurnoasisnamestcebcorepartyid-typeunregistered
To domibus-redurnoasisnamestcebcorepartyid-typeunregistered
That information can be found in the incoming message received by Domibus (eg see below)
Domibus administration dashboard includes a message logging page that gives the administrator information related to sent messages received messages and their status (SENT RECEIVED FAILED ACKNOWLEDGEDhellip)
The following state machines illustrate the evolution of the processing of messages according to the encountered events
Figure 10 - State machine of Corner 2 (sending access point)
Figure 11 - State machine of Corner 3 (receiving access point)
REJECTED
RECEIVED_WITH_WARNING
RECEIVED
DELETEDDOWNLOADED
[ebMS3 error receipt with severity FAILURE]
[ebMS3 error receipt with severity WARNING]
[ebMS3 receipt SUCCESS]
[Undownloaded retention period expired]
[C4 downloads message] [Download retention period expired]
[C4 downloads message] [Undownloaded retention period expired]
Domibus 334 Administration Guide
Page 93 134
Figure 12 - Domibus Message Log
Remark The administration dashboard is reachable via the following URLs httpyour_serveryour_port_numberdomibus (Tomcat) httpyour_serveryour_port_numberdomibus-wildfly (WildFly) httpyour_serveryour_port_numberdomibus-weblogic (WebLogic)
Application Logging
931 Domibus log files
Domibus has three log files
1 domibus-securitylog this log file contains all the security related information For example you can find information about the clients who connect to the application
2 domibus-businesslog this log file contains all the business related information For example when a message is sent or received etc
3 domibuslog this log file contains both the security and business logs plus miscellaneous logs like debug information logs from one of the framework used by the application etc
932 Logging properties
It is possible to modify the configuration of the logs by editing the logging properties file cef_edelivery_pathconfdomibuslogbackxml
Domibus 334 Administration Guide
Page 94 134
933 Error Log page
To go to the error log page of the Domibus Admin Console click on the Error log menu entry
This option lists all the Message Transfers error logs and includes the ErrorSignalMessageId ErrorDetail and Timestamp You can sort messages by using the up or down arrow to search for a specific message
Figure 13 - Domibus ndash Error Log page
Queue Monitoring
Domibus uses JMS queues to handle the messages
Domibus 334 Administration Guide
Page 95 134
Destination type
JNDI name Comment Description
Queue jmsdomibusinternaldispatchqueue No redelivery because redelivery of MSH messages is handled via ebMS3AS4
This queue is used for scheduling messages for sending via the MSH
Queue jmsdomibusinternalnotificationunknown Notifications about received messages (by the MSH) that do not match any backend routing criteria will be sent to this queue In production environment this queue should be monitored in order to handle those messages manually
Topic jmsdomibusinternalcommand This topic is used for sending commands to all nodes in a cluster For example it is used after a PMode was uploaded in order to notify all nodes to update their PMode cache (in case caching is enabled)
Queue jmsdomibusbackendjmsreplyQueue This queue is used for sending replies back to the sender of a message Replies contain a correlationId ebMS3 messageId (if possible) error messages (if available)
Queue jmsdomibusbackendjmsoutQueue Messages received by the MSH (that match the routing criteria for the JMS plugin) will be sent to this queue
Queue jmsdomibusbackendjmsinQueue This queue is the entry point for messages to be sent by the sending MSH
Queue jmsdomibusbackendjmserrorNotifyConsumer This queue is used to inform the receiver of a message that an error occurred during the processing of a received message
Queue jmsdomibusbackendjmserrorNotifyProducer This queue is used to inform the sender of a message that an error occurred during the processing of a message to be sent
Domibus 334 Administration Guide
Page 96 134
Queue jmsdomibusnotificationjms
Used for sending notifications to the configured JMS plugin
Queue jmsdomibusinternalnotificationqueue
This queue is used to notify the configured plugin about the status of the message to be sent
Queue jmsdomibusnotificationwebservice Used for sending notifications to the configured WS plugin
Queue jmsdomibusDLQ This is the Dead Letter Queue of the application The messages from other queues that reached the retry limit are redirected to this queue
Table 3 - Queue Monitoring
All these queues can be monitored and managed using the JMS Monitoring page which is accessible from the JMS Monitoring menu of the administration console
Warning For Tomcat server the maximum number of shown messages in the queue monitoring is defined by the lsquodomibuslistPendingMessagesmaxCountrsquo property In the Source field we have all the queues listed along with the number of messages pending in each queue
Domibus 334 Administration Guide
Page 97 134
If a queue is used internally by the application core its name will start with [internal] A regular expression is used to identify all the internal queues The value for this regular expression can be adapted in the domibusjmsinternalQueueexpression property from the
In the JMS Monitoring page the following operations can be performed
1 Inspecting and filtering the messages from a queue based on the following fields
a Signal Message id identifier of an error signal message
b Message id identifier of a message
c Error detail text of the error (full)
d AP Role role of the AP
e Error Code structured code of the error
f Source the source queue of the messages
g Error or Notified Time Period time interval that will filter the messages based on the
send dates
h JMS type the JMS header JMSType
i Selector the JMS message selector expression
Remark For more information on the JMS message headers and the JMS message selector please check the official documentation at httpsdocsoraclecomcdE19798-01821-1841bncesindexhtml
Domibus 334 Administration Guide
Page 98 134
2 Move a message
a Move the message from the DLQ to the original queue
- Select the JMS message from the DLQ and press the Move icon (in RED marker)
- Select the original queue from the Destination dropdown list in the dialog box
- Press the Ok button in the dialog and the message will be moved to the original
queue
Note the details of a message can be viewed by selecting it (double-clicking) from the message list
Domibus 334 Administration Guide
Page 99 134
Click Close to exit the dialog box
b Move multiple messages from the DLQ to the original queue
- Select multiple JMS messages from the DLQ and press the Move icon button
- Select the original queue from the Destination dropdown list and click Ok
Domibus 334 Administration Guide
Page 100 134
Remark
Please make sure that all the selected messages came from the same source queue Use the filtering capabilities to ensure this
3 Delete message(s)
a Delete one or more messages from one queue
- Select one or several JMS messages from the source queue and press the Delete
button
Domibus 334 Administration Guide
Page 101 134
- By clicking the Delete button the selected messages are removed from the screen
but you still have to confirm your changes by clicking on the Save button As long as
you have not clicked on the Save button your changes are not taken into account in
the system
- To cancel the changes you made click on the Cancel button instead
Domibus 334 Administration Guide
Page 102 134
Configuration of the queues
Queues should be configured appropriately and according to the backend system needs and re-delivery policy
951 Tomcat
Domibus uses ActiveMQ as JMS broker The various queues are configured in the cef_edelivery_pathconfdomibusinternalactivemqxml file
Please see ActiveMQ redelivery policy and configure the parameters below if needed
Access to the JMS messaging subsystem is protected by a username and a password in clear text defined in the Domibus properties file cef_edelivery_pathconfdomibusdomibusproperties
It is recommended to change the password for the default user
The user (activeMQusername) and the password (activeMQpassword) defined in the domibusproperties file are referenced in the authentication section of the activemqxml file provided
952 WebLogic
Please use the admin console of WebLogic to configure the re-delivery limit and delay if necessary
953 WildFly
Please use the admin console of WildFly to configure the re-delivery limit and delay if necessary
Domibus 334 Administration Guide
Page 104 134
LARGE FILES SUPPORT
Domibus supports transfers between Access Points of files up to 2 GB using Java 8 In order to compute the message signature Domibus loads the whole message into memory using a byte array In Java byte arrays can hold a maximum of 2 GB hence the Domibus limitation of 2 GB
If Domibus is started using Java 7 the limitation is 1 GB due to a limitation in Java 7 version
In order to optimize the sending of such large files HTTP chunking is activated by default in the connection with the receiver Access Points As chunked encoding is useful when sending larger amounts of data but decreases the performance on smaller amounts Domibus uses a threshold to activate the chunking when appropriate only
The following properties are used to configure chunking domibusdispatcherallowChunking and domibusdispatcherchunkingThreshold For more information about these properties please refer to the section 52 Domibus Properties
Domibus 334 Administration Guide
Page 105 134
DATA ARCHIVING
Whats archiving
Data archiving consists of moving messages that have been processed successfully or unsuccessfully by the access point to an external storage location for long-term retention
Archived data consists of older data that have been processed at the communication level by the access points that are still significant to the business and may be needed for future reference They may also be retained for legal constraints
Data archives are indexed and searchable to allow easy retrieval
It is not recommended to use Domibus as an archiving solution Nevertheless if the data really needs to be stored for long periods then it is possible to set the Data Retention Policy to allow it to be extracted from the database through the webservices or through an external archiving tool
Data Retention Policy
A data retention policy is a procedure established by the business for continuous information storage for operational legal or compliance reasons
The data retention policy needs to be defined based on the business needs and constraints
In Domibus the data retention policy can be found in the PMode file
In the above extract of the sample PMode configuration of Domibus the data retention policy is set to 14400 minutes (10 days) if the message is not downloaded This means that if the message is not downloaded it will be deleted and then only the metadata containing the information of the receiver and the acknowledgement will be retained
The data retention policy is set by default to 0 minutes if the message is downloaded This means that the message will be instantaneously deleted as soon as it is downloaded These two parameters retention_downloaded and retention_undownloaded can therefore be modified to meet the needs of the business
Data Extraction
In order to keep the metadata and the payload of the message for a longer period than the one set in the PMode it is recommended to extract it to an external storage As long as the retention worker does not delete it data can be extracted through the webservices or through an external archiving tool
Domibus 334 Administration Guide
Page 106 134
For more information please refer to the Data Model provided in the Domibus Software Architecture Document that can be found on the CEF Digital single web portal [REF6]
Domibus 334 Administration Guide
Page 107 134
NON REPUDIATION
In order to guarantee non-repudiation the sending Access Point (C2) stores the full SignalMessage including the MessageInfo the Receipt (that contains the NonRepudiationInformation for each part) and the signature of the receipt by the receiver Access Point (C3)
This will guarantee that the receiver Access Point (C3) cannot deny having received a message from the sender Access Point (C2) during the sending process However if the initial sender (C1) wants to be sure that the final recipient (C4) cannot deny having received a specific content inside this message then the sender must be able to show the specific content that was used to produce the receiver Access Point (C3) signature
Domibus as a sending Access Point (C2) keeps track of the metadata of the sent messages but does not store the actual message payloads Therefore it is recommended that the initial sender (C1) stores the message payloads safely for the time needed to guarantee non-repudiation of the sent messages
In order to guarantee non-repudiation the receiving Access Point (C3) stores the full UserMessage and the associated signature of the sender (C2)
This will guarantee that the sender Access Point (C2) cannot deny having sent a message to the receiver during the sending process However if the final recipient (C4) wants to be sure that the sender cannot deny having sent a specific content inside this message then the final recipient (C4) must be able to show the specific content that was used to produce the sender Access Point signature (C2)
Domibus as a receiving Access Point (C3) keeps track of the metadata of the received messages and will store the message payloads only for the (limited) duration configured in the retention period (specified in the PMode) Therefore it is recommended that the final recipient (C4) either stores the message payloads safely or aligns the retention period on the receiving Access Point (C3) with the time needed to guarantee non-repudiation of the received messages
Domibus 334 Administration Guide
Page 108 134
TLS CONFIGURATION
TLS Configuration
1311 Transport Layer Security in Domibus
One way of implementing TLS for the eDelivery AS4 profile is to use the TLS in the Domibus Message Handler (MSH) described below otherwise this would have to be handled at a higher level (eg Application Server Proxy etchellip)
To enable secure communication at the transport layer (TLS) between a sending and a receiving MSH (Access Point) both the client and the server need to be configured accordingly
The client is used in the initiator MSH to send the request and is therefore configured via CXF while the server is configured at containerapplication server level
1312 Client side configuration (One Way SSL)
The tlsClientParameters are configured in the cef_edelivery_pathconfdomibusclientauthenticationxml file
Remark your_trustore_ssl is used at the transport layer (SSL) while your_trustore described in sect512 ndash Certificates is used by Domibus to encrypt and sign (WS-Security)
When the clientauthenticationxml file is present and the endpoint of the receiving MSH is https the TLS parameters are added via the CXF framework to the send request
Domibus 334 Administration Guide
Page 109 134
The version of the TLS must be specified by setting secureSocketProtocol=TLSv12
If you use self-signed certificates you need to set disableCNCheck=true
The attribute disableCNCheck specifies whether JSSE should omit checking if the host name specified in the URL matches the host name specified in the Common Name (CN) of the servers certificate The attribute is false by default and must not be set to true during production use (cf[REF7])
Remark
TLSv12 is mandatory for eDelivery AS4 Profile
1313 Client side configuration (Two Way SSL)
The configuration is similar to the one used for One Way SSL except that the tlsClientParameters gets configured with both trustManagers and keystoreManagers The clientauthenticationxml file should look like this
your_trustore_ssl and your_keystore_ssl are used at the transport layer (SSL) while your_trustore and your_keystore described in sect512 ndash Certificates are used by Domibus to encrypt and sign (WS-Security)
Two Way SSL is optional and based on the eDelivery AS4 Profile
1314 Server side configuration
13141 Tomcat 8
In Serverxml add a new connector with the SSLEnabled attribute set to true
The keystore jks location and password must be specified otherwise the default ones will be taken into account
Domibus 334 Administration Guide
Page 110 134
TLS version can also be specified
The above connector has clientAuth=false which means that only the server has to authenticate itself (One Way SSL) To configure Two Way SSL which is optional in the eDelivery AS4 Profile set clientAuth=true in Serverxml and provide the location of the your_truststore_ssljks file so that the server can verify the client
Go to Servers select Server Name Configuration General then click on Client Cert Proxy Enabled
2 Add keystore and truststore
Go to Servers select Server Name Configuration Keystores and SSL tabs and use Custom Identity and Custom Trust then set keystore and trustore jks
To disable basic authentication at WebLogic level
By default WebLogic performs its own basic authentication checks before passing the request to Domibus As we want basic authentication to be performed by Domibus we need to disable it at the application server level
13144 Configure Basic and Certificates authentication in SoapUI
Go to File Preferences HTTP Settings and check the option Adds authentication information to outgoing requests
Domibus 334 Administration Guide
Page 112 134
Go to File Preferences SSL Settings add the KeyStore and KeyStore Password and check the option requires client authentication
To allow Basic Authentication select the Auth tab click Add New Authorization and select Basic Enter user and password (eg Username = admin Password = 123456)
13145 PMode update
If you enable HTTPS then your PMode Configuration Manager needs to make sure that all other endpoint PModes are modified accordingly
With the SSL connector configured as above the MSH endpoint is now httpsyour_domibus_host8443domibusservicesmsh
Domibus 334 Administration Guide
Page 113 134
After the updates upload the PModes via the Admin Console
In a dynamic discovery setup the sender andor the receiver parties and their capabilities are not configured in advance
The sending Access Point will dynamically retrieve the necessary information for setting up an interoperability process from the Service Metadata Publisher (SMP) The SMP stores the interoperability metadata which is a set of information on the recipient or end entity (its identifier supported business documents and processes) and AP (metadata which includes technical configuration information on the receiving endpoint such as the transport protocol and its address) cf[REF8]
The receiving AP registers its metadata in the SMP and configures the PMode to be able to accept messages from trusted senders that are not previously configured in the PMode The receiving AP will have to configure one process in its PMode for each SMP entry
The mapping between the PMode process and the SMP entry is defined in sect143 ndash PMode configuration for PEPPOL and sect148 - ndash PMode configuration for OASIS
Please note that the sender does not have to be registered in the SMP and the receiver merely extracts its identifier from the received message
The following sections describe how to configure Domibus AP in order to use Dynamic Discovery (sect143 ndash PMode configuration for PEPPOL sect144 ndash Policy and certificates for PEPPOL sect148 ndash PMode configuration for OASIS sect149 ndash Policy and certificates for OASIS)
Domibus configuration for PEPPOL
To enable the integration with the SMPSML components Domibus requires some changes in the domibusproperties configuration file which include
1 Adding the following properties to enable the usage of the PEPPOL dynamic discovery client
2 Setting the dynamic discovery client to use certificates to access the SMP These certificates are different in TEST and PRODUCTION therefore we need to specify the Mode used by the dynamic discovery client by setting the following property domibusdynamicdiscoverypeppolclientmodegtTEST
3 Setting the domibussmlzone property
4 Configuring the bean pModeProvider with DynamicDiscoveryPModeProvider
Domibus 334 Administration Guide
Page 115 134
PMode configuration for PEPPOL
1431 Sender PMode
In a dynamic discovery process the receiver of the messages is not known beforehand and therefore the PModeResponder parameter SHOULD NOT be set
The dynamic discovery process must include a leg which maps the configured entry (action service and service type ndash see section 145 ndash Message format for PEPPOL) of the Receiver in the SMP
The security policy to be used in the leg is the following (see section sect511 ndash Security Policies for more information)
initiatorRole=defaultInitiatorRole responderRole=defaultResponderRolegt ltinitiatorPartiesgt ltinitiatorParty name=senderaliasgt ltinitiatorPartiesgt lt-- no responderParties element --gt ltlegsgt ltleg name=pushTestcase1tc1Actiongt ltlegsgt ltprocessgt hellip
1432 Receiver PMode
Dynamic discovery configuration of the receiver is similar to the configuration of the sender except that the roles are swapped the sender of the messages is not known beforehand As a consequence the PModeInitiator parameter SHOULD NOT be set
The receiver must include the certificate of the trusted authority(ies) in its truststore It will only accept messages that were signed with certificates issued by the trusted authority(ies) (cf sect18 ndash Annex 1 - Usage of certificates in PEPPOL and OASIS for more information)
Message format for PEPPOL
When dynamic discovery is used the to field should not be statically configured in the PMode (the to field may even be omitted in the message) The lookup is performed by C2 based on the finalRecipient message property
Example of a message using the finalRecipient for dynamic discovery
The Service Metadata Record also provides the receiving ends certificate This certificate can be used to encrypt the message to be sent to the receiver The certificate can also provide the name of the gateway for this PMode by using the Certificates CNAME as the PMode identifier (cf[REF9])
Domibus configuration for OASIS
To enable the integration with the SMPSML components Domibus requires some changes in the domibusproperties configuration file
1 Add the following properties to enable the usage of the OASIS dynamic discovery client
Note this property is not mandatory as it defaults to the above value
2 Set the property domibussmlzone eg ehealthaccedeliverytecheceuropaeu
3 The bean pModeProvider must be configured with DynamicDiscoveryPModeProvider
PMode configuration for OASIS
1481 Sender PMode
In a dynamic discovery process the receiver of the messages is not known beforehand and therefore the PModeResponder parameter SHOULD NOT be set
Domibus 334 Administration Guide
Page 119 134
The dynamic discovery process must include a leg which maps the configured entry (action service and service type ndash cf 145 ndash Message format for PEPPOL) of the Receiver in the SMP
The security policy to be used in the leg is the following (see sect511 ndash Security Policies for more information)
Schema name should be added to action value Eg ehealth-actorid-qnsurnoasisnamesspecificationublschemaxsdCreditNote-2CreditNoteurnwwwcenbii
1482 Receiver PMode
The dynamic discovery configuration of the receiver is similar to the configuration of the sender except that the roles are swapped the sender of the messages is not known beforehand As a consequence the PModeInitiator parameter SHOULD NOT be set
The receiver must include the certificate of the trusted authority(ies) in its truststore It will only accept messages that were signed with certificates issued by the trusted authority(ies)
The sender truststore must include the SMP public certificate This certificate is used by the AP to validate the identity of the used SMP (cf sect18 ndash Annex 1 - Usage of certificates in PEPPOL and OASIS for more information)
Message format for OASIS
When dynamic discovery is used the to field should not be statically configured in the PMode (the to field may even be omitted in the message) The lookup is performed by C2 based on the finalRecipient message property
Note For OASIS clients in the PMode action value the document scheme must be included with the document ID (for PEPPOL client only document ID is needed)
Domibus 334 Administration Guide
Page 121 134
Example of message using the finalRecipient for dynamic discovery
In order to configure message pulling the process section should be configured with mep set to oneway and binding set to pull as shown in the following example
In the case of a pull process the initiatorParties section contains the party that initiate the pull request The responderParties section contains the parties that can be pulled from
In domibusproperties configuration file adapt the following properties to your needs Note that domibusmshpullcron and domibuspullqueueconcurency are mandatory
Cron expression used for configuring the message puller scheduling
domibusmshpullcron=0 0 01
Number of threads used to parallelize the pull requests
domibuspullqueueconcurency=1-1
Number or pull requests executed every cron cycle
domibuspullrequestsendperjobcycle=1
Configuration restriction
A correctly configured one-way pull process should only contain one party configured in the initiatorParties section
Different legConfiguration with the same defaultMpc (highlighted in red in the following configuration) should not be configured in the same pull process or across different pull processes
Domibus 334 Administration Guide
Page 123 134
If those restrictions are not respected the message will not be exchanged and a warning message will detail the configuration problem
SEVERE Exception sending context initialized event to listener instance of class orgspringframeworkwebcontextContextLoaderListener orgspringframeworkbeansfactoryBeanCreationException Error creating bean with name orgspringframeworkschedulingquartzSchedulerFactoryBean0 defined in ServletContext resource [WEB-INFmsh-configxml] Invocation of init method failed nested exception is orgquartzJobPersistenceException Failed to obtain DB connection from datasource springTxDataSourceorgspringframeworkschedulingquartzSchedulerFactoryBean0 comatomikosjdbcAtomikosSQLException Failed to grow the connection pool [See nested exception comatomikosjdbcAtomikosSQLException Failed to grow the connection pool] at orgspringframeworkbeansfactorysupportAbstractAutowireCapableBeanFactoryinitializeBean(AbstractAutowireCapableBeanFactoryjava1578) at orgspringframeworkbeansfactorysupportAbstractAutowireCapableBeanFactorydoCreateBean(AbstractAutowireCapableBeanFactoryjava545) at orgspringframeworkbeansfactorysupportAbstractAutowireCapableBeanFactorycreateBean(AbstractAutowireCapableBeanFactoryjava482) at orgspringframeworkbeansfactorysupportAbstractBeanFactory$1getObject(AbstractBeanFactoryjava305) at orgspringframeworkbeansfactorysupportDefaultSingletonBeanRegistrygetSingleton(DefaultSingletonBeanRegistryjava230) at orgspringframeworkbeansfactorysupportAbstractBeanFactorydoGetBean(AbstractBeanFactoryjava301) SEVERE One or more listeners failed to start Full details will be found in the appropriate container log file May 11 2016 101243 AM orgapachecatalinautilSessionIdGeneratorBase createSecureRandom INFO Creation of SecureRandom instance for session ID generation using [SHA1PRNG] took [13256] milliseconds May 11 2016 101243 AM orgapachecatalinacoreStandardContext startInternal SEVERE Context [domibus] startup failed due to previous errors May 11 2016 101243 AM orgapachecatalinacoreApplicationContext log INFO Closing Spring root WebApplicationContext May 11 2016 101243 AM orgapachecatalinacoreApplicationContext log INFO Shutting down log4j
Solution Setup the password properly in the domibusproperties
Exception sending context initialized event to listener
instance of class
SEVERE Exception sending context initialized event to listener instance of class orgspringframeworkwebcontextContextLoaderListener orgspringframeworkbeansfactoryBeanCreationException Error creating bean with name entityManagerFactory defined in URL [filehomeedeliverydomibusf1confdomibusdomibus-datasourcesxml] Cannot resolve reference to bean domibusJDBC-XADataSource while setting bean
Domibus 334 Administration Guide
Page 125 134
property dataSource nested exception is orgspringframeworkbeansfactoryBeanCreationException Error creating bean with name domibusJDBC-XADataSource defined in URL [filehomeedeliverydomibusf1confdomibusdomibus-datasourcesxml] Invocation of init method failed nested exception is comatomikosjdbcAtomikosSQLException The class commysqljdbcjdbc2optionalMysqlXADataSource specified by property xaDataSourceClassName could not be found in the classpath Please make sure the spelling is correct and that the required jar(s) are in the classpath
Solution Add MySQL connector in domibuslib folder
Neither the JAVA_HOME nor the JRE_HOME environment
variable is defined
Neither the JAVA_HOME nor the JRE_HOME environment variable is defined At least one of these environment variables is needed to run this program
Solution Set JAVA_HOME variable orand JRE_HOME
Cannot access Admin Console
httpyour_serveryour_port_numberdomibus No SEVER errors in logs but no admin option in browser under
Solution Check if the firewall is open for port_no (eg 8080)
Handshake Failure
Full stack trace below
orgapachecxfinterceptorFault Could not write attachments at orgapachecxfinterceptorAttachmentOutInterceptorhandleMessage(AttachmentOutInterceptorjava74) at orgapachecxfphasePhaseInterceptorChaindoIntercept(PhaseInterceptorChainjava308) at orgapachecxfendpointClientImpldoInvoke(ClientImpljava514) at orgapachecxfendpointClientImplinvoke(ClientImpljava423) at orgapachecxfendpointClientImplinvoke(ClientImpljava324) at orgapachecxfendpointClientImplinvoke(ClientImpljava277) at orgapachecxfendpointClientImplinvokeWrapped(ClientImpljava312) at orgapachecxfjaxwsDispatchImplinvoke(DispatchImpljava327) at orgapachecxfjaxwsDispatchImplinvoke(DispatchImpljava246) at eudomibusebms3senderMSHDispatcherdispatch(MSHDispatcherjava126) at eudomibusebms3senderMSHDispatcher$$FastClassBySpringCGLIB$$105974a1invoke(ltgeneratedgt) at orgspringframeworkcglibproxyMethodProxyinvoke(MethodProxyjava204) at orgspringframeworkaopframeworkCglibAopProxy$CglibMethodInvocationinvokeJoinpoint(CglibAopProxyjava717) at orgspringframeworkaopframeworkReflectiveMethodInvocationproceed(ReflectiveMethodInvocationjava157)
Domibus 334 Administration Guide
Page 126 134
at orgspringframeworktransactioninterceptorTransactionInterceptor$1proceedWithInvocation(TransactionInterceptorjava99) at orgspringframeworktransactioninterceptorTransactionAspectSupportinvokeWithinTransaction(TransactionAspectSupportjava281) at orgspringframeworktransactioninterceptorTransactionInterceptorinvoke(TransactionInterceptorjava96) at orgspringframeworkaopframeworkReflectiveMethodInvocationproceed(ReflectiveMethodInvocationjava179) at orgspringframeworkaopframeworkCglibAopProxy$DynamicAdvisedInterceptorintercept(CglibAopProxyjava653) at eudomibusebms3senderMSHDispatcher$$EnhancerBySpringCGLIB$$da53e95adispatch(ltgeneratedgt) at eudomibusebms3senderMessageSendersendUserMessage(MessageSenderjava116) at eudomibusebms3senderMessageSenderonMessage(MessageSenderjava195) at sunreflectNativeMethodAccessorImplinvoke0(Native Method) at sunreflectNativeMethodAccessorImplinvoke(NativeMethodAccessorImpljava57) at sunreflectDelegatingMethodAccessorImplinvoke(DelegatingMethodAccessorImpljava43) at javalangreflectMethodinvoke(Methodjava606) at orgspringframeworkaopsupportAopUtilsinvokeJoinpointUsingReflection(AopUtilsjava302) at orgspringframeworkaopframeworkReflectiveMethodInvocationinvokeJoinpoint(ReflectiveMethodInvocationjava190) at orgspringframeworkaopframeworkReflectiveMethodInvocationproceed(ReflectiveMethodInvocationjava157) at orgspringframeworktransactioninterceptorTransactionInterceptor$1proceedWithInvocation(TransactionInterceptorjava99) at orgspringframeworktransactioninterceptorTransactionAspectSupportinvokeWithinTransaction(TransactionAspectSupportjava281) at orgspringframeworktransactioninterceptorTransactionInterceptorinvoke(TransactionInterceptorjava96) at orgspringframeworkaopframeworkReflectiveMethodInvocationproceed(ReflectiveMethodInvocationjava179) at orgspringframeworkaopframeworkJdkDynamicAopProxyinvoke(JdkDynamicAopProxyjava207) at comsunproxy$Proxy163onMessage(Unknown Source) at orgspringframeworkjmslistenerAbstractMessageListenerContainerdoInvokeListener(AbstractMessageListenerContainerjava746) at orgspringframeworkjmslistenerAbstractMessageListenerContainerinvokeListener(AbstractMessageListenerContainerjava684) at orgspringframeworkjmslistenerAbstractMessageListenerContainerdoExecuteListener(AbstractMessageListenerContainerjava651) at orgspringframeworkjmslistenerAbstractPollingMessageListenerContainerdoReceiveAndExecute(AbstractPollingMessageListenerContainerjava315) at orgspringframeworkjmslistenerAbstractPollingMessageListenerContainerreceiveAndExecute(AbstractPollingMessageListenerContainerjava233) at orgspringframeworkjmslistenerDefaultMessageListenerContainer$AsyncMessageListenerInvokerinvokeListener(DefaultMessageListenerContainerjava1150)
Domibus 334 Administration Guide
Page 127 134
at orgspringframeworkjmslistenerDefaultMessageListenerContainer$AsyncMessageListenerInvokerexecuteOngoingLoop(DefaultMessageListenerContainerjava1142) at orgspringframeworkjmslistenerDefaultMessageListenerContainer$AsyncMessageListenerInvokerrun(DefaultMessageListenerContainerjava1039) at javalangThreadrun(Threadjava745) Caused by javaxnetsslSSLHandshakeException Received fatal alert handshake_failure at sunsecuritysslAlertsgetSSLException(Alertsjava192) at sunsecuritysslAlertsgetSSLException(Alertsjava154) at sunsecuritysslSSLSocketImplrecvAlert(SSLSocketImpljava1979) at sunsecuritysslSSLSocketImplreadRecord(SSLSocketImpljava1086) at sunsecuritysslSSLSocketImplperformInitialHandshake(SSLSocketImpljava1332) at sunsecuritysslSSLSocketImplstartHandshake(SSLSocketImpljava1359) at sunsecuritysslSSLSocketImplstartHandshake(SSLSocketImpljava1343) at sunnetwwwprotocolhttpsHttpsClientafterConnect(HttpsClientjava563) at sunnetwwwprotocolhttpsAbstractDelegateHttpsURLConnectionconnect(AbstractDelegateHttpsURLConnectionjava185) at sunnetwwwprotocolhttpHttpURLConnectiongetOutputStream(HttpURLConnectionjava1092) at sunnetwwwprotocolhttpsHttpsURLConnectionImplgetOutputStream(HttpsURLConnectionImpljava250) at orgapachecxftransporthttpURLConnectionHTTPConduit$URLConnectionWrappedOutputStreamsetupWrappedStream(URLConnectionHTTPConduitjava236) at orgapachecxftransporthttpHTTPConduit$WrappedOutputStreamhandleHeadersTrustCaching(HTTPConduitjava1302) at orgapachecxftransporthttpHTTPConduit$WrappedOutputStreamonFirstWrite(HTTPConduitjava1262) at orgapachecxftransporthttpURLConnectionHTTPConduit$URLConnectionWrappedOutputStreamonFirstWrite(URLConnectionHTTPConduitjava267) at orgapachecxfioAbstractWrappedOutputStreamwrite(AbstractWrappedOutputStreamjava47) at orgapachecxfioAbstractThresholdOutputStreamwrite(AbstractThresholdOutputStreamjava69) at orgapachecxfioAbstractWrappedOutputStreamwrite(AbstractWrappedOutputStreamjava60) at orgapachecxfioCacheAndWriteOutputStreamwrite(CacheAndWriteOutputStreamjava89) at orgapachecxfattachmentAttachmentSerializerwriteProlog(AttachmentSerializerjava172) at orgapachecxfinterceptorAttachmentOutInterceptorhandleMessage(AttachmentOutInterceptorjava72) 43 more
Solution If you receive this error then itrsquos likely that you configured the client with TLSv11 while the server only accepts TLSv12
Domibus 334 Administration Guide
Page 128 134
OPERATIONAL GUIDELINES
In this section you will find some recommendations on how to administer Domibus in an efficient way The following topics are tackled JMS Queue management log management capacity planning database management and the monitoring of message life cycle
JMS Queue Management
Domibus provides following out of the box features to manage the JMS Queues used in Domibus (see also sect94- Queue Monitoring)
Inspecting and filtering the messages from a queue based on the contents of Source Period
JMS Type or Selector
Move message from the DLQ (Dead Letter Queue) to the original Queue
Delete stuck or pending message(s) from Queues
It is recommended to monitor the Queue size and number of messages in the different Queues If some messages are stuck in any of the Queue then alerts must be sent to the Domibus Administrator
Please pay special attention to the deadletter queue (DLQ) Messages stuck in this queue is a signal that there is some issue in Domibus that needs to be analysed and an alert should be sent to the Domibus Administrator
Important
The lsquoListPendingMessagesrsquo operation on WS Plugin browses the JMS queue Max count is limited to destination MaxBrowsePageSize which can be changed via the lsquodomibuslistPendingMessagesmaxCountrsquo Domibus property
If your received messages are not returned by the webservice listPendingMessages method the you should
1 increase the value of the lsquodomibuslistPendingMessagesmaxCountrsquoproperty 2 delete the messages from the domibusnotificationwebservice queue with selector NOTIFICATION_TYPE=MESSAGE_SEND_SUCCESS using JMX tools httpactivemqapacheorghow-can-i-monitor-activemqhtml
Log Management
1721 Log Level
It is recommended that the log level is correctly set in all the environments
The log level should be set to INFODEBUG in all the test environments for de-bugging purpose
The log level should be set to ERRORWARN in production environment (keeping log level to INFO in production environment will degrade the performance of Domibus)
Domibus 334 Administration Guide
Page 129 134
1722 Log Rotation and Archiving
It is recommended that log rotation and archiving logic is implemented
Domibus provides by default log rotation but Domibus administrator should manage Domibus archiving logic
1723 Log Monitoring
It is recommended to monitor continuously Domibus logs It can be done using an automated script which looks for keywords like ERROR WARNING etc and reports all the errors and warnings to the Domibus administrator
Capacity Planning
1731 JVM Memory Management
Hereafter some recommendations
the JVM memory parameters must first be tested in a test environment with the load
expected in production
the JVM parameters ie heap size must be monitored with the help of automated scripts and
any abnormal hikes in heap size must be reported to the administrator
1732 CPU IO operations and Disk Space Monitoring
CPU IO operations and disk space must be continuously monitored using automated scripts Any abnormal hikes must be reported to Domibus administrator and further investigated
Database Management
1741 Database Monitoring
It is important to monitor the database size
The Payload of the message is deleted from the sending Access Point Only the metadata of the message stays in the table The Payload from the receiving Access Point is deleted based on the retention policy defined in the Pmode settings
Domibus uses approximately 40 MB of table space to store the metadata of 1000 messages
1742 Database Archiving
Since the Database contains AS4 receipts that are used for non-repudiation purposes they should be archived before purging the database
The metadata of the database can be purged if it is no longer required
1743 Monitor Message Life Cycle
It is recommended to monitor the message status in the TB_MessageLog table Automated scripts can be used to count different status in the table
Please pay special attention to the following statuses
Domibus 334 Administration Guide
Page 130 134
WAITING_FOR_RETRY this means that there is some issue between C2 and C3 that must be
resolved
SEND_FAILURE this means that that there is some issue between C2 and C3 that must be
resolved
SEND_ENQUEUED this message status is part of the successful message life cycle however
abnormal increase in the count of messages with this status means that there is an issue
Further investigation is recommended
Domibus 334 Administration Guide
Page 131 134
ANNEX 1 - USAGE OF CERTIFICATES IN PEPPOL AND OASIS
C2 C3
Keystore Truststore Keystore Truststore
PEPPOL
Certificate Senders (issued by CA) Empty Receivers CAs
Note
C2 signs the message with its private key
C2 discover C3s public certificate from the SMP
C3 signs the receipt with its private key
The receiver trusts all senders whos certificate were issue dby these CAs
OASIS
Certificate Senders (issued by CA) SMPs Receivers CAs
Note
C2 signs the message with its private key
C2 discover C3s public certificate from the SMP To trust the SMP the sender needs its public certificate
C3 signs the receipt with its private key
The receiver trusts all senders whos certificate were issue dby these CAs
Domibus 334 Administration Guide
Access Point Page 132 134
ANNEX 2 ndash DOCUMENT PARTS
Domibus 334 Administration Guide
Access Point Page 133 134
LIST OF FIGURES
Figure 1 - Diagram representing the Deployment of Domibus in a Cluster on WebLogic 23 Figure 2 - Diagram representing the Deployment of Domibus in a Cluster on Tomcat 39 Figure 3 - Diagram representing the Deployment of Domibus in a Cluster on WildFly 54 Figure 4 - Message Service Handler diagram 57 Figure 5 - PMode view 68
Standard Service 8am to 6pm (Normal EC working Days)
Standby Service 6pm to 8am (Commission and Public Holidays Weekends)
Only for critical and urgent incidents and only by phone
Domibus 334 Administration Guide
Page 9 134
CONVENTIONS
The commands and configuration files listed in this document usually contain a mix of reserved words (commands instructions and system related special words) and user defined words (chosen by the user) as well as comments and preferred values for certain variables The conventions used in this document to distinguish between them are the followings
To keep this document release agnostic as much as possible the strings x-y-z or xyz are intended to refer to the version of Domibus discussed in this version of the document in the present case Domibus 334
Bold is used for reserved words and commands
Normal italic together with a short description of the argument is used for user-defined names (chosen by you to designate items like users passwords database etc) Normally contains at least 2 words separated by _
Bold and Italic is used for advisable values which can be changed by the user depending on their infrastructure
Comments are sometimes added to describe the purpose of the commands usually enclosed in brackets ()
By default non-OS specific paths will be described using Linux patterns
Example 1 Sample Oracle Statement
create user edelivery_user identified by edelivery_password
grant all privileges to edelivery_user
(Where edelivery_user and edelivery_password are names chosen by the user)
- edelivery_user domibus_schema and edelivery_password are names chosen by the user
- localhost3306 represents hostnameport parameters of the MySQL database)
Domibus 334 Administration Guide
Page 10 134
PREREQUISITES
Please install the following software on the target system For further information and installation details we kindly advise you to refer to the software owners documentation
Java runtime environnement (JRE) version 7 or 8 httpwwworaclecomtechnetworkjavajavasedownloadsindexhtml
One of the supported Database Management Systems
o MySQL 56 or above
o Oracle 10g+
If you dont plan to deploy Domibus according to the Pre-Configured Single Server Deployment method you must also install one of the supported applicationweb servers
o WebLogic 12c
o WildFly 9
o Apache Tomcat 80x
All Domibus installation resources including full distributions and documentation can be found on the Single Web Portal httpseceuropaeucefdigitalwikidisplayCEFDIGITALDomibus
Binaries repository
All the Domibus 334 artefacts can be directly downloaded from the CEF Digital site (cf[REF1])
Domibus 334 Administration Guide
Page 11 134
DOMIBUS DEPLOYMENT
Remark
The variable cef_edelivery_path referring to the folder where the package is installed will be used later in this document
Database Configuration
For this step you will have to use the following resources (see section sect31ndashBinaries repository for the download location)
domibus-distribution-XYZ-sql-scriptszip
411 MySQL and Oracle Deletion scripts
A deletion script for MySQL (mysql5innoDb-334-delete-dbsql) and Oracle (oracle10g-334-delete-dbsql) Domibus DB is available in the domibus-distribution-XYZ-sql-scriptszip
The purpose of the script is to delete all messages within a user defined period to recover disk space The script requires a START_DATE parameter and an END_DATE parameter to be set
The tables affected by the execution of this script are
TB_MESSAGING
TB_ERROR_LOG
TB_PARTY_ID
TB_RECEIPT_DATA
TB_PROPERTY
TB_PART_INFO
TB_RAWENVELOPE_LOG
TB_ERROR
TB_USER_MESSAGE
TB_SIGNAL_MESSAGE
TB_RECEIPT
TB_MESSAGE_INFO
TB_MESSAGE_LOG Any information relevant to a message received or sent during the predefined period will be removed from these tables
In order to execute this script it is advised to use a UI tool such as SQL developer of MySQL workbench Important in order to keep the JMS queues synchronized with the DB data that will be deleted by this script the Domibus Administrator should remove manually the associated JMS messages from the plugin notifications queues
412 MySQL configuration
1 Unzip domibus-distribution-XYZ-sql-scriptszip in cef_edelivery_pathsql-scripts
Domibus 334 Administration Guide
Page 12 134
2 Open a command prompt and navigate to this directory cef_edelivery_pathsql-scripts
3 (Optional) Storing payload messages in a database with size over 30 MB
Domibus can temporarily store the messages in the database They are not deleted before they are successfully transferred to the final recipient (see sect7 ndash PMode Configuration) Therefore it is required to increase the maximum allowed size of packets Update the default properties of myini (Windows) or mycnf (Linux)
o max_allowed_packet property
The maximum size of one packet or any generated or intermediate string or any parameter sent by the mysql_stmt_send_long_data() C API function max_allowed_packet=512M
o innodb_log_file_size property
Size of each log file in a log group You should set the combined size of log files to about 25-100 of your buffer pool size to avoid unneeded buffer pool flush activity on log file overwrite However note that larger logfile size will increase the time needed for the recovery process innodb_log_file_size=5120M
o Restart MySQL service (Windows)
MySQL service
4 (Optional) For storing payload messages in a file system instead of a database see sect52 ndash Domibus Properties)
5 For MySQL 8 and ConnectorJ 80x please set the database timezone One way of setting the timezone is to modify the MySQL myini configuration file by adding the following property with the adjusted timezone It is recommended that the database timezone is the same as the timezone of the machine where Domibus is installed
default-time-zone=+0000
6 Execute the following MySQL commands at the command prompt
Remark
User defined names like root_password domibus_schema etc are in italic as
described in the Convention section
mysql -h localhost -u root_user --password=root_password -e drop schema if exists domibus_schemacreate schema domibus_schemaalter database domibus_schema charset=utf8 collate=utf8_bin create user edelivery_userlocalhost identified by edelivery_passwordgrant all on domibus_schema to edelivery_userlocalhost
Domibus 334 Administration Guide
Page 13 134
The above creates a schema (domibus_schema) and a user (edelivery_user) that have all the privileges on the schema
mysql -h localhost -u root_user --password=root_password domibus_schema lt mysql5innoDb-xyzddl
The above creates the required tables in domibus_schema
Remark
If you are using Windows make sure to have the parent directory of mysqlexe added to your PATH variable
413 Oracle configuration
1 Unzip domibus-distribution-XYZ-sql-scriptszip in cef_edelivery_pathsql-scripts
2 Open a command prompt and navigate to this directory cef_edelivery_pathsql-scripts
3 Open a command line session log in and execute the following commands
sqlplus sys as sysdba (password should be the one assigned during the Oracle installation ) =========================================================================== Once logged in Oracle CREATE USER ltedelivery_usergt IDENTIFIED BY ltedelivery_passwordgt DEFAULT TABLESPACE lttablespacegt QUOTA UNLIMITED ON lttablespacegt GRANT CREATE SESSION TO ltedelivery_usergt GRANT CREATE TABLE TO ltedelivery_usergt GRANT CREATE VIEW TO ltedelivery_usergt GRANT CREATE SEQUENCE TO ltedelivery_usergt GRANT EXECUTE ON DBMS_XA TO ltedelivery_usergt GRANT SELECT ON PENDING_TRANS$ TO ltedelivery_usergt GRANT SELECT ON DBA_2PC_PENDING TO ltedelivery_usergt GRANT SELECT ON DBA_PENDING_TRANSACTIONS TO ltedelivery_usergt CONNECT ltedelivery_usergt SHOW USER (should return edelivery_user) oracle10g-xyzddl EXIT ===========================================================================
Domibus on WebLogic 1213
This section does not include the installation of WebLogic server 1213 It is assumed that the WebLogic Server is installed and a Domain is created Hereafter the domain location will be referred as DOMAIN_HOME (user defined name)
Domibus 334 Administration Guide
Page 14 134
Remark
The Apache CXF library referred by Domibus internally uses the environment variable javaiotmpdir to buffer large attachments received If the property javaiotmpdir is not specified then by default this points to the ltWeblogic_domain_directorygt It is recommended to point this to a local directory _tmp on each managed server and accessible by the Weblogic application server The disk space allocated for _tmp directory would depend on the size of attachments received On production environment it is recommended to provide 100GB for _tmp
421 Single Server Deployment
For this step you will have to use the following resources (see section sect31ndashBinaries repository for the download location)
1 Download and unzip domibus-distribution- XYZ-weblogic-configurationzip in the directory DOMAIN_HOMEconfdomibus
2 Download and unzip domibus-distribution- XYZ-weblogic-warzip in a temporary folder to prepare it for deployment
3 Configure your Keystore based on section sect512 ndash Certificates
4 Add the following lines in
o For Windows DOMAIN_HOMEbinsetDomainEnvcmd
Locate the set DOMAIN_HOME statement and add the following lines after
hellip set DOMAIN_HOME Added for Domibus
Domibus 334 Administration Guide
Page 15 134
set EXTRA_JAVA_PROPERTIES=EXTRA_JAVA_PROPERTIES -Ddomibusconfiglocation=DOMAIN_HOMEconfDomibus -Djavaiotmpdir=ltpath to _tmp directorygt hellip
o For Linux DOMAIN_HOMEbinsetDomainEnvsh
Locate the export DOMAIN_HOME statement and add the following lines after
hellip export DOMAIN_HOME Added for Domibus EXTRA_JAVA_PROPERTIES=$EXTRA_JAVA_PROPERTIES -Ddomibusconfiglocation=$DOMAIN_HOMEconfdomibus -Djavaiotmpdir=ltpath to _tmp directorygt export EXTRA_JAVA_PROPERTIES hellip
5 Run the WebLogic Scripting Tool (WLST) in order to create the JMS resources and the Database datasources from the command line
o Download the WLST Package from following location httpseceuropaeucefdigitalartifactcontentrepositorieseDeliveryeueuropaecdigitipciswslt-api191wslt-api-191zip
o Configure the WSLT API tool
Unzip the wslt-api-191zip
Define the WL_HOME as a system environment variable to point to the WebLogic lsquowlserverrsquo directory as defined in the DOMAIN_HOMEbinsetDomainEnv[cmd|sh]
eg WL_HOME=wls12130wlserver
o Take the script WeblogicSingleServerproperties from domibus-distribution-XYZ-weblogic-configurationzip under the scripts directory and copy the WeblogicSingleServerproperties file into the wslt-api-191 directory and adapt the following properties
Adapt the properties for connecting to the WebLogic domain
MySQL configuration is commented by default To enable MySQL remove the comment () from the lines below Dont forget to add the comment () for Oracle to disable it
o Start the WebLogic domain from within DOMAIN_HOME
For Windows startWebLogiccmd
For Linux startWebLogicsh
o Execute the following command from within the wlstapi-191bin directory
For Windows wlstapicmd scriptsimportpy --property WeblogicSingleServerproperties
For Linux wlstapish scriptsimportpy --property WeblogicSingleServerproperties
Expected result
6 Activate the use of the authorization providers to protect the JMX access
7 The database dialect is pre-configured to use the Oracle database If you are using a MySQL database you should adapt the following properties in ltDOMAIN_HOMEgtconfdomibusdomibusproperties as highlighted in the example below
8 Install the WS Plugin For more details see section sect6212 ndash WebLogic
9 Deploy domibus-distribution-XYZ-weblogicwar
o Click on Install
o Navigate to the location of the war file and click Next
Domibus 334 Administration Guide
Page 20 134
o Choose Install this deployment as an application and click Next
o Accept the default options and click Next
Domibus 334 Administration Guide
Page 21 134
o Select the following option and click Finish
Domibus 334 Administration Guide
Page 22 134
o Here is an overview of the resulting settings you can now click on the Save button
The expected positive response to the deployment request should be the following
10 Verify the installation by navigating with your browser to httplocalhost7001domibus-weblogic if you can access the page it means the deployment was successful
(By default User = admin Password = 123456)
Remark
It is recommended to change the passwords for the default users (See sect91 ndash Administration for further information)
Domibus 334 Administration Guide
Page 23 134
Expected result
422 Clustered Deployment
Figure 1 - Diagram representing the Deployment of Domibus in a Cluster on WebLogic
Domibus 334 Administration Guide
Page 24 134
Remark
In this section we assume that a Domain and a WebLogic Cluster are already setup
For this step you will have to use the following resources (see section sect31ndashBinaries repository for the download location)
1 Download and unzip domibus-distribution- XYZ-weblogic-configurationzip in in a shared location that is accessible by all the nodes from the cluster We will refer to this directory as cef_shared_edelivery_pathDomibus
2 Download and unzip domibus-distribution- XYZ-weblogic-warzip in a temporary folder to prepare it for deployment
3 Configure your Keystore based on section sect512 ndash Certificates
4 Add the following lines in
o For Windows DOMAIN_HOMEbinsetDomainEnvcmd
Locate the set DOMAIN_HOME statement and add the following lines after
hellip set DOMAIN_HOME Added for Domibus set EXTRA_JAVA_PROPERTIES=EXTRA_JAVA_PROPERTIES -Ddomibusconfiglocation=DOMAIN_HOMEconfDomibus -Djavaiotmpdir=ltpath to _tmp directorygt hellip
o For Linux DOMAIN_HOMEbinsetDomainEnvsh
Locate the export DOMAIN_HOME statement and add the following lines after
hellip export DOMAIN_HOME Added for Domibus EXTRA_JAVA_PROPERTIES=$EXTRA_JAVA_PROPERTIES -Ddomibusconfiglocation=$DOMAIN_HOMEconfdomibus -Djavaiotmpdir=ltpath to _tmp directorygt export EXTRA_JAVA_PROPERTIES
Domibus 334 Administration Guide
Page 25 134
hellip
5 Run the WebLogic Scripting Tool (WLST) in order to create the necessary JMS resources and Database datasources from the command line
o Download the WLST Package from the following location httpseceuropaeucefdigitalartifactcontentrepositorieseDeliveryeueuropaecdigitipciswslt-api191wslt-api-191zip
o Configure the WSLT API tool
Unzip the wslt-api-191zip
Define the WL_HOME (SET or export command depending on your operating system) environment variable to point to the WebLogic wlserver directory
eg WL_HOME=wls12130wlserver
o Take the script WeblogicClusterproperties from domibus-distribution-XYZ-weblogic-configurationzip under the scripts directory and copy the WeblogicClusterproperties file into the wslt-api-191 directory and apply the following changes
Adapt the properties for connecting to the WebLogic domain
MySQL configuration is commented by default To enable MySQL remove the comment () from the lines below Dont forget to add the comment () for Oracle to disable it
6 Activate the use of the authorization providers to protect the JMX access
7 The database dialect is pre-configured to use the Oracle database If you are using the MySQL database you should adapt the dialect as highlighted in the text below in ltDOMAIN_HOMEgtconfdomibusdomibusproperties file
8 Install the WS plugin For more details refer to chapter sect6212 ndash WebLogic
9 Deploy domibus-distribution-XYZ-weblogicwar
Domibus 334 Administration Guide
Page 29 134
o Click Install
o Navigate to location DOMAIN_HOMEconfdomibus where the domibus-distribution-XYZ-weblogicwar file has been previously copied
o Select the domibus-distribution-XYZ-weblogicwar file and click Next
o Choose Install this deployment as an application and click Next
Domibus 334 Administration Guide
Page 30 134
o Select your cluster for the deployment target and click Next
Domibus 334 Administration Guide
Page 31 134
o Select the following options and click Next
Domibus 334 Administration Guide
Page 32 134
o Select the following option and click Finish
o Here is an overview of the resulting settings you can now click on the Save button
The expected positive response to the deployment request should be the following
Domibus 334 Administration Guide
Page 33 134
10 Verify the installation by navigating with your browser to httplocalhost7001domibus-weblogic
If you can access the page it means the deployment was successful
(by default user = admin password = 123456)
Remark
It is recommended to change the passwords for the default users (See sect91 ndash Administration for further information)
Expected result
Domibus 334 Administration Guide
Page 34 134
Domibus on Tomcat
Remarks
As Tomcat is not a full Java EE application server and does not offer JMS capabilities by default Domibus uses ActiveMQ as an in-memory JMS broker when deployed on a Tomcat servlet container The configuration for the ActiveMQ JMS broker can be found in cef_edelivery_pathdomibusinternalactivemqxml
The Apache CXF library referred by Domibus internally uses the environment variable javaiotmpdir to buffer large attachments received If the property javaiotmpdir is not specified then by default this points to the ltCATALINA_BASE directorytempgt It is recommended to point this to a local directory _tmp on each managed server and accessible by the Tomcat server The disk space allocated for _tmp directory would depend on the size of attachments received On production environment it is recommended to provide 100GB for _tmp
431 Pre-Configured Single Server Deployment
For this step you will have to use the following resources (see section sect31ndashBinaries repository for the download location)
domibus-distribution-XYZ-tomcat-fullzip
1 Unzip the archive
o Unzip domibus-distribution-XYZ-tomcat-fullzip to a location on your physical machine cef_edelivery_path
2 Prepare the database
o For MySQL database
Add MySQL JDBC driver (available on MySQL official web site cf [REF2]) in the folder cef_edelivery_pathdomibuslib
Remark
The version of the JDBC driver has to be mysql-connector-java-5140jar or higher
Edit the properties file cef_edelivery_pathconfdomibusdomibusproperties and adjust the highlighted parts in the text below according to your environment The properties associated to the database configuration are pre-configured for the MySQL database
---------------------------------- Database --------------------------------- Database server name domibusdatabaseserverName=localhost
Domibus 334 Administration Guide
Page 35 134
Database port domibusdatabaseport=3306 XA properties domibusdatasourcexapropertyuser=edelivery_user domibusdatasourcexapropertypassword=edelivery_password MySQL domibusdatasourcexapropertyurl=jdbcmysql$domibusdatabaseserverName$domibusdatabaseport domibus_schemapinGlobalTxToPhysicalConnection=true Non-XA Datasource domibusdatasourceurl=jdbcmysql$domibusdatabaseserverName$domibusdatabaseportdomibus_schemauseSSL=false domibusdatasourceuser=edelivery_user domibusdatasourcepassword=edelivery_password
o For Oracle database
Add the Oracle JDBC driver (eg ojdbc7jar) (available on the Oracle official web site cf[REF3]) in the cef_edelivery_pathdomibuslib folder
Edit the properties file cef_edelivery_pathconfdomibusdomibusproperties and adjust the highlighted parts in the text below according to your environment
---------------------------------- Database --------------------------------- Database server name domibusdatabaseserverName=localhost Database port domibusdatabaseport=1521 XA Datasource domibusdatasourcexaxaDataSourceClassName=oraclejdbcxaclientOracleXADataSource XA properties domibusdatasourcexapropertyuser=edelivery_user domibusdatasourcexapropertypassword=edelivery_password domibusdatasourcexapropertyurl=jdbcoraclethin$domibusdatabaseserverName$domibusdatabaseport[SID|Service] Non-XA Datasource domibusdatasourcedriverClassName=oraclejdbcOracleDriver domibusdatasourceURL=jdbcoraclethin$domibusdatabaseserverName$domibusdatabaseport[SID|Service] domibusdatasourceuser=edelivery_user domibusdatasourcepassword=edelivery_password
Remark
Configure the database dialect as it is pre-configured for MySQL by default
3 Configure your Keystore based on section sect512 ndash Certificates
4 Set JVM parameters
Domibus expects a single environment variable domibusconfiglocation pointing towards the cef_edelivery_pathconfdomibus folder
You can do this by editing the first command lines of cef_edelivery_pathdomibusbinsetenvbat (Windows) or cef_edelivery_pathdomibusbinsetenvsh (Linux) Set CATALINA_HOME equal to the absolute path of the installation cef_edelivery_pathdomibus
o For Windows edit cef_edelivery_pathdomibusbinsetenvbat by adding the following
hellip
set CATALINA_HOME=cef_edelivery_pathdomibus set CATALINA_TMPDIR=ltpath to _tmp directorygt set JAVA_OPTS=JAVA_OPTS -Dfileencoding=UTF-8 -Xms128m -Xmx1024m -XXPermSize=64m set JAVA_OPTS=JAVA_OPTS -Ddomibusconfiglocation=CATALINA_HOMEconfdomibus hellip
o For Linux edit cef_edelivery_pathdomibusbinsetenvsh by adding the following
cd cef_edelivery_path domibusbinchmod u+x sh startupsh
6 Display the Domibus home page on your browser httplocalhost8080domibus (By default User = admin Password = 123456)
Remark
It is recommended to change the passwords for the default users See sect91 ndash Administration for further information
If you can access the page it means the deployment was successful
Domibus 334 Administration Guide
Page 37 134
Expected result
432 Single Server Deployment
For this step you will have to use the following resources (see sect31ndash Binaries repository for the download location)
domibus-distribution-XYZ-tomcat-configurationzip
domibus-distribution-XYZ-tomcat-warzip
We assume that an Apache Tomcat 80x is already installed and the installation location is now considered as your cef_edelivery_pathdomibus
1 Download and unzip the artefact domibus-distribution-XYZ-tomcat-configurationzip into the
directory cef_edelivery_pathconfdomibus
2 Configure the MySQL or Oracle datasource as indicated in sect431 ndash Pre-Configured Single Server
Deployment
3 Configure your Keystore based on sect512 ndash Certificates
4 Execute step 4 from sect431 ndash Pre-Configured Single Server Deployment
5 If not already present create a folder and name it temp under cef_edelivery_pathconfDomibus
6 Rename domibus-MSH-XYZ-tomcatwar to domibuswar and deploy it to cef_edelivery_pathdomibus webapps
7 Launch the Domibus application
o For Windows
cd cef_edelivery_pathdomibusbin startupbat
o For Linux
Domibus 334 Administration Guide
Page 38 134
cd cef_edelivery_path domibusbin chmod +x sh startupsh
7 Display the Domibus home page on your browser httplocalhost8080domibus (By default User = admin Password = 123456)
Remark
It is recommended to change the passwords for the default users See sect91 ndash Administration for further information
If you can access the page it means the deployment was successful
Expected result
Domibus 334 Administration Guide
Page 39 134
433 Clustered Deployment
Figure 2 - Diagram representing the Deployment of Domibus in a Cluster on Tomcat
Remark
In this section we assume that a JMS Broker and a Loadbalancer are configured separately (eg httpd)
For this step you will have to use the following resources (see sect31ndash Binaries repository for the download location)
domibus-distribution-XYZ-tomcat-fullzip
domibus-distribution-XYZ-tomcat-warzip
1 Follow steps 1 2 3 4 and 5 from the sect432 ndash Single Server Deployment
2 Set the JVM parameters
Domibus expects a single JVM parameter $domibusconfiglocation pointing towards the cef_edelivery_pathconfdomibus folder
You can do this by editing cef_edelivery_pathdomibusbinsetenvbat (Windows) or cef_edelivery_pathdomibusbinsetenvsh (Linux) Set CATALINA_HOME equal to the absolute path of the installation cef_edelivery_pathDomibus
o For Windows edit cef_edelivery_pathdomibusbinsetenvbat by adding the following
Remark
your_node_id refers to the installed node in the cluster which starts normally at 01(then 02 etc)
hellip
set CATALINA_HOME=cef_edelivery_pathdomibus set CATALINA_TMPDIR=ltpath to _tmp directorygt set JAVA_OPTS=JAVA_OPTS -Dfileencoding=UTF-8 -Xms128m -Xmx1024m -XXPermSize=64m set JAVA_OPTS=JAVA_OPTS -Ddomibusconfiglocation=CATALINA_HOMEconfdomibus
Domibus 334 Administration Guide
Page 40 134
set JAVA_OPTS=JAVA_OPTS -Ddomibusnodeid=your_node_id hellip
o For Linux edit cef_edelivery_pathdomibusbinsetenvsh by adding the following
4 Change the following properties related to the Atomikos configuration in parameters in cef_edelivery_pathconfdomibusdomibusproperties
For clustered deployment
Uncomment the following lines comatomikosicatchoutput_dir=$domibusworklocation$domibusconfiglocationworktransactions$domibusnodeid comatomikosicatchlog_base_dir=$domibusworklocation$domibusconfiglocationworktransactions$domibusnodeidlog Comment the following lines comatomikosicatchoutput_dir=$domibusworklocation$domibusconfiglocationworktransactions comatomikosicatchlog_base_dir=$domibusworklocation$domibusconfiglocationworktransactionslog
5 Follow step 6 and 7 from the sect432 ndash Single Server Deployment
Domibus 334 Administration Guide
Page 41 134
Domibus on WildFly
Remark
The Apache CXF library referred by Domibus internally uses the environment variable javaiotmpdir to buffer large attachments received If the property javaiotmpdir is not specified then this defaults to values provided by the operating system to the JRE On UnixLinux systems this usually defaults to tmp On Windows systems this usually defaults to TEMP folder It is recommended to point this to a local directory _tmp on each managed server and accessible by the Wildfly server The disk space allocated for _tmp directory would depend on the size of attachments received On production environment it is recommended to provide 100GB for _tmp
441 Pre-Configured Single Server Deployment
In this section we assume that WildFly is installed at the location cef_edelivery_pathdomibus
For this step you will have to use the following resources (see section sect31ndash Binaries repository for the download location)
domibus-distribution-XYZ-wildfly-fullzip
1 Download and unzip the domibus-distribution-XYZ-wildfly-fullzip archive in your cef_edelivery_path location
2 Configure the MySQL database (Option 1)
o Drivers
Create the directory cef_edelivery_pathdomibusmodulessystemlayersbasecommysqlmain if it does not exist Under this directory
Download the MySQL JDBC driver available on MySQL official web site (cf[REF2]) and copy it in the folder
Remark
The version of the driver has to be mysql-connector-java-5140jar or higher
Create or edit the file cef_edelivery_pathdomibusmodulessystemlayersbasecommysqlmainmodulexml and copy the following module configuration Make sure to put the name of the driver you are using as an argument of resource-root element eg mysql-connector-java-5140jar
Create the directory cef_edelivery_pathdomibusmodulessystemlayersbasecomoraclemain if it does not exist Under this directory
Download and copy the Oracle JDBC driver (eg ojdbc7jar available on the Oracle official web site cf[REF3]) in the folder
Copy the file cef_edelivery_pathdomibusmodulessystemlayersbasecommysqlmainmodulexml in the recently created folder
Domibus 334 Administration Guide
Page 44 134
Edit modulexml by copying the following module configuration Make sure to put the name of the driver you are using as an argument of resource-root element eg ojdbc7jar
Add your DBMS driver metadata to the Drivers section in cef_edelivery_pathdomibusstandaloneconfigurationstandalone-fullxml (only change the items described below while replacing MYSQL configuration in the process)
4 Configure your Keystore based on sect512 ndash Certificates
5 Run the standalone server
o For Windows under cef_edelivery_pathdomibusbin
o standalonebat --server-config=standalone-fullxml
o For Linux under cef_edelivery_pathdomibusbin
o standalonesh --server-config=standalone-fullxml
6 Display the Domibus home page in your browser httplocalhost8080domibus-wildfly (by default User = admin Password = 123456)
Remark
It is recommended to change the passwords for the default users See sect91 ndash Administration for further information
If you can access the page it means the deployment was successful
Domibus 334 Administration Guide
Page 46 134
Expected result
442 Single Server Deployment
In this section we assume that WildFly is installed at the location cef_edelivery_pathdomibus
For this step you will have to use the following resources (see section sect31-Binaries repository for the download location)
domibus-distribution-XYZ-wildfly-warzip
domibus-distribution-XYZ-wildfly-configurationzip
1 Follow steps 2 (MySQL) or 3 (Oracle) from the sect441 ndash Pre-Configured Single Server Deployment
2 Configure the environment variables
For Windows edit cef_edelivery_pathdomibusbinstandaloneconfbat as follows
hellip set JAVA_OPTS=-Xms128M ndashXmx1024M -XXMaxPermSize=256M set JAVA_OPTS=JAVA_OPTS -DjavanetpreferIPv4Stack=true set JAVA_OPTS=JAVA_OPTS -Ddomibusconfiglocation=JBOSS_HOMEconfdomibus -Djavaiotmpdir=ltpath to _tmp directorygt hellip
For UnixLinux edit cef_edelivery_pathdomibusbinstandaloneconf as follows
3 Download and unzip domibus-distribution-XYZ-wildfly-configurationzip in the directory cef_edelivery_pathconfdomibus
4 Configure your Keystore based on sect512 ndash Certificates
5 Configure the JMS resources
Configure the JMS resources in the configuration file cef_edelivery_pathdomibusstandaloneconfigurationstandalone-fullxml by adding the jms-connection-factories and jms-queues
7 Connect to the Admin Console of WildFly at httplocalhost9990console
8 Click on Deployments in the console menu then click on Add
9 Select Upload a new deployment then click Next
10 Browse to the location of the domibus-distribution-XYZ-wildflywar file select it and click Next
Domibus 334 Administration Guide
Page 53 134
11 The deployment is successful when the name of the war file appears in the Deployment column
Expected result
443 Clustered Deployment
For this step you will have to use the following resources (see section sect31ndashBinaries repository for the download location)
domibus-distribution-XYZ-wildfly-configurationzip
domibus-distribution-XYZ-wildfly-warzip
In this section we assume that the setup of Wildfly 9 in domain mode has already been done and that the cluster has been enabled as described in the official documentation For more details on how to perform an installation of Wildfly 9 in domain mode please refer to the official documentation (cf[REF4])
Domibus 334 Administration Guide
Page 54 134
Figure 3 - Diagram representing the Deployment of Domibus in a Cluster on WildFly
In order to install Domibus in a WildFly cluster please follow the steps below
1 Download and unzip domibus-distribution-XYZ-wildfly-configurationzip in a shared location that is accessible by all the nodes from the cluster We will refer to this directory as cef_shared_edelivery_pathDomibus
2 Follow steps 2 (MySQL) or 3 (Oracle) from the sect441 ndash Pre-Configured Single Server Deployment
Remarks
o This step needs to be performed on all the nodes from the cluster o In the following 2 steps we will edit the profile full-ha from the configuration file
domainconfigurationdomainxml located in the master node
3 Configure the JMS queues and topics as indicated in sect442 point 5 ndash Configure the JMS resources
4 Configure the database dialect as indicated in sect441 point 3 ndash Edit the configuration file cef_edelivery_pathconfdomibusdomibusproperties
5 Configure the environment variables as follows
For Windows edit cef_edelivery_pathbindomainconfbat located in each WildFly node The environment variable setting needs to be performed for every node in the cluster
helliphelliphelliphelliphelliphellip set JAVA_OPTS=-Xms128M ndashXmx1024M -XXMaxPermSize=256M set JAVA_OPTS=JAVA_OPTS -DjavanetpreferIPv4Stack=true set JAVA_OPTS=JAVA_OPTS -Ddomibusconfiglocation=JBOSS_HOMEconfdomibus -Djavaiotmpdir=ltpath to _tmp directorygt helliphelliphelliphelliphelliphellip
Domibus 334 Administration Guide
Page 55 134
For UnixLinux edit cef_edelivery_pathbindomainconf located in each WildFly node The environment variable setting needs to be performed for every node in the cluster
bindomainconf is located in each WildFly node The environment variable setting needs to be performed in every node from the cluster
6 Deploy the domibus-distribution-XYZ-wildflywar to the cluster We will use the Wildfly Administration console for performing the deployment We will deploy the application on the other-server-group cluster which is configured step by step in the official documentation (cf[REF4])
Domibus 334 Administration Guide
Page 56 134
Domibus 334 Administration Guide
Page 57 134
DOMIBUS CONFIGURATION
Domibus exposes the Message Service Handler endpoint as servicesmsh Only this endpoint has to be reachable by the other AS4 Access Points and it is typically exposed on the internet
If the Default WS Plugin (sect612 ndash WS Plugin) is deployed Domibus exposes the Default WS Plugin endpoint as servicesbackend This endpoint should ONLY be exposed to the backend client(s) within the trusted zone and it should not be exposed to the internet
Figure 4 - Message Service Handler diagram
Security Configuration
511 Security Policies
The WS-Security policy used by Domibus when exchanging messages can be specified in the PMode configuration file (sect7 ndash PMode Configuration) The recommended security policy is eSensPolicyv20xml it can be found under cef_edelivery_pathconfdomibuspolicieseSensPolicyv20xml
512 Certificates
The certificates that are used for signing and encrypting the messages when communicating with the other Access Points can be configured in the property file located under cef_edelivery_pathconfdomibusdomibusproperties By default Domibus is pre-configured to use self-signed certificates Please note that self-signed certificates should be used only for testing purposes and are not intended for production use In order to configure Domibus to use custom certificates the following properties need to be modified
Domibus 334 Administration Guide
Page 58 134
The location of the keystore domibussecuritykeystorelocation=$domibusconfiglocationkeystoresgateway_keystorejks Type of the used keystore domibussecuritykeystoretype=jks The password used to load the keystore domibussecuritykeystorepassword=test123 Private key The alias from the keystore of the private key domibussecuritykeyprivatealias=blue_gw The private key password domibussecuritykeyprivatepassword=test123 Truststore The location of the truststore domibussecuritytruststorelocation=$domibusconfiglocationkeystoresgateway_truststorejks Type of the used truststore domibussecuritytruststoretype=jks The password used to load the trustStore domibussecuritytruststorepassword=test123
1 Create if not present a folder cef_edelivery_pathconfdomibuskeystores
2 Get your key pair from an external provider (Self-signed certificates should only be used for testing purposes not production) If you are interested in using the CEF Public Key Infrastructure Solution (cf[REF5])
3 Create if not present the public and private keys containers (eg truststorejks and keystorejks)
4 Import your private key into your keystore
Remarks
o Your private key and your keystore should always stay secret Please never share them
o The keystore alias has to be the same as the party ID defined in the sect7 ndash PMode Configuration It is strongly recommended to put your key pair (private and public key) and the public key of the other participants you trust in two separate containers
Domibus Properties
The following properties defined in the property file cef_edelivery_pathconfdomibusdomibusproperties can be used to configure Domibus
Configuration Property Default value Purpose
domibusmshmessageidsuffix domibuseu
This Property is used to generate the random Message id with a fixed suffix which is set by default to domibuseu The resulting format will be UUID$domibusmshmessageidsuffix This property is mandatory
domibusmshretrycron 05 It is the retry cron job to send the messages It is set by default to every 5 seconds This property is mandatory
Domibus 334 Administration Guide
Page 59 134
domibusdispatchebmserrorunrecoverableretry true This property should be set to true if Domibus needs to retry sending the failed messages This property is mandatory
domibussmlzone accedeliverytecheceuropaeu Set the SMLZone if Domibus needs to be used under Dynamic discovery model This property is only mandatory if an SML is used
domibusdynamicdiscoveryclientspecification OASIS
The property specifies the dynamic discovery client to be used for the dynamic process Possible values OASIS and PEPPOL
domibusdynamicdiscoverypeppolclientmode TEST
This information is passed to the PEPPOL client that requires to know if the usage is in PRODUCTION or TEST mode
Apart from validating response of signer certificates against the truststore the Oasis Dynamic Discovery Client gives the possibility to add (optional) a regular expression to validate any certificate metadata related to the subject of the signer certificate
Example domibusdynamicdiscoveryoasisclientregexCertificateSubjectValidation=^EHEALTH_SMP$
domibusdynamicdiscoverypartyidresponderrole
The role of the responder PartyId may be defined here (default values are urnfdcpeppoleu2017rolesapas4 for PEPPOL and httpdocsoasis-openorgebxml-msgebmsv30nscore200704responder for OASIS
The type of the PartyId may be defined here (default values are urnfdcpeppoleu2017identifiersap for PEPPOL and urnoasisnamestcebcorepartyid-typeunregistered for OASIS)
domibusbackendjmsInQueue domibusbackendjmsinQueue This queue is the entry point for messages to be sent by the sending MSH This property is only mandatory if the JMS plugin is used
domibusjmsqueuepull domibusinternalpullqueue Domibus internal queue used for dispatching the pull requests
domibusdeploymentclustered false If true the quartz scheduler jobs are clustered This property is mandatory it should be set to true if the deployment of Domibus is done in a cluster
messageFactoryClass
The factory for creating SOAPMessage objects Default values - TomcatWebLogic comsunxmlinternalmessagingsaajsoapver1_2SOAPMessageFactory1_2Impl - WildFly comsunxmlmessagingsaajsoapver1_2SOAPMessageFactory1_2Impl
domibusdispatcherallowChunking true Allows chunking when sending messages to other Access Points
domibusdispatcherchunkingThreshold 104857600
If domibusdispatcherallowChunking is true this property sets the threshold at which messages start getting chunked(in bytes) Messages under this limit do not get chunked Defaults to 100 MB
domibusdispatcherconcurency 5-20
Specify concurrency limits via a lower-upper String eg 5-10 or a simple upper limit String eg 10 (the lower limit will be 1 in this case) when sending messages to other Access Points
Domibus 334 Administration Guide
Page 60 134
domibusmshpullcron 0 0 01 Cron expression used for configuring the message puller scheduling
domibuspullqueueconcurency
1-1 Number of threads used to parallelize the pull requests
domibuspullrequestsendperjobcycle 1 Number of pull requests executed every cron cycle
domibusretentionWorkercronExpression 060 Cron expression used for configuring the retention worker scheduling The retention worker deletes the expired messages (downloaded and not-downloaded)
messageretentiondownloadedmaxdelete 50 This property is used to tweak the maximum downloaded messages to be deleted by the retention worker
messageretentionnot_downloadedmaxdelete 50 This property is used to tweak the maximum not-downloaded messages to be deleted by the retention worker
domibusattachmentstoragelocation -
It is possible to configure Domibus to save the message payloads on the file system instead of the database This setting is recommended when exchanging payloads bigger than 30MB In order to enable the file system storage please add the following property domibusattachmentstoragelocation= your_file_system_location where your_file_system_location is the location on the file system where the payloads will be saved Remark In a cluster configuration the file system storage needs to be accessible by all the nodes from the cluster
domibustaskExecutorthreadCount 50 Tomcat only customize the task executor threads count
domibusjmxuser jmsManager WebLogic specific the user that will be used to access the queues via JMX
domibusjmxpassword jms_Manager1 WebLogic specific the associated password of the configured domibusjmxuser
domibussendMessagemessageIdPattern ^[x20-x7E]$
When an initiator backend client submits messages to Domibus for transmission with the message id field populated then the message id should be RFC2822 compliant The pattern specified here ensures this validation This field is optional In case the existing client does not match this message id pattern during submission then this property can be omitted to skip the validation
Domibus 334 Administration Guide
Page 61 134
domibuslistPendingMessagesmaxCount 500
This property specifies the maximum number of messages that would be served when the listPendingMessages operation is invoked Setting this property is expected to avoid timeouts due to huge resultsets being served A value of 0 would return all the pending messages This property is optional Omitting this property would default the resultset size to 500 Note For Tomcat server the maximum number of shown messages in queue monitoring is defined by the lsquodomibuslistPendingMessagesmaxCountrsquo property
domibusfourcornermodelenabled true
This property affects the GUI search and behaviour If the property is set to false Final Recipient and Original Sender criteria disappear from Messages Filter Messages column picker and from Message details in the GUI The internal SQL queries for User and Signal Message do not use TB_PROPERTYNAME = finalRecipient and originalSender anymore
domibusdispatcherconnectionTimeout 240000
For connection between the access points ndash C2 amp C3 Specifies the amount of time in milliseconds that the consumer will attempt to establish a connection before it times out 0 is infinite
domibusdispatcherreceiveTimeout 240000 For connection between the access points ndash C2 amp C3 Specifies the amount of time in milliseconds that the consumer will wait for a response before it times out 0 is infinite
domibusmshretrytolerance
10800000
Timeout tolerance for retry messages (in miliseconds) Scheduled retries that due to any reason were not performed within this period will be timeout
domibussendMessagefailuredeletepayload
false Whether to delete the message payload or send failure Defaults to false (the admin could put the message back in the send queue)
domibusauthunsecureLoginAllowed true The property specifies if authentication is required or not
domibuspmodedaoimplementation
CachingPModeProvider Internal configuration provider for managing the PMode access
Tomcat only The configuration file of the embedded ActiveMQ broker In case an external broker is used this property is not needed and it should be deleted from the property file
Tomcat only(XA datasource) The fully qualified underlying XADataSource class name
domibusdatasourcexamaxLifetime 60 Tomcat only(XA datasource) Sets the maximum amount of seconds that a connection is kept in the pool before it is destroyed automatically
domibusdatasourcexaminPoolSize 5
Tomcat only(XA datasource) Sets the minimum pool size The amount of pooled connections will not go below this value The pool will open this amount of connections during initialization
domibusdatasourcexamaxPoolSize 100 Tomcat only(XA datasource) Sets the maximum pool size The amount of pooled connections will not go above this value
domibusdatabaseserverName localhost Tomcat only(XA datasource) The host name or the IP address of the database server
domibusdatabaseport 3306 Tomcat only(XA datasource) The port number of the database server
domibusdatasourcexapropertyuser edelivery Tomcat only(XA datasource) A user who has access to the Domibus database schema
domibusdatasourcexapropertypassword edelivery Tomcat only(XA datasource) The password of the user defined in the domibusdatasourcexapropertyuser property
If activated Domibus will verify before sending a User Message if the receivers certificate is valid and not revoked If the receivers certificate is not valid or it has been revoked Domibus will not send the message and it will mark it as SEND_FAILURE
domibussendercertificatevalidationonsending true
If activated Domibus will verify before sending a User Message if his own certificate is valid and not revoked If the certificate is not valid or it has been revoked Domibus will not send the message and it will mark it as SEND_FAILURE (default is true)
If activated Domibus will verify before receiving a User Message if the senders certificate is valid and not revoked If the certificate is not valid or it has been revoked Domibus will not accept the message (default is true)
domibussendertrustvalidationonreceiving false An extra security validation that requires that the party name reflected in the alias of the sender public key should also be contained in the subject of the certificate
domibusconsoleloginmaximumattempt
5 Maximum connection attempts before the account gets locked (suspended)
domibusconsoleloginsuspensiontime 60 Property defining how many minutes the account remains locked (suspended) before it is automatically unlocked by the system
Configuration Property Default value Purpose
Proxy Settings In case your Access Point has to use a proxy server you can configure it with these properties
domibusproxyenabled false truefalse depending on whether you need to use proxy or not
domibusproxyhttphost - Host name of the proxy server
domibusproxyhttpport - Port of Proxy server
domibusproxyuser - Username for authentication on the proxy server
domibusproxypassword - Password
domibusproxynonProxyHosts - Indicates the hosts that should be accessed without going through the proxy
Table 1 - Domibus Properties
Domibus 334 Administration Guide
Page 65 134
PLUGIN MANAGEMENT
This section describes the different types of plugins and their registration process
Default Plugins
Domibus comes with three default plugins The three Interface Control Documents (ICD) describe these three plugins (JMS WS and File System Plugin) (cf[REF6])
611 JMS Plugin
For the JMS plugin you will have to use the following resources (see section sect 31- Binaries repository for the download location)
domibus-distribution-XYZ-default-jms-pluginzip
612 WS Plugin
For the WS plugin you will have to use the following resources (see section sect31-Binaries repository for the download location)
domibus-distribution-XYZ-default-ws-pluginzip
6121 Domibus authentication
The default web service plugin includes an example of how to implement authentication and
authorization By default this feature is disabled to insure backwards compatibility with older
versions of Domibus
The documentation below answers the question how to enable and use the authentication in the
WS plugin
The default WS plugin supports
- Basic Authentication
- X509 Certificates Authentication
- Blue Coat Authentication
Remark
Blue Coat is the name of the reverse proxy at the Commission It forwards the request in HTTP
with the certificate details inside the request (ldquoClient-Certrdquo header key)
When more than one authentication method is used the Basic Authentication takes precedence on
both http and https
When no Basic Authentication is provided X509 certificates are expected on https requests
When no Basic Authentication is provided Blue Coat certificates are expected on http requests
Domibus 334 Administration Guide
Page 66 134
6122 Domibus Authorization
For convenience the WS plugin uses exactly the same database as configured for Domibus core to
store the userspasswords and certificate ids To learn more about authorization (and
authentication) please refer to the plugin cookbook (cf[REF6])
There are two default users already inserted in the database (make sure you already ran the migration scripts)
admin and user both with 123456 as password
admin has the role ROLE_ADMIN and user has the role ROLE_USER
Roles
ROLE_ADMIN has the permission to call
- submitMessage with any value for originalSender property
- retrieveMessage (any message among messages notified to this plugin)
- listPendingMessages will list all pending messages for this plugin
- getStatus and getMessageErrors
ROLE_USER has the permission to call
- submitMessage with originalSender equal to the originalUser
- retrieveMessage only if finalRecipient equals the originalUser
- listPendingMessages only messages with finalRecipient equal to the origi-nalUser
6123 Enable the authentication in Domibus
To enable the authentication at Domibus level the following steps must be configured
1 In confdomibusdomibusproperties set the property
ldquodomibusauthunsecureLoginAllowedrdquo to false
domibusauthunsecureLoginAllowed=false
2 The application server must be configured to allow https requests and pass the
authentication credentials to Domibus
613 File System Plugin
For the File System plugin you will have to use the following resources (see section sect31-Binaries repository for the download location)
domibus-distribution-XYZ-default-fs-pluginzip
Domibus 334 Administration Guide
Page 67 134
Custom Plugin
Users can develop their own plugins Please refer to the plugin cookbook for more details (cf[REF6])
621 Plugin registration
Remark
Please refer to section 914 - Message Filtering for the routing of the specific plugin after registering the plugin on your specific Application Server
6211 Tomcat
In order to install a custom plugin for Tomcat please follow the steps below
1 Stop Tomcat server
2 Copy the custom plugin jar file to the plugins folder CATALINA_HOMEconfdomibuspluginslib
3 Copy the custom plugin XML configuration file to CATALINA_HOMEconfdomibuspluginsconfig
4 Start Tomcat server
Remark
CATALINA_HOME is the folder where the Tomcat is installed
6212 WebLogic
In order to install a custom plugin for WebLogic please follow the steps below
1 Stop the WebLogic server
2 Copy the custom plugin jar file to the plugins folder DOMAIN_HOMEconfdomibuspluginslib
3 Copy the custom plugin XML configuration file to DOMAIN_HOMEconfdomibuspluginsconfig
4 Start the WebLogic server
Remark
DOMAIN_HOME is the folder corresponding to the WebLogic domain
6213 WildFly
In order to install a custom plugin please follow the steps below
1 Stop the WildFly server
2 Copy the custom plugin jar file to the plugins folder cef_edelivery_path confdomibuspluginslib
3 Copy the custom plugin XML configuration file to cef_edelivery_path confdomibuspluginsconfig
4 Start the WildFly server
Domibus 334 Administration Guide
Page 68 134
PMODE CONFIGURATION
Processing Modes (PModes) are used to configure Access Points The PMode parameters are loaded into the Access Point via an XML file
The features described in the PMode file are Security Reliability Transport Business Collaborations Error Reporting Message Exchange Patterns (MEPs) and Message Partition Channels (MPCs)
As different messages may be subject to various types of processing or as different business domains may have several requirements Access Points commonly support several PModes Some PMode parameters are mandatory others are optional For more information please refer to the Access Point Component Offering Document
Configuration
In Domibus PModes are XML files that you can create or edit You can configure the two files given cef_edelivery_pathconfpmodesdomibus-gw-sample-pmode-party_id_name1xml and cef_edelivery_pathconfpmodesdomibus-gw-sample-pmode-party_id_name2xml
The party_id_name1 value must be replaced with your own party name and the party_id_name2 with your corresponding party name
The party_id must match the alias of the certificate in the keystore and the endpoint must be the external access link to your instance
Remark
This step could be managed by a PMode Configuration Manager known to your Business Owner
If a new participants Access Point is joining your network you need to configure your PMode accordingly and re-upload it like mentioned in sect714 ndash Upload new Configuration
Processing modes (PModes) describe how messages are exchanged between AS4 partners (in this case Access Points blue_gw and red_gw) These files contain the identifiers of each AS4 Access Point (identified as parties in the PMode file below)
Sender and Receiver Identifiers represent the organizations that send and receive the business documents They are both used in the authorization process (PMode) Therefore adding modifying or deleting a participant implies modifying the corresponding PMode files
Here is an example of a PMode XML file
Remark
In this setup we have allowed each party (blue_gw or red_gw) to initiate the process If only blue_gw is supposed to send messages then put only blue_gw in ltinitiatorPartiesgt and red_gw in ltresponderPartiesgt
MPCs - Container which defines the different MPCs (Message Partition Channels)
MPC PMode[1]BusinessInfoMPC The value of this parameter is the identifier of the MPC (Message Partition Channel) to which the message is assigned It maps to the attribute Messaging UserMessage
Message Partition Channel allows the partition of the flow of messages from a Sending MSH to a Receiving MSH into several flows each of which is controlled separately An MPC also allows merging flows from several Sending MSHs into a unique flow that will be treated as such by a Receiving MSH The value of this parameter is the identifier of the MPC to which the message is assigned
MessageRetentionDownloaded - Retention interval for messages already delivered to the backend
Domibus 334 Administration Guide
Page 73 134
MessageRetentionUnDownloaded - Retention interval for messages not yet delivered to the backend
Parties - Container which defines the different PartyIdTypes Party and Endpoint
PartyIdTypes maps to the attribute MessagingUserMessage PartyInfo
Message Unit bundling happens when the Messaging element contains multiple child elements or Units (either User Message Units or Signal Message Units)
Party ID maps to the element MessagingUserMessage PartyInfo
The ebCore Party ID type can simply be used as an identifier format and therefore as a convention for values to be used in configuration and ndash as such ndash does not require any specific solution building block
Endpoint maps to PMode[1]ProtocolAddress
The endpoint is a party attribute that contains the link to the MSH The value of this parameter represents the address (endpoint URL) of the Receiver MSH (or Receiver Party) to which Messages under this PMode leg are to be sent Note that a URL generally determines the transport protocol (eg if the endpoint is an email address then the transport protocol must be SMTP if the address scheme is http then the transport protocol must be HTTP)
AS4 - Container
Reliability [Nonrepudiation] [ReplyPattern]
Nonrepudiation maps to PMode[1]SecuritySendReceiptNonRepudiation ReplyPattern maps to PMode[1]SecuritySendReceiptReplyPattern
PMode[1]SecuritySendReceiptNonRepudiation value = lsquotrue (to be used for non-repudiation of receipt) value = false (to be used simply for reception awareness) PMode[1]SecuritySendReceiptReplyPattern value = lsquoResponsersquo (sending receipts on the HTTP response or back-channel) PMode[1]SecuritySendReceiptReplyPattern value = lsquoCallbackrsquo (sending receipts use a separate connection)
retryTimeout maps to PMode[1]ReceptionAwarenessRetry=true PMode[1]ReceptionAwarenessRetryParameters retryCount maps to PMode[1]ReceptionAwarenessRetryParameters strategy maps to PMode[1]ReceptionAwarenessRetryParameters duplicateDetection maps to PMode[1]ReceptionAwarenessDuplicateDetection
These parameters are stored in a composite string bull retryTimeout defines timeout in seconds bull retryCount is the total number of retries bull strategy defines the frequency of retries The only strategy available as of now is CONSTANT bull duplicateDetection allows to check duplicates when receiving twice the same message The only duplicateDetection available as of now is TRUE
Securities - Container
Security - Container
Policy PMode[1]Security NOT including PMode[1]SecurityX509SignatureAlgorithm
The parameter defines the name of a WS-SecurityPolicy file
This parameter is not supported by WS-SecurityPolicy and therefore it is defined separately
BusinessProcessConfiguration - Container
Agreements maps to ebMessaging UserMessage CollaborationInfo AgreementRef
This OPTIONAL element occurs zero times or once The AgreementRef element is a string that identifies the entity or artifact governing the exchange of messages between the parties
Actions - Container
Action maps to Messaging UserMessage CollaborationInfoAction
This REQUIRED element occurs once The element is a string identifying an operation or an activity within a Service that may support several of these
Services - Container
ServiceTypes Type maps to Messaging UserMessage CollaborationInfo Service[type]
This REQUIRED element occurs once It is a string identifying the service that acts on the message and it is specified by the designer of the service
Domibus 334 Administration Guide
Page 75 134
MEP [Legs] - An ebMS MEP defines a typical choreography of ebMS User Messages which are all related through the use of the referencing feature (RefToMessageId) Each message of an MEP Access Point refers to a previous message of the same Access Point unless it is the first one to occur Messages are associated with a label (eg request reply) that precisely identifies their direction between the parties involved and their role in the choreography
Bindings - Container
Binding - The previous definition of ebMS MEP is quite abstract and ignores any binding consideration to the transport protocol This is intentional so that application level MEPs can be mapped to ebMS MEPs independently from the transport protocol to be used
Roles - Container
Role Maps to PModeInitiatorRole or PModeResponderRole depending on where this is used In ebMS3 message this defines the content of the following element bull For Initiator MessagingUserMessagePartyInfoFromRole bull For Responder MessagingUserMessagePartyInfoToRole
The required role element occurs once and identifies the authorized role (fromAuthorizedRole or toAuthorizedRole) of the Party sending the message (when present as a child of the From element) or receiving the message (when present as a child of the To element) The value of the role element is a non-empty string with a default value of httpdocsoasis-openorgebxml-msgebmsv30nscore200704defaultRole Other possible values are subject to partner agreement
Processes - Container
PayloadProfiles - Container
Payloads - Container
Domibus 334 Administration Guide
Page 76 134
Payload maps to PMode[1]BusinessInfoPayloadProfile
This parameter allows specifying some constraint or profile on the payload It specifies a list of payload parts A payload part is a data structure that consists of five properties
1 name (or Content-ID) that
is the part identifier and
can be used as an index in
the notation
PayloadProfile
2 MIME data type (textxml
applicationpdf etc)
3 name of the applicable
XML Schema file if the
MIME data type is
textxml
4 maximum size in kilobytes
5 Boolean string indicating
whether the part is
expected or optional
within the User message
The message payload(s) must match this profile
ErrorHandlings - Container
ErrorHandling - Container
ErrorAsResponse maps to PMode[1]ErrorHandlingReportAsResponse
This Boolean parameter indicates (if true) that errors generated from receiving a message in error are sent over the back-channel of the underlying protocol associated with the message in error If false such errors are not sent over the back-channel
ProcessErrorNotifyProducer maps to PMode[1]ErrorHandlingReportProcessErrorNotifyProducer
This Boolean parameter indicates whether (if true) the Producer (applicationparty) of a User Message matching this PMode should be notified when an error occurs in the Sending MSH during processing of the User Message to be sent
ProcessErrorNotifyConsumer maps to PMode[1]ErrorHandlingReportProcessErrorNotifyProducer
This Boolean parameter indicates whether (if true) the Consumer (applicationparty) of a User Message matching this PMode should be notified when an error occurs in the Receiving MSH during processing of the received User message
Domibus 334 Administration Guide
Page 77 134
DeliveryFailureNotifyProducer maps to PMode[1]ErrorHandlingReportDeliveryFailuresNotifyProducer
When sending a message with this reliability requirement (Submit invocation) one of the two following outcomes shall occur - The Receiving MSH successfully delivers (Deliver invocation) the message to the Consumer - The Sending MSH notifies (Notify invocation) the Producer of a delivery failure
Legs - Container
Leg - Because messages in the same MEP may be subject to different requirements - eg the reliability security and error reporting of a response may not be the same as for a request ndash the PMode will be divided into legs Each user message label in an ebMS MEP is associated with a PMode leg Each PMode leg has a full set of parameters for the six categories above (except for General Parameters) even though in many cases parameters will have the same value across the MEP legs Signal messages that implement transport channel bindings (such as PullRequest) are also controlled by the same categories of parameters except for BusinessInfo group
Process - In Process everything is plugged together
Table 2 - Domibus PMode configuration to ebMS3 mapping
714 Upload new Configuration
7141 Upload the PMode file
Remark In case of a cluster environment the PMode configuration is replicated automatically on all the nodes
1 To update the PMode configuration andor Truststore connect to the Administration Console using the administrators credentials (by default User = admin Password = 123456) to httplocalhost8080domibus
Remark
It is recommended to change the passwords for the default users See sect91 ndash Administration for further information
Domibus 334 Administration Guide
Page 78 134
2 Click on the PMode menu
Domibus 334 Administration Guide
Page 79 134
3 Press the Upload button
4 Press the Choose File button and navigate to the PMode file select it and click on the Open button (or equivalent) in the standard dialog box
Domibus 334 Administration Guide
Page 80 134
5 Once the file has been selected click OK to upload the PMode xml file
Remark
Every time a PMode is updated the truststore is also reloaded from the filesystem
7142 Upload the Truststore
1 Select the Truststore menu and press the Upload button
Domibus 334 Administration Guide
Page 81 134
2 Navigate to the Truststore and select it by clicking on the Open button (or equivalent) of
the standard file open dialog
3 Once the file has been selected enter the keystore password and click on the OK button
to activate the new truststore jks file
Domibus 334 Administration Guide
Page 82 134
SPECIAL SCENARIO SENDER AND RECEIVER ARE THE SAME
In this special scenario the Sender Access Point acts also as the Receiver Access Point Multiple backends can exchange messages via the same Access Point using the same or different plugins
PMode Configuration
A party (eg blue_gw) which is Sender and Receiver must be defined in both the ltinitiatorPartiesgt
A message that is sent to the same Access Point will have to contain the same party id in both From and To sections Below there is an example of a message sent using the Default WS Plugin
Due to some limitations related to the uniqueness of the message identifier a convention has been defined in this scenario The message ID used for the received message is derived from the message ID used for the sent message with the following rule the suffix _1 is added to the sent message id
Example
sent message ID is ae15851e-78fb-4b51-aac8-333c08c450d6domibus
received message ID is ae15851e-78fb-4b51-aac8-333c08c450d6domibus_1
Domibus 334 Administration Guide
Page 84 134
ADMINISTRATION TOOLS
Administration Console
911 Changing passwords
It is recommended to change the passwords for the default users who are allowed to have access to the Domibus Administration Console mainly admin and user
1 In order to change the password for a user navigate to the Users menu entry to obtain the list of
configured users
2 To edit the user details click on the EDIT icon (in RED) DO NOT click on the BIN icon as this
would DELETE the record
Domibus 334 Administration Guide
Page 85 134
3 In the popup window choose a new password using the rules shown
4 Confirm the password
5 Click on OK
Domibus 334 Administration Guide
Page 86 134
6 When done either click on Save to save the new password or Cancel to leave the password
unchanged
912 User Account Lockout Policy
A user account lockout policy has been implemented on Domibus Admin Console By default if a user tries to log to the Admin Console with a wrong password 5 times in a row his account will be suspended (locked)
You can define in domibusproperties (section 52 Domibus Properties) the number of failed attempts after which a userrsquos account will be locked
By default a user remains suspended during one hour before his account is automatically unlocked and the user can try to log again
If the user wants his account to be unlocked without waiting the default one hour he can ask his administrator to unlock the account To unlock the account the administrator must change the userrsquos status on the Admin Console from ldquoSuspendedrdquo to ldquoActiverdquo
Select the suspended user and click on ldquoEditrdquo
Domibus 334 Administration Guide
Page 87 134
Re-activate the user (unlock it) by checking the ldquoActiverdquo status and confirming with OK
Do not forget to click on Save on the next window and then on Yes to confirm the change
Domibus 334 Administration Guide
Page 88 134
913 Adding new users
1 New users can be added to the existing default users (admin and user) by clicking on New
2 For each new user you must enter a username an email a role and a password
Domibus 334 Administration Guide
Page 89 134
3 Click on OK
4 Again once the user has been created do not forget to click on the Save button on the Users
page to register your changes on the system
914 Message Filtering
Domibus allows the routing of messages to different plugins based on some messages attributes
From initial sender (C1)
To final recipient (C4)
Domibus 334 Administration Guide
Page 90 134
Action defined as Leg in the PMode
Service as defined in the PMode
The following rules apply
Domibus considers the ordered list of filters to route all messages The first filter matching the filter criteria will define the target plugin The order of the plugin is therefore important in the routing process
Note 1 if the filters are all mutually exclusive the order would not matter
Note 2 The Persisted column indicates if the plugin filter configuration has already been saved If a plugin filter configuration has not already been saved the Persisted value is unchecked and an error message is shown on the top of the screen In this case it is strongly recommended to review the filters configuration and save it afterwards
One plugin may be applied to multiple filters This is done by the use of the OR criteria (cf backendWebservice in the example below)
Multiple attributes could also be defined in one filter This is done by the use of the AND criteria (cf the first filter in the example below)
One filter may have no criteria meaning that all messages (not matching previous filters) will be routed to the corresponding plugin automatically As a result subsequent filters will therefore not be considered for any incoming message In the example below the last filter routes all remaining messages to plugin backendWebservice
Domibus 334 Administration Guide
Page 91 134
Figure 9 ndash Message Filter Page
Use the New and Delete buttons to create or delete a filter
As the order matters move up and down actions allow placing each filter in the right order
Cf Move Up and Move Down buttons
After some changes have been applied to the filters the Cancel and Save buttons become active
- Press Cancel to cancel the changes
- Press Save to save the changes and activate them immediately
The console will ask the user to confirm the operation before proceeding
Example of message attributes used for routing and matching the first filter used in the example above
Action TC1Leg1
Service bdxnoprocesstc2
From domibus-blueurnoasisnamestcebcorepartyid-typeunregistered
To domibus-redurnoasisnamestcebcorepartyid-typeunregistered
That information can be found in the incoming message received by Domibus (eg see below)
Domibus administration dashboard includes a message logging page that gives the administrator information related to sent messages received messages and their status (SENT RECEIVED FAILED ACKNOWLEDGEDhellip)
The following state machines illustrate the evolution of the processing of messages according to the encountered events
Figure 10 - State machine of Corner 2 (sending access point)
Figure 11 - State machine of Corner 3 (receiving access point)
REJECTED
RECEIVED_WITH_WARNING
RECEIVED
DELETEDDOWNLOADED
[ebMS3 error receipt with severity FAILURE]
[ebMS3 error receipt with severity WARNING]
[ebMS3 receipt SUCCESS]
[Undownloaded retention period expired]
[C4 downloads message] [Download retention period expired]
[C4 downloads message] [Undownloaded retention period expired]
Domibus 334 Administration Guide
Page 93 134
Figure 12 - Domibus Message Log
Remark The administration dashboard is reachable via the following URLs httpyour_serveryour_port_numberdomibus (Tomcat) httpyour_serveryour_port_numberdomibus-wildfly (WildFly) httpyour_serveryour_port_numberdomibus-weblogic (WebLogic)
Application Logging
931 Domibus log files
Domibus has three log files
1 domibus-securitylog this log file contains all the security related information For example you can find information about the clients who connect to the application
2 domibus-businesslog this log file contains all the business related information For example when a message is sent or received etc
3 domibuslog this log file contains both the security and business logs plus miscellaneous logs like debug information logs from one of the framework used by the application etc
932 Logging properties
It is possible to modify the configuration of the logs by editing the logging properties file cef_edelivery_pathconfdomibuslogbackxml
Domibus 334 Administration Guide
Page 94 134
933 Error Log page
To go to the error log page of the Domibus Admin Console click on the Error log menu entry
This option lists all the Message Transfers error logs and includes the ErrorSignalMessageId ErrorDetail and Timestamp You can sort messages by using the up or down arrow to search for a specific message
Figure 13 - Domibus ndash Error Log page
Queue Monitoring
Domibus uses JMS queues to handle the messages
Domibus 334 Administration Guide
Page 95 134
Destination type
JNDI name Comment Description
Queue jmsdomibusinternaldispatchqueue No redelivery because redelivery of MSH messages is handled via ebMS3AS4
This queue is used for scheduling messages for sending via the MSH
Queue jmsdomibusinternalnotificationunknown Notifications about received messages (by the MSH) that do not match any backend routing criteria will be sent to this queue In production environment this queue should be monitored in order to handle those messages manually
Topic jmsdomibusinternalcommand This topic is used for sending commands to all nodes in a cluster For example it is used after a PMode was uploaded in order to notify all nodes to update their PMode cache (in case caching is enabled)
Queue jmsdomibusbackendjmsreplyQueue This queue is used for sending replies back to the sender of a message Replies contain a correlationId ebMS3 messageId (if possible) error messages (if available)
Queue jmsdomibusbackendjmsoutQueue Messages received by the MSH (that match the routing criteria for the JMS plugin) will be sent to this queue
Queue jmsdomibusbackendjmsinQueue This queue is the entry point for messages to be sent by the sending MSH
Queue jmsdomibusbackendjmserrorNotifyConsumer This queue is used to inform the receiver of a message that an error occurred during the processing of a received message
Queue jmsdomibusbackendjmserrorNotifyProducer This queue is used to inform the sender of a message that an error occurred during the processing of a message to be sent
Domibus 334 Administration Guide
Page 96 134
Queue jmsdomibusnotificationjms
Used for sending notifications to the configured JMS plugin
Queue jmsdomibusinternalnotificationqueue
This queue is used to notify the configured plugin about the status of the message to be sent
Queue jmsdomibusnotificationwebservice Used for sending notifications to the configured WS plugin
Queue jmsdomibusDLQ This is the Dead Letter Queue of the application The messages from other queues that reached the retry limit are redirected to this queue
Table 3 - Queue Monitoring
All these queues can be monitored and managed using the JMS Monitoring page which is accessible from the JMS Monitoring menu of the administration console
Warning For Tomcat server the maximum number of shown messages in the queue monitoring is defined by the lsquodomibuslistPendingMessagesmaxCountrsquo property In the Source field we have all the queues listed along with the number of messages pending in each queue
Domibus 334 Administration Guide
Page 97 134
If a queue is used internally by the application core its name will start with [internal] A regular expression is used to identify all the internal queues The value for this regular expression can be adapted in the domibusjmsinternalQueueexpression property from the
In the JMS Monitoring page the following operations can be performed
1 Inspecting and filtering the messages from a queue based on the following fields
a Signal Message id identifier of an error signal message
b Message id identifier of a message
c Error detail text of the error (full)
d AP Role role of the AP
e Error Code structured code of the error
f Source the source queue of the messages
g Error or Notified Time Period time interval that will filter the messages based on the
send dates
h JMS type the JMS header JMSType
i Selector the JMS message selector expression
Remark For more information on the JMS message headers and the JMS message selector please check the official documentation at httpsdocsoraclecomcdE19798-01821-1841bncesindexhtml
Domibus 334 Administration Guide
Page 98 134
2 Move a message
a Move the message from the DLQ to the original queue
- Select the JMS message from the DLQ and press the Move icon (in RED marker)
- Select the original queue from the Destination dropdown list in the dialog box
- Press the Ok button in the dialog and the message will be moved to the original
queue
Note the details of a message can be viewed by selecting it (double-clicking) from the message list
Domibus 334 Administration Guide
Page 99 134
Click Close to exit the dialog box
b Move multiple messages from the DLQ to the original queue
- Select multiple JMS messages from the DLQ and press the Move icon button
- Select the original queue from the Destination dropdown list and click Ok
Domibus 334 Administration Guide
Page 100 134
Remark
Please make sure that all the selected messages came from the same source queue Use the filtering capabilities to ensure this
3 Delete message(s)
a Delete one or more messages from one queue
- Select one or several JMS messages from the source queue and press the Delete
button
Domibus 334 Administration Guide
Page 101 134
- By clicking the Delete button the selected messages are removed from the screen
but you still have to confirm your changes by clicking on the Save button As long as
you have not clicked on the Save button your changes are not taken into account in
the system
- To cancel the changes you made click on the Cancel button instead
Domibus 334 Administration Guide
Page 102 134
Configuration of the queues
Queues should be configured appropriately and according to the backend system needs and re-delivery policy
951 Tomcat
Domibus uses ActiveMQ as JMS broker The various queues are configured in the cef_edelivery_pathconfdomibusinternalactivemqxml file
Please see ActiveMQ redelivery policy and configure the parameters below if needed
Access to the JMS messaging subsystem is protected by a username and a password in clear text defined in the Domibus properties file cef_edelivery_pathconfdomibusdomibusproperties
It is recommended to change the password for the default user
The user (activeMQusername) and the password (activeMQpassword) defined in the domibusproperties file are referenced in the authentication section of the activemqxml file provided
952 WebLogic
Please use the admin console of WebLogic to configure the re-delivery limit and delay if necessary
953 WildFly
Please use the admin console of WildFly to configure the re-delivery limit and delay if necessary
Domibus 334 Administration Guide
Page 104 134
LARGE FILES SUPPORT
Domibus supports transfers between Access Points of files up to 2 GB using Java 8 In order to compute the message signature Domibus loads the whole message into memory using a byte array In Java byte arrays can hold a maximum of 2 GB hence the Domibus limitation of 2 GB
If Domibus is started using Java 7 the limitation is 1 GB due to a limitation in Java 7 version
In order to optimize the sending of such large files HTTP chunking is activated by default in the connection with the receiver Access Points As chunked encoding is useful when sending larger amounts of data but decreases the performance on smaller amounts Domibus uses a threshold to activate the chunking when appropriate only
The following properties are used to configure chunking domibusdispatcherallowChunking and domibusdispatcherchunkingThreshold For more information about these properties please refer to the section 52 Domibus Properties
Domibus 334 Administration Guide
Page 105 134
DATA ARCHIVING
Whats archiving
Data archiving consists of moving messages that have been processed successfully or unsuccessfully by the access point to an external storage location for long-term retention
Archived data consists of older data that have been processed at the communication level by the access points that are still significant to the business and may be needed for future reference They may also be retained for legal constraints
Data archives are indexed and searchable to allow easy retrieval
It is not recommended to use Domibus as an archiving solution Nevertheless if the data really needs to be stored for long periods then it is possible to set the Data Retention Policy to allow it to be extracted from the database through the webservices or through an external archiving tool
Data Retention Policy
A data retention policy is a procedure established by the business for continuous information storage for operational legal or compliance reasons
The data retention policy needs to be defined based on the business needs and constraints
In Domibus the data retention policy can be found in the PMode file
In the above extract of the sample PMode configuration of Domibus the data retention policy is set to 14400 minutes (10 days) if the message is not downloaded This means that if the message is not downloaded it will be deleted and then only the metadata containing the information of the receiver and the acknowledgement will be retained
The data retention policy is set by default to 0 minutes if the message is downloaded This means that the message will be instantaneously deleted as soon as it is downloaded These two parameters retention_downloaded and retention_undownloaded can therefore be modified to meet the needs of the business
Data Extraction
In order to keep the metadata and the payload of the message for a longer period than the one set in the PMode it is recommended to extract it to an external storage As long as the retention worker does not delete it data can be extracted through the webservices or through an external archiving tool
Domibus 334 Administration Guide
Page 106 134
For more information please refer to the Data Model provided in the Domibus Software Architecture Document that can be found on the CEF Digital single web portal [REF6]
Domibus 334 Administration Guide
Page 107 134
NON REPUDIATION
In order to guarantee non-repudiation the sending Access Point (C2) stores the full SignalMessage including the MessageInfo the Receipt (that contains the NonRepudiationInformation for each part) and the signature of the receipt by the receiver Access Point (C3)
This will guarantee that the receiver Access Point (C3) cannot deny having received a message from the sender Access Point (C2) during the sending process However if the initial sender (C1) wants to be sure that the final recipient (C4) cannot deny having received a specific content inside this message then the sender must be able to show the specific content that was used to produce the receiver Access Point (C3) signature
Domibus as a sending Access Point (C2) keeps track of the metadata of the sent messages but does not store the actual message payloads Therefore it is recommended that the initial sender (C1) stores the message payloads safely for the time needed to guarantee non-repudiation of the sent messages
In order to guarantee non-repudiation the receiving Access Point (C3) stores the full UserMessage and the associated signature of the sender (C2)
This will guarantee that the sender Access Point (C2) cannot deny having sent a message to the receiver during the sending process However if the final recipient (C4) wants to be sure that the sender cannot deny having sent a specific content inside this message then the final recipient (C4) must be able to show the specific content that was used to produce the sender Access Point signature (C2)
Domibus as a receiving Access Point (C3) keeps track of the metadata of the received messages and will store the message payloads only for the (limited) duration configured in the retention period (specified in the PMode) Therefore it is recommended that the final recipient (C4) either stores the message payloads safely or aligns the retention period on the receiving Access Point (C3) with the time needed to guarantee non-repudiation of the received messages
Domibus 334 Administration Guide
Page 108 134
TLS CONFIGURATION
TLS Configuration
1311 Transport Layer Security in Domibus
One way of implementing TLS for the eDelivery AS4 profile is to use the TLS in the Domibus Message Handler (MSH) described below otherwise this would have to be handled at a higher level (eg Application Server Proxy etchellip)
To enable secure communication at the transport layer (TLS) between a sending and a receiving MSH (Access Point) both the client and the server need to be configured accordingly
The client is used in the initiator MSH to send the request and is therefore configured via CXF while the server is configured at containerapplication server level
1312 Client side configuration (One Way SSL)
The tlsClientParameters are configured in the cef_edelivery_pathconfdomibusclientauthenticationxml file
Remark your_trustore_ssl is used at the transport layer (SSL) while your_trustore described in sect512 ndash Certificates is used by Domibus to encrypt and sign (WS-Security)
When the clientauthenticationxml file is present and the endpoint of the receiving MSH is https the TLS parameters are added via the CXF framework to the send request
Domibus 334 Administration Guide
Page 109 134
The version of the TLS must be specified by setting secureSocketProtocol=TLSv12
If you use self-signed certificates you need to set disableCNCheck=true
The attribute disableCNCheck specifies whether JSSE should omit checking if the host name specified in the URL matches the host name specified in the Common Name (CN) of the servers certificate The attribute is false by default and must not be set to true during production use (cf[REF7])
Remark
TLSv12 is mandatory for eDelivery AS4 Profile
1313 Client side configuration (Two Way SSL)
The configuration is similar to the one used for One Way SSL except that the tlsClientParameters gets configured with both trustManagers and keystoreManagers The clientauthenticationxml file should look like this
your_trustore_ssl and your_keystore_ssl are used at the transport layer (SSL) while your_trustore and your_keystore described in sect512 ndash Certificates are used by Domibus to encrypt and sign (WS-Security)
Two Way SSL is optional and based on the eDelivery AS4 Profile
1314 Server side configuration
13141 Tomcat 8
In Serverxml add a new connector with the SSLEnabled attribute set to true
The keystore jks location and password must be specified otherwise the default ones will be taken into account
Domibus 334 Administration Guide
Page 110 134
TLS version can also be specified
The above connector has clientAuth=false which means that only the server has to authenticate itself (One Way SSL) To configure Two Way SSL which is optional in the eDelivery AS4 Profile set clientAuth=true in Serverxml and provide the location of the your_truststore_ssljks file so that the server can verify the client
Go to Servers select Server Name Configuration General then click on Client Cert Proxy Enabled
2 Add keystore and truststore
Go to Servers select Server Name Configuration Keystores and SSL tabs and use Custom Identity and Custom Trust then set keystore and trustore jks
To disable basic authentication at WebLogic level
By default WebLogic performs its own basic authentication checks before passing the request to Domibus As we want basic authentication to be performed by Domibus we need to disable it at the application server level
13144 Configure Basic and Certificates authentication in SoapUI
Go to File Preferences HTTP Settings and check the option Adds authentication information to outgoing requests
Domibus 334 Administration Guide
Page 112 134
Go to File Preferences SSL Settings add the KeyStore and KeyStore Password and check the option requires client authentication
To allow Basic Authentication select the Auth tab click Add New Authorization and select Basic Enter user and password (eg Username = admin Password = 123456)
13145 PMode update
If you enable HTTPS then your PMode Configuration Manager needs to make sure that all other endpoint PModes are modified accordingly
With the SSL connector configured as above the MSH endpoint is now httpsyour_domibus_host8443domibusservicesmsh
Domibus 334 Administration Guide
Page 113 134
After the updates upload the PModes via the Admin Console
In a dynamic discovery setup the sender andor the receiver parties and their capabilities are not configured in advance
The sending Access Point will dynamically retrieve the necessary information for setting up an interoperability process from the Service Metadata Publisher (SMP) The SMP stores the interoperability metadata which is a set of information on the recipient or end entity (its identifier supported business documents and processes) and AP (metadata which includes technical configuration information on the receiving endpoint such as the transport protocol and its address) cf[REF8]
The receiving AP registers its metadata in the SMP and configures the PMode to be able to accept messages from trusted senders that are not previously configured in the PMode The receiving AP will have to configure one process in its PMode for each SMP entry
The mapping between the PMode process and the SMP entry is defined in sect143 ndash PMode configuration for PEPPOL and sect148 - ndash PMode configuration for OASIS
Please note that the sender does not have to be registered in the SMP and the receiver merely extracts its identifier from the received message
The following sections describe how to configure Domibus AP in order to use Dynamic Discovery (sect143 ndash PMode configuration for PEPPOL sect144 ndash Policy and certificates for PEPPOL sect148 ndash PMode configuration for OASIS sect149 ndash Policy and certificates for OASIS)
Domibus configuration for PEPPOL
To enable the integration with the SMPSML components Domibus requires some changes in the domibusproperties configuration file which include
1 Adding the following properties to enable the usage of the PEPPOL dynamic discovery client
2 Setting the dynamic discovery client to use certificates to access the SMP These certificates are different in TEST and PRODUCTION therefore we need to specify the Mode used by the dynamic discovery client by setting the following property domibusdynamicdiscoverypeppolclientmodegtTEST
3 Setting the domibussmlzone property
4 Configuring the bean pModeProvider with DynamicDiscoveryPModeProvider
Domibus 334 Administration Guide
Page 115 134
PMode configuration for PEPPOL
1431 Sender PMode
In a dynamic discovery process the receiver of the messages is not known beforehand and therefore the PModeResponder parameter SHOULD NOT be set
The dynamic discovery process must include a leg which maps the configured entry (action service and service type ndash see section 145 ndash Message format for PEPPOL) of the Receiver in the SMP
The security policy to be used in the leg is the following (see section sect511 ndash Security Policies for more information)
initiatorRole=defaultInitiatorRole responderRole=defaultResponderRolegt ltinitiatorPartiesgt ltinitiatorParty name=senderaliasgt ltinitiatorPartiesgt lt-- no responderParties element --gt ltlegsgt ltleg name=pushTestcase1tc1Actiongt ltlegsgt ltprocessgt hellip
1432 Receiver PMode
Dynamic discovery configuration of the receiver is similar to the configuration of the sender except that the roles are swapped the sender of the messages is not known beforehand As a consequence the PModeInitiator parameter SHOULD NOT be set
The receiver must include the certificate of the trusted authority(ies) in its truststore It will only accept messages that were signed with certificates issued by the trusted authority(ies) (cf sect18 ndash Annex 1 - Usage of certificates in PEPPOL and OASIS for more information)
Message format for PEPPOL
When dynamic discovery is used the to field should not be statically configured in the PMode (the to field may even be omitted in the message) The lookup is performed by C2 based on the finalRecipient message property
Example of a message using the finalRecipient for dynamic discovery
The Service Metadata Record also provides the receiving ends certificate This certificate can be used to encrypt the message to be sent to the receiver The certificate can also provide the name of the gateway for this PMode by using the Certificates CNAME as the PMode identifier (cf[REF9])
Domibus configuration for OASIS
To enable the integration with the SMPSML components Domibus requires some changes in the domibusproperties configuration file
1 Add the following properties to enable the usage of the OASIS dynamic discovery client
Note this property is not mandatory as it defaults to the above value
2 Set the property domibussmlzone eg ehealthaccedeliverytecheceuropaeu
3 The bean pModeProvider must be configured with DynamicDiscoveryPModeProvider
PMode configuration for OASIS
1481 Sender PMode
In a dynamic discovery process the receiver of the messages is not known beforehand and therefore the PModeResponder parameter SHOULD NOT be set
Domibus 334 Administration Guide
Page 119 134
The dynamic discovery process must include a leg which maps the configured entry (action service and service type ndash cf 145 ndash Message format for PEPPOL) of the Receiver in the SMP
The security policy to be used in the leg is the following (see sect511 ndash Security Policies for more information)
Schema name should be added to action value Eg ehealth-actorid-qnsurnoasisnamesspecificationublschemaxsdCreditNote-2CreditNoteurnwwwcenbii
1482 Receiver PMode
The dynamic discovery configuration of the receiver is similar to the configuration of the sender except that the roles are swapped the sender of the messages is not known beforehand As a consequence the PModeInitiator parameter SHOULD NOT be set
The receiver must include the certificate of the trusted authority(ies) in its truststore It will only accept messages that were signed with certificates issued by the trusted authority(ies)
The sender truststore must include the SMP public certificate This certificate is used by the AP to validate the identity of the used SMP (cf sect18 ndash Annex 1 - Usage of certificates in PEPPOL and OASIS for more information)
Message format for OASIS
When dynamic discovery is used the to field should not be statically configured in the PMode (the to field may even be omitted in the message) The lookup is performed by C2 based on the finalRecipient message property
Note For OASIS clients in the PMode action value the document scheme must be included with the document ID (for PEPPOL client only document ID is needed)
Domibus 334 Administration Guide
Page 121 134
Example of message using the finalRecipient for dynamic discovery
In order to configure message pulling the process section should be configured with mep set to oneway and binding set to pull as shown in the following example
In the case of a pull process the initiatorParties section contains the party that initiate the pull request The responderParties section contains the parties that can be pulled from
In domibusproperties configuration file adapt the following properties to your needs Note that domibusmshpullcron and domibuspullqueueconcurency are mandatory
Cron expression used for configuring the message puller scheduling
domibusmshpullcron=0 0 01
Number of threads used to parallelize the pull requests
domibuspullqueueconcurency=1-1
Number or pull requests executed every cron cycle
domibuspullrequestsendperjobcycle=1
Configuration restriction
A correctly configured one-way pull process should only contain one party configured in the initiatorParties section
Different legConfiguration with the same defaultMpc (highlighted in red in the following configuration) should not be configured in the same pull process or across different pull processes
Domibus 334 Administration Guide
Page 123 134
If those restrictions are not respected the message will not be exchanged and a warning message will detail the configuration problem
SEVERE Exception sending context initialized event to listener instance of class orgspringframeworkwebcontextContextLoaderListener orgspringframeworkbeansfactoryBeanCreationException Error creating bean with name orgspringframeworkschedulingquartzSchedulerFactoryBean0 defined in ServletContext resource [WEB-INFmsh-configxml] Invocation of init method failed nested exception is orgquartzJobPersistenceException Failed to obtain DB connection from datasource springTxDataSourceorgspringframeworkschedulingquartzSchedulerFactoryBean0 comatomikosjdbcAtomikosSQLException Failed to grow the connection pool [See nested exception comatomikosjdbcAtomikosSQLException Failed to grow the connection pool] at orgspringframeworkbeansfactorysupportAbstractAutowireCapableBeanFactoryinitializeBean(AbstractAutowireCapableBeanFactoryjava1578) at orgspringframeworkbeansfactorysupportAbstractAutowireCapableBeanFactorydoCreateBean(AbstractAutowireCapableBeanFactoryjava545) at orgspringframeworkbeansfactorysupportAbstractAutowireCapableBeanFactorycreateBean(AbstractAutowireCapableBeanFactoryjava482) at orgspringframeworkbeansfactorysupportAbstractBeanFactory$1getObject(AbstractBeanFactoryjava305) at orgspringframeworkbeansfactorysupportDefaultSingletonBeanRegistrygetSingleton(DefaultSingletonBeanRegistryjava230) at orgspringframeworkbeansfactorysupportAbstractBeanFactorydoGetBean(AbstractBeanFactoryjava301) SEVERE One or more listeners failed to start Full details will be found in the appropriate container log file May 11 2016 101243 AM orgapachecatalinautilSessionIdGeneratorBase createSecureRandom INFO Creation of SecureRandom instance for session ID generation using [SHA1PRNG] took [13256] milliseconds May 11 2016 101243 AM orgapachecatalinacoreStandardContext startInternal SEVERE Context [domibus] startup failed due to previous errors May 11 2016 101243 AM orgapachecatalinacoreApplicationContext log INFO Closing Spring root WebApplicationContext May 11 2016 101243 AM orgapachecatalinacoreApplicationContext log INFO Shutting down log4j
Solution Setup the password properly in the domibusproperties
Exception sending context initialized event to listener
instance of class
SEVERE Exception sending context initialized event to listener instance of class orgspringframeworkwebcontextContextLoaderListener orgspringframeworkbeansfactoryBeanCreationException Error creating bean with name entityManagerFactory defined in URL [filehomeedeliverydomibusf1confdomibusdomibus-datasourcesxml] Cannot resolve reference to bean domibusJDBC-XADataSource while setting bean
Domibus 334 Administration Guide
Page 125 134
property dataSource nested exception is orgspringframeworkbeansfactoryBeanCreationException Error creating bean with name domibusJDBC-XADataSource defined in URL [filehomeedeliverydomibusf1confdomibusdomibus-datasourcesxml] Invocation of init method failed nested exception is comatomikosjdbcAtomikosSQLException The class commysqljdbcjdbc2optionalMysqlXADataSource specified by property xaDataSourceClassName could not be found in the classpath Please make sure the spelling is correct and that the required jar(s) are in the classpath
Solution Add MySQL connector in domibuslib folder
Neither the JAVA_HOME nor the JRE_HOME environment
variable is defined
Neither the JAVA_HOME nor the JRE_HOME environment variable is defined At least one of these environment variables is needed to run this program
Solution Set JAVA_HOME variable orand JRE_HOME
Cannot access Admin Console
httpyour_serveryour_port_numberdomibus No SEVER errors in logs but no admin option in browser under
Solution Check if the firewall is open for port_no (eg 8080)
Handshake Failure
Full stack trace below
orgapachecxfinterceptorFault Could not write attachments at orgapachecxfinterceptorAttachmentOutInterceptorhandleMessage(AttachmentOutInterceptorjava74) at orgapachecxfphasePhaseInterceptorChaindoIntercept(PhaseInterceptorChainjava308) at orgapachecxfendpointClientImpldoInvoke(ClientImpljava514) at orgapachecxfendpointClientImplinvoke(ClientImpljava423) at orgapachecxfendpointClientImplinvoke(ClientImpljava324) at orgapachecxfendpointClientImplinvoke(ClientImpljava277) at orgapachecxfendpointClientImplinvokeWrapped(ClientImpljava312) at orgapachecxfjaxwsDispatchImplinvoke(DispatchImpljava327) at orgapachecxfjaxwsDispatchImplinvoke(DispatchImpljava246) at eudomibusebms3senderMSHDispatcherdispatch(MSHDispatcherjava126) at eudomibusebms3senderMSHDispatcher$$FastClassBySpringCGLIB$$105974a1invoke(ltgeneratedgt) at orgspringframeworkcglibproxyMethodProxyinvoke(MethodProxyjava204) at orgspringframeworkaopframeworkCglibAopProxy$CglibMethodInvocationinvokeJoinpoint(CglibAopProxyjava717) at orgspringframeworkaopframeworkReflectiveMethodInvocationproceed(ReflectiveMethodInvocationjava157)
Domibus 334 Administration Guide
Page 126 134
at orgspringframeworktransactioninterceptorTransactionInterceptor$1proceedWithInvocation(TransactionInterceptorjava99) at orgspringframeworktransactioninterceptorTransactionAspectSupportinvokeWithinTransaction(TransactionAspectSupportjava281) at orgspringframeworktransactioninterceptorTransactionInterceptorinvoke(TransactionInterceptorjava96) at orgspringframeworkaopframeworkReflectiveMethodInvocationproceed(ReflectiveMethodInvocationjava179) at orgspringframeworkaopframeworkCglibAopProxy$DynamicAdvisedInterceptorintercept(CglibAopProxyjava653) at eudomibusebms3senderMSHDispatcher$$EnhancerBySpringCGLIB$$da53e95adispatch(ltgeneratedgt) at eudomibusebms3senderMessageSendersendUserMessage(MessageSenderjava116) at eudomibusebms3senderMessageSenderonMessage(MessageSenderjava195) at sunreflectNativeMethodAccessorImplinvoke0(Native Method) at sunreflectNativeMethodAccessorImplinvoke(NativeMethodAccessorImpljava57) at sunreflectDelegatingMethodAccessorImplinvoke(DelegatingMethodAccessorImpljava43) at javalangreflectMethodinvoke(Methodjava606) at orgspringframeworkaopsupportAopUtilsinvokeJoinpointUsingReflection(AopUtilsjava302) at orgspringframeworkaopframeworkReflectiveMethodInvocationinvokeJoinpoint(ReflectiveMethodInvocationjava190) at orgspringframeworkaopframeworkReflectiveMethodInvocationproceed(ReflectiveMethodInvocationjava157) at orgspringframeworktransactioninterceptorTransactionInterceptor$1proceedWithInvocation(TransactionInterceptorjava99) at orgspringframeworktransactioninterceptorTransactionAspectSupportinvokeWithinTransaction(TransactionAspectSupportjava281) at orgspringframeworktransactioninterceptorTransactionInterceptorinvoke(TransactionInterceptorjava96) at orgspringframeworkaopframeworkReflectiveMethodInvocationproceed(ReflectiveMethodInvocationjava179) at orgspringframeworkaopframeworkJdkDynamicAopProxyinvoke(JdkDynamicAopProxyjava207) at comsunproxy$Proxy163onMessage(Unknown Source) at orgspringframeworkjmslistenerAbstractMessageListenerContainerdoInvokeListener(AbstractMessageListenerContainerjava746) at orgspringframeworkjmslistenerAbstractMessageListenerContainerinvokeListener(AbstractMessageListenerContainerjava684) at orgspringframeworkjmslistenerAbstractMessageListenerContainerdoExecuteListener(AbstractMessageListenerContainerjava651) at orgspringframeworkjmslistenerAbstractPollingMessageListenerContainerdoReceiveAndExecute(AbstractPollingMessageListenerContainerjava315) at orgspringframeworkjmslistenerAbstractPollingMessageListenerContainerreceiveAndExecute(AbstractPollingMessageListenerContainerjava233) at orgspringframeworkjmslistenerDefaultMessageListenerContainer$AsyncMessageListenerInvokerinvokeListener(DefaultMessageListenerContainerjava1150)
Domibus 334 Administration Guide
Page 127 134
at orgspringframeworkjmslistenerDefaultMessageListenerContainer$AsyncMessageListenerInvokerexecuteOngoingLoop(DefaultMessageListenerContainerjava1142) at orgspringframeworkjmslistenerDefaultMessageListenerContainer$AsyncMessageListenerInvokerrun(DefaultMessageListenerContainerjava1039) at javalangThreadrun(Threadjava745) Caused by javaxnetsslSSLHandshakeException Received fatal alert handshake_failure at sunsecuritysslAlertsgetSSLException(Alertsjava192) at sunsecuritysslAlertsgetSSLException(Alertsjava154) at sunsecuritysslSSLSocketImplrecvAlert(SSLSocketImpljava1979) at sunsecuritysslSSLSocketImplreadRecord(SSLSocketImpljava1086) at sunsecuritysslSSLSocketImplperformInitialHandshake(SSLSocketImpljava1332) at sunsecuritysslSSLSocketImplstartHandshake(SSLSocketImpljava1359) at sunsecuritysslSSLSocketImplstartHandshake(SSLSocketImpljava1343) at sunnetwwwprotocolhttpsHttpsClientafterConnect(HttpsClientjava563) at sunnetwwwprotocolhttpsAbstractDelegateHttpsURLConnectionconnect(AbstractDelegateHttpsURLConnectionjava185) at sunnetwwwprotocolhttpHttpURLConnectiongetOutputStream(HttpURLConnectionjava1092) at sunnetwwwprotocolhttpsHttpsURLConnectionImplgetOutputStream(HttpsURLConnectionImpljava250) at orgapachecxftransporthttpURLConnectionHTTPConduit$URLConnectionWrappedOutputStreamsetupWrappedStream(URLConnectionHTTPConduitjava236) at orgapachecxftransporthttpHTTPConduit$WrappedOutputStreamhandleHeadersTrustCaching(HTTPConduitjava1302) at orgapachecxftransporthttpHTTPConduit$WrappedOutputStreamonFirstWrite(HTTPConduitjava1262) at orgapachecxftransporthttpURLConnectionHTTPConduit$URLConnectionWrappedOutputStreamonFirstWrite(URLConnectionHTTPConduitjava267) at orgapachecxfioAbstractWrappedOutputStreamwrite(AbstractWrappedOutputStreamjava47) at orgapachecxfioAbstractThresholdOutputStreamwrite(AbstractThresholdOutputStreamjava69) at orgapachecxfioAbstractWrappedOutputStreamwrite(AbstractWrappedOutputStreamjava60) at orgapachecxfioCacheAndWriteOutputStreamwrite(CacheAndWriteOutputStreamjava89) at orgapachecxfattachmentAttachmentSerializerwriteProlog(AttachmentSerializerjava172) at orgapachecxfinterceptorAttachmentOutInterceptorhandleMessage(AttachmentOutInterceptorjava72) 43 more
Solution If you receive this error then itrsquos likely that you configured the client with TLSv11 while the server only accepts TLSv12
Domibus 334 Administration Guide
Page 128 134
OPERATIONAL GUIDELINES
In this section you will find some recommendations on how to administer Domibus in an efficient way The following topics are tackled JMS Queue management log management capacity planning database management and the monitoring of message life cycle
JMS Queue Management
Domibus provides following out of the box features to manage the JMS Queues used in Domibus (see also sect94- Queue Monitoring)
Inspecting and filtering the messages from a queue based on the contents of Source Period
JMS Type or Selector
Move message from the DLQ (Dead Letter Queue) to the original Queue
Delete stuck or pending message(s) from Queues
It is recommended to monitor the Queue size and number of messages in the different Queues If some messages are stuck in any of the Queue then alerts must be sent to the Domibus Administrator
Please pay special attention to the deadletter queue (DLQ) Messages stuck in this queue is a signal that there is some issue in Domibus that needs to be analysed and an alert should be sent to the Domibus Administrator
Important
The lsquoListPendingMessagesrsquo operation on WS Plugin browses the JMS queue Max count is limited to destination MaxBrowsePageSize which can be changed via the lsquodomibuslistPendingMessagesmaxCountrsquo Domibus property
If your received messages are not returned by the webservice listPendingMessages method the you should
1 increase the value of the lsquodomibuslistPendingMessagesmaxCountrsquoproperty 2 delete the messages from the domibusnotificationwebservice queue with selector NOTIFICATION_TYPE=MESSAGE_SEND_SUCCESS using JMX tools httpactivemqapacheorghow-can-i-monitor-activemqhtml
Log Management
1721 Log Level
It is recommended that the log level is correctly set in all the environments
The log level should be set to INFODEBUG in all the test environments for de-bugging purpose
The log level should be set to ERRORWARN in production environment (keeping log level to INFO in production environment will degrade the performance of Domibus)
Domibus 334 Administration Guide
Page 129 134
1722 Log Rotation and Archiving
It is recommended that log rotation and archiving logic is implemented
Domibus provides by default log rotation but Domibus administrator should manage Domibus archiving logic
1723 Log Monitoring
It is recommended to monitor continuously Domibus logs It can be done using an automated script which looks for keywords like ERROR WARNING etc and reports all the errors and warnings to the Domibus administrator
Capacity Planning
1731 JVM Memory Management
Hereafter some recommendations
the JVM memory parameters must first be tested in a test environment with the load
expected in production
the JVM parameters ie heap size must be monitored with the help of automated scripts and
any abnormal hikes in heap size must be reported to the administrator
1732 CPU IO operations and Disk Space Monitoring
CPU IO operations and disk space must be continuously monitored using automated scripts Any abnormal hikes must be reported to Domibus administrator and further investigated
Database Management
1741 Database Monitoring
It is important to monitor the database size
The Payload of the message is deleted from the sending Access Point Only the metadata of the message stays in the table The Payload from the receiving Access Point is deleted based on the retention policy defined in the Pmode settings
Domibus uses approximately 40 MB of table space to store the metadata of 1000 messages
1742 Database Archiving
Since the Database contains AS4 receipts that are used for non-repudiation purposes they should be archived before purging the database
The metadata of the database can be purged if it is no longer required
1743 Monitor Message Life Cycle
It is recommended to monitor the message status in the TB_MessageLog table Automated scripts can be used to count different status in the table
Please pay special attention to the following statuses
Domibus 334 Administration Guide
Page 130 134
WAITING_FOR_RETRY this means that there is some issue between C2 and C3 that must be
resolved
SEND_FAILURE this means that that there is some issue between C2 and C3 that must be
resolved
SEND_ENQUEUED this message status is part of the successful message life cycle however
abnormal increase in the count of messages with this status means that there is an issue
Further investigation is recommended
Domibus 334 Administration Guide
Page 131 134
ANNEX 1 - USAGE OF CERTIFICATES IN PEPPOL AND OASIS
C2 C3
Keystore Truststore Keystore Truststore
PEPPOL
Certificate Senders (issued by CA) Empty Receivers CAs
Note
C2 signs the message with its private key
C2 discover C3s public certificate from the SMP
C3 signs the receipt with its private key
The receiver trusts all senders whos certificate were issue dby these CAs
OASIS
Certificate Senders (issued by CA) SMPs Receivers CAs
Note
C2 signs the message with its private key
C2 discover C3s public certificate from the SMP To trust the SMP the sender needs its public certificate
C3 signs the receipt with its private key
The receiver trusts all senders whos certificate were issue dby these CAs
Domibus 334 Administration Guide
Access Point Page 132 134
ANNEX 2 ndash DOCUMENT PARTS
Domibus 334 Administration Guide
Access Point Page 133 134
LIST OF FIGURES
Figure 1 - Diagram representing the Deployment of Domibus in a Cluster on WebLogic 23 Figure 2 - Diagram representing the Deployment of Domibus in a Cluster on Tomcat 39 Figure 3 - Diagram representing the Deployment of Domibus in a Cluster on WildFly 54 Figure 4 - Message Service Handler diagram 57 Figure 5 - PMode view 68
Standard Service 8am to 6pm (Normal EC working Days)
Standby Service 6pm to 8am (Commission and Public Holidays Weekends)
Only for critical and urgent incidents and only by phone
Domibus 334 Administration Guide
Page 12 134
2 Open a command prompt and navigate to this directory cef_edelivery_pathsql-scripts
3 (Optional) Storing payload messages in a database with size over 30 MB
Domibus can temporarily store the messages in the database They are not deleted before they are successfully transferred to the final recipient (see sect7 ndash PMode Configuration) Therefore it is required to increase the maximum allowed size of packets Update the default properties of myini (Windows) or mycnf (Linux)
o max_allowed_packet property
The maximum size of one packet or any generated or intermediate string or any parameter sent by the mysql_stmt_send_long_data() C API function max_allowed_packet=512M
o innodb_log_file_size property
Size of each log file in a log group You should set the combined size of log files to about 25-100 of your buffer pool size to avoid unneeded buffer pool flush activity on log file overwrite However note that larger logfile size will increase the time needed for the recovery process innodb_log_file_size=5120M
o Restart MySQL service (Windows)
MySQL service
4 (Optional) For storing payload messages in a file system instead of a database see sect52 ndash Domibus Properties)
5 For MySQL 8 and ConnectorJ 80x please set the database timezone One way of setting the timezone is to modify the MySQL myini configuration file by adding the following property with the adjusted timezone It is recommended that the database timezone is the same as the timezone of the machine where Domibus is installed
default-time-zone=+0000
6 Execute the following MySQL commands at the command prompt
Remark
User defined names like root_password domibus_schema etc are in italic as
described in the Convention section
mysql -h localhost -u root_user --password=root_password -e drop schema if exists domibus_schemacreate schema domibus_schemaalter database domibus_schema charset=utf8 collate=utf8_bin create user edelivery_userlocalhost identified by edelivery_passwordgrant all on domibus_schema to edelivery_userlocalhost
Domibus 334 Administration Guide
Page 13 134
The above creates a schema (domibus_schema) and a user (edelivery_user) that have all the privileges on the schema
mysql -h localhost -u root_user --password=root_password domibus_schema lt mysql5innoDb-xyzddl
The above creates the required tables in domibus_schema
Remark
If you are using Windows make sure to have the parent directory of mysqlexe added to your PATH variable
413 Oracle configuration
1 Unzip domibus-distribution-XYZ-sql-scriptszip in cef_edelivery_pathsql-scripts
2 Open a command prompt and navigate to this directory cef_edelivery_pathsql-scripts
3 Open a command line session log in and execute the following commands
sqlplus sys as sysdba (password should be the one assigned during the Oracle installation ) =========================================================================== Once logged in Oracle CREATE USER ltedelivery_usergt IDENTIFIED BY ltedelivery_passwordgt DEFAULT TABLESPACE lttablespacegt QUOTA UNLIMITED ON lttablespacegt GRANT CREATE SESSION TO ltedelivery_usergt GRANT CREATE TABLE TO ltedelivery_usergt GRANT CREATE VIEW TO ltedelivery_usergt GRANT CREATE SEQUENCE TO ltedelivery_usergt GRANT EXECUTE ON DBMS_XA TO ltedelivery_usergt GRANT SELECT ON PENDING_TRANS$ TO ltedelivery_usergt GRANT SELECT ON DBA_2PC_PENDING TO ltedelivery_usergt GRANT SELECT ON DBA_PENDING_TRANSACTIONS TO ltedelivery_usergt CONNECT ltedelivery_usergt SHOW USER (should return edelivery_user) oracle10g-xyzddl EXIT ===========================================================================
Domibus on WebLogic 1213
This section does not include the installation of WebLogic server 1213 It is assumed that the WebLogic Server is installed and a Domain is created Hereafter the domain location will be referred as DOMAIN_HOME (user defined name)
Domibus 334 Administration Guide
Page 14 134
Remark
The Apache CXF library referred by Domibus internally uses the environment variable javaiotmpdir to buffer large attachments received If the property javaiotmpdir is not specified then by default this points to the ltWeblogic_domain_directorygt It is recommended to point this to a local directory _tmp on each managed server and accessible by the Weblogic application server The disk space allocated for _tmp directory would depend on the size of attachments received On production environment it is recommended to provide 100GB for _tmp
421 Single Server Deployment
For this step you will have to use the following resources (see section sect31ndashBinaries repository for the download location)
1 Download and unzip domibus-distribution- XYZ-weblogic-configurationzip in the directory DOMAIN_HOMEconfdomibus
2 Download and unzip domibus-distribution- XYZ-weblogic-warzip in a temporary folder to prepare it for deployment
3 Configure your Keystore based on section sect512 ndash Certificates
4 Add the following lines in
o For Windows DOMAIN_HOMEbinsetDomainEnvcmd
Locate the set DOMAIN_HOME statement and add the following lines after
hellip set DOMAIN_HOME Added for Domibus
Domibus 334 Administration Guide
Page 15 134
set EXTRA_JAVA_PROPERTIES=EXTRA_JAVA_PROPERTIES -Ddomibusconfiglocation=DOMAIN_HOMEconfDomibus -Djavaiotmpdir=ltpath to _tmp directorygt hellip
o For Linux DOMAIN_HOMEbinsetDomainEnvsh
Locate the export DOMAIN_HOME statement and add the following lines after
hellip export DOMAIN_HOME Added for Domibus EXTRA_JAVA_PROPERTIES=$EXTRA_JAVA_PROPERTIES -Ddomibusconfiglocation=$DOMAIN_HOMEconfdomibus -Djavaiotmpdir=ltpath to _tmp directorygt export EXTRA_JAVA_PROPERTIES hellip
5 Run the WebLogic Scripting Tool (WLST) in order to create the JMS resources and the Database datasources from the command line
o Download the WLST Package from following location httpseceuropaeucefdigitalartifactcontentrepositorieseDeliveryeueuropaecdigitipciswslt-api191wslt-api-191zip
o Configure the WSLT API tool
Unzip the wslt-api-191zip
Define the WL_HOME as a system environment variable to point to the WebLogic lsquowlserverrsquo directory as defined in the DOMAIN_HOMEbinsetDomainEnv[cmd|sh]
eg WL_HOME=wls12130wlserver
o Take the script WeblogicSingleServerproperties from domibus-distribution-XYZ-weblogic-configurationzip under the scripts directory and copy the WeblogicSingleServerproperties file into the wslt-api-191 directory and adapt the following properties
Adapt the properties for connecting to the WebLogic domain
MySQL configuration is commented by default To enable MySQL remove the comment () from the lines below Dont forget to add the comment () for Oracle to disable it
o Start the WebLogic domain from within DOMAIN_HOME
For Windows startWebLogiccmd
For Linux startWebLogicsh
o Execute the following command from within the wlstapi-191bin directory
For Windows wlstapicmd scriptsimportpy --property WeblogicSingleServerproperties
For Linux wlstapish scriptsimportpy --property WeblogicSingleServerproperties
Expected result
6 Activate the use of the authorization providers to protect the JMX access
7 The database dialect is pre-configured to use the Oracle database If you are using a MySQL database you should adapt the following properties in ltDOMAIN_HOMEgtconfdomibusdomibusproperties as highlighted in the example below
8 Install the WS Plugin For more details see section sect6212 ndash WebLogic
9 Deploy domibus-distribution-XYZ-weblogicwar
o Click on Install
o Navigate to the location of the war file and click Next
Domibus 334 Administration Guide
Page 20 134
o Choose Install this deployment as an application and click Next
o Accept the default options and click Next
Domibus 334 Administration Guide
Page 21 134
o Select the following option and click Finish
Domibus 334 Administration Guide
Page 22 134
o Here is an overview of the resulting settings you can now click on the Save button
The expected positive response to the deployment request should be the following
10 Verify the installation by navigating with your browser to httplocalhost7001domibus-weblogic if you can access the page it means the deployment was successful
(By default User = admin Password = 123456)
Remark
It is recommended to change the passwords for the default users (See sect91 ndash Administration for further information)
Domibus 334 Administration Guide
Page 23 134
Expected result
422 Clustered Deployment
Figure 1 - Diagram representing the Deployment of Domibus in a Cluster on WebLogic
Domibus 334 Administration Guide
Page 24 134
Remark
In this section we assume that a Domain and a WebLogic Cluster are already setup
For this step you will have to use the following resources (see section sect31ndashBinaries repository for the download location)
1 Download and unzip domibus-distribution- XYZ-weblogic-configurationzip in in a shared location that is accessible by all the nodes from the cluster We will refer to this directory as cef_shared_edelivery_pathDomibus
2 Download and unzip domibus-distribution- XYZ-weblogic-warzip in a temporary folder to prepare it for deployment
3 Configure your Keystore based on section sect512 ndash Certificates
4 Add the following lines in
o For Windows DOMAIN_HOMEbinsetDomainEnvcmd
Locate the set DOMAIN_HOME statement and add the following lines after
hellip set DOMAIN_HOME Added for Domibus set EXTRA_JAVA_PROPERTIES=EXTRA_JAVA_PROPERTIES -Ddomibusconfiglocation=DOMAIN_HOMEconfDomibus -Djavaiotmpdir=ltpath to _tmp directorygt hellip
o For Linux DOMAIN_HOMEbinsetDomainEnvsh
Locate the export DOMAIN_HOME statement and add the following lines after
hellip export DOMAIN_HOME Added for Domibus EXTRA_JAVA_PROPERTIES=$EXTRA_JAVA_PROPERTIES -Ddomibusconfiglocation=$DOMAIN_HOMEconfdomibus -Djavaiotmpdir=ltpath to _tmp directorygt export EXTRA_JAVA_PROPERTIES
Domibus 334 Administration Guide
Page 25 134
hellip
5 Run the WebLogic Scripting Tool (WLST) in order to create the necessary JMS resources and Database datasources from the command line
o Download the WLST Package from the following location httpseceuropaeucefdigitalartifactcontentrepositorieseDeliveryeueuropaecdigitipciswslt-api191wslt-api-191zip
o Configure the WSLT API tool
Unzip the wslt-api-191zip
Define the WL_HOME (SET or export command depending on your operating system) environment variable to point to the WebLogic wlserver directory
eg WL_HOME=wls12130wlserver
o Take the script WeblogicClusterproperties from domibus-distribution-XYZ-weblogic-configurationzip under the scripts directory and copy the WeblogicClusterproperties file into the wslt-api-191 directory and apply the following changes
Adapt the properties for connecting to the WebLogic domain
MySQL configuration is commented by default To enable MySQL remove the comment () from the lines below Dont forget to add the comment () for Oracle to disable it
6 Activate the use of the authorization providers to protect the JMX access
7 The database dialect is pre-configured to use the Oracle database If you are using the MySQL database you should adapt the dialect as highlighted in the text below in ltDOMAIN_HOMEgtconfdomibusdomibusproperties file
8 Install the WS plugin For more details refer to chapter sect6212 ndash WebLogic
9 Deploy domibus-distribution-XYZ-weblogicwar
Domibus 334 Administration Guide
Page 29 134
o Click Install
o Navigate to location DOMAIN_HOMEconfdomibus where the domibus-distribution-XYZ-weblogicwar file has been previously copied
o Select the domibus-distribution-XYZ-weblogicwar file and click Next
o Choose Install this deployment as an application and click Next
Domibus 334 Administration Guide
Page 30 134
o Select your cluster for the deployment target and click Next
Domibus 334 Administration Guide
Page 31 134
o Select the following options and click Next
Domibus 334 Administration Guide
Page 32 134
o Select the following option and click Finish
o Here is an overview of the resulting settings you can now click on the Save button
The expected positive response to the deployment request should be the following
Domibus 334 Administration Guide
Page 33 134
10 Verify the installation by navigating with your browser to httplocalhost7001domibus-weblogic
If you can access the page it means the deployment was successful
(by default user = admin password = 123456)
Remark
It is recommended to change the passwords for the default users (See sect91 ndash Administration for further information)
Expected result
Domibus 334 Administration Guide
Page 34 134
Domibus on Tomcat
Remarks
As Tomcat is not a full Java EE application server and does not offer JMS capabilities by default Domibus uses ActiveMQ as an in-memory JMS broker when deployed on a Tomcat servlet container The configuration for the ActiveMQ JMS broker can be found in cef_edelivery_pathdomibusinternalactivemqxml
The Apache CXF library referred by Domibus internally uses the environment variable javaiotmpdir to buffer large attachments received If the property javaiotmpdir is not specified then by default this points to the ltCATALINA_BASE directorytempgt It is recommended to point this to a local directory _tmp on each managed server and accessible by the Tomcat server The disk space allocated for _tmp directory would depend on the size of attachments received On production environment it is recommended to provide 100GB for _tmp
431 Pre-Configured Single Server Deployment
For this step you will have to use the following resources (see section sect31ndashBinaries repository for the download location)
domibus-distribution-XYZ-tomcat-fullzip
1 Unzip the archive
o Unzip domibus-distribution-XYZ-tomcat-fullzip to a location on your physical machine cef_edelivery_path
2 Prepare the database
o For MySQL database
Add MySQL JDBC driver (available on MySQL official web site cf [REF2]) in the folder cef_edelivery_pathdomibuslib
Remark
The version of the JDBC driver has to be mysql-connector-java-5140jar or higher
Edit the properties file cef_edelivery_pathconfdomibusdomibusproperties and adjust the highlighted parts in the text below according to your environment The properties associated to the database configuration are pre-configured for the MySQL database
---------------------------------- Database --------------------------------- Database server name domibusdatabaseserverName=localhost
Domibus 334 Administration Guide
Page 35 134
Database port domibusdatabaseport=3306 XA properties domibusdatasourcexapropertyuser=edelivery_user domibusdatasourcexapropertypassword=edelivery_password MySQL domibusdatasourcexapropertyurl=jdbcmysql$domibusdatabaseserverName$domibusdatabaseport domibus_schemapinGlobalTxToPhysicalConnection=true Non-XA Datasource domibusdatasourceurl=jdbcmysql$domibusdatabaseserverName$domibusdatabaseportdomibus_schemauseSSL=false domibusdatasourceuser=edelivery_user domibusdatasourcepassword=edelivery_password
o For Oracle database
Add the Oracle JDBC driver (eg ojdbc7jar) (available on the Oracle official web site cf[REF3]) in the cef_edelivery_pathdomibuslib folder
Edit the properties file cef_edelivery_pathconfdomibusdomibusproperties and adjust the highlighted parts in the text below according to your environment
---------------------------------- Database --------------------------------- Database server name domibusdatabaseserverName=localhost Database port domibusdatabaseport=1521 XA Datasource domibusdatasourcexaxaDataSourceClassName=oraclejdbcxaclientOracleXADataSource XA properties domibusdatasourcexapropertyuser=edelivery_user domibusdatasourcexapropertypassword=edelivery_password domibusdatasourcexapropertyurl=jdbcoraclethin$domibusdatabaseserverName$domibusdatabaseport[SID|Service] Non-XA Datasource domibusdatasourcedriverClassName=oraclejdbcOracleDriver domibusdatasourceURL=jdbcoraclethin$domibusdatabaseserverName$domibusdatabaseport[SID|Service] domibusdatasourceuser=edelivery_user domibusdatasourcepassword=edelivery_password
Remark
Configure the database dialect as it is pre-configured for MySQL by default
3 Configure your Keystore based on section sect512 ndash Certificates
4 Set JVM parameters
Domibus expects a single environment variable domibusconfiglocation pointing towards the cef_edelivery_pathconfdomibus folder
You can do this by editing the first command lines of cef_edelivery_pathdomibusbinsetenvbat (Windows) or cef_edelivery_pathdomibusbinsetenvsh (Linux) Set CATALINA_HOME equal to the absolute path of the installation cef_edelivery_pathdomibus
o For Windows edit cef_edelivery_pathdomibusbinsetenvbat by adding the following
hellip
set CATALINA_HOME=cef_edelivery_pathdomibus set CATALINA_TMPDIR=ltpath to _tmp directorygt set JAVA_OPTS=JAVA_OPTS -Dfileencoding=UTF-8 -Xms128m -Xmx1024m -XXPermSize=64m set JAVA_OPTS=JAVA_OPTS -Ddomibusconfiglocation=CATALINA_HOMEconfdomibus hellip
o For Linux edit cef_edelivery_pathdomibusbinsetenvsh by adding the following
cd cef_edelivery_path domibusbinchmod u+x sh startupsh
6 Display the Domibus home page on your browser httplocalhost8080domibus (By default User = admin Password = 123456)
Remark
It is recommended to change the passwords for the default users See sect91 ndash Administration for further information
If you can access the page it means the deployment was successful
Domibus 334 Administration Guide
Page 37 134
Expected result
432 Single Server Deployment
For this step you will have to use the following resources (see sect31ndash Binaries repository for the download location)
domibus-distribution-XYZ-tomcat-configurationzip
domibus-distribution-XYZ-tomcat-warzip
We assume that an Apache Tomcat 80x is already installed and the installation location is now considered as your cef_edelivery_pathdomibus
1 Download and unzip the artefact domibus-distribution-XYZ-tomcat-configurationzip into the
directory cef_edelivery_pathconfdomibus
2 Configure the MySQL or Oracle datasource as indicated in sect431 ndash Pre-Configured Single Server
Deployment
3 Configure your Keystore based on sect512 ndash Certificates
4 Execute step 4 from sect431 ndash Pre-Configured Single Server Deployment
5 If not already present create a folder and name it temp under cef_edelivery_pathconfDomibus
6 Rename domibus-MSH-XYZ-tomcatwar to domibuswar and deploy it to cef_edelivery_pathdomibus webapps
7 Launch the Domibus application
o For Windows
cd cef_edelivery_pathdomibusbin startupbat
o For Linux
Domibus 334 Administration Guide
Page 38 134
cd cef_edelivery_path domibusbin chmod +x sh startupsh
7 Display the Domibus home page on your browser httplocalhost8080domibus (By default User = admin Password = 123456)
Remark
It is recommended to change the passwords for the default users See sect91 ndash Administration for further information
If you can access the page it means the deployment was successful
Expected result
Domibus 334 Administration Guide
Page 39 134
433 Clustered Deployment
Figure 2 - Diagram representing the Deployment of Domibus in a Cluster on Tomcat
Remark
In this section we assume that a JMS Broker and a Loadbalancer are configured separately (eg httpd)
For this step you will have to use the following resources (see sect31ndash Binaries repository for the download location)
domibus-distribution-XYZ-tomcat-fullzip
domibus-distribution-XYZ-tomcat-warzip
1 Follow steps 1 2 3 4 and 5 from the sect432 ndash Single Server Deployment
2 Set the JVM parameters
Domibus expects a single JVM parameter $domibusconfiglocation pointing towards the cef_edelivery_pathconfdomibus folder
You can do this by editing cef_edelivery_pathdomibusbinsetenvbat (Windows) or cef_edelivery_pathdomibusbinsetenvsh (Linux) Set CATALINA_HOME equal to the absolute path of the installation cef_edelivery_pathDomibus
o For Windows edit cef_edelivery_pathdomibusbinsetenvbat by adding the following
Remark
your_node_id refers to the installed node in the cluster which starts normally at 01(then 02 etc)
hellip
set CATALINA_HOME=cef_edelivery_pathdomibus set CATALINA_TMPDIR=ltpath to _tmp directorygt set JAVA_OPTS=JAVA_OPTS -Dfileencoding=UTF-8 -Xms128m -Xmx1024m -XXPermSize=64m set JAVA_OPTS=JAVA_OPTS -Ddomibusconfiglocation=CATALINA_HOMEconfdomibus
Domibus 334 Administration Guide
Page 40 134
set JAVA_OPTS=JAVA_OPTS -Ddomibusnodeid=your_node_id hellip
o For Linux edit cef_edelivery_pathdomibusbinsetenvsh by adding the following
4 Change the following properties related to the Atomikos configuration in parameters in cef_edelivery_pathconfdomibusdomibusproperties
For clustered deployment
Uncomment the following lines comatomikosicatchoutput_dir=$domibusworklocation$domibusconfiglocationworktransactions$domibusnodeid comatomikosicatchlog_base_dir=$domibusworklocation$domibusconfiglocationworktransactions$domibusnodeidlog Comment the following lines comatomikosicatchoutput_dir=$domibusworklocation$domibusconfiglocationworktransactions comatomikosicatchlog_base_dir=$domibusworklocation$domibusconfiglocationworktransactionslog
5 Follow step 6 and 7 from the sect432 ndash Single Server Deployment
Domibus 334 Administration Guide
Page 41 134
Domibus on WildFly
Remark
The Apache CXF library referred by Domibus internally uses the environment variable javaiotmpdir to buffer large attachments received If the property javaiotmpdir is not specified then this defaults to values provided by the operating system to the JRE On UnixLinux systems this usually defaults to tmp On Windows systems this usually defaults to TEMP folder It is recommended to point this to a local directory _tmp on each managed server and accessible by the Wildfly server The disk space allocated for _tmp directory would depend on the size of attachments received On production environment it is recommended to provide 100GB for _tmp
441 Pre-Configured Single Server Deployment
In this section we assume that WildFly is installed at the location cef_edelivery_pathdomibus
For this step you will have to use the following resources (see section sect31ndash Binaries repository for the download location)
domibus-distribution-XYZ-wildfly-fullzip
1 Download and unzip the domibus-distribution-XYZ-wildfly-fullzip archive in your cef_edelivery_path location
2 Configure the MySQL database (Option 1)
o Drivers
Create the directory cef_edelivery_pathdomibusmodulessystemlayersbasecommysqlmain if it does not exist Under this directory
Download the MySQL JDBC driver available on MySQL official web site (cf[REF2]) and copy it in the folder
Remark
The version of the driver has to be mysql-connector-java-5140jar or higher
Create or edit the file cef_edelivery_pathdomibusmodulessystemlayersbasecommysqlmainmodulexml and copy the following module configuration Make sure to put the name of the driver you are using as an argument of resource-root element eg mysql-connector-java-5140jar
Create the directory cef_edelivery_pathdomibusmodulessystemlayersbasecomoraclemain if it does not exist Under this directory
Download and copy the Oracle JDBC driver (eg ojdbc7jar available on the Oracle official web site cf[REF3]) in the folder
Copy the file cef_edelivery_pathdomibusmodulessystemlayersbasecommysqlmainmodulexml in the recently created folder
Domibus 334 Administration Guide
Page 44 134
Edit modulexml by copying the following module configuration Make sure to put the name of the driver you are using as an argument of resource-root element eg ojdbc7jar
Add your DBMS driver metadata to the Drivers section in cef_edelivery_pathdomibusstandaloneconfigurationstandalone-fullxml (only change the items described below while replacing MYSQL configuration in the process)
4 Configure your Keystore based on sect512 ndash Certificates
5 Run the standalone server
o For Windows under cef_edelivery_pathdomibusbin
o standalonebat --server-config=standalone-fullxml
o For Linux under cef_edelivery_pathdomibusbin
o standalonesh --server-config=standalone-fullxml
6 Display the Domibus home page in your browser httplocalhost8080domibus-wildfly (by default User = admin Password = 123456)
Remark
It is recommended to change the passwords for the default users See sect91 ndash Administration for further information
If you can access the page it means the deployment was successful
Domibus 334 Administration Guide
Page 46 134
Expected result
442 Single Server Deployment
In this section we assume that WildFly is installed at the location cef_edelivery_pathdomibus
For this step you will have to use the following resources (see section sect31-Binaries repository for the download location)
domibus-distribution-XYZ-wildfly-warzip
domibus-distribution-XYZ-wildfly-configurationzip
1 Follow steps 2 (MySQL) or 3 (Oracle) from the sect441 ndash Pre-Configured Single Server Deployment
2 Configure the environment variables
For Windows edit cef_edelivery_pathdomibusbinstandaloneconfbat as follows
hellip set JAVA_OPTS=-Xms128M ndashXmx1024M -XXMaxPermSize=256M set JAVA_OPTS=JAVA_OPTS -DjavanetpreferIPv4Stack=true set JAVA_OPTS=JAVA_OPTS -Ddomibusconfiglocation=JBOSS_HOMEconfdomibus -Djavaiotmpdir=ltpath to _tmp directorygt hellip
For UnixLinux edit cef_edelivery_pathdomibusbinstandaloneconf as follows
3 Download and unzip domibus-distribution-XYZ-wildfly-configurationzip in the directory cef_edelivery_pathconfdomibus
4 Configure your Keystore based on sect512 ndash Certificates
5 Configure the JMS resources
Configure the JMS resources in the configuration file cef_edelivery_pathdomibusstandaloneconfigurationstandalone-fullxml by adding the jms-connection-factories and jms-queues
7 Connect to the Admin Console of WildFly at httplocalhost9990console
8 Click on Deployments in the console menu then click on Add
9 Select Upload a new deployment then click Next
10 Browse to the location of the domibus-distribution-XYZ-wildflywar file select it and click Next
Domibus 334 Administration Guide
Page 53 134
11 The deployment is successful when the name of the war file appears in the Deployment column
Expected result
443 Clustered Deployment
For this step you will have to use the following resources (see section sect31ndashBinaries repository for the download location)
domibus-distribution-XYZ-wildfly-configurationzip
domibus-distribution-XYZ-wildfly-warzip
In this section we assume that the setup of Wildfly 9 in domain mode has already been done and that the cluster has been enabled as described in the official documentation For more details on how to perform an installation of Wildfly 9 in domain mode please refer to the official documentation (cf[REF4])
Domibus 334 Administration Guide
Page 54 134
Figure 3 - Diagram representing the Deployment of Domibus in a Cluster on WildFly
In order to install Domibus in a WildFly cluster please follow the steps below
1 Download and unzip domibus-distribution-XYZ-wildfly-configurationzip in a shared location that is accessible by all the nodes from the cluster We will refer to this directory as cef_shared_edelivery_pathDomibus
2 Follow steps 2 (MySQL) or 3 (Oracle) from the sect441 ndash Pre-Configured Single Server Deployment
Remarks
o This step needs to be performed on all the nodes from the cluster o In the following 2 steps we will edit the profile full-ha from the configuration file
domainconfigurationdomainxml located in the master node
3 Configure the JMS queues and topics as indicated in sect442 point 5 ndash Configure the JMS resources
4 Configure the database dialect as indicated in sect441 point 3 ndash Edit the configuration file cef_edelivery_pathconfdomibusdomibusproperties
5 Configure the environment variables as follows
For Windows edit cef_edelivery_pathbindomainconfbat located in each WildFly node The environment variable setting needs to be performed for every node in the cluster
helliphelliphelliphelliphelliphellip set JAVA_OPTS=-Xms128M ndashXmx1024M -XXMaxPermSize=256M set JAVA_OPTS=JAVA_OPTS -DjavanetpreferIPv4Stack=true set JAVA_OPTS=JAVA_OPTS -Ddomibusconfiglocation=JBOSS_HOMEconfdomibus -Djavaiotmpdir=ltpath to _tmp directorygt helliphelliphelliphelliphelliphellip
Domibus 334 Administration Guide
Page 55 134
For UnixLinux edit cef_edelivery_pathbindomainconf located in each WildFly node The environment variable setting needs to be performed for every node in the cluster
bindomainconf is located in each WildFly node The environment variable setting needs to be performed in every node from the cluster
6 Deploy the domibus-distribution-XYZ-wildflywar to the cluster We will use the Wildfly Administration console for performing the deployment We will deploy the application on the other-server-group cluster which is configured step by step in the official documentation (cf[REF4])
Domibus 334 Administration Guide
Page 56 134
Domibus 334 Administration Guide
Page 57 134
DOMIBUS CONFIGURATION
Domibus exposes the Message Service Handler endpoint as servicesmsh Only this endpoint has to be reachable by the other AS4 Access Points and it is typically exposed on the internet
If the Default WS Plugin (sect612 ndash WS Plugin) is deployed Domibus exposes the Default WS Plugin endpoint as servicesbackend This endpoint should ONLY be exposed to the backend client(s) within the trusted zone and it should not be exposed to the internet
Figure 4 - Message Service Handler diagram
Security Configuration
511 Security Policies
The WS-Security policy used by Domibus when exchanging messages can be specified in the PMode configuration file (sect7 ndash PMode Configuration) The recommended security policy is eSensPolicyv20xml it can be found under cef_edelivery_pathconfdomibuspolicieseSensPolicyv20xml
512 Certificates
The certificates that are used for signing and encrypting the messages when communicating with the other Access Points can be configured in the property file located under cef_edelivery_pathconfdomibusdomibusproperties By default Domibus is pre-configured to use self-signed certificates Please note that self-signed certificates should be used only for testing purposes and are not intended for production use In order to configure Domibus to use custom certificates the following properties need to be modified
Domibus 334 Administration Guide
Page 58 134
The location of the keystore domibussecuritykeystorelocation=$domibusconfiglocationkeystoresgateway_keystorejks Type of the used keystore domibussecuritykeystoretype=jks The password used to load the keystore domibussecuritykeystorepassword=test123 Private key The alias from the keystore of the private key domibussecuritykeyprivatealias=blue_gw The private key password domibussecuritykeyprivatepassword=test123 Truststore The location of the truststore domibussecuritytruststorelocation=$domibusconfiglocationkeystoresgateway_truststorejks Type of the used truststore domibussecuritytruststoretype=jks The password used to load the trustStore domibussecuritytruststorepassword=test123
1 Create if not present a folder cef_edelivery_pathconfdomibuskeystores
2 Get your key pair from an external provider (Self-signed certificates should only be used for testing purposes not production) If you are interested in using the CEF Public Key Infrastructure Solution (cf[REF5])
3 Create if not present the public and private keys containers (eg truststorejks and keystorejks)
4 Import your private key into your keystore
Remarks
o Your private key and your keystore should always stay secret Please never share them
o The keystore alias has to be the same as the party ID defined in the sect7 ndash PMode Configuration It is strongly recommended to put your key pair (private and public key) and the public key of the other participants you trust in two separate containers
Domibus Properties
The following properties defined in the property file cef_edelivery_pathconfdomibusdomibusproperties can be used to configure Domibus
Configuration Property Default value Purpose
domibusmshmessageidsuffix domibuseu
This Property is used to generate the random Message id with a fixed suffix which is set by default to domibuseu The resulting format will be UUID$domibusmshmessageidsuffix This property is mandatory
domibusmshretrycron 05 It is the retry cron job to send the messages It is set by default to every 5 seconds This property is mandatory
Domibus 334 Administration Guide
Page 59 134
domibusdispatchebmserrorunrecoverableretry true This property should be set to true if Domibus needs to retry sending the failed messages This property is mandatory
domibussmlzone accedeliverytecheceuropaeu Set the SMLZone if Domibus needs to be used under Dynamic discovery model This property is only mandatory if an SML is used
domibusdynamicdiscoveryclientspecification OASIS
The property specifies the dynamic discovery client to be used for the dynamic process Possible values OASIS and PEPPOL
domibusdynamicdiscoverypeppolclientmode TEST
This information is passed to the PEPPOL client that requires to know if the usage is in PRODUCTION or TEST mode
Apart from validating response of signer certificates against the truststore the Oasis Dynamic Discovery Client gives the possibility to add (optional) a regular expression to validate any certificate metadata related to the subject of the signer certificate
Example domibusdynamicdiscoveryoasisclientregexCertificateSubjectValidation=^EHEALTH_SMP$
domibusdynamicdiscoverypartyidresponderrole
The role of the responder PartyId may be defined here (default values are urnfdcpeppoleu2017rolesapas4 for PEPPOL and httpdocsoasis-openorgebxml-msgebmsv30nscore200704responder for OASIS
The type of the PartyId may be defined here (default values are urnfdcpeppoleu2017identifiersap for PEPPOL and urnoasisnamestcebcorepartyid-typeunregistered for OASIS)
domibusbackendjmsInQueue domibusbackendjmsinQueue This queue is the entry point for messages to be sent by the sending MSH This property is only mandatory if the JMS plugin is used
domibusjmsqueuepull domibusinternalpullqueue Domibus internal queue used for dispatching the pull requests
domibusdeploymentclustered false If true the quartz scheduler jobs are clustered This property is mandatory it should be set to true if the deployment of Domibus is done in a cluster
messageFactoryClass
The factory for creating SOAPMessage objects Default values - TomcatWebLogic comsunxmlinternalmessagingsaajsoapver1_2SOAPMessageFactory1_2Impl - WildFly comsunxmlmessagingsaajsoapver1_2SOAPMessageFactory1_2Impl
domibusdispatcherallowChunking true Allows chunking when sending messages to other Access Points
domibusdispatcherchunkingThreshold 104857600
If domibusdispatcherallowChunking is true this property sets the threshold at which messages start getting chunked(in bytes) Messages under this limit do not get chunked Defaults to 100 MB
domibusdispatcherconcurency 5-20
Specify concurrency limits via a lower-upper String eg 5-10 or a simple upper limit String eg 10 (the lower limit will be 1 in this case) when sending messages to other Access Points
Domibus 334 Administration Guide
Page 60 134
domibusmshpullcron 0 0 01 Cron expression used for configuring the message puller scheduling
domibuspullqueueconcurency
1-1 Number of threads used to parallelize the pull requests
domibuspullrequestsendperjobcycle 1 Number of pull requests executed every cron cycle
domibusretentionWorkercronExpression 060 Cron expression used for configuring the retention worker scheduling The retention worker deletes the expired messages (downloaded and not-downloaded)
messageretentiondownloadedmaxdelete 50 This property is used to tweak the maximum downloaded messages to be deleted by the retention worker
messageretentionnot_downloadedmaxdelete 50 This property is used to tweak the maximum not-downloaded messages to be deleted by the retention worker
domibusattachmentstoragelocation -
It is possible to configure Domibus to save the message payloads on the file system instead of the database This setting is recommended when exchanging payloads bigger than 30MB In order to enable the file system storage please add the following property domibusattachmentstoragelocation= your_file_system_location where your_file_system_location is the location on the file system where the payloads will be saved Remark In a cluster configuration the file system storage needs to be accessible by all the nodes from the cluster
domibustaskExecutorthreadCount 50 Tomcat only customize the task executor threads count
domibusjmxuser jmsManager WebLogic specific the user that will be used to access the queues via JMX
domibusjmxpassword jms_Manager1 WebLogic specific the associated password of the configured domibusjmxuser
domibussendMessagemessageIdPattern ^[x20-x7E]$
When an initiator backend client submits messages to Domibus for transmission with the message id field populated then the message id should be RFC2822 compliant The pattern specified here ensures this validation This field is optional In case the existing client does not match this message id pattern during submission then this property can be omitted to skip the validation
Domibus 334 Administration Guide
Page 61 134
domibuslistPendingMessagesmaxCount 500
This property specifies the maximum number of messages that would be served when the listPendingMessages operation is invoked Setting this property is expected to avoid timeouts due to huge resultsets being served A value of 0 would return all the pending messages This property is optional Omitting this property would default the resultset size to 500 Note For Tomcat server the maximum number of shown messages in queue monitoring is defined by the lsquodomibuslistPendingMessagesmaxCountrsquo property
domibusfourcornermodelenabled true
This property affects the GUI search and behaviour If the property is set to false Final Recipient and Original Sender criteria disappear from Messages Filter Messages column picker and from Message details in the GUI The internal SQL queries for User and Signal Message do not use TB_PROPERTYNAME = finalRecipient and originalSender anymore
domibusdispatcherconnectionTimeout 240000
For connection between the access points ndash C2 amp C3 Specifies the amount of time in milliseconds that the consumer will attempt to establish a connection before it times out 0 is infinite
domibusdispatcherreceiveTimeout 240000 For connection between the access points ndash C2 amp C3 Specifies the amount of time in milliseconds that the consumer will wait for a response before it times out 0 is infinite
domibusmshretrytolerance
10800000
Timeout tolerance for retry messages (in miliseconds) Scheduled retries that due to any reason were not performed within this period will be timeout
domibussendMessagefailuredeletepayload
false Whether to delete the message payload or send failure Defaults to false (the admin could put the message back in the send queue)
domibusauthunsecureLoginAllowed true The property specifies if authentication is required or not
domibuspmodedaoimplementation
CachingPModeProvider Internal configuration provider for managing the PMode access
Tomcat only The configuration file of the embedded ActiveMQ broker In case an external broker is used this property is not needed and it should be deleted from the property file
Tomcat only(XA datasource) The fully qualified underlying XADataSource class name
domibusdatasourcexamaxLifetime 60 Tomcat only(XA datasource) Sets the maximum amount of seconds that a connection is kept in the pool before it is destroyed automatically
domibusdatasourcexaminPoolSize 5
Tomcat only(XA datasource) Sets the minimum pool size The amount of pooled connections will not go below this value The pool will open this amount of connections during initialization
domibusdatasourcexamaxPoolSize 100 Tomcat only(XA datasource) Sets the maximum pool size The amount of pooled connections will not go above this value
domibusdatabaseserverName localhost Tomcat only(XA datasource) The host name or the IP address of the database server
domibusdatabaseport 3306 Tomcat only(XA datasource) The port number of the database server
domibusdatasourcexapropertyuser edelivery Tomcat only(XA datasource) A user who has access to the Domibus database schema
domibusdatasourcexapropertypassword edelivery Tomcat only(XA datasource) The password of the user defined in the domibusdatasourcexapropertyuser property
If activated Domibus will verify before sending a User Message if the receivers certificate is valid and not revoked If the receivers certificate is not valid or it has been revoked Domibus will not send the message and it will mark it as SEND_FAILURE
domibussendercertificatevalidationonsending true
If activated Domibus will verify before sending a User Message if his own certificate is valid and not revoked If the certificate is not valid or it has been revoked Domibus will not send the message and it will mark it as SEND_FAILURE (default is true)
If activated Domibus will verify before receiving a User Message if the senders certificate is valid and not revoked If the certificate is not valid or it has been revoked Domibus will not accept the message (default is true)
domibussendertrustvalidationonreceiving false An extra security validation that requires that the party name reflected in the alias of the sender public key should also be contained in the subject of the certificate
domibusconsoleloginmaximumattempt
5 Maximum connection attempts before the account gets locked (suspended)
domibusconsoleloginsuspensiontime 60 Property defining how many minutes the account remains locked (suspended) before it is automatically unlocked by the system
Configuration Property Default value Purpose
Proxy Settings In case your Access Point has to use a proxy server you can configure it with these properties
domibusproxyenabled false truefalse depending on whether you need to use proxy or not
domibusproxyhttphost - Host name of the proxy server
domibusproxyhttpport - Port of Proxy server
domibusproxyuser - Username for authentication on the proxy server
domibusproxypassword - Password
domibusproxynonProxyHosts - Indicates the hosts that should be accessed without going through the proxy
Table 1 - Domibus Properties
Domibus 334 Administration Guide
Page 65 134
PLUGIN MANAGEMENT
This section describes the different types of plugins and their registration process
Default Plugins
Domibus comes with three default plugins The three Interface Control Documents (ICD) describe these three plugins (JMS WS and File System Plugin) (cf[REF6])
611 JMS Plugin
For the JMS plugin you will have to use the following resources (see section sect 31- Binaries repository for the download location)
domibus-distribution-XYZ-default-jms-pluginzip
612 WS Plugin
For the WS plugin you will have to use the following resources (see section sect31-Binaries repository for the download location)
domibus-distribution-XYZ-default-ws-pluginzip
6121 Domibus authentication
The default web service plugin includes an example of how to implement authentication and
authorization By default this feature is disabled to insure backwards compatibility with older
versions of Domibus
The documentation below answers the question how to enable and use the authentication in the
WS plugin
The default WS plugin supports
- Basic Authentication
- X509 Certificates Authentication
- Blue Coat Authentication
Remark
Blue Coat is the name of the reverse proxy at the Commission It forwards the request in HTTP
with the certificate details inside the request (ldquoClient-Certrdquo header key)
When more than one authentication method is used the Basic Authentication takes precedence on
both http and https
When no Basic Authentication is provided X509 certificates are expected on https requests
When no Basic Authentication is provided Blue Coat certificates are expected on http requests
Domibus 334 Administration Guide
Page 66 134
6122 Domibus Authorization
For convenience the WS plugin uses exactly the same database as configured for Domibus core to
store the userspasswords and certificate ids To learn more about authorization (and
authentication) please refer to the plugin cookbook (cf[REF6])
There are two default users already inserted in the database (make sure you already ran the migration scripts)
admin and user both with 123456 as password
admin has the role ROLE_ADMIN and user has the role ROLE_USER
Roles
ROLE_ADMIN has the permission to call
- submitMessage with any value for originalSender property
- retrieveMessage (any message among messages notified to this plugin)
- listPendingMessages will list all pending messages for this plugin
- getStatus and getMessageErrors
ROLE_USER has the permission to call
- submitMessage with originalSender equal to the originalUser
- retrieveMessage only if finalRecipient equals the originalUser
- listPendingMessages only messages with finalRecipient equal to the origi-nalUser
6123 Enable the authentication in Domibus
To enable the authentication at Domibus level the following steps must be configured
1 In confdomibusdomibusproperties set the property
ldquodomibusauthunsecureLoginAllowedrdquo to false
domibusauthunsecureLoginAllowed=false
2 The application server must be configured to allow https requests and pass the
authentication credentials to Domibus
613 File System Plugin
For the File System plugin you will have to use the following resources (see section sect31-Binaries repository for the download location)
domibus-distribution-XYZ-default-fs-pluginzip
Domibus 334 Administration Guide
Page 67 134
Custom Plugin
Users can develop their own plugins Please refer to the plugin cookbook for more details (cf[REF6])
621 Plugin registration
Remark
Please refer to section 914 - Message Filtering for the routing of the specific plugin after registering the plugin on your specific Application Server
6211 Tomcat
In order to install a custom plugin for Tomcat please follow the steps below
1 Stop Tomcat server
2 Copy the custom plugin jar file to the plugins folder CATALINA_HOMEconfdomibuspluginslib
3 Copy the custom plugin XML configuration file to CATALINA_HOMEconfdomibuspluginsconfig
4 Start Tomcat server
Remark
CATALINA_HOME is the folder where the Tomcat is installed
6212 WebLogic
In order to install a custom plugin for WebLogic please follow the steps below
1 Stop the WebLogic server
2 Copy the custom plugin jar file to the plugins folder DOMAIN_HOMEconfdomibuspluginslib
3 Copy the custom plugin XML configuration file to DOMAIN_HOMEconfdomibuspluginsconfig
4 Start the WebLogic server
Remark
DOMAIN_HOME is the folder corresponding to the WebLogic domain
6213 WildFly
In order to install a custom plugin please follow the steps below
1 Stop the WildFly server
2 Copy the custom plugin jar file to the plugins folder cef_edelivery_path confdomibuspluginslib
3 Copy the custom plugin XML configuration file to cef_edelivery_path confdomibuspluginsconfig
4 Start the WildFly server
Domibus 334 Administration Guide
Page 68 134
PMODE CONFIGURATION
Processing Modes (PModes) are used to configure Access Points The PMode parameters are loaded into the Access Point via an XML file
The features described in the PMode file are Security Reliability Transport Business Collaborations Error Reporting Message Exchange Patterns (MEPs) and Message Partition Channels (MPCs)
As different messages may be subject to various types of processing or as different business domains may have several requirements Access Points commonly support several PModes Some PMode parameters are mandatory others are optional For more information please refer to the Access Point Component Offering Document
Configuration
In Domibus PModes are XML files that you can create or edit You can configure the two files given cef_edelivery_pathconfpmodesdomibus-gw-sample-pmode-party_id_name1xml and cef_edelivery_pathconfpmodesdomibus-gw-sample-pmode-party_id_name2xml
The party_id_name1 value must be replaced with your own party name and the party_id_name2 with your corresponding party name
The party_id must match the alias of the certificate in the keystore and the endpoint must be the external access link to your instance
Remark
This step could be managed by a PMode Configuration Manager known to your Business Owner
If a new participants Access Point is joining your network you need to configure your PMode accordingly and re-upload it like mentioned in sect714 ndash Upload new Configuration
Processing modes (PModes) describe how messages are exchanged between AS4 partners (in this case Access Points blue_gw and red_gw) These files contain the identifiers of each AS4 Access Point (identified as parties in the PMode file below)
Sender and Receiver Identifiers represent the organizations that send and receive the business documents They are both used in the authorization process (PMode) Therefore adding modifying or deleting a participant implies modifying the corresponding PMode files
Here is an example of a PMode XML file
Remark
In this setup we have allowed each party (blue_gw or red_gw) to initiate the process If only blue_gw is supposed to send messages then put only blue_gw in ltinitiatorPartiesgt and red_gw in ltresponderPartiesgt
MPCs - Container which defines the different MPCs (Message Partition Channels)
MPC PMode[1]BusinessInfoMPC The value of this parameter is the identifier of the MPC (Message Partition Channel) to which the message is assigned It maps to the attribute Messaging UserMessage
Message Partition Channel allows the partition of the flow of messages from a Sending MSH to a Receiving MSH into several flows each of which is controlled separately An MPC also allows merging flows from several Sending MSHs into a unique flow that will be treated as such by a Receiving MSH The value of this parameter is the identifier of the MPC to which the message is assigned
MessageRetentionDownloaded - Retention interval for messages already delivered to the backend
Domibus 334 Administration Guide
Page 73 134
MessageRetentionUnDownloaded - Retention interval for messages not yet delivered to the backend
Parties - Container which defines the different PartyIdTypes Party and Endpoint
PartyIdTypes maps to the attribute MessagingUserMessage PartyInfo
Message Unit bundling happens when the Messaging element contains multiple child elements or Units (either User Message Units or Signal Message Units)
Party ID maps to the element MessagingUserMessage PartyInfo
The ebCore Party ID type can simply be used as an identifier format and therefore as a convention for values to be used in configuration and ndash as such ndash does not require any specific solution building block
Endpoint maps to PMode[1]ProtocolAddress
The endpoint is a party attribute that contains the link to the MSH The value of this parameter represents the address (endpoint URL) of the Receiver MSH (or Receiver Party) to which Messages under this PMode leg are to be sent Note that a URL generally determines the transport protocol (eg if the endpoint is an email address then the transport protocol must be SMTP if the address scheme is http then the transport protocol must be HTTP)
AS4 - Container
Reliability [Nonrepudiation] [ReplyPattern]
Nonrepudiation maps to PMode[1]SecuritySendReceiptNonRepudiation ReplyPattern maps to PMode[1]SecuritySendReceiptReplyPattern
PMode[1]SecuritySendReceiptNonRepudiation value = lsquotrue (to be used for non-repudiation of receipt) value = false (to be used simply for reception awareness) PMode[1]SecuritySendReceiptReplyPattern value = lsquoResponsersquo (sending receipts on the HTTP response or back-channel) PMode[1]SecuritySendReceiptReplyPattern value = lsquoCallbackrsquo (sending receipts use a separate connection)
retryTimeout maps to PMode[1]ReceptionAwarenessRetry=true PMode[1]ReceptionAwarenessRetryParameters retryCount maps to PMode[1]ReceptionAwarenessRetryParameters strategy maps to PMode[1]ReceptionAwarenessRetryParameters duplicateDetection maps to PMode[1]ReceptionAwarenessDuplicateDetection
These parameters are stored in a composite string bull retryTimeout defines timeout in seconds bull retryCount is the total number of retries bull strategy defines the frequency of retries The only strategy available as of now is CONSTANT bull duplicateDetection allows to check duplicates when receiving twice the same message The only duplicateDetection available as of now is TRUE
Securities - Container
Security - Container
Policy PMode[1]Security NOT including PMode[1]SecurityX509SignatureAlgorithm
The parameter defines the name of a WS-SecurityPolicy file
This parameter is not supported by WS-SecurityPolicy and therefore it is defined separately
BusinessProcessConfiguration - Container
Agreements maps to ebMessaging UserMessage CollaborationInfo AgreementRef
This OPTIONAL element occurs zero times or once The AgreementRef element is a string that identifies the entity or artifact governing the exchange of messages between the parties
Actions - Container
Action maps to Messaging UserMessage CollaborationInfoAction
This REQUIRED element occurs once The element is a string identifying an operation or an activity within a Service that may support several of these
Services - Container
ServiceTypes Type maps to Messaging UserMessage CollaborationInfo Service[type]
This REQUIRED element occurs once It is a string identifying the service that acts on the message and it is specified by the designer of the service
Domibus 334 Administration Guide
Page 75 134
MEP [Legs] - An ebMS MEP defines a typical choreography of ebMS User Messages which are all related through the use of the referencing feature (RefToMessageId) Each message of an MEP Access Point refers to a previous message of the same Access Point unless it is the first one to occur Messages are associated with a label (eg request reply) that precisely identifies their direction between the parties involved and their role in the choreography
Bindings - Container
Binding - The previous definition of ebMS MEP is quite abstract and ignores any binding consideration to the transport protocol This is intentional so that application level MEPs can be mapped to ebMS MEPs independently from the transport protocol to be used
Roles - Container
Role Maps to PModeInitiatorRole or PModeResponderRole depending on where this is used In ebMS3 message this defines the content of the following element bull For Initiator MessagingUserMessagePartyInfoFromRole bull For Responder MessagingUserMessagePartyInfoToRole
The required role element occurs once and identifies the authorized role (fromAuthorizedRole or toAuthorizedRole) of the Party sending the message (when present as a child of the From element) or receiving the message (when present as a child of the To element) The value of the role element is a non-empty string with a default value of httpdocsoasis-openorgebxml-msgebmsv30nscore200704defaultRole Other possible values are subject to partner agreement
Processes - Container
PayloadProfiles - Container
Payloads - Container
Domibus 334 Administration Guide
Page 76 134
Payload maps to PMode[1]BusinessInfoPayloadProfile
This parameter allows specifying some constraint or profile on the payload It specifies a list of payload parts A payload part is a data structure that consists of five properties
1 name (or Content-ID) that
is the part identifier and
can be used as an index in
the notation
PayloadProfile
2 MIME data type (textxml
applicationpdf etc)
3 name of the applicable
XML Schema file if the
MIME data type is
textxml
4 maximum size in kilobytes
5 Boolean string indicating
whether the part is
expected or optional
within the User message
The message payload(s) must match this profile
ErrorHandlings - Container
ErrorHandling - Container
ErrorAsResponse maps to PMode[1]ErrorHandlingReportAsResponse
This Boolean parameter indicates (if true) that errors generated from receiving a message in error are sent over the back-channel of the underlying protocol associated with the message in error If false such errors are not sent over the back-channel
ProcessErrorNotifyProducer maps to PMode[1]ErrorHandlingReportProcessErrorNotifyProducer
This Boolean parameter indicates whether (if true) the Producer (applicationparty) of a User Message matching this PMode should be notified when an error occurs in the Sending MSH during processing of the User Message to be sent
ProcessErrorNotifyConsumer maps to PMode[1]ErrorHandlingReportProcessErrorNotifyProducer
This Boolean parameter indicates whether (if true) the Consumer (applicationparty) of a User Message matching this PMode should be notified when an error occurs in the Receiving MSH during processing of the received User message
Domibus 334 Administration Guide
Page 77 134
DeliveryFailureNotifyProducer maps to PMode[1]ErrorHandlingReportDeliveryFailuresNotifyProducer
When sending a message with this reliability requirement (Submit invocation) one of the two following outcomes shall occur - The Receiving MSH successfully delivers (Deliver invocation) the message to the Consumer - The Sending MSH notifies (Notify invocation) the Producer of a delivery failure
Legs - Container
Leg - Because messages in the same MEP may be subject to different requirements - eg the reliability security and error reporting of a response may not be the same as for a request ndash the PMode will be divided into legs Each user message label in an ebMS MEP is associated with a PMode leg Each PMode leg has a full set of parameters for the six categories above (except for General Parameters) even though in many cases parameters will have the same value across the MEP legs Signal messages that implement transport channel bindings (such as PullRequest) are also controlled by the same categories of parameters except for BusinessInfo group
Process - In Process everything is plugged together
Table 2 - Domibus PMode configuration to ebMS3 mapping
714 Upload new Configuration
7141 Upload the PMode file
Remark In case of a cluster environment the PMode configuration is replicated automatically on all the nodes
1 To update the PMode configuration andor Truststore connect to the Administration Console using the administrators credentials (by default User = admin Password = 123456) to httplocalhost8080domibus
Remark
It is recommended to change the passwords for the default users See sect91 ndash Administration for further information
Domibus 334 Administration Guide
Page 78 134
2 Click on the PMode menu
Domibus 334 Administration Guide
Page 79 134
3 Press the Upload button
4 Press the Choose File button and navigate to the PMode file select it and click on the Open button (or equivalent) in the standard dialog box
Domibus 334 Administration Guide
Page 80 134
5 Once the file has been selected click OK to upload the PMode xml file
Remark
Every time a PMode is updated the truststore is also reloaded from the filesystem
7142 Upload the Truststore
1 Select the Truststore menu and press the Upload button
Domibus 334 Administration Guide
Page 81 134
2 Navigate to the Truststore and select it by clicking on the Open button (or equivalent) of
the standard file open dialog
3 Once the file has been selected enter the keystore password and click on the OK button
to activate the new truststore jks file
Domibus 334 Administration Guide
Page 82 134
SPECIAL SCENARIO SENDER AND RECEIVER ARE THE SAME
In this special scenario the Sender Access Point acts also as the Receiver Access Point Multiple backends can exchange messages via the same Access Point using the same or different plugins
PMode Configuration
A party (eg blue_gw) which is Sender and Receiver must be defined in both the ltinitiatorPartiesgt
A message that is sent to the same Access Point will have to contain the same party id in both From and To sections Below there is an example of a message sent using the Default WS Plugin
Due to some limitations related to the uniqueness of the message identifier a convention has been defined in this scenario The message ID used for the received message is derived from the message ID used for the sent message with the following rule the suffix _1 is added to the sent message id
Example
sent message ID is ae15851e-78fb-4b51-aac8-333c08c450d6domibus
received message ID is ae15851e-78fb-4b51-aac8-333c08c450d6domibus_1
Domibus 334 Administration Guide
Page 84 134
ADMINISTRATION TOOLS
Administration Console
911 Changing passwords
It is recommended to change the passwords for the default users who are allowed to have access to the Domibus Administration Console mainly admin and user
1 In order to change the password for a user navigate to the Users menu entry to obtain the list of
configured users
2 To edit the user details click on the EDIT icon (in RED) DO NOT click on the BIN icon as this
would DELETE the record
Domibus 334 Administration Guide
Page 85 134
3 In the popup window choose a new password using the rules shown
4 Confirm the password
5 Click on OK
Domibus 334 Administration Guide
Page 86 134
6 When done either click on Save to save the new password or Cancel to leave the password
unchanged
912 User Account Lockout Policy
A user account lockout policy has been implemented on Domibus Admin Console By default if a user tries to log to the Admin Console with a wrong password 5 times in a row his account will be suspended (locked)
You can define in domibusproperties (section 52 Domibus Properties) the number of failed attempts after which a userrsquos account will be locked
By default a user remains suspended during one hour before his account is automatically unlocked and the user can try to log again
If the user wants his account to be unlocked without waiting the default one hour he can ask his administrator to unlock the account To unlock the account the administrator must change the userrsquos status on the Admin Console from ldquoSuspendedrdquo to ldquoActiverdquo
Select the suspended user and click on ldquoEditrdquo
Domibus 334 Administration Guide
Page 87 134
Re-activate the user (unlock it) by checking the ldquoActiverdquo status and confirming with OK
Do not forget to click on Save on the next window and then on Yes to confirm the change
Domibus 334 Administration Guide
Page 88 134
913 Adding new users
1 New users can be added to the existing default users (admin and user) by clicking on New
2 For each new user you must enter a username an email a role and a password
Domibus 334 Administration Guide
Page 89 134
3 Click on OK
4 Again once the user has been created do not forget to click on the Save button on the Users
page to register your changes on the system
914 Message Filtering
Domibus allows the routing of messages to different plugins based on some messages attributes
From initial sender (C1)
To final recipient (C4)
Domibus 334 Administration Guide
Page 90 134
Action defined as Leg in the PMode
Service as defined in the PMode
The following rules apply
Domibus considers the ordered list of filters to route all messages The first filter matching the filter criteria will define the target plugin The order of the plugin is therefore important in the routing process
Note 1 if the filters are all mutually exclusive the order would not matter
Note 2 The Persisted column indicates if the plugin filter configuration has already been saved If a plugin filter configuration has not already been saved the Persisted value is unchecked and an error message is shown on the top of the screen In this case it is strongly recommended to review the filters configuration and save it afterwards
One plugin may be applied to multiple filters This is done by the use of the OR criteria (cf backendWebservice in the example below)
Multiple attributes could also be defined in one filter This is done by the use of the AND criteria (cf the first filter in the example below)
One filter may have no criteria meaning that all messages (not matching previous filters) will be routed to the corresponding plugin automatically As a result subsequent filters will therefore not be considered for any incoming message In the example below the last filter routes all remaining messages to plugin backendWebservice
Domibus 334 Administration Guide
Page 91 134
Figure 9 ndash Message Filter Page
Use the New and Delete buttons to create or delete a filter
As the order matters move up and down actions allow placing each filter in the right order
Cf Move Up and Move Down buttons
After some changes have been applied to the filters the Cancel and Save buttons become active
- Press Cancel to cancel the changes
- Press Save to save the changes and activate them immediately
The console will ask the user to confirm the operation before proceeding
Example of message attributes used for routing and matching the first filter used in the example above
Action TC1Leg1
Service bdxnoprocesstc2
From domibus-blueurnoasisnamestcebcorepartyid-typeunregistered
To domibus-redurnoasisnamestcebcorepartyid-typeunregistered
That information can be found in the incoming message received by Domibus (eg see below)
Domibus administration dashboard includes a message logging page that gives the administrator information related to sent messages received messages and their status (SENT RECEIVED FAILED ACKNOWLEDGEDhellip)
The following state machines illustrate the evolution of the processing of messages according to the encountered events
Figure 10 - State machine of Corner 2 (sending access point)
Figure 11 - State machine of Corner 3 (receiving access point)
REJECTED
RECEIVED_WITH_WARNING
RECEIVED
DELETEDDOWNLOADED
[ebMS3 error receipt with severity FAILURE]
[ebMS3 error receipt with severity WARNING]
[ebMS3 receipt SUCCESS]
[Undownloaded retention period expired]
[C4 downloads message] [Download retention period expired]
[C4 downloads message] [Undownloaded retention period expired]
Domibus 334 Administration Guide
Page 93 134
Figure 12 - Domibus Message Log
Remark The administration dashboard is reachable via the following URLs httpyour_serveryour_port_numberdomibus (Tomcat) httpyour_serveryour_port_numberdomibus-wildfly (WildFly) httpyour_serveryour_port_numberdomibus-weblogic (WebLogic)
Application Logging
931 Domibus log files
Domibus has three log files
1 domibus-securitylog this log file contains all the security related information For example you can find information about the clients who connect to the application
2 domibus-businesslog this log file contains all the business related information For example when a message is sent or received etc
3 domibuslog this log file contains both the security and business logs plus miscellaneous logs like debug information logs from one of the framework used by the application etc
932 Logging properties
It is possible to modify the configuration of the logs by editing the logging properties file cef_edelivery_pathconfdomibuslogbackxml
Domibus 334 Administration Guide
Page 94 134
933 Error Log page
To go to the error log page of the Domibus Admin Console click on the Error log menu entry
This option lists all the Message Transfers error logs and includes the ErrorSignalMessageId ErrorDetail and Timestamp You can sort messages by using the up or down arrow to search for a specific message
Figure 13 - Domibus ndash Error Log page
Queue Monitoring
Domibus uses JMS queues to handle the messages
Domibus 334 Administration Guide
Page 95 134
Destination type
JNDI name Comment Description
Queue jmsdomibusinternaldispatchqueue No redelivery because redelivery of MSH messages is handled via ebMS3AS4
This queue is used for scheduling messages for sending via the MSH
Queue jmsdomibusinternalnotificationunknown Notifications about received messages (by the MSH) that do not match any backend routing criteria will be sent to this queue In production environment this queue should be monitored in order to handle those messages manually
Topic jmsdomibusinternalcommand This topic is used for sending commands to all nodes in a cluster For example it is used after a PMode was uploaded in order to notify all nodes to update their PMode cache (in case caching is enabled)
Queue jmsdomibusbackendjmsreplyQueue This queue is used for sending replies back to the sender of a message Replies contain a correlationId ebMS3 messageId (if possible) error messages (if available)
Queue jmsdomibusbackendjmsoutQueue Messages received by the MSH (that match the routing criteria for the JMS plugin) will be sent to this queue
Queue jmsdomibusbackendjmsinQueue This queue is the entry point for messages to be sent by the sending MSH
Queue jmsdomibusbackendjmserrorNotifyConsumer This queue is used to inform the receiver of a message that an error occurred during the processing of a received message
Queue jmsdomibusbackendjmserrorNotifyProducer This queue is used to inform the sender of a message that an error occurred during the processing of a message to be sent
Domibus 334 Administration Guide
Page 96 134
Queue jmsdomibusnotificationjms
Used for sending notifications to the configured JMS plugin
Queue jmsdomibusinternalnotificationqueue
This queue is used to notify the configured plugin about the status of the message to be sent
Queue jmsdomibusnotificationwebservice Used for sending notifications to the configured WS plugin
Queue jmsdomibusDLQ This is the Dead Letter Queue of the application The messages from other queues that reached the retry limit are redirected to this queue
Table 3 - Queue Monitoring
All these queues can be monitored and managed using the JMS Monitoring page which is accessible from the JMS Monitoring menu of the administration console
Warning For Tomcat server the maximum number of shown messages in the queue monitoring is defined by the lsquodomibuslistPendingMessagesmaxCountrsquo property In the Source field we have all the queues listed along with the number of messages pending in each queue
Domibus 334 Administration Guide
Page 97 134
If a queue is used internally by the application core its name will start with [internal] A regular expression is used to identify all the internal queues The value for this regular expression can be adapted in the domibusjmsinternalQueueexpression property from the
In the JMS Monitoring page the following operations can be performed
1 Inspecting and filtering the messages from a queue based on the following fields
a Signal Message id identifier of an error signal message
b Message id identifier of a message
c Error detail text of the error (full)
d AP Role role of the AP
e Error Code structured code of the error
f Source the source queue of the messages
g Error or Notified Time Period time interval that will filter the messages based on the
send dates
h JMS type the JMS header JMSType
i Selector the JMS message selector expression
Remark For more information on the JMS message headers and the JMS message selector please check the official documentation at httpsdocsoraclecomcdE19798-01821-1841bncesindexhtml
Domibus 334 Administration Guide
Page 98 134
2 Move a message
a Move the message from the DLQ to the original queue
- Select the JMS message from the DLQ and press the Move icon (in RED marker)
- Select the original queue from the Destination dropdown list in the dialog box
- Press the Ok button in the dialog and the message will be moved to the original
queue
Note the details of a message can be viewed by selecting it (double-clicking) from the message list
Domibus 334 Administration Guide
Page 99 134
Click Close to exit the dialog box
b Move multiple messages from the DLQ to the original queue
- Select multiple JMS messages from the DLQ and press the Move icon button
- Select the original queue from the Destination dropdown list and click Ok
Domibus 334 Administration Guide
Page 100 134
Remark
Please make sure that all the selected messages came from the same source queue Use the filtering capabilities to ensure this
3 Delete message(s)
a Delete one or more messages from one queue
- Select one or several JMS messages from the source queue and press the Delete
button
Domibus 334 Administration Guide
Page 101 134
- By clicking the Delete button the selected messages are removed from the screen
but you still have to confirm your changes by clicking on the Save button As long as
you have not clicked on the Save button your changes are not taken into account in
the system
- To cancel the changes you made click on the Cancel button instead
Domibus 334 Administration Guide
Page 102 134
Configuration of the queues
Queues should be configured appropriately and according to the backend system needs and re-delivery policy
951 Tomcat
Domibus uses ActiveMQ as JMS broker The various queues are configured in the cef_edelivery_pathconfdomibusinternalactivemqxml file
Please see ActiveMQ redelivery policy and configure the parameters below if needed
Access to the JMS messaging subsystem is protected by a username and a password in clear text defined in the Domibus properties file cef_edelivery_pathconfdomibusdomibusproperties
It is recommended to change the password for the default user
The user (activeMQusername) and the password (activeMQpassword) defined in the domibusproperties file are referenced in the authentication section of the activemqxml file provided
952 WebLogic
Please use the admin console of WebLogic to configure the re-delivery limit and delay if necessary
953 WildFly
Please use the admin console of WildFly to configure the re-delivery limit and delay if necessary
Domibus 334 Administration Guide
Page 104 134
LARGE FILES SUPPORT
Domibus supports transfers between Access Points of files up to 2 GB using Java 8 In order to compute the message signature Domibus loads the whole message into memory using a byte array In Java byte arrays can hold a maximum of 2 GB hence the Domibus limitation of 2 GB
If Domibus is started using Java 7 the limitation is 1 GB due to a limitation in Java 7 version
In order to optimize the sending of such large files HTTP chunking is activated by default in the connection with the receiver Access Points As chunked encoding is useful when sending larger amounts of data but decreases the performance on smaller amounts Domibus uses a threshold to activate the chunking when appropriate only
The following properties are used to configure chunking domibusdispatcherallowChunking and domibusdispatcherchunkingThreshold For more information about these properties please refer to the section 52 Domibus Properties
Domibus 334 Administration Guide
Page 105 134
DATA ARCHIVING
Whats archiving
Data archiving consists of moving messages that have been processed successfully or unsuccessfully by the access point to an external storage location for long-term retention
Archived data consists of older data that have been processed at the communication level by the access points that are still significant to the business and may be needed for future reference They may also be retained for legal constraints
Data archives are indexed and searchable to allow easy retrieval
It is not recommended to use Domibus as an archiving solution Nevertheless if the data really needs to be stored for long periods then it is possible to set the Data Retention Policy to allow it to be extracted from the database through the webservices or through an external archiving tool
Data Retention Policy
A data retention policy is a procedure established by the business for continuous information storage for operational legal or compliance reasons
The data retention policy needs to be defined based on the business needs and constraints
In Domibus the data retention policy can be found in the PMode file
In the above extract of the sample PMode configuration of Domibus the data retention policy is set to 14400 minutes (10 days) if the message is not downloaded This means that if the message is not downloaded it will be deleted and then only the metadata containing the information of the receiver and the acknowledgement will be retained
The data retention policy is set by default to 0 minutes if the message is downloaded This means that the message will be instantaneously deleted as soon as it is downloaded These two parameters retention_downloaded and retention_undownloaded can therefore be modified to meet the needs of the business
Data Extraction
In order to keep the metadata and the payload of the message for a longer period than the one set in the PMode it is recommended to extract it to an external storage As long as the retention worker does not delete it data can be extracted through the webservices or through an external archiving tool
Domibus 334 Administration Guide
Page 106 134
For more information please refer to the Data Model provided in the Domibus Software Architecture Document that can be found on the CEF Digital single web portal [REF6]
Domibus 334 Administration Guide
Page 107 134
NON REPUDIATION
In order to guarantee non-repudiation the sending Access Point (C2) stores the full SignalMessage including the MessageInfo the Receipt (that contains the NonRepudiationInformation for each part) and the signature of the receipt by the receiver Access Point (C3)
This will guarantee that the receiver Access Point (C3) cannot deny having received a message from the sender Access Point (C2) during the sending process However if the initial sender (C1) wants to be sure that the final recipient (C4) cannot deny having received a specific content inside this message then the sender must be able to show the specific content that was used to produce the receiver Access Point (C3) signature
Domibus as a sending Access Point (C2) keeps track of the metadata of the sent messages but does not store the actual message payloads Therefore it is recommended that the initial sender (C1) stores the message payloads safely for the time needed to guarantee non-repudiation of the sent messages
In order to guarantee non-repudiation the receiving Access Point (C3) stores the full UserMessage and the associated signature of the sender (C2)
This will guarantee that the sender Access Point (C2) cannot deny having sent a message to the receiver during the sending process However if the final recipient (C4) wants to be sure that the sender cannot deny having sent a specific content inside this message then the final recipient (C4) must be able to show the specific content that was used to produce the sender Access Point signature (C2)
Domibus as a receiving Access Point (C3) keeps track of the metadata of the received messages and will store the message payloads only for the (limited) duration configured in the retention period (specified in the PMode) Therefore it is recommended that the final recipient (C4) either stores the message payloads safely or aligns the retention period on the receiving Access Point (C3) with the time needed to guarantee non-repudiation of the received messages
Domibus 334 Administration Guide
Page 108 134
TLS CONFIGURATION
TLS Configuration
1311 Transport Layer Security in Domibus
One way of implementing TLS for the eDelivery AS4 profile is to use the TLS in the Domibus Message Handler (MSH) described below otherwise this would have to be handled at a higher level (eg Application Server Proxy etchellip)
To enable secure communication at the transport layer (TLS) between a sending and a receiving MSH (Access Point) both the client and the server need to be configured accordingly
The client is used in the initiator MSH to send the request and is therefore configured via CXF while the server is configured at containerapplication server level
1312 Client side configuration (One Way SSL)
The tlsClientParameters are configured in the cef_edelivery_pathconfdomibusclientauthenticationxml file
Remark your_trustore_ssl is used at the transport layer (SSL) while your_trustore described in sect512 ndash Certificates is used by Domibus to encrypt and sign (WS-Security)
When the clientauthenticationxml file is present and the endpoint of the receiving MSH is https the TLS parameters are added via the CXF framework to the send request
Domibus 334 Administration Guide
Page 109 134
The version of the TLS must be specified by setting secureSocketProtocol=TLSv12
If you use self-signed certificates you need to set disableCNCheck=true
The attribute disableCNCheck specifies whether JSSE should omit checking if the host name specified in the URL matches the host name specified in the Common Name (CN) of the servers certificate The attribute is false by default and must not be set to true during production use (cf[REF7])
Remark
TLSv12 is mandatory for eDelivery AS4 Profile
1313 Client side configuration (Two Way SSL)
The configuration is similar to the one used for One Way SSL except that the tlsClientParameters gets configured with both trustManagers and keystoreManagers The clientauthenticationxml file should look like this
your_trustore_ssl and your_keystore_ssl are used at the transport layer (SSL) while your_trustore and your_keystore described in sect512 ndash Certificates are used by Domibus to encrypt and sign (WS-Security)
Two Way SSL is optional and based on the eDelivery AS4 Profile
1314 Server side configuration
13141 Tomcat 8
In Serverxml add a new connector with the SSLEnabled attribute set to true
The keystore jks location and password must be specified otherwise the default ones will be taken into account
Domibus 334 Administration Guide
Page 110 134
TLS version can also be specified
The above connector has clientAuth=false which means that only the server has to authenticate itself (One Way SSL) To configure Two Way SSL which is optional in the eDelivery AS4 Profile set clientAuth=true in Serverxml and provide the location of the your_truststore_ssljks file so that the server can verify the client
Go to Servers select Server Name Configuration General then click on Client Cert Proxy Enabled
2 Add keystore and truststore
Go to Servers select Server Name Configuration Keystores and SSL tabs and use Custom Identity and Custom Trust then set keystore and trustore jks
To disable basic authentication at WebLogic level
By default WebLogic performs its own basic authentication checks before passing the request to Domibus As we want basic authentication to be performed by Domibus we need to disable it at the application server level
13144 Configure Basic and Certificates authentication in SoapUI
Go to File Preferences HTTP Settings and check the option Adds authentication information to outgoing requests
Domibus 334 Administration Guide
Page 112 134
Go to File Preferences SSL Settings add the KeyStore and KeyStore Password and check the option requires client authentication
To allow Basic Authentication select the Auth tab click Add New Authorization and select Basic Enter user and password (eg Username = admin Password = 123456)
13145 PMode update
If you enable HTTPS then your PMode Configuration Manager needs to make sure that all other endpoint PModes are modified accordingly
With the SSL connector configured as above the MSH endpoint is now httpsyour_domibus_host8443domibusservicesmsh
Domibus 334 Administration Guide
Page 113 134
After the updates upload the PModes via the Admin Console
In a dynamic discovery setup the sender andor the receiver parties and their capabilities are not configured in advance
The sending Access Point will dynamically retrieve the necessary information for setting up an interoperability process from the Service Metadata Publisher (SMP) The SMP stores the interoperability metadata which is a set of information on the recipient or end entity (its identifier supported business documents and processes) and AP (metadata which includes technical configuration information on the receiving endpoint such as the transport protocol and its address) cf[REF8]
The receiving AP registers its metadata in the SMP and configures the PMode to be able to accept messages from trusted senders that are not previously configured in the PMode The receiving AP will have to configure one process in its PMode for each SMP entry
The mapping between the PMode process and the SMP entry is defined in sect143 ndash PMode configuration for PEPPOL and sect148 - ndash PMode configuration for OASIS
Please note that the sender does not have to be registered in the SMP and the receiver merely extracts its identifier from the received message
The following sections describe how to configure Domibus AP in order to use Dynamic Discovery (sect143 ndash PMode configuration for PEPPOL sect144 ndash Policy and certificates for PEPPOL sect148 ndash PMode configuration for OASIS sect149 ndash Policy and certificates for OASIS)
Domibus configuration for PEPPOL
To enable the integration with the SMPSML components Domibus requires some changes in the domibusproperties configuration file which include
1 Adding the following properties to enable the usage of the PEPPOL dynamic discovery client
2 Setting the dynamic discovery client to use certificates to access the SMP These certificates are different in TEST and PRODUCTION therefore we need to specify the Mode used by the dynamic discovery client by setting the following property domibusdynamicdiscoverypeppolclientmodegtTEST
3 Setting the domibussmlzone property
4 Configuring the bean pModeProvider with DynamicDiscoveryPModeProvider
Domibus 334 Administration Guide
Page 115 134
PMode configuration for PEPPOL
1431 Sender PMode
In a dynamic discovery process the receiver of the messages is not known beforehand and therefore the PModeResponder parameter SHOULD NOT be set
The dynamic discovery process must include a leg which maps the configured entry (action service and service type ndash see section 145 ndash Message format for PEPPOL) of the Receiver in the SMP
The security policy to be used in the leg is the following (see section sect511 ndash Security Policies for more information)
initiatorRole=defaultInitiatorRole responderRole=defaultResponderRolegt ltinitiatorPartiesgt ltinitiatorParty name=senderaliasgt ltinitiatorPartiesgt lt-- no responderParties element --gt ltlegsgt ltleg name=pushTestcase1tc1Actiongt ltlegsgt ltprocessgt hellip
1432 Receiver PMode
Dynamic discovery configuration of the receiver is similar to the configuration of the sender except that the roles are swapped the sender of the messages is not known beforehand As a consequence the PModeInitiator parameter SHOULD NOT be set
The receiver must include the certificate of the trusted authority(ies) in its truststore It will only accept messages that were signed with certificates issued by the trusted authority(ies) (cf sect18 ndash Annex 1 - Usage of certificates in PEPPOL and OASIS for more information)
Message format for PEPPOL
When dynamic discovery is used the to field should not be statically configured in the PMode (the to field may even be omitted in the message) The lookup is performed by C2 based on the finalRecipient message property
Example of a message using the finalRecipient for dynamic discovery
The Service Metadata Record also provides the receiving ends certificate This certificate can be used to encrypt the message to be sent to the receiver The certificate can also provide the name of the gateway for this PMode by using the Certificates CNAME as the PMode identifier (cf[REF9])
Domibus configuration for OASIS
To enable the integration with the SMPSML components Domibus requires some changes in the domibusproperties configuration file
1 Add the following properties to enable the usage of the OASIS dynamic discovery client
Note this property is not mandatory as it defaults to the above value
2 Set the property domibussmlzone eg ehealthaccedeliverytecheceuropaeu
3 The bean pModeProvider must be configured with DynamicDiscoveryPModeProvider
PMode configuration for OASIS
1481 Sender PMode
In a dynamic discovery process the receiver of the messages is not known beforehand and therefore the PModeResponder parameter SHOULD NOT be set
Domibus 334 Administration Guide
Page 119 134
The dynamic discovery process must include a leg which maps the configured entry (action service and service type ndash cf 145 ndash Message format for PEPPOL) of the Receiver in the SMP
The security policy to be used in the leg is the following (see sect511 ndash Security Policies for more information)
Schema name should be added to action value Eg ehealth-actorid-qnsurnoasisnamesspecificationublschemaxsdCreditNote-2CreditNoteurnwwwcenbii
1482 Receiver PMode
The dynamic discovery configuration of the receiver is similar to the configuration of the sender except that the roles are swapped the sender of the messages is not known beforehand As a consequence the PModeInitiator parameter SHOULD NOT be set
The receiver must include the certificate of the trusted authority(ies) in its truststore It will only accept messages that were signed with certificates issued by the trusted authority(ies)
The sender truststore must include the SMP public certificate This certificate is used by the AP to validate the identity of the used SMP (cf sect18 ndash Annex 1 - Usage of certificates in PEPPOL and OASIS for more information)
Message format for OASIS
When dynamic discovery is used the to field should not be statically configured in the PMode (the to field may even be omitted in the message) The lookup is performed by C2 based on the finalRecipient message property
Note For OASIS clients in the PMode action value the document scheme must be included with the document ID (for PEPPOL client only document ID is needed)
Domibus 334 Administration Guide
Page 121 134
Example of message using the finalRecipient for dynamic discovery
In order to configure message pulling the process section should be configured with mep set to oneway and binding set to pull as shown in the following example
In the case of a pull process the initiatorParties section contains the party that initiate the pull request The responderParties section contains the parties that can be pulled from
In domibusproperties configuration file adapt the following properties to your needs Note that domibusmshpullcron and domibuspullqueueconcurency are mandatory
Cron expression used for configuring the message puller scheduling
domibusmshpullcron=0 0 01
Number of threads used to parallelize the pull requests
domibuspullqueueconcurency=1-1
Number or pull requests executed every cron cycle
domibuspullrequestsendperjobcycle=1
Configuration restriction
A correctly configured one-way pull process should only contain one party configured in the initiatorParties section
Different legConfiguration with the same defaultMpc (highlighted in red in the following configuration) should not be configured in the same pull process or across different pull processes
Domibus 334 Administration Guide
Page 123 134
If those restrictions are not respected the message will not be exchanged and a warning message will detail the configuration problem
SEVERE Exception sending context initialized event to listener instance of class orgspringframeworkwebcontextContextLoaderListener orgspringframeworkbeansfactoryBeanCreationException Error creating bean with name orgspringframeworkschedulingquartzSchedulerFactoryBean0 defined in ServletContext resource [WEB-INFmsh-configxml] Invocation of init method failed nested exception is orgquartzJobPersistenceException Failed to obtain DB connection from datasource springTxDataSourceorgspringframeworkschedulingquartzSchedulerFactoryBean0 comatomikosjdbcAtomikosSQLException Failed to grow the connection pool [See nested exception comatomikosjdbcAtomikosSQLException Failed to grow the connection pool] at orgspringframeworkbeansfactorysupportAbstractAutowireCapableBeanFactoryinitializeBean(AbstractAutowireCapableBeanFactoryjava1578) at orgspringframeworkbeansfactorysupportAbstractAutowireCapableBeanFactorydoCreateBean(AbstractAutowireCapableBeanFactoryjava545) at orgspringframeworkbeansfactorysupportAbstractAutowireCapableBeanFactorycreateBean(AbstractAutowireCapableBeanFactoryjava482) at orgspringframeworkbeansfactorysupportAbstractBeanFactory$1getObject(AbstractBeanFactoryjava305) at orgspringframeworkbeansfactorysupportDefaultSingletonBeanRegistrygetSingleton(DefaultSingletonBeanRegistryjava230) at orgspringframeworkbeansfactorysupportAbstractBeanFactorydoGetBean(AbstractBeanFactoryjava301) SEVERE One or more listeners failed to start Full details will be found in the appropriate container log file May 11 2016 101243 AM orgapachecatalinautilSessionIdGeneratorBase createSecureRandom INFO Creation of SecureRandom instance for session ID generation using [SHA1PRNG] took [13256] milliseconds May 11 2016 101243 AM orgapachecatalinacoreStandardContext startInternal SEVERE Context [domibus] startup failed due to previous errors May 11 2016 101243 AM orgapachecatalinacoreApplicationContext log INFO Closing Spring root WebApplicationContext May 11 2016 101243 AM orgapachecatalinacoreApplicationContext log INFO Shutting down log4j
Solution Setup the password properly in the domibusproperties
Exception sending context initialized event to listener
instance of class
SEVERE Exception sending context initialized event to listener instance of class orgspringframeworkwebcontextContextLoaderListener orgspringframeworkbeansfactoryBeanCreationException Error creating bean with name entityManagerFactory defined in URL [filehomeedeliverydomibusf1confdomibusdomibus-datasourcesxml] Cannot resolve reference to bean domibusJDBC-XADataSource while setting bean
Domibus 334 Administration Guide
Page 125 134
property dataSource nested exception is orgspringframeworkbeansfactoryBeanCreationException Error creating bean with name domibusJDBC-XADataSource defined in URL [filehomeedeliverydomibusf1confdomibusdomibus-datasourcesxml] Invocation of init method failed nested exception is comatomikosjdbcAtomikosSQLException The class commysqljdbcjdbc2optionalMysqlXADataSource specified by property xaDataSourceClassName could not be found in the classpath Please make sure the spelling is correct and that the required jar(s) are in the classpath
Solution Add MySQL connector in domibuslib folder
Neither the JAVA_HOME nor the JRE_HOME environment
variable is defined
Neither the JAVA_HOME nor the JRE_HOME environment variable is defined At least one of these environment variables is needed to run this program
Solution Set JAVA_HOME variable orand JRE_HOME
Cannot access Admin Console
httpyour_serveryour_port_numberdomibus No SEVER errors in logs but no admin option in browser under
Solution Check if the firewall is open for port_no (eg 8080)
Handshake Failure
Full stack trace below
orgapachecxfinterceptorFault Could not write attachments at orgapachecxfinterceptorAttachmentOutInterceptorhandleMessage(AttachmentOutInterceptorjava74) at orgapachecxfphasePhaseInterceptorChaindoIntercept(PhaseInterceptorChainjava308) at orgapachecxfendpointClientImpldoInvoke(ClientImpljava514) at orgapachecxfendpointClientImplinvoke(ClientImpljava423) at orgapachecxfendpointClientImplinvoke(ClientImpljava324) at orgapachecxfendpointClientImplinvoke(ClientImpljava277) at orgapachecxfendpointClientImplinvokeWrapped(ClientImpljava312) at orgapachecxfjaxwsDispatchImplinvoke(DispatchImpljava327) at orgapachecxfjaxwsDispatchImplinvoke(DispatchImpljava246) at eudomibusebms3senderMSHDispatcherdispatch(MSHDispatcherjava126) at eudomibusebms3senderMSHDispatcher$$FastClassBySpringCGLIB$$105974a1invoke(ltgeneratedgt) at orgspringframeworkcglibproxyMethodProxyinvoke(MethodProxyjava204) at orgspringframeworkaopframeworkCglibAopProxy$CglibMethodInvocationinvokeJoinpoint(CglibAopProxyjava717) at orgspringframeworkaopframeworkReflectiveMethodInvocationproceed(ReflectiveMethodInvocationjava157)
Domibus 334 Administration Guide
Page 126 134
at orgspringframeworktransactioninterceptorTransactionInterceptor$1proceedWithInvocation(TransactionInterceptorjava99) at orgspringframeworktransactioninterceptorTransactionAspectSupportinvokeWithinTransaction(TransactionAspectSupportjava281) at orgspringframeworktransactioninterceptorTransactionInterceptorinvoke(TransactionInterceptorjava96) at orgspringframeworkaopframeworkReflectiveMethodInvocationproceed(ReflectiveMethodInvocationjava179) at orgspringframeworkaopframeworkCglibAopProxy$DynamicAdvisedInterceptorintercept(CglibAopProxyjava653) at eudomibusebms3senderMSHDispatcher$$EnhancerBySpringCGLIB$$da53e95adispatch(ltgeneratedgt) at eudomibusebms3senderMessageSendersendUserMessage(MessageSenderjava116) at eudomibusebms3senderMessageSenderonMessage(MessageSenderjava195) at sunreflectNativeMethodAccessorImplinvoke0(Native Method) at sunreflectNativeMethodAccessorImplinvoke(NativeMethodAccessorImpljava57) at sunreflectDelegatingMethodAccessorImplinvoke(DelegatingMethodAccessorImpljava43) at javalangreflectMethodinvoke(Methodjava606) at orgspringframeworkaopsupportAopUtilsinvokeJoinpointUsingReflection(AopUtilsjava302) at orgspringframeworkaopframeworkReflectiveMethodInvocationinvokeJoinpoint(ReflectiveMethodInvocationjava190) at orgspringframeworkaopframeworkReflectiveMethodInvocationproceed(ReflectiveMethodInvocationjava157) at orgspringframeworktransactioninterceptorTransactionInterceptor$1proceedWithInvocation(TransactionInterceptorjava99) at orgspringframeworktransactioninterceptorTransactionAspectSupportinvokeWithinTransaction(TransactionAspectSupportjava281) at orgspringframeworktransactioninterceptorTransactionInterceptorinvoke(TransactionInterceptorjava96) at orgspringframeworkaopframeworkReflectiveMethodInvocationproceed(ReflectiveMethodInvocationjava179) at orgspringframeworkaopframeworkJdkDynamicAopProxyinvoke(JdkDynamicAopProxyjava207) at comsunproxy$Proxy163onMessage(Unknown Source) at orgspringframeworkjmslistenerAbstractMessageListenerContainerdoInvokeListener(AbstractMessageListenerContainerjava746) at orgspringframeworkjmslistenerAbstractMessageListenerContainerinvokeListener(AbstractMessageListenerContainerjava684) at orgspringframeworkjmslistenerAbstractMessageListenerContainerdoExecuteListener(AbstractMessageListenerContainerjava651) at orgspringframeworkjmslistenerAbstractPollingMessageListenerContainerdoReceiveAndExecute(AbstractPollingMessageListenerContainerjava315) at orgspringframeworkjmslistenerAbstractPollingMessageListenerContainerreceiveAndExecute(AbstractPollingMessageListenerContainerjava233) at orgspringframeworkjmslistenerDefaultMessageListenerContainer$AsyncMessageListenerInvokerinvokeListener(DefaultMessageListenerContainerjava1150)
Domibus 334 Administration Guide
Page 127 134
at orgspringframeworkjmslistenerDefaultMessageListenerContainer$AsyncMessageListenerInvokerexecuteOngoingLoop(DefaultMessageListenerContainerjava1142) at orgspringframeworkjmslistenerDefaultMessageListenerContainer$AsyncMessageListenerInvokerrun(DefaultMessageListenerContainerjava1039) at javalangThreadrun(Threadjava745) Caused by javaxnetsslSSLHandshakeException Received fatal alert handshake_failure at sunsecuritysslAlertsgetSSLException(Alertsjava192) at sunsecuritysslAlertsgetSSLException(Alertsjava154) at sunsecuritysslSSLSocketImplrecvAlert(SSLSocketImpljava1979) at sunsecuritysslSSLSocketImplreadRecord(SSLSocketImpljava1086) at sunsecuritysslSSLSocketImplperformInitialHandshake(SSLSocketImpljava1332) at sunsecuritysslSSLSocketImplstartHandshake(SSLSocketImpljava1359) at sunsecuritysslSSLSocketImplstartHandshake(SSLSocketImpljava1343) at sunnetwwwprotocolhttpsHttpsClientafterConnect(HttpsClientjava563) at sunnetwwwprotocolhttpsAbstractDelegateHttpsURLConnectionconnect(AbstractDelegateHttpsURLConnectionjava185) at sunnetwwwprotocolhttpHttpURLConnectiongetOutputStream(HttpURLConnectionjava1092) at sunnetwwwprotocolhttpsHttpsURLConnectionImplgetOutputStream(HttpsURLConnectionImpljava250) at orgapachecxftransporthttpURLConnectionHTTPConduit$URLConnectionWrappedOutputStreamsetupWrappedStream(URLConnectionHTTPConduitjava236) at orgapachecxftransporthttpHTTPConduit$WrappedOutputStreamhandleHeadersTrustCaching(HTTPConduitjava1302) at orgapachecxftransporthttpHTTPConduit$WrappedOutputStreamonFirstWrite(HTTPConduitjava1262) at orgapachecxftransporthttpURLConnectionHTTPConduit$URLConnectionWrappedOutputStreamonFirstWrite(URLConnectionHTTPConduitjava267) at orgapachecxfioAbstractWrappedOutputStreamwrite(AbstractWrappedOutputStreamjava47) at orgapachecxfioAbstractThresholdOutputStreamwrite(AbstractThresholdOutputStreamjava69) at orgapachecxfioAbstractWrappedOutputStreamwrite(AbstractWrappedOutputStreamjava60) at orgapachecxfioCacheAndWriteOutputStreamwrite(CacheAndWriteOutputStreamjava89) at orgapachecxfattachmentAttachmentSerializerwriteProlog(AttachmentSerializerjava172) at orgapachecxfinterceptorAttachmentOutInterceptorhandleMessage(AttachmentOutInterceptorjava72) 43 more
Solution If you receive this error then itrsquos likely that you configured the client with TLSv11 while the server only accepts TLSv12
Domibus 334 Administration Guide
Page 128 134
OPERATIONAL GUIDELINES
In this section you will find some recommendations on how to administer Domibus in an efficient way The following topics are tackled JMS Queue management log management capacity planning database management and the monitoring of message life cycle
JMS Queue Management
Domibus provides following out of the box features to manage the JMS Queues used in Domibus (see also sect94- Queue Monitoring)
Inspecting and filtering the messages from a queue based on the contents of Source Period
JMS Type or Selector
Move message from the DLQ (Dead Letter Queue) to the original Queue
Delete stuck or pending message(s) from Queues
It is recommended to monitor the Queue size and number of messages in the different Queues If some messages are stuck in any of the Queue then alerts must be sent to the Domibus Administrator
Please pay special attention to the deadletter queue (DLQ) Messages stuck in this queue is a signal that there is some issue in Domibus that needs to be analysed and an alert should be sent to the Domibus Administrator
Important
The lsquoListPendingMessagesrsquo operation on WS Plugin browses the JMS queue Max count is limited to destination MaxBrowsePageSize which can be changed via the lsquodomibuslistPendingMessagesmaxCountrsquo Domibus property
If your received messages are not returned by the webservice listPendingMessages method the you should
1 increase the value of the lsquodomibuslistPendingMessagesmaxCountrsquoproperty 2 delete the messages from the domibusnotificationwebservice queue with selector NOTIFICATION_TYPE=MESSAGE_SEND_SUCCESS using JMX tools httpactivemqapacheorghow-can-i-monitor-activemqhtml
Log Management
1721 Log Level
It is recommended that the log level is correctly set in all the environments
The log level should be set to INFODEBUG in all the test environments for de-bugging purpose
The log level should be set to ERRORWARN in production environment (keeping log level to INFO in production environment will degrade the performance of Domibus)
Domibus 334 Administration Guide
Page 129 134
1722 Log Rotation and Archiving
It is recommended that log rotation and archiving logic is implemented
Domibus provides by default log rotation but Domibus administrator should manage Domibus archiving logic
1723 Log Monitoring
It is recommended to monitor continuously Domibus logs It can be done using an automated script which looks for keywords like ERROR WARNING etc and reports all the errors and warnings to the Domibus administrator
Capacity Planning
1731 JVM Memory Management
Hereafter some recommendations
the JVM memory parameters must first be tested in a test environment with the load
expected in production
the JVM parameters ie heap size must be monitored with the help of automated scripts and
any abnormal hikes in heap size must be reported to the administrator
1732 CPU IO operations and Disk Space Monitoring
CPU IO operations and disk space must be continuously monitored using automated scripts Any abnormal hikes must be reported to Domibus administrator and further investigated
Database Management
1741 Database Monitoring
It is important to monitor the database size
The Payload of the message is deleted from the sending Access Point Only the metadata of the message stays in the table The Payload from the receiving Access Point is deleted based on the retention policy defined in the Pmode settings
Domibus uses approximately 40 MB of table space to store the metadata of 1000 messages
1742 Database Archiving
Since the Database contains AS4 receipts that are used for non-repudiation purposes they should be archived before purging the database
The metadata of the database can be purged if it is no longer required
1743 Monitor Message Life Cycle
It is recommended to monitor the message status in the TB_MessageLog table Automated scripts can be used to count different status in the table
Please pay special attention to the following statuses
Domibus 334 Administration Guide
Page 130 134
WAITING_FOR_RETRY this means that there is some issue between C2 and C3 that must be
resolved
SEND_FAILURE this means that that there is some issue between C2 and C3 that must be
resolved
SEND_ENQUEUED this message status is part of the successful message life cycle however
abnormal increase in the count of messages with this status means that there is an issue
Further investigation is recommended
Domibus 334 Administration Guide
Page 131 134
ANNEX 1 - USAGE OF CERTIFICATES IN PEPPOL AND OASIS
C2 C3
Keystore Truststore Keystore Truststore
PEPPOL
Certificate Senders (issued by CA) Empty Receivers CAs
Note
C2 signs the message with its private key
C2 discover C3s public certificate from the SMP
C3 signs the receipt with its private key
The receiver trusts all senders whos certificate were issue dby these CAs
OASIS
Certificate Senders (issued by CA) SMPs Receivers CAs
Note
C2 signs the message with its private key
C2 discover C3s public certificate from the SMP To trust the SMP the sender needs its public certificate
C3 signs the receipt with its private key
The receiver trusts all senders whos certificate were issue dby these CAs
Domibus 334 Administration Guide
Access Point Page 132 134
ANNEX 2 ndash DOCUMENT PARTS
Domibus 334 Administration Guide
Access Point Page 133 134
LIST OF FIGURES
Figure 1 - Diagram representing the Deployment of Domibus in a Cluster on WebLogic 23 Figure 2 - Diagram representing the Deployment of Domibus in a Cluster on Tomcat 39 Figure 3 - Diagram representing the Deployment of Domibus in a Cluster on WildFly 54 Figure 4 - Message Service Handler diagram 57 Figure 5 - PMode view 68