30
Revised 05.10.17 Page 1 of 30 ACCOUNTING SERVICES’ BANNER FINANCE TRAINING MANUAL

Revised 05.10.17 Page 1 of 30
ACCOUNTING SERVICES’
BANNER FINANCE TRAINING MANUAL
Revised 05.10.17 Page 2 of 30
COURSE OBJECTIVES:
I. BANNER FINANCE TERMINOLOGY
II. BANNER FINANCE NAVIGATION TIPS
III. BANNER FINANCE FORMS
a. FGIBDST ‐ Budget Status
b. FGIBDSR ‐ Executive Budget Summary
c. FGITBAL ‐ General Ledger Trial Balance
d. FGITRND ‐ Transaction Detail Activity
e. FGIOENC – Organizational Encumbrance List
f. FGIENCD ‐ Encumbrance Detail Activity
g. FAIVNDH ‐ Vendor Detail History Form
h. NHIDIST ‐ Labor Distribution Data Inquiry Form
IV. BANNER FINANCE REPORT VIEWING, PRINTING AND SAVING TIPS
a. BANNER FINANCE REPORTS
i. FGRBDSC ‐ Budget Status
ii. FGRODTA ‐ Org Detail Activity
iii. FGRPDTA ‐ Program Detail Activity

Revised 05.10.17 Page 3 of 30
I. BANNER FINANCE TERMINOLOGY
What is a FOAPAL? The Banner System’s Chart of Accounts (COA) is the account structure used to track department transactions and is made up of the following:
F‐Fund
O‐Organization (Org)
A‐Account
P‐Program
A‐Activity
L‐Location
You can review our FOAPAL Training for more information. http://www.msudenver.edu/controller/resources/training/foapaltraining/ Data Entry: In Banner, each Fund, Org, Account, and Program is identified as either data‐enterable or not by a “Y” or “N”. Only use the items identified as “Y” Status: In Banner, each Fund, Org, Account, and Program is identified as either “A” for active or “I” for inactive. Only use the items identified as “A” Encumbrance (Budget Reservations): An account used to record the estimated amount of purchase orders, contracts, and salaries. The account is credited when goods or services are received. Form: A document in which information is entered and retrieved from in Banner. Forms are also referred to as objects. Query: Operation performed on specific screens to obtain detailed information. Information cannot be updated while in a query mode). Fiscal Year: July 1st to June 30th. WebXtender (Xtender): Banner's document imaging system. Xtender provides imaging, document management, data capture, storage management, output capture and report management capabilities.

Revised 05.10.17 Page 4 of 30
BANNER RULE CODES (TRANSACTION TYPES)
BUDGET ENTRIES: BD01 Permanent Adopted Budget BD02 Permanent Budget Adjustments CASH RECEIPT ENTRIES: CR05 Cash Receipts‐Cashiers CR06 Cash Receipts Adjustments JOURNAL ENTRIES: FT01 Journal Entry PAYROLL ENTRIES: HFNL Fringe Benefits Chargebacks HGNL Gross Payroll Expenditures without Encumbrance HGRS Gross Payroll Expenditures with Encumbrance HEEL Employee Liabilities HERL Employer Liabilities HFEX Actual Fringe Benefits Distribution ACCOUNTS PAYABLE/PURCHASING: INNI Invoice without Encumbrance INNC Credit Memo without Encumbrance INEI Invoice with Encumbrance INEC Credit Memo with Encumbrance CN__ Cancelled Invoice PORD Establish Purchase Order Encumbrance CORD Changes on Purchase Order POAD Additional Charges on Purchase Order PCRD Canceled Purchase Order REQP Purchase Requisition PLIB Corporate Card (previously Procurement Card) TLIB Event Card & Ghost Card (No longer used) GRANTS AND CONTRACTS ENTRIES: GRIC Grants‐Indirect Cost Charge GRIR Grants‐Indirect Cost Recovery GRRV Grants‐Accrued Revenue

Revised 05.10.17 Page 5 of 30
ACCOUNTS PAYABLE INFORMATION Accounts Payable Document Numbering Example: 17CA0123 The first and second digit of the Document # is the fiscal year.
17=2016‐2017 fiscal year The third digit of the Document # is the Accounting Technician responsible for that particular payment or transaction
The fourth through sixth digit of the Document # is the date the item is entered into the system:
A01 means the item was entered on July 1st.
A July G January
B August H February
C September I March
D October J April
E November K May
F December L June
The seventh and eighth digits of the Document # are a sequential listing of that technician’s payments for the day—letters are substituted for the seventh digit if the technician exceeds 99 payments:
23 = the 23rd payment by the technician
Example: 17CA01A1
A1 = the 101st payment by the technician
Grants Document Numbering
Since we are trying to keep grant payments separate from all other types of payments and because their fund varies by fiscal year, we use the following letter/number combination: For all grant payments, the first digit of the Document # is A/P Technician. The second and third digit of the Document # is the fiscal year. The rest of the sequence will follow the previous guidelines.
Example: C17A2305 Grant payment, 5th Grant transaction on July 23, 2016. The grant invoices have a sequential system separate from the non‐grant payments.

Revised 05.10.17 Page 6 of 30
II. BANNER NAVIGATION TIPS
Setting up My Banner: My Banner is useful for quick access to the forms you most commonly use, and is
simple to set up.
At the General Menu, double click on My Banner to open the folder.
Click on Organize My Banner under My Banner to open the form. (You may also simply type “GUAPMNU” in the Go To . . . field at the General Menu.
In GUAPMNU, you can identify forms from the left side of the screen and add them to your personal menu by:
Identifying and then clicking on the form you want to add.
Clicking on the arrow key to add the form to your menu.
Be sure to click on the “Save” icon to save your personal menu
Common Objects — These are used for all of the forms covered in training:
Rollback Icon ‐ Clears all information in a form and returns you to an enterable field in the key block. Exit Icon ‐ If you are in query mode, the first click cancels the query; the second click exits the form. If you are not in query mode, a single click will return you to the previous screen. Search Icon (drop down arrow) – Moves to a called form to search for values for the
related field. Display Image – Allows you to view a document that has been indexed into the system
using Application Xtender.
Next Block/Previous Block – Allows you to move from one block to the next.
Revised 05.10.17 Page 7 of 30
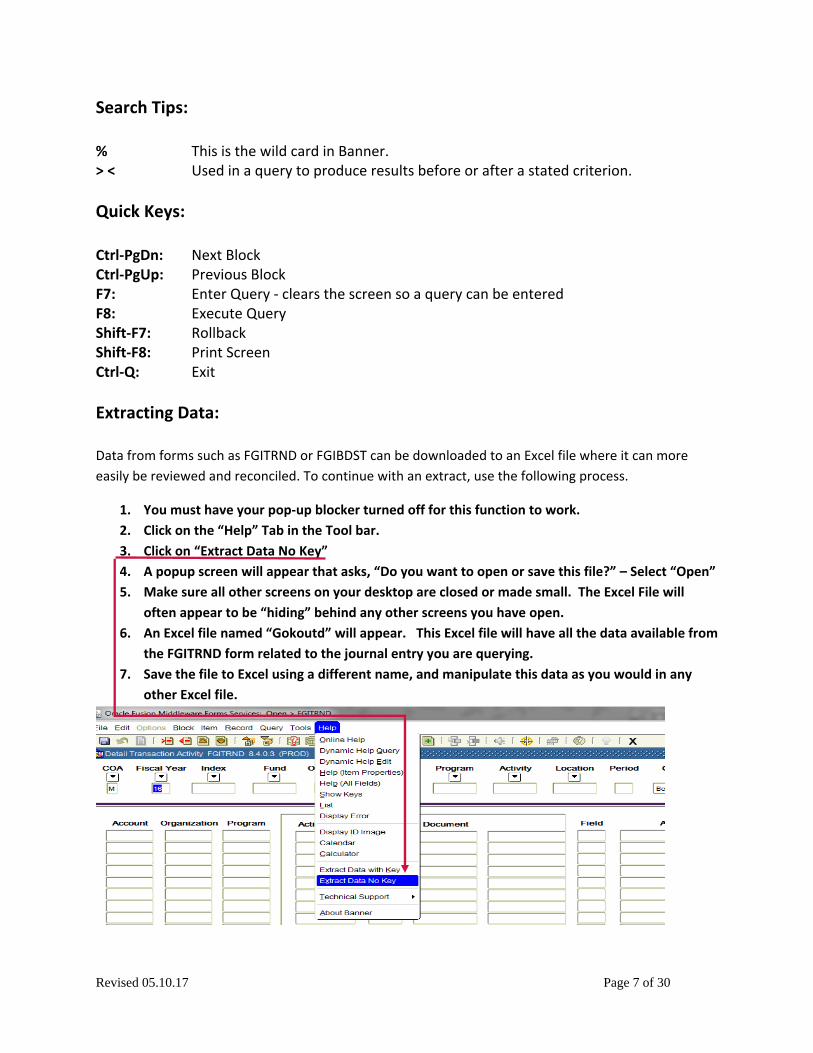
Search Tips: % This is the wild card in Banner. > < Used in a query to produce results before or after a stated criterion.
Quick Keys: Ctrl‐PgDn: Next Block Ctrl‐PgUp: Previous Block F7: Enter Query ‐ clears the screen so a query can be entered F8: Execute Query Shift‐F7: Rollback Shift‐F8: Print Screen Ctrl‐Q: Exit
Extracting Data: Data from forms such as FGITRND or FGIBDST can be downloaded to an Excel file where it can more
easily be reviewed and reconciled. To continue with an extract, use the following process.
1. You must have your pop‐up blocker turned off for this function to work.
2. Click on the “Help” Tab in the Tool bar.
3. Click on “Extract Data No Key”
4. A popup screen will appear that asks, “Do you want to open or save this file?” – Select “Open”
5. Make sure all other screens on your desktop are closed or made small. The Excel File will
often appear to be “hiding” behind any other screens you have open.
6. An Excel file named “Gokoutd” will appear. This Excel file will have all the data available from
the FGITRND form related to the journal entry you are querying.
7. Save the file to Excel using a different name, and manipulate this data as you would in any
other Excel file.
Revised 05.10.17 Page 8 of 30
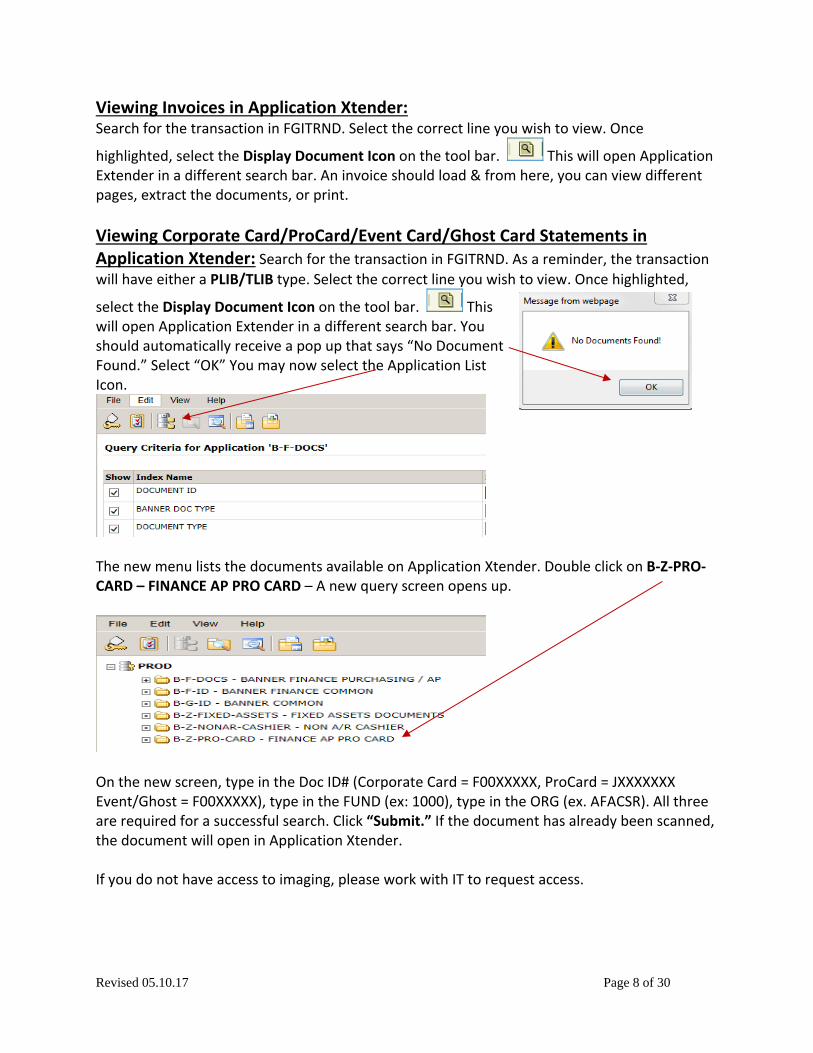
Viewing Invoices in Application Xtender: Search for the transaction in FGITRND. Select the correct line you wish to view. Once
highlighted, select the Display Document Icon on the tool bar. This will open Application Extender in a different search bar. An invoice should load & from here, you can view different pages, extract the documents, or print.
Viewing Corporate Card/ProCard/Event Card/Ghost Card Statements in Application Xtender: Search for the transaction in FGITRND. As a reminder, the transaction
will have either a PLIB/TLIB type. Select the correct line you wish to view. Once highlighted,
select the Display Document Icon on the tool bar. This will open Application Extender in a different search bar. You should automatically receive a pop up that says “No Document Found.” Select “OK” You may now select the Application List Icon.
The new menu lists the documents available on Application Xtender. Double click on B‐Z‐PRO‐CARD – FINANCE AP PRO CARD – A new query screen opens up.
On the new screen, type in the Doc ID# (Corporate Card = F00XXXXX, ProCard = JXXXXXXX Event/Ghost = F00XXXXX), type in the FUND (ex: 1000), type in the ORG (ex. AFACSR). All three are required for a successful search. Click “Submit.” If the document has already been scanned, the document will open in Application Xtender. If you do not have access to imaging, please work with IT to request access.

Revised 05.10.17 Page 9 of 30
Contacts:
Banner Questions: Accounting Services: 303‐556‐3030 or [email protected]
Vendor Payments/Travel Questions: Accounts Payable: 303‐556‐3030 or [email protected] Corporate Card Questions: Accounting Services: 303‐556‐3030 or [email protected] Budget related Questions: Budget Office: 303‐556‐3020 Payroll related Questions: Payroll: 303‐556‐3030 or [email protected] Human Resources: 303‐556‐3120
Trainings: FOAPAL Training: http://www.msudenver.edu/controller/resources/training/foapaltraining/ Fiscal Year End Training: See Controller’s Website for dates & times http://www.msudenver.edu/controller/
Corporate Card Training: http://msudenver.edu/controller/resources/training/corporatecard/
Purchasing Training: http://msudenver.edu/controller/resources/training/purchasing/
Travel Training: http://msudenver.edu/controller/resources/training/travel/
Revised 05.10.17 Page 10 of 30
III. BANNER FINANCE FORMS (most commonly used)
FGIBDST ‐ Budget Status
FGIBDSR ‐ Executive Budget Summary (Used by Budget)
FGITBAL ‐ General Ledger Trial Balance
FGIOENC ‐ Organizational Encumbrance List
FGIENCD ‐ Encumbrance Detail Activity
FGITRND ‐ Transaction Detail Activity
FAIVNDH ‐ Vendor Detail History Form
NHIDIST ‐ Labor Distribution Data Inquiry Form
FGRBDSC ‐ Budget Status
FGRODTA ‐ Org Detail Activity
FGRPDTA ‐ Program Detail Activity
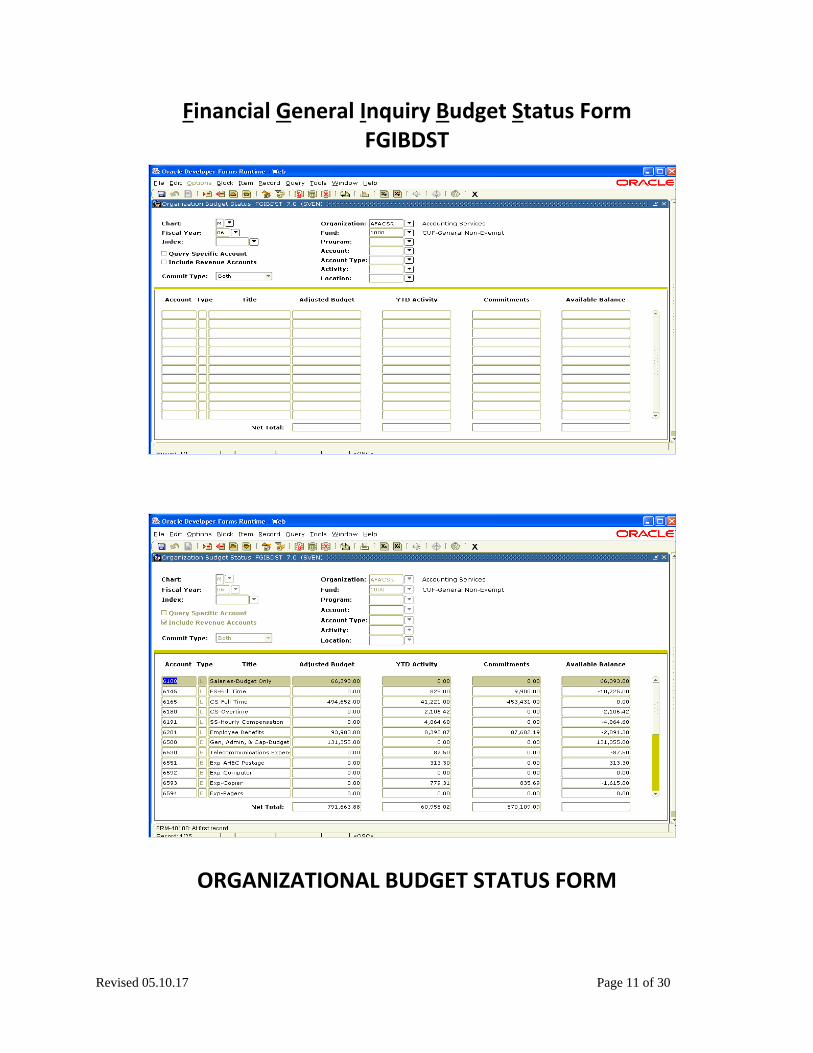
Revised 05.10.17 Page 11 of 30
Financial General Inquiry Budget Status Form FGIBDST
ORGANIZATIONAL BUDGET STATUS FORM

Revised 05.10.17 Page 12 of 30
Financial General Inquiry Budget Status Form
FGIBDST At “Go To…” field, type: FGIBDST
1) In the Chart field –M defaults
2) In the Fiscal Year Field – Current fiscal year defaults. Change year if you need a different fiscal year (for example: 17 for FY2016‐2017).
3) Click on Include Revenue Accounts (this removes the check mark)
Remove the check mark if your department does not have revenue.
4) In the Commit Ind Field ‐ Choose Both
5) In the Orgn Field ‐Type in your Org (Abbreviation for Organization)
6) In the Fund Field ‐Type in your Fund
7) In the Program Field ‐Type in your Program. It is generally best to leave the PROGRAM code field blank so that information related to any PROGRAM code is returned. This will also make it easier to identify program coding errors.
8) In the Account Field ‐ Type in an Account Number. If you choose to type in an account number, Banner will display that account and all successive accounts. If you leave the account field blank it will bring up all account numbers.
9) Control Page Down
Data is displayed by account number for each line item.
“Net Total ‐ Available” equals your available balance, which consists of your total budget less any year‐to‐date activity. Year‐to‐date activity includes salaries and other expenditures, less money set‐aside for purchase orders. At Menu Bar select Options: FGIBSUM: Budget Summary Information will display totals for Revenue, Labor, Direct
Expenditures, and Transfers, and a Net Total of all items listed.
FGIOENC: Organization Encumbrances will display purchase orders and the remaining balances
(For additional information see section on FGIENCD).
FGITRND: Transaction Detail Information will display a brief description of the expenditure that
you have highlighted. (For additional information see section on FGITRND).
Format Display Preferences will allow you to change the way numbers are presented in this
form.

Revised 05.10.17 Page 13 of 30
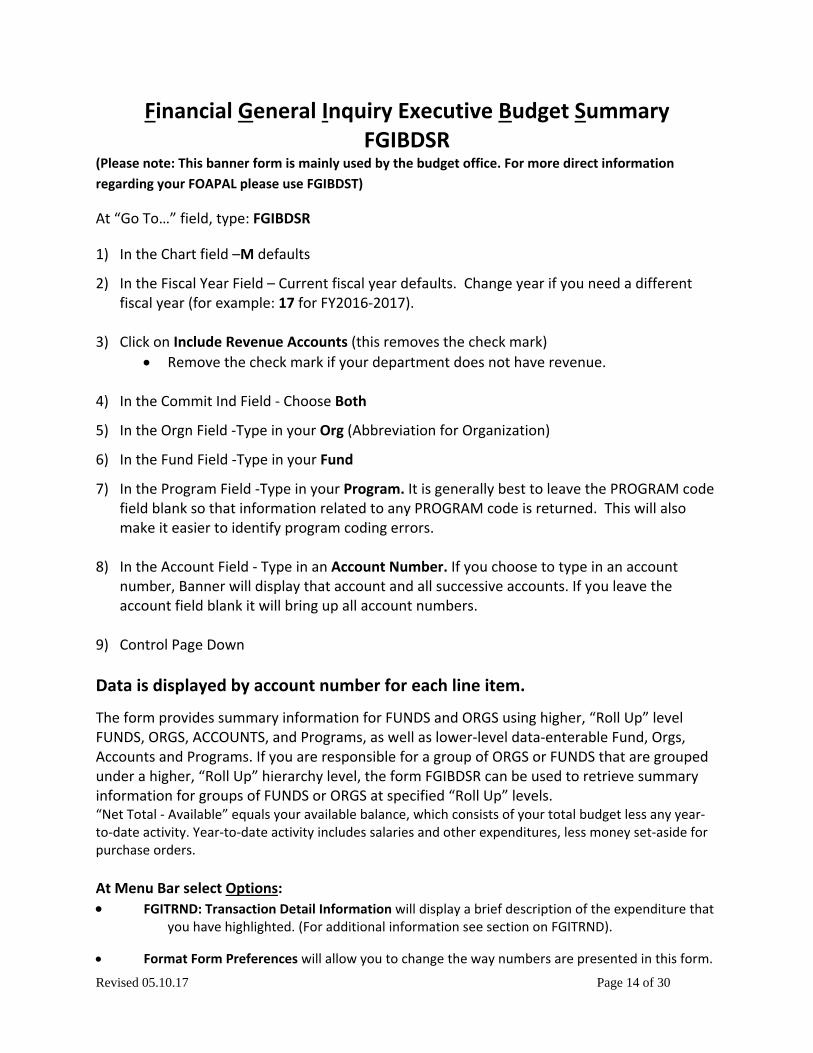
Financial General Inquiry Executive Budget Summary
FGIBDSR
Executive Budget Summary
Revised 05.10.17 Page 14 of 30
Financial General Inquiry Executive Budget Summary FGIBDSR
(Please note: This banner form is mainly used by the budget office. For more direct information
regarding your FOAPAL please use FGIBDST)
At “Go To…” field, type: FGIBDSR
1) In the Chart field –M defaults
2) In the Fiscal Year Field – Current fiscal year defaults. Change year if you need a different fiscal year (for example: 17 for FY2016‐2017).
3) Click on Include Revenue Accounts (this removes the check mark)
Remove the check mark if your department does not have revenue.
4) In the Commit Ind Field ‐ Choose Both
5) In the Orgn Field ‐Type in your Org (Abbreviation for Organization)
6) In the Fund Field ‐Type in your Fund
7) In the Program Field ‐Type in your Program. It is generally best to leave the PROGRAM code field blank so that information related to any PROGRAM code is returned. This will also make it easier to identify program coding errors.
8) In the Account Field ‐ Type in an Account Number. If you choose to type in an account number, Banner will display that account and all successive accounts. If you leave the account field blank it will bring up all account numbers.
9) Control Page Down
Data is displayed by account number for each line item.
The form provides summary information for FUNDS and ORGS using higher, “Roll Up” level FUNDS, ORGS, ACCOUNTS, and Programs, as well as lower‐level data‐enterable Fund, Orgs, Accounts and Programs. If you are responsible for a group of ORGS or FUNDS that are grouped under a higher, “Roll Up” hierarchy level, the form FGIBDSR can be used to retrieve summary information for groups of FUNDS or ORGS at specified “Roll Up” levels. “Net Total ‐ Available” equals your available balance, which consists of your total budget less any year‐to‐date activity. Year‐to‐date activity includes salaries and other expenditures, less money set‐aside for purchase orders.
At Menu Bar select Options:
FGITRND: Transaction Detail Information will display a brief description of the expenditure that you have highlighted. (For additional information see section on FGITRND).
Format Form Preferences will allow you to change the way numbers are presented in this form.
Revised 05.10.17 Page 15 of 30
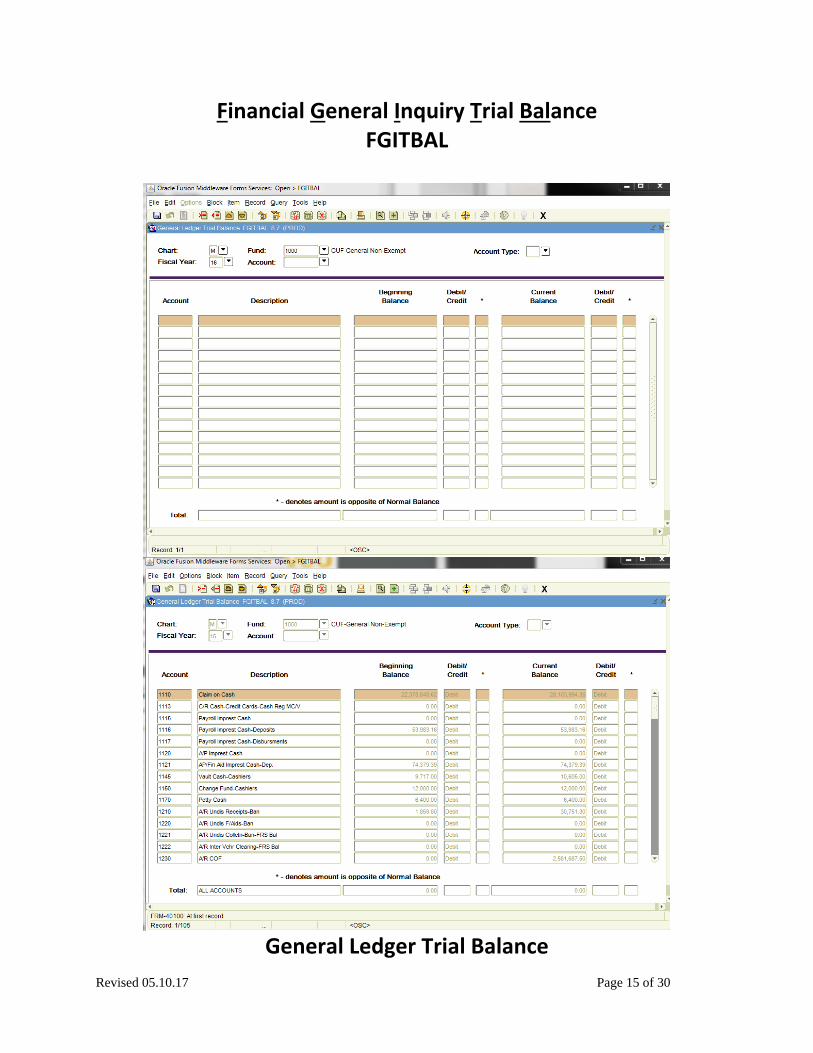
Financial General Inquiry Trial Balance FGITBAL
General Ledger Trial Balance
Revised 05.10.17 Page 16 of 30
Financial General Inquiry Trial Balance FGITBAL
At “Go To…” field, type: FGITBAL
1) In the Chart field –M defaults
2) In the Fiscal Year Field – Current fiscal year defaults. Change year if you need a different fiscal year (for example: 17 for FY2016‐2017).
3) In the Fund Field ‐Type in your FUND.
4) In the Account Field ‐Type in your ACCT. If you leave the account field blank it will bring up all account numbers within the FUND. The form does not show expense accounts like 6700, you must search using the Account Type.
5) You can select which types of accounts you would like to view by using the drop down menu next to Account Type.
6) To view all accounts under a FUND, leave the Account & A
7) Control Page Down
Data is displayed by account number for each line item.
On this form you’ll notice that current account balances are shown as debits and credits. Cash should be a debit balance. A credit cash balance indicates a deficit situation. Any accounts that show a credit or debit balance out of the ordinary will have an asterisk next to the field. At Menu Bar select Options: FGIGLAC: General Ledger Activity will display all of the activity under the Fund & Account Please
refer to the Banner Rule Codes above for information on the type of transaction.
Format Display Preferences will allow you to change the way numbers are presented in this
form.
Revised 05.10.17 Page 17 of 30
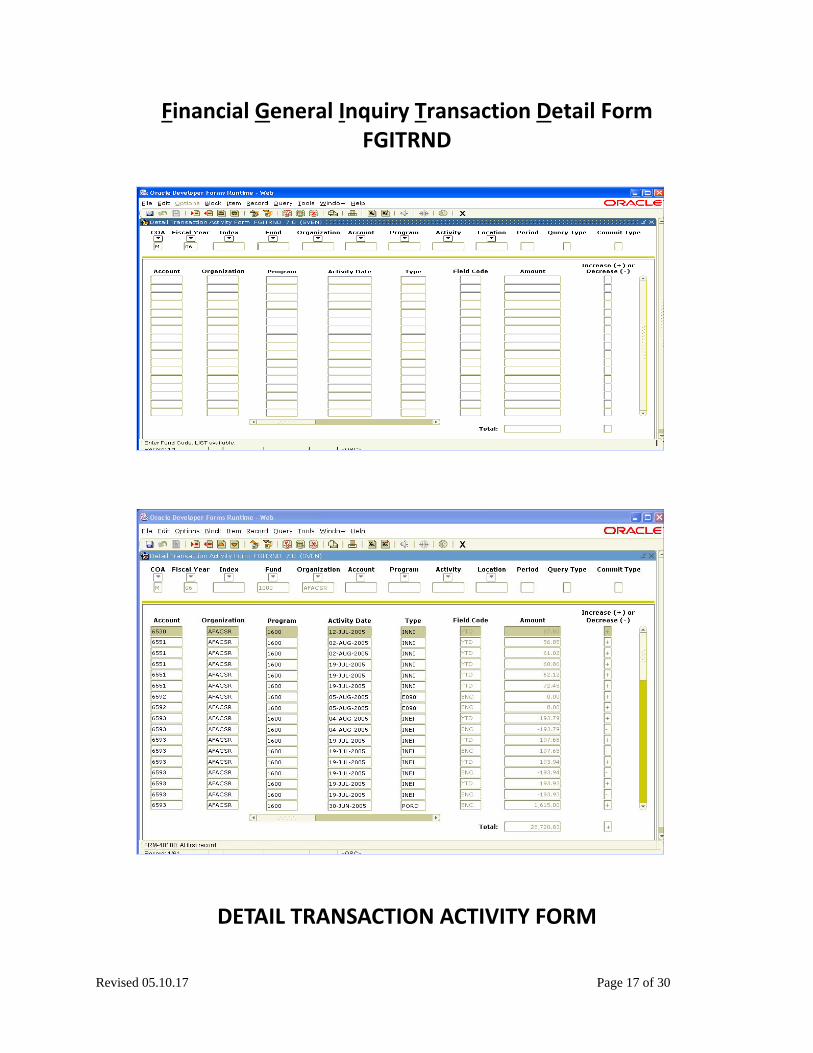
Financial General Inquiry Transaction Detail Form FGITRND
DETAIL TRANSACTION ACTIVITY FORM
Revised 05.10.17 Page 18 of 30
Financial General Inquiry Transaction Detail Form FGITRND
At “Go To…” field, type: FGITRND
1) In the COA field – M defaults
2) In the FY Field – Current fiscal year defaults, but can be changed if necessary.
3) In the Fund Field ‐Type in your Fund
4) In the Orgn Field ‐Type in your Org (Abbreviation for Organization)
5) In the Account Field ‐ Type in an Account Number‐‐If you choose to type in an account
number the information will be limited to that specific account number. If you leave the
account field blank it will bring up all account numbers.
6) In the Program Field ‐Type in your Program
7) Control Page Down
8) Press F8 to execute query – you may add criteria before executing query
The transaction information displays by Account and Org for posted activity. You will see all year‐to‐date activity such as increases and decreases in encumbrances, budget adjustments, and any journal entries affecting your FOAP. To view program, date, document type, document number, and document description; click on the arrows on the shaded scroll bar located next to the total column.
At Menu Bar select Options:
Query Document will display more information on the item that you have highlighted.
Detail Encumbrance Info will display purchase orders and the remaining balances. This
function is valid only for encumbrance type documents (For additional information, see
section on FGIENCD).
Query Total for all records will go to the last record listed and display a total of all items
listed.
Format Display Preferences will allow you to change the way numbers are presented in
this form.
Revised 05.10.17 Page 19 of 30
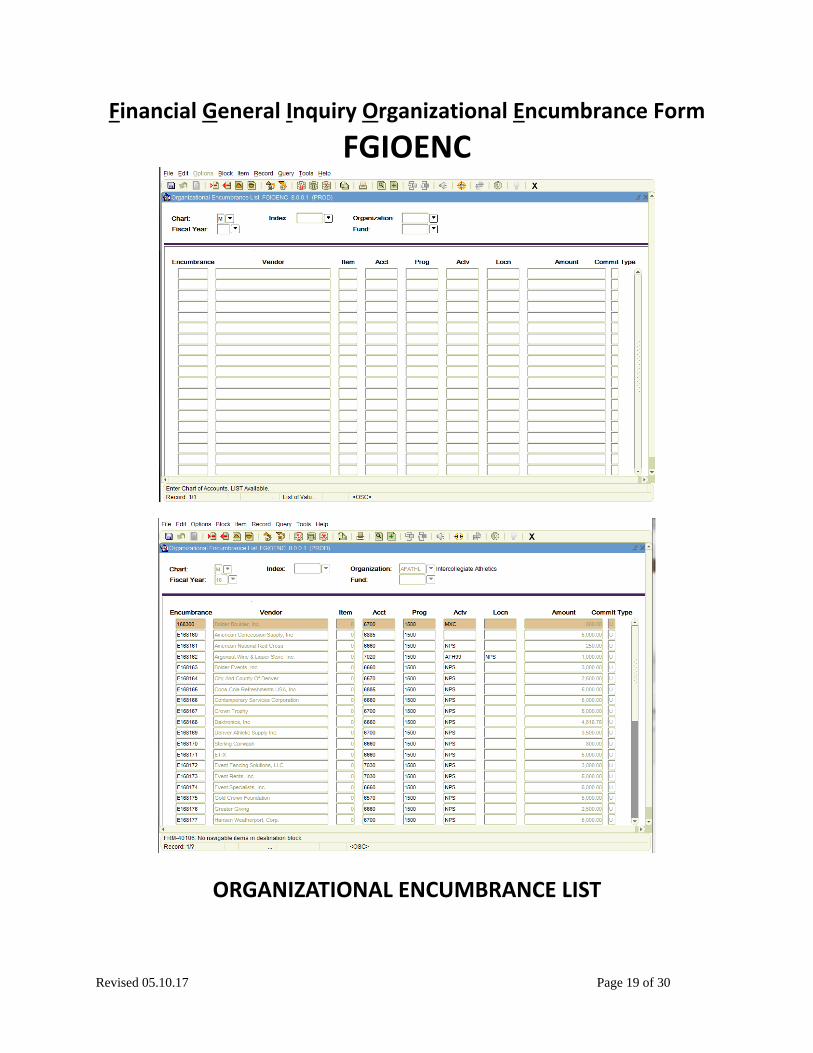
Financial General Inquiry Organizational Encumbrance Form FGIOENC
ORGANIZATIONAL ENCUMBRANCE LIST
Revised 05.10.17 Page 20 of 30
Financial General Inquiry Organizational Encumbrance Form FGIOENC
At “Go To…” field, type: FGIOENC
If you click the Search button at Organization, you will see the Organization list form, which
provides an online summary of all organizations including description and status. Double
click the Organization Code you wish to view.
Control Page Down
Control Page Down will bring up all unpaid encumbrances that fall under that ORG. There is no
need to enter any more information.
The Detail Encumbrance Activity Form displays:
Encumbrance
Vendor
The ACCOUNT, PROGRAM, ACTIVITY, and LOCATION Codes
Balance (current balance of purchase order)
For more information, highlight the Encumbrance you want to view in detail (simply select the
line) and go to “Options > Query Detail Encumbrance Info [FGIENCD]” This take you to a more
detailed page of the Encumbrance.
Revised 05.10.17 Page 21 of 30
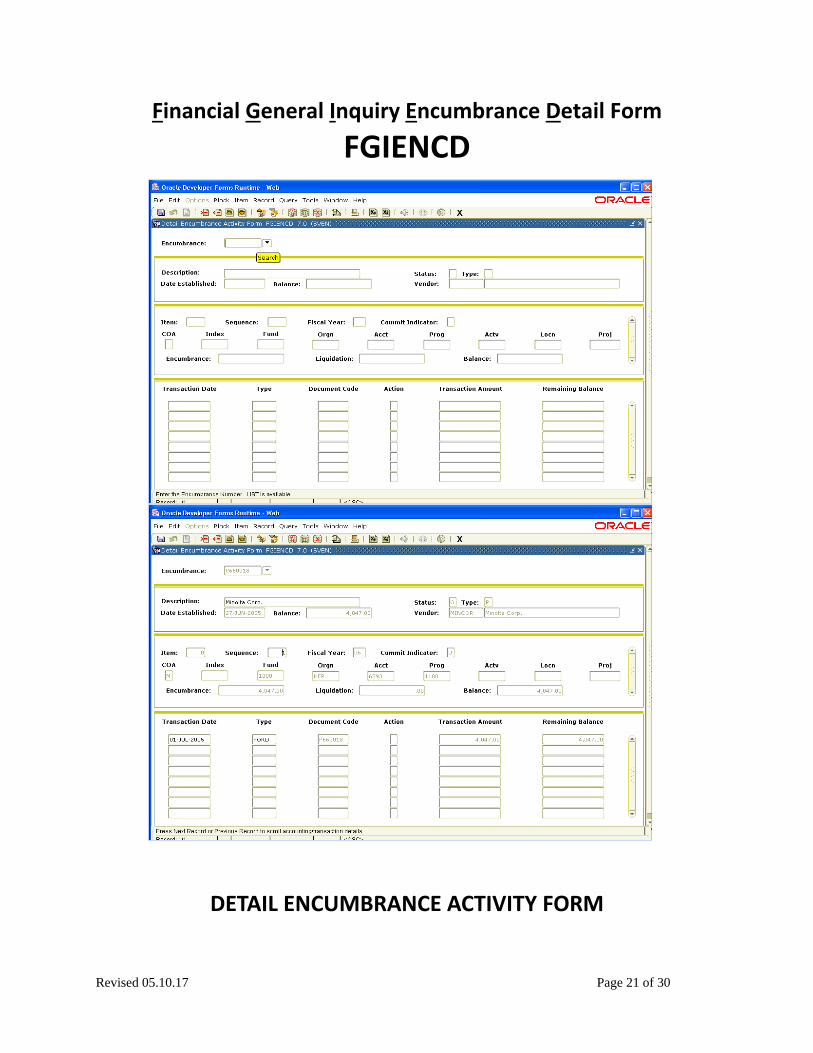
Financial General Inquiry Encumbrance Detail Form
FGIENCD
DETAIL ENCUMBRANCE ACTIVITY FORM

Revised 05.10.17 Page 22 of 30
Financial General Inquiry Encumbrance Detail Form FGIENCD
At “Go To…” field, type: FGIENCD
If you click the Search button at Encumbrance, you will see the encumbrance list form,
which provides an online summary of all open encumbrances including encumbrance type,
description, current balance and status.
In the Encumbrance field type the Purchase Order Number‐‐The letter V usually precedes the
purchase order numbers and letter E usually precedes the special purchase order number
(for example: V170001 or E170001).
Control Page Down
Control Page Down will bring up information in all sections of this form. There is no need to
enter any more information.
The Detail Encumbrance Activity Form displays:
Vendor
Banner FOAP
Encumbrance (beginning balance of purchase order)
Liquidation (all transactions liquidated against the purchase order)
Balance (ending balance of purchase order)
Activity against the PO (Invoices and change orders)
Revised 05.10.17 Page 23 of 30
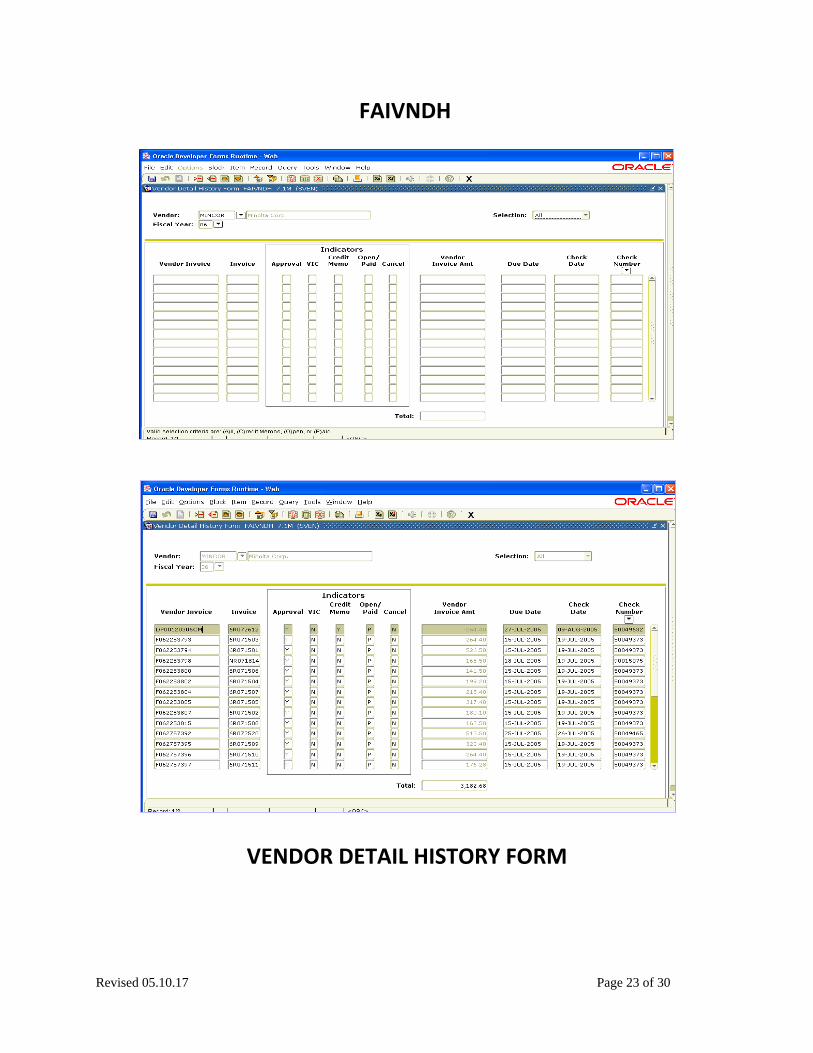
FAIVNDH
VENDOR DETAIL HISTORY FORM

Revised 05.10.17 Page 24 of 30
FAIVNDH At “Go To…” field, type: FAIVNDH
1. Enter the vendor code (for example: OFFMAX is the vendor code for Office Max).
If you do not know the vendor code:
Click on the search button to select a vendor from the Entity Name/ID Search Form
(FTIIDEN).
In the Last Name field, enter a possible spelling of the name you want (note that
searches default to case sensitive). If you enter a partial name, use a percent sign (%) as
a wild card. For example, you can enter %kon% to view all names with the letters ‘kon’
within the name. Once you have found the vendor, click on the Select icon. To view all
names in the Finance Database press F8 without any criteria.
2) Choose the type of invoice you wish to view from the Selection pull down menu. Your options include:
All All invoices attached to a specified vendor Credit Memo Only the credit memo invoices attached to the specified vendor Open Only those invoices that have not been paid to the specified vendor
Paid Only those invoices that have been paid to the specified vendor
3) Enter a Fiscal Year (e.g. 17 is Fiscal Year 2016‐2017)
4) Control Page Down
You will see all invoices for the vendor specified which are the type selected (this
includes invoices paid by other departments). In this form you will see invoice amounts,
due/paid dates, and check numbers. To view due/paid dates and check numbers, click
on the arrows on the horizontal scroll bar, located just below the total box. If you click
on the button next to Check, you will see all invoices paid on the highlighted check
number.
At Menu Bar select Options:
View Invoice Information will display accounting, commodity, and additional
information on the item you have highlighted (FAIINVE).
Commodity Information will display the commodity description (FOICOMM).
View Vendor Invoice most employees do not have access to this form (FAIVINV).
Query Total for all records will go to the last invoice and display the total of all invoices
meeting the selection criteria.
Revised 05.10.17 Page 25 of 30
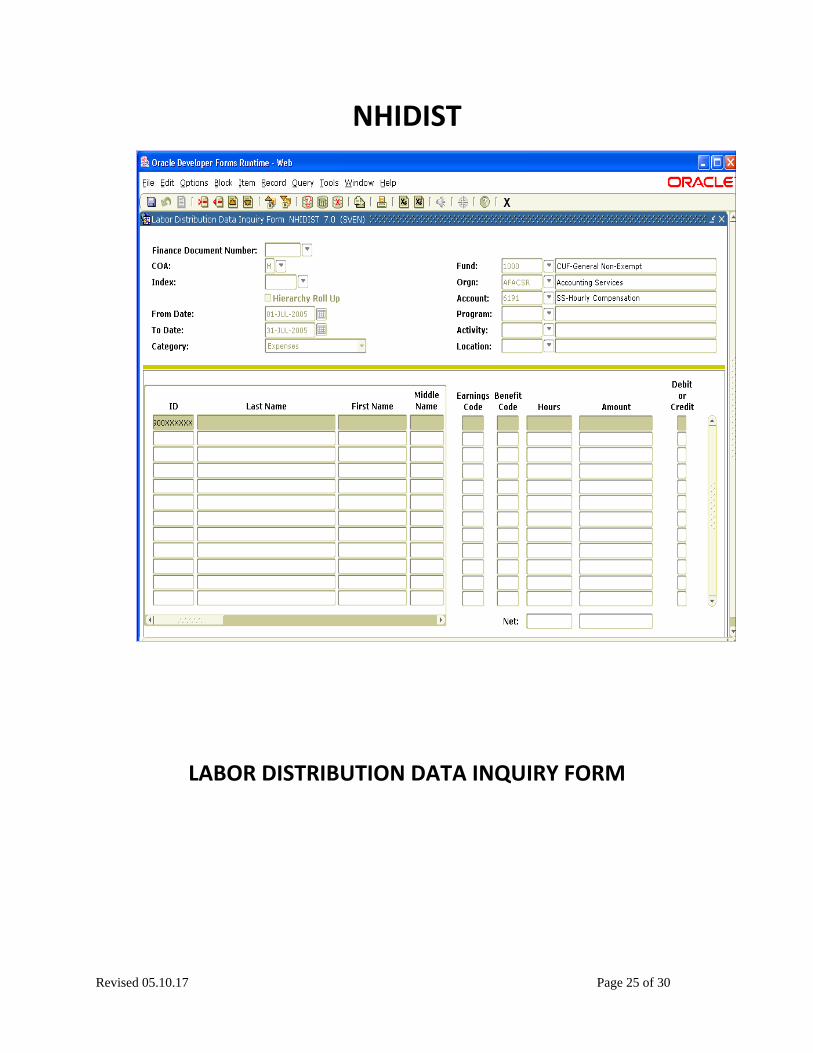
NHIDIST
LABOR DISTRIBUTION DATA INQUIRY FORM
Revised 05.10.17 Page 26 of 30
NHIDIST *Note: This is only necessary if you track Employee payroll. Must have access to your
Organization Code. Access given through HR.
At “Go” field, type: NHIDIST
1) The COA field – Defaults to M
2) In the From Date field – Enter the beginning date of a date range
For example: July 01, 2016 enter: 070116
3) In the To Date field – Enter the ending date of a date range
For example: July 31, 2016 enter: 073116
4) In the Category field – Click on Expenses
5) In the Fund field – Type in your Fund
6) In the Organization field – Type in your Organization (Org).
7) Control Page Down
8) Press F8 to execute query (You can limit the query first, if desired).
The payroll data is displayed by Employee ID number and Last Name. To view additional
information, click on the small arrows on the horizontal scroll bar located beneath the ID,
Last Name, First Name, and Middle Name columns.
Other data displayed:
Payroll Event: Displays the month and year that salaries and benefits were paid and the type of salaries and benefits paid. Example: MC equals Monthly Classified Salary.
Position: The position number refers to the position that the employee is currently in.
Employee Class: Classified, Faculty, Administrator, Student.
Rule Class: Types of Payroll Expense. Example: HGRS equals Payroll Gross Salary Expense.
Fund, Org, Account Program, Activity, Location
Earnings Code: Type of Pay. Example: Regular or Vacation
Benefit Code: Example: *FC is Fringe Chargeback Benefits, which is a combination of benefits charged to employer.
Hours
Amount
Debit or Credit: Expenses normally have a Debit (D) balance.
Net: Represents the total hours, salaries and benefits paid. You must be on the last line to get grand total.
Revised 05.10.17 Page 27 of 30
IV. BANNER FINANCE REPORT VIEWING, PRINTING,
AND SAVING TIPS
Processing Reports in Banner – General Notes
All three Reports in this packet run under the same main screen – GJAPCTL – Process Submission Control Form, so they work the same way and have the same commands, BUT DIFFERENT PARAMETERS.
If you do not narrow the ranges to specific Orgs, Funds, and/or Accounts, you will print information for the whole college, which will make it difficult to separate your own information.
To make the process easier, you can set the parameters for each report and save them with a name. Later, you type the name into the Parameter Set field at the top of the form and everything will be filled in automatically.
Change the dates manually each time you run the report. Do not save the dates as part of the parameter list or it will always print with the same dates.
You MUST do a control‐page down between the Parameter Values block and the Submission block before you will be able to click the Save button.
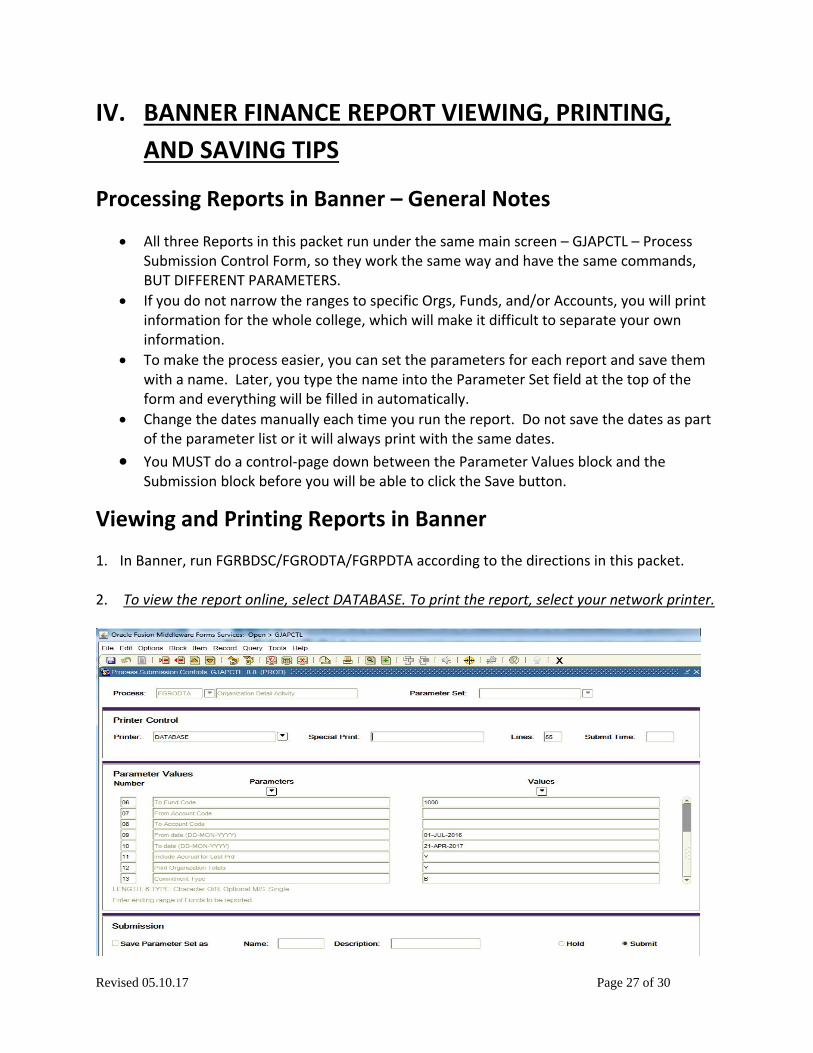
Viewing and Printing Reports in Banner
1. In Banner, run FGRBDSC/FGRODTA/FGRPDTA according to the directions in this packet.
2. To view the report online, select DATABASE. To print the report, select your network printer.
Revised 05.10.17 Page 28 of 30
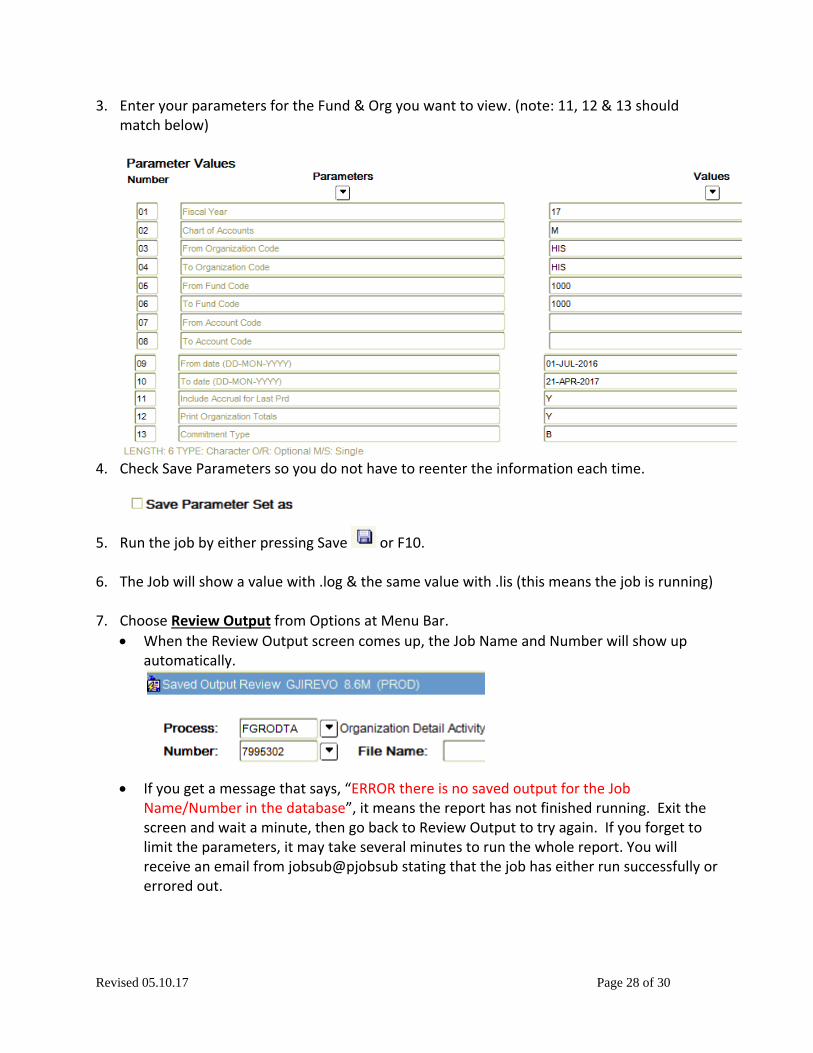
3. Enter your parameters for the Fund & Org you want to view. (note: 11, 12 & 13 should match below)
4. Check Save Parameters so you do not have to reenter the information each time.
5. Run the job by either pressing Save or F10.
6. The Job will show a value with .log & the same value with .lis (this means the job is running)
7. Choose Review Output from Options at Menu Bar.
When the Review Output screen comes up, the Job Name and Number will show up automatically.
If you get a message that says, “ERROR there is no saved output for the Job
Name/Number in the database”, it means the report has not finished running. Exit the screen and wait a minute, then go back to Review Output to try again. If you forget to limit the parameters, it may take several minutes to run the whole report. You will receive an email from jobsub@pjobsub stating that the job has either run successfully or errored out.
Revised 05.10.17 Page 29 of 30
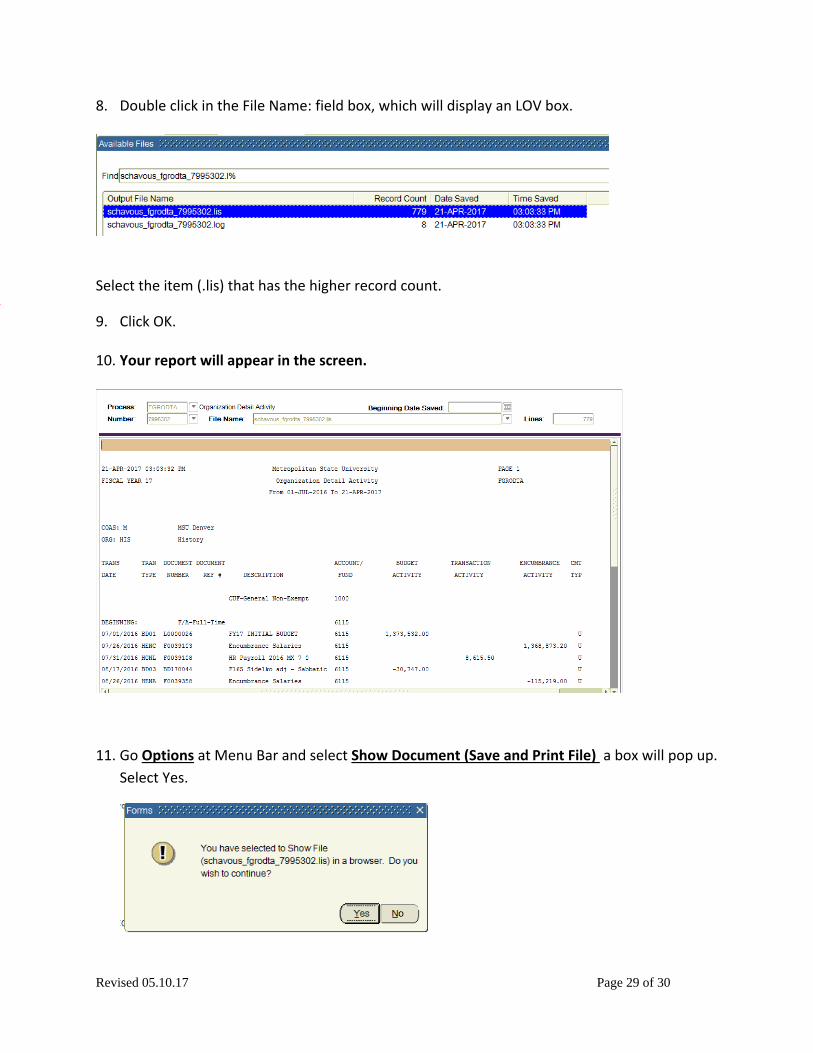
8. Double click in the File Name: field box, which will display an LOV box.
Select the item (.lis) that has the higher record count.
9. Click OK. 10. Your report will appear in the screen.
11. Go Options at Menu Bar and select Show Document (Save and Print File) a box will pop up.
Select Yes.

Revised 05.10.17 Page 30 of 30
12. The Document will open in a web browser (usually Internet Explorer) up go to File and Save
as…
Saving Banner Reports to Microsoft Word
Another way to view and save the report is as a Word document, but you will have to do
some reformatting.
1. Open the file in Microsoft Word. 2. Go to the menu and choose File, then click on Page Setup. 3. Change the margins to .5 all the way around, change the layout to landscape, click OK. 4. Go to the menu and choose Edit, then click on Select All. 5. Change the font size to 9. Once finished, the report will look and print like it should. 6. Save the file as a Word document and change the file name to something appropriate, i.e.
June_Budget.doc.
NOTE: If you do not change the name of the file, running the report again will automatically
over‐write the current report.


