1 Accounts (CRM) Buttons………………….……………………………………………….…………..….4 Search Accounts 4 Adding Accounts 6 Checking for Duplicate Accounts 6 Edit Accounts 7 Deleting Accounts 7 Filter 7 End Filter 9 Print Account 9 Google Maps 10 Proposal List 10 Sales Template 10 Account Tools..................................................................................................10 Merge Accounts 10 Dups Search 11 TCO Totals 11 Modules 12 Lease Tracker 12 Intelligent Device Mapper 12 Account Information……………..……………………………….………….…....12 Account Information (Address) 12 Account Name Dropdown 12 Account Notes 12 ERP # 12 Contact Details…………………………………………………..……..…………..13 Main Contact Information & Phone 13 Emailing Main Contact 13
Transcript
1
Accounts (CRM)
Buttons………………….……………………………………………….…………..….4 Search Accounts 4 Adding Accounts 6 Checking for Duplicate Accounts 6 Edit Accounts 7 Deleting Accounts 7 Filter 7 End Filter 9 Print Account 9 Google Maps 10 Proposal List 10 Sales Template 10 Account Tools..................................................................................................10 Merge Accounts 10 Dups Search 11 TCO Totals 11 Modules 12 Lease Tracker 12 Intelligent Device Mapper 12 Account Information……………..……………………………….………….…....12 Account Information (Address) 12 Account Name Dropdown 12 Account Notes 12 ERP # 12 Contact Details…………………………………………………..……..…………..13 Main Contact Information & Phone 13 Emailing Main Contact 13
2
Contact Rank 13 Additional Information……..……………………………..………….…….….….13 Account Classification 13 Zone 13 Reps 14 Assign / Remove Reps 14 Supplies Network 14 Tab Folders Contacts Tab …………………………………………………………………………16 Adding a New Contact 16 Edit Contact Information 16 Deleting a Contact 16 Send Email 17 Setting a Main Contact 17 Transfer Contact 17 Outlook Contacts 18 Contact Activity ……………………………………………………………………19 Creating & Completing a New Activity 20 Scheduling a Follow Up 21 Scheduling a Pending Activity 23 Completing a Pending Activity 25 Completing a New Activity 25 Editing an Activity 26 Delete an Activity 27 Find an Activity 27 Click and Drag Grouping Feature 27 Save Grid Layout 27 View Legend 27 Send to Outlook 28 Activity List 28 Email Notes....………………………………………………………………………..29 Sending Emails 29 Saving Sent Emails 29 Saving Received Emails 31 Deleting Emails Previously Saved 31 Viewing an Email 31 Opportunities …………………………………………………………………………31 Adding a New Opportunity 31 Editing a Existing Opportunity 32 Deleting a Existing Opportunity 32 Document Links ……………………………………………………………………...32 Adding a Document Link 33 Opening a Linked File 33 Deleting a Document Link 33
3
Equipment Summary – Covered in the TCO Section ……..….....………....33 List TCO 34 List ERP 34 ERP Not in TCO 34 Addresses………...……………………………………………….……………....…34 Adding an Address 34 Editing an Address 35 Deleting an Address 35 Additional Information Tab…..………………….….…………….…………..…35 Referred By 35 Group Name 35 Parent Account 35 Child Account 36 Assign Region 36 First Contact 36 Last Activity 36 SIC Code 36 Number of Employees 36 Launching Account Website 36 Buyers Mode 36 Bulk Activity Creation…………………………………………...………….……..37 Open a New Activity in Bulk 37 Complete an Activity in Bulk 38
4
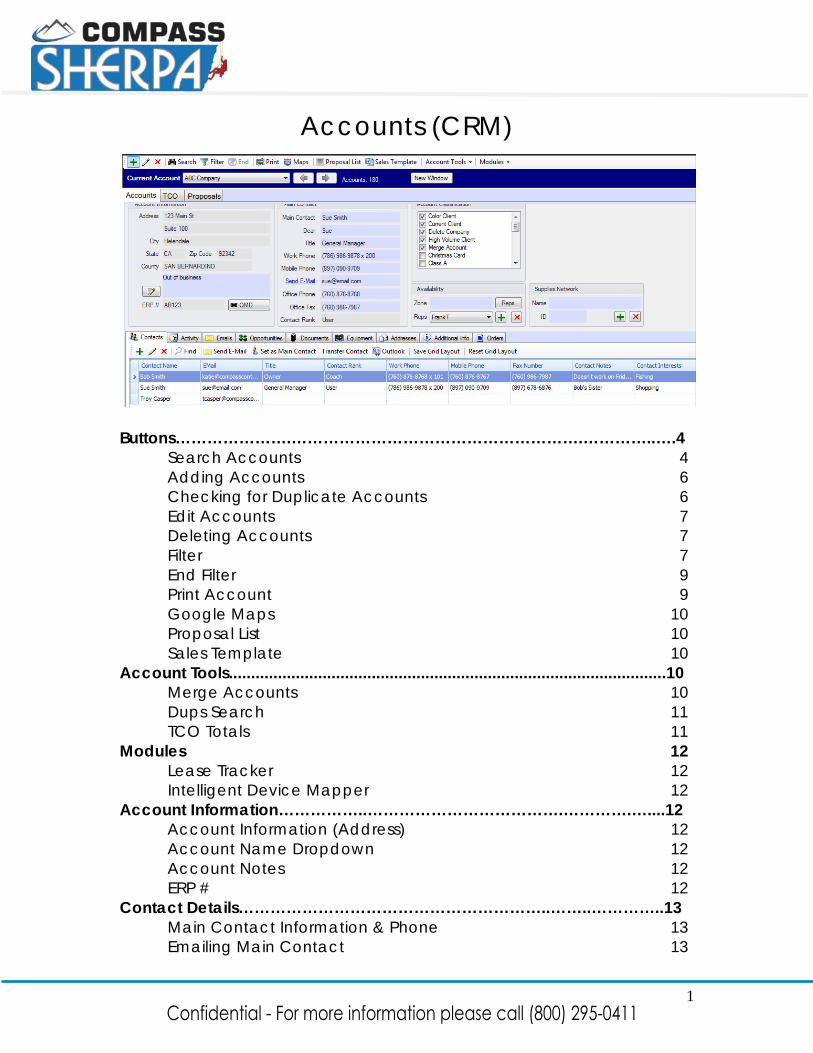
Accounts Tab – Top ½ of Screen
The top half of the accounts screen is where the main information about the account/client is entered. You can use this entire screen to add, edit, and search for accounts, set filters, and group accounts into similar categories. First, we’ll start with an overview of the buttons and their uses. When you click on the Accounts menu option, a new window will open showing you the account information of the last account record you were in. You can open multiple account records by clicking the New Window button and searching for an additional record, and you will have a new window that will open up for each account record. Buttons: Search Accounts: Allows you to search for an account by Company Name, Phone Number, Contact Name, Email Address, Zip code, County, ERP (Customer) Number or Equipment ID. You can also choose IS, BEGINS WITH, CONTAINS, or END WITH from the dropdown to expand your search even more.
5
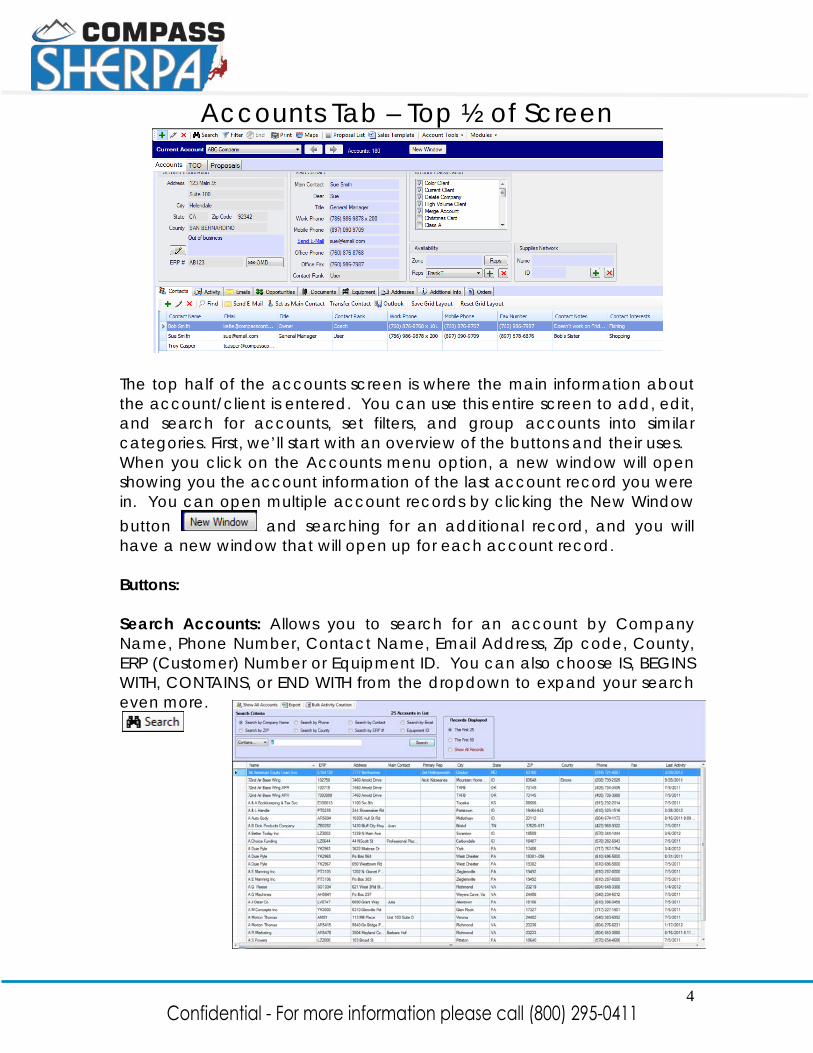
To Search for an Account: Type in the search criteria you want to search for (based on your Search Criteria choice) and this will pull up a list of the companies in your assigned territory that match the criteria. You can then double click on the company name that you want to choose and you will be brought to that account record, or click the X in the right hand corner to close the Search screen and go back to the previous account record you were on. You can also choose how many records you wish to be displayed at a time by using “The First 25, The First 50 or Show all Records” options. The default result is 25 matches, but to view the first 50, or show all matches your can select either one of those and click on Search again to display more results. Within the Search area there are also some additional functions using the buttons on the top of the page: Show All Accounts: The Show All Accounts Button will ignore the Search Criteria and show all accounts that a user can view, limited by the Records Displayed amount (The First 25, 50, All Records). When clicked on, you will receive a message that "This may take an extensive amount of time to load. Do you want to continue?". Depending on the amount of accounts viewable to the user, this might take a few seconds to load all of the accounts, but typically it will not.
Export to Excel: The information being viewed in the Search Accounts area can be exported by using the Export to Excel option available for the Administrator and Sales Manager Security Level. This will export the current accounts being viewed in the Search area.
Bulk Activity Creation: Bulk activity creation allows an activity to be completed or opened on all accounts showing in the Search Accounts area (usually acquired after filtering to a specific group of accounts), by just entering it once and applying it to all accounts. See Bulk Activity Creation on page 36 of this section for further details.
Direct Marketing: The direct marketing button is available on a per user basis set by the administrator and is used to export contacts for
6
outside Marketing Programs. If this button is showing, you can do a search in the Search Accounts area, then click the Direct Marketing button to export the contacts showing in the results of your search. When you click on Direct Marketing it will ask you where you want the file saved to. Browse to the location and click Save, and the file will be saved to that location. The columns exported will be the Phone Number, Company Name, Industry (pulled from the SIC Code field), Rep Name (if it is a Named Account), and Branch Location (pulled from the Address field). This can now be imported into the Marketing Program of your choice for mass marketing purposes.
Add Account: Used to add in new accounts into the database. To add a new account, click on the “+” button and enter in the account information in the respective fields. All the field names with an * are required fields. You must add information into these fields to successfully add an account. If you try to add an account and forget a required field, you will get a message after you click Submit to enter in the required information and the field name will turn red. There is also a feature where after the zip code is entered in, the City, State, County & area code for the phone number will automatically be filled in. When all information is entered, click the Submit button and you will be asked if you would like to add an additional account; if you would like to add another account click Yes and the form will clear out allowing you to add another record. If not, click No and the form will close and you will be taken to the new account record you just added. You may also get a message that another account exists with a same or similar company name and a list of accounts; this indicates that you have possibly entered a duplicate in the database. If the Account you are adding shows in this list and you don't want to add a duplicate account, click NO in this message and your account will NOT be added. If you do want to add the record, click YES and it will be added into the database. You can also search in this area using the Duplicate Account Search to search not only your assigned accounts, but all accounts in the database to see if an account already exists, but is assigned to another user. This searches by same or similar Company Name only; to search for duplicates based on other information see the "Dups Search" section below.
7
Edit Account: Clicking on this button allows you to edit all of the company’s information including company name, address, city, state, zip code, contact information, vertical markets, etc. This is not where you will edit or add additional Contact Names, that is done in the Contacts Tab (see Contacts section)
Delete Account: This button allows Managers/Administrators to delete accounts. It is usually grayed out for use by Sales Representatives. For users that do not have access to this button, you will request that an account be deleted my using the Delete Company check box in the Vertical Marketing area. Place a check in the “Delete Company” Account Classification check box when they find an account that needs to be removed. The Administrator can then run a filter to see all Accounts marked for deletion and verify them prior to removing.
Filter: Used to search your database by a combination of specific criteria; great for vertical marketing. To create a filter, click on the filter button, select Create a New Filter and enter your parameters; you can filter your accounts based on any combination of any of the fields in the Filter area.
8
If there is a blue section under your criteria (such as Zip Code) the criteria must be showing in the blue area before it will filter (double click or hit Enter to move it down to the blue area). You can test the results of the filter prior to running it by hitting the Test Filter button on the right side of the screen and it will show you how many results you have.
You can also save filters for future use. To save a Filter, select the filter parameters and then type in the name of the filter. Hit the Save Filter button. The system will pop up a message that your filter has been saved. To reuse a saved filter, click on the filter button and then “use a saved filter”. Multiple sections selected will narrow the list to the companies that fit all the criteria. If multiple items are selected in the same section (ie: 2 cities are selected) the filter will produce results for both. The Account Classification is the only area that gives the option to use either “And” or “Or” when selecting. “And” will result in companies that match exactly with all the Classifications selected. “Or” will result in companies with any of them marked. Zero Activity in the filter will result in a list of all accounts with no activity completed or created in the date range selected. This is a great tool to make sure all accounts are being contacted regularly. This looks are the last contact date, late activity date, and last completed activity date.
9
In the area to filter by Lease End Dates, there is an option to run the filter using the TCO Only check box. If checked, Compass will only display results using the equipment listed in the TCO tab. If unchecked, Compass will display results from both the Lease Tracker date as well as the TCO. If you do not have the Lease Tracker module, only TCO results will display regardless of the check box. To delete a filter field (ie: Boise in the City filter area), highlight the criteria and hit the Delete button on your keyboard. This will move it back up into the default list and you can select something else. You can also use the * for open-ended filters. Ex: for everything on Main St, type *Main* in the Address field. This will look for anything with “Main” in the address field. The * can be used in any field that is free type. Depending on where you place the *, is where the open ended search will happen. If placed at the beginning on a word or number the system will search for anything that ends with that word or number. If placed at the end, it will search for anything that begins with that word or number. If an * is placed on either side of the word or number it will search for anything that contains it. When you have entered in all the information you want to filter by, click the Filter button and you will be taken to the Search area and your results will show. You can now double click on any of the Company Names to go to that account record. Keep in mind that when you have a filter activated, you can only search and access accounts that meet that filter criteria. To end the filter and regain access to all of your accounts, you will have to end the filter first. End Filter: Click on this button to remove any filter currently applied to your database that is limiting the accounts you are able to view. This button will appear in Red Font when you have a filter activated.
Print Account: Displays a print preview of the information viewed on the Account Card. You can choose to include Contacts, Activities, Emails and/or Equipment from the TCO tab before you run it, and choose from from the last 10-100, or ALL.
10
Google Maps: Opens your internet browser to Google Maps and instantly maps you from the location of your office (set by your Administrator) to the location of the company you are currently viewing. You must be connected to the Internet to use this feature and may be asked to select a starting office location if you have multiple regions set.
Proposal List: Click to view a list of your proposals for all companies (or all reps that you can view if you are a manager). You can double click on any of them to go directly to that proposal and company. You can also search for specific proposals by Account Name, Prepared By, or Proposal Name in the drop down and entering in the name in the search field. If Prepared By is chosen, you can choose a user from the search field, or use the * to view all user's proposals.
Sales Template: Used to fill out Sales Letter Templates automatically (such as the Vito letter supplied by Compass). To use, click on the Sales Templates button, and select the correct template from the folder that opens. Once you’ve found the desired template, double click on it. The Word template will open and automatically fill out the account information. The Word templates must have been formatted correctly by your Compass Administrator for this feature to work properly.
Account Tools Dropdown
Merge Accounts: This is used by Administrators to merge duplicate accounts within the database. This button/feature is usually grayed out for use by Sales Representatives. Sales Reps should mark the “Merge Account” Account Classification when they find an account that needs to be merged with another. The Admin can then run a filter to see all Accounts marked for merging and verify them prior to combining. (This must be purchased as an add-on by
11
your company to be available for use. Please see the Administrator Manual for more information.)
Dups Search: Before adding a new account, this allows the user to check for Duplicates to make sure the record doesn’t already exist in another user’s database. You can search by any part of the Company Name, Address, Phone Number or Contact Name. Enter any part of the Search Criteria in the search field and click the Search button. Compass will bring up a list of accounts that are similar. This is a viewable option only. You will not be able to pull up a company you select from the list and view its details, as the account may not be assigned to the user. If an account is found, the user can now follow their Company policy to have the account reassigned to them instead of adding a duplicate into the database.
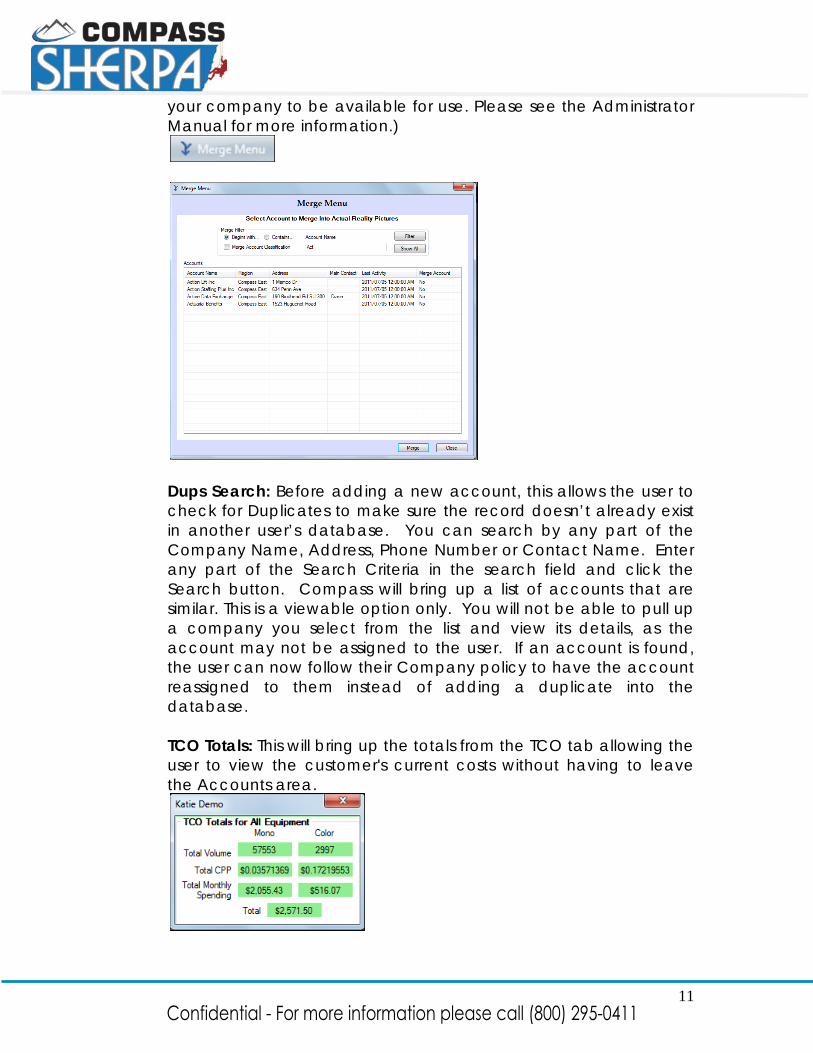
TCO Totals: This will bring up the totals from the TCO tab allowing the user to view the customer's current costs without having to leave the Accounts area.
12
Modules Dropdown:
Lease Tracker: This is where current lease information imported from the various banking vendors is stored to allow lease expiration follow-up. (This must be purchased as an add-on by your company to be available for use. Please see the Additional Module section for more information.) Intelligent Device Mapper: This is a Floor Plan Mapping Tool used to show current situations vs. proposed solutions on Floor Plan outlines. (This must be purchased as an add-on by your company to be available for use. Please see the Additional Module section for more information.) Account Information (Top Half of the Screen) :
Account Location: Account Address, City, State, Zip Code County, fields show the company information as originally entered when the account was added into your database. Account Name Drop Down: This drop down menu at the top of the screen allows you to access previously visited accounts within a certain time frame without having to go back to Search Accounts. The time frame is set by your Administrator, but typically is set to show a 5-7 day history.
Account Notes: A type-in field for notes pertinent to the Account, such as Annual sales, Number of Locations, etc. To enter notes, click on the Edit Notes button, type in your notes and then select Save. This field is also a good place for the user to put notes when requesting that an account be deleted. ERP Number: Shows the ERP client number (as determined by OMD, E-Automate, NextGen, etc), and is not changeable by Sales Representatives. It can be edited/added by Manager’s and higher in the Edit Account area. Next to the ERP number is a button that links to your ERP system for viewing purposes. The same button is located in the TCO tab as well. See the Additional Module section for more details.
13
Contact Details (Top Half of the Screen):
Contact Name & Info: Main Contact Name, Dear, Title, Work Phone, Mobile Phone, Email Address, Main Office Phone Number, Fax & Contact Rank show the Main Contact’s information as either entered in when the account was first added into the database, or the person who has been selected as the accounts’ main contact from the Contacts tab. To edit any of these fields, you must do it in the Contacts tab. See Contacts Tab Instructions for updating. Send E-Mail: Allows you to email the Main Account Contact via Outlook directly from Compass, if you have an email address listed. To use, click on the Send E-Mail Label. An Outlook email message, addressed to the contact, will pop up. Type your message as usual to the addressee, attach any files desired, etc., and then click the send button on the email. The message will send via Outlook and be asked if you want to save a copy of the email in the email notes tab within Compass. Contact Rank: Ranking of Main Contact as far as their role in the buying process. This field must be edited in the Contacts Tab.
Additional Information (Top Half of the Screen):
Account Classification: These checkboxes allow you to identify what type of account this is (i.e Current Customer, Priority Account, etc) and can be used for filtering and running reports. These checkboxes are customizable by your Administrator. Anything checked will show on top alphabetically, and anything unchecked will show under that, alphabetically. Once you check a box that wasn't previously checked it will go to the top of the list with the other checked classifications. Zone: If this account is part of a Zone (set up in the Administrator area), the name of that Zone will appear in the blue Zone field.
14
Reps Button: The Sales Reps button will show a list of all reps that have access to this account, either by territory rights or named account. It will also separate it by who is allowed to see it as a Rep, a Manager or an Administrator. Use the "Include ALL Territory Type" check box to add to the view any users that have access to the account because they have an ALL territory type in Manage Users.
Reps: The Reps field shows the Primary Named Account Rep, and all Secondary Named Account reps can be viewed by clicking on the drop down menu. If this is a territory account and not a named account, the Reps drop down will be blank. Assign Rep and Remove Rep: This feature is used by Managers/Administrators to assign Accounts. Reps can also add other reps to the account by clicking the + button and clicking the other users to have access to this account. Then hit Submit. Reps can be removed from an account by clicking the X button. They will be asked to verify that they want to remove that Rep.
Supplies Network: If you are a Supplies Network’s mpsSELECT™ CPI Cost Per Image Service or A La Carte Program Customer, Your Administrator will link the customer's record to the Supplies Network Program here; Only Administrators have access to do this. This will allow the Rep to choose Supplies Network Programs to import into the TCO and in the Printer Pricer area to use their provided pricing to price MPS.
15
To add the Name and ID to the customer record click the + button to see the available customers from the Supplies Network API. Highlight the correct customer and click the Assign button. By default you will see customers that aren't already assigned to a record in Sherpa. To see all accounts, click the check box "Include Mapped Accounts, however, if one of these accounts are chosen it will remove from the currently assigned account and reassign to the current account record you are on.
You can also search through available accounts using the Find feature at the top and type in a key word - it will filter through the list and show you any matches available.
16
Tabs – Bottom ½ of Screen Contacts Tab: The Contacts Tab is where you store all company Contact information. The more information you enter in about each contact, the more valuable your database is to you.
To Add a New Contact
Click on the Add button. Type in the Contact’s information and select Submit.
To Edit Contact Information
Highlight the contact’s name in the contact list. Select the Edit button and make any needed changes. You can also double click on a user to open the Edit Contact form. Click on the Update button to save changes.
To Delete a Contact
Highlight the contact’s name in the contact list. Select the Delete button and then say Yes to confirm that you want to delete the selected contact.
Find:
Allows you to search all contacts for that account by keyword. Click the Find button and type in the keyword and the contact list will be filtered to just show any matches.
17
To Send E-Mail To email a contact, make sure you have an email address listed, and highlight the contact that you would like to email and click on the Send E-Mail button. This will open an Outlook email with the contacts email address in the TO field. Once you send the email you will be asked if you want to Save a copy of the email into Compass, and a copy of the email will be saved in the Email Notes tab.
To Set a Main Contact
To make a contact the Main/Primary Contact (the contact whose information shows on the top of the Account Card when viewing the account), highlight the contact’s name in the contact list. Click on the Set as Main Contact button and it will refresh the top half of the screen with the new contact information. You must do this anytime you want to refresh the main contact’s info if you have edited it in the Contacts tab.
Transfer Contact This allows you to transfer a contact from one account to another, or copy a contact into an additional account.
Highlight the row of the contact you want to move / copy in the Contact list, and click on the Transfer Contact button.
Type in the beginning of the Company name you want to transfer the contact to, or copy to. Then highlight the company in the list and chooser to Transfer to New Account (this will remove the contact from the current account and move it to the one chosen), or Copy to New Account (this will create a copy of the contact to the new account - the contact will be in both accounts).
18
Outlook Contacts This feature allows authorized users to import contacts from Outlook into the current account, and export current account contacts to Outlook.
Click on the Outlook button and choose to either Import Contacts From Outlook or Export Contacts To Outlook.
If Importing Contacts from Outlook, once you click the button a form will pop up showing your current Outlook contacts on the left and your current Compass contacts for that account on the right. Select the contacts on the left that you want to import from Outlook into the selected company in Compass and click on the Import button.
To Export the Compass contacts for the selected account into your Outlook contacts, click on the Export Contacts to Outlook button and a similar form will pop up, but with your current Compass contacts for that account on the left, and your current Outlook contacts on the right. Choose the contacts you want to send to Outlook and click on the Export button.
19
Save Grid Layout
You can reorder the Contacts tab columns to any desired order or sort & then click Save Grid Layout. This will save your preferences.
Contact Activity Tab: The Contact Activity tab is used for entering in all communication and activity with the account including Phone Calls, Appointments, and scheduling follow-up Activities. You can also check your Activity list to see what items you have pending or past-due using the Activity List.
20
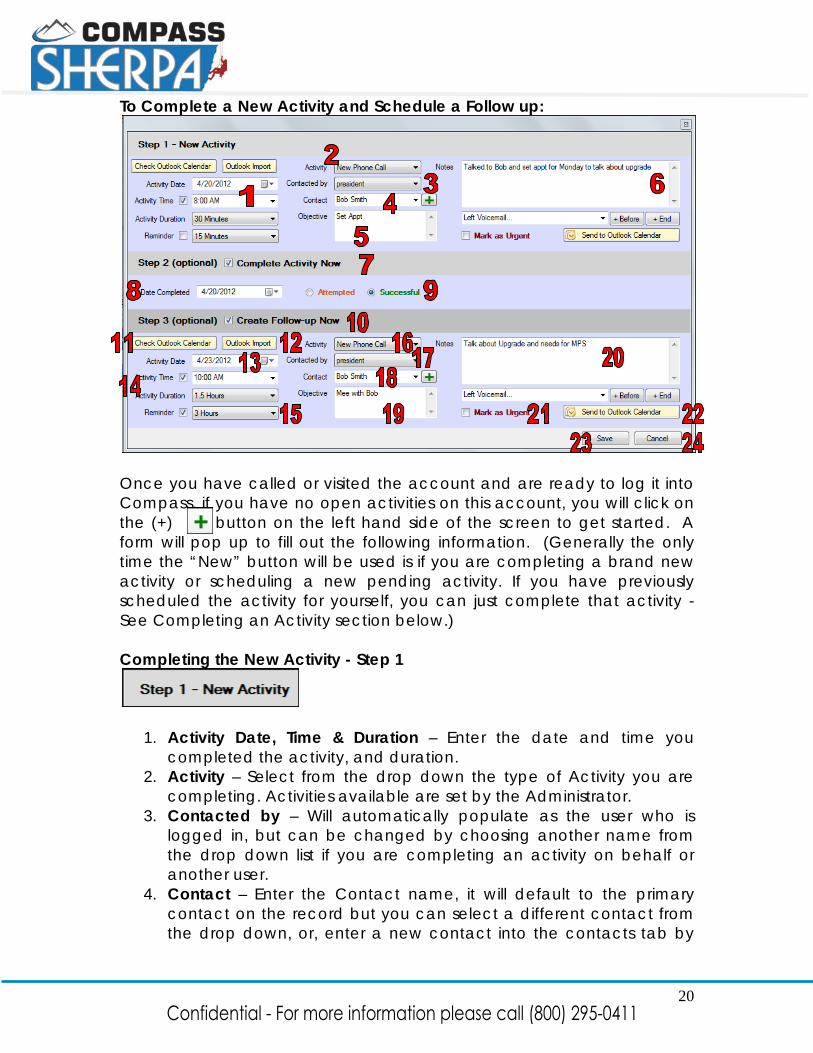
To Complete a New Activity and Schedule a Follow up:
Once you have called or visited the account and are ready to log it into Compass, if you have no open activities on this account, you will click on the (+) button on the left hand side of the screen to get started. A form will pop up to fill out the following information. (Generally the only time the “New” button will be used is if you are completing a brand new activity or scheduling a new pending activity. If you have previously scheduled the activity for yourself, you can just complete that activity - See Completing an Activity section below.) Completing the New Activity - Step 1
1. Activity Date, Time & Duration – Enter the date and time you completed the activity, and duration.
2. Activity – Select from the drop down the type of Activity you are completing. Activities available are set by the Administrator.
3. Contacted by – Will automatically populate as the user who is logged in, but can be changed by choosing another name from the drop down list if you are completing an activity on behalf or another user.
4. Contact – Enter the Contact name, it will default to the primary contact on the record but you can select a different contact from the drop down, or, enter a new contact into the contacts tab by
21
clicking the button next to the contact name and adding the information just as you would in the Contacts Tab. This new contact will be saved in the Contacts Tab as well as in the completed activity.
5. Objective – Enter your objective and what you were trying to accomplish by completing the activity.
6. Notes – Enter your results and details of the activity in the Notes field. For your convenience, you can also choose from predefined notes by choosing from the dropdown and choosing to add that text Before or After the notes you manually typed in.
Completing the Activity - Step 2
7. Complete Activity Now - Check this box to show your options to complete the activity.
8. Date Completed - Enter the date you actually completed the activity. It will default to the current date assuming you are completing the activity in Compass the same day you actually did it, however, if you are completing an activity that you actually did on a previous date you will want to put that date here.
9. Attempted vs Successful – Tag as either a Successful or Attempted activity, (Successful - you successfully accomplished your objective. Attempted - you did not successfully accomplish your objective). This will color code your activities to allow you to easily see how successful your activities are. This doesn’t affect anything other than setting a color to the activity in the list view; whether you mark the activity as Successful or Attempted, your activity will still count as Completed.
Scheduling the Follow-Up - Step 3
10. Create Follow-Up Now - Check this box to show your options to schedule the follow-up activity. If next to "Step 3" it says (required) instead of (optional), this means your Administrator has required you to schedule a follow-up whenever an activity is completed.
11. Check Outlook Calendar – Click on Check Outlook Calendar to have Compass check your Outlook calendar. A message screen
22
will pop up to show you your current appointments for the call back date entered.
12. Outlook Import – If you have entered an appt into Outlook, you can import that appt into your Sherpa follow-up activity. As soon as you are in the Follow-Up Activity area, click the Outlook Import button, select the appt you wish to import and hit Import. This will populate the Date, Time, Duration and Objective fields. You need to fill in the others before Submitting.
13. Activity Date – This is the date you will be doing the follow-up activity. It will default to the following work day; if you want to select a different date, just pick it from the drop down.
14. Appointment Time / Duration – Enter the time and duration for your follow up activity if needed; this is not a required field
15. Reminder – To schedule a Compass reminder check the reminder box and pick from the drop down for when you want the reminder to pop up and remind you.
16. Activity - Pick the type of activity you are scheduling from the dropdown
17. Contacted By – Will automatically populate as the user who is logged in, but can be changed by choosing another name from the drop down if you are scheduling an activity on behalf of another user.
18. Contact – Enter the Contact name that your activity is scheduled to be with. It will default to the primary contact on the record but you can select a different contact from the drop down, or, enter a new
contact into the contacts tab by clicking the button next to the contact name and adding the information just as you would in the Contacts Tab. This new contact will be saved in the Contacts Tab as well as in the future activity.
19. Objective – Enter your objective and what you will be trying to accomplish.
20. Notes – Enter any miscellaneous notes or the details of the activity in the Notes field. For your convenience, you can also choose from predefined notes by choosing from the dropdown and choosing to add that text Before or After the notes you manually typed in.
21. Mark as Urgent – Tagging an activity as urgent will place it at the
top of the Contact Activity Tab and highlight it in Red when viewing it in the activity list.
22. Send to Outlook – If you would like to send a pending appointment to your Outlook Calendar click on Send to Outlook and the appointment will be sent to your Outlook calendar. The Company name, Contact Name, activity notes and phone number will all be
23
sent to Outlook creating an appointment for the date and time scheduled in Compass. The duration and reminder time will also be set to what was entered in Compass.
23. Save – Click on the Save button to save your entry and finish
logging your completed activity and setting up your future activity. 24. Cancel – Click on the cancel button to exit the screen. This will not
save any of your notes from the activity you just completed. You will have to redo everything if you cancel.
Scheduling a Pending Activity: If you would like to simply schedule a future activity without completing an activity now, start by clicking on the on the (+) button on the left hand side of the screen to get started. A form will pop up to fill out the following information. (Generally the only time the “New” button will be used is if you are completing a brand new activity or scheduling a new pending activity. If you have previously scheduled the activity for yourself, you can just complete that activity - See Completing an Activity section below.) Scheduling a pending activity is exactly like completing an activity, except you click on Save after "Step 1" instead of proceeding to "Step 2", and the Activity Date field is the date you are scheduling the future activity for.
24
Scheduling a New Activity - Step 1
1. Check Outlook Calendar – Click on Check Outlook Calendar to have Compass check your Outlook calendar. A message screen will pop up to show you your current appointments for the call back date entered.
2. Outlook Import – If you have entered an appt into Outlook, you can import that appt into your Sherpa follow-up activity. As soon as you are in the Follow-Up Activity area, click the Outlook Import button, select the appt you wish to import and hit Import. This will populate the Date, Time, Duration and Objective fields. You need to fill in the others before Submitting.
3. Activity Date, Time & Duration – Enter the date and time you completed the activity, and duration.
4. Reminder – To schedule a Compass reminder check the reminder box and pick from the drop down for when you want the reminder to pop up and remind you.
5. Activity – Select from the drop down the type of Activity you are completing. Activities available are set by the Administrator.
6. Contacted by – Will automatically populate as the user who is logged in, but can be changed by choosing another name from the drop down list if you are completing an activity on behalf or another user.
7. Contact – Enter the Contact name, it will default to the primary contact on the record but you can select a different contact from the drop down, or, enter a new contact into the contacts tab by
clicking the button next to the contact name and adding the information just as you would in the Contacts Tab. This new contact will be saved in the Contacts Tab as well as in the completed activity.
8. Objective – Enter your objective and what you were trying to accomplish by completing the activity.
9. Notes – Enter any miscellaneous notes or the details of the activity in the Notes field. For your convenience, you can also choose from predefined notes by choosing from the dropdown and choosing to add that text Before or After the notes you manually typed in.
10. Mark as Urgent – Tagging an activity as urgent will place it at the top of the Contact Activity Tab and highlight it in Red when viewing it in the activity list.
11. Send to Outlook – If you would like to send a pending appointment to your Outlook Calendar click on Send to Outlook and the
25
appointment will be sent to you Outlook calendar. The Company name, Contact Name, activity notes and phone number will all be sent to Outlook creating an appointment for the date and time scheduled in Compass. The duration and reminder time will also be set to what was entered in Compass.
12. Save – Click on the Save button to save your entry and finish
logging your completed activity and setting up your future activity. 13. Cancel – Click on the cancel button to exit the screen. This will not
save any of your notes from the activity you just completed. You will have to redo everything if you cancel.
Completing a Pending Activity: If you have a scheduled Activity that you would like to complete, double click on the activity in the Activity list for that account, the form will pop up to enter your notes, mark as either attempted or successful, and schedule your next activity.
Completing the New Activity - Step 1
1. Notes – Enter your results and details of the activity in the Notes field. For your convenience, you can also choose from predefined notes by choosing from the dropdown and choosing to add that text Before or After the notes you manually typed in.
26
Completing the Activity - Step 2
2. Complete Activity Now - Check this box to show your options to complete the activity.
3. Date Completed - Enter the date you actually completed the activity. It will default to the current date assuming you are completing the activity in Compass the same day you actually did it, however, if you are completing an activity that you actually did on a previous date you will want to put that date here.
4. Attempted vs Successful – Tag as either a Successful or Attempted activity, (Successful - you successfully accomplished your objective. Attempted - you did not successfully accomplish your objective). This will color code your activities to allow you to easily see how successful your activities are. This doesn’t affect anything other than setting a color to the activity in the list view; whether you mark the activity as Successful or Attempted, your activity will still count as Completed.
5. Save – Click on the Save button to save your entry and finish logging your completed activity and setting up your future activity.
6. Cancel – Click on the cancel button to exit the screen. This will not save any of your notes from the activity you just completed. You will have to redo everything if you cancel.
Edit Activity: To edit an activity, highlight the activity field in the activity list of the activity you want to edit. Highlight the field you want to edit and a dialogue box will open that you can type your changes into. The Save Changes button will turn red indicating that you've made changes and need to save them. Columns that are solid colored (Status and Date Created) cannot be edited. Note: the ability to edit activities is determined by your Administrator. If you want to undo a change that you made to an activity, click the "Undo Changes button before you click the Save Changes button.
27
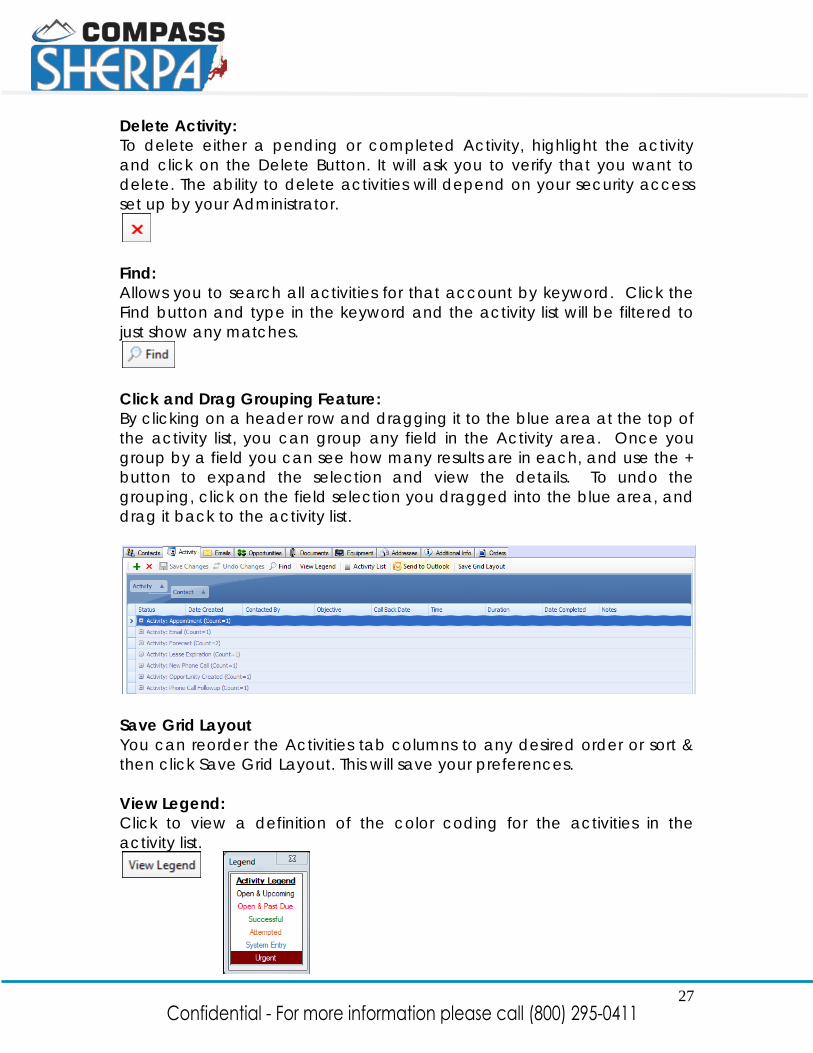
Delete Activity: To delete either a pending or completed Activity, highlight the activity and click on the Delete Button. It will ask you to verify that you want to delete. The ability to delete activities will depend on your security access set up by your Administrator.
Find: Allows you to search all activities for that account by keyword. Click the Find button and type in the keyword and the activity list will be filtered to just show any matches.
Click and Drag Grouping Feature: By clicking on a header row and dragging it to the blue area at the top of the activity list, you can group any field in the Activity area. Once you group by a field you can see how many results are in each, and use the + button to expand the selection and view the details. To undo the grouping, click on the field selection you dragged into the blue area, and drag it back to the activity list.
Save Grid Layout You can reorder the Activities tab columns to any desired order or sort & then click Save Grid Layout. This will save your preferences. View Legend: Click to view a definition of the color coding for the activities in the activity list.
28
Send To Outlook: To send a pending activity to your Outlook Calendar, highlight the activity in the activity list and click the Send to Outlook button. Make sure you have a time listed on the activity or it will not send to Outlook.
Activity List: Click on the Activity List Button to view a list of all your pending current & past due activities. This is a global list and shows activities for all accounts.
The following screen will open showing any activities you have scheduled for the past 6-months through the current date.
You can filter your pending activities by date range, Type of Activity, and by rep (if you’re a manager).
1. Activities in red font are past due, activities in green are due today, activities in black are due in the future, and activities with a red highlight have been tagged as urgent.
2. To select an activity, double click on the name of the company and you will be brought to that account record and the activity.
3. You can filter the list by Rep or Activity Type by using the Sales Rep and Activity dropdowns, or click on any column header to sort by that field. The * option in the dropdown will show all option from the dropdown list.
4. View/Print Activity List Details and Summary Reports allows you to print a list of the currently showing activities.
5. To automatically set a filter of just the accounts in your call back list, click the Filter Accounts by Activity List button. Click End Filter to end the filter and view all accounts.
29
6. You can also use the "Click and Drag Grouping" feature and move columns around as explained in the previous Activities section.
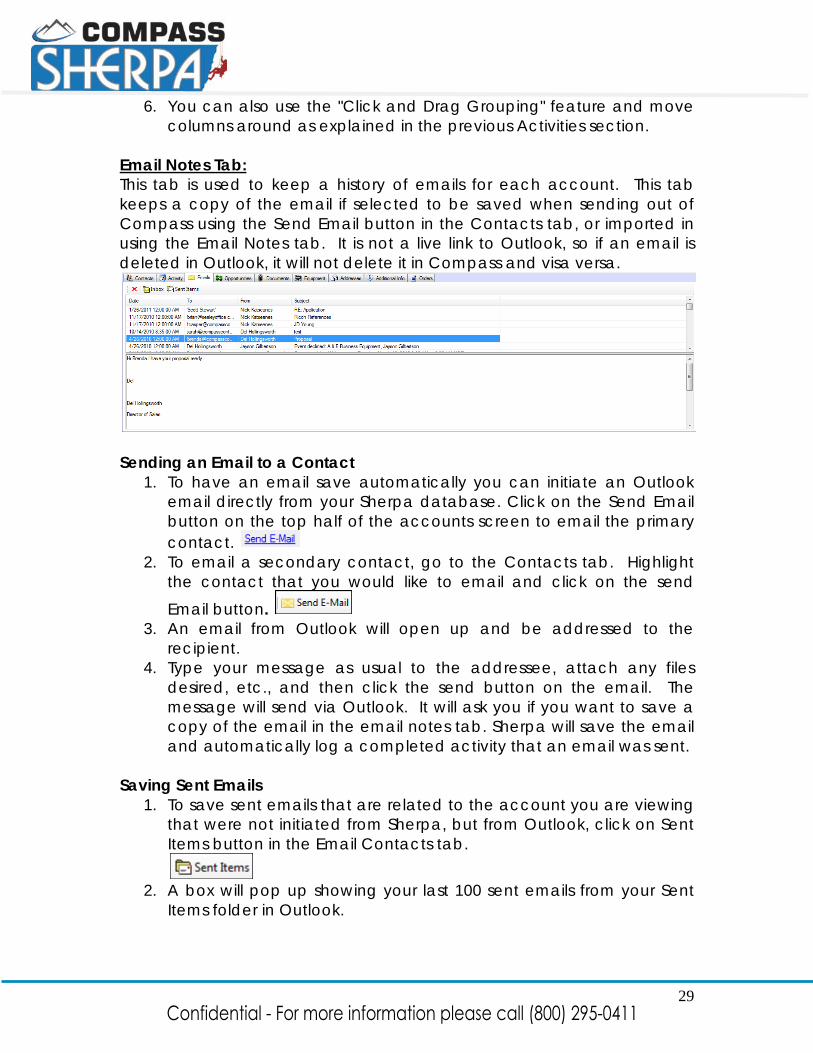
Email Notes Tab: This tab is used to keep a history of emails for each account. This tab keeps a copy of the email if selected to be saved when sending out of Compass using the Send Email button in the Contacts tab, or imported in using the Email Notes tab. It is not a live link to Outlook, so if an email is deleted in Outlook, it will not delete it in Compass and visa versa.
Sending an Email to a Contact
1. To have an email save automatically you can initiate an Outlook email directly from your Sherpa database. Click on the Send Email button on the top half of the accounts screen to email the primary contact.
2. To email a secondary contact, go to the Contacts tab. Highlight the contact that you would like to email and click on the send
Email button. 3. An email from Outlook will open up and be addressed to the
recipient. 4. Type your message as usual to the addressee, attach any files
desired, etc., and then click the send button on the email. The message will send via Outlook. It will ask you if you want to save a copy of the email in the email notes tab. Sherpa will save the email and automatically log a completed activity that an email was sent.
Saving Sent Emails
1. To save sent emails that are related to the account you are viewing that were not initiated from Sherpa, but from Outlook, click on Sent Items button in the Email Contacts tab.
2. A box will pop up showing your last 100 sent emails from your Sent
Items folder in Outlook.
30
3. Check the box of the email(s) you wish to save to this account, and
select “Save” in the upper right hand corner. You can save as many as you wish at one time for the one account that you’re currently in.
4. If you click on the email, you will be able to review its contents in the viewing pane below to verify it’s the correct email.
5. If you need to add more emails to your view in order to see one that you’re searching for, type the number in the Show box. The system defaults to showing the last 100 emails at a time. Click the Show button after typing in how many you’d like to view.
6. The email(s) will be saved in the Email Notes Tab Folder and an auto generated activity will be logged in the Contact Activity Tab for each email saved.
7. You can also view and select from other personal folders created within Outlook by using the + buttons under the Folders area to expand the section.
31
Saving Received Emails 1. To save received emails for the account you are viewing, click on
the Inbox button. 2. The 100 most recent email(s) received in your Outlook Inbox will
appear in a pop up box. 3. Check the box of the email(s) you wish to save to this account, and
select Save. 4. The email(s) will be saved in the Email Notes Tab Folder and an auto
generated activity will be logged in the Contact Activity Tab for each email saved.
Deleting Emails Previously Saved
1. To delete an email, highlight the email in the email list box that you want to delete.
2. Click on the Delete Email Button and then say Yes to confirm that you want to delete the selected email. The ability to delete emails will depend on your security access set up by your Administrator.
Viewing an Email
1. Highlight the email you wish to view by clicking on it once in the email list. Once selected, you will see the email details and notes in the space beneath it.
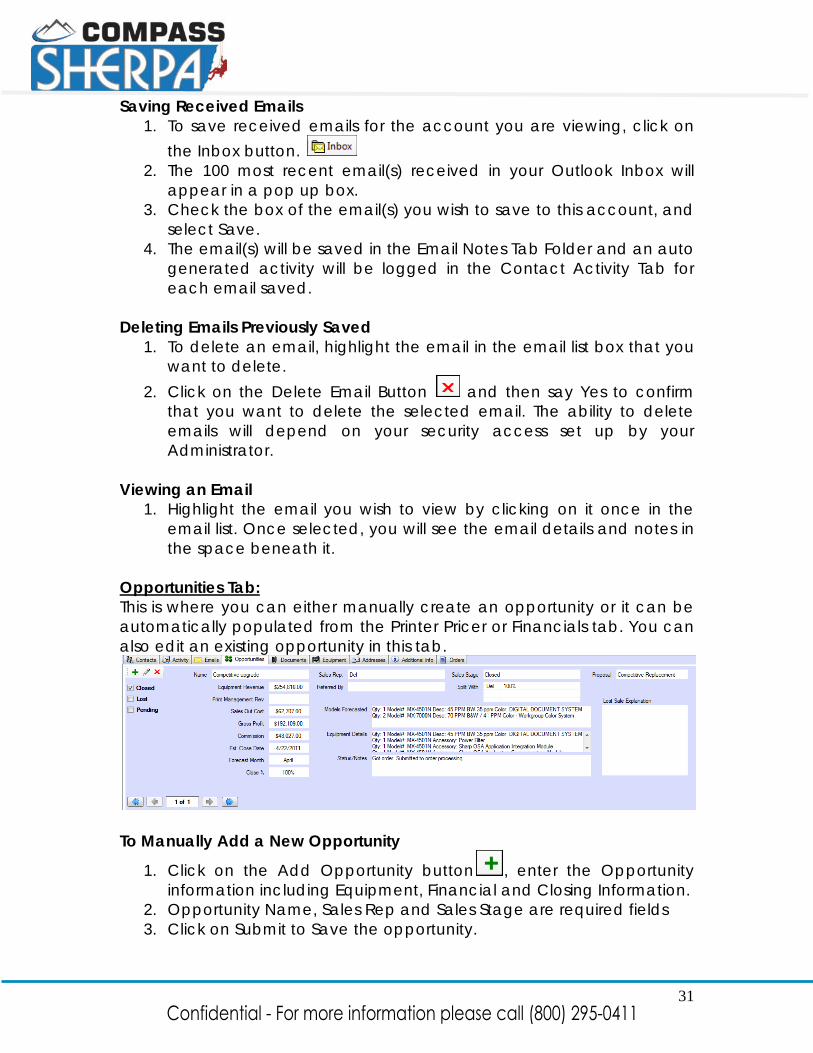
Opportunities Tab: This is where you can either manually create an opportunity or it can be automatically populated from the Printer Pricer or Financials tab. You can also edit an existing opportunity in this tab.
To Manually Add a New Opportunity
1. Click on the Add Opportunity button , enter the Opportunity information including Equipment, Financial and Closing Information.
2. Opportunity Name, Sales Rep and Sales Stage are required fields 3. Click on Submit to Save the opportunity.
32
To Edit an Opportunity 1. Make sure you are on the correct Opportunity. Select Edit
Opportunity. 2. Update as needed and click on the Submit button 3. Make sure all opportunities are closed out once the deal is either
Closed (Edit Current, check Closed the Sale box) or Lost (Edit Current, check Lost the Sale box and enter a lost sale explanation).
To Delete an Opportunity
1. Make sure you are on the correct Opportunity. Select Delete and then say Yes to confirm that you want to delete the selected Opportunity.
2. The ability to delete Opportunities will depend on your security access.
Document Links Tab: This Tab allows you to create pathways to documents related to the Account. This is not a copy of a document, but a link, therefore if you
33
delete, move or rename the original document the link with no longer work.
To Add a Document Link
1. Click on the Add button and browse to the document/file location that you would like to save.
2. Double Click on the file. 3. Enter a title and say OK.
To Open a Linked Document
1. Highlight the Document that you would like to open. 2. Select Open or Double Click on the Document. 3. If the linked file is on your company’s network, you must be
connected to the network to be able to access the file.
To Delete a Linked Document 1. Highlight the file that you want to Delete 2. Click on the Delete button and then say Yes to confirm that you
want to delete the selected Document.
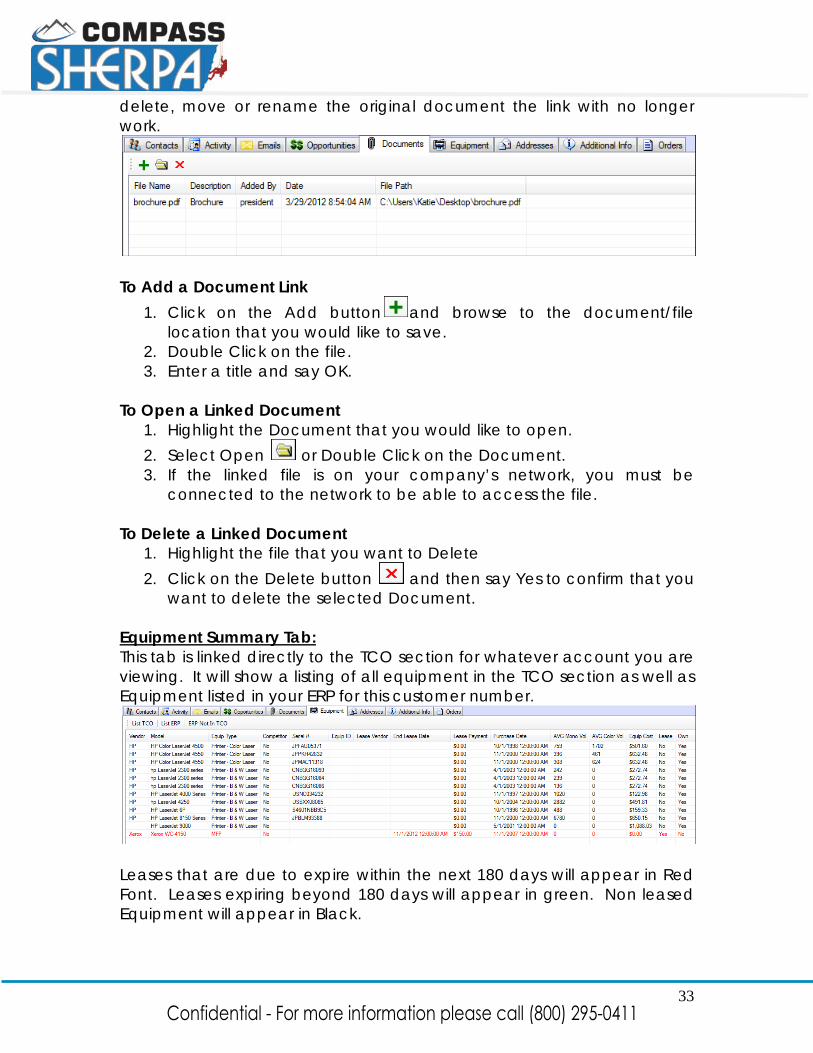
Equipment Summary Tab: This tab is linked directly to the TCO section for whatever account you are viewing. It will show a listing of all equipment in the TCO section as well as Equipment listed in your ERP for this customer number.
Leases that are due to expire within the next 180 days will appear in Red Font. Leases expiring beyond 180 days will appear in green. Non leased Equipment will appear in Black.
34
1. List TCO: Displays the equipment in the TCO section for that customer.
2. List ERP: Shows the equipment in your billing or ERP database for this client. In order for this button to work, the account you are on must have a correct customer number that corresponds with your billing/ERP database. You must also be connected to the network for this button to work. It is also important to note that clicking on this button does NOT transfer equipment information over from your billing/ERP into Compass. That is done in the TCO tab with the View/Import from ERP function.
3. ERP Not in TCO: Shows you the equipment that is in your billing/ERP
database, but has not yet been transferred into the Compass database. In order for this button to work, the account you are on must have a correct customer number that corresponds with your billing/ERP database. You must also be connected to the network for this button to work.
Addresses Tab: This allows you to store additional addresses/location information for the account.
To Add an Address
1. Click on the Add Address button. 2. Select the appropriate address type (Mailing, Billing, Shipping) from
the Type dropdown box, or type in the field. 3. Enter the address information into the appropriate fields and select
submit. Company Name, Address, City, State, Zip and Contact Name are required fields.
35
To Edit an Address 1. Scroll to the appropriate Address you wish to edit by using the
record ‘scroll’ buttons on the bottom left of the Address tab.
2. Click on the Edit Current button. 3. Make any changes as needed and select submit.
To Delete an Address
1. Scroll to the appropriate address you wish to delete using the record ‘scroll’ buttons on the bottom left of the Address tab.
2. Click on the Delete button and then say Yes to confirm that you
want to delete the selected Address. Additional Information Tab: This is where additional company information is held. The more information you enter in about each company, the more valuable your database is to you. To edit any of this information you must go to Edit Account in the top half of the screen and edit there.
Referred By: Enter in who referred this account/opportunity to you. Group Name: Allows you to group related records together. Parent Account: Allows you to assign ‘parent’ companies to branches, or link accounts together. To utilize, go to the Parent Company’s Record. Select Edit Account and check “Yes” that it is a Parent Company.
36
Now go to the Branch Record, select Edit Company and select the Parent Company’s name from the drop down. When you close the window, the name of the Parent company you selected will show in the Parent Account field.
If you wish to go to the parent company’s Record, click on the Parent Account link in blue.
Child Account(s): Click on the drop down arrow to view a list of Branch locations. To go to a branch record, select that record and click on Child Account(s) link in blue.
Assigned Region: Identifies what Region this account belongs to. Regions are set up by your Administrator. First Contact: Auto updated field which reflects the date the account was first contacted. Last Activity: Auto updated field which reflects the date the account was last contacted and an attempted activity was completed. SIC Code: Standard Industry Classification field. Used for grouping accounts into specific marketing groups. Number of Employees: Size of Company/Account based on the number of employees. Web Site: Allows you to launch the account’s Web Site directly from Compass. To launch, simply double click on the Web Site link in blue. You must have the www. at the beginning of the web address for the link to work. Buyers Mode: Ranking of Buyer based on current buying mode.
37
Bulk Activity Creation
This feature allows you to schedule or complete an activity (for a selected group of records) in the contact activity section for whatever search or filter you have activated.
1. Click on the Search Accounts button inside the Account tab or run a
filter which will result in the Search Accounts area. 2. If searching, enter your search criteria. You can search by Company
Name, Phone Number, Contact Name, Email Address, Zip Code, County or ERP # Click on the Search button to activate the search. You will see a list of accounts that match your search criteria or your activated filter.
3. Click on the Bulk Activity Creation button. The following box will appear:
4. Select whether you want to create an open activity or complete a
new activity for the selected accounts. An open activity will have a followup appear in the rep’s activity list on the callback date selected. A completed activity will generate an activity on all the accounts being viewed with no follow up on it. You can also eliminate accounts by un-checking the check box next to the name on the left of the screen.
To Open a New Pending Activity in Bulk: 5. Call Back Date: Select the date that you want the activity follow-up to
appear on. 6. Appointment Time & Duration: Enter in your time and duration if
applicable. This is not a required field.
38
7. Next Action: Select the Activity type that you would like to schedule from the “Next Action” dropdown.
8. Mark as Urgent: Tag the item as urgent, if needed. If scheduling a group of activities tagging them as urgent will highlight them on your callback list.
9. Contacted By: Select the user that you would like to schedule this activity for under the “Contacted by” dropdown. It will default to whomever you are logged in as. If scheduling for someone else, select their name.
10. Objective: Enter your objective for this future action. 11. Select the Create button. 12. You will receive the below message letting you know that the activities
were created successfully.
To Complete a New Activity in Bulk:
1. Activity Date: Defaults to today’s date as the day the activity is happening. You can select a different date if desired.
2. Appointment Time & Duration: Enter in your time and duration if applicable. This is not a required field.
3. Activity: Select the Activity type from the “Activity” dropdown. 4. Mark as Urgent: Because this will be a completed activity, clicking
Urgent will not do anything - this is only used when scheduling a pending activity.
5. Contacted By: Select the user that is completing this group of activities under the “Contacted by” dropdown. It will default to whomever you are logged in as. If scheduling for someone else, select their name.
6. Objective: Enter your objective for this activity. 7. Notes: Type in the details of the activity. 8. Select the Create button. 9. You will receive a message letting you know that the activities were