100
Accounts Receivable User’s Guide JOBSCOPE ®
Accounts Receivable User’s Guide JOBSCOPE ®

JOBSCOPE Accounts Receivable Copyright, Jobscope, LLC, 1996 - 2011 JOBSCOPE® Information in this document is subject to change without notice. Jobscope LLC makes no warranty of any kind regarding this material, and shall not be held liable for errors contained herein or for damages resulting from the use and performance of this material. The information in this document is protected by copyright. No part of this manual may be reproduced in any form without the expressed written consent of Jobscope LLC.

Accounts Receivable
JOBSCOPE Page 1
Table of Contents
Accounts Receivable ..................................................................................................................................... 4
Getting Started .............................................................................................................................................. 4
Foreign Currency ....................................................................................................................................... 4
Billing Types .............................................................................................................................................. 4
Credit Invoices ........................................................................................................................................... 5
Invoice Status ............................................................................................................................................ 5
Control Total for Payment Entries ............................................................................................................ 6
Automatic Calculation of Taxes ................................................................................................................ 6
Posting Payments and Accounts Receivable Credits ................................................................................ 7
Final Billings............................................................................................................................................... 7
Setting Up For Accounts Receivable ............................................................................................................. 8
Configuration Settings .............................................................................................................................. 8
Accounts Receivable ............................................................................................................................. 8
Job Accounting .................................................................................................................................... 13
Table Entries for Accounts Receivable .................................................................................................... 14
Company Codes (Table 0001) ............................................................................................................. 14
Currency Codes (Table 3013) .............................................................................................................. 15
State Codes (Table 7001) .................................................................................................................... 16
Billing Types (Table 7002) ................................................................................................................... 16
Terms (Table 7003) ............................................................................................................................. 17
Payment Codes (Table 7004) .............................................................................................................. 18
Advance Deposit Accounts (7005) ...................................................................................................... 20
Billing Codes (Table 7006) ................................................................................................................... 21
Tax Codes (Table 7008) ....................................................................................................................... 23
Commodity Codes (Table 7211) .......................................................................................................... 24
Accounts Receivable Main Display ............................................................................................................. 25
Billings Mode ............................................................................................................................................... 26
Opening an Existing Invoice .................................................................................................................... 30
Entering A New Invoice ........................................................................................................................... 31
Billing Details ....................................................................................................................................... 33

Accounts Receivable
JOBSCOPE Page 2
Other A/R Billing Header Fields .......................................................................................................... 35
Delete Billings.......................................................................................................................................... 37
Change Date Expected ............................................................................................................................ 38
Print A/R Invoices .................................................................................................................................... 39
Create A/R Invoices from Shipments ...................................................................................................... 42
Creating an Invoice Copy or Credit ......................................................................................................... 44
Progress Billings ...................................................................................................................................... 46
Create Progress Billings ....................................................................................................................... 47
Activate Progress Billings .................................................................................................................... 52
Progress Billings With An Advance Deposit ........................................................................................ 55
About the Database ............................................................................................................................ 57
Time and Material Billing ........................................................................................................................ 58
Setting Up for Time and Material Billing ............................................................................................. 59
How the System Gets the Rate ........................................................................................................... 60
Material Rate Codes ............................................................................................................................ 61
Labor Rate Codes ................................................................................................................................ 62
Creating Time and Material Invoices .................................................................................................. 63
Excluding Transactions ........................................................................................................................ 64
Analyzing the Results for the Material Transactions .......................................................................... 65
Analyzing the Result for the Labor Transaction .................................................................................. 67
Payments Mode .......................................................................................................................................... 70
Payments................................................................................................................................................. 70
Applying a Payment to a Single Invoice .............................................................................................. 71
Applying a Payment to Multiple Invoices ........................................................................................... 75
Inquiry ................................................................................................................................................. 79
Other Fields ......................................................................................................................................... 80
If You Are Using Foreign Currency ...................................................................................................... 81
Payment on Account ............................................................................................................................... 82
Applying the Existing POA Balance to an Invoice ................................................................................ 85
Processing a New Customer Payment ................................................................................................ 86
Other Fields on the Payment On Account Screen .............................................................................. 87
Payment On Account Liability Account ............................................................................................... 87

Accounts Receivable
JOBSCOPE Page 3
Payment On Account Reversal ................................................................................................................ 88
Advance Deposits .................................................................................................................................... 89
Advance Deposits Accounts ................................................................................................................ 90
Transfer Advance Deposits to POA ......................................................................................................... 91
Miscellaneous Cash Receipts .................................................................................................................. 93
Bank Deposits .......................................................................................................................................... 94
Entering a New Bank Deposit Record ................................................................................................. 94
Opening an Existing Bank Deposit Record .......................................................................................... 96
Starting the Bank Deposits Option ...................................................................................................... 97
Scheduling Reports in Jobscope .................................................................................................................. 98
Using a Workflow to Run Reports ........................................................................................................... 98

Accounts Receivable
JOBSCOPE Page 4
Accounts Receivable
The Accounts Receivable (A/R) module is used to enter billings to customers, record payments against
these billings, handle miscellaneous cash receipts, and provide ways of managing cash flow. The
Accounts Receivable module has four modes of operation, Billings, Payments, Update Customer Aging,
and Create VAT Extract File. Create VAT Extract was originally written for special Euro-zone reporting,
but is rarely used today.
Getting Started
You will need to have your customers entered into the Customer module before you can begin. It would
be preferable to have the open jobs entered also, but you can bill against a job with a job number of
00000000 (eight zeroes) if you don’t have jobs in yet, and you want to get started with billing. The
following sections provide information about the various functions in Accounts Receivable.
Foreign Currency
If you will be using foreign currency, and billing in foreign currency, see the Foreign Currency User Guide
for information on foreign currency.
Billing Types
Billing Types categorize receivable invoices. Billing types are defined in table 7002. A single character
code defines the types. The following codes are valid; however, other codes may be added to this table
as desired. If you plan to use the Progress Billings function, the billing type for normal, active invoices
should be a blank entry.
A - Anticipatory. This type allows entry of billings which are not to be printed or gathered into a
subledger for posting. When an invoice is entered with an A code, an A/R subledger record is
written with A in the Type field. The program that creates batches from subledgers will not
select a record with an A type. Anticipatory invoices, when ready to be issued, are checked by
the Progress Billings system by date range, if the invoices are selected, the billing types are
changed from A to blank. This will give the new invoice a Date Entered of the current date. The
original entry will have a Date Entered in the past. The program which automatically creates
batches from subledgers uses Date Entered in selecting transactions. You cannot print an invoice
with an A Billing Type.
C - Credit Memos. Customer Returns mode of the Job Management and Control module has a
function that will create a credit memo and put this code in the Type field.
L - Late. This type indicates that the invoice is for a job that is closed. The system will not accept
an invoice for a closed job unless this code is entered in the Type field.
Blank - Normal Billings. For normal billings, you can leave the Type field blank. This is a required
entry in the table.
AD - This type of billing is only used for internally created advance deposit records.

Accounts Receivable
JOBSCOPE Page 5
PA - This type of billing is only used for internally created payment on accounts records.
Credit Invoices
If an invoice has been erroneously entered, or for some other reason an entire invoice is to be credited,
you should enter a credit invoice. This credit invoice should be for an amount equal to the erroneous
invoice, but with a negative amount. You will probably want to treat credits just like normal billings,
except with a negative billing amount, meaning you can use the normal invoice numbering sequence,
and a Billing Type of blank.
Next, two payment entries should be made. One entry should be positive and for an amount equal to
the erroneous invoice, and should reference the erroneous invoice. The other payment entry should be
negative and reference the credit invoice. In most cases, the payment type should be a type which
identifies a transfer account to offset the entry.
If an invoice has been entered and then determined to be greater than it should have been, the credit
invoice should be entered in the amount of the overbilling, and the amount should be negative. When
the customer pays the reduced amount, a payment entry should be made in the full amount of the
original invoice. A second payment should be entered for the credit invoice, and this payment should be
a negative amount equal to the credit.
For example, if $100 was originally invoiced, and a determination is made that the invoice should have
been for $90, a credit invoice should be entered in the amount of $-10. When the payment of $90 is
received, a payment entry of $100 should be made against the original invoice, and a payment entry of -
$10 should be made to the credit invoice.
In most cases, the payment type should be a code which identifies the transfer account to offset the
entry.
Invoice Status
The Accounts Receivable subledger (IPARBLL) has a field called Payment Status. This field is
automatically updated by the system and is useful in reporting. The entries that the system makes to
this field are as follows.
IN - A new or “initial” invoice to which no payments have been made
PP - A partially paid invoice
CR - An overpaid invoice (credit balance)
RE - An invoice with only the retention amount outstanding
PD - An invoice which is paid in full (the sum of payments equals the amount of the invoice)

Accounts Receivable
JOBSCOPE Page 6
Control Total for Payment Entries
The Payments screen maintains a running total of entries. This total should match the bank deposit for
the entries, unless some entry other than cash is included.
After completing a set of cash entries, you may wish to print a listing of the entries. You can use the
Cash Register report to do so. Enter a date range that corresponds to the dates entered for the payment
transactions. If all entries have the current date, enter it as both the beginning and ending dates of the
range.
If the totals on the Cash Register report do not match the control total on the Payments screen, then
some entry probably has an erroneous date or amount. This payment should be identified by reviewing
the checks. When identified, the payment may be found by entering the customer number on the
Payment screen, or, if the invoice number is known, by entering the invoice number. The date may be
corrected when the payment is displayed on the screen.
Automatic Calculation of Taxes
Taxes are automatically calculated for invoices created automatically from shipments based upon these
factors, as outlined below.
The first is the Taxable field on the Job Line Items screen. Taxable allows entries of Y, N, or blank. If Y is
entered, the program reads the state and county tax codes in the ship-to site record for the customer,
or the customer record itself if no site is referenced. The program then uses these codes to calculate tax
entries if the function for automatically creating invoices from shipments is being used. If N is entered in
Taxable on the Job Line Items screen, taxes are not calculated. If the field is blank, the field is
automatically set to Y or N according to the default entry in System Configuration.
The second is whether or not your company is registered to collect taxes for the ship to state of the job
line item that was shipped. This designation is set in the States table (7001) in System Configuration.
The third is whether or not the job header for the line item that was shipped contains a value in the Tax
Exempt field. This value can be set on the customer entry and then is copied to jobs opened for the
customer but can be overridden. The Tax Exempt value will then be copied to an invoice created for a
shipment against that job line item and must be blank for taxes to be created.
The final check will be on the Tax Codes themselves. If the job header has a Ship To site supplied, the
check for tax codes will be against the Ship To Site entry. If no Ship To site is supplied on the job then
the check will be made against the customer entry. If the tax codes values found in the appropriate
place are valid the appropriate tax percentage will be used.
Taxes calculated by the program are written to the invoice, and are printed on the invoice.

Accounts Receivable
JOBSCOPE Page 7
Posting Payments and Accounts Receivable Credits
Most dates applicable to accounts receivable transactions are automatically entered by the system.
These dates are the basis for selecting which transactions are included in subledger batches. You should
read the section “Using the Financial Calendar for Backdating Subledger Transactions” in the General
Ledger User Guide.
The system automatically enters the current date in the Date Received field when you enter an invoice
payment; however, you may override this automatic entry, thus ensuring that the date received is
accurate for customer credit history.
You may manually enter the date received. Use care to assure that it is correct. An erroneous date entry
could cause the transaction to not be selected for inclusion in a subledger batch.
Final Billings
The Type field on the A/R Billings screen may be used to designate an invoice as being the final billing on
a job. In many instances, job completion is known at the time of billing, and entry of this information can
provide a flag indicating that the job is ready to be closed. The Type field is edited by Table 7002 and is
maintained in System Utilities.
A report may be generated for the special types to make these easy to find.

Accounts Receivable
JOBSCOPE Page 8
Setting Up For Accounts Receivable
There are several things that you need to do to get set up for Accounts Receivable.
Configuration Settings
Accounts Receivable
In System Utilities, System Configuration, Financials, select Accounts Receivable from the dropdown.
The Accounts Receivable screen displays. These are the settings you need to make before starting.
Assign Invoices Sequentially – You can manually assign invoice numbers, or you can let the system do it.
If you check it on, you can enter the Next Invoice number you want assigned in the Next Invoice: field.
Accounts Receivable
JOBSCOPE Page 9
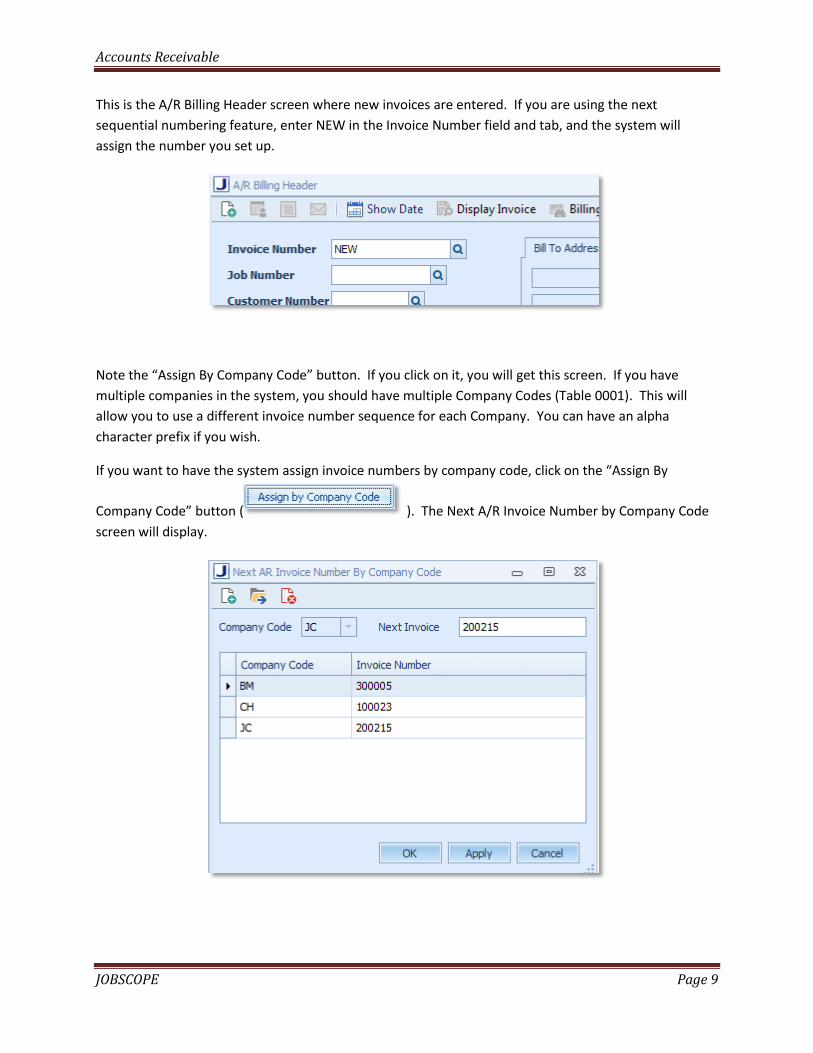
This is the A/R Billing Header screen where new invoices are entered. If you are using the next
sequential numbering feature, enter NEW in the Invoice Number field and tab, and the system will
assign the number you set up.
Note the “Assign By Company Code” button. If you click on it, you will get this screen. If you have
multiple companies in the system, you should have multiple Company Codes (Table 0001). This will
allow you to use a different invoice number sequence for each Company. You can have an alpha
character prefix if you wish.
If you want to have the system assign invoice numbers by company code, click on the “Assign By
Company Code” button ( ). The Next A/R Invoice Number by Company Code
screen will display.

Accounts Receivable
JOBSCOPE Page 10
So how do you get the system to assign a sequential invoice number based upon the entries on this
screen? As an example, let’s assume that we want to add a new invoice for company BM (shown in the
screen picture above). In the Invoice Number field on the A/R Billing Header screen, enter the company
code followed by “NEW” as in the picture below. The system will assign invoice number 300005.
The Next AR Invoice Number by Company Code screen displays a Toolbar at the top of the screen with
different available functions:
New: ( ) Use this function if you want to create a new Invoice Number by Company
Code record
Open: ( ) You can call up a record for editing by double clicking on it in the grid, or by
highlighting it and clicking on this icon
Delete: ( ) Use this function to delete the record currently displayed

Accounts Receivable
JOBSCOPE Page 11
Back on the Accounts Receivable configuration screen, set up the other entries that you will need.
Next Payment On Account Number – A payment on account is a payment that has no specified invoice.
These entries are numbered, and this is where you set up the numbering sequence.
Next Advance Deposit Number – Advance deposits are also numbered, and here is where the number
sequence is set up. Advance deposits are not linked to an invoice.
Next Credit Memo Number – This is the numbering sequence for credit memos created in Customer
Returns mode of the Job Management and Control module.
Next Bank Deposit Number – This is the number sequence for bank deposits, if you wish to use the
system to store bank deposit records.
Copy Line Item User Text to Inv (Invoice) Item – If this is checked on, then the job or release line item
user text will be copied to the invoice detail user text. If you’re not sure about this, leave it off.
Print Previously Invoiced On Form – If you want the amount previously invoiced on the job to be printed
on the invoice, check this on.
Use UK Net Terms Calculations – Select this option to use the UK method of calculating the “date due”
on Accounts Receivable invoices. Customers in the US should not select this option.
Use UK Format for AR Invoices – Select this option to use the UK format for the AR invoice form.
Customers in the US should not select this option.

Accounts Receivable
JOBSCOPE Page 12
Use Value Added Taxes – Select this option to display VAT fields on the windows throughout the system
and print VAT amounts and totals on reports.
Freight Discountable – Select this option to discount the freight charge before calculating the VAT
calculations.
Default VAT Freight Code – (1 alphanumeric character; edited by table 7208). You may wish to add the
Value Added Tax (VAT) code to the freight charge of an invoice. Your response to this prompt will
determine the default answer that displays in the Freight VAT code field on the Billing Text window.
Select a valid code from the table for this field.

Accounts Receivable
JOBSCOPE Page 13
Job Accounting
There are several settings here that affect Billings.
They are in the Apply Cost at Invoicing box. Applied Cost (sometimes it says Cost Applied) is the amount
on a job that has been moved from work in process to cost of goods sold. If the “No” box is checked,
then when an invoice is entered (or created by the Create A/R Invoices From Shipments function), then
no cost applied will be calculated. If the “All” box is checked, then all cost remaining in work in process
will be moved to cost of sales. If the “%” box is checked, then the field to the right of the box will allow
entry of a percentage amount, and, when an invoice is created, that percentage value will be multiplied
times the invoice amount and the result will be moved from work in process to cost of sales.

Accounts Receivable
JOBSCOPE Page 14
Table Entries for Accounts Receivable
Company Codes (Table 0001)
The first table that we want to work with is table 0001, Company Codes. A “Company” in Jobscope is an
entity represented in a single balance sheet and income statement. If you want to produce different
balance sheets and income statements for parts of your business entity, then you will need more than
one company code. Your database may already have a single entry in this table. You can either delete it
and add a new one, or change the address and other data and use that company code.
To access it, double click on it in the table list. It is shown below.
Don’t create a blank entry. Select a code, and enter the information. On the right side, where it says
Company Logo, you need to load the image that you want to appear at the top of your customer invoice.
You can click on Remove Image to get rid of the one that came with the system, and click on the browse
button and browse to the image you want to use.
Accounts Receivable
JOBSCOPE Page 15
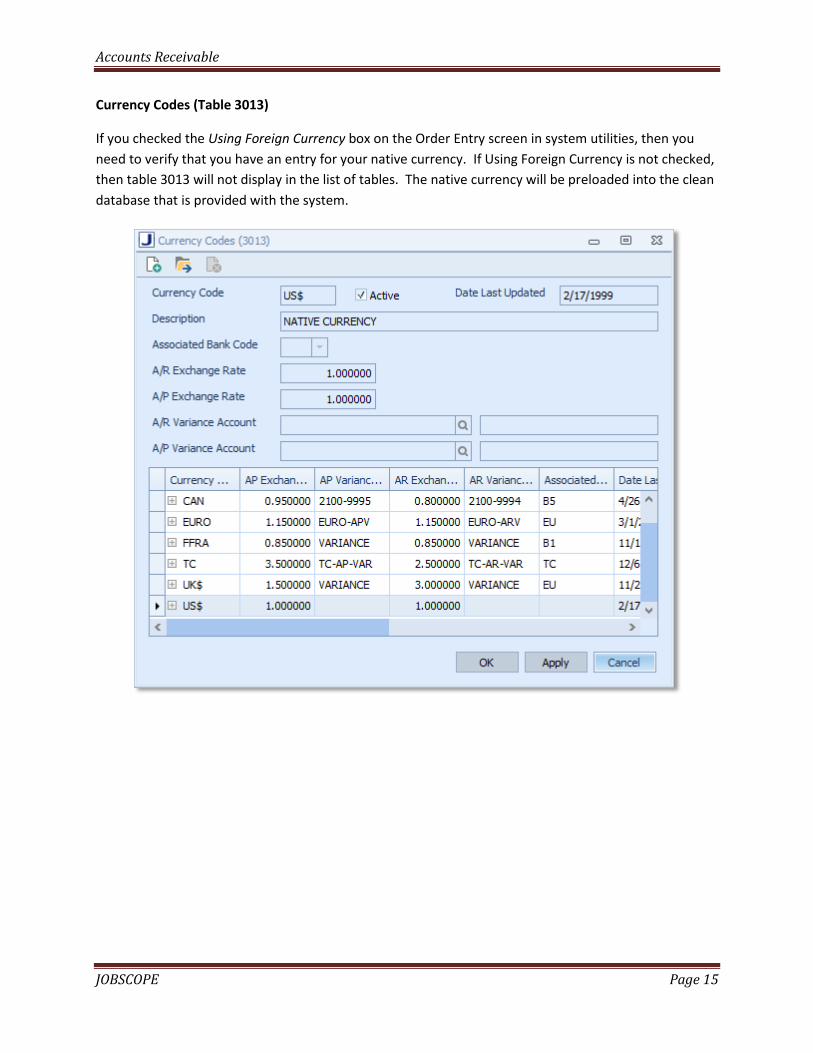
Currency Codes (Table 3013)
If you checked the Using Foreign Currency box on the Order Entry screen in system utilities, then you
need to verify that you have an entry for your native currency. If Using Foreign Currency is not checked,
then table 3013 will not display in the list of tables. The native currency will be preloaded into the clean
database that is provided with the system.

Accounts Receivable
JOBSCOPE Page 16
State Codes (Table 7001)
These entries should already be in the database for the United States.
Billing Types (Table 7002)
See the section “Billing Types” for information about this table. Verify that the entries below are in the
table. Do not delete any of these entries.

Accounts Receivable
JOBSCOPE Page 17
Terms (Table 7003)
This code is for payment terms for customer invoices. The system uses the Net Term # Days value to
determine when invoices are overdue, but it does not use the Discount Term # Days value. Discounts
must be entered as the payment is entered. Retention refers to the percentage retention which the
customer may keep until the job is complete. In the example below, in which the value is 7.0 percent, if
the customer pays 93.0 percent of the invoice, then the remaining 7.0 percent is not automatically
considered overdue. It still shows as an open balance, but not overdue. The VAT field is for Canadian
customers. The “Calculate Due Date from End-of-Month” box will calculate the due date from the end
of the month for the date of invoice if it is checked.

Accounts Receivable
JOBSCOPE Page 18
Payment Codes (Table 7004)
When you receive a payment, you want to define where the payment will go. Most people like to use a
blank entry to represent a normal cash or check payment. Other codes might be for discounts taken,
goods rejected, bad debt writeoff, etc. The Payment Debit Account is where the debit for the payment
should go (usually cash). In the other account field, POA stands for Payment On Account. If a customer
pays $10000.00, and you apply $8000.00 to open invoices using the Payment On Account function, then
the system needs to debit $10000.00 to cash (the Payment Debit Account), credit $8000.00 to Accounts
Receivable, and credit the POA Liability Account for the other $2000.00.
The Is For Deposit field designates that the payment account is an account for which you make deposits.
If it is not checked, then payment records for the bank code will not show on the Bank Deposits grid. If
the code is for bad debt write-offs, then this field would be left blank and these would not show in the
bank deposits.

Accounts Receivable
JOBSCOPE Page 19
Look at the two payment codes at the bottom of the grid. Notice that they both are for the same debit
account, CC00-2619. This is the general ledger account that represents the principal operating account,
and we want customer invoice payments and miscellaneous cash receipts to both go to this account, but
we want to have separate payment codes so that we can quickly see which is which.
Accounts Receivable
JOBSCOPE Page 20
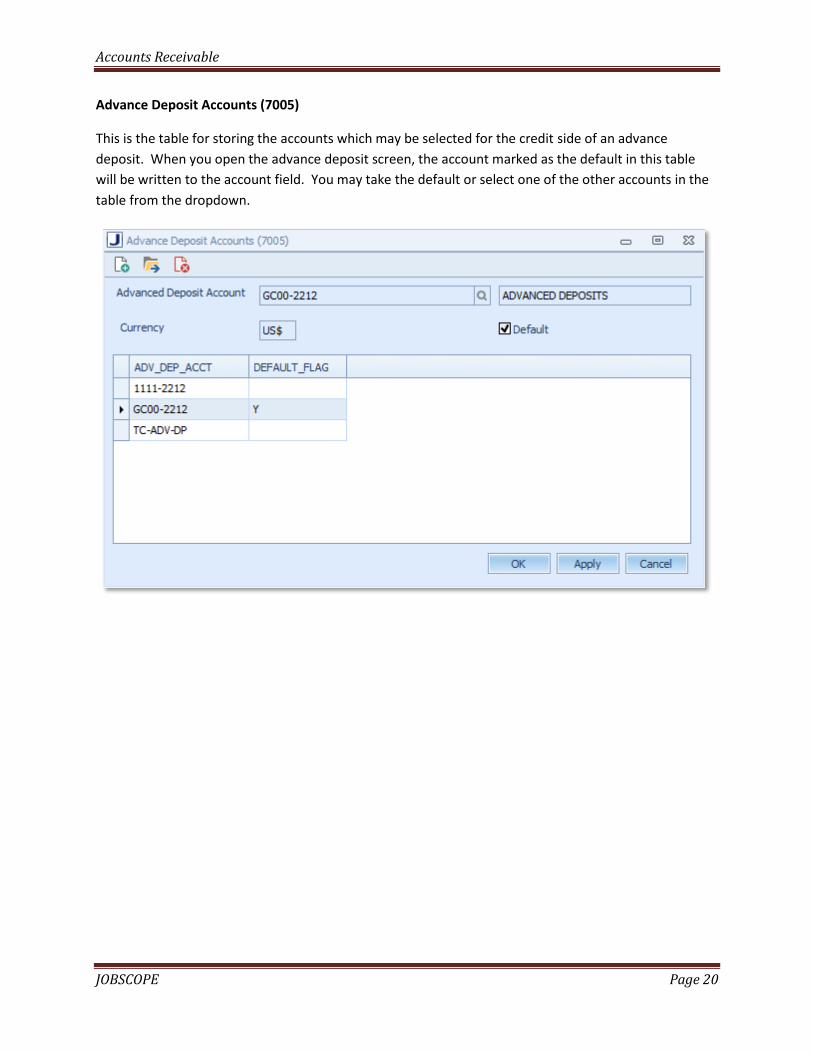
Advance Deposit Accounts (7005)
This is the table for storing the accounts which may be selected for the credit side of an advance
deposit. When you open the advance deposit screen, the account marked as the default in this table
will be written to the account field. You may take the default or select one of the other accounts in the
table from the dropdown.

Accounts Receivable
JOBSCOPE Page 21
Billing Codes (Table 7006)
Billing codes define the accounting for billing and accounts receivable transactions. This is the table with
the Remit To Address tab selected. Enter your remit to address and then select the Accounts tab.

Accounts Receivable
JOBSCOPE Page 22
This is the Accounts tab, and these are the other accounts you need.
A/R Account (Debit) – This is the Accounts Receivable account.
A/R Deferred Account CR – If you want billings to go directly to sales, put the sales account here.
If you are using a work in process scheme, then this should be a deferred income account.
Billings will then be moved from deferred income to sales either at job closing, or based on a
percentage completion value.
A/R Accrued Freight CR – If you designate part of the billing as freight, that amount will be
credited to this account.
A/R Accrued Tax CR – Same as freight except this is for tax.
Cost Applied Account DB – This is cost of goods sold. In Jobscope, under a work in process
inventory scheme, the amount that is moved from work in process to cost of goods sold on a job
is referred to as cost applied. At job closing, any amounts remaining in WIP for the job are
credited to WIP and debited to this account. The WIP accounts are in table 0012.

Accounts Receivable
JOBSCOPE Page 23
Sales Account – The sales account goes here. If you want billings to go directly to sales, then this
account and the A/R Deferred Account will be the same.
Cost Applied Material and the rest of the Cost Applied Accounts – You can set up the system so
that make for stock items maintain a cost breakdown according to these seven breakdowns;
material, material overhead, labor, labor overhead, engineering, engineering overhead, and
subcontracting. If you turn this on, then the inventory values will go to these accounts in the
general ledger instead of the normal single inventory account. In other words, when a make for
stock job is closed, the job cost breakdowns will go to these inventory accounts.
Tax Codes (Table 7008)
You can set up tax codes for customers. When you enter an invoice, the program will bring over that tax
code from the customer master and calculate a tax amount. You can set up codes if you collect taxes, or
put a blank in the table. This table must have a blank entry, and a blank entry should be in the database
when it is initially loaded. The system will not allow the deletion of the blank entry.
There is a special function here that you may find helpful. If the Ship To State abbreviation on the job
exists in the Tax code table (7008), and all the other checks described above are true, then the program
will add taxes even if the Customer Master screen has no tax code. This will allow you to maintain the
tax rate for a state in one place rather than having to set if for every customer.

Accounts Receivable
JOBSCOPE Page 24
Commodity Codes (Table 7211)
Commodity codes as related to VAT are usually the 8 digit code for VAT related transactions. Some like
to use it to define the EU guidelines for Restriction of Hazardous Substances (RoHS). In the US, some
might use it for the Standard Classification of Transported Goods 5-digit code, or the NIGP Commodity
Code which is used by many state and local governments.
The VAT Indicator is used to refer to a VAT code, which would normally be in table 7208, but the field is
not edited by the table so that it may be used for other purposes. Quantity Codes in VAT parlance is
what is commonly known as a unit of measure, such as EA for Each. There are two of them so that you
can have a primary and a secondary.
There is a whole series of 72xx tables that are used for Value Added Tax. This is the only72xx table that
is used when VAT is turned off. See the Value Added Tax User Guide for more information.

Accounts Receivable
JOBSCOPE Page 25
Accounts Receivable Main Display
Accounts Receivable has three modes of operation, Billings, Payments, and Create VAT Extract File.

Accounts Receivable
JOBSCOPE Page 26
Billings Mode
In Billings mode, There are six selections on the toolbar across the top.
Click on Billings to enter new invoices. This is the A/R Billing Header screen.
The A/R Billing Header screen displays a Toolbar at the top of the screen with different available
functions:

Accounts Receivable
JOBSCOPE Page 27
New: ( ) Use this function if you want to create a new Invoice record
Copy Invoice: ( ) Use this to make a copy or credit of an invoice. This is described in the
section “Creating an Invoice Copy or Credit” in this document.
User Defined Fields: ( ) Use this function to access the User Defined Fields form and enter
the desired values. The red tick indicates UDFs already have values for the selected invoice
record
User Text: ( ) Use this function to access the User Text screen and add free form
information to the invoice record. The red tick indicates UDFs already have values for the
selected invoice record
Email Invoice: ( ) Use this function to email the invoice
Hide (Show) Invoice Entered Date: ( ) This button will show the Date Entered
field if it is hidden, or hide it if it is shown. Invoices are gathered into batches for posting to the
general ledger based on the Date Entered date. For this reason, you may not want your users to
be able to change this date, but let the system automatically assign it. For more information,
see the section “Using the Financial Calendar for Backdating Subledger Transactions” in the
General Ledger User Guide. This icon will only display if the system is configured to use the
financial calendar.
o
Display Invoice: ( ) This displays the invoice. Click on it and you will display
the invoice as it appears to the customer. The logo on the invoice came from table 0001,
Company Codes (see the section in this User Guide).

Accounts Receivable
JOBSCOPE Page 28
Billing Details: ( ) When an invoice header is displayed, you can look at the
invoice details by clicking on this button
Invoice Inquiry:( ) The Inquiry button can be used to list invoices that meet
criteria which you can select in the screen below. This screen displays when you click on the
Inquiry button.

Accounts Receivable
JOBSCOPE Page 29
With the selection criteria entered, click on the Find button ( ). It might be only a
few invoices, or it might be hundreds. If you want to bring one up on the screen, note the
invoice number and open it as previously described.
The Cost Applied field on the A/R Billing Header shown earlier is not active. The reason is that
the Apply Cost at Invoicing in System Configuration is set to No. See the System
Configuration/Job Accounting section in this User Guide.

Accounts Receivable
JOBSCOPE Page 30
Opening an Existing Invoice
If you know the invoice number, you can type it in the Invoice Number field and tab. If you want to
browse for it, click on the browse button beside the Invoice Number field.
The Accounts Receivable Invoice browse screen displays. You can enter your search criteria and click on
the Search button. The invoices that meet the search criteria will display in the grid at the bottom.
Double click on the one you want to display.

Accounts Receivable
JOBSCOPE Page 31
Entering A New Invoice
To enter a new invoice, click on the New icon ( ).
To create a new invoice, the following required fields need to be populated:
Invoice Number – You can enter a number, or you can have the system assign the next number,
which is the preferable way. See the section “Configuration Settings” in this User Guide for the
several ways that you can do this. The invoice number may be up to 12 characters.
Job Number – Enter or select the job number for which you are billing. When you tab out of the
field, the system will write the Customer Number, Customer PO, Terms, Bill Code, Exchange
Rate, Routing, Attention field, and Company Code from the job record
This is all the required data for the invoice, so you may click on Apply to save the invoice header.

Accounts Receivable
JOBSCOPE Page 32
This is what it looks like at this point. If you like, you can add Jobsite, Jobsite state, and FOB Point to the
record. At this point the header is ready, and you are ready to enter the billing details. Click on the
Billing Details button ( ).

Accounts Receivable
JOBSCOPE Page 33
Billing Details
This is the Billing Details screen. The Job Line Item has been entered by the user and the system has
filled out Part Number, Description, and Unit Price. Enter the Quantity, and tab to the Taxable field. If
you don’t want to charge taxes, don’t check Taxable on. If you do want to charge taxes, check Taxable
on and the system will calculate taxes based on the tax codes in the Customer Master. If a customer
ship-to site record is referenced, the system will use the tax codes from the site. If no site record is
referenced, then the codes in the customer master will be used.

Accounts Receivable
JOBSCOPE Page 34
When you check Taxable on, the system calculates taxes based upon the tax codes in the Customer
Master. If a customer ship-to site record is referenced, the system will use the tax codes from the site.
If no site record is referenced, then the codes in the customer master will be used. You can change the
codes on this screen.
This is the bottom of the screen enlarged. Click on Apply or OK and it’s done.

Accounts Receivable
JOBSCOPE Page 35
Retention is an amount that the customer may “hold back”. This does not change the invoice amount.
If a retention amount is entered, then when the system determines whether an invoice is overdue or
not, the invoice will not be considered overdue if the invoice amount less the retention amount has
been paid.
When an new invoice is saved and there is a payment on account balance for the customer, a message
will display alerting you so that you can apply the payment on account balance.
Other A/R Billing Header Fields
There are a few other things about the A/R Billing Header that are worth noting. The Print Indicator will
be checked on when the “Print A/R Invoices” is run. That function will then not print the invoice again.
If you want an invoice printed again, call it up and check the Print Indicator off.
The Unapplied amount is the total unapplied cost remaining on the job. Unapplied cost is the job cost
that is still in work in process on the job.

Accounts Receivable
JOBSCOPE Page 36
The Date Expected is determined through a calculation of average days to pay in the Credit History
window for this customer.
The Currency field allows you to select a currency other than the default currency that the system will
write to the field. See the Foreign Conversion User Guide for more information.
The FOB Other Invoice field shows you the amount of other billings for the job.

Accounts Receivable
JOBSCOPE Page 37
Delete Billings
The Delete Billings selection displays this screen. When an invoice is created, a substantial amount of
data is written to many parts of the system. A simple delete of the data on the A/R Billing Header
screen would not update all of this data, and, in fact, there is no delete button on the A/R Billing Header
screen. The Delete Billings function will insure that the proper updates are performed. An invoice may
not be deleted if it has been gathered into a batch for posting to the general ledger.

Accounts Receivable
JOBSCOPE Page 38
Change Date Expected
This selection changes the Date Expected date that the system has calculated.

Accounts Receivable
JOBSCOPE Page 39
Print A/R Invoices
This selection prints invoices that have the Print Indicator checked off (not checked). The check box for
updating the Print Indicator allows you to print invoices without updating the Print Indicator to review
them first. You will normally run this function with Update Print Indicator checked on. Select the
Company Code for which you wish to print, and select the Billing Type. For most Jobscope users, a blank
billing type means a normal billing invoice.
Click OK when you are ready and the invoices will be printed.
Accounts Receivable
JOBSCOPE Page 40
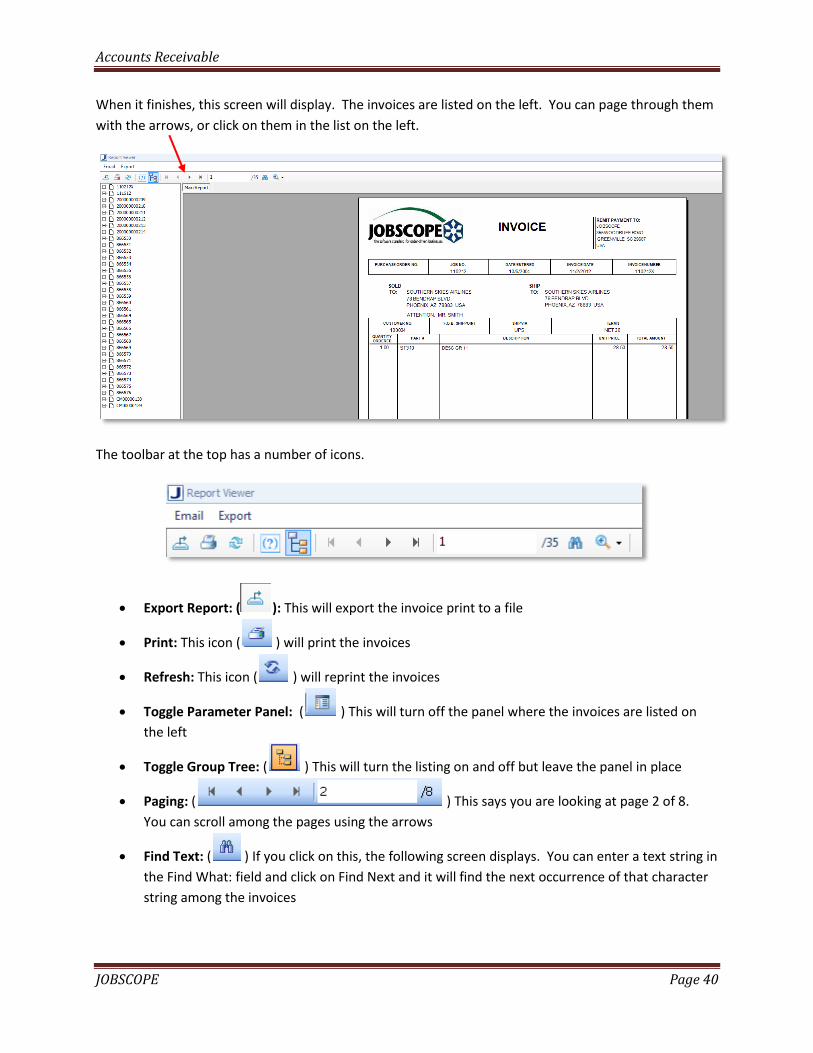
When it finishes, this screen will display. The invoices are listed on the left. You can page through them
with the arrows, or click on them in the list on the left.
The toolbar at the top has a number of icons.
Export Report: ( ): This will export the invoice print to a file
Print: This icon ( ) will print the invoices
Refresh: This icon ( ) will reprint the invoices
Toggle Parameter Panel: ( ) This will turn off the panel where the invoices are listed on
the left
Toggle Group Tree: ( ) This will turn the listing on and off but leave the panel in place
Paging: ( ) This says you are looking at page 2 of 8.
You can scroll among the pages using the arrows
Find Text: ( ) If you click on this, the following screen displays. You can enter a text string in
the Find What: field and click on Find Next and it will find the next occurrence of that character
string among the invoices

Accounts Receivable
JOBSCOPE Page 41
Zoom: ( ) Click on the down arrow and you will get a list of zooming options for the
display

Accounts Receivable
JOBSCOPE Page 42
Create A/R Invoices from Shipments
In many environments, particularly those with high order volume or spare part orders, the automatic
creation of A/R invoices based on shipments provides an efficient method of billing.
When you click on it, the Create A/R Invoices From Shipments screen displays. The Location Code is the
location code from which the shipments were made. The Date Shipped value comes from the shipping
entry. When the shipping entry is made, the system writes the current date to the Shipping Date field,
but the user can change it. Record Type comes from the Job Master for the job against which the
shipment was made. Most users use a blank record type for a job that may be billed using this program,
and an “M” Record Type for a job that must be manually billed. After selecting the Location Code and
Date Shipped, click on Ok to create the invoices.
The screen below will display. Click on OK.
When the process completes, a Status Log will display, which lists the invoices created. You may want to
print it.
There are several points related to the “Create A/R Invoices From Shipments” function.
• The invoice number is automatically assigned based on the next invoice number available.
• The amount of the billing that is applied (moved from Work-in-Process to Cost-of-Sales) is
determined by your entries in System Configuration. If you indicated in System Configuration that all

Accounts Receivable
JOBSCOPE Page 43
costs should be applied, then the entire billing amount is applied to Cost-of-Sales. If you selected a
percentage value, then that portion of the billing is applied. If you set the applied cost option to No,
then no cost is applied.
• The “Attention” field on the invoice is written from the “Attention” field in the job record.
• Calculation of taxes is based on the “Taxable” field on the Job Line Items screen, whether or not
you are registered to collect taxes in the Ship To state, and whether or not the job that was shipped is
exempt from taxes. If the “Taxable” field contains a Y, and you’ve indicated that you are registered to
collect taxes in the state to which the shipment went, and the job that was shipped was not tax exempt
the program reads the Tax 1 and Tax 2 codes in the customer record or the ship-to site record being
used for the job. Table 7008 is then searched to determine the tax percentage. If the field contains an
N, the program does not calculate taxes. If you are not registered to collect taxes in the state to which
the shipment was sent the program does not calculate taxes. If the Tax Exempt field on the job that was
shipped has any value the program does not calculate taxes. If the field is blank upon order entry, the
system writes the default defined in the Order Entry section of System Configuration. Taxes are then
calculated or not calculated based on this response.
There is a special function here that you may find helpful. If the Ship To State abbreviation on the job
exists in the Tax code table (7008), and all the other checks described above are true, then the program
will add taxes even if the Customer Master screen has no tax code. This will allow you to maintain the
tax rate for a state in one place rather than having to set if for every customer.
If the job associated with the billing has a foreign currency defined for it, the billing is created in the
foreign currency. The currency code and exchange rate are transferred from the jobs window and used
to calculate the invoice amounts. If the “Use Valued Added Taxes” prompt in AR Startup is set to Yes,
and a value is entered in the VAT code field, this VAT code, which is edited by table 7208, will determine
the percentage of VAT tax to be applied to the item.
If the job associated with the billing has a foreign currency defined for it, the billing is created in the
foreign currency. The currency code and exchange rate are transferred from the Job Header screen and
used to calculate the invoice amounts. See the Foreign Currency User Guide for more information.
These automatically-created invoices may be viewed on the A/R Billings screen in the same manner as a
manual billing and may be modified prior to printing.

Accounts Receivable
JOBSCOPE Page 44
Creating an Invoice Copy or Credit
This is the toolbar for the A/R Billing Header screen, with the Copy Invoice icon circled.
You can use this button to make a copy of the displayed invoice, or a credit invoice to offset the
displayed invoice.
When you click on it, you get this screen.
You can enter the new invoice number, or enter NEW to let the system assign the next one.
You can select the Type Billing you want for the new invoice.
The Invoice Date will default to the current date, but you can change it. The Date Due will be calculated,
but you can change it also.
The lines on the displayed invoice are displayed. The ones that are checked will be copied. When the
screen displays, all of the lines will be checked, so you need to uncheck any that you don’t want copied.

Accounts Receivable
JOBSCOPE Page 45
If you check the Credit Memo field, the quantity will be set to a negative value, which will result in a
negative dollar amount for the new invoice. If the displayed invoice is already a credit, the Credit Memo
field will not be lit.
When you have the screen set, click on the Copy button and the invoice will be copied. A message will
be displayed asking if you wish to view the new invoice.
Accounts Receivable
JOBSCOPE Page 46
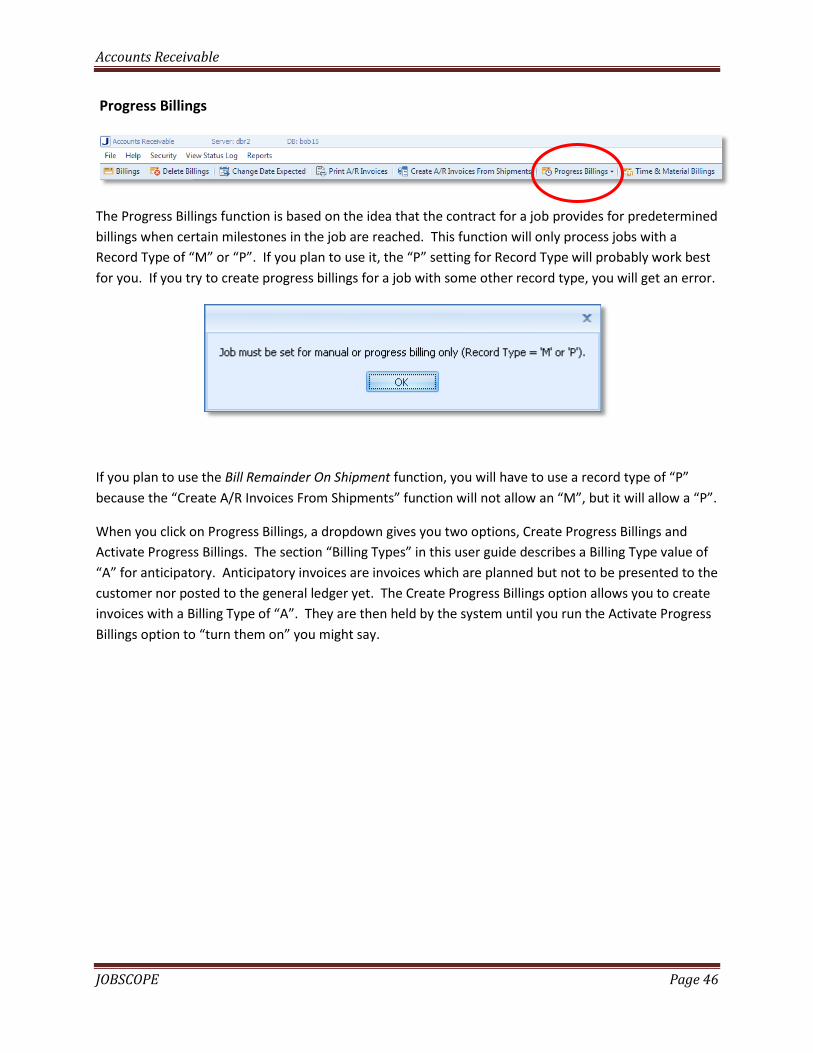
Progress Billings
The Progress Billings function is based on the idea that the contract for a job provides for predetermined
billings when certain milestones in the job are reached. This function will only process jobs with a
Record Type of “M” or “P”. If you plan to use it, the “P” setting for Record Type will probably work best
for you. If you try to create progress billings for a job with some other record type, you will get an error.
If you plan to use the Bill Remainder On Shipment function, you will have to use a record type of “P”
because the “Create A/R Invoices From Shipments” function will not allow an “M”, but it will allow a “P”.
When you click on Progress Billings, a dropdown gives you two options, Create Progress Billings and
Activate Progress Billings. The section “Billing Types” in this user guide describes a Billing Type value of
“A” for anticipatory. Anticipatory invoices are invoices which are planned but not to be presented to the
customer nor posted to the general ledger yet. The Create Progress Billings option allows you to create
invoices with a Billing Type of “A”. They are then held by the system until you run the Activate Progress
Billings option to “turn them on” you might say.

Accounts Receivable
JOBSCOPE Page 47
Create Progress Billings
To describe progress billings, we’ll use an example. We took an order several days ago. This is what it
looks like in Job Management and Control. We entered the job with a Record Type of M for manual
billings, since we plan to create at least one manual billing. If we planned to only do progress billings,
we would have used a Record Type of P. The job must have a record type of either P or M.
There are four line items. The total order amount is $73101.00. The contract provides for four progress
billings, 10% on receipt of the order, 30% in six weeks, 30% in 12 weeks, and the balance upon final
approval of the installation.
We’re going to set up the first three billings as progress billings, and then we’ll do a manual invoice for
the last one. We took the order on August 10, and it’s now August 12. The three billings will have dates
of August 10, September 21, and November 2.
We’re ready to set up the progress billings, so we’ll select Create Progress Billings.
Accounts Receivable
JOBSCOPE Page 48
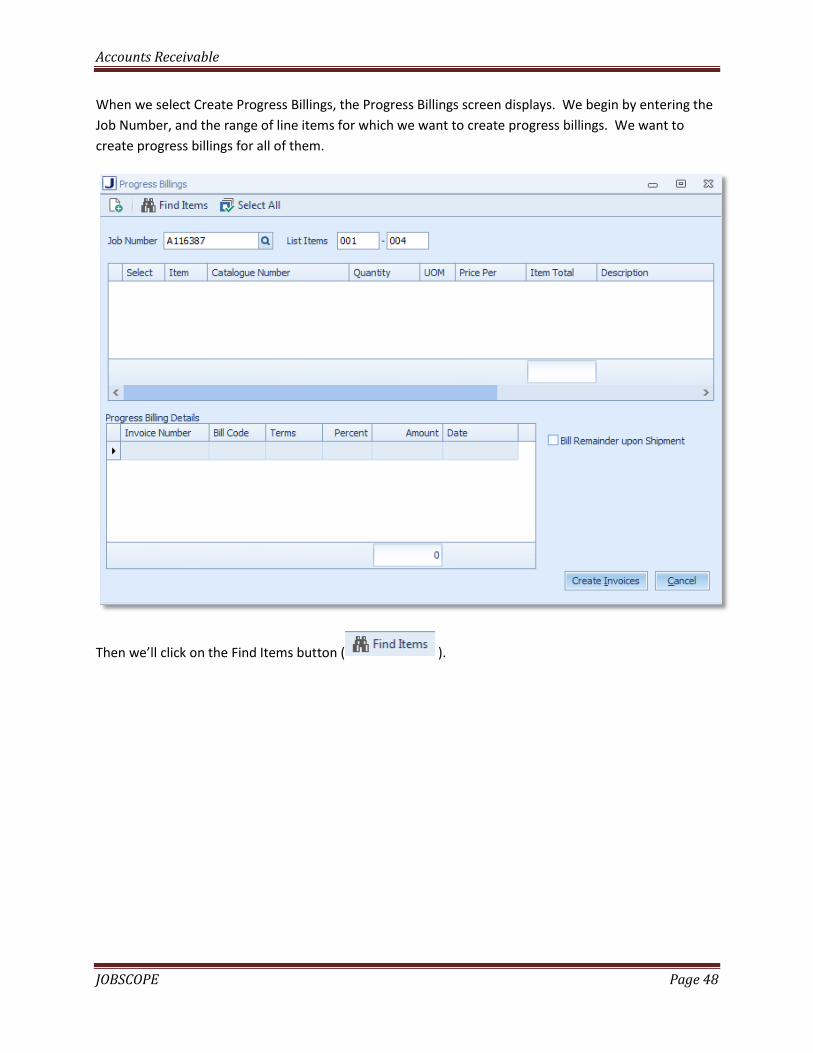
When we select Create Progress Billings, the Progress Billings screen displays. We begin by entering the
Job Number, and the range of line items for which we want to create progress billings. We want to
create progress billings for all of them.
Then we’ll click on the Find Items button ( ).

Accounts Receivable
JOBSCOPE Page 49
Now it looks like this. We can select the line items for which we want to create progress billings by
checking the box in the Select column.
You can use the Select All button ( ) to select them all without having to click on each one.
The Clear Screen icon at the top left ( ) will clear the screen in preparation for a new progress
billing entry.
Accounts Receivable
JOBSCOPE Page 50
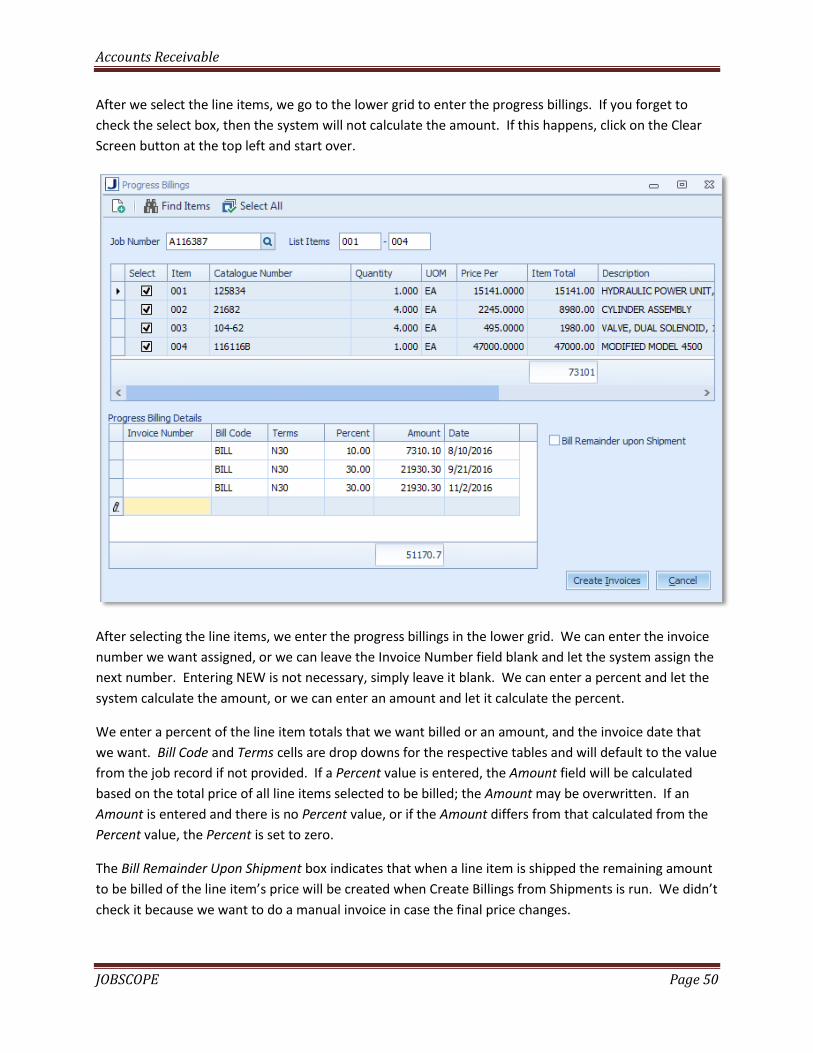
After we select the line items, we go to the lower grid to enter the progress billings. If you forget to
check the select box, then the system will not calculate the amount. If this happens, click on the Clear
Screen button at the top left and start over.
After selecting the line items, we enter the progress billings in the lower grid. We can enter the invoice
number we want assigned, or we can leave the Invoice Number field blank and let the system assign the
next number. Entering NEW is not necessary, simply leave it blank. We can enter a percent and let the
system calculate the amount, or we can enter an amount and let it calculate the percent.
We enter a percent of the line item totals that we want billed or an amount, and the invoice date that
we want. Bill Code and Terms cells are drop downs for the respective tables and will default to the value
from the job record if not provided. If a Percent value is entered, the Amount field will be calculated
based on the total price of all line items selected to be billed; the Amount may be overwritten. If an
Amount is entered and there is no Percent value, or if the Amount differs from that calculated from the
Percent value, the Percent is set to zero.
The Bill Remainder Upon Shipment box indicates that when a line item is shipped the remaining amount
to be billed of the line item’s price will be created when Create Billings from Shipments is run. We didn’t
check it because we want to do a manual invoice in case the final price changes.

Accounts Receivable
JOBSCOPE Page 51
When we have it like we want it, we click on the Create Invoices button ( ) and the
Anticipatory invoices will be created. In the example above, where multiple line items on one job were
selected, one invoice will be created with multiple (in this case four) line items. When it finishes, it
displays this message.
The process will use the next sequential invoice number from System Configuration. When the process
is finished a message box will appear that will show the invoice number created and the amount of the
invoice. The invoices in the grid will have been created as Anticipatory Invoices for the given date.
One other thing to note is that, if you create a progress billing for today’s date, it will create it with a
blank Billing Type, rather than the “A” for Anticipatory, making it a “ready to go” or activated, invoice.
Here are the invoices that were created. Notice that the second and third ones have a Type code of A
for Anticipatory, but the first one is blank, which means that it’s an active invoice. That’s because the
date of invoice was today or earlier.

Accounts Receivable
JOBSCOPE Page 52
Activate Progress Billings
This function allows us to find Progress Billings that have been previously created and convert them
from anticipatory invoices to regular customer invoices. Let’s assume that we run the activate process
once a week, and it’s time to run it for the week of September 18-24.
This time we’ll select Activate Progress Billings.
The Activate Progress Billings screen displays, and we enter the date range and click on the the Find
Invoices button ( ) and the invoices within the date range display in the grid. This week there’s only
one.

Accounts Receivable
JOBSCOPE Page 53
Select the invoices to activate by checking the box.
You can see the detail by clicking on the outline box.

Accounts Receivable
JOBSCOPE Page 54
Now we’re ready, so we click on OK or apply.
The selected invoices will be changed from “A” (Anticipatory) to blank (active invoice).

Accounts Receivable
JOBSCOPE Page 55
Progress Billings With An Advance Deposit
If the customer has made an advance deposit on the job, then the deposit will be applied to the first
invoice that is activated. Here’s an example of an advance deposit.

Accounts Receivable
JOBSCOPE Page 56
Here’s our progress billings set up. When the first invoice is activated, the advance deposit will be
applied to it.
In this example, the first invoice date was several days earlier than the create date. Since this date was
the current date or earlier, then the first invoice was activated, and the advance deposit was applied to
it.

Accounts Receivable
JOBSCOPE Page 57
About the Database
When a progress billing is created, a record is written in the ProgressBillings table. The bit field
IsActivated will be set to 0. When the invoice is activated, the ProgressBillings record will remain, and
the IsActivated column will be changed to 1.
If the Bill Remainder on Shipment box is checked on the Progress Billings screen, the program will write
an extra record in the ProgressBillings table that represents the remainder. The AmountBilled column in
the table will contain the remainder amount. When the Create A/R Invoices From Shipments program
creates an invoice for the remainder, it will update the invoice number and date in the special record for
the shipment. The special record for the shipment will have the column IsRemainderBilledOnShipment
set to 1.

Accounts Receivable
JOBSCOPE Page 58
Time and Material Billing
The Time and Material Billing functionality can simplify the process of creating time and material
invoices.
You can create standard time and material rate codes with the labor rates or material markups
predefined. For each of these codes, you can define customers who get a special rate instead of the
default rate for the rate code. The system will display all labor and material charges to a job, and you
can check which ones should be included in the invoice.
You can define a rate code for each employee.
For materials, if the part has a default selling price set up in the Part Prices screen in the Parts and
Change Control collection, and the rate code is left blank, then the system will use that default selling
price. If a rate code is selected, then the system will apply the rate code markup to the unit cost, even if
there is a default selling price. In other words, if you want to use the default selling price, leave the rate
code blank.

Accounts Receivable
JOBSCOPE Page 59
Setting Up for Time and Material Billing
You need to set up the Time and Material Rate Code table in System Utilities.
This table tells the system everything it needs to know to calculate time and material billing. You need
to create as many codes as you need to get the job done.
The first setting that the system uses is the check box labelled Is Labor Rate. If this is not checked, then
the system knows that the rate code is for materials. If it is checked, then the system knows that the
rate code is for labor.
The value in the Product Line field will be written to the invoice if a product line is not entered with the
job.
Only rate codes with the Is Active box checked will be considered by the system.
You can set up rate codes for specific labor and material categories. To do this, use a Rate Code that is
the same as the Category code. The billing system will default the rate code to this code.
The Employee Master has an Hourly Rate field. If the system is billing for labor, and no rate code is
selected, and the Hourly Rate field in the employee master for the employee performing the work is not

Accounts Receivable
JOBSCOPE Page 60
blank, the system will use the hourly rate from the employee master. This is an important point. The
Hourly Rate field in the employee master is normally used to define the employee’s actual pay rate, so if
the employee might be doing time and material work, you should define a rate code in the employee
master so that the system will not use his hourly rate.
How the System Gets the Rate
When the Time and Material Billing program displays a labor transaction, it attempts to find a labor rate
code to use. If it can find one, it will use it. If it can’t find one, then it will use the Hourly Rate field from
the employee master.
When the system looks for a code, it first checks to see if a rate code is set up for the customer. If it
finds one, it will use it. If there is not one, it will check to see if a rate code is set up for the employee,
and use that. If there is not labor rate code in the employee master, then it checks the employee hourly
rate. If the employee hourly rate is blank, then it will display a message.
You can always select a labor rate code when doing time and material billing.
After the system has a rate code, it may still not be able to select a rate. An example of this is the case
where the rate code does not have a sub rate code for the day of the week. In this case, and any case in
which the system has a rate code, but can’t determine a rate, it will use the default rate code for the
employee.
As stated earlier, if there’s any chance that an employee will have time billed in the Time and Material
Billing program, then that employee should have a labor rate code defined in the employee master. You
can always override it at billing time.

Accounts Receivable
JOBSCOPE Page 61
Material Rate Codes
For materials, the check box Is Labor Rate is not checked, and the system knows that the rate code is for
materials, and the system will display a Customer Rates grid, as shown below. When creating a time and
materials invoice, the system will check to see if a customer rate exists. If it does not, it will use the
Default Rate. When making this calculation, the system will use the rate value as a markup. As an
example, if the material unit cost is $100.00, and the rate is 62.00, then the billing amount will be
$162.00.
In the example below, the Is Labor Rate box is not checked, indicating that the rate is for materials. The
Is Percent box is not checked, so the rate is a markup in dollars. In this example, there are no customer
rates, and so the Default Rate would be used. If the material unit cost is $145.00, then the billing
amount will be $185.00.

Accounts Receivable
JOBSCOPE Page 62
Labor Rate Codes
If the Is Labor Rate box is checked, then the system knows that the rate code is for labor. In the
example below, the Default Rate of $60.00 per hour will be used if no Sub Rate Code is defined for the
customer nor for the employee. The system will first check to see if a labor rate code is defined for the
customer, and use that rate if it is not blank. If it is blank, then it will check to see if a labor rate code is
defined for the employee, and use that rate if it is not blank. If it is blank, then the system will use the
default labor rate code. The Sub Rate Code can be used to define special rates for a customer and also
rates which apply to specific days of the week. You cannot do percentage markups for labor, only a
dollar rate.
If you create a Sub Rate Code for a customer, you must mark the days of the week. If the rate applies
for every day, then check every day.
You must enter either a Sub Rate Code or a Customer Number on each sub rate line. You can enter both
if you wish. The sub rate code value will be written to the invoice for tracking purposes.
When the invoicing program makes a labor rate calculation, it will consider the Rate Code, Customer,
Date (which day of the week), Start, and End times. If the sub rate code line does not clearly include the
customer, day of the week, or time range, then the default rate will be used.

Accounts Receivable
JOBSCOPE Page 63
Creating Time and Material Invoices
To create a time and material invoice, click on Time & Material Billings on the toolbar.
The Time and Material Billing screen displays. Enter the Release Number (or the job) in the Release
Number field and tab. The labor and material transactions that have not been invoiced (not linked to an
invoice line) will display. In the Invoice Number field, enter the invoice number that you want assigned,
or enter NEW and let the system assign the next number.
In the Invoice column, check the transactions that you want to invoice. Click in the Rate Code column
and select a rate code. When you are ready, click on the Create Invoice button ( ) and the
invoice will be created.
If you check the Anticipatory box, the invoice will be created as an anticipatory invoice.

Accounts Receivable
JOBSCOPE Page 64
The system will create the invoice and display this message. It will also ask you if you wish to open it
now. If you answer yes, the system will open the invoice, allowing you to email it if you wish.
Excluding Transactions
You can tell the system to exclude transactions from the Time and Material Billing grids by checking the
Exclude from Billing flag shown in the display below. Once you have checked the transactions you wish
to exclude, you can click on the Refresh button and the transactions will be excluded. Clicking on Create
Invoice with transactions checked will also exclude those transactions.
You should be very careful when you do this because there is no way in the program to “unexclude” a
transaction. The ExcludeonTMBilling column in the PPHRTRX (labor) or IPALLOC (material) table must be
set to zero in the database in order to put a transaction back in the grid.

Accounts Receivable
JOBSCOPE Page 65
Analyzing the Results for the Material Transactions
This is the A/R Billing Details screen for a typical invoice, showing one of the material transactions.

Accounts Receivable
JOBSCOPE Page 66
This is the Time & Material Rate Code screen in Table Maintenance in System Utilities with Rate Code
STD displayed.
The material transactions used Rate Code STD, and the customer was 100004. The actual unit cost of
the transaction for part number 26983 was $795.00. The system used a rate of 55.00, which resulted in
a multiplier of 1.55, which resulted in a billing price of $1232.25 for each part.

Accounts Receivable
JOBSCOPE Page 67
Analyzing the Result for the Labor Transaction
This is the A/R Billing Details screen for a typical invoice, showing the labor transaction.

Accounts Receivable
JOBSCOPE Page 68
This is the Time & Material Rate Code screen in Table Maintenance in System Utilities with Rate Code
TLR displayed.
The labor transaction used Rate Code TLR, and the customer was 100004. Notice that there is no special
rate for customer 100004, so the default labor rate of $60.00 per hour was used.

Accounts Receivable
JOBSCOPE Page 69
You can see the previously invoiced items by checking the Show Invoiced Items box.

Accounts Receivable
JOBSCOPE Page 70
Payments Mode
Use this window to enter payments against an Accounts Receivable billing (invoice). Accounts
Receivable billings remain open until they are paid to exactly zero.
In Payments mode, there are seven selections on the toolbar across the top.
Payments
Click on Payments to enter new payments. This is the A/R Payments screen.
When you’re receiving payments by mail, you’ll probably enter the payment records, then make a single
bank deposit for all the payments. The Bank Deposits function serves this purpose very well. However,
if a single payment results in a deposit all by itself, then you can have the system create that deposit
record for you by checking the Create Bank Deposit Record Box on the screen.

Accounts Receivable
JOBSCOPE Page 71
Applying a Payment to a Single Invoice
The first step is to get the invoice. If you know the invoice number, you can enter it in the Invoice field.
When you tab out of the field, the invoice information will display. If you don’t know the invoice
number, you can browse for it.
To browse for the invoice, click on the Find button ( ) beside the Invoice field. The Accounts
Receivable Invoice browse screen displays.

Accounts Receivable
JOBSCOPE Page 72
Enter or select the browse criteria (here we have entered a job number), and click on the Search button
( ).
The search results display in the grid. Double click on the one you want.

Accounts Receivable
JOBSCOPE Page 73
The system writes the selected invoice number back to the A/R Payments screen. Tab out of the field
and the invoice information displays.
The Received field is the date the payment is received, and the system will default to the current date.
You can change it. If you change it to a date in a prior period and you are using the Financial Calendar,
you should read the section “Using the Financial Calendar for Backdating Subledger Transactions” in the
General Ledger User Guide.
The Type Payment field is for entries in table 7004. Unless you have a blank entry in the table, you must
select an entry from the dropdown. This selection will determine the debit account for the payment.
The Discount Type Payment field tells the system where to debit the discount.

Accounts Receivable
JOBSCOPE Page 74
Enter the amount of the payment in the Amount field and a customer check or transaction number if
desired, and a Description, if desired, and click on Apply. If you left the Customer Check Number field
blank, you will get this warning. If you want to go back and enter the check number, click on No. If you
don’t plan to enter a check number, click on Yes, and the payment is entered.

Accounts Receivable
JOBSCOPE Page 75
Applying a Payment to Multiple Invoices
In the prior section we talked about applying the payment to a selected invoice. If you want to apply the
payment to more than one invoice, you can select the invoices to which you wish to apply the payment
by using the Pay column in the grid at the bottom of the screen. It is labelled “Outstanding Billings for
Customer”. The Pay column may be moved to the right of the visible area in the grid when you first load
your system. You can scroll the grid out to the right to find the Pay column. When you find it, drag it to
the visible area of the grid and it will look something like this.
When a customer sends a payment against multiple invoices, you need to see the open invoices for the
customer and select the invoices against which to apply the payments, and also to enter the amount to
be applied against each invoice.
To see the open invoices for the customer, you need to get the Customer Number into the Customer
field and tab out of it. This will list the open invoices for the customer in the grid. You can do this by
entering the Customer Number, if you know it.
If you don’t know the customer number, you can browse the Customer field.
Click on the Find button ( ) beside the Customer field.

Accounts Receivable
JOBSCOPE Page 76
The Customer browse displays. Enter the browse criteria that you know. Here we have entered the first
characters of the customer name followed by a percent sign (wildcard), and clicked on the Search
button ( ). The customers meeting this criteria display in the grid at the bottom. Double click
on the one you want.

Accounts Receivable
JOBSCOPE Page 77
The A/R Payments screen displays with the customer written to the Customer field. Tab out of the field
and the open invoices for the customer display in the grid. Use the boxes in the Pay column below to
select the ones for which you want the payment applied.
As you check a box, the system will write the invoice amount to the Payment column. You can manually
change the amount to be paid on each invoice.
You can also enter a discounts taken amount in the Discount Taken column beside it.

Accounts Receivable
JOBSCOPE Page 78
The total amount of the payment and the total discounts taken display in total fields at the bottom of
the screen. The total Payment amount must match the entry in the Amount field. The Discount Taken
amount is not considered in this comparison. The discount is taken into account when the invoice is
gathered into a batch for posting.
In this case, we are paying the outstanding amount of $1450.00 on one invoice, and partial paying the
other one. You can see that the amount outstanding on the other one is $32501.00, and we are
applying only $28550.00.
After clicking on Apply to enter the payment, we can call up the customer again, and the grid looks like
this.

Accounts Receivable
JOBSCOPE Page 79
Inquiry
The last thing is the Inquiry button icon at the top.
Click on it and the Inquiry – AR Payments screen displays. Enter the selection criteria for the invoices
you want to see and click on the Find button ( ).
The Inquiry – A/R Payments screen displays with the selected invoices.

Accounts Receivable
JOBSCOPE Page 80
Other Fields
The Invoice Details section of the screen shows amounts in your native currency and the currency of the
invoice. The Control Amount is the amount entered during your entire session (since you signed on).
The currency displays to the right.

Accounts Receivable
JOBSCOPE Page 81
If You Are Using Foreign Currency
The Currency Total display field resets to zero when the currency changes. Before you begin, group
payments by currency code, then enter all payments that are in the same currency concurrently. This
allows you to track the value of payments made in each currency.

Accounts Receivable
JOBSCOPE Page 82
Payment on Account
If your customers often send a single check to cover multiple invoices, you may want to use the Payment
on Account function. This function allows you to designate to which invoices a customer’s payment
should be applied. You can do the same thing on the A/R Payments screen as described in the section
“Applying a Payment to Multiple Invoices”. The difference is that the Payment on Account function
allows you to maintain an “unapplied payment balance” amount for the customer. The Payments
screen requires that the payment amount exactly matches the amount applied to open invoices. An
example of an “unapplied payment balance” might be when a customer has $15000 in open invoices
and he or she sends a check for $15500. The Payment on Account function allows you to apply $15000
to the open invoices and leave the $500 as an unapplied payment balance. On the screen, this amount
is labeled as “Current POA Balance”.
Payment on Account transactions are stored in the same file as the accounts receivable invoices
(IPARBLL). The system assigns an invoice number with the prefix PA. The number part comes from the
entry in System Utilities.

Accounts Receivable
JOBSCOPE Page 83
Click on Payment on Account to begin. The Payment on Account screen displays. If you know the
customer number, enter it in the Customer field and tab.
The customer’s information displays on the screen.

Accounts Receivable
JOBSCOPE Page 84
If you don’t know the customer number, you can browse for the customer using the Open
button ( ).
This customer has a Current POA Balance (the “unapplied payment balance” we talked about before) of
$12544. You can do two things on this screen. First of all, you can apply the Current POA Balance, or
part of it, to an existing open invoice. The other thing is that you can process a new customer payment.
Let’s apply part of the Current POA Balance first. Go to the next page.

Accounts Receivable
JOBSCOPE Page 85
Applying the Existing POA Balance to an Invoice
Enter the $200.00 that you want to apply in the Amount POA Balance to Apply field, and highlight an
invoice in the grid. One of them may already be highlighted from when you first opened the screen, so
be sure you deliberately highlight the one you want.
Then click on the Update Invoice button ( ).
Notice that the Amount Applied column for the highlighted invoice (Invoice Number 866576) now
shows $3239.88. Now click on Apply or OK.
You can use the Update All Invoices ( ) button to apply all the POA balance to
outstanding invoices. Enter the amount in the Amount POA Balance to Apply field and click on Update
All Invoices and the system will start with the oldest invoice and pay them until the money runs out.

Accounts Receivable
JOBSCOPE Page 86
Processing a New Customer Payment
To process a new customer payment, call up the customer as described previously and enter the
amount of the payment in the Check/Deposit Amount field and click on Apply or OK. The system will
update the Current POA Balance by the amount entered.

Accounts Receivable
JOBSCOPE Page 87
Other Fields on the Payment On Account Screen
Date Received — The system will write the current date, but you can change it.
Currency Code – The customer’s currency code will appear here.
Exchange Rate — (numeric; 999999.999999) This rate is used to convert payment amounts in the
foreign currency to your native currency; the foreign currency payment amount is multiplied by this
exchange rate to calculate your native currency.
Description – (40 alphanumeric characters) This field may be used to record information about the
payment received.
Payment On Account Liability Account
To get the accounting right, you need to designate a liability account for Payment On Account. See the
section “Payment Codes (Table 7004)” for an explanation and how to do it.

Accounts Receivable
JOBSCOPE Page 88
Payment On Account Reversal
The Payment On Account Reversal window allows you to reverse Payment on Account transactions.
From the Payments mode select Payment On Account Reversal. The Payment on Account Reversal
screen displays. Enter the Customer Number for which you want a POA transaction reversed, and enter
the date range that covers the POA transaction and click on the Find POA button ( ). The screen will
look like this. The date range fields are labeled Invoice Date, but actually the date range is for the date
of the POA transaction. Check the box in the Select column, and click on Apply or OK.
The program will undo the selected POA transaction like it never happened.
The Reversal Date field allows you to select the date you want assigned to the reversal.

Accounts Receivable
JOBSCOPE Page 89
Advance Deposits
The Advance Deposits window allows you to log a payment before an invoice has been created.
From Payments mode select Advance Deposits. The Advance Deposits screen displays.
Enter the job number and the Payment Amount, and the screen will look like this.
The Deposit Account is the Default value in Table 7005. You can select a different account from the
dropdown. Enter a description if you like, and select a Payment Type, click on Apply or OK, and the
advance deposit is entered. When it is posted to the general ledger, the debit account will be the
Payment Debit Account from table 7004, based upon the Payment Type you selected, and the credit
account will be the Advance Deposit account from Table 7005.
Date Received is the date the cash was received. If this field is left blank, the system will write the
current system date. This date is used as the selection criteria for inclusion in subledger batches.
Description is 40 alphanumeric characters.
The Exchange Rate is used to convert payment amounts in the foreign currency to your native currency;
the foreign currency payment amount is multiplied by this exchange rate to calculate your native
currency amount. This field will default from table 7009, but you may change it.

Accounts Receivable
JOBSCOPE Page 90
Type Payment (2 alphanumeric characters; edited by table 7004) is the code indicating the type of
payment. A blank is usually considered a normal cash payment. Other codes may be used to indicate
discounts taken, goods rejected, bad debts written off, etc. If you have already made a deposit and you
still have a remaining balance, the “Type Payment” field should contain an “AD” in this field for Advance
Deposit. This value also determines the debit account.
Advance Deposits Accounts
If you use this function, you will need to designate an advance deposits account for each currency. See
the section “Advance Deposits Accounts (Table 7005)”. The net effect of an advance deposit should be a
debit to cash or some other asset account (from Table 7004, Payment Codes) and a credit to an advance
deposit account (from Table 7005, Advance Deposit Accounts).

Accounts Receivable
JOBSCOPE Page 91
Transfer Advance Deposits to POA
Advance deposits are entered for jobs, and can be viewed through Jobscope Analysis – Billings. The
internal invoice for the advance deposit will have a prefix of “DP”.
In some cases, you may want an advance deposit “disconnected” from the job and put into Payment On
Account for the customer so that this deposit can be applied to actual invoices. The Transfer Advance
Deposits to POA does that.
From Payments mode select Transfer Advance Deposits to POA. The Transfer Advance Deposits to POA
screen displays. Enter the job(s) that you want transferred, and click on Apply or OK.
If you are using foreign currency, select the “Convert Job’s Currency to Customer’s Currency” option.
(You must select this option in order to transfer Advance Deposits to Payment on Accounts, because
Payment on Accounts requires that the currency be in the customer’s default currency. If you do not
select this option, and you enter a job that is in a currency different from the customer’s default
currency, an error message is displayed. You must then either delete that job from the list, or select the
option.

Accounts Receivable
JOBSCOPE Page 92
This message will display when processing is complete.
In the Advance Deposits section we said that an advance deposit would debit cash and credit the
advance deposit account. The transfer to POA will debit the advance deposit account and credit the
POA account.
Be sure you have the POA account properly set up in Table 7004 (Payment Codes).

Accounts Receivable
JOBSCOPE Page 93
Miscellaneous Cash Receipts
Some receipts are not the result of Accounts Receivable billings. Such items might include vending
machine income, settlements, etc. Enter such receipts through the Miscellaneous Cash Receipts
function.
From Payments Mode select Miscellaneous Cash Receipts. The Miscellaneous Cash Receipts screen
displays.
Although your miscellaneous cash receipts may go to the same accounts as normal cash payments, it is
best to have a code like MC or whatever for miscellaneous cash receipts. The Payment Debit Account
from table 7004 will be written to the debit account field.
Enter or browse for a credit account using the Find button ( ) beside the Credit Account field. Enter
a Description if you like, and click on Apply or OK.
For foreign currency users, note that miscellaneous cash receipt amounts must be entered in your
native currency. The native currency code is displayed beside the Amount field.
Date Received (Date) — Enter the date the cash was received. If this field is left blank, the system will
write the current system date. This date is used as the selection criteria for inclusion in subledger
batches.
Post to Bank Reconciliation – Check this on if you wish this entry to appear in the grid on the Bank
Reconciliation screen.
The Control Amount field will maintain a running total of all entries made during the session.

Accounts Receivable
JOBSCOPE Page 94
Bank Deposits
The Bank Deposits selection allows you to maintain a record of your bank deposits and link payments to
those deposits. These entries do not update the general ledger.
When you click on the Bank Deposits selection, the Bank Deposits screen displays. The grid displays
payment records from the Accounts Receivable subledger (IPARPAY). The display has two filters. The
first one is for records with a Payment Code that has the Is For Deposit box checked in table 7004. The
second filter is for payments records not already linked to a deposit.
Entering a New Bank Deposit Record
When you first select Bank Deposits, the Bank Deposits screen will open in Clear Screen – Add New Item
mode, meaning it is ready for entry of a new bank deposit record. The next Deposit Number will be in
the Deposit Number field. This number comes from the entry in System Configuration. Select a date for
the Deposit Date field.
In the Payment Type field, you can select a Payment Code from table 7004, and only payments with that
code will be displayed in the grid. You can leave it blank and all payments not linked to a bank deposit
will display.
In the Bank Account field, select a bank account from the User Bank screen.

Accounts Receivable
JOBSCOPE Page 95
The Payments that have not been previously linked to a bank deposit record will display in the grid. To
link a payment to this bank deposit number, check the box in the Select column.
As you check each select box, a running total of what you have selected will be maintained in the Total
Selected field at the bottom.
The Select All button ( ) will check all the boxes on. You can then check some of them off
(uncheck them) as you like.
After you have selected all the payments you like, you must enter the Deposit Amount in the Deposit
Amount field, and that amount must match the “Total Selected” amount. If they don’t match, you will
get an error message when you click on Apply or OK, and the deposit record will not be saved.
When the screen is as you want it, click on Apply or OK and the deposit record will be saved, and the
screen will clear for a new deposit entry.

Accounts Receivable
JOBSCOPE Page 96
Opening an Existing Bank Deposit Record
If you know the actual deposit number originally assigned by the system, enter it in the Deposit Number
field and tab.
If you don’t know the number, click on the Find Deposit icon ( ) at the top left of the screen. The
Bank Deposit browse screen displays. You can select a deposit number from the dropdown, or enter the
Bank Account number, or a date range of deposit dates. You will probably use the date range most of
the time, as is displayed here.
The results of the search display in the grid. To work with one of them, double click on it.

Accounts Receivable
JOBSCOPE Page 97
Double clicking on a deposit record in the grid displays this screen. It looks just like the Back Deposits
screen in “Clear Screen” mode, except that the Show All button ( ) is on this screen.
Clicking on it will add all payments not matched to a bank deposit to the grid.
You can select or deselect additional payments. The Total Selected field at the bottom will maintain a
running total. When you have selected the proper payments, enter the new Deposit Amount, and click
on Apply or OK.
Starting the Bank Deposits Option
In most cases, Accounts Receivable invoices are created, payments made against them, and the
payments deposited before the Bank Deposits option is in use. This leaves a number of payments in the
system not linked to a deposit number. When a payment is linked to a deposit number, the deposit
number is written to the payment record (IPARPAY). When the grid displays payments, it displays the
payment records that have a blank Deposit Number field. To get these old payment records marked so
they don’t display, create the first deposit record and use a Bank Account value like “STARTUP” and
select all the payments that have been previously deposited. Your Jobscope project manager can do this
for you using the New Query function in Microsoft SQL Server Management Studio. If he does too
many, or not enough, you can correct it in the Bank Deposits selection as described in the section
“Opening an Existing Bank Deposit Record”.

Accounts Receivable
JOBSCOPE Page 98
Scheduling Reports in Jobscope
The video “Running Reports in Jobscope” describes how to run a report on a one time basis. The video
“Scheduling Reports in Jobscope” describes how a user can set up a report to run automatically on a
regular schedule. We refer to the program that does this as the Report Scheduler. You don’t need to do
anything to setup the users to run reports on a one time basis, but you do need to do some setup to
allow them to use the Report Scheduler.
The Report Scheduler uses the Workflow Service. In order to save the report results to a file, you need to have one of two methods setup on your server, and let all of your users know how to use the Report Scheduler. If you prefer your users to save their reports to a UNC path (the preferred method), then you need to setup the Workflow Service on the server to run as a domain user (not the Local System Account). Once you do this (and restart the service), your users can enter a path such as //machinename/xxx.pdf. Otherwise, the reports will save to the errorlog folder on the server. If you prefer to run the workflow service as the local system account, then you must setup a shared path on the server (the same server that is running the workflow service), and ask users to save exports to that location. You can enter these as local file paths (c:\SampleFilePath) and give users access to that folder. Remember, this is not the C drive on their local computer, but on the server! Once you have decided on one of the above methods, inform your users so they know how to enter the path for saving a scheduled report.
Using a Workflow to Run Reports
You can use a workflow to run reports. As an example, you might want the Cost Control Sheet to run
every time a new job is entered. This is described in the Workflow Users Guide.
October 30, 2017


