289
S A GE ACCPA C Sage Accpac ERP ™ Accounts Receivable 5.5A Getting Started
.
Sage Accpac International, Inc. Confidential
SAGE ACCPAC
Sage Accpac ERP™
Accounts Receivable 5.5A Getting Started

AR GS ttl.doc, printed on 1/31/2008, at 2:34:03 PM. Last saved on 1/31/2008 2:33:00 PM.
Sage Accpac International, Inc. Confidential
©2008 Sage Software, Inc. All rights reserved. Sage Software, Sage Software logos, and all Sage Accpac product and service names are registered trademarks or trademarks of Sage Software, Inc., or its affiliated entities. All other trademarks are the property of their respective owners. Sage Software, Inc. Publisher No part of this documentation may be copied, photocopied, reproduced, translated, microfilmed, or otherwise duplicated on any medium without written consent of Sage Software, Inc. Use of the software programs described herein and this documentation is subject to the Sage Software License Agreement enclosed in the software package.
Getting Started iii
Args‐toc‐55.doc, printed on 1/23/2008, at 7:21:46 PM. Last saved on 1/23/2008 7:21:00 PM.
Sage Software Confidential
Contents
Chapter 1: Introducing Accounts Receivable
Accounts Receivable Features ...................................................1–1 Tailor Accounts Receivable to Your Business ..................................1–2 Produce Comprehensive Management Reports ................................1–3 Manage Your Customer Records .............................................1–4 Adapt Transaction Processing to Your Needs..................................1–5 Produce Complete Audit Trails ..............................................1–6 Protect the Integrity of Your Accounts Receivable Data.........................1–7 Ensure Date Sensitivity at All Times..........................................1–8 Use Screen Displays to Quickly Review Your Data.............................1–8 Do Multicurrency Accounting ...............................................1–8
Integrating with Other Programs ................................................1–9 Accounts Receivable Documentation ............................................1–10
How to Use This Guide ....................................................1–10 The User Guide ...........................................................1–11 Online Documentation .....................................................1–12
Where To Now?...............................................................1–12
Chapter 2: What You Need to Know Before Setting Up Accounts Receivable
Choosing Accounts Receivable Options ..........................................2–2 Company Information ......................................................2–2 Processing Options .........................................................2–3 Transactions Options ......................................................2–12 Numbering Options .......................................................2–22 Statement Options .........................................................2–25

iv Sage Accpac Accounts Receivable
Args‐toc‐55.doc, printed on 1/23/2008, at 7:21:46 PM. Last saved on 1/23/2008 7:21:00 PM.
Sage Software Confidential
Retainage Options ........................................................ 2–27 Choosing G/L Integration Options.............................................. 2–31
Specifying When, Where, and How to Create G/L Transactions................ 2–32 Including Descriptive Information with G/L Transactions ..................... 2–35 Changing Your Choices for G/L Integration Options.......................... 2–36
Designing Accounts Receivable Coding Schemes ................................ 2–37 Sorting Order of Codes .................................................... 2–39
Entering Accounts Receivable Setup Information ................................ 2–39 Setting Up Account Sets ................................................... 2–40 Setting Up Billing Cycles................................................... 2–44 Setting Up Distribution Codes.............................................. 2–45 Setting Up Dunning Messages.............................................. 2–47 Setting Up E‐Mail Messages................................................ 2–47 Setting Up Interest Profiles................................................. 2–49 Setting Up Payment Codes................................................. 2–52 Setting Up Item Records ................................................... 2–53 Setting Up Salesperson Records ............................................ 2–57 Setting Up Terms Codes ................................................... 2–58 Setting Up Optional Fields ................................................. 2–60
Setting Up Customer Records .................................................. 2–64 Selecting the Account Type ................................................ 2–65 Creating Customer Groups ................................................ 2–67 Creating National Accounts................................................ 2–71 Adding Customers ........................................................ 2–77 Adding Ship‐To Locations ................................................. 2–90 Adding Recurring Charges................................................. 2–92
Importing and Exporting Accounts Receivable Records........................... 2–96 Entering Current and Historical Transactions.................................... 2–98
Entering Current‐Year Data ................................................ 2–98 Entering Historical (Previous‐Year) Data .................................... 2–99
Creating Formats for Printed Forms ........................................... 2–101 Setting Up Multicurrency Accounting in Accounts Receivable.................... 2–101 Where To Now? ............................................................. 2–103

Getting Started v
Args‐toc‐55.doc, printed on 1/23/2008, at 7:21:46 PM. Last saved on 1/23/2008 7:21:00 PM.
Sage Software Confidential
Chapter 3: Setting Up Your Accounts Receivable System
Before You Begin...............................................................3–1 Using Accounts Receivable with an Internet Browser ..............................3–2 Overview of Accounts Receivable Setup ..........................................3–2 While You Work ...............................................................3–3
Guideposts to Accounts Receivable Information ...............................3–5 Setting Up an Accounts Receivable System .......................................3–7
Step 1: Gather Data from Your Present Receivables System.....................3–7 Step 2: Add Receivable Accounts to Your Chart of Accounts ...................3–9 Step 3: Add Tax, Bank, and Currency Information for Accounts Receivable in
Common Services......................................................3–10 Step 4: Select Accounts Receivable Options ..................................3–10 Step 5: Add Setup Records .................................................3–34 Step 6: Add Customer Records .............................................3–66 Step 7: Add Ship‐To Locations (Optional) ...................................3–98 Step 8: Add Recurring Charges (Optional)..................................3–105 Step 9: Add Opening Balances and Current‐Year Transactions................3–117 Step 10: Add Customer Statistics (Optional) ................................3–122 Step 11: Add Item Statistics (Optional) .....................................3–126 Step 12: Add Salesperson Statistics (Optional)...............................3–128 Step 13: Design Customer Invoices, Statements, Deposit Slips, Labels, Checks, and
Letters ...............................................................3–130 Where To Now?..............................................................3–131
Appendix A: Setup Checklist Sample Setup Checklist ........................................................ A–2
Index


Getting Started 1–1
ARGS‐1.doc, printed on 2/5/2008, at 6:28:11 PM. Last saved on 2/5/2008 6:27:00 PM.
Sage Software Confidential
Introducing A
/R
Chapter 1 Introducing Accounts Receivable
This chapter introduces you to Accounts Receivable. It describes important features of the program, discusses how Accounts Receivable integrates with other applications, and suggests how to use the guides to learn about the system.
Accounts Receivable Features Accounts Receivable handles all your receivables record‐keeping and reporting needs, regardless of the size and complexity of your business.
You can use the Accounts Receivable program to set up and maintain your customer accounts, enter or import transactions from various sources, and print invoices. You can track account and transaction details on screen displays and printed reports.
You can use Accounts Receivable by itself or as part of an integrated system with other Sage Accpac accounting applications. You can also transfer Accounts Receivable data to and from spreadsheet and database programs.
Use Accounts Receivable through a browser or from the Sage Accpac desktop
You can access your Accounts Receivable data using the Sage Accpac desktop or through your Internet browser. All Accounts Receivable data entry forms are designed to enable users at remote locations to enter or view data using a browser.
To find out how to configure your system for use with an Internet browser, see the System Manager Administrator Guide.
The rest of this section describes some of the tasks you can accomplish using Accounts Receivable.

Accounts Receivable Features
1–2 Sage Accpac Accounts Receivable
ARGS‐1.doc, printed on 2/5/2008, at 6:28:11 PM. Last saved on 2/5/2008 6:27:00 PM.
Sage Software Confidential
Tailor Accounts Receivable to Your Business
• Set up any number of recurring charge invoices for fast invoicing of periodic charges.
• Set up recurring charges to use schedules with reminders, so that Sage Accpac reminds users to process recurring charges when they are due. (Users can process the transactions directly from the Reminder List, or they can use the Create Recurring Charge Batch form, later.)
• Set up any number of general ledger control account sets to assign to customers.
• Define distribution codes to speed data entry.
• Define payment codes for the types of payments you accept, including credit cards.
• Define as many payment terms as you need.
− Specify whether to include or exclude tax amounts in discount bases.
− Calculate due dates and discount dates from the invoice date, end of next month, day of next month, and days from day of next month.
− Define multiple payment schedules. Each payment can have a unique due date and discount date.
• Maintain an item price list for invoicing. An item list includes item number, description, unit of measure, cost, selling price, and sales and returns statistics.
• Handle both open‐item and balance‐forward customers in the same accounts receivable ledger.
• Define and use as many optional fields as you need to store additional information for all types of transactions, customer records, and ship‐to locations.

Accounts Receivable Features
Getting Started 1–3
ARGS‐1.doc, printed on 2/5/2008, at 6:28:11 PM. Last saved on 2/5/2008 6:27:00 PM.
Sage Software Confidential
Introducing A
/R
• Print invoices, bank deposit slips, customer statements, letters, and labels using the supplied formats — or change them to suit your needs.
• Choose whether to charge interest. For open‐item customers, decide whether you will charge interest on overdue balances or individual invoices.
• Set up billing cycles, so that you can print statements and charge interest for groups of customers at convenient times.
• Set up salesperson records and assign sales splits to the salespersons during invoice entry. Accounts Receivable keeps track of basic information and sales statistics for each salesperson.
• Print different dunning messages for each aging period and print different sets of messages with different statements.
Produce Comprehensive Management Reports
Accounts Receivable provides numerous sorting and selecting options on a full range of reports, journals, and lists. You can print most major reports on letter or A4 size paper, including:
• Aged Trial Balance. Reports outstanding transactions, aged by due date or by document date. Other report options include printing only customer records that are over the credit limit and printing the customer’s contact name, telephone number, and fax number for collection purposes.
• Aged Retainage. Reports outstanding retainage amounts. The report includes six aging periods: five aging periods you specify for the report, including the current period, plus a future period.
• Overdue Receivables. Reports outstanding transactions, aged by due date or by document date, for analyzing receivables.
• Customer Transactions. Provides a complete listing of transactions, including applied details.
Accounts Receivable Features
1–4 Sage Accpac Accounts Receivable
ARGS‐1.doc, printed on 2/5/2008, at 6:28:11 PM. Last saved on 2/5/2008 6:27:00 PM.
Sage Software Confidential
• Customer List And Statistics. Provides a summary of information in customer records, including addresses, customer options, statistics, comments, and recurring charge data.
• G/L Transactions. Lists all transactions generated by Accounts Receivable for posting to Sage Accpac General Ledger or another general ledger. You can create and list a separate G/L transaction batch each time you post invoices, receipts, adjustments, or revaluations.
Manage Your Customer Records
• Define an unlimited number of customer groups for gathering statistics and reporting purposes. Each customer is assigned to a group.
• Use national accounts to group customers whose invoices are paid from a single location. (National Accounts Management is a separate package that you can use with any edition of Accounts Receivable.) During receipt entry, Accounts Receivable displays the transactions for all members of the national account at once, so you can quickly assign the payment to the applicable customer accounts.
• Define an unlimited number of ship‐to locations (shipping addresses) for each customer.
• Accumulate customer statistics by periods you specify. Retain the statistics for as long as you want, or choose not to keep statistics, as you need.
• Add an unlimited number of comments to customer records, each up to 2,500 characters in length, with expiration and follow‐up dates.
• Set any records (such as customer records or payment terms) inactive if you want to stop using them on a daily basis but want to retain them for historical and reporting purposes.
Accounts Receivable Features
Getting Started 1–5
ARGS‐1.doc, printed on 2/5/2008, at 6:28:11 PM. Last saved on 2/5/2008 6:27:00 PM.
Sage Software Confidential
Introducing A
/R
Adapt Transaction Processing to Your Needs
• Maintain as many open batches of invoice, cash, and adjustment transactions as you need, for example, to group transactions by operator, time period, type of entry, or any other method you find useful.
• Use retainage accounting when invoicing your customers.
• Distribute invoices to as many general ledger sales or revenue accounts as you require.
• Print invoices individually as you enter them, or in batches.
• Quickly enter and print a deposit slip for the day’s receipts. You can enter the remaining receipt details at your leisure.
• Post overapplied receipts, partially applied receipts, and receipts that have a zero total.
• Create batches of interest and recurring charge invoices.
• Create or modify transactions, print batch listings, and even post batches from the Batch List forms.
• Record an NSF check to automatically reinstate the invoice(s) the check originally paid.
• Adjust open invoices during receipt entry.
• Enter credit notes, debit notes, and payments for specific invoices or “on account.” Save time by entering prepayments with invoices.
• Enter itemized or summary invoices. Itemized invoices use the Accounts Receivable item and price list information.
• Post batches that include both types of invoices.
• Calculate taxes on invoices on a summary or line‐by‐line basis.
• Enter negative detail lines in both summary and item invoices.

Accounts Receivable Features
1–6 Sage Accpac Accounts Receivable
ARGS‐1.doc, printed on 2/5/2008, at 6:28:11 PM. Last saved on 2/5/2008 6:27:00 PM.
Sage Software Confidential
• Override the program’s automatic tax calculation during invoice entry or when setting up recurring charges.
• Enter transactions directly, or import them from other accounting systems or applications.
• Choose the description and reference information you prefer when you send transactions to General Ledger.
• Create batches of transactions to write off uncollectible accounts.
• Allow or restrict editing of interest batches, recurring charge batches, invoice batches for which invoices have been printed, receipt batches for which deposit slips have been printed, and batches retrieved and imported from other programs.
• Create batches of currency revaluation transactions that reflect gains and losses from changes in exchange rates. The Aged Trial Balance report reflects the results of the revaluation transactions.
Produce Complete Audit Trails
• Keep complete details of fully paid transactions for as long as you choose, and print a history report.
• Drill down from General Ledger transactions to Accounts Receivable invoices, receipts, and adjustments, providing you have not deleted the transactions using the Clear History form.
• Delete history of fully paid transactions for selected customers, and delete posted and printed journals for selected posting sequences, as required to clear disk space.
• Print a journal of the entries posted in each posting run, listing key pieces of information you can use to track each detail.
• Print the Aged Trial Balance, Overdue Receivables, and Customer Transactions reports for a complete listing of transactions that have not yet been deleted.

Accounts Receivable Features
Getting Started 1–7
ARGS-1.doc, printed on 2/7/2008, at 10:09:18 AM. Last saved on 2/7/2008 10:08:00 AM.
Sage Software Confidential
Introducing A
/R
• Define the prefixes Accounts Receivable assigns to invoices, credit notes, debit notes, prepayments, unapplied cash, refund, and adjustment transactions.
• Optionally, require printing of batch listings and bank deposit slips before posting. (You can print deposit slips both before and after posting receipt batches.)
• Produce an audit trail for open-item accounts, showing how transactions have been paid and which transactions are still outstanding.
Protect the Integrity of Your Accounts Receivable Data
• You cannot delete customer accounts with outstanding transactions, and you cannot delete accounts that have non-zero balances.
• You cannot post transactions with duplicate document numbers.
• You cannot post an apply document transaction to a date earlier than the documents to which they apply, nor can you post a receipt or a refund to a date earlier than the document being paid or refunded.
• You cannot post adjustments and reversals (of receipts and refunds) to a date earlier than the document you are adjusting or reversing.
• You cannot post a retainage document to a date earlier than the posting date of the original document.
• When adding entries, you must use valid codes for customers, customer groups, national accounts, account sets, terms, billing cycles, recurring charges, distribution codes, tax groups, and bank accounts.
• You must complete specific tasks before proceeding with year-end processing.

Accounts Receivable Features
1–8 Sage Accpac Accounts Receivable
ARGS‐1.doc, printed on 2/5/2008, at 6:28:11 PM. Last saved on 2/5/2008 6:27:00 PM.
Sage Software Confidential
Ensure Date Sensitivity at All Times
• You can enter run dates for statements and aging reports, ensuring that transactions entered for the next period are not reported, and specify aging periods at the time of printing.
• Accounts Receivable posts all details of transactions to the same fiscal period that you use during transaction entry.
Use Screen Displays to Quickly Review Your Data
• Review current and historical transactions, as well as detailed statistics, for each customer account. Review the payment history for individual invoices at the touch of a button.
• Perform on‐screen aging and preview customer statements.
• Display a summary of each batch in the system.
Do Multicurrency Accounting
Sage Accpac multicurrency accounting allows you to enter, post, and report transactions in all the currencies you use in your business, including the euro.
You can also transfer multicurrency transactions from other Sage Accpac applications to Accounts Receivable, and import them from non‐Sage Accpac applications.
Accounts Receivable prints totals by currency on most major reports.
Accounts Receivable lets you:
• Accept the exchange rate associated with a rate type and date, or override the rate for individual invoices or payments.
• Apply cash to invoices in any currency.
• Include taxes on invoices in the tax reporting currency, if the document currency is different from the customer’s currency.
Integrating with Other Programs
Getting Started 1–9
ARGS‐1.doc, printed on 2/5/2008, at 6:28:11 PM. Last saved on 2/5/2008 6:27:00 PM.
Sage Software Confidential
Introducing A
/R
• View account balances and print key analysis reports in both the functional currency (the home currency of a given set of data) and source currencies (the currency in which a transaction was entered).
• Revalue transactions that you entered in other currencies, as exchange rates change. You can select the currencies, rate types, customer records, and account sets for which to revalue transactions.
• Recognize exchange gains and losses during revaluation or when you settle documents, depending on the gain/loss accounting method you use for your system.
• Print an Aged Trial Balance report that reflects the results of currency revaluation.
Integrating with Other Programs Accounts Receivable can be used by itself or as part of an integrated system with other Sage Accpac accounting applications. You can also transfer Accounts Receivable data to and from spreadsheet and database programs using the import and export facilities.
You can integrate Accounts Receivable with the following Sage Accpac applications:
• General Ledger and Financial Reporter. Accounts Receivable can create general ledger batches directly in General Ledger, or create batches that are ready to import to General Ledger at a remote location. You can choose to create general ledger batches automatically during posting or create the batches yourself when you are ready, and you can post transactions to the General Ledger in consolidated form or with full details. You can specify what you want to include as the reference and description for each transaction sent to the general ledger.
Accounts Receivable Documentation
1–10 Sage Accpac Accounts Receivable
ARGS‐1.doc, printed on 2/5/2008, at 6:28:11 PM. Last saved on 2/5/2008 6:27:00 PM.
Sage Software Confidential
• Order Entry. You can automatically create a batch of invoice and credit note transactions in Accounts Receivable when you use the Day End Processing form in Inventory Control.
You can verify Accounts Receivable customer information when you process orders and invoices in Order Entry, and you can drill down from an invoice, credit note, or debit note in Accounts Receivable to the originating transaction in Order Entry (version 5.0 and later). In addition, you can include unposted Order Entry transactions when performing credit checks for customers during invoice entry.
You can also specify shipping details in Accounts Receivable that Order Entry can use as defaults for a customer.
• Project and Job Costing. Accounts Receivable lets you enter and post job‐related invoices, debit notes, credit notes, and receipts that will update contracts that you maintain in Project and Job Costing. Account Receivable also accepts invoices created when you post billing worksheets in Project and Job Costing.
Accounts Receivable Documentation The Sage Accpac ERP 5.5 DVD includes the Getting Started guide and the User Guide in Adobe PDF format, as well the Update Notice and readme file for this version of Accounts Receivable.
You can install the Getting Started guide, the User Guide, and the Update Notice on Sage Accpac ERP servers and workstations when you install the Accounts Receivable program, and you can open them from the Help menu on the Sage Accpac ERP desktop.
How to Use This Guide
This Getting Started guide explains how to set up your data for Accounts Receivable.

Accounts Receivable Documentation
Getting Started 1–11
ARGS‐1.doc, printed on 2/5/2008, at 6:28:11 PM. Last saved on 2/5/2008 6:27:00 PM.
Sage Software Confidential
Introducing A
/R
To install Sage Accpac and set up your printer, follow the instructions in the System Manager Administrator Guide.
In addition to Chapter 1, Getting Started contains the following chapters:
Chapter 2, What You Need to Know Before Setting Up Accounts Receivable, tells you how to create an accounts receivable system that takes full advantage of the program’s features and meets your company’s current and future needs.
Chapter 3, Setting Up Your Accounts Receivable System, guides you through setting up Accounts Receivable to meet the unique needs of your company, and transferring your current accounts receivable data to your new system.
Appendix A, Setup Checklist, describes and shows the setup checklist, and explains how to print it.
The Index contains an alphabetical listing of topics in this guide, with corresponding page‐number references.
The User Guide
The Accounts Receivable documentation includes this Getting Started guide and the User Guide.
The Accounts Receivable User Guide contains an overview of Accounts Receivable processing, and details daily and periodic processing and maintenance procedures. It also shows reports printed from the sample data.
The appendixes in the Accounts Receivable User Guide describe the import and export features and provide other technical information for interested users.
Turn to the User Guide once you have finished setting up your Accounts Receivable system, following the instructions in this Getting Started guide.
Where To Now?
1–12 Sage Accpac Accounts Receivable
ARGS‐1.doc, printed on 2/5/2008, at 6:28:11 PM. Last saved on 2/5/2008 6:27:00 PM.
Sage Software Confidential
Online Documentation
When you install Accounts Receivable, you also install the following Accounts Receivable online documents:
• README.wri, ARTECHINFO.wri, FORMS.wri, and AR‐SETUP.pdf files in the \Sage Accpac\DOCS\AR55AENG directory.
README contains specialized information about the program, and describes any program changes that occurred after the manual was finished.
ARTECHINFO contains technical information, such as a list of all the database tables in the Accounts Receivable program, the Accounts Receivable fields you can import and export, and database or report changes.
FORMS lists the fields, field lengths, and descriptions you can include when customizing printed Accounts Receivable forms, such as invoices and statements.
AR‐SETUP is a checklist that lists the steps for setting up the Accounts Receivable program.
• The Accounts Receivable Update Notice, Getting Started Guide and User Guide if you choose to install Documents during Accounts Receivable installation.
You can choose the Accounts Receivable readme file and manuals from the Help menu on the Sage Accpac Desktop.
Where To Now? If you have just purchased the System Manager and Accounts Receivable, install the applications on your computer following the instructions in the System Manager Administrator Guide. If you have already installed System Manager, install Accounts Receivable following the instructions in the System Manager Administrator Guide.
Where To Now?
Getting Started 1–13
ARGS‐1.doc, printed on 2/5/2008, at 6:28:11 PM. Last saved on 2/5/2008 6:27:00 PM.
Sage Software Confidential
Introducing A
/R
If Accounts Receivable is already installed on your system, we suggest you read Chapter 2, “What You Need to Know Before Setting Up Accounts Receivable,” in this guide.
Also, the chapter on Accounts Receivable in the Sage Accpac Workbook, which comes with the System Manager, provides lessons on how to enter invoices and cash transactions, and print deposit slips. Try the lessons before you begin using Accounts Receivable with your own data.
You can find the Sage Accpac Workbook in the Docs directory on the Sage Accpac ERP 5.5 DVD. You can also choose it from the Help menu on the Sage Accpac ERP Desktop by clicking:
Help / Online Documentation / System Manager / Workbook
When you are ready to create your own Accounts Receivable system, follow the instructions in Chapter 3, “Setting Up Your Accounts Receivable System,” in this guide.


Getting Started 2–i
ARGS‐2.doc, printed on 1/23/2008, at 7:29:03 PM. Last saved on 1/23/2008 7:28:00 PM.
Sage Software Confidential
Before Setting
Up A
/R
Chapter 2 What You Need to Know Before
Setting Up Accounts Receivable
Choosing Accounts Receivable Options ..........................................2–2 Company Information ......................................................2–2 Processing Options .........................................................2–3
Using Multicurrency Accounting.........................................2–3 Processing Recurring Charges............................................2–4 Listing Unposted Batches................................................2–5 Editing Imported and External Batches ...................................2–5 Using Retainage Accounting .............................................2–5 Accumulating Customer, Item, and Salesperson Statistics...................2–7 Keeping Comments in Customer Records ................................2–11 Checking Customer Credit..............................................2–11
Transactions Options ......................................................2–12 Specifying a Default Invoice Type .......................................2–13 Specifying a Default Posting Date for Invoices ............................2–13 Specifying Automatic Tax Calculation ...................................2–14 Specifying a Default Tax Class for Summary Invoice Details ...............2–14 Specifying Options for Entering Items on Invoices ........................2–15 Specifying Options for Printing and Posting Invoices and Invoice Batches ...2–15 Specifying the Default Transaction Type, Payment Code, and Bank Code ...2–16 Specifying a Default Posting Date for Receipts ............................2–17 Including Pending Transactions when Applying Receipts .................2–18 Creating Deposit Slips when Adding a New Receipt Batch.................2–18 Printing Deposit Slips ..................................................2–18 Editing Deposit Slips After Printing Batch Listings ........................2–19 Editing Receipts After Printing Receipt Confirmations.....................2–20 Entering Adjustments in Receipt Batches.................................2–20

2–ii Sage Accpac Accounts Receivable
ARGS‐2.doc, printed on 1/23/2008, at 7:29:03 PM. Last saved on 1/23/2008 7:28:00 PM.
Sage Software Confidential
Displaying Open Documents During Receipt Entry....................... 2–20 Check for Duplicate Checks When Issuing Refunds....................... 2–21
Numbering Options....................................................... 2–22 Statement Options ........................................................ 2–25
Defining Aging Periods ................................................ 2–25 Entering Dunning Messages............................................ 2–25 Printing Zero‐Balance Statements ....................................... 2–26 Aging Credit Notes, Debit Notes, Receipts, Unapplied Cash,
and Prepayments .................................................. 2–26 Retainage Options ........................................................ 2–27
Specifying Retainage Defaults for Customer Records (Optional) ........... 2–27 Specifying Retainage Defaults for Invoice Entry and Retainage Processing .. 2–28 Choosing How to Report Tax on Retainage .............................. 2–29 Changing Retainage Options ........................................... 2–31
Choosing G/L Integration Options.............................................. 2–31 Specifying When, Where, and How to Create G/L Transactions................ 2–32
Choosing When to Produce General Ledger Transactions ................. 2–32 Choosing Whether to Create Separate General Ledger Batches............. 2–33 Choosing Whether to Consolidate General Ledger Transactions ........... 2–34 Defining G/L Source Codes............................................. 2–35
Including Descriptive Information with G/L Transactions ..................... 2–35 Selecting Information for General Ledger Transaction Fields .............. 2–35
Changing Your Choices for G/L Integration Options.......................... 2–36 Designing Accounts Receivable Coding Schemes ................................ 2–37
Sorting Order of Codes .................................................... 2–39 Entering Accounts Receivable Setup Information ................................ 2–39
Setting Up Account Sets ................................................... 2–40 Setting Up Billing Cycles................................................... 2–44 Setting Up Distribution Codes.............................................. 2–45
Using Distribution Codes with an Accounts Receivable Item List .......... 2–46 Using Distribution Codes without an Item List ........................... 2–46 Posting Transactions with Distribution Codes............................ 2–46 Creating Distribution Codes............................................ 2–46
Getting Started 2–iii
ARGS‐2.doc, printed on 1/23/2008, at 7:29:03 PM. Last saved on 1/23/2008 7:28:00 PM.
Sage Software Confidential
Before
Setting Up
Before Setting
Up A
/R
Setting Up Dunning Messages ..............................................2–47 Setting Up E‐Mail Messages ................................................2–47
Substitute Variables for E‐Mail Messages.................................2–48 Setting Up Interest Profiles .................................................2–49
Calculating Interest ....................................................2–49 Identifying Interest Invoices ............................................2–51 Assigning Interest Profiles to Customer Accounts.........................2–52 Charging Interest ......................................................2–52
Setting Up Payment Codes .................................................2–52 Setting Up Item Records ...................................................2–53
Adding Item Records ..................................................2–53 Assigning Item Numbers ...............................................2–54 Entering Item Units, Prices, and Costs ...................................2–54 Calculating Tax on Items ...............................................2–55 Entering Item Statistics .................................................2–56
Setting Up Salesperson Records.............................................2–57 Setting Up Terms Codes....................................................2–58 Setting Up Optional Fields .................................................2–60
Setting Up Customer Records ..................................................2–64 Selecting the Account Type .................................................2–65
Open Item ............................................................2–65 Balance Forward.......................................................2–66 Assigning Account Types to Customer Records...........................2–66
Creating Customer Groups .................................................2–67 Assigning Credit Limits to Customer Groups.............................2–68 Keeping Statistics for Customer Groups..................................2–69 Assigning Optional Fields to Customer Groups...........................2–70
Creating National Accounts ................................................2–71 Processing Transactions for National Accounts ...........................2–72 Specifying Billing and Shipping Addresses for National Accounts ..........2–73 Assigning Credit Limits to National Accounts ............................2–73 Placing National Accounts on Hold......................................2–74 Assigning Inactive Status to National Accounts ...........................2–74
2–iv Sage Accpac Accounts Receivable
ARGS‐2.doc, printed on 1/23/2008, at 7:29:03 PM. Last saved on 1/23/2008 7:28:00 PM.
Sage Software Confidential
Keeping Statistics for National Accounts................................. 2–75 Assigning Optional Fields to National Accounts.......................... 2–75 Creating National Accounts ............................................ 2–76
Adding Customers ........................................................ 2–77 Assigning Customer Numbers.......................................... 2–81 Entering Short Names ................................................. 2–82 Entering Credit Information and Credit Limits ........................... 2–83 Assigning On Hold or Inactive Status to Customer Accounts .............. 2–84 Using Customer Statistics .............................................. 2–85 Specifying Default Shipping Details for Customers ....................... 2–86 Allowing Partial Shipments and Backorder Quantities .................... 2–87 Checking for Duplicate Purchase Orders ................................ 2–87 Assigning Optional Fields to Customer Records.......................... 2–88 Processing Customer Comments........................................ 2–89 Entering Tax Information .............................................. 2–89 Entering Retainage Information for Customers ........................... 2–90
Adding Ship‐To Locations ................................................. 2–90 Using Optional Fields with Ship‐to Locations ............................ 2–91
Adding Recurring Charges................................................. 2–92 Importing and Exporting Accounts Receivable Records........................... 2–96 Entering Current and Historical Transactions.................................... 2–98
Entering Current‐Year Data ................................................ 2–98 Entering Opening Balances in Customer Accounts........................ 2–98
Entering Historical (Previous‐Year) Data .................................... 2–99 Creating Formats for Printed Forms ........................................... 2–101 Setting Up Multicurrency Accounting in Accounts Receivable.................... 2–101 Where To Now? ............................................................. 2–103

Getting Started 2–1
ARGS‐2.doc, printed on 1/23/2008, at 7:29:03 PM. Last saved on 1/23/2008 7:28:00 PM.
Sage Software Confidential
Before Setting
Up A
/R
Chapter 2 What You Need to Know Before
Setting Up Accounts Receivable
This chapter contains an overview of the steps to set up a Sage Accpac Accounts Receivable system, and explains the options you can select and the data you add during setup.
Read this chapter before setting up Accounts Receivable
Read this chapter before setting up Accounts Receivable. It will help you create a system that takes full advantage of the application’s features to meet your company’s current and future needs.
After reading this chapter, follow the instructions in Chapter 3, “Setting Up Your Accounts Receivable System,” to create your system. For information about processing daily transactions using Accounts Receivable, see the User Guide.
Install and set up the Sage Accpac System Manager first
Before you can begin Accounts Receivable setup, you must:
1. Install the Sage Accpac System Manager (including Bank Services and Tax Services), General Ledger (if you want to use it), and Accounts Receivable.
2. Create a system database and a company database.
3. Choose company‐wide options in Common Services.
4. Activate Bank and Tax Services.
5. Add information about the bank accounts, taxes, and currencies used in your accounts receivable system.
6. Install National Accounts Management and/or Transaction Analysis and Optional Fields Creator, if you plan to use national accounts or optional fields.
Choosing Accounts Receivable Options
2–2 Sage Accpac Accounts Receivable
ARGS‐2.doc, printed on 1/23/2008, at 7:29:03 PM. Last saved on 1/23/2008 7:28:00 PM.
Sage Software Confidential
Note: You must install National Accounts Management and Transaction Analysis and Optional Fields Creator before activating Accounts Receivable.
7. Activate Accounts Receivable.
Choosing Accounts Receivable Options Once you have activated Accounts Receivable (see the instructions in Chapter 5, “Activating Sage Accpac,” in the System Manager Administrator Guide), your first task is to use Accounts Receivable’s Options form to choose the options you want to use in your system.
The options you select determine how your Accounts Receivable system operates and the types of data that it stores and displays. You can also use the Options form after setup to review your entries and, as needed, change most of them.
This section explains the purposes and effects of the options that you can choose, presenting topics in their order of appearance on the Options form. The options are briefly mentioned again in sections that discuss operations that are affected by these options.
Company Information
You keep and update most company information using the Company Profile form in Common Services. However, you can store the name of an Accounts Receivable contact person or position, and enter the telephone and fax numbers you use in your Accounts Receivable system or department on the Company tab of the A/R Options form.
The Company tab also displays the name and address entered for the company in Common Services. To change the company name and address, use the Company Profile form in Common Services.

Choosing Accounts Receivable Options
Getting Started 2–3
ARGS‐2.doc, printed on 1/23/2008, at 7:29:03 PM. Last saved on 1/23/2008 7:28:00 PM.
Sage Software Confidential
Before Setting
Up A
/R
Processing Options
Use the Processing tab of the Options form to specify whether your Accounts Receivable system:
• Uses multicurrency accounting. • Processes recurring charges. • Requires printing of batch listings before posting. • Permits editing of imported and external batches. • Keeps details of posted invoices, receipts, and adjustments. • Uses retainage accounting. • Accumulates customer, item, and salesperson statistics. • Allows you to edit statistics. • Includes pending transactions during credit checks.
You also use the Processing tab to set the type of year and period by which to accumulate statistical data, and to specify the number of days to keep comments in customer records.
Functional currency
The Processing tab also displays the functional (home) currency used for the Accounts Receivable ledger. You select the functional currency for your company in the Company Profile form in Common Services when you first set up your Sage Accpac system. You cannot change the functional currency once you have selected it. For more information, see the System Manager User Guide.
Using Multicurrency Accounting
Multicurrency ledger
You can set up an Accounts Receivable system that lets you process and report transactions in all the currencies used by your company and its customers.
Using multicurrency accounting
To use more than one currency in Accounts Receivable, select the Multicurrency option on the Processing tab on the Options form. You can select this option only if you have already selected the Multicurrency option for the company in Common Services.
You can select the Multicurrency option at any time but, once you select the option, you cannot change Accounts Receivable back to a single‐currency ledger.
Choosing Accounts Receivable Options
2–4 Sage Accpac Accounts Receivable
ARGS‐2.doc, printed on 1/23/2008, at 7:29:03 PM. Last saved on 1/23/2008 7:28:00 PM.
Sage Software Confidential
Using a multicurrency Accounts Receivable system with other Sage Accpac applications
You can use multicurrency Accounts Receivable with all Sage Accpac applications, even if some applications use multicurrency accounting and others do not. For example, you can post transactions from a multicurrency Accounts Receivable system to a single‐currency Sage Accpac General Ledger.
Information about creating multicurrency records is included in the discussion of each record type. A summary of the steps to take to set up a multicurrency ledger is contained in the “Setting Up Multicurrency Accounting in Accounts Receivable” section, near the end of this chapter.
Processing Recurring Charges
If you regularly bill your customers for standard charges, such as monthly rent, you can create a recurring‐charge record for each customer and recurring charge you use.
To be able to create invoices for recurring charges, select the Process Recurring Charges option on the Processing tab of the Options form, then choose Recurring Charges from the Customers folder to create a record for each customer and charge, as described in the “Adding Recurring Charges” section, later in this chapter.
You can change your choice for the Process Recurring Charges option at any time.
Turning off the Process Recurring Charges option
Before turning off the Process Recurring Charges option, you should review any charges you have set up to make sure you do not want to continue invoicing them. You should also make sure you have invoiced all the recurring charges you intended to process before turning off the option.
If you turn the option off after you have created recurring‐charge records for your customers, you cannot produce recurring‐charge batches and you cannot edit or delete the records. If you later turn on the option again, the records you previously entered are still available.

Choosing Accounts Receivable Options
Getting Started 2–5
ARGS‐2.doc, printed on 1/23/2008, at 7:29:03 PM. Last saved on 1/23/2008 7:28:00 PM.
Sage Software Confidential
Before Setting
Up A
/R
Listing Unposted Batches
Using the Force Listing Of All Batches option
To strengthen your audit trail, select the Force Listing Of All Batches option. This option requires that you print listings of all invoice, receipt, and adjustment batches before you post them, and provides an important report for your audit trail. When you use the option, you must also print new listings of batches you edit.
If you do not use the option
You can print batch listings whether or not you use the Force Listing Of All Batches option. You can also print posting journals that provide complete information about the contents of all posted Accounts Receivable batches.
You can change your choice for this option at any time.
Editing Imported and External Batches
Allow Edit Of External Batches option
If you do not want to restrict editing of external batches, use the Allow Edit Of External Batches option. External batches are batches that you create in other Sage Accpac programs and send to Accounts Receivable (for example, invoice batches that you generate in Project and Job Costing or Order Entry).
Allow Edit Of Imported Batches option
To permit editing of batches you import from non‐Sage Accpac programs, use the Allow Edit Of Imported Batches option.
Selecting these options lets you edit external or imported invoice, receipt, and adjustment batches in Accounts Receivable before posting the batches. Not selecting the options increases your auditing and supervisory control by reducing the possibility of errors.
Using Retainage Accounting
Accounts Receivable lets you account for retainage, or holdbacks. Retainage (or a “holdback”) occurs when the customer delays payment of a percentage of a document total in one of the following circumstances:
• Your contract with the customer stipulates that certain conditions are to be fulfilled before a final payment is due.
Choosing Accounts Receivable Options
2–6 Sage Accpac Accounts Receivable
ARGS‐2.doc, printed on 1/23/2008, at 7:29:03 PM. Last saved on 1/23/2008 7:28:00 PM.
Sage Software Confidential
• Retainage is a statutory requirement (for example, under a Builders Lien Act).
Select the Retainage Accounting option
To use retainage accounting in Accounts Receivable, you must select the Retainage Accounting option on the Processing tab of the A/R Options form.
When you select the Retainage Accounting option, the Retainage tab appears, letting you specify default retainage settings for customers and document processing. (For more information about choosing default retainage settings, see “Retainage Options,” later in this chapter.)
Turning off the Retainage Accounting option
You can turn off the Retainage Accounting option, later, only if there are no unposted batches that include retainage and there are no outstanding retainage amounts.
Preparing your system for retainage accounting
If you select the Retainage Accounting option, you must also specify a retainage control account for each account set in your Accounts Receivable system.
For an overview on setting up account sets, see “Setting Up Account Sets,” later in this chapter.
Specify default retainage settings for customers
You also use the Retainage tab to set options for processing original and retainage documents in Accounts Receivable, and to specify default settings for each customer, including the retainage percentage, retention period, and retainage terms.
When you add a new customer, Accounts Receivable displays in the new customer record the retainage settings you specified in the A/R Options form, but you can change the settings for individual customers. When you enter an invoice, credit note, or debit note for a customer, Accounts Receivable uses the retainage settings from the customer record as defaults.
For an overview on setting up customers, see the section “Adding Customers,” elsewhere in this chapter. For step‐by‐step information on adding customer records, see “Step 6: Add Customer Records,” in Chapter 3 of this guide.

Choosing Accounts Receivable Options
Getting Started 2–7
ARGS‐2.doc, printed on 1/23/2008, at 7:29:03 PM. Last saved on 1/23/2008 7:28:00 PM.
Sage Software Confidential
Before Setting
Up A
/R
Accumulating Customer, Item, and Salesperson Statistics
Accounts Receivable can keep statistics from transactions posted for your customers, items, and salespersons. You can retain and review Accounts Receivable statistics by year and period as far back as the oldest year for which you keep statistics, and you can select the type of year and period by which to accumulate statistics.
Use the Processing tab of the Options form to select the statistics you want to keep and to make choices about how to report them. Accounts Receivable automatically keeps customer statistics, and you can choose whether to also keep statistics for your items and salespersons.
(You can clear customer statistics periodically using the Clear Statistics form, as described in the User Guide.)
The following information is stored:
Customer statistics • Customers, National Accounts, and Groups. For each customer, national account, and customer group, Accounts Receivable can store the total amount and number of invoices, receipts, discounts, credit notes, debit notes, adjustments, write‐offs, interest charges, returned checks, refunds, and paid invoices.
The data is reported by the period you specify.
When updating Customer, National Account, and Customer Group statistics, Accounts Receivable uses the document date to determine which year and period to update.
Customer activity Activity statistics kept for each customer include the amount and date of the customer’s highest balance and largest invoice in the current and previous years, as well as the amount and date of the last invoice, receipt, credit note, debit note, refund, adjustment, write‐off, interest charge, returned check, and discount posted to the account. Each customer record also shows the number of invoices paid in the current year and both the total and average numbers of days it took to pay them all.
Choosing Accounts Receivable Options
2–8 Sage Accpac Accounts Receivable
ARGS‐2.doc, printed on 1/23/2008, at 7:29:03 PM. Last saved on 1/23/2008 7:28:00 PM.
Sage Software Confidential
Reviewing statistics for customer groups and national accounts
Both types of statistics are also kept for national accounts, and period statistics are kept for customer groups.
Use the Customer Groups, National Accounts, and Customers forms to review the statistics.
Item statistics • Items. For each unit of measure in which you sell an item, Accounts Receivable can store: totals of sales, returns, cost of goods sold, and gross margins; numbers of invoices and credit notes issued for the item number, and the total quantity sold; and the date of the last invoice posted using each item number and unit of measure. You can also specify the type of year and period for which to display the information.
Use the Items form to review the statistics.
Salesperson statistics
• Salespersons. Accounts Receivable can store the total amount and number of invoices, receipts, credit notes, debit notes, discounts, and write‐offs posted to each salesperson code. You can also specify the type of year and period for which to display the information.
Use the Salespersons form to review the statistics.
Choosing which statistics to keep
For each type of statistics that you want to maintain (customers, items, and salespersons), you must select the Keep Statistics option.
Turning off options to keep statistics
If you turn off the Keep Statistics option for any type, the application immediately stops collecting statistics, although it retains figures already in the system until you use the Clear Statistics form to clear them. If you turn on the options again, there will be a gap in the statistical information for the period when the options were not used.
If you do not keep statistics, statistical information does not appear in the Customers, Customer Groups, National Accounts, Items, or the Salespersons forms, and the Item Sales History and Salesperson Statistics reports show only zeroes.

Choosing Accounts Receivable Options
Getting Started 2–9
ARGS‐2.doc, printed on 1/23/2008, at 7:29:03 PM. Last saved on 1/23/2008 7:28:00 PM.
Sage Software Confidential
Before Setting
Up A
/R
Options for maintaining statistics
For each set of statistics, you can choose:
• Whether to allow editing of statistics.
• Whether to include tax amounts in the statistical totals.
• The type of year and period for which to display and report statistics.
Using the Allow Edit Of Statistics option
To allow editing of the statistics that you keep, use the corresponding Allow Edit Of Statistics option on the Processing tab on the Options form.
Updating statistics Normally, you do not need to change statistics because they are updated automatically and accurately by Accounts Receivable each time you post batches. However, if you set up your Accounts Receivable system partway through a fiscal year, you may want to use the option to edit statistics so that you can enter figures for previous periods of the current year or for previous years.
From time to time, you may also want to edit a particular statistic because unusual circumstances have exaggerated the amount. For example, if a single invoice remained unpaid for a long period in an otherwise satisfactory account, you could adjust the total number of days to pay or the total number of paid invoices to correct the average so that it more accurately reflects the customer’s paying habits.
Keeping statistics in balance in customer groups and national accounts
If you edit a customer’s statistics, you should make the same changes to the statistics for the customer groups and national accounts to which the customer belongs. To verify that the totals still balance, print the Customer Group Statistics, National Account Statistics, and Customer Statistics reports for the records you change.
Changing your choices
You can change your choices for these options at any time. You may want to turn on an option when you are setting up your system, then turn it off to prevent errors caused by accidental editing.
Choosing Accounts Receivable Options
2–10 Sage Accpac Accounts Receivable
ARGS‐2.doc, printed on 1/23/2008, at 7:29:03 PM. Last saved on 1/23/2008 7:28:00 PM.
Sage Software Confidential
Using the Include Tax In Statistics option
If your company is required to charge taxes on its sales, you can include tax amounts in the statistical totals using the Include Tax In Statistics option on the Options form.
Changing your choice for the Include Tax In Statistics option
You can change your choice for the Include Tax In Statistics option any time you want, but should make changes only at the end of a reporting period. If you change before the end of a period, statistics for the period may include taxes in some amounts, but not in others, so that you cannot make meaningful comparisons within a period or with other periods.
Using the Accumulate By and Period Type options to specify reporting periods for statistics
You can choose the type of period by which statistics are totaled and reported within the year. You can display statistical totals by seven‐day periods, weekly, bi‐weekly, four‐week periods, monthly, bi‐monthly (two months at a time), quarterly, semi‐annually, or the periods in your company’s fiscal calendar.
Choosing the type of period
You can also choose whether to accumulate data by calendar or fiscal year. If you keep statistics by calendar year, the first period begins with January 1. If you keep dates by fiscal year, the first period begins on the first date in your company’s fiscal year.
Use the Accumulate By and Period Type options on the Processing tab of the Options form to indicate how you want to group statistics.
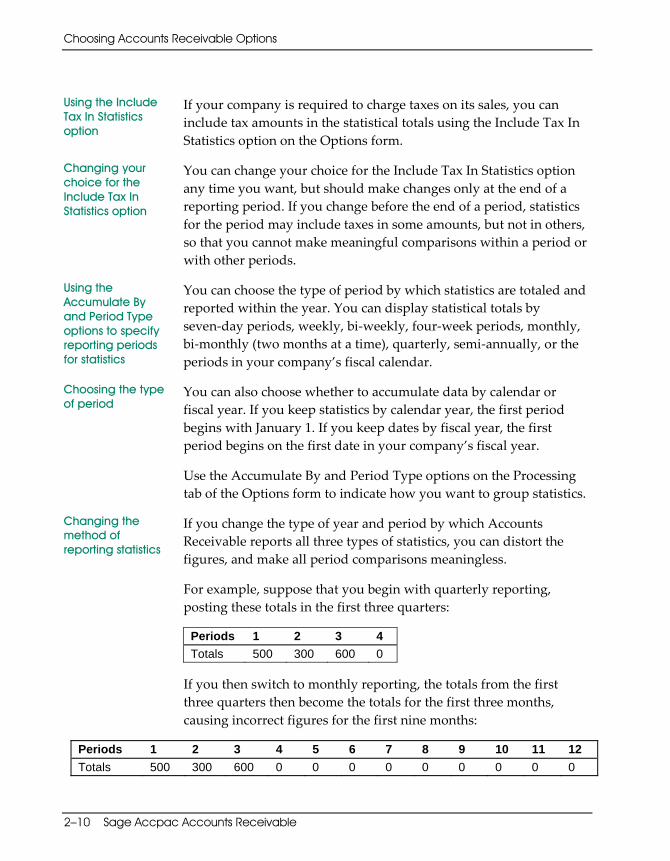
Changing the method of reporting statistics
If you change the type of year and period by which Accounts Receivable reports all three types of statistics, you can distort the figures, and make all period comparisons meaningless.
For example, suppose that you begin with quarterly reporting, posting these totals in the first three quarters:
Periods 1 2 3 4 Totals 500 300 600 0
If you then switch to monthly reporting, the totals from the first three quarters then become the totals for the first three months, causing incorrect figures for the first nine months:
Periods 1 2 3 4 5 6 7 8 9 10 11 12 Totals 500 300 600 0 0 0 0 0 0 0 0 0
Choosing Accounts Receivable Options
Getting Started 2–11
ARGS‐2.doc, printed on 1/23/2008, at 7:29:03 PM. Last saved on 1/23/2008 7:28:00 PM.
Sage Software Confidential
Before Setting
Up A
/R
If you need to change the type of year or period by which Accounts Receivable reports statistics, you should either do so after running Year End, or edit the statistics for the earlier periods in the year to correct distortions.
Keeping Comments in Customer Records
The Customers form allows you to enter as many comments as you want in each of your customer records. Each comment can contain up to 2,500 characters. For example, you might enter a comment about a customer complaint that is being investigated, or about a missing payment.
To make sure that comments are kept current, you can assign an expiration date for each comment. When you use the Customer Comments option in the Clear History form, comments that have reached the expiration date you specify are deleted.
Specify how long to keep comments
To specify the default number of days to keep comments, use the Default Number Of Days To Keep Customer Comments option on the Processing tab of the Options form.
Checking Customer Credit
Accounts Receivable lets you specify whether to include pending transactions when checking customer credit during invoice entry.
You can select any or none of the following:
• Include Pending A/R Transactions In Credit Check. Select this option if you want Accounts Receivable to include unposted documents created in Accounts Receivable when calculating a customer’s outstanding balance during credit checks.
• Include Pending O/E Transactions In Credit Check. Select this option if you want Accounts Receivable to include outstanding orders from Sage Accpac Order Entry when calculating a customer’s outstanding balance.
Choosing Accounts Receivable Options
2–12 Sage Accpac Accounts Receivable
ARGS‐2.doc, printed on 1/23/2008, at 7:29:03 PM. Last saved on 1/23/2008 7:28:00 PM.
Sage Software Confidential
• Include Pending Other Transactions In Credit Check. Select this option if you want programs from other software manufacturers (third‐party products) that you use with Sage Accpac to include unposted transactions during credit checks.
Transactions Options
Use the Transactions tab of the Options form to specify how the Invoice Entry, Receipt Entry, Quick Receipt Entry, and Refund Entry forms operate. You can specify:
• A default invoice type (item or summary).
• The type of date that appears as the default posting date in transaction entry forms.
• Automatic tax calculation as the default for entering tax amounts during invoice entry.
• Whether summary invoice details use tax class 1 as the default, rather than the customer tax class specified on the Invoice Entry Taxes tab.
• Whether to display the comment from the item record when you are entering invoices.
• Whether to show extended item costs on the Invoice Entry form when you enter invoices, credit notes, and debit notes.
• Whether you print invoices and whether to allow editing of invoices after you have printed copies of them.
• Default entries for the Transaction Type, Payment Code, and Bank fields in the Receipt Entry forms.
• Whether to create a separate deposit slip for each new batch.
• Whether to use Accounts Receivable to print deposit slips.

Choosing Accounts Receivable Options
Getting Started 2–13
ARGS‐2.doc, printed on 1/23/2008, at 7:29:03 PM. Last saved on 1/23/2008 7:28:00 PM.
Sage Software Confidential
Before Setting
Up A
/R
• The level of control you want to maintain over receipt batches, including whether to:
− Allow editing and deleting of receipt batches for which you have printed deposit slips or receipts.
− Require that you print deposit slips for receipt batches before you can post the batches.
− Permit adjustment entries in receipt batches.
• Whether to check for pending transactions when applying receipts.
• The order for the list of open documents (unpaid or unapplied) that appears when you are applying receipts.
• Whether to warn you if you try to process a refund check using the same check number as an existing check for the same bank.
These options are described in more detail in the following sections.
Specifying a Default Invoice Type
The Transactions tab lets you specify a default invoice detail type for Invoice Entry. Select Item or Summary, depending on the type of invoice you normally use.
Accounts Receivable uses the default invoice type when you create a new invoice batch or add an invoice in Invoice Entry. You can change the invoice type for specific documents in Invoice Entry.
Specifying a Default Posting Date for Invoices
Your selection for the Default Posting Date invoice option determines the date that appears as the default posting date on the A/R Invoice Entry form.
The posting date is the date that a document is posted to General Ledger, and it may be different from the document date. This distinction is particularly useful if you post a document to a different

Choosing Accounts Receivable Options
2–14 Sage Accpac Accounts Receivable
ARGS‐2.doc, printed on 1/23/2008, at 7:29:03 PM. Last saved on 1/23/2008 7:28:00 PM.
Sage Software Confidential
year or period from the document date. For example, Accounts Receivable uses posting dates, rather than document dates, to select open documents for revaluation, so that exchange adjustments are posted to the correct fiscal year and period.
You can select Document Date, Batch Date, or Session Date as the default posting date.
You can change the posting date for particular transactions when you enter or edit them.
Specifying Automatic Tax Calculation
Select the Calculate Taxes Automatically option if you want to use automatic tax calculation as the default for summary invoices on the Invoice Entry form. (This option does not affect tax calculation on item invoices.) Clear the option if you normally enter taxes manually.
Multicurrency ledger
The option Calculate Tax Reporting Amounts Automatically appears in multicurrency ledgers. If you report taxes in a currency different from your customer’s currencies or your functional currency, invoices must show the tax amount in the tax reporting currency, along with the exchange rate used for the conversion. Select the option if you want Accounts Receivable to calculate tax reporting amounts for invoices.
You can change the methods for individual invoices, debit notes, and credit notes when you enter them.
Specifying a Default Tax Class for Summary Invoice Details
Select the Default Detail Tax Class To 1 option if you want to use 1 as the default tax class for details on new summary invoices.
If you do not select this option, Accounts Receivable uses the customer tax class (from the Invoice Entry Taxes tab) as the default for new summary details.
Regardless of your selection for this option, on item invoices, Accounts Receivable uses the tax class set for the item
Choosing Accounts Receivable Options
Getting Started 2–15
ARGS‐2.doc, printed on 1/23/2008, at 7:29:03 PM. Last saved on 1/23/2008 7:28:00 PM.
Sage Software Confidential
Before Setting
Up A
/R
Specifying Options for Entering Items on Invoices
If you plan to define an item list in Accounts Receivable and enter item numbers on invoices, you can choose whether to display comments and costs from the item record when you enter invoices.
• Use Comments from Item Records on Invoices. You can display the comments from item records when you enter invoice details. You may want to see the comments, for example, because they contain important information about the item you are invoicing.
Using the Use Item Comment As Default option
To automatically display the comments, select Use Item Comment As Default on the Options form.
You can enter your own comments with detail lines on invoices, whether you use this option or not.
• Show Item Cost. You can display the cost from the item record for each item number you enter on an invoice detail line. The displayed cost is the extended cost (total cost for the specified quantity).
Costs are displayed for information purposes only. You cannot change the costs on the Invoice Entry form. You can enter different costs for items only using the Items form.
Using the Show Item Cost option
To display the cost automatically, select the Show Item Cost option on the Transactions tab of the Options form. If you do not use the option, the program displays no costs during invoice entry.
Specifying Options for Printing and Posting Invoices and Invoice Batches
To strengthen your audit trail and maintain supervisory control over invoice batches, you can:
• Use Accounts Receivable to print the invoices, credit notes, and debit notes you send to your customers, ensuring that the documents contain the exact information you entered for them.
Choosing Accounts Receivable Options
2–16 Sage Accpac Accounts Receivable
ARGS‐2.doc, printed on 1/23/2008, at 7:29:03 PM. Last saved on 1/23/2008 7:28:00 PM.
Sage Software Confidential
Using the Allow Printing Of Invoices option
To print invoices, credit notes, and debit notes, select the Allow Printing Of Invoices option. You can then print invoices using one of the invoice formats that are shipped with the Accounts Receivable package, or design your own format.
Selecting the Allow Printing Of Invoices option does not force you to print invoices, credit notes, and debit notes. It just allows you to choose whether to print them when you enter them in the Invoice Entry form or later, using the Invoice Printing form.
You can use the Invoice Printing form to print invoices, credit notes, or debit notes even after you have posted the batches that contain them. Accounts Receivable retains the information needed to print these documents until you clear the invoice data using the Clear History form.
Using the Allow Edit After Invoice Printed option
• Specify whether to allow changes or deletions in invoice batch entries after you have printed invoices from them.
To be able to change or delete existing invoices, credit notes, and debit notes after you have printed them, select the Allow Edit After Invoice Printed option.
If you do not select the option, you cannot edit or delete invoices, credit notes, or debit notes after you have printed them. This choice helps to make sure that each invoice, credit note, and debit note you post matches the batch listing and other reports and documents you printed for it.
The option controls changes only to batch entries. You can always change the batch date and description.
Specifying the Default Transaction Type, Payment Code, and Bank Code
Accounts Receivable lets you assign a default bank code, a default transaction type, and a default payment code for new transactions in the Receipt Entry form.
Assigning a default bank code
When deciding on the default bank code, you should select the code for the bank or bank account you use most often in receipt
Choosing Accounts Receivable Options
Getting Started 2–17
ARGS‐2.doc, printed on 1/23/2008, at 7:29:03 PM. Last saved on 1/23/2008 7:28:00 PM.
Sage Software Confidential
Before Setting
Up A
/R
transactions, so that you have to enter a bank code only if you are not using your usual bank.
You define bank codes in the Bank Services forms in Common Services, as described in the Tax and Bank Services User Guide.
Assigning a default transaction type
You can specify a transaction type to be used as the default during receipt entry. You can select Receipt or another type, such as Unapplied Cash, that you use most often.
Assigning a default payment code
You can also select a payment code, such as check or cash, to appear as the default payment code when you enter new receipts in the Receipt Entry form and new refunds in the Refund Entry form.
You create records for the types of receipts and refunds your company processes as described under “Setting Up Payment Codes,” later in this chapter. Once you have added your payment codes, you can select any of them as the default payment code.
Multicurrency ledgers
If you use multicurrency accounting, you specify in Bank Services the default rate type to use with bank codes. The rate type identifies the set of exchange rates and how to apply them to convert amounts in the bank currency to the functional currency.
To find out how to specify default rate types, see the Tax and Bank Services User Guide.
Specifying a Default Posting Date for Receipts
Your selection for the Default Posting Date receipts option determines the date that appears as the default posting date on A/R receipt entry forms.
The posting date is the date that a document is posted to General Ledger, and it may be different from the document date. This distinction is particularly useful if you post a document to a different year or period from the document date. For example, Accounts Receivable uses posting dates, rather than document dates, to select open documents for revaluation, so that exchange adjustments are posted to the correct fiscal year and period.

Choosing Accounts Receivable Options
2–18 Sage Accpac Accounts Receivable
ARGS‐2.doc, printed on 1/23/2008, at 7:29:03 PM. Last saved on 1/23/2008 7:28:00 PM.
Sage Software Confidential
You can select Document Date, Batch Date, or Session Date as the default posting date.
You can change the posting date for particular transactions when you enter or edit them.
Including Pending Transactions when Applying Receipts
Your selection for the Include Pending Transactions option determines whether Accounts Receivable includes unposted transactions when calculating pending amounts for Receipt Entry, and the type of transactions to include.
You can include unposted receipts, unposted receipts and adjustments, or all transactions, or you can choose to include none of them.
Creating Deposit Slips when Adding a New Receipt Batch
The Create Deposit Slip When Receipt Batch Is Created option is available only if you print deposit slips using Accounts Receivable. It lets you specify whether to create a new deposit slip whenever you add a new receipt batch.
If you do not select the option, you can assign several batches to a single deposit slip. For example, if several clerks enter receipt batches, but you make only one bank deposit per day, you can consolidate the day’s receipt batches on one deposit slip.
Printing Deposit Slips
You can use Accounts Receivable to print deposit slips for each batch of receipt transactions you enter. Use the deposit slips to verify batch contents to the receipts or documents from which you entered the receipts and as source documents for filling out the deposit slips you take to the bank.
If you want to use Accounts Receivable to print your deposit slips, select the Allow Printing Of Deposit Slips option.
Choosing Accounts Receivable Options
Getting Started 2–19
ARGS‐2.doc, printed on 1/23/2008, at 7:29:03 PM. Last saved on 1/23/2008 7:28:00 PM.
Sage Software Confidential
Before Setting
Up A
/R
Using the bank’s deposit slips
If you have deposit slips that are acceptable to your bank and that you can use in your printer, you may also be able to use Accounts Receivable to print on the deposit slips. (You can use Crystal Reports, available separately, to customize report forms for use with Accounts Receivable.)
Using the Force Printing Of Deposit Slips option
You can also make sure that you print deposit slips before you post batches by selecting the Force Printing Of Deposit Slips option. When you select this option, you cannot post receipt batches until you have printed their deposit slips.
Turning off the Allow Printing Of Deposit Slips option
Before turning off the option to print deposit slips, be sure to print any outstanding deposit slips you need. When you turn off the option, you cannot print deposit slips from Accounts Receivable. You could print them if you turned on the option again only if you have not cleared the batch information.
Editing Deposit Slips After Printing Batch Listings
Accounts Receivable lets you control whether you can edit entries in receipt batches or delete the entries or batches after you have printed deposit slips for them.
Using the Allow Edit After Deposit Slip Printed option
To be able to change existing batches, select the Allow Edit After Deposit Slip Printed option. To maintain supervisory control over existing deposit slips, turn on the option to allow authorized changes to the batches, then turn it off again to prevent changes that have not been approved.
When not to use the option
Do not allow editing if you want to prevent additions to, or deletion of, entries in receipt batches after you have printed deposit slips for the batches. You can still view the contents of receipt batches, regardless of your choice for the Allow Edit After Deposit Slip Printed option.
The option also applies only to batch entries. You can always change the batch date and description, and the bank account.
Choosing Accounts Receivable Options
2–20 Sage Accpac Accounts Receivable
ARGS‐2.doc, printed on 1/23/2008, at 7:29:03 PM. Last saved on 1/23/2008 7:28:00 PM.
Sage Software Confidential
Editing Receipts After Printing Receipt Confirmations
Accounts Receivable lets you specify whether you can change receipts after you have printed confirmations for them.
To be able to change or delete existing receipts after you have printed receipt confirmations, select the Allow Edit After Receipt Printed option.
When not to use the option
Do not allow editing if you want to prevent changes to receipt entries after you have printed receipt confirmations for them. This choice helps to ensure that each receipt you post matches the batch listing and other reports and documents you printed for it.
Entering Adjustments in Receipt Batches
Using the Allow Adjustments In Receipt Batches option, you can enter adjustments in Accounts Receivable receipt batches, as well as enter them separately in the Adjustment Entry form.
You can use this option, for example, when the amount of a check you receive to pay an invoice differs slightly from the invoice total. You can quickly write off the difference when you enter the receipt.
Displaying Open Documents During Receipt Entry
You can control the order in which you see unpaid invoices or unapplied credit notes in selection lists when you are applying receipts in the Receipt Entry forms. The Default Order Of Open Documents option lets you display the documents in the order that is easiest for you to use.
Accounts Receivable displays open documents by document number unless you select another order. To change the order at any time, use the Default Order Of Open Documents option on the Transactions tab on the Options form.
You can display open documents for each customer account by:
• Document Number. Lists open documents (unpaid or unapplied documents), such as invoices, credit notes, and debit
Choosing Accounts Receivable Options
Getting Started 2–21
ARGS‐2.doc, printed on 1/23/2008, at 7:29:03 PM. Last saved on 1/23/2008 7:28:00 PM.
Sage Software Confidential
Before Setting
Up A
/R
notes, by their document numbers, beginning with the lowest document number for each transaction type.
If you use this option, assign document prefixes that list documents in the order you prefer. If you want to see open invoices first, use an invoice prefix that comes first in alphabetical and ASCII order.
For example, the following prefixes would list invoices first, followed by interest invoices, credit notes, debit notes, prepayments, unapplied cash, and adjustments:
IN (invoice) INT (interest invoice) NCR (credit note) NDR (debit note) PP (prepayment) UC (unapplied cash) XADJ (adjustment)
• Purchase Order Number. Lists open documents by their purchase order numbers. Documents with the lowest purchase order numbers are displayed first.
• Due Date. Lists open documents by their due dates, beginning with the document with the oldest (earliest) due date.
• Order Number. Lists open documents by their sales order numbers. Documents with the lowest order numbers are listed first.
• Document Date. Lists open documents by their document dates, beginning with the oldest date.
• Current Balance. Lists open documents by their outstanding balances, beginning with the smallest amount.
Check for Duplicate Checks When Issuing Refunds
The Check For Duplicate Checks option lets you choose whether Accounts Receivable displays an error, a warning, or no message
Choosing Accounts Receivable Options
2–22 Sage Accpac Accounts Receivable
ARGS‐2.doc, printed on 1/23/2008, at 7:29:03 PM. Last saved on 1/23/2008 7:28:00 PM.
Sage Software Confidential
when you attempt to issue a refund check that uses the same number as an existing check for the same bank.
Numbering Options
Use the Numbering tab of the Options form to specify how Accounts Receivable identifies transactions and batches that you create. You can:
• Enter prefixes to be used with the document numbers Accounts Receivable assigns to invoices (including interest invoices and recurring‐charge invoices), credit notes, debit notes, receipts, prepayments, unapplied cash transactions, refunds, and adjustments.
• Enter the next number to assign to each type of transaction.
• Specify the length of each document number.
• View the next batch numbers and the next posting sequence numbers that Accounts Receivable will assign.
Accounts Receivable assigns a unique number to each document you add to a batch. The number is a combination of a prefix you enter on the Options form to identify the transaction type, and a number that is assigned sequentially by Accounts Receivable, starting with the number you specify.
Continuing your present numbering scheme
You can enter separate prefixes and document numbers on the Numbering tab for debit notes, credit notes, interest invoices, recurring charge invoices, receipts, prepayments, unapplied cash transactions, adjustments, and refunds, so you can continue with the numbering scheme used in your previous accounts receivable system.
Assigning prefixes For example, you might use “PP‐” for prepayment numbers, “UC‐” for unapplied cash transactions, and “AD‐” to identify adjustments. You can use up to six characters in each prefix.

Choosing Accounts Receivable Options
Getting Started 2–23
ARGS‐2.doc, printed on 1/23/2008, at 7:29:03 PM. Last saved on 1/23/2008 7:28:00 PM.
Sage Software Confidential
Before Setting
Up A
/R
The prefixes let you easily identify transactions in Accounts Receivable forms and on reports.
Changing the next document number
If you want to assign a lower number to the next number, change the prefix for the document type as well. You cannot use the same document number and prefix more than once in Accounts Receivable.
You can also specify the length of each document number, using a maximum length of 22 characters, including prefixes.
Letting A/R assign prefixes and document numbers
If you do not enter prefixes and document numbers, Accounts Receivable automatically assigns 1 as the first document number and uses the following prefixes for each document type, as listed here:
Document Type Prefix Invoice IN Debit Note DN Credit Note CN Interest Invoice INT Recurring Charge RC Receipt PY Prepayment PP Unapplied Cash UC Adjustment AD Refund RF
Separate numbering for retainage documents
Accounts Receivable uses the prefixes and next numbers specified for invoices, debit notes, and credit notes when you create retainage documents, unless you number retainage documents separately.
You use the option Use Separate Document Numbers When Creating Retainage Documents, on the Retainage tab of the Options form, if you want to number retainage documents separately. Accounts Receivable uses the following prefixes as defaults for retainage documents:
Document Type Prefix Retainage Invoice RIN Retainage Debit Note RDN Retainage Credit Note RCN
Choosing Accounts Receivable Options
2–24 Sage Accpac Accounts Receivable
ARGS‐2.doc, printed on 1/23/2008, at 7:29:03 PM. Last saved on 1/23/2008 7:28:00 PM.
Sage Software Confidential
Whether you add a transaction manually using the Invoice Entry form, Receipt Entry form, Quick Receipt Entry form, or Refund Entry form, or you create interest, recurring charge, or retainage transactions automatically, Accounts Receivable assigns a document number based on the type of transaction you choose and the prefixes and document numbers you specified on the Options form. When you add the document, Accounts Receivable updates the Next Number box for the transaction type on the Options form.
Entering the document number with transactions
If you prefer, you can enter your own document numbers when you add documents directly in a transaction entry form. However, Accounts Receivable does not update the next number on the Options form when you enter the number yourself, even if you use the same number as the program would have assigned.
Assigning numbers to interest and recurring-charge invoices
You must use the document numbers assigned by Accounts Receivable to the interest and recurring‐charge invoices you produce using the Create Interest Batch and Create Recurring Charge Batch forms. The program updates the Next Number boxes on the Options form for these transaction types when it creates the batches.
Highest document number
Numbers assigned to each type of document can go as high as 999999999. They are then automatically reset to 1.
If you reach the maximum number for a document type and want to continue using the prefix, you must clear all paid (completed) transactions before you can reassign the first number.
The next invoice batch number and posting sequence number
The Numbering tab also displays the numbers the program will assign to the next invoice batch, receipt batch, adjustment batch, and refund batch. It also displays the next posting sequence numbers to use when you post invoices, receipts, adjustments, refunds, and revaluation transactions.
Accounts Receivable automatically assigns 1 as the first invoice batch number and the first invoice posting sequence number. You do not specify the next batch number or posting sequence number, nor do you specify their lengths.

Choosing Accounts Receivable Options
Getting Started 2–25
ARGS‐2.doc, printed on 1/23/2008, at 7:29:03 PM. Last saved on 1/23/2008 7:28:00 PM.
Sage Software Confidential
Before Setting
Up A
/R
Statement Options
You can define the aging periods that Accounts Receivable uses to group overdue transactions or balances on customer statements and analytical reports. For each aging period, you can also specify the dunning message to print on customer statements, such as reminders to pay outstanding amounts by certain dates.
You can also specify whether to age credit notes, debit notes, prepayments, and unapplied cash transactions, or to always group these documents in the current (not due) category.
Defining Aging Periods
Accounts Receivable sorts outstanding transactions and balances for the Aged Trial Balance reports and customer statements into five periods, a current (not due) period and four overdue periods. You specify the length of each aging period for the Accounts Receivable system on the Options form.
You can change the aging periods for statements and reports at printing time, as well as choose whether to age transactions by their due dates or their document dates for each type of report.
For more information, see Chapter 7, “Reports,” in the User Guide.
Entering Dunning Messages
If you print one set of messages on customer statements, you can enter a separate message for each of the aging periods on the Options form.
Entering different messages for statements
If you do not use the same messages on all your statements, you can create different sets of messages using the Dunning Messages form, described later in this chapter.
How Accounts Receivable selects the message to print
When you print statements, you can select the set of messages to use. The message printed on a statement is the message that corresponds with the period that contains the oldest balance in the customer’s account.

Choosing Accounts Receivable Options
2–26 Sage Accpac Accounts Receivable
ARGS‐2.doc, printed on 1/23/2008, at 7:29:03 PM. Last saved on 1/23/2008 7:28:00 PM.
Sage Software Confidential
Printing Zero-Balance Statements
Select the Print Zero‐Balance Statements option if you want to be able to print statements for all your customers whether or not they have a balance outstanding.
For example, you may want to provide your customers with current records of their account statuses. You may also want to print messages on your statements, such as notices of sales, to encourage further purchases.
When you select Print Zero‐Balance Statements on the Statement tab, then select the Select Customers Based On Balance Type option in the Statements/Letters/Labels form, you can choose whether to include zero‐balance accounts for an individual printing run.
Do not select the option if you print statements only for customers who have a balance owing or a credit balance. This choice filters out zero‐balance accounts from the ranges of criteria you specify to print statements from the Statements/Letters/Labels form.
Aging Credit Notes, Debit Notes, Receipts, Unapplied Cash, and Prepayments
When you have credit notes, debit notes, receipts, unapplied cash, and prepayments that do not apply to specific invoice numbers or other documents, you can specify whether to report the amounts in the aging periods that contain their document dates, or to group them all in the current (not due) period.
You select these options on the Statement tab of the Options form. You can change your choices for the options at any time.
These options have no effect on credit notes and debit notes when they have been applied to specific document numbers. Applied amounts for these transactions are always included in the same aging periods as the documents to which they apply.
The selections you make for these aging options also affect the types of transactions you can select to write off in the Create Write‐Off Batch form. If you age unapplied credit notes and debit notes in the
Choosing Accounts Receivable Options
Getting Started 2–27
ARGS‐2.doc, printed on 1/23/2008, at 7:29:03 PM. Last saved on 1/23/2008 7:28:00 PM.
Sage Software Confidential
Before Setting
Up A
/R
current (not due) period, you cannot select them when you are writing off overdue transactions.
Retainage Options
Select Retainage Accounting before setting other retainage options
When you select the Retainage Accounting option on the Processing tab of the A/R Options form, the Retainage tab appears.
The section “Using Retainage Accounting,” earlier in this chapter, describes how and why to select the Retainage Accounting option. Chapter 2 in the User Guide contains overview information on processing retainage.
The Retainage tab contains a number of default retainage options that can save you time when you add new customers or process original and retainage documents. It also lets you specify how to process tax on retainage documents. This section describes these default options.
Specifying Retainage Defaults for Customer Records (Optional)
The Retainage tab lets you specify the following retainage settings to be used as defaults for new customer records:
The default retainage percentage
• Default Retainage Percentage. The default retainage percentage you enter on the Retainage tab appears on all new customer records. The retainage percentage determines the portion of a document total that a customer can withhold until the retainage due date when paying invoices, credit notes, and debit notes.
The retainage percentage from the customer record appears on original documents you enter for the customer.
The default retention period
• Default Retention Period. Use this field to specify the number of days from an original document date that customers can withhold a retained amount. The program determines the default retainage due date by adding the days in the default retention period to the original document date.

Choosing Accounts Receivable Options
2–28 Sage Accpac Accounts Receivable
ARGS‐2.doc, printed on 1/23/2008, at 7:29:03 PM. Last saved on 1/23/2008 7:28:00 PM.
Sage Software Confidential
You can always change the retainage settings for particular customers in the customer record and, if necessary, on unposted documents entered in Invoice Entry.
Specifying Retainage Defaults for Invoice Entry and Retainage Processing
Accounts Receivable uses the following settings as defaults when processing original and retainage documents:
Multicurrency • Default Retainage Exchange Rate. If you use multicurrency, you also choose the type of exchange rate to use when you process outstanding retainage. The Default Retainage Exchange Rate field lets you select whether to use the current exchange rate or the exchange rate used on the original document as the default.
• Report Tax. You use this option specify when to report tax on retainage. You can select:
− At Time Of Original Document − As Per Tax Authority
For detailed information that can help you decide how to use this option, see “Choosing How to Report Tax on Retainage,” later in this section.
Specify whether the retainage amount is based on tax
• Base Retainage Amount On. Use this field to specify whether retainage is calculated on the document total before or after tax is calculated.
Choose separate numbering for retainage documents
• Use Separate Document Numbering When Creating Retainage Documents. Select the Use Separate Document Numbering When Creating Retainage Documents option to use a separate numbering system to identify retainage documents that you generate using the Create Retainage Batch form.
When you select the option, the retainage document numbering grid becomes available, letting you specify the next number, length, and prefix to assign to retainage invoices, credit notes, and debit notes for the outstanding retainage amounts.

Choosing Accounts Receivable Options
Getting Started 2–29
ARGS‐2.doc, printed on 1/23/2008, at 7:29:03 PM. Last saved on 1/23/2008 7:28:00 PM.
Sage Software Confidential
Before Setting
Up A
/R
If you do not select the option, the program assigns the next invoice, credit note, or debit note number specified on the document numbering grid on the Numbering tab, as described under “Numbering Options,” earlier in this chapter.
Specifying when to create retainage documents
The Retainage tab also contains two options that let you control the timing of retainage processing:
• Number Of Days In Advance To Create Retainage Documents. This option lets you specify the default number of days before retainage is due to generate retainage documents.
This number appears as the default when you use the Create Retainage Batch form to generate a retainage batch. You can change the number of days in advance for a specific batch. (For example, if you use 5, the program creates invoices for retainage that is due with the next five days.)
Scheduling automatic retainage processing
• Schedule To Use For Automatic Creation Of Retainage Documents. If you plan to use the Reminder List to process retainage, you need to enter the schedule code for the frequency with which you want to process outstanding retainage.
“Zoom” button
If the schedule does not yet exist in Common Services, you can click the Zoom button beside the field, then create the schedule using the Schedules form that appears. You can also click the Zoom button to view the information for an existing schedule.
For information on using schedules and the Reminder List, see the System Manager User Guide.
Choosing How to Report Tax on Retainage
Normally, Accounts Receivable posts tax amounts to a tax liability account and updates Tax Services when you post invoices.
However, for retainage documents, the timing of the tax liability depends on the tax authority. Some tax authorities require that you report tax on retainage when you post a retainage document; others let you report the tax when you post an original document to which retainage applies.

Choosing Accounts Receivable Options
2–30 Sage Accpac Accounts Receivable
ARGS‐2.doc, printed on 1/23/2008, at 7:29:03 PM. Last saved on 1/23/2008 7:28:00 PM.
Sage Software Confidential
In Accounts Receivable, the Report Tax option lets you specify when to report tax on retainage, consistent with the law in your jurisdiction. You can make the following selections for this option:
• At Time Of Original Document. If you select this option, the program calculates and reports tax on retainage when you post an original document that includes retainage.
You can then use the Base Retainage Amount On field to specify whether to include tax in the retainage calculation.
• As Per Tax Authority. If you select this option, the program calculates tax when you post an original document, but reports the tax as specified for the tax authority.
You specify the tax reporting requirements for each tax authority using the Report Tax On Retainage Document option, in Tax Services. The choices for this option are:
− At Time Of Retainage Document. With this option, tax on retainage is calculated when you post original documents, but it is not reported until you post the retainage documents.
If you select this option for Accounts Receivable, retainage is based on amounts before tax for all tax authorities and customers.
− At Time Of Original Document. With this option, all tax amounts are calculated and the tax tracking reports are updated immediately when you post original documents.
− No Reporting. You would select this option for a tax authority only if you select At Time Of Original Document for the Report Tax option in Accounts Receivable (and in Accounts Payable, if you use it).
Last invoiced date In the Last Invoiced field, the program displays the date that you last ran Create Retainage Batch from the Reminder List.

Choosing G/L Integration Options
Getting Started 2–31
ARGS‐2.doc, printed on 1/23/2008, at 7:29:03 PM. Last saved on 1/23/2008 7:28:00 PM.
Sage Software Confidential
Before Setting
Up A
/R
Changing Retainage Options
You can edit the options on the Retainage tab at any time, but your changes affect only customer records and transactions that you add after making the changes.
Choosing G/L Integration Options Types of general ledger batches
Accounts Receivable creates separate batches of general ledger transactions for invoice batches, receipt batches, refund batches, and adjustment batches. If you use multicurrency accounting, Accounts Receivable also creates a separate batch of general ledger transactions each time you revalue Accounts Receivable transactions.
If you use Sage Accpac General Ledger, Accounts Receivable creates batches of receivables transactions right in General Ledger, where you can edit and post them.
If you use another general ledger system, or if your Sage Accpac General Ledger system is at another location, Accounts Receivable creates batches that you can import into your general ledger, or print, then enter manually into your general ledger.
Use G/L Integration to select options for G/L transactions
The G/L Integration form, available in the A/R Setup folder, provides several options for producing general ledger transactions in the form and at the time that best suits your requirements.
Assign data to General Ledger fields
The G/L Integration form also lets you assign a wide range of Accounts Receivable information to the entry description, detail reference, detail description, and detail comment used in general ledger transactions.
Reporting general ledger data
You can print the G/L Transactions report whether you post batches in General Ledger or not.
When you clear posting journals with the Clear History form, the general ledger transactions that were created with the cleared journals no longer appear on the G/L Transactions report. For more
Choosing G/L Integration Options
2–32 Sage Accpac Accounts Receivable
ARGS‐2.doc, printed on 1/23/2008, at 7:29:03 PM. Last saved on 1/23/2008 7:28:00 PM.
Sage Software Confidential
information about the G/L Transactions report, see Chapter 7, “Reports,” in the User Guide.
Specifying When, Where, and How to Create G/L Transactions
Accounts Receivable produces general ledger transactions from all batches you post. Each general ledger transaction includes all the information you need to update receivables data accurately in your general ledger.
You use the Integration tab on the G/L Integration form to specify:
• When to create general ledger transactions.
• Whether to create new batches for G/L transactions (and optionally post them) or to add them to existing G/L batches.
• Whether, and how, to consolidate transactions.
• Source codes to identify the types of Accounts Receivable transactions you send to General Ledger.
The Integration tab also displays the last posting sequence for which you created general ledger transactions. (If you create general ledger transactions during posting, this number is the same as the last posting sequence.) The next posting sequence numbers are displayed on the Invoicing and Transactions tabs of the Options form.
Choosing When to Produce General Ledger Transactions
The Create G/L Transactions option on the Integration tab provides the following choices for controlling when to create batches of G/L transactions:
• During Posting. Make this selection for the Create G/L Transactions option if you want to create general ledger transactions automatically each time you post Accounts Receivable batches.

Choosing G/L Integration Options
Getting Started 2–33
ARGS‐2.doc, printed on 1/23/2008, at 7:29:03 PM. Last saved on 1/23/2008 7:28:00 PM.
Sage Software Confidential
Before Setting
Up A
/R
• On Request Using Create G/L Batch Icon. Make this selection for the Create G/L Transactions option if you want to create general ledger batches only when you are ready.
You then use the Create G/L Batch form to create general ledger batches.
Note that you must create general ledger transactions before you can do year‐end processing or clear paid transactions and posting journals.
Choosing Whether to Create Separate General Ledger Batches
If you use Sage Accpac General Ledger, Accounts Receivable creates five types of general ledger batches, one each for posted invoice batches, receipt batches, refund batches, and adjustment batches, and one for revaluation transactions, if you use multicurrency accounting.
The Integration tab lets you choose whether to add general ledger transactions to existing batches when you post Accounts Receivable batches, or create a new general ledger batch every time you post Accounts Receivable batches. It also lets you choose to post new general ledger batches automatically in General Ledger.
Using the Create G/L Transactions By option
You use the Create G/L Transactions By option to specify whether to create one batch or separate batches for General Ledger, and whether to post new batches automatically.
• To produce only one general ledger batch of each type (invoice, receipt, adjustment, refund, revaluation), select Adding To An Existing Batch.
• To create a separate general ledger batch for each posted Accounts Receivable batch, select either Creating A New Batch or Creating And Posting A New Batch. The latter option automatically posts new G/L Batches in General Ledger.

Choosing G/L Integration Options
2–34 Sage Accpac Accounts Receivable
ARGS‐2.doc, printed on 1/23/2008, at 7:29:03 PM. Last saved on 1/23/2008 7:28:00 PM.
Sage Software Confidential
If you do not use Sage Accpac General Ledger, this option has no effect, and Accounts Receivable places all general ledger transactions in a single General Ledger batch.
Choosing Whether to Consolidate General Ledger Transactions
You can create consolidated batches of General Ledger transactions that combine several details into a single detail, or you can create unconsolidated batches that include all the details posted to each general ledger account.
Note: If you consolidate transactions, you cannot drill down from General Ledger to the original documents in Accounts Receivable.
Consolidating general ledger transactions during posting
To consolidate transactions, use the Consolidate G/L Batches option. This option lets you combine (consolidate) details posted with the same posting sequence, account number, and fiscal period into single details for each general ledger account. You can also combine details by posting sequence, account number, fiscal period, and source code.
Consolidation reduces the amount of information in the general ledger batch and results in a shorter G/L Transactions report. The option also “consolidates” the information in the Reference and Description fields for each transaction to “Consol. by A/R.”
Use the Consolidate G/L Batches option if you do not use drilldown or need a separate record of each detail posted to every general ledger account from Accounts Receivable transactions.
Creating detailed general ledger transactions
If you require detailed general ledger transaction information for your Accounts Receivable records, do not consolidate general ledger transactions. Accounts Receivable then creates a single detail in a General Ledger batch for each amount you post to a general ledger account.
The choice provides complete information in your general ledger transaction batch, but can result in a long G/L Transactions report

Choosing G/L Integration Options
Getting Started 2–35
ARGS‐2.doc, printed on 1/23/2008, at 7:29:03 PM. Last saved on 1/23/2008 7:28:00 PM.
Sage Software Confidential
Before Setting
Up A
/R
and a large General Ledger batch. However, you can consolidate the batch when you post it in Sage Accpac General Ledger.
Defining G/L Source Codes
Use the Source Type fields on the Integration tab to define the source code for each type of Accounts Receivable transaction, if you prefer not to use the default source codes.
The source code is a combination of the source ledger code (AR, which you cannot change) and the source type code, which you can specify for all the different types of transactions you can process in Accounts Receivable, including revaluation.
The source codes are used to identify transactions in General Ledger.
Note that the default source code for receipts is the same as for receipt reversals; refunds use the same default source code as refund reversals.
Including Descriptive Information with G/L Transactions
The Transactions tab on the G/L Integration form lets you choose the types of information from Accounts Receivable transactions to use in the transaction description, detail reference, detail description, and detail comment fields for general ledger transactions.
The information appears on Accounts Receivable’s posting journals and on General Ledger’s Journal Entry form and reports.
Selecting Information for General Ledger Transaction Fields
Use the Transactions tab of the G/L Integration form to select the information you need for your audit trail of unconsolidated Accounts Receivable transactions.
You can assign one or more pieces of information (segments) to each field, provided that the combined length of the segments and separators does not exceed 60 characters. Fields exceeding this limit are truncated when you post general ledger transactions.
Choosing G/L Integration Options
2–36 Sage Accpac Accounts Receivable
ARGS‐2.doc, printed on 1/23/2008, at 7:29:03 PM. Last saved on 1/23/2008 7:28:00 PM.
Sage Software Confidential
The segments you can select depend on the type of transaction to which you are assigning information and whether the information is for the transaction header or the details. This ensures that the information passed to General Ledger is relevant for each type of transaction. For example, you can assign the bank code or check number from customer refunds to any of the General Ledger fields.
When you create general ledger transactions, if no data exists in the source transaction field, the field is blank in the general ledger transaction. For example, if you assigned the original transaction description to the G/L Entry Description field, but there is no description for a particular entry, the field is blank in the G/L transaction.
Unconsolidated transactions
If you do not consolidate general ledger transactions, information for all the G/L fields is passed to General Ledger, as specified on the G/L Integration setup form.
Consolidated transactions
If you consolidate general ledger transactions, only the information for the G/L Entry Description field is passed to General Ledger. The detail reference, description, and comment are lost in consolidation.
For transactions consolidated in Accounts Receivable, the consolidation information is used in all the G/L fields (for example, CONSOL. BY AR ON 5/31/2010).
Changing Your Choices for G/L Integration Options
You can change any of your choices on the G/L Integration form at any time. You should be aware that your new choices apply only to general ledger transactions created after the change, and do not affect pre‐existing General Ledger batches.
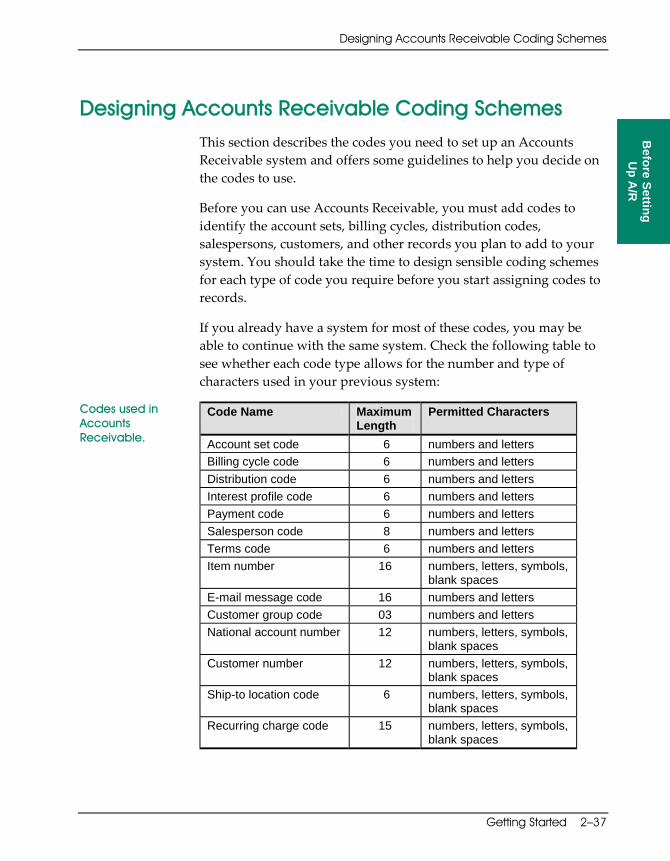
Designing Accounts Receivable Coding Schemes
Getting Started 2–37
ARGS‐2.doc, printed on 1/23/2008, at 7:29:03 PM. Last saved on 1/23/2008 7:28:00 PM.
Sage Software Confidential
Before Setting
Up A
/R
Designing Accounts Receivable Coding Schemes This section describes the codes you need to set up an Accounts Receivable system and offers some guidelines to help you decide on the codes to use.
Before you can use Accounts Receivable, you must add codes to identify the account sets, billing cycles, distribution codes, salespersons, customers, and other records you plan to add to your system. You should take the time to design sensible coding schemes for each type of code you require before you start assigning codes to records.
If you already have a system for most of these codes, you may be able to continue with the same system. Check the following table to see whether each code type allows for the number and type of characters used in your previous system:
Codes used in Accounts Receivable.
Code Name Maximum Length
Permitted Characters
Account set code 6 numbers and letters Billing cycle code 6 numbers and letters Distribution code 6 numbers and letters Interest profile code 6 numbers and letters Payment code 6 numbers and letters Salesperson code 8 numbers and letters Terms code 6 numbers and letters Item number 16 numbers, letters, symbols,
blank spaces E-mail message code 16 numbers and letters Customer group code 03 numbers and letters National account number 12 numbers, letters, symbols,
blank spaces Customer number 12 numbers, letters, symbols,
blank spaces Ship-to location code 6 numbers, letters, symbols,
blank spaces Recurring charge code 15 numbers, letters, symbols,
blank spaces

Designing Accounts Receivable Coding Schemes
2–38 Sage Accpac Accounts Receivable
ARGS‐2.doc, printed on 1/23/2008, at 7:29:03 PM. Last saved on 1/23/2008 7:28:00 PM.
Sage Software Confidential
When you design new coding schemes, you should assign codes that make it easy to identify each record type and that list records in the order you want them to appear on reports and in Finders.
Each code of a single type (such as customer numbers) must be unique. In most cases, you should also assign unique coding schemes to different types of records, so there is no chance of confusing one type of record with another.
You can use any combination of numbers and letters in all Accounts Receivable codes. You can also use other keyboard symbols and blank spaces in codes when assigning customer numbers, national account numbers, item numbers, recurring‐charge codes, and ship‐to location codes.
For example, each of the following could be a valid customer number:
A1 123 A01 A‐01 123A AB1234 AB 1234
To simplify codes, we recommend that you:
• Use the same number of characters in all codes of the same record type.
• Use codes of at least three characters to allow for future expansion.
• Use a numbering system that is significant for your business, such as codes that identify a geographical region, division, or vertical market.
• If possible, use only numbers (not letters or symbols), for consistency of sorting.
Entering Accounts Receivable Setup Information
Getting Started 2–39
ARGS‐2.doc, printed on 1/23/2008, at 7:29:03 PM. Last saved on 1/23/2008 7:28:00 PM.
Sage Software Confidential
Before Setting
Up A
/R
Sorting Order of Codes
Accounts Receivable sorts codes on screens and reports in a specific order, which you should take into consideration when designing codes.
Accounts Receivable reads codes from left to right, and generally uses the database sequence to put them in order.
For Pervasive SQL, the database order is usually a binary sequence, like this:
[Blank] ! ʺ # $ % & ʹ ( ) * + , ‐ . / 0 1 2 3 4 5 6 7 8 9 : ; < = > ? @ A B C D E F G H I J K L M N O P Q R S T U V W X Y Z [ \ ] ^ _ ` a b c d e f g h i j k l m n o p q r s t u v w x y z { | } ~
Accounts Receivable would sort the codes listed in the introduction to this discussion into the following order:
123 123A A‐01 A01 A1 AB 1234 AB1234
For SQL Server, you can set up the database as a binary sequence or in a dictionary sequence (where upper and lowercase letters are intermixed). Codes containing fewer than the maximum number of permitted characters are left justified in Accounts Receivable Finders and forms, and on reports.
Entering Accounts Receivable Setup Information Before you can add your customer records to Accounts Receivable, you must add other records that must be assigned to customers. This section describes the records you need, and explains the options you can select when setting up each type of record.
Entering Accounts Receivable Setup Information
2–40 Sage Accpac Accounts Receivable
ARGS‐2.doc, printed on 1/23/2008, at 7:29:03 PM. Last saved on 1/23/2008 7:28:00 PM.
Sage Software Confidential
You choose icons from the Setup form to set up:
• Account sets • Billing cycles • Distribution codes • Dunning messages (optional) • E‐Mail Messages (optional) • Interest profiles • Payment codes • Items (optional) • Salespersons (optional) • Terms • Optional fields (optional)
Setting Up Account Sets
Account sets are groups of general ledger accounts to which you post Accounts Receivable transactions. You assign an account set to each customer record to identify the general ledger accounts to which you post the customer’s transactions.
You can use just one account set for all your customers, or you can add as many sets as you need to categorize customer transactions by the accounts to which they are posted in your general ledger. For example, you may want to use separate account sets to designate different types of receivables or customers in different geographical areas.
You use the Account Sets form in the Setup folder to add account sets. You must define at least one account set before you can add customers to Accounts Receivable.
Contents of account sets
To add an account set, you enter a unique code of up to six characters and a description for the set. You also enter account numbers for the general ledger receivables control, receipt discounts, prepayment liability, retainage, and write‐offs accounts.

Entering Accounts Receivable Setup Information
Getting Started 2–41
ARGS‐2.doc, printed on 1/23/2008, at 7:29:03 PM. Last saved on 1/23/2008 7:28:00 PM.
Sage Software Confidential
Before Setting
Up A
/R
Multicurrency account sets
If you use multicurrency accounting, you also assign exchange gain and loss accounts and a rounding account to account sets that do not use the functional currency.
You must add at least one account set for each currency used by your customers. The account set you assign to a customer determines the currency you use for the customer.
General ledger accounts in account sets
You enter account numbers for the following general ledger accounts:
• Receivables Control account. An asset account to which you post the total amount receivable from all customers assigned to the account set.
Accounts Receivable creates transactions to debit the account when you post invoices for sales, interest charges, and recurring charges, and when you apply debit notes. The account is credited when invoices are paid, credit notes are applied, and amounts are written off.
The word “control” in the account name means that the account contains only totals, whereas the information stored by the Accounts Receivable program contains details at the transaction‐distribution level.
If all transactions are processed correctly, the total of all receivable balances in the Accounts Receivable system equals the total of the balances in the receivable control accounts in your general ledger.
• Receipt Discounts account. An expense account to which customer discounts taken for early payment are debited when you post receipt transactions that include discounts.
The account number you specify should be in the expenses or cost of goods sold section of your general ledger chart of accounts.
• Prepayment Liability account. A liability account to which prepayments are credited. The account is debited when prepayments are applied to invoices or refunded.
Entering Accounts Receivable Setup Information
2–42 Sage Accpac Accounts Receivable
ARGS‐2.doc, printed on 1/23/2008, at 7:29:03 PM. Last saved on 1/23/2008 7:28:00 PM.
Sage Software Confidential
• Write-Offs account. The expense account to which amounts are debited when you write off transactions and balances. The Create Write‐Off Batch form automatically produces transactions for this account.
• Retainage account. If you use retainage accounting, an asset account that accumulates outstanding retainage amounts until you clear the amounts by processing retainage invoices, retainage debit notes, and retainage credit notes.
Identifying multicurrency account sets
If you use multicurrency accounting, you assign a currency code to each account set. The account set identifies the currency for customers you assign to the set. Once you add an account set, you cannot change its currency.
Multicurrency general ledger accounts
In addition to the usual types of accounts used by single‐currency account sets, multicurrency account sets also include the accounts to which you post gains and losses when you revalue Accounts Receivable transactions at new exchange rates. You also add an exchange rounding account for rounding differences that arise from rounding in multicurrency transactions.
The general ledger accounts you assign to multicurrency account sets depend on the type of currency information you require in your general ledger. For example, you might use a separate receivables control account for each currency, but use the same numbers for the rest of the accounts in all your account sets.
If you use the same account number for all exchange gains and losses, the balance in that general ledger account is the net exchange gain or loss on receivables transactions.
You assign the following general ledger accounts to multicurrency account sets (account sets that do not use the functional currency) to record exchange gains and losses:
Entering Accounts Receivable Setup Information
Getting Started 2–43
ARGS‐2.doc, printed on 1/23/2008, at 7:29:03 PM. Last saved on 1/23/2008 7:28:00 PM.
Sage Software Confidential
Before Setting
Up A
/R
• Unrealized Exchange Gain and Unrealized Exchange Loss accounts.
Realized and Unrealized Gain/Loss accounting method
These accounts are available only if you use the Realized and Unrealized Gain/Loss accounting method for your Sage Accpac system. (You specify the accounting method for your company in the Company Profile, in Common Services.)
These accounts are income statement accounts to which you post the amount by which a multicurrency transaction increases or decreases, respectively, in its functional‐equivalent value when you revalue it at a new exchange rate.
A gain occurs when a change in the value of a transaction benefits you. A loss occurs when the change in value of a transaction favors your customer.
The gain or loss is “unrealized” because the transaction is not settled (that is, it has an outstanding balance, and the exchange rate for the transaction can continue to change until it is fully paid or written off).
If you change the accounting method to Recognized Gain/Loss, these accounts are visible, but they are no longer used for revaluation.
• Exchange Gain and Exchange Loss accounts. The income statement accounts to which you post the amount by which a multicurrency transaction increased or decreased in value in the functional currency due to fluctuations in the exchange rate.
Exchange gains and losses arise during settlement (for example, when an invoice is paid) if you receive more or less money in the functional currency than you expected.
Recognized Gain/Loss accounting method
If you use the Recognized Gain/Loss accounting method for your company (specified in the Company Profile), exchange gains and losses are recognized when you revalue documents, as well as on settlement of a transaction.

Entering Accounts Receivable Setup Information
2–44 Sage Accpac Accounts Receivable
ARGS‐2.doc, printed on 1/23/2008, at 7:29:03 PM. Last saved on 1/23/2008 7:28:00 PM.
Sage Software Confidential
• Exchange Rounding account. The income statement account to which you post differences that arise when converting to your functional currency from customer currencies and tax reporting currencies.
Assigning account sets to customer records
After defining account sets, you assign them to customer records using the Customer Groups form, the Customers form, and the National Accounts form (if you use the National Accounts program).
These forms are described in the “Setting Up Customer Records” section, later in this chapter.
Setting Up Billing Cycles
Billing cycles are time intervals into which you group customers for processing. You can perform the following tasks by billing cycle:
• Charge interest. • Print statements. • Print the Customer Transactions and Aged Trial Balance reports. • Create write‐off transactions.
Keeping track of billing dates
You can use billing cycles to invoice interest charges, and issue statements to selected groups of customers at different frequencies. For example, you may process some customer accounts on a monthly basis and others quarterly.
When you process records by billing cycle, Accounts Receivable keeps track of the dates when you last printed statements and created invoices for interest charges for each billing cycle.
When you use the Year End form, you are warned if you have not processed interest charges by billing cycle, but you can ignore the warning if you do not process by billing cycle.
Defining billing cycles
Accounts Receivable allows you to set up a variety of billing cycles using the Billing Cycles form in the A/R Setup folder. You must add at least one billing cycle before you can add customer records, because you must assign a billing cycle to each customer record.

Entering Accounts Receivable Setup Information
Getting Started 2–45
ARGS‐2.doc, printed on 1/23/2008, at 7:29:03 PM. Last saved on 1/23/2008 7:28:00 PM.
Sage Software Confidential
Before Setting
Up A
/R
When you define a billing cycle, you assign it a unique code of up to six characters, and a description. You also enter the frequency (number of days) with which interest is charged when you charge interest by overdue balances. For example, if you charge interest and send statements to customers once a month, you would enter 30 days as the frequency.
Printing remittance addresses on customer statements
You can enter a name and address to which customers assigned to the billing cycle are asked to send their payments. You can also print this name and address on the statement forms you use for the billing cycle. If you do not enter a remittance address, no return address is printed on statements for the billing cycle, unless you add an address to the statement report format you use for printing statements.
The information kept for each billing cycle includes the dates on which statements were last printed and interest charges were last invoiced (if you process interest charges by billing cycle).
The dates are displayed in the Billing Cycles form. Each time you make a change in a billing cycle record, the date of the change is entered in the Last Maintained field.
After defining billing cycles, you assign them to the customer records with which they will be used, as described in the “Adding Customers” section, later in this chapter.
Setting Up Distribution Codes
Distribution codes are a quick method of specifying the revenue, inventory, and cost of goods sold general ledger accounts to which you post data from sales transactions. When you use distribution codes in invoices and adjustments, Accounts Receivable displays the corresponding account number in the transaction entry forms.
You can also specify a “discountable” status for the distribution code. Your choice appears as the default discount status when you use the distribution code in an invoice, credit note, or debit note detail.
Entering Accounts Receivable Setup Information
2–46 Sage Accpac Accounts Receivable
ARGS‐2.doc, printed on 1/23/2008, at 7:29:03 PM. Last saved on 1/23/2008 7:28:00 PM.
Sage Software Confidential
Using Distribution Codes with an Accounts Receivable Item List
You can use distribution codes with an Accounts Receivable item list, if you have one. You can assign a distribution code to each item record to identify the accounts for which to produce general ledger entries when you post transactions for the item number. If necessary, you can change any of the account numbers for a transaction detail when you enter it.
Using Distribution Codes without an Item List
You can use distribution codes even if you do not use an Accounts Receivable item list. In this case, each distribution code identifies only a general ledger revenue account. When entering non‐item transactions, you can select either the appropriate distribution code or the revenue account to use.
You also assign distribution codes to each invoice detail you enter in a recurring charge record.
Posting Transactions with Distribution Codes
When you post invoice and adjustment batches, Accounts Receivable creates general ledger transactions for the accounts belonging to the distribution codes, and lists the information on the posting journals.
Creating Distribution Codes
You use the Distribution Codes form to add distribution codes. For each record, enter a unique code, up to six characters, a description (name) for the code, and the account numbers for the general ledger accounts you use with the code, as follows:
Adding distribution codes for items
• If you plan to assign the distribution code to an item record, enter numbers for all three general ledger accounts (revenue, inventory, and cost of goods sold).
Adding distribution codes for summary transactions
• If you plan to use the distribution code in summary transactions (transactions without item numbers), enter the general ledger account number for the revenue account only.

Entering Accounts Receivable Setup Information
Getting Started 2–47
ARGS‐2.doc, printed on 1/23/2008, at 7:29:03 PM. Last saved on 1/23/2008 7:28:00 PM.
Sage Software Confidential
Before Setting
Up A
/R
You can define as many distribution codes as you need to represent the various combinations of general ledger accounts to which you post sales data.
Setting Up Dunning Messages
You can automatically print your own messages, such as reminders about overdue accounts, notices of sales, or other information, on statements for your customers.
If you want, you can add a different message for each period into which you age customer accounts, including the current (not due) period. When producing a statement for a customer, Accounts Receivable then prints the message you entered for the period that contains the oldest balance in the customer’s account.
If you want to use dunning messages, you enter them on the Statement tab of the Options form, as described under “Entering Dunning Messages,” earlier in this chapter.
If you want to use more than one set of messages, add as many sets as you need in the Dunning Messages form. You can then select the messages when you print statements using the Statements/Letters/Labels form.
Setting Up E-Mail Messages
You use the E‐Mail Messages form to create standard messages to send with e‐mailed statements, letters, and invoices.
Tailor messages for individual customers
You can use variables (field names) from your company database to include customer‐ or company‐specific information on the messages. (See the next section, ʺSubstitute Variables for E‐Mail Messages,ʺ for a list of the variables you can use with each type of document.)
You identify each e‐mail message with a unique 16‐character Message ID code. When you select Customer as the Delivery Method on the Statements/Letters/Labels form or on the A/R Invoices form,

Entering Accounts Receivable Setup Information
2–48 Sage Accpac Accounts Receivable
ARGS‐2.doc, printed on 1/23/2008, at 7:29:03 PM. Last saved on 1/23/2008 7:28:00 PM.
Sage Software Confidential
you can select message codes for the message you want to send with the e‐mailed statements, letters, or invoices.
Substitute Variables for E-Mail Messages
If you use variable names from your company database in the subject line or in the body of e‐mail messages that you set up for use with invoices and with statements and letters, the program substitutes customer‐ or company‐specific information in the e‐mailed messages.
Invoice variables You can use the following variables with messages that you send with e‐mailed invoices:
$CUSTOMER_ID $CUSTOMER_NAME $CUSTOMER_CONTACT $COMPANY_PHONE $COMPANY_FAX $COMPANY_CONTACT $COMPANY_NAME
Statement and letter variables
You can use the following variables with messages that you send with e‐mailed statements and letters:
$CUSTOMER_ID $CUSTOMER_NAME $CUSTOMER_CONTACT $STATEMENT_BALANCE $OUTSTANDING_BALANCE $STATEMENT_DATE $CUTOFF_DATE $COMPANY_PHONE $COMPANY_FAX $COMPANY_CONTACT $COMPANY_NAME
Entering Accounts Receivable Setup Information
Getting Started 2–49
ARGS‐2.doc, printed on 1/23/2008, at 7:29:03 PM. Last saved on 1/23/2008 7:28:00 PM.
Sage Software Confidential
Before Setting
Up A
/R
Setting Up Interest Profiles
If you charge interest on overdue accounts, you can set up as many interest profiles in Accounts Receivable as you need for the methods and rates you use to determine interest charges.
With each interest profile, you specify:
• The number of the Interest Income account — the general ledger account to which you post revenue from interest charges.
• Whether to calculate interest on overdue documents (invoices) or on overdue balances in open‐item accounts. (Balance‐forward accounts are always charged interest on their overdue balances.)
• The number of days overdue before an invoice or account balance is charged interest.
• The annual rate at which you charge interest.
• Whether you compound outstanding interest charges (that is, charge interest on interest).
• The minimum amount, if any, you charge as interest, and whether you round lesser amounts up to the minimum or do not invoice them.
For example, if the minimum interest charge is $1.00, an amount of $0.98 is rounded up to $1.00 if you use the option to round up. If you do not use the option, no interest is charged, because the $0.98 amount is less than the minimum amount of $1.00.
Multicurrency interest profiles
If you use multicurrency accounting, you can also specify a minimum interest charge and annual interest rate for each currency used by the customers assigned to a particular interest profile.
Calculating Interest
Accounts Receivable lets you charge interest on overdue documents or overdue balances for your open‐item customers. Balance‐forward customers are always charged interest on their overdue balances.
Entering Accounts Receivable Setup Information
2–50 Sage Accpac Accounts Receivable
ARGS‐2.doc, printed on 1/23/2008, at 7:29:03 PM. Last saved on 1/23/2008 7:28:00 PM.
Sage Software Confidential
Calculating interest by document
When you charge interest by document, Accounts Receivable calculates interest separately for each overdue document or scheduled payment. Documents are overdue when they are outstanding beyond their due dates, plus any grace days you allow in the Interest Profile.
All invoices, unapplied debit and credit notes, unapplied cash, and unapplied prepayments are included in the interest calculation. If you selected Compound Interest in the Interest Profile, interest invoices are also included.
If Accounts Receivable determines that interest was charged previously, it uses the period from the date interest was last charged to the Run Date you enter in the Create Interest Batch form to calculate interest charges. Otherwise, it calculates interest from the document due date to the Run Date.
To calculate interest on an overdue invoice, Accounts Receivable multiplies the overdue amount by the annual interest rate and the number of days in the period, then divides the result by 365 (or 366 in a leap year):
(overdue invoice amount) (annual rate) (number of days overdue) 365
Because the interest calculation also includes credit notes, unapplied cash, and prepayments, the net interest may be negative. If the interest calculated is negative, no interest is charged or credited.
Calculating interest by balance
Accounts Receivable handles both balance‐forward and open‐item customers in the same way when calculating interest on overdue balances.
If any document is overdue beyond the grace period specified in the interest profile (in the Charge Interest On Accounts […] Days Overdue field), interest is charged on the total overdue balance from the date of the oldest overdue document. Current documents are not included in the calculation.
The period used in the interest calculation is from the due date of the oldest outstanding document to the Run Date you entered in the

Entering Accounts Receivable Setup Information
Getting Started 2–51
ARGS‐2.doc, printed on 1/23/2008, at 7:29:03 PM. Last saved on 1/23/2008 7:28:00 PM.
Sage Software Confidential
Before Setting
Up A
/R
Create Interest Batch form, unless interest has already been charged during that period. If interest has been charged previously, Accounts Receivable uses the period from the date interest was last charged to the Run Date.
Accounts Receivable calculates interest for the period by multiplying the net overdue balance as of the Run Date by the annual interest rate and by the number of days in the period, and then it divides the result by 365 (or 366 in a leap year):
(net balance) (annual rate) (number of days in the interest period) 365
The net overdue balance includes all overdue invoices, debit notes, interest invoices (if you selected Compound Interest in the interest profile), adjustments, and all unapplied credit notes, cash receipts, and prepayments.
If the net balance is negative, no interest is charged or credited.
Identifying Interest Invoices
You can specify a prefix to begin the invoice numbers that Accounts Receivable assigns to interest invoices. This prefix identifies interest charges on invoices, statements, and reports. For example, you might enter a prefix of “INT‐”.
You can also specify the number to assign to the next interest invoice. Accounts Receivable then automatically increases this number by 1 for each subsequent interest invoice.
Use the Numbering tab on the Options form to enter the prefix you want to use when assigning numbers to interest invoices. If you do not enter this information, Accounts Receivable automatically assigns INT as the prefix and 1 as the number of the first interest invoice.

Entering Accounts Receivable Setup Information
2–52 Sage Accpac Accounts Receivable
ARGS‐2.doc, printed on 1/23/2008, at 7:29:03 PM. Last saved on 1/23/2008 7:28:00 PM.
Sage Software Confidential
Assigning Interest Profiles to Customer Accounts
You must create at least one interest profile
You must add at least one interest profile in Accounts Receivable before you can add customer records, and you must assign an interest profile to each customer.
If you do not charge interest to certain customers, assign them to an interest profile with 0 (zero) as the annual rate.
Assign profiles to customer groups and national accounts
You also assign an interest profile to each customer group and national account to set the default profile for new customer records, but you can assign any of the interest profiles you use to your customers, regardless of their groups or national accounts.
Adding interest profiles
Use the Interest Profiles form to create interest profiles. Enter a code, using up to six characters, to identify the profile, a description, and other information that determines how to charge interest for the profile.
Charging Interest
When you are ready to charge interest, you use the Create Interest Batch form, specifying the accounts to charge, as described under “Charging Interest” in Chapter 2 of the User Guide.
Setting Up Payment Codes
You can enter all types of payments in Accounts Receivable, including cash, checks, credit cards, and the other ways that your customers pay you, or that you refund customers.
Your Accounts Receivable system must contain at least one payment code before you can add receipt or refund transactions.
Accounts Receivable uses the payment code you enter during receipt entry or refund entry to add information automatically about the type of payment. The program lists receipts separately by payment code on deposit slips. You may also want to batch receipts by payment code.

Entering Accounts Receivable Setup Information
Getting Started 2–53
ARGS‐2.doc, printed on 1/23/2008, at 7:29:03 PM. Last saved on 1/23/2008 7:28:00 PM.
Sage Software Confidential
Before Setting
Up A
/R
You should create a record for every type of receipt or refund payment that you process. During setup, Accounts Receivable automatically creates two payment codes, CHECK and CASH. You can use the default records, change them, or add other payment codes.
Adding payment codes
Use the Payment Codes form to define payment codes. For each type of payment you process in Accounts Receivable, enter a unique code, up to six characters, a description (such as the name of a credit card), and the type of payment (cash, check, credit card, or other).
Setting Up Item Records
If you want, you can set up a price list of the items you sell in Accounts Receivable, then look up and select the item numbers when entering invoices for your customers.
When you enter an item number with an invoice, Accounts Receivable displays a unit of measure and price per unit from the item record.
When you post invoices, Accounts Receivable creates general ledger transactions for the revenue, inventory, and cost of goods sold accounts used with the item. If you use the option to keep item statistics, posting also updates statistics in item records.
Adding Item Records
You use the Items form to create a record for each item in your price list.
Defining non-inventory items
You can also create records for non‐inventory items such as service charges and delivery fees. For non‐inventory items, you enter zero as the cost, so that Accounts Receivable does not produce transactions for the general ledger inventory and cost of goods sold accounts when you invoice the items.
Entering Accounts Receivable Setup Information
2–54 Sage Accpac Accounts Receivable
ARGS‐2.doc, printed on 1/23/2008, at 7:29:03 PM. Last saved on 1/23/2008 7:28:00 PM.
Sage Software Confidential
When to use item records
You must set up item records if you want to use item numbers for invoice entry, and if you want to create transactions for the inventory and cost of goods sold general ledger accounts.
Adding non-inventory items
You can have an item list in Accounts Receivable even if you use other Sage Accpac programs to print invoices and track inventory. For example, you might use Accounts Receivable to invoice service charges or other non‐inventory items that you do not want to include in your Inventory Control price list.
Assigning Item Numbers
Develop a logical scheme for assigning item numbers before adding item records. Consider the order in which you want to group items, such as in Accounts Receivable Finders, so you can quickly select them during invoice entry.
You should also consider the order in which you want to list items on Accounts Receivable reports. Refer to the “Sorting Order of Codes” section, earlier in this chapter, for information about how Accounts Receivable sorts item numbers and other Accounts Receivable codes.
Entering Item Units, Prices, and Costs
In each item record, you can specify all the units (for example, each, dozen, crate) in which you sell the item, and you can enter a price and cost for each unit, in each currency your customers use.
When you enter an item number and a unit of measure on an invoice, Accounts Receivable automatically displays the corresponding price per unit. Once you enter a quantity, Accounts Receivable calculates the extended amount of the sale (price multiplied by the number of units sold). If you change the unit of measure, quantity, or price on the invoice, Accounts Receivable recalculates the extended amount.
If your item records contain costs and you use the Show Item Cost option to display item costs during invoice entry, you can also see
Entering Accounts Receivable Setup Information
Getting Started 2–55
ARGS-2.doc, printed on 2/5/2008, at 6:38:05 PM. Last saved on 2/5/2008 6:37:00 PM.
Sage Software Confidential
Before Setting
Up A
/R
the extended cost for the unit of measure and item quantity you specified.
Multicurrency ledgers
In multicurrency systems, you enter separate prices and costs in all the currencies you use for each unit in which you sell the item. When you enter item numbers on invoices, Accounts Receivable displays only the units, prices, and costs entered for the customer’s currency.
Calculating Tax on Items
When you add invoices for items or save changes to existing invoices, Accounts Receivable automatically calculates all taxes using the tax rates specified in Tax Services and the tax authorities and classes assigned to each item record and customer account.
Set up tax authorities and classes in Tax Services first
If you charge sales taxes, you must create records in Tax Services for all the tax authorities and tax classes in your selling areas before you can enter tax information in item records.
Assign tax authorities and classes to item records
In each item record, you assign the tax authorities and corresponding tax classes that apply where you sell the item, and indicate whether you include tax in the selling price in each class. If you report VAT (value-added tax), you can also enter a commodity number on the Item tab for each item.
If an authority charges tax on a base other than item cost or selling price, you can enter the amount of the alternate tax base in the item record, as described in note 5 in Figure 2.1.
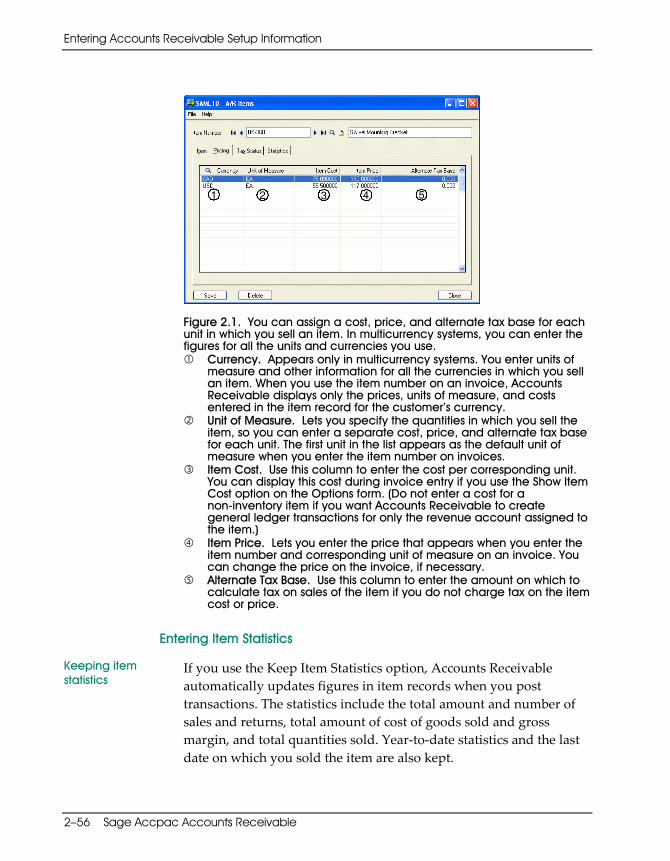
Entering Accounts Receivable Setup Information
2–56 Sage Accpac Accounts Receivable
ARGS‐2.doc, printed on 1/23/2008, at 7:29:03 PM. Last saved on 1/23/2008 7:28:00 PM.
Sage Software Confidential
1 2 3 4 5
Figure 2.1. You can assign a cost, price, and alternate tax base for each unit in which you sell an item. In multicurrency systems, you can enter the figures for all the units and currencies you use.
Currency. Appears only in multicurrency systems. You enter units of measure and other information for all the currencies in which you sell an item. When you use the item number on an invoice, Accounts Receivable displays only the prices, units of measure, and costs entered in the item record for the customer’s currency.
Unit of Measure. Lets you specify the quantities in which you sell the item, so you can enter a separate cost, price, and alternate tax base for each unit. The first unit in the list appears as the default unit of measure when you enter the item number on invoices.
Item Cost. Use this column to enter the cost per corresponding unit. You can display this cost during invoice entry if you use the Show Item Cost option on the Options form. (Do not enter a cost for a non-inventory item if you want Accounts Receivable to create general ledger transactions for only the revenue account assigned to the item.)
Item Price. Lets you enter the price that appears when you enter the item number and corresponding unit of measure on an invoice. You can change the price on the invoice, if necessary.
Alternate Tax Base. Use this column to enter the amount on which to calculate tax on sales of the item if you do not charge tax on the item cost or price.
Entering Item Statistics
Keeping item statistics
If you use the Keep Item Statistics option, Accounts Receivable automatically updates figures in item records when you post transactions. The statistics include the total amount and number of sales and returns, total amount of cost of goods sold and gross margin, and total quantities sold. Year‐to‐date statistics and the last date on which you sold the item are also kept.

Entering Accounts Receivable Setup Information
Getting Started 2–57
ARGS‐2.doc, printed on 1/23/2008, at 7:29:03 PM. Last saved on 1/23/2008 7:28:00 PM.
Sage Software Confidential
Before Setting
Up A
/R
When you sell an item in more than one standard quantity (unit of measure), Accounts Receivable keeps these statistics separately for each unit of measure in the item record.
Entering item history
If you want to add item statistics during setup, you must first select the Allow Edit Of (item) Statistics option on the Options form.
You then use the Items form to enter total sales, returns, and cost of goods sold for the years, periods, and units of measure you want to record. You can also enter the numbers sold and returned in each unit.
After setup, you may want to turn off the Allow Edit Of Statistics option or assign security to the Items form, to prevent accidental changes.
Multicurrency ledgers
Accounts Receivable keeps item statistics in the functional currency for the ledger, even in multicurrency ledgers.
Setting Up Salesperson Records
You can add a record in Accounts Receivable for each of your salespeople, then use the salesperson code to identify the person on transactions and reports. You can also enter an employee number and annual sales target or quota for each salesperson.
You also use the Salesperson form to indicate whether a salesperson earns commissions, and you can specify up to five commission rates for each salesperson.
If you use the Keep Salesperson Statistics option, Accounts Receivable automatically updates the total amounts and numbers of invoices, receipts, credit notes, debit notes, discounts, and write‐offs in salesperson records when you post transactions. The option also lets you enter statistics for the year to date and for prior years for each salesperson during setup, and edit or review the statistics as needed.
Entering Accounts Receivable Setup Information
2–58 Sage Accpac Accounts Receivable
ARGS‐2.doc, printed on 1/23/2008, at 7:29:03 PM. Last saved on 1/23/2008 7:28:00 PM.
Sage Software Confidential
If you want, you can assign security to the Salespersons form to prevent unauthorized changes to figures for individual salespersons.
Entering history If you use the options to keep and edit salesperson statistics in Accounts Receivable, you can use the Salespersons form to enter the amount and number of invoices, receipts, credit notes, debit notes, discounts, and write‐offs accumulated for each salesperson for as many periods and years as you want.
Assigning sales splits
You can assign up to five salesperson codes to each customer record and specify a percentage of the customer’s transactions to apply to each salesperson record.
If you assign salespersons and sales splits to a customer record, the percentages must total 100. For information about assigning sales splits to customer records, see “Adding Customers,” later in this chapter.
The salespersons and percentages assigned to a customer record appear automatically when you enter an invoice, credit note, or debit note for the customer. At that time, you can assign other salespeople or percentages for the particular document, if you want.
For information about using salesperson codes in invoice entry, see the “Entering Sales Splits on Invoices” section in Chapter 2 of the User Guide.
Calculating sales commissions
If you track commissions in Order Entry, Day End Processing uses the rates from the salesperson record to calculate commissions if the commission rates for the Inventory Control categories are zero. (For more information on how salesperson commissions are used in Order Entry, see the Order Entry documentation.)
Setting Up Terms Codes
Accounts Receivable automatically keeps all the payment terms by which your company determines invoice due dates, sets the rates and eligibility periods of discounts for early payment, and calculates discount bases.
Entering Accounts Receivable Setup Information
Getting Started 2–59
ARGS‐2.doc, printed on 1/23/2008, at 7:29:03 PM. Last saved on 1/23/2008 7:28:00 PM.
Sage Software Confidential
Before Setting
Up A
/R
Payment terms can be as simple as a due date and discount date and rate, or they can include payment schedules to allow for any number of installment payments.
Setting up terms for installment payments
You can use the Multiple Payment Schedule option to set up terms codes that allow installment payments. You can define installment periods that vary in length, and use different methods to calculate due dates and discounts. You can also set up as many installment periods for a terms code as you need.
Calculating discounts before or after tax
If you charge taxes on sales, you can specify whether to include tax in the document total that Accounts Receivable uses to calculate discount amounts.
Using standard due dates
If you use standard due dates, regardless of when the invoice was entered, you can create a terms code with a table to calculate a due date for each of up to four consecutive ranges of days on which invoices were issued. You can also specify due dates that are one or more months later.
For example, invoices entered between the first and fifteenth of each month may be due on the thirtieth of the month, and invoices entered between the sixteenth and the end of the month may be due on the fifteenth of the next month.
When you use this option, you can either define discount periods in the same way as for other terms options, or you can enter a table of standard discount periods to which a single percentage applies.
Defining terms You must define at least one set of terms before you can add customer records. For each set of terms, use the Terms form in the A/R Setup folder to enter a unique code of up to six characters, and a description.
You also specify whether to include tax in the discount base, the type of due date, and the discount type and rate (if there is a discount). “Type” can be a time interval (a specific number of days, or a number of days from a specific day of the month) or a fixed date (the end of the next month, or a specific day of the next month).
Entering Accounts Receivable Setup Information
2–60 Sage Accpac Accounts Receivable
ARGS‐2.doc, printed on 1/23/2008, at 7:29:03 PM. Last saved on 1/23/2008 7:28:00 PM.
Sage Software Confidential
Assigning terms codes to customer records
You assign a terms code to each customer record to set the default terms that appear when you enter invoices for the customer.
You can choose different terms for customers during invoice entry without changing the standard terms assigned in the customer records. You can also change payment schedule amounts and discount dates, and reduce discount amounts on individual invoices. However, you cannot increase the number of payments in a payment schedule.
Instructions for adding terms records are contained in “Step 5: Add Setup Records,” in Chapter 3. For more information about using terms codes to calculate discounts, see “Calculating Discounts” in Chapter 2 of the User Guide.
Setting Up Optional Fields
This form is available from the A/R Setup folder if you use Transaction Analysis and Optional Fields Creator, a separately licensed package that you can purchase and use with any edition of Accounts Receivable.
Use optional fields to customize Accounts Receivable
Optional fields let you customize your Accounts Receivable system by letting you store an unlimited amount of additional information with transactions, and with customer and ship‐to location records.
Because you can select records by optional field on a number of reports, optional fields also provide an additional means of analyzing customers and transactions in Accounts Receivable.
G/L can keep optional field information sent with transactions from A/R
If you use exactly the same optional fields in Accounts Receivable and General Ledger, General Ledger retains the optional field information used in transactions that you send from Accounts Receivable.
First, you must set up optional fields for your Sage Accpac system
You can use an unlimited number of optional fields in Accounts Receivable. However, you must first define optional fields for your Sage Accpac system using the Optional Fields form in Common
Entering Accounts Receivable Setup Information
Getting Started 2–61
ARGS‐2.doc, printed on 1/23/2008, at 7:29:03 PM. Last saved on 1/23/2008 7:28:00 PM.
Sage Software Confidential
Before Setting
Up A
/R
Services. (For more information about setting up optional fields in Common Services, see the System Manager Administrator Guide.)
Define the optional fields you want to use in A/R
Once you have set up optional fields for your Sage Accpac system, you use the Optional Fields form in the A/R Setup folder to define optional fields for use with the following Accounts Receivable records and transactions:
• Customers, National Accounts, and Customer Groups • Ship‐to Locations • Invoices • Invoice Details • Receipts • Adjustments • Revaluation transactions • Refunds
For each optional field you plan to use in Accounts Receivable, you specify:
• The type of optional field you are entering, indicating whether the optional field is to be used with specific Accounts Receivable setup records (customers, ship‐to locations, or items) or transactions (invoice headers or details, adjustments, receipts, or revaluations).
You can set up an unlimited number of optional fields for each type, providing the optional fields are set up in Common Services for use in your system.
• The optional field code for each optional field you are defining. Note that if you want to retain optional field information from Accounts Receivable transactions when you create batches for General Ledger, you must use the same optional fields for transactions in Accounts Receivable as you use in General Ledger.
• Whether or not the optional field has a default value. If you want to set a default value for the optional field, you must set the Value Set field to Yes.

Entering Accounts Receivable Setup Information
2–62 Sage Accpac Accounts Receivable
ARGS‐2.doc, printed on 1/23/2008, at 7:29:03 PM. Last saved on 1/23/2008 7:28:00 PM.
Sage Software Confidential
The Value Set field alerts the data entry clerk that a seemingly blank optional field actually has an entry. (By looking at the Value field, you cannot tell whether it has a “blank” default value or no value at all.)
• The default entry to use for the optional field. If the optional field you select requires validation, you must select a value that is defined for the optional field in Common Services. However, if the optional field allows blanks, you can leave the default entry blank.
If the optional field does not use validation, you can:
− Select a value that is defined for the optional field in Common Services.
− Leave the field blank.
− Enter a combination of alphanumeric or special characters and spaces. The entry must be consistent with the type of field (text, number, date, amount, and so on) and must not exceed the number of characters specified for the optional field. In a Yes/No field, you can enter only Yes or No. In an Integer field you can enter any integer with an absolute value less than 2,147,483,647.
• Whether you must fill in the optional field during data entry before you can save the record or transaction. If an optional field is required and has a default value, you can accept the value that appears or assign a different one, and then save the record.
If the optional field is required, but does not have a default value, you must fill in the field before you can proceed.
If you make an optional field a required field, the Auto Insert field changes to Yes. Normally, you want required fields to appear automatically in the records or transactions for which they are defined.

Entering Accounts Receivable Setup Information
Getting Started 2–63
ARGS‐2.doc, printed on 1/23/2008, at 7:29:03 PM. Last saved on 1/23/2008 7:28:00 PM.
Sage Software Confidential
Before Setting
Up A
/R
• Whether the program displays the optional field and its default entry on the form for the type of optional field when you set up new records or enter transactions.
For example, if you define Transit Number as an optional field for Invoices and you select Yes in the Auto Insert field, the Transit Number field appears automatically in Invoice Entry.
• Settings that determine whether General Ledger accounts and Project and Job Costing can be updated with optional field information from posted transactions, as described in the next section, “Optional Field Settings.”
Assigning optional fields to particular A/R records
After defining optional fields, you can assign them to particular customer, national account, customer group, and ship‐to location records, as described in the section, “Setting Up Customer Records,” later in this chapter.
A/R assigns optional fields when you create transactions automatically
Accounts Receivable assigns the optional fields you define for receivables transactions when you generate transactions using the following forms:
• Create Write‐Off Batch (adjustment optional fields) • Create Interest Batch (invoice optional fields) • Create Recurring Charges Batch (invoice optional fields) • Create Retainage Batch (invoice optional fields)
Optional Field Settings
You can — and should — restrict the flow of information that is passed to General Ledger when you post transactions that use optional fields. The Optional Fields setup form lets you specify groups of accounts for which values for an optional field can be passed to General Ledger. (The optional fields used in a transaction must also match the transaction details optional fields used for an account in order to be passed to General Ledger.)
If you use Sage Accpac Project and Job Costing, you can also specify whether optional field information for job‐related transactions is
Setting Up Customer Records
2–64 Sage Accpac Accounts Receivable
ARGS‐2.doc, printed on 1/23/2008, at 7:29:03 PM. Last saved on 1/23/2008 7:28:00 PM.
Sage Software Confidential
passed to Project and Job Costing, if the optional fields match those used for billings in that program.
Important Note that while all account groups are initially selected for new optional fields, you need to consider carefully the purpose of the optional field you are defining. You should send values to General Ledger only for optional fields that require financial analysis, and only to accounts where they are required. For example, you might want to send optional fields that contain customer numbers or sales territories only to revenue accounts.
You do not need to send optional field information for analysis that is performed only in Accounts Receivable. If you routinely send all the optional fields you use in Accounts Receivable transactions, your General Ledger may become unwieldy, and you may also slow down processing considerably.
Setting Up Customer Records Accounts Receivable allows you to keep very detailed records about your customers, and provides several options you can use to customize the records to match your business requirements.
Use this section to find out how customer records are set up and used in Accounts Receivable, and to choose the options that let you process customer information and transactions to suit your company’s procedures.
Preparing to add customer records
Before you can add customer records to Accounts Receivable, you must set up account sets, billing cycles, interest profiles, payment terms, and customer groups. If you want to assign salespersons to customer records, you must also set up salesperson records.
In addition, if you use Sage Accpac Transaction Analysis and Optional Field Creator (a separately licensed package), you must also set up in Common Services the optional fields you want to assign to Accounts Receivable records.

Setting Up Customer Records
Getting Started 2–65
ARGS‐2.doc, printed on 1/23/2008, at 7:29:03 PM. Last saved on 1/23/2008 7:28:00 PM.
Sage Software Confidential
Before Setting
Up A
/R
To read about these tasks, see the “Setting Up” section for each type of record, earlier in this chapter.
You take the following steps to prepare for and set up customer records in Accounts Receivable:
1. Define the customer groups. You use customer groups to categorize customers, such as by account type (open item or balance forward) and account set, by geographical areas, or for reporting purposes.
This step is required, and you must create at least one customer group.
2. Create national accounts. This optional step is available only if you installed the separate National Accounts Management package. You use national accounts if you deal with subsidiaries or branches of a company and you want to treat the company as one customer for billing, payment, and collection purposes, but enter invoices for and ship orders to individual branches separately.
3. Add customer records.
These steps are described in more detail in the following sections.
When you are ready to add your customer records to Accounts Receivable, follow the instructions in Chapter 3, “Setting Up Your Accounts Receivable System.”
Selecting the Account Type
Accounts Receivable maintains customer accounts in two ways, as open item or as balance forward accounts.
Open Item
In open‐item accounts, every customer transaction is kept as a unique current balance and document number. Generally, you apply receipts, credit notes, and debit notes to specific outstanding
Setting Up Customer Records
2–66 Sage Accpac Accounts Receivable
ARGS‐2.doc, printed on 1/23/2008, at 7:29:03 PM. Last saved on 1/23/2008 7:28:00 PM.
Sage Software Confidential
invoices, or as prepayments to future invoices. If any amount of a receipt, credit note, or debit note transaction is unapplied after the transaction is posted, you can apply the amount to other transactions for the same customer.
If you enter entire receipts, credit notes, or debit notes on account (without invoice numbers) for open‐item customers, you also later apply the amounts to outstanding customer transactions.
When you charge interest on open‐item accounts, you can choose whether to charge interest on individual overdue documents or on overdue account balances.
When using Accounts Receivable to print statements for open‐item customers, you can print statements that show all outstanding transactions, or you can print statements that show only activity since the last statement run.
Balance Forward
With balance‐forward accounts, you generally apply receipts, credit notes, and debit notes to the oldest customer transactions, in order of transaction date, rather than to specific invoices or other documents.
If you want to apply a receipt, credit note, or debit note to a specific invoice, you can do so by entering the invoice number with the transaction.
Interest charges on balance‐forward accounts are always calculated on the overdue account balances. You cannot charge interest on individual documents for this account type.
Statements for balance‐forward customers show a balance brought forward, the transactions posted in the current period, and the outstanding balance in each aging period.
Assigning Account Types to Customer Records
You assign an account type for each customer group you define. The selected account type becomes the default account type for the

Setting Up Customer Records
Getting Started 2–67
ARGS‐2.doc, printed on 1/23/2008, at 7:29:03 PM. Last saved on 1/23/2008 7:28:00 PM.
Sage Software Confidential
Before Setting
Up A
/R
customers and national accounts you assign to the group, but you can select a different type for individual customers or national accounts.
If a customer belongs to a national account, they are assigned the same account type as the national account, and you cannot change it.
Creating Customer Groups
You use customer groups to classify your customer records into groups that share similar characteristics. You must define your customer groups before you can add customer records.
Customer groups let you set default entries to speed up the task of adding customer records and national accounts, if you use them. You can also charge interest to a range of customer groups, produce recurring‐charge batches for them, and use them to select accounts for which to print statements and reports.
You can add as many customer groups as you need, but you must add at least one group.
Adding customer groups
Use the Customer Groups form to define the customer groups you need, assigning a unique code of up to six characters to identify each group. For information about selecting customer group codes, see the “Designing Accounts Receivable Coding Schemes” section, earlier in this chapter.
You also specify the following settings that Accounts Receivable uses as defaults for new customer records you add to the group:
• Account type (open item or balance forward) • Account set • Interest profile • Terms code • Billing cycle • Tax group and tax classes • Salespersons • Whether to print statements
Setting Up Customer Records
2–68 Sage Accpac Accounts Receivable
ARGS‐2.doc, printed on 1/23/2008, at 7:29:03 PM. Last saved on 1/23/2008 7:28:00 PM.
Sage Software Confidential
If you use national accounts, described in the next section, these default selections also appear in new national accounts you add to the customer group. (National Accounts Management is a separate package that is available for use with any edition of Accounts Receivable.)
Assigning Credit Limits to Customer Groups
Accounts Receivable can perform two types of credit checks during invoice entry. The Credit tab of the Customer Groups form lets you select options to perform either, both, or neither of the following credit checks for each customer group:
• [Issue Credit Warning When] Total Outstanding Balance Exceeds The Credit Limit. You select this option to generate a warning when you add a transaction for a customer whose outstanding balance is greater than the credit limit you specify.
• [Issue Credit Warning When] A/R Transactions Overdue By [#] Days or More Exceed The Overdue Limit. The name that appears for this option varies, depending on whether your ledger is single‐currency or a multicurrency one.
You select this option to generate a warning when you enter transactions for a customer whose overdue transactions exceed a specified amount and a specified number of days.
For example, if the option stipulates Transactions 90 Days And Later Exceed Amount 250.00, a credit warning appears when you enter a transaction for a customer that has transactions worth $300 that are overdue by 90 days.
If you select this option, you also enter the number of days overdue and the amount that a customerʹs overdue transactions must exceed to issue a warning.
In a single currency system, you specify one credit limit and one overdue limit for outstanding transactions for all the members of the customer group.

Setting Up Customer Records
Getting Started 2–69
ARGS‐2.doc, printed on 1/23/2008, at 7:29:03 PM. Last saved on 1/23/2008 7:28:00 PM.
Sage Software Confidential
Before Setting
Up A
/R
In a multicurrency system, you use the currency grid to specify a credit limit and an overdue limit for each currency used in the customer group.
If you include pending transactions during credit checks for your Accounts Receivable system, unposted transactions in Accounts Receivable or Order Entry can be included in the calculation of the outstanding balance.
The credit checks you specify for a customer group appear as default settings in new customer records or national accounts that you add to the customer group.
Allow Edit Of Credit Check option
You use the Allow Edit Of Credit Check option to indicate whether the customers and national accounts assigned to the group must use the group’s credit limit and overdue limit, or if they can have other limits.
Multicurrency ledgers
If you use multicurrency accounting, you enter a credit limit and an overdue limit in each of the currencies used by the customers in the group. The account set you entered for the customer group determines the default currency for the customer group, but you may assign different currencies to individual customers.
If the currency for the account set is not the functional currency, you also select the rate type to enter as the default rate type when you add a new multicurrency customer record to the group. (Rate types determine the rates at which to convert source‐currency amounts to the functional currency.)
Keeping Statistics for Customer Groups
Customer group statistics
Accounts Receivable keeps statistics for customer groups, and displays them in the Customer Groups form. You can review statistics by the type of year and period you specified on the Options form for customer statistics.
For each group, the program lists the amount and number of invoices, receipts, discounts, credit notes, debit notes, adjustments, write‐offs, interest charges, returned checks, and paid invoices. The
Setting Up Customer Records
2–70 Sage Accpac Accounts Receivable
ARGS‐2.doc, printed on 1/23/2008, at 7:29:03 PM. Last saved on 1/23/2008 7:28:00 PM.
Sage Software Confidential
program also calculates and displays the total days to pay, the average days to pay, and year‐to‐date statistics for the group.
You can edit the statistics in a customer group if you select the Allow Edit Of (customer) Statistics option on the Options form.
For more information about customer group statistics, see “Processing Options,” earlier in this chapter.
Accumulating tax amounts
The totals kept for invoices, credit notes, and debit notes can include or exclude any tax amounts that were posted with the documents, depending on the choice you enter for the Include Tax In Statistics option on the Options form, described earlier in this chapter.
Assigning Optional Fields to Customer Groups
If you use optional fields, you can assign to each customer group the optional fields and values you want to use as defaults for new customers or national accounts that use the group code.
Any optional customer fields that you set up for automatic insertion appear automatically, along with their default entries, on the Optional Fields tab of the Customer Groups form.
You can accept the optional fields that are displayed as defaults, or you can delete them. You can also assign any additional optional fields that are defined in Accounts Receivable for customers, national accounts, and customer groups.
You can also accept or change any entries that appear as defaults. If the optional field is validated, you must select a value that is defined for the optional field in Common Services.
You can add an unlimited number of optional fields to customer group records, providing that you first set them up:
• For your Sage Accpac system, in Common Services.
• For Accounts Receivable customers, national accounts, and customer groups using the A/R Optional Fields form.
Setting Up Customer Records
Getting Started 2–71
ARGS‐2.doc, printed on 1/23/2008, at 7:29:03 PM. Last saved on 1/23/2008 7:28:00 PM.
Sage Software Confidential
Before Setting
Up A
/R
If you use the same optional fields in new national accounts and customer records, Accounts Receivable uses the optional field entries from the customer group as defaults in the new national account and customer records. (If a customer belongs to a national account, however, the values from the national account are used.)
Creating National Accounts
National accounts are available as a separate package that you can purchase and use with any edition of Accounts Receivable. (Note that you must install National Accounts Management before activating Accounts Receivable.)
If you have customers who are subsidiaries or branch offices of a large company and you use national accounts, you can process a single payment from the head office and apply it to the subsidiary accounts. In one step, you can also limit the amount of credit you extend to a company.
To use this feature, you set up a national account for the head office, then assign the national account to the customer records for the head office and all its subsidiaries or branches.
You also create a separate customer record for each national account, as described in the “Adding Customers” section, later in this chapter. You use this customer account when you are applying receipts from the national account, and want to see the transactions for all the customers in the national account.
Keep contact information for the national account
If you deal with a main contact person at the national account, Accounts Receivable lets you enter telephone and fax numbers, an e‐mail address, and a Web site URL for the contact on a separate Contacts tab.
You can look up and print a report of total statistics from the transactions posted to all the customers in each national account, and you can print reports for one or more of your national accounts.

Setting Up Customer Records
2–72 Sage Accpac Accounts Receivable
ARGS‐2.doc, printed on 1/23/2008, at 7:29:03 PM. Last saved on 1/23/2008 7:28:00 PM.
Sage Software Confidential
You should use national accounts to process transactions for both a head office and its branches if you want to:
• Accept a single payment from a company and apply it to outstanding invoices for all its branches.
• Send invoices and statements to the head office, and send orders to the individual branches.
• Make sure that when you put a head office on hold, Accounts Receivable warns you about the hold when you enter invoices for its subsidiaries.
• Prevent posting further transactions to customers in the national account by assigning Inactive status to the national account.
• Apply different taxes to transactions for the head office and its branches.
• Assign the salespeople who are responsible for each national account, and set the default salespersons and percentages for the customers you add to the national account.
• Keep a set of sales and receipt statistics for the national account as a whole, and keep statistics separately for the head office and each branch.
Processing Transactions for National Accounts
You enter invoices separately for each of the customers in a national account, but you can receive a single payment from the head office and apply it to invoices for any of the customers in the national account.
To be able to apply receipts to the customers of a national account, you first set up a customer record for the national account (as described under “Adding Customers,” later in this chapter). You can then display and select any of the transactions posted for the account’s customers when you apply receipts from the national account.

Setting Up Customer Records
Getting Started 2–73
ARGS‐2.doc, printed on 1/23/2008, at 7:29:03 PM. Last saved on 1/23/2008 7:28:00 PM.
Sage Software Confidential
Before Setting
Up A
/R
Specifying Billing and Shipping Addresses for National Accounts
If you use Accounts Receivable to print your invoices, the program automatically prints the address from the customer record on the invoice.
If you need separate billing and shipping addresses for the head office of the national account and its branches, you enter the billing address in the national account record, then create a ship‐to location record for each of the other addresses you want to record for a branch.
For information about ship‐to locations, see the “Adding Ship‐To Locations” section, later in this chapter.
When you enter invoices for the branches, you select the ship‐to location (address) to which you are shipping the order. Accounts Receivable then prints the national account’s billing address on the invoices and the selected shipping addresses on any shipping labels you print.
Assigning Credit Limits to National Accounts
Accounts Receivable can warn you when you try to enter an invoice or a debit note for member customer of a national account whose:
• Total outstanding balance is greater than the national account’s credit limit.
If you use the option to include pending transactions in credit checks (on the A/R Options form), Accounts Receivable includes unposted transactions when calculating the outstanding balance.
• Balance of transactions overdue for a specified number of days or more exceeds the amount specified for the national account.
You can choose whether to add the transaction or to cancel it.
Accounts Receivable uses the credit checks specified for the customer group as defaults when you assign a new national account to a customer group. In turn, the credit checks used for the national

Setting Up Customer Records
2–74 Sage Accpac Accounts Receivable
ARGS‐2.doc, printed on 1/23/2008, at 7:29:03 PM. Last saved on 1/23/2008 7:28:00 PM.
Sage Software Confidential
account are used as defaults when you add new customer records to a national account.
If the customer group uses the option Allow Edit Of Credit Check, you can specify different credit checks and credit limits for the national account or any of its branches. Otherwise, you must use the customer group’s credit checks and credit limits for the national accounts you assign to the group, and for the customers you assign to the national account.
Accounts Receivable also indicates the customers and national accounts that are over their credit limits on batch listings.
Placing National Accounts on Hold
If you do not want to post new invoices to a national account, perhaps because there is a dispute about the account, you can place the national account on hold. Accounts Receivable then warns you about the hold when you enter invoices for customers assigned to the national account. You then decide whether to cancel the invoice or enter it.
The option has no effect on credit notes, debit notes, receipts, or prepayments.
Assigning Inactive Status to National Accounts
When you plan to delete a national account, you can make sure that no further transactions are posted for its customers by selecting Inactive as the status for the national account. You can delete a national account only when no customers are assigned to it and the national account balance is zero.
Inactive status allows you to keep a national account in your Accounts Receivable system until you are ready to delete it.
For more information about the Inactive status, see the Accounts Receivable User Guide.

Setting Up Customer Records
Getting Started 2–75
ARGS‐2.doc, printed on 1/23/2008, at 7:29:03 PM. Last saved on 1/23/2008 7:28:00 PM.
Sage Software Confidential
Before Setting
Up A
/R
Keeping Statistics for National Accounts
Accounts Receivable keeps the same period statistics for national accounts as for customer groups, and displays them on the Statistics tab of the National Accounts form. You can edit and display the statistics as described in the previous section for customer group statistics.
Accounts Receivable keeps track of additional activity statistics for each national account, including the amount and date of the highest balance and largest invoice in the current and previous years, and the last invoice, receipt, credit note, debit note, adjustment, write‐off, interest invoice, returned check, discount, and refund posted to the national account.
The program also calculates the total invoices paid, total days to pay, average days to pay, and year‐to‐date statistics for the account.
Assigning Optional Fields to National Accounts
If you use Transaction Analysis and Optional Fields Creator, you can assign an unlimited number of optional fields to store additional information you want to keep with national accounts.
Optional fields and values
Optional fields that you set up for automatic insertion in customer group, national account, and customer records automatically appear, along with their default entries, on the Optional Fields tab of the National Accounts form.
You can accept the default optional fields, or you can delete them. You can also assign any additional optional fields that are defined in Accounts Receivable for customers, national accounts, and customer groups.
If you use the same optional fields for the customer and the customer group to which the customer is assigned, the values from the customer group appear as defaults.

Setting Up Customer Records
2–76 Sage Accpac Accounts Receivable
ARGS‐2.doc, printed on 1/23/2008, at 7:29:03 PM. Last saved on 1/23/2008 7:28:00 PM.
Sage Software Confidential
Default entries may come from the optional field record
If no default entry is specified for a particular optional field in the customer group record, the program displays the default value assigned to the optional field on the A/R Optional Fields form.
You can accept or change the entry. However, if the optional field is validated, you must select a value that is defined for the optional field in Common Services.
Optional field entries from the national account appear as defaults on the Optional Fields tab for any new customer records you add to a national account, if the optional fields in the customer record match those used by the national account.
Creating National Accounts
You use the National Accounts form to define the national accounts you want to use. For each account, you specify a unique code, up to 12 characters. (For guidance in assigning national account codes, see the “Designing Accounts Receivable Coding Schemes” section, earlier in this chapter.)
You select a customer group for each national account, and choose the account type, account set, terms code, rate type (in multicurrency ledgers), billing cycle, interest profile, and optional fields (if you use them) that you use for most of the national account’s customers.
You can enter the address to which you send statements and letters for the national account, as well as the telephone and fax numbers, and the name of a contact at the head office.
This information appears as the default information in new customer records you add to the account, so that the billing address for the customers in the national account is automatically that of the national account, unless you change it.
Setting Up Customer Records
Getting Started 2–77
ARGS‐2.doc, printed on 1/23/2008, at 7:29:03 PM. Last saved on 1/23/2008 7:28:00 PM.
Sage Software Confidential
Before Setting
Up A
/R
Adding Customers
You use the Customers form to add most of your customer information to Accounts Receivable. This form lets you record background information, such as:
• The customer number (the code you use to identify the account), as described under “Assigning Customer Numbers,” later in this section.
• The customer’s name, billing address, phone and fax numbers, and two e‐mail addresses.
• A “short name” (an abbreviation or acronym that represents the customer). For more information, see “Entering Short Names,” later in this section.
• Telephone and fax numbers and an e‐mail address for a contact person.
• The tax classes used for the customer in each of the tax authorities that apply to the customer’s tax group, as described in “Entering Tax Information,” later in this section.
• Credit information, including a credit rating, as described under “Entering Credit Information and Credit Limits,” later in this section.
• Whether the account is on hold or inactive. See “Assigning On Hold or Inactive Status to Customer Accounts,” later in this section.
• The names of the salespeople, if any, assigned to the account, and the percentage of the customer’s transactions you allocate to each salesperson.
• The comments, instructions, or other information you want to print on correspondence with the customer, to display during transaction entry, or to keep for other purposes. For more information, see “Processing Customer Comments,” later in this section.

Setting Up Customer Records
2–78 Sage Accpac Accounts Receivable
ARGS‐2.doc, printed on 1/23/2008, at 7:29:03 PM. Last saved on 1/23/2008 7:28:00 PM.
Sage Software Confidential
• The date on which you started to do business with the customer.
• Whether you print statements for the customer.
• Additional information your company wants to include in the optional fields for your customer records.
For more information about optional fields, see “Setting Up Optional Fields,” earlier in this chapter.
• The customer group and national account, if any, to which the customer belongs.
• An optional two‐character territory code that your company uses to identify or sort customer accounts in a way that is not otherwise available in Sage Accpac Accounts Receivable. You maintain the information associated with each territory code outside of Accounts Receivable, but can use the code to select customers when printing Accounts Receivable reports and statements.
Pricing information • Pricing information. You can enter the customer price list and customer type to use as defaults on orders that you enter for the customer in Order Entry.
• Inventory location. You can specify an inventory location to use as the default on shipments that you process in Order Entry.
• Whether to allow partial shipments of items for a customer. Order Entry partially ships items only for customers that allow partial shipments. The default setting is Yes.
• Whether to allow backordered quantities for the customer, when you cannot fully ship an order in Order Entry. The default setting is Yes.
• Whether Order Entry displays a message if you enter an order or a shipment for a purchase order number that is already used in an existing order or standalone shipment for the customer.
Setting Up Customer Records
Getting Started 2–79
ARGS‐2.doc, printed on 1/23/2008, at 7:29:03 PM. Last saved on 1/23/2008 7:28:00 PM.
Sage Software Confidential
Before Setting
Up A
/R
• Whether to allow the customer to shop at your Web store through eTransact. The default setting is No.
Preparing to process customer transactions
You also use the Customers form to identify the ways in which you process transactions for each customer, specifying the:
• Account type (balance forward or open item). This choice indicates whether you apply receipts to the account balance, or treat each transaction as a unique document and apply receipts to specific document numbers.
• Account set. An account set identifies the general ledger receivables control, receipt discounts, prepayment liability, and write‐offs accounts to which the customer’s transactions are distributed.
If a customer belongs to a national account, you can assign a different account set than the one assigned to the national account, provided they use the same currencies.
Multicurrency ledgers
If you use multicurrency accounting, the account set also determines the currency for each customer, and it includes unrealized and realized exchange gain and loss accounts, and an exchange rounding account.
• Rate type. The rate type identifies the set of exchange rates to use to convert amounts in the customer currency to the functional currency.
• Payment code. Accounts Receivable lets you select a default payment code for the customer. If you do not set a default payment code for a particular customer, Receipt Entry uses the default payment code from the A/R Options form when you enter a receipt for the customer.
• If you accept credit cards as payment, you use the Credit Card tab to enter the customer’s credit card type, credit card number, cardholder name, and the card’s expiration date.
Setting Up Customer Records
2–80 Sage Accpac Accounts Receivable
ARGS‐2.doc, printed on 1/23/2008, at 7:29:03 PM. Last saved on 1/23/2008 7:28:00 PM.
Sage Software Confidential
During receipt entry, when you select the payment code for the customer’s credit card, Accounts Receivable displays the credit card information from the customer record as the default.
Set up credit card types in Bank Services, first
Note that you must set up credit card types in Bank Services before you can assign credit card payment codes to a customer or use them in Receipt Entry.
• Payment terms you usually allow the customer. Accounts Receivable uses this information to determine the default due date, discount period, and discount amount to display when you enter invoices for the customer.
• Taxes (if any) you charge the customer, including the customer’s tax group, authority, class, and registration number. This information tells Accounts Receivable how to calculate tax amounts on the customer’s invoices.
For more information, see “Entering Tax Information,” later in this section.
• Interest profile that identifies the method used to calculate the amount of interest to charge when the customer’s account is overdue.
• Retainage percentage, retention period, and retainage terms, if you use retainage accounting in your Accounts Receivable system. Accounts Receivable uses these settings as defaults when you enter an invoice, credit note, or debit note for the customer.
When you add a new customer record, Accounts Receivable displays the settings you specified in the A/R Options form as defaults, but you can change them.
Entering customer statistics
In addition to the information you can enter for each customer in the Customers form, Accounts Receivable automatically adds the statistics it collects from all transactions posted to each customer account.

Setting Up Customer Records
Getting Started 2–81
ARGS‐2.doc, printed on 1/23/2008, at 7:29:03 PM. Last saved on 1/23/2008 7:28:00 PM.
Sage Software Confidential
Before Setting
Up A
/R
If you use the Allow Edit Of (customer) Statistics option on the Options form, you can also enter these figures when you are setting up a new Accounts Receivable system, and revise them as needed. For more information, see “Using Customer Statistics,” later in this section.
Using multiple addresses for a single customer
If you need to keep more than one address for a customer, such as when you send the customer’s orders to more than one location, you can define as many additional addresses as you need, including a set of default shipping details, using the Ship‐To Locations form, as described in the “Adding Ship‐To Locations” section, later in this chapter.
Delivery method You can also specify whether to deliver statements, letters, and invoices to a customer by mail (by printing to your usual print destination), or by e‐mail (by printing to the customerʹs or the contactʹs e‐mail address).
Creating records to invoice recurring charges
If you regularly invoice the customer for the same order, such as monthly rent, you can create recurring charge records using the Recurring Charges form, discussed under “Adding Recurring Charges,” later in this chapter.
Importing customer records
You can import customer records into Accounts Receivable from non‐Sage Accpac programs, instead of entering them in the Customers form. For information about importing records, see the “Importing and Exporting” appendix in the User Guide.
Assigning Customer Numbers
You use the Customers form to add customer records. For each new record, you assign a unique customer number of up to 12 characters, including letters, numbers, and symbols. You may be able to continue with your present system of assigning customer numbers.
If you do not have a logical method for assigning customer numbers, you should develop a system before you add your customer records to Accounts Receivable. Your system should let you organize the records as you require, such as alphabetically, by region, and for
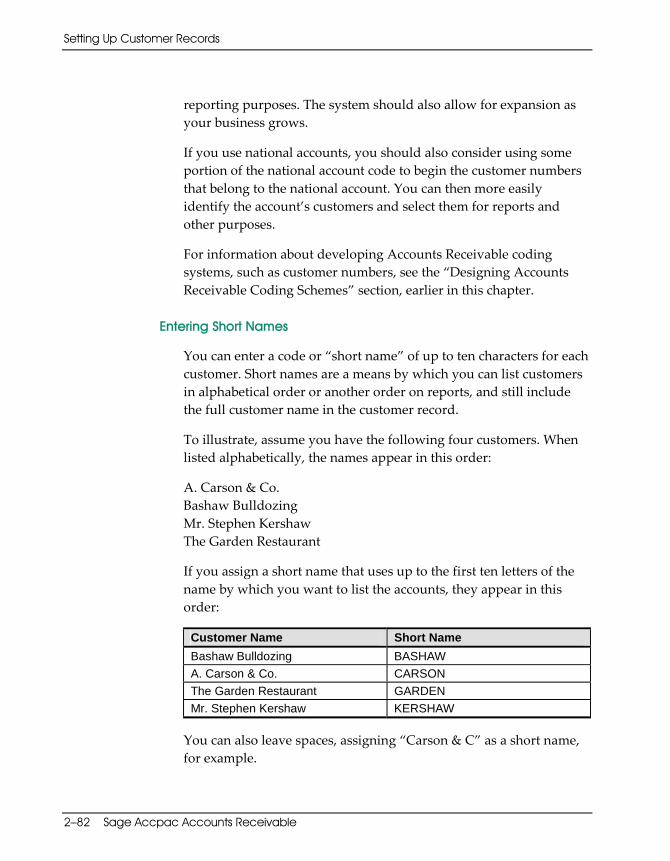
Setting Up Customer Records
2–82 Sage Accpac Accounts Receivable
ARGS‐2.doc, printed on 1/23/2008, at 7:29:03 PM. Last saved on 1/23/2008 7:28:00 PM.
Sage Software Confidential
reporting purposes. The system should also allow for expansion as your business grows.
If you use national accounts, you should also consider using some portion of the national account code to begin the customer numbers that belong to the national account. You can then more easily identify the account’s customers and select them for reports and other purposes.
For information about developing Accounts Receivable coding systems, such as customer numbers, see the “Designing Accounts Receivable Coding Schemes” section, earlier in this chapter.
Entering Short Names
You can enter a code or “short name” of up to ten characters for each customer. Short names are a means by which you can list customers in alphabetical order or another order on reports, and still include the full customer name in the customer record.
To illustrate, assume you have the following four customers. When listed alphabetically, the names appear in this order:
A. Carson & Co. Bashaw Bulldozing Mr. Stephen Kershaw The Garden Restaurant
If you assign a short name that uses up to the first ten letters of the name by which you want to list the accounts, they appear in this order:
Customer Name Short Name Bashaw Bulldozing BASHAW A. Carson & Co. CARSON The Garden Restaurant GARDEN Mr. Stephen Kershaw KERSHAW
You can also leave spaces, assigning “Carson & C” as a short name, for example.
Setting Up Customer Records
Getting Started 2–83
ARGS‐2.doc, printed on 1/23/2008, at 7:29:03 PM. Last saved on 1/23/2008 7:28:00 PM.
Sage Software Confidential
Before Setting
Up A
/R
When you are adding a customer record, Accounts Receivable automatically inserts the first ten characters of the customer name as the default short name for the record, but you can enter any short name you want to use, or not use a short name at all.
If you want, you can print short names on customer statements. You might then want to use them for a purpose that is unrelated to customer names.
Or, if you designed your customer numbers to list customers in alphabetical order or in another order that meets your requirements, you might choose not to use short names at all.
Entering Credit Information and Credit Limits
Accounts Receivable lets you enter credit information for each customer record, including the number and rating assigned to the customer by a credit bureau.
Assigning a credit limit to customer accounts
The credit checks and credit limits specified for the assigned customer group appear as defaults for new customers you add to the group, unless you assign a customer to a national account. If the customer is assigned to a national account, the credit information used for the national account appears as the default.
If the customer group uses the Allow Edit Of Credit Check option, you can change the credit checks performed for the customer during invoice entry.
If the customer group does not use the Allow Edit Of Credit Check option, the credit checks and credit limits that are assigned to the customer group are also assigned to the customer, and you cannot change them for individual customers or national accounts.
Using credit limits during transaction entry
If a customer’s account is over its own or the national account’s credit limit or overdue limit, Accounts Receivable warns you when you try to add a new invoice or debit note for the customer. You can decide whether to add the transaction or not.
Setting Up Customer Records
2–84 Sage Accpac Accounts Receivable
ARGS‐2.doc, printed on 1/23/2008, at 7:29:03 PM. Last saved on 1/23/2008 7:28:00 PM.
Sage Software Confidential
If you create a recurring‐charge invoice that places a customer over its credit limit or overdue limit, Accounts Receivable warns you on the batch listing you print for the recurring‐charge batch. You must then choose whether to post the charge or delete it from the batch.
Assigning On Hold or Inactive Status to Customer Accounts
You can place a customer account on hold when you want to temporarily suspend the account, and you can assign Inactive as the status when you plan to delete the account.
Entering transactions for on-hold accounts
When a customer account is on hold, Accounts Receivable warns you when you start to enter an invoice for the customer, and you can choose whether to continue entering the invoice.
You can always enter and post credit notes, debit notes, payments, and prepayments whether a customer account is on hold or not.
You can place individual customers in a national account on hold without placing the entire national account on hold.
Assigning inactive status
You assign Inactive status to customer accounts by selecting the Inactive option in the customer record. You can assign this status to a customer only if the account has a zero balance and no outstanding or unposted transactions. You can assign Inactive status if the account has active recurring charges, however.
When a customer account is inactive, you cannot post further transactions to the account, but you can retain the account in your Accounts Receivable system for as long as you need to keep it. When you are ready, you can use the Delete Inactive Records form or the Customers form to delete the account.
You can assign inactive status to individual customers in a national account on hold without making the entire national account inactive. If a national account is inactive, however, all of its customers are inactive as well, and you cannot post transactions to any of the accounts.

Setting Up Customer Records
Getting Started 2–85
ARGS‐2.doc, printed on 1/23/2008, at 7:29:03 PM. Last saved on 1/23/2008 7:28:00 PM.
Sage Software Confidential
Before Setting
Up A
/R
Using Customer Statistics
Accounts Receivable keeps statistics for customers, and displays them in the Customers form. You accumulate and view the statistics by the type of year (fiscal or calendar) and length of period you specified on the Options form for customer statistics.
For each customer, the program displays the amount and number of invoices, receipts, discounts, credit notes, debit notes, adjustments, write‐offs, interest charges, returned checks, and paid invoices.
The program also calculates and displays the total days to pay, average days to pay, and year‐to‐date statistics for the customer.
Activity statistics Accounts Receivable keeps track of the year‐to‐date amounts and the dates of the highest balance and largest invoice in the current and previous years, and the last invoice, receipt, credit note, debit note, adjustment, write‐off, interest invoice, returned check, discount, refund, and revaluation posted to the customer’s account.
The program also calculates the total invoices paid, total days to pay, and average days to pay for the account.
Editing statistics You can edit the statistics in a customer record if you select the Allow Edit Of Statistics option on the Options form. For more information about accumulating customer statistics, see “Processing Options,” earlier in this chapter.
Reporting tax amounts in statistics
The totals kept for invoices, credit notes, and debit notes can include or exclude tax amounts posted with the document, depending on your choice for the Include Tax In Statistics option on the Options form.
You can also see, but not change, the outstanding balance, number of open invoices, last statement balance, and last statement date for the account.
Setting Up Customer Records
2–86 Sage Accpac Accounts Receivable
ARGS‐2.doc, printed on 1/23/2008, at 7:29:03 PM. Last saved on 1/23/2008 7:28:00 PM.
Sage Software Confidential
Specifying Default Shipping Details for Customers
You can specify the following shipping details for each customer:
• Ship‐via method.
• Whether to allow partial shipments (used by Order Entry).
• Default inventory location (used by Order Entry), so that goods are shipped from the nearest warehouse location.
• Free on board (FOB) point.
• Primary ship‐to location.
If you ship to different addresses from the one in the customer record, you can create ship‐to location records for each address. You can then designate one of the ship‐to locations as the primary ship‐to address for the customer. (For more information about adding ship‐to location records, see “Adding Ship‐To Locations,” later in this chapter.)
You specify ship‐via methods and the FOB points in customer records and in ship‐to location records (on the Invoicing tab).
When you create a recurring charge record, an order, or an invoice, Accounts Receivable and Order Entry use the following rules to display default shipping details:
• If a primary ship‐to location exists for a customer, the address and the ship via method from the primary ship‐to location record appear by default.
• If no primary ship‐to location exists for a customer, the address and the ship via method from the customer record appear by default.
• If you enter any ship‐to location code in the recurring charge record, order, or invoice, the shipping details from that ship‐to location record override the other defaults.
Setting Up Customer Records
Getting Started 2–87
ARGS‐2.doc, printed on 1/23/2008, at 7:29:03 PM. Last saved on 1/23/2008 7:28:00 PM.
Sage Software Confidential
Before Setting
Up A
/R
Accounts Receivable uses the default ship‐via method and the FOB point when you set up a new recurring charge record for a customer. It uses the primary ship‐to location by default when you create an invoice for the customer.
Order Entry uses these defaults when you process an order for the customer.
Allowing Partial Shipments and Backorder Quantities
Accounts Receivable lets you specify whether to allow partial shipments for a customer. If you use Sage Accpac Order Entry, you can also specify whether to allow backorder quantities for the customer.
Allowing partial shipments
Order Entry lets you ship and invoice partial orders only for customers for whom you select the Allow Partial Shipments option in the customer record.
Allowing backorders
If you select Allow Backorder Quantities in the customer record and you use the option to calculate backorder quantities in Order Entry,
Order Entry automatically calculates the quantity to backorder when you partially ship an order for the customer. If you also use the option to commit backordered quantities in Order Entry, it creates a commitment for the unfilled portion of the order.
If you do not select Allow Backorder Quantities, no backorder quantity appears on invoices from Order Entry. Also, Order Entry does not create a commitment for unfilled quantities on partial shipments.
Checking for Duplicate Purchase Orders
The Check for Duplicate POs option lets you specify whether Sage Accpac Order Entry displays a message when you enter an order or a standalone shipment with a purchase order number that is already used in an existing order or shipment for the customer.

Setting Up Customer Records
2–88 Sage Accpac Accounts Receivable
ARGS‐2.doc, printed on 1/23/2008, at 7:29:03 PM. Last saved on 1/23/2008 7:28:00 PM.
Sage Software Confidential
Note: The purchase order number is the customerʹs order number. It is not generated by Sage Accpac Purchase Orders.
If you do not want Order Entry to check for duplicate purchase order numbers, select None in this field.
If you want Order Entry to check whether you have already processed a specified purchase order, select either:
• Warning — to display a warning message if the purchase order number is used on any existing orders or standalone shipments for the customer. You can still process the duplicate order or shipment when you receive a warning.
• Error — to display an error message when you enter a duplicate order or standalone shipment for the customer. You cannot post the duplicate order or shipment.
Assigning Optional Fields to Customer Records
If you use Transaction Analysis and Optional Fields Creator, you can assign optional fields to store additional information you want to keep with customer records.
You use the Optional Fields tab on the Customers form to assign optional fields to particular customers.
Optional fields that are marked for automatic insertion in customer records appear on the tab. You can accept the optional fields that are displayed as defaults, or you can delete them.
You can also assign any additional optional fields that are defined in Accounts Receivable for customers, national accounts, and customer groups.
The program assigns default values to the optional fields, as follows:
• If the customer belongs to a national account, for optional fields that match those used by the national account, values from the national account record appear as defaults.

Setting Up Customer Records
Getting Started 2–89
ARGS‐2.doc, printed on 1/23/2008, at 7:29:03 PM. Last saved on 1/23/2008 7:28:00 PM.
Sage Software Confidential
Before Setting
Up A
/R
• If the customer does not belong to a national account, for optional fields that match those used by the customer group, values from the customer group record appear as defaults.
• If no default entry is specified for an optional field in either the national account record or the customer group record, the program uses the value specified in the optional field setup record.
You can accept or change the default entries. However, if the optional field is validated, you must use a value that is defined for the optional field in Common Services.
Processing Customer Comments
You can enter any number of comments in customer records, using up to 2,500 characters for each comment.
When you enter a comment, you can also enter a follow‐up date when you want to check on the comment, as well as an expiration date when you want to delete the comment. Once the expiration date is reached, you can automatically delete it using the Clear History form to clear comments for the customer number.
Entering Tax Information
If you charge taxes on sales to customers, you enter all the necessary tax information in the customer record. Accounts Receivable then automatically calculates all the applicable taxes when you enter transactions for the customer.
To specify tax information in the Customers form, you first select the tax group that includes the taxing authorities, classes, and rates that apply in the customer’s geographical area. (You set up tax groups and other tax information in the Tax Services forms in Common Services.)
You then select the customer’s tax class for each authority, indicating the tax status of the customer (for example, whether the customer is taxable or tax‐exempt, or from another jurisdiction).
Setting Up Customer Records
2–90 Sage Accpac Accounts Receivable
ARGS-2.doc, printed on 1/24/2008, at 11:24:51 AM. Last saved on 1/24/2008 11:24:00 AM.
Sage Software Confidential
If the customer has a tax-exemption number or a registration number such as for the Canadian Goods and Services Tax (GST), you also enter it for the corresponding tax class. You can print this number on invoices and statements for the customer.
Entering Retainage Information for Customers
Default retainage settings for customers
If you use retainage accounting in your Accounts Receivable system, you should also specify default settings for each customer, including the retainage percentage, retention period, and retainage terms.
When you add a new customer, Accounts Receivable uses as defaults the retainage percentage, retention period, and retainage terms you specified on the A/R Options form, but you can change these settings for individual customers on the Invoicing tab of the new customer record.
When you enter an invoice, credit note, or debit note that includes retainage for a customer, Accounts Receivable uses the retainage settings from the customer record as defaults.
Adding Ship-To Locations
Ship-to locations are the addresses to which customers want you to send the goods they order. (Invoices and statements are sent to the address entered in the customer record.)
You can designate a particular ship-to location as the primary ship-to address for a customer. Later, when you create a recurring charge record, an order, or an invoice, the ship-via code and description from the primary ship-to location record appear as defaults. (For more information, see the section, “Specifying Default Shipping Details for Customers,” earlier in this chapter.)
Accounts Receivable can keep an almost unlimited number of ship-to addresses for your customers, and you can set the location to use when you are entering invoices or defining recurring-charge records.

Setting Up Customer Records
Getting Started 2–91
ARGS‐2.doc, printed on 1/23/2008, at 7:29:03 PM. Last saved on 1/23/2008 7:28:00 PM.
Sage Software Confidential
Before Setting
Up A
/R
For each ship‐to location, you can enter a shipping method or carrier, special instructions, and the tax group that applies at the shipping address. This information appears as defaults when you add invoices for the customer and ship‐to location. At invoice time, you can use or change the information for the particular invoice.
You can also enter separate telephone and fax numbers, and an e‐mail address, for a contact person on the Contacts tab.
Each ship‐to location can also specify the salespeople who share in transactions posted using the code for the ship‐to location, as well as the percentage of transaction totals to allocate to each salesperson. Accounts Receivable displays salesperson information from the customer record as the default, but you can change it for the ship‐to location.
You can set a ship‐to location Inactive, provided it is not used in any unposted documents.
Specifying ship-to locations
You use the Ship‐To Locations form to add shipping addresses for your customers and to designate a primary ship‐to location.
You can also specify a default inventory location for a ship‐to location, so that goods are shipped from the nearest warehouse location when you process shipments using Order Entry.
“Zoom” button
You can temporarily change or add to the information for a ship‐to location while you are entering an invoice by clicking the Zoom button next to the Ship‐to Location field of the Invoice Entry form.
You assign a code to identify each location, then select the code during invoice entry to identify the address and taxes for the order and to display the shipping method and any special instructions that apply.
Using Optional Fields with Ship-to Locations
If you use Transaction Analysis and Optional Fields Creator, you can assign an unlimited number of optional fields to store additional information you want to keep with ship‐to locations.
Setting Up Customer Records
2–92 Sage Accpac Accounts Receivable
ARGS‐2.doc, printed on 1/23/2008, at 7:29:03 PM. Last saved on 1/23/2008 7:28:00 PM.
Sage Software Confidential
You must first set up optional fields for ship‐to locations using the Optional Fields setup form before you can assign them to particular ship‐to location records.
If you define and use the same optional fields for customers and ship‐to locations as you use for invoices, the program can assign optional field entries from the ship‐to location record on invoices, debit notes, and credit notes when you specify a particular ship‐to location in Invoice Entry.
Optional fields and values marked for automatic insertion appear as defaults
Any ship‐to location optional fields that you marked for automatic insertion on the Optional Fields setup form appear, along with their default entries, on the Optional Fields tab when you add a new ship‐to location.
You can accept the default optional fields, or you can delete them. You can also assign any other optional fields that are defined for ship‐to locations in Accounts Receivable.
The default entry comes from the optional field record
The program displays the default entry from the optional field record. You can accept or change the default value. However, if the optional field is validated, you must select a value that is defined for the optional field in Common Services.
Adding Recurring Charges
If you have customers to whom you issue standard invoices at regular intervals, such as charges for monthly rent, you can define records for the charges and customers using the Recurring Charges form.
Specifying invoicing frequency
To determine when to invoice recurring charges and how to date the invoice, you assign each recurring charge a schedule that you have set up in Common Services.
Reminders to produce recurring charge invoices
If the schedule is set up to remind users when it is due for processing, the schedule appears automatically on the user’s Reminder List when it is due.
Setting Up Customer Records
Getting Started 2–93
ARGS‐2.doc, printed on 1/23/2008, at 7:29:03 PM. Last saved on 1/23/2008 7:28:00 PM.
Sage Software Confidential
Before Setting
Up A
/R
You can set up charges to recur indefinitely, or you can limit the number of times you invoice a recurring charge.
Specifying limits for the charge
You use the Expiration Type field to specify whether to restrict invoices beyond a specific date, a maximum amount, or a specified number of invoices. Depending on your choice for the expiration type, you also:
• Enter an expiration date for the charge. No invoices would be created for the charge after its expiration date.
• Specify a maximum amount for a charge. When the maximum amount has been invoiced to the customer, Accounts Receivable creates no further invoices for the recurring charge.
• Specify the number of invoices to process for the recurring charge. Once you have invoiced the specified number of times, Accounts Receivable creates no further invoices for the recurring charge.
Assigning payment terms to recurring charges
You enter a terms code for each recurring charge. The code determines the due date for recurring charge invoices, as well as the discount percentage and period. You can change any of this information on the invoice.
Invoice type You specify for each recurring charge whether to use item details or summary details when invoices are created. Accounts Receivable displays the default invoice type you specified on the A/R Options form as the default for new recurring charge records.
Adding general ledger and tax information
You can distribute each detail of a recurring charge to a different distribution code or general ledger revenue account, and you can specify how to calculate taxes for each charge.
You can enter negative details, providing the document total is not negative, and you can add recurring charges whose details sum to zero.
Adding detail comments
Accounts Receivable also lets you enter a comment with each recurring charge detail.
Setting Up Customer Records
2–94 Sage Accpac Accounts Receivable
ARGS‐2.doc, printed on 1/23/2008, at 7:29:03 PM. Last saved on 1/23/2008 7:28:00 PM.
Sage Software Confidential
Using optional fields
If you use optional fields, an Optional Fields tab appears.
When you first add a recurring charge, the tab displays any optional fields that you set up for automatic insertion on invoices, and assigns default entries, as follows:
• If you assigned to the customer the same optional fields you defined for invoices, the program displays the optional field entries from the customer record.
• If you assigned to the ship‐to location the same optional fields you defined for invoices, the program displays the entries from the ship‐to location record.
• If you assigned the same optional fields to the customer record and the ship‐to location record, the program displays the entries from the ship‐to location record.
• If an optional field that is defined for invoices is not assigned either to the customer or the ship‐to location, the program displays the default value specified for the invoice optional field.
You can delete or change the optional invoice fields used with a recurring charge, or add any that you have set up for use with invoices.
Optional detail fields
Any invoice details optional fields that you set up for automatic insertion are assigned to recurring charge details.
Optional fields indicator
An Optional Fields indicator (a field or a checkbox, depending whether you are using the detail‐entry grid or the Detail Accounts/Taxes form) shows whether a selected detail uses optional fields. Note that the program sets this indicator — you cannot select or clear it. If you delete all the optional fields associated with the detail, the program resets the Optional Fields indicator.
“Zoom” To check or to change the optional fields that are used for the detail, select the detail, then click the Zoom button beside the field, or press Shift+F9. The Optional Fields form appears, where you can add or
Setting Up Customer Records
Getting Started 2–95
ARGS‐2.doc, printed on 1/23/2008, at 7:29:03 PM. Last saved on 1/23/2008 7:28:00 PM.
Sage Software Confidential
Before Setting
Up A
/R
delete optional fields for the detail. You can add any optional fields that are defined for invoice details.
You can change the value for an optional field, as follows:
• If the optional field is validated, you must specify a value that you have defined for the optional field in Common Services. You can leave the value blank only if the optional field allows blanks.
• If the optional field is not validated, you can either select a value that you defined for the optional field in Common Services, or you can enter any value that is consistent with the type of optional field and that does not exceed the length specified for the field.
Allocating recurring-charge amounts to salespeople
You can assign salespeople to each recurring‐charge record and enter the percentage each salesperson earns of the commission on the recurring charge amount.
Entering shipping information for a recurring charge
You can assign a ship‐to location and enter the shipping method or carrier and any special instructions you want to print on the invoices.
If you have designated a primary ship‐to location for the customer, the ship via method and the FOB point specified in the primary ship‐to location are used as the defaults when you set up a new recurring charge record.
If there is no primary ship‐to location for the customer, the shipping details from the customer record are used instead. You can change the ship‐to location and the ship via method for the recurring charge, if you want.
You can also enter a sales order number and purchase order number with each recurring charge.
Last Invoiced date The record for each recurring charge shows the last date on which an invoice was created for it. This date is changed by Accounts Receivable each time you use the Create Recurring Charge Batch form to create an invoice for the charge.
Importing and Exporting Accounts Receivable Records
2–96 Sage Accpac Accounts Receivable
ARGS‐2.doc, printed on 1/23/2008, at 7:29:03 PM. Last saved on 1/23/2008 7:28:00 PM.
Sage Software Confidential
Entering taxes Accounts Receivable lets you enter total tax amounts and detail tax amounts manually in recurring charge records, or you can let the program calculate taxes for you when you create a recurring charge batch.
If you select the option to calculate taxes automatically, the program displays estimated taxes using the tax rates currently in effect. If tax rates change, the tax amounts will be different when you process the recurring charges.
Processing recurring charges
When you are ready to invoice the customers for the charges, you use the Create Recurring Charge Batch form to create the invoice batch automatically.
Updating recurring charges periodically
You can use the Update Recurring Charges form, periodically, to increase or decrease recurring charge details by a percentage or an amount for a range of customers.
Deleting a customer record removes recurring charges
Note: When you delete a customer record, all recurring charges for the customer are also deleted.
For information about creating and processing invoices for recurring charges, see the “Invoicing Recurring Charges” section in Chapter 2 of the User Guide.
Importing and Exporting Accounts Receivable Records
If you are transferring accounts receivable records from another computerized accounts receivable system, you may be able to transfer records directly into Sage Accpac Accounts Receivable by importing them.
You can also export records from another Sage Accpac Accounts Receivable database, edit them in a spreadsheet or other program to change codes, amounts, and other information, then import them into the new Accounts Receivable system that you are setting up.
Importing and Exporting Accounts Receivable Records
Getting Started 2–97
ARGS‐2.doc, printed on 1/23/2008, at 7:29:03 PM. Last saved on 1/23/2008 7:28:00 PM.
Sage Software Confidential
Before Setting
Up A
/R
Accounts Receivable records you can import and export include:
• Account sets • Billing cycles • Customer groups • Customers • Distribution codes • Dunning messages • Interest profiles • Items • National accounts • Payment codes • Recurring charges • Salespersons • Ship‐to locations • Terms codes • Optional Fields
You could, for example, export customer records to a spreadsheet to analyze the statistics. You could also export all customer records with the same account set to a spreadsheet, change their credit limits, then import them back into Accounts Receivable. Or, you could export all customer records, extract their balances, and write a program to build an invoice file of these balances.
You can also import and export transaction batches, as described in the “Importing Batches” and “Exporting Batches” sections in Chapter 2 of the User Guide.
Accounts Receivable can create export files in several formats, including Microsoft Excel and Microsoft Access, Comma Separated Values and Continuous ASCII file formats, dBase 5.0, and ODBC formats. You select the format to use when you export the data.
For information about importing and exporting Accounts Receivable records, see the appendix “Importing and Exporting” in the User Guide and “Importing and Exporting Data” in the System Manager User Guide.
Entering Current and Historical Transactions
2–98 Sage Accpac Accounts Receivable
ARGS‐2.doc, printed on 1/23/2008, at 7:29:03 PM. Last saved on 1/23/2008 7:28:00 PM.
Sage Software Confidential
Entering Current and Historical Transactions To properly set up your Accounts Receivable system, you must enter and post the current‐year opening balances in your customer accounts. If you set up partway through a fiscal year, you must also enter and post figures for the current year, up to the present date, and all outstanding transactions.
If you want to display and print reports of previous‐year data, you must enter those figures as well.
You can enter this data as statistical information for customer accounts, items, and salespersons for all the previous years for which you retain the data. You add the information you need during setup. The program then automatically updates the information every time you post transactions.
Entering Current-Year Data
The information in this section outlines the methods you can use to enter the opening balances in your customer accounts and enter any transactions that are outstanding for the current year to date. For step‐by‐step instructions, see “Step 9: Add Opening Balances and Current‐Year Transactions,” in Chapter 3, “Setting Up Your Accounts Receivable System.”
Entering Opening Balances in Customer Accounts
The method you use to create current customer account balances depends on how much information you want to transfer to Sage Accpac Accounts Receivable from your previous system.
You can enter the outstanding invoices in each customer account and the transactions, such as credit notes and receipts, that have been applied to the invoices, to establish the current balance of each open invoice.
Entering Current and Historical Transactions
Getting Started 2–99
ARGS-2.doc, printed on 2/5/2008, at 6:39:01 PM. Last saved on 2/5/2008 6:38:00 PM.
Sage Software Confidential
Before Setting
Up A
/R
This is the most thorough method. It provides you with full detail, letting you print accurate reports, reprint invoices, and answer customer’s inquiries quickly.
You can use other methods to set up your system. For example, you could add only each customer’s outstanding balance on the day you start using Accounts Receivable. Using this method, you post each customer’s outstanding balance as a single invoice with a single document date and due date, or as a single credit note, in the case of a credit balance.
This method treats all your customer accounts as if they were balance-forward accounts during setup. You cannot apply receipts to specific invoices that you issued before setup, and you cannot use Accounts Receivable to look up individual transactions to answer customer inquiries. You also cannot print complete invoices or correct aging reports from Accounts Receivable for the time before you set up your system.
Another method you might choose is to start your Accounts Receivable system as an all-new system, entering only new invoices and other transactions that occur after setup. You then run two receivable systems, processing existing invoices in your previous system until they are all completed, before switching entirely to Sage Accpac Accounts Receivable.
This method also does not let you use Accounts Receivable to print complete receivables reports, and can cause confusion about which system to check when tracking transactions.
Entering Historical (Previous-Year) Data
If you need to add sales history for previous years to a new Accounts Receivable system, you can add it quickly and easily using the form for the type of data you want, or you can import it.
If you use the options to keep and edit statistics, you can enter figures for customer groups, national accounts, customers,
Entering Current and Historical Transactions
2–100 Sage Accpac Accounts Receivable
ARGS‐2.doc, printed on 1/23/2008, at 7:29:03 PM. Last saved on 1/23/2008 7:28:00 PM.
Sage Software Confidential
salespersons, and items. You can add the figures by the periods and years you specified on the Options form.
Entering customer statistics for previous years and periods
For each customer, customer group, and national account, you can enter the amount and number of invoices, receipts, discounts, credit notes, debit notes, adjustments, write‐offs, interest charges, returned checks, paid invoices, and refunds.
For customers and national accounts, you can also enter the:
• Amount and date of the highest balance and of the largest invoice for the current year and previous year.
• Amount and date of the last invoice, receipt, credit note, debit note, adjustment, interest charge, returned check, discount, refund, and revaluation.
• Total days to pay and total number of paid invoices.
Entering item statistics for previous years and periods
For each item and unit of measure, you can enter the:
• Amount and number of sales and returns.
• Total cost of goods sold.
Accounts Receivable calculates the gross margin by subtracting cost of goods sold from sales for each unit and period.
Entering salesperson statistics for previous years and periods
For each salesperson, you can enter the amount and number of invoices, receipts, credit notes, debit notes, discounts, and write‐offs posted for the salesperson in each period.
You can review the figures in the customer, item and salesperson forms, and you can print them using the Statistics option in the Setup reports for each type of data. Step‐by‐step instructions for entering customer, item, and salesperson statistics are included in Chapter 3.
If you do not need historical data right away, you do not have to add it when you set up an Accounts Receivable system. The program updates the figures automatically each time you post transactions.
Creating Formats for Printed Forms
Getting Started 2–101
ARGS‐2.doc, printed on 1/23/2008, at 7:29:03 PM. Last saved on 1/23/2008 7:28:00 PM.
Sage Software Confidential
Before Setting
Up A
/R
Creating Formats for Printed Forms The Sage Accpac Accounts Receivable package includes sample reports that you can adapt to print on the forms you use for invoices, credit notes, debit notes, deposit slips, statements, letters, refund checks, and labels. You should set up and test the forms you want to use before you begin entering transactions.
Chapter 7, “Reports,” in the Accounts Receivable User Guide gives examples of the documents you can print with the sample Accounts Receivable report formats.
To view a list of the fields you can include when developing formats for printing:
• From the Sage Accpac program group on the Windows Start menu, click in order: Online Documentation, Accounts Receivable, Customizing Forms.
Setting Up Multicurrency Accounting in Accounts Receivable
This section summarizes the steps you take to set up a multicurrency Accounts Receivable system.
You use multicurrency accounting if you want to be able to process transactions in more than one currency.
To create a multicurrency Accounts Receivable system, you:
Select the Multicurrency option for the company
1. Turn on the Multicurrency option for the company database, and select a default rate type in the Company Profile form in Common Services.
Select the euro option
2. If your company uses the euro as its functional currency, turn on the euro option and select a reporting currency in the Company Profile form.

Setting Up Multicurrency Accounting in Accounts Receivable
2–102 Sage Accpac Accounts Receivable
ARGS‐2.doc, printed on 1/23/2008, at 7:29:03 PM. Last saved on 1/23/2008 7:28:00 PM.
Sage Software Confidential
Enter currency information in Common Services
3. Use the Common Services Currency forms to add any currency codes you need for Accounts Receivable, and enter rates for the currencies you use.
When you install Sage Accpac ERP, you also install a large set of currency codes that use standard international abbreviations and the format and number of decimal places that are normally used with each currency. You probably do not need to define new codes.
Turn on the A/R Multicurrency option
4. Use the A/R Options form to select the Multicurrency option for your Accounts Receivable system.
Add an account set for each currency
5. Use the Account Sets form to add at least one account set for every currency you want to use in Accounts Receivable. For each account set that does not use the functional currency, enter the currency code and the numbers of the exchange gain and loss and exchange rounding general ledger accounts to use.
Add interest rates for each currency
6. Use the Interest Profiles form to add interest records that include a minimum interest charge and annual interest rate for each currency used by the customers assigned to a particular interest profile.
Add item prices in each currency
7. Use the Items form to add pricing information for every currency and unit of measure in which you sell each item.
Enter multicurrency information for customer records
When you create customer groups, select the rate type for the group and enter a credit limit in each of the currencies used by the national accounts and customers you plan to assign to the group.
8. When you create national accounts, select an account set that uses the currency of the national account and the customer accounts, then enter the credit limit in that currency. You also enter a rate type for converting amounts in the currency to the functional currency.
When you add customer records, assign each record to an account set that uses the customer’s currency. If a customer is part of a
Where To Now?
Getting Started 2–103
ARGS‐2.doc, printed on 1/23/2008, at 7:29:03 PM. Last saved on 1/23/2008 7:28:00 PM.
Sage Software Confidential
Before Setting
Up A
/R
national account, the account set and currency are specified by the national account, and you cannot change them.
For information on processing multicurrency transactions, see “Processing Multicurrency Transactions” in Chapter 2 of the User Guide.
For information on using the euro in Sage Accpac ERP, see Chapter 8, “Entering Currency Information,” in the System Manager User Guide.
Where To Now? You are now ready to set up your own Sage Accpac Accounts Receivable system, following the steps in Chapter 3, “Setting Up Your Accounts Receivable System.”
You may also want to practice processing Accounts Receivable transactions using the lessons in the Sage Accpac Workbook.
If you are unfamiliar with the operation of the System Manager, you should read the System Manager User Guide.


Getting Started 3–i
ARGS‐3.doc, printed on 1/31/2008, at 4:12:08 PM. Last saved on 1/31/2008 4:11:00 PM.
Sage Software Confidential
Setting Up A
/R
Chapter 3 Setting Up Your
Accounts Receivable System
Before You Begin...............................................................3–1 Using Accounts Receivable with an Internet Browser ..............................3–2 Overview of Accounts Receivable Setup ..........................................3–2 While You Work ...............................................................3–3
Guideposts to Accounts Receivable Information ...............................3–5 Using Finders ..........................................................3–6 Using Help.............................................................3–6 Finding Additional Information ..........................................3–6 Finding Multicurrency Information.......................................3–6 Protecting Your Work ...................................................3–7
Setting Up an Accounts Receivable System .......................................3–7 Step 1: Gather Data from Your Present Receivables System.....................3–7 Step 2: Add Receivable Accounts to Your Chart of Accounts ...................3–9 Step 3: Add Tax, Bank, and Currency Information for Accounts Receivable
in Common Services ...................................................3–10 Step 4: Select Accounts Receivable Options ..................................3–10
Changing Your Accounts Receivable Options.............................3–28 Select G/L Integration Options ..........................................3–29
Step 5: Add Setup Records .................................................3–34 Add Account Sets......................................................3–36 Add Billing Cycles .....................................................3–39 Add Distribution Codes ................................................3–40 Add Dunning Messages (Optional) ......................................3–42 Add Interest Profiles ...................................................3–44 Add Payment Codes ...................................................3–47 Add Items (Optional) ..................................................3–48
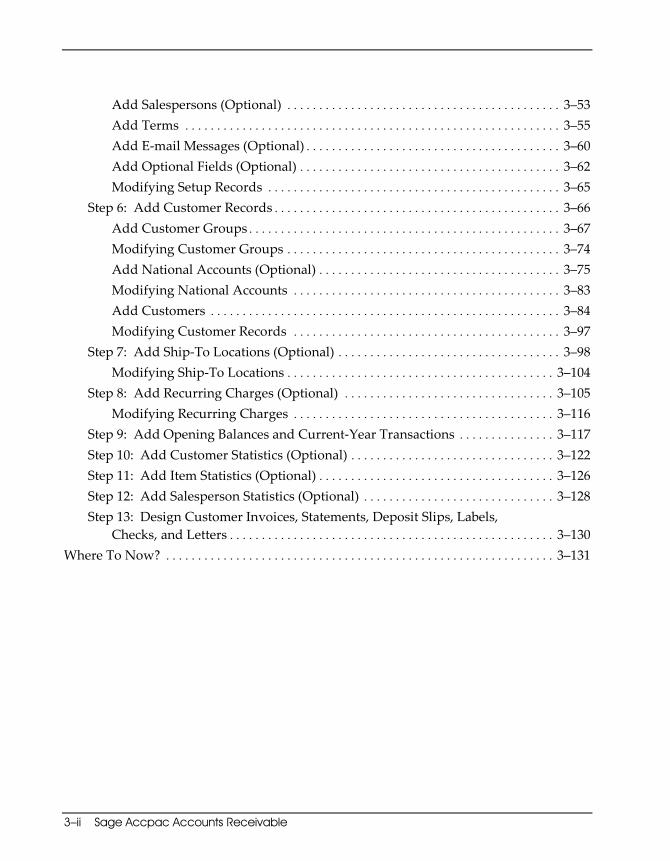
3–ii Sage Accpac Accounts Receivable
ARGS‐3.doc, printed on 1/31/2008, at 4:12:08 PM. Last saved on 1/31/2008 4:11:00 PM.
Sage Software Confidential
Add Salespersons (Optional) ........................................... 3–53 Add Terms ........................................................... 3–55 Add E‐mail Messages (Optional)........................................ 3–60 Add Optional Fields (Optional)......................................... 3–62 Modifying Setup Records .............................................. 3–65
Step 6: Add Customer Records............................................. 3–66 Add Customer Groups................................................. 3–67 Modifying Customer Groups ........................................... 3–74 Add National Accounts (Optional)...................................... 3–75 Modifying National Accounts .......................................... 3–83 Add Customers ....................................................... 3–84 Modifying Customer Records .......................................... 3–97
Step 7: Add Ship‐To Locations (Optional) ................................... 3–98 Modifying Ship‐To Locations.......................................... 3–104
Step 8: Add Recurring Charges (Optional) ................................. 3–105 Modifying Recurring Charges ......................................... 3–116
Step 9: Add Opening Balances and Current‐Year Transactions ............... 3–117 Step 10: Add Customer Statistics (Optional) ................................ 3–122 Step 11: Add Item Statistics (Optional)..................................... 3–126 Step 12: Add Salesperson Statistics (Optional) .............................. 3–128 Step 13: Design Customer Invoices, Statements, Deposit Slips, Labels,
Checks, and Letters................................................... 3–130 Where To Now? ............................................................. 3–131
Getting Started 3–1
ARGS‐3.doc, printed on 1/31/2008, at 4:12:08 PM. Last saved on 1/31/2008 4:11:00 PM.
Sage Software Confidential
Setting Up A
/R
Chapter 3 Setting Up Your
Accounts Receivable System
This chapter contains instructions for creating an Accounts Receivable system suited to your business. It also describes how to transfer your existing receivable records to Sage Accpac Accounts Receivable after you have set up the system.
The purpose of this chapter is to get you “up and running” quickly. The instructions assume you have read Chapter 2, “What You Need to Know Before Setting Up Accounts Receivable,” and have decided on the options you want to use in your Accounts Receivable system.
Using the Setup wizard
If you are using the Setup wizard to create a new Sage Accpac database, refer to the instructions in the System Manager Quick Start Guide, then return to this chapter to complete Accounts Receivable setup. The Setup wizard activates Accounts Receivable and lets you choose Accounts Receivable options.
Converting from ACCPAC Plus
If you are converting from the ACCPAC Plus version of Accounts Receivable, first read the instructions in the Converting from ACCPAC Plus Accounting manual before following the steps in this chapter.
Before You Begin Install and set up the Sage Accpac System Manager first
Before taking the steps in this chapter, you must install the Sage Accpac System Manager, create system and company databases, choose some company‐wide options in Common Services, and install and activate Bank and Tax Services.
Using Accounts Receivable with an Internet Browser
3–2 Sage Accpac Accounts Receivable
ARGS‐3.doc, printed on 1/31/2008, at 4:12:08 PM. Last saved on 1/31/2008 4:11:00 PM.
Sage Software Confidential
If you use Sage Accpac General Ledger, you must also add the general ledger accounts you need for the account sets you want to use in Accounts Receivable.
Install and activate Accounts Receivable according to the instructions in the System Manager User Guide.
Using Accounts Receivable with an Internet Browser All Accounts Receivable forms are designed to enable users at remote locations to enter and view data using an Internet browser.
If you are using Accounts Receivable through a browser, you navigate the program a little differently than you would from the Sage Accpac desktop, by clicking rather than double‐clicking to open a Sage Accpac program or form.
To find out how to set up your system for use on the Web and how to sign on to Sage Accpac through your browser, see the System Manager Administrator Guide and User Guide.
Overview of Accounts Receivable Setup Once you have activated the Accounts Receivable program for your company database, you are ready to set up the Accounts Receivable ledger.
The flow chart on pages 4 and 5 lists the tasks involved in setting up a Sage Accpac Accounts Receivable system. The step numbers identify the sets of instructions that explain the tasks more fully in the rest of this chapter.

While You Work
Getting Started 3–3
ARGS‐3.doc, printed on 1/31/2008, at 4:12:08 PM. Last saved on 1/31/2008 4:11:00 PM.
Sage Software Confidential
Setting Up A
/R
While You Work Use the Setup Checklist as a guide
You can simplify the setup process by using the Setup Checklist, checking off each step as you complete it. Appendix A, “Setup Checklist,” in this guide, contains a sample checklist and tells you how to print it.
Review “What You Need to Know...”
When you need background information before making a choice, consult Chapter 2, “What You Need to Know Before Setting Up Accounts Receivable,” in this manual.
Using a mouse or keyboard
Depending on your preference, you can use your mouse or your keyboard to move from field to field, or from tab to tab, to enter data in the forms. For information about using a mouse or keyboard, see the appendix “Using a Mouse or Keyboard,” in the System Manager User Guide.
Skip steps that do not apply to the way you will use Accounts Receivable.
While You Work
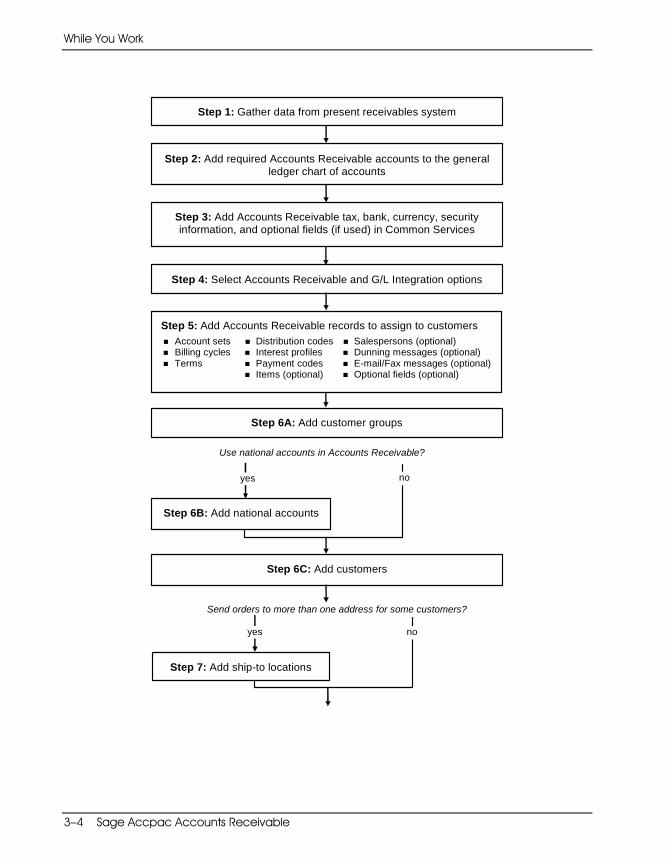
While You Work
3–4 Sage Accpac Accounts Receivable
ARGS‐3.doc, printed on 1/31/2008, at 4:12:08 PM. Last saved on 1/31/2008 4:11:00 PM.
Sage Software Confidential
Step 6B: Add national accounts
Step 2: Add required Accounts Receivable accounts to the general ledger chart of accounts
Step 3: Add Accounts Receivable tax, bank, currency, security information, and optional fields (if used) in Common Services
Step 1: Gather data from present receivables system
Step 4: Select Accounts Receivable and G/L Integration options
Step 5: Add Accounts Receivable records to assign to customers Account sets Distribution codes Salespersons (optional) Billing cycles Interest profiles Dunning messages (optional) Terms Payment codes E-mail/Fax messages (optional)
Items (optional) Optional fields (optional)
no
Use national accounts in Accounts Receivable?
Step 6A: Add customer groups
Step 6C: Add customers
yes
no
Send orders to more than one address for some customers?
Step 7: Add ship-to locations
yes
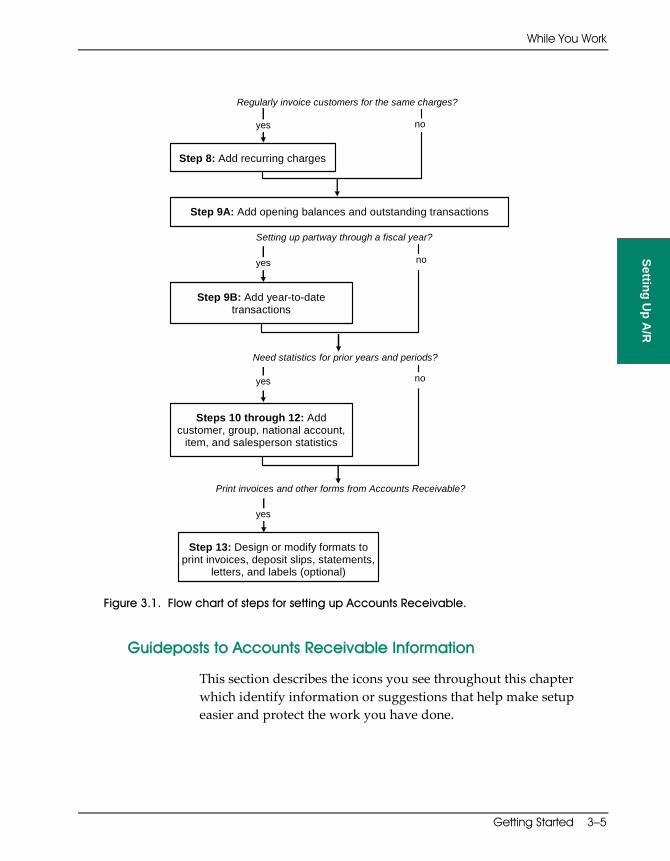
While You Work
Getting Started 3–5
ARGS‐3.doc, printed on 1/31/2008, at 4:12:08 PM. Last saved on 1/31/2008 4:11:00 PM.
Sage Software Confidential
Setting Up A
/R
Step 8: Add recurring charges
no
Regularly invoice customers for the same charges?
Step 9B: Add year-to-date transactions
no
Setting up partway through a fiscal year?
Steps 10 through 12: Add customer, group, national account,
item, and salesperson statistics
no
Need statistics for prior years and periods?
Print invoices and other forms from Accounts Receivable?
Step 13: Design or modify formats to print invoices, deposit slips, statements,
letters, and labels (optional)
Step 9A: Add opening balances and outstanding transactions
yes
yes
yes
yes
Figure 3.1. Flow chart of steps for setting up Accounts Receivable.
Guideposts to Accounts Receivable Information
This section describes the icons you see throughout this chapter which identify information or suggestions that help make setup easier and protect the work you have done.
While You Work
3–6 Sage Accpac Accounts Receivable
ARGS‐3.doc, printed on 1/31/2008, at 4:12:08 PM. Last saved on 1/31/2008 4:11:00 PM.
Sage Software Confidential
Using Finders
Use the Finder
When you see a Finder icon beside a field in a Sage Accpac form, you can use it to display a list of possible entries for the field. Use your mouse to click the Finder button or press F5 on your keyboard.
To choose a record quickly from a long list, select the Auto Search option. Then, type the characters that the record starts with or contains. The Finder displays the subset of records that match your search criteria.
To choose from a Finder list, use your mouse or an arrow key to select (highlight) a record, then double‐click or press Enter.
Using Help
If you have questions or encounter error messages as you work in Sage Accpac applications, press the F1 key, click Help on the menu, or click the Help button in a dialog box to display information about the form, fields, or message on your screen.
To get help on a specific topic, click Contents on the Help menu and choose a topic from the list, or click the Index tab, type the word you want to search for, then choose from the list.
Finding Additional Information
Further reading
The Information icon provides page number references to other sections in the Accounts Receivable manuals that contain background information about the setup tasks. You should read the suggested sections when you need more information about the task you are trying to accomplish.
Finding Multicurrency Information
Multicurrency ledgers
The multicurrency icon identifies information and instructions that apply to you only if you use multicurrency accounting with Accounts Receivable. If you do not use multicurrency accounting, the icon also lets you easily recognize sections you can skip.

Setting Up an Accounts Receivable System
Getting Started 3–7
ARGS‐3.doc, printed on 1/31/2008, at 4:12:08 PM. Last saved on 1/31/2008 4:11:00 PM.
Sage Software Confidential
Setting Up A
/R
Protecting Your Work
Check data integrity, make backups
Throughout this chapter, the microscope icon in the left margin reminds you to check data integrity and make backups of your Sage Accpac data. Do not ignore this suggestion.
As a rule, you should check integrity and back up your data any time you have added records that would be time‐consuming to have to enter a second time.
You should also always check data integrity and make a backup copy before you post batches or do other tasks that change your Accounts Receivable data.
For information about checking data integrity and making backups, see the chapter “Checking Data Integrity and Making Backups,” in the System Manager User Guide.
Setting Up an Accounts Receivable System This section guides you through the process of setting up Sage Accpac Accounts Receivable. The instructions in each step list the information you must enter to define a record, as well as optional information you may want to enter or that you may need for your particular system.
If you are not familiar with how to navigate through the forms in Sage Accpac, see the appendix “Using a Mouse or Keyboard,” in the System Manager User Guide.
Step 1: Gather Data from Your Present Receivables System
After you have activated your Sage Accpac Accounts Receivable data files, you must add the data from your company’s present receivables system to Sage Accpac.
Setting Up an Accounts Receivable System
3–8 Sage Accpac Accounts Receivable
ARGS-3.doc, printed on 2/5/2008, at 6:45:28 PM. Last saved on 1/31/2008 4:11:00 PM.
Sage Software Confidential
Refer to existing records
To begin, gather all your current accounts receivable records. These can be manual records or printed listings and reports from other accounting software, such as:
• A list of any general ledger accounts you need to add to General Ledger for your accounts receivable system, including receivables control, receipt discounts, prepayment liability, retainage, and write-off accounts.
Multicurrency ledgers
If you use multicurrency accounting, also list the numbers of the accounts you use for unrealized exchange gain, unrealized exchange loss, realized exchange gain, realized exchange loss, and exchange rounding.
See also page 2-40
These accounts are described in “Setting Up Account Sets” in Chapter 2.
• A list of your customers and the data you keep for each customer account, including year-to-date and previous-year statistics.
• Recurring charges information (if any).
• Aged accounts receivable listing as of the date you are transferring the information, including full account details for invoices, credit notes, and debit notes, if possible.
• Lists of the codes and other information you use to set up customer records, account sets, billing cycles, distribution codes, interest profiles, payment codes, salespersons, payment terms, items, customer groups, national accounts, shipping destinations, additional information you may want to track in optional fields, and territories.
• Samples of the preprinted or laser-printed forms for the invoices, credit notes, debit notes, deposit slips, statements, letters, and labels you use for your customers.
Step 1: Gather Data From Your Present Receivables System
Step 2: Add Receivable Accounts to Your Chart of Accounts
Getting Started 3–9
ARGS-3.doc, printed on 2/5/2008, at 6:51:14 PM. Last saved on 2/5/2008 6:51:00 PM.
Sage Software Confidential
Setting Up A
/R
Multicurrency ledgers
• If you use a multicurrency Accounts Receivable ledger, a list of the source currencies in which you deal and a list of current exchange rates.
Use the Setup checklist
• The Setup checklist you printed and filled out while reading Chapter 2, “What You Need to Know Before Setting Up Accounts Receivable.”
Consider importing the data
You may be able to enter much of the data by importing it from another application.
You can import data into Sage Accpac Accounts Receivable for customer groups, national accounts, customers, account sets, billing cycles, distribution codes, dunning messages, interest profiles, optional fields, payment codes, items, salespersons, and terms codes.
To see whether you can make use of the import option, read Appendix B, “Importing and Exporting,” in the User Guide.
Step 2: Add Receivable Accounts to Your Chart of Accounts
In Sage Accpac General Ledger or, if you do not use it, in another general ledger, add the accounts you need for your Accounts Receivable data, including:
• Receivables control • Receipt discounts • Prepayment liability • Revenue • Write-offs • Interest income • Retainage (if you use retainage accounting)
Multicurrency ledgers
If you use multicurrency accounting, also add accounts for:
• Unrealized exchange gain (if you use the Realized and Unrealized Gain/Loss accounting method)
• Unrealized exchange loss (if you use the Realized and Unrealized Gain/Loss accounting method)
Step 2: Add Receivable Accounts to Your Chart of Accounts

Setting Up an Accounts Receivable System
3–10 Sage Accpac Accounts Receivable
ARGS‐3.doc, printed on 1/31/2008, at 4:12:08 PM. Last saved on 1/31/2008 4:11:00 PM.
Sage Software Confidential
• Exchange gain
• Exchange loss
• Exchange Rounding (due to exchange differences)
Step 3: Add Tax, Bank, and Currency Information for Accounts Receivable in Common Services
Tax and Bank Services
Use the Tax Services and Bank Services forms in Common Services to enter the tax and bank information used by Accounts Receivable. For information about these services, see the Tax and Bank User Guide.
Multicurrency ledgers
If you use currency codes or currencies not yet included in the Common Services Currency forms, add the currencies you require, and enter rates for each currency, as described in the System Manager User Guide.
Step 4: Select Accounts Receivable Options
After you install the system and activate Accounts Receivable, you enter information in the A/R Options form (available in the Setup folder) to specify how you want your Accounts Receivable system to operate.
If you need to make changes after setup, you can modify the information in the A/R Options form.
You also enter information in the G/L Integration form (available in the Setup folder) to determine how your Accounts Receivable system interacts with General Ledger, including the types of information to send with the transactions created in Accounts Receivable for General Ledger. See the section “Select G/L Integration Options“ for step‐by‐step instructions on selecting these options.
Note that you may need to refresh your data by reopening your company for some of these options to take effect. For example, if you select the option to process recurring charges, you need to reopen
Step 3: Add Tax, Bank, and Currency Information
Step 4: Select Accounts Receivable Options
Step 4: Select Accounts Receivable Options
Getting Started 3–11
ARGS‐3.doc, printed on 1/31/2008, at 4:12:08 PM. Last saved on 1/31/2008 4:11:00 PM.
Sage Software Confidential
Setting Up A
/R
your company using the Open Company form to display the icons related to recurring charges.
The A/R Options form contains the following tabs:
• Company • Processing • Transactions • Numbering • Statement • Retainage (if you use retainage accounting)
Help Remember to press F1 or choose a Help key any time you want more information or have questions about the Options form.
If you are not familiar with choosing commands or moving your cursor around in Sage Accpac forms, refer to the appendix “Using a Mouse or Keyboard,” in the System Manager User Guide.
See also page 2-2
For background reading about setup options, see “Choosing Accounts Receivable Options” in Chapter 2 of this manual.
To select Accounts Receivable options:
1. Choose the Options icon in the A/R Setup folder to display the first tab of the Options form.
The company name and address displayed on this tab are taken from the Company Profile form in Common Services. You can change this information only in Common Services.
However, you can enter a separate contact name and telephone and fax numbers for Accounts Receivable on this tab.

Setting Up an Accounts Receivable System
3–12 Sage Accpac Accounts Receivable
ARGS‐3.doc, printed on 1/31/2008, at 4:12:08 PM. Last saved on 1/31/2008 4:11:00 PM.
Sage Software Confidential
The Company tab of the Options form
2. If required, change the entries on the Company tab as follows:
Contact Name. Type a name to identify a contact person or position in the company for whom you are creating the Accounts Receivable system, or use the field for your own purposes.
Telephone Number / Fax Number. Type the telephone and fax numbers of the company for which you are setting up records.
The format used for telephone numbers depends on whether the Format Phone Number option is selected in the Company Profile form in Common Services.
3. When finished, click the Processing tab.

Step 4: Select Accounts Receivable Options
Getting Started 3–13
ARGS‐3.doc, printed on 1/31/2008, at 4:12:08 PM. Last saved on 1/31/2008 4:11:00 PM.
Sage Software Confidential
Setting Up A
/R
The Processing tab of the Options form
4. Complete the Processing tab as follows:
Currency Options
Multicurrency. Select this option if you want to use more than one currency in your Accounts Receivable system.
The option does not appear in Accounts Receivable unless you chose it on the Options tab of the Company Profile form in Common Services.
You cannot turn off the Multicurrency option
You can turn the option on at any time, but you cannot turn it off again once you select it and save your choice in the Accounts Receivable Options form.
Processing Options Process Recurring Charges. Select this option if you want to be able to automatically create invoices for customers to whom you bill standard amounts on a regular basis, such as monthly rent.
Use the Recurring Charges setup form, as described in Step 8, later in this chapter, to create recurring‐charge records and assign them to your customers. You can then use Accounts Receivable to create an invoice batch of the charges when they are due.
Force Listing Of All Batches. Select this option if you want to make sure that lists of all invoice, receipt, and adjustment batches are printed before the batches are posted.
Setting Up an Accounts Receivable System
3–14 Sage Accpac Accounts Receivable
ARGS‐3.doc, printed on 1/31/2008, at 4:12:08 PM. Last saved on 1/31/2008 4:11:00 PM.
Sage Software Confidential
When you use the option, you cannot post batches until you print listings for them, and you must print new listings for batches you edit.
You can change your choice for this option at any time.
Allow Edit Of Imported Batches. Use this option if you want to be able to revise information in batches that you import from non‐Sage Accpac programs.
Do not use the option if you want to make sure that imported batches are posted without changes. If you do not use this option, you must correct batches containing errors in their source applications, and then import corrected transactions into Accounts Receivable.
Allow Edit Of External Batches. If you want to be able to edit batches that you create in Sage Accpac Order Entry or Project and Job Costing (if you use them) and send to Accounts Receivable, select this option.
Do not use the option if you want to make sure that exported batches are posted without changes.
Use retainage accounting
Retainage Accounting. Select this option if your customer invoices are subject to retainage, or holdbacks.
When you select this option, Accounts Receivable displays a Retainage tab on the Options form, allowing you to select retainage defaults.
See also page 2-5
For more information about retainage accounting, see the section “Using Retainage Accounting,” in Chapter 2.
Keep [ ] Statistics. Select this option to keep statistical information for customers, national accounts, customer groups, sales of items, and salespersons. (Keep Statistics is the default setting.)

Step 4: Select Accounts Receivable Options
Getting Started 3–15
ARGS‐3.doc, printed on 1/31/2008, at 4:12:08 PM. Last saved on 1/31/2008 4:11:00 PM.
Sage Software Confidential
Setting Up A
/R
Customer, National Account, and Group Statistics
Accounts Receivable automatically accumulates statistics from the transactions you post to customer accounts, and displays them in the Customers, National Accounts, and Customer Groups forms. The program also retains statistics on items and salespersons.
See also page 2-7
For information about keeping statistics, see “Accumulating Customer, Item, and Salesperson Statistics” in Chapter 2.
Using the options in this section, you can specify whether to allow users to change statistics, whether to include taxes in the totals kept, and how frequently to update statistics.
Allow Edit Of Statistics. Select this option if you want to be able to enter or revise year‐to‐date or previous‐year totals for customers, national accounts, and customer groups.
You can select this option only if you have selected the Keep Statistics option.
Use this option when setting up partway through an accounting year
You may want to turn on the option while you are setting up your Accounts Receivable system, particularly if you are creating the system partway through an accounting year. You can then enter more complete receivables records by adding the statistics from your previous system.
Once your system is operating, you may want to turn off the option because the program automatically updates the statistics when you post invoice, adjustment, and receipt batches.
Include Tax In Statistics. Use this option if you charge tax on invoices and you want to include tax amounts in the invoice totals kept for each customer, national account, and customer group. If you do not use the option, Accounts Receivable adds only before‐tax totals to the statistics.
You can select this option only if you have selected the corresponding Keep Statistics option.

Setting Up an Accounts Receivable System
3–16 Sage Accpac Accounts Receivable
ARGS‐3.doc, printed on 1/31/2008, at 4:12:08 PM. Last saved on 1/31/2008 4:11:00 PM.
Sage Software Confidential
Accumulate By / Period Type. Use these options to indicate whether you report statistics by fiscal year or calendar year, and to specify the period type to use.
If you choose to accumulate by calendar year, the starting date for statistics is January 1. If you choose to accumulate by fiscal year, the starting date is the first day of your fiscal year, as specified in the fiscal calendar in Common Services. Choose the type of year by which you kept these statistics in your previous system.
Use the same periods as in your present system
If you plan to enter historical data, ensure you choose the same period and year types as used in your present system.
Add statistics to the Customers, National Accounts, and Customer Groups forms in Step 10. Add statistics to the Items form in Step 11 and to the Salespersons form in Step 12.
Credit Checks Include Pending A/R Transactions in Credit Check. Select this option to include pending (unposted) Accounts Receivable transactions during credit checks.
Include Pending O/E Transactions in Credit Check. Select this option to include pending transactions from Order Entry (for example, orders that have not been shipped, or shipments that have not been invoiced) during credit checks.
Include Pending Other Transactions in Credit Checks. Select this option if you want programs from other software manufacturers (third‐party products) that you use with Sage Accpac to include unposted transactions during credit checks.
Default Number Of Days To Keep Comments. Specify the default number of days to keep any comments you enter in customer records.
5. When finished, click the Transactions tab.

Step 4: Select Accounts Receivable Options
Getting Started 3–17
ARGS‐3.doc, printed on 1/31/2008, at 4:12:08 PM. Last saved on 1/31/2008 4:11:00 PM.
Sage Software Confidential
Setting Up A
/R
The Transactions tab of the Options form
6. Complete the Transactions tab as follows:
Invoice options Default Invoice Type. Specify the type of details you normally use on invoices as the default for Invoice Entry. You can choose Item or Summary.
Accounts Receivable displays this invoice type as the default when you create a new invoice batch or enter a new document in Invoice Entry, or when you start a new recurring charge record.
Select a default invoice posting date
Default Posting Date. Select Document Date, Batch Date, or Session Date as the default posting date that appears on the A/R Invoice Entry form.
The posting date is the date that a document is posted to General Ledger, and it may be different from the document date.
You can change the posting date for particular transactions when you enter or edit them.
Default tax calculation method
Calculate Taxes Automatically. Select the Calculate Taxes Automatically option if you want to use automatic tax calculation as the default on the Invoice Entry form.
You can change the method for individual invoices, debit notes, and credit notes when you enter them.
Setting Up an Accounts Receivable System
3–18 Sage Accpac Accounts Receivable
ARGS‐3.doc, printed on 1/31/2008, at 4:12:08 PM. Last saved on 1/31/2008 4:11:00 PM.
Sage Software Confidential
Calculate Tax Reporting Amounts Automatically. Select this option if you want to use automatic tax calculation as the default method for calculating tax reporting amounts on invoices.
If you report taxes in a currency different from your customers’ currencies or your functional currency, invoices show the tax amount in the tax reporting currency, along with the exchange rate used for the conversion.
You can change the calculation method for particular invoices in Invoice Entry.
Default Detail Tax Class To 1. Select this option if you want to use 1 as the default tax class for new summary invoice details. If you do not select this option, Accounts Receivable uses the customer tax class (from the Invoice Entry Taxes tab) as the default for new details.
Invoice Entry options
Use Item Comment As Default. Use this option to display any comments from item records when you are entering invoice details.
Show Item Cost. Use this option to display the extended item cost (quantity x cost per unit) when you add items to invoices.
Invoice printing options
Allow Printing Of Invoices. Use this option if you want to use Accounts Receivable to print invoices.
Allow Edit After Invoice Printed. Use this option to allow changes or deletions in invoice batches after you have printed invoices for them.
You can select the option only if you also select the Allow Printing Of Invoices option.
Receipt options Default Transaction Type. Select one of the following transaction types as the default to be used during receipt entry:
• Receipt • Prepayment • Unapplied Cash
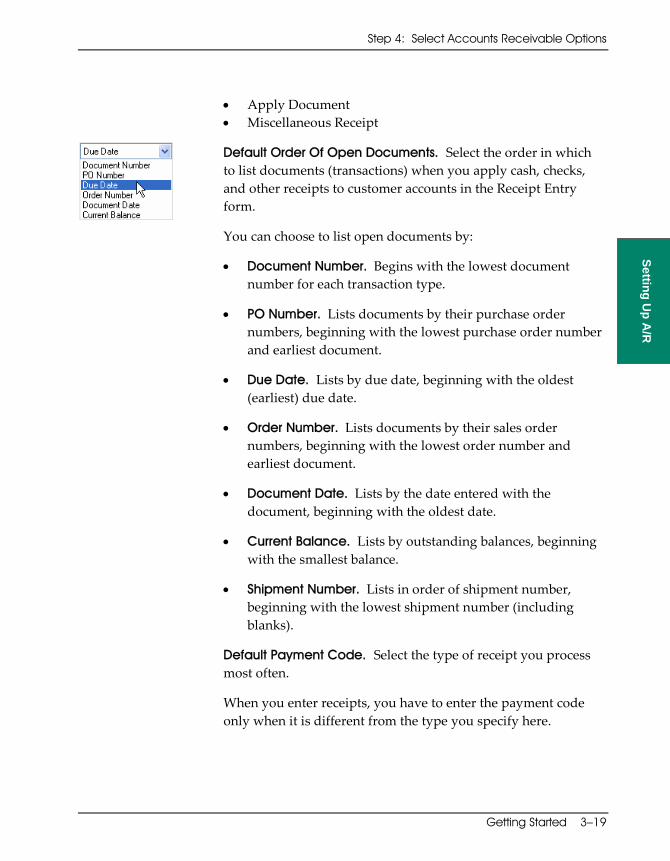
Step 4: Select Accounts Receivable Options
Getting Started 3–19
ARGS‐3.doc, printed on 1/31/2008, at 4:12:08 PM. Last saved on 1/31/2008 4:11:00 PM.
Sage Software Confidential
Setting Up A
/R
• Apply Document • Miscellaneous Receipt
Default Order Of Open Documents. Select the order in which to list documents (transactions) when you apply cash, checks, and other receipts to customer accounts in the Receipt Entry form.
You can choose to list open documents by:
• Document Number. Begins with the lowest document number for each transaction type.
• PO Number. Lists documents by their purchase order numbers, beginning with the lowest purchase order number and earliest document.
• Due Date. Lists by due date, beginning with the oldest (earliest) due date.
• Order Number. Lists documents by their sales order numbers, beginning with the lowest order number and earliest document.
• Document Date. Lists by the date entered with the document, beginning with the oldest date.
• Current Balance. Lists by outstanding balances, beginning with the smallest balance.
• Shipment Number. Lists in order of shipment number, beginning with the lowest shipment number (including blanks).
Default Payment Code. Select the type of receipt you process most often.
When you enter receipts, you have to enter the payment code only when it is different from the type you specify here.
Setting Up an Accounts Receivable System
3–20 Sage Accpac Accounts Receivable
ARGS‐3.doc, printed on 1/31/2008, at 4:12:08 PM. Last saved on 1/31/2008 4:11:00 PM.
Sage Software Confidential
See also page 3-47
Initially, Accounts Receivable has payment codes defined for cash, check, and credit card. If you want to use another type, you must first add it using the Payment Codes form, as described under the “Add Payment Codes” heading in “Step 5: Add Setup Records,” later in this chapter.
Default Bank Code. Select the code for the bank account to which you most often deposit receipts.
You must use one of the bank codes defined in the Bank Services form in Common Services. For information about setting up bank accounts, see the Tax and Bank User Guide.
Select a default receipt posting date
Default Posting Date. Select Document Date, Batch Date, or Session Date as the default posting date that appears on the A/R Receipt Entry form.
The posting date is the date that a document is posted to General Ledger, and it may be different from the document date.
You can change the posting date for particular transactions when you enter or edit them.
Include Pending Transactions. This option lets you include unposted transactions in pending balances when applying receipts in Receipt Entry. Select one of the following alternatives:
• None • Receipts • Receipts and Adjustments • All
Allow Printing Of Deposit Slips. Select this option if you want to use Accounts Receivable to print deposit slips.
Create Deposit Slip When Receipt Batch Is Created. This option is available if you also select the Allow Printing Of Deposit Slips option.
Select the option to create a new deposit slip whenever you add a new receipt batch.

Step 4: Select Accounts Receivable Options
Getting Started 3–21
ARGS‐3.doc, printed on 1/31/2008, at 4:12:08 PM. Last saved on 1/31/2008 4:11:00 PM.
Sage Software Confidential
Setting Up A
/R
Do not select the option if you want to be able to assign several batches to a single deposit slip.
Allow Edit After Deposit Slip Printed. Select this option if you want to be able to edit or delete receipt batches after printing deposit slips for them.
This option appears only if you first select the Allow Printing Of Deposit Slips option.
Force Printing Of Deposit Slips. Select this option to make sure that you print deposit slips for receipt batches before posting the batches.
This option affects only batches that contain receipts, such as cash and checks, that you deposit in a bank account. The option appears only if you select the Allow Printing Of Deposit Slips option.
Allow Adjustments In Receipt Batches. Select this option if you want to be able to enter adjustments or quickly write off small amounts while entering receipts, rather than having to enter the transactions separately.
Allow Edit After Receipt Printed. Select the Allow Edit After Receipt Printed option if you want to be able to change or delete existing receipts after you have printed receipt confirmations.
Check For Duplicate Checks. Select whether to display an error, a warning, or no message when you attempt to issue a refund check that uses the same number as an existing check for the same bank.
7. When finished, click the Numbering tab.
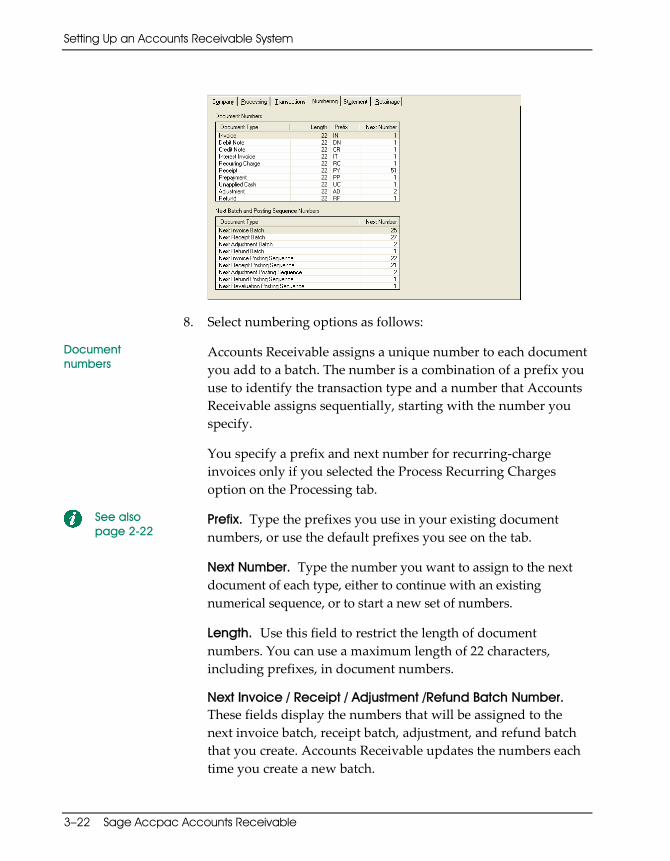
Setting Up an Accounts Receivable System
3–22 Sage Accpac Accounts Receivable
ARGS‐3.doc, printed on 1/31/2008, at 4:12:08 PM. Last saved on 1/31/2008 4:11:00 PM.
Sage Software Confidential
8. Select numbering options as follows:
Document numbers
Accounts Receivable assigns a unique number to each document you add to a batch. The number is a combination of a prefix you use to identify the transaction type and a number that Accounts Receivable assigns sequentially, starting with the number you specify.
You specify a prefix and next number for recurring‐charge invoices only if you selected the Process Recurring Charges option on the Processing tab.
See also page 2-22
Prefix. Type the prefixes you use in your existing document numbers, or use the default prefixes you see on the tab.
Next Number. Type the number you want to assign to the next document of each type, either to continue with an existing numerical sequence, or to start a new set of numbers.
Length. Use this field to restrict the length of document numbers. You can use a maximum length of 22 characters, including prefixes, in document numbers.
Next Invoice / Receipt / Adjustment /Refund Batch Number. These fields display the numbers that will be assigned to the next invoice batch, receipt batch, adjustment, and refund batch that you create. Accounts Receivable updates the numbers each time you create a new batch.
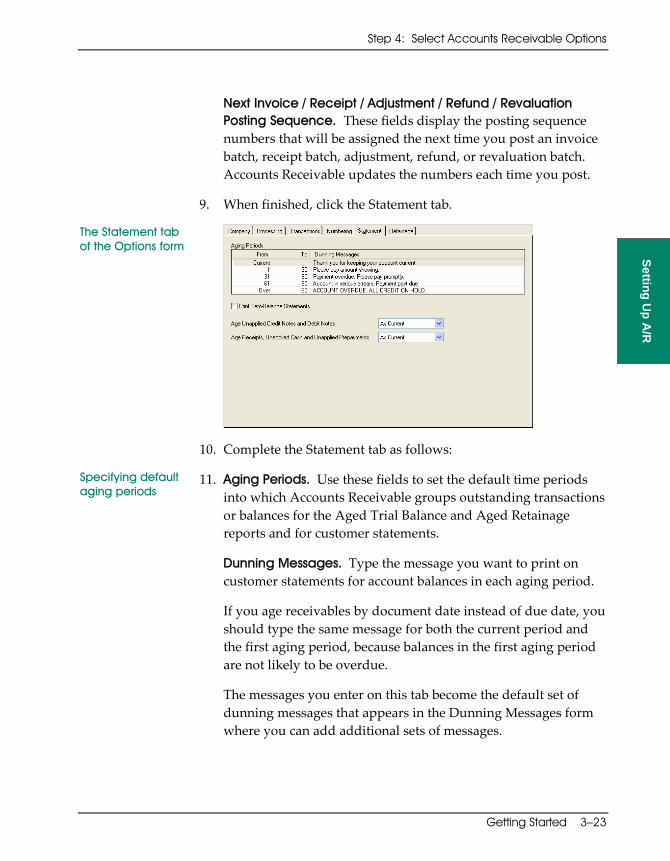
Step 4: Select Accounts Receivable Options
Getting Started 3–23
ARGS‐3.doc, printed on 1/31/2008, at 4:12:08 PM. Last saved on 1/31/2008 4:11:00 PM.
Sage Software Confidential
Setting Up A
/R
Next Invoice / Receipt / Adjustment / Refund / Revaluation Posting Sequence. These fields display the posting sequence numbers that will be assigned the next time you post an invoice batch, receipt batch, adjustment, refund, or revaluation batch. Accounts Receivable updates the numbers each time you post.
9. When finished, click the Statement tab.
The Statement tab of the Options form
10. Complete the Statement tab as follows:
Specifying default aging periods
11. Aging Periods. Use these fields to set the default time periods into which Accounts Receivable groups outstanding transactions or balances for the Aged Trial Balance and Aged Retainage reports and for customer statements.
Dunning Messages. Type the message you want to print on customer statements for account balances in each aging period.
If you age receivables by document date instead of due date, you should type the same message for both the current period and the first aging period, because balances in the first aging period are not likely to be overdue.
The messages you enter on this tab become the default set of dunning messages that appears in the Dunning Messages form where you can add additional sets of messages.
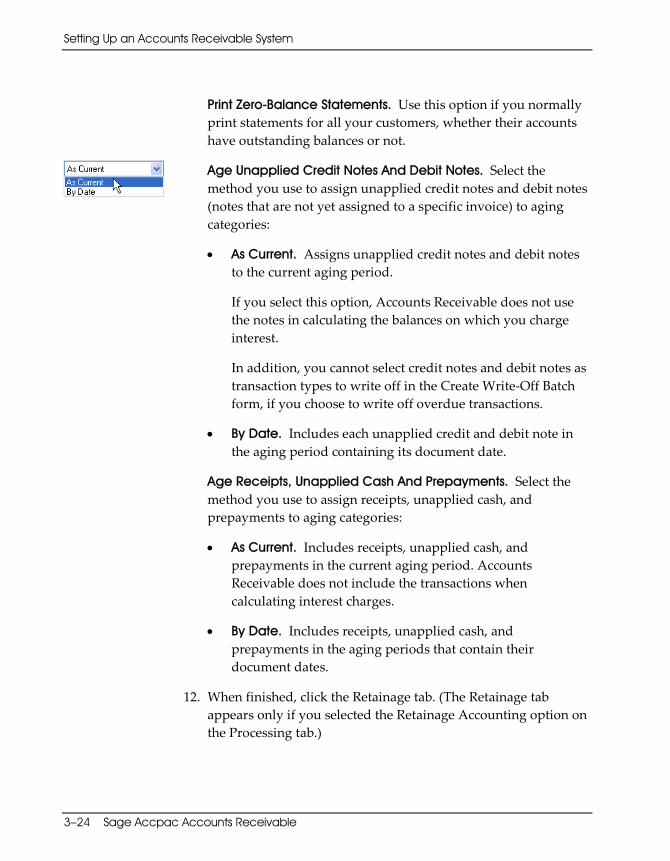
Setting Up an Accounts Receivable System
3–24 Sage Accpac Accounts Receivable
ARGS‐3.doc, printed on 1/31/2008, at 4:12:08 PM. Last saved on 1/31/2008 4:11:00 PM.
Sage Software Confidential
Print Zero-Balance Statements. Use this option if you normally print statements for all your customers, whether their accounts have outstanding balances or not.
Age Unapplied Credit Notes And Debit Notes. Select the method you use to assign unapplied credit notes and debit notes (notes that are not yet assigned to a specific invoice) to aging categories:
• As Current. Assigns unapplied credit notes and debit notes to the current aging period.
If you select this option, Accounts Receivable does not use the notes in calculating the balances on which you charge interest.
In addition, you cannot select credit notes and debit notes as transaction types to write off in the Create Write‐Off Batch form, if you choose to write off overdue transactions.
• By Date. Includes each unapplied credit and debit note in the aging period containing its document date.
Age Receipts, Unapplied Cash And Prepayments. Select the method you use to assign receipts, unapplied cash, and prepayments to aging categories:
• As Current. Includes receipts, unapplied cash, and prepayments in the current aging period. Accounts Receivable does not include the transactions when calculating interest charges.
• By Date. Includes receipts, unapplied cash, and prepayments in the aging periods that contain their document dates.
12. When finished, click the Retainage tab. (The Retainage tab appears only if you selected the Retainage Accounting option on the Processing tab.)
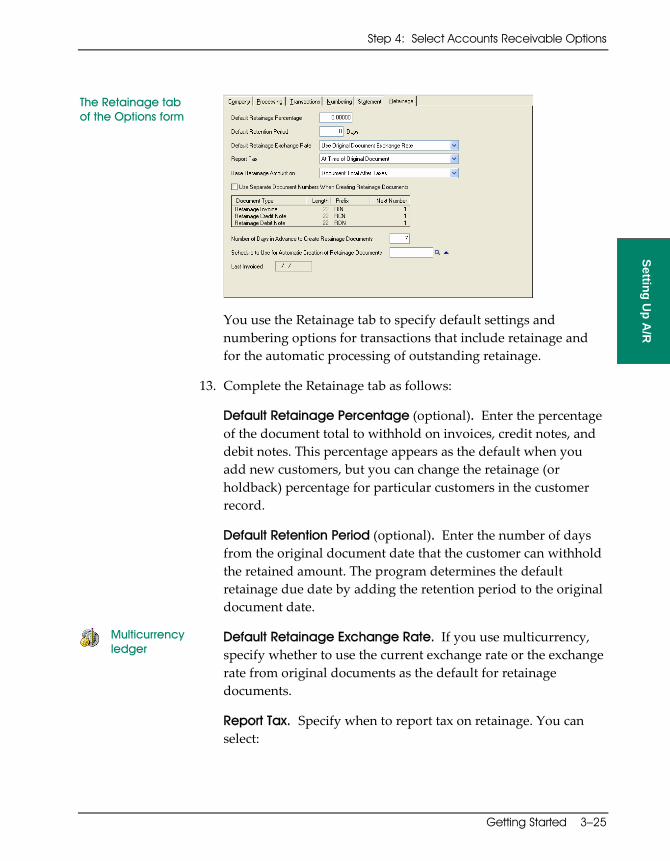
Step 4: Select Accounts Receivable Options
Getting Started 3–25
ARGS‐3.doc, printed on 1/31/2008, at 4:12:08 PM. Last saved on 1/31/2008 4:11:00 PM.
Sage Software Confidential
Setting Up A
/R
The Retainage tab of the Options form
You use the Retainage tab to specify default settings and numbering options for transactions that include retainage and for the automatic processing of outstanding retainage.
13. Complete the Retainage tab as follows:
Default Retainage Percentage (optional). Enter the percentage of the document total to withhold on invoices, credit notes, and debit notes. This percentage appears as the default when you add new customers, but you can change the retainage (or holdback) percentage for particular customers in the customer record.
Default Retention Period (optional). Enter the number of days from the original document date that the customer can withhold the retained amount. The program determines the default retainage due date by adding the retention period to the original document date.
Multicurrency ledger
Default Retainage Exchange Rate. If you use multicurrency, specify whether to use the current exchange rate or the exchange rate from original documents as the default for retainage documents.
Report Tax. Specify when to report tax on retainage. You can select:

Setting Up an Accounts Receivable System
3–26 Sage Accpac Accounts Receivable
ARGS‐3.doc, printed on 1/31/2008, at 4:12:08 PM. Last saved on 1/31/2008 4:11:00 PM.
Sage Software Confidential
• At Time Of Original Document — to report tax on retainage when you post original documents that include retainage. (Use the Base Retainage Amount On field to specify whether to base retainage on amounts before tax or after tax.)
• As Per Tax Authority — to report tax on retainage as specified for each tax authority in Tax Services.
If the tax authority specifies that tax is reported when you post original documents, Accounts Receivable calculates the tax amount and updates the tax tracking reports immediately when you post original documents.
If the tax authority specifies that tax is reported when you post retainage documents, Accounts Receivable calculates the tax amount when you post the original document, but it does not update the tax tracking reports until you post the retainage document.
If you select this option for Accounts Receivable, retainage amounts are based on amounts before tax for all tax authorities and customers.
Base Retainage Amount On. If you selected At Time Of Original Document for the Report Tax option, use this field to specify whether retainage is calculated for the document before or after tax is included.
Use Separate Document Numbering When Creating Retainage Documents (optional). Select this option to use a separate numbering system to identify retainage documents that you generate using the Create Retainage Batch form.
When you select the option, a numbering grid becomes available, letting you specify the next number, length, and prefix to assign to retainage invoices, credit notes, and debit notes (processed to clear outstanding retainage).
If you do not select the option, the program assigns the next invoice, credit note, or debit note number specified on the document numbering grid on the Numbering tab.

Step 4: Select Accounts Receivable Options
Getting Started 3–27
ARGS‐3.doc, printed on 1/31/2008, at 4:12:08 PM. Last saved on 1/31/2008 4:11:00 PM.
Sage Software Confidential
Setting Up A
/R
Number Of Days In Advance To Create Retainage Documents. Enter the default number of days before the retainage due date that you can generate retainage documents using the Create Retainage Batch form. (You can change the number of days for specific batches.)
When you create a retainage batch, the program generates documents only for retainage that is due or will become due during the period encompassed by the specified number of days in advance.
Schedule To Use For Automatic Creation Of Retainage Documents (optional). Enter or use the Finder to select the code for the schedule to use, if you want to process retainage from the Reminder List.
“Zoom” button
If the schedule does not yet exist in Common Services, you can click the Zoom button, then create the schedule using the Schedules form that opens. You can also click the Zoom button after entering a schedule code to view information about the schedule.
For information on using schedules and the Reminder List, see the System Manager User Guide.
Last Invoiced (display only). The Retainage tab displays the date that you last ran Create Retainage Batch from the Reminder List.
14. When finished, click Save.
15. To print a list of the options you chose for your Accounts Receivable system, click Print on the File menu or choose the Options icon from the Setup Reports folder.
16. Click Close to close the Options form.
For information about setting up your printer and printing Sage Accpac reports, see the chapter on printing in the System Manager User Guide.

Setting Up an Accounts Receivable System
3–28 Sage Accpac Accounts Receivable
ARGS-3.doc, printed on 2/5/2008, at 6:59:18 PM. Last saved on 2/5/2008 6:51:00 PM.
Sage Software Confidential
Changing Your Accounts Receivable Options
After setup, you can change any of the choices you made and information you entered in the A/R Options form, with the following exceptions and restrictions:
You cannot turn Multicurrency off
• You can select the Multicurrency option at any time, but cannot turn it off again once you select it and save the change.
Be careful changing the method of keeping statistics
• You can change the type of year (fiscal or calendar) and period by which you accumulate customer, item, and salesperson statistics, but should do so only at year-end. If you change either method partway through a year, the statistics already accumulated will be incorrect or in the wrong period.
For a more detailed explanation, see the “Accumulating Customer, Item, and Salesperson Statistics” section in Chapter 2.
Turning off the Keep History option
• If you stop keeping history, you can no longer drill down from General Ledger to source documents in Accounts Receivable and Order Entry.
Turning off the Retainage Accounting option
• You can turn off the Retainage Accounting option only if there are no unposted batches that include retainage and there are no outstanding retainage amounts.
You cannot change some options while other Accounts Receivable forms are open
• You cannot change most of your choices in the A/R Options form if other Accounts Receivable forms are open or other users are working with the Accounts Receivable database.
However, you can change the information on the Company tab, the information entered for optional fields, and dunning messages at any time.
For further information about updating and changing Accounts Receivable options, see “Changing Accounts Receivable Options” in Chapter 3 in the User Guide.

Step 4: Select Accounts Receivable Options
Getting Started 3–29
ARGS-3.doc, printed on 2/5/2008, at 7:00:54 PM. Last saved on 2/5/2008 6:51:00 PM.
Sage Software Confidential
Setting Up A
/R
Select G/L Integration Options
The G/L Integration form provides options that let you control how your Accounts Receivable system interacts with General Ledger, and lets you specify the types of information to send with the transactions you send to General Ledger from Accounts Receivable.
1. From the A/R Setup folder, choose the G/L Integration icon.
The G/L Options form appears, with the Integration tab displayed as follows:
The Integration tab of the G/L Integration form
2. Complete the Integration tab as follows:
G/L Source Codes. Use the Source Type fields in this section to define the source code for each type of Accounts Receivable transaction, if you prefer not to use the default source codes.
The source codes are made up of the source ledger and the source type, and are used to identify transactions in General Ledger. (You cannot change the source ledger, which is AR.)
G/L Transactions Generated Through. These fields display the posting sequence numbers for which you have created general ledger transactions.
Setting Up an Accounts Receivable System
3–30 Sage Accpac Accounts Receivable
ARGS‐3.doc, printed on 1/31/2008, at 4:12:08 PM. Last saved on 1/31/2008 4:11:00 PM.
Sage Software Confidential
If you create the transactions during posting, the sequence numbers are the same as the last posting sequence numbers you see for each type of batch on the Numbering tab on the A/R Options form.
If you use the Create G/L Batch icon to create general ledger transactions, the sequence numbers identify the last posting sequence of each batch type for which you have created the transactions.
Multicurrency If you use multicurrency accounting, revaluation transactions are created for the exchange gain and loss general ledger accounts when you revalue your Accounts Receivable ledger.
Create G/L Transactions. Use these settings to specify when to create general ledger transactions:
• During Posting. Select this option to automatically create general ledger transactions when you post Accounts Receivable batches.
• On Request Using Create G/L Batch Icon. Select this option if you want to use the Create G/L Batch form to create general ledger transactions.
Create G/L Transactions By. Select one of the following options to specify how to create general ledger transactions:
• Adding To An Existing Batch. Choose this option to add new general ledger transactions to existing batches.
Use this option during setup
You may want to select this option if your general ledger already contains the transactions you will post during setup to enter opening customer account balances and current transactions. This choice reduces the number of general ledger batches you need to delete after setup, making it easier to ensure that you do not accidentally post general ledger transactions twice.

Step 4: Select Accounts Receivable Options
Getting Started 3–31
ARGS-3.doc, printed on 2/5/2008, at 7:07:58 PM. Last saved on 2/5/2008 7:04:00 PM.
Sage Software Confidential
Setting Up A
/R
Do not select this option if you want to create a new general ledger batch each time you produce general ledger transactions.
• Creating A New Batch. Choose this option to produce a new general ledger batch each time you create general ledger transactions.
• Creating And Posting A New Batch. Choose this option to create and automatically post a new general ledger batch when you create general ledger transactions.
Note: If you do not use Sage Accpac General Ledger, all general ledger transactions are added to the same general ledger batch, regardless of the type of transaction and your choice for this option. When you are asked to whether to add the transactions to the existing batch or overwrite the batch, always choose to add to an existing batch.
Accounts Receivable automatically creates separate general ledger batches for invoices, receipts, refunds, adjustments, and for revaluation transactions (if you use multicurrency accounting).
Consolidate G/L Batches. Use this option to specify whether to combine transaction details for the same general ledger account into single details during posting, or to send unconsolidated Accounts Receivable transaction details to your general ledger.
You can choose:
• Do Not Consolidate. The general ledger transaction batch includes separate details for each invoice, credit note, debit note, receipt, or adjustment posted in Accounts Receivable.

Setting Up an Accounts Receivable System
3–32 Sage Accpac Accounts Receivable
ARGS‐3.doc, printed on 1/31/2008, at 4:12:08 PM. Last saved on 1/31/2008 4:11:00 PM.
Sage Software Confidential
Use this option during setup
We recommend you select this option during setup, so that the G/L Transactions report will provide complete details of all the transactions you enter to create opening customer account balances. You can then check the report against source documents and your general ledger account balances, to be sure you entered all transactions correctly.
You must select this option if you want to be able to drill down from General Ledger to source documents in Accounts Receivable (if you keep history).
Consolidation prevents drilldown
If you consolidate transactions, you cannot drill down from General Ledger transactions to source documents.
• Consolidate By Posting Seq., Account And Fiscal Period. Accounts Receivable combines all details with the same posting sequence, account number, and fiscal period into one detail.
• Consolidate By Posting Seq., Account, Fiscal Period And Source. Accounts Receivable combines all details with the same posting sequence, account number, fiscal period, and source code into one detail.
3. Click the Transactions tab to assign to G/L transaction fields information that is relevant for each transaction type.
The Transactions tab

Step 4: Select Accounts Receivable Options
Getting Started 3–33
ARGS-3.doc, printed on 2/5/2008, at 7:06:49 PM. Last saved on 2/5/2008 7:04:00 PM.
Sage Software Confidential
Setting Up A
/R
4. To assign information to a G/L transaction field:
a. Either double-click the field for the particular transaction header or detail, or select the field, then click Open.
The G/L Integration Detail form appears with the transaction type and the G/L transaction field you selected on the Transactions tab.
The G/L Integration Detail form
The G/L Integration Detail form lets you select specific pieces of information from Accounts Receivable transactions to use in G/L transactions.
b. Specify information for the selected G/L transaction field, as follows:
Segment separator i. Select a character to separate segments of information. (The separator is used only if you assign more than one segment. The default separator is a hyphen.)
Choose Segments From List
ii. To assign one or more segments to the selected transaction field, select the segment(s) from the Choose Segments From List, then click Include.
You can assign a maximum of five segments to a G/L Transaction field, providing the combination does not exceed 60 characters. If the assigned information exceeds this number of characters (including separators), it is truncated when the transaction is posted.
Once you have assigned segments and a separator, check the Example field to see how the information will appear on reports.
Setting Up an Accounts Receivable System
3–34 Sage Accpac Accounts Receivable
ARGS‐3.doc, printed on 1/31/2008, at 4:12:08 PM. Last saved on 1/31/2008 4:11:00 PM.
Sage Software Confidential
If you use Project and Job Costing, the names you chose for contract levels also appear (for example, Contract, Project, and Category).
Once the G/L Integration Detail form is open, you can assign information to other Accounts Receivable transaction types, as follows:
i. Select the transaction type or transaction detail type from the Transaction Type field.
The information displayed in the G/L Transaction Field and the Choose Segments From List fields changes, consistent with the selected transaction type.
G/L Transaction Field
ii. Select the G/L transaction field to which you are assigning information.
iii. In the Segment Separator field, select the symbol to use between information segments.
iv. Assign segments to include from Accounts Receivable transactions, as described in the preceding instructions.
5. When you have finished defining reference and description fields, click Save, and then click Close to return to the Transactions tab.
6. When you are satisfied with your choices for G/L integration, click Save, and then click Close.
Step 5: Add Setup Records
This step guides you through the process of adding the records and codes you assign when adding your customer accounts and entering transactions in Accounts Receivable. In most cases, you must add these records before you can add customer records.
Information you need to know or actions you need to take before adding each type of record are listed at the beginning of each section.

Step 5: Add Setup Records
Getting Started 3–35
ARGS‐3.doc, printed on 1/31/2008, at 4:12:08 PM. Last saved on 1/31/2008 4:11:00 PM.
Sage Software Confidential
Setting Up A
/R
Use the Accounts Receivable Setup icons to add these records:
• Account sets • Billing cycles • Distribution codes • Dunning messages (optional) • E‐mail messages (optional) • Interest profiles • Payment codes • Items (optional) • Salespersons (optional) • Terms (of payment) • Optional fields (optional)
While adding these records, you may notice two fields that are common to all Setup forms included in this step.
• Last Maintained. This is an information field in which Accounts Receivable automatically inserts the date of the last change made to the record. You do not fill in this field.
• Inactive. Select this option if you do not want to assign the records to any customers.
You would not likely use this option when adding records. Normally, you select it when you have decided to delete a record and want to ensure no further customer accounts are assigned to it. You can change your selection for the option at any time.
Check data Remember to check data integrity through Administrative Services and to make a backup copy each time you have added records that would be time‐consuming to add a second time.
To change or delete a record, see page 3-65
You can revise most of your entries as needed. Refer to the “Modifying Setup Records” section at the end of this step for information about how to change or delete records and about any restrictions that may apply.

Setting Up an Accounts Receivable System
3–36 Sage Accpac Accounts Receivable
ARGS‐3.doc, printed on 1/31/2008, at 4:12:08 PM. Last saved on 1/31/2008 4:11:00 PM.
Sage Software Confidential
Use Help Remember to press F1 to display Help when you want quick information about an Accounts Receivable field or form displayed on your screen. (The Help button appears on error messages where the F1 key is inactive.)
Add Account Sets
Account sets identify the general ledger accounts to which you post transactions entered for the customers assigned to each account set.
You must add at least one account set to Accounts Receivable before you can add customer records.
Multicurrency account sets
If you use multicurrency accounting, the accounts sets also identify the currencies of your customer records. You need at least one account set for each currency you use.
Before adding an account set, you must:
Use valid G/L account numbers
• Be sure your general ledger contains the accounts you want to assign to account sets in Accounts Receivable.
• Decide on the account set codes to use.
• Find out the numbers to assign to each account set for these general ledger accounts:
− Receivables control − Receipt discounts − Prepayment liability − Write‐offs − Retainage
Multicurrency account sets
• If you use multicurrency accounting, you also need to know the currency code for each account set that does not use the functional currency, as well as the account numbers for:
− Unrealized exchange gain (if you use the Realized and Unrealized Gain/Loss accounting method)
Step 5: Add Setup Records — Account Sets

Step 5: Add Setup Records — Account Sets
Getting Started 3–37
ARGS‐3.doc, printed on 1/31/2008, at 4:12:08 PM. Last saved on 1/31/2008 4:11:00 PM.
Sage Software Confidential
Setting Up A
/R
− Unrealized exchange loss (if you use the Realized and Unrealized Gain/Loss accounting method)
− Exchange gain
− Exchange loss
− Exchange rounding
See also page 2-40
For more information, see “Setting Up Account Sets” in Chapter 2.
To add an account set:
1. Choose Account Sets from the Setup folder.
2. Type for each account set:
Account Set Code. Type a unique code, up to six characters, to identify the account set.
Starting a new account set
To begin adding a new account set, you can just type the code for the set, or you can click the New icon next to the Account Set Code field.
Description. Type a description of the account set.
The Currency Code field appears only in multicurrency ledgers. Additional account fields appear if the account set does not use the functional currency.
Unrealized exchange gain and loss accounts appear if you use the Realized and Unrealized Gain/Loss accounting method or if you change from this accounting method.

Setting Up an Accounts Receivable System
3–38 Sage Accpac Accounts Receivable
ARGS-3.doc, printed on 2/5/2008, at 7:09:56 PM. Last saved on 2/5/2008 7:09:00 PM.
Sage Software Confidential
General Ledger Account. Type the general ledger account numbers for the receivables control, payment discounts, prepayment liability, and write-off accounts that make up the set. If you use retainage accounting in Accounts Receivable, you must also specify a retainage control account.
Select account numbers from the Finder
If you use Sage Accpac General Ledger with your Accounts Receivable database, a Finder icon appears beside each general ledger account field. Click the icon or press F5 to display a list of general ledger account numbers. Highlight the account you want, then press Enter to insert it in a field.
Multicurrency account sets
If you are defining a multicurrency account set that does not use the functional currency, you must also enter the currency code and the account numbers for exchange gains and losses, and for rounding errors that arise during currency conversion. If you use the Realized and Unrealized Gain/Loss accounting method, you also enter account numbers for unrealized gains and losses.
Accounts Receivable assigns this currency to all customers to which you assign this account set.
You cannot change the currency code assigned to an account set after you add the set.
Add the account set
3. When finished, click the Add button. Repeat the preceding steps for each account set you want to add.
4. Click Print on the File menu or choose Account Sets from the Setup Reports folder to print a list of the account sets you have added to verify that they are correct and complete. File the report.
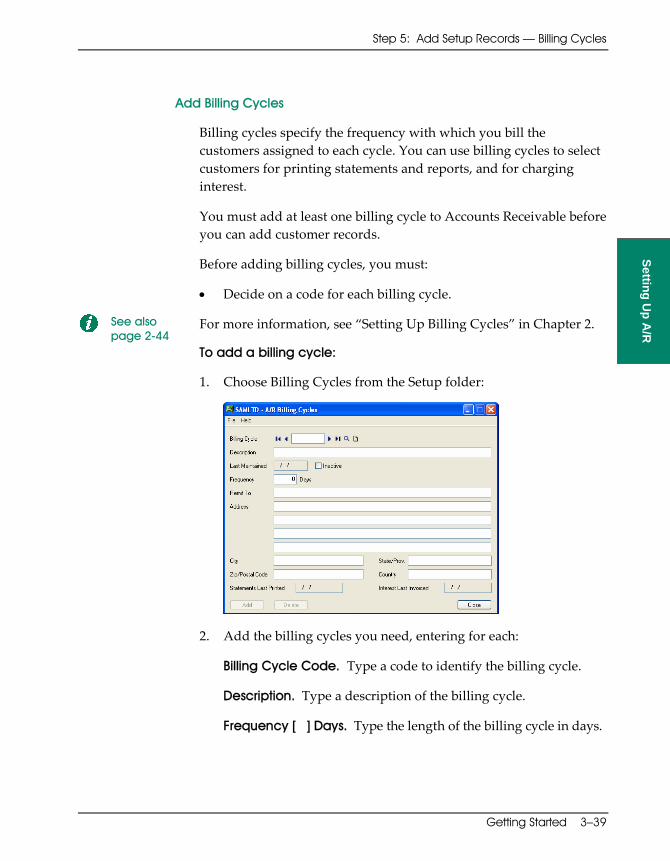
Step 5: Add Setup Records — Billing Cycles
Getting Started 3–39
ARGS‐3.doc, printed on 1/31/2008, at 4:12:08 PM. Last saved on 1/31/2008 4:11:00 PM.
Sage Software Confidential
Setting Up A
/R
Add Billing Cycles
Billing cycles specify the frequency with which you bill the customers assigned to each cycle. You can use billing cycles to select customers for printing statements and reports, and for charging interest.
You must add at least one billing cycle to Accounts Receivable before you can add customer records.
Before adding billing cycles, you must:
• Decide on a code for each billing cycle.
See also page 2-44
For more information, see “Setting Up Billing Cycles” in Chapter 2.
To add a billing cycle:
1. Choose Billing Cycles from the Setup folder:
2. Add the billing cycles you need, entering for each:
Billing Cycle Code. Type a code to identify the billing cycle.
Description. Type a description of the billing cycle.
Frequency [ ] Days. Type the length of the billing cycle in days.
Step 5: Add Setup Records — Billing Cycles
Setting Up an Accounts Receivable System
3–40 Sage Accpac Accounts Receivable
ARGS‐3.doc, printed on 1/31/2008, at 4:12:08 PM. Last saved on 1/31/2008 4:11:00 PM.
Sage Software Confidential
Remit To. Type the name of the person or position to which you want customers assigned to the billing cycle to send their payments.
Address. Type the address to which customers assigned to the billing cycle send their payments.
Add the billing cycle
3. When finished, click the Add button. Repeat the preceding steps for each billing cycle you want to add.
When you print statements by billing cycle or post interest or recurring charges that you created by billing cycle, Accounts Receivable enters the date in the corresponding Statements Last Printed, Interest Last Invoiced, or Recurring Charges Last Invoiced field.
4. Click Print on the File menu or choose Billing Cycles from the Setup Reports folder to print a list of the billing cycles you have added to verify that they are correct and complete. File the report.
Add Distribution Codes
Distribution codes identify general ledger accounts to which you post data from sales transactions. You must add at least one distribution code to Accounts Receivable before you can add item records or create item invoice batches.
Before adding a distribution code, you must:
• Be sure your Sage Accpac General Ledger or other general ledger contains the accounts you want to assign to distribution codes in Accounts Receivable.
• Decide on the distribution codes to use.
• Find out the numbers to assign to each distribution code for these general ledger accounts:
− Revenue account − Inventory account (used only with an item list)
Step 5: Add Setup Records — Distribution Codes

Step 5: Add Setup Records — Distribution Codes
Getting Started 3–41
ARGS‐3.doc, printed on 1/31/2008, at 4:12:08 PM. Last saved on 1/31/2008 4:11:00 PM.
Sage Software Confidential
Setting Up A
/R
− Cost of goods sold account (used only with an item list)
See also page 2-45
For more information, see “Setting Up Distribution Codes” in Chapter 2.
To add a distribution code:
1. Choose Distribution Codes from the Setup folder to display the Distribution Codes form.
2. Add the distribution codes you need, entering for each:
Distribution Code. Type a code to identify the distribution.
Description. Type a description of the distribution code.
General Ledger Account. Type the general ledger account numbers for those accounts to which you post transactions entered with the distribution code.
Using distribution codes without items
If you do not use items in Accounts Receivable, type the number for the revenue account only.
Using distribution codes with items
If you plan to use the distribution code with an item list, you must type numbers for all three accounts.
Setting Up an Accounts Receivable System
3–42 Sage Accpac Accounts Receivable
ARGS‐3.doc, printed on 1/31/2008, at 4:12:08 PM. Last saved on 1/31/2008 4:11:00 PM.
Sage Software Confidential
Select account numbers from the Finder
If you use Sage Accpac General Ledger with your Accounts Receivable database, a Finder icon appears beside each general ledger account field. Click the icon or press F5 to display a list of general ledger account numbers. Highlight the account you want, then press Enter to insert it in a field.
Discountable. Specify a default discount status for the distribution code.
Your choice for the distribution code appears as the default discount status when you use the distribution code in an invoice, credit note, debit note, or recurring charge detail.
Add the distribution code
3. When finished, click the Add button. Repeat the preceding steps for each distribution code you want to add.
4. Click Print on the File menu or choose Distribution Codes from the Setup Reports folder to print a list of the codes you have added to verify that they are correct and complete. File the report.
Add Dunning Messages (Optional)
Dunning messages are messages you print on statements for your customers. You can add a different message for each of the aging periods you use, and you can add any number of sets of messages.
Dunning messages are optional. You do not have to add them before you can add customer records. If you use the same messages for all your statements, you add the messages in the A/R Options form and do not need to add them again in the Dunning Messages form.
Before adding sets of dunning messages, you must decide on the codes to identify each set of messages.
See also page 2-47
For more information, see “Setting Up Dunning Messages” in Chapter 2.
Step 5: Add Setup Records — Dunning Messages
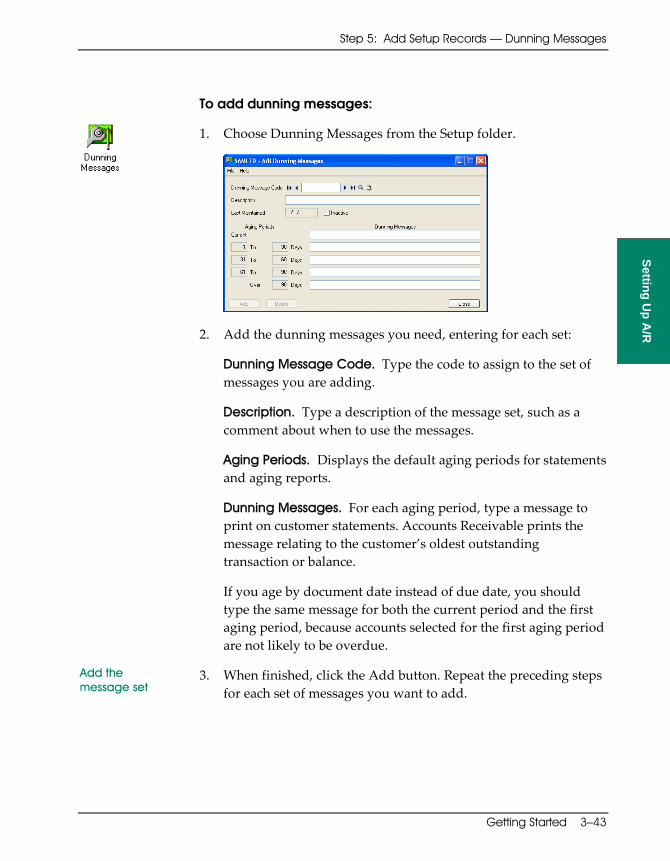
Step 5: Add Setup Records — Dunning Messages
Getting Started 3–43
ARGS‐3.doc, printed on 1/31/2008, at 4:12:08 PM. Last saved on 1/31/2008 4:11:00 PM.
Sage Software Confidential
Setting Up A
/R
To add dunning messages:
1. Choose Dunning Messages from the Setup folder.
2. Add the dunning messages you need, entering for each set:
Dunning Message Code. Type the code to assign to the set of messages you are adding.
Description. Type a description of the message set, such as a comment about when to use the messages.
Aging Periods. Displays the default aging periods for statements and aging reports.
Dunning Messages. For each aging period, type a message to print on customer statements. Accounts Receivable prints the message relating to the customer’s oldest outstanding transaction or balance.
If you age by document date instead of due date, you should type the same message for both the current period and the first aging period, because accounts selected for the first aging period are not likely to be overdue.
Add the message set
3. When finished, click the Add button. Repeat the preceding steps for each set of messages you want to add.

Setting Up an Accounts Receivable System
3–44 Sage Accpac Accounts Receivable
ARGS‐3.doc, printed on 1/31/2008, at 4:12:08 PM. Last saved on 1/31/2008 4:11:00 PM.
Sage Software Confidential
4. Click Print on the File menu or choose Dunning Messages from the Setup Reports folder to print a list of the messages and aging periods you have added to verify that they are correct and complete. File the report.
Add Interest Profiles
Interest profiles define the ways in which you charge interest. You assign an interest profile to each customer account to specify the rate and methods you use when charging interest on the customer’s overdue invoices or account balances.
You must add at least one interest profile before you can add customer records. If you do not charge interest, you should create a profile that uses 0 (zero) as the annual interest rate.
Before adding interest profiles, you must:
• Be sure your general ledger contains the account you want to assign as the interest income account in Accounts Receivable interest profiles.
• Decide on the code to identify each interest profile.
Multicurrency If you have a multicurrency ledger, you must also:
• Know the currency code for each currency that uses the interest profile.
• Determine the minimum interest charge and annual interest rate for each currency you use with an interest profile.
See also page 2-49
For more information, see “Setting Up Interest Profiles” in Chapter 2.
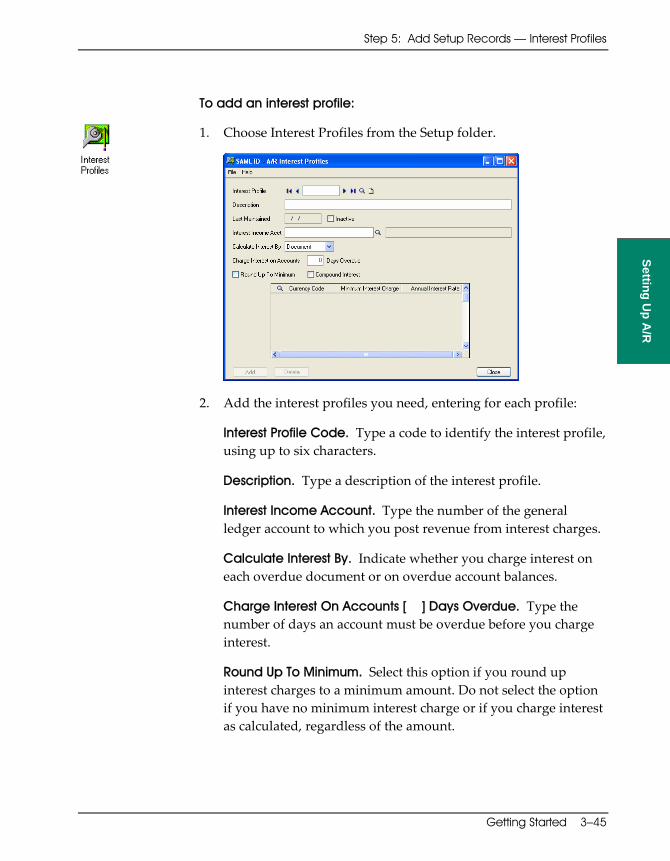
Step 5: Add Setup Records — Interest Profiles
Getting Started 3–45
ARGS‐3.doc, printed on 1/31/2008, at 4:12:08 PM. Last saved on 1/31/2008 4:11:00 PM.
Sage Software Confidential
Setting Up A
/R
To add an interest profile:
1. Choose Interest Profiles from the Setup folder.
2. Add the interest profiles you need, entering for each profile:
Interest Profile Code. Type a code to identify the interest profile, using up to six characters.
Description. Type a description of the interest profile.
Interest Income Account. Type the number of the general ledger account to which you post revenue from interest charges.
Calculate Interest By. Indicate whether you charge interest on each overdue document or on overdue account balances.
Charge Interest On Accounts [ ] Days Overdue. Type the number of days an account must be overdue before you charge interest.
Round Up To Minimum. Select this option if you round up interest charges to a minimum amount. Do not select the option if you have no minimum interest charge or if you charge interest as calculated, regardless of the amount.
Step 5: Add Setup Records — Interest Profiles
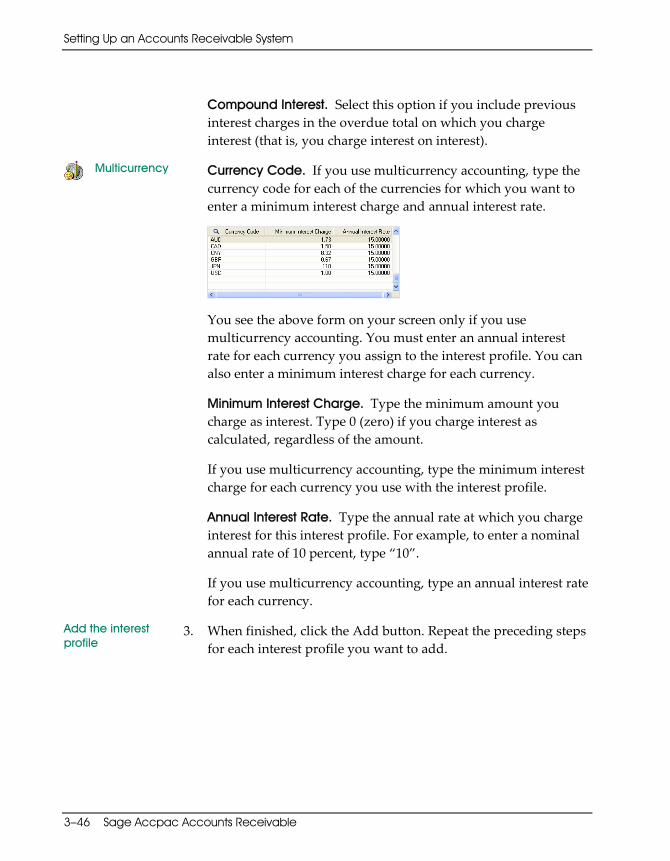
Setting Up an Accounts Receivable System
3–46 Sage Accpac Accounts Receivable
ARGS‐3.doc, printed on 1/31/2008, at 4:12:08 PM. Last saved on 1/31/2008 4:11:00 PM.
Sage Software Confidential
Compound Interest. Select this option if you include previous interest charges in the overdue total on which you charge interest (that is, you charge interest on interest).
Multicurrency Currency Code. If you use multicurrency accounting, type the currency code for each of the currencies for which you want to enter a minimum interest charge and annual interest rate.
You see the above form on your screen only if you use multicurrency accounting. You must enter an annual interest rate for each currency you assign to the interest profile. You can also enter a minimum interest charge for each currency.
Minimum Interest Charge. Type the minimum amount you charge as interest. Type 0 (zero) if you charge interest as calculated, regardless of the amount.
If you use multicurrency accounting, type the minimum interest charge for each currency you use with the interest profile.
Annual Interest Rate. Type the annual rate at which you charge interest for this interest profile. For example, to enter a nominal annual rate of 10 percent, type “10”.
If you use multicurrency accounting, type an annual interest rate for each currency.
Add the interest profile
3. When finished, click the Add button. Repeat the preceding steps for each interest profile you want to add.

Step 5: Add Setup Records — Payment Codes
Getting Started 3–47
ARGS‐3.doc, printed on 1/31/2008, at 4:12:08 PM. Last saved on 1/31/2008 4:11:00 PM.
Sage Software Confidential
Setting Up A
/R
Add Payment Codes
You use payment codes to identify the methods by which your customers can pay you. Payment codes include cash, checks, credit cards, and other payment methods (such as gift certificates).
You must add at least one payment code before you can add customer records.
Before adding payment codes to Accounts Receivable, you must:
• Decide on the codes to use for all the types of payments you process.
• Know the payment method for each payment code — cash, check, credit card, or other.
See also page 2-52
For more information, see “Setting Up Payment Codes” in Chapter 2.
To add a payment code:
1. Choose Payment Codes from the Setup folder to display the Payment Codes form.
Add the payment code
2. Add the payment codes you need, entering for each type
Payment Code. Type a code to identify the payment code, using up to six characters.
Description. Type a description to identify the payment code, such as the name of the credit card.
Payment Method. Select Cash, Check, Credit Card, or Other to identify the payment method for the record.
Step 5: Add Setup Records — Payment Codes
Setting Up an Accounts Receivable System
3–48 Sage Accpac Accounts Receivable
ARGS‐3.doc, printed on 1/31/2008, at 4:12:08 PM. Last saved on 1/31/2008 4:11:00 PM.
Sage Software Confidential
3. When finished, click the Add button. Repeat the preceding steps for each payment code you want to add.
4. Click Print on the File menu, or choose Payment Codes from the Setup Reports folder, to print a list of the payment codes you have added to verify that they are correct and complete. File the report.
Add Items (Optional)
Accounts Receivable lets you create a list of items with price, cost, and tax information to aid data entry on invoices. When you post item details, Accounts Receivable creates transactions for the revenue, inventory, and cost of goods sold general ledger accounts assigned to the items.
Skip this step if you do not need an item list in Accounts Receivable. If you use Sage Accpac Project and Job Costing, note that item records are required in invoice details for time and materials projects. Also, the program uses the tax class and tax status from item records as defaults in job‐related transactions.
Before adding item records, you must:
• Decide on the item number scheme.
• Use the Distribution Codes form to add the distribution codes you want to assign to items. You can also enter particular General Ledger accounts, rather than distribution codes, if you want.
Adding item statistics
If you want to add year‐to‐date or prior‐year statistics with items, you must first select the Keep Item Statistics option and the Allow Edit Of (item) Statistics option in the A/R Options form.
Before using an item number
Before you can use an item number on an invoice, you must enter at least one unit of measure in which you sell the item, and you should also assign the applicable tax authorities and classes to item records.
Step 5: Add Setup Records — Items
Step 5: Add Setup Records — Items
Getting Started 3–49
ARGS‐3.doc, printed on 1/31/2008, at 4:12:08 PM. Last saved on 1/31/2008 4:11:00 PM.
Sage Software Confidential
Setting Up A
/R
See also page 2-53
For information about adding item records, see “Setting Up Item Records” in Chapter 2.
The Items form contains up to four tabs, including:
• Item information
• Pricing information
• Tax Status information
• Item Statistics (appears only if you use the option to keep item statistics)
To add an item record:
The Item tab of the Items form
1. Choose Items from the Setup folder to display the Item tab, the first tab of the Items form.
2. Complete the fields as follows:
Item Number. Type a code to identify the item, using up to 16 characters, then press Tab to move to the Description field.
Description. Type a description (name) for the item.
Commodity No. Type the commodity number (used for value‐added tax reporting). If you do not use commodity numbers, leave the field blank or enter a reference of your own.
Setting Up an Accounts Receivable System
3–50 Sage Accpac Accounts Receivable
ARGS-3.doc, printed on 2/6/2008, at 2:59:20 PM. Last saved on 2/6/2008 2:58:00 PM.
Sage Software Confidential
Distribution Code. Type the distribution code that identifies the revenue, inventory, and cost of goods sold general ledger accounts to which you distribute transaction amounts posted for the item.
Alternatively, you can use the General Ledger Account fields to enter the individual revenue, inventory, and cost of goods sold accounts to update when you use the item in transactions.
If you want to reuse some of the accounts and the discount status from an existing distribution code, insert the distribution code in the item record, as usual. Then clear the code, and enter the General Ledger accounts you want to use.
Discountable. You can select a discountable status for an item code. When you use the item code for a detail on the Invoice Entry form, the detail line uses the Discountable status from item record, unless you change the distribution code for the detail later.
Comment. Type an optional comment such as usage guidelines or special handling instructions.
You can display comments on invoices
You can display the comments when entering invoices for the item if you selected the Use Item Comment As Default option in the A/R Options form.
3. When finished entering information on the Item tab, click the Pricing tab:
The Pricing tab of the Items form

Step 5: Add Setup Records — Items
Getting Started 3–51
ARGS‐3.doc, printed on 1/31/2008, at 4:12:08 PM. Last saved on 1/31/2008 4:11:00 PM.
Sage Software Confidential
Setting Up A
/R
4. Complete the Pricing tab as follows:
Multicurrency items
Currency. If you use multicurrency accounting, type the code for each currency in which you sell the item, then enter pricing information for the currency.
Remember to include the code for the functional currency and to enter units of measure and prices for each currency you specify.
You do not see this column on your screen if you do not use multicurrency accounting.
Unit Of Measure. Type the name or description of the unit in which you sell the item, such as EACH, DOZEN, or BOX. Add a line for each unit of measure you want to use.
Be careful typing the unit of measure
Check your entry before you leave the Unit Of Measure field, because you cannot change it later. If you need to change a unit of measure, you must add a new line with the correct unit of measure, then delete the incorrect line, as follows:
a. Press the Insert key to start a new line.
b. Type the correct unit of measure and the other information for the line.
c. Click or Tab to the incorrect line, then press the Delete key to delete it.
Item Cost. Type the cost of the item per the unit of measure.
Multicurrency If you use multicurrency accounting, type each cost and price in the currency you specified for the line.
Assigning costs for non-inventory items
When adding non‐inventory items, such as consulting fees or delivery charges, enter 0 (zero) as the cost, so that Accounts Receivable does not create entries for the inventory and cost of goods sold general ledger accounts when you post transactions using the item numbers.
Item Price. Type the normal selling price of the item per the unit of measure.
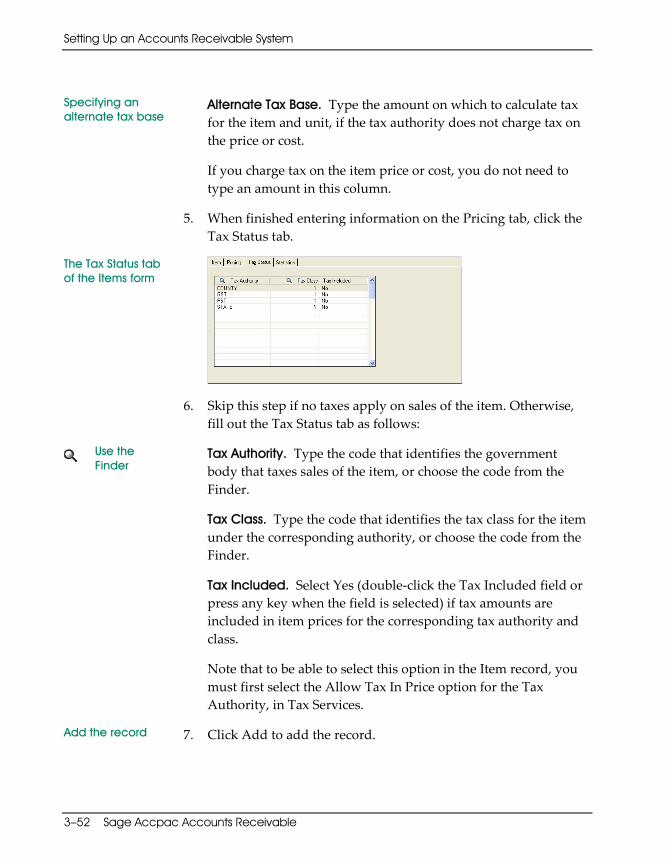
Setting Up an Accounts Receivable System
3–52 Sage Accpac Accounts Receivable
ARGS‐3.doc, printed on 1/31/2008, at 4:12:08 PM. Last saved on 1/31/2008 4:11:00 PM.
Sage Software Confidential
Specifying an alternate tax base
Alternate Tax Base. Type the amount on which to calculate tax for the item and unit, if the tax authority does not charge tax on the price or cost.
If you charge tax on the item price or cost, you do not need to type an amount in this column.
5. When finished entering information on the Pricing tab, click the Tax Status tab.
The Tax Status tab of the Items form
6. Skip this step if no taxes apply on sales of the item. Otherwise, fill out the Tax Status tab as follows:
Use the Finder
Tax Authority. Type the code that identifies the government body that taxes sales of the item, or choose the code from the Finder.
Tax Class. Type the code that identifies the tax class for the item under the corresponding authority, or choose the code from the Finder.
Tax Included. Select Yes (double‐click the Tax Included field or press any key when the field is selected) if tax amounts are included in item prices for the corresponding tax authority and class.
Note that to be able to select this option in the Item record, you must first select the Allow Tax In Price option for the Tax Authority, in Tax Services.
Add the record 7. Click Add to add the record.

Step 5: Add Setup Records — Salespersons
Getting Started 3–53
ARGS‐3.doc, printed on 1/31/2008, at 4:12:08 PM. Last saved on 1/31/2008 4:11:00 PM.
Sage Software Confidential
Setting Up A
/R
Repeat steps 1 through 7 for each of the items you want to add, then go to step 8.
Add statistics after posting transactions
If you selected the Allow Edit Of (item) Statistics option in the Options form, you can also add current‐year and previous‐year statistics for each of your items and units of measure, as described in Step 11, “Add Item Statistics,” later in this chapter.
You create some of these statistics automatically when you post transactions to enter your opening account balances and current‐year transactions in “Step 9: Add Opening Balances and Current‐Year Transactions.”
8. Click Print on the File menu or choose Items from the Setup Reports folder to print a list of the items you have added, to verify that they are correct and complete. File the report.
If you have added a large group of item numbers, you should now check data integrity through Administrative Services and make a backup copy of your data.
Add Salespersons (Optional)
Salesperson records identify your sales staff, so you can track sales by salesperson.
Salesperson records are optional. You do not have to add any salesperson records, or you can add one record that represents the entire staff.
Before adding a salesperson record, you must:
• Decide on the salesperson code.
• Turn on the Allow Edit Of (salesperson) Statistics option in the Options form if you want to add prior‐year statistics for your sales staff.
See also page 2-57
For information about adding salesperson records, see “Setting Up Salesperson Records” in Chapter 2.
Step 5: Add Setup Records — Salespersons

Setting Up an Accounts Receivable System
3–54 Sage Accpac Accounts Receivable
ARGS‐3.doc, printed on 1/31/2008, at 4:12:08 PM. Last saved on 1/31/2008 4:11:00 PM.
Sage Software Confidential
To add a salesperson record:
1. Choose Salespersons from the Setup folder to display the Salespersons form:
2. Add the salesperson records you need, entering for each:
Salesperson Code. Type a code to identify the salesperson, using up to eight characters.
Name. Type the salesperson’s name the way you want it to appear on Accounts Receivable screens and reports.
Employee Number. Type the employee number assigned to the salesperson in your company’s payroll records. This is an optional field, so you can leave it blank or enter other information in it.
Annual Sales Target. Type the amount of the sales target or quota for the salesperson in the current year. You can also leave this field showing zeroes if you do not assign sales targets.
Enter commission information
3. If the salesperson is paid commissions, fill in the fields on the Commission tab as follows:
a. Select the Paid Commissions option.

Step 5: Add Setup Records — Terms
Getting Started 3–55
ARGS‐3.doc, printed on 1/31/2008, at 4:12:08 PM. Last saved on 1/31/2008 4:11:00 PM.
Sage Software Confidential
Setting Up A
/R
b. In the Number Of Commission Rate field, select the number of commission rates that apply to the salesperson.
c. In the fields that appear, enter the rate as a percentage of sales, and enter the range of sales that applies to each rate.
Add the record 4. When ready, click Add (to add the record).
Repeat steps 1 through 3 for each of the records you want to add, then go to step 4.
Adding salesperson statistics
If you want to add salesperson statistics for prior periods, follow the instructions in Step 12, “Add Salesperson Statistics,” later in this chapter.
5. Click Print on the File menu or choose Salespersons from the Setup Reports folder to print the Salesperson Profile report for the salespeople you have added to verify that the records are correct and complete. File the report.
Add Terms
Accounts Receivable uses terms codes during invoice entry to calculate due dates. If you allow discounts for early payment of invoices, Accounts Receivable also uses terms codes to calculate discount periods and amounts on invoices.
You must add at least one terms record before you can enter Accounts Receivable transactions.
Before adding a terms record, you must know:
• The terms code.
• The method for calculating the due dates for invoices.
• Discount periods and percents (if used).
See also page 2-58
For background information about payment terms, see “Setting Up Terms Codes” in Chapter 2.
Step 5: Add Setup Records — Terms
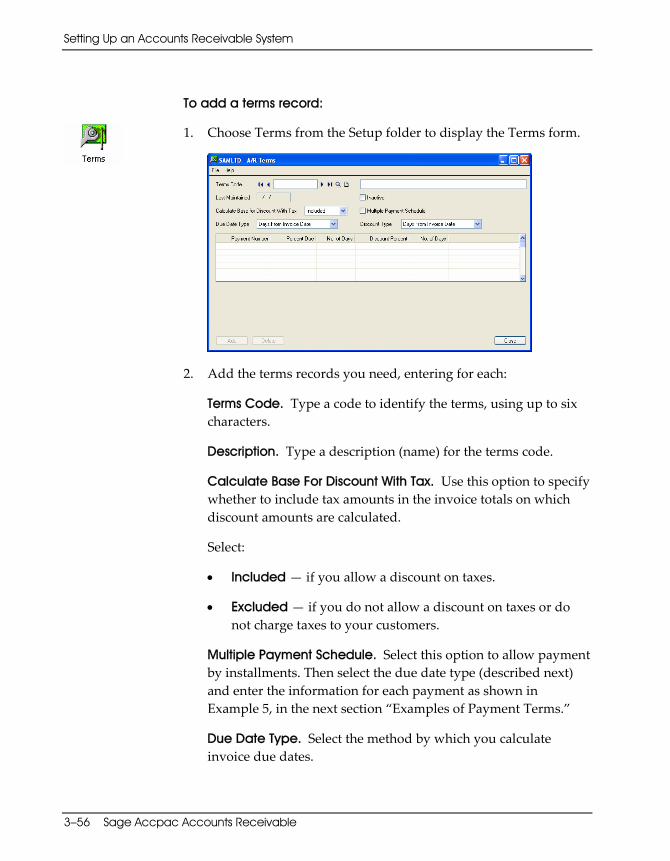
Setting Up an Accounts Receivable System
3–56 Sage Accpac Accounts Receivable
ARGS‐3.doc, printed on 1/31/2008, at 4:12:08 PM. Last saved on 1/31/2008 4:11:00 PM.
Sage Software Confidential
To add a terms record:
1. Choose Terms from the Setup folder to display the Terms form.
2. Add the terms records you need, entering for each:
Terms Code. Type a code to identify the terms, using up to six characters.
Description. Type a description (name) for the terms code.
Calculate Base For Discount With Tax. Use this option to specify whether to include tax amounts in the invoice totals on which discount amounts are calculated.
Select:
• Included — if you allow a discount on taxes.
• Excluded — if you do not allow a discount on taxes or do not charge taxes to your customers.
Multiple Payment Schedule. Select this option to allow payment by installments. Then select the due date type (described next) and enter the information for each payment as shown in Example 5, in the next section “Examples of Payment Terms.”
Due Date Type. Select the method by which you calculate invoice due dates.
Step 5: Add Setup Records — Terms
Getting Started 3–57
ARGS‐3.doc, printed on 1/31/2008, at 4:12:08 PM. Last saved on 1/31/2008 4:11:00 PM.
Sage Software Confidential
Setting Up A
/R
Select:
• Days From Invoice Date — if invoices are due in a specific number of days after the invoice date.
Then type the number of days in the Number Of Days column that appears. (See Examples 1 and 2 in the next section “Examples of Payment Terms.”)
• End Of Next Month — if invoices are due on the last day of the next month.
• Day Of Next Month — if invoices are due on a specific day in the next month.
Then type the number (representing the due date) in the Day Of Month column, as shown in Example 3.
• Days From Day Of Next Month — if invoices are due a standard number of days after a specific day in the next month.
Then type the number of days and the number that represents the day of the month, as in Example 4.
• Due Date Table — if you use standard due dates for invoices entered within specified ranges of days.
Then complete the table that appears, as shown in Example 6.
Use Help If you need help adding the information, press F1 to display Help windows (or click Help on the menu) to find out how to fill in a particular field or column.
For information about using a mouse or keyboard to enter data in Accounts Receivable forms, see the appendix “Using a Mouse or Keyboard,” in the System Manager User Guide.
Discount Type. Select the method you use to calculate the last day on which you allow your customers to take a discount for prompt payment. You select from the options described above

Setting Up an Accounts Receivable System
3–58 Sage Accpac Accounts Receivable
ARGS‐3.doc, printed on 1/31/2008, at 4:12:08 PM. Last saved on 1/31/2008 4:11:00 PM.
Sage Software Confidential
for Due Date Type, then type discount percentages. (See Example 2, in the next section.)
If you do not offer discounts to your customers, ignore the discount fields and columns.
Add the terms code
3. When finished adding a set of terms, click the Add button.
4. Click Print on the File menu or choose Terms from the Setup Reports folder to print a list of the payment terms you added to verify that they are correct and complete. File the report.
Examples of Payment Terms
Use the following examples as guides when entering your own terms information.
Example 1 (Net 30)
Terms are Net 30 (invoices are due in 30 days, no discount).
1. From the Due Date Type field, select Days From Invoice Date.
2. Type 30 in the first Number Of Days column.
Example 2 (2/10 Net 30)
Terms are 2%/10 Net 30 (invoices are due in 30 days, 2 percent discount if paid in first ten days).
1. From the Due Date Type field, select Days From Invoice Date for both Due Date Type and Discount Type.
2. Type 30 in the first Number Of Days column.
3. Type 2 in the Discount Percent column.
4. Type 10 in the second Number Of Days column.
Example 3 (Due on the 15th)
Invoices are due on the 15th day of the month that follows the invoice date. (Invoices issued in June are due on July 15.)
1. From the Due Date Type field, select Day Of Next Month.
2. Type 15 in the Day Of Month column.
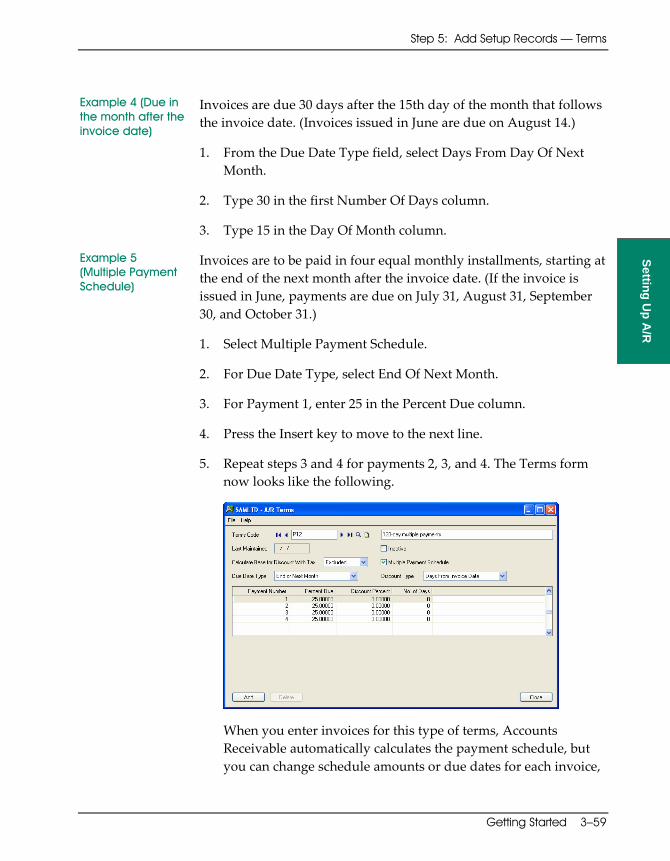
Step 5: Add Setup Records — Terms
Getting Started 3–59
ARGS‐3.doc, printed on 1/31/2008, at 4:12:08 PM. Last saved on 1/31/2008 4:11:00 PM.
Sage Software Confidential
Setting Up A
/R
Example 4 (Due in the month after the invoice date)
Invoices are due 30 days after the 15th day of the month that follows the invoice date. (Invoices issued in June are due on August 14.)
1. From the Due Date Type field, select Days From Day Of Next Month.
2. Type 30 in the first Number Of Days column.
3. Type 15 in the Day Of Month column.
Example 5 (Multiple Payment Schedule)
Invoices are to be paid in four equal monthly installments, starting at the end of the next month after the invoice date. (If the invoice is issued in June, payments are due on July 31, August 31, September 30, and October 31.)
1. Select Multiple Payment Schedule.
2. For Due Date Type, select End Of Next Month.
3. For Payment 1, enter 25 in the Percent Due column.
4. Press the Insert key to move to the next line.
5. Repeat steps 3 and 4 for payments 2, 3, and 4. The Terms form now looks like the following.
When you enter invoices for this type of terms, Accounts Receivable automatically calculates the payment schedule, but you can change schedule amounts or due dates for each invoice,

Setting Up an Accounts Receivable System
3–60 Sage Accpac Accounts Receivable
ARGS‐3.doc, printed on 1/31/2008, at 4:12:08 PM. Last saved on 1/31/2008 4:11:00 PM.
Sage Software Confidential
as needed. For example, you can specify that the first payment is not due for a year from the invoice date.
Example 6 (Due Date Table)
Invoices are due on the date assigned for the range of days in which an invoice was issued. (In this example, invoices dated from the 1st to the 15th of June are due on July 1, while invoices dated from the June 16 to 30 are due on July 15.)
1. In the Due Date Type field, select Due Date Table.
2. Complete the table as shown:
Standard discounts (Discount Date Table)
If you use standard discount periods for invoices entered within specified ranges of days, type the discount percentage for the terms, then complete the Discount Date Table, as described above for the Due Date Table.
Add E-mail Messages (Optional)
The E‐mail Messages form lets you create messages to send with e‐mailed statements, letters, and invoices.
See also page 2-48
For a list of the variables you can use with each type of e‐mailed document, see the section. “Substitute Variables for E‐mail Messages” in Chapter 2 of this guide.
To create a message that you can use with e-mailed statements, letters, or invoices:
1. Choose E‐mail Messages from the A/R Setup folder.
Step 5: Add Setup Records — E‐mail Messages

Step 5: Add Setup Records — E-mail Messages
Getting Started 3–61
ARGS‐3.doc, printed on 1/31/2008, at 4:12:08 PM. Last saved on 1/31/2008 4:11:00 PM.
Sage Software Confidential
Setting Up A
/R
2. Complete the fields on the form as follows:
Message Type. Select Statement, Invoice, or Letter, depending on the purpose of the message.
Message ID. Enter a code to identify this message, using up to 16 characters.
Description. Enter a description for the message.
Last Maintained. This display‐only field shows the last time you modified this e‐mail message.
Inactive. Select this field only when you want to make this message unavailable to use in invoices or statements.
E-mail Subject. Enter the subject line you want to use for the e‐mail message. Note that you can use field names, preceded by a dollar sign (as illustrated in the example, above), to insert customer‐ or company‐specific information in the subject line of the e‐mailed messages.
3. Enter the body of the e‐mail message. Use field names preceded by a dollar sign to identify variable information that you want to include with the message.
4. Click Add or Save when you are satisfied with your message.
Field names from your company database identify customer or company information to insert in the e-mail message.

Setting Up an Accounts Receivable System
3–62 Sage Accpac Accounts Receivable
ARGS‐3.doc, printed on 1/31/2008, at 4:12:08 PM. Last saved on 1/31/2008 4:11:00 PM.
Sage Software Confidential
Add Optional Fields (Optional)
The Optional Fields form is available in the A/R Setup folder if you use Transaction Analysis and Optional Field Creator.
Before adding A/R optional fields
Before you can define optional fields for use in Accounts Receivable, you must first set them up for system‐wide use in Common Services. For information on setting up system‐wide optional fields, see the System Manager User Guide.
See also page 2-60
For background information on the types of optional fields you can use in Accounts Receivable, see “Setting Up Optional Fields” in Chapter 2 of this guide.
To define optional fields for your Accounts Receivable system:
1. Choose Optional Fields from the A/R Setup folder.
2. Complete the following fields for each optional field you plan to use in Accounts Receivable:
Optional Fields For. Select the type of record or transaction for which you are defining the optional field. You can choose:
• Customers, National Accounts, And Customer Groups (or Customers And Customer Groups, if you do not use Sage Accpac National Accounts)
Step 5: Add Setup Records — Optional Fields

Step 5: Add Setup Records — Optional Fields
Getting Started 3–63
ARGS‐3.doc, printed on 1/31/2008, at 4:12:08 PM. Last saved on 1/31/2008 4:11:00 PM.
Sage Software Confidential
Setting Up A
/R
• Ship‐to Locations
• Invoices (associated with document headers — optional fields for document details are defined separately).
• Invoice Details
• Adjustments
• Receipts
• Revaluation
• Refunds
Optional Field / Description. Use the Finder to select the optional field codes you want to use for each type.
You can define an unlimited number of optional fields for each type, providing the optional fields are set up in Common Services for use in your system.
Note: If you want to retain Accounts Receivable optional field information when you create batches for General Ledger, you must use the same optional fields for transactions in Accounts Receivable as you use in General Ledger.
When you select an optional field code, the program displays the description for the optional field.
Value Set. Double‐click the Value Set column to indicate whether the optional field has a default value.
You must set the Value Set field to “Yes” to specify a default value for the optional field.
Default Value / Description. Enter or select the value that the program will display as the default for the optional field.
If the optional field you selected requires validation, you must select a value that is defined for the optional field in Common
Setting Up an Accounts Receivable System
3–64 Sage Accpac Accounts Receivable
ARGS‐3.doc, printed on 1/31/2008, at 4:12:08 PM. Last saved on 1/31/2008 4:11:00 PM.
Sage Software Confidential
Services. However, if the optional field allows blanks, you can leave the default value field blank.
If the optional field does not use validation, you can do one of the following:
• Select a value that is defined for the optional field in Common Services.
• Leave the field blank.
• Enter a combination of alphanumeric or special characters and spaces. The entry must be consistent with the type of field (text, number, date, amount, and so on), and must not exceed the number of characters specified for the optional field in Common Services. For example, in a Yes/No field, you can enter only Yes or No. In an Integer field you can enter any integer with an absolute value less than 2,147,483,647.
When you specify a value from Common Services, the program displays the description for the value.
Required. Double‐click this field to indicate whether the optional field must be used in the records and transactions for which it is created. During data entry, if an optional field is required and does not have a default value, you must fill in the field before you can proceed.
Auto Insert. Select Yes in this field if you want the program to display the optional field and its default value when you set up new records or enter transactions on the form for which you are defining the optional field.
For example, if you define Transit Number as an optional field for invoices and you select Yes in the Auto Insert field, the Transit Number field appears automatically in Invoice Entry.

Step 5: Add Setup Records — Modifying Records
Getting Started 3–65
ARGS‐3.doc, printed on 1/31/2008, at 4:12:08 PM. Last saved on 1/31/2008 4:11:00 PM.
Sage Software Confidential
Setting Up A
/R
Specify additional settings for the optional field
3. Click the Settings button, if it is available.
A separate form appears, listing all the groups of accounts that are affected when you post transactions of the type for which you are defining the optional field. Use the form to specify:
• The account groups for which values pass to General Ledger when you post transactions that include the optional field.
• Whether Accounts Receivable passes optional field information for job‐related transactions to Project and Job Costing, if you use Sage Accpac Project and Job Costing.
If the optional fields in the posted transactions match the optional fields defined for billings in Project and Job Costing, the optional field information is sent to that program.
4. Click Add (or Save) to add the optional field.
You can now assign the optional fields to customer, national account, customer group, and ship‐to location records, or use them in the types of transactions for which they are defined.
Modifying Setup Records
You can modify and delete the records you set up in this step as needed.
To modify a record, you select the code that identifies it (such as the account set code or the item number), then make your changes and save them.
You can change everything in most records except the identifying code or number. To change a code or number, you first add a record with the code or number you want to use, then delete the record you do not want.
Multicurrency ledgers
If you use multicurrency accounting, you cannot change the currency code assigned to an account set.
Step 5: Add Setup Records — Modifying Records
Setting Up an Accounts Receivable System
3–66 Sage Accpac Accounts Receivable
ARGS‐3.doc, printed on 1/31/2008, at 4:12:08 PM. Last saved on 1/31/2008 4:11:00 PM.
Sage Software Confidential
Deleting records You can delete dunning messages (except the default dunning message), payment codes, and items without restriction.
You can delete account sets, billing cycles, distribution codes, or interest profiles only when they are not assigned to customer records (including customer groups, national accounts, and customers). You can delete optional fields only if they are not assigned to customer records or transactions.
If you want to delete a code that is assigned to a customer record, ship‐to location, or transaction, you must first assign a different code to the customer group, national account, customer, ship‐to location, or transaction, or delete those records also.
For further information about updating and changing setup information, see Chapter 3 in the User Guide.
For information about moving around Sage Accpac forms using either a mouse or a keyboard, see the appendix “Using a Mouse or Keyboard,” in the System Manager User Guide.
Step 6: Add Customer Records
This step guides you through the process of adding your customer records to Accounts Receivable.
You use icons in the Customers folder to add the following types of customer records:
• Customer groups • National accounts (optional) • Customers
Remember to check data integrity through Administrative Services and make a backup copy each time you have added records that would be time‐consuming to add a second time.
Remember to use Help when you want quick information about Accounts Receivable fields and forms.
Step 6: Add Customer Records
Step 6: Add Customer Records — Customer Groups
Getting Started 3–67
ARGS‐3.doc, printed on 1/31/2008, at 4:12:08 PM. Last saved on 1/31/2008 4:11:00 PM.
Sage Software Confidential
Setting Up A
/R
Importing customer records
You can import your customer records into Accounts Receivable from another Sage Accpac Accounts Receivable database or from a non‐Sage Accpac program. You can import everything in the records except customer activity statistics.
See Appendix B in the User Guide for information about importing the data.
Add Customer Groups
Use customer groups to classify your customer records into groups that share similar characteristics, such as geographical locations.
You must add at least one customer group before you can add national accounts and customer records.
Before adding a customer group, you must:
• Add records for the account sets, terms codes, billing cycles, interest profiles, and optional fields that you want to assign to customer groups.
• Decide on the customer group code.
• Decide on the codes to use to identify the group’s:
− Account set − Terms − Billing cycle − Interest profile
• Determine the credit limit and the overdue limit for outstanding balances for the group.
Multicurrency ledgers
If you use multicurrency accounting, you must also know the rate type to use for the group, and you must assign an account set that uses the same currency as customers and national accounts you plan to assign to the group.
Step 6: Add Customer Records — Customer Groups
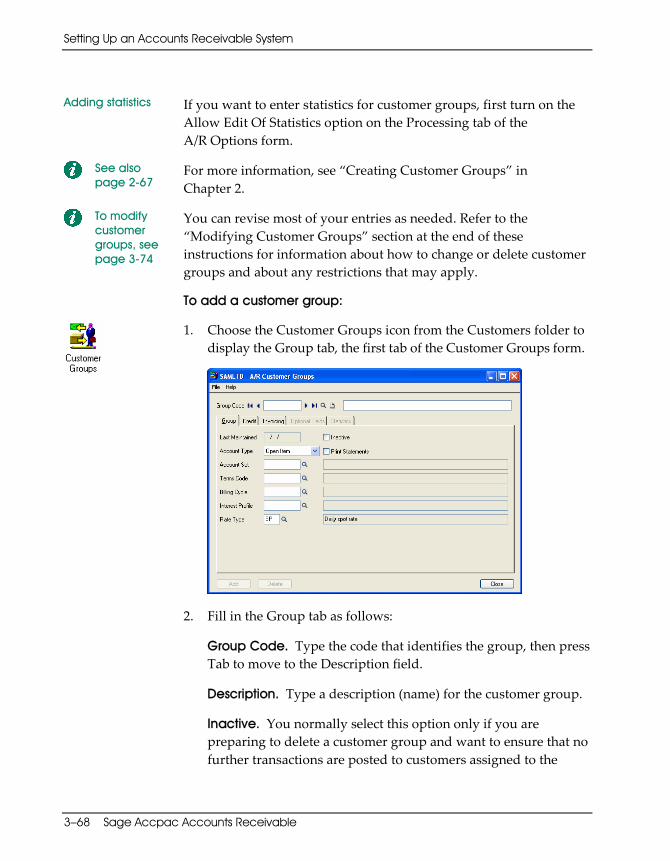
Setting Up an Accounts Receivable System
3–68 Sage Accpac Accounts Receivable
ARGS‐3.doc, printed on 1/31/2008, at 4:12:08 PM. Last saved on 1/31/2008 4:11:00 PM.
Sage Software Confidential
Adding statistics If you want to enter statistics for customer groups, first turn on the Allow Edit Of Statistics option on the Processing tab of the A/R Options form.
See also page 2-67
For more information, see “Creating Customer Groups” in Chapter 2.
To modify customer groups, see page 3-74
You can revise most of your entries as needed. Refer to the “Modifying Customer Groups” section at the end of these instructions for information about how to change or delete customer groups and about any restrictions that may apply.
To add a customer group:
1. Choose the Customer Groups icon from the Customers folder to display the Group tab, the first tab of the Customer Groups form.
2. Fill in the Group tab as follows:
Group Code. Type the code that identifies the group, then press Tab to move to the Description field.
Description. Type a description (name) for the customer group.
Inactive. You normally select this option only if you are preparing to delete a customer group and want to ensure that no further transactions are posted to customers assigned to the
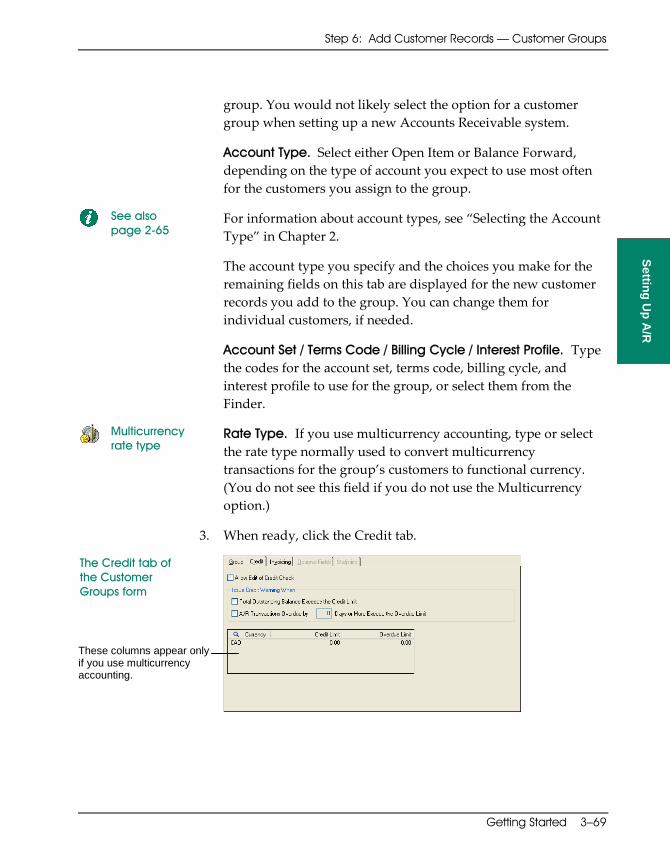
Step 6: Add Customer Records — Customer Groups
Getting Started 3–69
ARGS‐3.doc, printed on 1/31/2008, at 4:12:08 PM. Last saved on 1/31/2008 4:11:00 PM.
Sage Software Confidential
Setting Up A
/R
group. You would not likely select the option for a customer group when setting up a new Accounts Receivable system.
Account Type. Select either Open Item or Balance Forward, depending on the type of account you expect to use most often for the customers you assign to the group.
See also page 2-65
For information about account types, see “Selecting the Account Type” in Chapter 2.
The account type you specify and the choices you make for the remaining fields on this tab are displayed for the new customer records you add to the group. You can change them for individual customers, if needed.
Account Set / Terms Code / Billing Cycle / Interest Profile. Type the codes for the account set, terms code, billing cycle, and interest profile to use for the group, or select them from the Finder.
Multicurrency rate type
Rate Type. If you use multicurrency accounting, type or select the rate type normally used to convert multicurrency transactions for the group’s customers to functional currency. (You do not see this field if you do not use the Multicurrency option.)
3. When ready, click the Credit tab.
The Credit tab of the Customer Groups form
These columns appear only if you use multicurrency accounting.
Setting Up an Accounts Receivable System
3–70 Sage Accpac Accounts Receivable
ARGS-3.doc, printed on 2/7/2008, at 12:51:13 PM. Last saved on 2/7/2008 12:50:00 PM.
Sage Software Confidential
4. Complete the Credit tab as follows:
Allow Edit Of Credit Check. Select this option if you allow national accounts and customers to have different credit limits from the groups to which they are assigned.
See also page 2-83
For more information, see “Entering Credit Information and Credit Limits” in Chapter 2.
[Issue Credit Warning When] Total Outstanding Balance Exceeds The Credit Limit Of. Select this option to generate a warning when you add a transaction for a customer whose outstanding balance is greater than the credit limit you specify.
Credit Limit. Type the standard credit limit your company allows for customers in the group.
In a single currency system, you specify one credit limit for all the members of the customer group.
In a multicurrency system, you use the currency grid to specify a credit limit for each currency used in the customer group.
[Issue Credit Warning When] A/R Transactions Overdue By [#] Days Or More Exceed The Overdue Limit Of. Select this option to generate a warning when you enter transactions for a customer whose overdue transactions exceed a specified amount and a specified number of days.
If you select this option, use the Days box to enter the number of days that transaction balances can be overdue before generating a warning.
Overdue Limit. Type the maximum amount that transactions can be overdue for the specified number of days.
In a single currency system, specify one overdue limit. In a multicurrency system, use the currency grid to specify an amount for each currency used.
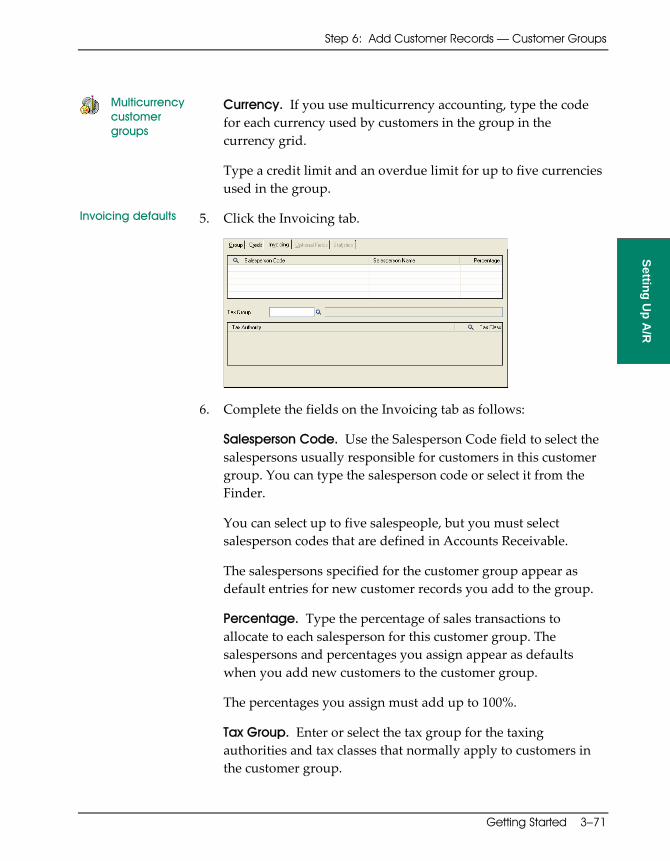
Step 6: Add Customer Records — Customer Groups
Getting Started 3–71
ARGS‐3.doc, printed on 1/31/2008, at 4:12:08 PM. Last saved on 1/31/2008 4:11:00 PM.
Sage Software Confidential
Setting Up A
/R
Multicurrency customer groups
Currency. If you use multicurrency accounting, type the code for each currency used by customers in the group in the currency grid.
Type a credit limit and an overdue limit for up to five currencies used in the group.
Invoicing defaults 5. Click the Invoicing tab.
6. Complete the fields on the Invoicing tab as follows:
Salesperson Code. Use the Salesperson Code field to select the salespersons usually responsible for customers in this customer group. You can type the salesperson code or select it from the Finder.
You can select up to five salespeople, but you must select salesperson codes that are defined in Accounts Receivable.
The salespersons specified for the customer group appear as default entries for new customer records you add to the group.
Percentage. Type the percentage of sales transactions to allocate to each salesperson for this customer group. The salespersons and percentages you assign appear as defaults when you add new customers to the customer group.
The percentages you assign must add up to 100%.
Tax Group. Enter or select the tax group for the taxing authorities and tax classes that normally apply to customers in the customer group.

Setting Up an Accounts Receivable System
3–72 Sage Accpac Accounts Receivable
ARGS-3.doc, printed on 2/6/2008, at 9:53:17 AM. Last saved on 2/6/2008 9:52:00 AM.
Sage Software Confidential
You define and update tax groups and enter other taxation information in the Tax Services forms in Common Services.
Tax Class. Enter or select the tax classes for each tax authority normally used to calculate taxes for customers in this customer group. (Tax classes identify the tax rates used to calculate taxes when you enter invoices, debit notes, and credit notes for customers.)
The tax group and tax classes you specify for the customer group appear as defaults when you assign new customers to the group.
Optional Fields 7. If you use Transaction Analysis and Optional Field Creator and you want to assign optional fields to this customer group, click the Optional Fields tab.
Optional fields that are set up for automatic insertion in customer group, national account, and customer records appear automatically on this tab, along with their default values.
You can accept the optional fields that appear or you can delete them, and you can accept or change any default values that appear:
• To delete an optional field, select the line on the grid, then press the Delete key.
Step 6: Add Customer Records — Customer Groups
Getting Started 3–73
ARGS‐3.doc, printed on 1/31/2008, at 4:12:08 PM. Last saved on 1/31/2008 4:11:00 PM.
Sage Software Confidential
Setting Up A
/R
• To assign additional optional fields, select the grid, then press the Insert key. Complete the fields on the new line as follows:
Use the Finder
Optional Field. Use the Finder to select the optional field codes you want to use with this customer group.
When you select an optional field code, the program displays the description for the optional field.
Value. Enter or select the value to display as the default in new national account and customer records.
Note that the Value Set field alerts you whether an optional field has an automatically inserted default value. If the field looks empty, but has a blank value, the Value Set field displays Yes. (You cannot tell whether an optional field has a “blank” default value or no value just by looking at the Value field.)
If you use the same optional fields in new national accounts and customer records, Accounts Receivable assigns optional field values from the customer group as default entries for the new records. (If the customer also belongs to a national account, however, it assigns the values from the national account.)
Add the group 8. When ready, click Add to add the group.
Add statistics after posting transactions
If you selected the Allow Edit Of (customer) Statistics option in the Options form, you can also add current‐year and previous‐year statistics for each of your customer groups, as described in Step 10, “Add Customer Statistics,” later in this chapter.
You will create some of these statistics automatically when you post transactions to enter your opening account balances and current‐year transactions in “Step 9: Add Opening Balances and Current‐Year Transactions.”
9. Add the next customer group you need.
Setting Up an Accounts Receivable System
3–74 Sage Accpac Accounts Receivable
ARGS‐3.doc, printed on 1/31/2008, at 4:12:08 PM. Last saved on 1/31/2008 4:11:00 PM.
Sage Software Confidential
Starting a new record
To start a new record, click the New icon next to the Group Code field, then type the code for the new customer group you want to define. Repeat steps 2 through 5 to add the record.
If you do not want to erase the information you entered for the previous group, simply type the code for the new customer group in the Group Code field, then press the Tab key. Edit the new record to change entries, as needed.
10. Click Print on the File menu or choose the Customer Groups icon from the Setup Reports folder to print the Customer Group List of the records you added.
Modifying Customer Groups
You can modify and delete customer groups as needed, with these restrictions:
• To change the customer group code, you must first set up a new customer group with the code you want to use, then delete the group using the code you no longer want.
• You can enter and edit group statistics only if you use the Allow Edit Of Statistics option.
• You cannot delete a customer group that is assigned to a national account or customer record, unless you first assign a different customer group to the national account or customer.
For further information about updating and changing records for customer groups, see “Adding, Editing, and Deleting Customer Groups” in Chapter 3 in the User Guide.

Step 6: Add Customer Records — National Accounts
Getting Started 3–75
ARGS-3.doc, printed on 2/7/2008, at 12:47:54 PM. Last saved on 2/6/2008 2:59:00 PM.
Sage Software Confidential
Setting Up A
/R
Add National Accounts (Optional)
National accounts are available as a separate package that you can use with Accounts Receivable. Note that you must install National Accounts Management before activating Accounts Receivable.
Use national accounts if you have customers who are subsidiaries or branch offices of the same company. You can then apply checks and other receipts from the national account to the invoices posted for the customers assigned to it.
You do not have to use national accounts, nor do you have to assign a national account to every customer record. If you set up without them and later decide to use them, you can assign national accounts to existing customer records as needed.
Before adding a national account, you must:
• Add the customer group, account set, billing cycle, and interest profile you want to assign to the national account.
• Decide on the national account number.
Multicurrency ledgers
If you use multicurrency accounting, you must also know the rate type to use for national accounts that do not use the functional currency, and you must assign an account set that uses the same currency as the customers in the national account.
Adding statistics If you want to enter statistics for national accounts, select the Allow Edit Of Statistics option on the A/R Options form.
See also page 2-71
For more information, see “Creating National Accounts” in Chapter 2.
To modify a national account, see page 3-83
You can revise most of your entries as needed. Refer to the “Modifying National Accounts” section at the end of these instructions for information about how to change or delete national accounts and about any restrictions that may apply.
ep 6: dd ustomer cords
ational ccounts
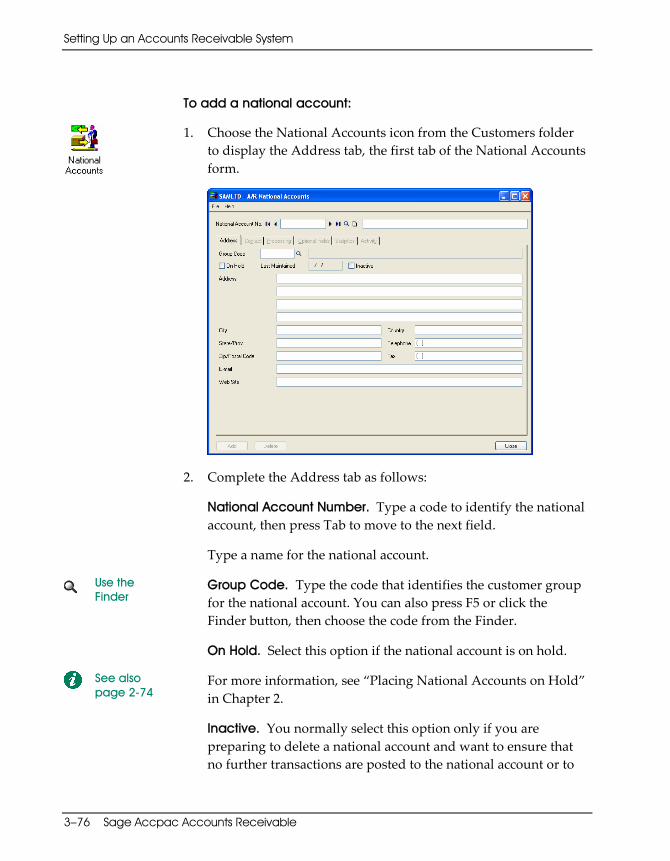
Setting Up an Accounts Receivable System
3–76 Sage Accpac Accounts Receivable
ARGS‐3.doc, printed on 1/31/2008, at 4:12:08 PM. Last saved on 1/31/2008 4:11:00 PM.
Sage Software Confidential
To add a national account:
1. Choose the National Accounts icon from the Customers folder to display the Address tab, the first tab of the National Accounts form.
2. Complete the Address tab as follows:
National Account Number. Type a code to identify the national account, then press Tab to move to the next field.
Type a name for the national account.
Use the Finder
Group Code. Type the code that identifies the customer group for the national account. You can also press F5 or click the Finder button, then choose the code from the Finder.
On Hold. Select this option if the national account is on hold.
See also page 2-74
For more information, see “Placing National Accounts on Hold” in Chapter 2.
Inactive. You normally select this option only if you are preparing to delete a national account and want to ensure that no further transactions are posted to the national account or to

Step 6: Add Customer Records — National Accounts
Getting Started 3–77
ARGS‐3.doc, printed on 1/31/2008, at 4:12:08 PM. Last saved on 1/31/2008 4:11:00 PM.
Sage Software Confidential
Setting Up A
/R
the customers assigned to it. You would not likely select this option for a national account when setting up a new Accounts Receivable system.
See also page 2-74
For more information, see “Assigning Inactive Status to National Accounts” in Chapter 2.
Address Information. Type the billing address, telephone and fax numbers, and the name of a contact person or position for the national account.
This information appears for all new customers you add to the account, but you can enter different information for individual customers in the Customers form.
Web Site (optional). Enter the URL (Internet address) for the national account, if known.
3. When ready, click the Contact tab, then enter contact information for the national account.
4. When ready, click the Processing tab.
The Processing tab of the National Accounts form
5. Complete the Processing tab as follows:
Account Type. Select either Open Item or Balance Forward, depending on the type of account you expect to assign most often to the customers in the national account.
Setting Up an Accounts Receivable System
3–78 Sage Accpac Accounts Receivable
ARGS‐3.doc, printed on 1/31/2008, at 4:12:08 PM. Last saved on 1/31/2008 4:11:00 PM.
Sage Software Confidential
See also page 2-65
For more information, see “Selecting the Account Type” in Chapter 2.
Print Statements. Select this option if you want to print statements for the national account. Statements for a national account list all the transactions for the customers using the national account.
You also can choose whether to print statements for the member customers of the national account when you set up the customer records. Then, when you print statements for the national account, Accounts Receivable prints additional statement pages for member customers for whom you selected the Print Statements option.
Account Set. The program displays the account set assigned to the customer group as the default, but you can change it.
The account set determines the customer currency. When you choose the account set, Accounts Receivable displays the currency code and the default rate type in the national account record.
Multicurrency account sets identify the customer’s currency and general ledger exchange gain and loss accounts and the exchange rounding account. In a multicurrency ledger, you can change the account set for a national account only to another account set that uses the same currency.
If a customer belongs to a national account, the national account’s account set is used as the default for the customer, but you can change it for individual customers. You can change a member customer’s account set only to one that uses the same currency as the national account.
Billing Cycle / Interest Profile. By default, these fields display the codes you assigned to the customer group to which the national account belongs, but you can choose other codes for the national account.
Step 6: Add Customer Records — National Accounts
Getting Started 3–79
ARGS-3.doc, printed on 2/7/2008, at 12:49:33 PM. Last saved on 2/6/2008 2:59:00 PM.
Sage Software Confidential
Setting Up A
/R
The billing cycle and interest profile you choose for the national account apply as well to the customer accounts that use the national account, and you cannot change them for individual customers.
Delivery Method. Specify the preferred method for delivering statements and invoices to the national account.
You can select choose:
• Mail — to print to your usual print destination for conventional mailing.
• E-mail — to send statements and invoices to the e-mail address entered for the national account on the Address tab.
• Contact’s E-mail — to send statements and invoices to the e-mail address specified for the national account contact on the Contact tab.
Credit bureau Information
Credit Number / Rating / Date. If you use credit bureau information for your accounts, type the credit bureau number and rating for the national account, and the date on which the rating was assigned.
Credit checks The credit checks and amounts you specified for the assigned customer group appear as defaults when you add a national account.
You can change the credit checks, as follows, only if you selected the Allow Edit Of Credit Check option for the customer group to which the national account belongs:
[Issue Credit Warning When] Total Outstanding Balance Exceeds the Credit Limit Of. Select this option to generate a warning when you add a transaction for a national account member whose outstanding balance is greater than the credit limit you specify.
Credit Limit. Type the standard credit limit your company allows for member customers of the national account.

Setting Up an Accounts Receivable System
3–80 Sage Accpac Accounts Receivable
ARGS-3.doc, printed on 2/6/2008, at 9:49:15 AM. Last saved on 2/6/2008 9:48:00 AM.
Sage Software Confidential
The Credit Limit for the customer group appears as the default. If you want to enter a different credit limit for the national account, type the amount.
This amount appears as the default credit limit in customer records assigned to the national account, but you can change the limit for individual customers, if you want.
[Issue Credit Warning When] A/R Transactions Overdue By [#] Days Or More Exceeds Overdue Limit Of. Select this option to generate a warning when you enter transactions for national account members if their overdue transactions exceed a specified amount and a specified number of days.
If you select this option, use the Days box to enter the number of days that transaction balances can be overdue before generating a warning. Also, type the limit that overdue transactions must exceed to trigger the warning.
The days and overdue limit specified for the customer group appear as defaults, but you can change them if the customer group allows you to edit credit checks.
The days and overdue limit you specify for a national account appear as defaults in new customer records you assign to the national account, but you can change the days and limit for individual customers.
Rate type for multicurrency transactions
Rate Type. If you use multicurrency accounting, select the rate type that you use most often when converting multicurrency transactions for the customers in the national account to the functional currency.
You see this field only if you use multicurrency accounting and the national account does not use the functional currency.
The currency for the national account is determined by the assigned account set.

Step 6: Add Customer Records — National Accounts
Getting Started 3–81
ARGS‐3.doc, printed on 1/31/2008, at 4:12:08 PM. Last saved on 1/31/2008 4:11:00 PM.
Sage Software Confidential
Setting Up A
/R
Assigning optional fields
6. If you use Transaction Analysis and Optional Field Creator and you want to check or change the optional fields assigned to the national account, click the Optional Fields tab.
The Optional Fields tab of the National Accounts form
The program displays any optional fields set up for automatic insertion in customer group, national account, and customer records.
If the national account uses the same optional fields as the customer group, the program displays the optional field entry from the customer group record.
If the optional field is not used in the customer group record, the program displays the default value assigned to the customer optional field on the A/R Optional Fields form.
7. You can change the optional fields or values that appear on the tab, as follows:
• To delete an optional field that has been assigned to the national account, select the line on the grid, then press the Delete key on your keyboard.
Setting Up an Accounts Receivable System
3–82 Sage Accpac Accounts Receivable
ARGS‐3.doc, printed on 1/31/2008, at 4:12:08 PM. Last saved on 1/31/2008 4:11:00 PM.
Sage Software Confidential
• To assign different optional fields, select a line on the grid, press the Insert key, and then complete the following fields on the new line:
Use the Finder
Optional Field. Use the Finder to select the optional field codes you want to use with this national account.
The program displays the description for the selected optional field.
Value. Enter or select the value to display as the default in new customer records that use the same optional field.
If the optional field you selected requires validation, you must select a value that is defined for the optional field in Common Services. If the optional field allows blanks, you can leave the field blank.
Add the record 8. When ready, click Add to add the national account.
Add statistics after posting transactions
If you selected the Allow Edit Of (customer) Statistics option on the Options form, you can also add current‐year and previous‐year statistics for each of your national accounts, as described in “Step 10: Add Customer Statistics,” later in this chapter.
You will create some of these statistics automatically when you post transactions to enter your opening account balances and current‐year transactions in “Step 9: Add Opening Balances and Current‐Year Transactions.”
9. Add the next national account you need.
Starting a new record
To start a new record, click the New icon next to the National Account Number field, then type the code for the new national account you want to define. Repeat steps 2 through 8 to add the record.
If you do not want to erase the information you entered for the previous national account, simply type the number (code) for the new account in the National Account Number field, then press
Step 6: Add Customer Records — National Accounts
Getting Started 3–83
ARGS‐3.doc, printed on 1/31/2008, at 4:12:08 PM. Last saved on 1/31/2008 4:11:00 PM.
Sage Software Confidential
Setting Up A
/R
the Tab key. Edit the new record to change entries, as needed, for the new national account.
10. Click Print on the File menu or choose the National Accounts icon from the Customer Reports folder to print the National Accounts List of the records you added.
Modifying National Accounts
You can modify and delete national accounts, as needed, with these restrictions:
• To change the national account number, you must first set up a new national account with the number you want to use, then delete the record you no longer want.
• You can change the credit limit for the national account only if you selected the Allow Edit Of Credit Check option for the national account’s customer group.
• You can edit national account statistics only if you selected the Allow Edit Of Statistics option in the Options form.
• You cannot delete a national account that is assigned to a customer record unless you first assign a different national account to the customer.
• If you change the customer group, account type, account set, billing cycle, or interest profile in a national account record, the same changes are made automatically in the records of customers assigned to the national account.
Multicurrency ledgers
• If you have a multicurrency ledger, you can change the account set assigned to a national account only to another account set that uses the same currency.
For further information about updating and changing national account records, see “Adding, Editing, and Deleting National Accounts” in Chapter 3 in the User Guide.
Setting Up an Accounts Receivable System
3–84 Sage Accpac Accounts Receivable
ARGS‐3.doc, printed on 1/31/2008, at 4:12:08 PM. Last saved on 1/31/2008 4:11:00 PM.
Sage Software Confidential
Add Customers
Use the Customers form to add records for your customers to Accounts Receivable.
You must add customer records before you can enter and process transactions in Accounts Receivable.
Before adding a customer, you must:
• Add the customer group, national account (if applicable), account set, billing cycle, interest profile, terms code, optional fields, and tax group you want to assign to the customer.
• Decide on the customer number.
Multicurrency ledgers
If you use multicurrency accounting, you must know the rate type to use for each customer who does not use the functional currency. You must also assign an account set that uses the customer’s currency.
Adding statistics If you want to enter statistics for customers, first turn on the Allow Edit Of Statistics option on the Processing tab of the Options form.
See also page 2-77
For more information about customer records, see “Adding Customers” in Chapter 2.
To add a customer:
1. Choose Customers from the Customers folder.
Step 6: Add Customer Records — Customers
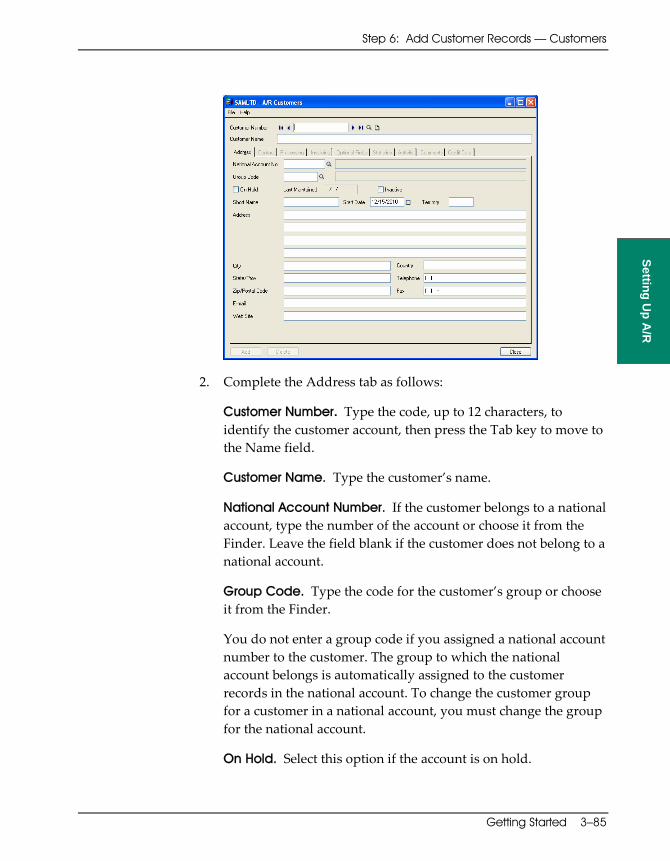
Step 6: Add Customer Records — Customers
Getting Started 3–85
ARGS‐3.doc, printed on 1/31/2008, at 4:12:08 PM. Last saved on 1/31/2008 4:11:00 PM.
Sage Software Confidential
Setting Up A
/R
2. Complete the Address tab as follows:
Customer Number. Type the code, up to 12 characters, to identify the customer account, then press the Tab key to move to the Name field.
Customer Name. Type the customer’s name.
National Account Number. If the customer belongs to a national account, type the number of the account or choose it from the Finder. Leave the field blank if the customer does not belong to a national account.
Group Code. Type the code for the customer’s group or choose it from the Finder.
You do not enter a group code if you assigned a national account number to the customer. The group to which the national account belongs is automatically assigned to the customer records in the national account. To change the customer group for a customer in a national account, you must change the group for the national account.
On Hold. Select this option if the account is on hold.
Setting Up an Accounts Receivable System
3–86 Sage Accpac Accounts Receivable
ARGS‐3.doc, printed on 1/31/2008, at 4:12:08 PM. Last saved on 1/31/2008 4:11:00 PM.
Sage Software Confidential
Inactive. You normally select this option only if you are preparing to delete a customer record and want to ensure that no further transactions are posted to the account. You would not likely select this option for a customer when setting up a new Accounts Receivable system.
See also page 2-84
For more information about the On Hold and Inactive fields in customer records, see “Assigning On Hold or Inactive Status to Customer Accounts” in Chapter 2.
Short Name. If you want, enter a code to use when selecting customers for reports, or leave the field blank.
Accounts Receivable automatically inserts the first ten characters of the name you type for the customer in the Name field as the short name, but you can change it.
See also page 2-82
For information about using short names, see the “Entering Short Names” section in Chapter 2.
Territory. If you want, type a code to assign the customer to a group that is used in your company, but for which there is no comparable record type in Accounts Receivable.
If you use territory codes, you create and maintain your list of the codes outside of Accounts Receivable.
Address Information. Type the billing address, telephone number, and fax number.
The address entered on this tab is automatically printed on invoices and statements for the customer.
Entering the address for customers who belong to a national account
If the customer belongs to a national account, the information entered for the national account appears in these fields. Type a different address for the customer only if you send invoices and statements directly to the customer, rather than to the head office of the national account.
If you need a separate record of the customer’s address, for example, because you send orders directly to the customer,

Step 6: Add Customer Records — Customers
Getting Started 3–87
ARGS‐3.doc, printed on 1/31/2008, at 4:12:08 PM. Last saved on 1/31/2008 4:11:00 PM.
Sage Software Confidential
Setting Up A
/R
rather than to the head office, add a ship‐to location for the customer, as described in Step 7, “Add Ship‐To Locations,” later in this chapter.
Start Date. Type the date when the customer first became one of your company’s accounts.
E-mail. Type the company’s e‐mail address in this field.
Web Site. If this company has a Web site, type the Web site address in this field.
3. When finished, click the Contact tab.
Enter information for the customer contact person, the person with whom you usually deal at this company. (This information is optional.)
4. When finished, click the Processing tab.
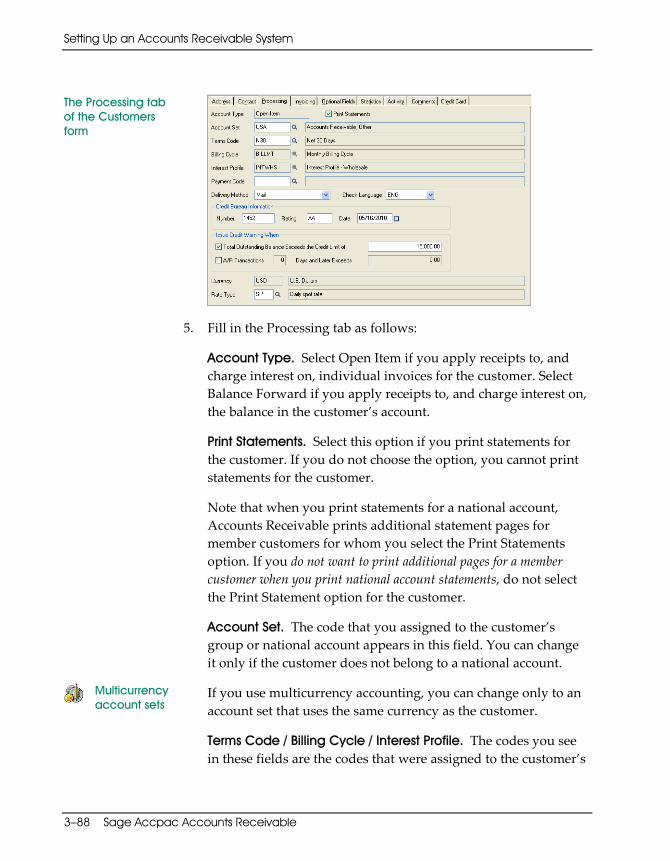
Setting Up an Accounts Receivable System
3–88 Sage Accpac Accounts Receivable
ARGS‐3.doc, printed on 1/31/2008, at 4:12:08 PM. Last saved on 1/31/2008 4:11:00 PM.
Sage Software Confidential
The Processing tab of the Customers form
5. Fill in the Processing tab as follows:
Account Type. Select Open Item if you apply receipts to, and charge interest on, individual invoices for the customer. Select Balance Forward if you apply receipts to, and charge interest on, the balance in the customer’s account.
Print Statements. Select this option if you print statements for the customer. If you do not choose the option, you cannot print statements for the customer.
Note that when you print statements for a national account, Accounts Receivable prints additional statement pages for member customers for whom you select the Print Statements option. If you do not want to print additional pages for a member customer when you print national account statements, do not select the Print Statement option for the customer.
Account Set. The code that you assigned to the customer’s group or national account appears in this field. You can change it only if the customer does not belong to a national account.
Multicurrency account sets
If you use multicurrency accounting, you can change only to an account set that uses the same currency as the customer.
Terms Code / Billing Cycle / Interest Profile. The codes you see in these fields are the codes that were assigned to the customer’s
Step 6: Add Customer Records — Customers
Getting Started 3–89
ARGS-3.doc, printed on 2/7/2008, at 12:50:12 PM. Last saved on 2/7/2008 12:49:00 PM.
Sage Software Confidential
Setting Up A
/R
group or national account. You can change the billing cycle and interest profile on this tab only if the customer does not belong to a national account. You can change the terms code at any time.
Payment Code. Select a default payment code for the customer. If you do not set a default payment code for a particular customer, Receipt Entry uses the default payment code from the A/R Options form.
Delivery Method. Specify the preferred method for delivering statements and invoices to the customer.
You can select:
• Mail — to print to your usual print destination for conventional mailing.
• E-mail — to send statements and invoices to the e-mail address specified for the customer on the Address tab.
• Contact’s E-mail — to send statements and invoices to the e-mail address specified for the customer contact on the Contact tab.
Credit Bureau Information
Credit Bureau Number / Rating / Date. If you use credit bureau information for your accounts, type the credit bureau number and rating for the customer, and the date on which the rating was assigned.
Credit checks The credit checks and amounts you specified for the assigned customer’s group or national account appear as defaults when you add a national account.
You can change the credit checks, as follows, only if you selected the Allow Edit Of Credit Check option for the customer group.
[Issue Credit Warning When] Total Outstanding Balance Exceeds The Credit Limit Of. Select this option to generate a warning when you add a transaction for a customer whose outstanding balance is greater than the credit limit you specify.

Setting Up an Accounts Receivable System
3–90 Sage Accpac Accounts Receivable
ARGS-3.doc, printed on 2/6/2008, at 10:10:31 AM. Last saved on 2/6/2008 10:09:00 AM.
Sage Software Confidential
Credit Limit. Type the credit limit you allow for this customer, if it is different from the default and the customer group uses the Allow Edit Of Credit Limit option.
[Issue Credit Warning When] A/R Transactions Overdue By [#] Days or More Exceed the Overdue Limit Of. Select this option to generate a warning when you enter transactions for the customer if the balance of their overdue transactions exceeds a specified amount and a specified number of days.
If you select this option, use the Days box to enter the number of days that transaction balances can be overdue before generating a warning. Also, type the amount that overdue transactions must exceed to trigger the warning.
You can specify a different overdue amount or maximum number of days, if the customer group allows you to edit credit checks.
See also page 2-83
For more information, see “Entering Credit Information and Credit Limits” in Chapter 2.
Assign the rate type
Rate Type. If you use multicurrency accounting, select the rate type to use when converting multicurrency customers’ transactions to their functional-currency equivalents.
Note that the currency for the customer is determined by the assigned account set.
6. When finished, click the Invoicing tab.

Step 6: Add Customer Records — Customers
Getting Started 3–91
ARGS‐3.doc, printed on 1/31/2008, at 4:12:08 PM. Last saved on 1/31/2008 4:11:00 PM.
Sage Software Confidential
Setting Up A
/R
The Invoicing tab of the Customers form
7. Fill in the Invoicing tab as follows:
Customer Price List. If you use Sage Accpac Inventory Control, a Finder appears, letting you choose the price list for the customer.
Customer Type. If you use Sage Accpac Inventory Control, select the code for the discount level you use to select prices for the customer.
Inventory Location. Specify an inventory location to use as the default location for shipments that you process for this customer in Order Entry.
FOB Point. Enter the free on board point.
Ship Via. If you use Order Entry, type a code that you have set up in Order Entry or select it using the Finder. If you do not use Order Entry, you can enter a code that you maintain elsewhere.
Accounts Receivable and Order Entry use the Ship Via details by default when you create an order, an invoice, or a recurring charge record for the customer, unless:
• You assign a primary ship‐to location to the customer, or
• You use any ship‐to location code in a specific order, invoice, or recurring charge record.

Setting Up an Accounts Receivable System
3–92 Sage Accpac Accounts Receivable
ARGS‐3.doc, printed on 1/31/2008, at 4:12:08 PM. Last saved on 1/31/2008 4:11:00 PM.
Sage Software Confidential
You can also leave this field blank if you do not want to use a Ship Via code.
Description (beside the Ship Via field). If you enter a Ship Via code, the description for that code appears by default. You can accept the description, or enter a new one.
Allow Partial Shipments. Select this option to allow partial shipments of items for a customer. Order Entry partially ships items only for customers that allow partial shipments. The default setting is Yes.
Allow Web Store Shopping. Select this option to allow a customer to shop at your Web store through eTransact. The default setting is No.
Allow Backorder Quantities. Select this option if the customer allows backorders.
If you do not select the option, no backorder quantity appears on invoices generated in Order Entry, and Order Entry does not create a commitment for unfilled quantities on partial shipments.
Check for Duplicate POs. If you want Order Entry to display a message when you enter an order or a shipment for a purchase order number that is already used in an existing order or standalone shipment for the customer, select the type of message you want to appear:
• Select Warning to receive a warning message. You can still process the duplicate order or shipment when you receive a warning.
• Select Error if you want to receive an error message when you enter a duplicate order or standalone shipment for the customer. You cannot post the duplicate order or shipment.
Assigned Salespersons
Salesperson information is optional. However, if you assign salespeople to the account, you must enter percentage splits that total 100.
Step 6: Add Customer Records — Customers
Getting Started 3–93
ARGS‐3.doc, printed on 1/31/2008, at 4:12:08 PM. Last saved on 1/31/2008 4:11:00 PM.
Sage Software Confidential
Setting Up A
/R
Salesperson Code. Select the codes for the salespersons who are responsible for the customer’s account.
Percentage. Type the percentage of the transaction total that is allocated to each salesperson on the customer’s invoices and other transactions.
The Percentage column must total 100.
Tax Group. Select the code that represents the tax group to which the customer belongs.
Multicurrency tax groups
If you use multicurrency accounting and you select a tax group that uses a different currency than the customer’s account set, the program warns you. When you enter invoices, debit notes, and credit notes using the tax group, Accounts Receivable displays amounts in the tax reporting currency, as well as in the customer’s currency.
Tax Class. Select the customer’s tax class for each of the tax authorities in the tax group.
Registration Number. Type the customer’s tax registration or exemption numbers, if any.
Retainage % (Percentage) / Retention Period / Retainage Terms. Specify default retainage settings to be used for invoices, credit notes, and debit notes you enter for the customer.
These fields appear only if you selected the Retainage Accounting option for your Accounts Receivable system. The settings you specified in the A/R Options form appear as defaults in new customer records.
8. The Optional Fields tab appears only if you use Transaction Analysis and Optional Field Creator and you defined optional fields for customers on the Options form.
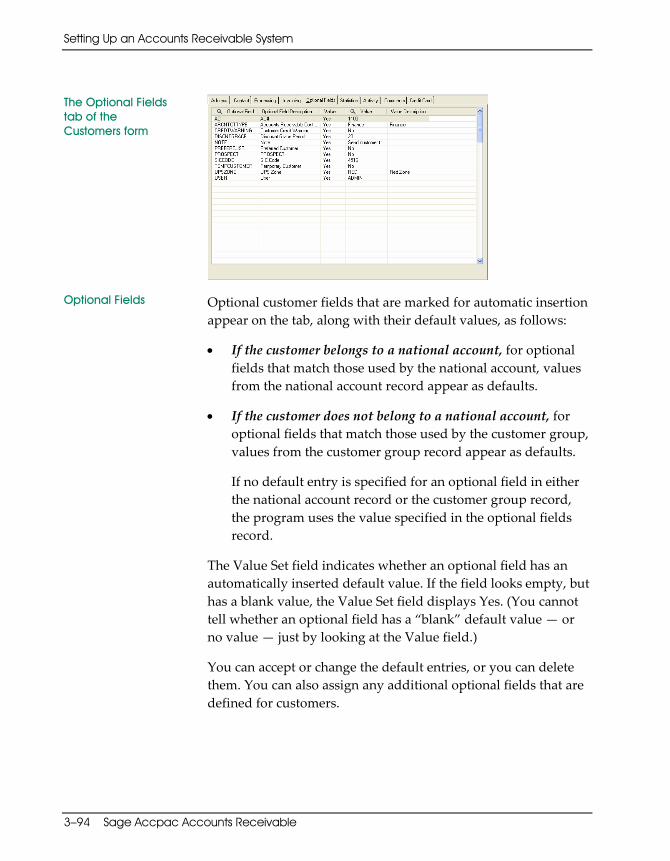
Setting Up an Accounts Receivable System
3–94 Sage Accpac Accounts Receivable
ARGS‐3.doc, printed on 1/31/2008, at 4:12:08 PM. Last saved on 1/31/2008 4:11:00 PM.
Sage Software Confidential
The Optional Fields tab of the Customers form
Optional Fields Optional customer fields that are marked for automatic insertion appear on the tab, along with their default values, as follows:
• If the customer belongs to a national account, for optional fields that match those used by the national account, values from the national account record appear as defaults.
• If the customer does not belong to a national account, for optional fields that match those used by the customer group, values from the customer group record appear as defaults.
If no default entry is specified for an optional field in either the national account record or the customer group record, the program uses the value specified in the optional fields record.
The Value Set field indicates whether an optional field has an automatically inserted default value. If the field looks empty, but has a blank value, the Value Set field displays Yes. (You cannot tell whether an optional field has a “blank” default value — or no value — just by looking at the Value field.)
You can accept or change the default entries, or you can delete them. You can also assign any additional optional fields that are defined for customers.
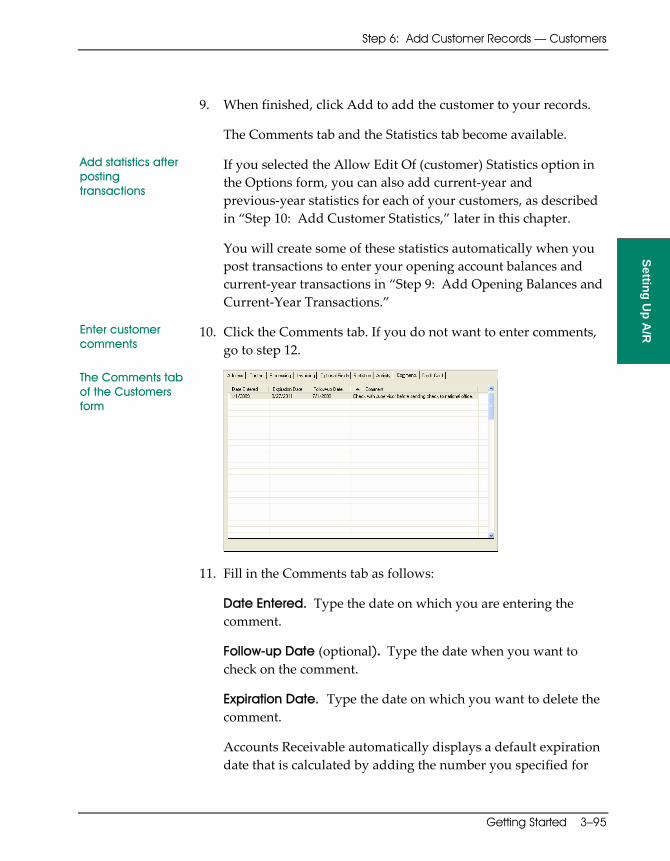
Step 6: Add Customer Records — Customers
Getting Started 3–95
ARGS‐3.doc, printed on 1/31/2008, at 4:12:08 PM. Last saved on 1/31/2008 4:11:00 PM.
Sage Software Confidential
Setting Up A
/R
9. When finished, click Add to add the customer to your records.
The Comments tab and the Statistics tab become available.
Add statistics after posting transactions
If you selected the Allow Edit Of (customer) Statistics option in the Options form, you can also add current‐year and previous‐year statistics for each of your customers, as described in “Step 10: Add Customer Statistics,” later in this chapter.
You will create some of these statistics automatically when you post transactions to enter your opening account balances and current‐year transactions in “Step 9: Add Opening Balances and Current‐Year Transactions.”
Enter customer comments
10. Click the Comments tab. If you do not want to enter comments, go to step 12.
The Comments tab of the Customers form
11. Fill in the Comments tab as follows:
Date Entered. Type the date on which you are entering the comment.
Follow-up Date (optional). Type the date when you want to check on the comment.
Expiration Date. Type the date on which you want to delete the comment.
Accounts Receivable automatically displays a default expiration date that is calculated by adding the number you specified for

Setting Up an Accounts Receivable System
3–96 Sage Accpac Accounts Receivable
ARGS‐3.doc, printed on 1/31/2008, at 4:12:08 PM. Last saved on 1/31/2008 4:11:00 PM.
Sage Software Confidential
the Default Number Of Days To Keep Comments option (in the Options form) to the Date Entered date.
Comment. Type a comment, using up to 2,500 characters.
Entering a long comment
If you are entering a long comment, double‐click the comment line, or select the line, then click the Comment Zoom button, to open a separate Comment form that lets you view the entire comment as you enter it.
Credit card 12. If you accept credit cards as payment from your customer, click the Credit Card tab.
13. Select the customer’s credit card type, then, enter the credit card number, cardholder name, and the card’s expiration date.
Encrypted credit card information is used automatically during Receipt Entry when you specify a credit card payment code, although you can change the credit card information for particular transactions.
Add the customer record
14. When finished, click Save. Repeat the preceding steps for each customer you want to add.
15. Click Print on the File menu or choose Customers from the Customer Reports folder to print the Customer List.
The Finder displays credit card types you have set up in Bank Services.

Step 6: Add Customer Records — Customers
Getting Started 3–97
ARGS‐3.doc, printed on 1/31/2008, at 4:12:08 PM. Last saved on 1/31/2008 4:11:00 PM.
Sage Software Confidential
Setting Up A
/R
Check your data
When you finish adding your customer records, you should check data integrity through Administrative Services and make a backup copy of the data to help ensure that you do not have to add the records a second time.
Modifying Customer Records
You can modify and delete customer records, as needed, with these restrictions:
• To change the customer number, you must first set up a new customer record with the number you want to use, then delete the record you no longer want.
• If you change the customer group for a customer record, Accounts Receivable does not overwrite existing fields.
• If you change the national account for a customer, Accounts Receivable overwrites the fields that must be identical to those of the national account, and you cannot change them. These are:
− Account type − Billing cycle − Interest profile
• You can change the customer’s credit check information only if you selected the Allow Edit Of Credit Check option for the customer’s group or national account, if any.
• You can edit customer statistics (period and activity) only if you use the Allow Edit Of Statistics option.
• You cannot delete a customer record that is used in unposted documents or that has outstanding transactions.
• You cannot set a customer record inactive if there are unposted documents for the customer.

Setting Up an Accounts Receivable System
3–98 Sage Accpac Accounts Receivable
ARGS‐3.doc, printed on 1/31/2008, at 4:12:08 PM. Last saved on 1/31/2008 4:11:00 PM.
Sage Software Confidential
Multicurrency ledgers
• If you use multicurrency accounting, you can change the national account or account set assigned to a customer only to another national account or account set that uses the same currency.
For more information, see “Adding, Editing, and Deleting Customer Records” in Chapter 3 of the User Guide.
Step 7: Add Ship-To Locations (Optional)
This step guides you through the process of adding records for the addresses to which you ship your customer orders.
Before adding a ship‐to location, you must:
• Add customer records.
• Find out the customer number for which to add a shipping location.
• Decide on the code to use to identify the ship‐to location.
See also page 2-60
If you use optional fields, you also need to define the optional fields that you want to assign ship‐to location records. For more information on defining optional fields, see “Setting Up Optional Fields,” in Chapter 2 in this guide.
See also page 2-90
For background information on ship‐to locations, see “Adding Ship‐To Locations” in Chapter 2.
See also page 3-104
You can revise most of your entries as needed. Refer to the “Modifying Ship‐To Locations” section at the end of this step for information about how to change or delete ship‐to locations and about any restrictions that may apply.
Use Help Remember to press F1 to use Help when you want quick information about fields and tabs in the Ship‐To Locations form.
If you need help figuring out how to use the Ship‐To Locations form using either a mouse or your keyboard, refer to the appendix “Using a Mouse or Keyboard,” in the System Manager User Guide.
Step 7: Add Ship‐To Locations (Optional)
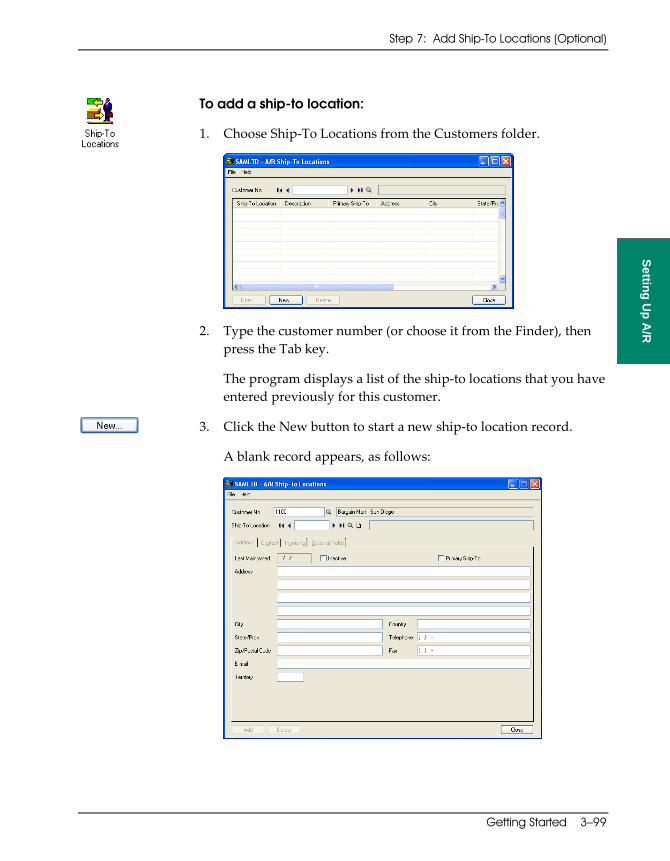
Step 7: Add Ship-To Locations (Optional)
Getting Started 3–99
ARGS‐3.doc, printed on 1/31/2008, at 4:12:08 PM. Last saved on 1/31/2008 4:11:00 PM.
Sage Software Confidential
Setting Up A
/R
To add a ship-to location:
1. Choose Ship‐To Locations from the Customers folder.
2. Type the customer number (or choose it from the Finder), then press the Tab key.
The program displays a list of the ship‐to locations that you have entered previously for this customer.
3. Click the New button to start a new ship‐to location record.
A blank record appears, as follows:

Setting Up an Accounts Receivable System
3–100 Sage Accpac Accounts Receivable
ARGS‐3.doc, printed on 1/31/2008, at 4:12:08 PM. Last saved on 1/31/2008 4:11:00 PM.
Sage Software Confidential
4. Type a unique code to identify the ship‐to location, then press the Tab key to move to the next field.
Type a description of the location.
5. Fill out the fields on the Address tab as follows:
Inactive. You normally select this option if you are preparing to delete a ship‐to location and want to make sure you do not select the location on any further invoices for the customer. You are not likely to select the Inactive option for a ship‐to location when setting up a new Accounts Receivable system.
Primary Ship-To. Select the Primary Ship‐To option if you want to designate this address as the primary ship‐to location for the customer. Accounts Receivable uses the primary ship‐to location as the default ship‐to location when you add a new recurring charge record or an invoice. Order Entry uses it as the default when you create an order.
Address Information. Type the shipping address, telephone and fax numbers, and the name of a contact person or position at the shipping location.
E-mail. Enter an e‐mail address for the ship‐to location. (This address can be different from the contact’s e‐mail address that you enter on the Contacts tab.)
Territory. If you use territory codes, type the code for the customer or shipping location.
6. When finished, click the Contact tab, and enter the name, telephone and fax numbers, and an e‐mail address for a contact person at the ship‐to location.
7. Next, click the Invoicing tab.

Step 7: Add Ship-To Locations (Optional)
Getting Started 3–101
ARGS‐3.doc, printed on 1/31/2008, at 4:12:08 PM. Last saved on 1/31/2008 4:11:00 PM.
Sage Software Confidential
Setting Up A
/R
The Invoicing tab of the Ship-To Locations form
8. Fill out the Invoicing tab as follows:
Customer Price List. If you use Sage Accpac Inventory Control, select the code for the price list that you use when you enter orders for the customer in Sage Accpac Order Entry. You can also leave this field blank.
Inventory Location. Enter a default inventory location from which goods should be shipped when you use this ship‐to location in Order Entry shipments.
FOB Point. Enter the free on board point.
Special Instructions. Type any information you want to record for the shipping location, or leave the field blank if you do not need it.
This information appears as the default when you enter invoices for the ship‐to location, but you can change it for individual invoices. You can also print the information on the customer’s invoices for this location, if you want.
Ship Via. If you use Order Entry, type a code that you have set up in Order Entry or select it using the Finder. If you do not use Order Entry, you can enter a code that you maintain elsewhere.
You can also leave this field blank if you do not want to use a Ship Via code.

Setting Up an Accounts Receivable System
3–102 Sage Accpac Accounts Receivable
ARGS‐3.doc, printed on 1/31/2008, at 4:12:08 PM. Last saved on 1/31/2008 4:11:00 PM.
Sage Software Confidential
Description (beside the Ship Via field). If you enter a Ship Via code, the description for that code appears by default. You can accept the description, or enter a new one.
If this is the primary ship‐to location, these details appear by default in new orders, invoices, and recurring charge records for the customer.
If this is not the primary ship‐to location, these details appear when you use this particular ship‐to location in an order, an invoice, or a recurring charge record for the customer.
Assigning salespersons
Salesperson Code / Salesperson Name / Percentage. Accounts Receivable automatically displays salesperson information from the customer record when you set up new ship‐to locations for a customer, but you can change the information for a specific ship‐to location, if necessary.
You can add up to five salespersons, but you do not have to enter any information in these fields. If you assign salespeople to the location, however, you must enter percentage splits that total 100.
See also page 3-84
You add salesperson information for the ship‐to location as you did for the customer record, following the instructions in the preceding “Add Customers” section in “Step 6: Add Customer Records.”
Tax Group. Select the tax group, if any, that contains the tax authorities, classes, and rates in effect at the shipping address.
Tax Class. Select the tax classes for the tax authorities in the tax group.
Registration Number. Type the customer’s tax registration or exemption numbers, if any, for each tax class that applies to the shipping location.
Optional Fields 9. When ready, click the Optional Fields tab, if it appears.
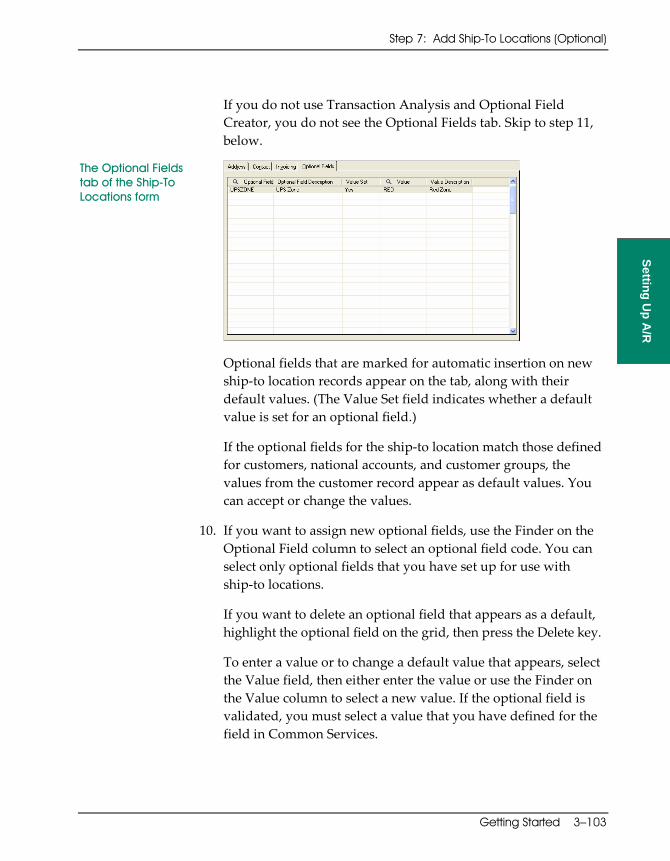
Step 7: Add Ship-To Locations (Optional)
Getting Started 3–103
ARGS‐3.doc, printed on 1/31/2008, at 4:12:08 PM. Last saved on 1/31/2008 4:11:00 PM.
Sage Software Confidential
Setting Up A
/R
If you do not use Transaction Analysis and Optional Field Creator, you do not see the Optional Fields tab. Skip to step 11, below.
The Optional Fields tab of the Ship-To Locations form
Optional fields that are marked for automatic insertion on new ship‐to location records appear on the tab, along with their default values. (The Value Set field indicates whether a default value is set for an optional field.)
If the optional fields for the ship‐to location match those defined for customers, national accounts, and customer groups, the values from the customer record appear as default values. You can accept or change the values.
10. If you want to assign new optional fields, use the Finder on the Optional Field column to select an optional field code. You can select only optional fields that you have set up for use with ship‐to locations.
If you want to delete an optional field that appears as a default, highlight the optional field on the grid, then press the Delete key.
To enter a value or to change a default value that appears, select the Value field, then either enter the value or use the Finder on the Value column to select a new value. If the optional field is validated, you must select a value that you have defined for the field in Common Services.
Setting Up an Accounts Receivable System
3–104 Sage Accpac Accounts Receivable
ARGS‐3.doc, printed on 1/31/2008, at 4:12:08 PM. Last saved on 1/31/2008 4:11:00 PM.
Sage Software Confidential
See also page 2-60
For more information about optional fields, see “Setting Up Optional Fields” in Chapter 2.
Add the ship-to location
11. When ready, click the Add button. Repeat the preceding steps for each ship‐to location you want to add.
12. Click Print on the File menu or choose Ship‐To Locations from the Customer Reports folder to print a list of the locations you added to verify that they are correct and complete. File the report.
Modifying Ship-To Locations
You can modify a ship‐to location at any time. However, you cannot delete a ship‐to location, or set it inactive, if it is used on any unposted documents.
To make changes to the ship‐to location record, select the customer number and ship‐to location code for the record you want to modify, then select or type new information for the fields you want to change.
You can change all the information in a ship‐to record for a customer except the ship‐to code. To change this code, you must add another record with the code you want to use, then delete the record you no longer need.
You can add only optional fields that you defined for ship‐to locations using the A/R Optional Fields setup form.
Changing multicurrency tax groups
If you use multicurrency accounting, you can change the tax group only to another tax group that uses the customer’s currency.
When finished modifying a record, click Save to confirm your changes.
To delete a ship‐to record using the ship‐to location form, select the customer number and the line for the ship‐to location, then click the Delete button. You can also open the ship‐to location record, and click Delete.

Step 8: Add Recurring Charges (Optional)
Getting Started 3–105
ARGS‐3.doc, printed on 1/31/2008, at 4:12:08 PM. Last saved on 1/31/2008 4:11:00 PM.
Sage Software Confidential
Setting Up A
/R
For further information about editing and deleting ship‐to locations, see Chapter 3 in the User Guide.
Step 8: Add Recurring Charges (Optional)
This step guides you through the process of adding recurring charges for customers to whom you issue standard invoices at regular intervals, such as for monthly rent.
Before adding a recurring charge, you must:
• Add the customer record for which you are adding the recurring charge.
• Decide on the code to identify the recurring charge. You can use the same code for different customers, so that all customers with service contracts could be assigned a SERVICE FEES charge code.
• Determine the start date for the charge, and the day of the month on which the recurring charge is due to be invoiced.
• Determine whether the recurring charge will expire on a certain date, or after you have billed a certain number of times or for a maximum amount.
• Determine the amount of each detail of the recurring charge.
• Decide whether to enter taxes manually or let the program calculate taxes when you create a recurring charge batch.
• If you use optional fields, make sure you have defined the invoice optional fields and invoice details optional fields that you want to assign to the recurring charge.
See also page 2-92
For more information, see “Adding Recurring Charges” in Chapter 2.
Step 8: Add Recurring Charges (Optional)

Setting Up an Accounts Receivable System
3–106 Sage Accpac Accounts Receivable
ARGS‐3.doc, printed on 1/31/2008, at 4:12:08 PM. Last saved on 1/31/2008 4:11:00 PM.
Sage Software Confidential
To change or delete a charge, see page 3-116
You can revise most of your entries as needed. Refer to the “Modifying Recurring Charges” section at the end of this step for information about how to change or delete recurring charges and about any restrictions that may apply.
Use Help Remember to press F1 to use Help when you want information quickly about fields and tabs in the Recurring Charges setup form.
If you need help using your mouse or keyboard to complete fields in the Recurring Charges setup form, refer to the appendix “Using a Mouse or Keyboard,” in the System Manager User Guide.
To add a recurring charge record for a customer:
1. Choose Recurring Charges from the Customers folder to display the Invoice tab, the first tab of the Recurring Charges setup form.
2. In the Recurring Charge Code field, type a unique code to identify the recurring charge, or use the Finder or the navigation buttons to select it, and enter a description of the recurring charge.
Note: You can assign the same charge code to different customers, changing the details for each one. This allows you to use general codes like RENT or SERVICE FEES.
You can use the Finder to select an existing schedule, or click this button and set up a new one in Common Services.

Step 8: Add Recurring Charges (Optional)
Getting Started 3–107
ARGS‐3.doc, printed on 1/31/2008, at 4:12:08 PM. Last saved on 1/31/2008 4:11:00 PM.
Sage Software Confidential
Setting Up A
/R
3. In the Customer Number field, type or use the Finder to select the customer number for which you are entering a recurring charge.
Using Zoom to display information
To display the customer’s name and billing address, click the Zoom button to the right of the Finder. You can also press F9 when the insertion point is in the Customer Number field.
4. Fill out the Invoice tab as follows:
Schedule Code. The schedule determines when the recurring charge is to be processed. Enter the code for the schedule that you want to attach to this record, or select it using the Finder.
Zoom If you want to set up a new schedule or modify an existing one, click the Zoom button near the Schedule Code field. (If you have security turned on for your system, note that you must have authorization to maintain schedules in Common Services to be able to add or modify a schedule.)
Start Date. Enter the date that the recurring charge for this customer begins.
When you create a batch for this recurring charge, Accounts Receivable includes the invoice for this customer only if the run date for the batch is the same as, or later than, the specified start date.
Next Invoice Date. Accounts Receivable updates this field when you generate an invoice using the Create Recurring Charge Batch form, or when you change the schedule for the recurring charge. You cannot change the date.
The program uses the Last Generated date together with the schedule to determine when the next invoice should be generated.
Last Generated. Accounts Receivable updates this date field when you create an invoice for this recurring charge. You cannot change the date.

Setting Up an Accounts Receivable System
3–108 Sage Accpac Accounts Receivable
ARGS-3.doc, printed on 2/21/2008, at 4:27:25 PM. Last saved on 2/21/2008 4:27:00 PM.
Sage Software Confidential
Expiration Type. Use this field to specify whether to limit the invoices for the recurring charge, as follows:
• Select Specific Date if you do not want to create any invoices for the recurring charge after a certain date. Type the expiration date for the recurring charge in the adjacent date field.
• Select Maximum Amount, and then specify the maximum amount that you can invoice for the recurring charge, if you want to stop processing invoices after reaching a maximum amount.
When you create a recurring charges batch, if the amount invoiced to date plus the new invoice amount will exceed the maximum, Accounts Receivable does not create the invoice. A message appears at the end of processing stating that the recurring charge for the customer will exceed the maximum amount.
• Select Number of Invoices, and then specify the number of invoices to process for the recurring charge, if you want to limit the number of invoices to process for the charge.
• Select No Expiration, if you want to process invoices indefinitely for the recurring charge.
Current Amount. If the recurring charge uses the Maximum Amount expiration type, the program displays the total invoiced for the recurring charge from the Statistics tab.
Current Count. If the recurring charge uses the Number Of Invoices expiration type, the program displays the total number of invoices created for the recurring charge from the Statistics tab.
Account Set. Accounts Receivable displays the customer’s account set in this field, but you can change it to another account set. In a multicurrency ledger, the new account set must use the customer’s currency.

Step 8: Add Recurring Charges (Optional)
Getting Started 3–109
ARGS‐3.doc, printed on 1/31/2008, at 4:12:08 PM. Last saved on 1/31/2008 4:11:00 PM.
Sage Software Confidential
Setting Up A
/R
Multicurrency ledgers
Rate Type. If you use multicurrency accounting, specify the rate type normally used to convert transactions entered for the recurring charge to the functional currency.
You do not see this option if you do not use multicurrency accounting.
Ship-To. Select the ship‐to location to use for the recurring charge, if you do not want to send the order to the address in the customer record. Click Zoom to display the shipping address to check that you chose the correct location.
Ship Via / Special Instructions. These fields display the information entered in the ship‐to location record. You can select a different Ship Via code, and type a different ship‐via description and special instructions for this recurring charge.
Description. Type a description for invoices you create for the charge. You can change the description for individual invoices on the Invoice Entry form.
PO Number. Type the customer’s purchase order number, if any, for the recurring charge.
Order Number. Type the sales order number, if any, issued for the recurring charge.
Terms. Select the code for the payment terms you allow the customer for the recurring charge.
5. When finished entering information on the Invoice tab, click the Detail tab to enter the amounts (details) for the charge.
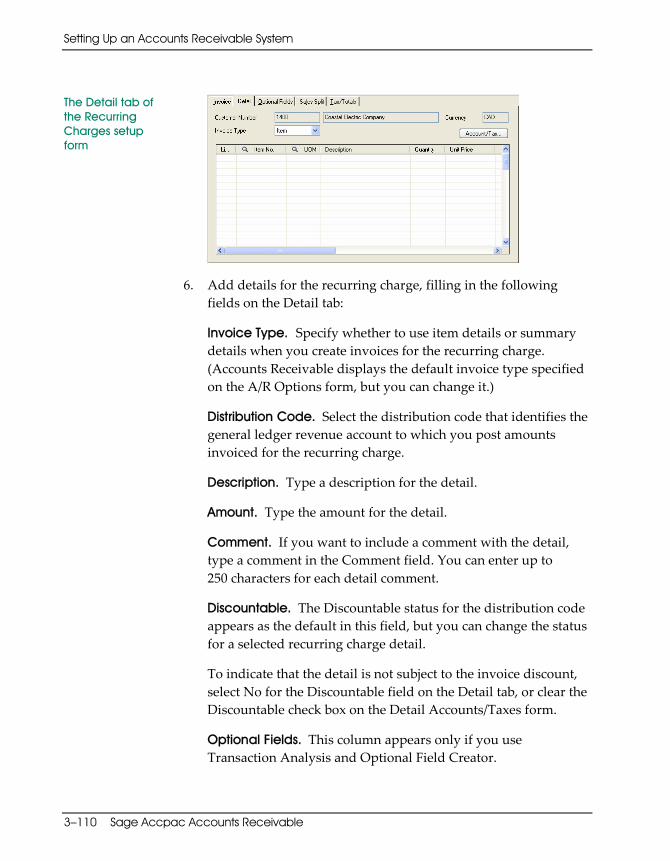
Setting Up an Accounts Receivable System
3–110 Sage Accpac Accounts Receivable
ARGS‐3.doc, printed on 1/31/2008, at 4:12:08 PM. Last saved on 1/31/2008 4:11:00 PM.
Sage Software Confidential
The Detail tab of the Recurring Charges setup form
6. Add details for the recurring charge, filling in the following fields on the Detail tab:
Invoice Type. Specify whether to use item details or summary details when you create invoices for the recurring charge. (Accounts Receivable displays the default invoice type specified on the A/R Options form, but you can change it.)
Distribution Code. Select the distribution code that identifies the general ledger revenue account to which you post amounts invoiced for the recurring charge.
Description. Type a description for the detail.
Amount. Type the amount for the detail.
Comment. If you want to include a comment with the detail, type a comment in the Comment field. You can enter up to 250 characters for each detail comment.
Discountable. The Discountable status for the distribution code appears as the default in this field, but you can change the status for a selected recurring charge detail.
To indicate that the detail is not subject to the invoice discount, select No for the Discountable field on the Detail tab, or clear the Discountable check box on the Detail Accounts/Taxes form.
Optional Fields. This column appears only if you use Transaction Analysis and Optional Field Creator.

Step 8: Add Recurring Charges (Optional)
Getting Started 3–111
ARGS‐3.doc, printed on 1/31/2008, at 4:12:08 PM. Last saved on 1/31/2008 4:11:00 PM.
Sage Software Confidential
Setting Up A
/R
If you have set up any invoice detail optional fields for automatic insertion, the column displays Yes for each detail.
Zoom To check or to change the optional fields that are used for a selected detail, click the Zoom button beside the field, or press Shift+F9. The Optional Fields form appears, letting you change or delete optional fields for the detail. You can also add any other optional fields that are defined for invoice details, and you can change their values.
• To delete an optional field, select it on the tab, then press the Delete key on your keyboard.
• To assign an optional field, press the Insert key, then use the Finder to choose the code for the recurring charges optional field.
See page 2-60
For an overview of optional fields, see “Setting Up Optional Fields” in Chapter 2.
See also page 2-92
For background information on assigning optional fields to recurring charge records, see “Adding Recurring Charges,” in Chapter 2.
Click the Accounts/Taxes button to:
• Verify or change the revenue account to which the detail will be distributed.
• Verify or change tax information for the detail.
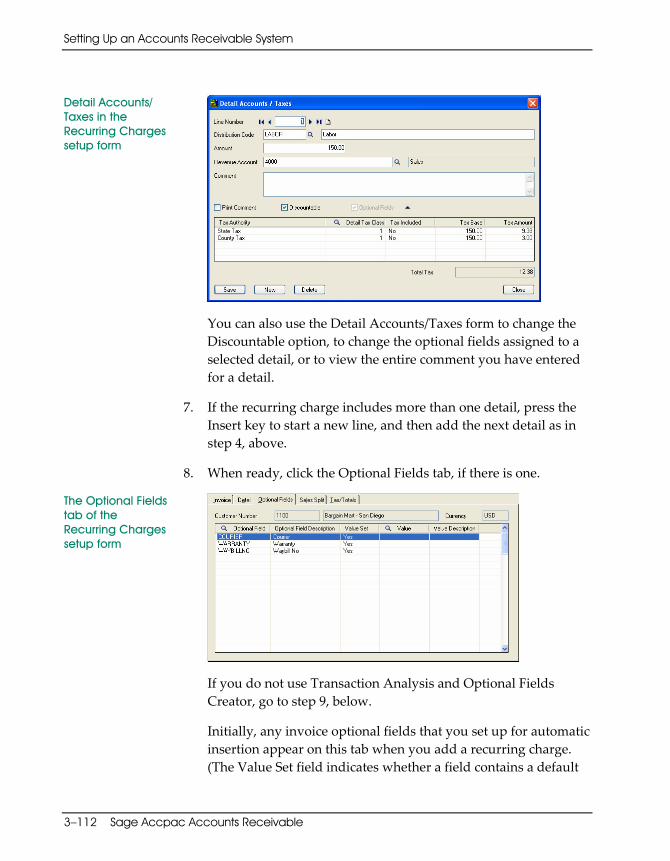
Setting Up an Accounts Receivable System
3–112 Sage Accpac Accounts Receivable
ARGS-3.doc, printed on 2/6/2008, at 10:13:29 AM. Last saved on 2/6/2008 10:13:00 AM.
Sage Software Confidential
Detail Accounts/ Taxes in the Recurring Charges setup form
You can also use the Detail Accounts/Taxes form to change the Discountable option, to change the optional fields assigned to a selected detail, or to view the entire comment you have entered for a detail.
7. If the recurring charge includes more than one detail, press the Insert key to start a new line, and then add the next detail as in step 4, above.
8. When ready, click the Optional Fields tab, if there is one.
The Optional Fields tab of the Recurring Charges setup form
If you do not use Transaction Analysis and Optional Fields Creator, go to step 9, below.
Initially, any invoice optional fields that you set up for automatic insertion appear on this tab when you add a recurring charge. (The Value Set field indicates whether a field contains a default

Step 8: Add Recurring Charges (Optional)
Getting Started 3–113
ARGS‐3.doc, printed on 1/31/2008, at 4:12:08 PM. Last saved on 1/31/2008 4:11:00 PM.
Sage Software Confidential
Setting Up A
/R
value.) These optional fields and values appear on generated recurring charge invoices, unless you change them.
• To delete an optional field, select it, then press the Delete key on your keyboard.
• To add an optional field, press the Insert key, then use the Finder to choose an optional field code.
See also page 2-60
For an overview of optional fields, see “Setting Up Optional Fields” in Chapter 2.
For background information on assigning optional fields to recurring charge records, see “Adding Recurring Charges,” in Chapter 2.
9. When ready, click the Sales Split tab to assign the salespeople, if any, who are responsible for the recurring charge.
The Sales Split tab of the Recurring Charges setup form
See also page 3-84
10. Fill out the salesperson information for the recurring charge as you did for customer records, following the instructions in step 6 in the “Add Customers” section, under “Step 6: Add Customer Records,” earlier in this chapter.
On new recurring charge records, Accounts Receivable displays the salespersons and percentages assigned to the customer record (or to the ship‐to location record, if you assigned one to the customer). If you want, you can change the salespeople and percentages, or you can delete all the salesperson information if it does not apply to the charge.

Setting Up an Accounts Receivable System
3–114 Sage Accpac Accounts Receivable
ARGS‐3.doc, printed on 1/31/2008, at 4:12:08 PM. Last saved on 1/31/2008 4:11:00 PM.
Sage Software Confidential
11. Click the Tax/Totals tab to:
• Verify taxes and totals for the recurring charge. Accounts Receivable calculates and displays estimated tax amounts for a recurring charge when you select the Calculate Tax option.
• Enter tax totals for the document, if you are entering taxes manually.
When you enter taxes manually, you must ensure that the total amount you enter for the authority on the Tax/Totals tab equals the sum of the detail taxes for each tax authority.
• Change the customer’s tax classes, if necessary.
The Tax/Totals tab on the Recurring Charges form
12. If you are entering taxes manually, complete the information on the Tax/Totals tab as follows:
Tax Group. Select the tax group that contains the tax authorities and tax classes to use for the recurring charge.
Calculate Tax. Select Calculate Tax if you want Accounts Receivable to calculate taxes for the invoice automatically when you create a recurring charge batch.
Do not select this option if:
• Tax is already included in the amount of the recurring charge.
• The charge is not taxable.
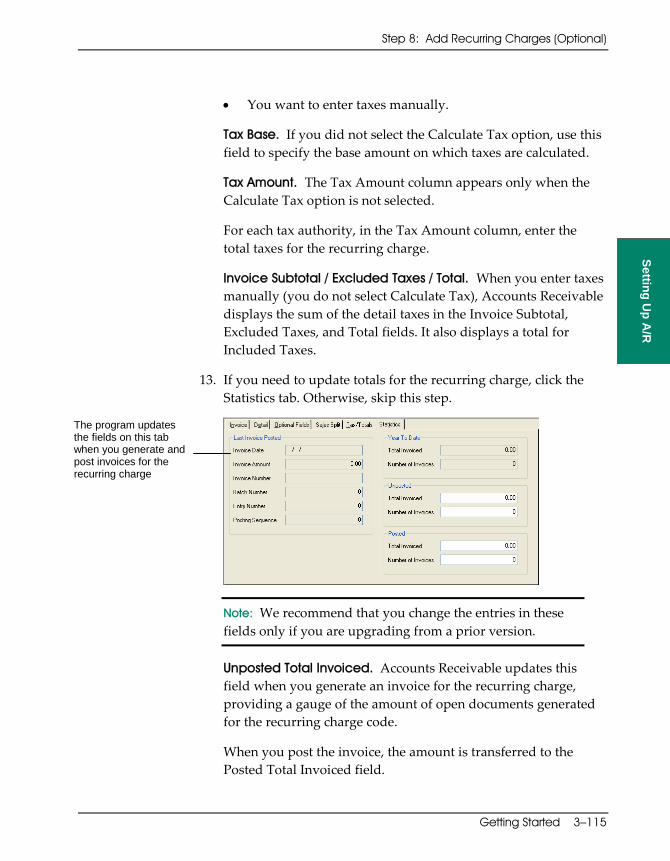
Step 8: Add Recurring Charges (Optional)
Getting Started 3–115
ARGS‐3.doc, printed on 1/31/2008, at 4:12:08 PM. Last saved on 1/31/2008 4:11:00 PM.
Sage Software Confidential
Setting Up A
/R
• You want to enter taxes manually.
Tax Base. If you did not select the Calculate Tax option, use this field to specify the base amount on which taxes are calculated.
Tax Amount. The Tax Amount column appears only when the Calculate Tax option is not selected.
For each tax authority, in the Tax Amount column, enter the total taxes for the recurring charge.
Invoice Subtotal / Excluded Taxes / Total. When you enter taxes manually (you do not select Calculate Tax), Accounts Receivable displays the sum of the detail taxes in the Invoice Subtotal, Excluded Taxes, and Total fields. It also displays a total for Included Taxes.
13. If you need to update totals for the recurring charge, click the Statistics tab. Otherwise, skip this step.
Note: We recommend that you change the entries in these fields only if you are upgrading from a prior version.
Unposted Total Invoiced. Accounts Receivable updates this field when you generate an invoice for the recurring charge, providing a gauge of the amount of open documents generated for the recurring charge code.
When you post the invoice, the amount is transferred to the Posted Total Invoiced field.
The program updates the fields on this tab when you generate and post invoices for the recurring charge

Setting Up an Accounts Receivable System
3–116 Sage Accpac Accounts Receivable
ARGS‐3.doc, printed on 1/31/2008, at 4:12:08 PM. Last saved on 1/31/2008 4:11:00 PM.
Sage Software Confidential
Unposted Number Of Invoices. Accounts Receivable updates this field when you generate or post an invoice for the recurring charge, providing a gauge of the number of open documents generated for the recurring charge code.
When you post the invoice, the amount is transferred to the Posted Number Of Invoices field.
Posted Total Invoiced. Accounts Receivable updates this field when you post an invoice for the recurring charge. If the recurring charge uses Maximum Amount as the expiration type, the program adds the total amount of posted and unposted invoices to determine whether the limit has been reached.
Editing the field does not affect the year‐to‐date amount.
Posted Number Of Invoices. Normally, Accounts Receivable updates this field when you post an invoice for the recurring charge. If the recurring charge uses Number Of Invoices as the expiration type, the program adds the number of posted and unposted invoices to determine whether the limit has been reached.
Editing the field does not affect the year‐to‐date total.
Add the recurring charge
14. When ready, click Add to add the recurring charge. Repeat the preceding steps for each recurring charge you want to add.
15. Click Print on the File menu or choose Recurring Charges from the Customer Reports folder to print a list of the recurring charges you have added to verify that they are correct and complete. File the report.
Modifying Recurring Charges
You can change or delete a recurring‐charge record at any time.
You can change all the information in a record except the recurring charge code. To change this code, you must add another record with

Step 9: Add Opening Balances and Current-Year Transactions
Getting Started 3–117
ARGS‐3.doc, printed on 1/31/2008, at 4:12:08 PM. Last saved on 1/31/2008 4:11:00 PM.
Sage Software Confidential
Setting Up A
/R
the code you want to use, and then delete the record you no longer need.
To make changes, select the recurring charge code and customer number for the record you want to change, then select or type new information for the fields you want to change. To delete a detail, select (highlight) the line, and then press the Delete key.
Changing multicurrency tax group
If you use multicurrency accounting, you can change the customer’s tax group only to another tax group that uses the same currency.
When finished modifying a record, click Save to confirm your changes.
To delete a recurring charge, select the recurring charge code and customer number, then click Delete.
Step 9: Add Opening Balances and Current-Year Transactions
In this step, you post batches to enter the invoice and other transaction details that make up the current balance in each of your customer accounts.
The method you use to create current customer account balances depends on how much information you want to transfer to Sage Accpac Accounts Receivable from your previous system.
The instructions in this step assume that:
• Your general ledger already includes the balances for the receivables transactions you enter to set up Accounts Receivable. The only transactions you want to post to your general ledger are new transactions you enter after setup.
• You have already added the tax groups, authorities, classes, and rates you use with Accounts Receivable. You do not want to send any tax information to Tax Services when you add your Accounts Receivable setup entries in this step.
Step 9: Add Opening Balances and Current‐Year Transactions
Setting Up an Accounts Receivable System
3–118 Sage Accpac Accounts Receivable
ARGS‐3.doc, printed on 1/31/2008, at 4:12:08 PM. Last saved on 1/31/2008 4:11:00 PM.
Sage Software Confidential
• You have defined the banks you need for Accounts Receivable in Bank Services, and have added outstanding deposits. You do not want to send information to your banks while you are entering setup transactions in Accounts Receivable.
• You want to enter complete information about each outstanding invoice, including the original invoice amount and the transactions that were applied to create the outstanding invoice balance.
• You have selected the options you want to use to enter and edit customer, item, and salesperson statistics in the steps that follow this step. Some of these statistics are created as you post the setup transactions.
See also page 2-98
For more information about other methods you may want to use to set up your system, see “Entering Opening Balances in Customer Accounts” in Chapter 2.
To add outstanding transactions to create opening balances:
Add tax information and bank accounts
1. Select No Reporting for the Tax Tracking option in all the tax authorities you use with Accounts Receivable.
See the Tax and Bank User Guide for information about selecting options for tax authorities.
2. Create a bank called SETUP in Bank Services.
Multicurrency ledgers
If you use multicurrency accounting, select the Multicurrency option for the bank account, then select the functional currency as the statement currency and assign the other currencies used by your customers.
See the Tax and Bank User Guide for information about defining banks.
3. If you have not already done so, select On Request Using Create G/L Batch Icon for the Create G/L Transactions option on the G/L Integration tab of the A/R Options form.
Step 9: Add Opening Balances and Current-Year Transactions
Getting Started 3–119
ARGS‐3.doc, printed on 1/31/2008, at 4:12:08 PM. Last saved on 1/31/2008 4:11:00 PM.
Sage Software Confidential
Setting Up A
/R
4. Create batches of the invoices that are outstanding in each customer’s account at setup. Make sure you enter the correct document dates and terms, so that the transactions are aged correctly.
Use the Invoice Entry form to add the transactions, as described in Chapter 4 in the User Guide.
5. Create batches of the receipts, credit notes, debit notes, and other transactions that you applied to the invoices in your other system.
Use the Invoice Entry, Receipt Entry, and Adjustment Entry forms to add the transactions, as described in chapters 4 and 5 in the User Guide.
Use the SETUP bank Use the SETUP bank code with each receipt batch you post.
6. Choose the Batch Listing icon from the Transaction Reports folder and print a listing of each batch you create. Compare the listings to the source documents from your previous system to be sure the data is complete and correct.
If you find mistakes, correct the batches, then print new listings of the corrected batches.
7. Use Administrative Services to check data integrity and make a new backup copy of your data to prepare for posting.
8. Choose each of the Batch List icons in the A/R Transactions folder in turn, and change the status of each batch to Ready To Post. Then post the batches.
9. Choose the Posting Journals icon from the Transaction Reports folder, and then print the journals of the batches you posted.
Compare the posting journals to the batch listings you printed earlier and the source documents from your previous system to be sure you posted all the transactions you need.

Setting Up an Accounts Receivable System
3–120 Sage Accpac Accounts Receivable
ARGS‐3.doc, printed on 1/31/2008, at 4:12:08 PM. Last saved on 1/31/2008 4:11:00 PM.
Sage Software Confidential
10. Choose the Customer Transactions icon from the Transaction Reports folder to print the Customer Transactions report for all your customers.
11. Select the following options for the report:
Select Transaction Types. Select all the options.
Report Type. Select Customer Transactions By Fiscal Year And Period.
Sort By. Select Account Set as the first Sort By option.
Account Type. Select All Customers.
12. Check the Customer Transactions report against your customer accounts to be sure you posted all transactions correctly.
13. Check the account set balances on the Customer Transactions report against the balances in the Receivables Control accounts in your general ledger to be sure the total of outstanding receivables in your general ledger equals the total of the accounts receivable ledger.
If the totals do not match, post missing transactions and adjustments to correct errors, then print the report and check it against the general ledger total again.
14. Choose the Create G/L Batch icon from the Periodic Processing folder, then create the general ledger transactions for the batches you posted.
15. Choose the G/L Transactions icon from the Transaction Reports folder, and then print the report for each of the batch types you posted in Accounts Receivable.
Compare the report to the General Ledger summaries on the posting journals and to the general ledger listing from your previous system to be sure the totals balance.
16. File the batch listings, posting journals, and other reports you printed in these steps as part of your setup records.
Step 9: Add Opening Balances and Current-Year Transactions
Getting Started 3–121
ARGS‐3.doc, printed on 1/31/2008, at 4:12:08 PM. Last saved on 1/31/2008 4:11:00 PM.
Sage Software Confidential
Setting Up A
/R
17. Check the Integration tab of the A/R Options form to see whether you want to change your selections for any of the options, such as the Create G/L Transactions By option.
18. If necessary, change your selection for the Tax Tracking option to At Invoice Level for the tax authorities you use with Accounts Receivable. (You selected No Reporting for the option in Tax Services in step 1 of these instructions.)
19. Reconcile, then delete the SETUP bank as follows:
a. Make a bank entry for the total deposit amount sent to the bank by your Accounts Receivable setup transactions.
b. Clear the individual deposits.
c. Post the reconciliation to reduce the bank balance to zero.
d. Delete the bank.
See the Tax and Bank User Guide for instructions about reconciling and deleting banks.
20. Process the general ledger batches.
If you have already posted the transactions to your general ledger. If the receivables and bank transactions you posted to set up your Accounts Receivable system were posted to your general ledger before you began Accounts Receivable setup, you need to delete the general ledger batches that you created during these setup steps. If you do not delete the batches, you risk posting them twice in your general ledger.
To delete the batches if you use Sage Accpac General Ledger, follow the instructions in the General Ledger User Guide. If you use another general ledger, delete them from the directory in which you keep your Sage Accpac Accounts Receivable data. (Delete the files that begin with the letters GLAR and GLBK, using the extension .CSV.)
If you have not previously posted the general ledger transactions. If you have not previously posted receivables
Setting Up an Accounts Receivable System
3–122 Sage Accpac Accounts Receivable
ARGS‐3.doc, printed on 1/31/2008, at 4:12:08 PM. Last saved on 1/31/2008 4:11:00 PM.
Sage Software Confidential
transactions in Sage Accpac General Ledger, you should print the receivables batch listing in General Ledger, check it for errors, make corrections, and print a new batch listing, if necessary, then post the batch following the instructions in the Sage Accpac General Ledger User Guide.
If you do not use Sage Accpac General Ledger, use your copy of the G/L Transactions List to enter the transactions in your general ledger manually, or import the General Ledger batches into another computerized general ledger.
Step 10: Add Customer Statistics (Optional)
After you post transactions to set up the current balances in your customer accounts, you may want to add account totals from earlier periods and years as statistics in the customer records.
Before adding customer statistics, you must:
• Add records for customers, customer groups, and national accounts, if used.
• Select the Allow Edit Of (customer) Statistics option on the Processing tab of the Options form.
See also page 2-85
For more information, see “Using Customer Statistics” in Chapter 2
To add statistics:
1. Choose the Customers icon from the A/R Customers folder.
2. Enter the number of the customer for whom you are adding statistics, or choose the number from the Finder.
3. Click the Statistics tab.
Step 10: Add Customer Statistics

Step 10: Add Customer Statistics
Getting Started 3–123
ARGS‐3.doc, printed on 1/31/2008, at 4:12:08 PM. Last saved on 1/31/2008 4:11:00 PM.
Sage Software Confidential
Setting Up A
/R
The Statistics tab of the Customers form
4. Fill in the Statistics tab as follows.
Year. Type the year for which you want to add statistics, or use the Finder to choose the year.
To choose the period
Period. Type the next period for which you want to add statistics, or click the keys to select the period.
Multicurrency ledgers
Currency. If you use multicurrency accounting, select the currency in which you are entering the statistics. You can add statistics in the customer’s currency and in the functional currency. (It is a good idea to enter statistics in both currencies, if this information is available.)
5. After specifying the year, period, and currency (if applicable), enter the data.
Amount. Type the total amount of invoices, receipts, credit notes, and other transaction types that were processed for the customer during the displayed period.
Count. Type the number of invoices, receipts, credit notes, and other transaction types that were processed for the customer in the period.
6. When finished, click the Activity tab.

Setting Up an Accounts Receivable System
3–124 Sage Accpac Accounts Receivable
ARGS‐3.doc, printed on 1/31/2008, at 4:12:08 PM. Last saved on 1/31/2008 4:11:00 PM.
Sage Software Confidential
The Activity tab of the Customers form
7. Check the statistics on the Activity tab. You may have filled them in already through the transactions you posted to set up the customer’s account.
Make any changes or additions you need, as follows:
Multicurrency ledgers
Currency. Select the currency type. You can add statistics in the customer’s currency and in the functional currency.
You do not see this field on your screen if you do not use multicurrency accounting in Accounts Receivable.
If the customer does not use the functional currency, the customer’s currency is displayed to the right of the Last Statement Balance field.
Amount. Type the amount of the highest balance this year, highest balance last year, and so on, for the customer.
Date. Type the date on which you entered the amount for each transaction.
Total Days To Pay. Type the number of days it took the customer to pay all the invoices that have been fully paid in the current year to date.
Total Invoices Paid. Type the number of invoices that were fully paid by the customer in the current year to date.
Last Invoice refers to the last posted invoice.

Step 10: Add Customer Statistics
Getting Started 3–125
ARGS‐3.doc, printed on 1/31/2008, at 4:12:08 PM. Last saved on 1/31/2008 4:11:00 PM.
Sage Software Confidential
Setting Up A
/R
8. When finished, click Save.
9. Repeat steps 2 through 8 for each set of customer statistics you want to add.
Print the Customer Statistics report
10. Click Print from the File menu or choose the Customers icon from the Customer Reports folder. When the Customers Report form appears, select Customer Period Statistics as the report type. Make other selections to include the periods and customers for which you have entered statistics, and then print the report.
Choose National Account as the first Select By option. If you do not use national accounts, choose Customer Group as the first Select By option. This choice groups customers on the report, so that you can compare your customer statistics reports with the statistical reports you print for national accounts and customer groups.
11. Compare the figures on the report to the statistical information in your previous receivables system to be sure you correctly entered all the statistics you require.
If you find mistakes, edit the statistics for those customers again to make corrections.
Add national account statistics
12. If you have added national accounts, use the National Accounts form to enter the statistical totals you need for all the customers in each national account. Follow the steps you took to enter statistics for customers, entering combined totals for all the customers in the national account.
Print the National Account Period Statistics report
13. Click Print on the File menu or choose the National Accounts icon from the Customer Reports folder. When the National Accounts Report form appears, select National Account Period Statistics as the report type. Select Number Of Documents. Make other selections to include the periods and national accounts for which you have entered statistics, then print the report.
14. Check the report to be sure the totals for the national account equal the totals for the customers in the national account. Correct

Setting Up an Accounts Receivable System
3–126 Sage Accpac Accounts Receivable
ARGS‐3.doc, printed on 1/31/2008, at 4:12:08 PM. Last saved on 1/31/2008 4:11:00 PM.
Sage Software Confidential
any errors, either in the national account record or the customer record.
Add customer group statistics
15. Use the Customer Groups form to enter statistical totals for all customers in each of your customer groups. You enter only period statistics for customer groups. No activity statistics are kept for groups.
Print the Customer Group Statistics report
16. Click Print on the File menu or choose the Customer Groups icon from the Setup Reports folder. When the Customer Groups Report form appears, select Customer Group Statistics as the report type. Select Number Of Documents. Make other selections to include the periods and groups for which you have entered statistics, and then print the report.
17. Check the report to be sure the totals for the customer group equal the totals for the customers in the group. Correct any errors, either in the customer group record or the customer records.
18. If desired, turn off the Allow Edit Of (customer) Statistics option in the Options form to prevent accidental changes to the statistics.
After setup, Accounts Receivable automatically updates these statistics when you post transactions.
Step 11: Add Item Statistics (Optional)
If you use an item list and chose the option to keep item statistics in A/R Options, you may have created some item statistics as you posted transactions to set up the current balances in your customer accounts. After setting up your customer accounts, you may also want to add item statistics from earlier periods and years.
Before adding item statistics, you must:
• Add item records.
Step 11: Add Item Statistics
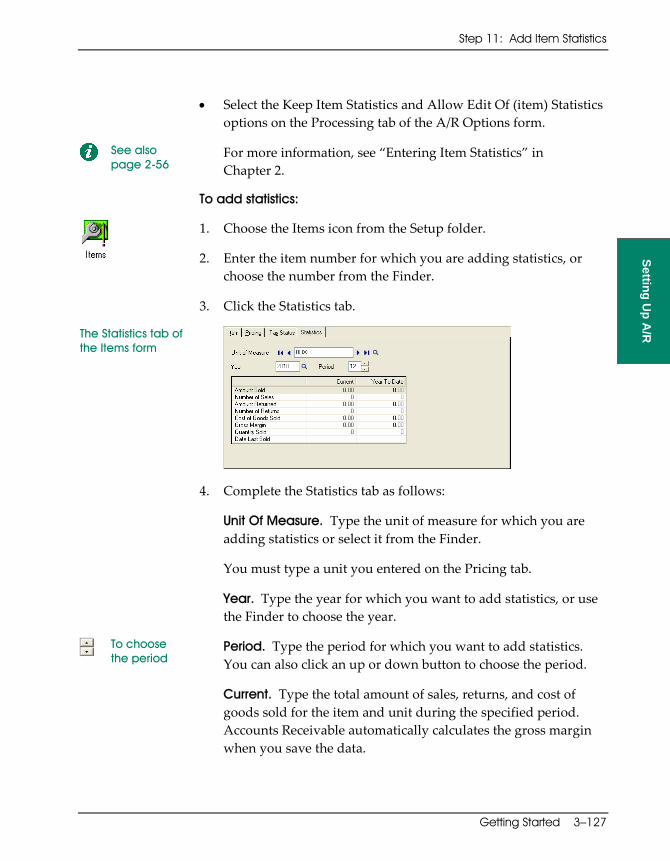
Step 11: Add Item Statistics
Getting Started 3–127
ARGS‐3.doc, printed on 1/31/2008, at 4:12:08 PM. Last saved on 1/31/2008 4:11:00 PM.
Sage Software Confidential
Setting Up A
/R
• Select the Keep Item Statistics and Allow Edit Of (item) Statistics options on the Processing tab of the A/R Options form.
See also page 2-56
For more information, see “Entering Item Statistics” in Chapter 2.
To add statistics:
1. Choose the Items icon from the Setup folder.
2. Enter the item number for which you are adding statistics, or choose the number from the Finder.
3. Click the Statistics tab.
The Statistics tab of the Items form
4. Complete the Statistics tab as follows:
Unit Of Measure. Type the unit of measure for which you are adding statistics or select it from the Finder.
You must type a unit you entered on the Pricing tab.
Year. Type the year for which you want to add statistics, or use the Finder to choose the year.
To choose the period
Period. Type the period for which you want to add statistics. You can also click an up or down button to choose the period.
Current. Type the total amount of sales, returns, and cost of goods sold for the item and unit during the specified period. Accounts Receivable automatically calculates the gross margin when you save the data.

Setting Up an Accounts Receivable System
3–128 Sage Accpac Accounts Receivable
ARGS‐3.doc, printed on 1/31/2008, at 4:12:08 PM. Last saved on 1/31/2008 4:11:00 PM.
Sage Software Confidential
Also, type the number of sales (invoices) and returns that included the item in the period, as well as the quantity sold.
Updating item statistics
After setup, Accounts Receivable automatically updates these amounts and numbers when you post transactions using the item number.
Accounts Receivable also enters the date of the last sale of the item in the specified unit and the total number of the units sold, and it updates the year‐to‐date statistics for this item, as well.
5. When finished adding the statistics for a period, click the Save button.
Select the unit of measure, year, and period for which to add the next set of statistics, as you did in step 4. When finished, click Save, then repeat steps 2 through 5 for all other statistics you want to add.
Turn off the Allow Edit Of Statistics option
6. If you turned on the Allow Edit Of (item) Statistics option in the Options form so that you could add item statistics, turn off the option when you are finished to prevent accidental changes.
Step 12: Add Salesperson Statistics (Optional)
If you use the option to keep salesperson statistics in Accounts Receivable, you have created some salesperson statistics as you posted transactions to set up the current balances in your customer accounts. After setting up your customer accounts, you may also want to add salesperson statistics from earlier periods and years.
Before adding salesperson statistics, you must:
• Add salesperson records.
• Select the Keep Salesperson Statistics and Allow Edit Of (salesperson) Statistics options on the Processing tab of the A/R Options form.
Step 12: Add Salesperson Statistics
Step 12: Add Salesperson Statistics
Getting Started 3–129
ARGS‐3.doc, printed on 1/31/2008, at 4:12:08 PM. Last saved on 1/31/2008 4:11:00 PM.
Sage Software Confidential
Setting Up A
/R
See also page 2-57
For more information, see “Setting Up Salesperson Records” in Chapter 2.
To add statistics:
1. Choose the Salespersons icon from the Setup folder.
2. Enter the salesperson number for which you are adding statistics, or choose the number from the Finder.
3. Add the salesperson statistics, entering for each:
Year. Type the year for which you are entering statistics, or choose it from the Finder.
Period. Type or select the period for which you are entering statistics.
4. Enter statistics for the specified period:
Amount. For each type of transaction, type the total amount processed for the salesperson during the selected year and period.
Count. Type the total number of each transaction type processed for the salesperson during the selected period.
5. When finished adding the statistics for a period, click the Save button.
Select the next year and period, then add the next set of statistics, as you did in steps 3 and 4. When finished, click Save, then repeat steps 2 through 5 for all other statistics you want to add.
Turn off the Allow Edit Of Statistics option
6. If you turned on the Allow Edit Of (salesperson) Statistics option in the Options form so that you could add salesperson statistics, turn off the option when you are finished, to prevent accidental changes to the statistics.
After setup, Accounts Receivable automatically updates these statistics when you post transactions using the salesperson’s number, including year‐to‐date statistics.

Setting Up an Accounts Receivable System
3–130 Sage Accpac Accounts Receivable
ARGS‐3.doc, printed on 1/31/2008, at 4:12:08 PM. Last saved on 1/31/2008 4:11:00 PM.
Sage Software Confidential
Step 13: Design Customer Invoices, Statements, Deposit Slips, Labels, Checks, and Letters
Sage Accpac Accounts Receivable includes sample report formats for an invoice, credit note, debit note, statement, deposit slip, refund check and payment advice, letter, and label. You may be able to use or adapt the formats to print on the forms you already send to your customers. You can also create your own formats.
The Readme file, Forms.wri, lists the types of data you can select from your customer records to print on the various forms. (To view this file, choose it from the ACCPAC\DOCS\ARxxAENG folder on the machine on which Sage Accpac is installed.)
Accounts Receivable includes Crystal Report (.RPT) versions of the following printed forms:
• ARDINVO.RPT — invoice for laser printer.
• ARDOTINV.RPT — invoice for dot matrix printer.
• ARLETT01.RPT — sample letter form.
• ARINVWWW.RPT — invoice used by e.AR.Inquiry.
• ARSTMT01.RPT — statement form.
• ARLBL01.RPT — sample label.
• ARDPST01.RPT — default deposit slip (includes only cash and check receipts).
• ARDPST02.RPT — deposit slip that includes cash, check, credit card, and other receipts.
• ARSTMT10.RPT — for printing statements on plain paper.
• ARSTMTPRE.RPT — for printing statements on preprinted forms.
• ARCHK01.RPT — advice‐check‐advice form for laser printer.
Step 13: Design Customer Invoices, Statements, Deposit Slips, Labels, and Letters
Where To Now?
Getting Started 3–131
ARGS‐3.doc, printed on 1/31/2008, at 4:12:08 PM. Last saved on 1/31/2008 4:11:00 PM.
Sage Software Confidential
Setting Up A
/R
• ARCHK01A.RPT — similar to ARCHK01. The check portion is ANSI‐compliant.
• ARCHK11.RPT — check‐advice‐advice for 11‐inch check forms.
• ARCHK11A.RPT — similar to ARCHK11A, is ANSI‐compliant.
Before you begin processing transactions, you should test your formats by printing on the forms you use.
To print test copies from your own data:
• Use the Invoices icon from the Transaction Reports folder to print invoices, credit notes, and debit notes. (You must first select the Allow Printing Of Invoices option from the Options form, and then add invoices, credit notes, and debit notes in the Invoice Entry form.)
• Use the Receipt Entry icon from the A/R Transactions folder or the Deposit Slips icon from the Transaction Reports folder to print deposit slips. (You must select the Allow Printing Of Deposit Slips option from the Options form, then create at least one receipt batch containing cash or checks.)
• Use the Statements/Letters/Labels icon in the Customer Reports folder to print customer statements, letters, and mailing labels.
Where To Now? Your Accounts Receivable system is now ready to use. Refer to the User Guide for information about entering transactions and operating your Accounts Receivable system on a daily basis. Where
To Now?

Getting Started A–1
ARGS‐A.doc, printed on 1/7/2008, at 8:29:25 PM. Last saved on 11/16/2007 1:08:00 PM.
Sage Software Confidential
Setup C
hecklist
Appendix A Setup Checklist
This appendix describes and shows the Accounts Receivable Setup Checklist, and tells you how to print it.
You can print the Setup Checklist (form AR‐SETUP.PDF), then use it to follow the step‐by‐step instructions for setting up Accounts Receivable in Chapter 3 of Getting Started. As you complete each step of the setup process, check off the item on the list, including:
• Gathering data from your present receivables system.
• Adding receivables accounts to your general ledger chart of accounts.
• Adding tax, bank, currency, and security information.
• Selecting options on the Accounts Receivable Options form.
• Adding Accounts Receivable records.
• Adding customer accounts and related records.
• Adding ship‐to locations.
• Adding recurring charges.
• Adding the opening balances and outstanding transactions for your customer accounts.
• Adding customer, item, and salesperson statistics.
• Preparing and testing formats for printed reports.
Sample Setup Checklist
A–2 Sage Accpac Accounts Receivable
ARGS‐A.doc, printed on 1/7/2008, at 8:29:25 PM. Last saved on 11/16/2007 1:08:00 PM.
Sage Software Confidential
Sample Setup Checklist The Accounts Receivable Setup Checklist on the following pages can guide you through the process of setting up your Accounts Receivable system.
To print the checklist:
1. From the Windows Start menu, click Programs, then Sage Accpac.
2. Click the subfolder Online Documentation, then Accounts Receivable 5.5A.
3. Click Setup Checklist.
You can also open the checklist from the folder X:\ACCPAC\DOCS\AR55AENG where X:ACCPAC is the drive and folder where your Sage Accpac programs are located.
Acrobat Reader will start.
4. On the File menu, click Print. Adjust the settings, and then click OK.
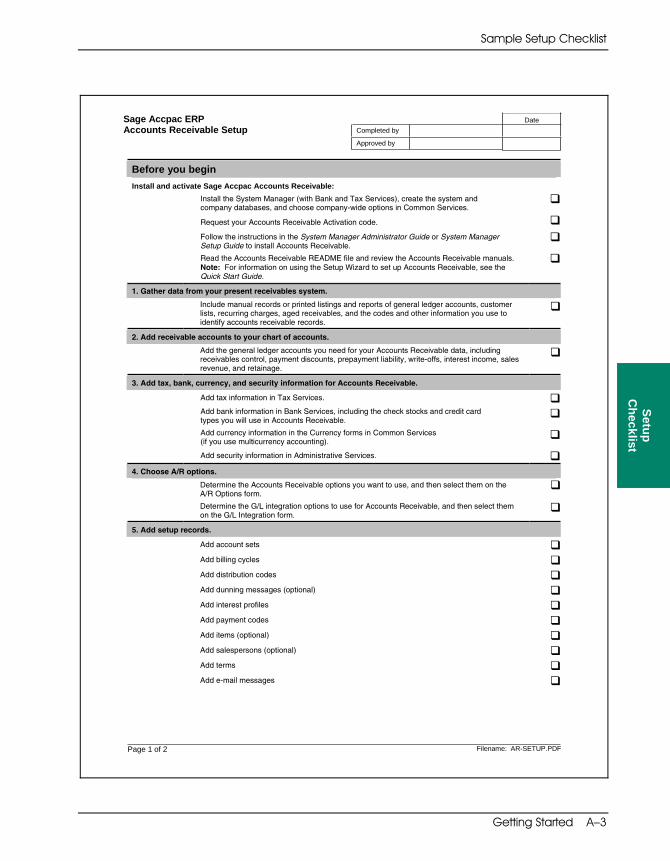
Sample Setup Checklist
Getting Started A–3
ARGS‐A.doc, printed on 1/7/2008, at 8:29:25 PM. Last saved on 11/16/2007 1:08:00 PM.
Sage Software Confidential
Setup C
hecklist
DateCompleted by
Sage Accpac ERPAccounts Receivable Setup
Approved by
Page 1 of 2 Filename: AR-SETUP.PDF
Before you beginInstall and activate Sage Accpac Accounts Receivable:
Install the System Manager (with Bank and Tax Services), create the system andcompany databases, and choose company-wide options in Common Services.
Request your Accounts Receivable Activation code.
Follow the instructions in the System Manager Administrator Guide or System ManagerSetup Guide to install Accounts Receivable.
Read the Accounts Receivable README file and review the Accounts Receivable manuals.Note: For information on using the Setup Wizard to set up Accounts Receivable, see theQuick Start Guide.
1. Gather data from your present receivables system.
Include manual records or printed listings and reports of general ledger accounts, customerlists, recurring charges, aged receivables, and the codes and other information you use toidentify accounts receivable records.
2. Add receivable accounts to your chart of accounts.
Add the general ledger accounts you need for your Accounts Receivable data, includingreceivables control, payment discounts, prepayment liability, write-offs, interest income, salesrevenue, and retainage.
3. Add tax, bank, currency, and security information for Accounts Receivable.
Add tax information in Tax Services.
Add bank information in Bank Services, including the check stocks and credit cardtypes you will use in Accounts Receivable.
Add currency information in the Currency forms in Common Services(if you use multicurrency accounting).
Add security information in Administrative Services.
4. Choose A/R options.
Determine the Accounts Receivable options you want to use, and then select them on theA/R Options form.
Determine the G/L integration options to use for Accounts Receivable, and then select themon the G/L Integration form.
5. Add setup records.
Add account sets
Add billing cycles
Add distribution codes
Add dunning messages (optional)
Add interest profiles
Add payment codes
Add items (optional)
Add salespersons (optional)
Add terms
Add e-mail messages

Sample Setup Checklist
A–4 Sage Accpac Accounts Receivable
ARGS‐A.doc, printed on 1/7/2008, at 8:29:25 PM. Last saved on 11/16/2007 1:08:00 PM.
Sage Software Confidential
DateCompleted by
Sage Accpac ERPAccounts Receivable Setup
Approved by
Page 2 of 2 Filename: AR-SETUP.PDF
Add setup records (continued...) If you use Sage Accpac Transaction Analysis and Optional Field Creator, add optional fields for:
Customers, National Accounts, and Customer Groups
Ship-To Locations
Invoices (invoice, credit note, and debit note documents)
Invoice Details
Receipts
Adjustments
Revaluation
Refunds
6. Add customer accounts and related records.
Add customer group records.
Add national account records, if you use national accounts.
Add customer records.
7. Add ship-to locations records (optional).
Use the Ship-To Locations form.
8. Add recurring charge records (optional).
Use the Recurring Charges form.
9. Add the opening balances and outstanding transactions for your customer accounts.
Post batches to enter the outstanding invoices and other transactions that make upthe current balance in each of your customer accounts.
10. Add customer statistics (optional).
Complete the Statistics and Activity tabs of the Customers form.
Complete the Statistics and Activity tabs of the National Accounts form, if you use nationalaccounts.
Complete the Statistics tab of the Customer Groups form.
11. Add item statistics (optional).
Complete the Statistics tab of the Items form.
12. Add salesperson statistics (optional).
Add statistics in the Salespersons form.
13. Prepare and test the formats for printing reports.
To find out how to adapt sample forms or create new ones, see the online documentation forSystem Manager. For a list of the fields you can use in your custom forms, see the document,FORMS.WRI in the Sage Software\Sage Accpac\DOCS\AR55AENG folder.
Print test copies from your own data.


Getting Started Index–1
Args‐inx.doc, printed on 1/28/2008, at 10:41:39 AM. Last saved on 1/28/2008 10:41:00 AM.
Sage Software Confidential
Index Index
Index
A
Account balance adding opening balances, 2–98, 3–117 entering statistics for previous periods
customer, 3–123 customer group, 3–126 national account, 3–125
Print Zero‐Balance Statements option, 2–26
Account set adding, 3–36 designing codes, 2–40 exchange gains and losses account, 2–42 general ledger accounts used, 2–41 multicurrency general ledger accounts,
2–42 overview, 2–40 requirements, 2–41
Account Sets form using, 3–36
Account type assigning
to customer groups, 2–66, 3–69 to customers, 3–88 to national accounts, 3–77, 3–78
balance forward applying receipts, 2–66 calculating interest charges, 2–66 information on statements, 2–66 overview, 2–66
open item applying receipts, 2–65 calculating interest charges, 2–66
Account type (continued)
information on statements, 2–66 overview, 2–65
Accounts Receivable codes and numbers, designing, 2–37 features, 1–1 manuals, 1–10, 1–11 using, with a browser, 3–2
Accounts Receivable options See: Options
Accumulate Customer Statistics With Tax (Included or Excluded) option choosing, 2–10
Activating Sage Accpac Accounts Receivable See: System Manager User Guide
Adding account sets, 3–36
overview, 2–40 billing cycles, 3–39
overview, 2–44 customer groups, 3–67
overview, 2–67 customer records, 3–84
overview, 2–64 distribution codes, 3–40
overview, 2–45 dunning messages, 3–42
overview, 2–47 e‐mail messages, 3‐60
overview, 2–47 interest profiles, 3–44
overview, 2–49 items, 3–48
overview, 2–53

Index–2 Sage Accpac Accounts Receivable
Args‐inx.doc, printed on 1/28/2008, at 10:41:39 AM. Last saved on 1/28/2008 10:41:00 AM.
Sage Software Confidential
Adding (Continued) national accounts, 3–75
overview, 2–76 payment codes, 3–47
overview, 2–52 salesperson records, 3–53
overview, 2–57 setup records, 3–34 ship‐to locations, 3–98
overview, 2–90 terms codes, 3–55
overview, 2–58 Adding To An Existing Batch option, 2–33 Address
customer Web site, 3–87 for billing cycle, 2–45 for mailing payments, 2–45 national account billing addresses, 3–77
Age Unapplied Cash And Prepayments option overview, 2–26 selecting, 3–24
Age Unapplied Credit Notes And Debit Notes option overview, 2–26 selecting, 3–24
Aging options Age Unapplied Cash And Prepayments,
2–26, 3–24 Age Unapplied Credit Notes And Debit
Notes, 2–26, 3–24 Aging Periods, 2‐25, 3‐23 Dunning Messages, 3–23
Allow Adjustments In Receipt Batches option overview, 2–20 selecting, 3–21
Allow Backorder Quantities field customer record, 3–92 overview, 2–87
Allow Edit After Deposit Slip Printed option overview, 2–19 selecting, 3–21
Allow Edit After Invoice Printed option overview, 2–16 selecting, 3–18
Allow Edit After Receipt Printed option overview, 2–20 selecting, 3–21
Allow Edit Of Credit Check option overview, 2–69 selecting in customer groups, 3–70
Allow Edit Of External Batches option overview, 2‐5 selecting, 3–14
Allow Edit Of Imported Batches option overview, 2‐5 selecting, 3–14
Allow Edit Of Statistics option, selecting for customers, customer groups, and
national accounts, 3–15 for items, 3–15 for salespersons, 3–15
Allow Partial Shipments option overview, 2–87 selecting for customers, 3–92
Allow Printing Of Deposit Slips option overview, 2–18 selecting, 3–20
Allow Printing Of Invoices option overview, 2–15 selecting, 3–18
Allow Web Store Shopping field customer record, 3–92
Alternate tax base amount specifying for items, 3–52
Annual sales target, 2–57, 3–54 Auto Insert (optional field), 2–63 Auto Search
using to find a record quickly, 3–6
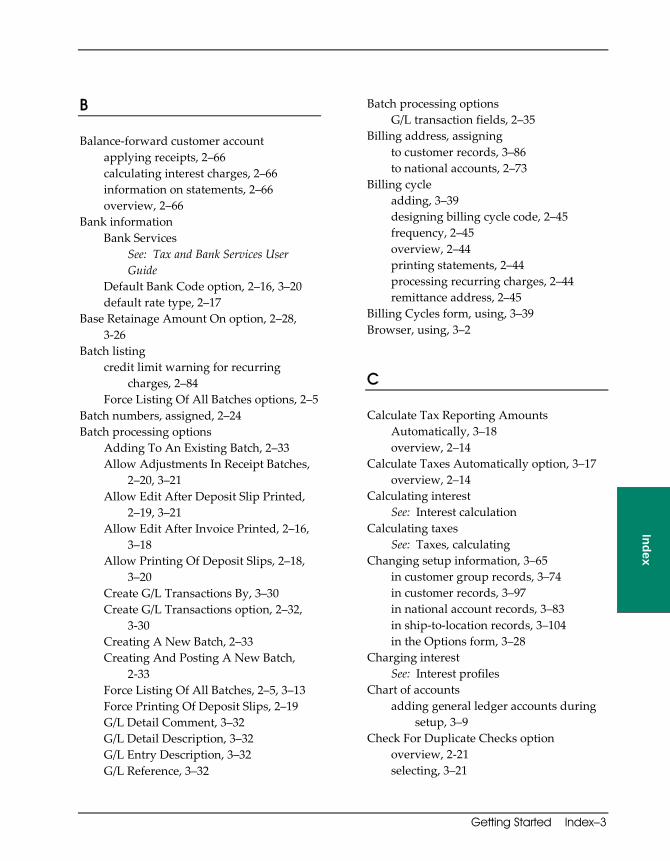
Getting Started Index–3
Args‐inx.doc, printed on 1/28/2008, at 10:41:39 AM. Last saved on 1/28/2008 10:41:00 AM.
Sage Software Confidential
Index
B
Balance‐forward customer account applying receipts, 2–66 calculating interest charges, 2–66 information on statements, 2–66 overview, 2–66
Bank information Bank Services
See: Tax and Bank Services User Guide
Default Bank Code option, 2–16, 3–20 default rate type, 2–17
Base Retainage Amount On option, 2–28, 3‐26
Batch listing credit limit warning for recurring
charges, 2–84 Force Listing Of All Batches options, 2–5
Batch numbers, assigned, 2–24 Batch processing options
Adding To An Existing Batch, 2–33 Allow Adjustments In Receipt Batches,
2–20, 3–21 Allow Edit After Deposit Slip Printed,
2–19, 3–21 Allow Edit After Invoice Printed, 2–16,
3–18 Allow Printing Of Deposit Slips, 2–18,
3–20 Create G/L Transactions By, 3–30 Create G/L Transactions option, 2–32,
3‐30 Creating A New Batch, 2–33 Creating And Posting A New Batch,
2‐33 Force Listing Of All Batches, 2–5, 3–13 Force Printing Of Deposit Slips, 2–19 G/L Detail Comment, 3–32 G/L Detail Description, 3–32 G/L Entry Description, 3–32 G/L Reference, 3–32
Batch processing options G/L transaction fields, 2–35
Billing address, assigning to customer records, 3–86 to national accounts, 2–73
Billing cycle adding, 3–39 designing billing cycle code, 2–45 frequency, 2–45 overview, 2–44 printing statements, 2–44 processing recurring charges, 2–44 remittance address, 2–45
Billing Cycles form, using, 3–39 Browser, using, 3–2
C
Calculate Tax Reporting Amounts Automatically, 3–18 overview, 2–14
Calculate Taxes Automatically option, 3–17 overview, 2–14
Calculating interest See: Interest calculation
Calculating taxes See: Taxes, calculating
Changing setup information, 3–65 in customer group records, 3–74 in customer records, 3–97 in national account records, 3–83 in ship‐to‐location records, 3–104 in the Options form, 3–28
Charging interest See: Interest profiles
Chart of accounts adding general ledger accounts during
setup, 3–9 Check For Duplicate Checks option
overview, 2‐21 selecting, 3–21
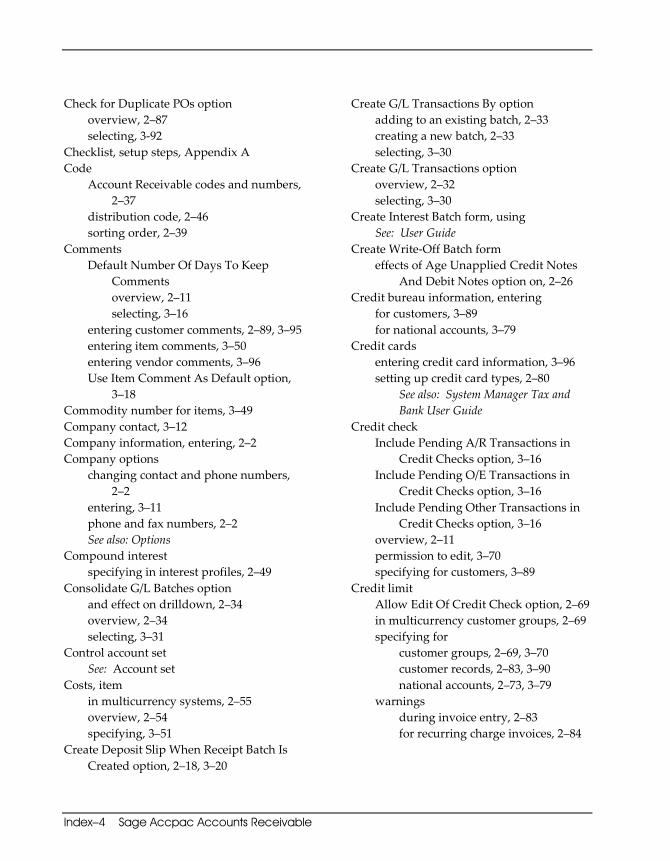
Index–4 Sage Accpac Accounts Receivable
Args‐inx.doc, printed on 1/28/2008, at 10:41:39 AM. Last saved on 1/28/2008 10:41:00 AM.
Sage Software Confidential
Check for Duplicate POs option overview, 2–87 selecting, 3‐92
Checklist, setup steps, Appendix A Code
Account Receivable codes and numbers, 2–37
distribution code, 2–46 sorting order, 2–39
Comments Default Number Of Days To Keep
Comments overview, 2–11 selecting, 3–16
entering customer comments, 2–89, 3–95 entering item comments, 3–50 entering vendor comments, 3–96 Use Item Comment As Default option,
3–18 Commodity number for items, 3–49 Company contact, 3–12 Company information, entering, 2–2 Company options
changing contact and phone numbers, 2–2
entering, 3–11 phone and fax numbers, 2–2 See also: Options
Compound interest specifying in interest profiles, 2–49
Consolidate G/L Batches option and effect on drilldown, 2–34 overview, 2–34 selecting, 3–31
Control account set See: Account set
Costs, item in multicurrency systems, 2–55 overview, 2–54 specifying, 3–51
Create Deposit Slip When Receipt Batch Is Created option, 2–18, 3–20
Create G/L Transactions By option adding to an existing batch, 2–33 creating a new batch, 2–33 selecting, 3–30
Create G/L Transactions option overview, 2–32 selecting, 3–30
Create Interest Batch form, using See: User Guide
Create Write‐Off Batch form effects of Age Unapplied Credit Notes
And Debit Notes option on, 2–26 Credit bureau information, entering
for customers, 3–89 for national accounts, 3–79
Credit cards entering credit card information, 3–96 setting up credit card types, 2–80
See also: System Manager Tax and Bank User Guide
Credit check Include Pending A/R Transactions in
Credit Checks option, 3–16 Include Pending O/E Transactions in
Credit Checks option, 3–16 Include Pending Other Transactions in
Credit Checks option, 3–16 overview, 2–11 permission to edit, 3–70 specifying for customers, 3–89
Credit limit Allow Edit Of Credit Check option, 2–69 in multicurrency customer groups, 2–69 specifying for
customer groups, 2–69, 3–70 customer records, 2–83, 3–90 national accounts, 2–73, 3–79
warnings during invoice entry, 2–83 for recurring charge invoices, 2–84
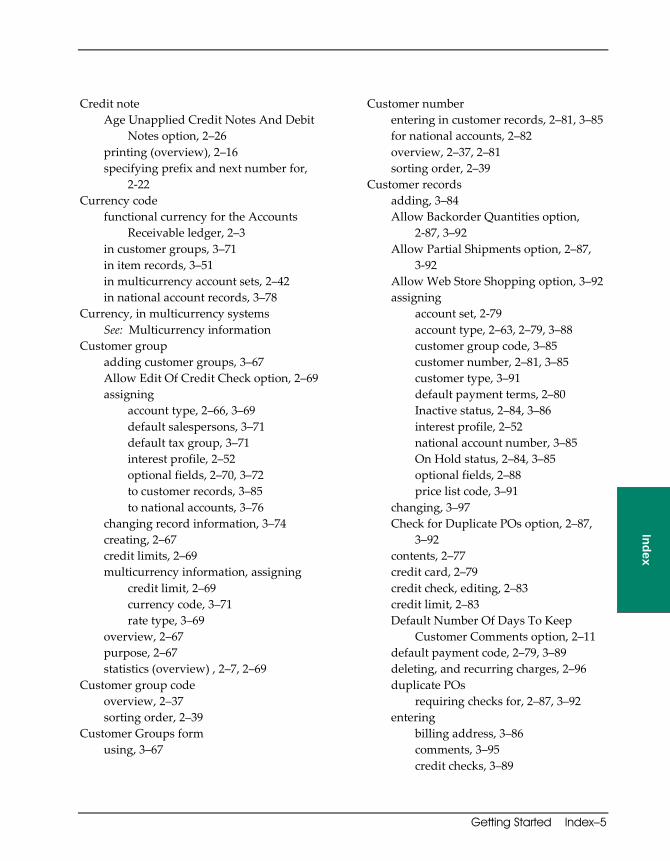
Getting Started Index–5
Args‐inx.doc, printed on 1/28/2008, at 10:41:39 AM. Last saved on 1/28/2008 10:41:00 AM.
Sage Software Confidential
Index
Credit note Age Unapplied Credit Notes And Debit
Notes option, 2–26 printing (overview), 2–16 specifying prefix and next number for,
2‐22 Currency code
functional currency for the Accounts Receivable ledger, 2–3
in customer groups, 3–71 in item records, 3–51 in multicurrency account sets, 2–42 in national account records, 3–78
Currency, in multicurrency systems See: Multicurrency information
Customer group adding customer groups, 3–67 Allow Edit Of Credit Check option, 2–69 assigning
account type, 2–66, 3–69 default salespersons, 3–71 default tax group, 3–71 interest profile, 2–52 optional fields, 2–70, 3–72 to customer records, 3–85 to national accounts, 3–76
changing record information, 3–74 creating, 2–67 credit limits, 2–69 multicurrency information, assigning
credit limit, 2–69 currency code, 3–71 rate type, 3–69
overview, 2–67 purpose, 2–67 statistics (overview) , 2–7, 2–69
Customer group code overview, 2–37 sorting order, 2–39
Customer Groups form using, 3–67
Customer number entering in customer records, 2–81, 3–85 for national accounts, 2–82 overview, 2–37, 2–81 sorting order, 2–39
Customer records adding, 3–84 Allow Backorder Quantities option,
2‐87, 3–92 Allow Partial Shipments option, 2–87,
3‐92 Allow Web Store Shopping option, 3–92 assigning
account set, 2‐79 account type, 2–63, 2–79, 3–88 customer group code, 3–85 customer number, 2–81, 3–85 customer type, 3–91 default payment terms, 2–80 Inactive status, 2–84, 3–86 interest profile, 2–52 national account number, 3–85 On Hold status, 2–84, 3–85 optional fields, 2–88 price list code, 3–91
changing, 3–97 Check for Duplicate POs option, 2–87,
3–92 contents, 2–77 credit card, 2–79 credit check, editing, 2–83 credit limit, 2–83 Default Number Of Days To Keep
Customer Comments option, 2–11 default payment code, 2–79, 3–89 deleting, and recurring charges, 2–96 duplicate POs
requiring checks for, 2–87, 3–92 entering
billing address, 3–86 comments, 3–95 credit checks, 3–89
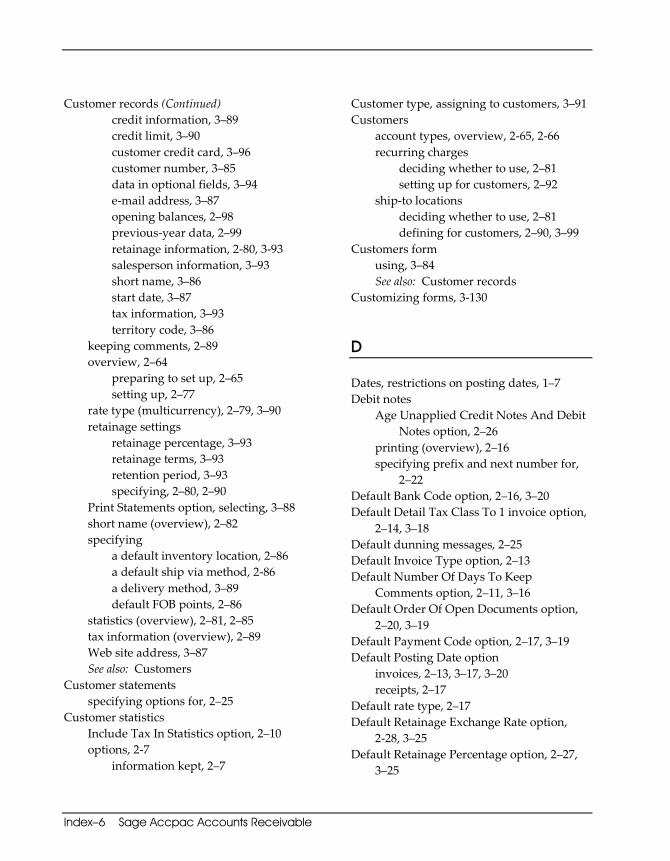
Index–6 Sage Accpac Accounts Receivable
Args‐inx.doc, printed on 1/28/2008, at 10:41:39 AM. Last saved on 1/28/2008 10:41:00 AM.
Sage Software Confidential
Customer records (Continued) credit information, 3–89 credit limit, 3–90 customer credit card, 3–96 customer number, 3–85 data in optional fields, 3–94 e‐mail address, 3–87 opening balances, 2–98 previous‐year data, 2–99 retainage information, 2‐80, 3‐93 salesperson information, 3–93 short name, 3–86 start date, 3–87 tax information, 3–93 territory code, 3–86
keeping comments, 2–89 overview, 2–64
preparing to set up, 2–65 setting up, 2–77
rate type (multicurrency), 2–79, 3–90 retainage settings
retainage percentage, 3–93 retainage terms, 3–93 retention period, 3–93 specifying, 2–80, 2–90
Print Statements option, selecting, 3–88 short name (overview), 2–82 specifying
a default inventory location, 2–86 a default ship via method, 2‐86 a delivery method, 3–89 default FOB points, 2–86
statistics (overview), 2–81, 2–85 tax information (overview), 2–89 Web site address, 3–87 See also: Customers
Customer statements specifying options for, 2–25
Customer statistics Include Tax In Statistics option, 2–10 options, 2‐7
information kept, 2–7
Customer type, assigning to customers, 3–91 Customers
account types, overview, 2‐65, 2‐66 recurring charges
deciding whether to use, 2–81 setting up for customers, 2–92
ship‐to locations deciding whether to use, 2–81 defining for customers, 2–90, 3–99
Customers form using, 3–84 See also: Customer records
Customizing forms, 3‐130
D
Dates, restrictions on posting dates, 1–7 Debit notes
Age Unapplied Credit Notes And Debit Notes option, 2–26
printing (overview), 2–16 specifying prefix and next number for,
2–22 Default Bank Code option, 2–16, 3–20 Default Detail Tax Class To 1 invoice option,
2–14, 3–18 Default dunning messages, 2–25 Default Invoice Type option, 2–13 Default Number Of Days To Keep
Comments option, 2–11, 3–16 Default Order Of Open Documents option,
2–20, 3–19 Default Payment Code option, 2–17, 3–19 Default Posting Date option
invoices, 2–13, 3–17, 3–20 receipts, 2–17
Default rate type, 2–17 Default Retainage Exchange Rate option,
2‐28, 3–25 Default Retainage Percentage option, 2–27,
3–25
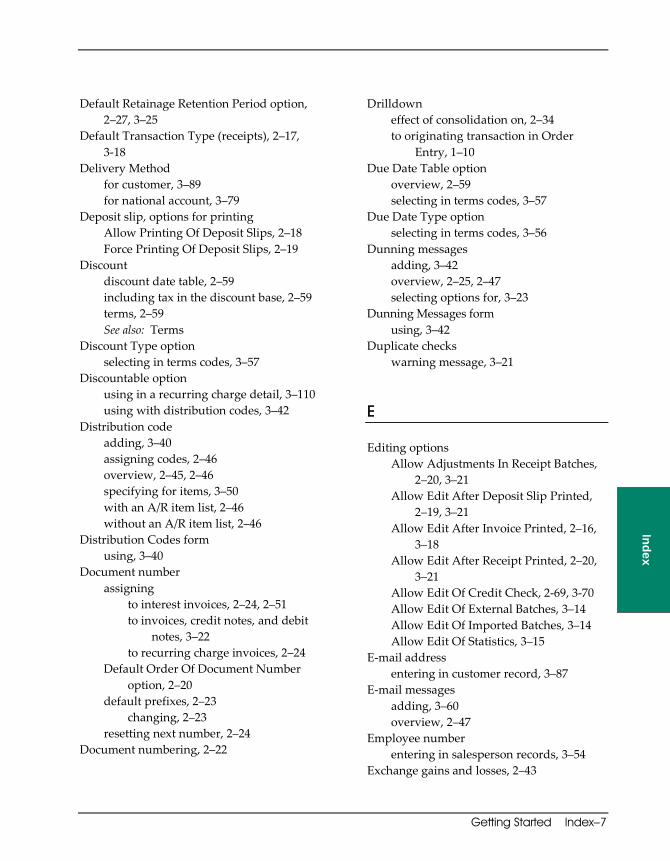
Getting Started Index–7
Args‐inx.doc, printed on 1/28/2008, at 10:41:39 AM. Last saved on 1/28/2008 10:41:00 AM.
Sage Software Confidential
Index
Default Retainage Retention Period option, 2–27, 3–25
Default Transaction Type (receipts), 2–17, 3‐18
Delivery Method for customer, 3–89 for national account, 3–79
Deposit slip, options for printing Allow Printing Of Deposit Slips, 2–18 Force Printing Of Deposit Slips, 2–19
Discount discount date table, 2–59 including tax in the discount base, 2–59 terms, 2–59 See also: Terms
Discount Type option selecting in terms codes, 3–57
Discountable option using in a recurring charge detail, 3–110 using with distribution codes, 3–42
Distribution code adding, 3–40 assigning codes, 2–46 overview, 2–45, 2–46 specifying for items, 3–50 with an A/R item list, 2–46 without an A/R item list, 2–46
Distribution Codes form using, 3–40
Document number assigning
to interest invoices, 2–24, 2–51 to invoices, credit notes, and debit
notes, 3–22 to recurring charge invoices, 2–24
Default Order Of Document Number option, 2–20
default prefixes, 2–23 changing, 2–23
resetting next number, 2–24 Document numbering, 2–22
Drilldown effect of consolidation on, 2–34 to originating transaction in Order
Entry, 1–10 Due Date Table option
overview, 2–59 selecting in terms codes, 3–57
Due Date Type option selecting in terms codes, 3–56
Dunning messages adding, 3–42 overview, 2–25, 2–47 selecting options for, 3–23
Dunning Messages form using, 3–42
Duplicate checks warning message, 3–21
E
Editing options Allow Adjustments In Receipt Batches,
2–20, 3–21 Allow Edit After Deposit Slip Printed,
2–19, 3–21 Allow Edit After Invoice Printed, 2–16,
3–18 Allow Edit After Receipt Printed, 2–20,
3–21 Allow Edit Of Credit Check, 2‐69, 3‐70 Allow Edit Of External Batches, 3–14 Allow Edit Of Imported Batches, 3–14 Allow Edit Of Statistics, 3–15
E‐mail address entering in customer record, 3–87
E‐mail messages adding, 3–60 overview, 2–47
Employee number entering in salesperson records, 3–54
Exchange gains and losses, 2–43
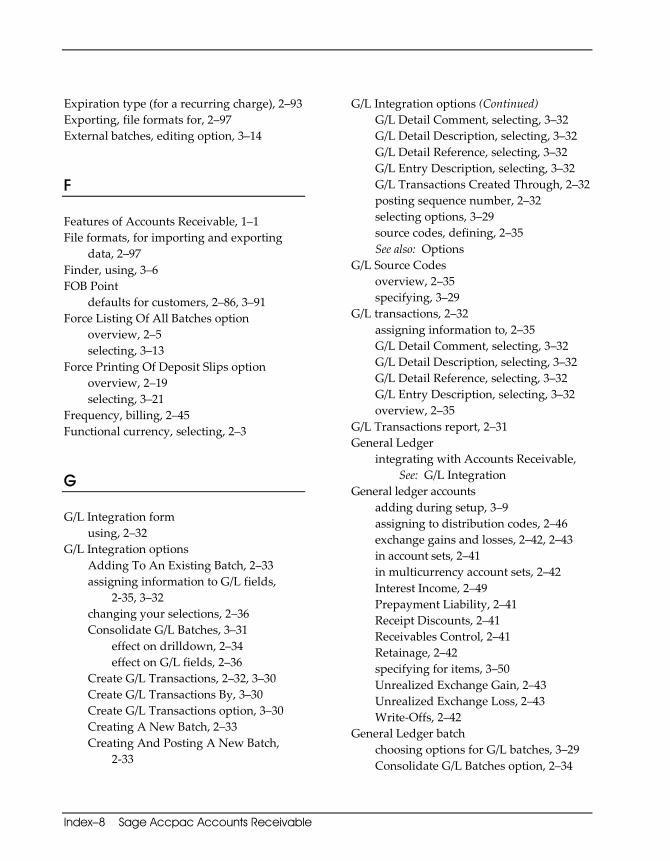
Index–8 Sage Accpac Accounts Receivable
Args‐inx.doc, printed on 1/28/2008, at 10:41:39 AM. Last saved on 1/28/2008 10:41:00 AM.
Sage Software Confidential
Expiration type (for a recurring charge), 2–93 Exporting, file formats for, 2–97 External batches, editing option, 3–14
F
Features of Accounts Receivable, 1–1 File formats, for importing and exporting
data, 2–97 Finder, using, 3–6 FOB Point
defaults for customers, 2–86, 3–91 Force Listing Of All Batches option
overview, 2–5 selecting, 3–13
Force Printing Of Deposit Slips option overview, 2–19 selecting, 3–21
Frequency, billing, 2–45 Functional currency, selecting, 2–3
G
G/L Integration form using, 2–32
G/L Integration options Adding To An Existing Batch, 2–33 assigning information to G/L fields,
2‐35, 3–32 changing your selections, 2–36 Consolidate G/L Batches, 3–31
effect on drilldown, 2–34 effect on G/L fields, 2–36
Create G/L Transactions, 2–32, 3–30 Create G/L Transactions By, 3–30 Create G/L Transactions option, 3–30 Creating A New Batch, 2–33 Creating And Posting A New Batch,
2‐33
G/L Integration options (Continued) G/L Detail Comment, selecting, 3–32 G/L Detail Description, selecting, 3–32 G/L Detail Reference, selecting, 3–32 G/L Entry Description, selecting, 3–32 G/L Transactions Created Through, 2–32 posting sequence number, 2–32 selecting options, 3–29 source codes, defining, 2–35 See also: Options
G/L Source Codes overview, 2–35 specifying, 3–29
G/L transactions, 2–32 assigning information to, 2–35 G/L Detail Comment, selecting, 3–32 G/L Detail Description, selecting, 3–32 G/L Detail Reference, selecting, 3–32 G/L Entry Description, selecting, 3–32 overview, 2–35
G/L Transactions report, 2–31 General Ledger
integrating with Accounts Receivable, See: G/L Integration
General ledger accounts adding during setup, 3–9 assigning to distribution codes, 2–46 exchange gains and losses, 2–42, 2–43 in account sets, 2–41 in multicurrency account sets, 2–42 Interest Income, 2–49 Prepayment Liability, 2–41 Receipt Discounts, 2–41 Receivables Control, 2–41 Retainage, 2–42 specifying for items, 3–50 Unrealized Exchange Gain, 2–43 Unrealized Exchange Loss, 2–43 Write‐Offs, 2–42
General Ledger batch choosing options for G/L batches, 3–29 Consolidate G/L Batches option, 2–34
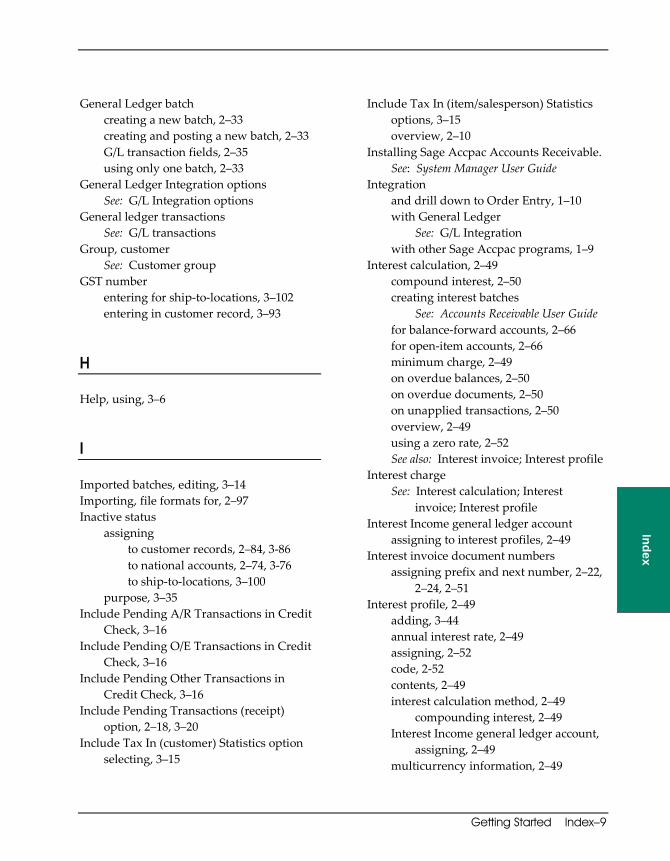
Getting Started Index–9
Args‐inx.doc, printed on 1/28/2008, at 10:41:39 AM. Last saved on 1/28/2008 10:41:00 AM.
Sage Software Confidential
Index
General Ledger batch creating a new batch, 2–33 creating and posting a new batch, 2–33 G/L transaction fields, 2–35 using only one batch, 2–33
General Ledger Integration options See: G/L Integration options
General ledger transactions See: G/L transactions
Group, customer See: Customer group
GST number entering for ship‐to‐locations, 3–102 entering in customer record, 3–93
H
Help, using, 3–6
I
Imported batches, editing, 3–14 Importing, file formats for, 2–97 Inactive status
assigning to customer records, 2–84, 3‐86 to national accounts, 2–74, 3‐76 to ship‐to‐locations, 3–100
purpose, 3–35 Include Pending A/R Transactions in Credit
Check, 3–16 Include Pending O/E Transactions in Credit
Check, 3–16 Include Pending Other Transactions in
Credit Check, 3–16 Include Pending Transactions (receipt)
option, 2–18, 3–20 Include Tax In (customer) Statistics option
selecting, 3–15
Include Tax In (item/salesperson) Statistics options, 3–15 overview, 2–10
Installing Sage Accpac Accounts Receivable. See: System Manager User Guide
Integration and drill down to Order Entry, 1–10 with General Ledger
See: G/L Integration with other Sage Accpac programs, 1–9
Interest calculation, 2–49 compound interest, 2–50 creating interest batches
See: Accounts Receivable User Guide for balance‐forward accounts, 2–66 for open‐item accounts, 2–66 minimum charge, 2–49 on overdue balances, 2–50 on overdue documents, 2–50 on unapplied transactions, 2–50 overview, 2–49 using a zero rate, 2–52 See also: Interest invoice; Interest profile
Interest charge See: Interest calculation; Interest
invoice; Interest profile Interest Income general ledger account
assigning to interest profiles, 2–49 Interest invoice document numbers
assigning prefix and next number, 2–22, 2–24, 2–51
Interest profile, 2–49 adding, 3–44 annual interest rate, 2–49 assigning, 2–52 code, 2‐52 contents, 2–49 interest calculation method, 2–49
compounding interest, 2–49 Interest Income general ledger account,
assigning, 2–49 multicurrency information, 2–49
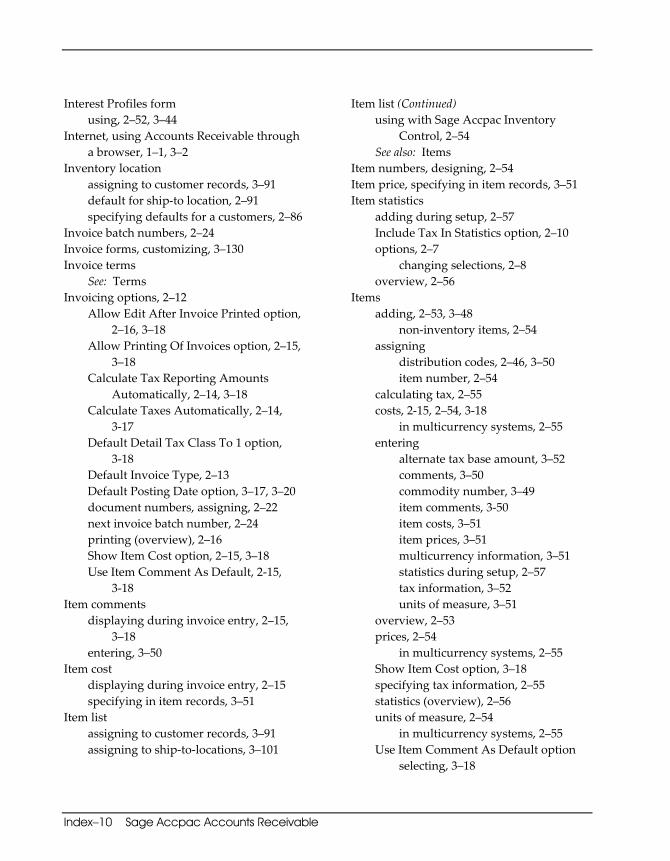
Index–10 Sage Accpac Accounts Receivable
Args-inx.doc, printed on 1/28/2008, at 10:47:58 AM. Last saved on 1/28/2008 10:47:00 AM.
Sage Software Confidential
Interest Profiles form using, 2–52, 3–44
Internet, using Accounts Receivable through a browser, 1–1, 3–2
Inventory location assigning to customer records, 3–91 default for ship-to location, 2–91 specifying defaults for a customers, 2–86
Invoice batch numbers, 2–24 Invoice forms, customizing, 3–130 Invoice terms
See: Terms Invoicing options, 2–12
Allow Edit After Invoice Printed option, 2–16, 3–18
Allow Printing Of Invoices option, 2–15, 3–18
Calculate Tax Reporting Amounts Automatically, 2–14, 3–18
Calculate Taxes Automatically, 2–14, 3-17
Default Detail Tax Class To 1 option, 3-18
Default Invoice Type, 2–13 Default Posting Date option, 3–17, 3–20 document numbers, assigning, 2–22 next invoice batch number, 2–24 printing (overview), 2–16 Show Item Cost option, 2–15, 3–18 Use Item Comment As Default, 2-15,
3-18 Item comments
displaying during invoice entry, 2–15, 3–18
entering, 3–50 Item cost
displaying during invoice entry, 2–15 specifying in item records, 3–51
Item list assigning to customer records, 3–91 assigning to ship-to-locations, 3–101
Item list (Continued) using with Sage Accpac Inventory
Control, 2–54 See also: Items
Item numbers, designing, 2–54 Item price, specifying in item records, 3–51 Item statistics
adding during setup, 2–57 Include Tax In Statistics option, 2–10 options, 2–7
changing selections, 2–8 overview, 2–56
Items adding, 2–53, 3–48
non-inventory items, 2–54 assigning
distribution codes, 2–46, 3–50 item number, 2–54
calculating tax, 2–55 costs, 2-15, 2–54, 3-18
in multicurrency systems, 2–55 entering
alternate tax base amount, 3–52 comments, 3–50 commodity number, 3–49 item comments, 3-50 item costs, 3–51 item prices, 3–51 multicurrency information, 3–51 statistics during setup, 2–57 tax information, 3–52 units of measure, 3–51
overview, 2–53 prices, 2–54
in multicurrency systems, 2–55 Show Item Cost option, 3–18 specifying tax information, 2–55 statistics (overview), 2–56 units of measure, 2–54
in multicurrency systems, 2–55 Use Item Comment As Default option
selecting, 3–18

Getting Started Index–11
Args‐inx.doc, printed on 1/28/2008, at 10:41:39 AM. Last saved on 1/28/2008 10:41:00 AM.
Sage Software Confidential
Index
Items form using, 2–53, 3–48
K
Keep (Customer, National Account, and Group) Statistics processing options, 3–14
Keep (item/salesperson) Statistics options effects of changing, 2–8 selecting, 3–14 using in item records, 2–56 using in salesperson records, 2–57
L
Label forms, designing, 3–130 Last Maintained field, purpose, 3–35 Letter forms, designing, 3–130
M
Mailing labels See: Label forms
Messages, e‐mailed with statements and invoices, 3–60
Messages, dunning See: Dunning Messages option
Minimum interest charge specifying, 2–49
Monthly billings See: Recurring charges
Multicurrency account set, 2–42 credit limits in customer groups, 2–69 default rate type, 2–17 exchange gains and losses, 2–43 general ledger accounts, 2–42
Multicurrency (Continued) interest profiles, 2–49 interest rates, 2–49 item costs, prices, and units of measure,
2–55 selecting the Multicurrency option, 3–13 summary of multicurrency setup, 2–101
Multicurrency account set, 2–42 Multicurrency information
assigning a currency code to customer groups, 3–71
entering for customers, 3–90 for items, 3–51
preparing for setup, 3–9 selecting the rate type
for customer groups, 3–69, 3–90 for national accounts, 3–80
Multicurrency option overview, 2–3 restriction on changing, 2–3
Multiple Payment Schedule option, 2–59 selecting in terms codes, 3–56
N
National account adding, 3–75 Allow Edit Of Credit Check option, 2–74 assigning
a customer number, 2–82 an interest profile, 2–52 to customer records, 3–85 optional fields to, 2–75
billing address, 2–73 changing record information, 3–83 creating (overview), 2–76 credit limit, 2–73 delivery method, specifying, 3–79 entering
account type, 3–77, 3–78
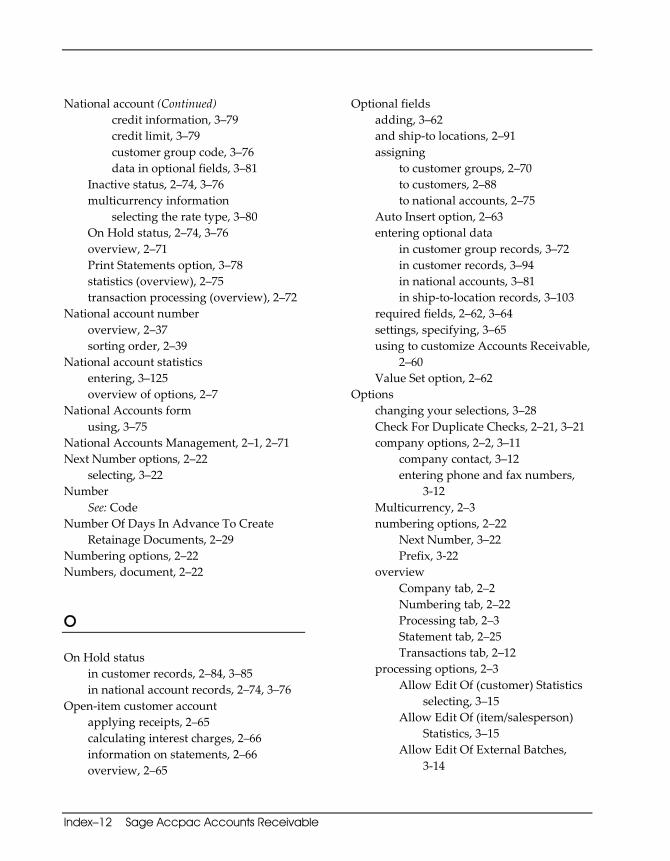
Index–12 Sage Accpac Accounts Receivable
Args‐inx.doc, printed on 1/28/2008, at 10:41:39 AM. Last saved on 1/28/2008 10:41:00 AM.
Sage Software Confidential
National account (Continued) credit information, 3–79 credit limit, 3–79 customer group code, 3–76 data in optional fields, 3–81
Inactive status, 2–74, 3–76 multicurrency information
selecting the rate type, 3–80 On Hold status, 2–74, 3–76 overview, 2–71 Print Statements option, 3–78 statistics (overview), 2–75 transaction processing (overview), 2–72
National account number overview, 2–37 sorting order, 2–39
National account statistics entering, 3–125 overview of options, 2–7
National Accounts form using, 3–75
National Accounts Management, 2–1, 2–71 Next Number options, 2–22
selecting, 3–22 Number
See: Code Number Of Days In Advance To Create
Retainage Documents, 2–29 Numbering options, 2–22 Numbers, document, 2–22
O
On Hold status in customer records, 2–84, 3–85 in national account records, 2–74, 3–76
Open‐item customer account applying receipts, 2–65 calculating interest charges, 2–66 information on statements, 2–66 overview, 2–65
Optional fields adding, 3–62 and ship‐to locations, 2–91 assigning
to customer groups, 2–70 to customers, 2–88 to national accounts, 2–75
Auto Insert option, 2–63 entering optional data
in customer group records, 3–72 in customer records, 3–94 in national accounts, 3–81 in ship‐to‐location records, 3–103
required fields, 2–62, 3–64 settings, specifying, 3–65 using to customize Accounts Receivable,
2–60 Value Set option, 2–62
Options changing your selections, 3–28 Check For Duplicate Checks, 2–21, 3–21 company options, 2–2, 3–11
company contact, 3–12 entering phone and fax numbers,
3‐12 Multicurrency, 2–3 numbering options, 2–22
Next Number, 3–22 Prefix, 3‐22
overview Company tab, 2–2 Numbering tab, 2–22 Processing tab, 2–3 Statement tab, 2–25 Transactions tab, 2–12
processing options, 2–3 Allow Edit Of (customer) Statistics
selecting, 3–15 Allow Edit Of (item/salesperson)
Statistics, 3–15 Allow Edit Of External Batches,
3‐14

Getting Started Index–13
Args‐inx.doc, printed on 1/28/2008, at 10:41:39 AM. Last saved on 1/28/2008 10:41:00 AM.
Sage Software Confidential
Index
Options (Continued) Allow Edit Of Imported Batches,
3‐14 credit checks, 2–11 Default Number Of Days To Keep
Comments, 2–11 for keeping statistics, 3–14 Force Listing Of All Batches, 2–5,
3‐13 Include Tax In (customer) Statistics,
3–15 including pending transactions in
credit checks, 3–16 Keep (Customer, National Account,
and Group) Statistics, 3–14 Keep (item/salesperson) Statistics,
3–14, 3–15 Process Recurring Charges, 2–4,
3‐13 Retainage Accounting, 2–6, 3–14 selecting the Multicurrency option,
2–33–13 refund option
Check For Duplicate Checks, 2‐21, 3‐21
Report Tax, 3–25 Retainage Accounting option, 2–6 retainage options
Base Retainage Amount On, 2–28, 3–26
Default Retainage Exchange Rate, 2–28, 3–25
Default Retainage Percentage option, 2–27, 3–25
Default Retention Period option, 2‐27, 3–25
Number Of Days In Advance To Create Retainage Documents, 2–29, 3–27
Options (Continued) Schedule To Use For Automatic
Creation Of Retainage Documents, 2–29, 3–27
Use Separate Document Numbering When Creating Retainage Documents, 2–28, 3‐26
selecting during setup, 3–10 statement processing options, 2–25
Age Unapplied Cash And Prepayments option, 2–26, 3–24
Age Unapplied Credit Notes And Debit Notes, 3–24
Aging Periods, 2–25, 3–23 Default Number Of Days To Keep
Comments, 3–16 Dunning Messages, 2–25, 3–23 Print Zero‐Balance Statements, 2‐26,
3–24 transactions options
Allow Adjustments In Receipt Batches, 2–12, 3–21
Allow Edit After Deposit Slip Printed, 2–19, 3–21
Allow Edit After Invoice Printed option, 2–16, 3–18
Allow Edit After Receipt Printed, 2‐20, 3–21
Allow Printing Of Deposit Slips, 2‐18, 3‐20
Allow Printing Of Invoices option, 2–15, 3–18
Calculate Tax Reporting Amounts Automatically, 2–14, 3–18
Calculate Taxes Automatically, 2‐14, 3‐17
Check For Duplicate Checks, 2‐21, 3‐21
Create Deposit Slip When Receipt Batch Is Created, 2–18, 3–20
Default Bank Code, 2–16, 3–20

Index–14 Sage Accpac Accounts Receivable
Args‐inx.doc, printed on 1/28/2008, at 10:41:39 AM. Last saved on 1/28/2008 10:41:00 AM.
Sage Software Confidential
Options (Continued) Default Detail Tax Class To 1
option, 3–18 Default Invoice Type, 2–13 Default Order Of Open Documents,
2–20, 3–19 Default Payment Code, 2–17, 3–19 Default Posting Date option, 3–17,
3–20 Default Transaction Type, 2–17 document numbers, assigning, 2–22 Force Printing Of Deposit Slips,
2‐19, 3‐21 Include Pending Transactions, 2–18,
3–20 next invoice batch number, 2–24 printing (overview), 2–16 Show Item Cost, 2–15, 3–18 Use Item Comment As Default,
2‐15, 3‐18 Order Entry
drill down to transactions in, 1–10 integrating with Accounts Receivable,
1–10 Overdue balances
calculating interest charges on, 2–50 Overdue limit
specifying for customer groups, 3–70
P
Payment codes assigning, 2–53 overview, 2–52
Payment Codes form using, 2–53, 3–47
Payment terms See: Terms
Percentage (sales split) entering in customer records, 3–93
Posting Create G/L Transactions option, 2–32
Posting dates restrictions on, 1–7
Posting options Adding To An Existing Batch option,
2‐33 Consolidate G/L Batches, 2–34 Create G/L Transactions, 2–32 Creating A New Batch option, 2–33 Creating And Posting A New Batch
option, 2–33 Posting sequence
invoice posting sequence number, 2–24 Prefix (document number) options
selecting, 3–22 Prepayment
Age Unapplied Cash And Prepayments option, 2–26
document numbers assigning prefix and next number,
2–22 Prepayment Liability account, 2–41
Price specifying for items, 3–51
Price list See: Item list
Price, item in multicurrency systems, 2–55 overview, 2–54
Primary ship‐to location overview, 2–86, 2–90 specifying for a customer, 3–100
Print Statements option selecting for customer records, 3–88 selecting for national accounts, 3–78
Print Zero‐Balance Statements option overview, 2–26 selecting, 3–24
Printing options Age Unapplied Cash And Prepayments,
3–24

Getting Started Index–15
Args‐inx.doc, printed on 1/28/2008, at 10:41:39 AM. Last saved on 1/28/2008 10:41:00 AM.
Sage Software Confidential
Index
Printing options (Continued) Age Unapplied Credit Notes And Debit
Notes, 3–24 Allow Printing Of Deposit Slips, 3–20 Allow Printing Of Invoices, 3–18 Force Printing Of Deposit Slips, 3–21 Print Zero‐Balance Statements, 3–24
Printing statements specifying options, 2–25
Process Recurring Charges option, 2–4 changing, 2–4 selecting, 3–13
Processing by billing cycle remittance address on statements, 2–45 updating the Last Maintained field, 2–45
Processing options See: Options
Processing retainage Report Tax option, 2–30
Processing transactions for national accounts, 2–72
Profile, interest See: Interest profiles
Program features, 1–1 Project and Job Costing
integrating with Accounts Receivable, 1–10
Purchase order number adding to a recurring‐charge record,
3‐109
R
Rate type assigning
to multicurrency customer groups, 3–69 to multicurrency recurring‐charge
records, 3–109 default rate type, 2–17
Receipt Discounts account, 2–41
Receipt options, 2–12 Allow Adjustments In Receipt Batches,
2–12, 2–20, 3–21 Allow Edit After Deposit Slip Printed
option, 2–19, 3–21 Allow Edit After Receipt Printed option,
2–20, 3–21 Allow Printing Of Deposit Slips option,
2–18, 3–20 Create Deposit Slip When Receipt Batch
Is Created, 2–18, 3–20 Default Bank Code, 2–16, 3–20 Default Order Of Open Documents, 3‐19 Default Payment Code, 2–17, 3‐19 default rate type (in a batch), 2–17 Default Transaction Type, 2–17, 3–18 document numbers
assigning prefix and next number, 2–22
Force Printing Of Deposit Slips option, 2–19, 3–21
Include Pending Transactions, 2–18, 3‐20
Receipt type adding, 3–47 default for a customer, 3–89
Receivables Control account, 2–41 Recurring charge invoice
assigning the document number, 2–24 prefix and next number, 2–22
Recurring charges adding, 2–92, 3–106 and deleting customer record, 2–96 and invoice frequency, 2–92 and tax calculation, 2–96 assigning
a schedule code, 3–107 a start date, 3–107 amounts and limits, 2–93 invoice detail optional fields, 3–111 payment terms, 2–93 recurring charge code, 3–106
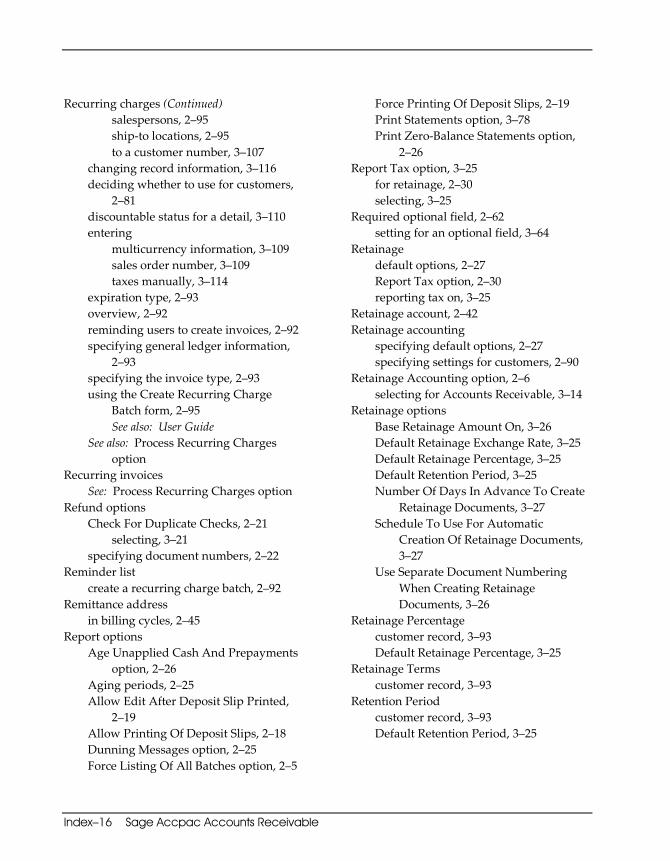
Index–16 Sage Accpac Accounts Receivable
Args‐inx.doc, printed on 1/28/2008, at 10:41:39 AM. Last saved on 1/28/2008 10:41:00 AM.
Sage Software Confidential
Recurring charges (Continued) salespersons, 2–95 ship‐to locations, 2–95 to a customer number, 3–107
changing record information, 3–116 deciding whether to use for customers,
2–81 discountable status for a detail, 3–110 entering
multicurrency information, 3–109 sales order number, 3–109 taxes manually, 3–114
expiration type, 2–93 overview, 2–92 reminding users to create invoices, 2–92 specifying general ledger information,
2–93 specifying the invoice type, 2–93 using the Create Recurring Charge
Batch form, 2–95 See also: User Guide
See also: Process Recurring Charges option
Recurring invoices See: Process Recurring Charges option
Refund options Check For Duplicate Checks, 2–21
selecting, 3–21 specifying document numbers, 2–22
Reminder list create a recurring charge batch, 2–92
Remittance address in billing cycles, 2–45
Report options Age Unapplied Cash And Prepayments
option, 2–26 Aging periods, 2–25 Allow Edit After Deposit Slip Printed,
2–19 Allow Printing Of Deposit Slips, 2–18 Dunning Messages option, 2–25 Force Listing Of All Batches option, 2–5
Force Printing Of Deposit Slips, 2–19 Print Statements option, 3–78 Print Zero‐Balance Statements option,
2–26 Report Tax option, 3–25
for retainage, 2–30 selecting, 3–25
Required optional field, 2–62 setting for an optional field, 3–64
Retainage default options, 2–27 Report Tax option, 2–30 reporting tax on, 3–25
Retainage account, 2–42 Retainage accounting
specifying default options, 2–27 specifying settings for customers, 2–90
Retainage Accounting option, 2–6 selecting for Accounts Receivable, 3–14
Retainage options Base Retainage Amount On, 3–26 Default Retainage Exchange Rate, 3–25 Default Retainage Percentage, 3–25 Default Retention Period, 3–25 Number Of Days In Advance To Create
Retainage Documents, 3–27 Schedule To Use For Automatic
Creation Of Retainage Documents, 3–27
Use Separate Document Numbering When Creating Retainage Documents, 3–26
Retainage Percentage customer record, 3–93 Default Retainage Percentage, 3–25
Retainage Terms customer record, 3–93
Retention Period customer record, 3–93 Default Retention Period, 3–25
Getting Started Index–17
Args‐inx.doc, printed on 1/28/2008, at 10:41:39 AM. Last saved on 1/28/2008 10:41:00 AM.
Sage Software Confidential
Index
S
Sage Accpac General Ledger using G/L Integration options, 2–31
Sage Accpac Workbook, 1–13 Sales split, entering
for recurring charges, 3–113 for ship‐to locations, 3–102 in customer records, 3–93
Sales target entering in salesperson records, 3–54
Sales tax including in statistics, 2–10 specifying in customer records, 2–89
Sales tax information specifying in item records, 2–55
Salesperson record, 2–57 adding, 3–53 assigning to customer records, 3–93 assigning to ship‐to‐locations, 3–102 entering default for customer groups,
3‐71 entering the employee number, 3–54
Salesperson statistics changing selections, 2–8 Include Tax In Statistics option, 2–10 overview of options, 2–7
Salespersons form using, 3–53
Sample terms, 3–58 Schedule To Use For Automatic Creation Of
Retainage Documents option, 2–29 Schedules
and timing of recurring charge invoices, 2–92
Setting up Accounts Receivable adding receivables accounts to your
general ledger, 3–9 adding setup records, 3–34
See: Setup records adding tax and bank information, 3–10
Setting up Accounts Receivable (Continued) assigning codes and numbers to
customer and setup records, 2–37 document numbers, 2–22 entering company contact, 3–12 entering company options, 3–11 entering customer transactions, 2–98 entering phone and fax numbers, 3–12 exporting setup information, 2–96 guideposts to Accounts Receivable
information, 3–5 importing setup information, 2–96 multicurrency
adding currency information, 3–10 Multicurrency option, 2–3, 3–13 preparing currency records, 3–9 summary of multicurrency setup,
2–101 overview, 3–2
entry options, 2–12 retainage accountingm 2–6 summary of steps, 3–1
preparing records from your other system, 3–8
selecting options for Accounts Receivable, 3–10 See also: Options
sorting order of codes and numbers, 2‐39
using the Setup Checklist, 3–3 using the Setup wizard, 3–1
Setting up customer records customer groups, 2–64, 2–67 customers, 2–64, 2–77, 3–66 national accounts, 2‐64, 2–71 overview of customer groups, 2–67 recurring charges, 2–92 ship‐to locations, 2–90
See also: Ship‐to location Setup checklist, Appendix A
using during setup, 3–3
Index–18 Sage Accpac Accounts Receivable
Args‐inx.doc, printed on 1/28/2008, at 10:41:39 AM. Last saved on 1/28/2008 10:41:00 AM.
Sage Software Confidential
Setup records account sets, 2–40, 3–36 adding, 3–34 billing cycles, 2–44, 3–39 changing, 3–65
See also: User Guide distribution codes, 2–45, 3–40, 3–42 dunning messages, 2–47, 3–42 e‐mail messages, 2–47 interest profiles, 2–49, 3–44 items, 2–53, 3–48 payment codes, 2–52, 3–47 preparing in your other system, 3–8 terms codes, 2–58 salesperson records, 2–57 sorting order of codes and numbers,
2‐39 terms codes, 2–58 See also: Setting up Accounts
Receivable; Setting up customer records
Setup wizard creating a new company database, 3–1
Ship Via Description, 3–92 Ship Via method
specifying defaults for customers, 2–86, 3–91
Shipping address entering for ship‐to‐locations, 3–100
Shipping details default for customers, 2–86
Ship‐to location adding, 2–90, 3–98 and optional fields, 2–91 assigning
Inactive status, 3–100 optional fields, 2–91 price list code, 3–101 ship‐to code, 3–100
changing record information, 3–104 deciding whether to use for a customer,
2–81
Ship‐to location (Continued) default inventory location, 2–91 entering
data in optional fields, 3–103 salesperson information, 3–102 shipping address, 3–100 ship‐to code, 3‐100 tax information, 3–102 territory code, 3–100
overview, 2–90 primary ship‐to location, 2‐86, 3‐100 specifying a ship‐via method, 3–101 specifying salespersons, 2–91
Ship‐To Location, primary overview, 2–86, 2–90 specifying for a customer, 3–100
Ship‐To Locations form using, 3–98
Ship‐via method specifying for a ship‐to location, 3–101
Short name assigning to customer records, 3–86 overview, 2–82
Show Item Cost option, 3–18 overview, 2–15
Sorting order, codes and numbers, 2–39 Standard invoices
See: Process Recurring Charges option Start date, entering
in customer records, 3–87 Statements
for balance‐forward customers, 2–66 for open‐item customers, 2‐66 for national accounts
Print Statements option, 3–78 See also: Options, statements
Statistics adding item statistics during setup, 2–57 Allow Edit Of (customer) Statistics
option, 3–15 Allow Edit Of (item/salesperson)
Statistics option, 3–15
Getting Started Index–19
Args‐inx.doc, printed on 1/28/2008, at 10:41:39 AM. Last saved on 1/28/2008 10:41:00 AM.
Sage Software Confidential
Index
Statistics (Continued) entering previous‐year customer
statistics, 2–99 excluding or including tax, 2–10 in customer groups, 2–69 in customer records, 2–81, 2–85 in national accounts, 2–75 Include Tax In (customer) Statistics
option, 3–15 changing your selection, 2–10
Include Tax In (item/salesperson) Statistics option, 3–15 changing your selection, 2–10
item records, 2‐56 Keep (item/salesperson) Statistics
option, 3–14 changing option selections, 2–8
options Allow Edit Of (customer) Statistics,
3–15 Allow Edit Of (item/salesperson)
Statistics, 3–15 Include Tax In (customer) Statistics,
3–15 Include Tax In (item/salesperson)
Statistics, 3–15 Include Tax In Statistics option, 2–
10 Keep (item/salesperson) Statistics,
3–14 overview
customer group statistics, 2–7 customer statistics, 2–7 item statistics, 2–56 national account statistics, 2–7 options, 2–7 salesperson statistics, 2–8
salespersons, 2–57 changing option selections, 2–8
T
Tax calcuating on item sales, 2–55 excluding or including in customer
statistics, 2–10 including in discount base, 2–59 including in statistics, 2–10 on retainage (timing of), 2–30 specifying alternate tax base amounts in
item records, 3–52 Tax calculation
default methods for invoice entry, 2–14, 3–17
for recurring charges, 2–96 on item sales, 2–55
Tax group default for customer groups, 3–71
Tax information, entering in customer records, 2–89, 3–93 in recurring charge records, 2–96
manual entry, 3–114 in item records, 2–55, 3–52 in ship‐to‐locations 2–91, 3–102
Tax on retainage reporting, 3–25 timing, 2–30
Telephone number entering, 3–12
Terms adding, 3–55 assigning to customers, 2–60 changing during invoice entry, 2–60 examples, 3–58 overview, 2–58 selecting
Discount Type option, 3–57 Due Date Table option, 3–57 Due Date Type option, 3–56 Multiple Payment Schedule option,
3–56 using due date tables, 2–59

Index–20 Sage Accpac Accounts Receivable
Args‐inx.doc, printed on 1/28/2008, at 10:41:39 AM. Last saved on 1/28/2008 10:41:00 AM.
Sage Software Confidential
Terms code Multiple Payment Schedule option, 2–59
Terms form using, 3–55
Territory code, entering in customer records, 3–86 in ship‐to‐locations, 3–100
Timed payments See: Multiple Payment Schedule option
Transaction Analysis and Optional Fields Creator, 2–1
Transactions assigning data to G/L transaction fields,
2–35, 3–32 entering to set up customer balances,
2‐98 processing for national accounts, 2–72
Transactions Options See: Options
U
Unapplied cash transaction Age Unapplied Cash And Prepayments
option, 2–26 assigning prefix and next number, 2–22
Unapplied transactions aging, 2–26 in interest calculations, 2–51
Unit of measure, item entering, 3–51 in multicurrency systems, 2–55 overview, 2–54
Unrealized exchange gains and losses general ledger accounts overview, 2–42, 2–43
Use Item Comment As Default option overview, 2–15 selecting, 3–18
Use Separate Document Numbering When Creating Retainage Documents option, 2–28
Using Accounts Receivable through an Internet browser, 1–1, 3–2 with other ACCPAC programs, 1–9
Using an Accounts Receivable item list with Sage Accpac Inventory Control,
2‐54 Using Finders, 3–6 Using Help, 3–6
V
Value Set option (for optional fields), 2–62 VAT (value‐added tax) number (for items),
3–49
W
Web using Accounts Receivable through a browser, 1–1, 3–2
Web site address entering in customer record, 3–87 for national account, 3–77
Write‐Offs account, overview, 2–42
Z
Zero rate to turn off interest charges, 2–52
Zero‐balance accounts Print Zero‐Balance Statements option,
2–26

Getting Started Index–1
Args‐inx.doc, printed on 1/28/2008, at 10:41:39 AM. Last saved on 1/28/2008 10:41:00 AM.
Sage Software Confidential
Index Index


