Montgomery County Public Schools The Department of Technology Consulting and Communications, OOD Montgomery County Public Schools, Rockville, MD Achievement Series Comprehensive User’s Guide
Transcript
Montgomery County Public Schools
The Department of Technology Consulting and Communications, OOD Montgomery County Public Schools, Rockville, MD
Achievement Series Comprehensive User’s Guide
This guide was prepared by: Yakoubou Ousmanou, Technology Consultant & Achievement Series Project Manager Ryan McNavage, Technology Consultant & Achievement Series Training Lead
Procedures and Steps for Solving Issues..................................................... 45 Hardware and Scan Station Issues........................................................................................... 45 IMS and OASIS Sectioning/Scheduling Issues....................................................................... 45 Access To Achievement Series Website ................................................................................. 45 Weighted Scoring .................................................................................................................... 46 Student Answer Sheets ............................................................................................................ 46 Training for Achievement Series............................................................................................. 46
Final Exams: Achievement Series Answer Sheets........................................ 47 Pre-printed student answer sheets ........................................................................................... 47 Blank or Non Pre-printed student answer sheets..................................................................... 47 What to do when student is not listed in Achievement Series................................................. 48 Handling Omitted and Multiple Marks in Achievement Series .............................................. 49
Changing Achievement Series Password ...................................................... 51
OVERVIEW Achievement Series is a web-based assessment tool from Scantron Corporation. MCPS uses Achievement Series for instant scoring of assessments using plain paper answer sheets and a scanner to produce standard based reporting of results at the student, classroom, school, and district level.
The Technology for Curriculum Mastery (TCM) initiative is part of the Superintendent's plan to recapture instructional time through the use of new technologies. Achievement Series is part of the TCM and Montgomery County Public Schools (MCPS) is leveraging the use of Achievement Series to:
• Save teachers time in scoring and reporting assessments
Teachers can spend less time scoring and analyzing
Teachers can spend more time on instruction
• Provide timely, accurate, and detailed reports
• Enable teachers to quickly adapt to meet the needs of all students
MCPS is using Achievement Series to facilitate scoring and reporting of the following:
Subject Assessments
Algebra Final Exams, Summative and Formative Assessments
English 9 &10 Final Exams
Biology Final Exams and end of unit assessments
NSL Final Exams and end of unit assessments
Middle Schools Math and English formative and summative assessments
Achievement Series is implemented in all middle and high schools
• Seven alternatives schools
• Two elementary schools with Grade 6
This comprehensive guide is intended for scanner operators, teachers, school testing coordinators, school based administrators, technology specialists, central office staff, Help Desk and support staff and all users of Achievement Series in Montgomery County Public Schools.
PRINTING STUDENT ANSWER SHEETS: QUICK GUIDE Prerequisite: Scan Station must be downloaded and configured by the school ITSS for the appropriate scanner/printer. DO NOT prints student answer sheets from the scanner. Print to the Gestetner or to any high volume printer.
LOGIN TO SCAN STATION
School Scan Operator or teacher logs into Scan Station.
School Site ID: _____________
Staff ID: ____________
Password: ___________
Call the Help Desk (301-517-5800) to get your School/Staff ID or your password.
1. Select the District Tests tab.
2. Select (highlight) the test name
3. Click the Form button
4. Select the Custom Plain Paper tab
5. Notice the Test ID at the top of the screen
The Answer Key Only test has only 1 Test ID
If a test has more than one version(ex. Alg_1_U3_EofU), select the desired Test ID
6. Select a Class
7. Check Select All Students box to choose the whole class or check specific students
8. Change the name in the Teacher box (lower right) if it is not correct
Note: The current name is the person who logged into Scan Station
IMPORTANT: Be sure these boxes in the lower right corner are checked:
Test ID
Student ID
Student Name
NOTE: To print a one page blank answer sheet, uncheck the Student ID and Student Name. Achievement Series will not allow you to print blank two pages answer sheets.
9. Now click PRINT
10. Click Yes when the Alert window pop ups.
8
11. When the PDF opens with the student test forms, select FiILE >PRINT
VERY IMPORTANT: In the section referred to as Page Handling make these selections:
Page Scaling: Select NONE
Auto Rotate and Center: This box must NOT be checked!
12. If the Adobe Settings are correct, then click OK to print the test forms.
13. After printing the forms, close the Adobe file.
Use this option to print a test answer sheet for each student. The form will contain the Student’s Name, Student ID and the Test IDs, all preprinted and preslugged.
1. Verify that a laser jet printer is connected to or accessible from the PC, and is on.
2. Open Scan Station and login with the Site ID, Staff ID and Password.
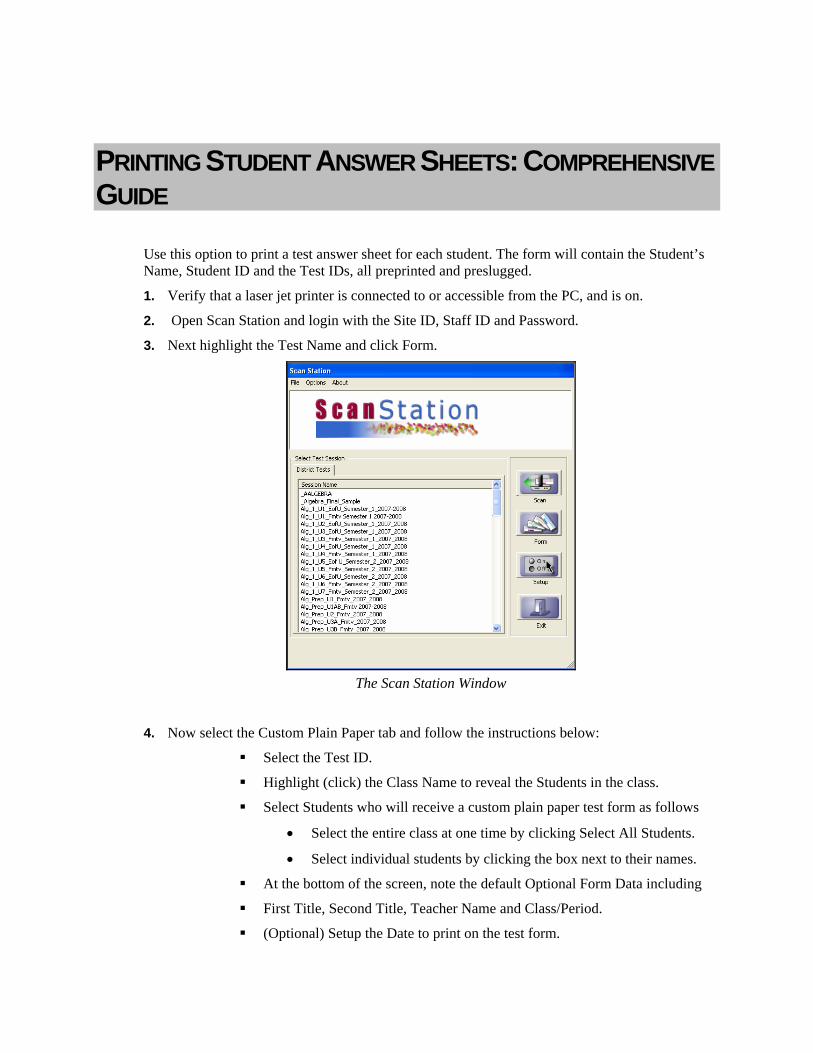
3. Next highlight the Test Name and click Form.
The Scan Station Window
4. Now select the Custom Plain Paper tab and follow the instructions below:
Select the Test ID.
Highlight (click) the Class Name to reveal the Students in the class.
Select Students who will receive a custom plain paper test form as follows
• Select the entire class at one time by clicking Select All Students.
• Select individual students by clicking the box next to their names.
At the bottom of the screen, note the default Optional Form Data including
First Title, Second Title, Teacher Name and Class/Period.
(Optional) Setup the Date to print on the test form.
10
Check Student ID, Student Name and Test ID.
Click Print to generate the Custom Plain Paper test forms.
NOTE: To print blank answer sheets (for 1 page answer sheets only), do not check student ID and Student Name in step above.
Plan Paper Printing Window
5. Once the Print button has been clicked, the PDF document will be created. If you selected more than one student, each student’s answer sheet will be included in this one PDF document.
6. As the PDF document is created, you will receive an Alert message. This message reminds you of some very important printing information. Click “Yes” to be reminded again. The Auto Rotate and Page Scaling options will automatically be deselected when printing. It is important that they remain deselected so that the answer sheets scan correctly.
Alert Message Window
7. Once the PDF answer sheets appear, you can Print or Save the student answer sheets.
11
PDF student Answer Sheet
8. To Save the answer sheets, go to File > Save As and give the file a name ending in .pdf.
Save As Window
9. To Print the answer sheets, go to File>Print and print the documents to a high volume printer. Do not print to the Achievement Series scanner.
Print Window
SCANNING STUDENT ANSWER SHEETS: QUICK GUIDE
1. Login in to Scan Station
2. Select DISTRICT TESTS
3. Select desired test
4. Click SCAN
5. Put forms in the Scanner’s Automatic Feeder. (Brother: Head first, Face up)
6. Click START SCAN on Scan Station.
7. After the forms have all scanned, look at the symbol by each form on Scan Station.
A Green Check Mark means the form has been successfully transmitted.
Two Red Dots means the first error on the form is a multiple mark.
An Open Red Circle means the first error on the form is an omitted mark.
A Red X means the form has a major error. (Wrong Test ID, Wrong Student ID) and needs to be rescanned.
8. Click the “red symbol” by the first form on the list and address errors as follows:
NOTE 1: If the “red symbol” is Two Red Dots or an Open Red Circle, examine all the student’s answers. Make necessary changes (according to the procedures outlined in the omitted/multiple marks memo-April 2008) as needed and click Accept or Update.
Tip! When forms are scanned on a Plain Paper Scanner, click inside an answer box and then click the Magnifying Glass icon to see an image of student’s actual marks.
NOTE 2: After a form has been modified and the changes have been accepted or updated, a yellow checkmark will display next to the student’s name
***HELPFUL HINTS ON SCANNING***
If a form is marked with a Red X and clicking the X indicates that the Test ID cannot be recognized, just click Manual Input. Then select a Test ID (top of screen), enter the Student’s ID, and select the same answers the student marked on the form.
If a form is marked with a Red X and clicking the X indicates that the Student ID Cannot be Found at the School, just click the Binoculars icon to find the student.
If the ID was pre-marked on the form, you will see it onscreen. Just enter the number in the ID box, click Search, and select the student matching that ID.
If the ID was not pre-marked, enter the student’s name in the Name box and search for that student. After he is located, select the student.
IMPORTANT: After the correct student has been selected you must click the
14
Update button on Scan Station to officially make the change. Then you can address any marking errors on the student’s form at this time.
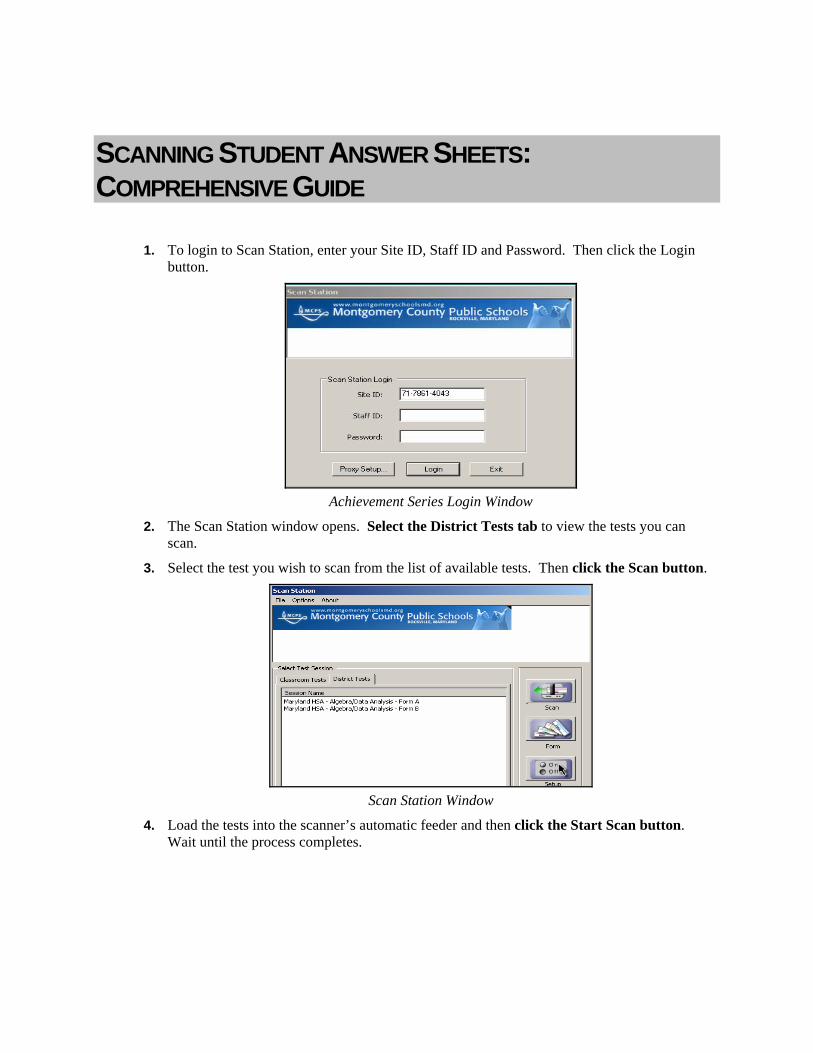
1. To login to Scan Station, enter your Site ID, Staff ID and Password. Then click the Login button.
Achievement Series Login Window
2. The Scan Station window opens. Select the District Tests tab to view the tests you can scan.
3. Select the test you wish to scan from the list of available tests. Then click the Scan button.
Scan Station Window
4. Load the tests into the scanner’s automatic feeder and then click the Start Scan button. Wait until the process completes.
16
Scanning Window
5. If there is a green check mark next to a student's name, the results were sent successfully to
Achievement Series. If there is any other mark, that student responses require action as described below.
• Two dots (··) indicates an answer with more than one response (multiple mark errors).
• An open O indicates an omission.
• A ? indicates that the response can't be read correctly.
• A red “X” indicates the form has a major error (wrong test ID, wrong student ID, wrong grade level)
If a red “X” appears next to a student’s name, check to make sure the correct test ID, student ID and grade level are on the answer sheet in question. Then rescan the test.
If one of the other error symbols above appears next to a name, click on the student’s name.
Scanning Window
6. If all answer sheets have been scanned correctly, skip to step 16 of this document. If multiple or omitted mark answers are indicated, continue with step 7.
17
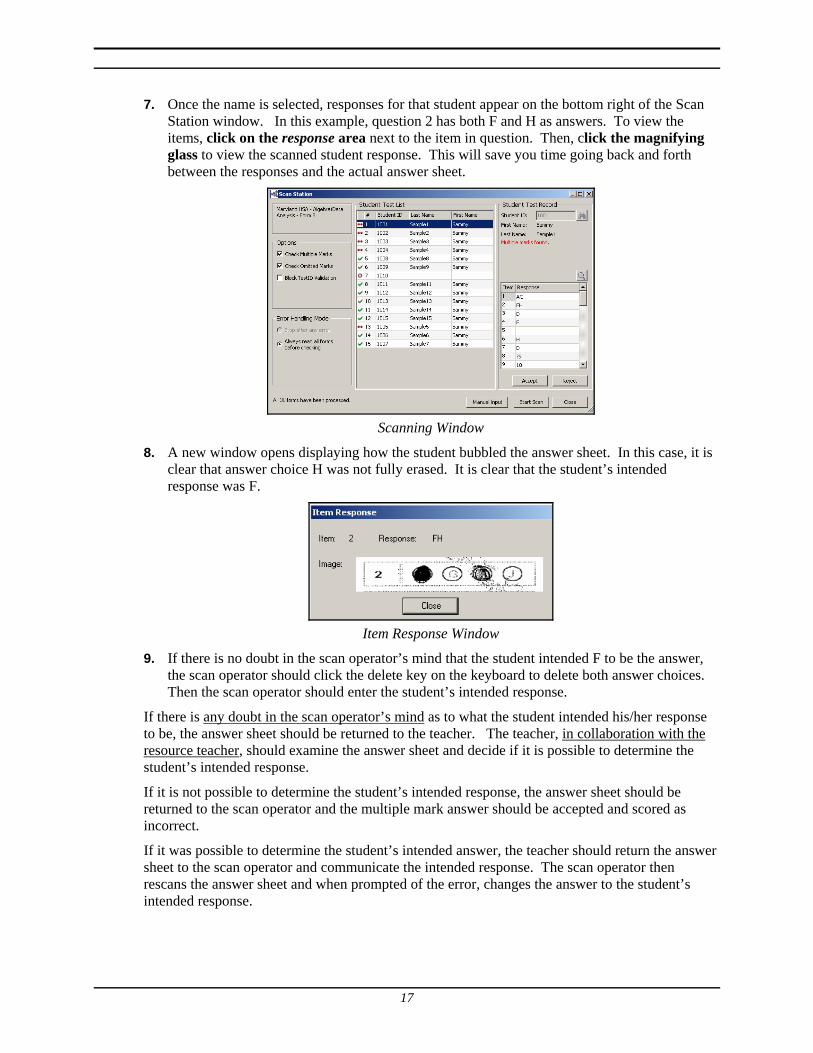
7. Once the name is selected, responses for that student appear on the bottom right of the Scan Station window. In this example, question 2 has both F and H as answers. To view the items, click on the response area next to the item in question. Then, click the magnifying glass to view the scanned student response. This will save you time going back and forth between the responses and the actual answer sheet.
Scanning Window
8. A new window opens displaying how the student bubbled the answer sheet. In this case, it is clear that answer choice H was not fully erased. It is clear that the student’s intended response was F.
Item Response Window
9. If there is no doubt in the scan operator’s mind that the student intended F to be the answer, the scan operator should click the delete key on the keyboard to delete both answer choices. Then the scan operator should enter the student’s intended response.
If there is any doubt in the scan operator’s mind as to what the student intended his/her response to be, the answer sheet should be returned to the teacher. The teacher, in collaboration with the resource teacher, should examine the answer sheet and decide if it is possible to determine the student’s intended response.
If it is not possible to determine the student’s intended response, the answer sheet should be returned to the scan operator and the multiple mark answer should be accepted and scored as incorrect.
If it was possible to determine the student’s intended answer, the teacher should return the answer sheet to the scan operator and communicate the intended response. The scan operator then rescans the answer sheet and when prompted of the error, changes the answer to the student’s intended response.
18
Item Response Area of Scanning Window
10. Once changes to an answer are made, click the Accept button. If there are additional problems with the student answer sheet, the completion status indicator will remain red. If there are no additional errors for that student, a yellow check mark will appear next to the student name. The yellow check mark indicates changes have been made to that student’s answer sheet. No further action is required for this student.
11. If an O appears next to a student’s name, an item has been omitted. Click on the student’s name.
12. Scroll down to the answer choice that has been omitted. Click on the response area next to the item in question, and then click the magnifying glass to view the response. If a student has omitted a selected response or griddable item (student produced response (SPR)), the scan operator should click the Update Button to accept the answer as intentionally omitted. The item will be scored as incorrect. If there are additional problems with the student answer sheet, the completion status indicator will remain red.
Scanning Window
13. If the omitted item is a BCR/ECR, the answer sheet should be returned to the teacher and the teacher should bubble in the appropriate choice. The answer sheet is then returned to the scan operator to be rescanned.
19
Item Response Window
14. When the question mark indicator (?) appears, a problem with a grid-in or student produced response (SPR) type item is indicated. The question mark indicates that the student response can’t be read correctly. The problem could be that the student has made multiple marks or omitted marks. Address these issues as previously described in this manual.
Item Response Area of Scanning Window
15. Once you have finished making all the required changes to a student’s answer sheet, click the Accept button. This will send that student’s results to Achievement Series. A yellow check mark will appear next to the student’s name.
16. When all scanning activity is completed, close the Scan Station window by clicking the Close button.
20
Scanning Window
MANUAL INPUT OF STUDENT ANSWER SHEETS IN ACHIEVEMENT SERIES
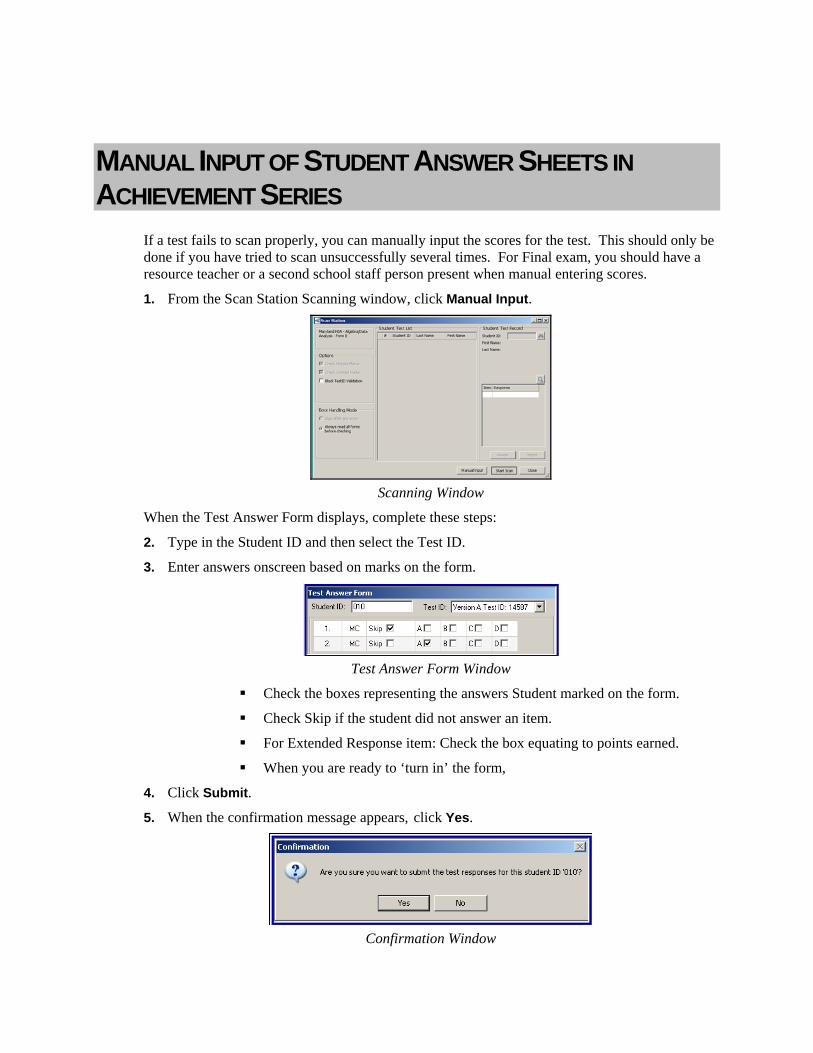
If a test fails to scan properly, you can manually input the scores for the test. This should only be done if you have tried to scan unsuccessfully several times. For Final exam, you should have a resource teacher or a second school staff person present when manual entering scores.
1. From the Scan Station Scanning window, click Manual Input.
Scanning Window
When the Test Answer Form displays, complete these steps:
2. Type in the Student ID and then select the Test ID.
3. Enter answers onscreen based on marks on the form.
Test Answer Form Window
Check the boxes representing the answers Student marked on the form.
Check Skip if the student did not answer an item.
For Extended Response item: Check the box equating to points earned.
When you are ready to ‘turn in’ the form,
4. Click Submit.
5. When the confirmation message appears, click Yes.
Confirmation Window
22
HANDLING OMITTED AND MULTIPLE MARKS
This guide provides directions on how teachers and scanner operators should handle omitted and multiple marks in Achievement Series. A summary of the new MCPS process for handling omitted and multiple marks is provided below.
1. If two or more marks clearly were made, or the student clearly omitted an answer, the
answer is scored incorrect
2. If it is clear that one mark was erased and another filled in, a student response is too lightly bubbled, or the student has indicated somehow (maybe in writing or with arrows) which one is the intended response, the teacher should review it with the resource teacher, determine if the right answer was selected and take the appropriate action as outlined in the attached document.
Achievement Series expects one mark on the student answer sheet for each item response unless that item was created as a Multiple Response item. To address the issue of omitted and multiple marks in Achievement Series, the step-by-step directions explained in the Scanning Student Answer section in this guide was created to be used by all Algebra I, Biology, English grade 9 and 10, and NSL Government teachers and scanner operators
In the following pages, you will find directions on how scanner operators should proceed when omitted and multiple marks are detected by the scanner. The processes described in this manual should be followed for all formative assessments, end of unit assessment, and end of semester exams delivered using Achievement Series.
The direction for handling omitted and multiple marks can be found on the web. You may download and save a copy by visiting the following link on the MCPS website:
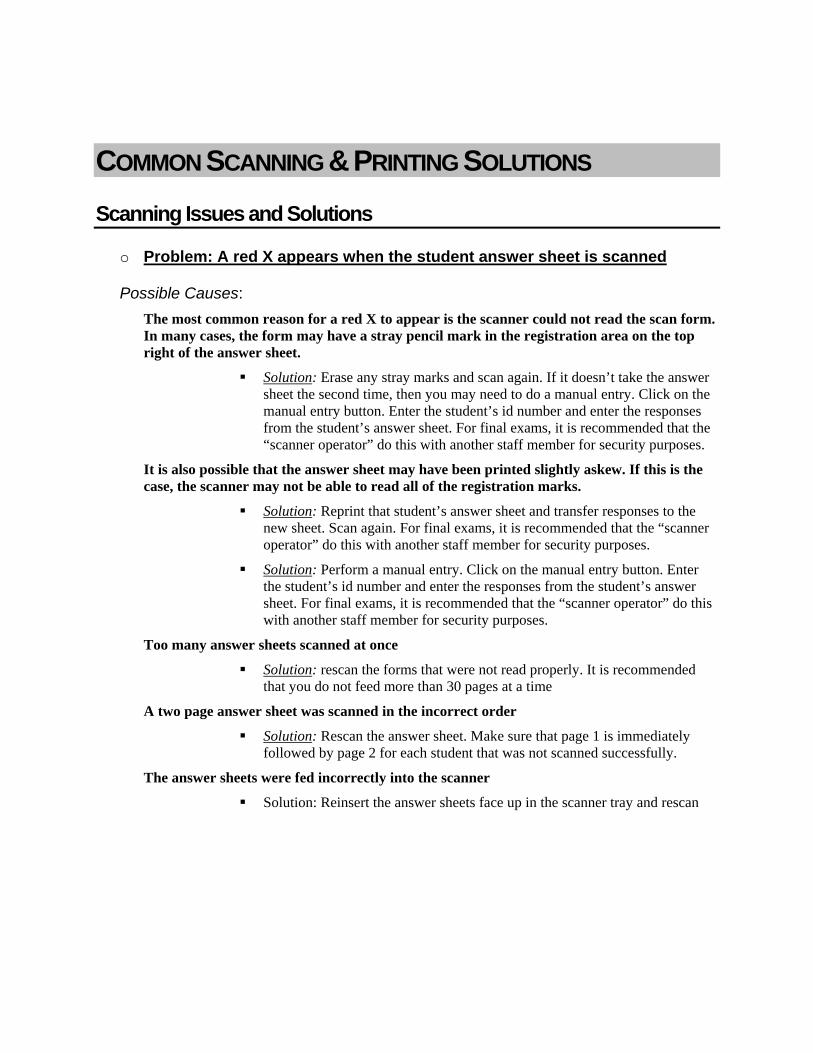
COMMON SCANNING & PRINTING SOLUTIONS Scanning Issues and Solutions
o Problem: A red X appears when the student answer sheet is scanned
Possible Causes:
The most common reason for a red X to appear is the scanner could not read the scan form. In many cases, the form may have a stray pencil mark in the registration area on the top right of the answer sheet.
Solution: Erase any stray marks and scan again. If it doesn’t take the answer sheet the second time, then you may need to do a manual entry. Click on the manual entry button. Enter the student’s id number and enter the responses from the student’s answer sheet. For final exams, it is recommended that the “scanner operator” do this with another staff member for security purposes.
It is also possible that the answer sheet may have been printed slightly askew. If this is the case, the scanner may not be able to read all of the registration marks.
Solution: Reprint that student’s answer sheet and transfer responses to the new sheet. Scan again. For final exams, it is recommended that the “scanner operator” do this with another staff member for security purposes.
Solution: Perform a manual entry. Click on the manual entry button. Enter the student’s id number and enter the responses from the student’s answer sheet. For final exams, it is recommended that the “scanner operator” do this with another staff member for security purposes.
Too many answer sheets scanned at once
Solution: rescan the forms that were not read properly. It is recommended that you do not feed more than 30 pages at a time
A two page answer sheet was scanned in the incorrect order
Solution: Rescan the answer sheet. Make sure that page 1 is immediately followed by page 2 for each student that was not scanned successfully.
The answer sheets were fed incorrectly into the scanner
Solution: Reinsert the answer sheets face up in the scanner tray and rescan
26
o Student scores are lower than anticipated Possible Causes The scanner did not read all of the student’s answers due to a light pencil marks or the student used a pencil other than a number 2 pencil.
Solution: Prevention- remind all students at the time of testing to use a number 2 pencil and to mark their answers completely. While the scanners can read ink, it is best for students to use a number 2 pencil. It is highly recommended to use the brand “Black Warrior" no 2 pencils, They seem to be a good dark color, and using these no 2 pencils will result in answers being read correctly by the scanners.
The teacher did not enter the BCR/ECR items on the assessment
Solution: Prevention- Make sure that teachers have recorded the BCR/ECR scores on the student answer sheets before scanning
•
o Student ID could not be found Possible Causes The student is not in Achievement Series
Solution: Teacher, class, and student information is uploaded nightly to Achievement Series. If the student is not listed in Achievement Series at the time of printing or scanning, check with the person in the school responsible for sectioning/scheduling to ensure that the student is listed in the right section at the school. Then, attempt to rescan the following day or within 48 hours.
A two page answer sheet was scanned in the incorrect order
Solution: Rescan the answer sheet. Make sure that page 1 is immediately followed by page 2 for each student that was not scanned successfully.
A blank answer sheet was printed for a new student and the wrong student id was entered on the form
Solution: Enter the correct student id on the answer sheet and rescan
•
o Paper Jam
Remove the jam. You may need to restart the computer. Log back into Scan Station and rescan the answer sheet
Printing Issues and Solutions o Student not listed in Scan Station software
Possible Causes Student is new to school and is not in the system yet
Solution: Teacher, class, and student information is uploaded nightly to Achievement Series. If the student is not listed in Achievement Series at the time of printing, check with the person in the school responsible for sectioning/scheduling to ensure that the student is listed in the right section at the school. Then, attempt to reprint the following day or within 48 hours.
Solution: Print a one page blank answer sheet for the student. Follow the same procedures used for printing an answer sheet with the student and testing information pre-slugged. However, uncheck the boxes for student name and student id. (Note: For exams with answer sheets that are two pages in length or more, a blank answer sheet cannot be printed in Achievement Series.)
o Answer sheets print very lightly Possible Causes
Answer sheets were printed to wrong printer
Solution: Remind scanner operator or teachers to print to the designated printer, preferably the Gestetner copier or other high speed printer configured for printing
o Answer sheets print askew Possible Causes
Possible jam in selected printer
Solution: Fix jam and reprint
o Answer sheets do not fit properly on the page Possible Causes
Adobe Acrobat print options not chosen properly
Solution: Make sure that Auto Rotate option is set to off and Page Scaling is set to none in Adobe print options
o Wrong class or exam was printed Possible Causes Scanner operator or teacher printed answer sheets for the first exam for the desired classes, but did not return to the main scanning screen to select the next exam to be printed
Solution: Before printing any answer sheet for a class, make sure that the correct assessment is chosen. Reprint with correct class and exam
VERY IMPORTANT REMINDER: When generating and printing the PDF answer sheets, in the section referred to as Page Handling make sure you have the following selections:
28
Page Scaling: Must be set to NONE
Auto Rotate and Center: This box must NOT be checked!
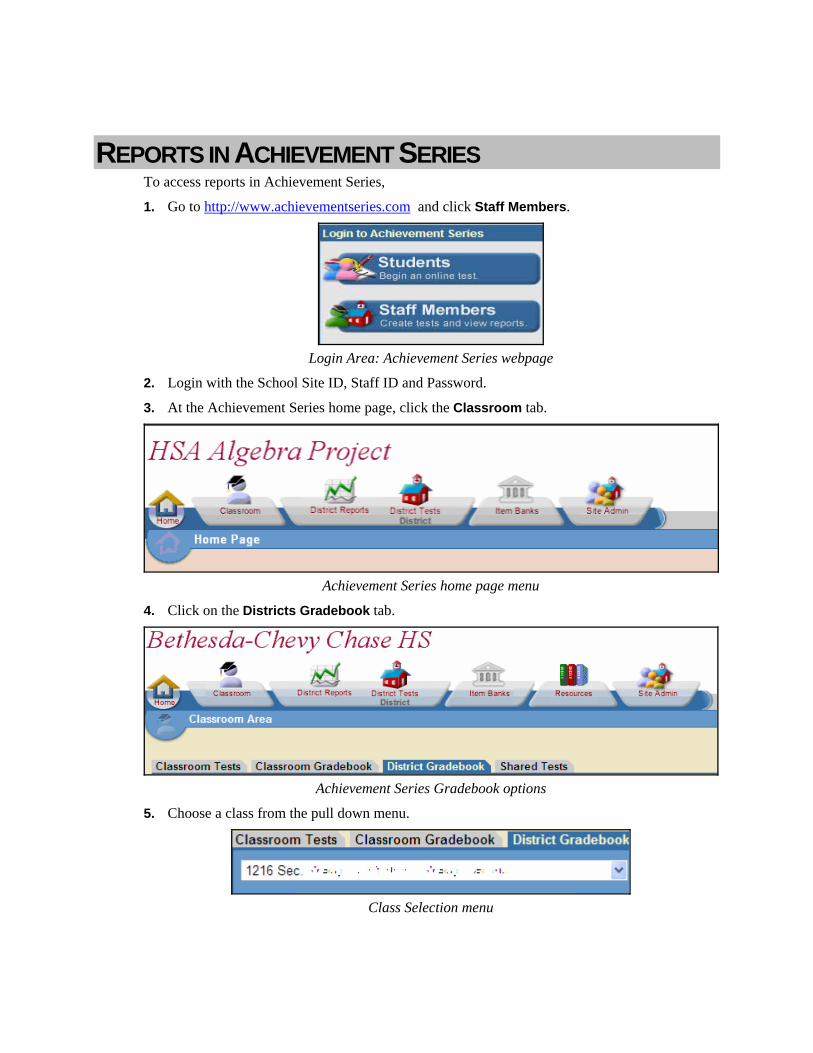
REPORTS IN ACHIEVEMENT SERIES To access reports in Achievement Series, 1. Go to http://www.achievementseries.com and click Staff Members.
Login Area: Achievement Series webpage
2. Login with the School Site ID, Staff ID and Password.
3. At the Achievement Series home page, click the Classroom tab.
Achievement Series home page menu
4. Click on the Districts Gradebook tab.
Achievement Series Gradebook options
5. Choose a class from the pull down menu.
Class Selection menu
30
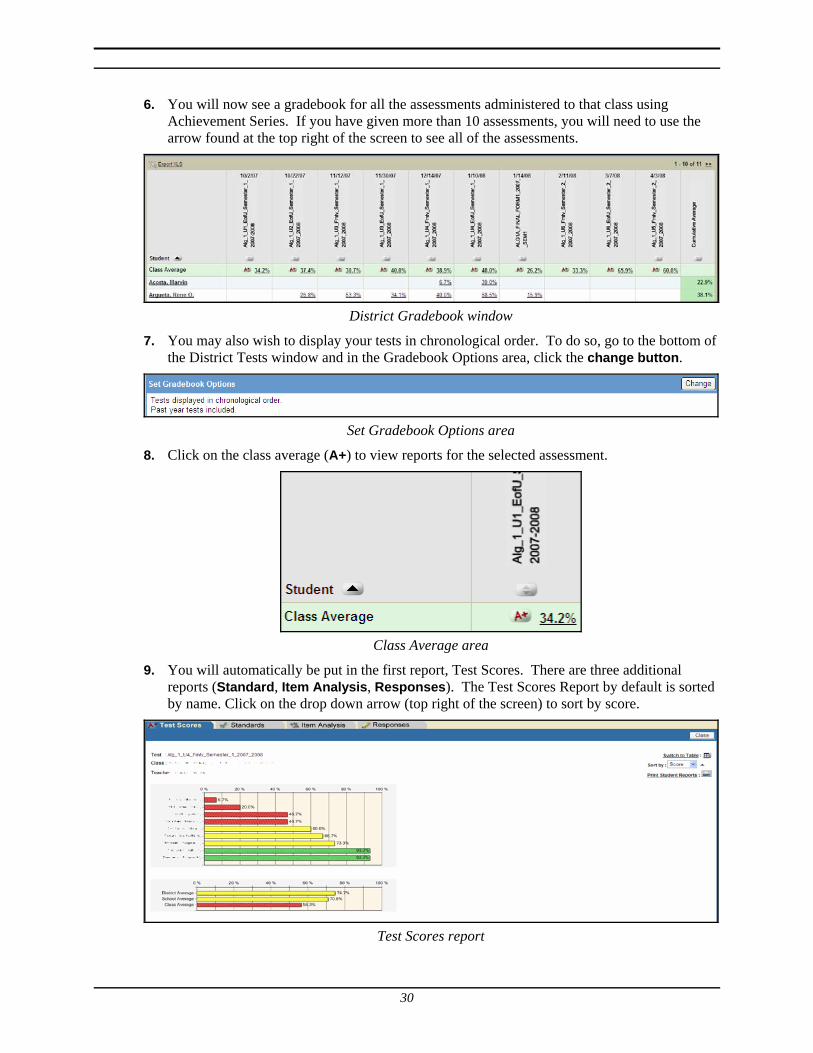
6. You will now see a gradebook for all the assessments administered to that class using Achievement Series. If you have given more than 10 assessments, you will need to use the arrow found at the top right of the screen to see all of the assessments.
District Gradebook window
7. You may also wish to display your tests in chronological order. To do so, go to the bottom of the District Tests window and in the Gradebook Options area, click the change button.
Set Gradebook Options area
8. Click on the class average (A+) to view reports for the selected assessment.
Class Average area
9. You will automatically be put in the first report, Test Scores. There are three additional reports (Standard, Item Analysis, Responses). The Test Scores Report by default is sorted by name. Click on the drop down arrow (top right of the screen) to sort by score.
Test Scores report
31
10. At the bottom of the Test Reports screen, you can compare how your class did in relation to the school and county.
11. Click on the Switch to Table link (top right of the screen) to see the scores in table form. You can sort the information by any of the underlined column headings by clicking on the heading.
Table View-Test Score report
12. At the top right of the screen, there is a link to view and Print Student Reports.
CAUTION: Do not print select student reports. These reports include correct answers as well as student responses and should not be shared with students.
13. The next report is the Standards Report. Click on the Standards tab at the Reports menu to view this report.
Reports menu
NOTE: It is often necessary to click the Close button in order to see the Standards, Item Analysis or the Responses reports.
14. The Standards report will appear in the default graph view. From the top right of the Standards reports window, you can sort the report by score or standard. You may also switch to Table view (recommended). Click on the Switch to Table link to switch your view.
Graph View of the Standards report
32
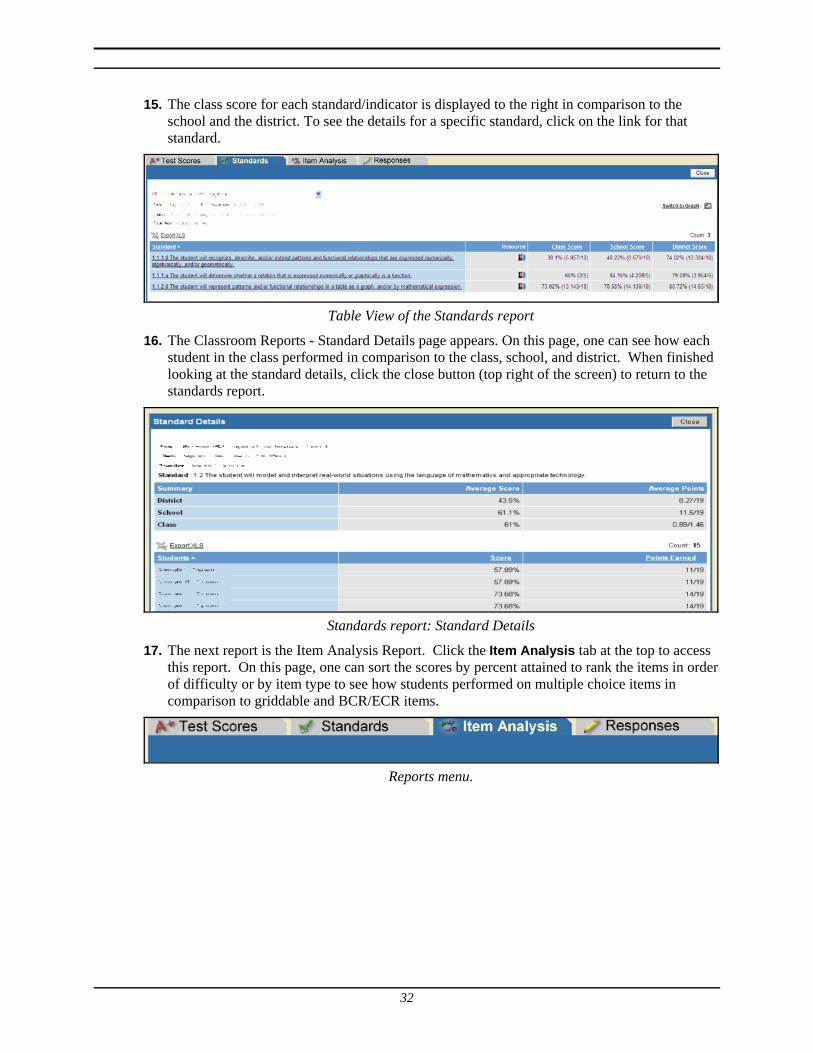
15. The class score for each standard/indicator is displayed to the right in comparison to the school and the district. To see the details for a specific standard, click on the link for that standard.
Table View of the Standards report
16. The Classroom Reports - Standard Details page appears. On this page, one can see how each student in the class performed in comparison to the class, school, and district. When finished looking at the standard details, click the close button (top right of the screen) to return to the standards report.
Standards report: Standard Details
17. The next report is the Item Analysis Report. Click the Item Analysis tab at the top to access this report. On this page, one can sort the scores by percent attained to rank the items in order of difficulty or by item type to see how students performed on multiple choice items in comparison to griddable and BCR/ECR items.
Reports menu.
33
18. On this report, you can sort the scores by percent attained, to rank the items in order of difficulty, or by item type to see how students performed on multiple choice items in comparison to griddable and BCR/ECR items. Click on any underlined column header to sort by that column.
Item Analysis report
19. To see how your students did on a particular item, from the Item Analysis report, click on the number of the item to display the item details.
Item Analysis report: Item Details
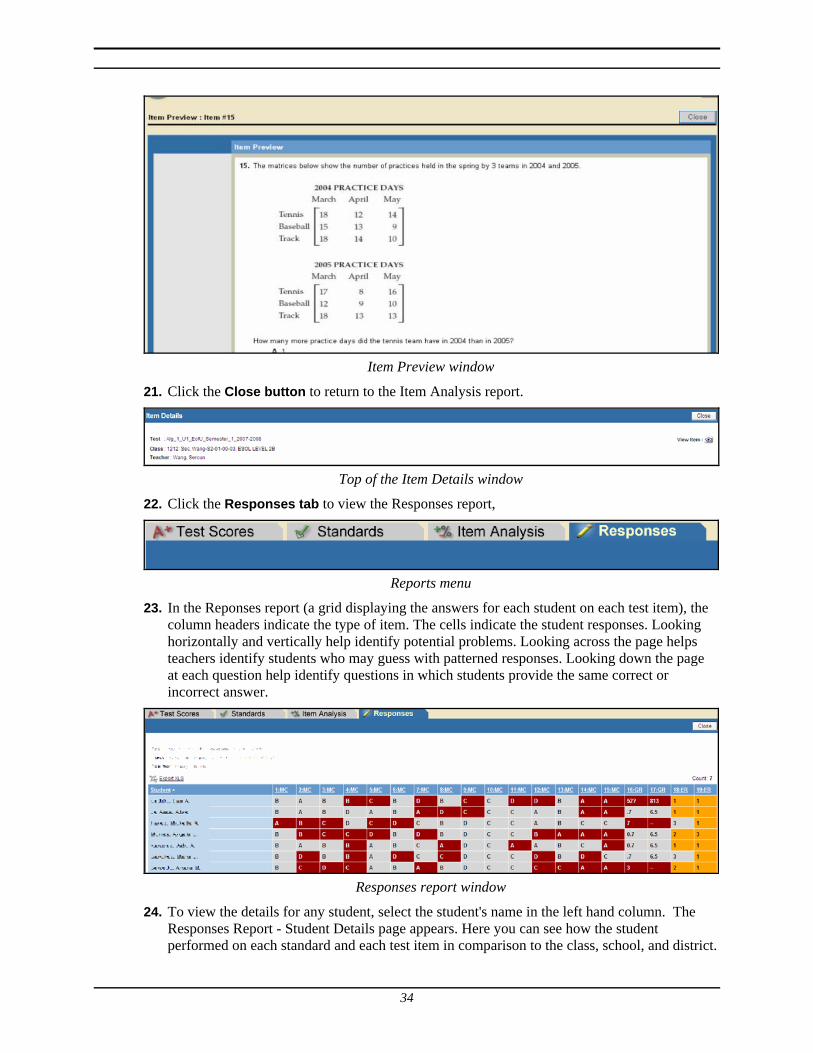
20. To view the actual item (for all Achievement Series assessments except final exams), click the View Item button (top right of the screen).
34
Item Preview window
21. Click the Close button to return to the Item Analysis report.
Top of the Item Details window
22. Click the Responses tab to view the Responses report,
Reports menu
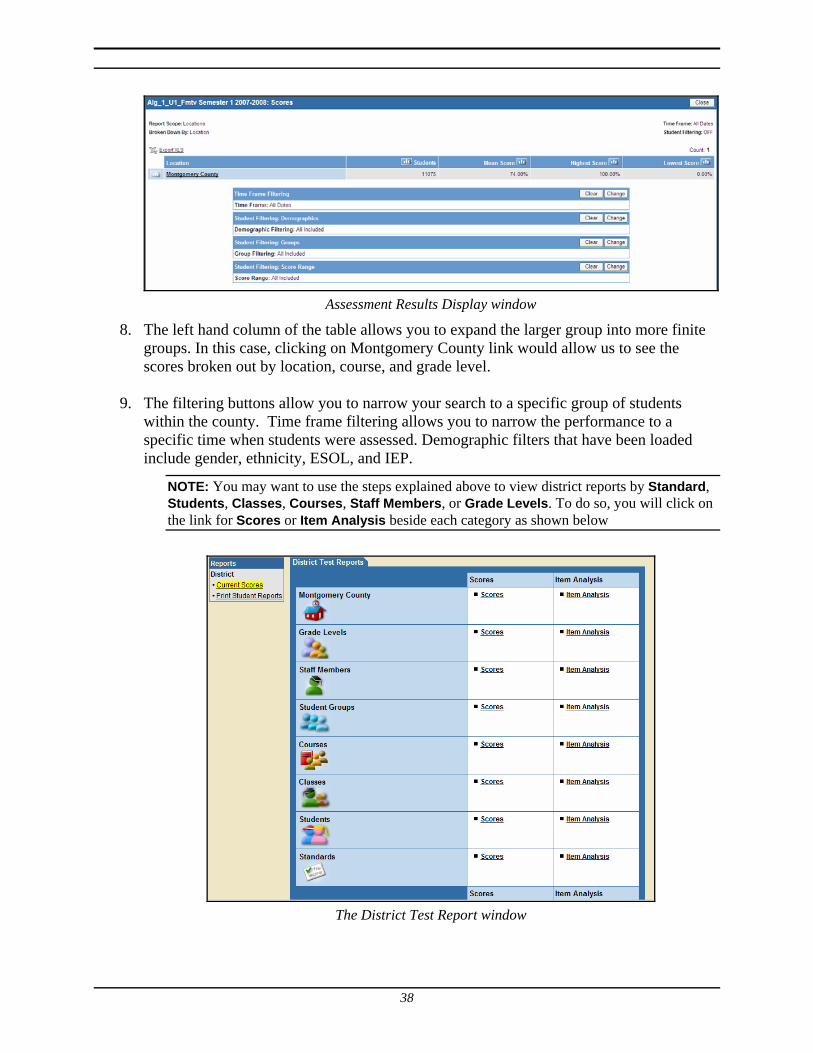
23. In the Reponses report (a grid displaying the answers for each student on each test item), the column headers indicate the type of item. The cells indicate the student responses. Looking horizontally and vertically help identify potential problems. Looking across the page helps teachers identify students who may guess with patterned responses. Looking down the page at each question help identify questions in which students provide the same correct or incorrect answer.
Responses report window
24. To view the details for any student, select the student's name in the left hand column. The Responses Report - Student Details page appears. Here you can see how the student performed on each standard and each test item in comparison to the class, school, and district.
35
Student Details report
25. Click the Close button to return to the Item Analysis report.
DISTRICT REPORTS IN ACHIEVEMENT SERIES District Reports are available at the school level to access school wide data and at the county level to access county wide data. To access district reports in Achievement Series,
1. Go to www.achievementseries.com 2. Click on the staff members button 3. Enter your login information:
Site ID: 68-5893-6297 (for those with district/countywide access) or your school Site ID Staff ID: Your Staff ID is your Outlook user name Password: Your assigned password. Call the Help Desk (301-517-5800) for login info.
4. Click on District Reports
District Reports button
5. Click on the link for Scores or Item Analysis link for the group you wish to examine (Note: The “student groups” link is not populated. The purpose of this link is to examine performance of district-defined groups such as after-school program participant, etc…)
Select Test Reports window
6. Click on the assessment you wish to view (Note: Not all of the assessments listed have
data at this time.)
Published Reports window
7. The results display the percentage based on the raw points earned.
38
Assessment Results Display window
8. The left hand column of the table allows you to expand the larger group into more finite groups. In this case, clicking on Montgomery County link would allow us to see the scores broken out by location, course, and grade level.
9. The filtering buttons allow you to narrow your search to a specific group of students within the county. Time frame filtering allows you to narrow the performance to a specific time when students were assessed. Demographic filters that have been loaded include gender, ethnicity, ESOL, and IEP.
NOTE: You may want to use the steps explained above to view district reports by Standard, Students, Classes, Courses, Staff Members, or Grade Levels. To do so, you will click on the link for Scores or Item Analysis beside each category as shown below
The District Test Report window
CALIBRATING SCANNER Scan Station does not support multiple scanner configurations on the same computer. If you have more than one scanner, set up a separate Scan Station computer for each one. To download and Install Scan Station, do the following:
1. Go to http://www.achievementseries.com
• Click Staff Member.
2. Login with the School Site ID, Staff ID and Password.
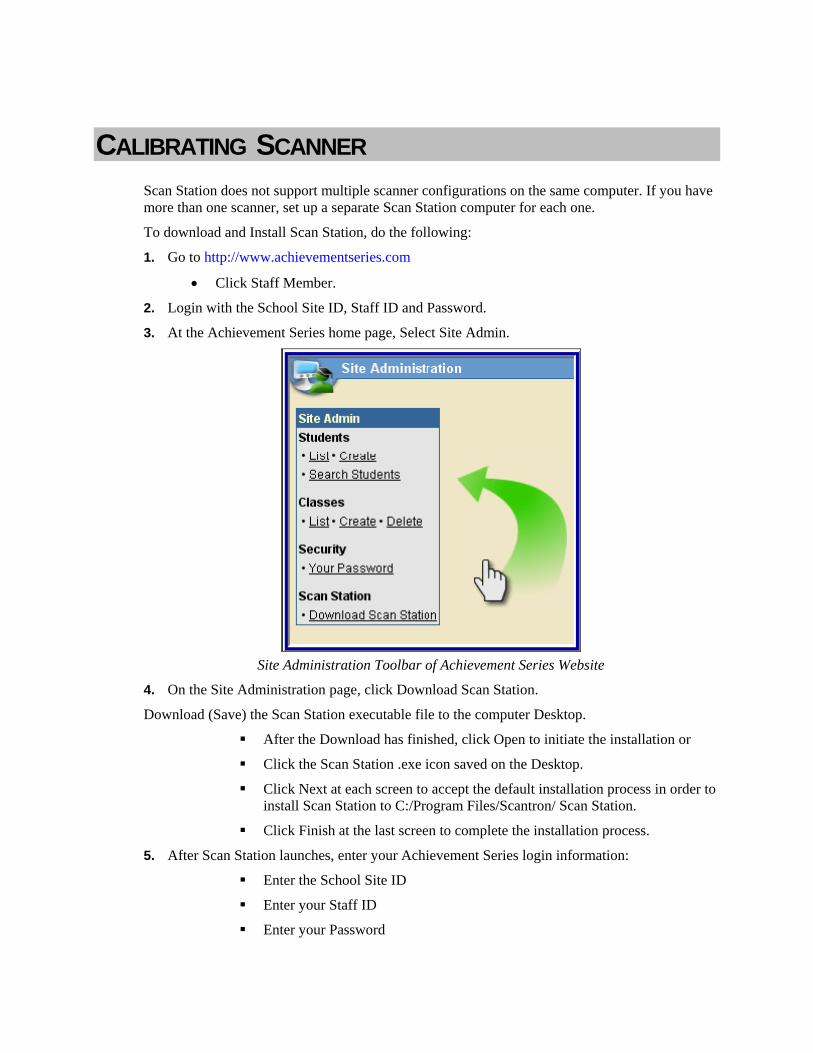
3. At the Achievement Series home page, Select Site Admin.
Site Administration Toolbar of Achievement Series Website
4. On the Site Administration page, click Download Scan Station.
Download (Save) the Scan Station executable file to the computer Desktop.
After the Download has finished, click Open to initiate the installation or
Click the Scan Station .exe icon saved on the Desktop.
Click Next at each screen to accept the default installation process in order to install Scan Station to C:/Program Files/Scantron/ Scan Station.
Click Finish at the last screen to complete the installation process.
5. After Scan Station launches, enter your Achievement Series login information:
Enter the School Site ID
Enter your Staff ID
Enter your Password
40
6. Click Login
Scan Station Login Window
7. Click the Setup button.
Scan Station Window
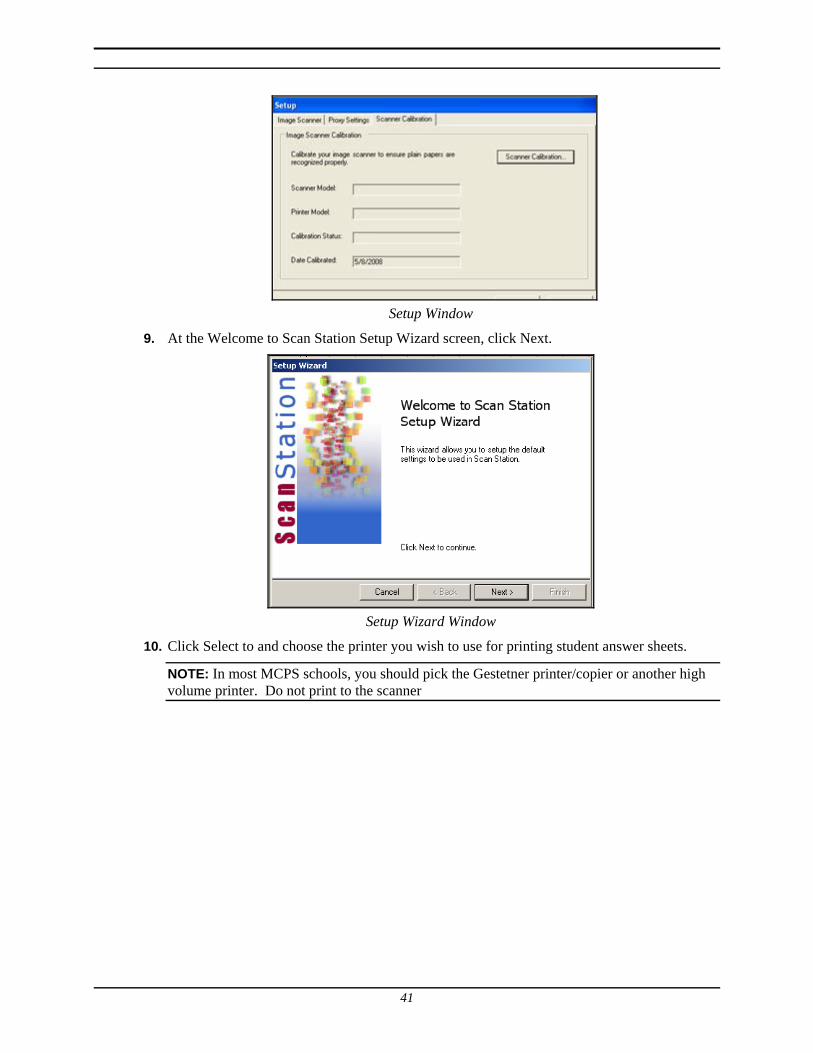
8. From the Setup window, click the Scanner Calibration tab at the top, then click the Scanner Calibration button.
41
Setup Window
9. At the Welcome to Scan Station Setup Wizard screen, click Next.
Setup Wizard Window
10. Click Select to and choose the printer you wish to use for printing student answer sheets.
NOTE: In most MCPS schools, you should pick the Gestetner printer/copier or another high volume printer. Do not print to the scanner
42
Calibration Wizard Window
11. Click the Print Calibration Form button. This will bring up a new window containing the PDF version of the calibration form. Print the form using the printer specified in the last step.
12. Once you have printed the calibration form, return to the Calibration Wizard window and, click Next.
Calibration Wizard Window
13. Place the printed calibration form in the automatic feeder of the scanner and
press start on the scanner to begin the calibration process.
14. Click next when the calibration form has completely scanned.
43
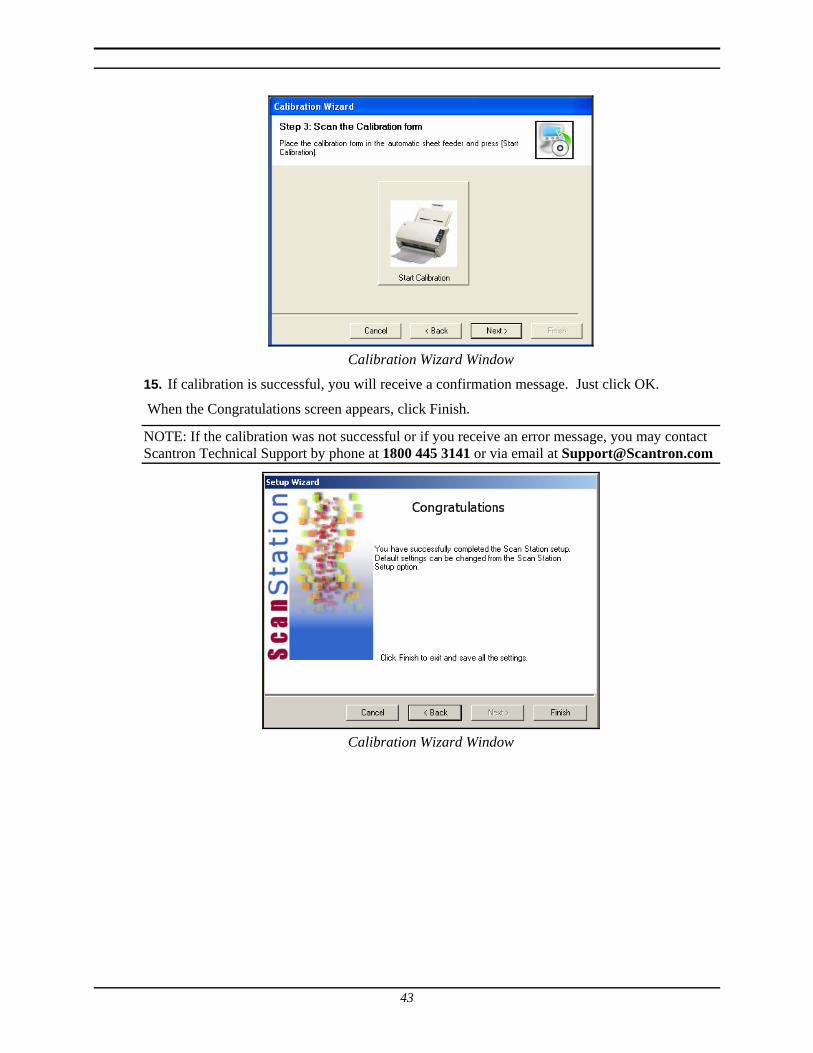
Calibration Wizard Window
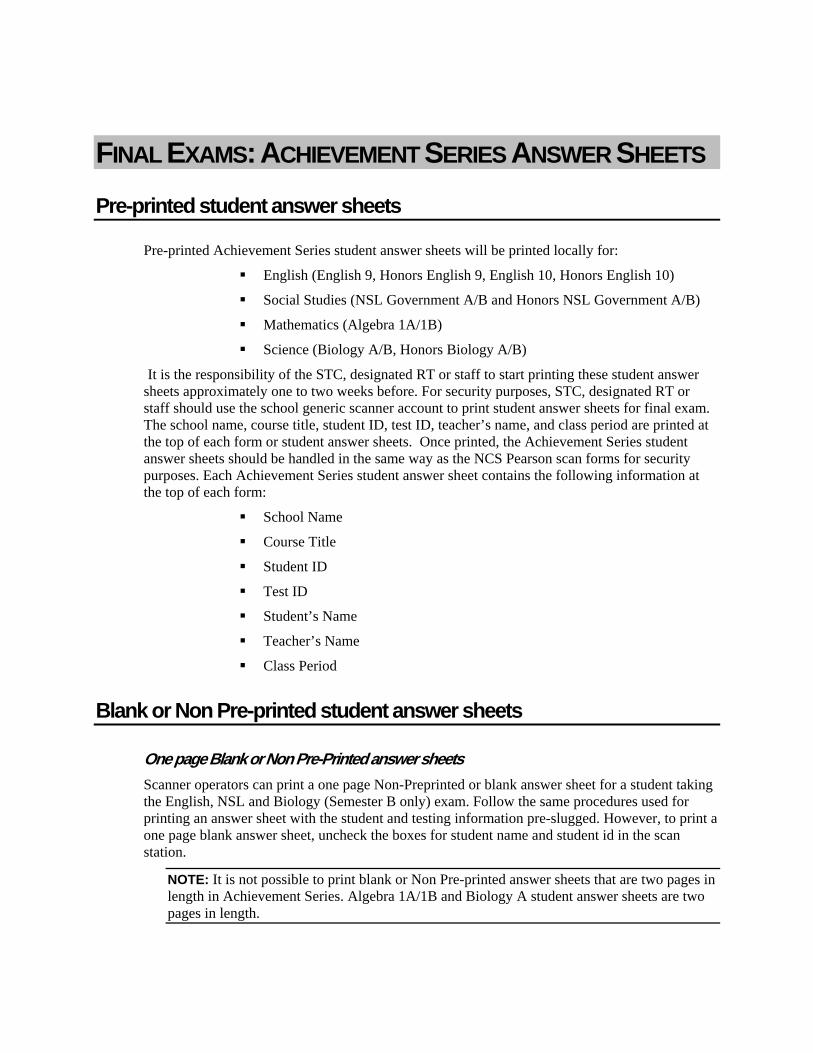
15. If calibration is successful, you will receive a confirmation message. Just click OK.
When the Congratulations screen appears, click Finish.
NOTE: If the calibration was not successful or if you receive an error message, you may contact Scantron Technical Support by phone at 1800 445 3141 or via email at [email protected]
Calibration Wizard Window
PROCEDURES AND STEPS FOR SOLVING ISSUES Hardware and Scan Station Issues
1. If there is any hardware (scanner or work station) missing or broken at your school, the school staff should contact their ITSS (Instructional Technology Support Specialist) who will open a Unicenter ticket for the Division of Field Operations (DOFO), office of the Chief Technology Officer.
2. If the scanner requires ink or paper, the school is responsible for purchasing additional ink and paper.
3. If a software update is required on the scanning workstation, DOFO will provide the update to all schools and the ITSS will install the upgrade.
4. If you are experiencing printing issues, contact your ITSS for resolution. DO NOT PRINT answer sheets from the DCP 8060 Brother Scanner. Print to a high volume printer (such as the Gestetner). The scanner is intended for scanning purposes only.
5. For any additional hardware issue not addressed above, please contact your ITSS.
IMS and OASIS Sectioning/Scheduling Issues Sectioning information in OASIS/IMS (Instructional Management System) is uploaded to Achievement Series daily. If you encounter any discrepancy with sectioning in Achievement Series, follow the procedure outline below:
1. Verify that sectioning is entered correctly in OASIS
2. A real teacher must be assigned to a class in OASIS, otherwise the class and the students in the class will not appear in Achievement Series
3. Allow 24 to 48 hours, after sectioning at the local school, for the class to appear in Achievement Series.
4. If sectioning is correct in OASIS and the class is not in AS, report the discrepancy to the Help Desk, who will contact the appropriate IMS staff for resolution.
Access To Achievement Series Website 1. Achievement Series access is determined by access levels in IMS. To obtain a higher level of
access in Achievement Series, the school staff should ask a school administrator to complete and submit the IMS User Request Form located on the IMS webpage. http://www.montgomeryschoolsmd.org/departments/ims/
2. If you are unable to login to Achievement Series, take the following actions:
Check to make sure that your user name and password are correct
46
Check to make sure that there are no spaces, blank spaces, or capital letter in your IMS or Achievement Series password
Contact the Help Desk(301-517-5800) if you continue to experience problems
3. Issues that cannot be resolved by the Help Desk (by email) will be escalated to the appropriate staff and offices. The Help Desk phone number is 301-517-5800
Weighted Scoring
1. Weighted scores should be available in Achievement Series starting August 2008.
2. Teachers can access weighted scores in IMS a day after the assessments are scanned in Achievement Series.
3. Weighted scores for final exams are uploaded to IMS twice daily during the final exam window.
4. To access IMS reports, visit: http://www.mcps.k12.md.us/departments/ims/
Student Answer Sheets 1. Achievement Series student answer sheets for formative and summative assessments may be
printed at the local school once the applicable assessment window opens. Program supervisors will notify schools of assessment window dates.
2. For final exams, schools may begin printing answer sheets one to two weeks before the first final exam date.
Training for Achievement Series
1. If teachers require documentation on printing, scanning student answer sheets or on accessing reports, they can locate resources on the MCPS Achievement Series website at: http://www.mcps.k12.md.us/departments/elearning/as/
2. Schools may also contact their assigned technology consultant to arrange for additional support. For a complete list of school assigned technology consultants, visit: http://www.mcps.k12.md.us/departments/techtraining/contact.shtm.
FINAL EXAMS: ACHIEVEMENT SERIES ANSWER SHEETS Pre-printed student answer sheets
Pre-printed Achievement Series student answer sheets will be printed locally for:
English (English 9, Honors English 9, English 10, Honors English 10)
Social Studies (NSL Government A/B and Honors NSL Government A/B)
Mathematics (Algebra 1A/1B)
Science (Biology A/B, Honors Biology A/B)
It is the responsibility of the STC, designated RT or staff to start printing these student answer sheets approximately one to two weeks before. For security purposes, STC, designated RT or staff should use the school generic scanner account to print student answer sheets for final exam. The school name, course title, student ID, test ID, teacher’s name, and class period are printed at the top of each form or student answer sheets. Once printed, the Achievement Series student answer sheets should be handled in the same way as the NCS Pearson scan forms for security purposes. Each Achievement Series student answer sheet contains the following information at the top of each form:
School Name
Course Title
Student ID
Test ID
Student’s Name
Teacher’s Name
Class Period
Blank or Non Pre-printed student answer sheets
One page Blank or Non Pre-Printed answer sheets Scanner operators can print a one page Non-Preprinted or blank answer sheet for a student taking the English, NSL and Biology (Semester B only) exam. Follow the same procedures used for printing an answer sheet with the student and testing information pre-slugged. However, to print a one page blank answer sheet, uncheck the boxes for student name and student id in the scan station.
NOTE: It is not possible to print blank or Non Pre-printed answer sheets that are two pages in length in Achievement Series. Algebra 1A/1B and Biology A student answer sheets are two pages in length.
48
Two pages Blank or Pre-Printed answer sheets For final exams with answer sheets that are two pages or more in length (Algebra (Semester A and B) and Biology (Semester A)), a blank answer sheet cannot be printed in Achievement Series. Follow the procedure outlined below to address two pages blank answer sheets.
Sectioning Sectioning information in OASIS/IMS (Instructional Management System) is uploaded to Achievement Series nightly. If you encounter any discrepancy with sectioning in Achievement Series, follow the procedure outlined below: 1. Verify that sectioning is entered correctly in OASIS
2. A real teacher must be assigned to a class in OASIS, otherwise the class and the students in the class will not appear in Achievement Series
3. Allow 24 to 48 hours, after sectioning at the local school, for the class to appear in Achievement Series.
4. If sectioning is correct in OASIS and the class or the student is not in AS after the 24 to 48 hours time period, then report the discrepancy to the Help Desk (301-517-5800), which will contact the appropriate IMS staff for resolution.
What to do when student is not listed in Achievement Series Possible Causes:
Student is new to school and is not in the OASIS system yet
Solution 1: Teacher, class, and student information is uploaded nightly to Achievement Series from OASIS. If the student is not listed in Achievement Series at the time of original printing, check with the person in the school responsible for sectioning to ensure that the student is listed in the right section at the school. Then, attempt to reprint the following day.
Solution 2: Print a one page blank answer sheet for a student taking the English, NSL and Biology (Semester B only) exam. Follow the same procedures used for printing an answer sheet with the student and testing information pre-slugged. However, to print a one page blank answer sheet, uncheck the boxes for student name and student id in the scan station.
NOTE: For final exams with answer sheets that are two pages or more in length (Algebra (Semester A and B) and Biology (Semester A)), a blank answer sheet cannot be printed in Achievement Series. Testing coordinators WILL NOT be providing blank answer sheets that are two pages or more in length. Follow the procedure outlined in Solution 1 for answer sheets that are two pages or more in length.
For more detailed directions on printing and scanning Achievement Series answer sheets, please refer to: http://www.mcps.k12.md.us/departments/elearning/as
49
Handling Omitted and Multiple Marks in Achievement Series The Omitted and Multiple Marks manual provides directions on how teachers and scanner operators should handle omitted and multiple marks in Achievement Series. A summary of the new MCPS policy on omitted and multiple marks issues is provided below.
• If two or more marks clearly were made, or the student clearly omitted an answer, the answer is scored incorrect
• If it is clear that one mark was erased and another filled in, a student response is too lightly bubbled, or the student has indicated somehow (maybe in writing or with arrows) which one is the intended response, the teacher should review it with the resource teacher, determines if the right answer was selected and take the appropriate action as outlined in the attached document.
Achievement Series expects one mark on the student answer sheet for each item response unless that item was created as a Multiple Response item. To address the issue of omitted and multiple marks in Achievement Series, a step-by-step document was created and was distributed to all Algebra I, Biology, English grade 9 and 10, and NSL Government teachers and scanner operators via direct email and during training. You may download a copy of the guide at :
In the Scanning Student Answer Sheet (Comprehensive Guide) section of this guide, you will find directions on how scanner operators should proceed when omitted and multiple marks are detected by the scanner. The processes described in that section should be followed for all formative assessments, end of unit assessment, and end of semester exams delivered using Achievement Series.
CHANGING ACHIEVEMENT SERIES PASSWORD Log into Achievement Series at www.achievementseries.com using the site id, user name, and password you were e-mailed. Contact Help Desk (301-517-5800) for login information
1. Click on the preferences tab in the upper right hand corner of the screen
2. Click on the staff member tab underneath your name
3. Click the change password link
4. Type in the password you were assigned where it prompts for your Old Password. Type your new password in both the Enter New Password and Confirm New Password fields.
5. Click the OK button
Once you have clicked the okay button, you may continue to work in Achievement Series or exit the browser. If your password is not working and you cannot access Achievement Series, contact the MCPS Help Desk at 301-517-5800 and they can reset your password.