Achill Sea Cliffs Rockclimbing in Achill Island EASY FEAR PRODUCTIONS Compiled by Carl Maddox The Climbing On a clear day, the Achill climbing experience can be superb. Quality climbing, great sea views and varied wildlife are all part of the mix. The sea cliff climbing in Achill is on well weathered and featured Daldradian Quartzite, and mainly in the lower to mid grades. As a general rule the rock offers excellent friction, good to excellent protection and very clean distinct lines. The climbs have an adventurous feel, often striking out directly above the sea, most requiring abseil access and often hanging belay stances. Parties should be well organized and competent in sea cliff access. The ground above the tops of some routes requires care; it is worth leaving abseil ropes in place to protect exit routes. Belay points are sometimes below the grass/ rocky top outs and this should be noted for the area your climbing in. Use of helmets is strongly advised. Sea conditions can be rough, at times requiring a high belay point to avoid spray and large waves. Once orientated and comfortable with the approach, Achill offers high quality climbing, covering a whole variety of situations and techniques. New routes are easily found, with scope for a huge number of lines at all grades.
Transcript
Achill Sea Cliffs
Rockclimbing in Achill Island
EASY FEAR PRODUCTIONS
Compiled by Carl Maddox
The Climbing
On a clear day, the Achill climbing experience can be superb. Quality climbing, great sea views and varied wildlife are all part of the mix.
The sea cliff climbing in Achill is on well weathered and featured Daldradian Quartzite, and mainly in the lower to mid grades. As a general rule the rock offers excellent friction, good to excellent protection and very clean distinct lines. The climbs have an adventurous feel, often striking out directly above the sea, most requiring abseil access and often hanging belay stances. Parties should be well organized and competent in sea cliff access. The ground above the tops of some routes requires care; it is worth leaving abseil ropes in place to protect exit routes.
Belay points are sometimes below the grass/ rocky top outs and this should be noted for the area your climbing in.
Use of helmets is strongly advised.
Sea conditions can be rough, at times requiring a high belay point to avoid spray and large waves.
Once orientated and comfortable with the approach, Achill offers high quality climbing, covering a whole variety of situations and techniques. New routes are easily found, with scope for a huge number of lines at all grades.
Parking and Approach
Main Approach
From Achill Sound take main R319 for approx 17km to Keel. Then onto Dooagh (3km). Stay on R319 towards Keem bay
Parking Area A
For access to areas, Foher, Waterfall Cove, Mweelaun Rocks and Carrickmore Point
2.5km from Dooagh, GR: F585044
Cars can be left at a lay-by on the road to Keem near the turn off to the water board plant. From here a short walk south east brings you to Waterfall cove (see crag entry) Approach to other crag areas described in relation to Waterfall cove.
Parking Area B
For access to areas, Fohernadihabby (Big Blue Area) and Fohermore (Ocean Boulevard Area)
1km from parking area A GR: F576044
From parking area A, continue towards Keem on R319 for 1km. Park at Grassy lay-by on left. This lay-by is found as road reaches highest point, just before the road dips and bends around a major gully line
Fohernadihabby (Big Blue Area)
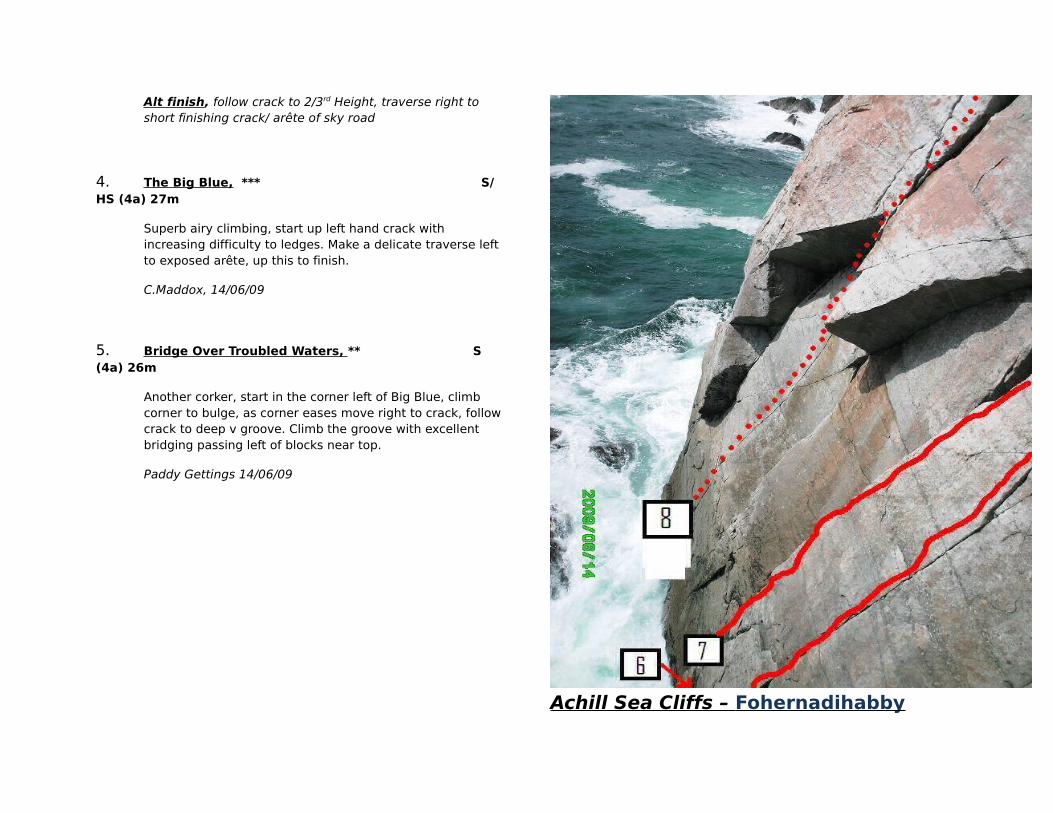
A compact area of cliffs 150m west of the major gully and bordered on the right by large overhangs which lead to a sizable cove. 30 meters from the left (west facing) edge of the cove is a series of obvious corners, arêtes, walls and crack lines facing out to the open sea. GR: 573043. The routes generally offer good clean rock, good protection and excellent friction. From the crag top, looking out to sea, the distinct corner of ‘Barnacle Bill’ marks the left edge of this section. Route descriptions start from the base of this route. All routes are approached by abseil, and some requiring a belay stance above high water mark
1. Barnacle Bill , * S (4a) 17m
Take obvious V corner and cracks, which when viewed from above mark’s the left section of this area.
C.Maddox, 14/06/09
All routes are now described from the base of the crag
2. Sky Road , * VS (4b) 17m
The arête just left of Barnacle Bill, bold in places
14/06/09
3. Thumper , ** VS (4c) 18m
The first full crack line left of Sky Road, Excellent crack climbing, with the crux near the start, and a layback to finish
Paddy Gettings 14/06/09
Alt finish, follow crack to 2/3rd Height, traverse right to short finishing crack/ arête of sky road
4. The Big Blue, *** S/HS (4a) 27m
Superb airy climbing, start up left hand crack with increasing difficulty to ledges. Make a delicate traverse left to exposed arête, up this to finish.
C.Maddox, 14/06/09
5. Bridge Over Troubled Waters, ** S (4a) 26m
Another corker, start in the corner left of Big Blue, climb corner to bulge, as corner eases move right to crack, follow crack to deep v groove. Climb the groove with excellent bridging passing left of blocks near top.
Paddy Gettings 14/06/09
Achill Sea Cliffs – Fohernadihabby
(Big Blue Area) Left Walls
6. Little Block of Horrors, * HS (4b) 26m
The thin crack line, 2m left of A Bridge Over Troubled Waters. Belay on small ledge 1-2m left of crack line. Tricky start, step right to crack and short hanging groove. Up crack to large wobbly block (seems secure), angle eases after block. Follow crack to end, step 1 meter right to short brown corner, up this and easy grooves to finish
C.Maddox. 16/06/09
7. Noo Shoos? Diff/ V.Diff 28m
Start 2 meters left of Little Block of Horrors. Follow corner crack to short easy chimney. Trend slightly left following obvious easy slabs, grooves and cracks to belay
Paddy Gettings 16/06/09
8. Echoes ** VS (5A) 25m
Nice climbing 2-3 meters left of Noo Shoos. Start at the thin finger crack, directly below A shaped overhang. Climb crack which gets steeper near overhang (crux, small wires useful), make delicate move to gain good hold below overhangs, another hard move gains foot ledge. Finish pleasantly through overhangs to easier scramble finish.
C.Maddox, 16/06/09
9. Crouching Tiger S (4a) 20m
This climb starts just left of Echoes, and follows crack and corner into the overhang, crouch up and traverse right to good foothold. Straight up overhang to finish as Echoes
C.Maddox, 24/08/09
Moving left from Echoes wall, around a blunt arete, is a steep wall dropping directly to the sea, the far side of this wall turns into the main zawn. The top section of the wall has a huge seawards slanting ledge, leading to capping well featured overhangs.
10. Ball Licker * S (4a) 28m
Start 1 meter right of Deliverance, below obvious right hand crack leading to vee groove/ corner. Up directly to ledge, scramble to steeper finish on right side of overhangs
Paddy Gettings 24/09/09
11. Deliverance * S (4a) 28m
2 meters right of Clockwork Orange, Straight up crack to huge ledge, tackle overhangs just right of main prow, heading to finish up steep 'green' wall.
C.Maddox, 24/09/09
12. Clockwork Orange ** HS (4b)
Central Orange and Black pock marked crack, straight up crack passing second crack at 2/3 height. From ledge straight up under main overhangs, pull over this in a dramatic and exposed position, large holds.
C.Maddox, 20/09/09
Achill Sea Cliffs – Area East of Big Blue Area
Park and approach as for Big Blue area. This area lies 150m east of Big blue area, approach down right (west) side of main gully. As edge of main gully turns to face open sea, follow cliff tops towards big blue area, for approx 75 meters. Two obvious large slabs appear. These routes are reached by abseil down the first slab.
13. Lepoard * Diff 38m
Take the obvious crack line in the middle of main slab
Charlotte Perkins 20/09/09
14. Corner Climb * V Diff 32m
Follow corner of slab/ walls up and travering right below overhangs to finish easily up slab
C.Maddox, 20/09/09
15. Pegasus ** HVS 5a/b 32m
Follow slab corner on far right of slab, above is a distinct hanging groove, follow groove, sustained to pull through overhang using crack on right. Up slab to overhangs, move delicately left under overhangs to vee-slot, reach through and pull onto slabs above, easier but delicate ground to finish C.Maddox, 24/09/09
16. Lola * HS (4b,4a) 28m
1. (4b).15m Start in middle of slab below large triangular block. Up slabs to block, pull up block to trick move left onto short slab, up slab to overhang , traverse left under overhang to end, belay at twin cracks. 2. (4a) 12m. Straight up twin cracks to steep orange wall, straight up steep orange wall on good holds
Paddy Gettings 24/09/09
Achill Sea Cliffs – Fohermore , Ocean Boulevard Area
Park as for Fohernadihabby, grassy lay-by, GR: 576044
This section is situated to the East of main gully, marked on OS map 30 as Fohermore. The area is contained with main gully to the West and small cove marking the east limit. Head straight down towards sea from parking. As you approach the cliffs traverse East (left) towards the Cove.
As zawn edge turns to face the open sea, a steep rock and grass drop off, leads to a large, clean rock rib below. Abseil from large thread, down grass to rib, continue to lowest point on rib, belaying on ledge just above high tide mark.
1. Ocean Boulevard, * S(4a) 30m
Climb up trending left to obvious overhanging crack with v groove above and to the left. Traverse overhang left and into v groove (crux). Up this and short corner above to belay below grass. Prusik out treating rock with care. A good adventure for the grade
Paddy Gettings 17/06/09
Moving slightly West, a small sea inlet separate’s the rib of Ocean Boulevard from the next obvious feature, the large V groove/ chimney
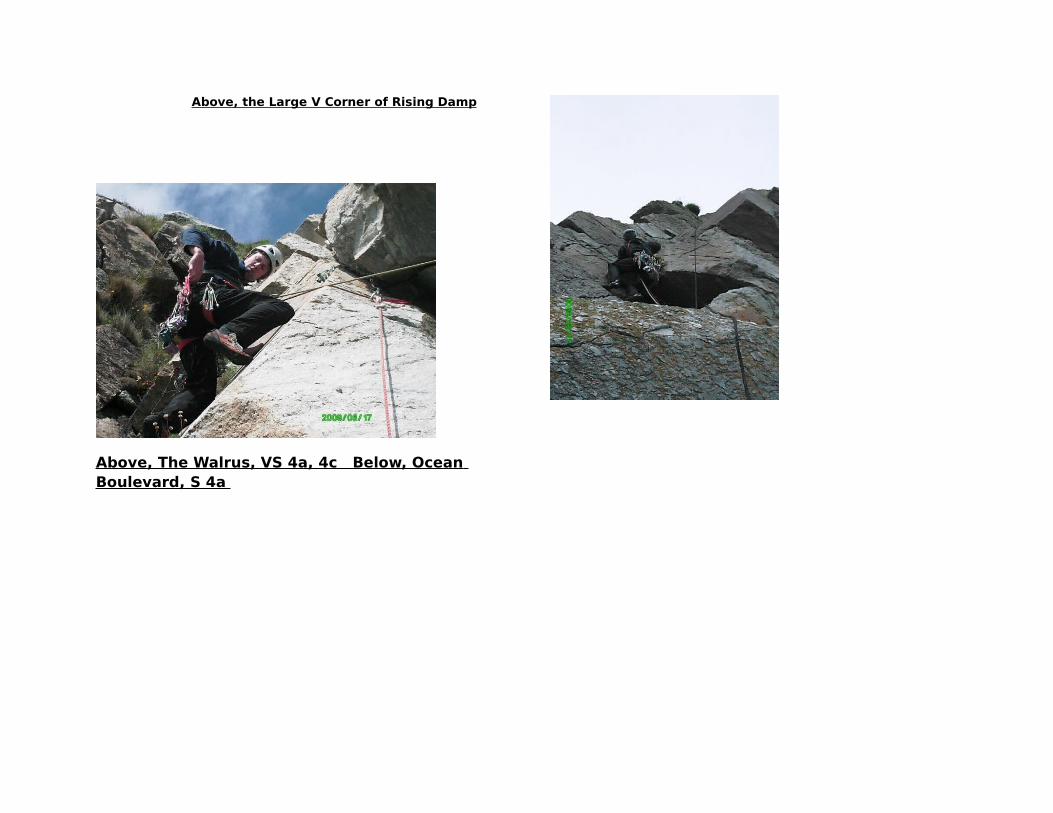
2. Rising Damp, * S (4a) 42m
A good value route, with well protected and mostly straight forward climbing. Abseil down corner to start at High tide mark, just right of damp lower cracks. Up and move into corner as soon as possible, follow corner then right to cracks avoiding vegetation near top. Treat blocks near top with Care.
Paddy Gettings 17/06/09
For the next route abseil in as for Rising damp. Move 6-7 meters right of Rising damp start to belay in a short corner, topped by overhang.
3. The Walrus * VS, (4a, 4c) 40m
A good climb with a fairly challenging second pitch
(4a) 22m. Pass out first overhang, taking v slot on right, easy ground leads up and left to large overhang. Pass this on left by stepping out onto steep cracked wall, follow cracks to low angled groove belay, just below next overhang
(5a) 18m. Up to overhang, which is passed on the left by delicate traverse out over lip of slab and gain corner crack on right (crux). Struggle up this before bursting through with relief to an easier finish up the short arête
C Maddox, 17/06/09
Above, the Large V Corner of Rising Damp
Above, The Walrus, VS 4a, 4c Below, Ocean Boulevard, S 4a
Above, The Walrus, VS 4a, 4c
Achill Sea Cliffs – Foher Area
About 500m, West of waterfall cove is a large rib of rock, pointing out to the open sea.
As right hand slab turns to face the open sea, routes described from below from right-left.
1. Foher Corner * Diff. 30m
The obvious crack and v-corner/ groove. Start easily up to corner, nice bridging leads to right traverse to ledge. Move left off ledge to rib, scramble up rib to finish
C.Maddox, B.Siddal, Sept, 2003
2. Potters S (3c) 35m
Start in middle of wall at orange slab. Trend left to left edge of wall, up slab to overhang, step right round overhang to blocky slab, up this (crux) to finish easily on rib above
B.Siddal, C.Maddox Sept, 2003
3. Stokie ** HS (4b) 18m
As the wall turns left two obvious, steep, left trending cracks topped by a distinct overhang appear. Follow cracks on good holds and protection in a leftwards rising traverse, under overhangs until cracks run out and force you to reach holds over the overhang. Up to belay. Great climbing, scramble out to finish
C.Maddox, B.Siddal, Sept, 2003
Two other routes, which wander just a bit too much are recorded for completeness. They are found 200m west of Foher Area, short walls with easy scramble access to non tidal rock ledges
4. Bootlegger HS (4b) 16m
C.Keely, C.Maddox, June 2004
5. Foot loose in Wonderland S/HS (4a) 15m
C.Maddox, C.Keely, June 2004
Achill Sea Cliffs – Waterfall Cove
This crag is situated on the coast between Dooagh and Keem bay. Cars can be left at a lay-by on the road to Keem near a turn off to the water treatment plant. From here a short walk south east brings you to a small cove. A small stream forms a waterfall at the back of the cove hence the area has been called Waterfall Cove. Eighteen routes have been made in this cove and the remainder are found to the east.
A large pebbled slab forms the bulk of the east facing side of the cove. To the left of this are a series of grooves and bulges, and a small orange and black slab. Left again is a slabby wall and the first eight routes can be found from here. Descent to the platform is by abseil, or down climbing
‘Slanting Grooves’ on the slabby wall Moderate, 18m
1. Babywinkle * V.Diff 18m
A nice climb on the slabby wall. The small corner formed by two cracks 6m left of In the Pink. Large friends/ hexes useful
T.McQueen, 1989
2. In The Pink Diff 20m
Obvious corner at right end of slabby wall, move left onto the slab as the corner bulges
D.Stelfox, M.Stelfox, 1989
The top out on this section is grass (routes 3-8) Belays are just below top out, care wet grass and climbing shoes! Recommended for teams to top out protected by top belay to safer ground on left. Body belay to protect last climber from top belay and across grass.
3. Sure Nuff ‘N’ Yes I Do * VS (4b) 20m
Start as for In The Pink. Up rightwards to niches then left on ramp to gain hanging pebbled corner. Up to belay just below grass. Slightly bold but straight forward on traverse
T.McQueen, A.McQueen, 1989
4. A Right One HS (4b) 20m
Up the orange and black slab and then the deep recessed groove to the right
A.Macfarlane, 1989
5. Colonial Boy ** E1 (5a/b) 20m
The thin crack line immediately right of the orange and black slab, and the shallow groove directly above, Belay at spike/ block just below the grass.
A.Macfarlane,T.McQueen, 1989
6. Zig Zag Wanderer ** HS (4b) 20m
Start from the rightmost and smallest ledge on the platform. Traverse right 3m to good cracks. Up, then rising traverse leftwards to ledge (crux). Right and round to finish directly up white pebbled slab at Colonial Boy belay.
T.McQueen, A.Macfarlane, 1989
7. Dawson and Mags * HS (4a/b) 20m
Traverse 3m further right from Zig Zag Wanderer to a crack which widens as it meets the sea. Up crack to overhang. Bridge up then swing out right on good jugs. Up easily then left sloping ramp to top. Belay to left of Colonial Boy
D.Stelfox, M.Stelfox, 1989
8. The Gash HS (4a) 25m
The most obvious crack line up the centre of the large pebbled slab. Gain starting niche by long rightwards traverse from the platform, or by abseiling into the back of the zawn and shorter traverse and shorter traverse left from boulders
A. Macfarlane, 1989
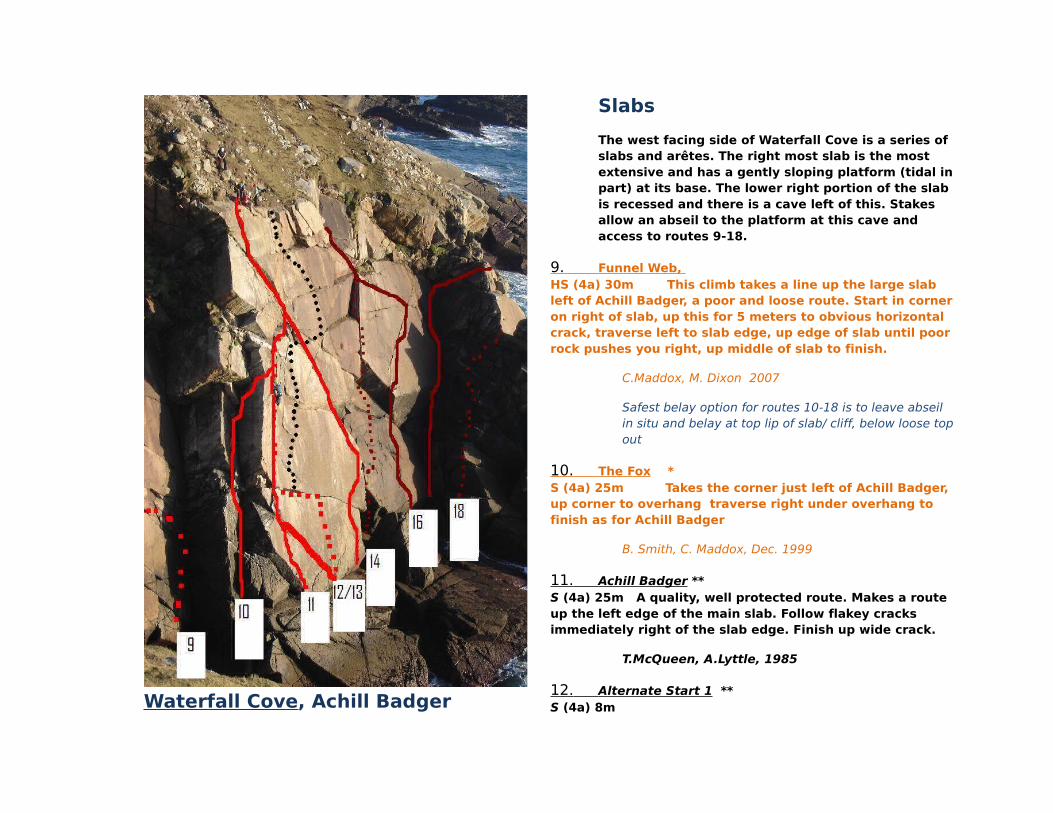
Waterfall Cove, Achill Badger
Slabs
The west facing side of Waterfall Cove is a series of slabs and arêtes. The right most slab is the most extensive and has a gently sloping platform (tidal in part) at its base. The lower right portion of the slab is recessed and there is a cave left of this. Stakes allow an abseil to the platform at this cave and access to routes 9-18.
9. Funnel Web, HS (4a) 30m This climb takes a line up the large slab left of Achill Badger, a poor and loose route. Start in corner on right of slab, up this for 5 meters to obvious horizontal crack, traverse left to slab edge, up edge of slab until poor rock pushes you right, up middle of slab to finish.
C.Maddox, M. Dixon 2007
Safest belay option for routes 10-18 is to leave abseil in situ and belay at top lip of slab/ cliff, below loose top out
10. The Fox * S (4a) 25m Takes the corner just left of Achill Badger, up corner to overhang traverse right under overhang to finish as for Achill Badger
B. Smith, C. Maddox, Dec. 1999
11. Achill Badger ** S (4a) 25m A quality, well protected route. Makes a route up the left edge of the main slab. Follow flakey cracks immediately right of the slab edge. Finish up wide crack.
T.McQueen, A.Lyttle, 1985
12. Alternate Start 1 ** S (4a) 8m
Climb the left trending crack to join the original route near the arête.
13. Alternate Start 2 * HVS (5a) 12m
Climb thin crack up centre of of slab to horizontal break, Traverse left to original route.
13a. Juraj HVS (5a/b) 28m
A continuation to this route was added by climbing a series of short grooves and horizontal breaks to the right of Achill Badger.
Juraj Georgievsky C Maddox May 2008.
Safest belay option for routes 10-18 is to leave abseil in situ and belay at top lip of slab/ cliff, below loose top out
14. The Myth of Trust ** HVS (5a) 30m
Start 6 meters right of Achill Badger and climb cracks slanting rightwards to the edge of the main slab. Lay off arête (Bold crux) to gain a wide leftwards slanting crack. Up this and finish as for Achill Badger
T.McQueen, A. Lyttle, 1985
15. Atlantic City * VS (4c) 30m
Start in the cave. Surmount jammed block at back of cave. Traverse right to recessed slab and
up to overhung niche. Through overhang (crux) to small ledge. Continue up short corner crack, move left and finish by crack in wall left of small slab (Belay here before grass is reached)
T.McQueen, 1985
16. Sapphire * HVS (5a) 30m
Start below centre of recessed slab (tide permitting), initial hard moves to gain slab. Directly up slab to overhang. Committing move to gain jug and pull up to upper slab. Easy fault right then left to ledges. Horizontally left to finish as for Atlantic City
T.McQueen, A. Lyttle, 1985
17. Hail Stone Corner S (4a) 25m
The corner which marks the right end of the recessed slab. Traverse right beneath overhanging blacks near the top to finish at arête.
T.McQueen, A. Lyttle, 1985
18. Escape Route Diff 30m
The easiest route up cracks and blocks right of hailstone corner to a breech left of a small pinnacle. Scramble up arête to finish.
T.McQueen, A. Lyttle, 1985
East of Waterfall Cove, Dingo Area
Facing the open sea around the arête is a square non tidal ledge. In good weather this is a real suntrap. It can be reached by traversing round from Waterfall cove, down climbing Touché Turtle or by abseil
19. Touché Turtle * Diff 30m
Climb the scoop just left of Suntrap ledge. Continue up easy angled corner to arête. Up this as for Escape Route.
T.McQueen, A. Lyttle, 1985
20. Levon Helm * E1 (5c) 30m
Climbs the corner at the back of suntrap ledge. Technical moves to gain groove, finish more easily up right edge of slab
T.McQueen, A. Macfarlane, 1989
Alt finish, Place protection on right of slab, traverse left 2 meters to finish directly up centre of slab (5b)
21. Gleaning the Crumbs * HVS (5b) 20m
From the right edge of suntrap ledge. Up short rightwards leading slab then back left through overhang. Easy ground to top.
A. Macfarlane, T.McQueen, 1989
22. Dingo ** S (4a) 25m
Traverse right from ledge across a chimney to the next wall. Take the crack up the middle of this wall. Excellent situations for the grade, maybe safer to abseil into hanging belay
A. Macfarlane, 1989
23. Indian Summer * S (4a) 25m
Takes the arête forming the right edge of Dingo wall. Traverse or abseil to hanging belay just left of arête. Traverse right to arête, up arête (No protection for 4 meters) and continue direct to easier ground above
C Maddox, B Siddal, Oct, 2003
East of Waterfall Cove, Achill Slab and Fair Dinkum Area
The next two routes start from a platform beneath an intimidating overhanging wall right of Dingo. The platform can be reached by abseil or by down climbing Achill Slab.
24. Achill Slab S (3c) 20m
The slab that forms the left boundary of the large overhanging wall and lies to the right of the wall Dingo is situated on
A. Macfarlane, 1989
25. Zawn Chorus HVS (4c) 25m
Take a slanting right to left line of weakness which becomes a chimney. At 12 meters traverse left across a well hung slab (often damp) to exposed ledge. Up sandy corner above, finishing out left of capstone. Poor rock at top needs to be cleaned (the last 2m were top roped)
T. McQueen, P. McClenaghan, 1989
Right of the overhanging wall is a smooth, bulging arête and then a deep cut chimney/ zawn. Right again are three routes. These can be easily reached by descending gentle slabs further to the east and traversing round. This is around 50m east of Waterfall Cove
26. Achilldorightly * V.Diff 15m
The stepped corner 6m right of the deep cut chimney/ zawn. Take the line of least resistance and finish entertainingly wide chimney
T.McQueen, A. Lyttle, 1983
Direct finish, VS (4c) 15m. Up stepped corner to ledge, straight up from ledge through overhanging corner/ crack. Short but strenuous
C. Maddox/ B. Smith 1999
27. Fair Dinkum * E2 (5b) 15m
A thin crack splitting the steep wall 2m right of Achilldorightly. Sustained quality climbing , small wires for protection
A.Macfarlane, D. Stelfox. 1989
28. Billy the Fish HVS (5a) 15m
The right to left slanting crack line (often damp) 2m right of Fair Dinkum. Try to ignore the two large ledges leading out rightwards
T.McQueen, A. McQueen, 1989
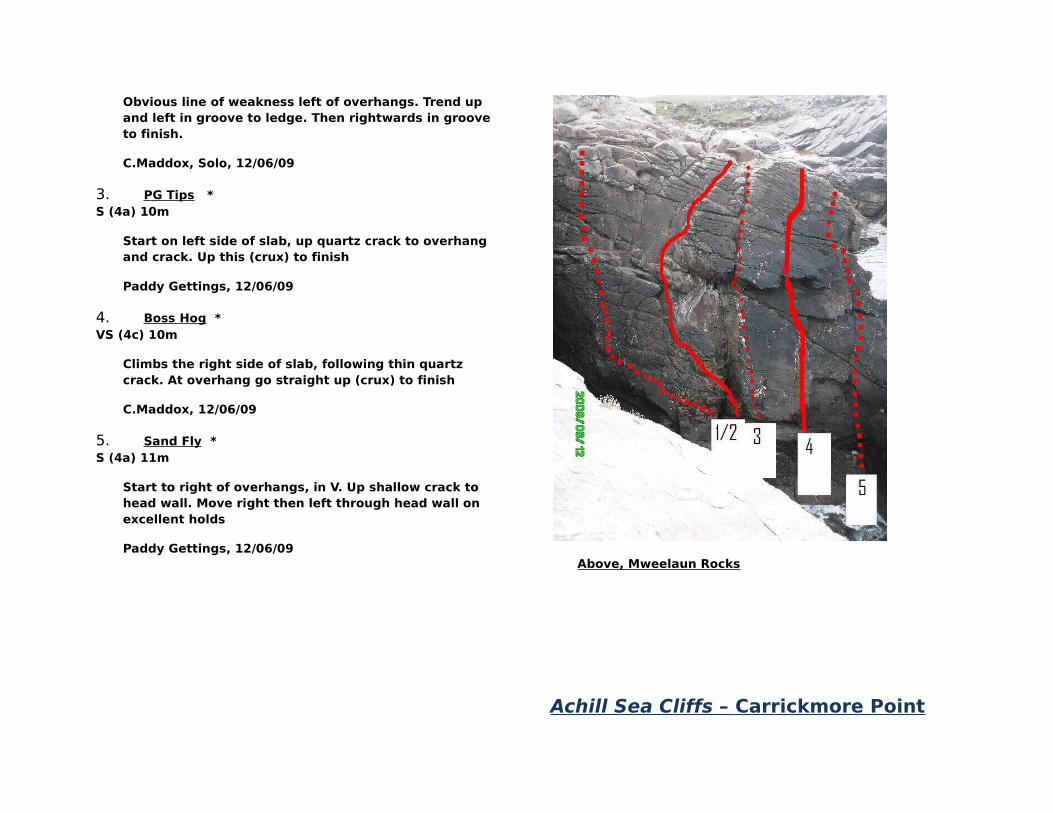
Achill Sea Cliffs – Mweelaun Rocks
(West of Waterfall Cove)
These crags are located east of Waterfall cove/ Achilldorightly wall. Across from the rock platform from Achilldorightly wall is a small zawn and east facing wall. A few short easy routes can be found here.
Further east again is a deep cut, narrow zawn, OS Map 30, GR 586041. The east facing wall of this zawn has steep walls, with potential for some harder routes. The west wall has a slab section at its base, with a distinct overhang at 2/3 Height.
Approach- Abseil into high tide mark, beneath overhangs, all routes start from here. Routes described from left/right
1. Rosco Diff 12m
Traverse left from slabs, crossing Uncle Jess and well featured wall, straight up to ledge, finish easily.
C.Maddox, 12/06/09
2. Uncle Jess Mod 10m
Obvious line of weakness left of overhangs. Trend up and left in groove to ledge. Then rightwards in groove to finish.
C.Maddox, Solo, 12/06/09
3. PG Tips * S (4a) 10m
Start on left side of slab, up quartz crack to overhang and crack. Up this (crux) to finish
Paddy Gettings, 12/06/09
4. Boss Hog * VS (4c) 10m
Climbs the right side of slab, following thin quartz crack. At overhang go straight up (crux) to finish
C.Maddox, 12/06/09
5. Sand Fly * S (4a) 11m
Start to right of overhangs, in V. Up shallow crack to head wall. Move right then left through head wall on excellent holds
Paddy Gettings, 12/06/09Above, Mweelaun Rocks
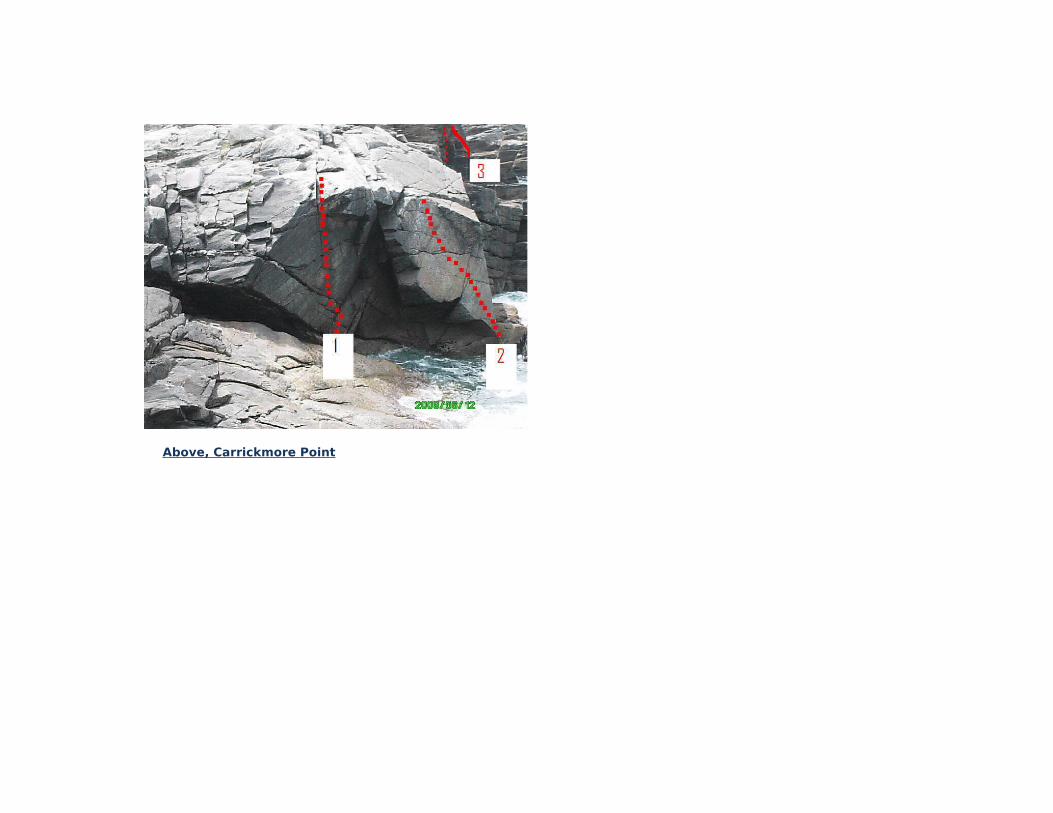
Achill Sea Cliffs – Carrickmore Point
West again of Mweelaun rocks/ zawn is a small rocky peninsula, with a short, steep wall, with a partly tidal platform (platform can be slippy in places)The left wall is steep with an undercut base. It has a distinct left trending crack, a steep vertical crack and overhangs to the right
Left Photo, Mweelaun rocks in foreground, with left wall and Carrickmore point behind
1. Daisy Duke ** HS (4b) 10m
Take the central crack straight up the steep left wall, crossing several horizontal breaks (cams useful). A great little route, easier than it looks
C.Maddox, 12/06/09
Just right of the left wall is a pebbled slab
2. Pebbles Diff 9m
Start at the lowest point of the slab, straight up, taking care with the pebbles
C.Maddox Solo, 12/06/09
Right again of pebble dashed slab is a steep pebble wall
At the end of the peninsula is a short 8m wall, of very weathered rock, several lines can be tackled between mod-diff standard


![Henry Cohn, Abhinav Kumar, Christian Reiher, and Achill ...arXiv:1306.6796v2 [math.NT] 27 Nov 2016 124 HENRY COHN, ABHINAV KUMAR, CHRISTIAN REIHER, AND ACHILL SCHURMANN For each potential](https://static.documents.pub/doc/80x56/600e0c15b135a37ccc103ea7/henry-cohn-abhinav-kumar-christian-reiher-and-achill-arxiv13066796v2-mathnt.jpg)

