LYT2658-003A Dear Customers Thank you for purchasing this JVC product. Before use, be sure to read “Read this before using the camera” (p.2–5) to use the product correctly. ACTION CAMERA GC-XA2 Detailed User Guide
Transcript
LYT2658-003A
Dear CustomersThank you for purchasing this JVC product.
Before use, be sure to read “Read this before using the camera” (p.2–5) to use the product
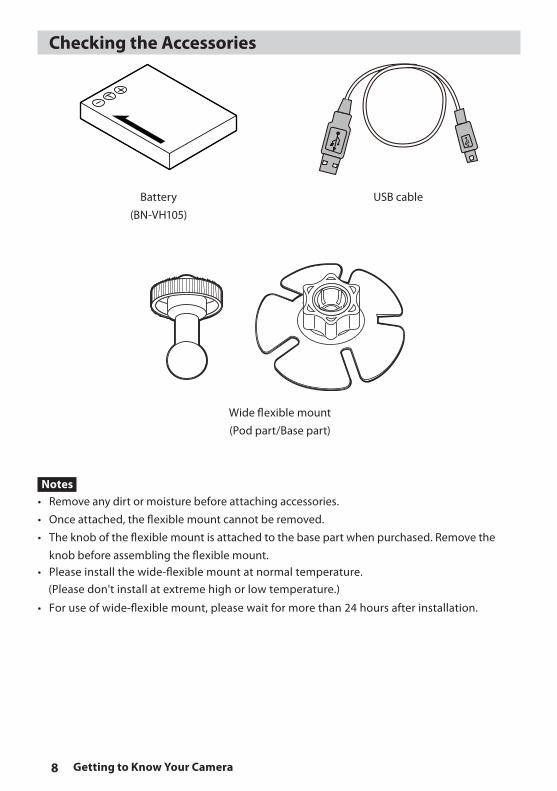
• Remove any dirt or moisture before attaching accessories.• Once attached, the �exible mount cannot be removed.• The knob of the �exible mount is attached to the base part when purchased. Remove the
knob before assembling the �exible mount.• Please install the wide-�exible mount at normal temperature. (Please don't install at extreme high or low temperature.)
• For use of wide-�exible mount, please wait for more than 24 hours after installation.
9Getting to Know Your Camera
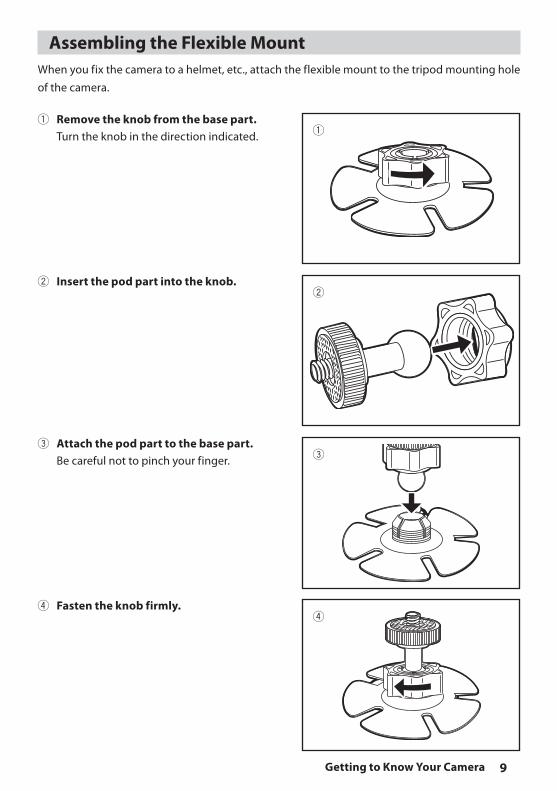
1 Remove the knob from the base part.Turn the knob in the direction indicated.
2 Insert the pod part into the knob.
3 Attach the pod part to the base part.Be careful not to pinch your finger.
4 Fasten the knob firmly.
1
2
3
4
Assembling the Flexible MountWhenyoufixthecameratoahelmet,etc.,attachtheflexiblemounttothetripodmountinghole
When attaching an optional product not manufactured by JVC, make sure that the product conforms to 1/4 ISO 1222.Attaching a product with a long screw may cause a malfunction.
Play/Record buttonSwitchestotherecording
mode/playbackmode.
Speaker
Microphone
Access LED
Lens
Battery slot (inside)
HDMI mini connector (inside)
Port/slot cover latch
SD slot (inside)
Mini USB Port (inside)
Tripod socket
Component Names and Functions
11Getting to Know Your Camera
1 Load the battery.~ Slide the port/slot cover latch in the
direction indicated.
Ÿ Slide and open the cover in the direction indicated while holding down the latch.
! Insert the battery in the correct direction (+/–) while pulling the blue lever to the left.
2 Charge the battery.~ Connect the USB cable.Ÿ Press < or > to select “Adapter”, and
2 Press < or > to select “Video Mode Options”, and press SET.
3 Press < or > to select “Video Effects”, and press SET.
4 Press Record to start recording.PressRecordagaintostoprecording.
Information
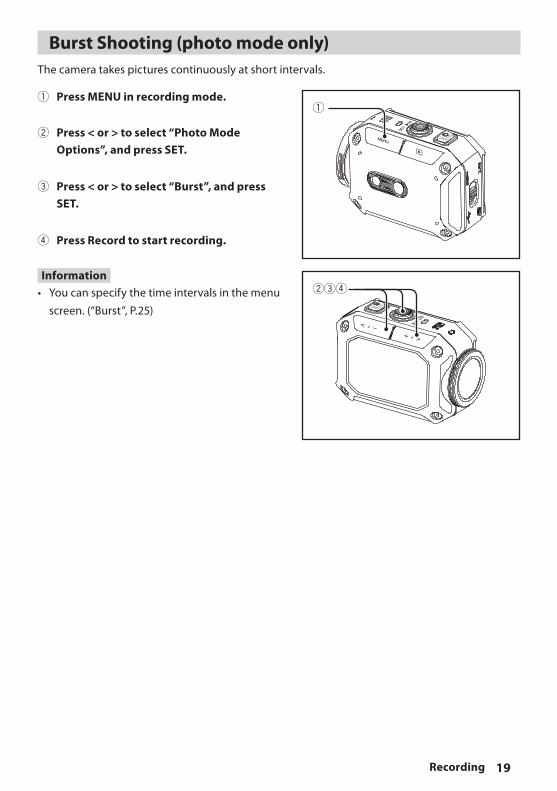
• Youcanspecifytheeffectinthemenuscreen.
(“Video Effects”,P.25)
Recording with a Special Effect (video mode only)Youcanaddaspecialeffecttothemovie.
1
234
18 Recording
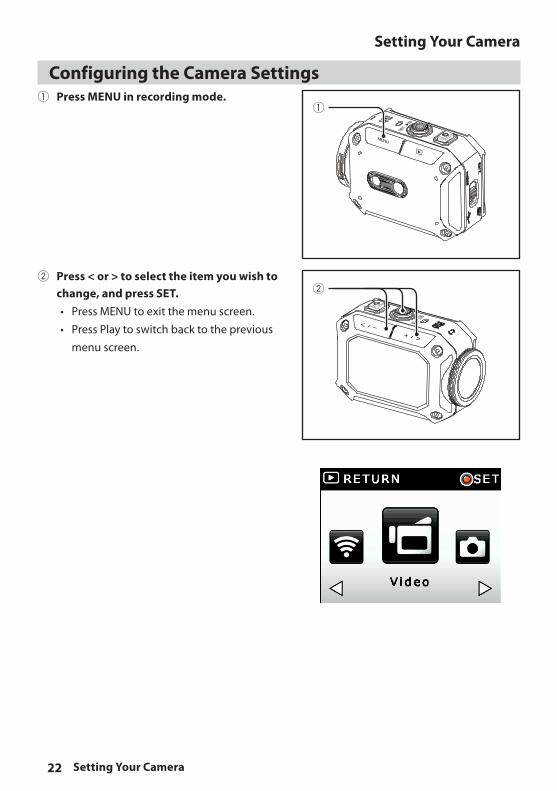
Press MENU in recording mode.
Press < or > to select “Video Mode Options”, and press SET.
Press < or > to select “Endless REC”, and press SET.
Press Record to start recording.Press Record again to stop recording.
Endless Recording (video mode only)The video �les are automatically divided every 15 minutes and saved.If there is not enough space in the SD card, the oldest �le is deleted and the recording continues while the battery lasts.
Notes
・If "Video Resolution" is set to "Full HD(1080p60)" or "Full HD (1080p50)", the "Endless recording" is not available.
19Recording
1 Press MENU in recording mode.
2 Press < or > to select “Photo Mode Options”, and press SET.
White Balance■■Thecameraadjuststhewhitebalanceautomatically.Inaddition,sixmanualsettingsare
available.
Auto Adjuststhewhitebalanceautomatically
Daylight Suitableforoutdoorconditions
Fluorescent1/ Fluorescent2
Suitableforfluorescentlightconditions
Tungsten Suitableforincandescentlightconditions
Blue (marine) Suitableforbluewaterconditions
Green (marine) Suitableforgreenwaterconditions
Video Resolution■■Youcanselectthequality/resolutionoftherecording.Thevaluechangesdependingonyour“TV
SYSTEM“setting.(“TVSystem”,P.27)
NTS
C
Full HD (1080p60) 1920x1080/60fpsFull HD (1080p30) 1920x1080/30fps
HD (960p30) 1280x960/30fpsHD (720p60) 1280x720/60fpsHD (720p30) 1280x720/30fps
WVGA30 848x480/30fps
PAL
Full HD (1080p50) 1920x1080/50fpsFull HD (1080p25) 1920x1080/25fps
HD (960p25) 1280x960/25fpsHD (720p50) 1280x720/50fpsHD (720p25) 1280x720/25fps
WVGA25 848x480/25fps
25Setting Your Camera
Video Time Lapse■■Youcanspecifythetimeintervalofthetimelapserecording.
0.2 Second Records1frameevery0.2seconds1 Second Records1frameevery1second5 Second Records1frameevery5seconds
10 Second Records1frameevery10seconds30 Second Records1frameevery30seconds60 Second Records1frameevery60seconds
Photo Time Lapse■■Youcanspecifythetimeintervalofthetimelapsephotography.
2 Second Takes1photoevery2seconds
5 Second Takes1photoevery5seconds
10 Second Takes1photoevery10seconds
30 Second Takes1photoevery30seconds
60 Second Takes1photoevery60seconds
Burst■■You can specify the speed and duration time of the burst shooting.
5/1 Second Executesburstshootingforupto1secondIfyoushootfor1second,5photosaresaved.
10/1 Second Executesburstshootingforupto1secondIfyoushootfor1second,10photosaresaved.
15/1 Second Executesburstshootingforupto1secondIfyoushootfor1second,15photosaresaved.
15/2 Second Executesburstshootingforupto2secondIfyoushootfor2seconds15photosaresaved.
15/3 Second Executesburstshootingforupto3secondIfyoushootfor3seconds,15photosaresaved.
Video Effects■■You can select the special effect.
Negative Reversesthebrightness.
Sepia Givesimagesabrownishtintlikeoldphotographs.
Vivid Thismakesthecolorsintheimagevivid.
B/W Recordsinblackandwhite.
26 Setting Your Camera
Time Stamp ■You can choose whether you add a timestamp or not, and the format of the timestamp. (You cannot delete the time stamp after recording.)
OFF Deactivates the time stamp function
YEAR/MONTH/DAY Records the timestamp in the format of year/month/day
MONTH/DAY/YEAR Records the timestamp in the format of month/day/year
DAY/MONTH/YEAR Records the timestamp in the format of day/month/year
EIS ■You can switch EIS (Electric Image Stabilizer) o� and on.
OFF Deactivates the EIS function
ON Activates the EIS function
Notes
Notes
Photo Resolution ■You can select the resolution of the image.
16M 4608 x 3456
8M 3264 x 2448
Inverse Picture ■You can �ip images vertically. This function is useful when you �x the camera upside down.
OFF Records a normal image
ON Records a �ipped image
More ■This menu includes advanced items, such as SD card formatting, factory reset, etc. (“Setting items in “More““, P.27)
・ Switch EIS function to o� when you take pictures of/record slow moving things with a tripod. ・ EIS may not work properly when the camera is vibrating too much.
・ If "Video Resolution" is set to "Full HD(1080p60)/Full HD (1080p50)", and if "Time stamp" is used, the Zooming is not available.
27Setting Your Camera
Setting items in “More“LCD Auto Off■■
The display automatically turns off 5 seconds after the start of recording. The display turns on
automatically at any operation or the end of recording.
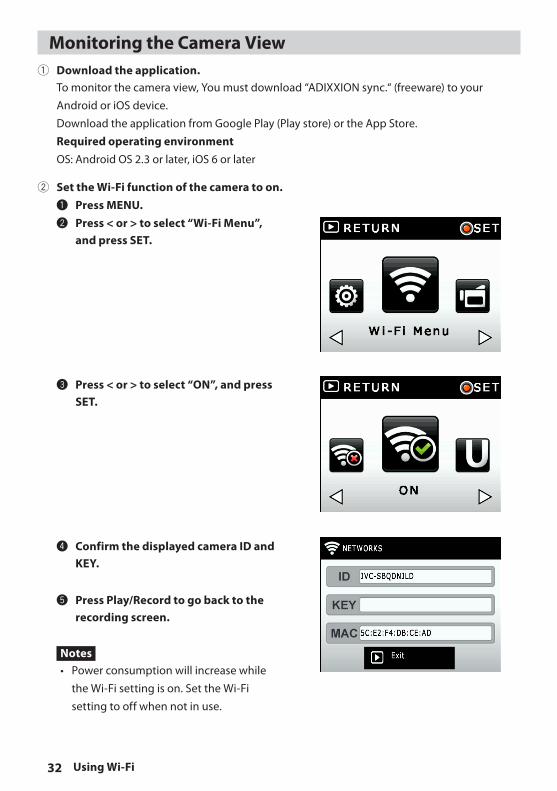
2 Set the Wi-Fi function of the camera to on.~ Press MENU.Ÿ Press < or > to select “Wi-Fi Menu”,
and press SET.
! Press < or > to select “ON”, and press SET.
⁄ Confirm the displayed camera ID and KEY.
@ Press Play/Record to go back to the recording screen.
Notes
• Powerconsumptionwillincreasewhile
theWi-Fisettingison.SettheWi-Fi
settingtooffwhennotinuse.
33Using Wi-Fi
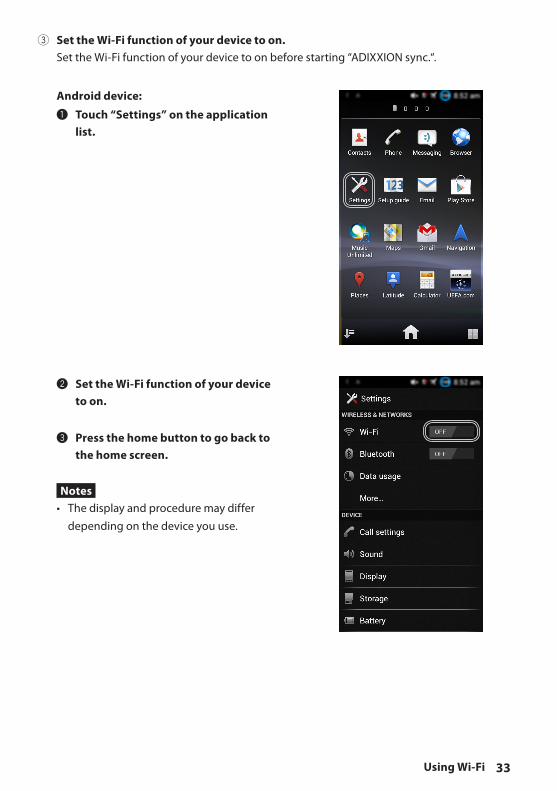
Android device:
~ Touch “Settings” on the application list.
Ÿ Set the Wi-Fi function of your device to on.
! Press the home button to go back to the home screen.
Notes
• Thedisplayandproceduremaydiffer
dependingonthedeviceyouuse.
3 Set the Wi-Fi function of your device to on.SettheWi-Fifunctionofyourdevicetoonbeforestarting“ADIXXIONsync.“.
34 Using Wi-Fi
iOS device:
~ Touch “Settings”.
Ÿ Touch “Wi-Fi”.
! Touch “Wi-Fi” to turn the Wi-Fi on.
⁄ Touch the Camera ID (JVC-****) on the list.
@ Enter the KEY.
$
Press the home button to go back to the home screen.
Notes
• Thedisplayandproceduremaydiffer
dependingontheiOSversion.
35Using Wi-Fi
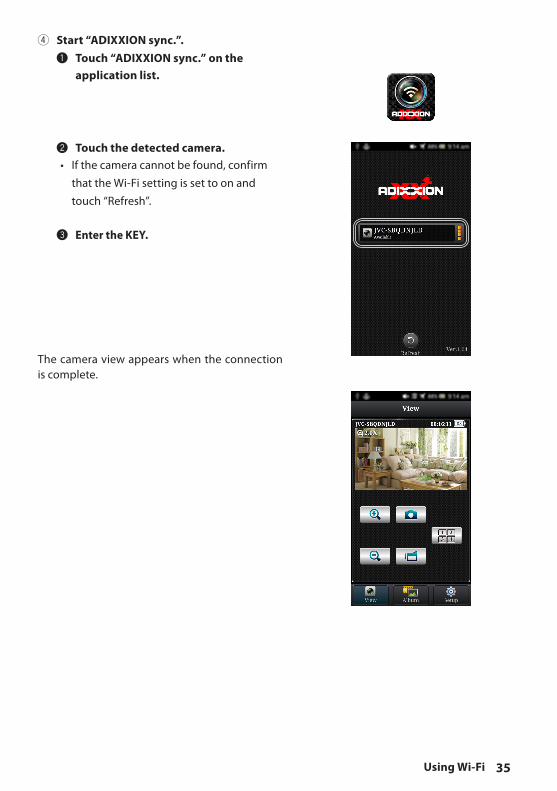
4 Start “ADIXXION sync.”.~ Touch “ADIXXION sync.” on the
application list.
Ÿ Touch the detected camera.• Ifthecameracannotbefound,confirm
thattheWi-Fisettingissettoonand
touch “Refresh”.
! Enter the KEY.
Thecameraviewappearswhentheconnectionis complete.
36 Using Wi-Fi
Zoom
To the monitor screen (this screen)
To the album screen To the setup screen
Recording/shooting
Switch between multiple cameras*1
Use this when multiple cameras are connected.
Control the camera from the application.
Monitor screenYou can do things such as monitor the camera view or record footage.
*1 If you are far from the receiver, there is interference, or if there is a microwave or another wireless device nearby, the communication speed may slow down or the connection may not be established.
Try to connect again in a better reception environment.
(Camera sound is not output.)
37Using Wi-Fi
Video index Photo index
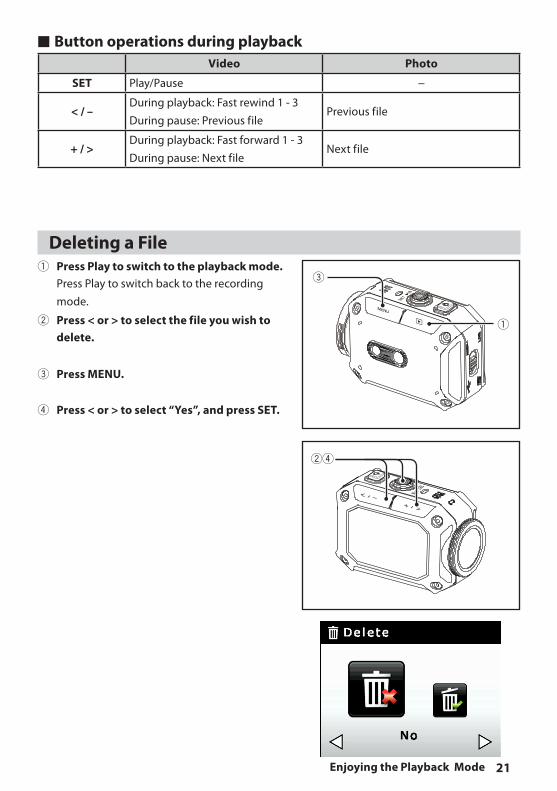
Delete
Album screenYou can check or delete images.
(*) It is displayed in the following cases. ・If the thumbnails has been deleted. ・If video �les has been split by a long time recording. ・If video �les has been split by the "Endless recording".
No thumbnail(*)
38 Using Wi-Fi
Setup screenYou can change the settings of the camera.
Camera settings
ID/Password ChangesthecameraIDandthepassword
Date & TimeAdjuststheclock.Touch toexportthetimesetonthedevice
Access Point Setting RegistertheaccesspointforYouTubeuploadingandUSTREAM
broadcasting
YouTube Register your YouTube account
USTREAM RegisteryourUSTREAMaccount
39Using Wi-Fi
Operations 1 to 3 are only required the first
time. Go to 4 (page42)iftheseoperationshave
already been carried out.
1 Connect the camera and the smartphone/tablet via a wireless LAN router.See“MonitoringtheCameraView”onpage
32.
2 Register an access point.~ Start “ADIXXION sync.”, and select the
detected camera.
Ÿ Touch “Setup”.
Broadcasting Using USTREAM
40 Using Wi-Fi
! Touch in “Access Point Setting”.
⁄ Select the access point you wish to use and enter the password.
@ Touch to return.
41Using Wi-Fi
3 Register the account you wish to use.~ Enter your “USTREAM” Username and
Password.
Ÿ Touch “Save to Camera”.
Information
• Accesshttp://www.ustream.tv/toregisteran
account.
42 Using Wi-Fi
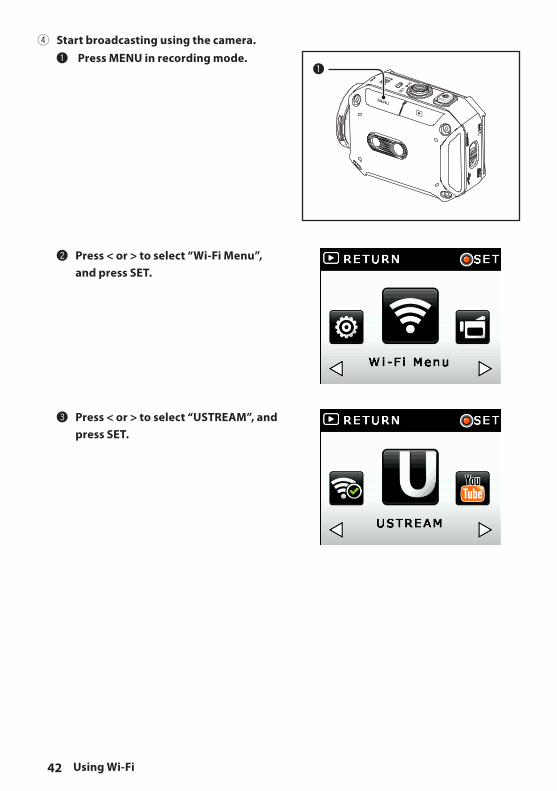
4 Start broadcasting using the camera.~ Press MENU in recording mode.
Ÿ Press < or > to select “Wi-Fi Menu”, and press SET.
! Press < or > to select “USTREAM”, and press SET.
~
43Using Wi-Fi
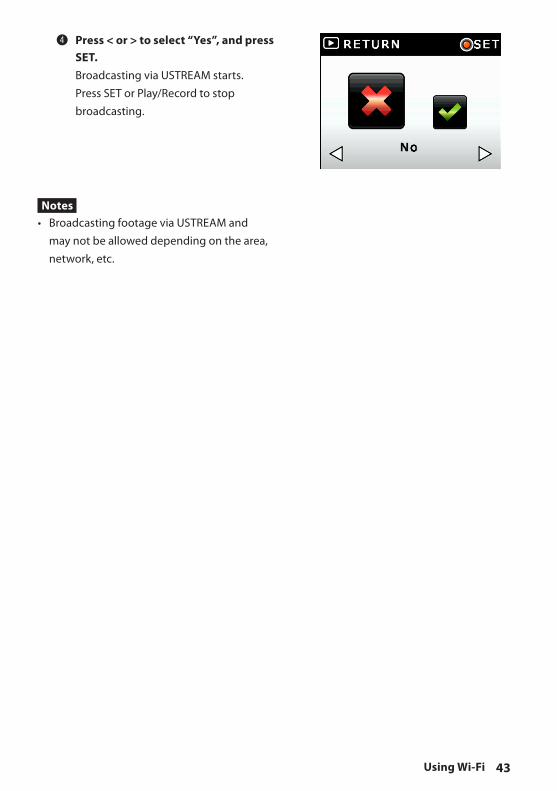
⁄ Press < or > to select “Yes”, and press SET.BroadcastingviaUSTREAMstarts.
PressSETorPlay/Recordtostop
broadcasting.
Notes
• BroadcastingfootageviaUSTREAMand
maynotbealloweddependingonthearea,
network,etc.
44 Using Wi-Fi
Operations 1 to 3 are only required the first
time. Go to 4 (page47)iftheseoperationshave
already been carried out.
1 Connect the camera and the smartphone/tablet via a wireless LAN router.See“MonitoringtheCameraView”onpage
32.
2 Register an access point.~ Start “ADIXXION sync.”, and select the
detected camera.
Ÿ Touch “Setup”.
Uploading to YouTube
45Using Wi-Fi
! Touch in “Access Point Setting”.
⁄ Select the access point you wish to use and enter the password.
@ Touch to return.
46 Using Wi-Fi
3 Register the account you wish to use.~ Enter your “YouTube” Username and
Password.
Ÿ Touch “Save to Camera”.
Information
• Accesshttp://www.youtube.com/toregister
an account.
47Using Wi-Fi
4 Start uploading using the camera.~ Press MENU in recording mode.
Ÿ Press < or > to select “Wi-Fi Menu”, and press SET.
! Press < or > to select “YouTube”, and press SET.
~
48 Using Wi-Fi
⁄ Press < or > to select the file to upload, and press SET.
UploadingtoYouTubestarts.
PressPlay/Recordtostopuploading.
Notes
• UploadingfilestoYouTubemaynotbe
alloweddependingonthearea,network,etc.
• Theprivacyoptionissetto“Public“(anyone
canwatchthefile).
49Using Wi-Fi
required
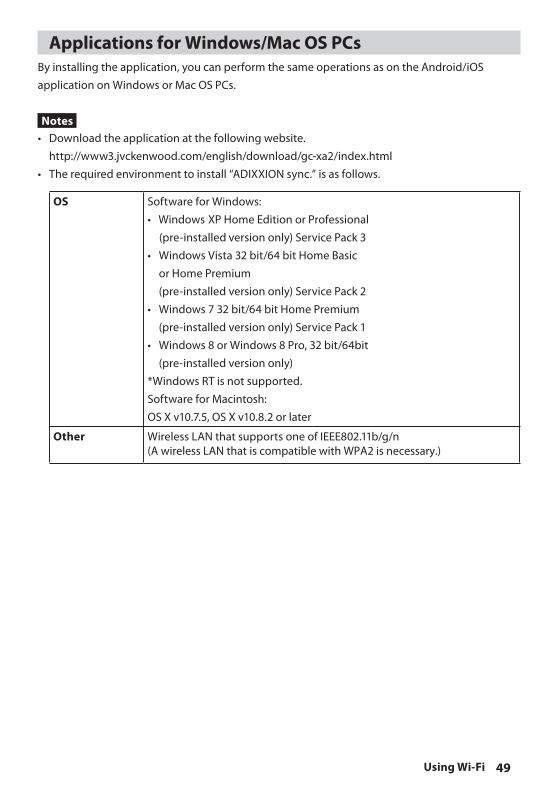
Applications for Windows/Mac OS PCsBy installing the application, you can perform the same operations as on the Android/iOS application on Windows or Mac OS PCs.
Notes
• Download the application at the following website. http://www3.jvckenwood.com/english/download/gc-xa2/index.html• The environment to install “ADIXXION sync.” is as follows.
OS Software for Windows:• Windows XP Home Edition or Professional (pre-installed version only) Service Pack 3• Windows Vista 32 bit/64 bit Home Basic
or Home Premium (pre-installed version only) Service Pack 2• Windows 7 32 bit/64 bit Home Premium (pre-installed version only) Service Pack 1• Windows 8 or Windows 8 Pro, 32 bit/64bit (pre-installed version only) *Windows RT is not supported.Software for Macintosh:OS X v10.7.5, OS X v10.8.2 or later
Other Wireless(A wireless LAN that is compatible with WPA2 is necessary.)
LAN that supports one of IEEE802.11b/g/n
50 Precautions on Using Wi-Fi
Cautions on the Wi-Fi Function• Operationisnotguaranteedonalldevices.
Radio Waves Used by this ProductThis product makes use of radio waves in the ISM band (2.4 GHz).Although a radio station license is not required to use this product, please take note of the following.Do not use this product near the following places:• Industrial,scientific,ormedicalequipment,suchasmicrowaveovensandpacemakers
Radio signals are unable to penetrate through reinforced steel, metal, or concrete.Theradiowavesusedbythisproductareunabletopenetratethroughreinforcedsteel,metal,or
Do not connect to wireless networks that you do not have authorization for.Once connected, it may be considered unauthorized access and legal action can be taken
There is a black or colored spot in the LCD monitor
This is not a malfunction.The LCD screen is manufactured using extremely high-precision technology, so over 99.99% of the pixels are operational for e�ective use. However, some tiny black and/or bright dots (white, red, blue or green) may appear on the LCD screen. These dots are a normal result of the manufacturing process, and do not a�ect the recording.
“Wrong Adapter” is displayed and power turns o�
The power is automatically turned o� to protect the electrical circuit if the AC adapter input exceeds 5 V.
The image �ickers Turn the power o�, and then turn it on again.
Connection to camera failed.(ADIXXION sync. for Windows/Mac)
・ Connection may fail by �rewall function of OS or security software. Please check Firewall settings. ・ If your PC is connected to other network, please try to connect again after releasing the connection. (e.g. Unplug the ethernet cable) (ADIXXION sync. may fail to connect if your PC is connected to other network.)・ Please check that your wireless LAN is compatible with WPA2.
56 Troubleshooting
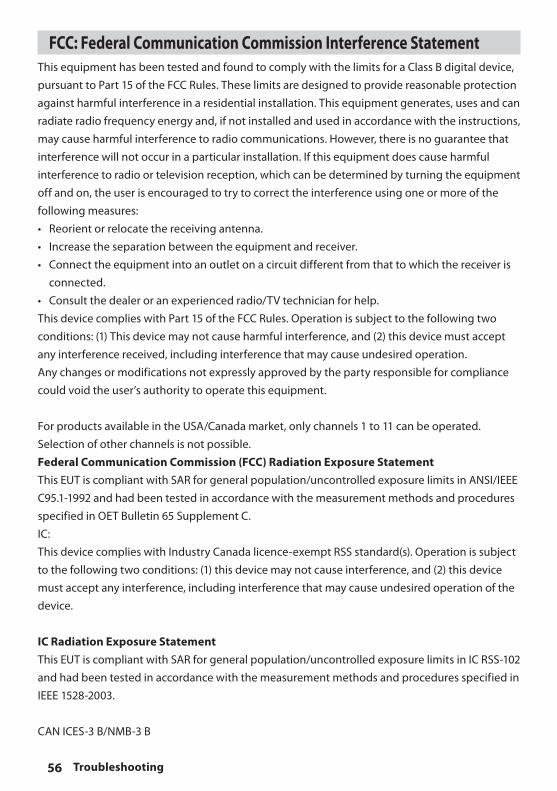
FCC: Federal Communication Commission Interference StatementThisequipmenthasbeentestedandfoundtocomplywiththelimitsforaClassBdigitaldevice,