32
ActivityTimeline User Guide https://activitytimeline.com Copyright © 2019 ActivityTimeline

ActivityTimeline User Guide
https://activitytimeline.com
Copyright © 2019 ActivityTimeline

1
Contents
1. Getting Started ........................................................................................................................................... 3
1.1 Overview ............................................................................................................................................. 3
1.2 Logging In and Out.............................................................................................................................. 4
2. Working with ActivityTimeline ................................................................................................................... 5
2.1 Header Panel ...................................................................................................................................... 5
2.2 Issues .................................................................................................................................................. 5
2.3 Assigning Tickets ................................................................................................................................. 6
2.4 Issue Card ........................................................................................................................................... 7
2.5 Creating a Custom Event or Issue ....................................................................................................... 7
2.6 Creating a Booking (Reservation) ....................................................................................................... 8
2.7 Creating a Placeholder ....................................................................................................................... 9
2.8 Creating a Milestone ........................................................................................................................ 10
2.9 Logging Work .................................................................................................................................... 11
2.10 Searching Issues ............................................................................................................................... 11
2.11 Applying Issue Filters ........................................................................................................................ 12
2.12 Grouping Issues ................................................................................................................................ 12
2.13 Sorting Order .................................................................................................................................... 13
2.14 Using Timeline Panel ........................................................................................................................ 13
2.15 Un-Scheduling a Task........................................................................................................................ 14
2.16 Changing Task Color ......................................................................................................................... 14
3. Plan view .................................................................................................................................................. 15
3.1 Dashboard Overview ........................................................................................................................ 15
3.2 Timeline Panel .................................................................................................................................. 16
3.3 Workload Indicator ........................................................................................................................... 16
3.4 User Card .......................................................................................................................................... 17
3.5 Milestone Panel ................................................................................................................................ 18
4. Work view ................................................................................................................................................. 19
4.1 My Dashboard Overview .................................................................................................................. 19
4.2 Issues Panel ...................................................................................................................................... 19
4.3 Charts................................................................................................................................................ 20
4.4 My Schedule panel ........................................................................................................................... 20
4.5 My Logged Hours panel .................................................................................................................... 20
5. Track view ................................................................................................................................................. 22
5.1 Timesheets Overview ....................................................................................................................... 22

2
5.2 Timesheets Approval ........................................................................................................................ 22
5.3 Timesheets Configuration Panel ...................................................................................................... 23
6. Report view .............................................................................................................................................. 24
6.1 Planning Reports .............................................................................................................................. 25
6.2 Time Sheet Reports .......................................................................................................................... 26
6.3 Tracking Reports ............................................................................................................................... 26
7. Integration with External Calendars ......................................................................................................... 27
7.1 Integration with Outlook Calendar ................................................................................................... 27
7.2 Integration with Google Calendar .................................................................................................... 27
7.3 Integration with Apple iCal ............................................................................................................... 28
8. Additional Information ............................................................................................................................. 29
8.1 Features and Benefits ....................................................................................................................... 29
8.2 Server System Requirements ........................................................................................................... 30
9. ActivityTimeline Administration ............................................................................................................... 31

3
1. Getting Started
1.1 Overview
Activity Timeline application for Atlassian Jira provides a visual resource planning and project tracking
dashboard to schedule Jira tasks along with custom events; calculate workload, availability and utilization;
generate timesheets and reports.
It works with both Jira Server/Data Center and Jira Cloud installation options.
It does not require any extra installations inside of Jira. ActivityTimeline is installable outside of Jira.
Activity Timeline provides four modules for a full workflow: Plan. Work. Track. Report
Plan. This module of ActivityTimeline add-on allows to do resource/project and
capacity planning. Plan and manage teamwork, schedule events, vacations,
bookings and tasks, calculate workload and availability.
Work. This module provides an all-inclusive personal workspace for everyday
work: personal tasks and schedule, logging worked hours, see overall progress of
own timesheet and display required utilization on the worklog charts.
Track. Timesheets module on Track view provides managers with a quick and
easy overview of logged time and ability to approve/export the timesheets.
Report. ActivityTimeline add-on allows generating various Web and Excel reports
based on workload, skills, availability, logged work hours and utilization.
ActivityTimeline is intended to help managing service, consultancy and creative teams with a dynamic
working schedule, frequent changes requests and people shared between projects.

4
1.2 Logging In and Out
To access and log into ActivityTimeline, follow the steps given below.
1. Open the browser and enter your specific link to ActivityTimeline application:
2. Enter your user name or email in the Jira Username text entry box.
3. Enter your password in the Jira Password text entry box.
4. Click SIGN IN. The Dashboard of the Activity Timeline application will be displayed.
Note: If you are using Google account with Jira then your Jira Administrator should configure Single Sign-On
(SSO) between Jira and ActivityTimeline for a successful login.
Note 2: Specify your Email address as username and API Token as password if you have Jira Cloud.
To log out of the application, simply click on user avatar icon and then click on Logout menu:
You will be logged out of the application.
ActivityTimeline provides an ability to log in via Single Sign-On (SSO) with a single button click
(if configured in Jira and ActivityTimeline - instructions here).

5
2. Working with ActivityTimeline
2.1 Header Panel
Header Panel includes the icons to access the main modules and pages like PLAN/WORK/TRACK/REPORT
views, My Account, Configurations, Help, Quick Product Tour, Feedback, Synchronization with Jira etc.
2.2 Issues
Jira issues are movable and resizable blue bars:

6
2.3 Assigning Tickets
You can easily assign tasks to a team member by drag’n’droping from a Left Panel.
1. Drag’and’drop an issue to assign it to a person:
Note that every issue/item can be dragged if start and end dates are configured in Jira and ActivityTimeline.
Once you drag and drop an issue from Issues Panel to user’s timeline, or from one person to another, you
are re-assigning the issue. The new assignee will be immediately updated in Jira.
2. Move issue to change planned start date:
The new assignee, start date and end date will be immediately updated in Jira.
3. Resize issue to change planned end date:
Resize by moving the left or right side of the issue. The new end date will be immediately updated in Jira.

7
2.4 Issue Card
Issue Card displays the main information about Jira issue or any event. Issue Card can be opened by clicking
on the Issue on a Dashboard or on a Left Panel. Issue Card includes the following information: Issue key,
Ticket name, Status, Assignee name, Time spent, Start / End / Due Date. It can include 3 extra fields.
The following operations can be performed on the Issue Card:
● Logging work; Changing Original and Remaining Estimate;
● Scheduling the ticket, changing Status and Color of the ticket;
2.5 Creating a Custom Event or Issue
1. Click on an empty cell or any timeline cell.
The Create New Item dialog will be displayed.
2. Select the type of the event. In the example, Day Off is selected.
3. Enter the title for the event in the Title text entry box.
4. Click Create. The event will be added.
8
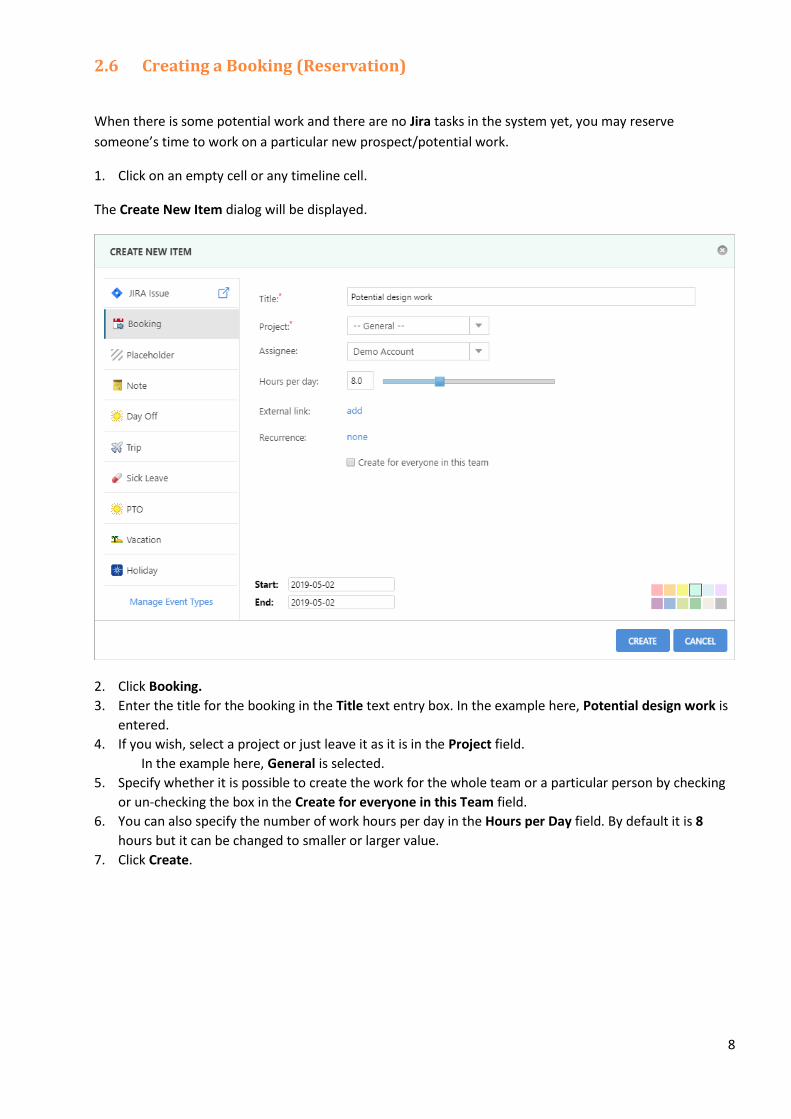
2.6 Creating a Booking (Reservation)
When there is some potential work and there are no Jira tasks in the system yet, you may reserve
someone’s time to work on a particular new prospect/potential work.
1. Click on an empty cell or any timeline cell.
The Create New Item dialog will be displayed.
2. Click Booking.
3. Enter the title for the booking in the Title text entry box. In the example here, Potential design work is
entered.
4. If you wish, select a project or just leave it as it is in the Project field.
In the example here, General is selected.
5. Specify whether it is possible to create the work for the whole team or a particular person by checking
or un-checking the box in the Create for everyone in this Team field.
6. You can also specify the number of work hours per day in the Hours per Day field. By default it is 8
hours but it can be changed to smaller or larger value.
7. Click Create.
9
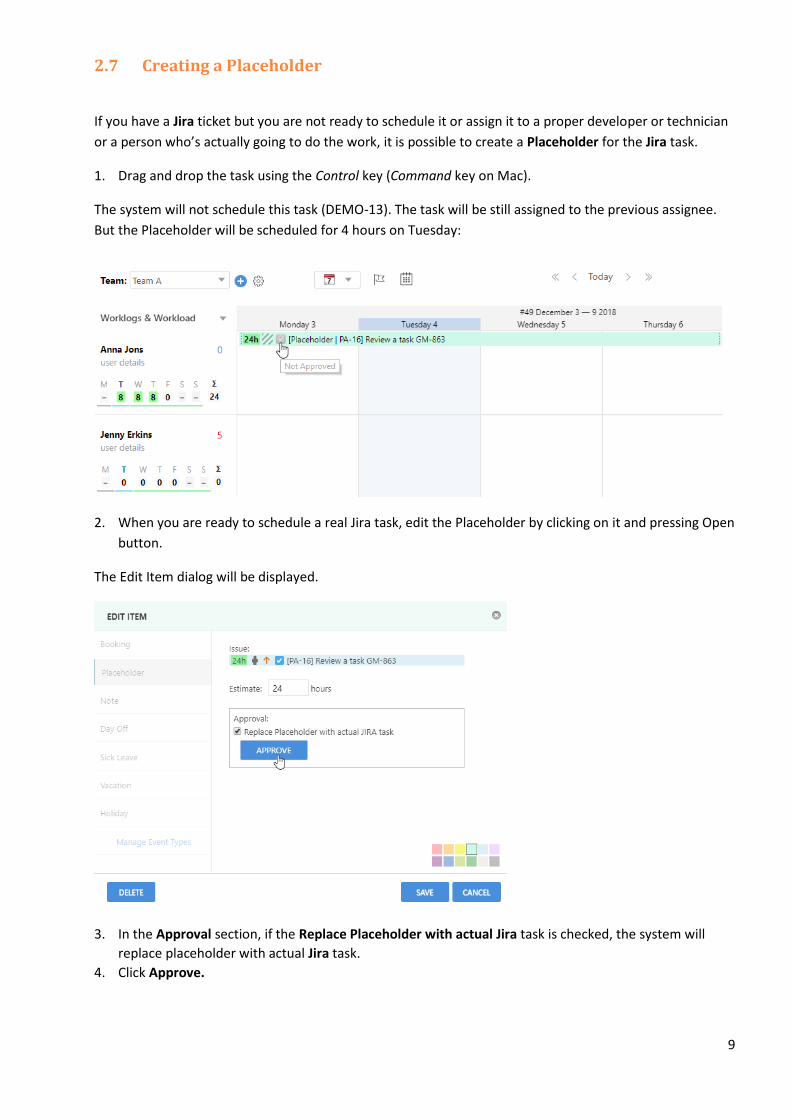
2.7 Creating a Placeholder
If you have a Jira ticket but you are not ready to schedule it or assign it to a proper developer or technician
or a person who’s actually going to do the work, it is possible to create a Placeholder for the Jira task.
1. Drag and drop the task using the Control key (Command key on Mac).
The system will not schedule this task (DEMO-13). The task will be still assigned to the previous assignee.
But the Placeholder will be scheduled for 4 hours on Tuesday:
2. When you are ready to schedule a real Jira task, edit the Placeholder by clicking on it and pressing Open
button.
The Edit Item dialog will be displayed.
3. In the Approval section, if the Replace Placeholder with actual Jira task is checked, the system will
replace placeholder with actual Jira task.
4. Click Approve.
10
Or click on checkbox icon on an issue and click Approve:
The system will automatically replace the Placeholder with the actual Jira task.
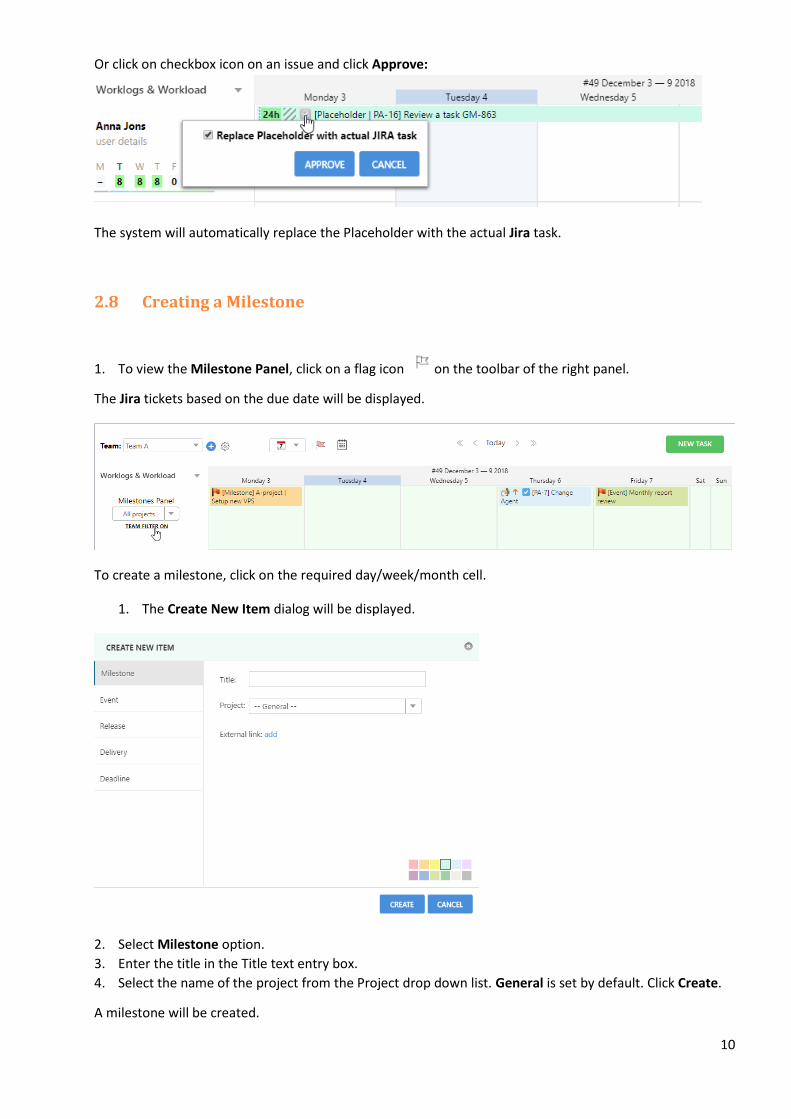
2.8 Creating a Milestone
1. To view the Milestone Panel, click on a flag icon on the toolbar of the right panel.
The Jira tickets based on the due date will be displayed.
To create a milestone, click on the required day/week/month cell.
1. The Create New Item dialog will be displayed.
2. Select Milestone option.
3. Enter the title in the Title text entry box.
4. Select the name of the project from the Project drop down list. General is set by default. Click Create.
A milestone will be created.

11
2.9 Logging Work
To log work, click on the ticket you worked on and click on Log work link. In the opened Time Tracking
dialog specify the spent time and date to log your work hours. Spent time is displaying on a Dashboard and
is calculated in your workload on Workload Indicator.
Detailed documentation: Work Log
2.10 Searching Issues
You may filter down to a required Jira ticket by using search option.
Search by issue key or keyword from the title by entering the text in the Search Issues text entry box. It
supports multiple keywords, you may add multiple keywords separated by space.

12
2.11 Applying Issue Filters You can apply filters on tickets in the left Issues Panel.
The Filter by Assignee and Filter by Resolution fields are the default settings. You can change these filters
to reflect your work flow or for the whole team. Simply select the filter you want to apply. You may also
use a combination of different filters.
The results will be displaying under the panel. To apply the results on the Dashboard switch Apply these filters to Timeline Panel toggle.
2.12 Grouping Issues
You can group issues by different fields such as Person, Project, Priority, Status, Release, Sprint,
Component, Parent Task, Issue Type, Epic and No grouping.

13
2.13 Sorting Order
You can change sorting order based on several options such as Project, Priority, Status, Release, Person,
Issue Type, Issue Title, Issue Color, Rank, Due Date, Created Date and Last Updated Date. You can also
change the order of sorting as ascending.
2.14 Using Timeline Panel
You can navigate to Timeline Panel in two ways:
● Click on the header and the system would jump through the scopes to wider or narrow scope.
● There is also a navigation bar at the top to navigate from weeks, days or months.
Timeline has a default view, but there is also a compact view if you want to get more space. You can select
the checkbox for compact view and the system would refresh the screen and try to compactly the display
all the data. It shrinks the workload and the left panel which can be closed altogether and provides more
space for the timeline.
You can manage the Jira tickets based on the number of hours worked on daily/weekly or monthly basis for
the particular project.

14
2.15 Un-Scheduling a Task
You can un-schedule a task in two methods.
Method 1
1. Click on the task you wish to un-schedule.
2. Press Schedule button.
3. In the dialog, clear out the available dates such as Start and End.
4. Press Change.
Method 2
Drag and drop the task to from the timeline to the UNSCHEDULE box in the left/bottom section. The task
will be un-scheduled.
2.16 Changing Task Color
1. Click on any Jira task or custom event
● Issue Card will open:
2. Click on small color box to change background color of a task.

15
3. Plan view
3.1 Dashboard Overview
Activity Timeline’s planning dashboard consists of four important core components such as Issues Panel,
Timeline Panel, Workload Indicator and Milestone Panel.
This view allows to find, filter, group and sort Jira issues, schedule tasks for the particular person or a team.
View the team schedule, add vacations, days off and reservations. Approve placeholders and bookings.
Automatically calculate the workload/utilization and availability of the team.
Log into Activity Timeline with a Jira account.
The Activity Timeline Dashboard will be displayed.
● Drag’n’drop/move/resize issues (blue bars) to schedule them to specific people on the timeline;
● Timeline calendar per each person - Every row corresponds to one person of selected team; every
column is one working day of the week: Monday, Tuesday, Wednesday, Thursday or Friday. Blue bars
are Jira issues scheduled to specific days.
● Scheduled Jira issue gets planned start and end dates - Start/end dates can be mapped to Jira custom
fields
● Issues are positioned in calendar based on three things: issue assignee, issue planned start date and
issue planned end date.
● Get visibility - View entire team on one screen during the whole working week/month or year.
Keep an eye on all tasks the currently in progress.

16
3.2 Timeline Panel
Timeline Panel helps you to manage and schedule Jira tickets on daily, weekly, or monthly basis for the
particular user or team(s).
Additional options on the Timeline Panel:
Selecting Team(s), Find team/person by skill/name/position, Change Calendar view, Milestones Panel, Select the exact Date, Switching to previous or next day/week/month/year, Create new Jira Task
3.3 Workload Indicator
Workload Indicator displays how many hours are allocated per each person per each work day based on
remaining estimate of scheduled Jira issues. In addition, it displays week summary of allocated hours per
every person.
Different colors indicate the workload of a day. They are calculated based on user involvement.
Full-time worker will have a green color if 8 hours of work is scheduled while part-time worker will get
green color with 4 hours of work:
● Grey (0 hours) nothing is scheduled ● Yellow (1-3 hours) < 50% of capacity ● Dark green (4-6 hours) 51% - 88% of capacity ● Green (7-8 hours) 89% - 100% of capacity ● Light red (9 hours) 101% - 125% of capacity
17
● Red (more then 10 hours) > 125% of capacity ● Blue (Day Off, Vacation, Sick Leave or Holiday) ● Purple (issue with Logged time, Day Off, Vacation, Sick Leave or Holiday)
Note:
Workload indicator will show aggregated values for higher timeline scopes like month/2
months/quarter/half-year/year.
Detailed documentation: Workload Indicator
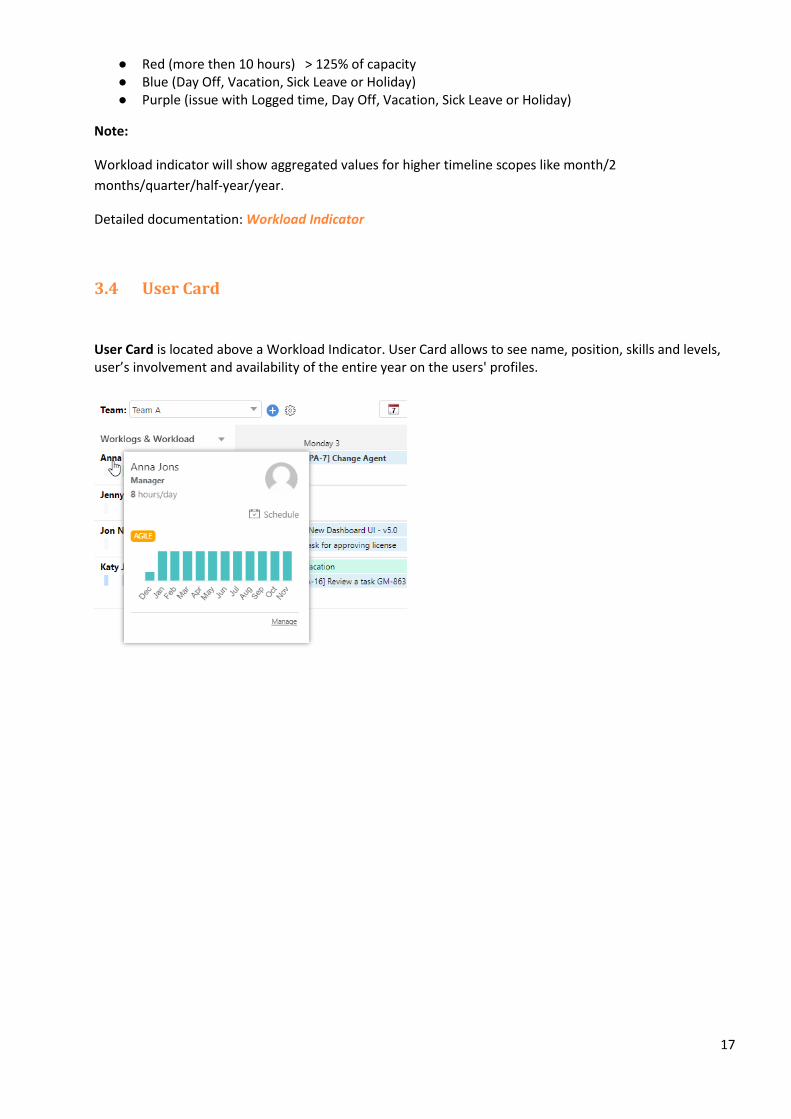
3.4 User Card
User Card is located above a Workload Indicator. User Card allows to see name, position, skills and levels, user’s involvement and availability of the entire year on the users' profiles.

18
3.5 Milestone Panel
Milestones Panel displays unresolved Jira issues based on a Due Date field or Fix Versions.
In addition, you may add your own custom milestones onto this panel. There are five custom milestone
types available: general milestone, event, release, delivery and deadline.
● Team Filter On/Team Filter Off - determines whether the panel shows all Jira issues or issues assigned
to current team only. Custom milestone events are always visible.
● Project Filter – filter items shown on the Milestones Panel by Jira project.
19
4. Work view
4.1 My Dashboard Overview
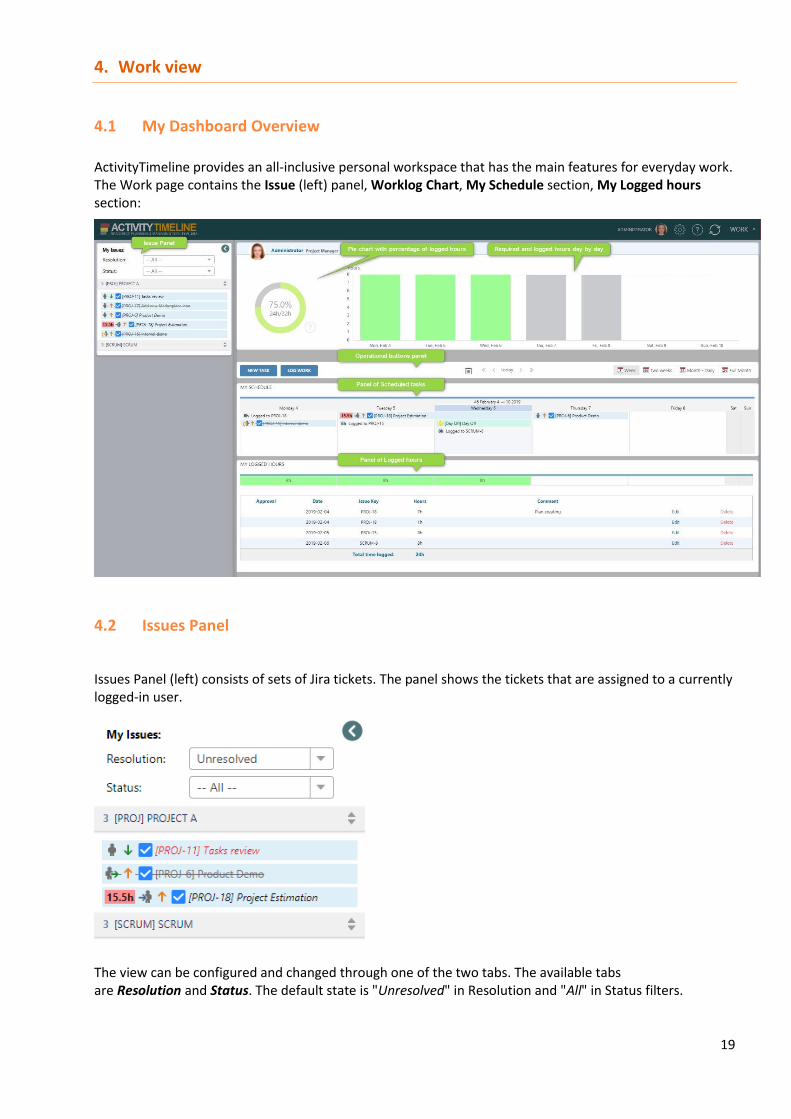
ActivityTimeline provides an all-inclusive personal workspace that has the main features for everyday work. The Work page contains the Issue (left) panel, Worklog Chart, My Schedule section, My Logged hours section:
4.2 Issues Panel
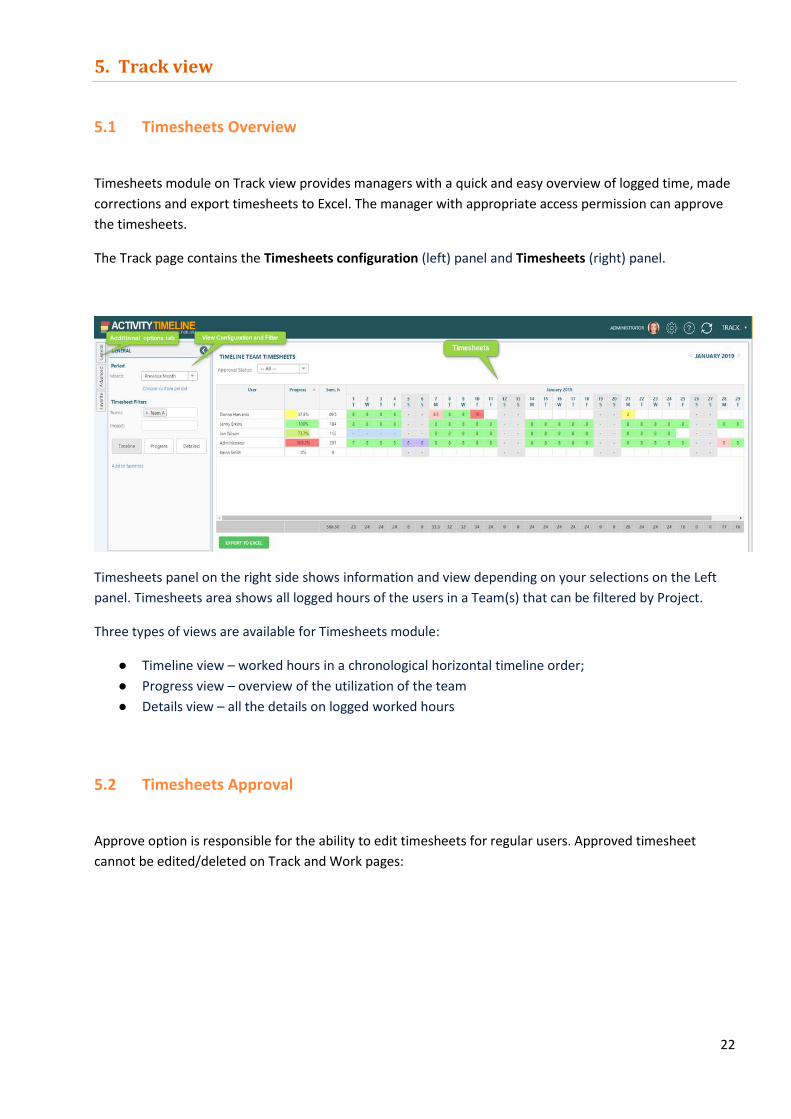
Issues Panel (left) consists of sets of Jira tickets. The panel shows the tickets that are assigned to a currently logged-in user.
The view can be configured and changed through one of the two tabs. The available tabs are Resolution and Status. The default state is "Unresolved" in Resolution and "All" in Status filters.

20
4.3 Charts
Charts on Work page visualize the progress of your work based on required hours and logged hours. You can always keep an eye on your logged time.
Pie chart represents the view of Required hours, Logged hours and Remaining hours per selected period.
Bar chart represents the view of Logged hours and Remaining hours per day.
4.4 My Schedule panel
My Schedule is a timeline schedule of a person. You can see, create, edit and delete Jira tasks, custom events and logged time on this panel.
You will see the assigned tasks that are already scheduled to you on the timeline. You may schedule your assigned issues from the left Issue Panel to your timeline.
Detailed documentation: Issue Scheduling
4.5 My Logged Hours panel
Main Worklogs operations you can do on this panel: track your worklogs, edit date, time and comment in worklog, add new or delete existing worklog.
First Worklog Hours Container panel shows logged hours per day.
Two new buttons will appear after hovering the cursor at a worklog cell:
Add new worklog button or click on a Day cell. The Time Tracking panel is opened with automatically filled-in time available on a particular day.
Filter worklog button on a particular day. The system filters worklogs on that day in a Worklog table by clicking on that button.

21
Second Worklog Table panel shows all worklogs for the selected period in a Calendar view. You can edit date, hours, comment by clicking on Edit link or delete worklog by clicking on Delete link. All changes are synchronized to Jira.
If Worklog Approval functionality in enabled in Configuration then an additional “Approval” column will be
displayed. Users can see which worklogs were approved by an authorized person (team manager).
Approved worklogs cannot be edited or deleted.
22
5. Track view
5.1 Timesheets Overview
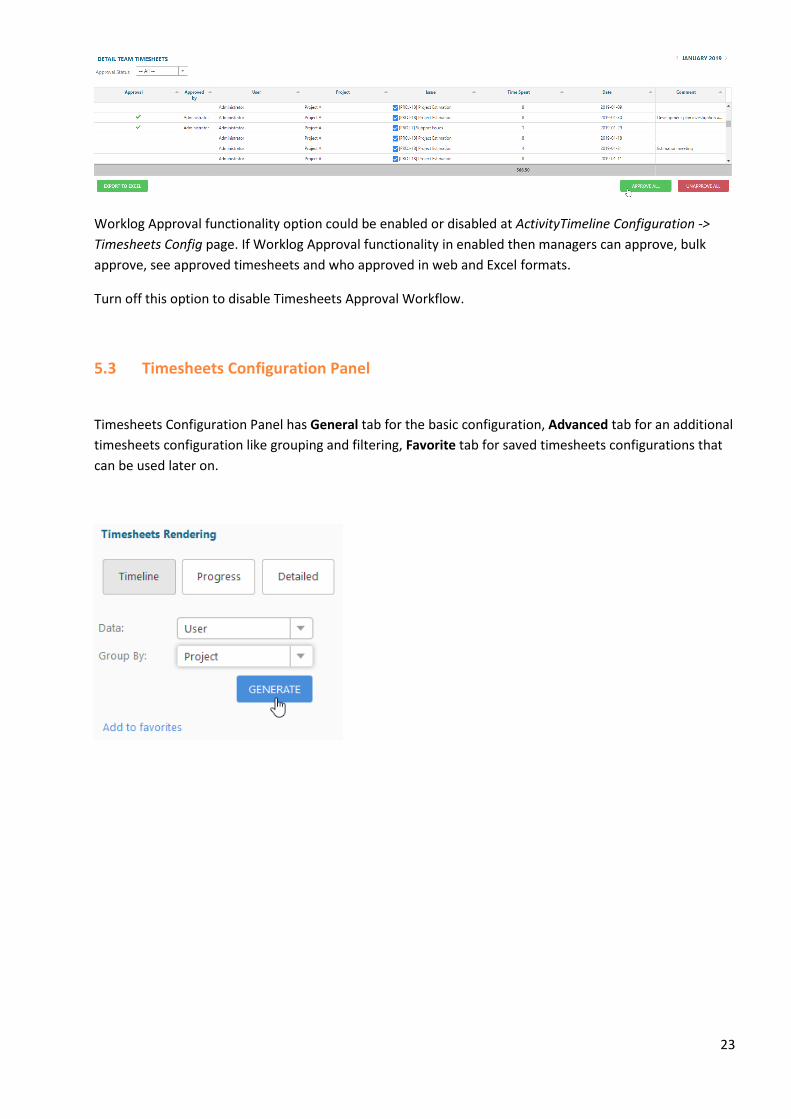
Timesheets module on Track view provides managers with a quick and easy overview of logged time, made
corrections and export timesheets to Excel. The manager with appropriate access permission can approve
the timesheets.
The Track page contains the Timesheets configuration (left) panel and Timesheets (right) panel.
Timesheets panel on the right side shows information and view depending on your selections on the Left
panel. Timesheets area shows all logged hours of the users in a Team(s) that can be filtered by Project.
Three types of views are available for Timesheets module:
● Timeline view – worked hours in a chronological horizontal timeline order;
● Progress view – overview of the utilization of the team
● Details view – all the details on logged worked hours
5.2 Timesheets Approval
Approve option is responsible for the ability to edit timesheets for regular users. Approved timesheet
cannot be edited/deleted on Track and Work pages:
23
Worklog Approval functionality option could be enabled or disabled at ActivityTimeline Configuration ->
Timesheets Config page. If Worklog Approval functionality in enabled then managers can approve, bulk
approve, see approved timesheets and who approved in web and Excel formats.
Turn off this option to disable Timesheets Approval Workflow.
5.3 Timesheets Configuration Panel
Timesheets Configuration Panel has General tab for the basic configuration, Advanced tab for an additional
timesheets configuration like grouping and filtering, Favorite tab for saved timesheets configurations that
can be used later on.
24
6. Report view
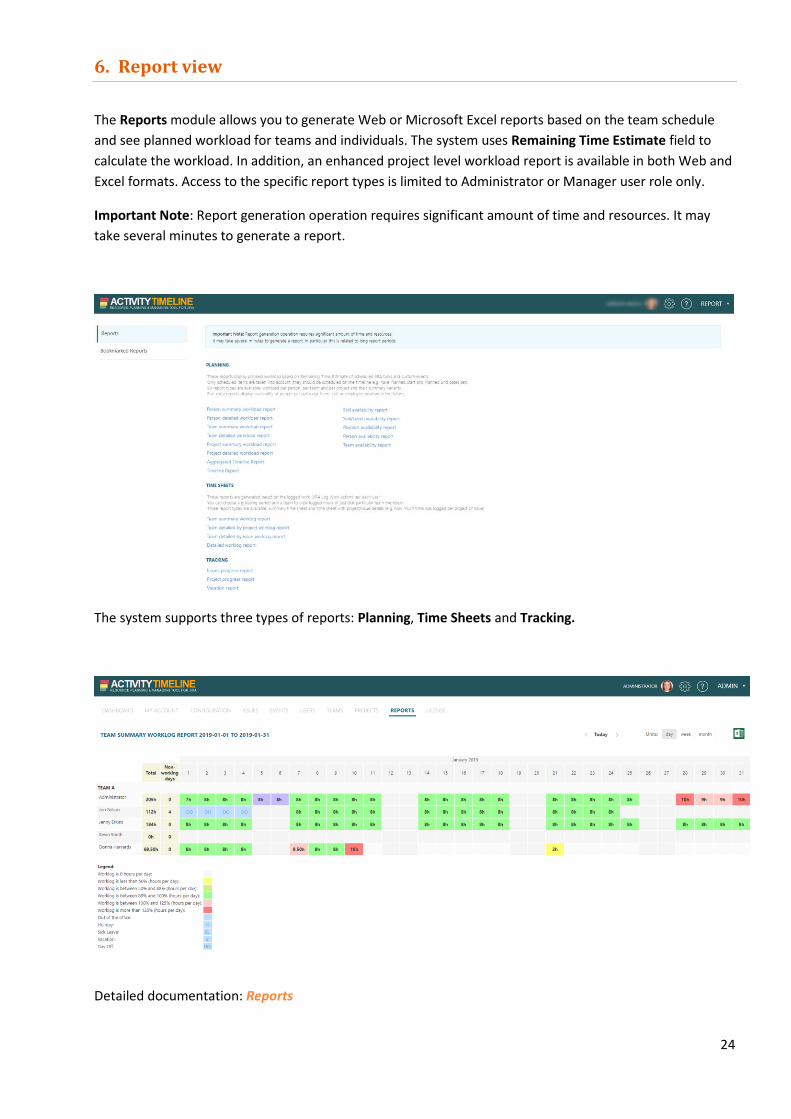
The Reports module allows you to generate Web or Microsoft Excel reports based on the team schedule
and see planned workload for teams and individuals. The system uses Remaining Time Estimate field to
calculate the workload. In addition, an enhanced project level workload report is available in both Web and
Excel formats. Access to the specific report types is limited to Administrator or Manager user role only.
Important Note: Report generation operation requires significant amount of time and resources. It may
take several minutes to generate a report.
The system supports three types of reports: Planning, Time Sheets and Tracking.
Detailed documentation: Reports

25
6.1 Planning Reports
This group of reports includes a set of reports generated by estimating the remaining time estimate. The
system would use remaining time estimate to plan start and end dates of Jira tickets to see whom those Jira
tickets is assigned, what their capacity is and build the workload reports. These reports display planned
workload based on Remaining Time Estimate of scheduled Jira tasks and custom events.
Note: Only scheduled items with estimate are taken into account.
Reports types available in this group:
● Person Summary Workload Report – Shows summary report of person’s workload.
● Person Detailed Workload Report – Shows detailed report of person’s workload.
● Team Summary Workload Report – Shows summary report of team’s workload.
● Team Detailed Workload Report – Shows detailed report of team’s workload.
● Project Summary Workload Report – Shows summary report of total number of hours planned per
each project.
● Project Detailed Workload Report – Shows detailed report of total number of hours planned per
each project.
● Aggregated Timeline Report – Shows an overall view of combined records in every project in Excel
format.
● Timeline Report – Allows to export the current timeline schedule into Excel file.
● Skill Availability Report – Shows report based on the skill availability of member in the team.
● Skill / Level Availability Report – Shows report based on the skill or level availability in the
organization.
● Position Availability Report – Shows report based on the position availability of member in the
team.
● Person Availability Report – Shows the number of available hours (or percentage) per person.
● Team Availability Report - Shows the number of available hours (or percentage) per team.
● Timeline Report – Allows to export the timeline schedule into Excel file. ● Aggregated Timeline Report – Allows to export the aggregated timeline schedule per project into
Excel file.

26
6.2 Time Sheet Reports
This group of reports includes a couple of other reports with regards to how many hours of work were
logged by people in a team. It is based on logged work not remaining time estimate. These reports are
generated based on the logged work (Jira Log Work action) per each user. You can choose a grouping
period and a team to view logged hours of just that particular team members.
The reports available in this group are:
● Team Summary Worklog Report – Shows the amount of logged work during a specific period like
month and the people who logged these hours to Jira tasks.
● Team Detailed by Project Work Log Report - Shows report on which projects the work was logged
in a timeline view.
● Team Detailed by Issue Work Log Report – Shows Jira tickets with the amount of logged work for
those tickets in a timeline view.
● Detailed Worklog Report - Shows worklog records of users along with their time and comments.
6.3 Tracking Reports
This group of reports helps track the time planned and time spent on specific Jira tickets for a defined
period of time. It can also show whether the initial estimates were correct or not (and how much).
The reports available in this group are:
● Issues Progress Report – Shows a summary of Jira tickets, time estimates (original and remaining),
time spent already on the tickets, and tickets status.
● Project progress report – Shows a summary of Jira projects, time estimates (original and
remaining), time spent already on the project, deviation and projects status.
● Vacation Report – Shows vacations, days off, sick leaves and holidays per each team member.

27
7. Integration with External Calendars
7.1 Integration with Outlook Calendar
1. Click on user account icon in top/right corner > Export Calendar.
2. Click Renew Calendar Link to generate a unique iCal data feed URL; Copy the URL.
3. Open your Microsoft Outlook Calendar.
4. Right-click on 'Other Calendars' and select Add Calendar -> From Internet... from a pop-up menu.
5. Paste the previously copied URL into the blank field and click OK and then Yes buttons.
Jira tasks and custom events that are scheduled on your timeline will appear in Microsoft Outlook
Calendar.
7.2 Integration with Google Calendar
1. Click on user account icon in top/right corner > Export Calendar.
2. Click Renew Calendar Link to generate a unique iCal data feed URL; Copy the URL.
3. Open your Google Calendar: https://www.google.com/calendar/
4. Click on a small triangle button next to Other Calendars menu; Select Add by URL from the pop-up
menu.
5. Paste the previously copied URL into the blank field and click Add Calendar button.
Jira tasks and custom events that are scheduled on your timeline should appear in Google Calendar.

28
Note: Google does not provide any control over the Calendar refresh rate. Google automatically gets
calendar updates approximately every 8 hours.
7.3 Integration
with Apple
iCal
1. Click on user account
icon in top/right corner
> Export Calendar.
2. Click Renew Calendar
Link to generate a
unique iCal data feed
URL > copy the URL.
3. Open your Apple iCal
application.
4. Click on Calendar main
menu and select
Subscribe...
(Command + Alt + S).
5. Paste the previously copied URL into the blank field and click 'Subscribe' button.
6. Change Auto-refresh period to Every hour and click OK' button.
Jira tasks and custom events that are scheduled on your timeline should appear in Apple iCal application.

29
8. Additional Information
8.1 Features and Benefits
● Activity Dashboard – Provides quick and efficient representation of scheduled tasks per each person in
every specific week.
● Workload Indicator - Displays how many hours are allocated per each person per each work day based
on remaining estimate of scheduled Jira issues. It also displays week summary of allocated hours per
every person. Different color indicates workload in hours of a day.
● Automatic Synchronization with Jira/Jira Agile -Every change in Jira will show up on Activity Timeline's
Dashboard and every update to issue on AT Dashboard will be propagated to your Jira database.
● Task Estimates at Hand- View estimates directly on the dashboard.
● Add Vacations, Days Off, Sick Leaves & Other Custom Events – Allows you to add Recurring Events,
Vacations, Day Offs, Sick Leaves, Holidays or just a note for somebody.
● Drag'n'Drop Interface - Assign, schedule, estimate tasks simply by dragging/resizing blue bars around
the screen.
● Weekly, Monthly, Quarterly, Half-Yearly & Yearly Scopes – Allows you to switch between weekly,
monthly, quarterly, half-yearly, and yearly views by selecting a corresponding option from a Scope drop
down menu.
● Milestones Panel – Allows you to define projects' milestones, sprints, deadlines etc. View Jira issues
based on a Due Date field and add your own milestones on that panel. Filter Milestones Panel events
by team with a single click.
● Work with Teams – Allows you to filter issues by teams, configure multiple dashboards per different
teams. One person can belong to multiple teams.
● Book Person's Time Ahead - Specify number of hours you expect some person to work on some
particular project or some general task. Activity Timeline will count your booking in person's workload
calculation algorithm. You can setup a recurring booking for repetitive tasks.
● Quick Issue Search - Start typing issue key or any word from issue title and get results immediately.
Search results are sorted by relevance so that the system is trying to show most relevant issues on top.
● Filter Issues by Type, Project, Team, Schedule, Resolution, or Assignee - Get only issues assigned to
you or your team, schedule them by drag'n'dropping into Timeline panel on the right side. Differentiate
scheduled and non-scheduled tasks.
● Group Issues with Single Click - One click and already filtered issues are getting grouped by
project/priority/status/release/sprint/component/parent task or assignee.
● Use Native Jira Filters - Configure any filter in Jira, make it as one of your favorites and use it in Activity
Timeline's issues panel.
● Quick Access to Jira Interface – Left mouse click on any blue issue box and Open button press will open
standard Jira issue dialog in AJAX popup frame. Middle mouse button click (or left click with Ctrl key
hold) - will open issue in a new web browser tab or window.
● Color Coding - Visually differentiate/highlight tasks that need attention from the regular ones. For
example, you may use Red color to highlight all tasks that need an immediate follow up.
● Advance Planning - Switch working week by just one click. Schedule tasks for next weeks or months in
advance. Book resource's time for some particular task in advance.
● Workload Report - Generate Web or MS Excel report based on scheduled tasks to see planned
workload for teams and individuals. The system uses "Remaining Time Estimate" field to calculate the

30
workload. In addition, an enhanced project level workload report is available in both Web and Excel
formats.
● iCal Export to External Calendars - Export your schedule to your favourite Calendar application -
Google Calendar, Microsoft Outlook or Apple iCal.
● Informative Feedback - Every action will accompany a notification that shows if action is performed or
failed.
● Split Jira Task - Allows you to split a single Jira task across multiple people and multiple periods. Simply
drag'n'drop a task with Shift key hold to split it.
● Placeholders for Jira Tasks - Use placeholders for Jira tickets and replace them with actual Jira tasks
when the plan is settled. Create Placeholder for an issue by drag'n'drop it with Ctrl/Command key hold.
● Auto Issue Scheduler - The system automatically schedules (plans) Jira tasks you choose for optimal
workload. You could choose which tasks you would like to auto-schedule: all assigned to a team/person
or the filtered ones. The system can even schedule Placeholders instead of real Jira tasks so you can
review and approve them later on.
8.2 Server System Requirements
System Requirements
Operating System For Server installation: Windows/Linux For Cloud based service: any OS with a web browser and internet access
Processor 2.4 GHz or higher
RAM 4 GB or above
Screen Resolution HD (1280 x 720 with 16-bit color) or greater
Internet Connection DSL or Broadband
Browser Internet Explorer 11.0 / Edge or newer Mozilla® Firefox 52.0 or newer Google Chrome 57.0 or newer Apple Safari 6.2 or newer

31
9. ActivityTimeline Administration
The Activity Timeline Administration involves how to administer, how to change users, roles, how to add
new projects and synchronize the issues.
1. To navigate to Configuration settings from the Dashboard view click on Configuration (gear) icon on
a toolbar.
➔ The Configuration page will be displayed.
You can customize the Jira Tickets using Jira Agile and also set the options like Issues, Events, Users, Teams,
Projects, Reports and License.
● Issues: Allows automatic synchronization of Jira issues. Every time a new issue comes in, the
automatic synchronization will load those changes. But if there are some changes in the
configuration like switching custom fields, mapping, changing between due date and planned end
dates in custom field or any other such manipulation of data, then a fresh portion of data from Jira
is needed to load and update the caches.
● Events: Allows you to manage existing timeline and milestones custom events types or add new
custom events types.
● Users and Teams: Allows you to configure and manage users and teams. Search for users and
Default Person Involvement. Also perform Bulk Mode search to change a bunch of configuration
options and properties of a set of users at once.
● Projects: Allows you to specify which Jira projects you would like to manage on the activity timeline
dashboard by checking or un-checking them. Clicking on the green sync icon will synchronize all the
tickets from Jira into activity timeline of this particular project.
● Reports: Allows you to configure settings to choose reports in Planning , Timesheets and Tracking
sections.
● License: Allows you to see the information about your ActivityTimeline license, update license key
or buy license key.
For detailed information, you may refer to the Administrator Guide at:
https://activitytimeline.com/docs/ActivityTimeline-Admin-Guide.pdf


