Page 1
AD FS 2.0 Step-by-Step Guide: Federation with Shibboleth 2 and the InCommon Federation
Microsoft Corporation
Published: October 2010
Version: 1.0
Author: Dave Martinez, Principal, Martinez & Associates LLC
Editor: Jim Becker
Technical reviewers: Mike Jones, Samuel Devasahayam, Larry Gilreath, Stuart Kwan,
Cristian Mezzetti (University of Bologna), Scott Cantor (The Ohio State University), and others
Abstract
Through its support for the WS-Federation and Security Assertion Markup Language (SAML) 2.0
protocols, Microsoft® Active Directory® Federation Services 2.0 (AD FS 2.0) provides claims-
based, cross-domain, Web single sign-on (SSO) interoperability with non-Microsoft federation
solutions. Shibboleth® 2, through its support for SAML 2.0, enables cross-domain, federated
SSO between environments that are running Microsoft and Shibboleth 2 federation
infrastructures.
Building on existing documentation, this step-by-step guide walks you through the setup of a
basic lab deployment of AD FS 2.0 and Shibboleth 2 that performs cross-product, browser-based
identity federation. Both products perform both identity federation roles: claims provider/identity
provider and relying party/service provider. In addition, this guide provides details about the steps
that are necessary for interoperability between AD FS 2.0 and the InCommon Federation, in
which Shibboleth software is widely used. We expect that interoperability with other federations in
the Research and Education sector would be achieved similarly.
This document is intended for developers and system architects who are interested in
understanding the basic modes of interoperability between AD FS 2.0 and Shibboleth 2.
Page 2
This document is provided ―as-is‖. Information and views expressed in this document, including
URL and other Internet Web site references, may change without notice. You bear the risk of
using it.
Some examples depicted herein are provided for illustration only and are fictitious. No real
association or connection is intended or should be inferred.
This document does not provide you with any legal rights to any intellectual property in any
Microsoft product. You may copy and use this document for your internal, reference purposes.
You may modify this document for your internal, reference purposes.
© 2010 Microsoft Corporation. All rights reserved.
Microsoft, Active Directory, Internet Explorer, SQL Server, Windows, Windows PowerShell, and
Windows Server are trademarks of the Microsoft group of companies. All other trademarks are
property of their respective owners.
Page 3
3
Contents
AD FS 2.0 Step-by-Step Guide: Federation with Shibboleth 2 and the InCommon Federation ..... 5
About This Guide.......................................................................................................................... 5
Terminology Used in This Guide .............................................................................................. 5
About the Author ....................................................................................................................... 5
Prerequisites and Requirements .................................................................................................. 6
AD FS 2.0 ................................................................................................................................. 6
Shibboleth ................................................................................................................................. 6
Windows ................................................................................................................................ 6
Shibboleth .............................................................................................................................. 7
Step 1: Preconfiguration Tasks ....................................................................................................... 7
Ensure IP Connectivity ................................................................................................................. 7
Configure Name Resolution ......................................................................................................... 8
Verify Clock Synchronization ....................................................................................................... 8
Enable SSL Server Authentication ............................................................................................... 8
Create and Apply a Self-Signed SSL Certificate for the Shibboleth SP (IIS) ........................ 9
Install Shibboleth SSL Certificates on the AD FS 2.0 Computer .......................................... 9
Create a Shibboleth Sample User .............................................................................................. 10
Create a Shibboleth Sample Application ................................................................................... 11
Complete Shibboleth SP Configuration ..................................................................................... 12
Step 2: Configure AD FS 2.0 as the Identity Provider and Shibboleth as the Relying Party ........ 13
Configure AD FS 2.0 .................................................................................................................. 13
Add a Relying Party Using Metadata ...................................................................................... 13
Edit Claim Rules for Relying Party Trust ................................................................................ 13
Add the Scope Element to AD FS 2.0 Metadata .................................................................... 15
Configure Shibboleth .................................................................................................................. 17
Add a New IdP Using Local Metadata .................................................................................... 17
Create a Link for Initiating Federated Access ............................................................................ 18
Step 3: Test AD FS 2.0 as the Identity Provider and Shibboleth as the Relying Party ................. 19
Step 4: Configure Shibboleth as the Identity Provider and AD FS 2.0 as the Relying Party ........ 19
Configure Shibboleth .................................................................................................................. 20
Add a New SP Using Remote Metadata................................................................................. 20
Add an Attribute to a Shibboleth-Generated Assertion........................................................... 22
Configure AD FS 2.0 .................................................................................................................. 23
Add a Claims Provider Using Metadata .................................................................................. 23
Edit Claim Rules for Claims Provider Trust ............................................................................ 24
Edit Claim Rules for the WIF Sample Application .................................................................. 25
Change the AD FS 2.0 Signature Algorithm ........................................................................... 26
Page 4
4
Step 5: Test Shibboleth as the Identity Provider and AD FS 2.0 as the Relying Party ................. 27
Appendix A: Using AD FS 2.0 in the InCommon Federation ........................................................ 28
Metadata Parsing with FEMMA .............................................................................................. 29
On the Shibboleth computer (shib.adatum.com): ................................................................ 29
On the AD FS 2.0 computer (fsweb.contoso.com): ............................................................. 30
Using FEMMA to Import IdPs ................................................................................................. 31
IDP-parsing FEMMA Script ................................................................................................. 31
FEMMA Template Files – IDP ............................................................................................. 37
Appendix B .................................................................................................................................... 39
WS-Federation Support .......................................................................................................... 39
Certification Authority–Issued, Token-Signing Certificates..................................................... 39
Federated Single Logout ........................................................................................................ 40
SAML 2.0 Artifact Profile ......................................................................................................... 40
Handling Name Qualifiers in AD FS 2.0 ................................................................................. 40
Page 5
5
AD FS 2.0 Step-by-Step Guide: Federation with Shibboleth 2 and the InCommon Federation
About This Guide This guide provides step-by-step instructions for configuring a basic identity federation
deployment between Microsoft® Active Directory® Federation Services 2.0 (AD FS 2.0) and
Shibboleth 2 (Shibboleth) by using the Security Assertion Markup Language (SAML) 2.0 protocol
(http://go.microsoft.com/fwlink/?LinkId=193996) with the SAML2.0 HTTP POST binding. In
Appendix A, this basic deployment is modified to demonstrate interoperability between AD FS 2.0
and a Shibboleth instance that is participating in the InCommon Federation.
Terminology Used in This Guide
Throughout this document, there are numerous references to federation concepts that are called
by different names in the Microsoft and Shibboleth products. The following table assists in
drawing parallels between the two vendors’ technologies.
AD FS 2.0 name Shibboleth name Concept
Security token Assertion An XML document that is created and sent
during a federated access request that
describes a user
Claims provider Identity provider (IdP) A partner in a federation that creates security
tokens for users
Relying party Service provider (SP) A partner in a federation that consumes
security tokens to provide access to
applications
Claims Assertion attributes Data about users that is sent inside security
tokens
In this deployment, each product performs both the claims provider/identity provider role and the
relying party/service provider role.
About the Author
Dave Martinez ([email protected] ) is Principal of Martinez & Associates, a technology
consultancy based in Redmond, Washington.
Page 6
6
Prerequisites and Requirements This lab assumes the pre-existence of deployments of AD FS 2.0 and Shibboleth as described in
the following sections.
AD FS 2.0
The test deployment that is created in the AD FS 2.0 Federation with a WIF Application Step-by-
Step Guide (http://go.microsoft.com/fwlink/?LinkId=193997) is used as starting point for this lab.
That lab uses a single Windows Server® 2008 R2 instance (fsweb.contoso.com) to host both the
AD FS 2.0 federation server and a Windows Identity Foundation (WIF) sample application. It
assumes the availability of a ―Contoso.com‖ domain in which fsweb.contoso.com is a member
server. The same computer can act as the domain controller and the federation server in test
deployments.
Shibboleth
The Shibboleth environment in this lab is hosted by a fictitious company called A. Datum
Corporation. Both the IdP and SP software components can be run on the same host computer.
This guide assumes that the environment was deployed as follows, in anticipation of the
configuration steps described later. Installation and deployment guides for Shibboleth are
available at the Shibboleth 2 documentation home page Web site
(http://go.microsoft.com/fwlink/?LinkId=204014).
Windows
Host operating system: Windows Server 2008 R2
Active Directory Domain Services (AD DS) server role installed to provide the Shibboleth user
identity repository:
Domain name: adatum.com
Host name: shib.adatum.com
A domain controller is an optional component for this lab. Another Lightweight
Directory Access Protocol (LDAP) directory can be used in this lab without
affecting the results.
Web Server role (Internet Information Services (IIS)) installed to host the Shibboleth-
protected sample application, as well as the preformatted hyperlinks that initiate federated
access
Application Development role services installed
IIS 6 Management Compatibility role services installed
Default website ports: HTTP (80) and HTTPS (443)
Note
Page 7
7
Shibboleth
Prerequisite for IdP: Java 5 or above. This lab used JRE version 6u21 for 32-bit Windows
(http://go.microsoft.com/fwlink/?LinkId=204015).
Set the JAVA_HOME environment variable to the install directory for this JRE (for
example, C:\Program Files (x86)\Java\jre6) before running the Shibboleth IdP
installer.
Latest Shibboleth IdP software, at Index of /downloads/shibboleth/idp/latest
(http://go.microsoft.com/fwlink/?LinkId=204016). This lab used version 2.2.0.
This installer automatically installs and configures Apache Tomcat 6.0.26 for 32-bit
Windows. It depends on an existing 32-bit Java JRE installation (below).
On the IdP Details setup screen, use the values in the following table.
Name Value
DNS Name shib.adatum.com
Browser facing port 444
Latest Shibboleth SP software for IIS 7 on 64-bit Windows, at the Shibboleth downloads page
(http://go.microsoft.com/fwlink/?LinkId=204017). This lab used version 2.3.1. Accept all the
default values during the installation.
Step 1: Preconfiguration Tasks
In this step, perform the prerequisite configuration steps to prepare the environment for testing
AD FS 2.0 as IdP/Shibboleth as SP (steps 2, 3) and/or Shibboleth as IdP/AD FS 2.0 as SP (steps
4, 5).
All of the actions in this section were performed while logged into Windows with
administrative privileges.
Ensure IP Connectivity Make sure that the Shibboleth (shib.adatum.com) and AD FS 2.0 (fsweb.contoso.com) computers
have IP connectivity between them. The Contoso.com domain controller, if it is running on a
separate computer, does not require IP connectivity to the Shibboleth system.
Note
Note
Note
Note
Page 8
8
Configure Name Resolution In this lab, we will use the hosts file on both computers to configure name resolution of the
partner federation servers and sample applications.
Production deployments should use Domain Name System (DNS) instead.
1) Locate the hosts file on the Shibboleth computer (shib.adatum.com). The default location
is C:\windows\system32\drivers\etc\hosts.
2) Right-click the file, and then click Open. Select Notepad to open the file.
3) Add an entry for fsweb.contoso.com, for example:
192.168.1.2 fsweb.contoso.com
4) If shib.adatum.com is not a Windows domain controller, add a second entry that points to
itself in the hosts file, for example:
192.168.1.3 shib.adatum.com
5) Save and close the file.
6) Locate the hosts file on the AD FS 2.0 computer (fsweb.contoso.com), and open it with
Notepad.
7) Add an entry for shib.adatum.com, for example:
192.168.1.3 shib.adatum.com
8) Save and close the file.
Verify Clock Synchronization Federation events typically have a short Time to Live (TTL). To avoid errors based on time-outs,
ensure that both computers have their clocks synchronized.
For information about how to synchronize a Windows Server 2008 R2 domain controller
to an Internet time server, see article 816042 in the Microsoft Knowledge Base
(http://go.microsoft.com/fwlink/?LinkID=60402).
Enable SSL Server Authentication Federation relies heavily on public key infrastructure (PKI), including Secure Sockets Layer (SSL)
encryption, for trustworthy transactions. To properly use SSL security in this lab, you will perform
the following prerequisite steps:
Create a new, self-signed certificate for the Shibboleth SP (IIS) server at shib.adatum.com.
(Note: the Shibboleth IdP Tomcat instance auto-generates an SSL certificate during setup.)
Note
To configure name resolution
Note
Page 9
9
Add the self-signed certificates being used by IIS and Tomcat at shib.adatum.com into the
Trusted Roots store of the AD FS 2.0 computer (fsweb.contoso.com).
Create and Apply a Self-Signed SSL Certificate for the Shibboleth SP (IIS)
This certificate enables SSL communication (as required by AD FS 2.0) with the Shibboleth SP
software, running on IIS on shib.adatum.com.
1) Click Start, click Administrative Tools, and then click Internet Information Services
(IIS) Manager.
2) In the left pane, click the icon with the computer name (SHIB). Then, in the IIS section of
the center pane, double-click Server Certificates.
3) In the right pane, under Actions, click Create Self-Signed Certificate.
4) In the Specify Friendly Name window, type iis_ssl, and then click OK.
5) In the left pane, in the Sites folder, right-click Default Web Site, and then click Edit
Bindings.
6) In the Site Bindings window, click Add.
7) In the Add Site Binding window, in the Type box, select HTTPS, and in the SSL
certificate box, select iis_ssl. Click OK, and then click Close.
Install Shibboleth SSL Certificates on the AD FS 2.0 Computer
Install the Shibboleth IdP and SP SSL certificates into the Trusted Roots store on
fsweb.contoso.com. This makes it possible for Internet Explorer to trust these web servers during
HTTPS communications.
1) From fsweb.contoso.com, use Internet Explorer to go to https://shib.adatum.com.
2) At the security warning, click the link to continue to the website. The Address Bar turns
red to signify that the page is protected by an SSL certificate that is not trusted.
3) Click the Certificate Error message next to the Internet Explorer address bar, and then
click View certificates.
4) In the Certificate window, on the General tab, click Install Certificate to start the
Certificate Import Wizard.
5) Click Next.
6) In the Certificate Store window, click Place all certificates in the following store.
7) Click Browse, and then click Show physical stores.
8) In the Trusted Root Certificate Authorities folder, select Local Computer, and then
click OK.
To generate and apply a new, self-signed SSL certificate for the Shibboleth SP
To install Shibboleth SSL certificates on fsweb.contoso.com
Page 10
10
9) Click Next, click Finish, click OK, and then click OK.
10) Use Internet Explorer to go to https://shib.adatum.com:444. (Note the port number.) Use
the previous process to install this SSL certificate into the local computer’s Trusted Roots
store.
11) Close and then reopen Internet Explorer, and revisit both web addresses. In both cases,
the address bar should remain white, signifying working SSL channels.
Create a Shibboleth Sample User Follow the steps in this procedure to add Alan Shen, an Adatum/Shibboleth user to
Active Directory for A. Datum.
1) Log in to the Shibboleth computer (shib.adatum.com) with domain administrator
credentials.
2) Click Start, click Administrative Tools, and then click Active Directory Users and
Computers.
3) In the console tree, under adatum.com, right-click the Users folder. Click New, and then
click User.
4) On the New Object – User page, type the following values, and then click Next.
Name Value
First name Alan
Last name Shen
Full name Alan Shen
User logon name alansh
5) Provide a password, clear the User must change password at next logon check box,
and then click Next.
6) Click Finish.
7) In the right pane of Active Directory Users and Computers, right-click the new user
object, and then click Properties.
8) On the General tab, in the E-mail box, type the following value, and then click OK.
Name Value
E-mail [email protected]
To add Alan Shen to Active Directory on shib.adatum.com
Page 11
11
Create a Shibboleth Sample Application The Shibboleth SP is automatically configured to protect a folder called ―secure‖ under the
Default Web Site. Complete the following procedure to create this ―secure‖ folder and place a
sample application in it for demonstrating federated access and claims processing. This
application simply lists all server variables, including Shibboleth attributes, that are present when
the page is accessed.
1) On the Shibboleth computer (shib.adatum.com), use Windows Explorer to navigate to
C:\inetpub\wwwroot.
2) Right-click the folder, click New, and then click Folder to create a new folder. Change the
name of the folder to secure.
3) Click Start, click All Programs, click Accessories, and then click Notepad to start
Notepad.
4) Copy and paste the following into Notepad:
<%@ Page Language="C#" %>
<html>
<head>
<title>Shibboleth Echo Page</title>
</head>
<body>
You are logged in using Shibboleth!
<hr />
<table>
<%
foreach( string key in Request.Headers )
{
%>
<tr>
<td>
<%= key %>
</td>
<td>
<%= Request.Headers[ key ] %>
</td>
</tr>
<%
}
%>
</table>
<hr />
To create a Shibboleth sample application
Page 12
12
</body>
</html>
5) In Notepad, on the File menu, click Save.
6) In the Save As window, navigate to the C:\inetpub\wwwroot\secure folder that you
created earlier.
7) In the Save as type drop-down box, select All Files (*.*), and in the File name box, type
default.aspx.
8) Click Save, and then close default.aspx.
Complete Shibboleth SP Configuration After it is installed, the Shibboleth SP requires additional configuration before it is ready for use.
That configuration is performed in the shibboleth2.xml file, which is in the Shibboleth SP folder.
1) From the Shibboleth computer (shib.adatum.com), use Windows Explorer to navigate to the
folder where the shibboleth2.xml configuration file is located. In this lab, the location is
C:\opt\shibboleth-sp\etc\shibboleth.
2) Right-click the shibboleth2.xml file, and then click Edit. The document should open in Notepad.
3) In Notepad, on the Edit menu, click Replace.
4) In the Replace window, type the following values.
Name Value
Find what: sp.example.org
Replace with: shib.adatum.com
5) Click Replace All.
6) Close the Replace window.
7) Save the shibboleth2.xml file.
8) Click Start, click Administrative Tools, and then click Internet Information Services (IIS)
Manager.
9) In the right pane, under Actions, click Restart.
To complete Shibboleth SP configuration
Page 13
13
Step 2: Configure AD FS 2.0 as the Identity Provider and Shibboleth as the Relying Party
In this step, you configure the scenario in which the Contoso domain administrator (through
AD FS 2.0) gets federated access to the A. Datum sample application (using Shibboleth). The
scenario uses the SAML 2.0 POST profile.
Configure AD FS 2.0
Add a Relying Party Using Metadata
Adding a partner into AD FS 2.0 using Shibboleth can be done either manually or through
metadata import. In this lab, you use metadata import.
1) In AD FS 2.0, in the console tree, right-click the Relying Party Trusts folder, and then
click Add Relying Party Trust to start the Add Relying Party Trust Wizard.
2) On the Select Data Source page, leave selected Import data about the relying party
published online or on a local network.
3) In the Federation metadata address field, type
https://shib.adatum.com/Shibboleth.sso/Metadata, and then click Next.
Note
Shibboleth auto-generated metadata is designed primarily for testing scenarios
(like this lab). It can be inadequate for production deployments.
4) Click OK to acknowledge the message ―Some of the content in the federation metadata
was skipped because it is not supported by AD FS 2.0.‖
5) In the Specify Display Name page, leave shib.adatum.com, and then click Next.
6) On the Choose Issuance Authorization Rules page, leave the default Permit all users
to access the relying party selected, and then click Next.
7) Click Next, and then click Close.
Edit Claim Rules for Relying Party Trust
Claim rules describe how AD FS 2.0 determines what data should reside inside the federation
security tokens that it generates. The claim rule in this section describes how data from
Active Directory is inserted in the security token that is created for Shibboleth.
Shibboleth is preconfigured to assert multiple attributes of the eduPerson object class, which is
specially designed for higher education institutions. These are not configured by default in
To add a relying party using metadata
Page 14
14
AD FS 2.0. Also, Shibboleth expects inbound SAML attributes names to use a different name
format (urn:oasis:names:tc:SAML:2.0:attrname-format:uri) than AD FS 2.0 publishes by default
(urn:oasis:names:tc:SAML:2.0:attrname-format:unspecified). For these reasons, we will use the
AD FS 2.0 custom rule language to generate Shibboleth-compliant claims.
We will generate an eduPersonPrincipalName claim, based on the user’s UPN, and an
eduPersonScopedAffiliation claim, based on domain membership.
1) The Edit Claim Rules dialog box should already be open. If not, In the AD FS 2.0 center
pane, under Relying Party Trusts, right-click shib.adatum.com, and then click Edit
Claim Rules.
2) On the Issuance Transform Rules tab, click Add Rule.
3) On the Select Rule Template page, select Send LDAP Attributes as Claims, and then
click Next.
4) On the Configure Rule page, in the Claim rule name box, type Get Data.
5) In the Attribute Store list, select Active Directory.
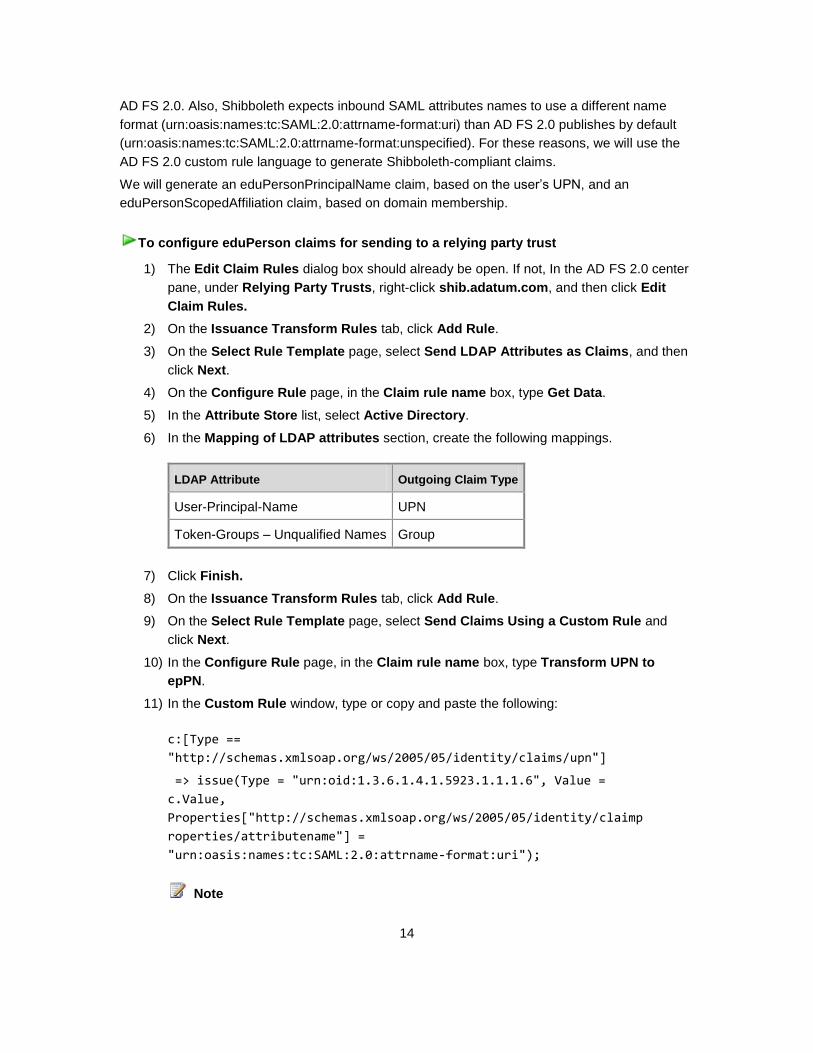
6) In the Mapping of LDAP attributes section, create the following mappings.
LDAP Attribute Outgoing Claim Type
User-Principal-Name UPN
Token-Groups – Unqualified Names Group
7) Click Finish.
8) On the Issuance Transform Rules tab, click Add Rule.
9) On the Select Rule Template page, select Send Claims Using a Custom Rule and
click Next.
10) In the Configure Rule page, in the Claim rule name box, type Transform UPN to
epPN.
11) In the Custom Rule window, type or copy and paste the following:
c:[Type ==
"http://schemas.xmlsoap.org/ws/2005/05/identity/claims/upn"]
=> issue(Type = "urn:oid:1.3.6.1.4.1.5923.1.1.1.6", Value =
c.Value,
Properties["http://schemas.xmlsoap.org/ws/2005/05/identity/claimp
roperties/attributename"] =
"urn:oasis:names:tc:SAML:2.0:attrname-format:uri");
Note
To configure eduPerson claims for sending to a relying party trust
Page 15
15
The object-identifier-style uniform resource name (URN) string
urn:oid:1.3.6.1.4.1.5923.1.1.1.6 is the formal SAML 2.0 name for the
eduPersonPrincipalName attribute—a name that the Shibboleth SP software
understands by default.
12) Click Finish.
13) On the Issuance Transform Rules tab, click Add Rule.
14) On the Select Rule Template page, select Send Claims Using a Custom Rule, and
then click Next.
15) On the Configure Rule page, in the Claim rule name box, type Transform Group to
epSA.
16) In the Custom Rule window, type or copy and paste the following:
c:[Type == "http://schemas.xmlsoap.org/claims/Group", Value ==
"Domain Users"]
=> issue(Type = "urn:oid:1.3.6.1.4.1.5923.1.1.1.9", Value =
"[email protected] ",
Properties["http://schemas.xmlsoap.org/ws/2005/05/identity/claimp
roperties/attributename"] =
"urn:oasis:names:tc:SAML:2.0:attrname-format:uri");
17) Click Finish, and then click OK.
Add the Scope Element to AD FS 2.0 Metadata
Many important Shibboleth attributes are scoped—they are presented in the format user@scope,
and the scope portion of the attribute is used as an authorization check during claims processing.
The eduPersonPrincipalName (epPN) claim configured above is an example—the suffix of the
epPN (contoso.com, the suffix of the UPN attribute used to populate the claim) will be used as an
authorization variable by the Shibboleth SP software.
A Shibboleth SP that is configured to accept scoped attributes (the default setting) checks
incoming scope values against a scope element that is included in the IdP partner’s XML
metadata document. AD FS 2.0 does not include a scope element in its automatically generated
metadata, and there is no way to modify the auto-publishing behavior to include additional
content. Therefore, to support the use of scoped attributes in this lab, we will create a manually
edited, unsigned metadata file for Contoso.com that includes a scope element. Later, Shibboleth
will use this modified file to establish its trust with AD FS 2.0.
Unsigned metadata documents make the relationship between IdP and SP insecure, and
their use is inadvisable in production deployments. Workarounds include the following:
Using a third-party trust fabric like the InCommon Federation to provide signed metadata.
Note
Page 16
16
Using AD FS 2.0-signed metadata but not using incompatible features, such as scoped
attributes.
Manually signing the edited metadata.
Sharing unsigned metadata between partners using a secured, out-of-band process
(secure e-mail, and so forth).
1) On the AD FS 2.0 computer (fsweb.contoso.com), use Internet Explorer to view
https://fsweb.contoso.com/FederationMetadata/2007-06/FederationMetadata.xml.
2) On the Page menu, click Save As, and then navigate to the Windows desktop and save
the file with the name editedFedMetadata.xml. Make sure to change the Save as type
dropdown box to All Files (*.*).
3) Use Windows Explorer to navigate to the Windows desktop, right-click
editedFedMetadata.xml, and then click Edit.
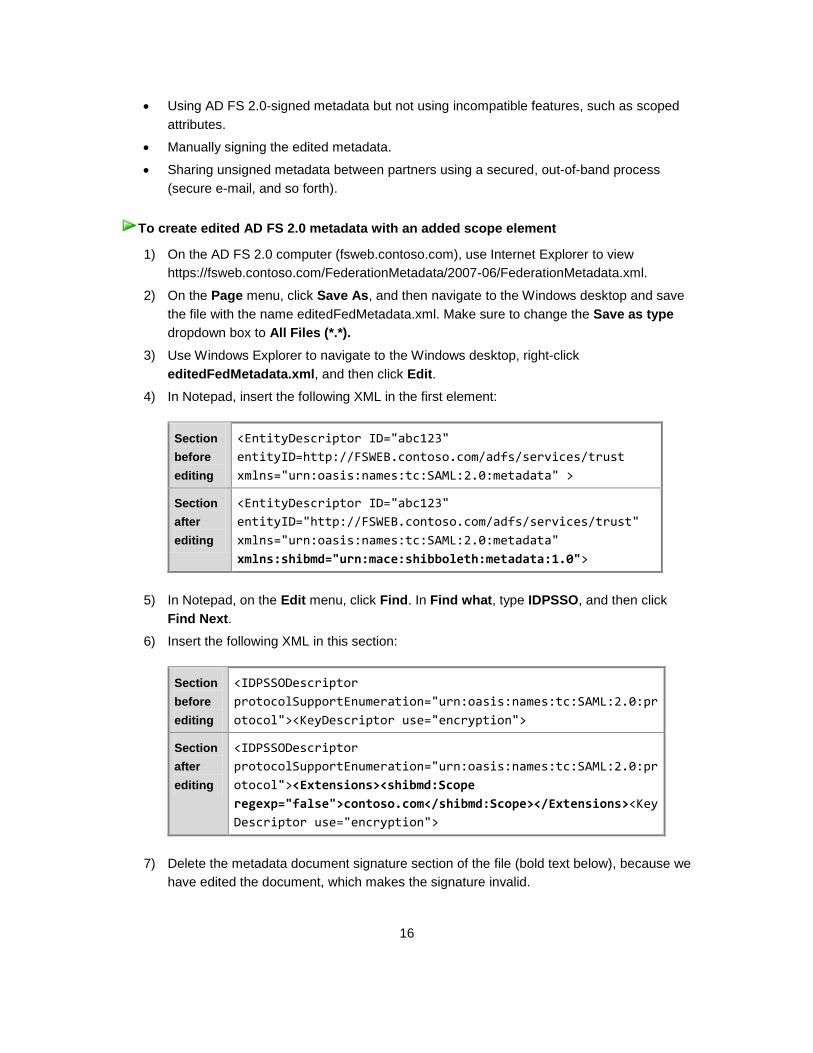
4) In Notepad, insert the following XML in the first element:
Section
before
editing
<EntityDescriptor ID="abc123"
entityID=http://FSWEB.contoso.com/adfs/services/trust
xmlns="urn:oasis:names:tc:SAML:2.0:metadata" >
Section
after
editing
<EntityDescriptor ID="abc123"
entityID="http://FSWEB.contoso.com/adfs/services/trust"
xmlns="urn:oasis:names:tc:SAML:2.0:metadata"
xmlns:shibmd="urn:mace:shibboleth:metadata:1.0">
5) In Notepad, on the Edit menu, click Find. In Find what, type IDPSSO, and then click
Find Next.
6) Insert the following XML in this section:
Section
before
editing
<IDPSSODescriptor
protocolSupportEnumeration="urn:oasis:names:tc:SAML:2.0:pr
otocol"><KeyDescriptor use="encryption">
Section
after
editing
<IDPSSODescriptor
protocolSupportEnumeration="urn:oasis:names:tc:SAML:2.0:pr
otocol"><Extensions><shibmd:Scope
regexp="false">contoso.com</shibmd:Scope></Extensions><Key
Descriptor use="encryption">
7) Delete the metadata document signature section of the file (bold text below), because we
have edited the document, which makes the signature invalid.
To create edited AD FS 2.0 metadata with an added scope element
Page 17
17
Section
before
editing
<EntityDescriptor ID="abc123"
entityID="http://FSWEB.contoso.com/adfs/services/trust"
xmlns="urn:oasis:names:tc:SAML:2.0:metadata"
xmlns:shibmd="urn:mace:shibboleth:metadata:1.0">
<ds:Signature
xmlns:ds="http://www.w3.org/2000/09/xmldsig#">
SIGNATURE DATA
</ds:Signature>
<RoleDescriptor xsi:type=…>
Section
after
editing
<EntityDescriptor ID="abc123"
entityID="http://FSWEB.contoso.com/adfs/services/trust"
xmlns="urn:oasis:names:tc:SAML:2.0:metadata"
xmlns:shibmd="urn:mace:shibboleth:metadata:1.0">
<RoleDescriptor xsi:type=…>
8) Save and close editedFedMetadata.xml.
Configure Shibboleth
Add a New IdP Using Local Metadata
Adding a partner using AD FS 2.0 into Shibboleth is done by referencing the partner’s XML
metadata document in the Shibboleth configuration. The metadata file can reside locally, or it can
be located at a URL. In this lab, we will use a local copy of the editedFedMetadata.xml file that we
just created, which can be sent to the partner through email.
1) Copy the editedFedMetadata.xml file, which is located on the desktop of the AD FS 2.0
computer (fsweb.contoso.com), to the desktop of the Shibboleth computer (shib.adatum.com).
2) From the Shibboleth computer (shib.adatum.com), use Windows Explorer to navigate to the
folder where the shibboleth2.xml configuration file is located. In this lab, the location is
C:\opt\shibboleth-sp\etc\shibboleth\.
3) Right-click the shibboleth2.xml file, and then click Edit. The document should open in Notepad.
4) In Notepad, on the Edit menu, click Find.
5) In Find what, type MetadataProvider, and then click Find Next.
6) Insert the following XML in this section. Note the removed comment tags at the top and bottom
of the section.
To add a new IdP using local metadata
Page 18
18
Section
before
editing
<!--
<MetadataProvider type="XML" file="partner-metadata.xml"/>
-->
Section
after
editing
<MetadataProvider type="XML"
file="C:\Users\Administrator\Desktop\editedFedMetadata.xml
"/>
7) Save and close the shibboleth2.xml file.
Note
Shibboleth administrators often need to configure inbound attribute management using the
attribute-map.xml and attribte-policy.xml files. In contrast, in this lab the default
configuration files that are distributed with Shibboleth already satisfy our requirements.
Create a Link for Initiating Federated Access Initiating federated access to a Shibboleth-protected application is typically done by accessing the
secured application directly. This invokes the Shibboleth SP’s <SessionInitiator> settings, which
are located in the shibboeth2.xml configuration file. All requests can be redirected to a single IdP,
or in a case in which an SP interacts with multiple IdPs, the request can invoke the Shibboleth 2
discovery service, a separate application that uses the SAML 2.0 IdP Discovery protocol.
As an alternative, access to a Shibboleth-protected resource can also be initiated by using a
preformatted hyperlink. The hyperlink sends the user directly to the Shibboleth SP, with
parameters that identify the IdP, allowing it to properly generate the SAML 2.0 authnRequest
without user input. This link can be located either at the account side (for example, on a Contoso
employee portal page) or at the resource side (for example, on an unprotected A. Datum site
page providing authentication options).
For the sake of simplicity, in this lab we will use a preformatted hyperlink to initiate federated
SSO, hosting the link on a web page on the IIS instance running on the Shibboleth computer
(shib.adatum.com).
1) On the Shibboleth computer (shib.adatum.com), open Notepad.
2) Add the following to a new document:
<p>Welcome to A. Datum!</p>
<p>Test Links - From AD FS 2.0 (IdP) to Shibboleth (SP)</p>
<a
href="https://shib.adatum.com/Shibboleth.sso/Login?target=https:/
/shib.adatum.com/secure&entityID=http://fsweb.contoso.com/adfs/se
rvices/trust">Link to Test SP-initiated POST Single Sign-on to
To create a link for initiating federated access
Page 19
19
Shibboleth from AD FS 2.0</a>
3) In Notepad, on the File menu, click Save.
4) In the Save As window, navigate to the C:\inetpub\wwwroot folder.
5) In the Save as type drop-down box, select All Files (*.*), and in File name, type
index.htm.
6) Click Save, and then close index,htm.
Step 3: Test AD FS 2.0 as the Identity Provider and Shibboleth as the Relying Party
In this scenario, the Contoso domain administrator accesses the federated sample application at
adatum.com.
For the best results, clear all the cookies in Internet Explorer on the AD FS 2.0 computer
(fsweb.contoso.com). To clear the cookies, click Tools, click Internet Options, click
Delete under Browsing History, and then select cookies for deletion.
1) Log in to the console of the fsweb.contoso.com server using the
CONTOSO\administrator account.
2) Open a browser window and navigate to http://shib.adatum.com.
3) Click the link to test SSO to Shibboleth from AD FS 2.0.
At this point, you should see the Shibboleth sample application. Notice the ―eppn‖ and ―affiliation‖
headers—these are the eduPersonPrincipalName and eduPersonScopedAffiliation claims that
you configured using the AD FS 2.0 claim rule language.
Step 4: Configure Shibboleth as the Identity Provider and AD FS 2.0 as the Relying Party
In this step, you configure a scenario in which Alan Shen, an A. Datum user, (using Shibboleth)
gets federated access to the WIF sample application through AD FS 2.0. As before, this scenario
uses the SAML 2.0 POST profile.
Note
To access the adatum.com application
Page 20
20
Configure Shibboleth
Add a New SP Using Remote Metadata
Adding a partner, using AD FS 2.0, into Shibboleth is done by referencing the partner’s XML
metadata document in Shibboleth configuration. The metadata file can reside locally, or it can be
located at a URL.
Unlike the Shibboleth SP, the Shibboleth IdP does not require a scope variable in partner
metadata. Therefore, here we’ll point Shibboleth to the AD FS 2.0 auto-generated metadata
document and configure Shibboleth to verify the metadata document signature. This will require a
local copy of the AD FS 2.0 signing certificate public key.
1) On the AD FS 2.0 computer (fsweb.contoso.com), in the AD FS 2.0 console tree, click the
Certificates folder.
2) In the center pane, right-click the certificate that is listed under Token-signing, and then click
View Certificate.
3) In the Certificate window, click the Details tab, and then click Copy to File to start the
Certificate Export Wizard.
4) Click Next.
5) On the Export File Format page, leave DER encoded binary X.509 selected, and then click
Next.
6) On the File to Export page, click Browse, navigate to the Windows desktop, and then type the
file name adfssign (leaving the type as .cer). Click Save.
7) Click Next, click Finish, click OK, and then click OK again.
1) Copy the adfssign.cer file, which is located on the desktop of the AD FS 2.0 computer
(fsweb.contoso.com), to the credentials folder of the Shibboleth IdP deployment on
shib.adatum.com. In this lab, the location is C:\Program Files
(x86)\Internet2\Shib2IdP\credentials.
2) On the Shibboleth computer, use Windows Explorer to navigate to the folder where the relying-
party.xml configuration file is located. In this lab, the location is C:\Program Files
(x86)\Internet2\Shib2IdP\conf.
3) Right-click the relying-party.xml file, and then click Edit. The document should open in Notepad.
4) In Notepad, on the Edit menu, click Find.
5) In Find what, type Metadata Configuration, and then click Find Next.
6) Add the following MetadataProvider in this section:
To copy the AD FS 2.0 signing public key to a file
To add a new SP using remote metadata
Page 21
21
Section
before
editing
<MetadataProvider id="TestShib"
xsi:type="FileBackedHTTPMetadataProvider"
xmlns="urn:mace:shibboleth:2.0:metadata"
metadataURL="http://www.testshib.org/metadata/testshib
-providers.xml" backingFile="C:\Program Files
(x86)\Internet2\Shib2Idp/metadata/Downloaded-
Metadata.xml" />
</MetadataProvider>
Section
after
editing
<MetadataProvider id="ADFS2"
xsi:type="FileBackedHTTPMetadataProvider"
xmlns="urn:mace:shibboleth:2.0:metadata"
metadataURL="https://fsweb.contoso.com/FederationMetad
ata/2007-06/FederationMetadata.xml"
backingFile="C:\Program Files
(x86)\Internet2\Shib2Idp/metadata/ADFSSP-Metadata.xml"
disregardSslCertificate="true" >
<MetadataFilter xsi:type="SignatureValidation"
xmlns="urn:mace:shibboleth:2.0:metadata"
trustEngineRef="shibboleth.FedTrustEngine"
requireSignedMetadata="true" />
</MetadataProvider>
</MetadataProvider>
7) Scroll down to the Security Configuration section of relying-party.xml.
8) Replace the following TrustEngine in this section. Note the moved comment tag.
Section
before
editing
<!-- This is where to put the engine used to evaluate the
signature on loaded metadata.
<security:TrustEngine id="shibboleth.FedTrustEngine"
xsi:type="security:StaticExplicitKeySignature">
<security:Credential id="FederationCredentials"
xsi:type="security:X509Filesystem">
<security:Certificate>C:\Program
Files\Internet2\Shib2Idp/credentials/federation.pe
m</security:Certificate>
</security:Credential>
</security:TrustEngine> -->
Section
after
<!-- This is where to put the engine used to evaluate the
Page 22
22
editing signature on loaded metadata.
-->
<security:TrustEngine id="shibboleth.FedTrustEngine"
xsi:type="security:StaticExplicitKeySignature">
<security:Credential id="FederationCredentials"
xsi:type="security:X509Filesystem">
<security:Certificate>C:\Program
Files\Internet2\Shib2Idp/credentials/adfssign.cer<
/security:Certificate>
</security:Credential>
</security:TrustEngine>
9) Save and close the relying-party.xml file.
Add an Attribute to a Shibboleth-Generated Assertion
The Shibboleth IdP software is preconfigured to include a number of assertion attributes in the
SAML assertions it generates, including an example of eduPersonScopedAffiliation. Here, we will
add the eduPersonPrincipalName attribute to the collection to use in AD FS 2.0 sample
application. We will limit inclusion of this attribute to assertions that are generated for Contoso.
1) From the Shibboleth computer (shib.adatum.com), use Windows Explorer to navigate to the
folder where the attribute-filter.xml configuration file is located. In this lab, the location is
C:\Program Files (x86)\Internet2\Shib2IdP\conf\.
2) Right-click the attribute-filter.xml file, and then click Edit. The document should open in
Notepad.
3) In Notepad, on the Edit menu, click Find.
4) In Find what, type givenName, and then click Find Next.
5) Uncomment and replace the following XML. Note the removed comment tags.
Section
before
editing
<!--
<AttributeFilterPolicy>
<PolicyRequirementRule
xsi:type="basic:AttributeRequesterString"
value="urn:example.org:sp:myPortal" />
<AttributeRule attributeID="givenName">
<PermitValueRule xsi:type="basic:ANY" />
</AttributeRule>
To add eduPersonPrincipalName to the Shibboleth security token
Page 23
23
</AttributeFilterPolicy>
-->
Section
after
editing
<AttributeFilterPolicy>
<PolicyRequirementRule
xsi:type="basic:AttributeRequesterString"
value="http://fsweb.contoso.com/adfs/services/trust"
/>
<AttributeRule attributeID="eduPersonPrincipalName">
<PermitValueRule xsi:type="basic:ANY" />
</AttributeRule>
</AttributeFilterPolicy>
6) Save and close the attribute-filter.xml file.
7) Click Start, click Administrative Tools, and then click Services.
8) Right-click the Apache Tomcat service, and then click Restart.
Note
Shibboleth administrators often need to configure LDAP queries to derive outbound
assertion attribute values using the attribute-resolver.xml file. In contrast, in this lab the
default configuration file that is distributed with Shibboleth already satisfies our
requirements.
Configure AD FS 2.0
Add a Claims Provider Using Metadata
Once again, you use the metadata import capabilities of AD FS 2.0 to create the A. Datum claims
provider. The metadata includes the public key that is used to validate security tokens that
Shibboleth signs.
1) In AD FS 2.0, in the console tree, right-click the Claims Provider Trusts folder, and then
click Add Claims Provider Trust to start the Add Claims Provider Trust Wizard.
2) On the Select Data Source page, click Import data about the relying party published
online or on a local network.
3) In Federation metadata address, type
https://shib.adatum.com:444/idp/profile/Metadata/SAML, and then click Next.
4) Click OK to acknowledge the message ―Some of the content in the federation metadata
To add a claims provider using metadata
Page 24
24
was skipped because it is not supported by AD FS 2.0.‖
5) In the Specify Display Name page, leave shib.adatum.com and click Next.
6) Click Next, and then click Close.
Edit Claim Rules for Claims Provider Trust
The following claim rule describes how data from Shibboleth is used in the security token that is
sent to the WIF sample application. eduPersonPrincipalName and eduPersonScopedAffiliation
are scoped attributes, meaning that Shibboleth (when it acts as the SP) checks the scope section
of the attributes against a value that is provided in an IdP partner's metadata. When AD FS 2.0
acts as an SP, it does not read or store the IdP partner's scope value during its metadata import.
However, it is possible to use the AD FS 2.0 claim rule language to simulate the "scope check"
behavior of a Shibboleth SP, as shown below.
1) The Edit Claim Rules dialog box should already be open. If not, In the AD FS 2.0 center
pane, under Claims Provider Trusts, right-click shib.adatum.com, and then click Edit
Claim Rules.
2) On the Acceptance Transform Rules tab, click Add Rule.
3) On the Select Rule Template page, select Send Claims Using a Custom Rule, and
then click Next.
4) On the Configure Rule page, in the Claim rule name box, type Transform epPN to
Name with Scope Check.
5) In the Custom Rule window, type or copy and paste the following:
c:[Type == "urn:oid:1.3.6.1.4.1.5923.1.1.1.6", Value =~
"^[email protected] $"]
=> issue(Type =
"http://schemas.xmlsoap.org/ws/2005/05/identity/claims/name",
Issuer = c.Issuer, OriginalIssuer = c.OriginalIssuer, Value =
c.Value, ValueType = c.ValueType);
6) Click Finish.
7) On the Acceptance Transform Rules tab, click Add Rule.
8) On the Select Rule Template page, select Send Claims Using a Custom Rule, and
then click Next.
9) On the Configure Rule page, in the Claim rule name box, type Transform epSA to
Role with Scope Check.
10) In the Custom Rule window, type or copy and paste the following:
c:[Type == "urn:oid:1.3.6.1.4.1.5923.1.1.1.9", Value =~
To configure eduPerson claims for inbound receipt and scope checking
Page 25
25
"^[email protected] "]
=> issue(Type =
"http://schemas.microsoft.com/ws/2008/06/identity/claims/role",
Issuer = c.Issuer, OriginalIssuer = c.OriginalIssuer, Value =
c.Value, ValueType = c.ValueType);
11) Click Finish, and then click OK.
Note
The object-identifier-style URN strings are the formal SAML 2.0 names for
eduPersonPrincipalName and eduPersonScopedAffiliation and names that the
Shibboleth IdP software sends by default.
Note
Attributes with formal names that are represented in URN strings cannot be
passed untransformed to WIF, because WIF can only understand claims using
URL-style names. That is why we transform the incoming eduPerson attributes to
Name and Role claims, instead of retaining their original claim types.
Note
Unlike Shibboleth, when it reads inbound attributes AD FS 2.0 ignores the
urn:oasis:names:tc:SAML:2.0:attrname-format:uri name format that Shibboleth
uses, and it simply reads the value.
Edit Claim Rules for the WIF Sample Application
At this point, incoming claims have been received at AD FS 2.0, but rules that describe what to
send to the WIF sample application have not yet been created. You now edit the existing claim
rules for the sample application to take into account the new Shibboleth external claims provider.
1) In AD FS 2.0, in the left navigation area, under Relying Party Trusts, right-click WIF
Sample App, and then click Edit Claim Rules.
2) On the Issuance Transform Rules tab, click Add Rule.
3) In the Select Rule Template page, select Pass Through or Filter an Incoming Claim,
and then click Next.
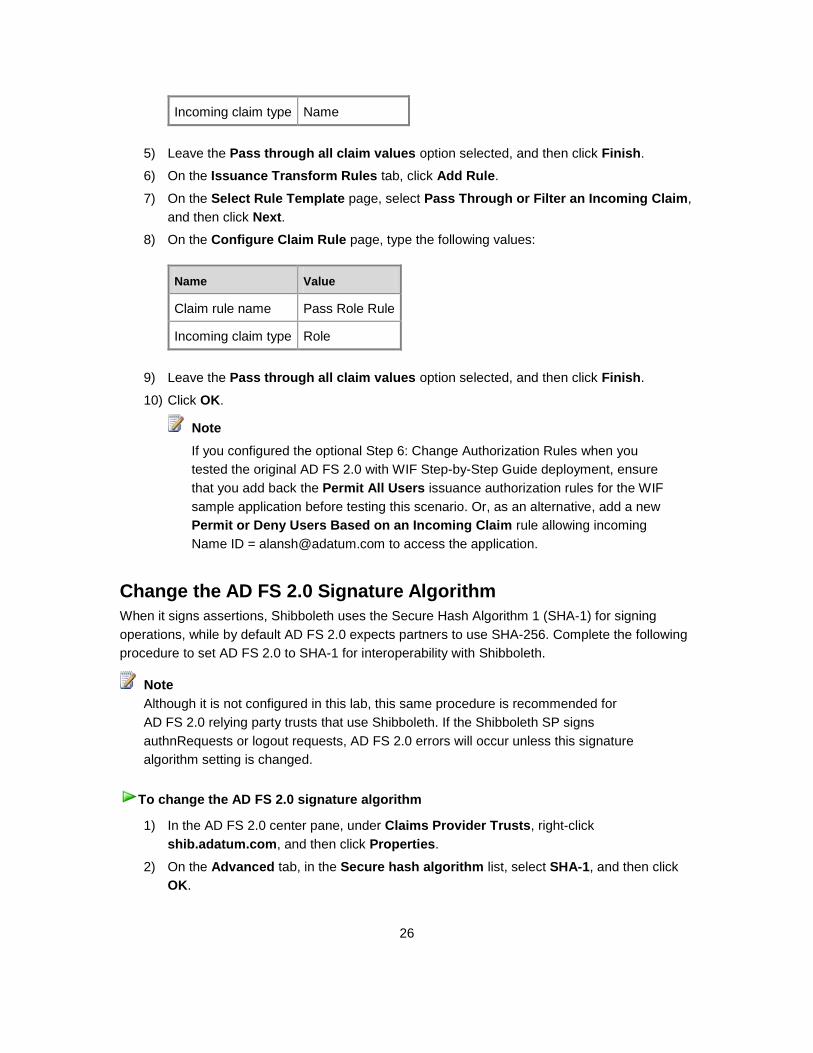
4) On the Configure Claim Rule page, type the following values:
Name Value
Claim rule name Pass Name Rule
To edit the claim rules for the WIF sample application
Page 26
26
Incoming claim type Name
5) Leave the Pass through all claim values option selected, and then click Finish.
6) On the Issuance Transform Rules tab, click Add Rule.
7) On the Select Rule Template page, select Pass Through or Filter an Incoming Claim,
and then click Next.
8) On the Configure Claim Rule page, type the following values:
Name Value
Claim rule name Pass Role Rule
Incoming claim type Role
9) Leave the Pass through all claim values option selected, and then click Finish.
10) Click OK.
Note
If you configured the optional Step 6: Change Authorization Rules when you
tested the original AD FS 2.0 with WIF Step-by-Step Guide deployment, ensure
that you add back the Permit All Users issuance authorization rules for the WIF
sample application before testing this scenario. Or, as an alternative, add a new
Permit or Deny Users Based on an Incoming Claim rule allowing incoming
Name ID = [email protected] to access the application.
Change the AD FS 2.0 Signature Algorithm
When it signs assertions, Shibboleth uses the Secure Hash Algorithm 1 (SHA-1) for signing
operations, while by default AD FS 2.0 expects partners to use SHA-256. Complete the following
procedure to set AD FS 2.0 to SHA-1 for interoperability with Shibboleth.
Although it is not configured in this lab, this same procedure is recommended for
AD FS 2.0 relying party trusts that use Shibboleth. If the Shibboleth SP signs
authnRequests or logout requests, AD FS 2.0 errors will occur unless this signature
algorithm setting is changed.
1) In the AD FS 2.0 center pane, under Claims Provider Trusts, right-click
shib.adatum.com, and then click Properties.
2) On the Advanced tab, in the Secure hash algorithm list, select SHA-1, and then click
OK.
Note
To change the AD FS 2.0 signature algorithm
Page 27
27
Step 5: Test Shibboleth as the Identity Provider and AD FS 2.0 as the Relying Party
In this scenario, Alan Shen (alansh) from A. Datum accesses the Contoso WIF sample
application.
Clear all the cookies in Internet Explorer on the AD FS 2.0 computer
(fsweb.contoso.com). To clear the cookies, click Tools, click Internet Options, click
Delete under Browsing History, and then select cookies for deletion.
1) On the AD FS 2.0 computer, open a browser window, and then navigate to
https://fsweb.contoso.com/ClaimsAwareWebAppWithManagedSTS/default.aspx.
2) The first page prompts you to select your organization from a list. Select
shib.adatum.com from the list, and then click Continue to Sign In.
Note
This page did not appear in the previous example when you were redirected to
AD FS 2.0. That is because at that point there was only one identity provider
registered in AD FS 2.0. When only one IdP is available, AD FS 2.0 defaults to
forwarding requests to that IdP.
3) The Shibboleth forms login page appears. Log in with the user name alansh and the
password you created for the user earlier, and then click Login.
When you access the WIF application, note the presence of the Name and Role claims, which
were added assertion attributes, and which successfully passed the "scope check" rule limitation
of passing only values with the adatum.com suffix.
Note
To access the WIF sample application
Page 28
28
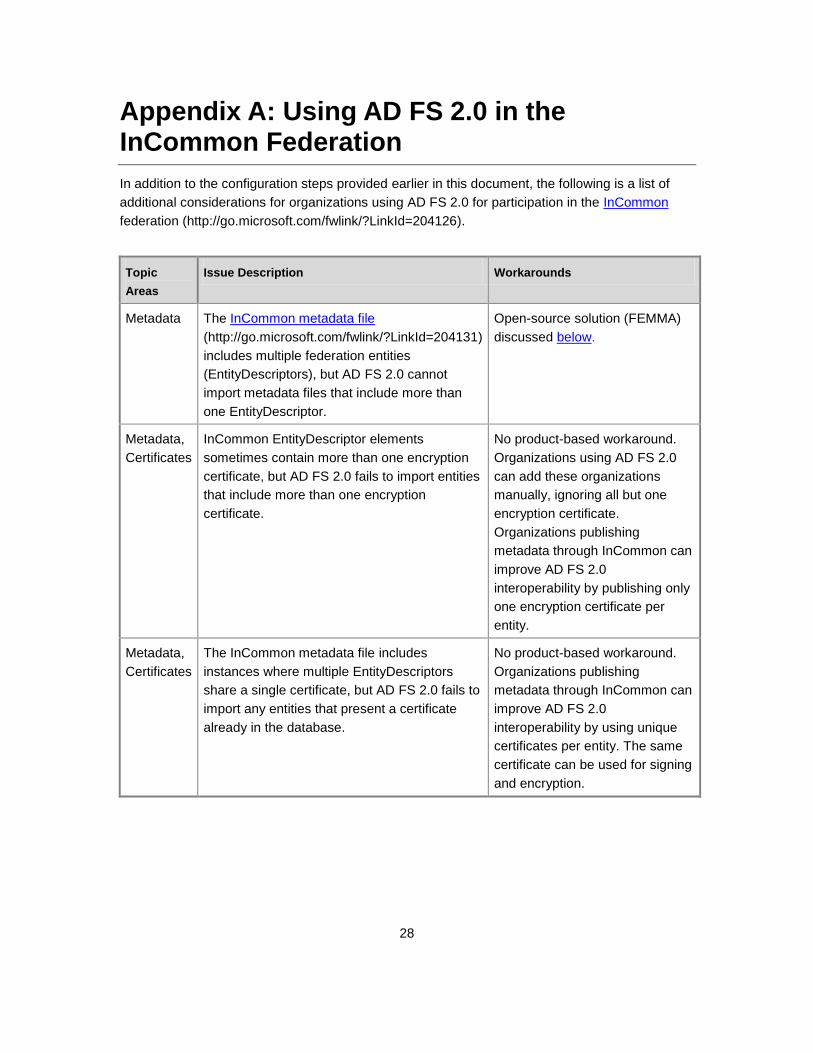
Appendix A: Using AD FS 2.0 in the InCommon Federation
In addition to the configuration steps provided earlier in this document, the following is a list of
additional considerations for organizations using AD FS 2.0 for participation in the InCommon
federation (http://go.microsoft.com/fwlink/?LinkId=204126).
Topic
Areas
Issue Description Workarounds
Metadata The InCommon metadata file
(http://go.microsoft.com/fwlink/?LinkId=204131)
includes multiple federation entities
(EntityDescriptors), but AD FS 2.0 cannot
import metadata files that include more than
one EntityDescriptor.
Open-source solution (FEMMA)
discussed below.
Metadata,
Certificates
InCommon EntityDescriptor elements
sometimes contain more than one encryption
certificate, but AD FS 2.0 fails to import entities
that include more than one encryption
certificate.
No product-based workaround.
Organizations using AD FS 2.0
can add these organizations
manually, ignoring all but one
encryption certificate.
Organizations publishing
metadata through InCommon can
improve AD FS 2.0
interoperability by publishing only
one encryption certificate per
entity.
Metadata,
Certificates
The InCommon metadata file includes
instances where multiple EntityDescriptors
share a single certificate, but AD FS 2.0 fails to
import any entities that present a certificate
already in the database.
No product-based workaround.
Organizations publishing
metadata through InCommon can
improve AD FS 2.0
interoperability by using unique
certificates per entity. The same
certificate can be used for signing
and encryption.
Page 29
29
Topic
Areas
Issue Description Workarounds
IdP
Discovery
The InCommon WAYF server currently only
speaks the SAML 1.1 protocol, which
AD FS 2.0 does not support. Therefore, the
WAYF cannot generate authnRequests for
AD FS 2.0 IdPs.
Three options:
SPs can run their own
Shibboleth discovery
service.
Use preformatted
hyperlinks that identify
AD FS 2.0 IdPs directly.
SPs can use AD FS 2.0,
which automatically
provides discovery
services for registered
IdPs.
Metadata Parsing with FEMMA
FEMMA is a tool that is independent and separate from both AD FS 2.0 and Shibboleth.
Microsoft, Internet2, and InCommon neither developed this tool nor endorse it through its
reference in this whitepaper.
Federation Metadata Manager for ADFS (http://go.microsoft.com/fwlink/?LinkId=204165), written
by Cristian Mezzetti of the University of Bologna, is a Python script that parses Shibboleth
federation metadata XML content and creates (a) a pool of metadata files (one for each partner
entity) and (b) a Windows PowerShell command-line interface script that automatically imports
the entities into AD FS 2.0. In addition, FEMMA includes templates for automatically importing
claim rules into newly created partner entities.
Testing of FEMMA during development of this lab was successful. We were able to use FEMMA
to parse a multi-entity metadata file and automatically import the separate entities with
Windows PowerShell. The following are the steps for testing FEMMA v0.2, with AD FS 2.0 as the
IdP and Shibboleth as the SP.
On the Shibboleth computer (shib.adatum.com):
1. Use Internet Explorer to browse to https://shib.adatum.com/Shibboleth.sso/Metadata, and
save the file to the IIS root (C:\inetpub\wwwroot\) as SP.xml.
2. Use Notepad to edit SP.xml:
a. Add the following to the top of the file:
<md:EntitiesDescriptor xmlns:md="urn:oasis:names:tc:SAML:2.0:metadata" >
b. Add the following to the end of the file:
Note
Page 30
30
</md:EntitiesDescriptor>
c. Add a second, fake <EntityDescriptor> to SP.xml:
i) Copy and paste the entire existing <EntityDescriptor> into SP.xml a second time.
ii) Change the entityID of the copied entity to https://shib.adatum.com/foo".
iii) Replace the signing and encryption certificates in the SPSSODescriptor:
(1) Temporarily rename the existing sp-key.pem and sp-cert.pem files in the
Shibboleth SP config directory (C:\opt\shibboleth-sp\etc\shibboleth) to old-sp-
key.pem and old.sp-cert.pem.
(2) Run the Keygen tool in this folder from a command prompt. This will create new
sp-key.pem and sp-cert.pem files.
(3) Open the newly generated sp-cert.pem file with Notepad.
(4) Copy the Base-64 encoded string.
(5) In /foo <SPSSODescriptor>, replace the two certificates with the contents.
(6) Save SP.xml.
(7) Rename the sp-key.pem and sp-cert.pem files to foo-sp-key.pem and foo-sp-
cert.pem. Rename old-sp-key.pem and old-sp-cert.pem back to sp-key.pem and
sp-cert.pem.
On the AD FS 2.0 computer (fsweb.contoso.com):
1. Download Python 2.5 (http://go.microsoft.com/fwlink/?LinkId=204170).
2. Install Python.
3. Download lxml (http://go.microsoft.com/fwlink/?LinkId=204171).
4. Place the lxml install file in the Python folder (C:\Python25\).
5. Install lxml.
6. Download FEMMA (http://go.microsoft.com/fwlink/?LinkID=204165).
7. Unzip FEMMA. In this lab, the install folder is C:\femma-0.2.
8. Edit the femma.py Python script. Change the idpEntityID field to read
https://shib.adatum.com/adfs/services/trust, and save.
9. In the AD FS 2.0 console, delete the current relying party trust for shib.adatum.com.
AD FS 2.0 does not allow the creation of multiple relying party trusts with the same EntityID.
10. Open a command prompt, and change the directory to the femma folder (in this lab,
C:\femma-0.2\).
11. Initiate FEMMA. In this lab, we used the following:
C:\femma-0.2>c:\python25\python.exe femma.py –m https://shib.adatum.com/SP.xml
12. Open Windows PowerShell.
13. Type Set-ExecutionPolicy Unrestricted at a Windows PowerShell command prompt to
enable scripts.
Page 31
31
14. Initiate the Windows PowerShell script at the Windows PowerShell prompt. In this lab, we
typed the following:
C:\femma-0.2\update_adfs_rptrust.ps1.
15. In the AD FS 2.0 console, click Refresh to see the new relying parties.
16. Right-click the relying party trust with the name https://shib.adatum.com/shibboleth, and then
click Edit Claim Rules.
The ScopedAffiliation rules will not work because Rule 1 depends on an Exchange
attribute that is not in our lab schema. Rule 1 can be modified to work with an
available multi-variable attribute, for example the description attribute.
17. Recreate and save the claim rules that you added earlier in this document.
18. Use Internet Explorer to visit https://shib.adatum.com/secure. Note the persistentid value,
which is presented with the proper NameQualifiers in accordance with the claim rule that is
automatically included by FEMMA from the ruleset_persistent.tpl file in the templates folder.
Larger files like the InCommon metadata file may take a long time to process, because
Windows PowerShell will encounter numerous exceptions during the import related to the
second and third (certificate-related) issues in the previous table. FEMMA includes a
blacklist capability for optionally excluding entities from the generated
Windows PowerShell script, which can improve performance.
Using FEMMA to Import IdPs
FEMMA, in its current form, only imports and configures SPSSODescriptors in SAML 2.0
metadata files. Those interested in importing IDPSSODescriptors can use the following edited
Python script. Changes to the original FEMMA script are highlighted in red. In addition, you will
need edited template files. These files are provided after the script.
IDP-parsing FEMMA Script
#!/usr/bin/env python
#
# Name: Federation Metadata Manager for ADFS (FEMMA)
# Version: 0.1
# Author: Cristian Mezzetti [email protected]
# Edited By: Dave Martinez
# Home-page: http://sourceforge.net/projects/femma
# License: GNU GPL v2
# Description: This script parses a (Shibboleth) federation
Note
Note
Page 32
32
# metadata XML content and creates a pool of
# metadata files and a powershell script in order
# to automatically configure and update an Active
# Directory Federation Services STS (Security Token Service).
#
# Copyright (C) 2010 Cristian Mezzetti
#
# This program is free software; you can redistribute it and/or modify
# it under the terms of version 2 of the GNU General Public License as
# published by the Free Software Foundation.
from lxml import etree
import urllib2, os, sys, getopt, string, ConfigParser, re
from string import Template
#### Adapt to your needs
spEntityID = "http://FSWEB.contoso.com/adfs/services/trust"
myClaimType = 'http://unibo/idem'
fedNamePrefix = "IDEM"
######################
settingsFile = "settings.cfg"
xmlDir = os.getcwd() + os.sep + "entities-temp"
rulesetDir = os.getcwd() + os.sep + "ruleset-temp"
templateDir = os.getcwd() + os.sep + "templates"
rulesetBaseTemplate = templateDir + os.sep + "ruleset_base.tpl"
rulesetPersistentTemplate = templateDir + os.sep + "ruleset_persistent.tpl"
rulesetTransientTemplate = templateDir + os.sep + "ruleset_transient.tpl"
pshTemplate = templateDir + os.sep + "powershell_metadata_update.tpl"
pshBaseTemplate = templateDir + os.sep + "powershell_base.tpl"
def tearUp():
"""
Initializes temp directories and checks for templates
"""
print("Starting")
Page 33
33
if os.path.exists(templateDir):
if not (os.path.exists(xmlDir) and os.path.isdir(xmlDir)):
os.mkdir(xmlDir)
if not (os.path.exists(rulesetDir) and os.path.isdir(rulesetDir)):
os.mkdir(rulesetDir)
else:
print "ERROR: Template dir " + templateDir + " not found."
sys.exit(1)
def rulesetCreation(myClaimType, rulesetFileName, idpEntityID, idpScope,
persistent=False):
"""
Creates Identity Provider ruleset file with NameID creation based on
transient-id by default
"""
try:
# load template from configured file
ruleBase = Template(open(rulesetBaseTemplate, "r").read())
if persistent:
ruleID = Template(open(rulesetPersistentTemplate, "r").read())
else:
ruleID = Template(open(rulesetTransientTemplate, "r").read())
# susbstitutes rules and entityID
outRuleset = ruleBase.substitute(cpScope=idpScope) + "\n" +
ruleID.substitute(claimBaseType=myClaimType, spNameQualifier=spEntityID,
nameQualifier=idpEntityID)
# create ruleset files
rulesetFile = open(rulesetFileName, "w")
rulesetFile.write(outRuleset)
rulesetFile.close()
except Exception, e:
print(e)
return
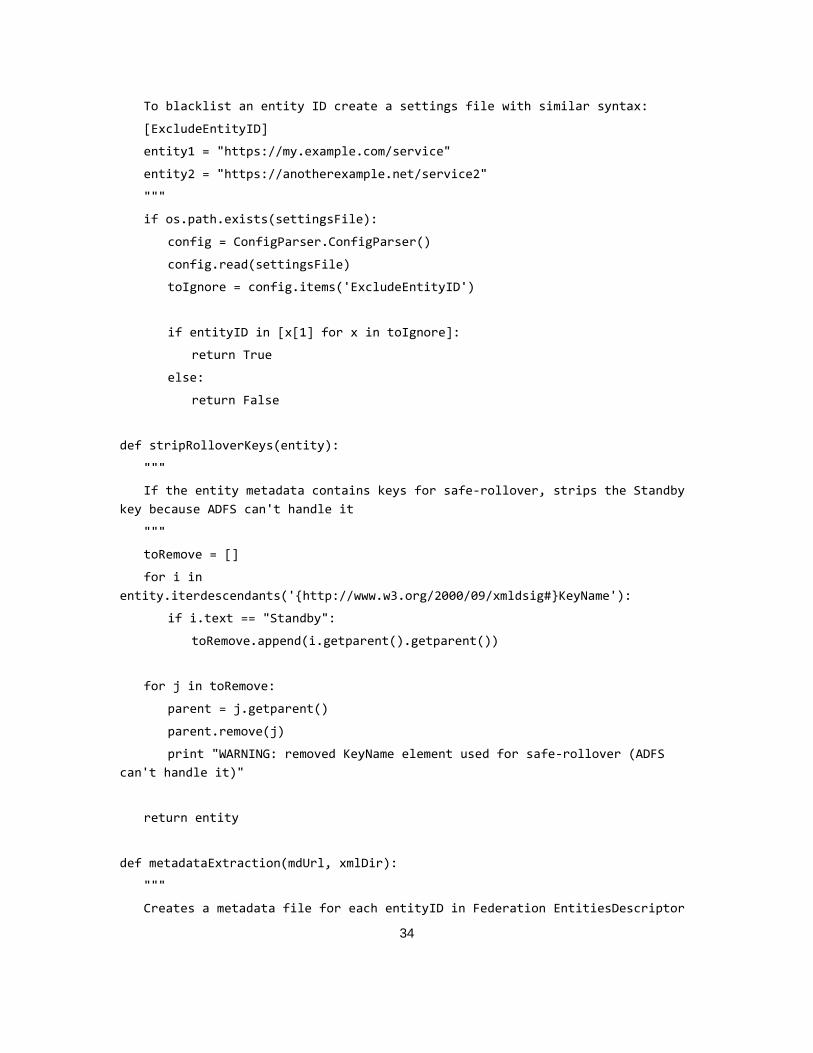
def entityToIgnore(entityID):
"""
Checks if the provided entityID of the Identity Provider is blacklisted
Page 34
34
To blacklist an entity ID create a settings file with similar syntax:
[ExcludeEntityID]
entity1 = "https://my.example.com/service"
entity2 = "https://anotherexample.net/service2"
"""
if os.path.exists(settingsFile):
config = ConfigParser.ConfigParser()
config.read(settingsFile)
toIgnore = config.items('ExcludeEntityID')
if entityID in [x[1] for x in toIgnore]:
return True
else:
return False
def stripRolloverKeys(entity):
"""
If the entity metadata contains keys for safe-rollover, strips the Standby
key because ADFS can't handle it
"""
toRemove = []
for i in
entity.iterdescendants('{http://www.w3.org/2000/09/xmldsig#}KeyName'):
if i.text == "Standby":
toRemove.append(i.getparent().getparent())
for j in toRemove:
parent = j.getparent()
parent.remove(j)
print "WARNING: removed KeyName element used for safe-rollover (ADFS
can't handle it)"
return entity
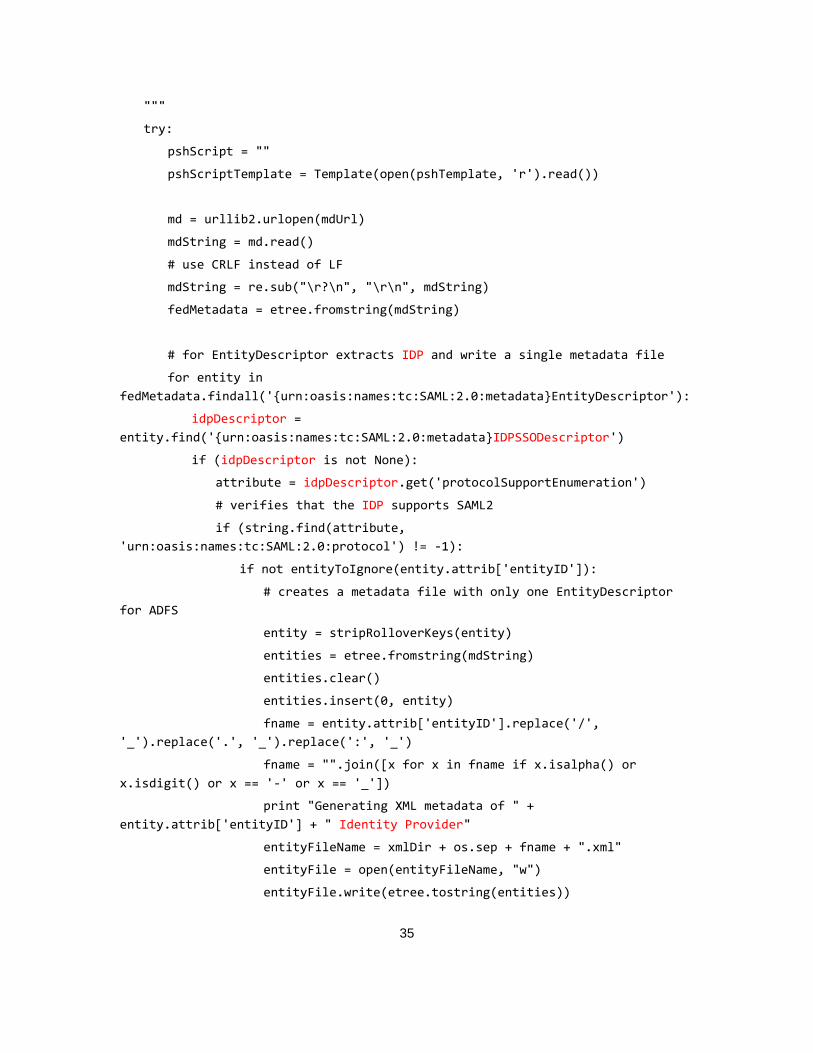
def metadataExtraction(mdUrl, xmlDir):
"""
Creates a metadata file for each entityID in Federation EntitiesDescriptor
Page 35
35
"""
try:
pshScript = ""
pshScriptTemplate = Template(open(pshTemplate, 'r').read())
md = urllib2.urlopen(mdUrl)
mdString = md.read()
# use CRLF instead of LF
mdString = re.sub("\r?\n", "\r\n", mdString)
fedMetadata = etree.fromstring(mdString)
# for EntityDescriptor extracts IDP and write a single metadata file
for entity in
fedMetadata.findall('{urn:oasis:names:tc:SAML:2.0:metadata}EntityDescriptor'):
idpDescriptor =
entity.find('{urn:oasis:names:tc:SAML:2.0:metadata}IDPSSODescriptor')
if (idpDescriptor is not None):
attribute = idpDescriptor.get('protocolSupportEnumeration')
# verifies that the IDP supports SAML2
if (string.find(attribute,
'urn:oasis:names:tc:SAML:2.0:protocol') != -1):
if not entityToIgnore(entity.attrib['entityID']):
# creates a metadata file with only one EntityDescriptor
for ADFS
entity = stripRolloverKeys(entity)
entities = etree.fromstring(mdString)
entities.clear()
entities.insert(0, entity)
fname = entity.attrib['entityID'].replace('/',
'_').replace('.', '_').replace(':', '_')
fname = "".join([x for x in fname if x.isalpha() or
x.isdigit() or x == '-' or x == '_'])
print "Generating XML metadata of " +
entity.attrib['entityID'] + " Identity Provider"
entityFileName = xmlDir + os.sep + fname + ".xml"
entityFile = open(entityFileName, "w")
entityFile.write(etree.tostring(entities))
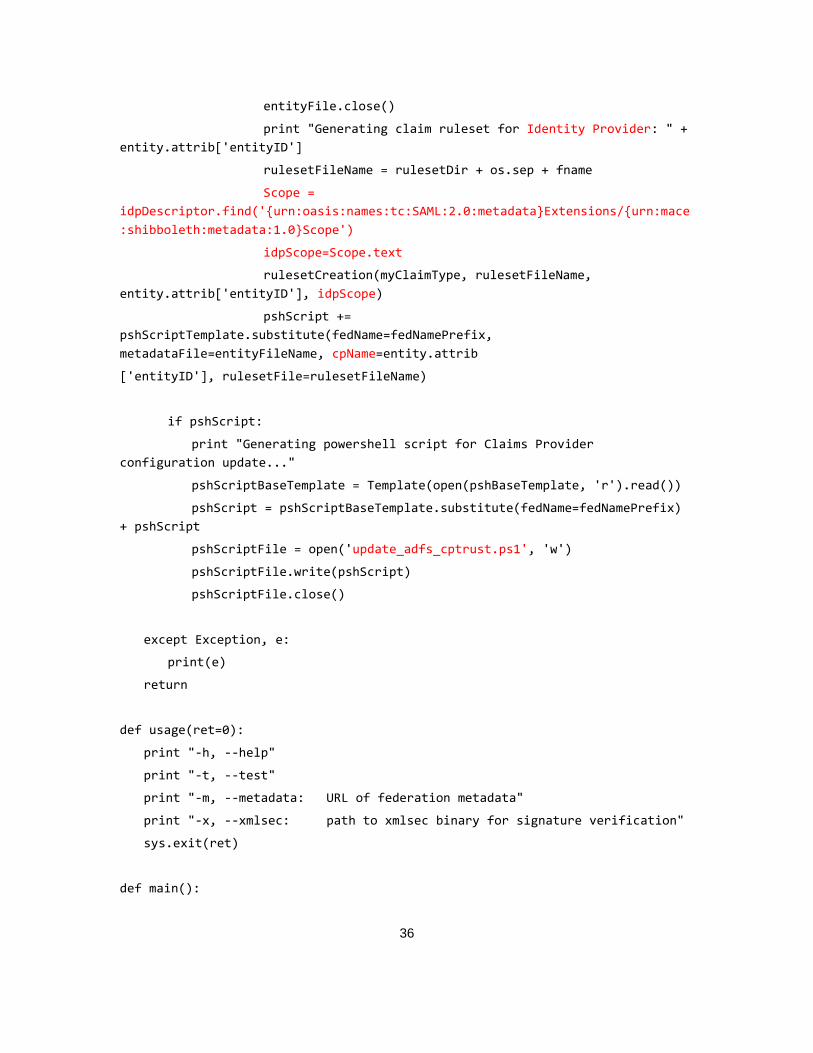
Page 36
36
entityFile.close()
print "Generating claim ruleset for Identity Provider: " +
entity.attrib['entityID']
rulesetFileName = rulesetDir + os.sep + fname
Scope =
idpDescriptor.find('{urn:oasis:names:tc:SAML:2.0:metadata}Extensions/{urn:mace
:shibboleth:metadata:1.0}Scope')
idpScope=Scope.text
rulesetCreation(myClaimType, rulesetFileName,
entity.attrib['entityID'], idpScope)
pshScript +=
pshScriptTemplate.substitute(fedName=fedNamePrefix,
metadataFile=entityFileName, cpName=entity.attrib
['entityID'], rulesetFile=rulesetFileName)
if pshScript:
print "Generating powershell script for Claims Provider
configuration update..."
pshScriptBaseTemplate = Template(open(pshBaseTemplate, 'r').read())
pshScript = pshScriptBaseTemplate.substitute(fedName=fedNamePrefix)
+ pshScript
pshScriptFile = open('update_adfs_cptrust.ps1', 'w')
pshScriptFile.write(pshScript)
pshScriptFile.close()
except Exception, e:
print(e)
return
def usage(ret=0):
print "-h, --help"
print "-t, --test"
print "-m, --metadata: URL of federation metadata"
print "-x, --xmlsec: path to xmlsec binary for signature verification"
sys.exit(ret)
def main():
Page 37
37
try:
opts, args = getopt.getopt(sys.argv[1:], "htm:x:", ["help", "test",
"metadata=", "xmlsec="])
except getopt.GetoptError, err:
print str(err)
usage(2)
mdUrl = ""
if opts.__len__() != 0:
for o, a in opts:
if o in ("-x", "--xmlsec"):
xmlsecbin = a
elif o in ("-m", "--metadata"):
mdUrl = a
else:
usage()
metadataExtraction(mdUrl, xmlDir)
else:
usage()
if __name__ == "__main__":
tearUp()
main()
FEMMA Template Files – IDP
Powershell_base.tpl
Get-ADFSClaimsProviderTrust | Where-Object {$$_.Name -like "($fedName)*"} | ForEach-Object {Remove-ADFSClaimsProviderTrust -TargetName $$_.Name}
Powershell_metadata_update.tpl
Add-ADFSClaimsProviderTrust -Name "($fedName) $cpName" -MetadataFile "$metadataFile" Set-ADFSClaimsProviderTrust -TargetName "($fedName) $cpName" -AcceptanceTransformRulesFile "$rulesetFile" -SignatureAlgorithm http://www.w3.org/2000/09/xmldsig#rsa-sha1
Ruleset_base.tpl
@RuleName = "Transform eppn to Name with Scope Check" c:[Type == "urn:oid:1.3.6.1.4.1.5923.1.1.1.6", Value =~ "^.+@$cpScope$"]
Page 38
38
=> issue(Type = "http://schemas.xmlsoap.org/ws/2005/05/identity/claims/name", Issuer = c.Issuer, OriginalIssuer = c.OriginalIssuer, Value = c.Value, ValueType = c.ValueType); @RuleName = "Transform epSA to Role with Scope Check" c:[Type == "urn:oid:1.3.6.1.4.1.5923.1.1.1.9", Value =~ "^.+@$cpScope"] => issue(Type = "http://schemas.microsoft.com/ws/2008/06/identity/claims/role", Issuer = c.Issuer, OriginalIssuer = c.OriginalIssuer, Value = c.Value, ValueType = c.ValueType);
Ruleset_persistent.tpl
@RuleName = "Pass Persistent NameID" c:[Type == "http://schemas.xmlsoap.org/ws/2005/05/identity/claims/nameidentifier", Properties["http://schemas.xmlsoap.org/ws/2005/05/identity/claimproperties/format"] == "urn:oasis:names:tc:SAML:2.0:nameid-format:persistent"] => issue(claim = c);
Ruleset_transient.tpl
@RuleName = "Pass Transient NameID" c:[Type == "http://schemas.xmlsoap.org/ws/2005/05/identity/claims/nameidentifier", Properties["http://schemas.xmlsoap.org/ws/2005/05/identity/claimproperties/format"] == "urn:oasis:names:tc:SAML:2.0:nameid-format:transient"] => issue(claim = c);
To see the transient Name ID that Shibboleth generates in the WIF sample application,
add a claim rule to the WIF Sample App relying party in AD FS 2.0 that passes an
inbound transient Name ID to the application.
Note
Page 39
39
Appendix B
The purpose of this section is to highlight other possibilities that are outside the scope of this
document but are available to architects when they deploy federation between AD FS 2.0 and
Shibboleth.
WS-Federation Support
AD FS 2.0 also supports the WS-Federation protocol for Web-based federation and SSO. The
Shibboleth SP likewise supports WS-Federation.
For information about how to deploy a test lab between Shibboleth and AD FS using WS-
Federation, see the legacy ADFS Step-by-Step Guide: Federation with Shibboleth Federation
Services (http://go.microsoft.com/fwlink/?LinkId=204190). While this document was written using
older versions of AD FS and Shibboleth, the content in this document can be extrapolated to
current versions.
Certification Authority–Issued, Token-Signing Certificates
For security reasons, production federation deployments require the use of digitally signed
security tokens. This lab uses self-signed, private key certificates, which are generated from
inside the AD FS 2.0 and Shibboleth products, for signing security tokens.
As an alternative, organizations can choose to use a private key certificate issued by a
certification authority (CA) for security-token signing. The primary benefit of using certificates that
are issued by a CA for token-signing is the ability to check for possible certificate revocation
against the certificate revocation list (CRL) from the issuing CA when acting as a relying party or
service provider.
Shibboleth does not perform CRL checking. Instead, it uses continuously refreshing/expiring
metadata to manage the replacement and discontinuation of support for a given certificate. In
AD FS 2.0, CRL checking is enabled by default for all claims provider trusts. This has implications
in federation deployments between Shibboleth (acting as an IdP) and AD FS 2.0 (acting as an
RP):
If the signing private key that Shibboleth uses includes a CRL Distribution Point (CDP)
extension, that location must be accessible by the AD FS 2.0 Federation Server, or CRL
checking fails, resulting in a failed access attempt. CDP extensions are added by default to
certificates that are issued by Active Directory Certificate Services (AD CS) in
Windows Server 2008 R2.
If the signing private key does not include a CDP extension, no CRL checking is performed
by AD FS 2.0.
You can turn off CRL checking for a specific claims provider trust by using the
Windows PowerShell command-line and scripting environment. For more information, see the
AD FS 2.0 Windows PowerShell Administration section of the AD FS 2.0 Operations Guide
(http://go.microsoft.com/fwlink/?LinkId=194005) and the AD FS 2.0 Cmdlets Reference
(http://go.microsoft.com/fwlink/?LinkId=177389).
Page 40
40
Federated Single Logout
Both AD FS 2.0 and the Shibboleth SP include support for federated single logout. Federated
single logout makes it possible for a user to log out completely from their IdP federation server, as
well as any replying party applications that are federated through a particular browser session.
Federated logout seeks to improve security by leaving no sessions open for misuse, hijacking, or
other malicious actions.
SAML 2.0 Artifact Profile
Both AD FS 2.0 and Shibboleth support the SAML 2.0 HTTP artifact binding as part of their
support for the SAML 2.0 protocol. The artifact profile differs in approach from the HTTP POST
profile, and it may be preferred in some situations.
Handling Name Qualifiers in AD FS 2.0
In AD FS 2.0, both the creation and consumption of name qualifiers for use with Name ID
elements is done using the custom-developed claim rules. The FEMMA example described in
Appendix A uses the claim rule language to generate a persistent ID from AD FS 2.0 with
associated NameQualifier and SPNameQualifier values, which Shibboleth properly displays the
web server as a ―persistentid‖ header with a $NameQualifier!$SPNameQualifier!$Value format.
When it acts as a relying party/service provider token service, AD FS 2.0 can use custom claim
rules (like the one below) to read and use name qualifier variables. This rule passes inbound
Name IDs to the application, retaining their original format but changing the value to include the
NameQualifier and SPNameQualifier values in the output string.
c:[Type == "http://schemas.xmlsoap.org/ws/2005/05/identity/claims/nameidentifier"] => issue(Type = c.Type, Properties["http://schemas.xmlsoap.org/ws/2005/05/identity/claimproperties/format"] = c.Properties["http://schemas.xmlsoap.org/ws/2005/05/identity/claimproperties/format"], Value = c.Properties["http://schemas.xmlsoap.org/ws/2005/05/identity/claimproperties/namequalifier"] + "!" + c.Properties["http://schemas.xmlsoap.org/ws/2005/05/identity/claimproperties/spnamequalifier"] + "!" + c.Value);
This script works only when the Name ID is sent in the Subject element of the XML
assertion. In cases in which a Name ID is provided in an AttributeStatement (for example,
as the value of an eduPersonTargetedID attribute), the Name ID value (that is, the
opaque identifier) is usable, but the name qualifiers cannot be appended to the value, as
shown above.
Note