32
Adafruit PiTFT - 2.8" Touchscreen Display for Raspberry Pi Created by Ladyada Last updated on 2013-11-30 12:00:29 AM EST
| Date post: | 28-Nov-2015 |
| Category: |
Documents |
| Upload: | gpendharkar |
| View: | 454 times |
| Download: | 0 times |
Adafruit PiTFT - 2.8" Touchscreen Display for Raspberry PiCreated by Ladyada
Last updated on 2013-11-30 12:00:29 AM EST
235
101010131616192222232629313131
Guide Contents
Guide ContentsOverviewAssemblySoftware InstallationBefore you startDownload & InstallModule Auto-loadingTouchscreen Install & CalibrateSetting up the TouchscreenX CalibrationPlaying VideosHow To Play VideosConverting/Resizing VideosUsing the ConsoleDisplaying ImagesExtras!Controlling the backlightTactile switch as power button
© Adafruit Industries http://learn.adafruit.com/adafruit-pitft-28-inch-resistive-touchscreen-display-raspberry-pi
Page 2 of 32
Overview
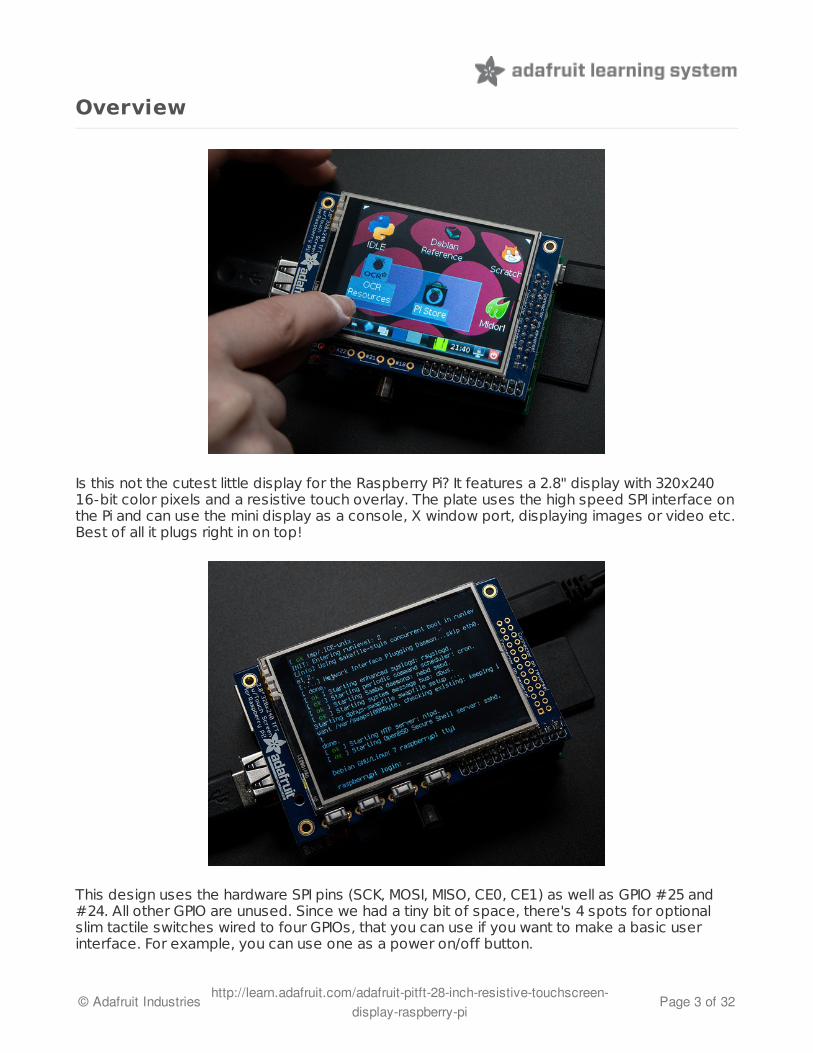
Is this not the cutest little display for the Raspberry Pi? It features a 2.8" display with 320x24016-bit color pixels and a resistive touch overlay. The plate uses the high speed SPI interface onthe Pi and can use the mini display as a console, X window port, displaying images or video etc.Best of all it plugs right in on top!
This design uses the hardware SPI pins (SCK, MOSI, MISO, CE0, CE1) as well as GPIO #25 and#24. All other GPIO are unused. Since we had a tiny bit of space, there's 4 spots for optionalslim tactile switches wired to four GPIOs, that you can use if you want to make a basic userinterface. For example, you can use one as a power on/off button.
© Adafruit Industries http://learn.adafruit.com/adafruit-pitft-28-inch-resistive-touchscreen-display-raspberry-pi
Page 3 of 32

To make it super easy for use: we've created a custom kernel package based of off Notro'sawesome framebuffer work, so you can install it over your existing Raspbian (or derivative)images in just a few commands.
This tutorial series shows you how to install the software, as well as calibrate the touchscreen,splay videos, display images such as from your PiCam and more!
© Adafruit Industries http://learn.adafruit.com/adafruit-pitft-28-inch-resistive-touchscreen-display-raspberry-pi
Page 4 of 32
Assembly
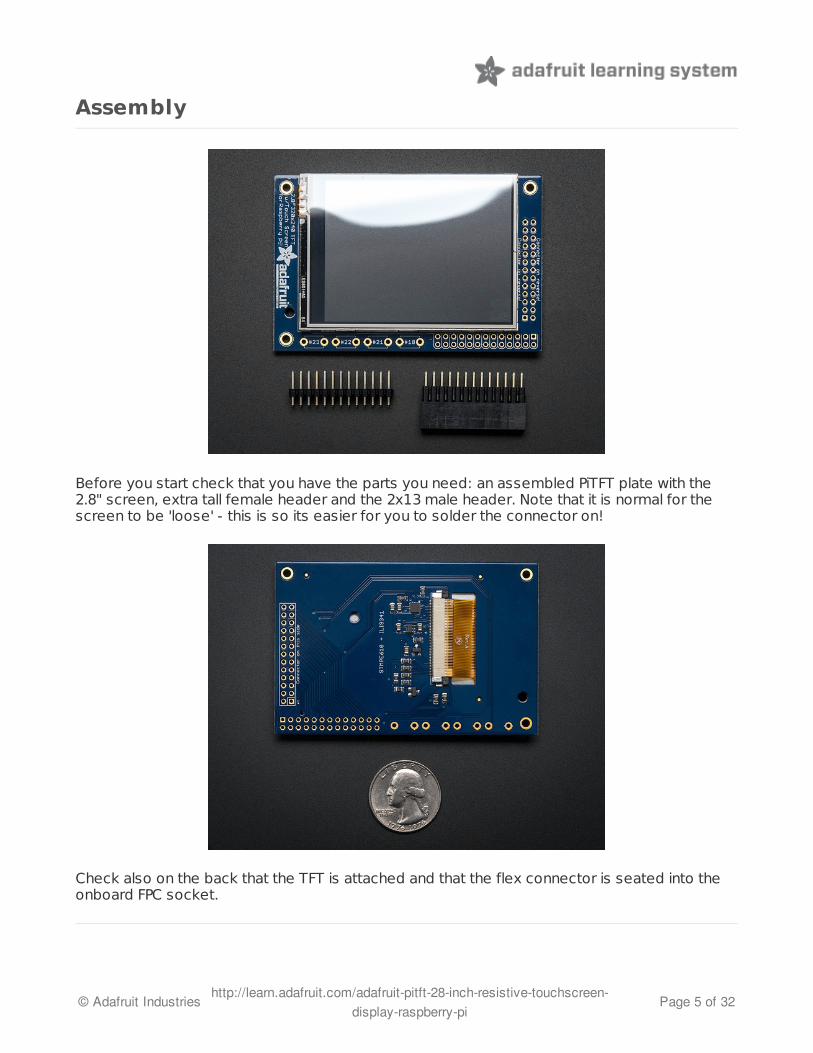
Before you start check that you have the parts you need: an assembled PiTFT plate with the2.8" screen, extra tall female header and the 2x13 male header. Note that it is normal for thescreen to be 'loose' - this is so its easier for you to solder the connector on!
Check also on the back that the TFT is attached and that the flex connector is seated into theonboard FPC socket.
© Adafruit Industries http://learn.adafruit.com/adafruit-pitft-28-inch-resistive-touchscreen-display-raspberry-pi
Page 5 of 32
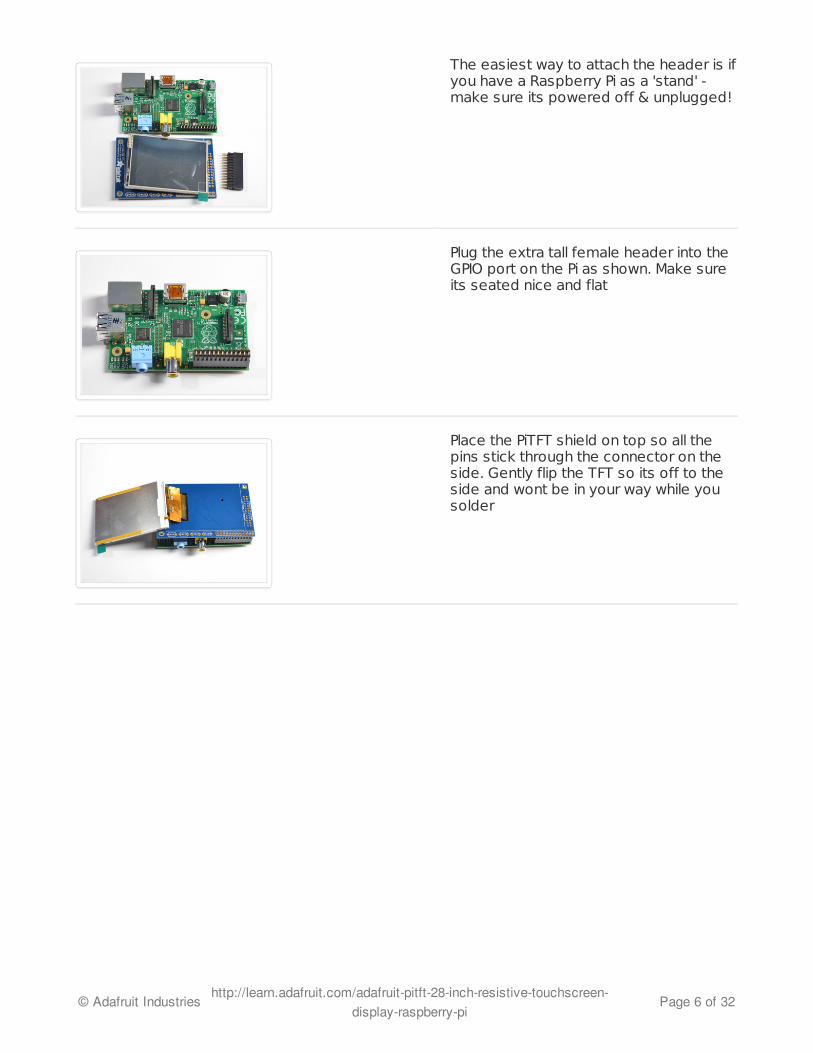
The easiest way to attach the header is ifyou have a Raspberry Pi as a 'stand' -make sure its powered off & unplugged!
Plug the extra tall female header into theGPIO port on the Pi as shown. Make sureits seated nice and flat
Place the PiTFT shield on top so all thepins stick through the connector on theside. Gently flip the TFT so its off to theside and wont be in your way while yousolder
© Adafruit Industries http://learn.adafruit.com/adafruit-pitft-28-inch-resistive-touchscreen-display-raspberry-pi
Page 6 of 32

Heat up your soldering iron, and grabsome solder. Start by tack-soldering oneof the corners while pressing on the plateto make it sit flat. Once you have one ortwo pins done you can continue to soldereach of the pins.
Before attaching the display, check thatall the pins are soldered nicely andthere's no bridging, cold solder, shorts,or unsoldered pins.
© Adafruit Industries http://learn.adafruit.com/adafruit-pitft-28-inch-resistive-touchscreen-display-raspberry-pi
Page 7 of 32
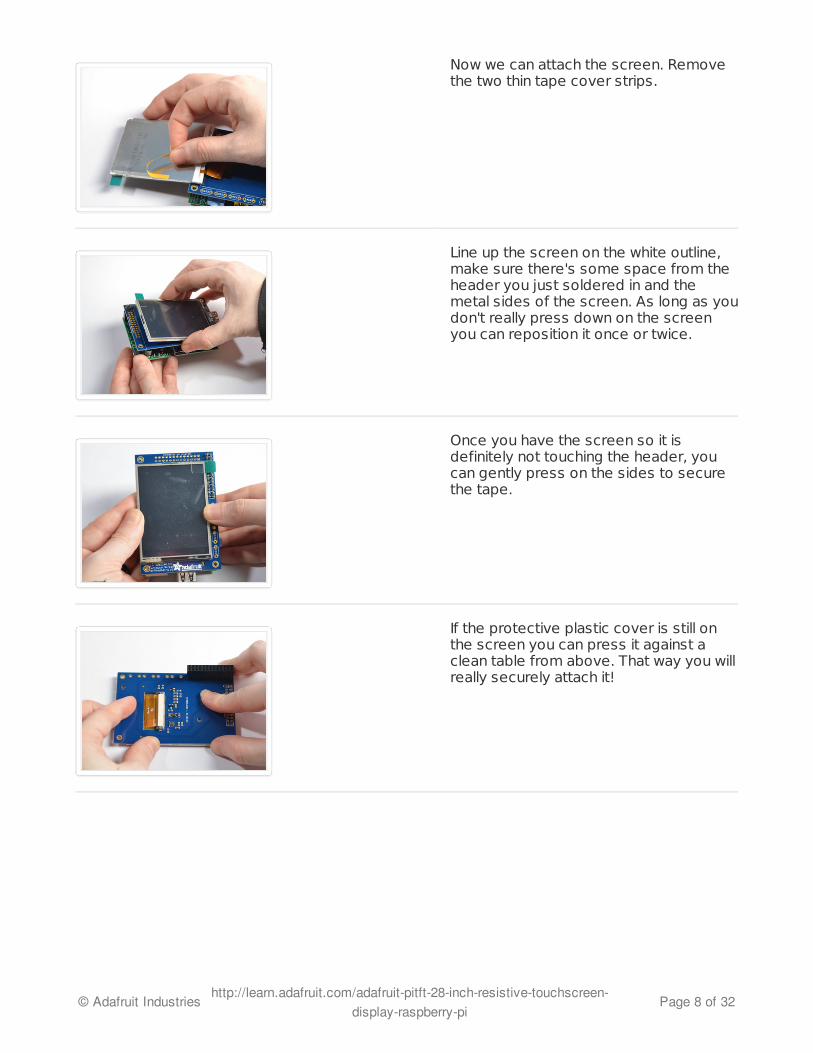
Now we can attach the screen. Removethe two thin tape cover strips.
Line up the screen on the white outline,make sure there's some space from theheader you just soldered in and themetal sides of the screen. As long as youdon't really press down on the screenyou can reposition it once or twice.
Once you have the screen so it isdefinitely not touching the header, youcan gently press on the sides to securethe tape.
If the protective plastic cover is still onthe screen you can press it against aclean table from above. That way you willreally securely attach it!
© Adafruit Industries http://learn.adafruit.com/adafruit-pitft-28-inch-resistive-touchscreen-display-raspberry-pi
Page 8 of 32
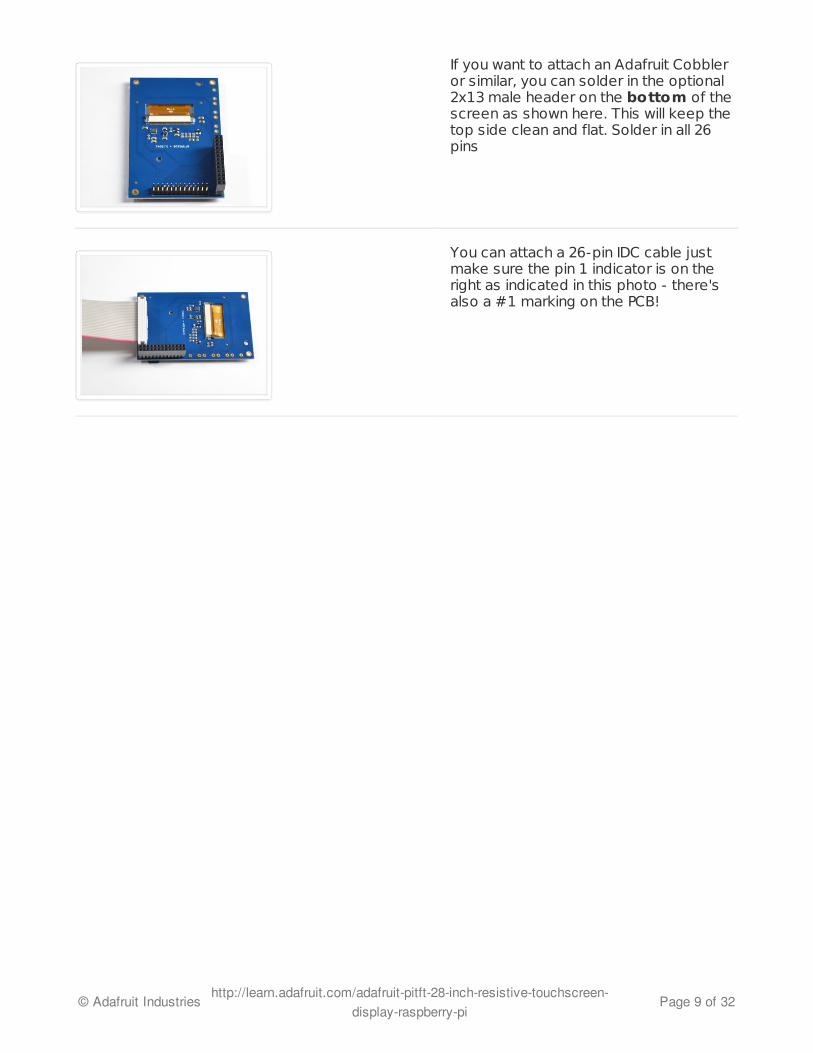
If you want to attach an Adafruit Cobbleror similar, you can solder in the optional2x13 male header on the bottom of thescreen as shown here. This will keep thetop side clean and flat. Solder in all 26pins
You can attach a 26-pin IDC cable justmake sure the pin 1 indicator is on theright as indicated in this photo - there'salso a #1 marking on the PCB!
© Adafruit Industries http://learn.adafruit.com/adafruit-pitft-28-inch-resistive-touchscreen-display-raspberry-pi
Page 9 of 32
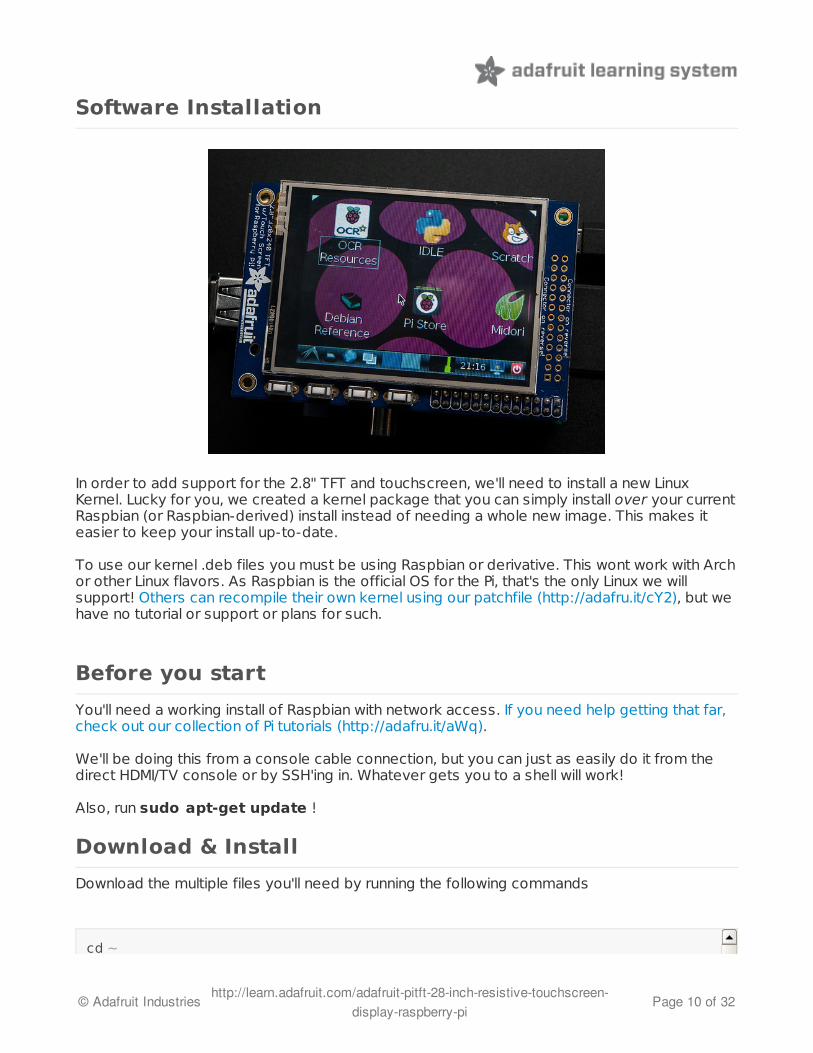
Software Installation
In order to add support for the 2.8" TFT and touchscreen, we'll need to install a new LinuxKernel. Lucky for you, we created a kernel package that you can simply install over your currentRaspbian (or Raspbian-derived) install instead of needing a whole new image. This makes iteasier to keep your install up-to-date.
To use our kernel .deb files you must be using Raspbian or derivative. This wont work with Archor other Linux flavors. As Raspbian is the official OS for the Pi, that's the only Linux we willsupport! Others can recompile their own kernel using our patchfile (http://adafru.it/cY2), but wehave no tutorial or support or plans for such.
Before you start
You'll need a working install of Raspbian with network access. If you need help getting that far,check out our collection of Pi tutorials (http://adafru.it/aWq).
We'll be doing this from a console cable connection, but you can just as easily do it from thedirect HDMI/TV console or by SSH'ing in. Whatever gets you to a shell will work!
Also, run sudo apt-get update !
Download & Install
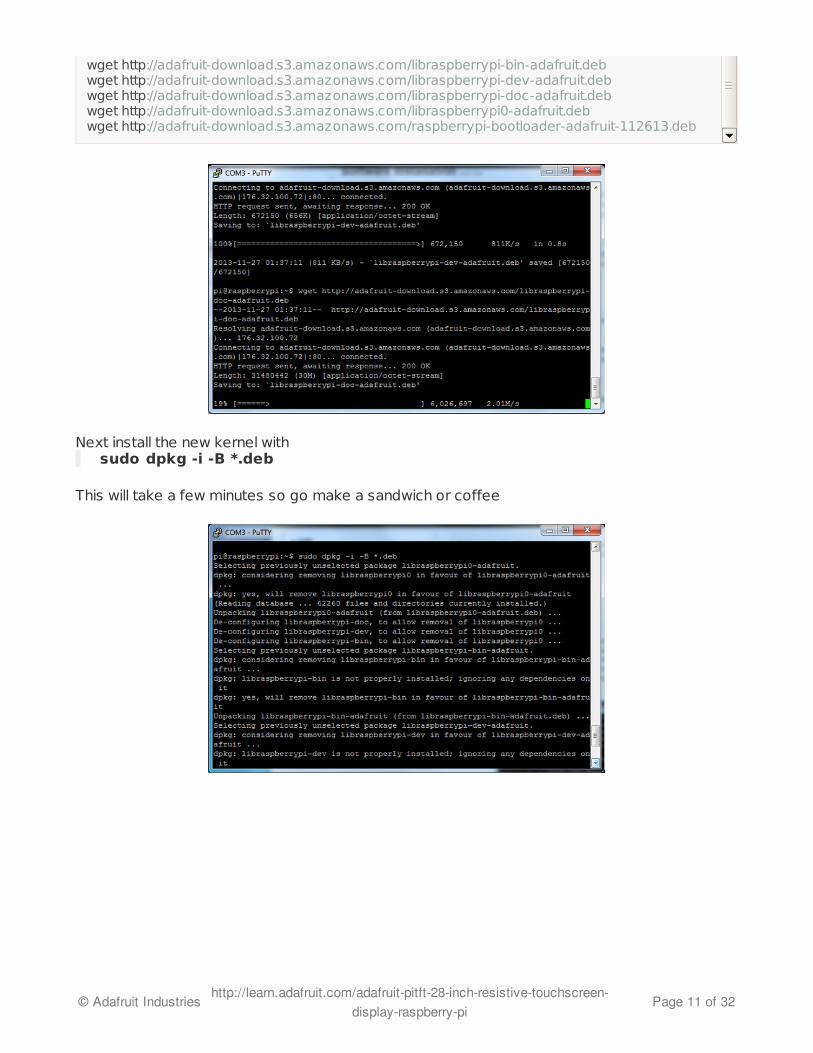
Download the multiple files you'll need by running the following commands
cd ~
© Adafruit Industries http://learn.adafruit.com/adafruit-pitft-28-inch-resistive-touchscreen-display-raspberry-pi
Page 10 of 32
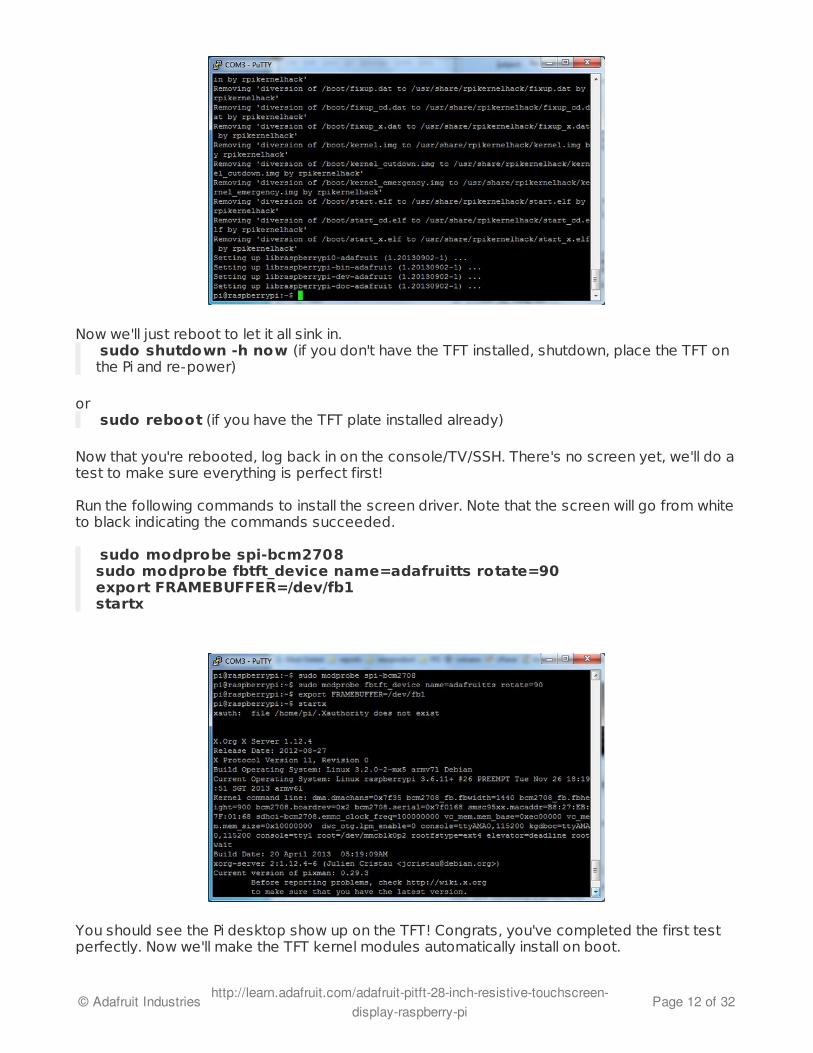
Next install the new kernel with sudo dpkg -i -B *.deb
This will take a few minutes so go make a sandwich or coffee
cd ~wget http://adafruit-download.s3.amazonaws.com/libraspberrypi-bin-adafruit.debwget http://adafruit-download.s3.amazonaws.com/libraspberrypi-dev-adafruit.debwget http://adafruit-download.s3.amazonaws.com/libraspberrypi-doc-adafruit.debwget http://adafruit-download.s3.amazonaws.com/libraspberrypi0-adafruit.debwget http://adafruit-download.s3.amazonaws.com/raspberrypi-bootloader-adafruit-112613.deb
© Adafruit Industries http://learn.adafruit.com/adafruit-pitft-28-inch-resistive-touchscreen-display-raspberry-pi
Page 11 of 32
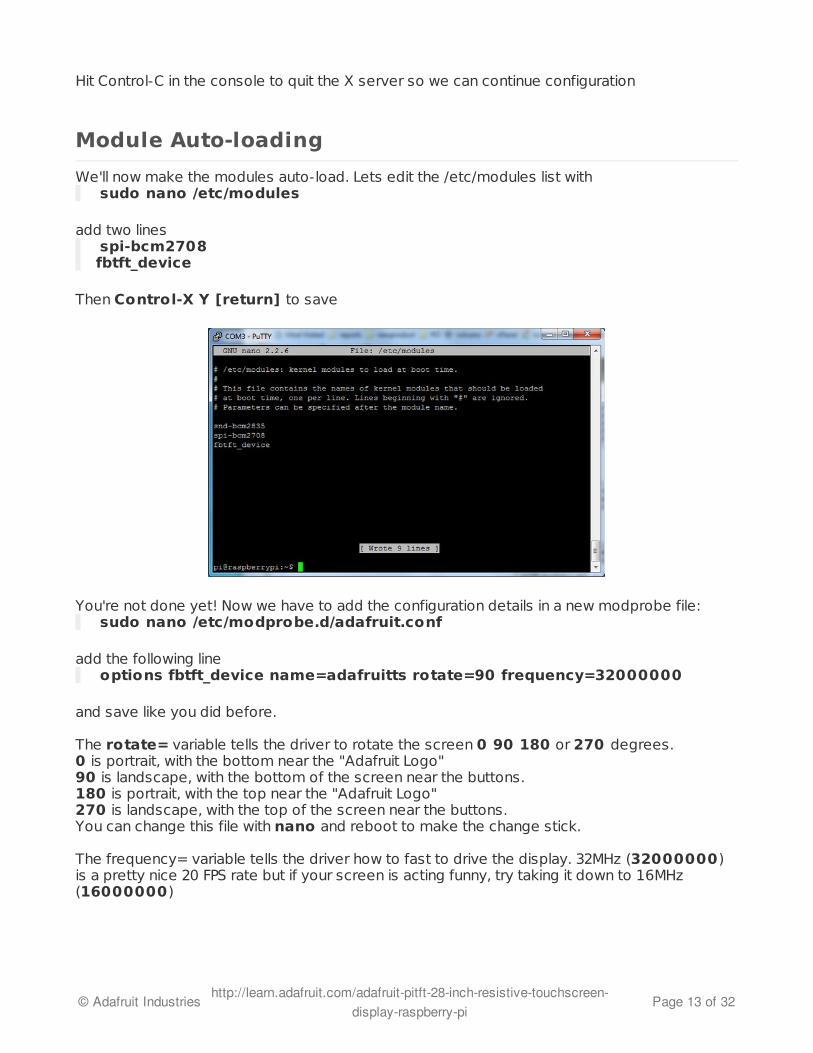
Now we'll just reboot to let it all sink in. sudo shutdown -h now (if you don't have the TFT installed, shutdown, place the TFT onthe Pi and re-power)
or sudo reboot (if you have the TFT plate installed already)
Now that you're rebooted, log back in on the console/TV/SSH. There's no screen yet, we'll do atest to make sure everything is perfect first!
Run the following commands to install the screen driver. Note that the screen will go from whiteto black indicating the commands succeeded.
sudo modprobe spi-bcm2708sudo modprobe fbtft_device name=adafruitts rotate=90export FRAMEBUFFER=/dev/fb1 startx
You should see the Pi desktop show up on the TFT! Congrats, you've completed the first testperfectly. Now we'll make the TFT kernel modules automatically install on boot.
© Adafruit Industries http://learn.adafruit.com/adafruit-pitft-28-inch-resistive-touchscreen-display-raspberry-pi
Page 12 of 32
Hit Control-C in the console to quit the X server so we can continue configuration
Module Auto-loading
We'll now make the modules auto-load. Lets edit the /etc/modules list with sudo nano /etc/modules
add two lines spi-bcm2708fbtft_device
Then Control-X Y [return] to save
You're not done yet! Now we have to add the configuration details in a new modprobe file: sudo nano /etc/modprobe.d/adafruit.conf
add the following line options fbtft_device name=adafruitts rotate=90 frequency=32000000
and save like you did before.
The rotate= variable tells the driver to rotate the screen 0 90 180 or 270 degrees. 0 is portrait, with the bottom near the "Adafruit Logo"90 is landscape, with the bottom of the screen near the buttons.180 is portrait, with the top near the "Adafruit Logo"270 is landscape, with the top of the screen near the buttons.You can change this file with nano and reboot to make the change stick.
The frequency= variable tells the driver how to fast to drive the display. 32MHz (32000000)is a pretty nice 20 FPS rate but if your screen is acting funny, try taking it down to 16MHz(16000000)
© Adafruit Industries http://learn.adafruit.com/adafruit-pitft-28-inch-resistive-touchscreen-display-raspberry-pi
Page 13 of 32
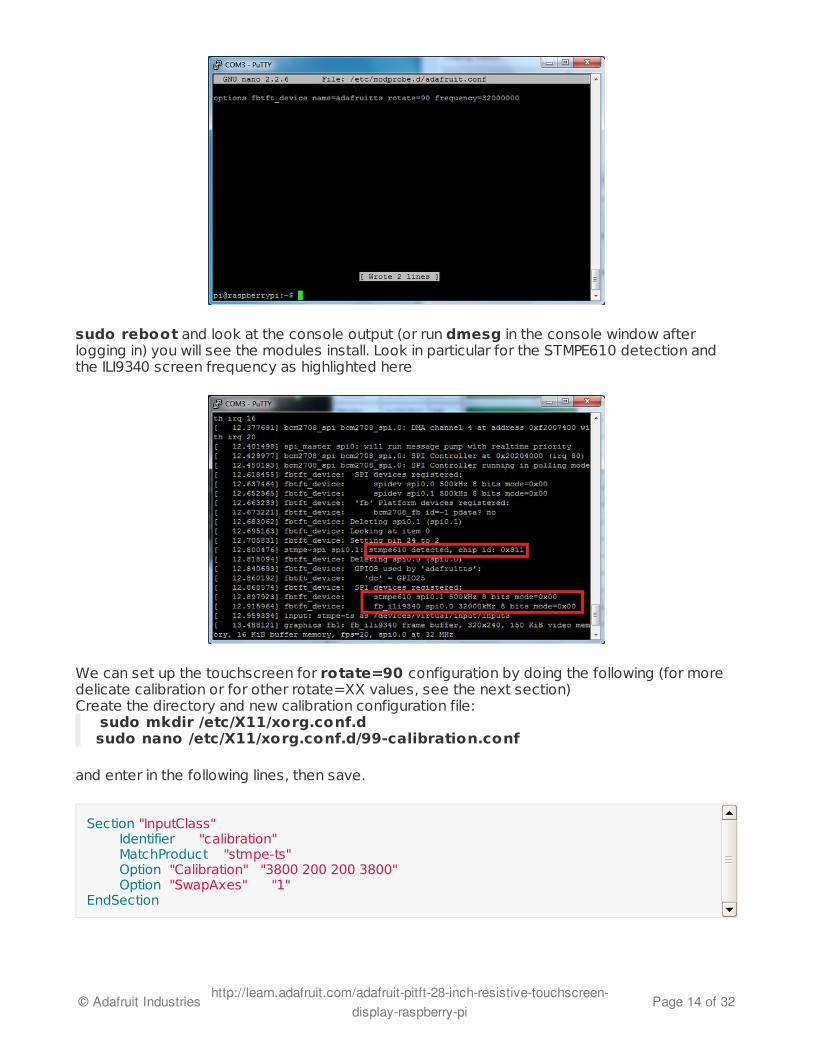
sudo reboot and look at the console output (or run dmesg in the console window afterlogging in) you will see the modules install. Look in particular for the STMPE610 detection andthe ILI9340 screen frequency as highlighted here
We can set up the touchscreen for rotate=90 configuration by doing the following (for moredelicate calibration or for other rotate=XX values, see the next section)Create the directory and new calibration configuration file:
sudo mkdir /etc/X11/xorg.conf.dsudo nano /etc/X11/xorg.conf.d/99-calibration.conf
and enter in the following lines, then save.
Section "InputClass" Identifier "calibration" MatchProduct "stmpe-ts" Option "Calibration" "3800 200 200 3800" Option "SwapAxes" "1"EndSection
© Adafruit Industries http://learn.adafruit.com/adafruit-pitft-28-inch-resistive-touchscreen-display-raspberry-pi
Page 14 of 32
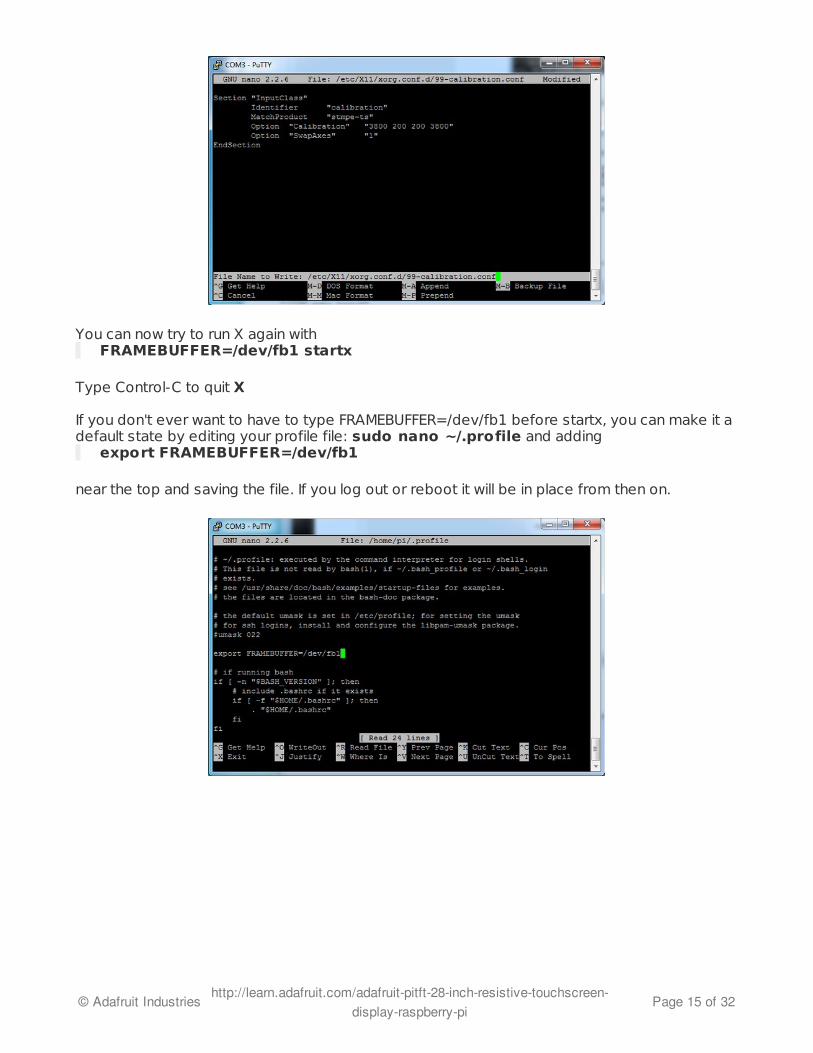
You can now try to run X again with FRAMEBUFFER=/dev/fb1 startx
Type Control-C to quit X
If you don't ever want to have to type FRAMEBUFFER=/dev/fb1 before startx, you can make it adefault state by editing your profile file: sudo nano ~/.profile and adding
export FRAMEBUFFER=/dev/fb1
near the top and saving the file. If you log out or reboot it will be in place from then on.
© Adafruit Industries http://learn.adafruit.com/adafruit-pitft-28-inch-resistive-touchscreen-display-raspberry-pi
Page 15 of 32
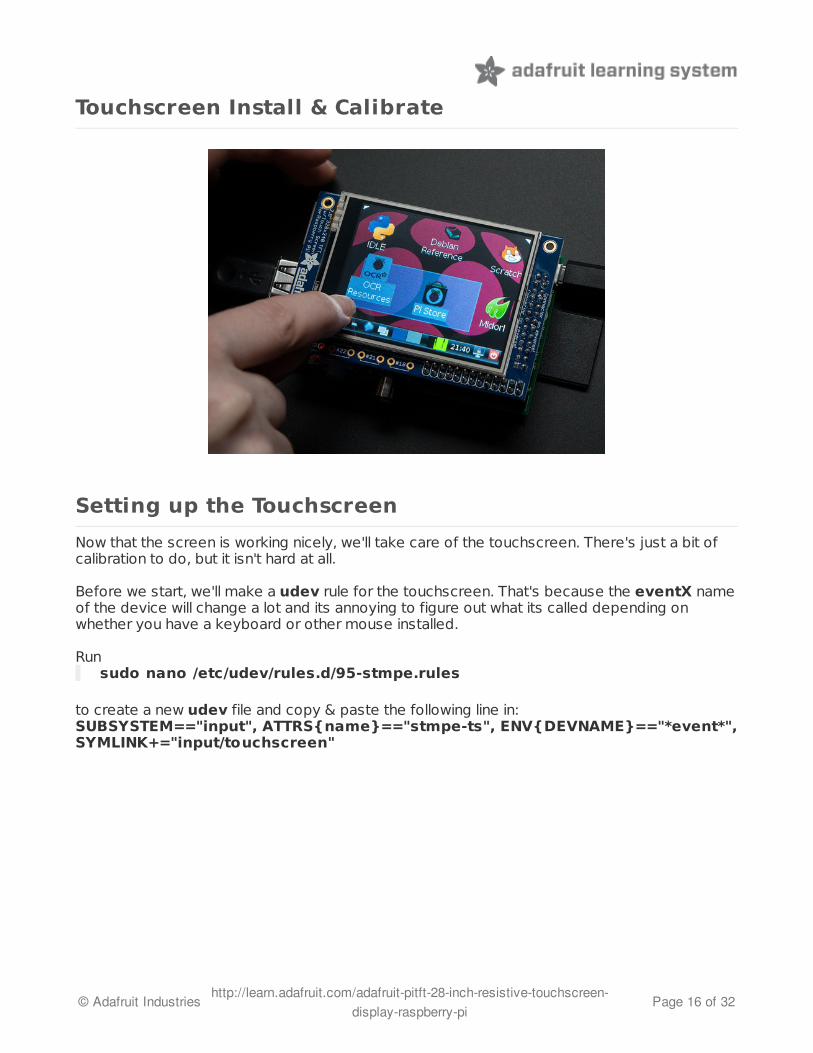
Touchscreen Install & Calibrate
Setting up the Touchscreen
Now that the screen is working nicely, we'll take care of the touchscreen. There's just a bit ofcalibration to do, but it isn't hard at all.
Before we start, we'll make a udev rule for the touchscreen. That's because the eventX nameof the device will change a lot and its annoying to figure out what its called depending onwhether you have a keyboard or other mouse installed.
Run sudo nano /etc/udev/rules.d/95-stmpe.rules
to create a new udev file and copy & paste the following line in:SUBSYSTEM=="input", ATTRS{name}=="stmpe-ts", ENV{DEVNAME}=="*event*",SYMLINK+="input/touchscreen"
© Adafruit Industries http://learn.adafruit.com/adafruit-pitft-28-inch-resistive-touchscreen-display-raspberry-pi
Page 16 of 32
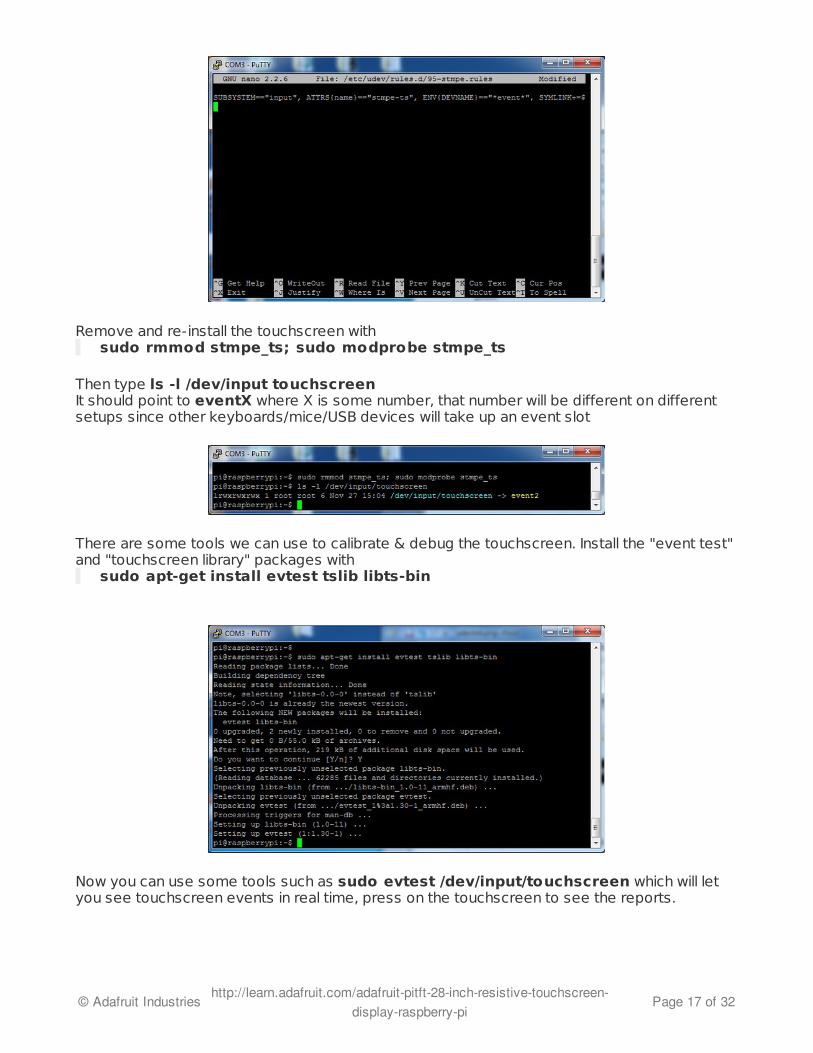
Remove and re-install the touchscreen with sudo rmmod stmpe_ts; sudo modprobe stmpe_ts
Then type ls -l /dev/input touchscreenIt should point to eventX where X is some number, that number will be different on differentsetups since other keyboards/mice/USB devices will take up an event slot
There are some tools we can use to calibrate & debug the touchscreen. Install the "event test"and "touchscreen library" packages with
sudo apt-get install evtest tslib libts-bin
Now you can use some tools such as sudo evtest /dev/input/touchscreen which will letyou see touchscreen events in real time, press on the touchscreen to see the reports.
© Adafruit Industries http://learn.adafruit.com/adafruit-pitft-28-inch-resistive-touchscreen-display-raspberry-pi
Page 17 of 32

OK lets start the calibration process! You will want to calibrate the screen once but shouldn'thave to do it more than that. We'll begin by calibrating on the command line by running
sudo TSLIB_FBDEVICE=/dev/fb1 TSLIB_TSDEVICE=/dev/input/touchscreents_calibrate
follow the directions on the screen, touching each point. Using a stylus is suggested so you geta precise touch. Don't use something metal, plastic only!
© Adafruit Industries http://learn.adafruit.com/adafruit-pitft-28-inch-resistive-touchscreen-display-raspberry-pi
Page 18 of 32
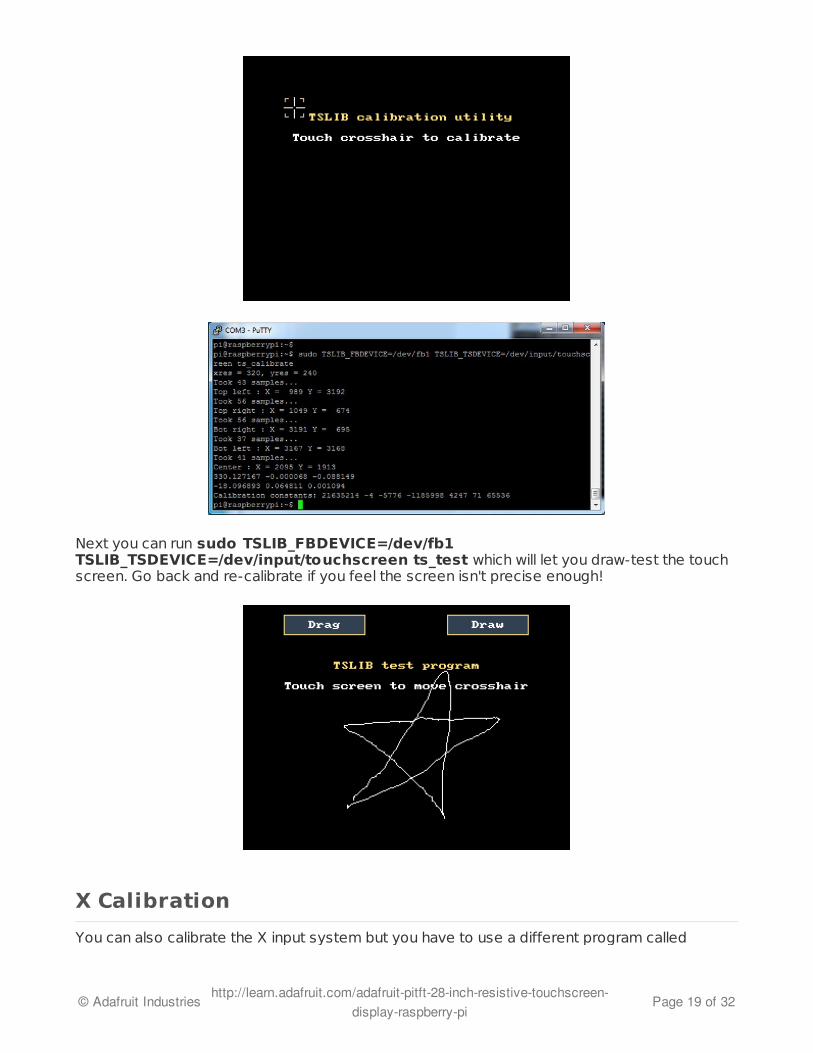
Next you can run sudo TSLIB_FBDEVICE=/dev/fb1TSLIB_TSDEVICE=/dev/input/touchscreen ts_test which will let you draw-test the touchscreen. Go back and re-calibrate if you feel the screen isn't precise enough!
X Calibration
You can also calibrate the X input system but you have to use a different program called
© Adafruit Industries http://learn.adafruit.com/adafruit-pitft-28-inch-resistive-touchscreen-display-raspberry-pi
Page 19 of 32
xinput_calibrator
You can do this if the calibration on the screen isnt to your liking or any time you change therotate=XX module settings for the screen. Since the screen and touch driver are completelyseparated, the touchscreen doesn't auto-rotate
Normally you'd have to compile it but we have a ready to go package for you so run:
Before you start the xinput_calibrator you will need to delete the old calibration data so run sudo rm /etc/X11/xorg.conf.d/99-calibration.conf
Before running startx and the calibrator - otherwise it gets really confused!
Now you'll have to run the xcalibrator while also running X. You can do this by startx and thenopening up the terminal program and running the xinput_calibrator command OR you can dowhat we do which is run startx in a SSH/Terminal shell and then run the xinput_calibrator in the Xwindow, which requires the following command order:
FRAMEBUFFER=/dev/fb1 startx &DISPLAY=:0.0 xinput_calibrator
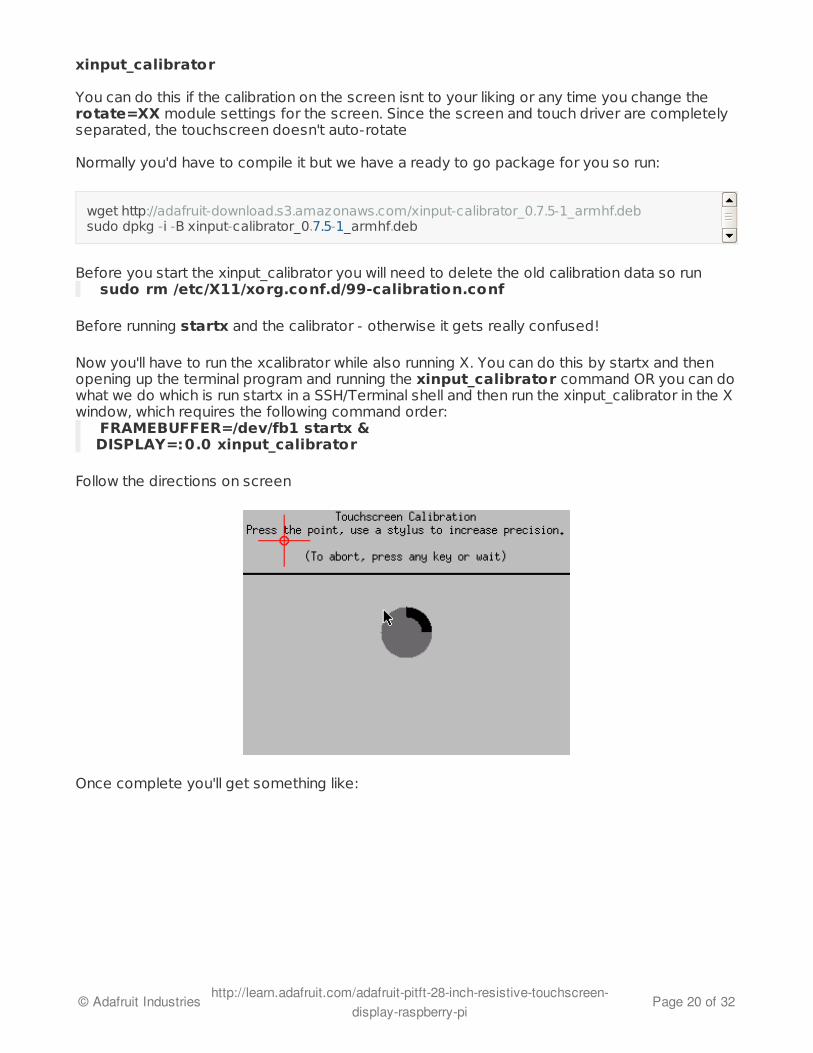
Follow the directions on screen
Once complete you'll get something like:
wget http://adafruit-download.s3.amazonaws.com/xinput-calibrator_0.7.5-1_armhf.debsudo dpkg -i -B xinput-calibrator_0.7.5-1_armhf.deb
© Adafruit Industries http://learn.adafruit.com/adafruit-pitft-28-inch-resistive-touchscreen-display-raspberry-pi
Page 20 of 32

Run sudo nano /etc/X11/xorg.conf.d/99-calibration.conf and copy the
or whatever you got, into there. You can quit X if you want by typing fg to bring that commandinto the foreground, and then Control-C to quit.
Your touchscreen is now super calibrated, hurrah!
Section "InputClass" Identifier "calibration" MatchProduct "stmpe-ts" Option "Calibration" "119 3736 3850 174" Option "SwapAxes" "1"EndSection
© Adafruit Industries http://learn.adafruit.com/adafruit-pitft-28-inch-resistive-touchscreen-display-raspberry-pi
Page 21 of 32
Playing Videos
How To Play Videos
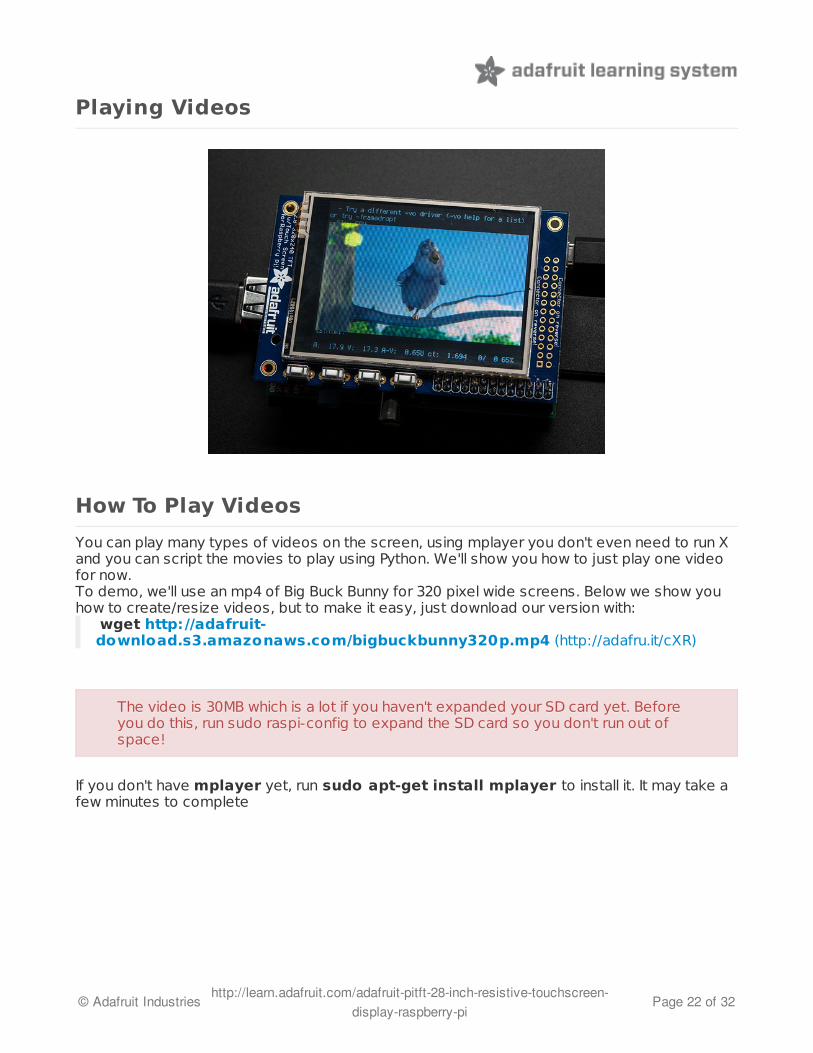
You can play many types of videos on the screen, using mplayer you don't even need to run Xand you can script the movies to play using Python. We'll show you how to just play one videofor now.To demo, we'll use an mp4 of Big Buck Bunny for 320 pixel wide screens. Below we show youhow to create/resize videos, but to make it easy, just download our version with:
wget http://adafruit-download.s3.amazonaws.com/bigbuckbunny320p.mp4 (http://adafru.it/cXR)
If you don't have mplayer yet, run sudo apt-get install mplayer to install it. It may take afew minutes to complete
The video is 30MB which is a lot if you haven't expanded your SD card yet. BeforeThe video is 30MB which is a lot if you haven't expanded your SD card yet. Beforeyou do this, run sudo raspi-config to expand the SD card so you don't run out ofyou do this, run sudo raspi-config to expand the SD card so you don't run out ofspace!space!
© Adafruit Industries http://learn.adafruit.com/adafruit-pitft-28-inch-resistive-touchscreen-display-raspberry-pi
Page 22 of 32
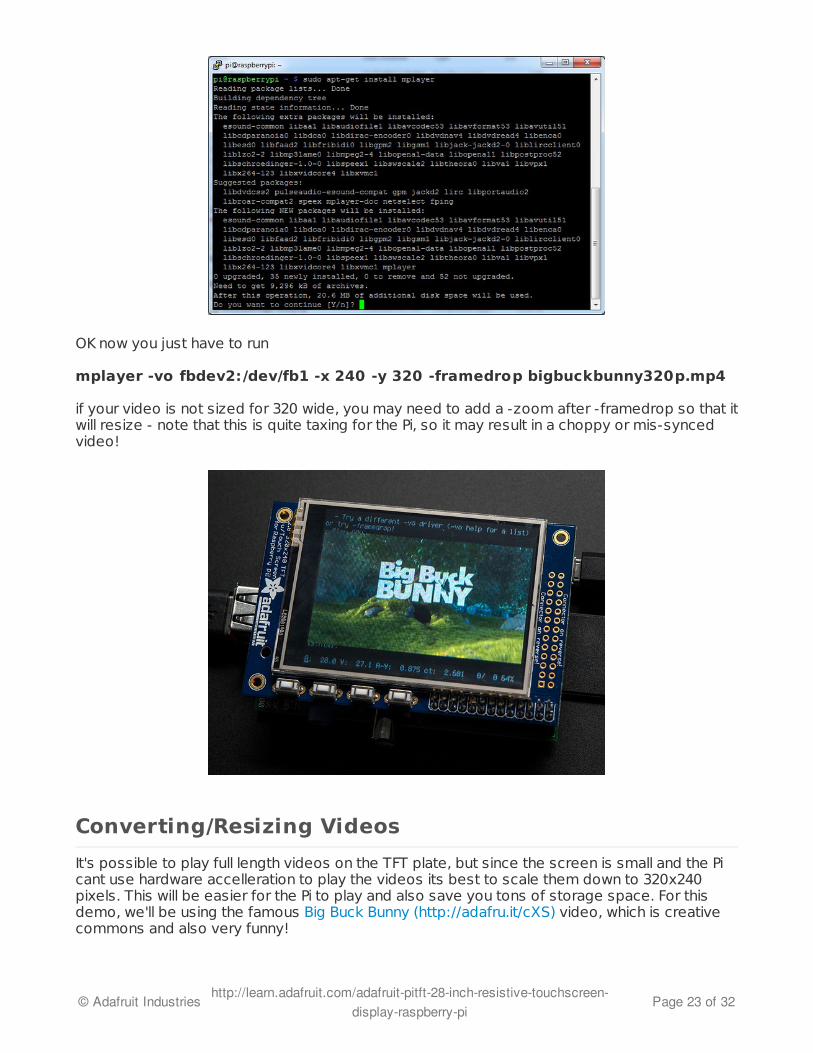
OK now you just have to run
mplayer -vo fbdev2:/dev/fb1 -x 240 -y 320 -framedrop bigbuckbunny320p.mp4
if your video is not sized for 320 wide, you may need to add a -zoom after -framedrop so that itwill resize - note that this is quite taxing for the Pi, so it may result in a choppy or mis-syncedvideo!
Converting/Resizing Videos
It's possible to play full length videos on the TFT plate, but since the screen is small and the Picant use hardware accelleration to play the videos its best to scale them down to 320x240pixels. This will be easier for the Pi to play and also save you tons of storage space. For thisdemo, we'll be using the famous Big Buck Bunny (http://adafru.it/cXS) video, which is creativecommons and also very funny!
© Adafruit Industries http://learn.adafruit.com/adafruit-pitft-28-inch-resistive-touchscreen-display-raspberry-pi
Page 23 of 32
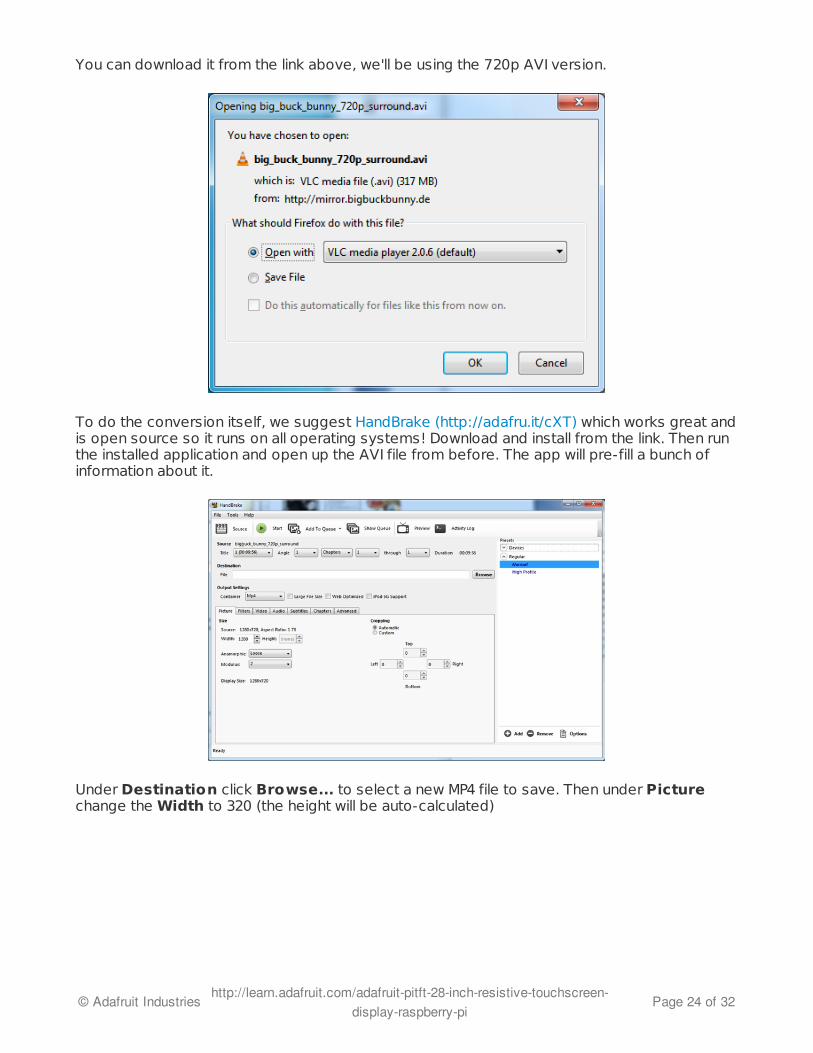
You can download it from the link above, we'll be using the 720p AVI version.
To do the conversion itself, we suggest HandBrake (http://adafru.it/cXT) which works great andis open source so it runs on all operating systems! Download and install from the link. Then runthe installed application and open up the AVI file from before. The app will pre-fill a bunch ofinformation about it.
Under Destination click Browse... to select a new MP4 file to save. Then under Picturechange the Width to 320 (the height will be auto-calculated)
© Adafruit Industries http://learn.adafruit.com/adafruit-pitft-28-inch-resistive-touchscreen-display-raspberry-pi
Page 24 of 32
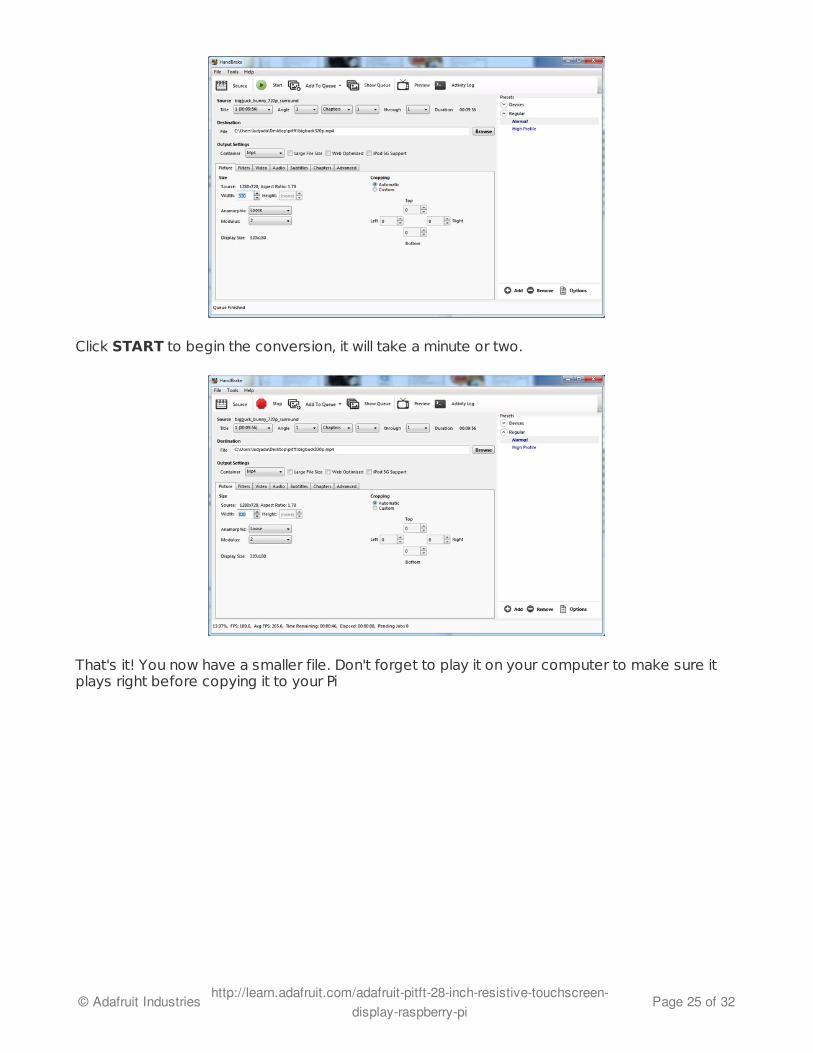
Click START to begin the conversion, it will take a minute or two.
That's it! You now have a smaller file. Don't forget to play it on your computer to make sure itplays right before copying it to your Pi
© Adafruit Industries http://learn.adafruit.com/adafruit-pitft-28-inch-resistive-touchscreen-display-raspberry-pi
Page 25 of 32
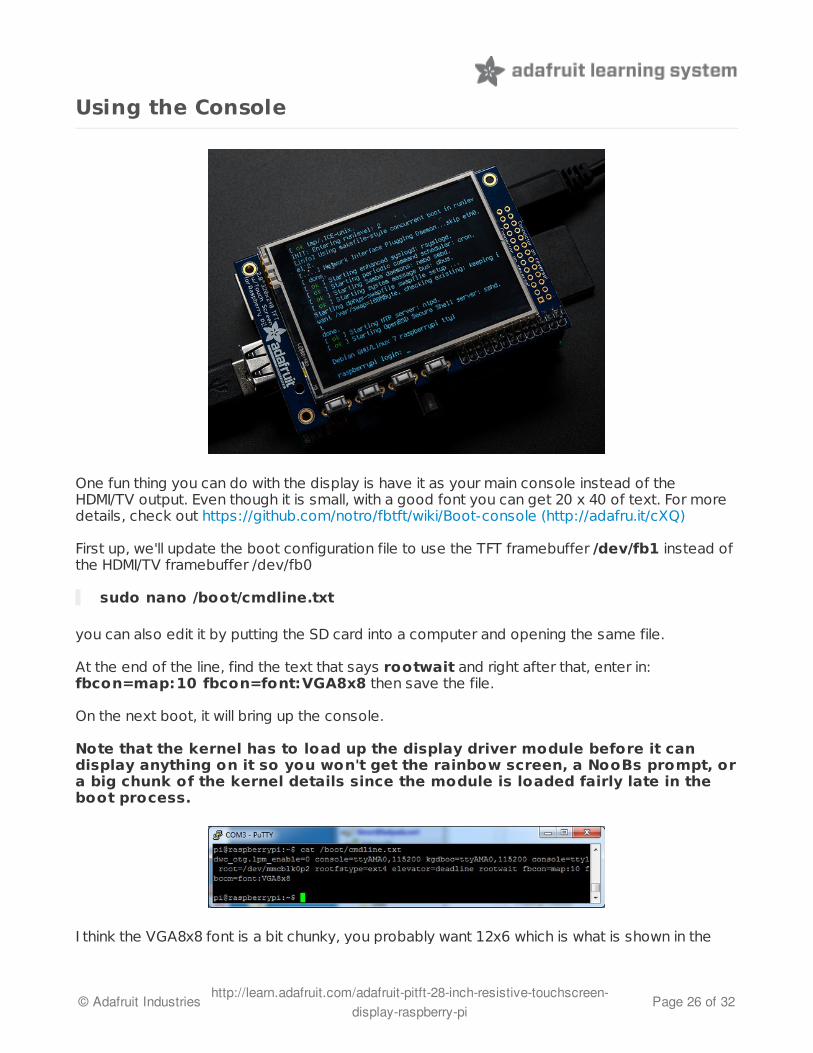
Using the Console
One fun thing you can do with the display is have it as your main console instead of theHDMI/TV output. Even though it is small, with a good font you can get 20 x 40 of text. For moredetails, check out https://github.com/notro/fbtft/wiki/Boot-console (http://adafru.it/cXQ)
First up, we'll update the boot configuration file to use the TFT framebuffer /dev/fb1 instead ofthe HDMI/TV framebuffer /dev/fb0
sudo nano /boot/cmdline.txt
you can also edit it by putting the SD card into a computer and opening the same file.
At the end of the line, find the text that says rootwait and right after that, enter in:fbcon=map:10 fbcon=font:VGA8x8 then save the file.
On the next boot, it will bring up the console.
Note that the kernel has to load up the display driver module before it candisplay anything on it so you won't get the rainbow screen, a NooBs prompt, ora big chunk of the kernel details since the module is loaded fairly late in theboot process.
I think the VGA8x8 font is a bit chunky, you probably want 12x6 which is what is shown in the
© Adafruit Industries http://learn.adafruit.com/adafruit-pitft-28-inch-resistive-touchscreen-display-raspberry-pi
Page 26 of 32
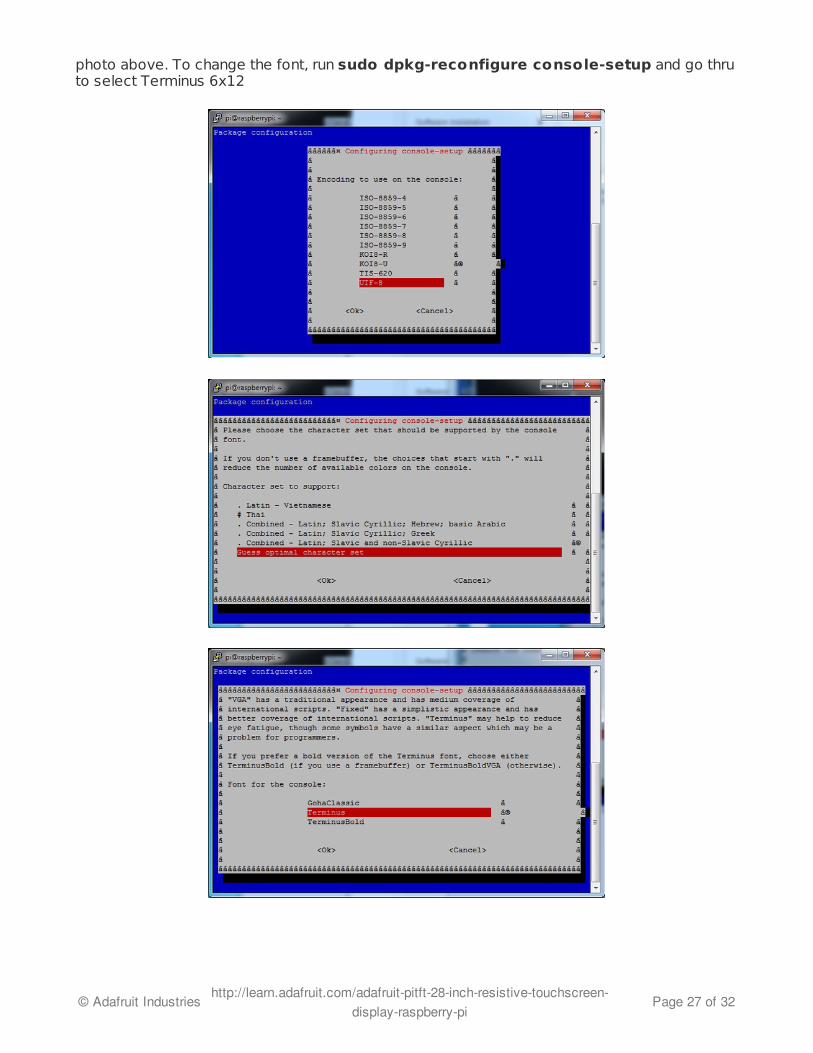
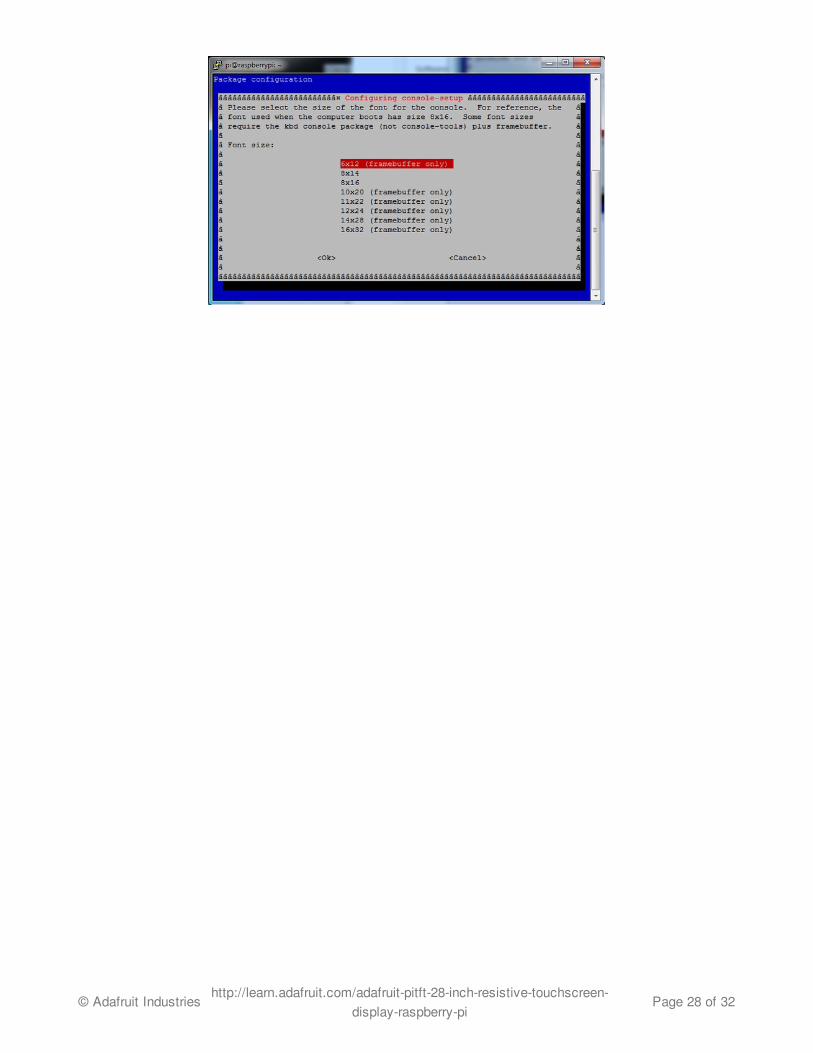
photo above. To change the font, run sudo dpkg-reconfigure console-setup and go thruto select Terminus 6x12
© Adafruit Industries http://learn.adafruit.com/adafruit-pitft-28-inch-resistive-touchscreen-display-raspberry-pi
Page 27 of 32
© Adafruit Industries http://learn.adafruit.com/adafruit-pitft-28-inch-resistive-touchscreen-display-raspberry-pi
Page 28 of 32
Displaying Images
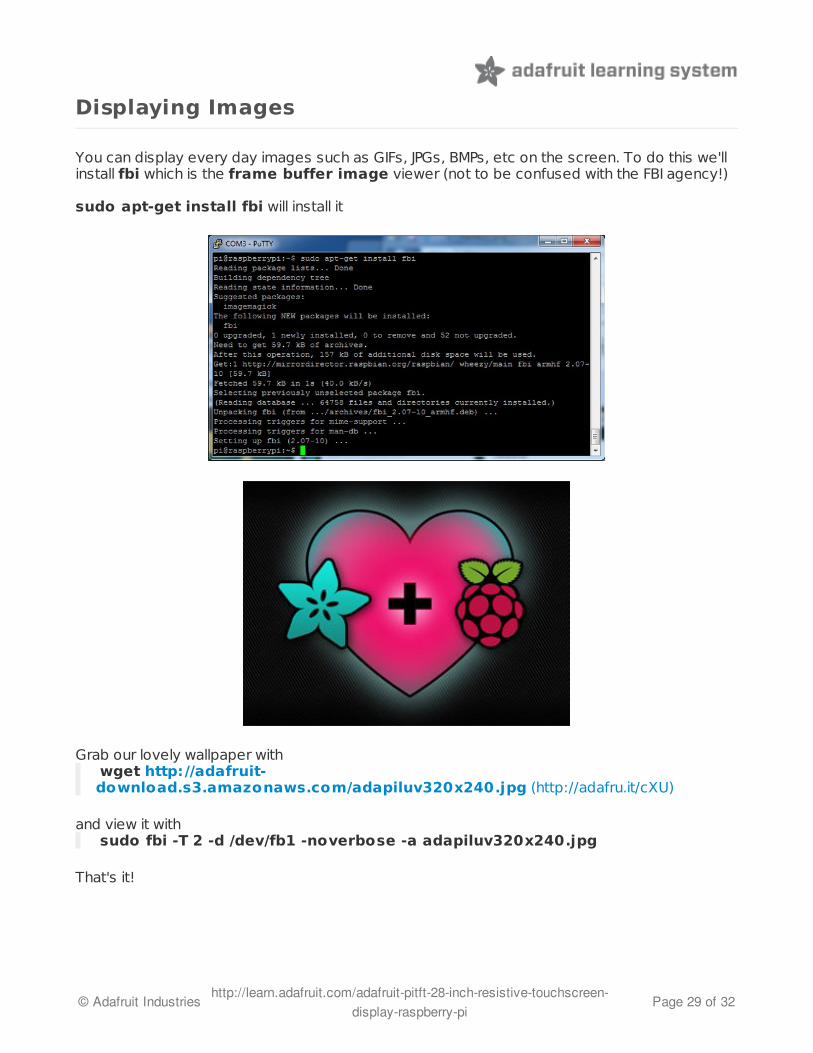
You can display every day images such as GIFs, JPGs, BMPs, etc on the screen. To do this we'llinstall fbi which is the frame buffer image viewer (not to be confused with the FBI agency!)
sudo apt-get install fbi will install it
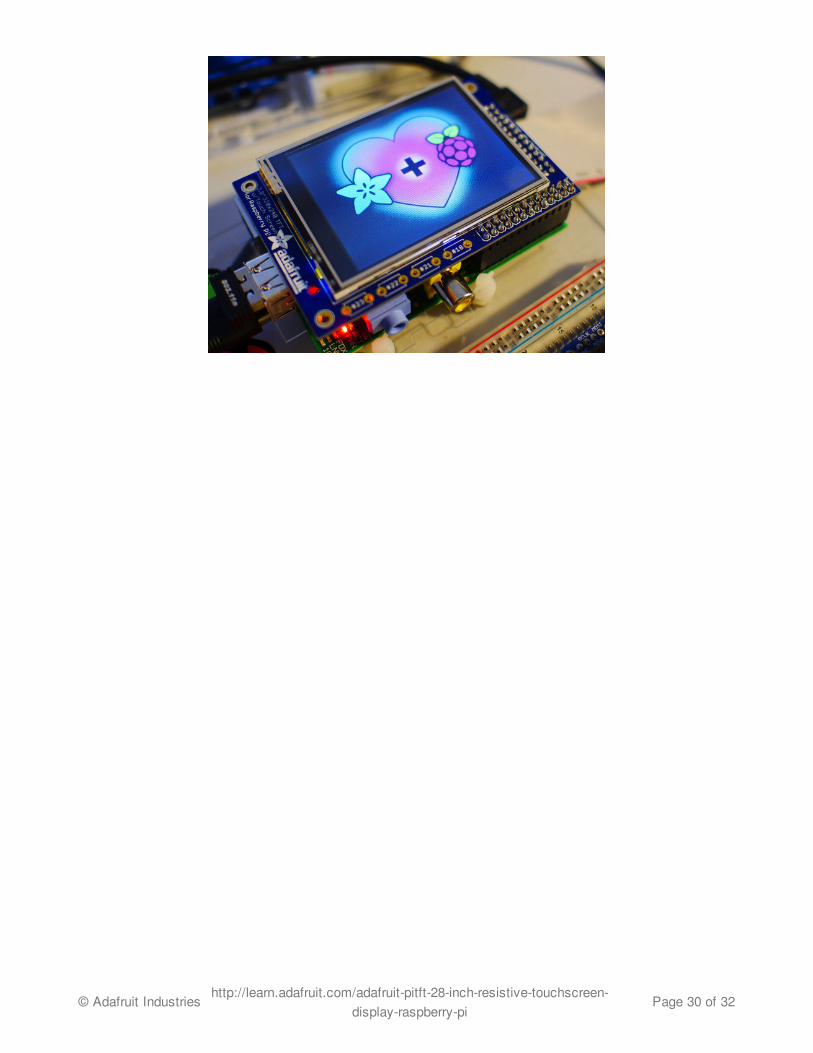
Grab our lovely wallpaper with wget http://adafruit-download.s3.amazonaws.com/adapiluv320x240.jpg (http://adafru.it/cXU)
and view it with sudo fbi -T 2 -d /dev/fb1 -noverbose -a adapiluv320x240.jpg
That's it!
© Adafruit Industries http://learn.adafruit.com/adafruit-pitft-28-inch-resistive-touchscreen-display-raspberry-pi
Page 29 of 32
© Adafruit Industries http://learn.adafruit.com/adafruit-pitft-28-inch-resistive-touchscreen-display-raspberry-pi
Page 30 of 32
Extras!
Controlling the backlight
There's a 4-LED backlight on the TFT and it draws ~75mA at all times. There might be timesyou'd like to save some power and turn off the backlight. The screen and touchplate will stillwork, you just can't see anything. We designed the board with the STMPE610 touchscreencontroller which has 2 extra GPIO and tied one of them to the transistor that controls thebacklight. You can use the command line to control the backlight.
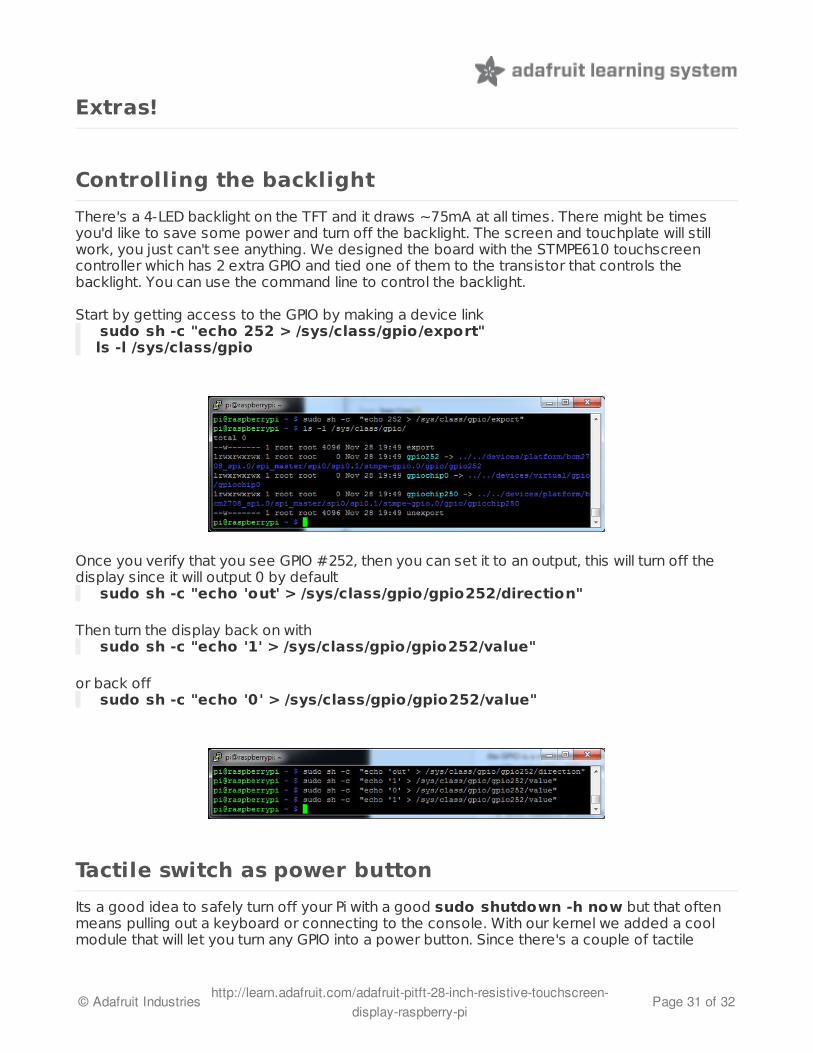
Start by getting access to the GPIO by making a device link sudo sh -c "echo 252 > /sys/class/gpio/export"ls -l /sys/class/gpio
Once you verify that you see GPIO #252, then you can set it to an output, this will turn off thedisplay since it will output 0 by default
sudo sh -c "echo 'out' > /sys/class/gpio/gpio252/direction"
Then turn the display back on with sudo sh -c "echo '1' > /sys/class/gpio/gpio252/value"
or back off sudo sh -c "echo '0' > /sys/class/gpio/gpio252/value"
Tactile switch as power button
Its a good idea to safely turn off your Pi with a good sudo shutdown -h now but that oftenmeans pulling out a keyboard or connecting to the console. With our kernel we added a coolmodule that will let you turn any GPIO into a power button. Since there's a couple of tactile
© Adafruit Industries http://learn.adafruit.com/adafruit-pitft-28-inch-resistive-touchscreen-display-raspberry-pi
Page 31 of 32
switches right there on the front, lets turn one into a power button. Press once to properly turnoff the pi, press again to start it up. Isn't that nice?
We'll be using GPIO #23, the left-most button. You can use any of them or other GPIO but #23'sour favorite number anyways.
You will have to grab a pack of slim tactile switches (http://adafru.it/1489) or otherwise solder ina button
Add rpi_power_switch to /etc/modules and save
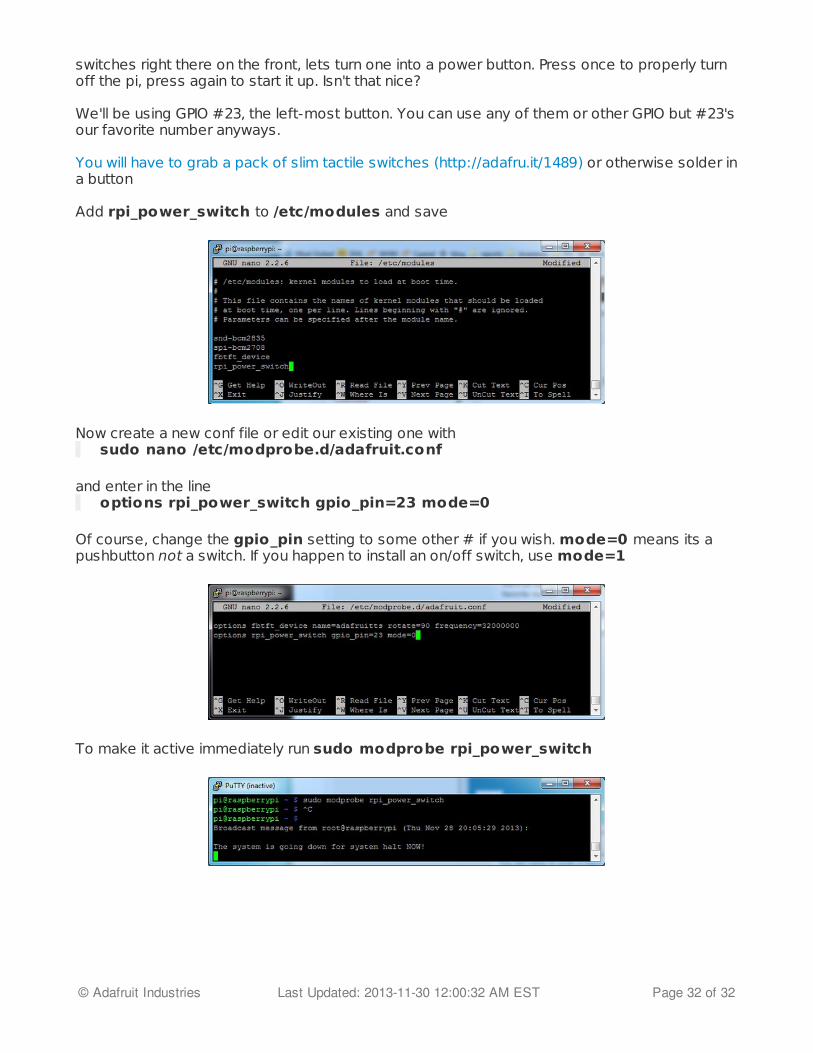
Now create a new conf file or edit our existing one with sudo nano /etc/modprobe.d/adafruit.conf
and enter in the line options rpi_power_switch gpio_pin=23 mode=0
Of course, change the gpio_pin setting to some other # if you wish. mode=0 means its apushbutton not a switch. If you happen to install an on/off switch, use mode=1
To make it active immediately run sudo modprobe rpi_power_switch
© Adafruit Industries Last Updated: 2013-11-30 12:00:32 AM EST Page 32 of 32


