ADC Remote Desktop Gateway Guide v9 This document is intended for any employee wanting to access the terminal servers or their office PC remotely for home or mobile working. This facility is available to any user who has been granted remote access and is an alternative to using the ‘access.ashfield-dc.gov.uk’ method. The remote desktop method has 2 key advantages: 1. It is less problematic to setup/use 2. It works from mobile devices (ipad, android tablets) and Apple Mac, as well as Windows. It even works from iphones and android phones. The following pages detail the steps for setting up remote desktop from your home PC (Windows and Mac), iPad/iPhone and Android. Most of the instructions are a one time setup to allow easy future remote access. There is also a generic section at the end describing the touch screen methods of using the mouse (ie. Moving the mouse pointer on the screen or using pure touch) Before you begin There are 2 types of connection you can make to the Council 1. Terminal servers – there are 2 terminal servers you can use called node41 and node42. These give basic desktop access as well as access to common Council applications. Access to these is restricted as each user requires an additional license to use them and we only have a limited number of licenses. 2. Your work PC – If your PC is not booted up at work, you can remotely boot it up before connecting to it. From your personal email account (or the council one via OWA), send an email to the Council email address [email protected]with the name of your PC in the subject line (eg. pcs-5-678) and your PC will be available to log into remotely a few minutes later. It is advisable to try this while you are at work to see if your PC is setup to be woken up remotely. If it doesn’t work, contact the I.T. helpdesk and they can change the Council’s PC settings to allow it to be woken up. Things to note When you log into the Council you will have to enter your username in the form ashfield-dc\adxxxxx and complete the phonefactor/Azure 2 factor authentication process (You need to be registered for this in advance) Do NOT select to save your password on mobile devices Remote access is still bound by the Security Policy/Acceptable Use Policy
Transcript
ADC Remote Desktop Gateway Guidev 9
This document is intended for any employee wanting to access the terminal servers or their office PC remotely for home or mobile working. This facility is available to any user who has been granted remote access and is an alternative to using the ‘access.ashfield-dc.gov.uk’ method. The remote desktop method has 2 key advantages:
1. It is less problematic to setup/use 2. It works from mobile devices (ipad, android tablets) and Apple Mac, as well as
Windows. It even works from iphones and android phones. The following pages detail the steps for setting up remote desktop from your home PC (Windows and Mac), iPad/iPhone and Android. Most of the instructions are a one time setup to allow easy future remote access. There is also a generic section at the end describing the touch screen methods of using the mouse (ie. Moving the mouse pointer on the screen or using pure touch)
Before you begin
There are 2 types of connection you can make to the Council
1. Terminal servers – there are 2 terminal servers you can use called node41 and node42.
These give basic desktop access as well as access to common Council applications.
Access to these is restricted as each user requires an additional license to use them
and we only have a limited number of licenses.
2. Your work PC – If your PC is not booted up at work, you can remotely boot it up before
connecting to it. From your personal email account (or the council one via OWA), send
an email to the Council email address [email protected] with the name of
your PC in the subject line (eg. pcs-5-678) and your PC will be available to log into
remotely a few minutes later. It is advisable to try this while you are at work to see if
your PC is setup to be woken up remotely. If it doesn’t work, contact the I.T. helpdesk
and they can change the Council’s PC settings to allow it to be woken up.
Things to note
When you log into the Council you will have to enter your username in the form
ashfield-dc\adxxxxx and complete the phonefactor/Azure 2 factor authentication
process (You need to be registered for this in advance)
Do NOT select to save your password on mobile devices
Remote access is still bound by the Security Policy/Acceptable Use Policy
Accessing from a Windows PC Although the following steps are the easiest way to setup a windows PC without the need for any additional software, there is also a remote desktop App available for Windows 8 & 10. If you want to install this App, just follow the instruction for the Apple/Android devices
Automated/simple way Go to https://da.ashfield.gov.uk and click on the links to use the prebuilt connections for Remote Desktop (please note it says ‘ashfield’ and not ‘ashfield-dc’ )
Manual setup
The following instructions are based on a Windows 7 home PC but the instructions should be very similar for Windows 8 and 10.
From the windows Start button, click on All
Programs>Accessories and then select
Remote Desktop Connection On the Remote Desktop Connection pop-up, click on Show Options
This will take you to a pop-up menu. Click on the Advanced tab and then select Settings in the Connect from anywhere section of the menu
You will now get the screen shown opposite: i. click on the radio button to Use these RD Gateway server settings (or TS Gateway if an older version of RDP is in use) ii. enter the following server name: da.ashfield.gov.uk Note that it is ashfield.gov.uk and NOT ashfield-dc.gov.uk iii. ensure that the logon method Ask for password (NTLM) is selected iv. also ensure that Use my RD Gateway credentials for the remote computer is ticked vi. click on OK Enter the name of your computer, e.g. pcs-5-678 or the terminal servers (node41 or node42) and click Connect (Alternatively, at this point you can click on
Options in the bottom left corner and choose to
save your setup to the desktop. This will give you
a desktop shortcut that can be double clicked in
future to connect to the Council)
When prompted for your username/password,
enter ‘ashfield-dc\’ in front of your username (eg.
ashfield-dc\ad12345) and type in tour usual PC
password and click on OK.
The first time you access a terminal server or PC,
you may get a pop-up similar to the following:
tick the check box and click on Yes if you don’t
want to be asked again about connecting to that
particular machine, and access to the computer
should now be complete.
da.ashfield.gov.uk
Accessing from a Mac
Setting up your Apple iMac or MacBook for remote desktop to ADC.
This guide will explain how to connect to YOUR work PC using an Apple iMac or MacBook.
Please note this it not for iPads or iPhones.
Step 1. Before you need to use this service:
Contact the IT department to set up Two-Factor authentication.
Take a note of your PC number (example: pcs-xx-xxx)
Step 2. Open the App Store on your mac and search for ‘Microsoft RDP’ (fig.1)
There is a version 8.0 and a version 10.0 – Choose the 10.0 (round icon) and install it.
Step 3. Once installed, locate and run the App. (fig.2)
fig.2
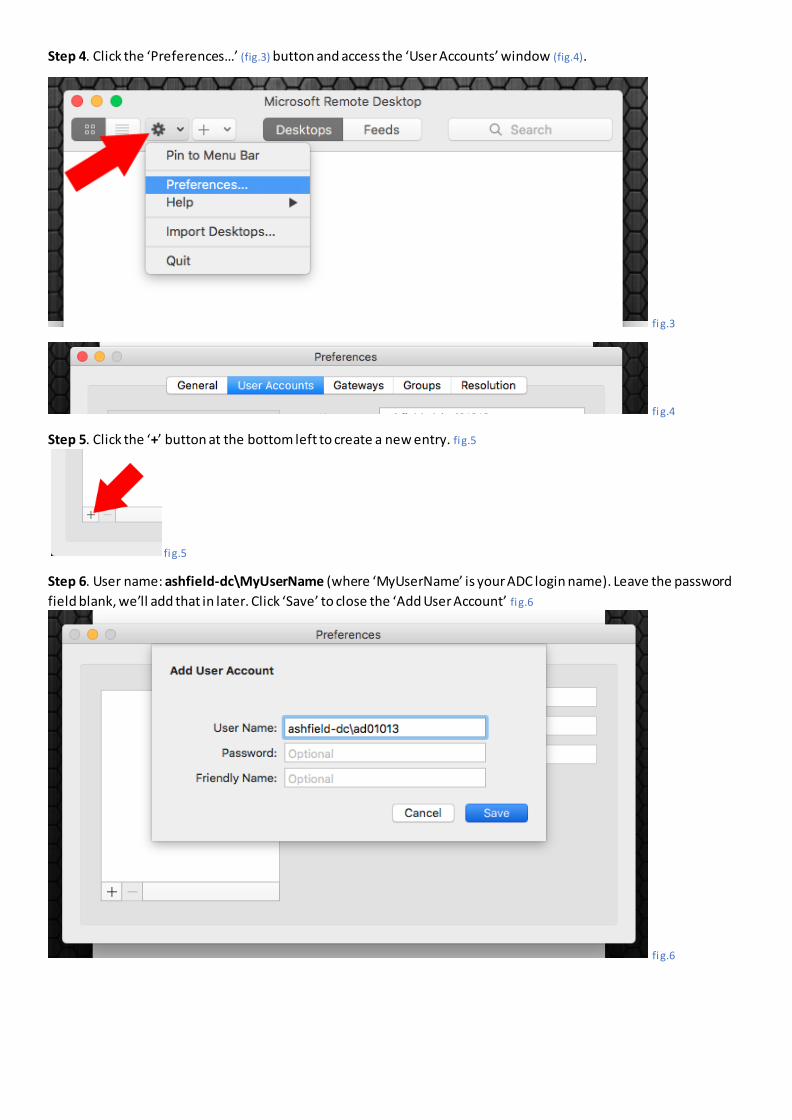
Step 4. Click the ‘Preferences…’ (fig.3) button and access the ‘User Accounts’ window (fig.4).
fig.3
fig.4
Step 5. Click the ‘+’ button at the bottom left to create a new entry. fig.5
fig.5
Step 6. User name: ashfield-dc\MyUserName (where ‘MyUserName’ is your ADC login name). Leave the password
field blank, we’ll add that in later. Click ‘Save’ to close the ‘Add User Account’ fig.6
fig.6
Step 7. Click on the ‘Gateways’ tab while still in the ‘Preferences…’ window. (fig.7)
(fig.7).
Step 8. Click the ‘+’ button at the bottom left to create a new entry. fig.8 and fig.9
fig.8
fig.9
Step 9. Give the Gateway a relatable ‘Friendly’ name like ADC, and for the Server use: da.ashfield.gov.uk. For the
‘User Account’ field, click the dropdown arrow to select the user account you created in the previous steps. Click
‘Save’ and then click the ‘Close’ window button on ‘Preferences’. (fig.10)
fig.10
Note: so we’ve set up a User and the connection to ADC – we now need to specify a computer
Step 10. Click the red ‘Add desktop’ button (fig.11)
fig.11
Step 11. Enter the name of your PC. In the ‘User Account’ field, choose the user you created earlier and click ‘Save’. (fig.12)
fig.12
Let’s check everything is ready…. Hover your cursor over the Desktop tile you’ve created and in the bottom right corner a ‘Pen’ edit icon will appear, click it to open a connection overview.
Things to check:
1. PC Name: shows your full PC name
2. User Account: Show your ashfield-dc\MyUserName
3. Gateway: shoe our ‘ADC’ gateway
Step 12. You can now double click the connection tile you’ve just created to initiate. (fig.13)
fig.13
Step 13. After starting the connection, you will be prompted to enter your ADC account password. (fig.14)
fig.14
Step 14. After entering your password and clicking ‘Done’, the phone that you have specified for Two -Factor
Authentication will ring. A sneaky American woman will say ‘thank you, etc etc’, and ‘please press the ‘Pound’ sign
on your phone’s keypad’. This is a trick. You actually need to press the ‘#’ button. She’ll then say ‘thank you and
goodbye’ – at this point you can hang up. fig.15
PLEASE NOTE: On occasion you may get 2 phone calls before the connection is successful.
fig.15
Step 15. You may get a certificate popup – simply ‘Continue’. fig.16
fig.16
Step 16. That’s it – you should be greeted with the Agile Splash
Screen and be able to use your ADC PC as though you are sat at
it
Accessing from IOS (iPad and iPhone) & Android
These instructions are specifically for an iPad but the process for an iPhone and Android will
be almost identical.
On your iPad/Android device, go to the App
Store and search for Windows Remote
Desktop. You should locate the free App
shown to the right and install it.
The android device may show an
extra screen to accept the agreement
Automated/simple way (for terminal server/tsfarm only) Once you have installed the App, go to


![[MS-RDPEI]: Remote Desktop Protocol: Input Virtual Channel ... · The Remote Desktop Protocol: Input Virtual Channel Extension applies to the Remote Desktop Protocol: Basic Connectivity](https://static.documents.pub/doc/80x56/5fb6d5eed3f54f6ff56efb20/ms-rdpei-remote-desktop-protocol-input-virtual-channel-the-remote-desktop.jpg)


