42
Add-on for Microsoft Flight Simulator A300 B4-200 Tutorial Flight

Add-on for MicrosoftFlight Simulator
A300 B4-200Tutorial Flight

SimCheck Airbus A300B4-200
Aerosoft GmbH 20102
Copyright: © 2010/ Aerosoft GmbH Airport Paderborn/Lippstadt D-33142 Bueren, Germany
Tel: +49 (0) 29 55 / 76 03-10 Fax: +49 (0) 29 55 / 76 03-33
E-Mail: [email protected] Internet: www.aerosoft.de www.aerosoft.com
All trademarks and brand names are trademarks or registered of their respective owners. All rights reserved.

3
SimCheck Airbus
A300B4-200
Add-on for
Microsoft Flight Simulator X
Tutorial Flight
SimCheck Airbus A300B4-200
Aerosoft GmbH 20104
ContentTUTORIAL FLIGHT .......................................................6
BCS1101: A300B4-200 FROM BRUSSELS TO LONDON HEATHROW .................................................... 6
A WORD OF WARNING ............................................... 6WHAT TO (NOT) EXPECT FROM THIS TUTORIAL ........... 7
SETTING UP YOUR COMPUTER AND FSX FOR THE TUTORIAL FLIGHT ..................................8
FSUIPC ................................................................................... 8Tutorial flight files ............................................................... 8
Loading the tutorial flight ......................................10
FLIGHT PREPARATION ..............................................11Ein kurzer Blick über den Panel Status ............................ 11
Overhead panel (Shift-5 or 5) .................................... 11Comms panel (Shift-9 or 9) ....................................... 12Throttle panel (Shift-6 or 6) ....................................... 12Captains main panel ................................................. 12LOADING FUEL .......................................................... 13Calling the fuel truck ................................................. 14Using the “Refuel” gauge ......................................... 15FLIGHT PREPARATION ................................................ 16Loading the flight plan in the CDU/INS ...................... 18Overhead panel ......................................................... 20Pressurisation panel (Shift-8 or 8) .............................. 21
Preparation Checklist ..............................................22START-UP AND PUSHBACK ................................................ 22
APU START (FUEL PANEL SHIFT-7 OR 7) ...................... 22SPEED BUG SETTINGS................................................ 23N1 Computer Setup .................................................. 23Final Checks .............................................................. 24
5
BEFORE PUSHBACK OR START checklist .................25ENGINE START........................................................... 25After Start ................................................................. 26
AFTER START checklist .............................................28TAXI .......................................................................... 28
TAXI checklist ...........................................................29BEFORE TAKE-OFF ..................................................... 29
BEFORE TAKE OFF checklist .....................................30TAKE OFF .................................................................. 30
PILOT ACTION ........................................................................FPI ....................................................................................... 30CLIMB .................................................................................. 32Cruise .................................................................................. 33DESCENT AND APPROACH PREPARATION ........................ 34
Approach Briefing ..................................................... 34Descent Preparation .......................................................... 37
DESCENT checklist ...................................................38DESCENT ............................................................................. 38
PILOT ACTION ........................................................... 38Final Approach ................................................................... 40
FINAL checklist .........................................................41AFTER LANDING ................................................................. 41
AFTER LANDING checklist .......................................42PARKING ............................................................................. 42

SimCheck Airbus A300B4-200
Aerosoft GmbH 20106
TUTORIAL FLIGHTBCS1101: A300B4-200 FROM BRUSSELS TO LONDON HEATHROW
Good day captain, welcome to your first flight with the SimCheck A300B4-203 freighter.
In this tutorial we fly from Brussels Airport in Belgium to London Heathrow in the United Kingdom. Until recently this sector was flown daily by European Air Transport, part of DHL, as flight BCS1101 (Eurotrans 1101).
A WORD OF WARNINGThe flight from Brussels to London is rather short so thing happen really fast! As with all flights, the most critical (but also the most fun !) phases are the take-off and the approach phase.
Especially at the typical take-off weights for these short flights, the climb rate of the A300 is very impressive and altitude restrictions come up faster than expected. So don’t be disappointed if you don’t succeed to do the tutorial 100% correct in your first attempt.
7
WHAT TO (NOT) EXPECT FROM THIS TUTORIALIn this tutorial we will discuss most of the standard procedures required to safely and correctly fly the Airbus A300B4; from engine start-up, to loading waypoints and a flight plan into the INS, to flying the actual route.
We will focus on the typical activities performed by the pilot and not so much on the first officers or the flight engineers job. A lot of attention will go to using the autopilot and auto-throttle correctly and understanding what the different modes of operation mean and do.
A complete guide showing the normal procedures for the A300 is available in the “A300B4\Manual” directory in the FSX folder, you will also find a normal checklist there that can be used with every flight !
Learning how to handle and hand fly a jet airliner is something we can’t teach you in 1 tutorial flight, that you will have to learn through practice.
SimCheck Airbus A300B4-200
Aerosoft GmbH 20108
SETTING UP YOUR COMPUTER AND FSX FOR THE TUTORIAL FLIGHT
FSUIPCThis panel needs the most recent version of FSUIPC installed on your computer to run correctly. At the time of writing the latest version was numbered “4.581”, any version before 4.54 will result in problem with the flight controls when the autopilot is switched on and with the auto throttle versus throttle joystick inputs. You don’t need a regi-stered version of FSUIPC however, a valid registration for the panel is included inside the main gauge file.
Download FSUIPC here: http://www.schiratti.com/dowson.html
Tutorial flight filesBefore we start this tutorial you will need to copy a few files from the “A300B4\Tutorial” directory in the FSX main program folder, to the “Microsoft Flight Simulator X” folder in your “My documents” directory1.
Copy the following files:
1.pln (the flight plan)•
TutorialA300.FLT (FSX flight file)•
TutorialA300.WX (FSX weather data)•

9
While you’re at it, you may want to check out the “A300B4\Settings” folder. This folder contains a file called “TutorialA300.dat” which contains all the panel settings related to the “TutorialA300.FLT” flight.
1 The “My documents” and the “Microsoft Flight Simulator X files” folder may be called differently on your computer when you are using a localized version of Windows or when you are running a localized version of Flight Simulator X.

SimCheck Airbus A300B4-200
Aerosoft GmbH 201010
Loading the tutorial flightThe SimCheck A300 is a complicated simulation and FSX doesn’t always like complicated add-ons. To avoid any problems during loading we strongly advice to first load the default Cessna 172 after starting up FSX and then load the Tutorial flight from the “File” menu.
This will open the “LOAD FLIGHT” dialog.
Open the “TutorialA300” (2) flight from the “My Saved Flights” Category (1) and click “Fly now” (3).
You are now set and ready to start the tutorial flight!
11
FLIGHT PREPARATION
Ein kurzer Blick über den Panel StatusQUICK SCAN OF THE PANEL STATE
Let’s start by doing a quick scan of the panel. The previous crew left the cockpit in a somewhat disorganized state and we have to be sure everything is setup correctly before we start the engines.
Overhead panel (Shift-5 or 5)Start at the bottom left corner of the overhead panel, move up that left row of controls and indicators, next move down the second row and work your way up again.
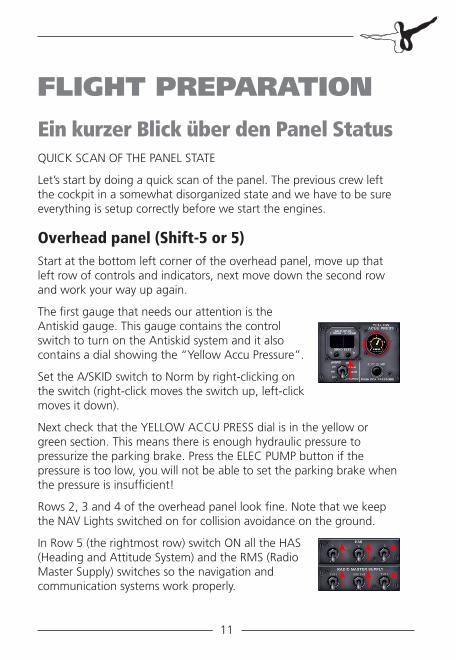
The first gauge that needs our attention is the Antiskid gauge. This gauge contains the control switch to turn on the Antiskid system and it also contains a dial showing the “Yellow Accu Pressure”.
Set the A/SKID switch to Norm by right-clicking on the switch (right-click moves the switch up, left-click moves it down).
Next check that the YELLOW ACCU PRESS dial is in the yellow or green section. This means there is enough hydraulic pressure to pressurize the parking brake. Press the ELEC PUMP button if the pressure is too low, you will not be able to set the parking brake when the pressure is insufficient!
Rows 2, 3 and 4 of the overhead panel look fine. Note that we keep the NAV Lights switched on for collision avoidance on the ground.
In Row 5 (the rightmost row) switch ON all the HAS (Heading and Attitude System) and the RMS (Radio Master Supply) switches so the navigation and communication systems work properly.
SimCheck Airbus A300B4-200
Aerosoft GmbH 201012
We won’t be needing HF during this flight so leave those OFF (HF should always be off during re/defueling).
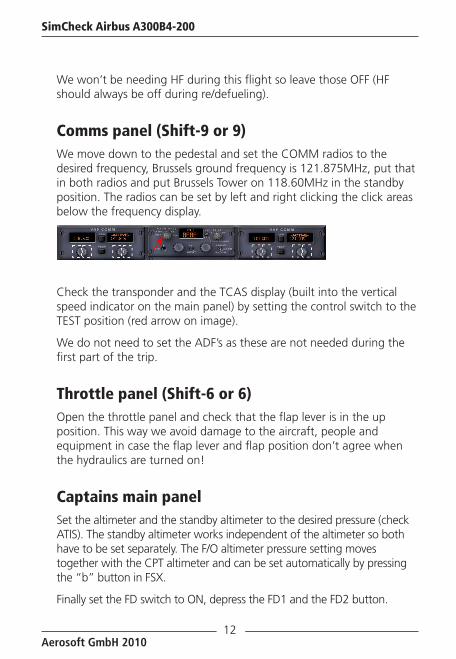
Comms panel (Shift-9 or 9)We move down to the pedestal and set the COMM radios to the desired frequency, Brussels ground frequency is 121.875MHz, put that in both radios and put Brussels Tower on 118.60MHz in the standby position. The radios can be set by left and right clicking the click areas below the frequency display.
Check the transponder and the TCAS display (built into the vertical speed indicator on the main panel) by setting the control switch to the TEST position (red arrow on image).
We do not need to set the ADF’s as these are not needed during the first part of the trip.
Throttle panel (Shift-6 or 6)Open the throttle panel and check that the flap lever is in the up position. This way we avoid damage to the aircraft, people and equipment in case the flap lever and flap position don’t agree when the hydraulics are turned on!
Captains main panelSet the altimeter and the standby altimeter to the desired pressure (check ATIS). The standby altimeter works independent of the altimeter so both have to be set separately. The F/O altimeter pressure setting moves together with the CPT altimeter and can be set automatically by pressing the “b” button in FSX.
Finally set the FD switch to ON, depress the FD1 and the FD2 button.
13
Check on the Failure and Performance Indicator (FPI) that no modes are displayed when a flight director is ON. The turn OFF the FD’s again.
LOADING FUELNow that the panel is set-up correctly we have to start loading fuel.
The flight from Brussels to London Heathrow is approximately 230NM, our alternate airfield today is London Gatwick (EGKK) which is 22NM from Heathrow. The cruising level to EGLL is fixed at FL220 and we expect a average 20kt headwind. As we expect runway 25R at Brussels we will have a rather long taxi ahead, so we have increased taxi fuel from the standard 880lbs to 1200lbs.
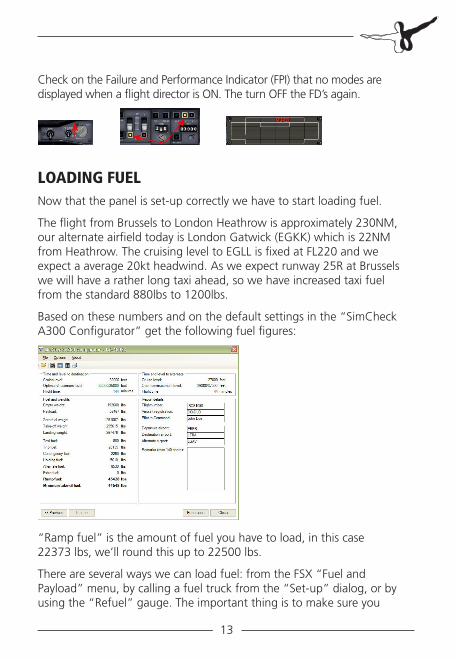
Based on these numbers and on the default settings in the “SimCheck A300 Configurator” get the following fuel figures:
“Ramp fuel” is the amount of fuel you have to load, in this case 22373 lbs, we’ll round this up to 22500 lbs.
There are several ways we can load fuel: from the FSX “Fuel and Payload” menu, by calling a fuel truck from the “Set-up” dialog, or by using the “Refuel” gauge. The important thing is to make sure you

SimCheck Airbus A300B4-200
Aerosoft GmbH 201014
load fuel from the “outside to the inside” so start by adding fuel to the external tanks, next the main wing tank and finally the center tank.
Calling the fuel truckWe will not discuss using the FSX menu for loading fuel and skip directly to calling a fuel truck from the set-up dialog. First open the set-up dialog by clicking “Set-up” on the main captains panel or by calling the ground crew from the overhead panel.
The left image shows the click area in the captains 2D view, the right image shows the click area on the overhead in Virtual Cockpit (VC) view.
In the set-up menu click the line select key (LSK) next to the “GROUND” option, this will open the “GROUND” window. Next click the LSK next to “CALL FUEL TRUCK” which will activate the “Fuel truck en route” message in FSX.
If and when the fuel truck arrives - depending on the settings in and the parking position the fuel truck may never arrive – the standard FSX fuel Settings dialog is shown.
15
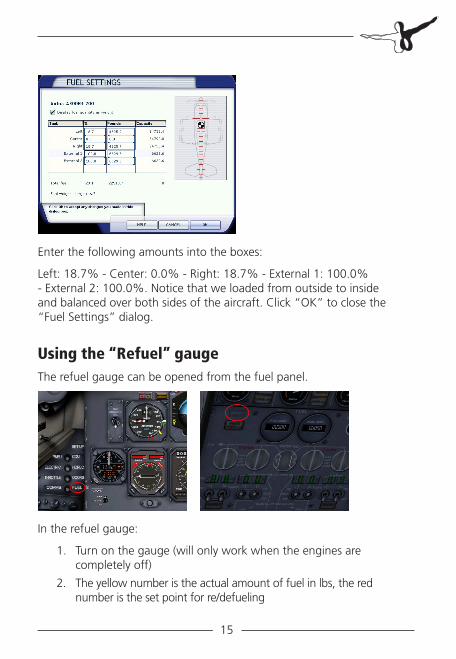
Enter the following amounts into the boxes:
Left: 18.7% - Center: 0.0% - Right: 18.7% - External 1: 100.0% - External 2: 100.0%. Notice that we loaded from outside to inside and balanced over both sides of the aircraft. Click “OK” to close the “Fuel Settings” dialog.
Using the “Refuel” gaugeThe refuel gauge can be opened from the fuel panel.
In the refuel gauge:
Turn on the gauge (will only work when the engines are 1. completely off)
The yellow number is the actual amount of fuel in lbs, the red 2. number is the set point for re/defueling

SimCheck Airbus A300B4-200
Aerosoft GmbH 201016
Set the desired the fuel by left and/or right clicking the click spots 3. marked with a white dashed line. The left area will in/decrease the set fuel in steps of 1000 lbs, the right area in steps of 10 lbs.
Click the “START” button to start refuelling the aircraft4.
Note: The refuel gauge can also be used to “defuel” the aircraft.
FLIGHT PREPARATIONNow that the fuel is onboard it is time to prepare for the flight! We’ll start by setting up the navigation instruments. We expect a HELEN3C departure from 25R at Brussels:
Lateral: At 700ft QNH RT (right turn) to intercept R-316 (radial 316) HUL to HELEN
Vertikal: Cross R-281 BUB at or above 1700ft QNH
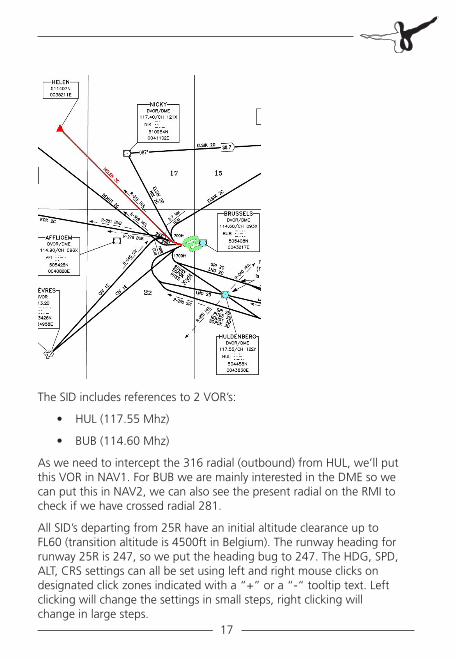
17
The SID includes references to 2 VOR’s:
HUL (117.55 Mhz)•
BUB (114.60 Mhz)•
As we need to intercept the 316 radial (outbound) from HUL, we’ll put this VOR in NAV1. For BUB we are mainly interested in the DME so we can put this in NAV2, we can also see the present radial on the RMI to check if we have crossed radial 281.
All SID’s departing from 25R have an initial altitude clearance up to FL60 (transition altitude is 4500ft in Belgium). The runway heading for runway 25R is 247, so we put the heading bug to 247. The HDG, SPD, ALT, CRS settings can all be set using left and right mouse clicks on designated click zones indicated with a “+” or a “-“ tooltip text. Left clicking will change the settings in small steps, right clicking will change in large steps.
SimCheck Airbus A300B4-200
Aerosoft GmbH 201018
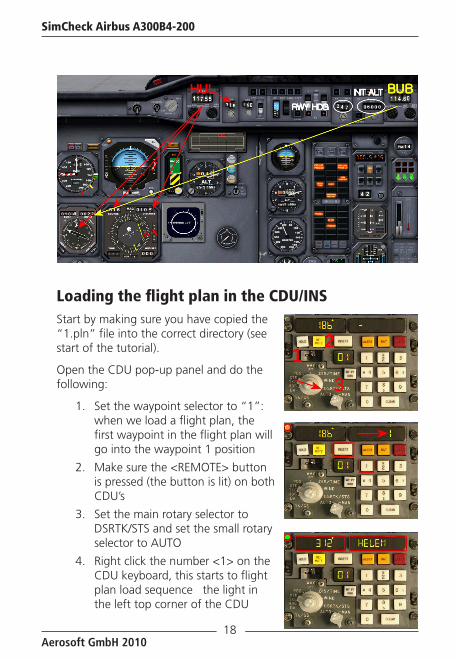
Loading the flight plan in the CDU/INSStart by making sure you have copied the “1.pln” file into the correct directory (see start of the tutorial).
Open the CDU pop-up panel and do the following:
Set the waypoint selector to “1”: 1. when we load a flight plan, the first waypoint in the flight plan will go into the waypoint 1 position
Make sure the <REMOTE> button 2. is pressed (the button is lit) on both CDU’s
Set the main rotary selector to 3. DSRTK/STS and set the small rotary selector to AUTO
Right click the number <1> on the 4. CDU keyboard, this starts to flight plan load sequence the light in the left top corner of the CDU
19
turns orange
Left click the number <1> on the CDU keyboard to enter the 5. number of the flight plan. In this case the flight plan number is “1”. The number one appears on the right data screen
Left click on the <INSERT> button to load the flight plan6.
The light in the left top corner of the CDU turns green to indi-7. cate the flight plan has been loaded successfully. At least the first 9 waypoints are...
The left data now displays the initial heading to the first 8. waypoint, the right data shows the name of the first waypoint: “HELEN”
The INS will now run in flight plan mode (green light), to cancel 9. flight plan mode and switch back to manual mode, click twice on the green light
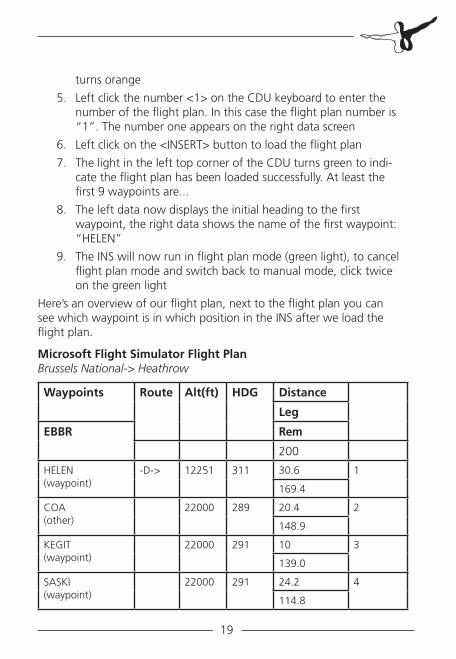
Here’s an overview of our flight plan, next to the flight plan you can see which waypoint is in which position in the INS after we load the flight plan.
Microsoft Flight Simulator Flight PlanBrussels National-> Heathrow
Waypoints Route Alt(ft) HDG Distance
Leg
EBBR Rem
200
HELEN (waypoint)
-D-> 12251 311 30.6 1
169.4
COA (other)
22000 289 20.4 2
148.9
KEGIT (waypoint)
22000 291 10 3
139.0
SASKI (waypoint)
22000 291 24.2 4
114.8

SimCheck Airbus A300B4-200
Aerosoft GmbH 201020
SUMUM (waypoint)
22000 291 15.6 5
99.2
LOGAN (waypoint)
22000 290 19.6 6
79.6
TRIPO (waypoint)
22000 265 19.8 7
59.9
SABER (waypoint)
15000 264 5.0 8
54.9
BRASO (waypoint)
----- 265 10 9
44.9
D85L (waypoint)
----- 264 7.3 Currently not loaded37.6
LAM (other) 7000 265 12.6 Currently not loaded25.0
EGLL (airport) 83 248 25.0 Currently not loaded0.0
Overhead panelMove back to the overhead panel to:
Turn on window heat, set the power swit-•ches to ON or LO All FAULT lights should be off
Turn on the FASTEN SEATBELTS sign•
Turn on the NO SMOKING sign• The AUTO setting is no longer used

21
Pressurisation panel (Shift-8 or 8)The pressurisation subpanel is part of the Flight Engineer panel.
The A300 has 2 cabin pressurisation systems that operate indepen-dently. We will be using system 1, but we will also set-up system 2 in case system 1 would fail.
Indicates the current differential pressure 1. in pounds per square inch (psi), this is the pressure difference between the inside of the cabin and the atmosphere outside. Maximum, normal differential pressure is 8.25psi
Shows the cabin vertical speed2.
Shows the current cabin altitude (button on the right bottom 3. of this dial is used to set the current QNH, above the transition altitude set pressure to 29.92 inch Hg)
The top part of this dial is set by turning knob number 5 and 4. shows the selected cabin altitude during the cruise. The small numbers show the cruising altitude in 1000 ft steps, the large numbers on the dial show the corresponding cabin altitude (also in 1000 ft steps). We will be cruising at FL220 so turn the dial so the white line crosses the 22 on the small dial which corresponds to a cabin altitude of 1500ft
Knob to set the cruise cabin altitude5.
Used to set the QNH for the cabin altitude controller, on the 6. ground set to the local QNH, when crossing the transition altitude, set to 1013.25 MB or 29.92 inch Hg
Knob to set the cabin vertical speed. Default setting is 400fpm, 7. maximum is 2000 fpm

SimCheck Airbus A300B4-200
Aerosoft GmbH 201022
Preparation Checklist
START-UP AND PUSHBACK
APU START (FUEL PANEL SHIFT-7 OR 7)We’ll perform an engine start using APU bleed air.
Open the fuel panel, the APU subpanel is located to the right of the fuel gauges. Set the master switch to ON, turn the fuel pump ON and set the control system switch to NORM.
Then press the START button. APU start is completely automatic and takes approximately 1 minute. You will first notice an increase in the N2 and a decrease in oil quantity as the oil gets pumped round the APU. Next the EGT will start to rise and N1 goes up. The APU uses fuel from the left tanks.
Once the APU is up and running
we can switch the electrics supply to the APU. The pneumatics supply has switched to the APU automatically as this was setup earlier on by the previous crew.
We don’t need the ground power supply anymore so we will cancel that through the set-up panel.
23
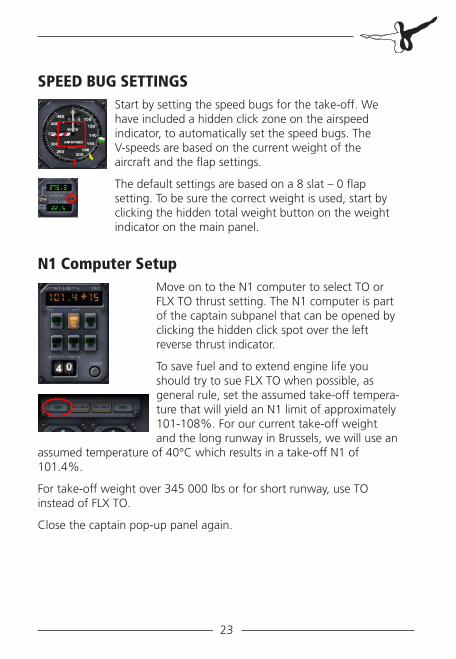
SPEED BUG SETTINGSStart by setting the speed bugs for the take-off. We have included a hidden click zone on the airspeed indicator, to automatically set the speed bugs. The V-speeds are based on the current weight of the aircraft and the flap settings.
The default settings are based on a 8 slat – 0 flap setting. To be sure the correct weight is used, start by clicking the hidden total weight button on the weight indicator on the main panel.
N1 Computer SetupMove on to the N1 computer to select TO or FLX TO thrust setting. The N1 computer is part of the captain subpanel that can be opened by clicking the hidden click spot over the left reverse thrust indicator.
To save fuel and to extend engine life you should try to sue FLX TO when possible, as general rule, set the assumed take-off tempera-ture that will yield an N1 limit of approximately 101-108%. For our current take-off weight and the long runway in Brussels, we will use an
assumed temperature of 40°C which results in a take-off N1 of 101.4%.
For take-off weight over 345 000 lbs or for short runway, use TO instead of FLX TO.
Close the captain pop-up panel again.
SimCheck Airbus A300B4-200
Aerosoft GmbH 201024
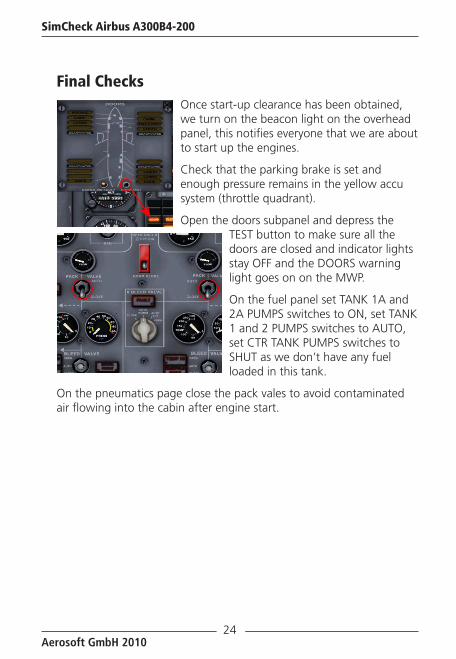
Final ChecksOnce start-up clearance has been obtained, we turn on the beacon light on the overhead panel, this notifies everyone that we are about to start up the engines.
Check that the parking brake is set and enough pressure remains in the yellow accu system (throttle quadrant).
Open the doors subpanel and depress the TEST button to make sure all the doors are closed and indicator lights stay OFF and the DOORS warning light goes on on the MWP.
On the fuel panel set TANK 1A and 2A PUMPS switches to ON, set TANK 1 and 2 PUMPS switches to AUTO, set CTR TANK PUMPS switches to SHUT as we don’t have any fuel loaded in this tank.
On the pneumatics page close the pack vales to avoid contaminated air flowing into the cabin after engine start.
25
BEFORE PUSHBACK OR START checklistENGINE START
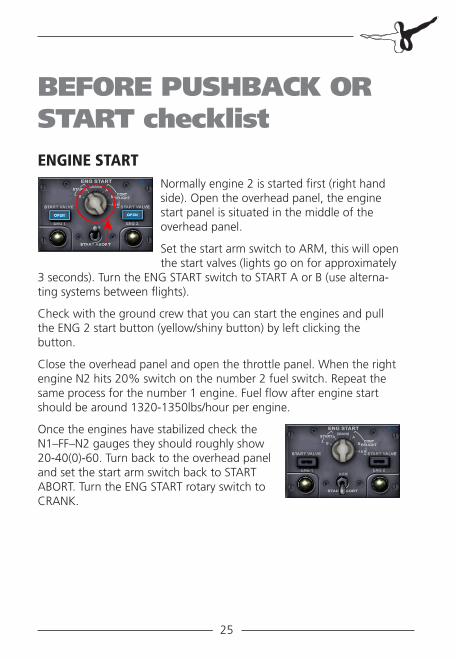
Normally engine 2 is started first (right hand side). Open the overhead panel, the engine start panel is situated in the middle of the overhead panel.
Set the start arm switch to ARM, this will open the start valves (lights go on for approximately
3 seconds). Turn the ENG START switch to START A or B (use alterna-ting systems between flights).
Check with the ground crew that you can start the engines and pull the ENG 2 start button (yellow/shiny button) by left clicking the button.
Close the overhead panel and open the throttle panel. When the right engine N2 hits 20% switch on the number 2 fuel switch. Repeat the same process for the number 1 engine. Fuel flow after engine start should be around 1320-1350lbs/hour per engine.
Once the engines have stabilized check the N1–FF–N2 gauges they should roughly show 20-40(0)-60. Turn back to the overhead panel and set the start arm switch back to START ABORT. Turn the ENG START rotary switch to CRANK.

SimCheck Airbus A300B4-200
Aerosoft GmbH 201026
After StartStill on the overhead panel, turn on the nacelle anti-ice protection switches and check the valve disagree lights go on, next turn off ice protection again as we won’t need it today.
Open the throttle panel again and set the pitch trim to around 2.8-3.0 using the joystick controls or standard FSX keyboard commands.
Move on to the electrics panel, at this time the APU is still providing all electric power. We have to switch the power supply to the engines.
Set the APU generator switch to the OFF position and the GEN 1 and GEN 2 switches to ON. Only the APU GEN OFF light should be lit.
The APU is still supplying some air to the pneumatics system, before we shut down the APU we have to switch the packs on and switch off the air bleed from the APU.
We can now safely turn off the APU.
Move back to the APU panel and turn off the APU master switch and fuel pump.
The APU will now go into automatic shut down mode. It takes about 1.5 minute for the APU to shut down.
Move up to the overhead and switch on the YAW DAM-PERS and PITCH
TRIM. The autopilot will not work when the yaw dampers are not turned on.
Set both the SEATBELTS and the NO SMOKING SIGNS to ON.
27
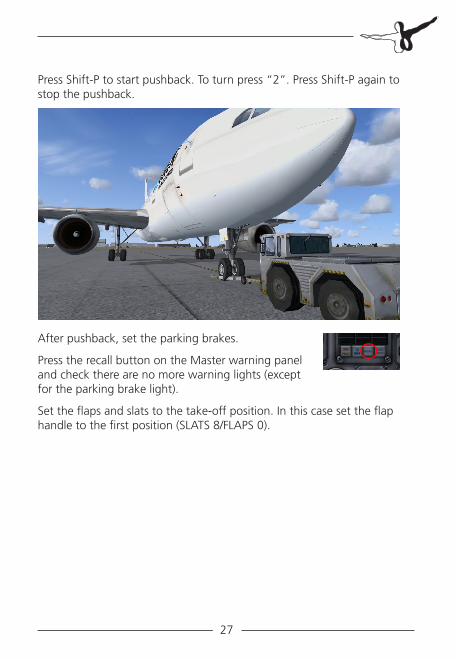
Press Shift-P to start pushback. To turn press “2”. Press Shift-P again to stop the pushback.
After pushback, set the parking brakes.
Press the recall button on the Master warning panel and check there are no more warning lights (except for the parking brake light).
Set the flaps and slats to the take-off position. In this case set the flap handle to the first position (SLATS 8/FLAPS 0).

SimCheck Airbus A300B4-200
Aerosoft GmbH 201028
AFTER START checklistTAXIWe have received taxi clearance to RWY25R. We will taxi via taxiway R, OUTERS and hold short at B3.
Set the nose light to TAXI, increase the throttle initially to approx 38% N1, once we are moving throttle can be reduced so we maintain a taxi speed of 15-20kts. When you start to taxi, check the brakes. During the taxi, always brake before entering a turn never while in the turn.
During taxi, check the flight controls to make sure they move freely through the complete range. Arm the speed brakes (Shift-/).
Note that in FSX the speed brakes go up automatically when the throttle is set to idle.
Check the V bugs again on the air speed indicator and also check the N1 limit on the N1 computer.
Scan the flight instruments for abnormal flags. Confirm cabin pressurisation is set up correctly.
Open the throttle panel and press the TO CONFIG TEST button. When this button is pressed the computer will check flap/slat, pitch trim and speed brake position for the take-off settings. When any of these are not set-up correctly, the configuration alarm will sound and the red CONFIG light goes on on the MWP.
Taxi to holding B3 and hold, set the parking brake.

29
TAXI checklistBEFORE TAKE-OFFTalk to tower control for take-off clearance.
Open the hydraulics windows (Shift-3 or 3) and check the brake tempera-ture, if one of the brakes is too hot, turn on the brake fan. Do not take-off with a hot brake as this may reduce braking performance in case of a rejected take-off. The BRAKE TEMP indicator will show the highest temperature of the 8 brakes.
We will leave the packs on for this departure (low take-off weight and plenty runway length).
Open the fuel panel and turn off the center tank fuel pumps (there’s no fuel in the center tanks anyway but you should never take-off with the center tanks supplying fuel to the engines). Set both the tanks shut off valves and the pump switches to SHUT.
After receiving take-off clearance, line-up and turn on the take-off lights and strobes (overhead panel).
On the runway, check the compass and HSI heading. Set the transponder to “TA” with a TCAS range of 5 or 10NM, set the right bottom switch to “ABOVE”.
On the glare shield, arm the auto throttle (A/T). Set the AUTOBRAKES to MAX.
On the fuel panel turn on all three probe heat switches. Press the <RECALL> button on the MWP to make sure no lights are on, next press the <TO INHI>
button on the MWP and check the light goes on, this will stop unimportant warnings on the MWP to distract you during take-off.
SimCheck Airbus A300B4-200
Aerosoft GmbH 201030
BEFORE TAKE OFF checklistTAKE OFFWe will be performing a static take off, this means that we will come to a complete stop on the runway before commencing the take off.
The takeoff and initial climbs can be very busy times in the cockpit, especially in a 1 pilot operation ! Read through the complete takeoff procedure before attempting a procedure so you know what to expect and do.
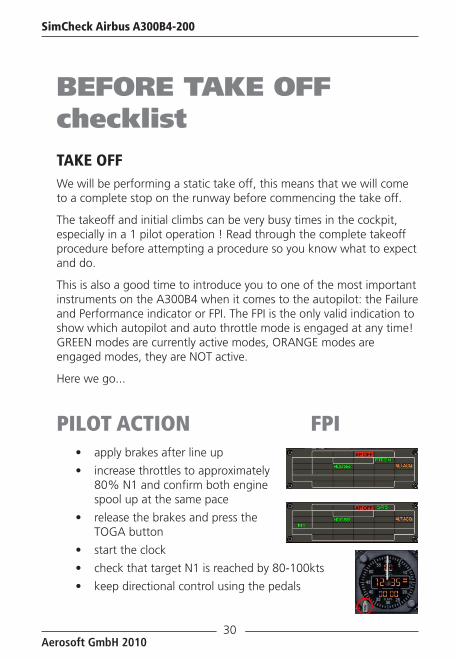
This is also a good time to introduce you to one of the most important instruments on the A300B4 when it comes to the autopilot: the Failure and Performance indicator or FPI. The FPI is the only valid indication to show which autopilot and auto throttle mode is engaged at any time! GREEN modes are currently active modes, ORANGE modes are engaged modes, they are NOT active.
Here we go...
PILOT ACTION FPIapply brakes after line up•
increase throttles to approximately •80% N1 and confirm both engine spool up at the same pace
release the brakes and press the •TOGA button
start the clock•
check that target N1 is reached by 80-100kts•
keep directional control using the pedals•

31
below 100kts apply slight forward yoke pressure for maximum •steering control
after V1 (white bug) there’s no more stopping, you have to •continue the takeoff
at V2 (yellow pointer) start rotating with approximately 3° per •second, continue rotation up to 15° nose up
when there is a positive rate of climb, retract the gear. When •the gear lights are off, set the gear lever to the neutral position
adjust the pitch to maintain V2+10 to V2+20 indicated •airspeed (approximately 18° nose up)
at 700 feet start a shallow right turn to intercept the 316 radial •outbound HUL
disarm the ground spoilers•
at 1700 feet set CR thrust on the •N1 computer and lower the nose to maintain speed V2+10 to V2+20 (around 15° nose up)
at 3200 feet, lower the nose to 10° up to increase the speed to •VFTO (red pointer)
retract the slats when passing V4 (yellow pointer)•
set bug speed to 250kts•
set the autopilot HDG bug to your current heading•
engage the autopilot. The FPI indi-•cations translate to: auto throttle is maintaining N1 reference, the roll axis maintains the heading set in the HDG window and the pitch mode tries to maintain the cur-rent vertical speed (PITCH). You can change the vertical speed by manually (with
the yoke) increasing or decreasing the pitch, the autopilot will •try and maintain the vertical speed that you had when the yoke was placed back in the neutral position
when reaching 250 kts engage IAS •mode, the aircraft will now adjust the pitch to maintain 250 kts
SimCheck Airbus A300B4-200
Aerosoft GmbH 201032
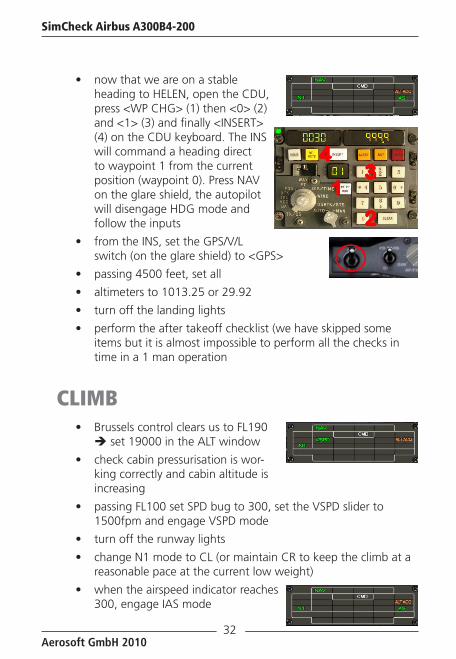
now that we are on a stable •heading to HELEN, open the CDU, press <WP CHG> (1) then <0> (2) and <1> (3) and finally <INSERT> (4) on the CDU keyboard. The INS will command a heading direct to waypoint 1 from the current position (waypoint 0). Press NAV on the glare shield, the autopilot will disengage HDG mode and follow the inputs
from the INS, set the GPS/V/L •switch (on the glare shield) to <GPS>
passing 4500 feet, set all•
altimeters to 1013.25 or 29.92•
turn off the landing lights•
perform the after takeoff checklist (we have skipped some •items but it is almost impossible to perform all the checks in time in a 1 man operation
CLIMBBrussels control clears us to FL190 • set 19000 in the ALT window
check cabin pressurisation is wor-•king correctly and cabin altitude is increasing
passing FL100 set SPD bug to 300, set the VSPD slider to •1500fpm and engage VSPD mode
turn off the runway lights•
change N1 mode to CL (or maintain CR to keep the climb at a •reasonable pace at the current low weight)
when the airspeed indicator reaches •300, engage IAS mode

33
when ALT ACQ becomes active •(turns GREEN on the FPI) engage SPD auto throttle mode. The aircraft will now reduce the climb speed to 900-1000fpm and level off at FL190
the aircraft will level off at FL190 •and ALT becomes the active vertical mode
check that the INS is automatically switching to the next way-•point when passing HELEN
Brussels control has cleared us up •to FL220; our requested cruising level. Set ALT window to 22000 and press Alt ACQ, ALT ACQ green will engage and the aircraft will make a slow 1000fpm climb up to FL220, keep SPD mode as the active A/T mode.
when reaching FL220 engage CR mode (if it wasn’t still se-•lected) on the N1 computer, we are now 10-12 minutes from takeoff
CruiseMonitor fuel is being used inside to outside, and fuel use is as expected.
Check that the cabin pressurisation system is performing as expected and monitor the progress through the different waypoints. Set the radios to COA (110.05MHz) and LAM (115.60MHz) as we will be passing these waypoints later in the flight. Cross check your position against these waypoints to detect any navigation errors by the INS!
After we passed COA VOR, Brussels clears us direct to SASKI which is the boundary of the Belgian airspace.
SASKI is waypoint 4 in the INS, to go direct to SASKI from position: open the CDU’s, on the left (main) CDU: press <WP CHG> (1), press <0> (2) then <4> (3), press <INSERT> (4)

SimCheck Airbus A300B4-200
Aerosoft GmbH 201034
DESCENT AND APPROACH PREPARATION
Approach BriefingThis is a really short flight and we have no time to waste. So let’s have a look at what we can expect during the approach into Heathrow.
We expect to land on RWY 27L and the typical STAR from Brussels is the LAM3A arrival.
Basically the initial approach phase into Heathrow starts at a point called LOGAN which is located 54.9NM from LAM VOR on the 085 radial. From there we proceed to TRIPO, SABER, BRASO and LAM, all on the same radial. We have one important altitude restriction at SABER (30NM from LAM) which we have to pass at FL140. The minimum altitude over LAM is FL70 and the transition altitude is 6000feet. The QNH at EGLL is 1013 so the transition level is FL70.
To determine our initial top of descent point (TOD) we use a simple rule-of-thumb:
TOD = altitude loss in 1000 of feet * 3
As we are cruising at FL220 and need to be at SABER at FL140, we will start descent 8 x 3 = 24NM miles from SABER which is more or less at LOGAN. Our descent rate will be equal to:
Descent rate = Ground speed * 5
which will be around 1800-2000fpm.

35
There is another important point on the charts called the “SLP” which is the speed limit point. The SLP is located at 12NM from LAM and we have to be at 250kts IAS at this point except when advised otherwise by ATC.
After we pass LAM we switch to a seconds chart describing the initial approach phase into London.
First we fly outbound LAM on the 275 radial descending to 6000 feet QNH. At 11NM from LAM we make a left turn to intercept the outbound radial 129 from BNN (113.75MHz). We can not descend below 6000 feet until reaching 15NM DME from BNN. After that point we descend to 3500 feet QNH while reducing speed to 180kts. At 19NM DME BNN we turn right to intercept the ILS for RWY27L after we cross the 134 radial BNN we can we can further descend to 3000 feet. At 10NM DME from the ILS 27L we can finally descend to 2500 feet until we are established on the glide slope.
SimCheck Airbus A300B4-200
Aerosoft GmbH 201036
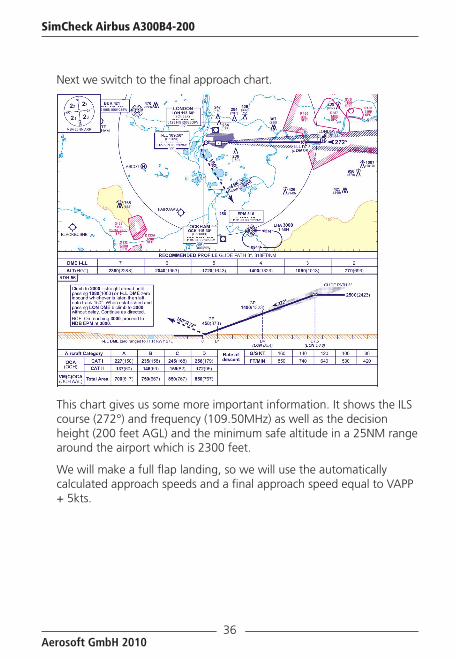
Next we switch to the final approach chart.
This chart gives us some more important information. It shows the ILS course (272°) and frequency (109.50MHz) as well as the decision height (200 feet AGL) and the minimum safe altitude in a 25NM range around the airport which is 2300 feet.
We will make a full flap landing, so we will use the automatically calculated approach speeds and a final approach speed equal to VAPP + 5kts.

37
After landing we have to taxi to the main cargo apron, we will vacate the runway at the high speed exit S6. We will use MED or HI auto-brakes setting in order to vacate the runway as quickly as possible.
That’s it ! Make sure you are familiar with this procedure so you know what to do when it gets really busy in the cockpit later on in the flight!
Descent Preparationcheck fuel remaining and cross check against the expected fuel•
press the RECALL button on the MWP and check•
obtain landing info at EGLL: winds calm, QNH 1013, expect •RWY27L
set NAV1 to LAM on 115.60MHz, set NAV2 to BNN on •113.75MHz. Set CRS to 085 as this is the radial we will be following into LAM
press the hidden click zone on the ASI to set the speed bugs•
set the DH to 200 feet•
setup the pressurisation system•
set to target altitude for the cabin pressure to airport elevation -400feet
set QNH of pressure regulator to airport pressure
set cabin pressure QNH to airport pressure
Request descent clearance•
SimCheck Airbus A300B4-200
Aerosoft GmbH 201038
DESCENT checklistDESCENTPILOT ACTION
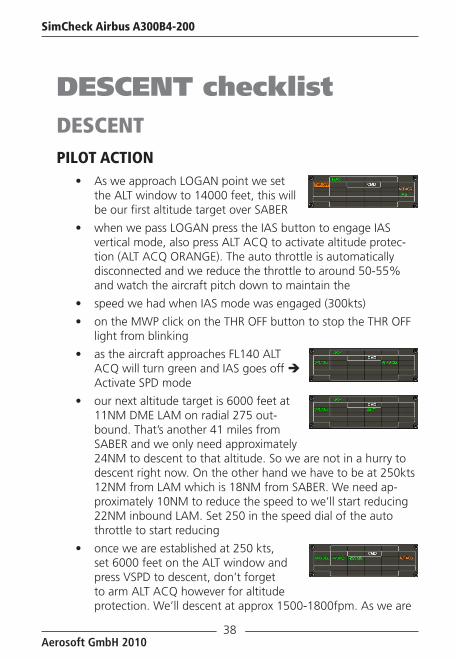
As we approach LOGAN point we set •the ALT window to 14000 feet, this will be our first altitude target over SABER
when we pass LOGAN press the IAS button to engage IAS •vertical mode, also press ALT ACQ to activate altitude protec-tion (ALT ACQ ORANGE). The auto throttle is automatically disconnected and we reduce the throttle to around 50-55% and watch the aircraft pitch down to maintain the
speed we had when IAS mode was engaged (300kts)•
on the MWP click on the THR OFF button to stop the THR OFF •light from blinking
as the aircraft approaches FL140 ALT •ACQ will turn green and IAS goes off Activate SPD mode
our next altitude target is 6000 feet at •11NM DME LAM on radial 275 out-bound. That’s another 41 miles from SABER and we only need approximately 24NM to descent to that altitude. So we are not in a hurry to descent right now. On the other hand we have to be at 250kts 12NM from LAM which is 18NM from SABER. We need ap-proximately 10NM to reduce the speed to we’ll start reducing 22NM inbound LAM. Set 250 in the speed dial of the auto throttle to start reducing
once we are established at 250 kts, •set 6000 feet on the ALT window and press VSPD to descent, don’t forget to arm ALT ACQ however for altitude protection. We’ll descent at approx 1500-1800fpm. As we are

39
getting very close to LAM which is the last usable waypoint in our flight plan we’ll now switch to HDG mode (don’t forget to set the GPS/VL switch back to V/L!) to follow the 085 radial inbound to LAM, as we are flying inbound the radial is more convenient to set 265 in the CRS dial
passing FL100 turn on the landing lights•
passing FL70 (transition level) set altimeters to QNH•
at 6000 feet maintain outbound LAM •on radial 275 until 11NM DME
at 11DME start a left turn to intercept •RDL129 outbound BNN. Before entering the turn or while in the turn, maintaining 6000 feet, reduce the speed to VFTO (red bug).
start the turn by setting HDG 180, follow the current radial •on the RMI, as you continue to turn set HDG 160, we will use this heading to intercept the 129 radial. Set BNN in NAV1 (113.75MHz) with course 129
on the N1 computer select GA•
at 15DME BNN (still in the turn) set •ALT to 3500 feet and engage ALT ACQ green for a slow descent. Reduce the speed to 180 kts and set SLATS 8 (flaps handle 1 down)
at 19DME BNN, turn right heading 180 (short base leg) once •established on heading 180 set HDG 240 to intercept the ILS 27L
set NAV1 to 109.50MHz, course to 272•
reduce speed to 160 kts and set flaps handle to position 2 •(SLATS 8 / FLAPS 8)
arm APPR mode when on the intercept heading•
after crossing radial 134 BNN, continue down to 3000 feet•

SimCheck Airbus A300B4-200
Aerosoft GmbH 201040
Final Approachset NAV2 to 109.50MHz•
check altimeters again•
verify the radio altimeters are alive•
once established on the localizer and the glideslope, activate •flight director 2
set ALT window to 3000 feet, the missed approach altitude•
at 4 DME check the altitude (should be 1400 feet AMSL)•
reduce speed to VAPP + 5kts (approximately 138kts) and add •flaps as you reduce the speed
extend the landing gear and arm the ground spoilers (Shift-/)•
turn on nose light•

41
FINAL checklistat 1000 feet AMSL disengage the autopilot and proceed manually•
monitor descent profile and LLZ make small corrections to stay •established
start flaring at 30 feet AGL•
at 20 feet AGL set throttles to idle•
at touchdown verify that the ground spoilers go up, if not set •ground spoilers manually (Press “/”)
check throttle are at idle and activate reversers•
check auto brakes are working, if not apply manual braking•
at 80 kts deactivate the reversers•
at speed 40kts, apply manual braking to disengage the auto •brakes
vacated the runway at S6•
AFTER LANDINGturn off the landing light and set nose •lights to TAXI
set the transponder to standby•
during taxi: clean up the flaps/slats •and speed brakes and set the pitch trim to 1° up
start the APU•
turn on the brake fans to cool the brakes•
open the fuel panel and turn the probe heats off•
SimCheck Airbus A300B4-200
Aerosoft GmbH 201042
AFTER LANDING checklist
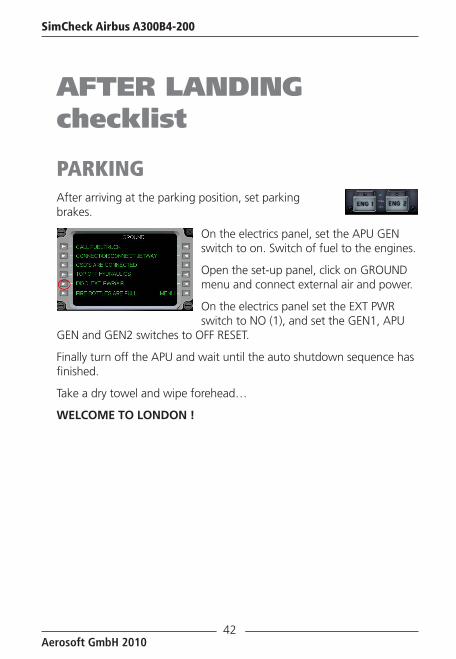
PARKINGAfter arriving at the parking position, set parking brakes.
On the electrics panel, set the APU GEN switch to on. Switch of fuel to the engines.
Open the set-up panel, click on GROUND menu and connect external air and power.
On the electrics panel set the EXT PWR switch to NO (1), and set the GEN1, APU
GEN and GEN2 switches to OFF RESET.
Finally turn off the APU and wait until the auto shutdown sequence has finished.
Take a dry towel and wipe forehead…
WELCOME TO LONDON !


