Tufts Data Lab 1 Adding a Field to the Attribute Table and using the Field Calculator Written by Barbara Parmenter, Updated by Carolyn Talmadge on January 14, 2016 OVERVIEW.........................................................................................................................................................................................1 ADDING A NEW FIELD TO A TABLE.....................................................................................................................................................1 EXAMPLE OF USING THE FIELD CALCULATOR TO ADD CENSUS DATA COLUMNS ...............................................................................2 USING THE FIELD CALCULATOR TO CALCULATE LAND VALUE PER SQUARE FOOT FOR SOMERVILLE PARCELS ...................................5 Overview You may frequently need to add a field to an existing GIS data table in order to calculate some value (e.g., adding up census fields, or calculating a ratio between two other numeric fields, or adding text to a number of records at once). Or sometimes you may need to convert a text field with numbers to a numeric field for mapping or analysis. In this tip sheet, we show you how to add a new field, and then we provide two examples of using the field calculator. See the ArcGIS 10.3 for an Overview of the Field Tools Adding a New Field to a Table Attribute fields can be added easily to GIS data layers. However, to add a field (or make any other changes to table structure or values) the data must be stored in an area you have write-access to (your own computer or, in the Tufts Data lab, your H: drive, an external hard drive, etc.) Since you don’t have write permission to the Tufts M: drive, export the data to your own space beforehand (right click on the data layer in the Table of Contents, and then click on Data Export Data). Assuming you have write access to the table: 1. Open the layer’s attribute table. 2. Click on Table Options ( ) in the upper left hand corner of the table. 3. Choose Add Field
Transcript
Tufts Data Lab
1
Adding a Field to the Attribute Table and using the Field Calculator
Written by Barbara Parmenter, Updated by Carolyn Talmadge on January 14, 2016
ADDING A NEW FIELD TO A TABLE ..................................................................................................................................................... 1
EXAMPLE OF USING THE FIELD CALCULATOR TO ADD CENSUS DATA COLUMNS ............................................................................... 2
USING THE FIELD CALCULATOR TO CALCULATE LAND VALUE PER SQUARE FOOT FOR SOMERVILLE PARCELS ................................... 5
Overview You may frequently need to add a field to an existing GIS data table in order to calculate some value (e.g., adding up census fields, or calculating a ratio between two other numeric fields, or adding text to a number of records at once). Or sometimes you may need to convert a text field with numbers to a numeric field for mapping or analysis.
In this tip sheet, we show you how to add a new field, and then we provide two examples of using the field calculator.
See the ArcGIS 10.3 for an Overview of the Field Tools
Adding a New Field to a Table Attribute fields can be added easily to GIS data layers. However, to add a field (or make any other changes to table structure or values) the data must be stored in an area you have write-access to (your own computer or, in the Tufts Data lab, your H: drive, an external hard drive, etc.) Since you don’t have write permission to the Tufts M: drive, export the data to your own space beforehand (right click on the data layer in the Table of Contents, and then click on Data Export Data).
Assuming you have write access to the table:
1. Open the layer’s attribute table.
2. Click on Table Options ( ) in the upper left hand corner of the table.
4. Name the new field and specify the type of data that you want it to hold (text, date, or one of the numeric types – double, short, long), then press OK. The new field should be located at the end of the table (far right).
Example of Using the Field Calculator to add Census Data Columns Let’s say we want to know the population of census blocks that are over 75 years old for the 2000 Census. MassGIS has census block polygons and a census table CEN2K10_B_POP_AGE_GEN.dbf. In this table there are fields for female population by age cohort and male population by age cohort. We want to add a new field that will contain the total population over 75 for each block.
1. First, make sure you have your own copy of the data files (on your H: drive or local computer). In Catalog, copy the CEN2K_B_POP_AGE_GEN.dbf and CENSUS2000BLOCKS_POLY.shp found in M:\State\MA\MassGIS\Census_2000\...
2. Add the polygon layer and the table to an ArcMap session from your H drive.
3. Right-click on the table and press open to open the table. Open the attribute table for the polygon as well. See what fields exist in both.
4. Next you need to join the census table to the census polygons using a common, unique field that they both share. In this example it will be the LOGRECNO field as the join field. To do this, right-click on the Census2000BLOCKS_POLY and choose Joins and Relates Join as shown below:
Tufts Data Lab
3
5. Fill out the dialog box as in the following graphic:
6. Click OK, and then NO to the Create Index window. It will take a second to load.
7. Open the attribute table of the Census2000Blocks_poly and scroll to the right to see newly added data.
8. Next, we will create a new field called Pop_gte75 (for population greater than or equal to 75). Keep the attribute table open and click on the Table Options button and choose Add Field. If you get an error then you did not save the data somewhere you have write access. Do so and then redo the join on your write accessible layer before you continue.
9. Fill out the dialog box as follows – for shape files, field names must be 10 characters or less, cannot contain space or symbols, and cannot start with a number!
10. Click OK
Tufts Data Lab
4
11. The new field will be at the far right end of the table, scroll over to see it. It is currently filled with 0’s because we only named it but have not calculated any values yet.
12. Right-click on the field name (POP_gte75) and choose Field Calculator. Say Yes to the warning of performing a calculation outside an edit session.
13. You’ll see the Field Calculator dialog box ready for your expression – you’ll see that it says “Pop_gte75 =” already written in (just above the white input area). Now you need to add in the expression to sum the census data fields. Your data names may be a bit longer, but if you scroll to the right they will match those shown below.
Tufts Data Lab
5
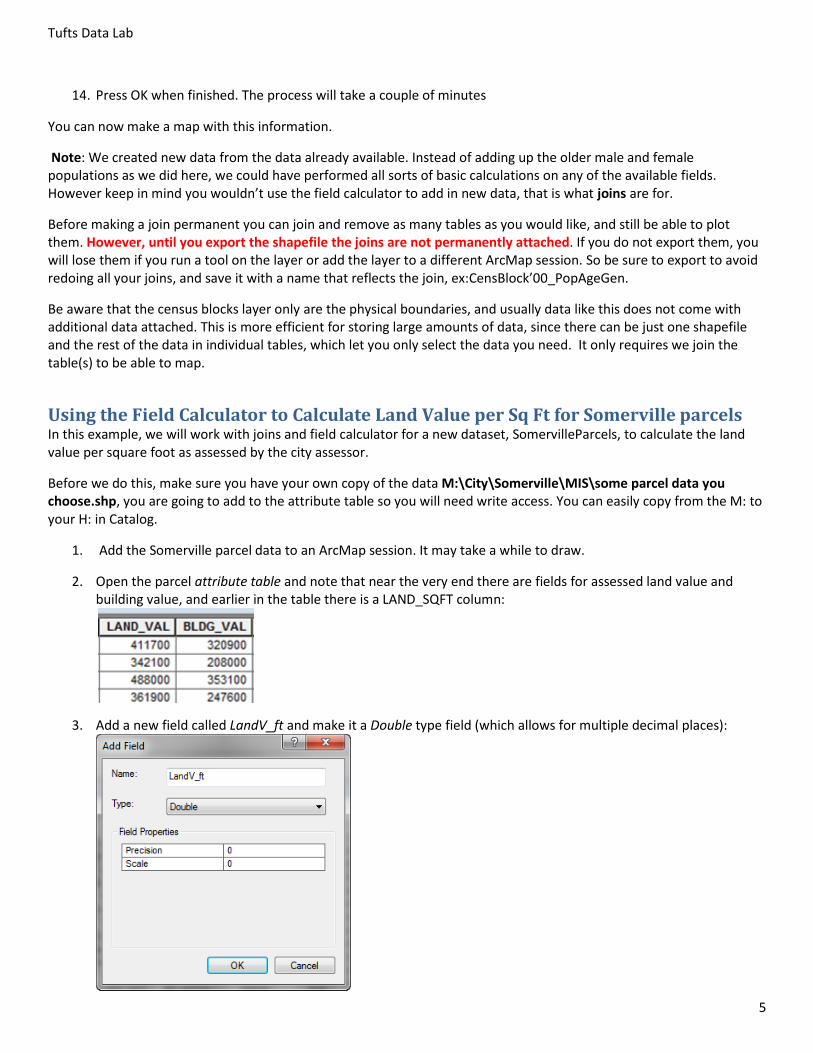
14. Press OK when finished. The process will take a couple of minutes
You can now make a map with this information.
Note: We created new data from the data already available. Instead of adding up the older male and female populations as we did here, we could have performed all sorts of basic calculations on any of the available fields. However keep in mind you wouldn’t use the field calculator to add in new data, that is what joins are for.
Before making a join permanent you can join and remove as many tables as you would like, and still be able to plot them. However, until you export the shapefile the joins are not permanently attached. If you do not export them, you will lose them if you run a tool on the layer or add the layer to a different ArcMap session. So be sure to export to avoid redoing all your joins, and save it with a name that reflects the join, ex:CensBlock’00_PopAgeGen.
Be aware that the census blocks layer only are the physical boundaries, and usually data like this does not come with additional data attached. This is more efficient for storing large amounts of data, since there can be just one shapefile and the rest of the data in individual tables, which let you only select the data you need. It only requires we join the table(s) to be able to map.
Using the Field Calculator to Calculate Land Value per Sq Ft for Somerville parcels In this example, we will work with joins and field calculator for a new dataset, SomervilleParcels, to calculate the land value per square foot as assessed by the city assessor.
Before we do this, make sure you have your own copy of the data M:\City\Somerville\MIS\some parcel data you choose.shp, you are going to add to the attribute table so you will need write access. You can easily copy from the M: to your H: in Catalog.
1. Add the Somerville parcel data to an ArcMap session. It may take a while to draw.
2. Open the parcel attribute table and note that near the very end there are fields for assessed land value and building value, and earlier in the table there is a LAND_SQFT column:
3. Add a new field called LandV_ft and make it a Double type field (which allows for multiple decimal places):
Tufts Data Lab
6
4. Now use field calculator to set our new field equal to Land_Val / Land_Sqft. Remember to always use the “buttons” rather than writing in the expression yourself. It is very easy to mess up the syntax.
5. The error you will get is telling us we can’t divide by 0 (some of the land square feet values are zero). Which is why it is important to always think through the calculation you are about to perform. All tools in GIS will work so long as their basic requirements are met; this leaves the responsibility of selecting the correct tool and performing sensible calculations on you, the user. Exit the error.
6. So before we can calculate our new field, we have to select all our parcels where the land square feet is greater than zero. Be sure to clear selected features ( ), before beginning or they will be included in whatever calculation/tool you next perform.
7. With nothing highlighted, click on the Table Options Select by Attributes…
8. Fill out the Select by Attributes dialog box as follows and click Apply.
9. Now with the parcels selected where the building value is greater than zero, we can use the Field Calculator function (the Field Calculator by default works only on selected records). Right click on the LandV_Ft field and choose Field Calculator. Be careful that when you select LandV_Ft you don’t accidentally highlight the column.
Tufts Data Lab
7
10. Fill out the dialog box as follows. Press OK when done, close table, and clear selection
Congratulations now you have a building to land ratio field which you can map. Here is a map of this new data – you can see that around Davis Square, the land value per square foot is higher.
Tufts Data Lab
8
For more tips and tutorials, please visit our website