Page 1
AD FS 2.0 Step-by-Step Guide: Federation with Oracle Identity Federation
Microsoft Corporation
Published: June 2010
Version: 1.0
Author: Dave Martinez, Principal, Martinez & Associates LLC
Editor: Jim Becker
Technical reviewers: Mike Jones, Stuart Kwan, Colin Dellow, Matt Steele
AbstractThrough its support for the WS-Federation and Security Assertion Markup Language (SAML) 2.0
protocols, Microsoft® Active Directory® Federation Services 2.0 (AD FS 2.0) provides claims-
based, cross-domain, Web single sign-on (SSO) interoperability with non-Microsoft federation
solutions. Oracle Identity Federation, through its support for SAML 2.0, enables cross-domain
federated SSO between environments that are running Microsoft and Oracle federation
infrastructures.
Building on existing documentation from both companies, this step-by-step guide walks you
through the setup of a basic lab deployment of AD FS 2.0 and Oracle Identity Federation that
performs cross-product, browser-based, identity federation. Both products perform both identity
federation roles: claims provider/identity provider and relying party/service provider. This
document is intended for developers and system architects who are interested in understanding
the basic modes of interoperability between AD FS 2.0 and Oracle Identity Federation.
Page 2
This document is provided “as-is”. Information and views expressed in this document, including
URL and other Internet website references, may change without notice. You bear the risk of using
it.
Some examples depicted herein are provided for illustration only and are fictitious. No real
association or connection is intended or should be inferred.
This document does not provide you with any legal rights to any intellectual property in any
Microsoft product. You may copy and use this document for your internal, reference purposes.
You may modify this document for your internal, reference purposes.
© 2010 Microsoft Corporation. All rights reserved.
Microsoft, Active Directory, Internet Explorer, SQL Server, Windows, Windows PowerShell, and
Windows Server are trademarks of the Microsoft group of companies. All other trademarks are
property of their respective owners.
Page 3
Contents
AD FS 2.0 Step-by-Step Guide: Federation with Oracle Identity Federation..................................5
About This Guide......................................................................................................................... 5
Terminology Used in This Guide..............................................................................................5
About the Author...................................................................................................................... 5
Prerequisites and Requirements.................................................................................................6
AD FS 2.0................................................................................................................................ 6
Oracle Identity Federation........................................................................................................6
Windows............................................................................................................................... 6
OIF........................................................................................................................................ 7
Step 1: Preconfiguration Tasks.......................................................................................................7
Ensure IP Connectivity................................................................................................................8
Configure Name Resolution........................................................................................................8
Verify Clock Synchronization.......................................................................................................8
Enable SSL Server Authentication...............................................................................................8
Create a New Self-signed SSL Certificate for Oracle HTTP Server......................................9
Apply New SSL Certificate in Oracle HTTP Server...............................................................9
Install OHS SSL Certificate on AD FS 2.0 Computer............................................................9
Install IIS SSL Certificate on OIF Computer........................................................................10
Change Federation URLs in OIF Metadata to Use SSL.....................................................10
Create Sample Users................................................................................................................11
Step 2: Configure AD FS 2.0 as the Identity Provider and OIF as the Relying Party....................12
Configure OIF............................................................................................................................ 12
Create New Trusted Provider Using Metadata.......................................................................12
Configure AD FS 2.0.................................................................................................................. 14
Add a Relying Party Using Metadata.....................................................................................14
Edit Claim Rules for Relying Party Trust................................................................................15
Disable AD FS 2.0 Encryption................................................................................................16
Change AD FS 2.0 Signature Algorithm.................................................................................17
Create Links for Initiating Federated Access.............................................................................17
Step 3: Test AD FS 2.0 as the Identity Provider and OIF as the Relying Party.............................18
Step 4: Configure OIF as the Identity Provider and AD FS 2.0 as the Relying Party....................19
Configure OIF............................................................................................................................ 19
Add Attribute to OIF-generated Assertion...............................................................................19
Configure AD FS 2.0.................................................................................................................. 20
Add a Claims Provider Using Metadata.................................................................................20
Edit Claim Rules for Claims Provider Trust............................................................................20
Edit Claim Rules for the WIF Sample Application...................................................................21
3
Page 4
Change AD FS 2.0 Signature Algorithm.................................................................................22
Create Link for Initiating Federated Access (optional)...............................................................23
Step 5: Test OIF as the Identity Provider and AD FS 2.0 as the Relying Party.............................23
Appendix....................................................................................................................................... 25
WS-Federation Support.........................................................................................................25
Certification Authority-issued Token Signing Certificates........................................................25
Federated Logout................................................................................................................... 26
SAML 2.0 Artifact Profile........................................................................................................26
Alternative Authentication Methods (OIF as IDP)...................................................................26
Persistent and Transient Name IDs........................................................................................26
URLs for Initiating SSO..........................................................................................................27
4
Page 5
AD FS 2.0 Step-by-Step Guide: Federation with Oracle Identity Federation
About This GuideThis guide provides step-by-step instructions for configuring a basic identity federation
deployment between Microsoft® Active Directory® Federation Services 2.0 (AD FS 2.0) and
Oracle Identity Federation (OIF) by using the Security Assertion Markup Language (SAML) 2.0
protocol (http://go.microsoft.com/fwlink/?LinkId=193996) with the SAML2.0 HTTP POST binding.
Terminology Used in This GuideThroughout this document, there are numerous references to federation concepts that are called
by different names in the Microsoft and Oracle products. The following table assists in drawing
parallels between the two vendors’ technologies.
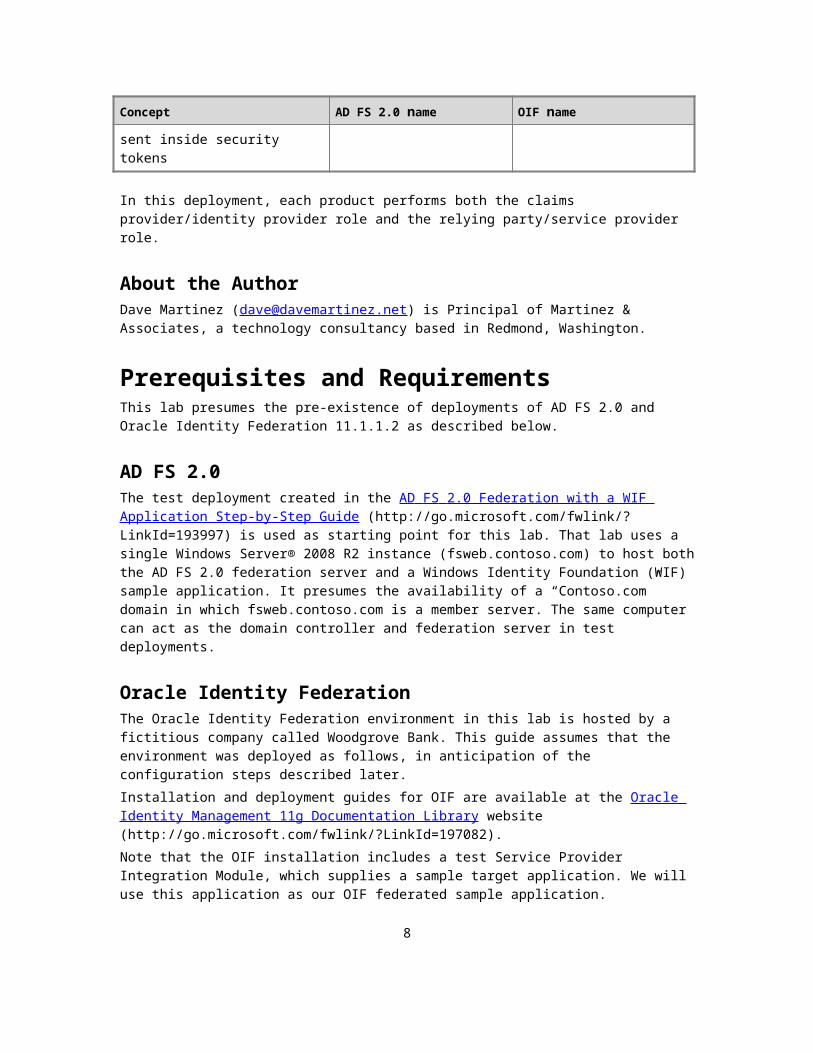
Concept AD FS 2.0 name OIF name
XML document sent from the
federation party that is managing
users to the federation party that
is managing an application during
an access request describing a
user
Security Token Assertion
Partner in a federation that
creates security tokens for users
Claims Provider Identity Provider
Partner in a federation that
consumes security tokens for
providing access to applications
Relying Party Service Provider
Data about users that is sent
inside security tokens
Claims Assertion attributes
In this deployment, each product performs both the claims provider/identity provider role and the
relying party/service provider role.
About the AuthorDave Martinez ([email protected] ) is Principal of Martinez & Associates, a technology
consultancy based in Redmond, Washington.
5
Page 6
Prerequisites and RequirementsThis lab presumes the pre-existence of deployments of AD FS 2.0 and Oracle Identity Federation
11.1.1.2 as described below.
AD FS 2.0The test deployment created in the AD FS 2.0 Federation with a WIF Application Step-by-Step
Guide (http://go.microsoft.com/fwlink/?LinkId=193997) is used as starting point for this lab. That
lab uses a single Windows Server® 2008 R2 instance (fsweb.contoso.com) to host both the
AD FS 2.0 federation server and a Windows Identity Foundation (WIF) sample application. It
presumes the availability of a “Contoso.com” domain in which fsweb.contoso.com is a member
server. The same computer can act as the domain controller and federation server in test
deployments.
Oracle Identity FederationThe Oracle Identity Federation environment in this lab is hosted by a fictitious company called
Woodgrove Bank. This guide assumes that the environment was deployed as follows, in
anticipation of the configuration steps described later.
Installation and deployment guides for OIF are available at the Oracle Identity Management 11g
Documentation Library website (http://go.microsoft.com/fwlink/?LinkId=197082).
Note that the OIF installation includes a test Service Provider Integration Module, which supplies
a sample target application. We will use this application as our OIF federated sample application.
Windows
Host operating system: Windows Server 2008 R2
Active Directory Domain Services server role installed to provide the OIF user identity and
federation data repositories:
Domain name: woodgrovebank.com
Host name: orafed.woodgrovebank.com
A domain controller is an optional component for this lab. Oracle Internet
Directory or another Lightweight Directory Access Protocol (LDAP) directory can
be used in this lab without impacting the results.
Web server role (Internet Information Services (IIS)) installed to host the preformatted
hyperlinks that initiate federated access:
Static content role service installed
Default website ports: HTTP (80) and HTTPS (443)
Windows Firewall with Advanced Security turned off, to easily allow for HTTPS
communications on nonstandard ports (See below.)
6
Note
Page 7
OIF
Product version: Oracle Identity Federation 11.1.1.2, as delivered in Oracle Identity
Management 11.1.1.3.
Note
Oracle Identity Management 11.1.1.3, the most recent OIM release, is the first
certified for use on Windows Server 2008 R2. However, after the 11.1.1.3 patch
update is installed, the OIF component remains at 11.1.1.2.
Other Oracle Identity Management components installed or configured simultaneously with
OIF:
Oracle HTTP Server, to act as a proxy for the OIF server, using its default HTTP (7777)
and HTTPS (4443) ports
Oracle Access Manager is a web access management product shipped OIM that
provides policy-based web access control. While often used in conjunction with
OIF, it is omitted from the configuration here because its use has no impact on
how federation with AD FS 2.0 is configured.
OIF Configuration type: Advanced
Automatic port assignment
LDAP (Microsoft Active Directory) as the User Data Store, LDAP Authentication
Mechanism, and Federation Data Store.
Note
Using Active Directory as the OIF repository requires secure LDAP (LDAPS)
communication. Follow the instructions in section 8.2.2.4 of the Administrator’s
Guide to Oracle Identity Federation 11g (http://go.microsoft.com/fwlink/?
LinkId=197149) to configure LDAP over SSL in OIF.
In-memory tables for User Session and Message store type
File for Configuration Store type
Federation Service URLs
SAML 2.0 SSO service URL:
http://orafed.woodgrovebank.com:7777/fed/idp/samlv20
SAML 2.0 Assertion consumer service URL:
http://www.woodgrovebank.com:7777/fed/sp/authnResponse20
7
Note
Page 8
Step 1: Preconfiguration Tasks
You perform all of the actions in this section while logged into Windows with
administrative privileges.
Ensure IP ConnectivityMake sure that the OIF (orafed.woodgrovebank.com) and AD FS 2.0 (fsweb.contoso.com)
computers have IP connectivity between them. The Contoso.com domain controller, if running on
a separate computer, does not require IP connectivity to the OIF system.
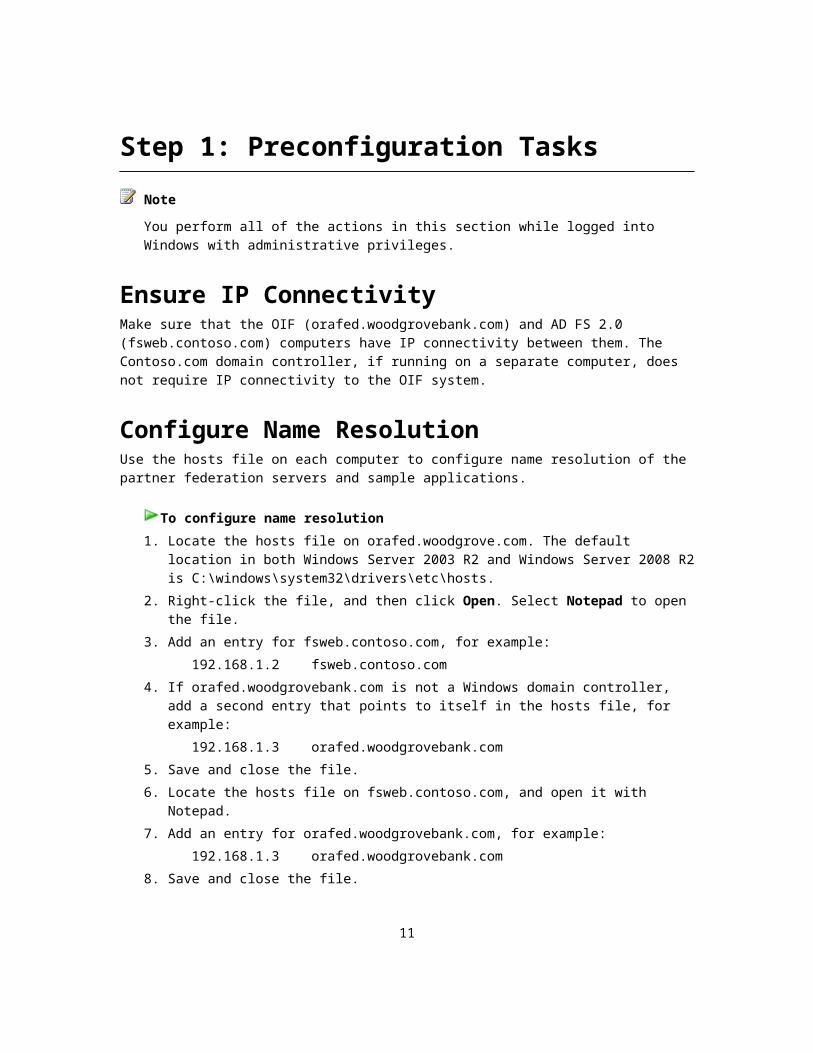
Configure Name ResolutionUse the hosts file on each computer to configure name resolution of the partner federation
servers and sample applications.
1. Locate the hosts file on orafed.woodgrove.com. The default location in both
Windows Server 2003 R2 and Windows Server 2008 R2 is C:\windows\system32\drivers\
etc\hosts.
2. Right-click the file, and then click Open. Select Notepad to open the file.
3. Add an entry for fsweb.contoso.com, for example:
192.168.1.2 fsweb.contoso.com
4. If orafed.woodgrovebank.com is not a Windows domain controller, add a second entry
that points to itself in the hosts file, for example:
192.168.1.3 orafed.woodgrovebank.com
5. Save and close the file.
6. Locate the hosts file on fsweb.contoso.com, and open it with Notepad.
7. Add an entry for orafed.woodgrovebank.com, for example:
192.168.1.3 orafed.woodgrovebank.com
8. Save and close the file.
Verify Clock SynchronizationFederation events typically have a short Time to Live (TTL). Ensure that both computers have
their clocks synchronized, to avoid errors based on time-outs.
8
Note
To configure name resolution
Page 9
Enable SSL Server AuthenticationFederation relies heavily on public key infrastructure (PKI), including Secure Sockets Layer (SSL)
encryption, for trustworthy transactions. To properly use SSL security in this lab, first create a new
self-signed certificate for the Oracle HTTP server (OHS) at orafed.woodgrovebank.com. Then,
add the self-signed certificates being used by it and IIS (at fsweb.contoso.com) into the Trusted
Roots store of the partner computer.
Create a New Self-Signed SSL Certificate for Oracle HTTP Server
1. Log into the Fusion Middleware Control interface (typically found at
http://orafed.woodgrovebank.com:7001/em) using your Weblogic administrator
credentials.
2. In the navigation tree on the left, in the Web Tier folder, right-click ohs1, and select
Security > Wallets.
3. On the Wallets page, click Create Self-Signed Wallet.
4. On the Create Self-Signed Wallet page, type OHSssl as the Wallet Name, and click OK,
leaving all other values unchanged.
Apply New SSL Certificate in Oracle HTTP Server
1. In the Fusion Middleware Control interface, in the navigation tree on the left, right-click
ohs1 in the Web Tier folder, and select Administration > Advanced Configuration.
2. On the Advanced Configuration page, in the select file drop-down box select ssl.conf,
and click Go.
3. Scroll down the file until you find the section titled #Path to the wallet.
4. Change the last segment of the next line so that it reads /keystores/OHSssl instead of
/keystores/default.
5. Click Apply.
6. In the left navigation tree, right-click ohs1, and select Control > Restart.
7. Click Restart in the Confirmation dialog box, and then click Close.
Install OHS SSL Certificate on the AD FS 2.0 Computer
Install the new OHS SSL certificate into the Trusted Roots store on fsweb.contoso.com. This
allows Internet Explorer to trust the web server during HTTPS communications; for example,
when AD FS 2.0 gets partner metadata, and when the Contoso user accesses the OIF federated
sample application.
9
To generate a new self-signed SSL certificate in OHS
To apply a new self-signed SSL certificate in OHS
To install the OHS SSL certificate into fsweb.contoso.com
Page 10
1. From fsweb.contoso.com, use Internet Explorer to visit
https://orafed.woodgrovebank.com:4443.
2. At the security warning, click the link to continue to the website. The Address Bar will turn
red to signify that the page is protected by an SSL certificate that is not trusted.
3. Click the Certificate Error message next to the Internet Explorer address bar, and then
click View certificates.
4. In the Certificate window, on the General tab, click Install Certificate to start the
Certificate Import Wizard.
5. Click Next.
6. In the Certificate Store window, click the radio button for Place all certificates in the
following store.
7. Click Browse, and then click Show physical stores.
8. Select Local Computer in the Trusted Root Certificate Authorities folder, and click
OK.
9. Click Next > Finish > OK > OK.
10. Close and reopen Internet Explorer, and then revisit
https://orafed.woodgrovebank.com:4443. This time the address bar should remain white,
signifying a working SSL channel.
Install the IIS SSL Certificate on the OIF Computer
1. From orafed.woodgrovebank.com, use Internet Explorer to visit
https://fsweb.contoso.com.
2. At the security warning, click the link to continue to the website. The Address Bar will turn
red to signify that the page is protected by an SSL certificate that is not trusted.
3. Click the Certificate Error message next to the Internet Explorer address bar, and then
click View certificates.
4. In the Certificate window, on the General tab, click Install Certificate to start the
Certificate Import Wizard.
5. Click Next.
6. In the Certificate Store window, click the radio button to Place all certificates in the
following store.
7. Click Browse, and then click Show physical stores.
8. Select Local Computer in the Trusted Root Certificate Authorities folder, and click
OK.
9. Click Next > Finish > OK > OK.
10. Close and reopen Internet Explorer, and then revisit https://fsweb.contoso.com. This time
the address bar should remain white, signifying a working SSL channel.
10
To install the IIS SSL certificate into orafed.woodgrovebank.com
Page 11
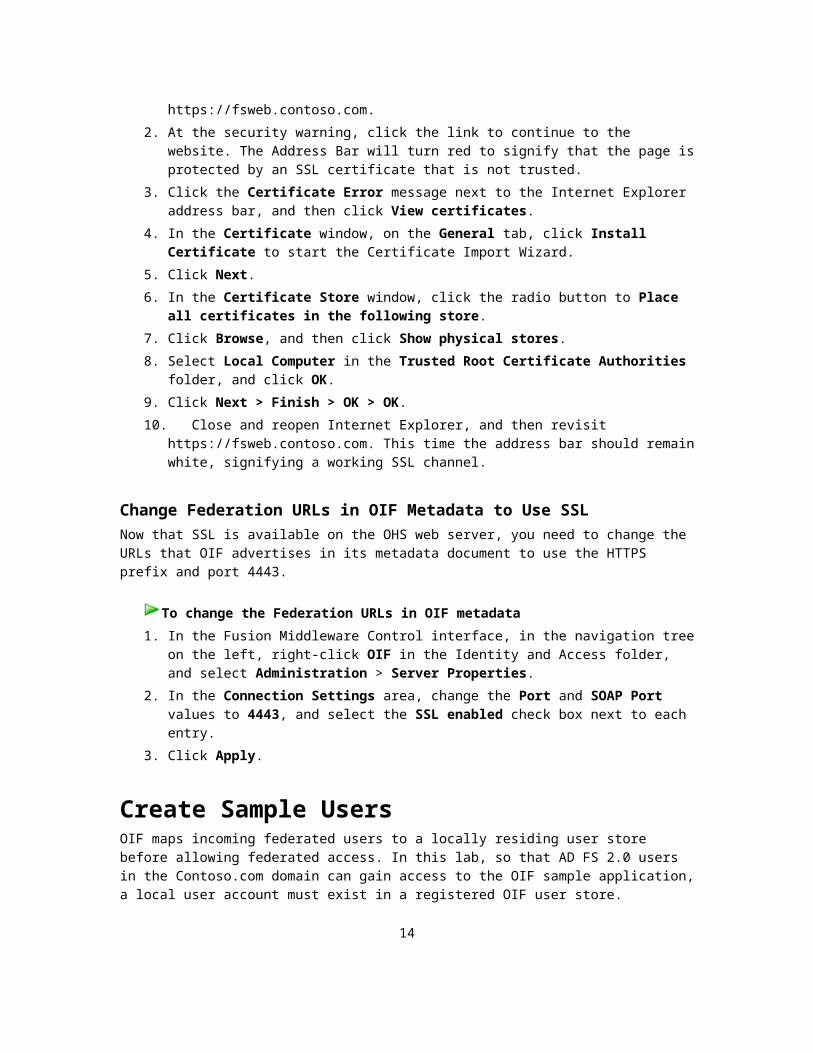
Change Federation URLs in OIF Metadata to Use SSL
Now that SSL is available on the OHS web server, you need to change the URLs that OIF
advertises in its metadata document to use the HTTPS prefix and port 4443.
1. In the Fusion Middleware Control interface, in the navigation tree on the left, right-click
OIF in the Identity and Access folder, and select Administration > Server Properties.
2. In the Connection Settings area, change the Port and SOAP Port values to 4443, and
select the SSL enabled check box next to each entry.
3. Click Apply.
Create Sample UsersOIF maps incoming federated users to a locally residing user store before allowing federated
access. In this lab, so that AD FS 2.0 users in the Contoso.com domain can gain access to the
OIF sample application, a local user account must exist in a registered OIF user store.
Follow the steps in this procedure to add Alan Shen, a Contoso/AD FS 2.0 user, to both the
Contoso Active Directory, and to the Active Directory on the OIF computer.
Additionally, add George Curio, a Woodgrove Bank/OIF user, to the OIF Active Directory. This is
the user that will access the AD FS 2.0 WIF sample application at Contoso.
1. Log in to the OIF computer (orafed.woodgrovebank.com) with domain administrator
credentials.
2. Click Start, click Administrative Tools, and then click Active Directory Users and
Computers.
3. In the console tree, under woodgrovebank.com, right-click the Users folder. Click New,
and then click User.
4. On the New Object – User page, type the following values, and then click Next.
Name Value
First name Alan
Last name Shen
Full name Alan Shen
User logon name alansh
5. Provide a password, clear the User must change password at next logon check box,
and then click Next.
11
To change the Federation URLs in OIF metadata
To add users to Active Directory (both computers)
Page 12
6. Click Finish.
7. In the right-most pane of Active Directory Users and Computers, right-click the new user
object, and then click Properties.
8. On the General tab, in the E-mail box, type the following, and then click OK.
Name Value
E-mail [email protected]
9. In the console tree, under woodgrovebank.com, right-click the Users folder. Click New,
and then click User. Follow the same procedure as above to add a second user with the
values in the following table.
Name Value
First name George
Last name Curio
Full name George Curio
User logon name georgec
E-mail [email protected]
10. Log in to the Contoso domain controller with administrative credentials, and add Alan
Shen to the Contoso Active Directory, using the same steps and values as above.
Note
It is not necessary to add George Curio, because the AD FS 2.0 sample
application does not require identity mapping.
Step 2: Configure AD FS 2.0 as the Identity Provider and OIF as the Relying Party
In this step, you configure the scenario in which Alan Shen from Contoso (through AD FS 2.0)
gets federated access to the Woodgrove Bank sample application (using OIF). The scenario uses
the SAML 2.0 POST profile.
12
Page 13
Configure OIF
Create a New Trusted Provider Using Metadata
Creating trusted providers with metadata supplied by AD FS 2.0 requires edits to the
AD FS 2.0 metadata XML file, which uses extension points in the SAML 2.0 metadata
standard (http://go.microsoft.com/fwlink/?LinkID=194835) that are not supported by
Oracle Identity Federation 11.1.1.2.
1. From the OIF computer (orafed.woodgrovebank.com), using Internet Explorer, go to the
AD FS 2.0 metadata XML file at
https://fsweb.contoso.com/FederationMetadata/2007-06/FederationMetadata.xml.
2. Click Page, and then click Save As to save FederationMetadata.xml to the desktop.
3. Open FederationMetadata.xml with an XML editor.
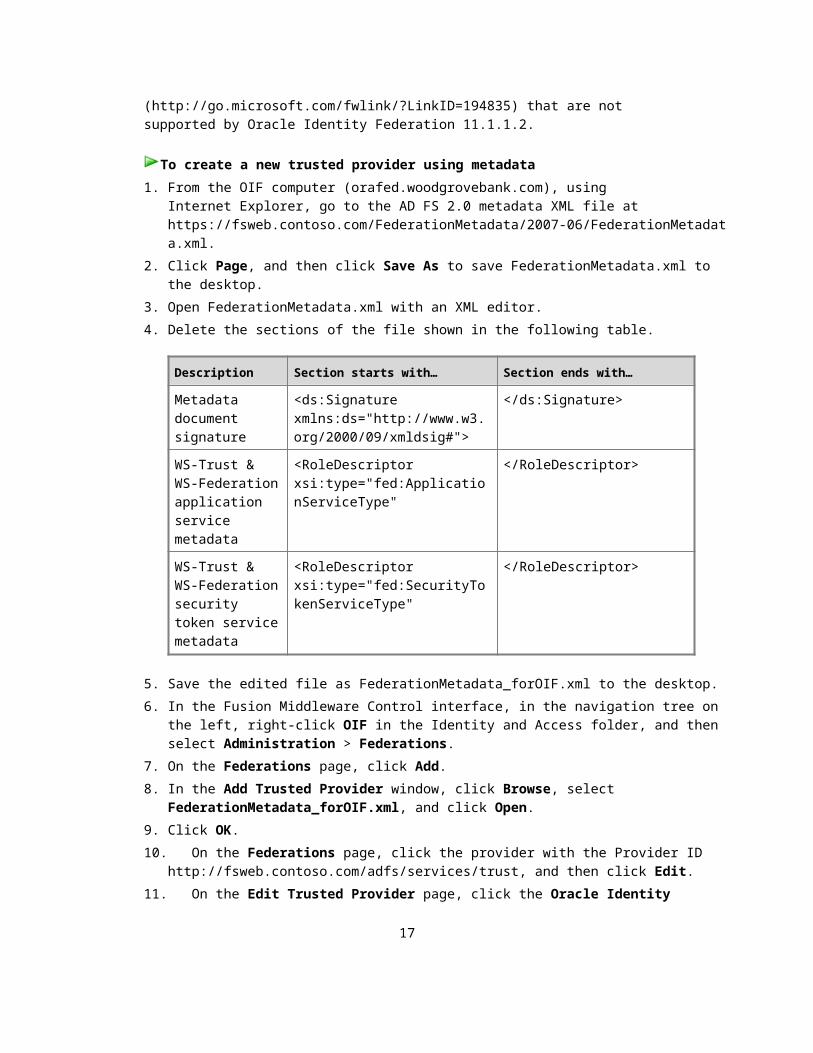
4. Delete the sections of the file shown in the following table.
Description Section starts with… Section ends with…
Metadata
document
signature
<ds:Signature
xmlns:ds="http://www.w3.org/200
0/09/xmldsig#">
</ds:Signature>
WS-Trust & WS-
Federation
application
service metadata
<RoleDescriptor
xsi:type="fed:ApplicationServiceT
ype"
</RoleDescriptor>
WS-Trust & WS-
Federation
security token
service metadata
<RoleDescriptor
xsi:type="fed:SecurityTokenServi
ceType"
</RoleDescriptor>
5. Save the edited file as FederationMetadata_forOIF.xml to the desktop.
6. In the Fusion Middleware Control interface, in the navigation tree on the left, right-click OIF in
the Identity and Access folder, and then select Administration > Federations.
7. On the Federations page, click Add.
8. In the Add Trusted Provider window, click Browse, select FederationMetadata_forOIF.xml,
and click Open.
9. Click OK.
10. On the Federations page, click the provider with the Provider ID
13
Note
To create a new trusted provider using metadata
Page 14
http://fsweb.contoso.com/adfs/services/trust, and then click Edit.
11. On the Edit Trusted Provider page, click the Oracle Identity Federation Settings tab.
12. Scroll to the Service Provider/Requester Settings section, and make the changes in the
following table. To edit a field, click the arrow icon to make editing available, and then make the
editing changes.
Name Value before editing Value after editing
Enable Auto Account Linking Unchecked Checked
Map User with Name ID Unchecked Checked
Default SSO Response Binding Artifact HTTP POST
Note
For simplicity, we are using the HTTP POST binding in this lab. Note, however, that
AD FS 2.0 supports the SAML 2.0 Artifact binding, which may be preferable in some
federation scenarios.
13. Click Apply.
Configure AD FS 2.0
Add a Relying Party Using MetadataYou can add a partner using OIF into AD FS 2.0 either manually or through metadata import. In
this lab, you use metadata import.
1. In AD FS 2.0, in the console tree, right-click the Relying Party Trusts folder, and then
click Add Relying Party Trust to start the Add Relying Party Trust Wizard.
2. On the Select Data Source page, leave Import data about the relying party published
online or on a local network selected.
3. In Federation metadata address, type
https://orafed.woodgrovebank.com:4443/fed/sp/metadata?providerid=http://
fsweb.contoso.com/adfs/services/trust, and click Next.
Note
OIF produces federation metadata documents for both the default OIF
configuration and partner-specific configurations. Earlier, you made a partner-
specific change in OIF to use HTTP Post instead of Artifact as the default
federation binding. This change impacts metadata. Using the Contoso-specific
metadata document above ensures that AD FS 2.0 will use HTTP POST during
14
To add a relying party using metadata
Page 15
IDP-initiated SSO.
4. Click OK to acknowledge that some metadata that AD FS 2.0 does not understand will be
skipped.
5. On the Specify Display Name page, type Woodgrove Bank, and click Next.
6. On the Choose Issuance Authorization Rules page, leave the default Permit all users
to access the relying party selected, and then click Next.
7. Click Next, and then click Close.
Edit Claim Rules for Relying Party TrustClaim rules describe how AD FS 2.0 determines what data should reside inside the federation
security tokens it generates. The claim rule in this section describes how data from
Active Directory is inserted in the security token created for OIF.
The primary claim that OIF needs is the NameIdentifier, or Name ID, which is the assertion
attribute that is used to map incoming federated users to OIF’s local user store.
1. The Edit Claim Rules dialog box should already be open. If not, In the AD FS 2.0 center
pane, under Relying Party Trusts, right-click Woodgrove Bank, and then click Edit
Claim Rules.
2. On the Issuance Transform Rules tab, click Add Rule.
3. On the Select Rule Template page, leave Send LDAP Attributes as Claims selected,
and click Next.
4. On the Configure Claim Rule page, in Claim rule name, type Get attributes.
5. In the Attribute Store list, select Active Directory.
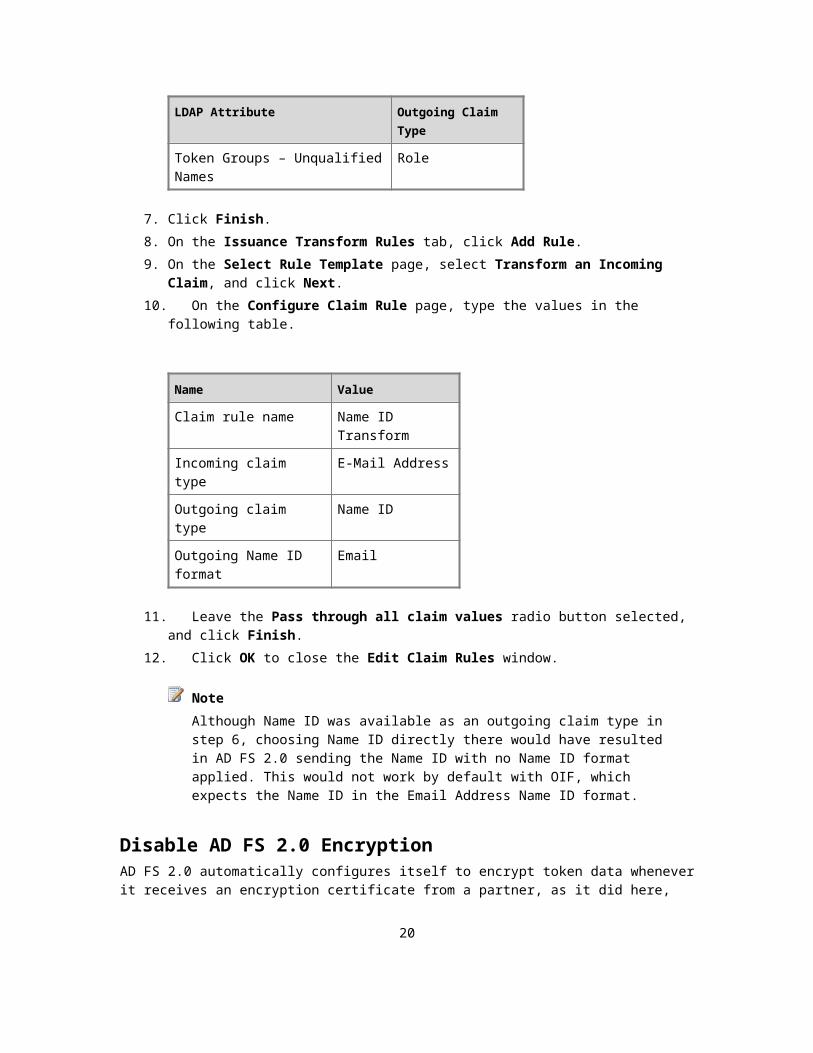
6. In the Mapping of LDAP attributes section, create the mappings in the following table.
LDAP Attribute Outgoing Claim Type
E-Mail-Addresses E-Mail Address
Token Groups – Unqualified Names Role
7. Click Finish.
8. On the Issuance Transform Rules tab, click Add Rule.
9. On the Select Rule Template page, select Transform an Incoming Claim, and click
Next.
10. On the Configure Claim Rule page, type the values in the following table.
15
To edit the claim rules for a relying party trust
Page 16
Name Value
Claim rule name Name ID Transform
Incoming claim type E-Mail Address
Outgoing claim type Name ID
Outgoing Name ID format Email
11. Leave the Pass through all claim values radio button selected, and click Finish.
12. Click OK to close the Edit Claim Rules window.
Note
Although Name ID was available as an outgoing claim type in step 6, choosing
Name ID directly there would have resulted in AD FS 2.0 sending the Name ID
with no Name ID format applied. This would not work by default with OIF, which
expects the Name ID in the Email Address Name ID format.
Disable AD FS 2.0 EncryptionAD FS 2.0 automatically configures itself to encrypt token data whenever it receives an
encryption certificate from a partner, as it did here, because OIF’s federation metadata document
included an encryption key that was auto-generated during OIF installation.
When performing encryption, AD FS 2.0 defaults to using 256-bit Advanced Encryption Standard
(AES) keys, or AES-256. In contrast, by default OIF supports only AES-128. To eliminate
decryption issues, follow the steps below to turn off encryption in tokens destined for Woodgrove
Bank.
1. On the AD FS 2.0 computer, click Start > Administrative Tools > Windows PowerShell
Modules.
2. At the Windows PowerShell™ command prompt, type
set-ADFSRelyingPartyTrust –TargetName orafed.woodgrovebank.com –EncryptClaims $False
3. Press ENTER.
An alternative way to address this issue is to upgrade OIF’s encryption capability.
Follow the instructions in section 8.4 of the Administrator’s Guide to Oracle
Identity Federation 11g (http://go.microsoft.com/fwlink/?LinkID=197149) to
download and install the Java Cryptography Extension (JCE) Unlimited Strength
Jurisdiction policy from Sun Microsystems.
You can make many configuration changes to AD FS 2.0 using the
Windows PowerShell command-line and scripting environment. For more
16
To disable encryption
Note Note
Page 17
information, see the AD FS 2.0 Windows PowerShell Administration section of
the AD FS 2.0 Operations Guide (http://go.microsoft.com/fwlink/?LinkId=194005)
and the AD FS 2.0 Cmdlets Reference (http://go.microsoft.com/fwlink/?
LinkId=177389).
Change AD FS 2.0 Signature AlgorithmWhen it acts as a relying party/service provider, OIF default behavior is to digitally sign
authnrequests that are sent to identity providers during SP-initiated SSO (which is described in
more detail below).
OIF uses the Secure Hash Algorithm 1 (SHA-1) for signing operations, while by default AD FS 2.0
expects partners to use SHA-256. Follow the steps below to set AD FS 2.0 to SHA-1 for
interoperability with OIF.
1. In the AD FS 2.0 center pane, under Relying Party Trusts, right-click
orafed.woodgrovebank.com, and then click Properties.
2. On the Advanced tab, in the Secure hash algorithm list, select SHA-1, and then click
OK.
Create Links for Initiating Federated AccessInitiating federated access to an OIF-protected application requires the use of a preformatted
hyperlink, unless the program is configured to integrate with Oracle Access Manager. The
hyperlink directs a user to a federation server to get a security token before being redirected to
the application. This link can be located either at the account side (for example, on a Contoso
employee portal page) or at the resource side (for example, on an unprotected
woodgrovebank.com site page providing authentication options).
Additionally, regardless of its physical location, the link can direct users to the OIF server (which
is called RP-initiated or SP-initiated SSO) or the AD FS 2.0 server (which is called IDP-initiated
SSO). The syntax of the link changes, depending on which model is chosen.
In this lab, you host the link on a web page on the OIF computer, which is served by IIS. You will
include both IDP- and SP-initiated SSO links. The links will result in federated access to an OIF-
supplied sample application.
1. On the OIF computer (orafed.woodgrovebank.com), navigate to c:\inetpub\wwwroot, and
create a new file called index.htm.
2. Right-click index.htm, and select Open With. Select Notepad to open the file.
17
To change the AD FS 2.0 signature algorithm
Note
An alternative way to handle this is to turn off the signing of Contoso-directed
authnrequests in OIF. On the Oracle Identity Federation Settings tab for the
Contoso trusted provider, clear the AuthnRequest check box in the Messages
to Send/Require Signed list, and click Apply.
To create links for initiating federated access
Page 18
3. Add the following to the document:
<p>Welcome to Woodgrove Bank</p>
<p>Test Links - From AD FS 2.0 to OIF</p>
<a href="https://orafed.woodgrovebank.com/fed/sp/initiatesso?providerid=http://
fsweb.contoso.com/adfs/services/trust”> Link to Test SP-initiated POST Single
Sign-On to OIF from AD FS 2.0 </a>
<p>
<a href="https://fsweb.contoso.com/adfs/ls/IdpInitiatedSignOn.aspx?
loginToRp=http://orafed.woodgrovebank.com:7777/fed/sp”> Link to Test IDP-
initiated POST Single Sign-On to OIF from AD FS 2.0</a>
4. Save and close the file.
Step 3: Test AD FS 2.0 as the Identity Provider and OIF as the Relying Party
In this scenario, Alan Shen from Contoso accesses the federated sample application at
woodgrovebank.com.
For the best results, clear all the cookies in Internet Explorer on the AD FS 2.0 computer
(fsweb.contoso.com). To clear the cookies, click Tools, click Internet Options, click
Delete under Browsing History, and then select cookies for deletion.
1. Log in to the console of the fsweb.contoso.com server using the CONTOSO\alansh
account.
2. Open a browser window and navigate to:
http://orafed.woodgrovebank.com.
3. Click either of the links to test SSO to OIF from AD FS 2.0.
At this point, you should see the OIF sample application. Notice the role claims that are sent from
inside Active Directory (for example, Domain Users) that are now available for use in the
federated application.
Review the log files for AD FS 2.0 in Event Viewer and for OIF in the Fusion Middleware Control
interface for more information.
18
Note
To access the woodgrovebank.com application
Page 19
Configure OIF auditing as described in Chapter 7 of the Administrator’s Guide to Oracle
Identity Federation 11g (http://go.microsoft.com/fwlink/?LinkID=197149) to see the
contents of the security tokens passing between environments.
In this lab, access to the OIF–protected application is somewhat controlled because it is
limited to users in the local OIF user store. For more robust access control, deploy OIF
with Oracle Access Manager.
Step 4: Configure OIF as the Identity Provider and AD FS 2.0 as the Relying Party
In this step, you configure a scenario in which a George Curio, a Woodgrove Bank user (using
OIF) gets federated access to the WIF sample application through AD FS 2.0. As before, this
scenario uses the SAML 2.0 POST profile.
Configure OIF
Add an Attribute to the OIF-Generated AssertionThe trusted provider that was created earlier for Contoso already includes the basic information
that OIF needs to generate security tokens for the Contoso sample application. We will make
some adjustments to add capabilities to the use case. The first is to add the user’s full name as
an attribute to the OIF-generated assertion, which will be used as the screen name in the
Contoso sample application.
1. In the Fusion Middleware Control interface, in the navigation tree on the left, right-click OIF in
the Identity and Access folder, and select Administration > Federations.
2. On the Federations page, click the provider with the Provider ID
http://fsweb.contoso.com/adfs/services/trust, and then click Edit.
3. On the Edit Trusted Provider page under the Oracle Identity Federation Settings tab, select
the Enable Attributes in Single Sign-On (SSO) check box.
4. On the next line, select the Email Address Name ID format check box, and then click Apply.
5. Under the Oracle Identity Federation Settings tab, click Edit next to Attribute Mapping and
Filters.
6. On the Attribute Mapping and Filters page, click the Name Mappings tab, and then click
Add.
19
Note
Note
To add the Name attribute to the OIF-generated security token
Page 20
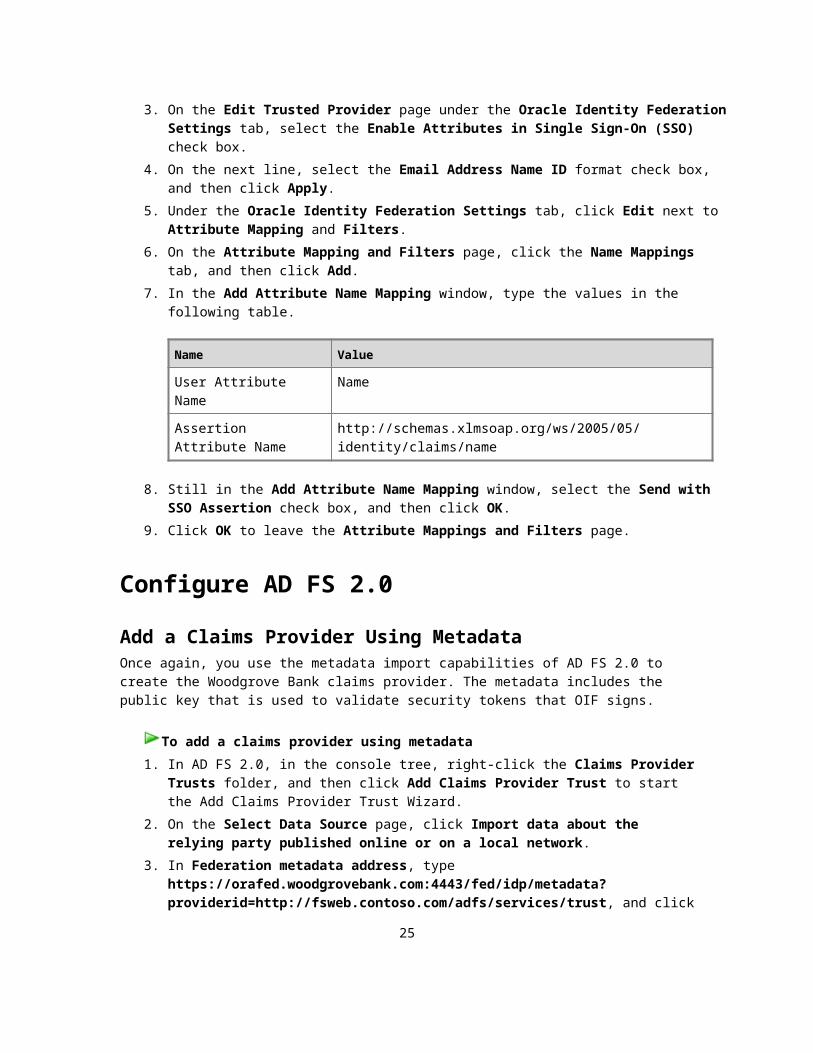
7. In the Add Attribute Name Mapping window, type the values in the following table.
Name Value
User Attribute Name Name
Assertion Attribute Name http://schemas.xlmsoap.org/ws/2005/05/identity/claims/name
8. Still in the Add Attribute Name Mapping window, select the Send with SSO Assertion check
box, and then click OK.
9. Click OK to leave the Attribute Mappings and Filters page.
Configure AD FS 2.0
Add a Claims Provider Using MetadataOnce again, you use the metadata import capabilities of AD FS 2.0 to create the Woodgrove
Bank claims provider. The metadata includes the public key that is used to validate security
tokens that OIF signs.
1. In AD FS 2.0, in the console tree, right-click the Claims Provider Trusts folder, and then
click Add Claims Provider Trust to start the Add Claims Provider Trust Wizard.
2. On the Select Data Source page, click Import data about the relying party published
online or on a local network.
3. In Federation metadata address, type
https://orafed.woodgrovebank.com:4443/fed/idp/metadata?providerid=http://
fsweb.contoso.com/adfs/services/trust, and click Next.
4. Click OK to acknowledge that some metadata that AD FS 2.0 does not understand will be
skipped.
5. In the Specify Display Name page, type Woodgrove Bank, and click Next.
6. Click Next, and then click Close.
Edit Claim Rules for Claims Provider TrustThe following claim rule describes how data from OIF is used in the security token that is sent to
the WIF sample application.
1. The Edit Claim Rules window should be open. If not, in the AD FS 2.0 center pane,
under Claims Provider Trusts, right-click Woodgrove Bank, and then click Edit Claim
20
To add a claims provider using metadata
To edit the claim rule for a claims provider trust
Page 21
Rules.
2. On the Acceptance Transform Rules tab, click Add Rule.
3. In the Select Rule Template page, select the Pass Through or Filter an Incoming
Claim box, and then click Next.
4. In the Configure Claim Rule page, use the values in the following table.
Name Value
Claim rule name Name ID Rule
Incoming claim type Name ID
Incoming name ID format Email
5. Select the Pass through only claim values that match a specific email suffix value
option. In Email suffix value, type woodgrovebank.com, and then click Finish.
6. Click Add Rule again.
7. On the Select Rule Template page, select the Pass Through or Filter an Incoming
Claim check box, and then click Next.
8. In the Configure Claim Rule page, in Claim rule name, use the values in the following
table.
Name Value
Claim rule name Name Rule
Incoming claim type Name
9. Leave the Pass through all claim values option selected, and then click Finish.
10. To acknowledge the security warning, click Yes.
11. Click OK.
Edit Claim Rules for the WIF Sample ApplicationAt this point, incoming claims have been received at AD FS 2.0, but rules that describe what to
send to the WIF sample application have not yet been created. You now edit the existing claim
rules for the sample application to take into account the new OIF external claims provider.
1. In AD FS 2.0, in the left navigation area, under Relying Party Trusts, right-click WIF
Sample App, and then click Edit Claim Rules.
2. On the Issuance Transform Rules tab, click Add Rule.
3. On the Select Rule Template page, select Pass Through or Filter an Incoming Claim,
21
To edit the claim rules for the WIF sample application
Page 22
and then click Next.
4. On the Configure Claim Rule page, type the values in the following table.
Name Value
Claim rule name Pass Name ID Rule
Incoming claim type Name ID
Incoming Name ID format Email
5. Leave the Pass through all claim values option selected, and then click Finish.
6. Click Add Rule again.
7. On the Select Rule Template page, select Pass Through or Filter an Incoming Claim,
and then click Next.
8. On the Configure Claim Rule page, type the values in the following table.
Name Value
Claim rule name Pass Name Rule
Incoming claim type Name
9. Leave the Pass through all claim values option selected, and then click Finish.
10. Click OK.
Note
If you configured the optional Step 6: Change Authorization Rules when you were
testing the original AD FS 2.0 with WIF Step-by-Step Guide deployment, ensure
that you add back the Permit All Users issuance authorization rules for the WIF
sample application before testing this scenario. Or, as an alternative, add a new
Permit or Deny Users Based on an Incoming Claim rule, allowing incoming
Name ID = [email protected] to access the application.
Change AD FS 2.0 Signature AlgorithmWhen it signs assertions, OIF uses the Secure Hash Algorithm 1 (SHA-1) for signing operations,
while AD FS 2.0 by default expects partners to use SHA-256. Follow the steps below to set
AD FS 2.0 to SHA-1 for interoperability with OIF.
1. In the AD FS 2.0 center pane, under Claims Provider Trusts, right-click
orafed.woodgrovebank.com, and then click Properties.
2. On the Advanced tab, in the Secure hash algorithm list, select SHA-1, and then click
22
To change the AD FS 2.0 signature algorithm
Page 23
OK.
Create Link for Initiating Federated Access (optional)The act of initiating federated access to an AD FS 2.0-protected application can use a
preformatted hyperlink, or a user can visit the application directly and take advantage of a feature
in AD FS 2.0 called home realm discovery. This is essentially SP-initiated SSO, because it results
in AD FS 2.0 sending an authnrequest to OIF, but it provides an interface to allow a user to select
their IDP from a list.
In this lab, we will access the application directly and use home realm discovery. However, as an
option, we will also host an SP-initiated SSO (from AD FS 2.0) link on our IIS page.
AD FS 2.0 does not support SAML 2.0-based IDP-initiated SSO to a WIF relying party
application.
1. On the OIF computer (orafed.woodgrovebank.com), navigate to c:\inetpub\wwwroot\
index.htm.
2. Right-click index.htm, and select Open With. Select Notepad to open the file.
3. Add the following to the end of the document:
<p>Test Links – From OIF to AD FS 2.0</p>
<a href="https://fsweb.contoso.com/adfs/ls/?wa=wsignin1.0&wtrealm=
https://fsweb.contoso.com/ClaimsAwareWebAppWithManagedSTS/default.aspx&
whr=http://orafed.woodgrovebank.com:7777/fed/idp”> Link to Test SP-Initiated
POST Single Sign-On to OIF from AD FS 2.0</a>
4. Save and close the file.
Step 5: Test OIF as the Identity Provider and AD FS 2.0 as the Relying Party
In this scenario, George Curio (georgec) from Woodgrove Bank accesses the Contoso WIF
sample application.
23
Note
To create a link for initiating federated access
Page 24
Clear all the cookies in Internet Explorer on the OIF computer
(orafed.woodgrovebank.com). To clear the cookies, click Tools, click Internet Options,
click Delete under Browsing History, and then select cookies for deletion.
1. On the OIF computer, open a browser window and navigate to
https://fsweb.contoso.com/ClaimsAwareWebAppWithManagedSTS/default.aspx.
2. The first page prompts you to select your organization from a list. Select Woodgrove
Bank from the list, and then click Continue to Sign In.
Note
This page did not appear in the previous example when you were redirected to
AD FS 2.0. This is because at that point there was only one identity provider
registered in AD FS 2.0. When only one IDP is available, AD FS 2.0 defaults to
forwarding requests to that IDP.
3. The OIF forms logon page appears. Log in with the user name georgec and the
password you created for the user earlier, and then click Sign in.
4. If you created the optional preformatted hyperlink earlier, you can try it now. Clear
cookies, visit http://orafed.woodgrovebank.com, and select the link to test SP-initiated
SSO to OIF from AD FS 2.0.
When you access the WIF application, note the presence of the name claim, which was an
additional assertion attribute. Also note the NameIdentifier claim, which successfully passed the
rule limitation of using only addresses with the woodgrovebank.com suffix.
Review the log files for AD FS 2.0 in Event Viewer and for OIF in the Fusion Middleware Control
interface for more information.
Configure OIF auditing as described in Chapter 7 of the Administrator’s Guide to Oracle
Identity Federation 11g (http://go.microsoft.com/fwlink/?LinkID=197149) to see the
contents of the security tokens passing between environments.
24
Note
To access the Contoso sample application
Note
Page 25
Appendix
The purpose of this section is to highlight other possibilities that are outside the scope of this
document but that are available to architects when they are deploying federation between
AD FS 2.0 and OIF.
WS-Federation SupportAD FS 2.0 continues to support the WS-Federation protocol for Web-based federation and SSO.
OIF also supports WS-Federation.
For information about how to deploy a test lab between OIF and AD FS using WS-Federation,
see the legacy ADFS Step-by-Step Guide: Federation with Oracle Identity Federation
(http://go.microsoft.com/fwlink/?LinkId=197273).
Certification Authority-Issued Token-Signing CertificatesFor security reasons, production federation deployments require the use of digitally signed
security tokens. This lab uses self-signed private key certificates, generated from inside the
AD FS 2.0 and OIF products, for signing security tokens.
As an alternative, organizations can use a private key certificate that a certification authority (CA)
issues for security token-signing. The primary benefit of using certificates issued from a CA for
token-signing is the ability to check for possible certificate revocation against the certificate
revocation list (CRL) from the issuing CA when acting as a relying party or service provider.
In OIF, CRL checking is not enabled by default. An administrator can add a CRL-checking step
through the OIF interface. In AD FS 2.0, CRL checking is enabled by default for all claims
provider trusts. This has implications in federation deployments between OIF (acting as an IDP)
and AD FS 2.0 (acting as an RP):
If the signing private key that OIF uses includes a CRL Distribution Point (CDP) extension,
that location must be accessible by the AD FS 2.0 federation server, or CRL checking fails,
resulting in a failed access attempt. CDP extensions are added by default to certificates that
are issued by Active Directory Certificate Services (AD CS) in Windows Server 2008 R2.
If the signing private key does not include a CDP extension, AD FS 2.0 performs no CRL
checking.
You can turn off CRL checking for a specific claims provider trust by using the
Windows PowerShell. For more information, see the AD FS 2.0 Windows PowerShell
Administration section of the AD FS 2.0 Operations Guide (http://go.microsoft.com/fwlink/?
LinkId=194005) and the AD FS 2.0 Cmdlets Reference (http://go.microsoft.com/fwlink/?
LinkId=177389).
25
Page 26
Federated LogoutBoth AD FS 2.0 and OIF include support for federated single logout. Federated single logout
makes it possible for a user to log out completely from their IDP federation server, as well as any
replying party applications that are federated through a particular browser session. Federated
logout improves security by ensuring that no sessions are left open for misuse, hijacking, or other
malicious actions.
SAML 2.0 Artifact ProfileBoth AD FS 2.0 and OIF support the SAML 2.0 HTTP artifact binding as part of their support for
the SAML 2.0 protocol. The artifact profile differs in approach from the HTTP POST profile, and it
may be preferred in some situations.
Alternative Authentication Methods (OIF as IDP)In this lab, when OIF acts as the IDP, the user who needs a security token authenticates to OIF
through forms authentication. OIF supports other methods of authentication to the federation
server, including:
Basic authentication.
Integration with Oracle Access Manager. OIF provides silent authentication based on the
pre-existence of an OAM user session, taking advantage of the authentication methods that
are available in OAM, including Integrated Windows Authentication (IWA).
Integration with Oracle Single Sign-On. OIF provides silent authentication based on the
pre-existence of an OSSO user session, taking advantage of the authentication methods that
are available in OSSO, including Windows Native Authentication (WNA).
Persistent and Transient Name IDsBoth AD FS 2.0 and OIF support the use of persistent and transient Name IDs in SAML 2.0
security tokens. Both types of Name ID use an opaque, alphanumeric string to represent a user,
instead of a readable and understandable value (such as an email address, which is used in this
lab).
A persistent Name ID uses the same alphanumeric value in each request from a given user, while
a transient Name ID changes in each browser session. Persistent Name IDs are useful in
account-linking scenarios, because they can be appended to an application-side user account
and then used like any other attribute for user disambiguation. Transient Name IDs are useful in
cases in which a user identity is not needed at the application—only confidence that the user
successfully authenticated at a trusted relying party—but an ID that tracks back to a specific user
is needed for repudiation and similar purposes.
The following table is a summary of the capabilities in this area.
26
Page 27
AD FS as IDP / FM as SP FM as IDP / ADFS as RP
Persistent Name ID /
account linkingWORKS
AD FS does not support
account linking scenario
Transient Name ID / pseudo-
anonymous accessWORKS WORKS
URLs for Initiating SSOBoth AD FS 2.0 and OIF support the use of parameters in hard-coded URLs that initiate the
federation process at a federation server that performs either the IDP or the relying party or SP
role.
For more information about building preformatted hyperlinks directed at OIF, see
section 4.2 of the Administrator’s Guide to Oracle Identity Federation 11g
(http://go.microsoft.com/fwlink/?LinkID=197149).
27
Note