ADMe Configuration steps and screenshots with NetWorker as
Backup Software
ABSTRACT This document provides ADMe Configuration steps and screenshots with NetWorker as Backup Software
October 2016
Copyright copy 2014 EMC Corporation All Rights Reserved EMC believes the information in this publication is accurate as of its publication date The information is subject to change without notice
The information in this publication is provided ldquoas isrdquo EMC Corporation makes no representations or warranties of any kind with respect to the information in this publication and specifically disclaims implied warranties of merchantability or fitness for a particular purpose Use copying and distribution of any EMC software described in this publication requires an applicable software license For the most up-to-date listing of EMC product names see EMC Corporation Trademarks on EMCcom
PART Number ndash H15523
Contents Executive Summary 3
Revision History 4
On Avamar Server 5
On NetWorker ServerStaging Server 7
ADMe Configuration (via ADMe GUI) 8
Start ADMe GUI 8
Create ldquoEnvironment Filerdquo 9
Client Group Configuration 9
Job Policy Configuration 11
Scheduling Job Policies 14
ADMe Configuration (via ADMe CLI) 16
Create ldquoEnvironment Filerdquo 16
Client Group Configuration 18
Job Policy Configuration 20
Backup Policy Configuration at the Backup Application (here EMC NetWorker 9002) 22
Recovery 30
Reference documents are available at 31
Executive Summary Avamar Data Migration Enabler (ADMe) is a software tool for migrating Avamar backup data to a different storage medium such as tape cloud storage or standalone USB drives
Backup data selected for migration is rehydrated to a staging server where it can be staged to the various storage types or export to tape using a tape backup product such as EMC NetWorker
For recovery migrated files can then be retrieved from storage or restored from tape using the backup applications native recovery tools
Revision History Revision Date Description A01 01st Oct 2016 First release of ADMe
Configuration steps and screenshots with NetWorker as Backup Software
On Avamar Server 1) Download adme-tar-versiontar and adme-versionwar (Avamar Data Migration Enabler 10 Web GUI) file from
2) Download mailx-122-1433x86_64rpm and ksh-93t-998x86_64rpm from httpscommunityemccomdocsDOC-7910
3) Transfer all the 4 files to tmp folder
4) Install Korn Shell
5) Install mailx
6) Create directory atoadmin
7) Transfer adme-tar-versiontar and adme-versionwar to the atoadmin directory
8) Rename adme-versionwar to admewar
9) and copy admewar to atoadmin on ADMe server and run below command
10) Unpack the adme-versiontar file
11) Install appropriate NetWorker Client for Linux
12) Launch Avamar GUI Create domain by name ldquoADMErdquo
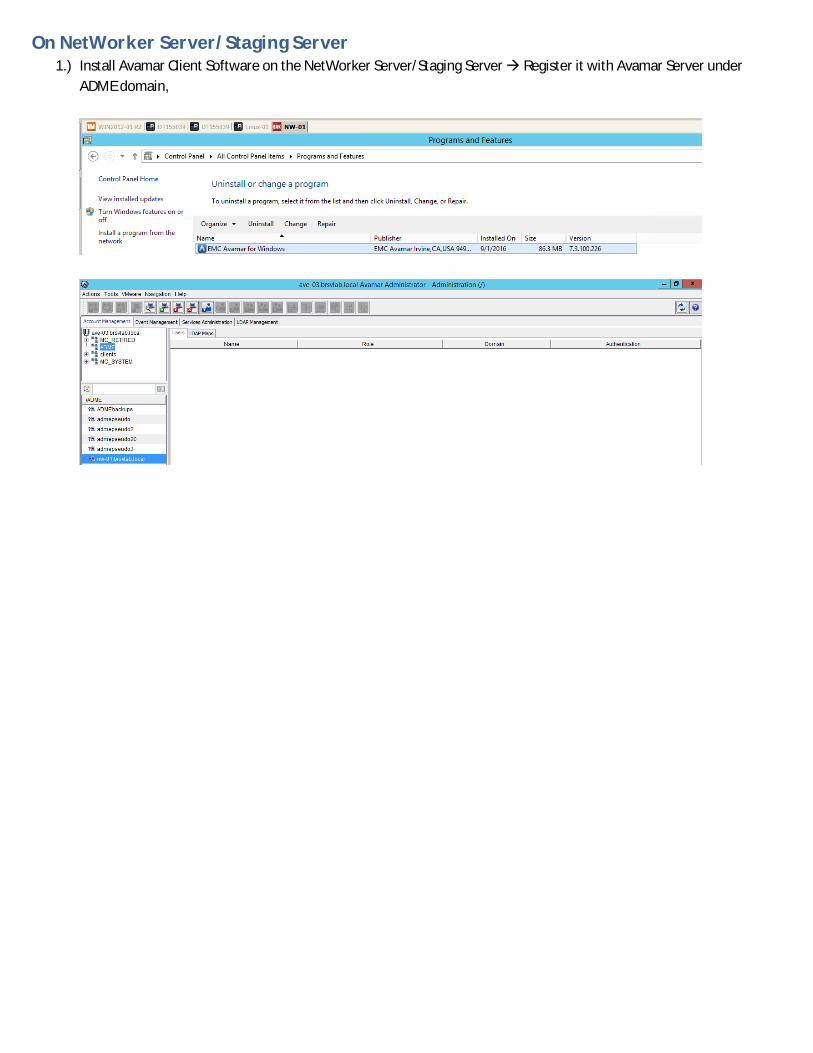
On NetWorker ServerStaging Server 1) Install Avamar Client Software on the NetWorker ServerStaging Server Register it with Avamar Server under
ADME domain
ADMe Configuration (via ADMe GUI)
Start ADMe GUI 1) Open any compatible browser and type httpsltAvamar-servergt8888
2) Enter user name = MCUser and its password
Create ldquoEnvironment Filerdquo 1) Click on ldquoEnvironmentrdquo Click on ldquo+rdquo sign
2) Update below parameters a Export Server Hostname b Export Method c Staging Server d Staging Server OS Type e Mail To Address f Error Mail To Address
Client Group Configuration 1) Click on ldquoClient Configrdquo Click on ldquo+rdquo sign at ldquoClient Groupsrdquo
2) Update below parameters
a Group Name b Label Name Filter c Retention Tag Value d Exclude Files e Include Files f Staging Path g Staging Server OS Type h Destination Path Suffix i Monthly Tape Policy j Yearly Tape Policy k Server Tape Policy
3) You may add additional client to the created groups click on ldquo+rdquo sign
4) Click on ldquo rdquo sign to calculate the ldquoGroup Sizerdquo ndash for which we need to perform export
Job Policy Configuration 1) Click on ldquo+rdquo sign at ldquoJob-Policiesrdquo
2) Update below parameters at ldquoBackup Selection Criteriardquo (whichever is applicable) and click ldquoNextrdquo
a Job Name b Environment- c Group d Plug-IN Type e First or Last f Retention Tag g Days of Week h Week Num i Include Backup j LabelName Field String k Define Search Date Range
3) Update below parameters at ldquoBackup Migration Criteriardquo (whichever is applicable) and click on ldquoCreate Jobrdquo
a Data Migration Action b Recovery Method c Staging Method d As an Archive e Purge Migrated Backups-ID(s) f Staging Path Suffix g Post Migration User Script h Folder Include or Exclude i Export Policy Override j Include Meta Data Listing k Custom Avtar Flags l Cloud Expiry Date
Scheduling Job Policies 1) Right click on ldquoJob-Policiesrdquo select ldquoSchedule-Modifyrdquo update the required parameters click on ldquoSaverdquo
ADMe Configuration (via ADMe CLI)
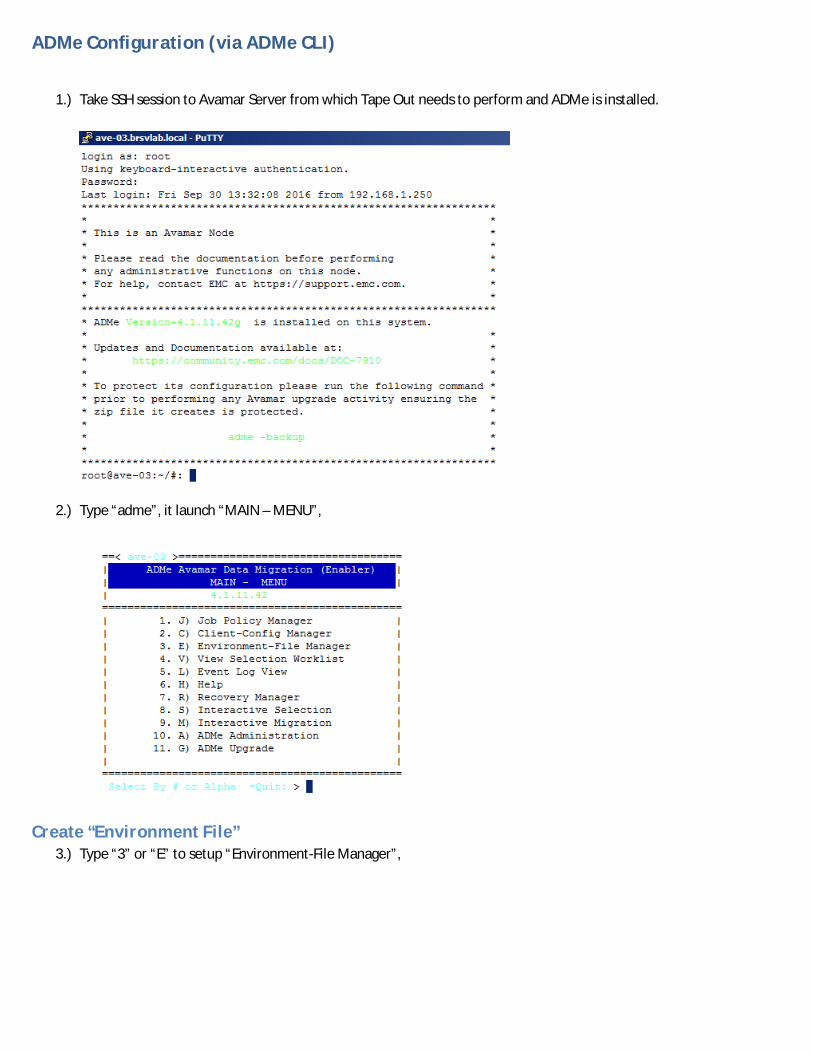
1) Take SSH session to Avamar Server from which Tape Out needs to perform and ADMe is installed
2) Type ldquoadmerdquo it launch ldquoMAIN ndash MENUrdquo
Create ldquoEnvironment Filerdquo 3) Type ldquo3rdquo or ldquoErdquo to setup ldquoEnvironment-File Managerrdquo
4) Update the environment file by selecting options 1 2 3 4 and 5 Below is the sample ldquoEnvironment Filerdquo
5) Click on ldquoParse-Checkrdquo to validate ldquoEnvironement-Filerdquo
6) Ensure that ldquoParse-Checkrdquo completes without any error
Client Group Configuration
1) Type ldquo2rdquo or ldquoCrdquo to setup ldquoClient-Config Managerrdquo
2) Select domain by entering number
3) Select the client(s) by typing ldquoArdquo
4) Either enter the client to the existing group or new group and update required fields ndash most important fields are ndash Fld-7 Fld-10 Fld-12 type ldquoCrdquo for commit
5) Enter ldquoQrdquo to come out of ldquoClient Group Configurationrdquo
Job Policy Configuration
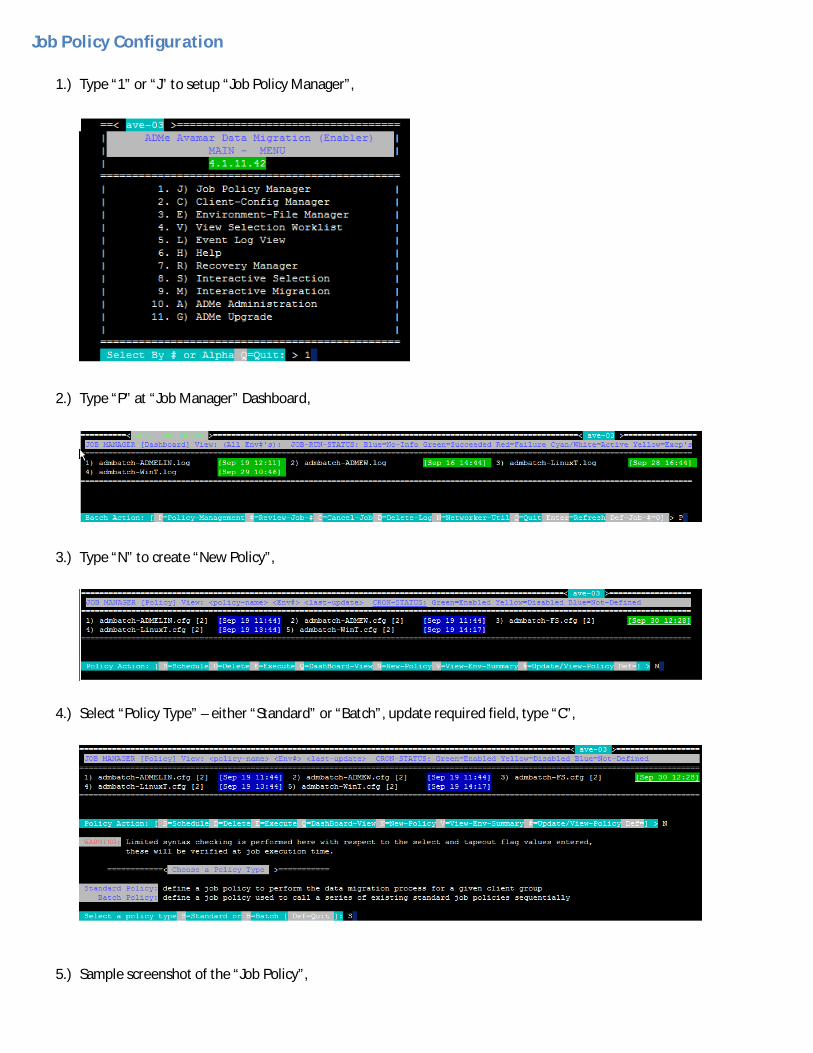
1) Type ldquo1rdquo or ldquoJrdquo to setup ldquoJob Policy Managerrdquo
2) Type ldquoPrdquo at ldquoJob Managerrdquo Dashboard
3) Type ldquoNrdquo to create ldquoNew Policyrdquo
4) Select ldquoPolicy Typerdquo ndash either ldquoStandardrdquo or ldquoBatchrdquo update required field type ldquoCrdquo
5) Sample screenshot of the ldquoJob Policyrdquo
Backup Policy Configuration at the Backup Application (here EMC NetWorker 9002) 1) Launch NMC (NetWorker Management Console) 2) Click on ldquoDevicesrdquo configure devices like - tape library (ATLVTL) AFTD (from CloudBoost) media pool
3) Click on ldquoProtectionrdquo 4) Click on ldquoClientsrdquo right click and select ldquoNew Client Wizardrdquo complete all the fields click on ldquoCreate click on ldquoFinishrdquo
5) Update saveset as per the staging path defined at ldquoClient Grouprdquo
6) Click on ldquoGroupsrdquo right-click and select ldquoNewrdquo select the client click ldquoOKrdquo
7) Click on ldquoPoliciesrdquo right-click and select ldquoNewrdquo
8) Click on ldquoCreate a new Workflowrdquo
9) Update the ldquoWorkflow Namerdquo select the ldquoGrouprdquo click on ldquoAddrdquo at ldquoActionsrdquo
10) Update ldquoAction Namerdquo update ldquoActionrdquo click on ldquoNextrdquo
11) Select ldquoDestination Poolrdquo click on ldquoNextrdquo
12) Review the configuration and click on ldquoConfigurerdquo click on ldquoOKrdquo
Recovery
1) Exported backups can be recover from the backup applicationrsquos recovery wizard 2) Kindly refer ldquoNetWorker Administration Guiderdquo for more details
Reference documents are available at
1) Documentation (always check for the latest documentation) a Refer ldquoAvamar 73 Data Migration Enabler User Guiderdquo at httpssupportemccomproducts779_Avamar-
Data-Migration-Enabler b Refer below documents at httpscommunityemccomdocsDOC-7910
i ADME_planning_questionnaire12doc ii ADME_compatibility_Guidepdf
iii ADME User Guidepdf iv adme_qapdf v Tapeout_LTR_comparison_chartpdf vi Migration_GSAN_to_DDpdf
2) Software can be downloaded from (always check for the latest software)
a httpssupportemccomproducts779_Avamar-Data-Migration-Enabler b Software are
i Avamar Data Migration Enabler 4111 ii Avamar Data Migration Enabler 10 Web GUI
c httpscommunityemccomdocsDOC-7910 d Software are
i mailx-122-1433x86_64rpm ii ksh-93t-998x86_64rpm
iii adme-tar-4-1-11-42gtar
Contents Executive Summary 3
Revision History 4
On Avamar Server 5
On NetWorker ServerStaging Server 7
ADMe Configuration (via ADMe GUI) 8
Start ADMe GUI 8
Create ldquoEnvironment Filerdquo 9
Client Group Configuration 9
Job Policy Configuration 11
Scheduling Job Policies 14
ADMe Configuration (via ADMe CLI) 16
Create ldquoEnvironment Filerdquo 16
Client Group Configuration 18
Job Policy Configuration 20
Backup Policy Configuration at the Backup Application (here EMC NetWorker 9002) 22
Recovery 30
Reference documents are available at 31
Executive Summary Avamar Data Migration Enabler (ADMe) is a software tool for migrating Avamar backup data to a different storage medium such as tape cloud storage or standalone USB drives
Backup data selected for migration is rehydrated to a staging server where it can be staged to the various storage types or export to tape using a tape backup product such as EMC NetWorker
For recovery migrated files can then be retrieved from storage or restored from tape using the backup applications native recovery tools
Revision History Revision Date Description A01 01st Oct 2016 First release of ADMe
Configuration steps and screenshots with NetWorker as Backup Software
On Avamar Server 1) Download adme-tar-versiontar and adme-versionwar (Avamar Data Migration Enabler 10 Web GUI) file from
2) Download mailx-122-1433x86_64rpm and ksh-93t-998x86_64rpm from httpscommunityemccomdocsDOC-7910
3) Transfer all the 4 files to tmp folder
4) Install Korn Shell
5) Install mailx
6) Create directory atoadmin
7) Transfer adme-tar-versiontar and adme-versionwar to the atoadmin directory
8) Rename adme-versionwar to admewar
9) and copy admewar to atoadmin on ADMe server and run below command
10) Unpack the adme-versiontar file
11) Install appropriate NetWorker Client for Linux
12) Launch Avamar GUI Create domain by name ldquoADMErdquo
On NetWorker ServerStaging Server 1) Install Avamar Client Software on the NetWorker ServerStaging Server Register it with Avamar Server under
ADME domain
ADMe Configuration (via ADMe GUI)
Start ADMe GUI 1) Open any compatible browser and type httpsltAvamar-servergt8888
2) Enter user name = MCUser and its password
Create ldquoEnvironment Filerdquo 1) Click on ldquoEnvironmentrdquo Click on ldquo+rdquo sign
2) Update below parameters a Export Server Hostname b Export Method c Staging Server d Staging Server OS Type e Mail To Address f Error Mail To Address
Client Group Configuration 1) Click on ldquoClient Configrdquo Click on ldquo+rdquo sign at ldquoClient Groupsrdquo
2) Update below parameters
a Group Name b Label Name Filter c Retention Tag Value d Exclude Files e Include Files f Staging Path g Staging Server OS Type h Destination Path Suffix i Monthly Tape Policy j Yearly Tape Policy k Server Tape Policy
3) You may add additional client to the created groups click on ldquo+rdquo sign
4) Click on ldquo rdquo sign to calculate the ldquoGroup Sizerdquo ndash for which we need to perform export
Job Policy Configuration 1) Click on ldquo+rdquo sign at ldquoJob-Policiesrdquo
2) Update below parameters at ldquoBackup Selection Criteriardquo (whichever is applicable) and click ldquoNextrdquo
a Job Name b Environment- c Group d Plug-IN Type e First or Last f Retention Tag g Days of Week h Week Num i Include Backup j LabelName Field String k Define Search Date Range
3) Update below parameters at ldquoBackup Migration Criteriardquo (whichever is applicable) and click on ldquoCreate Jobrdquo
a Data Migration Action b Recovery Method c Staging Method d As an Archive e Purge Migrated Backups-ID(s) f Staging Path Suffix g Post Migration User Script h Folder Include or Exclude i Export Policy Override j Include Meta Data Listing k Custom Avtar Flags l Cloud Expiry Date
Scheduling Job Policies 1) Right click on ldquoJob-Policiesrdquo select ldquoSchedule-Modifyrdquo update the required parameters click on ldquoSaverdquo
ADMe Configuration (via ADMe CLI)
1) Take SSH session to Avamar Server from which Tape Out needs to perform and ADMe is installed
2) Type ldquoadmerdquo it launch ldquoMAIN ndash MENUrdquo
Create ldquoEnvironment Filerdquo 3) Type ldquo3rdquo or ldquoErdquo to setup ldquoEnvironment-File Managerrdquo
4) Update the environment file by selecting options 1 2 3 4 and 5 Below is the sample ldquoEnvironment Filerdquo
5) Click on ldquoParse-Checkrdquo to validate ldquoEnvironement-Filerdquo
6) Ensure that ldquoParse-Checkrdquo completes without any error
Client Group Configuration
1) Type ldquo2rdquo or ldquoCrdquo to setup ldquoClient-Config Managerrdquo
2) Select domain by entering number
3) Select the client(s) by typing ldquoArdquo
4) Either enter the client to the existing group or new group and update required fields ndash most important fields are ndash Fld-7 Fld-10 Fld-12 type ldquoCrdquo for commit
5) Enter ldquoQrdquo to come out of ldquoClient Group Configurationrdquo
Job Policy Configuration
1) Type ldquo1rdquo or ldquoJrdquo to setup ldquoJob Policy Managerrdquo
2) Type ldquoPrdquo at ldquoJob Managerrdquo Dashboard
3) Type ldquoNrdquo to create ldquoNew Policyrdquo
4) Select ldquoPolicy Typerdquo ndash either ldquoStandardrdquo or ldquoBatchrdquo update required field type ldquoCrdquo
5) Sample screenshot of the ldquoJob Policyrdquo
Backup Policy Configuration at the Backup Application (here EMC NetWorker 9002) 1) Launch NMC (NetWorker Management Console) 2) Click on ldquoDevicesrdquo configure devices like - tape library (ATLVTL) AFTD (from CloudBoost) media pool
3) Click on ldquoProtectionrdquo 4) Click on ldquoClientsrdquo right click and select ldquoNew Client Wizardrdquo complete all the fields click on ldquoCreate click on ldquoFinishrdquo
5) Update saveset as per the staging path defined at ldquoClient Grouprdquo
6) Click on ldquoGroupsrdquo right-click and select ldquoNewrdquo select the client click ldquoOKrdquo
7) Click on ldquoPoliciesrdquo right-click and select ldquoNewrdquo
8) Click on ldquoCreate a new Workflowrdquo
9) Update the ldquoWorkflow Namerdquo select the ldquoGrouprdquo click on ldquoAddrdquo at ldquoActionsrdquo
10) Update ldquoAction Namerdquo update ldquoActionrdquo click on ldquoNextrdquo
11) Select ldquoDestination Poolrdquo click on ldquoNextrdquo
12) Review the configuration and click on ldquoConfigurerdquo click on ldquoOKrdquo
Recovery
1) Exported backups can be recover from the backup applicationrsquos recovery wizard 2) Kindly refer ldquoNetWorker Administration Guiderdquo for more details
Reference documents are available at
1) Documentation (always check for the latest documentation) a Refer ldquoAvamar 73 Data Migration Enabler User Guiderdquo at httpssupportemccomproducts779_Avamar-
Data-Migration-Enabler b Refer below documents at httpscommunityemccomdocsDOC-7910
i ADME_planning_questionnaire12doc ii ADME_compatibility_Guidepdf
iii ADME User Guidepdf iv adme_qapdf v Tapeout_LTR_comparison_chartpdf vi Migration_GSAN_to_DDpdf
2) Software can be downloaded from (always check for the latest software)
a httpssupportemccomproducts779_Avamar-Data-Migration-Enabler b Software are
i Avamar Data Migration Enabler 4111 ii Avamar Data Migration Enabler 10 Web GUI
c httpscommunityemccomdocsDOC-7910 d Software are
i mailx-122-1433x86_64rpm ii ksh-93t-998x86_64rpm
iii adme-tar-4-1-11-42gtar
Reference documents are available at
1) Documentation (always check for the latest documentation) a Refer ldquoAvamar 73 Data Migration Enabler User Guiderdquo at httpssupportemccomproducts779_Avamar-
Data-Migration-Enabler b Refer below documents at httpscommunityemccomdocsDOC-7910
i ADME_planning_questionnaire12doc ii ADME_compatibility_Guidepdf
iii ADME User Guidepdf iv adme_qapdf v Tapeout_LTR_comparison_chartpdf vi Migration_GSAN_to_DDpdf
2) Software can be downloaded from (always check for the latest software)
a httpssupportemccomproducts779_Avamar-Data-Migration-Enabler b Software are
i Avamar Data Migration Enabler 4111 ii Avamar Data Migration Enabler 10 Web GUI