248
TestDirector Administrator’s Guide Version 8.0
| Date post: | 26-Oct-2014 |
| Category: |
Documents |
| Upload: | youssef-el-deberky |
| View: | 104 times |
| Download: | 4 times |

TestDirectorAdministrator’s Guide
Version 8.0

TestDirector Administrator’s Guide, Version 8.0
This manual, and the accompanying software and other documentation, is protected by U.S. and international copyright laws, and may be used only in accordance with the accompanying license agreement. Features of the software, and of other products and services of Mercury Interactive Corporation, may be covered by one or more of the following patents: U.S. Patent Nos. 5,701,139; 5,657,438; 5,511,185; 5,870,559; 5,958,008; 5,974,572; 6,138,157; 6,144,962; 6,205,122; 6,237,006; 6,341,310; 6,360,332, 6,449,739; 6,470,383; 6,477,483; 6,549,944; 6,560,564; and 6,564,342.6,564,342; 6,587,969; 6,631,408; 6,631,411; 6,633,912 and 6,694,288. Other patents pending. All rights reserved.
Mercury, Mercury Interactive, the Mercury Interactive logo, LoadRunner, LoadRunner TestCenter, QuickTest Professional, SiteScope, SiteSeer, TestDirector, Topaz and WinRunner are trademarks or registered trademarks of Mercury Interactive Corporation or its subsidiaries, in the United States and/or other countries. The absence of a trademark from this list does not constitute a waiver of Mercury Interactive's intellectual property rights concerning that trademark.
All other company, brand and product names are registered trademarks or trademarks of their respective holders. Mercury Interactive Corporation disclaims any responsibility for specifying which marks are owned by which companies or which organizations.
Mercury Interactive Corporation379 North Whisman RoadMountain View, CA 94043Tel: (650) 603-5200Toll Free: (800) TEST-911Customer Support: (877) TEST-HLPFax: (650) 603-5300
© 2004 Mercury Interactive Corporation, All rights reserved
If you have any comments or suggestions regarding this document, please send them via e-mail to [email protected].
TDAG8.0/03

iii
Table of Contents
Welcome to TestDirector Administration........................................... viiUsing This Guide ............................................................................... viiiTestDirector Documentation Set....................................................... viiiOnline Resources ..................................................................................ixDocumentation Updates .......................................................................xTypographical Conventions..................................................................x
PART I: PROJECT CUSTOMIZATION
Chapter 1: Project Customization at a Glance .....................................3Starting Project Customization .............................................................3Understanding the Project Customization Window ............................7
Chapter 2: Managing Users in a Project ...............................................9About Managing Users in a Project.......................................................9Adding a User to a Project ...................................................................10Assigning Users to a User Group .........................................................12Removing a User from a Project..........................................................14
Chapter 3: Managing User Groups and Permissions..........................15About Managing User Groups and Permissions .................................16Adding User Groups ............................................................................17Setting User Group Permissions .........................................................19Setting Transition Rules ......................................................................23Hiding Data for a User Group .............................................................27Assigning Existing Sets of Permissions to User Groups ......................30Renaming User Groups .......................................................................30Deleting User Groups ..........................................................................31Understanding the Permission Settings Tasks ....................................31Customizing Module Access for User Groups.....................................42

Table of Contents
iv
Chapter 4: Customizing TestDirector Projects ..................................45About Customizing TestDirector Projects ...........................................45Customizing Project Entities ..............................................................46Customizing Project Lists ...................................................................55
Chapter 5: Setting the Mailing Configuration ...................................59About Setting the Mailing Configuration...........................................59Designating Mail Fields .......................................................................60Defining Mail Conditions ...................................................................61
Chapter 6: Setting Traceability Notification Rules .............................63About Setting Traceability Notification Rules.....................................63Setting Traceability Notification Rules................................................65
Chapter 7: Setting Up the TestDirector Workflow ............................67About Setting Up the TestDirector Workflow.....................................68Customizing Lists ................................................................................70Customizing Fields by User Groups ....................................................72Using the Script Editor ........................................................................76Understanding TestDirector Events ....................................................86Reference for TestDirector Events .......................................................87Understanding TestDirector Objects.................................................102Understanding the Actions Object ...................................................103Understanding the Action Object .....................................................104Understanding the x_Fields Objects .................................................105Understanding the Field Object ........................................................106Understanding the Lists Object ........................................................108Understanding the User Object ........................................................109
PART II : SITE ADMINISTRATION
Chapter 8: Site Administrator at a Glance........................................113Starting the Site Administrator .........................................................113The Site Administrator ......................................................................116Changing the Site Administrator Password ......................................117

Table of Contents
v
Chapter 9: Managing TestDirector Projects ....................................119About Managing TestDirector Projects .............................................120Understanding the TestDirector Project Structure............................121Creating TestDirector Domains.........................................................123Creating TestDirector Projects ..........................................................125Copying TestDirector Projects...........................................................138Updating Project Details ...................................................................141Querying Project Tables ....................................................................144Upgrading Projects ............................................................................146Deactivating and Activating Projects ................................................151Pinging Projects .................................................................................152Renaming Projects .............................................................................152Removing Projects from the Projects List .........................................153Deleting Projects................................................................................153Deleting Domains..............................................................................154Editing the Connection String ..........................................................155Restoring Project Access ....................................................................157Backing Up TestDirector Projects ......................................................161Renaming the Defects Module for a Project .....................................162
Chapter 10: Managing TestDirector Users .......................................163About Managing Users ......................................................................163Adding a New User ...........................................................................164Importing a New User .......................................................................166Defining User Properties ...................................................................168Changing Passwords..........................................................................169Enabling Users to Work with Windows Authentication ..................170Deleting Users....................................................................................172
Chapter 11: Managing User Connections and Licenses ...................173About Managing User Connections and Licenses ............................173Monitoring User Connections .........................................................174Managing TestDirector Licenses........................................................175
Chapter 12: Configuring Servers and Parameters............................177About Configuring Servers and Parameters ......................................177Configuring TestDirector Server Information ..................................178Defining New Database Servers ........................................................181Modifying Database Server Properties ..............................................184Deleting Database Servers .................................................................187Setting TestDirector Configuration Parameters ...............................187

Table of Contents
vi
PART III : APPENDIX
Appendix A: TestDirector 7.6 and 8.0: Migration Process ...............195Migrating Project Databases ..............................................................196Migrating Project Directories ............................................................198Migrating Domain Repositories ........................................................199Migrating TestDirector Servers ..........................................................202Oracle Database Operations ..............................................................208Microsoft SQL Database Operations .................................................211Sybase Database Operations..............................................................214Checking Project Directories.............................................................217Project Sanity Template.....................................................................219
Appendix B: TestDirector 7.2: Guidelines for Upgrading ................221About Creating a Staging Environment............................................221Creating a Staging Environment.......................................................222
Index ..................................................................................................227

vii
Welcome to TestDirector Administration
Welcome to TestDirector, Mercury Interactive’s Web-based test management tool. TestDirector helps you organize and manage all phases of the application testing process, including specifying testing requirements, planning tests, executing tests, and tracking defects.
Throughout the testing process, TestDirector’s projects are accessed by many users—including developers, testers, and quality assurance managers. In order to protect, maintain, and control information in a testing project, users are assigned to groups with different access privileges. Only a TestDirector administrator (belonging to the TDAdmin user group) has full access to all areas of TestDirector.
As a TestDirector administrator, you use TestDirector’s Project Customization to customize project entities and lists, set up user groups and permissions, configure mail, set traceability notification rules, and configure the workflow in the TestDirector modules.
You use the Site Administrator to create and maintain TestDirector projects; manage TestDirector users, connections, and licenses; define database servers; and modify TestDirector configurations.
Note that TestDirector is shipped without any passwords defined. To protect your testing data from unauthorized access, it is highly recommended that you set passwords early in the TestDirector process.

Welcome
viii
Using This Guide
This guide provides information regarding the administration, maintenance, and customization of TestDirector.
It contains three parts:
Part I Project Customization
Describes how to use the Project Customization window to control access to a project by defining the project users and their privileges. It also describes how to customize a project to meet the specific needs of the project users.
Part II Site Administration
Describes how to use the Site Administrator to manage TestDirector projects. This includes maintaining projects, users, connections, licenses, servers and configuration parameters.
Part III Appendix
Describes how to migrate project databases, project directories, domain repositories, and servers from a TestDirector 7.6 or TestDirector 8.0 source location to a TestDirector 8.0 target location. Also describes how to create a staging environment for upgrading from TestDirector 7.2 to 8.0.
TestDirector Documentation Set
In addition to this guide, TestDirector comes with a complete set of documentation:
TestDirector Installation Guide explains how to install TestDirector and the client database software needed to connect TestDirector to projects.
TestDirector Tutorial is a self-paced guide teaching you how to use TestDirector to manage the application testing process.
TestDirector User’s Guide explains how to use TestDirector to organize and execute all phases of the testing process. It describes how to define requirements, plan tests, run tests, and track defects.

Welcome
ix
TestDirector Open Test Architecture Guide explains how to use TestDirector’s open test architecture to integrate your own configuration management, defect tracking, and home-grown testing tools with a TestDirector project. It includes a complete reference to TestDirector’s new COM-based API.
Online Resources
TestDirector includes the following online resources:
Readme provides last-minute news and information about TestDirector.
What’s New in TestDirector describes the newest features in the latest versions of TestDirector.
Books Online displays the complete documentation set in .PDF format. Online books can be read and printed using Adobe Reader which can be downloaded from the Adobe Web site (http://www.adobe.com).
TestDirector Online Help provides immediate answers to questions that arise as you work with TestDirector. It describes menu commands and dialog boxes, and shows you how to perform TestDirector tasks. Check Mercury Interactive’s Customer Support Web site (http://support.mercury.com) for updates to TestDirector help files.
Customer Support Online uses your default Web browser to open Mercury Interactive’s Customer Support Web site. This site enables you to browse the Mercury Support Knowledge Base and add your own articles. You can also post to and search user discussion forums, submit support requests, download patches and updated documentation, and more. The URL for this Web site is http://support.mercury.com.
Mercury Interactive on the Web uses your default Web browser to open Mercury Interactive’s home page. This site provides the most up-to-date information on Mercury Interactive and its products. This includes new software releases, seminars and trade shows, customer support, educational services, and more. The URL for this Web site is http://www.mercury.com.

Welcome
x
Documentation Updates
Mercury Interactive is continuously updating its product documentation with new information. You can download the latest version of this document from the Customer Support Web site (http://support.mercury.com).
To download updated documentation:
1 In the Customer Support Web site, click the Documentation link.
2 Under Select Product Name, select TestDirector.
Note that if TestDirector does not appear in the list, you must add it to your customer profile. Click My Account to update your profile.
3 Click Retrieve. The Documentation page opens and lists the documentation available for the current release and for previous releases. If a document was recently updated, Updated appears next to the document name.
4 Click a document link to download the documentation.
Typographical Conventions
This book uses the following typographical conventions:
1, 2, 3 Bold numbers indicate steps in a procedure.
Bullets indicate options and features.
> The greater than sign separates menu levels (for example, File > Open).
Stone Sans The Stone Sans font indicates names of interface elements in a procedure that you perform actions upon (for example, “Click the Run button.”).
Bold Bold text indicates function names.
Italics Italic text indicates variable names, or introduces a new term.
Arial The Arial font is used for examples and statements that are to be typed in literally.

Welcome
xi
<> Angle brackets enclose a part of a URL address that needs to be typed in.
... In a line of syntax, an ellipsis indicates that more items of the same format may be included.

Welcome
xii

Part I
Project Customization


3
1Project Customization at a Glance
Using Project Customization, you control access to a project by defining the users who can enter the project and by determining the types of tasks each user can perform. You can also customize a project to meet the specific requirements of your testing team.
This chapter describes:
Starting Project Customization
Understanding the Project Customization Window
Starting Project Customization
You can customize your TestDirector projects using the Project Customization window.

Part I • Project Customization
4
To start project customization:
1 Open your Web browser and type your TestDirector URL(http://[Server name]/[virtual Directory name]/default.htm). The TestDirector Options window opens.
2 Click the TestDirector link.
The first time you run TestDirector, the application is downloaded to your computer. Subsequently, TestDirector automatically carries out a version check. If it detects a newer version on the server, it downloads it to your machine. Note that downloading TestDirector may take a few minutes.
Note: To download files to your computer, you must log in with administrator privileges. This applies if you are running TestDirector for the first time, upgrading to a newer version, or applying a service pack.

Chapter 1 • Project Customization at a Glance
5
After the TestDirector version has been checked and updated if necessary, the TestDirector Login window opens.
3 Click the Customize button located on the upper-right side of the window. The Login dialog box opens.
4 In the Domain list, select a domain.
Note: The DEFAULT domain is the only available domain in the TestDirector Standard Edition.

Part I • Project Customization
6
5 In the Project list, select a project.
If the TestDirector demonstration project was installed on the TestDirector server, you can select the TestDirector_Demo project (make sure that you select DEFAULT in the Domain list). The project helps introduce you to TestDirector and includes sample requirements, tests, test sets, test runs, and defects. For more information, refer to the TestDirector Tutorial.
6 In the User ID box, type admin or a user name with TestDirector administrator privileges (maximum length 20 characters).
Note: By default, if you type a user name that does not have administrator privileges, you are restricted to only two customization functions: Change Password and Change User Properties. For more information, see “Administration Tasks” on page 40.
7 In the Password box, type your password (maximum length 20 characters).
By default, a password is not defined for the administrator. To define or change the password, see “Changing Passwords” on page 169.
8 Click OK. The Project Customization window opens.
9 To exit the Project Customization window and return to the TestDirector Login window, click the Logout button located on the upper-left side of the window.

Chapter 1 • Project Customization at a Glance
7
Understanding the Project Customization Window
You can customize a project to meet the specific requirements of your testing team in the Project Customization window.
The Project Customization window contains the following links:
Change Password: A user can use this option to change his or her password. For more information, refer to the TestDirector User’s Guide.
An administrator can override and change a user’s password from the Users tab in the Site Administrator. For more information, see “Changing Passwords” on page 169.
Change User Properties: A non-administrator can use this option to change his or her user properties. For more information, refer to the TestDirector User’s Guide.
An administrator can override and change a user’s properties from the Users tab in the Site Administrator. For more information, see “Defining User Properties” on page 168.

Part I • Project Customization
8
Set Up Users: You can add and remove users from a TestDirector project. You can also assign users to user groups to restrict user access privileges. For more information, see Chapter 2, “Managing Users in a Project.”
Note that you create TestDirector users and define user properties from the Site Administrator. For more information, see Chapter 10, “Managing TestDirector Users.”
Set Up Groups: You can assign privileges to user groups by specifying permission settings. This includes specifying transition rules and hiding data. For more information, see Chapter 3, “Managing User Groups and Permissions.”
Customize Module Access: You can set the license for each user group in a project. The TestDirector license enables a user group to access all modules in TestDirector. The Defects Module license enables a user group to access only the Defects module. For more information, see “Customizing Module Access for User Groups” on page 42.
Customize Project Entities: You can customize your TestDirector project to suit your testing environment. A project can contain system fields and user-defined fields. System fields can be modified. User-defined fields can be added, modified, and deleted. For more information, see “Customizing Project Entities” on page 46.
Customize Project Lists: You can add your own customized lists to a project. A list contains values that you can enter in system or user-defined fields. For more information, see “Customizing Project Lists” on page 55.
Configure Mail: You can set up a mailing configuration to routinely inform users about defect repair activity. For more information, see Chapter 5, “Setting the Mailing Configuration.”
Set Traceability Notification Rules: You can activate traceability notification rules for your project. This instructs TestDirector to create alerts and send traceability notification e-mails when changes occur in your project. For more information, see Chapter 6, “Setting Traceability Notification Rules.”
Set Up Workflow: You can write and/or generate scripts that dynamically change the user interface in the TestDirector modules. For more information, see Chapter 7, “Setting Up the TestDirector Workflow.”

9
2Managing Users in a Project
As a TestDirector administrator, you can control access to a project by defining the users who can log into the project and by determining the types of tasks each user can perform.
This chapter describes:
Adding a User to a Project
Assigning Users to a User Group
Removing a User from a Project
About Managing Users in a Project
For each TestDirector project, you must select a list of valid users from the overall TestDirector users list. (The users list is created in the Site Administrator. For more information, see Chapter 10, “Managing TestDirector Users”). Each project also has a local admin and guest user.
You then need to assign each project user to a user group. Each group has access to certain TestDirector tasks.

Part I • Project Customization
10
Adding a User to a Project
You add new users to a TestDirector project by selecting them from the TestDirector users list created in the Site Administrator.
To add a user to a project:
1 In the Project Customization window, click the Set Up Users link. The Set Up Project Users dialog box opens.
You can click the User Name column to change the sort order from ascending to descending user names. You can also click the Full Name column to sort according to full names instead of user names.

Chapter 2 • Managing Users in a Project
11
2 Click the Add User button. The Add User to Project dialog box opens.
3 If the New button is available on this dialog box, you can add new TestDirector users to the list of available users. By default, this option is available only from the Site Administrator (Users tab). To enable this option, you need to set the CUSTOM_ENABLE_USER_ADMIN parameter in the Site Administrator (Site Config tab). For more information, see “Setting TestDirector Configuration Parameters” on page 187.
4 Select a user name from the list and click OK.
The user is added to the Project Users list and the user properties are displayed. User properties are defined in the Site Administrator. For more information, see “Defining User Properties” on page 168.
5 Click OK to close the Set Up Project Users dialog box.

Part I • Project Customization
12
Assigning Users to a User Group
After you add a user to the project, you can assign the user to one or more user groups. You can assign a user to a default user group, or to a customized user group. For more information on customizing a user group, see Chapter 3, “Managing User Groups and Permissions.” You can change the access privileges for an existing user at any time by changing the user group to which they are assigned.
Note: Every TestDirector project includes two default local user types: admin and guest. The admin user has the privileges of a TestDirector administrator (TDAdmin user group); the guest user has Viewer privileges. You cannot delete these users from a project. The properties of these users must be defined in the Set Up Project Users dialog box, not in the Site Administrator.
To assign a user to a user group:
1 In the Project Customization window, click the Set Up Users link. The Set Up Project Users dialog box opens.

Chapter 2 • Managing Users in a Project
13
2 In the Project Users list, select the user you want to assign to a user group. The user properties are displayed (name, e-mail, phone, and description).
Aside from admin and guest users, user properties are defined in the Site Administrator. For more information, see “Defining User Properties” on page 168.
3 Select the admin and guest users and define user properties for the current project. Note that the e-mail information is important as it enables the user to receive defects, tests, requirements, and test set notifications directly to his or her mailbox.
4 To assign the selected user to a user group, click a user group name in the Not Member Of list and click the left arrow button.
5 To remove the user from the currently selected user group, click a user group name in the Member Of list and click the right arrow button.
6 To move all the user groups from one list to the other, click the double arrow buttons.
7 Click OK to save your changes and close the Set Up Project Users dialog box.

Part I • Project Customization
14
Removing a User from a Project
To ensure the security of a project, you should remove any users who are no longer working on the project. Note that removing a user from a project does not delete the user from the TestDirector users list in the Site Administrator.
To remove a user from a project:
1 In the Project Customization window, click the Set Up Users link. The Set Up Project Users dialog box opens.
2 In the Project Users list, select the user you want to remove and click the Remove User button.
3 Click Yes to confirm. TestDirector removes the user from the Project Users list.
4 Click OK to close the Set Up Project Users dialog box.

15
3Managing User Groups and Permissions
You can control access to TestDirector projects and modules by defining the user groups who can enter them, and by determining the types of tasks each user group performs.
This chapter describes:
Adding User Groups
Setting User Group Permissions
Setting Transition Rules
Hiding Data for a User Group
Assigning Existing Sets of Permissions to User Groups
Renaming User Groups
Deleting User Groups
Understanding the Permission Settings Tasks
Customizing Module Access for User Groups

Part I • Project Customization
16
About Managing User Groups and Permissions
To enable each team member to do his/her job and protect a project from unauthorized access, TestDirector lets you assign each member to a specific user group. TestDirector includes predefined user groups with default privileges. Each group has access to certain TestDirector tasks.
When a project requires that certain user groups have privileges that are outside the scope of their default permissions, you can add your own customized user groups and assign each group a unique set of privileges.
After you set user group permissions, you can also define the TestDirector modules to which you want to give a user group access. When a user group member logs in to a project, TestDirector displays only the authorized modules.
User Group Permissions
TDAdmin Group members have full privileges in a TestDirector project.
Project Manager Group members have full privileges in the following TestDirector modules: Requirements, Test Plan, Test Lab, and Defects. The group also has some administration privileges.
QATester Group members have full privileges in the following TestDirector modules: Requirements, Test Plan, and Test Lab. In the Defects module, the group can only add and modify defects, but not delete them. The group also has some administration privileges.
Developer Group members privileges are limited to modifying attachments in the following modules: Requirements, Test Plan, and Test Lab. In the Defects module, group members can only add and modify defects, but not delete them. The group also has some administration privileges.
Viewer Group members have read-only privileges in a TestDirector project.

Chapter 3 • Managing User Groups and Permissions
17
Adding User Groups
If you determine that the default user groups do not meet the needs of your project, you can create additional user groups for your project.
To add a user group:
1 In the Project Customization window, click the Set Up Groups link. The Set Up Groups dialog box opens.

Part I • Project Customization
18
2 Click the New button. The New Group dialog box opens.
3 In the Name box, type a name for the group.
4 In the Create As list, assign the new group the privileges of an existing user group.
Tip: Choose an existing user group that has similar access privileges to the new user group you want to create. This minimizes the level of customization you will need to do.
5 Click OK.
6 Click Yes to confirm. The new group name is added to the Groups list in the Set Up Groups dialog box.
7 Click OK to close the Set Up Groups dialog box.

Chapter 3 • Managing User Groups and Permissions
19
Setting User Group Permissions
Every user group has a set of privileges, or permissions, which are defined by the TestDirector Administrator. You generally set the permissions for custom user groups at the beginning of the project, but you can modify a user group’s permissions at any time.
For example, suppose a group of users called DOC has Viewer permissions. In order to work more effectively on the project, they need to add, modify, and delete defects. As the TestDirector administrator, you can assign these privileges to the DOC group by specifying permission settings.
Note: You cannot modify the privileges of a default user group. To view permissions for a default user group, in the Set Up Groups dialog box, select the user group in the Groups list and click the View button. For more information, see “Understanding the Permission Settings Tasks” on page 31.
To set user group permissions:
1 In the Project Customization window, click the Set Up Groups link. The Set Up Groups dialog box opens.
2 In the Groups list, choose the user group for which you want to set permissions.

Part I • Project Customization
20
3 Click the Change button. The Permission Settings dialog box opens.

Chapter 3 • Managing User Groups and Permissions
21
4 Click a permission tab. For example, click Defects. The tab displays the tasks available in the Defects module.
5 Select the tasks that the selected user group can use. For more information on the available tasks, see “Understanding the Permission Settings Tasks” on page 31.
6 When you select a task with a sublevel, a list of associated fields appears below. Select the check boxes of the fields that the selected user group can use.
Transition rules for a selected field
Field modification by owner only
Permission tab
Task
Field
Data-hiding filter

Part I • Project Customization
22
7 To limit the capabilities of modifying a field, do any of the following:
To ensure that only the person who originally created the entry can change that value, select Can be modified by owner only. For more information, see the following section, “Owning TestDirector Objects”.
To limit the values a user group can select from a lookup list type field, set transition rules of permissible field values. For more information, see “Setting Transition Rules” on page 23.
8 For deleting tasks, you can ensure that only the person who originally created the entry can delete the value by selecting Can be deleted by owner only. For more information, see the following section, “Owning TestDirector Objects”.
9 You can click the Data-Hiding Filter link to instruct TestDirector to hide data from the current user group in the Test Plan, Test Lab, and Defects modules. For more information, see “Hiding Data for a User Group” on page 27.
10 Click OK to close the Permission Settings dialog box.
11 Click OK to save your changes and close the Set Up Groups dialog box.
Owning TestDirector Objects
When setting group permissions, you can limit the capabilities of modifying or deleting a field value, so that only the person who originally created the entry can change or delete the value. The following table describes the objects in TestDirector and the users that are considered the owners of the objects.
TestDirector Object Owner
Requirement The Author field (RQ_REQ_AUTHOR).
Test in the Test Plan module The Designer field (TS_RESPONSIBLE).
Test in the Test Lab module The Responsible Tester field (TC_TESTER_NAME).
Test run in the Test Lab module
The Tester field (RN_TESTER_NAME).
Defect The Assigned To field (BG_RESPONSIBLE).

Chapter 3 • Managing User Groups and Permissions
23
Setting Transition Rules
You can limit a group’s modifying privileges by setting transition rules for modifying values in fields. These rules determine the values that the group can modify in fields that you specify. Note that transition rules can only be set for lookup list fields.
For example, when modifying defect information, you can limit the items a user group can select in the Status field of a defect record. You can set a transition rule that only allows a user group to edit the Status field from “Fixed” to “Closed”.
Note: When using the Set Up Workflow to customize a TestDirector module, if you change a list of values for a field that is set with transition rules, these transition rules will be overridden by TestDirector. For more information on Set Up Workflow, see “Setting Up the TestDirector Workflow” on page 67.
To set transition rules:
1 In the Project Customization window, click the Set Up Groups link. The Set Up Groups dialog box opens.
2 In the Groups list, choose the user group for which you want to set permissions.
3 Click the Change button. The Permission Settings dialog box opens.
4 Click a permission tab. For example, click Defects. The tab displays the tasks available in the Defects module.
5 Select a task. For example, select Modify Defect. The task expands and lists available fields.
For more information on the available tasks, see “Understanding the Permission Settings Tasks” on page 31.

Part I • Project Customization
24
6 Under the selected task, select a field. For example, select Status. The Transition Rules grid appears on the right pane of the Permission Settings dialog box.
Transition Rules grid
Task
Field

Chapter 3 • Managing User Groups and Permissions
25
7 Click Add to add a transition rule. The Transition Rules Editor dialog box opens.
8 Under From, you can:
Select $ANY to allow a user group to modify the field, irrespective of the currently displayed value.
Select a value from the list. A user group will be able to modify the selected field only when the field displays the value you select. For example, to allow a user group to edit the Status field of a defect only if “Fixed” is the current value, select Fixed.
9 Under To, you can:
Select $ANY to allow a user group to change the field to any value.
Select a value from the list. A user group will be able to change the value of the selected field to only the value that you specify. For example, to allow a user group to change the value of the Status field only to “Closed”, select Closed.

Part I • Project Customization
26
10 Click OK to save and close the Transition Rules Editor dialog box. The new rules are displayed in the Transition Rules grid.
11 To modify a transition rule, select a rule from the Transition Rules grid and click the Edit button. In the Transition Rules Editor dialog box, modify the rule. Click OK.
12 To delete a transition rule, select a rule from the Transition Rules grid and click the Delete button. Click OK to confirm.
13 Click OK to close the Permission Settings dialog box.
14 Click OK to save your changes and close the Set Up Groups dialog box.

Chapter 3 • Managing User Groups and Permissions
27
Hiding Data for a User Group
You can instruct TestDirector to hide specific records that a user group can view in the Test Plan, Test Lab, and Defects modules. This includes the following options:
Filtering Data: You can set filters for specific fields, limiting the records that the user group can view. For example, you can set the filter for the field Assigned To to “[CurrentUser]”. This instructs TestDirector to allow only the current user to view specific records that are assigned to him or her.
For more information on filtering, refer to the TestDirector User’s Guide.
Defining Visible Fields: You can select which fields in a module the user group can see and which should be hidden. This can help in simplifying the volume of data displayed. Users belonging to a specific user group need to view only data that relates to their work. For example, in the Test Plan tab, you may want to hide the Path field from user groups that should not be able to access test scripts from the file system. Note that you cannot hide required fields.
To hide data:
1 In the Project Customization window, click the Set Up Groups link. The Set Up Groups dialog box opens.
2 In the Groups list, choose the user group for which you want to set permissions.
3 Click the View button. The Permission Settings dialog box opens.
4 Click a permission tab. For example, click Defects. The tab displays the tasks available in the Defects module.

Part I • Project Customization
28
5 Click the Data-Hiding Filter link located at the bottom left corner of the dialog box. For example, in the Defects tab, click the Defects Data-Hiding Filter. The Defects Data-Hiding Filter dialog box opens and displays the Filter tab.
6 Set a filter(s). For more information, refer to the TestDirector User’s Guide.

Chapter 3 • Managing User Groups and Permissions
29
7 Click the Visible Fields tab.
8 Select or clear the appropriate fields.
9 Click OK to close the Data-Hiding Filter dialog box.
10 Click OK to close the Permission Settings dialog box.
11 Click OK to save your changes and close the Set Up Groups dialog box.

Part I • Project Customization
30
Assigning Existing Sets of Permissions to User Groups
During the course of a project, you can assign one user group another user group’s permissions.
To assign an existing set of permissions to a user group:
1 In the Project Customization window, click the Set Up Groups link. The Set Up Groups dialog box opens.
2 In the Groups list, select a group name.
3 Click the Set As button. The Set Group As dialog box opens.
4 In the Set As list, select a group name.
5 Click OK.
6 Click Yes to confirm.
Renaming User Groups
You can rename a user group. Note that all customization performed on the group remains.
To rename a user group:
1 In the Project Customization window, click the Set Up Groups link. The Set Up Groups dialog box opens.
2 In the Groups list, select a group name.
3 Click the Rename button. The Rename Group dialog box opens.
4 Type a new name for the group.
5 Click OK to save your changes.

Chapter 3 • Managing User Groups and Permissions
31
Deleting User Groups
You can delete user groups that were added to a TestDirector project.
To delete a user group:
1 In the Project Customization window, click the Set Up Groups link. The Set Up Groups dialog box opens.
2 In the Groups list, select a group name.
3 Click the Delete button.
4 Click OK to confirm.
Understanding the Permission Settings Tasks
You can display the permissions of user groups in the Permission Settings dialog box. You can modify the permissions of custom user groups at any time. You cannot modify the permissions of the default user groups (TDAdmin, QATester, Project Manager, Developer, and Viewer).
To display permissions for a custom user group, in the Set Up Groups dialog box, select the user group in the Groups list, and click the View or Change button. For a default user group, click the View button. The Permission Settings dialog box opens.
The Permission Settings dialog box contains the following tabs: Requirements, Test Plan, Test Lab, Defects, and Administration.

Part I • Project Customization
32
Requirements Tasks
The Requirements tab displays the tasks available in the Requirements module.

Chapter 3 • Managing User Groups and Permissions
33
The Requirements tab includes the following tasks:
Task Description
Add Requirement User group can add requirements to the requirements tree.
Modify Requirement User group can modify requirements in the requirements tree. Note that this task enables you to specify the fields that the selected user group can modify. To ensure that only the owner of the requirement can modify it, click the Can be modified by owner only check box.
Delete Requirement User group can delete requirements from the requirements tree. To ensure that only the owner of the requirement can delete it, click the Can be deleted by owner only check box.
Add Tests to Coverage User group can add tests coverage to a requirement and requirements coverage to a test.
Remove Tests from Coverage User group can remove tests coverage from a requirement and requirements coverage from a test.

Part I • Project Customization
34
Test Plan Tasks
The Test Plan tab displays the tasks available in the Test Plan module.
The Test Plan tab includes the following tasks:
Task Description
Add Test User group can add tests to the test plan tree.
Modify Test User group can modify tests in the test plan tree. Note that this task enables you to specify the fields that the selected user group can modify. To ensure that only the owner of the test can modify it, click the Can be modified by owner only check box.

Chapter 3 • Managing User Groups and Permissions
35
Delete Test User group can delete tests from the test plan tree. To ensure that only the owner of the test can delete it, click the Can be deleted by owner only check box.
Add Design Step User group can add design steps in the Design Steps tab.
Modify Design Step User group can modify design steps in the Design Steps tab. Note that this task enables you to specify the fields that the selected user group can modify.
Delete Design Step User group can delete design steps from the Design Steps tab. To ensure that only the owner of the design step can delete it, click the Can be deleted by owner only check box.
Add Folder User group can add folders to the test plan tree.
Modify Folder User group can modify folders in the test plan tree. Note that this task enables you to specify the fields that the selected user group can modify.
Delete Folder User group can delete folders from the test plan tree.
Move Folder User group can move folders in the test plan tree.
Copy Folder User group can copy folders in the test plan tree.
Generate Script User group can convert the test steps of a manual test, displayed in the Design Steps tab, into an automated test.
Task Description
Part I • Project Customization
36
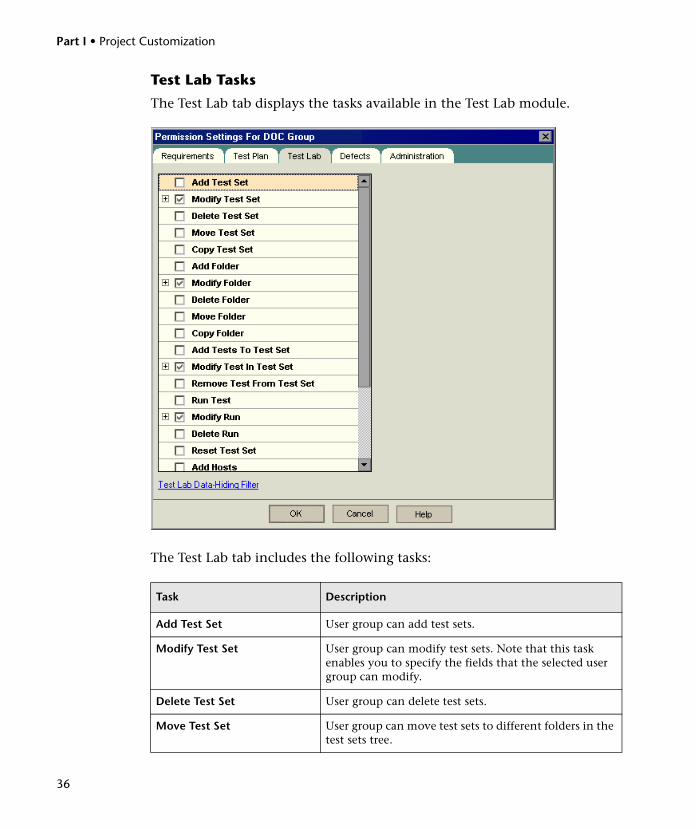
Test Lab Tasks
The Test Lab tab displays the tasks available in the Test Lab module.
The Test Lab tab includes the following tasks:
Task Description
Add Test Set User group can add test sets.
Modify Test Set User group can modify test sets. Note that this task enables you to specify the fields that the selected user group can modify.
Delete Test Set User group can delete test sets.
Move Test Set User group can move test sets to different folders in the test sets tree.

Chapter 3 • Managing User Groups and Permissions
37
Copy Test Set User group can copy test sets to folders in the test sets tree.
Add Folder User group can add folders to the test sets tree.
Modify Folder User group can modify folders in the test sets tree.
Delete Folder User group can delete folders in the test sets tree.
Move Folder User group can move folders in the test sets tree.
Copy Folder User group can copy folders in the test sets tree.
Add Tests to Test Set User group can add tests to a test set.
Modify Test in Test Set User group can modify tests in a test set. Note that this task enables you to specify the fields that the selected user group can modify. To ensure that only the owner of the test set can modify it, click the Can be modified by owner only check box.
Remove Test from Test Set User group can remove tests from a test set.
Run Test User group can run tests.
Modify Run User group can modify test run information. Note that this task enables you to specify the fields that the selected user group can modify. To ensure that only the owner of the run can modify it, click the Can be modified by owner only check box.
Delete Run User group can delete test run information. To ensure that only the owner of the run can delete it, click the Can be deleted by owner only check box.
Reset Test Set User group can clear all runs in a test set.
Add Hosts User group can add hosts for running tests.
Modify Hosts User group can modify host information.
Delete Hosts User group can delete hosts.
Add Host Group User group can add host groups for running tests.
Modify Host Group User group can modify host group information.
Delete Host Group User group can delete host groups.
Task Description

Part I • Project Customization
38
Defects Tasks
The Defects tab displays the tasks available in the Defects module.

Chapter 3 • Managing User Groups and Permissions
39
The Defects tab includes the following tasks:
Task Description
Add Defect User group can add defects to the Defects Grid. Note that you can customize the fields that appear in the Add Defect dialog box. Under Visible Fields in Add Defect Dialog Box, select the fields you want to be visible. Fields that are marked in red are mandatory if they are visible.
Modify Defect User group can modify defects in the Defects Grid. Note that this task enables you to specify the fields that the selected user group can modify. To ensure that only the owner of the defect can modify it, click the Can be modified by owner only check box.
Delete Defect User group can delete defects from the Defects Grid. To ensure that only the owner of the defect can delete it, click the Can be deleted by owner only check box.

Part I • Project Customization
40
Administration Tasks
The Administration tab displays the administrative tasks available in TestDirector.
The Administration tab includes the following tasks:
Task Description
Add Public Favorite Views User group can add public favorite views.
Modify Public Favorite Views User group can modify public favorite views.
Delete Public Favorite Views User group can delete public favorite views.
Add Private Favorite Views User group can add private favorite views.
Modify Private Favorite Views User group can modify private favorite views.

Chapter 3 • Managing User Groups and Permissions
41
Delete Private Favorite Views User group can delete private favorite views.
Clear History User group can clear the information displayed in the History table. For instructions on clearing history, refer to the TestDirector User’s Guide.
Change User Properties & Password
User group can change their passwords and properties, using the Change Password and Change User Properties links in the Project Customization window.
Set Up Users User group can add and remove users from a TestDirector project, using the Set Up Users link in the Project Customization window.
Set Up Groups User group can assign privileges to user groups and specify permission settings, using the Set Up Groups link in the Project Customization window.
Customize Module Access User group can decide the type of access a user group can have for TestDirector, using the Customize Module Access link in the Project Customization window.
Customize Project Entities User group can customize fields in a TestDirector project, using the Customize Project Entities link in the Project Customization window.
Customize Project Lists User group can add their own customized lists to a project, using the Customize Project Lists link in the Project Customization window.
Configure Mail User group can set up a mailing configuration to routinely inform users about defect repair activity, using the Configure Mail link in the Project Customization window.
Traceability Notification Rules User group can set up traceability notification rules, using the Traceability Notification Rules link in the Project Customization window.
Set Up Workflow User group can write and/or generate scripts that dynamically change the user interface in the TestDirector modules, using the Set Up Workflow link in the Project Customization window.
Task Description

Part I • Project Customization
42
Customizing Module Access for User Groups
For each TestDirector project, you can control the module access that each user group has by setting the license. The TestDirector license enables a user group to use all modules in a project. The Defects Module license enables a user group to use only the Defects module.
By stopping a user group from accessing unnecessary modules, you can better manage the number of licenses you have for TestDirector. For example, suppose a user group only uses TestDirector to add defects to a project. You can limit the group’s access to only the Defects module. When a user from that group logs in to TestDirector, he or she will see only the Defects module.
After you specify module access for a user group, you can monitor how many users are currently connected to a project, the time the users first logged in to the project, the time of the last action, and the type of access. For more information, see “Monitoring User Connections” on page 174. You can also determine the total number of TestDirector licenses in use. For more information, see “Managing TestDirector Licenses” on page 175.

Chapter 3 • Managing User Groups and Permissions
43
To customize module access for user groups:
1 In the Project Customization window, click the Customize Module Access link. The Customize Module Access dialog box opens.
The icon indicates that the user group has access to all TestDirector modules or only the Defects module.
2 To modify module access for a user group, select a cell and press the space bar or double-click.
3 Click OK to save your changes.

Part I • Project Customization
44

45
4Customizing TestDirector Projects
As a TestDirector administrator, you can customize a project to meet the specific needs of your testing team. For example, you can add or customize fields, and create categories and lists that reflect the needs of your testing project.
This chapter describes:
Customizing Project Entities
Customizing Project Lists
About Customizing TestDirector Projects
Before you begin a project, you can customize your project to reflect your unique testing requirements. As a project progresses, you can further adjust the project to meet its changing needs.
TestDirector contains system fields in which you enter information about a requirement, test, test step, test set, test run, or defect. You can modify the behavior of these TestDirector fields by restricting users to selecting values only from associated lists, by making entry in certain fields mandatory, and by preserving a history of values entered in the field. In addition, you can include data unique to your project by creating user-defined fields. You can associate these fields with TestDirector system and user-defined lists.
For example, if you are running tests on several builds of an application, you can add a Detected in Build field to the Add Defect dialog box. You can then create a selection list containing the values Build1, Build2, and Build3 and associate the list with the Detected in Build field.

Part I • Project Customization
46
Customizing Project Entities
Using the Customize Project Entities dialog box, you can customize your TestDirector project to suit your testing environment.
Each TestDirector project is divided into project entities. An entity is a table which contains data entered by users for a specific testing process.
System fields
User-defined fields
Project entity

Chapter 4 • Customizing TestDirector Projects
47
The following entities are available:
Each entity contains system fields and user-defined fields:
System fields are TestDirector default fields. You cannot add or delete system fields. You can only modify system fields.
User fields are fields that you can define and include in a TestDirector project to customize for your specific project needs. You can add, modify, and delete user-defined fields.
For detailed information on TestDirector entities and fields, refer to the TestDirector Open Test Architecture Guide.
Entity Description
DEFECT Defect data in the Defects module.
TEST Test data in the Test Plan module.
TEST STEP Design step data in the Test Plan module, and test step data in the Test Lab module.
RUN Test run data in the Test Lab module.
REQUIREMENT Requirement data in the Requirements module.
TEST IN TEST SET Test data in the Test Lab module.
TESTSET Test set data in the Test Lab module.

Part I • Project Customization
48
The Field Settings section displays the field properties. The following properties are available:
Properties Description
Field Name Indicates the field name used in the TestDirector database table.
Field Label Indicates the field name as it is displayed in TestDirector. You can type a new name or use the default name.
Field Type Specifies the type of data that the user can enter in the field. It includes the following types:
• Number: Enables integer entry only.
• String: Enables the entry of any character string.
• Date: Enables the selection of a date.
• Lookup List: Displays the Lookup List area and enables the selection from a drop-down list.
• User List: Enables the selection of a user name from your TestDirector users list.
• Memo: Enables the entry of blocks of data. The field is limited only by the amount of available disk space. Note that in Oracle or Microsoft SQL databases, you can add up to 3 memo fields to each TestDirector entity. The memo field is unavailable for Sybase or Microsoft Access.
Field Length Indicates the field size. (Available only when the String type is selected).
Note: In Oracle or Microsoft SQL databases, the maximum field length is 255 characters. In Sybase or Microsoft Access databases, the maximum field length is 40 characters.
History Preserves a log of values entered in the selected field.
Required Indicates that a user must enter a value for the field.
Masked Indicates the input data mask for the field. (Available only when the String type is selected). For more information, see “Defining Input Masks” on page 52.

Chapter 4 • Customizing TestDirector Projects
49
Lookup List Includes a list of predefined lists. (Available only when the Lookup List type is selected). To associate a field with a predefined list, select a list from the Lookup List box. To view or modify the selected list, click the Goto List button.
New List Creates a new list. (Available only when the Lookup List type is selected). To associate a field with a new list, click the New List button. The Customize Project Lists dialog box opens. For more information on customizing a list, see “Customizing Project Lists” on page 55.
Goto List Displays a predefined list. (Available only when the Lookup List type is selected). To open a predefined list, select a list from the Lookup List box. Click the Goto List button. The Customize Project Lists dialog box opens. For more information on customizing a list, see “Customizing Project Lists” on page 55.
Verify Value Limits the user to select a value only from the items that are listed in the list box. (Available only when the Lookup List type is selected).
Properties Description

Part I • Project Customization
50
Adding User-Defined Fields
You can customize a TestDirector project by adding user-defined fields. If you are using Oracle or Microsoft SQL databases, you can add up to 99 user-defined fields to each TestDirector entity. If you are using Microsoft Access or Sybase databases, refer to the following table:
To add a user-defined field:
1 In the Project Customization window, click the Customize Project Entities link. The Customize Project Entities dialog box opens.
2 Under Project Entities, expand an entity.
3 Click the User Fields folder.
4 To add a user-defined field, you can:
Click the New Field button to add a number, string, date, or list type field.
Click the New Field arrow and choose New Memo Field to add a memo field. Note that you can only add memo fields in Oracle or Microsoft SQL databases. You can add up to 3 memo fields to each TestDirector entity.
5 In the Field Settings section, set properties for the field. For more information, see the “Field Settings” section on page 48.
6 Click OK to close the Customize Project Entities dialog box.
EntityMaximum Number of User-Defined Fields for Microsoft Access or Sybase
DEFECT 24
TEST 24
TEST STEP 6
RUN 12
REQUIREMENT 24
TEST IN TEST SET 24
TESTSET 6

Chapter 4 • Customizing TestDirector Projects
51
Modifying System and User-Defined Fields
You can modify the properties of system and user-defined fields in your TestDirector project.
Note: You can only modify the following properties for system fields: Field Label, History, Required, and Verify Value. For more information, see the “Field Settings” section on page 48.
To modify a system or user-defined field:
1 In the Project Customization window, click the Customize Project Entities link. The Customize Project Entities dialog box opens.
2 Under Project Entities, expand an entity.
3 Expand the System Fields folder or the User Fields folder.
4 Click the field that you want to customize. The settings for that field appear under Field Settings.
5 Modify the properties for the selected field. For more information, see the “Field Settings” section on page 48.
6 Click OK to close the Customize Project Entities dialog box.
Deleting User-Defined Fields
You can delete user-defined fields from your TestDirector project.
To delete a user-defined field:
1 In the Project Customization window, click the Customize Project Entities link. The Customize Project Entities dialog box opens.
2 Under Project Entities, expand an entity.
3 Expand the User Fields folder.
4 Click the field that you want to delete and click the Remove Field button.
5 Click OK to confirm. The field is removed from the User Fields folder.
6 Click OK to save your changes and close the Customize Project Entities dialog box.

Part I • Project Customization
52
Defining Input Masks
The input mask option is used to prompt users for data input using a mask pattern. If the user attempts to enter a character that conflicts with the input mask, an error occurs. For example, to prompt the user to enter a phone number, you can define the following input mask:
!\(000\)000-0000
This input mask limits the user to numeric characters only. It is displayed in an edit box as follows:
(___) ___ - ____
Note: You can define input masks only for string type user-defined fields.
To define an input mask:
1 In the Field Settings section, select Masked. For more information, see the “Field Settings” section on page 48.

Chapter 4 • Customizing TestDirector Projects
53
2 Under Masked Edit Attributes, click the Define button. The Input Mask Editor dialog box opens.
3 In the Input Mask box, type an input mask or select a predefined mask.
You can use the following characters when defining input masks:
Mask Character
Description
! A space for a leading or trailing blank.
# A digit.
. A decimal.
: A time separator.
/ A date separator.
\ Treats the next character in the mask string as a literal. For example, you can include the (, ), #, &, A, and ? characters in the mask.
> Converts all the characters that follow to uppercase.
< Converts all the characters that follow to lowercase.

Part I • Project Customization
54
4 In the Test Input box, you can test the input mask.
5 Click OK to close the Input Mask Editor dialog box.
6 Click OK to close the Customize Project Entities dialog box.
A An alphanumeric character (entry required). For example: a – z, A – Z, or 0 – 9.
a An alphanumeric character (entry optional). For example: a – z, A – Z, or 0 – 9.
C A character (entry required). Valid values are ANSI characters in the following ranges: 32-126 and 128-255.
c A character (entry optional). Valid values are ANSI characters in the following ranges: 32-126 and 128-255.
L An alphabetic character or space (entry required). For example: a – z or A – Z.
l An alphabetic character or space (entry optional). For example: a – z or A – Z.
0 A digit (entry required). For example: 0 – 9.
9 A digit (entry optional). For example: 0 – 9.
_ Inserts spaces. When the user types characters in the field box, the cursor skips the _ character.
Mask Character
Description

Chapter 4 • Customizing TestDirector Projects
55
Customizing Project Lists
Using the Customize Project Lists dialog box, you can create, rename, and delete lists.
A list contains values that you can enter in a field. For example, the selection list for the Languages user-defined field may contain the values English and European Languages.
List name
List item
List sub-item

Part I • Project Customization
56
The list can also contain several levels of sublists. For example, the item English can contain a sublist with the sub-items English (Australia), English (Canada), English (Great Britain), and English (US).
Note: To associate a list with a field, see “Customizing Project Entities” on page 46.
Creating Lists
You can create a list for a field.
To create a list:
1 In the Project Customization window, click the Customize Project Lists link. The Customize Project Lists dialog box opens.
2 Click the New List button. The New List dialog box opens.
3 Type a name for the new list (maximum length 70 characters) and click OK. The list name appears in the Lists box.
4 To add an item to the list, select the list name in the Lists box and click the New Item button. The New Item dialog box opens. Type a name for the item and click OK.
5 To create a sub-item, select an item in List Items and click the New Sub-Item button. The New Sub-Item dialog box opens. Type a name for the sub-item and click OK.
Note: The maximum number of sub-items per item in the same hierarchical level in a list is 676.
6 Click OK to save your changes and exit the Customize Project Lists dialog box.

Chapter 4 • Customizing TestDirector Projects
57
Renaming Lists, Items, or Sub-Items
You can rename user-defined lists, and system and user-defined items or sub-items.
Note: You cannot change some system list items. For example, the Y and N in the YesNo list. For more information on system items that cannot be changed, refer to the TestDirector Knowledge Base (http://support.mercury.com) and search for problem number 7165.
To rename a list:
1 In the Project Customization window, click the Customize Project Lists link. The Customize Project Lists dialog box opens.
2 In the Lists box, select a list name.
3 Click the Rename List button. The Rename List dialog box opens.
4 Type a new name for the list.
5 Click OK to close the Rename List dialog box.
6 Click OK to close the Customize Project Lists dialog box.
To rename an item or sub-item:
1 In the Project Customization window, click the Customize Project Lists link. The Customize Project Lists dialog box opens.
2 In the Lists box, select a list name.
3 Under List Items, select an item.
4 Click the Rename Item button. The Rename List Item dialog box opens.
5 Type a new name for the item. Click OK.
6 Click OK to close the Customize Project Lists dialog box.

Part I • Project Customization
58
Deleting Lists, Items, or Sub-Items
You can delete user-defined lists, and system and user-defined items or sub-items.
Note:
You cannot delete a user-defined list that is being used as a lookup list for a field.
You cannot delete some system list items. For example, the Y and N in the YesNo list. For more information on system items that cannot be deleted, refer to the TestDirector Knowledge Base (http://support.mercury.com) and search for problem number 7165.
To delete a list:
1 In the Project Customization window, click the Customize Project Lists link. The Customize Project Lists dialog box opens.
2 In the Lists box, select a user-defined list name.
3 Click the Delete List button.
4 Click Yes to confirm.
5 Click OK to close the Customize Project Lists dialog box.
To delete an item or sub-item:
1 In the Project Customization window, click the Customize Project Lists link. The Customize Project Lists dialog box opens.
2 In the Lists box, select a list name.
3 Under List Items, select a list item.
4 Click the Delete Item button.
5 Click Yes to confirm.
6 Click OK to close the Customize Project Lists dialog box.
59
5Setting the Mailing Configuration
As a TestDirector administrator, you can routinely inform your personnel about defect repair activity. You determine the conditions for sending defect messages to each recipient by defining a mailing configuration.
This chapter describes:
Designating Mail Fields
Defining Mail Conditions
About Setting the Mailing Configuration
TestDirector enables you to automatically notify users via e-mail each time changes are made to specified defect fields. Configuring mail for a TestDirector project involves the following steps:
Click the Configure Mail link to define the defect fields and specify the users and conditions. See “Designating Mail Fields” on page 60, and “Defining Mail Conditions” on page 61.
In the Site Administrator’s Projects tab, enable the mail configuration for a project by selecting the E-mail defects automatically check box. Note that this check box must be selected for your mail configuration to work. For more information, see “Updating Project Details” on page 141.
In the Site Administrator’s Site Config tab, you can edit the MAIL_INTERVAL parameter which defines the time interval for sending the defect e-mails. Note that the interval applies to all projects. For more information, see “Setting TestDirector Configuration Parameters” on page 187.

Part I • Project Customization
60
In the Site Administrator’s Users tab, make sure you have specified the e-mail addresses of the users who should receive defect messages. For more information, see “Defining User Properties” on page 168.
Designating Mail Fields
When you designate a field as a mail field, any changes made to that field will cause TestDirector to send an e-mail message in the next time interval. For example, suppose you designate Status as a mail field and then update the Status field for a particular defect. In the next time interval, the details of the defect, including the updated status information, will be sent to designated users.
To designate mail fields:
1 In the Project Customization window, click the Configure Mail link. The Configure Mail dialog box opens.
Available Defect Fields contains the names of the fields that appear in the Defects Grid. Mail On Change Of contains the names of the fields currently assigned as mail fields.

Chapter 5 • Setting the Mailing Configuration
61
2 Choose a field(s) and click the arrow buttons (> and <) to move the field(s) from one list to the other. Click the double arrow buttons (>> and <<) to move all the fields from one list to the other.
3 Click OK to save your changes.
Defining Mail Conditions
Mail conditions determine when various users receive defect messages. For each user, you can define separate mail conditions. For example, you can specify that a user will only receive messages for defects assigned an urgent priority.
To define mail conditions:
1 In the Project Customization window, click the Configure Mail link. The Configure Mail dialog box opens.
2 Click the Condition tab.

Part I • Project Customization
62
3 Choose a name from the Users list.
In addition, you can choose Detected By or Assigned To. Select these items to notify users when defects that they detected or are responsible for repairing are modified.
4 Select the All Defects check box to notify the selected user of every change to a defect.
5 Alternatively, click the Condition button to define a filter under which the selected user will receive mail. Note that if you define multiple filters, the selected user will only receive mail if all of the conditions are met. For more information on filtering, refer to the TestDirector User’s Guide.
6 Click OK to save your changes and exit.

63
6Setting Traceability Notification Rules
As a TestDirector administrator, you can activate traceability notification rules for your project. This instructs TestDirector to create alerts and send emails to notify those responsible when changes occur in your project that may impact the testing process.
This chapter describes:
Setting Traceability Notification Rules
About Setting Traceability Notification Rules
TestDirector enables you to keep track of your requirements, tests and defects as you perform your project testing process. When an entity changes, you can instruct TestDirector to notify those responsible for any associated entities.
The traceability rules you can activate are based on the following associations you can create in TestDirector:
You can associate a test in the test plan tree with a requirement. This is performed by creating requirements coverage in the Test Plan module, or by creating tests coverage in the Requirements module.
You can associate a test with a defect. This is performed in the Test Plan module by choosing the Associated Defects command, or by adding a defect during a manual test run.
After you have established associations in your project, you can then trace changes using these associations. When an entity in your project changes, TestDirector notifies you of any associated entities that may be impacted by the change.

Part I • Project Customization
64
Notification involves two steps. Firstly, TestDirector flags the associated entity. Secondly, TestDirector sends an e-mail to the user responsible for the entity.
There are four traceability notification rules you can activate:
For more information on traceability, refer to the TestDirector User’s Guide.
Rule Entity Flagged User Notified Entity Changed
1 Test Test designer.
(Displayed in the Test Plan module, Details tab, in the Designer box.)
Associated requirement has any change, excluding a change in the status. For example, an added attachment.
2 Test Instance Responsible tester.
(Displayed in the Test Lab module, Execution Grid, in the Responsible Tester column.)
Associated defect status changes to “Fixed”.
3 Defect User responsible for the defect.
(Displayed in the Defects module in the Assigned To column.)
Associated test run status changes to “Passed”.
4 Test All project users. Also, note the following:
• Only the test designer is notified by e-mail
• Only the test designer can delete the alert.
(Test designer name is displayed in the Test Plan module, Details tab, in the Designer box.)
Associated requirement has any change, excluding a change in the status. For example, an added attachment.

Chapter 6 • Setting Traceability Notification Rules
65
Setting Traceability Notification Rules
You can activate four traceability notification rules.
To set traceability notification rules:
1 In the Project Customization window, click the Set Traceability Notification Rules link. The Set Traceability Notification Rules dialog box opens.
2 Select Active to activate a traceability rule. This instructs TestDirector to flag the entity when the associated entity changes.
3 Select Email to instruct TestDirector to send a notification e-mail to the specified user when the associated entity changes.
4 Click OK to save your changes.

Part I • Project Customization
66

67
7Setting Up the TestDirector Workflow
As a TestDirector administrator, you can create Visual Basic scripts that control the workflow in your TestDirector project
This chapter describes:
Customizing Lists
Customizing Fields by User Groups
Using the Script Editor
Understanding TestDirector Events
Reference for TestDirector Events
Understanding TestDirector Objects
Understanding the Actions Object
Understanding the Action Object
Understanding the x_Fields Objects
Understanding the Field Object
Understanding the Lists Object
Understanding the User Object

Part I • Project Customization
68
About Setting Up the TestDirector Workflow
Using Set Up Workflow, you can create Visual Basic scripts that control the workflow in your TestDirector project. You can restrict and dynamically change the fields and values that are available in each TestDirector module.
For example, you can control the fields and values that are available when tracking defects in the Defects module. Suppose you want the number of fields in the Add Defect dialog box to change according to the user that is submitting the defect. For example, you can configure the Assigned To and Priority fields to display only for a user that has developer privileges.
To open Set Up Workflow, click the Set Up Workflow link in the Project Customization window.

Chapter 7 • Setting Up the TestDirector Workflow
69
Set Up Workflow contains the following tools:
Script Generator - List Customization for Defects Module: Enables you to set a different list of field values, depending on the input of another value. For more information, see “Customizing Lists” on page 70.
Script Generator - Add Defect Field Customization: Enables you to modify the appearance of the Add Defect dialog box, so that different fields appear for each user group. For more information, see “Customizing Fields by User Groups” on page 72.
Script Generator - Defect Details Field Customization: Enables you to modify the appearance of the Defect Details dialog box, so that different fields appear for each user group. For more information, see “Customizing Fields by User Groups” on page 72.
Script Editor: Enables you to view and edit your Visual Basic script. This tool requires that you have background in Visual Basic. For more information, see “Using the Script Editor” on page 76.
Note: When using the Set Up Workflow to customize a TestDirector module, if you change a list of field values for a field that is set with transition rules, the transition rules will be overridden by TestDirector. For more information on transition rules, see “Setting Transition Rules” on page 23.

Part I • Project Customization
70
Customizing Lists
You can customize a list of field values to depend on the input of another value. For example, you can set the Detected in Versions list to change depending on the value that is selected in the Project field.
When customizing lists, you need to define the following rules:
Step 1- Primary/Secondary Rule: Select primary and secondary fields. When a primary field value is changed, the list of values in the secondary field changes automatically. For example, select Project as the primary field, and Detected in Versions as the secondary field.
Step 2 - List Match Rule: Select the lists that you want to be available in the secondary field, for each value that is selected in the primary field.
Note: You can customize lists only in the Defects module.
To customize a list:
1 In the Project Customization window, click the Set Up Workflow link. The Set Up Workflow dialog box opens.

Chapter 7 • Setting Up the TestDirector Workflow
71
2 Click the Script Generator - List Customization for Defects Module link. The Script Generator - List Customization dialog box opens.
3 Under Step 1, you can set the primary/secondary rules:
To set a rule, click <select primary> and select a field name. Click <select secondary> and select a field name. For more information on field names, refer to the TestDirector Open Test Architecture Guide.
To add a new rule, click the Add Primary/Secondary Rule button. Select field names for <select primary> and <select secondary>.
To delete a rule, click the Delete Primary/Secondary Rule button. Click Yes to confirm.
4 Under Step 2, you can set the list match rules:
To set a rule for a defined primary field value, click <select list> and select a list name.
To set a rule for an undefined primary field value, click <enter value> and type a primary field value. Press Enter. Click <select list> and select a list name.
Step 1
Step 2

Part I • Project Customization
72
To add a new rule, click the Add List Match Rule button. Click <enter value> and type a primary field value. Click <select list> and select a list name.
To delete a rule, click the Delete List Match Rule button. Click Yes to confirm.
5 To save your changes, you can:
Click the Apply Script Changes button to save and close the dialog box.
Click the Apply & View button to save and view your script changes in the Script Editor. For more information on the Script Editor, see “Using the Script Editor” on page 76.
Customizing Fields by User Groups
You can modify the appearance of the Add Defect and Defect Details dialog boxes, so that different fields are visible for each user group. You can also sort the order of the fields. For example, you may want the Assigned To and Priority fields to appear only for a user that has developer privileges. Also, you can customize the Assigned To field so that it is displayed before the Priority field.
Note: You can customize fields only in the Defects module.
To customize fields by user groups:
1 In the Project Customization window, click the Set Up Workflow link. The Set Up Workflow dialog box opens.

Chapter 7 • Setting Up the TestDirector Workflow
73
2 To modify the appearance of the Add Defect dialog box, click the Script Generator - Add Defect Field Customization link. The Script Generator - Add Defect Field Customization dialog box opens.

Part I • Project Customization
74
To modify the appearance of the Defect Details dialog box, click the Script Generator - Defect Details Field Customization link. The Script Generator - Defect Details Field Customization dialog box opens.
Available Fields contains the names of all the fields you can display. Visible Fields contains the names of the fields that can currently be seen by the selected user group, and their sorting priority.
3 From the User Group list, select a user group.
4 Choose field names and click the arrow buttons (> and <) to move a name between Available Fields and Visible Fields. Click the double arrow buttons (>> and <<) to move all the names from one list to the other. You can also drag the field names between lists.
5 In Visible Fields, to set a field as a required field, select the check box next to it. A required field is mandatory and is displayed in red in the Add Defect and Defect Details dialog boxes.

Chapter 7 • Setting Up the TestDirector Workflow
75
6 You can set the order in which fields are displayed using the up and down arrows. You can also drag the field names up or down.
7 You can set the Add Defect and Defect Details dialog boxes to include one or more input pages. By default, the fields are set to only display on one page. Use the up and downs arrows to move fields to the appropriate page.
8 To save your changes, you can:
Click the Apply Script Changes button to save and close the dialog box.
Click the Apply & View button to save and view your script changes in the Script Editor. For more information on the Script Editor, see “Using the Script Editor” on page 76.

Part I • Project Customization
76
Using the Script Editor
You can use the Script Editor to view and edit your Visual Basic script.
To open the Script Editor, click the Set Up Workflow link in the Project Customization window. The Set Up Workflow dialog box opens. Click the Script Editor link.
The Script Editor contains the following key elements:
Script Editor toolbar, with buttons of commands used when creating and debugging scripts. For more information, see “Script Editor Commands” on page 78.
Script Editor toolbar
Scripts Tree
Messages pane

Chapter 7 • Setting Up the TestDirector Workflow
77
Scripts Tree, a list of available events used when writing a script. The events are listed according to the following categories:
Note: A red indicator next to a category name in the Scripts Tree indicates an unsaved change.
For more information on events, see “Understanding TestDirector Events” on page 86.
Script Editor tab, displays the script for an event.
Command Bar Editor tab, displays buttons that you can define and add to a TestDirector module. For more information, see “Adding New Commands” on page 80.
Messages pane, displays syntax errors when you verify the script.
Category Description
Common Script General events that can be used with TestDirector.
Requirements Module Script
Events that can be used in the Requirements module.
Test Plan Module Script Events that can be used in the Test Plan module.
Test Lab Module Script Events that can be used in the Test Lab module.
Manual Runner Script Events that can be used in the Manual Runner dialog box. For more information on the Manual Runner dialog box, refer to the TestDirector User’s Guide.
Defects Module Script Events that can be used in the Defects module.

Part I • Project Customization
78
Script Editor Commands
The Script Editor toolbar has the following buttons and menu commands:
Save: Saves the changes made to a selected category in the Scripts Tree.
Print: Prints the script.
Undo: Reverses the last command or deletes the last entry you typed.
Redo: Reverses the action of your last Undo command.
Cut: Removes the selected text and places it on the Clipboard.
Copy: Copies the selected text to the Clipboard.
Paste: Inserts the contents of the Clipboard at the insertion point.
Delete: Deletes the selected text.
Find: Searches for specified text in the Script Editor.
Find Next: Finds the next occurrence of the text specified in the Find Text dialog box.
Replace: Replaces the specified text with replacement text.
Synchronize Tree with Script: Refreshes the Scripts Tree with any changes to your script.
Code Complete: Lists the TestDirector objects or properties that are available for scripting an event. For more information, see “Understanding TestDirector Objects” on page 102.
Lists Value: Opens the Select Value From List dialog box, displaying all the values that are available for each project list.
To add a list value to your script, select the value, and click the To Text button.
To copy a list value to the Clipboard, select the value and click the To Clipboard button.
For more information on lists and values, see “Understanding the Lists Object” on page 108.

Chapter 7 • Setting Up the TestDirector Workflow
79
Code Template: The Script Editor has an auto complete function which provides you with a list of possible methods, properties, variables, and field names to use as you write your script.
Syntax Check: Validates your script’s syntax and displays any error messages in the Messages pane.
Show/Hide Scripts Tree: Displays or hides the Scripts Tree.
Show/Hide Messages Pane: Displays or hides the Messages pane.
Properties: Opens the Properties dialog box, enabling you to change the properties of the Script Editor. For more information, see “Setting the Properties of the Script Editor” on page 82.
Save All: To save all changes, choose File > Save All.
Revert to Saved: To return to a previously saved version of a category in the Scripts Tree, select a changed category and choose File > Revert to Saved.
Select All: To select all text in the Script Editor, choose Edit > Select All.
Expand All: To expand all categories in the Scripts Tree, choose View > Expand All.
Collapse All: To collapse all categories in the Scripts Tree, choose View > Collapse All.
Go to Line Number: To jump to a specific line in the Script Editor, choose Search > Go to Line Number.
Field Names: To list system and user-defined fields that are available in the TestDirector project, choose Tools > Field Names.
Clear Messages: To clear syntax messages displayed in the messages pane, choose Tools > Clear Messages.

Part I • Project Customization
80
Adding New Commands
When writing a script in the Script Editor, you can define new toolbar buttons and menu commands.
To add a new command:
1 In the Script Editor, click the Command Bar Editor tab.

Chapter 7 • Setting Up the TestDirector Workflow
81
2 In the Command bar list, select the module or dialog box to which you want to add the new command:
3 Click Add. A default command name is added to the Commands list.
4 In the Caption box, type a new command name or use the default name.
5 In the Hint box, type a tooltip for the command.
6 In the Action Name box, type a new action name or use the default name.
7 Under Images, select an icon for your command.
8 Click Apply to apply your changes.
9 You can click Remove to delete a command from the Commands list.
10 Click the Save button to save the new command.
11 Click the Script Editor tab.
12 In the Scripts Tree, select the _ActionCanExecute event that corresponds to your new command.
13 In the script, add statements using the new action name (as defined in step 6), and set the return value to True or False.
For example, to add a new command to the Requirements module:
Function Requirements_ActionCanExecute(ActionName)Requirements_ActionCanExecute = True
If ActionName = "Requirements_Action1" ThenMsgBox "Action1"
End IfEnd Function
Option Description
Requirements The Requirements module.
TestPlan The Test Plan module.
TestLab The Test Lab module.
ManualRun The Manual Runner dialog box.
Defects The Defects module.

Part I • Project Customization
82
Setting the Properties of the Script Editor
You can customize the behavior of the Script Editor.
To set the properties of the Script Editor:
1 In the Script Editor, click the Properties button or choose Options > Editor Properties. The Properties dialog box opens.
2 In the Editor tab, you can set the following options:
Option Description
Auto indent mode Places the cursor under the first nonblank character of the preceding nonblank line when you press Enter.
Smart tab Tabs to the first non-whitespace character in the preceding line. If Use tab character is selected, this option is cleared.

Chapter 7 • Setting Up the TestDirector Workflow
83
Use tab character Inserts tab character. If cleared, inserts space characters. If Smart tab is selected, this option is cleared.
Backspace unindents Aligns the insertion point to the previous indentation level when you press Backspace, if the cursor is on the first non-blank character of a line.
Show line numbers Displays line numbers in the margin. If this option is selected, Show line numbers on gutter is enabled.
Show line numbers on gutter
Displays line numbers in the gutter. If Show line numbers is selected, this option is enabled.
Group undo Undoes your last editing command as well as any subsequent editing commands of the same type, if you press Alt+Backspace or choose Edit > Undo.
Cursor beyond EOF Enables you to position the cursor after the end-of-file character.
Cursor beyond EOL Enables you to position the cursor beyond the end-of-line character.
Selection beyond EOL Enables you to select beyond the end-of-line character.
Keep trailing blanks Keeps any blanks you might have at the end of a line.
Persistent blocks Keeps marked blocks selected even when the cursor is moved using the arrow keys, until a new block is selected.
Overwrite blocks Replaces a marked block of text with new text. If Persistent Blocks is also selected, text you enter is appended following the currently selected block.
Double click line Highlights the line when you double-click any character in the line. If disabled, only the selected word is highlighted.
Find text at cursor Places the text at the cursor into the Text To Find list box in the Find Text dialog box when you choose Search > Find.
Option Description

Part I • Project Customization
84
3 In the Display tab, you can set the following options:
Force cut and copy enabled
Enables the Cut and Copy commands, even when there is no text selected.
Use syntax highlight Enables you to change the colors and attributes of your text in the Script Editor. To set highlighting options, click the Display or Colors tab.
Overwrite cursor as block Controls the appearance of the caret when using the Overwrite mode.
Disable dragging Prevents you from dragging and dropping text.
Block indent Specifies the number of spaces to indent a marked block.
Tab stops Specifies the tabs that the cursor moves when you press Tab.
Keymapping Sets the keyboard mappings in the Script Editor. Supports the following keyboard mappings: Default, Classic, Brief, Epsilon, and Visual Studio.
Option Description
Editor gutter Enables you to set the width, color, and style of the gutter.
Editor margin Enables you to set the width, color, style, and position the right margin.
Use mono font Displays and uses only monospaced screen fonts, such as Courier.
Editor font Lists the available screen fonts.
Editor color Lists the available screen colors.
Size Lists predefined font sizes.
Option Description

Chapter 7 • Setting Up the TestDirector Workflow
85
4 In the Colors tab, you can set the following options:
Use read-only color This option is not in use.
Draw special symbols Sets special characters for displaying end-of-file, end-of-line, space, and tab.
Option Description
Color SpeedSetting Enables you to quickly configure the Script Editor display using predefined color combinations.
Element Specifies syntax highlighting for a particular code element.
Foreground color Sets the foreground color for the selected code element.
Background color Sets the background color for the selected code element.
Use default for Displays the code element using default system colors for the foreground, background, or both.
Text attributes Specifies format attributes for the code element.
Open Loads a color scheme from your computer.
Save Saves a color scheme to your computer.
Option Description

Part I • Project Customization
86
Understanding TestDirector Events
When writing a script in the Script Editor, you can use TestDirector events and define your own routines. The naming convention for an event is:
Module_Entity_Event
Module can be one of the following:
Entity can be one of the following (note that some events do not include an entity name):
For information on Event, see “Reference for TestDirector Events” on page 87.
Module Description
Project A non-specific module.
Requirements The Requirements module.
TestPlan The Test Plan module.
TestLab The Test Lab module.
Defects The Defects module.
ManualRun The Manual Runner dialog box.
Entity Description
Req Requirement data in the Requirements module.
Test Test data in the Test Plan module.
DesignStep Design step data in the Test Plan module.
TestSet Test set data in the Test Lab module.
TestSetTests Test data in the Test Lab module.
Bug Defect data in the Defects module.
Step Test step data in the Manual Runner dialog box.
Run Test run data in the Manual Runner dialog box.

Chapter 7 • Setting Up the TestDirector Workflow
87
Reference for TestDirector Events
The following section contains alphabetical references for all the TestDirector events. It includes the event name, description, syntax, type (Function or Sub), values returned, and module availability.
For information on the naming convention for an event, see “Understanding TestDirector Events” on page 86.
ActionCanExecute
Indicates that an action is initiated by the user and checks whether the user has permission to perform the action.
Syntax: Module_ActionCanExecute(ActionName)
Where: ActionName is the name of the action.
Type: Function
Returns: True or False
Availability: • Requirements_ActionCanExecute
• TestPlan_ActionCanExecute
• TestLab_ActionCanExecute
• Defects_ActionCanExecute
• ManualRun_ActionCanExecute

Part I • Project Customization
88
AfterPost
Indicates that an object is posted to the server. Follows a _CanPost event. It applies to the following objects: requirements, tests (in the Test Plan module), test sets, defects, and run steps or test runs (in the Manual Runner dialog box).
Attachment_CanDelete
Indicates whether an attachment can be deleted from the server.
Syntax: Module_Entity_AfterPost
Type: Sub
Returns: None
Availability: • Requirements_Req_AfterPost
• TestPlan_Test_AfterPost
• TestLab_TestSet_AfterPost
• Defects_Bug_AfterPost
• ManualRun_Step_AfterPost
• ManualRun_Run_AfterPost
Syntax: Module_Attachment_CanDelete(Attachment)
Where: Attachment is the lAttachment interface. For more information, refer to the TestDirector Open Test Architecture Guide.
Type: Function
Returns: True or False
Availability: • Requirements_Attachment_CanDelete
• TestPlan_Attachment_CanDelete
• TestLab_Attachment_CanDelete
• Defects_Attachment_CanDelete
• ManualRun_Attachment_CanDelete

Chapter 7 • Setting Up the TestDirector Workflow
89
Attachment_CanOpen
Indicates whether an attachment can be opened.
Attachment_CanPost
Indicates whether an attachment can be posted to the server.
Syntax: Module_Attachment_CanOpen(Attachment)
Where: Attachment is the lAttachment interface. For more information, refer to the TestDirector Open Test Architecture Guide.
Type: Function
Returns: True or False
Availability: • Requirements_Attachment_CanOpen
• TestPlan_Attachment_CanOpen
• TestLab_Attachment_CanOpen
• Defects_Attachment_CanOpen
• ManualRun_Attachment_CanOpen
Syntax: Module_Attachment_CanPost(Attachment)
Where: Attachment is the lAttachment interface. For more information, refer to the TestDirector Open Test Architecture Guide.
Type: Function
Returns: True or False
Availability: • Requirements_Attachment_CanPost
• TestPlan_Attachment_CanPost
• TestLab_Attachment_CanPost
• Defects_Attachment_CanPost
• ManualRun_Attachment_CanPost

Part I • Project Customization
90
Attachment_New
Indicates an attachment is added to TestDirector.
CanAddTests
Indicates whether tests can be added to a test set.
Syntax: Module_Attachment_New(Attachment)
Where: Attachment is the lAttachment interface. For more information, refer to the TestDirector Open Test Architecture Guide.
Type: Sub
Returns: None
Availability: • Requirements_Attachment_New
• TestPlan_Attachment_New
• TestLab_Attachment_New
• Defects_Attachment_New
• ManualRun_Attachment_New
Syntax: Module_Entity_CanAddTests (Tests_List)
Where: Tests_List is an array of Test IDs.
Type: Function
Returns: True or False
Availability: TestLab_TestSet_CanAddTests

Chapter 7 • Setting Up the TestDirector Workflow
91
CanCustomize
Indicates whether the user can access the Customization window.
CanDelete
Indicates whether an object can be deleted from the server. It applies to the following objects: requirements, tests (in the Test Plan module), test sets, and defects.
Syntax: Module_CanCustomize(DomainName, ProjectName, UserName)
Where: • DomainName is the domain name.
• ProjectName is the project name.
• UserName is the user name.
Type: Function
Returns: True or False
Availability: Project_CanCustomize
Syntax: Module_Entity_CanDelete
Type: Function
Returns: True or False
Availability: • Requirements_Req_CanDelete
• TestPlan_Test_CanDelete
• TestLab_TestSet_CanDelete
• Defects_Bug_CanDelete

Part I • Project Customization
92
CanLogin
Indicates whether the user can log in to the project.
CanLogout
Indicates whether the user can log out of the project.
Syntax: Module_CanLogin(DomainName, ProjectName, UserName)
Where: • DomainName is the domain name.
• ProjectName is the project name.
• UserName is the user name.
Type: Function
Returns: True or False
Availability: Project_CanLogin
Syntax: Module_CanLogout
Type: Function
Returns: True or False
Availability: Project_CanLogout

Chapter 7 • Setting Up the TestDirector Workflow
93
CanPost
Indicates whether an object can be posted to the server. It applies to the following objects: requirements, tests (in the Test Plan module), test sets, defects, and run steps or test runs (in the Manual Runner dialog box).
CanRemoveTests
Indicates whether tests can be removed from a test set.
Syntax: Module_Entity_CanPost
Type: Function
Returns: True or False
Availability: • Requirements_Req_CanPost
• TestPlan_Test_CanPost
• TestLab_TestSet_CanPost
• Defects_Bug_CanPost
• ManualRun_Step_CanPost
• ManualRun_Run_CanPost
Syntax: Module_Entity_CanRemoveTests (Tests_List)
Where: Tests_List is an array of Test IDs.
Type: Function
Returns: True or False
Availability: TestLab_TestSet_CanRemoveTests

Part I • Project Customization
94
DefaultRes
Sets the default results value for TestDirector events.
DialogBox
Indicates whether or not a dialog box is open.
Syntax: Module_DefaultRes
Type: Function
Returns: True or False
Availability: Project_DefaultRes
Syntax: Module_DialogBox(DialogBoxName, IsOpen)
Where: • DialogBoxName is the name of the dialog box.
• IsOpen indicates whether or not the dialog box is open.
Type: Sub
Returns: None
Availability: • Requirements_DialogBox
• TestPlan_DialogBox
• TestLab_DialogBox
• Defects_DialogBox
• ManualRun_DialogBox

Chapter 7 • Setting Up the TestDirector Workflow
95
EnterModule
Indicates that the module is in use.
ExitModule
Indicates that the module is no longer in use.
Syntax: Module_EnterModule
Type: Sub
Returns: None
Availability: • Requirements_EnterModule
• TestPlan_EnterModule
• TestLab_EnterModule
• Defects_EnterModule
• ManualRun_EnterModule
Syntax: Module_ExitModule
Type: Sub
Returns: None
Availability: • Requirements_ExitModule
• TestPlan_ExitModule
• TestLab_ExitModule
• Defects_ExitModule
• ManualRun_ExitModule

Part I • Project Customization
96
FieldCanChange
Indicates whether a field in an object can be changed. Applies to the following objects: requirements, tests (in the Test Plan module), design steps, test sets, tests (in the Test Lab module), defects, and run steps or test runs (in the Manual Runner dialog box).
Syntax: Module_Entity_FieldCanChange (FieldName, NewValue)
Where: • FieldName is the name of the field.
• NewValue is the name of the field value.
Type: Function
Returns: True or False
Availability: • Requirements_Req_FieldCanChange
• TestPlan_Test_FieldCanChange
• TestPlan_DesignStep_FieldCanChange
• TestLab_TestSet_FieldCanChange
• TestLab_TestSetTests_FieldCanChange
• Defects_Bug_FieldCanChange
• ManualRun_Step_FieldCanChange
• ManualRun_Run_FieldCanChange

Chapter 7 • Setting Up the TestDirector Workflow
97
FieldChange
Indicates whether a field value for one of the following objects is changed: requirements, tests (in the Test Plan module), design step, test set, test (in the Test Lab module), defects, and run steps or test runs (in the Manual Runner dialog box).
GetDetailsPageName
Indicates the page name in the Defect Details dialog box.
Syntax: Module_Entity_FieldChange (FieldName)
Where: FieldName is the name of the field.
Type: Sub
Returns: None
Availability: • Requirements_Req_FieldChange
• TestPlan_Test_FieldChange
• TestPlan_DesignStep_FieldChange
• TestLab_TestSet_FieldChange
• TestLab_TestSetTests_FieldChange
• Defects_Bug_FieldChange
• ManualRun_Step_FieldChange
• ManualRun_Run_FieldChange
Syntax: Module_GetDetailsPageName(PageName, PageNum)
Where: • PageName is the default page name (for example, Page 1).
• PageNum is the page number.
Type: Function
Returns: String (returns the page name)
Availability: Defects_GetDetailsPageName

Part I • Project Customization
98
GetNewBugPageName
Indicates the page name in the Add Defect dialog box.
InitNewTask
Reserved for future use.
MoveTo
Indicates that the user clicks from one object to the next. Applies to one of the following objects: requirements, tests (in the Test Plan module), design steps, test sets, tests (in the Test Lab module), defects, or steps (in the Manual Runner dialog box).
Syntax: Module_GetNewBugPageName(PageName, PageNum)
Where: • PageName is the default page name (for example, Page 1).
• PageNum is the page number.
Type: Function
Returns: String (returns the page name)
Availability: Defects_GetNewBugPageName
Syntax: Module_Entity_MoveTo
Type: Sub
Returns: None
Availability: • Requirements_Req_MoveTo
• TestPlan_Test_MoveTo
• TestPlan_DesignStep_MoveTo
• TestLab_TestSet_MoveTo
• TestLab_TestSetTests_MoveTo
• Defects_Bug_MoveTo
• ManualRun_Step_MoveTo

Chapter 7 • Setting Up the TestDirector Workflow
99
MoveToSubject
Indicates that the user moves from one subject to another in the test plan tree.
New
Indicates that an object is added to TestDirector. Applies to one the following objects: requirements, tests (in the Test Plan module), test sets, defects, or steps (in the Manual Runner dialog box).
Syntax: Module_MoveToSubject(Subject)
Where: Subject is the ISysTreeNode interface. For more information, refer to the TestDirector Open Test Architecture Guide.
Type: Sub
Returns: None
Availability: TestPlan_MoveToSubject
Syntax: Module_Entity_New
Type: Sub
Returns: None
Availability: • Requirements_Req_New
• TestPlan_Test_New
• TestLab_TestSet_New
• Defects_Bug_New
• ManualRun_Step_New

Part I • Project Customization
100
RunTests
Indicates that the user clicks the Run button to run tests in the Test Lab module.
RunTestSet
Indicates that the user clicks the Run Test Set button to run a test set in the Test Lab module.
Syntax: Module_RunTests(Tests)
Where: Tests is an array of Test IDs.
Type: Sub
Returns: None
Availability: TestLab_RunTests
Syntax: Module_RunTestSet(Tests)
Where: Tests is an array of Test IDs.
Type: Sub
Returns: None
Availability: TestLab_RunTestSet

Chapter 7 • Setting Up the TestDirector Workflow
101
RunTestsManually
Indicates that the user clicks the Run arrow and chooses Run Manually to run tests in the Test Lab module.
Syntax: Module_RunTestsManually(Tests)
Where: Tests is an array of Test IDs.
Type: Sub
Returns: None
Availability: TestLab_RunTestsManually

Part I • Project Customization
102
Understanding TestDirector Objects
The following table summarizes the TestDirector objects that are available for writing a script.
Object Description
Actions Includes the lists of actions that are available for the following modules: Project, Requirements, Test Plan, Test Lab, Defects, and the Manual Runner dialog box. For more information, see “Understanding the Actions Object” on page 103.
Note that the Actions object handles the Action objects in the TestDirector project. For an explanation of the Action object, see “Understanding the Action Object” on page 104.
x_Fields Includes the following field types:
• Req_Fields: Contains fields and properties that are available in the Requirements module.
• Test_Fields: Contains fields and properties that are available for tests in the Test Plan module.
• Design_Step_Fields: Contains fields and properties that are available for design steps in the Test Plan module.
• TestSet_Fields: Contains fields and properties that are available for test sets in the Test Lab module.
• TestSet_Test_Fields: Contains fields and properties that are available for tests in the Test Lab module.
• Bug_Fields: Contains fields and properties that are available for defects in the Defects module and the Manual Runner dialog box.
• Step_Fields: Contains fields and properties that are available for steps in the Manual Runner dialog box.
• Run_Fields: Contains fields and properties that are available for test runs in the Manual Runner dialog box.
For more information on fields, see “Understanding the x_Fields Objects” on page 105.
Note that the x_Fields object handles the Field objects in the TestDirector project. For an explanation of the Field object, see “Understanding the Field Object” on page 106.

Chapter 7 • Setting Up the TestDirector Workflow
103
Understanding the Actions Object
When writing a script in the Script Editor, you can use the Actions object to manipulate toolbar buttons and menu commands. For example, you can set the Add Defect dialog box to open automatically when you enter the Defects module. In the Defects_EnterModule event, you can use the following code:
NewDefectAction=Actions.Action(“BugAddAction1”)NewDefectAction.Execute
The following table lists the properties that you can access when using the Actions object. It includes the property name, description and an indication of whether the property is read-only (R) or read and write (R/W). It also indicates the type of data returned by the property.
For more information on defining actions, “Adding New Commands” on page 80.
Lists Includes the lists that are available in a TestDirector project. For more information, see “Understanding the Lists Object” on page 108.
TDConnection Includes the properties for establishing and terminating project sessions. For detailed information on TDConnection, refer to the TestDirector Open Test Architecture Guide.
User Includes the properties of the user that is currently logged in to a TestDirector project. For more information, see “Understanding the User Object” on page 109.
Property R/W Type Description
Action R Object Allows access to every action in a list. The index for this property is the action name.
Object Description

Part I • Project Customization
104
Understanding the Action Object
When writing a script in the Script Editor, you can use the Action object to verify whether a button or command is enabled, checked, or visible. You can also use it to execute actions. For example, suppose you want the Defect Details dialog box to open automatically when you move from one defect to another in the Defects Grid. In the Defects_Bug_MoveTo event, you can use the following code:
NewDefectAction=Actions.Action(“DefectDetailsAction1”)#Defect Details opens after executing the next lineNewDefectAction.Execute
The following table lists the properties that you can access when using the Action object. It includes the property name, description and an indication of whether the property is read-only (R) or read and write (R/W). It also indicates the type of data returned by the property.
The Action object includes the following method:
Property R/W Type Description
Enabled R/W Boolean Indicates whether an action is enabled. A disabled action can not be invoked by the user, but can be invoked from the workflow script.
Checked R/W Boolean Indicates whether an action is checked in TestDirector.
Visible R/W Boolean Indicates whether an action is visible in TestDirector.
Method Description
Execute Executes the action.

Chapter 7 • Setting Up the TestDirector Workflow
105
Understanding the x_Fields Objects
When writing a script in the Script Editor, you can use the following x_Fields objects: Req_Fields, Test_Fields, Design_Step_Fields, TestSet_Fields, TestSet_Test_Fields, Bug_Fields, Step_Fields, and Run_Fields.
For example, to set a certain property for all fields in the Req_Fields.Fields object, you can refer to each field using its field ID number (Req_Fields.FieldById). Suppose you want to set all fields to be visible (IsVisible) in a dialog box. You can use the following code:
For i = 1 to Req_Fields.CountReq_Fields.FieldById(i).IsVisible = True
Next
The following table lists the properties that you can access when using the x_Fields objects. It includes the property name, description and an indication of whether the property is read-only (R) or read and write (R/W). It also indicates the type of data returned by the property.
Property R/W Type Description
Count R Long Returns the number of fields in the current object.
Field(FieldName) R Object Accesses the fields by field name or field label.
FieldByld(FieldID) R Object Accesses the field by the field ID number.

Part I • Project Customization
106
Understanding the Field Object
When writing a script in the Script Editor, you can use the Field object to access the property of an entity field. For example, suppose you want a message box to appear when a user does not have the permission to change a value in the Status field. You can use the following code:
Msgbox "You don’t have permission to change <" &Bug_Fields.Field("BG_STATUS").FieldLabel & "> field."
The following table lists the properties that you can access when using the Field object. It includes the property name, description and an indication of whether the property is read-only (R) or read and write (R/W). It also indicates the type of data returned by the property.
Property R/W Type Description
FieldLabel R String Specifies the user label name of the field.
FieldName R String Specifies the logical name of the field.
IsModified R Boolean Specifies if the value was modified.
IsNull R Boolean Specifies if the field value is absent.
IsReadOnly R/W Boolean Specifies if the field value is ready-only.
IsRequired R/W Boolean Specifies if the field value is required. Enables you to overwrite field customization information. Note that to modify the field value of the IsRequired property, the field value of the IsVisible property must be set to “True”. All changes to the IsRequired property are ignored if the field value is not visible.
IsVisible R/W Boolean Specifies if the field is displayed in the module.

Chapter 7 • Setting Up the TestDirector Workflow
107
PageNo R/W Integer Specifies the page on which the field is displayed in the Add Defect dialog box and in the Defect Details dialog box.
List R/W List Attaches a list to the field and sets or changes a list that is attached to the field. Note that you cannot attach a list to BG_SUBJECT, BG_DESCRIPTION, BG_SUMMARY, or any field that is not a lookup list type field.
Value R/W Variant Sets or retrieves the value of the field.
ViewOrder R/W Integer Determines the order in which the field appears in the Add Defect dialog box and the Defect Details dialog box.
Property R/W Type Description

Part I • Project Customization
108
Understanding the Lists Object
When writing a script in the Script Editor, you can use the Lists object to limit field input to a specific list of values. For example, suppose you want to set the list in the Planned Closing Version field, depending on the Project field value, you can use the following code:
If Bug_Fields.Field("BG_PROJECT").Value = "Project 1" ThenBug_Fields.Field("BG_PLANNED_CLOSING_VER").List = Lists("All
Projects")...
End If
The following table lists the properties that you can access when using the Lists object. It includes the property name, description, and an indication of whether the property is read-only (R) or read and write (R/W). It also indicates the type of data returned by the property.
Property R/W Type Description
List R ISysTreeNode Accesses the TestDirector lists.

Chapter 7 • Setting Up the TestDirector Workflow
109
Understanding the User Object
When writing a script in the Script Editor, you can use the User object to query user properties. For example, suppose you want a message box to open when checking the permission of a user on a specific project. You can use the following code:
If User.IsInGroup("TDAdmin") Then MsgBox "The user " & User.FullName & " has administrative permissions for this project."
...End If
The following table lists the properties that you can access when using the User object. It includes the property name, description, and an indication of whether the property is read-only (R) or read and write (R/W). It also indicates the type of data returned by the property.
Property R/W Type Description
FullName R/W String Returns the first and last name of a user.
IsInGroup (GroupName)
R Boolean Checks whether or not a user is a member of a predefined/user-defined group.
UserName R String Returns the user name used when logging in to TestDirector.

Part I • Project Customization
110

Part II
Site Administration


113
8Site Administrator at a Glance
Using the Site Administrator, you can create and maintain TestDirector projects, users, and servers.
This chapter describes:
Starting the Site Administrator
The Site Administrator
Changing the Site Administrator Password
Starting the Site Administrator
You create and maintain your TestDirector projects using the Site Administrator.

Part II • Site Administration
114
To start the Site Administrator:
1 Open your Web browser and type your TestDirector URL(http://<Server name>/<virtual Directory name>/default.htm). The TestDirector Options window opens.
2 Click the Site Administrator link.
The first time you run the Site Administrator, the application is downloaded to your computer. Subsequently, TestDirector automatically carries out a version check. If it detects a newer version on the server, it downloads it to your machine.
Note: To download files to your computer, you must log in with administrator privileges. This applies if you are running TestDirector for the first time, upgrading to a newer version, or applying a service pack.

Chapter 8 • Site Administrator at a Glance
115
After the TestDirector version has been checked and updated if necessary, the Site Administrator Login window opens.
3 In the Password box, type your site administrator password (maximum length 20 characters).
By default, the Site Administrator has no password defined. To define or change the password, see “Changing the Site Administrator Password” on page 117.
Select Remember Password if you want TestDirector to keep your password.
4 Click Login. The Site Administrator opens.

Part II • Site Administration
116
The Site Administrator
The TestDirector Site Administrator contains the following tabs:
Click the Projects tab to manage your TestDirector projects. This includes adding new domains and projects, querying data in a project, restoring a project, upgrading a project, renaming a project, and activating or deactivating a project. For more information, see Chapter 9, “Managing TestDirector Projects.”
Click the Users tab to add a new user and define user properties, including changing passwords. For more information, see Chapter 10, “Managing TestDirector Users.”
Click the Connections tab to monitor the users currently connected to a TestDirector server. For more information, see Chapter 11, “Managing User Connections and Licenses.”
Click the Licenses tab to monitor the total number of TestDirector licenses in use and to modify the license key number. For more information, see Chapter 11, “Managing User Connections and Licenses.”
Click the TD Servers tab to modify TestDirector server information, such as the log file and mail protocol. For more information, see Chapter 12, “Configuring Servers and Parameters.”
Click the DB Servers tab to manage your database servers. This includes adding a new database server, editing a server’s connection string, changing a server’s default administrator user name and password, and changing a user password. Note that this tab is available only in the TestDirector Enterprise Edition. For more information, see Chapter 12, “Configuring Servers and Parameters.”
Click the Site Config tab to modify TestDirector configuration parameters. For more information, see Chapter 12, “Configuring Servers and Parameters.”
Click the SiteScope tab to monitor Web, network and system performance. By using SiteScope, you can proactively identify and resolve any potential TestDirector server performance issues. Note that SiteScope is available only in the TestDirector Enterprise Edition. For more information, refer to the TestDirector Add-ins page.

Chapter 8 • Site Administrator at a Glance
117
Changing the Site Administrator Password
To secure the information in the Site Administrator, you should define a password. Note that by default, the Site Administrator has no password defined.
To change the Site Administrator password:
1 In the TestDirector Options window or TestDirector Login window, click the Site Administrator link. Alternatively, choose Start > Programs > TestDirector 8.0 > Site Administrator. The Site Administrator Login window opens.
2 Click the Change Password link. The Change Administrator Password dialog box opens.
3 In the New Password box, type a new password (maximum length 20 characters).
4 In the Retype Password box, retype the password.
5 Click OK.

Part II • Site Administration
118

119
9Managing TestDirector Projects
The Site Administrator enables you to manage and maintain TestDirector domains and projects.
This chapter describes:
Understanding the TestDirector Project Structure
Creating TestDirector Domains
Creating TestDirector Projects
Copying TestDirector Projects
Updating Project Details
Querying Project Tables
Upgrading Projects
Deactivating and Activating Projects
Pinging Projects
Renaming Projects
Removing Projects from the Projects List
Deleting Projects
Deleting Domains
Editing the Connection String
Restoring Project Access
Backing Up TestDirector Projects
Renaming the Defects Module for a Project

Part II • Site Administration
120
About Managing TestDirector Projects
Before you start working in TestDirector, you need to create a TestDirector project. A TestDirector project is a database for collecting and storing data relevant to a testing process. You can create a TestDirector project that works on Microsoft Access, Oracle, Sybase, or Microsoft SQL. You can create an empty TestDirector project, or you can copy the content of an existing project to a new project. You can also restore access to an existing project.
After you create a project, you can query the contents of a project by defining and running SQL statements, and deactivate/activate access to a project. You can also upgrade a project from a previous TestDirector version to the current TestDirector version.
TestDirector projects are grouped by domain. A domain contains a group of related TestDirector projects and assists you in organizing and managing a large number of projects. For example, you may wish to create a domain for business process projects and another domain for IT development projects.
Note: The following limitations exist in the TestDirector Standard Edition:
Only five users can connect concurrently to each TestDirector server.
The Default domain is the only available domain.
Microsoft Access is the only available database.

Chapter 9 • Managing TestDirector Projects
121
Understanding the TestDirector Project Structure
When you install TestDirector, the installation program creates a domain repository, which is called TD_Dir (by default). The domain repository is a working area for a group of domains that are shared by multiple users. Each domain stores TestDirector projects. The domain repository includes a default domain which stores the TestDirector_Demo project. When you create a new project, you can add it to the default domain or to a user-defined domain.
The following diagram shows the structure of the domain repository. It illustrates the domains, projects, subdirectories, and files that are included in a new project.
DefaultDomain
TestDirector_DemoProject
Project_1
Project_2
Project_3
Domain_1
AttachSettings
StyleSheets
Tests
Dbid.iniTestDir.mdb(Microsoft Access only)
Domain_2
Domain_3
Domain Repository(TD_Dir)

Part II • Site Administration
122
In the above example, TestDirector_Demo Project, Project_1, Project_2, and Project_3 are stored in the Default Domain. The user-defined domains are Domain_1, Domain_2, and Domain_3.
Each new TestDirector project contains:
Attach, a subdirectory for storing attachments.
Settings, a subdirectory for storing public and private favorite views.
StyleSheets, a subdirectory for storing style sheets that are used when mailing defects, requirements, or tests.
Tests, a subdirectory for storing automated tests.
Dbid.ini, an initialization file that stores the project information. This file is needed for restoring a connection to a project. For more information, see “Restoring Project Access” on page 157.
TestDir.mdb, the actual Microsoft Access database (available only in Microsoft Access projects).
Note: You can migrate project databases, project directories, domain repositories, and servers from one location to another. For more information, see Appendix A, “TestDirector 7.6 and 8.0: Migration Process”.

Chapter 9 • Managing TestDirector Projects
123
Creating TestDirector Domains
You can add new domains to the Site Administrator. TestDirector organizes projects in the Projects list by domain. Note that you can create new domains only in the TestDirector Enterprise Edition.
Note: You can migrate a domain repository from one location to another. For more information, see Appendix A, “TestDirector 7.6 and 8.0: Migration Process”.
To create a domain:
1 In the Site Administrator, click the Projects tab.
2 Click the Create Domain button. The Create Domain dialog box opens.
3 Type a Domain Name and click OK.
TestDirector adds the new domain to the Projects list in alphabetical order.

Part II • Site Administration
124
In the right pane, under Directories, you can view the location of the domain.
4 To add a person’s name as a contact when there are questions or problems with the domain and/or its projects, click the Contact Name link. In the Set Contact Name dialog box, type the name of the contact person and click OK.
5 To add the email address of the contact person for the domain, click the Contact E-Mail link. In the Set Contact E-Mail dialog box, type the e-mail address and click OK.
6 To change the number of users allowed to connect concurrently to the domain, click the User Quota link. The Domain User Quota dialog box opens.
Choose Maximum Connections and type the maximum number of concurrent connections allowed. Click OK.
Note: You can also change the number of users allowed to connect concurrently to a project. For more information, see “Updating Project Details” on page 141.

Chapter 9 • Managing TestDirector Projects
125
Creating TestDirector Projects
You can create the following types of TestDirector projects: Microsoft Access, Microsoft SQL, Oracle, or Sybase.
Note: Sybase, Microsoft SQL, and Oracle are available only in the TestDirector Enterprise edition.
You create Microsoft SQL, Oracle, or Sybase projects using the database server properties that you defined during TestDirector installation, or in the Site Administrator’s DB Servers tab. For more information on defining database servers during TestDirector installation, refer to the TestDirector Installation Guide. For more information on defining database servers using the DB Servers tab, see “Defining New Database Servers” on page 181.
When you create a new TestDirector project, you can copy the contents of an existing project to a new project. For more information, see “Copying TestDirector Projects” on page 138.
Note: You can migrate a project from one location to another. For more information, see Appendix A, “TestDirector 7.6 and 8.0: Migration Process”.

Part II • Site Administration
126
Creating a Microsoft Access Project
You can create a TestDirector project that works on a Microsoft Access database.
To create a Microsoft Access project:
1 In the Site Administrator, click the Projects tab.
2 Click the Create Project button. The Create Project dialog box opens.
3 In the Project Name box, type a name for your TestDirector project.
4 In the In Domain box, select a domain. Note that once the project has been created, you can move it to a different domain in the Projects list, using a drag-and-drop operation.
5 Under Database Type, select MS Access.

Chapter 9 • Managing TestDirector Projects
127
6 Click Next. The following dialog box opens.
7 Verify the project details. To change any of the details, click Back.
8 You can select Activate Project to instruct TestDirector to activate the new project. For more information, see “Deactivating and Activating Projects” on page 151.
9 To create the new project, you can:
Click Create to create the new project, with the contents empty. The new project is added to the Projects list.
Click Copy to copy the contents of an existing project to the project. For more information, see “Copying TestDirector Projects” on page 138.

Part II • Site Administration
128
Creating a Microsoft SQL Project
You can create a TestDirector project that works on a Microsoft SQL database.
To create a Microsoft SQL project:
1 In the Site Administrator, click the Projects tab.
2 Click the Create Project button. The Create Project dialog box opens.
3 In the Project Name box, type a name for your TestDirector project.
4 In the In Domain box, select a domain. Note that once the project has been created, you can move it to a different domain in the Projects list using a drag-and-drop operation.
5 Under Database Type, select MS-SQL.

Chapter 9 • Managing TestDirector Projects
129
6 Click Next. The following dialog box opens.
7 In the Server Name box, select a server name from the list.
8 In the DB Admin User box, type the login name of the Microsoft SQL database administrator.
Note that the login name of the Microsoft SQL database administrator is automatically displayed in the DB Admin User box if you defined it in the DB Servers tab. For more information, see “Defining New Database Servers” on page 181.
9 In the DB Admin Password box, type the password of the Microsoft SQL database administrator.
Note that the password of the Microsoft SQL database administrator is automatically displayed in the DB Admin Password box if you defined it in the DB Servers tab. For more information, see “Defining New Database Servers” on page 181.

Part II • Site Administration
130
10 Click Next. The following dialog box opens.
11 Verify the project details. To change any of the details, click Back.
12 You can select Activate Project to instruct TestDirector to activate the new project. For more information, see “Deactivating and Activating Projects” on page 151.
13 To create the new project, you can:
Click Create to create the new project, with the contents empty. The new project is added to the Projects list.
Click Copy to copy the contents of an existing project to the project. For more information, see “Copying TestDirector Projects” on page 138.

Chapter 9 • Managing TestDirector Projects
131
Creating an Oracle Project
You can create a TestDirector project that works on an Oracle database. Note that on an Oracle database server, projects and users are identical. Therefore, if you are creating multiple Oracle projects and want each project/user you create to have its own password, you must define a new database server. Each database server must have its own unique alias and user password for each project you create. For more information on defining database servers, see “Defining New Database Servers” on page 181.
To create an Oracle project:
1 In the Site Administrator, click the Projects tab.
2 Click the Create Project button. The Create Project dialog box opens.
3 In the Project Name box, type a name for your TestDirector project.
4 In the In Domain box, select a domain. Note that once the project has been created, you can move it to a different domain in the Projects list, using a drag-and-drop operation.
5 Under Database Type, select Oracle.

Part II • Site Administration
132
6 Click Next. The following dialog box opens.
7 In the Server Name box, select a server name from the list.
8 In the DB Admin User box, type the login name of the Oracle database administrator.
Note that the login name of the Oracle database administrator is automatically displayed in the DB Admin User box if you defined it in the DB Servers tab. For more information, see “Defining New Database Servers” on page 181.
9 In the DB Admin Password box, type the password of the Oracle database administrator.
Note that the password of the Oracle database administrator is automatically displayed in the DB Admin Password box if you defined it in the DB Servers tab. For more information, see “Defining New Database Servers” on page 181.

Chapter 9 • Managing TestDirector Projects
133
10 Click Next. The following dialog box opens.
11 In the Create in TableSpace box, select a storage location from the list.
12 In the Temporary TableSpace box, select a temporary storage location for the new project.
13 Click Next. The following dialog box opens.

Part II • Site Administration
134
14 Verify the project details. To change any of the details, click Back.
15 You can select Activate Project to instruct TestDirector to activate the new project. For more information, see “Deactivating and Activating Projects” on page 151.
16 To create the new project, you can:
Click Create to create the new project, with the contents empty. The new project is added to the Projects list.
Click Copy to copy the contents of an existing project to the project. For more information, see “Copying TestDirector Projects” on page 138.
Creating a Sybase Project
You can create a TestDirector project that works on a Sybase database.
To create a Sybase project:
1 In the Site Administrator, click the Projects tab.
2 Click the Create Project button. The Create Project dialog box opens.
3 In the Project Name box, type a name for your TestDirector project.

Chapter 9 • Managing TestDirector Projects
135
4 In the In Domain box, select a domain. Note that once the project has been created, you can move it to a different domain in the Projects list, using a drag-and-drop operation.
5 Under Database Type, select Sybase.
6 Click Next. The following dialog box opens.
7 In the Server Name box, select a server name from the list.
8 In the DB Admin User box, type the login name of the Sybase database administrator.
Note that the login name of the Sybase database administrator is automatically displayed in the DB Admin User box if you defined it in the DB Servers tab. For more information, see “Defining New Database Servers” on page 181.
9 In the DB Admin Password box, type the password of the Sybase database administrator.
Note that the password of the Sybase database administrator is automatically displayed in the DB Admin Password box if you defined it in the DB Servers tab. For more information, see “Defining New Database Servers” on page 181.

Part II • Site Administration
136
10 Click Next. The following dialog box opens.
11 From the Create on Device list, select a device location for the project. In the Max Size box, you can set the maximum amount of disk space for the project.
12 From the Log on Device list, select a device. In the Max Size box, you can set the maximum amount of disk space for the log.

Chapter 9 • Managing TestDirector Projects
137
13 Click Next. The following dialog box opens.
14 Verify the project details. To change any of the details, click Back.
15 You can select Activate Project to instruct TestDirector to activate the new project. For more information, see “Deactivating and Activating Projects” on page 151.
16 To create the new project, you can:
Click Create to create the new project, with the contents empty. The new project is added to the Projects list.
Click Copy to copy the contents of an existing project to the project. For more information, see “Copying TestDirector Projects” on page 138.

Part II • Site Administration
138
Copying TestDirector Projects
When you create a new TestDirector project, you can copy the contents of an existing project to the new project.
Note: If your TestDirector server becomes unavailable while copying, you can resume the copying process at a later stage. To resume copying, reopen the Site Administrator and select the project from the Projects list. In the right pane, click the Click Here link.
Note: You can migrate a project from one location to another. For more information, see Appendix A, “TestDirector 7.6 and 8.0: Migration Process”.
To copy a TestDirector Project:
1 Deactivate the project you want to copy. For more information, see “Deactivating and Activating Projects” on page 151.
2 Create a project:
For a Microsoft Access project, see Steps 1 - 8 in “Creating a Microsoft Access Project” on page 126.
For a Microsoft SQL project, see Steps 1 - 12 in “Creating a Microsoft SQL Project” on page 128.
For an Oracle project, see Steps 1 - 15 in “Creating an Oracle Project” on page 131.
For a Sybase project, see Steps 1 - 15 in “Creating a Sybase Project” on page 134.

Chapter 9 • Managing TestDirector Projects
139
3 In the Create Project dialog box, click Copy. The following dialog box opens.
4 In the From Project box, select the project you want to copy.
5 Select Customization to copy project lists, host data, system and user-defined fields, and transition rules to the new project. If this option is selected, you can also choose to copy any of the following options:
Option Description
Requirements Copies requirement data from the project. Selecting this option enables you to choose Include History.
Tests Copies test data from the project. If this option is selected, you can also choose to copy the following options:
• Test Sets: Copies test set data from the project.
• Runs: Copies run data from the project.
Selecting this option enables you to choose Include History.
Defects Copies defect data from the project. Selecting this option enables you to choose Include History.

Part II • Site Administration
140
6 Select Users and Groups to copy user and group information and permission settings. If this option is selected, you can also copy any of the following options:
7 To clear all options, click Clear All.
8 To select all options, click Select All.
9 Click Copy to add the new project to the Projects list.
Include History Copies history data for the options that are selected.
Public Favorite Views
Copies public favorite view data from the project. For more information, refer to the TestDirector User’s Guide.
Option Description
Private Favorite Views
Copies private favorite view data from the project. For more information, refer to the TestDirector User’s Guide.
Mail Conditions Copies the mailing configuration data. For more information, see “Setting the Mailing Configuration” on page 59.
Option Description

Chapter 9 • Managing TestDirector Projects
141
Updating Project Details
You can view and update project details such as project type, project status, and project storage. You can also enable the automatic sending of defect e-mails.
Tip: You can move a project to a different domain in the Projects list using a drag-and-drop operation. Note that this does not change the physical location of the project.
To update project details:
1 In the Site Administrator, click the Projects tab.
2 In the Projects list, select a project.

Part II • Site Administration
142
3 Under Project Database, view the following project details:
Field Description
Database Type The project types can be Microsoft Access, MS-SQL, Sybase, or Oracle.
Project Status Indicates whether the project is active. For information on deactivating/activating a project, see “Deactivating and Activating Projects” on page 151.
Database Name The project name, as defined in the database.
Database Server The name of the database server on which the database is located.
Created From Project The project was copied from this project. An Empty Database value indicates that the project was not copied. For more information, see “Copying TestDirector Projects” on page 138.
Restored From Project The project was restored from this project. For more information, see “Restoring Project Access” on page 157.
Note that this field is displayed instead of Created From Project.
Created From Domain The project was copied from this domain.
Restored From Domain
The project was restored from this domain. For more information, see “Restoring Project Access” on page 157.
Note that this field is displayed instead of Created From Domain.
Connection String The ADO connection string. To modify the connection string, see “Editing the Connection String” on page 155.
DB User Password The user password for the Oracle server on which the database is located. To modify this password, see “Modifying Database Server Properties” on page 184.
Project Directory The location of the project.

Chapter 9 • Managing TestDirector Projects
143
4 Select Send defect emails automatically to enable the mail configuration settings for a project. This instructs TestDirector to automatically e-mail specified users every time set defect fields are updated. For more information on configuring mail, see Chapter 5, “Setting the Mailing Configuration.”
TestDirector sends the defect messages automatically, at specified time intervals. To edit the time interval, locate the MAIL_INTERVAL parameter in the Site Config tab. For more information, see “Setting TestDirector Configuration Parameters” on page 187.
To manually send the defect messages that have accumulated during the current time interval, click the Email Now button.
5 To change the number of users allowed to connect concurrently to the project, click the User Quota link. The Project User Quota dialog box opens.
Choose Maximum Connections and type the maximum number of concurrent connections allowed. Click OK.
Note: The maximum number of users allowed to connect concurrently to the project should not exceed the number of users allowed to connect to its domain. For more information, see “Creating TestDirector Domains” on page 123.
Note: If you are using the TestDirector Standard Edition, you cannot exceed five user connections.

Part II • Site Administration
144
6 To add a description for the project, click the Description link. In the Edit Project Description dialog box, add your description and click OK.
7 Click the Refresh Projects List button to refresh the projects in a specific domain. To refresh projects in all domains, click the Refresh Projects List arrow and choose Refresh All Domains.
Querying Project Tables
You can query specific data that is stored in your project. You query a project by defining and running SQL statements. The following examples show SQL queries and the results that they return.
Query Results
select * from BUGwhere BG_STATUS = ‘open’
All defects that are open.
select * from BUGwhere BG_RESPONSIBLE = ‘james_td’ or BG_RESPONSIBLE = ‘mary_td’
All defects assigned to either James or Mary.
select count (*) from BUGwhere BG_RESPONSIBLE = ‘mary_td’
The number of defects assigned to Mary.
select * from BUGwhere BG_RESPONSIBLE=’james_td’ and BG_STATUS= ’open’
All open defects assigned to James.

Chapter 9 • Managing TestDirector Projects
145
Using the first query example, the SQL query returns the following:
To query a project:
1 In the Site Administrator, click the Projects tab.
2 In the Projects list, double-click a project.
3 Select a table. TestDirector automatically runs the “SELECT *” query for this table and displays all the data for the table in the SQL Query Results grid.
4 Define a query by typing SQL statements in the SQL pane.
5 Click the Execute SQL button or press ALT-Q. The data returned by the query appears in the SQL Query Results grid.
SQL pane
SQL Query Results grid
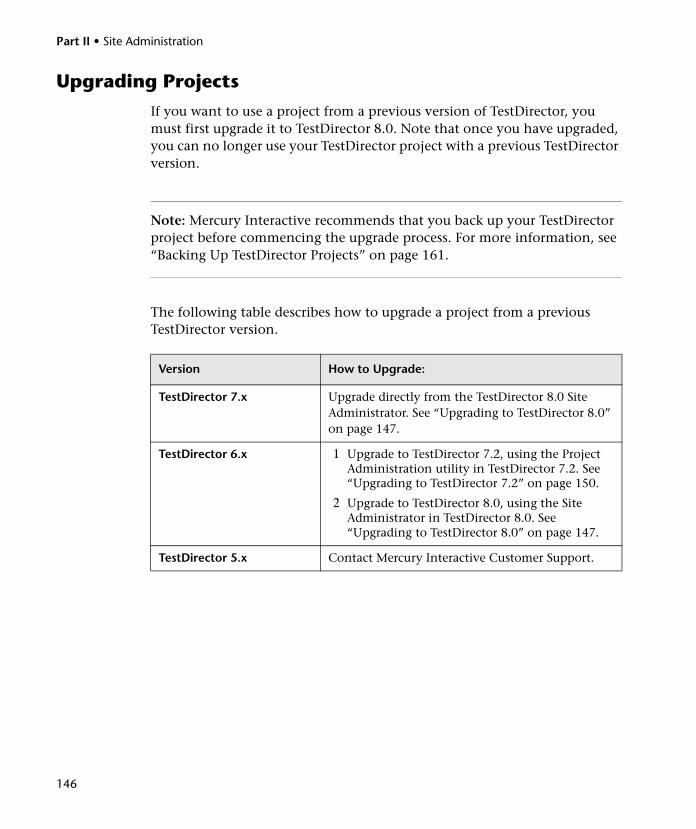
Part II • Site Administration
146
Upgrading Projects
If you want to use a project from a previous version of TestDirector, you must first upgrade it to TestDirector 8.0. Note that once you have upgraded, you can no longer use your TestDirector project with a previous TestDirector version.
Note: Mercury Interactive recommends that you back up your TestDirector project before commencing the upgrade process. For more information, see “Backing Up TestDirector Projects” on page 161.
The following table describes how to upgrade a project from a previous TestDirector version.
Version How to Upgrade:
TestDirector 7.x Upgrade directly from the TestDirector 8.0 Site Administrator. See “Upgrading to TestDirector 8.0” on page 147.
TestDirector 6.x 1 Upgrade to TestDirector 7.2, using the Project Administration utility in TestDirector 7.2. See “Upgrading to TestDirector 7.2” on page 150.
2 Upgrade to TestDirector 8.0, using the Site Administrator in TestDirector 8.0. See “Upgrading to TestDirector 8.0” on page 147.
TestDirector 5.x Contact Mercury Interactive Customer Support.

Chapter 9 • Managing TestDirector Projects
147
Upgrading to TestDirector 8.0
To use a TestDirector 7.x project in TestDirector 8.0, you must first upgrade it to TestDirector 8.0. You can choose to upgrade one project at a time, or several projects in a domain concurrently.
Notes:
If you are upgrading a project to a different server or database, see Appendix A, “TestDirector 7.6 and 8.0: Migration Process”.
If you are upgrading from TestDirector 7.2 to TestDirector 8.0, you can create a staging environment that replicates the production environment. For more information, see Appendix B, “TestDirector 7.2: Guidelines for Upgrading”.
For more information on upgrading projects, refer to the TestDirector Knowledge Base (http://support.mercury.com) and search for problem number 30698.
To upgrade a single project to TestDirector 8.0:
1 In the Site Administrator, click the Projects tab.
2 In the Projects list, select a project.
3 Click the Upgrade Project button. If the project is active, you are prompted to deactivate it. For more information, see “Deactivating and Activating Projects” on page 151.
4 Click OK to confirm that you want to upgrade your project. TestDirector begins upgrading your project.
5 Click OK when prompted with a message that the upgrade was successful.

Part II • Site Administration
148
To upgrade several projects in a domain concurrently:
1 In the Site Administrator, click the Projects tab.
2 In the Projects list, select a domain.
3 Click the Multiple Projects Upgrade button. The Multiple Projects Upgrade dialog box opens.
4 Under After the upgrade, choose whether you want TestDirector to leave all projects deactivated after the upgrade, activate only the previously active projects, or activate all projects. Note that by default, only the currently active projects are activated after the upgrade is performed.

Chapter 9 • Managing TestDirector Projects
149
5 You can view the TestDirector version in which a project was created. You can view the version numbers for all the projects in the domain, or select specific projects for which you want to view the version numbers:
To view the version numbers for all projects, click Select All and then click the Display Versions button.
To view the version numbers for specific projects only, select the boxes beside the project names and click the Display Versions button.
The project version number appears in the Version column.
6 You can upgrade all projects in the domain, or select specific projects to upgrade:
To upgrade all projects, click Select All and then click the Upgrade Projects button.
To upgrade specific projects only, select the boxes beside the project names and click the Upgrade Projects button.
If a project is active, you are prompted to deactivate it. For more information, see “Deactivating and Activating Projects” on page 151.
TestDirector displays the upgrading process and results in the Upgrade Results box.
7 Click Close to close the Multiple Projects Upgrade dialog box.

Part II • Site Administration
150
Upgrading to TestDirector 7.2
To use a TestDirector 6.x project in TestDirector 8.0, you must first upgrade it to TestDirector 7.2. You then upgrade it to TestDirector 8.0.
To upgrade to TestDirector 7.2:
1 If TestDirector 6.x is installed on your computer, copy the dbadmin.exe and empty_db.mdb files from the Bin directory on your TestDirector 8.0 CD-ROM to your computer. Alternatively, you can copy the files from the <drive>:\<TDBIN directory>\Apps directory.
If TestDirector 6.x is not installed on your computer, you must first install BDE on your computer, and then copy the dbadmin.exe and empty_db.mdb files from the Bin directory on your TestDirector 8.0 CD-ROM to your computer. You can install BDE from the Redist\BDE folder on the TestDirector 8.0 CD-ROM. Alternatively, you can install BDE from the <drive>:\<TDBIN directory>\Redist directory.
2 Double-click the dbadmin.exe file. The Login dialog box opens.
3 Type the project administrator password and click OK. The Project Administration utility opens.
4 Select a project.
Note: If you cannot view the list of projects, choose Connection > Change Common Directory or click the Change button, and select the directory in which your TestDirector 6.x projects are stored.
5 Click Upgrade or choose Project > Upgrade. A message box opens.
6 Click OK to start the upgrade process. When the process ends, a message box opens.
7 Click OK.
8 Upgrade from TestDirector 7.2 to TestDirector 8.0. See “Upgrading to TestDirector 8.0” on page 147.

Chapter 9 • Managing TestDirector Projects
151
Deactivating and Activating Projects
You can deactivate or activate a TestDirector project. Note that before you can activate a project created with a previous TestDirector version, you must first upgrade the project. For more information, see “Upgrading Projects” on page 146.
When you deactivate a project, the project name is removed from the Projects box in the TestDirector Login window. TestDirector does not delete the project from the server. Any users currently connected to the project are forced to log out when you deactivate.
Note: It is recommended that you deactivate a project before you change any data that may cause inconsistency for a connected user.
To deactivate a project:
1 In the Site Administrator, click the Projects tab.
2 In the Projects list, select a project.
3 Click the Deactivate Project button. A message box indicates that all connected users will be disconnected.
4 Click OK to confirm. The project is deactivated and TestDirector changes the project icon in the Projects list from yellow to red.
To activate a project:
1 In the Site Administrator, click the Projects tab.
2 In the Projects list, select a project.
3 Click the Activate Project button. The project is activated and TestDirector changes the project icon in the Projects list from red to yellow.

Part II • Site Administration
152
Pinging Projects
You can check whether a project is connected to the Site Administrator.
To ping a project:
1 In the Site Administrator, click the Projects tab.
2 In the Projects list, select a project.
3 Click the Ping Project button.
4 Click OK when prompted with a message that the ping was successful.
Renaming Projects
You can rename a project in the Projects list.
To rename a project:
1 In the Site Administrator, click the Projects tab.
2 In the Projects list, select a project.
3 Click the Rename Project button. If the project is active, you are prompted to deactivate it. For more information, see “Deactivating and Activating Projects” on page 151.
4 In the Rename Project dialog box, enter the new name for the project and click OK. The project is renamed in the Projects list.

Chapter 9 • Managing TestDirector Projects
153
Removing Projects from the Projects List
You can remove a project from the Projects list in the Site Administrator. Note that this does not delete the project from the server and you can restore the project if necessary. For more information, see “Restoring Project Access” on page 157.
To remove a project from the Projects list:
1 In the Site Administrator, click the Projects tab.
2 In the Projects list, select a project.
3 Click the Remove Project button.
4 Click OK to confirm. Note that if the project is still active, you are prompted to deactivate it. For more information, see “Deactivating and Activating Projects” on page 151.
5 Click OK.
Deleting Projects
You can delete a project from the Projects list in the Site Administrator. Note that this deletes the contents of the project from the server and you cannot restore the project.
Note: To delete an Oracle project through an Oracle utility (not from the Site Administrator), the following privileges are required:
GRANT SELECT ON "SYS"."GV_$SESSION" TO <USER>;GRANT ALTER SYSTEM TO <USER>;
To delete a project:
1 In the Site Administrator, click the Projects tab.
2 In the Projects list, select a project.
3 Click the Delete Project button.

Part II • Site Administration
154
4 Click OK to confirm. Note that if the project is still active, you are prompted to deactivate it. For more information, see “Deactivating and Activating Projects” on page 151.
In addition, if you did not specify a database administrator user name or password, the Default Admin Password dialog box opens. Enter the database administrator’s user name and password and click OK.
5 Click OK.
Deleting Domains
You can delete a domain from the Projects list and remove its contents from the server.
Note: You cannot delete a domain if it contains projects. To delete the domain, you must first delete the projects. For more information, see “Deleting Projects” on page 153.
To delete a domain:
1 In the Site Administrator, click the Projects tab.
2 In the Projects list, select a domain.
3 Click the Delete Domain button.
4 Click Yes to confirm.

Chapter 9 • Managing TestDirector Projects
155
Editing the Connection String
You can edit a project’s ADO connection string.
To edit the connection string:
1 In the Site Administrator, click the Projects tab.
2 In the Projects list, select a project.
3 Click the Edit ADO Connection String button. If the project is still active, you are prompted to deactivate it. For more information, see “Deactivating and Activating Projects” on page 151.
The Connection String Editor dialog box opens.
The Connection String Editor includes the following attributes:
Attribute Description
Provider The name of the ADO provider to be used for the connection.
Data Source The name of the database server or data source. For Oracle, Microsoft SQL, and Sybase the %DB_SERVER% property is replaced by the project’s database server name. For example, TDORASERVER. For Microsoft Access, the %MDB_FILENAME% parameter is replaced by the file name of the data source. For example, testdir.mdb.

Part II • Site Administration
156
4 In the ADO Connection String box, modify the attributes of the connection string.
5 To test the connection string, click Test Connection.
6 Click OK to save your connection string modification and close the Connection String Editor.
User ID The user name to be used when connecting to the data source. For Microsoft SQL and Sybase, the %DB_USER% parameter is replaced by the user name of the database administrator. For Oracle, the %DB_USER% parameter is replaced by the database name, using this format: domain name_project name_DB. For example, DEFAULT_MyProject_DB.
Password The password to be used when connecting to the data source. For Microsoft SQL and Sybase, the %PASSWORD% parameter is replaced by the password of the database administrator. For Oracle, the %PASSWORD% parameter is replaced by the password of the database name.
Initial Catalog The name of a default Microsoft SQL or Sybase type project to be used when connecting to a data source. The %DB_NAME% parameter is replaced by the database name, using the following format: domain name_project name_DB. For example, DEFAULT_MyProject_DB.
Attribute Description

Chapter 9 • Managing TestDirector Projects
157
Restoring Project Access
You can restore access to a project that is not in your current Projects list in the Site Administrator. For example, you may want to access a project from another TestDirector 8.0 server or access a project from a common directory created in a previous version of TestDirector. After you restore access to a project, it is added to the Projects list in the Site Administrator.
You can restore access to projects created in all versions of TestDirector using the Restore Project dialog box in the Site Administrator. This enables you to restore access to one project at a time. If you want to restore access to projects created in versions earlier than TestDirector 7.5, you can restore several projects simultaneously using the TestDirector Restore Project Access dialog box, available from the TestDirector program group.
After you restore a project, you must upgrade it to TestDirector 8.0, if necessary, to activate it. For more information on upgrading, see “Upgrading Projects” on page 146.
Restoring Access to a Single Project
You can restore access to a single project using the Site Administrator.
To restore access to a project:
1 In the Site Administrator, click the Projects tab.
2 Click the Restore Project button. The Restore Project dialog box opens.
3 To locate the directory that includes the project(s) that you want to restore, click the browse button to the right of the DBID.INI File Location box. The Open File dialog box opens.

Part II • Site Administration
158
4 Locate the directory.
To locate a TestDirector 7.2 (or earlier version) project, locate the common directory (default name is CommDir).
To locate a TestDirector 7.5 (or later version) project, locate the domain repository (default name is TD_Dir).
5 Select the appropriate Dbid.ini file and click Open. The Restore Project dialog box opens and displays the database name, type, and server, and the directory path of the project.
6 In the Restore Into Domain box, select the domain in which you want the restored project to be located.
7 Click Restore and click OK.
8 Click Close to close the Restore Project dialog box and view the restored project in the Projects list.

Chapter 9 • Managing TestDirector Projects
159
Restoring Access to Several Pre-TestDirector 7.5 Projects
You can restore access to several pre-TestDirector 7.5 projects simultaneously using the TestDirector Restore Project Access dialog box, available from the TestDirector program group.
To restore access to several pre-TestDirector 7.5 projects:
1 Choose Start > Programs > TestDirector 8.0 > TestDirector Restore Project Access. The TestDirector Restore Project Access dialog box opens.
2 To locate the directory that includes the projects that you want to restore, click the browse button to the right of the Restore from box. The Open File dialog box opens.
3 Locate the common directory (default name is CommDir).
4 In the Files of type list, select aliases.cfg. This is an initialization file which contains alias information for every project in the common directory.
5 Select the file and click Open. The projects that you can restore are displayed in the Available Projects box.

Part II • Site Administration
160
6 In the Domain Name list, select a domain name. By default, the domain name is the DEFAULT domain. The projects that are currently available in your selected domain are displayed in the Current Projects List box.
To refresh the domain names in the Domain Name list, click the Refresh Domains List button.
7 To restore several Microsoft Access projects, select them in the Available Projects box, and click the Restore button. The projects appear in the Current Projects List box.
To restore several Oracle, Microsoft SQL Server, or Sybase projects, select them in the Available Projects box, and click the Restore button. The Select DB Server dialog box opens. Select a server name, and click OK. The projects appear in the Current Projects List box.
8 To restore all Microsoft Access projects, click the Restore All button. The projects appear in the Current Projects List box.
To restore all Oracle, Microsoft SQL Server, or Sybase projects, click the Restore All button. The Select DB Server dialog box opens. Select a server name, and click OK. The projects appear in the Current Projects List box.
9 To remove a project from the Current Projects List box, select a project and click the Remove Project button.
10 Click Close.
11 To view the restored projects in the Projects list, click the Refresh Projects List button in the Site Administrator’s Projects tab.

Chapter 9 • Managing TestDirector Projects
161
Backing Up TestDirector Projects
You can protect data stored in your databases by backing up your TestDirector projects. Mercury Interactive recommends that you back up your TestDirector projects before uninstalling TestDirector or upgrading from previous versions.
Note: If you are migrating project databases, domain repositories, and servers from one location to another, see Appendix A, “TestDirector 7.6 and 8.0: Migration Process”, for more information on backing up.
TestDirector stores its data in the following locations:
DomsInfo contains the doms.mdb file (stores user’s information and the projects list), connection strings, parameters, global style sheets, and the database template (Empty_DB.mdb). This directory is located in <system drive:>\Program Files\Common Files\Mercury Interactive.
Domain repository contains automated tests, attachments, settings, and style sheets for each project. For Microsoft Access projects, it also contains the database itself (TestDir.mdb). The domain repository path is defined during the installation of TestDirector.
To verify the domain repository location of a project, select a project from the Projects list in the Site Administrator’s Projects tab. In the right pane, Project Directory indicates the domain repository path of the project.
Database server contains all other project data (such as manual tests, defects, customization, test sets, and test runs). The database server name is defined when you install the database client software.
To verify the name of the database for the project, select a project from the Projects list in the Site Administrator’s Projects tab. In the right pane, Database Name indicates the project’s database name.

Part II • Site Administration
162
Contact your system administrator to back up the DomsInfo directory and the domain repository. Note that if you are storing projects or tests outside your domain repository, you will need to back them up as well.
To back up the database server, contact your database administrator.
Renaming the Defects Module for a Project
You can rename the Defects module for a specific project. For example, you can change the name of the Defects module from Defects to Bugs.
Note: You can rename the Defects module for all your TestDirector projects by adding the REPLACE_TITLE parameter in the Site Config tab. For more information, see “Setting TestDirector Configuration Parameters” on page 187.
To rename the Defects module for a project:
1 In the project database’s DATACONST table, define the DC_CONST_NAME parameter value as REPLACE_TITLE.
2 In the same table, define the DC_VALUE parameter as follows:
original title [singular];new title [singular];original title [plural];new title [plural]
For example, if you want to change the name of the module from Defects to Bugs, enter the following value for the DC_VALUE parameter:
Defect;Bug;Defects;Bugs

163
10Managing TestDirector Users
You manage TestDirector users in the Site Administrator. You can add and import new TestDirector users, define user properties, and change user passwords.
This chapter describes:
Adding a New User
Importing a New User
Defining User Properties
Changing Passwords
Enabling Users to Work with Windows Authentication
Deleting Users
About Managing Users
You use the Site Administrator to manage the users connected to your TestDirector projects. You begin by adding or importing new users to the Users list in the Site Administrator. You can then define properties for the users and change or override a user’s password. Note that you can also enable users to log in to TestDirector using their Windows passwords.
Note: You can monitor which users are connected to each project and disconnect a user from a project, if necessary. For more information, see Chapter 11, “Managing User Connections and Licenses.”

Part II • Site Administration
164
Adding a New User
You can add new users to the Users list in the Site Administrator. Once the user is added, you can define user properties. For more information, see “Defining User Properties” on page 168.
You can also import new users from other network domains. For more information, see “Importing a New User” on page 166.
Note: Creating a new user for a TestDirector project consists of two steps:
Adding the user to the Users list in the Site Administrator (as described in this section).
Assigning the user to a user group using Project Customization. Each user group has access to certain TestDirector tasks. For more information, see Chapter 2, “Managing Users in a Project,” and Chapter 3, “Managing User Groups and Permissions.”

Chapter 10 • Managing TestDirector Users
165
To add a new user:
1 In the Site Administrator, click the Users tab.
You can click the User Name column to change the sort order from ascending to descending user names. You can also click the Full Name column to sort according to full names instead of user names.
2 Click the New User button. The User Details dialog box opens.
3 Type a User Name (maximum length 20 characters) and Full Name.
4 In the Domain Authentication box, type the user’s Microsoft Windows domain authentication properties. For more information, see “Enabling Users to Work with Windows Authentication” on page 170.
5 Type additional user information: Email, Phone Number, and a Description.
6 Click OK. The new user is added to the Users list.

Part II • Site Administration
166
Importing a New User
You can import new users from network domains to the Users list in the Site Administrator. You can select specific user names, or all the user names in a network domain(s). After the user names are imported to the Users list, you can define user properties. For more information, see “Defining User Properties” on page 168.
To import a new user name:
1 In the Site Administrator, click the Users tab.

Chapter 10 • Managing TestDirector Users
167
2 Click the Import Users button. The Import Users dialog box opens.
3 To add all the user names in a domain, select a network domain name.
4 To select a specific name(s), expand a network domain and select a user name(s).
5 Click OK. The new user name(s) is added to the Users list. When you highlight the new name, the user’s Windows authentication properties appear in the Domain Authentication field. For more information, see “Enabling Users to Work with Windows Authentication” on page 170.

Part II • Site Administration
168
Defining User Properties
You can define properties for users in the Site Administrator. Note that the e-mail information is important, as it enables the user to receive defects, tests, requirements, and test set notifications directly to his or her mailbox.
When you add the user to a project, TestDirector displays the user properties you defined in the Users tab.
To define user properties:
1 In the Site Administrator, click the Users tab.
2 Select a user from the Users list.
3 In the right pane, click a detail link to open the User Details dialog box.
4 Edit the following properties: Full Name, Domain Authentication, Email, Phone Number, and Description.
Note: For more information on the Domain Authentication field, see “Enabling Users to Work with Windows Authentication” on page 170.
5 Click OK to save your changes.

Chapter 10 • Managing TestDirector Users
169
Changing Passwords
The administrator can change and override a user’s password.
Note: A non-administrator can change his or her password using the Change Password link in the Project Customization window. For more information, refer to the TestDirector User’s Guide.
To change a password:
1 In the Site Administrator, click the Users tab.
2 Select a user from the Users list.
3 Click the Password button. The Set User Password dialog box opens.
4 In the New Password box, type a new password (maximum length 20 characters).
5 In the Retype Password box, retype the user’s new password.
6 Click OK.

Part II • Site Administration
170
Enabling Users to Work with Windows Authentication
You can allow users to log in to TestDirector using their Microsoft Windows passwords, instead of a TestDirector password. You can enable Windows authentication for new users as well as existing users. Note that when you change a user’s password in TestDirector, it does not change the user’s Microsoft Windows password.
Note: To enable the admin and guest default user types to work with Windows authentication, you must do the following:
Define the NTDOMAIN parameter in the Site Config tab. For more information, see “Setting TestDirector Configuration Parameters” on page 187.
In the Set Up Project Users dialog box, type the Windows user name in the Full Name box. For more information, see Chapter 2, “Managing Users in a Project.”
To enable Windows authentication for a new user:
1 Start the LogonService1 service on the TestDirector server.
In Windows 2000 or Windows 2003, choose Start > Programs > Administrative Tools > Services > LogonService1.
In Windows NT, choose Start > Settings > Control Panel > Services > LogonService1.
2 In the Site Administrator’s Users tab, import the Windows user to the Users list. The user’s Windows authentication properties are automatically added to the Domain Authentication field. For more information, see “Importing a New User” on page 166.
3 Add the imported user to a TestDirector project using the Set Up Users link in the Project Customization window. For more information, see “Adding a User to a Project” on page 10.

Chapter 10 • Managing TestDirector Users
171
4 In the Site Administrator’s Site Config tab, add the AUTHENTICATION parameter and set it to LDAP. For more information, see “Setting TestDirector Configuration Parameters” on page 187.
5 Restart the TestDirector server.
To enable Windows authentication for an existing user:
1 Start the LogonService1 service on the TestDirector server.
In Windows 2000 or Windows 2003, choose Start > Programs > Administrative Tools > Services > LogonService1.
In Windows NT, choose Start > Settings > Control Panel > Services > LogonService1.
2 In the Site Administrator’s Site Config tab, add the AUTHENTICATION parameter and set it to LDAP. For more information, see “Setting TestDirector Configuration Parameters” on page 187.
3 If Windows domain authentication is not specified for some of your users (users not recently added or imported), add the NTDOMAIN parameter in the Site Config tab. Set the parameter value to the default Windows domain you want to enable for Windows authentication. The users without a specified Windows domain authentication will use this domain authentication by default.
4 If Windows domain authentication is not specified for a user, and the user belongs to a domain other than the one enabled by default for Windows authentication, enter the appropriate domain authentication properties in the user’s Domain Authentication field in the Users tab. For more information, see “Defining User Properties” on page 168.
5 Restart the TestDirector server.

Part II • Site Administration
172
Deleting Users
You can delete a user from the Users list.
To delete a user:
1 In the Site Administrator, click the Users tab.
2 Select a user from the Users list.
3 Click the Delete User button.
4 Click Yes to confirm.

173
11Managing User Connections and Licenses
In the Site Administrator, you can monitor user connections and modify license information.
This chapter describes:
Monitoring User Connections
Managing TestDirector Licenses
About Managing User Connections and Licenses
You use the Connections tab in the Site Administrator to manage the users connected to your TestDirector projects, by monitoring which users are connected. For more information, see “Monitoring User Connections” on page 174.
You use the Licenses tab in the Site Administrator to view TestDirector license information and to modify the license key, if needed. For more information, see “Managing TestDirector Licenses” on page 175.

Part II • Site Administration
174
Monitoring User Connections
You can monitor the users currently connected to a TestDirector server. For each user, you can view the domain and project being used, the user’s computer name, the time the user first logged in to the project, and the time the last action was performed.
You can also view the licenses that are currently being used by each user. The TestDirector license indicates that the user can access all modules in a specific project. The Defects Module license indicates that the user can access only the Defects module.
Note that you can modify access to a TestDirector project using the Customize Module Access link. For more information, see “Customizing Module Access for User Groups” on page 42.
Note: To view the total number of licenses that are in use for each TestDirector module, click the Licenses tab. For more information, see “Managing TestDirector Licenses” on page 175.
To monitor user connections:
1 In the Site Administrator, click the Connections tab.

Chapter 11 • Managing User Connections and Licenses
175
2 To refresh the Connections list, click the Refresh Connections List button.
To instruct TestDirector to automatically refresh the Connections list, click the Refresh Connections List arrow and choose Automatic Refresh. By default, the Connections list is automatically refreshed every 60 seconds. To change the automatic refresh rate, click the Refresh Connections List arrow and choose Set Refresh Rate. In the Set Refresh Rate dialog box, specify a new refresh rate in seconds.
3 To disconnect a user from a project, select the row and click the Disconnect Users button. Click Yes to confirm.
Managing TestDirector Licenses
You can view the total number of licenses in use and the maximum number of licenses that you have for each TestDirector module. When other Mercury Interactive tools—such as WinRunner or QuickTest Professional—are connected to a TestDirector project, you can view the total number of licenses in use for these tools. You can also modify your license key number.
Note: To view the TestDirector licenses that are currently being used by each user, click the Connections tab. For more information, see “Monitoring User Connections” on page 174.

Part II • Site Administration
176
To manage TestDirector licenses:
1 In the Site Administrator, click the Licenses tab.
2 To refresh the license information displayed in the Licenses tab, click the Refresh Licenses List button.
3 To modify the license number, click the Modify License Key button and type the new license number in the License Edit dialog box. Click OK.

177
12Configuring Servers and Parameters
You use the Site Administrator to configure TestDirector servers, define and modify database servers, and set TestDirector configuration parameters.
This chapter describes:
Configuring TestDirector Server Information
Defining New Database Servers
Modifying Database Server Properties
Deleting Database Servers
Setting TestDirector Configuration Parameters
About Configuring Servers and Parameters
You use the TD Servers tab to configure TestDirector server information. You can set the TestDirector server log file, TestDirector mail protocol, lock timeout, and maximum number of database handles. For more information, see “Configuring TestDirector Server Information” on page 178.
You use the DB Servers tab to define database servers that were not defined during installation. For each database server, you enter the database type, server alias, default connection string, and administrator user and password. For more information, see “Defining New Database Servers” on page 181.
In addition, you use the DB Servers tab to modify existing database server definitions, including the default user password. For more information, see “Modifying Database Server Properties” on page 184.

Part II • Site Administration
178
Note: The DB Servers tab is available only in the TestDirector Enterprise Edition.
You use the Site Config tab to add and modify TestDirector configuration parameters. For more information, see “Setting TestDirector Configuration Parameters” on page 187.
Configuring TestDirector Server Information
You can configure information about the TestDirector server. This includes:
Setting the TestDirector server log file: The TestDirector server can write all TestDirector events—TDAPI functions that send requests to a TestDirector project—to a log file. The log file displays the date and time the server executed a function. This enables Mercury Interactive customer support to trace where errors occur, if necessary. By default, the TestDirector server does not automatically record events.
Setting the TestDirector mail protocol: TestDirector uses e-mail to send defects, tests, requirements, and test set notifications to TestDirector project users. You can select the e-mail protocol used by the TestDirector server. The TestDirector server supports the MAPI and SMTP mail protocols.
Setting the lock timeout: TestDirector locks objects while they are in use. You can set the lock timeout to determine the number of hours after which the locks expire.
Setting the maximum number of database connections: The TestDirector server can open a number of connections for each project on a database server. You can set the maximum number of concurrent connections that can be opened by the TestDirector server for each project.

Chapter 12 • Configuring Servers and Parameters
179
Note: If you are migrating a server from one machine to another, you must also configure the new server information. For more information, see Appendix A, “TestDirector 7.6 and 8.0: Migration Process”.
To configure TestDirector server information:
1 In the Site Administrator, click the TD Servers tab.
The General Settings area displays the TestDirector server IP address and virtual directory name.
2 Under Log File Settings, click the Log File Status link to configure the type of log file you want the TestDirector server to create. Select one of the following options in the Log Status dialog box:

Part II • Site Administration
180
Debug: Instructs TestDirector to create a log file and record all TestDirector events.
Errors: Instructs TestDirector to create a log file and record any errors that occur.
None: Instructs TestDirector not to create a log file. This is the default option.
3 Click the Max. Log Lines link to open the Maximum Log Lines dialog box and configure the maximum number of lines that the TestDirector server can write to the log file. The default value is 10,000. Note that TestDirector creates a new log file after the log file reaches the maximum number of lines.
4 Click the Log File Location link to configure the directory path of the log file. In the Log File Location dialog box, type the new location for the log file. By default, the TestDirector server saves the log file to the folder C:\TMP.
5 Click the Mail Protocol link to configure the mail service used by the TestDirector server. Select one of the following options in the Set Mail Protocol dialog box:
None: If you select this option, TestDirector does not send e-mail.
SMTP Server: The SMTP (Simple Mail Transfer Protocol) Server option uses a local server on the network for sending mail. Note that this option supports HTML format.
Type the address of the SMTP server available on your local area network. If you do not know the SMTP server address, contact your mail or system administrator. Note that the SMTP protocol uses port 25. Make sure that this port is not blocked by a firewall.
Windows MAPI: The Windows MAPI (Mail Application Programming Interface) option uses a local Windows messaging application profile. This option is enabled if a mail application supporting MAPI is installed on your machine (for example, Microsoft Outlook 2000 or Lotus Notes). Note that this option does not support HTML format.
Select a profile name. If you have Microsoft Outlook Express installed, select Default.
For information on creating a profile, refer to the TestDirector Installation Guide.

Chapter 12 • Configuring Servers and Parameters
181
Microsoft IIS SMTP Service: The SMTP (Simple Mail Transfer Protocol) Service option uses a local server on your machine for sending mail. This option is enabled if you installed Microsoft IIS SMTP Service during the Microsoft IIS installation. Note that this option supports HTML format.
For more information on installing this option, refer to the TestDirector Installation Guide.
6 Click the Lock Timeout link to open the Lock Timeout dialog box and configure the maximum number of hours that TestDirector objects can remain locked.
7 Click the Max. Database Connections link to open the Maximum Database Connections dialog box and configure the maximum number of concurrent connections that can be opened by the TestDirector server for each project.
8 Click the Refresh TD Servers List button to refresh the TD servers list.
Defining New Database Servers
You can define database servers that were not defined during the installation process. To do so, you must have the corresponding database client installed on your TestDirector server. For more information on installing database clients, refer to the TestDirector Installation Guide.
Note: If you are migrating a server from one machine to another, you must also define a new database alias. For more information, see Appendix A, “TestDirector 7.6 and 8.0: Migration Process”.
To define a new database server:
1 In the Site Administrator, click the DB Servers tab.

Part II • Site Administration
182
2 Click the New Database Server button. The Create Database Server dialog box opens.
3 Under Database Type, select the type of database server you want to define: Oracle, Sybase, or MS-SQL.
Note: There are two types of MS-SQL servers: one that uses SQL authentication and another that uses Microsoft Windows authentication.
4 Under Database Values, in the Server Alias box, type the alias that you created when you installed the database client.
For MS-SQL, this is usually TDSQLSERVER.
For Sybase, this is usually TDSYBASESERVER.
For Oracle, this is usually TDORASERVER.
For more information on creating aliases, refer to the TestDirector Installation Guide.

Chapter 12 • Configuring Servers and Parameters
183
5 In the DB Admin User box, type the login name of the database administrator.
For an Oracle server, the default administrator user account enabling you to create TestDirector projects is system. To enable a different user account to create projects in Oracle, the following Oracle privileges are required by TestDirector. Note that the user account should be created on the Oracle database server by an Oracle database administrator logging in as SYS. The user name must be capitalized.
CREATE USER <USER> IDENTIFIED BY <PASSWORD>DEFAULT TABLESPACE <USERS_TABLE> TEMPORARYTABLESPACE <TEMP_TABLE> ACCOUNT UNLOCK;
GRANT CREATE SESSION TO <USER> WITH ADMIN OPTION;GRANT CREATE TABLE TO <USER> WITH ADMIN OPTION;GRANT CREATE VIEW TO <USER> WITH ADMIN OPTION;GRANT CREATE USER TO <USER>;GRANT SELECT ON "SYS"."DBA_FREE_SPACE" TO <USER>;GRANT SELECT ON "SYS"."DBA_TABLESPACES" TO <USER>;GRANT ALTER USER TO <USER>;GRANT DROP USER TO <USER>;GRANT SELECT ON V$INSTANCE TO <USER>;
For a Sybase server, the default administrator user account enabling you to create TestDirector projects is sa.
For an MS-SQL (SQL Auth.) server, the default administrator user account enabling you to create TestDirector projects is sa.
Note: If you selected the MS-SQL (Win Auth.) database type, the DB Admin User box is unavailable. The login name of the database administrator is the Windows user that is set to run TestDirector as a service. For more information on setting TestDirector as a service, refer to the TestDirector Installation Guide.

Part II • Site Administration
184
6 In the DB Admin Password box, type the password of the database administrator. Note that this field is unavailable if you selected the MS-SQL (Win Auth.) database type.
7 In the Retype Password box, retype the password.
8 Under Default Connection String, you can edit the default ADO connection string. For more information, see “Editing the Connection String” on page 155.
9 To check whether you can connect to the database server, click the Ping Database Server button. The DB admin user and password you entered are displayed in the Ping Database Server dialog box. Click OK.
10 Click OK to close the Create New Database Server dialog box. The new database server you defined appears in the Database Servers list.
Modifying Database Server Properties
You can modify the database server properties that you defined during the installation process.
To modify database server properties:
1 In the Site Administrator, click the DB Servers tab.

Chapter 12 • Configuring Servers and Parameters
185
2 Select a database server in the Database Servers list. The following properties are displayed:
3 To modify the ADO connection string, click the Edit ADO Connection String button, or click the Connection String link. Edit the ADO connection string in the Connection String Editor and click OK. For more information, see “Editing the Connection String” on page 155.

Part II • Site Administration
186
4 To modify the database administrator’s login name, click the DB Admin User link. Type the new login name in the Default Admin User dialog box, and click OK.
For more information on defining a new login name for a database administrator, see “Defining New Database Servers” on page 181.
5 To modify the database administrator’s password, click the Password button, or click the DB Admin Password link. In the Set Database Admin Password dialog box, type the old and new passwords, and retype the new password. Click OK.
6 If you selected an MS-SQL or a Sybase server, click the TD User Password link to modify the default password for the user TD. This is the user that creates projects in TestDirector. In the Change Default TD User Password dialog box, type the old and new passwords, and retype the new password. Click OK.
7 If you selected an Oracle server, click the Default DB User Password link to modify the default user password. In the Change Default Database User Password dialog box, type the old and new passwords, and retype the new password. Click OK.
Note: Projects and users are identical on an Oracle database server. If you want each project or user to have its own password, you must define a new database server, with its own unique alias and user password, for each project you create.
8 To check whether you can connect to the database server, click the Ping Database Server button. The DB admin user and password you entered are displayed in the Ping Database Server dialog box. Click OK.

Chapter 12 • Configuring Servers and Parameters
187
Deleting Database Servers
You can delete database servers from the Database Servers list.
To delete a database server:
1 In the Site Administrator, click the DB Servers tab.
2 Select a database server in the Database Servers list.
3 Click the Delete Database Server button.
4 Click Yes to confirm.
Setting TestDirector Configuration Parameters
You use the Site Config tab to modify existing TestDirector configuration parameters and add new ones.
You can modify the following default TestDirector configuration parameters:
Parameter Description
ATTACH_MAX_SIZE The maximum size (in kilobytes) of an attachment that can be sent with an e-mail from TestDirector. If the attachment size is greater than the specified value, the e-mail will still be sent without the attachment. By default, the maximum e-mail attachment size is unlimited.
CUSTOM_ENABLE_USER_ADMIN
If this parameter is set to “N”, you can add new TestDirector users from the Site Administrator (Users tab) only.
If this parameter is set to “Y” (the default), new TestDirector users can also be added from Project Customization. In the Set Up Users dialog box, click Add User. The Add User to Project dialog box opens. If this parameter is enabled, a New button is available for adding new TestDirector users. For more information, see “Adding a User to a Project” on page 10.

Part II • Site Administration
188
LICENSE_LOG_DIR The directory location of the TestDirector log files for tracking license usage activities. By default, the location is set to C:\LicenseLog.
MAIL_FORMAT The format TestDirector uses to send e-mails. By default, the format is set to “HTML”. To instruct TestDirector to send e-mails as plain text, change the value to “Text”. TestDirector uses e-mail to send defects, requirements, tests, and test set notifications to TestDirector project users.
Note: If you are working with the Windows MAPI protocol, TestDirector can send e-mails only as plain text.
MAIL_INTERVAL The time interval in minutes for sending defect e-mails according to your mail configuration settings. By default, the value is set to 10 minutes. Note that this applies only if you select the E-mail defects automatically check box in the Projects tab, under project details. For more information on configuring mail, see Chapter 5, “Setting the Mailing Configuration.”
VC
Note: This parameter is only available in the TestDirector Enterprise Edition.
If this parameter is set to “Y”, version control is enabled. If this parameter is set to “N” (the default), version control is disabled. If you enable version control, you can create a version control database for any project.
Note: To work with version control, you must install a supported third party version control tool, the TestDirector Version Control Add-in, and the TestDirector Connectivity Add-in on your TestDirector server. For more information on TestDirector add-ins, refer to the TestDirector Installation Guide.
WAIT_BEFORE_DISCONNECT
The time interval in minutes that the TestDirector client can be inactive before it is disconnected from the TestDirector server. Disconnecting the client enables the license to be used by another TestDirector user. By default, the value is set to 600 minutes. If you set the value to -1, TestDirector will not disconnect, regardless of how long the client is inactive.
Parameter Description
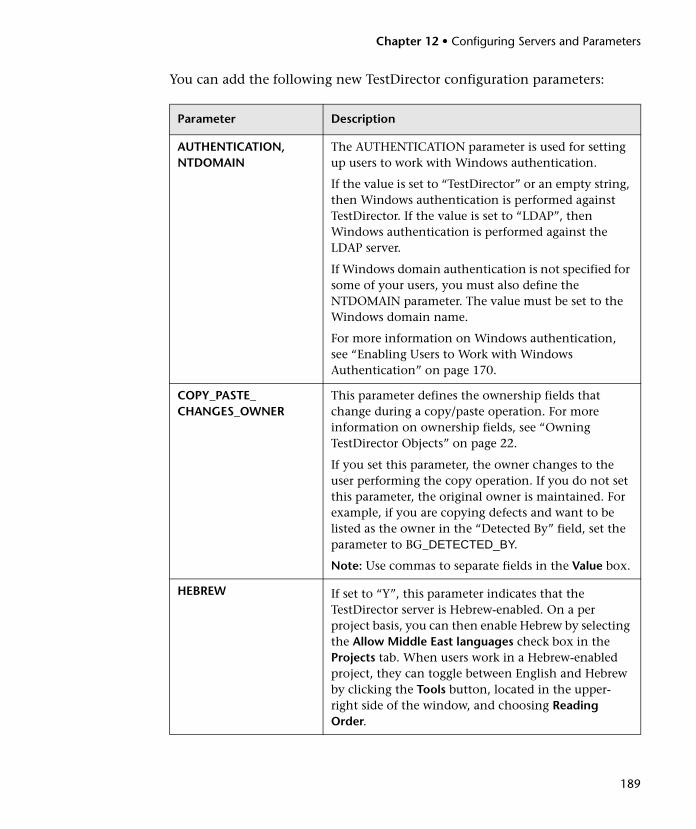
Chapter 12 • Configuring Servers and Parameters
189
You can add the following new TestDirector configuration parameters:
Parameter Description
AUTHENTICATION, NTDOMAIN
The AUTHENTICATION parameter is used for setting up users to work with Windows authentication.
If the value is set to “TestDirector” or an empty string, then Windows authentication is performed against TestDirector. If the value is set to “LDAP”, then Windows authentication is performed against the LDAP server.
If Windows domain authentication is not specified for some of your users, you must also define the NTDOMAIN parameter. The value must be set to the Windows domain name.
For more information on Windows authentication, see “Enabling Users to Work with Windows Authentication” on page 170.
COPY_PASTE_CHANGES_OWNER
This parameter defines the ownership fields that change during a copy/paste operation. For more information on ownership fields, see “Owning TestDirector Objects” on page 22.
If you set this parameter, the owner changes to the user performing the copy operation. If you do not set this parameter, the original owner is maintained. For example, if you are copying defects and want to be listed as the owner in the “Detected By” field, set the parameter to BG_DETECTED_BY.
Note: Use commas to separate fields in the Value box.
HEBREW If set to “Y”, this parameter indicates that the TestDirector server is Hebrew-enabled. On a per project basis, you can then enable Hebrew by selecting the Allow Middle East languages check box in the Projects tab. When users work in a Hebrew-enabled project, they can toggle between English and Hebrew by clicking the Tools button, located in the upper-right side of the window, and choosing Reading Order.

Part II • Site Administration
190
LR DIRECTFILEACCESS This parameter applies if you are integrating with LoadRunner. If set to “Y”, it enables the direct accessing of scripts located within the same LAN as your TestDirector client/server.
REPLACE_TITLE This parameter defines the name of the Defects module. You can rename the Defects module by entering the following in the Value box: original title [singular];new title [singular];original title [plural];new title [plural]
For example, if you want to change the name of the module from Defects to Bugs, enter the following in the Value box:Defect;Bug;Defects;Bugs
Note: This parameter defines the name of the Defects module for all projects. To define the name of the Defects module for a specific project only, see “Renaming the Defects Module for a Project” on page 162.
WR DIRECTFILEACCESS This parameter applies if you are integrating with WinRunner. If set to “Y”, it enables the direct accessing of scripts located within the same LAN as your TestDirector client/server.
Parameter Description

Chapter 12 • Configuring Servers and Parameters
191
To set TestDirector parameters:
1 In the Site Administrator, click the Site Config tab.
2 To edit a parameter, select it from the list and click the Edit Parameter button. The Edit Parameter dialog box opens. Type a new value and value description, and click OK.
3 To add a new parameter to the list, click the New Parameter button. The Create Parameter dialog box opens. Type a name, value, and description for the parameter you want to add. Click OK.
4 To delete a parameter from the list, select it and click the Delete Parameter button. Click Yes to confirm.
5 Click the Refresh Parameters List button to refresh the parameter list.

Part II • Site Administration
192

Part III
Appendix


195
ATestDirector 7.6 and 8.0: Migration Process
You can migrate project databases, project directories, domain repositories, and servers from one location to another. Before you begin the migration process, you must prepare your database. After you complete the migration process, you must verify that the migration was successful.
Note: This section is relevant for migrating from the following:
TestDirector 7.6 source location to a TestDirector 8.0 target location
TestDirector 8.0 source location to another TestDirector 8.0 target location
If you are upgrading from TestDirector 7.2, see Appendix B, “TestDirector 7.2: Guidelines for Upgrading”
This appendix describes:
Migrating Project Databases
Migrating Project Directories
Migrating Domain Repositories
Migrating TestDirector Servers
Oracle Database Operations
Microsoft SQL Database Operations
Sybase Database Operations
Checking Project Directories
Project Sanity Template

Appendixes
196
Migrating Project Databases
You migrate a project database from a source database server to a target database server. For example, suppose you want to migrate the project database of the TD_1 project from ORASRV1 to the ORASRV2 database server.
Notes:
This section is relevant for the following client-server database types: Microsoft SQL, Oracle, and Sybase.
During the migration process, the migrated project database will be unavailable to users.
To roll back from the procedure, restore the backed up DomsInfo folder (see step 1 below).
To migrate a project database:
1 Back up the DomsInfo folder located in <system drive>:\Program Files\Common Files\Mercury Interactive. For more information, see “Backing Up TestDirector Projects” on page 161.
2 In the Site Administrator’s DB Servers tab, create and test a new database alias for the target database server. For example, create the ORASRV2 database alias. For more information, see “Defining New Database Servers” on page 181.
3 In the Projects tab, note the project repository path in the Project Directory field. After you complete the migration process, you will need this path to restore the project.
4 Remove the project from the Projects list. For example, remove TD_1 from the Projects list. For more information, see “Removing Projects from the Projects List” on page 153.

Appendix A • TestDirector 7.6 and 8.0: Migration Process
197
5 Before you move the project database from the source database server, you must do the following:
For Oracle databases: Export the Oracle users according to your DBA policies or as described in “Exporting Oracle Users” on page 208.
For Microsoft SQL or Sybase databases: Back up the project database according to your DBA policies, or as described in “Backing Up Microsoft SQL Project Databases” on page 211 or “Backing Up Sybase Project Databases” on page 214.
6 Move the project database to the target database server, as follows:
For Oracle databases: Import the Oracle users according to your DBA policies or as described in “Importing Oracle Users” on page 209.
For Microsoft SQL or Sybase databases: Restore the project database according to your DBA policies, or as described in “Restoring Microsoft SQL Project Databases” on page 212 or “Restoring Sybase Project Databases” on page 215.
7 Modify the database server alias in the project configuration file, as follows:
In the Microsoft Internet Explorer, open the project repository path (see step 3).
Locate the Dbid.ini file and open it in Notepad.
Locate the Database Server= entry in the file and change its value to the name of the target database server you defined in step 2.
For example, change the current database server from ORASRV1 to ORASRV2.
Save and close the Dbid.ini file
8 Restore the project to the Projects list in the Site Administrator. For more information, see “Restoring Project Access” on page 157.
9 Verify that you can access the project. For more information, see “Project Sanity Template” on page 219.

Appendixes
198
Migrating Project Directories
You can migrate the project directories from a source server to a target server, or from one location in the file system to another. For example, suppose you want to migrate the Demo_DB project directory from \\server1\TD_Dir\Default to \\server2\TD_Dir\Default.
Notes:
This section is relevant for the following client-server database types: Microsoft Access, Microsoft SQL, Oracle, and Sybase.
During the migration process, the migrated project will be unavailable to users.
To migrate a project directory:
1 In the Site Administrator’s Projects tab, note the project repository path in the Project Directory field. After you complete the migration process, you will need this path to restore the project.
2 Remove the project from Projects list. For more information, see “Removing Projects from the Projects List” on page 153.
3 Copy the project directory folder from the source to the target location. For example, copy the Demo_DB project directory folder from \\server1\TD_Dir\Default to \\server2\TD_Dir\Default.
4 Verify the permissions of the target folder, subfolders, and files. To work properly, TestDirector requires Full Control permission on the project directory for the user that is set to run TestDirector as a service.
5 Restore the project to the Projects list in the Site Administrator. For more information, see “Restoring Project Access” on page 157.
6 Verify that all test scripts, attachments, and test runs exist in the project directory. For more information, see “Checking Project Directories” on page 217.
7 Check the project accessibility and correctness. For more information, see “Project Sanity Template” on page 219.

Appendix A • TestDirector 7.6 and 8.0: Migration Process
199
Migrating Domain Repositories
You can migrate the domain repository from a source location to a target location. By default, the domain repository is called TD_Dir. A domain repository contains the Default domain and user-defined domains. Each domain contains TestDirector projects. For example, suppose you want to migrate TD_Dir from C:\ to D:\.
Notes:
This section is relevant for the following client-server database types: Microsoft Access, Microsoft SQL, Oracle, and Sybase.
During the migration process, the TestDirector server will be unavailable to users.
To roll back from the procedure, restore the DomsInfo folder and the mercury.ini file backed up in steps 2 and 3 below.
To migrate a domain repository:
1 In the system tray, right-click the TestDirector icon , and choose Stop TestDirector to stop the TestDirector services.
2 Back up the DomsInfo folder located in <system drive>:\Program Files\Common Files\Mercury Interactive. For more information, see “Backing Up TestDirector Projects” on page 161.
3 Back up the mercury.ini file located in <system drive>:\Winnt.
4 Open the mercury.ini file. In the [TD-General] section, locate TDRepDir=. Note the domain repository location. For example, if TDRepDir=C:\TD\TD_Dir\, then the TD_Dir domain repository is located in the C:\TD folder.
5 Copy the domain repository folder from the source to the target location and rename it if needed. For example, to move the domain repository from C:\TD\TD_Dir to D:\TD_Repository, copy the TD_Dir folder from C:\TD to D:\, and rename it TD_Repository.

Appendixes
200
6 Verify the permissions of the target folder, subfolders, and files. To work properly, TestDirector requires Full Control permission on the project directory for the user that is set to run TestDirector as a service.
7 On the target location, Change the domain repository path in mercury.ini, as follows:
Open mercury.ini file from <system drive>:\Winnt.
In the [TD-General] section, locate TDRepDir=.
Change its value to the destination location path.
For example, your are moving the domain repository from C:\TD\TD_Dir to D:\TD_Repository, change its value from TDRepDir=C:\TD\TD_Dir\ to TDRepDir= D:\TD_Repository\.
Save and close the mercury.ini file.
8 Change the project directory attribute for all projects.
You can change the location of each project separately by removing the project from the Projects list in the Site Administrator (see “Removing Projects from the Projects List” on page 153), and then restore it back to the Projects list from the destination location (see “Restoring Project Access” on page 157).
Alternatively, you can change the location of all projects by editing the doms.mdb file in Microsoft Access, as follows:
In Microsoft Access, open the doms.mdb file located in <system drive>:\Program Files\Common Files\Mercury Interactive\DomsInfo\.
Open the PROJECTS table in Datasheet view.
Find the PHYSICAL_DIRECTORY column and set the focus on one of the cells in this column.
Choose Edit > Replace. The Find and Replace dialog box opens.

Appendix A • TestDirector 7.6 and 8.0: Migration Process
201
Specify the following information:
• In the Find What box, specify the source location of the domain repository. For example, C:\TD\TD_Dir.
• In the Replace With box, specify the destination location of the domain repository. For example, D:\TD_Repository.
• In the Look In box, select PHYSICAL_DIRECTORY.
• In the Match box, select Start of Field.
• In the Search box, select All.
• Click Replace All.
• Click Yes to confirm.
• Close the doms.mdb file.
9 In the system tray, right-click the TestDirector icon , and choose Start TestDirector to start the TestDirector services.
10 Check the project accessibility and correctness. For more information, see “Project Sanity Template” on page 219.

Appendixes
202
Migrating TestDirector Servers
You can migrate a TestDirector server from a source machine to a target machine.
Notes:
This section is relevant for the following client-server database types: Microsoft Access, Microsoft SQL, Oracle, and Sybase.
Before you commence the migration process, make sure that TestDirector is already installed on the target server. Verify that the target server does not include any projects, user-defined domains, and user names.
During the migration process, the TestDirector servers on the source and target machines will be unavailable to users.
To roll back from the procedure, on the target machine, restore the DomsInfo folder and the mercury.ini file backed up in steps 2 and 3 below.
To migrate a TestDirector server:
1 On the source and target machines, in the system tray, right-click the TestDirector icon , and choose Stop TestDirector to stop the TestDirector services.
2 On the target machine, back up the DomsInfo folder located in <system drive>:\Program Files\Common Files\Mercury Interactive. For more information, see “Backing Up TestDirector Projects” on page 161.
3 Back up the mercury.ini file located in <system drive>:\Winnt.
4 On the source machine, copy doms.mdb located in <system drive>:\Program Files\Common Files\Mercury Interactive\DomsInfo\ to a temporary location on the target machine and rename it to source_doms.mdb.
5 In Microsoft Access, open the source_doms.mdb file.

Appendix A • TestDirector 7.6 and 8.0: Migration Process
203
6 Open another instance of Microsoft Access and open the doms.mdb file, located in <system drive>:\Program Files\Common Files\Mercury Interactive\DomsInfo\.
7 From the source_doms.mdb and doms.mdb files, open each USERS table in Datasheet view.
Note: The window title of both tables looks identical; make sure that the data is modified in the correct table.
8 In the doms.mdb file, if the USERS table contains any data, delete it:
Choose Edit > Select All Records.
Choose Edit > Delete. Click Yes to confirm.
9 Copy all records from the USERS table in the source_doms.mdb file to the USERS table in the doms.mdb file:
Choose Edit > Select All Records to select all records in the USERS table of the source_doms.mdb file.
Choose Edit > Copy to copy selected records.
Switch to the USERS table window of the doms.mdb file and choose Edit > Paste Append to paste all records.
Close the USERS table of the source_doms.mdb file.
10 Query the number of user IDs in the USERS table of the doms.mdb file, as follows:
In the USERS table, set the focus on any cell in the USER_ID column.
Choose Records > Sort > Sort Descending. Note the number of the first record.
Close the USERS table of the doms.mdb file.

Appendixes
204
11 Update the user sequence value in the SEQUENCES table of the doms.mdb file to match the number of user IDs in the USERS table, as follows:
Open the SEQUENCES table.
Locate the record with the USER_SEQ value in the SEQUENCE_NAME field.
Change the SEQUENCE_VALUE field of this record to the number of user IDs (see step 10). Add an additional user ID to your total. For example, if you have 1000 user IDs, set the SEQUENCE_VALUE to 1001.
Close the SEQUENCES table of the doms.mdb file.
12 From the source_doms.mdb and doms.mdb files, open each DOMAINS table in Datasheet view.
Note: In Microsoft Access, the window title of both tables looks identical; make sure that the data is modified in the correct table.
13 In the doms.mdb file, if the DOMAINS table contains any data, delete it:
Choose Edit > Select All Records.
Choose Edit > Delete. Click Yes to confirm the deletion.
14 Copy all records from the DOMAINS table in the source_doms.mdb file to the DOMAINS table in the doms.mdb file, as follows:
In the DOMAINS table of the source_doms.mdb file, choose Edit > Select All Records.
Choose Edit >Copy to copy all selected records.
Switch to the DOMAINS table of the doms.mdb file and choose Edit > Paste Append to paste all records.
Close the DOMAINS table of the source_doms.mdb file.

Appendix A • TestDirector 7.6 and 8.0: Migration Process
205
15 Query the number of domain IDs in the DOMAINS table of the doms.mdb file, as follows:
In the DOMAINS table, set the focus on any cell in the DOMAIN_ID column.
Choose Records > Sort > Sort Descending. Note the number of the first record.
Close the DOMAINS table of the doms.mdb file.
16 Update the user sequence value in the SEQUENCES table of the doms.mdb file to match the number of domain IDs in DOMAINS table, as follows:
Open the SEQUENCES table of the doms.mdb file.
Find the record with the DOMAIN_SEQ value in the SEQUENCE_NAME field.
Change the SEQUENCE_VALUE field of this record to the number of domain IDs (see step 15). Add an additional domain ID to your total. For example, if you have 20 IDs, set the SEQUENCE_VALUE to 21.
Close the SEQUENCES table of the doms.mdb file.
17 Close the source_doms.mdb and doms.mdb files.
18 On the source server, locate the domain repository location from the mercury.ini file, as follows:
Open the mercury.ini file from <system drive>:\Winnt.
In the [TD-General] section, locate TDRepDir=. TDRepDir indicates the domain repository location. For example, if TDRepDir=C:\TD\TD_Dir\ then the TD_Dir domain repository is located in the C:\TD folder.
19 On the target server, verify the permissions of the domain repository folder, subfolders, and files. To work properly, TestDirector requires Full Control permission on the project directory for the user that is set to run TestDirector as a service.

Appendixes
206
20 Copy the domain repository to the target server. This step is required only in following situations:
The domain repository is located on the local disk of the source TestDirector server.
The domain repository is located on a shared network drive, but the user set to run TestDirector as a service on the target machine cannot be given Full Control permission on the domain repository location.
To copy the domain repository, perform steps 3 - 5 of “Migrating Domain Repositories” on page 199.
21 On the target machine, define the domain repository location in the mercury.ini file. This step is required only if you specified the domain repository location to be different to the location specified on the source server, or the one you have selected in step 20 on page 206.
To define the domain repository location in the mercury.ini file:
Open the mercury.ini file from <system drive>:\Winnt.
In the [TD-General] section, locate TDRepDir=.
Change the TDRepDir path to the destination location path. For example, if you are moving the domain repository from C:\TD\TD_Dir to D:\TD_Repository, change TDRepDir to D:\TD_Repository\.
Save and close the mercury.ini file.
22 In the system tray of the target sever, right-click the TestDirector icon , and choose Start TestDirector to start the TestDirector services.
23 Open the Site Administrator’s Users tab and verify the users list, as follows:
Review the existing users. All users available on the source server should exist on the target server. The user properties (Full Name, E-Mail, Phone Number, and Description) on the target server should correspond to the properties on the source server.
Add and delete a new user.
24 Click the Projects tab and verify the domain list, as follows:
Review the existing domains and their properties. Domains on the source server must correspond to the domains on the target server.
Add and delete a new domain.

Appendix A • TestDirector 7.6 and 8.0: Migration Process
207
25 Click the DB Servers tab and create a database server alias.
For a Microsoft Access database type, skip to step 26.
For Oracle, Microsoft SQL, or Sybase create a database alias for use by all projects.
It is recommended that you use the same alias name as on the source TestDirector server. If you want to use a different alias name, change the database alias in the configuration file of each project, as explained in step 6 in “Migrating Project Databases” on page 196.
An alias with the same name must exist on the database client configuration.
26 Click the TD Servers tab and verify the configuration of the TestDirector server. Update the configuration if needed (according to the configuration on the source TestDirector server).
27 Click the Site Config tab and verify the parameters. If you created any custom parameters on the source server, add them to the Site Config tab on the target server. For more information, see “Configuring Servers and Parameters” on page 177.
28 On the target TestDirector server, restore all projects to the corresponding domains. For more information, see “Restoring Project Access” on page 157.
29 Check the project accessibility and correctness. For more information, see “Project Sanity Template” on page 219.

Appendixes
208
Oracle Database Operations
When migrating an Oracle project database, you export users from the source database server and import them to the target database server. For more information on migrating an Oracle project database, see “Migrating Project Databases” on page 196.
Exporting Oracle Users
Before you move the project database from the source database server, you export the Oracle users.
To export an Oracle user:
1 Open the exp utility in the Command Prompt dialog box and log in to the server with administrator permissions.
Choose Start > Run. The Run dialog box opens.
In the Open box, type cmd and click OK.
In the Command Prompt dialog box, type exp and press Enter.
Specify the user name and password of the user that has administrator permissions. For example, system.
2 When the Enter array fetch buffer size: 4096 prompt is displayed, press Enter to select the default size.
3 When the Export file: EXPDAT.DMP prompt is displayed, specify the path and the name of the target dump file with the .DMP extension. For example, d:\export\my_proj.dmp.
4 When the (1)E(ntire database), (2)U(sers), or (3)T(ables): (2)U prompt is displayed, press Enter to select the default option (2)U(sers).
5 For the prompts that follow, press Enter to accept the default values.
6 When the User to be exported: (RETURN to quit) prompt is displayed, specify the user name that you want to export and press Enter. If you want to export several users to the same dump file, perform the same step for each user.
7 Press Enter to exit the User to be exported: (RETURN to quit) prompt and start the exporting process.

Appendix A • TestDirector 7.6 and 8.0: Migration Process
209
Importing Oracle Users
To import an Oracle user you need to create a tablespace for the user and then create a default Oracle user. You can then import the TestDirector Oracle user from the dump file.
To import an Oracle user:
1 Create a tablespace with the same name as the one on the source Oracle server, as follows:
In the DBA Studio, under the Storage root, right-click the Tablespaces folder and choose Create.
Specify the name and the size of the tablespace. The name must be the same as the one on the source Oracle server. The size of the tablespace must be set according to the imported user.
Click Create.
2 Create the Oracle user in the tablespace, as follows:
In the DBA Studio, under Security node, right-click the Users folder and choose Create.
Specify the user name. It is recommended that you use the same name as the one used in the source database server.
In Enter Password and Confirm Password, type the password for this user. For more information, see “Modifying Database Server Properties” on page 184.
In the Tablespaces section, select the tablespace you have previously created.
Select a temporary tablespace.
Click the Quota tab. Select the tablespace you have previously created, and select Unlimited.
Select the temporary tablespace you have previously selected, and select Unlimited.
Click Create.

Appendixes
210
3 Create a batch file (with the .BAT extension) to invoke the Oracle import utility and the user from a given dump file.
Specify the command as follows:
imp <user name>/<password> file=<source dump file> log=<log file> IGNORE=Y GRANTS=Y BUFFER=20000 FEEDBACK=1000 fromuser=<original user name> touser=<the new user>
Where:
For Example:
imp system/manager file=d:\export\my_proj.dmp log=d:\import\my_proj_imp.log IGNORE=Y GRANTS=Y BUFFER=20000 FEEDBACK=1000 fromuser=td_project_db touser=td_new_project_db
To import several Oracle users, you create new users on the target database server, and specify the source and target users in the fromuser and touser parameters. Make sure that you separate each user by a comma.
For example, suppose you want to import 2 users (td_proj1 and td_proj2) to the new users (td_new1 and td_new2):
imp system/manager file=d:\export\my_proj.dmp log=d:\import\my_proj_imp.log IGNORE=Y GRANTS=Y BUFFER=20000 FEEDBACK=1000 fromuser= td_proj1,td_proj2 touser=td_new1,td_new2
Syntax Description
<user name> The user name with administrator permissions on the Oracle server. For example, system.
<password> The password of the specified user.
<source dump file> The location and the source dump file (with the .DMP extension).
<log file> The location and file name to be used by the imp utility when logging the import process.
<original user name> The original name of the Oracle user on the source Oracle server.
<the new user> The name of the new user.

Appendix A • TestDirector 7.6 and 8.0: Migration Process
211
4 Execute the batch file created in the previous step. After the importing process is complete, you can view the log file.
Microsoft SQL Database Operations
Before you migrate a Microsoft SQL project database, you must do the following:
Backing Up Microsoft SQL Project Databases
Restoring Microsoft SQL Project Databases
Modifying "td" User Ownership in Microsoft SQL Server
For more information on migrating Microsoft SQL database, see “Migrating Project Databases” on page 196.
Backing Up Microsoft SQL Project Databases
Before you migrate a Microsoft SQL project database from the source database server to the target database server, you must back up the project database.
To back up a Microsoft SQL project database:
1 To open SQL Server Enterprise Manager, choose Start > Programs >Microsoft SQL Server.
2 Connect to the Microsoft SQL Server database, as follows:
Expand Microsoft SQL Servers.
Expand SQL Server Group.
Locate the server that contains the project database that you want to back up.

Appendixes
212
3 Back up the project database to a specified location, as follows:
Expand the Databases list and select the project database.
Right-click the project database and choose All Tasks > Backup Database.
Click Add. The Select Backup Destination dialog box opens.
Select File name and enter the full path of the target backup file. Click OK.
In the SQL Server Backup window, click OK.
Restoring Microsoft SQL Project Databases
When migrating a Microsoft SQL project database, you restore the project database to the target database server.
To restore a Microsoft SQL project database:
1 To open the SQL Server Enterprise Manager, choose Start > Programs > Microsoft SQL Server.
2 Connect to the Microsoft SQL Server project database, as follows:
Expand Microsoft SQL Servers.
Expand SQL Server Group.
Locate the server that contains the project database that you want to restore.
3 Create a new project database for restoring your backed up project database:
Select the Databases folder.
From the right-click menu, select New Database.
In the General tab, type the name of the new project database in the Name text box.
In the Data Files tab, set the size according to the size of the original project database.
Click OK.

Appendix A • TestDirector 7.6 and 8.0: Migration Process
213
4 Restore the project database from the backup file, as follows:
Select the Databases folder.
From the right-click menu, choose All Tasks > Restore Database.
From the Restore as database list, select the name of the project database that you created in the previous step.
Select From device and click the Select Devices button.
Click Add.
In the File Name box, specify the full path of the backup file (with the .BAK extension) and click OK.
Click OK.
In the Restore Database dialog box, click Options.
Select the Force restore over existing database check box.
Make sure that you have the appropriate path in the Move to physical file name column and click OK.
Modifying "td" User Ownership in Microsoft SQL Server
Modify the "td"’ user of the TestDirector database and make it identical to the "td" user of the Microsoft SQL Server database.
Tip: For more information on modifying “td” user ownership, refer to the TestDirector Knowledge Base (http://support.mercury.com) and search for Problem ID 10388.
To modify "td" user ownership in Microsoft SQL Server:
1 Choose Start > Programs > Microsoft SQL Server > Query Analyzer.
2 Login as sa and connect to your server.

Appendixes
214
3 Select the TestDirector project and run the following commands:
EXEC sp_change_users_login ’Report’
This unlinks the “td” user.
EXEC sp_change_users_login ’Update_One’, ’td’, ’td’
This links the "td" user of the TestDirector database to the same ID as the "td" user of the Microsoft SQL Server database.
Sybase Database Operations
Before you migrate a Sybase project database, you must first back up the project database in the source database server. When migrating, you must then restore the project database to the target database server. For more information on migrating a Sybase project database, see “Migrating Project Databases” on page 196.
Note: Before you back up or restore a project database, make sure that the Sybase BCKServer_<machine name>_BS service is started on the Sybase server machine.
Backing Up Sybase Project Databases
Before you migrate a Sybase project database from the source database server to the target database server, you must back up the project database.
To back up a Sybase project database:
1 Choose Start > Programs > Sybase to open Sybase Central.
2 Connect to the Sybase server:
Expand Sybase Adaptive Server Enterprise.
Locate the server that contains the project database that you want to back up.

Appendix A • TestDirector 7.6 and 8.0: Migration Process
215
3 Back up the project database to the file on the specified location, as follows:
Expand the Databases list. Right-click the project database that you want to back up and choose Backup.
In the Create Backup Command dialog box, click Next.
In the Select Type of Backup dialog box, select Backup the entire database and click Next.
In the Select Dump Devices dialog box, click Add.
Select Explicit dump device and provide the full path and name of the target backup file. Click OK. Click Next.
In the Select Backup Name dialog box, click Next.
Select File name and enter the full path of the target backup file. Click OK.
In the Choose the Dump Performance Option dialog box, click Next.
Click Finish.
Restoring Sybase Project Databases
When migrating a Sybase project database, you restore the project database to the target database server.
To restore a Sybase project database:
1 To open Sybase Central, choose Start > Programs > Sybase.
2 Connect to the Sybase server:
Expand Sybase Adaptive Server Enterprise.
Locate the server that contains the project database that you want to backup.

Appendixes
216
3 Create a new project database for storing the backed up project database, as follows:
Select the Databases folder.
Choose File > New > Database. The Create a New Database dialog box opens.
Type the name of the new project database. Click Next.
Click Add. In the Available Devices dialog box, select Data.
Select a data device from the device list. Specify the size according to the size of the original database. Click OK.
Click Add. In the Available Devices dialog box, select Transaction log.
Select a data device from the devices list. Specify the size according to the size of the original project database. Click OK.
Click Next.
Click Next.
Click Finish.
4 Restore the project database from the backup file:
Right-click the project database that you created in the previous step in the Databases folder and choose Restore.
Click Next.
Make sure that the Restore the entire database option is selected. Click Next.
Click Add. In the Select Dump Devices dialog box, select Explicit dump device.
In the Physical Path box, specify the location of the backup file. Click OK. Click Next.
In the Select Restore Name dialog box, specify the backup name of the database. Click Next. Click Finish.

Appendix A • TestDirector 7.6 and 8.0: Migration Process
217
Checking Project Directories
After you migrate a project directory to a new location, it is recommended that you verify all test scripts, attachments, and test runs in the project directory. For more information on migrating a project directory, see “Migrating Project Directories” on page 198.
To check a project directory:
1 Log in to the Site Administrator.
2 In the Projects tab, select a project and expand its tables.
3 In the DATACONST table, check db_directory and tests_directory:
Select the DATACONST table.
In DC_CONST_NAME, locate db_directory.
Check the DC_CONST_VALUE column value of this entry. The value of this entry should be “.” (point).
In DC_CONST_NAME, locate test_directory.
Check the DC_CONST_VALUE column value of this entry. The value of this entry should be “.” (point).
4 In the CROS_REF table, check that all attachments have relative paths:
Select the CROS_REF table.
Type the following query in the SQL pane:
SELECT * FROM CROS_REFWHERE CR_REFERENCE LIKE ’%\%’ OR CR_REFERENCE LIKE ’%:\%’
Click the Execute SQL button.
Check that the grid is empty.

Appendixes
218
5 Check that each test has a relative path in the TEST table:
Select the TEST table.
Type the following query in the SQL pane:
SELECT * FROM TEST WHERE TS_PATH LIKE ’%\%’ OR TS_PATH LIKE ’%:\%’
Click the Execute SQL button.
Check that the grid is empty.
6 Check that each run has a relative path in the RUN table:
Select the RUN table.
Type the following query in the SQL pane:
SELECT * FROM RUNWHERE RN_PATH LIKE ’%\%’ OR RN_PATH LIKE ’%:\%’
Click Execute SQL.
Check that the grid is empty.

Appendix A • TestDirector 7.6 and 8.0: Migration Process
219
Project Sanity Template
After migration, it is recommended that you perform a project sanity check in the Site Administrator and TestDirector.
Project Sanity in the Site Administrator
After migration, you perform a sanity test in the Site Administrator.
To perform project sanity in the Site Administrator:
1 Open the Site Administrator.
2 In the Projects tab, select a project.
3 To verify the connection, click the Ping button.
4 In the Project Directory box, verify the path.
5 In the Projects list, expand the project and make sure that you can view all tables. Select a populated table and make sure that you can view the data.
Project Sanity in TestDirector
After migration, you perform a sanity test in TestDirector.
To perform project sanity in TestDirector:
1 Check project connection:
Log in to a project as admin. In the Requirement module, verify several requirements. In the Test Plan module, verify several folders, tests, and design steps. In the Test Lab module, verify several test set folders, test sets, runs, and test steps. In the Defects module, verify several defects.
Verify that you can log in to the Project Customization window as admin.
2 Check TestDirector site users:
Log in to the project using different user names (except for admin or guest).
Send an e-mail to any TestDirector user that has an e-mail address defined.

Appendixes
220
3 Check TestDirector Project Customization:
Log in to the Customization window with any user name, other than admin, that has administrative permissions for this project.
Check the details of several users, groups, lists, and mail conditions.
Open the Customize Project Entities dialog box, and verify several system and user-defined fields. Check the correctness of the label and the type. For a list type field, click the Goto List button and check that the corresponding list opens.
4 Check the TestDirector Set Up Workflow:
Open the Script Editor and verify the scripts.
Modify a script, for example, add a comment. Save the script.
Log in to TestDirector and simulate an action that triggers an event in your script.
5 Check test scripts and attachments:
In the Test Plan module, select an automated test from the test plan tree. Select the Script tab. Verify the script.
Create a new automated test of any type and delete it.
Verify attachments in different modules.
Verify that you can add and delete an attachment.

221
BTestDirector 7.2: Guidelines for Upgrading
Before you upgrade from TestDirector 7.2 to TestDirector 8.0, Mercury Interactive recommends that you create a staging environment that replicates the production environment.
Note: For guidelines on upgrading from TestDirector 7.6, see “Migrating TestDirector Servers” on page 202.
This appendix describes:
Creating a Staging Environment
About Creating a Staging Environment
Before you upgrade to Testdirector 8.0, it is recommended that you create a staging environment on an isolated system that mirrors the current production environment.
To create a staging environment, you need the following machines:
Production Web server: This IIS machine is used for production. It contains TestDirector.
Production database server: This machine is used for storing TestDirector data which comes from the production Web server. It contains Oracle, Microsoft SQL Server, or Sybase.

Appendixes
222
Testing Web server: This IIS machine is used for installing TestDirector and testing the new upgraded version.
Testing database server: This machine is used for storing the data which comes from the testing Web server. It contains Oracle, Microsoft SQL Server, or Sybase.
Creating a Staging Environment
Before you commence the upgrading process, you can create a TestDirector 7.2 environment that is isolated from production.
Note: You must use the same license key number for both the production Web server and the testing Web server. For more information on licenses, see “Managing TestDirector Licenses” on page 175.
To create a staging environment:
1 Install TestDirector 7.2 on a testing Web server. Make sure that you install the appropriate TestDirector service packs and database clients. You must also configure the same database aliases to match the database aliases on the production Web server. For more information on installing TestDirector, refer to the TestDirector Installation Guide.
2 Create a new TestDirector project using each database client that you configured. Check the project accessibility and correctness. For example, if you are using Microsoft SQL Server, create a TestDirector project using Microsoft SQL Server as the back-end database.

Appendix B • TestDirector 7.2: Guidelines for Upgrading
223
3 Back up your TestDirector production environment.
Tip: For more information on backing up your TestDirector production environment, refer to the TestDirector Knowledge Base (http://support.mercury.com) and search for Problem ID 12875.
4 On the production database server, prepare the database for the move.
For Oracle databases: Export the Oracle users according to your DBA policies, or as described in “Exporting Oracle Users” on page 208.
For Microsoft SQL databases: Back up the databases according to your DBA policies, or as described in “Backing Up Microsoft SQL Project Databases” on page 211.
For Sybase databases: Back up the databases according to your DBA policies, or as described in “Backing Up Sybase Project Databases” on page 214.
5 Copy the database to the testing database server.
For Oracle databases: Import the Oracle users according to your DBA policies, or as explained in “Importing Oracle Users” on page 209.
For Sybase databases: Restore the databases according to your DBA policies, or as described in “Restoring Sybase Project Databases” on page 215.
For Microsoft SQL databases: Restore the databases according to your DBA policies, or as described in “Restoring Microsoft SQL Project Databases” on page 212. You must also modify the "td" user ownership in Microsoft SQL Server. For more information, see “Modifying "td" User Ownership in Microsoft SQL Server” on page 213.
6 Copy the project folders that you want to migrate from your production Common Directory to the Common Directory of your test server.

Appendixes
224
7 On the testing Web server, open the Project Administration Utility. Select the project and click the Configuration tab. PATH indicates the project directory for this project. If the path is not in UNC format (for example, \\machine name\common directory\project folder\), map a network drive to your new Common Directory, as follows:
In the Project Administration Utility, select the Projects folder and select the Properties tab. This tab displays the attributes for Common Directory.
Open Windows Explorer and share the Common Directory folder.
Map a drive to the shared Common Directory to map the server to itself.
In the Project Administration Utility, click Change to change the Common Directory to the mapped drive.
8 Choose Connections > Restore All. The Select Directory dialog box opens. Make sure the mapped drive is highlighted. Click OK. All projects are restored to the Projects list.
Note: If you are unable to use Restore All, choose Connections > Restore to restore a single project at a time.
9 Verify the dataconst table for each restored project to ensure that the db_directory path is correct for your client-server databases.
Choose Tools > Request Live.
Select a restored project and click the Connect button.
Click the + sign to expand the project and view its list of tables.
Select the dataconst table. The table contains two columns. The first column is db_directory. In the second column, DC_VALUE, change its value to the same PATH as defined in the Configuration tab.
10 Check the project accessibility and correctness in the Project Administration Utility, TestDirector, and Project Customization.

Appendix B • TestDirector 7.2: Guidelines for Upgrading
225
11 After creating the testing environment, upgrade the projects. For more information on upgrading, see “Upgrading Projects” on page 146.
Tip: For more information on upgrading, you can also refer to the TestDirector Knowledge Base (http://support.mercury.com) and search for Problem ID 25993.

Appendixes
226

227
A
Action object, Script Editor 104Action property 103Actions object, Script Editor 103Activate Project button 151Add Defect task 39Add Design Step task 35Add Folder task 35, 37Add Host Group task 37Add Hosts task 37Add List Match Rule button 72Add Primary/Secondary Rule button 71Add Private Favorite Views task 40Add Public Favorite Views task 40Add Requirement task 33Add Test Set task 36Add Test task 34Add Test to Test Set task 37Add Tests to Coverage task 33Add User button, Customization 11Add User to Project dialog box 11admin user 12Administration tab, Permission Settings
dialog box 40ADO connection string, editing 155Adobe Acrobat Reader ixaliases.cfg file 159ATTACH_MAX_SIZE parameter 187AUTHENTICATION parameter 171, 189Automatic Refresh, command 175
B
backups 161Microsoft SQL 211Sybase 214
Books Online ixBug_Fields object 105
C
Can Be Deleted By Owner Only check box, Permission Settings dialog box 22
Can Be Modified By Owner Only check box, Permission Settings dialog box 22
Change Administrator Password dialog box 117
Change button, Set Up Groups dialog box 20Change Password link
Project Customization window 7Site Administrator 117
Change User Properties and Password task 41Change User Properties link 7Checked property 104Clear History task 41Clear Messages command, Script Editor 79Code Complete button 78Code Template button 79Collapse All command, Script Editor 79Condition tab, Configure Mail dialog box 61Configure Mail dialog box 60Configure Mail task 41Connection String Editor dialog box 155,
185Connections tab 174Contact E-Mail link 124Contact Name link 124Contents and Index, Online Help ixCopy button 78Copy Folder task 35, 37Copy Test Set task 37COPY_PASTE_CHANGES_OWNER
parameter 189
Index

Index
228
Count property 105Create Domain button 123Create Domain dialog box 123Create Parameter dialog box 191Create Project button 128, 131, 134Create Project button, Projects tab 126Create Project dialog box 126, 128, 131, 134CUSTOM_ENABLE_USER_ADMIN parameter
11, 187customization, project 45–58Customize button 5Customize Module Access dialog box 43Customize Module Access task 41Customize Project Entities dialog box 46Customize Project Entities task 41Customize Project Lists dialog box 55Customize Project Lists task 41Cut button, Script Editor 78
D
data hiding 27database server properties, modifying
184–186database servers
defining 181–187deleting 187
databasesexporting Oracle users 208importing Oracle users 209Microsoft SQL backups 211Microsoft SQL restores 212migration 196Sybase backups 214Sybase restores 215
Data-Hiding Filter link 28DB Admin Password link 186DB admin password, database server 184,
186DB Admin User link 186DB admin user, database server 183, 186DB Servers tab 181–187Dbid.ini file 122Deactivate Project button 151Default DB User Password link 186
Defects Data-Hiding Filter dialog boxFilter tab 28Visible Fields tab 29
Defects Data-Hiding Filter link 28Defects module, renaming 190Defects module, renaming per project 162Defects tab, Permission Settings dialog box
38Defects_ActionCanExecute event 87Defects_Attachment_CanDelete event 88Defects_Attachment_CanOpen event 89Defects_Attachment_CanPost event 89Defects_Attachment_New event 90Defects_Bug_AfterPost event 88Defects_Bug_CanDelete event 91Defects_Bug_CanPost event 93Defects_Bug_FieldCanChange event 96Defects_Bug_FieldChange event 97Defects_Bug_MoveTo event 98Defects_Bug_New event 99Defects_DialogBox event 94Defects_EnterModule event 95Defects_ExitModule event 95Defects_GetDetailsPageName event 97Defects_GetNewBugPageName event 98Defects_InitNewTask event 98Define New Database Server dialog box 182Delete button, Script Editor 78Delete button, Set Up Groups dialog box 31Delete Database Server button 187Delete Defect task 39Delete Design Step task 35Delete Domain button 154Delete Folder task 35, 37Delete Host Group task 37Delete Hosts task 37Delete Item button 58Delete List button 58Delete List Match Rule button 72Delete Parameter button, Site Config tab 191Delete Primary/Secondary Rule button 71Delete Private Favorite Views task 41Delete Project button 153Delete Public Favorite Views task 40Delete Requirement task 33Delete Run task 37

Index
229
Delete Test Set task 36Delete Test task 35Delete User button, Users tab 172demonstration project 6Design_Step_Fields object 105Disconnect Users button 175documentation updates xDomain User Quota dialog box 124domains
creating 123deleting 154migrating 199repository structure 121
doms.mdb file 161DomsInfo directory 161
E
Edit ADO Connection String button, DB Servers tab 185
Edit ADO Connection String button, Projects tab 155
Edit Parameter button 191Edit Parameter dialog box 191Edit Project Description dialog box 144Enabled property 104entities 46–54
adding user-defined fields 50definition 46deleting user-defined fields 51field settings 48modifying system and user-defined
fields 51events, Script Editor 86Execute method 104Execute SQL button 145Expand All command, Script Editor 79
F
Field Names command, Script Editor 79Field object 106Field property 105FieldByld property 105FieldLabel property 106FieldName property 106
Fields tab, Configure Mail dialog box 60Find button, Script Editor 78Find Next button, Script Editor 78FullName property 109
G
Generate Script task 35Go to Line Number command, Script Editor
79Goto List button 49guest user 12
H
HEBREW parameter 189History check box, Customized Project
Entities dialog box 48
I
Import Users button 167Import Users dialog box 167Input Mask Editor dialog box 53IsInGroup property 109IsModified property 106IsNull property 106IsReadOnly property 106IsRequired property 106IsVisible property 106
L
LICENSE_LOG_DIR parameter 188Licenses tab 175List Match rule 70List property 107, 108lists 55–58
creating 56deleting 58deleting items or sub-items 58renaming 57renaming items or sub-items
57scripting generation 70
Lists object 108Lists Value button 78

Index
230
Lock Timeout dialog box 181Log File Location dialog box 180Log File Status link 179log file, TestDirector server 178Log Status dialog box 179Login dialog box, Project Customization 5Logout button 6LR DIRECTFILEACCESS parameter 190
M
mail configuration 59–62defining conditions 61designating fields 60
Mail Protocol link 180MAIL_FORMAT parameter 188MAIL_INTERVAL parameter 188mailing defects
defining mail conditions 61designating mail fields 60
ManualRun_ActionCanExecute event 87ManualRun_Attachment_CanDelete event
88ManualRun_Attachment_CanOpen event 89ManualRun_Attachment_CanPost event 89ManualRun_Attachment_New event 90ManualRun_DialogBox event 94ManualRun_EnterModule event 95ManualRun_ExitModule event 95ManualRun_Run_AfterPost event 88ManualRun_Run_CanPost event 93ManualRun_Run_FieldCanChange event 96ManualRun_Run_FieldChange event 97ManualRun_Step_AfterPost event 88ManualRun_Step_CanPost event 93ManualRun_Step_FieldCanChange event 96ManualRun_Step_FieldChange event 97ManualRun_Step_MoveTo event 98ManualRun_Step_New event 99Masked check box, Customized Project
Entities dialog box 48Maximum Database Connections dialog box
181Maximum Log Lines dialog box 180Mercury Interactive on the Web ix
Microsoft Accesscopying projects 138creating projects 126
Microsoft IIS SMTP Service option 181Microsoft SQL
copying projects 138creating projects 128
Microsoft SQL (SQL Auth.)defining database server 182
Microsoft SQL (Win Auth.)defining database server 182
migrationcreating an upgrading staging
environment for TestDirector 7.2 221
domain repositories 199project databases 196project directories 198, 217project sanity template 217TestDirector servers 202
Modify Defect task 39Modify Design Step task 35Modify Folder task 35, 37Modify Host Group task 37Modify Hosts task 37Modify License Key button 176Modify Private Favorite Views task 40Modify Public Favorite Views task 40Modify Requirement task 33Modify Run task 37Modify Test in Test Set task 37Modify Test Set task 36Modify Test task 34modules
customizing access 42monitoring user connections 174
Move Folder task 35, 37Move Test Set task 36Multiple Projects Upgrade button 148
N
New button, Add User to Project dialog box 11
New button, Set Up Groups dialog box 18New Database Server button 182

Index
231
New Field button 50New Group dialog box 18New Item button 56New Item dialog box 56New List button 49, 56New List dialog box 56New Parameter button, Site Config tab 191New Sub-Item button 56New Sub-Item dialog box 56New User button, Users tab 165NTDOMAIN parameter 170, 171, 189
O
objects, Script Editor 102online help ixonline resources ixOracle
copying projects 138creating projects 131defining database server 182
owners 22
P
PageNo property 107parameters 187–191Password button, DB Servers tab 186Password button, Users tab 169passwords
changing in Site Administrator 117changing user passwords 169
Paste button, Script Editor 78Permission Settings dialog box 20, 31permissions
assigning existing set to other user groups 30
changing 20customizing module access for user
groups 42data hiding 27monitoring module access 174setting user groups 19transition rules 23viewing 19
Ping Database Server button 184, 186
Ping Database Server dialog box 184, 186Ping Project button 152Primary/Secondary rule 70Print button, Script Editor 78project administration
activating projects 151backing up projects 161copying projects 138creating domains 123creating projects 125deactivating projects 151deleting database servers 187deleting domains 154deleting projects 153editing connection string 155migration 195pinging projects 152project structure 121removing projects from Projects list
153renaming projects 152renaming the Defects module for a
project 162restoring access to projects 157SQL queries 144upgrading a single project 146upgrading multiple projects 147viewing project details 141
project customization 45–58adding user-defined fields 50creating lists 56deleting items or sub-items 58deleting lists 58deleting user-defined fields 51exiting 6modifying fields 51overview 3, 45Project Customization window 3renaming items or sub-items 57renaming lists 57starting 3
Project Customization window 3project entities 46–54project lists 55–58Project User Quota dialog box 143Project_CanCustomize event 91

Index
232
Project_CanLogin event 92Project_CanLogout event 92Project_DefaultRes event 94projects
activating 151backing up 161copying 138creating 125deactivating 151deleting 153editing connection string 155pinging 152removing from Projects list 153renaming 152renaming the Defects module 162restoring access 157SQL queries 144upgrading a single project 146upgrading multiple projects 147viewing project details 141
Projects tab, Site Administrator 119–162Properties button, Script Editor 79Properties dialog box 82
R
Read Me First ixRedo button 78Refresh Connections List button 175Refresh Domains List button 160Refresh Licenses List button 176Refresh Parameters List button 191Refresh Projects List button 144, 160Refresh TD Servers List button 181Remove Field button 51Remove Project, Projects tab 153Remove Test from Test Set task 37Remove Tests from Coverage task 33Remove User button, Customization 14Rename button, Set Up Groups dialog box 30Rename Group dialog box 30Rename Item button 57Rename List button 57Rename List dialog box 57Rename List Item dialog box 57Rename Project button 152
Replace button, Script Editor 78REPLACETITLE parameter 190Req_Fields object 105Required check box, Customized Project
Entities dialog box 48Requirements tab, Permission Settings dialog
box 32Requirements_ActionCanExecute event 87Requirements_Attachment_CanDelete event
87, 88, 89Requirements_Attachment_CanPost event
89Requirements_Attachment_New event 90Requirements_DialogBox event 94Requirements_EnterModule event 95Requirements_ExitModule event 95Requirements_Req_AfterPost event 88Requirements_Req_CanDelete event 91Requirements_Req_CanPost event 93Requirements_Req_FieldCanChange event
96Requirements_Req_FieldChange event 97Requirements_Req_MoveTo event 98Requirements_Req_New event 99Reset Test Set task 37Restore Project button 157Restore Project dialog box 158restores
Microsoft SQL project databases 212Sybase project databases 215
Revert to Saved command, Script Editor 79Run Test task 37Run_Fields object 105
S
Save All command, Script Editor 79Save button, Script Editor 78Script Editor
Action object 104Actions object 103Bug_Fields object 105Design_Step_Fields object 105events 86Field object 106finding and replacing text 78

Index
233
Script Editor (con’t)Lists object 108objects 102Req_Fields object 105Run_Fields object 105setting properties 82starting 76Step_Fields object 105TDConnection object 103Test_Fields object 105TestSet_Fields object 105TestSet_Test_Fields object 105toolbar 78User object 109
script generatorfield customization by user groups 72list customization 70script editor 76
Script Generator - Add Defect Field Customization dialog box 73
Script Generator - Defect Details Field Customization dialog box 74
Script Generator - List Customization dialog box 71
Select All command, Script Editor 79Select Value from List dialog box 78Send defect emails automatically check box
143server alias 182Set As button, Set Up Groups dialog box 30Set Contact E-Mail dialog box 124Set Contact Name dialog box 124Set Group As dialog box 30Set Mail Protocol dialog box 180Set Traceability Notification Rules dialog box
65Set Up Groups dialog box 17Set Up Groups task 41Set Up Project Users dialog box 10, 12, 14Set Up Users task 41set up workflow 67–109Set Up Workflow dialog box 68Set Up Workflow task 41Set User Password dialog box 169Show/Hide Messages Pane button 79Show/Hide Scripts Tree button 79
Site Administratorchanging password 117Connections tab 174DB Servers tab 181–187Licenses tab 175Projects tab 119–162Site Config tab 187–191starting 113TD Servers tab 178–181Users tab 164–172
Site Config tab, Site Administrator 187–191SMTP Server option 180SQL queries 144starting project customization 3starting the Site Administrator 113Step_Fields object 105Sybase
copying projects 138creating projects 134defining database server 182
Synchronize Tree with Script button 78Syntax Check button 79system fields
definition 47modifying 51settings 48
T
tasks, Permission Settings dialog boxAdministration tab 40Defects tab 38Requirements tab 32Test Lab tab 36Test Plan tab 34
TD Servers tab, Site Administrator 178–181TD User Password link 186TD user password, database server 186TDConnection object, Script Editor 103technical support online ixTest Lab Data-Hiding Filter dialog box
Filter tab 28Visible Fields tab 29
Test Lab Data-Hiding Filter link 28Test Lab tab, Permission Settings dialog box
36

Index
234
Test Plan Data-Hiding Filter dialog boxFilter tab 28Visible Fields tab 29
Test Plan Data-Hiding Filter link 28Test Plan tab, Permission Settings dialog box
34Test_Fields object 105TestDir.mdb database 122, 161TestDirector
creating an upgrading staging environment for TestDirector 7.2 221
TestDirector documentation set viiiTestDirector domains
creating 123deleting 154repository structure 121
TestDirector licensesmodifying license number 175module licenses in use 174, 175
TestDirector migrationdomain repositories 199project databases 196project directories 198, 217project sanity template 217servers 202
TestDirector modulescustomizing access 42monitoring user connections 174
TestDirector projectsactivating 151backing up 161copying 138creating 125deactivating 151deleting 153editing connection string 155pinging 152removing from Projects list 153renaming 152restoring access 157SQL queries 144upgrading a single project 146upgrading multiple projects 147viewing project details 141
TestDirector Restore Project Access dialog box 159
TestDirector server information 178–181TestDirector server log file 178TestDirector_Demo project 6TestLab_ActionCanExecute event 87TestLab_Attachment_CanDelete event 88TestLab_Attachment_CanOpen event 89TestLab_Attachment_CanPost event 89TestLab_Attachment_New event 90TestLab_DialogBox event 94TestLab_EnterModule event 95TestLab_ExitModule event 95TestLab_RunTests event 100TestLab_RunTestSet event 100TestLab_RunTestsManually event 101TestLab_TestSet_AfterPost event 88TestLab_TestSet_CanAddTests event 90TestLab_TestSet_CanDelete event 91TestLab_TestSet_CanPost event 93TestLab_TestSet_CanRemoveTests event 93TestLab_TestSet_FieldCanChange event 96TestLab_TestSet_FieldChange event 97TestLab_TestSet_MoveTo event 98TestLab_TestSet_New event 99TestLab_TestSetTests_FieldCanChange event
96TestLab_TestSetTests_FieldChange event 97TestLab_TestSetTests_MoveTo event 98TestPlan_ActionCanExecute event 87TestPlan_Attachment_CanDelete event 88TestPlan_Attachment_CanOpen event 89TestPlan_Attachment_CanPost event 89TestPlan_Attachment_New event 90TestPlan_DesignStep_FieldCanChange event
96TestPlan_DesignStep_FieldChange event 97TestPlan_DesignStep_MoveTo event 98TestPlan_DialogBox event 94TestPlan_EnterModule event 95TestPlan_ExitModule event 95TestPlan_MoveToSubject event 99TestPlan_Test_AfterPost event 88TestPlan_Test_CanDelete event 91TestPlan_Test_CanPost event 93TestPlan_Test_FieldCanChange event 96

Index
235
TestPlan_Test_FieldChange event 97TestPlan_Test_MoveTo event 98TestPlan_Test_New event 99TestSet_Fields object 105TestSet_Test_Fields object 105traceability notification rules 63–65Traceability Notification Rules task 41transition rules
deleting 26modifying 26setting 23
Transition Rules Editor dialog box 25typographical conventions x
U
Undo button, Script Editor 78updates, documentation xUpgrade Project button 147upgrading
a single project 146multiple projects 147
User Details dialog box 165, 168user groups
adding 17assigning users to 12customizing module access 42data hiding 27deleting 31permissions 19–30renaming 30setting transition rules 23
User object, Script Editor 109user password, database server 186User Quota link 124, 143user-defined fields
adding 50definition 47deleting 51modifying 51settings 48
UserName property 109users 9–14
adding new names 164adding to a project 10assigning to a user group 12
users (con’t)changing passwords for 169defining properties 168deleting 172importing new names 166monitoring connections 174removing from a project 14
Users tab, Site Administrator 164–172
V
Value property 107VC parameter 188Verify Value check box, Customized Project
Entities dialog box 49ViewOrder property 107Visible property 104
W
WAIT_BEFORE_DISCONNECT parameter 188
What’s New in TestDirector ixWindows authentication 170Windows MAPI option 180workflow scripts 67–109WR DIRECTFILEACCESS parameter 190

Index
236


