Page 1
Administrator Steps 1-10 for TLE Setup and Implementation
Step 1: How to Access the Teaching and Learning Exchange (TLE)
Go to www.stepupforstudents.org ►APPLY/LOGIN ►Teaching and Learning Exchange ► Bookmark the TLE to your computer’s internet homepage toolbar for quicker access.
The TLE can be accessed from any internet accessible device.
Step 2: Creating a Login
First Time Users: When given access to the TLE, you received a welcome email directly from the TLE system
titled “Welcome to the Teaching and Learning Exchange”. The email included a link to the TLE and a system-
generated password. Your username is your school email address, and you must change the system-generated
password as soon as you log in for the first time. http://bit.ly/TLEStaff
Forgotten Logins or Passwords:
If you have already created your own password and have forgotten your password information, follow these
steps: Access the TLE using the directions in Step 1 ► Forgot Password ► Enter the email address your
Administrator used to register you. You will receive an email containing a temporary password. ► Go back to
the TLE Homepage and enter your email and temporary password to log in.
After you have logged in using your temporary password, you can reset it using a password of choice. ►Click
your name in the upper righthand corner of the TLE Home page. ► Change Password ►Enter current
password and new password twice. http://bit.ly/TLELogin
Step 3: Training Mode
Admin ►Training Mode ► On (NO parent notifications) or Off (Turns training mode off and enables
notifications)
**Remember to turn off training mode at the end of training or whenever your teachers are ready to share
student information with parents.**
Steps 3-10 must be completed by the School Administrator
to set up TLE Administrative Features prior to enrolling students and creating classes.
Page 2
Step 4: Grading Scales
Calculated Grading Scale: Admin ► Report Card Settings ►Grading Scale ► Create New ► Select
Calculated Grading Scale ► Select School Year ►Enter Description (i.e. High School Grading Scale or Lower
Levels Grading Scale) ► Enter Numerical Scale Beginning at 100 ►
Alternate Grading Scale: Admin ► Grading Scale ► Create New ► Select Alternate Grading Scale ►
Select School Year ► Enter Description (i.e. Kindergarten – 2nd Grade or P.E.) ► Enter Grade Letter and
Description (i.e. E = Excellent, I = Needs Improvement, etc.) ►
NOTE: Name the grading scales something that will make sense to your teacher. They will be selecting the grading scale
that is appropriate for their students when they create Unit Plans.
http://bit.ly/TLEGradingScales
Step 5: Report Card and Grading Period Settings
Grading Period Settings: Admin ► Grading Period Settings ► Select School Year ►Enter Grading Period
Dates ► http://bit.ly/TLEGradingPeriods
Setting Conduct Scale: Admin ► Report Card Settings ► Conduct Scale ► Select School Year
Conduct Scale (Optional Feature): Fill out this box with your school’s conduct grades and
descriptions (e.g., A, B, C, D, F or Green, Yellow, Red) ► Describe the behavior markers that
correspond with that conduct grade ► ► Or Select and then if you do not want to
use conduct grades.
Conduct Comments: A list of conduct codes and comments/descriptions will automatically populate.
You may choose to keep these comments, edit, add to, or decrease the number of comments. Note that
the system will not allow you to save if the comments are deleted completely. ►
Report Card Display Options: Admin ► Report Card Settings ► Display Options ► Select School year ►
“+ Create New” http://bit.ly/TLEReportCards
Step 6: Uploading Custom Standards
Preloaded standards for the following subject areas for grades PreK-12 already exist in the system: PK3 (Florida Early
Learning Standards for 3 Year Olds), PK4 (Florida Early Learning Standards for 4 Year Olds), Pre-Kindergarten (New
York State Pre-Kindergarten Foundation for Common Core), Language Arts, Mathematics, Music, Physical Education,
Science, Social Studies, Special Needs, and Visual Arts.
Custom Standards are specific to your school’s curriculum (i.e. Bible, Dance, Home Economics).
To upload Custom Standards: Admin ► Upload/Manage Standards ► Download the Custom Standards
Template. ►An Excel Spreadsheet will automatically download ► Open the file ► Go to “File” at top left
►Save As ► Choose a folder to save the file in ►Name your file with a name that matches the standards that
your teachers would recognize (i.e. Bible, Dance, Home Economics) and save. ► Fill out the spreadsheet with
all of your custom standards by entering: Subject ►Sub Domain/Strand (optional) ► Grade (multiple grade
levels can be entered if needed) ► Code/Benchmark ► Description ► Save and close the spreadsheet ► Go
back to “Upload/Manage Standards” page ► Choose the right school year in the drop down menu ► Choose
File ►Find the spreadsheet you just filled out and saved ► Click open ►Click upload► Your Custom
Standards will automatically load at the bottom left of the page. NOTE: All Custom Standards within a certain subject area can be entered on the same spreadsheet (i.e. K-5 Bible Standards). If you
have custom standards in more than one subject (i.e. Dance and Bible), each subject will need its own spreadsheet. The only field
that is not required to be filled out on the spreadsheet is Sub Domain/Strand.
http://bit.ly/TLEStandards
Page 3
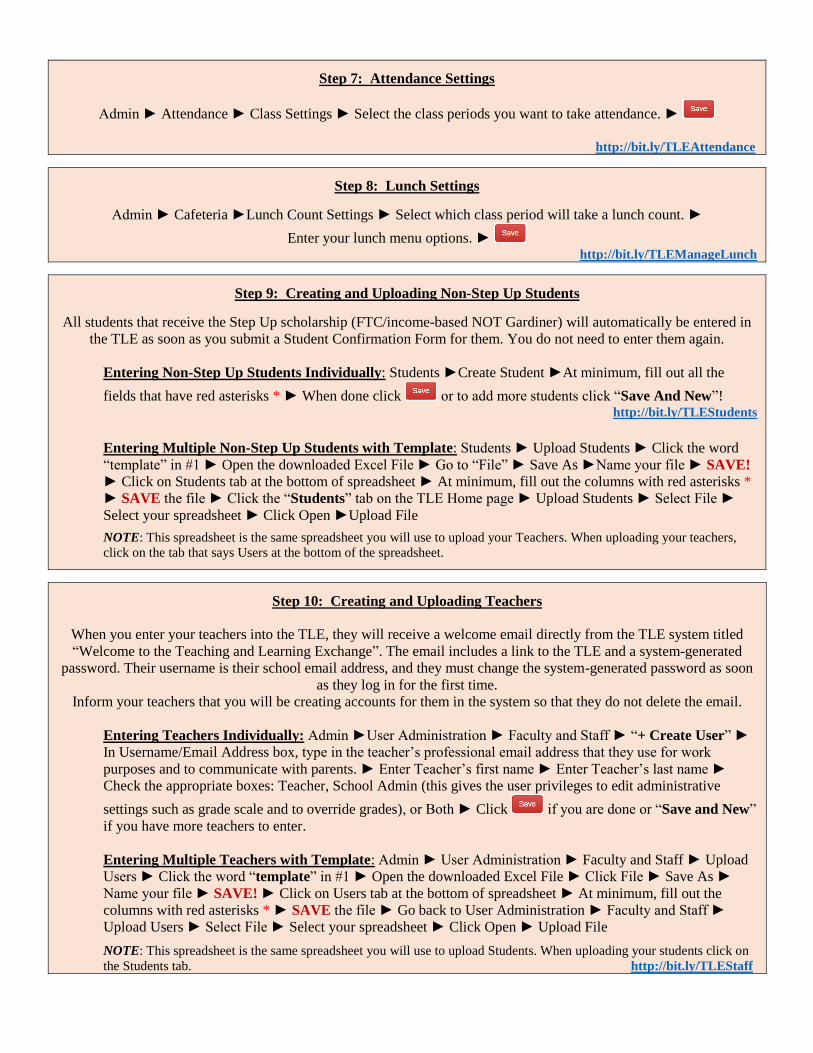
Step 7: Attendance Settings
Admin ► Attendance ► Class Settings ► Select the class periods you want to take attendance. ►
http://bit.ly/TLEAttendance
Step 8: Lunch Settings
Admin ► Cafeteria ►Lunch Count Settings ► Select which class period will take a lunch count. ►
Enter your lunch menu options. ► http://bit.ly/TLEManageLunch
Step 9: Creating and Uploading Non-Step Up Students
All students that receive the Step Up scholarship (FTC/income-based NOT Gardiner) will automatically be entered in
the TLE as soon as you submit a Student Confirmation Form for them. You do not need to enter them again.
Entering Non-Step Up Students Individually: Students ►Create Student ►At minimum, fill out all the
fields that have red asterisks * ► When done click or to add more students click “Save And New”! http://bit.ly/TLEStudents
Entering Multiple Non-Step Up Students with Template: Students ► Upload Students ► Click the word
“template” in #1 ► Open the downloaded Excel File ► Go to “File” ► Save As ►Name your file ► SAVE!
► Click on Students tab at the bottom of spreadsheet ► At minimum, fill out the columns with red asterisks *
► SAVE the file ► Click the “Students” tab on the TLE Home page ► Upload Students ► Select File ►
Select your spreadsheet ► Click Open ►Upload File
NOTE: This spreadsheet is the same spreadsheet you will use to upload your Teachers. When uploading your teachers,
click on the tab that says Users at the bottom of the spreadsheet.
Step 10: Creating and Uploading Teachers
When you enter your teachers into the TLE, they will receive a welcome email directly from the TLE system titled
“Welcome to the Teaching and Learning Exchange”. The email includes a link to the TLE and a system-generated
password. Their username is their school email address, and they must change the system-generated password as soon
as they log in for the first time.
Inform your teachers that you will be creating accounts for them in the system so that they do not delete the email.
Entering Teachers Individually: Admin ►User Administration ► Faculty and Staff ► “+ Create User” ►
In Username/Email Address box, type in the teacher’s professional email address that they use for work
purposes and to communicate with parents. ► Enter Teacher’s first name ► Enter Teacher’s last name ►
Check the appropriate boxes: Teacher, School Admin (this gives the user privileges to edit administrative
settings such as grade scale and to override grades), or Both ► Click if you are done or “Save and New”
if you have more teachers to enter.
Entering Multiple Teachers with Template: Admin ► User Administration ► Faculty and Staff ► Upload
Users ► Click the word “template” in #1 ► Open the downloaded Excel File ► Click File ► Save As ►
Name your file ► SAVE! ► Click on Users tab at the bottom of spreadsheet ► At minimum, fill out the
columns with red asterisks * ► SAVE the file ► Go back to User Administration ► Faculty and Staff ►
Upload Users ► Select File ► Select your spreadsheet ► Click Open ► Upload File
NOTE: This spreadsheet is the same spreadsheet you will use to upload Students. When uploading your students click on
the Students tab. http://bit.ly/TLEStaff
Page 4
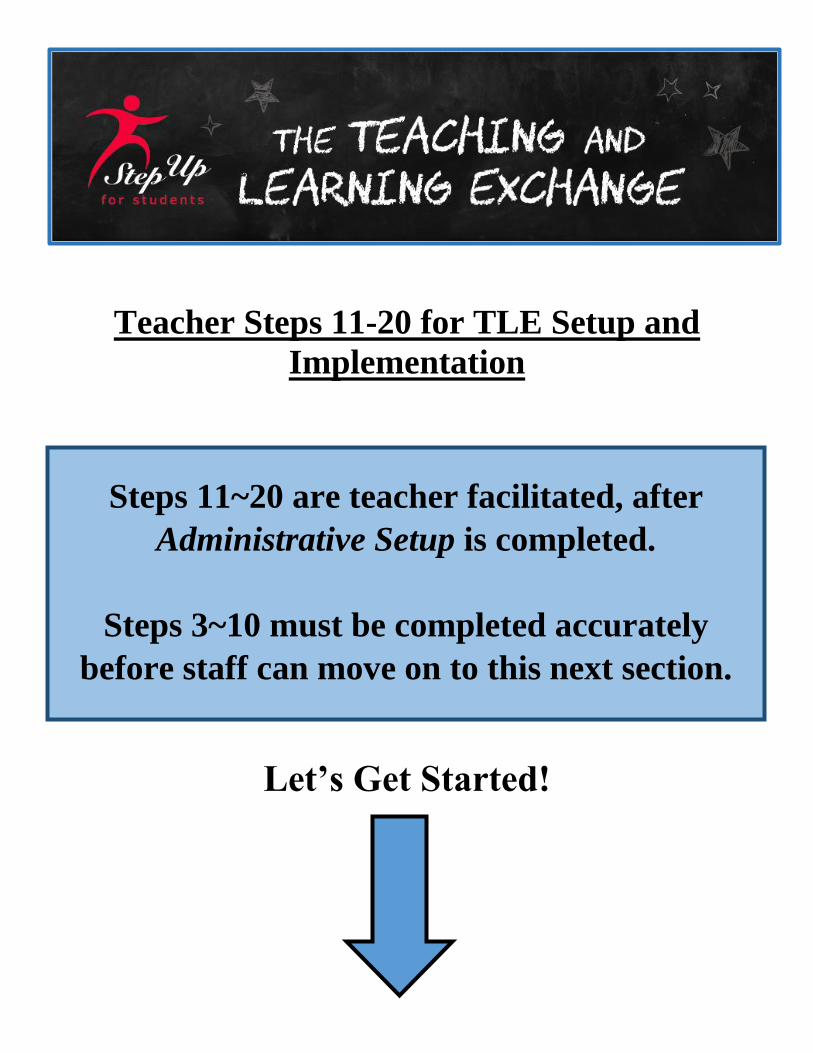
Teacher Steps 11-20 for TLE Setup and
Implementation
Let’s Get Started!
Steps 11~20 are teacher facilitated, after
Administrative Setup is completed.
Steps 3~10 must be completed accurately
before staff can move on to this next section.
Page 5
*Required Steps for All Teachers
Teacher Steps 11-20 for TLE Setup and Implementation
*Step 11 – Setting Up Classes
Creating Classes: If the Administrator hasn’t created classes assigned to you, you can create classes for
yourself.
Classes ► Click “+ Create Class” button in blue on the right hand side of the screen > Follow the prompts
provided.
• Description – this is the name of the class that will appear on the Report Card, Progress Report, and PLP.
• Period – this is the period the class meets during the school day. This is only important for MS or HS
classes.
• Grade Level – Choose all grade levels taught in this specific class.
• Standard Subject for Class – Choose the Standards you wish to align with units and lessons from the
drop down menu. If none, choose “Other”. Standards can be customized to fit your specific needs, but
must be uploaded to the TLE by your Administrator prior to setting up this class.
• Be sure to select the red NEXT!
• Grading Scale – Choose the appropriate grading scale for your class. Your Administrator should have
already uploaded all the necessary grading scales for you to choose from.
• Credits – If the Grading Scale chosen for your class has been set up to compute credits, you will be
prompted to enter how many credits this class is worth (0.5 or 1.0 credits). After entering an amount for
credits, you will be prompted to determine when this credit is awarded (ex: at the end of the semester or at
the end of the school year).
• Weighted (Honors/AP) GPA Scale: If the Class you are setting up is an Honors or Advanced Placement
class (usually designated for high school courses) be sure to check the box next to the GPA scale. This will
tell the TLE to compute this class’ GPA on the Honors/AP scale that has been predetermined by the
Administrator.
• Be sure to select the red NEXT!
http://bit.ly/TLECreateClass4Teachers
Choose Performance Measures: This section directly answers the question, “How do you grade your
students’ performance?” Select the appropriate method in which you record your students’ numeric grades.
• Points Based System – I will enter how many points each assignment is worth.
o Record an Assignment regardless of category
o The total possible points of an assignment is predetermined by the teacher.
o Student Average is computed by dividing the total points earned by the student by the total points
possible.
• Weighted System – I will enter the percentages each type of assignment is worth.
o Teacher will select the Performance Measures that will be used and enter a weight according to
each category (ex: Homework, Participation, Quiz, Test, etc.)
o The total for all categories MUST be equal to 100%.
o Student Average is computed by adding all the assignments in each category and then assigning
the appropriate weight of the category that was predetermined by the teacher
• Be sure to ►click SAVE!
** Please note: Class performance measures will be selected during the class creation
process to ensure consistent grading practices within a class throughout the school year. If at
any point the class performance measures are changed throughout the school year, grades will
be re-calculated accordingly which could render any previously printed report cards to no
longer be accurate.
Page 6
*Required Steps for All Teachers
*Step 12 – Enrolling Students in Classes
Select the Class You Wish to Add Students to: From your Home screen, select the class you wish to add
students to from the list of classes you have created.
• Select the blue “+Add Students” button to the right of the Enrolled Students row.
• Search for students by Grade Level first, but if you are unable to locate all of the students in the specific
class, you may search by Student Last Name, or Existing Classes.
• When Student Names appear, either “Select All” if selecting all students in that grade level, or click the
select box to the left to select individual student names.
• If differentiating a student’s standards level, select the appropriate grade level in the “Standards Level”
drop-down menu before saving.
• Be sure to ►click SAVE!
• You will receive a green boxed message when students are successfully saved. The students saved will
now appear in the Enrolled Students box on the class page.
• You will need to close the Add Students box by clicking the “X” button in the top right corner of the box.
*Please Note: If student names do not appear in the list of available students to choose from, your Administrator will
need to add them before you can enroll them in a class. http://bit.ly/TLEStudents
Step 13– View/Edit Grade Level Standards
This tool is for scoping and sequencing when specific standards will be taught throughout the school year. Standards
for the entire year can be selected at one time and adjusted as needed throughout the year, or selected prior to each unit.
The resulting document will show which standards that have not covered in the course of the year. Standards can also
be differentiated for students who are not working at the same level as the rest of your class.
• Become familiar with the abbreviations used for the Standards Achievement Codes:
o I – Teacher plans to introduce standard
o L – In the process of learning skill
o R – Review
o P – Passed but not mastered
o M –Mastery (earned 80% or higher)
o F – Failed
• Depending on grade level and subject content, some standards are organized by themes.
• Standards in blue are hyperlinked to definitions, descriptions, and internet resources for teacher use.
• After finding the Standard you will be teaching in your class, track across the row of the Standard to the
month of the year you will be teaching the Standard.
• Click the empty cell and select the appropriate Standards Achievement Code.
• The pencil icon to the right of the Standards Achievement Codes will allow you to record students’
differentiated Standards.
o ►Click the pencil icon
o The Standard you selected will appear with the description and a list of students enrolled.
o ►Click to the right of the student name you wish to differentiate Standards for.
o Select the appropriate Standards Achievement Code for these students.
Using Multiple Grade Level Standards in the Same Class: A teacher with a class of more than one grade
level can select which Grade Level Standards they wish to work with. The Grade Level Standards button can
be found directly under the Class Description. The lowest selecting Grade Level Standard automatically
appears with a drop-down menu selection with the other Grade Levels selected during the class creation. This
will also depend on the Grade Level Standards selected for a specific student when enrolling them in a class. A
teacher can toggle back and forth between the Grade Level Standards as needed.
Page 7
*Required Steps for All Teachers
Print Class Standards: When selecting the red “Print Class Standards” button in the top right-hand corner
of the box, the TLE will redirect the teacher to a PDF copy of what has previously been selected. A teacher
can print the spreadsheet as a hard-copy document or choose to save it as a PDF. You may also print the
spreadsheet to use a worksheet to later use to input the information in the TLE as needed.
Save Class Standards Template: Teachers may wish to save a copy of their Class Standards to use in
subsequent school years. Once you have all the information included in your Class Standards spreadsheet,
simply click the red “Save Class Standards Template” button in the top right-hand corner of the box. The
TLE will give you a green “Class Standards Template Successfully Saved” message at the top right-hand
corner of the screen.
http://bit.ly/TLEStandards http://bit.ly/TLEMapCurriculum4Teachers
Step 14 – Identify Instructional Strategies for Year
This is an easy way to update the Personal Learning Plans and Lesson Plans for all the students in your class with your
classroom strategies.
• All Strategies listed come from educational best practices. Any strategies that you don’t see listed, but
would like to add can be added at the very bottom of the list under “Add Other” before selecting.
• Strategies are organized according to themes (Identifying Similarities and Differences, Homework and
Practice, Summarizing and Note Taking, etc.)
• All Strategies in blue are hyperlinked to definitions, descriptions, and internet resources for teacher use.
• Simply select the Strategy by clicking in the associated box.
• Be sure to click SAVE!
Step 15 – Creating Assignments
Assignments can now be created and graded independently from a Unit Plan.
Assignments: To set up individual assignments, follow these steps:
• ►Click “create assignment”
• Boxes with * must be completed; those boxes include:
o Type - Click arrow to designate the appropriate assignment type to align with Performance
Measures
o Title - Record an assignment title, this is what the parent views in the Gradebook
o Due Date – select the assignment due date by clicking on calendar icon and making sure to
click DONE once desired date is chosen
o Points – designate the point value for the assignment (this value will later appear in the
gradebook to align with assignment designated points)
http://bit.ly/TLECreatingAssignments4Teachers
These features can also be completed to enhance assignment creation:
o Assignment – this box allows for an assignment description or specifics to note or record
o Standards – this feature allows standards for this assignment to be selected and aligned
o Attached Files – assignment files or attachments can be uploaded by using this feature
o Be sure to ►click SAVE!
Page 8
*Required Steps for All Teachers
Step 16 – Create/Edit Unit Plans
In most traditional classrooms, the Unit Plan will be the entire grading period or quarter. However, this could also be a
thematic unit or a project based segment.
Unit Plans:
• Select the purple “Create/Edit Unit Plans” from the Class Home page.
• Select blue “+Create Unit Plan” button to the right of the Unit Plan List
• Follow the prompts provided by completing each box. Titles with a red asterisk beside them are required
fields.
• Be sure to select the appropriate grading period for the Unit Plan
• Be sure to ► click SAVE & CLOSE or SAVE & NEXT! http://bit.ly/TLEUnitPlans4Teachers
Lesson Plans:
• Select the blue “+Create Lesson Plan” button to the right of the Lesson Plan List
• Follow the prompts provided by completing each box. Titles with a red asterisk beside them are required
fields.
• Both “Activities” and “Resources and Materials” boxes are place holders and can be text boxes. Some
schools require teachers to record goals, objectives, or other additional information in their lesson plans.
This is a great location for any additional information that needs to be recorded by the teacher.
• Students who need specific lessons differentiated can be recorded by clicking the red “Differentiated
Instruction” button at the bottom of the Lesson Plan.
o When “Differentiated Instruction” button is selected, a separate tab will populate the screen.
o Select the students for differentiated instruction from the enrolled students in the class.
o Record/Edit/Add Instructional Strategies for the selected student(s).
o Be sure to ►click SAVE! The selected student’s PLP has been automatically updated. http://bit.ly/TLELessonPlans4Teachers
Add Assignments:
• Select the red “Create Assignment” button to the right of the Assignment List
• Follow the prompts by completing each box.
• The information provided in the “Title” box will be what the parent views in the Gradebook. If a teacher
has multiple grade levels in the same class, he/she needs to be a specific as possible in the “Assignment”
box so as to avoid any confusion on the part of the parents.
• Teachers may attached selected files so that parents can see an example of the assignment or of the content.
• Be sure to ►click SAVE and NEXT! http://bit.ly/TLECreatingAssignments4Teachers
Enter Grades:
• Enter student scores on the appropriate assignment next to the correct student name.
• Student Points Earned, Cumulative Average, Letter Grade, and Standards Achievement will automatically
populate to the right of the Student Name based on what the teacher has previously selected in the creation
of the class.
• A Class Summary can be seen at the bottom of the Gradebook. The Class Summary includes the class
Cumulative Average, the Letter Grade, and the Standard Achievement Code average.
• Be sure to ►click SAVE!
• The TLE will provide a green “Gradebook Saved Successfully” message in the top right-hand corner of
the screen. http://bit.ly/TLEGradebook4Teachers
*All Gradebooks can be e-mailed, printed in hard-copy form, or printed as a PDF by selecting the appropriate choice in
the top right-hand corner of the Gradebook page. These choices are blue buttons found just underneath the Unit Plan
dashboard at the top of the page.
Page 9
*Required Steps for All Teachers
Step 17 - Entering Gradebook Without Going Through Unit Plans
Teachers may enter their Gradebook without having to go through the necessary steps of each Unit Plan.
To do so:
• Select the appropriate Class from the “My Classes” list on the teacher’s home page.
• Select the blue “Gradebook” button with the icon that is to the right of the Class Title
Step 18 – Report Cards
Report Cards will be generated by the Administrator and automatically pull Gradebook information from the students’
classes.
Administrator will predetermine the following items:
• The display options of the Report Cards
• Conduct Grades and/or Comments to be used
• The amount of time for missing or incomplete work to be recorded
• Acceptable Report Card Comments menu that the teacher may select from
• School preference on free-form teacher comments
Teachers will need to complete the following things prior to Report Cards being printed:
• Verify that all Student Grades are recorded correctly in the Class Gradebook
• Select the Class from the “My Classes” list on the teacher’s home page.
• Select the blue “Class Grades” button with icon to the right of the class title
• Record the appropriate “Comment”, “Conduct Grade”, and “Conduct Comments” as predetermined by
the Administrator.
• Select whether or not a Parent Conference is being requested for this class
• Be sure to ►click SAVE!
• The TLE will provide a green “Grades Saved Successfully” message in the top right-hand corner of the
screen.
*The Report Card Comments, Conduct Grade, and Conduct Comments selections can be exported as an Excel
spreadsheet by selecting the blue “Export” button to the top right of the grading period grades selection. Teachers may
save this as a separate document for future use. http://bit.ly/TLEReportCards
Step 19 – Taking Attendance/Lunch Count
Teachers can assist the school’s front office in the recording of attendance. The administrator can predetermine when a
teacher records attendance for their classes. MS and HS classes can be given the option of recording individual class
attendance for all students.
• Select the appropriate Class from the “My Classes” list on the teacher’s home page
• Select the orange “Take Attendance/Lunch Count” button from the Class home page.
• All students’ attendance record for the class automatically defaults to “Present”. If no students are absent,
select the red “SAVE” button.
• Record any students that are absent by selecting the appropriate assignment under the “Attendance” drop-
down menu.
o Your Administrator may have predetermined that all absent students be recorded as “Unexcused”
until such time as they provide the correct documentation to make their absence “Excused.”
o Teachers will have access to their classes’ attendance until the end of the school day. Any further
edits to a student’s attendance will have to be completed by an Administrator.
Page 10
*Required Steps for All Teachers
• Parent Contact regarding a specific absence should be recorded under the appropriate student’s “Parent
Contact?” and “Notes” column.
• School lunch should also be completed by selecting the appropriate menu selection which was
predetermined by the Administrator.
• Teachers can Print or run Reports for their classes by selecting the blue “Print” button or the purple
“Reports” button to the top right of the Enrolled Students list. However, the school’s front office will have
the capability of running reports within the parameters they have selected.
http://bit.ly/TLEAttendanceLunch4Teachers
Step 20 - Personal Learning Plans (PLP)
The PLP is an interactive document that reflects what a student is expected to learn over the course of a school year and
can include teaching strategies and mutually determined parent and student responsibilities. A PLP provides a
collaborative framework for the parent and teacher to identify student assets, weaknesses, and expectations, as well as
strategies and interventions to address academic, behavioral, social, and emotional growth. PLPs are designed for use
during a face-to-face conference and ensure three-way communication among the teacher, parent and student, which
results in a commitment by all parties to support student growth.
The PLP section for each student is a great place to record all the necessary information regarding a student’s current
learning and academic progress. Some schools choose to use the PLP as a Conference Report, so that the
Administrator is certain that all conferences on campus are being conducted using a similar format and covering similar
material. To complete a student’s PLP:
• Select the appropriate student from either the “Students” tab in the very top tool bar on the home page or
from the appropriate Class in the teacher’s home page.
• Select “Student Info” to the far right of the appropriate student.
• Select the red “Personal Learning Plan” button to the right of the student information and just under the
red “Edit Student Info” button.
• Select the appropriate Grading Period you wish to create a PLP for. Click the red “View” button to the
right of the appropriate Grading Period and just below the red “Print” button.
• Follow the prompts by completing each box as you move through the PLP with the parent. For parents or
guardians who only have a few minutes and cannot complete the entire PLP in collaboration with the
teacher, you can preselect and complete the PLP prior to meeting together.
Learning Gains: One completed with historical data from a student’s achievement testing results, this section
will show a parent and teacher what learning gains a student has had over the course of the recorded
information. Schools can determine the best method of inputting student data so as to make it easier for a
teacher to not only collaborate with the parent, but to also determine what academic deficiencies a student may
have.
Student Profile: Every conference should begin with something positive about the student. This is where a
teacher records the student’s strengths, interests, and assets that he/she brings to the class. This also is where
the teacher records any concerns that he/she has for the student, as well as the parents’ concerns.
Class Grades: Automatically populates from the Class Gradebooks.
Attendance Summary: Automatically populates from the Class Attendance Reports
Additional Comments: This is a great location to record information regarding a student’s academic
assessments (observations, specific testing data, etc.).
Classes by Description: Automatically populated from all classes the student is enrolled in. Each teacher can
complete their section of the student’s PLP regardless of whether or not they are in attendance at the
conference.
Page 11
*Required Steps for All Teachers
o Instructional Strategies:
▪ School-based Resources and Strategies that are automatically populated from the Class’
Instructional Strategies as predetermined by the teacher.
▪ Can be edited for any conference by selecting the red “Edit” button in the top right-hand
corner of the Instructional Strategies box.
▪ Information in blue is hyperlinked for definitions, descriptions, and internet resources
which can be shared with the student or parent.
o Student Responsibilities:
▪ Non-School Based Resources and Strategies for the student specifically
▪ Can be edited for any conference by selecting the red “Edit” button in the top right-hand
corner of the Student Responsibilities box.
o Caregiver Interventions:
▪ Non-School Based Resources and Strategies for the parent or caregiver specifically
▪ Can be edited for any conference by selecting the red “Edit” button in the top right-hand
corner of the Caregiver Interventions box.
Social/Emotional/Behavioral Growth Goals: SEB provides support for how students act and behave at
school for not only the student, but also for the teacher and caregiver.
o Select the red “Edit” button located just under the Social/Emotional/Behavioral Growth Goals title.
o All SEB titles are taken from Response to Intervention (RTI).
o Teachers may add additional areas of SEB by selecting the “Add Other” tab at the bottom of the
selection, then selecting their addition by checking next to the selection.
o Be sure to select the red “SAVE SELECTED” button.
o Selection will now appear in the blank box.
o Complete the Instructional Strategies, Student Responsibilities, and Caregiver Interventions by
editing each box.
o Be sure to select the red “SAVE SELECTED” button at the bottom of each box.
Printing or Publishing the PLP: We recommend printing your final PLP!
o The last page of the PLP is a signature sheet.
o Send a copy home with the parent/caregiver for future reference
o Save a copy either as a hard-copy of PDF for school use and conference documentation
http://bit.ly/TLEPLPPart1 http://bit.ly/TLEPLPPart2 http://bit.ly/TLEPLPPart3
Adding Announcements
Teachers can add announcements to their Class by:
• Selecting the appropriate Class from the “My Classes” List on the teacher home page.
• Selecting the “+” button to the right of the “Announcements” tab.
• Complete the appropriate content for the “Announcement”
• Attach any important files (blank copies of permission slips, flyers, etc.)
• Be sure to ►click SAVE!
• The TLE will provide a green “Announcement Created” message in the top right-hand corner of the
screen.
• To delete the announcement, simply select the red “X” to the right of the message.
• The TLE will provide a green “Successfully Deleted Announcement” message in the top right-hand corner
of the screen.
Page 12
*Required Steps for All Teachers
Create Summer Learning Plans
Teachers can create Summer Learning Plans and associate them with specific students or classes.
• Select the green “Create Summer Learning Plan” button from the appropriate Class home page.
• Follow the prompts by completing the boxes as necessary.
• Be sure to select the red “SAVE” button in the bottom right-hand corner of the tab.
Extra Resources
How to find help within the TLE: Help can be found in several ways through your TLE page:
Help Videos: Click ►Help ► Help Videos. Here you will find short instructional videos on every feature of
the TLE.
Find Help on a Specific Topic: Click ►Need Help? button at the top right of any page. This will take you to
the page in TLE handbook for help on the specific features you are working on.
Accessing the TLE User Guide: Click Help ►TLE User Guide. Here you can download the entire user
guide.
Give Us Feedback: Here is where you can give us new feedback or vote on the items that others have
suggested.
1. Click on the floating Smiley Face on the left side of every TLE page.
2. Click Help ►Feedback
Extra Resources
How to Create Uniform Email Addresses for Teachers & Staff:
Gmail, Yahoo, and Hotmail are websites that allow you to create free email addresses. You can suggest that each
teacher go on the site of your choice and create a professional email exclusively used for school communications. For
example: [email protected]
Also, for a yearly fee you can purchase a domain name such as [email protected] through Google. This
service costs $5 per user per month for 30 GB of storage or $10 per user per month for unlimited storage. For pricing
details visit the site below:
https://apps.google.com/intx/en_us/pricing.html


![TLE ANALYSER · TLE ANALYSER User Manual v2.8 TLE analysis ... TLE ANALYSER Version 2.8 - 2013 TLE ANALYSER - User Manual [4] 2. TLE Analyser Setup and Options TLE Updater allow to](https://static.documents.pub/doc/80x56/5aa68a5c7f8b9a517d8ea13c/tle-analyser-analyser-user-manual-v28-tle-analysis-tle-analyser-version-28.jpg)


