548
Oracle® Fusion Middleware Administrator’s Guide for Oracle SOA Suite 11g Release 1 (11.1.1) E10226-02 October 2009

Oracle® Fusion MiddlewareAdministrator’s Guide for Oracle SOA Suite
11g Release 1 (11.1.1)
E10226-02
October 2009

Oracle Fusion Middleware Administrator's Guide for Oracle SOA Suite, 11g Release 1 (11.1.1)
E10226-02
Copyright © 2006, 2009, Oracle and/or its affiliates. All rights reserved.
Primary Author:
Contributing Author: V. Beecher, D. Bradshaw, T. Das, J. Garcia, M. Kennedy, P. Purich, T. Van Raalte, S. Vasudevan
Contributor: Oracle SOA Suite and Oracle Fusion Middleware Control development, product management, and quality assurance teams
This software and related documentation are provided under a license agreement containing restrictions on use and disclosure and are protected by intellectual property laws. Except as expressly permitted in your license agreement or allowed by law, you may not use, copy, reproduce, translate, broadcast, modify, license, transmit, distribute, exhibit, perform, publish, or display any part, in any form, or by any means. Reverse engineering, disassembly, or decompilation of this software, unless required by law for interoperability, is prohibited.
The information contained herein is subject to change without notice and is not warranted to be error-free. If you find any errors, please report them to us in writing.
If this software or related documentation is delivered to the U.S. Government or anyone licensing it on behalf of the U.S. Government, the following notice is applicable:
U.S. GOVERNMENT RIGHTS Programs, software, databases, and related documentation and technical data delivered to U.S. Government customers are "commercial computer software" or "commercial technical data" pursuant to the applicable Federal Acquisition Regulation and agency-specific supplemental regulations. As such, the use, duplication, disclosure, modification, and adaptation shall be subject to the restrictions and license terms set forth in the applicable Government contract, and, to the extent applicable by the terms of the Government contract, the additional rights set forth in FAR 52.227-19, Commercial Computer Software License (December 2007). Oracle USA, Inc., 500 Oracle Parkway, Redwood City, CA 94065.
This software is developed for general use in a variety of information management applications. It is not developed or intended for use in any inherently dangerous applications, including applications which may create a risk of personal injury. If you use this software in dangerous applications, then you shall be responsible to take all appropriate fail-safe, backup, redundancy, and other measures to ensure the safe use of this software. Oracle Corporation and its affiliates disclaim any liability for any damages caused by use of this software in dangerous applications.
Oracle is a registered trademark of Oracle Corporation and/or its affiliates. Other names may be trademarks of their respective owners.
This software and documentation may provide access to or information on content, products, and services from third parties. Oracle Corporation and its affiliates are not responsible for and expressly disclaim all warranties of any kind with respect to third-party content, products, and services. Oracle Corporation and its affiliates will not be responsible for any loss, costs, or damages incurred due to your access to or use of third-party content, products, or services.

iii
Contents
Preface .............................................................................................................................................................. xvii
Audience.................................................................................................................................................... xviiDocumentation Accessibility .................................................................................................................. xviiRelated Documents ................................................................................................................................. xviiiConventions ............................................................................................................................................. xviii
Part I Understanding Oracle SOA Suite
1 Introduction and Concepts
What Is Oracle Fusion Middleware? .................................................................................................... 1-1What Is Oracle SOA Suite?..................................................................................................................... 1-1
Understanding the SOA Infrastructure Application .................................................................... 1-2Understanding SOA Composite Applications............................................................................... 1-4Understanding SOA Composite Application Instances............................................................... 1-6Understanding Service Components and Service Component Instances ................................. 1-7Understanding Binding Components ............................................................................................. 1-8Understanding Service Engines ....................................................................................................... 1-9Understanding the Service Infrastructure ................................................................................... 1-10Understanding the Contents of SOA Composite Applications................................................ 1-10
Administration of Oracle SOA Suite ............................................................................................... 1-11Configuration of Oracle SOA Suite .............................................................................................. 1-11
Understanding the Order of Precedence for Audit Level Settings................................... 1-12Monitoring of Oracle SOA Suite ................................................................................................... 1-13Management of Oracle SOA Suite ................................................................................................ 1-13
Understanding Fault Recovery .............................................................................................. 1-14Understanding Policies ........................................................................................................... 1-16
Understanding How Policies are Executed .................................................................. 1-16Understanding the Life Cycle State of SOA Composite Applications............................. 1-17Understanding SOA Composite Application Automated Testing................................... 1-17
Part II Getting Started with Administration
2 Getting Started with Administering Oracle SOA Suite
Logging into Oracle Enterprise Manager Fusion Middleware Control Console......................... 2-1Navigating to Oracle SOA Suite Administration Tasks ................................................................... 2-2

iv
Navigating Through the SOA Infrastructure Home Page and Menu........................................ 2-2Navigating Through the SOA Composite Application Home Page and Menu ....................... 2-8Navigating to Deployed Java EE Applications........................................................................... 2-11Navigating to the Oracle WebLogic Server Administration Console and Other Pages....... 2-13Navigating to the SOA Infrastructure or SOA Composite Application Home Page............ 2-15
Logging Out of Oracle Enterprise Manager Fusion Middleware Control Console ................. 2-15
Part III Administering the SOA Infrastructure
3 Configuring the SOA Infrastructure
Configuring SOA Infrastructure Properties ....................................................................................... 3-1Disabling Instance and Fault Count Metrics Retrieval with the System MBean Browser ...... 3-7
Stopping and Starting the SOA Infrastructure ................................................................................. 3-7SOA Composite Application States and SOA Infrastructure Shutdown................................... 3-8Restarting the SOA Infrastructure Does Not Activate Endpoints When a Retired Composite is Activated ............................................................................................................................... 3-8SOA Infrastructure Startup Failure When cwallet.sso Includes the SOA Map ........................ 3-8
Changing the SOA Infrastructure Server URL Property Port ......................................................... 3-9Configuring Log Files........................................................................................................................... 3-10
Configuring the Logging File Encoding Property...................................................................... 3-12Changing the Driver Name to Support XA Drivers ....................................................................... 3-12
4 Monitoring the SOA Infrastructure
Monitoring SOA Infrastructure Recent Instances and Faults ......................................................... 4-1Monitoring Processing Requests........................................................................................................... 4-4Monitoring Service and Reference Binding Components in the SOA Infrastructure ............... 4-5
Part IV Administering SOA Composite Applications
5 Deploying SOA Composite Applications
Deploying Applications.......................................................................................................................... 5-1Redeploying Applications...................................................................................................................... 5-3Undeploying Applications ..................................................................................................................... 5-4
6 Securing SOA Composite Applications
Introduction to Securing SOA Composite Applications.................................................................. 6-2Configuring SOA Composite Applications for Two-Way SSL Communication......................... 6-2Invoking References in One-Way SSL Environments in Oracle JDeveloper............................... 6-4Configuring Oracle SOA Suite and Oracle HTTP Server for SSL Communication................... 6-5
Configuring Oracle HTTP Server for SSL Communication......................................................... 6-5Configuring Certificates for Oracle Client, Oracle HTTP Server, Oracle WebLogic Server ... 6-6
Automatically Authenticating Oracle BPM Worklist Users in SAML SSO Environments....... 6-7Automatically Authenticating Oracle BPM Worklist Users in Windows Native Authentication Environments ............................................................................................................................................ 6-8Listing Oracle Internet Directory as the First Authentication Provider ........................................ 6-8Switching from Non-SSL to SSL Configurations with Oracle BPM Worklist............................. 6-8
v
Configuring Security for Human Workflow WSDL Files................................................................ 6-8Configuring SSL Between SOA Composite Application Instances and Oracle WebCache ..... 6-9Using a Custom Trust Store for One-Way SSL During Design Time ............................................ 6-9Enabling an Asynchronous Process Deployed to an SSL-Enabled, Managed Server to Invoke Another Asynchronous Process Over HTTP....................................................................................... 6-9
7 Monitoring SOA Composite Applications
Monitoring SOA Composite Application Recent Instances and Faults........................................ 7-1
8 Managing SOA Composite Applications
Initiating a SOA Composite Application Test Instance ................................................................... 8-1Managing the State of Deployed SOA Composite Applications ................................................... 8-7
Managing the State of All Applications at the SOA Infrastructure Level ................................. 8-8Managing the State of an Application from the SOA Composite Application Home Page 8-10Starting and Stopping a Managed Oracle WebLogic Server .................................................... 8-13
Monitoring and Deleting SOA Composite Application Instances from the Application Home Page .......................................................................................................................................................... 8-14
Mismatch Between the Number of SOA Composite Application Instances and Service Component Instances ..................................................................................................................... 8-18Setting the Composite Instance Name at Design Time ............................................................. 8-18
Setting the Composite Instance Name in Oracle Mediator ............................................... 8-18Setting the Composite Instance Name in a BPEL Process ................................................. 8-19
Monitoring and Deleting SOA Composite Application Instances at the SOA Infrastructure Level ......................................................................................................................................................... 8-19Recovering from SOA Composite Application Faults at the SOA Infrastructure Level ........ 8-21
Examples of Fault Recovery for BPEL Processes........................................................................ 8-26Example: Single Fault Recovery for BPEL Processes.......................................................... 8-27Example: Bulk Fault Recovery for BPEL Processes ............................................................ 8-28
Examples of Fault Recovery for Oracle Mediator ...................................................................... 8-28Example: Single Fault Recovery for Oracle Mediator ........................................................ 8-29Example: Bulk Fault Recovery for Oracle Mediator ........................................................... 8-31
Recovering from SOA Composite Application Faults in the Application Home Page........... 8-32Automating the Testing of SOA Composite Applications............................................................ 8-36Managing SOA Composite Application Policies............................................................................ 8-39
WS-RM Sessions .............................................................................................................................. 8-42Policy Attachments and Local Optimization in Composite-to-Composite Invocations ...... 8-42
Deleting Large Numbers of Instances............................................................................................... 8-43Selectively Deleting Instances Using a Filter Criteria................................................................ 8-43Procedures For Deleting Instances ............................................................................................... 8-44
Deleting a SIngle Instance....................................................................................................... 8-44Deleting All Instances Using a Filter Criteria ...................................................................... 8-44Deleting All Rejected Messages Using a Filter Criteria...................................................... 8-45Deleting the Component Instances Created when Global Instance Tracking is Disabled ........................................................................................................................ 8-46Deleting Composite Instances, Rejected Messages, and Orphaned Instances................ 8-46
Exporting a Running SOA Composite Application ....................................................................... 8-47

vi
Part V Administering BPEL Process Service Components and Engines
9 Configuring BPEL Process Service Components and Engines
Configuring BPEL Process Service Engine Properties...................................................................... 9-1Setting the Audit Level at the BPEL Process Service Component Level ....................................... 9-4
10 Monitoring BPEL Process Service Components and Engines
Viewing the Audit Trail and Process Flow of a BPEL Process Service Component................. 10-1Monitoring BPEL Process Service Component Instances and Faults ......................................... 10-9Monitoring BPEL Process Service Component Instances ........................................................... 10-11Monitoring Sensor Data and Values in BPEL Process Service Components........................... 10-12Monitoring BPEL Process Service Engine Instances and Faults ................................................ 10-13Monitoring BPEL Process Service Engine Request and Thread Statistics............................... 10-16Monitoring BPEL Process Service Engine Instances .................................................................... 10-17Monitoring Deployed BPEL Processes in the Service Engine.................................................... 10-18
11 Managing BPEL Process Service Components and Engines
Recovering from BPEL Process Service Component Faults.......................................................... 11-1Managing BPEL Process Service Component Policies................................................................... 11-4Recovering from BPEL Process Service Engine Faults .................................................................. 11-5Performing BPEL Process Service Engine Message Recovery...................................................... 11-7Disabling BPEL Monitors and Sensors............................................................................................. 11-9
Part VI Administering Oracle Mediator Service Components and Engines
12 Configuring Oracle Mediator Service Components and Engines
Introduction to Configuring Oracle Mediator................................................................................. 12-1Configuring Audit-Level Flags........................................................................................................... 12-3Configuring Metrics-Level Flag ......................................................................................................... 12-3Configuring Parameters for Parallel Infrastructure ....................................................................... 12-3Configuring Parameters for Error/Retry Infrastructure................................................................. 12-4Configuring Parameters for Heartbeat Framework........................................................................ 12-4
13 Monitoring Oracle Mediator Service Components and Engines
Monitoring Mediator Service Components ..................................................................................... 13-1Monitoring Instance Statistics ....................................................................................................... 13-1
About the Instance Information Sections in the Dashboard Tab ...................................... 13-2Monitoring Routing Statistics........................................................................................................ 13-4
What You May Need to Know About Monitoring Routing Statistics ............................. 13-5Monitoring Mediator Service Engine................................................................................................ 13-6
Monitoring Request Breakdown Statistics .................................................................................. 13-6What You May Need to Know About Request Breakdown Statistics ............................. 13-6
14 Managing Oracle Mediator Service Components and Engines
Viewing the Deployed Mediator Service Components ................................................................. 14-1

vii
What You May Need to Know About the Information in the Deployed Components Tab 14-2Managing Mediator Faults .................................................................................................................. 14-2
What You May Need to Know About the Information in the Faults Tab .............................. 14-5Managing Mediator Policies ............................................................................................................... 14-6
What You May Need to Know About the Information in the Policies Tab............................ 14-7
15 Managing Cross-References
Deleting Cross-Reference Values ....................................................................................................... 15-1
Part VII Administering Decision Service Components and Business Rules Service Engines
16 Configuring Business Rules Engine
Configuring the Business Rules Engine ........................................................................................... 16-1
17 Monitoring Decision Service Components and Engines
Monitoring Business Rules Service Engine Instances and Faults .............................................. 17-1Monitoring Business Rules Service Engine Statistics ................................................................... 17-3Monitoring Business Rules Service Engine Instances................................................................... 17-5Monitoring Business Rules Service Engine Faults......................................................................... 17-7Monitoring Business Rules Service Engine Deployed Components.......................................... 17-8Monitoring Decision Service Component Instances from a Composite Application ............. 17-9Monitoring Decision Service Component Logs ............................................................................ 17-11
Viewing Decision Service Component Logs ............................................................................. 17-11Setting the Diagnostic Logging Level with Log Configuration ............................................. 17-13
Part VIII Administering Human Task Service Components and Human Workflow Service Engines
18 Configuring Human Workflow Service Components and Engines
Configuring Human Workflow Notification Properties ............................................................... 18-1Configuring Human Workflow Task Service Properties............................................................... 18-5Configuring Oracle HTTP Server for Task Form Attachments .................................................... 18-9Configuring the Pluggable Notification Service ............................................................................ 18-9
Pluggable Notification Service Implementation....................................................................... 18-10Pluggable Notification Service Registration ............................................................................. 18-10
Configuring Multiple Send Addresses........................................................................................... 18-11Configuring Notification Retries ..................................................................................................... 18-12Configuring the Identity Service ..................................................................................................... 18-12
Adding an Authentication Provider .......................................................................................... 18-13Creating Users and Groups in the Authentication Provider .................................................. 18-17
Creating Users and Groups Using WebLogic Console .................................................... 18-17Creating Users and Groups Using Oracle Internet Directory ......................................... 18-19
Configuring the Directory Service.............................................................................................. 18-24Customizing the Identity Provider............................................................................................. 18-25

viii
Seeding Users, Groups, and Application Roles using LDAP Tools.......................................... 18-25Changing the Default Password in the Embedded LDAP Server ......................................... 18-25Seeding Users or Groups through the LDAP Browser............................................................ 18-26Seeding Application Roles using WLST Scripts ....................................................................... 18-27Seeding Application Roles in Oracle Enterprise Manager Fusion Middleware Control Console ............................................................................................................................. 18-27
19 Monitoring Human Workflow Service Components and Engines
Monitoring Human Task Service Component Instances and Faults........................................... 19-1Viewing the Status of Human Workflow Tasks .............................................................................. 19-3Monitoring Human Task Service Component Instances............................................................... 19-5Monitoring Human Workflow Service Engine Instances and Faults ......................................... 19-6Monitoring Human Workflow Service Engine Active Requests and Operation Statistics .... 19-8Monitoring Human Workflow Service Engine Instances ........................................................... 19-10Monitoring Deployed Human Workflows in the Service Engine ............................................. 19-11
20 Managing Human Workflow Service Components and Engines
Managing Human Task Service Component Policies .................................................................... 20-1Recovering from Human Workflow Service Engine Faults .......................................................... 20-3Managing the URI of the Human Task Service Component Task Details Application .......... 20-5Recovering from Human Task Service Component Faults ........................................................... 20-6Managing Outgoing Notifications and Incoming E-mail Notifications .................................... 20-7Moving Human Workflow Data from a Test to a Production Environment.............................. 20-9
Moving Human Workflow Data from Test to Production Environments ........................... 20-10migration.properties File Syntax................................................................................................. 20-12
Migration Property File Examples ...................................................................................... 20-13Exporting All Protected Attribute Labels.................................................................... 20-13Importing All Protected Attribute Labels ................................................................... 20-13Exporting Specific Protected Attribute Labels ........................................................... 20-14Importing Specific Protected Attribute Labels ........................................................... 20-14Exporting Nonprotected Task Payload Flex Field Mappings for All Task Definition IDs ........................................................................................................................ 20-14Importing Nonprotected Task Payload Flex Field Mappings for All Task Definition IDs ........................................................................................................................ 20-14Exporting Nonprotected Task Payload Flex Field Mappings for a Specific Task Definition ID ......................................................................................................... 20-15Importing Nonprotected Task Payload Flex Field Mappings for a Specific Task Definition ID ........................................................................................................ 20-15Exporting All Rules for a Specific User ....................................................................... 20-15Importing All Rules for a Specific User....................................................................... 20-16Exporting All Rules for a Specific Group.................................................................... 20-16Importing All Rules for a Specific Group.................................................................... 20-16Exporting All User Views.............................................................................................. 20-16Importing All User Views ............................................................................................. 20-17Exporting a Specific User View .................................................................................... 20-17Importing a Specific User View.................................................................................... 20-17Export All Standard Views............................................................................................ 20-17

ix
Importing All Standard Views...................................................................................... 20-17Exporting a Specific Standard View ............................................................................ 20-18Importing a Specific Standard View ............................................................................ 20-18
ant Script Data Migration Syntax................................................................................................ 20-18
Part IX Administering Oracle Business Activity Monitoring
21 Configuring Oracle Business Activity Monitoring
Introduction to Configuring Oracle BAM........................................................................................ 21-1Configuring Oracle BAM Web Basic Properties ............................................................................. 21-2
Configuring Oracle BAM Web Applications Properties ........................................................... 21-2Configuring Application URL....................................................................................................... 21-4Configuring Report Loading Indicator ........................................................................................ 21-4Configuring Server Name.............................................................................................................. 21-4
Configuring Oracle BAM Server Basic Properties ......................................................................... 21-4Configuring Oracle BAM Server Properties ............................................................................... 21-5Configuring Data Source JNDI ..................................................................................................... 21-7Configuring Application URL....................................................................................................... 21-7Configuring Viewset Sharing ........................................................................................................ 21-7Configuring Report Cache Persistence Manager ....................................................................... 21-8Configuring Oracle Data Integrator Integration Properties ..................................................... 21-8Configuring Outbound Email Account ....................................................................................... 21-8
Configuring the Logger........................................................................................................................ 21-9Configuring Oracle User Messaging Service................................................................................. 21-10Configuring Oracle BAM Distribution Lists ................................................................................. 21-12Configuring Oracle BAM Adapter................................................................................................... 21-14
Configuring Oracle BAM Adapter Properties .......................................................................... 21-15Configuring the Adapter to Retry Sending Messages...................................................... 21-17
Configuring Oracle BAM Connection Factories....................................................................... 21-17Configuring HTTPS for Oracle BAM Adapter .................................................................. 21-20
Configuring Trusted Domains .................................................................................................... 21-22Configuring Credential Mapping............................................................................................... 21-22
Configuring Oracle BAM Batching Properties.............................................................................. 21-24Configuring Security .......................................................................................................................... 21-26
Configuring Credential Mapping............................................................................................... 21-27Configuring Oracle BAM User Permissions ............................................................................. 21-27Configuring Secure Socket Layer................................................................................................ 21-27Configuring Oracle Internet Directory ...................................................................................... 21-28
Configuring Advanced Properties ................................................................................................... 21-28Oracle BAM Configuration Property Reference ........................................................................... 21-30
22 Monitoring Oracle Business Activity Monitoring
Introduction to Monitoring Oracle BAM ......................................................................................... 22-1Monitoring Oracle BAM Server Components ................................................................................. 22-1
Monitoring Oracle BAM Active Data Cache............................................................................... 22-2Monitoring the Event Engine Component .................................................................................. 22-4

x
Monitoring the Report Cache Component .................................................................................. 22-6Monitoring the Enterprise Message Sources............................................................................... 22-8Monitoring the Client Requests in Progress................................................................................ 22-9
Monitoring Oracle BAM Web Applications .................................................................................... 22-9Monitoring Oracle BAM Report Server ..................................................................................... 22-10Monitoring Open Connections.................................................................................................... 22-11
Monitoring Oracle BAM Web Services........................................................................................... 22-11Monitoring Oracle BAM Performance ............................................................................................ 22-12Monitoring Oracle BAM Logs .......................................................................................................... 22-14
23 Managing Oracle Business Activity Monitoring
Introduction to Managing Oracle BAM............................................................................................ 23-1Managing Oracle BAM Availability.................................................................................................. 23-1Managing Oracle BAM Users ............................................................................................................. 23-2
Defining Users and Groups ........................................................................................................... 23-4Using Previously Seeded Group Members ................................................................................. 23-4Adding Members to Application Roles ....................................................................................... 23-5Understanding Oracle BAM Application Roles ......................................................................... 23-8Configuring Oracle WebLogic Server Embedded LDAP Server ............................................. 23-9
Using the Oracle WebLogic Server Administration Console ............................................ 23-9Adding a Group ...................................................................................................................... 23-9Adding a User .......................................................................................................................... 23-9Adding a User to a Group ...................................................................................................... 23-9
Populating Users in Oracle BAM Administrator ..................................................................... 23-10Using the Registerusers Utility ............................................................................................ 23-10Populating By User Login..................................................................................................... 23-12
Managing Oracle BAM Object Ownership................................................................................ 23-13Removing Invalid Users from Oracle BAM Administrator.................................................... 23-14
Part X Administering Oracle User Messaging Service
24 Configuring Oracle User Messaging Service
User Messaging Service Overview .................................................................................................... 24-1Components ..................................................................................................................................... 24-2Architecture...................................................................................................................................... 24-2
Introduction to Oracle User Messaging Service Configuration................................................... 24-3Accessing User Messaging Service Configuration Pages.............................................................. 24-5
How to Set the Storage Method ................................................................................................... 24-5How to Add or Remove User Messaging Preferences Business Terms.................................. 24-5
Adding Business Terms .......................................................................................................... 24-5Removing Business Terms...................................................................................................... 24-5
Configuring User Messaging Service Drivers ................................................................................. 24-5How to Configure a Driver............................................................................................................ 24-6
About Driver Properties ......................................................................................................... 24-7Securing Passwords................................................................................................................. 24-8Configuring the E-Mail Driver............................................................................................... 24-9

xi
E-Mail Driver Interoperability ........................................................................................ 24-9Common Properties.......................................................................................................... 24-9Email Custom Properties............................................................................................... 24-10Client API MessageInfo Support.................................................................................. 24-12
Configuring the SMPP Driver.............................................................................................. 24-12SMPP Driver Interoperability ....................................................................................... 24-12Common Properties........................................................................................................ 24-13Custom Properties .......................................................................................................... 24-14Client API MessageInfo Support.................................................................................. 24-15
Configuring the XMPP Driver ............................................................................................. 24-16About XMPP.................................................................................................................... 24-16XMPP Driver Interoperability....................................................................................... 24-16Third-Party Software...................................................................................................... 24-17Driver Application Archive (EAR)............................................................................... 24-17Common Properties........................................................................................................ 24-17XMPP Custom Properties.............................................................................................. 24-18Client API MessageInfo Support.................................................................................. 24-20
Configuring the VoiceXML Driver...................................................................................... 24-20VoiceXML Driver Interoperability ............................................................................... 24-20Common Properties........................................................................................................ 24-20VoiceXML Custom Properties ...................................................................................... 24-21Client API MessageInfo Support.................................................................................. 24-22
Configuring the Worklist Driver ......................................................................................... 24-22Install the Worklist Driver............................................................................................. 24-22Common Properties........................................................................................................ 24-23Custom Properties .......................................................................................................... 24-24Client API MessageInfo Support.................................................................................. 24-24
Configuring the Proxy Driver .............................................................................................. 24-24Common Properties........................................................................................................ 24-25Proxy Custom Properties............................................................................................... 24-25Client API MessageInfo Support.................................................................................. 24-26
Securing User Messaging Service .................................................................................................... 24-26Web Service Security on Notification......................................................................................... 24-27Enabling UMS Service Security .................................................................................................. 24-27Enabling Client Security............................................................................................................... 24-27Keystore Configuration................................................................................................................ 24-28Client Aliases ................................................................................................................................. 24-28
Troubleshooting Oracle User Messaging Service ......................................................................... 24-29
25 Monitoring Oracle User Messaging Service
Monitoring Oracle User Messaging Service .................................................................................... 25-1Using Message Status ..................................................................................................................... 25-3Deregistering Messaging Client Applications ............................................................................ 25-4Monitoring Drivers Using the All Tab ......................................................................................... 25-5
Log Files .................................................................................................................................................. 25-5Configuring Logging ...................................................................................................................... 25-6
Metrics and Statistics............................................................................................................................ 25-8

xii
26 Managing Oracle User Messaging Service
Deploying Drivers................................................................................................................................. 26-1Using WebLogic Server Administration Console ...................................................................... 26-1Using Oracle Enterprise Manager to Deploy Drivers................................................................ 26-5Using WLST Commands................................................................................................................ 26-7
deployUserMessagingDriver ................................................................................................. 26-7Description......................................................................................................................... 26-7Syntax ................................................................................................................................. 26-7Examples ............................................................................................................................ 26-8
Using the Oracle Fusion Middleware Configuration Wizard .................................................. 26-8Undeploying and Unregistering Drivers.......................................................................................... 26-8
Part XI Administering Oracle JCA Adapters
27 Configuring Oracle JCA Adapters
Searching for Rejected Messages for an Inbound Adapter .......................................................... 27-1Deleting Rejected Messages for an Inbound Adapter ................................................................... 27-2Searching for Faults for an Outbound Adapter .............................................................................. 27-3Configuring the End Point Properties for an Inbound Adapter .................................................. 27-4
Editing a Predefined Property for an Inbound Adapter ........................................................... 27-4Adding Predefined Properties for an Inbound Adapter ........................................................... 27-5Creating a New Property for an Inbound Adapter.................................................................... 27-6Deleting a Property for an Inbound Adapter.............................................................................. 27-6Reverting a Property Value for an Inbound Adapter................................................................ 27-7
Configuring the End Point Properties for an Outbound Adapter ............................................... 27-8Editing a Predefined Property for an Outbound Adapter ........................................................ 27-8Adding a Predefined Property for an Outbound Adapter ....................................................... 27-9Creating a New Property for an Outbound Adapter............................................................... 27-10Deleting a Property for an Outbound Adapter ........................................................................ 27-11Reverting a Property Value for an Outbound Adapter........................................................... 27-12
28 Monitoring Oracle JCA Adapters
Monitoring Instances and Faults for an Inbound Adapter ........................................................... 28-1Monitoring Recent Faults and Rejected Messages for an Inbound Adapter ............................ 28-2Monitoring Faults and Rejected Messages for an Inbound Adapter.......................................... 28-3Monitoring Properties for an Inbound Adapter ............................................................................. 28-4Monitoring Instances and Faults for an Outbound Adapter ........................................................ 28-5Monitoring Recent Faults for an Outbound Adapter .................................................................... 28-5Monitoring Faults for an Outbound Adapter .................................................................................. 28-6Monitoring Properties for an Outbound Adapter .......................................................................... 28-7Monitoring Adapter Logs .................................................................................................................... 28-8
29 Managing Oracle JCA Adapters
Managing Policies for an Inbound Adapter .................................................................................... 29-1Managing Policies for an Outbound Adapter ................................................................................. 29-2
xiii
Part XII Administering Oracle B2B
30 Configuring Oracle B2B
Configuring B2B Server Properties ................................................................................................... 30-1Configuring B2B Operations .............................................................................................................. 30-2
Restricting Access to Document Types: The b2b.r1ps1 Property ............................................ 30-4Configuring B2B Attributes ................................................................................................................ 30-5
31 Monitoring Oracle B2B
Monitoring the B2B Infrastructure .................................................................................................... 31-1Accessing Oracle B2B from the B2B Infrastructure Page .............................................................. 31-4Viewing the Message Flow of a B2B Binding Component ........................................................... 31-4Viewing Services and References ...................................................................................................... 31-6
Part XIII Administering Business Events
32 Managing Business Events
Overview of Event Delivery Network .............................................................................................. 32-1Subscribing to Business Events.......................................................................................................... 32-1Managing Business Event Subscribers ............................................................................................. 32-4Recovering from Business Event Faults............................................................................................ 32-7
Part XIV Administering Binding Components
33 Configuring Service and Reference Binding Components
Configuring Service and Reference Binding Component Properties......................................... 33-1Configuring Properties for Web Services .................................................................................... 33-2Configuring Properties for Oracle JCA Adapters ...................................................................... 33-3
Oracle AQ Adapter.................................................................................................................. 33-4Oracle Database Adapter ........................................................................................................ 33-5Oracle File Adapter.................................................................................................................. 33-9Oracle FTP Adapter ............................................................................................................... 33-14Oracle JMS Adapter ............................................................................................................... 33-22Oracle MQ Series Adapter.................................................................................................... 33-23Oracle Socket Adapter........................................................................................................... 33-27Oracle JCA Adapters Endpoint Properties ........................................................................ 33-28
Changing the Endpoint Reference and Service Key for Oracle Service Registry Integration ......................................................................................................................... 33-30
Configuring Caching of WSDL URLs ................................................................................. 33-31
34 Monitoring Service and Reference Binding Components
Monitoring Binding Component Instances and Faults ................................................................. 34-1Monitoring Binding Component Rejected Messages ................................................................... 34-3

xiv
35 Managing Service and Reference Binding Components
Managing Binding Component Policies........................................................................................... 35-1Override Policy Configuration Property Values ........................................................................ 35-3Limitation on MTOM Optimization in Reference Binding Component Messages............... 35-4
Part XV Appendixes
A Demo User Community
Using the Demo User Community....................................................................................................... A-1Users........................................................................................................................................................... A-1Groups ....................................................................................................................................................... A-3soa-infra Application Roles................................................................................................................... A-4SOATestDemoApp Application Roles ................................................................................................ A-5Roles Granted to and Owned by Users............................................................................................... A-5The WorkflowPermission Class ........................................................................................................... A-6
B Troubleshooting Oracle SOA Suite
Best Practice for Starting and Stopping a Managed Server ............................................................ B-1Optimizing the Loading of Pages with Instance and Faults Metrics ............................................ B-2Resolving Message Failure Caused By Too Many Open Files ....................................................... B-3Extending Tablespaces to Avoid Problems at Run Time ................................................................. B-4Resolving Connection Timeouts .......................................................................................................... B-5Increasing Database Connection Values............................................................................................. B-5Accessing Oracle Enterprise Manager Fusion Middleware Control Console on Dual Stack Hosts that Support IPv4 and IPv6.................................................................................................................... B-6
C Oracle Enterprise Manager Roles
Roles and Privileges................................................................................................................................ C-1Overall Role Functionality Matrix .................................................................................................. C-1SOA Infrastructure Page .................................................................................................................. C-2SOA Infrastructure Menu ................................................................................................................ C-3SOA Composite Menu...................................................................................................................... C-3Composite Home Page ..................................................................................................................... C-3BPEL Process Service Engine........................................................................................................... C-4Mediator Service Engine .................................................................................................................. C-4Human Workflow Service Engine .................................................................................................. C-4Business Rules Service Engine ........................................................................................................ C-5BPEL Process Service Component Home Page ............................................................................ C-5Mediator Service Component Home Page .................................................................................... C-6Human Task Service Component Home Page ............................................................................. C-6Decision Service Component Home Page ..................................................................................... C-6Flow Trace Page ................................................................................................................................ C-7Audit Trail .......................................................................................................................................... C-7Services Home Page.......................................................................................................................... C-7References Home Page ..................................................................................................................... C-7B2B Pages............................................................................................................................................ C-8

xv
Business Events Page........................................................................................................................ C-8System MBean Browser.................................................................................................................... C-8
Index

xvi

xvii
Preface
Oracle Fusion Middleware Administrator's Guide for Oracle SOA Suite describes how to administer the components of Oracle SOA Suite, including:
■ The SOA Infrastructure and SOA composite applications
■ Composite components and service engines such as the BPEL service engine, Oracle Mediator service engine, human workflow service engine, and business rules service engine
■ Oracle B2B, Oracle Adapters, Oracle BAM, and Oracle User Messaging Service
AudienceThis document is intended for administrators managing applications on an SOA platform.
Documentation AccessibilityOur goal is to make Oracle products, services, and supporting documentation accessible to all users, including users that are disabled. To that end, our documentation includes features that make information available to users of assistive technology. This documentation is available in HTML format, and contains markup to facilitate access by the disabled community. Accessibility standards will continue to evolve over time, and Oracle is actively engaged with other market-leading technology vendors to address technical obstacles so that our documentation can be accessible to all of our customers. For more information, visit the Oracle Accessibility Program Web site at http://www.oracle.com/accessibility/.
Accessibility of Code Examples in DocumentationScreen readers may not always correctly read the code examples in this document. The conventions for writing code require that closing braces should appear on an otherwise empty line; however, some screen readers may not always read a line of text that consists solely of a bracket or brace.
Accessibility of Links to External Web Sites in DocumentationThis documentation may contain links to Web sites of other companies or organizations that Oracle does not own or control. Oracle neither evaluates nor makes any representations regarding the accessibility of these Web sites.

xviii
Deaf/Hard of Hearing Access to Oracle Support ServicesTo reach Oracle Support Services, use a telecommunications relay service (TRS) to call Oracle Support at 1.800.223.1711. An Oracle Support Services engineer will handle technical issues and provide customer support according to the Oracle service request process. Information about TRS is available at http://www.fcc.gov/cgb/consumerfacts/trs.html, and a list of phone numbers is available at http://www.fcc.gov/cgb/dro/trsphonebk.html.
Related DocumentsFor more information, see the following Oracle resources:
■ Oracle Fusion Middleware Developer's Guide for Oracle SOA Suite
■ Oracle Fusion Middleware User's Guide for Oracle B2B
■ Oracle Fusion Middleware User's Guide for Oracle Business Activity Monitoring
■ Oracle Fusion Middleware User's Guide for Technology Adapters
■ Oracle Fusion Middleware User's Guide for Oracle Business Rules
■ Oracle Fusion Middleware Language Reference Guide for Oracle Business Rules
ConventionsThe following text conventions are used in this document:
Convention Meaning
boldface Boldface type indicates graphical user interface elements associated with an action, or terms defined in text or the glossary.
italic Italic type indicates book titles, emphasis, or placeholder variables for which you supply particular values.
monospace Monospace type indicates commands within a paragraph, URLs, code in examples, text that appears on the screen, or text that you enter.

Part IUnderstanding Oracle SOA Suite
This part describes Oracle SOA Suite.
This part includes the following chapter:
■ Chapter 1, "Introduction and Concepts"


1
Introduction and Concepts 1-1
1 Introduction and Concepts
This chapter provides a brief introduction to Oracle Fusion Middleware, Oracle Service-Oriented Architecture (SOA) Suite, and administration of Oracle SOA Suite from Oracle Enterprise Manager Fusion Middleware Control Console.
This chapter includes the following topics:
■ Section 1.1, "What Is Oracle Fusion Middleware?"
■ Section 1.2, "What Is Oracle SOA Suite?"
■ Section 1.3, "Administration of Oracle SOA Suite"
For more information about Oracle Enterprise Manager Fusion Middleware Control Console administrative tasks and Oracle Fusion Middleware concepts, see the following documents:
■ Oracle Fusion Middleware Administrator's Guide
■ Oracle Fusion Middleware 2 Day Administration Guide
■ Oracle Fusion Middleware Concepts
1.1 What Is Oracle Fusion Middleware?Oracle Fusion Middleware is a collection of standards-based software products that spans a range of tools and services: from Java EE and developer tools, to integration services, business intelligence, and collaboration. Oracle Fusion Middleware offers complete support for development, deployment, and management.
1.2 What Is Oracle SOA Suite?Oracle SOA Suite is a middleware component of Oracle Fusion Middleware. Oracle SOA Suite provides a complete set of service infrastructure components for designing, deploying, and managing SOA composite applications. Oracle SOA Suite enables services to be created, managed, and orchestrated into SOA composite applications. Composites enable you to easily assemble multiple technology components into one SOA composite application. Oracle SOA Suite plugs into heterogeneous IT infrastructures and enables enterprises to incrementally adopt SOA.
You can administer Oracle SOA Suite from Oracle Enterprise Manager Fusion Middleware Control Console. The following sections provide an overview of the components of Oracle SOA Suite:
■ Section 1.2.1, "Understanding the SOA Infrastructure Application"
■ Section 1.2.2, "Understanding SOA Composite Applications"

What Is Oracle SOA Suite?
1-2 Oracle Fusion Middleware Administrator's Guide for Oracle SOA Suite
■ Section 1.2.3, "Understanding SOA Composite Application Instances"
■ Section 1.2.4, "Understanding Service Components and Service Component Instances"
■ Section 1.2.5, "Understanding Binding Components"
■ Section 1.2.6, "Understanding Service Engines"
■ Section 1.2.7, "Understanding the Service Infrastructure"
■ Section 1.2.8, "Understanding the Contents of SOA Composite Applications"
For introductory information about Oracle SOA Suite, see Oracle Fusion Middleware Developer's Guide for Oracle SOA Suite.
1.2.1 Understanding the SOA Infrastructure ApplicationThe SOA Infrastructure is a Java EE-compliant application running in Oracle WebLogic Server. The application manages composites and their life cycle, service engines, and binding components.
You deploy SOA composite applications designed in Oracle JDeveloper to the SOA Infrastructure. In the example shown in Figure 1–1, many SOA composite applications are deployed to the SOA Infrastructure and are visible in Oracle Enterprise Manager Fusion Middleware Control Console.
From the SOA Infrastructure home page, you can perform administration tasks such as monitoring SOA composite applications, monitoring individual composite instances, and updating the state of SOA composite applications and individual composite instances. You can also perform corrective actions such as fault recovery.
Figure 1–1 SOA Composite Applications Deployed in the SOA Infrastructure
You can click a specific SOA composite application in the Composite table to access its home page. Figure 1–2 shows the upper part of the home page for the EventMediatorDemo SOA composite application. From the SOA composite application home page, you can perform administration tasks such as monitoring instances, recovering from faults, managing the state of application instances, and

What Is Oracle SOA Suite?
Introduction and Concepts 1-3
attaching policies. You can also perform a limited number of configuration tasks at the SOA composite application level, such as specifying the composite audit level and payload validation. These tasks are displayed at the top of the page.
Figure 1–2 SOA Composite Application Home Page (Upper Part)
Figure 1–3 shows the lower part of the home page for the EventMediatorDemo SOA composite application. The service components and service and reference binding components included in the EventMediatorDemo composite are shown.
Figure 1–3 SOA Composite Application Home Page (Lower Part)
For more information, see the following sections:
■ Section 1.2.2, "Understanding SOA Composite Applications"
■ Part III, "Administering the SOA Infrastructure"

What Is Oracle SOA Suite?
1-4 Oracle Fusion Middleware Administrator's Guide for Oracle SOA Suite
1.2.2 Understanding SOA Composite ApplicationsSOA composite applications such as those shown in the Deployed Composites page in Figure 1–1 consist of the following:
■ Service components such as Oracle Mediator for routing, BPEL processes for orchestration, human tasks for workflow approvals, and decision services for working with business rules
■ Binding components (services and references) for connecting SOA composite applications to external services, applications, and technologies
These components are assembled into a single SOA composite application. Having the components assembled into one unit of deployment (the application) greatly simplifies the management and life cycle of SOA applications.
Figure 1–4 provides an example of a SOA composite application in the SOA Composite Editor in Oracle JDeveloper. Service binding components (such as orderprocessor_client_ep) advertise their capabilities to external consumers. The service exposes a public interface of the SOA composite application (OrderBookingComposite) consisting of BPEL process, Oracle Mediator, human task, and decision service components. A wire connects the service to a specific component or reference in the composite. Reference binding components (such as CreditCardAuthorizationService and PartnerSupplierService) enable messages to be sent from the SOA composite application to external services. The service binding components, service components, and reference binding components are wired (connected) for communication.

What Is Oracle SOA Suite?
Introduction and Concepts 1-5
Figure 1–4 SOA Composite Application
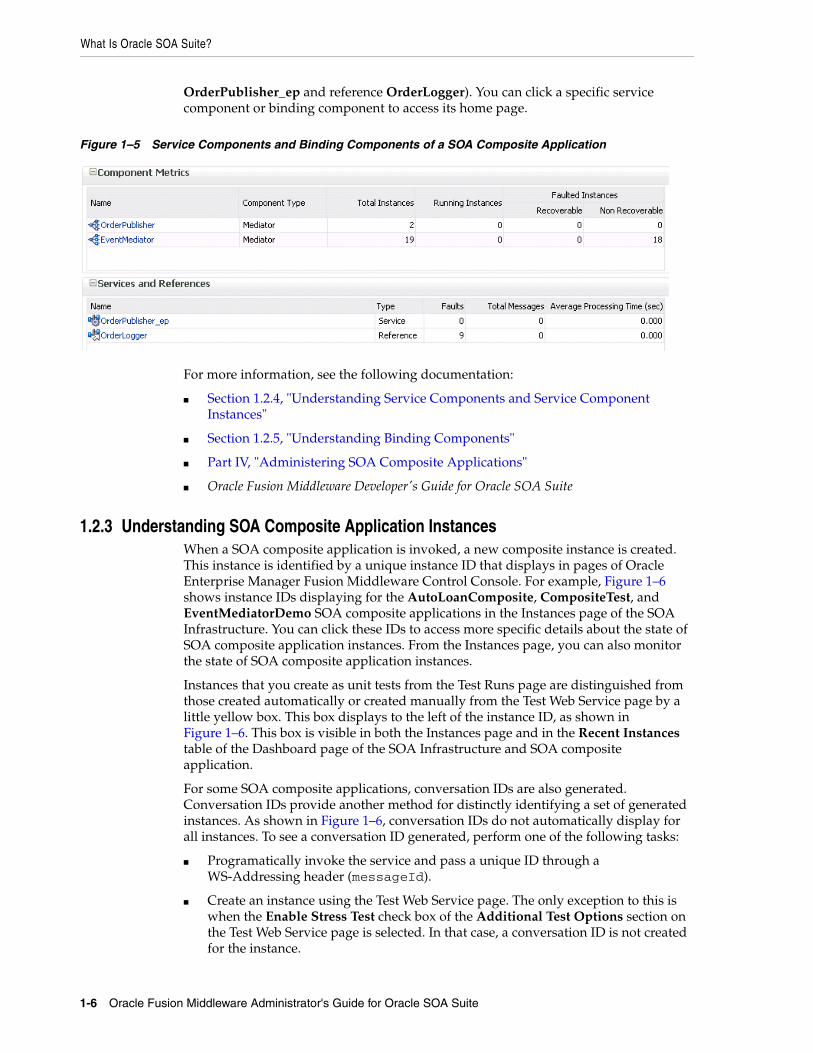
The service components and binding components included in a SOA composite application appear in the lower part of an application home page, as shown in Figure 1–3 and Figure 1–5. The example in Figure 1–5 shows two service components (OrderPublisher and EventMediator) and two binding components (service
What Is Oracle SOA Suite?
1-6 Oracle Fusion Middleware Administrator's Guide for Oracle SOA Suite
OrderPublisher_ep and reference OrderLogger). You can click a specific service component or binding component to access its home page.
Figure 1–5 Service Components and Binding Components of a SOA Composite Application
For more information, see the following documentation:
■ Section 1.2.4, "Understanding Service Components and Service Component Instances"
■ Section 1.2.5, "Understanding Binding Components"
■ Part IV, "Administering SOA Composite Applications"
■ Oracle Fusion Middleware Developer's Guide for Oracle SOA Suite
1.2.3 Understanding SOA Composite Application InstancesWhen a SOA composite application is invoked, a new composite instance is created. This instance is identified by a unique instance ID that displays in pages of Oracle Enterprise Manager Fusion Middleware Control Console. For example, Figure 1–6 shows instance IDs displaying for the AutoLoanComposite, CompositeTest, and EventMediatorDemo SOA composite applications in the Instances page of the SOA Infrastructure. You can click these IDs to access more specific details about the state of SOA composite application instances. From the Instances page, you can also monitor the state of SOA composite application instances.
Instances that you create as unit tests from the Test Runs page are distinguished from those created automatically or created manually from the Test Web Service page by a little yellow box. This box displays to the left of the instance ID, as shown in Figure 1–6. This box is visible in both the Instances page and in the Recent Instances table of the Dashboard page of the SOA Infrastructure and SOA composite application.
For some SOA composite applications, conversation IDs are also generated. Conversation IDs provide another method for distinctly identifying a set of generated instances. As shown in Figure 1–6, conversation IDs do not automatically display for all instances. To see a conversation ID generated, perform one of the following tasks:
■ Programatically invoke the service and pass a unique ID through a WS-Addressing header (messageId).
■ Create an instance using the Test Web Service page. The only exception to this is when the Enable Stress Test check box of the Additional Test Options section on the Test Web Service page is selected. In that case, a conversation ID is not created for the instance.

What Is Oracle SOA Suite?
Introduction and Concepts 1-7
Figure 1–6 SOA Composite Application Instance IDs
For more information, see the following sections:
■ Section 1.2.4, "Understanding Service Components and Service Component Instances"
■ Part IV, "Administering SOA Composite Applications"
■ Section 8.1, "Initiating a SOA Composite Application Test Instance"
1.2.4 Understanding Service Components and Service Component InstancesSOA composite applications include service components. Service components are the basic building blocks of SOA composite applications. Service components implement a part of the overall business logic of the SOA composite application.
The following service components can be used in a SOA composite application:
■ BPEL process — For process orchestration of synchronous and asynchronous processes
■ Oracle Mediator — For content transformation and routing events (messages) between service producers and consumers.
■ Human task — For modeling a human task (for example, manual order approval) that describes the tasks for users or groups to perform as part of an end-to-end business process flow
■ Decision service — For making a decision or for processing based on business rules
From the service component home page in Oracle Enterprise Manager Fusion Middleware Control Console, you can perform administration tasks such as monitoring instances, recovering from faults, and attaching policies.

What Is Oracle SOA Suite?
1-8 Oracle Fusion Middleware Administrator's Guide for Oracle SOA Suite
As described in Section 1.2.3, "Understanding SOA Composite Application Instances," each application instance has its own instance ID. Each service component instance included in a SOA composite application instance also has its own instance ID that displays in Oracle Enterprise Manager Fusion Middleware Control Console. Figure 1–7 shows an instance ID (workflow:200000) displaying in the Instance ID column for the VacationRequestTask human task service component of the VacationRequest SOA composite application. You can monitor the state of that service component instance from the Instances page. You can also click this instance to access more specific details about the service component.
Figure 1–7 Service Component Instance IDs
For more information about administering service components, see the following sections:
■ Part V, "Administering BPEL Process Service Components and Engines"
■ Part VI, "Administering Oracle Mediator Service Components and Engines"
■ Part VIII, " Administering Human Task Service Components and Human Workflow Service Engines"
■ Part VII, "Administering Decision Service Components and Business Rules Service Engines"
1.2.5 Understanding Binding ComponentsBinding components connect SOA composite applications to external services, applications, and technologies (such as messaging or databases). Binding components are organized into two groups:
■ Services — Provide the outside world with an entry point to the SOA composite application. The WSDL file of the service advertises its capabilities to external applications. The service bindings define how a SOA composite service can be invoked (for example, through SOAP).
■ References — Enable messages to be sent from the SOA composite application to external services (for example, the same functionality that partner links provide for BPEL processes, but at the higher SOA composite application level).
In Oracle Enterprise Manager Fusion Middleware Control Console, you can perform binding component administration tasks such as attaching policies, monitoring

What Is Oracle SOA Suite?
Introduction and Concepts 1-9
rejected messages, and setting binding component properties. Figure 1–8 shows the home page of a service binding component.
Figure 1–8 Binding Components
For more information, see Part XIV, "Administering Binding Components".
1.2.6 Understanding Service EnginesThe SOA Infrastructure includes a set of service engines (BPEL process, human workflow, decision service, and Oracle mediator) that execute the business logic of their respective components within the SOA composite application (for example, a BPEL process).
Figure 1–9 provides an example in Oracle Enterprise Manager Fusion Middleware Control Console of the BPEL process service engine. In this engine, the Calling, LoanService, and CreditRatingService BPEL process service components run. Note the multiple instance IDs for LoanService and CreditRatingService. The BPEL process service components are included in two separate SOA composite applications:
■ Calling is included in the Calling SOA composite application.
■ LoanService and CreditRatingService are included in the CompositeTest SOA composite application.
However, each BPEL process service component runs in the same BPEL process service engine. You can click the links on the page to see more details about each BPEL process service component instance, the service component itself, or the SOA composite application in which it is included.

What Is Oracle SOA Suite?
1-10 Oracle Fusion Middleware Administrator's Guide for Oracle SOA Suite
Figure 1–9 Service Components Running in a Service Engine
In Oracle Enterprise Manager Fusion Middleware Control Console, you can perform service engine administration tasks such as monitoring instances, recovering from faults, manually recovering (BPEL) failed messages, and configuring properties specific to each service engine. These configuration properties impact all service components that execute in the service engine, no matter the SOA composite application in which the service components are included. The service engine pages also include engine-specific statistics and performance metrics.
For more information about administering service engines, see the following sections:
■ Part V, "Administering BPEL Process Service Components and Engines"
■ Part VI, "Administering Oracle Mediator Service Components and Engines"
■ Part VIII, " Administering Human Task Service Components and Human Workflow Service Engines"
■ Part VII, "Administering Decision Service Components and Business Rules Service Engines"
1.2.7 Understanding the Service InfrastructureThe service infrastructure provides the internal message transport infrastructure for connecting components and enabling data flow. The service infrastructure is responsible for routing messages along the wire connections between services, service components, and references.
For more information, see the following sections:
■ Section 4.2, "Monitoring Processing Requests"
■ Oracle Fusion Middleware Developer's Guide for Oracle SOA Suite for details about wiring
1.2.8 Understanding the Contents of SOA Composite ApplicationsYour SOA composite application can consist of a variety of service components, binding components, and services that you administer from Oracle Enterprise Manager Fusion Middleware Control Console:

Administration of Oracle SOA Suite
Introduction and Concepts 1-11
■ BPEL processes
■ Human workflows
■ Oracle Mediator
■ Decision services (Oracle Business Rules)
■ JCA Adapters
■ Oracle BAM
■ Oracle B2B
■ Business events
■ Oracle User Messaging Service
For conceptual information about these service components, binding components, and services, see Oracle Fusion Middleware Getting Started with Oracle SOA Suite.
1.3 Administration of Oracle SOA Suite You can perform a variety of Oracle SOA Suite administration (configuration, monitoring, and management) tasks from Oracle Enterprise Manager Fusion Middleware Control Console. This section provides an overview of these tasks:
■ Section 1.3.1, "Configuration of Oracle SOA Suite"
■ Section 1.3.2, "Monitoring of Oracle SOA Suite"
■ Section 1.3.3, "Management of Oracle SOA Suite"
The administrative tasks that you can perform are based on the roles to which you are mapped; each role corresponds to a different set of privileges. Certain users can be mapped to simple monitoring privileges (for instance view-only access), while other users can be granted full access, including the ability to update configurations, restart servers, and so on. For more information about roles in Oracle Enterprise Manager Fusion Middleware Control Console, see Appendix C, "Oracle Enterprise Manager Roles."
1.3.1 Configuration of Oracle SOA SuiteYou can perform Oracle SOA Suite configuration tasks in Oracle Enterprise Manager Fusion Middleware Control Console. Configuration tasks consist of setting properties such as audit levels and payload validation for your environment. Properties can be set at the following levels:
■ SOA Infrastructure (impacting all SOA composite applications)
■ Service engines (impacting all service components that execute in the engine, no matter the SOA composite application in which they are included)
■ SOA composite application (impacting all service components that are included in that composite application)
■ Oracle B2B bindings
■ Service and reference binding components message header properties
In terms of order of precedence, inherited SOA composite application property settings (such as audit level settings and payload validation) take the highest precedence, followed by service engine settings, followed by SOA Infrastructure settings. However, most properties do not have this type of precedence to consider.

Administration of Oracle SOA Suite
1-12 Oracle Fusion Middleware Administrator's Guide for Oracle SOA Suite
1.3.1.1 Understanding the Order of Precedence for Audit Level SettingsAudit tracking enables you to select the level of information to be collected by the message tracking infrastructure. Audit level tracking can be set at the following levels:
■ BPEL process service component
■ SOA composite application
■ Service engine
■ SOA Infrastructure
If you set audit tracking at multiple levels, it is important to understand which setting takes precedence. Table 1–1 provides examples of the order of precedence for audit level settings.
Table 1–1 Examples of Order of Precedence
Component CompositeService Engine
SOA Infrastructure
Which Setting Takes Precedence?
No property Off Production Development Composite.
The audit level is set to Off. The service engine and SOA Infrastructure audit levels do not take effect.
No property Inherit Development Production Service engine.
The audit level is set to Development. The payload is shown in the assign activity. The SOA Infrastructure audit level does not take effect.
No property Inherit Inherit Production SOA Infrastructure.
The audit level is set to Production.
No property Inherit Production/Development/Off/Inherit
Off The overall audit is not shown.
The composite inherits the audit level from the SOA Infrastructure. The payload is shown in the assign activity based on the service engine audit level setting.
Development Off Production Development Composite.
Since the composite audit level is set to Off, the overall audit is not shown. The service engine audit level is shown, but the Development setting for the component takes precedence.
The payload is shown in the assign activity based on the component audit level setting of Development.
Inherit Off Production Development Composite.
Since the composite audit level is set to Off, the overall audit is not shown. The service engine audit level is not shown because Off is inherited from the composite.

Administration of Oracle SOA Suite
Introduction and Concepts 1-13
For more information, see the following sections:
■ Chapter 3, "Configuring the SOA Infrastructure"
■ Section 9.1, "Configuring BPEL Process Service Engine Properties"
■ Section 9.2, "Setting the Audit Level at the BPEL Process Service Component Level"
■ Chapter 18, "Configuring Human Workflow Service Components and Engines"
■ Chapter 33, "Configuring Service and Reference Binding Components"
1.3.2 Monitoring of Oracle SOA SuiteYou can perform Oracle SOA Suite monitoring tasks in Oracle Enterprise Manager Fusion Middleware Control Console, including monitoring the following:
■ Instances, faults, and rejected messages in the SOA Infrastructure, SOA composite applications, service components, service engines, and service and reference binding components
■ Service engine, service infrastructure, and binding component processing request performance
■ Service and reference binding component message processing totals and average processing times
■ Audit trail and process flow behavior in service components
■ Service engine request and thread states in BPEL processes and human workflows
1.3.3 Management of Oracle SOA SuiteYou can perform Oracle SOA Suite management tasks in Oracle Enterprise Manager Fusion Middleware Control Console, including managing the following:
■ Startup and shutdown of the SOA Infrastructure application
■ Composite state (activating, retiring, starting, stopping, and setting the default composite version)
■ Deleting and aborting composite instances
■ Deployment, undeployment, and redeployment actions for SOA composite applications
■ Export of a running SOA composite application to a JAR file.
■ Manual initiation of SOA composite application test instances from the Test Web Service page
Notes:
■ When the composite audit level is set to Off, there is no audit trail generated for this composite and all service engines used within the composite.
■ When the composite audit level is set to Inherit, it always inherits the settings of the SOA Infrastructure.
■ When the composite audit level is set to Off, the component inherits the service engine settings.

Administration of Oracle SOA Suite
1-14 Oracle Fusion Middleware Administrator's Guide for Oracle SOA Suite
■ Recovery from faults in SOA composite applications, service components, service engines, and business events
■ Manual recovery of failed messages in BPEL processes
■ Automated unit testing of SOA composite applications
■ Attachment of policies to SOA composite applications, service components, and binding components
■ Incoming and outgoing notification messages in human workflow
■ Subscriptions to business events and testing of event publications
The following sections provide a more specific overview of several management tasks:
■ Section 1.3.3.1, "Understanding Fault Recovery"
■ Section 1.3.3.2, "Understanding Policies"
■ Section 1.3.3.3, "Understanding the Life Cycle State of SOA Composite Applications"
■ Section 1.3.3.4, "Understanding SOA Composite Application Automated Testing"
1.3.3.1 Understanding Fault RecoveryYou can perform fault recovery actions on BPEL process, Oracle Mediator, human workflow, and business event subscription faults (which include database and component subscription faults) identified as recoverable in Oracle Enterprise Manager Fusion Middleware Control Console. The following types of fault recovery are supported:
■ Recovery from individual faults, where you have access to the most granular recovery options specific to each type of fault
■ Recovery from multiple (bulk) faults, where you select multiple faults for recovery
You can perform individual and bulk recovery actions on recoverable faults at the following levels:
■ Faults occurring in all SOA composite applications in the SOA Infrastructure
■ Faults occurring in an individual SOA composite application
■ Faults occurring in service components
■ Faults occurring in service engines
■ Faults occurring in business events
You perform fault recovery on faults identified as recoverable in Oracle Enterprise Manager Fusion Middleware Control Console. For BPEL process faults to be identified as recoverable, there must be a fault policy defined that is bound to the fault (through the fault-bindings.xml file) and which triggers the action ora-human-intervention. A BPEL component fault can be recovered in only this case. If no fault policy is defined as part of the composite, then a recoverable BPEL process fault is not possible.
You define a fault recovery policy in the fault-policies.xml and fault-bindings.xml files outside of Oracle Enterprise Manager Fusion Middleware Control Console. These files are packaged with the SOA composite
Note: Backup and recovery of Oracle SOA Suite is described in Oracle Fusion Middleware Administrator's Guide.

Administration of Oracle SOA Suite
Introduction and Concepts 1-15
application that you deploy to the SOA Infrastructure and administer in Oracle Enterprise Manager Fusion Middleware Control Console.
Oracle Mediator and human workflow faults do not have the same behavior; they can create recoverable faults without any fault policy. For errors in human task service components or human workflow service engines, you perform fault recovery on faults identified as recoverable from the Oracle BPM Worklist.
The following types of faults can be displayed in Oracle Enterprise Manager Fusion Middleware Control Console:
■ Business: Application-specific faults that are generated when there is a problem with the information being processed (for example, a social security number is not found in the database).
■ System: Network errors or other types of errors such as a database server or a Web service being unreachable.
■ Oracle Web Service Manager (OWSM): Errors on policies attached to SOA composite applications, service components, or binding components. Policies apply security to the delivery of messages.
Faults can also be classified as either of the following:
■ Recoverable or nonrecoverable:
Only certain types of faults are identified as recoverable. Table 1–2 provides examples of several recoverable and nonrecoverable faults.
■ Rejected Messages:
A fault is classified as a rejected message based on where it occurs. If a fault occurs before entering a SOA composite, without generating a composite instance, it is classified as a rejected message. A system or a policy fault can be identified as a rejected message.
For more information on performing fault recovery, see the following sections:
■ Section 8.5, "Recovering from SOA Composite Application Faults at the SOA Infrastructure Level"
■ Section 8.6, "Recovering from SOA Composite Application Faults in the Application Home Page"
■ Section 11.1, "Recovering from BPEL Process Service Component Faults"
■ Section 11.3, "Recovering from BPEL Process Service Engine Faults"
■ Section 14.2, "Managing Mediator Faults"
■ Section 20.2, "Recovering from Human Workflow Service Engine Faults"
■ Section 20.4, "Recovering from Human Task Service Component Faults"
Table 1–2 Faults
Recoverable Faults Nonrecoverable Faults
■ Business faults and some specific system faults
■ Oracle Mediator input file path and output directory mismatch
■ An Oracle BPM Worklist user is not authorized to perform relevant (expected) actions
■ Rejected messages
■ Most system faults
■ Non-existent references
■ Service invocation failures
■ Policy faults

Administration of Oracle SOA Suite
1-16 Oracle Fusion Middleware Administrator's Guide for Oracle SOA Suite
■ Section 32.4, "Recovering from Business Event Faults"
1.3.3.2 Understanding PoliciesYou can attach and detach policies at the following levels in Oracle Enterprise Manager Fusion Middleware Control Console:
■ SOA composite applications
■ Service components
■ Service and reference binding components
Policies apply security to the delivery of messages. Oracle Fusion Middleware uses a policy-based model to manage Web services. The following types of policies are supported:
■ Security — Implements WS-Security 1.0 and 1.1 standards. They enforce authentication and authorization of users, identity propagation, and message protection (message integrity and message confidentiality).
■ Reliable Messaging — Supports the WS-ReliableMessaging protocol, guaranteeing the end-to-end delivery of messages.
■ Message Transmission Optimization Mechanism (MTOM) — Ensures that attachments are in MTOM format, a format for efficiently sending binary data to and from Web services.
■ WS-Addressing — Verifies that SOAP messages include WS-Addressing headers in conformance with the WS-Addressing specification. Transport-level data is included in the XML message rather than relying on the network-level transport to convey this information.
■ Management — Logs request, response, and fault messages to a message log. Management policies can include custom policies.
Policies are part of an enterprise policy framework that allows policies to be centrally created and managed.
For more information, see the following documentation:
■ Section 8.8, "Managing SOA Composite Application Policies"
■ Section 11.2, "Managing BPEL Process Service Component Policies"
■ Section 20.1, "Managing Human Task Service Component Policies"
■ Section 35.1, "Managing Binding Component Policies"
■ Oracle Fusion Middleware Security and Administrator's Guide for Web Services for definitions of available policies and details about which policies to use for your environment
1.3.3.2.1 Understanding How Policies are Executed Policies are executed before a message reaches the component with the attached policy. This causes the error to display in the component preceding the component with the attached policy. For example:
■ A policy attached to an Oracle Mediator service component is executed on the wire before the message is passed to the Oracle Mediator. This causes the fault to display in the service binding component instead of the Oracle Mediator.
■ A policy attached to a human task service component is executed in the preceding BPEL process service component before the message is passed to the human task service component. This causes the fault to display in the BPEL process service component instead of the human task service component.

Administration of Oracle SOA Suite
Introduction and Concepts 1-17
To see the exact location of the policy error, view the audit trail.
1.3.3.3 Understanding the Life Cycle State of SOA Composite ApplicationsYou can administer the entire life cycle state of deployed SOA composite applications from Oracle Enterprise Manager Fusion Middleware Control Console. An application is automatically activated when you deploy it to the SOA Infrastructure. During deployment, you can specify a specific revision number for the application. A revision is a specific deployed version of the application. You can deploy multiple revisions of an application, enabling all to run at the same time.
This is a key benefit of revisions. For example, you may have an older revision of an application running with one customer that is still valid. You then begin a partnership with a different customer that requires a slight modification to the design of the application. At some point, you plan to migrate the old customer to the newer revision of the application, but for now that is not necessary. Revisions enable you to run both applications.
The revision value is added to the application name in Oracle Enterprise Manager Fusion Middleware Control Console. For example, in Figure 1–1 on page 1-2, revision 1.0 is the version for many deployed SOA composite applications. If a new request comes in for a specific composite application revision, that composite application revision is invoked. If a new request comes in without specifying a revision, the default revision is invoked. A small green dot distinguishes the default revision from other revisions.
You can perform the following life cycle administration tasks on a SOA composite application from Oracle Enterprise Manager Fusion Middleware Control Console:
■ Create an instance.
■ Stop and restart application revisions. An application revision is typically started instantly after deployment.
■ Retire and activate application revisions. Application revisions are instantly activated upon deployment.
■ Set an application as the default version.
■ Deploy, undeploy, and redeploy application revisions.
■ Delete specific instances of an application revision.
For more information about administering the life cycle states of a SOA composite application, see the following sections:
■ Section 8.1, "Initiating a SOA Composite Application Test Instance"
■ Section 8.2, "Managing the State of Deployed SOA Composite Applications"
■ Section 8.3, "Monitoring and Deleting SOA Composite Application Instances from the Application Home Page"
■ Section 8.4, "Monitoring and Deleting SOA Composite Application Instances at the SOA Infrastructure Level"
1.3.3.4 Understanding SOA Composite Application Automated TestingYou can create, deploy, and run test cases that automate the testing of SOA composite applications. Test cases enable you to simulate the interaction between a SOA composite application and its references before deployment in a production environment. Test suites consist of a logical collection of one or more test cases. Each test case contains a set of commands to perform as the test instance is executed. The

Administration of Oracle SOA Suite
1-18 Oracle Fusion Middleware Administrator's Guide for Oracle SOA Suite
execution of a test suite is known as a test run. Each test corresponds to a single SOA composite application instance. Instances generated by the execution of these tests are distinguished as test instances by a little yellow box next to their instance ID, as shown in Figure 1–6.
The test suite framework provides the following features:
■ Uses emulations to simulate the behavior of components with which your SOA composite application interacts during execution. Instead of invoking a specific component, you can specify a response from the component.
■ Uses assertions to validate data during process execution.
For information about designing test cases for SOA composite applications, Oracle Fusion Middleware Developer's Guide for Oracle SOA Suite.

Part IIGetting Started with Administration
This part describes how to navigate to Oracle SOA Suite administration tasks in Oracle Enterprise Manager Fusion Middleware Control Console.
This part includes the following chapter:
■ Chapter 2, "Getting Started with Administering Oracle SOA Suite"


2
Getting Started with Administering Oracle SOA Suite 2-1
2 Getting Started with Administering OracleSOA Suite
This chapter describes how to access Oracle Enterprise Manager Fusion Middleware Control Console and SOA Infrastructure configuration, monitoring, and management tasks.
This chapter includes the following topics:
■ Section 2.1, "Logging into Oracle Enterprise Manager Fusion Middleware Control Console"
■ Section 2.2, "Navigating to Oracle SOA Suite Administration Tasks"
■ Section 2.3, "Logging Out of Oracle Enterprise Manager Fusion Middleware Control Console"
For more information about service engines, service components, binding components, and the SOA Infrastructure, see Chapter 1, "Introduction and Concepts."
2.1 Logging into Oracle Enterprise Manager Fusion Middleware Control Console
To log in to Oracle Enterprise Manager Fusion Middleware Control Console:
1. Use Internet Explorer 7, Mozilla Firefox 2.0.0.2, Safari 4.0, or Firefox 3.0.x to access the following URL:
http://host_name:port/em
where host_name is the name of the host on which Oracle Enterprise Manager Fusion Middleware Control Console is installed and port is a number that is dynamically set during installation. This port is typically 7001, but is the HTTP port associated with the Oracle HTTP Server. For environments in which the SSL port was enabled during configuration, the default port is 7002.
2. Enter weblogic/password and click Login.
where:
■ weblogic is the default Oracle Enterprise Manager Fusion Middleware Control Console administrator user name (you can change this during installation)
■ password is the password you entered during Oracle SOA Suite installation
The Accessibility Preference dialog appears the first time you log in. If you want, you can select to not display this option again.

Navigating to Oracle SOA Suite Administration Tasks
2-2 Oracle Fusion Middleware Administrator's Guide for Oracle SOA Suite
3. Select an appropriate action and click Continue.
The farm home page is displayed. From there, you can navigate to Oracle SOA Suite in several different ways, as described in the following sections.
For more information about installation, see Oracle Fusion Middleware Installation Guide for Oracle SOA Suite.
2.2 Navigating to Oracle SOA Suite Administration TasksThis section describes methods for navigating to Oracle SOA Suite administration tasks in Oracle Enterprise Manager Fusion Middleware Control Console:
■ Section 2.2.1, "Navigating Through the SOA Infrastructure Home Page and Menu"
■ Section 2.2.2, "Navigating Through the SOA Composite Application Home Page and Menu"
■ Section 2.2.3, "Navigating to Deployed Java EE Applications"
■ Section 2.2.4, "Navigating to the Oracle WebLogic Server Administration Console and Other Pages"
■ Section 2.2.5, "Navigating to the SOA Infrastructure or SOA Composite Application Home Page"
2.2.1 Navigating Through the SOA Infrastructure Home Page and MenuYou can navigate to Oracle SOA Suite administration tasks through the SOA Infrastructure home page and menu. The SOA Infrastructure provides you with access to all deployed SOA composite applications, service engines, service components, business events, and other elements.
To navigate through the SOA Infrastructure home page and menu:
1. Expand SOA > soa-infra in the navigator.
This displays all SOA composite applications running in the SOA Infrastructure for that managed server.
Note: Note that the Farm menu always displays at the top of the navigator. As you expand the SOA folder in the navigator and click the links displayed beneath it, the SOA Infrastructure menu becomes available at the top of the page.

Navigating to Oracle SOA Suite Administration Tasks
Getting Started with Administering Oracle SOA Suite 2-3
2. Click soa-infra.
This displays the Dashboard page of the SOA Infrastructure. Click the help icon at the top of this page to access the Resource Center for the entire Oracle SOA Suite. The upper part of the page displays details about recently deployed SOA composite application instances, deployed composites, recent faults, and rejected messages. You can click a specific SOA composite application name or instance ID to access additional details. You can also click Show All at the bottom of each section to see more information about all items.

Navigating to Oracle SOA Suite Administration Tasks
2-4 Oracle Fusion Middleware Administrator's Guide for Oracle SOA Suite
The lower part of the page displays details about the service engines provided by the SOA Infrastructure and a graphical representation of the number of instances and faults for all SOA composite applications hosted in the SOA Infrastructure. You must expand these sections to see this information. Click a service engine name to access more specific details.
3. Note that the SOA Infrastructure menu appears below the soa-infra name at the top of the page.
4. Select the SOA Infrastructure menu.
Note: Depending upon your current location, the context of this menu changes to provide you with the administrative options most relevant to your current location. For example, when you are within the pages of a SOA composite application, the SOA Composite menu displays instead.

Navigating to Oracle SOA Suite Administration Tasks
Getting Started with Administering Oracle SOA Suite 2-5
These administrative options enable you to perform the following tasks.
Option Description
Home This option displays the following details of the SOA Infrastructure Dashboard page:
■ Recent SOA composite application instances.
■ Deployed SOA composite details (status, instance, and fault counts).
■ Recent faults and rejected messages in all SOA composite application instances, including whether the instance is recoverable.
■ Number of components hosted by services engines and the faults in those components.
■ Graphical representation of the number of instances and faults for all SOA composite applications hosted in the SOA Infrastructure.
For more information, see Section 4.1, "Monitoring SOA Infrastructure Recent Instances and Faults."
Monitoring This option displays the following details:
■ A summary of performance statistics in the SOA infrastructure.
■ Request processing details that show the breakup of time spent in handshaking requests between the binding components, service infrastructure, and service engines.
For more information, see Section 4.2, "Monitoring Processing Requests."
Control This option enables you to start or shut down the SOA Infrastructure.
Logs This option enables you to view and configure the logging levels for run-time loggers.
For more information, see Section 3.4, "Configuring Log Files."
SOA Deployment
This option enables you to deploy, undeploy, or redeploy SOA composite applications.
For more information, see Section 5.1, "Deploying Applications."
Service Engines
This option provides access to monitoring and management tasks for the BPEL process, Oracle Mediator, human workflow, and business rules service engines.
Bindings This option displays details about recently active document types and trading partners, and inbound and outbound endpoints for Oracle B2B.

Navigating to Oracle SOA Suite Administration Tasks
2-6 Oracle Fusion Middleware Administrator's Guide for Oracle SOA Suite
Services and References
This option displays message processing metrics for service and reference binding components in all SOA composite applications.
For more information, see Section 4.3, "Monitoring Service and Reference Binding Components in the SOA Infrastructure."
Business Events
This option displays available business events, current event subscribers, and fault details.
For more information, see Chapter 32, "Managing Business Events."
SOA Administration
This option provides access to the following configuration tasks for the SOA Infrastructure and each service engine:
■ Common Properties: For setting properties that impact the entire SOA Infrastructure, such as viewing and setting the SOA Infrastructure audit level, capturing the state of the SOA composite application instance, enabling the payload validation of incoming messages, specifying the callback server and server URLs, setting UDDI registry properties, viewing the data source JNDI locations, setting the nonfatal connection retry count, setting Web service binding properties, and disabling the retrieval of instance and fault count metrics.
For more information, see Section 3.1, "Configuring SOA Infrastructure Properties."
■ BPEL Properties: For setting the audit trail size, maximum document size for a variable, payload validation for incoming and outgoing messages, audit trail level, BPEL monitor and sensor disabling status, and dispatcher thread level for invoke message threads, system threads, and engine threads.
For more information, see Section 9.1, "Configuring BPEL Process Service Engine Properties."
■ Mediator Properties: For setting the audit level, metrics level, number of parallel worker threads, number of maximum rows retrieved for parallel processing, parallel thread sleep values, error thread sleep values, container ID refresh time, and container ID lease timeout values.
For more information, see Section 12.1, "Introduction to Configuring Oracle Mediator."
■ Workflow Notification Properties: For setting the workflow service notification mode and actionable e-mail address value.
For more information, see Section 18.1, "Configuring Human Workflow Notification Properties."
■ Workflow Task Service Properties: For setting the actionable e-mail account, adding the worklist application URL, selecting the pushback assignee, adding portal realm mapping, and adding the task auto release configuration priority.
For more information, see Section 18.2, "Configuring Human Workflow Task Service Properties."
■ B2B Server Properties: For enabling Dynamic Monitoring Service (DMS) metrics.
■ Cross References: For selecting cross-reference values.
Security This option displays the following selections:
■ Application Policies: For creating application policies that an application relies upon for controlling access to resources.
■ Application Roles: For creating application roles for applications.
This option is available for all deployed Java EE applications, including the SOA Infrastructure (soa-infra) application. Note that these options do not configure security policies for SOA composites.
For more information about attaching policies to composite applications, see Section 8.8, "Managing SOA Composite Application Policies."
Option Description

Navigating to Oracle SOA Suite Administration Tasks
Getting Started with Administering Oracle SOA Suite 2-7
5. Select a specific SOA composite application from the soa-infra list shown in Step 1 (for example, AutoLoanComposite).
The SOA Infrastructure menu is now displayed above the navigator, providing you with access to the same high-level administrative options, even when you are within the pages of a SOA composite application. This menu changes positions when you select a composite application.
6. Right-click soa-infra in the navigator. The menu that displays provides you with access to the same administrative options that appear in the SOA Infrastructure menu.
Administration This option displays the following selections:
■ MDS Connections: For managing metadata service (MDS) connections.
■ TopLink Sessions: For managing cache for the TopLink persistence framework.
■ System MBean Browser: For advanced configuration of properties across applications and components.
For more information, see Oracle Fusion Middleware Administrator's Guide for instructions on using the System Mean Browser.
In addition to configuring the System MBean Browser from Oracle Enterprise Manager Fusion Middleware Control Console, you also can invoke SOA configuration MBean operations with the Web Logic Scripting Tool (WLST). For information, see Oracle Fusion Middleware Oracle WebLogic Scripting Tool.
General Information
This option displays general details about the SOA Infrastructure, such as the Oracle Enterprise Manager Fusion Middleware Control Console version, Oracle home, and Oracle instance.
Option Description

Navigating to Oracle SOA Suite Administration Tasks
2-8 Oracle Fusion Middleware Administrator's Guide for Oracle SOA Suite
2.2.2 Navigating Through the SOA Composite Application Home Page and MenuYou can navigate directly to Oracle SOA Suite administration tasks for a specific SOA composite application.
To navigate through the SOA composite application home page and menu:
1. Expand SOA > soa-infra in the navigator.
This displays all SOA composite applications running in the SOA Infrastructure.
2. Select a specific SOA composite application (for this example, AutoLoanComposite [1.0] is selected).
This displays the home page for the selected SOA composite application. The upper part of the page displays details about recent instances and faults and rejected messages. This part of the page also provides you with access to important administrative and configuration tasks at the composite level.

Navigating to Oracle SOA Suite Administration Tasks
Getting Started with Administering Oracle SOA Suite 2-9
3. Click Show All at the bottom of each section to see more of these items. You can also click links to access more details about a specific composite instance or fault.
The lower part of the page displays details about the service components (in this example, decision service (business rules), BPEL process, and human workflow) and binding components (services and references) included in the SOA composite application. You can click a specific service component or service or reference binding component in the Name column to access more specific details.
When you are within the pages of a SOA composite application, the SOA Composite menu appears below the application name at the top of the page. This menu provides you with administrative options specific to the current composite application.
4. Select the SOA Composite menu.

Navigating to Oracle SOA Suite Administration Tasks
2-10 Oracle Fusion Middleware Administrator's Guide for Oracle SOA Suite
These administrative options enable you to perform the following tasks.
Option Description
Home This option displays the following details for the SOA composite application home page.
■ Recent instances.
■ Recent faults and rejected messages, including whether the instance is recoverable.
■ Service components included in the SOA composite application.
■ Services and references included in the SOA composite application.
For more information, see Section 8.2, "Managing the State of Deployed SOA Composite Applications."
Monitoring This option displays the performance summary statistics for the selected SOA composite application.
SOA Deployment
This option enables you to undeploy or redeploy this SOA composite application, or deploy another SOA composite application.
For more information, see Section 5.1, "Deploying Applications."
Export This option enables you to export a running SOA composite application to a JAR file.
For more information, see Section 8.10, "Exporting a Running SOA Composite Application."
Test Service This option enables you to manually initiate an instance of this deployed SOA composite application through the Test Web Service page.
For more information, see Section 8.1, "Initiating a SOA Composite Application Test Instance."
Unit Tests This option enables you to run test cases that simulate the interaction between the current SOA composite application and its Web service partners before deployment to a production environment. This generates test instances of the composite.
For more information, see Section 8.7, "Automating the Testing of SOA Composite Applications."
Policies This option enables you to view and attach or detach policies to or from the SOA composite application.
For more information, see Section 8.8, "Managing SOA Composite Application Policies."
SOA Infrastructure
This option takes you to the SOA Infrastructure home page.

Navigating to Oracle SOA Suite Administration Tasks
Getting Started with Administering Oracle SOA Suite 2-11
5. Right-click the name of a SOA composite application in the navigator. A menu is displayed that provides you with access to the same administrative options that appear in the SOA Composite menu.
2.2.3 Navigating to Deployed Java EE ApplicationsYou can navigate to deployed Java EE applications related to Oracle SOA Suite components. These applications are Java EE applications that represent the SOA system components, such as the technology adapters, Oracle B2B, Oracle BPM Worklist, and so on. You can deploy a Web service and see it listed here. You can also click individual applications (for example, the deployed Web service) and manage and test that you can deploy WAR and EAR files from here. If you have deployed your own Java EE applications, they also display here.
1. Expand Application Deployments in the navigator.
2. Expand Internal Applications.
3. Expand Resource Adapters.
A list of deployed Java EE applications related to Oracle SOA Suite components appears.
SOA Infrastructure Common Properties
This option enables you to view and set the audit level, capture the state of the SOA composite application instance, enable the payload validation of incoming messages, set UDDI registry properties, specify the callback server and server URLs, view the data source JNDI locations, set the nonfatal connection retry counts, set Web service binding properties, and disable the retrieval of instance and fault count metrics. The SOA composite application typically inherits the settings defined at the SOA Infrastructure level.
For more information, see Section 3.1, "Configuring SOA Infrastructure Properties."
Service/ Reference Properties
This option enables you to configure WSDL file properties for the service and reference binding components included in the SOA composite application.
For more information, see Section 33.1, "Configuring Service and Reference Binding Component Properties."
General Information
This option displays general details about this SOA composite application, such as the Oracle Enterprise Manager Fusion Middleware Control Console version, Oracle home, and Oracle instance.
Option Description

Navigating to Oracle SOA Suite Administration Tasks
2-12 Oracle Fusion Middleware Administrator's Guide for Oracle SOA Suite
Note that Oracle B2B (b2bui) appears in the Internal Applications folder, while Oracle BPM Worklist (worklistapp) appears in the top level Application Deployments folder.
4. Click a specific application (for this example, worklistapp is selected).
The page displays details about application performance.

Navigating to Oracle SOA Suite Administration Tasks
Getting Started with Administering Oracle SOA Suite 2-13
Note that while Oracle Enterprise Manager Fusion Middleware Control Console displays the URLs for all deployed modules, you cannot directly invoke them from this page. For example, you cannot invoke the DefaultToDoTaskFlow module from the Web Modules section.
2.2.4 Navigating to the Oracle WebLogic Server Administration Console and Other Pages
Most pages in Oracle Enterprise Manager Fusion Middleware Control Console include a Related Links menu in the upper right corner. Depending upon your current location, the context of the menu changes to provide links to relevant pages. For example, when you are on a service engine page, the Related Links menu provides links to the SOA Infrastructure home page, the BPEL process configuration properties page, the Oracle WebLogic Server Administration Console, and a page for service engine log files. Figure 2–1 provides details. You can also click soa-infra at the top of the BPEL service engine page to go directly to the SOA Infrastructure home page.
Figure 2–1 Related Links Menu for a SOA Composite Application
When you are on the page of a service component of a SOA composite application, several navigational menus and links are available:
■ The Related Links menu provides links to the SOA Infrastructure home page and the applicable service engine home page. Figure 2–2 provides details.
■ Bread crumbs display in the upper left corner as you traverse further into a SOA composite application.
■ Within any SOA composite application page (including the service component pages), links to the SOA Infrastructure pages also remain available through the SOA Infrastructure menu that displays next to the Farm menu above the navigator. For example, this enables you to go from the home page of a specific BPEL service component directly to the BPEL service engine configuration properties page.
■ Names at the top of the page can be clicked to navigate to parent pages. For example, clicking the name of a composite at the very top of a service component page enables you to go to the composite that includes that component.

Navigating to Oracle SOA Suite Administration Tasks
2-14 Oracle Fusion Middleware Administrator's Guide for Oracle SOA Suite
Figure 2–2 Related Links Menu for a Service Component of a SOA Composite Application
The service engines, SOA administration (such as the SOA Infrastructure Common Properties page), and business event pages all provide access to Oracle WebLogic Server Administration Console from the Related Topics list. Selecting WebLogic Server Console opens a new browser page and takes you to the login prompt for the Oracle WebLogic Server Administration Console. Your current page in Oracle Enterprise Manager Fusion Middleware Control Console is not lost. After logging in, the home page is displayed. Figure 2–3 provides details.
Figure 2–3 Oracle WebLogic Server Administration Console
You can perform the following Oracle SOA Suite tasks from Oracle WebLogic Server Administration Console:
■ Configure adapter connections for composite references
■ Create and manage data sources utilized by adapters
■ Create and manage JMS resources utilized by adapters
■ Manage SOA Infrastructure data sources (for example, modifying connection pool settings)

Logging Out of Oracle Enterprise Manager Fusion Middleware Control Console
Getting Started with Administering Oracle SOA Suite 2-15
■ Administer security of human workflow users
■ Manage Oracle WebLogic Server transaction (JTA) settings (for example, the transaction timeout value)
2.2.5 Navigating to the SOA Infrastructure or SOA Composite Application Home PageYou can access the home page of the SOA Infrastructure or a specific SOA composite application from the Farm home page.
1. In the Deployments section of the Farm home page, click soa-infra or a specific SOA composite application (for example, VacationRequest).
The home page for your selection is displayed.
2.3 Logging Out of Oracle Enterprise Manager Fusion Middleware Control Console
To log out of Oracle Enterprise Manager Fusion Middleware Control Console:
1. Note the following details about logging out.
■ If multiple windows are open (for example, the help window, topology viewer, and flow trace), logging out of any window logs you out of the entire application in all open windows.
■ If you log out with any unsaved configuration changes, you receive no warning message and your changes are lost.
2. In the upper right corner of any page, click the Log Out link.

Logging Out of Oracle Enterprise Manager Fusion Middleware Control Console
2-16 Oracle Fusion Middleware Administrator's Guide for Oracle SOA Suite

Part IIIAdministering the SOA Infrastructure
This part describes how to administer the SOA Infrastructure.
This part includes the following chapters:
■ Chapter 3, "Configuring the SOA Infrastructure"
■ Chapter 4, "Monitoring the SOA Infrastructure"


3
Configuring the SOA Infrastructure 3-1
3 Configuring the SOA Infrastructure
This chapter describes how to configure the properties of the SOA Infrastructure. These property settings can apply to all SOA composite applications running in the SOA Infrastructure.
This chapter includes the following topics:
■ Section 3.1, "Configuring SOA Infrastructure Properties"
■ Section 3.2, "Stopping and Starting the SOA Infrastructure"
■ Section 3.3, "Changing the SOA Infrastructure Server URL Property Port"
■ Section 3.4, "Configuring Log Files"
■ Section 3.5, "Changing the Driver Name to Support XA Drivers"
For more information, see Section 1.2.1, "Understanding the SOA Infrastructure Application."
3.1 Configuring SOA Infrastructure PropertiesYou can configure the following properties for the SOA Infrastructure:
■ Audit level
■ Composite instance state to capture
■ Payload validation
■ Callback server and server URLs
■ Instance and fault count metrics retrieval
■ Universal Description, Discovery, and Integration (UDDI) registry
■ Java Naming and Directory Interface (JNDI) data source
■ Web service binding properties
The properties set at this level impact all deployed SOA composite applications, except those composites for which you explicitly set different audit level values at the composite application or service engine levels.
Additional advanced properties for the SOA Infrastructure can be configured through the System MBean Browser. To access these properties from the SOA Infrastructure menu, select Administration > System MBean Browser > Application Defined MBeans > oracle.as.soainfra.config.
To configure SOA Infrastructure properties:
1. Access this page through one of the following options:

Configuring SOA Infrastructure Properties
3-2 Oracle Fusion Middleware Administrator's Guide for Oracle SOA Suite
The SOA Infrastructure Common Properties page displays the following properties.
Descriptions for the properties at the top of the page are provided in the following table.
From the SOA Infrastructure Menu...
From the SOA Folder in the Navigator...
From the SOA Composite Menu...
1. Select SOA Administration > Common Properties.
1. Right-click soa-infra.
2. Select SOA Administration > Common Properties.
1. Select SOA Infrastructure Common Properties.
Note: Some property fields are designated with an icon showing green and red arrows. If you change these properties, you must restart the SOA Infrastructure.

Configuring SOA Infrastructure Properties
Configuring the SOA Infrastructure 3-3
Element Description
Audit Level Select the level of information to be collected by the message tracking infrastructure. This information is collected in the instance data store (database) associated with the SOA Infrastructure. This setting has no impact on what gets written to log files.
■ Off: No composite instance tracking and payload tracking information is collected. No more composite instances can be created. No logging is performed. Note that no logging and display of instances in Oracle Enterprise Manager Fusion Middleware Control Console can result in a slight performance increase for processing instances. Instances are created, but are not displayed.
■ Development: Enables both composite instance tracking and payload detail tracking. However, this setting may impact performance. This level is useful largely for testing and debugging purposes.
■ Production: Composite instance tracking is collected, but the Oracle Mediator service engine does not collect payload details and the BPEL process service engine does not collect payload details for assign activities (payload details for other BPEL activities are collected). This level is optimal for most normal production operations.
Capture Composite Instance State
Select to capture the SOA composite application instance state. Enabling this option may result in additional run time overhead during instance processing. This option provides for separate tracking of the running instances. All instances are captured as either running or not running. This information displays later in the State column of the composite instances tables for the SOA Infrastructure and SOA composite application, where:
■ It shows the counts of running instances versus total instances
■ You can also limit the view to running instances only
Valid states are running, completed, faulted, recovery needed, stale, terminated, suspended, and state not available.
The running and completed states are captured only if this check box is selected. Otherwise, the state is set to unknown. The conditional capturing of these states is done mainly to reduce the performance overhead on SOA Infrastructure run time.
Note: If this property is disabled and you create a new instance of a SOA composite application, a new instance is created, but the instance does not display as running, faulted, stale, suspended, terminated, completed, or requiring recovery in the table of the Dashboard page of the composite application. This is because capturing the composite state of instances is a performance-intensive process.
For example, if you enable this property and create an instance of a SOA composite application in the Test Web Service page, a new instance appears in the Dashboard page of the composite application. If you click Show Only Running Instances in the Dashboard page, the instance displays as running. If you then disable this property and create another instance of the same composite application, a new, running instance is created. However, if you then select Show Only Running Instances, the new instance is not listed in the table of running instances.
In addition, to terminate a running instance, the instance must have a state (for example, running, faulted, suspended). This activates the Abort button on the Instances page of a SOA composite application. If this check box is not enabled before creating an instance, the Abort button is inactive, and you cannot terminate the instance.

Configuring SOA Infrastructure Properties
3-4 Oracle Fusion Middleware Administrator's Guide for Oracle SOA Suite
2. Make changes appropriate to your environment.
The UDDI Registry Properties section displays the following properties. You can integrate SOA composite applications running in the SOA Infrastructure with the UDDI registry. The UDDI registry provides a standards-based foundation for locating published services and managing metadata about services (security, transport, or quality of service). You can browse and select published services that meet your needs.
The User and Password properties are applicable if the UDDI registry is secured. These are only used for the secure HTTP configuration of Oracle Service Registry (OSR). The Inquiry URL property is public.
For more information about the UDDI registry, visit the following URL:
http://www.oracle.com/technology/tech/soa/uddi/index.html
For information about setting the endpoint reference and service key, see Section 33.1.3, "Changing the Endpoint Reference and Service Key for Oracle Service Registry Integration."
3. Make changes appropriate to your environment.
The Server URLs section displays the following properties. If not explicitly set here, these values are determined at run time by querying the Oracle WebLogic Server cluster, the Web server, or the local server properties.
Payload Validation Select to enable validation of incoming and outgoing messages. Nonschema-compliant payload data is intercepted and displayed as a fault.
Element Description Example
Inquiry URL Enter the URL of the master registry you want to query. The URL must not refer to the slave registry itself. Otherwise, you can lose some data. The inquiry URL obtains full-standard UDDI version 3 structures. This is the same UDDI inquiry URL that you specified in the Create UDDI Registry Connection wizard.
http://master.mycompany.com:8888/registry/uddi/inquiry
User Enter the registry inquiry user. admin
Password Enter the password for the master registry inquiry user.
Enter a password that utilizes good security practices.
Element Description
Callback Server URL Enter the callback server URL. This URL is sent by the server as part of the invocation to a foreign service provider.
Element Description

Configuring SOA Infrastructure Properties
Configuring the SOA Infrastructure 3-5
4. Make changes appropriate to your environment.
The Display Data Counts section enables you to disable the retrieval of instance and fault count metrics that display on various pages and dialogs, such as the Dashboard pages of the SOA Infrastructure, SOA composite applications, service engines, and service components, and the Delete with Options: Instances dialog. Instead, these metrics are replaced with links that you click to retrieve the instance and fault count metrics when you need this information. This setting can improve the time it takes to load pages. For additional details, see Section 3.1.1, "Disabling Instance and Fault Count Metrics Retrieval with the System MBean Browser" for changing this property from the System MBean Browser and Section B.2, "Optimizing the Loading of Pages with Instance and Faults Metrics."
5. Select the check box.
6. Expand the Advanced section.
Server URL Enter the server URL. This URL is published as part of the SOAP address of a service in the concrete WSDL file.
Note: In previous releases, you manually configured SOAP optimization with the optSoapShortcut property. For this release, SOAP optimization is automatically configured. Therefore, if you upgrade to 11g R1 and are using the optimized shortcut approach in existing applications, note that optimized calls are activated only when the host name value (as referred to in the WSDL URL in the composite.xml file) matches the Server URL value. Either set both values to the host name (for example, myhost) or to the full domain name (for example, myhost.domain.com). If these values do not match, a regular SOAP call is performed instead of an optimized local call.
Note: If you change the Callback Server URL and Server URL values (for example, when moving from a test to a production environment), you must restart Oracle WebLogic Server for the WSDLs to be regenerated.
Note: Any changes to this property impact all SOA farms associated with this Oracle Enterprise Manager instance.
Element Description

Configuring SOA Infrastructure Properties
3-6 Oracle Fusion Middleware Administrator's Guide for Oracle SOA Suite
The Data Sources section displays the following properties. A data source enables you to retrieve a connection to a database server.
7. Make changes appropriate to your environment.
The Web Service Binding Properties section displays the following options.
8. Make changes appropriate to your environment.
9. Click Apply.
10. If you make changes and want to reset these properties to their previous values, click Revert.
11. To change advanced parameters, click More SOA Infra Advanced Configuration Properties. This opens the System MBean Browser. Properties that display include the following. Descriptions are provided for each property.
■ GlobalTxMaxRetry — The maximum number of times an invocation exception can be retried.
Element Description Example
Server Data Source JNDI
Displays the JNDI location for the server data source. Click Configure to go to the data source configuration page of the Oracle WebLogic Server Administration Console. Global transaction support should be disabled for this data source.
jdbc/SOALocalTxDataSource
Server Transaction Data Source JNDI
Displays the JNDI location for the server transactional data source. Click Configure to go to the data source configuration page of the Oracle WebLogic Server Administration Console. You must configure the data source for global transactions.
jdbc/SOADataSource
Nonfatal Connection Retry Count
Enter the maximum number of times a nonfatal connection error can be retried before failing. These type of errors occur for any connection error with the dehydration store (for example, Oracle Real Application Clusters failover, database shutdown, and so on).
10
Element Description Example
Oracle SSL Ciphers Enter the list of supported Oracle ciphers.
A cipher suite is a set of algorithms that provide security for data transmissions. Before data can flow through an SSL connection, both sides of the connection must negotiate common algorithms to use.
SSL_RSA_WITH_RC4_128_MD5
Oracle Wallet Password
Enter the wallet password for the keystore. Enter a password that utilizes good security practices.
Use Chunking Select to enable chunking of data for SOAP over HTTP deliveries.
- -
Chunk Size Specify a chunk size. The value must be less than or equal to 999. The size is used for SOAP over HTTP deliveries and is specified in bytes.
500

Stopping and Starting the SOA Infrastructure
Configuring the SOA Infrastructure 3-7
■ GlobalTxRetryInterval — The number of seconds between retries for an invocation exception.
■ HttpProxyAuthRealm — The HTTP proxy authentication realm.
■ HttpProxyAuthType — The HTTP proxy authentication type.
■ HttpProxyHost — The HTTP proxy host.
■ HttpProxyPassword — The password for HTTP proxies that require authentication.
■ HttpProxyPort — The HTTP proxy port number.
■ HttpProxyUsername — The user name for HTTP proxies that require authentication.
■ HttpServerURL — The HTTP protocol URL published as part of the SOAP address of a process in the WSDL file.
■ HttpsServerURL — The HTTPS protocol URL published as part of the SOAP address of a process in the WSDL file.
■ KeystoreLocation — The path to the Oracle SOA Suite keystore.
■ UddiCacheLifetime — The UDDI endpoint cache life span.
3.1.1 Disabling Instance and Fault Count Metrics Retrieval with the System MBean Browser
As described in Section 3.1, "Configuring SOA Infrastructure Properties," you can disable the retrieval of instance and fault count metrics with the Display Data Counts property in the SOA Infrastructure Common Properties page.
You can also change this property through the System MBean Browser.
1. Select Application Defined MBeans > emom.props > Server:AdminServer > Application: em > Properties > emoms.properties.
Note that emoms.properties is only available for selection if you previously modified the Display Data Counts property in the SOA Infrastructure Common Properties page.
2. In the Name column of the Attributes tab, click Properties.
3. In the Value column, expand Element_20.
4. In the Element column, enter false to disable metrics retrieval.
5. Click Apply.
6. Restart the SOA Infrastructure. Note that a restart is not required if you instead change the Display Data Counts property in the SOA Infrastructure Common Properties page.
3.2 Stopping and Starting the SOA InfrastructureYou can stop and start the SOA Infrastructure for maintenance or for configuration restarts.
To start and stop the SOA Infrastructure:

Stopping and Starting the SOA Infrastructure
3-8 Oracle Fusion Middleware Administrator's Guide for Oracle SOA Suite
1. To shut down the SOA Infrastructure, select Shut Down.
2. Click OK when prompted to shut down the SOA Infrastructure.
3. Wait for SOA Infrastructure shutdown to complete.
4. To start the SOA Infrastructure, select Start Up.
3.2.1 SOA Composite Application States and SOA Infrastructure ShutdownSOA composite application states are not updated to indicate that they are down after SOA Infrastructure shutdown. If you attempt to access the composite, you receive an error message stating that composite details cannot be retrieved:
soa-infra runtime connection error An error happened while connecting tosoa-infra runtime at t3://152.61.150.106:8001/soa-infra.
This message may lead you to believe that another issue exists in the system. However, this is not the case.
These composite states display as up, or in some cases pending, because this metric indicates whether the composite is enabled, and is independent of whether the SOA Infrastructure is started. In addition, the composite is still active and can receive requests on other managed servers in a cluster.
3.2.2 Restarting the SOA Infrastructure Does Not Activate Endpoints When a Retired Composite is Activated
If a SOA composite application with adapter endpoints is in a retired state, the endpoints are not activated if you perform the following actions:
■ Restart the SOA Infrastructure
■ Activate the SOA composite application
This is because files, records, and so on are not picked up by the endpoint adapters. As a workaround, redeploy the SOA composite application after restarting the SOA Infrastructure.
3.2.3 SOA Infrastructure Startup Failure When cwallet.sso Includes the SOA MapWhen cwallet.sso has the SOA map, you receive an error message similar to the following when attempting to start the SOA Infrastructure.
Caused By: java.security.UnrecoverableKeyException: Password verification failed at sun.security.provider.JavaKeyStore.engineLoad(JavaKeyStore.java:769) at sun.security.provider.JavaKeyStore$JKS.engineLoad(JavaKeyStore.java:38) at java.security.KeyStore.load(KeyStore.java:1185) at oracle.j2ee.ws.saaj.util.SSLUtil.loadKeyStore(SSLUtil.java:73) at oracle.j2ee.ws.saaj.util.SSLUtil.getKeyManagerFactory(SSLUtil.java:88) at oracle.j2ee.ws.saaj.util.SSLUtil.getKeyManagers(SSLUtil.java:97)
From the SOA Infrastructure Menu... From the SOA Folder in the Navigator...
1. Select Control. 1. Right-click soa-infra.
2. Select Control.
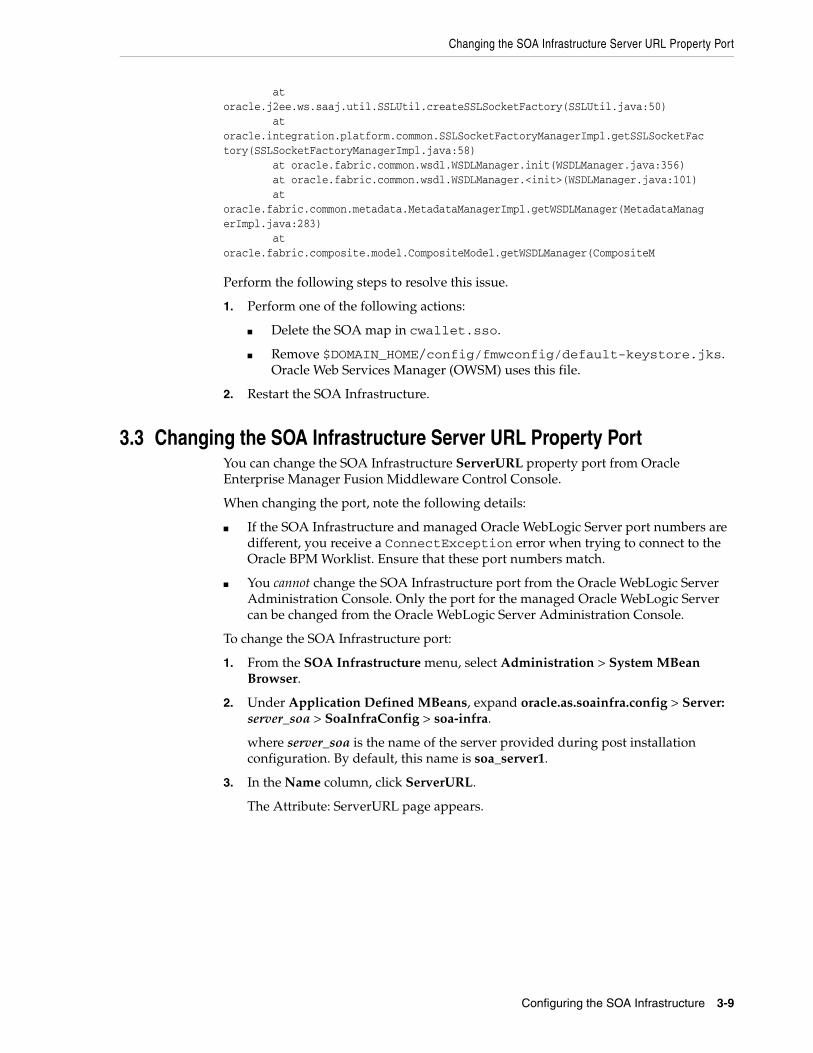
Changing the SOA Infrastructure Server URL Property Port
Configuring the SOA Infrastructure 3-9
at oracle.j2ee.ws.saaj.util.SSLUtil.createSSLSocketFactory(SSLUtil.java:50) at oracle.integration.platform.common.SSLSocketFactoryManagerImpl.getSSLSocketFac tory(SSLSocketFactoryManagerImpl.java:58) at oracle.fabric.common.wsdl.WSDLManager.init(WSDLManager.java:356) at oracle.fabric.common.wsdl.WSDLManager.<init>(WSDLManager.java:101) at oracle.fabric.common.metadata.MetadataManagerImpl.getWSDLManager(MetadataManag erImpl.java:283) at oracle.fabric.composite.model.CompositeModel.getWSDLManager(CompositeM
Perform the following steps to resolve this issue.
1. Perform one of the following actions:
■ Delete the SOA map in cwallet.sso.
■ Remove $DOMAIN_HOME/config/fmwconfig/default-keystore.jks. Oracle Web Services Manager (OWSM) uses this file.
2. Restart the SOA Infrastructure.
3.3 Changing the SOA Infrastructure Server URL Property PortYou can change the SOA Infrastructure ServerURL property port from Oracle Enterprise Manager Fusion Middleware Control Console.
When changing the port, note the following details:
■ If the SOA Infrastructure and managed Oracle WebLogic Server port numbers are different, you receive a ConnectException error when trying to connect to the Oracle BPM Worklist. Ensure that these port numbers match.
■ You cannot change the SOA Infrastructure port from the Oracle WebLogic Server Administration Console. Only the port for the managed Oracle WebLogic Server can be changed from the Oracle WebLogic Server Administration Console.
To change the SOA Infrastructure port:
1. From the SOA Infrastructure menu, select Administration > System MBean Browser.
2. Under Application Defined MBeans, expand oracle.as.soainfra.config > Server: server_soa > SoaInfraConfig > soa-infra.
where server_soa is the name of the server provided during post installation configuration. By default, this name is soa_server1.
3. In the Name column, click ServerURL.
The Attribute: ServerURL page appears.

Configuring Log Files
3-10 Oracle Fusion Middleware Administrator's Guide for Oracle SOA Suite
4. In the Value field, change the port.
5. Click Apply.
6. Change the managed Oracle WebLogic Server port in the Oracle WebLogic Server Administration Console to the same value.
In environments in which a load balancer is used in front of an Oracle WebLogic Server cluster, the ServerURL property host and port can be different from the Oracle WebLogic Server server host and port. This is typical for enterprise deployment environments in which a load balancer distributes requests across the managed servers in the Oracle WebLogic Server cluster. For more details, see Oracle Fusion Middleware Enterprise Deployment Guide for Oracle SOA Suite.
3.4 Configuring Log FilesOracle SOA Suite components generate log files containing messages that record all types of events, including startup and shutdown information, errors, warning messages, access information on HTTP requests, and additional information.
To configure log files:
1. Access this page through one of the following options:
The Log Configuration page displays the following details:
From the SOA Infrastructure Menu... From the SOA Folder in the Navigator...
1. Select Logs > Log Configuration. 1. Right-click soa-infra.
2. Select Logs > Log Configuration.

Configuring Log Files
Configuring the SOA Infrastructure 3-11
■ A View list for selecting the type of loggers for which to view information:
– Persistent: Loggers that become active when a component is started. Their configuration details are saved in a file and their log levels are persisted across component restarts.
– Active run time: Loggers that are automatically created during run time and become active when a particular feature area is exercised (for example, oracle.soa.b2b or oracle.soa.bpel). Their log levels are not persisted across component restarts.
■ A table that displays the logger name, Oracle Diagnostic Logging (ODL) level for setting the amount and type of information to write to a log file, the log file, and the log level state.
2. Perform the following log file tasks on this page:
a. In the Logger Name column, expand a logger name. This action enables you to specify more specific logging levels within a component.
b. In the Oracle Diagnostic Logging Level columns, select the level and type of information to write to a log file.
c. In the Log File column, click a specific log file to create and edit log file configurations.
For more information about ODL log files and the level and type of logging information to write to a log file, see Oracle Fusion Middleware Administrator's Guide.
3. Click the Log Files tab.
This page enables you to create and edit log file configurations, including the log file in which the log messages are logged, the format of the log messages, the rotation policies used, and other parameters based on the log file configuration class.

Changing the Driver Name to Support XA Drivers
3-12 Oracle Fusion Middleware Administrator's Guide for Oracle SOA Suite
For more information, see Oracle Fusion Middleware Administrator's Guide.
3.4.1 Configuring the Logging File Encoding PropertyThe oracle-soa-handler log handler property of the soa-diagnostic.log file has no encoding property specified in the SOA_Domain/config/fmwconfig/servers/server_soa/logging.xml file. Instead, the soa-diagnostic.log file is written in the operating system’s default encoding format. This can cause the following problems:
■ Non-ASCII error messages can become unreadable because logging information is written to soa-diagnostic.log in the server’s default encoding format.
■ On Windows operating systems, writing in the default encoding format can lead to non-ASCII data loss.
To avoid this problem, specify a value of UTF-8 for the oracle-soa-handler log handler property in the logging.xml file.
<?xml version='1.0'?><logging_configuration> <log_handlers> <log_handler name='wls-domain' class='oracle.core.ojdl.weblogic.DomainLogHandler' level='WARNING'/> <log_handler name='oracle-soa-handler' class='oracle.core.ojdl.logging.ODLHandlerFactory'> <property name='path' value='c:\soa1210.1411\user_projects\domains\soa/servers/server_soa/logs/soa-diagnostic.log'/> <property name='maxFileSize' value='10485760'/> <property name='maxLogSize' value='104857600'/> <property name='supplementalAttributes' value='J2EE_APP.name,J2EE_MODULE.name,WEBSERVICE.name,WEBSERVICE_PORT.name,composite_instance_id,component_instance_id,composite_name,component_name'/> <property name='encoding' value='UTF-8'/> </log_handler> </log_handlers>...
Log files are written with ODL. You can view the content of log files from Oracle Enterprise Manager Fusion Middleware Control Console.
For more information about logging, see Oracle Fusion Middleware Administrator's Guide.
3.5 Changing the Driver Name to Support XA DriversIf your data sources require support for XA drivers, you must change the driver name on Oracle WebLogic Server. This is particularly true for environments in which BPEL processes assume XA is present when calling database adapters and JMS adapters.

Changing the Driver Name to Support XA Drivers
Configuring the SOA Infrastructure 3-13
Change the driver name through one of the following methods.
■ Edit in Oracle WebLogic Server Administration Console.
1. Log into Oracle WebLogic Server Administration Console.
2. In the left pane, select Domain Structure.
3. Select Services > JDBC > Data Source > SOADataSource > Connection Pool.
4. For the Driver Class Name, change the value to oracle.jdbc.xa.client.OracleXADataSource.
This provides support for the XA driver.
5. Restart the server.
■ Edit the SOADataSource-jdbc.xml file.
1. Open the soaDataSource-jdbc.xml file on Oracle WebLogic Server.
2. Change the SOADataSource driver name from oracle.jdbc.OracleDriver to oracle.jdbc.xa.client.OracleXADataSource.
<?xml version="1.0" encoding="UTF-8"?><jdbc-data-source/. . .. . ./ <name>SOADataSource</name> <jdbc-driver-params> <url>jdbc:oracle:thin:@adc60086fems.us.oracle.com:1537:co0yd570</url> <driver-name>*oracle.jdbc.xa.client.OracleXADataSource*</driver-name> <properties> <property> <name>user</name> <value>fusion_soainfra</value> </property> </properties>/ . . . . . ./ </jdbc-driver-params>/. . .. . ./</jdbc-data-source>

Changing the Driver Name to Support XA Drivers
3-14 Oracle Fusion Middleware Administrator's Guide for Oracle SOA Suite

4
Monitoring the SOA Infrastructure 4-1
4 Monitoring the SOA Infrastructure
This chapter describes how to monitor the SOA Infrastructure. All SOA composite applications are deployed to the SOA Infrastructure.
This chapter includes the following topics:
■ Section 4.1, "Monitoring SOA Infrastructure Recent Instances and Faults"
■ Section 4.2, "Monitoring Processing Requests"
■ Section 4.3, "Monitoring Service and Reference Binding Components in the SOA Infrastructure"
For more information, see Section 1.2.1, "Understanding the SOA Infrastructure Application."
4.1 Monitoring SOA Infrastructure Recent Instances and FaultsYou can monitor the SOA composite applications deployed to the SOA Infrastructure.
To monitor SOA Infrastructure recent instances and faults:
1. Access this page through one of the following options:
The upper part of the SOA Infrastructure Dashboard page displays the following details:
■ Recent SOA composite application instances, instance IDs, and starting times. By default, only running instances are shown.
■ The status of deployed SOA composite applications and their revision numbers, the number of instances created for each application, and the number of faulted instances in each application. The total number of deployed composites also displays in parentheses next to the Show All link.
■ Recent faults and rejected messages, including the error message, whether you can recover from the fault, the time at which the fault occurred, the SOA composite application in which the fault occurred, the location of the fault (service binding component, service component, or reference binding component), the instance ID of the SOA composite application, and a link to log messages describing the fault or rejected message. You can recover from
From the SOA Infrastructure Menu...
From the SOA Folder in the Navigator...
From the SOA Composite Menu...
1. Select Home. 1. Select soa-infra. 1. Select SOA Infrastructure.

Monitoring SOA Infrastructure Recent Instances and Faults
4-2 Oracle Fusion Middleware Administrator's Guide for Oracle SOA Suite
faults identified as recoverable at the SOA Infrastructure, SOA composite application, service engine, and service component levels.
2. In the Recent Composite Instances section, perform the following tasks:
a. In the Instance ID column, click a specific instance ID to show the message flow through the various service components and binding components.
b. In the Composite column, click a specific SOA composite application to access its home page.
c. Click Show All below the section to access the Instances page of the SOA Infrastructure.
3. In the Deployed Composites section, perform the following tasks:
a. In the Composite column, click a specific SOA composite application to access its home page.
b. Click Show All below the section to access the Deployed Composites page of the SOA Infrastructure.
4. In the Recent Faults and Rejected Messages section, perform the following tasks:
a. In the Error Message column, click an error message to display complete information about the fault. If the fault is identified as recoverable, click the Recover Now link to perform fault recovery.
b. In the Recovery column, if a fault is identified as recoverable, click Recover to perform fault recovery.
c. In the Composite column, click a SOA composite application to access its home page.

Monitoring SOA Infrastructure Recent Instances and Faults
Monitoring the SOA Infrastructure 4-3
d. In the Fault Location column, click a specific location to access the home page of the service, component, or reference in which the fault occurred.
e. In the Composite Instance ID column, click a composite instance ID to access the flow trace of the message that contains that fault.
f. In the Logs column, click a specific log to access the Log Messages page, with the search criteria prefiltered to display any log messages related to the fault.
g. Click Show All below the section to access the Recent Faults and Rejected Messages page of the SOA Infrastructure.
The lower part of the SOA Infrastructure Dashboard page displays the following details:
■ The number of service components running in the service engines (BPEL process, Oracle Mediator, human workflow, and business rules) and the number of faulted instances for each service engine.
■ A graphical representation of the total number of instances and faults for all SOA composite applications since the SOA Infrastructure was last restarted.
5. In the Name column of the Service Engines section, click a specific service engine to access its home page.
For more information, see the following sections:
■ Section 1.2.4, "Understanding Service Components and Service Component Instances"
■ Section 1.2.6, "Understanding Service Engines"
■ Section 1.3.3.1, "Understanding Fault Recovery"
■ Section 8.1, "Initiating a SOA Composite Application Test Instance"

Monitoring Processing Requests
4-4 Oracle Fusion Middleware Administrator's Guide for Oracle SOA Suite
■ Oracle Fusion Middleware Administrator's Guide for details about viewing and searching log files
4.2 Monitoring Processing RequestsYou can monitor SOA Infrastructure processing requests. These are metrics for the message delivery between the service engines, service infrastructure, and binding components. Once a message is handed over to a service engine, the amount of time it takes to process that message (instance processing time) is not captured in these metrics.
To monitor processing requests:
1. Access this page through one of the following options:
The Request Processing page enables you to monitor the following details:
■ The average request processing time for both synchronous and asynchronous messages, active requests, requests processed, and faulted requests in the service engines and service infrastructure.
■ The average request processing time, requests processed, and errors occurring in service (inbound) and reference (outbound) binding components.
From the SOA Infrastructure Menu... From the SOA Folder in the Navigator...
1. Select Monitoring > Request Processing.
1. Right-click soa-infra.
2. Select Monitoring > Request Processing.

Monitoring Service and Reference Binding Components in the SOA Infrastructure
Monitoring the SOA Infrastructure 4-5
2. In the Service Engines section, click a specific service engine (for example, BPEL Engine) to access details such as recent instances using this service engine, components using this service engine, and recent fault occurrences.
For more information, see the following sections:
■ Section 1.2.5, "Understanding Binding Components"
■ Section 1.2.6, "Understanding Service Engines"
■ Section 1.2.7, "Understanding the Service Infrastructure"
4.3 Monitoring Service and Reference Binding Components in the SOA Infrastructure
You can monitor all service and reference binding components used in all SOA composite applications deployed to the SOA Infrastructure. Services provide the outside world with an entry point to the SOA composite application. The WSDL file of the service advertises its capabilities to external applications. References enable messages to be sent from the SOA composite application to external services in the outside world.
To monitor service and reference binding components in the SOA Infrastructure:
1. Access this page through one of the following options:
The Services page displays details about the names of the services, the SOA composite applications in which the services are used, the total number of messages processed, the average processing time, and the number of faults occurring in the services.
2. In the Service column, click a specific service to access its home page.
3. In the Composite column, click a specific SOA composite application to access its home page.
4. Click the References tab.
The References page displays details about the names of the references, the SOA composite applications in which the references are used, the total number of
From the SOA Infrastructure Menu... From the SOA Folder in the Navigator...
1. Select Services and References. 1. Right-click soa-infra.
2. Select Services and References.
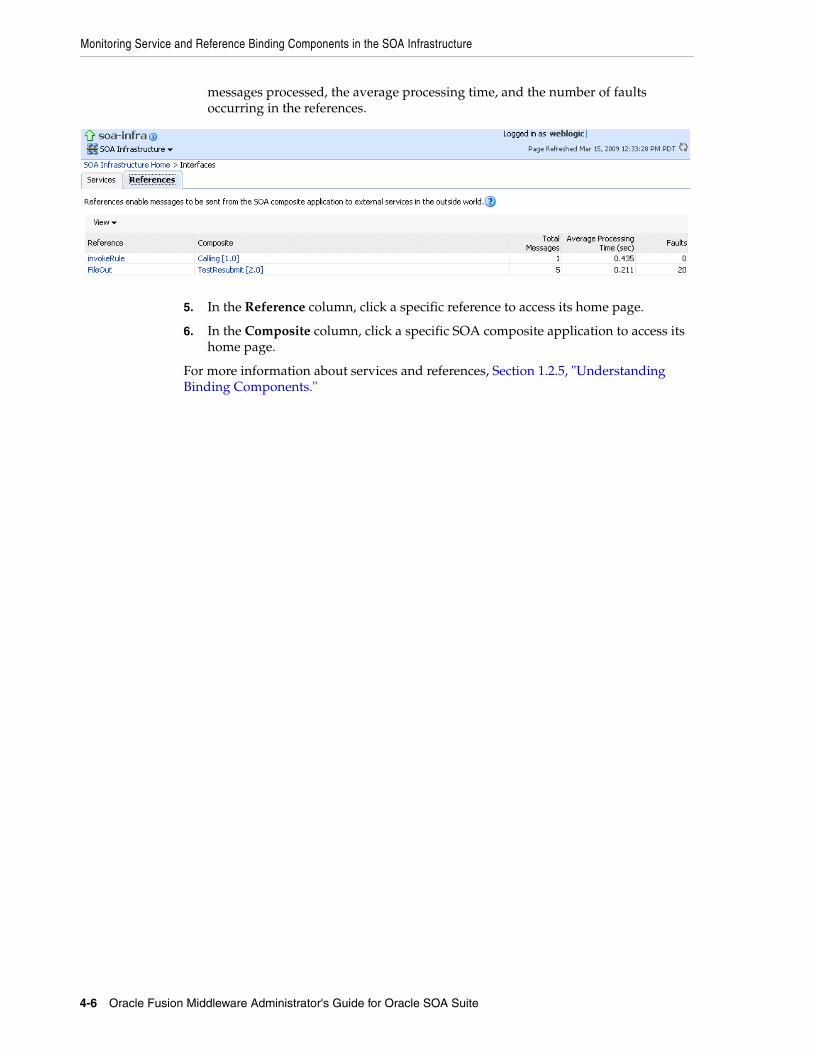
Monitoring Service and Reference Binding Components in the SOA Infrastructure
4-6 Oracle Fusion Middleware Administrator's Guide for Oracle SOA Suite
messages processed, the average processing time, and the number of faults occurring in the references.
5. In the Reference column, click a specific reference to access its home page.
6. In the Composite column, click a specific SOA composite application to access its home page.
For more information about services and references, Section 1.2.5, "Understanding Binding Components."

Part IVAdministering SOA Composite Applications
This part describes how to administer SOA composite applications.
This part includes the following chapters:
■ Chapter 5, "Deploying SOA Composite Applications"
■ Chapter 6, "Securing SOA Composite Applications"
■ Chapter 7, "Monitoring SOA Composite Applications"
■ Chapter 8, " Managing SOA Composite Applications"


5
Deploying SOA Composite Applications 5-1
5Deploying SOA Composite Applications
This chapter describes how to deploy, redeploy, and undeploy a SOA composite application. To deploy from Oracle Enterprise Manager Fusion Middleware Control Console, you must first create a deployable archive in Oracle JDeveloper or through the ant or WebLogic Scripting Tool (WLST) command line tools. The archive can consist of a single SOA composite application revision in a JAR file or multiple composite application revisions (known as a SOA bundle) in a ZIP file.
This chapter includes the following topics:
■ Section 5.1, "Deploying Applications"
■ Section 5.2, "Redeploying Applications"
■ Section 5.3, "Undeploying Applications"
For information on the following:
■ Creating SOA composite application archives and configuration plans in which you define the URLs and property values to use for test, development, and production environments, see Oracle Fusion Middleware Developer's Guide for Oracle SOA Suite
■ For information on deploying with ant scripts, see Oracle Fusion Middleware Developer's Guide for Oracle SOA Suite
■ For information on deploying with WLST, see Oracle Fusion Middleware WebLogic Scripting Tool Command Reference
5.1 Deploying ApplicationsYou can deploy SOA composite applications from Oracle Enterprise Manager Fusion Middleware Control Console with the Deploy SOA Composite wizard. Use the Deploy SOA Composite wizard to deploy any of the following:
■ A new SOA composite application for the first time
■ A new revision (for example, 2.0) alongside an older revision (for example, 1.0) without impacting the latter. The revision deployed last becomes the new default
Note: If Oracle Enterprise Manager Fusion Middleware Control Consolee is run in a single sign-on (SSO)-enabled environment, you are again prompted to enter the user name and password credentials as part of the last step of the Deploy SOA Composite, Undeploy SOA Composite, and Redeploy SOA Composite wizards. This information is only requested once per Oracle Enterprise Manager Fusion Middleware Control Console session.

Deploying Applications
5-2 Oracle Fusion Middleware Administrator's Guide for Oracle SOA Suite
revision of that composite (unless you specify otherwise at a later step during deployment).
■ A bundle (ZIP file) containing multiple SOA composite application revisions (for example, revisions 2.0, 3.0, and 4.0) of a SOA composite application that has different revisions currently deployed (for example, 1.0). This option enables you to deploy revisions 1.0, 2.0, 3.0, and 4.0 at the same time. The bundle can also contain revisions of different composites. There is no restriction that all revisions must be of the same composite application. There should not be any cross references between the composites in the same bundle. For example, composite A revision 1.0 should not reference Composite B revision 1.0.
Deployment extracts and activates the composite application in the SOA Infrastructure. Once an application is deployed, you can perform administration tasks, such as creating instances, configuring properties, monitoring performance, managing instances, and managing policies and faults.
To deploy applications:
1. Access the Deploy SOA Composite wizard through one of the following options:
The Select Archive page appears.
Note: If you want to redeploy an existing revision of an application, do not use this wizard. Instead, use the Redeploy SOA Composite wizard.
From the SOA Infrastructure Menu...
From the SOA Folder in the Navigator...
From the SOA Infrastructure Home Page...
From the SOA Composite Menu...
1. Select SOA Deployment > Deploy.
1. Right-click soa-infra.
2. Select SOA Deployment > Deploy.
1. Click the Deployed Composites tab.
2. Above the Composite table, click Deploy.
1. Select SOA Deployment > Deploy Another Composite.
Redeploying Applications
Deploying SOA Composite Applications 5-3
2. In the Archive or Exploded Directory section, specify the archive of the SOA composite application to deploy. The archive contains the project files of the composite to be deployed (for example, HelloWorld_rev1.0.jar for a single archive or OrderBooking_rev1.0.zip for multiple archives). This information is required.
3. In the Configuration Plan section, optionally specify the configuration plan to include with the archive. The configuration plan enables you to define the URL and property values to use in different environments. During process deployment, the configuration plan is used to search the SOA project for values that must be replaced to adapt the project to the next target environment.
4. Click Next.
The Select Target page appears.
This page lists the available deployment targets (servers and clusters). Expand the table rows for a specific target to see the applications that are deployed on that target.
5. Select the Oracle WebLogic Server or cluster to which to deploy the SOA composite application archive. You can deploy to multiple servers and clusters.
6. Click Next.
The Confirmation page appears.
7. Review your selections.
8. Select whether to deploy the SOA composite application as the default revision. The default revision is instantiated when a new request comes in.
9. Click Deploy.
Processing messages are displayed.
At this point, the deployment operation cannot be canceled. Deployment continues even if the browser window is closed.
10. When deployment has completed, the home page of the newly deployed composite revision automatically displays. A confirmation message at the top of the page tells you that the composite has been successfully deployed. In the case of a bundle deployment, the Deployed Composites page of the SOA Infrastructure is displayed.
For information about creating configuration plans and deploying applications from Oracle JDeveloper, see Oracle Fusion Middleware Developer's Guide for Oracle SOA Suite.
5.2 Redeploying ApplicationsYou can redeploy SOA composite applications from Oracle Enterprise Manager Fusion Middleware Control Console with the Redeploy SOA Composite wizard. Using the Redeploy SOA Composite wizard has the following consequences:
■ A new version of a revision of a currently deployed SOA composite application is redeployed (for example, old version 1.0 is redeployed as new version 1.0).
■ If the older, currently deployed version of this revision has running instances, the state of those instances is changed to stale. The instance state is available in the instance listing, and you can access audit and flow trace details.

Undeploying Applications
5-4 Oracle Fusion Middleware Administrator's Guide for Oracle SOA Suite
To redeploy applications:
1. Access this page through one of the following options:
The Select Archive page appears.
2. In the Archive or Exploded Directory section, select the location of the SOA composite application revision you want to redeploy.
3. In the Configuration Plan section, optionally specify the configuration plan to include with the archive.
4. Click Next.
The Confirmation page appears.
5. Select whether to redeploy the SOA composite application as the default revision.
6. Click Redeploy.
Processing messages are displayed.
At this point, the deployment operation cannot be canceled. Deployment continues even if the browser window is closed.
7. When redeployment has completed, click Close.
When redeployment has completed, the home page of the newly redeployed composite revision is displayed. A confirmation message at the top of the page tells you that the composite has been successfully redeployed.
5.3 Undeploying ApplicationsYou can undeploy SOA composite applications from Oracle Enterprise Manager Fusion Middleware Control Console with the Undeploy SOA Composite wizard. Using the Undeploy SOA Composite wizard has the following consequences:
Notes:
■ If you want to maintain multiple revisions of a deployed application (for example, revisions 1.0 and 2.0), do not use this wizard. Instead, use the Deploy SOA Composite wizard.
■ Redeploying multiple SOA composite applications at once is not supported.
From the SOA Infrastructure Menu...
From the SOA Folder in the Navigator...
From the SOA Infrastructure Home Page...
From the SOA Composite Menu...
1. Select SOA Deployment >Redeploy.
The Select Composite page appears.
2. In the SOA Composite Deployments section, select the SOA composite application revision you want to redeploy, and click Next.
1. Right-click soa-infra.
2. Select SOA Deployment > Redeploy.
The Select Composite page appears.
3. In the SOA Composite Deployments section, select the SOA composite application revision you want to redeploy, and click Next.
1. Click the Deployed Composites tab.
2. In the Composite table, select a specific SOA composite application. Only one application can be redeployed at a time.
3. Above the Composite table, click Redeploy.
1. Select SOA Deployment > Redeploy.

Undeploying Applications
Deploying SOA Composite Applications 5-5
■ You can no longer configure and monitor this revision of the application.
■ You can no longer process instances of this revision of the application.
■ The state of currently running instances is changed to stale and no new messages sent to this composite are processed.
■ The instance state of the undeployed composite application is set to stale. The BPEL process audit trail and flow diagram are not accessible. You must redeploy the composite to view the audit trail and flow diagram.
■ If you undeploy the default revision of the application (for example, 2.0), the next available revision of the application becomes the default (for example, 1.0).
To undeploy applications:
1. Access this page through one of the following options:
The Confirmation page appears.
2. If you are satisfied, click Undeploy. Note that you are warned if you are about to undeploy the last remaining revision of a deployed composite application.
Processing messages are displayed.
At this point, the undeploy operation cannot be canceled. Undeployment continues even if the browser window is closed.
Note: If you want to undeploy and then redeploy an existing revision of this application, do not use this wizard. Instead, use the Redeploy SOA Composite wizard. The Redeploy SOA Composite wizard enables you to redeploy an existing revision of a SOA composite application and remove (overwrite) the older, currently deployed version of the revision.
Note: Undeploying multiple SOA composite applications in one step is not supported.
From the SOA Infrastructure Menu...
From the SOA Folder in the Navigator...
From the SOA Infrastructure Home Page...
From the SOA Composite Menu...
1. Select SOA Deployment >Undeploy.
The Select Composite page appears.
2. In the SOA Composite Deployments section, select a specific SOA composite application to undeploy, and click Next.
1. Right-click soa-infra.
2. Select SOA Deployment > Undeploy.
The Select Composite page appears.
3. In the SOA Composite Deployments section, select a specific SOA composite application to undeploy, and click Next.
1. Click the Deployed Composites tab.
2. In the Composite table, select a specific SOA composite application. Only one application can be undeployed at a time.
3. Above the Composite table, click Undeploy.
1. Select SOA Deployment > Undeploy.

Undeploying Applications
5-6 Oracle Fusion Middleware Administrator's Guide for Oracle SOA Suite
3. When undeployment has completed, the SOA Infrastructure Deployed Composites page automatically displays. A confirmation message at the top of the page tells you that the composite has been successfully undeployed.

6
Securing SOA Composite Applications 6-1
6Securing SOA Composite Applications
This chapter describes security procedures unique to SOA composite applications.
This chapter includes the following topics:
■ Section 6.1, "Introduction to Securing SOA Composite Applications"
■ Section 6.2, "Configuring SOA Composite Applications for Two-Way SSL Communication"
■ Section 6.3, "Invoking References in One-Way SSL Environments in Oracle JDeveloper"
■ Section 6.4, "Configuring Oracle SOA Suite and Oracle HTTP Server for SSL Communication"
■ Section 6.5, "Automatically Authenticating Oracle BPM Worklist Users in SAML SSO Environments"
■ Section 6.6, "Automatically Authenticating Oracle BPM Worklist Users in Windows Native Authentication Environments"
■ Section 6.7, "Listing Oracle Internet Directory as the First Authentication Provider"
■ Section 6.8, "Switching from Non-SSL to SSL Configurations with Oracle BPM Worklist"
■ Section 6.9, "Configuring Security for Human Workflow WSDL Files"
■ Section 6.10, "Configuring SSL Between SOA Composite Application Instances and Oracle WebCache"
■ Section 6.11, "Using a Custom Trust Store for One-Way SSL During Design Time"
■ Section 6.12, "Enabling an Asynchronous Process Deployed to an SSL-Enabled, Managed Server to Invoke Another Asynchronous Process Over HTTP"
Note: See the following sections for information on attaching and detaching policies:
■ Section 8.8, "Managing SOA Composite Application Policies"
■ Section 11.2, "Managing BPEL Process Service Component Policies"
■ Section 14.3, "Managing Mediator Policies"
■ Section 20.1, "Managing Human Task Service Component Policies"
■ Section 35.1, "Managing Binding Component Policies"

Introduction to Securing SOA Composite Applications
6-2 Oracle Fusion Middleware Administrator's Guide for Oracle SOA Suite
6.1 Introduction to Securing SOA Composite ApplicationsThis chapter describes security procedures unique to SOA composite applications. Most SOA composite application security procedures do not require SOA-unique steps and can be performed by following the documentation listed in Table 6–1.
6.2 Configuring SOA Composite Applications for Two-Way SSL Communication
Oracle SOA Suite uses both the Oracle WebLogic Server and Sun secure socket layer (SSL) stacks for two-way SSL configurations.
■ For the inbound Web service bindings, Oracle SOA Suite uses the Oracle WebLogic Server infrastructure and, therefore, the Oracle WebLogic Server libraries for SSL.
■ For the outbound Web service bindings, Oracle SOA Suite uses JRF HttpClient and, therefore, the Sun JDK libraries for SSL.
Due to this difference, start Oracle WebLogic Server with the following JVM option.
1. Open the following file:
■ On UNIX operating systems, open $MIDDLEWARE_HOME\user_projects\domains\domain_name\bin\setDomainEnv.sh.
■ On Window operating systems, open MIDDLEWARE_HOME/user_projects/domains/domain_name/bin/setDomainEnv.bat.
2. Add the following lines in the JAVA_OPTIONS section, if the server is enabled for one-way SSL (server authorization only):
-Djavax.net.ssl.trustStore=your_truststore_location
For two-way SSL, the keystore information (location and password) is not required.
Table 6–1 Security Documentation
For Information On... See The Following Guide...
Securing Oracle Fusion Middleware
Oracle Fusion Middleware Security Guide
Securing and administering Web services
Oracle Fusion Middleware Security and Administrator's Guide for Web Services
Understanding Oracle WebLogic Server security
Oracle Fusion Middleware Understanding Security for Oracle WebLogic Server
Securing an Oracle WebLogic Server production environment
Oracle Fusion Middleware Securing a Production Environment for Oracle WebLogic Server
Securing Oracle WebLogic Server
Oracle Fusion Middleware Securing Oracle WebLogic Server
Developing new security providers for use with Oracle WebLogic Serverr
Oracle Fusion Middleware Developing Security Providers for Oracle WebLogic Server
Securing Web service for Oracle WebLogic Server
Oracle Fusion Middleware Securing WebLogic Web Services for Oracle WebLogic Server
Programming security for Oracle WebLogic Server
Oracle Fusion Middleware Programming Security for Oracle WebLogic Server

Configuring SOA Composite Applications for Two-Way SSL Communication
Securing SOA Composite Applications 6-3
In addition, perform the following steps to enable two-way SSL for a SOA composite application to invoke another SOA composite application or another non-SOA application.
1. On the client side, provide the keystore location.
a. From the SOA Infrastructure menu, select SOA Administration > Common Properties.
b. At the bottom of the page, click More SOA Infra Advanced Configuration Properties.
c. Click KeystoreLocation.
d. In the Value column, enter the keystore location.
e. Click Apply.
f. Click Return.
2. During design time in Oracle JDeveloper, update the reference section in the composite.xml file with the oracle.soa.two.way.ssl.enabled property.
<reference name="Service1" ui:wsdlLocation=". . ."> <interface.wsdl interface=". . ."/> <binding.ws port=". . ."> <property name="oracle.soa.two.way.ssl.enabled">true</property> </binding.ws> </reference>
3. In Oracle Enterprise Manager Fusion Middleware Control Console, select WebLogic Domain > domain_name.
4. Right-click domain_name and select Security > Credentials.
5. Click Create Map.
6. In the Map Name field, enter a name (for example, SOA), and click OK.
7. Click Create Key.
8. Enter the following details.
Note: Both the server and client are assumed to have been configured for SSL with mutual authentication.
Field Description
Select Map Select the map created in Step 6 (for this example, SOA).
Key Enter the key name (KeystorePassword is the default).
Type Select Password.
User Name Enter the keystore user name (KeystorePassword is the default).
Password Enter the password that you created for the keystore.
Note: When you set up SSL in Oracle WebLogic Server, a key alias is required. You must enter mykey as the alias value. This value is required.

Invoking References in One-Way SSL Environments in Oracle JDeveloper
6-4 Oracle Fusion Middleware Administrator's Guide for Oracle SOA Suite
9. Set the keystore location in Oracle Enterprise Manager Fusion Middleware Control Console. See Step 1 for instructions.
10. Modify the composite.xml syntax to use https and sslport to invoke a SOA composite application. For example, change the syntax shown in bold:
<?xml version="1.0" encoding="UTF-8" ?> <!-- Generated by Oracle SOA Modeler version 1.0 at [4/1/09 11:01 PM]. --> <composite name="InvokeEchoBPELSync" revision="1.0" label="2009-04-01_23-01-53_994" mode="active" state="on" xmlns="http://xmlns.oracle.com/sca/1.0" xmlns:xs="http://www.w3.org/2001/XMLSchema" xmlns:wsp="http://schemas.xmlsoap.org/ws/2004/09/policy" xmlns:orawsp="http://schemas.oracle.com/ws/2006/01/policy" xmlns:ui="http://xmlns.oracle.com/soa/designer/"> <import namespace="http://xmlns.oracle.com/CustomApps/InvokeEchoBPELSync/BPELProcess1" location="BPELProcess1.wsdl" importType="wsdl"/><import namespace="http://xmlns.oracle.com/CustomApps/EchoBPELSync/BPELProcess1"location="http://hostname:port/soa-infra/services/default/EchoBPELSync/BPELProcess1.wsdl"importType="wsdl"/>
to use https and sslport:
location="https://hostname:sslport/soa-infra/services/default/EchoBPELSync/BPELProcess1.wsdl"
6.3 Invoking References in One-Way SSL Environments in Oracle JDeveloper
When invoking a Web service as an external reference from a SOA composite application in one-way SSL environments, ensure that the certificate name (CN) and the host name of the server exactly match. This ensures a correct SSL handshake.
For example, if a Web service is named adfbc and the certificate has a server name of myhost05, the following results in an SSL handshake exception.
<import namespace="/adfbc1/common/" @ location="https://myhost05.us.oracle.com:8002/CustomApps-adfbc1-context-root/Ap pModuleService?WSDL" importType="wsdl"/> <import namespace="/adfbc1/common/" location="Service1.wsdl" importType="wsdl"/>
If you switch the order of import, the SSL handshake passes.
<import namespace="/adfbc1/common/" location="Service1.wsdl" importType="wsdl"/> <import namespace="/adfbc1/common/" @ location="https://myhost05.us.oracle.com:8002/CustomApps-adfbc1-context-root/Ap pModuleService?WSDL" importType="wsdl"/>
Note the following restrictions around this issue:

Configuring Oracle SOA Suite and Oracle HTTP Server for SSL Communication
Securing SOA Composite Applications 6-5
■ There are no options for ignoring host name verification in Oracle JDeveloper as exist with the Oracle WebLogic Server Administration Console. This is because the SSL kit used by Oracle JDeveloper is different. Only the trust store can be configured from the command line. All other certificate arguments are not passed.
■ In the WSDL file, https://hostname must match with that in the certificate, as described above. You cannot perform the same procedures as you can with a browser. For example, if the host name is myhost05.us.oracle.com in the certificate's CN, then you can use myhost05, myhost05.us.oracle.com, or the IP address from a browser. In Oracle JDeveloper, always use the same name as in the certificate (that is, myhost05.us.oracle.com).
6.4 Configuring Oracle SOA Suite and Oracle HTTP Server for SSL Communication
Follow these steps to configure SSL communication between Oracle SOA Suite and Oracle HTTP Server.
6.4.1 Configuring Oracle HTTP Server for SSL Communication1. Update mod_ssl.conf with the <Location /integration/services>
location directive.
LoadModule weblogic_module ${ORACLE_HOME}/ohs/modules/mod_wl_ohs.so
<IfModule mod_weblogic.c> WebLogicHost host.domain.com WLLogFile <logdir>/ohs_ssl.log Debug ALL DebugConfigInfo ON SecureProxy ON MatchExpression *.jsp WlSSLWallet <OHS_HOME>/instances/instance1/config/OHS/ohs1/keystores/default</IfModule>
<Location /soa-infra> WebLogicPort 8002 SetHandler weblogic-handler ErrorPage http://host.domain.com:port/error.html</Location>
<Location /b2bconsole> WebLogicPort 8002 SetHandler weblogic-handler ErrorPage http://host.domain.com:port/error.html</Location>
<Location /b2b> WebLogicPort 8002 SetHandler weblogic-handler ErrorPage http://host.domain.com:port/error.html </Location>
<Location /integration/worklistapp> WebLogicPort 8002 SetHandler weblogic-handler ErrorPage http://host.domain.com:port/error.html

Configuring Oracle SOA Suite and Oracle HTTP Server for SSL Communication
6-6 Oracle Fusion Middleware Administrator's Guide for Oracle SOA Suite
</Location>
<Location /integration/services> WebLogicPort 8002 SetHandler weblogic-handler ErrorPage http://host.domain.com:port/error.html</Location>
<Location /DefaultToDoTaskFlow> WebLogicPort 8002 SetHandler weblogic-handler ErrorPage http://host.domain.com:port/error.html</Location>
<Location /OracleBAM> WebLogicPort 9002 SetHandler weblogic-handler ErrorPage http://host.domain.com:port/error.html</Location>
<Location /OracleBAMWS>> WebLogicPort 9002> SetHandler weblogic-handler> ErrorPage http://host.domain.com:port/error.html> </Location>
<Location /sdpmessaging/userprefs-ui/> WebLogicPort 8002 SetHandler weblogic-handler ErrorPage http://host.domain.com:port/error.html</Location>
2. Start the Oracle WebLogic Servers as described in Section 6.2, "Configuring SOA Composite Applications for Two-Way SSL Communication."
6.4.2 Configuring Certificates for Oracle Client, Oracle HTTP Server, Oracle WebLogic Server
1. Export the user certificate from the Oracle HTTP Server wallet.
orapki wallet export -wallet . -cert cert.txt -dn 'CN=\"Self-Signed Certificate for ohs1 \",OU=OAS,O=ORACLE,L=REDWOODSHORES,ST=CA,C=US'
2. Import the above certificate into the Oracle WebLogic Server truststore as a trusted certificate.
keytool -file cert.txt -importcert -trustcacerts -keystore DemoTrust.jks
3. Export the certificate from the Oracle WebLogic Server truststore.
keytool -keystore DemoTrust.jks -exportcert -alias wlscertgencab -rfc -filecertgencab.crt
4. Import the above certificate to the Oracle HTTP Server wallet as a trusted certificate.
orapki wallet add -wallet . -trusted_cert -cert certgencab.crt -auto_login_only
5. Restart Oracle HTTP Server.

Automatically Authenticating Oracle BPM Worklist Users in SAML SSO Environments
Securing SOA Composite Applications 6-7
6. Restart the Oracle WebLogic Servers as described in Section 6.2, "Configuring SOA Composite Applications for Two-Way SSL Communication."
6.5 Automatically Authenticating Oracle BPM Worklist Users in SAML SSO Environments
In order to be automatically authenticated when accessing a second Oracle BPM Worklist from a first Oracle BPM Worklist in Security Assertion Markup Language (SAML) SSO environments, you must perform the following steps. Otherwise, you are prompted to log in again when you access the second Oracle BPM Worklist. In these environments, the first Oracle BPM Worklist is configured as the SAML identity provider and the second Oracle BPM Worklist that you are attempting to access is configured as the SAML service provider.
1. Add /integration/worklistapp/* as the redirect URL for worklistapp to the SAML service provider site's SAML2IdentityAsserter configuration as follows.
a. In the Oracle WebLogic Server Administration Console, select Security Realms.
b. Click the realms for the service providers.
c. Select the Providers tab, and then the Authentication subtab.
d. From the provider list, select the provider with the description SAML 2.0 Identity Assertion Provider.
If you do not see the SAML identity assertion provider configuration, follow the instructions in Oracle Fusion Middleware Securing Oracle WebLogic Server.
e. Select the Management tab.
f. Under the Management tab, you can see a list of identity provider partners. These are hosts that have been configured as the SAML identity provider partners for this SAML identity service provider site. Remember that this configuration step is performed on the identity service provider site on which the worklist application is hosted.
g. Select the identity provider site where you want the user to perform the initial login.
h. Scroll down the page until you see the field Redirect URIs.
i. Add /integration/worklistapp/* to the list.
After performing this step, you can log in to Oracle BPM Worklist at the SAML identity provider site though the regular URL of/integration/worklistapp. If necessary, you can then navigate to the URL /integration/worklistapp/ssologin at the SAML service provider site, where you gain access to Oracle BPM Worklist and are automatically authenticated.
For more information on SAML2IdentityAsserter and configuring SSO with Web browsers and HTTP clients, see Oracle Fusion Middleware Securing Oracle WebLogic Server.

Automatically Authenticating Oracle BPM Worklist Users in Windows Native Authentication Environments
6-8 Oracle Fusion Middleware Administrator's Guide for Oracle SOA Suite
6.6 Automatically Authenticating Oracle BPM Worklist Users in Windows Native Authentication Environments
For Windows native authentication through Kerberos to work with Oracle BPM Worklist, you must use the /integration/worklistapp/ssologin protected URL. For example, after configuring Windows native authentication, you access Oracle BPM Worklist as follows:
http://host_name.domain_name:8001/integration/worklistapp/ssologin
For information on configuring SSO with Microsoft clients, see Oracle Fusion Middleware Securing Oracle WebLogic Server.
6.7 Listing Oracle Internet Directory as the First Authentication ProviderThe Oracle BPM Worklist and workflow services use Java Platform Security (JPS) and the User and Role API. For this reason, the Oracle Internet Directory authenticator must be the first provider listed when workflow is used with Oracle Internet Directory. If Oracle Internet Directory is not listed first (for example, it is listed below DefaultAuthenticator), login authentication fails.
For information about changing the order of authentication providers, see Oracle Fusion Middleware Securing Oracle WebLogic Server.
6.8 Switching from Non-SSL to SSL Configurations with Oracle BPM Worklist
Switching from non-SSL to SSL configurations with Oracle BPM Worklist requires the Frontend Host and Frontend HTTPS Port fields to be set in Oracle WebLogic Server Administration Console. Not doing so results in exception errors when you attempt to create to-do tasks.
1. Log in to Oracle WebLogic Server Administration Console.
2. In the Environment section, select Servers.
3. Select the name of the managed server (for example, soa_server1).
4. Select Protocols, then select HTTP.
5. In the Frontend Host field, enter the host name on which Oracle BPM Worklist is located.
6. In the Frontend HTTPS Port field, enter the SSL listener port.
7. Click Save.
6.9 Configuring Security for Human Workflow WSDL FilesIf the WSDL files for human workflow services are not exposed to external consumers, then set the flag that exposes the WSDL to false for each of the services:
<expose-wsdl>false</expose-wsdl>
For more information, see Oracle Fusion Middleware Developer's Guide for Oracle Web Services.

Enabling an Asynchronous Process Deployed to an SSL-Enabled, Managed Server to Invoke Another Asynchronous Process
Securing SOA Composite Applications 6-9
6.10 Configuring SSL Between SOA Composite Application Instances and Oracle WebCache
The Test Web Service page, in an Oracle WebCache and Oracle HTTP Server environment, may require communication back through Oracle WebCache. Therefore, SSL must be configured between the SOA composite application instance and Oracle WebCache (that is, export the user certificate from the Oracle WebCache wallet and import it as a trusted certificate in the Oracle WebLogic Server truststore).
6.11 Using a Custom Trust Store for One-Way SSL During Design TimeTo invoke a SOA composite application from another composite over HTTPS when using a custom trust store created with a tool such as keytool or orapki, perform the following actions in Oracle JDeveloper.
1. To fetch a WSDL file in the reference section, set the trust store information in Tools > Preferences > Http Analyzer > HTTPS Setup > Client Trusted Certificate Keystore.
2. During deployment to an SSL-enabled server, use the JSSE property at the command line:
jdev -J-Djavax.net.ssl.trustStore=your_trusted_location
6.12 Enabling an Asynchronous Process Deployed to an SSL-Enabled, Managed Server to Invoke Another Asynchronous Process Over HTTP
Assume you create the following environment:
■ Asynchronous BPEL process A that invokes asynchronous BPEL process B
■ Asynchronous BPEL process A is deployed to a one-way SSL enabled, managed server
■ All WSDL reference and bindings use plain HTTP
At run time, the WSDL is looked for over HTTPS, and the callback message from asynchronous BPEL process B fails.
To resolve this issue, the callbackServerURL property must be passed at the reference binding level in the composite.xml file. This explicitly indicates the value of the callback URL for the given reference invocation. If the client composite is running in an SSL-managed server, then the callback defaults to SSL.
<reference name="Service1" ui:wsdlLocation="http://localhost:8000/soa-infra/services/default/AsyncSecondB PELMTOM/BPELProcess1.wsdl"> <interface.wsdl interface="http://xmlns.oracle.com/Async/AsyncSecondBPELMTOM/BPELProcess1#wsdl .interface(BPELProcess1)" callbackInterface="http://xmlns.oracle.com/Async/AsyncSecondBPELMTOM/BPELProcess1#wsdl.interface(BPELProcess1Callback)"/> <binding.ws port="http://xmlns.oracle.com/Async/AsyncSecondBPELMTOM/BPELProcess1#wsdl.endp oint(bpelprocess1_client_ep/BPELProcess1_pt)" location="http://localhost:8000/soa-infra/services/default/AsyncSecondBPELMTOM /bpelprocess1_client_ep?WSDL"> <wsp:PolicyReference URI="oracle/wss_username_token_client_policy" orawsp:category="security"

Enabling an Asynchronous Process Deployed to an SSL-Enabled, Managed Server to Invoke Another Asynchronous Process
6-10 Oracle Fusion Middleware Administrator's Guide for Oracle SOA Suite
orawsp:status="enabled"/> <wsp:PolicyReference URI="oracle/wsaddr_policy" orawsp:category="addressing" orawsp:status="enabled"/> . <property name="callbackServerURL">http://localhost:8000/</property> . </binding.ws> . <callback> <binding.ws port="http://xmlns.oracle.com/Async/AsyncSecondBPELMTOM/BPELProcess1#wsdl.endp oint(bpelprocess1_client_ep/BPELProcess1Callback_pt)"> <wsp:PolicyReference URI="oracle/wss_username_token_service_policy" orawsp:category="security" orawsp:status="enabled"/> </binding.ws> </callback> . </reference>

7
Monitoring SOA Composite Applications 7-1
7 Monitoring SOA Composite Applications
This chapter describes how to monitor instances and faults in SOA composite applications.
This chapter includes the following topic:
■ Section 7.1, "Monitoring SOA Composite Application Recent Instances and Faults"
For more information, see Section 1.2.2, "Understanding SOA Composite Applications."
7.1 Monitoring SOA Composite Application Recent Instances and FaultsYou can monitor SOA composite application recent instances and faults from the SOA composite application Dashboard page. This page provides a high-level overview of the most recent state of the application.
To monitor SOA composite application recent instances and faults:
1. Access this page through one of the following options:
2. Click Dashboard (if it is not already selected).
The upper part of the Dashboard page displays the following details:
■ A summary of composite life cycle states at the top of the Dashboard page, such as the number of running instances, total instances, and mode of the composite (active or retired).
■ Recent SOA composite application instances, including the instance ID, name, conversation ID, state (for example, faulted or completed), and start time.
■ Recent faults and rejected messages, including the error message, whether or not you can recover from the fault, the time at which the fault occurred, the fault location (service, service component, or reference), the instance ID of the SOA composite application, and a link to log files describing the fault.
From the SOA Infrastructure Menu... From the SOA Folder in the Navigator...
1. Select Home.
2. Select the Deployed Composites tab.
3. In the Composite section, select a specific SOA composite application.
1. Under soa-infra, select a specific SOA composite application.

Monitoring SOA Composite Application Recent Instances and Faults
7-2 Oracle Fusion Middleware Administrator's Guide for Oracle SOA Suite
3. In the Recent Instances section, perform the following tasks:
a. In the Instance ID column, click a specific instance ID to receive all instance details (flow trace and individual component audit trails) about the composite application. This displays the faults in the continuous context of a message flow from instance to instance.
b. Click Show All below the section to access the Instances page of the SOA composite application.
4. In the Recent Faults and Rejected Messages section, perform the following tasks:
a. In the Error Message column, click an error message to display complete information about the fault. If the fault is identified as recoverable, click the Recover Now link to perform fault recovery.
b. In the Recovery column, if a fault is identified as recoverable, click Recover to perform fault recovery at the component instance level.
c. In the Fault Location column, click a specific location to access the Dashboard page for the service, service component, or reference.
Note: If you disable the Capture Composite Instance State check box, the Recent Instances section does not show instances in need of fault recovery as running. However, these instances in need of recovery are still running and display in the Recoverable column of the Component Metrics section of this page, regardless of whether the instances state is captured or not.

Monitoring SOA Composite Application Recent Instances and Faults
Monitoring SOA Composite Applications 7-3
d. In the Composite Instance ID column, click a composite instance ID to access the flow trace of the message that contains the fault. This displays the faults in the continuous context of a message flow from instance to instance.
e. In the Logs column, click a specific log to access the Log Messages page filtered for the specific faulted instance.
f. Click Show All below the section to access the Recent Faults and Rejected Messages page of the SOA composite application.
The lower part of the Dashboard page displays the following details:
■ The name and type of service components used in this SOA composite application, the number of running and total instances, and the number of recoverable and nonrecoverable faulted instances for each service component.
■ The name and type of service (inbound) and reference (outbound) binding components used in this SOA composite application, the number of binding component faults, the total messages processed, and the average message processing time.
The Faulted Instances columns of the Component Metrics section count faults that are recoverable and nonrecoverable. Component instances associated with a recoverable fault are not considered faulted. These instances are considered to be running because they have not reached the end of the life cycle. These instances can be recovered through a recovery option such as retry, rethrow, abort, and so on. This count can differ from the Recent Instances section of this page and the Faults and Rejected Messages page, which list faults without making a distinction between recoverable and nonrecoverable.
5. In the Name column of the Component Metrics section, click a service component. This displays its home page for viewing specific details about instances, faults, and policies.
6. In the Name column of the Services and References section, click a service or reference. This displays its home page for viewing specific details about instances, faults, policies, rejected messages, and message header configuration properties.
Note: You can also go to the Instances tab and the Faults and Rejected Messages tab of the SOA Infrastructure to monitor instances and faults across all deployed composites, respectively. From there, you can click a specific composite for additional details.
Monitoring SOA Composite Application Recent Instances and Faults
7-4 Oracle Fusion Middleware Administrator's Guide for Oracle SOA Suite
For more information, see the following sections:
■ Section 1.2.3, "Understanding SOA Composite Application Instances"
■ Section 1.2.4, "Understanding Service Components and Service Component Instances"
■ Section 1.2.5, "Understanding Binding Components"
■ Section 8.5, "Recovering from SOA Composite Application Faults at the SOA Infrastructure Level"
■ Section 8.6, "Recovering from SOA Composite Application Faults in the Application Home Page"
■ Oracle Fusion Middleware Administrator's Guide for details about viewing and searching log files

Managing SOA Composite Applications 8-1
8Managing SOA Composite Applications
This chapter describes how to manage SOA composite applications, including initiating a test instance of an application; managing faults, policies, and instance states; and testing SOA composite applications.
This chapter includes the following topics:
■ Section 8.1, "Initiating a SOA Composite Application Test Instance"
■ Section 8.2, "Managing the State of Deployed SOA Composite Applications"
■ Section 8.3, "Monitoring and Deleting SOA Composite Application Instances from the Application Home Page"
■ Section 8.4, "Monitoring and Deleting SOA Composite Application Instances at the SOA Infrastructure Level"
■ Section 8.5, "Recovering from SOA Composite Application Faults at the SOA Infrastructure Level"
■ Section 8.6, "Recovering from SOA Composite Application Faults in the Application Home Page"
■ Section 8.7, "Automating the Testing of SOA Composite Applications"
■ Section 8.8, "Managing SOA Composite Application Policies"
■ Section 8.9, "Deleting Large Numbers of Instances"
■ Section 8.10, "Exporting a Running SOA Composite Application"
8.1 Initiating a SOA Composite Application Test InstanceThis section describes how to initiate a test instance of a deployed SOA composite application.
To initiate a SOA composite application test instance:
1. Access this page through one of the following options:
Note: The procedures in this guide describe how to access Oracle Enterprise Manager Fusion Middleware Control Console pages from the SOA Infrastructure menu, soa-infra icon in the navigator, and SOA Composite menu. You can also access many pages from the Farm home page. For more information, see Section 2.2.5, "Navigating to the SOA Infrastructure or SOA Composite Application Home Page."

Initiating a SOA Composite Application Test Instance
8-2 Oracle Fusion Middleware Administrator's Guide for Oracle SOA Suite
2. If the composite includes multiple services, the Test button has a drop-down list to select the service to test.
The Test Web Service page for initiating an instance appears.
This page provides many options for initiating an instance. At a minimum, you must specify the XML payload data to use in the Input Arguments section.
The WSDL file and endpoint URL are populated automatically based on the service you selected to test. The endpoint URL is derived from the WSDL and can be overridden to invoke that service at a different location. If the service selected has multiple ports, a drop-down list is displayed. Otherwise, the port of the current service is displayed.
3. Accept the default values for these fields or provide values appropriate to your test environment.
4. If you change the WSDL file, click Parse WSDL to reload the WSDL file.
If the WSDL URL does not contain the revision number, it is processed by the default composite application. For example, if there are two revisions of a
From the SOA Infrastructure Menu...From the SOA Folder in the Navigator...
From the Composite Menu...
1. Select Home.
2. Select the Deployed Composites tab.
3. In the Composite section, select a specific SOA composite application.
4. At the top of the page, click Test.
1. Under soa-infra, select a specific SOA composite application.
2. At the top of the page, click Test.
1. Select Test Service > client.
Note: The Test button is disabled in the following situations:
■ The SOA composite application revision is stopped or retired.
■ There are no Web services available for the application. Only composites having services with Web service bindings can be tested from this page.

Initiating a SOA Composite Application Test Instance
Managing SOA Composite Applications 8-3
composite application named HelloWorld, then the following endpoints are exposed by them:
■ http://host:port/soa-infra/services/default/HelloWorld!1.0/client
■ http://host:port/soa-infra/services/default/HelloWorld!2.0/client
However, if the WSDL specified for Web service invocation does not contain the revision details (for example, http://host:port/soa-infra/services/default/HelloWorld/client), it is processed by the composite revision that is set as default.
5. If you want to edit the endpoint URL, click Edit Endpoint URL and make appropriate changes.
The lower part of the Test Web Service page consists of the Request tab. This tab enables you to specify security, quality of service, HTTP transport, stress testing options, and XML input arguments:
The Security section includes the following fields for passing security properties with messages.
Field Description
WSS Username Token Inserts a WS-Security SOAP header. The Username field is required, and the Password field is optional.

Initiating a SOA Composite Application Test Instance
8-4 Oracle Fusion Middleware Administrator's Guide for Oracle SOA Suite
6. Accept the default values for these fields or provide values appropriate to your test environment.
The Quality of Service section includes the following fields. Oracle Fusion Middleware uses a policy-based model to manage Web services. A policy applies behavior requirements to the delivery of messages. For additional details about using the Test Web Service page, see Oracle Fusion Middleware Security and Administrator's Guide for Web Services.
Http Basic Auth Inserts the username and password credentials in the HTTP transport header. Both the Username and Password fields are required.
Custom Policy Uses a custom policy to authenticate the user (specifies the URI for the custom policy). The Username and Password fields are optional.
None Select to not specify security credentials. This is the default selection.
Field Description
WS-RM Select one of the following options for testing WS-Reliable Messaging (RM) protocol policies. Reliable messaging policies support this protocol, which guarantees the end-to-end delivery of messages.
■ WSDL Default: Executes the default behavior of the WSDL. For example, if the WSDL contains a reference to a WS-RM policy, then the policy is enforced. If the WSDL does not contain a reference to a WS-RM policy, then reliable messaging is not tested.
■ None: No policy for WS-RM is tested even if the WSDL contains a reference to a policy.
■ Custom: Enforces a custom policy. Specify the URI of the custom policy in the Policy URI field. If a WS-RM policy is referenced in the WSDL, it is ignored, and the policy specified in the Policy URI field is used instead.
MTOM Select one of the following options for testing Message Transmission Optimization Mechanism (MTOM) policies. MTOM policies ensure that attachments are in MTOM format, a format for efficiently sending binary data to and from Web services.
■ WSDL Default: Executes the default behavior of the WSDL. For example, if the WSDL contains a reference to an MTOM policy, then the policy is enforced. If the WSDL does not contain a reference to an MTOM policy, then MTOM is not tested.
■ None: No policy for MTOM is tested, even if the WSDL contains a reference to a policy.
■ Custom: Enforces a custom policy. Specify the URI of the custom policy in the Policy URI field. If an MTOM policy is referenced in the WSDL, it is ignored, and the policy specified in the Policy URI field is used instead.
Field Description

Initiating a SOA Composite Application Test Instance
Managing SOA Composite Applications 8-5
7. Accept the default values for these fields or provide values appropriate to your test environment.
The HTTP Transport Options section includes the following fields.
8. Accept the default values for these fields or provide values appropriate to your test environment.
The Additional Test Options section includes the following fields. This section provides a simple stress test that simultaneously invokes multiple instances.
9. Accept the default values for these fields or provide values appropriate to your test environment.
WS-Addressing Select one of the following options for testing WS addressing policies. WS addressing policies verify that SOAP messages include WS-Addressing headers in conformance with the WS-Addressing specification.
■ WSDL Default: Executes the default behavior of the WSDL. For example, if the WSDL contains a reference to a WS-Addressing policy, then the policy is enforced. If the WSDL does not contain a reference to a WS-Addressing policy, then WS-Addressing is not tested.
■ None: No policy for WS-Addressing is tested even if the WSDL contains a reference to a policy.
■ Custom: Enforces a custom policy. Specify the URI of the custom policy in the Policy URI field. If a WS-Addressing policy is referenced in the WSDL, it is ignored, and the policy specified in the Policy URI field is used instead.
Field Description
Enable SOAP Action Specifies whether the WSDL soap:operation has a soapAction attribute. This flag is enabled if a soapAction attribute exists. If you do not want to send a request with the SOAP action HTTP header, then clear the check box.
SOAP Action Displays the soapAction attribute of the WSDL soap:operation, if one exists. You may specify a different SOAP action in this text box.
Note: This is not a real stress test tool. Therefore, do not enter huge values for both concurrent threads and the number of times to invoke the operation. Doing so can result in errors.
Field Description
Enable Stress Test Click Enable to create a simple stress test. With this enabled, no conversation ID is displayed.
Concurrent Threads Enter the number of concurrent threads on which the invocations should be sent. The default is 5 threads.
Loops per Thread Enter the number of times to invoke the operation. The default is 10 times.
Delay in Milliseconds
Specify the delay of milliseconds to wait between operation invocations. The default is 1000 milliseconds (1 second).
Field Description
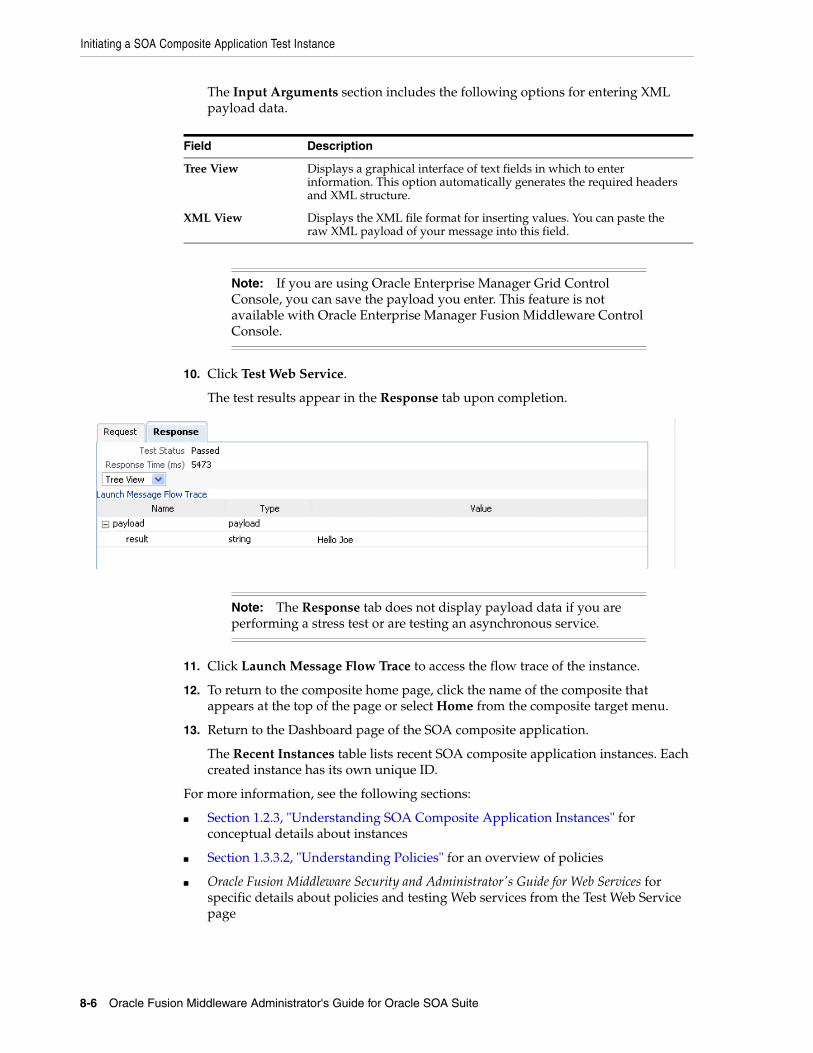
Initiating a SOA Composite Application Test Instance
8-6 Oracle Fusion Middleware Administrator's Guide for Oracle SOA Suite
The Input Arguments section includes the following options for entering XML payload data.
10. Click Test Web Service.
The test results appear in the Response tab upon completion.
11. Click Launch Message Flow Trace to access the flow trace of the instance.
12. To return to the composite home page, click the name of the composite that appears at the top of the page or select Home from the composite target menu.
13. Return to the Dashboard page of the SOA composite application.
The Recent Instances table lists recent SOA composite application instances. Each created instance has its own unique ID.
For more information, see the following sections:
■ Section 1.2.3, "Understanding SOA Composite Application Instances" for conceptual details about instances
■ Section 1.3.3.2, "Understanding Policies" for an overview of policies
■ Oracle Fusion Middleware Security and Administrator's Guide for Web Services for specific details about policies and testing Web services from the Test Web Service page
Field Description
Tree View Displays a graphical interface of text fields in which to enter information. This option automatically generates the required headers and XML structure.
XML View Displays the XML file format for inserting values. You can paste the raw XML payload of your message into this field.
Note: If you are using Oracle Enterprise Manager Grid Control Console, you can save the payload you enter. This feature is not available with Oracle Enterprise Manager Fusion Middleware Control Console.
Note: The Response tab does not display payload data if you are performing a stress test or are testing an asynchronous service.
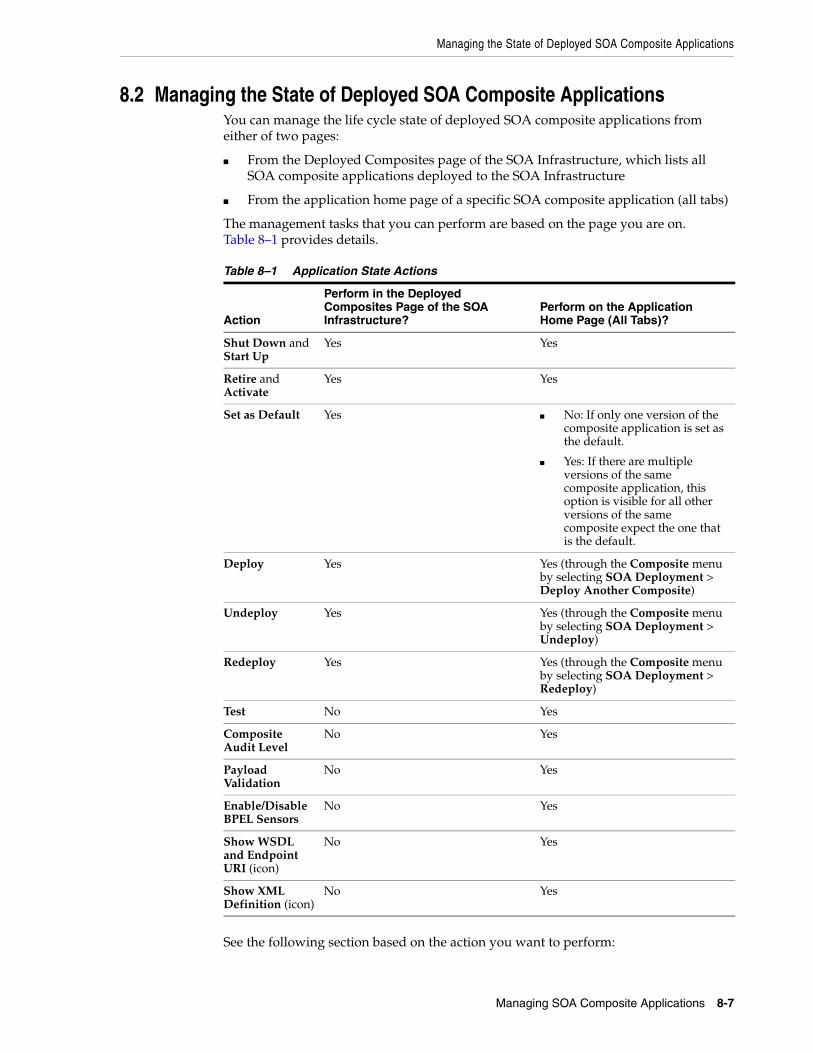
Managing the State of Deployed SOA Composite Applications
Managing SOA Composite Applications 8-7
8.2 Managing the State of Deployed SOA Composite ApplicationsYou can manage the life cycle state of deployed SOA composite applications from either of two pages:
■ From the Deployed Composites page of the SOA Infrastructure, which lists all SOA composite applications deployed to the SOA Infrastructure
■ From the application home page of a specific SOA composite application (all tabs)
The management tasks that you can perform are based on the page you are on. Table 8–1 provides details.
See the following section based on the action you want to perform:
Table 8–1 Application State Actions
Action
Perform in the Deployed Composites Page of the SOA Infrastructure?
Perform on the Application Home Page (All Tabs)?
Shut Down and Start Up
Yes Yes
Retire and Activate
Yes Yes
Set as Default Yes ■ No: If only one version of the composite application is set as the default.
■ Yes: If there are multiple versions of the same composite application, this option is visible for all other versions of the same composite expect the one that is the default.
Deploy Yes Yes (through the Composite menu by selecting SOA Deployment > Deploy Another Composite)
Undeploy Yes Yes (through the Composite menu by selecting SOA Deployment > Undeploy)
Redeploy Yes Yes (through the Composite menu by selecting SOA Deployment > Redeploy)
Test No Yes
Composite Audit Level
No Yes
Payload Validation
No Yes
Enable/Disable BPEL Sensors
No Yes
Show WSDL and Endpoint URI (icon)
No Yes
Show XML Definition (icon)
No Yes

Managing the State of Deployed SOA Composite Applications
8-8 Oracle Fusion Middleware Administrator's Guide for Oracle SOA Suite
■ Section 8.2.1, "Managing the State of All Applications at the SOA Infrastructure Level"
■ Section 8.2.2, "Managing the State of an Application from the SOA Composite Application Home Page"
For more information, see Section 1.2.2, "Understanding SOA Composite Applications."
8.2.1 Managing the State of All Applications at the SOA Infrastructure LevelYou can manage the state of all SOA composite applications from the Deployed Composites page at the SOA Infrastructure level.
To manage the state of all applications at the SOA Infrastructure level:
1. Access this page through one of the following options:
2. Click the Deployed Composites tab.
The Deployed Composites page displays the following details:
■ A utility for searching for a specific SOA composite application by specifying a full or partial composite name and clicking Search.
■ A list of all SOA composite applications deployed in the SOA Infrastructure, including their current mode (active or retired), number of instances, number of faulted instances, and last modification date (deployment time, redeployment time, or any composite configuration change). The green dot to the left of the name indicates that this is the default revision of the application.
From the SOA Infrastructure Menu...
From the SOA Folder in the Navigator...
From the SOA Composite Menu...
1. Select Home. 1. Click soa-infra. 1. Select SOA Infrastructure.
Note: To always see the latest details about deployed SOA composite applications, click the Refresh icon in the upper right corner or navigate away from this page and return to it.
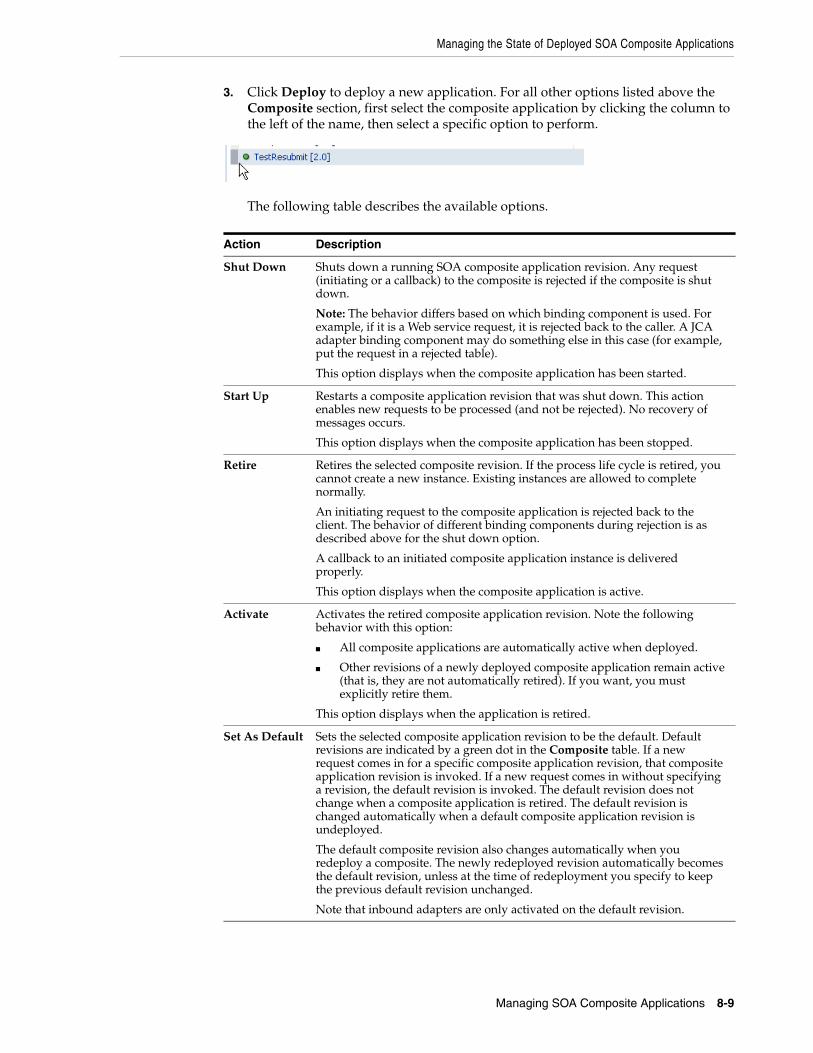
Managing the State of Deployed SOA Composite Applications
Managing SOA Composite Applications 8-9
3. Click Deploy to deploy a new application. For all other options listed above the Composite section, first select the composite application by clicking the column to the left of the name, then select a specific option to perform.
The following table describes the available options.
Action Description
Shut Down Shuts down a running SOA composite application revision. Any request (initiating or a callback) to the composite is rejected if the composite is shut down.
Note: The behavior differs based on which binding component is used. For example, if it is a Web service request, it is rejected back to the caller. A JCA adapter binding component may do something else in this case (for example, put the request in a rejected table).
This option displays when the composite application has been started.
Start Up Restarts a composite application revision that was shut down. This action enables new requests to be processed (and not be rejected). No recovery of messages occurs.
This option displays when the composite application has been stopped.
Retire Retires the selected composite revision. If the process life cycle is retired, you cannot create a new instance. Existing instances are allowed to complete normally.
An initiating request to the composite application is rejected back to the client. The behavior of different binding components during rejection is as described above for the shut down option.
A callback to an initiated composite application instance is delivered properly.
This option displays when the composite application is active.
Activate Activates the retired composite application revision. Note the following behavior with this option:
■ All composite applications are automatically active when deployed.
■ Other revisions of a newly deployed composite application remain active (that is, they are not automatically retired). If you want, you must explicitly retire them.
This option displays when the application is retired.
Set As Default Sets the selected composite application revision to be the default. Default revisions are indicated by a green dot in the Composite table. If a new request comes in for a specific composite application revision, that composite application revision is invoked. If a new request comes in without specifying a revision, the default revision is invoked. The default revision does not change when a composite application is retired. The default revision is changed automatically when a default composite application revision is undeployed.
The default composite revision also changes automatically when you redeploy a composite. The newly redeployed revision automatically becomes the default revision, unless at the time of redeployment you specify to keep the previous default revision unchanged.
Note that inbound adapters are only activated on the default revision.

Managing the State of Deployed SOA Composite Applications
8-10 Oracle Fusion Middleware Administrator's Guide for Oracle SOA Suite
For more information, see Section 1.3.3.3, "Understanding the Life Cycle State of SOA Composite Applications."
8.2.2 Managing the State of an Application from the SOA Composite Application Home Page
You can manage the state of an individual SOA composite application from the application’s home page.
To manage the state of an application from the SOA composite application home page:
1. Access this page through one of the following options:
Deploy Deploys a revision. Deployment activates the composite application in the SOA Infrastructure. Use this selection when you want to deploy:
■ A new SOA composite application for the first time
■ A new revision (for example, 2.0) of a SOA composite application that has a different revision that is currently deployed (for example, 1.0). This option enables both revisions 1.0 and 2.0 to be deployed at the same time.
If you specify a revision that exists, you receive an error. You must change this revision outside of the Deploy SOA Composite wizard.
Note: Deploying multiple SOA composite applications at the same time is supported.
For more information, see Section 5.1, "Deploying Applications."
Undeploy Undeploys the selected composite application revision. The consequences of this action are as follows:
■ You can no longer configure and monitor this revision of the composite application.
■ You can no longer process instances of this revision of the composite application.
■ You cannot view previously completed processes.
■ The state of currently running instances is changed to stale and no new messages sent to this composite are processed.
■ If you undeploy the default revision of the composite application (for example, 2.0), the next available revision of the composite application becomes the default (for example, 1.0).
Note: Undeploying multiple SOA composite applications at the same time is not supported.
For more information, see Section 5.3, "Undeploying Applications."
Redeploy Redeploys an existing revision of a SOA composite application. The consequences of this action are as follows:
■ A new version of a revision of a currently deployed SOA composite application is redeployed (for example, old version 1.0 is redeployed as new version 1.0).
■ The older, currently-deployed version of this revision is removed (overwritten).
■ If the older, currently-deployed version of this revision has running instances, the state of those instances is changed to stale.
For more information, see Section 5.2, "Redeploying Applications."
Action Description

Managing the State of Deployed SOA Composite Applications
Managing SOA Composite Applications 8-11
The Dashboard of the selected SOA composite application is displayed (for this example, AutoLoanComposite).
2. From the list of options at the top of the page, select a specific action to perform. These options also display at the top of the Instances, Faults and Rejected Messages, Unit Tests, and Policies pages of the SOA composite application.
From the SOA Infrastructure Menu... From the SOA Folder in the Navigator...
1. Select Home.
2. Select the Deployed Composites tab.
3. Select a specific SOA composite application.
1. Under soa-infra, select a specific SOA composite application.
Note: The Total field of the Recent Instances section sometimes does not display the correct number of total instances despite instances having completed successfully. In these cases, click the Refresh icon in the upper right corner to view the actual number of total instances.
Action Description
Shut Down See the table under Step 3 on page 8-9 for a description of this option.
Start Up See the table under Step 3 on page 8-9 for a description of this option.
Retire See the table under Step 3 on page 8-9 for a description of this option.
Activate See the table under Step 3 on page 8-9 for a description of this option.

Managing the State of Deployed SOA Composite Applications
8-12 Oracle Fusion Middleware Administrator's Guide for Oracle SOA Suite
Test Enables you to initiate a test instance from the Test Web Service page.
Note: This button is disabled when the SOA composite application is stopped or retired. This is because you cannot create an instance for a stopped or retired application. This button is also disabled when there are no Web services available for the application. Only composites having services with Web service bindings can be tested from this page.
For more information, see Section 8.1, "Initiating a SOA Composite Application Test Instance."
Settings: Composite Audit Level
Sets the level of audit tracking to perform at the SOA composite application level. This setting can override the audit level defined at the SOA Infrastructure level. By default, the value is Inherit, which does not override the SOA Infrastructure level setting.
If you select to set the audit tracking level, the following options are available:
■ Inherit: Logging matches the SOA Infrastructure audit level that you set on the SOA Infrastructure Common Properties page. This is the default setting.
■ Production: Minimal information for SOA composite application instances is collected. For example, the BPEL process and Oracle Mediator service engines do not capture the payload. Therefore, the payload details are not available in the flow audit trails. The BPEL service engine collects payload details for all activities except assign activities. This level is optimal for most normal operations and testing.
■ Development: Complete information for SOA composite application instances is collected. This option allows both composite instance tracking and payload tracking. This setting may impact performance because the payload is stored at each step in the message flow. This setting is useful for debugging purposes.
■ Off: No logging is performed. Composite instance tracking and payload tracking information are not collected.
Setting audit level tracking at the SOA composite application level overrides the same tracking set at the SOA Infrastructure level. By default, the settings are the same at the SOA composite application and SOA Infrastructure levels. SOA composite application settings are automatically changed when the global SOA Infrastructure settings are changed. By choosing any other setting at the SOA composite application level, you are overriding the inherited settings.
One form of overriding is when you explicitly select the same local composite value that happens to be the current global value. If the SOA Infrastructure setting is then changed, this specific composite does not inherit the new value. For example, assume the SOA Infrastructure setting is Off. Therefore, all composites have their audit tracking set to Off. Then, you explicitly set composite XYZ to Off. Then, go to the SOA Infrastructure and change the setting to Production. The tracking levels for all composites are now Production; except for XYZ, which is still set to Off.
Note the following impact of instance tracking changes on message flows that span several SOA composite applications. For example, a composite invoking another composite through a reference binding component or an event published in one composite and subscribed to in another composite.
■ If an intermediate composite has disabled instance tracking, then a single message flow across multiple composite instances appears as separate, unconnected flows. For example, assume a message flows through composites C1, C2, and C3. C1 and C3 have enabled instance tracking, while C2 has disabled it. Two separate flows for C1 and C3 display in Oracle Enterprise Manager.
■ Sources or targets of events or messages may not display. For example, assume you have two composites: C1 and C2. If C1 has disabled instance tracking, the flow trace does not display the origin of message flow and makes it appear as if C2 was directly invoked.
Action Description

Managing the State of Deployed SOA Composite Applications
Managing SOA Composite Applications 8-13
For more information, see the following sections:
■ Section 1.3.3.3, "Understanding the Life Cycle State of SOA Composite Applications"
■ Section 3.1, "Configuring SOA Infrastructure Properties"
8.2.3 Starting and Stopping a Managed Oracle WebLogic ServerIf you start and stop a managed Oracle WebLogic Server on which the SOA Infrastructure is deployed in the middle of BPEL processing in a SOA composite application, note the following issues:
■ For synchronous BPEL processes
The whole scenario is synchronous and the instances that are in a running state (after server restart) are pending in the BPEL wait activity. Therefore, the flow thread ends with the server (while sleeping in the wait activity). When the server is restarted, the same instance is not restarted because the flow is synchronous. Therefore, these instances always remain in a running state because no processing can happen on these after server restart.
■ For asynchronous BPEL process
If server shutdown occurred in the middle of a BPEL invoke activity, the messages received by BPEL are not handled. BPEL does not automatically recover these messages during restart; these must be recovered manually using facade API calls.
Settings: Payload Validation
Validates the XML schema-based payload at the inbound and outbound points of the composite revision. If you enable payload validation and there is an invalid payload (that does not follow the schema), a fault is generated for that message.
The exception to this is the response message of a synchronous service. That message is not validated, even with payload validation enabled. Note that the inbound message is still validated; only the outbound message is not.
Settings: Enable/Disable BPEL Monitors and Sensors
Select an option to invoke a confirmation dialog that displays the current status of the sensors. Note that when BPEL sensors are disabled at the service engine level, you cannot enable or disable BPEL sensors at the SOA composite application level.
■ Disable: Select to disable BPEL sensors for all BPEL components in this SOA composite application.
■ Enable: Select to enable BPEL sensors for all BPEL components in this SOA composite application.
The Enable/Disable BPEL Sensors selection only displays for composites that have a BPEL service component, regardless of whether that component includes sensors.
For more information, see Section 8.10, "Exporting a Running SOA Composite Application."
Show WSDL and endpoint URI (icon)
Click to display the endpoint addresses and WSDLs of all external services for this SOA composite application.
Show Composite XML Definition (... icon)
Click to show the XML definition of the SOA composite application.
Action Description
Monitoring and Deleting SOA Composite Application Instances from the Application Home Page
8-14 Oracle Fusion Middleware Administrator's Guide for Oracle SOA Suite
8.3 Monitoring and Deleting SOA Composite Application Instances from the Application Home Page
Section 8.2, "Managing the State of Deployed SOA Composite Applications" describes how to manage the life cycle state of SOA composite applications. You can also monitor and delete specific SOA composite application instances from the Instances page of the application home page.
To monitor and delete SOA composite application instances from the application home page:
1. Access this page through one of the following options:
2. Click the Instances tab.
The Instances page displays the following details:
■ A utility for searching for a specific instance by specifying a criteria and clicking Search.
■ SOA composite application instance ID, name, conversation ID, most recent known state of each instance since the last data refresh of the page (for example, completed successfully, running, unknown, and so on), instance start time, and a log file describing any faults. A unique instance ID is created whenever a new instance of a SOA composite application is initiated either automatically by an external consumer of the application or manually by an administrator from the Test Web Service page.
If a ? icon is displayed, the Capture Composite Instance State check box was not enabled on the SOA Infrastructure Common Properties dialog. Therefore, the instance state was not evaluated. Determining the composite instance state requires evaluating the states of the underlying component, Therefore, this can be disabled to improve performance.
From the SOA Infrastructure Menu... From the SOA Folder in the Navigator...
1. Select Home.
2. Select the Deployed Composites tab.
3. Select a specific SOA composite application.
1. Under soa-infra, select a specific SOA composite application.

Monitoring and Deleting SOA Composite Application Instances from the Application Home Page
Managing SOA Composite Applications 8-15
If composite sensors are included in your SOA composite application, the Instances tab has the following differences:
■ The Add Fields button appears next to Search and Reset in the search utility. This button enables you to add sensor values to your search criteria.
Note: It is possible to generate orphaned service component instances. These instances are generated without any associated composite application instances. The orphaned component instances are generated under the following circumstances:
■ The SOA Infrastructure audit level is set to Off or the composite audit level is set to Off. Even in such cases, the BPEL process service engine can generate instance data for the service components that are included in the SOA composite application.
■ The SOA Infrastructure audit level is set to Off. However, the BPEL process or Oracle Mediator service engine audit level is set to a value other than the Off.
■ All the audit levels are set to Off, but some faults are generated in one of the service engines. In these cases, the component instance gets generated.
To delete orphaned instances or large numbers of instances, use the PL/SQL purge script described in Section 8.9, "Deleting Large Numbers of Instances." Selecting the Delete All Instance options in the Delete with Options dialog also deletes orphaned component instances. However, this method is not recommended for deleting large numbers of instances (for example, thousands), as the operation times out.

Monitoring and Deleting SOA Composite Application Instances from the Application Home Page
8-16 Oracle Fusion Middleware Administrator's Guide for Oracle SOA Suite
■ A Composite Sensors column appears to the Instances table. Click the sensor icon in that column to display the details of sensor values available in a given instance of the composite.
3. From the Add Fields list, select composite sensors to add to the search criteria. In this example, four have been selected (CustomerDetails, NameSensor, Datesensor, and Yearsensor).
4. Input specific values by which each sensor searches. Only the composite instances in which the sensor values match your specified criteria are returned.
5. Click Reset to remove all composite sensor fields from the search criteria or click the Remove icon to the right of the field to remove an individual sensor.
6. Select a specific instance to delete by clicking a row in the Instances table. To select multiple instances, press Ctrl-Click or Shift-Click for the rows you want to select.
7. Select a specific action to perform.
Action Description
Delete Selected Deletes the selected instance.
After deleting an instance, instance details are no longer available for review.

Monitoring and Deleting SOA Composite Application Instances from the Application Home Page
Managing SOA Composite Applications 8-17
8. In the Instances table, perform the following additional tasks:
a. In the Instance ID column, click a specific instance ID to show the message flow through the various service components and binding components. If an instance ID is listed as unavailable, you can click the Unavailable link for details.
b. In the State column, if an instance state is marked as Unknown, click it to display more details.
c. If the Composite Sensors column is available, click a sensor icon to display details about composite sensors included in the instance, such as name, location, and value.
d. In the Logs column, click a specific log to access the Log Messages page with filtered messages specific to that instance.
For more information, see the following sections:
■ Section 1.2.3, "Understanding SOA Composite Application Instances"
■ Section 1.3.3.3, "Understanding the Life Cycle State of SOA Composite Applications"
■ Section 8.1, "Initiating a SOA Composite Application Test Instance"
Delete with Options Prompts you to first specify a criteria for deleting the selected instance directly from the database:
■ Common Delete Options: Select a preset range of instances to delete from a list (for example, older than 24 hours).
■ Delete All Instances Of This Composite: Select to delete all instances of the composite. This option deletes the rejected messages associated and all component, service, and reference instances associated with the composite, including those not associated with any composite instance ID.
Note: If this composite has thousands of instances to delete, do not use this option. Instead, use the purge script described in Section 8.9, "Deleting Large Numbers of Instances."
■ Delete All Instances That Match These Criteria: Specify a criteria for deleting instances, including the instance ID, conversation ID, start and stop times, and instance state.
Any selections you may have made in the Instances page (such as specifying and executing a search criteria) are ignored for this operation.
Abort Terminates the selected instance. However, instance details are still available for review.
Note: Multiple revisions of a SOA composite application that includes inbound JCA adapters are displayed as running. However, only the most recent revision (the default version) is considered active. All previous revisions are not considered active. This is because for inbound JCA adapters, there can only be one active revision of a SOA composite application at any time. The JCA adapter endpoints in all previous revisions are de-activated.
Action Description

Monitoring and Deleting SOA Composite Application Instances from the Application Home Page
8-18 Oracle Fusion Middleware Administrator's Guide for Oracle SOA Suite
■ Oracle Fusion Middleware Administrator's Guide for details about viewing and searching log files
8.3.1 Mismatch Between the Number of SOA Composite Application Instances and Service Component Instances
The number of SOA composite application instances may not always match the number of service component instances displaying in Oracle Enterprise Manager Fusion Middleware Control Console.
A SOA composite application instance is first created when the composite is invoked. When the service components within the composite receive a subsequent invocation, a corresponding service component instance is created that refers to the composite instance ID previously created.
There can be scenarios under which the composite instance is created, but the underlining service component instance is not created. For example:
■ The composite instance is created, but the invocation has not yet reached the service component due to a system failure.
■ The composite instance is created, but the invocation fails payload validation and is rejected. In this case, invocation does not reach the underlining service components.
You can also have orphaned service component instances for which no SOA composite application instance has been created.
8.3.2 Setting the Composite Instance Name at Design TimeYou can set the instance name of a SOA composite application during design time in Oracle Mediator and Oracle BPEL Process Manager. The instance name appears as a Name column on the Instances page of a SOA composite application. When you specify a search criteria on the Instances page of a SOA composite application or the SOA Infrastructure, you can specify this name in the Name field.
8.3.2.1 Setting the Composite Instance Name in Oracle Mediator1. Set the composite instance name through one of the following options:
■ Use the setCompositeInstanceTitle(title) XPath expression function as the source and tracking.compositeInstanceTitle as the target property name in the Assign Value dialog.

Monitoring and Deleting SOA Composite Application Instances at the SOA Infrastructure Level
Managing SOA Composite Applications 8-19
■ Use the setCompositeInstanceTitle(title) XPath expression function in the XSLT Mapper.
8.3.2.2 Setting the Composite Instance Name in a BPEL Process1. Use the Java BPEL exec extension bpelx:exec. This extension includes the
built-in method setCompositeInstanceTitle(String title)for setting the instance name.
For more information, see Oracle Fusion Middleware Developer's Guide for Oracle SOA Suite.
8.4 Monitoring and Deleting SOA Composite Application Instances at the SOA Infrastructure Level
Section 8.2, "Managing the State of Deployed SOA Composite Applications" described how to manage the life cycle state of all instances of a specific SOA composite application. You can also monitor and delete any number of instances across all deployed SOA composite applications from the Instances page of the SOA Infrastructure home page. This page lists all SOA composite application instances deployed to the SOA Infrastructure.

Monitoring and Deleting SOA Composite Application Instances at the SOA Infrastructure Level
8-20 Oracle Fusion Middleware Administrator's Guide for Oracle SOA Suite
To monitor and delete SOA composite application instances at the SOA infrastructure level:
1. Access this page through one of the following options:
2. Click the Instances tab.
The Instances page displays the following details:
■ A utility for searching for a specific instance by specifying a criteria and clicking Search.
■ All SOA composite application instances in the SOA Infrastructure, including instance and conversation IDs, composite name and revision, SOA composite application instance state, and instance start time.
You can also terminate and delete instances from this page.
3. Select a specific instance by clicking a row in the Instances table. To select multiple instances, press Ctrl-Click or Shift-Click for the rows you want to select.
4. Select a specific action to perform.
From the SOA Infrastructure Menu...
From the SOA Folder in the Navigator...
From the SOA Composite Menu...
1. Select Home. 1. Click soa-infra. 1. Select SOA infrastructure.
Action Description
Delete Selected Deletes the selected instance.
Recovering from SOA Composite Application Faults at the SOA Infrastructure Level
Managing SOA Composite Applications 8-21
5. In the Instance ID column, click a specific instance ID to show the message flow through the various service components and binding components. If the instance ID is unavailable, the message flow cannot be accessed. However, you can still click the link for details.
6. In the Composite column, click a specific SOA composite application to access its home page.
7. In the Logs column, click a specific log to access the Log Messages page with filtered messages specific to that instance.
8.5 Recovering from SOA Composite Application Faults at the SOA Infrastructure Level
You can monitor and perform individual and bulk fault recoveries for BPEL process and Oracle Mediator service components across any number of your SOA composite applications. For BPEL process faults to be identified as recoverable, there must be a fault policy defined that is bound to the fault (through the fault-bindings.xml file) and which triggers the action ora-human-intervention. However, without defining any fault policies, the fault takes its normal course as either a recoverable or nonrecoverable fault. Examples of performing both individual and bulk recovery are provided in this section. Human task service component or human workflow service engine faults are recovered from the Oracle BPM Worklist.
To recover from SOA composite application faults at the SOA Infrastructure level:
1. Access this page through one of the following options:
Delete with Options Prompts you to first specify a criteria for deleting the selected instance directly from the database.
■ Common Delete Options: Select a preset range of instances to delete from a list (for example, older than 24 hours).
■ Delete All Instances That Match These Criteria: Specify a criteria for deleting instances, including the instance ID, conversation ID, start and stop times, and instance state
Any instance state selections you made at the top of the Instances page are ignored for this operation.
Notes:
■ If this composite has thousands of instances to delete, do not use this option. Instead, use the purge script described in Section 8.9, "Deleting Large Numbers of Instances."
■ If you delete an instance with faults, those faults no longer display in the Faults and Rejected Messages page.
Abort Terminates the selected instance. However, instance details are still available for review.
Note: If you delete an instance with faults, those faults no longer display in the Faults and Rejected Messages page. In addition, if a terminated instance (shown as aborted) had a fault, it is not added to the fault count.
From the SOA Infrastructure Menu...
From the SOA Folder in the Navigator...
From the SOA Composite Menu...
1. Select Home. 1. Click soa-infra. 1. Select SOA infrastructure.
Action Description

Recovering from SOA Composite Application Faults at the SOA Infrastructure Level
8-22 Oracle Fusion Middleware Administrator's Guide for Oracle SOA Suite
2. Click the Faults and Rejected Messages tab.
The Faults and Rejected Messages page displays the following details for all SOA composite application faults:
■ A utility for searching for a specific fault by specifying a criteria and clicking Search. Click the Help icon for details.
■ Faults and rejected messages, including the error message, whether you can recover from the fault, the time of the fault, if the fault message is classified as a rejected message (if so, a check mark is displayed), the SOA composite application in which the fault occurred, the fault location, and the instance ID.
Faults identified as recoverable can be recovered.
3. Select faults for recovery using one of the following options. Note that fault recovery selection at the SOA Infrastructure level matches the SOA composite application level and BPEL process and Oracle Mediator service component levels.
Note: You cannot search for human workflow error messages by entering details in the Error Message Contains field because these faults are not persisted in the dehydration store.

Recovering from SOA Composite Application Faults at the SOA Infrastructure Level
Managing SOA Composite Applications 8-23
4. Select an action from the Recovery Action list.
For... Then...
Single fault recovery
There are three options from which to choose for single-fault recovery:
1. Click the row of the fault that has been identified as recoverable. With the row highlighted, select a specific action from the Recovery Action list, as described in Step 4.
2. In the Recovery column, click the Recover link to access the Faults page of the instance audit trail to perform fault recovery.
3. In the Error Message column, click the message of a fault that has been identified as recoverable. This displays complete fault details, including the fault ID, fault time, fault location, fault type, and error message text. A Recover Now option displays for recoverable faults. Click Recover Now to access the Faults page of the instance audit trail to perform fault recovery.
Bulk fault recovery
There are two options from which to choose for bulk-fault recovery:
1. Use Shift+Click or Control+Click to select specific faults in the rows.
or
2. From the Select menu, choose Select All Recoverable. Then use Shift+Click or Control+Click to deselect the faults to not include in the recovery operation.
Then:
3. Select an action from the Recovery Action list, as described in Step 4.
Note: Only the actions applicable to all selected faults are available.
Recovery of all faults
1. From the Select menu, choose Select All Recoverable.
2. Select an action from the Recovery Action list, as described in Step 4.
Note: Only the actions applicable to all selected faults are available.
Action Description Action is Available for...
Retry Retries the instance directly. An example of a scenario in which to use this recovery action is when the fault occurred because the service provider was not reachable due to a network error. The network error is now resolved.
BPEL process and Oracle Mediator
Abort Terminates the entire instance. BPEL process and Oracle Mediator
Replay Replays the entire scope again in which the fault occurred.
BPEL process
Rethrow Rethrows the current fault. BPEL fault handlers (catch branches) are used to handle the fault. By default, all exceptions are caught by the fault management framework unless an explicit rethrow fault policy is provided.
BPEL process
Continue Ignores the fault and continues processing (marks the faulting activity as a success).
BPEL process

Recovering from SOA Composite Application Faults at the SOA Infrastructure Level
8-24 Oracle Fusion Middleware Administrator's Guide for Oracle SOA Suite
5. If you want to delete rejected messages, click Delete Rejected Messages.
This displays the Delete: Rejected Messages dialog for specifying a criteria for deleting rejected messages of all the composites directly from the database.
6. Specify a criteria and click Delete.
7. If you want to perform a bulk recovery of messages, click Recover with Options.
This displays the Recover with Options dialog for specifying a criteria for recovering BPEL and mediator messages of all composites directly from the database. Human workflow messages can be recovered manually from Oracle BPM Worklist. Business event and business rule messages cannot be recovered.
Note: In most cases, fault policy actions are automatically executed. The only exception is if you defined a fault policy that uses the action ora-human-intervention. This action creates a recoverable fault that can be recovered from Oracle Enterprise Manager Fusion Middleware Control Console.

Recovering from SOA Composite Application Faults at the SOA Infrastructure Level
Managing SOA Composite Applications 8-25
8. Specify a criteria. Retry and Abort are the only recovery actions permitted.
9. Click Recover. Depending upon the number of messages, recovery can take some time.
10. Perform the following additional tasks from within the faults table:
a. From the View list, select Columns > Fault ID to display the fault IDs for each error message. The fault ID is automatically generated and uniquely identifies a fault. The fault ID also displays when you click an error message.
b. In the Composite column, click a specific SOA composite application to access its home page.
c. In the Fault Location column, click a specific location to access the faults page for the location of the fault. The location can be a service, service component, or reference.
d. In the Composite Instance ID column, click a specific ID to access the flow trace of the instance.
e. In the Logs column, click a specific log to access the Log Messages page with filtered messages specific to that instance.
Note: For bulk fault recovery at the SOA Infrastructure level, a check of the state of composites cannot be performed. If the state of a composite is set to off, a recovery of its faults cannot be performed. However, no error or warning message is displayed. Upon submission of the bulk fault recovery request, the server checks if the originating composite's state is set to off. That fact is then noted in the log, and the fault is skipped.
You are also not notified when a fault has been skipped during recovery for any other reason (for example, an unsupported service engine, an unrecoverable fault, and so on).

Recovering from SOA Composite Application Faults at the SOA Infrastructure Level
8-26 Oracle Fusion Middleware Administrator's Guide for Oracle SOA Suite
11. See the following sections for examples of single and bulk fault recovery with BPEL processes and Oracle Mediator.
■ Section 8.5.1, "Examples of Fault Recovery for BPEL Processes"
■ Section 8.5.2, "Examples of Fault Recovery for Oracle Mediator"
For more information about concepts and instructions on designing a fault policy, see the following documentation:
■ Section 1.3.3.1, "Understanding Fault Recovery"
■ Oracle Fusion Middleware Developer's Guide for Oracle SOA Suite
8.5.1 Examples of Fault Recovery for BPEL ProcessesThis section provides examples of how to define a fault policy that enables human intervention on a BPEL process fault and perform single and bulk fault recovery on a BPEL process service component.
■ Section 8.5.1.1, "Example: Single Fault Recovery for BPEL Processes"
■ Section 8.5.1.2, "Example: Bulk Fault Recovery for BPEL Processes"
In this example, you define a fault policy specifying that a fault be manually recovered through human intervention. If an invalid social security number is submitted from a loan broker BPEL process to a credit rating service, the credit rating service returns a negative credit fault. This human intervention action is defined with the ora-human-intervention action in the fault-policies.xml file. Without fault policies, BPEL instances do not generate recoverable faults (instead they are nonrecoverable); the ora-human-intervention action makes the fault recoverable.
<faultPolicies xmlns="http://schemas.oracle.com/bpel/faultpolicy"><faultPolicy version="2.0.1" id="CRM_ServiceFaults" xmlns:env="http://schemas.xmlsoap.org/soap/envelope/" xmlns:xs="http://www.w3.org/2001/XMLSchema" xmlns="http://schemas.oracle.com/bpel/faultpolicy" xmlns:xsi="http://www.w3.org/2001/XMLSchema-instance"> <Conditions> <faultName xmlns:credit="http://services.otn.com" name="credit:NegativeCredit"> <!-- we get this fault when SSN starts with 0--> <condition> <test>$fault.payload="Bankruptcy Report"</test> <action ref="ora-human-intervention"/> </condition> </faultName> </Conditions></faultPolicy></faultPolicies>
The fault-bindings.xml file associates the fault policies defined in the fault-policies.xml with the CRM_ServiceFaults composite.
<faultPolicyBindings version="2.0.1" xmlns="http://schemas.oracle.com/bpel/faultpolicy" xmlns:xsi="http://www.w3.org/2001/XMLSchema-instance"> <composite faultPolicy="CRM_ServiceFaults"/></faultPolicyBindings>
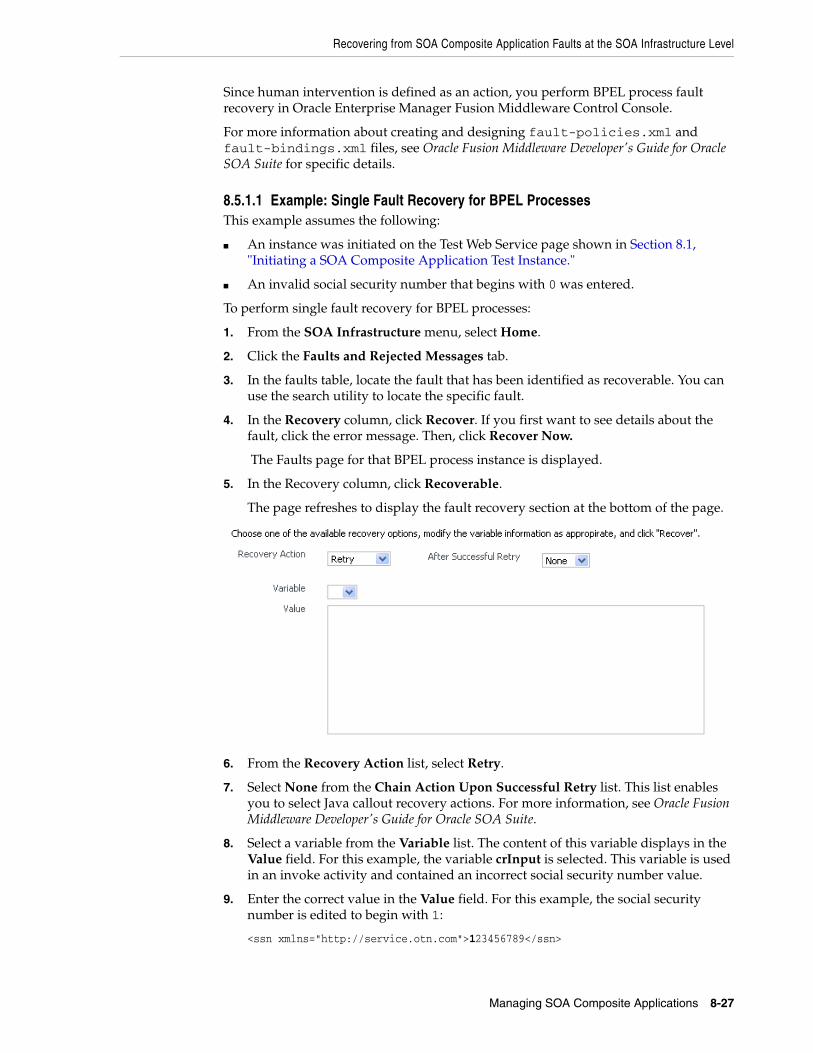
Recovering from SOA Composite Application Faults at the SOA Infrastructure Level
Managing SOA Composite Applications 8-27
Since human intervention is defined as an action, you perform BPEL process fault recovery in Oracle Enterprise Manager Fusion Middleware Control Console.
For more information about creating and designing fault-policies.xml and fault-bindings.xml files, see Oracle Fusion Middleware Developer's Guide for Oracle SOA Suite for specific details.
8.5.1.1 Example: Single Fault Recovery for BPEL ProcessesThis example assumes the following:
■ An instance was initiated on the Test Web Service page shown in Section 8.1, "Initiating a SOA Composite Application Test Instance."
■ An invalid social security number that begins with 0 was entered.
To perform single fault recovery for BPEL processes:
1. From the SOA Infrastructure menu, select Home.
2. Click the Faults and Rejected Messages tab.
3. In the faults table, locate the fault that has been identified as recoverable. You can use the search utility to locate the specific fault.
4. In the Recovery column, click Recover. If you first want to see details about the fault, click the error message. Then, click Recover Now.
The Faults page for that BPEL process instance is displayed.
5. In the Recovery column, click Recoverable.
The page refreshes to display the fault recovery section at the bottom of the page.
6. From the Recovery Action list, select Retry.
7. Select None from the Chain Action Upon Successful Retry list. This list enables you to select Java callout recovery actions. For more information, see Oracle Fusion Middleware Developer's Guide for Oracle SOA Suite.
8. Select a variable from the Variable list. The content of this variable displays in the Value field. For this example, the variable crInput is selected. This variable is used in an invoke activity and contained an incorrect social security number value.
9. Enter the correct value in the Value field. For this example, the social security number is edited to begin with 1:
<ssn xmlns="http://service.otn.com">123456789</ssn>

Recovering from SOA Composite Application Faults at the SOA Infrastructure Level
8-28 Oracle Fusion Middleware Administrator's Guide for Oracle SOA Suite
10. Click Set Value, and click Yes when prompted to continue.
11. Click Recover to recover from the fault, then click Yes when prompted to continue.
The page refreshes to indicate that no faults occurred.
8.5.1.2 Example: Bulk Fault Recovery for BPEL ProcessesFor the social security number example, selecting Retry is not an option for performing a bulk recovery, since the value for the social security number is incorrect and requires correction. An example of performing a bulk recovery with the Retry option is if the social security number is correct, but the system providing the credit rating service was temporarily unavailable and caused a composite reference fault. This prevents the messages from being delivered. Once the credit rating service is available again, selecting Retry re-attempts the invocation to the credit rating service through the composite reference.
To perform bulk fault recovery for BPEL processes:
1. Perform Steps 1 through 2 of Section 8.5.1.1, "Example: Single Fault Recovery for BPEL Processes."
2. In the search utility, enter a criteria based on known fault parameters (for example, the time range, composite name, component type (BPEL process), and so on).
3. If the search returns too many results, limit it by selecting the Show only recoverable faults check box.
4. From the Select list, choose Select All Recoverable.
5. From the Recovery Action list, select Abort.
All selected faults are manually terminated.
8.5.2 Examples of Fault Recovery for Oracle MediatorThis section provides an example of how to perform single and bulk fault recovery on an Oracle Mediator service component.
■ Section 8.5.2.1, "Example: Single Fault Recovery for Oracle Mediator"
■ Section 8.5.2.2, "Example: Bulk Fault Recovery for Oracle Mediator"
In this example, an inbound Siebel adapter service binding component submits a payload message to Oracle Mediator for transformation. The processed payload message is then delivered to an outbound file adapter reference binding component. However, the outbound directory into which to write the payload message is not configured with write permissions. This causes a fault to occur. The fault policy defined during design time specifies that the fault be manually recovered through human intervention. Note that three retries are attempted, as defined with the retryCount attribute. The condition and action are defined as follows in the fault-policies.xml file.
Recoverable Oracle Mediator faults do not require a fault policy (though it is one way to make faults recoverable, as described through an ora-human-intervention action). Any parallel routing rule that receives a remote fault from the outbound endpoint also creates a recoverable fault (in this specific example, the fault policy is not required if the Oracle Mediator uses a parallel routing rule to invoke the outbound file adapter).
<faultPolicies xmlns="http://schemas.oracle.com/bpel/faultpolicy">

Recovering from SOA Composite Application Faults at the SOA Infrastructure Level
Managing SOA Composite Applications 8-29
<faultPolicy version="2.0.1" id="ConnectionFaults" xmlns:env="http://schemas.xmlsoap.org/soap/envelope/" xmlns:xs="http://www.w3.org/2001/XMLSchema" xmlns="http://schemas.oracle.com/bpel/faultpolicy" xmlns:xsi="http://www.w3.org/2001/XMLSchema-instance"> <Conditions> <faultName xmlns:medns="http://schemas.oracle.com/mediator/faults" name="medns:mediatorFault"> <condition> <test>contains($fault.mediatorErrorCode, "TYPE_FATAL_ MESH")</test> <action ref="ora-retry"/> </condition> </faultName> </Conditions>. . .. . . <Action id="ora-retry"> <retry> <retryCount>3</retryCount> <retryInterval>5</retryInterval> <retryFailureAction ref="ora-human-intervention"/> <retrySuccessAction ref="ora-terminate"/> </retry> </Action> </Actions></faultPolicy></faultPolicies>
Note that processing is set to retry 3 times before terminating.
The fault policies are associated with the ConnectionFaults composite in the fault-bindings.xml file:
<faultPolicyBindings version="2.0.1" xmlns="http://schemas.oracle.com/bpel/faultpolicy" xmlns:xsi="http://www.w3.org/2001/XMLSchema-instance"> <composite faultPolicy="ConnectionFaults"/></faultPolicyBindings>
8.5.2.1 Example: Single Fault Recovery for Oracle MediatorFor this example, the sap output directory is made read-only. An inbound file adapter retrieves the sender.xml file from the siebel directory and the message is routed through Oracle Mediator to an outbound file adapter reference for placing a file in the sap directory.
To perform single fault recovery for Oracle Mediator:
1. Change the directory permissions at the operating system command prompt.
chmod 000 sapcp sender.xml siebel/
2. From the SOA Infrastructure menu, select Home.
3. Click the Faults and Rejected Messages tab.
Note that three faults appear, based on three retries being attempted. In this case, you see three retries only because the fault policy on the Oracle Mediator interaction with the outbound file adapter defines three retries. Without the fault policy, there is only one fault (no automated retries).

Recovering from SOA Composite Application Faults at the SOA Infrastructure Level
8-30 Oracle Fusion Middleware Administrator's Guide for Oracle SOA Suite
4. Click the specific instance ID in the Composite Instance ID column.
The Flow Trace appears. The faults table at the top of the page displays the fault messages. If you want to see where the faulted Oracle Mediator instance is located in the overall message flow, select the fault in the faults table. This highlights the associated instance in the trace table. You can then click the instance to access its audit trail to see more details about the faulted flow.
5. Locate the Oracle Mediator component instance fault you want to recover in the Faults table and click Recover in the Recovery column.
6. Select Sender from the Payload Part list.
The payload is automatically displayed in the Payload field. If necessary, payload modifications can be performed in this field. For this example, payload modification is not necessary.
7. Change the sap directory to be writable at the operating system command prompt.
chmod 777 sap
8. Return to the Faults tab and click the Refresh icon in the upper right corner of the page.
9. Click Retry.
10. Click Yes when prompted to resubmit the selected fault for recovery.
The page refreshes to indicate that no faults occurred.
11. Click the Audit Trail tab.
The final message indicates that manual recovery was successful and the message payload was written to the sap directory.
Note: Steps 4 through 10 represent one way to recover this single fault. The fault can also be recovered directly from the Oracle Mediator faults page through the Recovery Action list.

Recovering from SOA Composite Application Faults at the SOA Infrastructure Level
Managing SOA Composite Applications 8-31
8.5.2.2 Example: Bulk Fault Recovery for Oracle MediatorAssume the sap directory to which to write the sender.xml payload message is again configured with read-only permissions at the operating system command prompt. Three copies of the sender.xml file are placed in the siebel directory of the inbound Siebel adapter service binding component. This creates three instances.
chmod 000 sapcp sender.xml siebel/cp sender.xml siebel/cp sender.xml siebel/
To perform bulk fault recovery for Oracle Mediator:
1. Change the sap directory to be writable.
2. From the SOA Infrastructure menu, select Home.
3. Click the Faults and Rejected Messages tab.
4. In the search utility, enter a criteria based on known fault parameters (for example, the time range, composite name, and so on).
5. If the search returns too many results, limit it by selecting the Show only recoverable faults check box.
6. Change the sap directory to be writable at the operating system command prompt.
chmod 777 sap
7. Select all the faults to be recovered.
8. Select Retry from the Recovery Action list.
9. Select Yes when prompted to perform fault recovery.
10. Click the Audit Trail tab.

Recovering from SOA Composite Application Faults in the Application Home Page
8-32 Oracle Fusion Middleware Administrator's Guide for Oracle SOA Suite
The final message indicates that manual recovery was successful and the message payload was successfully written to the sap directory.
8.6 Recovering from SOA Composite Application Faults in the Application Home Page
You can monitor and perform individual and bulk fault recoveries in your SOA composite application. For BPEL process faults to be identified as recoverable, there must be a fault policy defined that is bound to the fault (through the fault-bindings.xml file) and which triggers the action ora-human-intervention. However, without defining any fault policies, the fault takes its normal course as either a recoverable or nonrecoverable fault. Human workflow faults can also be recovered, but not directly from Oracle Enterprise Manager Fusion Middleware Control Console. Instead, the audit trail provides a link to the Oracle BPM Worklist, from which the fault can be addressed.
To recover from SOA composite application faults in the application home page:
1. Access this page through one of the following options:
2. Click the Faults and Rejected Messages tab.
The Faults and Rejected Messages page displays the following details for the selected SOA composite application:
■ A utility for searching for a specific fault by specifying a criteria and clicking Search. Click the Help icon for details.
■ Faults and rejected messages in SOA composite application instances, including the error message, whether you can recover from the fault, the time of the fault, if the fault message is classified as a rejected message (if so, a check mark is displayed), the fault location, the composite instance ID, and links to log files that describe the fault.
From the SOA Infrastructure Menu... From the SOA Folder in the Navigator...
1. Select Home.
2. Select Deployed Composites.
3. In the Composite section, select a specific SOA composite application.
1. Under soa-infra, select a specific SOA composite application.
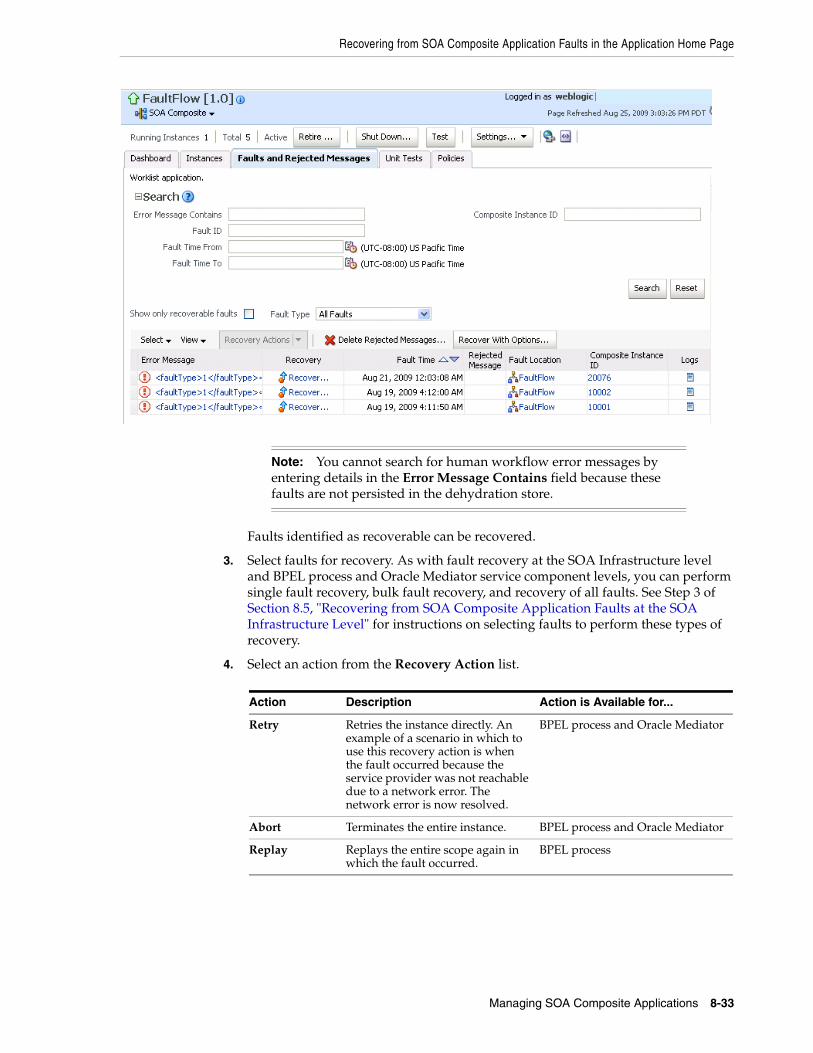
Recovering from SOA Composite Application Faults in the Application Home Page
Managing SOA Composite Applications 8-33
Faults identified as recoverable can be recovered.
3. Select faults for recovery. As with fault recovery at the SOA Infrastructure level and BPEL process and Oracle Mediator service component levels, you can perform single fault recovery, bulk fault recovery, and recovery of all faults. See Step 3 of Section 8.5, "Recovering from SOA Composite Application Faults at the SOA Infrastructure Level" for instructions on selecting faults to perform these types of recovery.
4. Select an action from the Recovery Action list.
Note: You cannot search for human workflow error messages by entering details in the Error Message Contains field because these faults are not persisted in the dehydration store.
Action Description Action is Available for...
Retry Retries the instance directly. An example of a scenario in which to use this recovery action is when the fault occurred because the service provider was not reachable due to a network error. The network error is now resolved.
BPEL process and Oracle Mediator
Abort Terminates the entire instance. BPEL process and Oracle Mediator
Replay Replays the entire scope again in which the fault occurred.
BPEL process

Recovering from SOA Composite Application Faults in the Application Home Page
8-34 Oracle Fusion Middleware Administrator's Guide for Oracle SOA Suite
5. If you want to delete rejected messages, click Delete Rejected Messages.
This displays the Delete: Rejected Messages dialog for specifying a criteria for deleting rejected messages of the current composite directly from the database.
6. If you want to perform a bulk recovery of messages, click Recover with Options.
This displays the Recover with Options dialog for specifying a criteria for recovering BPEL and mediator messages of the current composite directly from the database. Human workflow messages can be recovered manually from Oracle BPM Worklist. Business event and business rule messages cannot be recovered.
Rethrow Rethrows the current fault. BPEL fault handlers (catch branches) are used to handle the fault. By default, all exceptions are caught by the fault management framework unless an explicit rethrow fault policy is provided.
BPEL process
Continue Ignores the fault and continues processing (marks the faulting activity as a success).
BPEL process
Note: In most cases, fault policy actions are automatically executed. The only exception is if you defined a fault policy that uses the action ora-human-intervention. This action creates a recoverable fault that can be recovered from Oracle Enterprise Manager Fusion Middleware Control Console.
Action Description Action is Available for...

Recovering from SOA Composite Application Faults in the Application Home Page
Managing SOA Composite Applications 8-35
7. Specify a criteria. Retry and Abort are the only recovery actions permitted.
8. Click Recover. Depending upon the number of messages, recovery can take some time.
9. Perform the following additional monitoring tasks from within the faults table:
a. From the View list, select Columns > Fault ID to display the fault IDs for each error message. The fault ID is automatically generated and uniquely identifies a fault. The fault ID also displays when you click an error message.
b. In the Fault Location column, click a specific location to access the faults page for the location of the fault. The location can be a service, component, or reference.
c. In the Component Instance ID column, click a specific service component ID to access task details about the instance (for example, the current state of a task). Note that rejected messages do not have a component instance ID.
d. In the Logs column, click a specific log to access the Log Messages page with filtered messages specific to that instance.
For more information, see the following sections:
Note: For bulk fault recovery at the SOA composite application level, a check of the state of the composite is performed. If the state of the composite is set to off, a message is displayed warning you that a recovery cannot be performed.
You are not notified when a fault has been skipped during recovery for any reason (for example, an unsupported service engine, an unrecoverable fault, and so on).

Automating the Testing of SOA Composite Applications
8-36 Oracle Fusion Middleware Administrator's Guide for Oracle SOA Suite
■ Section 1.2.4, "Understanding Service Components and Service Component Instances"
■ Section 1.3.3.1, "Understanding Fault Recovery"
■ Section 8.5.1, "Examples of Fault Recovery for BPEL Processes"
■ Section 8.5.2, "Examples of Fault Recovery for Oracle Mediator"
8.7 Automating the Testing of SOA Composite ApplicationsYou can create, deploy, and run test cases that automate the testing of SOA composite applications. Test cases enable you to simulate the interaction between a SOA composite application and its Web service partners before deployment in a production environment. This helps to ensure that a process interacts with Web service partners as expected by the time it is ready for deployment to a production environment. You create test cases in Oracle JDeveloper and include them in a SOA composite application that is then deployed and administered from Oracle Enterprise Manager Fusion Middleware Control Console.
To test SOA composite applications:
1. Access this page through one of the following options:
The test cases that display were designed in Oracle JDeveloper and included in a deployed SOA composite application.
2. Select the entire test suite or individual tests of a suite to run, and click Execute.
Note: Before testing SOA composite applications from Oracle Enterprise Manager Fusion Middleware Control Console, see Oracle Fusion Middleware Developer's Guide for Oracle SOA Suite for instructions on creating test cases.
From the SOA Infrastructure Menu...
From the SOA Folder in the Navigator...
From the SOA Composite Menu...
1. Select Home.
2. Select Deployed Composites.
3. In the Composite section, select a specific SOA composite application.
4. Click the Unit Tests tab.
1. Under soa-infra, select a specific SOA composite application.
2. Click the Unit Tests tab.
1. Select Unit Test.

Automating the Testing of SOA Composite Applications
Managing SOA Composite Applications 8-37
You are prompted to create a test.
3. Enter the following values, and click OK.
The Test Runs page automatically displays for tracking the running tests.
The Test Runs page enables you to track running test cases and view test results. Test suites consist of a logical collection of one or more test cases. Each test case contains a set of commands to perform as the test instance is executed. The execution of a test suite is known as a test run.
Field Description
Test Run Name Enter a name for the test instance. When testing is complete, report details are captured under this name.
Timeout Enter a value in seconds in which to complete this test. If the test does not complete within this time limit, then testing is terminated.
Number of Concurrent Test Instances
Enter the number of test instances to create.

Automating the Testing of SOA Composite Applications
8-38 Oracle Fusion Middleware Administrator's Guide for Oracle SOA Suite
4. In the Test Run Name column, click a specific test run to display details in the Results of Test Run section. If you want to create more test runs, you can switch back to the Test Cases page at any time.
The Results of Test Run sections displays details about the executed test run, such as a test summary and the success rate. Click the Help icon for additional details.
5. View assertion details at the bottom of the page. Assertions enable you to verify variable data or process flow.
6. Click a composite instance number to view specific test details.
The composite instances created by executing unit test runs display with a yellow square next to the instance ID in the Instances page of a SOA composite application and in the Recent Instances tables of the SOA Infrastructure and SOA composite application. This yellow box distinguishes these instances from test instances created on the Test Web Service page or automatically created by external consumers of the application.
For more information, see the following documentation:

Managing SOA Composite Application Policies
Managing SOA Composite Applications 8-39
■ Section 1.3.3.4, "Understanding SOA Composite Application Automated Testing"
■ Oracle Fusion Middleware Developer's Guide for Oracle SOA Suite for instructions on creating test cases in Oracle JDeveloper
8.8 Managing SOA Composite Application PoliciesYou can attach or detach security policies to and from currently deployed SOA composite applications. Policies apply security to the delivery of messages.
To manage SOA composite application policies:
1. Access this page through one of the following options:
The Policies page enables you to attach and detach policies to and from BPEL process service components. The policies table displays the attached policy name, the component to which the policy is attached, the policy reference status (enabled or disabled) that you can toggle, the category (Management, Reliable Messaging, MTOM Attachment, Security, or WS Addressing), the violations, and the authentication, authorization, confidentiality, and integrity failures since the SOA Infrastructure was last restarted.
Note: Before attaching policies, see Oracle Fusion Middleware Security and Administrator's Guide for Web Services for definitions of available policies and details about which ones to use in your environment.
From the SOA Infrastructure Menu...
From the SOA Folder in the Navigator...
From the SOA Composite Menu...
1. Select Home.
2. Select Deployed Composites.
3. In the Composite section, select a specific SOA composite application.
4. Click the Policies tab.
1. Under soa-infra, select a specific SOA composite application.
2. Click the Policies tab.
1. Select Policies.

Managing SOA Composite Application Policies
8-40 Oracle Fusion Middleware Administrator's Guide for Oracle SOA Suite
2. Click Attach/Detach To.
If multiple services or components are available, you are prompted to select the service or component for which to perform the attachment or detachment.
3. Select the component to which to attach or detach a policy.
This invokes a dialog for attaching or detaching policies.
Currently attached policies appear in the Attached Policies section. Additional policies available for attachment appear in the Available Policies section.

Managing SOA Composite Application Policies
Managing SOA Composite Applications 8-41
4. Select policies to attach that are appropriate to your environment.
5. Click Attach.
The attached policy appears in the Attached Policies section.
6. Attach additional policies as needed.
7. When you are finished attaching policies, click Validate.
8. If an error message appears, make the necessary corrections until you no longer have any validation errors.
9. Click OK.
The attached policy displays in the policies table.

Managing SOA Composite Application Policies
8-42 Oracle Fusion Middleware Administrator's Guide for Oracle SOA Suite
For more information about policies, see the following documentation:
■ Section 1.3.3.2, "Understanding Policies"
■ Oracle Fusion Middleware Security and Administrator's Guide for Web Services for definitions of available policies and details about which ones to use for your environment
8.8.1 WS-RM SessionsMultiple requests from Oracle SOA Suite in a single WS-RM session are not currently supported. Each request is in an individual WS-RM session.
8.8.2 Policy Attachments and Local Optimization in Composite-to-Composite Invocations
OWSM supports a SOA local optimization feature for composite-to-composite invocations in which the reference of one composite specifies a Web service binding to a second composite. Local optimization enables you to bypass the HTTP stack and SOAP/normalized message conversions during run time. Local optimization is not used if the composites are in different containers. If a policy is attached to the Web service binding, the policy may not be invoked if local optimization is used.
By default, an OWSM security policy includes a local-optimization property that identifies if the policy supports local optimization. You can view the setting for a policy in Oracle Enterprise Manager Fusion Middleware Control Console.
1. In the application navigator, expand the WebLogic Domain folder.
2. Right-click WLS_SOAWC, and select Web Services > Policies.
3. Select a policy and click Export to File.
4. Open the file with a text editor and search for local-optimization to identify the value. This property supports the following values:
■ on: Local optimization is used in the attached policy, and the policy is not applied at run time.
■ off: Local optimization is not used in the attached policy, and the policy is applied at run time.
■ check-identity: If a JAAS subject exists in the current thread, local optimization is used. Otherwise, local optimization is not used.

Deleting Large Numbers of Instances
Managing SOA Composite Applications 8-43
For information on the default local optimization settings for security policies, see Oracle Fusion Middleware Security and Administrator's Guide for Web Services.
You can override the local-optimization setting for a policy by adding the oracle.webservices.local.optimization property in the binding section of the composite.xml file. The following values are supported:
■ true: Local optimization is used, and the policy is not applied.
■ false: Local optimization is not used, regardless of the default setting for the local-optimization property at the OWSM policy level. This setting forces the policy to be applied.
For example, the following setting of false causes oracle/wss_username_token_client_policy to be applied.
<binding.wsport="http://xmlns.oracle.com/CalledBPELProcessApp_jws/CalledBPELProcess/CalledBPELProcess#wsdl.endpoint(calledbpelprocess_client_ep/CalledBPELProcess_pt)"
location="http://sta00634.us.oracle.com:8001/soa-infra/services/default/CalledBPELProcess!1.0/calledbpelprocess_client_ep?WSDL"> <wsp:PolicyReference URI="oracle/wss_username_token_client_policy" orawsp:category="security"orawsp:status="enabled"/> <wsp:PolicyReference URI="oracle/log_policy"orawsp:category="management" orawsp:status="enabled"/> <propertyname="oracle.webservices.local.optimization">false</property> </binding.ws>
8.9 Deleting Large Numbers of InstancesDeleting thousands of instances with the Delete with Options button on the Instances page of a SOA composite application takes time and may result in a transaction timeout. Instead, use the purge-script.sql PL/SQL script for instance and rejected message deletion.
The following sections provide examples of how to use the PL/SQL procedures that are a part of this script.
8.9.1 Selectively Deleting Instances Using a Filter CriteriaUse the instance filter to selectively delete instances.
create or replace type instance_filter as object( composite_name varchar2(200), composite_revision varchar2(20), state integer, min_created_date timestamp, max_created_date timestamp, );
Note: The purge-script.sql PL/SQL script cannot be used on a SQL Server database.

Deleting Large Numbers of Instances
8-44 Oracle Fusion Middleware Administrator's Guide for Oracle SOA Suite
■ composite_name: The name of the SOA composite application, such as OrderBooking.
■ composite_revision: The revision of the composite, such as 1.0.
■ state: The state of the instance. The following state values are possible:
STATE_RUNNING constant integer := 0;STATE_RECOVERY_REQUIRED constant integer := 1;STATE_COMPLETED_SUCCESSFULLY constant integer := 2;STATE_FAULTED constant integer := 3;STATE_TERMINATED_BY_USER constant integer := 4;STATE_SUSPENDED constant integer := 5;STATE_STALE constant integer := 6;STATE_UNKNOWN constant integer := 32;
■ min_created_date: The minimum date range.
■ max_created_date: The maximum date range.
8.9.2 Procedures For Deleting InstancesThis section describes the procedures available for deleting composite instances, rejected messages, and orphaned instances.
8.9.2.1 Deleting a SIngle InstanceThis procedure deletes a single composite instance with the given composite instance ID. All dependent records associated with this composite instance are deleted.
FABRIC.DELETE_COMPOSITE_INSTANCE(A_COMPOSITE_INSTANCE_ID IN INTEGER)
The following example deletes the composite instance with the ID of 100.
EXEC FABRIC.DELETE_COMPOSITE_INSTANCE(100);
8.9.2.2 Deleting All Instances Using a Filter CriteriaThis procedure deletes all composite instances matching the specified filter criteria.
FABRIC.DELETE_COMPOSITE_INSTANCES(FILTER IN INSTANCE_FILTER, MAX_INSTANCES IN INTEGER, PURGE_PARTITIONED_DATA IN BOOLEAN DEFAULT TRUE) RETURN INTEGER;
■ FILTER: The filter for selectively deleting the composite instances.
■ MAX_INSTANCES: The maximum number of instances to delete per invocation. If the value MAX_INSTANCES is 100 and the total number of instances matching the specified filter is 200, the invocation of this procedure causes only 100 instances to be deleted.
■ PURGE_PARTITIONED_DATA: Indicates whether the records from the partitioned table must be deleted.
The following example deletes the first 100 composite instances matching the specified filter.
DECLARE FILTER INSTANCE_FILTER := INSTANCE_FILTER();
MAX_INSTANCES NUMBER; DELETED_INSTANCES NUMBER; PURGE_PARTITIONED_DATA BOOLEAN := TRUE;BEGIN

Deleting Large Numbers of Instances
Managing SOA Composite Applications 8-45
FILTER.COMPOSITE_NAME := 'OrderBookingComposite'; FILTER.COMPOSITE_REVISION := '1.0';
FILTER.STATE := fabric.STATE_TERMINATED_BY_USER;
FILTER.MIN_CREATED_DATE := to_timestamp('2009-07-01','YYYY-MM-DD'); FILTER.MAX_CREATED_DATE := to_timestamp('2009-08-24','YYYY-MM-DD'); MAX_INSTANCES := 100;
DELETED_INSTANCES := FABRIC.DELETE_COMPOSITE_INSTANCES( FILTER => FILTER, MAX_INSTANCES => MAX_INSTANCES, PURGE_PARTITIONED_DATA => PURGE_PARTITIONED_DATA );
END;/
8.9.2.3 Deleting All Rejected Messages Using a Filter CriteriaThis procedure deletes all rejected messages matching the specified filter criteria.
FABRIC.DELETE_REJECTED_MESSAGES(FILTER IN INSTANCE_FILTER, MAX_INSTANCES IN INTEGER, PURGE_PARTITIONED_DATA IN BOOLEAN DEFAULT TRUE) RETURN INTEGER;
■ FILTER: The filter for selectively deleting the rejected messages.
■ MAX_INSTANCES: The maximum number of instances to be deleted per invocation. If the value MAX_INSTANCES is 100 and the total number of instances matching the specified filter is 200, the invocation of this procedure causes only 100 instances to be deleted.
■ PURGE_PARTITIONED_DATA: Indicates whether the records from the partitioned table must be deleted.
The following example deletes the first 100 rejected messages matching the specified filter.
DECLARE
FILTER INSTANCE_FILTER := INSTANCE_FILTER();
MAX_INSTANCES NUMBER; DELETED_INSTANCES NUMBER;BEGIN
FILTER.COMPOSITE_NAME := 'OrderBookingComposite'; FILTER.COMPOSITE_REVISION := '1.0';
FILTER.MIN_CREATED_DATE := to_timestamp('2009-07-01','YYYY-MM-DD'); FILTER.MAX_CREATED_DATE := to_timestamp('2009-08-24','YYYY-MM-DD'); MAX_INSTANCES := 100;
DELETED_INSTANCES := FABRIC.DELETE_REJECTED_MESSAGES( FILTER => NULL, MAX_INSTANCES => MAX_INSTANCES );
END;/

Deleting Large Numbers of Instances
8-46 Oracle Fusion Middleware Administrator's Guide for Oracle SOA Suite
8.9.2.4 Deleting the Component Instances Created when Global Instance Tracking is DisabledThis procedure is primarily used to delete the component instances created when global instance tracking is disabled. Orphaned instances are not associated with the composite instance ID.
FABRIC.DELETE_ORPHANED_INSTANCES(FILTER IN INSTANCE_FILTER, MAX_INSTANCES IN INTEGER, PURGE_PARTITIONED_DATA IN BOOLEAN DEFAULT TRUE) RETURN INTEGER;
■ FILTER: The filter for selectively deleting the orphaned instances.
■ MAX_INSTANCES: The maximum number of instances to be deleted per invocation. If the value MAX_INSTANCES is 100 and the total number of instances matching the specified filter is 200, the invocation of this procedure causes only 100 instances to be deleted.
■ PURGE_PARTITIONED_DATA: Indicates whether the records from the partitioned table must be deleted.
The following example deletes multiple orphaned instances based on the specified filter.
DECLARE
FILTER INSTANCE_FILTER := INSTANCE_FILTER(); MAX_INSTANCES NUMBER; DELETED_INSTANCES NUMBER;BEGIN FILTER.COMPOSITE_NAME := 'OrderBookingComposite'; FILTER.COMPOSITE_REVISION := '1.0';
FILTER.STATE := fabric.STATE_COMPLETED_SUCCESSFULLY; FILTER.MIN_CREATED_DATE := to_timestamp('2009-07-01','YYYY-MM-DD'); FILTER.MAX_CREATED_DATE := to_timestamp('2009-08-24','YYYY-MM-DD'); MAX_INSTANCES := 100;
DELETED_INSTANCES := FABRIC.DELETE_ORPHANED_INSTANCES( FILTER => FILTER, MAX_INSTANCES => MAX_INSTANCES );
END;/
8.9.2.5 Deleting Composite Instances, Rejected Messages, and Orphaned InstancesThis procedure internally invokes the procedures for deleting composite instances, rejected messages, and orphaned instances. This procedure is convenient for deleting all composite instances, rejected messages, and orphaned instances in a single invocation.
FABRIC.DELETE_ALL(FILTER IN INSTANCE_FILTER, MAX_INSTANCES IN INTEGER, PURGE_PARTITIONED_DATA IN BOOLEAN DEFAULT TRUE) RETURN INTEGER;
The following example deletes composite instances, rejected messages, and orphaned instances based on the specified filter.

Exporting a Running SOA Composite Application
Managing SOA Composite Applications 8-47
DECLARE FILTER INSTANCE_FILTER := INSTANCE_FILTER(); MAX_INSTANCES NUMBER; DELETED_INSTANCES NUMBER;BEGIN FILTER.COMPOSITE_NAME := 'OrderBookingComposite'; FILTER.COMPOSITE_REVISION := '1.0';
FILTER.STATE := fabric.STATE_COMPLETED_SUCCESSFULLY;
FILTER.MIN_CREATED_DATE := to_timestamp('2009-07-01','YYYY-MM-DD'); FILTER.MAX_CREATED_DATE := to_timestamp('2009-08-24','YYYY-MM-DD'); MAX_INSTANCES := 100;
DELETED_INSTANCES := FABRIC.DELETE_ALL( FILTER => FILTER, MAX_INSTANCES => MAX_INSTANCES );
END;/
8.10 Exporting a Running SOA Composite ApplicationYou can export the contents of a running SOA composite application to an archive JAR file. The file can include some or all of the following data:
■ The original design-time composite.
■ Postdeployment changes in the rules dictionary and domain value maps (DVMs).
■ Postdeployment property changes such as binding component properties, composite properties such as audit level settings and payload validation status, and policy attachments.
To export a running SOA composite application:
1. Go to the home page of the SOA composite application to export.
2. From the SOA Composite menu, select Export.
The Export Composite page appears.
Notes:
■ SOA composite application exporting is only currently allowed at the individual SOA composite level.
■ Shared metadata is not exported as part of the composite export SAR (service archive).

Exporting a Running SOA Composite Application
8-48 Oracle Fusion Middleware Administrator's Guide for Oracle SOA Suite
3. Select an option.
■ Option 1: Generates an archive file containing the original design-time composite and the postdeployment details described in Option 2 and Option 3.
■ Option 2: Includes the original design-time composite and postdeployment changes in the rules dictionary and DVMs.
■ Option 3: Includes the original design-time composite and postdeployment property changes such as binding component properties, composite properties such as audit level settings and payload validation status, and policy attachments.
■ Option 4: Generates an archive file containing only the original design-time composite. Options 2 and 3 are not included.
4. If you want to append an additional name to the existing file, select Specify Custom Extension Text. For example, entering MyText to a file named sca_OrderBookingComposite_rev1.0.jar names the exported file as sca_OrderBookingComposite_rev1.0-MyText.jar.
5. Click Export.
The Processing: Export Composite dialog displays the progress of archive file generation. When generation completes, you are prompted to save the file.
6. Click Save File.
A dialog appears for either opening or saving the file to a directory on your local host.

Exporting a Running SOA Composite Application
Managing SOA Composite Applications 8-49
7. Specify the local directory in which to save the JAR file.
8. In the upper right of the Processing: Export Composite dialog, click the x icon to close the dialog.
9. On the Export Composite page, note that the Cancel button has changed to Done.
10. Click Done.
The Export Composite is closed and you are returned to the SOA composite application home page.
Note: It is important that you click the Save File button. Do not simply close this dialog. Although the composite is exported, you cannot retrieve the actual exported file.

Exporting a Running SOA Composite Application
8-50 Oracle Fusion Middleware Administrator's Guide for Oracle SOA Suite

Part VAdministering BPEL Process Service
Components and Engines
This part describes how to administer BPEL process service components and engines.
This part includes the following chapters:
■ Chapter 9, "Configuring BPEL Process Service Components and Engines"
■ Chapter 10, "Monitoring BPEL Process Service Components and Engines"
■ Chapter 11, "Managing BPEL Process Service Components and Engines"


9
Configuring BPEL Process Service Components and Engines 9-1
9 Configuring BPEL Process ServiceComponents and Engines
This chapter describes how to configure BPEL process service components and service engines.
This chapter includes the following topic:
■ Section 9.1, "Configuring BPEL Process Service Engine Properties"
■ Section 9.2, "Setting the Audit Level at the BPEL Process Service Component Level"
9.1 Configuring BPEL Process Service Engine PropertiesYou can configure BPEL process service engine properties. The properties are used by the BPEL process service engine during processing of BPEL service components.
To configure BPEL process service engine properties:
1. Access this page through one of the following options:
The BPEL Service Engine Properties page displays properties for setting audit trail and large document thresholds, setting dispatcher thread properties, validating payload schema, and setting the audit trail level.
From the SOA Infrastructure Menu... From the SOA Folder in the Navigator...
1. Select SOA Administration > BPEL Properties.
1. Right-click soa-infra.
2. Select SOA Administration > BPEL Properties.

Configuring BPEL Process Service Engine Properties
9-2 Oracle Fusion Middleware Administrator's Guide for Oracle SOA Suite
2. Make changes to the service engine properties that are appropriate to your environment.
Property Description
Audit Level Select one of the following options:
■ Off: Composite instance tracking and payload tracking information is not collected.
■ Inherit: Logging equals the SOA Infrastructure audit level. This setting enables the BPEL audit level to automatically change when the global setting is changed. Setting a different audit level tracking in this page overrides the tracking set at the SOA Infrastructure level.
■ Minimal: The BPEL service engine does not capture any audit details. Therefore, they are not available in the flow audit trails. All other events are logged.
■ Production: The BPEL service engine does not capture the payload. The payload details are not available in the flow audit trails. Payload details for other BPEL activities are collected, except for assign activities. This level is optimal for most normal operations and testing.
■ Development: Allows both composite instance tracking and payload tracking. All events are logged. However, it may impact performance. This level is useful mostly for debugging purposes.
Audit Trail Threshold
Enter the maximum size in bytes of an instance audit trail before it is chunked and saved in a dehydration store table separate from the audit trail. If the threshold is exceeded, the View XML link is shown in the audit trail instead of the payload.
Large Document Threshold
Enter the maximum size of a generated document within a BPEL process component instance before it is stored in a separate table in the dehydration store.
Dispatcher System Threads
Specify the total number of threads allocated to process system dispatcher messages. System dispatcher messages are general clean-up tasks that are typically processed quickly by the server (for example, releasing stateful message beans back to the pool). Typically, only a small number of threads are required to handle the number of system dispatch messages generated during run time.
The default value is 2 threads. Any value less than 1 thread is changed to the default.

Configuring BPEL Process Service Engine Properties
Configuring BPEL Process Service Components and Engines 9-3
3. Click Apply.
4. If you want to configure advanced BPEL properties in the System MBean Browser, click More BPEL Configuration Properties. Properties that display include the following. Descriptions are provided for each property.
■ BpelcClasspath — The extra BPEL class path to include when compiling BPEL-generated Java sources.
■ ExpirationMaxRetry — The maximum number of times a failed expiration call (wait/onAlarm) is retried before failing.
■ ExpirationRetryDelay — The delay between expiration retries.
■ InstanceKeyBlockSize — The size of the block of instance IDs to allocate from the dehydration store during each fetch.
■ MaximumNumberOfInvokeMessagesInCache — The number of invoke messages stored in in-memory cache.
■ OneWayDeliveryPolicy — Changes whether one-way invocation messages are delivered.
■ StatsLastN — The size of the most recently processed request list.
■ SyncMaxWaitTime — The maximum time a request and response operation takes before timing out.
5. Make changes appropriate to your environment.
Dispatcher Invoke Threads
Specify the total number of threads allocated to process invocation dispatcher messages. Invocation dispatcher messages are generated for each payload received and are meant to instantiate a new instance. If the majority of requests processed by the engine are instance invocations (as opposed to instance callbacks), greater performance may be achieved by increasing the number of invocation threads. Higher thread counts may cause greater CPU utilization due to higher context switching costs.
The default value is 20 threads. Any value less than 1 thread is changed to the default.
Dispatcher Engine Threads
Specify the total number of threads allocated to process engine dispatcher messages. Engine dispatcher messages are generated whenever an activity must be processed asynchronously. If the majority of processes deployed are durable with a large number of dehydration points (midprocess receive, onMessage, onAlarm, and wait activities), greater performance may be achieved by increasing the number of engine threads. Note that higher thread counts can cause greater CPU utilization due to higher context switching costs.
The default value is 30 threads. Any value less than 1 thread is changed to the default.
Payload Validation
Select to enable validation of inbound and outbound messages. Nonschema-compliant payload data is intercepted and displayed as a fault.
Note: This setting is independent of the SOA composite application and SOA Infrastructure payload validation level settings. If payload validation is enabled at both the service engine and SOA Infrastructure levels, data is checked twice: once when it enters the SOA Infrastructure, and again when it enters the service engine.
Disable BPEL Monitors and Sensors
Select this check box to disable all BPEL monitors and sensors defined for all BPEL components across all deployed SOA composite applications.
Property Description
Setting the Audit Level at the BPEL Process Service Component Level
9-4 Oracle Fusion Middleware Administrator's Guide for Oracle SOA Suite
9.2 Setting the Audit Level at the BPEL Process Service Component Level
You can set the audit level for a BPEL process service component. This setting takes precedence over audit level settings at the SOA Infrastructure, service engine, and SOA composite application levels. The service component level setting is only available for BPEL processes and is not supported for the mediator, human workflow, and business rule service components.
There are two ways to set the audit level for BPEL process service components. Supported values are Off, Minimal, Inherit, Development, and Production.
■ In the System MBean Browser of Oracle Enterprise Manager Fusion Middleware Control Console:
1. In the navigation tree, expand the SOA folder.
2. Right-click soa-infra, and select Administration > System MBean Browser.
3. Select Application Defined MBeans > oracle.soa.config > Server: server_name > SCAComposite > Composite_Name > SCAComposite.SCAComponent > BPEL_Service_Component > Properties.
4. Click the Add icon.
5. Expand the Element_number folder.
6. From the many list, select false.
7. In the name field, enter bpel.config.auditlevel.
8. In the value field, enter a value.
9. Click Apply.
■ In Oracle JDeveloper:
1. Set the bpel.config.auditLevel property to an appropriate value in the composite.xml file of your SOA project.
<component name="BPELProcess"> <implementation.bpel src="BPELProcess.bpel" /> <property name="bpel.config.auditLevel">Off</property> </component>
For more information about audit levels, see Section 1.3.1.1, "Understanding the Order of Precedence for Audit Level Settings."

10
Monitoring BPEL Process Service Components and Engines 10-1
10 Monitoring BPEL Process ServiceComponents and Engines
This chapter describes how to monitor BPEL process service components and service engines.
This chapter includes the following topics:
■ Section 10.1, "Viewing the Audit Trail and Process Flow of a BPEL Process Service Component"
■ Section 10.2, "Monitoring BPEL Process Service Component Instances and Faults"
■ Section 10.3, "Monitoring BPEL Process Service Component Instances"
■ Section 10.4, "Monitoring Sensor Data and Values in BPEL Process Service Components"
■ Section 10.5, "Monitoring BPEL Process Service Engine Instances and Faults"
■ Section 10.6, "Monitoring BPEL Process Service Engine Request and Thread Statistics"
■ Section 10.7, "Monitoring BPEL Process Service Engine Instances"
■ Section 10.8, "Monitoring Deployed BPEL Processes in the Service Engine"
For more information, see the following sections:
■ Section 1.2.4, "Understanding Service Components and Service Component Instances"
■ Section 1.2.6, "Understanding Service Engines"
10.1 Viewing the Audit Trail and Process Flow of a BPEL Process Service Component
This section describes how to view the audit trail and process flow of a BPEL process service component in a SOA composite application instance.
To view the audit trail and process flow of a BPEL process service component:
1. Access this page through one of the following options:
Note: This section assumes a SOA composite application instance has been initiated. If not, see Section 8.1, "Initiating a SOA Composite Application Test Instance" for instructions.

Viewing the Audit Trail and Process Flow of a BPEL Process Service Component
10-2 Oracle Fusion Middleware Administrator's Guide for Oracle SOA Suite
The Dashboard page for the selected composite application appears.
2. Use one of the following methods to select an instance of the application:
■ For recent instances of this application, click the instance number of an instance in the Instance ID column of the Recent Instances section.
■ For all instances of this application, click the Instances tab, then click a specific instance in the Instance ID list.
The Flow Trace page displays the following details:
■ The Faults section shows the faults occurring in the services, service components, and references that comprise the SOA composite application. Sensors enable you to monitor BPEL process activities, variables, and faults during run time. Selecting a fault highlights the row in the Trace section in which the fault occurred. Closing the fault clears the selection in the Trace section.
■ The Sensors section displays details about composite sensors included in the service and reference binding components of the SOA composite application. The total number of sensors is shown in the section header. Composite sensors can be added to service and reference binding components during design time in Oracle JDeveloper. You cannot add composite sensors to service components. Selecting a composite sensor in this section highlights the service or reference in the Trace section in which composite sensor data was collected. Closing the sensor clears the selection in the Trace section.
■ The Trace section shows the sequence of the message flow through the services, service components, and references that comprise the SOA composite application.
The flow trace is a run-time trail of a message flow identified by an execution context ID (ECID) that displays in the upper right corner of the page. An ECID enables you to track a message flow that crosses instances of different composites. The flow trace lists all services, references, components across composites participating in the flow.
From the SOA Infrastructure Menu... From the SOA Folder in the Navigator...
1. Select Home.
2. Select the Deployed Composites tab.
3. In the Composite section, select a specific SOA composite application.
1. Under soa-infra, select a specific SOA composite application.
Note: Expand the Faults or Sensors sections one at a time. The fault or sensor information only displays for viewing in this way.

Viewing the Audit Trail and Process Flow of a BPEL Process Service Component
Monitoring BPEL Process Service Components and Engines 10-3
For the flow example in the Trace section, the service binding component, Oracle Mediator service component, and reference binding component involved in the flow have successfully received and processed messages.
Note the following restrictions with ECIDs:
■ A separate ECID displays for each instance of a composite application and not for the composite level ECID that can track the complete flow of any instances for the composite application.
■ To get complete flow information, you must find the composite level ECID in the log files. Use that value to get all information for a particular composite and therefore all its executed instances.
■ ECIDs are not propagated through business events. This can limit the amount of logging information that is collected. For example, if you publish an event that is subscribed to in the same composite application, limited logging information is available.
3. Select a fault in the Faults section.
This highlights the row in the Trace section in which the fault occurred.
4. Close the fault to clear the selection in the Trace section.
5. Expand the Sensors section to display composite sensors.

Viewing the Audit Trail and Process Flow of a BPEL Process Service Component
10-4 Oracle Fusion Middleware Administrator's Guide for Oracle SOA Suite
6. Select a sensor in the Sensors section.
This highlights the row in the Trace section in which the composite sensor data was collected.
7. In the Instance column of the Trace section, click a specific BPEL process service component instance. Service component instances can be accessed from this section; services and references cannot be accessed.
The Instance page appears.
Use these four pages to view the audit trail, flow, sensor values, and faults of a BPEL process service component instance. The following links provide additional details about the instance:

Viewing the Audit Trail and Process Flow of a BPEL Process Service Component
Monitoring BPEL Process Service Components and Engines 10-5
■ Flow Trace link: Click the breadcrumbs in the upper left corner of the page to access the flow trace for the ECID (composite instance) that contains this BPEL component instance.
■ Information icon: Click the information icon to the right of the name of the BPEL component (in the page title) to see biographical information about this BPEL instance. This information includes a summary of the instance, including instance ID, ECID, instance startup time or last modification time, instance state (for example, running), and number of faults.
This icon only displays on the Audit Trail pages of BPEL processes and Oracle Mediators, and not on the pages of human tasks and business rules.
■ Audit Level Settings: Click to display information details, such as the audit level used by this instance.
■ View Raw XML: Click to display the raw XML of the audit trail.
The Audit Trail tab displays execution details about the activities in the BPEL process.
8. Scroll through the audit trail to check for errors and expand the payload links to view their contents at a given point in the flow. This audit trail shows a fault in a BPEL process activity.
9. Click the Flow tab.
A flow diagram of the BPEL process activities appears. This flow diagram shows a fault highlighted in a BPEL process activity.

Viewing the Audit Trail and Process Flow of a BPEL Process Service Component
10-6 Oracle Fusion Middleware Administrator's Guide for Oracle SOA Suite
10. Click an activity to view the flow of the payload through the process.
11. Scroll through the flow diagram to check for errors and click the highlighted activity to view error messages.
Note: If using Internet Explorer, you can click Copy details to clipboard to copy the activity details to the clipboard. If using Mozilla Firefox, this link does not appear. Instead, you must manually select the text and copy and paste it to a file.
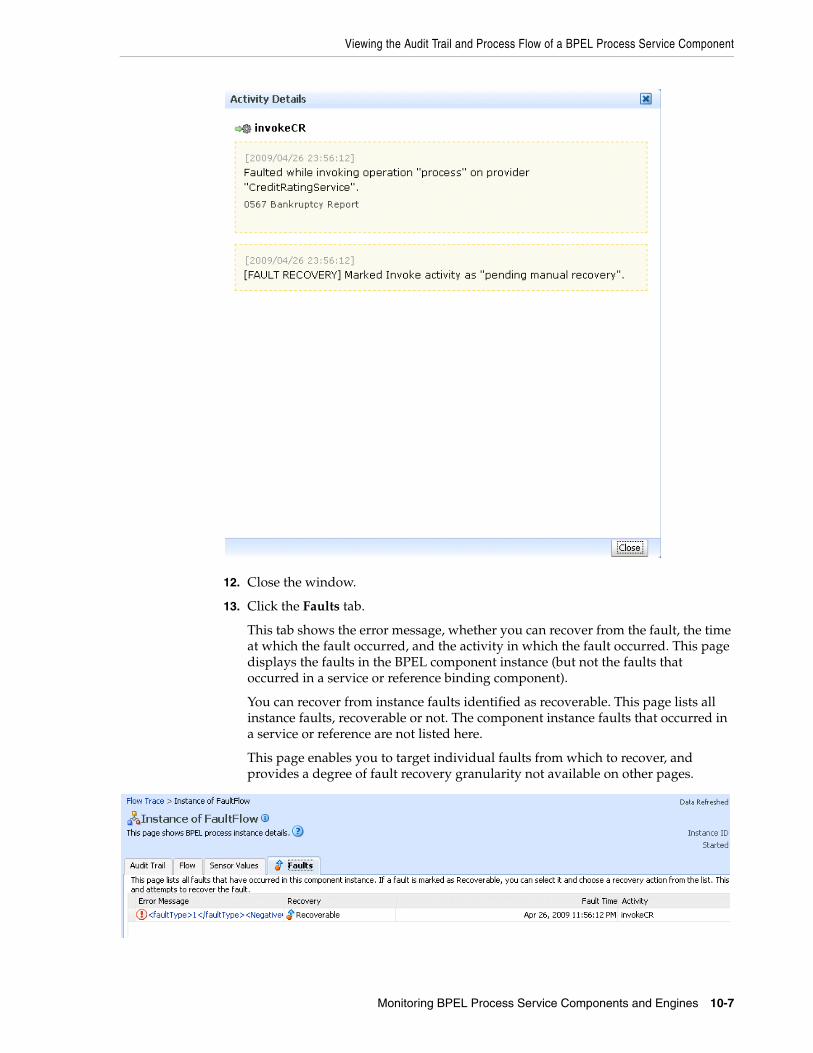
Viewing the Audit Trail and Process Flow of a BPEL Process Service Component
Monitoring BPEL Process Service Components and Engines 10-7
12. Close the window.
13. Click the Faults tab.
This tab shows the error message, whether you can recover from the fault, the time at which the fault occurred, and the activity in which the fault occurred. This page displays the faults in the BPEL component instance (but not the faults that occurred in a service or reference binding component).
You can recover from instance faults identified as recoverable. This page lists all instance faults, recoverable or not. The component instance faults that occurred in a service or reference are not listed here.
This page enables you to target individual faults from which to recover, and provides a degree of fault recovery granularity not available on other pages.

Viewing the Audit Trail and Process Flow of a BPEL Process Service Component
10-8 Oracle Fusion Middleware Administrator's Guide for Oracle SOA Suite
However, you cannot perform bulk fault recoveries on this page. To perform bulk fault recovery, use one of the following pages:
■ Faults and Rejected Messages page of a specific SOA composite application or of the SOA Infrastructure
■ Faults page of the BPEL process service engine or of a specific BPEL process service component
14. Select a fault for recovery that has been identified as recoverable through one of the following methods. The page refreshes to display a fault recovery section at the bottom of the page.
■ If you click a fault in the Error Message column, a popup message displays details about the fault, including the fault ID, fault time, fault location, fault type, and complete error message text. If the fault is identified as recoverable, a Recover Now button displays that you can click.
■ You click a fault identified as recoverable in the Recovery column.
15. Select an action from the Recovery Action list.
Your selection causes additional fields to appear. For example, the following fields display if you select Rethrow.
16. Use the After Successful Retry list to select defined actions to invoke after a successful retry. If you select a variable in the Variable list, you can edit the value in the Value text box.
Action Description
Retry Retries the instance with an option to provide a retry success action. An example of a scenario in which to use this recovery action is when the fault occurred because the service provider was not reachable due to a network error. The network error is now resolved.
Abort Aborts the entire instance.
Replay Replays the entire scope again in which the fault occurred.
Rethrow Rethrows the current fault. BPEL fault handlers (catch branches) are used to handle the fault. By default, all exceptions are caught by the fault management framework unless an explicit rethrow fault policy is provided.
Continue Ignores the fault and continues processing (marks the faulting activity as a success).

Monitoring BPEL Process Service Component Instances and Faults
Monitoring BPEL Process Service Components and Engines 10-9
17. Click the Back button of your browser to exit the flow diagram.
10.2 Monitoring BPEL Process Service Component Instances and FaultsYou can monitor BPEL process service component recent instances and faults. Each service component in a SOA composite application has its own instance ID. These IDs are different from the overall instance ID of the SOA composite application of which each service component is a part.
To monitor BPEL process service component instances and faults:
1. Access this page through one of the following options:
2. In the Component Metrics section, select the BPEL process service component.
3. Click Dashboard.
The upper part of the Dashboard page displays the following details:
■ Recent instances of the BPEL process service component, including the instance ID, the state of the instance (for example, completed successfully or faulted), the start time, the last modification time, and logs describing the instance.
■ Recent faults in the BPEL process service component, including the error message, whether you can recover from the fault, the time at which the fault occurred, the instance ID of the BPEL service component, the BPEL activity in which the fault occurred, and logs describing the fault.
■ The average processing time for each activity in the BPEL process service component.
From the SOA Infrastructure Menu... From the SOA Folder in the Navigator...
1. Select Home.
2. Select the Deployed Composites tab.
3. In the Composite section, select a specific SOA composite application.
1. Under soa-infra, select a specific SOA composite application.

Monitoring BPEL Process Service Component Instances and Faults
10-10 Oracle Fusion Middleware Administrator's Guide for Oracle SOA Suite
4. In the Recent Instances section, perform the following tasks:
a. In the Instance ID column, click an instance ID for a service component to view its audit trail, process flow, sensor values, and faults.
b. In the Logs column, click a specific log to access the Log Messages page with filtered messages specific to that instance.
c. Click Show All below the section to access the Instances page of the service component.
5. In the Recent Faults section, perform the following tasks:
a. In the Error Message column, click an error message to display complete information about the fault. If the fault is identified as recoverable, click the Recover Now link to perform fault recovery.
b. In the Recovery column, click a fault identified as Recoverable to perform fault recovery at the component instance level.
c. In the Logs column, click a specific log to access the Log Messages page with filtered messages specific to that instance.
d. Click Show All below the section to access the Faults page of the service component.
The lower part of the Dashboard page displays the following details:
■ A graphical representation of the number of successful, faulted, and incoming (pending) instances of the BPEL process service component over a specific time range.
■ The number of faults and message processed by any reference binding component with which this BPEL process service component communicated.

Monitoring BPEL Process Service Component Instances
Monitoring BPEL Process Service Components and Engines 10-11
For more information, see Section 1.2.3, "Understanding SOA Composite Application Instances" and Oracle Fusion Middleware Administrator's Guide for details about viewing and searching log files.
10.3 Monitoring BPEL Process Service Component InstancesYou can monitor BPEL process service component instances. Each service component has its own unique instance ID. This ID is in addition to the instance ID of the overall SOA composite application of which this service component is a part.
To monitor BPEL process service component instances:
1. Access this page through one of the following options:
2. Select the BPEL process service component in the Component Metrics section.
3. Click Instances.
The Instances page displays the following details:
■ A utility for searching for a specific BPEL service component instance by specifying a criteria and clicking Search.
■ BPEL process service component instances, including the instance ID, instance state (for example, completed or faulted), instance start time, last instance modification time, and log files describing the instance.
From the SOA Infrastructure Menu... From the SOA Folder in the Navigator...
1. Select Home.
2. Select the Deployed Composites tab.
3. In the Composite section, select a specific SOA composite application.
1. Under soa-infra, select a specific SOA composite application.

Monitoring Sensor Data and Values in BPEL Process Service Components
10-12 Oracle Fusion Middleware Administrator's Guide for Oracle SOA Suite
4. In the Instance ID column, click an instance ID for a service component to view its audit trail, process flow, sensor values, and faults.
5. In the Logs column, click a specific log to access the Log Messages page with filtered messages specific to that instance.
For more information, see Section 1.2.3, "Understanding SOA Composite Application Instances."
10.4 Monitoring Sensor Data and Values in BPEL Process Service Components
You can view the fault, activity, and variable sensor data of a BPEL process service component. You design sensors in BPEL processes and trackable fields in Oracle JDeveloper. Sensors enable you to monitor BPEL process activities, variables, and faults during run time.
To monitor sensor data and values in BPEL process service components:
1. Access this page through one of the following options:
2. Use one of the following methods to select an instance of the application:
■ For recent instances of this application, click the instance number of an instance in the Instance ID column of the Recent Instances section.
From the SOA Infrastructure Menu... From the SOA Folder in the Navigator...
1. Select Home.
2. Select the Deployed Composites tab.
3. In the Composite section, select a specific SOA composite application.
1. Under soa-infra, select a specific SOA composite application.

Monitoring BPEL Process Service Engine Instances and Faults
Monitoring BPEL Process Service Components and Engines 10-13
■ For all instances of this application, click the Instances tab, then click a specific instance in the Instance ID column.
The Flow Trace page appears.
3. Click a specific BPEL process service component in the Instance column of the Trace section.
4. Click the Sensor Values tab.
5. Select a sensor to view details.
If you created JMS sensors in your BPEL process, JMS sensor values do not display in Oracle Enterprise Manager Fusion Middleware Control Console. Only sensor values in which the sensor action is to store the values in the database appear (for example, database sensor values).
For more information about sensors, see Oracle Fusion Middleware Developer's Guide for Oracle SOA Suite.
10.5 Monitoring BPEL Process Service Engine Instances and FaultsYou can monitor instances and faults of all BPEL process service components running in the BPEL process service engine. These BPEL process service components can be part of separate SOA composite applications.
To monitor BPEL process service engine instances and faults:
1. Access this page through one of the following options:

Monitoring BPEL Process Service Engine Instances and Faults
10-14 Oracle Fusion Middleware Administrator's Guide for Oracle SOA Suite
2. Click Dashboard.
The upper part of the Dashboard page displays recent instances of all BPEL process service components running in the BPEL process service engine, including the instance ID of the service component, the service component name, the SOA composite application of which the service component is a part, the state of the instance (for example, completed successfully or faulted), the instance start time, the last modification time, and logs describing the instance.
3. In the Recent Instances section, perform the following monitoring tasks:
a. In the Instance ID column, click an instance ID for a service component to view its audit trail, process flow, sensor values, and faults.
b. In the Component column, click a specific service component to access its home page.
c. In the Composite column, click a specific SOA composite application to access its home page.
d. In the Logs column, click a specific log to access the Log Messages page with filtered messages specific to that instance.
e. Click Show All below the section to access the Instances page of the service engine.
The lower part of the Dashboard page displays the following details:
■ The service components running in the service engine, the SOA composite applications of the service components, the state of the applications (for example, running), and the total, running, and faulted instances in the service engine.
■ The recent faults in the service engine, including the error message, whether you can recover from the fault, the time at which the fault occurred, the SOA composite application in which the fault occurred, the service component, the instance ID of the service component, the activity in which the fault occurred, and log files describing the fault.
From the SOA Infrastructure Menu... From the SOA Folder in the Navigator...
1. Select Service Engines > BPEL. 1. Right-click soa-infra.
2. Select Service Engines > BPEL.

Monitoring BPEL Process Service Engine Instances and Faults
Monitoring BPEL Process Service Components and Engines 10-15
4. In the Components section, perform the following tasks:
a. In the Name column, click a specific service component to access its home page.
b. In the Composite column, click a specific SOA composite application to access its home page.
c. Click Show All below the section to access the Deployed Components page of the service engine.
5. In the Recent Faults section, perform the following tasks:
a. In the Error Message column, click an error message to display complete information about the fault. If the fault is identified as recoverable, click the Recover Now link to perform fault recovery.
b. In the Recovery column, click a fault identified as Recoverable to perform fault recovery at the component instance level.
c. In the Composite column, click a specific SOA composite application to access its home page.
d. In the Component column, click a specific service component to access its home page.
e. In the Component Instance ID column, click an instance ID for a service component to view its audit trail, process flow, sensor values, and faults.
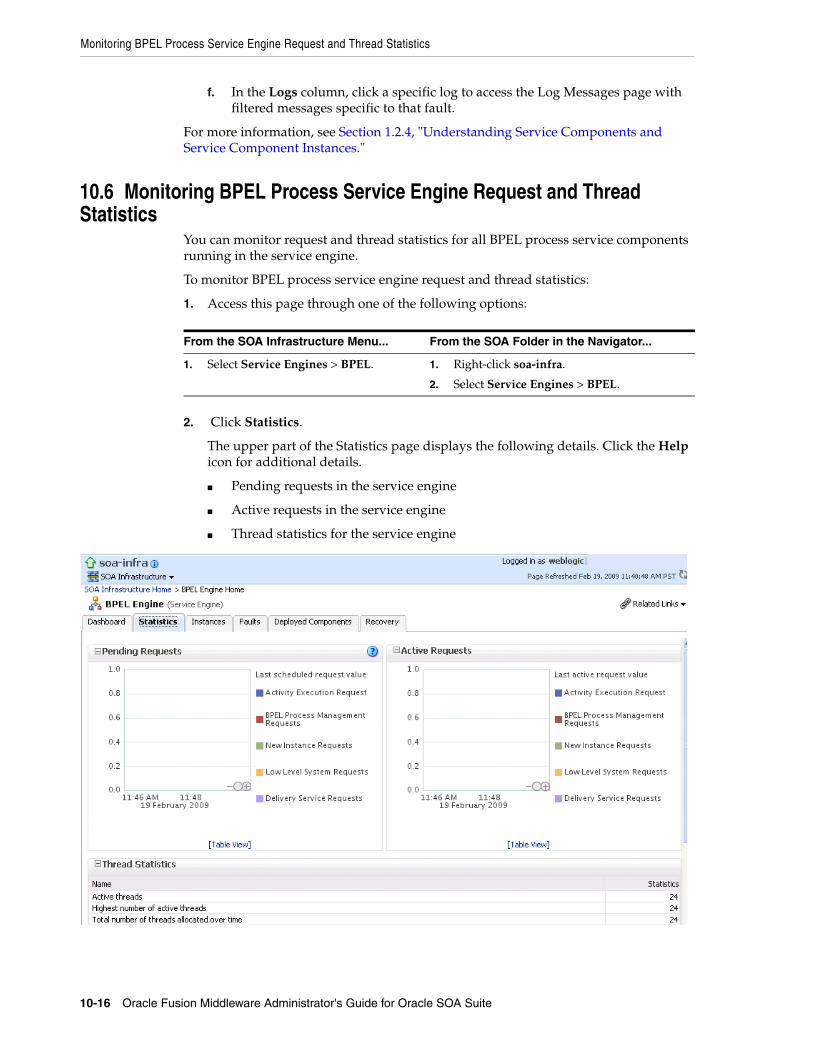
Monitoring BPEL Process Service Engine Request and Thread Statistics
10-16 Oracle Fusion Middleware Administrator's Guide for Oracle SOA Suite
f. In the Logs column, click a specific log to access the Log Messages page with filtered messages specific to that fault.
For more information, see Section 1.2.4, "Understanding Service Components and Service Component Instances."
10.6 Monitoring BPEL Process Service Engine Request and Thread Statistics
You can monitor request and thread statistics for all BPEL process service components running in the service engine.
To monitor BPEL process service engine request and thread statistics:
1. Access this page through one of the following options:
2. Click Statistics.
The upper part of the Statistics page displays the following details. Click the Help icon for additional details.
■ Pending requests in the service engine
■ Active requests in the service engine
■ Thread statistics for the service engine
From the SOA Infrastructure Menu... From the SOA Folder in the Navigator...
1. Select Service Engines > BPEL. 1. Right-click soa-infra.
2. Select Service Engines > BPEL.

Monitoring BPEL Process Service Engine Instances
Monitoring BPEL Process Service Components and Engines 10-17
The lower part of the Statistics page displays details about the count and minimum, maximum, and average request processing times.
10.7 Monitoring BPEL Process Service Engine InstancesYou can monitor all BPEL process service component instances running in the service engine. These BPEL process service components can be part of separate SOA composite applications.
To monitor BPEL process service engine instances:
1. Access this page through one of the following options:
2. Click Instances.
The Instances page displays the following details:
■ A utility for searching for a specific instance by specifying a criteria and clicking Search.
■ Instances, including the instance ID of the service component, the service component name, the SOA composite application name, the state of the instance (for example, completed successfully, running, or faulted), the instance start time, the last modification time, and log files describing the instance.
From the SOA Infrastructure Menu... From the SOA Folder in the Navigator...
1. Select Service Engines > BPEL. 1. Right-click soa-infra.
2. Select Service Engines > BPEL.

Monitoring Deployed BPEL Processes in the Service Engine
10-18 Oracle Fusion Middleware Administrator's Guide for Oracle SOA Suite
3. In the Instances section, perform the following monitoring tasks:
a. In the Instance ID column, click an instance ID for a service component to view its audit trail, process flow, sensor values, and faults.
b. In the Component column, click a specific service component to access its home page.
c. In the Composite column, click a specific SOA composite application to access its home page.
d. In the Logs column, click a specific log to access the Log Messages page with filtered messages specific to that instance.
For more information, see Section 1.2.4, "Understanding Service Components and Service Component Instances."
10.8 Monitoring Deployed BPEL Processes in the Service EngineYou can monitor all deployed SOA composite applications with BPEL process service components running in the service engine.
To monitor deployed BPEL processes in service engines:
1. Access this page through one of the following options:
From the SOA Infrastructure Menu... From the SOA Folder in the Navigator...
1. Select Service Engines > BPEL. 1. Right-click soa-infra.
2. Select Service Engines > BPEL.

Monitoring Deployed BPEL Processes in the Service Engine
Monitoring BPEL Process Service Components and Engines 10-19
2. Click Deployed Components.
The Deployed Components page displays the following details:
■ A utility for searching for a specific deployed SOA composite application by specifying a criteria and clicking Search.
■ Details about deployed SOA composite applications with BPEL process service components running in this service engine, including the service component name, the SOA composite application, the current status, and the total, running, and faulted instances in the service engine.
3. In the Name column, click a specific service component to access its home page.
4. In the Composite column, click a specific SOA composite application to access its home page.

Monitoring Deployed BPEL Processes in the Service Engine
10-20 Oracle Fusion Middleware Administrator's Guide for Oracle SOA Suite

11
Managing BPEL Process Service Components and Engines 11-1
11 Managing BPEL Process ServiceComponents and Engines
This chapter describes how to manage BPEL process service components and service engines.
This chapter includes the following topics:
■ Section 11.1, "Recovering from BPEL Process Service Component Faults"
■ Section 11.2, "Managing BPEL Process Service Component Policies"
■ Section 11.3, "Recovering from BPEL Process Service Engine Faults"
■ Section 11.4, "Performing BPEL Process Service Engine Message Recovery"
■ Section 11.5, "Disabling BPEL Monitors and Sensors"
For more information, see the following sections:
■ Section 1.2.4, "Understanding Service Components and Service Component Instances"
■ Section 1.2.6, "Understanding Service Engines"
11.1 Recovering from BPEL Process Service Component FaultsYou can monitor and perform individual and bulk fault recoveries for BPEL process service components that are identified as recoverable. For BPEL process faults to be identified as recoverable, there must be a fault policy defined that is bound to the fault (through the fault-bindings.xml file) and which triggers the action ora-human-intervention. However, without defining any fault policies, the fault takes its normal course as either a recoverable or nonrecoverable fault.
To recover from BPEL process service component faults:
1. Access this page through one of the following options:
2. Select the BPEL process service component in the Component Metrics section.
3. Click Faults.
From the SOA Infrastructure Menu... From the SOA Folder in the Navigator...
1. Select Home.
2. Select the Deployed Composites tab.
3. In the Composite section, select a specific SOA composite application.
1. Under soa-infra, select a specific SOA composite application.

Recovering from BPEL Process Service Component Faults
11-2 Oracle Fusion Middleware Administrator's Guide for Oracle SOA Suite
The Faults page displays the following details:
■ A utility for searching for a specific fault by specifying a criteria and clicking Search. Click the Help icon for details.
■ Faults that occurred in the service component, including the fault ID, error message, whether you can recover from the fault, time at which the fault occurred, service component instance ID, activity in which the fault occurred, and a link to a log file describing the fault.
BPEL process service component faults identified as recoverable can be recovered.
4. Select faults for recovery using one of the following methods. Note that fault recovery selection at the BPEL process service component level equals the SOA Infrastructure level, SOA composite application level, and Oracle Mediator service component level.

Recovering from BPEL Process Service Component Faults
Managing BPEL Process Service Components and Engines 11-3
5. Select an action from the Recovery Action list.
6. Perform the following additional monitoring tasks from within the faults table:
For... Then...
Single fault recovery
There are three options from which to choose for single-fault recovery:
1. Click the row of the fault that has been identified as recoverable. With the row highlighted, select a specific action from the Recovery Action list, as described in Step 5.
2. In the Recovery column, click the Recover link to access the Faults page of the instance audit trail to perform fault recovery.
3. In the Error Message column, click the message of a fault that has been identified as recoverable. This displays complete fault details, including the fault ID, fault time, fault location, fault type, and error message text. A Recover Now option displays for recoverable faults. Click Recover Now to access the Faults page of the instance audit trail to perform fault recovery.
Bulk fault recovery
There are two options from which to choose for bulk-fault recovery:
1. Use Shift+Click or Control+Click to select specific faults in the rows.
or
2. From the Select menu, choose Select All Recoverable. Then use Shift+Click or Control+Click to deselect the faults to not include in the recovery operation.
Then:
3. Select an action from the Recovery Action list, as described in Step 5.
Note: Only the actions applicable to all selected faults are available.
Recovery of all faults
1. From the Select menu, choose Select All Recoverable.
2. Select an action from the Recovery Action list, as described in Step 5.
Note: Only the actions applicable to all selected faults are available.
Note: In most cases, fault policy actions are automatically executed. The only exception is if you defined a fault policy that uses the action ora-human-intervention. This action creates a recoverable fault that can be recovered from Oracle Enterprise Manager Fusion Middleware Control Console.
Action Description
Retry Retries the instance directly. An example of a scenario in which to use this recovery action is when the fault occurred because the service provider was not reachable due to a network error. The network error is now resolved.
Abort Aborts the entire instance.
Replay Replays the entire scope again in which the fault occurred.
Rethrow Rethrows the current fault. BPEL fault handlers (catch branches) are used to handle the fault. By default, all exceptions are caught by the fault management framework unless an explicit rethrow fault policy is provided.
Continue Ignores the fault and continues processing (marks the faulting activity as a success).

Managing BPEL Process Service Component Policies
11-4 Oracle Fusion Middleware Administrator's Guide for Oracle SOA Suite
a. Click the Show only recoverable faults check box to display only faults from which you can recover.
b. From the Fault Type list, select to display all faults, system faults, business faults, or Oracle Web Service Manager (OWSM) faults in the faults table. Click the Help icon for a description of these fault types.
c. From the View list, select Columns > Fault ID to display the fault IDs for each error message. The fault ID is automatically generated and uniquely identifies a fault. The fault ID also displays when you click an error message.
d. In the Component Instance ID column, click a specific service component ID to access task details about the instance (for example, the current state of a task). Note that rejected messages do not have a component instance ID.
e. In the Logs column, click a link to access the Log Messages page with filtered messages specific to that instance.
For more information, see the following documentation:
■ Section 1.3.3.1, "Understanding Fault Recovery"
■ Section 8.5.1, "Examples of Fault Recovery for BPEL Processes"
■ Oracle Fusion Middleware Developer's Guide for Oracle SOA Suite
■ Oracle Fusion Middleware Administrator's Guide for details about viewing and searching log files
11.2 Managing BPEL Process Service Component PoliciesYou can attach and detach policies to and from BPEL process service components in currently deployed SOA composite applications. Policies apply security to the delivery of messages. Oracle Fusion Middleware uses a policy-based model to manage Web services.
To manage BPEL process service component policies:
1. Access this page through one of the following options:
2. Select the BPEL process service component in the Component Metrics section.
3. Click Policies.
The Policies page enables you to attach and detach policies to and from BPEL process service components. The policies table displays the attached policy name, the policy reference status (enabled or disabled) that you can toggle, the category (Management, Reliable Messaging, MTOM Attachment, Security, or WS
Note: Before attaching policies, see Oracle Fusion Middleware Security and Administrator's Guide for Web Services for definitions of available policies and details about which ones to use in your environment.
From the SOA Infrastructure Menu... From the SOA Folder in the Navigator...
1. Select Home.
2. Select the Deployed Composites tab.
3. In the Composite section, select a specific SOA composite application.
1. Under soa-infra, select a specific SOA composite application.

Recovering from BPEL Process Service Engine Faults
Managing BPEL Process Service Components and Engines 11-5
Addressing), the violations, and the authentication, authorization, confidentiality, and integrity failures since the SOA Infrastructure was last restarted.
4. Click Attach/Detach.
If multiple components are available, you are prompted to select the service or component for which to perform the attachment or detachment.
5. Select the service or component to which to attach or detach a policy.
This invokes a dialog for attaching or detaching policies.
Policies currently attached appear in the Attached Policies section. Additional policies available for attachment appear in the Available Policies section.
6. Select to attach policies appropriate to your environment.
7. Click Attach.
8. When you are finished attaching policies, click Validate.
9. If an error message appears, make the necessary corrections until you no longer have any validation errors.
10. Click OK.
The attached policy displays in the policies table.
For more information, see the following documentation:
■ Section 1.3.3.2, "Understanding Policies"
■ Section 8.8, "Managing SOA Composite Application Policies" for the dialogs that display during policy attachment
■ Oracle Fusion Middleware Security and Administrator's Guide for Web Services for definitions of available policies and details about which ones to use for your environment
11.3 Recovering from BPEL Process Service Engine FaultsYou can monitor and perform individual and bulk recoveries of faults occurring in BPEL process service engines that are identified as recoverable. All BPEL process service component faults, regardless of the SOA composite application instance of which they are a part, can be viewed in the BPEL process service engine. For BPEL process faults to be identified as recoverable, there must be a fault policy defined that is bound to the fault (through the fault-bindings.xml file) and which triggers the
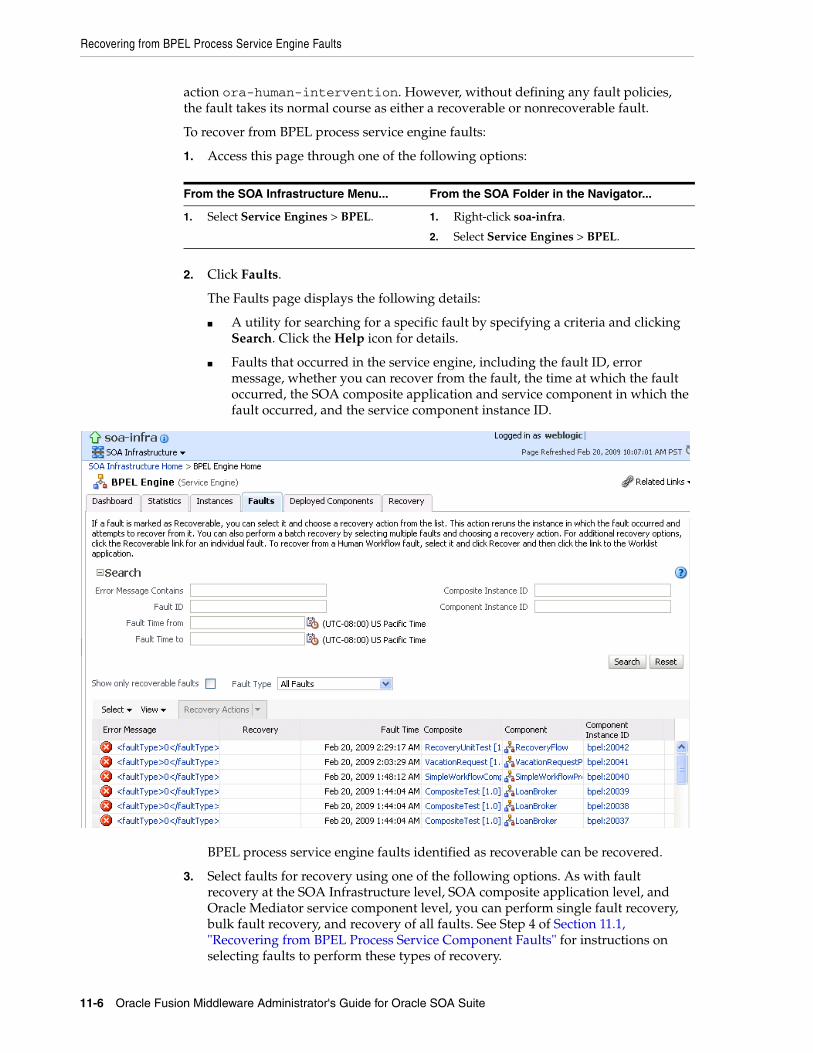
Recovering from BPEL Process Service Engine Faults
11-6 Oracle Fusion Middleware Administrator's Guide for Oracle SOA Suite
action ora-human-intervention. However, without defining any fault policies, the fault takes its normal course as either a recoverable or nonrecoverable fault.
To recover from BPEL process service engine faults:
1. Access this page through one of the following options:
2. Click Faults.
The Faults page displays the following details:
■ A utility for searching for a specific fault by specifying a criteria and clicking Search. Click the Help icon for details.
■ Faults that occurred in the service engine, including the fault ID, error message, whether you can recover from the fault, the time at which the fault occurred, the SOA composite application and service component in which the fault occurred, and the service component instance ID.
BPEL process service engine faults identified as recoverable can be recovered.
3. Select faults for recovery using one of the following options. As with fault recovery at the SOA Infrastructure level, SOA composite application level, and Oracle Mediator service component level, you can perform single fault recovery, bulk fault recovery, and recovery of all faults. See Step 4 of Section 11.1, "Recovering from BPEL Process Service Component Faults" for instructions on selecting faults to perform these types of recovery.
From the SOA Infrastructure Menu... From the SOA Folder in the Navigator...
1. Select Service Engines > BPEL. 1. Right-click soa-infra.
2. Select Service Engines > BPEL.

Performing BPEL Process Service Engine Message Recovery
Managing BPEL Process Service Components and Engines 11-7
4. Select an action from the Recovery Action list.
5. Perform the following additional monitoring tasks from within the faults table:
a. Click the Show only recoverable faults check box to only display faults from which you can recover.
b. From the Fault Type list, select to display all faults, system faults, business faults, or OWSM faults in the faults table. Click the Help icon for a description of these fault types.
c. From the View list, select Columns > Fault ID to display the fault IDs for each error message. The fault ID is automatically generated and uniquely identifies a fault. The fault ID also displays when you click an error message.
d. In the Composite column, click a specific SOA composite application to access its home page.
e. In the Component column, click a specific service component to access its home page.
f. In the Component Instance ID column, click a specific service component ID to access task details about the instance (for example, the current state of a task). Note that rejected messages do not have a component instance ID.
For more information, see the following sections:
■ Section 1.3.3.1, "Understanding Fault Recovery" for conceptual details about faults
■ Section 8.5.1, "Examples of Fault Recovery for BPEL Processes"
11.4 Performing BPEL Process Service Engine Message RecoveryYou can perform a manual recovery of undelivered invoke or callback messages due to a transaction rollback in the process instance. Recovery of invoke messages applies to asynchronous BPEL processes only. Synchronous BPEL processes return an error to
Note: In most cases, fault policy actions are automatically executed. The only exception is if you defined a fault policy that uses the action ora-human-intervention. This action creates a recoverable fault that can be recovered from Oracle Enterprise Manager Fusion Middleware Control Console.
Action Description
Retry Retries the instance with an option to provide a retry success action. An example of a scenario in which to use this recovery action is when the fault occurred because the service provider was not reachable due to a network error. The network error is now resolved.
Abort Aborts the entire instance.
Replay Replays the entire scope again in which the fault occurred.
Rethrow Rethrows the current fault. BPEL fault handlers (catch branches) are used to handle the fault. By default, all exceptions are caught by the fault management framework unless an explicit rethrow fault policy is provided.
Continue Ignores the fault and continues processing (marks the faulting activity as a success).

Performing BPEL Process Service Engine Message Recovery
11-8 Oracle Fusion Middleware Administrator's Guide for Oracle SOA Suite
the calling client and are not recoverable from this page. Recoverable activities are activities that failed and can be recovered. For example, if you are using the file adapter to initiate an asynchronous BPEL process and your system crashes while the instance is processing, you can manually perform recovery when the server restarts to ensure that all message records are recovered.
To perform BPEL process service engine message recovery:
1. Access this page through one of the following options:
2. Click Recovery.
The Recovery page displays the following details:
■ A utility for searching for a specific message failure by specifying a criteria and clicking Search. Click the Help icon for details.
■ Message failure in the service engine, including the conversation ID, whether you can recover from the message failure, the service component and composite application in which the failure occurred, and the time at which the fault occurred.
3. Select a fault in the table.
4. Select one of the following options:
From the SOA Infrastructure Menu... From the SOA Folder in the Navigator...
1. Select Service Engines > BPEL. 1. Right-click soa-infra.
2. Select Service Engines > BPEL.

Disabling BPEL Monitors and Sensors
Managing BPEL Process Service Components and Engines 11-9
Once a message is submitted for recovery, the BPEL process service engine may take time to complete the action. This typically takes less than several seconds. During this time, the message remains visible in the Recovery page. Duplicate attempts to recover the same message in that period are ignored. Refresh the page every few seconds to receive the latest recovery status.
11.5 Disabling BPEL Monitors and SensorsBy default, BPEL sensors defined in SOA composite applications are enabled. You can disable all BPEL sensors (variable, fault, and activity) at the following levels:
■ At the BPEL service engine level (defined for all the BPEL components across all deployed SOA composite applications).
■ At the SOA composite application level (applies to all BPEL sensors defined for all BPEL components that comprise the composite). The service engine level setting takes precedence when sensors are disabled (that is, the composite level setting for enabling and disabling BPEL sensors has no impact if the global service engine level setting is disabled). If the global service engine level setting is enabled (the default setting), you can enable or disable BPEL sensors at the composite level.
You can also disable BPEL monitors, which are used to capture BPEL process metrics that are sent to Oracle BAM Server, and then used for analysis and graphic display.
Disabling sensors means that sensor values are not captured during run time. This results in the values not being displayed in the Sensor Values page of the BPEL audit trail.
You cannot enable or disable BPEL sensors at the service component level.
To disable BPEL monitors and sensors at the service engine level:
1. Access the BPEL Service Engine Properties page by following the steps in Section 9.1, "Configuring BPEL Process Service Engine Properties."
2. Select the Disable BPEL Monitors and Sensors check box.This action enables the BPEL engine to disable all calls to sensors.
3. Click Apply.
To disable BPEL monitors and sensors at the SOA composite application level:
1. Go to the home page of the SOA composite application in which you want to disable monitors and sensors.
2. From the Settings menu, select Enable/Disable BPEL Monitors and Sensors. This selection only displays for composites that have a BPEL service component, regardless of whether that component includes sensors.
Action Description
Recover Retries the message in which the fault occurred.
If an asynchronous BPEL process encounters a transaction rollback scenario because of any underlying exception error, it rolls back to the last dehydration activity. If this is a new instance, and a receive activity was the first dehydration activity, the BPEL process service engine creates a recoverable invoke. When you click Recover to recover the invoke, the service engine creates a new instance. This instance may run to completion with no exception error. However, you continue to see the older instance identified as faulted.
Mark Cancelled Marks the message so it is never delivered.

Disabling BPEL Monitors and Sensors
11-10 Oracle Fusion Middleware Administrator's Guide for Oracle SOA Suite
3. If sensors are enabled at the BPEL process service engine level, the current setting for sensors at the SOA composite application level indicates which confirmation message displays next.
a. If monitors and sensors are enabled at the composite level, you are prompted to confirm to disable all BPEL monitors and sensors defined for all BPEL components that comprise the selected composite.
b. If monitors and sensors are disabled at the composite level, you are prompted to confirm to enable all BPEL monitors and sensors defined for all BPEL components that comprise the selected composite.
4. If monitors and sensors are disabled at the BPEL process service engine level, then an inline message is displayed indicating that you cannot modify the monitor and sensor values. The current setting for monitors and sensors at the composite level is not shown in this case.
For more information about BPEL monitors, see Oracle Fusion Middleware Developer's Guide for Oracle SOA Suite.

Part VIAdministering Oracle Mediator Service
Components and Engines
This part describes how to administer Oracle Mediator service components and engines.
This part includes the following chapters:
■ Chapter 12, "Configuring Oracle Mediator Service Components and Engines"
■ Chapter 13, "Monitoring Oracle Mediator Service Components and Engines"
■ Chapter 14, "Managing Oracle Mediator Service Components and Engines"
■ Chapter 15, "Managing Cross-References"


12
Configuring Oracle Mediator Service Components and Engines 12-1
12 Configuring Oracle Mediator ServiceComponents and Engines
This chapter describes how to configure Oracle Mediator (Mediator) service components and service engines.
This chapter includes the following topics:
■ Section 12.1, "Introduction to Configuring Oracle Mediator"
■ Section 12.2, "Configuring Audit-Level Flags"
■ Section 12.3, "Configuring Metrics-Level Flag"
■ Section 12.4, "Configuring Parameters for Parallel Infrastructure"
■ Section 12.5, "Configuring Parameters for Error/Retry Infrastructure"
■ Section 12.6, "Configuring Parameters for Heartbeat Framework"
12.1 Introduction to Configuring Oracle MediatorYou can configure the properties of Mediator Service Engine by setting the parameters mentioned in this chapter. These parameters can be set in the following ways:
■ By setting the values of the parameters in the Mediator Service Engine Properties page:

Introduction to Configuring Oracle Mediator
12-2 Oracle Fusion Middleware Administrator's Guide for Oracle SOA Suite
Perform the following steps to display the Mediator Service Engine Properties page:
1. Open the SOA Infrastructure Home page.
2. From the SOA Infrastructure menu, select SOA Administration and then Mediator Properties.
■ By setting the values of the parameters in an MBean browser:
Perform the following steps to set the values in an MBean browser:
1. From the SOA Infrastructure menu, select Administration and then System MBean Browser
The System MBean Browser page is displayed.
2. Expand the node oracle.as.soainfra.config in the left pane (below the page title).
The Server:soa_server1 node is displayed.
3. Expand the Server:soa_server1 node.
The MediatorConfig node is displayed.
4. Expand the MediatorConfig node.
The mediator MBean is displayed.
5. Click the mediator MBean.
The properties of the MBean are displayed on the right pane.
6. Change the value of the properties and click Apply.
Note: You do not need to restart the server for changing these properties.

Configuring Parameters for Parallel Infrastructure
Configuring Oracle Mediator Service Components and Engines 12-3
12.2 Configuring Audit-Level FlagsYou can configure the Mediator-specific auditLevel flag for audit levels. The value of this flag overrides the value of the global SOA infrastructure audit-level flag. The possible values of this flag are:
■ Off - Switches off auditing of Mediator. Composite instance tracking and payload tracking information are not collected.
■ Inherit - Level of audit is the same as the SOA infrastructure. This setting enables the Mediator audit level to automatically change, when the global setting is changed. Setting a different audit level tracking, for this page, overrides the tracking set at the SOA Infrastructure level.
■ Production - All events are logged. All audit details, except the details of assign activities, are logged. Instance tracking information is collected, but payload details are not captured and these details are not available in the flow audit trails. This level is optimal for most typical operations and testing.
■ Development - All events and all audit details are logged. In addition, payload details are captured and are available in the flow audit trails. This level is useful for debugging purposes, but may impact performance.
The default value of this flag is Inherit.
12.3 Configuring Metrics-Level FlagYou can set the Mediator-specific flag metricsLevel for configuring the Dynamic Monitoring Service (DMS) metrics level. DMS metrics are used to measure the performance of application components. The possible values of this flag are:
■ Enabled - Enables DMS metrics tracking
■ Disabled - Disables DMS metrics tracking
12.4 Configuring Parameters for Parallel InfrastructureYou can configure the parallel infrastructure by setting the following parameters:
■ ParallelWorkerThreadCount - Specifies the number of parallel dispatchers for message processing. Increase this parameter to increase the number of outbound threads for parallel processing.
■ ParallelMaxRowsRetrieved - Specifies the number of rows retrieved per iteration for parallel processing. You can set the value of this parameter to 50 to 100 times of the ParallelWorkerThreadCount parameter, depending on the memory consumption limit.
■ ParallelLockerThreadSleep - Specifies the idle time between two successive iterations for retrieving rows, when there is no message for parallel processing. The time is measured in seconds.
Note: Audit levels were known as instance tracking levels in the Oracle Application Server 10g releases.
Note: A large value for the ParallelMaxRowsRetrieved parameter can result in memory exhaustion.

Configuring Parameters for Error/Retry Infrastructure
12-4 Oracle Fusion Middleware Administrator's Guide for Oracle SOA Suite
12.5 Configuring Parameters for Error/Retry InfrastructureYou can configure the error/retry infrastructure by setting the following parameter:
■ ErrorLockerThreadSleep - Specifies the idle time between two successive iterations for retrieving errored out messages, when there is no errored out message from parallel processing. The time is measured in seconds.
12.6 Configuring Parameters for Heartbeat FrameworkThe heartbeat infrastructure is a part of the Mediator Service Engine and is used to detect the absence of a Mediator Service Engine instance due to failure or shutdown of a node. The heartbeat infrastructure creates a unique identifier for each instance of the Mediator Service Engine and performs the necessary house-keeping tasks, if a Mediator Service Engine fails. The heartbeat infrastructure consists of a heartbeat thread. The heartbeat thread periodically updates the time stamp associated with each Mediator Service Engine's unique identifier. By updating the time stamp associated with it, a Mediator Service Engine announces its presence to the other Mediator Service Engines. The heartbeat thread also checks if there are unique identifiers that have not been updated for a particular period of time. You can configure the heartbeat Framework by setting the following parameters:
■ ContainerIdLeaseRefresh - Specifies the time interval at which the heartbeat thread periodically updates the time stamp associated with each Mediator Service Engine's unique identifier.
■ ContainerIdLeaseTimeout - Specifies the time interval at which the heartbeat thread periodically checks if there are unique identifiers that have not been updated for a particular period of time.
By configuring these parameters, you can specify the period used by the heartbeat thread to detect the failure of a Mediator Service Engine.
Note:
■ The default value of the ContainerIdLeaseRefresh parameter is 60 seconds.
■ In case of unplanned outages, you must wait as much time as specified as the ContainerIdLeaseRefresh interval, after restarting the server. The server requires this much time to complete the instances still in the running state.
Note:
■ The default value of the ContainerIdLeaseRefresh parameter is 60 seconds.
■ In case of unplanned outages, you must wait as much time as specified as the ContainerIdLeaseRefresh interval, after restarting the server. The server needs this much time to complete the instances still in the running state.

13
Monitoring Oracle Mediator Service Components and Engines 13-1
13Monitoring Oracle Mediator ServiceComponents and Engines
This chapter describes how to monitor Oracle Mediator (Mediator) service components and engines.
This chapter includes the following topics:
■ Section 13.1, "Monitoring Mediator Service Components"
■ Section 13.2, "Monitoring Mediator Service Engine"
13.1 Monitoring Mediator Service ComponentsThis section describes how to monitor Mediator components. It contains the following topics:
■ Section 13.1.1, "Monitoring Instance Statistics"
■ Section 13.1.2, "Monitoring Routing Statistics"
13.1.1 Monitoring Instance StatisticsYou can use the Dashboard tab of the Mediator Component Home page to view the instance summary, recent instances list, and instance per minute data.
To view the instance statistics of a Mediator component:
1. Open the Mediator Component Home page.
2. Click Dashboard.
3. View the Recent Instances and Instance Rate Per Min sections.
Note: To view the Instance Rate Per Min section, you may have to expand the panel by clicking on the plus (+) icon appearing to the left of the section title.

Monitoring Mediator Service Components
13-2 Oracle Fusion Middleware Administrator's Guide for Oracle SOA Suite
13.1.1.1 About the Instance Information Sections in the Dashboard TabThis section describes the instance information sections in the Dashboard tab.
Recent InstancesThe Recent Instances section provides the following information about the recent Mediator component instances:
■ Instance ID - The unique instance ID of a specific Mediator component instance.
■ State - The state of the specific Mediator component instance. It has the following values: Stale, Terminated by user, Faulted, Suspended, Completed successfully, Recovery required, and Running.
– Stale - Composite, for which this Mediator instance was created, is undeployed.
– Terminated by User - The instance was aborted manually through Enterprise Manager, or automatically by a fault policy.
– Faulted - Instance is faulted and cannot be recovered.
– Completed successfully - Everything is fine with this instance and it ran successfully.
– Recovery required - Instance is faulted and can be recovered through Oracle Enterprise Manager manually.
For more information about recovering a fault, refer to Section 14.2, "Managing Mediator Faults".
– Running - One or more routing rules of the Mediator component are still running.
■ Start Date - The date when the specific Mediator component instance was started.
■ Last Modified Date - The date when the specific Mediator component instance was modified for the last time.
■ Source - The operation or event that triggered the Mediator component.
■ Logs - The location of the Log file that has the log message related to the Mediator component instance.
This section provides information only about recent instances. To view all instances of a component, click Instances or Show All on Dashboard tab to navigate to the Instances tab. To view only those instances that are in running state, select Show Only Running Instances.
The Instances tab of the Mediator Component Home page enables you to search for a Mediator Component instance or view a Mediator Component instance based on the criteria specified.

Monitoring Mediator Service Components
Monitoring Oracle Mediator Service Components and Engines 13-3
Recent FaultsThe Recent Faults section provides the following information about the recent faults that occurred while executing the Mediator component:
■ Error Message - The detailed error message associated with the faulted instance.
■ Recovery - Identifies whether the fault is recoverable or not. If a fault is marked as recoverable, you can select it and choose a recovery action from the Recovery Actions list. You can also click Recover for that fault to access more recovery options at the component instance level.
■ Fault Time - The time when the specific fault occurred in the specific Mediator component instance.
■ Component Instance ID - The unique instance ID of a specific Mediator component instance.
■ Case - The routing source case, where the fault occurred.
■ Logs - The log location that has the log message related to the fault. Click this link to find more details about the fault and potential causes of the fault.
This section provides information only about recent faults. To view all faults of a component, click Faults or Show All on Dashboard tab to navigate to the Faults tab. If you want to view only the faults caused by a system error, then click Show only system faults. System faults are related to system failure issues, such as a database or network being inaccessible.
The Faults tab of the Mediator Component Home page enables you to search for faults based on the specified criteria and to recover or abort multiple faults.

Monitoring Mediator Service Components
13-4 Oracle Fusion Middleware Administrator's Guide for Oracle SOA Suite
For more details about the information available on Faults tab, refer to Section 14.2, "Managing Mediator Faults".
Routing StatisticsRouting Statistics section enables you to view the routing data of a source operation or subscribed event. For more information, refer to Section 13.1.2, "Monitoring Routing Statistics".
Instance Rate Per Min SectionThe Instance Rate per Min (Realtime Data) section provides information about the execution rate of the Mediator instances per minute. This section displays a graph that shows real-time data for successful, faulted, and incoming instances in the last five minutes.
You can have a tabular view of the instance rate for last five minutes by clicking Table View.
ReferencesThe References section provides information about the references used by the Mediator component and any recent faults:
■ Name - The name of the references associated with the Mediator component.
■ Faults - The number of faults for this reference.
■ Message Count - Total number of times this reference was invoked.
■ Average Response Time - The average Processing time in milliseconds for the reference.
13.1.2 Monitoring Routing StatisticsYou can use the Routing Statistics section of the Dashboard tab in the Mediator Component Home page to view the routing data of a source operation or subscribed event.
To view the routing statistics of a Mediator component:
1. Open the Mediator Component Home page.

Monitoring Mediator Service Components
Monitoring Oracle Mediator Service Components and Engines 13-5
2. Click Dashboard.
3. In the Routing Statistics section, select a routing source from the Select Route Source list.
4. Expand the Route Target table.
5. View the routing statistics for all targets in the Route Target table.
The Route Target section under the Routing Statistics section enables you to view statistics of the target routes of the Mediator component. This section provides the following information about a Mediator component instance:
■ Name - The name of the Route Target of the Mediator component.
■ Error - The number of errors that occurred during routing.
■ Average Processing Time - The average processing time for the instances of the specific Mediator component. This field has two subfields, Success and Failure. The Success subfield shows the average processing time for the instances of the specific Mediator component that executed successfully. The Failure subfield shows the average processing time for the instances of the specific Mediator component that failed to execute successfully.
■ Average Invocation Time - The average Invocation Time for the instances of the specific Mediator Component.
13.1.2.1 What You May Need to Know About Monitoring Routing StatisticsThe Routing Statistics section provides the following information about the routing source and its various targets:
■ Number of successfully processed messages
■ Average processing time for successful messages
■ Number of faulted messages
■ Average processing time for faulted messages
■ Number of incoming messages

Monitoring Mediator Service Engine
13-6 Oracle Fusion Middleware Administrator's Guide for Oracle SOA Suite
13.2 Monitoring Mediator Service EngineYou can assess the efficiency level of the Mediator Service Engine by monitoring the request breakdown statistics.
13.2.1 Monitoring Request Breakdown StatisticsTo view the request breakdown statistics of the currently deployed Mediator components:
1. Open the SOA Infrastructure Home page.
2. From the SOA Infrastructure menu, select Service Engines and then Mediator.
The Mediator Service Engine Home page is displayed.
3. Click the Statistics tab.
4. View the Request Breakdown statistics.
13.2.1.1 What You May Need to Know About Request Breakdown StatisticsThe Request Breakdown section provides information about the count and the average time taken for processing the following actions:
■ Invoke One Way - One-way invocations from Mediator Service Engine.
■ Transformation - Transforming messages in Mediator Service Engine.
■ Enqueue - Dehydrating messages for parallel routing rules.
■ Invoke - Request-response invocations from Mediator Service Engine.
■ Publish - Publishing events from Mediator Service Engine.
■ Condition Evaluation - Filter conditions evaluation by Mediator.
■ Validation - Message validations by Mediator Service Engine.
Note: Dehydrating of messages means storing the incoming messages in database for parallel routing rules, so that they can be processed later by worker threads.

14
Managing Oracle Mediator Service Components and Engines 14-1
14 Managing Oracle Mediator ServiceComponents and Engines
This chapter describes how to manage Oracle Mediator (Mediator) service components and engines.
This chapter includes the following topics:
■ Section 14.1, "Viewing the Deployed Mediator Service Components"
■ Section 14.2, "Managing Mediator Faults"
■ Section 14.3, "Managing Mediator Policies"
14.1 Viewing the Deployed Mediator Service ComponentsThe Deployed Components tab of the Mediator Service Engine Home page enables to search for the Mediator Components of a composite application or view the Mediator Components of a composite application, based on the criteria specified.
To manage deployed Mediator service components:
1. Open the SOA Infrastructure Home page.
2. From the SOA Infrastructure menu, select Service Engines and then Mediator.
3. Click Deployed Components.
4. View details about all Mediator service components currently deployed in SOA composite applications.
5. Use the Search section to search for and display specific deployed Mediator service components.

Managing Mediator Faults
14-2 Oracle Fusion Middleware Administrator's Guide for Oracle SOA Suite
14.1.1 What You May Need to Know About the Information in the Deployed Components Tab
The Deployed Components tab of the Mediator Service Engine Home page provides the following information about deployed components:
■ Name - The name of the component. You can click the component name to access its home page.
■ Composite - The name of the composite application. You can click the composite name to access its home page.
■ Status - The status of the component, whether it is up or down.
■ Total Instances - The number of total instances.
■ Running Instances - The number of running instances.
■ Recoverable Instances - The number of recoverable instances.
■ Non Recoverable Instances - The number of nonrecoverable instances.
14.2 Managing Mediator FaultsTo manage Mediator faults:
1. Open the SOA Infrastructure Home page.
2. From the SOA Infrastructure menu, select Service Engines and then Mediator.
3. Click Faults.
4. View details about all faults in Mediator service components.

Managing Mediator Faults
Managing Oracle Mediator Service Components and Engines 14-3
5. Use the Search section to search for and display specific faults in Mediator service components. If you do not specify a search criterion, all faults are displayed in the Faults table. Specify a search criterion and click Search to see the updated results.
6. If a fault is marked as recoverable, you can select it and choose a recovery action from the Recovery Actions list.
You can also recover multiple faults as a batch. To select multiple faults, press Shift+Click or Control+Click on the rows in the Faults table. Then, select a recovery action from the Recovery Actions list. Note that in this case, only the common actions applicable to all selected faults are available.
7. Click Error Message and then Recover Now....
The Faults tab of the Mediator Instance Details page of the specific Mediator component instance, where the fault occurred, is displayed.
This page can also be displayed by clicking Recovery column of a fault.

Managing Mediator Faults
14-4 Oracle Fusion Middleware Administrator's Guide for Oracle SOA Suite
8. Select the fault by clicking Message. The details of the fault are displayed in the lower pane.
9. Click Retry or Abort based on your need.
10. To confirm your action, click Yes on the Confirmation dialog as shown in the following figure:

Managing Mediator Faults
Managing Oracle Mediator Service Components and Engines 14-5
You will get the following Information dialog that displays the status of the recovery action.
14.2.1 What You May Need to Know About the Information in the Faults TabThe Faults tab of the Mediator Service Engine Home page requires the following information about faults to perform a search:
■ Error Message Contains - A complete or partial error message.
■ Fault ID - The automatically generated fault ID that uniquely identifies a fault.
■ Fault Time from - The date at which to begin the search for faults.
■ Fault Time to - The date at which to end the search for faults.
■ Composite Instance ID - The exact ID of the instance in which the SOA composite application fault occurred.
■ Component Instance ID - The exact ID of the component instance.
You can customize the display of searched faults by specifying the following options:
Managing Mediator Policies
14-6 Oracle Fusion Middleware Administrator's Guide for Oracle SOA Suite
■ Show Only Recoverable Faults - Enables you to view only those faults, on which you can perform recovery actions.
■ Fault Type - Type of the fault. A fault can be of the following types:
– Business faults - These faults are application-specific faults that are generated when there is a problem with the information being processed. For example, when a social security number is not found in the database.
– System faults - These faults are related to system failure issues, such as a database or network being inaccessible.
– Oracle Web Services Manager (OWSM) policy faults - These faults are generated during failure of an attached policy.
The Faults tab of the Mediator Service Engine Home page provides the following information about faults:
■ Fault ID - The ID of the fault. This number is automatically generated and uniquely identifies a fault. This column does not automatically display in this table. To display this column, select Columns, then Fault ID from the View menu. The fault ID also displays when you click an error message.
■ Error Message - The error messages of faults occurring in the service engine. You can click an error message to display complete information about the fault.
■ Recovery - Identifies if a specific fault is recoverable. If a fault is marked as recoverable, you can select it and choose a recovery action from the Recovery Actions list.
■ Fault Time - The time at which the fault occurred.
■ Composite - The SOA composite application in which the fault occurred. You can click this link to access the composite home page.
■ Component - The Mediator service component in which the fault occurred. You can click this link to access the component home page.
■ Component Instance ID - The instance ID of the service component in which the fault occurred.
■ Case - Specifies whether the fault is a business fault, a system fault, or an error.
■ Logs - You can click this link to access log files describing the fault.
14.3 Managing Mediator PoliciesOracle Fusion Middleware uses a policy-based model to manage Web services. Policies apply behavioral requirements to the delivery of messages.
To manage Mediator policies:
1. Open the Mediator Component Home page.
2. Click Policies.
3. View the policies attached to a Mediator component.

Managing Mediator Policies
Managing Oracle Mediator Service Components and Engines 14-7
4. Click Attach/Detach to attach or detach a policy.
The Attach/Detach Policies page is displayed. All the attached policies are displayed in the upper pane and all the policies available to be attached are displayed in the lower pane.
5. Click a policy in the lower pane to select it and click Attach to attach it to the Mediator component. Click a policy to in the upper pane to select it and click Detach to detach it from the Mediator component.
14.3.1 What You May Need to Know About the Information in the Policies TabThe Policies tab of the Mediator Component Home page provides the following information about a Mediator component instance:
■ Policy Name - The name of the policy.
■ Policy Reference Status - The policy status. It can be either enabled or disabled. Disabling a policy temporarily turns it off without detaching it.
■ Category - The category of the policy. It has the following values: Management, Reliable Messaging, MTOM Attachments, Security, and WS Addressing.
■ Total Violations - The total number of violations since the SOA Infrastructure was restarted.

Managing Mediator Policies
14-8 Oracle Fusion Middleware Administrator's Guide for Oracle SOA Suite
■ Security Violation - The number of violations in each category. Category can have the following values: Authentication, Authorization, Confidentiality, and Integrity.

15
Managing Cross-References 15-1
15Managing Cross-References
Cross-references enable you to associate identifiers for equivalent entities created in different applications. This chapter describes how to manage cross-references.
For more information about cross-references, refer to Oracle Fusion Middleware Developer's Guide for Oracle SOA Suite.
This chapter includes the following topics:
■ Section 15.1, "Deleting Cross-Reference Values"
15.1 Deleting Cross-Reference ValuesYou can use the Cross References page to select tables and columns from which you want to delete the values.
To delete values from cross-reference tables and columns:
1. Open the SOA Infrastructure Home page.
2. From the SOA Infrastructure menu, select SOA Administration and then Cross References.
The Cross References page is displayed.
3. In the Select Tables and Columns section, select one of the following options:
■ All tables: To delete values from all tables.
Deleting Cross-Reference Values
15-2 Oracle Fusion Middleware Administrator's Guide for Oracle SOA Suite
■ Select a table and columns: To select either a specific table from which to delete values, or to select one or more columns from a specific table from which to delete values.
4. In the Select Values section, select one of the following options:
■ All: To delete all values from selected table and columns.
■ Marked for delete: To delete only the values that have been marked for deletion from the selected table and columns.
■ Updated between: To delete values updated between a specific time periods.
5. If you select the Updated between option in Step 4, then you must enter a starting date in the From field and an ending date in the To field.
6. Click Delete.

Part VIIAdministering Decision Service
Components and Business Rules ServiceEngines
This part describes how to administer Decision Service components and Business Rules service engines.
This part includes the following chapters:
■ Chapter 16, "Configuring Business Rules Engine"
■ Chapter 17, "Monitoring Decision Service Components and Engines"


16
Configuring Business Rules Engine 16-1
16Configuring Business Rules Engine
This chapter describes how to configure Business Rules Engines.
This chapter includes the following topics:
■ Section 16.1, "Configuring the Business Rules Engine"
16.1 Configuring the Business Rules EngineThe Business Rules Engine does not support any user level configuration. For information on monitoring and managing Decision Service components that run on Business Rules Engines, see Chapter 17, "Monitoring Decision Service Components and Engines".

Configuring the Business Rules Engine
16-2 Oracle Fusion Middleware Administrator's Guide for Oracle SOA Suite

17
Monitoring Decision Service Components and Engines 17-1
17Monitoring Decision Service Componentsand Engines
This chapter describes how to monitor Decision Service Components. Decision Service Components are also called Business Rules components in the Oracle Fusion Middleware documentation.
This chapter includes the following topics:
■ Section 17.1, "Monitoring Business Rules Service Engine Instances and Faults"
■ Section 17.2, "Monitoring Business Rules Service Engine Statistics"
■ Section 17.3, "Monitoring Business Rules Service Engine Instances"
■ Section 17.4, "Monitoring Business Rules Service Engine Faults"
■ Section 17.5, "Monitoring Business Rules Service Engine Deployed Components"
■ Section 17.6, "Monitoring Decision Service Component Instances from a Composite Application"
■ Section 17.7, "Monitoring Decision Service Component Logs"
17.1 Monitoring Business Rules Service Engine Instances and Faults Using the Business Rules Engine home page Dashboard tab, you can monitor recent instances and faults of Decision Service components running in the SOA Infrastructure. These Decision Service components can be part of separate SOA composite applications. Decision Service Components are also called Business Rules components in the Oracle Fusion Middleware documentation.
1. Access the Business Rules Engine home page through one of the following options:
2. Click Dashboard.
The Recent Instances area of the Dashboard tab displays recent instances of all Decision Service components, including the instance ID of the Decision Service component, the Decision Service component name, the SOA composite application of which the Decision Service component is a part, the state of the instance, for
From the SOA Infrastructure Menu... From the SOA Folder in the Navigator...
1. Select Service Engines > Business Rules.
1. Select soa-infra.
2. Right-click and select Service Engines > Business Rules.

Monitoring Business Rules Service Engine Instances and Faults
17-2 Oracle Fusion Middleware Administrator's Guide for Oracle SOA Suite
example, completed successfully or faulted, the instance start time, the last modification time, and a Show logs icon (clicking the Show logs icon shows the Log Messages page with filtered messages specific to that instance).
3. In the Instance ID column, click an instance ID for a Decision Service component to view its audit trail.
Note: To see the state with the correct information, you must set the Capture Composite Instance State option. You can change this setting on the SOA Administration Common Properties page. Turning this feature on allows for separate tracking for "running" instances. However, this may impact the performance. For information on setting this option, see Section 3.1, "Configuring SOA Infrastructure Properties".

Monitoring Business Rules Service Engine Statistics
Monitoring Decision Service Components and Engines 17-3
4. In the Component column, click a specific Decision Service component to access its home page.
5. In the Composite column, click a specific SOA composite application to access its home page.
6. In the Logs column, click a specific log to access the Log Messages page with filtered messages specific to that instance.
7. Click Show All to access the Instances page of the service engine.
The lower part of the Dashboard tab displays the following:
■ The Components table shows the Decision Service components deployed on the Business Rules engine across SOA composites. It also shows the status of the SOA composites and the instance count information in the respective instance state columns.
■ The Recent Faults area shows the recent faults in the service engine, including the error message, the time at which the fault occurred, the SOA composite application in which the fault occurred, the Decision Service component, and the instance ID of the Decision Service component, and a Show logs icon (clicking the Show logs icon shows the Log Messages page with filtered messages specific to that instance).
For more information, see Section 1.2.4, "Understanding Service Components and Service Component Instances".
17.2 Monitoring Business Rules Service Engine StatisticsUsing the Business Rules Engine home page Statistics tab, you can monitor the Business Rules engine performance and metrics. This page shows service engine-level not component-level details. Business Rules components are also called Decision Service Components in the Oracle Fusion Middleware documentation.
1. Access the Business Rules Engine statistics page through one of the following options:
2. Click Statistics.
The Statistics tab displays the following:
Note: The contents of the audit trail page depends on the Audit Level settings. When the Audit Level property is set to Production, the audit trail shows only the activity names. When the Audit Level is in Development mode, the audit trail shows the Decision Service instance payload details. In other modes, for example Off, the audit trail does not show Decision Service details. You can change the Audit Level on the SOA Administration Common Properties page. Additionally, this option can be set for a specific composite from the home page for the composite.
From the SOA Infrastructure Menu... From the SOA Folder in the Navigator...
Select Service Engines > Business Rules. 1. Select soa-infra.
2. Right-click and select Service Engines > Business Rules.

Monitoring Business Rules Service Engine Statistics
17-4 Oracle Fusion Middleware Administrator's Guide for Oracle SOA Suite
■ Average Request Processing Time: This chart displays the average request processing time of the Business Rules engine since server startup. That is, how many requests were processed by the service engine per unit of time.
■ Business Rules Cache Statistics: This area provides details about the service engine cache. This area lists the types of caches used by the service engine and the object count in each of the caches. All these metrics are based on the object count since server startup.
■ Business Rules Operation Statistics: This area shows the operation statistics. Using the operation statistics you can determine the number of calls to Oracle Business Rules Decision Functions since server startup, and determine the total time spent in Decision Functions since server startup.
Note: When you view Business Rules Operation Statistics for composite applications created with Oracle Fusion Middleware 11g Release 1 (11.1.1), the only operation shown is the callFunction operation. In this release the Decision Service only calls Oracle Business Rules using Decision Functions, and this operation is indicated with values for the operation named callFunction (with Count and Average(ms) fields). With composite applications that were migrated from older releases, the Decision Service performs callFunction operations and the other operations listed in the Business Rules Operation Statistics area. For these migrated projects, you can debug the flow of the request through various important operations within the service engine. Also, you can find any long-running operations and take the necessary actions. These metrics also are since server startup.

Monitoring Business Rules Service Engine Instances
Monitoring Decision Service Components and Engines 17-5
17.3 Monitoring Business Rules Service Engine InstancesUsing the Business Rules Engine home page Instances tab, you can monitor all Decision Service component instances. These Decision Service components can be part of separate SOA composite applications. Decision Service Components are also called Business Rules components in the Oracle Fusion Middleware documentation.
1. Access the Business Rules Engine Instances page through one of the following options:
2. Click Instances.
The Instances tab displays the following:
■ A utility for searching for a specific instance by specifying criteria and clicking Search.
■ Instances, including the instance ID of the Decision Service component, the Decision Service component name, the SOA composite application name, the state of the instance (for example, completed successfully, running, or faulted),
From the SOA Infrastructure Menu... From the SOA Folder in the Navigator...
Select Service Engines > Business Rules. 1. Select soa-infra.
2. Right-click and select Service Engines > Business Rules.

Monitoring Business Rules Service Engine Instances
17-6 Oracle Fusion Middleware Administrator's Guide for Oracle SOA Suite
the instance start time, the last modification time, and a Show logs icon (clicking the Show logs icon shows the instance log messages).
3. In the Instance ID column, click an instance ID for a Decision Service component to view its audit trail details.
4. In the Component column, click a specific Decision Service component to access its home page.
5. In the Composite column, click a specific SOA composite application to access its home page.
6. In the Logs column, click a specific log to access the Log Messages page with filtered messages specific to that instance.
For more information, see Section 1.2.4, "Understanding Service Components and Service Component Instances"
Note: The contents of the audit trail page depends on the Audit Level settings. When the Audit Level property is set to Production, the audit trail shows only the activity names. When the Audit Level is in Development mode, the audit trail shows the Decision Service instance payload details. You can change the Audit Level on the SOA Administration Common Properties page. Additionally, this option can be set for a specific composite from the home page for the composite.

Monitoring Business Rules Service Engine Faults
Monitoring Decision Service Components and Engines 17-7
17.4 Monitoring Business Rules Service Engine FaultsUsing the Business Rules Engine home page Faults tab, you can monitor all Decision Service component faults. The Faults tab shows this information for Decision Service components that can be part of separate SOA composite applications. Decision Service Components are also called Business Rules components in the Oracle Fusion Middleware documentation.
1. Access the Business Rules Engine Faults tab through one of the following options:
2. Click Faults.
The Faults tab displays the following:
■ A utility for searching for a specific fault by specifying criteria and clicking Search. Click the Help icon for details.
■ Faults that occurred in the Decision Service component, including the error message, the time at which the fault occurred, the SOA composite application and Decision Service component in which the fault occurred, and the Decision Service component instance ID.
Decision Service component instance faults cannot be recovered.
3. You can perform the following monitoring tasks from within the Faults tab:
a. From the Fault Type list, select to display All Faults, system faults, business faults, or Oracle Web Services Manager faults in the Faults tab.
Note: Decision Service component faults are always nonrecoverable.
From the SOA Infrastructure Menu... From the SOA Folder in the Navigator...
Select Service Engines > Business Rules. 1. Right-click soa-infra.
2. Select Service Engines > Business Rules.

Monitoring Business Rules Service Engine Deployed Components
17-8 Oracle Fusion Middleware Administrator's Guide for Oracle SOA Suite
b. From the View list, select Columns > Fault ID to display the fault IDs for each fault. The fault ID is automatically generated and uniquely identifies a fault. The fault ID is also displayed when you click an error message.
c. In the Component column, click a specific Decision Service component to access its home page.
d. In the Component Instance ID column, click a specific Decision Service component instance ID to view the audit trail.
e. In the Logs column, click a specific log to access the Log Messages page with filtered messages specific to the instance. Clicking the log link shows the faults and error messages related to that faulted instance.
4. In the Error Message column, click to view the fault details.
For more information, see Section 1.2.4, "Understanding Service Components and Service Component Instances".
17.5 Monitoring Business Rules Service Engine Deployed ComponentsUsing the Business Rules Engine home page Deployed Components tab, you can monitor all Decision Service components deployed across SOA composite applications. Decision Service Components are also called Business Rules components in the Oracle Fusion Middleware documentation.
1. Access the Business Rules Engine Deployed Components tab through one of the following options:
2. Click Deployed Components.
The Deployed Components tab displays the following:
■ A utility for searching for a specific component by specifying criteria and clicking Search.
■ Components, including the name, the SOA composite application name, the status (Up or Down), and the instances count (total, running, and faulted).
Note: The contents of the audit trail page depends on the Audit Level settings. When the Audit Level property is set to Production, the audit trail shows only the activity names. When the Audit Level is in Development mode, the audit trail shows the Decision Service instance payload details. You can change the Audit Level on the SOA Administration Common Properties page. Additionally, this option can be set for a specific composite from the home page for the composite.
From the SOA Infrastructure Menu... From the SOA Folder in the Navigator...
Select Service Engines > Business Rules. 1. Right-click soa-infra.
2. Select Service Engines > Business Rules.

Monitoring Decision Service Component Instances from a Composite Application
Monitoring Decision Service Components and Engines 17-9
3. In the Name column, click a name to navigate to the Component home page and view component details.
4. In the Composite column, click a specific SOA composite application to access its home page.
For more information, see Section 1.2.4, "Understanding Service Components and Service Component Instances".
17.6 Monitoring Decision Service Component Instances from a Composite Application
You can monitor Decision Service component instances from a composite application. Each Decision Service component instance has its own unique instance ID. This ID is in addition to the instance ID of the overall SOA composite application of which this Decision Service component is a part. Decision Service Components are also called Business Rules components in the Oracle Fusion Middleware documentation.
1. Access a Decision Service component from a composite application through one of the following options:
Note: To see the state with the correct information, you must set the Capture Composite Instance State option. You can change this setting on the SOA Administration Common Properties page. Turning this feature on allows for separate tracking for "running" instances. However, this may impact the performance. For information on setting the option, see Section 3.1, "Configuring SOA Infrastructure Properties".

Monitoring Decision Service Component Instances from a Composite Application
17-10 Oracle Fusion Middleware Administrator's Guide for Oracle SOA Suite
2. The Component Metrics table on the composite dashboard provides a high-level overview of each Decision Service component. This table includes columns showing the Component Type, the Total Instances, the Running Instances, and the Faulted Instances (recoverable and nonrecoverable).
3. Select a Decision Service component in the Component Metrics section to display the corresponding Decision Service Component page.
From the SOA Infrastructure Menu... From the SOA Folder in the Navigator...
1. In the navigator, select soa-infra.
2. From the SOA Infrastructure menu, Select Home.
3. Click Deployed Composites tab.
4. In the Composite table select a specific SOA composite application that includes a Decision Service component.
1. Expand soa-infra.
2. Select a specific SOA composite application that includes a Decision Service component.

Monitoring Decision Service Component Logs
Monitoring Decision Service Components and Engines 17-11
For more information, see Section 1.2.3, "Understanding SOA Composite Application Instances".
17.7 Monitoring Decision Service Component LogsYou can monitor Decision Service component logs. Decision Service Components are also called Business Rules components in the Oracle Fusion Middleware documentation.
17.7.1 Viewing Decision Service Component LogsTo view the logs select soa-infra and right-click. In the navigation tree select Logs and click View Log Messages. This displays the Log Messages page.

Monitoring Decision Service Component Logs
17-12 Oracle Fusion Middleware Administrator's Guide for Oracle SOA Suite
The Log Messages page opens. Use this page to select target log files.
To access a pre-filtered list of log files for each instance or fault, click in the Logs column from any specific page (for example in the Decision Service engine or component's Faults or Instances tables).
For example, from the Faults table, click the Logs column.

Monitoring Decision Service Component Logs
Monitoring Decision Service Components and Engines 17-13
17.7.2 Setting the Diagnostic Logging Level with Log ConfigurationUse the Log Configuration page to configure the logging level. To open the Log Configuration page, right-click soa-infra and select Logs >Log Configuration.
To configure the Decision Service component logging level, expand the oracle.soa.service.rules and the oracle.soa.services.rules.obrtrace loggers and set the notification level.

Monitoring Decision Service Component Logs
17-14 Oracle Fusion Middleware Administrator's Guide for Oracle SOA Suite

Part VIIIAdministering Human Task Service
Components and Human Workflow ServiceEngines
This part describes how to administer human task service components and human workflow service engines.
This part includes the following chapters:
■ Chapter 18, "Configuring Human Workflow Service Components and Engines"
■ Chapter 19, "Monitoring Human Workflow Service Components and Engines"
■ Chapter 20, "Managing Human Workflow Service Components and Engines"


18
Configuring Human Workflow Service Components and Engines 18-1
18 Configuring Human Workflow ServiceComponents and Engines
This chapter describes how to configure human task service components and the human workflow service engine.
This chapter includes the following topics:
■ Section 18.1, "Configuring Human Workflow Notification Properties"
■ Section 18.2, "Configuring Human Workflow Task Service Properties"
■ Section 18.3, "Configuring Oracle HTTP Server for Task Form Attachments"
■ Section 18.4, "Configuring the Pluggable Notification Service"
■ Section 18.5, "Configuring Multiple Send Addresses"
■ Section 18.6, "Configuring Notification Retries"
■ Section 18.7, "Configuring the Identity Service"
■ Section 18.8, "Seeding Users, Groups, and Application Roles using LDAP Tools"
18.1 Configuring Human Workflow Notification PropertiesYou can configure human workflow notification properties, such as setting the notification mode for messages and setting actionable addresses. These properties are used to notify users of changes to the state of a task. Workflow notifications can use three types of addresses:
■ From address: For sending notifications.
■ Actionable address: For receiving actionable responses.
■ Reply to address: For receiving reply notifications.
To configure human workflow notification properties:
1. Access this page through one of the following options:
Note: In the following procedures, you must configure your channel drivers before configuring your workflow notification properties. Ensure that you know all necessary driver addresses before beginning (for example, the incoming IMAP and outgoing SMTP e-mail servers).

Configuring Human Workflow Notification Properties
18-2 Oracle Fusion Middleware Administrator's Guide for Oracle SOA Suite
The Workflow Notification Properties page appears.
You now configure Oracle User Messaging Service to send and receive notifications. During configuration, you provide the addresses that are used by human workflow.
2. Click Go to the Messaging Driver Page.
3. Click Configure Driver in the upper right section of the page. This takes you to a page to configure the messaging service driver, including properties such as incoming IMAP and outgoing SMTP e-mail servers, outgoing server user names and passwords, and so on. For handling incorrect e-mail responses, the e-mail driver should be configured to handle incoming mails. This action enables human workflow participants to receive and forward notifications. Messaging drivers support the various messaging transports. See section Section 24.4.1, "How to Configure a Driver" for instructions.
From the SOA Infrastructure Menu... From the SOA Folder in the Navigator...
1. Select SOA Administration > Workflow Notification Properties.
1. Right-click soa-infra.
2. Select SOA Administration > Workflow Notification Properties.

Configuring Human Workflow Notification Properties
Configuring Human Workflow Service Components and Engines 18-3
4. Return to the Workflow Notification Properties page.
5. Specify the mode of the notification service. The possible values are:
■ ALL: The e-mail, short message service (SMS), instant message (IM), and voice channels are configured and notification is sent through any channel that you use.
■ EMAIL: Only the e-mail channel is configured for sending notification messages.
■ NONE: No channel is configured for sending notification messages. This is the default setting.
6. Specify notification channel values:
Notes:
■ The host name and IP address of the e-mail server with which you configure must also be added to the /etc/hosts file of the server on which Oracle SOA Suite is running. For example, if the host name is xyz.oracle.com and the IP address is aa.bb.cc.dd, then add this information to the /etc/hosts file.
■ After you configure the inbound (IMAP) e-mail server, the outbound (SMTP) e-mail server, or both, you must restart the managed Oracle WebLogic Server on which the SOA Infrastructure is configured for these setting to take effect.

Configuring Human Workflow Notification Properties
18-4 Oracle Fusion Middleware Administrator's Guide for Oracle SOA Suite
7. Click Apply.
8. If you want to configure advanced notification properties in the System MBean Browser, click More Workflow Notification Configuration Properties. Properties that display include the following. Descriptions are provided for each property.
■ ASNSDriverIMAddress — The address at which to receive incoming instant messages (IMs).
■ CustomNSDriverPropertyNames — Returns custom notification services property names.
■ FaxCoverPageCount — The return number of configured fax cover pages.
9. Make changes appropriate to your environment.
Field Description Example
Email: From Address Enter the outgoing e-mail address from which end users receive notifications.
Note: You can only receive error messages when the outgoing e-mail address is also configured to receive incoming messages. This ensures that error messages from incorrect or nonexistent e-mail addresses are captured by the server. Even if you configure a separate incoming account in the Email: Reply To Address field, error messages do not appear in the server logs.
Email: Actionable Address Enter the incoming email address for performing task actions. The actionable e-mail account is the account in which task action-related e-mails are received and processed by human workflow.
Email: Reply To Address Enter the address to display in e-mails sent out from Oracle SOA Suite. It can be a dummy address such as [email protected] or a valid address. If a valid address is provided, and configured in the Messaging Driver page, then if a user replies to actionable e-mails, human workflow sends an automated e-mail indicating the correct usage. This is another incoming email account.

Configuring Human Workflow Task Service Properties
Configuring Human Workflow Service Components and Engines 18-5
For more information about notifications and the User Messaging Service, see the following documentation:
■ Part X, "Administering Oracle User Messaging Service"
■ Oracle Fusion Middleware Developer's Guide for Oracle SOA Suite
18.2 Configuring Human Workflow Task Service PropertiesYou can assign the actionable e-mail account name, specify workflow session time out and custom classpath URL properties values, configure dynamic assignment and task escalation functions of the assignment service, and set additional human workflow properties.
Dynamic assignment functions select a particular user or group from either a group, or from a list of users or groups. The selection is made according to criteria specific to the particular dynamic assignment function.
To configure human workflow task service properties:
1. Access this page through one of the following options:
The upper part of the Workflow Task Service Properties page displays the field for the actionable e-mail account and the automatically defined dynamic assignment functions.
Note: If your IM message contains content that appears to be actionable, note that acting upon the task from within the message does not cause any action to be taken. For example, acting upon the task in the following IM message does not cause any action to occur.
Help desk request for wfaulk Task Help desk request for wfaulkrequires your attention. NOTE: You can act on the task bycopy-pasting one of following lines as your response.
RESOLVED : [[NID]] : Pt12uRUu9H+Xem4NYS2o7dKDtqNLs42d4YIs8ySO8Gn0ZVYFsb1SQVenRukRE+ IcE7c4XDb+tPazvP v9T2iA0qylDg0bTaVxX13HhsrCYAg= : [[NID]] UNRESOLVED : [[NID]] : xT9l06rbaGRAey+BtgQyJIXk62mkFtCe7ocKxwNLIsPzyE5/7AnGwXlBodEgQxr6 jorvsw2F54k/C1 r5mvyAJpAp4I4IekOHi4qhQ3eSbBHdzET1IL4F3qV/KZ/BAUsq : [[NID]]
From the SOA Infrastructure Menu... From the SOA Folder in the Navigator...
1. Select SOA Administration > Workflow Task Service Properties.
1. Right-click soa-infra.
2. Select SOA Administration > Workflow Task Service Properties.

Configuring Human Workflow Task Service Properties
18-6 Oracle Fusion Middleware Administrator's Guide for Oracle SOA Suite
2. Enter the following details.
3. Go to the Dynamic Assignment and Task Escalation Functions section.
The dynamic assignment functions are defined in the following table. You can also create your own functions and register them with the workflow service.
Function Description
Actionable Email Account Enter the incoming, actionable e-mail account to use.
The default account name is Default, which is the account configured in Section 18.1, "Configuring Human Workflow Notification Properties." If a different account name is specified in this field, then create and configure the account as described in Section 18.5, "Configuring Multiple Send Addresses."
Workflow Service Session Timeout (in minutes)
Enter the length of time that a user logged into the Oracle BPM Worklist can remain inactive before their session expires, and they are required to log in again. This also applies to authenticated sessions created through one of the TaskQueryService authentication methods.
Workflow Custom Classpath URL
Enter the URL classpath. This is the classpath used by workflow services to look up classes implementing custom dynamic assignment and task escalation functions, custom callbacks, and customized instances of the system resource bundle, WorkflowLabels.properties.
This can be any valid URL (either a local file path or remote URL). The classpath can specify either a directory or a JAR file. If the URL specifies a directory, it must include a trailing '/' character.

Configuring Human Workflow Task Service Properties
Configuring Human Workflow Service Components and Engines 18-7
4. Click a function to display its parameters and values in the Parameters section.
5. Click Add to add a function. You are prompted to specify the following:
■ Function name
■ Class path
■ Function parameter name
■ Function parameter value
Note that you cannot add multiple properties to a function on this page. To do that, use the System MBean Browser, which is available by selecting Administration > System MBean Browser from the SOA Infrastructure menu.
6. Click OK.
7. If you want to update the value of a parameter in a function, select the function in the Dynamic Assignment and Task Escalation Functions table.
The parameter value displays for editing.
8. Update the value.
9. Expand the Advanced section.
The Advanced section displays the following properties:
Function Type Description
ROUND_ROBIN Dynamic assignment
This function picks each user or group in turn. This function uses the initialization parameter MAX_MAP_SIZE. This parameter specifies the maximum number of sets of users or groups for which the function can maintain ROUND_ROBIN counts. The dynamic assignment function holds a list of users and groups in memory for each group (or list of users and groups) on which it is asked to execute the ROUND_ROBIN function.
LEAST_BUSY Dynamic assignment
This function picks the user or group with the least number of tasks currently assigned to it.
MANAGERS_MANAGER Task escalation
This function picks the manager’s manager.
MOST_PRODUCTIVE Dynamic assignment
This function picks the user or group that has completed the most tasks over a certain time period (by default, the last seven days).This function uses the initialization parameter DEAFULT_TIME_PERIOD. This parameter specifies the length of time (in days) over which to calculate the user's productivity. This value can be overridden when calling the MOST_PRODUCTIVE dynamic assignment function. Use an XPath function by specifying an alternative value as the third parameter in the XPath function call.
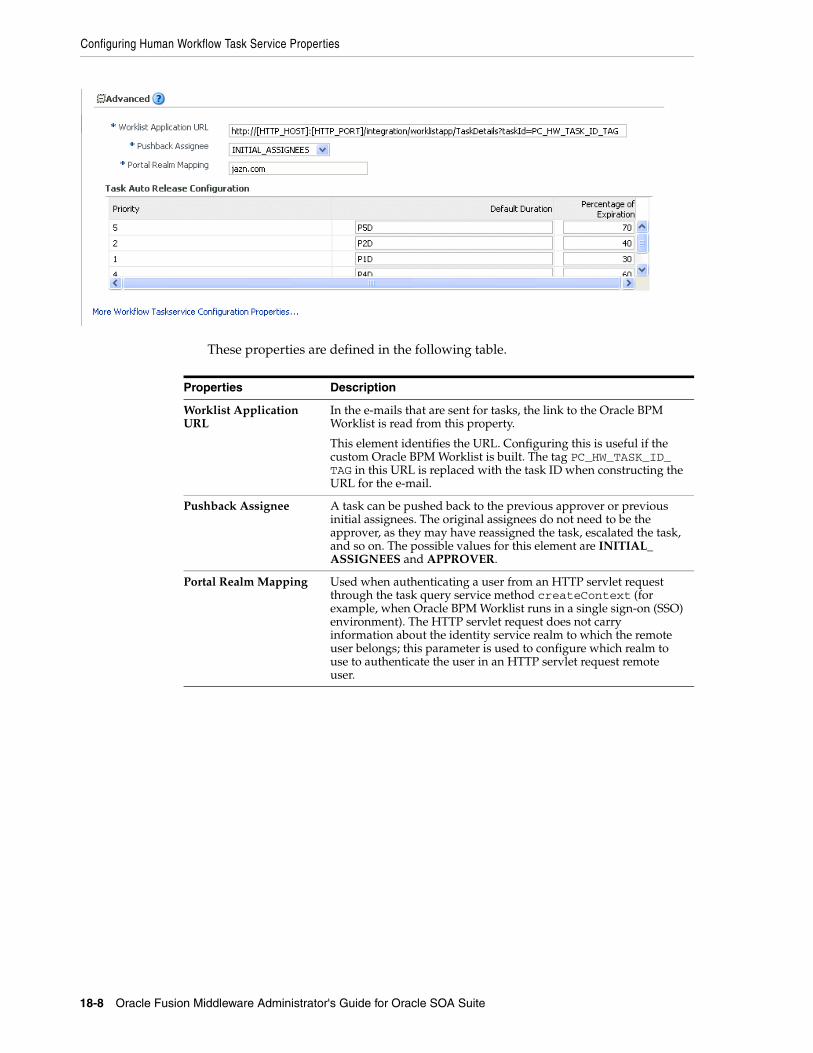
Configuring Human Workflow Task Service Properties
18-8 Oracle Fusion Middleware Administrator's Guide for Oracle SOA Suite
These properties are defined in the following table.
Properties Description
Worklist Application URL
In the e-mails that are sent for tasks, the link to the Oracle BPM Worklist is read from this property.
This element identifies the URL. Configuring this is useful if the custom Oracle BPM Worklist is built. The tag PC_HW_TASK_ID_TAG in this URL is replaced with the task ID when constructing the URL for the e-mail.
Pushback Assignee A task can be pushed back to the previous approver or previous initial assignees. The original assignees do not need to be the approver, as they may have reassigned the task, escalated the task, and so on. The possible values for this element are INITIAL_ASSIGNEES and APPROVER.
Portal Realm Mapping Used when authenticating a user from an HTTP servlet request through the task query service method createContext (for example, when Oracle BPM Worklist runs in a single sign-on (SSO) environment). The HTTP servlet request does not carry information about the identity service realm to which the remote user belongs; this parameter is used to configure which realm to use to authenticate the user in an HTTP servlet request remote user.

Configuring the Pluggable Notification Service
Configuring Human Workflow Service Components and Engines 18-9
10. Make changes appropriate to your environment.
11. Click Apply.
12. If you want to configure advanced task service properties in the System MBean Browser, click More Workflow Taskservice Configuration Properties. See Step 8 of Section 18.1, "Configuring Human Workflow Notification Properties" for a list of some advanced properties that are displayed.
13. Make changes appropriate to your environment.
For more information about the task service and assignment service, see Oracle Fusion Middleware Developer's Guide for Oracle SOA Suite.
18.3 Configuring Oracle HTTP Server for Task Form AttachmentsWhen adding an attachment to the task form through Oracle HTTP Server (OHS), the location, /ADFAttachmenthelper, must be included in the OHS configuration. For example, add the following to the mod_wl_ohs.config file of OHS, under instance_home/config/OHS/ohs_instance:
<Location /ADFAttachmentHelper> SetHandler weblogic-handler PathTrim /weblogic ErrorPage http:/WEBLOGIC_HOME:WEBLOGIC_PORT/</Location>
18.4 Configuring the Pluggable Notification ServiceCustom notification service implementations can be plugged in and used instead of the default notification service providers. You can plug in a custom notification service for all channels or selectively for specific channels. For example, the notification service provides the ability to plug in an existing SMS implementation instead of the default SMS notification service.
Task Auto Release Configuration
When a task is assigned to a group, application role, or multiple users, a user must first acquire the task before working on it. Once the task is acquired, other users cannot work on the task. If a user acquires a task, but does not act on it, the task is eventually automatically released, allowing other users to acquire the task. This prevents a user from acquiring tasks, then forgetting to work on them. This prevents others from working on them. Task auto release enables you to configure the time period that elapses after a user acquires a task and before the system automatically releases the task and makes it available again to other users. The auto release durations can be configured as a default duration and as a percentage of the expiration duration of a given task. The auto release durations can be configured differently for tasks of different priority.
For example, assume the task automatic release duration for priority 2 tasks is set to 50%, with a default duration of 12 hours. If a priority 2 task is set to expire in two days, the task is automatically released after one day (which is 50% of the expiration duration). If no expiration date is set for the task, then the task is automatically released after 12 hours (which is the default automatic release duration).
Properties Description

Configuring the Pluggable Notification Service
18-10 Oracle Fusion Middleware Administrator's Guide for Oracle SOA Suite
18.4.1 Pluggable Notification Service ImplementationTo plug in a notification service, perform one of the following tasks:
■ Implement interface oracle.bpel.services.notification.ICustomNotificationService
■ Extend the abstract class oracle.bpel.services.notification.AbstractCustomNotificationServiceImpl.
This interface has methods for the following channels:
■ Voice
■ SMS
■ Instant messaging (IM)
The plugged-in notification service can override the default providers for one or more channels. When the custom notification service is overriding the default implementation for a subset of channels, the methods corresponding to the other channels (channels that are not overridden) are not called by the notification service. Those methods can just return null. Alternatively, the implementation can extend the following abstract class:
oracle.bpel.services.notification.AbstractCustomNotificationServiceImpl
which provides empty implementations for each of the channels. In that case, the implementation can just extend the methods for the interested channels.
The implementation and its dependent classes must be available in the classpath of Oracle WebLogic Server.
18.4.2 Pluggable Notification Service RegistrationOnce the implementation is available, you register it in the System MBean Browser.
To register the pluggable notification service:
1. Log in to Oracle Enterprise Manager Fusion Middleware Control Console.
2. In the navigator, expand the SOA folder.
3. Right-click soa-infra, and select Administration > System Mbean Browser.
The System MBean Browser displays on the right side of the page.
4. Expand Application Defined MBeans > oracle.as.soainfra.config > Server: server_name > HWFMailerConfig > human-workflow.
5. Click the CustomNSDriverPropertyNames property on the right side of the page.
6. Record the values displayed by CustomNSDriverPropertyNames for the All, Voice, Email, Fax, Pager, SMS, and IM properties.
7. Click Return.
8. Click the Operations tab.
9. Click setCustomNSDriverPropertyValue.
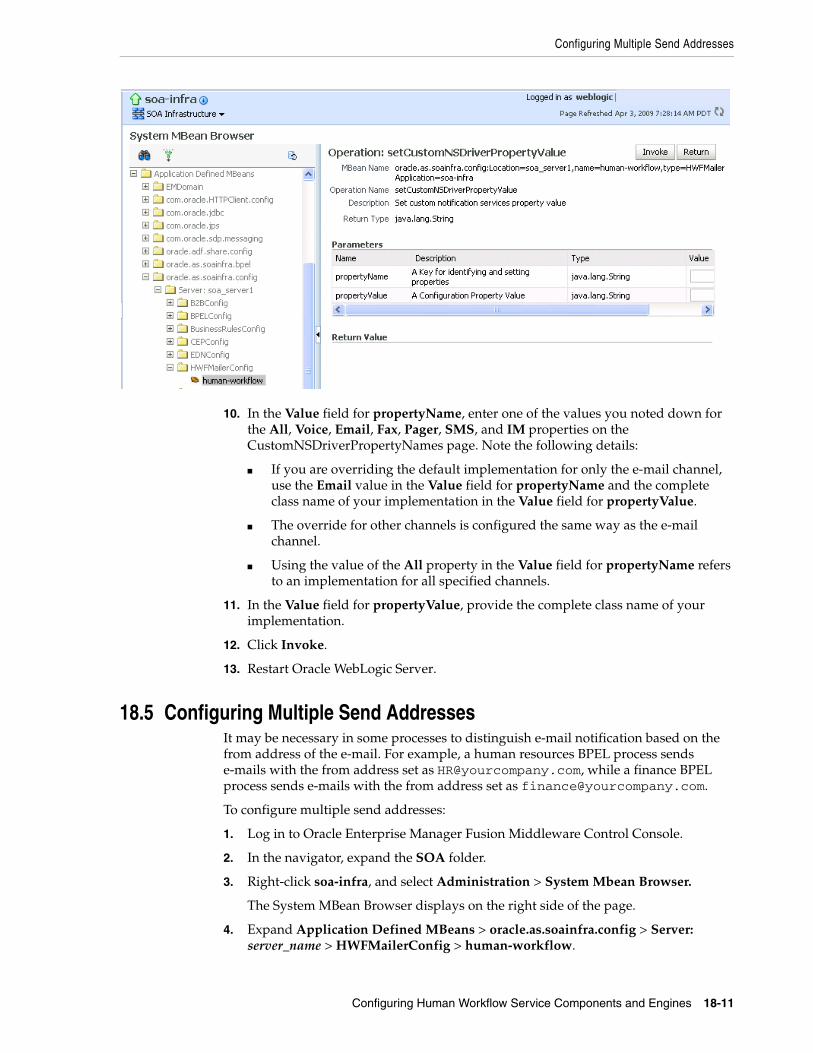
Configuring Multiple Send Addresses
Configuring Human Workflow Service Components and Engines 18-11
10. In the Value field for propertyName, enter one of the values you noted down for the All, Voice, Email, Fax, Pager, SMS, and IM properties on the CustomNSDriverPropertyNames page. Note the following details:
■ If you are overriding the default implementation for only the e-mail channel, use the Email value in the Value field for propertyName and the complete class name of your implementation in the Value field for propertyValue.
■ The override for other channels is configured the same way as the e-mail channel.
■ Using the value of the All property in the Value field for propertyName refers to an implementation for all specified channels.
11. In the Value field for propertyValue, provide the complete class name of your implementation.
12. Click Invoke.
13. Restart Oracle WebLogic Server.
18.5 Configuring Multiple Send AddressesIt may be necessary in some processes to distinguish e-mail notification based on the from address of the e-mail. For example, a human resources BPEL process sends e-mails with the from address set as [email protected], while a finance BPEL process sends e-mails with the from address set as [email protected].
To configure multiple send addresses:
1. Log in to Oracle Enterprise Manager Fusion Middleware Control Console.
2. In the navigator, expand the SOA folder.
3. Right-click soa-infra, and select Administration > System Mbean Browser.
The System MBean Browser displays on the right side of the page.
4. Expand Application Defined MBeans > oracle.as.soainfra.config > Server: server_name > HWFMailerConfig > human-workflow.

Configuring Notification Retries
18-12 Oracle Fusion Middleware Administrator's Guide for Oracle SOA Suite
5. Under the Attributes tab, record the value of the ASNSDrivers attribute. By default, only the Default value is available.
6. Click Return.
7. Click the Operations tab.
8. Click setASNSDriver.
9. For propertyName, enter a value (for this example, EmailFromAddress).
10. For propertyValue, enter a value (for this example, [email protected]).
11. For driverName, enter a value (for this example, HR).
12. Click Invoke.
13. Add as many accounts as the number of from addresses needed:
■ For propertyName, enter a value (for this example, EmailFromAddress).
■ For propertyValue, enter a value (for this example, [email protected]).
■ For driverName, enter a value (for this example, Finance).
14. Click Invoke.
The ASNSDriver attribute now shows all the accounts created in the previous steps and the getCustomNSDriverPropertyValue operation now shows the addresses being used for each of the drivers.
15. Using Oracle WebLogic Server Administration Console, install multiple Oracle User Messaging Service e-mail drivers, one for each from address.
16. Configure the e-mail drivers to use the required from address for sending outgoing e-mails.
17. In Oracle JDeveloper during design time, use HR as the account name to configure an e-mail activity for an HR BPEL process and Finance as the account name to configure an e-mail activity for the finance BPEL process.
18.6 Configuring Notification RetriesOracle SOA Suite provides support for reliable notifications. The outbound notification creates a notification message with a unique notification ID and stores the message and unique ID in the dehydration store. It then enqueues this unique ID in the JMS queue and commits the transaction. A message-driven bean (MDB) listening on this queue dequeues the message and sends a notification to the user. If there is any notification failure, the notification retries three times. If the retries all fail, it marks this notification as errored.
18.7 Configuring the Identity ServiceBy default, the identity service uses the embedded LDAP server in Oracle WebLogic Server as the default authentication provider. You can, however, configure Oracle WebLogic to use an alternative authentication provider, such as Oracle Internet Directory, Microsoft Active Directory, or Sun iPlanet, along with the default authenticator.
This section describes how to add an authentication provider and create users and groups in the authentication provider using either Oracle WebLogic Administration Console or Oracle Directory Services Manager.

Configuring the Identity Service
Configuring Human Workflow Service Components and Engines 18-13
This section describes the following topics:
■ Section 18.7.1, "Adding an Authentication Provider"
■ Section 18.7.2, "Creating Users and Groups in the Authentication Provider"
■ Section 18.7.3, "Configuring the Directory Service"
18.7.1 Adding an Authentication ProviderYou can add an authentication provider to a security realm using Oracle WebLogic Server Administration Console.
To add an authentication provider:1. Log in to the Oracle WebLogic Server Administration Console.
2. Click Security Realms in the Domain Structure pane, and click the name of a realm in the list (myrealm, for example).
3. Click Providers > Authentication.
The Authentication Providers page appears.
Figure 18–1 Security Realm Authentication Providers
4. Click New to add a new authentication provider.
The Create a New Authentication Provider page appears.

Configuring the Identity Service
18-14 Oracle Fusion Middleware Administrator's Guide for Oracle SOA Suite
Figure 18–2 Create a New Authentication Provider
5. Type a name for the provider in the Name field, choose the authenticator type using the Type drop-down list, and click OK.
For example, you can type OIDAuthenticator as the name and choose OracleInternetDirectoryAuthenticator as the type for a provider that authenticates users using the Oracle Internet Directory.
Similarly, you can type a name and choose ActiveDirectoryAuthenticator, iPlanetAuthenticator, openLDAPAuthenticator, or NovellAuthenticator from the list to specify the corresponding authenticator.
6. On the Providers > Authentication page, click the authenticator that you just created.
The settings for the authentication provider appears.
Note: When using Oracle Internet Directory as the authentication provider, you must set the orclsslinteropmode attribute to 0 (zero) using Oracle Directory Services Manager. See Section 18.7.3, "Configuring the Directory Service" for more information.

Configuring the Identity Service
Configuring Human Workflow Service Components and Engines 18-15
Figure 18–3 Settings for the Authentication Provider
7. Choose SUFFICIENT from the Control Flag drop-down list, and click Save.
This specifies that if a user is authenticated successfully using this authenticator, WebLogic should accept the authentication and not continue to invoke any additional authenticators. If the authentication fails, Oracle WebLogic Server attempts to authenticate the user using the next authenticator in the list.
If you set the Control Flag to SUFFICIENT, ensure that all subsequent authenticators also have the Control Flag set to SUFFICIENT. Likewise, ensure that the Control Flag of the default authenticator is set to SUFFICIENT as well.
8. Click Provider Specific to enter the details for the authenticator server.
9. Enter the provider-specific information about the authentication provider, check the Use Retrieved User Name as Principal check box, and click Save.
Table 18–1 lists information you must specify. Use the default setting for the rest of the fields.
Table 18–1 Provider Specific Authentication Server Settings
Field Description
Host The host name or IP address on which the authenticator server is running.
Port The port number on which the authenticator server is running.
Principal The Distinguished Name (DN) of the authenticator server user that Oracle WebLogic Server should use when connecting to the server.
Credential The credential (usually a password) used to connect to the authenticator server.
User Base DN The base Distinguished Name (DN) of the tree in the LDAP directory that contains users.
Group Base DN The base Distinguished Name (DN) of the tree in the LDAP directory that contains groups.
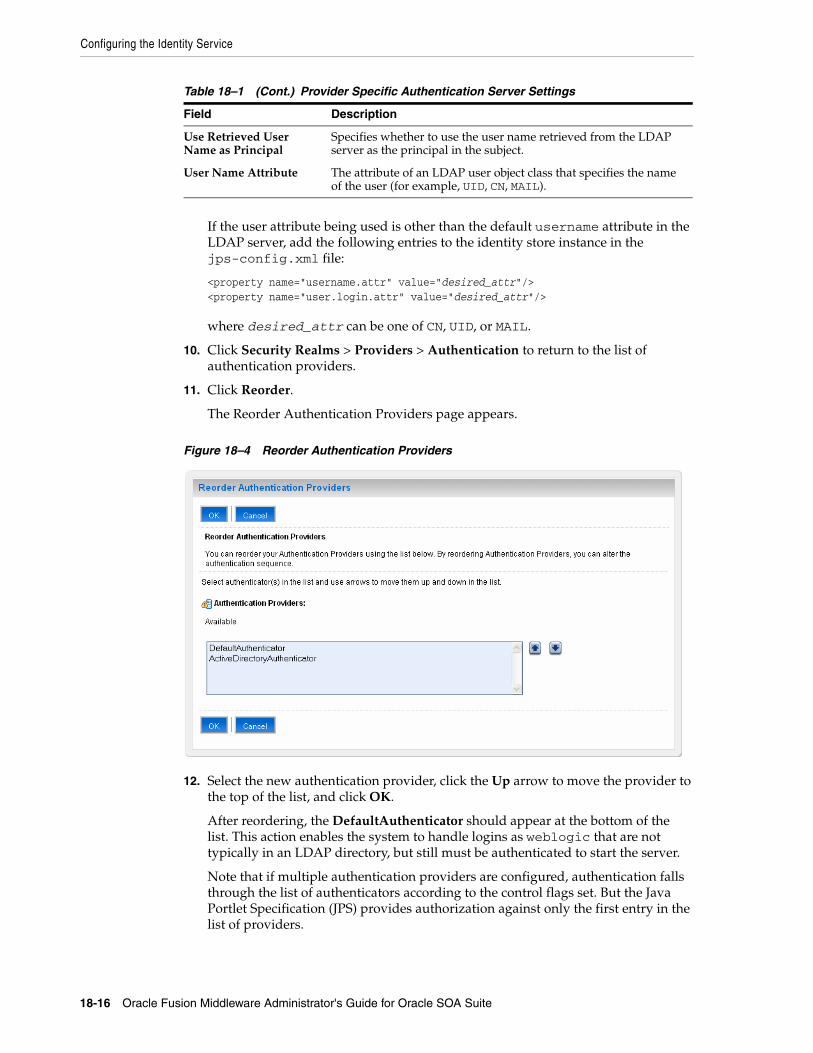
Configuring the Identity Service
18-16 Oracle Fusion Middleware Administrator's Guide for Oracle SOA Suite
If the user attribute being used is other than the default username attribute in the LDAP server, add the following entries to the identity store instance in the jps-config.xml file:
<property name="username.attr" value="desired_attr"/><property name="user.login.attr" value="desired_attr"/>
where desired_attr can be one of CN, UID, or MAIL.
10. Click Security Realms > Providers > Authentication to return to the list of authentication providers.
11. Click Reorder.
The Reorder Authentication Providers page appears.
Figure 18–4 Reorder Authentication Providers
12. Select the new authentication provider, click the Up arrow to move the provider to the top of the list, and click OK.
After reordering, the DefaultAuthenticator should appear at the bottom of the list. This action enables the system to handle logins as weblogic that are not typically in an LDAP directory, but still must be authenticated to start the server.
Note that if multiple authentication providers are configured, authentication falls through the list of authenticators according to the control flags set. But the Java Portlet Specification (JPS) provides authorization against only the first entry in the list of providers.
Use Retrieved User Name as Principal
Specifies whether to use the user name retrieved from the LDAP server as the principal in the subject.
User Name Attribute The attribute of an LDAP user object class that specifies the name of the user (for example, UID, CN, MAIL).
Table 18–1 (Cont.) Provider Specific Authentication Server Settings
Field Description

Configuring the Identity Service
Configuring Human Workflow Service Components and Engines 18-17
18.7.2 Creating Users and Groups in the Authentication ProviderYou can create users and groups in the authentication provider using either Oracle WebLogic Server Administration Console or Oracle Directory Services Manager.
18.7.2.1 Creating Users and Groups Using WebLogic ConsoleYou can create users and groups for a specific provider, and define user and group membership, using the Oracle WebLogic Server Administration Console.
To create a user using WebLogic Console:1. Log in to the Oracle WebLogic Console.
2. Click Security Realms in the Domain Structure pane, and click the name of a realm in the list (myrealm, for example).
3. Click Users and Groups > Users.
The Users page appears.
Figure 18–5 WebLogic Console Users and Groups
4. Click New to add a new user. The Create a New User page appears.
5. Enter the required information about the user, and click OK.
Table 18–2 lists information you must specify.
Table 18–2 User Properties
Field Description
Name (Required) The name of the new user.
Description A description of the new user.
Provider The provider for the user.
Password The password associated with the login name for the new user.
Confirm Password Confirmation of the password.

Configuring the Identity Service
18-18 Oracle Fusion Middleware Administrator's Guide for Oracle SOA Suite
The system creates the new user in the specified provider and shows the Users page. You can configure group membership for the user, as required.
6. To specify group membership for the user, click the newly-created user in the list. The settings for the new user page appear.
7. Click Groups to specify group membership for the user.
8. Select a group in the Available list and click the right arrow to move it to the Chosen list.
You can press Ctrl-Click to select multiple groups to move.
9. Click Save.
To create a group using WebLogic Console:1. Click Users and Groups > Groups.
The Groups page appears.
Figure 18–6 WebLogic Console Groups
2. Click New to add a new group. The Create a New Group page appears.
3. Enter the required information about the group, and click OK.
Table 18–3 lists information you must specify.
Table 18–3 Group Properties
Field Description
Name (Required) The name of the new group.

Configuring the Identity Service
Configuring Human Workflow Service Components and Engines 18-19
The system creates the new group in the specified provider and shows the Groups page. You can configure group membership for the group, as required.
4. To specify group membership for the group (specify parent groups), click the newly-created group in the list. The settings for the new group page appear.
5. Click Membership to add the group to other groups.
6. Select a parent group in the Available list and click the right arrow to move it to the Chosen list.
You can press Ctrl-Click to select multiple groups to move.
7. Click Save.
18.7.2.2 Creating Users and Groups Using Oracle Internet DirectoryYou can create users and groups using Oracle Internet Directory through the Oracle Directory Services Manager.
To connect to Oracle Internet Directory from the Oracle Directory Services Manager:1. Launch the Oracle Directory Services Manager by navigating to the following URL
using a Web browser:
http://host_name:port/odsm/faces/odsm.jspx
where host_name and port are the host name and the managed server port number on which Oracle Internet Directory is running.
2. Click the Connect to a directory link and choose Create a New Connection in the drop-down menu. The New Connection dialog appears.
3. Select OID as the directory type, enter values in the required fields, and click Connect.
Table 18–4 lists information you can specify.
Description A description of the new group.
Provider The provider for the group.
Table 18–4 Group Properties
Field Description
Name The name of the connection.
Server (Required) The host name or IP address of the system on which Oracle Internet Directory is running.
Port (Required) The port number on the system on which Oracle Internet Directory is running.
SSL Enabled Select to enable a Secure Sockets Layer (SSL) communication.
User Name (Required) The user name used to log in to Oracle Internet Directory.
Password (Required) The password associated with the user name.
Start Page The start page after logging into Oracle Internet Directory.
Table 18–3 (Cont.) Group Properties
Field Description

Configuring the Identity Service
18-20 Oracle Fusion Middleware Administrator's Guide for Oracle SOA Suite
The Oracle Directory Services Manager Home tab appears.
4. Click the Data Browser tab. You can use this tab to create and remove entries.
To create a domain:1. Click the Create a new entry button in the Data Tree pane. The Entry Properties
page of the Create New Entry wizard appears.
2. Click the Add button to add the required object class for the domain. The Add Object Class dialog box appears.
3. Type the name of the object class. When the correct object class appears in the Name list, select it, and click OK.
4. Repeat Steps 2 and 3 to add all the required object classes for the domain. Generally, top, domain, and orclContainer are the object classes required for a domain.
5. Click Browse to choose the parent of the domain. The Select Distinguished Name (DN) Path dialog box appears.
Figure 18–7 Select Distinguished Name (DN) Path (Domain)
6. Select the parent of the domain and click Select. You can create a hierarchy of entries by selecting the appropriate parent domains.
7. Click Next in the Create New Entry dialog box. The Mandatory Properties page of the Create New Entry wizard appears.
8. Type and select values for the required fields, and click Next.
Table 18–5 lists information you can specify.
Table 18–5 Mandatory Properties (Domain)
Field Description
dc (Required) The domain component.
Relative Distinguished Name
(Required) The relative distinguished name of the user.

Configuring the Identity Service
Configuring Human Workflow Service Components and Engines 18-21
The Status page of the Create New Entry wizard appears.
9. Verify the status of the new domain, and click Finish to create the new domain.
To create a user:1. Click the Create a new entry button in the Data Tree pane. The Entry Properties
page of the Create New Entry wizard appears.
2. Click the Add button to add the required object class for the user. The Add Object Class dialog box appears.
3. Type the name of the object class. When the correct object class appears in the Name list, select it, and click OK.
4. Repeat Steps 2 and 3 to add all the required object classes for the user. Generally, top, person, inetorgperson, organizationalPerson, and orcluser are the object classes required for a user.
5. Click Browse to choose the parent of the user. The Select Distinguished Name (DN) Path dialog box appears.
Figure 18–8 Select Distinguished Name (DN) Path (User)
6. Select the parent of the user and click Select.
7. Click Next in the Create New Entry dialog box. The Mandatory Properties page of the Create New Entry wizard appears.
8. Type and select values for the required fields, and click Next.
Table 18–6 lists information you can specify.
Table 18–6 Mandatory Properties (User)
Field Description
cn (Required) The common name.
sn (Required) The surname (last name).
Relative Distinguished Name
(Required) The relative distinguished name of the user.
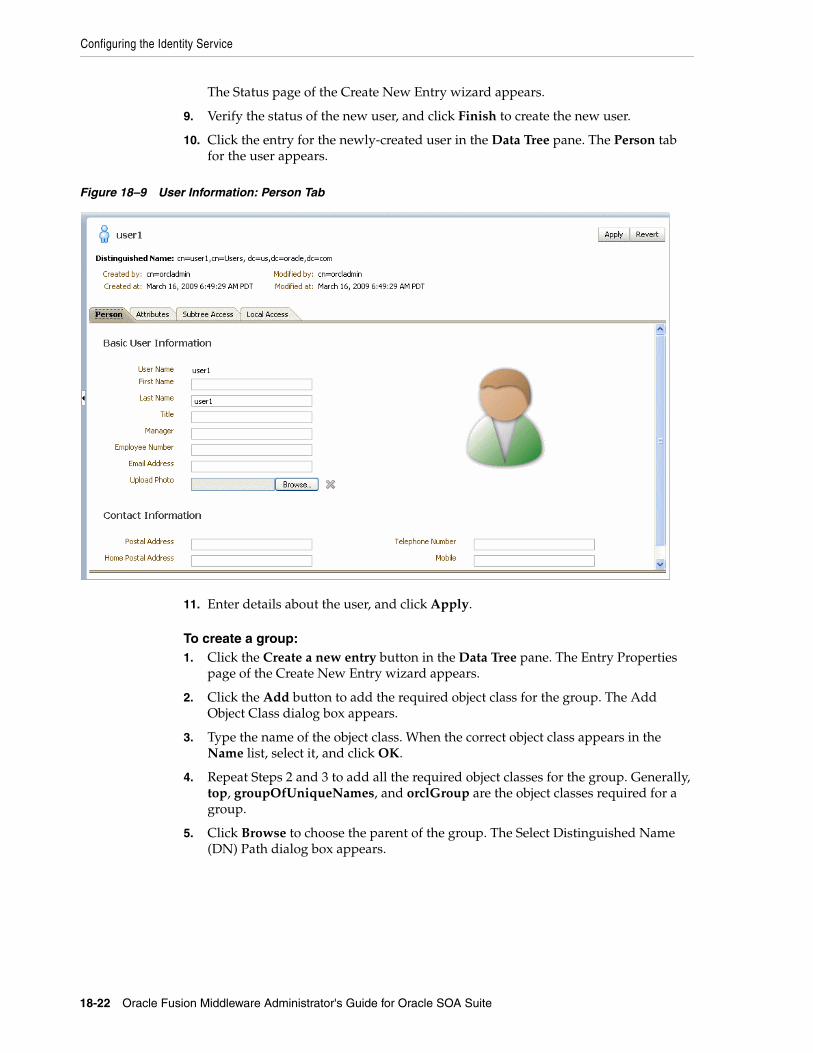
Configuring the Identity Service
18-22 Oracle Fusion Middleware Administrator's Guide for Oracle SOA Suite
The Status page of the Create New Entry wizard appears.
9. Verify the status of the new user, and click Finish to create the new user.
10. Click the entry for the newly-created user in the Data Tree pane. The Person tab for the user appears.
Figure 18–9 User Information: Person Tab
11. Enter details about the user, and click Apply.
To create a group:1. Click the Create a new entry button in the Data Tree pane. The Entry Properties
page of the Create New Entry wizard appears.
2. Click the Add button to add the required object class for the group. The Add Object Class dialog box appears.
3. Type the name of the object class. When the correct object class appears in the Name list, select it, and click OK.
4. Repeat Steps 2 and 3 to add all the required object classes for the group. Generally, top, groupOfUniqueNames, and orclGroup are the object classes required for a group.
5. Click Browse to choose the parent of the group. The Select Distinguished Name (DN) Path dialog box appears.

Configuring the Identity Service
Configuring Human Workflow Service Components and Engines 18-23
Figure 18–10 Select Distinguished Name (DN) Path (Group)
6. Select the parent of the group and click Select.
7. Click Next in the Create New Entry dialog box. The Mandatory Properties page of the Create New Entry wizard appears.
8. Type and select values for the required fields, and click Next.
Table 18–7 lists information you can specify.
The Status page of the Create New Entry wizard appears.
9. Verify the status of the new group, and click Finish to create the new group.
10. Click the entry for the newly-created group in the Data Tree pane. The Group tab for the group appears.
Table 18–7 Mandatory Properties
Field Description
cn (Required) The common name.
Relative Distinguished Name
(Required) The relative distinguished name of the group.

Configuring the Identity Service
18-24 Oracle Fusion Middleware Administrator's Guide for Oracle SOA Suite
Figure 18–11 Group Information: Group Tab
11. Specify details about the group, and click Apply.
To delete an entry:1. Select an entry in the Data Tree pane.
2. Click the Delete this entry button in the Data Tree pane.
18.7.3 Configuring the Directory ServiceWhen using Oracle Internet Directory as the authentication provider, you must set the orclsslinteropmode attribute to 0 (zero) using Oracle Directory Services Manager.
To configure the directory service:
1. Launch Oracle Directory Services Manager and choose an Oracle Internet Directory connection using the drop-down list.
2. Click the Data Browser tab.
3. Expand the cn=subconfigsubentry > cn=osdldapd > cn=oid1 nodes.

Seeding Users, Groups, and Application Roles using LDAP Tools
Configuring Human Workflow Service Components and Engines 18-25
Figure 18–12 Oracle Directory Services Manager Data Browser
4. In the Attributes tab, set the orclsslinteropmode attribute to 0.
5. Click the Apply button.
18.7.4 Customizing the Identity ProviderTo customize the identity provider (for example, to handle user and role information stored in home grown solutions), see the 11g R1 release notes.
18.8 Seeding Users, Groups, and Application Roles using LDAP ToolsThis section provides an overview of the procedures required for seeding users, groups, and application roles with LDAP tools.
When you create a task, you assign humans to participate in and act upon the task. Participants can perform actions upon tasks during run time from Oracle BPM Worklist, such as approving a vacation request, rejecting a purchase order, providing feedback on a help desk request, or some other action. There are three types of participants:
■ Users
■ Groups
■ Application roles
For more information, see Oracle Fusion Middleware Developer's Guide for Oracle SOA Suite.
18.8.1 Changing the Default Password in the Embedded LDAP ServerThe password credential is accessible from the Oracle WebLogic Server Administration Console by selecting Security > Embedded LDAP for your domain.

Seeding Users, Groups, and Application Roles using LDAP Tools
18-26 Oracle Fusion Middleware Administrator's Guide for Oracle SOA Suite
For instructions on changing the default password credential, see Chapter 9, "Managing the Embedded LDAP Server" of Oracle Fusion Middleware Securing Oracle WebLogic Server.
18.8.2 Seeding Users or Groups through the LDAP Browser1. Start an LDAP browser (for example, openLdap browser, ldapbrowser, jXplorer,
and so on). See the documentation for your browser for instructions.
2. Connect to the LDAP server by providing the host name, port number on which the server is running, and the administration user credentials with which to log in.
■ For Embedded LDAP:
a. The default managed server port number is 7001.
b. The administration credential username is cn=admin.
c. The administration credential password is what you set in Section 18.8.1, "Changing the Default Password in the Embedded LDAP Server."
■ For OIDm:
a. The default port number is 3060.
b. The administration username is cn=orcladmin.
c. The administration password is the password for the LDAP server.
3. Seed a user or group through the browser by performing the following steps:
a. Select a parent under which to add a user or group.
b. Select the Edit menu and choose an appropriate option to add a new entry.
c. Enter all required attribute values for the entry.
4. Seed users or groups through the LDIF file by performing the following steps:
a. Select the domain under which to seed the users or groups.
b. Select the LDIF menu and choose to import an LDIF file.
c. In the Import LDIF File dialog, browse for and select the LDIF file and click Import.
Similarly, the users or groups seeded on the LDAP server can be exported to an LDIF file by selecting the Export option from the LDIF menu.
5. Add attributes to the users or groups by performing the following steps:
a. Select an entry for which to add a new attribute.
b. Right-click and choose the option to add a new attribute.
c. In the Add Attribute dialog, provide the name and value of the attribute.
You can only add attributes that are defined in the LDAP server schema.
6. Delete attributes for users or groups by performing the following steps:
a. Select an entry for which to delete a new attribute.
b. Select an attribute from the list of attributes and delete it.

Seeding Users, Groups, and Application Roles using LDAP Tools
Configuring Human Workflow Service Components and Engines 18-27
18.8.3 Seeding Application Roles using WLST ScriptsFor instructions on using the WebLogic Scripting Tool (WLST) to seed application roles, see Chapter 4, "Infrastructure Security Custom WLST Commands" of Oracle Fusion Middleware WebLogic Scripting Tool Command Reference.
18.8.4 Seeding Application Roles in Oracle Enterprise Manager Fusion Middleware Control Console
1. In the navigator, select the appropriate Oracle WebLogic Server under WebLogic Domain > Farm_Domain_name.
2. In the right pane, select WebLogic Domain -> Security -> Application Roles.
3. Create an application role by performing the following steps:
a. Select the Create option in the Application Roles page.
The Create Application Role page appears.
b. In the Application list, select the application name (server_name/soa_infra) under which to create a role.
c. Enter the role name, display name, and description for the application role.
d. Add members by selecting Add Role in the Roles section and Add User in the Users section.
e. Click OK to create the application role.
4. Edit application roles by performing the following steps:
a. In the Application list of the Search section of the Application Roles page, select an appropriate application.
This action lists all the application roles created for that application.
b. To the right of the Role Name list, click the Search icon.
c. Select the application role to edit.
d. Click Edit.
e. Add or delete roles in the Roles section and Users section of the Edit Application Role page.
f. Click OK.
5. Delete application roles by performing the following steps:
a. In the Application list of the Search section of the Application Roles page, select an appropriate application.
This action lists all the application roles created for that application.
b. Select the application role to delete.
c. Click the Delete button to delete the application role.
d. Click Yes in the Confirmation dialog.

Seeding Users, Groups, and Application Roles using LDAP Tools
18-28 Oracle Fusion Middleware Administrator's Guide for Oracle SOA Suite

19
Monitoring Human Workflow Service Components and Engines 19-1
19 Monitoring Human Workflow ServiceComponents and Engines
This chapter describes how to monitor human task service components and the human workflow service engine.
This chapter includes the following topics:
■ Section 19.1, "Monitoring Human Task Service Component Instances and Faults"
■ Section 19.2, "Viewing the Status of Human Workflow Tasks"
■ Section 19.3, "Monitoring Human Task Service Component Instances"
■ Section 19.4, "Monitoring Human Workflow Service Engine Instances and Faults"
■ Section 19.5, "Monitoring Human Workflow Service Engine Active Requests and Operation Statistics"
■ Section 19.6, "Monitoring Human Workflow Service Engine Instances"
■ Section 19.7, "Monitoring Deployed Human Workflows in the Service Engine"
For more information, see the following sections:
■ Section 1.2.4, "Understanding Service Components and Service Component Instances"
■ Section 1.2.6, "Understanding Service Engines"
19.1 Monitoring Human Task Service Component Instances and FaultsYou can monitor human task service component recent instances and faults. Each service component in a SOA composite application has its own instance ID. These IDs are different from the overall instance ID of the SOA composite application of which each service component is a part.
To monitor human task service component instances and faults:
1. Access this page through one of the following options:
From the SOA Infrastructure Menu... From the SOA Folder in the Navigator...
1. Select Home.
2. Select the Deployed Composites tab.
3. In the Composite section, select a specific SOA composite application.
1. Under soa-infra, select a specific SOA composite application.

Monitoring Human Task Service Component Instances and Faults
19-2 Oracle Fusion Middleware Administrator's Guide for Oracle SOA Suite
2. Select the human task service component in the Component Metrics table.
The upper part of the Dashboard page displays the following details:
■ Recent instances of the human task service component, including the instance ID of the service component, the state of the instance (for example, completed or running), the instance start time, the last modification time, and links to log files describing the instances.
■ Recent faults in the human task service component, including the error message, whether the fault is recoverable, the time at which the fault occurred, the instance ID of the human task service component, and links to log files describing the faults.
3. In the Recent Instances section, perform the following tasks:
a. In the Instance ID column, click an instance ID for a service component to monitor the current status of a task on which approval actions are being taken.
b. In the Logs column, click a specific log to access the Log Messages page with filtered messages specific to that instance.
c. Click Show All below the section to access the Instances page of the service component.
4. In the Recent Faults section, perform the following tasks:
a. In the Error Message column, click an error message to display complete information about the fault. If the fault is identified as recoverable, click the Recover Now link to perform fault recovery.
b. In the Recovery column, click a fault identified as Recoverable to perform fault recovery at the component instance level.
c. In the Logs column, click a specific log to access the Log Messages page with filtered messages specific to that instance.
d. Click Show All below the section to access the Faults page of the service component.

Viewing the Status of Human Workflow Tasks
Monitoring Human Workflow Service Components and Engines 19-3
The lower part of the Dashboard page displays the following details:
■ A graphical representation of business outcomes.
■ Assignees that take the longest time to respond to and act upon tasks.
■ The number of successful, faulted, and instantiated instances processed per minute.
■ The number of faults occurring and messages processed in any reference binding component with which this human task service component communicated.
■ The notification channels used for task approval in the human task service component.
For more information, see Section 1.2.3, "Understanding SOA Composite Application Instances" and Oracle Fusion Middleware Administrator's Guide for details about viewing and searching log files.
19.2 Viewing the Status of Human Workflow TasksYou can monitor the current status of human workflow tasks being acted upon by participants.
To view the status of human workflow tasks:
1. Access this page through one of the following options:
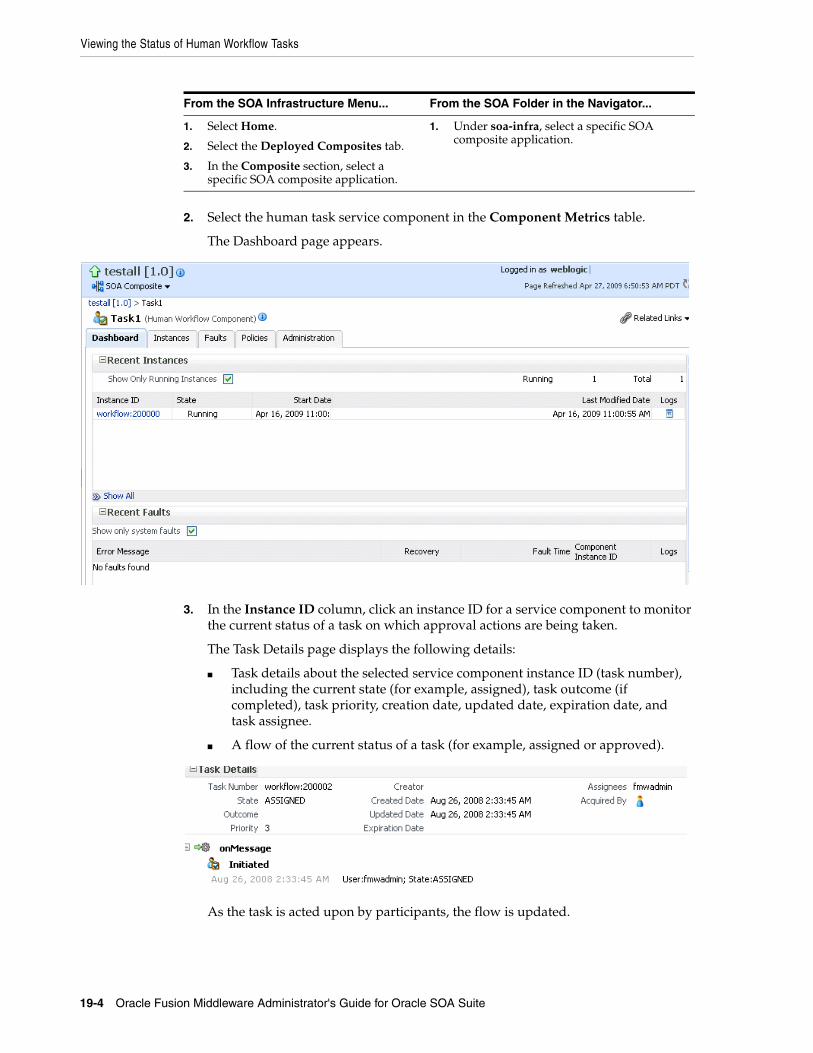
Viewing the Status of Human Workflow Tasks
19-4 Oracle Fusion Middleware Administrator's Guide for Oracle SOA Suite
2. Select the human task service component in the Component Metrics table.
The Dashboard page appears.
3. In the Instance ID column, click an instance ID for a service component to monitor the current status of a task on which approval actions are being taken.
The Task Details page displays the following details:
■ Task details about the selected service component instance ID (task number), including the current state (for example, assigned), task outcome (if completed), task priority, creation date, updated date, expiration date, and task assignee.
■ A flow of the current status of a task (for example, assigned or approved).
As the task is acted upon by participants, the flow is updated.
From the SOA Infrastructure Menu... From the SOA Folder in the Navigator...
1. Select Home.
2. Select the Deployed Composites tab.
3. In the Composite section, select a specific SOA composite application.
1. Under soa-infra, select a specific SOA composite application.

Monitoring Human Task Service Component Instances
Monitoring Human Workflow Service Components and Engines 19-5
4. In the upper right corner of the page, click Worklist Application to access the login page for the Oracle BPM Worklist.
For more information, see Section 1.2.3, "Understanding SOA Composite Application Instances."
19.3 Monitoring Human Task Service Component InstancesYou can monitor human task service component instances. Each service component has its own unique instance ID. This ID is in addition to the instance ID of the overall SOA composite application of which this service component is a part.
To monitor human task service component instances:
1. Access this page through one of the following options:
2. Select the human task service component in the Component Metrics table.
3. Click Instances.
The Instances page displays the following details:
■ A utility for searching for a specific human task service component instance by specifying a criteria and clicking Search.
■ Instances, including the instance ID of the service component, the state of the instance (for example, completed successfully or faulted), the instance start time, the last modification time, and links to log files describing the instance.
Note: Human workflow invocations from the BPEL service engine use different transactions than BPEL processes. Therefore, if a BPEL transaction is rolled back for any reason, the workflow task instances are still created.
From the SOA Infrastructure Menu... From the SOA Folder in the Navigator...
1. Select Home.
2. Select the Deployed Composites tab.
3. In the Composite section, select a specific SOA composite application.
1. Under soa-infra, select a specific SOA composite application.

Monitoring Human Workflow Service Engine Instances and Faults
19-6 Oracle Fusion Middleware Administrator's Guide for Oracle SOA Suite
4. In the Instance ID column, click a specific ID for a service component to monitor the current status of a task on which approval actions are being taken.
5. In the Logs column, click a specific log to access the Log Messages page with filtered messages specific to that instance.
For more information, see Section 1.2.3, "Understanding SOA Composite Application Instances" and Oracle Fusion Middleware Administrator's Guide for details about viewing and searching log files.
19.4 Monitoring Human Workflow Service Engine Instances and FaultsYou can monitor instances and faults of all human task service component instances running in the human workflow service engine. These human task service components can be part of separate SOA composite applications.
To monitor human workflow service engine instances and faults:
1. Access this page through one of the following options:
2. Click Dashboard.
The upper part of the Dashboard page displays the following details:
■ Recent instances of all human task service components running in the human workflow service engine, including the instance ID of the service component, the service component, the SOA composite application of which the service component is a part, the state of the instance (for example, completed, running, or faulted), the instance start time, and the last modification time.
■ Service components, including the service component name, SOA composite application, state of the service component, and total, running, and faulted instances.
From the SOA Infrastructure Menu... From the SOA Folder in the Navigator...
1. Select Service Engines > Human Workflow.
1. Right-click soa-infra.
2. Select Service Engines > Human Workflow.
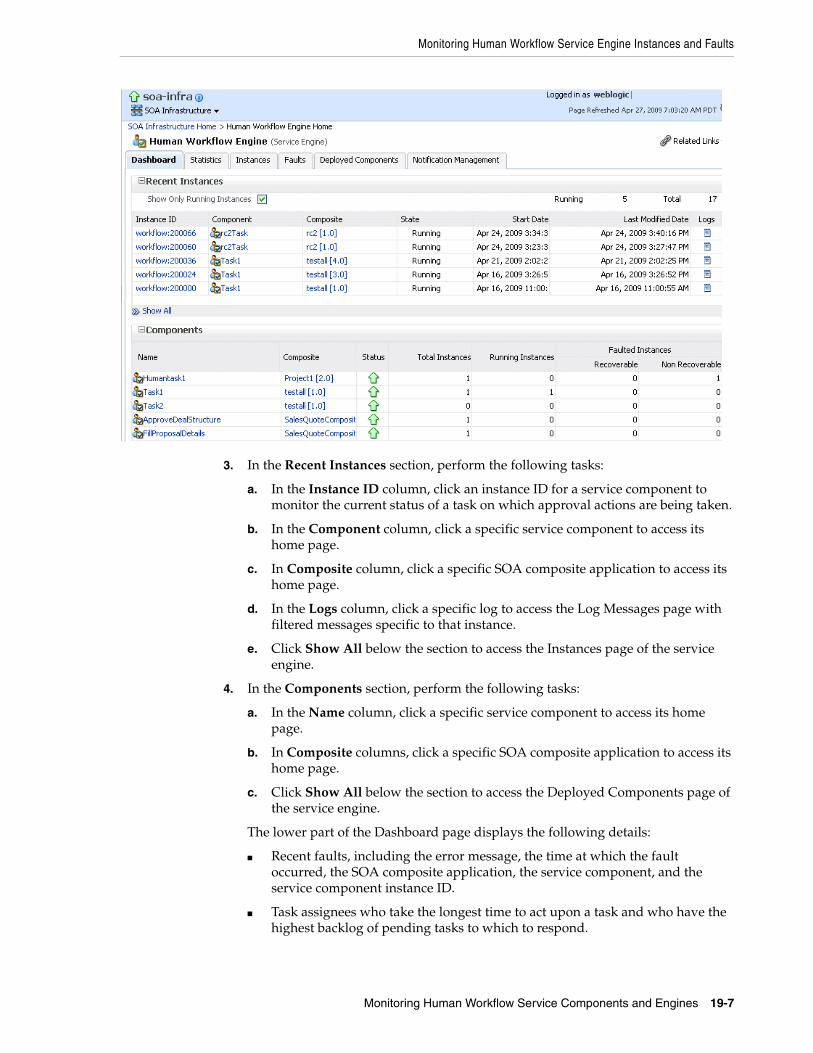
Monitoring Human Workflow Service Engine Instances and Faults
Monitoring Human Workflow Service Components and Engines 19-7
3. In the Recent Instances section, perform the following tasks:
a. In the Instance ID column, click an instance ID for a service component to monitor the current status of a task on which approval actions are being taken.
b. In the Component column, click a specific service component to access its home page.
c. In Composite column, click a specific SOA composite application to access its home page.
d. In the Logs column, click a specific log to access the Log Messages page with filtered messages specific to that instance.
e. Click Show All below the section to access the Instances page of the service engine.
4. In the Components section, perform the following tasks:
a. In the Name column, click a specific service component to access its home page.
b. In Composite columns, click a specific SOA composite application to access its home page.
c. Click Show All below the section to access the Deployed Components page of the service engine.
The lower part of the Dashboard page displays the following details:
■ Recent faults, including the error message, the time at which the fault occurred, the SOA composite application, the service component, and the service component instance ID.
■ Task assignees who take the longest time to act upon a task and who have the highest backlog of pending tasks to which to respond.
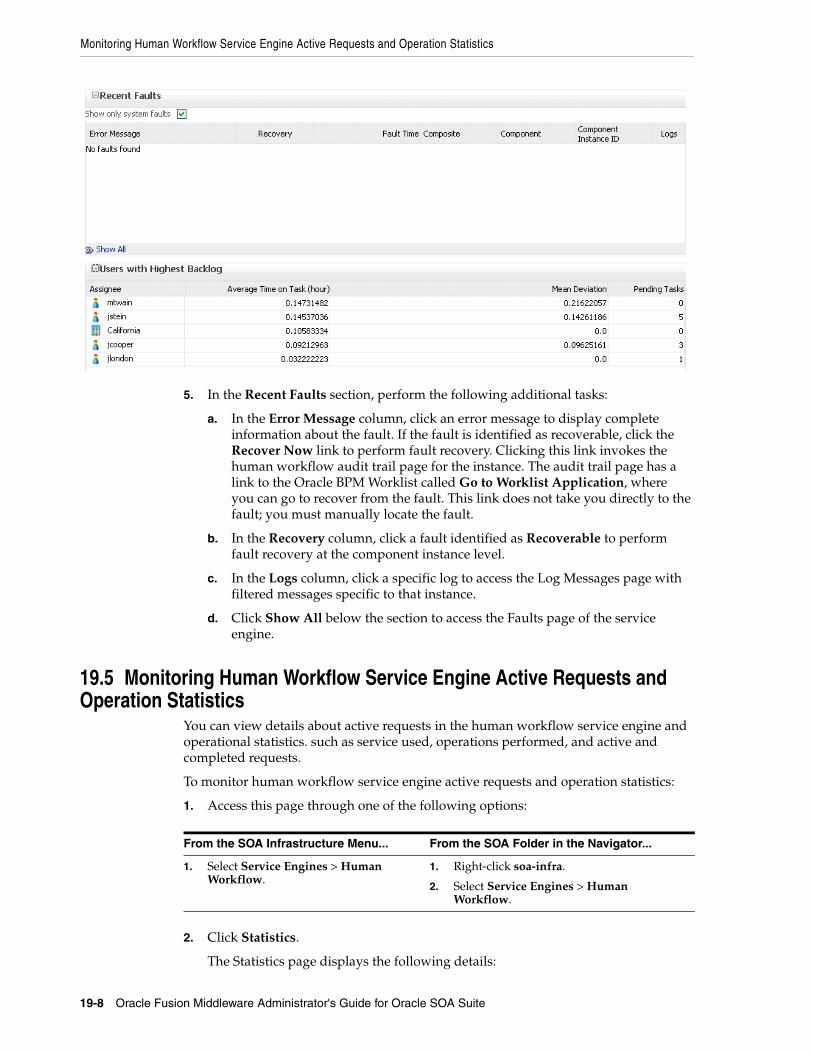
Monitoring Human Workflow Service Engine Active Requests and Operation Statistics
19-8 Oracle Fusion Middleware Administrator's Guide for Oracle SOA Suite
5. In the Recent Faults section, perform the following additional tasks:
a. In the Error Message column, click an error message to display complete information about the fault. If the fault is identified as recoverable, click the Recover Now link to perform fault recovery. Clicking this link invokes the human workflow audit trail page for the instance. The audit trail page has a link to the Oracle BPM Worklist called Go to Worklist Application, where you can go to recover from the fault. This link does not take you directly to the fault; you must manually locate the fault.
b. In the Recovery column, click a fault identified as Recoverable to perform fault recovery at the component instance level.
c. In the Logs column, click a specific log to access the Log Messages page with filtered messages specific to that instance.
d. Click Show All below the section to access the Faults page of the service engine.
19.5 Monitoring Human Workflow Service Engine Active Requests and Operation Statistics
You can view details about active requests in the human workflow service engine and operational statistics. such as service used, operations performed, and active and completed requests.
To monitor human workflow service engine active requests and operation statistics:
1. Access this page through one of the following options:
2. Click Statistics.
The Statistics page displays the following details:
From the SOA Infrastructure Menu... From the SOA Folder in the Navigator...
1. Select Service Engines > Human Workflow.
1. Right-click soa-infra.
2. Select Service Engines > Human Workflow.

Monitoring Human Workflow Service Engine Active Requests and Operation Statistics
Monitoring Human Workflow Service Components and Engines 19-9
■ Active requests in the service engine. Use this graphic to get an idea of the current service engine load. Only under extreme load conditions is there data shown in the graph. This is because most requests are processed instantaneously by the service engine. The data is collected by a Dynamic Monitoring Service (DMS) state sensor. Once the requests are processed by the service engine, the count goes to zero. This action enables you to know the current load on the service engine (for example, if it is too high).
■ Average request message processing time in the service engine since the last startup of the SOA Infrastructure. Use this graph to check service engine performance. Note that while the processing time is calculated based on the last startup of the SOA Infrastructure, the data displaying in the graph is only gathered from the time at which you first accessed this page. The graph does not continue calculating and displaying data if you have not accessed this page. The DMS phase event sensor calculates the average request processing time and provides the processing time data.
■ Operation statistics about human workflow services used in the service engine, including the human workflow service used, the operation performed by the service, the number of active and completed requests, the count, and the average processing time.
For more information, see the following documentation:
■ Section 1.2.4, "Understanding Service Components and Service Component Instances"
■ Oracle Fusion Middleware Developer's Guide for Oracle SOA Suite for details about human workflow services and operations
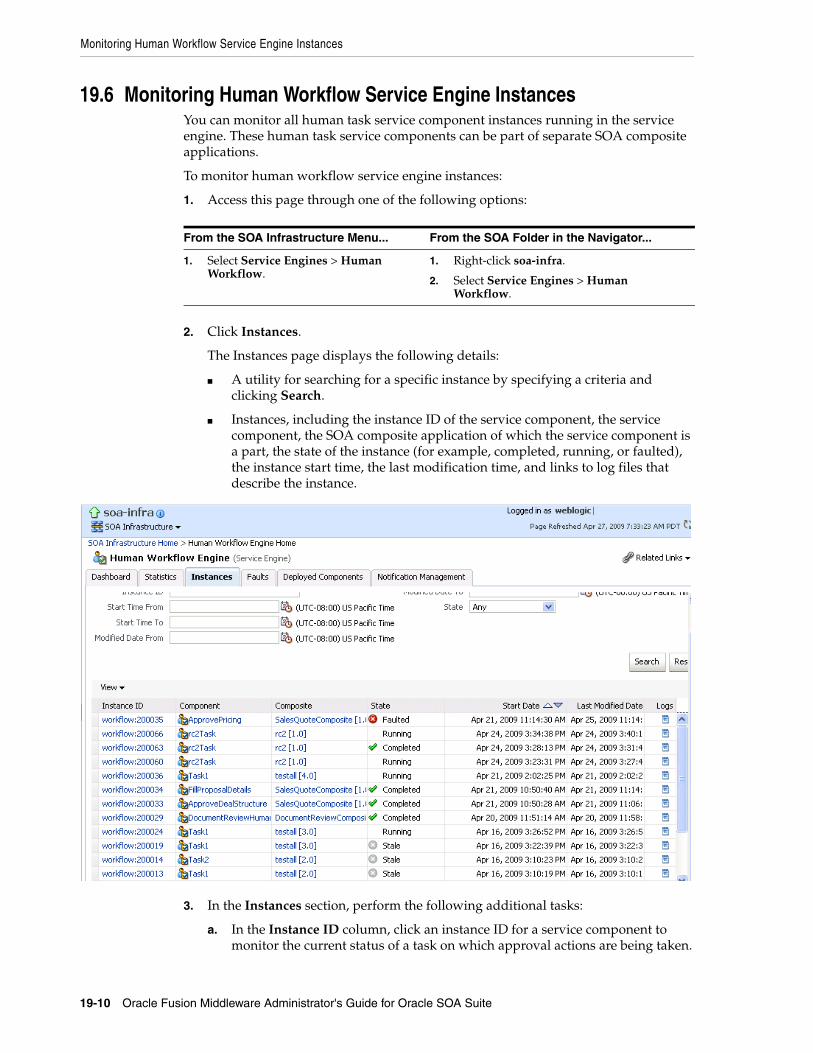
Monitoring Human Workflow Service Engine Instances
19-10 Oracle Fusion Middleware Administrator's Guide for Oracle SOA Suite
19.6 Monitoring Human Workflow Service Engine InstancesYou can monitor all human task service component instances running in the service engine. These human task service components can be part of separate SOA composite applications.
To monitor human workflow service engine instances:
1. Access this page through one of the following options:
2. Click Instances.
The Instances page displays the following details:
■ A utility for searching for a specific instance by specifying a criteria and clicking Search.
■ Instances, including the instance ID of the service component, the service component, the SOA composite application of which the service component is a part, the state of the instance (for example, completed, running, or faulted), the instance start time, the last modification time, and links to log files that describe the instance.
3. In the Instances section, perform the following additional tasks:
a. In the Instance ID column, click an instance ID for a service component to monitor the current status of a task on which approval actions are being taken.
From the SOA Infrastructure Menu... From the SOA Folder in the Navigator...
1. Select Service Engines > Human Workflow.
1. Right-click soa-infra.
2. Select Service Engines > Human Workflow.

Monitoring Deployed Human Workflows in the Service Engine
Monitoring Human Workflow Service Components and Engines 19-11
b. In the Component column, click a specific service component to access its home page.
c. In the Composite column, click a specific SOA composite application to access its home page.
d. In the Logs column, click a specific log to access the Log Messages page with filtered messages specific to that instance.
For more information, see Section 1.2.3, "Understanding SOA Composite Application Instances" and Oracle Fusion Middleware Administrator's Guide for details about viewing and searching log files.
19.7 Monitoring Deployed Human Workflows in the Service EngineYou can monitor all deployed SOA composite applications with human task service components running in the service engine.
To monitor deployed human workflows in service engines:
1. Access this page through one of the following options:
2. Click Deployed Components.
The Deployed Components page displays the following details:
■ A utility for searching for a specific deployed SOA composite application by specifying the full name and clicking Search.
■ Details about deployed human task service components running in this service engine, including the service component name, the SOA composite application, the current status, and the number of total, faulted, and running instances.
From the SOA Infrastructure Menu... From the SOA Folder in the Navigator...
1. Select Service Engines > Human Workflow.
1. Right-click soa-infra.
2. Select Service Engines > Human Workflow.

Monitoring Deployed Human Workflows in the Service Engine
19-12 Oracle Fusion Middleware Administrator's Guide for Oracle SOA Suite
3. In the Name column, click a specific service component to access its home page.
4. In the Composite column, click a specific SOA composite application to access its home page.

20
Managing Human Workflow Service Components and Engines 20-1
20 Managing Human Workflow ServiceComponents and Engines
This chapter describes how to manage human task service components and the human workflow service engine.
This chapter includes the following topics:
■ Section 20.1, "Managing Human Task Service Component Policies"
■ Section 20.2, "Recovering from Human Workflow Service Engine Faults"
■ Section 20.3, "Managing the URI of the Human Task Service Component Task Details Application"
■ Section 20.4, "Recovering from Human Task Service Component Faults"
■ Section 20.5, "Managing Outgoing Notifications and Incoming E-mail Notifications"
■ Section 20.6, "Moving Human Workflow Data from a Test to a Production Environment"
For more information, see the following sections:
■ Section 1.2.4, "Understanding Service Components and Service Component Instances"
■ Section 1.2.6, "Understanding Service Engines"
20.1 Managing Human Task Service Component PoliciesYou can attach and detach security policies to and from human task service components of currently deployed SOA composite applications. Policies apply security to the delivery of messages. Oracle Fusion Middleware uses a policy-based model to manage Web services.
Note: Human task service components are also known as human workflow service components in Oracle Enterprise Manager Fusion Middleware Control Console.
Note: Before attaching policies, see Oracle Fusion Middleware Security and Administrator's Guide for Web Services for definitions of available policies and details about which ones to use in your environment.

Managing Human Task Service Component Policies
20-2 Oracle Fusion Middleware Administrator's Guide for Oracle SOA Suite
To manage human task service component policies:
1. Access this page through one of the following options:
2. Select the human task service component in the Component Metrics table.
3. Click Policies.
The Policies page enables you to attach and detach security policies to and from a human task service component. The policies table displays the attached policy name, the policy reference status (enabled or disabled) that you can toggle, the category (Management, Reliable Messaging, MTOM Attachment, Security, or WS Addressing), the total violations, and the authentication, authorization, confidentiality, and integrity failures since the SOA Infrastructure was last restarted.
4. Click Attach/Detach.
If multiple components are available, you are prompted to select the service or component for which to perform the attachment or detachment.
5. Select the service or component to which to attach or detach a policy.
This invokes a dialog for attaching or detaching policies.
Policies currently attached appear in the Attached Policies section. Additional policies available for attachment appear in the Available Policies section.
6. Select to attach policies appropriate to your environment.
7. Click Attach.
8. When you are finished attaching policies, click Validate.
9. If an error message appears, make the necessary corrections until you no longer have any validation errors.
10. Click OK.
The attached policy displays in the policies table.
For more information, see the following documentation:
From the SOA Infrastructure Menu... From the SOA Folder in the Navigator...
1. Select Home.
2. Select the Deployed Composites tab.
3. In the Composite section, select a specific SOA composite application.
1. Under soa-infra, select a specific SOA composite application.

Recovering from Human Workflow Service Engine Faults
Managing Human Workflow Service Components and Engines 20-3
■ Section 1.3.3.2, "Understanding Policies"
■ Section 8.8, "Managing SOA Composite Application Policies" for the dialogs that display during policy attachment
■ Oracle Fusion Middleware Security and Administrator's Guide for Web Services for definitions of available policies and details about which ones to use for your environment
20.2 Recovering from Human Workflow Service Engine FaultsYou can view and recover from faults in the human workflow service engine. All human task service component faults, regardless of the SOA composite application instance of which they are a part, can be viewed in the human workflow service engine.
Human workflow invocations from the BPEL service engine use different transaction than BPEL processes. Therefore, if a BPEL transaction is rolled back for any reason, the workflow task instances are still created.
To view and recover from human workflow service engine faults:
1. Access this page through one of the following options:
2. Click Faults.
The Faults page displays the following details:
■ A utility for searching for a specific fault by specifying a criteria and clicking Search. Click the Help icon for details.
■ Faults that occurred in the human workflow service engine, including the fault ID, error message, whether you can recover from the fault, the time at which the fault occurred, the SOA composite application and human task service component in which the fault occurred, the instance ID of the human task service component, and a link to a log file describing the fault.
From the SOA Infrastructure Menu... From the SOA Folder in the Navigator...
1. Select Service Engines > Human Workflow.
1. Right-click soa-infra.
2. Select Service Engines > Human Workflow.

Recovering from Human Workflow Service Engine Faults
20-4 Oracle Fusion Middleware Administrator's Guide for Oracle SOA Suite
Human task service engine faults identified as recoverable can be recovered from Oracle BPM Worklist.
3. Perform fault recovery through either of the following methods:
a. In the Error Message column, click a specific message to display complete fault details, including the fault ID, fault time, fault location, fault type, and error message text. If the fault is recoverable, a Recover Now button displays that you can click to recover from the fault. Clicking this button invokes the human workflow audit trail page for the instance. The audit trail page has a link to the Oracle BPM Worklist called Go to Worklist Application, where you can go to recover from the fault. The Oracle BPM Worklist link does not take you directly to the fault; you must manually locate the fault.
b. In the Recovery column, click a fault that is marked as recoverable to invoke the human workflow audit trail page for the instance. The audit trail page provides the same link to the Oracle BPM Worklist called Go to Worklist Application.
4. Perform the following additional monitoring tasks from within the faults table:
a. Click the Show only recoverable faults check box to display only faults from which you can recover.
b. From the Fault Type list, select to display all faults, system faults, business faults, or Oracle Web Service Manager (OWSM) faults in the faults table. Click the Help icon for a description of these fault types.
c. From the View list, select Columns > Fault ID to display the fault IDs for each error message. The fault ID is automatically generated and uniquely identifies a fault. The fault ID also displays when you click an error message.
d. In the Composite column, click a specific SOA composite application to access its home page.
e. In the Component column, click a specific service component to access its home page.

Managing the URI of the Human Task Service Component Task Details Application
Managing Human Workflow Service Components and Engines 20-5
f. In the Component Instance ID column, click a specific service component ID to access task details about the instance (for example, the current state of a task). Note that rejected messages do not have a component instance ID.
g. In the Logs column, click a specific log to access the Log Messages page with filtered messages specific to that instance.
20.3 Managing the URI of the Human Task Service Component Task Details Application
You can add or remove the URI of the task details application used in human workflow.
To manage the URI of the human task service component task details application:
1. Access this page through one of the following options:
2. Select the human task service component in the Component Metrics table.
3. Click Administration.
The Administration page shows the URI for the task details application.
4. Click the Add icon to specify the following details for the URI:
■ Application name
■ Host name
■ HTTP port
■ HTTPS port (optional)
■ URI
5. Click Apply.
From the SOA Infrastructure Menu... From the SOA Folder in the Navigator...
1. Select Home.
2. Select the Deployed Composites tab.
3. In the Composite section, select a specific SOA composite application.
1. Under soa-infra, select a specific SOA composite application.

Recovering from Human Task Service Component Faults
20-6 Oracle Fusion Middleware Administrator's Guide for Oracle SOA Suite
20.4 Recovering from Human Task Service Component FaultsYou can view and recover from human task service component faults. The human task service component is also known as the human workflow service component.
To view and recover from human task service component faults:
1. Access this page through one of the following options:
2. Select the human task service component in the Component Metrics table.
3. Click Faults.
The Faults page displays the following details:
■ A utility for searching for a specific human task service component fault by specifying a criteria and clicking Search. Click the Help icon for details.
■ Faults that occurred in the human task service component, including the fault ID, error message, whether you can recover from the fault, the time at which the fault occurred, the instance ID of the human task service component, and a link to a log file describing the fault.
Human workflow service engine faults identified as recoverable can be recovered from the Oracle BPM Worklist.
4. Perform fault recovery through either of the following methods:
a. In the Error Message column, click a specific message to display complete fault details, including the fault ID, fault time, fault location, fault type, and
From the SOA Infrastructure Menu... From the SOA Folder in the Navigator...
1. Select Home.
2. Select the Deployed Composites tab.
3. In the Composite section, select a specific SOA composite application.
1. Under soa-infra, select a specific SOA composite application.

Managing Outgoing Notifications and Incoming E-mail Notifications
Managing Human Workflow Service Components and Engines 20-7
error message text. If the fault is recoverable, a Recover Now button displays that you can click to recover from the fault. Clicking this button invokes the human workflow audit trail page for the instance. The audit trail page has a link to the Oracle BPM Worklist called Go to Worklist Application, where you can go to recover from the fault. The Oracle BPM Worklist link does not take you directly to the fault; you must manually locate the fault.
b. In the Recovery column, click a fault that is marked as recoverable to invoke the human workflow audit trail page for the instance. The audit trail page provides the same link to the Oracle BPM Worklist called Go to Worklist Application.
5. Perform the following additional monitoring tasks from within the faults table:
a. Click the Show only recoverable faults check box to display only faults from which you can recover.
b. From the Fault Type list, select to display all faults, system faults, business faults, or OWSM faults in the faults table. Click the Help icon for a description of these fault types.
c. From the View list, select Columns > Fault ID to display the fault IDs for each error message. The fault ID is automatically generated and uniquely identifies a fault. The fault ID also displays when you click an error message.
d. In the Component Instance ID column, click a specific service component ID to access task details about the instance (for example, the current state of a task). Note that rejected messages do not have a component instance ID.
e. In the Logs column, click a specific log to access the Log Messages page with filtered messages specific to that instance.
20.5 Managing Outgoing Notifications and Incoming E-mail NotificationsYou can manage incoming and outgoing notifications through e-mail in human workflow, including testing messages, resending messages, and identifying messages as spam.
Incoming and outgoing notifications are sent to and from human workflow. Incoming notifications are responses to actionable notifications. For example, an outgoing notification is sent to the manager of an employee requesting vacation leave. The manager approves the request by clicking the Approve link in the actionable notification e-mail. This action sends an incoming notification to human workflow for possible additional processing.
To manage outgoing notifications and incoming e-mail notifications:
1. Access this page through one of the following options:
2. Click Notification Management.
The upper part of the Notification Management page displays the following details:
From the SOA Infrastructure Menu... From the SOA Folder in the Navigator...
1. Select Service Engines > Human Workflow.
1. Right-click soa-infra.
2. Select Service Engines > Human Workflow.

Managing Outgoing Notifications and Incoming E-mail Notifications
20-8 Oracle Fusion Middleware Administrator's Guide for Oracle SOA Suite
■ A utility for searching for a specific message by specifying a criteria and clicking Search. You must expand the Search icon to display this utility.
■ Outgoing notifications, including the source ID, the source type (for example, if a notification is sent by a BPEL service component, the type is BPEL), the channel used (for example, e-mail, SMS, instant messenger, or voice), the address of the message recipient, the message status (for example, error, send, retry, sent), and the time at which the message was sent.
The lower part of the Notification Management page displays the following details:
■ A utility for searching for a specific message by specifying a criteria and clicking Search. You must expand the Search icon to display this utility.
■ Incoming notifications, including the message ID, the channel used (same types as for outgoing notifications), the address of the message sender, the address of the message recipient, the message status (replied e-mail notification, unsolicited e-mail, unknown e-mail content, response not processed, and response processed), a link to the content of the message, and the time at which the message was received.
3. Perform the following actions on outgoing notifications.
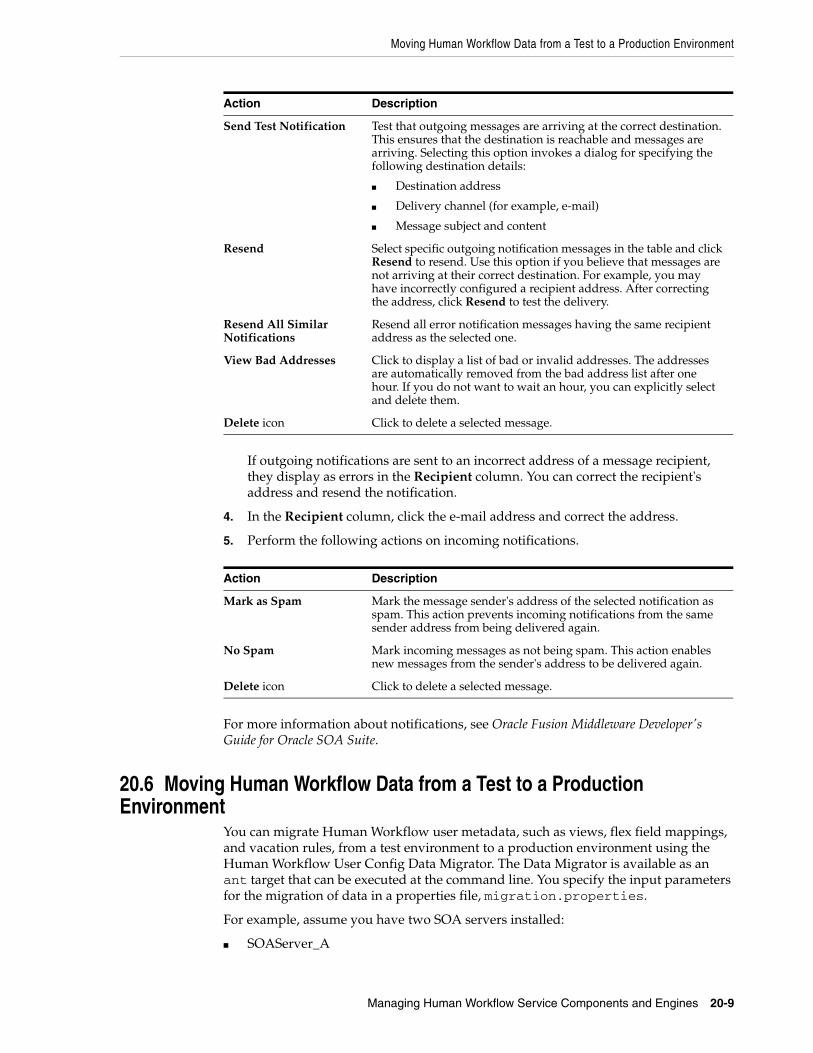
Moving Human Workflow Data from a Test to a Production Environment
Managing Human Workflow Service Components and Engines 20-9
If outgoing notifications are sent to an incorrect address of a message recipient, they display as errors in the Recipient column. You can correct the recipient's address and resend the notification.
4. In the Recipient column, click the e-mail address and correct the address.
5. Perform the following actions on incoming notifications.
For more information about notifications, see Oracle Fusion Middleware Developer's Guide for Oracle SOA Suite.
20.6 Moving Human Workflow Data from a Test to a Production Environment
You can migrate Human Workflow user metadata, such as views, flex field mappings, and vacation rules, from a test environment to a production environment using the Human Workflow User Config Data Migrator. The Data Migrator is available as an ant target that can be executed at the command line. You specify the input parameters for the migration of data in a properties file, migration.properties.
For example, assume you have two SOA servers installed:
■ SOAServer_A
Action Description
Send Test Notification Test that outgoing messages are arriving at the correct destination. This ensures that the destination is reachable and messages are arriving. Selecting this option invokes a dialog for specifying the following destination details:
■ Destination address
■ Delivery channel (for example, e-mail)
■ Message subject and content
Resend Select specific outgoing notification messages in the table and click Resend to resend. Use this option if you believe that messages are not arriving at their correct destination. For example, you may have incorrectly configured a recipient address. After correcting the address, click Resend to test the delivery.
Resend All Similar Notifications
Resend all error notification messages having the same recipient address as the selected one.
View Bad Addresses Click to display a list of bad or invalid addresses. The addresses are automatically removed from the bad address list after one hour. If you do not want to wait an hour, you can explicitly select and delete them.
Delete icon Click to delete a selected message.
Action Description
Mark as Spam Mark the message sender's address of the selected notification as spam. This action prevents incoming notifications from the same sender address from being delivered again.
No Spam Mark incoming messages as not being spam. This action enables new messages from the sender's address to be delivered again.
Delete icon Click to delete a selected message.

Moving Human Workflow Data from a Test to a Production Environment
20-10 Oracle Fusion Middleware Administrator's Guide for Oracle SOA Suite
A test server that includes human workflow user-configurable data (user views, standard views, user rules, group rules, attribute labels, and task payload flex field mappings).
■ SOAServer_B
A production server to which you want to move the data on SOAServer_A.
Since you have a significant amount of data on SOAServer_A, it can be time consuming to manually migrate all of the data to SOAServer_B.
You can use the Data Migrator to move the data from the test server to the production server. You run the ant target at the command line of SOAServer_A to migrate data to SOAServer_B.
Migration is always performed through an XML file. The Data Migrator supports the following operations:
■ Export operation: Stores all the human workflow user-configurable data from the source SOA server to the XML file.
■ Import operation: Creates all the Human Workflow user-configurable data in the target SOA server by reading from the XML file.
The Data Migrator consists of the following files:
■ migration.properties: Contains all required input properties in terms of key-value pairs for migration operations.
■ build.xml: Contains the ant target runHwfMigrator that executes the Data Migrator
20.6.1 Moving Human Workflow Data from Test to Production EnvironmentsPerform the following steps to move data from a test to a production environment.
1. Ensure that the PATH environment variable contains the JAVA_HOME and ANT_HOME environment variables and that they point to the locations within the Oracle SOA Suite installation.
2. Create a migration.properties file in any location to export user metadata for the worklist application (for example, group rules, views, flex field mappings, and vacation rules) from the test environment. See Section 20.6.2.1, "Migration Property File Examples" for instructions on how to specify properties.
Note the following:
– You can export only nonprotected flex field mappings
– You can export only protected attribute labels
– You can only export one type of data at a time.
– When you export data for a particular user or group, you must export each in separate operations.
– You must export attribute labels before you export flex field mappings.
To export attribute labels, use the following values in the migration.properties file:
objectType = TASK_PAYLOAD_FLEX_FIELD_MAPPINGmigrateAttributeLabel = true

Moving Human Workflow Data from a Test to a Production Environment
Managing Human Workflow Service Components and Engines 20-11
To export flex field mappings, use the following values in the migration.properties file:
objectType = TASK_PAYLOAD_FLEX_FIELD_MAPPINGmigrateAttributeLabel = false
3. Export the data with the ant script. The following example shows how to invoke the command and specify the parameters:
ant -f ant-t2p-worklist.xml -Dbea.home=/scratch/oracle/MW_HOME -Dsoa.home=/scratch/oracle/MW_HOME/AS11gR1SOA -Dmigration.properties.file=migration.properties -Dsoa.hostname=hostname -Dsoa.rmi.port=7001 -Dsoa.admin.user=weblogic -Drealm=jazn.com -Dmigration.file=/tmp/export_all_userRules.xml -Dmap.file=/tmp/export_all_userRules_mapper.xml
See Section 20.6.3, "ant Script Data Migration Syntax" for instructions on specifying ant properties.
4. Ensure that the application is deployed to the production system.
5. Create the migration.properties file to import user metadata for the worklist application to the production environment.
Note the following:
– You can only import one type of data at a time.
– When you import data for a particular user or group, you must import them in separate operations.
– You must import attribute labels before you import flex field mappings.
To import attribute labels, use the following values in the migration.properties file:
objectType = TASK_PAYLOAD_FLEX_FIELD_MAPPINGmigrateAttributeLabel = true
To import flex field mappings, use the following values in the migration.properties file:
objectType = TASK_PAYLOAD_FLEX_FIELD_MAPPINGmigrateAttributeLabel = false
6. Import the data to the production environment from the file export_all_userRules.xml, which you created with the map.file property in Step 3. The following example shows how to invoke the command and specify the properties:
ant -f ant-t2p-worklist.xml -Dbea.home=/scratch/oracle/MW_HOME -Dsoa.home=/scratch/oracle/MW_HOME/AS11gR1SOA -Dmigration.properties.file=migration.properties -Dsoa.hostname=hostname -Dsoa.rmi.port=7001
Note: After specifying the Admin user name, enter the password when prompted.

Moving Human Workflow Data from a Test to a Production Environment
20-12 Oracle Fusion Middleware Administrator's Guide for Oracle SOA Suite
-Dsoa.admin.user=weblogic -Dsoa.admin.password=password -Drealm=jazn.com -Dmigration.file=/tmp/export_all_userRules.xml -Dmap.file=/tmp/export_all_userRules_mapper.xml
Note that if the data, such as rules and views, are attached to the user, then the user must be an available user in the production SOA server.
7. Deploy J2EE human task forms, as you would deploy any .ear file.
8. If necessary, update the workflow notification configuration with production mail server and inbound and outbound e-mail accounts. See Section 18.1, "Configuring Human Workflow Notification Properties."
20.6.2 migration.properties File SyntaxThe migration.properties file specifies the input parameters for data migration. The template for this file is located in the following directory:
The migration.properties file contains the following input parameters:
operationType = {EXPORT | IMPORT}objectType = {VIEW | RULE | TASK_PAYLOAD_FLEX_FIELD_MAPPING}name = name of VIEW or TASK_PAYLOAD_FLEX_FIELD_MAPPINGuser = username of VIEW or RULEgroup = groupname for RULEgrantPermission = {true | false}migrateAttributeLabel = {true | false}override = {true | false} skip = {true | false}migrateToActiveVersion = {true | false}
Argument Definition
operationType Specify to perform one of the following actions:
■ EXPORT: Data is migrated from a SOA server instance into an XML file.
■ IMPORT: Data is migrated from the XML file into the SOA server instance.
objectType Specify the type of object to migrate:
■ VIEW: Migrates views.
■ RULE: Migrates vacation rules.
■ TASK_PAYLOAD_FLEX_FIELD_MAPPING: Migrates flex field mappings.
name Specify the object name if you specified VIEW or TASK_PAYLOAD_FLEX_FIELD_MAPPING values for the objectType. This property refers to the following:
■ viewName for VIEW
■ taskDefinitionId for TASK_PAYLOAD_FLEX_FIELD_MAPPING
Specify ALL to identify all objects of this kind.
user Specify the user name only if you specified the VIEW or RULE value for the objectType property. If a user is not specified for VIEW, it implies STANDARD_VIEW.

Moving Human Workflow Data from a Test to a Production Environment
Managing Human Workflow Service Components and Engines 20-13
20.6.2.1 Migration Property File ExamplesThis section provides examples how to configure the migration.properties file.
20.6.2.1.1 Exporting All Protected Attribute Labels The following example exports all protected attribute labels.
operationType = EXPORTobjectType = TASK_PAYLOAD_FLEX_FIELD_MAPPINGname = ALLuser = jcoopergroup =grantPermission = truemigrateAttributeLabel = trueoverride = trueskip = truemigrateToActiveVersion = false
20.6.2.1.2 Importing All Protected Attribute Labels The following example imports all protected attribute labels.
operationType = IMPORTobjectType = TASK_PAYLOAD_FLEX_FIELD_MAPPINGname = ALLuser = jcoopergroup =grantPermission = true
group Specify this property only if you specified the RULE value of the objectType property. It identifies the group name (for example, LoanAgentGroup).
grantPermission Specify this property only if you specified the VIEW value of the objectType property.
■ true: Migrates view definitions and grants.
■ false: Migrates only view definitions.
migrateAttributeLabel Specify one of the following values:
■ true: Migrates only attribute labels. Payload mappings are not migrated.
■ false: Does not migrate attribute labels and payload mappings.
override Specify whether to override the data on the target SOA server:
■ true: Overrides the existing workflow user-configurable data on the target SOA server.
■ false: Does not override the target SOA server instance that has the workflow user-configurable data.
skip Specify error handling details.
■ true: Errors are skipped and the migration utility continues processing.
■ false: Any encountered error halts the migration.
migrateToActiveVersion Specify a value for mapping task definition IDs.
■ true: Maps task definition IDs to the active version in the target SOA server instance.
■ false: Does not map task definitions.
Argument Definition

Moving Human Workflow Data from a Test to a Production Environment
20-14 Oracle Fusion Middleware Administrator's Guide for Oracle SOA Suite
migrateAttributeLabel = trueoverride = trueskip = truemigrateToActiveVersion = false
20.6.2.1.3 Exporting Specific Protected Attribute Labels The following example exports specific protected attribute labels.
operationType = EXPORTobjectType = TASK_PAYLOAD_FLEX_FIELD_MAPPINGname = cb801c91-4605-4e96-a234-aeb8441f0388user = jcoopergroup =grantPermission = truemigrateAttributeLabel = trueoverride = trueskip = truemigrateToActiveVersion = false
20.6.2.1.4 Importing Specific Protected Attribute Labels The following example imports specific protected attribute labels.
operationType = IMPORTobjectType = TASK_PAYLOAD_FLEX_FIELD_MAPPINGname = cb801c91-4605-4e96-a234-aeb8441f0388user = jcoopergroup =grantPermission = truemigrateAttributeLabel = trueoverride = trueskip = truemigrateToActiveVersion = false
20.6.2.1.5 Exporting Nonprotected Task Payload Flex Field Mappings for All Task Definition IDs The following example exports nonprotected task payload flex field mappings for all task definition IDs.
operationType = EXPORTobjectType = TASK_PAYLOAD_FLEX_FIELD_MAPPINGname = ALLuser = jcoopergroup =grantPermission = truemigrateAttributeLabel = falseoverride = trueskip = truemigrateToActiveVersion = false
20.6.2.1.6 Importing Nonprotected Task Payload Flex Field Mappings for All Task Definition IDs The following example imports nonprotected task payload flex field mappings for all task definition IDs. Task payload flex field mappings use attribute labels. As a prerequisite, find out the attribute labels involved in the task payload flex field mappings to import. These attribute labels must be available in the target SOA server before the import of nonprotected task payload flex field mappings into the target SOA server.
The recommended steps are as follows:
■ Import the attribute labels into the target SOA server.
■ Import the task payload flex field mappings into the target SOA server.

Moving Human Workflow Data from a Test to a Production Environment
Managing Human Workflow Service Components and Engines 20-15
operationType = IMPORTobjectType = TASK_PAYLOAD_FLEX_FIELD_MAPPINGname = ALLuser = jcoopergroup =grantPermission = truemigrateAttributeLabel = falseoverride = trueskip = truemigrateToActiveVersion = false
20.6.2.1.7 Exporting Nonprotected Task Payload Flex Field Mappings for a Specific Task Definition ID The following example exports nonprotected task payload flex field mappings for a specific task definition ID.
operationType = EXPORTobjectType = TASK_PAYLOAD_FLEX_FIELD_MAPPINGname = default/HelpDeskRequestComposite!1.0*c9856b8b-bc9e-46a4-8aef-698e539ba1d7/HelpDeskRequestHumanTaskuser = jcoopergroup =grantPermission = truemigrateAttributeLabel = falseoverride = trueskip = truemigrateToActiveVersion = false
20.6.2.1.8 Importing Nonprotected Task Payload Flex Field Mappings for a Specific Task Definition ID The following example imports nonprotected task payload flex field mappings for a specific task definition ID. Task payload flex field mappings make use of attribute labels. As a prerequisite, find out the attribute labels that are involved in the task payload flex field mappings to import. These attribute labels must be available in the target SOA server before the import of nonprotected task payload flex field mappings into the target SOA server.
The recommended steps are as follows:
■ Import the attribute labels into the target SOA server.
■ Import the task payload flex field mappings into the target SOA server.
operationType = IMPORTobjectType = TASK_PAYLOAD_FLEX_FIELD_MAPPINGname = default/HelpDeskRequestComposite!1.0*c9856b8b-bc9e-46a4-8aef-698e539ba1d7/HelpDeskRequestHumanTaskuser = jcoopergroup =grantPermission = truemigrateAttributeLabel = falseoverride = trueskip = truemigrateToActiveVersion = false
20.6.2.1.9 Exporting All Rules for a Specific User This example exports all rules for a specific user. Note that the group property is left blank when you export rules for a specific user.
operationType = EXPORTobjectType = RULE

Moving Human Workflow Data from a Test to a Production Environment
20-16 Oracle Fusion Middleware Administrator's Guide for Oracle SOA Suite
name = ALLuser = jcoopergroup =grantPermission = truemigrateAttributeLabel = falseoverride = trueskip = truemigrateToActiveVersion = false
20.6.2.1.10 Importing All Rules for a Specific User This example imports all rules for a specific user. Note that the group property is left blank when you import rules for a specific user.
operationType = IMPORTobjectType = RULEname = ALLuser = jcoopergroup =grantPermission = truemigrateAttributeLabel = falseoverride = trueskip = truemigrateToActiveVersion = false
20.6.2.1.11 Exporting All Rules for a Specific Group This example exports all rules for a specific group. Note that the user property is left blank when you export rules for a specific group.
operationType = EXPORTobjectType = RULEname = ALLuser =group = LoanAgentGroupgrantPermission = truemigrateAttributeLabel = falseoverride = trueskip = truemigrateToActiveVersion = false
20.6.2.1.12 Importing All Rules for a Specific Group This example imports all rules for a specific group. Note that the user property is left blank when you import rules for a specific group.
operationType = IMPORTobjectType = RULEname = ALLuser =group = LoanAgentGroupgrantPermission = truemigrateAttributeLabel = falseoverride = trueskip = truemigrateToActiveVersion = false
20.6.2.1.13 Exporting All User Views This example exports all user views.
operationType = EXPORTobjectType = VIEWname = ALLuser = jcoopergroup =

Moving Human Workflow Data from a Test to a Production Environment
Managing Human Workflow Service Components and Engines 20-17
grantPermission = truemigrateAttributeLabel = falseoverride = trueskip = truemigrateToActiveVersion = false
20.6.2.1.14 Importing All User Views This example imports all user views.
operationType = IMPORTobjectType = VIEWname = ALLuser = jcoopergroup =grantPermission = truemigrateAttributeLabel = falseoverride = trueskip = truemigrateToActiveVersion = false
20.6.2.1.15 Exporting a Specific User View This example exports a specific user view.
operationType = EXPORTobjectType = VIEWname = jcooperUserView1user = jcoopergroup =grantPermission = truemigrateAttributeLabel = falseoverride = trueskip = truemigrateToActiveVersion = false
20.6.2.1.16 Importing a Specific User View This example imports a specific user view.
operationType = IMPORTobjectType = VIEWname = jcooperUserView1user = jcoopergroup =grantPermission = truemigrateAttributeLabel = falseoverride = trueskip = truemigrateToActiveVersion = false
20.6.2.1.17 Export All Standard Views This example exports all standard views.
operationType = EXPORTobjectType = VIEWname = ALLuser =group = LoanAgentGroupgrantPermission = truemigrateAttributeLabel = falseoverride = trueskip = truemigrateToActiveVersion = false
20.6.2.1.18 Importing All Standard Views This example imports all standard views.
operationType = IMPORTobjectType = VIEW

Moving Human Workflow Data from a Test to a Production Environment
20-18 Oracle Fusion Middleware Administrator's Guide for Oracle SOA Suite
name = ALLuser =group = LoanAgentGroupgrantPermission = truemigrateAttributeLabel = falseoverride = trueskip = truemigrateToActiveVersion = false
20.6.2.1.19 Exporting a Specific Standard View This example exports a specific standard view.
operationType = EXPORTobjectType = VIEWname = MyStandardView1user =group = LoanAgentGroupgrantPermission = truemigrateAttributeLabel = falseoverride = trueskip = truemigrateToActiveVersion = false
20.6.2.1.20 Importing a Specific Standard View This example imports a specific standard view.
operationType = IMPORTobjectType = VIEWname = MyStandardView1user =group = LoanAgentGroupgrantPermission = truemigrateAttributeLabel = falseoverride = trueskip = truemigrateToActiveVersion = false
20.6.3 ant Script Data Migration SyntaxUse the ant script for data migration. The script is located in the following directory:
ORACLE_HOME/bin/ant-t2p-worklist.xml
The script uses the following format to migrate human workflow configurable data from one SOA server to another:
ant -f ant-t2p-worklist.xml -Dbea.home=BEA_HOME -Dsoa.home=SOA_HOME-Dmigration.properties.file=MIGRATION_PROPERTY_FILE_PATH-Dsoa.hostname=SOA_HOSTNAME -Dsoa.rmi.port=SOA_RMI_PORT -Dsoa.admin.user=SOA_ADMIN_USER -Dsoa.admin.password=SOA_ADMIN_PASSWORD-Drealm=REALM -Dmigration.file=MIGRATION_FILE -Dmigration.file=<MIGRATION_FILE>-Dmap.file=MAP_FILE

Moving Human Workflow Data from a Test to a Production Environment
Managing Human Workflow Service Components and Engines 20-19
For example:
ant -f ant-t2p-worklist.xml -Dbea.home=/net/myhost/jsmith/fmwhome-Dsoa.home=/net/myhost/jsmith/fmwhome/AS11gR1SOA -Dmigration.properties.file=migration.properties-Dsoa.hostname=myhost.us.oracle.com -Dsoa.rmi.port=7001-Dsoa.admin.user=weblogic-Drealm=jazn.com-Dmigration.file=/tmp/export_all_userRules.xml-Dmap.file=/tmp/export_all_userRules_mapper.xml
Argument Definition
bea.home The absolute path of the installation directory for Oracle WebLogic Server.
soa.home The absolute path of the Oracle SOA Suite home directory.
migration.properties.file
The absolute path to the migration.properties file.
soa.hostname The host name of the SOA server instance.
Note: You must specify the complete domain name, such as myhost.us.oracle.com, instead of myhost.
soa.rmi.port The remote method invocation (RMI) port of the SOA server instance.
soa.admin.user The Admin user name to connect to the SOA server instance.
soa.admin.password The Admin user password to connect to the SOA server instance.
realm The realm of the SOA server instance.
migration.file The complete path location of the migration file in which all user-configurable data from the SOA server is exported to or imported from.
map.file The full path location of the map file in which all the TaskDefinitionId mappings in the target SOA server are provided. This file enables you to customize the mapping.
Note: After specifying the Admin user name, enter the password when prompted.

Moving Human Workflow Data from a Test to a Production Environment
20-20 Oracle Fusion Middleware Administrator's Guide for Oracle SOA Suite

Part IXAdministering Oracle Business Activity
Monitoring
This part describes how to administer Oracle Business Activity Monitoring.
This part includes the following chapters:
■ Chapter 21, "Configuring Oracle Business Activity Monitoring"
■ Chapter 22, "Monitoring Oracle Business Activity Monitoring"
■ Chapter 23, "Managing Oracle Business Activity Monitoring"


Configuring Oracle Business Activity Monitoring 21-1
21Configuring Oracle Business Activity
Monitoring
This chapter introduces Oracle Business Activity Monitoring (Oracle BAM) configuration, and it explains how to configure Oracle BAM Server properties, Web applications properties, and distribution lists.
This chapter includes the following topics:
■ Section 21.1, "Introduction to Configuring Oracle BAM"
■ Section 21.2, "Configuring Oracle BAM Web Basic Properties"
■ Section 21.3, "Configuring Oracle BAM Server Basic Properties"
■ Section 21.4, "Configuring the Logger"
■ Section 21.5, "Configuring Oracle User Messaging Service"
■ Section 21.6, "Configuring Oracle BAM Distribution Lists"
■ Section 21.7, "Configuring Oracle BAM Adapter"
■ Section 21.8, "Configuring Oracle BAM Batching Properties"
■ Section 21.9, "Configuring Security"
■ Section 21.10, "Configuring Advanced Properties"
■ Section 21.11, "Oracle BAM Configuration Property Reference"
21.1 Introduction to Configuring Oracle BAMOracle BAM Server is the collection of the components Oracle BAM Active Data Cache (Oracle BAM ADC), Oracle BAM Report Cache, Oracle BAM Enterprise Message Sources (EMS), and Oracle BAM Event Engine.
The Oracle BAM Web applications are a collection of thin clients (Active Studio, Architect, Administrator, and Active Viewer) and Oracle BAM Report Server.
For more information about each of the subcomponents of Oracle BAM Server and Oracle BAM Web applications, see Oracle Fusion Middleware User's Guide for Oracle Business Activity Monitoring.
The most commonly used Oracle BAM Server and Web applications properties are configured in Oracle Enterprise Manager Fusion Middleware Control Console. See Section 21.3, "Configuring Oracle BAM Server Basic Properties" and Section 21.2, "Configuring Oracle BAM Web Basic Properties" for more information.

Configuring Oracle BAM Web Basic Properties
21-2 Oracle Fusion Middleware Administrator's Guide for Oracle SOA Suite
Security configuration is discussed in Section 21.9, "Configuring Security", and adding and managing Oracle BAM roles (permissions) and user accounts is discussed in Section 23.3, "Managing Oracle BAM Users."
Oracle User Messaging Service (UMS) must be configured so that alerts are delivered to Oracle BAM users. See Section 21.5, "Configuring Oracle User Messaging Service" for this information.
When using Oracle BAM in an SOA composite application, the Oracle BAM Adapter configuration must be completed. See Section 21.7, "Configuring Oracle BAM Adapter" for more information.
Advanced properties are located in configuration files that must be edited using the System MBean Browser. See Section 21.10, "Configuring Advanced Properties" for more information. Also, see Section 21.11, "Oracle BAM Configuration Property Reference" for a listing of all properties available for Oracle BAM configuration.
Oracle BAM distribution lists are used to send alerts and reports to multiple Oracle BAM users, rather than having to specify several individual recipients. Distribution lists are configured in the Oracle BAM Administrator application. See Section 21.6, "Configuring Oracle BAM Distribution Lists" for more information.
For performance tuning information for Oracle BAM, see Oracle Fusion Middleware Performance and Tuning Guide.
For Oracle BAM high availability configuration information, see Oracle Fusion Middleware High Availability Guide.
21.2 Configuring Oracle BAM Web Basic PropertiesSome basic Oracle BAM Web applications properties are configured using Oracle Enterprise Manager Fusion Middleware Control Console.
Oracle BAM Web applications must be restarted when changes are made to any Oracle BAM properties. See Section 23.2, "Managing Oracle BAM Availability" for information about restarting Oracle BAM.
The following topics describe how to configure each property:
■ Section 21.2.1, "Configuring Oracle BAM Web Applications Properties"
■ Section 21.2.2, "Configuring Application URL"
■ Section 21.2.3, "Configuring Report Loading Indicator"
■ Section 21.2.4, "Configuring Server Name"
For information about configuring advanced properties, see Section 21.10, "Configuring Advanced Properties" and Section 21.11, "Oracle BAM Configuration Property Reference."
21.2.1 Configuring Oracle BAM Web Applications PropertiesThe Oracle BAM Web applications properties are configured in the OracleBamWeb Properties page in Fusion Middleware Control Console.
To configure Oracle BAM Web applications properties:
1. Go to the OracleBamWeb Properties page in Fusion Middleware Control Console by selecting the OracleBamWeb node.
Open Fusion Middleware Control Console in your Web browser at:

Configuring Oracle BAM Web Basic Properties
Configuring Oracle Business Activity Monitoring 21-3
http://host_name:port_number/em
In the navigation tree, the Oracle BAM Web node is named OracleBamWeb in the BAM folder.
2. Select BAM Web Properties in the BAM Web menu.
The BAM Web Properties page opens.
3. Enter the desired values in each of the fields provided.
See the following sections for information about configuring each of the properties:

Configuring Oracle BAM Server Basic Properties
21-4 Oracle Fusion Middleware Administrator's Guide for Oracle SOA Suite
■ Section 21.2.2, "Configuring Application URL"
■ Section 21.2.3, "Configuring Report Loading Indicator"
■ Section 21.2.4, "Configuring Server Name"
4. Click Apply.
You must restart the Oracle BAM application after any property changes.
21.2.2 Configuring Application URLThe Application URL property value must be updated from localhost to the actual host name to generate the correct URLs for reports and alerts.
The Application URL property is configured in both the Oracle BAM Web applications properties page and the Oracle BAM Server properties page. In Oracle BAM Web applications page, the URL is used to generate the full URL for reports and alerts.
Note that this property is common to both Oracle BAM Web applications and Oracle BAM Server. If it is configured on one page, the same value appears on the other configuration page.
21.2.3 Configuring Report Loading IndicatorThe Report Loading Indicator property specifies whether the report loading indicator is enabled or disabled by default when viewing reports in Oracle BAM Active Studio and Oracle BAM Active Viewer.
With this property enabled, the report loading indicator is shown by default when a report is viewed; however, individual users can choose to disable the report loading indicator in their user preferences configuration. See Oracle Fusion Middleware User's Guide for Oracle Business Activity Monitoring for more information.
21.2.4 Configuring Server NameThe Server Name property provides the host name of Oracle BAM Server. Oracle BAM Web applications are separate applications that require the location of Oracle BAM Server to get data from the Active Data Cache and Report Cache for the Oracle BAM Report Server.
21.3 Configuring Oracle BAM Server Basic PropertiesSome basic Oracle BAM Server properties are configured using Oracle Enterprise Manager Fusion Middleware Control Console.
Oracle BAM Server must be restarted after any changes to Oracle BAM properties. See Section 23.2, "Managing Oracle BAM Availability" for information about restarting Oracle BAM.
The following topics describe how to configure each property:
■ Section 21.3.1, "Configuring Oracle BAM Server Properties"
■ Section 21.3.2, "Configuring Data Source JNDI"
■ Section 21.3.3, "Configuring Application URL"
■ Section 21.3.4, "Configuring Viewset Sharing"
■ Section 21.3.5, "Configuring Report Cache Persistence Manager"

Configuring Oracle BAM Server Basic Properties
Configuring Oracle Business Activity Monitoring 21-5
■ Section 21.3.6, "Configuring Oracle Data Integrator Integration Properties"
■ Section 21.3.7, "Configuring Outbound Email Account"
For information about configuring advanced properties, see Section 21.10, "Configuring Advanced Properties" and Section 21.11, "Oracle BAM Configuration Property Reference."
21.3.1 Configuring Oracle BAM Server PropertiesOracle BAM Server properties are configured in the OracleBamServer Properties page in Oracle Enterprise Manager Fusion Middleware Control Console.
To configure Oracle BAM Server properties:
1. Go to the Oracle BAM Server home page by selecting the OracleBamServer node in Fusion Middleware Control Console.
Open Fusion Middleware Control Console in your Web browser at:
http://host_name:port_number/em
In the navigation tree, the Oracle BAM Server node is named OracleBamServer, and it is found in the BAM folder.
2. Select BAM Server Properties from the BAM Server menu.

Configuring Oracle BAM Server Basic Properties
21-6 Oracle Fusion Middleware Administrator's Guide for Oracle SOA Suite
The BAM Server Properties page opens.
3. Enter the desired values in each of the fields provided.
See the following sections for information about configuring each of the properties:
■ Section 21.3.2, "Configuring Data Source JNDI"
■ Section 21.3.3, "Configuring Application URL"
■ Section 21.3.4, "Configuring Viewset Sharing"

Configuring Oracle BAM Server Basic Properties
Configuring Oracle Business Activity Monitoring 21-7
■ Section 21.3.5, "Configuring Report Cache Persistence Manager"
■ Section 21.3.6, "Configuring Oracle Data Integrator Integration Properties"
■ Section 21.3.7, "Configuring Outbound Email Account"
4. Click Apply.
You must restart the Oracle BAM application after any property changes.
21.3.2 Configuring Data Source JNDIThe Data Source JNDI property specifies the database used by Oracle BAM ADC. Enter the data source JNDI name created for Oracle BAM ADC. For general information about configuring data sources see Oracle Fusion Middleware Configuring and Managing JDBC for Oracle WebLogic Server
21.3.3 Configuring Application URLThe Application URL property is used only by Oracle BAM Web applications. This configuration property is no longer used by Oracle BAM Server. See Section 21.2.2, "Configuring Application URL" for information about configuring this property for Oracle BAM Web applications.
21.3.4 Configuring Viewset SharingThe Viewset Sharing property enables viewset sharing when possible. A viewset is an object that represents a query to a given Oracle BAM data object. A viewset can include fields (which can be columns from the data object or lookups from other data objects), aggregates, groups, or calculated fields. A viewset can also be sorted, filtered, and row-level security is applied implicitly to it.
Typically, a particular viewset can be shared with other users if they are trying to access the same Oracle BAM dashboard, if the viewsets are not dissimilar due to factors such as row-level security, prompts or parameters used in filters, and so on.
A snapshot is a query result set that can be created by the viewset. Snapshots can be produced from a viewset after it is opened. Because snapshot generation is so performance-intensive, viewset sharing allows Oracle BAM Server to take only one snapshot of a given view to share across multiple users of the same dashboard.
Sharing viewsets between users of the same views improves performance, but requires that new users wait for viewsets to be synchronized as each new user begins sharing the viewset.
The first user who opens an Oracle BAM dashboard receives a new snapshot (which is cached) and immediately receives active data in real time. Changes for active data, called change lists, are cached.
When additional users open the same dashboard, they receive the cached snapshot that was generated for the first user, and they receive cached change lists (more rapidly than the first user) while the "Synchronizing Active Data" message is displayed.
By default, up to 50 change lists are cached, so if multiple users open a dashboard, secondary users must wait for up to 50 change lists to be sent to the dashboard before they begin receiving real-time active data.
The ElementsCountLimit property can be set to allow fewer change lists to be cached. See Section 21.11, "Oracle BAM Configuration Property Reference" for information about configuring advanced properties.

Configuring Oracle BAM Server Basic Properties
21-8 Oracle Fusion Middleware Administrator's Guide for Oracle SOA Suite
21.3.5 Configuring Report Cache Persistence ManagerThe Report Cache Persistence Manager property specifies the persistence location (file based or memory based). Select the appropriate persistence location for your Oracle BAM Report Cache.
21.3.6 Configuring Oracle Data Integrator Integration PropertiesThe Oracle Data Integrator integration properties specify values for integrating Oracle Data Integrator with Oracle BAM Server.
Enter the appropriate values for the following properties:
ODI User: The user that executes the scenarios in Oracle Data Integrator.
ODI Password: The encoded Oracle Data Integrator password.
ODI Work Repository Name: The name of the Oracle Data Integrator work repository database.
ODI Agent Host: The IP address or host name of the server where the Oracle Data Integrator agent is running.
ODI Agent Port: The Transmission Control Protocol (TCP) port on which the Oracle Data Integrator agent is listening.
21.3.7 Configuring Outbound Email AccountThis section explains how to configure the e-mail address that appears in the From header of e-mail notifications sent by the Oracle BAM Event Engine.
The Outbound Email Account property on Oracle BAM Server must point to a dedicated e-mail account for delivering Oracle BAM alert notification e-mail messages and Oracle BAM report link e-mail messages.
If an Oracle BAM alert configured with a secondary action to send an e-mail notification fails on the primary action, this property must be configured with an e-mail address that Oracle UMS can access at run time. Creating a dedicated e-mail account for this purpose is recommended.
To complete the configuration, you must configure the Oracle UMS usermessagingdriver-email driver. See Section 21.5, "Configuring Oracle User Messaging Service" for details.
Oracle BAM Event Engine has another configuration property, TimeoutPeriodToGetFailedStatusesInMins, which is the time interval for which the Event Engine waits after delivering an e-mail notification, to see if it receives any failure notification from Oracle UMS. The default value for this property is 10 minutes. If a failure notification does not arrive within this time, the Event Engine assumes that e-mail delivery was successful, and the failover action is discarded. Failure notifications arriving after this time are ignored by the Event Engine. See Section 21.11, "Oracle BAM Configuration Property Reference" for information about configuring TimeoutPeriodToGetFailedStatusesInMins.
Note: Administrators should not use personal e-mail accounts to test alerts, because Oracle UMS may delete e-mail notifications in the mail box and continue deleting messages as they arrive.
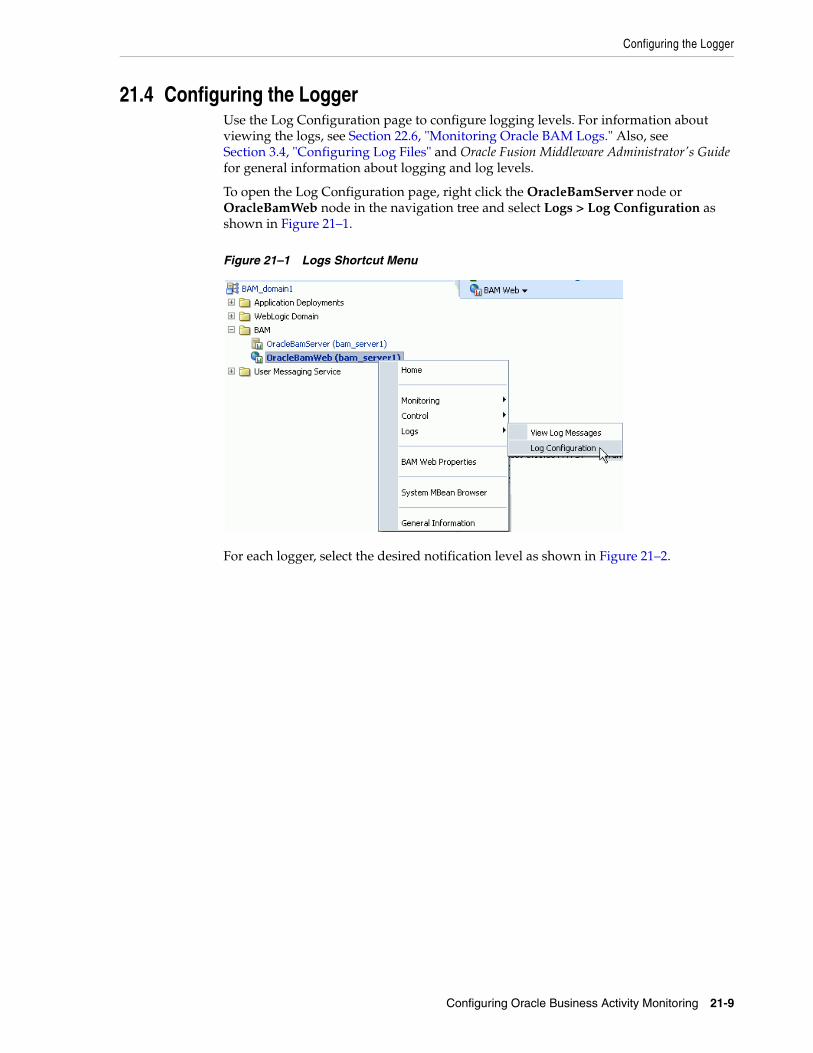
Configuring the Logger
Configuring Oracle Business Activity Monitoring 21-9
21.4 Configuring the LoggerUse the Log Configuration page to configure logging levels. For information about viewing the logs, see Section 22.6, "Monitoring Oracle BAM Logs." Also, see Section 3.4, "Configuring Log Files" and Oracle Fusion Middleware Administrator's Guide for general information about logging and log levels.
To open the Log Configuration page, right click the OracleBamServer node or OracleBamWeb node in the navigation tree and select Logs > Log Configuration as shown in Figure 21–1.
Figure 21–1 Logs Shortcut Menu
For each logger, select the desired notification level as shown in Figure 21–2.

Configuring Oracle User Messaging Service
21-10 Oracle Fusion Middleware Administrator's Guide for Oracle SOA Suite
Figure 21–2 Setting Log Levels
21.5 Configuring Oracle User Messaging ServiceOracle User Messaging Service (UMS) must be configured properly in Fusion Middleware Control Console to send e-mail notifications when alerts are issued.
The UMS e-mail driver monitors the outbound e-mail account configured for Oracle BAM Server for any delivery failures, including rejected e-mails. E-mail delivery failure notifications are asynchronous, that is, there is no definite time within which e-mail rejection notification is received.
To configure the service:
1. Open Fusion Middleware Control Console in your Web browser at:
http://host_name:port_number/em
2. Go to the usermessagingdriver-email (User Messaging Email Driver) page in Fusion Middleware Control Console by expanding the User Messaging Service folder, then selecting the usermessagingdriver-email (bam_server1) node.

Configuring Oracle User Messaging Service
Configuring Oracle Business Activity Monitoring 21-11
3. From the User Messaging Email Driver shortcut menu, select Email Driver Properties.
4. In the Driver-Specific Configuration section, the properties IncomingMailServer, IncomingUserIDs, and IncomingUserPasswords must be provided with the Internet Message Access Protocol (IMAP) server name (Oracle UMS also supports POP3), e-mail account name, and password to access this e-mail account.
See Section 24.4, "Configuring User Messaging Service Drivers" for more information. Table 24–4, " Custom E-Mail Properties" contains specific information about the properties you must configure.
5. Click Apply to save the changes.

Configuring Oracle BAM Distribution Lists
21-12 Oracle Fusion Middleware Administrator's Guide for Oracle SOA Suite
6. Enter the e-mail account in the Outbound Email Account property in the Oracle BAM Server configuration. See Section 21.3.7, "Configuring Outbound Email Account" for details.
21.6 Configuring Oracle BAM Distribution ListsOracle BAM distribution lists are used to send alerts and reports to multiple Oracle BAM users, rather than having to specify several individual recipients. Oracle BAM distribution lists are configured using the Oracle BAM Administrator application.
To configure distribution lists:
1. Go to the Oracle BAM start page, log in, and select Administrator.
The Oracle BAM start page is located at:
http://host_name:port_number/OracleBAM/
2. Select Distribution List management from the list.
3. Click Create.
4. Enter a unique Distribution List Name and click Create.
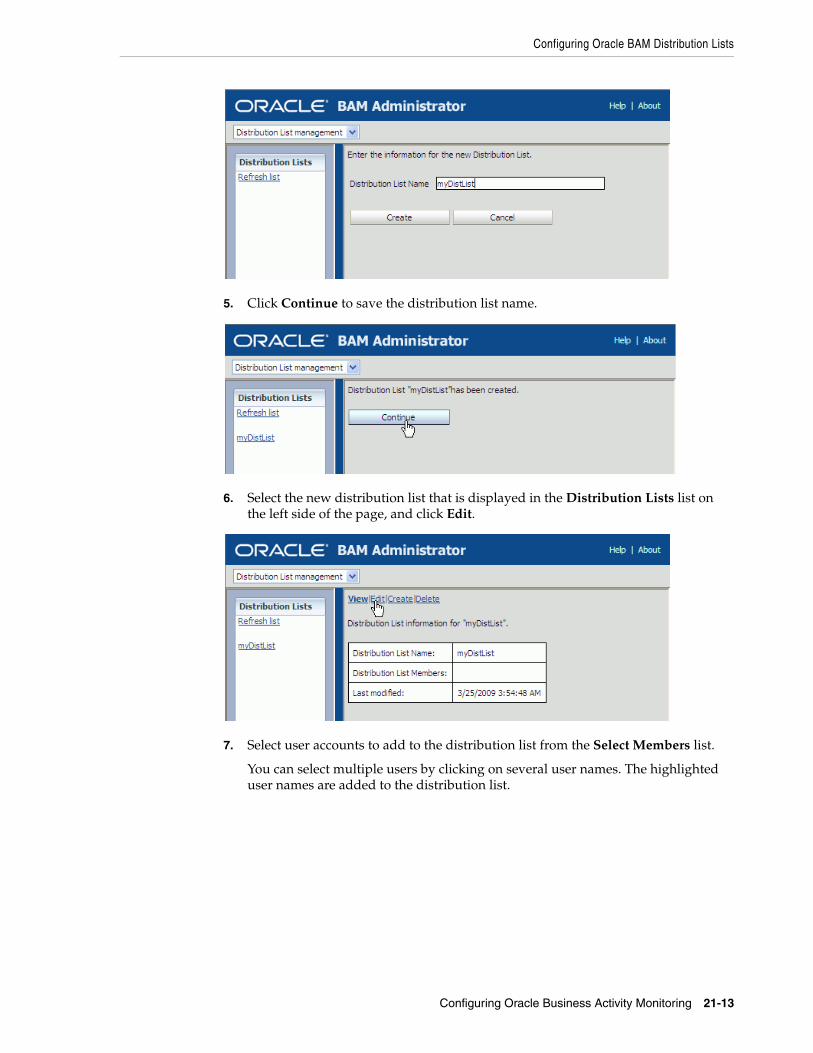
Configuring Oracle BAM Distribution Lists
Configuring Oracle Business Activity Monitoring 21-13
5. Click Continue to save the distribution list name.
6. Select the new distribution list that is displayed in the Distribution Lists list on the left side of the page, and click Edit.
7. Select user accounts to add to the distribution list from the Select Members list.
You can select multiple users by clicking on several user names. The highlighted user names are added to the distribution list.

Configuring Oracle BAM Adapter
21-14 Oracle Fusion Middleware Administrator's Guide for Oracle SOA Suite
8. Click Save.
The users are added to the distribution list.
21.7 Configuring Oracle BAM AdapterOracle BAM Adapter properties, including the adapter batching properties, are configured in Oracle WebLogic Server Administration Console. See Section 21.7.1, "Configuring Oracle BAM Adapter Properties" for details.
Some issues that must be considered when Oracle BAM Adapter (including Oracle BAM sensor actions in a BPEL process) is used in an SOA composite application are configuring connection factories, trusted domains, and credential mapping.
Before deploying applications that use Oracle BAM Adapter, a connection factory to Oracle BAM Server must be configured. You can configure both Remote Method Invocation (RMI) and Simple Object Access Protocol (SOAP) connection factories. See Section 21.7.2, "Configuring Oracle BAM Connection Factories" for details.
When using the RMI connection between an SOA composite application and Oracle BAM Server, that is when they are deployed in different domains, trusted domain configuration must be done in Oracle WebLogic Server Administrative Console. See Section 21.7.3, "Configuring Trusted Domains" for more information.
If the Oracle BAM Adapter is using credentials rather than a plain text user name and password, in order for Oracle BAM Adapter (including Oracle BAM sensor actions in a BPEL process) to connect to Oracle BAM Server, the credentials must also be established and mapped. See Section 21.7.4, "Configuring Credential Mapping" for more information.

Configuring Oracle BAM Adapter
Configuring Oracle Business Activity Monitoring 21-15
21.7.1 Configuring Oracle BAM Adapter PropertiesOracle BAM Adapter properties are configured in Oracle WebLogic Server Administration Console.
To configure Oracle BAM Adapter properties:1. Go to the Oracle WebLogic Server Administration Console
(http://host_name:port_number/console), and log on.
2. In the Domain Structure menu, select Deployments.
3. In the Deployments summary table, search for OracleBamAdapter and click it.
4. In the Settings for OracleBamAdapter page, select the Configuration tab, and then the Properties tab in the second row.
Notes: Use plain text user names and passwords only in nonproduction mode. Do not mix using credential mapping and plain text user information; apply one at a time to avoid confusion.
Because Oracle BAM and Oracle SOA Infrastructure use different identity stores, an Oracle BAM user must be configured in the service infrastructure identity store if there is not a common service infrastructure user and Oracle BAM user.
Oracle BAM Adapter does not support transactional behavior. Even though there is a section in Oracle WebLogic Server Administration Console for configuring transaction support, Oracle BAM Adapter must remain at the No Transaction level.

Configuring Oracle BAM Adapter
21-16 Oracle Fusion Middleware Administrator's Guide for Oracle SOA Suite
5. Enter the new values, select the checkboxes for each updated value, and click Save.
See Table 21–1, " Oracle BAM Adapter Configuration Properties" for information about each property.
Also, see Section 21.8, "Configuring Oracle BAM Batching Properties" for general information about configuring batching properties.
6. Restart the server.
Note: To commit these changes to the deployment plan you must click Activate Changes in the Change Center. If the Activate Changes button does not appear, see the Oracle BAM Troubleshooting Guide on the Oracle Technology Network web site for a workaround:
http://www.oracle.com/technology/products/integration/bam/collateral/documentation.html
Table 21–1 Oracle BAM Adapter Configuration Properties
RMI Property SOAP Property Default Description
Batch_Lower_Limit SOAP_Batch_Lower_Limit 1000 The minimum amount of elements in a batch before it is sent out.
Batch_Upper_Limit SOAP_Batch_Upper_Limit 5000 The maximum amount of elements in a batch before it is sent out.
Batch_Timeout SOAP_Batch_Timeout 5000 The timeout in milliseconds after which the batch is sent out even if it is not full.

Configuring Oracle BAM Adapter
Configuring Oracle Business Activity Monitoring 21-17
21.7.1.1 Configuring the Adapter to Retry Sending MessagesIf messages from BPEL process monitors are published when Oracle BAM Server is unavailable, the messages are not persisted and therefore are not published to the Oracle BAM data objects when Oracle BAM Server comes back online.
You can change this behavior by setting the Oracle BAM Adapter property Block_On_Batch_Full to true in Oracle BAM Adapter configuration as described in Section 21.7.1, "Configuring Oracle BAM Adapter Properties."
For more information about BPEL process monitors see "Instrumenting BPEL Processes With Monitors" in Oracle Fusion Middleware Developer's Guide for Oracle SOA Suite.
21.7.2 Configuring Oracle BAM Connection FactoriesSome configuration in the Oracle WebLogic Server Administration Console is necessary before using Oracle BAM Adapter.
Use the Oracle WebLogic Server Administration Console to configure the Oracle BAM connection factories for connections with Oracle BAM Server.
To configure Oracle BAM connection factories:
1. Go to the Oracle WebLogic Server Administration Console (http://host_name:port_number/console), and log on.
2. In the Domain Structure menu, select Deployments.
3. In the Deployments summary table, search for OracleBamAdapter and click it.
Block_On_Batch_Full SOAP_Block_On_Batch_Full true The default setting for block on batch full, which indicates whether batching operations should block when the batch is full. If true then batching calls block until room is freed up in the batch for the operation. If false then BatchIsFullException exception is thrown.
Number_Batches SOAP_Number_Batches 10 The limit of the number of pending calls allowed.
Table 21–1 (Cont.) Oracle BAM Adapter Configuration Properties
RMI Property SOAP Property Default Description

Configuring Oracle BAM Adapter
21-18 Oracle Fusion Middleware Administrator's Guide for Oracle SOA Suite
4. In the Settings for OracleBamAdapter page, select the Configuration tab, and then the Outbound Connection Pools tab in the second row.
5. Configure the connection factory interface that you intend to use in Oracle JDeveloper, by expanding the appropriate Group and Instance target and clicking the Java Naming and Directory Interface (JNDI) name.
To configure the connection factory for RMI-based calls, click to expand the oracle.bam.adapter.adc.RMIConnectionFactory group and select the JNDI name that the user uses in Oracle JDeveloper. The eis/bam/rmi connection factory is provided out of the box.
To configure the connection factory for SOAP-based calls, click to expand the oracle.bam.adapter.adc.SOAPConnectionFactory group and select the JNDI name that the user uses in Oracle JDeveloper. The eis/bam/soap connection factory is provided out of the box.
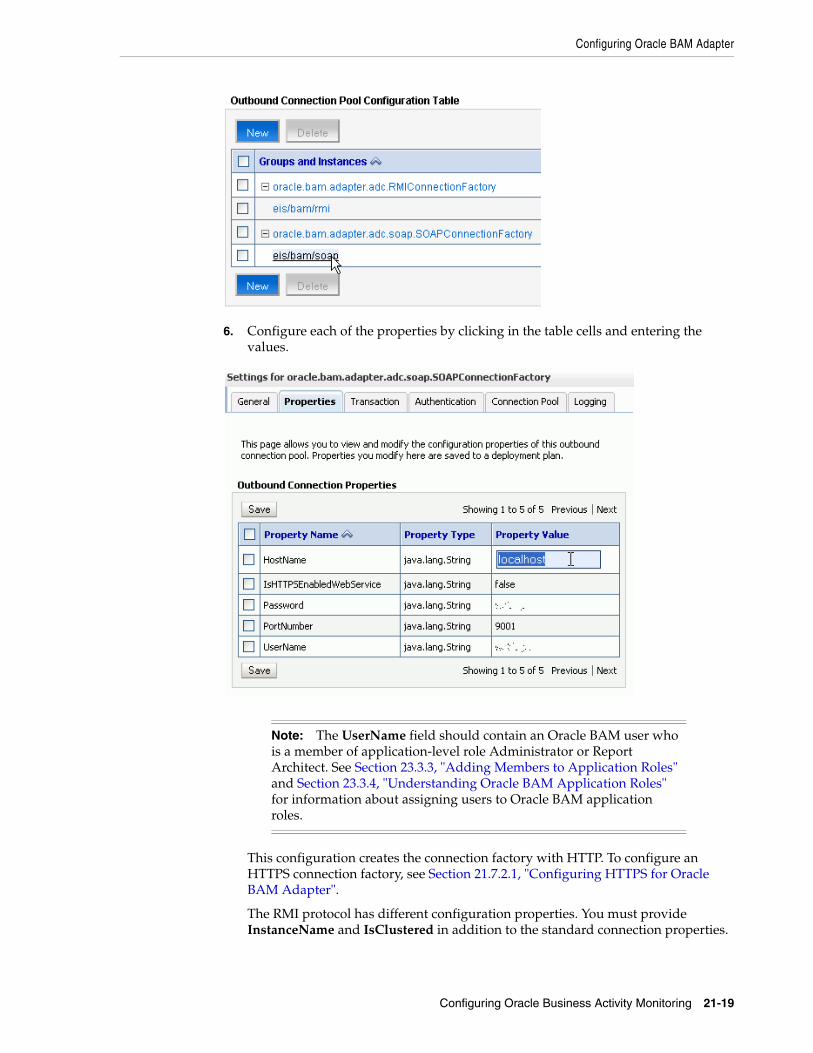
Configuring Oracle BAM Adapter
Configuring Oracle Business Activity Monitoring 21-19
6. Configure each of the properties by clicking in the table cells and entering the values.
This configuration creates the connection factory with HTTP. To configure an HTTPS connection factory, see Section 21.7.2.1, "Configuring HTTPS for Oracle BAM Adapter".
The RMI protocol has different configuration properties. You must provide InstanceName and IsClustered in addition to the standard connection properties.
Note: The UserName field should contain an Oracle BAM user who is a member of application-level role Administrator or Report Architect. See Section 23.3.3, "Adding Members to Application Roles" and Section 23.3.4, "Understanding Oracle BAM Application Roles" for information about assigning users to Oracle BAM application roles.

Configuring Oracle BAM Adapter
21-20 Oracle Fusion Middleware Administrator's Guide for Oracle SOA Suite
7. Select the checkboxes next to the values you have updated and click Save.
21.7.2.1 Configuring HTTPS for Oracle BAM AdapterTo configure HTTPS:
1. Locate the oracle.bam.adapter.adc.soap.SOAPConnectionFactory connection factory in the Oracle WebLogic Server Administration Console as described in Section 21.7, "Configuring Oracle BAM Adapter".
2. Click to expand the oracle.bam.adapter.adc.soap.SOAPConnectionFactory node, select the eis/bam/soap option, and click New.
Note: To commit these changes to the deployment plan you must click Activate Changes in the Change Center. If the Activate Changes button does not appear, see the Oracle BAM Troubleshooting Guide on the Oracle Technology Network web site for a workaround:
http://www.oracle.com/technology/products/integration/bam/collateral/documentation.html

Configuring Oracle BAM Adapter
Configuring Oracle Business Activity Monitoring 21-21
3. Select the oracle.bam.adapter.adc.soap.SOAPConnectionFactory option and click Next.
4. Enter a JNDI name for this connection factory and click Finish.
5. Select the eis/bam/https connection pool instance in the Groups and Instances list.
6. Complete the configuration properties as shown in Section 21.7, "Configuring Oracle BAM Adapter," and change the IsHTTPSEnabledWebService value to true.

Configuring Oracle BAM Adapter
21-22 Oracle Fusion Middleware Administrator's Guide for Oracle SOA Suite
21.7.3 Configuring Trusted DomainsWhen using the RMI connection between an SOA composite application and Oracle BAM Server, that is when they are deployed in different domains, trusted domain configuration must be done in Oracle WebLogic Server Administrative Console.
To configure trusted domains:
1. Using the Oracle WebLogic Server Administration Console, in both SOA and Oracle BAM Server domains, go to base_domain > Security > General, and expand the Advanced settings.
2. Enter the credential for the WebLogic Server domain in the Credential and Confirm Credential fields.
Enter the same credential in both the SOA and Oracle BAM Server domains to establish trust between the domains.
3. Save and Activate the changes, then restart Oracle WebLogic Server.
For more information about trusted domains see "Enabling Global Trust" in Oracle Fusion Middleware Securing Oracle WebLogic Server.
21.7.4 Configuring Credential MappingConfigure Oracle BAM Adapter to securely store user name and password properties using Oracle WebLogic Server credential mapping functionality.
Note: Use plain text user names and passwords only in nonproduction mode. Do not mix using credential mapping and plain text user information; apply one at a time to avoid confusion.

Configuring Oracle BAM Adapter
Configuring Oracle Business Activity Monitoring 21-23
To configure credential mapping:
1. Using the Oracle WebLogic Server Administration Console, go to Deployment > OracleBamAdapter > Security > Credential Mappings.
2. Click New and select an outbound connection pool instance for which to create a credential mapping entry, then click Next (By default, Oracle BAM is installed with two connection pools, eis/bam/rmi and eis/bam/soap).
3. Select Unauthenticated WLS User, and click Next (Unauthenticated WLS User is similar to an anonymous user).
4. Specify a corresponding user name and password for connecting to Oracle BAM Server, then click Finish to complete the credential mapping.
Note: Ensure that a separate credential mapping entry for each outbound connection pool is created. If there are any additional outbound connection pools other than the defaults, you must create corresponding credential mappings for them as well.

Configuring Oracle BAM Batching Properties
21-24 Oracle Fusion Middleware Administrator's Guide for Oracle SOA Suite
5. Repeat these steps to create the credential mapping for the other Oracle BAM connection pool entries.
After you configure the credential mappings for each of the outbound connection pool entries, the mappings appear in the Credential Mappings table.
6. For these changes to take effect, Oracle WebLogic Server must be restarted.
21.8 Configuring Oracle BAM Batching PropertiesThe batch processor batches operations (for example, insert, update, upsert, and delete) between the client and the Active Data Cache server to improve performance by limiting the number of remote calls. For example, 10 update operations could be processed in a single remote call with batching enabled, rather than making 10 remote calls.
Oracle BAM batching properties are located in the BAMCommonConfig.xml file at:
WLS_HOME/user_projects/domains/base_domain/config/fmwconfig/servers/bam_server1/applications/oracle-bam_11.1.1/config/
Oracle BAM must be restarted after any changes to Oracle BAM properties. See Section 23.2, "Managing Oracle BAM Availability" for information about restarting Oracle BAM.
Note: Batching is used only on incoming data, not on internal Oracle BAM processes.

Configuring Oracle BAM Batching Properties
Configuring Oracle Business Activity Monitoring 21-25
Table 21–2 Active Data Cache API and SOAP (Oracle BAM Adapter) Batching Properties
Oracle BAM ADC API Property SOAP Property Default Description
ActiveDataCache_Datasets_Batching_Limit_PendingCalls
Adapter_SOAP_Batching_Limit_PendingCalls
10 The limit of the number of pending calls allowed.
ActiveDataCache_Datasets_Batching_Limit_Lower
Adapter_SOAP_Batching_Limit_Lower
1000 The minimum number of elements in a batch before it is sent out.
ActiveDataCache_Datasets_Batching_Limit_Upper
Adapter_SOAP_Batching_Limit_Upper
5000 The maximum number of elements in a batch before it is sent out.
ActiveDataCache_Datasets_Batching_Timeout
Adapter_SOAP_Batching_Timeout
5000 The timeout interval in milliseconds after which the batch is sent out even if it is not full.
ActiveDataCache_Datasets_Batching_FlushOnDemand_Limit
Adapter_SOAP_Batching_FlushOnDemand_Limit
1000 The number of rows to take into a batch when flushing on demand.
ActiveDataCache_Datasets_Batching_RetryInterval
Adapter_SOAP_Batching_RetryInterval
30000 The interval in milliseconds at which batch processing should attempt to retry failed flush attempts.
ActiveDataCache_Datasets_Batching_MaxRetryInterval
Adapter_SOAP_Batching_MaxRetryInterval
3600000 The maximum interval in milliseconds at which batch processing should attempt to retry failed flush attempts.
ActiveDataCache_Datasets_Batching_MaximumRetries
Adapter_SOAP_Batching_MaximumRetries
Integer.MAX_VALUE
The maximum number of times batch processing should attempt to retry failed flush attempts. Zero indicates no retry.

Configuring Security
21-26 Oracle Fusion Middleware Administrator's Guide for Oracle SOA Suite
Batching Retry MechanismThe batching retry mechanism is designed to retry remote calls to the server in the event communication with the server is lost due to, for example, network problems or Oracle BAM Server going offline. The operation of this retry mechanism is governed by the configuration properties detailed in this section. The term flush refers to the attempt to send the batch calls to the Oracle BAM Server for processing.
The RetryInterval property specifies the interval between retry attempts in milliseconds. If the MaxRetryInterval value is unspecified (0), then the code continues retrying at the RetryInterval value until the batch flush is successful or the MaximumRetries value is exceeded.
If the MaxRetryInterval value is specified, then the retry interval value is doubled on each retry up to the MaxRetryInterval value. It stays at the MaxRetryInterval rate until the batch flush is successful, or the MaximumRetries value is exceeded. This allows the retry rate to decline over time to a more reasonable long-term rate. If the server does not recover quickly, do not continue to retry at a rapid rate.
If the MaximumRetries value is 0, then no retries are attempted and failed batches are discarded.
If the SuspendOnDisconnect value is true, then all batching is permanently suspended until the client application is restarted, regardless of whether communication with Oracle BAM Server is reestablished.
If the pending batch limit is reached and the current batch is full (maximum size reached), then batch calls are blocked. There is no place to queue the operation from the current call, so Oracle BAM blocks the client until the condition resolves itself.
Table 21–2 describes the configuration properties that can be specified for the Active Data Cache API batching (which is used by the RMI connection factory, configured in Section 21.7.2, "Configuring Oracle BAM Connection Factories").
The Oracle BAM Adapter batching mechanism (used by the SOAP connection factory) has an identical set of configuration properties and default values.
21.9 Configuring SecuritySecurity is configured in Oracle WebLogic Server. See Oracle Fusion Middleware Securing Oracle WebLogic Server for information about the topics listed in this section.
General information about Oracle WebLogic Server security is available in Oracle Fusion Middleware Understanding Security for Oracle WebLogic Server.
ActiveDataCache_Datasets_Batching_SuspendOnDisconnect
Adapter_SOAP_Batching_SuspendOnDisconnect
false Suspend on disconnect, which indicates whether batching operations should be permanently suspended if and when the connection to Oracle BAM Server is lost.
Table 21–2 (Cont.) Active Data Cache API and SOAP (Oracle BAM Adapter) Batching
Oracle BAM ADC API Property SOAP Property Default Description

Configuring Security
Configuring Oracle Business Activity Monitoring 21-27
This section address the following security topics as they relate to Oracle BAM:
■ Section 21.9.1, "Configuring Credential Mapping"
■ Section 21.9.2, "Configuring Oracle BAM User Permissions"
■ Section 21.9.3, "Configuring Secure Socket Layer"
■ Section 21.9.4, "Configuring Oracle Internet Directory"
21.9.1 Configuring Credential MappingCredential mapping is used to securely store user name and password properties when using the Oracle BAM Adapter. For information see Section 21.7.4, "Configuring Credential Mapping."
21.9.2 Configuring Oracle BAM User PermissionsTo provide secure access to the Oracle BAM applications, users are assigned to roles that provide the necessary permissions. See Section 23.3, "Managing Oracle BAM Users" for more information.
21.9.3 Configuring Secure Socket LayerOracle WebLogic Server provides the facilities needed to enable Secure Socket Layer (SSL) on any Oracle SOA Suite and Oracle WebCenter connections into Oracle WebLogic Server.
Use the Java Development Kit (JDK) keytool utility to create and manage keystores and certificates, and use the Oracle WebLogic Server Administration Console to configure Oracle WebLogic Server listeners.
See "Configuring SSL" in Oracle Fusion Middleware Securing Oracle WebLogic Server for more information.
Although Oracle WebLogic Server lets you configure the Oracle BAM Web applications on both SSL and non-SSL ports, and Oracle BAM can also be configured to run on both SSL and non-SSL ports, it causes issues with the URL configured for Oracle BAM alerts. When Oracle BAM is running on both SSL and non-SSL ports, it cannot send two Oracle BAM report URLs to the alert e-mail receiver. It is the responsibility of the administrator to decide which mode of access (SSL or non-SSL) to use for the Oracle BAM report URL recipients.
To start Oracle BAM in SSL mode, and enable Oracle BAM clients (like ICommand) to invoke Oracle BAM ADC, invoke EJBs, JMS resources, and JDBC resources using SSL, you must configure the following Oracle BAM properties:
Communication_Protocol in the BAMCommonConfig.xml, BAMServerConfig.xml, and BAMICommandConfig.xml files, as follows:
Default value: <Communication_Protocol>t3</Communication_Protocol>
For SSL using t3s: <Communication_Protocol>t3s</Communication_Protocol>
ListenPort in BAMCommonConfig.xml file, as follows:
Default value: <ListenPort>ListenPort</ListenPort>
For SSL: <ListenPort>SSLListenPort</ListenPort>

Configuring Advanced Properties
21-28 Oracle Fusion Middleware Administrator's Guide for Oracle SOA Suite
21.9.4 Configuring Oracle Internet DirectoryFor general information about configuring Oracle Internet Directory, see "Configuring Users and Groups in the Oracle Internet Directory and Oracle Virtual Directory Authentication Providers" in Oracle Fusion Middleware Securing Oracle WebLogic Server.
To use Oracle Internet Directory with Oracle BAM:
1. Configure Oracle Internet Directory using the Oracle WebLogic Server Administration Console.
2. Create OracleSystemUser in Oracle Internet Directory, by connecting to Oracle Internet Directory with an Lightweight Directory Access Protocol (LDAP) browser and creating a user in the same base user Distinguished Name that was provided in the Oracle WebLogic Server Administration Console while configuring Oracle Internet Directory.
3. Run the following SQL statements to null the user global unique identifiers (GUID) in the Oracle BAM schema:
UPDATE "SysIterUser" SET "SysIterUser"."GUID" = NULL,"SysIterUser"."Inactive" = NULL;
21.10 Configuring Advanced PropertiesOracle BAM provides many advanced properties not available for configuration using the OracleBamServer and OracleBamWeb properties pages in Fusion Middleware Control Console. These advanced properties are configured using the System MBean Browser.
See Section 21.11, "Oracle BAM Configuration Property Reference" for a listing of all properties available for Oracle BAM configuration.
To configure the advanced properties using the System MBean Browser:
1. Select System MBean Browser in the OracleBAMWeb or OracleBAMServer menu.
2. Select the path to the appropriate Application Defined MBeans page:

Configuring Advanced Properties
Configuring Oracle Business Activity Monitoring 21-29
■ For properties common to all Oracle BAM components select Application Defined MBeans > oracle.bam.common > Server: bam_server1 > Application: oracle-bam > Config > BAMCommonConfig (see Figure 21–3).
■ For Oracle BAM Server-specific properties select Application Defined MBeans > oracle.bam.server > Server: bam_server1 > Application: oracle-bam > Config > BAMServerConfig.
■ For Oracle BAM Web applications-specific properties select Application Defined MBeans > oracle.bam.web > Server: bam_server1 > Application: oracle-bam > Config > BAMWebConfig.
Figure 21–3 System MBean Browser Navigation Tree
The associated configuration properties are displayed in the System MBean Browser.

Oracle BAM Configuration Property Reference
21-30 Oracle Fusion Middleware Administrator's Guide for Oracle SOA Suite
3. Edit property values in the Values column, and click Apply.
4. Oracle BAM must be restarted after any changes to Oracle BAM properties. See Section 23.2, "Managing Oracle BAM Availability" for information about restarting Oracle BAM.
Oracle BAM Configuration Property FilesAll Oracle BAM properties are located in configuration files. These files are located in the following directory on the host where the Oracle BAM components are installed:
WLS_HOME/user_projects/domains/base_domain/config/fmwconfig/servers/bam_server1/applications/oracle-bam_11.1.1/config
The configuration properties usually go into the BAMCommonConfig.xml file, which contains the properties global to all Oracle BAM components. These properties can also be specified in component specific configuration files:
■ Oracle BAM Server-specific properties are configured in BAMServerConfig.xml
■ Oracle BAM Web applications-specific properties are configured in BAMWebConfig.xml
■ Oracle BAM ICommand utility-specific properties are configured in BAMICommandConfig.xml
The properties set in the BAMCommonConfig.xml file are always loaded. Any additional configuration files must be loaded explicitly. Oracle BAM Server explicitly loads the BAMServerConfig.xml file, the Oracle BAM Web applications explicitly load the BAMWebConfig.xml file, and ICommand explicitly loads the BAMICommandConfig.xml file. When a configuration file is loaded, its properties override any properties previously set, that is properties specified in BAMServerConfig.xml override properties set in BAMCommonConfig.xml.
21.11 Oracle BAM Configuration Property ReferenceThis section provides a brief description of each Oracle BAM configuration property that may be used.
Advanced properties are configured in the Fusion Middleware Control Console System MBean Browser. See Section 21.10, "Configuring Advanced Properties" for information about configuring properties that do not appear in the Oracle BAM configuration pages in Fusion Middleware Control Console.

Oracle BAM Configuration Property Reference
Configuring Oracle Business Activity Monitoring 21-31
Table 21–3 Oracle BAM Configuration Properties
Property Name Description
ActiveDataCache.API.Batching.ThreadPool.CoreSize
Indicates how many threads to keep in the Oracle BAM ADC API ThreadPools when idle.
Default: 5
ActiveDataCache.API.Batching.ThreadPool.KeepAliveTimeInSecs
Amount of time (in seconds) to keep an idle thread in the Oracle BAM ADC API ThreadPools.
Default: 20
ActiveDataCache.API.Batching.ThreadPool.MaxSize
Maximum number of threads in the Oracle BAM ADC API ThreadPools.
Default: 100
ActiveDataCache.API.Batching.ThreadPool.QueueSize
Maximum number of messages that can be queued in the Oracle BAM ADC API ThreadPools.
Default: 30
ActiveDataCache.API.BufferedDataReader.ThreadPool.CoreSize
Indicates how many threads to keep in the Oracle BAM ADC BufferedDataReader ThreadPools when idle.
Default: 10
ActiveDataCache.API.BufferedDataReader.ThreadPool.KeepAliveTimeInSecs
Amount of time (in seconds) to keep an idle thread in the Oracle BAM ADC BufferedDataReader ThreadPools.
Default: 20
ActiveDataCache.API.BufferedDataReader.ThreadPool.MaxSize
Maximum number of threads in the Oracle BAM ADC BufferedDataReader ThreadPools.
Default: 100
ActiveDataCache.API.BufferedDataReader.ThreadPool.QueueSize
Maximum number of messages that can be queued in the Oracle BAM ADC BufferedDataReader ThreadPools.
Default: 30
ActiveDataCache.Kernel.ActiveDataQueue.ThreadPool.CoreSize
Indicates how many threads to keep in the Oracle BAM ADC ActiveDataQueue ThreadPools when idle.
Default: 20
ActiveDataCache.Kernel.ActiveDataQueue.ThreadPool.KeepAliveTimeInSecs
Amount of time (in seconds) to keep an idle thread in the Oracle BAM ADC ActiveDataQueue ThreadPools.
Default: 20
ActiveDataCache.Kernel.ActiveDataQueue.ThreadPool.MaxSize
Maximum number of threads in the Oracle BAM ADC ActiveDataQueue ThreadPools.
Default: 100
ActiveDataCache.Kernel.ActiveDataQueue.ThreadPool.QueueSize
Maximum number of messages that can be queued in the Oracle BAM ADC ActiveDataQueue ThreadPools.
Default: 30

Oracle BAM Configuration Property Reference
21-32 Oracle Fusion Middleware Administrator's Guide for Oracle SOA Suite
ActiveDataCache_Datasets_Batching_FlushOnDemand_Limit
Number of rows to include in a batch when flushing on demand.
See Section 21.8, "Configuring Oracle BAM Batching Properties" for more information.
Default: 1000
ActiveDataCache_Datasets_Batching_Limit_Lower
The minimum amount of elements in a batch before it is sent to the server. Depending on the load, batches may contain more than this minimum (up to the maximum) but will never contain less than this minimum (unless the timeout expires).
See ActiveDataCache_Datasets_Batching_Timeout for the exception to this rule.
See Section 21.8, "Configuring Oracle BAM Batching Properties" for more information.
Default: 1000
ActiveDataCache_Datasets_Batching_Limit_PendingCalls
The limit of the number of pending batches that are waiting to be sent to the server. When this limit is reached and the current batch is full (at its upper limit), further batched operations become blocking calls until this condition is cleared. This limit throttles the client and keeps it from overrunning the server.
See Section 21.8, "Configuring Oracle BAM Batching Properties" for more information.
Default: 10
ActiveDataCache_Datasets_Batching_Limit_Upper
The maximum amount of elements in a batch before it is sent out. A batch will never contain more than this maximum.
See Section 21.8, "Configuring Oracle BAM Batching Properties" for more information.
Default: 5000
ActiveDataCache_Datasets_Batching_MaximumRetries
The maximum number of times batch processing retries failed attempts to send the batch to the server. A value of 0 (zero) indicates no retry.
Default: 2147483647
ActiveDataCache_Datasets_Batching_MaxRetryInterval
The maximum interval in milliseconds at which batch processing retries failed attempts to send the batch to the server. If this maximum retry interval is specified, the retry interval will be doubled on each retry attempt until the interval reaches this maximum value. Further retries will use this maximum value. This enables the configuration of retry attempts that will taper off should the failure not resolve itself quickly. If a maximum retry interval of 0 (zero) is specified, the retry interval will not change.
Default: 3600000
Table 21–3 (Cont.) Oracle BAM Configuration Properties
Property Name Description

Oracle BAM Configuration Property Reference
Configuring Oracle Business Activity Monitoring 21-33
ActiveDataCache_Datasets_Batching_RetryInterval
The interval in milliseconds at which batch processing retries failed attempts to send the batch to the server. Retry is attempted when the failure is due to server connectivity problems such as the server being restarted.
Default: 30000
ActiveDataCache_Datasets_Batching_SuspendOnDisconnect
Indicates whether batching operations are permanently suspended if and when the connection to Oracle BAM server is lost.
Default: false
ActiveDataCache_Datasets_Batching_ThreadPoolSize
The constant size thread pool (that is, containing a fixed number of threads).
Default: 25
ActiveDataCache_Datasets_Batching_Timeout
The time-out in milliseconds after which the batch is sent out even if it is not full (has less than the configured minimum in ActiveDataCache_Datasets_Batching_Limit_Lower).
The time-out ensures that operations are not waiting overlong in a batch due to inactivity. A batched operation will never wait longer than this time-out to be sent to the server.
See Section 21.8, "Configuring Oracle BAM Batching Properties" for more information.
Default: 50
Adapter_SOAP_Batching_FlushOnDemand_Limit
Number of rows to include in a batch when flushing on demand.
See Section 21.8, "Configuring Oracle BAM Batching Properties" for more information.
Default: 1000
Adapter_SOAP_Batching_Limit_Lower The minimum amount of elements in a batch before it is sent out.
See Section 21.8, "Configuring Oracle BAM Batching Properties" for more information.
Default: 1000
Adapter_SOAP_Batching_Limit_Upper The maximum amount of elements in a batch before it is sent out.
See Section 21.8, "Configuring Oracle BAM Batching Properties" for more information.
Default: 5000
Adapter_SOAP_Batching_Timeout The timeout interval in milliseconds after which the batch is sent out even if it is not full.
See Section 21.8, "Configuring Oracle BAM Batching Properties" for more information.
Default: 50
ADC_PassThrough_Import_BatchSize The maximum number of rows that are imported from an external data object.
Default: 50
Table 21–3 (Cont.) Oracle BAM Configuration Properties
Property Name Description
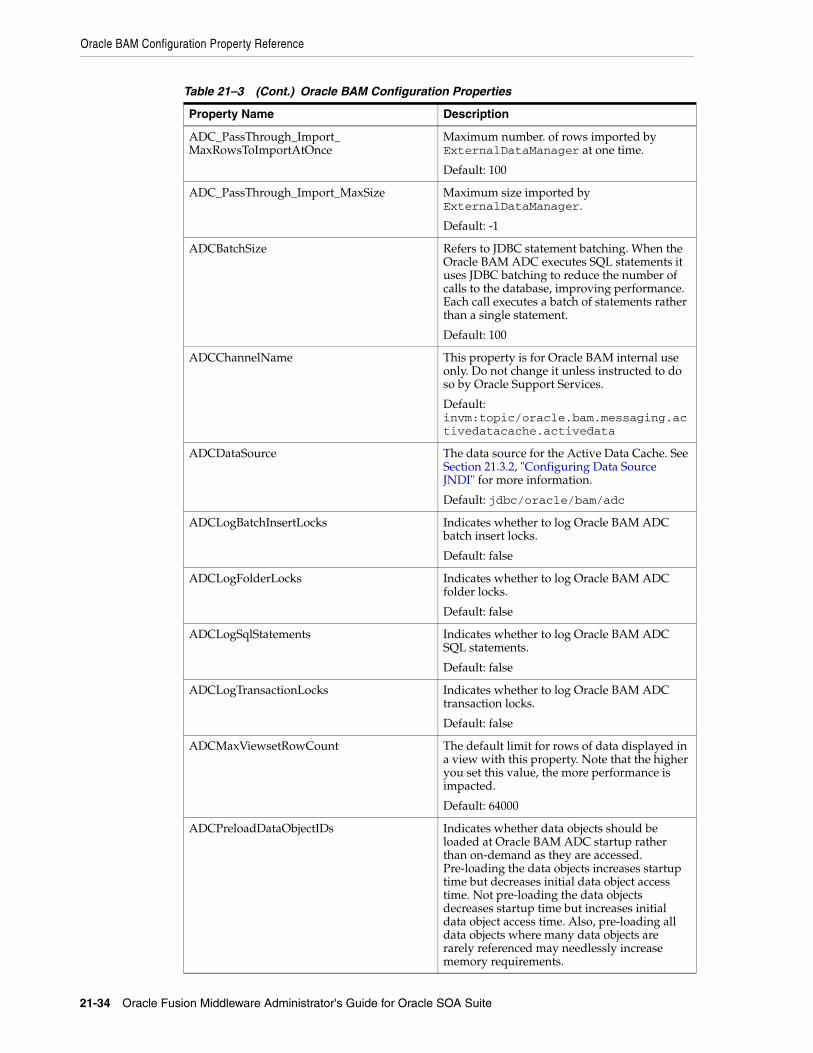
Oracle BAM Configuration Property Reference
21-34 Oracle Fusion Middleware Administrator's Guide for Oracle SOA Suite
ADC_PassThrough_Import_MaxRowsToImportAtOnce
Maximum number. of rows imported by ExternalDataManager at one time.
Default: 100
ADC_PassThrough_Import_MaxSize Maximum size imported by ExternalDataManager.
Default: -1
ADCBatchSize Refers to JDBC statement batching. When the Oracle BAM ADC executes SQL statements it uses JDBC batching to reduce the number of calls to the database, improving performance. Each call executes a batch of statements rather than a single statement.
Default: 100
ADCChannelName This property is for Oracle BAM internal use only. Do not change it unless instructed to do so by Oracle Support Services.
Default: invm:topic/oracle.bam.messaging.activedatacache.activedata
ADCDataSource The data source for the Active Data Cache. See Section 21.3.2, "Configuring Data Source JNDI" for more information.
Default: jdbc/oracle/bam/adc
ADCLogBatchInsertLocks Indicates whether to log Oracle BAM ADC batch insert locks.
Default: false
ADCLogFolderLocks Indicates whether to log Oracle BAM ADC folder locks.
Default: false
ADCLogSqlStatements Indicates whether to log Oracle BAM ADC SQL statements.
Default: false
ADCLogTransactionLocks Indicates whether to log Oracle BAM ADC transaction locks.
Default: false
ADCMaxViewsetRowCount The default limit for rows of data displayed in a view with this property. Note that the higher you set this value, the more performance is impacted.
Default: 64000
ADCPreloadDataObjectIDs Indicates whether data objects should be loaded at Oracle BAM ADC startup rather than on-demand as they are accessed. Pre-loading the data objects increases startup time but decreases initial data object access time. Not pre-loading the data objects decreases startup time but increases initial data object access time. Also, pre-loading all data objects where many data objects are rarely referenced may needlessly increase memory requirements.
Table 21–3 (Cont.) Oracle BAM Configuration Properties
Property Name Description

Oracle BAM Configuration Property Reference
Configuring Oracle Business Activity Monitoring 21-35
ADCPushInterval The rate at which Oracle BAM Active Data Cache pushes events to Oracle BAM Report Server. This is one factor that affects the frequency at which active events occur on Oracle BAM dashboard pages. Increasing this interval reduces the load on Oracle BAM Server. However, larger intervals increase the likelihood of multiple updates in the dashboard being collapsed into single updates.
Note that you can override the default ADCPushInterval within particular reports by setting the Active Data Retrieval Interval property in the Report Properties dialog box for a particular Oracle BAM dashboard or report. Open a report in Active Studio, then select Edit > Change Report Properties > Advanced to set the active data retrieval interval. Nonzero values override the ADCPushInterval value for that particular report.
Default: 1000
ADCPushThreadPoolSize Indicates the size of the threadpool for Oracle BAM ADC push functionality.
Default: 10
ADCRetryCount Number of times to retry the Oracle BAM Active Data Cache connection.
Default: 2
ADCSecurityFiltersEnabled Indicates whether Oracle BAM ADC security filters are to be enabled.
Default: true
ADCServerName Host name of Oracle BAM Server.
Oracle Data Integrator uses this property as an Oracle BAM connection parameter.
Default: localhost
ADCServerPort Port used by Oracle BAM Server.
Oracle Data Integrator uses this property as an Oracle BAM connection parameter.
Default: 7001
ADCViewsetTimeoutSec Specifies the time-out for retrieving a viewset.
Default: 0
ADCWaitTime Interval between Active Data Cache connection attempts.
Default: 20
ApplicationURL URL for Oracle BAM Web applications and Oracle BAM Server. See Section 21.3.3, "Configuring Application URL" and Section 21.2.2, "Configuring Application URL" for more information.
Default: http://localhost:7001
Table 21–3 (Cont.) Oracle BAM Configuration Properties
Property Name Description

Oracle BAM Configuration Property Reference
21-36 Oracle Fusion Middleware Administrator's Guide for Oracle SOA Suite
Architect_Content_PageSize Controls how many rows are shown when viewing data object contents in Oracle BAM Architect.
Default: 100
AutoIncrementBlockSize Indicates amount of increment for block size.
Default: 100
CacheDirectory Designates the directory used by Report Cache to cache snapshots and active data.
Default: cache
ChangeListDelay This property is for Oracle BAM internal use only. Do not change it unless instructed to do so by Oracle Support Services.
Default: 1
ChannelName This property is for Oracle BAM internal use only. Do not change it unless instructed to do so by Oracle Support Services.
Default: OracleBAM
CheckViewsFallingBehindInterval Indicates the interval to check whether views are falling behind.
Default: 20
CollaborationNILogin Whether NI Login is used.
Default: false
ColumnarTimeout Indicates the columnar time-out.
Default: 0
Communication_Protocol Specifies the communication protocol for EJB.
For SSL using t3: <Communication_Protocol>t3s</Communication_Protocol>
See Section 21.9.3, "Configuring Secure Socket Layer."
Default: t3
ConnectionFactoryName This property is for Oracle BAM internal use only. Do not change it unless instructed to do so by Oracle Support Services.
Default: jms/QueueConnectionFactory
DeletesActiveDataSize InsertsActiveDataSize, UpdatesActiveDataSize, UpsertsActiveDataSize, DeletesActiveDataSize determine how many inserts, updates, upserts, and deletes, respectively, should be executed before releasing and then requiring the lock on the data object being modified. This keeps the operation from holding the data object lock for long periods of time when there are Viewsets open on this data object.
Default: 50
Table 21–3 (Cont.) Oracle BAM Configuration Properties
Property Name Description

Oracle BAM Configuration Property Reference
Configuring Oracle Business Activity Monitoring 21-37
DisplayUIStackTrace This property is for Oracle BAM internal use only. Do not change it unless instructed to do so by Oracle Support Services.
This property enables user interface stack traces (by setting this property value to true). This property is used for temporary diagnostic purposes only because exposing a stack with internal details is a potential security threat.
Default: false
DistributionListGroupType This property is for Oracle BAM internal use only. Do not change it unless instructed to do so by Oracle Support Services.
Default: none
ElementsCountLimit The number of change lists that are cached before rewriting the cache file.
The default value is 50. When the 51st change list is received, it is cached by replacing the 1st change list.
Default: 50
ElementsSizeLimit This property is for Oracle BAM internal use only. Do not change it unless instructed to do so by Oracle Support Services.
Default: 500
EmailIDForSender E-mail address that appears in the From header of notifications sent by the Event Engine. See Section 21.3.7, "Configuring Outbound Email Account" for more information.
Default: [email protected]
EMSConnectionRecoveryDuration This property is for Oracle BAM internal use only. Do not change it unless instructed to do so by Oracle Support Services.
EnableADCDatasetLockTimeout This property is for Oracle BAM internal use only. Do not change it unless instructed to do so by Oracle Support Services.
Indicates whether data set lock timeout is enabled.
Default: false
EnableDataTruncationMsg Indicates whether to enable the data truncation message.
Default: false
EnableGetAllViewsInOneRoundTrip Allows all views to be retrieved in one round trip.
Default: true
EventEngine.Action.ThreadPool.CoreSize Indicates how many threads to keep in the Event Engine Action ThreadPools when idle.
Default: 4
Table 21–3 (Cont.) Oracle BAM Configuration Properties
Property Name Description

Oracle BAM Configuration Property Reference
21-38 Oracle Fusion Middleware Administrator's Guide for Oracle SOA Suite
EventEngine.Action.ThreadPool.KeepAliveTimeInSec
Amount of time (in seconds) to keep an idle thread in the Event Engine Action ThreadPools.
Default: 20
EventEngine.Action.ThreadPool.MaxSize Maximum number of threads in the Event Engine Action ThreadPools.
Default: 100
EventEngine.Action.ThreadPool.QueueSize Maximum number of messages that can be queued in the Event Engine Action ThreadPools.
Default: 4
EventEngine.AlertHistory.ThreadPool.CoreSize
Indicates how many threads to keep in the Event Engine AlertHistory ThreadPools when idle.
Default: 4
EventEngine.AlertHistory.ThreadPool.KeepAliveTimeInSecs
Amount of time (in seconds) to keep an idle thread in the Event Engine Action ThreadPools.
Default: 20
EventEngine.AlertHistory.ThreadPool.MaxSize
Maximum number of threads in the Event Engine AlertHistory ThreadPools.
Default: 100
EventEngine.AlertHistory.ThreadPool.QueueSize
Maximum number of messages that can be queued in the Event Engine RuleFire ThreadPools.
Default: 10
EventEngineAlertHistoryEventLogging This property is for Oracle BAM internal use only. Do not change it unless instructed to do so by Oracle Support Services.
Default: false
EventEngineAlertHistoryRecordsPerWrite This property is for Oracle BAM internal use only. Do not change it unless instructed to do so by Oracle Support Services.
Default: 10
EventEngine.RuleFire.ThreadPool.CoreSize Indicates how many threads to keep in the Event Engine RuleFire ThreadPools when idle.
Default: 4
EventEngine.RuleFire.ThreadPool.KeepAliveTimeInSecs
Amount of time (in seconds) to keep an idle thread in the Event Engine RuleFire ThreadPools.
Default: 20
EventEngine.RuleFire.ThreadPool.MaxSize Maximum number of threads in the Event Engine RuleFire ThreadPools.
Default: 100
EventEngine.RuleFire.ThreadPool.QueueSize Maximum number of messages that can be queued in the Event Engine RuleFire ThreadPools.
Default: 4
Table 21–3 (Cont.) Oracle BAM Configuration Properties
Property Name Description

Oracle BAM Configuration Property Reference
Configuring Oracle Business Activity Monitoring 21-39
EventEngineCheckADCIntervalSecs This property is for Oracle BAM internal use only. Do not change it unless instructed to do so by Oracle Support Services.
Default: 5
EventEngineMaxConnections This property is for Oracle BAM internal use only. Do not change it unless instructed to do so by Oracle Support Services.
Default: 25
EventEngineMaxShutdownWaitInterval This property is for Oracle BAM internal use only. Do not change it unless instructed to do so by Oracle Support Services.
Default: 10
EventEngineSaveLastFireIntervalSecs This property is for Oracle BAM internal use only. Do not change it unless instructed to do so by Oracle Support Services.
Default: 10
FileHandleCacheSize Used by Oracle BAM Report Cache to cache file handles of the files used for caching when file-based persistence is used (see Section 21.3.5, "Configuring Report Cache Persistence Manager" for information about persistence management).
Handle caching increases the speed of reading and writing active data and snapshots. Each viewset has two file handles--one for the snapshot and another for active data.
The value for this property sets the number of file handles that are cached by default.
To disable file handle caching, set this property value to zero (0).
The cost of file handle caching is that all of the cached file handles remain open, and so a) on servers configured for a very small number of concurrent open file handles, and b) on servers heavily loaded with open file handle count reaching the maximum value, this could create a problem. For these scenarios, reduce FileHandleCacheSize to an appropriate smaller value.
Default: 100
GenericSatelliteChannelName This property is for Oracle BAM internal use only. Do not change it unless instructed to do so by Oracle Support Services.
Default: invmjms:topic/oracle.bam.messaging.systemobjectnotification
Table 21–3 (Cont.) Oracle BAM Configuration Properties
Property Name Description

Oracle BAM Configuration Property Reference
21-40 Oracle Fusion Middleware Administrator's Guide for Oracle SOA Suite
GenericSatelliteSystemObjectNames This property is for Oracle BAM internal use only. Do not change it unless instructed to do so by Oracle Support Services.
Default values:
SystemObjectName=SysIterReport,MonitorColumnName=SysIterLastModified,MessageColumn1=SysIterID,MessageColumn2=SysIterLastModified;
SystemObjectName=SysIterUser,MonitorColumnName=SpecificTimeZoneOffset,MessageColumn1=SysIterID;
SystemObjectName=SysIterUser,MonitorColumnName=AdjustTimeZoneSetting,MessageColumn1=SysIterID;
SystemObjectName=SysIterUser,MonitorColumnName=AdjustDaylightSavingsSetting,MessageColumn1=SysIterID;
SystemObjectName=SysIterDataset,MonitorColumnName=SysIterLastModified,MessageColumn1=SysIterID;
HelpAppLocation This property is no longer used in Oracle BAM.
iActiveDataCloseReportsTimeout Timeout to close reports.
Default: 500
iActiveDataMaxDiffCounter The maximum difference counter for iActiveData.
Default: 10
iActiveDataMinIntervalsToWait The minimum interval to wait for iActiveData.
Default: 5
iActiveDataReloadOnSecsBehindThreshold The threshold value for reloading iActiveData. The
Default: 10
iActiveDataRestartInterval The restart interval for iActiveData.
Default: 3000
iActiveDataRestartTimeout The restart timeout value for iActiveData.
Default: 10000
iActiveDataScriptsCleanupFactor A property to address a Microsoft Internet Explorer memory leak, when active data is coming into the dashboard at a fast pace, by forcing periodic browser refreshes. This value may be further increased when active data is coming to the dashboard at a rate of 25 events per second or greater. You can monitor the Microsoft Internet Explorer memory consumption to determine an appropriate value.
Default: 1048576
Table 21–3 (Cont.) Oracle BAM Configuration Properties
Property Name Description

Oracle BAM Configuration Property Reference
Configuring Oracle Business Activity Monitoring 21-41
ICommand_Default_User_Name Specifies default security credentials for running ICommand operations. See Oracle Fusion Middleware Administrator's Guide for Oracle SOA Suite for more information.
ICommand_Default_Password Specifies default security credentials for running ICommand operations. See Oracle Fusion Middleware Administrator's Guide for Oracle SOA Suite for more information.
Import_BatchSize Batch size for import by ExternalDataManager.
Default: 50
Import_MaxRowsAtOnce Maximum number of rows imported by ExternalDataManager at one time.
Default: 100
Import_MaxSize Maximum size imported by ExternalDataManager.
Default: -1
InsertsActiveDataSize InsertsActiveDataSize, UpdatesActiveDataSize, UpsertsActiveDataSize, and DeletesActiveDataSize determine how many inserts, updates, upserts, and deletes, respectively, should be executed before releasing and then requiring the lock on the data object being modified. This keeps the operation from holding the data object lock for long periods of time when there are viewsets open on this data object.
Default: 50
ListenPort For SSL: <ListenPort>SSLListenPort</ListenPort>
See Section 21.9.3, "Configuring Secure Socket Layer."
Default: ListenPort
MaxDBNodeFailoverRetries Used in Oracle BAM RAC High Availability configuration. Indicates the number of retries Oracle BAM Server attempts in an event of a RAC failover.
Default: 5
MTTimerThreadPoolSize Oracle BAM has a timer implementation that dispatches timer events using a thread pool. This allows timer events to be processed in parallel. This property determines the thread pool size for this timer implementation.
Default: 5
ODIAgentHost The IP address or host name of the server where the Oracle Data Integrator agent is running. See Section 21.3.6, "Configuring Oracle Data Integrator Integration Properties" for more information.
Default: localhost
Table 21–3 (Cont.) Oracle BAM Configuration Properties
Property Name Description

Oracle BAM Configuration Property Reference
21-42 Oracle Fusion Middleware Administrator's Guide for Oracle SOA Suite
ODIAgentPort The TCP port on which the Oracle Data Integrator agent is listening. See Section 21.3.6, "Configuring Oracle Data Integrator Integration Properties" for more information.
Default: 20910
ODIPassword The encoded Oracle Data Integrator password. See Section 21.3.6, "Configuring Oracle Data Integrator Integration Properties" for more information.
Default: SUNOPSIS
ODIUser The user that executes the scenarios in Oracle Data Integrator. See Section 21.3.6, "Configuring Oracle Data Integrator Integration Properties" for more information.
Default: SUPERVISOR
ODIWorkRepositoryName The name of the Oracle Data Integrator work repository database. See Section 21.3.6, "Configuring Oracle Data Integrator Integration Properties" for more information.
Default: WORK_DEV
oracle.bam.common.messaging.util.
MessageConsumerRegistryQueuedPusher_CorePoolSize
Indicates how many threads to keep in Message Registry ThreadPool when idle.
Default: 20
oracle.bam.common.messaging.util.
MessageConsumerRegistryQueuedPusher_KeepAliveTime
Amount of time (in seconds) to keep an idle thread in the Message Registry ThreadPool.
Default: 60
oracle.bam.common.messaging.util.
MessageConsumerRegistryQueuedPusher_MaximumPoolSize
Maximum number of threads in the Message Registry ThreadPool.
Default: 100
oracle.bam.common.messaging.util.
MessageConsumerRegistryQueuedPusher_MaximumQueueSize
Maximum number of messages that can be queued in the Message Registry ThreadPool.
Default: 30
RecordsLimitForEmail The number of rows allowed in a List view or Columnar report used in an e-mail attachment before a limit error is displayed. Attachments containing reports can become large because they include data compared to a report link that accesses the report and data on Oracle BAM Server.
Default: 1000
RecordsLimitForSaveOffline This property is for Oracle BAM internal use only. Do not change it unless instructed to do so by Oracle Support Services.
Default: 0
RecordsLimitForValueBrowser Number of values that are presented in values browser for constructing filter expressions.
Default: 50
Table 21–3 (Cont.) Oracle BAM Configuration Properties
Property Name Description

Oracle BAM Configuration Property Reference
Configuring Oracle Business Activity Monitoring 21-43
ReportCache.ViewSets.ThreadPool.CoreSize Number of threads to keep in Report Cache ThreadPool when idle.
Default: 5
ReportCache.ViewSets.ThreadPool.KeepAliveTimeInSecs
Amount of time (in seconds) to keep an idle thread in the Report Cache ThreadPool.
Default: 20
ReportCache.ViewSets.ThreadPool.MaxSize Maximum number of threads in the Report Cache ThreadPool.
Default: 100
ReportCache.ViewSets.ThreadPool.QueueSize
Maximum no. of messages that can be queued in the Report Cache ThreadPool.
Default: 30
ReportCacheChannelName This property is for Oracle BAM internal use only. Do not change it unless instructed to do so by Oracle Support Services.
Default: invmjms:topic/oracle.bam.messaging.reportcache.activedata
ReportCacheMaxConnections The maximum number of connections allowed by Report Cache to its clients.
Default: 25
ReportCacheMaxShutdownWaitInterval This property is for Oracle BAM internal use only. Do not change it unless instructed to do so by Oracle Support Services.
Default: 10
ReportCachePersistenceManager See Section 21.3.5, "Configuring Report Cache Persistence Manager" for more information.
Default: FileBasedPersistenceManager
ReportLoadingSetting The report loading indicator to be enabled. See Section 21.2.3, "Configuring Report Loading Indicator" for more information.
Default: on
SensorFactory This property is for Oracle BAM internal use only. Do not change it unless instructed to do so by Oracle Support Services.
Default: oracle.bam.common.statistics.noop.SensorFactoryImpl
ServerName The Oracle BAM Server host name. See Section 21.2.4, "Configuring Server Name" for more information.
Default: localhost
Table 21–3 (Cont.) Oracle BAM Configuration Properties
Property Name Description

Oracle BAM Configuration Property Reference
21-44 Oracle Fusion Middleware Administrator's Guide for Oracle SOA Suite
UpdatesActiveDataSize InsertsActiveDataSize, UpdatesActiveDataSize, UpsertsActiveDataSize, and DeletesActiveDataSize determine how many inserts, updates, upserts, and deletes, respectively, should be executed before releasing and then requiring the lock on the data object being modified. This keeps the operation from holding the data object lock for long periods of time when there are Viewsets open on this data object.
Default: 50
UpsertsActiveDataSize InsertsActiveDataSize, UpdatesActiveDataSize, UpsertsActiveDataSize, and DeletesActiveDataSize determine how many inserts, updates, upserts, and deletes, respectively, should be executed before releasing and then requiring the lock on the data object being modified. This keeps the operation from holding the data object lock for long periods of time when there are Viewsets open on this data object.
Default: 50
UseDBFailover This property is for Oracle BAM internal use only. Do not change it unless instructed to do so by Oracle Support Services.
Default: true
ViewSetExpiryTimeout This property is for Oracle BAM internal use only. Do not change it unless instructed to do so by Oracle Support Services.
Default: 120
ViewSetSharing See Section 21.3.4, "Configuring Viewset Sharing" for more information.
Default: true
Table 21–3 (Cont.) Oracle BAM Configuration Properties
Property Name Description

Monitoring Oracle Business Activity Monitoring 22-1
22Monitoring Oracle Business Activity
Monitoring
This chapter describes how to view Oracle Business Activity Monitoring (Oracle BAM) performance statistics and logs using Oracle Enterprise Manager Fusion Middleware Control Console.
This chapter includes the following topics:
■ Section 22.1, "Introduction to Monitoring Oracle BAM"
■ Section 22.2, "Monitoring Oracle BAM Server Components"
■ Section 22.3, "Monitoring Oracle BAM Web Applications"
■ Section 22.4, "Monitoring Oracle BAM Web Services"
■ Section 22.5, "Monitoring Oracle BAM Performance"
■ Section 22.6, "Monitoring Oracle BAM Logs"
22.1 Introduction to Monitoring Oracle BAMYou can monitor several aspects of the Oracle BAM components using Oracle Enterprise Manager Fusion Middleware Control Console.
The Oracle BAM Server home page in Fusion Middleware Control Console enables you to monitor each of the Oracle BAM Server Components: Active Data Cache, Event Engine, Report Cache, and Enterprise Message Sources. See Section 22.2, "Monitoring Oracle BAM Server Components" for more information.
The Oracle BAM Web home page in Fusion Middleware Control Console enables you to monitor Oracle BAM Report Server. See Section 22.3, "Monitoring Oracle BAM Web Applications" for more information.
In addition, the Performance Summary pages for each component allow you to track specific statistics of your choosing. See Section 22.5, "Monitoring Oracle BAM Performance" for more information.
Also, you can configure and monitor Oracle BAM logs using Fusion Middleware Control Console. See Section 22.6, "Monitoring Oracle BAM Logs" for more information.
22.2 Monitoring Oracle BAM Server ComponentsOracle BAM Server components are monitored on the Fusion Middleware Control Console page for Oracle BAM Server.

Monitoring Oracle BAM Server Components
22-2 Oracle Fusion Middleware Administrator's Guide for Oracle SOA Suite
To monitor Oracle BAM Server components:
Open Fusion Middleware Control Console in your Web browser at:
http;//host_name:port_number/em
Then, go to the Oracle BAM Server home page by selecting BAM > OracleBamServer in the navigation tree.
In the OracleBamServer page, you can select each tab (Active Data Cache, Event Engine, Report Cache, Enterprise Message Sources) to monitor the individual Oracle BAM Server components.
22.2.1 Monitoring Oracle BAM Active Data CacheOracle BAM Active Data Cache (Oracle BAM ADC) is designed and optimized to handle large amounts of data in real time. Data coming into Oracle BAM ADC immediately updates all defined calculations and aggregates in real time in an in-memory cache so that this data can be pushed as quickly as possible to Oracle BAM dashboards and reports. Data fed to the Oracle BAM ADC is received from a combination of sources, from Java Message Service (JMS) topics and queues to more traditional data queries and databases. Oracle BAM ADC ensures that no matter the source, when Oracle BAM Server is aware of the incoming data, it is streamed to Oracle BAM alerts and dashboards as incremental changes.
There are two key components to the Oracle BAM ADC, data sets and viewsets. Oracle BAM ADC receives transactions (insert, update, upsert, delete) into the data sets. These data sets are constructed based on the design that an Oracle BAM developer defines for data relationships when data objects are defined in Oracle BAM Architect. Data objects can be reflective of flat tables of data, or more complex, star-schema relationships between data objects, which are represented in Oracle BAM as data object look-ups.
After data is updated in the data sets, viewsets that are listening on these data sets go into action. The viewsets have knowledge of all of the open Oracle BAM dashboards and alerts that users are viewing in the Oracle BAM system. Viewsets ensure that data updates to these open objects are incrementally updated first, using a push-based mechanism to publish updates to open dashboards and alerts, providing users with the latest information.
Use the Oracle BAM pages in Fusion Middleware Control Console to monitor statistics for all data objects in Oracle BAM ADC as a group, or select a particular data object from the Data Objects list to monitor.
Note: Alternatively, on the farm home page, you can also select the Oracle BAM targets from the right side page content area, where it displays details of the farm.

Monitoring Oracle BAM Server Components
Monitoring Oracle Business Activity Monitoring 22-3
ViewsetsActive viewsets are those which are typically seen in Oracle BAM reports. Open viewsets are the sum of active and static open viewsets.
Oracle BAM reports and alerts use active viewsets. Oracle BAM Server uses static viewsets for internal process. There are also internal parts of the code that use static viewsets on system objects (metadata tables). It is possible that if Oracle BAM Server is not closing the static viewsets, you observe different values for them.
Static viewsets do not support active data generation and are used to fetch data from data objects, therefore, they are kept open for only a very short time when data is fetched. For that reason, in the Open Viewsets counter, the values appearing most of the time are from active viewsets.
Viewset Count VariationYou can monitor the viewset count for Oracle BAM components Active Data Cache, Report Cache, and Report Server. You may see that viewset counts do not match between Active Data Cache, Report Cache, and Report Server metrics.
The Report Server opens viewsets through the Report Cache for all of the views contained in the reports opened in browsers. The Active Data Cache opens more viewsets than the Report Cache. One such viewset opened is in the Active Data Cache through the Event Engine.
Whenever the Event Engine starts, it loads all the defined alerts, and for those alerts that are defined to monitor data changes in the Active Data Cache, corresponding viewsets are opened in the Active Data Cache. That is why more viewsets are
Note: When you select a data object from the list, cached data is displayed to preserve performance. You must refresh the page (using the Refresh icon) to display the latest data associated with the selected data object.

Monitoring Oracle BAM Server Components
22-4 Oracle Fusion Middleware Administrator's Guide for Oracle SOA Suite
displayed in the Active Data Cache monitoring page than on the Report Cache and Report Server pages.
For most of the views in a report, there is a corresponding viewset in the Active Data Cache. Viewsets opened by the report are shared with the subsequent instances of that report, except for Crosstab views. In reports using the Crosstab view, the viewset call is different than the one used by other views. When a report containing a Crosstab view is opened, three viewsets are opened in the Active Data Cache. Two of the viewsets are closed immediately after fetching the data, while one is kept open to monitor the incoming changes.
Operations Per SecondThe Operations Per Second statistic includes all of the insert, update, upsert, and delete operations occurring on the selected data object. The Operations Per Second graph displays statistic for the last 5 minutes.
Average Batch Size for OperationsThe Average Batch Size For Operations statistic is the average number of records included in each batch operation on the selected data object. The Average Batch Size for Operations graph displays statistic for the last 5 minutes.
Waiting ThreadsCertain operations must be synchronized, requiring a data object to be locked. This statistic displays the number of threads that are blocked, waiting for the data object to be unlocked in order to perform subsequent operations.
Total TransactionsThe Total Transactions statistic displays the number of transactions on Oracle BAM data objects. It is the sum of committed and rolled back transactions. The Total Transactions graph also displays the number of open and completed transactions.
For example, if you add a row in an Oracle BAM data object and save it (commit), it is one transaction. This metric is useful only if the client of Oracle BAM Server is using transactions.
Transactions can also be used by an EMS, when connecting to a JMS topic or queue.
You can configure this metric to track transactions in the Oracle BAM sensor actions in BPEL and in the Oracle Data Integrator knowledge modules.
In regard to Rolled Back Transactions, if an invalid insert operation is attempted on an Oracle BAM data object, Oracle BAM Server rolls back the transaction.
22.2.2 Monitoring the Event Engine ComponentThe Event Engine is used by Oracle BAM Server to evaluate and execute Oracle BAM alerts. The Event Engine monitors complex data conditions and implements specified rules. Rules can include a series of conditions and actions attached to an event. The Event Engine continuously monitors the information in the Active Data Cache for certain conditions and executes the related actions defined in associated rules.
The Event Engine is responsible for tracking events based on date, time, or data changes. The Event Engine design employs a satellite concept, in which there are four different systems (satellites) within which event clauses can be registered and tracked.

Monitoring Oracle BAM Server Components
Monitoring Oracle Business Activity Monitoring 22-5
The Date and Time satellites are both based on a scheduler, and they are used for alerts such as "E-mail a snapshot of this Oracle BAM dashboard to me every morning at 8 a.m."
The Manual satellite is use to manually send alerts by name (using a Web service call).
The Data satellite is used to track alerts that are based on specific changes in the data of a given data object, such as "Call this Web service when SUM(Sales) > 10000 in the MediaSales data object," or "Let me know when anything in this dashboard changes."
You can monitor statistics for active Event Engine rules, condition met rates, and processing queues.
Active RulesActive Rules displays the number of alert rules that are active (not expired or invalid) in Oracle BAM Event Engine. Active Rules displays the total number of alert rules in Oracle BAM Event Engine, which is the sum of alerts created for all of the Oracle BAM users.
Rule Fire Rate Per SecondThe Rule Fire Rate Per Second group of statistics displays the rates of events over the last 5 minutes for Actual, Events Accepted, and Events Rejected rates.
Actual rule fire rate per second is the number of events fired per second in Event Service. It is the number of events fired per second, taking into account number of times alerts fired events in the previous 5 minutes. For example, if when the OracleBamServer page was loaded, only 2 alerts fired in previous 5 minutes, the value shown would be 2/(5 X 60), that is 0.0067. So, if fired twice in 300 seconds, it would fire 0.0067 times in one second.
Events Accepted is the number of events fired per second from the satellite. That it, the number of events fired per second from alerts configured, that were accepted (for further processing), taking into account events that were accepted in the previous 5 minutes. The value shown is calculated in the same way as Actual. Unless the Event Engine's queue thresholds are exceeded, all events fired are accepted and processed further.
Events Rejected is the number of rejecting events per second. That is, the number of events fired per second from alerts configured, that were rejected (for further processing), taking into account events that were rejected in the previous 5 minutes. The value shown is calculated the same way as Actual. Fired events are rejected when the Event Engine's queue thresholds are exceeded. Ideally this value should be zero.

Monitoring Oracle BAM Server Components
22-6 Oracle Fusion Middleware Administrator's Guide for Oracle SOA Suite
Processing Queues SizesThe Processing Queues Sizes graph displays the size of the event processing queue, that is, the number of events waiting to be processed. These queues are emptied as soon as the events are processed, so there would have to be a large number of events being generated simultaneously to see alerts waiting for processing in the queues.
The Processing Queues Sizes graph displays statistics for the last 5 minutes. The graph displays Rules Fired, Alert Actions and Alerts History Queue health.
Rules Fired Queue displays the number of events that were fired that are waiting to be processed. The Event Engine maintains internal in-memory queue for fired events where all the events are placed temporarily, before being pulled out from here for further processing, as soon as the Event Engine resources are available. This metric shows the number of events fired waiting in queue to be picked by the system.
Alert Actions Queue displays the number of actions waiting to be processed. The Event Engine maintains internal in-memory queue for actions where all the actions are placed temporarily, before being pulled out from here for further processing, as soon as the Event Engine resources are available. This metric shows the number of actions waiting in queue to be picked by the system.
Alerts History Queue displays the number of alert history items to be saved. The Event Engine maintains internal in-memory queue for all history items, where all the items are temporarily placed, and before picking them up to save to back end. This metric shows the number of history items waiting in queue to be picked by the system.
22.2.3 Monitoring the Report Cache ComponentThe Report Cache assists the Active Data Cache with maintenance of the viewset snapshots in memory. The Report Cache opens viewsets in the Active Data Cache for the Report Server (an Oracle BAM Web applications component). It then caches the snapshot (in small parts) and the active data before sending it to the Report Server. This allows for random access into the snapshot and recovery from losing the connection to Oracle BAM Server. The Report Cache also, along with the Active Data Cache, supports viewset sharing.
Active Data SessionsThe Active Data Sessions statistic displays the total number of Report Cache sessions with active data.

Monitoring Oracle BAM Server Components
Monitoring Oracle Business Activity Monitoring 22-7
When a user opens multiple browser windows on a single computer to view Oracle BAM reports, all of the open browser windows share the same Active Data Session. It does not matter whether the user opens the same report or different reports in each browser window, the Active Data Sessions count is always 1.
Active Data ReportsThe Active Data Reports statistic displays the total number of open reports requesting active data.
Files CountThe Files Count statistic displays the total number of files currently managed by FileBasedPersistenceManager when the Oracle BAM Server is configured to use a file-based persistence manager. See Section 21.3.5, "Configuring Report Cache Persistence Manager" for more information.
Elements CountThe Elements Count statistic displays the total number of elements currently managed by InMemoryPersistenceManager when the Oracle BAM Server is configured to use a memory-based persistence manager. See Section 21.3.5, "Configuring Report Cache Persistence Manager" for more information.
ViewsetsThe Viewsets group of statistics displays the following counters:
Average Open Time (sec) is the average time taken to open a viewset.
Outgoing Message Rate (per sec) is the number of change lists delivered per second by Report Cache to all of its clients.
Message Rate Per Viewset (sec) the number of change lists delivered per second per viewset.
Total Open Viewsets is the total number of viewsets (that is, the sum of shared, unshared, and inherited viewsets) maintained in Report Cache for all of the views contained in the reports opened in browsers.
The Open Viewsets graph displays shared, inherited, and unshared viewsets.
Shared Viewsets are the parent viewsets (these are the viewsets that are opened first).
Inherited Viewsets are the child viewsets (these viewsets are opened later).
Unshared Viewsets (independent viewsets) are neither shared or inherited.
Viewset sharing occurs whenever possible for performance reasons (the consumers require the exact same viewsets, so the viewsets can be shared). If the viewsets cannot be shared, they are unshared.
When users who do not have any differences in row-level security open the same report at close to the same time, the viewsets that are created for them in the Active Data Cache are shared in the Report Cache.
Note: Viewset counts may not match between Active Data Cache, Report Cache, and Report Server metrics. See "Viewset Count Variation" on page 22-3 for more information.
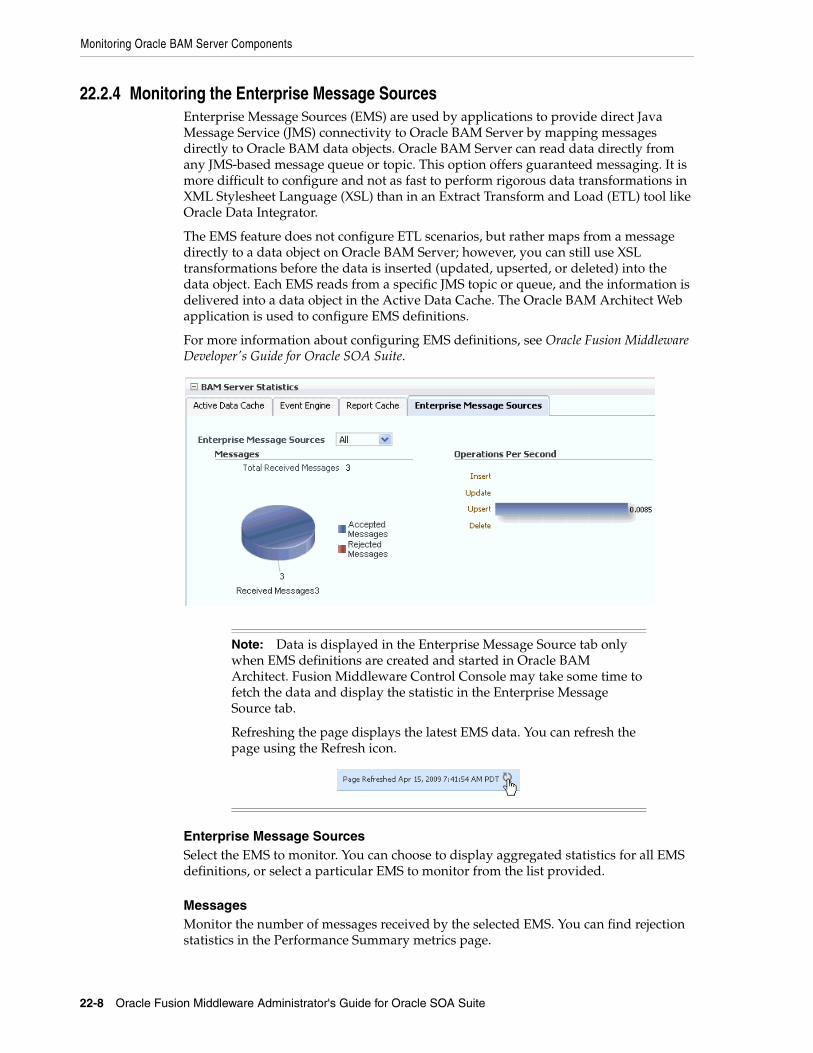
Monitoring Oracle BAM Server Components
22-8 Oracle Fusion Middleware Administrator's Guide for Oracle SOA Suite
22.2.4 Monitoring the Enterprise Message SourcesEnterprise Message Sources (EMS) are used by applications to provide direct Java Message Service (JMS) connectivity to Oracle BAM Server by mapping messages directly to Oracle BAM data objects. Oracle BAM Server can read data directly from any JMS-based message queue or topic. This option offers guaranteed messaging. It is more difficult to configure and not as fast to perform rigorous data transformations in XML Stylesheet Language (XSL) than in an Extract Transform and Load (ETL) tool like Oracle Data Integrator.
The EMS feature does not configure ETL scenarios, but rather maps from a message directly to a data object on Oracle BAM Server; however, you can still use XSL transformations before the data is inserted (updated, upserted, or deleted) into the data object. Each EMS reads from a specific JMS topic or queue, and the information is delivered into a data object in the Active Data Cache. The Oracle BAM Architect Web application is used to configure EMS definitions.
For more information about configuring EMS definitions, see Oracle Fusion Middleware Developer's Guide for Oracle SOA Suite.
Enterprise Message SourcesSelect the EMS to monitor. You can choose to display aggregated statistics for all EMS definitions, or select a particular EMS to monitor from the list provided.
MessagesMonitor the number of messages received by the selected EMS. You can find rejection statistics in the Performance Summary metrics page.
Note: Data is displayed in the Enterprise Message Source tab only when EMS definitions are created and started in Oracle BAM Architect. Fusion Middleware Control Console may take some time to fetch the data and display the statistic in the Enterprise Message Source tab.
Refreshing the page displays the latest EMS data. You can refresh the page using the Refresh icon.

Monitoring Oracle BAM Web Applications
Monitoring Oracle Business Activity Monitoring 22-9
The Messages graph displays the number of Received Messages broken down into Accepted Messages and Rejected Messages, and at the top of the graph the number of Total Received Messages is displayed.
Operations Per SecondMonitor the rate of insert, update, upsert, and delete operations performed by the selected EMS.
The Operations Per Second graph displays statistic for last 5 minutes.
For more granular detail about the rates for each type of operation, go to the Performance Summary page. See Section 22.5, "Monitoring Oracle BAM Performance" for more information.
22.2.5 Monitoring the Client Requests in ProgressThe Oracle BAM Client Requests in Progress chart is displayed in the lower right corner of the Oracle BAM Server home page. Client requests include all of the requests made to the Oracle BAM Server Enterprise Java Beans (EJB).
There are a lot of internal requests made when opening a single report (for permissions, the report metadata, the views data, and so on); however, the user may or may not see those internal requests displayed in this chart.
22.3 Monitoring Oracle BAM Web ApplicationsOracle BAM Web applications are monitored in the Oracle BAM Web page of Fusion Middleware Control Console.
To monitor Oracle BAM Report Server go to the Oracle BAM Web home page by selecting BAM > OracleBamWeb in the navigation tree.

Monitoring Oracle BAM Web Applications
22-10 Oracle Fusion Middleware Administrator's Guide for Oracle SOA Suite
Figure 22–1 BAM Web Statistics
22.3.1 Monitoring Oracle BAM Report ServerOracle BAM Report Server applies the report definitions to the data sets retrieved from the Oracle BAM ADC for presentation in a browser. It manages information paging for viewing and printing reports. After reports are created, they are stored in the Oracle BAM ADC so that report creation is not repeated each time. Most reporting views are designed to support live, active displays of data changing in real time.
You can monitor statistics for Oracle BAM Report Server connections, viewsets, and reports.
ConnectionsThe Connections statistics display the following:
Open Connections is the number of connections open on the Report Server. An open connection corresponds to each user per session. It is different from the number of reports opened, because one user could at most have one connection open at a time regardless of how many reports the user has opened.
Message Rate (per sec) is the total number of messages (viewset change lists) delivered per second to all users (connections).
Message Rate Per Connection (sec) is the number of messages (viewset change lists) delivered per second per user (connection).

Monitoring Oracle BAM Web Services
Monitoring Oracle Business Activity Monitoring 22-11
ViewsetsThe Viewsets statistics display the number of open viewsets (Open), and the average amount of time (in seconds) that it takes to open the viewsets on the server (Average Open Time (sec)).
Average Open Time (sec) is a measure of the average length of time the server requires to construct the viewset and send it to the Web browser. This statistic does not take into account the amount of time required to render the HTML and load the Javascript on the client-side Web browser.
ReportsThe Report statistic displays the total number of open reports. The Open Connections graph displays open connections to Oracle BAM Web applications. You can use the zoom axis to zoom in on a particular time in which you are interested to see the open connections statistic.
The total number of reports includes the count of duplicate reports opened by the same user. Even if the same report is opened in multiple browser windows, each instance is considered a separate report, because a new viewset is opened in Report Server (through Oracle BAM Report Cache) for each report instance, though the viewsets are shared.
22.3.2 Monitoring Open ConnectionsThe Oracle BAM Open Connections chart is displayed in the lower right corner of the Oracle BAM Server home page.
22.4 Monitoring Oracle BAM Web ServicesOracle BAM Web services details are not listed in the Oracle BAM home pages. Oracle BAM Web services counters are available by selecting WebLogic Domain > soa_bam_domain > bam_server1 in the navigation tree, and selecting the JEE Web Services tab in the Most Requested region as shown in Figure 22–2.
Oracle BAM provides DataObjectDefinition, DataObjectOperationsByName, DataObjectOperationsByID, DataObjectOperations10131, ManualRuleFire, and
Note: Viewset counts may not match between Active Data Cache, Report Cache, and Report Server metrics. See "Viewset Count Variation" on page 22-3 for more information.
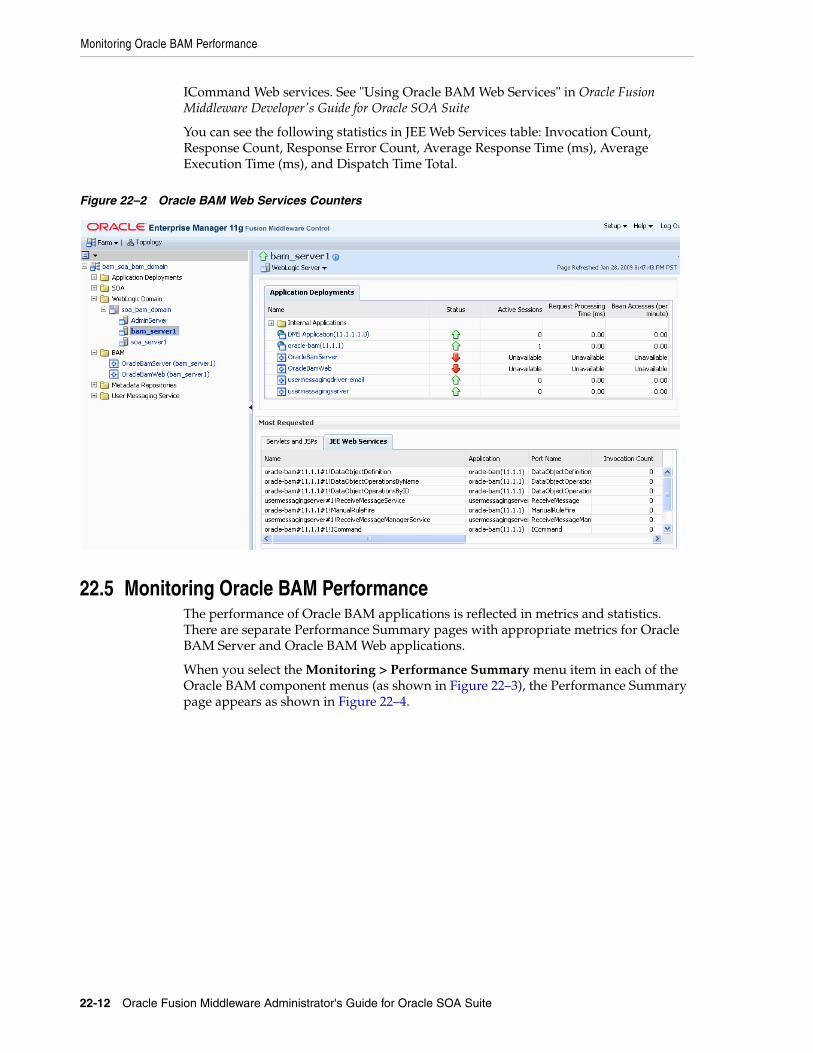
Monitoring Oracle BAM Performance
22-12 Oracle Fusion Middleware Administrator's Guide for Oracle SOA Suite
ICommand Web services. See "Using Oracle BAM Web Services" in Oracle Fusion Middleware Developer's Guide for Oracle SOA Suite
You can see the following statistics in JEE Web Services table: Invocation Count, Response Count, Response Error Count, Average Response Time (ms), Average Execution Time (ms), and Dispatch Time Total.
Figure 22–2 Oracle BAM Web Services Counters
22.5 Monitoring Oracle BAM PerformanceThe performance of Oracle BAM applications is reflected in metrics and statistics. There are separate Performance Summary pages with appropriate metrics for Oracle BAM Server and Oracle BAM Web applications.
When you select the Monitoring > Performance Summary menu item in each of the Oracle BAM component menus (as shown in Figure 22–3), the Performance Summary page appears as shown in Figure 22–4.

Monitoring Oracle BAM Performance
Monitoring Oracle Business Activity Monitoring 22-13
Figure 22–3 Monitoring Shortcut Menu
Figure 22–4 Performance Summary Page
Many metrics are available for capture and display (most of which are also displayed in the Oracle BAM component home pages). Descriptions of each metric are available in the metrics help pages.
To get the most valuable, focused information, use the Metric Palette. Click Show Metric Palette to display the Metric Palette, shown in Figure 22–5.
Choose the metrics in which you are most interested. As you select or deselect metrics from the palette, the metrics graph at the left is updated automatically.

Monitoring Oracle BAM Logs
22-14 Oracle Fusion Middleware Administrator's Guide for Oracle SOA Suite
Figure 22–5 Metric Palette for Oracle BAM Web Applications
Right click the metric label and select Help, as shown in Figure 22–6, to find more information about each of the metrics.
Figure 22–6 Metrics Shortcut Menu
22.6 Monitoring Oracle BAM LogsOracle BAM logs are configured and viewed using Fusion Middleware Control Console.
For information about using the logger features see the online Help page. For information about configuring the logger, see Section 21.4, "Configuring the Logger."
To view the logs, right click the OracleBamServer node or OracleBamWeb node in the navigation tree and select Logs > View Log Messages as shown in Figure 22–7.
Note: Despite having separate log pages for Oracle BAM Server and Oracle BAM Web applications, each page displays the logs for all Oracle BAM application components.

Monitoring Oracle BAM Logs
Monitoring Oracle Business Activity Monitoring 22-15
Figure 22–7 Logs Shortcut Menu
The log viewer page opens as shown in Figure 22–8. Use this page to query for information about the component. Fields and lists are used to customize the query.
Figure 22–8 Log Messages Page
After entering your search criteria, click Target Log Files. The Log Files page appears as shown in Figure 22–9. You can view specific log information (shown in Figure 22–10) or download the log.
Figure 22–9 Log Files Page

Monitoring Oracle BAM Logs
22-16 Oracle Fusion Middleware Administrator's Guide for Oracle SOA Suite
Figure 22–10 Log File bam_server1.log

Managing Oracle Business Activity Monitoring 23-1
23Managing Oracle Business Activity
Monitoring
This chapter describes how to manage Oracle Business Activity Monitoring (Oracle BAM) components and features.
This chapter includes the following topics:
■ Section 23.1, "Introduction to Managing Oracle BAM"
■ Section 23.2, "Managing Oracle BAM Availability"
■ Section 23.3, "Managing Oracle BAM Users"
23.1 Introduction to Managing Oracle BAMUse Oracle Enterprise Manager Fusion Middleware Control Console to manage Oracle BAM availability. See Section 23.2, "Managing Oracle BAM Availability" for more information.
Oracle BAM users and groups are created in Oracle WebLogic Server Administration Console (or in a security provider configured for your Oracle WebLogic Server); application-level roles are administered and new groups/roles and policies/grants can be created in Fusion Middleware Control Console (in Application Policies); and the users’ Oracle BAM objects are managed in Oracle BAM Administrator. See Section 23.3, "Managing Oracle BAM Users" for more information.
23.2 Managing Oracle BAM AvailabilityOracle BAM Server and Web applications can be started and stopped using Fusion Middleware Control Console. Or, as a convenience, the entire Oracle BAM application (or the Oracle WebLogic Server to which it is deployed) can be restarted in the Oracle WebLogic Server Administration Console.
Restarting is required for any configuration changes made in the Oracle BAM configuration properties pages or configuration files.
To start or stop Oracle BAM components in Fusion Middleware Control Console:
1. Open Fusion Middleware Control Console in your Web browser at:
http;//host_name:port_number/em
2. Locate the OracleBamServer or OracleBamWeb node in the Fusion Middleware Control Console navigation tree.

Managing Oracle BAM Users
23-2 Oracle Fusion Middleware Administrator's Guide for Oracle SOA Suite
3. Right click the node to open the shortcut menu, and select Control.
Start Up starts the component.
Shut Down shuts down the component.
23.3 Managing Oracle BAM UsersThese are the main steps for managing Oracle BAM users:
1. Configure the Security ProviderUsers, groups, or both, to be used with Oracle BAM users must be present in a security provider configured for your Oracle WebLogic Server. See Oracle Fusion Middleware Securing Oracle WebLogic Server for the main steps and links to detailed information about configuring security for Oracle WebLogic Server.
Note: Do not use Start Up alone to restart the component. To restart the component, you must stop the component using Shut Down before using Start Up to start the component or an error occurs.

Managing Oracle BAM Users
Managing Oracle Business Activity Monitoring 23-3
2. Create Users and GroupsUsers and groups are defined in the configured security provider (for example, in the Oracle WebLogic Server embedded LDAP server). Refer to your specific security provider documentation for details on defining users and groups. See Section 23.3.1, "Defining Users and Groups" and Section 23.3.2, "Using Previously Seeded Group Members" for more information.
See Section 23.3.5, "Configuring Oracle WebLogic Server Embedded LDAP Server" for example instructions about using Oracle WebLogic Server Administration Console to create users and groups.
3. Assign Users and Groups to Application RolesIn turn, these users, groups, or both, are assigned to Oracle BAM application-level roles that grant those users, groups, or both, specific permissions for using Oracle BAM applications. Users and groups are granted Oracle BAM application permissions based on their Oracle BAM role membership.
See Section 23.3.3, "Adding Members to Application Roles" for a detailed description of the Oracle BAM application roles and their associated Oracle BAM application permissions.
Membership in Oracle BAM application roles is administered from the Application Roles page for Oracle BAM provided by Fusion Middleware Control Console. This page allows users and groups to be added as members to the various Oracle BAM application roles and allows creation of new application roles. See Section 23.3.4, "Understanding Oracle BAM Application Roles" for more information.
With the exception of the Administrator role, membership in an Oracle BAM application role does not imply any Oracle BAM data access permissions. The Oracle BAM application roles only grant the user access to the associated Oracle BAM user interface as described in Section 23.3.4, "Understanding Oracle BAM Application Roles."
When the user logs on to the Oracle BAM start page, there is a button for each of the Oracle BAM applications. Whether these buttons are enabled or not is based on the user's Oracle BAM application role membership.
4. Populate Users In Oracle BAM ApplicationsUsers are not visible from Oracle BAM Administrator until they have logged into Oracle BAM for the first time. Oracle BAM also provides a utility that you can run to populate the users in Oracle BAM Administrator. See Section 23.3.6, "Populating Users in Oracle BAM Administrator" for more information.
Note: Oracle BAM does not support assigning Oracle BAM application permissions directly to users and groups. Oracle BAM application permissions can only be granted to Oracle BAM application roles.
The only way to grant Oracle BAM application permissions to users and groups is to make those users and groups members of an Oracle BAM application role associated with the desired Oracle BAM application permissions.
Note: Changes to a user's group and role membership could take as much as 5 minutes to propagate throughout the system.

Managing Oracle BAM Users
23-4 Oracle Fusion Middleware Administrator's Guide for Oracle SOA Suite
5. Set Up Data Access Permissions on Oracle BAMSpecific data access permissions can be granted to users and groups using Oracle BAM Architect and Oracle BAM Active Studio. Users and groups can be granted "read". "update" and "delete" access permissions to specific Data Objects and Folders. See "Creating Permissions on Data Objects" and "Using Data Object Folders" in Oracle Fusion Middleware Developer's Guide for Oracle SOA Suite for more information.
Data access permissions can also be granted to users and groups at the row level for Data Objects. See "Creating Security Filters" in Oracle Fusion Middleware Developer's Guide for Oracle SOA Suite for information about row-level data security.
Individual report authors can control which Oracle BAM users have access to reports. See "Setting Folder Permissions" in Oracle Fusion Middleware User's Guide for Oracle Business Activity Monitoring for more information.
6. Manage Oracle BAM Object OwnershipWhen Oracle BAM users are removed from the security provider, the user accounts still appear in Oracle BAM Administrator because they may own Oracle BAM objects that must be transferred to other users before the user is completely removed from Oracle BAM. Object ownership is managed using Oracle BAM Administrator (see Section 23.3.7, "Managing Oracle BAM Object Ownership").
7. Remove Users From Oracle BAMThe administrator must also remove users from Oracle BAM Administrator after they are deactivated in the security provider (see Section 23.3.8, "Removing Invalid Users from Oracle BAM Administrator").
About OracleSystemUserOracleSystemUser is the default owner of all Oracle BAM objects. It is required by Oracle BAM Server and must not be deleted.
23.3.1 Defining Users and GroupsUsers are defined in the configured security provider's identity store (for example, Oracle WebLogic Server embedded LDAP server).
Groups, also referred to as enterprise-level roles, are also defined in this identity store. Groups are referred to as enterprise-level roles to distinguish them from application-level roles.
The enterprise-level roles are global to Oracle WebLogic Server, and they are applicable to all applications running on that server, including Oracle BAM. The application-level roles are specific to each application.
See Section 23.3.5, "Configuring Oracle WebLogic Server Embedded LDAP Server" for example instructions about using Oracle WebLogic Server Administration Console to create users and groups.
23.3.2 Using Previously Seeded Group MembersThe following Oracle WebLogic Server groups have been previously seeded in the Oracle BAM application policy:
■ BamAdministrators: Member of application role Administrator.
■ BamReportArchitects: Member of application role Report Architect.
■ BamReportCreators: Member of application role Report Creator.

Managing Oracle BAM Users
Managing Oracle Business Activity Monitoring 23-5
■ BamReportViewers: Member of application role Report Viewer.
These members are a convenience. If you define these groups in your configured security provider, you can then assign Oracle BAM application-level roles to specific users and groups by placing them into these groups. All of this can be done from your security provider and does not require any Oracle BAM application policy modifications.
You must create these groups manually in the security provider because Oracle BAM does not automatically seed users or groups in the configured security provider.
23.3.3 Adding Members to Application RolesThe Oracle BAM application policy defines the Oracle BAM application-level roles described in Section 23.3.4, "Understanding Oracle BAM Application Roles" including role membership. The Oracle BAM application policy is managed in Fusion Middleware Control Console. The default policy store provider is the XML file-based policy store.
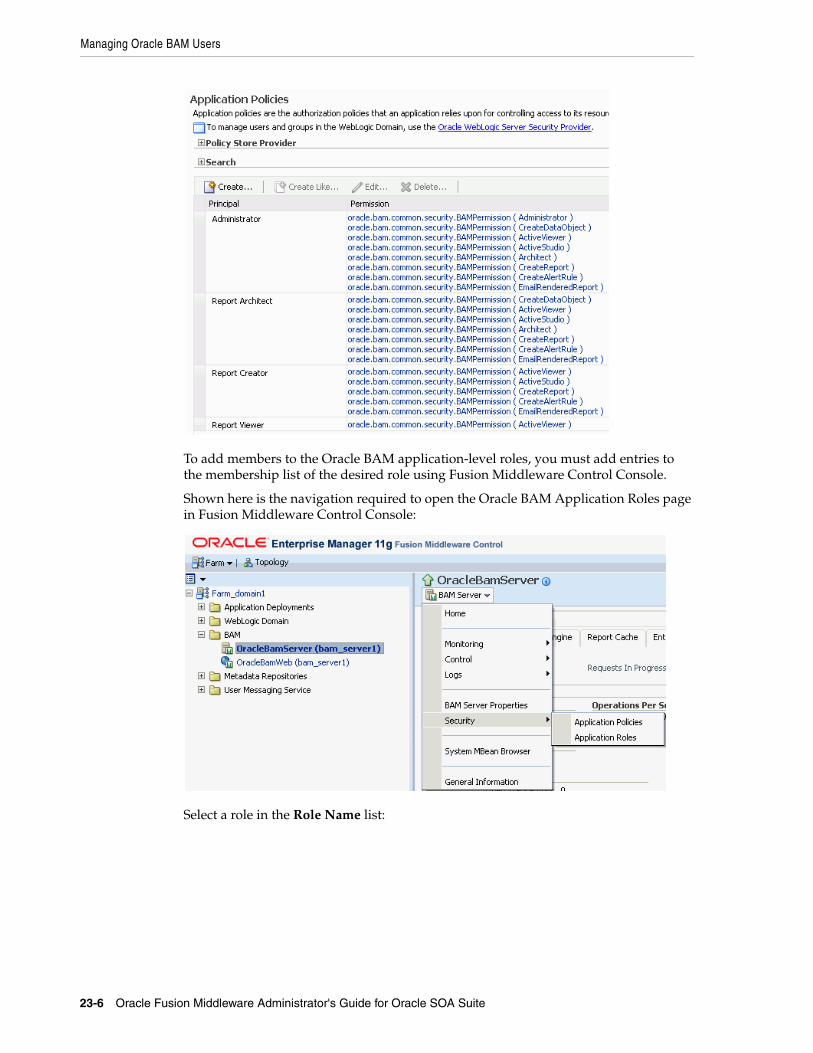
Managing Oracle BAM Users
23-6 Oracle Fusion Middleware Administrator's Guide for Oracle SOA Suite
To add members to the Oracle BAM application-level roles, you must add entries to the membership list of the desired role using Fusion Middleware Control Console.
Shown here is the navigation required to open the Oracle BAM Application Roles page in Fusion Middleware Control Console:
Select a role in the Role Name list:

Managing Oracle BAM Users
Managing Oracle Business Activity Monitoring 23-7
Add a member to the role:
Select an available user and move it to the Selected Users list:

Managing Oracle BAM Users
23-8 Oracle Fusion Middleware Administrator's Guide for Oracle SOA Suite
23.3.4 Understanding Oracle BAM Application RolesOracle BAM defines the following application level roles:
■ Administrator: Has access to all features.
■ Report Architect: Has access to features for creating data objects and reports.
■ Report Creator: Has access to features for creating reports.
■ Report Viewer: Has access to features for viewing reports.
The application roles determine the permissions granted to specific users or groups. If a user or group is a member of one of these Oracle BAM application roles, then they are granted the associated Oracle BAM permissions.
The Oracle BAM application roles are granted the following permissions:
Administrator Permissions■ Administrator: Has full access to Oracle BAM Administrator application
functionality
■ CreateDataObject: Can create data objects in Oracle BAM Architect
■ ActiveViewer: Has full access to Oracle BAM Active Viewer application functionality
■ ActiveStudio: Has full access to Oracle BAM Active Studio application functionality
■ Architect: Has full access to Oracle BAM Architect application functionality
■ CreateReport: Can create reports in Oracle BAM Active Studio
■ CreateAlertRule: Can create alerts in Oracle BAM Architect and Oracle BAM Active Studio
■ EmailRenderedReport: Can e-mail report attachments to Oracle BAM users
Report Architect Permissions■ CreateDataObject: Can create data objects in Oracle BAM Architect
■ ActiveViewer: Has full access to Oracle BAM Active Viewer application functionality
■ ActiveStudio: Has full access to Oracle BAM Active Studio application functionality
■ Architect: Has full access to Oracle BAM Architect application functionality
■ CreateReport: Can create reports in Oracle BAM Active Studio
■ CreateAlertRule: Can create alerts in Oracle BAM Architect and Oracle BAM Active Studio
■ EmailRenderedReport: Can e-mail report attachments to Oracle BAM users
Report Creator Permissions■ ActiveViewer: Has full access to Oracle BAM Active Viewer application
functionality
■ ActiveStudio: Has full access to Oracle BAM Active Studio application functionality
■ CreateReport: Can create reports in Oracle BAM Active Studio

Managing Oracle BAM Users
Managing Oracle Business Activity Monitoring 23-9
■ CreateAlertRule: Can create alerts in Oracle BAM Active Studio
■ EmailRenderedReport: Can e-mail report attachments to Oracle BAM users
Report Viewer Permissions■ ActiveViewer: Has full access to Oracle BAM Active Studio application
functionality
23.3.5 Configuring Oracle WebLogic Server Embedded LDAP ServerThe Oracle WebLogic Server embedded LDAP server is the default security provider for Oracle WebLogic Server. This section describes the procedures for adding new users and groups to the Oracle WebLogic Server embedded LDAP server.
See "Managing the Embedded LDAP Server" in Oracle Fusion Middleware Securing Oracle WebLogic Server for information about configuring the embedded LDAP server.
23.3.5.1 Using the Oracle WebLogic Server Administration ConsoleOracle WebLogic Server administration is performed using the Oracle WebLogic Server Administration Console at
http://host_name:port_number/console
Oracle WebLogic Server must be running to access the administration console. This console requires the user to log in with Oracle WebLogic Server administrator credentials. After successfully logging in, the user is placed at the Oracle WebLogic Server Administration Console home page.
23.3.5.2 Adding a Group To add a group:
1. Go to Home > Security Realms > myrealm > Users and Groups in Oracle WebLogic Server Administration Console.
2. Select the Groups tab, and click New.
3. Enter the desired group name and description. Do not change the provider.
4. Click OK.
23.3.5.3 Adding a UserTo add a user:
1. Go to Home > Security Realms > myrealm > Users and Groups in Oracle WebLogic Server Administration Console.
2. Select the Users tab, and click New.
3. Enter the desired user name, description, and login password. Do not change the provider.
4. Click OK.
23.3.5.4 Adding a User to a GroupTo add a user to a group:
1. Go to Home > Security Realms > myrealm > Users and Groups in Oracle WebLogic Server Administration Console.

Managing Oracle BAM Users
23-10 Oracle Fusion Middleware Administrator's Guide for Oracle SOA Suite
2. Select the Users tab, and select the desired user.
3. Select the Groups tab.
4. Move the desired groups from the Available list to the Chosen list. The Chosen list represents the list of groups of which the user is now a member.
5. Click Save.
23.3.6 Populating Users in Oracle BAM AdministratorUsers are not automatically populated in Oracle BAM Administrator by the security provider. The system administrator must either run the registerusers utility, or have users log in to the Oracle BAM start page by using the provided credentials, before they can be managed in Oracle BAM Administrator.
Oracle BAM is a monitoring and analytics application that in implementation often supports requirements to secure data, not only at the user and permissions level, but also at the row level for specific analytic data. Because of requirement, Oracle BAM users require some management in Oracle BAM Administrator that is not provided in the standard Oracle WebLogic Server user management tool set. In order to configure these additional security features for a specific user, that user must be defined in Oracle BAM Administrator.
See the following topics for more information:
■ Section 23.3.6.1, "Using the Registerusers Utility"
■ Section 23.3.6.2, "Populating By User Login"
23.3.6.1 Using the Registerusers UtilityThe registerusers utility is a standalone Java application for registering users with Oracle BAM Server. Normally, Oracle BAM is not aware of a particular defined user until that user logs into Oracle BAM for the first time. On initial login, Oracle BAM looks up the user in the configured security provider, and synchronizes Oracle BAM's definition for that user with that of the configured security provider. This includes the user name, role membership, group membership, user properties (for example, e-mail address), and so on.
Because Oracle BAM is not aware of defined users until they have logged in at least one time, it is not possible to perform certain Oracle BAM user configuration related to that user. For example, when defining data object permissions in Oracle BAM, the user is not present in the list of known users presented by the permission editor.
The registerusers utility allows a user with Oracle BAM administrator privileges to register a list of users with Oracle BAM. The result of this registration is that these users are fully defined in Oracle BAM and available for further Oracle BAM user configuration, such as defining data object permissions.
The users are only added to Oracle BAM if they are successfully authenticated with the security provider. The input to this utility is a simple list of white-space delimited user names.
The registerusers utility confirms the successful registration of each user to standard out, and the failed registration of any user to standard error. The following is sample output from the registerusers utility:
>registerusers -file cmd_file.txtEnter Password:Connecting to BAM server as user weblogic.Registering users...

Managing Oracle BAM Users
Managing Oracle Business Activity Monitoring 23-11
Registration Succeeded For User: washington.Registration Failed For User: adams. Reason: BAM-00400: Authentication failed.Registration Succeeded For User: jefferson.Registration Failed For User: nixon. Reason: BAM-00400: Authentication failed.Registration Succeeded For User: reagan.Registration Succeeded For User: clinton.Registration Succeeded For User: obama.
If the utility is executed without any arguments, then the command syntax is displayed to standard out.
The syntax of the command is:
registerusers -adminuser <adminusername> -adminpswd <password> -host <host> -port <port> -protocol <protocol> [-file <filename>]... [<username>]...
where:
<adminusername> specifies the name of a user with Oracle BAM administrator privileges.
<password> specifies the password for the user specified by -adminuser.
<host> specifies the host name or IP address of the target Oracle BAM Server. Default: localhost
<port> specifies the port number of the target Oracle BAM server. Default: 7001
<protocol> specifies the communication protocol to be used. Can be t3 or t3s for SSL. Default: t3
<filename> specifies a file containing command line arguments. The -file option is replaced by the contents of the specified file.
<username> specifies the name of a user to be registered with Oracle BAM.
For example:
>registerusers -adminuser weblogic -adminpswd weblogic -host localhost -port 7001 -protocol t3 -file cmd_file.txt smith jones
If the -adminuser option is omitted, then it is prompted for from standard in. If the -adminpswd option is omitted, it is prompted for from standard in using a password prompt where typed characters are hidden.
The file represented by <filename> should contain white-space delimited command line arguments. White-space includes blanks, EOL characters, and commas. Both single- and double-quoted strings are supported.
The file can also contain double-slash and slash-asterisk comments for documentation purposes. These comments are ignored.
If a command line argument must contain any white-space characters (including commas), forward slashes (/) (as in file paths), or asterisks (*), then it must be quoted. For example, "/dir1/dir2/file.txt".
The file can contain further -file options. The file should be in UTF-8 format to support extended character sets.
The following is a sample command file:
// Specify Oracle BAM administrator account to execute command. Password is not// provided so that the user is securely prompted for the password.-adminuser user_name// Configure the target BAM server.

Managing Oracle BAM Users
23-12 Oracle Fusion Middleware Administrator's Guide for Oracle SOA Suite
-host localhost -port 7001 -protocol t3// Register the following users.jones /* This is Mr. Jones. */smith /* This is Ms. Smith. */// Register users from another file.-file "/dir1/dir2/user_list.txt"
Default values for -host, -port, and -protocol arguments are included in the UserRegisterConfig.xml file. These defaults are only used if the option is not specified on the command line. If these options are not specified on the command line, or in the UserRegisterConfig.xml configuration file, then hard-wired defaults are used. The command syntax shows the default values that are in effect.
The hard-wired defaults are:
-host localhost -port 7001 -protocol t3
The following is an example of a UserRegisterConfig.xml file. The -host default is picked up from the ADCServerName element, the -port default is picked up from the ADCServerPort element, and the -protocol default is picked up from the Communication_Protocol element.
<?xml version="1.0" encoding="UTF-8" standalone="yes"?><UserRegister><ADCServerName>localhost</ADCServerName><ADCServerPort>7001</ADCServerPort><Communication_Protocol>t3</Communication_Protocol>
</UserRegister>
23.3.6.2 Populating By User LoginTo populate users in Oracle BAM Administrator:
1. Have each Oracle BAM user open the Oracle BAM start page and log in using the credentials specified by the security provider.
The Oracle BAM start page can be found at:
http://host_name:port_number/OracleBAM/
2. The administrator opens the Oracle BAM start page, logs in, and selects Administrator.
3. Select User management from the list, if the User Management page is not displayed in Oracle BAM Administrator.

Managing Oracle BAM Users
Managing Oracle Business Activity Monitoring 23-13
Figure 23–1 Oracle BAM Administrator Function List
4. Verify that each Oracle BAM user appears in the Users list (use the Refresh list link to show the latest data).
23.3.7 Managing Oracle BAM Object OwnershipWhen Oracle BAM users are removed from the security provider, the user accounts continue to appear in the Oracle BAM Administrator application with an exclamation mark (!) icon to indicate that they are not valid.
These users do not have access to Oracle BAM applications, but remain visible because they may own objects in Oracle BAM that must be transferred to other users before the user is completely removed from Oracle BAM.
Object ownership is managed using Oracle BAM Administrator.
To transfer object ownership:
1. Go to the Oracle BAM start page, log in, and select Administrator.
The Oracle BAM start page can be found at:
http://host_name:port_number/OracleBAM/
2. Select User management from the list (see Figure 23–1).
3. Select the user in the Users list that currently owns the objects you can reassign.
4. Click Reassign Ownership.
The Select Names dialog box displays a list of users.
5. Select a user account in the list that becomes the new owner of the objects.

Managing Oracle BAM Users
23-14 Oracle Fusion Middleware Administrator's Guide for Oracle SOA Suite
6. Click OK.
Reports are moved to a subfolder named after the selected user name.
Alerts are moved, and a zero (0) is appended to the alert name if the selected owner has an alert with the same name. If the alert needs an item updated or specified, an exclamation mark (!) is displayed on the alert icon in Oracle BAM Architect and Oracle BAM Active Studio Alerts pages.
Shared reports and folders change ownership but are not moved.
23.3.8 Removing Invalid Users from Oracle BAM AdministratorInvalid users are not automatically removed from Oracle BAM because they may own reports and alerts that must be transferred to active Oracle BAM users. After those objects are transferred, an invalid user may be deleted from Oracle BAM Administrator.
To remove invalid users:
1. Go to the Oracle BAM start page, log in, and select Administrator.
The Oracle BAM start page can be found at:
http://host_name:port_number/OracleBAM/
2. Select User management from the list (see Figure 23–1).
3. Select an invalid user in the Users list whose objects have been reassigned.
See Section 23.3.7, "Managing Oracle BAM Object Ownership" for information about reassigning objects.
An inactive user has an exclamation point (!) icon next to the user name.
4. Click Delete.

Part XPart X Administering Oracle User Messaging
Service
This part describes how to administer Oracle Messaging Service.
This part includes the following chapters:
■ Chapter 24, "Configuring Oracle User Messaging Service"
■ Chapter 25, "Monitoring Oracle User Messaging Service"
■ Chapter 26, "Managing Oracle User Messaging Service"


Configuring Oracle User Messaging Service 24-1
24Configuring Oracle User Messaging Service
This chapter describes how to configure Oracle User Messaging Service (UMS).
This chapter includes the following topics:
■ Section 24.1, "User Messaging Service Overview"
■ Section 24.2, "Introduction to Oracle User Messaging Service Configuration"
■ Section 24.3, "Accessing User Messaging Service Configuration Pages"
■ Section 24.4, "Configuring User Messaging Service Drivers"
■ Section 24.5, "Securing User Messaging Service"
■ Section 24.6, "Troubleshooting Oracle User Messaging Service"
24.1 User Messaging Service OverviewOracle User Messaging Service enables two-way communication between users and deployed applications. Key features include:
■ Support for a variety of messaging channels—Messages can be sent and received through Email, IM (XMPP), SMS (SMPP), and Voice. Messages can also be delivered to a user’s SOA/WebCenter Worklist.
■ Two-way Messaging—In addition to sending messages from applications to users (referred to as outbound messaging), users can initiate messaging interactions (inbound messaging). For example, a user can send an email or text message to a specified address; the message is routed to the appropriate application which can then respond to the user or invoke another process according to its business logic.
■ User Messaging Preferences—End users can use a web interface to define preferences for how and when they receive messaging notifications. Applications immediately become more flexible; rather than deciding whether to send to a user’s email address or instant messaging client, the application can simply send the message to the user, and let UMS route the message according to the user’s preferences.
■ Robust Message Delivery—UMS keeps track of delivery status information provided by messaging gateways, and makes this information available to applications so that they can respond to a failed delivery. Or, applications can specify one or more failover addresses for a message in case delivery to the initial address fails. Using the failover capability of UMS frees application developers from having to implement complicated retry logic.

User Messaging Service Overview
24-2 Oracle Fusion Middleware Administrator's Guide for Oracle SOA Suite
■ Pervasive integration within Fusion Middleware: UMS is integrated with other Fusion Middleware components providing a single consolidated bi-directional user messaging service.
– Integration with Oracle BPEL—Oracle JDeveloper includes pre-built BPEL activities that enable messaging operations. Developers can add messaging capability to a SOA composite application by dragging and dropping the desired activity into any workflow.
– Integration with Oracle Human Workflow—UMS enables the Human Workflow engine to send actionable messages to and receive replies from users over email.
– Integration with Oracle BAM—Oracle BAM uses UMS to send email alerts in response to monitoring events.
– Integration with Oracle WebCenter—UMS APIs are available to developers building applications for Oracle WebCenter Spaces. The API is a realization of Parlay X Web Services for Multimedia Messaging, version 2.1, a standard web service interface for rich messaging.
24.1.1 ComponentsThere are three types of components that make up Oracle User Messaging Service. These components are standard Java EE applications, making it easy to deploy and manage them using the standard tools provided with Oracle WebLogic Server.
■ UMS Server: The UMS Server orchestrates message flows between applications and users. The server routes outbound messages from a client application to the appropriate driver, and routes inbound messages to the correct client application. The server also maintains a repository of previously sent messages in a persistent store, and correlates delivery status information with previously sent messages.
■ UMS Drivers: UMS Drivers connect UMS to the messaging gateways, adapting content to the various protocols supported by UMS. Drivers can be deployed or undeployed independently of one another depending on what messaging channels are available in a given installation.
■ UMS Client applications: UMS client applications implement the business logic of sending and receiving messages. A UMS client application might be a SOA application that sends messages as one step of a BPEL workflow, or a WebCenter Spaces application that can send messages from a web interface.
In addition to the components that make up UMS itself, the other key entities in a messaging environment are the external gateways required for each messaging channel. These gateways are not a part of UMS or Oracle WebLogic Server. Since UMS Drivers support widely-adopted messaging protocols, UMS can be integrated with existing infrastructures such as a corporate email servers or XMPP (Jabber) servers. Alternatively, UMS can connect to outside providers of SMS or text-to-speech services that support SMPP or VoiceXML, respectively.
24.1.2 ArchitectureThe system architecture of Oracle User Messaging Service is shown in Figure 24–1.
For maximum flexibility, the components of UMS are separate Java EE applications. This allows them to be deployed and managed independently of one another. For example, a particular driver can be stopped and reconfigured without affecting message delivery on all other channels.

Introduction to Oracle User Messaging Service Configuration
Configuring Oracle User Messaging Service 24-3
Exchanges between UMS client applications and the UMS Server occur as SOAP/HTTP web service requests for web service clients, or through Remote EJB and JMS calls for BPEL messaging activities. Exchanges between the UMS Server and UMS Drivers occur through JMS queues.
Oracle UMS server and drivers are installed alongside SOA or BAM in their respective WebLogic Server instances. A WebCenter installation includes the necessary libraries to act as a UMS client application, invoking a server deployed in a SOA instance.
Figure 24–1 UMS architecture
24.2 Introduction to Oracle User Messaging Service ConfigurationOracle User Messaging Service enables users to receive notifications sent from SOA applications that are developed and deployed to the Oracle WebLogic Server using Oracle JDeveloper.
At the application level, there is notification activity for a specific delivery channel (such as SMS or E-Mail). For example, when you build a SOA application that sends e-mail notification, you drag and drop an Email Activity component from the JDeveloper Component Palette to the appropriate location within a workflow. The application connects then sends notifications.
For more information about Oracle JDeveloper, see your JDeveloper documentation.
To enable the workflow participants to receive and forward notifications, use Oracle 11g Enterprise Manager to set the Oracle User Messaging Service environment by configuring the appropriate driver instances that reside on the same Oracle WebLogic

Introduction to Oracle User Messaging Service Configuration
24-4 Oracle Fusion Middleware Administrator's Guide for Oracle SOA Suite
Server on which you deploy the workflow application (Figure 24–2). Oracle User Messaging Service includes drivers that support messaging through E-Mail, IM, SMS and voice channels. For more information, see Section 24.4, "Configuring User Messaging Service Drivers".
Figure 24–2 Oracle Enterprise Manager 11g Fusion Middleware Control
In order for workflow participants to actually receive the notifications, they must register the devices that they use to access messages through User Messaging Preferences (Figure 24–3).
Figure 24–3 User Messaging Preferences

Configuring User Messaging Service Drivers
Configuring Oracle User Messaging Service 24-5
24.3 Accessing User Messaging Service Configuration PagesYou configure User Messaging Service through Oracle Enterprise Manager Fusion Middleware Control. For more information on Oracle Enterprise Manager, see your Oracle Enterprise Manager documentation.
24.3.1 How to Set the Storage Method Use the Basic Configuration page to set deployment type for the Messaging Server (that is, select the storage method for run time and management data) and add (or remove) the User Messaging Preference Business Terms that are used for creating message filters.
Select Persistent (the default) to enable entries and the Messaging Store to persist when the server has been restarted. In the Transient mode (which is recommended for lightweight deployments), the Messaging Server does not maintain any data stored in the Messaging Store after a restart.
24.3.2 How to Add or Remove User Messaging Preferences Business TermsThe Basic Configuration page enables you to add or remove the business terms used to construct the message filters in User Message Preferences. For more information about building messaging filters with business terms, refer to Adding Business Terms.
24.3.2.1 Adding Business Terms
To add a business term to User Messaging Preferences:
1. Click Add.
2. Enter a descriptive name for the business term.
3. Select a data type (string, number, or date).
4. Click Apply.
24.3.2.2 Removing Business TermsTo remove a business term from User Messaging Preferences:
1. Select the business term.
2. Click Delete.
3. Click Apply to confirm the new term.
24.4 Configuring User Messaging Service DriversOracle User Messaging Service includes the following drivers.
■ E-Mail Driver
■ SMPP Driver
■ XMPP Driver
Note: Business Terms are stored per server instance. If there are multiple instances (as in a cluster), then new business terms must be added to each instance individually.
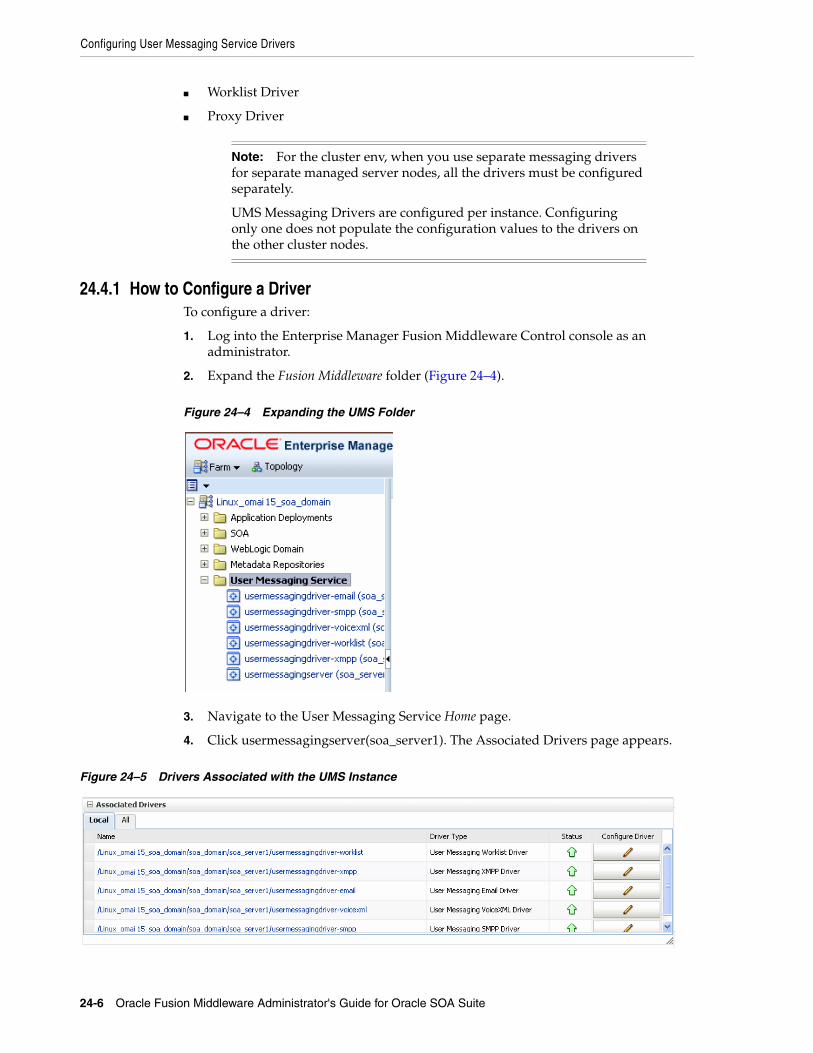
Configuring User Messaging Service Drivers
24-6 Oracle Fusion Middleware Administrator's Guide for Oracle SOA Suite
■ Worklist Driver
■ Proxy Driver
24.4.1 How to Configure a DriverTo configure a driver:
1. Log into the Enterprise Manager Fusion Middleware Control console as an administrator.
2. Expand the Fusion Middleware folder (Figure 24–4).
Figure 24–4 Expanding the UMS Folder
3. Navigate to the User Messaging Service Home page.
4. Click usermessagingserver(soa_server1). The Associated Drivers page appears.
Figure 24–5 Drivers Associated with the UMS Instance
Note: For the cluster env, when you use separate messaging drivers for separate managed server nodes, all the drivers must be configured separately.
UMS Messaging Drivers are configured per instance. Configuring only one does not populate the configuration values to the drivers on the other cluster nodes.

Configuring User Messaging Service Drivers
Configuring Oracle User Messaging Service 24-7
5. Select the Local tab to access the drivers collocated with the UMS server instance. These drivers may or may not be registered with the UMS server depending on whether or not they are properly configured. The ALL tab lists all drivers that are deployed in the domain and registered to all the UMS server instances.
6. Find the Email driver in the list, and then click the adjacent Configure Driver icon.
The configuration page displays (Figure 24–6).
Figure 24–6 The Basic Configuration Page for a Selected Driver
7. If needed, expand the Driver-Specific Configuration section and configure the driver parameters. For more information, see Section 24.4.1.1, "About Driver Properties".
24.4.1.1 About Driver PropertiesOracle User Messaging Service drivers share common properties (listed in Table 24–1) that are used by the Messaging Engine when routing outbound messages. Typically, administrators set such Quality of Service (QoS) properties as driver cost (Cost) and driver speed (Speed), supported carriers (SupportedCarriers), and supported protocols (SupportedProtocols). Driver developers configure properties that typically do not require modification by the administrator, such as supported delivery types (SupportedDeliveryTypes), and supported content types (SupportedContentTypes).
Note: Properties such as SendingQueuesInfo are for advanced use and only require modification for advanced deployment topologies.
Table 24–1 Common Driver Properties
Name DescriptionMandatory Property?
Capability Sets the driver’s capability to send or receive messages. The values are SEND, RECEIVE, and BOTH.
Yes
Cost The cost level of the driver (from 0 - 10). 0 is least expensive; 10 is most expensive. If the value is not in this range, cost is considered to be 0.
No
DefaultSenderAddress The default address of the sender. The driver uses these addresses when sending a message that has no sender address specified, or when the specified sender address is not in the sender addresses list and the driver does not support using the application-provided sender address.
No

Configuring User Messaging Service Drivers
24-8 Oracle Fusion Middleware Administrator's Guide for Oracle SOA Suite
24.4.1.2 Securing PasswordsSensitive driver properties (namely, passwords) can be stored securely in the credential store using Oracle Enterprise Manager. Properties are marked with the flag Encoded Credential and have a custom entry form field.
To store a sensitive driver property securely:
1. Go to the driver configuration page of the selected driver.
2. In the Driver-Specific Configuration section, locate the property with the Encoded Credential flag set.
3. Select the credential type (Depending on the selected credential type, you are prompted to enter the username and/or password.). There are three options:
■ Indirect password, create new user (default option)—specify the username and real password; the password is stored in the credential store with the username as part of the key. The key and a fixed folder (map name) are stored in the driver deployment's driverconfig.xml.
■ Indirect password, use existing user—choose an existing username/key in the credential store (to reference the password you stored previously).
■ User a clear text password—specify the password, and it is stored directly in driverconfig.xml.
4. click Apply to save the changes.
5. Restart the driver application or the container for the changes to take effect.
SenderAddresses The list of sender addresses that the driver supports. If provided by the driver, the Messaging Engine can use this to route a sending message to the driver by matching against the sender address of the message.
No
SendingQueuesInfo The information for the Driver Sending Queue. Yes
Speed The speed level of the driver (from 0-10, with 10 being the fastest). No
SupportedCarriers A comma-delimited list of supported carriers. No
SupportedContentTypes
The content type supported by the driver. Yes
SupportedDeliveryTypes
The delivery types supported by the driver. Yes
SupportedProtocols A comma-delimited list of supported protocols. Entering an asterisk (*) for any protocol.
No
SupportedStatusTypes The status types supported by the driver. No
SupportsCancel Supports a Cancel operation on a message. No
SupportsReplace Supports a Replace operation on a message. No
SupportsStatusPolling For certain protocols, an active polling of the remote gateway must be performed to check the status of a message previously sent. This property indicates whether the driver supports such status polling. If set to true, the Messaging Engine invokes the driver connection's getStatus() operation.
No
SupportsTracking Supports Tracking operation on a message. No
Table 24–1 (Cont.) Common Driver Properties
Name DescriptionMandatory Property?

Configuring User Messaging Service Drivers
Configuring Oracle User Messaging Service 24-9
You can check the password in the driver deployment directory's driverconfig.xml. For an indirect password, the format is:
value="->mapName:keyName" (mapName is the driver target name, and the key is <parameter_name>.<username>)
For example, here is a sample entry in driverconfig.xml for an Email Driver's OutgoingPassword property:
<Property value="->/Farm_base_domain/base_domain/server_soa/usermessagingdriver-email:OutgoingPassword.ouser" encodedCredential="true" type="java.lang.String" mandatory="no" name="OutgoingPassword" description="oracle.sdp.messaging.EmailDriverConfig.outgoingPassword"/>
24.4.1.3 Configuring the E-Mail DriverThe E-Mail Driver both sends and receives messages (that is, its Capability property is set to BOTH by default). The E-Mail Driver sends messages over SMTP and uses either IMAP and POP3 for receiving messages.
24.4.1.3.1 E-Mail Driver Interoperability This section details interoperability features of the E-Mail Driver.
The E-Mail driver is compatible with these protocols: POP3, IMAP4, and SMTP.
E-Mail Driver features include:
■ Automatic connection retry
■ SMTP for message sending
■ IMAP4 and POP3 for message receiving (using polling)
■ Scalable, highly available
■ Prevents message loss and avoids duplication
The Gateway Vendors and Versions in Table 24–2 have been verified.
24.4.1.3.2 Common Properties These are common driver properties that are indicative of the capabilities of this driver for use by the engine when routing outbound messages. Some properties are set by the driver developer and do not normally require modification, while others can be modified by the administrator to change the routing behavior. Some properties such as SendingQueuesInfo are for advanced use and only require modification for advanced deployment topologies. For a complete description of these properties and available values refer to the javadoc of DriverConfigPropertyNames.
Table 24–2 E-Mail Driver Gateway Vendors and Versions
Vendor Version
Oracle Beehive Release 1 (1.4.3)
Oracle Collaboration Suite 10g Release 1 (10.1.2)
Microsoft Exchange 2003
Dovecot (IMAP4/POP3) 0.99.11
sendmail (SMTP) 8.13.1

Configuring User Messaging Service Drivers
24-10 Oracle Fusion Middleware Administrator's Guide for Oracle SOA Suite
24.4.1.3.3 Email Custom Properties These are properties specific to this driver and are generally associated with configuring access to the remote gateway and certain protocol or channel-specific behavior.
Table 24–3 Common Email Properties
Name Description Mandatory Default Value
InstanceName Instance Name (for internal use only)
Yes Email-Driver
Capability Message sending and receiving capability
Yes Both
SupportedDeliveryTypes Supported Delivery Types Yes Email
SupportedContentTypes Supported Content Types Yes text/plain, text/html, multipart/mixed, multipart/alternative, multipart/related
SupportedStatusTypes Supported Status Types No DELIVERY_TO_GATEWAY_SUCCESS, DELIVERY_TO_GATEWAY_FAILURE, USER_REPLY_ACKNOWLEDGEMENT_SUCCESS, USER_REPLY_ACKNOWLEDGEMENT_FAILURE
Cost Cost No N/A
Speed Speed No N/A
SupportedCarriers Supported Carriers No N/A
Supported Protocols Supported Protocols No N/A
SupportsCancel Supports Cancel Operation on the Message
No False
SupportsReplace Supports Replace Operation on the Message
No False
SupportsTracking Supports Tracking Operation on the Message
No False
SupportsStatusPolling Supports Status Polling Operation on the Message
No False
SenderAddresses Sender Addresses No N/A
DefaultSenderAddress Default Sender Address No N/A
SendingQueuesInfo Driver Sending Queue Info Yes OraSDPM/QueueConnectionFactory:OraSDPM/Queues/OraSDPMDriverDefSndQ1
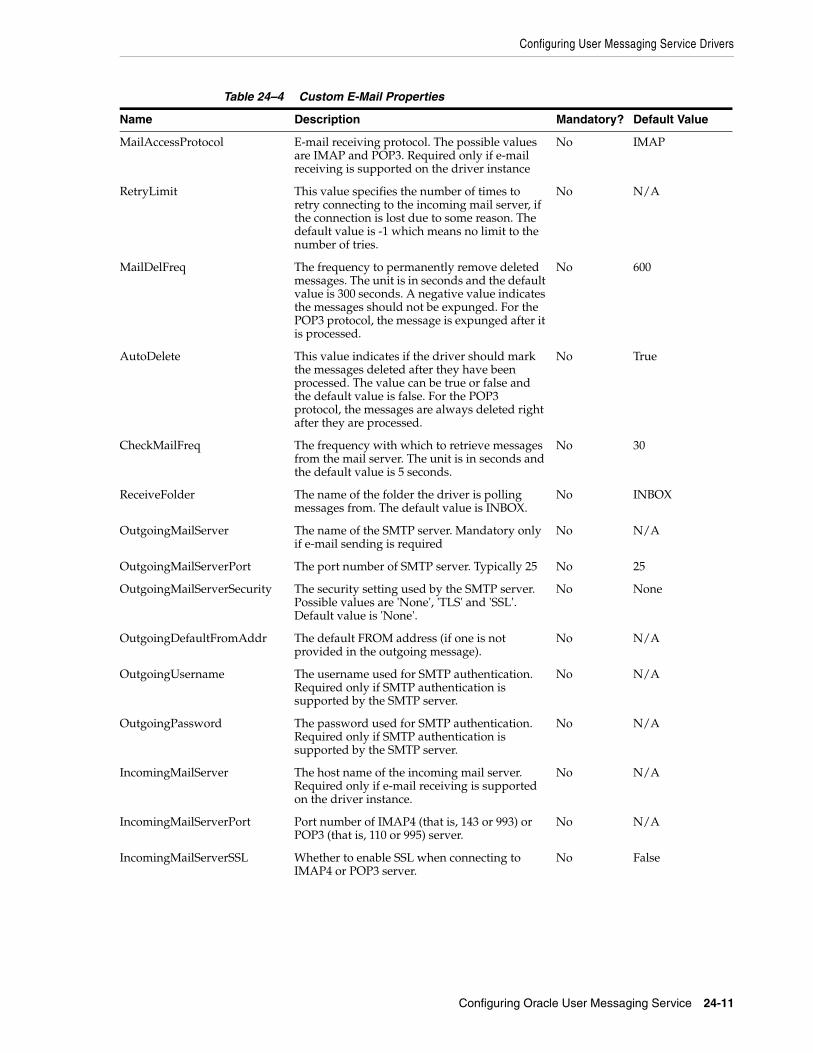
Configuring User Messaging Service Drivers
Configuring Oracle User Messaging Service 24-11
Table 24–4 Custom E-Mail Properties
Name Description Mandatory? Default Value
MailAccessProtocol E-mail receiving protocol. The possible values are IMAP and POP3. Required only if e-mail receiving is supported on the driver instance
No IMAP
RetryLimit This value specifies the number of times to retry connecting to the incoming mail server, if the connection is lost due to some reason. The default value is -1 which means no limit to the number of tries.
No N/A
MailDelFreq The frequency to permanently remove deleted messages. The unit is in seconds and the default value is 300 seconds. A negative value indicates the messages should not be expunged. For the POP3 protocol, the message is expunged after it is processed.
No 600
AutoDelete This value indicates if the driver should mark the messages deleted after they have been processed. The value can be true or false and the default value is false. For the POP3 protocol, the messages are always deleted right after they are processed.
No True
CheckMailFreq The frequency with which to retrieve messages from the mail server. The unit is in seconds and the default value is 5 seconds.
No 30
ReceiveFolder The name of the folder the driver is polling messages from. The default value is INBOX.
No INBOX
OutgoingMailServer The name of the SMTP server. Mandatory only if e-mail sending is required
No N/A
OutgoingMailServerPort The port number of SMTP server. Typically 25 No 25
OutgoingMailServerSecurity The security setting used by the SMTP server. Possible values are 'None', 'TLS' and 'SSL'. Default value is 'None'.
No None
OutgoingDefaultFromAddr The default FROM address (if one is not provided in the outgoing message).
No N/A
OutgoingUsername The username used for SMTP authentication. Required only if SMTP authentication is supported by the SMTP server.
No N/A
OutgoingPassword The password used for SMTP authentication. Required only if SMTP authentication is supported by the SMTP server.
No N/A
IncomingMailServer The host name of the incoming mail server. Required only if e-mail receiving is supported on the driver instance.
No N/A
IncomingMailServerPort Port number of IMAP4 (that is, 143 or 993) or POP3 (that is, 110 or 995) server.
No N/A
IncomingMailServerSSL Whether to enable SSL when connecting to IMAP4 or POP3 server.
No False

Configuring User Messaging Service Drivers
24-12 Oracle Fusion Middleware Administrator's Guide for Oracle SOA Suite
24.4.1.3.4 Client API MessageInfo Support These properties are message delivery related which are specified through client API. Table 24–5 describes if the protocol or driver implementation honors such properties.
24.4.1.4 Configuring the SMPP DriverSMPP (Short Message Peer-to-Peer) is one of the most popular GSM SMS protocols. User Messaging Service includes a pre-built implementation of the SMPP protocol as a driver that is capable of both sending and receiving short messages. If the sending feature is enabled, the SMPP driver opens one TCP connection to the SMS-C (Short Message Service Center) as a transmitter for sending. If the driver’s receiving feature is enabled, it opens another connection to the SMS-C as a receiver for receiving. Only two TCP connections (both initiated by the driver) are needed for all communication between the driver and the SMS-C.
24.4.1.4.1 SMPP Driver Interoperability This section details interoperability features of the SMPP Driver.
The SMPP driver is compatible with these protocols: SMPP v3.4.
IncomingMailIDs The e-mail addresses corresponding to the user names. Each e-mail address is separated by a comma and must reside in the same position in the list as their corresponding user name appears on the usernames list. Required only if e-mail receiving is supported on the driver instance.
No N/A
IncomingUserIDs The list of user names of the mail accounts the driver instance is polling from. Each name must be separated by a comma, for example, foo,bar. Required only if e-mail receiving is supported on the driver instance
No N/A
IncomingUserPasswords The list of passwords corresponding to the user names. Each password is separated by a comma and must reside in the same position in the list as their corresponding user name appears on the usernames list. Required only if e-mail receiving is supported on the driver instance.
No N/A
IncomingProcessingChunkSize Max number of messages processed per message polling.
No 100
Table 24–5 Client API MessageInfo Support
Name Description Support
Expiration Expiration means how long the message may exist until it expires.
False
Delay Delay means the amount of time that must elapse before the message is sent.
False
Note: The SMPP Driver implements Version 3.4 of the SMPP protocol and only supports connections to an SMS-C that supports this version.
Table 24–4 (Cont.) Custom E-Mail Properties
Name Description Mandatory? Default Value

Configuring User Messaging Service Drivers
Configuring Oracle User Messaging Service 24-13
SMPP Driver features include:
■ Automatic connection retry
■ HTTP proxy for firewall traversal
■ Authentication configuration
■ Configurable chunk size
■ Bulk Sending
■ Encoding: UCS2, IA5, GSM_DEFAULT
■ Priority Setting
■ Configurable Window size
■ Plain text content only
The Gateway Vendors in Table 24–6 have been verified.
24.4.1.4.2 Common Properties These are common driver properties that are indicative of the capabilities of this driver for use by the engine when routing outbound messages. Some properties are set by the driver developer and do not normally require modification, while others can be modified by the administrator to change the routing behavior. Some properties such as SendingQueuesInfo are for advanced use and only require modification for advanced deployment topologies. For a complete description of these properties and available values refer to the javadoc of DriverConfigPropertyNames.
Table 24–6 SMPP Driver Gateway Vendors
Vendor
Logica CMG
Clickatell
Verisign
OpenSMPP (simulator)
Table 24–7 Common SMPP Properties
Name Description Mandatory Default Value
InstanceName Instance Name (for internal use only)
Yes SMPP-Driver
Capability Message sending and receiving capability
Yes Both
SupportedDeliveryTypes Supported Delivery Types Yes SMS
SupportedContentTypes Supported Content Types Yes text/plain
SupportedStatusTypes Supported Status Types No DELIVERY_TO_GATEWAY_SUCCESS, DELIVERY_TO_GATEWAY_FAILURE
Cost Cost No N/A
Speed Speed No N/A
SupportedCarriers Supported Carriers No N/A
Supported Protocols Supported Protocols No N/A

Configuring User Messaging Service Drivers
24-14 Oracle Fusion Middleware Administrator's Guide for Oracle SOA Suite
24.4.1.4.3 Custom Properties These are properties specific to this driver and are generally associated with configuring access to the remote gateway and certain protocol or channel-specific behavior.
SupportsCancel Supports Cancel Operation on the Message
No False
SupportsReplace Supports Replace Operation on the Message
No False
SupportsTracking Supports Tracking Operation on the Message
No False
SupportsStatusPolling Supports Status Polling Operation on the Message
No False
SenderAddresses Sender Addresses No N/A
DefaultSenderAddress Default Sender Address No N/A
SendingQueuesInfo Driver Sending Queue Info
Yes OraSDPM/QueueConnectionFactory:OraSDPM/Queues/OraSDPMDriverDefSndQ1
Table 24–8 Custom SMPP Properties
Name Description Mandatory? Default Value
SmsAccountId The Account Identifier on the SMS-C. Yes N/A
SmsServerHost The name (or IP address) of the SMS-C server.
Yes N/A
TransmitterSystemId The account ID that is used to send out messages.
Yes N/A
ReceiverSystemId The account ID that is used to receive messages.
Yes N/A
TransmitterSystemType The type of transmitter system. Yes The default value is Logica.
ReceiverSystemType The type of receiver system. Yes The default value is Logica.
TransmitterSystemPassword
The password of the transmitter system. Yes N/A
ReceiverSystemPassword The password for the receiver system. Yes N/A
ServerTransmitterPort The TCP port number of the transmitter system.
Yes N/A
ServerReceiverPort The TCP port number of the receiver system.
Yes N/A
DefaultEncoding The default encoding of the SMPP driver.
No The default value is UCS2.
EncodingAutoDetect If set to true (the default), the SMPP driver encodes automatically.
No The default value is true.
LocalSendingPort The local TCP port used by the SMPP driver to messages to the SMS-C.
No N/A
LocalReceivingPort The local TCP port used by the SMPP drivers to receive messages from the SMS-C.
No N/A
Table 24–7 (Cont.) Common SMPP Properties
Name Description Mandatory Default Value

Configuring User Messaging Service Drivers
Configuring Oracle User Messaging Service 24-15
24.4.1.4.4 Client API MessageInfo Support These properties are message delivery related which are specified through client API. Table 24–9 describes if the protocol or driver implementation honors such properties.
LocalAddress The host name (or IP address) of the server that hosts the SMPP driver.
No N/A
WindowSize The window size for SMS. This value must be a positive number.
No The default value is 1.
EnquireInterval The interval, in seconds, to send an enquire message to the SMS-C.
No The default value is 30.
ThrottleDelay The delay, in seconds, between throttles. No The default value is 15.
BindRetryDelay The delay, in seconds, for a binding retry.
No The default value is 30.
ResponseTimer Time lapse allowed between SMPP request and response, in seconds. Default is 30.
No 30
RegisteredDeliveryMask The delay, in seconds, for a binding retry.
No 0xFF
RangeSetNull Set to true to set the address range field of BIND_RECEIVER to null. Set to false (the default value) to set the address range field to SmsSystemId.
No The default value is false.
PriorityAllowed The highest priority allowed for the SMPP driver. The range is 0 (normal) to 3 (highest).
No The default value is 0.
BulkSending Setting this value to true (the default) enables sending messages in bulk to the SMS-C.
No. The default value is true.
PayloadSending If set to true, the SMPP driver always uses the message payload properties when sending messages to the SMS-C.
No The default value is false.
SourceTon The Type of Number (TON) for ESME address(es) served through SMPP receiver session.
No The default value is 0.
SourceNpi The Numbering Plan Indicator (NPI) for ESME address(es) served through the SMPP receiver session.
No The default value is 0.
DestinationTon The Type of Number (TON) for destination.
No The default value is 0.
DestinationNpi The Numbering Plan Indicator (NPI) for destination.
No The default value is 0.
ExtraErrorCode A comma-delimited list of error codes. No N/A
MaxChunks The maximum SMS chunks for a message.
No The default value is -1 (no maximum).
ChunkSize The size of each SMS message chunk. No The default value is 160.
LongMessageSending Supports sending long messages. No N/A
DatagramMessageMode Supports Datagram Message mode. No N/A
Table 24–8 (Cont.) Custom SMPP Properties
Name Description Mandatory? Default Value

Configuring User Messaging Service Drivers
24-16 Oracle Fusion Middleware Administrator's Guide for Oracle SOA Suite
24.4.1.5 Configuring the XMPP DriverThe XMPP Driver provides unidirectional as well as bidirectional access from Oracle Fusion Middleware to end users for real-time instant messaging (IM) through XMPP (Extensible Messaging and Presence Protocol). This driver enables end users to receive alert notifications or interactively chat with applications through their IM client of choice.
24.4.1.5.1 About XMPP XMPP is an open, XML-based protocol for Instant Messaging and Presence. XMPP-based software is deployed on thousands of servers across the Internet and is used by millions of people worldwide. XMPP consists of a client/server architecture, which resembles the ubiquitous e-mail network. XMPP servers are completely decentralized, allowing anyone to set up their own server. Messaging is achieved as in the email network, where recipients are addressed by a username and a host name (for example: username@host name).
In the XMPP network, users are identified by an XMPP (Jabber) ID, which consists of a username and the host name of the particular XMPP server to which the user connects. An end user of XMPP connects to an XMPP server using an XMPP client in order to send instant messages to other XMPP users. XMPP, however, is not the only protocol network available for instant messaging. XMPP has an extensible and modular architecture. It integrates with proprietary IM networks such as Yahoo, MSN, AOL and ICQ using transport gateways that can connect to these networks. This allows XMPP users to communicate with those on other networks.
In order to use the XMPP Driver in UMS, you must have access to a Jabber/XMPP server and an XMPP account for the UMS XMPP Driver instance to login as. In addition, the XMPP Driver includes configuration parameters that enable UMS to communicate with users on Yahoo, MSN, AOL or ICQ IM networks. This requires that you additionally have accounts on these proprietary IM networks to which you are connecting from the XMPP Driver, and thus, allow end users of those particular networks to communicate with UMS.
24.4.1.5.2 XMPP Driver Interoperability This section details interoperability features of the XMPP Driver.
The XMPP driver is compatible with these protocols: XMPP (RFC 3920, 3921).
XMPP Driver features include:
■ Automatic connection retry
■ HTTP proxy for firewall traversal
■ Plain text content only
The Gateway Vendors and Versions in Table 24–6 have been verified.
Table 24–9 Client API MessageInfo Support
Name Description Support
Expiration Expiration means how long the message may exist until it expires.
True
Delay Delay means the amount of time that must elapse before the message is sent.
False

Configuring User Messaging Service Drivers
Configuring Oracle User Messaging Service 24-17
24.4.1.5.3 Third-Party Software The XMPP Driver uses or requires the following third-party software:
24.4.1.5.4 Driver Application Archive (EAR) $ORACLE_HOME/communications/applications/sdpmessagingdriver-xmpp.ear
24.4.1.5.5 Common Properties These are common driver properties that are indicative of the capabilities of this driver for use by the engine when routing outbound messages. Some properties are set by the driver developer and do not normally require modification, while others can be modified by the administrator to change the routing behavior. Some properties such as SendingQueuesInfo are for advanced use and only require modification for advanced deployment topologies. For a complete description of these properties and available values refer to the javadoc of DriverConfigPropertyNames.
Table 24–10 XMPP Driver Gateway Vendors and Versions
Vendor Version
Jabberd v1, v2
ejabberd v2
Table 24–11 Required Third-Party Software
Name Instructions Version(s)
JabberBeans This driver uses the JabberBeans Java library to connect to a Jabber/XMPP Instant Messaging Server. This driver includes a licensed copy of JabberBeans (version 0.9.1).
0.9.1
XMPP Server Optional. To download and install your own Jabber/XMPP server, pick and install a server from http://www.jabber.org.
Yahoo, MSN, AOL(AIM), and ICQ Transport Gateways
Optional. Follow the transport installation guide that comes with the Jabber/XMPP server to install and configure one or more transports to connect to proprietary IM gateways.
Note: You are not required to install your own XMPP Server if you have access to an existing server. For a list of public servers, see http://www.jabber.org.
Table 24–12 Common XMPP Properties
Name Description Mandatory Default Value
InstanceName Instance Name (for internal use only)
Yes XMPP-IM-Driver
Capability Message sending and receiving capability
Yes Both
SupportedDeliveryTypes
Supported Delivery Types Yes IM
SupportedContentTypes
Supported Content Types Yes text/plain

Configuring User Messaging Service Drivers
24-18 Oracle Fusion Middleware Administrator's Guide for Oracle SOA Suite
24.4.1.5.6 XMPP Custom Properties The XMPP Driver includes the custom properties shown below.
SupportedStatusTypes Supported Status Types No DELIVERY_TO_GATEWAY_SUCCESS, DELIVERY_TO_GATEWAY_FAILURE
Cost Cost No N/A
Speed Speed No N/A
SupportedCarriers Supported Carriers No N/A
Supported Protocols Supported Protocols No N/A
SupportsCancel Supports Cancel Operation on the Message
No False
SupportsReplace Supports Replace Operation on the Message
No False
SupportsTracking Supports Tracking Operation on the Message
No False
SupportsStatusPolling Supports Status Polling Operation on the Message
No False
SenderAddresses Sender Addresses No N/A
DefaultSenderAddress Default Sender Address No N/A
SendingQueuesInfo Driver Sending Queue Info
Yes OraSDPM/QueueConnectionFactory:OraSDPM/Queues/OraSDPMDriverDefSndQ1
Table 24–13 Custom XMPP Properties
Name Description MandatoryDefault Values
IMServerHost Jabber server host name. For multiple servers, use a comma-delimited list (for example, my1.host.com, my2.host.com). If only one host name is specified, it is used for all accounts.
Yes N/A
IMServerPort Corresponding comma-delimited list of Jabber server ports (for example: 5222, 5222)
Yes 5222
IMServerUsername List of Jabber usernames to login as (these user accounts are automatically created, if necessary, on the corresponding Jabber servers). If you have multiple servers listed above, there must be an equal number of usernames (one username per server). If you have only one server listed above, all usernames listed here use that server (for example oracleagent1, oracleagent2). You may also enter a complete Jabber ID if its domain name is different from the Jabber server host name (for example, [email protected]).
Yes N/A
IMServerPassword Corresponding comma-delimited list of passwords for each username listed above.
Yes N/A
Table 24–12 (Cont.) Common XMPP Properties
Name Description Mandatory Default Value

Configuring User Messaging Service Drivers
Configuring Oracle User Messaging Service 24-19
YahooEnable Enable/disable Yahoo Transport (set true to enable, and leave blank to set false to disable), for each user account specified above in a comma-delimited list.
No N/A
YahooUsername comma-delimited list of Yahoo account IDs (requires that you already have these IDs registered on Yahoo), for each user account above (leave entries blank for accounts without Yahoo). Entering valid Yahoo account info allows Yahoo users to access applications through instant messaging.
No N/A
YahooPassword Corresponding comma-delimited list of Yahoo account passwords.
No N/A
MSNEnable Enable/Disable MSN Transport (set true to enable, and leave blank or set false to disable), for each user account specified above in a comma-delimited list.
No N/A
MSNUsername comma-delimited list of MSN Messenger (known as .NET passport) account IDs (requires that you already have these IDs registered as .NET passports), for each user account above (leave entries blank for accounts without MSN). Entering valid .NET account info allows MSN Messenger users to access applications through instant messaging.
No N/A
MSNPassword Corresponding comma-delimited list of MSN Messenger account passwords.
No N/A
AOLEnable Enable/Disable AOL IM (AIM) Transport (set 'true' to enable, and leave blank or set 'false' to disable), for each user account specified above in a comma-delimited list.
No N/A
AOLUsername comma-delimited list of AOL IM (AIM) account IDs (requires that you already have these IDs registered with AOL), for each user account above (leave entries blank for accounts without AOL). Entering valid AOL account info allows AOL users to access applications through instant messaging.
No N/A
AOLPassword Corresponding comma-delimited list of AOL IM account passwords.
No N/A
ICQEnable Enable/Disable ICQ IM Transport (set 'true' to enable, and leave blank or set 'false' to disable), for each user account specified above in a comma-delimited list.
No N/A
ICQUsername comma-delimited list of ICQ account IDs (requires that you already have these IDs registered with ICQ), for each user account above (leave entries blank for accounts without ICQ). Entering valid ICQ account info allows ICQ users to access applications through instant messaging
No N/A
ICQPassword Corresponding comma-delimited list of ICQ account passwords.
No N/A
Table 24–13 (Cont.) Custom XMPP Properties
Name Description MandatoryDefault Values

Configuring User Messaging Service Drivers
24-20 Oracle Fusion Middleware Administrator's Guide for Oracle SOA Suite
24.4.1.5.7 Client API MessageInfo Support These properties are message delivery related which are specified through client API. The table below describes if the protocol or driver implementation honors such properties.
24.4.1.6 Configuring the VoiceXML DriverThe VoiceXML Driver supports the Genesys VoiceGenie gateway's outbound call protocol to send messages authored in VoiceXML. The gateway delivers the message using text-to-speech synthesis.
24.4.1.6.1 VoiceXML Driver Interoperability This section details interoperability features of the VoiceXML Driver.
The VoiceXML driver is compatible with these protocols: VoiceXML over HTTP (VoiceGenie gateway protocol).
VoiceXML Driver features include:
■ VoiceXML content only
The Gateway Vendor and Version in Table 24–6 has been verified.
24.4.1.6.2 Common Properties These are common driver properties that are indicative of the capabilities of this driver for use by the engine when routing outbound messages. Some properties are set by the driver developer and do not normally require modification, while others can be modified by the administrator to change the routing behavior. Some properties such as SendingQueuesInfo are for advanced use and only require modification for advanced deployment topologies. For a complete description of these properties and available values refer to the javadoc of DriverConfigPropertyNames.
RetryLimit Number of times the driver should attempt to reconnect when disconnected from the Jabber server. Enter -1 for unlimited retries.
No N/A
RetryInterval Time interval (in seconds) between reconnect attempts.
No N/A
Table 24–14 Client API MessageInfo Support
Name Description Support
Expiration Expiration means how long the message may exist until it expires.
False
Delay Delay means the amount of time that must elapse before the message is sent.
False
Table 24–15 VoiceXML Driver Gateway Vendor and Version
Vendor Version
Genesys VoiceGenie 6.4.2
Table 24–13 (Cont.) Custom XMPP Properties
Name Description MandatoryDefault Values

Configuring User Messaging Service Drivers
Configuring Oracle User Messaging Service 24-21
24.4.1.6.3 VoiceXML Custom Properties The VoiceXML Driver includes the custom properties shown below.
Table 24–16 Common VoiceXML Properties
Name Description Mandatory Default Value
InstanceName Instance Name (for internal use only)
Yes VoiceXML-Driver
Capability Message sending and receiving capability
Yes SEND
SupportedDeliveryTypes
Supported Delivery Types Yes VOICE
SupportedContentTypes Supported Content Types Yes text/vxml, text/x-vxml
SupportedStatusTypes Supported Status Types No DELIVERY_TO_GATEWAY_SUCCESS, DELIVERY_TO_GATEWAY_FAILURE
Cost Cost No N/A
Speed Speed No N/A
SupportedCarriers Supported Carriers No N/A
Supported Protocols Supported Protocols No N/A
SupportsCancel Supports Cancel Operation on the Message
No False
SupportsReplace Supports Replace Operation on the Message
No False
SupportsTracking Supports Tracking Operation on the Message
No False
SupportsStatusPolling Supports Status Polling Operation on the Message
No False
SenderAddresses Sender Addresses No N/A
DefaultSenderAddress Default Sender Address No N/A
SendingQueuesInfo Driver Sending Queue Info
Yes OraSDPM/QueueConnectionFactory:OraSDPM/Queues/OraSDPMDriverDefSndQ1
Table 24–17 Custom VoiceXML Properties
Name Description MandatoryDefault Values
VoiceXMLOutboundServletURI
The URL of the VoiceXML/VoiceGenie gateway.
Yes N/A
VoiceXMLOutboundServletUserName
The user name of the VoiceXML gateway.
No N/A
VoiceXMLOutboundServletPassword
The password of the VoiceXML gateway. No N/A
VoiceXMLOutboundServletDNIS
The number that appears in the recipient’s ID display.
No N/A

Configuring User Messaging Service Drivers
24-22 Oracle Fusion Middleware Administrator's Guide for Oracle SOA Suite
24.4.1.6.4 Client API MessageInfo Support These properties are message delivery related which are specified through client API. The table below describes if the protocol or driver implementation honors such properties.
24.4.1.7 Configuring the Worklist DriverThe Worklist driver enables notifications from all sources to be sent to users in the form of worklist tasks for integration into the users' WebCenter Unified Worklist.
This integration is achieved by exposing a Worklist channel (delivery type) to applications and end users. Messages sent through the user's Worklist channel are processed by the Worklist driver. The User Messaging Service API semantics are the same as those for existing channels such as IM or Email. This driver handles sending messages only. The Driver Application Archive (EAR) is located at: $ORACLE_HOME/communications/applications/sdpmessagingdriver-worklist.ear
24.4.1.7.1 Install the Worklist Driver To enable the messaging worklist feature, the WebLogic SOA domain must be extended using the extension template available at $ORACLE_HOME/common/templates/applications/oracle.ums.driver.worklist_template_11.1.1.jar. To extend a SOA domain using the Oracle Fusion Middleware Configuration Wizard:
VoiceXMLReceiveURL The URL of this driver's servlet which handles incoming requests from the VoiceXML Gateway. The format is http://<host>:<port>/usermessagingdriver-voicexml/receive. The default behavior, if this property is not set, is to use the local container's HTTP listen host and port. The auto-generated default URL only works for the first driver instance. For additional instances, the context root is different and this property must be configured using the correct context root replacement for /sdpmessagingdriver-voicexml.
No N/A
Table 24–18 Client API MessageInfo Support
Name Description Support
Expiration Expiration means how long the message may exist until it expires.
False
Delay Delay means the amount of time that must elapse before the message is sent.
False
Note: Worklist Message tasks are accessible both through a WebCenter that has been configured to search the BPEL connection that the Worklist message driver is sending messages to, as well as through the BPEL Worklist application. The BPEL Worklist Application also shows these message-based tasks as Worklist items.
Table 24–17 (Cont.) Custom VoiceXML Properties
Name Description MandatoryDefault Values

Configuring User Messaging Service Drivers
Configuring Oracle User Messaging Service 24-23
1. Launch Oracle Fusion Middleware Configuration Wizard ($ORACLE_HOME/common/bin/config.sh or %ORACLE_HOME%\common\bin\config.cmd).
2. Select the Extend an existing WebLogic domain option.
3. Select the desired SOA domain directory.
4. Select the Extend my domain using an existing extension template option.
5. Click Browse, and navigate to $ORACLE_HOME/common/templates/applications
6. Select oracle.ums.driver.worklist_template_11.1.1.jar
7. Complete the remaining steps of the Oracle Fusion Middleware Configuration Wizard, and restart the SOA servers.
24.4.1.7.2 Common Properties The following common driver properties are indicative of the capabilities of this driver for use by the engine when routing outbound messages. Some properties are set by the driver developer and do not normally require modification, while others can be modified by the administrator to change the routing behavior. Some properties such as SendingQueuesInfo are for advanced use and only require modification for advanced deployment topologies. For a complete description of these properties and available values see the javadoc of DriverConfigPropertyNames.
Note: Special Considerations if the SOA managed server is on a remote computer: The oracle.ums.driver.worklist_template_11.1.1.jar extension template includes a SOA composite application (sca_sdpmessagingsca-worklist-composite_rev1.0.jar) that is copied to $DOMAIN_HOME/soa/autodeploy, and is auto-deployed by the SOA Infra run time upon server restart. However, if the SOA Infra run time is on a remote computer, and the domain is packed with the -managed=true option (the correct option to use), this directory is not included in the archive. Thus, the composite is not deployed upon restarting the SOA managed server.
In order to complete the installation, copy the contents of $DOMAIN_HOME/soa/autodeploy from the AdminServer computer to the corresponding location on the remote computer with the SOA managed server, and restart the SOA managed server. You may have to create the directory structure soa/autodeploy under $DOMAIN_HOME on the remote computer.
Table 24–19 Common Worklist Properties
Name Description Mandatory? Default Value
InstanceName Instance Name (for internal use only)
Yes Worklist-Driver
Capability Message sending and receiving capability
Yes SEND
SupportedDeliveryTypes Supported Delivery Types Yes WORKLIST
SupportedContentTypes Supported Content Types Yes text/plain, text/html
SupportedStatusTypes Supported Status Types No DELIVERY_TO_GATEWAY_SUCCESS, DELIVERY_TO_GATEWAY_FAILURE
Cost Cost No N/A

Configuring User Messaging Service Drivers
24-24 Oracle Fusion Middleware Administrator's Guide for Oracle SOA Suite
24.4.1.7.3 Custom Properties The following custom property is available:
24.4.1.7.4 Client API MessageInfo Support This table shows if the protocol or driver implementation honor the following message delivery-related properties that are specified through the client API.
24.4.1.8 Configuring the Proxy DriverThe Proxy Driver acts as a Messaging Web Service client to a Fusion Middleware Messaging server hosted elsewhere in the intranet or Internet. It uses SOAP over HTTP (the Parlay X Multimedia Web Service protocol) to send messages and receive messages as well as return message delivery status. The ParlayX Web Service relays messages from one UMS instance to another. It can be used to relay traffic from multiple instances in an Intranet to a terminating instance that has all of the protocol-specific drivers configured to an external gateway such as an SMSC, or to an SMTP or IMAP mail server.
Speed Speed No N/A
SupportedCarriers SupportedCarriers No N/A
SupportedProtocols SupportedProtocols No N/A
SupportsCancel Supports Cancel Operation on the Message
No False
SupportsReplace Supports Replace Operation on the Message
No False
SupportsTracking Supports Tracking Operation on the Message
No False
SupportsStatusPolling Supports Status Polling Operation on the Message
No False
SenderAddresses Sender Addresses No N/A
DefaultSenderAddress Default Sender Address No N/A
SendingQueuesInfo Driver Sending Queue Info Yes OraSDPM/QueueConnectionFactory:OraSDPM/Queues/OraSDPMDriverDefSndQ1
Table 24–20 Custom Worklist Property
Name Description MandatoryDefault Value
BPELConnectionURL The URL of the BPEL server to connect to. The format is 'http://<bpel-host>:<bpel-port>'. The default behavior, unless changed, is to use the local container's HTTP connection URL.
Table 24–21 Client API MessageInfo Support
Name Description Support
Expiration Expiration means how long the message may exist until it expires.
False
Delay Delay means the amount of time that must elapse before the message is sent.
False
Table 24–19 (Cont.) Common Worklist Properties
Name Description Mandatory? Default Value

Configuring User Messaging Service Drivers
Configuring Oracle User Messaging Service 24-25
24.4.1.8.1 Common Properties These are common driver properties that are indicative of the capabilities of this driver for use by the engine when routing outbound messages. Some properties are set by the driver developer and do not normally require modification, while others can be modified by the administrator to change the routing behavior. Some properties such as SendingQueuesInfo are for advanced use and only require modification for advanced deployment topologies. For a complete description of these properties and available values refer to the javadoc of DriverConfigPropertyNames.
24.4.1.8.2 Proxy Custom Properties The Proxy Driver includes the custom properties shown below.
Table 24–22 Common Proxy Properties
Name Description Mandatory Default Value
InstanceName Instance Name (for internal use only)
Yes Proxy-Driver
Capability Message sending and receiving capability
Yes SEND
SupportedDeliveryTypes
Supported Delivery Types Yes EMAIL, SMS, VOICE, IM, WORKLIST
SupportedContentTypes
Supported Content Types Yes *
SupportedStatusTypes Supported Status Types No DELIVERY_TO_GATEWAY_SUCCESS, DELIVERY_TO_GATEWAY_FAILURE
Cost Cost No N/A
Speed Speed No N/A
SupportedCarriers Supported Carriers No N/A
Supported Protocols Supported Protocols No N/A
SupportsCancel Supports Cancel Operation on the Message
No False
SupportsReplace Supports Replace Operation on the Message
No False
SupportsTracking Supports Tracking Operation on the Message
No False
SupportsStatusPolling Supports Status Polling Operation on the Message
No False
SenderAddresses Sender Addresses No N/A
DefaultSenderAddress Default Sender Address No N/A
SendingQueuesInfo Driver Sending Queue Info
Yes OraSDPM/QueueConnectionFactory:OraSDPM/Queues/OraSDPMDriverDefSndQ1

Securing User Messaging Service
24-26 Oracle Fusion Middleware Administrator's Guide for Oracle SOA Suite
24.4.1.8.3 Client API MessageInfo Support These properties are message delivery related which are specified through client API. The table below describes if the protocol or driver implementation honors such properties.
24.5 Securing User Messaging ServiceThe User Messaging Preferences User Interface and the Parlay X Web Services can be secured at the transport-level using Secure Sockets Layer (SSL). By default, all deployed web services are unsecured. Web Service Security should be enabled for any services that are deployed in a production environment.
■ To enable SSL in the Oracle WebLogic Server, see "Configure SSL for Oracle WebLogic Server" in the Oracle Fusion Middleware Administrator’s Guide. This step is sufficient to secure the User Messaging Preferences User Interface.
■ To secure the Parlay X Web Services, see "Configuring Transport-Level Security" in the Securing WebLogic Web Services.
UMS supports the use of Oracle Web Services Manager WS-Security policies to protect UMS web services. For more information about Oracle Web Services Manager, see "Using Oracle Web Service Security Policies", in Oracle Fusion Middleware Securing WebLogic Web Services for Oracle WebLogic Server.
The recommended security configuration for web services uses Security Assertion Markup Language (SAML) tokens to pass identities between web service clients and UMS. With SAML tokens, instead of the web service client passing a username and password to UMS, a trust relationship is established between the client and UMS by means of exchanging certificates. Once this keystore configuration is in place, the web service client passes only the user identity, and vouches for the fact that it has authenticated the user appropriately.
The recommended policies to use for UMS web services are:
■ oracle/wss11_saml_token_with_message_protection_service_policy (server-side)
Table 24–23 Custom Proxy Properties
Name Description MandatoryDefault Values
GatewayURL The URL to the hosted 11g UMS Web Service gateway. The URL is in the following format:
http://<host>:<port>/sdpmessaging/parlayx/SendMessageService
Yes N/A
Username Username of the messaging gateway. No N/A
Password The password of the username No N/A
Policies comma-delimited list of Oracle Web Services Manager WS-Security policies to be attached to proxy driver requests
No N/A
Table 24–24 Client API MessageInfo Support
Name Description Support
Expiration Expiration means how long the message may exist until it expires.
False
Delay Delay means the amount of time that must elapse before the message is sent.
False
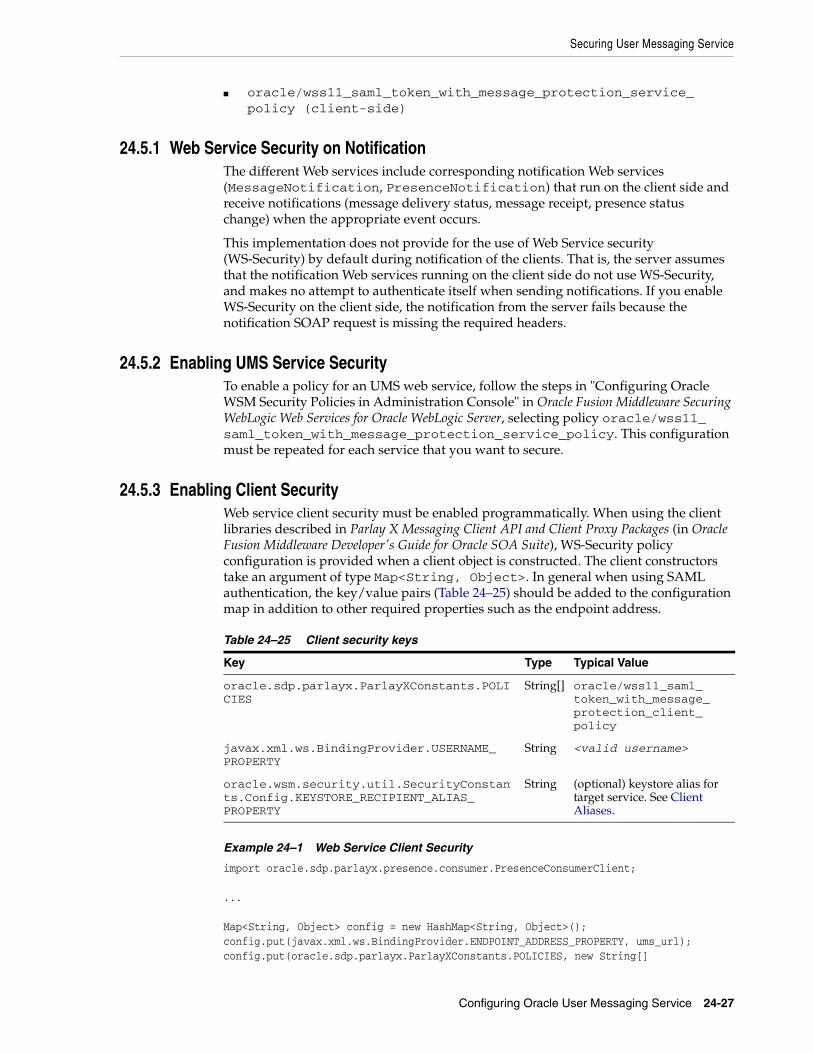
Securing User Messaging Service
Configuring Oracle User Messaging Service 24-27
■ oracle/wss11_saml_token_with_message_protection_service_policy (client-side)
24.5.1 Web Service Security on NotificationThe different Web services include corresponding notification Web services (MessageNotification, PresenceNotification) that run on the client side and receive notifications (message delivery status, message receipt, presence status change) when the appropriate event occurs.
This implementation does not provide for the use of Web Service security (WS-Security) by default during notification of the clients. That is, the server assumes that the notification Web services running on the client side do not use WS-Security, and makes no attempt to authenticate itself when sending notifications. If you enable WS-Security on the client side, the notification from the server fails because the notification SOAP request is missing the required headers.
24.5.2 Enabling UMS Service Security To enable a policy for an UMS web service, follow the steps in "Configuring Oracle WSM Security Policies in Administration Console" in Oracle Fusion Middleware Securing WebLogic Web Services for Oracle WebLogic Server, selecting policy oracle/wss11_saml_token_with_message_protection_service_policy. This configuration must be repeated for each service that you want to secure.
24.5.3 Enabling Client SecurityWeb service client security must be enabled programmatically. When using the client libraries described in Parlay X Messaging Client API and Client Proxy Packages (in Oracle Fusion Middleware Developer's Guide for Oracle SOA Suite), WS-Security policy configuration is provided when a client object is constructed. The client constructors take an argument of type Map<String, Object>. In general when using SAML authentication, the key/value pairs (Table 24–25) should be added to the configuration map in addition to other required properties such as the endpoint address.
Example 24–1 Web Service Client Security
import oracle.sdp.parlayx.presence.consumer.PresenceConsumerClient; ... Map<String, Object> config = new HashMap<String, Object>();config.put(javax.xml.ws.BindingProvider.ENDPOINT_ADDRESS_PROPERTY, ums_url);config.put(oracle.sdp.parlayx.ParlayXConstants.POLICIES, new String[]
Table 24–25 Client security keys
Key Type Typical Value
oracle.sdp.parlayx.ParlayXConstants.POLICIES
String[] oracle/wss11_saml_token_with_message_protection_client_policy
javax.xml.ws.BindingProvider.USERNAME_PROPERTY
String <valid username>
oracle.wsm.security.util.SecurityConstants.Config.KEYSTORE_RECIPIENT_ALIAS_PROPERTY
String (optional) keystore alias for target service. See Client Aliases.

Securing User Messaging Service
24-28 Oracle Fusion Middleware Administrator's Guide for Oracle SOA Suite
{"oracle/wss11_saml_token_with_message_protection_client_policy"});config.put(javax.xml.ws.BindingProvider.USERNAME_PROPERTY, "test.user1"); PresenceConsumerClient presenceClient = new PresenceConsumerClient(config);
24.5.4 Keystore ConfigurationIn order to use the recommended WS-Security policy, you must configure a keystore containing the public and private key information required by OWSM. Refer to "Configuring the Credential Store Using WLST" in Oracle Fusion Middleware Securing WebLogic Web Services for Oracle WebLogic Server for information on how to configure the keystore and corresponding credential store entries.
■ If both your web service client and UMS server are in the same domain, then they share a keystore and credential store.
■ If your web service client and UMS server are in different domains, then you must import the UMS public key into your client domain's keystore, and must import your client domain's public key into the UMS keystore.
24.5.5 Client AliasesWhen using certain WS-Security policies such as the SAML policy recommended here, the client must use the server's public key to encrypt the web service request. However, there is generally only one keystore configured per domain. Therefore, if you have a domain in which there are web service clients that communicate with web services in multiple other domains, then you may be required to override the default keystore entry used by OWSM.
For example, if you have a domain in which application "A" is a web service client to a UMS web service, and application "B" is a web service client to a web service in another domain, then A's requests must be encrypted using the public key of the UMS domain, and B's requests must be encrypted using the public key of the other domain. You can accomplish this goal by overriding the keystore alias used by OWSM for each request:
■ Import (for example) the UMS public key with alias "ums_public_key", and the other public key with alias "other_public_key".
■ When creating an UMS web service client, specify the recipient keystore alias parameter, setting the key to oracle.wsm.security.util.SecurityConstants.Config.KEYSTORE_RECIPIENT_ALIAS_PROPERTY and the value to "ums_public_key" as shown in Example 24–2.
Example 24–2 Client Aliases
import oracle.sdp.parlayx.multimedia_messaging.send.SendMessageClient ... Map<String, Object> config = new HashMap<String, Object>();config.put(javax.xml.ws.BindingProvider.ENDPOINT_ADDRESS_PROPERTY, ums_url);config.put(oracle.sdp.parlayx.ParlayXConstants.POLICIES, new String[] {"oracle/wss11_saml_token_with_message_protection_client_policy"});config.put(javax.xml.ws.BindingProvider.USERNAME_PROPERTY, "test.user1");config.put(oracle.wsm.security.util.SecurityConstants.Config.KEYSTORE_RECIPIENT_ALIAS_PROPERTY, "ums_public_key")SendMessageClient sendClient = new SendMessageClient(config);
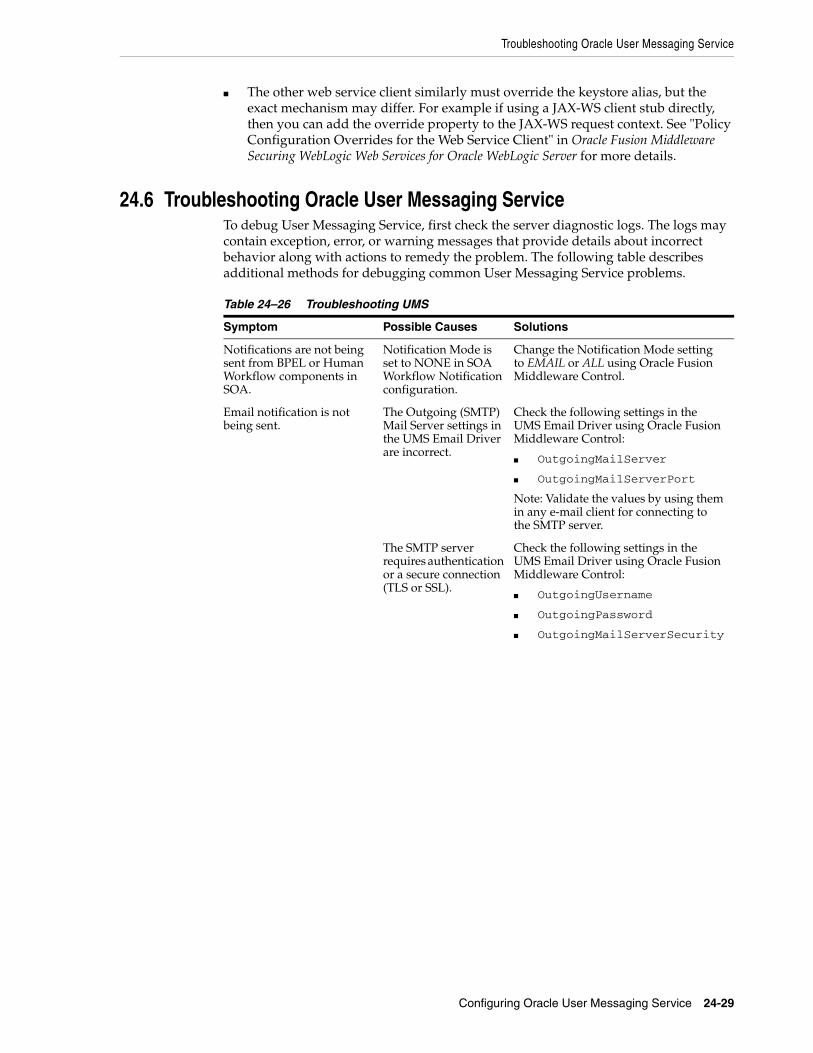
Troubleshooting Oracle User Messaging Service
Configuring Oracle User Messaging Service 24-29
■ The other web service client similarly must override the keystore alias, but the exact mechanism may differ. For example if using a JAX-WS client stub directly, then you can add the override property to the JAX-WS request context. See "Policy Configuration Overrides for the Web Service Client" in Oracle Fusion Middleware Securing WebLogic Web Services for Oracle WebLogic Server for more details.
24.6 Troubleshooting Oracle User Messaging ServiceTo debug User Messaging Service, first check the server diagnostic logs. The logs may contain exception, error, or warning messages that provide details about incorrect behavior along with actions to remedy the problem. The following table describes additional methods for debugging common User Messaging Service problems.
Table 24–26 Troubleshooting UMS
Symptom Possible Causes Solutions
Notifications are not being sent from BPEL or Human Workflow components in SOA.
Notification Mode is set to NONE in SOA Workflow Notification configuration.
Change the Notification Mode setting to EMAIL or ALL using Oracle Fusion Middleware Control.
Email notification is not being sent.
The Outgoing (SMTP) Mail Server settings in the UMS Email Driver are incorrect.
Check the following settings in the UMS Email Driver using Oracle Fusion Middleware Control:
■ OutgoingMailServer
■ OutgoingMailServerPort
Note: Validate the values by using them in any e-mail client for connecting to the SMTP server.
The SMTP server requires authentication or a secure connection (TLS or SSL).
Check the following settings in the UMS Email Driver using Oracle Fusion Middleware Control:
■ OutgoingUsername
■ OutgoingPassword
■ OutgoingMailServerSecurity

Troubleshooting Oracle User Messaging Service
24-30 Oracle Fusion Middleware Administrator's Guide for Oracle SOA Suite
Notifications are not being sent because of error message: No matching drivers found for sender address = <address>
The UMS Driver for the appropriate channel is configured with a specific list of SenderAddresses, and the message sent by the application has set a non-matching Sender Address.
Note: UMS Server matches the outbound message's sender address, if set, against the available drivers' SenderAddresses to find a matching driver to use for delivering the message. If a driver has set one or more SenderAddresses, then the UMS Server only sends messages with the matching sender address to it.
■ Check the following settings in the appropriate UMS Driver using Oracle Fusion Middleware Control:
SenderAddresses
Note: The format for SenderAddresses is a comma-delimited list of <DeliveryType>:<Address>.
For example:
EMAIL:[email protected], EMAIL:[email protected]
■ Leave this property blank, if you want this driver to service outbound messages for all sender addresses for this channel (delivery type).
■ If there are multiple driver instances deployed for the same channel (delivery type) with different configurations, use the SenderAddresses to differentiate the driver instances. For example, one instance can be set with a specific value in SenderAddresses to only service outbound messages with that matching sender address, while the other instance can keep the SenderAddresses blank in order to service all outbound messages that do not specify any sender address or one that does not match that of the first driver instance.
■ SenderAddresses that are configured with the incorrect syntax (such as missing <DeliveryType>:) are ignored by the UMS Server for the purpose of driver selection.
The email client inconsistently receives notifications.
The Incoming Mail Server settings in the UMS Email Driver are configured with the same email account to which notifications are being sent.
If the notification is sent to the same account, the UMS Email Driver may download and process the email before the email client can display it.
Use an exclusive e-mail account for Incoming Mail Server settings. Check the following settings in the UMS Email Driver using Oracle Fusion Middleware Control:
■ IncomingMailIDs
■ IncomingUserIDs
Table 24–26 (Cont.) Troubleshooting UMS
Symptom Possible Causes Solutions

Troubleshooting Oracle User Messaging Service
Configuring Oracle User Messaging Service 24-31
SOA Human Workflow notifications are sent, but are not actionable.
The Actionable Email Address is not configured in SOA Workflow Notification Properties.
Set the Actionable Email Address in SOA Workflow Notification Properties with the address of the email account configured in the UMS Email Driver.
The Human Workflow task is not set to send actionable notifications.
Set the actionable attribute for the Human Workflow task in JDeveloper and redeploy the SOA composite application.
SOA Human Workflow actionable notifications are sent, but no action is taken after responding.
The Incoming Mail Server settings in the UMS Email Driver are incorrect.
Check the following settings in the UMS Email Driver using Oracle Fusion Middleware Control:
■ MailAccessProtocol (IMAP or POP3, in uppercase)
■ ReceiveFolder
■ IncomingMailServer
■ IncomingMailServerPort
■ IncomingMailServerSSL
■ IncomingMailServerSSL
■ IncomingUserIDs
■ IncomingUserPasswords
■ ImapAuthPlainDisable
Note: Validate the values by using them in any e-mail client for connecting to an IMAP or POP3 server.
The mail access protocol is incorrect.
Check the following settings in the UMS Email Driver using Oracle Fusion Middleware Control:
■ MailAccessProtocol (IMAP or POP3, in uppercase)
The email server is SSL-enabled.
Check the following settings in the UMS Email Driver using Oracle Fusion Middleware Control:
■ IncomingMailServerSS
The receive folder name is incorrect.
Check the following settings in the UMS Email Driver using Oracle Fusion Middleware Control:
■ ReceiveFolder
Note: Some email servers may expect the value INBOX to be inbox or Inbox (that is, case-sensitive). Based on your email server, use an appropriate value.
A non-default email client is configured for receiving notifications. When the user clicks the approval link, the default mail client page opens, which may send emails to a different email server.
Configure the default email client to receive actionable notifications.
Table 24–26 (Cont.) Troubleshooting UMS
Symptom Possible Causes Solutions

Troubleshooting Oracle User Messaging Service
24-32 Oracle Fusion Middleware Administrator's Guide for Oracle SOA Suite
SOA BPEL User Notification or Human Workflow notifications are sent to the correct delivery type (email, sms, and so on) but to the wrong address.
A self-provisioned messaging channel was created by the user in User Messaging Preferences for use in BPEL User Notification or Human Workflow use cases.
Note: The User Messaging Preferences UI allows the end user to create his or her own messaging channel for various use cases, but these are not to be used for BPEL User Notification and Human Workflow.
Do not use a self-provisioned messaging channel for BPEL User Notification or Human Workflow use cases (that is, do not set as Default channel, and do not use in a messaging filter for such use cases). BPEL User Notification and Human Workflow utilize User Messaging Preferences only for the delivery type preference, and the actual address is retrieved from the user profile in the identity management system.
Note: Addresses from the user profile in the identity management system are available through User Messaging Preferences using pre-defined channel names, such as Business Email, Business Mobile, Business Phone, Instant Messaging. Use these pre-defined messaging channels instead for BPEL User Notification and Human Workflow use cases.
Table 24–26 (Cont.) Troubleshooting UMS
Symptom Possible Causes Solutions
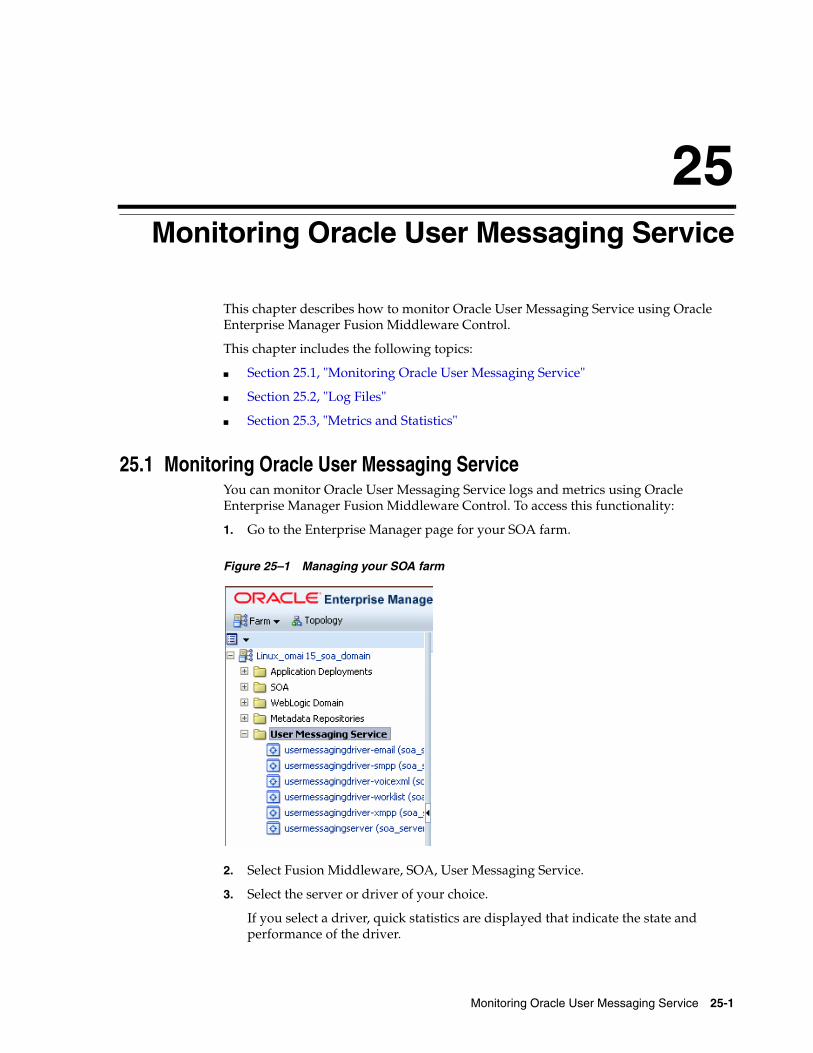
Monitoring Oracle User Messaging Service 25-1
25Monitoring Oracle User Messaging Service
This chapter describes how to monitor Oracle User Messaging Service using Oracle Enterprise Manager Fusion Middleware Control.
This chapter includes the following topics:
■ Section 25.1, "Monitoring Oracle User Messaging Service"
■ Section 25.2, "Log Files"
■ Section 25.3, "Metrics and Statistics"
25.1 Monitoring Oracle User Messaging ServiceYou can monitor Oracle User Messaging Service logs and metrics using Oracle Enterprise Manager Fusion Middleware Control. To access this functionality:
1. Go to the Enterprise Manager page for your SOA farm.
Figure 25–1 Managing your SOA farm
2. Select Fusion Middleware, SOA, User Messaging Service.
3. Select the server or driver of your choice.
If you select a driver, quick statistics are displayed that indicate the state and performance of the driver.

Monitoring Oracle User Messaging Service
25-2 Oracle Fusion Middleware Administrator's Guide for Oracle SOA Suite
If you select a server, you see a list of associated drivers, in addition to the quick statistics. You can select one of the drivers to view its statistics, or you can click the Configure Driver icon to configure it. For more information on configuring drivers, see Chapter 24, "Configuring Oracle User Messaging Service".
Figure 25–2 Using the Configure Driver icon
4. Right-click a driver to take the actions listed in.
Figure 25–3 Available actions
Table 25–1 Driver actions
Selection Action
Home The Home page lists the quick statistics for the selected driver.
Control Start Up or Shut Down driver.
Logs View and configure message logs for the selected driver.
Performance Summary Displays Performance Statistics on a customizable metrics page. Use this page to view statistics for this driver. Customize this page using the Metric Palette. The Metric Palette enables you to choose from all of the available metrics so that you see only the information that is most valuable to you.
Message Status Check the delivery status of messages sent and received, and resend selected messages. You can filter the search by adding more search fields and setting the desired operator and search value. Some fields can be added multiple times in order to use them with different and complementary operators, or with the Contains operator.
Messaging Client Applications
Messaging client applications registered with the User Messaging Service can be manually de-registered in cases where the applications have been undeployed and are holding onto access points that must be made available to other applications.

Monitoring Oracle User Messaging Service
Monitoring Oracle User Messaging Service 25-3
For more information about Oracle Enterprise Manager, see your Oracle Enterprise Manager documentation.
25.1.1 Using Message StatusYou can check the delivery status of messages sent and received, and resend selected messages. To check message status:
1. In the navigation tree, right-click the UMS target for which you want to view message status.
2. Select Message Status. The Message Status page appears.
3. Click Search to search the messages using the default criteria. The search returns a listing for the messages.
Figure 25–4 Message Status
Server Properties Configure message storage method and business terms for message filter creation. See Chapter 24, "Configuring Oracle User Messaging Service" for more information.
System MBean Browser System MBean Browser the System MBeans and their configuration settings.
General Information General Information displays the name, version, Oracle Home, and host for the selected driver.
Table 25–1 (Cont.) Driver actions
Selection Action

Monitoring Oracle User Messaging Service
25-4 Oracle Fusion Middleware Administrator's Guide for Oracle SOA Suite
You can customize the search by adding more search fields and setting the desired operator and search value. Some fields can be added multiple times in order to use them with different and complementary operators, or with the Contains operator. To customize the search:
1. Click Add Fields.
2. Select the field(s) on which you want to search.
3. Choose operators and fill in variables as needed.
4. Click Search. The customized search is done and results returned.
Figure 25–5 Custom search
5. If you want to resend a message, select the message in the list and click Resend.
25.1.2 Deregistering Messaging Client ApplicationsYou can manually deregister Messaging Client Applications after the applications have been undeployed and are holding onto access points that must be made available to other applications. To deregister Messaging Client Applications:
1. Right-click a target in the navigation tree, and select Messaging Client. The Messaging Client page appears.
2. Select the message that you want to deregister.
3. Click De-register.

Log Files
Monitoring Oracle User Messaging Service 25-5
Figure 25–6 Messaging Client Applications page
A confirmation box appears asking you to confirm your choice.
4. Confirm your choice.
25.1.3 Monitoring Drivers Using the All TabThe All tab only lists successfully-registered drivers in the domain (not all drivers that exist).
Since the drivers are not configured out-of-the-box, they are not registered unless you configure them. To ensure that you see all of the drivers in the v tab, configure the SMPP, VoiceXML and XMPP drivers (if you plan to use them). Once configured, they are registered with the engine and are displayed in the All tab.
25.2 Log FilesRight-click the driver for which you want to view log information, the choose Logs, View Log Files. The Log Messages page appears.
Figure 25–7 Querying logs
Use this page to query for log information about the driver. Fields and lists are used to customize the query. After entering your search criteria, click Log Files. The Log Files page appears.

Log Files
25-6 Oracle Fusion Middleware Administrator's Guide for Oracle SOA Suite
Figure 25–8 Log search results
You can view log information or download the log.
25.2.1 Configuring LoggingUse Enterprise Manager to configure log levels.
Figure 25–9 Configuring log levels
For each logger, set the notification level.

Log Files
Monitoring Oracle User Messaging Service 25-7
Figure 25–10 Select notification level
As a result of your configuration actions, notifications appear according to your specification.
Figure 25–11 Viewing log files

Metrics and Statistics
25-8 Oracle Fusion Middleware Administrator's Guide for Oracle SOA Suite
Figure 25–12 Error messages
25.3 Metrics and StatisticsThe performance of your applications is reflected in metrics and statistics. When you select the Performance Summary for a driver, the Performance Summary page appears.
Figure 25–13 UMS metrics
Many metrics are available for capture and display, but in order to get the most valuable, focused information, use Metric Palette. Click Show Metric Palette to display the Metric Palette. Choose the metrics in which you are most interested. As you select or deselect metrics from the palette, the metrics display is automatically updated.

Metrics and Statistics
Monitoring Oracle User Messaging Service 25-9
Figure 25–14 Metrics Palette

Metrics and Statistics
25-10 Oracle Fusion Middleware Administrator's Guide for Oracle SOA Suite
Managing Oracle User Messaging Service 26-1
26Managing Oracle User Messaging Service
This chapter describes how to manage Oracle User Messaging Service.
This chapter includes the following topic:
■ Section 26.1, "Deploying Drivers"
■ Section 26.2, "Undeploying and Unregistering Drivers"
26.1 Deploying DriversWhen you install Oracle UMS, pre-installed drivers are included (Email, XMPP, SMPP, and VoiceXML). Of these, only the Email driver is deployed to the WebLogic Server. To deploy the others, target that driver to the WebLogic Server (using WebLogic Administration Console, or you can target the drivers when creating or extending the domain using the Oracle Fusion Middleware Configuration Wizard).
The Worklist driver must be deployed to a SOA Server if you want to make use of the UMS integration with Worklist. Because this integration involves multiple JEE applications and a SOA composite, there is a special extension template you must use to enable this feature in one step. See Install the Worklist Driver for more information.
You can deploy additional drivers in a variety of ways using: WebLogic Server Administration Console, Oracle Enterprise Manager, WLST commands, and through the Oracle Fusion Middleware Configuration Wizard.
26.1.1 Using WebLogic Server Administration ConsoleUse WebLogic Server Administration Console to deploy drivers.
1. In the Domain Structure region of the console, click Deployments. The Home page for Deployments appears.
Note: To deploy two or more driver instances of a particular driver EAR, you must use the custom deployment plan templates available at $ORACLE_HOME/communications/plans. See Using Oracle Enterprise Manager to Deploy Drivers for instructions on deploying drivers using Oracle Enterprise Manager.
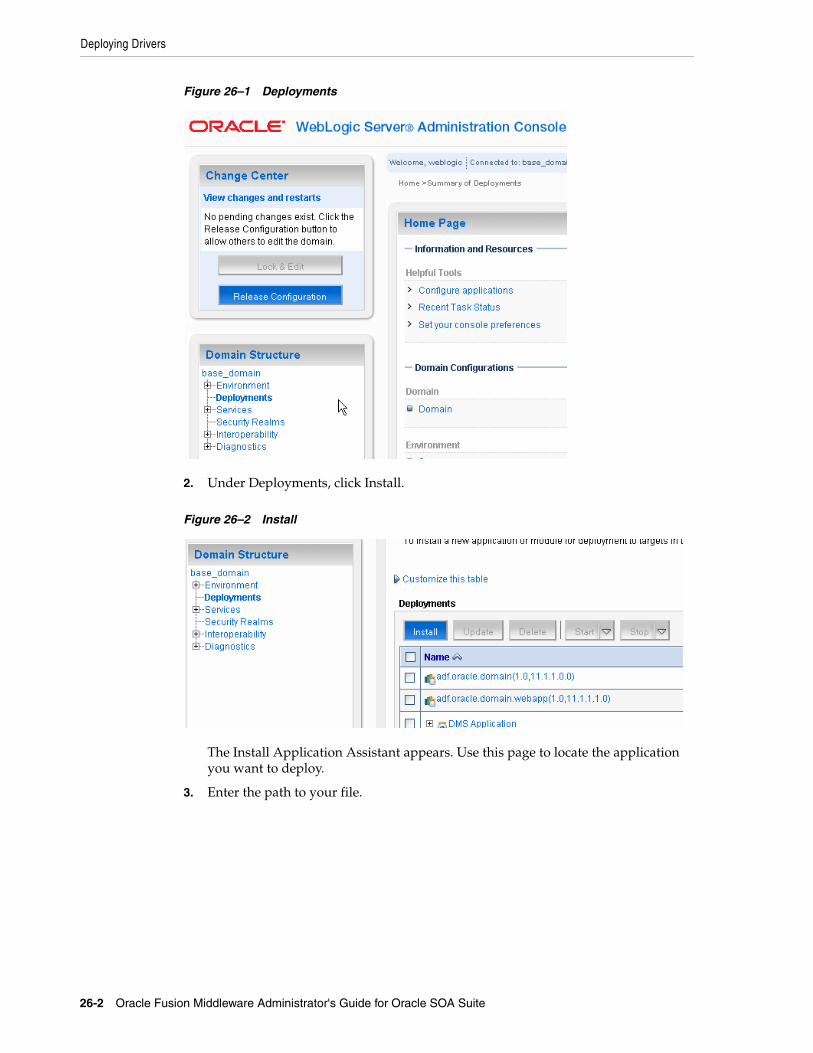
Deploying Drivers
26-2 Oracle Fusion Middleware Administrator's Guide for Oracle SOA Suite
Figure 26–1 Deployments
2. Under Deployments, click Install.
Figure 26–2 Install
The Install Application Assistant appears. Use this page to locate the application you want to deploy.
3. Enter the path to your file.

Deploying Drivers
Managing Oracle User Messaging Service 26-3
Figure 26–3 Install Application Assistant
4. Click Next. You are asked to choose the targeting style.
Figure 26–4 Targeting style
5. Use the Default (Install this deployment as an application). A Summary page appears.

Deploying Drivers
26-4 Oracle Fusion Middleware Administrator's Guide for Oracle SOA Suite
Figure 26–5 Summary page
6. Accept the settings. You can change setting here, but it is recommended that you accept the settings as they are. Click Finish. A Confirmation page appears.
Figure 26–6 Confirmation page
7. In order for your deployment to be complete, you must activate your changes, so click Activate Changes.
Figure 26–7 Activate changes
A final confirmation appears.

Deploying Drivers
Managing Oracle User Messaging Service 26-5
Figure 26–8 Final confirmation
26.1.2 Using Oracle Enterprise Manager to Deploy DriversFollow these steps to deploy drivers using Oracle Enterprise Manager.
1. Retrieve a deployment template (for example: ORACLE_HOME/communications/plans)
2. Copy the plan to a location of your choice (to the same directory or any other directory).
3. Edit the plan:
Replace DriverDeploymentName with whichever name you want to use (ensure you replace all instances of the name).
Replace DriverShortName with any name you like.
4. Start Oracle Enterprise Manager.
5. Enter the location of the .ear file (Figure 26–9).
6. Enter the location of the Deployment Plan (Figure 26–9).
Figure 26–9 Deploying UMS Drivers using Oracle Enterprise Manager

Deploying Drivers
26-6 Oracle Fusion Middleware Administrator's Guide for Oracle SOA Suite
The Select Target screen appears.
Figure 26–10 Select Target screen
7. Select the SOA target.
8. Enter an application name in the Application Attributes screen. The application name must exactly match the string used for DriverDeploymentName (in Step 3 above) which is provided in the Deployment Plan. If it does not, the deployment and activation fails. The Deployment Setting screen appears.
Figure 26–11 Deployment Settings screen
9. Click Deploy. The Deployment Completed screen appears.

Deploying Drivers
Managing Oracle User Messaging Service 26-7
Figure 26–12 Deployment Completed screen
10. To see the result (driver deployed), start the SOA Server.
26.1.3 Using WLST CommandsYou can deploy drivers using the WLST command deployUserMessagingDriver.
26.1.3.1 deployUserMessagingDriverCommand Category: UMS
Use with WLST: Online
26.1.3.1.1 Description deployUserMessagingDriver is used to deploy additional instances of user messaging drivers.
Specify a base driver type (for example: email, xmpp, voicexml, and others) and a short name for the new driver deployment. The string usermessagingdriver- is prepended to the specified application name. Any valid parameters for the deploy command can be specified, and is passed through when the driver is deployed.
26.1.3.1.2 Syntax deployUserMessagingDriver(baseDriver, appName, [targets], [stageMode], [options])
Argument Definition
baseDriver Specifies the base messaging driver type.
Must be a known driver type, such as 'email', 'proxy', 'smpp', 'voicexml', or 'xmpp'.
appName A short descriptive name for the new deployment. The specified value is prepended with the string usermessagingdriver-

Undeploying and Unregistering Drivers
26-8 Oracle Fusion Middleware Administrator's Guide for Oracle SOA Suite
26.1.3.1.3 Examples To deploy a second instance of an email driver with name myEmail.
wls:/base_domain/serverConfig> deployUserMessagingDriver(baseDriver='email', appName='myEmail')
To deploy a second instance of an email driver, specifying deployment targets.
wls:/base_domain/serverConfig> deployUserMessagingDriver(baseDriver='email', appName='email2', targets='server1,server2')
26.1.4 Using the Oracle Fusion Middleware Configuration WizardTo install the SMPP, XMPP and VoiceXML drivers, extend the domain using the extension template available at $ORACLE_HOME/common/templates/applications/oracle.ums.drivers_template_11.1.1.jar.
To extend a domain using Oracle Fusion Middleware Configuration Wizard:
1. Launch Oracle Fusion Middleware Configuration Wizard ($ORACLE_HOME/common/bin/config.sh or %ORACLE_HOME%\common\bin\config.cmd).
2. Select the Extend an existing WebLogic domain option.
3. Select the desired domain directory containing UMS.
4. Select the Extend my domain using an existing extension template option.
5. Click Browse, and navigate to $ORACLE_HOME/common/templates/applications
6. Select oracle.ums.drivers_template_11.1.1.jar
7. Complete the remaining steps of the Oracle Fusion Middleware Configuration Wizard, and remember to target the required drivers to the desired WebLogic servers and/or clusters.
8. Restart the appropriate WebLogic servers.
26.2 Undeploying and Unregistering DriversSince Messaging Drivers are standard JEE applications, they can be undeployed from the Oracle WebLogic Server using standard Oracle WebLogic tools such as the Admin Console or WLST.
However, since the UMS server keeps track of the messaging drivers that have been registered with it in a persistent store (database), this registration must be cleaned in a separate step using a run time MBean exposed by the UMS server. The procedure to do this from Oracle Enterprise Manager is as follows:
1. Ensure the UMS server is available.
targets
stageMode
options
Optional. Additional arguments that are valid for the deploy command can be specified and is passed through when the new driver is deployed.
Argument Definition

Undeploying and Unregistering Drivers
Managing Oracle User Messaging Service 26-9
2. In Oracle Enterprise Manager, select any usermessagingserver target in the domain.
3. From the target's menu, select System MBean Browser.
4. In System MBean Browser, locate the ComponentAdministration MBean of usermessagingserver:
Expand the folder com.oracle.sdp.messaging > Server (such as Server: soa_server1) > SDPMessagingrun time > ComponentAdministration.
5. Invoke the operation listDriverInstances.
a. Click the Operations tab.
b. Click the operation listDriverInstances.
c. Click Invoke.
d. Identify and copy the name of the driver you want to unregister. (for example: /Farm_soa_bam_domain/soa_bam_domain/soa_server1/usermessagingdriver-email:oracle_sdpmessagingdriver_email#Email-Driver)
Figure 26–13 Listing Driver Instances
6. Click Return.
7. Invoke the operation unregisterDriverInstance with the desired driver name.
a. Click the operation unregisterDriverInstance.
b. Paste the driver name in the Value field (for example: /Farm_soa_bam_domain/soa_bam_domain/soa_server1/usermessagingdriver-email:oracle_sdpmessagingdriver_email#Email-Driver).
c. Click Invoke.

Undeploying and Unregistering Drivers
26-10 Oracle Fusion Middleware Administrator's Guide for Oracle SOA Suite
Figure 26–14 Unregistering a Driver Instance
8. Check the confirmation dialog for success.
This completes the unregistration of the specified driver from the UMS server and it is no longer used in future message delivery.

Part XIPart XI Administering Oracle JCA Adapters
This part describes how to administer Oracle Adapters.
This part includes the following chapters:
■ Chapter 27, "Configuring Oracle JCA Adapters"
■ Chapter 28, "Monitoring Oracle JCA Adapters"
■ Chapter 29, "Managing Oracle JCA Adapters"


27
Configuring Oracle JCA Adapters 27-1
27Configuring Oracle JCA Adapters
This chapter describes how to configure Oracle JCA Adapters.
This chapter includes the following topics:
■ Section 27.1, "Searching for Rejected Messages for an Inbound Adapter"
■ Section 27.2, "Deleting Rejected Messages for an Inbound Adapter"
■ Section 27.3, "Searching for Faults for an Outbound Adapter"
■ Section 27.4, "Configuring the End Point Properties for an Inbound Adapter"
■ Section 27.5, "Configuring the End Point Properties for an Outbound Adapter"
27.1 Searching for Rejected Messages for an Inbound AdapterUse the Search feature to search for faults and rejected messages for an inbound adapter.
To search for faults and rejected messages for an inbound adapter:
1. Navigate to the SOA composite application by using either of the following options:
2. Click the Faults and Rejected Messages tab.
3. Enter any or all of the following search criteria:
From the SOA Infrastructure Menu... From the SOA Folder in the Navigator...
1. Click Home.
The SOA Infrastructure page is displayed.
2. Click the Deployed Composites tab.
The list of deployed composite applications is displayed.
3. In the Composite section, click a specific SOA composite application.
The SOA Composite home page is displayed.
4. Click the inbound adapter (service) from the Services and References section in the right panel.
The Service Home page is displayed.
1. Under soa-infra, click a specific SOA composite application.
The SOA Composite home page is displayed.
2. Click the inbound adapter (service) from the Services and References section in the right panel.
The Service Home page is displayed.

Deleting Rejected Messages for an Inbound Adapter
27-2 Oracle Fusion Middleware Administrator's Guide for Oracle SOA Suite
■ Error Message Contains
Enter any part of the error message text.
■ Fault ID
Enter the ID of the fault.
■ Fault Time From
Enter the lower limit of the time when the fault could have occurred.
■ Fault Time To
Enter the upper limit of the time when the fault could have occurred.
■ Composite Instance ID
Enter the ID of the composite.
■ Fault Type
Select a type from the list of faults available.
4. Click Search to start the search operation.
The fault or rejected message matching the criteria you specified is displayed.
5. Click Reset to reset the search criteria.
For more information about configuring adapters, see Oracle Fusion Middleware User's Guide for Technology Adapters.
27.2 Deleting Rejected Messages for an Inbound AdapterYou can directly delete rejected messages from the database by specifying a search criteria.
To delete rejected messages for an inbound adapter:
1. Navigate to the SOA composite application by using either of the following options:
2. Click the Faults and Rejected Messages tab.
3. Click Delete Rejected Messages....
From the SOA Infrastructure Menu... From the SOA Folder in the Navigator...
1. Click Home.
The SOA Infrastructure page is displayed.
2. Click the Deployed Composites tab.
The list of deployed composite applications is displayed.
3. In the Composite section, click a specific SOA composite application.
The SOA Composite home page is displayed.
4. Click the inbound adapter (service) from the Services and References section in the right panel.
The Service Home page is displayed.
1. Under soa-infra, click a specific SOA composite application.
The SOA Composite home page is displayed.
2. Click the inbound adapter (service) from the Services and References section in the right panel.
The Service Home page is displayed.

Searching for Faults for an Outbound Adapter
Configuring Oracle JCA Adapters 27-3
The Delete: Rejected Messages dialog is displayed.
4. Specify a selection criterion for deleting rejected messages directly from the database, and then click Delete.
Note that to delete a fault, you must delete the associated composite instance from the Instances page.
For more information about configuring adapters, see Oracle Fusion Middleware User's Guide for Technology Adapters.
27.3 Searching for Faults for an Outbound AdapterUse the Search feature to search for faults for an outbound adapter.
To search for faults for an outbound adapter:
1. Navigate to the SOA composite application by using either of the following options:
2. Click the Faults tab.
3. In the Search section, enter any or all of the following search criteria:
■ Error Message Contains
Enter any part of the error message text.
■ Fault ID
Enter the ID of the fault.
■ Fault Time From
Enter the lower limit of the time when the fault could have occurred.
■ Fault Time To
Enter the upper limit of the time when the fault could have occurred.
■ Composite Instance ID
Enter the ID of the composite.
■ Fault Type
From the SOA Infrastructure Menu... From the SOA Folder in the Navigator...
1. Click Home.
The SOA Infrastructure page is displayed.
2. Click the Deployed Composites tab.
The list of deployed composite applications is displayed.
3. In the Composite section, click a specific SOA composite application.
The SOA Composite home page is displayed.
4. Click the outbound adapter (reference) from the Services and References section in the right panel.
The Reference Home page is displayed.
1. Under soa-infra, click a specific SOA composite application.
The SOA Composite home page is displayed.
2. Click the outbound adapter (reference) from the Services and References section in the right panel.
The Reference Home page is displayed.

Configuring the End Point Properties for an Inbound Adapter
27-4 Oracle Fusion Middleware Administrator's Guide for Oracle SOA Suite
Select the type of the fault from the list of types available.
4. Click Search to start the search operation.
The fault matching the criteria you specified is displayed.
5. Click Reset to reset the search criteria.
For more information about configuring adapters, see Oracle Fusion Middleware User's Guide for Technology Adapters.
27.4 Configuring the End Point Properties for an Inbound AdapterThis section describes how to configure the end point properties for an inbound adapter. It includes the following topics:
■ Section 27.4.1, "Editing a Predefined Property for an Inbound Adapter"
■ Section 27.4.2, "Adding Predefined Properties for an Inbound Adapter"
■ Section 27.4.3, "Creating a New Property for an Inbound Adapter"
■ Section 27.4.4, "Deleting a Property for an Inbound Adapter"
■ Section 27.4.5, "Reverting a Property Value for an Inbound Adapter"
27.4.1 Editing a Predefined Property for an Inbound AdapterThe properties of an adapter are usually defined in Oracle JDeveloper during design time. However, it is possible edit the predefined properties at a later stage.
To edit a predefined property for an inbound adapter:
1. Navigate to the SOA composite application by using either of the following options:
2. Edit a predefined property:
a. Click Properties to see a list of the currently defined binding properties.
b. Select the property you want to edit.
c. Edit the value in the Value text box, and then click Save.
From the SOA Infrastructure Menu... From the SOA Folder in the Navigator...
1. Click Home.
The SOA Infrastructure page is displayed.
2. Click the Deployed Composites tab.
The list of deployed composite applications is displayed.
3. In the Composite section, click a specific SOA composite application.
The SOA composite home page is displayed.
4. Click the inbound adapter (service) from the Services and References section in the right panel.
The Service Home page is displayed.
1. Under soa-infra, click a specific SOA composite application.
The SOA Composite home page is displayed.
2. Click the inbound adapter (service) from the Services and References section in the right panel.
The Service Home page is displayed.

Configuring the End Point Properties for an Inbound Adapter
Configuring Oracle JCA Adapters 27-5
You have edited a predefined property for an inbound adapter.
For more information about configuring adapters, see Oracle Fusion Middleware User's Guide for Technology Adapters.
27.4.2 Adding Predefined Properties for an Inbound AdapterThe properties of an adapter are usually defined in Oracle JDeveloper during design time. However, it is possible to add properties at a later stage.
To add a predefined property for an inbound adapter:
1. Navigate to the SOA composite application by using either of the following options:
2. Add a predefined property:
a. Click the Properties tab to see a list of the currently defined binding properties.
b. Click the Add button.
A new empty row is appended to the existing list of properties.
c. Click the Select Values icon in the Name field of the new row.
The Properties dialog is displayed.
d. Select a property that is valid for the particular adapter from the list of properties, and then click OK.
e. Click Save.
You have added a predefined property for an inbound adapter.
For more information about configuring adapters, see Oracle Fusion Middleware User's Guide for Technology Adapters.
Note: Though the Properties tab list both endpoint and the binding properties, you can only add endpoint properties.
From the SOA Infrastructure Menu... From the SOA Folder in the Navigator...
1. Click Home.
The SOA Infrastructure page is displayed.
2. Click the Deployed Composites tab.
The list of deployed composite applications is displayed.
3. In the Composite section, click a specific SOA composite application.
The SOA composite home page is displayed.
4. Click the inbound adapter (service) from the Services and References section in the right panel.
The Service Home page is displayed.
1. Under soa-infra, click a specific SOA composite application.
The SOA composite home page is displayed.
2. Click the inbound adapter (service) from the Services and References section in the right panel.
The Service Home page is displayed.

Configuring the End Point Properties for an Inbound Adapter
27-6 Oracle Fusion Middleware Administrator's Guide for Oracle SOA Suite
27.4.3 Creating a New Property for an Inbound AdapterThe properties of an adapter are usually defined in Oracle JDeveloper during design time. However, it is possible to add new properties at a later stage.
To create a new property for an inbound adapter:
1. Navigate to the SOA composite application by using either of the following options:
2. Create a new property:
a. Click the Properties tab to see the list of the currently defined binding properties.
b. Click the Add button.
A new empty row is appended to the existing list of properties.
c. Specify the property name and value in the Name and the Value fields of the new row.
d. Click Save.
You have created a new property for an inbound adapter.
For more information about configuring adapters, see Oracle Fusion Middleware User's Guide for Technology Adapters.
27.4.4 Deleting a Property for an Inbound AdapterYou can delete only properties that you added from the predefined list of properties or the ones that you newly created.
To delete a property for an inbound adapter:
1. Navigate to the SOA composite application by using either of the following options:
From the SOA Infrastructure Menu... From the SOA Folder in the Navigator...
1. Click Home.
The SOA Infrastructure page is displayed.
2. Click the Deployed Composites tab.
The list of deployed composite applications is displayed.
3. In the Composite section, click a specific SOA composite application.
The SOA composite home page is displayed.
4. Click the inbound adapter (service) from the Services and References section in the right panel.
The Service Home page is displayed.
1. Under soa-infra, click a specific SOA composite application.
The SOA Composite home page is displayed.
2. Click the inbound adapter (service) from the Services and References section in the right panel.
The Service Home page is displayed.

Configuring the End Point Properties for an Inbound Adapter
Configuring Oracle JCA Adapters 27-7
2. Delete a property:
a. Click the Properties tab to see a list of the currently defined binding properties.
b. Select the property you want to delete, and then click Delete.
A message asking you to confirm your action is displayed.
c. Click OK to confirm.
d. Click Save.
You have deleted a property for an inbound adapter.
For more information about configuring adapters, see Oracle Fusion Middleware User's Guide for Technology Adapters.
27.4.5 Reverting a Property Value for an Inbound AdapterYou can only revert the properties that you have changed. Also note that you can perform the revert operation only on the existing property values and not on those that you added from the predefined list of properties or the ones that you created.
To revert a property value for an inbound adapter:
1. Navigate to the SOA composite application by using either of the following options:
From the SOA Infrastructure Menu... From the SOA Folder in the Navigator...
1. Click Home.
The SOA Infrastructure page is displayed.
2. Click the Deployed Composites tab.
The list of deployed composite applications is displayed.
3. In the Composite section, click a specific SOA composite application.
The SOA Composite home page is displayed.
4. Click the inbound adapter (service) from the Services and References section in the right panel.
The Service Home page is displayed.
1. Under soa-infra, click a specific SOA composite application.
The SOA Composite home page is displayed.
2. Click the inbound adapter (service) from the Services and References section in the right panel.
The Service Home page is displayed.
Configuring the End Point Properties for an Outbound Adapter
27-8 Oracle Fusion Middleware Administrator's Guide for Oracle SOA Suite
2. Revert a property value for an inbound adapter:
a. Click the Properties tab to see a list of the currently defined binding properties.
b. Select the property you want to revert, and then click Revert.
A message asking you to confirm your action is displayed.
c. Click OK to confirm.
d. Click Save.
You have reverted a property value for an inbound adapter.
For more information about configuring adapters, see Oracle Fusion Middleware User's Guide for Technology Adapters.
27.5 Configuring the End Point Properties for an Outbound AdapterThis section describes how to configure the end point properties for an outbound adapter. It includes the following topics:
■ Section 27.5.1, "Editing a Predefined Property for an Outbound Adapter"
■ Section 27.5.2, "Adding a Predefined Property for an Outbound Adapter"
■ Section 27.5.3, "Creating a New Property for an Outbound Adapter"
■ Section 27.5.4, "Deleting a Property for an Outbound Adapter"
■ Section 27.5.5, "Reverting a Property Value for an Outbound Adapter"
27.5.1 Editing a Predefined Property for an Outbound AdapterThe properties of an adapter are usually defined in Oracle JDeveloper during design time. However, it is possible to edit the predefined properties at a later stage.
To edit a predefined property for an outbound adapter:
1. Navigate to the SOA composite application by using either of the following options:
From the SOA Infrastructure Menu... From the SOA Folder in the Navigator...
1. Click Home.
The SOA Infrastructure page is displayed.
2. Click the Deployed Composites tab.
The list of deployed composite applications is displayed.
3. In the Composite section, click a specific SOA composite application.
The SOA Composite home page is displayed.
4. Click the inbound adapter (service) from the Services and References section in the right panel.
The Service Home page is displayed.
1. Under soa-infra, click a specific SOA composite application.
The SOA Composite home page is displayed.
2. Click the inbound adapter (service) from the Services and References section in the right panel.
The Service Home page is displayed.

Configuring the End Point Properties for an Outbound Adapter
Configuring Oracle JCA Adapters 27-9
2. Edit a predefined property:
a. Click the Properties tab to see a list of the currently defined binding properties.
b. Select the property you want to edit.
c. Edit the value in the Value text box, and then click Save.
You have edited a predefined property for an outbound adapter.
For more information about configuring adapters, see Oracle Fusion Middleware User's Guide for Technology Adapters.
27.5.2 Adding a Predefined Property for an Outbound AdapterThe properties of an adapter are usually defined in Oracle JDeveloper during design time. However, it is possible to add predefined properties at a later stage.
From the SOA Infrastructure Menu... From the SOA Folder in the Navigator...
1. Click Home.
The SOA Infrastructure page is displayed.
2. Click the Deployed Composites tab.
The list of deployed composite applications is displayed.
3. In the Composite section, click a specific SOA composite application.
The SOA Composite home page is displayed.
4. Click the outbound adapter (reference) from the Services and References section in the right panel.
The Reference Home page is displayed.
1. Under soa-infra, click a specific SOA composite application.
The SOA Composite home page is displayed.
2. Click the outbound adapter (reference) from the Services and References section in the right panel.
The Reference Home page is displayed.
Note: For Oracle MQ Series Adapter in an asynchronous outbound request/reply scenario, properties are differentiated by an (Enqueue) or (Dequeue) label. For example, QueueName(Enqueue) is used for putting a message and QueueName(Dequeue) is used for dequeuing the reply.
When editing Oracle MQ Series Adapter properties in this scenario, note the following:
■ If you change the ReplyToQueueName(Enqueue) property, you must also change the QueueName(Dequeue) property to the same value.
■ If you change the MessageId(Dequeue) property, you must also change the MessageId(Enqueue) property to the same value.
■ If you change the CorrelationId(Dequeue) property, you must also change the CorrelationId(Enqueue) property to the same value.

Configuring the End Point Properties for an Outbound Adapter
27-10 Oracle Fusion Middleware Administrator's Guide for Oracle SOA Suite
To add a predefined property for an outbound adapter:
1. Navigate to the SOA composite application by using either of the following options:
2. Add a predefined property:
a. Click the Properties tab to see a list of the currently defined binding properties.
b. Click the Add button.
A new empty row is appended to the existing list of properties.
c. Click the Select Value icon in the Name field of the new row.
The Properties dialog is displayed.
d. Select a property that is valid for the particular adapter from the list of properties, and then click OK.
e. Click Save.
You have added a predefined property for an outbound adapter.
For more information about configuring adapters, see Oracle Fusion Middleware User's Guide for Technology Adapters.
27.5.3 Creating a New Property for an Outbound AdapterThe properties of an adapter are usually defined in Oracle JDeveloper during design time. However, it is possible to add new properties at a later stage.
To create a new property for an outbound adapter:
1. Navigate to the SOA composite application by using either of the following options:
From the SOA Infrastructure Menu... From the SOA Folder in the Navigator...
1. Click Home.
The SOA Infrastructure page is displayed.
2. Click the Deployed Composites tab.
The list of deployed composite applications is displayed.
3. In the Composite section, click a specific SOA composite application.
The SOA Composite home page is displayed.
4. Click the outbound adapter (reference) from the Services and References section in the right panel.
The Reference Home page is displayed.
1. Under soa-infra, click a specific SOA composite application.
The SOA Composite home page is displayed.
2. Click the outbound adapter (reference) from the Services and References section in the right panel.
The Reference Home page is displayed.

Configuring the End Point Properties for an Outbound Adapter
Configuring Oracle JCA Adapters 27-11
2. Create a new property:
a. Click the Properties tab to see a list of the currently defined binding properties.
b. Click the Add button.
A new empty row is appended to the existing list of properties.
c. Specify the property name and value in the Name and the Value fields of the new row.
d. Click Save.
You have created a new property for an outbound adapter.
For more information about configuring adapters, see Oracle Fusion Middleware User's Guide for Technology Adapters.
27.5.4 Deleting a Property for an Outbound AdapterYou can delete only properties that you added from the predefined list of properties or the ones that you newly created.
To delete a property for an outbound adapter:
1. Navigate to the SOA composite application by using either of the following options:
From the SOA Infrastructure Menu... From the SOA Folder in the Navigator...
1. Click Home.
The SOA Infrastructure page is displayed.
2. Click the Deployed Composites tab.
The list of deployed composite applications is displayed.
3. In the Composite section, click a specific SOA composite application.
The SOA Composite home page is displayed.
4. Click the outbound adapter (reference) from the Services and References section in the right panel.
The Reference Home page is displayed.
1. Under soa-infra, click a specific SOA composite application.
The SOA Composite home page is displayed.
2. Click the outbound adapter (reference) from the Services and References section in the right panel.
The Reference Home page is displayed.

Configuring the End Point Properties for an Outbound Adapter
27-12 Oracle Fusion Middleware Administrator's Guide for Oracle SOA Suite
2. Delete a property for an outbound adapter:
a. Click the Properties tab to see a list of the currently defined binding properties.
b. Select the property you want to delete, and then click Delete.
A message asking you to confirm your action is displayed.
c. Click OK to confirm.
d. Click Save.
You have deleted a property for an outbound adapter.
For more information about configuring adapters, see Oracle Fusion Middleware User's Guide for Technology Adapters.
27.5.5 Reverting a Property Value for an Outbound AdapterYou can revert changes made, if any, only for the already existing property values and not those that you added from the predefined list of properties or the ones that you newly created.
To revert a property value for an inbound adapter:
1. Navigate to the SOA composite application by using either of the following options:
From the SOA Infrastructure Menu... From the SOA Folder in the Navigator...
1. Click Home.
The SOA Infrastructure page is displayed.
2. Click the Deployed Composites tab.
The list of deployed composite applications is displayed.
3. In the Composite section, click a specific SOA composite application.
The SOA Composite home page is displayed.
4. Click the outbound adapter (reference) from the Services and References section in the right panel.
The Reference Home page is displayed.
1. Under soa-infra, click a specific SOA composite application.
The SOA Composite home page is displayed.
2. Click the outbound adapter (reference) from the Services and References section in the right panel.
The Reference Home page is displayed.

Configuring the End Point Properties for an Outbound Adapter
Configuring Oracle JCA Adapters 27-13
2. Revert a property value for an outbound adapter:
a. Click the Properties tab to see a list of the currently defined binding properties.
b. Select the property you want to revert, and then click Revert.
A message asking you to confirm your action is displayed.
c. Click OK to confirm.
d. Click Save.
You have reverted a property value for an outbound adapter.
For more information about configuring adapters, see Oracle Fusion Middleware User's Guide for Technology Adapters.
From the SOA Infrastructure Menu... From the SOA Folder in the Navigator...
1. Click Home.
The SOA Infrastructure page is displayed.
2. Click the Deployed Composites tab.
The list of deployed composite applications is displayed.
3. In the Composite section, click a specific SOA composite application.
The SOA Composite home page is displayed.
4. Click the outbound adapter (reference) from the Services and References section in the right panel.
The Reference Home page is displayed.
1. Under soa-infra, click a specific SOA composite application.
The SOA Composite home page is displayed.
2. Click the outbound adapter (reference) from the Services and References section in the right panel.
The Reference Home page is displayed.

Configuring the End Point Properties for an Outbound Adapter
27-14 Oracle Fusion Middleware Administrator's Guide for Oracle SOA Suite

28
Monitoring Oracle JCA Adapters 28-1
28Monitoring Oracle JCA Adapters
This chapter describes how to monitor Oracle JCA Adapters.
This chapter includes the following topics:
■ Section 28.1, "Monitoring Instances and Faults for an Inbound Adapter"
■ Section 28.2, "Monitoring Recent Faults and Rejected Messages for an Inbound Adapter"
■ Section 28.3, "Monitoring Faults and Rejected Messages for an Inbound Adapter"
■ Section 28.4, "Monitoring Properties for an Inbound Adapter"
■ Section 28.5, "Monitoring Instances and Faults for an Outbound Adapter"
■ Section 28.6, "Monitoring Recent Faults for an Outbound Adapter"
■ Section 28.7, "Monitoring Faults for an Outbound Adapter"
■ Section 28.8, "Monitoring Properties for an Outbound Adapter"
■ Section 28.9, "Monitoring Adapter Logs"
28.1 Monitoring Instances and Faults for an Inbound AdapterAn invocation to a service from a composite may result in an error. This error is captured as a fault in the service. You can view the details of the instances and faults of the inbound adapter in the Instances and Faults section of the Dashboard tab.
To monitor instances and faults for an inbound adapter:
1. Navigate to the SOA composite application by using either of the following options:

Monitoring Recent Faults and Rejected Messages for an Inbound Adapter
28-2 Oracle Fusion Middleware Administrator's Guide for Oracle SOA Suite
2. Monitor the instances and faults for an inbound adapter:
a. Click Dashboard.
The Dashboard tab is displayed.
b. View the instances and faults listed in the Instances and Faults section.
The details of the fault is displayed in a line chart in the Instances and faults section. This line chart shows the total number of outgoing messages since the start of the server, and the total number of faults since the start of the server.
For more information about monitoring adapters, see Oracle Fusion Middleware User's Guide for Technology Adapters.
28.2 Monitoring Recent Faults and Rejected Messages for an Inbound Adapter
To monitor the recent rejected messages for an inbound adapter:
1. Navigate to the SOA composite application by using either of the following options:
From the SOA Infrastructure Menu... From the SOA Folder in the Navigator...
1. Click Home.
The SOA Infrastructure page is displayed.
2. Click the Deployed Composites tab.
The list of deployed composites is displayed.
3. In the Composite section, click a specific SOA composite application.
The the SOA Composite home page is displayed.
4. Click the inbound adapter (service) from the Services and References section in the right panel.
The Service Home page is displayed.
1. Under soa-infra, click a specific SOA composite application.
The the SOA Composite home page is displayed.
2. Click the inbound adapter (service) from the Services and References section in the right panel.
The Service Home page is displayed.
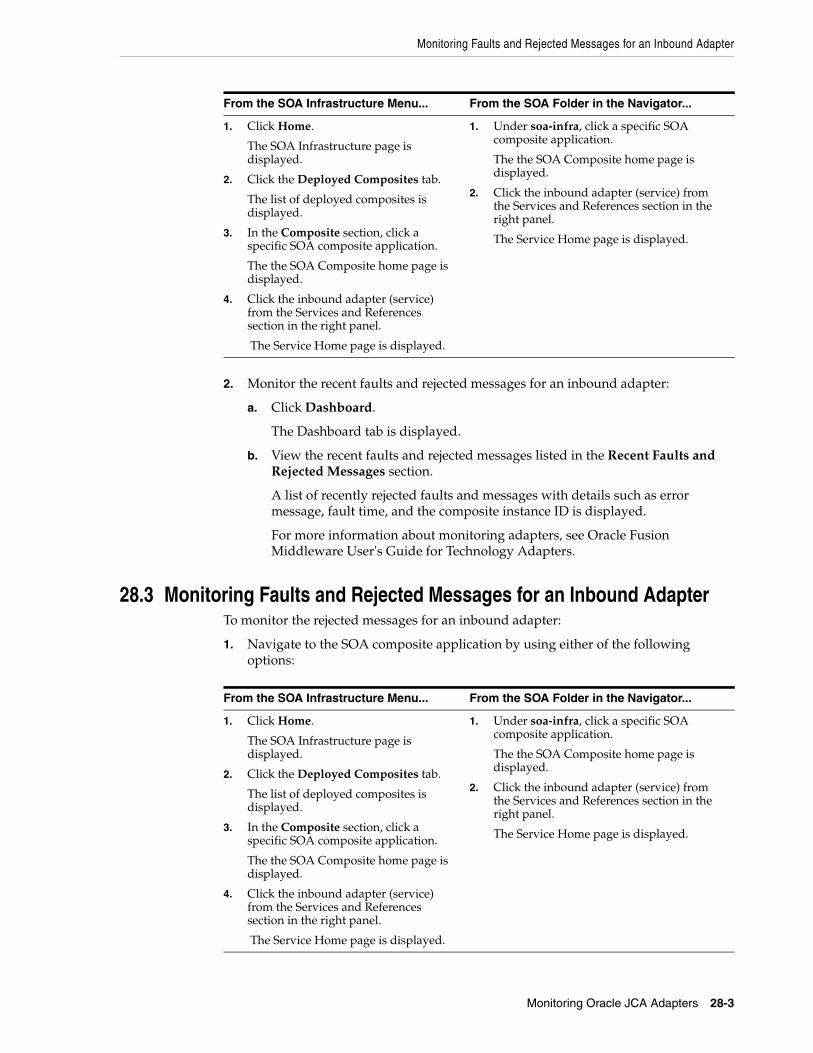
Monitoring Faults and Rejected Messages for an Inbound Adapter
Monitoring Oracle JCA Adapters 28-3
2. Monitor the recent faults and rejected messages for an inbound adapter:
a. Click Dashboard.
The Dashboard tab is displayed.
b. View the recent faults and rejected messages listed in the Recent Faults and Rejected Messages section.
A list of recently rejected faults and messages with details such as error message, fault time, and the composite instance ID is displayed.
For more information about monitoring adapters, see Oracle Fusion Middleware User's Guide for Technology Adapters.
28.3 Monitoring Faults and Rejected Messages for an Inbound AdapterTo monitor the rejected messages for an inbound adapter:
1. Navigate to the SOA composite application by using either of the following options:
From the SOA Infrastructure Menu... From the SOA Folder in the Navigator...
1. Click Home.
The SOA Infrastructure page is displayed.
2. Click the Deployed Composites tab.
The list of deployed composites is displayed.
3. In the Composite section, click a specific SOA composite application.
The the SOA Composite home page is displayed.
4. Click the inbound adapter (service) from the Services and References section in the right panel.
The Service Home page is displayed.
1. Under soa-infra, click a specific SOA composite application.
The the SOA Composite home page is displayed.
2. Click the inbound adapter (service) from the Services and References section in the right panel.
The Service Home page is displayed.

Monitoring Properties for an Inbound Adapter
28-4 Oracle Fusion Middleware Administrator's Guide for Oracle SOA Suite
2. Monitor the faults and rejected messages for an inbound adapter:
a. Click Faults and Rejected Messages.
The Faults and Rejected Messages tab is displayed.
A list of faults and rejected messages with details such as error message, fault time, and composite instance ID is displayed.
For more information about monitoring adapters, see Oracle Fusion Middleware User's Guide for Technology Adapters.
28.4 Monitoring Properties for an Inbound AdapterTo monitor the properties for an inbound adapter:
1. Navigate to the SOA composite application by using either of the following options:
2. Monitor the properties for an inbound adapter:
a. Click Properties.
The Properties tab is displayed.
A list of properties with details such as name and value is displayed.
For more information about monitoring adapters, see Oracle Fusion Middleware User's Guide for Technology Adapters.
From the SOA Infrastructure Menu... From the SOA Folder in the Navigator...
1. Click Home.
The SOA Infrastructure page is displayed.
2. Click the Deployed Composites tab.
The list of deployed composites is displayed.
3. In the Composite section, click a specific SOA composite application.
The the SOA Composite home page is displayed.
4. Click the inbound adapter (service) from the Services and References section in the right panel.
The Service Home page is displayed.
1. Under soa-infra, click a specific SOA composite application.
The the SOA Composite home page is displayed.
2. Click the inbound adapter (service) from the Services and References section in the right panel.
The Service Home page is displayed.
Note: In any adapter that has an inbound asynchronous request-reply scenario (the Get Message operation preceding the Send Reply operation) only details about the activation specification are displayed, and details about the interaction specification are not displayed.

Monitoring Recent Faults for an Outbound Adapter
Monitoring Oracle JCA Adapters 28-5
28.5 Monitoring Instances and Faults for an Outbound AdapterAn invocation to a reference from a composite may result in an error. This error is captured as a fault in the reference. The details of the instances and faults of the outbound adapter can be viewed in the Instances and Faults section of the Dashboard tab.
To monitor instances and faults for an outbound adapter:
1. Navigate to the SOA composite application by using either of the following options:
2. Monitor the instances and faults for an outbound adapter:
a. Click Dashboard.
The Dashboard tab is displayed.
b. View the instances and faults listed in the Instances and Faults section.
The details of the fault is displayed in a line chart in the Instances and Faults tab. This line chart shows the total number of outgoing messages since the start of the server, and the total number of faults since the start of the server.
For more information about monitoring adapters, see Oracle Fusion Middleware User's Guide for Technology Adapters.
28.6 Monitoring Recent Faults for an Outbound AdapterTo monitor recent faults for an outbound adapter:
1. Navigate to the SOA composite application by using either of the following options:
From the SOA Infrastructure Menu... From the SOA Folder in the Navigator...
1. Click Home.
The SOA Infrastructure page is displayed.
2. Click the Deployed Composites tab.
The list of deployed composites is displayed.
3. In the Composite section, click a specific SOA composite application.
The the SOA Composite home page is displayed.
4. Click the outbound adapter (reference) from the Services and References section in the right panel.
The Service Home page is displayed.
1. Under soa-infra, click a specific SOA composite application.
The the SOA Composite home page is displayed.
2. Click the outbound adapter (reference) from the Services and References section in the right panel.
The Service Home page is displayed.

Monitoring Faults for an Outbound Adapter
28-6 Oracle Fusion Middleware Administrator's Guide for Oracle SOA Suite
2. Monitor the recent faults for an outbound adapter:
a. Click Dashboard.
The Dashboard tab is displayed.
b. View the recent faults listed in the Recent Faults section.
A list of recent faults with details such as name, time, and type is displayed.
For more information about monitoring adapters, see Oracle Fusion Middleware User's Guide for Technology Adapters.
28.7 Monitoring Faults for an Outbound AdapterTo monitor faults for an outbound adapter:
1. Navigate to the SOA composite application by using either of the following options:
2. Monitor the faults for an outbound adapter:
From the SOA Infrastructure Menu... From the SOA Folder in the Navigator...
1. Click Home.
The SOA Infrastructure page is displayed.
2. Click the Deployed Composites tab.
The list of deployed composites is displayed.
3. In the Composite section, click a specific SOA composite application.
The the SOA Composite home page is displayed.
4. Click the outbound adapter (reference) from the Services and References section in the right panel.
The Service Home page is displayed.
1. Under soa-infra, click a specific SOA composite application.
The the SOA Composite home page is displayed.
2. Click the outbound adapter (reference) from the Services and References section in the right panel.
The Service Home page is displayed.

Monitoring Properties for an Outbound Adapter
Monitoring Oracle JCA Adapters 28-7
a. Click the Faults tab.
The Faults tab is displayed.
b. Click View.
A list of faults with details such as name, time, and type is displayed.
For more information about monitoring adapters, see Oracle Fusion Middleware User's Guide for Technology Adapters.
28.8 Monitoring Properties for an Outbound AdapterTo monitor properties for an outbound adapter:
1. Navigate to the SOA composite application by using either of the following options:
2. Monitor the properties for an outbound adapter:
a. Click the Properties tab.
The Properties portlet is displayed.
b. Click View.
A list of properties with details such as name, and value is displayed.
For more information about monitoring adapters, see Oracle Fusion Middleware User's Guide for Technology Adapters.
From the SOA Infrastructure Menu... From the SOA Folder in the Navigator...
1. Click Home.
The SOA Infrastructure page is displayed.
2. Click the Deployed Composites tab.
The list of deployed composites is displayed.
3. In the Composite section, click a specific SOA composite application.
The the SOA Composite home page is displayed.
4. Click the outbound adapter (reference) from the Services and References section in the right panel.
The Service Home page is displayed.
1. Under soa-infra, click a specific SOA composite application.
The the SOA Composite home page is displayed.
2. Click the outbound adapter (reference) from the Services and References section in the right panel.
The Service Home page is displayed.
Note: In the case of an adapter which has an outbound asynchronous request-reply scenario (the Send Message operation preceding the Get Response operation), only details about the interaction specification are displayed, and details about the activation specification are not displayed.

Monitoring Adapter Logs
28-8 Oracle Fusion Middleware Administrator's Guide for Oracle SOA Suite
28.9 Monitoring Adapter LogsOracle Fusion Middleware components generate log files containing messages that record all types of events, including startup and shutdown information, errors, warning messages, access information on HTTP requests, and additional information. There is only one log for all Oracle JCA Adapters, and the log is called oracle.soa.adapter.
To monitor the File adapter logs:
1. Navigate to Composite Home, J2EE Application (menu), Monitoring, Logs.
2. Find the oracle.soa.adapter logger for adapters and increase verbosity.
3. Find resulting log files.
4. Make an adapter to fail. For example, delete a directory that the file adapter is supposed to write to, or delete a table that the Database adapter is reading from.
5. Ensure that the resulting log files give a good indication of the cause of failure.
For information about configuring logs, see Section 3.4, "Configuring Log Files."

29
Managing Oracle JCA Adapters 29-1
29Managing Oracle JCA Adapters
This chapter describes how to manage Oracle Adapters.
This chapter includes the following topics:
■ Section 29.1, "Managing Policies for an Inbound Adapter"
■ Section 29.2, "Managing Policies for an Outbound Adapter"
29.1 Managing Policies for an Inbound AdapterTo manage policies for an inbound adapter:
1. Navigate to the SOA composite application by using either of the following options:
2. Click the Policies tab.
If the selected service has Web service bindings, then you can start the Policy Attachment wizard and attach policies. However, if the selected service does not have any Web service bindings, then a message stating that there are no subjects available for attachment is displayed.
For more information about managing adapters, see Oracle Fusion Middleware User's Guide for Technology Adapters.
From the SOA Infrastructure Menu... From the SOA Folder in the Navigator...
1. Click Home.
The SOA Infrastructure page is displayed.
2. Click the Deployed Composites tab.
The list of deployed composite applications is displayed.
3. In the Composite section, click a specific SOA composite application.
The SOA Composite home page is displayed.
4. Click the inbound adapter (service) from the Services and References section in the right panel.
The Service Home page is displayed.
1. Under soa-infra, click a specific SOA composite application.
The SOA Composite home page is displayed.
2. Click the inbound adapter (service) from the Services and References section in the right panel.
The Service Home page is displayed.

Managing Policies for an Outbound Adapter
29-2 Oracle Fusion Middleware Administrator's Guide for Oracle SOA Suite
29.2 Managing Policies for an Outbound AdapterTo manage policies for an outbound adapter:
1. Navigate to the SOA composite application by using either of the following options:
2. Click the Policies tab.
If the selected reference has Web service bindings, then you can start the Policy Attachment wizard and attach policies. However, if the selected reference does not have any Web service bindings, then a message stating that there are no subjects available for attachment is displayed.
For more information about managing adapters, see Oracle Fusion Middleware User's Guide for Technology Adapters.
From the SOA Infrastructure Menu... From the SOA Folder in the Navigator...
1. Click Home.
The SOA Infrastructure page is displayed.
2. Click the Deployed Composites tab.
The list of deployed composite applications is displayed.
3. In the Composite section, click a specific SOA composite application.
The SOA Composite home page is displayed.
4. Click the outbound adapter (reference) from the Services and References section in the right panel.
The Service Home page is displayed.
1. Under soa-infra, click a specific SOA composite application.
The SOA Composite home page is displayed.
2. Click the outbound adapter (reference) from the Services and References section in the right panel.
The Service Home page is displayed.

Part XIIPart XII Administering Oracle B2B
This part describes how to administer Oracle B2B.
This part includes the following chapters:
■ Chapter 30, "Configuring Oracle B2B"
■ Chapter 31, "Monitoring Oracle B2B"


30
Configuring Oracle B2B 30-1
30 Configuring Oracle B2B
This chapter describes how to configure Oracle B2B using Oracle Enterprise Manager Fusion Middleware Control.
This chapter includes the following topic:
■ Section 30.1, "Configuring B2B Server Properties"
■ Section 30.2, "Configuring B2B Operations"
■ Section 30.3, "Configuring B2B Attributes"
30.1 Configuring B2B Server PropertiesYou can configure the Enable Metrics property on the B2B Server Properties page, shown in Figure 30–1.
Figure 30–1 The Enable Metrics Property
The default is to enable EM metrics, which includes data on the top 5 recently active document types, top 5 recently active trading partners, and inbound and outbound endpoints.
Note: You do not need to restart the server after changing this property.

Configuring B2B Operations
30-2 Oracle Fusion Middleware Administrator's Guide for Oracle SOA Suite
To configure B2B server properties using Oracle Enterprise Manager Fusion Middleware Control:
1. Expand the SOA node.
2. Select the SOA infrastructure, for example, soa-infra(11.1.1) (soa_server1).
3. From the SOA Infrastructure menu, select SOA Administration and then B2B Server Properties.
4. Select Enable Metrics to view data on the B2B Bindings and SOA Composite pages.
For information on using Oracle B2B, which enables the secure and reliable exchange of business documents between an enterprise and its trading partners, see Oracle Fusion Middleware User's Guide for Oracle B2B.
30.2 Configuring B2B OperationsYou can configure the properties of B2B operations by setting values using the System MBean Browser, as shown in Figure 30–2.

Configuring B2B Operations
Configuring Oracle B2B 30-3
Figure 30–2 B2BConfig: b2b MBean Browser
To specify B2B operation properties:
1. Using the Oracle Enterprise Manager Fusion Middleware Control Console, expand the SOA node and select the soa-infra node.
2. From the SOA Infrastructure menu, choose Administration and then System MBean Browser.
The System MBean Browser page is displayed.
3. Under Application Defined MBeans, expand the oracle.as.soainfra.config node.
4. Expand the Server:soa_server1 node.
5. Expand the B2BConfig node.
6. Click the b2b MBean.
The properties of the MBean are displayed in the right pane.
7. Click the Operations tab.
8. Click an operation in the list.
Note: Restarting the SOA Server is required after updating the following MBean properties:
■ b2b.inboundThreadCount
■ b2b.outboundThreadCount
Note (a shortcut): To access the Application Defined MBeans: B2BConfig:b2b page, you can also click the More B2B Configuration Properties link on the B2B Server Properties page, shown in Figure 30–1.

Configuring B2B Operations
30-4 Oracle Fusion Middleware Administrator's Guide for Oracle SOA Suite
9. Provide the needed information—key, value, and an optional comment—and click Invoke.
See Appendix B, "Setting B2B Configuration Properties in Fusion Middleware Control" in Oracle Fusion Middleware User's Guide for Oracle B2B for a list of property names and possible values, including properties for turning off validation during deployment, setting the MDS cache size, setting thread count and thread sleep time, specifying how functional acknowledgments are handled, setting payload obfuscation, and more.
30.2.1 Restricting Access to Document Types: The b2b.r1ps1 PropertyTo enable restricting access to document types, the property b2b.r1ps1 is set to true by default. To change the value of b2b.r1ps1:
1. Do Steps 1 through 7 in Section 30.2, "Configuring B2B Operations."
2. Click setProperty.
3. For the key parameter, enter b2b.r1ps1, and for the value parameter, enter false. (The default is true.)

Configuring B2B Attributes
Configuring Oracle B2B 30-5
4. Click Invoke.
30.3 Configuring B2B AttributesYou can configure B2B attributes by setting values using the System MBean Browser, as shown in Figure 30–3.

Configuring B2B Attributes
30-6 Oracle Fusion Middleware Administrator's Guide for Oracle SOA Suite
Figure 30–3 Configuring B2B Attributes
To specify B2B attribute properties:
1. Do Steps 1 through 6 in Section 30.2, "Configuring B2B Operations."
2. Click the Attributes tab.
3. Click Properties.
4. Expand Element_0, Element_1, and so on to find the property you want to change.
5. Note the property name and value and click Return.
For example, under Element_3, you see the b2b.payloadObfuscation property with the default value false.
6. Click the Operations tab.
7. Click setProperty.
8. Enter values for the key, value, and optional comment.

Configuring B2B Attributes
Configuring Oracle B2B 30-7
For example, to enable payload obfuscation, set b2b.payloadObfuscation to true.
9. Click Invoke.
10. Click Return.

Configuring B2B Attributes
30-8 Oracle Fusion Middleware Administrator's Guide for Oracle SOA Suite

31
Monitoring Oracle B2B 31-1
31 Monitoring Oracle B2B
This chapter describes how to monitor Oracle B2B using Oracle Enterprise Manager Fusion Middleware Control.
This chapter includes the following topics:
■ Section 31.1, "Monitoring the B2B Infrastructure"
■ Section 31.2, "Accessing Oracle B2B from the B2B Infrastructure Page"
■ Section 31.3, "Viewing the Message Flow of a B2B Binding Component"
■ Section 31.4, "Viewing Services and References"
31.1 Monitoring the B2B InfrastructureTo monitor the B2B infrastructure, shown in Figure 31–1, EM metrics must be enabled (the default) on the B2B Server Properties page.

Monitoring the B2B Infrastructure
31-2 Oracle Fusion Middleware Administrator's Guide for Oracle SOA Suite
Figure 31–1 B2B Infrastructure (SOA Binding)
Use the B2B Server Properties link under Related Links to change the setting. See Section 30.1, "Configuring B2B Server Properties," for more information on enabling EM metrics.
Table 31–1 describes the information displayed on the B2B Infrastructure (SOA Binding) page.
Table 31–1 B2B Infrastructure (SOA Binding)
Area/Field Description
Top 5 Recently Active Document Types This section shows the active document types with the maximum number of messages exchanged (inbound and outbound combined) during the current session of the server.
The document types listed in this section are from Oracle DMS metrics, triggered by run-time sensors. This data is not persisted. Therefore, if Oracle B2B is restarted, then new data based on Oracle B2B activity appears here.
Number of Messages Processed Shows the number of document messages exchanged between the host and trading partners. Outbound indicates messages sent from the host to the trading partner and Inbound indicates messages sent from the trading partner to the host.
Average Message Processing Time (sec) Shows the average document processing time, in seconds, for both outbound and inbound messages.
Average Message Size (kb) Shows the average document size, in kilobytes, for both outbound and inbound messages.
Errors Shows the document error count.

Monitoring the B2B Infrastructure
Monitoring Oracle B2B 31-3
To monitor the B2B infrastructure using Oracle Enterprise Manager Fusion Middleware Control:
1. Expand the SOA node.
2. Select the SOA infrastructure, for example, soa-infra (soa_server1).
Top 5 Recently Active Trading Partners This section shows the active trading partners with the maximum number of messages exchanged (from and to combined) during the current session of the server.
The trading partners listed here are from Oracle DMS metrics, triggered by run-time sensors. This data is not persisted. Therefore, if Oracle B2B is restarted, then new data based on Oracle B2B activity appears here.
Number of Messages Processed Shows the number of messages sent and received between the host and trading partners. From indicates messages sent from this partner to its trading partner. To indicates messages received by this partner from the trading partner.
Average Message Processing Time (sec) Shows the average document processing time, in seconds, for exchanged messages.
Average Message Size (kb) Shows the average document size, in kilobytes, for exchanged messages.
Errors Shows the document error count.
Inbound Endpoints This section shows the status of the listening endpoints at the time the connection was attempted (not for a later point in time). For example, in an EDI transaction using Generic File transport, when Oracle B2B reads from a directory, that directory is the inbound endpoint.
Protocol Indicates the type of transport protocol used in the exchange, for example, File, AQ, and FTP, among others.
Endpoint Indicates the location from which messages are received. The endpoint can be a URL, folders, or path, among others.
Status Indicates the status (up or down) of the endpoint (protocol) the last time a connection was attempted.
Outbound Endpoints This section show the status of the delivery endpoints at the time the delivery was attempted (not for a later point in time). For example, in an EDI transaction using Generic File transport, when Oracle B2B writes to a directory, that directory is the outbound endpoint.
Protocol Indicates the type of transport protocol used in the exchange, for example, File, AQ, and FTP, among others.
Endpoint Indicates the location to which messages are sent. The endpoint can be a URL, folders, or path, among others.
Status Indicates the status (up or down) of the endpoint (protocol) the last time a delivery was attempted.
Table 31–1 (Cont.) B2B Infrastructure (SOA Binding)
Area/Field Description

Accessing Oracle B2B from the B2B Infrastructure Page
31-4 Oracle Fusion Middleware Administrator's Guide for Oracle SOA Suite
3. From the SOA Infrastructure menu, select Bindings and then B2B.
See Table 31–1 for a description of the information displayed.
Information displayed in Oracle Enterprise Manager is based on DMS metrics, including inbound and outbound endpoints. Therefore, changes to Oracle B2B run-time data are not necessarily or immediately reflected in the Oracle Enterprise Manager console.
For example, if you purge run-time data or make B2B configuration changes in the Oracle B2B interface, the changes do not affect DMS metrics. To view current run-time data, use the Oracle B2B interface. Enterprise Manager Console data shows B2B message traffic from the time that the B2B (SOA) server starts.
31.2 Accessing Oracle B2B from the B2B Infrastructure PageUse the B2B Console link under Related Links, as shown in Figure 31–2, to log in to Oracle B2B.
Figure 31–2 Accessing Oracle B2B from Oracle Enterprise Manager Fusion Middleware Control
See Oracle Fusion Middleware User's Guide for Oracle B2B for information on using the Oracle B2B interface.
31.3 Viewing the Message Flow of a B2B Binding ComponentTo view the message flow of a B2B binding component in a SOA composite application instance:
1. Select a SOA composite application with a B2B binding component.

Viewing the Message Flow of a B2B Binding Component
Monitoring Oracle B2B 31-5
A list of the recent instances is displayed in the Dashboard tab.
2. To see all instances of this composite application, click the Instances tab.

Viewing Services and References
31-6 Oracle Fusion Middleware Administrator's Guide for Oracle SOA Suite
3. Click a specific instance in the Instance ID list to see faults and the flow trace.
The Trace displays the following details:
■ The Faults section shows the faults occurring and sensor information collected in the services, service components, and references that comprise the SOA composite application.
■ The Trace section shows the sequence of the message flow through the services, service components, and references that comprise the SOA composite application.
31.4 Viewing Services and ReferencesThe Dashboard tab for a composite application, shown in Figure 31–3, lists the services and references used in the composite.
Note: You can see details of a specific message by searching on the instance ID on the Reports tab of Oracle B2B.

Viewing Services and References
Monitoring Oracle B2B 31-7
Figure 31–3 Services and References
When B2B is used as a service (inbound), it receives messages from trading partners and delivers them to SOA composite applications. When B2B is used as a reference (outbound), it sends messages from the SOA composite application to partners.
Details of the B2B reference shown in the figure, B2B_Send_ebMS_PO, are displayed on the Reference Home page, shown in Figure 31–4.

Viewing Services and References
31-8 Oracle Fusion Middleware Administrator's Guide for Oracle SOA Suite
Figure 31–4 The B2B Reference, B2B_Send_ebMS_PO
The Instances and Faults area shows the number of outgoing messages and the number of faults since the server was started. See Table 31–1 for a description of the Top 5 Recently Active Trading Partners area. The Recent Faults area lists the faults, including details such as the error message, time of the fault, and the associated composite instance ID. Faults can be on the incoming messages processed by a service binding component or on the outgoing messages processed by a reference binding component. See Chapter 34, "Monitoring Service and Reference Binding Components," for more information.

Part XIIIAdministering Business Events
This part describes how to administer business events.
This part includes the following chapter:
■ Chapter 32, "Managing Business Events"


32
Managing Business Events 32-1
32 Managing Business Events
This chapter describes how to manage business events. Business events consist of message data sent as the result of an occurrence in a business environment. When a business event is published, other service components or database agents can subscribe to it.
This chapter includes the following topics:
■ Section 32.1, "Overview of Event Delivery Network"
■ Section 32.2, "Subscribing to Business Events"
■ Section 32.3, "Managing Business Event Subscribers"
■ Section 32.4, "Recovering from Business Event Faults"
For more information about business events, see Oracle Fusion Middleware Developer's Guide for Oracle SOA Suite.
32.1 Overview of Event Delivery NetworkThe subsystem of SOA that accepts published business events and delivers them to the subscribers is called Event Delivery Network (EDN). Starting from this release of Oracle Application Server, EDN has two different implementations, namely, EDN-DB and EDN-JMS. EDN-DB uses an Oracle Database as a back-end store and depends on Oracle-specific features. EDN-JMS uses a vanilla JMS Queue as a back-end store. The correct implementation is configured by the SOA installer during the installation time. You can also make postinstallation changes. From an application development point of view, the two implementations are identical and the behavior is the same.
32.2 Subscribing to Business EventsYou can subscribe to business events in Oracle Enterprise Manager Fusion Middleware Control Console. Business events consist of message data sent as the result of an occurrence in a business environment. You create business events in Oracle JDeveloper and include them in SOA composite applications that you deploy to Oracle Enterprise Manager Fusion Middleware Control Console. Service components and database agents can subscribe to business events. Only database agents can be subscribed to from Oracle Enterprise Manager Fusion Middleware Control Console. Service components are only subscribed to from Oracle JDeveloper. When a business event is published, the entity subscribed to that event receives it.
To subscribe to business events:
1. Access this page through one of the following options:

Subscribing to Business Events
32-2 Oracle Fusion Middleware Administrator's Guide for Oracle SOA Suite
The Events page displays the following details:
■ A utility for searching for a specific business event by specifying a full or partial name and clicking the Search icon. Click the Help icon for details.
■ Business events, including the namespace used, event name, number of subscriptions to each event, and number of failed event deliveries. Business events are contained within their namespace.
2. Select a specific event in the Namespaces and Events section.
3. Click Show Event Definition.
The event definition language (EDL) file for the selected event appears. The business event is defined using EDL. EDL is a schema used to build business event definitions.
In this example, two business events named OrderReceivedEvent and ProductSoldAlert appear in the event definition. The namespace (orders) and associated schema file (ProductOrder.xsd) are referenced.
From the SOA Infrastructure Menu... From the SOA Folder in the Navigator...
Select Business Events. Right-click soa-infra and select Select Business Events.

Subscribing to Business Events
Managing Business Events 32-3
4. Click OK to close the dialog.
5. Click Subscribe to subscribe a database agent to the event selected in the Namespaces and Events table.
The Create Database Subscription to an Event dialog appears. You create an agent to listen for and subscribe to appropriate events when they are published.
6. Enter the following values. An asterisk indicates a required field.
Note: Step 5, step 6, and step 7 are not applicable to business events implementing EDN-JMS.
Field Description
Event Namespace Displays the event namespace.
Event Name Displays the event name.
Database Agent Specify a database agent name or click Create Agent to create an agent. The agent listens for and subscribes to appropriate events when they are published.

Managing Business Event Subscribers
32-4 Oracle Fusion Middleware Administrator's Guide for Oracle SOA Suite
7. Click Subscribe.
8. Click Test to test a selected event. This action enables you to publish a test event that subscribers can act upon.
The Test Event dialog appears.
9. Specify the XML payload to use in the test.
10. Click Publish.
For more information, see the following documentation:
■ Section 1.2.8, "Understanding the Contents of SOA Composite Applications"
■ Oracle Fusion Middleware Developer's Guide for Oracle SOA Suite for details about business events
32.3 Managing Business Event SubscribersYou can also create, edit, and delete existing database subscriptions. When a business event is published, service components and database agents can subscribe to it. Use this page to view all subscriptions to business events. This page also enables you to manage event subscriptions by database agents. Service component subscriptions are created in Oracle JDeveloper during design time and cannot be modified in Oracle Enterprise Manager Fusion Middleware Control Console.
Consistency Level Select one of the following options:
■ Guaranteed: Delivers events to the subscriber asynchronously without a global transaction. The subscriber can choose to create its own local transaction for processing, but it is committed independently of the rest of the event processing. By default, guaranteed delivery attempts to deliver the event to the subscriber for three times. If it cannot deliver the event in these three attempts, then the delivery fails. Also, there is a possibility that a system failure can cause an event to be delivered multiple times because there is no global transaction. If the subscriber throws an exception (or fails in any way), the exception is logged, but the event is not resent.
■ Immediate: Delivers events to the subscriber on the same transaction and same thread as the publisher. The publish call does not return until all immediate subscribers have completed processing. If any subscribers throw an exception, no additional subscribers are invoked and an exception is thrown to the publisher.
XPath Filter If you want to filter the event, specify an XPath expression. When the subscription is delivered and the expression logic is satisfied, the event is accepted for delivery. If the logic is not satisfied, the event is not delivered.
Note: Enforcement of policies for event subscriptions is not supported in this release. You can attach or detach a policy to or from a service component that subscribes to a business event (such as Oracle Mediator) without being warned. This action does not result in any errors; policy enforcement simply does not occur.
Field Description
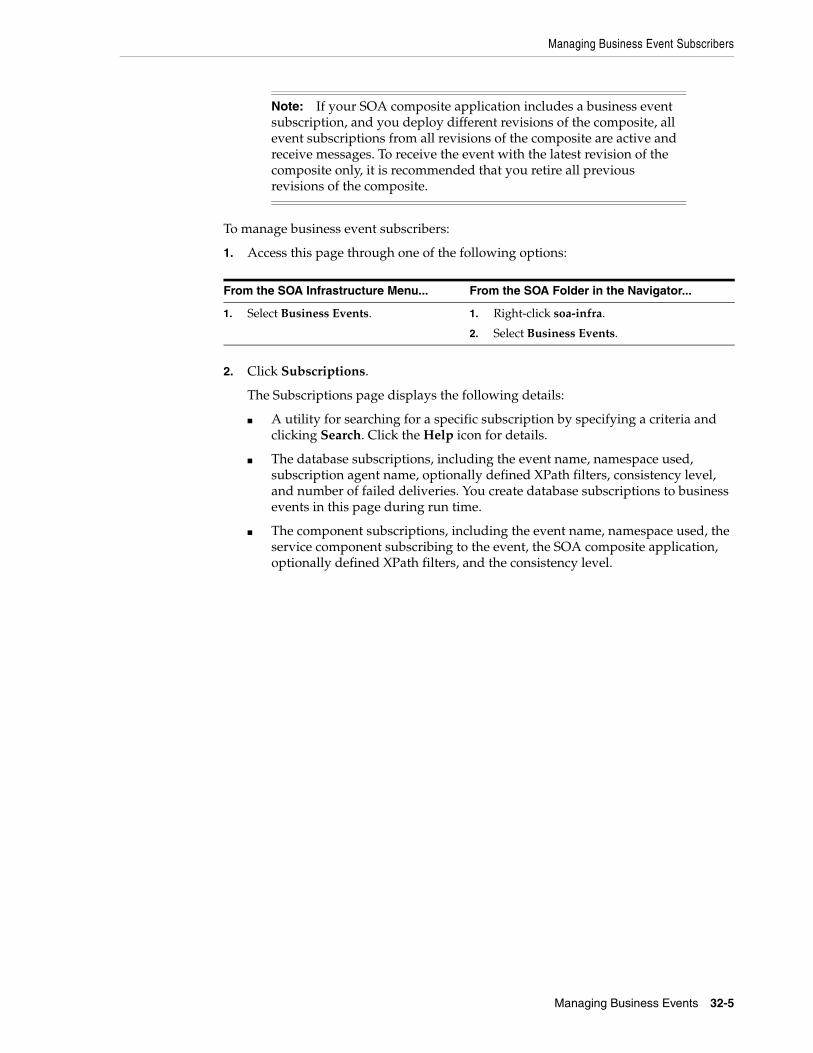
Managing Business Event Subscribers
Managing Business Events 32-5
To manage business event subscribers:
1. Access this page through one of the following options:
2. Click Subscriptions.
The Subscriptions page displays the following details:
■ A utility for searching for a specific subscription by specifying a criteria and clicking Search. Click the Help icon for details.
■ The database subscriptions, including the event name, namespace used, subscription agent name, optionally defined XPath filters, consistency level, and number of failed deliveries. You create database subscriptions to business events in this page during run time.
■ The component subscriptions, including the event name, namespace used, the service component subscribing to the event, the SOA composite application, optionally defined XPath filters, and the consistency level.
Note: If your SOA composite application includes a business event subscription, and you deploy different revisions of the composite, all event subscriptions from all revisions of the composite are active and receive messages. To receive the event with the latest revision of the composite only, it is recommended that you retire all previous revisions of the composite.
From the SOA Infrastructure Menu... From the SOA Folder in the Navigator...
1. Select Business Events. 1. Right-click soa-infra.
2. Select Business Events.

Managing Business Event Subscribers
32-6 Oracle Fusion Middleware Administrator's Guide for Oracle SOA Suite
3. Click the appropriate icon below the Database Subscriptions title to create, edit, or delete a database subscription.
Note: Step 3 and step 4 are not applicable to business events implementing EDN - JMS.

Recovering from Business Event Faults
Managing Business Events 32-7
4. Click Manage Database Agents to edit the PL/SQL procedure or delete agents not currently subscribing to events.
5. In the Subscription Component column, click a service component to access its home page.
6. In the Composite column, click a SOA composite application to access its home page.
For more information about business events, refer to Oracle Fusion Middleware Developer's Guide for Oracle SOA Suite.
32.4 Recovering from Business Event FaultsYou can recover from business event faults that are identified as recoverable.
To recover from business event faults:
1. Access this page through one of the following options:
2. Click Faults.
The Faults page displays the following details:
■ A utility for searching for a specific business event fault by specifying a criteria and clicking Search.
■ Faults occurring in a business event, including the error message, whether you can recover from the fault, the time at which the fault occurred, the event namespace, event name, the subscriber, and the subscription type (database or component). The Recoverable? column identifies faults for which recovery actions can be performed.
From the SOA Infrastructure Menu... From the SOA Folder in the Navigator...
1. Select Business Events. 1. Right-click soa-infra.
2. Select Business Events.

Recovering from Business Event Faults
32-8 Oracle Fusion Middleware Administrator's Guide for Oracle SOA Suite
3. From the View list, select Columns > Fault ID to display the fault IDs for each error message.
4. Click a specific fault that has been identified as recoverable and select one of the following options:
5. In the Logs column, click a specific log to access the Log Messages page with filtered messages specific to that instance.
For more information about business events, see Oracle Fusion Middleware Developer's Guide for Oracle SOA Suite.
Action Description
Retry Retries the instance in which the fault occurred.
Abort Aborts the entire instance in which the fault occurred.

Part XIVAdministering Binding Components
This part describes how to administer binding components.
This part includes the following chapters:
■ Chapter 33, "Configuring Service and Reference Binding Components"
■ Chapter 34, "Monitoring Service and Reference Binding Components"
■ Chapter 35, "Managing Service and Reference Binding Components"


33
Configuring Service and Reference Binding Components 33-1
33Configuring Service and Reference BindingComponents
This chapter describes how to configure properties for Web service and JCA adapter service and reference binding components that are included in SOA composite applications. Binding components are network protocols and services that connect the SOA platform with the outside world.
This chapter includes the following topic:
■ Section 33.1, "Configuring Service and Reference Binding Component Properties"
For more information about binding components, see the following documentation:
■ Section 1.2.5, "Understanding Binding Components"
■ Oracle Fusion Middleware Developer's Guide for Oracle SOA Suite
33.1 Configuring Service and Reference Binding Component PropertiesYou can configure message header properties for the service and reference binding components included in a deployed SOA composite application.
To configure service and reference binding component properties:
1. Access this page through one of the following options:
The following binding component properties appear for a Web service.
Note: You cannot configure message header properties for direct binding components that invoke a SOA composite application through a remote RMI call. For this reason, the Properties tab does not display for direct binding components.
From the SOA Infrastructure Menu...
From the SOA Folder in the Navigator...
From the SOA Composite Menu...
1. Select Services and References.
2. Select a specific service or reference.
3. Click the Properties tab.
1. Right-click soa-infra.
2. Select Services and References.
3. Select a specific service or reference.
4. Click the Properties tab.
1. Select Services/Reference Properties.
2. Select a specific service or reference.
3. Click the Properties tab.
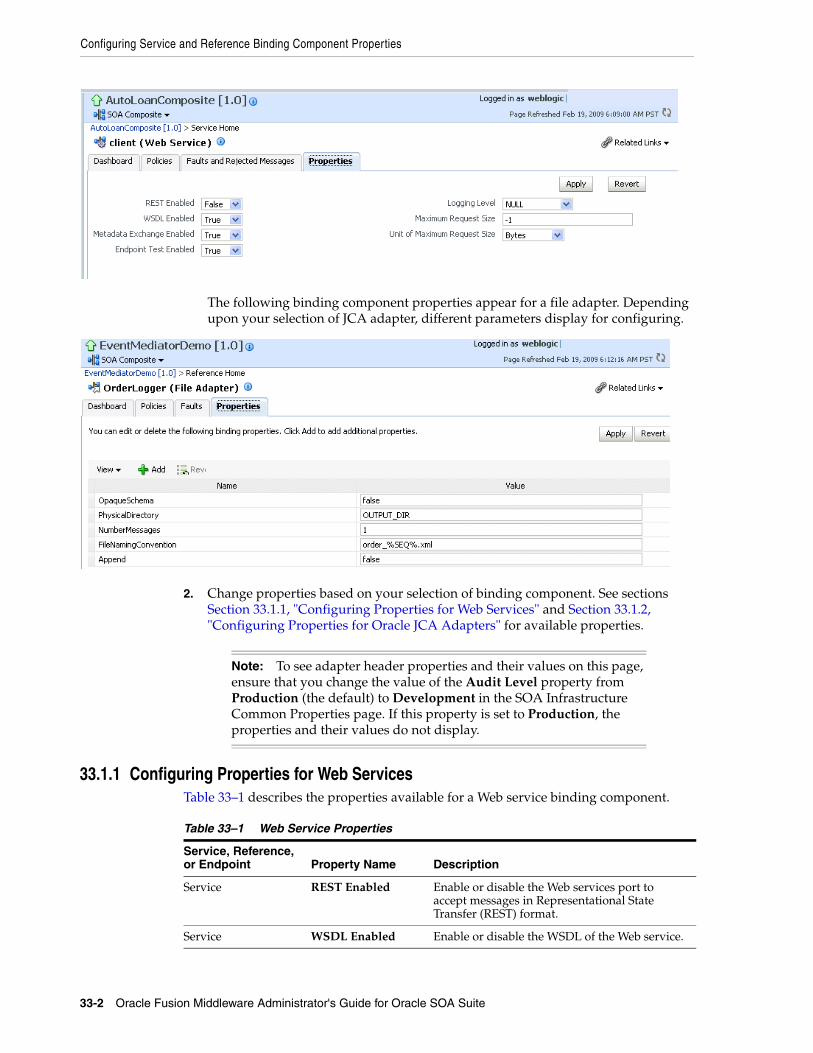
Configuring Service and Reference Binding Component Properties
33-2 Oracle Fusion Middleware Administrator's Guide for Oracle SOA Suite
The following binding component properties appear for a file adapter. Depending upon your selection of JCA adapter, different parameters display for configuring.
2. Change properties based on your selection of binding component. See sections Section 33.1.1, "Configuring Properties for Web Services" and Section 33.1.2, "Configuring Properties for Oracle JCA Adapters" for available properties.
33.1.1 Configuring Properties for Web ServicesTable 33–1 describes the properties available for a Web service binding component.
Note: To see adapter header properties and their values on this page, ensure that you change the value of the Audit Level property from Production (the default) to Development in the SOA Infrastructure Common Properties page. If this property is set to Production, the properties and their values do not display.
Table 33–1 Web Service Properties
Service, Reference, or Endpoint Property Name Description
Service REST Enabled Enable or disable the Web services port to accept messages in Representational State Transfer (REST) format.
Service WSDL Enabled Enable or disable the WSDL of the Web service.

Configuring Service and Reference Binding Component Properties
Configuring Service and Reference Binding Components 33-3
33.1.2 Configuring Properties for Oracle JCA AdaptersNote that if you manually add a nonregistered JCA binding level property in the composite.xml file, then you cannot subsequently edit that property or also any other registered properties for that service or reference through the Oracle Enterprise Manager Console.
This section includes the following topics:
■ Section 33.1.2.1, "Oracle AQ Adapter"
■ Section 33.1.2.2, "Oracle Database Adapter"
■ Section 33.1.2.3, "Oracle File Adapter"
■ Section 33.1.2.4, "Oracle FTP Adapter"
Service Metadata Exchange Enabled
Enable or disable a metadata exchange of the Web service.
Service Endpoint Test Enabled
Enable or disable an endpoint test of the Web service.
Service Logging Level Select the level of logging to perform on the Web service.
Service Maximum Request Size
Enter the maximum request size of the Web service. A value of -1 indicates the size is unlimited.
Service Unit of Maximum Request Size
Select the request unit of the Web service (either bytes, kilobytes, megabytes, or gigabytes).
Table 33–2 Types of JCA Adapters
Property Type Description Restrictions
Activation specification and interaction specification
Activation specification properties operate as services and interaction specification properties operate as references in a SOA composite application.
Do not add or remove these properties. You can only change their values.
These properties require the adapter endpoint to be recycled. These types of properties are also dependent upon other properties. If you attempt to add one of these properties, you have no way of knowing which dependent properties must also be added.
Endpoint These are tuning-related properties that are not exposed through the activation or interaction specification properties, such as specifying time outs, thresholds, maximum intervals, and so on.
There are no restrictions on adding, removing, or changing endpoint properties. The adapter is notified when these properties are added, removed, or changed, but it does not require redeployment.
Note that you cannot add or remove jca.retry.* endpoint properties without redeploying the composite. However, you can change these properties by using the Oracle Enterprise Manager Console without redeploying the composite.
Table 33–1 (Cont.) Web Service Properties
Service, Reference, or Endpoint Property Name Description

Configuring Service and Reference Binding Component Properties
33-4 Oracle Fusion Middleware Administrator's Guide for Oracle SOA Suite
■ Section 33.1.2.5, "Oracle JMS Adapter"
■ Section 33.1.2.6, "Oracle MQ Series Adapter"
■ Section 33.1.2.7, "Oracle Socket Adapter"
■ Section 33.1.2.8, "Oracle JCA Adapters Endpoint Properties"
33.1.2.1 Oracle AQ AdapterTable 33–3 describes the properties available for the Oracle AQ Adapter.
Table 33–3 Oracle AQ Adapter Properties
Service, Reference, or Endpoint Property Name Description
Service DequeueTimeOut Sets the dequeue timeout interval.
Service ConnectionRetryDelay
Sets the connection retry interval.
Service adapter.aq.dequeue.threads
Number of dequeue threads.
Service jca.retry.count Number of retries to post the message.
Service jca.retry.interval
Time interval between message retries.
Service QueueName Indicates the AQ queue name.
Service DatabaseSchema Database schema name that hosts the queue.
Service SchemaValidation
Validates the message payload.
Service ObjectFieldName Specifies ADT entry used as a payload.
Note that you cannot edit this property in the Oracle Enterprise Manager Console.
Service PayloadHeaderRequired
Specifies if ADT entries except for payload are accessible.
Service DequeueCondition
Specifies the expression to dequeue messages.
Service Consumer Specifies the consumer of a queue.
Service MessageSelectorRule
Specifies the message selector to dequeue messages.
Service StreamPayload Specifies if payload is streamed or not.
Service Correlation Specifies a correlation criterion or search criterion for the dequeue operation. For the enqueue operation, the value becomes the correlation of the message sent to AQ.
Reference Username Identifies a user name requesting access to a secure environment or program, such as an Oracle database or Oracle Applications system.
Reference Responsibility Specifies a collection of functions within Oracle E-Business Suite. Each user is assigned one or more responsibilities to allow access to the appropriate functions and data.
Reference QueueName Indicates an AQ queue name.

Configuring Service and Reference Binding Component Properties
Configuring Service and Reference Binding Components 33-5
33.1.2.2 Oracle Database AdapterTable 33–4 describes the properties available for the Oracle Database Adapter.
Reference DatabaseSchema Indicates the Database schema name that hosts the queue.
Reference ObjectFieldName Specify the ADT entry to use as a payload.
Note that you cannot edit this property in the Oracle Enterprise Manager Console.
Reference PayloadHeaderRequired
Specify if ADT entries except for payload is accessible.
Reference RecipientList Specify recipient of the messages.
Reference Correlation Specifies a correlation criterion or search criterion for the dequeue operation. For the enqueue operation the value becomes the correlation of the message sent to AQ.
Table 33–4 Oracle Database Adapter Properties
Service, Reference, or Endpoint Property Name Description
Service DescriptorName The key into the TopLink metadata indicating the root relational table.
Note that you cannot edit this property in the Oracle Enterprise Manager Console.
Service QueryName The key into the TopLink metadata indicating the named query to execute, with predefined where clause and parameters.
Note that you cannot edit this property in the Oracle Enterprise Manager Console.
Service MappingsMetaDataUR
In conjunction with MappingsMetaDataURL the path to the TopLink metadata file which describes how a database schema has been mapped to a particular predefined XML schema.
Note that you cannot edit this property in the Oracle Enterprise Manager Console.
Service MappingsMetaDataUR
Indicates the path to the TopLink metadata file which describes how a database schema has been mapped to an XML schema.
Note that you cannot edit this property in the Oracle Enterprise Manager Console.
Service OXMappingsMetaDataURL
In conjunction with MappingsMetaDataURL the path to the TopLink metadata file which describes how a database schema has been mapped to a particular predefined XML schema.
Note that you cannot edit this property in the Oracle Enterprise Manager Console.
Service PollingInterval Indicates the number of seconds between queries to the database for new events.
Table 33–3 (Cont.) Oracle AQ Adapter Properties
Service, Reference, or Endpoint Property Name Description

Configuring Service and Reference Binding Component Properties
33-6 Oracle Fusion Middleware Administrator's Guide for Oracle SOA Suite
Service MaxRaiseSize Indicates the maximum number of XML records that can be raised at a time to Oracle BPEL Process Manager or the activation listener.
Service PollingStrategy Indicates the method in which events are raised from the database. Also known as AfterReadStrategy.
Note that you cannot edit this property in the Oracle Enterprise Manager Console.
Service MarkReadColumn Indicates status column used by LogicalDeletePollingStrategy, for indicating which rows have been processed.
Service MarkUnreadValue The status of unprocessed rows.
Service MarkReservedValue
The status of rows reserved by this polling instance.
Service MarkReadValue The status of processed rows.
Service SequencingTableName
For example, the DB_ADAPTER_SEQUENCING.
Service SequencingTableKeyColumn
For example, TABLE_NAME. This column holds the primary keys of the various sequences stored.
Service SequencingTableValueColumn
For example, LAST_READ_ID. This is the column that holds the value of the last processed sequence value.
Service SequencingColumn For example, SCOTT.EMP.EMP_ID. This is the monotonically increasing column on the polled table.
Service SequencingColumnType
For example, the java.math.BigDecimal, java.sql.Timestamp. The type of sequence counter used.
Service SequencingTableKey
For example, the SCOTT.EMP. This is the key into the sequencing helper table, usually the name of the table being polled.
Service ShouldCacheSequenceValue
For SequencingPollingStrategy, the lastReadId can be kept in-memory so it does not have to be read at the start of each polling interval.
Service ShouldWriteSequenceValue
For SequencingPollingStrategy, the lastReadId can be kept in-memory and only written out to disk or a database when the process, application server, or both are shut down.
Service DeleteDetailRows For the delete polling strategy, this indicates whether to delete detail rows and master rows after XML records have been read.
Service SequencingDataSourceName
For ExternalSequencingPollingStrategy.
Service SequencingIsXADataSource
For ExternalSequencingPollingStrategy.
Table 33–4 (Cont.) Oracle Database Adapter Properties
Service, Reference, or Endpoint Property Name Description

Configuring Service and Reference Binding Component Properties
Configuring Service and Reference Binding Components 33-7
Service UseBatchDestroy Deletes or updates multiple processed rows with a single Data Manipulation Language (DML) statement.
Service DelayCommit Indicates whether to delay the commit/destroy action until all rows picked up (across multiple maxTransactionSize units) have been processed.
Service PollForChildUpdates
Indicates whether an update to a detail row must result in the master row and all its details being picked up for processing.
Service ShouldOrderRows For SequencingPollingStrategy, there may be cases where you do not want to order the rows by the sequence value.
Service NumberOfThreads Indicates the number of transactional threads to be used by the database adapter.
Service FetchSize Indicates the JDBC level cursor fetch size.
Service MaxBatchWritingSize
Indicates the JDBC level statements per batch statement.
Service DeleteFromCursor Indicates the JDBC level delete while iterating over ResultSet.
Service UseDirectSQL Enables performance optimization in certain cases.
Service ReturnSingleResultSet
Reads from multiple joined tables in a single SQL select rather than many and returns a single giant result set.
Service MaxTransactionSize
Maximum number of rows to raise as part of one database transaction.
Service SequencingFileName
For FileSequencingPollingStrategy only. The file contains a single value, the last read sequence value / updated time. Timestamps appear in ISO format.
Service SchemaValidation Validates the xml against the xml schema before raising it. Can only happen if the auto-generated has been hand-edited, that is, to add restrictions. Invalid records are rejected.
Service EnableStreaming Allows LOBs and multirecord XML files to be streamed through SAX events, allowing only a small part of payload to be kept in memory at a time.
Reference DescriptorName The key into the TopLink metadata indicating the root relational table.
Note that you cannot edit this property in the Oracle Enterprise Manager Console.
Reference OutputCompletedXml
Indicates if this interaction execution have an output message that is the input message with primary keys set.
Table 33–4 (Cont.) Oracle Database Adapter Properties
Service, Reference, or Endpoint Property Name Description

Configuring Service and Reference Binding Component Properties
33-8 Oracle Fusion Middleware Administrator's Guide for Oracle SOA Suite
Reference MappingsMetaDataURL
The path to the toplink.xml file that describes how a database schema has been mapped to an XML schema.
Note that you cannot edit this property in the Oracle Enterprise Manager Console.
Reference OXMappingsMetaDataURL
In conjunction with MappingsMetaDataURL the path to the TopLink metadata file which describes how a database schema has been mapped to a particular predefined XML schema.
Note that you cannot edit this property in the Oracle Enterprise Manager Console.
Reference GetActiveUnitOfWork
Operations within the same JTA transaction use the same TopLink Session and connection, and writes occur together on JTA commit.
Reference DmlType Indicates the type of Data Modify Language (DML) operation (merge, insert, update, delete, write).
Reference OutputCompletedXml
Does this interaction execute have an output message which is the input message with primary keys set. Useful when assigning primary keys on insert.
Reference OptimizeMerge Sets some properties to improve performance of the merge. For one, if multiple objects are merged, the read queries to check existence and load database versions into memory for comparison are performed as a single query, using an in() clause on the primary key.
Reference DetectOmissions Indicates whether to differentiate between null and not there in the input XML. The difference between <director /> (omission) and <director xsi:nil=\"true\"/> (null).
Reference MaxBatchWritingSize
The JDBC level statements per batch statement.
Reference UseDirectSQL Enables performance optimization in certain cases.
Reference QueryName The key into the TopLink metadata indicating the named query to execute, with predefined where clause and parameters.
Reference IsQueryByExample The query is generated dynamically on each invoke, based on matching the example input xml record.
Reference ReturnSingleResultSet
An advanced feature that influences how many total selects TopLink uses when querying against multiple related tables (that is, Master-Detail). Safest is the default (one per table); setting to true that attempts one total, by outer joining all related selects into a single result set.
Reference CursorWindowSize How many records to return at a time when selecting a huge number of rows in a single query.
Table 33–4 (Cont.) Oracle Database Adapter Properties
Service, Reference, or Endpoint Property Name Description

Configuring Service and Reference Binding Component Properties
Configuring Service and Reference Binding Components 33-9
33.1.2.3 Oracle File AdapterTable 33–5 describes the properties available for the Oracle File Adapter.
Reference EnableStreaming Allows LOBs and multirecord XMLs to be streamed through SAX events, allowing only a small part of payload to be kept in memory at a time.
Reference SqlString The SQL to execute in the pure SQL interaction.
Note that you cannot edit this property in the Oracle Enterprise Manager Console.
Reference IsTransactional Indicates whether the pure SQL being executed is a write that must occur within transaction boundaries.
Reference QueryTimeout Indicates the JDBC level queryTimeout setting.
Note that you cannot edit this property in the Oracle Enterprise Manager Console.
Reference MaxRows Indicates the JDBC level maxRows setting.
Note that you cannot edit this property in the Oracle Enterprise Manager Console.
Reference SchemaName The schema of the stored procedure to execute.
Reference PackageName The package of the stored procedure to execute.
Reference ProcedureName The procedure of the stored procedure to execute.
Reference Overload Further identifies the stored procedure to execute (in case of overloading) by the expected number of parameters.
Reference QueryTimeout Indicates the JDBC level queryTimeout setting.
Table 33–5 Oracle File Adapter Properties
Service, Reference, or Endpoint Property Name Description
Service PhysicalDirectory
Specifies the physical directory for the File/FTP adapter.
Service UseHeaders Set to true if the File/FTP adapter must publish metadata, for example, file name, directory name, last modified data, file size and exclude the payload. This is typically used in large payload scenarios where-in you simply want to use the inbound adapter as a notifier.
Service Recursive If set to true, the File/FTP adapter processes files recursively in sub-directories.
Service PhysicalArchiveDirectory
Directory where the inbound File/FTP adapter archives files after they have been processed successfully.
Table 33–4 (Cont.) Oracle Database Adapter Properties
Service, Reference, or Endpoint Property Name Description
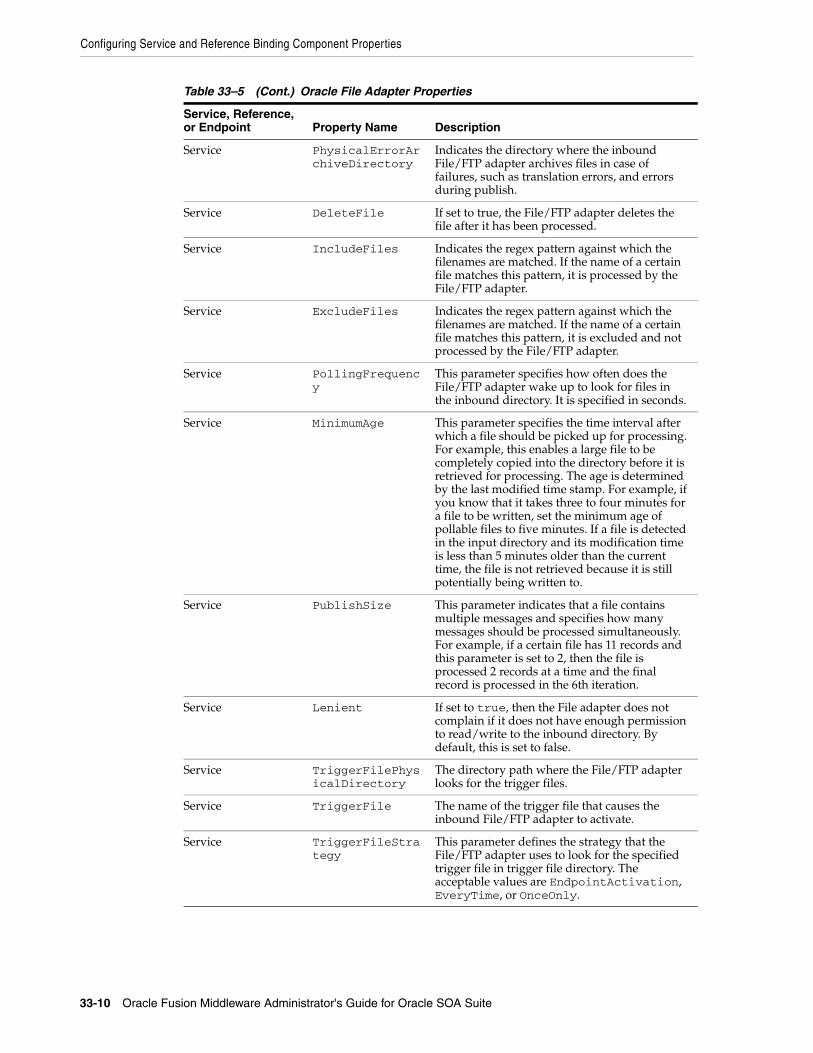
Configuring Service and Reference Binding Component Properties
33-10 Oracle Fusion Middleware Administrator's Guide for Oracle SOA Suite
Service PhysicalErrorArchiveDirectory
Indicates the directory where the inbound File/FTP adapter archives files in case of failures, such as translation errors, and errors during publish.
Service DeleteFile If set to true, the File/FTP adapter deletes the file after it has been processed.
Service IncludeFiles Indicates the regex pattern against which the filenames are matched. If the name of a certain file matches this pattern, it is processed by the File/FTP adapter.
Service ExcludeFiles Indicates the regex pattern against which the filenames are matched. If the name of a certain file matches this pattern, it is excluded and not processed by the File/FTP adapter.
Service PollingFrequency
This parameter specifies how often does the File/FTP adapter wake up to look for files in the inbound directory. It is specified in seconds.
Service MinimumAge This parameter specifies the time interval after which a file should be picked up for processing. For example, this enables a large file to be completely copied into the directory before it is retrieved for processing. The age is determined by the last modified time stamp. For example, if you know that it takes three to four minutes for a file to be written, set the minimum age of pollable files to five minutes. If a file is detected in the input directory and its modification time is less than 5 minutes older than the current time, the file is not retrieved because it is still potentially being written to.
Service PublishSize This parameter indicates that a file contains multiple messages and specifies how many messages should be processed simultaneously. For example, if a certain file has 11 records and this parameter is set to 2, then the file is processed 2 records at a time and the final record is processed in the 6th iteration.
Service Lenient If set to true, then the File adapter does not complain if it does not have enough permission to read/write to the inbound directory. By default, this is set to false.
Service TriggerFilePhysicalDirectory
The directory path where the File/FTP adapter looks for the trigger files.
Service TriggerFile The name of the trigger file that causes the inbound File/FTP adapter to activate.
Service TriggerFileStrategy
This parameter defines the strategy that the File/FTP adapter uses to look for the specified trigger file in trigger file directory. The acceptable values are EndpointActivation, EveryTime, or OnceOnly.
Table 33–5 (Cont.) Oracle File Adapter Properties
Service, Reference, or Endpoint Property Name Description

Configuring Service and Reference Binding Component Properties
Configuring Service and Reference Binding Components 33-11
Service MaxRaiseSize This parameter specifies the maximum number of files that the File/FTP adapter submits for processing in each polling cycle. For example, if the inbound directory has 1000 files and this parameter is set to 100 and the polling frequency is one minute, then the File/FTP adapter submits 100 files every minute.
Service DirectorySeparator
When you choose multiple directories, the generated JCA files use \";\" as the separator for these directories. However, if you want, you can change the separator to something else. If you do so, manually add DirectorySeparator=\"<<chosen separator>>\" in the generated JCA file. For example, to use a comma (,) as the separator, you must first change the separator to \",\" in the physical directory and then add DirectorySeparator=\",\" in the JCA file.
Service AsAttachment If set to true, it causes the inbound file to be published as an attachment.
Service CharacterSet Set it to the Character Set for the attachment. This parameter is not used internally by the File/FTP adapter and it is meant for third party applications that process the attachments published by the File/FTP adapter.
Service Encoding Set it to the encoding for the attachment. This parameter is not used internally by the File/FTP adapter and it is meant for third party applications that process the attachments published by the File/FTP adapter.
Service ContentType Set it to the Mime-Type for the attachment. This parameter is not used internally by the File/FTP adapter and it is meant for third party applications that process the attachments published by the File/FTP adapter.
Service ListSorter Specifies the sorter that the File/FTP adapter use to sort files in the inbound. You can set this parameter to \"oracle.tip.adapter.file.inbound.listing.TimestampSorterAscending\" or \"oracle.tip.adapter.file.inbound.listing.TimestampSorterDescending\". You can also plug in your own sorter by writing a class that implements \"java.util.Comparator\".
Service SingleThreadModel
If the value is true, the File/FTP adapter poller processes files in the same thread. In other words, it does not use the global in-memory queue for processing.
Table 33–5 (Cont.) Oracle File Adapter Properties
Service, Reference, or Endpoint Property Name Description

Configuring Service and Reference Binding Component Properties
33-12 Oracle Fusion Middleware Administrator's Guide for Oracle SOA Suite
Service ThreadCount If this parameter is available, the adapter creates its own processor threads rather than depending on the global thread pool processor threads (by default, four of them). In other words, this parameter partitions the in-memory queue and each composite application gets its own in-memory queue. If the ThreadCount is set to \"0\", then it behaves in the same manner as the single thread model. If ThreadCount is set to \"-1\", then it starts using the global thread pool. The maximum for this property is 40.
Service recoveryInterval
Used by the inbound adapter to configure the recovery interval in case of errors. For example, if the physical directory is nonexistent, then the adapter uses this value to perform periodic sleep/wake ups to check if the physical directory has been created and is accessible.
Reference PhysicalDirectory
Specifies the physical directory for the file/FTP adapter.
Reference NumberMessages Specifies the outbound file naming convention used.
Reference ElapsedTime This parameter is used for outbound batching. When the time specified elapses, the outgoing file is created. The parameter is of type String and is not mandatory. The default value is 1.
Reference FileSize Indicates if an opaque schema is being used.
Reference FileNamingConvention
This parameter is for the naming convention for the outbound write operation file.
Reference FileName Use this parameter to specify a static single file name during the write operation.
Reference Append Setting this parameter to \"true\" causes the File/FTP adapter to append to a file on the outbound. If the file does not exist, a new file is created.
Reference UseStaging If \"true\", then the outbound File/FTP adapter writes translated data to a staging file and afterward it streams the staging file to the target file. If \"false\", then the outbound File/FTP adapter does not use an intermediate staging file.
Reference ConcurrentThreshold
The maximum number of translation activities that can be allowed to execute in parallel for a particular outbound scenario. The translation step during the outbound operation is CPU intensive and hence must to be guarded as it might cause starvation in other applications/threads. The maximum is 100 (same as the maximum for dspMaxThreads in BPEL).
Reference SequenceName Specifies the Oracle database sequence name to be used if you have already configured the outbound File/FTP adapter for high availability.
Table 33–5 (Cont.) Oracle File Adapter Properties
Service, Reference, or Endpoint Property Name Description

Configuring Service and Reference Binding Component Properties
Configuring Service and Reference Binding Components 33-13
Reference oracle.tip.adapter.file.mutex
Set it to the class name that specifies the mutex you want to use for the outbound write operation. This class must extend the "oracle.tip.adapter.file.Mutex" abstraction.
Reference serializeTranslation
If set to \"true\", then the translation step is serialized using a semaphore. The number of permits for semaphore (guarding the translation step) comes from ConcurrentThreshold parameter (above). If \"false\", then the translation step occurs outside the semaphore.
Reference inMemoryTranslation
This parameter is applicable only if UseStaging is \"false\". If set to \"true\", then the translation step occurs in-memory that is, an in-memory byte array is created. If set to \"false\", then the adapter creates an output stream to the target file (FTP, FTPS and SFTP included) and allows the translator to translate and write directly to the stream.
Reference DeleteFile If set to \"true\", the File/FTP adapter deletes the file after it has been processed.
Reference IgnoreZeroByteFile
Set it to true if you do not want the File/FTP adapter to throw an exception during the outbound read operation if the file could not be found. This parameter is ignored if the schema for the inbound file is anything other than "Opaque".
Reference IncludeFiles Indicates the regex pattern against which the filenames are matched. If the name of a certain file matches this pattern, it is processed by the File/FTP adapter.
Reference ExcludeFiles Includes the regex pattern against which the filenames are matched. If the name of a certain file matches this pattern, it is excluded and not processed by the File/FTP adapter.
Reference Recursive If set to true, the File/FTP adapter processes files recursively in sub-directories.
Reference MaxRaiseSize This parameter specifies the maximum number of files that the File/FTP adapter submits for processing in each polling cycle. For example, if the inbound directory has 1000 files and this parameter is set to 100 and the polling frequency is one minute, then the File/FTP adapter submits 100 files every minute.
Table 33–5 (Cont.) Oracle File Adapter Properties
Service, Reference, or Endpoint Property Name Description

Configuring Service and Reference Binding Component Properties
33-14 Oracle Fusion Middleware Administrator's Guide for Oracle SOA Suite
33.1.2.4 Oracle FTP AdapterTable 33–6 describes the properties available for the Oracle FTP Adapter.
Reference DirectorySeparator
When you choose multiple directories, the generated JCA files use \";\" as the separator for these directories. However, if you want, you can change the separator to something else. If you do so, manually add DirectorySeparator=\"<<chosen separator>>\" in the generated JCA file. For example, to use a comma (,) as the separator, you must first change the separator to \",\" in the Physical directory and then add DirectorySeparator=\",\" in the JCA file.
Reference SourceFileName The source file for the File I/O operation.
Reference SourcePhysicalDirectory
The source directory for the File I/O operation.
Reference SourceType Set this to \"native\" if the source file is native and \"xml\" if the source file is XML.
Reference SourceSchema Set it to the schema for the source file.
Reference SourceSchemaRoot
Set it to the root element name for the source file.
Reference TargetFileName Indicates the target file for the File I/O operation.
Reference TargetPhysicalDirectory
Indicates the target directory for the File I/O operation.
Reference TargetType Set this to \"native\" if the target file is native and \"xml\" if the source file is XML.
Reference TargetSchema Set it to the schema for the target file.
Reference TargetSchemaRoot
Set it to the root element name for the target file.
Reference Xsl Set it to the XSL transformer between the source and target.
Reference Type Set it \"COPY\",\"MOVE\", or \"DELETE\".
Reference BatchSize Set it to the batch size for the batching transformation.
Reference ChunkSize Specifies the number of outbound messages.
Table 33–6 Oracle FTP Adapter Properties
Service, Reference, or Endpoint Property Name Description
Service timestampOffset This parameter is used by the FTP adapter to tackle time zone issues, typically to convert the time difference between the ftp server and the system on which the ftp adapter is running to millisecond.
Service PhysicalDirectory
This parameter specifies the physical directory for the File/FTP adapter.
Table 33–5 (Cont.) Oracle File Adapter Properties
Service, Reference, or Endpoint Property Name Description

Configuring Service and Reference Binding Component Properties
Configuring Service and Reference Binding Components 33-15
Service UseHeaders Set to \"true\" if the File/FTP adapter must publish metadata, for example, file name, directory name, last modified data, file size and exclude the payload. This is typically used in large payload scenarios where-in you simply want to use the inbound adapter as a notifier.
Service FileType Set it to either \"ascii\" or \"binary\" depending on the requirement.
Service Recursive If set to \"true\", the File/FTP adapter processes files recursively in sub-directories.
Service PhysicalArchiveDirectory
Directory where the inbound File/FTP adapter archives files after they have been processed successfully.
Service PhysicalErrorArchiveDirectory
Indicates the directory where the inbound File/FTP adapter archives files in case of failures, such as translation errors, and errors during publish.
Service UseRemoteArchive
Set this parameter to \"true\" to notify the FTP adapter that the archival directory is on the same FTP server. If set to \"false\", the FTP adapter uses a local file system folder for archival.
Service UseNlst Set this parameter to \"true\" if you need the FTP Adapter to use the \"NLST\" FTP command instead of the \"LIST\" that the adapter uses by default.
Service DeleteFile If set to \"true\", the File/FTP adapter deletes the file after it has been processed.
Service IncludeFiles Indicates the regex pattern against which the filenames are matched. If the name of a certain file matches this pattern, it is processed by the File/FTP adapter.
Service ExcludeFiles Indicates the Regex pattern against which the filenames are matched. If the name of a certain file matches this pattern, it is excluded and not processed by the File/FTP adapter.
Service PollingFrequency
This parameter specifies how often does the File/FTP adapter wake up to look for files in the inbound directory. It is specified in seconds.
Service MinimumAge This parameter specifies the time interval after which a file should be picked up for processing. For example, this enables a large file to be completely copied into the directory before it is retrieved for processing. The age is determined by the last modified time stamp. For example, if you know that it takes three to four minutes for a file to be written, set the minimum age of pollable files to five minutes. If a file is detected in the input directory and its modification time is less than 5 minutes older than the current time, the file is not retrieved because it is still potentially being written to.
Table 33–6 (Cont.) Oracle FTP Adapter Properties
Service, Reference, or Endpoint Property Name Description

Configuring Service and Reference Binding Component Properties
33-16 Oracle Fusion Middleware Administrator's Guide for Oracle SOA Suite
Service PublishSize This parameter indicates that a file contains multiple messages and specifies how many messages should be processed simultaneously. For example, if a certain file has 11 records and this parameter is set to 2, then the file is processed 2 records at a time and the final record is processed in the 6th iteration.
Service TriggerFilePhysicalDirectory
The directory path where the File/FTP adapter looks for the trigger files.
Service TriggerFile The name of the trigger file that causes the inbound File/FTP adapter to activate.
Service TriggerFileStrategy
This parameter defines the strategy that the File/FTP adapter uses to look for the specified trigger file in trigger file directory. The acceptable values are EndpointActivation, EveryTime or OnceOnly.
Service MaxRaiseSize This parameter specifies the maximum number of files that the File/FTP adapter submits for processing in each polling cycle. For example, if the inbound directory has 1000 files and this parameter is set to 100 and the polling frequency is one minute, then the File/FTP adapter submits 100 files every minute.
Service DirectorySeparator
When you choose multiple directories, the generated JCA files use \";\" as the separator for these directories. However, if you want, you can change the separator to something else. If you do so, manually add DirectorySeparator=\"<<chosen separator>>\" in the generated JCA file. For example, to use a comma (,) as the separator, you must first change the separator to \",\" in the Physical directory and then add DirectorySeparator=\",\" in the JCA file.
Service AsAttachment If set to \"true\", it causes the inbound file to be published as an attachment.
Service CharacterSet Set it to the Character Set for the attachment. This parameter is not used internally by the File/FTP adapter and it is meant for third party applications that process the attachments published by the File/FTP adapter.
Service Encoding Set it to the Encoding for the attachment. This parameter is not used internally by the File/FTP adapter and it is meant for third party applications that process the attachments published by the File/FTP adapter.
Service ContentType Set it to the Mime-Type for the attachment. This parameter is not used internally by the File/FTP adapter and it is meant for third party applications that process the attachments published by the File/FTP adapter.
Table 33–6 (Cont.) Oracle FTP Adapter Properties
Service, Reference, or Endpoint Property Name Description

Configuring Service and Reference Binding Component Properties
Configuring Service and Reference Binding Components 33-17
Service ListSorter Specifies the sorter that the File/FTP adapter use to sort files in the inbound. You can set this parameter to \"oracle.tip.adapter.file.inbound.listing.TimestampSorterAscending\" or \"oracle.tip.adapter.file.inbound.listing.TimestampSorterDescending\". You can also plug in your own sorter by writing a class that implements \"java.util.Comparator\".
Service SingleThreadModel
If the value is true, the File/FTP adapter poller processes files in the same thread. In other words, it does not use the global in-memory queue for processing.
Service ThreadCount If this parameter is available, the adapter creates it's own processor threads rather than depending on the global thread pool processor threads (by default 4 of them). In other words, this parameter partitions the in-memory queue and each composite application gets its own in-memory queue. If the ThreadCount is set to \"0\", then it behaves in the same manner as the SingleThreadModel. If the ThreadCount is set to \"-1\", then it starts using the global thread pool. The maximum for this property is 40.
Service recoveryInterval
Used by the inbound adapter to configure the recoveryInterval in case of errors. For example, if the PhysicalDirectory is non-existent, then the adapter uses this value to perform periodic sleep/wakeups to check if the PhysicalDirectory has been created and is accessible.
Service jca.message.encoding
This parameter is used to override the encoding specified in the NXSD schema for the inbound File/FTP adapter.
Service oracle.tip.adapter.file.debatching.rejection.quantum
This property lets you control the size of a rejected message for the inbound File/FTP adapter partner link. For example, if you set it to \"100\", it causes the File/FTP adapter to reject 100 lines from the file since the actual file is too large.
Service useFileSystem This parameter is used by the inbound File/FTP adapter during read-only polling in a clustered environment. Setting it to \"true\" causes the adapter to use the file system to store metadata about files that have been already processed. Setting it to \"false\" causes the adapter to use a database table.
Table 33–6 (Cont.) Oracle FTP Adapter Properties
Service, Reference, or Endpoint Property Name Description

Configuring Service and Reference Binding Component Properties
33-18 Oracle Fusion Middleware Administrator's Guide for Oracle SOA Suite
Service oracle.tip.adapter.file.timeout.recoverpicked.minutes
Used by the inbound high-av adapter when using \"FILEADAPTER_IN\" as the coordinator. Remember that when a file is first claimed (enqueued) by a node for processing FILE_PROCESSED column in FILEADAPTER_IN is set to \"0\". At a later point in time, when one of the decoupled Processor threads picks up the file for processing, the value of FILE_PROCESSED column is updated from \"0\" to \"1\". And when the file is processed completely, the FILE_PROCESSED column is updated from \"1\" to \"2\". However, if the processor thread picks up a file but the node crashes before it could process the file, then the file is never processed. This parameter is used to \"undo\" the pick operation. The adapter does this by deleting the entries in FILEADAPTER_IN table that have been picked up but not processed within the value specified here.
Service oracle.tip.adapter.file.timeout.recoverunpicked.minutes
Used by the inbound high-av adapter when using \"FILEADAPTER_IN\" as the coordinator. Remember that when a file is first claimed by a node for processing FILE_PROCESSED column in FILEADAPTER_IN is set to \"0\". At a later point in time, when the decoupled-Processor thread picks up the file for processing, the value of FILE_PROCESSED column is updated from \"0\" to \"1\". And when the file is processed completely, the FILE_PROCESSED column is updated from \"1\" to \"2\". If the node crashes when the FILE_PROCESSED is still \"0\", it means that the file is enqueued by a node (this means no other nodes can pick this one up). However, it also means that the decoupled processor threads have still not picked this one for processing. This parameter is used to \"undo\" the claim(enqueue_ operation. The adapter does this by deleting the entries in FILEADAPTER_IN table that have been claimed (for example, FILE_PROCESSED ==\"0\"), but not picked up until now.
Service purgeIntervalMillis
Defines how often would the poller thread purge control files for read-only polling scenarios. Defaults to 5 days.
Service oracle.tip.adapter.file.highavailability.maxRetryInterval
Number of milliseconds after which the inbound File/FTP adapter retries to establish database connection in distributed polling scenarios.
Service oracle.tip.adapter.file.highavailability.maxRetry
Number of times that the inbound File/FTP adapter retries to establish database connection in distributed polling scenarios.
Service oracle.tip.adapter.file.rejectOriginalContent
Setting to \"true\" causes the File/FTP adapter to reject the original actual content. If set to \"false\", the adapter rejects the XML data created because of to the translation step.
Table 33–6 (Cont.) Oracle FTP Adapter Properties
Service, Reference, or Endpoint Property Name Description

Configuring Service and Reference Binding Component Properties
Configuring Service and Reference Binding Components 33-19
Service notifyEachBatchFailure
Setting to \"true\" causes the File/FTP adapter to call the Notification Agent's onBatchFailure every time an error occurs in a de-batching scenario. If set to \"false\", the File/FTP adapter calls onBatchFailure only once after all messages in the de-batching scenario.
Reference PhysicalDirectory
Directory Path for the File/FTP adapter.
Reference FileType Set it to either \"ascii\" or \"binary\" depending on the requirement.
Reference NumberMessages This parameter is used for outbound batching. The outgoing file is created when the number of messages condition is met. The parameter is of type String and is not mandatory. The default value is 1.
Reference ElapsedTime This parameter is used for outbound batching. When the time specified elapses, the outgoing file is created. The parameter is of type String and is not mandatory. The default value is 1.
Reference FileSize This parameter is used for outbound batching. The outgoing file is created when the file size condition is met. The parameter is of type String and is not mandatory. The default value is 1000 KB.
Reference FileNamingConvention
This parameter is for the naming convention for the outbound write operation file.
Reference FileName Use this parameter to specify a static single file name during the write operation.
Reference Append Setting this parameter to \"true\" causes the File/FTP adapter to append to a file on the outbound. If the file does not exist, a new file is created.
Reference UseStaging If \"true\", then the outbound File/FTP adapter writes translated data to a staging file and afterward it streams the staging file to the target file. If \"false\", then the outbound File/FTP adapter does not use an intermediate staging file.
Reference ConcurrentThreshold
The maximum number of translation activities that can be allowed to execute in parallel for a particular outbound scenario. The translation step during the outbound operation is CPU intensive and hence must to be guarded as it might cause starvation in other applications/threads. The maximum is 100 (same as the maximum for dspMaxThreads in BPEL).
Reference SequenceName Specifies the Oracle database sequence name to be used if you have already configured the outbound File/FTP adapter for high availability.
Table 33–6 (Cont.) Oracle FTP Adapter Properties
Service, Reference, or Endpoint Property Name Description

Configuring Service and Reference Binding Component Properties
33-20 Oracle Fusion Middleware Administrator's Guide for Oracle SOA Suite
Reference oracle.tip.adapter.file.mutex
Set it to the class name that specifies the mutex you want to use for the outbound write operation. This class must extend \"oracle.tip.adapter.file.Mutex\" abstraction.
Reference serializeTranslation
If set to \"true\", then the translation step is serialized using a semaphore. The number of permits for semaphore (guarding the translation step) comes from ConcurrentThreshold parameter (above). If \"false\", then the translation step occurs outside the semaphore.
Reference inMemoryTranslation
This parameter is applicable only if UseStaging is \"false\". If set to \"true\", then the translation step occurs in-memory that is, an in-memory byte array is created. If set to \"false\", then the adapter creates an output stream to the target file (FTP, FTPS and SFTP included) and allows the translator to translate and write directly to the stream.
Reference FileType Set it to either \"ascii\" or \"binary\" depending on the requirement.
Reference UseRemoteArchive
Set this parameter to \"true\" to notify the FTP adapter that the archival directory is on the same FTP server. If set to \"false\", the FTP adapter uses a local file system folder for archival.
Reference DeleteFile If set to \"true\", the File/FTP adapter deletes the file after it has been processed.
Reference IgnoreZeroByteFile
Set it to \"true\" if you do not want the File/FTP adapter to throw an exception during the outbound read operation if the file could not be found. This parameter is ignored if the schema for the inbound file is anything other than \"Opaque\".
Reference IncludeFiles Indicates the regex pattern against which the filenames are matched. If the name of a certain file matches this pattern, it is processed by the File/FTP adapter.
Reference ExcludeFiles Indicates the regex pattern against which the filenames are matched. If the name of a certain file matches this pattern, it is excluded and not processed by the File/FTP adapter.
Reference Recursive If set to \"true\", the File/FTP adapter processes files recursively in subdirectories.
Reference MaxRaiseSize This parameter specifies the maximum number of files that the File/FTP adapter submits for processing in each polling cycle. For example, if the inbound directory has 1000 files and this parameter is set to 100 and the polling frequency is one minute, then the File/FTP adapter submits 100 files every minute.
Table 33–6 (Cont.) Oracle FTP Adapter Properties
Service, Reference, or Endpoint Property Name Description

Configuring Service and Reference Binding Component Properties
Configuring Service and Reference Binding Components 33-21
Reference DirectorySeparator
When you choose multiple directories, the generated JCA files use \";\" as the separator for these directories. However, if you want, you can change the separator to something else. If you do so, manually add DirectorySeparator=\"<<chosen separator>>\" in the generated JCA file. For example, to use a comma (,) as the separator, you must first change the separator to \",\" in the Physical directory and then add DirectorySeparator=\",\" in the JCA file.
Reference UseNlst Set this parameter to \"true\" if you need the FTP adapter to use the \"NLST\" FTP command instead of \"LIST\" that the adapter uses by default.
Reference timestampOffset This parameter is used by the FTP adapter to tackle time zone issues, typically to convert the time difference between the FTP server and the system on which the FTP adapter is running to millisecond.
Reference SourceFileName Indicates the source file for the File I/O operation.
Reference SourcePhysicalDirectory
Indicates the source directory for the File I/O operation.
Reference SourceType Set this to \"native\" if the source file is native and \"xml\" if the source file is xml.
Reference SourceSchema Set it to the schema for the source file.
Reference SourceSchemaRoot
Set it to the root element name for the source file.
Reference TargetFileName Indicates the target file for the File I/O operation.
Reference TargetPhysicalDirectory
The target directory for the File I/O operation.
Reference TargetType Set this to \"native\" if the target file is native and \"xml\" if the source file is xml.
Reference TargetSchema Set it to the schema for the target file.
Reference TargetSchemaRoot
Set it to the root element name for the target file.
Reference Xsl Set it to the XSL transformer between the source and target.
Reference Type Set it to either \"ascii\" or \"binary\" depending on the requirement.
Reference BatchSize Set it to the batch size for the batching transformation.
Reference SourceIsRemote Set it to \"false\" to notify the FTP adapter that the source for the I/O operation is a local file system as opposed to remote FTP server.
Table 33–6 (Cont.) Oracle FTP Adapter Properties
Service, Reference, or Endpoint Property Name Description

Configuring Service and Reference Binding Component Properties
33-22 Oracle Fusion Middleware Administrator's Guide for Oracle SOA Suite
33.1.2.5 Oracle JMS AdapterTable 33–7 describes the properties available for the Oracle JMS Adapter.
Reference TargetIsRemote Set it to \"false\" to I/O notify the FTP adapter that the target for the I/O operation is a local file system as opposed to remote FTP server.
Reference ChunkSize Set it to the ChunkSize for the chunked interaction operation.
Table 33–7 Oracle JMS Adapter Properties
Service, Reference, or Endpoint Property Name Description
Service adapter.jms.encoding
Set the encoding to be used by JMS inbound adapter.
Service adapter.jms.receive.timeout
Set the receive timeout interval.
Service adapter.jms.retry.interval
Set the interval JMS adapter would retry.
Service adapter.jms.registration.interval
Set the registration interval.
Service adapter.jms.receive.threads
Set the number of receive threads.
Service JMSReplyToDestinationProperties
Set the reply to destination.
Service JMSReplyUseMessageIdForCorrelation
Whether message id is necessary for correlation. Valid values are 'true' or 'false'.
Service JMSReplyUseCorrelationIdForCorrelation
Whether correlation id is necessary for correlation. Valid values are true or false.
Service suppressHeaders Whether to bypass headers or not. Valid values are true or false.
Service JMSReplyPropagateJMSExpiration
Whether a reply message is created with a TTL value of other than 0 which is the default value in a request reply scenario. Valid values are true or false.
Service minimumDelayBetweenMessages
A throttling parameter (in milliseconds) that adds a brief sleep between each inbound posted message, thus slowing down the message inflow.
Reference requestReply.useCorrelation
Whether correlation is necessary in a request reply scenario. Valid values are true or false.
Reference requestReply.cacheReceivers
Whether correlation is necessary in a request reply scenario. Valid values are true or false.
Reference DestinationName Name of JMS physical destination.
Table 33–6 (Cont.) Oracle FTP Adapter Properties
Service, Reference, or Endpoint Property Name Description

Configuring Service and Reference Binding Component Properties
Configuring Service and Reference Binding Components 33-23
33.1.2.6 Oracle MQ Series AdapterTable 33–8 describes the properties available for the Oracle MQ Series Adapter.
Reference PayloadType Indicates the JMS Message type.
Reference DeliveryMode Set JMS delivery mode. Delivery Modes supported by JMS API are PERSISTENT and NON_PERSISTENT.
Reference TimeToLive Indicates the message lifetime in milliseconds.
Reference Priority Indicates the JMS message priority.
Reference PayloadEntry Specify the MapMessage entry to use as the payload.
Reference AttachmentList Specify MapMessage entry to use as the payload and publish as an attachment.
Reference RequestDestinationName
Indicates the name of JMS physical destination.
Reference ReplyDestinationName
Indicates the name of JMS physical destination.
Reference AllowTemporaryReplyDestination
Allows creation of temporary destination for receiving messages.
Reference DurableSubscriber
Indicates the unique name of durable subscription within a client identifier.
Reference MessageSelector Message selector expression used for message selection when delivering message to Destination.
Reference ReplyTimeout Indicates the Timeout to receive a reply message.
Table 33–8 Oracle MQ Series Adapter Properties
Service, Reference, or Endpoint Property Name Description
Service MessageType Indicates the message type of outbound/dequeue message.
Service QueueName Indicates the name of inbound/outbound queue.
Service UseMessageEncodingForTranslation
Set to true if characterSet from header is used while translation.
Service InboundThreadCount
Indicates the number of threads used in inbound.
Service BackoutQueueName
Indicates the name of a backout queue where rejected message would go.
Service BackoutQueueManagerName
Indicates the name of the backout queue manager where the rejected message goes.
Service MaximumBackoutCount
Indicates the number of times adapter would retry before sending the message to a backout queue.
Table 33–7 (Cont.) Oracle JMS Adapter Properties
Service, Reference, or Endpoint Property Name Description

Configuring Service and Reference Binding Component Properties
33-24 Oracle Fusion Middleware Administrator's Guide for Oracle SOA Suite
Service BackoutInterval Indicates the interval between a retry for a backout message.
Service jca.message.encoding
This encoding value overwrites any encoding specified, either in MQMD or in a schema file.
Service UseMessageEncodingForTranslation
Set to \"true\" if characterSet field of MQMD is to be used for translation in inbound. If set to \"false\" the translator uses the encoding from the schema file. You can use the jca.message.encoding property to overwrite any encoding specified, either in MQMD or in the schema file
Service FallbackReplyToQueueName
Indicates the Fallback Reply To queue name.
Service FallbackReplyToQueueManagerName
Indicates the Fallback Reply To queue manager name.
Service Priority Indicates the priority of the reply/outbound message.
Service Expiry Indicates the expiry time for the reply/outbound message.
Service Persistence Indicates the persistence of the reply/outbound message.
Service Feedback Indicates the feedback code of the reply/outbound message.
Note that you cannot edit this property in the Oracle Enterprise Manager Console.
Service MessageFormat Indicates the format of the reply/outbound message.
Service OnDeliveryFailure
Indicates the behavior of adapter if reply/outbound message delivery fails.
Service SegmentIfRequired
Indicates the segmentation property for the message.
Service CopyPersistenceFromInbound
Indicates the copy persistence from inbound message to reply message in a Sync Req-Res(inbound) scenario.
Service PropagateExpiryInterval
Indicates the propagate expiry interval from the inbound message to the reply message in a Sync Req-Res(inbound) scenario.
Service QueueName Indicates the name of the inbound/outbound queue.
Service GetMessageOptions
Indicates the Get message options for an outbound dequeue scenario.
Service FilterByMsgId Indicates the Message ID to be used for filtering.
Service FilterByCorrelId
Indicates the correlation ID to be used for filtering.
Service FilterByGroupId Indicates the Group ID to be used for filtering.
Table 33–8 (Cont.) Oracle MQ Series Adapter Properties
Service, Reference, or Endpoint Property Name Description

Configuring Service and Reference Binding Component Properties
Configuring Service and Reference Binding Components 33-25
Service FilterByMsgSeqNumber
Indicates the message sequence number to be used for filtering.
Service FilterByMsgSeqNumber
Indicates the message sequence number to be used for filtering.
Reference QueueName Indicates the name of the inbound/outbound queue.
Reference DistributionList
Indicates the distribution list where the message goes.
Reference PartialDeliveryForDL
Set to false if the message must go to all the queues in the DL. Otherwise, it is set to true.
Reference SecondaryQueueManagerName
Indicates the name of the secondary queue manager.
Reference MessageFormat Indicates the format of the reply/outbound message.
Reference ReplyMessageId Indicates the correlation scheme for the message ID to be set.
Reference ReplyCorrelationId
Indicates the correlation scheme for the correlation ID to be set.
Reference MessageId Indicates the correlation scheme for the outbound message.
Reference CorrelationId Indicates the correlation scheme for the outbound message.
Reference ReportCOA Indicates the COA report to be set on the message.
Reference ReportCOD Indicates the COD report to be set on the message.
Reference ReportException Indicates the exception report to be set on the message.
Reference ReportExpiry Indicates the expiration report to be set on the message.
Reference ReportPAN Indicates if PAN is required.
Reference ReportNAN Indicates if NAN is required.
Reference FallbackReplyToQueueName
Indicates the Fallback Reply To queue name.
Reference FallbackReplyToQueueManagerName
Indicates the Fallback Reply To queue manager name.
Reference Priority Indicates the priority of the reply/outbound message.
Reference Expiry Indicates the expiry time for the reply/outbound message.
Reference Persistence Indicates the persistence of the reply/outbound message.
Reference Feedback Indicates the feedback code of the reply/outbound message.
Table 33–8 (Cont.) Oracle MQ Series Adapter Properties
Service, Reference, or Endpoint Property Name Description

Configuring Service and Reference Binding Component Properties
33-26 Oracle Fusion Middleware Administrator's Guide for Oracle SOA Suite
Reference ReplyToQueueName
Indicates the ReplyToQueue to be set on the message.
Note that you cannot edit this property in Oracle Enterprise Manager Fusion Middleware Control Console.
Reference ReplyToQueueManagerName
Indicates the ReplyToQueueManager to be set on the message.
Note that you cannot edit this property in Oracle Enterprise Manager Fusion Middleware Control Console
Reference OnDeliveryFailure
Indicates the behavior of adapter if reply/outbound message delivery fails.
Reference SegmentIfRequired
Indicates the segmentation property for the message.
Reference PartialDeliveryForDL
Set to true if partial delivery to DistributionList is allowed. Otherwise, it is set to false.
Reference SyncSolicitReqRes
Set to true if it is a Sync Req-Res(outbound) scenario. Otherwise, it is set to false.
Note that you cannot edit this property in Oracle Enterprise Manager Fusion Middleware Control Console.
Reference ResponseOpaqueSchema
Set to true if a reply/report message in a Sync Req-Res scenario has an opaque schema.
Reference ResponseWaitInterval
Indicates the wait time for the reply/report to arrive.
Reference ResponseNoMessageAllowed
Set to true if no message is allowed as a reply/report after specified wait interval.
Reference ResponseGetMessageOptions
Indicates the Get message options for a reply/report.
Reference ResponseQueueOpenOptions
Indicates the open options for a reply/report queue.
Reference PutMessageOptions
Indicates the Put message options.
Reference QueueOpenOptions
Indicates the open options for the queue.
Note that you cannot edit this property in Oracle Enterprise Manager Fusion Middleware Control Console.
Reference UseMessageEncodingForTranslation
Set to true if characterSet from the header is used while in translation.
Reference DynamicQueueName
Indicates the dynamic queue name.
Reference AlternateUserID Indicates the alternate user ID.
Reference WaitInterval Indicates the wait interval for the outbound dequeue.
Table 33–8 (Cont.) Oracle MQ Series Adapter Properties
Service, Reference, or Endpoint Property Name Description

Configuring Service and Reference Binding Component Properties
Configuring Service and Reference Binding Components 33-27
33.1.2.7 Oracle Socket AdapterTable 33–9 describes the properties available for the Oracle Socket Adapter.
Reference NoMessageAllowed
Set to true if no message is allowed in the outbound dequeue scenario after a specified wait interval.
Reference UseMessageEncodingForTranslation
Set to \"true\" if the characterSet field of MQMD is to be used for translation in the inbound direction. If set to \"false\", the translator uses the encoding from the schema file. You can use the jca.message.encoding property to overwrite any encoding specified, either in MQMD or in the schema file.
Note: Properties such as TransMode and XSLT, which are not listed in Table 33–9, are displayed in the Properties tab. However, you cannot edit properties that are not listed in Table 33–9. Making changes to noneditable properties makes the composite invalid and would require remodeling of the composite.
Table 33–9 Oracle Socket Adapter Properties
Service, Reference, or Endpoint Property Name Description
Service Port The port on which the inbound socket adapter listens for incoming socket connections.
Service Encoding Indicates the character encoding of the native data.
Note that you cannot edit this property in Oracle Enterprise Manager Fusion Middleware Control Console.
Service ByteOrder Indicates the byte order of the native data as bigEndian or littleEndian.
Note that you cannot edit this property in Oracle Enterprise Manager Fusion Middleware Control Console.
Reference Host Indicates the host to which the outbound socket adapter opens a socket connection.
Reference Port Indicates the port to which the outbound socket adapter tries to connect.
Reference Encoding Indicates the character encoding of the native data.
Note that you cannot edit this property in Oracle Enterprise Manager Fusion Middleware Control Console.
Table 33–8 (Cont.) Oracle MQ Series Adapter Properties
Service, Reference, or Endpoint Property Name Description

Configuring Service and Reference Binding Component Properties
33-28 Oracle Fusion Middleware Administrator's Guide for Oracle SOA Suite
33.1.2.8 Oracle JCA Adapters Endpoint PropertiesTable 33–10 describes the endpoint properties available for the Oracle JCA Adapters.
You cannot add or remove the endpoint properties without redeploying the composite. However, you can change the endpoint properties by using the Oracle Enterprise Manager Console without redeploying the composite.
Reference ByteOrder Indicates the byte order of the native data as bigEndian or littleEndian.
Note that you cannot edit this property in Oracle Enterprise Manager Fusion Middleware Control Console.
Table 33–10 Oracle JCA Adapters Endpoint Properties
Direction (Inbound/Outbound) Property Name Description
Inbound activationInstances This property can increase the number of polling (Worker) threads for any inbound JCA resource adapter. It is only meant to help increase concurrency (scalability) for adapters, which do not natively support multi threading. Since most of the adapters included with Fusion Middleware natively support multithreading, this setting would mostly be useful to third party (custom) JCA adapters, which do not natively support multi threading. Set this property to the number of threads that is required for a particular JCA Service (endpoint).
Inbound UseWorkManager By default, JCA adapters use the standard Fusion Middleware WebLogic WorkManager for starting polling (Worker) threads. However, if you want a particular JCA service (endpoint) to use custom (user-defined) WorkManager, then this property enables you to specify the name of such a custom WorkManager. The WorkManager is only used to start the JCA Service (endpoint) for which this property has been defined.
Inbound rejectUncorrelatedMessages
When native correlation is used to correlate an inbound asynchronous message with a previous outbound message (by way of defining a callback interface (for a reference) or by a mid process receive (in BPEL)) the JCA framework normally always try to post the message to the composite, whether the inbound message can be correlated or not. By setting this property to true, the JCA framework rejects a message, which cannot be correlated (when native correlation is active).
Table 33–9 (Cont.) Oracle Socket Adapter Properties
Service, Reference, or Endpoint Property Name Description

Configuring Service and Reference Binding Component Properties
Configuring Service and Reference Binding Components 33-29
The following examples show how to specify the endpoint properties in the composite.xml file in Oracle JDeveloper:
■ Example 1: Specifying Endpoint Properties - Inbound
■ Example 2: Specifying Endpoint Properties - Outbound
Example 1: Specifying Endpoint Properties - Inbound<service name="Inbound"> <interface.wsdl interface="http://xmlns...#wsdl.interface(Inbound_PortType)"/> <binding.jca config="Inbound_db.jca"> <property name="jca.retry.interval">5</property> <property name="jca.retry.interval">1</property> <property name="jca.retry.backoff">2</property> <property name="jca.retry.maxInterval">6</property> </binding.jca></service>
Notice that the inbound property jca.retry.maxPeriod is not supported (like it is in outbound).
Example 2: Specifying Endpoint Properties - Outbound<reference name="Outbound"> <interface.wsdl interface="http://xmlns...#wsdl.interface(Outbound_PortType)"/> <binding.jca config="Outbound_jms.jca"> <property name="jca.retry.count">5</property> <property name="jca.retry.interval">1</property> <property name="jca.retry.backoff">2</property>
Inbound jca.retry.count Indicates the maximum number of retries before rejection.
Inbound jca.retry.interval Indicates the time interval between retries (measured in seconds).
Inbound jca.retry.backoff Indicates the retry interval growth factor (positive integer).
Inbound jca.retry.maxInterval Indicates the maximum value of retry interval; that is, a cap if backoff is greater than 1.
Outbound jca.retry.count Indicates the maximum number of retries before throwing retryable error condition back to invoking service engine.
Outbound jca.retry.interval Indicates the time interval between retries (measured in seconds).
Outbound jca.retry.backoff Indicates the retry interval growth factor (positive integer).
Outbound jca.retry.maxInterval Indicates the maximum value of retry interval; that is, a cap if the backoff is greater than 1.
Outbound jca.retry.maxPeriod Indicates the maximum total retry period. Retries do not occur longer than the value specified in this parameter.
Table 33–10 (Cont.) Oracle JCA Adapters Endpoint Properties
Direction (Inbound/Outbound) Property Name Description

Configuring Service and Reference Binding Component Properties
33-30 Oracle Fusion Middleware Administrator's Guide for Oracle SOA Suite
<property name="jca.retry.maxInterval">6</property> <property name="jca.retry.maxPeriod">30</property> </binding.jca></reference>
33.1.3 Changing the Endpoint Reference and Service Key for Oracle Service Registry Integration
If a reference binding component of the SOA composite application is integrated with Oracle Service Registry (OSR), you can change the endpoint reference and service key in the General section of this page.
The UDDI ServiceKey field automatically displays the value of binding.ws property="oracle.soa.uddi.serviceKey" from the composite.xml file if you selected to use UDDI for run-time resolution of the endpoint.
You can edit the UDDI ServiceKey field after the SOA composite application has been deployed to either:
■ Change the value as needed
■ Add it to a composite that did not use UDDI for run-time endpoint resolution.
The Endpoint Address field represents the endpoint location as defined with the ws.binding endpointURI property in the composite.xml file. The Endpoint Address field is not filled in after the SOA composite application has been deployed, but can override the endpoint location in the concrete WSDL.
The endpoint location order of precedence is as follows:
■ Dynamically set the binding oracle.soa.uddi.serviceKey at run time in the UDDI ServiceKey field.
■ Dynamically set the binding property endpointURI at run time in the Endpoint Address field.
■ Use the binding property value for oracle.soa.uddi.serviceKey in the composite.xml file (viewable and editable in Oracle Enterprise Manager Fusion Middleware Control Console).
■ Use the binding property value for endpointURI in the composite.xml file (viewable and editable in Oracle Enterprise Manager Fusion Middleware Control Console).
■ Use the location specified in the concrete WSDL.
Figure 33–1 provides shows both fields.

Configuring Service and Reference Binding Component Properties
Configuring Service and Reference Binding Components 33-31
Figure 33–1 Endpoint Reference and Service Key Properties
1. In the UDDI ServiceKey field, change the service key to use during run time.
2. In the Endpoint Address field, enter the endpoint address to use during run time.
You can edit both fields. The value for one field is selected and used based on what you selected in the UDDI Deployment Options dialog during design time. The changes to these fields are persisted in the composite.xml file during run time.
For information about design-time tasks such as how to publish a business service, create a connection to the UDDI registry, and configure a SOA project to invoke a service from the registry, see Oracle Fusion Middleware Developer's Guide for Oracle SOA Suite.
For information about how to set the inquiry URL during run time, see Section 3.1, "Configuring SOA Infrastructure Properties."
33.1.3.1 Configuring Caching of WSDL URLsCaching of endpoint WSDL URLs occurs by default during run time. If an endpoint WSDL URL is resolved using the orauddi protocol, subsequent invocations retrieve the WSDL URLs from cache, and not from OSR. You can increase the amount of time that the endpoint WSDL URL is available in cache for inquiry by the service key with the UddiCacheLifetime property. This property invalidates the cache at specified time intervals. The default value is 86400 seconds. The minimum value is 300 seconds.
To configure endpoint caching of WSDL URLs:
1. From the SOA Infrastructure menu, select Administration > System MBean Browser.
2. Select Application Defined MBeans > oracle.as.soainfra.config > Server: soa_server1 > SoaInfraConfig > soa-infra > Attributes.
3. Click the UddiCacheLifetime property on the right side of the page.
4. Enter a value.
5. Click Apply.

Configuring Service and Reference Binding Component Properties
33-32 Oracle Fusion Middleware Administrator's Guide for Oracle SOA Suite

34
Monitoring Service and Reference Binding Components 34-1
34 Monitoring Service and Reference BindingComponents
This chapter describes how to monitor service and reference binding components included in SOA composite applications.
This chapter includes the following topics:
■ Section 34.1, "Monitoring Binding Component Instances and Faults"
■ Section 34.2, "Monitoring Binding Component Rejected Messages"
For more information, see the following documentation:
■ Section 1.2.5, "Understanding Binding Components" for conceptual details about binding components
■ Part XII, "Administering Oracle B2B" for details about Oracle B2B
■ Oracle Fusion Middleware Developer's Guide for Oracle SOA Suite
34.1 Monitoring Binding Component Instances and FaultsYou can monitor instances and faults for all binding components included in SOA composite applications.
To monitor binding component instances and faults:
1. Access this page through one of the following options:
2. Click Dashboard (if it is not selected).
3. Select a specific service or reference in the Services and References section.
4. If you select a service that is a JCA adapter or Web service, the Dashboard page displays the following details:
■ A graphic representation of the total incoming messages and faults since server startup.
From the SOA Infrastructure Menu... From the SOA Folder in the Navigator...
1. Select Home.
2. Select the Deployed Composites tab.
3. In the Composite section, select a specific SOA composite application.
1. Under soa-infra, select a specific SOA composite application.

Monitoring Binding Component Instances and Faults
34-2 Oracle Fusion Middleware Administrator's Guide for Oracle SOA Suite
■ Recently rejected messages, including the message name, time of the fault, and the type of fault (business or system).
5. If you select a service that invokes a SOA composite application through a remote RMI call (known as direct binding), the Dashboard page displays similar details as described in Step 4. Direct binding enables SOA composite applications to be invoked through an API that supports transaction and security propagation across JVMs.
The word Direct displays in the header to indicate that this is a direct binding component. However, no Polices and Properties tabs are available for direct binding components.

Monitoring Binding Component Rejected Messages
Monitoring Service and Reference Binding Components 34-3
6. If you select a reference, the Dashboard page displays the following details:
■ A graphic representation of the total outgoing messages and faults since server startup.
■ Recent faults, including the time of the fault and the type of fault (business or system).
Reference binding components are only available for JCA adapters and Web services.
34.2 Monitoring Binding Component Rejected Messages You can monitor rejected messages for all binding components included in a SOA composite application.
To monitor binding component rejected messages:
1. Access this page through one of the following options:
2. Select a service or reference in the Services and References section.
3. Click Faults and Rejected Messages.
The Faults and Rejected Messages page shows the list of faults and rejected messages, including details such as the error message, time of the fault, and the
From the SOA Infrastructure Menu... From the SOA Folder in the Navigator...
1. Select Home.
2. Select the Deployed Composites tab.
3. In the Composite section, select a specific SOA composite application.
1. Under soa-infra, select a specific SOA composite application.

Monitoring Binding Component Rejected Messages
34-4 Oracle Fusion Middleware Administrator's Guide for Oracle SOA Suite
associated composite instance ID. Depending upon the type of the binding component selected, the faults can be on the incoming messages processed by a service binding component or outgoing messages processed by a reference binding component.
You can perform fault recovery from this page.
4. Click a specific message in the Error Messages column to display complete fault details, including the fault ID, fault time, fault location, fault type, and error message text. A Recover Now option displays for recoverable faults. Click Recover Now to perform fault recovery.
5. If you want to delete rejected messages., click Delete Rejected Messages.
6. This displays a dialog for specifying a criteria for deleting rejected messages.

Monitoring Binding Component Rejected Messages
Monitoring Service and Reference Binding Components 34-5
7. Specify a criteria, and click Delete.

Monitoring Binding Component Rejected Messages
34-6 Oracle Fusion Middleware Administrator's Guide for Oracle SOA Suite

35
Managing Service and Reference Binding Components 35-1
35 Managing Service and Reference BindingComponents
This chapter describes how to manage Web service and JCA adapter service and reference binding components included in SOA composite applications.
This chapter includes the following topic:
■ Section 35.1, "Managing Binding Component Policies"
For more information, see the following documentation:
■ Section 1.2.5, "Understanding Binding Components" for conceptual details about binding components
■ Oracle Fusion Middleware Developer's Guide for Oracle SOA Suite
35.1 Managing Binding Component PoliciesYou can attach and detach security policies to and from binding components included in a currently deployed SOA composite application. Policies apply security to the delivery of messages. Oracle Fusion Middleware uses a policy-based model to manage Web services.
Notes:
■ Oracle SOA Suite does not support multiple bindings for service or reference binding components (for example, specifying both SOAP 1.1 and SOAP 1.2 in the composite.xml file). Support is only provided for a single Web service binding per service or reference. If you specify multiple bindings, remove all but one and redeploy your SOA composite application.
■ The only type of binding component to which you can attach a policy is a Web service. If you click the Policies tab for another type of binding component, such as a JCA adapter, ADF-BC service, or EJB service, the following message is displayed:
Policies can be attached to web service bindings and SOAcomponents.
Note: Before attaching policies, see Oracle Fusion Middleware Security and Administrator's Guide for Web Services for definitions of available policies and details about which ones to use in your environment.

Managing Binding Component Policies
35-2 Oracle Fusion Middleware Administrator's Guide for Oracle SOA Suite
To manage binding component policies:
1. Access this page through one of the following options:
The list of currently deployed SOA composite applications appears.
2. In the Composite list, select an application.
The Dashboard page for the selected SOA composite application appears. The Services and References section of this tab displays the binding components being used in the application.
3. In the Services and References section, select a service or reference.
4. Click Policies.
The Policies page enables you to attach and detach security policies to and from a service or reference binding component. The policies table displays the attached policy name, the policy reference status (enabled or disabled), the category (Management, Reliable Messaging, MTOM Attachment, Security, or WS Addressing), the violations since the SOA Infrastructure was last restarted, and the authentication, authorization, confidentiality, and integrity failures since the SOA Infrastructure was last restarted.
5. Click Attach/Detach.
If multiple components are available, you are prompted to select the service or component for which to perform the attachment or detachment.
From the SOA Infrastructure Menu... From the SOA Folder in the Navigator...
1. Select Home.
2. Select the Deployed Composites tab.
3. In the Composite section, select a specific SOA composite application.
1. Under soa-infra, select a specific SOA composite application.

Managing Binding Component Policies
Managing Service and Reference Binding Components 35-3
6. Select the service or component to which to attach or detach a policy.
This invokes a dialog for attaching or detaching policies.
Policies currently attached appear in the Attached Policies section. Additional policies available for attachment appear in the Available Policies section.
7. Select policies to attach that are appropriate to your environment.
8. Click Attach.
9. When you are finished attaching policies, click Validate.
10. If an error message appears, make the necessary corrections until you no longer have any validation errors.
The attached policy displays in the policies table.
11. Click OK.
For more information, see the following documentation:
■ Section 1.3.3.2, "Understanding Policies"
■ Section 8.8, "Managing SOA Composite Application Policies" for the dialogs that display during policy attachment
■ Oracle Fusion Middleware Security and Administrator's Guide for Web Services for definitions of available policies and details about which ones to use for your environment
35.1.1 Override Policy Configuration Property ValuesYour environment may include multiple servers with the same policies. However, each server may have their own specific policy requirements. To satisfy your run-time requirements, you can override the property values for some management and security policies attached to service and reference binding components.
1. Follow the instructions in Section 35.1, "Managing Binding Component Policies" to attach a policy to a service or reference binding component.
2. Select the attached policy in the table.
The Security Configuration Details table displays at the bottom of the page.
Note: If you attach a policy to a service binding component (client) and initiate an instance of the SOA composite application in the Test Web Service page, and the policy attachment fails, an Oracle Web Services Manager (OSWM) policy error is not generated and viewable in Oracle Enterprise Manager Fusion Middleware Control Console.
If the same SOA composite application instance is initiated externally, a policy error is generated and viewable in Oracle Enterprise Manager Fusion Middleware Control Console.
For service components (such as a BPEL process) or reference binding components, the policy error is always generated and viewable, regardless of whether the application instance was initiated externally or internally through the Test Web Service page.

Managing Binding Component Policies
35-4 Oracle Fusion Middleware Administrator's Guide for Oracle SOA Suite
3. In the Value field, enter a value to override the default value in the Original Value column.
4. Click Apply.
For more information on overriding policy values, see Oracle Fusion Middleware Security and Administrator's Guide for Web Services.
35.1.2 Limitation on MTOM Optimization in Reference Binding Component MessagesMTOM optimization is not supported for messages sent from a reference binding component to an external service. All binary messages leaving the reference binding component increase by 33%.

Part XVAppendixes
This part includes the following appendixes:
■ Appendix A, "Demo User Community"
■ Appendix B, "Troubleshooting Oracle SOA Suite"
■ Appendix C, "Oracle Enterprise Manager Roles"


A
Demo User Community A-1
ADemo User Community
This appendix describes the demo user community for task assignments in Oracle SOA Suite.
This appendix includes the following topics:
■ Section A.1, "Using the Demo User Community"
■ Section A.2, "Users"
■ Section A.3, "Groups"
■ Section A.4, "soa-infra Application Roles"
■ Section A.5, "SOATestDemoApp Application Roles"
■ Section A.6, "Roles Granted to and Owned by Users"
■ Section A.7, "The WorkflowPermission Class"
A.1 Using the Demo User CommunityAfter installing Oracle SOA Suite, you must seed the user demo community in the database. The demo user community is an organizational hierarchy of users and groups.
To seed the demo user community:
1. Download the workflow-001-DemoCommunitySeedApp sample from the following URL:
http://www.oracle.com/technology/sample_code/products/hwf/index.html
2. Follow the instructions in the README.txt file included with this sample. This file describes how to seed the user demo community described in the appendix.
A.2 UsersTable A–1 lists the users in the demo community.

Users
A-2 Oracle Fusion Middleware Administrator's Guide for Oracle SOA Suite
Figure A–1 shows the organizational hierarchy of the demo community.
Table A–1 Users in the Demo Community
UserUser Name First Name Last Name Title Manager E-Mail
1 achrist Agatha Christie Loan Consultant
wfaulk [email protected]
5 cdickens Charles Dickens CEO -- [email protected]
6 cdoyle Conan Doyle Loan Agent 2
rsteven [email protected]
3 EHEMING Ernest Hemingway CFO JVerne [email protected]
7 fkafka Franz Kafka Manager 1 ltolstoy [email protected]
8 istone Irving Stone Loan Agent 2
sfitzger [email protected]
9 jausten Jane Austen Loan Consultant
fkafka [email protected]
10 jcooper James Cooper Loan Agent 1
jstein [email protected]
11 jlondon Jack London Loan Agent 1
sfitzger [email protected]
12 jstein John Steinbeck Manager 2 wfaulk [email protected]
2 JVerne Jules Verne CIO cdickens [email protected]
13 ltolstoy Leo Tolstoy Director wfaulk [email protected]
14 mmitch Margaret Mitchell Loan Analyst
fkafka [email protected]
15 mtwain Mark Twain Loan Agent 2
jstein [email protected]
16 rsteven Robert Stevenson Manager 3 jstein [email protected]
17 sfitzger Scott Fitzgerald Manager 1 wfaulk [email protected]
18 szweig Stefan Zweig Loan Analyst
fkafka [email protected]
4 VHUGO Victor Hugo HR Manager
EHEMING [email protected]
19 wfaulk William Faulkner Vice President
cdickens [email protected]
20 wshake William Shakespeare Manager 3 rsteven [email protected]

Groups
Demo User Community A-3
Figure A–1 Demo Community Organizational Hierarchy
A.3 GroupsTable A–2 lists the groups in the demo community; the users and groups that are granted each group role (direct grantees and all grantees); and the group roles and application roles granted to each group (direct-granted roles and all granted roles). See Table A–6 for the roles granted to users sorted by user.
Table A–2 Groups in the Demo Community: Grant Relationships
Group Direct Grantees All Grantees Direct-Granted Roles All Granted Roles
RegionalOffices CentralRegion, WesternRegion, EasternRegion
szweig, wshake, jcooper, WesternRegion, mmitch, EasternRegion, jlondon, CentralRegion, istone, cdoyle, mtwain, California, fkafka
- -
EasternRegion szweig, wshake, mmitch, fkafka
szweig, wshake, mmitch, fkafka
RegionalOffices RegionalOffices
CentralRegion jlondon, mtwain jlondon, mtwain RegionalOffices RegionalOffices
Vice PresidentWilliam FaulknerWfaulk
Manager1Scott Fitzgeraldsfitzger
CIOJules Vernejverne
CFOErnest Hemingwayheming
HR ManagerVictor Hugovhugo
Manager2John Steinbeckjstein
Loan Agent1Jack Londonjlondon
Loan Agent2Irving Stoneistone
Loan ConsultantAgatha Christieachrist
Manager1Franz Kafkafkafka
DirectorLeo Tolstoyltolstoy
Loan AnalystStefan Zweigszweig
Loan AnalystMargaret MunnerlynMitchellmmitch
Loan ConsultantJane Austinjausten
Manager3Robert Louis Stevensonrsteven
Loan Agent1 Loan Agent2
James Cooperjcooper
Mark Twainmtwain
Loan Agent2 Manager 3
Conan Doylecdoyle
William Shakespearewshake
CEOCharles DickensCdickens

soa-infra Application Roles
A-4 Oracle Fusion Middleware Administrator's Guide for Oracle SOA Suite
Table A–3 continues information for several groups listed in Table A–2. It lists the users and groups (direct owners and all owners) that own each group and the group roles (direct-owned roles and all owned roles) that each group owns. See Table A–6 for the roles owned by users sorted by user.
A.4 soa-infra Application RolesTable A–4 lists the soa-infra application roles; the users, groups, and roles that are granted each application role (direct grantees and all grantees); and the roles granted to each application role (direct-granted roles and all granted roles). See Table A–6 for the application roles granted to users sorted by user.
WesternRegion cdoyle, California jcooper, istone, cdoyle, California
RegionalOffices RegionalOffices
California jcooper, istone jcooper, istone WesternRegion RegionalOffices, WesternRegion
LoanAgentGroup jlondon, wshake, LoanAnalyticGroup, jcooper, istone, cdoyle, mtwain
szweig, jlondon, wshake, LoanAnalyticGroup, jcooper, istone, cdoyle, mtwain, mmitch, fkafka
- -
LoanAnalyticGroup
szweig, mmitch, fkafka
szweig, mmitch, fkafka BPMWorkflowCustomize, LoanAgentGroup
BPMWorkflowCustomize, LoanAgentGroup
Supervisor jcooper, mtwain, rsteven
jcooper, mtwain, rsteven
- -
Executives cdickens, JVerne, EHEMING, VHUGO
cdickens, JVerne, EHEMING, VHUGO
- -
Table A–3 Groups in the Demo Community: Ownership Relationships
Group Direct Owners All Owners Direct Owned Roles All Owned Roles
EasternRegion jstein jstein - -
WesternRegion jstein jstein - -
California fkafka fkafka - -
LoanAgentGroup jcooper, fkafka jcooper, fkafka - -
LoanAnalyticGroup jstein jstein - -
Supervisor jstein jstein - -
Table A–4 Application Roles in soa-infra
Application Role Direct Grantees All Grantees Direct-Granted Roles All Granted Roles
SOAAdmin Administrators Administrators BPMWorkflowAdmin BPMWorkflowCustomize BPMWorkflowAdmin
BPMWorkflowAdmin SOAAdmin, demoadmin
SOAAdmin, demoadmin, Administrators
BPMWorkflowCustomize BPMWorkflowCustomize
BPMWorkflowCustomize LoanAnalyticGroup, BPMWorkflowAdmin
szweig, LoanAnalyticGroup, SOAAdmin, BPMWorkflowAdmin, mmitch, fkafka, Administrators, demoadmin
- -
Table A–2 (Cont.) Groups in the Demo Community: Grant Relationships
Group Direct Grantees All Grantees Direct-Granted Roles All Granted Roles

Roles Granted to and Owned by Users
Demo User Community A-5
For more information about application roles, see Oracle Fusion Middleware Developer's Guide for Oracle SOA Suite.
A.5 SOATestDemoApp Application RolesTable A–5 lists the roles in the SOATestDemoApp application.
A.6 Roles Granted to and Owned by UsersTable A–6 lists the roles granted to each user (direct-granted roles and all granted roles) and the roles owned by each user (direct-owned roles and all owned roles).
Table A–5 SOATestDemoApp Roles
Application Role Direct Grantees All Grantees Direct-Granted Roles All Granted Roles
DevTeam rsteven rsteven, mmitch, fkafka, jcooper, istone
QATeam jlondon, Supervisor jlondon, jcooper, mtwain, rsteven, mmitch, fkafka, istone
ProductionTeam mmitch, fkafka, California
mmitch, fkafka, jcooper, istone
DevTeam, QATeam DevTeam, QATeam
Table A–6 Roles for Each User
User Name Direct-Granted Roles All Granted Roles Direct-Owned Roles All Owned Roles
achrist Executives - - -
cdickens - - Executives -
cdoyle WesternRegion, LoanAgentGroup
RegionalOffices, WesternRegion, LoanAgentGroup
- -
EHEMING Executives
fkafka LoanAnalyticGroup, EasternRegion, ProductionTeam
BPMWorkflowCustomize, RegionalOffices, LoanAnalyticGroup, LoanAgentGroup, EasternRegion, ProductionTeam, DevTeam, QATeam
LoanAgentGroup, California
LoanAgentGroup, California
istone LoanAgentGroup, California RegionalOffices, WesternRegion, LoanAgentGroup, California, DevTeam, QATeam, ProductionTeam
- -
jausten - - - -
jcooper Supervisor, LoanAgentGroup, California
RegionalOffices, WesternRegion, Supervisor, LoanAgentGroup, California, DevTeam, QATeam, ProductionTeam
LoanAgentGroup LoanAgentGroup
jlondon CentralRegion, LoanAgentGroup, QATeam
CentralRegion, RegionalOffices, LoanAgentGroup, QATeam
- -
jstein - - LoanAnalyticGroup WesternRegion, Supervisor, EasternRegion
LoanAnalyticGroup WesternRegion, Supervisor, EasternRegion
JVerne Executives

The WorkflowPermission Class
A-6 Oracle Fusion Middleware Administrator's Guide for Oracle SOA Suite
A.7 The WorkflowPermission ClassTable A–7 lists the permissions defined in the WorkflowPermission class and the application roles associated with each permission.
ltolstoy - - - -
mmitch LoanAnalyticGroup, EasternRegion, ProductionTeam
BPMWorkflowCustomize RegionalOffices, LoanAnalyticGroup, LoanAgentGroup, EasternRegion, DevTeam, QATeam, ProductionTeam
- -
mtwain CentralRegion, Supervisor, LoanAgentGroup
CentralRegion, RegionalOffices, Supervisor, LoanAgentGroup, QATeam
- -
rsteven Supervisor, DevTeam Supervisor, DevTeam - -
sfitzger - - - -
szweig LoanAnalyticGroup, EasternRegion
BPMWorkflowCustomizeDemoApp/FlexFieldRole, RegionalOffices, LoanAnalyticGroup, LoanAgentGroup, EasternRegion
vhugo Executives
wfaulk - - - -
wshake LoanAgentGroup, EasternRegion
RegionalOffices, LoanAgentGroup, EasternRegion
- -
Table A–7 WorkflowPermission Class
Permission Application Role with Permission
workflow.mapping.publicFlexField BPMWorkflowAdmin, BPMWorkflowCustomize
workflow.mapping.protectedFlexField BPMWorkflowAdmin
workflow.admin BPMWorkflowAdmin
workflow.admin.evidenceStore BPMWorkflowAdmin
Table A–6 (Cont.) Roles for Each User
User Name Direct-Granted Roles All Granted Roles Direct-Owned Roles All Owned Roles

B
Troubleshooting Oracle SOA Suite B-1
BTroubleshooting Oracle SOA Suite
This appendix describes how to troubleshoot issues you can encounter when using Oracle SOA Suite.
This appendix includes the following topics:
■ Section B.1, "Best Practice for Starting and Stopping a Managed Server"
■ Section B.2, "Optimizing the Loading of Pages with Instance and Faults Metrics"
■ Section B.3, "Resolving Message Failure Caused By Too Many Open Files"
■ Section B.4, "Extending Tablespaces to Avoid Problems at Run Time"
■ Section B.5, "Resolving Connection Timeouts"
■ Section B.6, "Increasing Database Connection Values"
■ Section B.7, "Accessing Oracle Enterprise Manager Fusion Middleware Control Console on Dual Stack Hosts that Support IPv4 and IPv6"
B.1 Best Practice for Starting and Stopping a Managed ServerAs a best practice, it is always recommended that you start and stop a managed server through one, but not both, of the following methods. Do not mix these methods, such as starting the managed server from the command line and stopping it from Oracle Enterprise Manager Fusion Middleware Control Console, or vice versa.
■ Oracle Enterprise Manager Fusion Middleware Control Console
With this method, the node manager must be up and running. The node manager tracks all managed server startups and shutdowns performed from Oracle Enterprise Manager Fusion Middleware Control Console. With this method, the server state is not an issue.
■ Command line
With this method, the node manager does not track the server state. Therefore, if you start the server from the command line and shut it down from Oracle Enterprise Manager Fusion Middleware Control Console, the Oracle WebLogic Administration Server accesses the node manager to determine its status, which returns a state of Unknown.
Perform the following steps to stop and start the server from Oracle Enterprise Manager Fusion Middleware Control Console.
1. Expand the WebLogic domain.
2. Select the managed server (for example, named soa_server1).
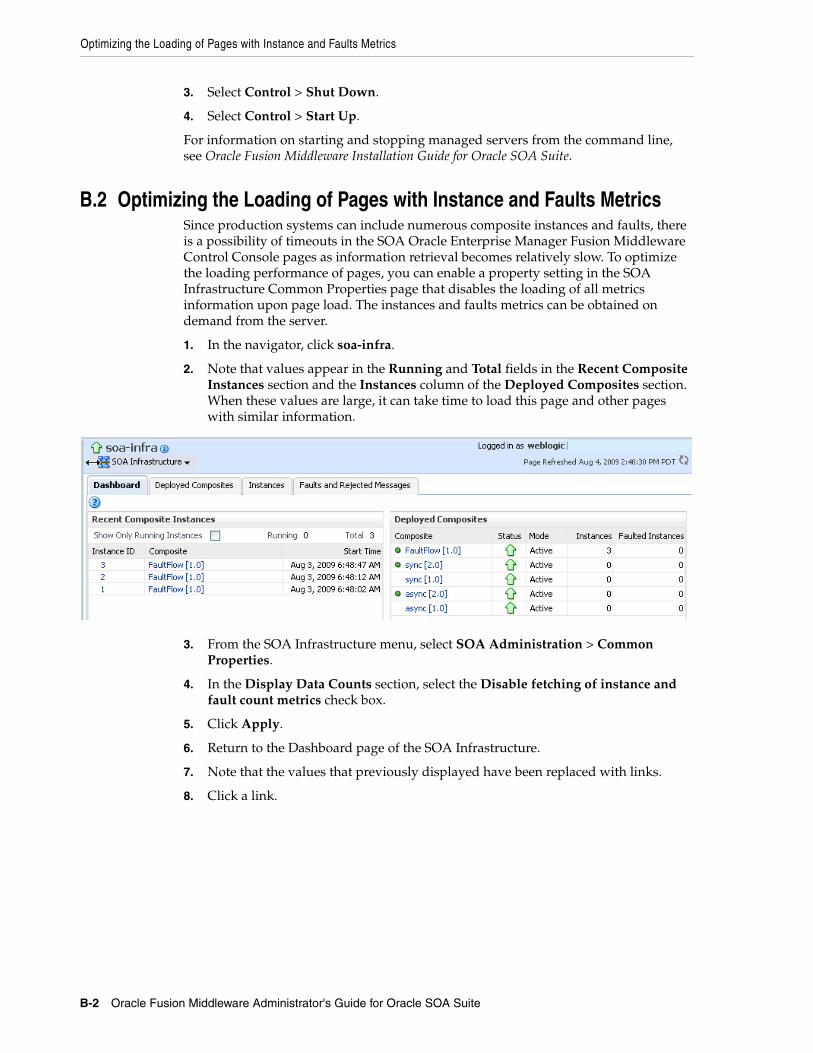
Optimizing the Loading of Pages with Instance and Faults Metrics
B-2 Oracle Fusion Middleware Administrator's Guide for Oracle SOA Suite
3. Select Control > Shut Down.
4. Select Control > Start Up.
For information on starting and stopping managed servers from the command line, see Oracle Fusion Middleware Installation Guide for Oracle SOA Suite.
B.2 Optimizing the Loading of Pages with Instance and Faults MetricsSince production systems can include numerous composite instances and faults, there is a possibility of timeouts in the SOA Oracle Enterprise Manager Fusion Middleware Control Console pages as information retrieval becomes relatively slow. To optimize the loading performance of pages, you can enable a property setting in the SOA Infrastructure Common Properties page that disables the loading of all metrics information upon page load. The instances and faults metrics can be obtained on demand from the server.
1. In the navigator, click soa-infra.
2. Note that values appear in the Running and Total fields in the Recent Composite Instances section and the Instances column of the Deployed Composites section. When these values are large, it can take time to load this page and other pages with similar information.
3. From the SOA Infrastructure menu, select SOA Administration > Common Properties.
4. In the Display Data Counts section, select the Disable fetching of instance and fault count metrics check box.
5. Click Apply.
6. Return to the Dashboard page of the SOA Infrastructure.
7. Note that the values that previously displayed have been replaced with links.
8. Click a link.

Resolving Message Failure Caused By Too Many Open Files
Troubleshooting Oracle SOA Suite B-3
The values are calculated for the link you selected. When the calculation is complete, a message displays the total values.
For more information about setting this property, see Section 3.1, "Configuring SOA Infrastructure Properties."
B.3 Resolving Message Failure Caused By Too Many Open FilesYou can receive the following error at run time or compilation time, depending on the number of JAR files being used, the use of file descriptors by JDK 6/JRE, or both.
Message send failed: Too many open files
To resolve this error, increase the number of file descriptors to at least 4096.
1. Use the limit command (for the C shell) or the ulimit command (for the Bash shell) to identify the value for descriptors. A value of 1024 is typically too low, especially for JDK 6.
% limit
cputime unlimited
Notes:
■ If you click a link to retrieve instance and fault count metrics, and Oracle Enterprise Manager Fusion Middleware Control Console times out, increase the transaction timeout property. For more information, see Section B.5, "Resolving Connection Timeouts."
■ If you click Recalculate, and the recalculation occurs quickly, the progress indicator does not have a chance to render. However, any updates to the data are reflected on-screen.

Extending Tablespaces to Avoid Problems at Run Time
B-4 Oracle Fusion Middleware Administrator's Guide for Oracle SOA Suite
filesize unlimiteddatasize unlimitedstacksize 10240 kbytescoredumpsize unlimitedmemoryuse unlimitedvmemoryuse unlimiteddescriptors 1024memorylocked 500000 kbytesmaxproc 46720
2. Log in as the root user on your operating system.
3. Edit the /etc/security/limits.conf file to increase the value for descriptors.
For this example, the limits.conf file looks as follows after increasing the limit for all users to 4096:
#<domain> <type> <item> <value>#
#* soft core 0#* hard rss 10000#@student hard nproc 20#@faculty soft nproc 20#@faculty hard nproc 50#ftp hard nproc 0#@student - maxlogins 4
# End of file@svrgroup soft memlock 500000@svrgroup hard memlock 500000* soft nofile 4096* hard nofile 4096
4. Close your terminal and reopen for the change to take effect. A system restart is not required.
B.4 Extending Tablespaces to Avoid Problems at Run TimeIf the database tablespace is not extended, run time processing can be impacted. Messages are not processed or persisted, and exception errors similar to the following can appear in the log files. This is because Oracle BPEL Process Manager relies on the database to store instance data. If the database is not available, run-time processing is impacted.
INFO: MediatorServiceEngine returning after processing the request for operation = processResponse
[EL Warning]: 2009.01.14 11:46:16.783--UnitOfWork(32372128)--Exception [EclipseLink-4002] (Eclipse Persistence Services - 1.1 (Build SNAPSHOT-20081007)): org.eclipse.persistence.exceptions.DatabaseException Internal Exception: java.sql.BatchUpdateException: ORA-01691: unable to extend lob segment SH_SOAINFRA.SYS_LOB0000145067C00007$$ by 1024 in tablespace SH_SOAINFRA
Error Code: 1691 Query: InsertObjectQuery(com.collaxa.cube.persistence.dto.AuditTrail@199b33d) [EL Warning]: 2009.01.14 11:46:16.782--UnitOfWork(32372128)--Exception [EclipseLink-4002] (Eclipse Persistence Services - 1.1 (Build

Increasing Database Connection Values
Troubleshooting Oracle SOA Suite B-5
SNAPSHOT-20081007)): org.eclipse.persistence.exceptions.DatabaseException Internal Exception: java.sql.BatchUpdateException: ORA-01691: unable to extend lob segment SH_SOAINFRA.SYS_LOB0000145067C00007$$ by 1024 in tablespace SH_SOAINFRA . . .. . .
Ensure that you set a tablespace to automatically extend itself by a specified amount when it reaches its size limit. If you do not enable autoextend, ensure that you respond when alerted that the tablespace is reaching its critical or warning threshold size. You can respond to size alerts by manually increasing the tablespace size.
B.5 Resolving Connection TimeoutsYou can receive a connection timeout error under circumstances such as the following:
■ You run a SOA composite application with a large payload that takes more than 30 seconds to process.
■ You are invoking a stress test using a large payload from the Test Web Service page of Oracle Enterprise Manager Fusion Middleware Control Console.
■ You are passing a large number of message files (one million) into a composite with a file adapter service.
■ You are retrieving instance and fault count metrics in Oracle Enterprise Manager Fusion Middleware Control Console.
To avoid receiving timeout errors, increase the transaction timeout property as follows:
1. Log into Oracle WebLogic Administration Console.
2. Click JTA.
3. Change the value of Timeout Seconds (the default is 30).
4. Click Save.
5. Restart Oracle WebLogic Server.
B.6 Increasing Database Connection ValuesYou can receive the following error message because of slow connections to the database.
Exception [TOPLINK-4002] (Oracle TopLink - 11g Release 1 (11.1.1.1.0) (Build 090304)): oracle.toplink.exceptions.DatabaseException Internal Exception: java.sql.SQLException: Internal error: Cannot obtain XAConnection weblogic.common.resourcepool.ResourceDeadException: Pool SOADataSource has been disabled because of hanging connection tests, cannot allocate resources to applications.
If this occurs, perform the following steps:
1. Open the DOMAIN_HOME\bin\setSOADomainEnv.cmd file.
2. Uncomment the lines shown in bold.
# 8331492: Value of weblogic.resourcepool.max_test_wait_secs is 10 # seconds. It can be increased by uncommenting line below if your database # connections are slow. See SOA documentation for more details. EXTRA_JAVA_PROPERTIES="${EXTRA_JAVA_PROPERTIES}

Accessing Oracle Enterprise Manager Fusion Middleware Control Console on Dual Stack Hosts that Support IPv4 and IPv6
B-6 Oracle Fusion Middleware Administrator's Guide for Oracle SOA Suite
-Dweblogic.resourcepool.max_test_wait_secs=30" export EXTRA_JAVA_PROPERTIES
3. Save your changes and restart the managed Oracle WebLogic Server.
B.7 Accessing Oracle Enterprise Manager Fusion Middleware Control Console on Dual Stack Hosts that Support IPv4 and IPv6
If you run Oracle SOA Suite on a dual stack host that supports both IPv4 and IPv6, you must update the etc/hosts file as shown in Table B–1 for IPv4 clients to access IPv6 URLs in Oracle Enterprise Manager Fusion Middleware Control Console.
Table B–1 IPv4 and IPv6 Settings in etc/hosts File
On The... Edit the etc/hosts File as Follows....
On the IPv4 client: xx.xxx.xxx.xxx myhost10-ipv6
where xx.xxx.xxx.xxx is the IP address of IPv6.
On the IPv6 client fdf5:74cc:db0a::0:1 myhost10-ipv6 myhost10-ipv6.us.oracle.com
Note: Replace fdf5:74cc:db0a::0:1 with a value appropriate to your host environment.

C
Oracle Enterprise Manager Roles C-1
COracle Enterprise Manager Roles
This appendix describes the privileges that users with the administrator, operator, and monitor roles are authorized with when accessing pages in Oracle Enterprise Manager Fusion Middleware Control Console.
This chapter includes the following topic:
■ Section C.1, "Roles and Privileges"
For information about how to create roles, add users to groups, and secure resources with roles and policies, see Oracle Fusion Middleware Securing Resources Using Roles and Policies for Oracle WebLogic Server and the Oracle Fusion Middleware Oracle WebLogic Server Administration Console Online Help. Click the Contents link in the Console Help to access procedures for performing the above-mentioned tasks.
C.1 Roles and PrivilegesOracle Enterprise Manager Fusion Middleware Control Console supports the notion of role-based access. Users are mapped to different roles; each role corresponds to a different set of privileges. Using this mechanism, you can provision certain users with simple monitoring privileges (for instance view-only access), while administrators can be granted full access, including the ability to update configurations, restart servers, and so on.
The following roles have been defined for Oracle WebLogic Server in Oracle Enterprise Manager Fusion Middleware Control Console:
■ Administrator
This role provides complete management and monitoring capabilities.
■ Operator
This role provides restricted management capabilities.
■ Monitor
This role provides read-only capabilities.
C.1.1 Overall Role Functionality MatrixTable C–1 lists the actions that users with each role can perform.
Table C–1 Role Functionality Matrix
Actions Monitor Operator Administrator
View monitoring metrics Yes Yes Yes

Roles and Privileges
C-2 Oracle Fusion Middleware Administrator's Guide for Oracle SOA Suite
C.1.2 SOA Infrastructure PageTable C–2 lists the lowest role that a user must have to access this page and the privileges that each role has on this page.
View configurations Yes Yes Yes
Update configurations No No Yes
Handle fault actions No Yes Yes
Create instances using the Test Web Service page
Yes Yes Yes
Start, stop, retire, and activate a composite
No Yes Yes
Execute unit tests No Yes Yes
Attach and detach policies No No Yes
View instances, the flow trace, and the audit trail
Yes Yes Yes
View audit trail payloads Yes Yes Yes
Delete instances No No Yes
Start and stop the SOA Infrastructure
No Yes Yes
Perform deployment options (deploy, undeploy, and redeploy)
No Yes Yes
Modify composite properties (enable payload and audit level)
No Yes Yes
Table C–2 SOA Infrastructure Page
Page ElementsLowest Role for Accessing Monitor Operator Administrator
View Dashboard tab Monitor Yes Yes Yes
View Deployed Composites tab
■ Start/stop (SOA Infrastructure)
■ Activate/retire
■ Deployment options
■ Set as default
Monitor
Operator
Operator
Operator
Operator
Yes
No
No
No
No
Yes
Yes
Yes
Yes
Yes
Yes
Yes
Yes
Yes
Yes
View Instances tab
■ Delete options (all)
■ Abort
Monitor
Administrator
Administrator
Yes
No
No
Yes
No
No
Yes
Yes
Yes
View Faults and Rejected Messages tab
■ Recovery actions
■ Delete rejected messages
Monitor
Operator
Administrator
Yes
No
No
Yes
Yes
No
Yes
Yes
Yes
Table C–1 (Cont.) Role Functionality Matrix
Actions Monitor Operator Administrator

Roles and Privileges
Oracle Enterprise Manager Roles C-3
C.1.3 SOA Infrastructure MenuTable C–3 lists the lowest role that a user must have to access the options on this menu and the privileges that each role has on the menu options.
C.1.4 SOA Composite MenuTable C–4 lists the lowest role that a user must have to access the options on this menu and the privileges that each role has on the menu options.
C.1.5 Composite Home PageTable C–5 lists the lowest role that a user must have to access this page and the privileges that each role has on this page.
Table C–3 SOA Infrastructure Menu
Menu ItemsLowest Role for Accessing Monitor Operator Administrator
Control Operator No Yes Yes
SOA Deployment Operator No Yes Yes
Logs >Log Configuration Administrator No No Yes
Other menu items Monitor Yes Yes Yes
Table C–4 SOA Composite Menu
Menu ItemsLowest Role for Accessing Monitor Operator Administrator
SOA Deployment Operator No Yes Yes
Test Service Monitor Yes Yes Yes
Other menu items Monitor Yes Yes Yes
Table C–5 Composite Home Page
Page Elements Lowest Role for Accessing Monitor Operator Administrator
View Dashboard tab
■ Test composite service action
■ Activate/retire action
■ Start/stop action
■ Property changes (settings)
Monitor
Operator
Operator
Operator
Operator
Yes
No
No
No
No
Yes
Yes
Yes
Yes
Yes
Yes
Yes
Yes
Yes
Yes
View Instances tab
■ Delete/abort actions
Monitor
Administrator
Yes
No
Yes
No
Yes
Yes
View Faults tab
■ Fault recovery actions
■ Delete rejected messages
Monitor
Operator
Administrator
Yes
No
No
Yes
Yes
No
Yes
Yes
Yes
View Unit Test tab
■ Execute test action
Monitor
Operator
Yes
No
Yes
Yes
Yes
Yes
View Policies tab
■ Attach/detach action
Monitor
Administrator
Yes
No
Yes
No
Yes
Yes

Roles and Privileges
C-4 Oracle Fusion Middleware Administrator's Guide for Oracle SOA Suite
C.1.6 BPEL Process Service EngineTable C–6 lists the lowest role that a user must have to access this page and the privileges that each role has on this page.
C.1.7 Mediator Service EngineTable C–7 lists the lowest role that a user must have to access this page and the privileges that each role has on this page.
C.1.8 Human Workflow Service EngineTable C–8 lists the lowest role that a user must have to access this page and the privileges that each role has on this page.
Table C–6 BPEL Process Service Engine
Menu ItemsLowest Role for Accessing Monitor Operator Administrator
View Dashboard tab Monitor Yes Yes Yes
View Statistics tab Monitor Yes Yes Yes
View Instances tab Monitor Yes Yes Yes
View Faults tab
■ Fault recovery actions (abort, retry, and so on)
Monitor
Operator
Yes
No
Yes
Yes
Yes
Yes
View Deployed Components tab Monitor Yes Yes Yes
Message Recovery tab
■ BPEL message recovery action
Monitor
Operator
Yes
No
Yes
Yes
Yes
Yes
View Configuration (Properties page)
■ Apply button
■ Add button
Monitor
Administrator
Administrator
Yes
No
No
Yes
No
No
Yes
Yes
Yes
Table C–7 Mediator Service Engine
Page ElementsLowest Role for Accessing Monitor Operator Administrator
View Dashboard tab Monitor Yes Yes Yes
View Statistics tab Monitor Yes Yes Yes
View Instances tab Monitor Yes Yes Yes
View Faults tab
■ Fault recovery action (abort, retry, and so on)
Monitor
Operator
Yes
No
Yes
Yes
Yes
Yes
View Deployed Components tab
Monitor Yes Yes Yes
View Configuration (Properties page)
Monitor Yes Yes Yes
Apply button Administrator No No Yes

Roles and Privileges
Oracle Enterprise Manager Roles C-5
C.1.9 Business Rules Service EngineTable C–9 lists the lowest role that a user must have to access this page and the privileges that each role has on this page.
C.1.10 BPEL Process Service Component Home PageTable C–10 lists the lowest role that a user must have to access this page and the privileges that each role has on this page.
Table C–8 Human Workflow Service Engine
Page ElementsLowest Role for Accessing Monitor Operator Administrator
View Dashboard tab Monitor Yes Yes Yes
View Statistics tab Monitor Yes Yes Yes
View Instances tab Monitor Yes Yes Yes
View Faults tab
■ Fault recovery action (abort, retry, and so on)
Monitor
Operator
Yes
No
Yes
Yes
Yes
Yes
View Deployed Components tab Monitor Yes Yes Yes
View Notification Management tab
■ Send notifications
Monitor
Administrator
Yes
No
Yes
No
Yes
Yes
Configuration (Properties page)
■ Apply button
Monitor
Administrator
Yes
No
Yes
No
Yes
Yes
Table C–9 Business Rules Service Engine
Page ElementsLowest Role for Accessing Monitor Operator Administrator
View Dashboard tab Monitor Yes Yes Yes
View Instances tab Monitor Yes Yes Yes
View Faults tab Monitor Yes Yes Yes
View Deployed Components tab
Monitor Yes Yes Yes
Table C–10 BPEL Process Service Component Home Page
Page ElementsLowest Role for Accessing Monitor Operator Administrator
View Dashboard tab Monitor Yes Yes Yes
View Instances tab Monitor Yes Yes Yes
View Faults tab
■ Fault recovery action
Monitor
Operator
Yes
No
Yes
Yes
Yes
Yes
View Policies tab
■ Attach/detach action
Monitor
Administrator
Yes
No
Yes
No
Yes
Yes

Roles and Privileges
C-6 Oracle Fusion Middleware Administrator's Guide for Oracle SOA Suite
C.1.11 Mediator Service Component Home PageTable C–11 lists the lowest role that a user must have to access this page and the privileges that each role has on this page.
C.1.12 Human Task Service Component Home PageTable C–12 lists the lowest role that a user must have to access this page and the privileges that each role has on this page.
C.1.13 Decision Service Component Home PageTable C–13 lists the lowest role that a user must have to access this page and the privileges that each role has on this page.
Table C–11 Mediator Service Component Home Page
Page ElementsLowest Role for Accessing Monitor Operator Administrator
View Dashboard tab Monitor Yes Yes Yes
View Instances tab Monitor Yes Yes Yes
View Faults tab
■ Fault recovery action
Monitor
Operator
Yes
No
Yes
Yes
Yes
Yes
View Policies tab
■ Attach/detach action
Monitor
Administrator
Yes
No
Yes
No
Yes
Yes
Table C–12 Human Task Service Component Home Page
Page ElementsLowest Role for Accessing Monitor Operator Administrator
View Dashboard tab Monitor Yes Yes Yes
View Instances tab Monitor Yes Yes Yes
View Faults tab
■ Fault recovery action
Monitor
Operator
Yes
No
Yes
Yes
Yes
Yes
View Policies tab
■ Attach/detach action
Monitor
Administrator
Yes
No
Yes
No
Yes
Yes
View Administration tab
■ Apply changes
Monitor
Administrator
Yes
No
Yes
No
Yes
Yes
Table C–13 Decision Service Component Home Page
Page ElementsLowest Role for Accessing Monitor Operator Administrator
View Dashboard tab Monitor Yes Yes Yes
View Instances tab Monitor Yes Yes Yes
View Faults tab
■ Fault recovery action
Monitor
Operator
Yes
No
Yes
Yes
Yes
Yes
View Policies tab
■ Attach/detach action
Monitor
Administrator
Yes
No
Yes
No
Yes
Yes

Roles and Privileges
Oracle Enterprise Manager Roles C-7
C.1.14 Flow Trace PageTable C–14 lists the lowest role that a user must have to access this page and the privileges that each role has on this page.
C.1.15 Audit TrailTable C–15 lists the lowest role that a user must have to access this page and the privileges that each role has on this page.
C.1.16 Services Home PageTable C–16 lists the lowest role that a user must have to access this page and the privileges that each role has on this page.
C.1.17 References Home PageTable C–17 lists the lowest role that a user must have to access this page and the privileges that each role has on this page.
Table C–14 Flow Trace Page
Page ElementsLowest Role for Accessing Monitor Operator Administrator
View Flow trace Monitor Yes Yes Yes
Table C–15 Audit Trail Page
Page ElementsLowest Role for Accessing Monitor Operator Administrator
View Audit Trail tab
■ Audit trail payloads
Monitor
Monitor
Yes
Yes
Yes
Yes
Yes
Yes
View Flow Debug tab Monitor Yes Yes Yes
View Sensors tab Monitor Yes Yes Yes
View Fault Recovery tab
■ Recovery action
Monitor
Operator
Yes
No
Yes
Yes
Yes
Yes
Table C–16 Services Home Page
Page ElementsLowest Role for Accessing Monitor Operator Administrator
View Dashboard tab Monitor Yes Yes Yes
View Policies tab
■ Attach/detach action
Monitor
Administrator
Yes
No
Yes
No
Yes
Yes
View Faults tab
■ Delete rejected messages
Monitor
Administrator
Yes
No
Yes
No
No
Yes
View Properties
■ Apply changes
■ Add properties
Monitor
Administrator
Administrator
Yes
No
No
Yes
No
No
Yes
Yes
Yes

Roles and Privileges
C-8 Oracle Fusion Middleware Administrator's Guide for Oracle SOA Suite
C.1.18 B2B PagesTable C–18 lists the lowest role that a user must have to access these pages and the privileges that each role has on these pages.
C.1.19 Business Events PageTable C–19 lists the lowest role that a user must have to access this page and the privileges that each role has on this page.
C.1.20 System MBean BrowserTable C–20 lists the lowest role that a user must have to access this browser and the privileges that each role has on this page.
Table C–17 References Home Page
Page ElementsLowest Role for Accessing Monitor Operator Administrator
View Dashboard tab Monitor Yes Yes Yes
View Policies tab
■ Attach/detach action
Monitor
Administrator
Yes
No
Yes
No
Yes
Yes
View Faults tab
■ Delete rejected messages
Monitor
Administrator
Yes
No
Yes
No
Yes
Yes
View Properties
■ Apply changes
■ Add properties
Monitor
Administrator
Administrator
Yes
No
No
Yes
No
No
Yes
Yes
Yes
Table C–18 B2B Page
Page ElementsLowest Role for Accessing Monitor Operator Administrator
View B2B Configuration page
■ Apply changes
Monitor
Administrator
Yes
No
Yes
No
Yes
Yes
View B2B Bindings page Monitor Yes Yes Yes
Table C–19 Business Events Page
Page ElementsLowest Role for Accessing Monitor Operator Administrator
View Events tab
■ Subscribe/test
■ Show event definition
Monitor
Administrator
Monitor
Yes
No
Yes
Yes
No
Yes
Yes
Yes
Yes
View Subscriptions tab
■ Add/edit/delete subscriptions
■ Manage database agents
Monitor
Administrator
Administrator
Yes
No
No
Yes
No
No
Yes
Yes
Yes
View Faults tab
■ Retry/abort
Monitor
Operator
Yes
No
Yes
Yes
Yes
Yes
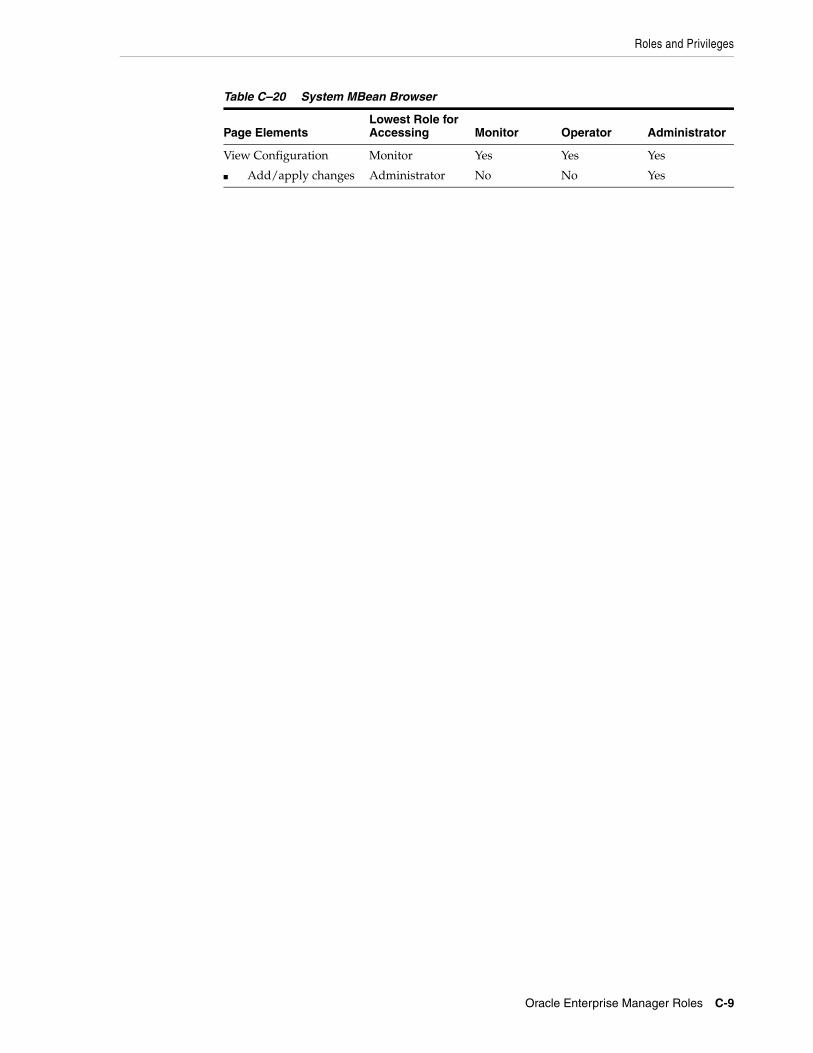
Roles and Privileges
Oracle Enterprise Manager Roles C-9
Table C–20 System MBean Browser
Page ElementsLowest Role for Accessing Monitor Operator Administrator
View Configuration
■ Add/apply changes
Monitor
Administrator
Yes
No
Yes
No
Yes
Yes

Roles and Privileges
C-10 Oracle Fusion Middleware Administrator's Guide for Oracle SOA Suite

Index-1
Index
Aactionable email account, 18-6Active Data Cache, 22-2adapters
See also Oracle Adaptersaddresses
configuring multiple send addresses, 18-11application roles
seeding with WLST scripts, 18-27assertions
definition, 1-18audit level
BPEL process service engine, 9-2impact of disabling audit tracking across multiple
composite flows, 8-12order of precedence, 1-12, 8-12setting at the BPEL process service component
level, 9-4SOA composite application, 8-12SOA Infrastructure, 3-3
audit trackingorder of precedence, 1-12
audit trailsensors, 10-2viewing for a BPEL process service
component, 10-1audit trail threshold, 9-2audit-level flags
Oracle Mediator, 12-3authentication providers
adding, 18-13
BB2B
bindings, 31-1monitoring, 31-1server properties, 30-1
B2B infrastructuremonitoring, 31-1
backup, 1-14BAM
See Oracle Business Activity Monitoringbinding components
configuring, 33-1
definition, 1-8direct binding, 34-2faults, 34-1instances, 34-1managing, 35-1monitoring, 4-5, 34-1policies, 35-1properties, 33-1references, 1-8rejected messages, 34-3restrictions on specifying multiple bindings, 35-1services, 1-8
BPEL monitorsdisabling, 11-9
BPEL process service componentsaudit trail and process flow, 10-1configuring, 9-1defining a fault policy, 1-14definition, 1-7fault recovery, 11-1faults, 10-9, 11-1instances, 10-9, 10-11managing, 11-1monitoring, 10-1policies, 11-4sensor data, 10-12
BPEL process service enginesaudit level, 9-2configuring, 9-1deployed processes, 10-18fault recovery, 11-5faults, 10-13, 11-5instances, 10-13, 10-17managing, 11-1message failure and recovery, 11-7monitoring, 10-1payload validation, 9-3request and thread statistics, 10-16
BPEL sensorsdisabling, 11-9disabling at the service engine level, 9-3disabling at the SOA composite application
level, 8-13browsers
supported, 2-1bulk recovery

Index-2
of faults, 8-24, 8-34business events
fault recovery, 32-7faults, 32-7managing, 32-1policies on event subscriptions are not
supported, 32-4receiving events in a composite with multiple
revisions, 32-5subscribers, 32-4subscribing to, 32-1
business faults, 1-15business rules
configuring, 16-1engine cache and operation statistics, 17-3monitoring, 17-1
business rules service engine, 16-1faults, 17-7
business rules service enginesdeployed components, 17-8instances, 17-5
Ccallback server URL
property, 3-4property change requires a restart, 3-5
chunking, 3-6composite sensors
audit trail, 10-2searching for, 8-15
composite URLsediting, 8-3
conversation IDdefinition, 1-6
cross referencesOracle Mediator, 15-1
Ddata sources
definition, 3-6properties, 3-6
decision component log files, 17-11decision service component
faults, 17-7decision service component statistics, 17-3decision service components
definition, 1-7deployed components, 17-8instances, 17-9monitoring, 17-1
demo user community, A-1deployed components
Oracle Mediator, 14-1deployment
guidelines, 5-1revisions of different composites, 5-2SOA composite applications, 5-1
direct binding, 34-2
cannot configure properties for, 33-1dispatcher engine threads, 9-3dispatcher invoke threads, 9-3dispatcher system threads, 9-2distribution lists, 21-12drivers
deployingOracle User Messaging Service, 26-1
dynamic assignment functions, 18-5dynamic assignments, 18-6
EECIDs
definition, 10-2restrictions, 10-3
e-mail addressescorrecting, 20-8
e-mail serverIMAP, 18-2SMTP, 18-2
emulationsdefinition, 1-18
endpoint propertiesinbound adapters, 27-4outbound adapters, 27-8
endpoint referencechanging for Oracle Service Registry, 33-30
endpoint URLsediting, 8-3
engine cache and operation statisticsbusiness rules, 17-3
enterprise message sources, 22-8Error/Retry infrastructure
Oracle Mediator, 12-4Event Engine, 22-4exporting
a running SOA composite application, 8-47
Ffault policy, 8-24
creating, 1-14, 8-26, 8-28, 8-32definition, 1-14required for BPEL process fault recovery, 1-14
faultsbinding components, 34-1BPEL process service component fault
recovery, 11-1BPEL process service engine fault recovery, 11-5bulk recovery, 8-24, 8-34business event fault recovery, 32-7business events, 32-7business fault definition, 1-15business rules service engine, 17-7examples of BPEL process fault recovery, 8-26examples of nonrecoverable faults, 1-15examples of Oracle Mediator fault recovery, 8-28examples of recoverable faults, 1-15human workflow fault recovery, 8-22, 20-3, 20-6

Index-3
human workflow service components, 19-1, 20-6human workflow service engines, 19-6, 20-3in audit trail, 10-2inbound adapters, 28-1Oracle Mediator, 14-2Oracle Web Service Manager fault
definition, 1-15outbound adapters, 28-5, 28-6recovery, 1-14recovery of SOA composite application
faults, 4-2, 7-2SOA composite application fault recovery, 8-32SOA Infrastructure, 8-21SOA Infrastructure fault recovery, 8-21system fault definition, 1-15types, 1-15
File Adapterlogs, 28-8
functionsrestrictions on adding multiple properties to a
function, 18-7
Ggroups
seeding with LDAP tools, 18-25
HHeartbeat Framework
Oracle Mediator, 12-4human workflow
fault recovery, 8-22faults not persisted in the dehydration store, 8-22moving data from a test to a production
environment, 20-9notifications, 20-7
properties, 18-1prerequisites for configuring notification
properties, 18-1task service properties, 18-5task status, 19-3WSDL files
security, 6-8human workflow service components
configuring, 18-1definition, 1-7fault recovery, 20-6faults, 19-1, 20-6instances, 19-1, 19-5managing, 20-1monitoring, 19-1performing fault recovery from Oracle BPM
Worklist, 1-15policies, 20-1URI of task details application, 20-5
human workflow service enginesconfiguring, 18-1deployed workflows, 19-11fault recovery, 20-3
faults, 19-6, 20-3, 20-6instances, 19-6, 19-10managing, 20-1monitoring, 19-1requests and operation statistics, 19-6, 19-8
Iidentity service
customizing the provider, 18-25third-party providers, 18-12
IMAP e-mail serverconfiguring, 18-2
instance and fault metrics pagesdisabling in the System MBean Browser, 3-7disabling the retrieval of instance and fault count
metrics, 3-5, B-2optimizing the loading of, 3-5, B-2
instance IDcreating, 1-6, 8-14
instance states, 3-3definition, 3-3scenarios under which the state is not
evaluated, 8-14instances
aborting, 8-17binding components, 34-1business rules service engines, 17-5capturing the composite instance state, 3-3decision service components, 17-9deleting at the SOA Infrastructure level, 8-19,
8-20deleting from a composite application home
page, 8-14, 8-16deleting large numbers of, 8-43distinguishing unit test instances from other
instances, 1-6human workflow service components, 19-1, 19-5human workflow service engines, 19-6, 19-10inbound adapters, 28-1initiating a test instance, 8-1invoking multiple instances, 8-5mismatch between composite instances and service
component instances, 8-18outbound adapters, 28-5service components, 1-7setting the composite instance name at design
time, 8-18SOA composite applications, 1-6states, 3-3statistics
Oracle Mediator, 13-1instant messaging
messages are not actionable, 18-5
JJava EE applications
navigating through, 2-11

Index-4
Llarge document threshold, 9-2LDAP tools
seeding users, groups, and application roles, 18-25
local optimizationconfiguring, 8-42
log filesaccessing, 2-5configuring, 3-10encoding property, 3-12viewing, 17-11
logging inOracle Enterprise Manager Fusion Middleware
Control, 2-1logging out
Oracle Enterprise Manager Fusion Middleware Control, 2-15
Mmanaged servers
starting and stopping, B-1Mediator
See Oracle Mediatormessage recovery
in BPEL process service engines, 11-7message sources, 22-8metrics-level flags
Oracle Mediator, 12-3migration
of human workflow data from a test to a production environment, 20-9
MTOM optimizationrestrictions, 35-4
multiple instancesinvoking, 8-5
multiple send addressesconfiguring, 18-11
Nnotification service
pluggable, 18-9notifications
actionable addresses, 18-4configuration modes, 18-3configuring addresses, 18-4human workflow
incoming e-mail, 20-7outgoing, 20-7properties, 18-1
prerequisites for configuring, 18-1
OOracle Adapters
configuring, 27-1deployed resource adapters, 2-11endpoint properties
inbound adapters, 27-4outbound adapters, 27-8
faultsinbound adapters, 28-1outbound adapters, 28-5, 28-6
File Adapterlogs, 28-8
in multiple revisions of SOA composite applications, 8-17
instancesinbound adapters, 28-1outbound adapters, 28-5
managing, 29-1monitoring, 28-1policies
inbound adapters, 29-1outbound adapters, 29-2
propertiesinbound adapters, 28-4outbound adapters, 28-7
rejected messagesinbound adapters, 28-2, 28-3
Oracle B2Baccessing from Oracle Enterprise Manager Fusion
Middleware Control, 31-4configuring, 30-1EM metrics, 30-1monitoring, 31-1
Oracle BPM Worklistperforming fault recovery from, 1-15
Oracle Business Activity Monitoring (BAM)configuring, 21-1managing, 23-1monitoring, 22-1
Oracle Enterprise Manager Fusion Middleware Control
accessing Oracle B2B, 31-4logging in, 2-1logging out, 2-15
Oracle Fusion Middlewaredefinition, 1-1
Oracle Internet Directory, 21-28Oracle Mediator service components
configuring, 12-1definition, 1-7fault recovery, 1-15managing, 14-1monitoring, 13-1
Oracle Mediator service enginesmanaging, 14-1monitoring, 13-1
Oracle Service Registrychanging the endpoint reference and service
key, 33-30configuring caching of WSDL URLs, 33-31inquiry URL, 3-4properties, 3-4
Oracle SOA Suiteadministration, 1-11, 2-1configuration, 1-11

Index-5
definition, 1-1management, 1-13monitoring, 1-13
Oracle SSL ciphers, 3-6Oracle User Messaging Service (UMS)
configuring, 24-1managing, 26-1monitoring, 25-1
Oracle wallet password, 3-6Oracle Web Service Manager faults, 1-15Oracle WebLogic Server Administration Console
accessing, 2-13performing Oracle SOA Suite administrative tasks
from, 2-14OracleSystemUser, 23-4ora-human-intervention action
fault policy definitions, 8-24, 8-32, 8-34orphaned service component instances
generating, 8-15OWSM
See also Oracle Web Services Manager
PParallel infrastructure
Oracle Mediator, 12-3passwords
changing the default password in the embedded LDAP server, 18-25
payload validationBPEL process service engine, 9-3SOA composite applications, 8-13SOA Infrastructure, 3-4
payloadssaving, 8-6
pluggable notification service, 18-9registration, 18-10
policiesbinding components, 35-1BPEL process service components, 11-4definition, 1-16execution of, 1-16faults, 1-15human workflow service components, 20-1inbound adapters, 29-1local attachments, 8-42location of errors in services and references, 35-3no support for policies on event
subscriptions, 32-4Oracle Mediator, 14-6outbound adapters, 29-2overriding policy configuration property
values, 35-3SOA composite applications, 8-39supported categories, 1-16
portschanging the SOA Infrastructure server URL
port, 3-9privileges
required for performing specific tasks, 1-11, C-1
propertiesactionable addresses, 18-4actionable e-mail account, 18-6audit level of BPEL process service engine, 9-2audit level of SOA composite application, 8-12audit level of SOA Infrastructure, 3-3audit trail threshold, 9-2binding components, 33-1callback server URL, 3-4capture composite instance state of SOA
Infrastructure, 3-3changing of specific properties requires a
restart, 3-2chunking, 3-6data sources, 3-6dispatcher engine threads, 9-3dispatcher invoke threads, 9-3dispatcher system threads, 9-2dynamic assignment and task escalation
functions, 18-6inbound adapters, 28-4large document threshold, 9-2notification properties, 18-3Oracle Service Registry, 3-4Oracle SSL ciphers, 3-6Oracle wallet password, 3-6order of precedence, 1-11, 3-1, 8-12outbound adapters, 28-7payload validation in SOA composite
applications, 8-13payload validation in SOA Infrastructure, 3-4payload validation in the BPEL process service
engine, 9-3server URL, 3-4SOA Infrastructure, 3-1Web service binding, 3-6
purginginstances, 8-43
Rredeployment
guidelines, 5-3SOA composite applications, 5-3
referencesdefinition, 1-8, 4-5location of policy errors, 35-3monitoring, 4-6
rejected messagesbinding components, 34-3definition, 1-15inbound adapters, 28-2, 28-3
Reports Engine, 22-10request breakdown
statisticsOracle Mediator, 13-6
requests and operation statisticshuman workflow service engines, 19-6, 19-8
revisiondefinition, 1-17

Index-6
revisionsdistinguishing the default revision from other
revisions, 1-17version added to the application name, 1-17
rolesrequired for performing specific tasks, 1-11, C-1
routingstatistics
Oracle Mediator, 13-4rules See business rules
SSecure Socket Layer, 21-27security
application policies, 2-6application roles, 2-6automatically authenticating Oracle BPM Worklist
users in SAML SSO environments, 6-7automatically authenticating Oracle BPM Worklist
users in Windows Native authentication environments, 6-8
available documentation, 6-2configuring for human workflow WSDL files, 6-8configuring for two-way SSL communication, 6-2configuring Oracle SOA Suite and Oracle HTTP
Server for SSL communication, 6-5configuring SSL between SOA composite
application instances and Oracle WebCache, 6-9
listing Oracle Internet Directory as the first authentication provider, 6-8
passing security properties with messages, 8-3switching from non-SSL to SSL configurations with
Oracle BPM Worklist, 6-8seeding
users, groups, and application roles with LDAP tools, 18-25
sensors, 10-2disabling BPEL monitors and sensors, 11-9disabling BPEL sensors at the service engine
level, 9-3disabling BPEL sensors at the SOA composite
application level, 8-13monitoring, 10-12
server URLproperty, 3-4property change requires a restart, 3-5
service and reference binding components See binding components
service componentsBPEL processes, 10-1, 11-1definition, 1-7human workflow, 18-1, 19-1, 20-1instance IDs, 1-7instances, 1-7Oracle Mediator, 12-1orphaned instances, 8-15
service enginesBPEL processes, 10-1, 11-1
business rules, 16-1definition, 1-9human workflow, 18-1, 19-1, 20-1monitoring at the SOA Infrastructure level, 4-3monitoring the average request processing
times, 4-4Oracle Mediator, 12-1
service infrastructuredefinition, 1-10monitoring the average request processing
times, 4-4service key
changing for Oracle Service Registry, 33-30services
definition, 1-8, 4-5location of policy errors, 35-3monitoring, 4-5
SMTP e-mail serverconfiguring, 18-2
SOA composite applicationsactivating a revision, 8-9application states after SOA Infrastructure
shutdown, 3-8audit level, 8-12configuring for two-way SSL communication, 6-2configuring Oracle SOA Suite and Oracle HTTP
Server for SSL communication, 6-5contents, 1-10definition, 1-4deployed states, 8-7deploying, 5-1deploying a revision, 8-10fault recovery, 8-32faults, 8-32instances, 1-6
deleting, 8-14, 8-19life cycle, 1-17managing, 8-1managing the application state at the SOA
Infrastructure level, 8-8managing the application state from the SOA
composite application home page, 8-10monitoring, 7-1monitoring faults, 7-1monitoring instances, 7-1packaging, 5-1payload validation, 8-13redeploying, 5-3redeploying a revision, 8-10retiring a revision, 8-9securing, 6-1setting the default revision, 8-9showing the composite XML definition, 8-13showing the WSDL and endpoint URI, 8-13shutting down a revision, 8-9starting up a revision, 8-9test instances, 8-1testing, 1-17, 8-12, 8-36undeploying, 5-4undeploying a revision, 8-10

Index-7
SOA Composite menudescription of options, 2-10navigating through, 2-8
SOA Infrastructureaudit level, 3-3changing ports, 3-9configuring, 3-1fault recovery, 8-21faults, 8-21managing the application state, 8-8monitoring, 4-1payload validation, 3-4processing requests, 4-4properties, 3-1recent instances and faults, 4-1restarting the SOA Infrastructure does not activate
endpoints when a retired composite is activated, 3-8
starting and stopping, 3-7startup failure when cwallet.sso includes the SOA
map, 3-8SOA Infrastructure application
definition, 1-2SOA Infrastructure menu
description of options, 2-5navigating through, 2-2
sources, message, 22-8SSL, 21-27
configuring SOA composite applications for two-way SSL communication, 6-2
stress testinginvoking multiple instances, 8-5
System Bean BrowserCustomNSDriverPropertyNames property, 18-10UddiCacheLifetime property, 33-31
system faults, 1-15System MBean Browser
ASNSDriverIMAddress property, 18-4ASNSDrivers property, 18-12BpelcClasspath property, 9-3bpel.config.auditlevel property, 9-4CustomNSDriverPropertyNames property, 18-4disabling instance and fault count metrics
retrieval, 3-7ExpirationMaxRetry property, 9-3ExpirationRetryDelay property, 9-3FaxCoverPageCount property, 18-4GlobalTxMaxRetry property, 3-6GlobalTxRetryInterval property, 3-7HttpProxyAuthRealm property, 3-7HttpProxyAuthType property, 3-7HttpProxyHost property, 3-7HttpProxyPassword property, 3-7HttpProxyPort property, 3-7HttpProxyUsername property, 3-7HttpServerURL property, 3-7HttpsServerURL property, 3-7InstanceKeyBlockSize property, 9-3instructions on using, 2-7invoking custom MBeans with WLST, 2-7
KeystoreLocation property, 3-7, 6-3MaximumNumberOfInvokeMessagesInCache
property, 9-3navigational path, 3-1OneWayDeliveryPolicy property, 9-3ServerURL property, 3-9StatsLastN property, 9-3SyncMaxWaitTime property, 9-3UddiCacheLifetime property, 3-7
Ttask escalations, 18-6task service properties
human workflow, 18-5test cases
definition, 1-17test suite
assertions, 1-18definition, 1-17emulations, 1-18
testinginitiating a test instance, 8-1restrictions on displaying payload data in the Test
Web Service page, 8-6restrictions on stress tool of Test Web Service
page, 8-5scenarios in which the Test button is
disabled, 8-2, 8-12troubleshooting
extending tablespaces, B-4resolving connection timeouts, B-5resolving message failure caused by too many
open files, B-3
UUDDI See Oracle Service RegistryUMS See Oracle User Messaging Serviceundeployment
guidelines, 5-4SOA composite applications, 5-4
unit testsassertions, 1-18distinguishing unit test instances from other
instances, 1-6emulations, 1-18of SOA composite applications, 1-17running, 8-36test cases, 1-17test suites, 1-17
usersdemo community, A-1seeding with LDAP tools, 18-25
WWeb browsers
supported, 2-1Web service binding
properties, 3-6

Index-8
WLSTinvoking custom MBeans, 2-7
WSDL fileshuman workflow, 6-8specifying the default revision, 8-3
WS-Reliable Messagingrestrictions, 8-42
XXA drivers
changing the driver name, 3-12


