CHAPTER 4-1 Cisco Prime Service Catalog 10.0 R2 Installation Guide OL-31474-01 4 Advanced Configuration and Troubleshooting Tips for Cognos • Overview, page 4-1 • Miscellaneous Configuration, page 4-1 • Understanding Roles, page 4-3 • Moving Reports from Development to Production Environments, page 4-5 • Modifying Form Data Reporting Configuration, page 4-7 • Configuring HTTPS for Cognos, page 4-14 • Troubleshooting, page 4-16 • Supported Time Zone, page 4-23 Overview This chapter contains troubleshooting tips and optional configuration instructions for Cognos. Miscellaneous Configuration Configuring Client Browsers to View a Report as Excel Some users may report an issue with attempting to view a report in Excel format. The Excel screen pops up briefly and then disappears. To address this issue, add the Cognos Server URL to the Local Intranet zone of the client browser: Step 1 Open the client browser window. Step 2 Choose Tools > Internet Options. Step 3 Click Security. Step 4 Choose the Local Intranet zone. Step 5 Click Sites. Step 6 Click Advanced.
Transcript
CisOL-31474-01
C H A P T E R 4
Advanced Configuration and Troubleshooting Tips for Cognos
• Overview, page 4-1
• Miscellaneous Configuration, page 4-1
• Understanding Roles, page 4-3
• Moving Reports from Development to Production Environments, page 4-5
• Modifying Form Data Reporting Configuration, page 4-7
• Configuring HTTPS for Cognos, page 4-14
• Troubleshooting, page 4-16
• Supported Time Zone, page 4-23
OverviewThis chapter contains troubleshooting tips and optional configuration instructions for Cognos.
Miscellaneous Configuration
Configuring Client Browsers to View a Report as Excel Some users may report an issue with attempting to view a report in Excel format. The Excel screen pops up briefly and then disappears. To address this issue, add the Cognos Server URL to the Local Intranet zone of the client browser:
Step 1 Open the client browser window.
Step 2 Choose Tools > Internet Options.
Step 3 Click Security.
Step 4 Choose the Local Intranet zone.
Step 5 Click Sites.
Step 6 Click Advanced.
4-1co Prime Service Catalog 10.0 R2 Installation Guide
Chapter 4 Advanced Configuration and Troubleshooting Tips for Cognos Miscellaneous Configuration
Step 7 Enter the Cognos Server URL.
Note To determine the Cognos server URL, try one of the View as Excel features in the Reporting module and look for the URL that appears in the title bar of the window that appears briefly before closing itself. This is the URL you need to enter. You may want to load a screen capture application and snap the screen if it disappears too quickly to read in real time.
Step 8 Click Add.
Configuring Cognos Memory UsageYou configure Cognos memory usage by modifying the heap size for Cognos. To modify the heap size for the Cognos server:
Step 1 Stop the IBM Cognos service.
Step 2 Open the startup.bat located under the C:\Program Files\cognos\c10_64\bin64 directory.
Step 3 In the startup.bat file, you can see different heap size settings recommended by Cognos, based on the RAM size of your Cognos machine:
rem “for machines with 1GB RAM”
set CATALINA_OPTS=-Xmx768m -XX:MaxNewSize=384m -XX:NewSize=192m -XX:MaxPermSize=128m %DEBUG_OPTS%
rem “for machines with 2GB RAM”
rem set CATALINA_OPTS=-Xmx1152m -XX:MaxNewSize=576m -XX:NewSize=288m -XX:MaxPermSize=128m %DEBUG_OPTS%
rem “for machines with 3GB RAM”
rem set CATALINA_OPTS=-Xmx1536m -XX:MaxNewSize=768m -XX:NewSize=384m -XX:MaxPermSize=128m %DEBUG_OPTS%
Based on your system RAM size, you can use any one the above heap size settings or modify the heap size settings, and comment the rest of the heap size settings by prefixing the line with rem.
Step 4 Restart the IBM Cognos service.
Setting the Timeout Interval on IBM Cognos ServerThe IBM Cognos session timeout setting should match that of Service Catalog to allow Single Sign-On to work seamlessly.
To set the timeout interval:
Step 1 Choose Start > All Programs > IBM Cognos 10-64 > IBM Cognos Configuration.
Step 2 Choose Environment > IBM Cognos service.
Step 3 Click IBM Cognos.
4-2Cisco Prime Service Catalog 10.0 R2 Installation Guide
OL-31474-01
Chapter 4 Advanced Configuration and Troubleshooting Tips for CognosUnderstanding Roles
Step 4 Under Resource Properties, choose Ping timeout in seconds. Enter 960 as the timeout interval in seconds. 960 is the maximum possible value.
Figure 4-1 Choose Ping Timeout Duration
Step 5 Save the configuration (by clicking the Save icon).
Step 6 Restart the IBM Cognos service.
Understanding Roles
Roles for Accessing Reporting FeaturesThe roles listed in the table below are defined in the Organization Designer module, and should be assigned to users who need to access the Reporting and Advanced Reporting modules.
If you assign a user to the predefined role “Service Operations Report User”, the user should be able to run the prebuilt Request Center reports.
Table Legend
RC = Request Center
4-3Cisco Prime Service Catalog 10.0 R2 Installation Guide
OL-31474-01
Chapter 4 Advanced Configuration and Troubleshooting Tips for Cognos Understanding Roles
Role Capabilities Description
Service Operations Report User
• View RC Reports Module: Reporting
• Ability to view the KPI dashboard and run RC (Service Performance) reports
Advanced Reporting – BusinessAuthor
• View RC Reports
• Ad-Hoc Reports
Modules: Reporting and Advanced Reporting
• Access to the Ad-Hoc Reports tab in the Advanced Reporting module
Advanced Reporting – ProfessionalAuthor
• View RC Reports
• Ad-Hoc Reports
• Report Designer
Modules: Reporting and Advanced Reporting
• Ability to view the KPI dashboard (RC)
• Access to the Ad-Hoc Reports tab in the Advanced Reporting module
• Access to Report Designer
Reporting Administrator
• View RC Reports Modules: Reporting and Advanced Reporting
• Access to Reports in the Advanced Reporting module
• Ability to view the KPI dashboard and run RC (Service Performance) reports
Service Team Administrator
• View RC Reports Module: Reporting
• Ability to view the KPI dashboard and run RC (Service Performance) reports
Advanced Reporting Administrator
• View RC Reports
• Ad-Hoc Reports
• Report Designer
• KPI Administrator
• Report Administrator
Modules: Reporting and Advanced Reporting
• Access to the reports (RC)
• Ability to view the KPI dashboard (RC)
• Access to Ad-Hoc Reports tab in the Advanced Reporting module
• Access to Report Designer
• Access to manage Reporting folders, dashboard, administration of Cognos, schedule reports, save reports and permissions administration, create reports
• Access to the KPI Administration function
Site Administrator All Modules: Reporting and Advanced Reporting
• All Service Catalog and Cognos capabilities
4-4Cisco Prime Service Catalog 10.0 R2 Installation Guide
OL-31474-01
Chapter 4 Advanced Configuration and Troubleshooting Tips for CognosMoving Reports from Development to Production Environments
Moving Reports from Development to Production EnvironmentsThis section describes how to move Report Designer reports and Ad-Hoc queries that you create in a development environment to a production environment.
PrerequisitesYou must be a user with the ability to administer the Reporting module to move reports using the Deployment option discussed below. The predefined roles Site Administrator include this capability.
You must have access to the file system of the Cognos servers for both the source and target environments.
Creating an Export File
Step 1 On the development machine, create a folder named CustomReports in the Public Folders directory of Cognos. The name of the folder may vary, but it must be a public folder.
Step 2 Copy the new report to the CustomReports folder created above.
Step 3 Log into Service Catalog as a user with the Report Administrator capability.
Step 4 Go to Launch on the right hand side top corner and click IBM Cognos Administration.
Step 5 Click the Configuration tab.
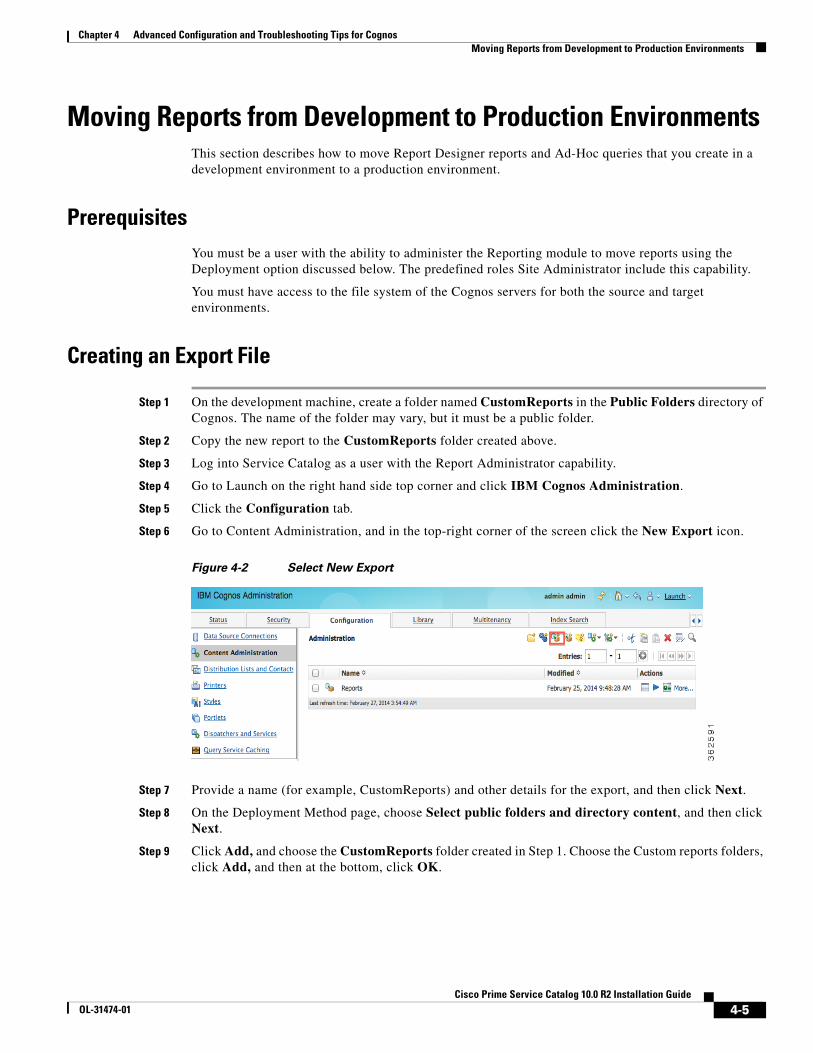
Step 6 Go to Content Administration, and in the top-right corner of the screen click the New Export icon.
Figure 4-2 Select New Export
Step 7 Provide a name (for example, CustomReports) and other details for the export, and then click Next.
Step 8 On the Deployment Method page, choose Select public folders and directory content, and then click Next.
Step 9 Click Add, and choose the CustomReports folder created in Step 1. Choose the Custom reports folders, click Add, and then at the bottom, click OK.
4-5Cisco Prime Service Catalog 10.0 R2 Installation Guide
OL-31474-01
Chapter 4 Advanced Configuration and Troubleshooting Tips for Cognos Moving Reports from Development to Production Environments
Figure 4-3 Choose CustomReport
Step 10 Deselect Disable after import, and then click Next.
Step 11 Click Next.
Step 12 In the “Select the directory content” section, choose Include Cognos groups and roles and Replace existing entries, and click Next.
Step 13 In the “Specify the general options” section, choose Include access permissions and Apply to new and existing entries.
Step 14 Under External namespaces, choose Include references to external namespaces.
Step 15 In the “Entry ownership” section, choose The user performing the import, and click Next in the “Specify the general options” section.
Step 16 In the “Specify a deployment archive” section, click Next.
Step 17 In the “Review the summary” section, click Next.
Step 18 In the “Select an action” section, click Finish.
Step 19 Choose Now, and in “Run with options” section click Run.
This process creates CustomReports.zip in the <CognosHome>\c10_64\deployment folder of Cognos SOURCE machine.
Import the Exported File
Step 1 Copy the exported file CustomReports.zip to the <CognosHome>\c10_64\deployment folder on the production machine.
Step 2 Go to Launch on the right hand side top corner and click IBM Cognos Administration.
Step 3 Click the Configuration tab.
Step 4 Go to Content Administration and then click the New Import icon in the top-right corner of the screen.
4-6Cisco Prime Service Catalog 10.0 R2 Installation Guide
OL-31474-01
Chapter 4 Advanced Configuration and Troubleshooting Tips for CognosModifying Form Data Reporting Configuration
Figure 4-4 Choose New Import Icon
Step 5 Choose CustomReports, and click Next.
Step 6 Choose CustomReports, and in the “Select the public folders content” section, click Next.
Step 7 In the “Select the directory content” section, click Next.
Step 8 In the “Specify the general options” section, click Next.
Step 9 In the “Review the summary” section, click Next.
Step 10 In the “Select an action” section, click Finish.
Step 11 The new report folder CustomReports appears in the in public folders area of the production machine.
Modifying Form Data Reporting ConfigurationAs your environment grows, you may need to increase the number of form data reporting (Ad-Hoc reporting) dictionary and service tables; for example, if you bring additional services online or decide that you need to report on the contents of additional dictionaries. You can use the FDR Configurator utility to modify the form data reporting configuration after installing Cisco Prime Service Catalog Reporting (see Chapter 2, “Reporting Guide”).
This section describes how to launch and configure the FDR Configurator.
Note You must log in as a user with administrative privileges to perform the tasks described in this section.
Launching the FDR ConfiguratorTo execute the program:
Step 1 On the Cognos machine, set the JAVA_HOME environment variable to <COGNOS_HOME>\bin64\jre\7.0. Then, add %JAVA_HOME%\bin to the beginning of the PATH environment variable.
Step 2 Stop all programs that access the Data Mart database.
Step 3 Go to the “<Reporting_Install_Dir>\cognos\bin” directory.
Step 4 Double-click fdrConfigurator.exe to launch the FDR Configurator.
4-7Cisco Prime Service Catalog 10.0 R2 Installation Guide
OL-31474-01
Chapter 4 Advanced Configuration and Troubleshooting Tips for Cognos Modifying Form Data Reporting Configuration
A progress bar appears. When complete, the first page of the FDR Configurator wizard appears (Introduction), as shown in Figure 4-5 below.
Figure 4-5 Introduction
How to Use the Configuration WizardThe configuration wizard guides you through the configuration by presenting pages of fields to be configured. As each page is completed, click Next to advance to the next page, or Previous to return to a previous page. At the end of the wizard, click Install to begin the configuration. At any time, you may click Cancel to exit the wizard without configuring.
The configuration options are case-sensitive, so ensure that you enter a value, such as a database name, with case sensitivity; otherwise, your configuration may fail.
Running the FDR Configurator WizardThis section provides instructions for running the FDR Configurator wizard.
Step 1 Launch the FDR Configurator (see “Launching the FDR Configurator” section on page 4-7).
Step 2 On the first page of the wizard (Introduction, Figure 4-5), click Next to begin.
4-8Cisco Prime Service Catalog 10.0 R2 Installation Guide
OL-31474-01
Chapter 4 Advanced Configuration and Troubleshooting Tips for CognosModifying Form Data Reporting Configuration
Step 3 For the next two pages of the wizard, for the Reporting installation you want to modify, choose your database type and enter the password for your Data Mart database, clicking Next after each page (see Running the Reporting Installation Wizard, page 2-11 for more information).
After clicking Next on the Data Mart Database page, the Form Data Reporting Tables page of the wizard appears, as shown in Figure 4-6 below.
Figure 4-6 Form Data Reporting Tables
Step 4 Your Form Data Reporting Tables settings are retrieved from your existing Data Mart database. You can modify these settings as described in Table 4-1 below.
Table 4-1 Form Data Reporting Tables
Option Description
Dictionary table prefix If you must change the prefix, use only alphabetic characters and the underscore character. Do not use any numeric or special characters. A modification will cause the tables to be deleted and then recreated. It also resets the timestamp in database.
Your form reporting data will need to be regenerated by running the ETL Scripts like ‘update_datamart.cmd’ or ‘update_datamart fdr.cmd’ scripts in full mode (see the Reporting Guide, page 2-1). You must also restart the “IMB Cognos” service.
4-9Cisco Prime Service Catalog 10.0 R2 Installation Guide
OL-31474-01
Chapter 4 Advanced Configuration and Troubleshooting Tips for Cognos Modifying Form Data Reporting Configuration
If you click Restore Defaults, your edited values are overwritten by the current configuration values from your existing Data Mart database.
Step 5 Click Next to proceed to the next page of the wizard.
The Form Data Reporting Dictionary Settings page of the wizard appears, as shown in Figure 4-7 below.
Service table prefix If you must change the prefix, use only alphabetic characters and the underscore character. Do not use any numeric or special characters. A modification will cause the tables to be deleted and then recreated. It also resets the timestamp in database.
Your form reporting data will need to be regenerated by running the ETL Script 'update_datamart.cmd' in full mode (see the Reporting Guide, page 2-1). You must also restart the “IMB Cognos” service.
Table columns prefix The prefix for the field names in each table. This name is used to create tables with field name like FIELD1, FIELD2, …, FIELDn. A modification will cause the tables to be deleted and then recreated. It also resets the timestamp in database.
Your form reporting data will need to be regenerated by running the ETL Script 'update_datamart.cmd' in full mode (see the Reporting Guide, page 2-1). You must also restart the “IMB Cognos” service.
Text column max length This parameter indicates the maximum size of dictionary and service table object varchar field size.
You can only increment the current value. No data will be lost and timestamp is not reset. A modification will alters the Dictionary and Services tables in the Data mart database by changing the size of VARCHAR() columns.
Table 4-1 Form Data Reporting Tables
4-10Cisco Prime Service Catalog 10.0 R2 Installation Guide
OL-31474-01
Chapter 4 Advanced Configuration and Troubleshooting Tips for CognosModifying Form Data Reporting Configuration
Figure 4-7 Form Data Reporting Dictionary Settings
Step 6 Your Form Data Reporting Dictionary settings are retrieved from your existing Data Mart database. You can modify your Form Data Reporting Dictionary Settings as described in Table 4-2.
Table 4-2 Form Data Reporting Dictionary Settings
Option Description
Dictionary tables Number of tables required in the Data Mart database to store the data for reportable dictionaries. One table is needed per reportable dictionary.
You can only increment the current value to maximum of 800. All existing data will be retained and tables are created incrementally.
Text fields Number of Text type fields that are used in dictionaries based on the customer form reporting analysis.
A modification will cause the tables to be deleted and then recreated. It also resets the timestamp in database.
Your form reporting data will need to be regenerated by running the ETL Scripts like 'update_datamart.cmd' or 'update_datamart fdr.cmd' scripts in full mode (see the Advanced Configuration and Troubleshooting Tips for Cognos, page 4-1. You must also restart the “IMB Cognos” service.
4-11Cisco Prime Service Catalog 10.0 R2 Installation Guide
OL-31474-01
Chapter 4 Advanced Configuration and Troubleshooting Tips for Cognos Modifying Form Data Reporting Configuration
If you click Restore Defaults, your edited values are overwritten by the current configuration values from your existing Data Mart database.
Step 7 Click Next to proceed to the next page of the wizard.
The Form Data Reporting Service Settings page of the wizard appears, as shown in Figure 4-8.
Figure 4-8 Form Data Reporting Service Settings
Numeric fields Number of Numeric fields that are used in dictionaries based on the customer form reporting analysis.
A modification will cause the tables to be deleted and then recreated. It also resets the timestamp in database.
Your form reporting data will need to be regenerated by running the ETL Script 'update_datamart.cmd' in full mode (see the Reporting Guide, page 2-1. You must also restart the “IMB Cognos” service.
Date fields Number of Date fields that are used in dictionaries based on the customer form reporting analysis.
A modification will cause the tables to be deleted and then recreated. It also resets the timestamp in database.
Your form reporting data will need to be regenerated by running the ETL Script 'update_datamart.cmd' in full mode (see the Reporting Guide, page 2-1. You must also restart the “IMB Cognos” service.
Table 4-2 Form Data Reporting Dictionary Settings
4-12Cisco Prime Service Catalog 10.0 R2 Installation Guide
OL-31474-01
Chapter 4 Advanced Configuration and Troubleshooting Tips for CognosModifying Form Data Reporting Configuration
Step 8 Your Form Data Reporting Service settings are retrieved from your existing Data Mart database. You can modify your Form Data Reporting Service Settings as described in Table 4-3.
If you click Restore Defaults, your edited values are overwritten by the current configuration values from your existing Data Mart database.
Step 9 Click Next to proceed to the Summary page of the wizard.
Step 10 The configuration wizard has enough information to start the configuration process. Review the settings that appear on this page. If you need to make any changes, click Previous to go back to a page and make the necessary changes. If they are correct, click Install to begin the configuration. Do not interrupt the wizard during this process.
Step 11 If the configuration process completes successfully, click Done to exit the configuration wizard.
If the configuration process fails, click Done to exit the configuration wizard, and then return to Step 1 to retry the FDR Configurator. Logs of the configuration process are located in the “<Reporting_Install_Dir>\_CSP_FDRConfigurator\Logs” directory.
Table 4-3 Form Data Reporting Service Settings
Option Description
Service tables Number of tables required in the Data Mart database to store the data for reportable services. One table is needed per reportable service.
You can only increment the current value to maximum of 800. All existing data will be retained and tables are created incrementally.
Text fields Number of Text type fields that are used in services based on the customer form reporting analysis.
A modification will cause the tables to be deleted and then recreated. It also resets the timestamp in database.
Your form reporting data will need to be regenerated by running the ETL Script 'update_datamart.cmd' in full mode (see the Reporting Guide, page 2-1. You must also restart the “IMB Cognos” service.
Numeric fields Number of Numeric fields that are used in services based on the customer form reporting analysis.
A modification will cause the tables to be deleted and then recreated. It also resets the timestamp in database.
Your form reporting data will need to be regenerated by running the ETL Script 'update_datamart.cmd' in full mode (see the Reporting Guide, page 2-1. You must also restart the “IMB Cognos” service.
Date fields Number of Date fields that are used in services based on the customer form reporting analysis.
A modification will cause the tables to be deleted and then recreated. It also resets the timestamp in database.
Your form reporting data will need to be regenerated by running the ETL Scripts like 'update_datamart.cmd' or 'update_datamart fdr.cmd' scripts in full mode (see the Reporting Guide, page 2-1. You must also restart the “IMB Cognos” service.
4-13Cisco Prime Service Catalog 10.0 R2 Installation Guide
OL-31474-01
Chapter 4 Advanced Configuration and Troubleshooting Tips for Cognos Configuring HTTPS for Cognos
Configuring HTTPS for Cognos
Overview of SSL Support in Cognos Server To enable SSL support on the Cognos Server one has to change the protocol of the Cognos Gateway to HTTPS (assuming that the Web Server like IIS is also setup for HTTPS).
Figure 4-9 SSL Support Overview
Prerequisites and Assumptions1. Https should be enabled on IIS Server where Cognos Server is installed.
2. Remove the TCP port (80) on IIS.
Note In Windows Server 2008 R2 we can not remove TCP port (80) and hence Firewall should be used to disable the TCP port (80).
3. For additional security one can use a Firewall to block all the non-SSL ports on the system where Cognos+IIS is installed (for example, port 80 and 9300).
4. All Command-line utilities used for SA/Reporting will still Http protocol as those commands are run on the same system where Cognos Server is installed.
5. It is also an overhead and performance concern to enable Https/SSL for the command-line utilities, and hence it remains non-SSL.
6. “CognosServername” in the CnfParams table should be manually changed to set the SSL port that is configured on IIS.
Configuring Cognos 10.2.1 for SSLTo configure Cognos 10.2.1 for SSL:
Step 1 Choose Program Files > IBM Cognos 10-64 > IBM Cognos Configuration.
Step 2 Choose Environment > Gateway URI. Change http to https, and port default 80 to 443.
Step 3 Choose Cryptography > Use mutual authentication? and change to True.
Step 4 Choose Cryptography > Cognos > Use third party CA? and change to True.
Step 5 Save the configuration.
Step 6 Stop the IBM Cognos Service.
Step 7 Restart.
Changes to newscale.properties for SSL
Step 1 In the newscale.properties file, find the cognoswebprotocol parameter, and change http to https.
Step 2 Restart the Request Center application server.
4-15Cisco Prime Service Catalog 10.0 R2 Installation Guide
OL-31474-01
Chapter 4 Advanced Configuration and Troubleshooting Tips for Cognos Troubleshooting
Verification
Step 1 Log on to https://CognosServername.domain.com/cognos10, and check whether you can logon to Cognos Connection.
Step 2 Log on to https://RequestCenterServername.domain.com/RequestCenter, and check whether you can navigate to Reporting or Advanced Reporting modules.
TroubleshootingIf you receive any of the errors described in this chapter, please try the recommended solution.
CAM_AAA_Authenticate Failed
Error
The root causes for this issue would be:
• Application has not been logged on with fully qualified domain name.
• Cognos server name does not contain a valid domain name.
Figure 4-10 Error Message
Solution 1
Log on to the Request Center application with a fully qualified domain name. You need to give the fully qualified name for the host name (<host Name>+<domain names>).
For example:
• inssa.oqkqas.celosis.com
• inssa.celosis.com
• inssa.celosis.net
Solution 2
• Open the setup.properties file located under (<cognos_temp_Installer> /cognosinstaller).
• Edit the gateway and application server as below if the server name does not have a fully qualified domain name.
4-16Cisco Prime Service Catalog 10.0 R2 Installation Guide
OL-31474-01
Chapter 4 Advanced Configuration and Troubleshooting Tips for CognosTroubleshooting
– Open a Command Prompt window, go to <cognos_temp_Installer> /cognosinstaller) directory, and execute configure.cmd script.
Logon failed (401 Unauthorized) while execution of batch scripts under (<requestcenter.destination>/Cognos/bin)
Error
• The root cause for this would be that the customer policy does not allow enabling the Anonymous access option in IIS.
C:\cisco\cognos\bin>create_datasource.cmd2008-07-11 03:32:33,271 INFO Creating the DataSource...2008-07-11 03:32:33,567 INFO Database connection String: ^User ID:^?Password:;LOCAL;OL;DBInfo_Type=MS;Provider=SQLOLEDB;User ID=%s;Password=%s;Data Source=vmhost13;Provider_String=Initial Catalog=Datamart;@COLSEQ=2008-07-11 03:32:34,895 ERROR Login failed...2008-07-11 03:32:34,895 ERROR (401)Unauthorized
Solution
Step 1 Open Internet Services Manager.
Step 2 In the left pane of Internet Information Services, expand the server name.
Step 3 Expand Default Web Site.
Step 4 Expand the cognosc10 virtual directory.
Step 5 Click the cgi-bin virtual directory.
Step 6 In the right pane of Internet Information Services, right-click the Authentication icon and ensure Anonymous Authentication status is enabled as show below, in order to enable this under actions, you could enable link.
Figure 4-11 Anonymous Authentication
Step 7 Restart IIS.
Step 8 Open a Command Prompt window, go to <requestcenter.destination>\Cognos\bin directory, and execute failed batch scripts.
4-17Cisco Prime Service Catalog 10.0 R2 Installation Guide
OL-31474-01
Chapter 4 Advanced Configuration and Troubleshooting Tips for Cognos Troubleshooting
Custom Reports Data Model does not exists error when clicking on the Ad-Hoc Reporting link in Request Center
Error
The root cause for this issue is:
• The Custom Reports Data Model package is not published to the Cognos Server.
Solution
Open a Command Prompt window, go to the <requestcenter.destination>\Cognos\bin directory, and execute the create_model.cmd and publish_fdr_pkg.cmd scripts.
Unable to Start Cognos Service and Dispatcher Errors
Error
The root causes for this issue could be various reasons.
• Check the log files (cogserver.log and cogconfig_response.csv) located at </cognos_installed_location/c10_64/logs> and capture the error codes and see the solutions below associated with each error code.
Error Codes
CFG-ERR-0103 Unable to start IBM Cognos service. Execution of the external process returns an error code value of ‘-1’.
The root causes for this issue would be:
• The named account used to start the IBM Cognos service had an expired password or does not have admin privileges.
• The shutdown port number has a conflict.
Solution 1
Step 1 Go to the services.
Step 2 Go to IBM Cognos Service. Right-click and choose Properties.
Step 3 Click the Logon tab, enter the account information and password.
Note Ensure that the user account provided has admin privileges and the given password has not expired.
Step 4 Go Services and restart the IBM Cognos Service.
4-18Cisco Prime Service Catalog 10.0 R2 Installation Guide
OL-31474-01
Chapter 4 Advanced Configuration and Troubleshooting Tips for CognosTroubleshooting
Solution 2
Step 1 Choose Start > Programs > IBM Cognos 10-64 > IBM Cognos Configuration.
Step 2 Change the shut down port number from 9399 to 9410.
Step 3 Save changes and restart the IBM Cognos Service.
Import_reports.cmd fails while upgrading
Error
ERROR CM-REQ-4204 The replace operation failed because the class (exportDeployment) of the existing object, ‘/adminFolder/exportDeployment[@name=‘Reports’]’.
The root cause for this issue is:
• Report archive file (Report. zip) got corrupted in the cognos server.
Solution
Step 1 Log on as administrator to Request Center.
Step 2 Choose the Reporting module.
Step 3 Click the Reports tab.
Step 4 On the right-hand side, click Launch > IBM Cognos Administration.
Step 5 Choose the Configuration tab, click Content Administration, then click Reports.
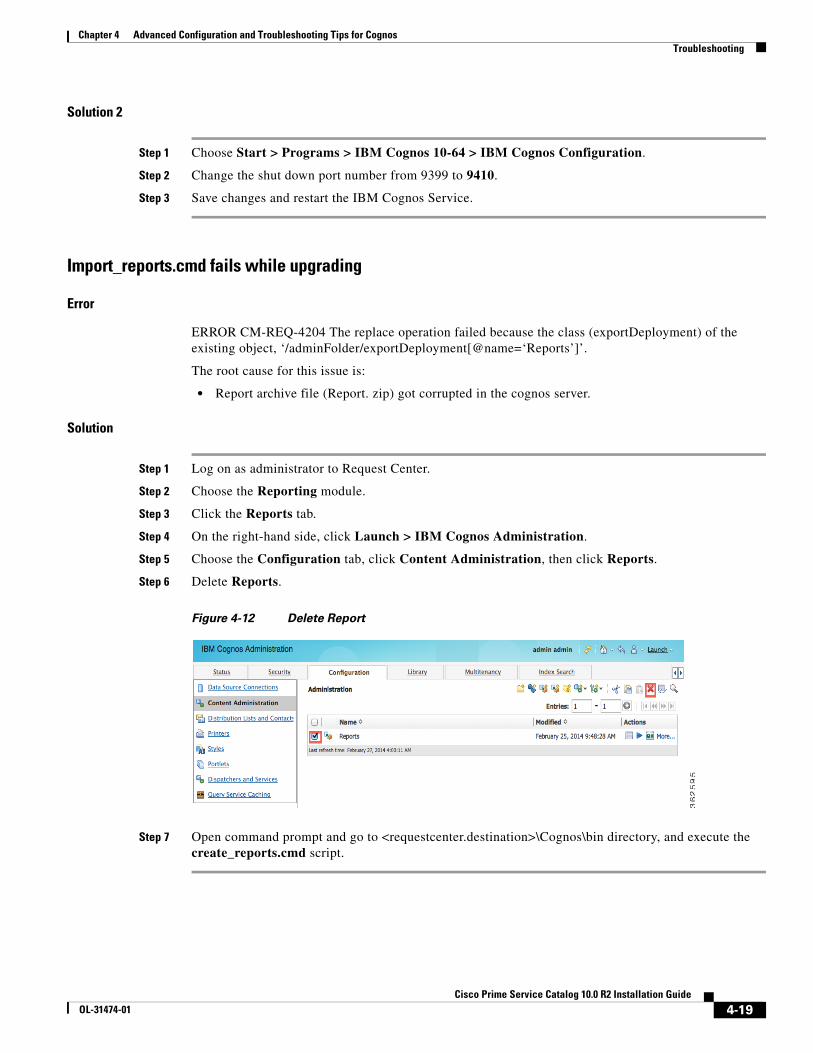
Step 6 Delete Reports.
Figure 4-12 Delete Report
Step 7 Open command prompt and go to <requestcenter.destination>\Cognos\bin directory, and execute the create_reports.cmd script.
4-19Cisco Prime Service Catalog 10.0 R2 Installation Guide
OL-31474-01
Chapter 4 Advanced Configuration and Troubleshooting Tips for Cognos Troubleshooting
Update_datamart.cmd fails (For SQL Server Database)
Error
INFO UDA-SQL-0115 Inappropriate SQL request.
INFO UDA-SQL-0564 [Microsoft OLE DB Provider for SQL Server] Could not find stored procedure ‘sp_DropDMIndxs’. (SQLSTATE=42000, SQLERRORCODE=2812).
The root cause for this issue is:
• Default schema owner for the Data Mart database objects (table/views/stored procedure) was not dbo.
Solution
Step 1 Ensure the default schema owner for the Data Mart database is dbo.
Step 2 Open a command prompt and go to <requestcenter.destination>\Cognos\bin directory, and execute the update_datamart.cmd script.
publish_fdr_pkg.cmd fails even After create_model.cmd runs Successfully
Error
The root cause for this error would be either the Reportable Dictionary or Service has the same name as a query subject (dimension/fact table name).
2008-10-14 22:19:13,155 INFO Action: Modify successful, continuing...2008-10-14 22:19:13,202 INFO Action: Modify successful, continuing...2008-10-14 22:19:13,233 INFO Action: Modify successful, continuing...2008-10-14 22:19:13,233 INFO Action: Modify failed, skipping...2008-10-14 22:19:13,249 INFO Reason: BMT-MD-0006 Another object of type ‘Query Subject’ already exists with the name ‘Person’ in Namespace ‘FormETL’. Please choose a unique name.2008-10-14 22:19:13,249 INFO 2008-10-14 22:19:13,249 INFO Transaction: 10 failed, skipping...2008-10-14 22:19:13,249 INFO 2008-10-14 22:19:13,249 INFO Transaction: 112008-10-14 22:19:13,264 INFO Action: Modify failed, skipping...2008-10-14 22:19:13,264 INFO Reason: BME-SP-0023 Invalid property handle ID: /O/name[0]/O/[FormETL].[RC_SERVICELOCATION].[FIELD1]2008-10-14 22:19:13,264 INFO Transaction: 11 failed, skipping...2008-10-14 22:19:13,280 INFO 2008-10-14 22:19:13,280 INFO Transaction: 122008-10-14 22:19:13,327 INFO Action: SetSecurityViewDefinition failed, skipping...2008-10-14 22:19:13,327 INFO Reason: BME-SP-0023 Invalid property handle ID: [FormETL].[Person].[REQUISITIONID]2008-10-14 22:19:13,327 INFO Transaction: 12 failed, skipping...
Note For more log information, go to c:\<APP_HOME>\logs\cognos_metamodel_update.log.
Solution
Open the particular dictionary or service shown in the log file, rename the dictionary or service to a unique name, run update_datamart.cmd, then create_model.cmd, and then publish_fdr_pkg.cmd.
4-20Cisco Prime Service Catalog 10.0 R2 Installation Guide
OL-31474-01
Chapter 4 Advanced Configuration and Troubleshooting Tips for CognosTroubleshooting
Note Do not name a dictionary or service which is reportable with the following names:
• Calendar Scheduled Date
• CalendarStartedDate
• CalendarDueDate
• CalendarClosedDate
• Customer
• Dictionary
• Keyword
• Performer
• Queue
• Requestor
• Service
• TaskType
• All Tasks
• Authorization Tasks
• Service Delivery Tasks
• RequisitionTaskFact
• ServiceRequestFact
• ServiceTaskFact
• TaskEffortEntryFact
• Group
• Organizational Unit
• Person
In order for the ETL scripts to run correctly, it is important that you set the system clock of the Service Catalog Application Server machine correctly, and the system clock of the Service Catalog database machine correctly. Furthermore, the database clock for the RDBMS instance where the Service Catalog database resides needs to match the system clock of the operating system where the database is installed. All date/time values are stored in the Service Catalog database and in the Data Mart database in GMT. Therefore, if you have a distributed environment where the Application Server machine is different from the database machine, it is OK for these two machines to be in different time zones. Just make sure that the system clock is set correctly for whatever time zone each machine happens to be in.
If you are using Symantec Antivirus, you must be running version 10.0.2.2000 or later.
4-21Cisco Prime Service Catalog 10.0 R2 Installation Guide
OL-31474-01
Chapter 4 Advanced Configuration and Troubleshooting Tips for Cognos Troubleshooting
How to find the Report URL
Solution
Step 1 Log on to Request Center.
Step 2 Choose the Reporting module.
Step 3 Right-click the Report, and choose Copy Shortcut, as shown below.
Figure 4-13 Copy Shortcut
Step 4 If you paste the shortcut in same browser window as the Request Center instance was opened, it will take you to the respective report.
Step 5 If you open a new browser window and paste the shortcut, it will prompt with the namespace drop-down list. Choose newScale namespace, and enter the logon credential—it will take you to the respective report.
How to change the reports home page from default List View to Details View
Solution
Step 1 Log on to the Request Center application.
Step 2 Choose the Reporting module.
Step 3 Click the Reports tab.
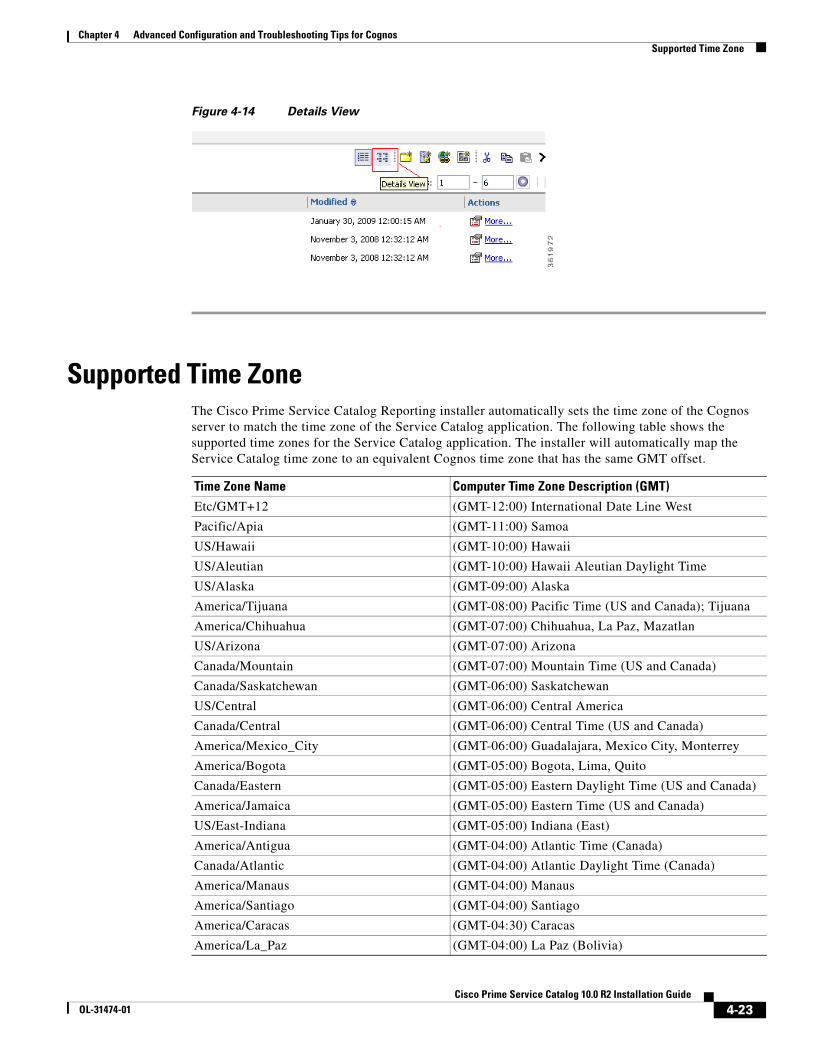
Step 4 On the right-hand side, click Details View, as shown below.
4-22Cisco Prime Service Catalog 10.0 R2 Installation Guide
OL-31474-01
Chapter 4 Advanced Configuration and Troubleshooting Tips for CognosSupported Time Zone
Figure 4-14 Details View
Supported Time ZoneThe Cisco Prime Service Catalog Reporting installer automatically sets the time zone of the Cognos server to match the time zone of the Service Catalog application. The following table shows the supported time zones for the Service Catalog application. The installer will automatically map the Service Catalog time zone to an equivalent Cognos time zone that has the same GMT offset.
Time Zone Name Computer Time Zone Description (GMT)Etc/GMT+12 (GMT-12:00) International Date Line West
Pacific/Apia (GMT-11:00) Samoa
US/Hawaii (GMT-10:00) Hawaii
US/Aleutian (GMT-10:00) Hawaii Aleutian Daylight Time
US/Alaska (GMT-09:00) Alaska
America/Tijuana (GMT-08:00) Pacific Time (US and Canada); Tijuana
America/Chihuahua (GMT-07:00) Chihuahua, La Paz, Mazatlan
US/Arizona (GMT-07:00) Arizona
Canada/Mountain (GMT-07:00) Mountain Time (US and Canada)
Canada/Saskatchewan (GMT-06:00) Saskatchewan
US/Central (GMT-06:00) Central America
Canada/Central (GMT-06:00) Central Time (US and Canada)
America/Mexico_City (GMT-06:00) Guadalajara, Mexico City, Monterrey
America/Bogota (GMT-05:00) Bogota, Lima, Quito
Canada/Eastern (GMT-05:00) Eastern Daylight Time (US and Canada)
America/Jamaica (GMT-05:00) Eastern Time (US and Canada)
US/East-Indiana (GMT-05:00) Indiana (East)
America/Antigua (GMT-04:00) Atlantic Time (Canada)
Canada/Atlantic (GMT-04:00) Atlantic Daylight Time (Canada)
America/Manaus (GMT-04:00) Manaus
America/Santiago (GMT-04:00) Santiago
America/Caracas (GMT-04:30) Caracas
America/La_Paz (GMT-04:00) La Paz (Bolivia)
4-23Cisco Prime Service Catalog 10.0 R2 Installation Guide
OL-31474-01
Chapter 4 Advanced Configuration and Troubleshooting Tips for Cognos Supported Time Zone
America/Sao_Paulo (GMT-03:00) Brasilia
America/Godthab (GMT-03:00) Greenland
America/Argentina/Buenos_Aires (GMT-03:00) Buenos Aires
America/Guyana (GMT-04:00) Georgetown
America/St_Johns (GMT-03:30) Newfoundland and Labrador
Asia/Kolkata (GMT+05:30) Chennai, Kolkata, Mumbai, New Delhi
Asia/Kathmandu (GMT+05:45) Kathmandu
Asia/Dhaka (GMT+06:00) Astana, Dhaka
Asia/Novosibirsk (GMT+07:00) Novosibirsk
Asia/Colombo (GMT+05:30) Sri Jayawardenepura
Asia/Rangoon (GMT+06:30) Yangon (Rangoon)
Asia/Bangkok (GMT+07:00) Bangkok, Hanoi, Jakarta
Time Zone Name Computer Time Zone Description (GMT)
4-24Cisco Prime Service Catalog 10.0 R2 Installation Guide
OL-31474-01
Chapter 4 Advanced Configuration and Troubleshooting Tips for CognosSupported Time Zone
Note The Europe/Moscow, Pacific/Fiji, Pacific/Apia, Asia/Yakutsk, and Asia/Vladivostok Time Zones currently do not support Daylight Saving Time. Thus, if you have to use one of these Time Zone Names, then either use one of the other Time Zone Names that has the same GMT offset, or consult with the Cisco Technical Assistance Center (TAC).
Asia/Krasnoyarsk (GMT+08:00) Krasnoyarsk
Asia/Irkutsk (GMT+09:00) Irkutsk
Asia/Kuala_Lumpur (GMT+08:00) Kuala Lumpur, Singapore
Asia/Taipei (GMT+08:00) Taipei
Australia/Perth (GMT+08:00) Perth
Asia/Chongqing (GMT+08:00) Beijing, Chongqing, Hong Kong SAR,
Asia/Seoul (GMT+09:00) Seoul
Asia/Tokyo (GMT+09:00) Osaka, Sapporo, Tokyo
Asia/Yakutsk (GMT+09:00) Yakutsk
Australia/Darwin (GMT+09:30) Darwin
Australia/Adelaide (GMT+09:30) Adelaide
Australia/Hobart (GMT+10:00) Hobart
Australia/Canberra (GMT+10:00) Canberra, Melbourne, Sydney
Australia/Brisbane (GMT+10:00) Brisbane
Asia/Vladivostok (GMT+10:00) Vladivostok
Pacific/Guam (GMT+10:00) Guam, Port Moresby
Pacific/Guadalcanal (GMT+11:00) Solomon Islands, New Caledonia
Pacific/Auckland (GMT+12:00) Auckland, Wellington
Pacific/Fiji (GMT+12:00) Fiji Islands
Pacific/Tongatapu (GMT+13:00) Nuku alofa
Time Zone Name Computer Time Zone Description (GMT)
4-25Cisco Prime Service Catalog 10.0 R2 Installation Guide
OL-31474-01
Chapter 4 Advanced Configuration and Troubleshooting Tips for Cognos Supported Time Zone
4-26Cisco Prime Service Catalog 10.0 R2 Installation Guide