61
10 Advanced

10 Advanced

Advanced 393
AdvancedKnox Manage provides you with more advanced features on the Admin Portal:
Enterprise-Firmware Over The Air (E-FOTA) service
E-FOTA service allows you to manage and configure firmware updates on Samsung devices running Android 7.0 Nougat or higher.
Certificates for applications
External certificates can be added for the different purposes and types on Knox Manage to use network services such as Wi-Fi, VPN, Exchange, and APNs.
Directory server
Knox Manage provides the Active Directory (AD) service that is built upon the industry-standard Lightweight Directory Access Protocol (LDAP) to access intra-enterprise data by integrating corporate’s directory server.
Open API
Open API supports the development of Knox Manage functions, such as providing access to the Knox Manage server, securing the authentication, and easily customizing the application programming and services.
Samsung Knox Manage Cloud Connector (SCC)
SCC allows you to connect the user information in the client’s Active Directory/LDAP server and the certificate information in the CA server with the user’s device, and thus use them safely.
Mobile Admin
Knox Manage’s Mobile Admin enables you to conveniently view the service history in a mobile environment and provides essential device management features, helping you to improve productivity at work.
Mail server
Mail servers, such as Microsoft Exchange Server or Office 365, can be integrated and used through Knox Manage on the user’s device.

Advanced 394
This chapter explains the following topics:
→ Managing Enterprise-Firmware Over The Air (E-FOTA)
→ Managing Certificates
→ Integrating a directory server
→ Setting a directory connector
→ Managing Open API
→ Using Cloud Connector
→ Using Mobile Admin
→ Configuring the Exchange server

Advanced 395
Managing Enterprise-Firmware Over The Air (E-FOTA)Knox Manage supports an Enterprise-Firmware Over The Air (E-FOTA) service that allows you to manage and configure firmware updates on Samsung devices running Android 7.0 Nougat or higher.
To use the E-FOTA service, you should register the E-FOTA license in the Knox Manage Admin Portal. Once you have registered the E-FOTA license in the Knox Manage Admin Portal, the E-FOTA groups organized by device model and carrier are created automatically. You can assign desired devices that need to be updated to an E-FOTA group and update them with the desired firmware version.
NOTE If you want to use Knox E-FOTA Advanced on Android Enterprise devices, navigate to Profile > Samsung Knox (Android Enterprise) > System and add Knox E-FOTA Advanced apk(com.samsung.android.knox.efota) in the Whitelisted Device Admin policy and apply a profile.
Viewing the E-FOTA group list
Once you have registered an E-FOTA license in the Knox Manage Admin Portal, E-FOTA groups organized by device model and carrier are created automatically. Navigate to Advanced > E-FOTA Management to view all the E-FOTA group information on the ”E-FOTA Management” page. You can also perform the following actions on this page.
Icon Description
E-FOTA Group Update Update the E-FOTA group information.
SearchSearch for a specific group for the entered group model name or carrier code.
Assign Device
Assign devices to the E-FOTA group for firmware updates. For more information, see Assigning devices to an E-FOTA group for firmware updates.
Firmware update settingSelect the firmware update type and specify the firmware version. For more information, see Modifying the firmware update configurations.
Update status per device View the firmware update status for each device in the E-FOTA group.
E-FOTA change historyView the change histories of the E-FOTA group. For more information, see Viewing the change histories of E-FOTA groups.

Advanced 396
Assigning devices to an E-FOTA group for firmware updates
If there are devices using the same model name and carrier code as the E-FOTA group created on the E-FOTA group list on the ”E-FOTA Management” page, assign the devices to the E-FOTA group for firmware updates.
To assign devices to an E-FOTA group for firmware updates, complete the following steps:
1. Navigate to Advanced > E-FOTA Management.
2. On the ”E-FOTA Management” page, click in the row of the E-FOTA group that you want to assign devices to.
3. In the “Assign Device” window, click the checkboxes next to desired devices for firmware update on the device list, and then click to add the selected devices to the device with E-FOTA group list. The selected devices will be added to the device with the E-FOTA group list.
• To remove the devices on the device with E-FOTA group list, click the checkboxes next to the devices to remove from the device with E-FOTA group list, and then click .
• To add all the devices to the device with E-FOTA group list, click Add all.
• To remove all the devices on the device with E-FOTA group list, click Remove all.
4. Click Next.
5. In the “Firmware update” window, select one of the following firmware update types from the drop-down list.
• Select: Allows you to choose to update devices with the target firmware version or not. Users can postpone the firmware update.
• Force: Updates the devices with the target firmware version forcibly at the set time. Users cannot postpone the firmware update.
6. On the firmware version list, select the desired firmware version to apply to the devices, and then click OK.
• Click of the target firmware version to view the detailed information on the target firmware version.
• If you select Force for firmware update type, specify the following information on the “Firmware Scheduling” window.– Start Date: Click to select a specific date to start the target firmware version update.– Start Time: Select a specific time to start the target firmware version update.– End Date: Click to select a specific date to end the target firmware version update.– End Time: Select a specific time to end the target firmware version update.

Advanced 397
NOTE • The updated date is set to GMT + 0.
• The start date and end date must be at least three days apart and can be up to a maximum of seven days apart. Also, the gap between the start time and the end time must not exceed 12 hours.
Modifying the firmware update configurations
You can modify the set firmware update configurations for each E-FOTA group.
To modify the firmware update configurations, complete the following steps:
1. Navigate to Advanced > E-FOTA Management.
2. On the ”E-FOTA Management” page, click in the row of the E-FOTA group whose firmware you want to modify to update its configuration.
3. In the “Firmware update” window, select one of the following firmware updates type from the drop-down list.
• Select: Allows you to choose to update devices with the target firmware version or not. Users can postpone the firmware update.
• Force: Update the devices with the target firmware version forcibly at the set time. Users cannot postpone the firmware update.
4. On the firmware version list, select the desired firmware version to apply to the devices, and then click OK.
• Click of the target firmware version to view the detailed information on the target firmware version.
• If you select Force for firmware update type, specify the following information on the “Firmware Scheduling” window.– Start Date: Click to select a specific date to start the target firmware version update.– Start Time: Select a specific time to start the target firmware version update.– End Date: Click to select a specific date to end the target firmware version update.– End Time: Select a specific time to end the target firmware version update.
NOTE • The updated date is set to GMT + 0.
• The start date and end date must be at least three days apart and can be up to a maximum of seven days apart. Also, the gap between the start time and the end time must not exceed 12 hours.
Advanced 398
Viewing the firmware update status of devices
You can view the status of firmware updates of the devices in an E-FOTA group.
To view the firmware update status of the devices, complete the following steps:
1. Navigate to Advanced > E-FOTA Management.
2. On the ”E-FOTA Management” page, click in the row of the E-FOTA group that you want to view the status of device firmware updates.
3. In the “Update status per device” window, view the detailed update status information for each device, such as the user and device information, OS version, device status, and the detailed result of the firmware updates.
• Click to send a device command to the filed or unapplied devices for updating the firmware to the target OS version.
Viewing the change histories of E-FOTA groups
You can view the history of changes made to an E-FOTA group.
To view the change histories of an E-FOTA group, complete the following steps:
1. Navigate to Advanced > E-FOTA Management.
2. On the ”E-FOTA Management” page, click in the row of the E-FOTA group that you want to view the change histories of.
3. In the “E-FOTA change history” window, view the detailed update information specified for the relevant E-FOTA group and update results on the list. You can also view the log date, update type, target firmware versions, and OS version.

Advanced 399
Managing CertificatesEnhance security by using certificates issued by applications. Add external certificates on Knox Manage for the different purposes and types to use network services such as Wi-Fi, VPN, Exchange, and APNs. You can view the details of the issued certificates and delete the invalid ones.
Certificate authority (CA)
Register the Certificate Authority (hereinafter CA) to use the Knox Manage certificate services. Before adding the CA, first download the CA root certificate from a SCEP-supported CA server. This also enables you to issue device certificates and external certificates. The Cloud Connector is provided between the CA server and the Knox Manage server for secure data transmission. For more information about the Cloud Connector, see Using Cloud Connector.
Adding a certificate authority (CA)
To add a CA, complete the following steps:
1. Navigate to Advanced > Certificate > Certificate Authority (CA).
2. On the “Certificate Authority (CA)” page, click Add.
3. On the “Add Certificate Authority” page, enter the following CA information.
• CA Name: Assign a unique name for each CA.
• Description: Enter a description for the CA.
• CA Type: Select a CA type. The input information varies depending on the selected CA type.– When the CA type is ADCS:
Item Description
Host NameEnter the CA server host URL address.
e.g. http://emm.smartemm.com/
Request Method
Select a method to send the certificate validity check request to the CA.
• CERTSRV: Validity is checked with the CRL method when logging into the user device.
• URL: Validity is checked with the OCSP method when logging into the user device.

Advanced 400
Item Description
CA Cert Chain URL
Enter the CA Cert Chain URL address.
NOTE This field is automatically entered based on the host name if the CERTSRV is selected as the request method.
WSURLEnter the registered Certificate Enrollment Web Service (CES) address to provide web service with the CA.
Key Algorithm Select a key algorithm type between EC and RSA.
Key Length
Select a key length.
NOTE The key length varies depending on the selected key algorithm type.
Auth MethodSelect an authentication method between User account and Certificate.
User ID Enter the Knox Manage user ID.
Password Enter the password for the user ID.
Workstation Enter the workstation information.
Domain Enter the domain name that is used on Knox Manage.
Certificate Type
Select a certificate type.
NOTE This field appears only when Certificate is selected as the authentication method.
Certificate KeyStore
Click Browse and select a certificate file in the CER, DER, PFX, or P12 format.
NOTE This field appears only when Certificate is selected as the authentication method.
KeyStore Password
Enter the password for the uploaded certificate KeyStore file.
NOTE This field appears only when Certificate is selected as the authentication method.

Advanced 401
– When the CA type is Generic SCEP or NDES:
Item Description
SCEP URLEnter the SCEP IP or URL to send the certificate validity check request to the CA.
e.g. http://emm.smartemm.com/certsrv/mscep/mscep.dll
Key AlgorithmOnly RSA is supported when Generic SCEP and NDES CA types are selected.
Key Length Select a key length from among 2048, 3072, or 4096.
Challenge Type
Select a challenge type to authenticate the selected CA type.
• Dynamic: Enter the information used on the Knox Manage server for authentication configuration.
• Static: Enter the challenge password.
• No Challenge: If no challenge is selected the challenge password is not required.
NOTE The Dynamic field is enabled only when the NDES type CA is selected.
User ID
Enter the Knox Manage user ID.
NOTE This field appears only when Dynamic is selected as the challenge type.
Password
Enter the password for the user ID.
NOTE This field appears only when Dynamic is selected as the challenge type.
Domain
Enter the domain name that is used on Knox Manage.
NOTE This field appears only when Dynamic is selected as the challenge type.
Challenge URL Enter the challenge URL address used on Knox Manage.
Challenge Password
Enter the same password used for the authentication password.
NOTE This field appears only when Static is selected as the challenge type.
Retry Count
Select a maximum number of retry to issue certificates.
NOTE • The default value is set to 5.
• The retry count value can be between 1 – 10 times.

Advanced 402
– When the CA type is CertAgent:
Item Description
RAMI URLEnter the RAMI IP address or URL to send the certificate validity check request to the CA.
e.g. http://emm.smartemm.com/certagentadmin/ca/rami
Key Algorithm Select a key algorithm type between EC and RSA.
Key Length
Select a key length.
NOTE The key length varies depending on the selected key algorithm type.
CA Account Enter the CA account ID.
Certificate KeyStoreClick Browse and select a certificate file in the CER, DER, PFX or P12 format.
KeyStore Password Enter the password for the uploaded certificate KeyStore file.
– When CA type is EST:
Item Description
Host Name Enter the CA server host URL address.
Port Enter the CA server host port number.
Use proxy Click the Use proxy checkbox to enable proxy use for the CA server.
CA Label
Enter the CA server label.
NOTE Contact Knox Manage Technical Support for the CA label.
Key Algorithm Select a key algorithm type between EC and RSA.
Key Length
Select a key length.
NOTE The key length varies depending on the selected key algorithm type.
Challenge Password Enter the password for the CA server authentication.
Auth MethodSelect an authentication method between User account and Certificate.
User ID Enter the Knox Manage user ID.
Password Enter the password for the user ID.

Advanced 403
Item Description
Certificate KeyStore
Click Browse and select a certificate file in the CER, DER, PFX or P12 format.
NOTE This field appears only when Certificate is selected as the authentication method.
KeyStore Password
Enter the password for the uploaded certificate KeyStore file.
NOTE This field appears only when Certificate is selected as the authentication method.
• Test Connection: Click to check if the entered CA information connects to the CA server successfully.
NOTE To add a CA, you must pass the connection test.
• Managing CA: Select a CA server name from the root CA list.
4. Click Save.
Viewing a certificate authority (CA)
Navigate to Advanced > Certificate > Certificate Authority (CA) to view all the CA information on the “Certificate Authority (CA)” page.
To view the detailed information of a specific CA, click the CA name of a specific CA on the list.
Modifying a certificate authority (CA)
To modify a CA, complete the following steps:
1. Navigate to Advanced > Certificate > Certificate Authority (CA).
2. On the “Certificate Authority (CA)” page, click the checkbox for the CA you want to modify, and the click Modify.
3. On the “Modify Certificate Authority” page, modify the CA information. The information varies depending on the selected CA type.
NOTE You can register a new root certificate when modifying the CA.
4. Click Save.

Advanced 404
Deleting a certificate authority (CA)
To delete a CA, complete the following steps:
1. Navigate to Advanced > Certificate > Certificate Authority (CA).
2. On the “Certificate Authority (CA)” page, click the checkbox for the CA you want to delete, and the click Delete.
3. In the “Delete Certificate Authority” window, click OK.
NOTE You can delete the CA only when there is no template in use.
Certificate templates
The CA server manages certificates through certificate templates. You can add multiple templates and modify them to standardize and simplify the process of issuing certificates.
Adding certificate templates
To add a certificate template, complete the following steps:
1. Navigate to Advanced > Certificate > Certificate Template.
2. On the “Certificate Template” page, click Add.
3. On the “Add Certificate Template” page, enter the following information:
• Template Name: Assign a unique name for each certificate template.
• Description: Enter a description for the certificate template.
• Type: Only External is supported.
• Platform: You can select Android, iOS, or both. When both platforms are selected, the usage types that can be commonly applied to them will be displayed.
NOTE Depending on the device platform, the certificate usage type varies.

Advanced 405
• CA: Select a CA. Input information varies depending on the selected CA type.
• CA Template Name: Enter the CA template name. The CA template name is required when ADCS type CA is selected.
• Profile ID: Enter the profile ID. The profile ID is required when CertAgent type CA is selected.
NOTE A master profile will be used for an empty value.
• CA Label: Enter the CA label. The CA label is required when EST type CA is selected.
NOTE The label of the selected CA will be used for an empty value.
• Subject Name: Enter a subject name in a CN={Subject name value} format.
NOTE You can also click Lookup to open the reference item list and select an item from it. The reference value will be automatically entered.
• Certificate Usage: Select a certificate usage type.– Wi-Fi: Authorizes connecting with AP for Wi-Fi.– VPN: Authorizes encrypted VPN communication when registering Knox Manage on devices.– Exchange: Authorizes user authentication and services in Exchange.– Knox Generic VPN: Authorizes encrypted VPN communication for Knox enabled Android
devices.– Knox VPN: Authorizes encrypted VPN communication specialized for Samsung devices.
• SAN Type: Select a SAN type, and then enter the SAN value. Then click to add.
NOTE You can also click Lookup to open the reference item list and select a SAN reference item from it. The reference value will be automatically entered.
4. Click Save.
5. In the “OK” window, click OK.

Advanced 406
Viewing certificate templates
Navigate to Advanced > Certificate > Certificate Template to view all the template information on the “Certificate Template” page.
• To view the detailed information of the specific certificate template, click a template name from among the certificate templates on the list.
• To view the detailed information of the specific CA, click a CA from among the certificate templates on the list.
Modifying certificate templates
To modify a certificate template, complete the following steps:
1. Navigate to Advanced > Certificate > Certificate Template.
2. On the “Certificate Template” page, click the checkbox for the certificate you want to modify, and the click Modify.
3. On the “Modify Certificate Template” page, modify the certificate template information.
• Template Name: Assign a unique name for the certificate template.
• Description: Enter a description for the certificate template.
• Type: Only External is supported.
• Platform: Select a device platform from among Common, Android or iOS.
• CA: Select a CA type. Input information will vary depending on the selected CA type.
• CA Template Name: Enter the CA template name. The CA template name is required when ADCS type CA is selected.
• Profile ID: Enter the profile ID. The profile ID is required when CertAgent type CA is selected.
NOTE A master profile will be used for an empty value.
• CA Label: Enter the CA label. The CA label is required when EST type CA is selected.
NOTE The label of the selected CA will be used for an empty value.
• Subject Name: Enter a subject name in a CN={Subject name value} format.
NOTE You can also click Lookup to open the reference item list and select an item from it. The reference value will be automatically entered.

Advanced 407
• Certificate Usage: Select a certificate usage type.– Wi-Fi: Authorizes connecting with AP for Wi-Fi.
NOTE The device configuration for Wi-Fi needs to be checked if Wi-Fi is selected as the certificate usage.
– VPN: Authorizes encrypted VPN communication when registering Knox Manage on devices.
NOTE The device configuration for VPN needs to be checked if VPN is selected as the certificate usage.
– Exchange: Authorizes user authentication and services in Exchange.– Knox Generic VPN: Authorizes encrypted VPN communication for Knox enabled devices.
NOTE • This field appears only when Android is selected as the device platform.
• The device configuration for VPN needs to be checked if Knox Generic VPN is selected as the certificate usage.
– Knox VPN: Authorizes encrypted VPN communication specialized for Galaxy devices.
NOTE This field appears only when Android is selected as the device platform.
• SAN Type: Select a SAN type and then enter the SAN value. Then click to add.
NOTE You can also click Lookup to open the reference item list and select a SAN reference item from it. The reference value will be automatically entered.
4. Click Save.
5. In the “OK” window, click OK.
Deleting certificate templates
To delete certificate templates, complete the following steps:
1. Navigate to Advanced > Certificate > Certificate Template.
2. On the “Certificate Template” page, click the checkbox for the certificate template you want to delete, and the click Delete.
3. In the “Delete Certificate Template” window, click OK.
NOTE You can delete the template in use only when the Android and iOS settings have been deleted from the device management profile.
Advanced 408
External certificates
External certificates are used in the Profile policies for user authentication configuration. Register an external certificate and manage it in Knox Manage without receiving a certificate issued from the CA.
NOTE APNs certificate, which authorizes the Apple Push Notification services, can be viewed but not registered. For more information about registering APNs certificates, see Setting an APNs certificate (iOS only).
Adding external certificates
To add an external certificate, complete the following steps:
1. Navigate to Advanced > Certificate > External Certificate.
2. On the “External Certificate” page, click Add.
3. On the “Add External Certificate” page, enter the following information:
• External Certificate Name: Assign a unique name for each external certificate.
• Purpose: Select a purpose for the external certificate.– Wi-Fi: Authorizes connecting with AP for Wi-Fi.– Knox VPN: Authorizes encrypted VPN communication specialized for Galaxy devices.– VPN: Authorizes encrypted VPN communication when registering Knox Manage on devices.– Exchange: Authorizes the user authentication and services in Exchange.– CA Cert: Issued by the CA as requested by the user’s public key.– Knox Generic VPN: Authorizes encrypted VPN communication for Knox enabled devices.– Supervision Certificate: Authorizes iOS device pairing to use the remote detection mode.
NOTE If Supervision Certificate is selected as an external certificate purpose, the certificate type is automatically selected as Server.
• Type: Select a type for the external certificate.– Root: Highest level of certificate that identifies the Root CA (Certificate Authority).– User: Certificate issued for general purposes, such as devices or applications.– Server: Server certificate for general purposes.
• File Name: Click and select a certificate file in the CER, DER, PFX or P12 format.
• Password: Enter the password of the selected certificate.
• Description: Enter a description for the external certificate.
4. Click Save.

Advanced 409
Viewing external certificates
Navigate to Advanced > Certificate > External Certificate to view the external certificate information on the “External Certificate” page.
Modifying external certificates
Modify external certificates by renewing the currently registered external certificate file with a new file.
NOTE • The use and type of the external certificate cannot be modified.
• APNs certificates cannot be modified.
To modify an external certificate, complete the following steps:
1. Navigate to Advanced > Certificate > External Certificate.
2. On the “External Certificate” page, click the checkbox for the external certificate you want to modify, and the click Modify.
3. On the “Modify External Certificate” page, modify the external certificate information.
4. Click Save.
Deleting external certificates
To delete an external certificate, complete the following steps:
1. Navigate to Advanced > Certificate > External Certificate.
2. On the “External Certificate” page, click the checkbox for the external certificate you want to delete, and the click Delete.
3. In the “Delete” window, click OK.
NOTE APNs certificates and certificates in use cannot be deleted.

Advanced 410
Viewing certificates issuing history
Navigate to Advanced > Certificate > Certificates Issuing history to view a history of all issued certificates. Issued certificates can be renewed upon expiration or user request. For Android devices, users can update certificates. For iOS devices, certificates are automatically updated by the CA server.
The certificate statuses of the issued certificates on Knox Manage are as follows:
• Generated: The certificate has been successfully issued and is currently in use.
• Deleted: The certificate is deleted by the administrator and cannot be used on Knox Manage.
• Revoked: The certificate has expired and has been revoked from the CA server.
Deleting certificates
You can delete certificates used on the iOS devices, which are saved and then distributed from the Knox Manage server, unlike other device platforms. To delete a certificate, complete the following steps:
1. Navigate to Advanced > Certificate > Certificates Issuing history.
2. On the “Certificate Issuing history” page, click to set an issued period.
3. Click the checkbox for the certificate you want to delete and click Delete.
NOTE Certificates used on devices other than iOS cannot be deleted.
4. In the “Delete” window, click OK.

Advanced 411
Integrating a directory serverKnox Manage provides the Active Directory (AD) service that is built upon the industry-standard Lightweight Directory Access Protocol (LDAP) to access intra-enterprise data by integrating corporate’s directory server.
Once the AD service is configured, you can perform the following:
• Keep user, organizational, and group information synchronized across multiple sites throughout the enterprise and update information on demand or automatically at specified intervals.
• Simplify the user registration process within the company through VPN, Microsoft Exchange, Certificate, or email account integration.
To configure and use the AD service, the following procedures must be performed:
Integrating a directory server
Configuring a directory connector
Configuring user authentication settings
and search
Viewing the directory server status
Navigate to Advanced > Directory Integration > Directory Pool to view all the directory server status information on the “Directory Pool” page.
To view the detailed information of a specific directory server, click the pool name of a specific directory server on the list.

Advanced 412
Adding a directory server
Add a directory server in the Admin Portal to synchronize corporate user information by integrating the corporate directory server.
To add a directory server, complete the following steps:
1. Navigate to Advanced > Directory Integration > Directory Pool.
2. On the “Directory Pool” page, click Add.
3. On the “Add Directory Pool” page, enter the following information:
• Directory Pool Name: Enter a name for the pool that is up to 20 characters and that consists of letters, numbers, or special characters (only dashes and underscores are allowed) to distinguish it from other directory services.
• Encryption Type: Select one of the following encryption types for the internet communication protocol used for communication with the directory server.– None: No encryption– SSL: Secured Socket Layer– TLS: Transport Layer Security
• Auth Type: Select one of the following authentication types used for communication with the directory server.
NOTE Knox Manage provides a secure channel between the directory server and the Knox Manage server through Cloud Connector. If you select the authentication type as GSSAPI (Kerberos), Cloud Connector cannot be used. For more information about Cloud Connector, see Using Cloud Connector.
– None: no encryption– Simple: Select this if you are not certain about the authentication type.

Advanced 413
– DIGEST-MD5 (SASL), CRAM-MD5 (SASL), or GSSAPI (Kerberos): If you select one of these authentication types, configure the additional advanced settings on the Authentication Detailed Setting tab as follows:
Authentication type Description
DIGESTMD5 (SASL) and CRAMMD5 (SASL)
Enter the following information for configuring the settings for Simple Authentication and security layer (SASL), which is a telnet-based protocol.
• SASL Realm: Enter the realm value of the SASL server in the relevant domain’s format, such as sample.com.
• Quality of Protection: Select one of the following qualities of the data protection options.– Authentication only: Protects the data only for authentication.– Authentication with integrity: Ensures the integrity of all the data
exchanged, including authentication data.– Authentication with integrity and privacy: Ensures integrity for
all the data exchanges, including authentications through data encryption.
• Protection Strength: Select one of the data protection levels.– High: Use 128-bit encryption.– Medium: Use 56-bit encryption.– Low: Use 40-bit encryption.– Mutual authentication: Click the checkbox to ensure data validity
by inserting the key into the data exchanged between the client and server.
GSSAPI (Kerberos)
Enter the following information for GSSAPI (Kerberos) authentication.
• Kerberos Credential Configuration: Select one of the following methods for obtaining a Kerberos ticket.– Use native TGT: Select this if you have already issued a ticket in
the Admin Portal.– Obtain TGT from KDC: Issue a new ticket using the default user ID
and password.
• Kerberos Configuration: Select one of the following methods for configuring the Kerberos server.– Use native system configuration: Use the Kerberos server
information defined in the Java Property.– Use following configuration: Enter the following Kerberos server
information manually.– Kerberos Realm: Enter the realm of the Kerberos server.– KDC Host: Enter the Kerberos Key Distribution Center (KDC) host
or the IP address.– KDC Port: Enter the KDC port number.

Advanced 414
• IP/Host: Enter the IP or host address of the directory address. Enter the TCP port number that should be used for communication with the directory server. 389 is the default port number used for unencrypted communication with the directory server.
• User ID: Enter the user ID (administrator account) that can access the directory server and read it. It can be entered in various forms, such as domain\administrator ID, administrator ID@domain or CN=administrator ID, CN=Users, DC=domain, DC=com.
• Password: Enter the user ID’s password.
• Max Active Limit: Select the maximum number of active connections available from 10 to 50.
• Max Idle Limit: Select the maximum number of idle connections available from 0 to 30.
• Description: Enter a description of the directory server.
4. Click Test Connection to test suitability with the entered information of the directory server, and then click Save to add the directory server.
Updating directory server status
Once you have added a directory server in the Knox Manage Admin Portal, you can update the status information of the specific directory servers on the list.
To update the directory server status, complete the following steps:
1. Navigate to Advanced > Directory Integration > Directory Pool.
2. On the “Directory Pool” page, click the checkbox for a specific directory server on the list, and then click Check Directory Status to update its directory server status. You can view the updated status information of the selected directory server on the list.
Advanced 415
Copying a directory server
You can copy an existing directory server and add a new directory server to the list.
To copy a directory server, complete the following steps:
1. Navigate to Advanced > Directory Integration > Directory Pool.
2. On the “Directory Pool” page, click the checkbox for a specific directory server that you want to copy information from, and then click Copy.
3. On the “Copy Directory Pool” page, modify the existing information if necessary, and click Save to add a new directory server to the list.
Modifying directory server information
You can modify the information of an existing directory server.
To modify directory server information, complete the following steps:
1. Navigate to Advanced > Directory Integration > Directory Pool.
2. On the “Directory Pool” page, click the checkbox for a specific directory server that you want to modify the information of, and then click Modify.
3. On the “Modify Directory Pool” page, modify the existing information, and click Save to save the modified information of the selected directory server on the list. For more information about entering directory server information, see Adding a directory server.

Advanced 416
Deleting directory servers
You can delete directory servers from the list.
To delete directory servers, complete the following steps:
1. Navigate to Advanced > Directory Integration > Directory Pool.
2. On the “Directory Pool” page, click the checkbox for a specific directory server that you want to delete from the list, and then click Delete.
3. In the “Delete Connection Information” window, click OK.
Setting a directory connectorUsing a directory connector, you can filter client’s user information on the directory server integrated with Knox Manage.
Once a directory connecter is configured, you can perform the followings:
• Extract the required user information through the directory type, set range, and detailed filter settings.
• Simplify the user registration process, which improve work efficiency.
To set a directory connector, the following settings must be configured.
• Directory type
• Base DN and range
• Filters
• Output field
Viewing the directory connector status
Navigate to Advanced > Directory Integration > Directory Service to view all the directory connector status information on the ”Directory Service” page.
To view the detailed information of a specific directory server, click the service ID of the specific directory connector on the list.

Advanced 417
Adding a directory connector
Add a directory connector to extract required client’s information on the directory server.
To add a directory connector, complete the following steps:
1. Navigate to Advanced > Directory Integration > Directory Service.
2. On the “Directory Service” page, click Add.
3. On the “Add Directory Service” page, enter the following information:
• Service ID: Enter a Service ID of up to 50 characters containing letters, numbers, and special characters (only dashes and underscores are allowed).
• Service Name: Enter a Service name to distinguish it from other directory connectors.
• Status: Select the status of the directory connector to use. The default value is Activated.
• Pool Name: Select the pool (directory server) that you have already created for directory servers in the Admin Portal. To view the detailed information for each registered pool, navigate to Advanced > Directory Integration > Directory Pool.
• Service Type: Select one of the following service type to perform user authentication or user searches on the directory server integrated with Knox Manage.
Classification Service type Description
Authentication
Authentication
Makes Authentication requests to a client’s directory server.
NOTE The filter and output fields are automatically entered in accordance with the directory server type.
User-defined authentication
Makes Authentication requests to a client’s directory server.
NOTE The filter and output fields must be entered manually in accordance with your desired settings.

Advanced 418
Classification Service type Description
Search
User Search
Searches for user information only.
NOTE The filter and output fields are automatically entered in accordance with the directory server type.
Organization Search
Searches for organization information only.
NOTE The filter and output fields are automatically entered in accordance with the directory server type.
User-defined searchSearches for desired user information using the filter values entered manually. This information can also be sent to devices.
Profile Configuration (User information)
Searches for user information using the filter set for the directory connector. To use this type, the policy of the user information input method must be selected as Connector interworking. For more information on configuring policies, see Configuring policies by device platform.
Profile Configuration (Certificate information)
Authenticates for a user using the filter set for the directory connector. To use this type, the policy of the user certificate information input method must be selected as Connector interworking. For more information on configuring policies, see Configuring policies by device platform.
NOTE To authenticate users on devices using globalLdapServiceAuthenticator selected as the authenticator, select the service type as Authentication or User-defined authentication. For more information about how to select the authenticator, see Setting the user authentication method.
• Base DN: Click Select to open the “Select Base DN” window and select a starting location for searches in the directory server. Entering a Base DN value can reduce the time required to search for data by limiting searches to a specific location.– Selected DN: Shows the selected DN (Distinguish Name).
• Filter: Click Select to open the “Select Object Class” window and select an Object Class and attributes for the LDAP Syntax string that will be used to filter search results.– Recommended Properties: Displays the recommended properties of the selected object
class.– Return Value: Displays the LDAP Syntax of the selected property information and object
class.

Advanced 419
– Default: Select the object class name defined by default as a filter.– Custom: Select the object class name defined by connected directory server as a filter.
• Range: Select one of the following search range for the directory server based on the specified base DN.– Object: Within the level of the base DN.– One Level: Within the level including the sub-level of the base DN.– Subtree: Within all sub-levels of the base DN.
• Output Field: Select one of the following return information range to only extract the desired attributes.– All: Returns all attributes for the searched entries.– Select: Returns only the selected attributes for the searched entries. To select the desired
properties to be used for the filter, click Select Property to open the “Select Property” window and select the desired properties on the loaded attribute list. To apply the selected properties click Add.– To delete an attribute from the selected properties list, click next to the attribute.
NOTE • To modify the name of the selected sources and return properties, double-click an item on the “Output Field Settings” field, and then modify it.
• The return property names may not be returned if the modified property names are same as existing property names on the loaded attribute list.
4. Click Save to add a directory connector.
Testing a directory service
Before using the directory connector, check if the directory connector operates properly on the directory server.
To test a directory connector, complete the following steps:
1. Navigate to Advanced > Directory Integration > Directory Service.
2. On the “Directory Service” page, click the checkbox for a directory connector that you want to test, and then click Test.

Advanced 420
3. In the “Test” window, enter the following information:
• URL: Select the output form from the drop-down list. The URL will be automatically entered for a test when the service is requested.
• Parameter: Enter a parameter key and value (ex. userId=administrator) in the filter.– Select: Select the desired parameter previously saved in the “Select Parameter” window that
you want to use as an input parameter.To add an input parameter, click Add and, in the “Add Parameter” window, enter the following information:– Parameter ID: Enter an input ID of up to 50 characters containing letters, numbers, and
special characters (only dashes and underscores are allowed) to distinguish it from other parameters.
– Description: Enter a description of the input parameter.– Parameter: Enter a parameter key and value (ex. userId=administrator) in the filter. The
test parameter must be identical to the value entered in the service’s filter.
4. Click Send to test the service connection, and then view the test results displayed in a tree structure with the results expanded to the last node in the “Send Result” window.

Advanced 421
Setting the directory service operating hours
Set the operating hours for each directory connector to have them operate at a desired time and record logs for the service. You can also notify users of the non-operating hours by sending a message.
To set the directory service operating hours, complete the following steps:
1. Navigate to Advanced > Directory Integration > Directory Service.
2. On the “Directory Service” page, click the checkbox for a specific directory connector on the list, and then click Connect.
3. On the “Connector Service” page, set the directory service operating hours and log service details.
Item Description
Connector Service Time
Select one of the following connector service time options.
• Always (Default): Operates the directory connector service time from 00:00 - 24:00, Monday to Sunday.
• Individual: Select the desired operating day and hours of the directory connector.– To add an operating schedule, select the desired day and hours, and then
click .– To delete a set schedule, click next to the set schedule.– View Timetable: Displays the previously set service operating schedule in a
time table.
Simulation Enter a simulation description for the operating schedule.
Message during non-operating hours
Enter a message to notify users of non-operating hours. The message is sent to user devices when the service is not operating.
Log Service Setting
Select one of the following log recording methods.
• Do not write the log (Default): Disables use of the service transaction log recording.
• Use the connector service transaction log: Enables use of the service transaction log recording.

Advanced 422
Copying a directory connector
You can copy an existing directory connector and add a new directory connector to the list.
To copy a directory connector, complete the following steps:
1. Navigate to Advanced > Directory Integration > Directory Service.
2. On the “Directory Service” page, click the checkbox for a specific directory connector that you want to copy information from, and then click Copy.
3. On the “Copy Directory Service” page, modify the existing information if necessary, and click Save to add a new directory connector on the list.
Modifying directory connector information
You can modify the information of an existing directory connector.
To modify directory connector information, complete the following steps:
1. Navigate to Advanced > Directory Integration > Directory Service.
2. On the “Directory Service” page, click the checkbox for a specific directory connector that you want to modify the information of, and then click Modify.
3. On the “Modify Directory Service” page, modify the existing information, and click Save to save the modified information of the selected directory server on the list. For more information about entering directory server information see, Adding a directory connector.
Deleting directory connectors
You can delete directory connectors from the list.
To delete directory connectors, complete the following steps:
1. Navigate to Advanced > Directory Integration > Directory Service.
2. On the “Directory Service” page, click the checkbox for a specific directory connector that you want to delete from the list, and then click Delete.
3. In the “Delete” window, click OK.

Advanced 423
Managing Open APIKnox Manage uses the OAuth2 authentication method as a standardized open protocol to provide an Open API for developers. With the Open API, you can support the development of Knox Manage functions, such as providing access to the Knox Manage server, securing the authentication, and easily customizing the application programming and services.
Managing API clients
Add and manage API clients via Knox Manage. Management of API clients includes copying, modifying, deleting, and activating or deactivating API client accounts.
Viewing API clients
Navigate to Advanced > EMM API > API Client to view all the client information on the “API Client” page.
To view detailed information of a specific API client, click the client ID of a specific API client on the list.
Adding API clients
To add an API client, complete the following steps:
1. Navigate to Advanced > EMM API > API Client.
2. On the “API Client” page, click Add.
3. In the “Add API Client” window, enter the following API client information:
• Client ID: Assign a unique client ID to use for a token request.
• Password: Enter a new password between 8 and 30 characters. The password must be a combination of letters, numbers, and special characters.
• Token Validity(sec): Enter the access time for when the Open API is called.
4. Click Save.

Advanced 424
Copying API clients
Copy an existing API client and create a new API client. When you reuse a client information, you cannot load the client ID and password of the existing API client.
To copy an API client, complete the following steps:
1. Navigate to Advanced > EMM API > API Client.
2. On the “API Client” page, click the checkbox for the API client you want to copy, and the click Copy.
3. In the “Copy API Client” window, enter the following API client information:
• Client ID: Assign a unique client ID to use for a token request. The API client ID cannot be modified.
• Password: Enter a new password between 8 and 30 characters. The password must be a combination of letters, numbers, and special characters.
• Token Validity(sec): Displays the copied access time for when the Open API is called.
4. Click Save.
Modifying API clients
You can modify the information of an existing API client.
To modify an API client, complete the following steps:
1. Navigate to Advanced > EMM API > API Client.
2. On the “API Client” page, click the checkbox for the API client you want to modify the information of, and the click Modify.
3. In the “Modify API Client” window, modify the following client information:
• Client ID: Displays the API client ID.
• Password: Modify the password between 8 and 30 characters. The password must be a combination of letters, numbers, and special characters.
• Token Validity(sec): Modify access time for when the Open API is called.
4. Click Save.

Advanced 425
Deleting API clients
You can delete API clients from the list.
To delete an API client, complete the following steps:
1. Navigate to Advanced > EMM API > API Client.
2. On the “API Client” page, click the checkbox for the API client you want to delete from the list, and the click Delete.
3. In the “Delete“ window, click OK.
Activating or deactivating API clients
To activate or deactivate API client, complete the following steps:
1. Navigate to Advanced > EMM API > API Client.
2. On the “API Client” page, click the checkbox for the API client you want to activate or deactivate, and the click Change Status.
3. In the “Change Status” window, click OK.
• The status of the API client changes to Active or Inactive depending on its previous status. Once activated, the Open API can be called using the API client. Once deactivated, the Open API cannot be called using the API client.

Advanced 426
Invalidating tokens
Invalidate all the currently active tokens. An invalidated token cannot be used again and a new one must be requested through the OAuth2 authentication method.
NOTE If you call the Open API with an invalidated token, an error message appears and the API call will be disabled and a new token must be republished.
To invalidate tokens, complete the following steps:
1. Navigate to Advanced > EMM API > API Client.
2. On the “API Client” page, click the checkbox for the API client you want to invalidate tokens of, and the click Token Invalidate.
3. In the “Token Invalidate” window, click OK.
Viewing the API log
Navigate to Advanced > EMM API > API Log to view all the API log information on the “API Log” page.
Viewing the API client log
Navigate to Advanced > EMM API > API Client Log to view all the API client log information on the “API Client Log” page.
To view the API client log’s error details, click a specific API client log on the list. The error details are displayed at the bottom of the page.
The following is a sample of error codes details from the API client log list:
Parameters:deviceId=&Result:{“resultValue”:null,”resultCode”:”-102”,”resultMessage”:”deviceId - Null or Empty string”}

Advanced 427
Using Cloud ConnectorSamsung Knox Manage Cloud Connector (SCC) creates a secure channel for data transfers between the client’s enterprise system and the Knox Manage cloud server. It allows you to connect the user information in the client’s Active Directory/LDAP server and the certificate information in the CA server with the user’s device, and thus use them safely.
SCC is configured as follows:
Firewall
PublicNetwork LDAP in Client Site
LDAP B
LDAP A
CA A
Firewall
SCC ControlService Server
SCCServer 1
Knox Managein Cloud
KnoxManageServer
SCCServer N
DB
LDAP AConnector
CA AConnector
LDAP BConnector
InternetL4
SCCClient A
SCCClient B
Knox Manage server
It is installed on the cloud and communicates with a user’s device to provide the Knox Manage services. You can establish servers separately per tenant.
Connector
The Knox Manage server provides the LDAP and CA connectors to connect to the client’s LDAP and CA servers. You can conduct a connection test when configuring LDAP and CA in the Admin Portal.
SCC
• SCC provides a secure channel between the client’s enterprise system and the Knox Manage cloud server.
• SCC consists of the SCC client, SCC server, and Control Service Server.
• The SCC Client is installed on the client’s site and makes a secure Transport Layer Security (TLS) channel with the SCC server.

Advanced 428
• The SCC Server is installed on the cloud. It sends the requests from the Knox Manage server to the SCC client, and delivers the responses from the SCC client to the Knox Manage server.
• The SCC Control Service Server (CS server) is installed on the cloud and automatically assigns a port number to be used for LDAP and CA service.
L4 Switch
The L4 Switch equally distributes the requests from the SCC client.
DB
DB saves the information of the LDAP and CA service of the tenant and the IP/Port information of the SCC server.
Linked system
This refers to the client’s LDAP and CA servers to be linked with Knox Manage.
Preparing for installation
Before installing SCC, prepare the following:
License
Register the Knox Manage license in the Admin Portal.
SCC client server hardware
Microsoft Windows Server 2008 R2 (64-bit), 2012 (64-bit), or 2016 (64-bit) should be used to run the server software.
Java Development Kit (JDK)
• Install Java Development Kit 1.7 (64-bit) or 1.8 (64-bit).
• Patch the JCE module based on JDK version. For more information, see Installing Java patches.
Network environments
• The firewall between the SCC Client and the LDAP server should be open.
• The firewall between the SCC Client and the CA server should be open.
• The firewall between the L4 switch for accessing the SCC Server and the SCC Client. Refer to the list below for the firewall information of L4 domains according to the service regions.
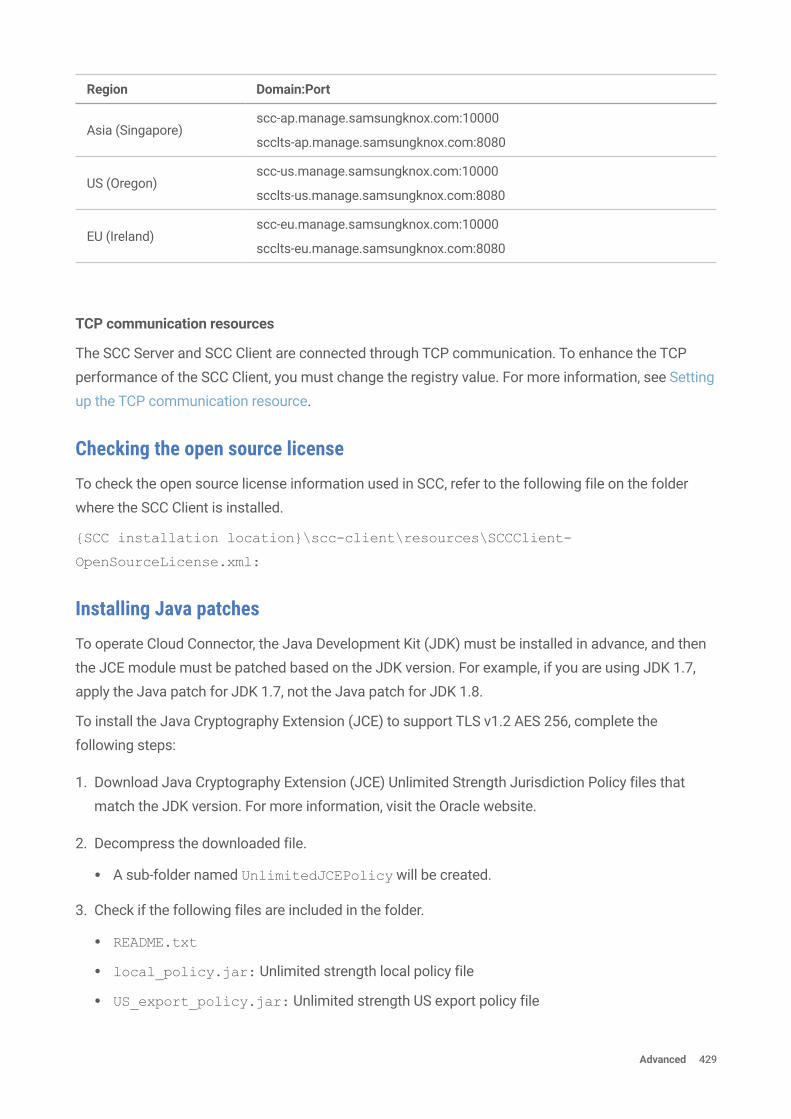
Advanced 429
Region Domain:Port
Asia (Singapore)scc-ap.manage.samsungknox.com:10000
scclts-ap.manage.samsungknox.com:8080
US (Oregon)scc-us.manage.samsungknox.com:10000
scclts-us.manage.samsungknox.com:8080
EU (Ireland)scc-eu.manage.samsungknox.com:10000
scclts-eu.manage.samsungknox.com:8080
TCP communication resources
The SCC Server and SCC Client are connected through TCP communication. To enhance the TCP performance of the SCC Client, you must change the registry value. For more information, see Setting up the TCP communication resource.
Checking the open source license
To check the open source license information used in SCC, refer to the following file on the folder where the SCC Client is installed.
{SCC installation location}\scc-client\resources\SCCClient-
OpenSourceLicense.xml:
Installing Java patches
To operate Cloud Connector, the Java Development Kit (JDK) must be installed in advance, and then the JCE module must be patched based on the JDK version. For example, if you are using JDK 1.7, apply the Java patch for JDK 1.7, not the Java patch for JDK 1.8.
To install the Java Cryptography Extension (JCE) to support TLS v1.2 AES 256, complete the following steps:
1. Download Java Cryptography Extension (JCE) Unlimited Strength Jurisdiction Policy files that match the JDK version. For more information, visit the Oracle website.
2. Decompress the downloaded file.
• A sub-folder named UnlimitedJCEPolicy will be created.
3. Check if the following files are included in the folder.
• README.txt
• local_policy.jar: Unlimited strength local policy file
• US_export_policy.jar: Unlimited strength US export policy file

Advanced 430
4. Copy two JAR files (local_policy.jar, US_export_ policy.jar) from the UnlimitedJCEPolicy folder to the %JAVA_HOME% \jre\lib\security folder.
NOTE If the Java patch is not installed successfully, the Cloud Connector will not operate normally.
Setting up the TCP communication resource
It is recommended to change the registry value for the TCP resource in the SCC Client for enhanced TCP performance.
To change the registry value, complete the following steps:
1. On your computer, open the Registry Editor.
2. Navigate to the path below:
HKLM\SYSTEM\CurrentControlSet\Services\Tcpip\Parameters
3. Change each value of the following items. If the value does not exist, right-click on the mouse, and then select New > DWORD (32- bit) Value to create a new one.
• TcpTimedWaitDelay
Change the default value of 240 (4 minutes) into 30 (30 seconds) to convert the disconnected TCP resource rapidly. For more information, see https://technet.microsoft.com/enus/library/cc938217.aspx.
• MaxUserPort
Change the default value from 5000 to the maximum value of 65534 to increase the number of concurrent requests delivered to SCC from the application. For more information, see https://technet.microsoft.com/kokr/library/cc938196.aspx.

Advanced 431
Installing the SCC client
To install the SCC client on a client’s site where the LDAP and CA are installed, complete the following steps. The IP address and port number of the L4 switch for accessing the SCC server is configured in the configuration file.
CAUTION Each tenant can only be mapped to one SCC Client.
1. From the Admin Portal, click Download > Cloud Connector Client and download the SCC Client.
2. Decompress the downloaded file.
3. Execute the SCC_Setup_{Version}_{Builddate}.exe file.
4. Select the language to use and click OK.
5. Click Next when the InstallShield Wizard starts.
6. Read the End User License Agreement carefully, select I accept the terms in the license agreement, and click Next.
7. Click Browse and specify a folder where JDK Home is installed.
• If the message ”The selected directory is not a Java directory” appears, specify another folder.
8. Click Next.
9. Set a folder to install JDK Home and click Next.
• The default installation path is C:\SamsungSDS\ and you can change the path if necessary.
10. Enter the tenant ID and click Install.
• The tenant ID is the corporate domain that comes after an @ when you log in to the Admin Portal.
11. Once the installation is completed, click Finish.
• To register the SCC client service automatically to Windows for use as a background service, click Register for Windows Service.

Advanced 432
Running SCC client
You can run the SCC client either by executing the batch file manually or allowing the Windows background service to run it automatically.
Running SCC client manually
To run SCC client manually, execute the batch file from the path below:
SCC installation folder}/scc-client/bin/sccClientStart.bat
When you close the command window, the SCC client service will be terminated.
Running SCC client automatically
To run the SCC client automatically, complete the following steps:
1. Executing the batch file from the path below to register the SCC client to the Windows background services:
{SCC installation folder}/scc-client/bin/scc_service_install.bat
2. Check the service name below in Start > Administrative Tools > Services:
SAMSUNG Knox Manage Cloud Connector Client(1) Background Service
3. Right-click on the service name and click Start to run the service.
• To stop the service, right-click on the service name and click Stop.
To disable the SCC client background service, execute the batch file from the path below:
{SCC installation folder}/scc-client/bin/scc_service_uninstall.bat
Configuring the SCC client
If the L4 domains in the service region are changed after installing the SCC client, modify SERVER_IP and SERVER_PORT in the batch file below and restart the SCC client:
{SCC installation folder}\sccclient\bin\sccClientStart.bat file.

Advanced 433
Updating the SCC client
You can update Cloud Connector when a new version is available.
To update the SCC client, complete the following steps:
1. Create a backup file of the existing version of the SCC client.
• It is recommended to compress the existing installation folder and move the compressed file to a backup folder.
• After the update, you can execute the SCC_Setup_{Version}_{Builddate}.exe file again to delete the SCC client.
2. Stop the currently running SCC client.
• If the SCC client is running as a batch file, close the SCC Client Services window.
• If the SCC client is launched as a Windows background service, it automatically terminates and reruns at the time of the update.
3. Decompress the new version of the SCC_{Region}.zip file.
4. Execute the SCC_Setup_{Version}_{Builddate}.exe file.
5. When the upgrade confirmation pop-up appears, click Yes.
6. Click Next when the InstallShield Wizard starts.
7. Click Update.
• The SCC client and Java will be installed in the same path of the previous version.
8. Click Finish.
Integrating services in Knox Manage
The administrator at the client side can access the Admin Portal and configure the settings for LDAP and CA service integration.
Integrating LDAP in Knox Manage
When the client’s LDAP is ready, the administrator should enter the LDAP server information in the Admin Portal. The entered information is then sent to the SCC CS server with the tenant’s information, and the SCC CS server assigns an IP and Port for the LDAP service to the SCC server. From then on, Knox Manage will not connect directly with the LDAP server, but will use the LDAP service using the IP and Port provided from the SCC server.

Advanced 434
To integrate LDAP on the Knox Manage Admin Portal, configure the Directory Integration in Advanced > Directory Integration. For more information about LDAP integration, see Integrating a directory server.
• IP/Host: Enter the host name of the LDAP service. (e.g. ldap.client.com)
• Port: The default port number is 389 and it can be modified.
Integrating CA in Knox Manage
The administrator should register the CA server in the Admin Portal to integrate the Knox Manage server with the client’s CA server via SCC.

Advanced 435
The following example shows how to register an ADCS, one of the available CA types, in Advanced > Certificate > Certificate Authority (CA) in the Admin Portal. This is applicable when HTTPS is used for CA. For more information about the CA settings, see Adding a certificate authority (CA).
• Host Name: Enter the host name of the SCC server.
• WSURL: Enter the Certificate Enrollment Web Service (CES) address of the actual CA server registered for the web service.
NOTE Although every CA type supported by Knox Manage is available, the ADCS CA’s Windows type certification is not available.

Advanced 436
Fixing background service errors
If the SCC background service suddenly stops because of an error, the message below pops up or an error log is created in the Windows Event Viewer.
This error occurs when the msvcr*.dll library cannot be loaded with Java. To fix the error, perform one of the following two solutions:
Setting PATH from JAVA_HOME
The JAVA_HOME environment variable can be used to set the PATH. To set the PATH variable using JAVA_HOME, complete the following steps:
1. In the Control Panel of your computer, select System and Security > System > Advanced system settings > Environment Variables.
2. Select Path under System variables, and then click Edit.
3. Click New.
4. Enter {JAVA_HOME}\bin in the text input filed, and then click OK.
• For example, if JAVA is installed under C:\Program Files\JAVA, you can enter that path in the text input field.
Copying msvcr*.dll
You can copy the msvcr*.dll file from the path {JAVA_HOME}\bin to the {SCC installation folder}\bin path, and then restart SCC. The file name differs depending on the JAVA version. For example, the JAVA version 1.8 has msvcr100.dll.
Advanced 437
Using Mobile AdminMobile Admin allows for convenient management by providing the administrators and sub-administrators with Knox Manage’s key device management features. With Mobile Admin’s mobile-friendly user interface, you can monitor users and devices on your own mobile devices. In addition, the Mobile Admin limits the authority to manage or control the devices depending on the type of the administrator.
Mobile Admin basic information
Knox Manage offers the following Mobile Admin features:
• Dashboard: Provides summarized information of the devices and users. You can also easily monitor the security status of the enrolled devices by viewing the compliance violation and device command history through the dashboard.
• Device management: Provides full management capabilities for devices of all OS types. You can view the information of all enrolled devices and control the devices by sending a device command.
• User management: Manages all user accounts. You can view the information of the user accounts and control the account status.
Meet the requirements listed below to ensure the efficient operation of Mobile Admin.
Item Requirement
Administrator’s PC Browser: Chrome/Resolution: 5.8-inch display (1440 x 2960 pixels)
Mobile OS All platforms are supported.
Supported language English, Korean
NOTE If the selected language in Mobile Admin is not supported on the mobile device, Mobile Admin will be displayed in English.

Advanced 438
Understanding the Mobile Admin screen
Get familiar with the Mobile Admin’s interface features before starting Mobile Admin.
1 2 3 4
5
No. Item Description
1 Menu
Tap to open the side menus. The following menus are provided:
• Basic Information: View the admin name, company name, admin ID, license version, license expiration date, and the number of registered devices by the total number of devices in the tenant’s license.
• Dashboard: View the management status of devices and users. For more information, see Viewing the Mobile Admin dashboard.
• Devices: Manage the Knox Manage installed devices. For more information, see Managing devices on Mobile Admin.
• Users: Manage the Knox Manage device users. For more information, see Managing users on Mobile Admin.
• Logout: Logout from the Mobile Admin.
2 Content page name Displays the content page name of the selected side menu.
3 Refresh Tap to view the latest information on the content page.
Advanced 439
No. Item Description
4 AlertTap to view the alerts based on audit events that occurred on the device. For more information, see Viewing Mobile Admin alert list.
5 Content pageDisplays a list of information for the selected side menu or the details about the selected resources.
NOTE • If you do not use the Mobile Admin screen for longer than the maximum session timeout value, the logout pop-up appears. Tap Cancel to stay logged in.
• The maximum session timeout value is set in Setting > Configuration > Basic Configuration > Preferences on the Knox Manage Admin Portal.
Viewing the Mobile Admin dashboard
Tap > Dashboard to view the management status of devices and users and other information.
On the “Dashboard” screen, you can view the following information:
• Device Status: Displays the number of devices enrolled in Knox Manage and the number of devices by device status.
– Tap the total number of devices to move to the “Devices” screen.
• Compliance Violation: Displays the number of activated “Devices” with a root OS, root app, or no profile.
– Tap the number of occurrences of the violation to move to the “Devices” screen.
• Device/User(Activated): Displays the number of the activated devices and the number of activated users.
– Tap the number of the activated devices or users to move to the “Devices” or “Users” screen.
• OS Status(Activated): Displays the number of the activated devices by OS type and the ratio of each OS to the total number of devices.
• Users by Organization: Displays the status of user accounts by organization including the total number of organizations, total number of users, organization lists, and the users in each organization.
• Device Command History: Displays the number of device commands sent to devices by date.

Advanced 440
Viewing Mobile Admin alert list
Tap on the right corner of the Mobile Admin screen to view the major changes on devices. Based on the audit events that occurred on the user devices, you can view the alert list displaying the information on the audit event name, device ID, and audit event duration.
The filter types of the alert list on Mobile Admin are as follows:
• Changes In Server Status: Displays only the alerts for the audit events that occurred when the server’s certificate status or the system file changed, or in the following situations:
– A server certificate has expired or been revoked.
– A system file has been created, modified, or deleted.
– A system file integrity error occurred.
– An uncertified package has been found.
• Failed Policies: Displays only the alerts for the audit events that occurred when the device commands sent to apply the policies via the device management profile failed.
• Changes In Device Status: Displays only the alerts for the audit events that occurred when the device status changed.
• Security Violations: Displays only the alerts for the audit events that occurred when the device violated policies or when a CheckPoint MTP finds a malicious application on the device.
NOTE The alerts for security violations that occurred within a week are displayed.
• Others: Displays other audit events.
You can also perform the following actions on this screen.
Icon Description
SearchTap to open the search window on the alert list. To close the search window, re-tap the icon.
Sort Rearrange the alert list by date of creation or by ascending/descending order.
Filter Apply a filter to display a relevant audit event on the alert list.

Advanced 441
Starting up Mobile Admin
To begin using Mobile Admin, you will need to enter the Knox Manage Admin Portal URL in your device’s browser. Then, tap Go to Mobile Admin at the bottom of the login page. Once you accessed and logged in to the Mobile Admin, you can view and control Knox Manage’s device management features on your device.
Logging in to Mobile Admin
Log in to Mobile Admin by using the same login credentials used for the Knox Manage Admin Portal. Super administrators can use all the features provided in Mobile Admin, while sub-administrators with Service Desk administrator privileges have restricted use.
To login to Mobile Admin, complete the following steps:
1. Visit the Knox Manage Admin Portal using the web browser on the device to access the Mobile Admin.
2. At the bottom of the screen, tap Go to Mobile Admin.
• The Mobile Admin login page will appear.
3. Enter the Knox Manage admin ID and password on the Mobile Admin login page.
NOTE • If you enter incorrect user ID or password for 5 consecutive times, you will be locked out for 10 minutes.
• If you log in to the Mobile Admin portal for the first time or use a temporary password, enter a new password and repeat the password to confirm.
4. On the “Privacy Policy” pop-up, tap the checkbox next to I agree.
5. Tap OK.
Creating Service Desk administrator accounts
To create a Service Desk administrator account, you will need to add a sub-administrator with Service Desk administrator privileges on the Knox Manage Admin Portal.
To create a Service Desk administrator account, complete the following steps:
1. On the Knox Manage Admin Portal, navigate to Setting > Admin Console > Administrator.
2. On the “Administrator” page, click .

Advanced 442
3. In the “Add Administrator” window, enter the information. For more information, see Adding an administrator.
NOTE When entering the information in the “Add Administrator” window, you must select the administrator type as Sub-Admin and the administrator permission as Service Desk.
4. Click Save.
Using Mobile Admin at a Service Desk
Service Desk administrators can access Mobile Admin and manage the devices enrolled in Knox Manage. For more information on the device command and device information, see Sending device commands on Mobile Admin.
NOTE Not all features on Mobile Admin are available to the Service Desk administrators.
Managing devices on Mobile Admin
Manage the devices enrolled in Knox Manage with Mobile Admin. You can view device information including the device activation type and device status. You can also control devices by sending device commands or messages.
Using Mobile Admin device menu
Navigate to > Devices to view all the Knox Manage enrolled devices. To view detailed information of a specific device, tap the device name of a specific device on the list.
You can also perform the following actions on this screen.
Icon Description
Device Command Send a device command to the activated devices.
SearchSearch for a specific device for the entered device ID in the search window. To close the search window, re-tap the icon.
SortRearrange the device list by the date of occurrence or in ascending/descending order.
Filter Filter the device list by the current device account status.

Advanced 443
Viewing device activation types on Mobile Admin
Navigate to > Devices to view the device activation type at the right corner of the device list. The activation type for Android Legacy devices is not displayed.
The device activation types on the device list are as follows:
• Knox Workspace: Android Legacy devices using Knox Workspace
• Fully Managed: Android Enterprise devices activated as a Fully Managed type. For more information, see Enrolling Android Enterprise (AE) devices.
• Fully Managed with Work Profile: Android Enterprise devices activated as a Fully Managed with Work Profile type. For more information, see Enrolling Android Enterprise (AE) devices.
• Work Profile: Android Enterprise devices activated as a Work Profile type. For more information, see Enrolling Android Enterprise (AE) devices.
• DEP: iOS devices activated through DEP. For more information, see Using the Apple Device Using the Apple Device Enrollment Program (iOS devices only).
Viewing device status on Mobile Admin
Navigate to > Devices to view the current status of a device on the device list. The statuses are displayed as an icon.
The device statuses on the device list are as follows:
Icon Description
Provisioning The device is enrolled but Knox Manage is not activated.
Activated The device is registered as activated in Knox Manage.
DeactivatedThe device cannot be controlled through Knox Manage. You can unenroll the device according to the device communication status.
Blocked by SystemThe device has exceeded the set Keepalive interval, or the system blocked a Knox Manage app installed on a device that has been factory reset.
Expired
The device cannot be controlled by administrators due to the expiration of the license validity period.
• You can change the status to Unenrolled.
• The status automatically changes to Enrolled upon license update. For more information, see Renewing an expired license.

Advanced 444
Sending device commands on Mobile Admin
Control the device by sending device commands from the Mobile Admin. Depending on the device activation type, you can select different areas to send device commands to. Device commands can only be sent to activated devices.
• For more information on the Android Enterprise device commands, see List of device commands: Android Enterprise.
• For more information on the Android Legacy device commands, see List of device commands: Android Legacy/Knox Workspace.
• For more information on the iOS device commands, see List of device commands: iOS.
• For more information on the Windows device commands, see List of device commands: Windows.
To send device commands on Mobile Admin, complete the following steps:
1. Navigate > Devices.
2. On the “Devices” screen, tap the checkbox next to the device you want to control from the device list.
• You can also tap to open the search window and enter a mobile ID you want to control.
3. Tap at the right corner of the device list.
• is enabled for activated devices only.
4. In the “Device Command” pop-up, tap the device command you want to send.
• Select an area to send a device command depending on the device activation type.
5. Tap OK.
Advanced 445
Sending messages on Mobile Admin
Send a text message to the device using Mobile Admin.
To send a message on Mobile Admin, complete the following steps:
1. Navigate to > Devices.
2. On the “Devices” screen, tap the checkbox next to the device you want to send a message to.
• You can also tap to open the search window and enter a mobile ID you want to send a message to.
3. Tap at the right corner of the device list.
• is enabled for activated devices only.
4. In the “Device Command” pop-up, tap Send message.
5. On the “Send message” screen, enter the following information:
• Title: Enter the title of the message to be sent.
• Content: Enter the message to be sent.
6. Tap OK.

Advanced 446
Managing users on Mobile Admin
Manage the Knox Manage device users on Mobile Admin. You can view the detailed user account information and control the status of the users.
Using Mobile Admin users menu
Navigate to > Users to view the information of the user accounts on Knox Manage. To view detailed information of a specific user, tap the user name of a specific user on the list.
You can also perform the following actions on this screen.
Icon Description
SearchSearch for a specific user for the entered user ID or user name in the search window. To close the search window, re-tap the icon.
SortRearrange the user list by the date of occurrence or in ascending/descending order.
Filter Filter the user list by the current user account status.
Activating or deactivating user accounts
To activate or deactivate the user account, complete the following steps:
1. Navigate to > Users.
2. On the “Users” screen, tap the user on the user list whose account you want to activate or deactivate.
3. On the “User Information” screen, tap the following:
• Tap (Inactive) to activate the user account.– Once the user account is activated, devices enrolled for the user account can be controlled.
• Tap (Activated) to deactivate the user account.– Once the user account is inactive, devices enrolled for to the account cannot be controlled,
regardless of the device status.
4. In the confirmation message pop-up, tap OK.

Advanced 447
Configuring Microsoft ExchangeMail servers, such as the Microsoft Exchange Server and Office 365, can be integrated with Knox Manage on user’s devices. To integrate a mail server with Knox Manage, you should access and configure the Microsoft Exchange Server by authenticating user information in the Active Directory (AD) service based on a certificate issued by a Certificate Authority (CA). Before configuring Exchange, the following items must be configured and prepared:
• Active Directory (AD) service (For more information on configuring the AD service, see Integrating a directory server.)
• Certification Authority (CA) server (The client certificate must be issued for authentication.)
• Microsoft Exchange server (To use certificate based authentication in the Microsoft Exchange server, visit the Microsoft website at https://technet.microsoft.com/EN-US/library/mt791265(v=exchg.160).aspx and follow the instructions.)
• Registered user accounts and organizations (For more information on configuring the AD service, see Creating user accounts and Adding an organization.)
• Cloud Connector Client (The Cloud Connector Client must be installed on the client site to configure a secure channel with the Cloud Connector when connecting to the Active Directory server and the CA server. For more information, see Installing the SCC client.)

Advanced 448
Configuring the Exchange server
To configure the Exchange server by authenticating the users on the devices with Exchange ActiveSync, additional settings are required for Certificate Authentication (CA), SSL, and client certificates.
Enabling Certificate Authentication (CA)
Active Directory Client Certificate Authentication must be enabled to configure Certificate Authentication.
To configure Certificate Authentication (CA), complete the following steps:
1. On your desktop, click Start > Run.
2. Type inetmgr, and then click OK to open the Internet Information Services (IIS) Manager.
• Alternately, on your desktop, you can click Start > Programs or All Programs > Administrative Tools > Internet Information Services (IIS) Manager to open the Internet Information Services (IIS) Manager.
3. In the Connections node, select the name of your web server, and then double-click Authentication in the “IIS” section.
4. Double-click Active Directory Client Certificate Authentication, and then click Enable in the “Actions” window.

Advanced 449
Enabling SSL
After enabling Active Directory Client Certificate Authentication, the SSL must be enabled to use Active Directory Client Certificate Authentication.
To enable SSL, complete the following steps:
1. On your desktop, click Start > Run.
2. Type inetmgr, and then click OK to open the Internet Information Services (IIS) Manager.
• Alternately, on your desktop, you can click Start > Programs or All Programs > Administrative Tools > Internet Information Services (IIS) Manager to open the Internet Information Services (IIS) Manager.
3. In the Connections node, select Microsoft-Server-ActiveSync under Default Web Site, and then double-click SSL Settings in the “IIS” section.
4. Click the checkbox next to Require SSL, and then click Require under Client certificates.
5. Click Apply in the “Actions” window.
Configuring client certificate mapping
Configure client certificate mapping after enabling Certificate Authentication and applying SSL.
To configure client certificate mapping, complete the following steps:
1. On your desktop, click Start > Run.
2. Type inetmgr, and then click OK to open the Internet Information Services (IIS) Manager.
• Alternately, on your desktop, you can click Start > Programs or All Programs > Administrative Tools > Internet Information Services (IIS) Manager to open the Internet Information Services (IIS) Manager.
3. In the Connections node, select Microsoft-Server-ActiveSync under Default Web Site, and then double-click Configuration Editor in the “IIS” section.
4. From the Section drop-down menu, navigate to system.webServer/security/authentication.
5. Select True in the “enabled” section, and then click Apply in the “Actions” window.

Advanced 450
Configuring ADCS and AD for Microsoft Exchange
To configure ADCS and AD for Exchange, some specific settings for the use of Exchange are required when creating a directory server, directory connector, Certificate Authentication (CA), and certificate template.
To configure ADCS and AD for Exchange, complete the following steps:
NOTE To provide a secure channel among directory servers, directory connectors, and CA servers, you should install Cloud Connector in advance before configuring a profile with ADCS and AD for Exchange. For more information about Cloud Connector, see Using Cloud Connector.
1. Add a directory server for accessing intra-enterprise data on the AD server. For more information about entering information in detail, see Adding a directory server.
NOTE To use Cloud Connector, select TRUE from the Cloud Connector drop-down menu.
2. Add a directory connector for specific filtered searches. For more information about entering detailed information, see Adding a directory connector.
NOTE If the service type is selected as Profile Configuration, the policy of the user information input method must be selected as Connector interworking. For more information on configuring policies, see Configuring policies by device platform.
3. Add a certificate authority (CA) for authenticating the users. For more information about entering information in detail, see Adding a certificate authority (CA).
NOTE Once a connection test is completed, the target CA that issues and manages the relevant certificates is displayed.
4. Add a certificate template. For more information about entering information in detail, see Adding certificate templates. Also, for Exchange settings, the following must be done.
• The subject name must be selected as CN=(Email).
• The certificate usage must be selected as Exchange.
• The San type must be selected as Email Address and click to select Email from the SAN reference item list.

Advanced 451
Configuring a profile for Microsoft Exchange
Configure a profile for Exchange using a certificate authority (CA) or a certificate connector. Some specific settings for using Microsoft Exchange are required when creating a profile.
To configure a profile using a CA or certificate connector, complete the following steps:
1. Create a new profile. For more information about entering information in detail, see Creating a new profile.
2. Add conditions for the profile. For more information about entering information in detail, see Adding events for profiles.
3. Configure policies by device platform. For more information about entering information in detail, see Configuring policies by device platform. Also, for the Exchange policy, the following must be done.
• Click the checkbox next to Office 365 to configure the Exchange settings by automatically filling out the Exchange server address and the setting the SSL option to Use.
• Set the user information input method to Connector interworking to use a directory connector. For more information about creating a directory connector, see Adding a directory connector.
• Select one of the user certificate input methods.– Issuing external CA (Using a CA): Select the certificate template. For more information about
creating a certificate template see Adding certificate templates.– Connecting interworking (using a certificate connector): Select the certificate connector. For
more information about creating a certificate connector, see Adding a directory connector.
NOTE To enable a certificate connector, the service type of the directory connector must be set as Profile Configuration (Certificate). For more information about selecting the service type, see Adding a directory connector.
• Select Use for use of SSL to configure the SSL between the device and the Exchange server.

Advanced 452
Accessing Microsoft Exchange on the device
After all the settings for Exchange are completed through the Internet Information Services (IIS) Manager and Admin Portal, access and use Exchange on the device.
To access Exchange on the device, complete the following steps:
1. On the Knox Manage application, tap Download Configuration from the side menu, and then tap Install to download the Exchange configuration for the device. The user certificate for Exchange will be installed on the device.
NOTE To install the Exchange configuration, the Knox Manage user ID must be same as the user ID of the AD server.
2. Tap the notification to set up the new email account.
3. Accept the privacy policy and activate the device administrator, and then check if the email account has been added to the Samsung Email application.
NOTE The user’s email address that is registered in the Knox Manage Admin Portal is used as the email account for the Exchange server.


