Advanced Topics in Management Reporter 1 Agenda: Using the Report Wizard o How to use the Management Reporter Report Wizard to quickly create Balance Sheets and Statements of Profit and Loss. Forecast Report o How to use the Column Definition Print Control feature to create a report that shows actual amounts for completed periods and budget amounts for future periods. Statement Of Cash Flows o How to set up Row Definition and Column Definition information required to create a Statement of Cash Flows. Consolidations with Excel Spreadsheet information o Describes the building block set up that is needed to pull data from an Excel workbook to produce a consolidated report with your GP data and an external Excel file. Generating Reports o Describes the steps needed to generate reports, print, and download to Excel, as well as publishing to Sharepoint. Management Reporter Security o Includes steps to configure security in Reporting Trees and in the Report Viewer
Transcript
Advanced Topics in Management Reporter
1
Agenda:
Using the Report Wizard o How to use the Management Reporter Report Wizard to quickly create Balance Sheets and Statements of Profit and Loss.
Forecast Report o How to use the Column Definition Print Control feature to create a report that shows actual amounts for completed periods and
budget amounts for future periods.
Statement Of Cash Flows o How to set up Row Definition and Column Definition information required to create a Statement of Cash Flows.
Consolidations with Excel Spreadsheet information o Describes the building block set up that is needed to pull data from an Excel workbook to produce a consolidated report with
your GP data and an external Excel file.
Generating Reports o Describes the steps needed to generate reports, print, and download to Excel, as well as publishing to Sharepoint.
Management Reporter Security o Includes steps to configure security in Reporting Trees and in the Report Viewer
Advanced Topics in Management Reporter
2
Using the Report Wizard
Follow the steps in the wizard to create your reports.
Advanced Topics in Management Reporter
3
Creating a Forecast Report
Column Definition is the key to this report
Set up alternate columns for Actual and Budget
o Specify the Period in each column o Actual columns will be B, D, F, etc. o Budget columns will be C, E, G, etc.
Advanced Topics in Management Reporter
4
Print Control
Use for rows to print Actual amounts
Use for rows to print Budget amounts
Header for Actuals
Header for Budgets
Advanced Topics in Management Reporter
5
Statement of Cash Flows Column Definition
There will be 2 non-printing columns that you can change to printing if you want to check the report values. Column C uses the Periods Covered of YTD/BB so that only the beginning balances for the year are printed.
Advanced Topics in Management Reporter
6
Row Definition
Row Code Description
Format Code
Related Formulas / Rows / Units
Format Override
Normal Balance
Print Control
Column Restriction Row Modifier
Link To Financial Dimensions
100 DES
130 Net Income From Operations C +Account = [4000:8710]
For Row 1240, use the Account Modifier /BB so that you only print the beginning balance. For Row 1270, use the formula in the Related Formulas of B=B.1240, E=C.1240 so that the correct data prints. For Row 1420, use the Account Modifier /Y so that you only print the end of year amount. You can change Non-Printing Rows so that they print to make sure the report is in balance and then make them non-printing for the final version of the report.
Advanced Topics in Management Reporter
9
Report Definition Be sure you calculate columns first in the Settings tab.
Advanced Topics in Management Reporter
10
Consolidations with Excel Spreadsheet Information
Here is an example of an Excel Spreadsheet with descriptions in column A and Amounts in Column B.
Advanced Topics in Management Reporter
11
In the Row Format, create column K to Link To External Worksheet by clicking Edit and selecting Row Links:
Advanced Topics in Management Reporter
12
Select External Worksheet in the Link Type. WKS1 defaults as the Link Name, which you can change, and you can enter a Description. You can also use the Row Links window to add links to other companies for consolidations.
Advanced Topics in Management Reporter
13
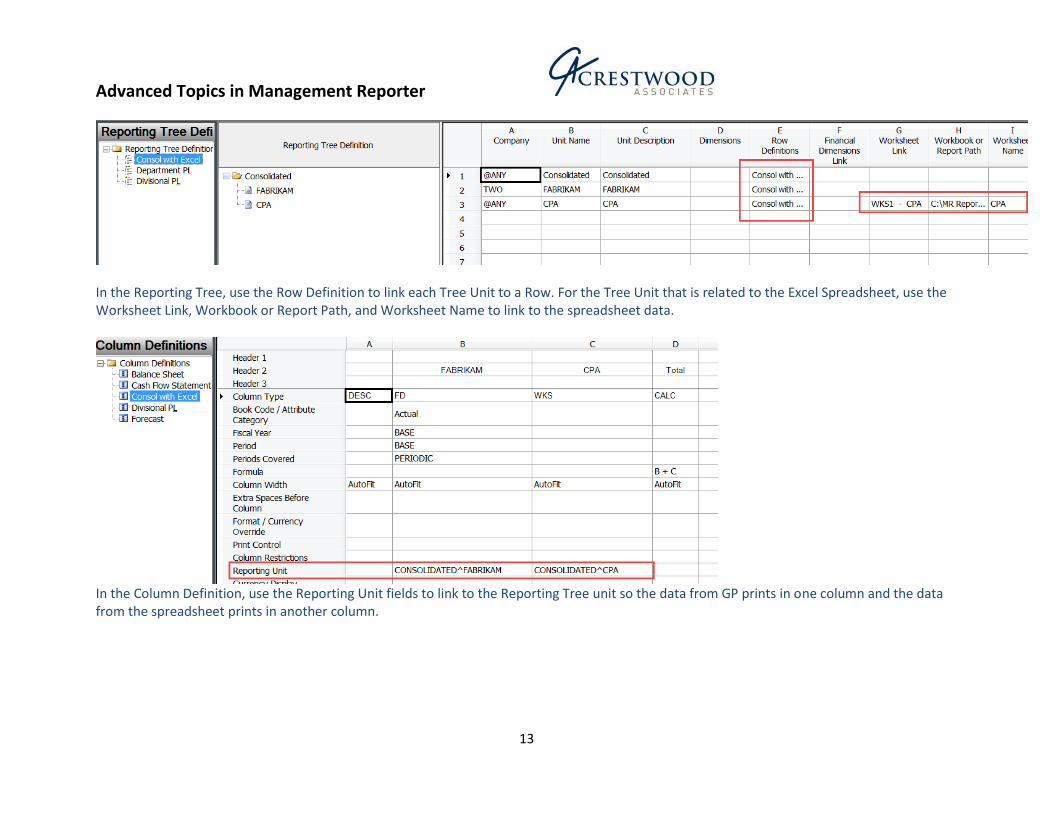
In the Reporting Tree, use the Row Definition to link each Tree Unit to a Row. For the Tree Unit that is related to the Excel Spreadsheet, use the Worksheet Link, Workbook or Report Path, and Worksheet Name to link to the spreadsheet data.
In the Column Definition, use the Reporting Unit fields to link to the Reporting Tree unit so the data from GP prints in one column and the data from the spreadsheet prints in another column.
Advanced Topics in Management Reporter
14
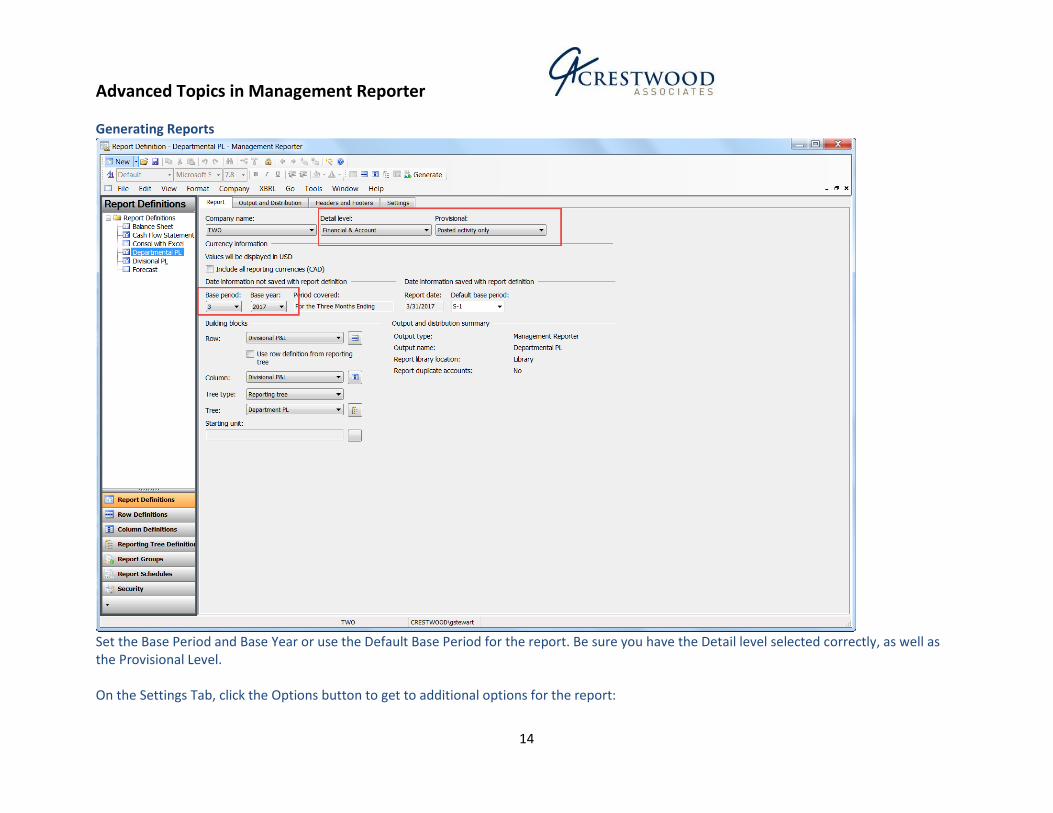
Generating Reports
Set the Base Period and Base Year or use the Default Base Period for the report. Be sure you have the Detail level selected correctly, as well as the Provisional Level. On the Settings Tab, click the Options button to get to additional options for the report:
Advanced Topics in Management Reporter
15
This is where you can get to the Page Setup, Account & Transaction Detail and Additional Options.
Advanced Topics in Management Reporter
16
On the Output and Distribution tab, note that you can Generate to Multiple Library Locations. Using this allows you to generate reports to SharePoint by entering your SharePoint document library link in the Related Report Link location. When you generate to a SharePoint Document Library, the reports are shown like this:
Advanced Topics in Management Reporter
17
When you click any report it will open a dialog where you have the option to view in Excel, Report Viewer, or as an XPS document.
Microsoft Video, How To Configure Microsoft SharePoint with Management Reporter: http://www.youtube.com/watch?v=SjN9sdY1YLw
An example of a report generated to the HTML viewer. When you run the report with a Reporting Tree, you can click on the Reporting Tree button and select
individual tree units. Once in a tree unit, you can click the Add Comment button and make comments on the report if you have it selected in the Report Definition.
The Download button allows you to download to XPS, Excel, or the Report Viewer.
Advanced Topics in Management Reporter
19
Report Viewer:
You can add folders, set permissions on folders, add files and download to Excel, XPS, or Print, as well as email links to reports.
If you have security you can drill down to GP.
Advanced Topics in Management Reporter
20
Use Report Groups to set up a group of reports. Then you can generate the entire group at the same time.
Use Report Schedules to schedule an individual report or a report group:
Advanced Topics in Management Reporter
21
Management Reporter Security
1. Within Management Reporter, security is set on domain user accounts. After you add a user, be sure to assign the Management Reporter role and then click the Company Access button to assign the companies the user can access. The following is the list of roles available:
a. Administrator – full rights including setting up users b. Designer – can design reports, generate reports, view reports c. Generator – can generate reports, view reports d. Viewer – can view reports
2. Within Building Blocks – set password protection using the Lock icon in the Menu Bar when you have a building block open 3. Within Reporting Trees – set security on the tree units in Column L (Unit Security) – this will carry into Report Viewer and SharePoint 4. Within Report Viewer – set security on folders
a. Assigning users or groups to a folder grants them access to that folder and its contents. For example, users assigned to the Report Library root folder automatically will gain access to all subfolders and reports. You also can right-click on an individual report within the Report Library and grant access to a specific report.
Advanced Topics in Management Reporter
22
b. It is easier to create folders for each report group/security group and assign the appropriate permissions to the folders. Then, any report you publish to a selected folder will automatically inherit the permissions from the folder. Within the Report Library permissions window, you can control the specific View, Edit, Create and Delete permissions for the selected folder/report.
c. After setting up your folders in the Report Library, don’t forget to update the output path on the Report Definition to the correct folder within the Report Library!
Advanced Topics in Management Reporter
23
Bonus question: How to see a list of who last modified a building block and when it was last modified, or who generated a report and when it
was last generated:
Click the Folder icon on the Menu Bar to open the “Open” window. This will show tabs for each of the building blocks. The Report Definitions tab shows the building block that is assigned to each report. It also shows the date the report was last generated and who generated it. All tabs will show the date the building block was last modified and who modified it.