ADVENTURE PADDLING POOL IAN 281523 ERLEBNIS-PLANSCHBECKEN Bedienungs- und Sicherheitshinweise DJEČJI BAZEN Upute za posluživanje i za Vašu sigurnost ADVENTURE PADDLING POOL Operation and Safety Notes
Transcript
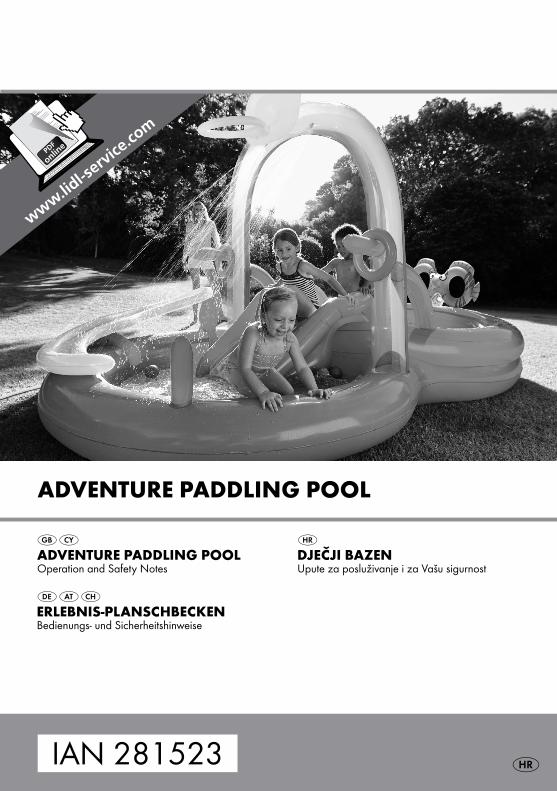
ADVENTURE PADDLING POOL
IAN 281523
ERLEBNIS-PLANSCHBECKEN Bedienungs- und Sicherheitshinweise
DJEČJI BAZEN Upute za posluživanje i za Vašu sigurnost
ADVENTURE PADDLING POOL Operation and Safety Notes
GB / CY Operation and Safety Notes Page 5HR Upute za posluživanje i za Vašu sigurnost Stranica 9DE / AT / CH Bedienungs- und Sicherheitshinweise Seite 13
A
B C
14
5
1 a3
2
D E
F G
H I
6
5 GB/CY
Adventure Paddling Pool
Introduction
We congratulate you on the purchase of your new product. You have chosen a high quality product. Familiarise yourself with the product before using it for the first time. In addition, please carefully refer to the operating instructions and the safety advice below. Only use the product as instructed and only for the indicated field of application. Keep these in-structions in a safe place. If you pass the product on to anyone else, please ensure that you also pass on all the documentation with it.
Intended use
This product is intended for use for playing / paddling. This product is intended for private, outdoor use only. It must not be used by children under 3 years old. The product is not intended for commercial use.
Description of parts and features
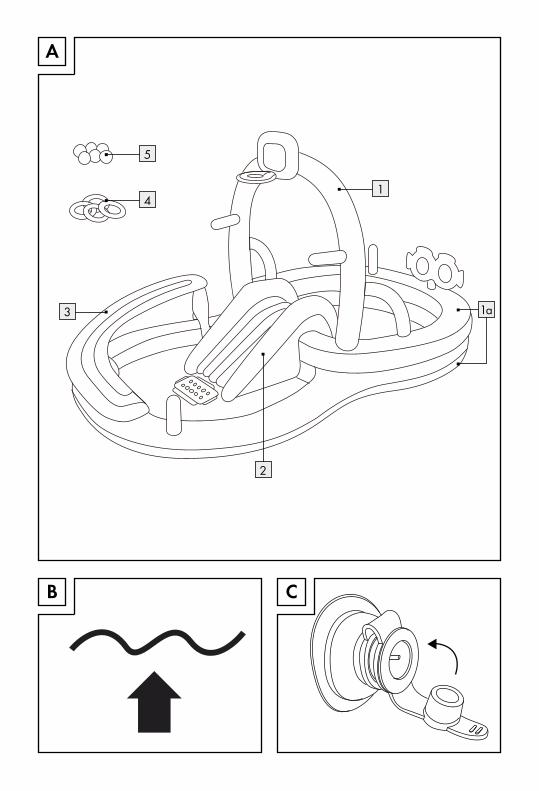
1 Adventure Paddling Pool1 a Main chamber2 Slide3 Ball track 4 Throwing quoits5 Balls6 Repair patch
Technical data
Dimensions: approx. 300 x 180 x 160 cm (L x W x H) (when inflated)
KEEP ALL THE SAFETY ADVICE AND INSTRUC-TIONS IN A SAFE PLACE FOR FUTURE REFERENCE!
Avoid the risk of injury!
RISK OF LOSS OF LIFE OR ACCIDENT
TO INFANTS AND CHILDREN! Never leave children unsupervised with the
packaging material or the product. The packaging material presents a suffocation hazard and there is a risk of loss of life from strangulation and / or drowning. Children often underestimate danger. Always keep the product out of reach of children.
WARNING! Never leave your child unattended – drowning hazard.
WARNING! Only for domestic use. Children can drown in very small amounts of
water. Empty the pool when not in use. Do not install the paddling pool over concrete,
asphalt or any other hard surface. When filling with water, the maximum depth of
the water should not exceed the maximum water level mark on the product (see fig. B).
Once inflated, make sure that the product does not come in contact with stones, gravel or other sharp objects which could puncture the item.
Do not use the product without slide.
6 GB/CY
Operation
Note: Before using the product for the first time, check it carefully for holes, porous places and seams that are not airtight.Recommendation: Pump the product up and leave it alone for one day. Let a new product air outside in fresh air for a couple of days.Recommendation: Place the activity toy on a level surface at least 2 m from any structure or obstruction such as a fence, garage, house, over-hanging branches, laundry lines or electrical wires.
Pumping up the product
CAUTION! Inflatable plastic products react sensi-tively to the cold and hot. That is why you should never use the product when the ambient temperature falls to below 15 ° C and rises above 40 ° C. Otherwise damage to the product may result.Note: Basically, only an adult should be responsible for pumping the pool up. Make sure that you do not pump too much air into the product. On no ac-count should you use a compressor. Stop the process when resistance increases during pumping and the seams start to stretch. Otherwise the material might tear. Only use manual pumps and / or pumps specifi-cally designed for use with inflatable plastic products. IMPORTANT! Keep in mind that air temperature and weather conditions can affect the air pressure inside inflatable products. In cold weather the prod-uct behaves as if it has less air pressure in it because the air inside contracts. Under these conditions you may have to add air. In hot weather the air inside expands. Under these conditions you may have to remove air in order to avoid overfilling.Note: You will need a pump with conical ad-apter (ø approx. 7.5 mm / 17.5mm) for the air valve to in-flate the product.
Roll the product out first and then check for holes, tears and other damage.
1. Inflate the main chambers 1 a : Inflate the main chambers and close the seal-ing cap (see fig. C). Inflate the main chambers 1 a until they feel firm to the touch. It should be possible to depress each main chamber 1 a slightly by pressing it with your fingers.
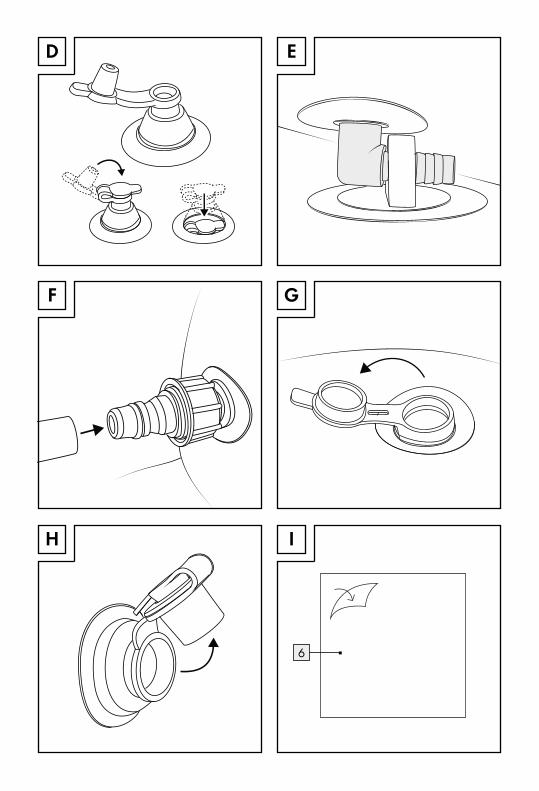
2. Inflate all the rest parts: Open the valve and inflate the air chambers. Close the valve closure and depress the valve using slight pressure (see fig. D).
3. Attaching the slide 2 : Place the inflated slide 2 on the edge of the paddling pool. Fix the slide 2 to the upper edge of the paddling pool and to the floor. Insert the four pins in the relevant eyelets on the paddling pool and ensure that these are inserted fully through the eyelets (see fig. E).
4. Attaching the ball track 3 : Place the inflated ball track 3 on the edge of the paddling pool and attach all three hook-and-loop fasteners.
5. Attaching the garden hose: Connect a garden hose with an interior diame-ter of 13–15mm to the water connector on the article (see fig. F). We recommend the use of a hose coupling 13–15mm for easy assembly.
Filling the product with water
Fill the product slowly and do not leave the product unsupervised during filling.
Emptying the product
Open the outlet valves and allow the water to drain out (see fig. G). Note: please take the local regulations into account regarding specific requirements on the disposal of water from swimming pools.
Deflating the product
Remove the garden hose. Remove the ball track 3 and the slide 2 .
7 GB/CY
Deflate the product as follows:1. Open the sealing caps (see fig. H) to quickly
deflate the main chambers 1 a .2. Deflate the other components open the valve
and pinch the valve shaft together slightly so that the air can escape. Introduce a ventilation tube into the valve for a quicker deflation. Note: Make sure that the product is com-pletely dry before folding it together.
Cleaning and Maintenance
On no account should you use corrosive or scouring detergents.
Use a slightly damp, lint-free cloth to clean the product.
Change the water of paddling pools frequently (particularly in hot weather) or when noticeablycontaminated.
Repairing the product
Note: Minor damage can be repaired by the owner using the supplied repair kit. Have any major damage carried out at a specialist repair shop.
First let all the air escape from of the product. Cut the repair patch 6 to suit the size of the
hole. Note: Ensure that the repair patch 6 is larger than the hole and overlaps the edges of the hole.
Round off the sides of the repair patch 6 and pull off the protective foil.
Place the repair patch 6 on the hole and press it down firmly. If necessary, stand a heavy object on the repair patch 6 .
Wait for 24 hours before you pump up the product again.
Storage instruction
Make sure that the product is completely dry both inside and out when wishing to store it for any length of time. Otherwise mildew and mould may form.
Store the product in a dark, dry place – out of reach of children.
The ideal storage temperature is 10–20 °C. Ensure that the product does not come into
contact with sharp objects during storage.
Disposal
The packaging is made entirely of recycla-ble materials, which you may dispose of at local recycling facilities.
Contact your local refuse disposal authority for more details of how to dispose of your worn-outproduct.
Warranty
The product has been manufactured to strict quality guidelines and meticulously examined before deli-very. In the event of product defects you have legal rights against the retailer of this product. Your legal rights are not limited in any way by our warranty detailed below.
The warranty for this product is 3 years from the date of purchase. Should this product show any fault in materials or manufacture within 3 years from the date of purchase, we will repair or re-place it – at our choice – free of charge to you.
The warranty period begins on the date of purchase. Please keep the original sales receipt in a safe location. This document is required as your proof of purchase. This warranty becomes void if the product has been damaged, or used or main-tained improperly.
8 GB/CY
The warranty applies to defects in material or ma-nufacture. This warranty does not cover product parts subject to normal wear, thus possibly conside-red consumables (e.g. batteries) or for damage to fragile parts, e.g. switches, rechargeable batteries or glass parts.
9 HR
Dječji bazen
Uvod
Čestitamo vam na kupnji novog proizvoda. Time ste se odlučili za jedan vrlo kvalitetan proizvod. Informirajte se o proizvodu prije prve upotrebe. Za to pomno pročitajte slijedeće upute za uporabu i sigurnost. Koristite ovaj proizvod u skladu s navede-nim uputama te u navedene svrhe. Sačuvajte ove upute. U slučaju davanja proizvoda trećim osobama, izručite također svu pripadajuću dokumentaciju.
Namjena
Ovaj proizvod je namijenjen za igranje /kupanje. Proizvod je isključivo namijenjen za privatnu upo-rabu na vanjskom prostoru. Zabranjena je uporaba djeci mlađoj od 3 godine. Proizvod nije namijenjen za profesionalnu uporabu.
Opis dijelova
1 Dječji bazen1 a Glavna komora2 Tobogan3 Staza za kugle 4 Prstenovi za bacanje5 Lopte6 Zakrpa za popravke
Tehnički podaci
Dimenzije: oko 300 x 180 x 160 cm (L x B x H) (napuhan)
Maks. dozvoljena tjelesna težina za tobogan: ca. 50 kg
Opseg isporuke
1 dječji bazen 4 prstena za bacanje6 lopta2 zakrpe za popravke2 cjevčice za puštanje zraka1 upute za uporabu
Sigurnosne upute
SAČUVAJTE SVE SIGURNOSNE NAPOMENE I OPĆE UPUTE NA SIGURNOM MJESTU.
Izbjegavajte opasnost od ozljeda!
OPASNOST PO ŽIVOT I OPASNOST OD NEZGODE ZA MALU DJECU I
DJECU! Ne ostavljajte djecu nikad bez nad-zora u blizini omotnog materijala i proizvoda. Prijeti opasnost od gušenja omotnim materijalom i opasnost po život od davljenja i / ili utapanja. Djeca često potcjenjuju opasnost. Držite djecu uvijek podalje od proizvoda.
PAŽNJA! Nikada ne ostavljajte dijete bez nadzora. Opasnost od gušenja.
PAŽNJA! Samo za kućnu upotrebu. Djeca se mogu utopiti i u malim količinama
vode. Ispraznite bazen, dok se ne koristi. Bazen za kupanje se ne smije postavljati na
beton, asfalt ili na druge tvrde površine. Kod punjenja vodom, dubina vode ne smije
preći graničnu oznaku naznačenu na proiz-vodu, koja ukazuje na maksimalno dozvoljenu razinu vode (vidi prikaz B).
Obratite pozornost na to, da proizvod dok je napumpan, ne dolazi u kontakt s kamenjem
10 HR
šljunkom ili drugim oštrim predmetima, koji bi mogli oštetiti proizvod.
Nemojte upotrebljavati proizvod bez tobo-gana.
Rukovanje
Napomena: Prije prve upotrebe temeljito provje-rite proizvod, da li ima rupe, porozna mjesta i pro-pusne šavove.Preporuka: Napumpajte proizvod i ostavite ga da jedan dan leži. Nove proizvode ostavite da se par dana prozrače na zraku.Preporuka: postavite spravu za aktivnu igru na ravnoj površini i na najmanje 2 metra udaljenosti od drugih građevina ili prepreka, npr. od ograde, garaže, kuće.
Napuhavanje proizvoda
OPREZ! Plastični proizvodi na napuhavanje osjetljivi su na hladnoću i vrućinu. Stoga nemojte upotrebljavati proizvod ako okolna temperatura padne ispod 15 °C, odn. naraste iznad 40 °C. U protivnom može doći do oštećenja proizvoda.Uputa: Napumpavanje trebaju uvijek preuzeti odrasli. Vodite računa da proizvod ne napunite s previše zraka.Ni u kojem slučaju nemojte upotrebljavati kompre-sor. Prekinite postupak kad prilikom pumpanja naraste otpor i kad se šavovi napnu. U suprotnom može doći do pucanja materijala. Upotrebljavajte samo ručne pumpe i / ili pumpe koje su specijalno namijenjene za plastične proizvode na napuhavanje. VAŽNO! Obratite pozornost da temperatura zraka i vremenski uvjeti djeluju na tlak zraka proi-zvoda na napuhavanje. Na hladnom vremenu tlak zraka u proizvodu pada jer se zrak steže. Pod tim uvjetima morate eventualno dodati zrak. Na vrućini se zrak širi. Pod tim uvjetima morate eventualno ispustiti zrak, da biste sprječili prekomjernu napunjenost.Napomena: da biste napuhali proizvod, po-trebna vam je za zračni ventil pumpa sa stožastim priključkom (ø oko 7,5 mm / 17,5 mm).
Najprije raširite proizvod i provjerite da li ima rupe, pukotine ili druga oštećenja.
1. Glavne komore 1 a napuniti sa zrakom: Napunite glavne komore 1 a sa zrakom i za-tvorite zaporne kapice (vidi sl. C). Napunite glavne komore 1 a tako dugo sa zrakom, sve dok ne osjetite da su čvrste. Trebali biste svaku zračnu komoru moći lagano pritisnuti sa prstima.
2. Ostale komponente napuniti sa zrakom: Otvorite ventil i napunite zračne komore sa zrakom. Zatvorite zatvarač ventila i pritisnite ventil lagano prema dolje (vidi sl. D).
za kupanje. Postavite tobogan 2 na gornji rub bazena za kupanje i na pod.
Stavite četiri iglice u odgovarajuće ušice u ba-zenu za kupanje i pazite, da se ove potpuno nalaze u ušicama (vidi sl. E).
4. Pričvršćivanje staze za kugle 3 : Postavite napuhanu stazu za kugle 3 na rubu
bazena za kupanje i fiksirajte ju sa sva tri za-tvarača sa čičkom.
5. Priključivanje vrtnog crijeva za vodu: Priključite vrtno crijevo za vodu sa unutarnjim
promjerom od 13–15 mm na priključak za vodu na proizvodu (vidi sl. F). Za jednostavnu montažu preporuča se spojnica za crijevo od 13–15 mm.
Punjenje proizvoda sa vodom
Polako punite proizvod i za to vrijeme ga ne ostavljajte bez nadzora.
Pražnjenje proizvoda
Otvorite ispusne ventile i pustite da voda oteče (vidi sl. G). Napomena: molimo da uvažite lokalne propise u vezi specifičnih uvjeta za odlaganje vode iz bazena.
11 HR
Ispuštanje zraka
Odstranite vrtno crijevo za vodu. Odstranite stazu za kugle 3 i tobogan 2 .
Ispustite zrak na sljedeći način:1. Otvorite zaporne kapice (vidi sl. H), kako biste
glavne komore 1 a brzo ispraznili.2. Ispustite zrak iz drugih komponenata. Otvorite
ventil i malo stisnite vrat ventila, tako da zrak može izlaziti. Za brže ispuštanje zraka gurnite cjevčicu za puštanje zraka u ventil. Napomena: vodite računa o tome, da je proizvod potpuno suh, prije nego što ga potpuno smotate.
Čišćenje i održavanje
Ne koristite ni u kojem slučaju nagrizajuća ili agresivna sredstva za čišćenje.
Za čišćenje upotrebljavajte malo navlaženu krpu koja ne pušta vlakanca.
Vodu iz bazena često izmijenite (osobito za vrijeme vrućih dana) ili dok je vidljivo zaprljana.
Popravak proizvoda
Uputa: manja oštećenja možete popraviti sami pomoću priloženog materijala za popravak. Kod većih oštećenja obratite se specijaliziranoj trgovini.
Ispustite najprije sav zrak iz proizvoda. Izrežizte zakrpu za popravak 6 koja odgo-
vara veličini rupe. Napomena: vodite računa da zakrpa 6 bude veća od rupe i da je rubovi dobro prekrivaju.
Izrežite naokrug rubove zakrpe 6 i odlijepite zaštitnu foliju.
Postavite zakrpu 6 na rupu i čvrsto je priti-snite. Eventualno postavite težak predmet na zakrpu 6 .
Pričekajte 24 sata prije ponovnog napumpava-nja proizvoda.
Skladštenje
Vodite računa da proizvod iznutra i izvana bude potpuno suh kad ga želite spremiti na duže vrijeme. U suprotnom se mogu javiti mrlje od vlage i plijesan.
Čuvajte proizvod u tamnom i suhom prostoru – izvan dohvata djece.
Idealna skladišna temperatura je između 10 i 20 °C.
Osigurajte, da proizvod ne dođe u kontakt sa oštrim predmetima, za vrijeme skladištenja.
Zbrinjavanje
Omot se sastoji od materijala koji ne ugrožava okoliš. Zbrinite ga u lokalnim posudama za reciklažu.
Mogućnosti za zbrinjavanje dotrajalog proizvoda možete saznati od vaše općinske ili gradske uprave.
Jamstvo
Proizvod se brižno izrađuje prema strogim smjerni-cama kvalitete i prije isporuke savjesno ispituje. U slučaju nedostataka na ovom proizvodu, na raspo-laganju imate zakonska prava protiv prodavača tog uređaja. Vaša zakonska prava ovim našim jamstvom koje je predstavljeno u nastavku, ostaju netaknuta.
Za ovaj proizvod dobivate jamstvo u trajanju od 3 godine od datuma kupnje. Jamstveni rok počinje s datumom kupovine. Molimo dobro sačuvajte originalan račun s blagajne. To je dokumentacija kao dokaz kupovine koji će se zahtijevati.
Ako u razdoblju od 3 godine od datuma kupovine ovog proizvoda nastane kakva greška na materi-jalu ili tvornočka greška, proizvod ćemo – prema našem izboru – besplatno popraviti ili zamijeniti. Ovo jamstvo se poništava, kada se proizvod ošteti, nestručno koristi ili ne održava.
12 HR
Jamstvo vrijedi za nedostatke na materijalu ili tvor-ničke pogreške. Ovo jamstvo se ne proteže na dije-love proizvoda, koji podliježu normalnom trošenju i stoga se mogu smatrati kao normalni potrošni dijelovi (npr. baterije) ili za oštećenja na krhkim dijelovima, npr. prekidaču, punjivim baterijama ili takvi, koji su izrađeni od stakla.
13 DE/AT/CH
Erlebnis-Planschbecken
Einleitung
Wir beglückwünschen Sie zum Kauf Ihres neuen Produkts. Sie haben sich damit für ein hochwertiges Produkt entschieden. Machen Sie sich vor dem ers-ten Gebrauch mit dem Produkt vertraut. Lesen Sie hierzu aufmerksam die nachfolgende Bedienungs-anleitung und die Sicherheitshinweise. Benutzen Sie das Produkt nur wie beschrieben und für die angegebenen Einsatzbereiche. Bewahren Sie diese Anleitung auf. Händigen Sie alle Unterlagen bei Weitergabe des Produktes an Dritte mit aus.
Bestimmungsgemäßer Gebrauch
Das Produkt ist zum Spielen / Planschen bestimmt. Das Produkt ist nur für den privaten Außengebrauch vorgesehen. Das Produkt darf nicht von Kindern unter 3 Jahren verwendet werden. Das Produkt ist nicht für den gewerblichen Einsatz bestimmt.
Teilebeschreibung
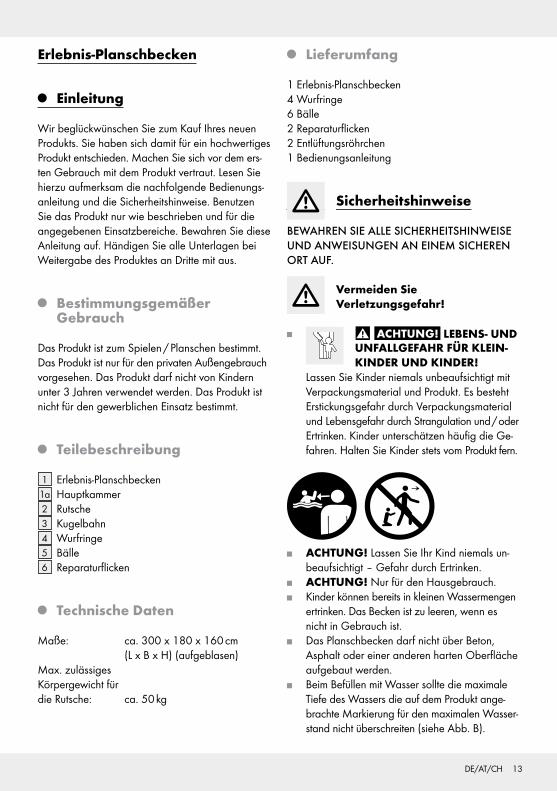
1 Erlebnis-Planschbecken1 a Hauptkammer2 Rutsche3 Kugelbahn 4 Wurfringe5 Bälle6 Reparaturflicken
Technische Daten
Maße: ca. 300 x 180 x 160 cm (L x B x H) (aufgeblasen)
Max. zulässiges Körpergewicht für die Rutsche: ca. 50 kg
BEWAHREN SIE ALLE SICHERHEITSHINWEISE UND ANWEISUNGEN AN EINEM SICHEREN ORT AUF.
Vermeiden Sie Verletzungsgefahr!
ACHTUNG! LEBENS- UND UNFALLGEFAHR FÜR KLEIN-KINDER UND KINDER!
Lassen Sie Kinder niemals unbeaufsichtigt mit Verpackungsmaterial und Produkt. Es besteht Erstickungsgefahr durch Verpackungsmaterial und Lebensgefahr durch Strangulation und / oder Ertrinken. Kinder unterschätzen häufig die Ge-fahren. Halten Sie Kinder stets vom Produkt fern.
ACHTUNG! Lassen Sie Ihr Kind niemals un-beaufsichtigt – Gefahr durch Ertrinken.
ACHTUNG! Nur für den Hausgebrauch. Kinder können bereits in kleinen Wassermengen
ertrinken. Das Becken ist zu leeren, wenn es nicht in Gebrauch ist.
Das Planschbecken darf nicht über Beton, Asphalt oder einer anderen harten Oberfläche aufgebaut werden.
Beim Befüllen mit Wasser sollte die maximale Tiefe des Wassers die auf dem Produkt ange-brachte Markierung für den maximalen Wasser-stand nicht überschreiten (siehe Abb. B).
14 DE/AT/CH
Achten Sie darauf, dass das Produkt, sobald es aufgeblasen ist, nicht mit Steinen, Kies oder anderen spitzen Gegenständen, die das Produkt beschädigen könnten, in Berührung kommt.
Verwenden Sie das Produkt nicht ohne Rutsche.
Bedienung
Hinweis: Vor dem ersten Einsatz das Produkt gründlich auf Löcher, poröse Stellen und undichte Nähte untersuchen.Empfehlung: Produkt aufblasen und einen Tag lang liegen lassen. Neue Produkte ein paar Tage an der frischen Luft auslüften.Empfehlung: Stellen Sie das Aktivitätsspielzeug auf einer ebenen Fläche und mindestens 2 m von anderen Aufbauten oder Hindernissen entfernt auf, z. B. Zaun, Garage, Haus, ausladende Zweige, Wäscheleinen oder elektrische Leitungen.
Produkt aufpumpen
VORSICHT! Aufblasbare Plastikprodukte reagieren sensibel auf Kälte und Hitze. Verwenden Sie das Produkt daher nicht, wenn die Umgebungstemperatur unter 15 °C sinkt bzw. über 40 °C steigt. Andernfalls kann es zu Beschädigungen des Produkts kommen.Hinweis: Das Aufpumpen sollten grundsätzlich Erwachsene übernehmen. Achten Sie darauf, dassSie nicht zuviel Luft in das Produkt pumpen. Verwenden Sie keinesfalls einen Kompressor. Stoppen Sie den Vorgang, wenn der Widerstand während des Pumpens zunimmt und sich die Nähte spannen. Andernfalls kann das Material reißen. Verwenden Sie nur manuelle Pumpen und / oder Pumpen, die speziell für aufblasbare Plastikprodukte bestimmt sind. WICHTIG! Beachten Sie, dass sich Lufttemperatur und Wetterbedingungen auf den Luftdruck von auf-blasbaren Produkten auswirken. Bei kaltem Wetter verliert das Produkt an Luftdruck, weil sich die Luft zusammenzieht. Unter diesen Bedingungen müssen Sie ggf. Luft hinzufügen. Bei Hitze dehnt sich die Luft aus. Unter diesen Bedingungen müssen Sie ggf. Luft ablassen, um eine Überfüllung zu verhin-dern.
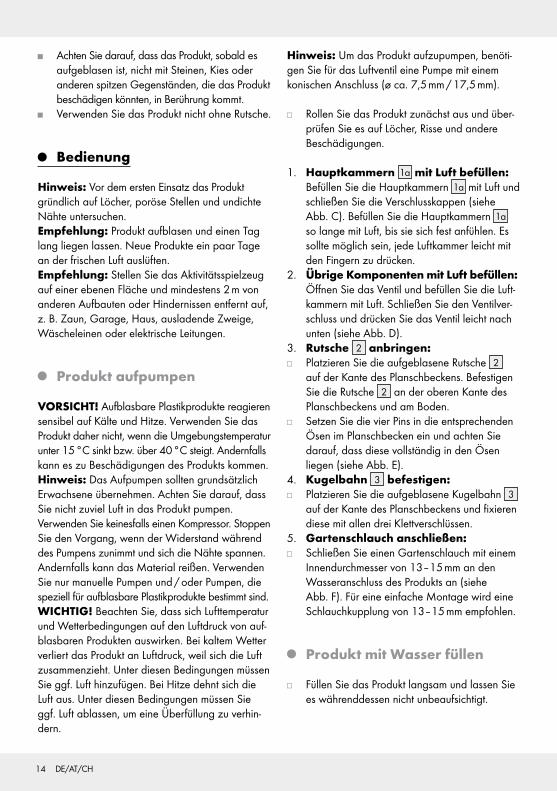
Hinweis: Um das Produkt aufzupumpen, benöti-gen Sie für das Luftventil eine Pumpe mit einem konischen Anschluss (ø ca. 7,5 mm / 17,5 mm).
Rollen Sie das Produkt zunächst aus und über-prüfen Sie es auf Löcher, Risse und andere Beschädigungen.
1. Hauptkammern 1 a mit Luft befüllen: Befüllen Sie die Hauptkammern 1 a mit Luft und schließen Sie die Verschlusskappen (siehe Abb. C). Befüllen Sie die Hauptkammern 1 a so lange mit Luft, bis sie sich fest anfühlen. Es sollte möglich sein, jede Luftkammer leicht mit den Fingern zu drücken.
2. Übrige Komponenten mit Luft befüllen: Öffnen Sie das Ventil und befüllen Sie die Luft-kammern mit Luft. Schließen Sie den Ventilver-schluss und drücken Sie das Ventil leicht nach unten (siehe Abb. D).
3. Rutsche 2 anbringen: Platzieren Sie die aufgeblasene Rutsche 2
auf der Kante des Planschbeckens. Befestigen Sie die Rutsche 2 an der oberen Kante des Planschbeckens und am Boden.
Setzen Sie die vier Pins in die entsprechenden Ösen im Planschbecken ein und achten Sie darauf, dass diese vollständig in den Ösen liegen (siehe Abb. E).
4. Kugelbahn 3 befestigen: Platzieren Sie die aufgeblasene Kugelbahn 3
auf der Kante des Planschbeckens und fixieren diese mit allen drei Klettverschlüssen.
5. Gartenschlauch anschließen: Schließen Sie einen Gartenschlauch mit einem
Innendurchmesser von 13–15 mm an den Wasseranschluss des Produkts an (siehe Abb. F). Für eine einfache Montage wird eine Schlauchkupplung von 13–15 mm empfohlen.
Produkt mit Wasser füllen
Füllen Sie das Produkt langsam und lassen Sie es währenddessen nicht unbeaufsichtigt.
15 DE/AT/CH
Produkt leeren
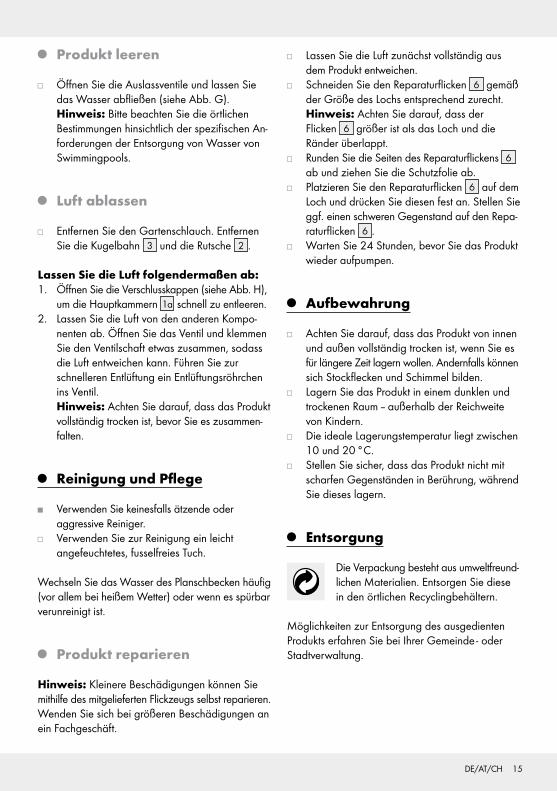
Öffnen Sie die Auslassventile und lassen Sie das Wasser abfließen (siehe Abb. G). Hinweis: Bitte beachten Sie die örtlichen Bestimmungen hinsichtlich der spezifischen An-forderungen der Entsorgung von Wasser von Swimmingpools.
Luft ablassen
Entfernen Sie den Gartenschlauch. Entfernen Sie die Kugelbahn 3 und die Rutsche 2 .
Lassen Sie die Luft folgendermaßen ab:1. Öffnen Sie die Verschlusskappen (siehe Abb. H),
um die Hauptkammern 1 a schnell zu entleeren.2. Lassen Sie die Luft von den anderen Kompo-
nenten ab. Öffnen Sie das Ventil und klemmen Sie den Ventilschaft etwas zusammen, sodass die Luft entweichen kann. Führen Sie zur schnelleren Entlüftung ein Entlüftungsröhrchen ins Ventil. Hinweis: Achten Sie darauf, dass das Produkt vollständig trocken ist, bevor Sie es zusammen-falten.
Reinigung und Pflege
Verwenden Sie keinesfalls ätzende oder aggressive Reiniger.
Verwenden Sie zur Reinigung ein leicht angefeuchtetes, fusselfreies Tuch.
Wechseln Sie das Wasser des Planschbecken häufig (vor allem bei heißem Wetter) oder wenn es spürbar verunreinigt ist.
Produkt reparieren
Hinweis: Kleinere Beschädigungen können Sie mithilfe des mitgelieferten Flickzeugs selbst reparieren. Wenden Sie sich bei größeren Beschädigungen an ein Fachgeschäft.
Lassen Sie die Luft zunächst vollständig aus dem Produkt entweichen.
Schneiden Sie den Reparaturflicken 6 gemäß der Größe des Lochs entsprechend zurecht. Hinweis: Achten Sie darauf, dass der Flicken 6 größer ist als das Loch und die Ränder überlappt.
Runden Sie die Seiten des Reparaturflickens 6 ab und ziehen Sie die Schutzfolie ab.
Platzieren Sie den Reparaturflicken 6 auf dem Loch und drücken Sie diesen fest an. Stellen Sie ggf. einen schweren Gegenstand auf den Repa-raturflicken 6 .
Warten Sie 24 Stunden, bevor Sie das Produkt wieder aufpumpen.
Aufbewahrung
Achten Sie darauf, dass das Produkt von innen und außen vollständig trocken ist, wenn Sie es für längere Zeit lagern wollen. Andernfalls können sich Stockflecken und Schimmel bilden.
Lagern Sie das Produkt in einem dunklen und trockenen Raum – außerhalb der Reichweite von Kindern.
Die ideale Lagerungstemperatur liegt zwischen 10 und 20 °C.
Stellen Sie sicher, dass das Produkt nicht mit scharfen Gegenständen in Berührung, während Sie dieses lagern.
Entsorgung
Die Verpackung besteht aus umweltfreund-lichen Materialien. Entsorgen Sie diese in den örtlichen Recyclingbehältern.
Möglichkeiten zur Entsorgung des ausgedienten Produkts erfahren Sie bei Ihrer Gemeinde - oderStadtverwaltung.
16 DE/AT/CH
Garantie
Das Produkt wurde nach strengen Qualitätsrichtlinien sorgfältig produziert und vor Anlieferung gewissen-haft geprüft. Im Falle von Mängeln dieses Produkts stehen Ihnen gegen den Verkäufer des Produkts gesetzliche Rechte zu. Diese gesetzlichen Rechte werden durch unsere im Folgenden dargestellte Garantie nicht eingeschränkt.
Sie erhalten auf dieses Produkt 3 Jahre Garantie ab Kaufdatum. Die Garantiefrist beginnt mit dem Kaufdatum. Bitte bewahren Sie den Original-Kas-senbon gut auf. Diese Unterlage wird als Nach-weis für den Kauf benötigt.
Tritt innerhalb von 3 Jahren ab dem Kaufdatum dieses Produkts ein Material- oder Fabrikationsfehler auf, wird das Produkt von uns – nach unserer Wahl – für Sie kostenlos repariert oder ersetzt. Diese Garantie verfällt, wenn das Produkt beschädigt, nicht sach-gemäß benutzt oder gewartet wurde.
Die Garantieleistung gilt für Material- oder Fabrika-tionsfehler. Diese Garantie erstreckt sich nicht auf Produktteile, die normaler Abnutzung ausgesetzt sind (z. B. Batterien) und daher als Verschleißteile ange-sehen werden können oder für Beschädigungen an zerbrechlichen Teilen, z. B. Schalter, Akkus oder die aus Glas gefertigt sind.