READ AND SAVE THESE INSTRUCTIONS finished size 5.5” wide x 8.5” high CLEAN MIST ™ TOP-FILL SENSATOUCH ™ HUMIDIFIER WITH REMOTE CONTROL, AUTO LED DIM & AROMA TRAY TABLETOP & FLOOR STANDING Instruction Manual and Warranty Information
Transcript
READ AND SAVE THESE INSTRUCTIONS
finished size 5.5” wide x 8.5” high
CLEAN MIST™ TOP-FILL SENSATOUCH™ HUMIDIFIER WITH REMOTE CONTROL, AUTO LED DIM & AROMA TRAY
If you have a respiratory condition, please contact your physician prior to use.
FCC STATEMENT
Potential for Radio/Television interference
This device complies with Part 18 of the FCC Rules. Operation is subject to the following two conditions: (1) This device may not cause harmful interference, and (2) this device must accept any interference received, including interference that may cause undesired operation.This product has been tested and found to comply with the limits for a Class B digital device, pursuant to Part 18 of the FCC rules.
These limits are designed to provide reasonable protection against harmful interference in a residential installation. The product generates, uses, and can radiate radio frequency energy and, if not installed and used in accordance with the instructions, may cause harmful interference to radio communications. However, there is no guarantee that the interference will not occur in a particular installation. If the product does cause harmful interference to radio or television reception, which can be determined by turning the product on or off, the user is encouraged to try to correct the interference by one or more of the following measures:
• Reorient or relocate the receiving antenna.• Increase the separation between the product and the receiver.• Connect the product into an outlet on a circuit different from that to which the receiver is connected.• Consult the dealer or an experienced radio/TV technician for help.• Changes or modifications not expressly approved by the party responsible for compliance could void the
user’s authority to operate the equipment.
1
SAFETY INSTRUCTIONS
• This appliance has a polarized plug (one blade is wider than the other) as a safetyfeature. If the plug does not fit fully into the outlet, reverse the plug. If it still doesn’tfit, contact a qualified electrician. DO NOT attempt to defeat this safety feature.
• Before using the humidifier, extend the cord and inspect for any signs of damage; DONOT use if the cord has been damaged.
• Keep cord away from heated surfaces and out of the way, where it cannot bestepped on or tripped over.
• NEVER use in an environment where explosive gases are present.• Place humidifier on a stable level surface; DO NOT place on carpet, next to
heating vents, under direct sunlight, in high temperature areas, or near computersand electronic equipment.
• DO NOT place the the humidifier directly on wood furniture or other surfaces whichcould get damaged by water.
• DO NOT direct the mist against a wall or home appliances.• NEVER operate without water in the Tank; DO NOT use anything other than room
temperature tap or distilled water.• NEVER add essential oils directly to the water, as this will damage the unit and void
the warranty.• DO NOT touch the water in the Base during operation.• DO NOT expose or immerse the Base in water when cleaning.• DO NOT pour water into the base through the Air Outlet during cleaning and filling.• NEVER block the Air Outlet or intake or cover the unit when it’s in operation• DO NOT use any attachments not provided with the unit.• Discontinue use if humidifier makes loud noises or has a strange smell.• DO NOT attempt to repair or adjust the unit; servicing must be performed by
professional or qualified personnel.
Battery Disposal: DO NOT dispose of batteries in fire. Improper handling/disposal of batteries may cause batteries to explode or leak. Please dispose of batteries responsibly by throwing away batteries in a proper trash receptacle per township ordinance.
• Only operate when fully assembled; only use as intended and described in this manual.• Keep out of reach of small children.• Always insert plug securely into the power source.• Unplug the unit and empty the Water Tank and Base before carrying/moving.• Only unplug when the humidifier is turned off; ensure hands are dry.• Always turn off the unit before removing, emptying or filling the Water Tank.• Perform regular maintenance of the Ultrasonic Nebulizer; NEVER scrape Nebulizer with
a hard or sharp object.• Dry the unit completely before storage; store in a cool, dry place.• Do not drop, hit or otherwise subject this product to excessive shock.
READ AND SAVE THESE INSTRUCTIONS: Falure to followall the instructions may result in electrical shock.
WARNING
CAUTION
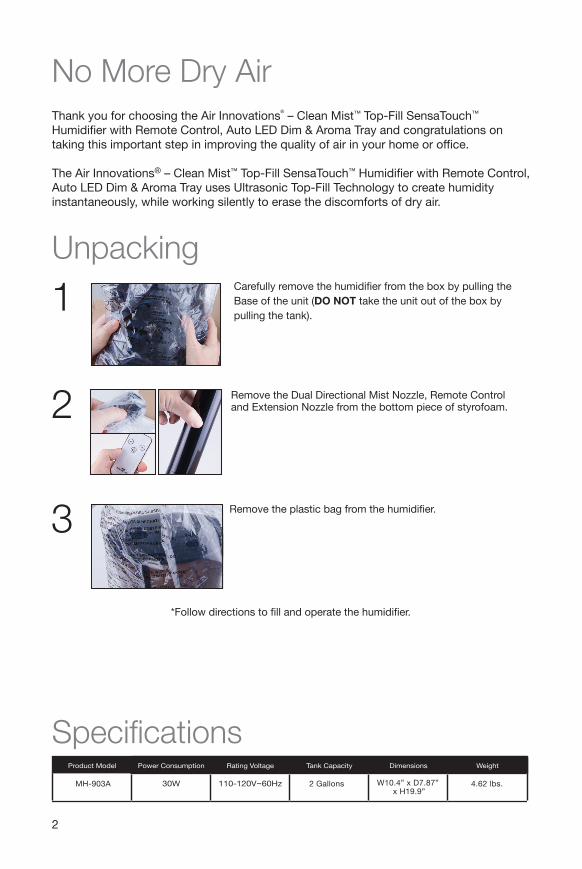
No More Dry AirThank you for choosing the Air Innovations® – Clean Mist™ Top-Fill SensaTouch™ Humidifier with Remote Control, Auto LED Dim & Aroma Tray and congratulations on taking this important step in improving the quality of air in your home or office.
The Air Innovations® – Clean Mist™ Top-Fill SensaTouch™ Humidifier with Remote Control, Auto LED Dim & Aroma Tray uses Ultrasonic Top-Fill Technology to create humidity instantaneously, while working silently to erase the discomforts of dry air.
Unpacking
Specifications
*Follow directions to fill and operate the humidifier.
2
1
2
3 Remove the plastic bag from the humidifier.
Remove the Dual Directional Mist Nozzle, Remote Controland Extension Nozzle from the bottom piece of styrofoam.
Carefully remove the humidifier from the box by pulling the Base of the unit (DO NOT take the unit out of the box by pulling the tank).
MH-903A 2 Gallons 4.62 lbs.W10.4” x D7.87” x H19.9”
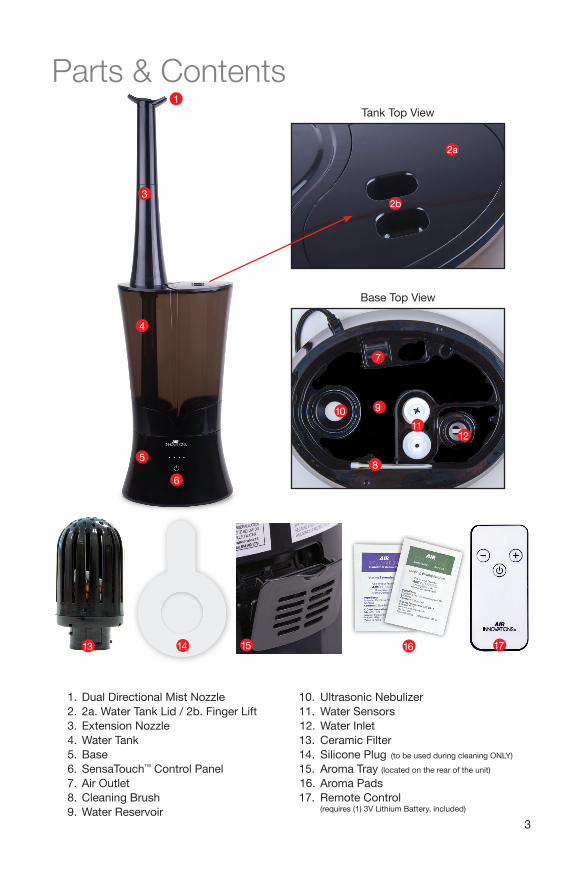
1. Dual Directional Mist Nozzle2. 2a. Water Tank Lid / 2b. Finger Lift3. Extension Nozzle4. Water Tank5. Base6. SensaTouch™ Control Panel7. Air Outlet8. Cleaning Brush9. Water Reservoir
10. Ultrasonic Nebulizer11. Water Sensors 12. Water Inlet13. Ceramic Filter14. Silicone Plug (to be used during cleaning ONLY)
15. Aroma Tray (located on the rear of the unit)
16. Aroma Pads17. Remote Control
(requires (1) 3V Lithium Battery, included)
3
Parts & Contents
7
8
91011
12
Tank Top View
Base Top View
2b
13 14
1
3
4
5
6
2a
15 1716
Ensure the Water Tank is firmly seated on the Base so there is no visible gap between WaterTank and Base.
Use the Finger Lift to open the Water Tank Lid.
1 2
Filling The Water Tank WARNING: Never turn Water Tank upside down when full. WARNING: DO NOT use extremely cold water, since it may temporarily reduce the mist output. WARNING: NEVER fill with hot/warm water or use additives as this could damage the unit and
void the warranty. WARNING: If you have hard water use our Humidifier Demineralization Filters (available at www.
Air-Innovations.com) or use ONLY filtered/distilled water.
Fill the Water Tank using clean, cool water.Note: Do not fill past the MAX fill line.
43Close the Water Tank Lid. NOTE: DO NOT block air holes as this will effect the performance of the unit.
5 6Attach the Dual Directional Mist Nozzle to the top of the Water Tank. To easily control the direction of the mist simply separate the Dual Directional Mist Nozzle and position as desired-see photo above.
Extension Nozzle – To convert the humidifier from a Tabletop unit to a Floor Standing unit simply remove the Dual Directional Mist Nozzle from the top of the Water Tank. Place the unit on your desired floor area and insert the Extension Nozzle into the top of the Water Tank. Then place the Dual Directional Nozzle on the top of the 16” Extension Nozzle.
4
55
Operating InstructionsManual Use - Plug unit into a standard (120V AC) electrical outlet.
ON/OFF - Touch the SensaTouch™ power button to turn the humidifier on. NOTE: During the first use the waterless indicator may illuminate before mist appears; allow up to 15 minutes for the water in the tank to transfer to the base.
Mist Output - When you turn the unit ON, it will default to the Low mist setting and one white LED light will be lit. Touching the power button again will increase the output, and is indicated by the additional white LED lights (see below). Touch once for Medium, twice for High, three times for the Turbo setting. Touching the power button a fourth time will turn the humidifier off. NOTE: Turbo setting is intended for those wanting a more powerful mist and works best while the Extension Nozzle is being used.
Auto LED Dim: After approximately 30 seconds, the LED light will automatically turn off. Touching the power button on the unit or remote will illuminate the light again but will not change the setting. Touch the power button a second time to alter the setting. The humidifier is factory set to silent mode and will only beep to indicate the unit is out of water.
Extra Features
Auto Safety Shut-Off - When the Tank is out of water the Waterless indicator will illuminate and the automatic safety shut-off will turn the unit OFF. The unit will beep three times before turning off.
Aroma Tray- By inserting an Air Innovations Aroma Pad into the built-in Aroma Tray, you can transform your humidifier into an easy-to-use fragrance dispenser. Visit www.Air-Innovations.com to purchase additional Aroma Pads.
AROMATRAY
LOW MEDIUM HIGH TURBO
Remote Control - Our humidifier includes a convenient Remote Control, which allows you to access all the functions of the unit. Be sure to remove the clear pull tab before usingthe remote.• Press the power button to start and stop the humidifier.• Unit will turn on in the Low mist setting. Press the Plus button once for the Medium
mist setting, twice for High, three times for Turbo. White LED lights will illuminate,and increase, on the humidifier for each mist setting.
• Press the Minus button to decrease the mist output.
a b c d
Replacing The Remote Control Battery Push the tab to the left of the battery tray towards the right to unlock the tray (a). While the the tab is pushed, pull out the battery tray (b). Remove the battery from the tray and replace it with a new 3 volt lithium battery (CR2025) with the positive side facing up (c). Insert the tray back into the bottom of the remote contol until it locks in (d).
a
b
d
e
Weekly Cleaning & Care WARNING: Before cleaning always turn power off and unplug the unit from outlet. WARNING: DO NOT rinse Base under faucet. To clean, wipe the Base with a soft cloth. WARNING: DO NOT use any solvents or aggressive cleaning agents. Keep water away from the Air Outlet. WARNING: DO NOT tamper with the Water Sensor.
About White Dust -Use of high-mineral content water may cause a white mineral residue to accumulate on room surfaces near the humidifier. The mineral residue is commonly referred to as “White Dust”. The higher the mineral content (the harder your water), the greater the potential for White Dust. The White Dust is not caused by a defect in the humidifier, but is due only to minerals suspended in the water from your tap. WARNING: If you have hard tap water STOP using tap water and visit our website (www.Air-Innovations.com) to purchase our Humidifier Demineralization Filters or use ONLY filtered or distilled water.
Tank Cleaning - Unplug unit & remove the Mist Nozzle from the top of the Water Tank then remove the Water Tank from the unit. Turn the tank upside down and drain any water from the tank. Wipe the tank with a soft damp cloth then rinse it with warm water inside and out.
Base Cleaning 1. Unplug unit.2. Use enclosed Silicone Plug and place over water inlet (see below).3. Clean the Base by gently wiping with a soft damp cloth.
White Dust Cleaning - If mineral deposits are evident around the Ultrasonic Nebulizer a and Water Sensor, clean these surfaces with a soft cloth and a small amount of undiluted white vinegar. If necessary, mix a solution of 50% white vinegar and 50% water and fill the Base with enough solution to cover the Ultrasonic Nebulizer a . Allow it to soak for an hour and then use the providedbrush to gently loosen buildup on the Ultrasonic Nebulizer b . Put 1 cup of water in the Base and wipe clean with a soft cloth.
WARNING: DO NOT rinse Base under faucet. WARNING: When emptying the Water Reservoir in the Base,
make sure that the water is poured away from the Air Outlet c . If water is poured into the outlet it may damage the humidifier.
Ceramic Water Filter Cleaning 1. Unplug unit and empty water from Tank.2. Lift Water Tank Lid and place hand inside the Tank and moderately grasp
the Ceramic Water Filter and unscrew by twisting counterclockwise d . Rinse the Ceramic Filter with running tap water for approx 20-30 seconds e . Then replace filter inside Water Tank by twisting clockwise until secure f .
Surface Cleaning - Clean all surfaces of the unit with a clean damp soft cloth.
6
1. Follow all cleaning instructions prior to storage.2. Dry all parts, including the inside of the Water Tank.3. Preferably store in its original box, in a dry place away from high temperatures.4. Follow all cleaning instructions after long periods of storage.
Storage
c f
Using Silicone PlugPlease apply the enclosed plug during cleaning ONLY in order to avoid debris from entering the pump. NOTE: the plug MUST be REMOVED for normal operation and filling.
Troubleshooting
7
Problem Solution
Weak or no mist output. The water in the unit is too cold: Replace with cool but not cold water or set output to High and wait 10-15 minutes.
The surface of the Ultrasonic Nebulizer is dirty: Clean Ultra-sonic Nebulizer. (see pg. 6 “White Dust Cleaning”)
Ultrasonic Nebulizer is not working: See Warranty.
Air Holes in Lid are blocked: Do not cover or block air holes.
White dust is forming on nearby furniture.
Hard tap water may deposit a certain amount of dust. Visit our website (www.Air-Innovations.com) to purchase Humidifier Demineralization Filters or use distilled water.
Water is leaking. Water Tank Installation: Make sure the tank is correctly attached. (see pg. 4 “Filling the Water Tank”)
Humidifier is not on a level surface: Place on level surface.
Condensation is forming around humidifier or windows.
Mist output level is too high for room size: Decrease the mist output.
Direction of Rotating Mist Nozzle: Change direction of nozzle.
Aroma Tray does not close. Aroma Pad is not seated properly: Remove and reinsert the pad.
4 LED lights continuously flash for more than one minute.
Unit is in Alert Mode: Unplug and restart the humidifier;if problem continues, call our Customer Service Center for assistance.
Missing parts. Call us toll free at: 844-600-1370, Monday thru Friday 8:30am to 5pm EST.