44
Agilent Technologies Agilent 1260 Infinity Manual Injector User Manual

Agilent Technologies
Agilent 1260 Infinity Manual Injector
User Manual

Notices© Agilent Technologies, Inc. 2006 - 2011, 2012
No part of this manual may be reproduced in any form or by any means (including elec-tronic storage and retrieval or translation into a foreign language) without prior agree-ment and written consent from Agilent Technologies, Inc. as governed by United States and international copyright laws.
Manual Part NumberG1328-90013
Edition10/2012
Printed in Germany
Agilent TechnologiesHewlett-Packard-Strasse 8 76337 Waldbronn
This product may be used as a com-ponent of an in vitro diagnostic sys-tem if the system is registered with the appropriate authorities and com-plies with the relevant regulations. Otherwise, it is intended only for gen-eral laboratory use.
Warranty
The material contained in this docu-ment is provided “as is,” and is sub-ject to being changed, without notice, in future editions. Further, to the max-imum extent permitted by applicable law, Agilent disclaims all warranties, either express or implied, with regard to this manual and any information contained herein, including but not limited to the implied warranties of merchantability and fitness for a par-ticular purpose. Agilent shall not be liable for errors or for incidental or consequential damages in connection with the furnishing, use, or perfor-mance of this document or of any information contained herein. Should Agilent and the user have a separate written agreement with warranty terms covering the material in this document that conflict with these terms, the warranty terms in the sep-arate agreement shall control.
Technology Licenses The hardware and/or software described in this document are furnished under a license and may be used or copied only in accor-dance with the terms of such license.
Restricted Rights LegendIf software is for use in the performance of a U.S. Government prime contract or subcon-tract, Software is delivered and licensed as “Commercial computer software” as defined in DFAR 252.227-7014 (June 1995), or as a “commercial item” as defined in FAR 2.101(a) or as “Restricted computer soft-ware” as defined in FAR 52.227-19 (June 1987) or any equivalent agency regulation or contract clause. Use, duplication or dis-closure of Software is subject to Agilent Technologies’ standard commercial license terms, and non-DOD Departments and Agencies of the U.S. Government will
receive no greater than Restricted Rights as defined in FAR 52.227-19(c)(1-2) (June 1987). U.S. Government users will receive no greater than Limited Rights as defined in FAR 52.227-14 (June 1987) or DFAR 252.227-7015 (b)(2) (November 1995), as applicable in any technical data.
Safety Notices
CAUTION
A CAUTION notice denotes a hazard. It calls attention to an operating procedure, practice, or the like that, if not correctly per-formed or adhered to, could result in damage to the product or loss of important data. Do not proceed beyond a CAUTION notice until the indicated condi-tions are fully understood and met.
WARNING
A WARNING notice denotes a hazard. It calls attention to an operating procedure, practice, or the like that, if not correctly performed or adhered to, could result in personal injury or death. Do not proceed beyond a WARNING notice until the indi-cated conditions are fully under-stood and met.
1260 Infinity Manual Injector
In This Guide
In This Guide
This manual covers the Agilent 1260 Infinity Manual Injector (G1328C).
1 Introduction
Operation and mechanical hardware
2 Installing the Manual Injector
Installation of the manual injector
3 Using the Manual Injector
How to use the manual injector
4 Maintenance
Instructions on simple, routine repair procedures
5 Parts and Materials for Maintenance
Detailed illustrations and lists for identification of parts and materials
6 Appendix
Additional information
1260 Infinity Manual Injector 3

Contents
Contents
1 Introduction 5
Introduction to the Manual Injector 6
2 Installing the Manual Injector 7
Unpacking the Manual Injector 8Installing the Manual Injector 10Flow Connections 14Leak Drainage 16
3 Using the Manual Injector 17
Warnings and Cautions 18Solvent Information 19Information on Injection Seal Material 20Needles 21Injecting Sample 22
4 Maintenance 25
Overview of Maintenance 26Flushing the Manual Injector 27Cleaning the Manual Injector 28Injection-Valve Seal 29Position-Sensing Switch 32
5 Parts and Materials for Maintenance 35
Manual Injector 36Injection-Valve Assembly 38
6 Appendix 41
Agilent Technologies on Internet 42
4 1260 Infinity Manual Injector

1260 Infinity Manual Injector
1Introduction
Introduction to the Manual Injector 6
Operation and mechanical hardware
5Agilent Technologies

1 IntroductionIntroduction to the Manual Injector
Introduction to the Manual Injector
Sample is loaded into the external 20- µl sample loop through the injection port at the front of the valve. The valve has a ceramic stator and PEEK injection seal. PEEK is compatible with pH 0- 14, incompatible with some concentrated mineral acids. A make- before- break passage in the stator ensures flow is not interrupted when the valve is switched between the INJECT and LOAD positions, and back again (see also “Needles” on page 21 and “Flow Connections” on page 14).
The valve is mounted on a steel mounting pole, and can be installed at the left- or right- hand side of the LC system.
Figure 1 The Manual Injector installed to the mounting pole
6 1260 Infinity Manual Injector

1260 Infinity Manual Injector
2Installing the Manual Injector
Unpacking the Manual Injector 8
Damaged Packaging 8
Delivery Checklist 8
Installing the Manual Injector 10
Flow Connections 14
Leak Drainage 16
Installation of the manual injector
7Agilent Technologies

2 Installing the Manual InjectorUnpacking the Manual Injector
Unpacking the Manual Injector
Damaged Packaging
Upon receipt of your manual injector, inspect the shipping containers for any signs of damage. If the containers or cushioning material are damaged, save them until the contents have been checked for completeness and the manual injector has been mechanically checked. If the shipping container or cushioning material is damaged, notify the carrier and save the shipping material for the carriers inspection.
Delivery Checklist
Ensure all parts and materials have been delivered with the manual injector. The delivery checklist is shown in Table 1 on page 8. To aid in parts identification, please see “Parts and Materials for Maintenance” on page 35. Please report missing or damaged parts to your local Agilent Technologies sales and service office.
Table 1 Manual Injector Checklist
Description Quantity
Manual Front Loading Injector Valve, 600 bar (5067-4191).A 20 µL sample loop is connected between Ports 1 and 4. The valve is supplied with a start cable, Hex Keys (×2), Mounting Screws (×2) Vent Lines(×2), Needle Port Cleaner (×1), Long Nuts (×3), Extra Long Nut (×1), Ferrules (×4) and a mounting bracket.
1
Mounting pole, stainless steel (5001-3738) 1
Connection capillary, 0.17 mm id, 500 mm (G1328-87600) 1
Base plate (G1328-44121) 1
Organizer plate (5042-8553) 1
Catch tube cap (5042-8576) 1
8 1260 Infinity Manual Injector

Installing the Manual Injector 2Unpacking the Manual Injector
Valve syringe, fixed needle, 50 µL (5190-1501) 1
User Manual (G1328-90013) 1
Table 1 Manual Injector Checklist
Description Quantity
1260 Infinity Manual Injector 9

2 Installing the Manual InjectorInstalling the Manual Injector
Installing the Manual Injector
1 Place the baseplate on the bench.
2 Connect the two organizer plates to the base plate.
Figure 2 Connecting the Organizer Plates
3 Screw the mounting pole into one of the two holes in the organizer plate.
CAUTION "Defective on arrival" problems
If there are signs of damage, please do not attempt to install the module. Inspection by Agilent is required to evaluate if the instrument is in good condition or damaged.
➔ Notify your Agilent sales and service office about the damage.
➔ An Agilent service representative will inspect the instrument at your site and initiate appropriate actions.
NOTE The manual injector can be installed at the left- or right-hand side of the instrument stack.
10 1260 Infinity Manual Injector

Installing the Manual Injector 2Installing the Manual Injector
4 Slide the manual injector onto the mounting pole (see Figure 3 on page 11). Tighten the mounting screw.
Figure 3 Installing the Mounting Pole and Manual Injector
1260 Infinity Manual Injector 11

2 Installing the Manual InjectorInstalling the Manual Injector
5 Install other system modules on top of the manual injector baseplate (see Figure 4 on page 12).
Figure 4 Installing the System
12 1260 Infinity Manual Injector

Installing the Manual Injector 2Installing the Manual Injector
Figure 5 Installing the Start Cable
6 Connect the capillaries to the manual injector (see “Flow Connections” on page 14).
1. See Figure 6 on page 15
1260 Infinity Manual Injector 13

2 Installing the Manual InjectorFlow Connections
Flow Connections
1 Connect the pump outlet capillary to port 2.
2 Connect the column- compartment inlet capillary to port 3.
3 Connect the sample loop between ports 1 and 4.
WARNING Toxic, flammable and hazardous solvents, samples and reagents
The handling of solvents, samples and reagents can hold health and safety risks.
➔ When working with these substances observe appropriate safety procedures (for example by wearing goggles, safety gloves and protective clothing) as described in the material handling and safety data sheet supplied by the vendor, and follow good laboratory practice.
➔ The volume of substances should be reduced to the minimum required for the analysis.
➔ Do not operate the instrument in an explosive atmosphere.
CAUTION Prevent siphoning
➔ The outlets of the two vent capillaries (ports 5 and 6) and the needle port must be at the same level to prevent siphoning (see Figure 7 on page 15).
14 1260 Infinity Manual Injector

Installing the Manual Injector 2Flow Connections
4 Connect one vent capillary (supplied with valve) to port 5 and one to port 6.
Figure 6 Flow Connections
Figure 7 Vent Capillaries
1260 Infinity Manual Injector 15

2 Installing the Manual InjectorLeak Drainage
Leak Drainage
Figure 8 Leak Drainage
WARNING Leaking injector fittings
In the event of a leak, solvent will drop into the leak channel in the baseplate, from where it is channelled to the front and back of the baseplate.
➔ Check the manual injector fittings periodically for signs of leakage.
16 1260 Infinity Manual Injector

1260 Infinity Manual Injector
3Using the Manual Injector
Warnings and Cautions 18
Solvent Information 19
Information on Injection Seal Material 20
Needles 21
Injecting Sample 22
How to use the manual injector
17Agilent Technologies

3 Using the Manual InjectorWarnings and Cautions
Warnings and Cautions
See “Flushing the Manual Injector” on page 27.
WARNING Ejection of mobile phase
When using sample loops larger than 100 µL, mobile phase may be ejected from the needle port as the mobile phase in the sample loop decompresses.
➔ Please observe appropriate safety procedures (for example, goggles, safety gloves and protective clothing) as described in the material handling and safety data sheet supplied by the solvent vendor, especially when toxic or hazardous solvents are used.
WARNING Splashing of solvent
➔ When using the Needle Port Cleaner, empty the syringe slowly to prevent solvent from splashing back at you.
➔ Please observe appropriate safety procedures (for example, goggles, safety gloves and protective clothing) as described in the material handling and safety data sheet supplied by the solvent vendor, especially when toxic or hazardous solvents are used.
CAUTION Potential damage to the valve
➔ Rinse the valve with water after using buffer solutions to prevent crystals from forming, which can cause scratches on the rotor seal.
18 1260 Infinity Manual Injector

Using the Manual Injector 3Solvent Information
Solvent Information
Observe the following recommendations on the use of solvents.
Flow Cell
Long term operation at pH > 11 should be avoided. Never leave strongly alkaline solutions in the flow cell without flow.
Solvents
Always filter solvents through 0.4 µm filters, small particles can permanently block filters, frits and capillaries. Avoid the use of the following steel- corrosive solvents:
• Solutions of alkali halides and their respective acids (for example, lithium iodide, potassium chloride, and so on).
• High concentrations of inorganic acids like sulfuric acid, especially at higher temperatures (replace, if your chromatography method allows, by phosphoric acid or phosphate buffer which are less corrosive against stainless steel).
• Halogenated solvents or mixtures which form radicals and/or acids, for example:
2 CHCl3 + O2 → 2 COCl2 + 2 HCl
This reaction, in which stainless steel probably acts as a catalyst, occurs quickly with dried chloroform if the drying process removes the stabilizing alcohol.
• Chromatographic grade ethers, which can contain peroxides (for example, THF, dioxane, di- isopropylether). Such ethers should be filtered through dry aluminium oxide which adsorbs the peroxides.
• Solutions of organic acids (acetic acid, formic acid, and so on) in organic solvents. For example, a 1- % solution of acetic acid in methanol may attack steel.
• Mixtures of carbon tetrachloride with 2- propanol or THF. dissolve stainless steel.
1260 Infinity Manual Injector 19

3 Using the Manual InjectorInformation on Injection Seal Material
Information on Injection Seal Material
The manual injector is supplied with a PEEK injection seal. PEEK is compatible with pH 0- 14, incompatible with some concentrated mineral acids (see “Injection-Valve Assembly” on page 38).
20 1260 Infinity Manual Injector

Using the Manual Injector 3Needles
Needles
Use needles with 0.028- inch outer diameter (22 gauge) × 2- inch long needle, without electro- taper, and with 90° point style (square tip).
CAUTION Needle can damage valve
➔ Always use the correct needle size.
1260 Infinity Manual Injector 21

3 Using the Manual InjectorInjecting Sample
Injecting Sample
LOAD PositionLOAD Position
In the LOAD position (see Figure 9 on page 22), the pump is connected directly to the column (ports 2 and 3 connected), and the needle port is connected to the sample loop. At least 2 to 3 sample- loop volumes (more if better precision is required) of sample should be injected through the needle port to provide good precision. The sample fills the loop, and excess sample is expelled through the vent tube connected to port 6.
Figure 9 LOAD Position
INJECT Position
In the INJECT position (see Figure 10 on page 23), the pump is connected to the sample loop (ports 1 and 2 connected). All of the sample is washed
22 1260 Infinity Manual Injector
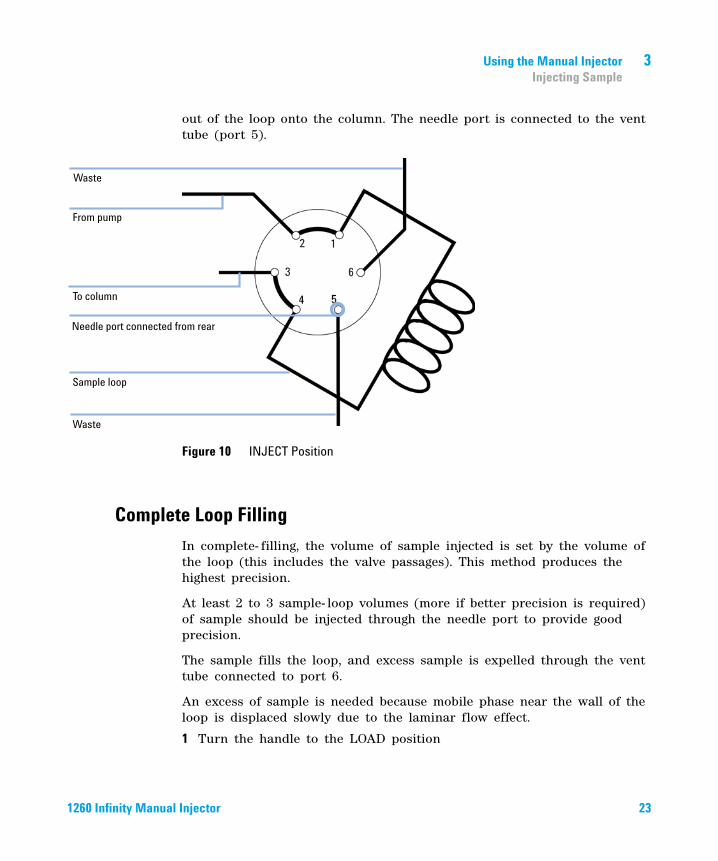
Using the Manual Injector 3Injecting Sample
out of the loop onto the column. The needle port is connected to the vent tube (port 5).
Figure 10 INJECT Position
Complete Loop Filling
In complete- filling, the volume of sample injected is set by the volume of the loop (this includes the valve passages). This method produces the highest precision.
At least 2 to 3 sample- loop volumes (more if better precision is required) of sample should be injected through the needle port to provide good precision.
The sample fills the loop, and excess sample is expelled through the vent tube connected to port 6.
An excess of sample is needed because mobile phase near the wall of the loop is displaced slowly due to the laminar flow effect.
1 Turn the handle to the LOAD position
1260 Infinity Manual Injector 23

3 Using the Manual InjectorInjecting Sample
2 Insert the syringe into the needle port. You should feel slight resistance as the needle passes through the needle seal before it stops against the stator face.
3 Load the sample slowly onto the loop. Repeat this step for higher precision.
4 Leave the syringe in and turn the handle to INJECT.
Partial Loop Filling
If you only have small quantities of sample, this is the method of choice. In the partialfilling method the volume of sample injected is set by the syringe. In this method, no more than half a loop volume of sample should be loaded into the loop. For example, load no more than 10 µL into a 20 µL loop. With larger than half the loop volume, some of the sample is lost out Vent Line 6. This is because sample flows down the center of the loop at twice the average velocity due to the laminar flow effect.
1 In INJECT, use the Needle Port Cleaner to flush out the needle port with about 1 mL of mobile phase to flush out contamination from the earlier injection. This liquid will exit out Vent Line 5.
2 Insert the syringe into the needle port. You should feel slight resistance as the needle passes through the needle seal before it stops against the stator face.
3 Load the sample slowly onto the loop.
4 Leave the syringe in and turn the handle to INJECT.
24 1260 Infinity Manual Injector

1260 Infinity Manual Injector
4Maintenance
Overview of Maintenance 26
Flushing the Manual Injector 27
Cleaning the Manual Injector 28
Injection-Valve Seal 29
Position-Sensing Switch 32
Instructions on simple, routine repair procedures
25Agilent Technologies
4 MaintenanceOverview of Maintenance
Overview of Maintenance
Table 2 Overview of Repair Procedures
Procedure Typical Frequency Time Required Notes
Flushing the injector After using aqueous buffers or salt solutions
5 minutes See “Flushing the Manual Injector” on page 27
Exchanging the injection-valve seal
After approximately 10000 to 20000 injections, or when the valve performance shows indication of leakage or wear
10 minutes See “Injection-Valve Seal” on page 29
Exchanging the position-sensing switch
When cable damaged or when no start signal is sent when switching to the inject position
10 minutes See “Position-Sensing Switch” on page 32
26 1260 Infinity Manual Injector

Maintenance 4Flushing the Manual Injector
Flushing the Manual Injector
1 Switch the valve to the INJECT position.
2 Use the pump to flush the sample loop and seal grooves.
3 Use the needle- port cleaner (supplied with the valve) and syringe to flush the needle port and vent capillary.
Figure 11 Needle-port Cleaner
CAUTION Damage through crystal formation
The use of aqueous buffers or salt solutions can lead to crystal formation which may cause scratches on the injection seal.
➔ Always rinse the valve with water after using aqueous buffers or salt solutions.
1260 Infinity Manual Injector 27

4 MaintenanceCleaning the Manual Injector
Cleaning the Manual Injector
The manual injector base should be kept clean. Cleaning should be done with a soft cloth slightly dampened with water or a solution of water and a mild detergent.
28 1260 Infinity Manual Injector

Maintenance 4Injection-Valve Seal
Injection-Valve Seal
When • Poor injection-volume reproducibility• Leaking injection valve
Tools required Description
Hexagonal key, 9/64 inch
Parts required # p/n Description
1 5068-0052 Rotor seal, PEEK
1 Loosen the three stator screws. 2 Remove the stator head.
1260 Infinity Manual Injector 29

4 MaintenanceInjection-Valve Seal
3 Remove the stator ring. 4 Remove the seal.
5 Install the new seal. Ensure the seal is positioned as shown.
6 Install the stator ring. Ensure the pin in the stator ring is aligned with the hole in the valve body and the position sensoring switch is back in place.
30 1260 Infinity Manual Injector

Maintenance 4Injection-Valve Seal
7 Insert the stator face onto the stator head. 8 Install the stator head onto the valve. Ensure the pin in the stator ring is aligned with the hole in the stator head.
9 Secure the stator head in place with the stator screws. Tighten each screw alternately ¼-turn until the stator head is secure.
1260 Infinity Manual Injector 31

4 MaintenancePosition-Sensing Switch
Position-Sensing Switch
When • No start signal when switching to the inject position
Tools required Description
Hexagonal key, 9/64 inch
Parts required # p/n Description
1 0490-1849 Position-sensing switch
1 Loosen the three stator screws. 2 Remove the stator head.
32 1260 Infinity Manual Injector
Maintenance 4Position-Sensing Switch
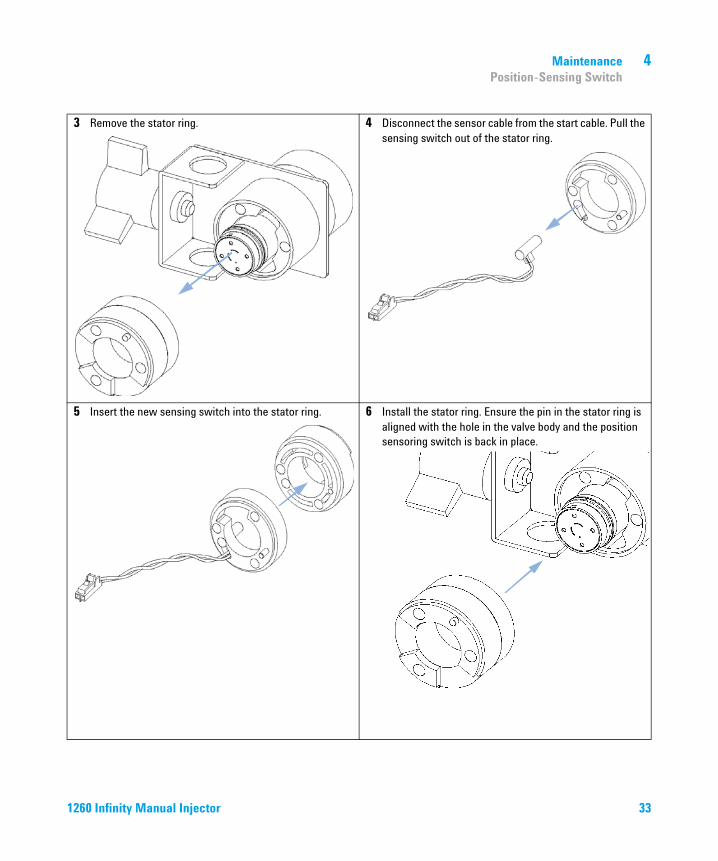
3 Remove the stator ring. 4 Disconnect the sensor cable from the start cable. Pull the sensing switch out of the stator ring.
5 Insert the new sensing switch into the stator ring. 6 Install the stator ring. Ensure the pin in the stator ring is aligned with the hole in the valve body and the position sensoring switch is back in place.
1260 Infinity Manual Injector 33

4 MaintenancePosition-Sensing Switch
7 Insert the stator face onto the stator head. 8 Install the stator head onto the valve. Ensure the pin in the stator ring is aligned with the hole in the stator head.
9 Secure the stator head in place with the stator screws. Tighten each screw alternately ¼-turn until the stator head is secure.
10 Reconnect the sensor cable to the start cable.
34 1260 Infinity Manual Injector

1260 Infinity Manual Injector
5Parts and Materials for Maintenance
Manual Injector 36
Injection-Valve Assembly 38
Detailed illustrations and lists for identification of parts and materials
35Agilent Technologies

5 Parts and Materials for MaintenanceManual Injector
Manual Injector
Manual injector valve see “Injection- Valve Assembly” on page 38.
Item p/n Description
1 5067-4191 Manual Front Loading Injector Valve, 600 bar
2 5001-3738 Mounting pole, stainless steel
3 G1328-44121 Base plate
4 5042-8553 Organizer plate
5042-8576 Catch tube cap
5 5043-0208 Name plate
5190-1501 Valve syringe, fixed needle, 50 µL
G1328-87600 Connection capillary, 0.17 mm id, 500 mm
0100-1677 Start cable
36 1260 Infinity Manual Injector

Parts and Materials for Maintenance 5Manual Injector
Figure 12 Manual Injector
1260 Infinity Manual Injector 37

5 Parts and Materials for MaintenanceInjection-Valve Assembly
Injection-Valve Assembly
Manual Front Loading Injector Valve, 600 bar (5067- 4191) with starts cable (complete assembly), including operating instructions, needle port cleaner, vent tubes (×2) and fittings, 5/64 and 9/64- inch hex keys. Includes items 1 – 8 .
Item p/n Description
1 1535-4045 Bearing Ring, (Qty 1, replacement)
2 1535-4046 Isolation seal
3 5068-0052 Rotor seal, PEEK
4 5068-0118 Stator ring
5 0100-1859 Stator face
6 0100-1860 Stator head
7 5068-0020 Stator Screws, 10/pack
8710-0060 Hex-key wrench, 9/64 inch
0490-1849 Position-sensing switch
8 1400-3166 Ring stand, mounting bracket
38 1260 Infinity Manual Injector

Parts and Materials for Maintenance 5Injection-Valve Assembly
Figure 13 Injection-Valve Assembly
NOTE Accuracy of sample loops
The actual volume of a sample loop can differ by +/- 10% for a 20ul loop. Smaller loops can have a greater deviation and bigger loops a smaller one. Use partial loop filling if you must know the actual injected volume.
1260 Infinity Manual Injector 39

5 Parts and Materials for MaintenanceInjection-Valve Assembly
Sample loops stainless steel
Sample loops PEEK
p/n Description
0101-1248 Sample loop 5 µL
0100-1923 Sample loop 10 µL
0100-1922 Sample loop 20 µL
0100-1924 Sample loop 50 µL
0100-1921 Sample loop 100 µL
0101-1247 Sample loop 200 µL
0101-1246 Sample loop 500 µL
0101-1245 Sample loop 1 mL
0101-1244 Sample loop 2 mL
0101-1243 Sample loop 5 mL
p/n Description
0101-1241 Sample loop 5 µL
0101-1240 Sample loop 10 µL
0101-1239 Sample loop 20 µL
0101-1238 Sample loop 50 µL
0101-1242 Sample loop 100 µL
0101-1227 Sample loop 200 µL
0101-1236 Sample loop 500 µL
0101-1235 Sample loop 1 mL
0101-1234 Sample loop 2 mL
0101-1230 Sample loop 5 mL
40 1260 Infinity Manual Injector

1260 Infinity Manual Injector
6Appendix
Agilent Technologies on Internet 42
Additional information
41Agilent Technologies

6 AppendixAgilent Technologies on Internet
Agilent Technologies on Internet
For the latest information on products and services visit our worldwide web site on the internet at:
http://www.chem.agilent.com
42 1260 Infinity Manual Injector

Index
Index
AAgilent on internet 42
APG-remote 13
Bbuffers 27
Ccapillary connections 14
cleaning the manual injector 28
Ddamaged packaging 8
delivery checklist 8
description 6
Eexchanging
injection seal 29position-sensing switch 32
Fflow cell
solvent information 19
flow connections 14
flushing the manual injector 27
Iinformation
on internet 42
injecting sample 6
INJECT 6, 22
injection seal 29tefzel 20vespel 20
installation 10
installing the manual injector 10
internet 42, 42
Lleak channel 16
leak drainage 16
leaks 14
LOAD 6, 22
Mmake-before-break 6
Nneedle type 21
needle-port cleaner 27
needles 21
Pposition-sensing switch 32
position-sensor cable 13
precision 22
Rrepair procedures
injection seal 29position-sensing switch 32
Ssalt solutions 27
sample loops 6
sample volume 22
solventsacids 19buffers 27ethers 19rinsing 27salt solutions 27steel-corrosive 19
start cable 13
Uunpacking
damaged packaging 8delivery checklist 8
Wworldwide web 42
1260 Infinity Manual Injector 43
www.agilent.com
In This Book
This manual contains user information about the Agilent 1260 Infinity Manual Injector. The manual describes the following:
• introduction to the manual injector,
• installing the manual injector,
• using the manual injector,
• maintenance of the manual injector,
• parts and materials, and
• additional information.
© Agilent Technologies 2006 - 2011, 2012
Printed in Germany 10/2012
*G1328-90013**G1328-90013*G1328- 90013
Agilent Technologies


