15
Software Development Department AMERICAN INTERNATIONAL UNIVERSITY-BANGLADESH AIUB ONLINE ADMISSION USER MANUAL
Software Development Department
AMERICAN INTERNATIONAL UNIVERSITY-BANGLADESH
AIUB ONLINE ADMISSION USER MANUAL
1
Online Admission Form Fill up User Manual Through this website, the online admission system allows you to fill up the admission form for the
admission exam in AMERICAN INTERNATIONAL UNIVERSITY-BANGLADESH.
The user interface has been designed to be intuitive and thus removes the need for a user guide.
The system allows:
Applicants to:
• Create an Account
• Access the Account
• Reset Account Password
• Apply for Admission
• Print the Admission Form
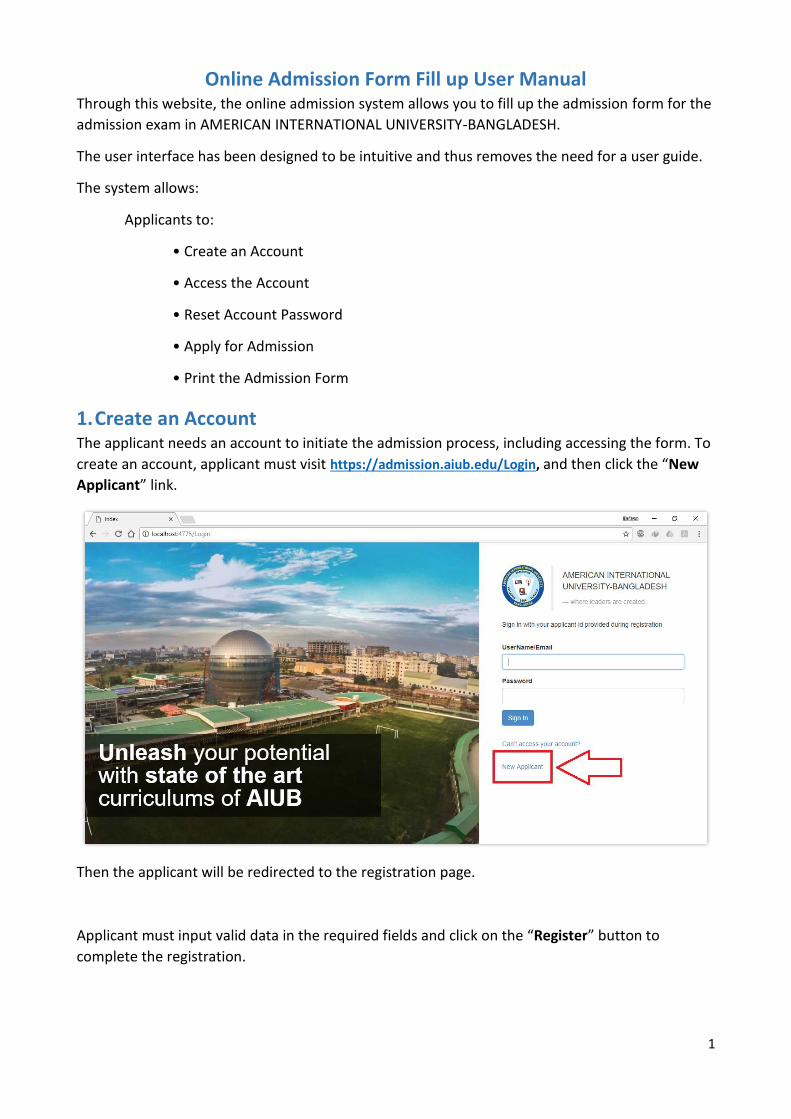
1. Create an Account The applicant needs an account to initiate the admission process, including accessing the form. To
create an account, applicant must visit https://admission.aiub.edu/Login, and then click the “New
Applicant” link.
Then the applicant will be redirected to the registration page.
Applicant must input valid data in the required fields and click on the “Register” button to
complete the registration.
2
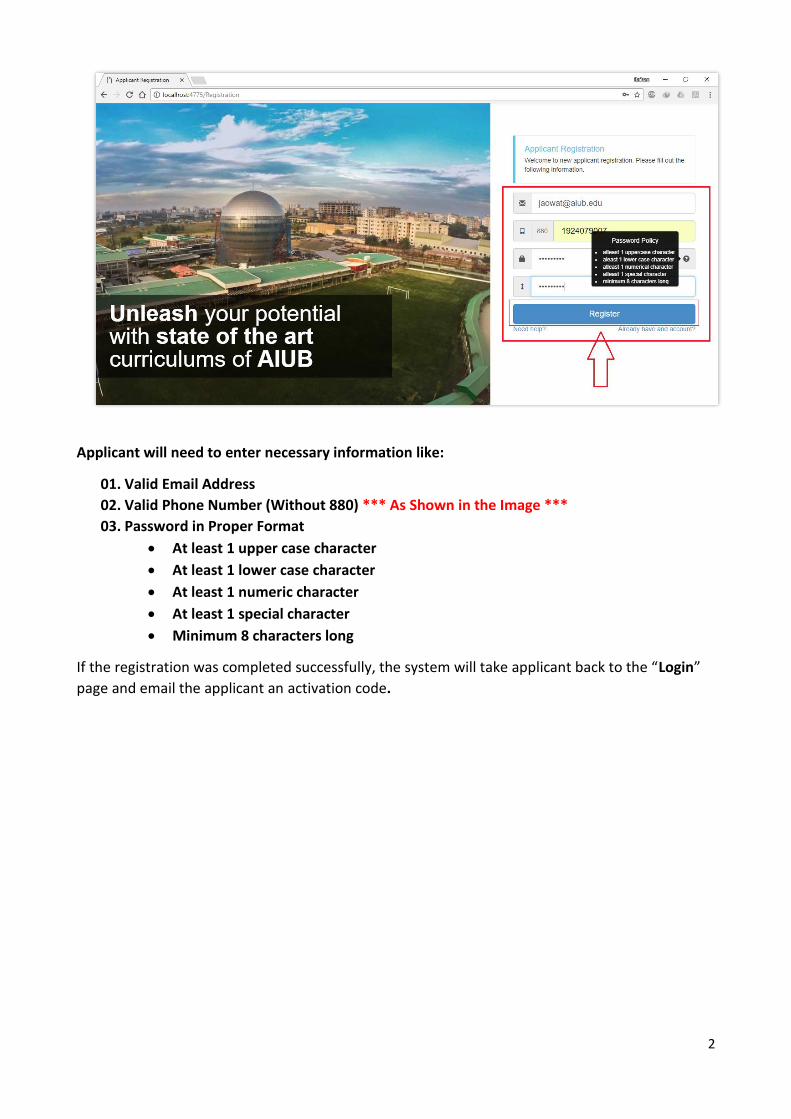
Applicant will need to enter necessary information like:
01. Valid Email Address
02. Valid Phone Number (Without 880) *** As Shown in the Image ***
03. Password in Proper Format
• At least 1 upper case character
• At least 1 lower case character
• At least 1 numeric character
• At least 1 special character
• Minimum 8 characters long
If the registration was completed successfully, the system will take applicant back to the “Login”
page and email the applicant an activation code.
3
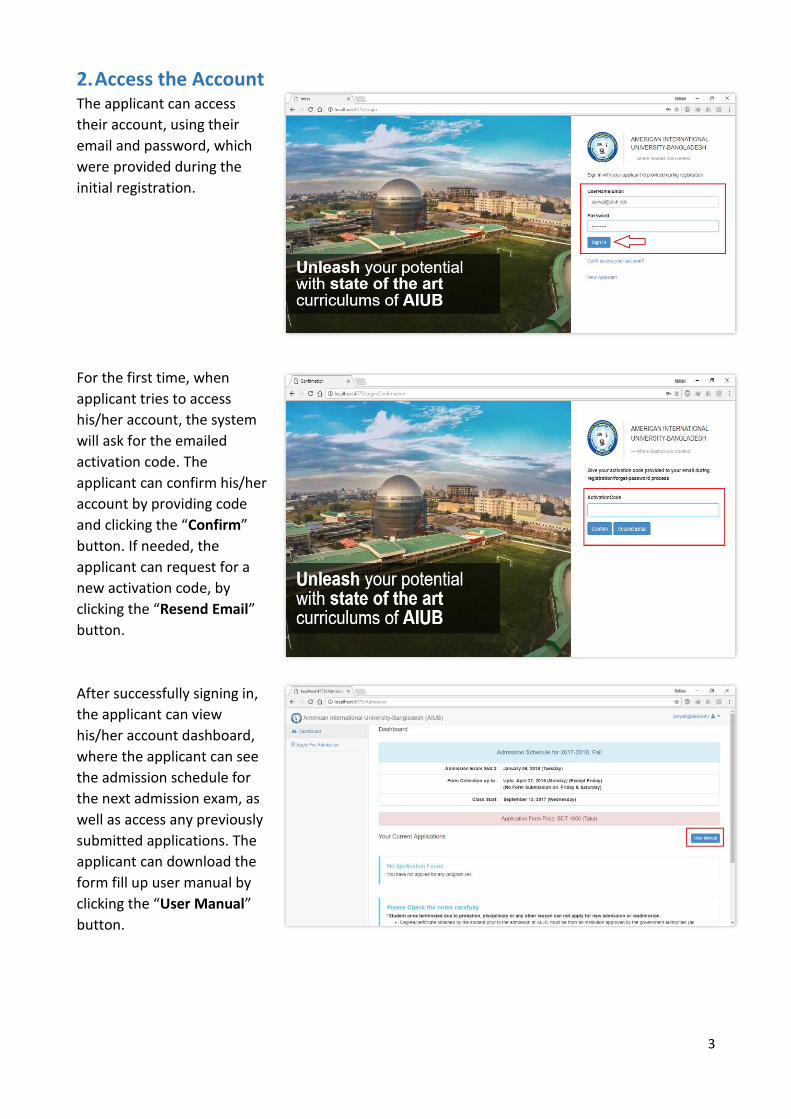
2. Access the Account The applicant can access
their account, using their
email and password, which
were provided during the
initial registration.
For the first time, when
applicant tries to access
his/her account, the system
will ask for the emailed
activation code. The
applicant can confirm his/her
account by providing code
and clicking the “Confirm”
button. If needed, the
applicant can request for a
new activation code, by
clicking the “Resend Email”
button.
After successfully signing in,
the applicant can view
his/her account dashboard,
where the applicant can see
the admission schedule for
the next admission exam, as
well as access any previously
submitted applications. The
applicant can download the
form fill up user manual by
clicking the “User Manual”
button.
4
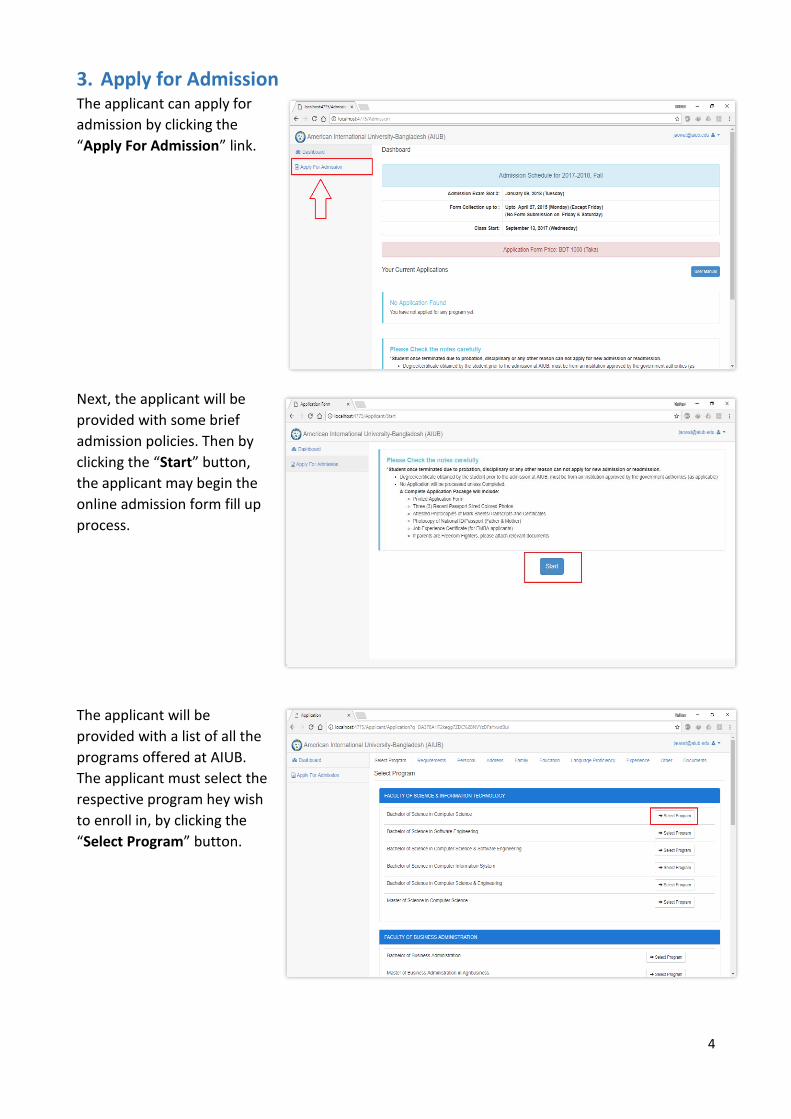
3. Apply for Admission The applicant can apply for
admission by clicking the
“Apply For Admission” link.
Next, the applicant will be
provided with some brief
admission policies. Then by
clicking the “Start” button,
the applicant may begin the
online admission form fill up
process.
The applicant will be
provided with a list of all the
programs offered at AIUB.
The applicant must select the
respective program hey wish
to enroll in, by clicking the
“Select Program” button.
5
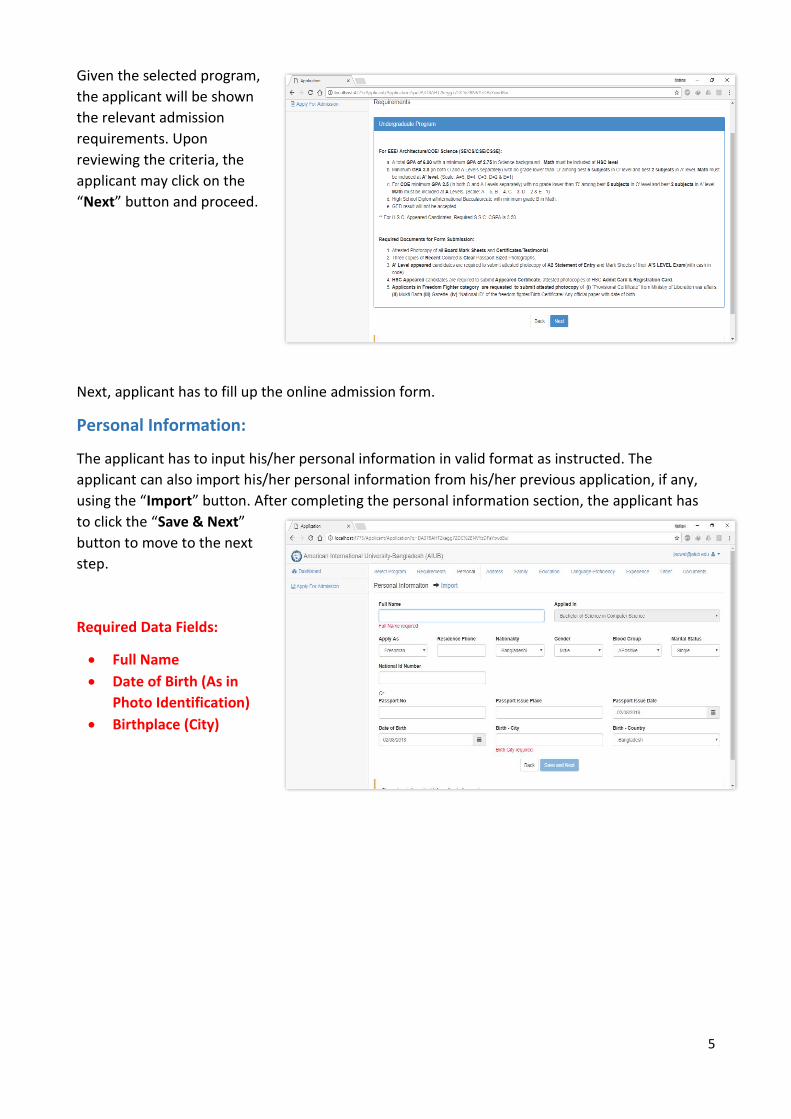
Given the selected program,
the applicant will be shown
the relevant admission
requirements. Upon
reviewing the criteria, the
applicant may click on the
“Next” button and proceed.
Next, applicant has to fill up the online admission form.
Personal Information:
The applicant has to input his/her personal information in valid format as instructed. The
applicant can also import his/her personal information from his/her previous application, if any,
using the “Import” button. After completing the personal information section, the applicant has
to click the “Save & Next”
button to move to the next
step.
Required Data Fields:
• Full Name
• Date of Birth (As in
Photo Identification)
• Birthplace (City)
6
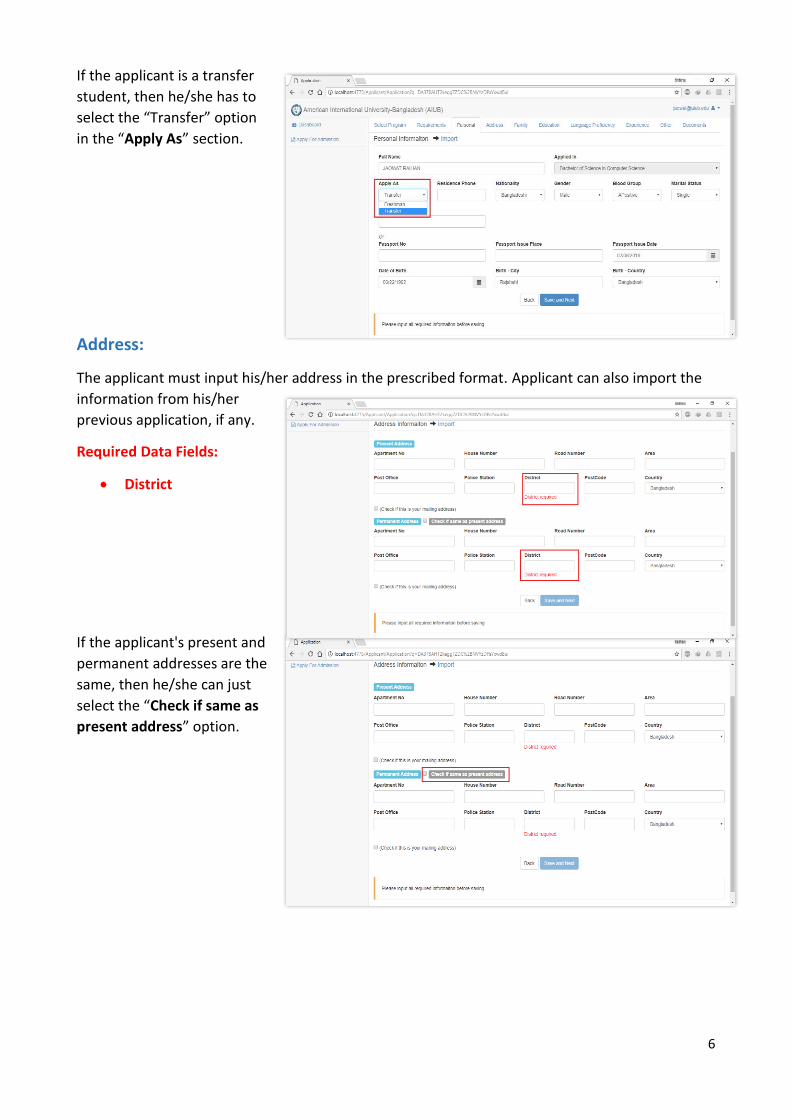
If the applicant is a transfer
student, then he/she has to
select the “Transfer” option
in the “Apply As” section.
Address:
The applicant must input his/her address in the prescribed format. Applicant can also import the
information from his/her
previous application, if any.
Required Data Fields:
• District
If the applicant's present and
permanent addresses are the
same, then he/she can just
select the “Check if same as
present address” option.
7
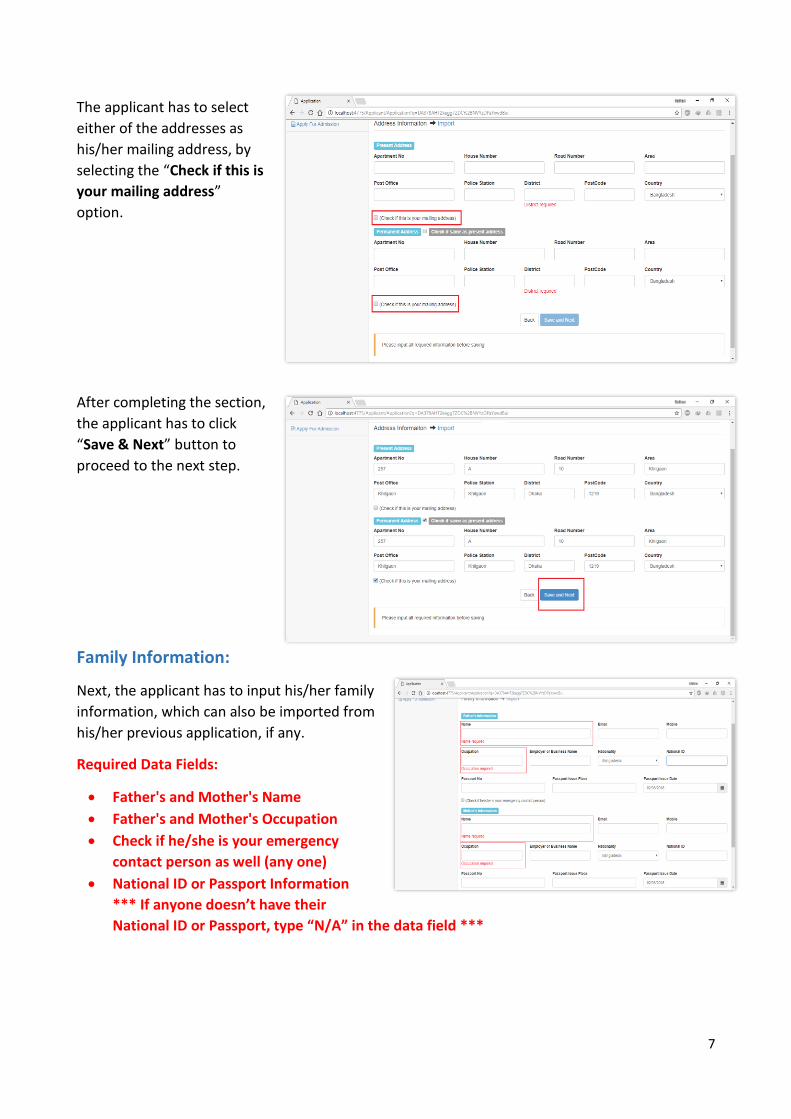
The applicant has to select
either of the addresses as
his/her mailing address, by
selecting the “Check if this is
your mailing address”
option.
After completing the section,
the applicant has to click
“Save & Next” button to
proceed to the next step.
Family Information:
Next, the applicant has to input his/her family
information, which can also be imported from
his/her previous application, if any.
Required Data Fields:
• Father's and Mother's Name
• Father's and Mother's Occupation
• Check if he/she is your emergency
contact person as well (any one)
• National ID or Passport Information
*** If anyone doesn’t have their
National ID or Passport, type “N/A” in the data field ***
8
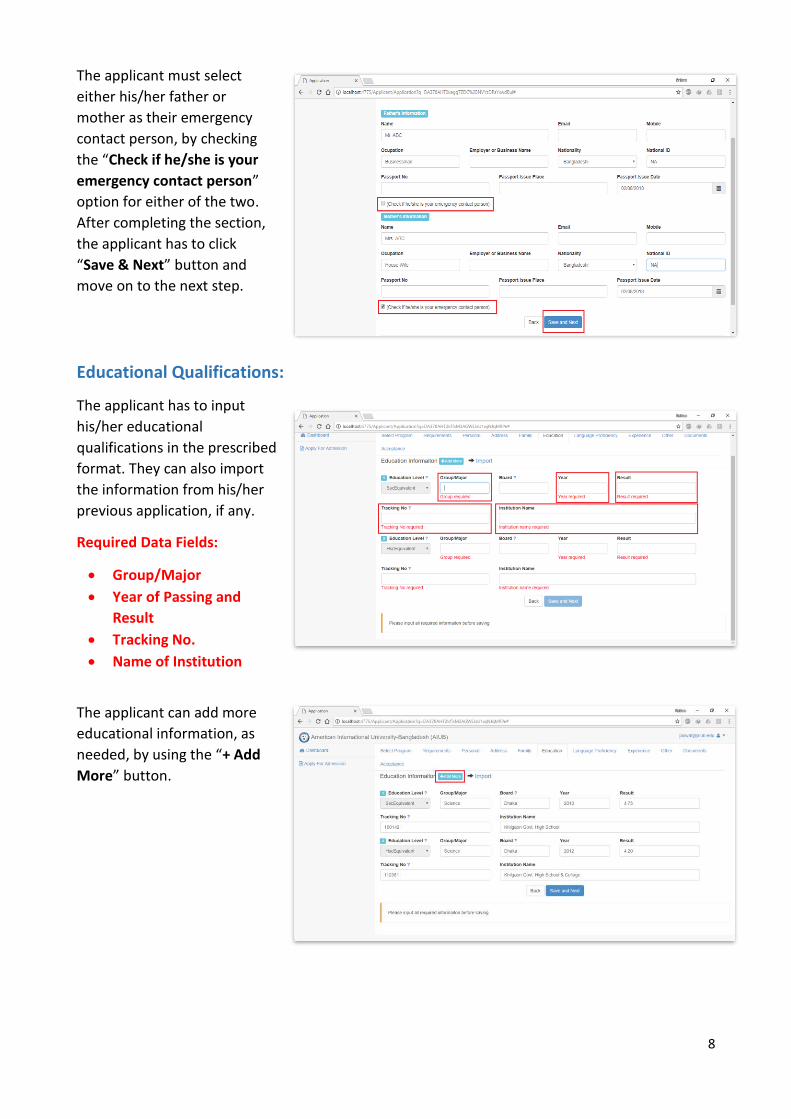
The applicant must select
either his/her father or
mother as their emergency
contact person, by checking
the “Check if he/she is your
emergency contact person”
option for either of the two.
After completing the section,
the applicant has to click
“Save & Next” button and
move on to the next step.
Educational Qualifications:
The applicant has to input
his/her educational
qualifications in the prescribed
format. They can also import
the information from his/her
previous application, if any.
Required Data Fields:
• Group/Major
• Year of Passing and
Result
• Tracking No.
• Name of Institution
The applicant can add more
educational information, as
needed, by using the “+ Add
More” button.
9
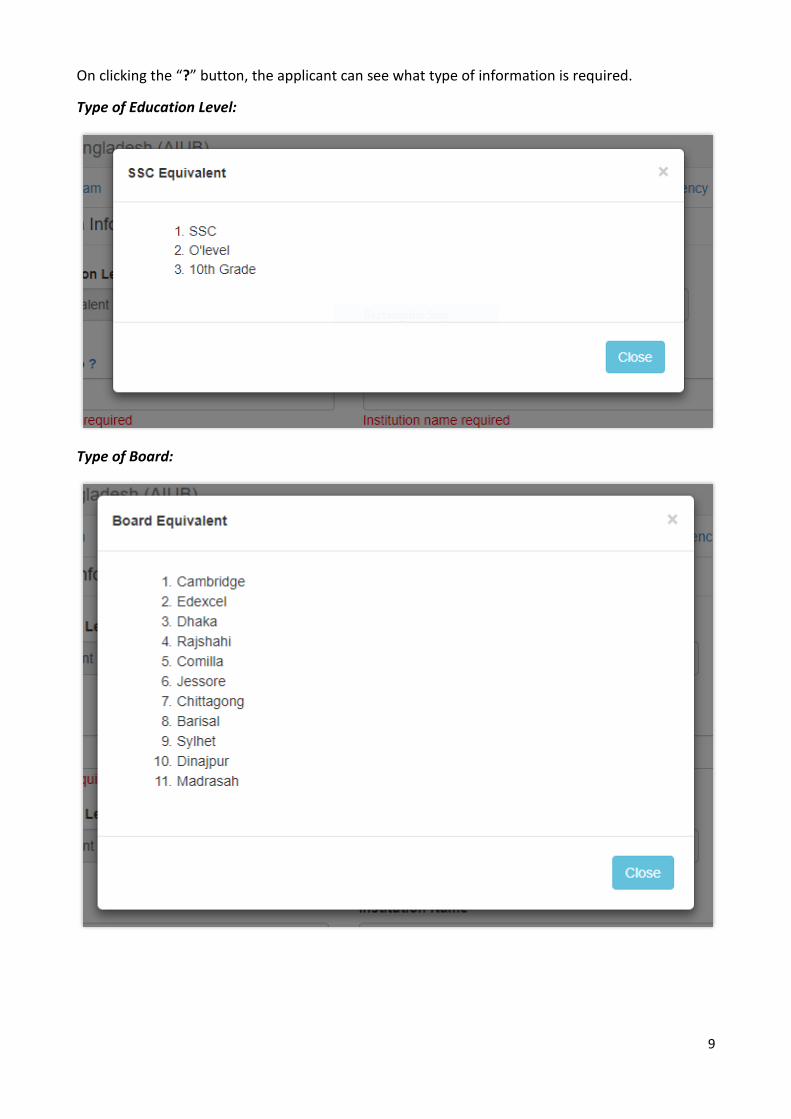
On clicking the “?” button, the applicant can see what type of information is required.
Type of Education Level:
Type of Board:
10
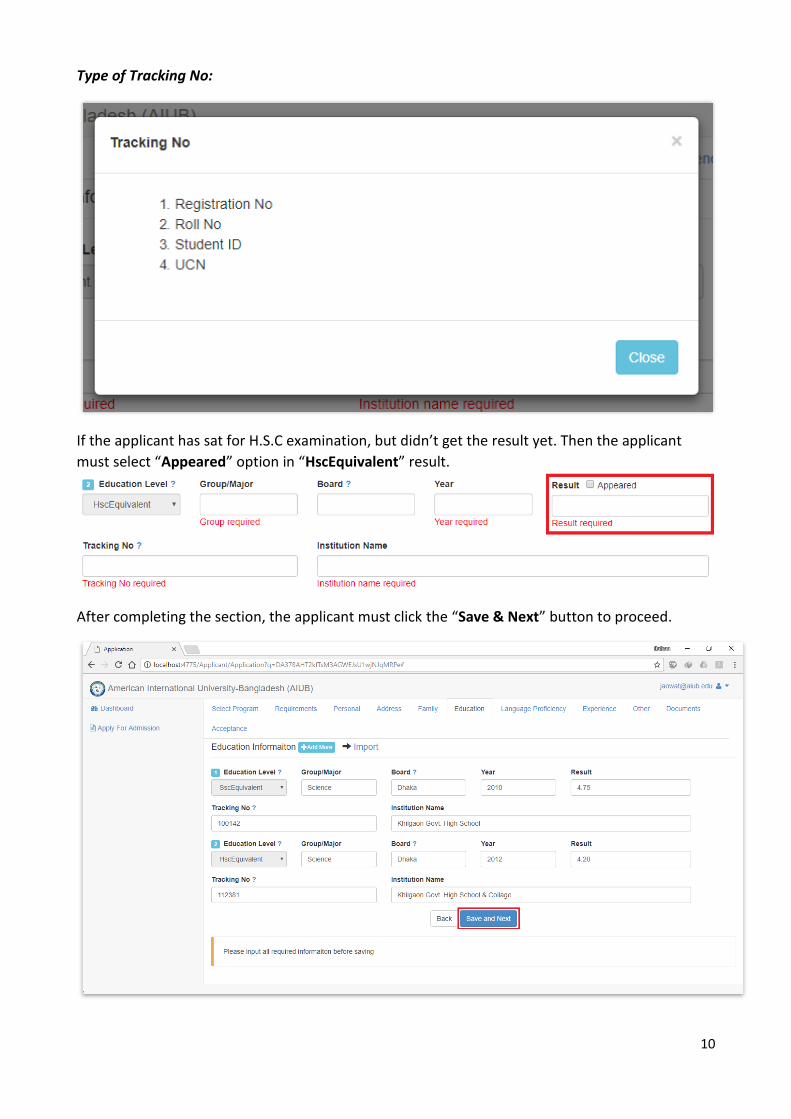
Type of Tracking No:
If the applicant has sat for H.S.C examination, but didn’t get the result yet. Then the applicant
must select “Appeared” option in “HscEquivalent” result.
After completing the section, the applicant must click the “Save & Next” button to proceed.
11
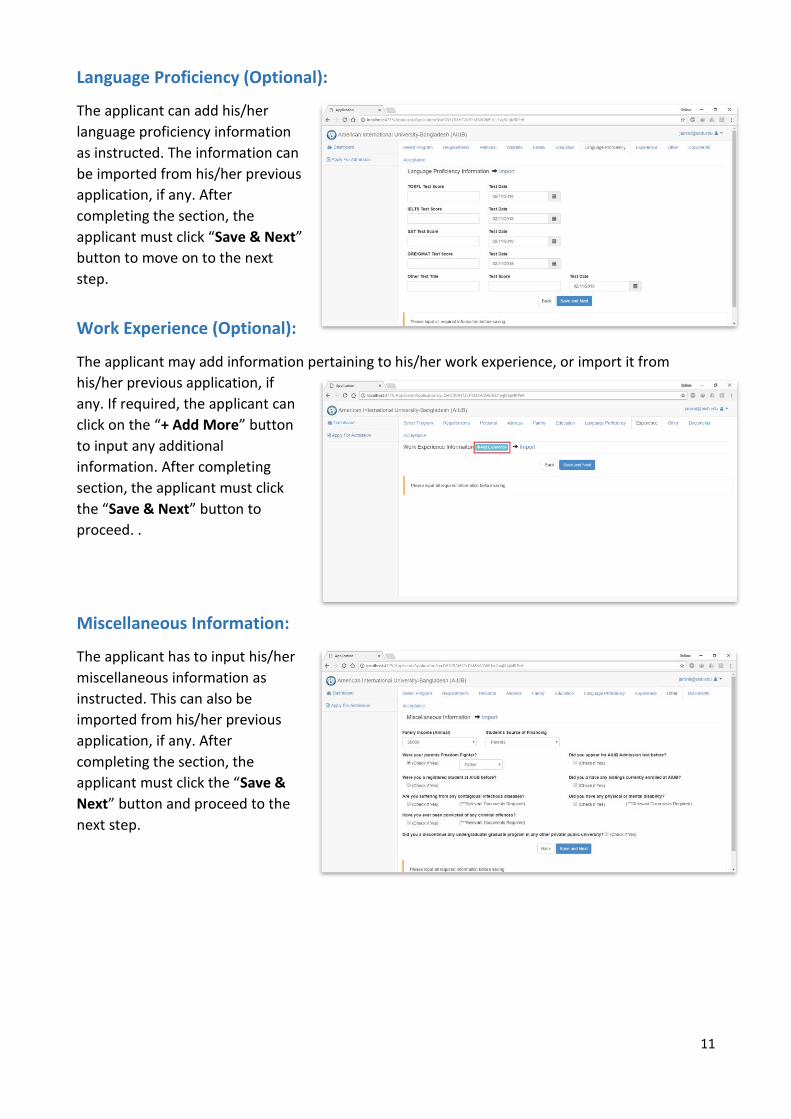
Language Proficiency (Optional):
The applicant can add his/her
language proficiency information
as instructed. The information can
be imported from his/her previous
application, if any. After
completing the section, the
applicant must click “Save & Next”
button to move on to the next
step.
Work Experience (Optional):
The applicant may add information pertaining to his/her work experience, or import it from
his/her previous application, if
any. If required, the applicant can
click on the “+ Add More” button
to input any additional
information. After completing
section, the applicant must click
the “Save & Next” button to
proceed. .
Miscellaneous Information:
The applicant has to input his/her
miscellaneous information as
instructed. This can also be
imported from his/her previous
application, if any. After
completing the section, the
applicant must click the “Save &
Next” button and proceed to the
next step.
12
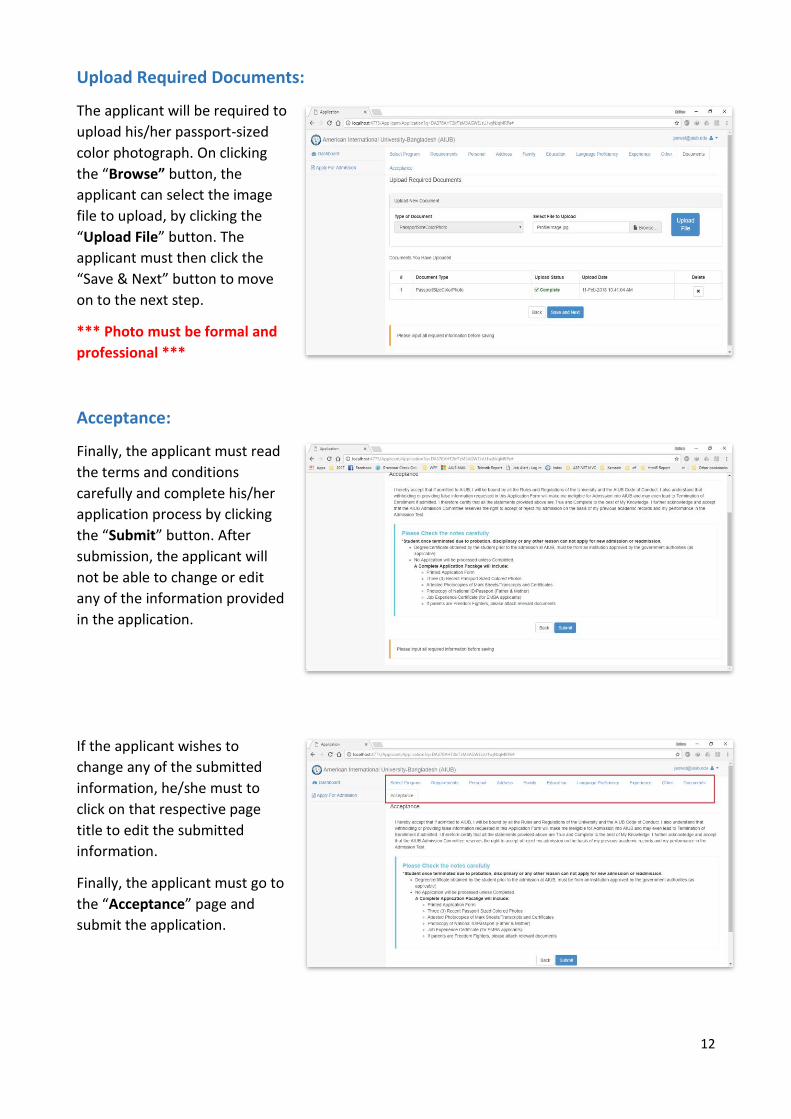
Upload Required Documents:
The applicant will be required to
upload his/her passport-sized
color photograph. On clicking
the “Browse” button, the
applicant can select the image
file to upload, by clicking the
“Upload File” button. The
applicant must then click the
“Save & Next” button to move
on to the next step.
*** Photo must be formal and
professional ***
Acceptance:
Finally, the applicant must read
the terms and conditions
carefully and complete his/her
application process by clicking
the “Submit” button. After
submission, the applicant will
not be able to change or edit
any of the information provided
in the application.
If the applicant wishes to
change any of the submitted
information, he/she must to
click on that respective page
title to edit the submitted
information.
Finally, the applicant must go to
the “Acceptance” page and
submit the application.
13
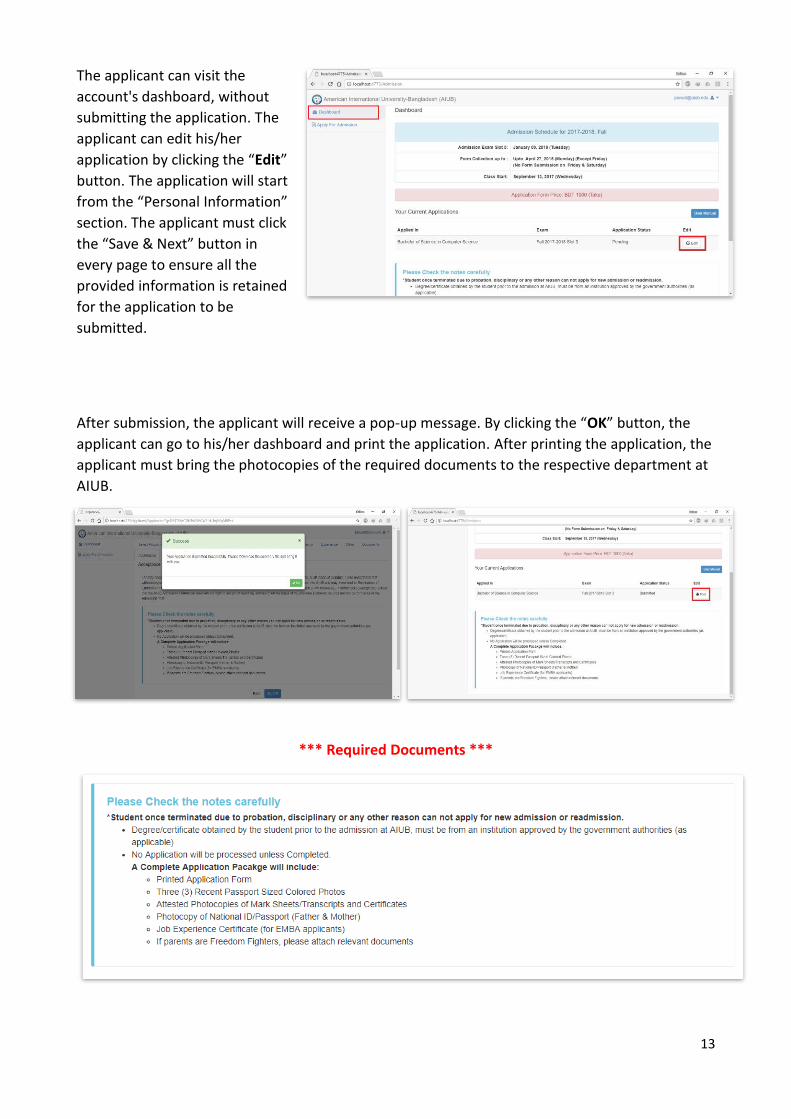
The applicant can visit the
account's dashboard, without
submitting the application. The
applicant can edit his/her
application by clicking the “Edit”
button. The application will start
from the “Personal Information”
section. The applicant must click
the “Save & Next” button in
every page to ensure all the
provided information is retained
for the application to be
submitted.
After submission, the applicant will receive a pop-up message. By clicking the “OK” button, the
applicant can go to his/her dashboard and print the application. After printing the application, the
applicant must bring the photocopies of the required documents to the respective department at
AIUB.
*** Required Documents ***
14
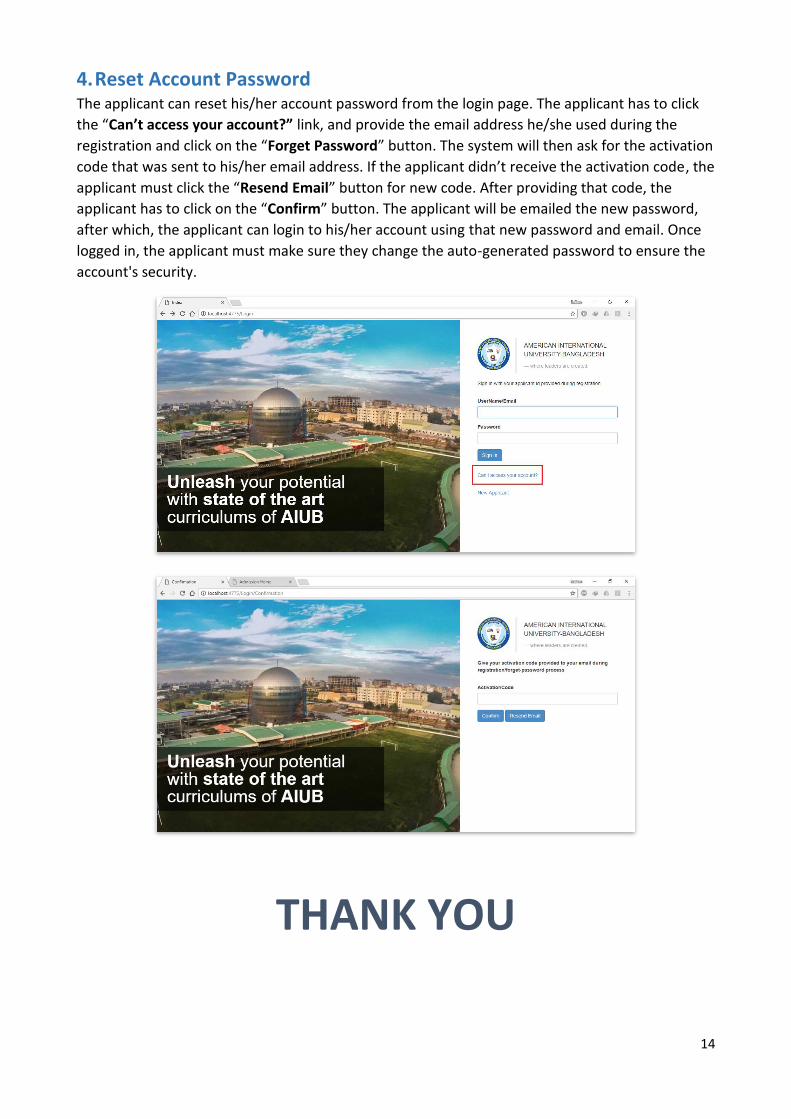
4. Reset Account Password The applicant can reset his/her account password from the login page. The applicant has to click
the “Can’t access your account?” link, and provide the email address he/she used during the
registration and click on the “Forget Password” button. The system will then ask for the activation
code that was sent to his/her email address. If the applicant didn’t receive the activation code, the
applicant must click the “Resend Email” button for new code. After providing that code, the
applicant has to click on the “Confirm” button. The applicant will be emailed the new password,
after which, the applicant can login to his/her account using that new password and email. Once
logged in, the applicant must make sure they change the auto-generated password to ensure the
account's security.
THANK YOU


