ibm.com/redbooks AIX 5L Differences Guide Version 5.1 Edition René Akeret Anke Hollanders Stuart Lane Antony Peterson AIX 5L - The industrial strength UNIX operating system Intel Itanium-based and IBM POWER-based platform support Version 5.0 and Version 5.1 enhancements explained
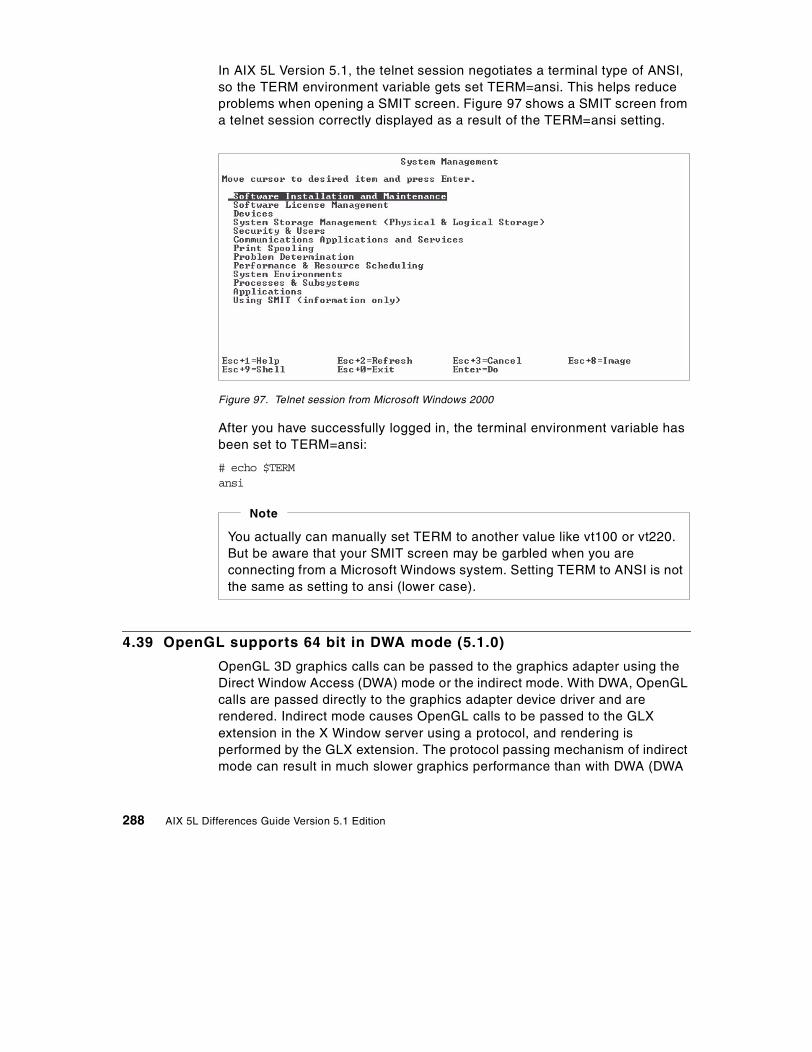
Transcript
ibm.com/redbooks
AIX 5L Differences GuideVersion 5.1 Edition
René AkeretAnke Hollanders
Stuart LaneAntony Peterson
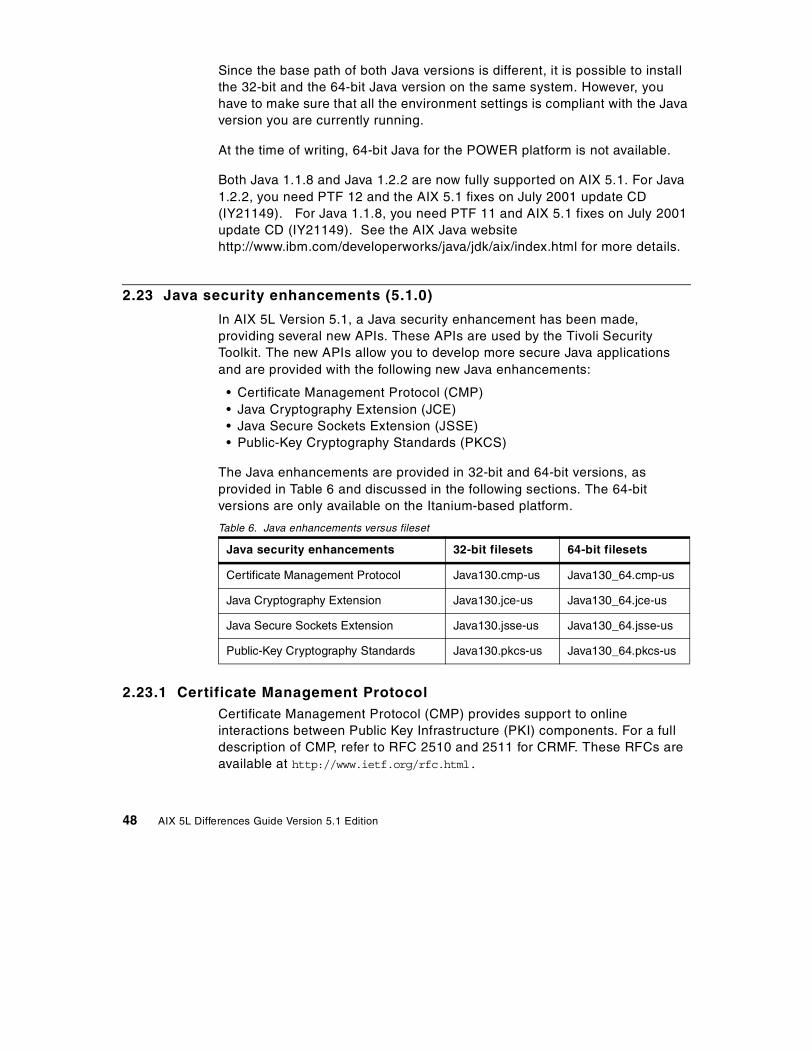
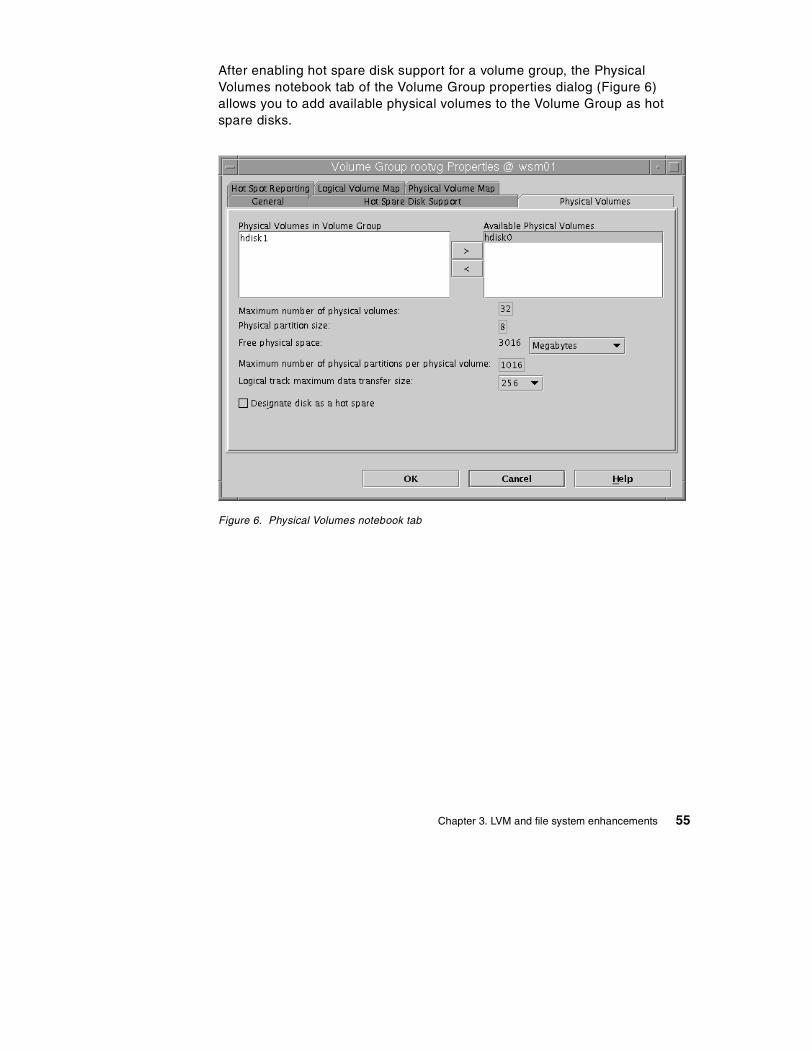
AIX 5L - The industrial strength UNIX operating system
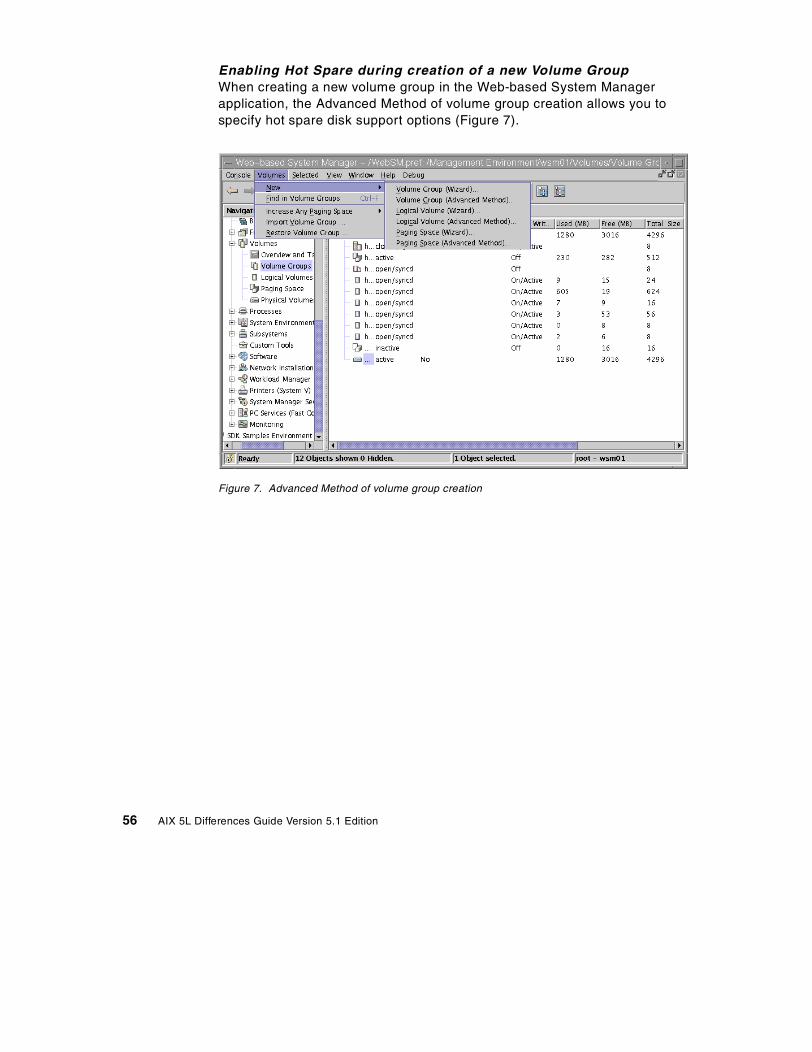
Intel Itanium-based and IBM POWER-based platform support
Version 5.0 and Version 5.1 enhancements explained
This edition applies to AIX 5L for POWER Version 5.1, program number 5765-E61 and for Itanium-based systems Version 5.1, program number 5799-EAR available as an PRPQ.
This document was updated on September 28, 2001.
Comments may be addressed to:IBM Corporation, International Technical Support OrganizationDept. JN9B Building 003 Internal Zip 283411400 Burnet RoadAustin, Texas 78758-3493
When you send information to IBM, you grant IBM a non-exclusive right to use or distribute the information in any way it believes appropriate without incurring any obligation to you.
Before using this information and the product it supports, be sure to read the general information in Appendix B, “Special notices” on page 473.
This redbook focuses on the latest enhancements introduced in AIX 5L Version 5.1. It is intended to help system administrators, developers, and users understand these enhancements and evaluate potential benefits in their own environments.
AIX 5L is available for POWER and Itanium-based systems. AIX 5L was made generally available May 4, 2001. AIX 5L for Itanium-based systems is available as a PRPQ. Both platforms were developed from the same common code base.
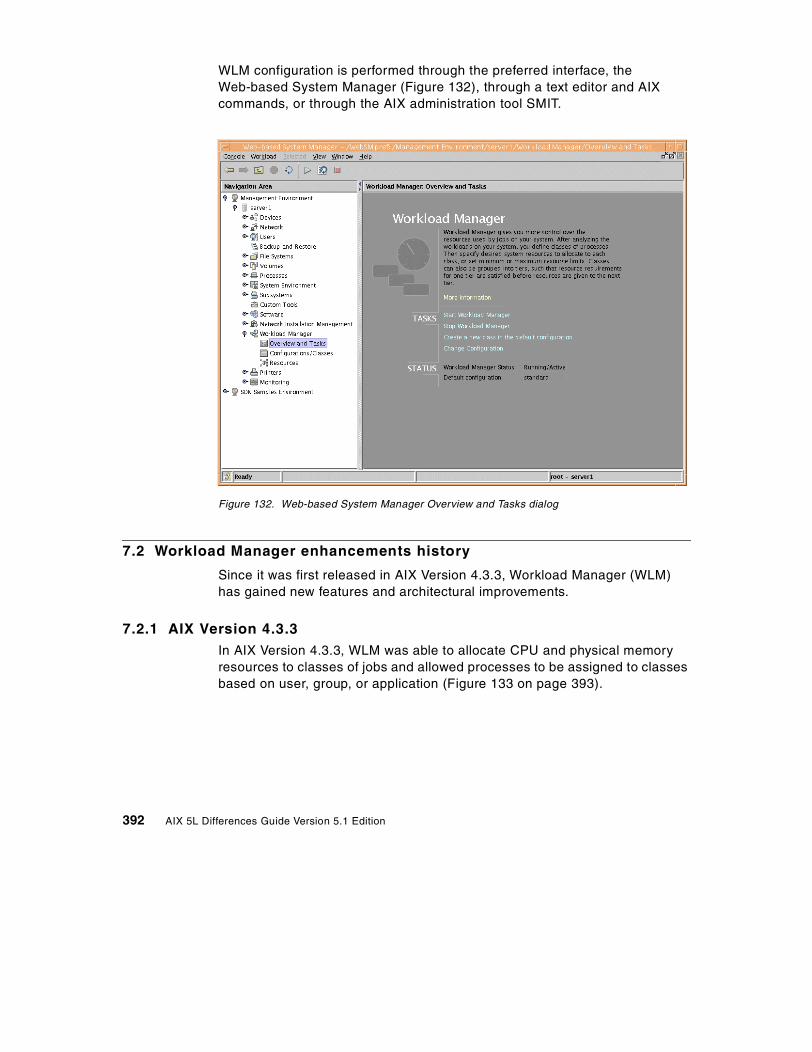
AIX 5L introduces many new features, including Linux affinity, 32- and 64-bit kernel and application support, virtual IP, quality of service enhancements, enhanced error logging, dynamic paging space reduction, hot-spare disk management, advanced Workload Manager, JFS2, and others. The availability of an improved Web-based System Manager continues AIX’s move towards a standard, unified interface for system tools. There are many other enhancements available with AIX 5L, and you can explore them in this redbook.
This publication is a companion publication to the previously published AIX Version 4.3 Differences Guide, SG24-2014, Third Edition, which focused on the enhancements introduced in AIX Version 4.3.3.
For customers who are familiar with AIX 5L Version 5.0, features that are new in AIX 5L Version 5.1 are indicated by a version number (5.1.0) in the title of the section.
The team that wrote this redbook
This redbook was produced by a team of specialists from around the world working at the International Technical Support Organization, Austin Center.
René Akeret is an RS/6000 IT Specialist in Switzerland. He has four years experience with AIX and the RS/6000. He holds a survey and a postgraduate degree UAS in Computer Science from Fachhochschule Beider Basel. His areas of expertise include RS/6000 systems and RS/6000 SP systems.
Anke Hollanders is an RS/6000 IT Specialist in Belgium. She has four years experience with AIX and the RS/6000. She holds an Electro-Mechanical Engineering degree from Groep T Leuven. Her areas of expertise include RS/6000 systems, RS/6000 SP systems, Solaris, and HP-UX.
Stuart Lane is an RS/6000 IT Specialist in South Africa. He has three years experience with AIX and the RS/6000. His areas of expertise include RS/6000 systems, RS/6000 SP systems, RS6000 hardware, and SCO Unixware.
Antony Peterson is a RS/6000 IT Specialist from the IBM Support Center in Australia. He has seven years experience with AIX and the RS/6000 hardware. His areas of expertise include RS/6000 systems and RS/6000 SP systems.
The authors of the first edition are:
Erwin Behnen IBM Germany
Mauro Minomizaki IBM Brazil
Armin Olaf Roell IBM Germany
The project that produced this publication was managed by:
Scott Vetter IBM Austin
Thanks to the following people for their invaluable contributions to this project. Without their help, this publication would have been impossible.
Ackermann, Jack IBM Austin
Albot, Andre L. IBM Austin
Alford, Jack IBM Austin
Allen, James P. IBM Austin
Amin, Sandy IBM Austin
Batten, David IBM Austin
Batten, Pamela IBM Austin
Beals, Stephanie IBM Poughkeepsie
Birgen, Greg IBM Austin
Borunda, Maritza IBM Austin
Brandyberrry, Matthew IBM Austin
Brenner, Larry IBM Austin
Brown, Deanna Quigg IBM Austin
Brown, Joe IBM Austin
Brown, Mark IBM Austin
xxii AIX 5L Differences Guide Version 5.1 Edition
Brown, William IBM Austin
Buros, Bill IBM Austin
Carroll, Scott IBM Austin
Castillo, George IBM Austin
Celikkan, Ufuk IBM Austin
Chaky, Joseph IBM Poughkeepsie
Chang, Daisy IBM Austin
Christensen, Carol IBM Austin
Clissold, David IBM Austin
Cossmann, Helmut IBM Heidelberg
Craft, Julie IBM Austin
Cuan, Elizabeth IBM Austin
De Leon, Baltazar IBM Austin
Devendran, Saravanan IBM Austin
Doshi, Bimal IBM Austin
Echols, Walter IBM Austin
Emmons, John IBM Austin
Fernandes, Lilian S IBM Austin
Flaig, Greg IBM Austin
Fontenot, Nathan IBM Austin
Fontenot, Shevaun IBM Austin
Freimuth, Douglas M. IBM Watson Research
Furutera, Masahiro IBM Japan
Geise, David IBM Austin
Genty, Denise IBM Austin
Griffiths, Nigel IBM U.K.
Hall, Lon IBM Austin
Harrell, Michael S. IBM Austin
Haugh, Julianne IBM Austin
Hezari, Emilia IBM Austin
xxiii
Horton, Joshua IBM Poughkeepsie
Hsiao, Duen-wen IBM Austin
Irwin, Frank IBM Austin
Iwata, Megumi IBM Japan
Jain, Vinit IBM Austin
Jones, Corradino IBM Austin
Kamat, Naveen IBM India
Kline, Nyralin IBM Austin
Laib, Greg IBM Poughkeepsie
Lentz, Jim IBM Austin
Lowe, Suanne IBM Austin
Lu, Yantian (Tom) IBM Austin
Machutt, Susan IBM Austin
Mall, Michael IBM Austin
McBrearty, Gerald IBM Austin
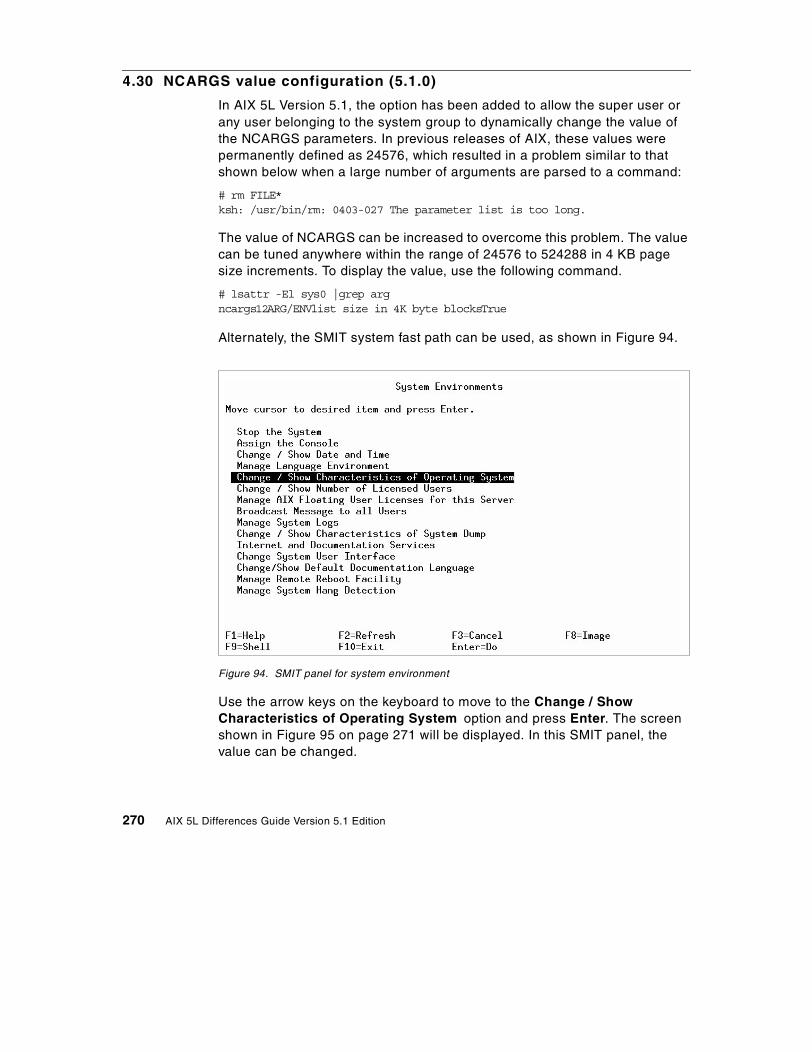
McCorkle, Brian IBM Austin
McCracken, Dave IBM Austin
McCreary, Hye-Young IBM Austin
McNichol, Dan IBM Austin
Messing, Jeff IBM Austin
Mishra, Rajeev IBM Austin
Mita, Hajime IBM Tokyo
Molis, Steve IBM Austin
Nasypany, Stephen IBM Austin
Nema, A IBM India
Neuman, Grover IBM Austin
Nguyen, Dac IBM Austin
Nichols III, Frank L. IBM Austin
Olesen, Mark IBM Austin
Pafumi, Jim IBM Austin
xxiv AIX 5L Differences Guide Version 5.1 Edition
Pargaonkar, Shirish IBM Austin
Parichhah, Subhrata IBM India
Partridge, Jim IBM Austin
Patel, Jayant IBM Austin
Payne, Marilyn IBM Austin
Peckham, Steve IBM Austin
Poston, Rick IBM Austin
Potluri, Prasad V. IBM Austin
Ramirez, Ruben IBM Austin
Ramirez, Tony IBM Austin
Rosas, Jeff IBM Austin
Rothaupt, Krystal IBM Poughkeepsie
Rozendal, Kenneth IBM Austin
Scherrer, Carolyn IBM Austin
Segura, Ernest IBM Austin
Shaffer, Jim IBM Austin
Sharma, Rakesh IBM Austin
Shi, Danling IBM Austin
Shieh, Johnny IBM Austin
Smolders, Luc IBM Austin
Springen, Nancy L. IBM Austin
Swanberg, Randy IBM Austin
Taylor, Kurt IBM Austin
Toungate, Marvin IBM Austin
Tran, Kim IBM Austin
Unnikrishnan, Rama IBM Austin
Unruh, Steve IBM Austin
Vaidyanathan, Basu IBM Austin
Vazzalwar, Girish IBM Austin
Veeramalla, Ramesh IBM Austin
xxv
Comments welcome
Your comments are important to us!
We want our redbooks to be as helpful as possible. Please send us your comments about this or other redbooks in one of the following ways:
• Fax the evaluation form found in “IBM Redbooks review” on page 515 to the fax number shown on the form.
• Use the online evaluation form found at ibm.com/redbooks
AIX is IBM’s strategic UNIX operating system for mission-critical, core business applications. The industrial-strength features and functions of AIX have been well proven over the years in a wide variety of server environments, from relatively small, single-processor systems through IBM’s massively parallel Scalable POWERParallel servers. These features include:
• State-of-the-art 32-bit and 64-bit kernels
• 32-bit and 64-bit application programming interfaces (APIs) support
• Linux affinity that allows customers to realize a smooth technology transition between two of the industry’s most open, standards-based operating environments, AIX and Linux.
• Workload Manager to balance the most complex workloads.
• Simplified system management - System Management Interface Tool (SMIT) and Web-based System Management
AIX 5L represents the next generation of AIX. Fortified with open technologies from some of the world's top providers, AIX 5L builds on a solid heritage of supplying integrated, enterprise-class support for RS/6000 and IBM ̂pSeries systems.
With AIX 5L Version 5.1, IBM provides an industrial strength UNIX operating system with increased levels of integration, flexibility, and performance for meeting the high demands of today's mission-critical workloads.
The following list is a quick description of the enhancements and differences available in this release. For further information, consult the references provided.
• AIX 5L kernel and application development differences
A summary of these differences can be found in Section 1.1, “AIX 5L kernel and application development differences summary” on page 6.
• Development environment and tools enhancements
- An improved print function for DBX that provides more legible output is explained in Section 2.2, “DBX enhancements” on page 15.
- Pthread enhancements, including application-level access to the pthread debug library, a new method to unregister atfork handlers, and a read/write locking enhancement are explained in Section 2.3, “Pthread differences and enhancements” on page 17.
- Core file enhancements that allow an application to core dump without termination are discussed in Section 2.11, “Lightweight core file support” on page 34.
- Enhancements to the KDB kernel debugger including a new way to load it and additional subcommands are discussed in Section 2.5, “KDB kernel debugger and kdb command enhancements” on page 22.
- Enhancements that allow application level control over the scheduler during critical sections to prevent loss of context are explained in Section 2.9, “Context switch avoidance” on page 32.
- 32-bit application scaling enhancements are discussed in Section 2.10, “Very large program support” on page 33.
- A new Korn shell, ksh93, is discussed in Section 2.20, “KornShell enhancements” on page 45.
- Enhancements in malloc provide faster access to free memory for applications is discussed in Section 2.15, “Malloc enhancements” on page 38.
- An improved restore command helps you recover sparse database files, as explained in Section 2.17, “Non-sparseness support for the restore command” on page 41.
- The pax command includes support for large files, such as dumps greater than 2 GB, as discussed in Section 2.18, “The pax command enhancements” on page 42.
- AIX 5L introduces the IBM AIX Developer Kit, JAVA 2 Technology Edition, Version 1.3.0, as discussed in Section 2.24, “Java currency” on page 49.
• LVM and file system enhancements
- New LVM hot-spare disk support, new redefinevg, migratelp, and recreatevg commands, new logical track group sizes, and hot spot management are discussed in Section 3.1, “Summary of the enhancements” on page 51.
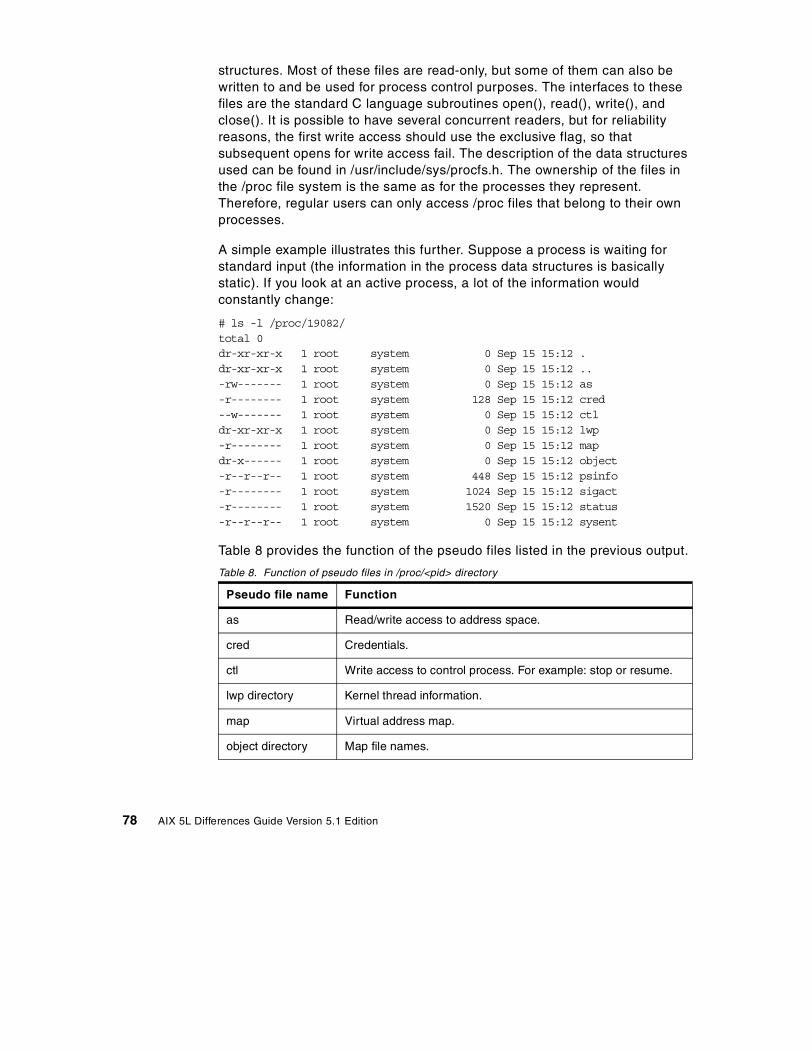
- The /proc file system is discussed in Section 3.3, “The /proc file system” on page 77.
- The JFS2 is introduced in Section 3.4, “The enhanced Journaled File System” on page 81. It provides the capability to store much larger files than JFS, in a more efficient manner.
- NFS statd, AutoFS, and CacheFS enhancements are discussed in Section 3.5, “NFS statd multithreading” on page 96, Section 3.6,
2 AIX 5L Differences Guide Version 5.1 Edition
“Multithreaded AutoFS” on page 97, and Section 3.7, “Cache file system enhancements” on page 97.
- A new passive mirror write consistency check can improve disk mirroring performance as discussed in Section 3.8, “Passive mirror write consistency check” on page 99.
- Updates to LVM libraries for multithreaded applications are discussed in Section 3.9, “Thread-safe liblvm.a” on page 100.
• System management and utility enhancements
- An expanded set of devices that allow for simultaneous multiple device configuration during system startup is discussed in Section 4.9, “Fast device configuration enhancement” on page 140.
- New ways for you to dynamically manage your paging areas, such as deactivating a paging space with the swapoff command or decreasing its size, is discussed in Section 4.11, “Paging space enhancements” on page 146.
- Updates to the error log provide a more concise view of system errors, such as a link between the error log and diagnostics, or the elimination of duplicate errors, are described in Section 4.13, “Error log enhancements” on page 151.
- AIX 5L provides a set of resources to be monitored and actions to be taken at defined events providing automatic monitoring and recovery of select critical system resources. For more information, see Section 4.14, “Resource Monitoring and Control (RMC)” on page 154.
- Shutdown logging is available, as described in Section 4.15, “Shutdown enhancements” on page 171.
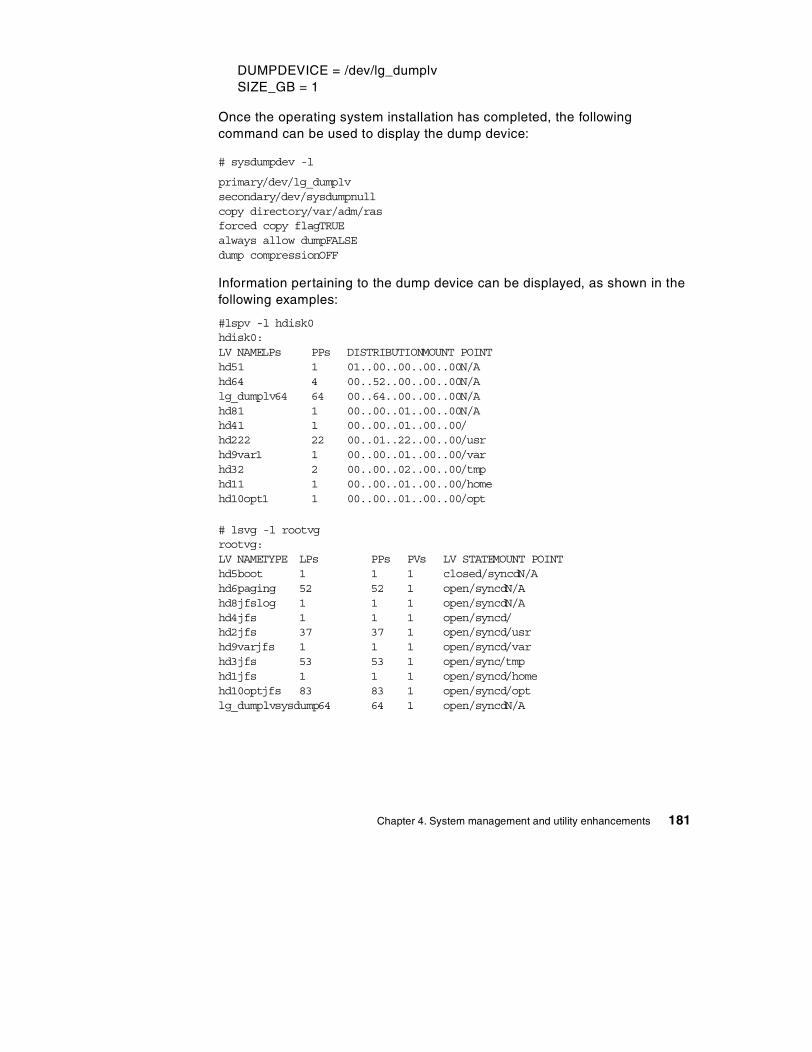
- New methods to diagnose system errors through dump improvements are described in Section 4.18, “System dump enhancements” on page 179.
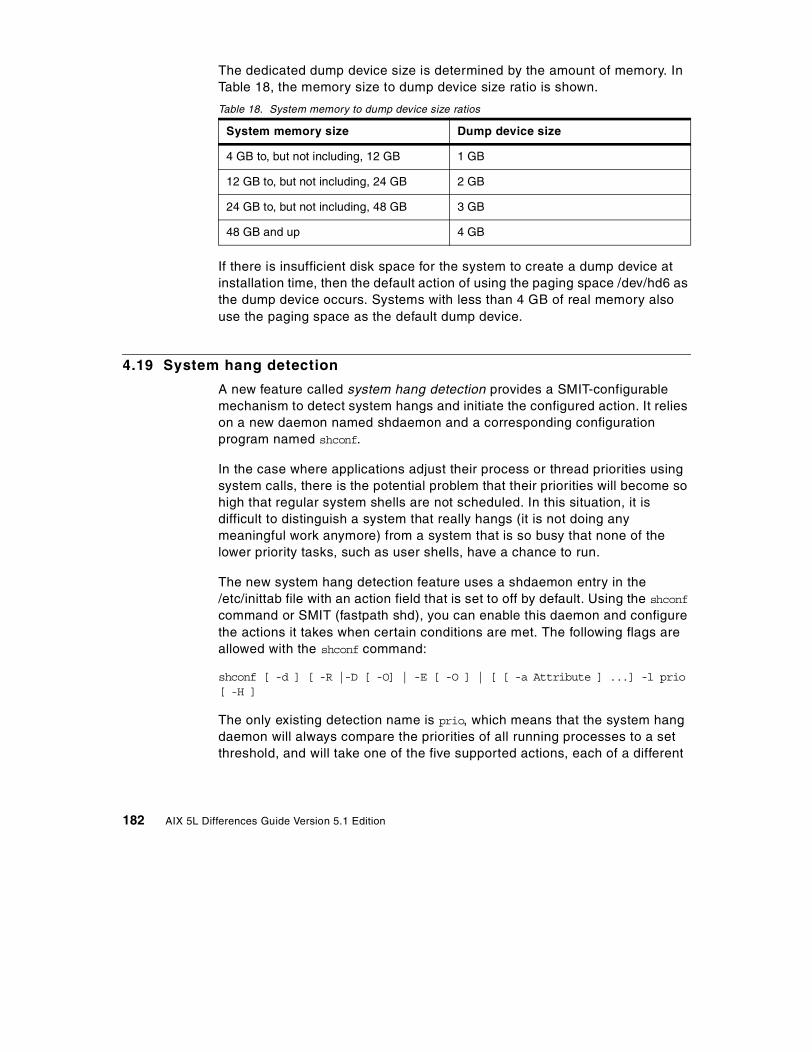
- The ability to recover from certain system hangs is covered in Section 4.19, “System hang detection” on page 182.
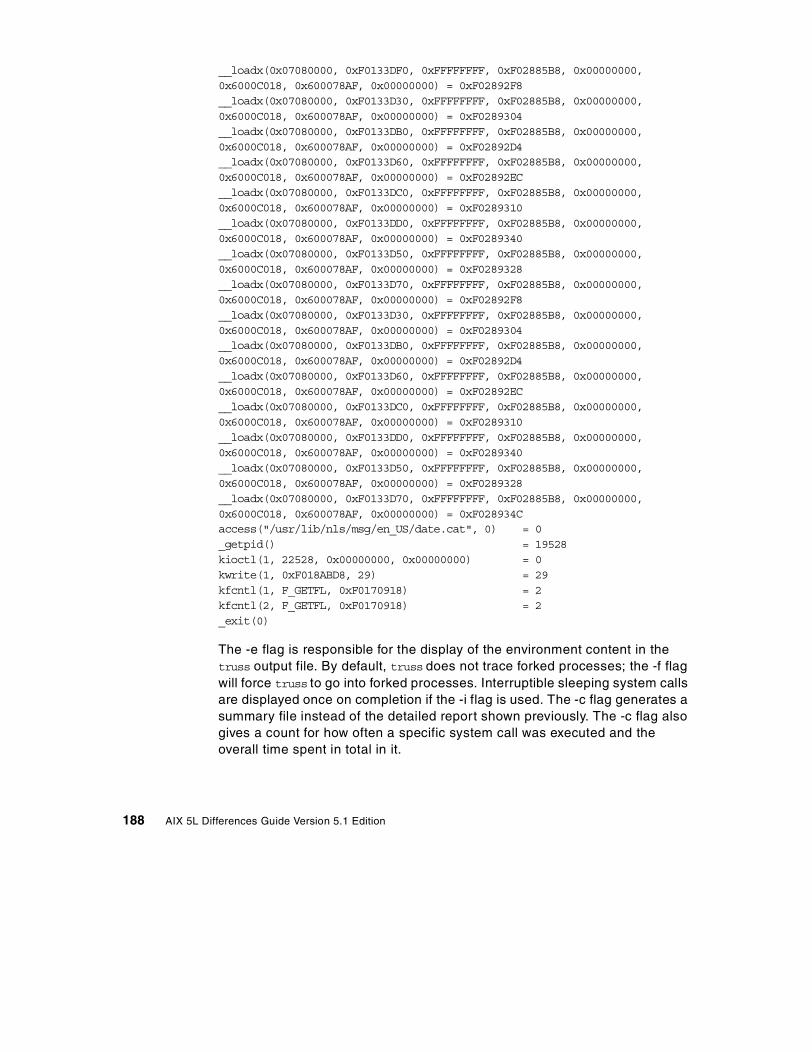
- Enhancements to performance tools, including the truss, iostat, and vmstat commands, are discussed in Section 4.21, “Performance Analysis Tools” on page 186.
- Workload Manager continues to receive improvements, as discussed in Chapter 7, “Workload Manager” on page 391.
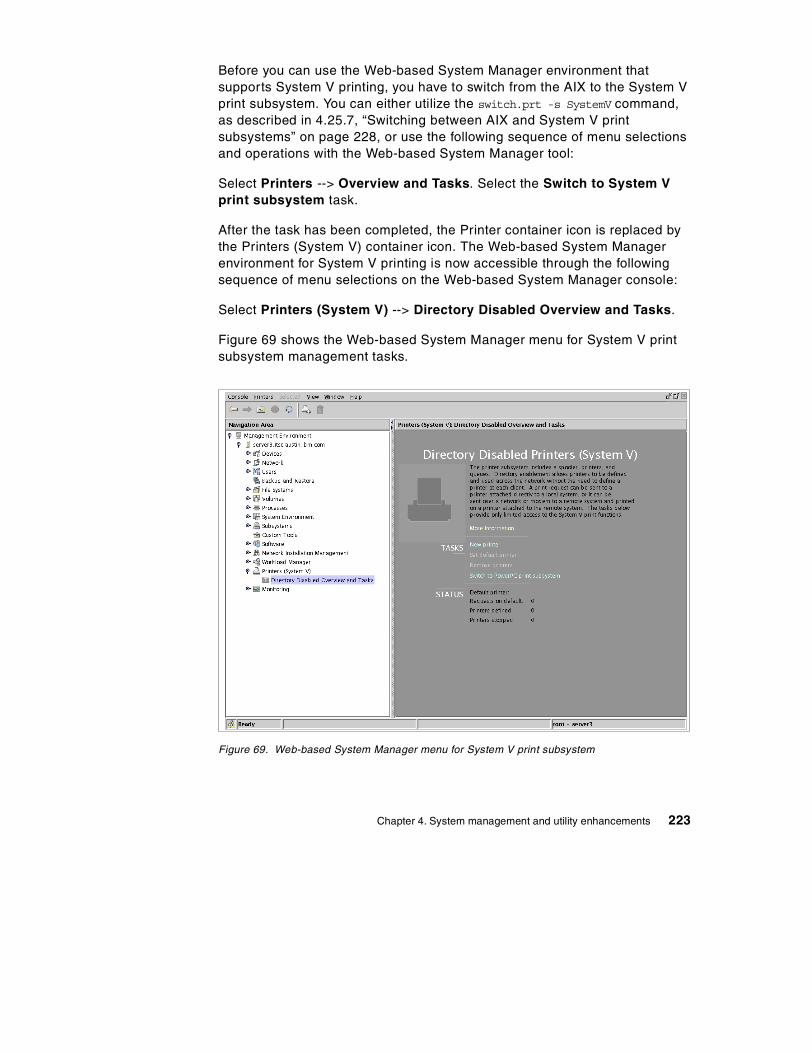
- The new System V Release 4 print subsystem is discussed in Section 4.25, “System V Release 4 print subsystem” on page 204.
Chapter 1. AIX 5L introduction and overview 3
- Web-Based System Manager receives major usability improvements with a much improved architecture and usability enhancements, such as accelerator keys. A discussion of all the enhancements can be found in Section 4.27, “Web-based System Manager for AIX 5L” on page 236.
- Security and User authentication and LDAP enhancements are discussed in Sections 4.28, “User and group integration” on page 260; 4.31, “IBM SecureWay Directory Version 3.2” on page 271; and 4.32, “LDAP name resolution enhancement” on page 275.
- A new documentation search engine to handle single- and double-byte searches together is discussed in Section 4.36, “Documentation search-engine enhancement” on page 286.
- AIX is Tivoli ready, as discussed in Section 4.41, “Tivoli readiness” on page 291.
- An updated Welcome Center available with CATIA will teach you what is available for AIX in the CATIA market. For more information, see Section 4.42, “CATIA Welcome Center” on page 291.
• Networking Enhancements
- The demand for QoS arises from applications such as digital audio/video or real-time applications and the need to manage bandwidth resources for arbitrary administratively-defined traffic classes. For more information, see Section 5.1, “Quality of service support” on page 295.
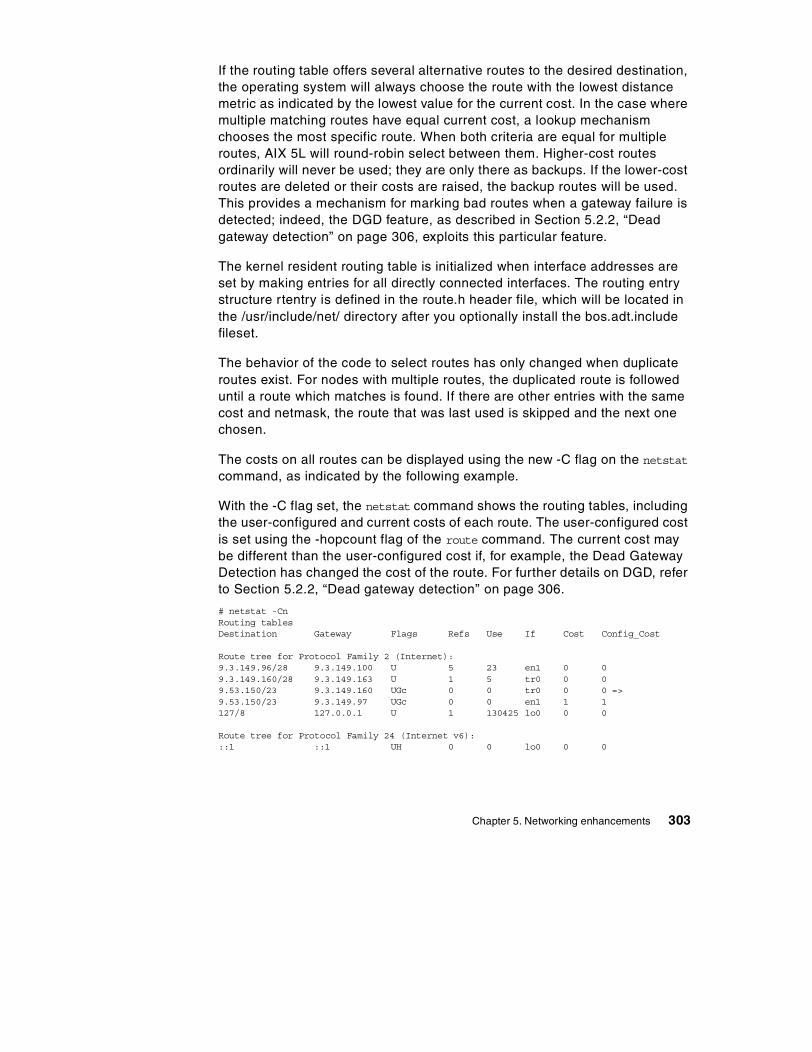
- Together, multipath routing and dead gateway detection provide automatic selection of alternate network pathways that provide significant improvements in network availability. For more information, see Section 5.2, “TCP/IP routing subsystem enhancements” on page 299.
- With Virtual IP Address, the application is bound to a virtual IP address, not a real network interface that can fail. When a network or network interface failure is detected (using routing protocols or other schemes), a different network interface can be used by modifying the routing table without affecting application operation. For more information, see Section 5.5, “Virtual IP address support” on page 331.
- Dynamic Feedback Protocol (DFP) is a way to provide load statistics to a load manager so that load can be balanced by sending future connections to available servers. For more information, see Section 5.13, “Dynamic Feedback Protocol (5.1.0)” on page 361.
4 AIX 5L Differences Guide Version 5.1 Edition
- Sendmail Version 8.11 improves performance by having multiple queues, memory-buffered pseudo-files, and more control over resolver time-outs. For more information, see Section 4.20, “Sendmail upgrade enhancements (5.1.0)” on page 184.
- TCP/IP performance over congested networks is improved through increased initial windows, explicit congestion notification, and limited transmit mechanism functions, which are configurable by a system administrator. For more information, see Section 5.2, “TCP/IP routing subsystem enhancements” on page 299.
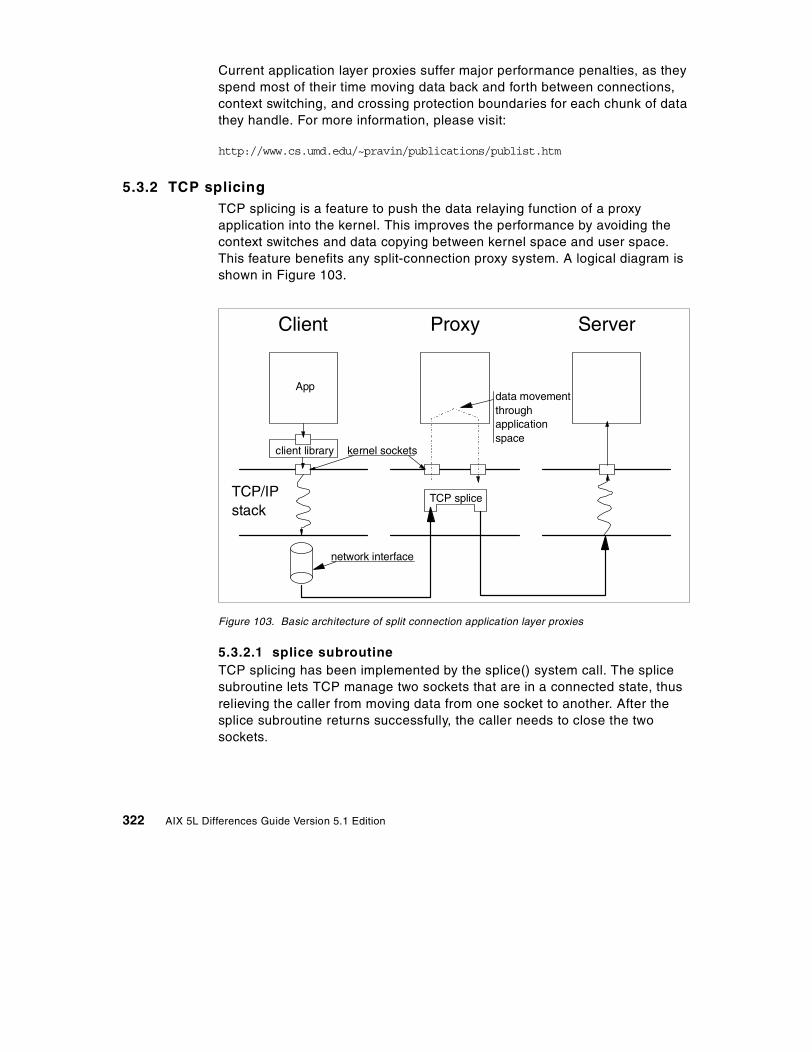
- TCP splicing helps push the data-relaying function of a proxy application (from server-side socket to the client-side socket or vice versa) into the kernel. For more information, see Section 5.3.2, “TCP splicing” on page 322.
- Network Interface Takeover is a new option allowing the configuration of multiple adapters, including IBM 10/100 Mbps Ethernet PCI adapter, Gigabit Ethernet-SX PCI adapter, and 10/100/1000 Base-T Ethernet PCI adapter, allowing one or more to be designated as a backup. For more information, see Section 5.16, “Etherchannel enhancements (5.1.0)” on page 369.
- Virtual LAN (VLAN) provides the ability to create virtual LANs across multiple physical LANs or segment and/or divide physical LAN segments into virtual LANs. For more information, see Section 5.17, “Virtual local area network (VLAN) (5.1.0)” on page 374.
- Enhancements to the Network Buffer Cache and HTTP GET kernel extension provide class leading Web server performance. For more information, see Sections 5.6, “Network Buffer Cache dynamic data support” on page 335, and 5.7, “HTTP GET kernel extension enhancements” on page 338.
- Applications can be modified to capture network data packets through a new interface, as explained in Section 5.8, “Packet capture library” on page 342.
- To allow more flexible development of firewall software, AIX provides additional hooks, as described in Section 5.9, “Firewall hooks enhancements” on page 343.
- PC Interoperability using Fast Connect File and Print Services provides support for Windows 2000, improved user and name mapping, share options, WTS support, better performance, and more, as discussed in Section 5.10, “Fast Connect enhancements” on page 345.
Chapter 1. AIX 5L introduction and overview 5
• Enhancements to increase affinity with Linux
- A set of Linux-compatible routines has been added to AIX 5.1 so that Linux applications using these routines do not have to supply their own libraries. For more information, see Section 6.2, “AIX source affinity for Linux applications (5.1.0)” on page 388.
- AIX Toolbox for Linux Applications, delivered on a supplemental CD, which contains a collection of open source and GNU software built for AIX and packaged in RPM format. For more information, see Section 6.1, “AIX Toolbox for Linux Applications” on page 379.
• A list of packages and filesets that are not part of the AIX 5L Itanium-based offering is provided in Appendix A, “AIX 5L POWER and Itanium-based differences” on page 471.
1.1 AIX 5L kernel and application development differences summary
The AIX development team made every effort possible to make AIX 5L for the POWER and Itanium-based platforms appear and function identically; there are, however, a few unavoidable differences due to the underlying hardware.
The following list provides a summary of the major differences, from a kernel and application development point of view, between POWER and Itanium-based systems:
• The most influential difference is the use of the IA64 instruction set architecture (ISA). Itanium-based platforms operate in little endian mode. The Itanium-based ISA arranges instructions into bundles and groups. It also contains instruction predication to enable explicit parallelism in instruction execution.
• Itanium-based AIX has a 64-bit kernel. There is no 32-bit kernel for Itanium-based systems.
• Common header files contain #ifdef _ia64 to denote differences between Itanium-based and POWER structures.
• Itanium-based systems have a different machine register context. The MST, signal context, and jump buffers all contain different context. The user space debugger for Itanium-based systems also displays the IA64 registers.
• Itanium-based systems have a different application binary interface (ABI) than POWER. Linkage and parameter passing conventions are different from POWER due to the machine register context differences between the platforms.
6 AIX 5L Differences Guide Version 5.1 Edition
• The Itanium-based machine architecture contains a register stack engine (RSE). The RSE requires a second stack area for every thread. The RSE stack is allocated by the operating system and programs typically do not need to be aware of it. There are environment variables available to applications that need to control the size of the RSE stack.
• Itanium-based systems do not provide the ptrace() function. Itanium-based AIX provides the /proc file system for debugging and tracing user applications.
• 64-bit Itanium-based applications receive an exception if they try to fetch from or store into address 0. This is different than 64-bit POWER applications, which can fetch from location 0. 32-bit Itanium-based applications can fetch from location 0.
• The layout of the user address space is different between Itanium-based AIX and POWER. For example, the addresses where shared libraries and shared memory created areas reside is different between the platforms. There are also differences in the kernel address space layout.
• Itanium-based AIX uses the ELF object file format for executable programs. ELF object file utilities are provided, such as, ar, nm, ld, and others. The object file utilities generally do not share options with the POWER versions. Shared libraries reside in different directories. Shared libraries end in a .so suffix versus .a for POWER. Lazy binding is the default symbol binding mode. The runtime linker is contained in libc.so.
• There are a number of low level differences in the system which are typically not visible to applications. These differences include booting, system initialization, virtual address translation hardware, I/O interrupt hardware, exception interrupts, DMA, Intel firmware callbacks, machine check support, and others.
• Itanium-based AIX has a different kernel debugger than POWER. The Itanium-based kernel debugger commands are different from POWER.
1.2 AIX 5L 64-bit kernel overview
AIX 5L provides a new, scalable, 64-bit kernel that:
• Provides simplified data and I/O device sharing for multiple applications on the same system.
• Provides more scalable kernel extensions and device drivers that make full use of the kernel’s system resources and capabilities.
• Allows for future hardware development that will provide even larger single image systems ideal for server consolidation or workload scalability.
Chapter 1. AIX 5L introduction and overview 7
This following sections provide a general understanding of the new 64-bit kernel.
1.2.1 Why is a 64-bit kernel needed?There are a combination of factors that drive the requirement for a 64-bit kernel. The primary factor is the trend in system design towards massive amounts of system resources, terabytes of memory, hundreds of processors, and thousands of I/O slots. A resulting factor is that customers see these massive single systems as an opportunity for server consolidation, migrating all of the workloads that used to be across a number of individual servers onto a single massive server. The kernel is responsible for managing the physical resources as well as the process workload, all of which are growing exponentially.
Similar to the need for a database program to move from a 32-bit environment to a 64-bit environment in order to take advantage of the vast address space to efficiently manage more data in memory, the kernel also needs to move from the constrained 32-bit environment to a 64-bit environment to efficiently support and manage the ever expanding resources and workload. Some specific examples include
• Increasing the size of VMM (Virtual Memory Manager) data structures in order to support the larger memory configurations.
• The increased number and size of data structures in the global kernel address space required to support the possibility of thousands of physical and logical devices and their device drivers.
• The ability to scale kernel data types to more easily support greater than 32-bit addressability in areas of 64-bit user address space, large files, number of inodes, device numbering, thread IDs, and so on.
1.2.2 How the AIX VMM maps to the IA64 architectureThe AIX memory management model was designed specifically around the POWER processor architecture. Fundamentally, the address space is broken up into segments of 256 MB in size. In a 32-bit POWER machine, this amounts to 16 segments comprising the entire 4 GB address space that is visible at any one time. In a 64-bit POWER machine, this amounts to literally billions of segments visible (with appropriate hardware/software Segment Lookaside Buffer (SLB) reload handling) at any one time. Providing addressability to another 256 MB segment is as easy as loading a segment register, segment table entry, or SLB with a unique ID that identifies the segment. In the POWER architecture, access to data within a segment can be controlled at the segment granularity, and the Segment Identifier
8 AIX 5L Differences Guide Version 5.1 Edition
participates in the hardware page table and Translation Lookaside Buffer (TLB) virtual to physical mapping, allowing multiple processes to share the same physical page table and TLB translations in the case of a shared memory segment, provided that segment is mapped into their respective address spaces.
The Itanium architecture breaks up the 64-bit address space into eight mammoth (2^61 in size) regions. With the exception of the granularity, the concept of the IA64 region is similar to the POWER segment. The region has a unique ID associated with it that participates in the hardware page table and TLB virtual to physical mappings; this allows multiple processes to share the same page table and TLB translations, provided the same region is mapped into their respective address spaces. The AIX memory management model still manages the virtual address space in terms of 256 MB segments, even on the Itanium architecture. Only now, the segment is a purely logical entity, with no direct tie to any hardware facility. So applying this same model onto the Itanium architecture presents some challenges. First, considering a 32-bit process, the process's entire address space (4 GB) is wholly contained in the very front of region 0 in the Itanium architecture. Since everything this process must access, private data as well as shared, must reside within the same region (which is the hardware entity that would provide access protection and translation sharing), the only option is to create single private regions for each 32-bit process. This requires that any shared memory segments be accessed using aliased mappings to the shared physical memory within the private address space. For a 64-bit process, which has visibility to the entire eight regions of the address space, AIX memory management can establish truly shared mappings in a global shared region between 64-bit processes. Within a global shared region, which represents a collection of shared text or data mappings between 64-bit processes, segment level isolation and protection is emulated using IA64 Protection Key Registers (PKRs). PKRs allow the assignment of a unique tag that also participates in page table and TLB translation, providing another level of granularity (to the page level, rather than the region level) of unique isolation and access control. So two 64-bit processes sharing access to a shared memory segment not only have a global shared region mapped into their address space, but also share the unique tag loaded into their Protection Key Registers allowing the access.
Even though the AIX memory management continues to allocate and manage the address space in 256 MB segments, these are merely logical groupings of pages within a flat address space model. So translating the AIX on POWER concept of attaching a segment, which consists of loading a hardware facility with a segment identifier, on IA64, amounts to allocating a 256 MB slot in the flat
Chapter 1. AIX 5L introduction and overview 9
address space (on a 256 MB boundary) and mapping the requested collection of pages. The only specific consideration is to which region of the flat address space should the slot be allocated. A global kernel segment would be allocated in region 7 (the kernel region). A segment temporarily attached by the kernel would be allocated a slot out of region 5 (the temp attach region). A private user segment would be allocated from region 0 (user private region). And a shared user segment (shared library text, mmap file, or shmat segment) would be allocated from regions 1, 2, 3, or 4 (user shared regions).
1.2.3 64-bit kernel considerationsThere are some points for consideration for this new 64-bit kernel.
• The 64-bit kernel is the only kernel for Itanium-based systems.
• Both 32-bit and 64-bit kernels are available for the POWER platform.
• Only 64-bit CHRP-compliant PowerPC machines are supported for the 64-bit kernel on the POWER platform.
• Only Itanium-based machines are supported for the Itanium architecture.
• Only 64-bit kernel extensions are supported; that means no existing 32-bit kernel extensions (in the case of POWER) can be reused for the 64-bit kernel.
• Kernel extensions and device drivers must be compiled in 64-bit mode to be loaded into the 64-bit kernel.
• The 32-bit and 64-bit application environments are available on all 64-bit platforms (POWER and Itanium-based).
1.2.4 Selecting the 64-bit kernel on POWER systemsAIX 5L for POWER now provides a 64-bit kernel as well as the previously available 32-bit kernel. In addition, some data types have been enlarged to support this 64-bit kernel.
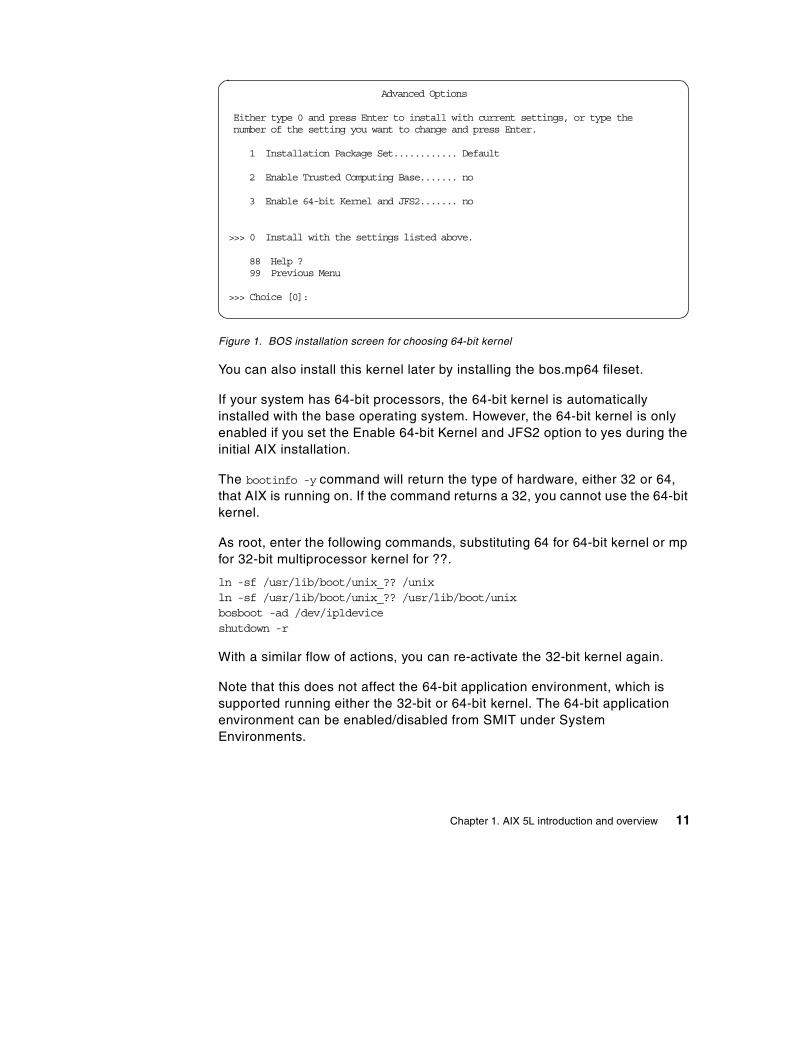
The installation of this new 64-bit kernel is selectable through the Advanced Option screen during the initial AIX installation. As shown in Figure 1 on page 11, you need to toggle option three to install this new kernel.
10 AIX 5L Differences Guide Version 5.1 Edition
Figure 1. BOS installation screen for choosing 64-bit kernel
You can also install this kernel later by installing the bos.mp64 fileset.
If your system has 64-bit processors, the 64-bit kernel is automatically installed with the base operating system. However, the 64-bit kernel is only enabled if you set the Enable 64-bit Kernel and JFS2 option to yes during the initial AIX installation.
The bootinfo -y command will return the type of hardware, either 32 or 64, that AIX is running on. If the command returns a 32, you cannot use the 64-bit kernel.
As root, enter the following commands, substituting 64 for 64-bit kernel or mp for 32-bit multiprocessor kernel for ??.
With a similar flow of actions, you can re-activate the 32-bit kernel again.
Note that this does not affect the 64-bit application environment, which is supported running either the 32-bit or 64-bit kernel. The 64-bit application environment can be enabled/disabled from SMIT under System Environments.
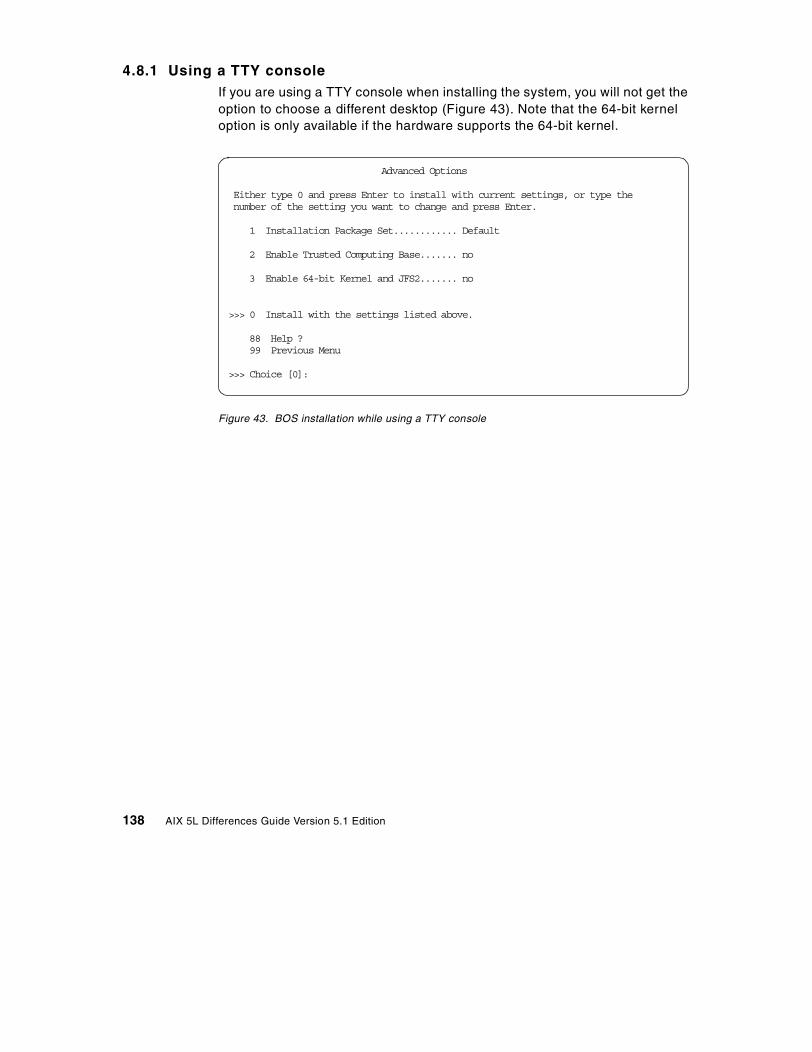
Advanced Options
Either type 0 and press Enter to install with current settings, or type thenumber of the setting you want to change and press Enter.
1 Installation Package Set............ Default
2 Enable Trusted Computing Base....... no
3 Enable 64-bit Kernel and JFS2....... no
>>> 0 Install with the settings listed above.
88 Help ?99 Previous Menu
>>> Choice [0]:
Chapter 1. AIX 5L introduction and overview 11
1.2.5 Adapters supported on 64-bit kernelIn this section, a list of adapters that, at the time of writing, have no 64-bit kernel support are provided in Table 1, and a description on how to check for support is provided follows.
Table 1. Adapters restricted to 32-bit kernel support
A simple means of determining whether or not an adapter is supported by the 64-bit kernel is to perform the following exercise:
# lsdev -Cc adapter |grep ent2ent2 Available 30-68 IBM 10/100 Mbps Ethernet PCI Adapter (23100020)
For example, if it is necessary to determine whether the ethernet adapter ent2 is supported by the 64-bit kernel, take the number in parenthesis from the output of the lsdev -Cc adapter command and use it as part of the fileset name:
The file command is now invoked on the device driver file /usr/lib/drivers/pci/phxentdd:
Adapter Description Feature Code 64-bit kernel support
Digital trunk adapter 6310, 6311 no
ESCON control unit 2751 no
4-port artic960Hx 2947, 2948 no
FDDI 2741 no
2-port multiprotcol (X.25 mode) 2962 no
PCI cryptographic coprocessor 4963 no
12 AIX 5L Differences Guide Version 5.1 Edition
# file /usr/lib/drivers/pci/phxentdd
phxentdd: archive (big format)
The file type archive (big format) implies that this is an adapter that is supported by the 64-bit kernel. In the following example, the file type signifies that the adapter is not supported by the 64-bit kernel:
# file /usr/lib/drivers/pci/ncr810dd
ncr810dd: executable (RISC System/6000) or object module
Chapter 1. AIX 5L introduction and overview 13
14 AIX 5L Differences Guide Version 5.1 Edition
Chapter 2. Development environment and tool enhancements
AIX 5L provides several enhancements that assist you in developing your own software. This chapter is dedicated to them.
2.1 Large data type support - binary compatibility
To support further application growth and scalability and the new 64-bit kernel on the POWER platform, some data types, such as time_t, have been enlarged from 32-bit to 64-bit.
Therefore, 64-bit applications compiled under AIX Version 4.3 will not run under AIX 5L and have to be recompiled. The reverse is true as well; that means in a mixed environment of machines running AIX Version 4.3 and 5L, you must have two versions of your 64-bit applications available and a means to select the correct binary for each platform. 32-bit applications are not affected by this change.
For the Itanium-based platform, this feature is the standard programming model. Application binaries are not compatible between POWER and Itanium-based systems.
2.2 DBX enhancements
The print subcommand in DBX is enhanced to provide an easier to read display output. In AIX Version 4.3.3 and previous releases, array elements and structure or union fields are printed serially, one after the other, on a single line, which sometimes makes it hard to understand.
This feature is only available on the POWER platform. For Itanium-based systems, a SUI/PICL application debugger should be used.
A sample output of the dbx print output subcommand in AIX Version 4.3 follows:
You can enable the new print subcommand style using set $pretty="on"; this mode will use indentation to represent static scope of each value. A sample output is provided below:
Another output style can be enabled. The verbose mode will use qualified names instead of indentation to represent the static scope. To enable verbose mode, use set $pretty="verbose". A sample output for verbose mode is provided below:
These settings can be preserved by adding them to the .dbxinit file in your home directory.
2.3 Pthread differences and enhancements
The following sections discuss the major changes in the area of pthreads.
Note that any calls ending in _np signifies that a library routine is non-portable and should not be used in code that will be ported to other UNIX-based systems.
2.3.1 Debug libraryIn AIX Version 4.3.3 and previous releases, dbx was the only debugger that could access information about pthreads library objects. In AIX 5L, the pthreads debug library (libpthdebug.a) provides a set of functions that allows application developers to examine and modify pthread library objects.
This library can be used for both 32-bit and 64-bit applications and it is thread safe. The pthread debug library provides applications access to the pthread library information. This includes information on pthreads, pthread attributes, mutexes, mutex attributes, condition variables, condition variable attributes, read/write locks, read/write lock attributes, and information about the state of the pthread library.
2.3.2 Unregister atfork handlerThe pthread API is enhanced to support unregistering atfork handlers. This is needed for times when the module in which an atfork handler resides is unloaded but the application continues and later calls fork.
Chapter 2. Development environment and tool enhancements 17
A new pthread API function, pthread_atfork_unregister_np(), is provided to unregister handlers installed with either of the pthread_atfork() and pthread_atfork_np() calls.
2.3.3 Atfork and cancellation cleanup handler support (5.1.0)The pthread API library has been enhanced to support debugging for atfork handlers and cancellation cleanup handlers. The new enhancements allows debuggers to get information about all active atfork and cancellation cleanup handlers in a process. This new enhancement is available on POWER only.
The following new functions make the debugging enhancements available:
• pthdb_atfork()
• pthdb_atfork_arg()
• pthdb_atfork_child()
• pthdb_atfork_parent()
• pthdb_atfork_prepare()
• pthdb_atfork_type()
• pthdb_cleanup()
• pthdb_cleanup_arg()
• pthdb_cleanup_func()
The definitions of the new functions are similar to the following:
int pthdb_atfork(pthdb_session_t session, pthdb_atfork_t *atforkp, int cmd);
int pthdb_atfork_arg(pthdb_session_t session, pthdb_atfork_t atfork, pthdb_addr_t *argp);
int pthdb_atfork_child(pthdb_session_t session, pthdb_atfork_t atfork, pthdb_addr_t*funcp);
int pthdb_atfork_parent(pthdb_session_t session, pthdb_atfork_t atfork, pthdb_addr_t*funcp);
int pthdb_atfork_prepare(pthdb_session_t session, pthdb_atfork_t atfork, pthdb_addr_t*funcp);
int pthdb_atfork_type(pthdb_session_t session, pthdb_atfork_t atfork, pthdb_atfork_type_t*typep);
int pthdb_cleanup(pthdb_session_t session, pthdb_pthread_t pthread, pthdb_cleanup_t*cleanupp, int cmd);
int pthdb_cleanup_func(pthdb_session_t session, pthdb_pthread_t pthread, pthdb_cleanup_tcleanup, pthdb_addr_t *funcp);
int pthdb_cleanup_arg(pthdb_session_t session, pthdb_pthread_t pthread, pthdb_cleanup_tcleanup, pthdb_addr_t *argp);
18 AIX 5L Differences Guide Version 5.1 Edition
2.3.4 Wait list and pthread state information enhancements (5.1.0)This enhancement provides the ability of the pthread library to be debugged using the pthread debug library. Using the new enhancement increases the accuracy with which the pthread debug library can detect hangs and deadlocks in pthreaded applications. This feature is available on POWER only.
When a pthread must wait on a pthread object (mutex, condition variable, read-write lock, and so forth), there are times when its wait/wakeup scheduling responsibilities are handled completely within the kernel as opposed to in the pthread library. In such cases, for performance reasons, the wait list associated with the object and the state of the pthread are not always updated to accurately reflect the pthread's true condition while it is waiting in the kernel. This feature ensures wait list and state information is accurate for pthreads waiting on process private pthread objects.
2.3.5 Signal context support enhancements (5.1.0)In AIX 5L Version 5.0, an extension of the pthread library function pthread_getthrds_np() was introduced, to support signal handler contexts on the stack. In AIX 5L Version 5.1, the pthread library is enhanced with a new API to support a similar function. Since the Itanium-based platform does not provide the needed information, this feature is available on POWER only.
Just like the pthread library feature, this feature enables debuggers to access the signal stacks and initial stack of a given pthread. It returns either the current context of the pthread or the pthread context at the time of a specific signal delivery. This function also supplies the number of frames in the requested stack.
The new feature consists of one new pthread debug library API routine. This routine requests the following input:
• pthread • Request signal level
The output, based on your input, is as follows:
• Total number of signal levels on the pthreads stack • Number of frames in the requested signal stack • A context (only one of the following):
- The context at the time of signal delivery (if a signal level is different from the current level that is requested and exists).
- The current context (if signal level zero is requested or the pthread has no signal contexts).
Chapter 2. Development environment and tool enhancements 19
• Return code indicating either success or failure
The new function in the pthread library has the following definition:
2.3.6 Deadlock detection (5.1.0)The pthread deadlock detection function has been added to the public interface of the pthread debug library. This enables the debugger, such as dbx, to present information to the user, which uniquely describes any deadlocks within the debugged process, or debuggee.
The deadlock detection provides value to the debugger user by streamlining debugging scenarios that call for computing when the debuggee is in a deadlock. Without this new pthread debug library-level of support for deadlock detection, the debugger visually presents the current state of lock objects and lets you manually compute dependency relationships between all lock objects.
2.3.7 Resource query support (5.1.0)The pthread resource query support provides a pthread debug library interface to query a pthread for the resource it owns or the resource it is waiting on.
Four new API functions have been added to the pthread debug library:
• pthdb_pthread_owner_resource()
• pthdb_pthread_waiter_resource()
• pthdb_resource_type()
• pthdb_resource_handle()
Upon the first call to pthdb_pthread_owner_resource(), since the pthread debug library session has been updated, the mutex and rwlock debug lists will be traversed and all locked resources will be stored in a list associated with the pthread that owns the specific resource. The resource at the head of the list corresponding to the pthread in the request will be returned.
Subsequent calls to pthdb_pthread_owner_resource() will result in the remainder of owned resources being returned to the user. As long as the pthread debug session is not updated, the information will be retrieved from the lists created on the first call.
2.3.8 Multiple read/write lock read ownersThe X/Open Standard (XPG 5) read/write locks allow a single write owner or multiple read owners of the lock. This improves critical section performance for data, which is read much more often than it is written. AIX 5L enables the pthread library to save multiple read owners for process-private read/write locks. By default, the pthread library will save multiple read owners.
These read/write locks are made available through the pthread.h header file using the pthread_rwlock_t data type and several pthread_rwlock_*() functions.
2.4 Thread level resource collection (5.1.0)
The Dynamic Probe Class Library (DPCL) tool is designed to collect a target application’s performance data, including resource usage, hardware counter information, and so forth. Previously, the getrusage() system call was used, but this facilitates the entire process scope resource usage only, therefore it cannot be used to query the resource usage per thread. Because it is also necessary to monitor threaded applications, the DPCL tool will call the
Chapter 2. Development environment and tool enhancements 21
pthread_getrusage_np() library call. This pthread library call supports both 32-bit and 64-bit applications and 32-bit and 64-bit kernels. In the instance where old binaries make use of this pthread library call, it will be necessary to recompile the source code.
For additional information on DPCL, the following Web site is available.
http://www.cs.wisc.edu/~paradyn/DPCL
2.5 KDB kernel debugger and kdb command enhancements
The KDB kernel debugger and kdb command are enhanced. For AIX 5L and subsequent releases, the KDB kernel debugger is the standard kernel debugger and is included in the unix_up, unix_mp, and unix_64 kernels, which may be found in /usr/lib/boot. This enhancement is only available on the POWER platform. For Itanium-based systems, use the iadb debugger.
2.5.1 Kernel debugger introductionThe KDB kernel debugger must be loaded at boot time. This requires that a boot image is created with the debugger enabled. To enable the KDB kernel debugger in AIX 5L, the bosboot command must be invoked with options set to enable KDB. The kernel debugger can be enabled using either the -I or -D options of bosboot.
Examples of bosboot commands:
• bosboot -a -d /dev/ipldevice
• bosboot -a -d /dev/ipldevice -D
• bosboot -a -d /dev/ipldevice -I
2.5.2 New functions and enhancements (5.1.0)New subcommands were added to KDB in AIX 5L Version 5.1, in order to provide some functions already present in the crash command
aliasThe alias subcommand defines or displays aliases. The alias subcommand creates or redefines alias definitions or writes existing alias definitions to standard output. The syntax of the command is:
alias [AliasName [=string]]
22 AIX 5L Differences Guide Version 5.1 Edition
linkThe link subcommand prints the contents of memory in terms of words, in a linked list format. For example, you can print n contiguous words and then, on start, print from the word whose address is in the next pointer offset until the terminating address. This performs the same function as the link function in the crash utility. The syntax of the command is:
link <start_addr> <num_words> [<next_ptr_offset>[<end_value>]]
set scrollThe set scroll subcommand is a new toggle introduced to the KDB command. Using this command at the kdb command prompt, you can toggle the page scrolling during the output of any kdb subcommand. For example:
set scroll onset scroll off
set $repeatThe set $repeat subcommand invokes the last command issued. For example:
<ctrl p> will display the last command.<enter> will invoke that command.
dcal and hcalThe dcal and hcal subcommands are modified to include the additional operators ^, %, and ().
convThe conv subcommand performs base conversions. The syntax for this command is:
conv [-bdox | -axx] num
where num is the value to be converted and the optional flags indicate the base for num:
• -b = binary
• -d = decimal (default)
• -o = octal
• -x = hex
• -axx = base xx (2 to 36)
The input value is then displayed in binary, octal, decimal, and hex.
Chapter 2. Development environment and tool enhancements 23
dumpThe dump subcommand performs exactly the same function as the dump subcommand in crash, to dump the contents of storage.
errptThe errpt subcommand prints all error log entries not picked up by the errdemon and allows the printing of a user-specified number of entries that have been picked up by the errdemon (the default is 3).
inodeThe inode subcommand has two additional options. A -c flag displays the reference count of an inode. The second flag is -d. This flag requires that the next three arguments to the subcommand specify the major and minor device numbers and the inode number to be displayed. These changes will be made for both the KDB kernel debugger and the kdb command.
lkeOption -n name is added to the lke subcommand to allow specification of a substring that is required to occur within a loader entry name (for it to be displayed).
mbufA new -n option allows following the chain for the m_next element until the end of the chain. This chain is the collection of mbufs for a single packet. The -a option allows following the chain of m_act entries. This chain is a group of packets linked together. The -a and -n options can be used together. When both options are used, information for the mbufs within each packet is displayed; then the display proceeds to the next packet. These options were added to both the KDB kernel debugger and kdb command.
netmThe netm subcommand displays the most recent net_malloc_police record when invoked without any arguments. It may be invoked with an -a option to display all net_malloc_police records. It may also be invoked with an address to display records whose address or caller fields match the given address.
proc or pIn AIX 5L Version 5.1, the proc subcommand has an additional - (minus character) option. This option will list all the contents of the proc table. The * (asterisk) lists a summary of the proc table content.
In Version 5.0, the -s option was added to the KDB proc subcommand. This option will be available for use in conjunction with the * (asterisk) option,
24 AIX 5L Differences Guide Version 5.1 Edition
which displays a summary of all processes. The -s option will limit output to processes that are in the state specified following the -s flag.
sockAn additional function is added to the KDB sock subcommand. This function is available through the use of the -p flag and may be used to limit the output from the socket subcommand to just sockets associated with a specific process.
sr64A new -n option is added to the sr64 subcommand. This option may be used to indicate the uadnode data structures information to be displayed for the uadnodes associated with the segment information displayed.
statusThe status subcommand is added to both the KDB kernel debugger and kdb command. For each CPU, the CPU number and the thread ID, thread slot, process ID, process slot, and process name for the current thread are displayed.
thread or thIn AIX 5L Version 5.1, the thread subcommand has an additional - (minus character) option. This option will display all the contents of the thread table. The * (asterisk) lists a summary of the thread table contents.
In AIX Version 5.0, the thread subcommand received the -r and -p flag. The -r flag displays only runnable threads. The -p flag requires that a process table entry be specified and will display all threads for the indicated process.
varrmThe varrm subcommand is added to both the KDB kernel debugger and command, and it allows user-defined variables to be cleared. A variable will be cleared by issuing the varrm subcommand and specifying the variable name as a parameter. Clearing a variable deletes the variable from the list of user-defined variables, freeing the slot for use by another user-defined variable.
varlistThe varlist subcommand is added to the KDB kernel debugger and kdb command, and it lists the names and values for any user defined variables.
Chapter 2. Development environment and tool enhancements 25
2.6 IADB kernel debugger for Itanium-based systems (5.1.0)
The IADB kernel debugger is only available on Itanium-based systems. This debugger is equivalent to the KDB kernel debugger on POWER systems.
The IADB kernel debugger is part of the kernel and is disabled by default. There are different ways to enable, invoke, or activate the IADB debugger.
• Enable means that the kernel debugger is initialized and configured into the kernel.
• Invoke means to stop in the kernel debugger at boot time as soon as the debugger is initialized.
• Activate means to break into the kernel debugger, presuming the debugger has been enabled previously.
The IADB kernel debugger can only run from the serial port and uses a baud rate of 115200, parity none, 8 bits per character, and the number of stop bits is 1.
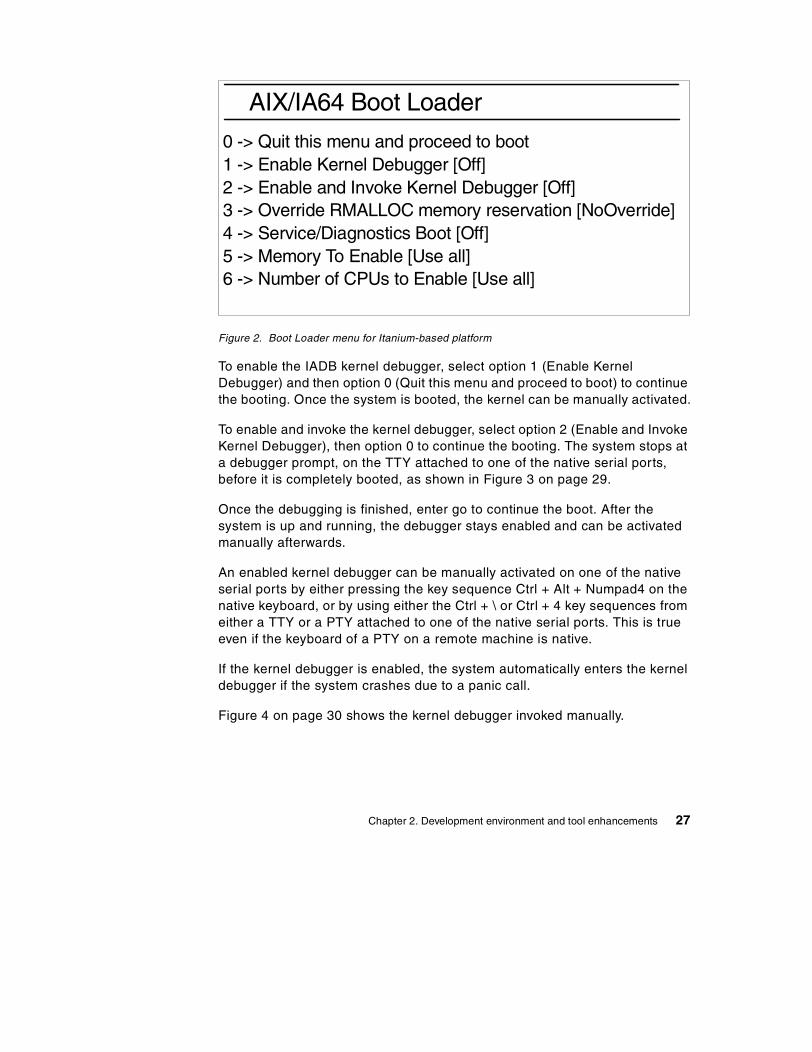
2.6.1 The Boot Loader menuThe IADB kernel debugger can be enabled and invoked through the Boot Loader menu during booting, as shown in Figure 2 on page 27.
An ibm3151-type terminal can not be used since its baud rate does not go up to 115200. The best configuration is a serial connection session from another system so that large scroll X window objects, cut-and-paste, and so forth, can be used.
Note
26 AIX 5L Differences Guide Version 5.1 Edition
Figure 2. Boot Loader menu for Itanium-based platform
To enable the IADB kernel debugger, select option 1 (Enable Kernel Debugger) and then option 0 (Quit this menu and proceed to boot) to continue the booting. Once the system is booted, the kernel can be manually activated.
To enable and invoke the kernel debugger, select option 2 (Enable and Invoke Kernel Debugger), then option 0 to continue the booting. The system stops at a debugger prompt, on the TTY attached to one of the native serial ports, before it is completely booted, as shown in Figure 3 on page 29.
Once the debugging is finished, enter go to continue the boot. After the system is up and running, the debugger stays enabled and can be activated manually afterwards.
An enabled kernel debugger can be manually activated on one of the native serial ports by either pressing the key sequence Ctrl + Alt + Numpad4 on the native keyboard, or by using either the Ctrl + \ or Ctrl + 4 key sequences from either a TTY or a PTY attached to one of the native serial ports. This is true even if the keyboard of a PTY on a remote machine is native.
If the kernel debugger is enabled, the system automatically enters the kernel debugger if the system crashes due to a panic call.
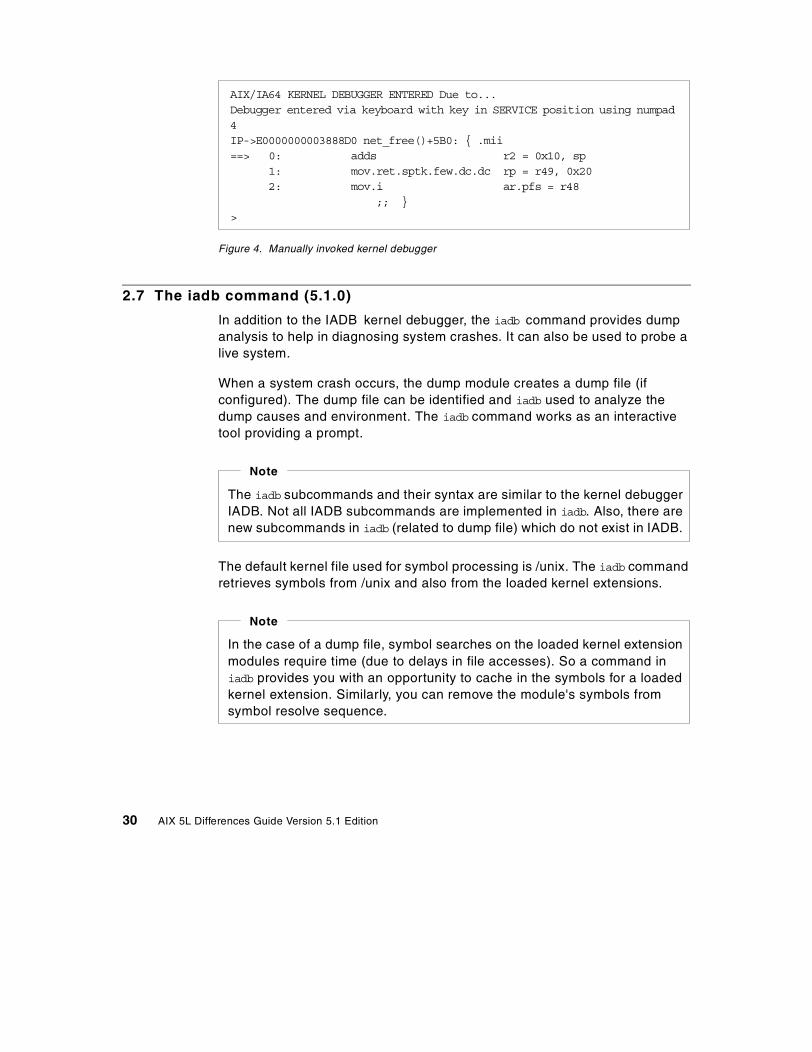
Figure 4 on page 30 shows the kernel debugger invoked manually.
0 -> Quit this menu and proceed to boot1 -> Enable Kernel Debugger [Off]2 -> Enable and Invoke Kernel Debugger [Off]3 -> Override RMALLOC memory reservation [NoOverride]4 -> Service/Diagnostics Boot [Off]5 -> Memory To Enable [Use all]6 -> Number of CPUs to Enable [Use all]
AIX/IA64 Boot Loader
Chapter 2. Development environment and tool enhancements 27
2.6.2 The bosboot commandThe IADB kernel debugger can be engaged by executing the bosboot command with either the -I or -D flag in uppercase.
The -D flag enables the IADB kernel debugger but does not invoke it during operating system initialization. The -I flag enables and invokes the IADB kernel debugger during operating system initialization.
To enable and invoke the kernel debug program during operating system initialization, use the command:
# bosboot -a -d /dev/ipldevice -I
To enable the kernel debug program but not invoke it during operating system initialization, use the command:
# bosboot -a -d /dev/ipldevice -D
To disable the kernel debug program, use the command:
# bosboot -a -d /dev/ipldevice
Once the IADB kernel debugger is enabled, it can be manually activated by either pressing the key sequence Ctrl + Alt + Numpad4 on the native keyboard, or by using either the Ctrl + \ or Ctrl + 4 key sequences from either a TTY or a PTY attached to one of the native serial ports.
2.6.3 The breakpoint functionA user can invoke the kernel debug program from the kernel code or application code running in either user mode or kernel mode by embedding a brkpoint() function. The syntax for calling this function is as follows:
brkpoint();
The breakpoint can also be invoked with a variable number of parameters, thus making values of those parameters visible on the saved stack frame when the kernel debug program is entered. For an application code running in kernel mode, and for other kernel subsystems such as loader, the brkpoint() function is made available as one of the kernel services. For application code running in user mode, the brkpoint() function is made available as a system
You must reboot the system before these commands take effect.
Note
28 AIX 5L Differences Guide Version 5.1 Edition
call by the C run-time library, enabling it to enter the kernel debug program. The kernel debug program presents the same command line interface regardless of the mode in which the system was running when it entered the kernel debug program.
2.6.4 Code display of the kernel debuggerThe output of the IADB kernel debugger is always sent to the display device connected to one of the native serial ports.
When the IADB kernel debugger is invoked, it displays a specific code on the display panel and displays the prompt. The prompt includes the logical CPU number that serviced the request to enter the kernel debugger if it is for a multi-processor (MP) machine. A prompt for an MP machine appears as: >0> and for a uni-processor (UP) machine, the prompt is: >. If you switch the CPU using the cpu command, the prompt reflects the switched CPU number, for example, >7> after command '>4> cpu 7'.
Figure 3 shows an invoked IADB kernel debugger during boot.
Figure 3. Invoked kernel debugger during boot
Figure 4 shows a kernel debugger manually invoked by using Ctrl + Alt + Numpad4.
Chapter 2. Development environment and tool enhancements 29
Figure 4. Manually invoked kernel debugger
2.7 The iadb command (5.1.0)
In addition to the IADB kernel debugger, the iadb command provides dump analysis to help in diagnosing system crashes. It can also be used to probe a live system.
When a system crash occurs, the dump module creates a dump file (if configured). The dump file can be identified and iadb used to analyze the dump causes and environment. The iadb command works as an interactive tool providing a prompt.
The default kernel file used for symbol processing is /unix. The iadb command retrieves symbols from /unix and also from the loaded kernel extensions.
AIX/IA64 KERNEL DEBUGGER ENTERED Due to...Debugger entered via keyboard with key in SERVICE position using numpad4IP->E0000000003888D0 net_free()+5B0: { .mii==> 0: adds r2 = 0x10, sp
1: mov.ret.sptk.few.dc.dc rp = r49, 0x202: mov.i ar.pfs = r48
;; }>
The iadb subcommands and their syntax are similar to the kernel debugger IADB. Not all IADB subcommands are implemented in iadb. Also, there are new subcommands in iadb (related to dump file) which do not exist in IADB.
Note
In the case of a dump file, symbol searches on the loaded kernel extension modules require time (due to delays in file accesses). So a command in iadb provides you with an opportunity to cache in the symbols for a loaded kernel extension. Similarly, you can remove the module's symbols from symbol resolve sequence.
Note
30 AIX 5L Differences Guide Version 5.1 Edition
Table 2 lists the flags of the iadb command.
Table 2. Flags of the iadb command
2.7.1 Differences between IADB and iadbThe iadb command pages its output through the more command. Since the user interface in iadb is based on a pseudo TTY, the q key for stopping more does not work. Instead you have to press q and then Enter to quit the more.
The user interface for the iadb command supports vi editor-based editing by default. A history file in your home directory retains the last run commands.
Most of the display-oriented subcommands of IADB are supported in iadb. Commands related to breakpoints, kernel specific registers are not supported.
2.7.2 Relation between iadb, kdb, or crashThe iadb command is different from the kdb command and crash. The iadb command supports unique commands that may also be present in kdb and crash. However, iadb subcommands follow the syntax of commands in IADB (the kernel debugger in an Itanium-based environment).
2.8 Kernel scalability enhancements for SMP machines (5.1.0)
In AIX 5L Version 5.1, changes in the kernel services for process/thread event handling have been made to improve scalability on SMP machines. The contention on the kernel_lock has been reduced by introducing a new service which uses a complex lock for serialization instead of the global kernel_lock. This reduces contention for the global kernel_lock and allows multiple event callouts to be made simultaneously.
2.8.1 Proch callouts implementationProch callouts are a service that allows a kernel extension to register a callout handler to be called when threads or processes are created and destroyed.
Flag Description
-u File Specifies the file to use for system analysis. If this flag is not specified, the default file is used for analysis.
-d Dump_file Specifies the Dump_File to be used for analysis. The Dump_File is a valid dump file and is taken on the AIX/Itanium-based system corresponding to the file specified with the -u flag.
Chapter 2. Development environment and tool enhancements 31
In AIX 5L Version 5.0 and earlier, these handlers are registered using the prochadd(), and unregistered using prochdel() kernel service.
In AIX 5L Version 5.1 new kernel services have been added to register and unregister callouts. In the new implementation, callouts are registered through proch_reg() and unregistered using proch_unreg().
The new callouts handle exactly the same potential set of events at exactly the same points with respect to kernel operation. The kernel extension specifies which event callouts’ desired version is being used, when the handler is registered by passing a mask (prochr_mask) of the desired callout events.
When the handler is called, it is passed the address of its prochr structure, the event type (for example, PROCHR_TERMINATE), and the thread or process ID identifying the thread or process for which event the callout is being made.
The following additions have been made to the proc.h file:
struct prochr{
struct prochr *prochr_next; /* next pointer */void (*prochr_handler)(); /* function to be called */uint prochr_mask; /* conditions under which to call */int pad; /* padding for structure */
extern int proch_reg(struct prochr *);extern int proch_unreg(struct prochr *);
2.9 Context switch avoidance
For application programs that are using their own thread control or locking code, it is helpful to signal the dispatcher that the program is in a critical section and should not to be preempted or stopped.
AIX 5L now allows an application to specify the beginning and ending of a critical section. The prototypes for these functions are listed in
32 AIX 5L Differences Guide Version 5.1 Edition
/usr/include/sys/thread_ctl.h. After an initial call of EnableCriticalSections(), a call to BeginCriticalSection() increments a memory location in the process data structure. The memory location is decremented again by a call to EndCriticalSection(). This location is checked by the dispatcher, and if it is positive, the process receives another time slice (up to 10 ms). If the process sleeps, or calls yield(), or is checked by the dispatcher a second time, this behavior is automatically disabled. If the process is preempted by a higher priority process, it is again queued in the priority queue, but at the beginning instead of the end of the queue.
If a thread is still in a critical section at the end of the extra time slice, it loses its scheduling benefit for one time slice. At the end of that time slice, it is eligible again for another slice benefit. If a thread never leaves a critical section, it can not be stopped by a debugger or control-Z from the parent shell.
This feature works on a per-thread basis. In multithreaded applications, each thread can declare critical sections and each thread doing so must call the EnableCriticalSections() function. If a process, even a multithreaded process, has one of its threads in a critical section, the process can not be stopped
2.10 Very large program support
AIX 5L now supports a more flexible way for 32-bit programs to make maximum use of the eight available data segments as either heap or shared memory. At the time of writing, this feature is only available on the POWER platform.
With very large program support, programs can specify the size of the heap they want to use with the -bmaxdata option for the ld command. The following command compiles and links a program to allow up to eight segments to be used for the data heap with very large program support:
cc sample.c -bmaxdata:0x80000000/dsa
The new support in AIX 5L offers a dynamic segment allocation (DSA) algorithm that is used to create the segments for the data heap dynamically. The command shown in the example specifies that the program is allowed to grow its data heap up to eight segments. Segments that are not used by the data heap are available to the program to be used for other purposes, such as memory mapped files. Once a segment is claimed by the data heap, however, it is no longer available for other purposes. In addition, the behavior of system calls such as mmap() and shmat() are changed to start allocating from the top of the address space and work down if the DSA flag is specified.
Chapter 2. Development environment and tool enhancements 33
AIX also allows you to change the maxdata value of the XCOFF file at program loading time. The environment valuable LDR_CNTRL will be used as the ld option for this purpose. For example:
export LDR_CNTRL=MAXDATA=0x40000000
tells the AIX loader to override the maxdata field of the XCOFF file for execution to use four data segments.
2.11 Lightweight core file support
AIX 5L supports lightweight core files (lwcf) that consist of stack tracebacks from each thread and process. This enhancement assists large parallel jobs that need a way of collecting and displaying the state of all threads and processes when the job is abnormally terminated.
This enhancement provides two new routines, mt_trce() and install_lwcf_handler(), to be used by programs to generate a lightweight core file. This lightweight core file provides traceback information for each thread in each process of a potentially distributed application for debugging purposes.
Core files can be generated without process termination to increase application availability.
2.12 Core file naming enhancements (5.1.0)
AIX 5L Version 5.1 has changed the way it names the core file used for a core dump. In earlier AIX releases, a core file was always named core. If more than one application dumped or the same application dumped more than once, you always lost the earlier core file. Beginning with AIX 5L Version 5.1, each core file can be uniquely named so no core file will be overwritten with a new one. This feature helps debugging and tracing application failures.
2.12.1 File namingBy default, a new core file is named core. To enable the new enhancement, set the CORE_NAMING environment variable to yes.
After setting the CORE_NAMING variable, the new core file names are of the format core.pid.ddhhmmss, where:
pid Process ID
dd Day of the month
34 AIX 5L Differences Guide Version 5.1 Edition
hh Hours
mm Minutes
ss Seconds
The following is an example of core files recorded on a test system:
# ls -ltotal 1080-rw-r--r-- 1 root system 389223 Feb 20 17:40 core.20136.20234026-rw-r--r-- 1 root system 180423 Feb 20 17:40 core.20138.20234059-rw-r--r-- 1 root system 221923 Feb 10 14:20 core.10138.20202033
2.12.2 Error log entryEach core dump causes a new error log entry. A look at this entry will help to identify the application that caused the core dump.
The user’s PROCESS ID stanza shows the process ID of the dumped process. This number has to be the same as the one in the core file name. The PROGRAM NAME stanza holds the name of the dumped application.
# errpt -a
LABEL: CORE_DUMPIDENTIFIER: C60BB505Date/Time: Tue May 1 03:41:44 CDTSequence Number: 15Machine Id: 000BC6FD4C00Node Id: server1Class: SType: PERMResource Name: SYSPROCDescriptionSOFTWARE PROGRAM ABNORMALLY TERMINATEDProbable CausesSOFTWARE PROGRAM
The expected value of the CORE_NAMING variable is yes. However, any value will work. So if CORE_NAMING variable is set to no, it will also generate the new style core file (core.pid.ddhhmmss).
Note
Be aware that the time stamp in the file name is in GMT time format, so it does not reflect the current time on the system if an offset is used. To have the actual time the application dumped, you have to manually add the time zone offset.
Note
Chapter 2. Development environment and tool enhancements 35
User CausesUSER GENERATED SIGNAL
Recommended ActionsCORRECT THEN RETRY
Failure CausesSOFTWARE PROGRAM
Recommended ActionsRERUN THE APPLICATION PROGRAMIF PROBLEM PERSISTS THEN DO THE FOLLOWINGCONTACT APPROPRIATE SERVICE REPRESENTATIVE
Detail DataSIGNAL NUMBER
11USER'S PROCESS ID:
18048FILE SYSTEM SERIAL NUMBER
5INODE NUMBER
2050PROGRAM NAMEviADDITIONAL INFORMATIONoncore 184????Unable to generate symptom string.
2.13 Gathering core files (5.1.0)
This enhancement automates core collection processes and packages them into a single archive. This archive will have all the necessary information to successfully analyze the core on any machine.
2.13.1 Using the snapcore commandThe snapcore command gathers a core file, program, and libraries used by the program and compresses the information into a pax file. The file can then be downloaded to disk or tape, or transmitted to a remote system. The information gathered with the snapcore command allows you to identify and resolve problems with an application.
2.13.1.1 Collecting informationTo collect all the information you might need to debug and analyze the problem, you can use the snapcore command, as shown in the following steps:
1. Change to the directory where the core dump file is located:
# ls -ltotal 84176-rw-r--r-- 1 root system 2704 Feb 21 09:52 core.18048.01084144-rw-r--r-- 1 root system 38572032 Feb 20 23:49 gennames.out
36 AIX 5L Differences Guide Version 5.1 Edition
-rw-rw-rw- 1 root system 2260904 Feb 20 23:43 trace.out-rw-r--r-- 1 root system 2260224 Feb 20 23:43 trace.rpt
2. Run the snapcore command to collect all needed files:
# snapcore -d /tmp/myDir core.18048.01084144
The snapcore command will gather all information and create a new compressed pax archive in the /tmp/myDir directory. If you do not specify a special directory using the -d flag, the archive will be stored in /tmp/snapcore directory. The new archive file will be named as snapcore_<$pid>.pax.Z.
# ls -l /tmp/myDirtotal 5504-rw-r--r-- 1 root system 2815081 Feb 21 09:56 snapcore_20576.pax.Z
To check the content of the pax archive, use the following command:
2.13.2 Using check_core utilityThe check_core utility is used by the snapcore command to gather all information about the core dump. This is a small C-program and is located in the /usr/lib/ras directory.
Change to the directory where the core dump file is located and run the check_core utility against the core dump file. You will receive a list containing the program that caused the core dump and the libraries used by it.
Chapter 2. Development environment and tool enhancements 37
2.14 Pluggable Authentication Mechanism security support (5.1.0)
Pluggable Authentication Mechanism (PAM) is a flexible mechanism for authenticating users.
The PAM support provides a way to develop programs that are independent of an authentication scheme. These programs need authentication modules to be attached to them at runtime in order to work. Which authentication module is to be attached is dependent on the local system setup.
In AIX 5L Version 5.1, support for X/Open Single Sign-on Service (XSSO) and PAM has been added. For more information about XSSO, please visit:
http://www.opennc.com/pubs/catalog/u039.htm
2.15 Malloc enhancements
The following sections discuss new ways for applications to access memory.
2.15.1 Malloc multiheapThe multiheap malloc was introduced in AIX Version 4.3.3 as part of the service stream and it may not be well known. It is available on both the POWER and Itanium-based platforms.
A single free memory pool (or heap) is provided, by default, by malloc. In AIX Version 4.3.3, the capability to enable the use of multiple heaps of free
To make the check_core utility available for use, you must have the bos.rte.serv_aid fileset installed, as shown with the following command:
The PAM related files are not included in AIX 5L Version 5.1 BOS CD-ROM media, but are included in first shiped Update CD as APAR IY19060. After applying this APAR, PAM related files are included in bos.rte.security, bos.adt.includes filesets updates, both at the 5.1.0.1 level.
Note
38 AIX 5L Differences Guide Version 5.1 Edition
memory was introduced, which reduces thread contention for access to memory. This feature could be enabled by setting the MALLOCMULTIHEAP environment variable to the number of heaps. Setting MALLOCMULTIHEAP in this manner enables malloc multiheap to use any of 32 heaps and the fast heap selection algorithm. The applications that benefit the most by this setting are multithreaded applications on multiprocessor systems.
2.15.2 Malloc bucketsMalloc buckets was introduced in AIX Version 4.3.3 as part of the service stream. It is available on both the POWER and Itanium-based platforms.
Malloc buckets provides an optional buckets-based extension of the default allocator. It is intended to improve malloc performance for applications that issue large numbers of small allocation requests. When malloc buckets is enabled, allocation requests that fall within a predefined range of block sizes are processed by malloc buckets. All other requests are processed in the usual manner by the default allocator.
Malloc buckets is not enabled by default. It is enabled and configured prior to process startup by setting the MALLOCTYPE and MALLOCBUCKETS environment variables.
The default configuration for malloc buckets should be sufficient to provide a performance improvement for many applications that issue large numbers of small allocation requests. However, it may be possible to achieve additional gains by setting the MALLOCBUCKETS environment variable to modify the default configuration. Developers who wish to modify the default configuration should first become familiar with the application's memory requirements and usage. Malloc buckets can then be enabled with the bucket_statistics option to fine tune the buckets configuration.
2.16 Software vital product data (5.1.0)
The vpdadd and vpddel commands in AIX 5L Version 5.1 are executables where as in earlier versions of AIX, they were shell scripts. The reason for this is to improve the performance of the commands and also because they are now APIs for the VPD. The vpdadd command is called to add entries to the product, lpp, history, and vendor databases of the ODM. vpdadd and vpddel are only intended to be used to manipulate the SWVPD and not actually install or uninstall objects. The vpddel command removes entries from the VPD and vendor databases.
The syntax of the vpdadd command is:
Chapter 2. Development environment and tool enhancements 39
The descriptions of the flags are provided in Table 3.
Table 3. Flags of the vpdadd command
Flags Description
-c <component> The component name to add to the VPD. This entry must be unique insofar as the destination directory. If the entry already exists, no new entry will be added and no error will occur. This allows a force install.
-v <v.r.m.f> Version, release, modification, and fix level.
-D <destination directory> This is the prefix directory for the files being installed. The default is /usr/opt.
-I <description> The description of the component being installed.
-R <fileset name v.r.m.f> Requisite software. Must be specified in quotes. This flag can be used more than once.
-U <uninstaller> The command to launch the uninstaller for this component.
-C <message catalogue> The message catalogue to search for a translated description of the component.
-S <message set> The message set if more than one in the catalog.
-M <message number> The message number for the description.
-p <product> The product name to be added to the VPD. The entry is only added if it is unique insofar as v.r.m.f or destination directory. If it is not unique, no error occurs. This allows a force install.
-f <feature> The feature name to add to the VPD. The entry is only added if it is unique insofar as v.r.m.f and destination directory. If it is not unique, no error occurs. This allows a force install.
-u Specifies that the entry to be added is an update. If a base level fileset does not exist, then an error will occur.
The descriptions of the flags are provided in Table 4.
Table 4. Flags of the vpddel command
2.17 Non-sparseness support for the restore command
In AIX 5L, the restore command has a new -e flag, which preserves the sparseness or non-sparseness of files created with the backup command.
A file is a sequence of indexed blocks of arbitrary size. The indexing is accomplished through the use of direct mapping or indirect index blocks from the files inode. Each index within a file’s address range is not required to map to an actual data block.
A file that has one or more indexes that are not mapped to a data block is referred to as being sparsely-allocated or a sparse file. A sparse file will have a size associated with it, but it will not have all of the data blocks allocated to fulfill the size requirements. To identify if a file is sparsely-allocated, use the fileplace command. It will indicate all blocks in the file that are not currently allocated.
Such files are commonly used by database applications. The blocks with the NULL values are also often called holes. The default behavior of the restore
-P <parent> Specifies the parent software unit. For example, a component would specify either a feature or a product as its parent, depending on where it was in the tree. This is flag is optional and is used to allow tree listings in Web-based System Manager.
Flags Description
-c <component> Removes the specified component.
-v <v.r.m.f> The version, release, modification, and fix levels of the component to be deleted from the VPD or vendor database.
-f <feature> The feature to be removed from the vendor database.
-p <product> The product to be removed from the vendor database.
Flags Description
Chapter 2. Development environment and tool enhancements 41
command is to save disk space and therefore to create sparse files (if possible). This is the correct behavior, if the original file is also a sparse file, but incorrect in the case of the backup of a non-sparse file.
This enhancement restores the non sparse files as non sparse as they were archived by the name format of the backup command for both packed and unpacked files. It is necessary to know the sparseness/non-sparseness of the file(s) before archiving the files, because enabling this flag restores the sparse files as non-sparse.
This flag should be enabled only if files are to be restored are non sparse consisting of more than 4 KB nulls. If the -e flag is specified during restore, it successfully restores all normal files normally and non-sparse database files as non sparse.
2.18 The pax command enhancements
In AIX 5L, the pax command is enhanced to support a 64-bit POSIX-defined data format, which is used by default. The objective of this command is to allow archiving of large files, such as dumps. The commands cpio and tar do not support files used as input larger than 2 GB, because they are limited by their 32-bit formats. There are no plans to enhance these programs to support this situation in the future.
If you have to archive files larger than 2 GB, the only available option is the pax command provided your file system supports them. Suppose you have several tar archives with a size in total exceeding the 2 GB limit. With the following command, you can create an archive for all of them:
# pax -x pax -wvf soft.pax ./soft?.tar
The default mode for pax (without the -x option) is to behave as tar. The -x option will allow pax the ability to work with files larger than 2 GB, a behavior tar does not have.
This enhancement is also available on AIX Version 4.3.3 service releases.
2.19 The snap command enhancements (5.1.0)
The snap command gathers system configuration information and compresses the information into a pax file. The information gathered with the snap command may be required to identify and resolve system problems.
42 AIX 5L Differences Guide Version 5.1 Edition
2.19.1 Flag enhancementsThe following sections discuss the new and enhanced flags for the snap command.
2.19.1.1 The -t flag enhancementsIf in AIX 5L Version 5.0, the -t flag is used for the snap command, the following information will be collected in the tcpip.snap output file:
The enhancement to the snap command, when used with the -t flag, is that in addition to creating the tcpip.snap file, snap will add the following TCP/IP configuration files to the output device:
When snap is used with the -c flag (to create a compact pax image), these files will be included in the image.
2.19.2 The -T flag enhancementsThe -T flag gathers all the log files for a multiple CPU trace. Only the base file, named trcfile, is captured with the -g flag.
snap [-g] -T trcfile
For example, you can gather a multiple CPU trace file with the trace command:
# trace -C all
The trace can be stopped from collecting with the trcoff command. If no alternative log file is specified, trace will write to the default log file /var/adm/ras/trcfile.
To run the snap command on the default log file, enter the following command:
# snap -g -T /var/adm/ras/trcfile
2.19.2.1 The -w flag enhancementsRunning the snap command with the -w flag will gather all WLM information in the directory /tmp/ibmsupt/wlm. This information includes the following files:
2.19.2.2 The -x flagThe -x flag has been added to the snap command to launch the adump command without any parameter. The -x flag is used in conjunction with the -D flag. The result of the adump command will go into the /tmp/ibmsupt/dump directory. The file is called adump.report.
# snapusage: snap -x -D
# cd /tmp/ibmsupt/dump/# lsadump.report dump.Z dump.snap unix.Z
The adump command runs a Perl script that gathers information needed for support professionals to start the dump analysis.
2.20 KornShell enhancements
In AIX 5L, the 1993 version of the ksh implementation of the KornShell command and scripting language is provided in addition to the 1988 version. In addition, the default value of the shell attribute for a user is changed from /bin/ksh to /usr/bin/ksh.
2.20.1 ksh93In AIX 5L, the default shell is still /usr/bin/ksh, which is hardlinked to /usr/bin/psh, /usr/bin/sh, and /usr/bin/tsh. This is an enhanced ksh implementation of the 1988 version of the KornShell, making it POSIX compliant. In addition to this shell, an unmodified version of the 1993 version of ksh is supplied as /usr/bin/ksh93. This version is also POSIX compliant.
With the exception of POSIX-specific items, the 93 version should be backward compatible with the 88 version. Therefore, no changes to shell scripts should be necessary. You should check your scripts for compatibility problems with this release.
This new version of ksh has the following functional enhancements:
• Key binding
• Associative arrays
• Complete ANSI-C printf() function
• Name reference variables
• New expansion operators
• Dynamic loading of built-in commands
Chapter 2. Development environment and tool enhancements 45
• Active variables
• Compound variables
For a detailed description of the new features, consult the official KornShell Web site at http://www.kornshell.com.
2.20.2 New value for shell attributeThe value of the shell attribute is changed to read /usr/bin/ksh. This is especially important for the root user. In previous versions of AIX, the value reads /bin/ksh and relies therefore on the existence of the link between /bin and /usr/bin. If this link is accidentally removed, the system becomes unbootable, because there is no shell available for root and many of the system commands.
2.21 Perl 5.6 (5.1.0)
Perl 5.5.3 was shipped in AIX Version 4.3.3. In an effort to ship the latest code, Perl 5.6 is shipped in AIX 5L Version 5.1, as can be shown with the following command:
# perl -vThis is perl, v5.6.0 built for aix
Copyright 1987-2000, Larry Wall
The Perl environment is packaged and shipped in two filesets: perl.rte and perl.man.en_US.
Any changes made on the Perl source, and how to compile it on AIX 5L Version 5.1, are documented in the /usr/lpp/perl.rte/README.perl.aix file.
2.21.1 Installing more than one Perl versionPerl is installed in /usr/opt/perl5, with the accompanying man pages in /usr/share/man. There is a link from /usr/bin/perl to the Perl executable /usr/opt/perl5/bin/perl5.6.0. The Perl libraries are in /usr/opt/perl5/lib/5.6.0, with a link to there from /usr/lib/perl. To support a different version of Perl (for example, Perl 5.5.3) on the same system, do not use the installp command, because the fileset name is not different and installp will only allow you to have one version of the same fileset installed. Instead of using installp, you can do the following, which will put the Perl executables and libraries on your system.
46 AIX 5L Differences Guide Version 5.1 Edition
1. Mount the first AIX installation media and use the restore command to install another Perl version:
# mount -r -vcdrfs /dev/cd# /mnt# cd / restore -xvf /mnt/usr/sys/inst.images/perl.rte 5.5.3.0
2. Make sure you remember to set up the links to point to whichever version of Perl you want to use.
2.21.2 Security considerationsMake sure that you do not have directories in the LIBPATH with write access to non-root users.
If the /usr/opt/perl5/bin/perl executable has its LIBPATH set to "/usr/local/lib:/usr/lib:/lib" and if the /usr/local/lib directory exists on the system with write access for non-root users, then a non-root user could put a Trojan horse copy of the libc.a or libbsd.a shared library into this directory. Then, if a system administrator were to run a system management command which uses Perl 5.6, the administrator would inadvertently execute the Trojan horse copy of the shared library. This would cause the Trojan horse code to execute with the system administrator's privileges!
2.22 32-bit and 64-bit Java for Itanium-based platform (5.1.0)
In AIX 5L Version 5.1, the 32-bit and the 64-bit versions of Java are now available for the Itanium-based platform. Table 5 provides the available 32-bit and 64-bit base Java filesets.
Table 5. Filesets for 32-bit and 64-bit Java on IA64
In the previous example, /dev/cd# is your CD drive (for example, /dev/cd0). You could also NFS mount the images if you do not have them available on CD.
Note
Chapter 2. Development environment and tool enhancements 47
Since the base path of both Java versions is different, it is possible to install the 32-bit and the 64-bit Java version on the same system. However, you have to make sure that all the environment settings is compliant with the Java version you are currently running.
At the time of writing, 64-bit Java for the POWER platform is not available.
Both Java 1.1.8 and Java 1.2.2 are now fully supported on AIX 5.1. For Java 1.2.2, you need PTF 12 and the AIX 5.1 fixes on July 2001 update CD (IY21149). For Java 1.1.8, you need PTF 11 and AIX 5.1 fixes on July 2001 update CD (IY21149). See the AIX Java website http://www.ibm.com/developerworks/java/jdk/aix/index.html for more details.
2.23 Java security enhancements (5.1.0)
In AIX 5L Version 5.1, a Java security enhancement has been made, providing several new APIs. These APIs are used by the Tivoli Security Toolkit. The new APIs allow you to develop more secure Java applications and are provided with the following new Java enhancements:
The Java enhancements are provided in 32-bit and 64-bit versions, as provided in Table 6 and discussed in the following sections. The 64-bit versions are only available on the Itanium-based platform.
Table 6. Java enhancements versus fileset
2.23.1 Certificate Management ProtocolCertificate Management Protocol (CMP) provides support to online interactions between Public Key Infrastructure (PKI) components. For a full description of CMP, refer to RFC 2510 and 2511 for CRMF. These RFCs are available at http://www.ietf.org/rfc.html.
2.23.2 Java Cryptography ExtensionJava Cryptography Extension (JCE) provides a framework and implementations for encryption and key handling. For more information about JCE, visit http://java.sun.com/products/jce.
2.23.3 Java Secure Sockets ExtensionJava Secure Sockets Extension (JSSE) enables secure Internet communications. It provides a Java version of Secure Sockets Layer (SSL) and Transport Layer Security (TLS) protocols. For more information about JSSE, visit http://java.sun.com/products/jsse.
2.23.4 Public-Key Cryptography StandardsIBM Public-Key Cryptography Standards (PKCS) implementation supports the following RSA standards: PKCS #1, #3, #5, #6, #7, #8, #9, #10, and #12. For more information about PKCS, visit http://www.rsasecurity.com/rsalabs/pkcs/index.html.
2.24 Java currency
In AIX 5L, the default Java version installed is IBM AIX Developer Kit, Java2 Technology Edition, Version 1.3.0.
The default AIX Developer Kit is installed in /usr/java130. Please see the README for instructions on how to setup the PATH environment variable prior to using the Developer Kit. When multiple versions of the Developer Kit are installed, setting the PATH selects the version of the Developer Kit that runs.
Java installed on AIX 5L is, by default, the 32-bit Java 1.3.0. The 64-bit Java 1.3.0 will also run on AIX 5L Itanium-based systems, but will not be installed by default and will be in a different directory when it is installed.
The Web site specifically for Java on AIX is: http://www.ibm.com/developerworks/java/jdk/aix/
Chapter 2. Development environment and tool enhancements 49
50 AIX 5L Differences Guide Version 5.1 Edition
Chapter 3. LVM and file system enhancements
AIX 5L introduces several new features for the logical volume manager and supports the second generation journaled file system (JFS2) and the /proc pseudo file system.
3.1 Summary of the enhancements
The following enhancements to volume group commands in AIX 5L will be discussed in this section.
• New ownership of root file system
• The redefinevg command
• The read-only varyonvg command
• LVM hot spare disk in a volume group
• Support for different logical track group sizes
• LVM hot-spot management
• The migratelp command
• The recreatevg command
• The mkvg command
• The mklv and extendlv commands
• The /proc file system
• The Enhanced Journaled File System
• Performance enhancements for statd, AutoFS, and CacheFS
The following sections contain the enhancements pertaining to the LVM on AIX.
3.2.1 The redefinevg commandThe command redefinevg is rewritten in C to improve performance.
3.2.2 Read-only varyonvgThe command varyonvg now supports a -r flag that allows a volume group to be varied-on in read-only mode.
3.2.3 LVM hot spare disk in a volume groupThe chpv and the chvg commands are enhanced with a new -h flag that allows you to designate disks as hot spare disks in a volume group and to specify a policy to be used in the case of failing disks. These commands are not replacements for the sparing support available with SSA disks; they complement it. You can also use them with SSA disks when you add one to your volume group.
There is a new -s flag for the chvg command that is used to specify synchronization characteristics.
The following command marks hdisk1 as a hot spare disk:
# chpv -hy hdisk1
This is only successful if there are not already allocated logical partitions on this disk. Using n instead of y would remove the hot spare disk marker. If you add a physical volume to a volume group (to mark it as a hot spare disk), the disk has to have, at least, the same capacity as the smallest disk already in the volume group.
After you have marked one or more disks as hot spare disks, you have to decide which policy to use in case a disk is starting to fail. There are four different policies you can specify with the -h flag, shown using the following syntax:
These new options have an effect only if the volume group has mirrored logical volumes.
Note
52 AIX 5L Differences Guide Version 5.1 Edition
# chvg -hhotsparepolicy -ssyncpolicy VolumeGroup
The following four values are valid for the hotsparepolicy argument:
y This policy automatically migrates partitions from one failing disk to one spare disk. From the pool of hot spare disks, the smallest one that is big enough to substitute for the failing disk will be used.
Y This policy automatically migrates partitions from a failing disk, but might use the complete pool of hot spare disks.
n No automatic migration will take place. This is the default value for a volume group.
r This value removes all disks from the pool of hot spare disks for this volume group.
The syncpolicy argument can only use the values y and n.
y This will automatically try to synchronize stale partitions.
n This will not automatically try to synchronize stale partitions.
The latter argument is also the default for a volume group.
After setting this up, Volume Group Status Area (VGSA) write failures and Mirror Write Consistency (MWC) write failures will mark a physical volume missing and start the migration of data to the hot spare disk.
Web-based System Manager allows for easy configuration of Hot Spare Disk support as discussed in the following sections.
Chapter 3. LVM and file system enhancements 53
Enabling Hot Spare Disk Support in an existing Volume GroupProperties can be changed on the fly for an existing volume group in order to turn on hot spare disk support for that volume group by enabling the appropriate check box on the Volume Group Properties Dialog panel (Figure 5 on page 54).
Figure 5. Volume Group Properties dialog
54 AIX 5L Differences Guide Version 5.1 Edition
After enabling hot spare disk support for a volume group, the Physical Volumes notebook tab of the Volume Group properties dialog (Figure 6) allows you to add available physical volumes to the Volume Group as hot spare disks.
Figure 6. Physical Volumes notebook tab
Chapter 3. LVM and file system enhancements 55
Enabling Hot Spare during creation of a new Volume GroupWhen creating a new volume group in the Web-based System Manager application, the Advanced Method of volume group creation allows you to specify hot spare disk support options (Figure 7).
Figure 7. Advanced Method of volume group creation
56 AIX 5L Differences Guide Version 5.1 Edition
As in previous releases of Web-based System Manager, you assign physical volumes to a volume group, along with Volume Group name and any other attributes, such as Logical Track Maximum data transfer size (Figure 8).
Figure 8. New Volume Group dialog
Chapter 3. LVM and file system enhancements 57
Subsequent panels in the sequential dialog allow configuration of large volume groups (those volume groups as great as 128 physical disks) and allow for support of 'Big' disks (those with more than 1016 partitions per physical disk) as shown in Figure 9.
Figure 9. New Volume Group, second panel in dialog
58 AIX 5L Differences Guide Version 5.1 Edition
The third panel in the new volume group sequence allows you to enable the support for hot spare disks (Figure 10).
Figure 10. New Volume Group, third panel in dialog
Chapter 3. LVM and file system enhancements 59
The fourth panel allows you to select any unused physical volumes that you may have in your system and assign them to the volume group being created as hot spares (Figure 11).
Figure 11. New Volume Group, fourth panel in dialog
60 AIX 5L Differences Guide Version 5.1 Edition
The fifth panel allows you to set the migration characteristics for the 'fail over' from a bad disk to those assigned as hot spares in the hot spare disk pool (Figure 12).
Figure 12. New Volume Group, fifth panel in dialog
3.2.4 Support for different logical track group sizesAIX 5L now supports different logical track group (LTG) sizes. In previous versions of AIX, the only supported LTG size was 128 KB. This is still the default for the creation of new volume groups, even under AIX 5L. You can change this value when you create a new volume group with the mkvg command, or later for an existing volume group with the chvg command.
The LTG corresponds to the maximum allowed transfer size for disk I/O (many disks today support sizes larger than 128 KB). To take advantage of these larger transfer sizes and get a better disk I/O performance, AIX 5L now accepts values of 128 KB, 256 KB, 512 KB, and 1024 KB for the LTG size, and possibly even larger values in the future. The maximum allowed value is the smallest maximum transfer size supported by all disks in a volume group. The mkvg SMIT screen shows all four values in the selection dialog for the LTG. The chvg SMIT screen shows only the values for the LTG supported by the disks. The supported sizes are discovered using an ioctl(IOCINFO) call.
Chapter 3. LVM and file system enhancements 61
Since there may be several physical volumes existing in one volume group, and LTG is an attribute of a volume group, you should specify minimum LTG size among physical volumes, if they consist of different types of disk drives.
The following command shows how to change the LTG size for testvg from the default of 128 KB to 256 KB.
# chvg -L256 testvg
To ensure the integrity of the volume group, this command varies off the volume group during the change. The mkvg command supports the same new -L flag.
To find out what the maximum supported LTG size of your hard disk is, you can use the lquerypv command with the -M flag. The output gives the maximum LTG size in KB, as can be seen from the following lines:
# /usr/sbin/lquerypv -M hdisk0256
You can list the values for all the new options (LTG size, AUTO SYNC, and HOT SPARE) with the lsvg command. Note that the volume group identifier has been widened from 16 to 32 characters.
# lsvg rootvgVOLUME GROUP: rootvg VG IDENTIFIER: 000bc6fd00004c00000000e10fdd7f52VG STATE: active PP SIZE: 16 megabyte(s)VG PERMISSION: read/write TOTAL PPs: 1084 (17344 megabytes)MAX LVs: 256 FREE PPs: 1032 (16512 megabytes)LVs: 11 USED PPs: 52 (832 megabytes)OPEN LVs: 10 QUORUM: 2TOTAL PVs: 2 VG DESCRIPTORS: 3STALE PVs: 0 STALE PPs: 0ACTIVE PVs: 2 AUTO ON: yesMAX PPs per PV: 1016 MAX PVs: 32LTG size: 128 kilobyte(s) AUTO SYNC: yesHOT SPARE: yes (one to one)
Logical Track Group size can be selected at volume group creation time or changed from the Physical Volumes tab in the Volume Group Properties Notebook. Web-based System manager, in the 'Logical track maximum data transfer size' drop-down list, shows all data transfer sizes. Those that are not valid for the selected volume group are grayed out and not selectable (Figure 13 on page 63).
62 AIX 5L Differences Guide Version 5.1 Edition
Figure 13. Volume Group Properties dialog
3.2.5 LVM hot-spot managementTwo new commands, lvmstat and migratelp, help you to identify and remedy hot-spot problems within your logical volumes. You have a hot-spot problem if
Because the physical volume and volume group identifiers have been changed from 16 characters to 32 characters, you can only access a volume group created on AIX 5L from an AIX Version 4.3.3 system after you have applied the appropriate fixes from the Fall 2000 AIX Version 4.3.3 Update CD. You can access a volume group created on AIX Version 4.3.3 on an AIX 5L system, but using any of the new features, like setting a different logical track group size, will change some of the volume group identification internal data structures in a way that the volume group becomes unusable on an AIX Version 4.3.3 or previous release.
Note
Chapter 3. LVM and file system enhancements 63
some of the logical partitions on your disk have so much disk I/O that your system performance noticeably suffers. By default, no statistics for the logical volumes are gathered. The gathering of statistics has to be enabled first with the lvmstat command for either a logical volume or an entire volume group.
The complete command syntax for lvmstat is as follows:
With the -c flag, you specify how many lines from the top you want to have listed.
With the -C flag, you can clear the counter for the specified logical volume or volume group.
The -s flag suppresses the header lines for subsequent outputs if you are using the interval and iteration arguments. In the case of interval and iteration, only values for logical volumes for which there was a change in the last interval will be outputted. If there was no change at all, only a . (period) will be printed to the console.
The first use of lvmstat, after enabling, displays the counter values since system reboot. Each usage thereafter displays the difference from the last call.
Flag Description
-e Enables the gathering of statistics about the logical volume.
-d Disables the gathering of statistics.
-l Specifies the name of a logical volume to work on.
-v Specifies the name of a volume group to work on. You can also enable, in the first step, a volume group and selectively disable afterwards some logical volumes you are not working with.
-F Separates the output of the statistics by colons (to make it easier for parsing by other scripts).
64 AIX 5L Differences Guide Version 5.1 Edition
The following example is a session where data was copied from /unix to /tmp:
As shown, there is activity on the hd3 logical volume, which is mounted on /tmp, on hd8, which is the jfslog logical volume, on hd4, which is / (root), on hd2, which is /usr, and on hd9var, which is /var. The following output provides details on hd3 and hd2:
The output for a volume group provides a summary for all the I/O activity of a logical volume. It is separated into the number of I/O requests (iocnt), the kilobytes read and written (Kb_read and Kb_wrtn, respectively), and the transferred data in KB/s (Kbps). If you request the information for a logical volume, you receive the same information, but for each logical partition separately. If you have mirrored logical volumes, you receive statistics for each of the mirror volumes. In the previous sample output, several lines for logical partitions without any activity were omitted. The output is always sorted in decreasing order on the iocnt column.
Web-based System Manager allows for easy configuration of Hot Spot Management.
66 AIX 5L Differences Guide Version 5.1 Edition
Enabling Hot Spot Reporting at the Volume Group Level, from the Hot Spot Reporting tab of the Volume Group Properties tab (Figure 14), turns on the reporting feature for all logical volumes within the volume group.
Figure 14. Volume Group Properties Hot Spot Reporting tab
Chapter 3. LVM and file system enhancements 67
Hot Spot Reporting can also be enabled from the Hot Spot Reporting tab of the Logical Volumes Property notebook (Figure 15) without having to enable the feature for the entire volume group.
Figure 15. Logical Volumes Properties Notebook
68 AIX 5L Differences Guide Version 5.1 Edition
Once the Hot Spot feature is enabled, either for a logical volume or a volume group, the user can select either entity and use the pull-down or pop-up menu to access the "Manage Hot Spots..." Sequential dialog (Figure 16).
Figure 16. Manage Hot Spots sequential dialog
Chapter 3. LVM and file system enhancements 69
The first dialog in the series, once "Manage Hot Spots..." has been selected (Figure 17), allows you to define your reporting and display statistics.
Figure 17. Hot Spot Management
70 AIX 5L Differences Guide Version 5.1 Edition
The second dialog displays information the user specified in the previous panel. This includes Logical Partition number, number of mirrors, I/O count, KB read and written, and data transfer rate (Figure 18).
Figure 18. Hot Spot Management statistics
Chapter 3. LVM and file system enhancements 71
This list not only displays information, but also allows you to select (Figure 19) the logical partition that the user may want to migrate to a disk with less I/O activity. This feature allows the user to manage potential disk I/O bottlenecks.
Figure 19. Hot Spot selection
72 AIX 5L Differences Guide Version 5.1 Edition
The final dialog panel (Figure 20) in the sequence allows the user to specify the destination physical partition and check the information before committing any changes to the system.
Figure 20. Physical destination partition
3.2.6 The migratelp commandWith the output of the lvmstat command described in the previous section, it is easy to identify the logical partitions with the heaviest traffic. If you have several logical partitions with heavy usage on one physical disk and want to balance these across the available disks, you can use the new migratelp command to move these logical partitions to other physical disks.
The migratelp command will not work with partitions of striped logical volumes.
Note
Chapter 3. LVM and file system enhancements 73
This command uses, as parameters, the name of the logical volume, the number of the logical partition (as it is displayed in the lvmstat output), and an optional number for a specific mirror copy. If information is omitted, the first mirror copy is used. You have to specify the target physical volume for the move; in addition, you can specify a target physical partition number. If successful, the output will appear similar to the following:
# migratelp hd3/1 hdisk1/109migratelp: Mirror copy 1 of logical partition 1 of logical volume
hd3 migrated to physical partition 109 of hdisk1.
3.2.7 The recreatevg commandThe recreatevg command is used when you have a disk to disk copy to perform, but you want to create a unique volume and not an exact mirror. A direct dd copy would create a problem because all the information, such as VGDAs and LVs, in one disk is copied to the other. Duplicate volume group, logical volume, and file system mount points are prevented by using the recreatevg command. Command options allow you to specify a logical volume name, a prefix label to uniquely define the VG. Automatic name generation is the default.
The recreatevg command is also supported in AIX Version 4.3.3maintenance level 8 with APAR IY10456. To utilize the functionality provided by this command, you have to issue the following command sequence after the real duplication of the physical volume contents using ESS's FlashCopy function or whatever resembled function. These operations are mandatory to avoid potential collisions of LVM component names (PVID, volume group name, logical volume name, file system name).
In the previous example, hdiskX is the duplicated target physical volume name, newvg_name is newly assigned volume group name, /newfs and newlv are used for prefix of the newly assigned file systems and logical volumes contained in this volume group.
3.2.8 The mkvg command (5.1.0)In AIX 5L Version 5.1, the mkvg command has been enhanced to automatically determinate the correct PP size when creating a new volume group. If no PP size is specified (-s flag), the mkvg command attempts to figure out the correct PP size based on the disks you trying to put into a volume group.The following examples show how to use the new enhancements.
74 AIX 5L Differences Guide Version 5.1 Edition
In the first example, a 2.2 GB disk is used to create a new volume group named ds9vg. The PP size for the new volume group should be at least 4 MB.
# mkvg -y ds9vg hdisk2ds9vg
The output of the lsvg command shows that the volume group was created with a PP size of 4 MB:
# lsvg ds9vgVOLUME GROUP: ds9vg VG IDENTIFIER: 000bc6fd00004c00000000e524747a95VG STATE: active PP SIZE: 4 megabyte(s)VG PERMISSION: read/write TOTAL PPs: 537 (2148 megabytes)MAX LVs: 256 FREE PPs: 537 (2148 megabytes)LVs: 0 USED PPs: 0 (0 megabytes)OPEN LVs: 0 QUORUM: 2TOTAL PVs: 1 VG DESCRIPTORS: 2STALE PVs: 0 STALE PPs: 0ACTIVE PVs: 1 AUTO ON: yesMAX PPs per PV: 1016 MAX PVs: 32LTG size: 128 kilobyte(s) AUTO SYNC: noHOT SPARE: no
For the second example, two 8 GB disks and one 2.2 GB disk are used to create a new volume group. Here, the PP size must be 16 MB or greater:
# mkvg -y bigvg hdisk3 hdisk4 hdisk5bigvg
To verify the size chosen, use the lsvg command and have a look at the PP size field:
# lsvg bigvgVOLUME GROUP: bigvg VG IDENTIFIER: 000bc6fd00004c00000000e524858625VG STATE: active PP SIZE: 16 megabyte(s)VG PERMISSION: read/write TOTAL PPs: 1218 (19488 megabytes)MAX LVs: 256 FREE PPs: 1218 (19488 megabytes)LVs: 0 USED PPs: 0 (0 megabytes)OPEN LVs: 0 QUORUM: 2TOTAL PVs: 3 VG DESCRIPTORS: 3STALE PVs: 0 STALE PPs: 0ACTIVE PVs: 3 AUTO ON: yesMAX PPs per PV: 1016 MAX PVs: 32LTG size: 128 kilobyte(s) AUTO SYNC: noHOT SPARE: no
3.2.9 The mklv and extendlv command (5.1.0)In AIX 5L Version 5.1, to create or extend a logical volume, you can now specify blocks, KB, MB, and GB, rather than number of partitions. The mklv and extendlv commands automatically determine the minimum number of partitions needed to fill the request.
Size units that can be used are as follows:
b,B For blocks (512 byte)k,K For KB
Chapter 3. LVM and file system enhancements 75
m,M For MBg,G For GB
In the following example, a logical volume that contains at least 1 block (512 byte) is created. Since the PP size of the bigvg volume group is 16 MB, the size of the new logical volume will be 16 MB.
MIRROR WRITE CONSISTENCY: on/ACTIVEEACH LP COPY ON A SEPARATE PV ?: yes
# lsvg -l bigvgbigvg:LV NAME TYPE LPs PPs PVs LV STATE MOUNT POINTmb_lv jfs 309 309 1 closed/syncd N/A
The mb_lv logical volume in the next example is extended by 50 MB. Since a PP has 16 MB in size, the extended LV should at least have four more PPs.
# extendlv mb_lv 50M
# lsvg -l bigvgbigvg:LV NAME TYPE LPs PPs PVs LV STATE MOUNT POINTblock_lv jfs 1 1 1 closed/syncd N/Ak_lv jfs 1 1 1 closed/syncd N/Akb_lv jfs 2 2 1 closed/syncd N/Amb_lv jfs 313 313 1 closed/syncd N/A#
3.3 The /proc file system
AIX 5L provides support of the /proc file system. This pseudo file system maps processes and kernel data structures to corresponding files. The output of the mount and df commands showing /proc is provided in the following examples:
The entry in the /etc/vfs file appears as follows:
# lsvfs procfsprocfs 6 none none
Each process is assigned a directory entry in the /proc file system with a name identical to its process ID. In this directory, several files and subdirectories are created corresponding to internal process control data
Chapter 3. LVM and file system enhancements 77
structures. Most of these files are read-only, but some of them can also be written to and be used for process control purposes. The interfaces to these files are the standard C language subroutines open(), read(), write(), and close(). It is possible to have several concurrent readers, but for reliability reasons, the first write access should use the exclusive flag, so that subsequent opens for write access fail. The description of the data structures used can be found in /usr/include/sys/procfs.h. The ownership of the files in the /proc file system is the same as for the processes they represent. Therefore, regular users can only access /proc files that belong to their own processes.
A simple example illustrates this further. Suppose a process is waiting for standard input (the information in the process data structures is basically static). If you look at an active process, a lot of the information would constantly change:
# ls -l /proc/19082/total 0dr-xr-xr-x 1 root system 0 Sep 15 15:12 .dr-xr-xr-x 1 root system 0 Sep 15 15:12 ..-rw------- 1 root system 0 Sep 15 15:12 as-r-------- 1 root system 128 Sep 15 15:12 cred--w------- 1 root system 0 Sep 15 15:12 ctldr-xr-xr-x 1 root system 0 Sep 15 15:12 lwp-r-------- 1 root system 0 Sep 15 15:12 mapdr-x------ 1 root system 0 Sep 15 15:12 object-r--r--r-- 1 root system 448 Sep 15 15:12 psinfo-r-------- 1 root system 1024 Sep 15 15:12 sigact-r-------- 1 root system 1520 Sep 15 15:12 status-r--r--r-- 1 root system 0 Sep 15 15:12 sysent
Table 8 provides the function of the pseudo files listed in the previous output.
Table 8. Function of pseudo files in /proc/<pid> directory
Pseudo file name Function
as Read/write access to address space.
cred Credentials.
ctl Write access to control process. For example: stop or resume.
lwp directory Kernel thread information.
map Virtual address map.
object directory Map file names.
78 AIX 5L Differences Guide Version 5.1 Edition
The pseudo file, named as, allows you to access the address space of the process, and as it can be seen by the rw (read/write) access flags, you can read and write to the memory belonging to the process.
It should be understood that only the user regions of the process' address can be written to under /proc. Also, a copy of the address space of the process is made while tracing under /proc. This is the address space that can be modified. This is done so when the as file is closed, the original address space is unmodified.
The cred file provides information about the credentials associated with this process. Writing to the ctl file allows you to control the process; for example, to stop or to resume it. The map file allows access to the virtual address map of the process. Information usually shown by the ps command can be found in the psinfo file, which is readable for all system users. The current status of all signals associated with this process is recorded in the sigact file. State information for this process, such as the address and size of the process heap and stack (among others), can be found in the status file. Finally, the sysent file allows you to check for the system calls available to this process.
The object directory contains files with names as they appear in the map file. These files correspond to files mapped in the address space of the process. For example, the content of this directory appears as follows:
# ls -l /proc/19082/objecttotal 13192dr-x------ 1 root system 0 Sep 15 15:09 .dr-xr-xr-x 1 root system 0 Sep 15 15:09 ..-r-xr-xr-x 1 bin bin 6264 Aug 24 21:16 a.out-rwxr-xr-x 1 bin bin 14342 Aug 22 22:37 jfs.10.5.10592-r-xr-xr-x 2 bin bin 6209308 Aug 24 13:03 jfs.10.5.2066-r--r--r-- 1 bin bin 118267 Aug 24 15:06 jfs.10.5.2076-r-xr-xr-x 1 bin bin 11009 Aug 24 14:59 jfs.10.5.4129-r--r--r-- 1 bin bin 377400 Aug 24 15:05 jfs.10.5.4161-r-xr-xr-x 1 bin bin 6264 Aug 24 21:16 jfs.10.5.6371
psinfo Information for the ps command; readable by everyone.
sigact Signal status.
status Process state information, such as address, size of heap or stack.
sysent Information about system calls.
Pseudo file name Function
Chapter 3. LVM and file system enhancements 79
The a.out file always represents the executable binary file for the program running in the process itself. Because the example program is written in C and must use the C runtime library, it can be concluded from the size of the entry named jfs.10.5.2066 that this corresponds to the /usr/ccs/lib/libc.a file. Checking this file reveals that the numbers in the file name are the major and minor device numbers, and the inode number, respectively. This can be seen in the following output, where /usr corresponds to /dev/hd2 and the ncheck command is used to find a file belonging to an inode in a specific file system:
# ls -l /dev/hd2brw-rw---- 1 root system 10, 5 Sep 20 16:09 /dev/hd2# ncheck -i 2066 /dev/hd2/dev/hd2:2066 /ccs/lib/libc.a
The lwp directory has subdirectory entries for each kernel thread running in the process. The term lwp stands for lightweight process and is the same as the term thread used in the AIX documentation. It is used in the context of the /proc file system to keep a common terminology with the /proc implementation of other operating systems. The names of the subdirectories are the thread IDs. The test program has only one thread with the ID 54891, as shown in the output of the ps command. Therefore, only the content of this one thread directory is shown:
# ps -mo THREAD -p 19082USER PID PPID TID ST CP PRI SC WCHAN F TT BND COMMANDroot 19082 20678 - A 0 83 1 700e6244 200001 pts/3 - wc
- - - 54891 S 0 83 1 700e6244 10400 - - -# ls -l /proc/19082/lwp/54891total 0dr-xr-xr-x 1 root system 0 Sep 15 15:03 .dr-xr-xr-x 1 root system 0 Sep 15 15:03 ..--w------- 1 root system 0 Sep 15 15:03 lwpctl-r--r--r-- 1 root system 120 Sep 15 15:03 lwpsinfo-r-------- 1 root system 1200 Sep 15 15:03 lwpstatus
The lwpctl, lwpsinfo, and lwpstatus files contain thread specific information to control this thread, for the ps command, and about the state, similar to the corresponding files in the /proc/<pid> directory.
As an example of what can be obtained from reading these files, the following lines show the content of the cred file (after the use of the od command):
The output shows, in the left most column, the byte offset of the file in octal representation. The remainder of the lines are the actual content of the file in hexadecimal notation. Even if the directory listing shows the size of the file to be 128 bytes or 0200 bytes in octal, the actual output is 0260 or 176 bytes in size. This is due to the dynamic behavior of the last field in the corresponding structure. The digit 7 in the line with the number 0160 specifies the number of groups the user ID running this process belongs to. Because every user ID is at least part of its primary group, but belongs possibly to a number of other groups which can not be known in advance, only space for the primary group is reserved in the cred data structure. In this case, the primary group ID is zero, because the user ID running this process is root. Reading the complete content of the file, nevertheless, reveals all the other group IDs the user currently belongs to. The group IDs in this case (2, 3, 7, 8, 0xa (10), and 0xb (11)) map to the groups bin, sys, security, cron, audit, and lp. This is exactly the set of groups the user ID root belongs to by default.
3.4 The enhanced Journaled File System
The Journaled File System 2 (JFS2) is an enhanced and updated version of the JFS on AIX Version 4.3 and previous releases. The journaled file system JFS and JFS2 are native to the AIX operating system. The file system links the file and directory data to the structure used by storage and retrieval mechanisms.
Both JFS (the default) and JFS2 are available on POWER systems. Only JFS2 is supported on Itanium-based systems.
JFS2 has new features that includes extent based allocation, sorted directories, and dynamic space allocation for file system objects.
Chapter 3. LVM and file system enhancements 81
3.4.1 What’s new in JFS2?Table 9 on page 82 provides a comparison chart between the JFS2 and the standard JFS.
Table 9. Journaled File System specifications
3.4.1.1 Extent based addressing structuresJFS2 uses extent based addressing structures, along with aggressive block allocation policies, to produce compact, efficient, and scalable structures for mapping logical offsets within files to physical addresses on disk.
An extent is a sequence of contiguous blocks allocated to a file as a unit and is described by a triple, consisting of <logical offset, length, physical address>. The addressing structure is a B+-tree populated with extent
1 PB stands for PetaBytes, which is equal to 1,048,576 GigaBytes.2 TB stands for TeraBytes, which is equal to 1,024 GigaBytes.
82 AIX 5L Differences Guide Version 5.1 Edition
descriptors (the triples above), rooted in the inode, and keyed by logical offset within the file.
3.4.1.2 Variable block sizeJFS2 supports block sizes of 512, 1024, 2048, and 4096 bytes on a per file system basis, allowing users to optimize space utilization based upon their application environment. Smaller block sizes reduce the amount of internal fragmentation within files and directories and are more space efficient. However, small blocks can increase path length, since block allocation activities will occur more often than if a larger block size were used. The default block size is 4096 bytes, since performance, rather then space utilization, is generally the primary consideration for server systems.
3.4.1.3 Dynamic disk inode allocationJFS2 dynamically allocates space for disk inodes as required, freeing the space when it is no longer required. This support avoids the traditional approach of reserving a fixed amount of space for disk inodes at file system creation time, thus eliminating the need for customers to estimate the maximum number of files and directories that a file system will contain.
3.4.1.4 Directory organizationTwo different directory organizations are provided. The first organization is used for small directories and stores the directory contents within the directory's inode. This eliminates the need for separate directory block I/O as well as the need for separate storage allocation. Up to eight entries may be stored in-line within the inode, excluding the self (.) and parent (..) directory entries, which are stored in a separate area of the inode.
The second organization is used for larger directories and represents each directory as a B+-tree keyed on name. The intent is to provide faster directory lookup, insertion, and deletion capabilities when compared to traditional unsorted directory organizations.
3.4.1.5 On-line file system free space defragmentationJFS2 supports the defragmentation of free space in a mounted and actively accessed file system. Once a file system's free space has become fragmented, defragmenting the file system allows JFS2 to provide more I/O-efficient disk allocations and to avoid some out of space conditions.
Defragmentation support is provided in two pieces. The first piece is a user space JFS2 utility which examines the file system's metadata to determine the extent of free space fragmentation and to identify the file system reorganization activities required to reduce or eliminate the fragmentation.
Chapter 3. LVM and file system enhancements 83
The second piece is integrated into the JFS2 kernel extension and is called by the user space utility. This second piece actually performs the reorganization activities, under the protection of journaling and with appropriate serialization to maintain file system consistency.
3.4.2 CompatibilityIn this section, how the JFS2 interacts with the JFS environment is described.
3.4.2.1 Mixed volumes compatibilityIn some cases, there will be many servers coexisting with different levels of AIX in a data center. From the JFS point of view, you can only import volume groups and mount file systems from AIX 4.X to AIX 5L servers. It is not possible to mount the JFS2 file system on AIX 4.X machines.
AIX 5L servers importing volume groups with JFS file systems.Figure 21 on page 84 shows an example of an AIX Version 4.X machine exporting a volume group, and an AIX 5L machine importing this volume group and mounting a file system.
Figure 21. Example of a server with AIX 5L importing and mounting JFS volumes
AIX 5L AIX 4.X
importing the volume group with JFS filesystem
/myfs
myvg
AIX 5L AIX 4.X
/myfs
myvg
exporting a volume group in AIX 4.x
84 AIX 5L Differences Guide Version 5.1 Edition
3.4.2.2 NFS mounting compatibilityThere are two possible scenarios when mounting NFS file systems across different versions of JFS:
1. An AIX 5L JFS2 machine NFS mounting a remote JFS file system, as shown in Figure 22 on page 85.
Figure 22. AIX 5.0 JFS2 machine NFS mounting a JFS file system
2. An AIX 4.X JFS machine NFS mounting a remote JFS2 file system, as can shown in Figure 23.
In a case of JFS-type migration (for example, for performance or security reasons), a backup/restore approach is required. There is no LVM nor JFS command that migrates JFS volumes automatically.
It is possible to migrate JFS volumes in two different ways:
1. Backing up the file system, removing it, and recreating it in the JFS2 type, then restoring the backup above the new file system.
2. If there is enough disk space available in the volume group, it is possible to create a new JFS2 file systems structure with the same attributes, and just copy all the files from one file system to another.
JFS-type migration note
AIX 5L AIX 4.x
/myfs_remote
exported JFS1 filesystem
/myfs
Chapter 3. LVM and file system enhancements 85
Figure 23. AIX 4.X JFS machine NFS mounting a JFS2 file system
Both scenarios have no compatibility issues.
3.4.3 Commands and utilities changesThere is a set of new commands included in AIX for JFS2 management, and a set of JFS commands that are updated to handle JFS2 file systems.
In this section, a brief explanation about these JFS commands is provided.
AIX 5L AIX 4.x
/myfs2_remote
exported JFS2 filesystem
/myfs2
86 AIX 5L Differences Guide Version 5.1 Edition
3.4.3.1 Creating a JFS2 file systemThe easiest way to create a JFS2 file system is through SMIT. Using the SMITjfs2 fast path will show a JFS2 management menu, as shown in Figure 24.
Figure 24. SMIT panel for JFS2 management
Using the SMIT menu, the first option, Add an Enhanced Journaled File System, creates the JFS2 file system, and the second option, Add an Enhanced File System on a Previously Defined Logical Volume, creates a JFS2 file system on a previously created logical volume, which may be needed to organize or by the application for instance.
In the following sections, the add options from Figure 24 are discussed.
Chapter 3. LVM and file system enhancements 87
Add an enhanced file systemThis option in the SMIT JFS2 menu allows the creation of a JFS2 file system with a size of 512-byte blocks and the mount point, as shown in Figure 25.
Figure 25. SMIT panel for adding a JFS2 file system
88 AIX 5L Differences Guide Version 5.1 Edition
Add on a Previously Defined Logical VolumeIf a non-default logical volume is needed for the JFS2 file system creation, this logical volume must be defined prior to the file system creation.
The Logical Volume type must be assigned as JFS2; otherwise, it will not appear as a selectable logical volume in the file system creation, as shown in Figure 26.
Figure 26. SMIT panel for adding a Logical volume and assign as JFS2
After creating the logical volume, you must associate this logical volume with the file system to be created. Go to the SMIT jfs2 panel and choose the second option.
Chapter 3. LVM and file system enhancements 89
If the logical volume was created correctly, it must appear as a selectable logical volume, as shown in Figure 27.
Figure 27. SMIT panel for showing the logical volume selection
After selecting the correct logical volume, you have to complete the relevant SMIT fields.
3.4.3.2 Command Line InterfaceIt is also possible to create the JFS2 file system using the command line interface (CLI). An additional VFS type was added to the crfs command.
When using CLI operations, the crfs command requires a -v jfs2 flag in order to create a JFS2-type file system.
# crfs -v jfs2 -g rootvg -a size=1 -m /jfs2 -A yes -p rw -a agblksize=4096mkfs completed successfully.16176 kilobytes total disk space.New File System size is 32768.
The output above illustrates a crfs command used to create a /jfs2 file system using JFS2.
90 AIX 5L Differences Guide Version 5.1 Edition
3.4.3.3 Web-based System ManagerYou can manage JFS2 file systems from the Web-based System Manager interface. It is possible to create, enlarge, remove, and monitor JFS2 file systems from this management tool, as shown in Figure 28.
Figure 28. Web-based System Manager panel for file system creation
3.4.3.4 Check and Recover File SystemThe fsck utility was enhanced to also handle JFS2-type file systems. This utility checks the file system for consistency and repairs problems found.
# fsck -V jfs2 /myfs****************The current volume is: /dev/lv01File system is clean.All observed inconsistencies have been repaired.
If the -V flag is not specified, fsck will figure out the JFS type by the VFS type specified for this file system and work in the assumed way:
# fsck /myfs****************The current volume is: /dev/lv01File system is clean.
All observed inconsistencies have been repaired.
Chapter 3. LVM and file system enhancements 91
3.4.3.5 Creating a JFS2 Log DeviceIf you need to create a separate log device for a JFS2 file system, you must specify JFS2LOG as the logical volume type, as shown in Figure 29.
Figure 29. SMIT panel for adding a logical volume as a jfs2log device
Otherwise, you will not be able to format the log device and use it as a log for a JFS2 file system.
3.4.3.6 Format a JFS2 Log DeviceIf you need to format a separate log device for a JFS2 file system, keep in mind that the logform command is set to -V jfs2 flag in order to create a correct type of log device. For example:
If the -V flag is not specified, the logform command will try to determine what kind of log device will be created through the VFS information encountered in the logical volume.
To verify the VFS type of a logical volume, you must check the output of the following command:
# lslv newlog | grep TYPETYPE: jfs2log WRITE VERIFY: off
92 AIX 5L Differences Guide Version 5.1 Edition
3.4.3.7 Inline logA new type of log can be created for JFS2 type file systems. An inline log is a feature specific to JFS2 file systems that allows you to create the log within the same data logical volume.
With an inline log, each JFS2 file system can have its own log device without having to share this device. For a scenario with multiples of hot swap disk devices and large number of file systems, this feature can be used to improve RAS if a system loses a single disk that contains the log device for multiple file systems. See Figure 25 on page 88 for the SMIT panel with inline log enablement.
In the following example, the output for the mount command shows the logical volume and log device as the same device:
# mountnode mounted mounted over vfs date options----- --------------- --------------- ------ ------------ ---------------
3.4.4 JFS2 rootvg support for 64-bit systems (5.1.0)AIX 5L Version 5.1 introduced a feature to set all file systems in the rootvg as JFS2 type file systems.
While installing a system with the complete overwrite option, you can enable the 64-bit kernel and JFS2, as shown in Figure 30 on page 94. If this option is enabled, the installation task will create JFS2 file systems in the rootvg.
Chapter 3. LVM and file system enhancements 93
Figure 30. Advanced Options installation menu
If the system is not 64-bit enabled, the third menu item, regarding 64-bit kernel and JFS2, will not be displayed. If you do a migration install, the third menu item is also available, but it will not convert the existing file systems to JFS2. The installation task will install the 64-bit kernel only.
3.4.4.1 Complete overwrite installationAfter an new and complete overwrite installation, all file systems in the rootvg are of the type JFS2, as shown in the following example:
3.4.4.2 Migration installationA migration BOS install does not convert the existing file systems to JFS2. But, of course, you can create JFS2 file systems later on. The following example shows rootvg file systems as JFS:
# lsvg -l rootvgrootvg:LV NAME TYPE LPs PPs PVs LV STATE MOUNT POINThd5 boot 1 1 1 closed/syncd N/Ahd6 paging 48 48 1 open/syncd N/A
Advanced Options
Either type 0 and press Enter to install with current settings, or type thenumber of the setting you want to change and press Enter.
3.4.4.3 JFS2 support for NIM installationsFor NIM installations, you have to customize the bosinst.data file, if you want JFS2 for the root file systems. You need to enable the 64-bit kernel and JFS2 file systems option from the BOS install. In order to do that, the INSTALL_64BIT_KERNEL field needs to be set to yes.
3.4.5 Performance enhancements (5.1.0)To enhance the performance on a JFS2 file system, a vnode cache has been added and the inode generation numbers have changed.
3.4.5.1 Vnode cache The problem is that on each access of a file (vnode) by NFS, the vnode and its accompanying inode must be reactivated. Use of a vnode cache keeps
Only 64-bit enabled systems support NIM installations of the 64-bit kernel and JFS2 support for root file systems.
Note
Chapter 3. LVM and file system enhancements 95
these objects in an active state and it becomes much simpler to find and use them. The vnode cache has been adapted from the existing JFS design and implemented in JFS2.
• The existing interfaces have been renamed.
• Old interface names versus new interface names is provided in Table 10.
Table 10. Old JFS names versus new JFS2 interface names
• The vnc_remove interface has changed to handle the JFS2 requisites.
• The inode numbers are increased in size to 64 bits.
• The size of the cache had been tied to the size of the JFS inode cache. The default number is 50 cache entries per megabyte of real memory.
3.4.5.2 File system changesTo improve the hash key distribution, the inode generation number has changed. In AIX 5L Version 5.0, the inode generation number started at zero when a file system was mounted, and new inodes got ever increasing values. In AIX 5L Version 5.1, the inode generation number starts at a number derived from the current time. This results in more non-zero bits and more variation.
3.5 NFS statd multithreading
In AIX 5L, the NFS statd daemon is multithreaded. In AIX Version 4.3, when the statd daemon is detecting whether the clients are up or not, it hangs and waits for a time out when a client can not be found. If there are a large number of clients that are offline, it can take a long time to time out all of them sequentially. In AIX 5L, rpc.statd is now running as a daemon user, not as root user.
With a multithreading design, stat requests run in parallel to solve the time-out problem. The server statd monitors clients and the client’s statd monitors the server if a client has multiple mounts. Connections are dropped
Existing interface name New interface name
jfs_vnc_init vnc_init
jfs_vnc_lookup vnc_lookup
jfs_vnc_enter vnc_enter
jfs_vnc_remove vnc_remove
jfs_vnc_purge vnc_purge
96 AIX 5L Differences Guide Version 5.1 Edition
if the remote partner can not be detected without affecting other stat operations. The following example is an output from the ps -mo THREAD
command that shows three different threads for rpc.statd daemon:
# ps -mo THREAD -p 17570USER PID PPID TID ST CP PRI SC WCHAN F TT BND COMMAND
With this new feature, the AutoFS mounter daemon remains responsive, even if one of the servers from which it tries to mount file systems becomes unavailable. As a single-threaded application, it would not be possible for the kernel to switch to the corresponding process if that process waits for a network connection to an unresponsive server.
3.7 Cache file system enhancements
In AIX 5L, the cache file system (cachefs) allows 64-bit operations. In both 32- and 64-bit environments, cachefs now handles files larger than 2 GB. In AIX Version 4.3.3 and earlier releases, cachefs only runs on a 32-bit system and all files must be 2 GB (at a maximum).
When making the transition from a 32-bit POWER kernel to a 64-bit POWER kernel, there is no need to recreate the cache directory.
3.7.1 The cachefslog command (5.1.0)A new command is available in AIX 5L Version 5.1 named cachefslog. To use the cachefslog command, the user must be logged in as the superuser. The following example shows the setup of a cache file system (CacheFS) and the use of the cachefslog command to set up cache file system logging. In the example, the NFS mount point and exported file systems have already been set up, but are not mounted through the use of the standard mount command.
Chapter 3. LVM and file system enhancements 97
The /home file system of server3 is to be mounted locally on the /mnt directory using the following command:
If the df -k command is invoked, the mount point is displayed in the following manner:
Filesystem 1024-blocks Free %Used Iused %Iused Mounted on
server3:/home 16384 15800 4% 25 1%
/my_cachefs/.cfs_mnt_points/_home
server3:/home 16384 15800 4% 25 1% /mnt
The purpose of the cachefslog command is to display and set up where CacheFS statistics are logged. The cachefslog file is used to log CacheFS statistics, such as populating and removing files, and so forth. At this point, in the example, there is no log file for CacheFS. This is evident after running the following command:
# cachefslog /mnt
not logged: /mnt
To set up the file /my_cachefs/cachelog to log the statistics for CacheFS, the following command should be used:
AIX 5L introduces a new passive mirror write consistency check (MWCC) algorithm for mirrored logical volumes. This option only applies to big volume groups.
Previous versions of AIX used a single MWCC algorithm, which is now called the active MWCC algorithm, to distinguish it from the new algorithm. With active MWCC, records of the last 62 distinct logical transfer groups (LTG) written to disk are kept in memory and also written to a separate checkpoint area on disk. Because only new writes are tracked, if new MWCC tracking tables have to be written out to the disk checkpoint area, the disk performance can degrade if there are a lot of random write requests issued. The purpose of the MWCC is to guarantee the consistency of the mirrored logical volumes in case of a crash. After a system crash, the logical volume manager will use the LTG tables in the MWCC copies on disk to make sure that all mirror copies are consistent.
The new passive MWCC algorithm does not use an LTG tracking table, but sets a dirty bit for the mirrored logical volume as soon as the volume is opened for writes. This bit gets cleared only if the volume is successfully synced and is closed. In the case of a system crash, the entire mirrored logical volume will undergo a background re-synchronization spawned during varyon of the volume group, because the dirty bit has not been cleared. Once the background resynchronization completes, the dirty bit is cleared, but can be reset at any time if the mirrored logical volume is opened. It should be noted that the mirrored logical volume can be used immediately after system reboot, even though it is undergoing background resynchronization.
The trade-off for the new passive MWCC algorithm compared to the default active MWCC algorithm is better performance during normal system operations. However, there is additional I/O that may slow system
Chapter 3. LVM and file system enhancements 99
performance during the automatic background resynchronization that occurs during recovery after a crash.
The lslv and chlv commands have been changed accordingly. Instead of outputting just an off or on in the MIRROR WRITE CONSISTENCY field, the value now reads on/ACTIVE or on/PASSIVE, as shown in the following example:
The -w flag for the chlv command now accepts either an a or y option to turn on active mirror write consistency checking, or a p option to use the new passive MWCC algorithm. The n option turns off mirror write consistency checking.
The passive MWCC fucntion is supported on Big VG format volume groups only.
3.9 Thread-safe liblvm.a
In AIX 5L, the libraries implementing query functions of the logical volume manager (LVM) functions (liblvm.a) are now thread-safe. Because LVM commands must be able to run even when the system is booting or being installed, the LVM library can not rely on the availability of the pthread support library. Therefore, the internal architecture of the liblvm.a library ensures that the library is thread safe.
The following libraries are now thread safe:
• lvm_querylv
• lvm_querypv
100 AIX 5L Differences Guide Version 5.1 Edition
• lvm_queryvg
• lvm_queryvgs
3.10 The .indirect for JFS (5.1.0)
When a file is opened, an in-core inode is created by the operating system. The in-core inode contains a copy of all the fields defined in the disk inode, plus additional fields for tracking the in-core inode.
The JFS caches in-core inodes very aggressively. Once an in-core inode has been bound to a virtual memory object, the indirect pages required to access all of the file's indirect blocks are allocated. These indirect pages are not freed up until the inode is pushed out of cache, the file system is unmounted, or the file is deleted or truncated.
Failures due to .indirect exhaustion are increasing. The typical scenario is that the customer is copying a large number of large files to a large file system. Because the JFS caches the inode for each new target file, .indirect can fill up fairly quickly and writes will start failing with the errno of ENOMEM.
In the previous versions of AIX, the default behavior of the .indirect is to use a single segment, and the segment is used by the JFS to map in .indirect blocks. For AIX 5L Version 5.1, the default behavior is to use multiple segments. In all cases, the user is able to specify, using a mount option, whether or not multiple segments are used, thus having the ability to override the default.
Additional file system specific options for the mount command are as follows:
-o Options mind Specifies the use of multiple segment default foraix Version 5.1
nomind Specifies the use of single segment
3.11 Complex inode lock (5.1.0)
In AIX 5L Version 5.1, a complex inode lock has been added to allow multiple simultaneous readers and exclusive writers. The inode locks have been
At the time of writing, there are no man pages or command reference support available. This enhancement is for JFS only, JFS2 has a different design.
Note
Chapter 3. LVM and file system enhancements 101
changed to reduce contention on multiuser workloads. The inode lock macros are shown below:
• IWRITE_LOCK()
The INODE_LOCK() macro from previous versions of AIX has been renamed IWRITE_LOCK() in AIX 5L Version 5.1 and its function has changed to acquire the complex lock i_rwlock in write mode.
• IREAD_LOCK()
This is the new macro added to acquire the complex lock i_rwlock in read mode.
• INODE_UNLOCK()
The INODE_UNLOCK() macro of previous versions of AIX has been changed to release the complex lock i_rwlock.
• ISIMPLE_LOCK()
A new inode lock macro called ISIMPLE_LOCK() has been added and its function is to acquire the simple lock i_nodelock.
• ISIMPLE_UNLOCK()
A new inode unlock macro called ISIMPLE_UNLOCK().
3.12 Uppercase mapping for ISO CD-ROM file systems (5.1.0)
For some case sensitive applications, such as SAP, there is a requirement that the content of the CD-ROM be translated into uppercase where, in fact, this content is recorded on the medium in lower or mixed case. An option has been added to the mount command in AIX 5L Version 5.1 to accommodate this. Note that this feature is for ISO formatted CD-ROMs.
# mount -v’cdrfs’ -p -r -o upcase /dev/cd0 /cdrom
# ls /cdrom
CDLABEL.ASC DATA LABEL.ASC OS390 VERSION.EBC
CDLABEL.EBC DOCU LABEL.EBC UNIX
CRCFILE.DAT GROUP.ASC NT VERSION.ASC
Using the standard method of mounting a CD-ROM is still supported and the content remains in lowercase.
# mount -v’cdrfs’ -p -r /dev/cd0 /cdrom
# ls /cdrom
cdlabel.asc data label.asc os390 version.ebc
cdlabel.ebc docu label.ebc unix
crcfile.dat group.asc nt version.asc
102 AIX 5L Differences Guide Version 5.1 Edition
The nocase option of the mount command, at the time of writing, is still under development and will probably be released at a later date. This option will preserve the case as it is on the CD-ROM.
# mount -v’cdrfs’ -p -r -o nocase /dev/cd0 /cdrom
# ls /cdrom
CDLABEL.ASC DATA LABEL.ASC OS390 VERSION.EBC
CDLABEL.EBC DOCU LABEL.EBC UNIX
CRCFILE.DAT GROUP.ASC NT VERSION.ASC
The upcase and nocase mount options are not available in the SMIT mount panels or other system administration tools.
3.13 The root file system ownership
In previous versions of AIX, the root file system (/) was owned by bin.bin. In AIX 5L Version 5.1, that ownership has changed to root.system to avoid the root user’s dead letter from writing to the root file system.
Chapter 3. LVM and file system enhancements 103
104 AIX 5L Differences Guide Version 5.1 Edition
Chapter 4. System management and utility enhancements
AIX 5L provides many enhancements in the area of system management and utilities. This chapter discusses these enhancements.
AIX 5L Version 5.1 has been enhanced to handle electronic software license agreements. There are new features to administer license agreements and associated documents. Information about all available license agreements on the system is kept in the /usr/lib/objrepos/lag agreement database file. The agreement database only includes license agreements information and no information about usage licenses such as administered by LUM. The agreement text itself is stored in the /usr/swlag/<locale> directory. The license agreement database is designed so that license information from non-IBM installation programs can be integrated.
The content of a license agreement file might appear similar to the following:
# more /usr/swlag/en_US/BOS.liInternational Program License Agreement
Part 1 - General Terms
PLEASE READ THIS AGREEMENT CAREFULLY BEFORE USING THE PROGRAM. IBM WILL LICENSE THEPROGRAM TO YOU ONLY IF YOU FIRST ACCEPT THE TERMS OF THIS AGREEMENT. BY USING THE PROGRAMYOU AGREE TO THESE TERMS. IF YOU DO NOT AGREE TO THE TERMS OF THIS AGREEMENT, PROMPTLYRETURN THE UNUSED PROGRAM TO THE PARTY (EITHER IBM OR ITS RESELLER) FROM WHOM YOU ACQUIREDIT TO RECEIVE A REFUND OF THE AMOUNT YOU PAID.
The Program is owned by International Business Machines Corporation or one of itssubsidiaries (IBM) or an IBM supplier, and is copyrighted and licensed, not sold.
The term "Program" means the original program and all whole or partial copies of it. AProgram consists of machine- readable instructions, its components, data, audio-visualcontent (such as images, text, recordings, or pictures), and related licensed materials.
This Agreement includes Part 1 - General Terms, Part 2 - Country-unique Terms, and"License Information" and is the complete agreement regarding the use of this Program,and replaces any prior oral or written communications between you and IBM. The terms ofPart 2 and License Information may replace or modify those ofPart 1.
1. License
Use of the Program
IBM grants you a nonexclusive license to use the Program You may 1) use the Program to theextent of authorizations you have acquired and 2) make and install copies to support thelevel of use authorized, providing you reproduce the copyright notice and any otherlegends of ownership on each copy, or partial copy, of the Program.If you acquire this Program as a program upgrade, your authorization to use the Programfrom which you upgraded is terminated.
You will ensure that anyone who uses the Program does so only in compliance with the termsof this Agreement.You may not 1) use, copy, modify, or distribute the Program except as provided in thisAgreement; 2) reverse assemble, reverse compile, or otherwise translate the Programexcept as specifically permitted by law without the possibility of contractual waiver; or3) sublicense, rent, or lease the Program.
4.1.1 The inulag commandThe inulag command is a front end to the subroutines to manage license agreements. Options other than listing the contents of the database can only be done by root, since the agreement database is writable only by root. The inulag command has several flags; for detailed information, see the man pages or the online documentation.
The -l flag, for example, lists all available software license agreements:
4.1.2 installp enhancementsThe installp command has been modified to recognize, display, require, and log software license agreements. The -E flag has been added to display software license agreements. The -Y flag is used to agree to the required software license agreements for software to be installed. For further or more detailed information, refer to the man pages or online documentation.
4.1.2.1 Using SMITThe SMIT install panels have been enhanced with two new fields to handle the software license agreements, as shown in Figure 31 on page 107.
106 AIX 5L Differences Guide Version 5.1 Edition
Figure 31. SMIT panel for accepting new software agreements using installp
The fields shown are as the follows:
ACCEPT new license agreements If this field set to YES, the -Y flag is added to the installp command. If the value is NO, the installation will fail.
Preview new LICENSE agreements If YES, the -p and -E flags are added to the installp command. This results in an installation preview only.
4.1.3 The lslpp command enhancementsThe lslpp command has also been enhanced to display the license agreement information of the installed filesets.
If the -E option is specified with the lslpp command, then the arguments will simply be passed through to inulag -l with an -n fileset argument for each fileset argument passed in, as shown in the following example:
4.1.4 Additional information in the bosinst.data fileThe bosinst.data file contains a new field named ACCEP_LICENSES. If the field is set to no, you have to accept all licenses after the first reboot. If ACCEP_LICENSES is set to yes, you will not be prompted after a new installation.
The following is an extract from the bosinst.data file:
# FORCECOPY = no, yes# ALWAYS_ALLOW = no, yescontrol_flow:
4.1.5 System installation (BOS install)Installing or migrating to AIX 5L Version 5.1 when not using a mksysb backup or SPOT copy will cause you to always accept the software license
108 AIX 5L Differences Guide Version 5.1 Edition
agreements. See Chapter 4.1.6, “Accepting licenses after reboot” on page 109 for more information.
In the case of an installation from a mksysb backup or a SPOT copy, then the ACCEPT_LICENSES value will dictate if you have to accept the license agreements manually or not. If ACCEPT_LICENSES=yes, then inulag -A will be invoked to accept the license agreements automatically. If ACCEPT_LICENSES=no, then inulag -D will be invoked to revalidate all license agreements. In that case you have to accept all agreements by the next system reboot. If ACCEPT_LICENSES was not set or set to some other value, then no inulag operation will take place.
4.1.6 Accepting licenses after rebootAfter a migration to AIX 5L Version 5.1 or a new install, you have to accept all software license agreements, as shown in Figure 32. If not, you probably used a mksysb or NIM install, while the ACCEP_LICENSES stanza in the bosinst.data file was set to yes.
Figure 32. Configuration Assistant, software license accepting screen after reboot
Click the View License button to show all outstanding licenses or just click the Accept button to accept all licenses at once.
Chapter 4. System management and utility enhancements 109
4.1.7 SMIT function enhancedSMIT screens have been added to display the content of the license agreement database, as shown in Figure 33.
Figure 33. SMIT panel for license management
4.2 Manual disk partitioning on Itanium-based platforms (5.1.0)
AIX traditionally has not supported partitioned disks. Currently, the entire disk is defined by an hdisk ODM object and /dev/hdiskn special file with a single major and minor number assigned to the physical disk. Currently, when a disk becomes a physical volume (having a PVID), an old style master boot record (MBR) renamed the IPL control block, which contains the PVID, is written into the first sector.
AIX 5L Version 5.1 allows for disks selected during BOS install to be manually or automatically partitioned. With manual partitioning, the installer can specify size of System and Physical Volume partitions on a disk when the efdisk utility is run during BOS Install.
110 AIX 5L Differences Guide Version 5.1 Edition
The Extensible Firmware Interface (EFI) used on Itanium-based platforms provides a set of boot time and runtime firmware services to the operating system boot loader and the operating system itself. EFI has defined a new disk partitioning scheme to replace the legacy DOS partitioning support.
When booting from a disk device, the EFI firmware utilizes one or more system partitions containing an EFI file system (FAT32) to locate EFI applications and drivers, including the OS boot loader. These applications and drivers provide OEMs the capability to extend firmware or provide the operating system with assistance during boot time or runtime. In addition, it is expected that operating systems will define partitions unique to the operating system. EFI applications, invoked from the EFI shell, also have the capability to display and potentially create additional partitions before the OS is booted.
Itanium-based systems support a maximum of seven partitions on a physical disk. Additional partitions beyond the first seven will be ignored. A new utility, efdisk, acts as a partition manager and provides the capability to display, create, or delete partitions on a designated physical disk. Partitioning changes to a disk will not become effective until the disk has been unconfigured, and configured again (chdev, rmdev, mkdev, cfgmgr, or reboot).
Special files will be created for the following partition types:
Entire physical disk n access (used by efdisk)/dev/hdiskN_allSystem partition index y on physical disk N/dev/hdiskN_syPhysical volume partition on physical disk N/dev/hdiskNUnknown partition index x on physical disk N/dev/hdiskN_px
4.2.1 The efdisk partition managerThe efdisk command is the partition manager for AIX on Itanium-based systems. This command will manage the partitions on a physical disk. The command is directed at a logical disk hdiskx. The efdisk command provides options to:
• Display partition information about a disk.
• Initialize partition information on a disk. This operation writes new partition information on a disk. This operation is sometimes called formatting or partitioning a disk.
The BOS manual disk partitioning is only supported on Itanium-based systems.
Note
Chapter 4. System management and utility enhancements 111
• Interactively add and delete partitions on a disk.
• Batch mode add and delete partitions on a disk. (Option used by BOS install.)
• Query partition status for a disk. (Option used by BOS install.)
It will open the /dev/hdiskx_all special file associated with the requested logical disk name and display the existing partition information.
4.2.1.1 efdisk command The efdisk command has the following syntax:
efdisk [-flags] hdisk_device_file
The efdisk command can be used with the flags displayed in Table 11.
Table 11. Flags of efdisk command
The hdisk_device_file parameter specifies the disk the efdisk command is to process. The disk can be specified by its logical hdiskx name (for example hdisk0) or its special file name /dev/hdiskx_all. The command will open the specified disk’s special file name /dev/hdiskx_all and operate on that disk.
An example of the output form running the efdisk command is:
Partition Manager Main Option Menu: /dev/hdisk0_alla) Add a partitiond) Delete a partitionp) Display detailed partition list
w) Write changes to disk and exitq) Quit without writing changes
Enter option:
Chapter 4. System management and utility enhancements 113
4.2.1.2 Custom partition types The efdisk command supports custom partition types on EFI formatted disks. You can define custom partition types in the /etc/diskpartitions configuration file. When /etc/diskpartitions contains valid custom partition type entries, the efdisk command allows the user to create partitions of the type described by the entry.
The format of custom partition type entries in the /etc/diskpartitions file are in the format GUID DESCRIPTION TYPE with:
GUID The partition's type GUID. These have the form 12345678-1234-1234-1234-123456789abcThey must have the exact form shown, 36 characters, hex digits in the grouping shown, separated by the '-' (hyphen) character.
DESCRIPTION A quoted (") string describing the partition. The string may be up to 35 characters.
TYPE A string containing a short name for the partition. The string may be up to 7 characters.
Lines beginning with '#' character are comment lines.
The following is an example of the /etc/diskpartitions file:
c2d426f8-1d34-183c-1234-1330d61872b9 "Data Base Partition" db2372dc84-3ff3-2736-29a1-2562a5b7ff00 "Special Partition" special
4.2.2 Configuring manual partitions during BOS installBOS install supports two types of partitioning: auto and manual. In order to create a boot disk, a system partition must be present. The partitioning is supported by the AIX efdisk command. Once the partitions are in place, the system partition must be formatted as a FAT32 file system. This is supported by the AIX command eformat.
114 AIX 5L Differences Guide Version 5.1 Edition
Choosing between manual or auto partitioning is done during the BOS installation. Once the Installation and Settings menu has appeared, select New and Complete Overwrite, as shown in Figure 34 on page 115.
Figure 34. Method of installation
This menu will lead to the menu Change Disk(s) Where You Want to Install. In this menu, you choose the disks on which you want to install.
Change Method of Installation
Type the number of the installation method and press Enter.
>>> 1 New and Complete OverwriteOverwrites EVERYTHING on the disk selected for installation,except for System Partitions. Warning: Only use this methodif there is nothing in the operating system partition you wantto preserve.
2 Preservation InstallPreserves SOME of the existing data on the disk selected forinstallation. Warning: This method overwrites the usr (/usr),variable (/var), temporary (/tmp), and root (/) file systems.Other product (applications) files and configuration data will bedestroyed.
88 Help ?99 Previous Menu
>>> Choice [1]:
Chapter 4. System management and utility enhancements 115
This will automatically lead you to the next menu, Select Disk(s) for Manual Partitioning, as shown in Figure 35 on page 116.
Figure 35. Select disks for manual partitioning
If you do not select any disks, the auto partitioning will be implemented. If you want to manually partition your disk, select the disk you want to use and create the partitions needed, as shown in Figure 36 on page 117. Make sure there is a System Partition, as it is needed to create the boot logical volume.
Select Disk(s) for Manual Partitioning
Press Enter with no disk(s) selected to have all disks listedauto-partitioned. Type the number(s) for the disk(s) to bemanually partitioned and press Enter. To cancel a choice typethe corresponding number and press Enter.
Name Location Code Size(MB) VG Status Bootable
1 hdisk0 02-00-00-0,0 8761 rootvg Yes
>>> 0 Continue with choices indicated above
88 Help ?99 Previous Menu
>>> Choice [0]: 1
116 AIX 5L Differences Guide Version 5.1 Edition
Figure 36. Manual partitioning
Some notes regarding partitioning are as follows:
• Auto-partitioning will not destroy existing System Partitions (it will overwrite all others though, for example, Linux and AIX).
• Manual-partitioning will recognize other partitions (for example, Linux) and allows you to do an install without destroying them, if that is your intent.
4.2.3 Disk device driver and disk configuration methodThe hard disk device drivers and associated configuration methods in Itanium-based systems are partition-aware. An additional object class (CuPart) is created to contain the logical association between a physical disk instance, the device major and minor number, the partition type, and the Guaranteed Unique Partition Identifier.
Each physical disk on the system will reserve eight minor numbers for the disk instance to provide unpartitioned access to the entire disk and up to seven partition accesses. In order to continue support for 32-bit applications, the low order three bits of the minor number are reserved for the physical disk partitions.
The PVID handling nature of the chgdisk method is changed for Itanium-based systems. On AIX for POWER, the change disk method handles creating a PVID or clearing a PVID based on the PV attribute flag. The media is generally updated directly by the change method, and the disk does not have to be reconfigured. On Itanium-based systems, the same operation will
-----------------------------------------------------------------------INDEX TYPE SIZE(Meg) StartingLBA NAME
0 physvol 8441.0 34 Physical Volume5 system 20.0 17287191 System Partition3 system 300.0 17328151 Test partition
Partition Manager Main Option Menu: /dev/hdisk0_alla) Add a partitiond) Delete a partitionp) Display detailed partition list
w) Write changes to config file and exit
Enter option:
Chapter 4. System management and utility enhancements 117
occur, but in a different manner. The chgdisk method will not directly update the media, but will instead cause the disk to be reconfigured, and allow the configure method to complete the processing of the PV attribute.
The disk configure method creates the special file for the physical disk, accesses and loads the driver, and then processes any PV attribute. After the PV attribute has been processed, the partitions are configured, making the changes active.
• If PV=yes and the disk does not have valid EFI partition headers, EFI partition headers will be created, and a single physical volume partition type will be created utilizing all space on the disk.
• If PV=yes and the disk does have valid EFI partition headers, but no physical volume partition type, a physical volume partition type will be created utilizing the largest unallocated space on the disk.
• If PV=yes and the disk already has a physical volume partition, the preexisting partition is not changed.
• If PV=clear and there is a physical volume partition on the disk, the PVID is first cleared from any IPL record in the first sector of the physical volume partition.
4.2.4 EFI and LEGACY partition table supportThe efdisk and associated libdiskpart library supports disks formatted with both EFI and LEGACY partition tables. LEGACY style is the existing ‘PC style’ disk partitioning format, where partition tables are defined in block zero on the disk. EFI is a new disk partitioning format being adopted by Intel and others. EFI style disk partitioning will be the default when efdisk is asked to initialize a disk with default style partition tables. No support is provided to convert a disk from LEGACY to EFI style other than to initialize a disk EFI style. Initializing a disk causes all data on the disk to be lost.
The advantage of EFI-style disk partitioning is that the disk’s partition tables are replicated on the disk and, in the event of tables that are corrupted, can be recovered from the back up table. This requires efdisk and libdiskpart to do a considerable amount of housekeeping in respect to partition table management. When accessing and/or updating a disk, the command and library must perform a number of operations to determine and maintain the validity of the EFI style partition tables.
118 AIX 5L Differences Guide Version 5.1 Edition
4.2.4.1 Example of an LEGACY partitionThe output of the efdisk -p hdiskn command for LEGACY partitions is similar to the one for EFI partitions; only the header specifies if it is a EFI or LEGACY partition.
4.2.5 Mirrored boot SupportWith respect to partitioning, mirrored boot is possible since BOS-install creates a system partition on all target installation disks and attempts to write the bootloader to all system partitions.
If a disk is added to the root volume group and the boot logical volume is mirrored, the efdisk command must be used to create a system partition on the disk prior to making the new disk a physical volume. In order to keep the information current, when any system changes are made, a bosboot -a -d
/dev/hdiskx command needs to be used to update the alternate disk’s system information. In addition, a bootlist command is required to add the alternate boot devices into the firmware supported boot list.
Chapter 4. System management and utility enhancements 119
4.3 The geninstall command (5.1.0)
AIX 5L version 5.1 introduces a new install command named geninstall. The geninstall command allows the installation of software packaged in different formats other than installp. These include InstallShield Multi-Platform (ISMP), the Red Hat Package Manager (RPM) installer and Uniform Device Interface (UDI).
The geninstall command accepts all current installp flags and passes them on to installp. This allows programs (like NIM) to continue to always send in installp flags to geninstall, but only the flags that make sense are used.
Usage geninstall: List installable software on device
geninstall -L -d <media>
Table 12 displays the flags that can be used with the geninstall command.
Table 12. Flags of the geninstall command
Flag Description
-d <device media or directory >
Specifies the device or directory containing the images to install.
-E Not supported in AIX 5L Version 5.1.
-f <file> Specifies the file containing a list of entries to install. Each entry in the file must be preceded by a format type prefix. Currently, geninstall accepts the following prefixes:I:bos.net (Installp)J:Webshere (ISMP)R:mtools (RPM)U:devices.pci.8602912 (UDI)
This information is given in the geninstall -L output.
120 AIX 5L Differences Guide Version 5.1 Edition
4.3.1 Install RPM packagesInstead of using the rpm installer, you can use geninstall to install Linux RPM packages.
-I <installpflags> Specifies the installp flags to use when calling the installp command. The flags that are used during an install operation for installp are the a, b, c, D, e, E, F, g, I, J, M, N, O, p, Q, q, S, t, v, V, w, and X flags.
The installp flags that should not be used during install are the C, i, r, S, z, A, and l flags. The installp command should be called directly to perform these functions.
The -u, -d, -L, and -f flags should be given outside the -I flag.
-L Lists the contents of the media. The output format is the same as the installp -Lc format, with additional fields at the end for ISMP, RPM, and UDI formatted products.
-N Not supported in AIX 5L Version 5.1
-R ResponseFile Takes the full path name of the ResponseFile to send to the ISMP installer program.
-u Performs an uninstall of the specified software. For ISMP products, the uninstaller listed in the vendor database is called, prefixed by a "J:".
-Y Agrees to required software license agreements for software to be installed. This flag is also accepted as an installp flag with the -I option.
-Z Tells geninstall to invoke the installation in silent mode.
Flag Description
If you are using geninstall for more than one package format, you have to split the packages into separate directories. Make sure that each directory contains only one package format. For example, make a subdirectory called rpm for all Linux RPM packages and an installp directory for all AIX LPPs.
Note
Chapter 4. System management and utility enhancements 121
The following output shows a directory with RPM packages only:
# ls /tmp/geninstall/RPMbash2-2.04-3.aix4.3.ppc.rpm zlib-devel-1.1.3-7.aix4.3.ppc.rpminfo-4.0-5.aix4.3.ppc.rpm zoo-2.10-4.aix4.3.ppc.rpmzip-2.3-1.aix4.3.ppc.rpm zsh-3.0.8-1.aix4.3.ppc.rpmzlib-1.1.3-7.aix4.3.ppc.rpm zsh-3.0.8-2.aix4.3.ppc.rpm
To install all RPM packages in the /tmp/geninstall/RPM directory at once, use the following command:
4.3.2 Install AIX LPPsUsing geninstall is also a way to install AIX LPP packages. The geninstall calls the installp command to install additional AIX LPP packages.
The directory in the following example output shows AIX LPP packages only:
# ls -l /tmp/geninstall/installptotal 5784-rw-r--r-- 1 root system 2070528 Mar 29 18:10 IMNSearch.bld.2.3.1.0.I-rw-r--r-- 1 root system 882688 Mar 29 18:11 bos.INed.5.1.0.0.I
To install the bos.INed LPP package, use the following geninstall syntax:
Chapter 4. System management and utility enhancements 123
4.4 The gencopy command (5.1.0)
AIX 5L Version 5.1 introduces a new install command named gencopy. The gencopy command allows a user to copy different package formats. It determines what images must be copied and calls the appropriate command.
In AIX 5L Version 5.1, the gencopy and bffcreate command create subdirectories in the default or user-specified target directory that correspond to the package format type.
[-b "<bffcreate_flags>" ] -f <file> | <copy_list...> | all
-t Defaults to /usr/sys/inst.images
Usage gencopy: List software products and packages on media.gencopy -L -d <media>
The commonly used flags are listed in Table 13.
Table 13. Flags of the gencopy command
Flag Description
-b <bffcreate_flags> The following flags are valid: l, q, v, w, and S.
-d <device media or directory>
The device or directory where the install images exist. Media can be a device (/dev/cd0, /dev/rmt0) or directory.
Do not specify the Version, Release, Modification or Fix level of the fileset; otherwise, the installation will fail with an similar error to this:
Pre-installation Failure/Warning Summary----------------------------------------Name Level Pre-installation Failure/Warning-------------------------------------------------------------------------------bos.INed.5.1.0.0 Not found on the installation media
Note
124 AIX 5L Differences Guide Version 5.1 Edition
4.4.0.1 Examples1. To copy all of the images from CD media (/dev/cd0) to an LPP_SOURCE
(/export/lpp_source/510_lppsource):
gencopy -d/dev/cd0 -t /export/lpp_source/510_lppsource all
2. To copy several images from CD media to the default directory:
where /tmp/mixed_packages.txt contains the following packages:
I:bos.gamesR:mtoolsJ:WebSphere
4. To list the contents of the CD media:
geninstall –Ld /dev/cd0
-f <file> File containing a list of entries to copy to the target location. Each entry in the file must be preceded by a “format type” prefix. Currently, gencopy accepts the following prefixes:
This information is given in the gencopy -L output
-D Calls bffcreate with the -D option, instructing it to remove images after the copy. This flag is not valid with non-installp images.
-L List the contents of the media. The output format is the same as the bffcreate -Lc format, with additional fields at the end for ISMP, RPM, and UDI formatted products.
-t <target_location> Specifies the directory where the installation image files are to be stored. If the -t flag is not specified, the files are saved in the /usr/sys/inst.images directory.
-X Automatically extends the file system if space is needed.
Flag Description
Chapter 4. System management and utility enhancements 125
This listing is colon separated, and contains the following information:
When we copied the install images to the target directory, in this case the/usr/sys/inst.images directory, the gencopy and bffcreatecommand created two new sub-directories for the images:
4.5 Install Wizard for application and middleware (5.1.0)
The introduction of the Itanium-based platform created the requirement for a new packaging and installation method. The installation is done by the geninstall command instead of the installp command.
The geninstall command allows the installation of software packaged in different formats other than installp. These include InstallShield Multi-Platform (ISMP), the Red Hat Package Manager (RPM) installer and Uniform Device Interface (UDI) formats. The install_wizard is available on POWER and Itanium-based systems and is contained in the sysmgt.websm.apps package.
There are three separate paths to the wizard: standalone, NIM client, and NIM master. It is very similar to the Install Base Operating System wizard in that respect.
126 AIX 5L Differences Guide Version 5.1 Edition
Standalone The user is installing from a locally attached device or directory.
NIM Client The user is a configured NIM client and is initiating the install from the client side.
NIM master The user is a configured NIM master and is installing one or more NIM machines or a NIM machine group.
The wizard does not support installing software on multiple NIM machine groups or NIM SPOT resources.
4.5.1 Invoking the Wizard The Install Wizard can be invoked in many different ways.
• Using the Web-based System Manager Software Overview plug-in Install Software.
• From the command line using /usr/sbin/install_wizard -d
device_name/lpp_source.
• From the Installed Software plug-in wizard Method. The current Install Additional Software dialog is invoked by the Advanced method menu item.
• From the NIM and NIM Overview plug-in’s Install Software menu.
• From the NIM Overview plug-in Install Software on a Network Installation Client Tasks item.
• From the NIM Machines and Groups plug-in wizard Method menu item.
Chapter 4. System management and utility enhancements 127
4.5.2 Example of the Install WizardThe wizard is invoked from the command line using /usr/sbin/install_wizard-d device_name/lpp_source, as shown in Figure 37.
Figure 37. Installation Wizard invoked by the command line
128 AIX 5L Differences Guide Version 5.1 Edition
Once the wizard is invoked, you can select the source of the installation image, which can be a device or a directory containing the image, as shown in Figure 38.
Figure 38. Installation Wizard for selecting source of installation
Chapter 4. System management and utility enhancements 129
The wizard will guide you through the installation. Figure 39, shows two ways of installation: you can select a full installation or select the software from a product to install.
Figure 39. Installation Wizard for selecting the software to install
130 AIX 5L Differences Guide Version 5.1 Edition
You can select the product you want to install; the next screen will list the software you can install (see Figure 40).
Figure 40. Installation Wizard for selecting software from product
Chapter 4. System management and utility enhancements 131
Once you have your software selected, you can verify your settings or start the installation, as shown in Figure 41.
Figure 41. Installation Wizard to begin installation
132 AIX 5L Differences Guide Version 5.1 Edition
The installation can be followed or stopped on the display (see Figure 42).
Figure 42. Installation Wizard task panel
4.6 The devinstall command enhancement (5.1.0)
The new devinstall command can be used to install different packages for devices. It is called by cfgmgr or BOS install.
Originally, devinstall called installp to install software required by devices; now it calls geninstall to add support for UDI formatted device drivers.
The geninstall command is a wrapper program for installp, Install Shield Multi Platform (ISMP), Red Hat Package Manager (RPM), and udisetup. It accepts all current installp flags and passes them on to installp.
4.6.1 The previous structure of devinstallThe previous version of devinstall consists of three parts.
In the first part, the devinstall command does the initialization work, including parsing the input from the command line and setting up certain variables, such as package file (pkgfile) from the -f flag, and the device name used to install the required packages (instdev) from the -d flag. It then builds
Chapter 4. System management and utility enhancements 133
a package list based on the packages in the package file. Packages are listed only once in the package list. Each entry in the list has the following structure:
• INSTALLP_CMD is defined as /usr/sbin/installp. • argsbuf is defined as -axqNXQg -e /var/adm/ras/devinstall.log -d instdev -f
pkgfile.
In the third part, devinstall checks the summary file /var/adm/sw/installp.summary, which is generated by the installp command, for the results of each package install attempt and, based on this information, creates or updates the following two files:
/var/adm/dev_pkg.failLists the packages that failed to install (if any).
/usr/sys/inst.data/sys_bundles/Hdwr-Diag.defLists all packages that have installed successfully.
4.6.2 Structure of the new version of devinstallThe first part stays the same as the previous version except the entry structure in the package list.
The new structure is:
134 AIX 5L Differences Guide Version 5.1 Edition
struct pkgname {
char packagename[256];like devices.pci.xxxxxxxxint inst_status;The package is installed or uninstalled, initialized as
uninstalled.int pkg_status;it could be 0 or old_name. 0 means it is a new package name
andold_name:it is a existing package in dev_pkg.fail file or bundle file. It
is initialized as 0 (new package).struct pkgname *next;The pointer pointing to next package.
};
The main changes are in the second and third parts. After setting up variables, it calls geninstall instead of installp:
• GENINSTALL_CMD is defined as /usr/sbin/geninstall. • argsbuf is defined as -I "axqNXQge /var/adm/ras/devinstall.log" -d instdev
-f pkgfile.
geninstall determines how to install the required packages by using the options following the -I flag.
In the third part, devinstall checks the summary file (/var/adm/sw/geninstall.summary) generated by geninstall for the results of each package install attempt and, based on this information, creates or updates the following two files:
/var/adm/dev_pkg.failLists the packages that failed to install (if any).
/usr/sys/inst.data/sys_bundles/devices.bndLists all packages that have installed successfully.
The geninstall.summary file has the same format as installp.summary, but it includes the results of udisetup.
After installation is done, devinstall goes through geninstall.summary file to find which packages are installed. If a package is installed successfully or is already installed, it will be marked in package list as installed (inst_status = INSTALLED). Otherwise, it will stay in uninstalled state (inst_status =UNINSTALLED). Then devinstall will update the /usr/sys/inst.data/sys_bundles/devices.bnd file or /var/adm/dev_pkg.fail file. Before any packages are written to a file, devinstall checks if they are already in the file (usr/sys/inst.data/sys_bundle/devices.bnd or
Chapter 4. System management and utility enhancements 135
/var/adm/dev_pkg.fail). If a package is already in the file, it will be marked in the package list as old_name (pkg_status = OLD_NAME) and will not be written to the file. So only the packages that are installed successfully and are not in the bundle file will be written to /usr/sys/inst.data/sys_bundles/devices.bnd. Similarly, only the packages that failed to install and are not in the /var/adm/dev_pkg.fail will be written to it.
4.7 Migrating POWER servers to AIX 5L Version 5.1 (5.1.0)
A migration can be performed whenever a version or release upgrade is required, for example, AIX Version 4.3.3 can be migrated to AIX 5L Version 5.1. Migrating to AIX 5L Version 5.1 from AIX Version 3.2 and all releases of AIX Version 4 is supported. Since there was only a limited release, migration from AIX Version 5.0, to AIX 5L Version 5.1 is not supported.
The first part of the migration process is to save all of the user configurable files and merge new changes into the existing files. Any changes to ODM files or SMIT database ODM files will be merged into the saved files. Migration only merges files associated with the boot image. The migration process removes files that are:
• Replaced in the new bos image
• No longer part of bos
• Have been identified as no longer supported
The old bos image files are replaced with the updated version and the ODM databases are merged. The obsolete filesets are removed and the filesets that are already present in the system are updated to the latest level from the AIX 5L Version 5.1 product media. It is necessary to run an update all to update files from the Expansion Pack. The SMIT update_all option can be used to update these filesets.
To migrate the current operating system to AIX 5L Version 5.1, it is necessary to insert the CD-ROM Volume 1 of the installation set into the CD-ROM drive of the server and reboot the server. In the case of microchannel servers, it is necessary to turn the key to service mode. With CHRP technology servers, it is necessary to press either the F5 key for graphic consoles or the 5 key for ASCII consoles when the server reaches the E1F1 checkpoint on the LCD
This section relates to the POWER platform only.
Note
136 AIX 5L Differences Guide Version 5.1 Edition
display. This checkpoint coincides with the icons appearing on the bottom of the screen. The server will now boot from the CD-ROM. The migration procedure is the same as that for earlier versions of AIX.
4.8 BOS installation allows different desktops (5.1.0)
During a BOS installation, you can choose between different desktops:
CDE The Common Desktop EnvironmentGNOME The GNOME desktopKDE The K Desktop EnvironmentNONE No desktop
CDE is the standard desktop for AIX. KDE and GNOME are part of the AIX Toolbox for Linux Applications.
If you want use KDE or GNOME as your primary desktop, the installation of the AIX Toolbox for Linux Applications is also required. For more information about KDE and GNOME, see 6.1.4, “Graphical framework” on page 385.
The desktop option is only available if you use an LFT console when installing the system.
The KDE and GNOME desktops and their utilities are not translated into the same languages as AIX.
This function is currently available on only the POWER platform.
Note
Chapter 4. System management and utility enhancements 137
4.8.1 Using a TTY consoleIf you are using a TTY console when installing the system, you will not get the option to choose a different desktop (Figure 43). Note that the 64-bit kernel option is only available if the hardware supports the 64-bit kernel.
Figure 43. BOS installation while using a TTY console
Advanced Options
Either type 0 and press Enter to install with current settings, or type thenumber of the setting you want to change and press Enter.
1 Installation Package Set............ Default
2 Enable Trusted Computing Base....... no
3 Enable 64-bit Kernel and JFS2....... no
>>> 0 Install with the settings listed above.
88 Help ?99 Previous Menu
>>> Choice [0]:
138 AIX 5L Differences Guide Version 5.1 Edition
4.8.2 Using an LFT consoleUsing an LFT console (Figure 44) to install the system, you will get the option to choose between different desktops. The 64-bit kernel option is only available if the hardware is 64-bit enabled.
Figure 44. BOS installation menu while using a LFT console
Since the AIX Toolbox for Linux Applications is not a part of the AIX BOS CDs, you need the Toolbox for Linux Applications CD. Therefore, a warning message is displayed on the console (Figure 45).
Figure 45. Warning messages during desktop install
Advanced Options
Either type 0 and press Enter to install with current settings, or type thenumber of the setting you want to change and press Enter.
1 Desktop............................. GNOME
2 Enable Trusted Computing Base....... no
3 Enable 64-bit Kernel and JFS2....... no
>>> 0 Install with the settings listed above.
88 Help ?99 Previous Menu
>>> Choice [0]:
WARNING: The desktop you have selected (GNOME or KDE) is notpart of the operating system and is installed from the"Toolbox for Linux Applications" media. You will be prompted for the medialater in the install process. If you do not have the"Toolbox for Linux Applications" media available, return to the Advancedoptions menu to select another desktop. To continue, type 1 and press Enter.You will have another opportunity to change your desktop selection after youinsert the "Toolbox for Linux Applications" media.
1 Continue with Install2 Return to the Advanced Options screen
Chapter 4. System management and utility enhancements 139
4.8.3 Using NIM for BOS installationFor a NIM install, all additional filesets must be available in the lpp_source. If it is an LFT CONSOLE, the DESKTOP field in the control_flow stanza of the bosinst.data file can be set to the desired desktop (CDE, NONE, GNOME or KDE). If the CONSOLE is not an LFT, the DESKTOP field is ignored.
The following is an extract of the bosinst.data file, showing the Desktop variable set to GNOME:
AIX 4.3.3 introduced a new device configuration methodology in order to reduce the time needed to detect and configure all the devices attached to the system. The cfgmgr command was changed so that it can run device configuration methods in parallel rather than sequentially (one at a time). This function does not support every device on every bus type.
AIX 5L adds support for parallel configuration of Fiber Channel (FC) adapters and devices, and an expanded list of devices and bus types:
• Fiber Channel adapters and devices (POWER platform)
• PCI buses on CHRP systems (POWER platform)
• PCI SCSI adapters on CHRP and PReP systems (POWER platform)
140 AIX 5L Differences Guide Version 5.1 Edition
• PCI async adapters and their concentrators on CHRP and PReP systems (POWER platform)
• SCSI disks on any POWER platform
• TTYs on any POWER platform
This feature is only available on the POWER platform.
4.10 Mksysb on CD or DVD (5.1.0)
CD (CD-R, CD-RW), DVD (DVD-R, DVD-RAM) are devices supported as mksysb media on AIX 5L Version 5.1. As described in the following section, there are three types of CDs (the use of the term CD in this chapter will also imply DVD) that can be created:
• Personal System Backup
• Generic Backup
• Non-bootable Volume Group Backup
4.10.1 Personal system backupA personal mksysb CD will only boot and install the system where it was created. This type of mksysb backup is same as the mksysb backup on a tape media.
4.10.2 Generic backupA generic backup has the following platform related conditions.
Power-based systemThis type of backup CD is used to boot and install any platform (rspc, rs6k, or chrp). It contains all three boot images and the device and kernel filesets to enable cloning. The bos.mp fileset will be automatically installed, because the MP kernel is required to support booting both UP and MP systems. The MP kernel will not be made the running kernel if the system is a UP system. All device filesets will also be automatically installed for creation of CD file systems that supports booting and installation on any system.
Itanium-based systemGeneric CD backup may or may not install on another Itanium-based system. IBM does not control the device drivers for the Itanium-based systems; there is an endless number of possible drivers that could be attached to the system. Thus, IBM can not ensure that all devices’ driver software is installed.
Chapter 4. System management and utility enhancements 141
4.10.3 Non-bootable volume group backup This type of backup CD is non-bootable and contains only a volume group image. If the image in the CD is a rootvg image, the CD can be used to install AIX after booting from a product CD-ROM. This CD can also be used as a source media for the alt_disk_install command. The CD-R and DVDs can be used as a backup media for the non-rootvg volume group and the volume group can be restored using the restvg command.
4.10.4 Tested software and hardwareBecause IBM does not sell or support the AIX software to create CDs, they must be obtained from independent hardware and software vendors. Table 14 lists the tested software, hardware, and their combinations required for this feature. There are many CD-R (CD recordable), CD-RW (CD ReWritable), DVD-R (DVD Recordable) and DVD-RAM (DVD Random access) drives available. IBM tested the listed drives in Table 14.
Table 14. Required Hardware and Software for Backup CDs
The listed software is used in conjunction with the mkcd command to make backups on CD-Rs and DVDs.
Software Hardware
GNU & Free Software Foundation, Inc.cdrecord Version 1.8a5mkisofs Version 1.5
GNU software Matsushita LF-D291 - DVD-RAMIBM DVD-RAM
At the time of writing, the Itanium-based systems are limited to GNU software and Yamaha CRW8424S.
Note
142 AIX 5L Differences Guide Version 5.1 Edition
For information on how to obtain the software, see the README file maintained in /usr/lpp/bos.sysmgt/mkcd/README.oem_cdwriters, or as HTML in the /usr/lpp/bos.sysmgt/mkcd.README.html file.
4.10.5 The mkcd commandMksysb or savevg images are written to CD-Rs and DVDs using the mkcd command. The mkcd command requires code supplied by third party vendors so that it can create the RockRidge file system and write the backup image to CD media. This code must be linked to /usr/sbin/mkrr_fs (for creating the Rock Ridge format image) and /usr/sbin/burn_cd (for writing to the CD-R or DVD-RAM device). For example, if you are using Jodian software, you will need to create the following links:
The process for creating a mksysb CD using the mkcd command is:
1. If file systems or directories are not specified, they will be created by mkcd and removed at the end of the command (unless the -R or -S flags are used). mkcd will create following file systems:
- /mkcd/mksysb_image
Contains a mksysb image. Enough space must be free to hold the mksysb.
- /mkcd/cd_fs
Contains CD file systems structures. At least 645 MB of free space is required (up to 8.8 GB for DVD).
- /mkcd/cd_image
Contains final the CD image before writing to CD-R. At least 645 MB of free space is required (up to 8.8 GB for DVD).
The /mkcd/cd_fs and /mkcd/cd_image may required to have 8.8 GB of free space each, depending how big the mksysb is.
Only the CHRP platform supports booting from DVD. However, a DVD media backup may be created or read on any platform (RSPC, RS6K, or CHRP) using a DVD device. Also, you may boot from other devices (CD, tape, or network) on any platform and then install from the DVD provided. The boot media's boot image contains support for DVD devices.
Note
Chapter 4. System management and utility enhancements 143
User provided file systems or directories can be NFS mounted.
The file systems provided by the user will be checked for adequate space and an error will be given if there is not enough space. Write access will also be checked.
2. If a mksysb image is not provided, mkcd calls mksysb, and stores the image in the directory specified with the -M flag or in /mkcd/mksysb_image.
3. The mkcd command creates the directory structure and copies files based on the cdfs.required.list and the cdfs.optional.list files.
4. Device images are copied to ./installp/ppc or ./installp/ia64 if the -G flag is used or the -l flag is given (with a list of images to copy).
5. The mksysb image is copied to the file system. It determines the current size of the CD file system at this point, so it knows how much space is available for the mksysb. If the mksysb image is larger than the remaining space, multiple CDs are required. It uses dd to copy the specified number of bytes of the image to the CD file system. It then updates the volume ID in a file. A variable is set from a function that determines how many CDs are required to hold the entire mksysb image.
6. The mkcd command then calls the mkrr_fs command to create a RockRidge file system and places the image in the specified directory.
7. The mkcd command then calls the burn_cd command to create the CD.
8. If multiple CDs are required, the user is instructed to remove the CD and put the next one in and the process continues until the entire mksysb image is put on the CDs. Only the first CD supports system boot.
4.10.6 Additional flags for the mkcd commandThe following is a list of additional flags for the mkcd command.
The /mkcd/cd_images (with an ‘s’) may need to be even larger than 8.8 GB or 645 MB if the -R or -S flags were specified (if it is multi-volume), because there must be sufficient space to hold each volume.
Note
144 AIX 5L Differences Guide Version 5.1 Edition
Table 15 provides a description of the flags.
Table 15. Additional flags of the mkcd command
The following is an example of the -r flag:
/# mkcd -r /home -d /dev/rmt0 -L/# mount -o ro /dev/cd0 /mnt/# cd mnt/mnt# find . -print./guest./guest/perfagent.tools./guest/bos.perf./guest/xmwlm.010216./guest/xmwlm.010315./guest/.toc./guest/nohup.out./guest/xmwlm.010316./guest/short.rec./antony./antony/testfile/mnt#
Flag Description
-L Creates large DVD sized images.
-E <proto> Used to specify the DOS partition proto file. This flag is used in conjunction with the -j flag to build an El Torito formatted CD to be used on the Itanium-based platform.
-j <proto> Create a RockRidge file system image and back up the files listed. A separate directory structure will be created to look like the file system described in the proto file, so space will be required. See the -r flag if just a RockRidge file system is required.
-r <dir> Creates a CD file system image. If the -S or -R flags are NOT used, then the image will be burned to CD and removed. This flag is also a fast way to create a CD file system image based on a directory structure that already exists. It does not require extra space to create the CD file system, only the CD file system image. It is an easy way to back up data to CD.
Chapter 4. System management and utility enhancements 145
4.11 Paging space enhancements
AIX 5L provides two enhancements for managing paging space. A new command, swapoff, allows you to deactivate a paging space. The -d flag, for the chps command, provides the ability to decrease the size of a paging space. For both commands, a system reboot is no longer required.
4.11.1 Deactivating a paging spaceTo deactivate a paging space with the swapoff command, you can either use:
# swapoff device name { device name ... }
or a system management tool, such as SMIT (fast path swapoff), as shown in Figure 46.
Figure 46. SMIT panel for deactivate a paging space
This command may fail due to:
• Paging space size constraints
• I/O errors
Because it is necessary to move all pages (in use on the paging space) to be deactivated to other paging spaces, there must be enough space available in the other active paging spaces. Basically, this command pages in all active
146 AIX 5L Differences Guide Version 5.1 Edition
pages (after marking the paging space to be deactivated as unavailable) and allows the AIX VMM to page these pages out again to the other available paging spaces. In the case of I/O errors, you should check the error log, deactivate the paging space you are working on for the next system reboot with the chps command, and reboot the system. Do not try to reactivate paging spaces with I/O errors before you have checked the corresponding disk with the appropriate diagnostic tools. The lsps command will display, in this case, the string I/O err in the column with the heading Active.
Using Web-based System Manager, a paging space can be deactivated by selecting that paging space from either the Paging Space, Logical Volume or Volume Groups plug-in and selecting "Stop...(2)" from the "Selected" pull-down or pop-up menus (Figure 47).
Figure 47. Selected pulldown for volume management
Chapter 4. System management and utility enhancements 147
4.11.2 Decreasing the size of a paging spaceBy using the new -d flag, you can decrease the size of an existing paging space using the chps command as follows:
# chps -dLogicalPartitions PagingSpace
or specify it on the SMIT panel (fast path chps), as shown in Figure 48.
Figure 48. SMIT panel for decreasing the size of a paging space
148 AIX 5L Differences Guide Version 5.1 Edition
Using Web-based System Manager a paging space can be dynamically decreased in size by selecting that paging space, bringing up the 'Properties' dialog for that paging space and inputting the size to de-allocate in either Megabytes or Physical partitions (Figure 49). Web-based System Manager then issues the appropriate commands to perform the action and automatically notifies you of success or any error condition it encounters.
Figure 49. Properties dialog to increase page space
The actual processing is done by the shell script shrinkps. In the case of decreasing the size of an active paging space, shrinkps will create a temporary paging space, move all pages from the paging space to be decreased to this temporary one, delete the old paging space, recreate it with the new size, move all the pages back, and finally delete the temporary paging space. This temporary paging space is always created in the same volume group as the one you try to decrease. It is therefore necessary to have enough space available in the volume group for this temporary paging space. If you decrease the size of a deactivated paging space, the creation of a temporary paging space is not necessary and therefore omitted.
Chapter 4. System management and utility enhancements 149
The following example shows the commands needed to remove one logical partition from paging01:
# lsps -aPage Space Physical Volume Volume Group Size %Used Active Auto Typepaging01 hdisk0 rootvg 48MB 1 yes yes lvhd6 hdisk0 rootvg 32MB 11 yes yes lv# chps -d 1 paging01shrinkps: Temporary paging space paging00 created.shrinkps: Paging space paging01 removed.shrinkps: Paging space paging01 recreated with new size.# lsps -aPage Space Physical Volume Volume Group Size %Used Active Auto Typepaging01 hdisk0 rootvg 32MB 1 yes yes lvhd6 hdisk0 rootvg 32MB 12 yes yes lv
As you can imagine from the above description, the deactivation or decrease in size of an active paging space can result in a noticeable performance degradation, depending on the size and usage of the paging space and the current system workload. But the main advantage is that there is no system reboot necessary to rearrange the paging space.
If you are working with the primary paging space (usually hd6), this command will prevent you from decreasing the size below 32 MB or actually deleting it. If you decrease the primary paging space, a temporary boot image and a temporary /sbin/rc.boot pointing to this temporary primary paging space will be created to make sure the system is always in a state where it can be safely rebooted.
4.12 dd command enhancements (5.1.0)
The dd command now supports multiple volume spanning by using the span=yes option. In the case where span=no, dd does not span multiple volumes and functions as though the span option is omitted altogether. The following commands show an example of copying a source file onto multiple volumes using a 1.44 MB diskette drive:
These command enhancements are not available through the Web-based System Manager. The Web-based System Manager allows you, by default, to specify the increase in size for a paging space in the Megabytes field.
Note
150 AIX 5L Differences Guide Version 5.1 Edition
Insert next media on /dev/fd0 ,and press enter
Proceeding to next media for write8+0 records in.8+0 records out.
To restore from a multiple volume dd image, insert the first volume and perform the following procedure. Ensure that the diskettes are inserted in the correct consecutive order.
# dd if=/dev/fd0 of=restorefile bs=720b span=yes conv=syncInsert next media on /dev/fd0, and press 'y' to continue or 'n' to quityProceeding to next media for readInsert next media on /dev/fd0, and press 'y' to continue or 'n' to quitn8+0 records in.8+0 records out.
Take note that the file size of restorefile is different to that of testfile.uuThe reason for this is that the dd command will dump the entire content of the diskette, including blank spaces, into the file. The file restorefile will have the size of two 1.44 MB diskettes. Using the uudecode command, the file is restored to its original size:
# uudecode restorefile
4.13 Error log enhancements
AIX 5L provides three enhancements in the area of error logging. First, you can specify a time threshold that treats identical errors arriving closer than this threshold as duplicates and counts them only once. Second, with the errpt command, you can now request an intermediate format that removes seldom needed data from the detailed error report format. A third enhancement, the diagnostic tool, will now put additional information into the error log entry.
Exercise care when selecting the block size since an incorrect value can result in data inconsistency or overlap. The correct block size should be amultiple of the physical volume size. Also, each volume should be externally labelled so that the volumes can be restored in the correct order.
Note
Chapter 4. System management and utility enhancements 151
4.13.1 Elimination of duplicate errorsThe errdemon command was enhanced in AIX 5L to support four additional flags. The flags -D and -d specify if duplicate error log entries are to be removed or not. The default is the -D flag, which instructs the command to remove the duplicates. With the -t and -m flags, you can control what is considered a duplicate error log entry. A value in the range 1 to 231 - 1 specifies the time in milliseconds within which an error identical to the previous one is considered a duplicate. The default value for this flag is 100 or 0.1 seconds. The -m flag sets a count, after which the next error is no longer considered a duplicate of the previous one. The range for this value is 1 to 231 - 1 with a default of 1000.
The following command increases the time threshold to one second and the number of duplicates after which the same error would again be counted as a new one to 100000:
# /usr/lib/errdemon -m 100000 -t 1000
The errpt command also has a new -D flag, which consolidates duplicate errors. In conjunction with the -a flag, only the number of duplicate errors and the timestamps for the first and last occurrence are reported. This is complemented by a new -P flag, which displays only the duplicate errors logged by the new mechanisms of errdemon mentioned previously.
4.13.2 The errpt command enhancementsIn addition to the two new flags (-D and -P) mentioned in the previous section, errpt now supports an intermediate output format using the -A flag, in addition to the summary and the details already provided. Only the values for LABEL, Date/Time, Type, Resource Name, Description, and Detail Data are displayed.
The following lines show the output of the errpt command for one specific error using the summary, intermediate, and detailed option, respectively:
# errpt -j 9DBCFDEEIDENTIFIER TIMESTAMP T C RESOURCE_NAME DESCRIPTION9DBCFDEE 0919101600 T O errdemon ERROR LOGGING TURNED ON# errpt -A -j 9DBCFDEE---------------------------------------------------------------------------LABEL: ERRLOG_ONDate/Time: Tue Sep 19 10:16:41 CDTType: TEMPResource Name: errdemonDescriptionERROR LOGGING TURNED ON# errpt -a -j 9DBCFDEE---------------------------------------------------------------------------LABEL: ERRLOG_ON
4.13.3 Link between error log and diagnosticsWhen the diagnostic tool runs, it automatically tries to diagnose hardware errors it finds in the error log. Starting with AIX 5L, the information generated by the diag command is put back into the error log entry, so that it is easy to make the connection between the error event and, for example, the FRU number required to repair failing hardware. The following lines show an example of this process; first the header of the error log entry is shown, and then the information added by the diagnostic tool:
Chapter 4. System management and utility enhancements 153
Description:System shutdown due to: 1) Loss of AC power, 2)Power button was pushed without propersystem shutdown, 3) Power supply failure.
4.14 Resource Monitoring and Control (RMC)
In AIX 5L, a new Resource Monitoring and Control (RMC) subsystem is available that originated as the Reliable Scalable Cluster Technology (RSCT) on the IBM SP platform. The use of RSCT is growing and, therefore, it is now shipped with AIX. RMC is a major component of RSCT and is automatically installed and configured when AIX is installed.
This subsystem allows you to associate predefined responses with predefined conditions for monitoring system resources. An example is to broadcast a message when the /tmp file system becomes 90 percent full to summon the attention of a system administrator.
At the time of writing, this feature is only available on the POWER platform.
4.14.1 Packaging and installationThe RMC subsystem is installed by default and is delivered in one bundle named rsct.core containing nine different filesets with the following names:
# lslpp -L "*rsct*"Fileset Level State Description
----------------------------------------------------------------------------rsct.core.auditrm 2.2.0.0 C RSCT Audit Log Resource Managerrsct.core.errm 2.2.0.0 C RSCT Event Response Resource
Managerrsct.core.fsrm 2.2.0.0 C RSCT File System Resource
Managerrsct.core.gui 2.2.0.0 C RSCT Graphical User Interfacersct.core.hostrm 2.2.0.0 C RSCT Host Resource Managerrsct.core.rmc 2.2.0.0 C RSCT Resource Monitoring and
Controlrsct.core.sec 2.2.0.0 C RSCT Securityrsct.core.sr 2.2.0.0 C RSCT Registryrsct.core.utils 2.2.0.0 C RSCT Utilities
All executables and related items are installed into the /usr/sbin/rsct directory, while the log files and other temporary data is located in /var/ct. The following entry is located in /etc/inittab:
Due to this entry, the RMC subsystem is also automatically started. This subsystem can be controlled using the SRC commands, but it also has its own control command (/usr/sbin/rsct/bin/rmcctrl), which is the preferred way to stop and start it. Due to the number of available options on this subsystem, it can only be controlled through the Web-based System Manager. A SMIT interface is not available at the time of publication.
4.14.2 Concepts of RMCThe basic function of RMC is based on two concepts: conditions and responses. To provide you a ready-to-use system, 84 conditions and 8 responses are predefined for you. You can use them as they are, customize them, or use them as templates to define your own conditions and responses. To monitor a condition, simply associate one or more responses with the condition.
A condition monitors a specific property, such as total percentage used, in a specific resource class, such as JFS. You can monitor the condition for one or more, or all the resources within the monitored property, such as /tmp, or /tmp and /var, or all the file systems. Each condition contains an event expression to define an event and an optional rearm expression to define a rearm event. The event expression is a combination of the monitored property, mathematical operators, and some numbers, such as PercentTotUsed > 90 in the case of a file system. The rearm expression is a similar entity, for example, PercentTotUsed < 85.
Chapter 4. System management and utility enhancements 155
The following figures provide an example of a condition property dialog with two tabs: General (Figure 50) and Monitored Resource (Figure 51 on page 157).
Figure 50. Condition Properties dialog - General tab
Chapter 4. System management and utility enhancements 157
Each response can consist of one or more actions. Figure 52 provides an example for a Response Properties dialog.
Figure 52. Response Properties dialog - General tab
The Add or Modify buttons launch an Action Properties dialog.
To define an action, you can choose one of the three predefined commands, Send mail, Log an entry to a file, or Broadcast a message, or you can specify an arbitrary program or a script of your own by using the Run program option. The action can be active for an event only, for a rearm event only, or for both. You can also specify a time window in which the action is active, such as always, or only during on-shift on weekdays.
158 AIX 5L Differences Guide Version 5.1 Edition
The following figures provide an example of an Action Properties dialog with two tabs: General (Figure 53) and a When in Effect (Figure 54 on page 160).
Figure 53. Action Properties dialog - General tab
Chapter 4. System management and utility enhancements 159
Figure 54. Action Properties dialog - When in Effect tab
The previously mentioned predefined commands are using the notifyevent, wallevent, and logevent scripts, respectively, in the /usr/sbin/rsct/bin subdirectory. These command scripts capture events through the Event Response resource manager (ERRM) environment variables and notify you of the events through e-mails, logs, and broadcast messages. Do not modify these predefined command scripts. However, you can copy these predefined commands as templates to create your own scripts and use them for the “Run program” option.
Note that because the logevent script uses the alog command to log events to the files you designate, the content of these files can be listed with the alog command.
If the event expression of a condition is evaluated to be true, an event occurs, and the ERRM checks all responses associated with the condition and executes the event actions defined in these responses. Only after the rearm
160 AIX 5L Differences Guide Version 5.1 Edition
expression becomes true and the ERRM has executed the corresponding rearm event actions defined in the responses can the event and the event actions be generated again.
For each of the event and rearm events, the actions taken in response to them and the success or failure of any commands running in these actions are logged by the Audit Log resource manager (AuditRM) to the audit log. The standard error of a run command, if any, is always logged to the audit log. The standard output of a run command is logged to the audit log only if the “Redirect command’s standard output to audit log” option is selected for the command in the Action Properties dialog. The audit log records can be listed with the lsaudrec command or removed from the log file with the rmaudrec command.
4.14.3 How to set up an efficient monitoring systemThe following steps are provided to assist you in setting up an efficient monitoring system:
1. Review the predefined conditions of your interests. Use them as they are, customize them to fit your configurations, or use them as templates to create your own.
2. Review the predefined responses. Customize them to suit your environment and your working schedule. For example, the response "Critical notifications" is predefined with three actions:
a. Log events to /tmp/criticalEvents.
b. E-mail to root.
c. Broadcast message to all logged-in users any time when an event or a rearm event occurs.
You may modify the response, such as to log events to a different file any time when events occur, e-mail to you during non-working hours, and add a new action to page you only during working hours. With such a setup, different notification mechanisms can be automatically switched, based on your working schedule.
3. Reuse the responses for conditions. For example, you can customize the three severity responses, "Critical notifications," "Warning notifications," and "Informational notifications" to take actions in response to events of different severities, and associate the responses to the conditions of respective severities. With only three notification responses, you can be notified of all the events with respective notification mechanisms based on their urgencies.
Chapter 4. System management and utility enhancements 161
4. Once the monitoring is set up, your system continues being monitored whether your Web-based System Manager session is running or not. To know the system status, you may bring up a Web-based System Manager session and view the Events plug-in, or simply use the lsaudrec command from the command line interface to view the audit log.
4.14.4 Web-based System Manager enhancements (5.1.0)The single system monitoring application for Web-based System Manager that was shipped with AIX 5L Version 5.0 has been enhanced with some new monitoring plug-ins.
Enhancements in AIX 5L Version 5.1 include:
• Host Overview plug-in enhancements
• Audit log dialogs enhancements
• Conditions plug-in and dialogs enhancements
4.14.4.1 Host Overview plug-in enhancementsAs shown in Figure 55 on page 163, the Host Overview plug-in provides a convenient summary of a minimal set of vital signs of a system, which are:
• Operating system level
• IP address
• Machine type
• Serial number
• Number of processors
• CPU cycles
• Memory
• Paging space
• File system utilization
The Host Overview plug-in is packaged as part of Web-based System Manager base code. The dynamic status area on the Host Overview plug-in will be shown only if RSCT is installed.
162 AIX 5L Differences Guide Version 5.1 Edition
Figure 55. Web-based System Manager, Host Overview plug-in
The host menu, shown in Figure 56 on page 164, from the menu bar provides an easy way to perform critical tasks, such as the following:
• List Top 10 Processes
• Delete a Process
• Expand a Journaled File System
• Increase Paging Space
• Shutdown
• Reconnect to RMC System
The menu choice Reconnect to RMC System is shown only if RSCT is installed. It is enabled only when the Host Overview plug-in is disconnected from the RMC monitoring subsystem. Use this menu choice to reconnect the session to the RMC.
Chapter 4. System management and utility enhancements 163
Figure 56. Web-based System Manager, host menu of the overview plug-in
4.14.4.2 EventsThe events plug-in shows all the events, rearm events, and errors that occur during the current Web-based System Manager session.
Audit log dialogs enhancementsA new audit log plug-in, as shown in Figure 57 on page 165, has been added to the Events plug-in. The audit log dialog can be launched from the Events menu in the menu bar. The audit log records events, rearm events, and errors that have occurred on the system once the monitoring function is started, whether a Web-based System Manager session is running or not. In addition, it also records the actions that take place in response to the events or the rearm events, and it records errors on the underlying monitoring subsystems. It can be a useful and informative tool for system administrators. You can also look at the audit log at the command line by issuing the lsaudrec command, or remove unwanted audit log entries using the audit log dialog or at the command line by using the rmaudrec command.
164 AIX 5L Differences Guide Version 5.1 Edition
Figure 57. Web-based System Manager, audit log panel
4.14.4.3 ConditionsThe conditions plug-in displays a rich set of predefined conditions (Figure 59 on page 166) for you to monitor your system, such as the memory, paging space, adapters, file systems, physical volume, running programs, and so forth. You can use the conditions as they are or customize them.
Conditions plug-in and dialogs enhancementsSeveral changes have been made to the Conditions plug-in. The enhancements are:
• In the Condition property dialog (shown in Figure 58 on page 166).
- A new Monitored property shows you if the condition is currently being monitored or not.
• In the Conditions plug-in.
- A new column, Monitored, shows the details view of the Conditions plug-in. Yes indicates the condition is currently being monitored. Click the column heading to sort the conditions into their monitored states.
- Additional icons are provided for the condition objects to indicate whether a condition is being monitored or not.
- New icons and menu choices have been added so you can start and stop monitoring right from the Conditions plug-in without going through the monitoring dialog.
Chapter 4. System management and utility enhancements 165
Figure 58. Web-based System Manager, condition property panel
Figure 59. Web-based System Manager, conditions panel
166 AIX 5L Differences Guide Version 5.1 Edition
4.14.5 ResourcesThe resources that can be monitored are managed by two resource managers: the File System Resource Manager (FSRM), and the Host Resource Manager (HostRM).
The FSRM monitors all local JFSs on a machine and checks for the status (offline, online), the total percentage used, and the percentage of inodes used in the file system.
The HostRM supports nine different resource classes. The network adapter resource classes (Ethernet Device, Token Ring Device, ATM Device and FDDI Device) each monitor five different properties, such as receive error rates and others. There is one resource class (Physical Volume) supporting the monitoring of the hard disk. It checks for four different properties, for example, percentage of time the device was busy between two consecutive observations. The percentage of free paging space is currently the only supported property of the resource class Paging Device. The Processor resource class monitors processor utilization by checking, for example, for the idle time property and others.
The Host resource class supports 46 different properties that represent all different areas, in order to get a system-wide status of your machine. This includes, among others, properties such as the size of the system run queue, sizes and change in size of various memory buffer pools in the kernel, and overall utilization of all processors in the system.
The last resource class (Program) checks if a specific program is running or the number of processes for a specific program is changing. The predefined condition in this resource class checks to see if the sendmail daemon is running. You can restrict this condition by specifying a filter expression, which can use the various fields supported by the ps command. This allows, for example, monitoring of only programs running with a specific user ID.
All resource classes support, in addition to their specific properties, a general configuration change property. With this property, you can send a mail to root or any other specified user whenever the configuration of a device changes. The JFS, PagingDevice, and Processor resource classes support the operational state property.
The RMC subsystem is comprised of several multithreaded daemons, as shown in the following output:
# ps -mo THREAD -p 5948,20388,21942,23792,25348USER PID PPID TID ST CP PRI SC WCHAN F TT BND COMMAND
The main control daemon (rmcd), the event response daemon (IBM.ERrmd), and the audit daemon (IBM.AuditRMd) run as soon as the RMC subsystem is activated. The file system IBM.FSrmd and host daemon IBM.HostRMd are only active if a file system or host condition, respectively, is monitored.
4.14.6 Command line interface (5.1.0)This section describes the new Resource Monitoring and Control (RMC) and Event Response Resource Manager (ERRM) command line interfaces (CLI).
168 AIX 5L Differences Guide Version 5.1 Edition
The RMC CLI allows system administrators the ability to manage resources and resource classes. A resource class defines a particular software or hardware entity. For example, the IBM.Host resource class defines the system. A resource is an instance of a resource class. The RMC CLI consists of the commands shown in Table 16.
Table 16. RMC commands
The ERRM CLI provides system administrators a command line alternative to the Web-based System Manager tool to control monitoring on your system. These commands allow you to affect monitoring by creating conditions, responses, and associations between them. The ERRM CLI consists of the commands shown in Table 17.
Table 17. ERRM commands
Commands Description
mkrsrc Defines a new resource.
rmrsrc Removes a defined resource.
lsrsrc Lists (displays) resources or a resource class.
lsrsrcde Lists a resource or resource class definition.
chrsrc Changes the persistent attribute values of a resource or resource class.
refrsrc Refreshes the resources within the specified resource class.
lsactdef Lists (displays) action definitions of a resource or resource class.
Commands Description
mkcondition Creates a new condition definition which can be monitored.
rmcondition Removes a condition.
chcondition Changes any of the attributes of a defined condition.
lscondition Lists information about one or more conditions.
mkresponse Creates a new response definition with one action.
rmresponse Removes a response.
chresponse Adds or deletes the actions of a response or renames a response.
lsresponse Lists information about one or more responses.
rmcondresp Deletes a link between a condition and one or more responses.
mkcondresp Creates a link between a condition and one or more responses.
Chapter 4. System management and utility enhancements 169
The following example is an output generated from some of the ERRM commands:
# startcondresp "/tmp space used" "Critical notifications" "E-mail rootanytime”
# lscondition | moreDisplaying condition information:Name MonitorStatus"Processes in swap queue" "Not monitored""Processes in run queue" "Not monitored""/var space used" "Not monitored""/tmp space used" "Monitored""File system space used" "Not monitored"
# lscondresp "/tmp space used"Displaying condition with response information:
condition-response link 1:Condition = "/tmp space used"Response = "E-mail root anytime"State = "Active"
condition-response link 2:Condition = "/tmp space used"Response = "Critical notifications"State = "Active"
For further details on the commands and their flags, parameters, and arguments listed in this section. For additional information, see Resource Monitoring and Control Guide and Reference, SC23-4345.
stopcondresp Stops monitoring a condition that has one or more linkedresponses.
lscondresp Lists information about a condition and its linked responses, if any.
Commands Description
170 AIX 5L Differences Guide Version 5.1 Edition
4.15 Shutdown enhancements
AIX 5L enhances the shutdown command with a -l flag to log the output (from select actions during the shutdown) to the file /etc/shutdown.log. The contents of this file appears similar to the following:
# cat /etc/shutdown.log
Fri Aug 25 13:21:30 CDT 2000shutdown: THE SYSTEM IS BEING SHUT DOWN NOW
User(s) currently logged in:root
Stopping some active subsystems...
0513-044 The dpid2 Subsystem was requested to stop.0513-044 The hostmibd Subsystem was requested to stop.0513-044 The qdaemon Subsystem was requested to stop.0513-044 The writesrv Subsystem was requested to stop.0513-044 The wsmrefserver Subsystem was requested to stop.
detached en0 from the network interface listdetached en1 from the network interface listdetached et0 from the network interface listdetached lo0 from the network interface listdetached tr0 from the network interface list
The output of consecutive shutdowns (if the -l flag is used) is appended to the /etc/shutdown.log file. Therefore, this information is available even if there are problems with booting the system and the machine had to be shut down several times. The log file continues to grow until the system administrator intervenes.
4.16 Crontab enhancements (5.1.0)
AIX 5L Version 5.1 provides an enhancement in cron logging. The log file is mainly used for accounting and now has more detailed information, which is added by the new cron daemon. The /var/adm/cron/log now includes the following:
• The starting time of the daemon and the PID of the cron process.
• The owner of the job run by the cron daemon.
Chapter 4. System management and utility enhancements 171
• The time of execution of the job.
• The PID of the job.
• The actual command line that is run to accomplish the job.
• Whether the job has run successfully or not.
The following display format is used:
User : CMD (actual command that is executed) : time when the job is executed : Cron Job with pid : Successful
User : CMD (actual command that is executed) : time when the job is executed : Cron Job with pid : Failed
Every time cron runs a job (either from the crontab file, for the system-related jobs, or from the /var/spool/cron/crontab/userfile, for user-related processes), all its activity will be logged into the /var/adm/cron/log file in the mentioned format.
4.17 Trace facility (5.1.0)
AIX 5L Version 5.1 introduces several new features for the trace facility. These include a new command, trcevgrp, and additional flags to the trace and trcrpt commands.
4.17.1 The trace command enhancementsThe trace command has been enhanced in AIX 5L Version 5.1 with the addition of a new flag and enhancement to other flags.
4.17.1.1 The -f flag enhancementIn single mode, the collection of trace events stops when the in-memory trace buffer fills up. The maximum in-memory buffer has been increased to extend the trace.
The -f flag has been modified to allow a maximum trace buffer size of 268435184*2 or 536870368 bytes. The maxbuffer size for other options is unchanged.
172 AIX 5L Differences Guide Version 5.1 Edition
The -f option actually uses two buffers, which behave as a single buffer. The two buffers are now used for the single-buffer trace. Thus, the term single-buffer refers to the function. In order to keep the function the same as before, I/O is held until all the tracing has been done. If I/O is started from buffer A while tracing to B, then the tracing in buffer B would reflect the I/O for buffer A. This would represent a function change from the previous action of trace -f.
The -T Size flag overrides the default trace buffer size of 128 KB with the value stated. You must be root to request more than 1 MB of buffer space. The maximum possible size is 268435184 bytes, unless -f is used, in which case it is 536870368 bytes. In the circular and the alternate modes, the trace buffer size must be one-half or less the size of the trace log file. In the single mode, the trace log file must be at least the size of the buffer. See the -L flag for information on controlling the trace log file size. Also note that trace buffers use pinned memory, in other words, they are not pageable. Therefore, the larger the trace buffers, the less physical memory is available to applications. Unless the -b or -B flags are specified, the system attempts to allocate the buffer space from the kernel heap. If this request can not be satisfied, the system then attempts to allocate the buffers as separate segments.
4.17.1.2 The -J and -K flag enhancementThe trace command has been enhanced to specify the event groups to be included (-J) or excluded (-K). Event groups are described in 4.17.3, “Trace Event Groups” on page 175. The -J and -K flags work like -j and -k, except with event groups instead of individual hook IDs. All four flags (-j, -J, -k, and -K) may be specified. The -J has been available in previous versions of AIX, but not universally documented.
Chapter 4. System management and utility enhancements 173
SMIT panels have also been updated, with the additional of Event groups to EXCLUDE from trace, as shown in Figure 60.
Figure 60. SMIT panel for START Trace
4.17.2 The trcrpt command enhancementsPrevious versions of trcrpt only allow the -d and -k flags to specify a list of hooks to include and exclude. trcrpt has been enhanced to allow hook groups (4.17.3, “Trace Event Groups” on page 175) to be included/excluded; the -D flag includes and the -K flag excludes.
4.17.2.1 The new -D and -K flagsThe -D flag limits the report to hook IDs in the Event groups list, plus any hook IDs specified with the -d flag.
The -K flag excludes from the report hook IDs in the event-groups list, plus any hook IDs specified with the -k flag.
174 AIX 5L Differences Guide Version 5.1 Edition
The trace report SMIT screen has also been updated, with the additional line Event Groups to INCLUDE in report (-D flag) and Event groups to EXCLUDE from report (-K flag), as shown in Figure 61.
Figure 61. SMIT panel for Trace Report
4.17.3 Trace Event GroupsTrace event groups combine multiple trace hook IDs into a trace group; this allows hooks to be turned on or off at once when starting a trace.
4.17.3.1 trcevgrp commandThe trcevgrp command provides a facility for you maintain the trace Event groups. The Event groups are hook IDs grouped together. You must be in the system group to add, delete, or change trace event groups. You may not modify or delete event groups whose type is reserved. Figure 62 on page 176 shows the SMIT panel for Manage Event Groups (fast path smit grpmenu).
Chapter 4. System management and utility enhancements 175
Figure 62. SMIT panel for Manage Event Groups
The following is a description of the fields for the Manage Event Groups:List all Event Groups This will use trcengrp -l to get the list of
event groups.
Add an Event Group This allows you to add a new event group based on an existing event group or create your own event group. It uses trcevgrp -a to add the event group.
Change/Show an Event Group This allows you to retrieve and modify an event group. The trcevgrp -l is used to retrieve the information. trcevgrp -u is used to update the existing record.
Remove Event Group This allows you to remove user created event groups. trcevgrp -r is used to remove the event groups.
Add an Event Group The Add function (as shown in Figure 63 on page 177 and Figure 64 on page 178) allows you to add a new event group from a template. Figure 63 shows the first screen for adding an Event Group.
176 AIX 5L Differences Guide Version 5.1 Edition
Event Group ID (optional) This allows the user to select a template from a list of existing event groups.
Event Group ID This is the name of the new event group.
Event Group Description A brief description of the new event group.
Event Group Hook IDs The hook IDs you wish to trace. The hook IDs should be separated with a ‘,’ (comma) and no spaces.
Figure 63. SMIT panel for creating a new Event Group
Groups that are reserved may not be modified or removed. For example: tidhk - Hooks needed to display thread name (reserved)
Note
Chapter 4. System management and utility enhancements 177
Figure 64. SMIT panel for creating a new Event Group
4.17.3.2 The trcevgrp command To get a listing of all event groups, enter the following command:
# trcevgrp -l
To add a new group, enter the command:
# trcevgrp -a -d "description of this group" -h "500 501 502" mygrp
This will add the group named mygrp and give it the description "description of this group," and define it to have hooks of 500, 501, and 502.
To add another hook to the group above, enter the following command:
# trcevgrp -u -d "description of this group" -h "500 501 502 503" mygrp
Note that it is necessary to specify all the hook IDs.
To remove a group, enter:# trcevgrp -r test
178 AIX 5L Differences Guide Version 5.1 Edition
4.18 System dump enhancements
AIX 5L provides the following enhancements in the area of system dumps:
• A new command, dumpcheck, that checks to see if the dump device and the copy directory for the dump are large enough to actually accept a system dump.
• The creation of a core file for a process without terminating the process.
• Minor enhancements to the snap command.
• Dedicated dump device
4.18.1 The dumpcheck commandThe new dumpcheck command has the following syntax:
By default, dumpcheck is started by a crontab entry each afternoon at 3:00 PM local time. The output of the command will be logged in the system error log. With the -p flag, you can request a dumpcheck at any time and the result is printed to stdout. The output would look similar to the following example:
# /usr/lib/ras/dumpcheck -pThere is not enough free space in the file system containing the copy directoryto accommodate the dump.File system name /var/adm/rasCurrent free space in kb 14360Current estimated dump size in kb 25600
The -l flag logs the command output into the system error log and is the default parameter if no other parameter is specified. With the -t flag, you can specify, with a time value in crontab format enclosed in single or double quotation marks, at what time this check will be run by the cron facility. The -P flag updates the crontab entry to reflect whatever parameters are specified with it. The cron facility mails the standard output of a command to the user who runs this command (in this case, root). If you use the -p flag in the crontab entry, root will be sent a mail with the standard output of the dumpcheck command.
Currently, the command output redirection (> /dev/null 2>&1) will not automatically be removed, which prevents the cron facility from sending the mail. You have to remove this redirection manually.
Note
Chapter 4. System management and utility enhancements 179
The -r flag removes the corresponding crontab entry. This flag can not be used together with any other flag.
4.18.2 The coredump() system callAn application can now create a core file by using the new coredump() system call. This call takes, as a single parameter, a pointer to a coredumpinfop structure that sets the path and file name for the core file to be generated.
To use coredump(), you must compile your source with the -bM:UR options. The -b flag is for ld, M: is to specify a Module type, and UR saves the user registers on system calls.
4.18.3 The snap command enhancementsThe snap command in AIX 5L uses the pax command instead of the tar command to create the snap file. This is necessary to manage the ever increasing sizes of the dump files, as file sizes larger than 2 GB are only supported by the pax command. The snap command also links the dump file to the directory structure it creates instead of copying it into the structure, which wastes disk space. The data needed most for analyzing the situation (that is, what caused the dump) is written out first, so that it has a good chance to be part of the archive file created by snap even if the dump is only partially successful. For other enhancements to pax, see 2.18, “The pax command enhancements” on page 42.
4.18.4 Dedicated dump device (5.1.0)In AIX Version 4.3.3 and earlier, the paging space is used as the default dump device created at installation time. AIX 5L Version 5.1 servers with a real memory size larger than 4 GB will, at installation time, have a dedicated dump device created. This dump device is automatically created and no user intervention is required. The default name of the dump device is lg_dumplv. This name and the size of the dump device can be changed by using the bosinst.data file on a diskette at boot time. A new stanza has been added to the bosinst.data file called large_dumplv, which contains two fields. The first field is DUMPDEVICE, which is the name of the dump device and has a maximum size of 15 characters. In the case of an alternate installation disk, the DUMPDEVICE field is limited to 11 characters. The second field is SIZE_GB, which denotes the size of the dump device in GB. SIZE_GB is a maximum of three characters long and it must be a whole number. The stanza will appear similar to that shown in the following example.
large_dump:
180 AIX 5L Differences Guide Version 5.1 Edition
DUMPDEVICE = /dev/lg_dumplvSIZE_GB = 1
Once the operating system installation has completed, the following command can be used to display the dump device:
Chapter 4. System management and utility enhancements 181
The dedicated dump device size is determined by the amount of memory. In Table 18, the memory size to dump device size ratio is shown.
Table 18. System memory to dump device size ratios
If there is insufficient disk space for the system to create a dump device at installation time, then the default action of using the paging space /dev/hd6 as the dump device occurs. Systems with less than 4 GB of real memory also use the paging space as the default dump device.
4.19 System hang detection
A new feature called system hang detection provides a SMIT-configurable mechanism to detect system hangs and initiate the configured action. It relies on a new daemon named shdaemon and a corresponding configuration program named shconf.
In the case where applications adjust their process or thread priorities using system calls, there is the potential problem that their priorities will become so high that regular system shells are not scheduled. In this situation, it is difficult to distinguish a system that really hangs (it is not doing any meaningful work anymore) from a system that is so busy that none of the lower priority tasks, such as user shells, have a chance to run.
The new system hang detection feature uses a shdaemon entry in the /etc/inittab file with an action field that is set to off by default. Using the shconf command or SMIT (fastpath shd), you can enable this daemon and configure the actions it takes when certain conditions are met. The following flags are allowed with the shconf command:
The only existing detection name is prio, which means that the system hang daemon will always compare the priorities of all running processes to a set threshold, and will take one of the five supported actions, each of a different
System memory size Dump device size
4 GB to, but not including, 12 GB 1 GB
12 GB to, but not including, 24 GB 2 GB
24 GB to, but not including, 48 GB 3 GB
48 GB and up 4 GB
182 AIX 5L Differences Guide Version 5.1 Edition
priority, when the entire system fails to run a process below the specified priority any time in the time-out period.
The -d flag displays the current status of the shdaemon. The -R flag restores the system default values. With the -D and -E flags, you can display either the default or the effective values of the configuration parameters. The -H flag adds an optional header to this output. You can request a more concise output by using the -O flag together with either the -D or -E flags (in this case, the -H flag is not allowed). It displays two lines: one with the colon-separated names, and one with the colon-separated values of the configuration parameters. With the -a flag and a name/value pair, you can change the parameter values.
After a new default system installation that has effective values that are identical to the default values occurs, the output of the shconf command appears as follows:
# shconf -dsh_pp=disable# shconf -E -l prio -Hattribute value description
sh_pp disable Enable Process Priority Problempp_errlog disable Log Error in the Error Loggingpp_eto 2 Detection Time-outpp_eprio 60 Process Prioritypp_warning disable Display a warning message on a consolepp_wto 2 Detection Time-outpp_wprio 60 Process Prioritypp_wterm /dev/console Terminal Devicepp_login enable Launch a recovering login on a consolepp_lto 2 Detection Time-outpp_lprio 56 Process Prioritypp_lterm /dev/tty0 Terminal Devicepp_cmd disable Launch a commandpp_cto 2 Detection Time-outpp_cprio 60 Process Prioritypp_cpath / Scriptpp_reboot disable Automatically REBOOT systempp_rto 5 Detection Time-outpp_rprio 39 Process Priority
The ss_pp parameter determines the availability of the system hang detection feature. Enabling it with the default configuration may generate the following error:
# shconf -l prio -a sh_pp=enableshconf:Enable to configure the emergency login.shconf: Configuration method error.
You have to disable the pp_login action, enable the system hang detection, and then configure the desired actions. The output of these commands appears as follows:
Chapter 4. System management and utility enhancements 183
# shconf -l prio -a sh_pp=disableshconf: Priority Problem Conf has changed.# shconf -l prio -a pp_login=disableshconf: Priority Problem Conf has changed.# shconf -l prio -a sh_pp=enableshconf: Priority Problem Conf has changed.shconf: WARNING: Priority Problem Detection is enabled with all actions disabled.
The last command shown in the previous output toggles the action field of the shdaemon entry in /etc/inittab to respawn and starts the /usr/sbin/shdaemon program. After enabling (for example, the errlog action), the priority of the shdaemon process is 0, the highest possible value. This is shown in the following example:
# ps lwx 19580F S UID PID PPID C PRI NI ADDR SZ RSS WCHAN TTY TIME CMD
240001 A 0 19580 1 0 60 20 fa5e 192 236 EVENT - 0:00 /usr/sbin/shdaemon# shconf -l prio -a pp_errlog=enableshconf: Priority Problem Conf has changed.# ps lwx 19584
F S UID PID PPID C PRI NI ADDR SZ RSS WCHAN TTY TIME CMD240001 A 0 19584 1 0 0 20 fa5e 33000 33044 EVENT - 0:00/usr/sbin/shdaemon
This action makes sure that the shdaemon is always scheduled and can evaluate the current machine status and take the configured actions when appropriate. The available actions include the following:
errlogGenerates an entry in the error log.
warningDisplays a warning message on a console; the default is /dev/console.
loginEnables a login shell with priority 0 on a serial terminal; the default is /dev/tty0.
cmdStarts a command with priority 0.
rebootAutomatically reboots the machine.
4.20 Sendmail upgrade enhancements (5.1.0)
AIX 5L Version 5.1 uses Sendmail Version 8.11.0. This version has several enhancements and changes.
• The sendmail files sendmail.cf and aliases have been moved to the /etc/mail directory. Links exist on the POWER platforms that are required for the migration to AIX 5L Version 5.1 from earlier releases of AIX. On Itanium-based platforms, the sendmail files are in /etc/mail and no links exist between them and the /etc directory. The following listing shows the links on the POWER platform.
-# ls -l /etc/sendmail.cf /etc/aliases
184 AIX 5L Differences Guide Version 5.1 Edition
-lrwxrwxrwx 1 root system 21 Mar 07 10:28/etc/sendmail.cf -> /etc/mail/sendmail.cf
-lrwxrwxrwx 1 root system 17 Mar 07 10:28 /etc/aliases-> /etc/mail/aliases
• Sendmail supports the Berkeley DB 3.1.14 format to more efficiently store the aliases.db database file. Other databases used can store their data in the Berkeley database formats.
• Support for message submission agents.
• Multiple queues, memory buffered pseudo files, and more control over resolver time-outs improve performance.
• The ability to connect to servers running on named sockets.
• Better LDAP integration and support for LDAP-based routing.
• Improved support for virtual hosting.
• Even better anti-spam control features.
• Several new map classes, which include arith and macro.
More information on Sendmail Version 8.11.0 is available from the following Web site.
http://www.sendmail.org
4.20.1 Sendmail 8.11.0 supports the Berkeley DBThe Berkeley DB is an embedded database system that supports keyed access to data. The library includes support for the following access methods:
• Btrees
• Hashing
• Fixed and Variable-Length records
It also provides core database services, such as page cache management, transactions, locking, and logging. An API is provided that allows developers to easily embed database-style function and support into other objects or interfaces.
The Berkeley DB support is now available on AIX 5L Version 5.1 for Sendmail 8.11.0. As long as the aliases database is not rebuilt, sendmail will continue to read it in its old DBM format. This consists of two files: /etc/mail/aliases.dir and /etc/mail/aliases.pag. However, when the aliases database is rebuilt, sendmail will change this format to Berkeley DB. This file will be stored in /etc/mail/aliases.db.
Chapter 4. System management and utility enhancements 185
In the /etc/mail/alias file, uppercase characters on the left hand side of the alias are converted to lowercase before being stored in the aliases database. In the following example, mail sent to the testalias user alias fails, since TEST is converted to test when the second line is stored.
TEST: user@machine
testalias: TEST
To preserve uppercase in user names and alias names, add the u flag to the local mailer description in the /etc/mail/sendmail.cf file. Thus, in the previous example, mail to the testalias user alias would succeed. The /etc/mail/sendmail.cf for the local mailer would appear similar to the following:
The Performance Analysis Tools in AIX 5L add the following:
• The truss command allows the tracing of all system calls made and signals received by a command or an existing process. 4.21.1, “Process system call tracing with truss” on page 186 describes truss in more detail.
• The alstat command is a new tool which reports alignment exception statistics. This tool can be used to detect performance degradations caused by misalignment data or code.
For AIX 5L on POWER and Itanium-based systems, the following tools and commands are available: alstat, gennames, truss, iostat, vmstat, sar, prof,tprof, and gprof.
The following analysis tools are available on POWER only: emstat, filemon, fileplace, netpmon, pprof, rmss, svmon, and topas.
The following tools have been withdrawn in AIX 5L: bf (bigfoot), bfrpt, locktrace, stem, and syscalls. Consult the man pages for svmon, locktrace, and truss to locate similar functions.
4.21.1 Process system call tracing with trussAIX 5L now supports the truss command, which allows you to trace system calls executed by a process as well as record the received signals and the occurrence of machine faults.
The application to trace is either specified on the command line of the truss command or truss can be attached to one or more already running processes
186 AIX 5L Differences Guide Version 5.1 Edition
by using the -p flag with a list of process IDs. The complete list of flags supported by the truss command is:
If the -o flag that redirects the output of truss to a file is not used, the truss output goes to standard out and can be mixed with the output of the command truss is tracing. Before describing the other flags, the following lines show an example of running the date command under truss:
The -e flag is responsible for the display of the environment content in the truss output file. By default, truss does not trace forked processes; the -f flag will force truss to go into forked processes. Interruptible sleeping system calls are displayed once on completion if the -i flag is used. The -c flag generates a summary file instead of the detailed report shown previously. The -c flag also gives a count for how often a specific system call was executed and the overall time spent in total in it.
188 AIX 5L Differences Guide Version 5.1 Edition
The other flags allow the inclusion (or exclusion, if the ! (exclamation point) is used) by name of specific system calls, signals, machine faults, or the data read from or written to specific file descriptors. By default, truss displays symbolic constants from the appropriate system header files as the arguments of the system calls; this can be forced to always display hexadecimal values by using the -x flag. These four flags accept the symbol all to include all possible system calls, signals, and so forth. The return value of the system call is shown on the right hand side of the equal sign.
For this simple date command (shown in the previous output), the truss output file is already about 10 KB. You need to reduce the number of system calls you are tracing, or attach truss to a running process only for a limited amount of time, to keep the size of the truss output file within a manageable range.
4.21.2 Emulation and alignment detectionA new tool was added in the perfagent.tools fileset; in addition to the existing emstat command, alstat will count alignment interrupts while emstat will display emulation statistics.
Both commands can use the -v flag, which will display the statistics per CPU in SMP systems.
The emstat command is only available on the POWER platform.
4.21.3 Performance monitor APIA new set of APIs is available to provide access to Performance Monitor data on selected processor types, namely 604, 604e, POWER3, POWER3-II, RS64-II, RS64-III, and RS64-IV. Other processors of the POWER platform not listed are not supported by this API.
This feature is only available on the POWER platform.
Refer to “Performance Monitor API Programming Concepts” section in Chapter 10 “Programming on Multiprocessor Systems” of the Programming Guides publication in the Online Documentation Library for a complete list of API calls, as well as several sample programs.
Chapter 4. System management and utility enhancements 189
4.21.4 The tprof command (5.1.0)The tprof command reports CPU usage for individual programs and the system as a whole. This command is a useful tool for anyone with a Java, C, C++, or FORTRAN program that might be CPU-bound and who wants to know which sections of the program are most heavily using the CPU. The tprof command also reports the fraction of time the CPU is idle. These reports can be useful in determining CPU usage in a global sense.
4.21.4.1 tprof support for Java profilingIn AIX 5L Version 5.1, the tprof command has been enhanced to do subroutine or method level profiling for JAVA applications. The Java Virtual Machine Profiling Interface (JVMPI), a new feature supported by Java 1.2 or later, has been enhanced to do class and method level profiling for JAVA applications.
The -j flag was added to tprof to enable profiling for JAVA applications. The profiling report generated by tprof for Java applications is similar to that of a standard tprof profiling report.
The following example shows the profiling of an JAVA application named hello:
Method Name Ticks % Method ID Load Addr Size=========== ===== ==== ========= ========= ====ensureOpen[()V] 1 0.1 34554ed8 346af3bc 314
4.21.5 The locktrace command (5.1.0)Starting with AIX 5L Version 5.1, the lockstat command is no longer supported. Tracing locks, including at class level, can now be done with the locktrace command, which is part of the bos.perf.tools and is shipped with the base AIX CD-ROMs for AIX POWER and Itanium-based systems.
The locktrace command controls which kernel locks are being traced by the trace subsystem. The default is to trace none even if the machine has been rebooted after running the bosboot -L command. If bosboot -L was run, kernel lock tracing can be turned on or off for one or more (up to 32) individual lock classes, or for all lock classes. If bosboot -L was not run, lock tracing can only be turned on for all locks or none.
• On the regular kernel, locktrace -S allows the tracing of all locks regardless of their class membership, but will not set the classid.instance data word normally present in tracehook 112 (lock taken or unused) and 113 (lock released). The addresses of the locks and the addresses of the lock function caller will still be reported, allowing lock identification in many cases.
• On the bosboot -L kernel, locktrace -S also allows all locks regardless of their class membership, but will make the classid.instance data available in tracehooks 112 and 113.
Chapter 4. System management and utility enhancements 191
Table 19 lists the flags that can be used with the locktrace command.
Table 19. Flags of the locktrace command
4.21.5.1 Example of the locktrace commandThis example describes a trace on a regular kernel. Start with enabling the lock tracing with the following command:
# locktrace -Slock tracing enabled for all classes
Once the lock tracing is enabled, start the trace command:
#trace -a -T 768000 -L 10000000 -o /tmp/trace.out
Run a few commands, for example:
#crfs -v jfs -g datavg -a size='43' -m /test#fsck /dev/ftptestlv
Stop the tracing and convert the output file:
# trcstop# trcrpt /tmp/trace.out > /tmp/trace.rpt
The trace.rpt will have the locks listed and appears similar to the following:
Thu Mar 15 16:53:42 2001System: AIX server1 Node: 5Machine: 000BC6FD4C00Internet Address: 0903F038 9.3.240.56The system contains 4 cpus, of which 4 were traced.Buffering: Kernel HeapThis is from a 32-bit kernel.Tracing all hooks.
Flag Description
-r classname Turn off lock tracing for all the kernel locks belonging to the specified class. This option always fails if bosboot -L was not run.
-s classname Turn on lock tracing for all the kernel locks belonging to the specified class. This option always fails if bosboot -L has not been executed.
-R Turn off all lock tracing.
-S Turn on lock tracing for all locks regardless of their class membership.
-l Lists the kernel lock tracing current status.
192 AIX 5L Differences Guide Version 5.1 Edition
trace -a -T 768000 -L 10000000 -o trace.out
ID ELAPSED_SEC DELTA_MSEC APPL SYSCALL KERNEL INTERRUPT
To start tracing the SEM_LOCK_CLASS, use the following command:
# locktrace -s SEM_LOCK_CLASS
4.21.6 Cmdstat tools enhancement (5.1.0)The cmdstat commands are those software tools found in the bos.acct fileset that monitor system performance. The cmdstat commands include vmstat, iostat, and sar. The enhancements made have no impact on existing functions of the cmdstat tools. The enhancements are as follows.
• In previous releases of AIX, these commands made direct /dev/kmem reads. These reads from /dev/kmem have been replaced by calls to the perfstat kernel extension. The APIs fetch the kernel statistics and populate the corresponding performance tools data structure.
• The cmdstat commands in previous release (AIX 5L) required two different executables: one for 32-bit kernels and one for 64-bit kernels. AIX 5L Version 5.1 has performance tools data structures used by the perfstat APIs that are not kernel bit sensitive.
For more information, see 4.23, “Perfstat API library (5.1.0)” on page 203.
4.21.7 The vmstat command enhancementsThe vmstat command has two new flags in AIX 5L; these new flags add new controls and improve monitoring.
Chapter 4. System management and utility enhancements 193
The -I flag outputs a report with the new columns fi and fo; these columns indicate the number of file pages in (fi) and out (fo). In this report, the re and cy columns are not displayed. A new p column displays the number of threads waiting for a physical I/O operation.
# vmstat -I 1 3kthr memory page faults cpu
-------- ----------- ------------------------ ------------ -----------r b p avm fre fi fo pi po fr sr in sy cs us sy id wa0 0 0 46391 228 0 0 0 0 0 2 108 156 20 1 0 99 00 1 0 46391 226 0 0 0 0 0 0 432 8080 53 1 1 98 00 1 0 46391 226 0 0 0 0 0 0 424 91 50 0 0 99 0
The -t flag shows a time stamp at the end of each line, as shown in the following:
# vmstat -t 1 3kthr memory page faults cpu time----- ----------- ------------------------ ------------ ----------- --------r b avm fre re pi po fr sr cy in sy cs us sy id wa hr mi se0 0 46905 5752 0 0 0 0 2 0 108 156 20 1 0 99 0 11:46:280 1 46905 5749 0 0 0 0 0 0 429 7264 72 1 1 98 0 11:46:290 1 46905 5749 0 0 0 0 0 0 434 165 60 0 0 99 0 11:46:30
4.21.8 The iostat command enhancementsThe iostat command is enhanced with new parameters that provide a better presentation of the generated reports.
The -s flag adds a new line to the header of each statistics data that reports the sum of all activity on the system.
The -a flag produces an output similar to the -s flag output, with the difference that it provides an adapter basis sum of activities. After displaying the adapter activity, it provides a per-disk basis set of statistics.
# iostat -a 1 3tty: tin tout avg-cpu: % user % sys % idle % iowait
4.21.9 The netpmon and filemon commands enhancementsNew offline support allows you to generate netpmon reports with a normal trace report file and a gennames output for improved use and scalability on target systems.
At the time of writing, this feature is only available on the POWER platform.
To use the new function, you must generate a normal trace output (for example, through smit trace and then start trace), and then generate an unformatted trace file through the output trace file, as shown in the following example:
Immediately following the collection of the trace file, you should also run the gennames command and save its output:
# gennames > /tmp/gennames.out
When both files are correctly set, you can generate your offline report using the -i and -n flags, as shown in the following netpmon example:
# netpmon -i /tmp/newtrcfile -n /tmp/gennames.out
4.21.10 The gennames command enhancement (5.1.0)The gennames command gathers all the information necessary to run the tprof, filemon, netpmon, or pprof commands in off-line mode.
Chapter 4. System management and utility enhancements 195
The gennames command has been enhanced with a new -f flag. The -f flag is needed for processing offline filemon traces (to be added to the gennames output).
The following example shows how to run filemon in offline mode while using the gennames command:
# trace -a -T 768000 -L 10000000 -o trace.out -j000,000,001,002,003,005,006,139,102,10C,106,00A,107,101,104,10D,15B,12E,130,163,19C,154,3D3,1BA,1BE,1BC,10B,221,1C9,222,228,232,45B
Stop the trace after you have run the monitored application programs or system commands:
# trcstop
Create the gennames file:
# gennames -f > gennames.out
Format the trace file while using the trcrpt command:
# trcrpt -r trace.out > trace.rpt
Run filemon with both -i and -n flags:
filemon -i trace.rpt -n gennames.out -O all
4.21.11 The svmon command enhancementsThe svmon command has been enhanced to display information about Tiers, superclasses, and subclasses introduced with the Workload Manager in AIX 5L update.
This feature is only available on the POWER platform.
Four new flags, discussed in the following sections, can be used in order to make use of this new function.
196 AIX 5L Differences Guide Version 5.1 Edition
4.21.11.1 The -W flagThe -W flag is used to collect statistics for either an entire superclass or only a specific subclass. The following example is an output generated for a superclass:
4.21.11.2 The -e flagThe -e flag reports the statistics for the subclass of a superclass. It only applies to superclasses or tiers. The -e flag is only allowed with -T and -W. A sample output is shown in the following example:
Chapter 4. System management and utility enhancements 197
4.21.11.3 The -T flagThe -T flag reports the statistics of all the classes in a tier. If a parameter is passed with the -T flag, then only the classes belonging to the tier will be analyzed. A list of tiers can be provided. When no parameter is specified, all the defined tiers of the class will be analyzed. Examples of flag interaction and command response follows.
The -T flag with no parameter provides the following results.
The -T flag with the -a flag indicating a specific superclass provides the following results. All the subclasses of the indicated superclass in the tier tiernumber will be reported.
Vsid Esid Type Description Inuse Pin Pgsp Virtualdb99 - pers large file /dev/lv04:23 27702 0 - -8010 - work misc kernel tables 3287 0 1210 3289
0 - work kernel seg 3134 1635 1919 33798811 - work kernel pinned heap 3087 1222 1226 31878af0 - pers /dev/hd2:112665 2316 0 - -
As shown in the preceding examples, you can mix different flags to obtain different outputs. Refer to the svmon command man pages to check for other combinations.
4.21.12 The topas command enhancementsThe topas command is a performance monitoring tool that was introduced in AIX Version 4.3.3. In AIX 5L, it has several new enhancements, including Workload Manager support, an improved set of CPU usage panels, several new column sort options, NFS statistics, and per disk or adapter breakdown of network and disk usage.
This feature is only available on the POWER platform.
Figure 65 provides a sample topas main screen. This section is too brief to demonstrate all the features. It is recommended that the topas tool is given a complete exploration through hands-on use.
Chapter 4. System management and utility enhancements 199
Figure 65. Topas main screen
4.21.12.1 Workload manager supporttopas displays the CPU, disk, and block I/O usage for each class. By default, it will display the top two classes. Two new commands were added to topas to change the Workload Manager monitoring. The w (lower case) command will toggle the top two classes on or off, and the W (upper case) command will switch to a full Workload Manager classes monitoring screen.
The example shown in Figure 65 has the top two classes enabled, while Figure 66 shows the entire set of classes being monitored by topas.
The bottom of the screen shows only processes belonging to the currently selected class (system in the example), using the same new 80 column display now available with the new P command to monitor all processes on the system.
200 AIX 5L Differences Guide Version 5.1 Edition
Figure 66. Workload Manager screen using W subcommand
4.21.12.2 CPU displayBy default, topas will display cumulative CPU usage as in previous releases. However, the c (lower case) command can toggle to a per CPU usage view on SMP systems. The c command also toggles CPU monitoring off (see Figure 67 on page 202).
Chapter 4. System management and utility enhancements 201
Figure 67. Topas with per CPU usage enabled
4.22 Performance tools repackaging (5.1.0)
In AIX 5L Version 5.1, the base performance tools are repackaged and moved from the perfagent.tools to the bos.perf.tools fileset.
To use the utilities in the bos.perf.tools fileset, you also have to install the following filesets:
bos.sysmgt.tracebos.perf.perfstatperfagent.tools
Tools that have been repackaged and available in the bos.perf.tools fileset are provided in Table 20.
Table 20. Performance tools packaging versus platform
Performance utility POWER-based Itanium-based
/usr/bin/locktrace X X
/usr/bin/pprof X
/usr/bin/rmss X
202 AIX 5L Differences Guide Version 5.1 Edition
The perfagent.tools fileset remains to support the PTX base dependencies. The perfagent.tools fileset has, as prerequisite, bos.perf.tools and bos.perf.perfstat, so the basic performance tools will be automatically picked up and installed on the system.
4.23 Perfstat API library (5.1.0)
A set of new APIs are available for easy access to kernel performance metrics. The APIs are in bos.perf.libperfstat fileset. The goal of these APIs is to eliminate the need for ISV to use /dev/kmem and avoid dependencies on kernel data structures which can change from release to release. The APIs will be enhanced in future releases but binary compatibility will be preserved, therefore virtually eliminating the need for ISVs to port their system monitoring tools to each new AIX release.
Table 21. New performance APIs
/usr/bin/genkex X
/usr/bin/gennames X X
/usr/bin/netpmon X
/usr/bin/genkld X
/usr/bin/fileplace X
/usr/bin/ipfilter X
/usr/bin/svmon X
/usr/bin/tprof X X
/usr/bin/emstat X
/usr/bin/filemon X
/usr/bin/topas X
/usr/bin/stripnm X
/usr/bin/genld X
/usr/bin/alstat X X
API Purpose
perfstat_cpu Retrieves individual CPU usage statistics.
Performance utility POWER-based Itanium-based
Chapter 4. System management and utility enhancements 203
4.24 FDPR code duplication optimization
FDPR is a tool, first introduced in AIX 3.2, that optimizes binaries generated from xl compilers. It contains two major components: aopt, which is used for instrumenting and reordering of AIX XCOFF executables, and fdpr, which is a more user-friendly interface to the aopt command.
This feature is only available on the POWER platform.
A new improvement introduced with AIX 5L is the Code Duplication optimization. Code Duplication optimization eliminates the need to invoke the store and restore functions of small, but frequently used functions in the Link Register, which were not suitable for optimization, by creating a new copy of the callee function and redirecting the calling instructions to its duplicated copy.
4.25 System V Release 4 print subsystem
On the Itanium-based platform:
• The classic AIX print subsystem is not available.
• The System V Release 4 print subsystem is the default.
On the POWER platform:
• Both the AIX and the System V Release 4 print subsystems are available.
• The AIX print subsystem is the default.
When the AIX Print Subsystem was created, it was designed to combine the features of the System V and Berkeley Software Distribution (BSD) printing standard, along with some unique features found only in AIX. This design had some distinct advantages in the past:
perfstat_cpu_total Retrieves global CPU usage statistics.
perfstat_disk Retrieves individual disk usage statistics.
perfstat_disk_total Retrieves global disk usage statistics.
perfstat_memory_total Retrieves global memory usage statistics.
perfstat_netinterface_total Retrieves global network interface usage statistics.
API Purpose
204 AIX 5L Differences Guide Version 5.1 Edition
• Easy transition to AIX
To provide an easy transition from another operating system to AIX, many of the commands traditionally used for printing were provided. For example, BSD users could still print using the same lpr command they had become accustomed to. Also, scripts that were used to print did not necessarily need to be changed.
• Powerful and versatile print drivers
The print drivers used to drive specific printers were designed in such a way that most printing options available on the printer could be used by selecting one or more of the many flags known to the backend. In addition, the print data stream could easily be modified with user and system defined filters and formatters.
• Limits fields
Limits fields that gave users a valid range of choices for each option would prohibit a user from using an incorrect value, and would send a message to the user stating the reason for the resulting print job rejection.
However, the same features that gave AIX printing an advantage over other UNIX operating systems also served to make the AIX print subsystem less compliant to widely used standards. With the development of AIX 5L for Itanium-based platforms, it was necessary to look for an alternative print solution that provides a more standard, less complex print subsystem that potentially embodies the concept of directory enablement, and lets the source code of AIX 5L for POWER and AIX 5L for Itanium-based systems intersect as much as possible.
The AIX 5L for Itanium-based systems’ development team selected the System V Release 4 (SVR4) print subsystem as the printing solution, and this print subsystem was added to AIX 5L for POWER with the long-term goal of making it the default print solution for AIX. In AIX 5L for Itanium-based systems, it will be the only print subsystem offered. 4.25.1, “Understanding the System V print service” on page 206 provides a brief overview of the print request processing of the newly implemented System V print subsystem in AIX 5L for POWER, and 4.25.3, “System V print subsystem management” on page 218 describes the commands which are available to manage the System V printer services. System administrators who prefer to use graphical system management tools will find useful information in 4.25.5, “User interface for AIX and System V print subsystems” on page 222.
If the code for both print subsystems is installed, the base operating system of the current AIX 5L release uses the traditional AIX print subsystem by default and the System V print subsystem is not active. 4.25.2, “Packaging
Chapter 4. System management and utility enhancements 205
and installation” on page 208 covers the details about fileset packaging and the installation of the System V print subsystem support in AIX 5L.
AIX 5L provides a command menu, a SMIT menu, and a Web-based System Manager menu, which allows the system administrator to switch between the AIX and the System V print subsystems, but will not allow both print subsystems to be active at the same time. 4.25.7, “Switching between AIX and System V print subsystems” on page 228 gives in-depth information about the switching process and the related commands.
Supplemental information about the user interface specification, the terminfo database, and the supported printers can be found in the 4.25.4, “User interface specifications” on page 220, and 4.25.6, “Terminfo and supported printers” on page 226.
4.25.1 Understanding the System V print serviceThe System V print subsystem was ported from SCO’s UnixWare 7 to AIX 5L. The print subsystem, as such, supports local printing (parallel and serial), remote printing using BSD's lpd protocol (RFC 1179), and network printing using Hewlett-Packard’s (HP) JetDirect. The code was internationalized to conform to and to comply with AIX international standards and requirements.
The System V print service is a collection of utilities that assists you, as system administrator (or printer administrator), to configure, monitor, and control the printers on your system.
The print service:
• Receives files users want to print.
• Filters the files (if needed), so they can print correctly.
• Schedules the work of one or more printers.
• Starts programs that interface with the printers.
• Keeps track of the status of jobs.
• Alerts you to printer problems.
• Keeps track of mounting forms and filters.
• Issues error messages when problems arise.
Figure 68 on page 207 shows an overview of the processing of a print request, illustrates the following explanations, and helps to understand the overall concept.
206 AIX 5L Differences Guide Version 5.1 Edition
Figure 68. Overview of print request processing
When a user sends a file to a printer, the print service assigns a unique name, the request ID, to the request (print job).
The request ID consists of the name of the printer on which the file is to be printed and a unique number identifying the file. Use this request ID to find out the status of the print job or to cancel the print job. The print service keeps track of all the print requests in an associated request log.
The print job is spooled, or lined up, with other print jobs to be sent to a printer. Each print job is processed and waits its turn in line to be printed. This line of pending print jobs is called a print queue.
Each printer has its own queue; you can hold jobs in the queue, move jobs up in a queue, or transfer jobs to another queue.
lp command
print service(spooling daemon)
optionalslow filter
standardinterface program
optionalfast filter
laser printer
print serviceconfiguration
terminfodatabase
1
2
3
4b
4a
(printerinitialization)
(jobscreening)
default filter
KEY:
disk files
UNIX system process
data access
UNIX system processcontrol
communication path
UNIX system processcontrol (alternate)
Chapter 4. System management and utility enhancements 207
Each print request is sent to a spooling daemon, lpsched, that keeps track of all the jobs. The daemon is created when you start the print service. The spooling daemon is also responsible for keeping track of the status of the printers and slow filters; when a printer finishes printing a job, the daemon starts printing another job if one is queued.
You can customize the print service by adjusting or replacing some of the items shown in Figure 68 on page 207. The following numbers are explanations of the keys used in the diagram:
1. For most printers, you need only to change the printer configuration stored on disk. For further details, refer to the lpadmin command documentation for adding or modifying a local printer.
2. The print service relies on the standard interface script and the terminfo database to initialize each printer and set up a selected page size, character pitch, line pitch, and character set. For printers that are not represented in the terminfo database, you can add a new entry that describes the capabilities of the printer. The print service uses the terminfo database in two parallel capacities: screening print requests to ensure that those requests can be handled by the desired printer, and setting the printer so it is ready to print the requests. For example, if the terminfo database does not show a printer capable of setting a page length requested by a user, the spooling daemon rejects the request. However, if it does show it to be capable, then the interface program uses the same information to initialize the printer.
3. If you have a particularly complicated printer or if you want to use features not provided by the print service, you can change the interface script. This script is responsible for managing the printer: it prints the banner page, initializes the printer, and invokes a filter to send copies of the user's files to the printer.
4. To provide a link between the applications used on your system and the printers, you can add slow and fast filters. Each type of filter can convert a file into another form (for example, mapping one set of escape sequences into another), and can provide a special setup by interpreting print modes requested by a user. Slow filters are run separately by the spooling daemon to avoid slow queues. Fast filters are run so their output goes directly to the printer; thus, they can exert control over the printer.
4.25.2 Packaging and installationThe AIX and System V print subsystems are both packaged with the base operating system, but which filesets are installed during the initial base installation depends on the hardware configuration of your system. The
208 AIX 5L Differences Guide Version 5.1 Edition
option chosen for the Installation Configuration (default/minimal) under the Advanced Options menu during the base system installation process does not have any impact on the selection and installation of the print subsystem filesets.
The filesets given below provide the core function of the AIX print subsystem:
bos.rte.printers Front end printer support.
printers.rte Printer backend.
printers.msg.xx_XX.rte Printer backend messages for the system specific locale indicated by xx_XX in the fileset name.
The frontend printer support, bos.rte.printers, is part of the bos.rte file package, and therefore is always installed on the system. This fileset provides frontend print commands, such as qprt, lpr, enq, mkque, and rmque, that allow a user or the system administrator to interact with the qdaemon’s spooler queues. For compatibility and usability reasons, the traditional AIX print subsystem maps several System V and BSD print commands to the AIX specific print commands. For example, the lp command used to be nothing more than a program which translates the System V lp flags to their counterparts of the enq AIX command, and after all the command line arguments were processed, the translated list of flags is finally used to call the enq command. As far as the frontend is concerned, the System V commands affected are cancel, lp, and lpstat. For BSD, the relevant frontend commands are lpq, lpr, and lprm.
In AIX 5L, the System V and BSD frontend print commands are still in the /usr/bin directory but, by default, they are now linked to the traditional AIX print command wrappers in the /usr/aix/bin directory:
# ls -l /usr/bin | grep aixlrwxrwxrwx 1 root system 19 Sep 06 15:46 cancel -> /usr/aix/bin/cancellrwxrwxrwx 1 root system 15 Sep 06 15:46 lp -> /usr/aix/bin/lplrwxrwxrwx 1 root system 16 Sep 06 15:46 lpq -> /usr/aix/bin/lpqlrwxrwxrwx 1 root system 16 Sep 06 15:46 lpr -> /usr/aix/bin/lprlrwxrwxrwx 1 root system 17 Sep 06 15:46 lprm -> /usr/aix/bin/lprmlrwxrwxrwx 1 root system 19 Sep 06 15:46 lpstat -> /usr/aix/bin/lpstat
The AIX printer backend is a collection of programs called by the spooler's qdaemon command to manage a print job that is queued for printing. The printer backend performs the following functions:
• Receives a list of one or more files to be printed from the qdaemon command.
• Uses printer and formatting attribute values from the database; overridden by flags entered on the command line.
Chapter 4. System management and utility enhancements 209
• Initializes the printer before printing a file.
• Runs filters as necessary to convert the print data stream to a format supported by the printer.
• Provides filters for simple formatting of ASCII documents.
• Provides support for printing national language characters.
• Passes the filtered print data stream to the printer device driver.
• Generates header and trailer pages.
• Generates multiple copies.
• Reports paper out, intervention required, and printer error conditions.
• Reports problems detected by the filters.
• Cleans up after a print job is canceled.
• Provides a print environment that a system administrator can customize to address specific printing needs.
The AIX printer backend fileset printers.rte belongs to several of the default system bundles which are located in the /usr/sys/inst.data/sys_bundle directory. These bundles include:
App-Dev.bnd Application Development Bundle: A collection of software products for developing application programs.
Client.bnd Client Bundle: A collection of software products for single user systems running in a stand-alone or networked client environment.
Pers-Prod.bnd Personal Productivity Bundle: A collection of software products for graphical desktop systems running AIX and PC applications.
Server.bnd Server Bundle: A collection of software products for multi-user systems running in a stand-alone or networked environment.
The fact that the bundles listed belong to the default system bundle category does not imply that any of these bundles are installed by default. They are predefined and supplied for your convenience, but the system administrator would have to intentionally initiate the installation of any of the bundles.
Furthermore, the printers.rte fileset is not listed in any of the default system bundles, which are used during the base installation process:
ASCII.autoi An ASCII terminal system bundle file that lists filesets to install if the console is not a low function terminal (LFT).
210 AIX 5L Differences Guide Version 5.1 Edition
BOS.autoi A system bundle file that lists the group of packages and filesets that will always be installed when the Default Installation Configuration under the Advanced Options menu (during the base system installation process) was specified.
MIN_BOS.autoi A system bundle file that lists the group of packages and filesets that will always be installed when the Minimal Installation Configuration under the Advanced Options menu (during the base system installation process) was specified.
GOS.autoi A graphics system bundle file that lists filesets to install if the console is an LFT and when the Default Installation Configuration was chosen (during the base system installation process).
MIN_GOS.autoi A graphics system bundle file that lists filesets to install if the console is an LFT and when the Minimal Installation Configuration was chosen (during the base system installation process).
Since printers.rte is not explicitly included in any of the bundle files with the autoi extension, the requisite for printers.rte of other filesets determines whether or not the backend support for the AIX print subsystem is installed. The fileset dependencies are defined by the multi-volume .toc file in the /usr/sys/mvCD directory of the installation media, and at the time of publication, four fileset dependencies designated printers.rte as a required fileset for installation. These fileset dependencies include:
bos.txt.tfs Text formatting services commands
printers.ibmNetPrinter.attach en_US IBM Network Printer attachment
printers.ibmNetColor.attach en_US IBM Network Color Printer attachment
The most significant fileset of the ones listed is bos.txt.tfs. The text formatting services are included in GOS.autoi and MIN_GOS.autoi and are also directly required by the X11.Dt.rte fileset for the AIX Common Desktop Environment (CDE) support.
Chapter 4. System management and utility enhancements 211
Table 22 summarizes the different combinations for the AIX print subsystem backend support. These combinations’ parts include the HW configuration, installation configuration, and system administrators intervention.
Table 22. AIX print subsystem backend support
As mentioned before, the traditional AIX print subsystem maps several System V and BSD print commands to the AIX specific print commands. As far as the backend print support is concerned, the only two System V commands affected are disable and enable. In AIX 5L, these specific System V backend print commands are still in the /usr/bin directory, but by default they are now linked to the traditional AIX print command wrappers in the /usr/aix/bin directory:
# ls -l /usr/bin | grep -E "\/enable|disable"lrwxrwxrwx 1 root system 20 Sep 05 13:46 disable -> /usr/aix/bin/disablelrwxrwxrwx 1 root system 19 Sep 05 13:46 enable -> /usr/aix/bin/enable
In addition to the AIX print command wrappers for System V and BSD print commands in the /usr/aix/bin directory, a new lock file _AIX_print_subsystem is installed under the /usr/aix directory. The existence of the lock file indicates that the AIX print subsystem is active. For reference, a full listing of the /usr/aix directory is provided in the following:
# ls -lR /usr/aixtotal 8-rw-rw-r-- 1 root system 0 Sep 01 18:02 _AIX_print_subsystemdrwxr-xr-x 2 bin bin 512 Sep 05 13:46 bin/usr/aix/bin:
total 576-r-xr-xr-x 1 bin bin 33648 Aug 24 21:22 cancel-r-xr-x--- 1 root printq 33488 Aug 24 21:22 disable-r-xr-x--- 1 root printq 33376 Aug 24 21:22 enable-r-xr-xr-x 1 bin bin 34228 Aug 24 21:22 lp-r-xr-xr-x 1 bin bin 33916 Aug 24 21:22 lpq-r-xr-xr-x 1 bin bin 35236 Aug 24 21:22 lpr-r-xr-xr-x 1 bin bin 34312 Aug 24 21:22 lprm-r-xr-xr-x 1 bin bin 35368 Aug 24 21:22 lpstat
The package of the System V print subsystem is named bos.svprint and consists of four filesets:
bos.svprint.fonts System V Print Fonts
bos.svprint.hpnp System V Hewlett-Packard JetDirect
bos.svprint.ps System V Print Postscript
bos.svprint.rte System V Print Subsystem
These filesets are supplemented by the locale-specific message support and the System V printer terminal definitions:
bos.msg.xx_XX.svprint System V Print Subsystem Messages for the system specific locale (indicated by xx_XX in the fileset name).
bos.terminfo.svprint.data System V Printer Terminal Definitions.
The filesets bos.svprint.* and bos.terminfo.svprint.data are included in the BOS.autoi system bundle and will be installed by default on all AIX 5L systems. The main script that handles the system installation tasks, /usr/lpp/bosinst/bi_main, also ensures that the locale-specific message support is available through bos.msg.xx_XX.svprint.
All System V and BSD commands that are mapped by the executables in the /usr/aix/bin directory to the AIX print subsystem specific commands have their native System V or BSD counterpart in the /usr/sysv/bin directory. During a switch from the AIX to the System V print subsystem, the respective duplicate commands will be handled by removing the inactive print subsystems command’s symbolic links and adding new symbolic links for the active commands. The following directory listing reflects this configuration on a system where the initially active AIX print subsystem was deactivated and switched to the System V print subsystem by the use of the newly introduced switch.prt command:
ls -l /usr/bin | grep sysvlrwxrwxrwx 1 root system 20 Sep 12 18:58 cancel -> /usr/sysv/bin/cancellrwxrwxrwx 1 root system 21 Sep 12 18:58 disable -> /usr/sysv/bin/disablelrwxrwxrwx 1 root system 20 Sep 12 18:58 enable -> /usr/sysv/bin/enablelrwxrwxrwx 1 root system 16 Sep 12 18:58 lp -> /usr/sysv/bin/lp
Chapter 4. System management and utility enhancements 213
Once the System V print subsystem is active, the new lock file _SYS5_print_subsystem will be present in the /usr/sysv directory and the AIX print subsystem lock file /usr/aix/_AIX_print_subsystem will no longer exist. You will find the recursive listing for the /usr/sysv directory in the following example (note the differences in user and group ownership in comparison to the executables in the /usr/aix/bin directory):
# ls -lR /usr/sysvtotal 8-r--r--r-- 1 root system 0 Sep 12 16:13 _SYS5_print_subsystemdrwxr-xr-x 2 bin bin 512 Dec 31 1969 bin/usr/sysv/bin:total 2136---x--x--x 1 lp lp 112506 Aug 24 21:21 cancel---s--x--- 1 root lp 113034 Aug 24 21:22 disable---s--x--- 1 root lp 113034 Aug 24 21:22 enable---x--x--x 1 lp lp 137338 Aug 24 21:21 lp-r-sr-xr-x 1 lp lp 166690 Aug 24 21:22 lpq-r-xr-xr-x 1 bin bin 27182 Aug 24 21:22 lpr-r-xr-xr-x 1 bin bin 116930 Aug 24 21:22 lprm---x--x--x 1 lp lp 189442 Aug 24 21:21 lpstat
AIX 5L introduces a new user named lp and a related group named the same. The user lp is added to the /etc/passwd file for ownership of a majority of the files, which belong to the bos.svprint package. The entry in the /etc/passwd file is similar to the following example:
lp:*:11:11::/var/spool/lp:/bin/false
The group lp is added to the /etc/group file for group ownership of a majority of the files, which belong to the bos.svprint package. The entry in the /etc/group file is similar to the following example:
lp:!:11:root,lp,printq
Furthermore, the lp user is added to the formerly existing printq group. The entriy in the /etc/group file is similar to the following example:
printq:!:9:lp
So, the lp user and a user who belongs lp group can administer System V print sub system, while root user and a user who belongs to printq group (the newly added lp user is also a member of the printq group) can administer AIX print sub system. The root user can administer both print sub system, since the root user belongs to both printq and lp groups.
The AIX Print Subsystem is active by default. For both print subsystems, the active frontend commands are located and accessible as always through links
214 AIX 5L Differences Guide Version 5.1 Edition
in the /usr/bin directory. The commands for the frontend that are not active are not located in the directories, which are normally accessible to users through the standard definition of the PATH environment variable. To use the inactive frontend, it must be switched using a command or, preferably, by the use of the System Management Interface Tool (SMIT), or by the Web-based System Management tool. More details about switching between the different print subsystems are given in 4.25.7, “Switching between AIX and System V print subsystems” on page 228. Only one frontend can be active at any moment.
The remainder of this section provides a set of comprehensive listings of files, directories, user and administrative commands, and internal programs that are installed or created on your system in order to support System V printing. For each entity, the file mode, ownership, group ownership, and the fully qualified pathname is given. Separate listings account for the differences, which depend on the type of the active print subsystem, and some comments are given for further explanation.
Changes and additions, which were applied to the bos.rte.printers fileset, are as follows:
File Mode Owner Group Pathname========== ===== ===== ================================================drwxr-xr-x bin bin /usr/aix/bin (AIX)-rwxr-xr-x bin bin /usr/aix/bin/cancel (AIX)-rwxr-xr-x bin bin /usr/aix/bin/lp (AIX)-rwxr-xr-x bin bin /usr/aix/bin/lpq (AIX)-rwxr-xr-x bin bin /usr/aix/bin/lpr (AIX)-rwxr-xr-x bin bin /usr/aix/bin/lprm (AIX)-rwxr-xr-x bin bin /usr/aix/bin/lpstat (AIX)-r-sr-x--- root system /usr/sbin/switch.prt (AIX)-rwx------ root system /usr/sbin/switch.prt.subsystem (AIX)
During the installation of AIX 5L, the bos.rte.printers fileset and the newly introduced directory /usr/aix/bin are created. They hold the AIX print subsystem BSD compatibility executables. The switch.prt executable and switch.prt.subsystem script allow switching to the System V print subsystem.
Links and the lock file that were created during the base operating system installation process are as follows:
File Mode Owner Group Pathname========== ===== ===== ================================================lrwxrwxrwx root system /usr/bin/cancel -> /usr/aix/bin/cancellrwxrwxrwx root system /usr/bin/lp -> /usr/aix/bin/lplrwxrwxrwx root system /usr/bin/lpq -> /usr/aix/bin/lpqlrwxrwxrwx root system /usr/bin/lpr -> /usr/aix/bin/lprlrwxrwxrwx root system /usr/bin/lprm -> /usr/aix/bin/lprmlrwxrwxrwx root system /usr/bin/lpstat -> /usr/aix/bin/lpstatlrwxrwxrwx root system /usr/bin/disable -> /usr/aix/bin/disablelrwxrwxrwx root system /usr/bin/enable -> /usr/aix/bin/enable-rwxrwx--- root system /usr/aix/_AIX_print_subsystem (AIX)
Chapter 4. System management and utility enhancements 215
The listed links and the lock file are only present when the traditional AIX print subsystem is active, and they are created during the BOS installation process by the function Add_Printer_Links of the bi_main script. For your reference, an excerpt of the relevant section in the bi_main script is provided in the following example:
...# Add_Printer_Links# Adds links and touches a file, to support# the repackaging of printer filesets.# This is only called for product installs ($PT=yes).#function Add_Printer_Links{...
Changes and additions, which were applied to the printers.rte fileset, appear as follows:
File Mode Owner Group Pathname========== ===== ===== ================================================-r-xr-x--- root printq /usr/aix/bin/disable (AIX)-r-xr-x--- root printq /usr/aix/bin/enable (AIX)lrwxrwxrwx root system /usr/bin/disable -> /usr/aix/bin/disable (AIX)lrwxrwxrwx root system /usr/bin/enable -> /usr/aix/bin/enable (AIX)
The links /usr/bin/disable and /usr/bin/enable are created during the printers.rte post installation phase.
216 AIX 5L Differences Guide Version 5.1 Edition
A list of all files and directories in bos.svprint.rte are as follows:
File Mode Owner Group Pathname========== ===== ===== ================================================drwxrwxr-x lp lp /usr/lib/lpdrwxrwxr-x lp lp /usr/lib/lp/bindrwxrwxr-x lp lp /usr/lib/lp/modeldrwxrwxr-x root system /usr/lib/lp/objreposdrwxr-xr-x bin bin /usr/sysvdrwxr-xr-x bin bin /usr/sysv/bin
Links and files which are exclusively present when the System V print subsystem is active are as follows:
File Mode Owner Group Pathname========== ===== ===== ================================================lrwxrwxrwx root system /usr/bin/cancel -> /usr/sysv/bin/cancellrwxrwxrwx root system /usr/bin/lp -> /usr/sysv/bin/lplrwxrwxrwx root system /usr/bin/lpq -> /usr/sysv/bin/lpqlrwxrwxrwx root system /usr/bin/lpr -> /usr/sysv/bin/lprlrwxrwxrwx root system /usr/bin/lprm -> /usr/sysv/bin/lprmlrwxrwxrwx root system /usr/bin/lpstat -> /usr/sysv/bin/lpstatlrwxrwxrwx root system /usr/bin/disable -> /usr/sysv/bin/disablelrwxrwxrwx root system /usr/bin/enable -> /usr/sysv/bin/enable[Created on the fly when switching to System V print subsystem]-rwxrwx--- root lp /usr/sysv/_SYS5_print_subsystem
Chapter 4. System management and utility enhancements 217
4.25.3 System V print subsystem managementIn general, print administrators should use the Web-based System Manager to manage the System V print service. For further details about the Web-based System Manager support for the System V print service management, refer to 4.25.5, “User interface for AIX and System V print subsystems” on page 222. If you need to manage your print service from the command line, the remainder of this section provides a brief summary of the System V print service command line interface. All listed commands are fully documented in the AIX product documentation library.
Table 23 lists the print service commands available to all users. All commands are located in the /usr/bin directory.
Table 23. Print service commands available to all users
The administrator can give users the ability to disable and enable a printer so that, when a printer is malfunctioning, the user can turn the printer off without having to call the administrator. (However, in your printing environment, it might not be reasonable to allow regular users to disable a printer.)
Table 24 provides a summary of the print service commands available only to the system or print administrator. To use the administrative commands, you must have root user authority or be member of either the printq or the lp group. All of the administrative print service commands listed in Table 24 are located in the /usr/sbin directory with two exceptions: the lpsched program
Command Description
cancel The cancel command allows users to cancel print requests previously sent with the lp command. The command permits cancellation of requests based on their request-ID or based on the login-ID of their owner.
lp The lp command arranges for the named files and associated information (collectively called a request) to be printed. If file names are not specified on the command line, the standard input is assumed. Alternatively, the lp command is used to change the options for a request submitted previously. The print request identified by the request-ID is changed according to the print-options specified with this command.
lpstat The lpstat command displays information about the current status of the print service. If no options are given, lpstat displays the status of all print requests made by the user.
218 AIX 5L Differences Guide Version 5.1 Edition
resides in the /usr/lib/lp directory, and the enable and disable commands are found in the /usr/bin directory.
Table 24. Administrative print service commands
The administrative print service commands listed in Table 24 are supplemented by three default printer filters used by interface programs, which are located in the /usr/lib/lp/bin directory: lp.cat, lp.set, lp.tell. The
Command Description
acceptreject
accept allows the queuing of print requests for the named destinations. A destination can be either a printer or a class of printers.
reject prevents queuing of print requests for the named destinations.
enabledisable
The enable command activates the named printers, enabling them to print requests submitted by the lp command. If the printer is remote, the command will only enable the transfer of requests to the remote system.
The disable command deactivates the named printers, disabling them from printing requests submitted by lp.
lpadmin lpadmin configures the lp print service by defining printers and devices. It is used to add and change printers, to remove printers from service, to set or change the system default destination, to define alerts for printer faults, to mount print wheels, and to define printers for remote printing services.
lpfilter The lpfilter command is used to add, change, delete, and list a filter used with the lp print service. These filters are used to convert the content type of a file to a content type acceptable to a printer.
lpforms The lpforms command is used to administer the use of preprinted forms, such as company letterhead paper, with the System V printservice.
lpmove lpmove moves requests that were queued by lp between destinations (printers or classes of printers).
lpsched lpsched allows you to start the System V print service.
lpshut lpshut shuts down the print service. All printers that are printing at the time lpshut is invoked will stop printing.
lpsystem The lpsystem command is used to define parameters for the LP print service, with respect to communication (using a high-speed network like TCP/IP) with remote systems.
lpusers The lpusers command is used to set limits to the queue priority level that can be assigned to jobs submitted by users of the System V printservice.
Chapter 4. System management and utility enhancements 219
lp.cat program reads the file to be printed on its standard input and writes it to the device to be printed on. Interface programs may call lp.set to set the character pitch, line pitch, page width, page length, and character set on the printer. Also, interface programs can use lp.tell to forward descriptions of printer faults to the print service. lp.tell sends everything that it reads on its standard input to the print service. The print service forwards the message as an alert to the print administrator
Finally, the four BSD compatibility commands (lpc, lpr, lpq, and lprm) are available in the /usr/bin directory for users and administrators.
A comprehensive listing of the file modes, ownership, group ownership and the fully qualified path name for each of the commands mentioned in this section are given in 4.25.4, “User interface specifications” on page 220.
4.25.4 User interface specificationsThe user interface specifications for the System V print subsystem are documented in the man pages for the printing and associated commands. Table 25 provides an overview of the available commands for the System V print subsystem. BSD system compatibility commands are also included in the list and noted accordingly.
In previous AIX releases, some System V and BSD print commands were mapped to AIX print subsystem commands to enhance compatibility and usability of the AIX print services. The executables of these commands were nothing more than wrappers, which called the AIX print subsystem specific enq command after all command line arguments had been translated to a list of enq specific flags. Since AIX 5L offers the possibility to use the System V print subsystem as an alternative to the traditional AIX print subsystem, the relevant commands have to be supplied in two different versions. The traditional AIX print subsystem command wrappers for the System V and BSD print executables are kept in the /usr/aix/bin directory, while the native System V print subsystem counterparts are collectively located in the /usr/sysv/bin directory. The relevant commands are referenced by symbolic links in the /usr/bin directory. The symbolic links always point to the version of the executable related to the type of the active print subsystem. The duplicate commands are marked below with an asterisk (*), but as far as the user interface specification for the System V print subsystem is concerned, only
220 AIX 5L Differences Guide Version 5.1 Edition
the native BSD compatibility executables in the /usr/sysv/bin directory are relevant.
Table 25. System V printing: user and administrative commands
For more detailed information about specific commands, refer to 4.25.3, “System V print subsystem management” on page 218 and the AIX documentation library.
At the end of this section, a set of comprehensive listings of properties that are associated with the user interface commands and their related directories is provided. For each entity, the file mode, ownership, group ownership, and the fully qualified pathname is given.
Properties of System V user interface commands and related directories appear as follows:
File Mode Owner Group Pathname========== ===== ===== ================================================drwxrwxr-x lp lp /usr/lib/lpdrwxrwxr-x lp lp /usr/lib/lp/bindrwxr-xr-x bin bin /usr/sysvdrwxr-xr-x bin bin /usr/sysv/bin
-r-xr-xr-x bin bin /usr/bin/lpc---x--x--x lp lp /usr/lib/lp/bin/lp.cat---x--x--x lp lp /usr/lib/lp/bin/lp.set---x--x--x lp lp /usr/lib/lp/bin/lp.tell---s--x--- root lp /usr/lib/lp/lpsched---s--x--- root lp /usr/sbin/accept---s--x--- root lp /usr/sbin/lpadmin---s--x--- root lp /usr/sbin/lpfilter---s--x--- root lp /usr/sbin/lpforms---s--x--- root lp /usr/sbin/lpmove---s--x--- root lp /usr/sbin/lpshut---s--x--- root lp /usr/sbin/lpsystem---s--x--- root lp /usr/sbin/lpusers---s--x--- root lp /usr/sbin/reject-r-sr-x--- root system /usr/sbin/switch.prt-rwx------ root system /usr/sbin/switch.prt.subsystem---x--x--x lp lp /usr/sysv/bin/cancel---s--x--- root lp /usr/sysv/bin/disable---s--x--- root lp /usr/sysv/bin/enable---x--x--x lp lp /usr/sysv/bin/lp-r-sr-xr-x lp lp /usr/sysv/bin/lpq-r-xr-xr-x bin bin /usr/sysv/bin/lpr-r-xr-xr-x bin bin /usr/sysv/bin/lprm---x--x--x lp lp /usr/sysv/bin/lpstat
Chapter 4. System management and utility enhancements 221
Links and files, which are only present when the System V print subsystem is active, appear as follows:
File Mode Owner Group Pathname========== ===== ===== ================================================lrwxrwxrwx root system /usr/bin/cancel -> /usr/sysv/bin/cancellrwxrwxrwx root system /usr/bin/lp -> /usr/sysv/bin/lplrwxrwxrwx root system /usr/bin/lpq -> /usr/sysv/bin/lpqlrwxrwxrwx root system /usr/bin/lpr -> /usr/sysv/bin/lprlrwxrwxrwx root system /usr/bin/lprm -> /usr/sysv/bin/lprmlrwxrwxrwx root system /usr/bin/lpstat -> /usr/sysv/bin/lpstatlrwxrwxrwx root system /usr/bin/disable -> /usr/sysv/bin/disablelrwxrwxrwx root system /usr/bin/enable -> /usr/sysv/bin/enable[Created on the fly when switching to System V print subsystem]-rwxrwx--- root lp /usr/sysv/_SYS5_print_subsystem (AIX S5 mode)
4.25.5 User interface for AIX and System V print subsystemsIn the current release of AIX 5L, the Web-based System Manager provides the graphical user interface that will be used for the most common functions of the System V print subsystem. For more advanced functions, or to use less common features, users and administrators have to rely on the command line interfaces.
The System V print subsystem management tasks to be performed by the Web-based System Manager application include:
• Adding new printers or classes (parallel, serial, remote, and network).
• Setting the default printer.
• Removing printers or classes of printers.
• Switching to AIX print subsystem.
The status information to be displayed by the Web-based System Manager application includes:
• Showing the default printer.
• Displaying the requests on the default printer.
• Displaying the printers defined on the system.
• Displaying the stopped printers on the system.
• Showing the printers that currently have problems.
There are no SMIT menus for the System V print subsystem. The only exception to this is a menu that switches between the traditional AIX and the System V print subsystem on the POWER platform.
Note
222 AIX 5L Differences Guide Version 5.1 Edition
Before you can use the Web-based System Manager environment that supports System V printing, you have to switch from the AIX to the System V print subsystem. You can either utilize the switch.prt -s SystemV command, as described in 4.25.7, “Switching between AIX and System V print subsystems” on page 228, or use the following sequence of menu selections and operations with the Web-based System Manager tool:
Select Printers --> Overview and Tasks. Select the Switch to System V print subsystem task.
After the task has been completed, the Printer container icon is replaced by the Printers (System V) container icon. The Web-based System Manager environment for System V printing is now accessible through the following sequence of menu selections on the Web-based System Manager console:
Select Printers (System V) --> Directory Disabled Overview and Tasks.
Figure 69 shows the Web-based System Manager menu for System V print subsystem management tasks.
Figure 69. Web-based System Manager menu for System V print subsystem
Chapter 4. System management and utility enhancements 223
If, for example, you would like to define a local print queue named prop24p for your predefined IBM Proprinter 24 P print device /dev/lp0, select the New printer task and follow the instructions of the Add New Printer wizard. Figure 70 shows the Step 4 of 4: Verify Settings and Add New Printer panel, which is displayed by the Add New Printer wizard just right before you have the option to complete the task by clicking on Finish. Note that the device support for the printer must be installed on the system and that the configuration for lp0 must be completed before you engage in the System V print queue configuration. The printer type can be selected from the pull-down menu next to the field What is the printer type? in the Step 3 of 4: Specify Printer Options wizard menu.
Figure 70. Add New Printer Web-based System Manager wizard: Step 4 of 4
If the user-defined printer class ASCII does not already exist, it will be created during the final command execution of the Web-based System Manager wizard. Also, the final commands executed by the Web-based System Manager Add New Printer wizard allow the newly configured prop24p printer to accept (accept command) queuing requests and enable (enable command) the printer to print requests submitted by the lp command. The printer will not be defined as the system default print destination. If the user-defined class
224 AIX 5L Differences Guide Version 5.1 Edition
did not exist before, the wizard creates the class, but will not allow queueing of requests to the class as the print destination.
System administrators who prefer the command line interface to the System V print subsystem can configure the same print queue using the following command sequence:
The new printer can optionally be defined as the system default print destination and the /etc/hosts file may be submitted as the first test for the System V local print queue:
# lpadmin -d prop24p# lp /etc/hosts
The lpstat -t command, entered immediately after the submission of the print request, gives comprehensive status information about the System V print subsystem:
# lpstat -tscheduler is runningsystem default destination: prop24pmembers of class ASCII:
prop24pdevice for prop24p: /dev/lp0ASCII not accepting requests since Mon Sep 25 20:02:47 2000 -
new destinationprop24p accepting requests since Mon Sep 25 20:03:08 2000printer prop24p now printing prop24p-9. enabled since Mon Sep 25 20:03:15 2000.available.prop24p-9 root 1439 Mon Sep 25 20:09:18 2000 on prop24p
It was previously mentioned that the System V print subsystem management tasks are currently not supported through the SMIT tool. However, some changes and additions have been made to account for the introduction of the System V print subsystem feature.
The Print Spooling menu of the SMIT tool was changed to show that most of the menu choices that now exist are only valid for the AIX Print Subsystem. The AIX print subsystem menu items will still be displayed if the System V print subsystem is active, but they will not work properly, because most of the underlying AIX print subsystem commands and daemons are turned off or disabled in some manner by the switch.prt.subsytem script during the switch from the AIX to the System V print subsystem. In addition, one new menu item has ben added at the bottom of the Print Spooling menu; it is valid for AIX and System V printing. The name of this item is Change/Show Current Print Subsystem and it can be used for either displaying the current running
Chapter 4. System management and utility enhancements 225
print subsystem or for changing from one to the other. Figure 71 on page 226 shows the new Print Spooling menu of SMIT.
Figure 71. Print Spooling menu of SMIT
4.25.6 Terminfo and supported printersSince System V printing depends heavily on extracting information from the terminfo database to configure and initialize printers, one file has been added which contains the terminfo definitions for all of the printers supported by this subsystem. The name of the file is svprint.ti, and it is located in the /usr/lib/terminfo directory. The file is compiled and stored in the respective
226 AIX 5L Differences Guide Version 5.1 Edition
terminfo directories at install time. The printers supported in the terminfo data base are listed in Table 26:
Table 26. Supported printers in the terminfo database
Since many printers can be supported by the same terminfo file, the list of printers that are officially supported by System V printing is much larger. In addition, many printer manufacturers support their own printers for System V and send the support out with the printers. This greatly increases the total number. The list of manufacturers includes, but is not limited to the IBM Printer Division and Lexmark International. In later releases, more printers
Chapter 4. System management and utility enhancements 227
will be supported and shipped with AIX. The current list of supported printers is given in Table 27:
Table 27. Printer support by the System V print subsystem in AIX 5L
4.25.7 Switching between AIX and System V print subsystemsThe current default print subsystem on AIX is the traditional AIX print subsystem. The System V print subsystem is offered as an alternate method of printing. At install time, the AIX print subsystem will always be set as the active one, and System V will always be set as the inactive one. They can not both be set to the active state at the same time using the normal procedures. However, there is nothing to prevent an administrator from overriding this manually (at their own risk).
Canon Bubble Jet 10ex Canon Bubble Jet 130e Canon Bubble Jet 200 Canon Bubble Jet 300 Canon Bubble Jet 330 Epson FX 850 Epson FX 1050 Epson DFX 5000 Epson DFX 8000 Epson LQ 570 Epson LQ 870 Epson LQ 1170 Epson EPL 7500 HP LaserJet (PCL) HP LaserJet (Postscript) HP LaserJet II (PCL) HP LaserJet II (Postscript) HP LaserJet III (PCL) HP LaserJet III (Postscript) HP LaserJet IIIsi (PCL) HP LaserJet IIIsi (Postscript) HP LaserJet 4 (PCL) HP LaserJet 4 (Postscript) HP LaserJet 4L/4ML (PCL) HP LaserJet 4L/4ML (Postscript) HP LaserJet 4P/4MP (PCL) HP LaserJet 4P/4MP (Postscript) HP LaserJet 4M/4M (PCL) HP LaserJet 4M/4M (Postscript) HP LaserJet 4Si/4Si MX (PCL) HP LaserJet 4Si/4Si MX (Postscript) HP LaserJet 4 Plus/4M Plus (PCL) HP LaserJet 4 Plus/4M Plus (Postscript) HP LaserJet 4V/4MV (PCL) HP LaserJet 4V/4MV (Postscript) HP LaserJet 5 (PCL) HP LaserJet 5 (Postscript) HP LaserJet 5L/5ML (PCL) HP LaserJet 5L/5ML (Postscript) HP LaserJet 5P/5MP (PCL) HP LaserJet 5P/5MP (Postscript) HP LaserJet 5Si/5Si MX (PCL) HP LaserJet 5Si/5Si MX (Postscript) HP LaserJet 5Si Mopier (PCL) HP LaserJet 5Si Mopier (Postscript) HP LaserJet 6P (PCL)
HP LaserJet 6P (Postscript) HP LaserJet 6L (PCL) HP LaserJet 6L (Postscript) HP DeskJet 500 HP DeskJet 1200C/1200CPS HP DeskJet 1600C/1600CM HP Paint Jet IBM ProPrinter Oki 320 Oki 390 Oki OL 400 Oki OL 800 Panasonic KX-P1180 Panasonic KX-P1695 Panasonic KX-P1124 Panasonic KX-P1624 PostScript (Serial) PostScript (Parallel) PostScript (Serial w/ page reversal) PostScript (Parallel w/ page reversal) Unisys AP1337 - Epson emulation Unisys AP1337 - IBM emulation Unisys AP1339 - Epson emulation Unisys AP1339 - IBM emulation Unisys AP1357 - Epson emulation Unisys AP1357 - IBM emulation Unisys AP1359 - Epson emulation Unisys AP1359 - IBM emulation Unisys AP1371 - Epson emulation Unisys AP1371 - IBM emulation Unisys AP9205 - IBM emulation Unisys AP9205 - HP Laserjet emulation Unisys AP9205 - HP Laserjet Plotter emulation Unisys AP9210 - IBM emulation Unisys AP9210 - HP Laserjet emulation Unisys AP9210 - HP Laserjet Plotter emulation Unisys AP9215 - Epson emulation Unisys AP9215 - Diablo emulation Unisys AP9215 - IBM emulation Unisys AP9215 - HP Laserjet emulation Unisys AP9310 - HP Laserjetemulation Unisys AP9312 - HP Laserjet emulation Unisys AP9316 - HP Laserjet emulation Unisys AP9415 - HP Laserjet emulation Other
228 AIX 5L Differences Guide Version 5.1 Edition
AIX provides a command, accessible through SMIT and the Web-based System Manager, which will allow a system administrator to display the current active print subsystem, and to switch between the active and inactive one. The command is intended to be executed only by the Web-based System Manager or SMIT, but will work from the command line with the proper permissions. That command, located in /usr/sbin, is switch.prt [ -s
print_subsystem] [ -d ]. The valid values for the print_subsystem keyword are AIX and SystemV. Running the command with the -d flag will display the current print subsystem; if you do not specify any flag, a brief help message is displayed on the screen:
# switch.prtUsage: [-s AIX | SystemV ] [-d]-s switches to AIX print system or SystemV print system.-d displays current subsystem.
For security reasons, the switch.prt command serves as a front-end to the script /usr/sbin/switch.prt.subsystem, which actually does the real work.
The basic logic of the script for switching from the traditional AIX to the System V print subsystem is outlined in the following example. The tasks that have to be performed by switching to the reverse direction (from the System V to the traditional AIX print subsystem) are similar, and you are encouraged to examine the code of the original script.
# Switch from AIX to System V
# sflag indicates the print subsystem to be switch to# and the internal variable PRINTSUBSYSTEM refers to# the type of the currently active print subsystem
else if sflag = SystemV && PRINTSUBSYSTEM = AIXthen if (active print jobs)
then echo "All print jobs must be terminatedbefore you can switch to $PRINTSUBSYSTEM"
exit 1else
Stop qdaemonStop writesrvStop lpd
Change the action field of the inittab entries forqdaemon, writesrv, lpd, and piobe to prevent the unwantedstart of this subsystems at system boot.
# The following disables the smit menus as much as# possiblemv /usr/lib/lpd/pio/etc/*.attach files to *.attach.AIX
# Change the lock files from AIX to System Vrm /usr/aix/_AIX_print_subsystemtouch /usr/sysv/_SYS5_print_subsystem
#force System V links over the existing AIX links for the#duplicate commands between them
Chapter 4. System management and utility enhancements 229
#add the new symbolic links to the tcbck databasetcbck -a /usr/bin/cancel symlinks=/usr/sysv/bin/canceltcbck -a /usr/bin/enable symlinks=/usr/sysv/bin/enabletcbck -a /usr/bin/disable symlinks=/usr/sysv/bin/disabletcbck -a /usr/bin/lp symlinks=/usr/sysv/bin/lptcbck -a /usr/bin/lpstat symlinks=/usr/sysv/bin/lpstattcbck -a /usr/bin/lpq symlinks=/usr/sysv/bin/lpqtcbck -a /usr/bin/lpr symlinks=/usr/sysv/bin/lprtcbck -a /usr/bin/lprm symlinks=/usr/sysv/bin/lprm
#start lpsched/usr/lib/lp/lpschedecho System V Print Subsystem Started
#Update the inittab to start the System V Print Subsystem at system boot
exit 0
A closer examination of the switch.prt.subsystem script reveals that the /var/spool/lpd/qdir is probed for files with file names beginning with the letter n or r, which indicate the existence of pending print jobs. If the search yields a positive result, the script is terminated with an appropriate error message. Consequently, the method provided to switch from one print subsystem to the other does not migrate any pending print jobs.
If no pending print jobs could be identified, the system resource controller command stopsrc is used to stop the qdaemon, writesrv, and lpd daemons which control the AIX print subsystem. After that, the action field for the related inittab entries are changed by the chitab command from wait to off and the respective inittab entry for the piobe print subsystem backend process is treated in the same fashion.
For the time being, there are no SMIT menus provided to assist users and system administrators perform System V print subsystem related tasks. Therefore, the AIX print subsystem SMIT menus are not replaced by System
230 AIX 5L Differences Guide Version 5.1 Edition
V specific entities, but merely hidden by appending the AIX suffix to the menu definition files in the /usr/lib/lpd/pio/etc directory.
Because the operating system determines (by the name of the relevant lock file) the type of the active print subsystem, the script replaces the lock file /usr/aix/_AIX_print_subsystem (of the traditional AIX print subsystem) with the lock file /usr/sysv/_SYS5_print_subsystem (of the System V print subsystem).
In AIX 5L, the System V and BSD print commands are still in the /usr/bin directory, but are now either linked to the traditional AIX print command wrappers in the /usr/aix/bin directory or to the appropriate executables in the /usr/sysv/bin (if the System V print subsystem is active). Consequently, switch.prt.subsystem forces the System V links to take precedence over the AIX links when the system administrator switches from the AIX to the System V print subsystem.
If the Trusted Computing Base (TCB) feature is installed on the system, additional measures have to be taken in order to preserve the integrity of the /etc/security/sysck.cfg TCB file definition database. The tcbck -d command is used to remove the current symbolic links from the configuration during a switch, and the tcbck -a command adds the new symbolic link, including the proper user and group ownership attributes, to the file definition database. If the tcbck command audits the security state of the system by checking the installation of the files defined in /etc/security/sysck.cfg, no mismatch between the file attributes in the trusted computing base and the actual system configuration will be reported.
Finally, if the lpsched daemon is started, and if an entry for lpsched exists in inittab, then the related action state is changed from off to wait; otherwise, a new entry will be added after the cron entry.
4.25.8 System V print for Itanium-based platforms (5.1.0)In AIX 5L Version 5.1, Web-based System Manager supports only System V Print subsystem on Itanium-based systems.
The Web-based System Manager guides you through the installation and configuration of printers, as shown in Figure 72 on page 232.
Chapter 4. System management and utility enhancements 231
Figure 72. Web-based System Manager for System V print
You can select either the Standard Overview and Tasks or Standard Printers. The Standard Overview and Tasks will guide you through the setup of new printers or through other administrative tasks, as shown in Figure 73 on page 233.
232 AIX 5L Differences Guide Version 5.1 Edition
Figure 73. Standard Overview and Tasks
The Standard Printers displays a list of configured printers, as shown in Figure 74 on page 234.
Chapter 4. System management and utility enhancements 233
Figure 74. Standard Printers
4.26 Printer serviceability enhancement (5.1.0)
There are two new features to improve the serviceability of the printing subsystem. One covers the qdaemon debugging, and the other one the JetDirect backend (piohpnpf).
4.26.1 Enable debugging for qdaemonqdaemon has been enhanced in AIX 5L Version 5.1, so debugging can be turned on by a system administrator. Debug information useful to diagnosing failures will be recorded in a file that can be examined by support or service personnel.
To enable debugging, qdaemon must to be restarted by specifying the -D flag to startsrc, as in the following example.
234 AIX 5L Differences Guide Version 5.1 Edition
# stopsrc -s qdaemon# startsrc -s qdaemon -a "-D /tmp/qdaemon.log"
4.26.2 Enable debugging for JetDirect backendThe JetDirect backend (piohpnpf) has been modified to enhance the level of information that is reported to qdaemon when a failure occurs.
Traditionally, when the JetDirect backend, piohpnpf, abends, the user only gets a very cursory message from qdaemon indicating that the backend has had a fatal exit. To get further information, the system administrator has to turn on logging capability for piohpnpf. This generates a file on disk that contains more specific information. However, in moderate to large size installations, it is often impractical to enable logging for piohpnpf (as it logs everything, not just failures). Hence, the need arises for more detailed messages to be sent back using the console or e-mail in case of failure.
To enable the debugging option on piohpnpf, modify the piojetd script so piohpnpf is invoked with the -D flag. You can find the piojetd file in the /usr/lib/lpd/pio/etc directory. Open the file and go to the line (34 on the test system):
Enabling the qdaemon debugging has the potential to adversely affect the performance of the AIX printing subsystem. The high level of disk I/O can slow down printing in a moderate to high volume printing installation. Turning on debugging will output information to a file on disk. It will be the responsibility of the system administrator to ensure that there is enough disk space, as this file could potentially get very large, very quickly in a high volume printing environment.
Note
The debugging should not be carelessly turned on. Some customers do not want to have messages e-mailed to them or shown on the console.
Note
Chapter 4. System management and utility enhancements 235
4.27 Web-based System Manager for AIX 5L
The Web-based System Manager is enhanced in AIX 5L. This section provides an in-depth look at what has changed from previous versions.
Keep in mind that the discussion of AIX Version 4.3.3 and previous POWER platform editions in this section is only for historical reference. AIX 5L for Itanium-based systems benefit from all the enhancements made in previous POWER platform releases as the cumulative function was ported.
4.27.1 Web-based System Manager architectureThe Web-based System Manager enables a system administrator to manage AIX machines either locally from a graphics terminal or remotely from a PC or AIX client. Information is entered through the GUI components on the client side. The information is then sent over the network to the Web-based System Manager server, which runs the necessary commands to perform the required action.
The Web-based System Manager is implemented using the Java programming language. The implementation of Web-based System Manager in Java provides:
• Cross-platform portability: Any client platform with a Java 1.3-enabled Web browser is able to run a Web-based System Manager client object.
• Distributed processing: A Web-based System Manager client is able to issue commands to AIX machines remotely through the network.
• Multiple launch points: The Web-based System Manager can be launched either in a Java Application Mode locally within the machine to manage both a local and remote system, in a Java Applet mode through a system with a Web browser with Java 1.3, and in Windows PC Client mode, where client code is downloaded from an AIX host.
For more information about AIX System Management, or the Web-based System Manager architecture and previous releases features, refer to AIX Version 4.3 Differences Guide, SG24-2014, third edition.
It is also possible to press F1 during a Web-based System Manager session, and the main help panel will be displayed.
Note
236 AIX 5L Differences Guide Version 5.1 Edition
4.27.1.1 User interfaceThe User Interface has improved noticeably; the console provides a convenient and familiar interface for managing multiple AIX hosts. The console panel is divided into two panes: a Navigation Area, on the left, for displaying the hierarchy of host computers and management applications and a Contents Area, on the right, for displaying the contents of each level in the navigation hierarchy, as shown with the optional SDK Samples Environment installed in Figure 75.
Figure 75. Web-based System Manager user interface
4.27.1.2 Plug-in architectureAs shown in Figure 75, the Navigation Area, on the left, has the host names of the servers to be administered, and each server contains a list of items that the Web-based System Manager can handle.
Each item contains a name and an icon. Each icon in this area is a plug-in. When the user selects a plug-in icon in the Navigation Area, the plug-in displays its contents in the Contents Area, updates the menu bar and tool bar with its actions, and updates the Tips Area with links for help on relevant tasks. Plug-ins are somewhat analogous to applications; they encapsulate a collection of management functions in the form of managed objects, collections of managed objects, tasks, and actions. A plug-in can consist of:
Chapter 4. System management and utility enhancements 237
• An overview panel
• One or more sub plug-ins
• An overview and one or more sub plug-ins
• A collection of managed objects
• A panel for launching management interfaces in a panel external to the console
The Web-based System Manager plug-in architecture is designed to provide a high degree of flexibility in the design of client applications. Both object and task-oriented plug-in models are provided, as well as the ability to integrate applications developed outside of the Web-based System Manager framework. The object-oriented design of the framework supports consistency across plug-ins while enabling the flexibility to extend and customize plug-in classes. The Web-based System Manager supports the classes of plug-ins discussed in the following sections.
ContainerContainer plug-ins are the most common type of plug-in used in the Web-based System Manager user interface. Container plug-ins are somewhat analogous to directories in a file system (or folders in a graphical file system manager). They contain other plug-ins, managed objects, or combinations of plug-ins and managed objects. Figure 76 on page 239 shows a Container plug-in example.
238 AIX 5L Differences Guide Version 5.1 Edition
Figure 76. Container plug-in example
Containers present objects in views. The Web-based System Manager supports the typical object views (Large Icon, Small Icon, and Details), as well as two hierarchical views (Tree and Tree-Details). Figure 76 shows an example of a Container plug-in used in the Large Icon view; Figure 77 on page 240 illustrates the detail view.
Chapter 4. System management and utility enhancements 239
Figure 77. Example of Container, logical volumes container in detail view
OverviewOverview plug-ins are panel interfaces that appear in the contents area of a console child panel. The primary functions of overviews are to:
• Explain the function provided by an application plug-in.
• Provide a launch point for routine or getting started tasks.
• Summarize the status of one or more management functions.
In addition, because overviews are task-based rather than object-based, they can be used to provide quicker and easier access to some functions than container views. In cases where a management function does not lend itself to an object-oriented design (for example, backup and restore), the entire application can be implemented using one or more overview plug-ins.
240 AIX 5L Differences Guide Version 5.1 Edition
Figure 78. Overview plug-in example, users and groups overview
LaunchLaunch plug-ins serve as a mechanism for launching applications that were implemented outside of the Web-based System Manager framework. By using a launch plug-in, these external applications may be integrated into the Web-based System Manager console. The launch plug-in provides an overview-like panel with title, description area, a link to browser-based help, and a task link for launching the external application.
4.27.1.3 Standard plug-ins for Web-based System ManagerWhen you first run Web-based System Manager using the new graphical interface, keep in mind that all navigation is performed on the left side of the user interface.
Even if you have more than one server registered, each server will have standard plug-ins, as shown in Table 28.
Chapter 4. System management and utility enhancements 241
Table 28. List of standard plug-ins in Web-based System Manager
Plug-In Containers Action
Devices Overview and TasksAll DevicesCommunicationStorage DevicesPrinters, DisplayInput DevicesMultimediaSystem Devices
All hardware devices, related actions like add, remove, and change and show.
Network Network OverviewTCP/IP (IPv4 or IPv6)Point-to-Point (PPP)NISNIS+SNMP: included in AIX 5L.Virtual Private Networks
All network related actions such as TCP/IP network, basic configuration, remove network interface, and NIS.
Users Overview and TasksAll GroupsAll UsersAdministrative Roles
Users and Groups related actions, as well as administrative roles for users authorization.
Backup and Restore No containers, all options are located in the overview panel.
Performs actions related to backup, such as image backup, incremental backup, and restore.
242 AIX 5L Differences Guide Version 5.1 Edition
File Systems Overview and TasksJournaled File SystemsNetwork File SystemsExported DirectoriesCD-ROM File SystemsCache File Systems
All File Systems related tasks, such as add and remove a file system.
Volumes Overview and TasksVolume GroupsLogical VolumesPaging SpacePhysical Volumes
All logical volume manager related actions, including Volume Groups and Physical Volumes.
Processes Overview and TasksAll Processes
Process related action, such as changing priority, kill a process, and list all processes.
System Environment Overview and TasksSettings
System Environment will handle operations, such as shutdown and broadcast messages, as well as licenses and Kerberos settings. License manager container is a new option.
Subsystems Overview and TasksAll Subsystems
All subsystems related tasks can be done through this option, such as list, start, or kill a subsystem.
Plug-In Containers Action
Chapter 4. System management and utility enhancements 243
Custom Tools No containers, just a Custom Tools helps icon. Additional icons will be added for each Custom Tool created.
Custom Tools allows you to integrate any command or Web application into Web-based System Manager.
Software Overview and TasksInstalled Software
All software related tasks, such as List and Install new software.
NIM Overview and Tasks Network Installation Manager (NIM) can be set up from this option, as well as NIM administration.
Workload Manager Overview and TasksConfigurations/ClassesResources
All Workload Manager related tasks, such as Create class assignment rules, Update, and Stop Workload Manager. Incorporates all new enhancements for AIX 5L.
Printers Overview and TasksAll Printers
All printing related tasks, such as add a printer, remove a printer queue, and list all printers. Includes System V printing subsystem.
Plug-In Containers Action
244 AIX 5L Differences Guide Version 5.1 Edition
A Security plug-in, not available with a default install, will be made available once you install the Expansion Pack. It is part of the base system, however.
4.27.1.4 Modes of operationAs in previous releases, the Web-based System Manager can be launched from a variety of launch points. For example:
• Java application mode through the wsm command in AIX command line on the system being managed.
• Java application mode, where the console is running on one AIX system, but managing remote systems. Called client-server mode.
• Management Console icon on CDE.
• Java applet mode through Java 1.3-enabled Web browser.
• Windows PC Client mode.
The Windows PC client code is downloaded from an AIX host, then installed permanently on the PC. Because all the Java code is native on the PC, startup time and performance are exceptionally good compared to applet mode.
The user can start Web-based System Manager PC Client in several ways:
- Double-click on the Web-based System Manager icon that was installed on the system desktop.
- Select the Web-based System Manager entry in the Programs menu.
- Locate the wsm.exe executable in Windows Explorer by changing to the install directory and double-clicking.
- Change to the install directory within an MS-DOS panel and type wsm.exe
Monitoring Overview and TasksConditionsResponsesEvents
All monitoring related tasks, such as create new conditions, list responses and events. It is a new option in Web-based System Manager.
Plug-In Containers Action
Chapter 4. System management and utility enhancements 245
This flexibility allows you to perform administrative tasks across multiple servers regardless of where you perform them. From a mode of operation point of view, the Web-based System Manager can be managed from three different ways, as discussed in the following sections.
LocalAIX systems with a Graphical User Interface (GUI) can use this mode to perform local tasks. This mode is enabled by default.
Figure 79 shows the Management Console icon that starts the Web-based System Manager on CDE.
Figure 79. Web-based System Manager icon on CDE user interface
Client-server modeThe administrator can add hosts, represented by icons, to additional Internet-attached hosts in the Navigation Area of the console. The list of hosts and user interface preferences are stored in a console preferences file. The console preferences file can be stored on a specific host that will serve as the contact host or in a distributed file system (to allow it to be accessed directly from multiple hosts). When multiple hosts are set up to be managed from a single console, the Web-based System Manager operates in client-server mode. The first machine contacted by the client acts as the managing host while the other hosts in the navigation area are managed hosts.
246 AIX 5L Differences Guide Version 5.1 Edition
Applet modeIn applet or browser mode, the administrator can manage one or more AIX hosts remotely from the client platform’s Web-browsers with Java 1.3. To access the console in this manner, an AIX host need only be configured with a Web-server (provided on the AIX Bonus or Expansion Pack CDs). Once the Web-server is installed and configured, the host can serve the console to the client. The administrator simply enters a URL, hostname/wsm.html, into the browser. A Web page is then served to the browser that prompts the user for a user name and password. Once authenticated to the server, the console launches into a separate panel frame. In Web-based System Manager applet mode, the browser is used only for logging in and launching the console. Once running, the console is relatively independent of the browser.
4.27.2 Web-based System Manager enhancements for AIX 5LTable 29 provides a comparison list of new enhancements on the Web-based System Manager presented with AIX 5L.
Table 29. Comparison chart with the new enhancements
4.27.2.1 MonitoringRefer to 4.14, “Resource Monitoring and Control (RMC)” on page 154 for monitoring details.
AIX Version 4.3 AIX 5L Version
Launch Pad and multiple panels Management Console
Single host management Point-to-Point multiple host management
Java 1.1 Java 1.3
Back end shell script execution Shell script and API execution interface
AIX on POWER AIX on POWER and Itanium-based systems
SSL security option SSL security option
Kerberos V5 integration in AIX
Monitoring, notification, and control
Chapter 4. System management and utility enhancements 247
4.27.2.2 Session logA new feature introduced in Web-based System Manager for AIX 5L is the Session Log. This log is located on the Console menu, and will log the following events:
• All actions performed in any managed host.
• Success or Failure messages.
• Security Level messages.
Figure 80 shows a sample output from a Session Log.
Figure 80. An example of an output from a Session Log
When this log is opened, you will discover the following controls:
Find Will search for a particular string or sentence among the messages already logged.
Save Will save any new entry in the log table, and will append to the log file specified in the Save as option.
Save as Will save all entries in the log table, and will store them in a new file, or will create the default file in /tmp/websm.log.
Clear Will remove all entries in the log table.
Close Will close the Session Log panel.
If you double-click any entry in the log table, a new panel will popup with detailed information on that specific entry. An example is shown in Figure 81 on page 249.
248 AIX 5L Differences Guide Version 5.1 Edition
Figure 81. An example of Session Log detailed entry
4.27.2.3 Custom ToolsIt is possible to integrate other administration applications into Web-based System Manager. Custom Tools extends the capabilities of the Registered Applications tool in previous releases. As before, URL-based applications can be added, but in addition, a new Command Tool option allows any tool that can be invoked through the command line to be integrated into Web-based System Manager.
There are two different types of Custom Tools:
• Web Tools, which are the URL-based applications to be integrated.
• Command Tools, which are the shell executable-based applications to be integrated.
The Web Tool acts exactly the same way as in previous the Web-based System Manager release.
Figure 82 on page 250 shows the Command Tool creation.
Chapter 4. System management and utility enhancements 249
Figure 82. Command Tool creation dialog
The Command Tool is a new option that allows you to integrate virtually any command line executable into the Web-based System Manager. To create a Command Tool, you need to specify the name of the Tool (a default icon is provided, but you can specify an alternate icon in GIF format), an optional description of the Tool, the complete path to the command, and a chosen result type. The result type can be one of the following:
Do not show the result panel Executes the command, but will not display the results of this command.
Show result panel Opens a new panel with output generated by the specified command.
X client, no result panel The tool is an X client application. It will display its own GUI interface as the result panel.
Figure 83 on page 251 shows the sample output of a Command Tool that chose Show result panel as the result type.
250 AIX 5L Differences Guide Version 5.1 Edition
Figure 83. Example of result type Show result panel
4.27.2.4 Tips areaAny container that you select on the Navigation Area will bring you tips on the related topic if Show Tips Bar is enabled. To enable it, you need to select View in the menu bar and then Show, and enable Tips Bar.
Figure 84 shows an example of a tip.
Figure 84. Tips bar example
Chapter 4. System management and utility enhancements 251
4.27.2.5 PreferencesIn the AIX 5L release of the Web-based System Manager, it is possible to have a customized environment for any user in any machine for the Web-based System Manager. This can be done through the new control for preferences.
When the Web-based System Manager is started, the session uses the stored preferences. This includes such preferences as the console panel format and the machines being managed. By default, the preference file is saved to $HOME/WebSM.pref, which is the user's home directory on the managing machine.
To save the state of the console without closing a session, use the menu option Console, and then Save. A user is always prompted to save the console state when closing Web-based System Manager.
Table 30 shows which components are saved in the preferences file.
Table 30. Components that are saved in the preferences file
4.27.2.6 SNMP integrationAIX 5L provides the SNMP interface for the Web-based System Manager framework for use by applications that need to do monitoring; it also provides overview query enhancements to Network applications.
Figure 85 on page 253 shows the panel for the SNMP monitor configuration.
Component Status saved in preferences file?
Navigation Area No
Tool Bar Yes
Tips Bar Yes
Description Bar Yes
Status Bar Yes
252 AIX 5L Differences Guide Version 5.1 Edition
Figure 85. SNMP Monitor configuration through Web-based System Manager
4.27.2.7 Enterprise management framework integrationIn AIX 5L, there is a new way to launch the Web-based System Manager: it can be context launchable from the tool palette and tool menu from Tivoli NetView NT and AIX.
In environments that already have Tivoli Netview server running, AIX 5L servers can be easily integrated and remotely managed through any Tivoli Netview servers launching the Web-based System Manager.
4.27.3 Web-based System Manager PC Client (5.1.0)Web-based System Manager PC Client provides an installable application for the Windows PC Client. The Web-based System Manager console is provided for clients on Windows NT, Windows 2000, and Windows Me.
The Web-based System Manager console running on a PC will provide remote system administration support for AIX 32-bit and 64-bit systems.
At the time of writing, availability of NLS support on the Itanium-based platform is limited.
Chapter 4. System management and utility enhancements 253
4.27.3.1 Configuring the managed machineIn order to support the Web-based System Manager PC Client, the server must have the following the software installed:
• IHS 1.3.12
• Java 1.3
• Web-based System Manager 5.1
• bos.net.*
The applet mode is configured using the IBM HTTP Server (IHS), using the configassist command (/usr/bin/configassist). This script will create all necessary links in the /usr/HTTPServer/htdocs. Running this script will prompt you with the Configuration Assistant Task, as shown in Figure 86.
Choose the option Configure a Web server to run Web-based System Manager in a browser, as shown in Figure 87.
Figure 87. Web server to run Web-based System Manager in a browser.
Chapter 4. System management and utility enhancements 255
You will have the option of which Web browser you want to use, as shown in Figure 88 on page 256.
Figure 88. Configure Web-based System Manager Applet Mode
You can exit the Configuration Assistant by selecting Exit the Configuration Assistant.
Set the default browser depending on what browser you are using on your PC. The default browser can be set through SMIT --> System Environments, Internet and Documentation Services --> Change/Show Default Browser.
4.27.3.2 Configuring Web-based System Manager PC ClientIn order to configure the Web-based System Manager PC Client, you need around 35 MB free disk space on your PC. Start your browser and go to http://configured_mm/pc_client/setup.htm, with configured_mm being your AIX server name. The InstallShield Multi-Platform will lead you through the setup of your Web-based system Manager PC Client, as shown in Figure 89 on page 257 and Figure 90 on page 257.
256 AIX 5L Differences Guide Version 5.1 Edition
Figure 89. InstallShield Multi-Platform for PC Client
Figure 90. Installation of Web-based System manager PC Client
Chapter 4. System management and utility enhancements 257
When the installation is finished, you can launch the Web-based system Manager PC Client through Start --> Programs --> Web-based System Manager PC Client. You will receive a login screen, as shown in Figure 91 on page 258.
Figure 91. Log On screen for Web-based System Manager PC Client
Once you are logged in, Web-based System Manager will run and you are able to manage your AIX operating system from your PC, as shown in Figure 92 on page 259.
258 AIX 5L Differences Guide Version 5.1 Edition
Figure 92. Web-based System Manager PC Client
4.27.4 Accessibility for Web-based System ManagerBecause the Web-based System Manager in AIX 5L is using Java 2 Standard Edition 1.3, or more specifically the Java Foundation Classes, which are a default part of this version, you can now operate most of the panels, menus, screen controls, and dialogs without using a mouse or other pointing device.
Limited mobility users will welcome this function as well as any experienced administrator.
Two accessibility features are provided by default: mnemonics and accelerators. Mnemonics allow you to execute a certain action on a visible dialog without pressing the space bar or Enter key by simultaneously holding down the Alt key and the underlined letter designated in the label belonging to the desired action. Accelerators, on the other hand, are always available, even if the dialog or menu panel with the accompanying action is not visible. These accelerators or shortcuts are usually a combination of the Ctrl, Alt, or Shift key, or a combination of these with a regular letter key or special keys (such as Tab or function keys).
A Keys Help provides a complete list of navigation and windowing keys, and the mnemonics and accelerators for menus are shown in the user interface.
Chapter 4. System management and utility enhancements 259
Figure 93 shows an example for the mnemonic key. In this example, pressing Alt-R selects the entry Remotely with rlogin and telnet commands in the Enable login group, regardless of where the cursor is currently located. The Ctrl-Q key shortcut exits the Web-based System Manager, independent of which dialog is currently active.
Figure 93. Accessibility example
4.28 User and group integration
In previous AIX releases, DCE and NIS were supported as alternate authentication mechanisms. AIX Version 4.3.3 added LDAP support and the initial support for specifying a loadable module as an argument for the user/group managing commands, such as mkuser, lsuser, rmuser. But this was only generally documented in the /usr/lpp/bos/README file. AIX 5L now offers a general mechanism to separate the identification and authentication of users and groups, and defines an application programming interface (API) that specifies what function entry points a module has to make available to be able to work as an identification or authentication method. This allows for
260 AIX 5L Differences Guide Version 5.1 Edition
more sophisticated customized login methods beyond what is provided by the standard ones based on /etc/passwd or DCE.
At the time of writing, DCE, the LDAP server, and Kerberos are not supported on Itanium-based systems.
4.28.1 Existing authentication methodsThe standard AIX authentication method is a variant of the regular UNIX shadow password based implementation, meaning that the information about groups and their members is stored in the /etc/group file, information about users is stored in the /etc/passwd file (with the exception of the encrypted passwords), and related information, which is stored in /etc/security/passwd. This standard method is only implicitly defined and is therefore referred to by the name files when you have to distinguish it from other methods. Other authentication methods have to be explicitly defined in configuration files, as explained in the following section.
The information stored in the /etc/group and /etc/passwd files is called the basic attributes, while the information in the files in the /etc/security directory is called the extended attributes. The files in the /etc/security directory are AIX specific files, such as the /etc/security/user.roles, which defines which roles a user can take. All the regular AIX commands that create groups or users, change their settings, or remove them are working with this set of files.
DCE, for instance, is an identification and authentication mechanism (in addition to the standard file method supported in AIX). This allows DCE users to be locally authenticated on an AIX system by specifying their DCE identity and password. For user and group management, you have to use the DCE specific commands; you can not use the mkuser command, for example, to create a DCE user.
The setup for using this alternate authentication involves several steps. DCE uses a loadable binary module named /usr/lib/security/DCE. This module belongs to the dce.client.core.rte.security fileset. It handles the communication between user, local AIX commands, and the DCE servers. You can specify the full path to this module as a stanza with a freely chosen name as the value for the program attribute in the /usr/lib/security/methods.cfg file. If you choose the name DCE, the stanza appears as follows:
DCE:program = /usr/lib/security/DCE
Chapter 4. System management and utility enhancements 261
Because there was no clear separation between user identification and authentication before AIX 5L, the name of this stanza is used for two different purposes:
• First, as a value for the registry attribute in the /etc/security/user file for either single specific users or in the default stanza. This informs AIX that this user is not locally managed, but managed by a remote mechanism.
• Second, to enable authentication through DCE. The primary authentication method is specified as the value of the auth1 attribute in the /etc/security/user file and has the default value SYSTEM. It is also possible to have a secondary authentication method specified with the auth2 attribute, but this is rarely used. The default value for SYSTEM is “compat,” which is an abbreviation for the combination of the standard AIX mechanism (files) and NIS. To enable authentication using DCE, override the value of the SYSTEM attribute, for example, with the following statement:
SYSTEM = "DCE OR DCE[UNAVAIL] AND compat"
When a user tries to login to an AIX system with this setting for a user ID, the user ID and password are automatically handed over to the loadable module specified as the value of the program attribute of the DCE stanza in /usr/lib/security/methods.cfg. This module checks with the DCE servers to see if the user ID and password combination is valid. If it is, the user is authenticated locally in the AIX system and obtains DCE credentials. If this fails due to the unavailability of DCE, not because of a wrong password, the next step is to check if this user ID and password combination is a locally valid one. If it is, the user is authenticated locally, but has no DCE credentials. If it fails, the user receives the message that either a wrong user ID or a wrong password was used. There is a defined grammar which specifies the order of authentication modules to try, and what actions to take if one of them fails or is unavailable.
If you set the registry attribute to DCE to indicate that the DCE loadable module is responsible for managing the user IDs, and use the lsuser command to see the attributes for a specific user, you will miss some of the attributes, such as unsuccessful_login_count or roles. Some attributes are not even listed and some of them are listed but without their values. If you want to see or reset the value for the unsuccessful_login_count of a user, you have to temporarily switch the registry attribute back to files. Starting with AIX Version 4.3.3, several user and group managing commands now support an optional -R flag, which specifies the loadable module used for accessing the user and group attributes.
262 AIX 5L Differences Guide Version 5.1 Edition
The commands supporting the -R flag are:
• chfn
• chgroup
• chgrpmem
• chsh
• chuser
• lsgroup
• lsuser
• mkgroup
• mkuser
• passwd
• rmgroup
• rmuser
4.28.2 Identification and authentication architectureIn AIX 5L, support for loadable identification and authentication modules is now fully documented and enhanced, in comparison to the feature already available with AIX Version 4.3.3. The tasks of user identification and user authentication are now clearly separated and can be executed by two different loadable modules.
User identification comprises all the necessary information about what user IDs exist and what the attributes for these user IDs are. This information must be consistent, so some kind of database must be used. This database can be flat file based, such as the regular /etc/passwd mechanism, or it can be a relational database, such as DB2, as in the case of IBMs LDAP implementation.
User authentication, on the other hand, is a transitory process where a user claims to have a certain identity and the system has to check if this is true or not. For this process, the system requires a unique piece of information about this user (usually a password). When the user authenticates, the system challenges them by requesting that they type in their password. The user’s response is then compared to the stored unique piece of information and, depending on the outcome of this comparison, the request is accepted or denied. This information, which uniquely identifies a user, must also be stored permanently, but it does not necessarily have to be in the same database where the user identification is stored. With this separation of identification
Chapter 4. System management and utility enhancements 263
and authentication, and the definition of an API, the architecture in AIX exists to support authentication methods that are far more sophisticated than the usual password-based mechanism.
AIX 5L now supports loadable modules that are either responsible for identification, for authentication, or both (as already supported in the past). For a fully supported login process, you need both identification and authentication as well. You can use either one loadable module, which supports both (as in the past), or you can specify one loadable module, one of which is responsible for the identification part and one of which is responsible for authentication. Such a combination of two modules is called a compound module.
To support this new feature, the stanzas in the /usr/lib/security/methods.cfg file now accept the attributes domain and option in addition to the already supported program and program_64 attributes. With the optional domain attribute, you can specify an arbitrary text string that is passed as is to the loadable module. The module can use this string for whatever purposes it likes, but usually it is used to distinguish between several supported domains. The options attribute also takes an arbitrary text string, consisting of comma separated values or name/value pairs, which is then passed to the loadable module as is. There are some predefined values which are interpreted by the AIX system itself. You can specify either authonly or dbonly to indicate that this module is only responsible for the authentication or the identification part. To connect a single purpose module with a specific module for the complementary part of the identification and authentication process, you can use the db=<module> or auth=<module> options.
For example: suppose you want to configure a system to use LDAP for user identification and DCE for user authentication. You have to create, at minimum, two stanzas in the /usr/lib/security/methods.cfg file which specify these two programs. For example:
With this setting you can, for example, specify LDAP as the value for the registry attribute. For identification purposes, the LDAP load module would be used and as soon as authentication is needed, the module specified in the
264 AIX 5L Differences Guide Version 5.1 Edition
DCE stanza would be used. You can create the same effect with the following three stanzas:
In this case, you would specify LDAPDCE as the value of the registry attribute. This would allow for other possible authentication modules to be used in conjunction with LDAP identification. Stanza names can only be used in other stanzas if they have been previously defined.
In AIX 5L, programming interfaces have been documented that describe what function calls a loadable module has to support if it wants to handle the identification part or the authentication part. There are also a couple of support and administrative function calls that handle the internal table that tracks pointers to all available authentication and identification modules that must be opened and closed.
If you are using user or group accounting commands, such as lsuser without using the -R flag, information from all defined identification load modules is displayed. Therefore, a user ID may be listed twice if it is defined for two modules. The displayed attributes can also be different, because not all attributes have to be supported by all modules. Values for attributes defined for more than one module are shown as set for the first loaded module (this is often the implicitly defined standard files module). To avoid confusion, it is recommended to always supply a name for a specific load module using the -R flag.
4.28.3 Native Kerberos Version 5 supportAIX 5L includes native Kerberos Version 5 support, which can be used as an authentication loadable module, as described in the 4.28.2, “Identification and authentication architecture” on page 263. If you use the Kerberos Version 5 authentication method as the default login method, a user will automatically acquire appropriate credentials after a successful login. This support has to be installed separately and is provided in the following filesets:
# lslpp -L "krb5*"Fileset Level State Description----------------------------------------------------------------------------
Chapter 4. System management and utility enhancements 265
krb5.client.rte 1.1.0.0 C Network Authentication ServiceClient
krb5.client.samples 1.1.0.0 C Network Authentication ServiceSamples
krb5.doc.en_US.html 1.1.0.0 C Network Auth Service HTMLDocumentation - U.S. English
krb5.doc.en_US.pdf 1.1.0.0 C Network Auth Service PDFDocumentation - U.S. English
krb5.msg.en_US.client.rte 1.1.0.0 C Network Auth Service Client Msgs- U.S. English
krb5.server.rte 1.1.0.0 C Network Authentication ServiceServer
krb5.toolkit.adt 1.1.0.0 C Network Authentication ServiceApp. Dev. Toolkit
The executables and documentation are installed in the /usr/krb5 directory; configuration files, logs, and other changing files are in the /etc/krb5 and /var/krb5 directories. This avoids any mix-up with an already existing Kerberos installation (for example, from DCE).
The only exceptions are the files and links put into /usr/sbin, as shown in the following partial directory listing:
The configure, unconfigure, start, and stop scripts are only here for convenience, so you do not have to type the complete path to these commands. The mkkrb5srv command sets up an Kerberos V5 server and the mkkrb5clnt command sets up a Kerberos V5 client. Finally, the mkseckrb5 command migrates existing users from the default authentication method to the Kerberos V5 method.
To make this setup work, the hostname command should provide a full, qualified host name, as shown in the following line:
# hostnameserver1.itsc.austin.ibm.com
266 AIX 5L Differences Guide Version 5.1 Edition
The first step in this setup is to create a Kerberos server. To accomplish this task, use the mkkrb5srv command, specifying the flags as shown in the following example:
# mkkrb5srv -r DG.itsc.austin.ibm.com -s server1.itsc.austin.ibm.com -ditsc.austin.ibm.com -a admin/admin
The flags used specify a realm with the -r flag (which is a free form string), the server name with the -s flag, and a domain with the -d flag. If you do not specify an admin principal with the -a flag, the default is admin/admin. These commands create the /etc/krb5/krb5.conf file and some other configuration files in the /var/krb5/krb5kdc directory. If these configuration files already exist, they are not modified by this command. Several default principals that manage the Kerberos environment will also be created. The command will also add two entries to the /etc/inittab file, as shown in the following example output:
These two daemons are also started by the mkkrb5srv command. The kadmind daemon is the administration daemon and the krb5kdc is the actual Key Distribution Center (KDC) daemon, which is responsible for the creation of the secret keys. During the setup process, you are prompted to provide passwords for various principals. You should make note of them, because they are needed in further steps of this setup.
On any machine where you want to use the Kerberos authentication method, you have to run the mkkrb5clnt command with several flags. An example is shown in the following line:
# mkkrb5clnt -r DG.itsc.austin.ibm.com -c server1.itsc.austin.ibm.com -sserver1.itsc.austin.ibm.com -d itsc.austin.ibm.com -a admin/admin -A -ifiles -K -T
The meanings of the -r, -d, and -a flags are the same as described previously for the mkkrb5srv command. The -c and -s flag specify the host where the
If your hostname command only outputs a short name without the domain name, the setup will not work, because only a principal for the short name will be created. The request from the client, where a user wants to login with the Kerberos method, coming over the network will always be the conjunction of the short hostname and the domain name, and no principal exists for this situation.
Note
Chapter 4. System management and utility enhancements 267
kadmind and the KDC daemon are running. The -i flag with the files argument specifies the integrated login, and the -K flag makes Kerberos the default authentication method. The -A flag makes root an administrator for Kerberos on this machine. Finally, the -T flag requests a Ticket-Granting Ticket (TGT) from the server. This creates a keytab file in the /var/krb5/security/keytab directory and the /etc/krb5/krb5.conf configuration file. The last step is omitted if you create the client on the same machine you created the server on, because this file already exists in this case. The command also creates the following two entries in the /usr/lib/security/methods.cfg file:
KRB5:program = /usr/lib/security/KRB5
KRB5files:options = db=BUILTIN,auth=KRB5
The last entry is used to modify the SYSTEM attribute of the default stanza in the /etc/security/user file to read:
default:SYSTEM = "KRB5files OR compat"
With this setting, Kerberos is tried, as a first step, as the authentication method; if this fails, the regular AIX method is tried.
After being authenticated with the /usr/krb5/bin/kinit command, root can create users residing in the KRB5files domain. The following example commands can be used to create a user krb5user and to set an initial password (it is recommended that you use a more secure password):
The output of the lsuser command shows all the Kerberos attributes, beginning with krb5_, defined for this user in addition to the regular AIX user attributes:
The new user can telnet to the client machine and login with the password just set up. After a successful login, the user environment has the following settings:
These settings show that the user is authenticated using the KRB5files method and the path to the credentials file.
With the help of the mkseckrb5 command, you can migrate a user existing in the files domain to the KRB5files domain. The following lines show an example session for a user krb5eins:
# mkseckrb5 krb5einsPlease enter the admin principal name: admin/adminEnter password:Importing krb5einsEnter password for principal "[email protected]":Re-enter password for principal "[email protected]":
If you do not want to enter the password twice for the migrated user, you can use the -r flag, which creates a random password for you. You can then use the passwd command to set a password for this user.
4.29 Concurrent groups enhancement (5.1.0)
In AIX 5L Version 5.1, the number of concurrent user groups have been enhanced to allow up to 64 groups per process. In previous versions of AIX, the system allowed a maximum 32 concurrent group memberships.
Chapter 4. System management and utility enhancements 269
4.30 NCARGS value configuration (5.1.0)
In AIX 5L Version 5.1, the option has been added to allow the super user or any user belonging to the system group to dynamically change the value of the NCARGS parameters. In previous releases of AIX, these values were permanently defined as 24576, which resulted in a problem similar to that shown below when a large number of arguments are parsed to a command:
# rm FILE*ksh: /usr/bin/rm: 0403-027 The parameter list is too long.
The value of NCARGS can be increased to overcome this problem. The value can be tuned anywhere within the range of 24576 to 524288 in 4 KB page size increments. To display the value, use the following command.
Alternately, the SMIT system fast path can be used, as shown in Figure 94.
Figure 94. SMIT panel for system environment
Use the arrow keys on the keyboard to move to the Change / Show Characteristics of Operating System option and press Enter. The screen shown in Figure 95 on page 271 will be displayed. In this SMIT panel, the value can be changed.
270 AIX 5L Differences Guide Version 5.1 Edition
Figure 95. SMIT panel for Change / Show Characteristics of Operating System
To change the value of NCARGS, the following command can be used.
# chdev -l sys0 -a ncargs=’64’
4.31 IBM SecureWay Directory Version 3.2
Version 3.2 of the IBM SecureWay Directory implements the Lightweight Directory Access Protocol (LDAP) Version 3.2 and is offered with the AIX operating system product at no additional charge.
LDAP consists of two major functions, the client and the server.
At the time of writing, the server is only available on the POWER platform.
Increasing the values of NCARGS uses additional kernel memory and this may result in a performance issue on systems that have small memory sizes.
Note
Chapter 4. System management and utility enhancements 271
4.31.1 LDAP client for Itanium-based platform (5.1.0)In AIX 5L Version 5.1, the LDAP client has been ported to the Itanium-based platform. The current release provides only the C runtime libraries and header files for AIX operating system exploiters. The LDAP server has not yet been ported to the Itanium-based platform.
Table 31 shows the content of the available filesets for the Itanium-based platform.
Table 31. LDAP filesets available on Itanium-based platform
4.31.2 LDAP OverviewThe IBM SecureWay Directory Version 3.2 consists of the following components:
• slapd: the server executable
• Command line import/export utilities
• A server administration tool with a Web-browser based interface for configuration and administration of the directory
• A Java-based directory content management tool and online user guide
• Online administration Helps
• Online LDAP programming references (C, server plug-ins, and Java/JNDI)
• SecureWay Directory Client Software Development Kit (SDK) that includes C runtime libraries and Java classes
The product includes a Lightweight Directory Access Protocol (LDAP) Version 3 server that supports IETF LDAPv3 (RFC 2251) protocol, schema, RootDSE, UTF-8, referrals, Simple Authentication and Security Layer (SASL) authentication mechanism, and related specifications. In addition, it includes support for Secure Socket Layer (SSL), replication, access control, client certificate authentication, CRAM MD5 authentication, change log, password encryption, server plug-ins, enhanced search capability for compound Relative Distinguish Name (RDN), Web-based Server Administration, LDAP V3 schema definitions, IBM common schema definitions, schema migration, and performance improvements.
LDAP filesets Further description
ldap.client.rte SecureWay Directory Client Runtime (no encryption)
With over 18 major product enhancements, Version 3.2 of the IBM SecureWay Directory represents one of the most significant updates of the product to date. Some of the more significant enhancements and new functions and features include:
• Fine grain access control - Attribute level ACLs
The IBM SecureWay Directory now allows the management of access down to the individual attribute level. A directory administrator may now control who may see individual attributes for each entry within the directory. This allows access to be managed on individual attribute level, which gives a much finer control. Fine grain access control is often used when specific attributes need to be managed by an entry owner and other entry attributes are managed by the directory administrator.
• Unlimited connections - Improved server threading model
The IBM SecureWay Directory has proven to be a performance leader. To sustain and further enhance the striking performance of the product, the threading model for the directory has been improved. The IBM SecureWay Directory will now utilize thread pools, thus reducing the number of threads utilized when many clients connect to the server concurrently. This change will allow a much larger number of clients to connect to a server, which in turn reduces the number of servers required in a given LDAP environment.
• Support for Kerberos V5 (server and client, including C and JNDI) - GSSAPI
The IBM SecureWay Directory now supports authentication utilizing Kerberos V5. Kerberos V5 has become an important authentication method. Supporting Kerberos V5 authentication methods improves the ability of the directory to provide a single authentication method across the enterprise.
The SecureWay Directory Client SDK includes a Java-based Directory Management Tool, APIs to locate LDAP servers that are published in DNS, client-side caching for the Java-based JNDI interface, as well as other JNDI enhancements.
LDAP is a new technology that is rapidly evolving. IBM is committed to deliver the latest LDAP technology achievements in the robust high-performance LDAP server implementation of the IBM SecureWay Directory product. Version 3.2 of the IBM SecureWay Directory not only keeps pace with the industry, but provides many industry-leading innovations, as documented by the list of improvements given below:
Chapter 4. System management and utility enhancements 273
• Performance improvements through Table Reduction (for Fast Server Startup)
• Componentization of Install
• Integrated install for selection of prerequisite software, separate server versus client install
• WebAdmin and Directory Management Tool (DMT) GUI
• Separation of Configuration versus Data Management Tasks
• Enhancements to Directory Management functions supported by DMT
• Improved panel helps, messages, error logging and reporting
• Exploitation of Java 1.2
• Replication enhancements
• Event notification (server and client support)
• Security auditing
• Limited transaction support
• Automatic LDAP server selection for C and JNDI client
• Support for latest DB/2 releases - UDB 6.1 and UDB 7.1
• GSKit 4.0 exploitation
• Backup/restore support
• Sample Java beans illustrating JNDI usage
On AIX, the new IBM SecureWay Directory version translates messages for Group 1 national languages, including Brazilian Portuguese, French, German, Italian, Spanish, Japanese, Korean, Simplified Chinese, Traditional Chinese, Czech, Polish, Hungarian, Russian, Catalan, and Slovakian.
The directory provides scalability by storing information in the IBM DB/2 Universal Database (UDB). DB/2 is packaged with the directory product, but you may only use the DB2 component in association with your licensed use of the SecureWay Directory.
IBM SecureWay Directory is designed from the ground up to be a standards-based, reliable, secure, high-performing enterprise directory that can scale as your directory usage grows. For further information on the IBM SecureWay Directory, please refer to the URL:
http://www-4.ibm.com/software/network/directory/
274 AIX 5L Differences Guide Version 5.1 Edition
4.32 LDAP name resolution enhancement
The Lightweight Directory Access Protocol (LDAP) is an open industry standard that defines a method for accessing and updating information in a directory.
Prior to AIX 5L, the name resolver routines only resolve names using the Domain Name System (DNS) hierarchical naming function, through the Network Information Services (NIS and NIS+), or by the use of the local /etc/hosts file.
AIX 5L enhances the name resolver routines to optionally utilize the information stored in an LDAP server hosts database to accomplish name resolution.
In order to implement LDAP name resolution support in AIX 5L, some extensions to the LDAP server schema are indispensable. The relevant new object class and the related attributes are described in 4.32.1, “IBM SecureWay Directory schema for LDAP name resolution” on page 275. A new AIX command helps to migrate existing local /etc/hosts information to the LDAP server hosts database. More information about this command and the related LDAP Data Interchange Format file is given in 4.32.2, “LDIF file for LDAP host database” on page 277. 4.32.3, “LDAP configuration file for local resolver subroutines” on page 278 explains the integration of the LDAP name resolution support with the other, more traditional sources for name resolution in the AIX network subsystem environment. For a quick start and for experienced administrators, a brief outline of the procedures necessary to configure an LDAP based name resolution is provided in 4.32.4, “LDAP based name resolution configuration” on page 280. Finally, 4.32.5, “Performance and limitations” on page 281 covers performance aspects and limitations of the LDAP based name resolution.
4.32.1 IBM SecureWay Directory schema for LDAP name resolutionAn LDAP directory entry describes some object. An object class is a general description, sometimes called a template, of an object as opposed to the description of a particular object. For instance, the object class person has a surname attribute, whereas the object describing John Smith has a surname attribute with the value Smith. The object classes that a directory server can store and the attributes they contain are described by schema. Schema define what object classes are allowed where in the directory, what attributes they must contain, what attributes are optional, and the syntax of each attribute. More generically, one can say that an LDAP schema defines the rules for ordering data within the directory structure.
Chapter 4. System management and utility enhancements 275
In order to support LDAP name resolution, the new object class ibm-HostTable was introduced to the IBM SecureWay Directory schema. IBM SecureWay Directory designates IBMs implementation of the LDAP server and client functionality, and is included in the AIX operating system product at no additional charge. The new ibm-HostTable object class can be used to store the name-to-Internet-address mapping information for every host on a given network.
The ibm-HostTable object class is defined as follows:
Object Class name: ibm-HostTableDescription: Host Table entry which has a collection of hostnameto
Attribute Name: ipAddressDescription: IP Address of the hostname in the Host TableOID: TBDSyntax: caseIgnoreStringLength: 256Single Valued: YesAttribute Name: ibm-hostAliasDescription: Alias of the hostname in the Host TableOID: TBDSyntax: caseIgnoreStringLength: 256Single Valued: Multi-valuedAttribute Name: ipAddressTypeDescription: Address Family of the IP Address (1=IPv4, 2=IPv6)OID: TBDSyntax: IntegerLength: 11Single Valued: YesAttribute Name: hostDescription: The hostname of a computer system.OID: 1.13.18.0.2.4.486Syntax: caseIgnoreStringLength: 256Single Valued: Multi-valuedAttribute Name: description
276 AIX 5L Differences Guide Version 5.1 Edition
Description: Comments that provide a description of a directory objectentry.OID: 2.5.4.13Syntax: caseIgnoreStringLength: 1024Single Valued: Multi-valued
Please note that only the three attributes (ipAddress, ibm-hostAlias, and ipAddressType) are new to the IBM SecureWay Directory LDAP implementation. The attributes host and description were previously part of the IBM SecureWay Directory schema.
4.32.2 LDIF file for LDAP host databaseWhen an LDAP directory is loaded for the first time or when many entries have to be changed at once, it is not very convenient to change every single entry on a one-by-one basis. For this purpose, LDAP supports the LDAP Data Interchange Format (LDIF), which can be seen as a convenient, yet necessary, data management mechanism.
The LDIF format is used to convey directory information or a description of a set of changes made to directory entries. An LDIF file consists of a series of records separated by line separators. A record consists of a sequence of lines describing a directory entry or a sequence of lines describing a set of changes to a single directory entry. An LDIF file specifies a set of directory entries or a set of changes to be applied to directory entries, but not both at the same time.
To support the implementation and configuration of LDAP based name resolution, AIX 5L offers the new hosts2ldif command. The hosts2ldif command resides in the /usr/bin directory and creates an LDIF file from /etc/hosts or another file that has the same format. With no options, the /etc/hosts file is used to create the /tmp/hosts.ldif LDIF file using cn=hosts as the base Distinguished Name (baseDN). The baseDN specifies the starting point for the name resolution database within the Directory Information Tree (DIT) structure of the LDAP server. The LDIF file can be used during the configuration process for the LDAP server to load any existing name resolution information that is stored in /etc/hosts files.
The listing below shows a sample LDAP Data Interchange Format (LDIF) file that needs to be generated by the hosts2ldif command:
The numbers in the value of the ipAddressType attribute are defined in RFC 1700, where ipAddressType 1 refers to IP Version 4 and ipAddressType 2 designates the IP Version 6 protocol.
4.32.3 LDAP configuration file for local resolver subroutinesThe process of obtaining an Internet address from a host name is known as name resolution and is done by the gethostbyname subroutine. The process of translating an Internet address into a host name is known as reverse name resolution and is done by the gethostbyaddr subroutine. These routines are essentially accessors into a library of name translation routines known as resolvers.
Resolver routines on hosts running TCP/IP normally attempt to resolve names using the following sources:
• BIND/DNS (named)
• Network Information Service (NIS and NIS+)
• Local /etc/hosts file
278 AIX 5L Differences Guide Version 5.1 Edition
Traditionally, the ordering of name resolution services can be specified in the /etc/netsvc.conf file, the /etc/irs.conf file, or the NSORDER environment variable. The settings in the /etc/netsvc.conf configuration file override the settings in the /etc/irs.conf file. The NSORDER environment variable overrides the settings in the /etc/irs.conf and the /etc/netsvc.conf files.
Beginning with AIX 5L, the name resolver routines can optionally utilize the information of an LDAP server database to accomplish name resolution.
An entry in the /etc/irs.conf file is of the following format: map mechanism [option]. If the system administrator specifies hosts as the value for the map parameter, the given entry defines the mechanism for mapping host names to their IP addresses. AIX 5L allows you to configure LDAP as a new value for the mechanism parameter. The ldap parameter value prompts the resolver routines to query an LDAP server. For example, to use an LDAP server to resolve a host name that can not be found in the /etc/hosts file, you would have to enter the following lines in the /etc/irs.conf file:
# Use LDAP server to resolve host names that can not be found in the# /etc/hosts filehosts local continuehosts ldap
The necessary information about the related LDAP server is supplied by the /etc/resolv.ldap file that must be configured for this mechanism to work.
The /etc/netsvc.conf configuration file format was similarly expanded to add support for LDAP based name resolution. Within the /etc/netsvc.conf file, the ordering of the name resolution mechanism is specified by an entry of the following format: hosts = value [, value]. Beginning with AIX 5L, the keyword hosts accepts the new value ldap, in addition to the previously known values such as bind, local, nis, and nis+. In an analogy to the /etc/irs.conf file entries, the ldap value causes the network subsystem to use LDAP services for resolving names and the necessary information about the related LDAP server is supplied by the /etc/resolv.ldap file, which must be configured to activate this mechanism. For example, to use the LDAP server for resolving names, indicate that it is authoritative, and to use the BIND service as an alternative, enter the following lines in the /etc/netsvc.conf file:
# Use LDAP server authoritative for resolving names, and use the BIND# service if the resolver can not contact the LDAPhosts = ldap = auth , bind
Finally, the NSORDER environment variable accepts a new keyword (ldap) to refer to the LDAP based name resolution. For example, if you want to supplement the default name services ordering (bind, nis, or the local
Chapter 4. System management and utility enhancements 279
/etc/hosts file) with the additional support of an LDAP server, the NSORDER environment variable has to be defined as follows:
# export NSORDER=bind,nis,local,ldap
Whatever way is chosen to enable the network subsystem to benefit from an LDAP based name resolution, the related /etc/resolv.ldap configuration file has to be present and appropriately configured. The /etc/resolv.ldap file defines the LDAP server information for local resolver subroutines. If the /etc/resolv.ldap file is not present, the system will rely on the default or alternative name resolution mechanisms defined by the /etc/netsvc.conf file, the /etc/irs.conf files, or the NSORDER environment variable.
The resolv.ldap file contains one ldapserver entry, which is required, and one searchbase entry, which is optional. The ldapserver entry specifies the Internet address of the LDAP server to the resolver subroutines. The entry must take the following format:
ldapserver address [ port ]
The address parameter specifies the dotted decimal address of the LDAP server. The port parameter is optional; it specifies the port number that the LDAP server is listening on. If you do not specify the port parameter, then it defaults to 389.
The searchbase optional entry specifies the base Distinguished Name (baseDN) of the name resolution database on the LDAP server. This entry must take the following format:
searchbase baseDN
The baseDN parameter specifies the starting point for the name resolution database on the LDAP server. If you do not define this entry, then the searchbase entry defaults to cn=hosts.
For example, to define an LDAP server with an IP address 192.9.201.1, that listens on the port 636, and with a searchbase cn=hosttab, enter the following lines in the /etc/resolv.ldap file:
# LDAP server information for local resolver subroutinesldapserver 192.9.201.1 636searchbase cn=hosttab
4.32.4 LDAP based name resolution configurationUse the following procedure to configure the LDAP server to store name-to-Internet-address mapping host information:
280 AIX 5L Differences Guide Version 5.1 Edition
1. Add a suffix on the LDAP server. The suffix is the starting point of the hosts database. For example, "cn=hosts". This can be done using the Web-based IBM SecureWay Directory Server Administration tool.
2. Create an LDAP Data Interchange Format (LDIF) file. This can be done manually or with the hosts2ldif command, which creates an LDIF file from the /etc/hosts file. Refer to the hosts2ldif command manual page in the AIX documentation library for more information.
3. Import the hosts directory data from the LDIF file on the LDAP server. This can be done with the ldif2db command or through the Web-based IBM SecureWay Directory Server Administration tool.
To configure the client to access the hosts database on the LDAP server, use the following procedure:
1. Create the /etc/resolv.ldap file. Refer to the section resolv.ldap File Format for TCP/IP in the AIX documentation library for more information and a detailed example of a resolv.ldap file.
2. Change the default name resolution through the NSORDER environment variable, the /etc/netsvc.conf file, or the /etc/irs.conf file. Refer to the section netsvc.conf File Format for TCP/IP or the section irs.conf File Format for TCP/IP in the AIX documentation for more information.
4.32.5 Performance and limitationsThe AIX 5L enhancements of the resolver routines are designed and capable of supporting LDAP based name resolution for either Version 2 or Version 3 of the Lightweight Directory Access Protocol. But in order to enable LDAP base name resolution with an LDAP server that uses the protocol Version 2, it is necessary to manually create extensions to the LDAP schema. Refer to 4.32.1, “IBM SecureWay Directory schema for LDAP name resolution” on page 275 for more detailed information about the new and indispensable object class ibm-HostTable and the related attributes that were used to extend the LDAP schema of the IBM SecureWay Directory LDAP Version 3 implementation.
Since the resolver can possibly search through additional maps and the time-out for the LDAP search is 30 seconds, there could be some performance degradation in the amount of time it takes to resolve a name. However, if the LDAP server environment is properly designed and implemented to support LDAP base name resolution, and if, on the client side, the appropriate configurations of the /etc/netsvc.conf file, the /etc/irs.conf file, or the NSORDER environment variable are established, the performance will be of the same order as for the DNS mechanism.
Chapter 4. System management and utility enhancements 281
4.33 LDAP security audit plug-in (5.1.0)
Since the default audit function provided by the IBM SecureWay Directory may not be suited for the needs of the AIX security information management, an LDAP security plug-in has been added to AIX 5L Version 5.1.
The LDAP security audit plug-in provides auditing of the LDAP security information server under the framework of the AIX security audit subsystem. The new LDAP plug-in works independently from the SecureWay Directory audit plug-in. You can decide to invoke either one of them or both of them at the same time.
At the time of writing, this function is available only on the POWER platform.
4.33.1 ImplementationThe LDAP security plug-in has been implemented as /usr/ccs/lib/libsecldapaudit.a. The result of the plug-in operation is either AUDIT_OK or AUDIT_FAIL. A logical diagram is shown in Figure 96.
Figure 96. Implementation detail of the LDAP security audit plug-in
slapdServer
ProcessAudit
Logging
Client Request
AIX Info?
Priv Port?
Yes
Yes
No
No Error Result
SecurityAudit Plug-in
Pre-operationPlug-In
282 AIX 5L Differences Guide Version 5.1 Edition
4.33.2 Configuration filesDue to the LDAP enhancements, the /etc/security/audit/events and /etc/security/audit/config files have been updated.
4.33.2.1 Audit events fileThe following entries has been added to the /etc/security/audit/events file:
4.33.3 Audit informationIf the audit service is started (audit start), you can check to see if the new LDAP security audit plug-in is active:
# audit queryauditing onaudit bin manager is process 9094audit events:ldapserver -LDAP_Bind,LDAP_Unbind,LDAP_Add,LDAP_Delete,LDAP_Modify,LDAP_Modifydn,LDAP_Search,LDAP_Compare
4.34 Extended host name support (5.1.0)
In AIX 5L Version 5.1, the maximum storage size has been increased for display of a remote host name. In the new version utmp.h and rhost.h, the ut_host string has been modified to display up to 256 characters, depending on commands that use ut_host.
The modified structure is as follows for utmp.h and rhost.h:
char ut_host[256]; /* host name */
For example, using the who command, AIX 5L Version 5.1 displays the following:
# whoroot pts/0 Feb 22 10:40 (ausres41.itso.austin.ibm.com)
Previous versions of AIX would appear as follows:
# whoantonyp pts/0 Feb 23 03:43 (ausres41.itsc.au)
Other commands that use the ut_host string are halt, reboot, acct, tsm,
and uucp.
284 AIX 5L Differences Guide Version 5.1 Edition
4.35 Common Information Model Object Manager (5.1.0)
Common Information Model (CIM) is a common data model by which systems, applications, networks, and devices are modeled in a common framework for use by managing applications. A CIM Object Manager (CIMOM) is developed to provide a mechanism for the exchange of information in order for systems management applications to leverage CIM technology.
In AIX 5L Version 5.1, a CIM Object Manager (CIMOM) is available. The CIM Object Manager makes CIM objects available to Web-based Enterprise Management (WBEM) applications. The CIM Object Manager is provided as an RPM package named OpenCIMOM included in the AIX Toolbox for Linux Application CD, which is shipped with the AIX 5L BOS installation media.
The CIMOM follows an open source standard. For more information on the CIMOM APIs, refer to:
http://www.snia.org.
For more information about the Common Information Model, see:
http://www.dmtf.org.
See Chapter 6, “Linux applications on AIX (5.1.0)” on page 379 for more information.
AIX 5L Version 5.1 does not provide any CIM objects; it just provides the CIM Object Manager service.
4.35.1 Common Information ModelCommon Information Model (CIM) is a conceptual view of a managed network/enterprise environment. It extends the existing instrumentation and management standards (SNMP, DMI, CMIP and so forth) by using object oriented constructs and design. That kind of model is not bound to a particular implementation. In fact, it should be possible to build applications using management data from a variety of sources and different management systems. Data of those applications would be collected, stored and analyzed using a common format (CIM).
4.35.1.1 The CIM SchemaThe CIM Schema provides the actual model descriptions. The CIM Schema supplies a set of classes with properties and associations that provide a well
Chapter 4. System management and utility enhancements 285
understood conceptual framework within which it is possible to organize the available information about the managed environment.
4.35.1.2 Managed Object FormatThe management information is described in a language based on the Interface Definition Language (IDL) called the Managed Object Format (MOF).
The following example illustrates MOF, the syntax of the CIM Schemas:
[Abstract, Description(“An abstraction or emulation of a hardware entity, that may ““or may not be Realized in physical hardware. ... “) ]
class CIM_LogicalDevice : CIM_LogicalElement{...
[Key, MaxLen (64), Description (“An address or other identifying information to uniquely ““name the LogicalDevice.”) ]
string DeviceID;[Description (“Boolean indicating that the Device can power managed. ...”) ]
boolean PowerManagementSupported;[Description (“Requests that the LogicalDevice be enabled (\”Enabled\” ““input parameter = TRUE) or disabled (= FALSE). ...)” ]
unit32 EnableDevice ([IN] boolean Enabled);...};
4.36 Documentation search-engine enhancement
The Documentation Library Service in AIX 5L uses a new search engine. The Text Search Engine (TSE) is replacing the NetQuestion Version 1.2.3 (IMNSearch) that was presented in AIX Version 4.3.3.
Some of the enhancements of Text Search Engine over NetQuestion include:
• Use of a single search engine for both single byte or double byte character sets, instead of one engine for each type of character.
• The Text Search Engine does not need a writable index file, so you can have the Documentation CD-ROM mounted and do all the searches through the mounted CD-ROM without file write permission problems.
• The new Text Search Engine supports Russian Language through the ISO-8859-5 Russian codeset.
286 AIX 5L Differences Guide Version 5.1 Edition
• The Text Search Engine is installed by default with the AIX base installation unless Minimal install is used.
The Text Search Engine provides binary compatibility, and can read all NetQuestion search indexes. From a migration path point of view, AIX Version 4.3 machines will be able to upgrade to this new version without problems. However, re-building old user-created documents using the new engine will significantly improve search performance.
4.37 OpenType font support (5.1.0)
In AIX 5L Version 5.1, the TrueType font rasterizer, available in AIX 5.0 and earlier, has been replaced by a version from the AGFA Corporation (http://www.agfa.com). Using a different TrueType rasterizer provides a better font quality.
4.37.1 TrueType rasterizer A TrueType rasterizer generates character bitmaps for screens and printers. In order to do this, the following steps are required:
1. Decode the glyph from its compressed representation in the TrueType file and read the outline description of the character.
2. Scale the glyph according to the desired point size and output device.
3. Execute the glyph's hinting program, with the effect of distorting the glyph's control points.
4. Filling the hinted outline with pixels and make a bitmap image of the glyph.
5. Pass the bitmap to the system.
4.38 Terminal support enhancements (5.1.0)
The terminal emulation in AIX 5L Version 5.1 has been enhanced to support the ANSI terminal type.
4.38.1 ANSI terminal supportThe default emulation in Microsoft Windows telnet is VT-100/ANSI. There is no documented way to override the default emulation with command line options. One can, however, change the emulation after the session opens. When connecting to earlier AIX releases, the telnet command negotiates a terminal type of VT-100.
Chapter 4. System management and utility enhancements 287
In AIX 5L Version 5.1, the telnet session negotiates a terminal type of ANSI, so the TERM environment variable gets set TERM=ansi. This helps reduce problems when opening a SMIT screen. Figure 97 shows a SMIT screen from a telnet session correctly displayed as a result of the TERM=ansi setting.
Figure 97. Telnet session from Microsoft Windows 2000
After you have successfully logged in, the terminal environment variable has been set to TERM=ansi:
# echo $TERMansi
4.39 OpenGL supports 64 bit in DWA mode (5.1.0)
OpenGL 3D graphics calls can be passed to the graphics adapter using the Direct Window Access (DWA) mode or the indirect mode. With DWA, OpenGL calls are passed directly to the graphics adapter device driver and are rendered. Indirect mode causes OpenGL calls to be passed to the GLX extension in the X Window server using a protocol, and rendering is performed by the GLX extension. The protocol passing mechanism of indirect mode can result in much slower graphics performance than with DWA (DWA
You actually can manually set TERM to another value like vt100 or vt220. But be aware that your SMIT screen may be garbled when you are connecting from a Microsoft Windows system. Setting TERM to ANSI is not the same as setting to ansi (lower case).
Note
288 AIX 5L Differences Guide Version 5.1 Edition
performance has been measured to be significantly faster than indirect for most operating scenarios).
Support for 64-bit indirect mode was first introduced in AIX Version 4.3.1. New 64-bit DWA support is introduced with AIX 5L Version 5.1.
The AIX 64-bit execution environment is important for certain data visualization applications which may require a larger memory address space, or increased precision for integer computations. It supports up to 232 shared data segments. Note that 64-bit applications compiled for execution in the AIX Version 4.3 64-bit environment will need to be recompiled for execution in the AIX 5L Version 5.1 64-bit environment.
Applications that use 64-bit DWA may experience some performance differences, compared to 32-bit DWA applications on POWER3 based systems. Degradations can be avoided by compiling the application into a shared library so that it resides in the same 4 GB region as the system's shared libraries.
The following graphics adapters will be 64-bit enabled:
• GTX6000P
• GTX4000P
OpenGL is packaged in device dependent and device independent filesets. The device dependent software resides in separate filesets for 32-bit and 64-bit libraries. The device independent software resides in a combined 32/64-bit library. Table 32 provides the adapters and their respective filesets that support DWA.
Table 32. Supported adapters and required filesets
Additional information about OpenGL support on AIX 5L Version 5.1 can be found in /usr/lpp/OpenGL/README.
Supported Adapter Required Fileset
GTX4000P OpenGL.OpenGL_X.dev.pci.14106e01.PPC64
GTX6000P OpenGL.OpenGL_X.dev.pci.14107001.PPC64
OpenGL software is only available for POWER systems.
Note
Chapter 4. System management and utility enhancements 289
4.39.1 New packaging informationOpenGL provides two new packages in order to fully support the 64-bit in DWA mode, as shown in Table 33.
Table 33. New packaging information
4.40 Capacity Upgrade on Demand (5.1.0)
This section applies specifically to the IBM ̂pSeries 680, 7017 Model S80 systems and Itanium-based systems.
Capacity Upgrade on Demand is a mechanism that enables a customer to be supplied a system with a greater number of CPUs than initially required, providing reserve hardware capacity when growth requires it. CUoD only enables the number of CPUs that the customer is authorized to use. Additional CPUs can be enabled by invoking the chcod CUoD command. This command can only be run by the super user or a user with system group membership.
Multiprocessor Itanium-based systems may need to run the chcod command to activate the additional processors on their system.
4.40.1 chcod commandThe following example shows the syntax of the chcod command:
The flag options for the chcod command are shown in Table 34.
Table 34. Flags of the chcod command
4.41 Tivoli readiness
AIX 5L for the POWER architecture is compliant with the specifications that the Tivoli Ready mark requires for operating systems.
At the time of writing, this feature is only available on the POWER platform.
The difference from the previous AIX Version 4.3 version is that the Tivoli Management Agent (TMA) is now part of the base CDs, and it is installed automatically with a normal AIX installation.
The following lines are the list of filesets installed for Tivoli Readiness:
# lslpp -L "Tivoli*"Fileset Level State Description----------------------------------------------------------------------------Tivoli_Management_Agent.client.rte
3.2.0.0 C Management Agent runtime"
4.42 CATIA Welcome Center
When ordering a new workstation machine with software preloaded, a Netscape browser will start automatically right after AIX initializes. This browser will show you the new CATIA Welcome Center for AIX 5L.
Flags Description
-c <customer_information> This string of information will be used in the error log and in the body of an email message sent. It may not contain a white space character. Characters supported are alphanumeric, ”.” (decimal point), “,” (comma), “-” (hyphen), “(“ open parenthesis, and “)” closed parenthesis. This flag is optional and has a limit of 255 characters.
-h The command usage message.
-n number This value must be 0 or greater and specifies the number of resource types to be authorized. The -r option flag and the -n option flag must be used together.
-r <resource type> This flag specifies the resource type. The only supported value for resource type in AIX 5L Version 5.1 is proc, for processor. The -r option flag and the -n option flag must be used together.
Chapter 4. System management and utility enhancements 291
This feature is only available on the POWER platform.
Figure 98 shows the CATIA Welcome Center main screen.
Figure 98. CATIA Welcome Center main screen
You can navigate through the Welcome Center options by either using the hyperlinks provided at the bottom of the page, or by pressing the Links word on the page.
The following options are available through the main screen:
• About your RS/6000: This link provides access to the contents of the CATIA CD-ROM, RS/6000 hardware technical details and offerings, AIX links, and access to the Online Documentation Library.
• System Administration: This link provides access to the System Configuration (see Figure 99), which gives you details on the current hardware and software environment of the local system; Configuration
292 AIX 5L Differences Guide Version 5.1 Edition
Assistant, a Web-based System Manager and System Expert links are also available.
Figure 99. System Configuration details in the CATIA Welcome Center
• CATIA Solutions: Gives you access to various links related to CATIA V5, CATIA V4, and Enovia CATWeb Solutions.
• Contact IBM: Provides links to RS/6000, AIX and CATIA Services, and Support Homepages, as well as the Education and Training Homepage.
Chapter 4. System management and utility enhancements 293
294 AIX 5L Differences Guide Version 5.1 Edition
Chapter 5. Networking enhancements
AIX 5L provides many enhancements in the networking area. They are described in this chapter.
5.1 Quality of service support
A new method for regulating network traffic flows named Quality of Service (QoS) was introduced in AIX Version 4.3.3. The demand for QoS arises from applications such as digital media or real-time applications and the need to manage bandwidth resources for arbitrary administratively-defined traffic classes.
AIX 5L further enhances the QoS implementation to support overlapping policies in the QoS manager. Directly related to this feature is the new and additional capability to specify a priority for a given policy. To improve the manageability of a QoS configuration, AIX 5L also offers four new commands to add, delete, modify, and list QoS policies.
5.1.1 QoS manager overlapping policiesThe QoS implementation in AIX 5L offers, among other features, a policy-based network traffic categorization and conditioning for the Differentiated Services (DS) and Integrated Services (IS) QoS model. In order for network equipment to provide QoS features from various vendors that interoperate correctly, it is necessary to standardize the underlying policy scheme for QoS. The AIX policy schema is based on the Internet Draft <draft-rajan-policy-qosschema-01.txt> of the Internet Engineering Task Force (IETF).
A policy condition is a characteristic of an IP packet, and a policy action is an action the packet receives when it meets a policy condition. A policy condition is defined by five characteristics of a packet. They are source IP address, source port number, destination IP address, destination port, and protocol type (TCP or UDP). A policy action includes token bucket parameters and a TOS byte value defining in-profile traffic.
From an administrator’s point of view, a policy is essentially a collection of configuration parameters to regulate certain types of traffic flow.
There are two core components of the QoS subsystem that are relevant to the policy-based networking function:
• QoS kernel extension (/usr/lib/drivers/qos)
The QoS kernel extension resides in /usr/lib/drivers/qos and is loaded and unloaded using the cfgqos and ucfgqos configuration methods. This kernel extension enables QoS support and provides the QoS manager functionality.
• Policy agent (/usr/sbin/policyd)
The policy agent is a user-level daemon (/usr/sbin/policyd). It provides support for policy management and interfaces with the QoS kernel extension (QoS manager) to install, modify, and delete policy rules. Policy rules may be defined in the local configuration file (/etc/policyd.conf), retrieved from a central network policy server using LDAP, or both. AIX 5L also offers a command line interface to manage and administer policy rules.
Each policy definition requires a ServicePolicyRules and a ServiceCategories object within the /etc/policyd.conf file. The ServicePolicyRules object establishes the policy condition and the ServiceCategories object determines the policy action. The structure for the ServicePolicyRules object is shown in the following example:
Used conventions:i : integer values : a character stringa : IP address format B.B.B.B(R) : Required parameter(O) : Optional parameter
ServicePolicyRules s{
SelectorTag s # Required tag for LDAP SearchProtocolNumber i # Transport protocol id for the policy ruleSourceAddressRange a1-a2DestinationAddressRange a1-a2SourcePortRange i1-i2DestinationPortRange i1-i2PolicyRulePriority i # Highest value is enforced firstServiceReference s # Service category name for this policy rule
}
wheres (R): is the name of this policy ruleSelectorTag (R): required only for LDAP to Search object classProtocolNumber (R): default is 0 which causes no match, must explicitly specifySourceAddressRange (O): from a1 to a2 where a2 >= a1, default is 0, any sourceaddressSourcePortRange (O): from i1 to i2 where i2 >= i1, default is 0, any source portDestinationAddressRange (O): same as SourceAddressRangeDestinationPortRange (O): same as SourcePortRangePolicyRulePriority (O): Important to specify when overlapping policies existServiceReference (R): service category this rule uses
296 AIX 5L Differences Guide Version 5.1 Edition
Note that the newly introduced attribute PolicyRulesPriority and each ServicePolicyRules object is associated with a unique instance of the ServiceCategory referred to by the ServiceReference attribute.
During the start of the QoS subsystem, the policy agent installs the defined policies to be used by the QoS manager. Previous AIX releases took a conservative approach toward overlapping policies by completely disallowing them. This had implications for deployment and actual usage, where the system administrator may want to specify or assume a given ordering between the potentially overlapping policies. In AIX releases prior to AIX 5L, the QoS manager effectively searched for a matching policy in a way that did not allow a priority among the policies.
One example to illustrate the issues related to overlapping policies is as follows.
A customer desires to configure simultaneous policies for application audio (AppA) and application video (AppV). The first application (AppA) may select a valid port number for the source port and a wild card for the destination, while the second application (AppV) selects a wild card for the source port and a valid port number for the destination. The five attributes of the related ServicePolicyRules objects (source IP address, source port number, destination IP address, destination port, and either TCP or UDP) that are used by the QoS Manager to identify specific policy rules, may all have fields identical, with the exception of source and destination port for the two applications. When installing the policy definitions for both applications under AIX Version 4.3.3, the second policy in the installation sequence was found to be overlapping, an error was flagged, and the policy was not installed. While the policies were overlapping, if the system allowed the installation of both policies, the two applications would not have assigned conflicting ports. The policies would not have overlapped, because the application (AppA) that uses the source port it would not have assigned a destination port overlapping with the second application (AppV) and vice versa.
This may happen with different applications in other scenarios. Even though the policies are allowed to install in practice, they may overlap, so order of policy installation becomes important.
In order to allow the installation of overlapping policies, the order in which the policies are input to the QoS Manager needs to be preserved. The highest priority policy in the overlapping case will be input to the QoS Manager from the policy agent last, and that order is maintained for proper policy enforcement. The last policy installed from the policy agent that matches will be enforced over previously installed policies in the overlapping case.
Chapter 5. Networking enhancements 297
The policy agent’s capability was extended to allow system administrators to set priorities for policies, so that they get installed in a desired order onto the QoS kernel extension. In order to do this, an attribute called PolicyRulePriority was added to the ServicePolicyRules structure. The ServicePolicyRules objects are defined in the /etc/policyd.conf configuration file. The PolicyRulePriority attribute can be set to any positive integer. If no value is specified, the default is set to 0. The absolute value of this attribute has no meaning and only the relative values are important. The policies are installed onto the AIX 5L kernel in the order of the highest priority first. Every time a new policy is added to the policy agent, it is inserted into the policies list based on its priority, and finally the whole list is installed onto the QoS manager stack.
The priority for any specific policy can be specified by manually editing the ServicePolicyRules stanzas in the /etc/policyd.conf policy agent configuration file. Alternatively, you can use the new command line interface as described in Section 5.1.2, “QoS manager command line support” on page 298.
QoS is an optionally installable feature and packaged with the bos.net.tcp.server fileset.
5.1.2 QoS manager command line supportBeginning with AIX 5L, four new commands are available to add, modify, delete, or list Quality of Service policies. These AIX commands operate on the /etc/policyd.conf policy agent configuration file, so the use of a text editor is not required to manage policies. Once an add, modify, or remove command is executed, the change takes effect immediately and the local configuration file of the policy agent is updated to permanently keep the change. The list command will prompt the policy agent to query its internal indexed list to provide the information about ServiceCategories and ServicePolicyRules, which define the active policies. Also, a flag will be available for the command line programs to allow prioritization of policies, so the correct order of enforcement can be determined in the event of a policy overlap. The policy agent must input the policies to the QoS Manager in the order of lowest priority first.
The QoS command line interface consists of the commands provided in the following sections, with their given syntax and usage.
5.1.2.1 The qosadd command The qosadd command adds the specified Service Category or Policy Rule entry in the policyd.conf file and installs the changes in the QoS Manager.
5.1.2.2 The qosmod commandThe qosmod command modifies the specified Service Category or Policy Rule entry in the policyd.conf file and installs the changes in the QoS Manager.
To modify an existing service category or policy rule:
5.1.2.3 The qoslist commandThe qoslist command lists the specified Service Category or Policy Rule. The qoslist command lists all Service Categories or Policy Rules if no specific name is given. The syntax is:
#qoslistusage: qoslist [ServiceCategory][Policy Rule] <policy or service>
5.1.2.4 The qosremove commandThe qosremove command removes the specified Service Category or Policy Rule entry in the policyd.conf file and the associated policy or service in the QoS Manager. The syntax is:
#qosremoveusage: qosremove <ServicePolicyRule or ServiceCategory> <policy or service>
5.2 TCP/IP routing subsystem enhancements
AIX 5L offers multipath routing and Dead Gateway Detection (DGD) as new features of the TCP/IP routing subsystem. They are intended to enable administrators to configure their systems for load balancing and failover.
Multipath routing provides the function necessary to configure a system with more than one route to the same destination. This is useful for load balancing
Chapter 5. Networking enhancements 299
by routing IP traffic over different network segments, or to specify backup routes to use with Dead Gateway Detection. Section Section 5.2.1, “Multipath routing” on page 300 covers the details on this new routing feature.
Dead Gateway Detection enables a system to discover if one of its gateways is down and use an alternate gateway. DGD offers an active and a passive mode of operation to account for different kinds of customer requirements (in respect to performance and availability). Section 5.2.2, “Dead gateway detection” on page 306 provides more in depth information about this enhancement to the TCP/IP routing subsystem.
Both new routing features are implemented for IP Version 4 (IPV4) and IP Version 6 (IPV6).
5.2.1 Multipath routingPrior to AIX 5L, a new route could be added to the routing table only if it was different from the existing routes. The new route would have to be different by either destination, netmask, or group ID. The sample output of the netstat command, depicted in the following, shows two routing table entries that have the same netmask. However, the route for the token ring interface differs from the route associated with the Ethernet interface by the destination:
# netstat -rnRouting tablesDestination Gateway Flags Refs Use If PMTU Exp Groups
Route tree for Protocol Family 2 (Internet):9.3.21/24 9.3.21.22 U 106 17412 tr1 - .9.3.22/24 9.3.22.37 U 0 266344 en0 - .
The following netstat command output was taken from a system where two routes for two different gateways are defined with the same destination but for different netmasks.
# netstat -rnRouting tablesDestination Gateway Flags Refs Use If PMTU Exp Groups
Route tree for Protocol Family 2 (Internet):10/24 9.3.21.22 UGc 0 0 tr1 - - =>10/23 9.3.22.37 UGc 0 0 en0
In the case where the destination address is the same but the netmask is different, the most specific route that matches will be used. In the previous example, packets sent to 10.0.0.1 - 10.0.0.255 would use the 10/24 route, since it is more specific, while packets sent to 10.0.1.1 - 10.0.1.255 would use the 10/23 route, since they do not match the 10/24 route but do match the 10/23 route.
300 AIX 5L Differences Guide Version 5.1 Edition
The third possible differentiator for a unique route definition is given by the group ID list. The groups associated with a route are listed in the column of the netstat -r output, which is labeled with the keyword Groups. These groups are comprised of AIX group IDs, and they determine which users have permission to access the route. This feature is used by system administrators to enforce security policies or to provide different classes of service to different users.
With the new multipath routing feature in AIX 5L, routes no longer need to have a different destination, netmask, or group ID list. If there are several routes that equally qualify as a route to a destination, AIX will use a cyclic multiplexing mechanism (round-robin) to choose between them. The benefit of this feature is twofold:
• Enablement of load balancing between two or more gateways.
• Feasibility of load balancing between two or more interfaces on the same network can be realized. The administrator would simply add several routes to the local network, one through each interface.
In order to implement multipath routing, AIX 5L allows you to define a user-configurable cost attribute for each route and offers the option to associate a particular interface with a given route. These enhancements are configurable by the parameters -hopcount and -if of the route command. In the following, you find an excerpt of the manual page for the route command. Note the new -active_dgd parameter that turns on the active DGD for a given route, which will be described later on in Section 5.2.2.3, “Active Dead Gateway Detection” on page 312:
Flags-n Displays host and network names numerically, rather than
symbolically, when reporting results of a flush or of any action in verbose mode.
-q Specifies quiet mode and suppresses all output.
-v Specifies verbose mode and prints additional details.
-net Indicates that the Destination parameter should be interpreted as a network.
-netmask Specifies the network mask to the destination address. Make sure this option follows the Destination parameter.
Chapter 5. Networking enhancements 301
-host Indicates that the Destination parameter should be interpreted as a host.
-prefixlen n Specifies the length of a destination prefix (the number of bits in the netmask).
ParametersArguments Specifies one or more of the following arguments. Where n is
specified as a variable to an argument, the value of the n variable is a positive integer.
-active_dgd Enables Active Dead Gateway Detection on the route.
-hopcount n Specifies maximum number of gateways in the route.
-if ifname Specifies the interface (en0, tr0 ...) to associate with this route so that packets will be sent using this interface when this route is chosen.
Commands Specifies one of six possibilities: add, flush, delete, change, monitor, or get.
Family Specifies the address family (inet, inet6, or xns).
Destination Identifies the host or network to which you are directing the route.
Gateway Identifies the gateway to which packets are addressed.
5.2.1.1 User-configurable cost attribute of routesThe user-configurable cost of a route is specified as a positive integer value for the variable associated with the -hopcount parameter. The integer can be any number between 0 and the maximum possible value of MAX_RT_COST, which is defined in the /usr/include/net/route.h header file to be INT_MAX. The value of INT_MAX is defined in /usr/include/sys/limits.h to be 2147483647. The header files will be on your system after you install the bos.adt.include fileset. The -hopcount parameter existed in the past, and the assigned integer value was supposed to reflect the number of gateways in the route. However, in previous AIX releases, the parameter value given during the configuration of the route had no effect on how the route was used.
Even so, the -hopcount parameter in AIX 5L refers historically to the number of gateways in the route; the number configurable by the system administrator can be totally unrelated to the actual presence or absence of any real gateways in the network environment. The user-configurable cost attribute’s sole purpose is to establish a metric, which is used to create a priority hierarchy among the entries in the routing table.
302 AIX 5L Differences Guide Version 5.1 Edition
If the routing table offers several alternative routes to the desired destination, the operating system will always choose the route with the lowest distance metric as indicated by the lowest value for the current cost. In the case where multiple matching routes have equal current cost, a lookup mechanism chooses the most specific route. When both criteria are equal for multiple routes, AIX 5L will round-robin select between them. Higher-cost routes ordinarily will never be used; they are only there as backups. If the lower-cost routes are deleted or their costs are raised, the backup routes will be used. This provides a mechanism for marking bad routes when a gateway failure is detected; indeed, the DGD feature, as described in Section 5.2.2, “Dead gateway detection” on page 306, exploits this particular feature.
The kernel resident routing table is initialized when interface addresses are set by making entries for all directly connected interfaces. The routing entry structure rtentry is defined in the route.h header file, which will be located in the /usr/include/net/ directory after you optionally install the bos.adt.include fileset.
The behavior of the code to select routes has only changed when duplicate routes exist. For nodes with multiple routes, the duplicated route is followed until a route which matches is found. If there are other entries with the same cost and netmask, the route that was last used is skipped and the next one chosen.
The costs on all routes can be displayed using the new -C flag on the netstat command, as indicated by the following example.
With the -C flag set, the netstat command shows the routing tables, including the user-configured and current costs of each route. The user-configured cost is set using the -hopcount flag of the route command. The current cost may be different than the user-configured cost if, for example, the Dead Gateway Detection has changed the cost of the route. For further details on DGD, refer to Section 5.2.2, “Dead gateway detection” on page 306.
# netstat -CnRouting tablesDestination Gateway Flags Refs Use If Cost Config_Cost
Route tree for Protocol Family 2 (Internet):9.3.149.96/28 9.3.149.100 U 5 23 en1 0 09.3.149.160/28 9.3.149.163 U 1 5 tr0 0 09.53.150/23 9.3.149.160 UGc 0 0 tr0 0 0 =>9.53.150/23 9.3.149.97 UGc 0 0 en1 1 1127/8 127.0.0.1 U 1 130425 lo0 0 0
Route tree for Protocol Family 24 (Internet v6):::1 ::1 UH 0 0 lo0 0 0
Chapter 5. Networking enhancements 303
5.2.1.2 Interface specific routesThe implementation of TCP/IP routing in previous AIX releases did not provide any mechanism to associate a specific interface with a route. When there were multiple interfaces on the same network, the same outgoing interface for all destinations accessible through that network was always chosen. In order to configure a system for network traffic load balancing, it is desirable to have multiple routes so that the network subsystem routes network traffic to the same network segment by using different interfaces. AIX 5L introduces the new -if argument to the route command, which can be used to associate a particular interface with a specific route.
The -if parameter argument must not be mistaken for the -interface parameter argument of the route command. The -interface argument specifies that the route being added is an interface route, which means it is a direct route to the local network and does not go through a gateway.
The following example shows the usage of the route command to establish an interface specific host route from a given computer on one network to its counterpart on a different network:
route add 192.100.201.7 192.100.13.7 -if tr0
The 192.100.201.7 address is that of the receiving computer (destination parameter) and the 192.100.13.7 address is that of the routing computer (gateway parameter). The -if argument assigns the static host route to the token ring interface tr0.
5.2.1.3 Deletion and modification of routesThe route command, used in conjunction with the delete qualifier command, examines the entries in the kernel route table and deletes only the specified route in the routing table if a unique route has been successfully identified. In previous AIX releases, this command could only fail if no route entry matched the specified command line parameters. Since AIX 5L offers the option to specify multiple routes to the same destination, but with different gateways or interfaces, the route delete command may fail, because more than one route matches the criteria for deletion. So if the attempt to delete a route fails, an error message is returned (as always), but this message explicitly mentions that there are now two possible error conditions which have to be considered. The following example shows the error message returned by the route delete
command on a system with more than one defined default route:
# route delete default0821-279 writing to routing socket: The process does not exist.default net default: route: not in table or multiple matches
304 AIX 5L Differences Guide Version 5.1 Edition
In order to account for the possible existence of multiple routes to the same destination but with different gateways or interfaces in AIX 5L, similar modifications were implemented for the command to change a route. This means that the route change command will return an error message whenever no unique route could be identified, regardless of the absence of a given route or the existence of multiple routes to the same destination. Note that only the user-configurable cost, gateway, and interface of a route can be changed.
5.2.1.4 Limitations for multipath routingYou must completely understand the limitations when using Multipath routing in conjunction with the path maximum transfer unit (PMTU) discovery feature of AIX.
When the destination of a connection is on a remote network, the operating system's TCP, by default, advertises a maximum segment size (MSS) of 512 bytes. This conservative value is based on a requirement that all IP routers support an MTU of at least 576 bytes.
The optimal MSS for remote networks is based on the smallest MTU of the intervening networks in the route between source and destination. In general, this is a dynamic quantity and could only be ascertained by some form of path MTU discovery.
The AIX 5L operating system supports a path MTU discovery algorithm as described in RFC 1191. Path MTU discovery can be enabled for TCP and UDP applications by modifying the tcp_pmtu_discover and udp_pmtu_discover options of the no command. When enabled for TCP, path MTU discovery will automatically force the size of all packets transmitted by TCP applications to not exceed the discovered path MTU size. Since UDP applications themselves determine the size of their transmitted packets, UDP applications must be specifically written to utilize path MTU information by using the IP_FINDPMTU socket option, even if the udp_pmtu_discover network option is enabled. By default, the tcp_pmtu_discover and udp_pmtu_discover options are disabled on Version 4.2.1 through Version 4.3.1, and enabled on Version 4.3.2 and later.
When the path MTU has been discovered for a network route, a separate host route is cloned for the path. These cloned host routes, as well as the path MTU value for the route, can be displayed using the netstat -r command. Accumulation of cloned routes can be avoided by allowing unused routes to expire and be deleted. Route expiration is controlled by the route_expire option of the no command. Route expiration is disabled by default on Version 4.2.1 through Version 4.3.1, and set to one minute on Version 4.3.2 and later.
Chapter 5. Networking enhancements 305
Beginning with AIX 5L, you may have several equal-cost routes to a given network, but with different associated gateways, on a system for which PMTU discovery is enabled. When traffic is sent to a host on that specific network, a host route will be cloned from whichever network route was chosen by the cyclic multiplexing code of the multipath routing algorithm. Because the cloned host route is always more specific than the original network route of which the clone was derived, all traffic to that host will use the same gateway as long as the cloned route exists and, consequently, no cyclic multiplexing among the different gateways associated with the equal-cost route to the specific network will take place.
Since PMTU discovery is enabled by default in AIX 5L, system administrators may consider disabling the network options tcp_pmtu_discover or udp_pmtu_discover to turn off route cloning (in order to take full advantage of the new multipath routing feature). This measure will prevent the creation of the cloned host routes and will instead allow cyclic multiplexing between equal-cost routes to the same network.
5.2.2 Dead gateway detectionThe new Dead Gateway Detection (DGD) feature in AIX 5L implements a mechanism for hosts to detect a dysfunctional gateway, adjust its routing table accordingly, and re-route network traffic to an alternate backup route if available. DGD is generally most useful for hosts that use static rather than dynamic routing.
5.2.2.1 OverviewAIX releases prior to AIX 5L did not permit you to configure multiple routes to the same destination. If a route's first hop gateway failed to provide the required routing function, AIX continued to try to use the broken route and address the dysfunctional gateway. Even if there was another path to the destination which would have offered an alternative route, AIX did not have any means to identify and switch to the alternate route unless a change to the kernel routing table was explicitly initiated, either manually or by running a routing protocol program, such as gated or routed. Gateways on a network run routing protocols and communicate with one another. So if one gateway goes down, the other gateways will detect it, and adjust their routing tables to use alternate routes. (Only the hosts continue to try to use the dead gateway.)
The new DGD feature in AIX 5L enables host systems to sense and isolate a dysfunctional gateway and adjust the routing table to make use of an alternate gateway without the aid of a running routing protocol program.
306 AIX 5L Differences Guide Version 5.1 Edition
AIX 5L implements DGD based on the requirements given in RFC 1122 Sections 3.3.1.4 and 3.3.1.5, and RFC 816. These RFCs contain a number of suggestions on mechanisms for doing DGD, but currently no completely satisfactory algorithm has been identified. In particular, the RFCs require that pinging to discover the state of a gateway be avoided or extremely limited, and they recommend that the IP layer receive hints that a gateway is up or down from transport and other layers that may have some knowledge of whether a data transmission succeeded. However, in one of the two possible modes (active mode) for the AIX 5L DGD feature, status information of a gateway is collected with the help of pinging, and hence the AIX 5L DGD implementation is not fully compliant with the RFCs mentioned above.
DGD utilizes the functions of AIX 5L multipath routing. The multipath routing feature allows for multiple routes to the same destination which can be used for load balancing and failover. Refer to Section 5.2.1, “Multipath routing” on page 300 for further details.
The DGD implementation in AIX 5L offers the flexibility to address two distinct sets of customer requirements:
• Requirement for minimal impact on network and system environment in respect to compatibility and performance. The detection of a dysfunctional gateway and the switch from the associated route over to an alternate gateway route must be accomplished without any significant overhead.
• Requirement for maximum availability of network services and connections. If a gateway goes down, a host must always discover that fact within a few seconds and switch to a working gateway.
Since both sets of requirements can not be satisfied by a single mechanism, AIX 5L DGD offers a passive and an active mode of operation.
The passive Dead Gateway Detection addresses the need for minimal overhead, while the active Dead Gateway Detection ensures maximum availability while imposing some additional workload onto network segments and connected systems. Passive DGD is disabled system wide by default, but active DGD is defined as an attribute for a particular route, and therefore requires to be enabled on a route to route basis.
5.2.2.2 Passive Dead Gateway DetectionOne of the two modes for Dead Gateway Detection will work without actively pinging the gateways known to a given system; therefore, this mode is referred to as passive DGD.
Chapter 5. Networking enhancements 307
Passive DGD will take action to use a backup route if a dysfunctional gateway has been detected. The backup route can have a higher current cost than the route associated with the dysfunctional gateway which allows you to configure primary (lower cost) gateways and secondary (higher cost) backup gateways. As such, DGD expands the TCP inherent failover between alternate equal cost routes, as introduced by the new AIX 5L multipath routing feature.
The passive DGD mechanism depends on protocols that provide information about the state of the relevant gateways. If the protocols in use are unable to give feedback about the state of a gateway, a host will never know that a gateway is down and no action will be taken.
The Transmission Control Protocol (TCP), in conjunction with the Address Resolution Protocol (ARP), is able to give the necessary feedback about the state of a specific gateway. It is important to note that these two protocols give different types of feedback, and that you have to use both protocols to receive the full benefit of the passive DGD feature.
TCP identifies round-trip traffic that is not getting through. It will correctly detect that the gateway in question is down if it is indeed no longer forwarding traffic. However, it may incorrectly report that the gateway is down if there is a temporary routing problem elsewhere in the network that the first-hop gateway will soon detect and adjust to, or if the address it is sending to is unreachable or nonexistent.
On the other hand, ARP still perceives a gateway to be up even if it is no longer forwarding traffic. The only thing ARP can detect with certainty is whether the first-hop gateway can be reached, but it does not sense whether the network traffic is forwarded and reaches its final destination. So transitory problems elsewhere in the network can not cause ARP to mistake a functional for a dysfunctional gateway.
Because TCP can not detect if the destination for the network traffic is supposed to be reachable, the decisions about a gateway's state can not be based only on TCP. Instead, TCP is used to prompt Dead Gateway Detection under certain conditions to determine the state of a gateway based on feedback from ARP.
For IPv6, it is not necessary to use passive Dead Gateway Detection. The Neighbor Discovery Protocol (NDP) contains all the functions that passive DGD adds for IPv4.
Note
308 AIX 5L Differences Guide Version 5.1 Edition
Multipath routing in AIX 5L allows you to specify a distance metric or cost associated with a route. Routes to the same destination with equal cost will be selected by a cyclic multiplexing algorithm. Routes with a higher cost will not be used unless there is a problem with the lower-cost routes. Passive DGD exploits the multipath routing feature to provide failover for dysfunctional gateways.
If feedback is received from ARP that a gateway might be down, the current costs of all routes using that gateway will be increased to the maximum value MAX_RT_COST (refer to Section 5.2.1.1, “User-configurable cost attribute of routes” on page 302 for further details). The user-configurable cost will not be changed, but eventually will be used in the future to restore the current cost to the original value if the gateway comes up again. If alternative routes to the same destination with a cost equal to the original cost of the deprecated route are defined, the TCP/IP subsystem will use those exclusively, and the route whose current cost was increased is no longer addressed. If there were no other routes to the destination, the original route is still the lowest-cost route, and the system will continue to try to use it.
When the current cost of a route is increased, as described previously, a timer will be set for a configurable period of time. This will be specified by a new network option called dgd_retry_time. The default value for this network option is set to five minutes, since that is about the amount of time it will take a gateway that has crashed to reboot. Use the no -o command to display or change the dgd_retry_timer network option. The no command output in the following example shows the value for the dgd_retry_timer on a system where this specific network option is set to the default of 5:
# no -o dgd_retry_timedgd_retry_time = 5
Note that the network options set by the no command are only in effect until the next reboot. If you would like to use the customized settings for the network options permanently, you will have to include the appropriate no commands in the network startup script /etc/rc.net. This script is executed during the boot process and will establish the network options with the customized values of your choice.
When the timer expires, the cost will be restored to its original user-configured value. If the gateway did not come up in the meantime, the next attempt to send traffic will raise the current cost for the routes in question again to the maximum value and the timer is reset for another five minute wait. If the gateway is back up, that route will continue to be used. The only exception to this is when active DGD is in use, as described in Section
Chapter 5. Networking enhancements 309
5.2.2.3, “Active Dead Gateway Detection” on page 312. In this case, a flag on the route will indicate that active detection is in use, and passive detection should not restore the cost to its original value.
ARP requests are only sent out if the ARP cached entry has expired. By default, ARP entries expire after 20 minutes. So if a gateway goes down, it may take quite a long time (relative to transaction events that require responsive networks) before DGD senses any problem with a given gateway through ARP protocol. For this reason, the DGD mechanism monitors to see if TCP retransmits packets too many times, and in the case where it suspects that a gateway is down, it deletes the ARP entry for that gateway. The next time any traffic is sent along the given route, an ARP request is initiated, which provides the necessary information about the state of the gateway to DGD.
TCP is not supposed to initiate a change of the cost associated with a route, because it does not know whether the gateway is actually down or if the destination is just unreachable. For this reason, TCP indirectly initiates an ARP request by deleting the ARP cache entry for the gateway in question. On the other hand, TCP is aware of any particular failing connection. So, TCP explores (independently of the feedback of the initiated ARP requests) if there is any other route to its destination with a cost equal to the one it is currently using. If TCP identifies alternate routes, it tries to use them. This way, the connection in question will still recover right away, if the gateway really was down.
It is important to carefully choose the criteria for deciding that a gateway is down. A failover to a backup gateway just because a single packet was lost in the network must be avoided, but in the case of an actual gateway failure, network availability must be restored with as little delay as possible. The number of lost packets needed before a gateway will be suspected or considered as dysfunctional is user-configurable by the new network option named dgd_packets_lost. The network option dgd_packets_lost can be displayed and changed by the no -o command and is set to 3 by default. The no command output in the following example shows the value for the dgd_packets_lost on a system where this specific network option is set to the default of 3:
# no -o dgd_packets_lostdgd_packets_lost = 3
The same restrictions which were mentioned before in respect to the dgd_retry_timer network option apply for the dgd_packets_lost network option.
310 AIX 5L Differences Guide Version 5.1 Edition
If TCP retransmits the same packet as many number of times as defined by dgd_packets_lost and gets no response, it deletes the ARP entry for the gateway route it was using and tries to use an alternative route. When the next attempt is made to send a packet along the gateway route, no ARP cache entry is found, and ARP sends out a request to collect the missing information. The value for dgd_packets_lost also determines how often no response of an ARP request is tolerated before a gateway finally will be considered to be down and the costs of all routes using it will be increased to the maximum possible value.
The control flow for DGD as described implies that DGD will work even when non-TCP traffic occurs. Under this condition, DGD depends on the ARP protocol feedback only, and the related relatively long lifetime values for ARP cache entries will slow down the detection of dysfunctional gateways. However, DGD will still allow you to configure primary (lower cost) and secondary (higher cost) gateways, and it handles the failover from a dysfunctional primary gateway to the secondary backup gateway.
One important aspect in respect to passive DGD must be considered in security sensitive environments. There are many cases where TCP could mistake a functional gateway being dysfunctional: the destination that TCP is trying to reach may be turned off, has crashed, be unreachable, or be non-existent. Also, packets may be filtered by a firewall or an other security mechanism on the way to the destination to name just one possibility. In these cases, the ARP entry for the gateway in use will be deleted in order to force Dead Gateway Detection to be initiated and to find out if the gateway is actually down. This will cause extra overhead and traffic on the network for the ARP packets to be sent, and also for other connections to wait for an ARP response. In general, this extra overhead will be fairly minimal. It does not happen very often that a connection will be attempted to an unreachable address, and the overhead associated with an ARP is quite small. However, the possibility exists that malicious users could continually try to connect to addresses they knew to be unreachable to purposely degrade performance for other users on the system and generate extra traffic on the network.
To protect systems and users against these types of attacks, a new network option named passive_dgd was introduced with the implementation of DGD in AIX 5L. The passive_dgd default value is 0, indicating that passive DGD will be off by default. The network option passive_dgd can be displayed and changed by the no -o command. The no command output in the following example shows the value for the passive_dgd on a system where this specific network option is set to the default of 0:
# no -o passive_dgd
Chapter 5. Networking enhancements 311
passive_dgd = 0
If you want to permanently enable passive DGD, you will have to include the following command line in the network startup script /etc/rc.net:
no -o passive_dgd=1
5.2.2.3 Active Dead Gateway DetectionPassive Dead Gateway Detection has low overhead and is recommended for use on any network that has redundant gateways. However, passive DGD is done on a best-effort basis only. Some protocols, such as UDP, do not provide any feedback to the host if a data transmission is failing, and in this case, no action can be taken by passive DGD. Passive DGD detects that a gateway is down only if it does not respond to ARP requests.
When no TCP traffic is being sent through a gateway, passive DGD will not sense a dysfunctional state of the particular gateway. The host has no mechanism to detect such a situation until TCP traffic is sent or the gateway's ARP entry times out, which may take up to 20 minutes. But this situation does not modify route costs. In other words, a gateway not forwarding packets is not considered dead.
This behavior is unacceptable in information technology environments with very strict availability requirements. AIX 5L offers a second DGD mechanism, specifically for these environments, named Active Dead Gateway Detection. Active DGD will ping gateways periodically, and if a gateway is found to be down, the routing table is changed to use alternate routes to bypass the dysfunctional gateway.
A new network option called dgd_ping_time will allow the system administrator to configure the time interval between the periodic ICMP echo request/reply exchanges (ping) in units of seconds. The network option dgd_ping_time can be displayed and changed by the no -o command and is set to 5 seconds by default. The no command output in the following example shows the value for dgd_ping_time on a system where this specific network option is set to the default of 5:
# no -o dgd_ping_timedgd_ping_time = 5
You should include an appropriate no command line in the /etc/rc.net file to ensure that a value for this network option, which deviates from the default, stays in effect across reboots of your system.
Active dead gateway detection will be off by default and it is recommended to be used only on machines that provide critical services and have high
312 AIX 5L Differences Guide Version 5.1 Edition
availability requirements. Since active DGD imposes some extra network traffic, network sizing and performance issues have to receive careful consideration. This applies especially to environments with a large number of machines connected to a single network.
Active DGD operates on a per-route basis, and it is turned on by the new parameter argument -active_dgd of the route command. The following example shows how the route command is used to add a new default route through the 9.3.240.58 gateway with a user-configurable cost of 2, and which is under the surveillance of active DGD:
The netstat -C command list the routes defined to the system, including their current and user-configurable cost. The new flag A, as listed for the default route through the 9.3.240.58 gateway, indicates that the active DGD for this particular route is turned on.
# netstat -CRouting tablesDestination Gateway Flags Refs Use If Cost Config_Cost
Route Tree for Protocol Family 2 (Internet):default 9.3.240.59 UG 3 104671 tr1 2 2 =>default 9.3.240.58 UGA 0 0 tr1 2 29.3.240/24 server2 U 32 67772 tr1 0 0127/8 loopback U 6 1562 lo0 0 0
Route Tree for Protocol Family 24 (Internet v6):::1 ::1 UH 0 0 lo0 0 0
The kernel will keep a list of all the gateways that are subject to active DGD. Each time dgd_ping_time seconds passes, all the gateways on the list will be pinged. A pseudo-random number is used to slightly randomize the ping times. If several hosts on the same network use active DGD, the randomized ping times ensure that not all of the hosts ping at exactly the same time. If any gateways fail to respond, they will be pinged several times repeatedly with a 1 second pause between pings. The total number of times they are pinged will be determined by the dgd_packets_lost network option. This network option was already introduced in Section 5.2.2.2, “Passive Dead Gateway Detection” on page 307 above, but note that this option has a slightly different meaning for passive DGD compared to active DGD.
The network option dgd_packets_lost in passive DGD refers to the number of TCP packets lost (if any) in the course of data transmission, whereas for active DGD, the option is specifically related to the packets used in an ICMP echo request/reply exchange (ping) to sense the state of the gateways that are under the surveillance of active DGD.
Chapter 5. Networking enhancements 313
If the gateway does not respond to any of these pings, it will be considered to be down, and the costs of all routes using that gateway will be increased to the maximum value, which is defined to be MAX_RT_COST. MAX_RT_COST in turn is equal to INT_MAX=2147483647, the highest possible value for an integer. These definitions can be examined in the /usr/include/net/route.h and the /usr/include/sys/limits.h header files, which are optionally installed on your system as part of the bos.adt.include fileset.
The gateway will remain on the list of gateways to be pinged, and if it responds at any point in the future, the costs on all routes using that gateway will be restored to their user-configured values.
Passive DGD does not decrease the cost on any route for which active detection is being done, as active detection has its own mechanism for recovery when a gateway comes back up. However, passive DGD is allowed to increase the cost on a route for which active detection is in use, as it is quite likely that passive detection will discover the outage first when TCP traffic is being sent.
5.2.2.4 DGD network options and command changesFour new network options are defined for Dead Gateway Detection and all of them are runtime attributes that can be changed at any time. Table 35 provides details of the attributes of these options:
Table 35. Network options for Dead Gateway Detection
If the customized DGD network attributes are intended to be permanent, the system administrator must include the appropriate no command in /etc/rc.net.
Network Option Default Description
dgd_packets_lost 3 Specifies how many consecutive packets must be lost before Dead Gateway Detection decides that a gateway is down.
dgd_ping_time 5 Specifies how many seconds should pass between pings of a gateway by active Dead Gateway Detection.
dgd_retry_time 5 Specifies how many minutes a route's cost should remain raised when it has been raised by Passive Dead Gateway Detection. After this number of minutes pass, the route's cost is restored to its user-configured value.
passive_dgd 0 Specifies whether Passive Dead Gateway Detection is enabled. A value of 0 turns it off, and a value of 1 enables it for all gateways in use.
314 AIX 5L Differences Guide Version 5.1 Edition
Otherwise, the customized network options will be reset to their default during a system boot. For example, if you want to turn on passive DGD permanently, you have to include the following line in /etc/rc.net:
# The following no command enables passive Dead Gateway Detection# after each system bootif [ -f /usr/sbin/no ] ; then
/usr/sbin/no -o passive_dgd=1fi
5.2.2.5 DGD sample configurationFigure 100 on page 316 depicts the basic system environment that will be used throughout this section to give an example for active Dead Gateway Detection. Server1 attached to the token ring network 9.3.240.0 (netmask 255.255.255.0) has two default routes to the Client1 computer in the Ethernet segment 10.47.0.0 (netmask 255.255.0.0). One route goes through the Gateway1, which has a token ring interface tr0 with the IP address 9.3.240.58 and an Ethernet interface en0 with the IP address 10.47.1.1. The second route uses Gateway2, which is configured to have a token ring interface tr0 with the IP address 9.3.240.59 and an Ethernet interface en0 with the IP address 10.47.1.2. The no -o ipforwarding=1 command was used on both gateway systems to enable the gateway function. The Ethernet interface of Client1 has the IP address of 10.47.1.3. Server1 and Client1 run AIX 5L and on both systems, the no -o tcp_pmtu_discover=0 and the no -o
udp_pmtu_discover=0 commands were used to disable dynamic PMTU discovery interference with multipath routing. Also, on both computers, the passive_dgd network option was set to 1 by the no -o passive_dgd=1 command to enable passive DGD. It is not required to have passive DGD enabled in order to use the active DGD function, but for TCP-based network traffic, passive DGD may initiate the failover to the backup gateway earlier than active DGD normally would. If the network traffic is not TCP-based, then the active pinging of the gateways by active DGD will get the information about the state of the gateway faster than passive DGD potentially could get it through the expiration of the ARP cache entry.
Chapter 5. Networking enhancements 315
Figure 100. DGD sample configuration
For Server1 and Client1, the default routes were configured through the SMIT menu Add Static Route, which you can access directly by the smit mkroute
command. The default routes were defined to have the same user-configurable cost, but to use different gateways. The underlying SMIT script, which is associated with the Add Static Route SMIT task, uses the chdev command for the inet0 device to permanently define routes. The route command affects only the current kernel routing table and all additions and changes applied to the routing table will be lost after a system boot.
The netstat -Cn command output, shown in the following lines, reflects the routing table entries that were made. The reference count for both gateway routes is 2, because after the setup of the routing environment, four telnet sessions to Client1 were initiated from Server1. Multipath routing ensured (through cyclic multiplexing) that the sessions are divided evenly among the two default routes. The flag A in the Flags column indicate that active DGD is set for both default routes:
# netstat -CnRouting tables
Server1:tr0: 9.3.240.57
Gateway1en0: 10.47.1.1tr0: 9.3.240.58
Gateway2en0: 10.47.1.2tr0: 9.3.240.59
Client1en0: 10.47.1.3
Token RingNetwork9.3.240.0
EthernetNetwork10.47.0.0
316 AIX 5L Differences Guide Version 5.1 Edition
Destination Gateway Flags Refs Use If Cost Config_Cost
Route Tree for Protocol Family 2 (Internet):default 9.3.240.58 UGA 2 154 tr1 2 2 =>default 9.3.240.59 UGA 2 177 tr1 2 29.3.240/24 9.3.240.57 U 4 160 tr1 0 0127/8 127.0.0.1 U 4 190 lo0 0 0
Route Tree for Protocol Family 24 (Internet v6):::1 ::1 UH 0 0 lo0 0 0
To test the active DGD feature, the ifconfig tr0 down command was used to disable the gateway function of Gateway1. After the takeover has been completed, netstat -Cn returns the following output:
# netstat -CnRouting tablesDestination Gateway Flags Refs Use If Cost Config_Cost
Route Tree for Protocol Family 2 (Internet):default 9.3.240.59 UGA 4 604 tr1 2 2 =>default 9.3.240.58 UGA 0 245 tr1 MAX 29.3.240/24 9.3.240.57 U 5 479 tr1 0 0127/8 127.0.0.1 U 0 190 lo0 0 0
Route Tree for Protocol Family 24 (Internet v6):::1 ::1 UH 0 0 lo0 0 0
The reference count for the route through Gateway1 has dropped from 2 to 0 and both associated connections are now handled by the backup route through Gateway2. In order to mark the dysfunctional gateway as unusable, the current cost of that route was set to the maximum possible value, as indicated by the keyword MAX.
5.2.3 User interface for multipath routing and DGDSystem management tasks that are related to the new multipath routing and DGD features are supported on the command line interface level by new parameters and flags to the route and netstat commands.
Two parameters were added to the route command in order to support the multipath routing feature. The -hopcount argument of the route parameters requires a positive integer as the variable value. The variable value refers to the user-configurable cost for a given route and supposedly relates to the maximum number of gateways in the route. However, the ultimate objective in introducing the user-configurable costs for a route is to implement a priority hierarchy among the defined routes. The new -if argument must be supplemented by a variable that takes a defined network interface as the variable value. The -if argument specifies the interface to associate with a route, so that packets will be sent using this interface when the given route is chosen.
Chapter 5. Networking enhancements 317
In addition to the two new parameters which support multipath routing, one parameter was specifically added to the route command to implement active DGD. The name of this parameter is active_dgd, and whenever this parameter is given during the definition of a route, active DGD will be enabled for the particular route.
Note that the route command only changes the kernel routing table but does not permanently change the attributes of the inet0 device.
To preserve route definitions across system boot processes, you have to change the attributes of the inet0 device either by using the chdev command or with the aid of the Add Static Route SMIT menu.
Table 36 provides an overview of the new parameters added to the route command that support the new routing features in AIX 5L:
Table 36. route command parameters for multipath routing and DGD
The new -C flag (as shown in Table 37 on page 319) was added to the netstat command to provide additional routing table information. The netstat-C command displays the routing tables, including the user-configured and current costs of each route.
The current cost is either dynamically determined during the route definition process and reflects the number of gateways in the route or it is equal to the user-configured cost. The user-configurable costs can be set just for the routes in the current kernel routing table using the route command with the -hopcount parameter, or they are permanently defined by the appropriate chdev command as attributes of the inet0 device. The current cost may be
Parameter argument
Argument variable
Description
-active_dgd NA Enables active DGD on given route.
-hopcount n Specifies relative cost of a given route, if the n variable is a positive integer.
-if ifname Specifies the interface ifname (en0, tr0, ...) to associate with this route, so that packets will be sent using this interface when this route is chosen.
318 AIX 5L Differences Guide Version 5.1 Edition
different than the user-configured cost if Dead Gateway Detection has changed the cost of the route.
Table 37. New netstat command flag
More details about the command line interfaces for multipath routing and DGD are given in Section 5.2.2.2, “Passive Dead Gateway Detection” on page 307 and Section 5.2.2.3, “Active Dead Gateway Detection” on page 312 and in the standard AIX documentation library.
In addition to the command line interface for configuration and administration of the multipath routing and DGD feature, AIX 5L provides graphical user interface support for the relevant systems management tasks through SMIT and the Web-based System Manager tool.
The menus of the System Management Interface Tool (SMIT), which assists the addition of a static route for IP Version 4 (IPV4) and for IP Version 6 (IPV6), were changed to accommodate the new user-configurable metric (cost) option, to account for the added flexibility needed to associate a particular interface with a specific route, and to support Dead Gateway Detection.
In the SMIT menus, Add a Static Route and Add an IPV6 Static Route, three new fields were added to take input for the underlying SMIT script, that in turn uses the chdev command to set the route attribute for the inet0 Internet network extension. Refer to Table 38 for further details about the field definition:
Table 38. Static Route and Add an IPV6 Static Route SMIT menu new fields
Command Description
netstat -C Shows the routing tables, including the user-configured and current costs of each route. The user-configured cost is set using the -hopcount flag of the route command. The current cost may be different than the user-configured cost if Dead Gateway Detection has changed the cost of the route.
Field Description
Network Interface(interface to associate route with)
Specifies the interface (en0, tr0 ...) to associate with this route so that packets will be sent using this interface when this route is chosen.
COST User-configurable distance metric for route.
Enable Active Gateway Detection Enables Active DGD on the route.
Chapter 5. Networking enhancements 319
In order to add an alternate default route to your system, you will have to use the keyword default as the destination address in the SMIT input panel.
The SMIT fastpaths mkroute and mkroute6 bring you directly to the SMIT menus for IPV4 and IPV6 (that are related to the systems management task) to add a static route. Figure 101 depicts the SMIT menu Add Static Route, which supports the IPV4 specific task.
Figure 101. Add Static Route SMIT menu
The Web-based System Manager environment for multipath routing and DGD is accessible through the following sequence of menu selections on the Web-based System Manager console:
3. Complete the following in the Add/Change a static route menu: Destination Type, Gateway address, Network interface name (drop-down menu), Subnet mask, Metric (Cost), and the Enable active dead gateway detection check box.
4. Click Add/Change Route.
320 AIX 5L Differences Guide Version 5.1 Edition
Figure 102 shows the Web-based System Manager menu for static route management related tasks.
Figure 102. Web-based System Manager menu for static route management
5.3 TCP enhancements (5.1.0)
TCP splicing has been made available in AIX 5L Version 5.1. TCP splicing is an enhancement to make split-connection proxies more effective.
5.3.1 Split-connection proxy systemsMany designs for Internet services use split-connection proxies, in which a proxy machine is interposed between the server and the client machines in order to mediate the communication between them. Split-connection proxies have been used for everything from HTTP caches to security firewalls to encryption servers. Split-connection proxy designs are attractive because they are backwards compatible with existing servers, allow administration of the service at a single point (the proxy), and typically are easy to integrate with existing applications.
Chapter 5. Networking enhancements 321
Current application layer proxies suffer major performance penalties, as they spend most of their time moving data back and forth between connections, context switching, and crossing protection boundaries for each chunk of data they handle. For more information, please visit:
5.3.2 TCP splicingTCP splicing is a feature to push the data relaying function of a proxy application into the kernel. This improves the performance by avoiding the context switches and data copying between kernel space and user space. This feature benefits any split-connection proxy system. A logical diagram is shown in Figure 103.
Figure 103. Basic architecture of split connection application layer proxies
5.3.2.1 splice subroutineTCP splicing has been implemented by the splice() system call. The splice subroutine lets TCP manage two sockets that are in a connected state, thus relieving the caller from moving data from one socket to another. After the splice subroutine returns successfully, the caller needs to close the two sockets.
App
Client Proxy Server
client library kernel sockets
TCP/IPstack
TCP splice
data movementthroughapplicationspace
network interface
322 AIX 5L Differences Guide Version 5.1 Edition
Syntax of splice() subroutine#include <sys/types.h>#include <sys/socket.h>
int splice(socket1, socket2, flags)int socket1, socket2;int flags;
Parameterssocket1, socket2 Specifies a socket that had gone through a successful
connect() or accept(). The two sockets should be of type SOCK_STREAM and protocol IPPROTO_TCP. Specifying a protocol of zero also works.
flags Set to zero. Currently ignored. In the future, different values could get supported.
Return ValuesUpon successful completion, splice() subroutine returns zero. On error, it returns -1. An errno will indicate the specific error.
Error Codes
EBADF socket1 or socket2 is not valid.
ENOTSOCK socket1 or socket2 refers to a file, not a socket.
EOPNOTSUPP socket1 or socket2 is not of type SOCK_STREAM.
EINVAL The parameters are invalid.
EEXIST socket1 or socket2 is already spliced.
ENOTCONN socket1 or socket2 is not in connected state.
EAFNOSUPPORT The sockets (socket1 or socket2) address family notsupported for this subroutine.
At the time this redbook is written, no application is using the new socket system call splice(); therefore, basic performance numbers are not available. But it is expected that for proxy type applications, the performance gain should be significant when a large amount of data is transferred. For short sessions, there may not be any gain.
Note
Chapter 5. Networking enhancements 323
5.3.3 UDP fragmentationWith UDP data transfers, fragmentation occurs. The datagram in AIX 5L Version 5.1 is reassembled before the driver layer. Instead of individual packets being sent to the driver, a chain of packets is sent, which overcomes multiple trips through the IP layer for each fragment, thus improving performance.
5.3.4 TCB headlockIn previous versions of AIX, the global lock TCBHEAD_LOCK is part of a critical code path that impedes performance in loaded systems. The TCBHEAD_LOCK has been removed and replaced with an array of hash lists each with its own lock.
5.3.5 Explicit Congestion NotificationThe Explicit Congestion Notification (ECN) feature for TCP can be enabled by the new network option tcp_ecn through the no command.
Normally, TCP uses packet drops as an indication of congestion. With Explicit Congestion Notification, routers do not have to drop packets to notify congestion. An ECN-capable TCP receiver would notify the TCP sender of the congestion by setting a bit in the TCP header. On receipt of this notification from the TCP receiver, the TCP sender's congestion control response should be the same as it would respond to a dropped packet. Adding ECN capability to the TCP layer helps applications that are sensitive to delays or packet loss.
For TCP, ECN has three new functions:
• Negotiation between the end points during connection setup to determine if they are both ECN-capable.
• An ECN-Echo (ECE) flag in the TCP header, so that the data receiver can inform the data sender when a Congestion Experienced (CE) packet has been received.
• A Congestion Window Reduced (CWR) flag in the TCP header, so that the data sender can inform the data receiver that the congestion window has been reduced.
ECN capability is only available on the TCP layer.
Note
324 AIX 5L Differences Guide Version 5.1 Edition
This feature is created under the assumption that the source TCP uses the standard congestion control algorithms of Slow-start, Fast Retransmit, and Fast Recovery (RFC 2001).
Two new flags are created in the Reserved field of the TCP header. The TCP mechanism for negotiating ECN-capability uses the ECN-Echo (ECE) flag in the TCP header. Bit 9 in the Reserved field of the TCP header is designated as the ECN-Echo flag. The location of the 6-bit Reserved field in the TCP header is shown in Figure 104.
Figure 104. The previous definition of bytes 13 and 14 of the TCP header
To enable the TCP receiver to determine when to stop setting the ECN-Echo flag, a second new flag in the TCP header, the CWR flag, is introduced. The CWR flag is assigned to Bit 8 in the Reserved field of the TCP header.
This specification of these fields leaves the Reserved field as a 4-bit field using bits 4-7, as shown in Figure 105 on page 325.
Figure 105. The new definition of bytes 13 and 14 of the TCP header
ECN uses the ECN Capable Transport (ECT) and CE flags in the IP header for signaling between routers and connection end points, and uses the ECN-Echo and CWR flags in the TCP header for TCP-end point to TCP-end point signaling.
For a TCP connection, a typical sequence of events in an ECN-based reaction to congestion is as follows:
1 2
URG
ACK
PSH
RST
SYN
FIN
Header Length Reserved
0 1 2 3 4 5 6 7 8 9 10 11 12 13 14 15
1 2
URG
ACK
PSH
RST
SYN
FIN
Header Length Reserved
0 1 2 3 4 5 6 7 8 9 10 11 12 13 14 15
CWR
ECE
Chapter 5. Networking enhancements 325
• The ECT bit is set in packets transmitted by the sender to indicate that ECN is supported by the transport entities for these packets.
• An ECN-capable router detects impending congestion and detects that the ECT bit is set in the packet it is about to drop. Instead of dropping the packet, the router chooses to set the CE bit in the IP header and forwards the packet.
• The receiver receives the packet with the CE bit set, and sets the ECN-Echo flag in its next TCP ACK sent to the sender.
• The sender receives the TCP ACK with ECN-Echo set, and reacts to the congestion as if a packet had been dropped.
• The sender sets the CWR flag in the TCP header of the next packet sent to the receiver to acknowledge its receipt of and reaction to the ECN-Echo flag.
For more detailed information about Explicit congestion Notification, refer to www.aciri.org/floyd and www.ietf.org
5.3.6 IPv6 API upgradeStarting with AIX 5L Version 5.1, the IPv6 protocol has been enhanced with three new library routines, getipnodebyname, getipnodebyaddr and freehostent, as part of RFC 2553. The fileset affected by these new routines is bos.rte.libc.
The getipnodebyname subroutine allows the caller more control over the types of addresses required and is thread safe and serves for nodename-to-address translation. It also does not need a global option like RES_USE_INET6. The name argument can be either a node name or a numeric (either a dotted-decimal IPv4 or colon-separated IPv6) address.
The parameters of the getipnodebyname subroutine are listed in Table 39. In order to obtain a more detailed list of the flags used, refer to RFC 2553.
Table 39. Parameters of getipnodebyname
Parameter Description
name Specifies either a node name or a numeric (either a dotted-decimal IPv4 or colon-separated IPv6) address.
af Specifies the address family, which is either AF_INET or AF_INET6.
flags Controls the types of addresses searched for and the types of addresses returned.
error_num Returns argument to the caller with the appropriate error code.
326 AIX 5L Differences Guide Version 5.1 Edition
The getipnodebyaddr subroutine serves for address-to-nodename translation and is thread-safe. The getipnodebyaddr subroutine is similar in its name query to the gethostbyaddr subroutine except in one case. If af equals AF_INET6 and the IPv6 address is an IPv4-mapped IPv6 address or an IPv4-compatible address, then the first 12 bytes are skipped over and the last 4 bytes are used as an IPv4 address with af equal to AF_INET to lookup the name.
The parameters of the getipbynodeaddr subroutine are listed in Table 40.
Table 40. Parameters of getipnodebyaddr subroutine
The freehostent subroutine serves to free memory allocated by getipnodebyname and getipnodebyaddr. It frees any dynamic storage pointed to by elements of ptr. This includes the hostent structure and the data areas pointed to by the h_name, h_addr_list, and h_aliases members of the hostent structure.
5.4 TCP/IP RAS enhancements (5.1.0)
The TCP/IP Reliability, Availability, and Serviceability (RAS) is extended with enhancements described in this section.
5.4.1 Snap enhancementThe snap command is modified to provide more configuration files when running the -t flag. For a detailed listing of the TCPIP configuration files, see Section 4.18.3, “The snap command enhancements” on page 180.
5.4.2 Network option enhancementsThe no command, used to set network options, has been enhanced in AIX 5L Version 5.1.
Parameter Description
src Specifies a node address. It is a pointer to either a 4-byte (IPv4) or 16-byte (IPv6) binary format address.
af Specifies the address family, which is either AF_INET or AF_INET6.
len Specifies the length of the node binary format address.
error_num Returns argument to the caller with the appropriate error code.
Chapter 5. Networking enhancements 327
5.4.2.1 Use of syslog to log messagesThe no command logs a message to the syslog using the LOG_KERN facility when any networking kernel option is set. This message includes the option name, value, time, and UID value.
For example, the no option rfc2414 is set to 1 and then back to 0. Make sure the syslog daemon is running and the destination of the output of the syslog daemon is defined in the /etc/syslog.conf file. The output of the log file would appear similar to the following:
Mar 12 16:14:17 server3 syslogd: restartMar 12 16:14:21 server3 no[22084]: Network option rfc2414 was set to thevalue 1Mar 12 16:14:26 server3 no[22086]: Network option rfc2414 was set to thevalue 0
5.4.2.2 SodebugA new network option named sodebug is added to the options of the no command. This option sets the SO_DEBUG flag on any socket that is created. The TCP protocol records outgoing and incoming packet events when the socket used has had the SO_DEBUG option turned on for the socket.
5.4.2.3 New Reno algorithm for Fast Recovery.In the typical implementation of the TCP Fast Recovery algorithm (first implemented in the 1990 BSD Reno release, and referred to as the Reno algorithm), the TCP data sender only retransmits a packet after a retransmit timeout has occurred, or after three duplicate acknowledgments have arrived triggering the Fast Retransmit algorithm. A single retransmit timeout might result in the retransmission of several data packets, but each invocation of the Reno Fast Retransmit algorithm leads to the retransmission of only a single data packet.
The network option tcp_newreno enables the modification the TCP’s Fast Recovery algorithm, as described in RFC 2582. This fixes the limitation of TCP's Fast Retransmit algorithm to quickly recover from dropped packets when multiple packets in a panel are dropped. In AIX 5L Version 5.1, the default of tcp_newreno is on (1).
5.4.2.4 RFC2414: Increasing TCP's initial windowThe no option rfc2414 enables the increasing of TCP's initial window, as described in RFC 2414. The default is off (0). Set this to 1 to turn it on. When it is on, the initial window will depend on the setting of the tunable option tcp_init_window.
328 AIX 5L Differences Guide Version 5.1 Edition
5.4.2.5 Initial TCP windowThe network option tcp_init_window is only used when rfc2414 is turned on. If rfc2414 is on and this value is zero, then the initial window computation is done according to RFC2414. If this value is non-zero, the initial (congestion) window is initialized a number of maximum sized segments equal to tcp_init_window.
5.4.2.6 Explicit Congestion notificationThe network option tcp_ecn enables TCP level support for Explicit Congestion Notification, as described in RFC 2481. The default is off (0). Turning it on (1) will make all connections negotiate ECN capability with the peer. For this feature to work, you need support from the peer TCP and also IP level ECN support from the routers in the path.
For more detailed information, see Section 5.3.5, “Explicit Congestion Notification” on page 324.
5.4.2.7 Limited transmit for TCP Loss RecoveryLimited transmit is a new Transmission Control Protocol (TCP) mechanism that is used to more effectively recover lost segments when a connection's congestion window is small, or when a large number of segments are lost in a single transmission window. The Limited Transmit algorithm calls for sending a new data segment in response to each of the first two duplicate acknowledgments that arrive at the sender. Transmitting these segments increases the probability that TCP can recover from a single lost segment using the fast retransmit algorithm, rather than using a costly retransmission timeout. Limited transmit can be used both in conjunction with, and in the absence of, the TCP selective acknowledgment (SACK) mechanism.
The network option limited_transmit enables the enhanced TCP's loss recovery. The default is on (1).
5.4.3 The iptrace command enhancementThe iptrace data logging facility is modified to keep track of the number of bytes of data written. If a log file limit is specified and the number of bytes written reaches this limit, the current log file will be renamed with the .old extension and data will be written to the new file without the extension. When iptrace is started with the log limit set, it will rename any existing log file to one with the .old extension. When the log limit option is not specified using the -L option, then iptrace behavior is the same as the past version.
Using iptrace with the -P flag, the command expects a comma separated list of protocols.
Chapter 5. Networking enhancements 329
Using the iptrace command with the -p flag, the command expects a comma separated list of ports.
5.4.4 Trace enhancementThe following enhancements may help network problem determination. For more information on trace, see Section 4.17.1, “The trace command enhancements” on page 172.
5.4.4.1 The -C flag enhancementRunning the trace command with the -C flag traces one set of buffers per CPU in the CPUList. The CPUs can be separated by commas, or enclosed in double quotation marks and separated by commas or blanks. To trace all CPUs, specify all.
Since this flag uses one set of buffers per CPU, and produces one file per CPU, it can consume large amounts of memory and file space, and should be used with care. The files produced are named trcfile, trcfile-0, trcfile-1, and so on, where 0, 1, and so on are the CPU numbers. If -T or -L are specified, the sizes apply to each set of buffers and each file. On a uniprocessor system, you may specify -C all, but -C with a list of CPU numbers is ignored. If -C is used to specify more than one CPU, such as -Call or -C "0 1", the associated buffers are not put into the system dump.
Flag Description
-P Protocol_list Records packets that use the protocol specified by the Protocol_list variable, which is a comma separated list of protocols. The Protocols can be a decimal number or name from the /etc/protocols file.
-p Port_list Records packets that use the port number specified by the Port_list variable, which is a comma separated list of ports. The Port variable can be a decimal number or name from the /etc/services file.
-L Log_size This option causes iptrace to log data in such that the LogFile is copied to LogFile.old at the start and also every time it becomes approximately Log_size bytes long.
330 AIX 5L Differences Guide Version 5.1 Edition
5.4.4.2 Additional trace hooksA trace hook identifier is a three-digit hexadecimal number that identifies an event being traced. You specify the trace hook identifier in the first twelve bits of the hook word.
Trace hook identifiers are defined in the /usr/include/sys/trchkid.h file. The values 0x010 through 0x0FF are available for use by user applications. All other values are reserved for system use. The currently defined trace hook identifiers can be listed using the trcrpt -j command.
The hook type identifies the composition of the event data and is user-specified.
Beginning with AIX 5L Version 5.1, the trace hooks HKWD_TCPIP and HKWD_SOCKET are replaced by the following hooks:
• HKWD_SOCKET(252) - only socket calls • HKWD_TCP (25B) - only TCP function trace • HKWD_UDP (25C) - only UDP function trace • HKWD_IP (25D) - only IP function trace • HKWD_IP6 (25E) - only IP6 function trace • HKWD_PCB (25F) - traces all PCB related functions • HKWD_SLOCKS (253) - traces all locks in socket and TCP/IP functions
5.5 Virtual IP address support
In previous AIX releases, an application had to bind to a real network interface in order to get access to a network or network services. If the network became inaccessible or the network interface failed, the application’s TCP/IP session was lost, and the application was no longer available.
To overcome application availability problems as described, AIX 5L offers support for virtual IP addresses (VIPA) for IPv4 and IPv6. The VIPA related code is part of the bos.net.tcp.client fileset, which belongs to the BOS.autoi and MIN_BOS.autoi system bundles, and therefore will always be installed on your AIX system.
With VIPA, the application is bound to a virtual IP address, not a real network interface that can fail. When a network or network interface failure is detected (using routing protocols or other schemes), a different network interface can be used by modifying the routing table. If the re-routing occurs fast enough, then TCP/IP sessions will not be lost.
Chapter 5. Networking enhancements 331
A traditional IP address is associated with a specific network adapter. Virtual IP address are supported by a network interface that is not associated with any particular network adapter. The operating system will interact with a virtual interface through the interface specific device special file. The device special file will be located in the /dev directory and the device name consists of the two letter abbreviation for virtual interface (vi) and an appended interface number. The VIPA system management tasks are supported by the appropriate changes and additions to the interface related high level operating system commands mkdev, chdev, rmdev, lsdev, lsattr, ifconfig, and netstat. Also, all VIPA management tasks are covered by SMIT and the Web-based System Manager tool.
The following example shows how to configure a virtual interface (vi0) for the Internet address 9.3.160.120 with the netmask of 255.255.255.0, using the mkdev command.
The virtual interface belongs to the device class if, the subclass VI, and is of the device type vi.
# mkdev -c if -s VI -t vi -a netaddr='9.3.160.120' -a netmask='255.255.255.0' -w 'vi0' -astate='up'
You can also use the SMIT fastpath mkinetvi (smit mkinetvi command) to get access to the relevant SMIT menu, as shown in Figure 106.
Figure 106. Add a Virtual IP Address Interface SMIT menu
332 AIX 5L Differences Guide Version 5.1 Edition
The lsdev command will list the virtual network interface and the traditional network interfaces as members of the interface class if:
# lsdev -HCc if -F 'name class subclass type status description'name class subclass type status description
en0 if EN en Available Standard Ethernet Network Interfaceen1 if EN en Defined Standard Ethernet Network Interfaceet0 if EN ie3 Defined IEEE 802.3 Ethernet Network Interfaceet1 if EN ie3 Defined IEEE 802.3 Ethernet Network Interfacelo0 if LO lo Available Loopback Network Interfacetr0 if TR tr Available Token Ring Network Interfacevi0 if VI vi Available Virtual IP Address Network Interface
Also, the netstat command reports the existence of the newly defined interface:
System administrators can use the lsattr command to examine the device attributes for virtual network interfaces, and the ifconfig command is enabled to handle the new network interface type:
# lsattr -El vi0netaddr 9.3.160.120 N/A Truestate up Standard Ethernet Network Interface Truenetmask 255.255.255.0 Maximum IP Packet Size for This Device Truenetaddr6 Maximum IP Packet Size for REMOTE Networks Truealias6 Internet Address Trueprefixlen Current Interface Status Truealias4 TRAILER Link-Level Encapsulation True
As indicated by the example, virtual network interfaces are similar to traditional network interfaces in most ways. A virtual interface is apparently configured and customized using the same system management commands as for real network interfaces. A system administrator has the option to define multiple virtual interfaces and can choose to associate aliases with them.
One of the main advantages of choosing a virtual device, as opposed to defining aliases to real network interfaces, is that a virtual device can be brought up or down separately without having any effect on the real interfaces of a system. Furthermore, it is not possible to change the address of an alias
Chapter 5. Networking enhancements 333
(aliases can only be added and deleted), but the address of a virtual interface can be changed.
For applications and processes, the difference between a real and a virtual IP address is completely transparent, and therefore they can bind to a virtual interface just like to any other network interface.
However, a virtual address takes precedence over other interface addresses in source address selection if an application locally binds to a wildcard address. (Telnet would be an example for an application having this binding characteristic.) This enables applications to make use of VIPA without any changes. In situations where there are multiple virtual addresses, the address of the first virtual interface on the list of interfaces will be chosen.
Since a virtual interface does not have a device associated with it, no route pointing to this interface will be added at configuration time. It is not possible to add routes on your local system that point to a virtual interface.
The gated process, which provides the gateway routing function in AIX, does not add a route for any virtual interface; also, gated will not send advertisements over the virtual interface, like it does for the other interfaces. However, gated does include the virtual interface in its advertisement to its neighboring routers, which enable these routers to add a host route for the virtual address.
Because the virtual interface does not relate to any real network interface, packets will never go in or out of the interface, and, consequently, the packet count for the virtual interface will always be zero. For the same reason, the virtual network interface will not respond to ARP requests.
Considering all the information given in the paragraphs above, you can complete the description of the data and control flow for network traffic through a virtual interface.
When an application locally bound to a wildcard address connects to a remote host, a VIPA is selected as its source address. The interface the outgoing packet actually uses is determined by the route table based solely on the destination address. The remote host receives the packet and then tries to send a response to the host using the virtual address. The remote host and all routers along the way must have a route that will send the packet with the virtual address to one of the network interfaces of the host with the virtual address.
Either gated running on the host with VIPA will send information, which enables the adjacent routers and the remote host to add a host route for the
334 AIX 5L Differences Guide Version 5.1 Edition
virtual address, or the intermediate routes have to be configured manually along the route.
5.6 Network Buffer Cache dynamic data support
The Network Buffer Cache (NBC) was introduced in AIX Version 4.3.2. to improve the performance of network file servers, such as the Web server, FTP server, and SMB server. In AIX Version 4.3.3, the NBC design was improved to allow the use of 256 MB private memory segments for caching additional data. This design was chosen to eliminate the need to use pinned kernel heap and the network memory pools that had size restrictions. The use of private segments allows a system limit, set by the no option nbc_pseg, of 2**20 segments. A setting should not exceed 2**19, because file systems, processes, and other applications also require segments. Therefore, the total amount of data can be 256*2**19 or the limit set by the nbc_pseg_limit option. Only as much physical memory is consumed as data exists in a segment.
With the same AIX release, a second key for the cache access mechanism was introduced to support the HTTP GET kernel extension in conjunction with the Fast Response Cache Architecture (FRCA).
AIX 5L further enhances the Network Buffer Cache kernel extension to facilitate a dynamic data buffer cache and to support an expiration time per cache object. Also, internal memory usage code optimizations were applied to expand the caching capacity of NBC.
Within the scope of the kernel address space, NBC uses network memory for caching data which is accessed frequently through networks. For example, by enabling and using the NBC, the IBM HTTP Server can cache frequently referenced Web pages to eliminate the repetitive costs of moving data among the file buffers, user buffers, and the networking buffers. NBC, as a kernel component, provides kernel services for its users to take advantage of the network buffer cache. In the NBC context, the term users refer to other kernel components or kernel extensions. Application level users have to go through APIs provided by those kernel components or kernel extensions to interact with the NBC.
There are two ways for an application to exploit the NBC feature:
• Using the send_file() system call.
• Using the Fast Response Cache Architecture (FRCA) API.
Chapter 5. Networking enhancements 335
The new AIX 5L NBC enhancements are only accessible for applications through the FRCA API.
5.6.1 Dynamic data buffer cacheIn previous AIX releases, there is only one type of cache object that is cached in the NBC. Each cache object held copies of original data already existing in the file subsystem and, therefore, the related cache object type was named NBC_NAMED_FILE. Since the NBC was designed to improve the performance of typical network file servers, this single cache type was sufficient to improve the performance of Web servers in static Web page access scenarios. However, more and more Web pages consist of dynamically generated data and contents. These Web pages are not necessarily saved in files, and they are much more volatile than static file pages. For these reasons, NBC’s capability was expanded to accommodate dynamically generated data (for example, dynamic pages or page fragments) generated by user level applications.
Beginning with AIX 5L, NBC offers support for caching data buffers created and given by kernel users. The most prominent kernel user that depends on NBC is the FRCA kernel extension. FRCA utilizes the NBC and provides a platform independent API for Web servers to add and delete dynamic data buffer caches on AIX systems. FRCA also accesses the NBC cache whenever an HTTP GET request can be satisfied by the cache in the system interrupt context. The new NBC features provides adequate kernel services for FRCA to improve the overall IBM HTTP Web Server performance.
To the NBC, the dynamic data buffer cache is a group of buffers that were allocated and given by other kernel extensions or kernel components. These buffers are in the mbuf chain format for keeping and accessing from the NBC. The buffers are pinned in memory, and the cache object creators have the responsibility to keep these memory pinned for the lifetime of the cache. These buffers can be allocated from regular mbuf pool (m_get(), net_malloc(), etc), from kernel heap (xmalloc()), or from private segments. When the buffers are given to the NBC for caching, it is the responsibility of the kernel extension or kernel component using NBC to build up an mbuf chain and set up the mbuf headers correctly for the corresponding buffers. The private segments do not have to be mapped by users at the time of adding, but they have to be pinned all the time.
The buffer cache is subject to the previously existing NBC flushing control. All caches are on the LRU (least recently used) list in the NBC. When the total cache size reaches the NBC system limits (multiple configured network
336 AIX 5L Differences Guide Version 5.1 Edition
options), any buffer cache may get removed from the NBC just like other caches.
A new cache type, NBC_FRCA_BUF, will be the cache type for the dynamic buffer cache associated with the FRCA. A primary key for type NBC_FRCA_BUF is generated and controlled by FRCA to uniquely identify each piece of cache within the NBC_FRCA_BUF type in the NBC.
Three new statistics were added for keeping track of the cache objects of the new cache type in the NBC:
1. Current total NBC_FRCA_BUF entries: Number of cache entries with NBC_FRCA_BUF type which currently exist in the cache.
2. Maximum total NBC_FRCA_BUF entries: Highest number of cache entries with NBC_FRCA_BUF type that have ever been created in cache.
3. Current total user buffer size: Byte count of the total buffer size currently in the NBC that is not accounted in either the mbuf pool memory or the private segments.
Use the netstat -c command to display the NBC statistics which are related to the new cache type, as in the following example:
# netstat -c
Network Buffer Cache Statistics:-------------------------------Current total cache buffer size: 256Maximum total cache buffer size: 256Current total cache data size: 0Maximum total cache data size: 0Current number of cache: 1Maximum number of cache: 1Number of cache with data: 1Number of searches in cache: 1Number of cache hit: 0Number of cache miss: 1Number of cache newly added: 1Number of cache updated: 0Number of cache removed: 0Number of successful cache accesses: 0Number of unsuccessful cache accesses: 0Number of cache validation: 0Current total cache data size in private segments: 0Maximum total cache data size in private segments: 0Current total number of private segments: 0Maximum total number of private segments: 0Current number of free private segments: 0Current total NBC_NAMED_FILE entries: 0Maximum total NBC_NAMED_FILE entries: 0Current total NBC_FRCA_BUF entries: 1Maximum total NBC_FRCA_BUF entries: 1Current total user buffer size: 131072
Chapter 5. Networking enhancements 337
5.6.2 Cache object-specific expiration timeIn previous AIX releases, the NBC provides cache invalidation based on a time limit specified by the cache access client, not the creator. In other words, once the cache is loaded, it is assumed to be good; the frequency of invalidation checking or updating is up to the client’s tolerance. This is acceptable with a cache object that is expected to be reasonably static. For dynamic data, however, it is necessary to support an expiration time per cache object.
In AIX 5L, the NBC will invalidate the buffer cache according to a time-to-live value specified by the creator. Each buffer cache object has a live-time limit specified when it is first added to the NBC. When the cache is accessed, and if the age of the cache object exceeds the live-time limit, the NBC will remove this particular piece of cache and return NULL to the client. The client can also specify a time to make sure that the cache object is not older than expected. If the cache is older than the client’s time limit, the NBC will return a NULL; the cache object, however, is still considered valid. The resolution for both time limit values is in units of seconds.
5.7 HTTP GET kernel extension enhancements
Starting with AIX Version 4.3.2, the Fast Response Cache Architecture (FRCA) with the HTTP GET kernel extension was introduced to AIX.
AIX 5L improves the FRCA HTTP GET kernel extension to support HTTP 1.1 persistent connections. Other enhancements to the HTTP GET kernel extension include an external 64-bit ready API (to give every user space program access to the existing function of the HTTP GET kernel extension) and additional support for a new cache type based on memory buffers.
The FRCA utilizes the AIX Network Buffer Cache (NBC) to greatly improve the Web server response time for HTTP GET requests. Figure 107 illustrates the FRCA data flow for an incoming request, which refers to a Web page located on a given Web server. The HTTP GET requests are intercepted and the response is sent directly from the AIX NBC on the input interrupt. No data is copied between kernel and user space, and no user context switch is necessary. If the HTTP GET request can be serviced by the engine, the user space Web server is not contacted and never sees the request. GET requests that can not be serviced by the kernel engine are passed to the user space Web server.
The logic of FRCA is shown in Figure 107 on page 339.
338 AIX 5L Differences Guide Version 5.1 Edition
Figure 107. FRCA GET data flow
5.7.1 HTTP 1.1 persistent connections supportWhen AIX Version 4.3.2 was released, the predominant protocol in use was HTTP Version 1.0, with a major part of all requests referring to static content. Since then, a shift toward HTTP Version 1.1 has taken place. One of the major differences between the two versions of HTTP is the newer version's well defined ability to handle multiple requests per connection while the previous version almost always closes a connection after a single request. Keeping a connection established for several requests allows the underlying transport layer protocol (TCP) to make better use of the available bandwidth by adapting to it over time.
The implementation of the HTTP GET kernel extension prior to AIX 5L either transparently redirected the pending request to a user space Web server, or it closed the connection after serving a single request.
With HTTP 1.1, a well defined way of imposing entity boundaries on the exchanged HTTP data has been introduced, which will rapidly result in widespread use of persistent connections. For that reason, AIX 5L adds support for HTTP 1.1 persistent connections to the FRCA feature.
GET request
ObjectCached?
Web Server
NetworkBuffer Cache
Yes
No
User space
Kernel space
FRCA
response from HTTP server
FRCA update
response from FRCA
Chapter 5. Networking enhancements 339
The support for persistent connections was such that the HTTP GET kernel extension parses an incoming packet like before, but with only a little addition to the previously used code path. As the packet may contain multiple requests, it loops over the data and marks down the number of bytes from the input buffer that belong to the current request, the request's protocol version, and the absence of a connection header that includes the connection-token close.
On a per request basis, the kernel extension then acts according to the following rules:
• If the protocol version of the current request is not HTTP 1.1, then in case of a cache hit, it adds the response to the response buffer, sends the buffer and closes the connection, or in case of a cache miss, it sends the buffer and reconnects the connection to the user space Web server.
• If the protocol version of the current request is HTTP 1.1 and the close token has been detected, then in case of a cache hit, it adds the response to the response buffer, sends the buffer and closes the connection, or in case of a cache miss, it sends the buffer and reconnects the connection to the user space Web server.
• If the protocol version of the current request is HTTP 1.1 and the close token has not been detected, then in case of a cache hit, it adds the response to the response buffer, sends the buffer and keeps the connection in kernel space, or in case of a cache miss, it sends the buffer and reconnects the connection to the user space Web server.
5.7.2 External 64-bit FRCA APIBeginning with AIX 5L, an external 64-bit FRCA API is offered to allow more user space applications to exploit the existing function of the HTTP GET kernel extension.
The external API largely follows the structure of the internal API, which consists of a set of functions to create and control an FRCA instance and another set of functions to create and fill a cache for a given FRCA instance. It is implemented as a layer on top of the internal API, which results in no changes to the previously existing HTTP GET kernel extension itself. The API will cover only the major part of the existing function of the HTTP GET kernel extension, but not all of it. Functions specific to the AIX platform, such as control over the amount of time that the HTTP GET kernel extension may spend on interrupt, will not be covered by the external API, and are left to the existing frcactrl program. The frcactrl command controls and configures the FRCA kernel extension and is documented in the AIX documentation library.
340 AIX 5L Differences Guide Version 5.1 Edition
As the internal API continues to exist unchanged, all currently existing code developed against the internal API continues to work without a single change required.
AIX 5L provides a 64-bit version of the external API library to accommodate 64-bit applications. The following services that compose the external API are defined in /usr/include/net/frca.h. They are made available to user space applications through the libfrca.a library:
FrcaCtrlCreate Creates a FRCA control instance.
FrcaCtrlDelete Deletes a FRCA control instance.
FrcaCtrlStart Starts the interception of TCP data connections for a previously configured FRCA instance.
FrcaCtrlStop Stops the interception of TCP data connections for a FRCA instance.
FrcaCtrlLog Modifies the behavior of the logging subsystem.
FrcaCacheCreate Creates a cache instance within the scope of a FRCA instance.
FrcaCacheDelete Deletes a cache instance within the scope of a FRCA instance.
FrcaCacheLoadFile Loads a file into a cache associated with a FRCA instance.
FrcaCacheUnloadFile Removes a cache entry from a cache that is associated with a FRCA instance.
5.7.3 Memory based HTTP entities cachingAIX 5L adds new services to the internal FRCA API to support caching of HTTP entities that are based on memory buffers and have no association with a file. The underlying NBC data cache provides the related NBC cache object type NBC_FRCA_BUF. The NBC_FRCA_BUF type in NBC refers the new dynamic data buffer cache, which is introduced with AIX 5L in order to expand the NBC caching capabilities to allow for Web pages with dynamically generated data and contents. For further details about the new NBC cache object type, refer to Section 5.6, “Network Buffer Cache dynamic data support” on page 335.
The previous implementation of the HTTP GET kernel extension only handled cache objects with content data that is tightly coupled to files in the local file system. This works fine in the case of static HTML pages that are stored in the local file system but it does not handle semi-dynamic content very well.
Chapter 5. Networking enhancements 341
The term “semi-dynamic” refers to content that is static to a certain degree (for example, a dynamically rendered HTML page that changes only once a minute, but has a reasonably higher access rate, such as once a second).
Although the semi-dynamic content could be written to a file, which in turn could be loaded into the HTTP kernel extension using the existing API, this involves some overhead, especially when the code that renders the content is executed on a different machine.
AIX 5L introduces a new service to the internal API to support caching of memory-based HTTP cache objects, which allows FRCA to handle caching of HTTP data that is not represented in the file system. One of the main purposes of the service is to accommodate application level cache managers residing on remote systems.
5.8 Packet capture library
Previous AIX operating system releases and AIX 5L offer the Berkeley Packet Filter (BPF) as a packet capture system. AIX 5L introduces, in addition to that, a Packet Capture Library (libpcap.a), which provides a high-level user interface to the BPF packet capture facility. The AIX 5L Packet Capture Library is implemented as part of the libpcap library, Version 0.4 from LBNL (Lawrence Berkeley National Laboratory).
The Packet Capture Library user-level subroutines interface with the existing BPF kernel extensions to allow users access for reading unprocessed network traffic. By using the new 24 subroutines of this library, users can write their own network-monitoring tools.
To accomplish packet capture, follow the following procedure:
1. Decide which network device will be the packet capture device. Use the pcap_lookupdev subroutine to do this.
2. Obtain a packet capture descriptor by using the pcap_open_live subroutine.
3. Choose a packet filter. The filter expression identifies which packets you are interested in capturing.
4. Compile the packet filter into a filter program using the pcap_compile subroutine. The packet filter expression is specified in an ASCII string.
5. After a BPF filter program is compiled, notify the packet capture device of the filter using the pcap_setfilter subroutine. If the packet capture data is to be saved to a file for processing later, open the previously saved packet
342 AIX 5L Differences Guide Version 5.1 Edition
capture data file, known as the savefile, using the pcap_dump_open subroutine.
6. Use the pcap_dispatch or pcap_loop subroutine to read in the captured packets and call the subroutine to process them. This processing subroutine can be the pcap_dump subroutine, if the packets are to be written to a savefile, or some other subroutine you provide.
7. Call the pcap_close subroutine to clean up the open files and deallocate the resources used by the packet capture descriptor.
The current implementation of the libpcap library applies to IP Version 4 and only the reading of packets is supported. Applications using the Packet Capture Library subroutines must be run as root user. The files generated by libpcap applications can be read by tcpdump and vice-versa. However, the tcpdump command in AIX 5L does not use the libpcap library.
The Packet Capture Library libpcap.a is located in the /usr/lib directory after you have optionally installed the bos.net.tcp.server fileset. The bos.net.tcp.server fileset also provides the BPF kernel extension (/usr/lib/drivers/bpf), which is used by the libpcap subroutines. The library related header file pcap.h can be examined in the /usr/include/ directory, if you choose to install the bos.net.tcp.adt fileset. The libpcap sample code, which is also part of the bos.net.tcp.adt fileset, can be found in /usr/samples/tcpip/libpcap.
Further information about BPF can be found in UNIX Network Programming, Volume 1: Networking APIs: Sockets and XTI, Second Edition by W. Richard Stevens.
5.9 Firewall hooks enhancements
The AIX TCP/IP stack provides a way for other kernel extensions to insert themselves into the stack at specific points using hooks.
AIX 5L introduces two new firewall hooks that expand the functional spectrum of the already existing hooks for IP filtering and offers additional potential to improve the performance of firewalls. The new hooks will be part of the existing netinet kernel extension, which is packaged in bos.net.tcp.client.
The firewall hook routines provide kernel-level hooks for IP packet filtering enabling IP packets to be selectively accepted, rejected, or modified during reception, transmission, and decapsulation. These hooks are initially NULL, but are exported by the netinet kernel extension and will be invoked if assigned non-NULL values.
Chapter 5. Networking enhancements 343
The following routines are included in AIX 5L as hooks for IP packet filtering:
• ip_fltr_in_hook
• ip_fltr_out_hook
• ipsec_decap_hook
• inbound_fw (new in AIX 5L)
• outbound_fw (new in AIX 5L)
The ip_fltr_in_hook routine is used to filter incoming IP packets, the ip_fltr_out_hook routine filters outgoing IP packets, and the ipsec_decap_hook routine filters incoming encapsulated IP packets.
The new AIX 5L inbound_fw and outbound_fw firewall hooks allow kernel extensions to get control of packets at the place where IP receives them. The outbound_fw hook was added exactly at the point where IP is entered when transmitting packets and the inbound_fw hook at the point where IP is called to process receive packets. The two new firewall hooks in AIX 5L are supplemented by additional methods to call the main IP code and to save firewall hook arguments in order to inject the filtered packets into the network at a later time. Also, some changes to existing routines were made alongside with the implementation of the new firewall hooks.
The code of following existing functions had been changed:
ipintr_noqueue2 The ipintr_noqueue2 hook itself and all references to ipintr_noqueue2 are removed. The function of ipintr_noqueue2 is provided by passing a null NDD parameter to ipintr_noqueue.
ipintr_noqueue Most of ipintr_noqueue's code was moved to ipintr_noqueue_post_fw.
ip_output Most of ip_output's code was moved to ip_output_post_fw.
The following new functions were added in AIX 5L to support the new firewall hooks:
ipintr_noqueue_post_fw The ipintr_noqueue_post_fw hook contains the code that used to be in ipintr_noqueue and may be called from either ipintr_noqueue or from the firewall hook routine pointed at by inbound_fw.
inbound_fw_save_args The inbound_fw_save_args hook gives a firewall hook routine, called through the inbound_fw
344 AIX 5L Differences Guide Version 5.1 Edition
variable, the ability to save a copy of the inbound_fw_args_t *args. This copy can be used to call ipintr_noqueue_post_fw at a later time.
inbound_fw_free_args The inbound_fw_free_args hook frees a inbound_fw_args_t created by inbound_fw_save_args.
ip_output_post_fw The ip_output_post_fw hook largely contains the code that used to be in ip_output.
outbound_fw_save_args The outbound_fw_save_args hook creates a copy of outbound_fw_args_t *args. In doing so, it also makes sure all the things pointed at by *args remain valid indefinitely, either by copying or making references.
outbound_fw_free_args The outbound_fw_free_args hook frees a outbound_fw_args_t created by outbound_fw_save_args. It also frees and removes references from anything pointed at by outbound_fw_args_t *args.
If inbound_fw is set, ipintr_noqueue, the IP input routine, calls inbound_fw and then exits. If not, ipintr_noqueue calls ipintr_noqueue_post_fw and then exits. If the inbound_fw hook routine wishes to pass the packet into IP, it can call ipintr_noqueue_post_fw. The inbound_fw hook may copy its args parameter by calling inbound_fw_save_args, and may free its copy of its args parameter by calling inbound_fw_free_args.
Similarly, ip_output calls outbound_fw if it is set, and calls ip_output_post_fw if not. The outbound_fw hook can call ip_output_post_fw if it wants to send a packet. The outbound_fw hook may copy its args parameter by calling outbound_fw_save_args, and later free its copy of its args parameter by calling outbound_fw_free_args.
5.10 Fast Connect enhancements
IBM AIX Fast Connect provides support for the Server Message Block ( SMB) protocol to deliver file and print serving to PC clients. In AIX 5L, there are several improvements that will be discussed in this section.
At the time of writing, this feature is only available on the POWER platform.
Chapter 5. Networking enhancements 345
5.10.1 Locking enhancementsSome applications require shared files between AIX server-based applications and PC client applications. The file server requires lock mechanisms to protect these files against multiple modifications at the same time. Because of this, Fast Connect implements UNIX locking in addition to internal locking, to allow exclusions based on file locks taken by PC clients. AIX 5L implements the following lock enhancements:
• Opportunistic locks take exclusive lock on the file when the exclusive opportunistic lock is granted and the file will be unlocked when the opportunistic lock is broken.
• SMB share modes are implemented with a UNIX lock consistent with the granted open mode and share mode.
5.10.2 Per share optionsSeveral advanced features of AIX Fast Connect are available as per-share options. These options are encoded as bit fields within the sh_options parameter of each share definition. These options must be defined when the share is created with the net share /add command, or set through system management tools.
Per-share options currently allowed by net share /add are shown in the Table 42.
Table 42. Per-share value options
5.10.3 PC user name to AIX user name mappingWhen a client tries to access resources on the server, it needs to establish an SMB/CIFS session. The SMB/CIFS session setup can use either user level security or share level security.
Parameter Values Default Description
sh_oplockfiles (0,1) 1 If oplocks=1, enables opportunistic lock on this share
sh_searchcache (0,1) 0 If searchcache=1, enables search caching on this share
sh_sendfile (0,1) 0 If sendfile=1, enables sendfile API on this share
In case of user level security, clients must present their user names. In previous Fast Connect releases, it was required that the user name match the one on AIX exactly. In many situations, this one-to-one mapping of user names is not possible.
AIX Fast Connect on AIX 5L allows the server administrators to configure the mapping of PC user names to AIX user names. When enabled, AIX Fast Connect tries to map every incoming client user name to a server user name, and then uses that server user name for further user authentication and AIX credentials.
Figure 108 shows the SMIT panel with the user name mapping option highlighted.
Figure 108. SMIT panel with user name mapping option highlighted
If the user name mapping function is enabled, then you can define mapping between client user name (Windows) and server user name (AIX) using the following SMIT dialog: smit -> Communications Applications and Services -> AIX Fast Connect -> Configuration -> Fast Connect Users -> Map a User. The mapping information is stored in /etc/cifs/cifsPasswd. Figure 109 on page 348 shows the smit panel for this function.
Chapter 5. Networking enhancements 347
Figure 109. Map a Client User Name to a Server Name panel
5.10.4 Windows Terminal Server supportWindows Terminal Server from Microsoft and other similar products allow support of multiple users on one Windows NT machine. When a multiuser NT machine connects to a Fast Connect server for File and Print Services, it can use multiple SMB sessions over one transport session. In AIX 5L, Fast Connect allows multiple SMB sessions over one transport session. In previous releases, Fast Connect was limited to one SMB session per transport connection.
5.10.5 Search cachingGenerally, file search operation requests from a PC client take large amounts of resources, and performance issues may arise if a large number of clients do file search operations at the same time.
In AIX 5L, Fast Connect allows you to enable search caching. If enabled, all the cached structures will compare their time stamps to the original files to check for modifications periodically. This feature improves file searching significantly.
Figure 110 shows the SMIT panel with the Enable search caching option highlighted. Search caching must be enabled for the share by enabling the per share option in addition to the global parameter shown.
348 AIX 5L Differences Guide Version 5.1 Edition
Figure 110. SMIT panel with Enable search caching option highlighted
5.10.6 Memory mapped I/O (5.1.0)AIX 5L Version 5.1 allows files to be mapped to memory. A region of memory is reserved for these files, this region allows access to mapped files, which is much faster and CPU efficient. The shmat() system call is used to maximize performance.
Mapping can be used to reduce the overhead involved in writing and reading the contents of files. Once the contents of a file are mapped to an area of user memory, the file may be manipulated as if it were data in memory, using pointers to that data instead of input/output calls. The copy of the file on disk also serves as the paging area for that file, saving paging space. Because mapped files can be accessed more quickly than regular files, the system can load a program more quickly if its executable object file is mapped to a file.
By default, the memory mapped I/O function is not exploited. To enable this function, you need to insert the following entry in /etc/cifs/cifsConfig. Currently, there is no system management tool to do this for you.
mmapfiles = 1
Chapter 5. Networking enhancements 349
5.10.7 send_file APIAIX Fast Connect provides the functionality to exploit send_file routine since AIX Version 4.3.3 and AIX Fast Connect 2.1. The send_file is a API to reduce system over head, sending cached file directly from cached in NBC to connection socket. By default this functionality is disabled, so to enable this function, you have to select yes the Enable send file API support field in the following SMIT panel. It is also possible to turn on this function per-share, please refer to Section 5.10.2, “Per share options” on page 346.
Figure 111 shows the smit panel to set these attributes.
Figure 111. Send_file attributes
5.11 NFS and NIS enhancements (5.1.0)
The following are the enhancements that have been made to NFS and NIS.
5.11.1 Netgroups for NFS exportA netgroup file can be created on an NFS server to list a group of systems that can access a network file system. In the following example, the host
350 AIX 5L Differences Guide Version 5.1 Edition
name of the NFS server is itsos7a. Using netgroups makes system administration of NFS mounts easier. The following example shows the format of the /etc/netgroup file:
root_group_name (server1,,)(server2,,)(server3,,)
The group has a label name of root_group_name. Any label name can be used. The three fields within parentheses are known as a triple. The first field of the triple is the name of a server, the second field is the user name and the third field is the domain name. In the preceding example, the second and third fields are not required. The names server1, server2 and server3 are the names of systems that are required to access network file systems on the NFS server itsos7a.
The /etc/netgroup file is searched before /etc/hosts, if it exists. Therefore, the netgroup name is always searched before the host name.
The /etc/exports file must be edited to include an entry for the exported file system, as in the following example:
/home -access=root_group_name
The implication from the preceding examples of the /etc/netgroup and /etc/exports files is that the systems named server1, server2, and server3 will be able to mount and access the data on the /home file system of the NFS server itsos7a. To mount the /home file system of the NFS server itsos7a from the client system server1, enter the following command:
# mount itsos7a:/home /mnt
Additional groups can be added to the /etc/netgroup file as shown below, and additional exports can be added to the /etc/exports file:
5.11.2 Updating password maps in NISIn AIX 5L Version 5.1, the yppasswordd daemon directly updates the password maps and pushes the new maps to the slave servers when a password change request is processed. This results in a performance
Chapter 5. Networking enhancements 351
improvement when updating the NIS maps, compared to previous versions of AIX, where a rebuild of the maps occurred each time an update was made.
By default, this function is disabled, therefore a traditional mechanism, such as forking a command child process on the /var/yp directory is used. To use this function, you must issue the following command to add the -r option to the yppasswdd subsystem.
# chsys -s yppasswdd -a “/etc/passwd -r”
5.12 Internet Key Exchange enhancements (5.1.0)
In AIX 5L Version 5.1, new features are added to Internet Security Association and Key Management Protocol (ISAKMP), also known as Internet Key Exchange or IKE.
The following topics are discussed in the subsequent sections:
• Security enhancements • New serviceability features • System management enhancements
5.12.1 Security enhancementsThe Virtual Private Network (VPN) support has been enhanced with several new security features.
5.12.1.1 IKE group enhancementVPN includes new functions, such as adding groups, default policies, and supporting wild cards. Support of wild cards, groups, and default policies simplifies the configurations for remote access and DHCP scenarios. You are able to specify one policy, then indicate a group of users or set of users whose remote IDs will use those policies. To manage the group, entries can be added to the group and key database without changing the security policy information.
A group must be defined before using that group name in a tunnel definition. Use the ikedb command to define groups. This command accepts XML text as input to create a group definition in the IKE databases. The group's size is limited to 1 KB. The part of the XML file used to create a group would appear similar to the following:
5.12.1.2 IKE command line interfaceIn AIX 5L Version 5.1, a new command line interface is available to retrieve, update, delete, import, and export information in the Internet Key Exchange (IKE) database. IKE tunnels have more complex policy parameters and in most cases, you must use the Web-based System Manager interface to configure IKE.
To perform a put, which writes to the database based on the given XML-file, use the following command syntax:
# ikedb -p[F s] [ -e entity-file ] [ XML-file ]
Chapter 5. Networking enhancements 353
To perform a get, which displays what is stored in the IKE database, use the following command syntax. Output is sent to stdout and is in XML format, which is suitable for processing with ikedb -p.
# ikedb -g[r] [ -t type [ -n name | -i ID -y ID-type ] ]
To perform a delete on the specified item from the database, use the following command syntax. The flags are the same as for the -g flag, except that -r is not supported.
# ikedb -d -t type [ -n name | -i ID -y ID-type ]
The following is example of ikedb -g:
# ikedb -g -t IKETunnel -n testtunnel | more
<?xml version="1.0"?>
<AIX_VPN>
<IKETunnel
IKE_TunnelName="testtunnel"
IKE_ProtectionRef="testtunnel_TRANSFORM"
IKE_Flags_AutoStart="Yes"
IKE_Flags_MakeRuleWithOptionalIP="No">
<IKELocalIdentity>
<IPV4_Address Value="9.3.240.58"/>
</IKELocalIdentity>
<IKERemoteIdentity>
<IPV4_Address Value="9.3.240.57"/>
</IKERemoteIdentity>
</IKETunnel>
</AIX_VPN>
To perform a conversion from a Linux IPSec configuration file to an AIX IPSec configuration file in XML format, use the following command syntax. It requires one or two files from Linux as input, a configuration file, and, possibly, a secrets file with pre-shared keys.
To perform an expunge on the database, use the following command syntax. This empties out the database.
# ikedb -x
To perform an output of the DTD that specifies all elements and attributes for an XML file that is used by the ikedb command, use the following command syntax. The DTD is sent to stdout.
354 AIX 5L Differences Guide Version 5.1 Edition
# ikedb -o
For further details on the flags, parameters, and arguments listed above, refer to the appropriate manual pages of the AIX documentation library.
5.12.1.3 Import/Export IPSEC configuration with LinuxFreeS/WAN (http://www.freeswan.org), which is Open Source, is the most widely used VPN software for Linux. Although FreeS/WAN does not have the flexibility of AIX IPSec, it provides most of the commonly used functions.
FreeS/WAN 1.5 or higher is required to import the VPN definitions successfully in AIX.
The IPSEC configuration in Linux is defined in two different files (/etc/ipsec.conf and /etc/ipsec.secrets).
Since the IKE support on Linux is only a subset of what is supported on AIX, not all options are able to be imported from one platform to another.
Table 43 lists how the Linux VPN function have been mapped to AIX.
Table 43. Linux versus AIX VPN function mapping
Linux keyword AIX mapping Default value
interfaces None; not needed. None
forwardcontrol Not available, but can be simulated using the no command.
no
syslog Not available, but can be simulated using the syslog.conf.
daemon.error
klipsdebug Not available, but can be simulated using the trace.
None
plutodebug Not available, but can be simulated using the logging feature of isakmpd and /etc/isakmpd.conf files.
None
dumpdir No comparable function. Can be simulated by changing to that directory and starting from there.
None
dump N/A. None
pluto No comparable function. yes
plutoload No comparable function. AIX loads all defined tunnels in db.
None
Chapter 5. Networking enhancements 355
plutostart Autostart None
plutowait No comparable function. yes
plutobackgroundload No comparable function. no
prepluto No comparable function. None
postpluto No comparable function. None
type tunnel/transport. tunnel
auto Autostart. no
left Local/Remote IP/ID. None
leftid Local/Remote ID. The value of left
leftrsasigkey No comparable function. None
leftsubnet Local/Remote subnet. None
leftnexthop Local/Remote subnet. The value of right
leftupdown No comparable function. None
leftfirewall No comparable function. None
right Local/Remote IP/ID. None
rightid Local/Remote ID. The value of right
rightrsasigkey No comparable function. None
rightsubnet Local/Remote subnet. None
rightnexthop Local/Remote subnet. The value of left
rightupdown No comparable function. None
rightfirewall No comparable function. None
keyexchange Redundant information. ike
auth AH/ESP in AIX. ESP
authby authentication secret
pfs pfs yes
keylife lifetime 8h
rekeyfuzz No comparable function. 100%
Linux keyword AIX mapping Default value
356 AIX 5L Differences Guide Version 5.1 Edition
To import a tunnel configuration from Linux to AIX, perform the following steps:
1. Copy the Linux configuration files (/etc/ipsec.conf, /etc/ipsec.secrets) to AIX.
2. Run the ikedb command with the -c option. This will convert the configuration and load it into database.
3. Initiate the tunnel and verify the status.
In the following example, these steps were performed on a test system.
On the Linux machine1. Login as root.
2. Enter # cd /etc
3. Open FTP transfer to the AIX system:
a. ftp> cd /tmp
b. ftp> put ipsec.conf
c. ftp> put ipsec.secrets
d. ftp> quit
4. Enter # ipsec setup restart
5. Enter # exit
On the AIX machine1. Login as root.
2. Enter # cd /tmp
3. Enter # ikedb -c or ikedb -c -l ipsec.conf -k ipsec.secrets
4. Enter # ike cmd=activate
With the ikedb command you can read or edit the IKE database. The input and output format is an Extensible Markup Language (XML) file.
For more detail about the ikedb command, see Section 5.12.1.2, “IKE command line interface” on page 353.
keyingtries No comparable function. 3
ikelifetime lifetime 1h
Linux keyword AIX mapping Default value
Chapter 5. Networking enhancements 357
The ikeconvert utility reads the Linux configuration file and converts it into the XML format, which is suitable for loading in the AIX IKE database.
5.12.2 New serviceability featuresTo make system administration easier and to prevent file systems from filling up, the outputs have combined using syslogd. The isakmpd daemon reads the logging level from its own configuration file (/etc/isakmp.conf), but the log file name is taken from the syslogd configuration file (/etc/syslog.conf).
5.12.3 System management enhancementsNew and enhanced Web-based System Manager dialogs provide a better way to configure and administer IKE, as shown in Figure 112.
Figure 112. Web-based System Manager VPN screen
The Task and Overview panels allow you to perform several configuration tasks:
• Configure a basic tunnel connection
• Manage certificates
• Start IP security
358 AIX 5L Differences Guide Version 5.1 Edition
• Stop IP security
You also get a quick status overview of the following services:
• IP security service
• Internet Key Exchange daemon
• Digital certificate support
• IP packet filtering
Selecting Overview and Tasks provides the menu shown in Figure 113.
Figure 113. Web-based System Manager VPN Task and Overview panel
5.12.4 Notify messagesThe Notify Messages enhancement provides additional error information when setting up Security Associations.
The Security Association Payload is used to negotiate security attributes and to indicate the Domain of Interpretation (DOI) and Situation under which the negotiation is taking place.
During Security Association (SA) negotiation, it is possible that errors may occur. The informational exchange with a Notify payload provides a controlled
Chapter 5. Networking enhancements 359
method of informing a peer entity that errors have occurred during protocol processing.
The Notification Payload can contain both ISAKMP and DOI-specific data and is used to transmit informational data, such as error conditions, to an ISAKMP peer. It is possible to send multiple Notification Payloads in a single ISAKMP message. The Notification Payload contains notification data that specifies why an SA could not be established, such as NO-PROPOSAL-CHOSEN, INVALID-SIGNATURE, and AUTHENTICATION-FAILED.
When a Notify payload is received, the receiving entity can take appropriate action according to its local policy. A user views any notification payload information by turning the IKE logging level to 'EVENTS' and viewing the payload information in the log. The NOTIFY information is useful in debugging when an IKE negotiation fails.
The following are the status-type Notification messages:
• CONNECTED
• RESERVED (future use)
• DOI-specific codes
• Private Use
For more detailed information, refer to RFC 2407, RFC 2408, and RFC 2409.
5.12.5 The syslog enhancementsThe Internet Key Exchange (IKE) daemons are provided in Table 44.
Table 44. Web-based System Manager tunnel daemons
The tmd and cpsd daemons log events to syslog and starting with AIX 5L Version 5.1, the isakmpd daemon also logs events to syslog. The logging is enabled by configuring the syslog daemon and refreshing the daemons by issuing the command ike cmd=log. The /etc/isakmpd.conf configuration file can be set up to specify the logging level. The level can be configured as the following:
none No logging (the default).
Daemon Description
tmd The Tunnel Manager daemon
isakmpd The IKE daemon
cpsd The certificate proxy daemon
360 AIX 5L Differences Guide Version 5.1 Edition
error Only logging protocol and API errors.
isakmp_events Only logging IKE protocol events and errors.
Information Logging protocol and implementation information (recommended for debugging).
The setting of the log level can be done through the Web-based System Manager, IKE plug-in, as shown in Figure 114.
Figure 114. Level of IKE components to be logged
When the syslog daemon is running and debugging is turned on, isakmpd will send logging events to the output file of the syslog daemon. The log file is similar to the following example:
Mar 15 11:45:47 server3 isakmpd: error: logpipe failed to be ready forreadingMar 15 11:48:18 server3 isakmpd:entropy_src::entropy_src():stat(/usr/sbin/ikentropy):No such file ordirectory.Mar 15 11:48:18 server3 isakmpd:/usr/sbin/isakmpd:/usr/sbin/isakmpd:isakmpd:initcrypto dlopen of des failedMar 15 11:48:18 server3 isakmpd: isakmpdError number = 2
5.13 Dynamic Feedback Protocol (5.1.0)
In AIX 5L Version 5.1 the Dynamic Feedback Protocol (DFP) is now supported. The Dynamic Feedback Protocol provides a mechanism for reporting statistics to server load balancing (SLB) devices, for example, Cisco’s (http://www.cisco.com) Catalyst 4840G, Catalyst 6000 or LocalDirect, so that future connections can be handled by most available servers.
Chapter 5. Networking enhancements 361
5.13.1 The dfpd agentThe DFP agent is available in the bos.net.tcp.server fileset. The agent is designed to be controlled using the system resource controller (SRC). To start the daemon, just use the normal SRC commands.
# startsrc -s dfpd0513-059 The dfpd Subsystem has been started. Subsystem PID is 23218.
To start the DFP agent automatically, an entry in the /etc/rc.tcpip file is needed. The new entry is similar to the following:
# Start up the dfpd dynamic feedback protocol daemonstart /usr/sbin/dfpd "$src_running"
5.13.2 Configuration fileThe configuration file of the Dynamic Feedback Protocol daemon (dfpd) is shown in the following:
# cat /etc/dfpd.conf# @(#)20 1.1 src/tcpip/etc/dfpd.conf, dfp, tcpip510 10/3/00 15:56:33# The md5key is the secret key (upto 64 bytes) that is the same as the one# defined in the load manager configuration.md5key 1234567890abcdefabcdef12345678901234567890abcdefabcdef1234567890
# This is the port that dfpd will listen on for load manager connections.ldlistener 8002
# This is the time in seconds that between computations of cpu idle time.pollidletime 30
# This is multiplication factor that is applied to the cpu idle time before# sending it to the load manager. This is useful to rationalize the weights# among machines of different capacities.# The mfactor is a positive integer value.mfactor 1
5.13.3 ReportsThe DFP agent reports the statistics of the host it is running on. The agent collects the percent of time the CPU is idle. This CPU idle time gets multiplied with a factor (mfactor) specified in the configuration file to get the weight. This weight is being reported to the Load Manager. The multiplication factor is, by default, the number of CPUs if not specified in the configuration. It is possible to configure the interval between successive CPU idle time computations. The default value is 30 seconds. To smooth out the variations in CPU idle time, the average of the last two readings is used.
A DFP agent does not collect, maintain, or provide bind information to the Load Manager.
362 AIX 5L Differences Guide Version 5.1 Edition
To ensure integrity of the data communication, the DFP Agent and the Load Manager share a secret key up to 64 bytes long.
The load manager sends a keepalive time when a connection is initiated. If the load manager does not provide a keepalive time, then a default of 60 seconds is assumed. The CPU idle time information will be sent to the load manager periodically with the period being the lower of the keepalive time and the time between CPU idle computations.
5.14 ATM LANE and MPOA enhancements (5.1.0)
The ATM LAN Emulation device driver emulates the operation of Standard Ethernet, IEEE 802.3 Ethernet, and IEEE 802.5 token ring LANs. It encapsulates each LAN packet and transfers its LAN data over an ATM network at up to OC12 speeds (622 megabits per second). This data can also be bridged transparently to a traditional LAN with ATM/LAN bridges, such as the IBM 2216. The logical presentation of an ATM system environment LAN Emulation is shown in Figure 115.
Figure 115. System environment ATM LAN Emulation
The ATM LANE device driver is a dynamically loadable device driver. Each LE client or multiprotocol over ATM (MPOA) client is configurable by the operator, and the LANE driver is loaded into the system as part of that configuration
Ethernet Application Token-Ring Application
ATM LANE/MPOA
ATM Device Driver
Protocol Stack (TCP/IP, SNA, IPX, NetBios...)
ATM Network
Chapter 5. Networking enhancements 363
process. If an LE client or MPOA client has already been configured, the LANE driver is automatically reloaded at reboot time as part of the system configuration process.
5.14.1 Debug optionIn AIX 5L Version 5.1, the debug_trace option, when configuring the ATM LANE device driver, can be set to off.
The debug_trace option specifies whether the MPOA client should keep a real time debug log within the kernel and allow full system trace capability. Select Yes to enable full tracing capabilities for this Client. Select No for optimal performance when minimal tracing is desired. The default is Yes (full tracing capability).
Toggling a LANE/MPOA trace off disables all normal flow trace points to both the system trace and the internal driver trace buffer. This will improve performance of the interface on large SMP systems. Error conditions will continue to trace to the system trace and the internal driver trace buffer.
There are different ways to toggle the debug option on and off. You can configure the LANE/MPOA client with SMIT and are able to select the full tracing, as shown in Figure 118 on page 368.
5.15 Multiprotocol over ATM enhancements (5.1.0)
The multiprotocol over ATM (MPOA) implementation supports IPv4 without options. In AIX 5L Version 5.1, MPOA has been enhanced to support IP fragmentation. Since ATM is not available on the Itanium-based platform, this feature is for POWER only.
5.15.1 IP fragmentationHaving unlike protocols at each end of a shortcut (Figure 116) poses a special problem, because they do not necessarily have the same maximum transmission unit (MTU) sizes defined at each end.
364 AIX 5L Differences Guide Version 5.1 Edition
Figure 116. An example of a MPOA network
Ethernet has a LANE frame size of 1516 and MTU of 1500 bytes, while token ring can have LANE frame sizes of 4544 or 18190 bytes with subsequently larger MTUs. These are clearly incompatible and require the MPOA layer to do IP fragmentation.
5.15.1.1 Send IP packet to MPOA shortcutA packet going out onto an MPOA shortcut will be fragmented if the following conditions are true:
1. The flags field in the IP header has the Do not fragment bit turned off.
2. The ip_len field in the IP header has a value larger than the MTU returned in the MPOA Resolution Reply.
3. MPOA IP fragmentation is enabled.
4. MBUFs can be obtained to create all the fragments.
If any of the above conditions are false, the packet will be sent down the LANE path. If fragmentation is performed, each fragment will have as large of an ip_len as possible that does not exceed the MTU returned in the MPOA Resolution Reply and does not violate the rules for IP fragmentation.
Default Path
MPS 1
ELANIP Subnet
4.1.1
MPC 1
LANIP Subnet
4.1.1
IP Host A4.1.1.1
MPS 2
ELANIP Subnet
4.1.3
MPC 2
LANIP Subnet
4.1.3
IP Host B4.1.3.1
LIS orELAN IP Subnet
4.1.2
Shortcut Path
Chapter 5. Networking enhancements 365
5.15.1.2 Receive IP packet from MPOA shortcutA packet received on an MPOA shortcut that will be reassembled into an IEEE 802.3 frame format will be fragmented if the following conditions are true:
1. The flags field in the IP header has the Do not fragment bit turned off.
2. The ip_len field in the IP header has a value larger than the LE Client's NDD MTU, minus the size of the DLL header.
If a packet requiring fragmentation has the Do not fragment bit turned on in the flags field of the IP header, the MPOA client (MPC) will drop the packet and generate an ICMP message (ICMP Unreachable Error, Fragmentation Required). The ICMP message contains the largest IP MTU that the LE Client can handle.
Reassemble to IEEE 802.3 Ethernet formatThe IEEE 802.3 frame format contains a length field that can not have a value larger than 1500 bytes. For this reason, packets received on a shortcut to be reassembled into an IEEE 802.3 frame format must be fragmented to be received.
Reassemble to Standard Ethernet formatA packet received on an MPOA shortcut that will be reassembled into a Ethernet frame format will never be fragmented. The Ethernet frame format does not contain any length information, so there is no need to fragment these packets once they have been received. The only limitation is the packet can not be larger than what IP can handle. Currently, IP can handle up to 64 KB. The current LANE maximum frame size is 18190 bytes, so this is not an issue.
Reassemble to token ring formatA packet received on an MPOA shortcut that will be reassembled into a LANE token ring frame format will never be fragmented. The token ring frame format does not contain any length information, so there is no need to fragment these packets once they have been received. The only limitation is the packet can not be larger than what IP can handle. Currently, IP can handle up to 64 KB.
5.15.1.3 Configure IP fragmentationTo disable the IP fragmentation feature, you need a configured and available ATM LAN Emulation MPOA client adapter. Use the following command to check the available adapters:
atm1 Available 30-78IBM PCI 155 Mbps ATM Adapter (14107c00)ent1 Available ATM LAN Emulation Client (Ethernet)mpc0 Available ATM LAN Emulation MPOA Client
The IP fragmentation can be changed by using SMIT, as shown in Figure 117.
Figure 117. SMIT panel for change / show an MPOA client
You can also verify the settings of the multi-protocol client (MPC) device by using the lsattr command:
# lsattr -El mpc0auto_cfg No Auto Configuration with LEC/LECS Truesc_setup_count 10 Shortcut Setup Frame Count Truesc_setup_time 1 Shortcut Setup Frame Time in seconds Trueinit_retry_time 5 Initial Request Retry Time in seconds Trueretry_time_max 40 Maximum Request Retry Time in seconds Truehold_down_time 160 Failed Resolution request retry Hold Down Time in seconds Truevcc_inact_time 20 VCC Inactivity Timeout value in minutes Truedebug_trace Yes Debug Trace Enabled Truefragment Yes Enable MPOA Fragmentation True
If MPOA fragmentation is enabled, outgoing packets will be fragmented if needed.
If MPOA fragmentation is disabled, the outgoing packages are never fragmented. If fragmentation is needed, the packets have to be sent down to the LANE.
Chapter 5. Networking enhancements 367
Incoming packets will be fragmented when necessary, regardless if MPOA fragmentation is enabled or not.
Figure 118. SMIT panel for adding an ATM LE client
The same debug control is available with a token ring ATM LE client or an MPOA client. You can select this through SMIT, as shown in Figure 118. Also, depending on the device driver type, one of the following commands can be used to toggle the debug tracing on and off dynamically while the client is operational:
# entstat -t Toggles LANE Ethernet debug tracing on and off.
# tokstat -t Toggles LANE token ring debug tracing on and off.
# mpcstat -t Toggles MPOA debug tracing on and off.
5.15.2 Token ring support for MPOAAIX 5L Version 5.1 provides support for token ring for multiprotocol over ATM (MPOA). This also includes the capability to transfer shortcut data between unlike LAN IP protocol layers, such as token ring to Ethernet, or token ring to IEEE 802.3. The panel for adding this function is shown in Figure 119.
368 AIX 5L Differences Guide Version 5.1 Edition
Figure 119. SMIT panel for adding a token ring ATM LE client
5.16 Etherchannel enhancements (5.1.0)
Etherchannel is a network aggregation technology that allows you to produce a single large pipe by combining the bandwidth of multiple Ethernet adapters. In AIX 5L Version 5.1, the Etherchannel feature has been enhanced to support the detection of interface failures. This is called network interface backup.
EtherChannel is a trademark registered by Cisco Systems and is generally called multi-port trunking or link aggregation. If your Ethernet switch device has this function, you can exploit the support provided in AIX 5L Version 5.1. In this case, you must configure your Ethernet switch to create a channel by aggregating a series of Ethernet ports.
5.16.1 Network interface backup modeIn the network interface backup mode, the channel will only activate one adapter at a time. The intention is that the adapters are plugged into different Ethernet switches, each of which is capable of getting to any other machine on the subnet/network. When a problem is detected, either with the direct connection, or through inability to ping a machine, the channel will deactivate the current adapter, and activate a backup adapter.
Chapter 5. Networking enhancements 369
5.16.1.1 Configuring Etherchannel for network interface backup Use SMIT either by choosing the SMIT fastpath etherchannel or going through the menu (Devices -> Communication -> Etherchannel), as shown in Figure 120.
Figure 120. SMIT panel to add a new Etherchannel
Choose Add An Etherchannel to add a new Etherchannel definition to your system, as shown in Figure 121 on page 371.
The network interface backup feature is currently supported by 10/100 Ethernet and gigabit Ethernet PCI cards (devices.pci.23100020.rte and devices.pci.14100401.rte). If you are using other devices, you may receive unexpected results.
Note
370 AIX 5L Differences Guide Version 5.1 Edition
Figure 121. SMIT panel for choosing the adapters that belongs to the channel
To create a new Etherchannel, you have to select the network interfaces that will be a part of the channel. If you select an interface that is in use or already part of another Etherchannel, you will receive an error similar to:
Method error (/usr/lib/methods/cfgech):0514-001 System error:
Method error (/usr/lib/methods/chgent):0514-062 can not perform the requested function because the
specified device is busy.
Chapter 5. Networking enhancements 371
Figure 122. SMIT panel for configuring the Etherchannel
Choose a valid alternate hardware address for the new Etherchannel, as shown in Figure 122. Change the Etherchannel mode to netif_backup to enable the network interface backup feature. In that mode, the channel will poll the adapter for Link Status. If the Link Status is not up (either due to a cable being unplugged, switch down, or device driver problem), the channel will switch to another adapter.
This mode is the only one that makes use of the Internet Address to Ping, Number of Retries, and Retry Time-out fields. The following list provides the meaning of the fields:
Internet Address to Ping The address will be pinged if the address field has a non-zero address and the mode is set to netif_backup. If the channel is unable to ping the address for the Number of Retries times in Retry Time-out intervals, the channel will switch adapters.
Number of Retries The number of retries is the number of ping response failures before the channel switches adapters. The default is three times.
Retry Timeout The retry timeout is the interval in seconds between the times when the channel will send
372 AIX 5L Differences Guide Version 5.1 Edition
out a ping packet and poll the adapter's Link Status. The default is one second intervals.
Once the Etherchannel has been configured, the new adapter and interfaces are available, as shown in the following example:
server1:/home/root>lsdev -Cc adaptertok0 Available 10-68 IBM PCI Tokenring Adapter (14103e00)ent0 Available 10-78 IBM 10/100 Mbps Ethernet PCI Adapter (23100020)ent1 Available 10-80 IBM PCI Ethernet Adapter (22100020)ent2 Available 20-60 IBM 10/100 Mbps Ethernet PCI Adapter (23100020)sioma0 Available 01-K1-01 Mouse Adapterent4 Available Etherchannelent3 Available 10-70 3Com 3C905-TX-IBM Fast EtherLink XL NIC
server1:/home/root>lsdev -Cc ifen1 Defined 10-80 Standard Ethernet Network Interfaceen2 Defined 20-60 Standard Ethernet Network Interfaceet0 Defined 10-78 IEEE 802.3 Ethernet Network Interfaceet1 Defined 10-80 IEEE 802.3 Ethernet Network Interfaceet2 Defined 20-60 IEEE 802.3 Ethernet Network Interfacelo0 Available Loopback Network Interfacetr0 Available 10-68 Token Ring Network Interfaceen3 Available 10-70 Standard Ethernet Network Interfaceet3 Defined 10-70 IEEE 802.3 Ethernet Network Interfaceen0 Defined 10-78 Standard Ethernet Network Interfaceen4 Defined Standard Ethernet Network Interfaceet4 Defined IEEE 802.3 Ethernet Network Interface
5.16.1.2 Configuring IP on the Etherchannel interfaceThe new interface can be configured like any other network interface. Use SMIT to define an IP address on the interface:
Use the ping command to test the new IP connection:
server1:/home/root>ping 10.0.0.3
PING 10.0.0.3: (10.0.0.3): 56 data bytes64 bytes from 10.0.0.3: icmp_seq=0 ttl=255 time=0 ms64 bytes from 10.0.0.3: icmp_seq=1 ttl=255 time=0 ms64 bytes from 10.0.0.3: icmp_seq=2 ttl=255 time=0 ms
Chapter 5. Networking enhancements 373
5.17 Virtual local area network (VLAN) (5.1.0)
Virtual Local Area Networks (VLAN) can be thought of as logical broadcast domains. A VLAN splits up groups of network users on a real physical network into segments of logical networks. This implementation supports the IEEE 802.1Q VLAN tagging standard, with the capability to support multiple VLAN IDs running on Ethernet adapters. Each VLAN ID is associated with a separate Ethernet interface to the upper layers (for example, IP) and creates unique logical Ethernet adapter instances per VLAN, for example, ent1, ent2, and so on.
The IEEE 802.1Q VLAN support can be configured over any supported Ethernet adapters. If connecting to a switch, the switch must support IEEE 802.1Q VLAN.
You can configure multiple VLAN logical devices on a single system. Each VLAN logical device constitutes an additional Ethernet adapter instance. These logical devices can be used to configure the same Ethernet IP interfaces used with physical Ethernet adapters. As such, the no option, ifsize (default 8), needs to be increased to include not only the Ethernet interfaces for each adapter, but also any VLAN logical devices that are configured. See the no command documentation for more information.
When configuring a VLAN network, ensure that all virtual adapters within the virtual network have the same VLAN ID.
Each VLAN can have a different maximum transmission unit (MTU) value, even if sharing a single physical Ethernet adapter.
VLAN support is managed through SMIT. Type the smit vlan fast path from the command line and make your selection from the main VLAN menu. Online help is available.
After you have configured a VLAN, configure the IP interface, for example, en1 for standard Ethernet or et1 for IEEE 802.3, using Web-based System Manager, SMIT, or the command line interface.
The following command shows the SMIT fastpath for the local virtual area network configuration methods:
# smitty vlan
374 AIX 5L Differences Guide Version 5.1 Edition
Or you can select the Web-based System Manager to accomplish this task (Figure 123): Add a VLAN -> Select an Ethernet Adapter
Figure 123. SMIT panel for adding a VLAN
The lsdev command will list the virtual LAN adapters as a member of the adapter class, as provided in the following output:
# lsdev -HCc adapter
name status location description
sa0 Available 01-S1 Standard I/O Serial Portsa1 Available 01-S2 Standard I/O Serial Portsiokma0 Available 01-K1 Keyboard/Mouse Adapterfda0 Available 01-D1 Standard I/O Diskette Adapterscsi0 Available 10-60 Wide/Ultra-2 SCSI I/O Controllerscsi1 Available 10-61 Wide/Ultra-2 SCSI I/O Controllersonl0 Available 20-58 GXT4000P Graphics Adaptersioka0 Available 01-K1-00 Keyboard Adaptersiota0 Available 01-Q1 Tablet Adapterppa0 Available 01-R1 CHRP IEEE1284 (ECP) Parallel Port Adapterpaud0 Available 01-Q2 Ultimedia Integrated Audioent0 Available 10-80 IBM 10/100 Mbps Ethernet PCI Adapter (23100020)tok0 Available 10-88 IBM PCI Tokenring Adapter (14103e00)sioma0 Available 01-K1-01 Mouse Adapterent1 Available VLAN
Chapter 5. Networking enhancements 375
Enter the following command to further set up a VLAN, then follow the example in Figure 124 and Figure 125:
# smit chinet
Figure 124. SMIT panel for Change / Show Characteristics of a Network Interface
Figure 125. SMIT panel for Changing a Network Interface
376 AIX 5L Differences Guide Version 5.1 Edition
The netstat command reports the existence of the newly defined interface. Also, you will notice that the en0 and en1 have the same MAC address:
# netstat -in
Name Mtu Network Address Ipkts Ierrs Opkts Oerrs Coll
Remote dump is not supported over a VLAN. Also, VLAN logical devices can not be used to create a Cisco Systems Etherchannel.
Chapter 5. Networking enhancements 377
378 AIX 5L Differences Guide Version 5.1 Edition
Chapter 6. Linux applications on AIX (5.1.0)
AIX 5L incorporates a strong Linux affinity through the AIX Toolbox for Linux Applications and the integration of the Linux development environment into AIX libraries. This makes it possible to compile and run Linux applications on AIX, providing the ideal background to support this fast growing and competitive market. Countless developers around the world are completely focused on developing applications for Linux systems, and now you can easily port these applications and run them directly on AIX, taking advantage of all the features and benefits this operating system offers.
6.1 AIX Toolbox for Linux Applications
On January 12, 2001, the AIX Toolbox for Linux Applications was announced for AIX Version 4.3.3 only. It is now available for AIX 5L.
The AIX Toolbox for Linux Applications provides the tools to port Linux applications to AIX, as well as the tools to work on those applications. Additionally, the toolbox contains several applications that have already been recompiled for use with AIX
The AIX Toolbox for Linux Applications contains a wide variety of software, including, but not limited to:
Application Development gcc, g++, gdb, rpm, cvs, automake, autoconf, libtool, bison, flex, and gettext
Desktop Environments GNOME and KDE
GNU base utilities gawk, m4, indent, sed, tar, diffutils, fileutils, findutils, textutils, grep, and sh-utils
Programming Languages guile, python, tcl/tk, and rep-gtk
System Utilities emacs, vim, bzip2, gzip, git, elm, ncftp, rsync, wget, lsof, less, samba, zip, unzip, and zoo
Graphics Applications ImageMagick, transfig, xfig, xpdf, ghostscript, gv, and mpage
A version of the AIX Toolbox for Linux Applications is shipped with all AIX media. It can be ordered individually using the form numbers provided in Table 45.
Table 45. Form number for AIX Toolbox for Linux Applications CD
6.1.1 Basic Linux commandsThe basic Linux commands, such as tar, gzip, gunzip, bzip2, and so forth, are installed in the /opt/freeware/bin directory. To use those commands, you have to specify either the whole path or set the PATH variable.
Using a Linux command instead of an AIX command may be practical. For example, the Linux tar command offers options to directly compress and uncompress a tar file:
# /opt/freeware/bin/tar --helpGNU `tar' saves many files together into a single tape or disk archive, andcan restore individual files from the archive.... skipping some output ...Usage: /opt/freeware/bin/tar [OPTION]... [FILE]...Archive format selection:-V, --label=NAME create archive with volume name NAME
PATTERN at list/extract time, a globbing PATTERN-o, --old-archive, --portability write a V7 format archive
--posix write a POSIX conformant archive-z, --gzip, --ungzip filter the archive through gzip-Z, --compress, --uncompress filter the archive through compress
--use-compress-program=PROG filter through PROG (must accept -d)
Form number Product
LCD4-1077-00 AIX Toolbox for Linux Applications, POWER platform
LCD4-1075-00 AIX Toolbox for Linux Applications, Itanium-based platform
Because all AIX system management utilities are expecting to call the native AIX commands to manage the system, the use of Linux commands might cause unexpected results when the PATH variable is used to run Linux commands before AIX commands.
Note
380 AIX 5L Differences Guide Version 5.1 Edition
6.1.2 System management toolsSince AIX offers SMIT and Web-based System Manager to administer and manage the system, there is no need for Linux system configuration tools. However, there are a few management tools available that you can experiment with.
6.1.2.1 User administrationThe kuser command, as shown in Figure 126, allows easy user administration. The kuser command is provided by the KDE package. Since the user definitions are stored in flat ASCII files, changing them with a Linux tool will not cause problems, provided that LDAP or NIS is not in use.
Figure 126. User administration provided by KDE
In general, always use the native AIX tools, such as Web-based System Manager, to administer or manage an AIX system.
Note
Chapter 6. Linux applications on AIX (5.1.0) 381
6.1.2.2 System V init editorThe ksysv command, provided by the KDE package, is an available tool to manage the System V initialization structure (/etc/rc.d). Figure 127 shows the ksysv utility.
Figure 127. System V init editor provided by KDE
6.1.3 Red Hat Package ManagerThe Red Hat Package Manger (RPM, http://www.redhat.com) is part of the AIX Toolbox for Linux Applications. It facilitates installation and maintenance of Linux applications.
The rpm command is available as an AIX LPP fileset on the AIX 5L Version 5.1 base CD. If you want use rpm to install additional Linux packages, make sure the corresponding fileset (rpm.rte) is installed, as shown in the following example:
# lslpp -l rpm.rteFileset Level State Description----------------------------------------------------------------------------
The RPM database, which holds information about the installed RPM packages, is located in /var/opt/freeware/lib/rpm, with a symbolic link created in /var/lib, so you can also access it at /var/lib/rpm.
382 AIX 5L Differences Guide Version 5.1 Edition
6.1.3.1 rpm commandThe rpm command is used to install, upgrade, query, and delete Linux RPM packages. The tool is also used to maintain the RPM package database. The following example provides a look at all the possible uses:
6.1.3.2 Install RPM packagesThe following example shows the installation of the Linux xscreensaver rpm package:
# rpm -i xscreensaver-3.25-2.aix4.3.ppc.rpm
Trying to install an RPM package that is already installed on the system will fail, and a message similar to the following will appear:
# rpm -ivpackage AfterStep-1.8.0-1 is already installed
6.1.3.3 Query the RPM databaseTo get an overview of all or just a particular RPM package installed on the system, use the -q flag with the rpm command, as shown in the following example:
Before installing any RPM packages, make sure there is enough space left in the /opt file system. Since Linux applications are installed in the /opt/freeware directory and rpm does not automatically extend the file system, it has to be done manually.
Note
384 AIX 5L Differences Guide Version 5.1 Edition
6.1.4 Graphical frameworkThe graphical desktops available in the AIX Toolbox for Linux Applications are composed of different elements, which provide a specific graphical development framework. This framework depends upon the desktop you decide to use. Figure 128 on page 385 shows the interaction of the graphical libraries and the different desktops.
Figure 128. AIX Toolbox for Linux Applications graphical framework
GLib
GDK
GTK
GnomeLibs
GNOME
XLib
QtXt
Motif
KDE CDEApplication Layer
Library Layer
Chapter 6. Linux applications on AIX (5.1.0) 385
6.1.4.1 GNOME desktopGNOME (http://www.gnome.org), a very popular desktop environment (Figure 129) on Linux platforms, is also part of the AIX Toolbox for Linux Applications. Once installed, you can use GNOME as your primary desktop. GNOME can be installed at BOS installation time (see Section 4.8, “BOS installation allows different desktops (5.1.0)” on page 137) or at any later time.
Figure 129. Gnome Desktop running on AIX 5L Version 5.1
386 AIX 5L Differences Guide Version 5.1 Edition
6.1.4.2 KDE desktopKDE (http://www.kde.com) is another well-known desktop for Linux. KDE2 has been recompiled on AIX 5L Version 5.1 and is part of the AIX Toolbox for Linux Applications. At the time of the writing, KDE 1.1.2 was available, as shown in Figure 130 on page 387. Similar to the GNOME desktop, KDE can be installed (POWER platform only) at any time or while installing the base AIX operating system. For further details, see Section 4.8, “BOS installation allows different desktops (5.1.0)” on page 137.
Figure 130. KDE 1.1.2 desktop running on AIX 5L Version 5.1
Chapter 6. Linux applications on AIX (5.1.0) 387
6.1.4.3 GTK+ user interface builder (Glade)Glade (Figure 131) is a free user interface builder for GTK+ and GNOME. It is released under the GNU General Public License (GPL).
Glade can produce C source code itself. C++, Ada95, Python, and Perl support is also available, using external tools that process the XML interface description files output by Glade.
Figure 131. Glade running on AIX 5L Version 5.1
6.2 AIX source affinity for Linux applications (5.1.0)
Since AIX and Linux do not use the same APIs and system calls, several modifications have been made to provide more source level compatibility in AIX 5L Version 5.1.
The following example shows the changes for the reboot system call. Both the Linux and AIX reboot API are available in AIX 5L Version 5.1. The reboot API is just one example of a dual-semantic function. The list of dual-semantic functions is still increasing.
typedef struct {caddr_t uf_strt_ptr; /* Pointer to start of image */ulong uf_img_len; /* Length of image */void *uf_xmem; /* Pointer to cross mem desc */
} update_flash_t;
#endif /* _H_REBOOT */
In AIX 5L Version 5.1 the prototype has been enhanced to be compatible with Linux. The new prototype is similar to the following:
typedef struct {caddr_t uf_strt_ptr; /* Pointer to start of image */ulong uf_img_len; /* Length of image */void *uf_xmem; /* Pointer to cross mem desc */
} update_flash_t;
#ifdef _LINUX_SOURCE_COMPATextern int __linux_reboot(int);#define reboot(a) __linux_reboot((a))
6.2.1 Compiling open source software This short section describes how to compile and install open source software without using the RPM utility. Basically, by using the utilities provided by the
Chapter 6. Linux applications on AIX (5.1.0) 389
Toolbox, this can be done as usual for those packages. As an example, use the fvwm2 window manager. Download the sources, starting at http://fvwm.org or http://xwinman.org, and unpack under the directory /opt/freeware/src:
# cd /opt/freeware/src# tar -xzvf fvwm-2.2.4.tar.gz
Change to the newly created fvwm-2.2.4 directory and follow the instructions in the INSTALL and README files. During the final make install, the software will be installed in subdirectories (like bin, lib, man, and so on) of the directory given as the --prefix option to configure. Remember to set the environment appropriately to be able to execute the binaries and find the executables later on:
# /configure --prefix=/opt/freeware[...skipping some output...]
Configuration:
FVWM Version: 2.2.4
Build extra modules? noHave ReadLine support? noHave RPlay support? noHave XPM support? no: Xpm library or header not found!
# make 2>&1 | tee make.log[...skipping some output...]
# make install 2>&1 | tee makeinstall.log[...skipping some output...]
The previously described installation procedure is generic for applications developed according to the GNU coding standards, as described at http://www.gnu.org/prep/standards_toc.html. In general, developing applications according to these standards will ensure easy portability to various UNIX-based platforms, including Linux.
However, if a Linux application does not compile on AIX, then you should add -D_LINUX_SOURCE_COMPAT to the compiler flags and try again. In general, the flag is not needed, but few functions require it. It is always safe to use the flag when compiling Linux applications.
390 AIX 5L Differences Guide Version 5.1 Edition
Chapter 7. Workload Manager
AIX Workload Manager (WLM) is an operating system feature introduced in AIX Version 4.3.3. It is a part of the operating system kernel at no additional charge.
In AIX 5L, WLM provides additional controls that fill out many of the capabilities of Workload Manager.
Keep in mind that the discussion of AIX Version 4.3.3 and previous POWER platform editions in this section is only for historical reference. AIX 5L for Itanium-based systems benefit from all the enhancements made in previous POWER platform releases, as the cumulative function was ported.
7.1 Overview
WLM is designed to give the system administrator greater control over how the scheduler and Virtual Memory Manager (VMM) allocate CPU, physical memory, and I/O resources to processes. It can be used to prevent different jobs from interfering with each other and to allocate resources based on the requirements of different groups of users.
The major use of WLM is for large SMP systems, and it is typically used for server consolidation, where workloads from many different server systems, (print, database, general user, transaction processing systems, and so on) are combined. These workloads often compete for resources and have differing goals and service level agreements. At the same time, WLM can be used in uniprocessor workstations to improve responsiveness of interactive work by reserving physical memory. WLM can also be used to manage individual SP nodes.
WLM provides isolation between user communities with very different system behaviors. This can prevent effective starvation of workloads with certain characteristics, such as interactive or low CPU usage jobs, by workloads with other characteristics, such as batch or high CPU usage.
WLM offers the system administrator the ability to create different classes of service and specify attributes for those classes. The system administrator has the ability to classify jobs automatically into classes, based upon the user, group, or path name of the application.
WLM configuration is performed through the preferred interface, the Web-based System Manager (Figure 132), through a text editor and AIX commands, or through the AIX administration tool SMIT.
Figure 132. Web-based System Manager Overview and Tasks dialog
7.2 Workload Manager enhancements history
Since it was first released in AIX Version 4.3.3, Workload Manager (WLM) has gained new features and architectural improvements.
7.2.1 AIX Version 4.3.3In AIX Version 4.3.3, WLM was able to allocate CPU and physical memory resources to classes of jobs and allowed processes to be assigned to classes based on user, group, or application (Figure 133 on page 393).
392 AIX 5L Differences Guide Version 5.1 Edition
Figure 133. Basic Workload Manager elements in AIX Version 4.3
7.2.2 AIX Version 4.3.3 with Maintenance Level 2With AIX Maintenance Level 2 (APAR IY06844), additional features were added to the first release of WLM, which were:
• Classification of existing processes to avoid stopping and starting applications when stopping and starting WLM.
• Passive mode to allow before and after WLM comparisons.
• Management of application file names, which allowed WLM to start even if some applications listed in the rules file could not be accessed.
7.2.3 AIX 5LThis section focuses on WLM functions that are available in AIX 5L, starting by outlining the enhancements it presents over its earlier release. The enhancements include:
• Management of disk I/O bandwidth, in addition to the already existing CPU cycles and real memory.
• Graphic display of resource utilization.
• Performance Toolbox integration with WLM classes, enabling the toolbox to display performance statistics.
Users
Groups
Apps/Jobs
Tiers
Class Lim it
Classes
Class Target (Shares)
Rules
Process attribute value
Memory
CPU Time
System resources
Chapter 7. Workload Manager 393
• Fully dynamic configuration, including setting up new classes without restarting WLM.
• Application Programming Interface (API) to enable external applications to modify the system’s behavior.
• Manual reclassification of processes, which provides the ability to have multiple instances of the same application in different classes.
• More application isolation and control:
- New subclasses add ten times the granularity of control (from 27 to 270 controllable classes).
- Administrators can delegate subclass management to other users and groups rather than root or system.
- Possibility of inheritance of classification from parent to child processes.
• Application path name wildcard flexibility extended to user name and group name.
• Tier separation enforced for all resources, enabling a deeper prioritization of applications.
7.3 Concepts and architectural enhancements
The following section outlines the concepts provided with WLM on AIX 5L.
7.3.1 ClassesThe central concept of WLM is the class. A class is a collection of processes (jobs) that has a single set of resource limits applied to it. WLM assigns processes to the various classes and controls the allocation of system resources among the different classes. For this purpose, WLM uses class assignment rules and per-class resource shares and limits set by the system administrator. The resource entitlements and limits are enforced at the class level. This is a way of defining classes of service and regulates the resource utilization of each class of applications to prevent applications with very
For more information on previous Workload Manager architecture and features, refer to the following publications:
• AIX Version 4.3 Differences Guide, SG24-2014
• AIX 5L Workload Manager (WLM), SG24-5977
Note
394 AIX 5L Differences Guide Version 5.1 Edition
different resource utilization patterns from interfering with each other when they are sharing a single server.
7.3.1.1 Hierarchy of classesWLM allows system administrators to set up a hierarchy of classes with two levels by defining superclasses and subclasses. In other words, a class can either be a superclass or a subclass. The main difference between superclasses and subclasses is the resource control (shares and limits):
• At the superclass level, the determination of resource entitlement (based on the resource shares and limits) is based on the total amount of each resource managed by WLM available on the machine.
• At the subclass level, the resource shares and limits are based on the amount of each resource allocated to the parent superclass.
The system administrator (the root user) can delegate the administration of the subclasses of each superclass to a superclass administrator (a non-root user), thus allocating a portion of the system resources to each superclass and then letting superclass administrators distribute the allocated resources among the users and applications they manage.
WLM supports 32 superclasses (27 user defined plus five predefined). In turn, each superclass can have 12 subclasses (10 user defined and two predefined, as shown in Figure 134 on page 396). Depending on the needs of the organization, a system administrator can decide to use only superclasses or both superclasses and subclasses. An administrator can also use subclasses only for some of the superclasses.
Each class is given a name by the WLM administrator who creates it. A class name can be up to 16 characters long and can only contain uppercase and lowercase letters, numbers, and underscores (_). For a given WLM configuration, the names of all the superclasses must be different from one another, and the names of the subclasses of a given superclass must be different from one another. Subclasses of different superclasses can have the same name. The fully qualified name of a subclass is superclass_name.subclass_name.
In the remainder of this section, whenever the term class is used, it is applicable to both subclasses and superclasses. The following subsections describe both super and subclasses in greater detail, as well as the backward compatibility WLM provides to configurations of its first release.
Chapter 7. Workload Manager 395
Figure 134. Hierarchy of Classes
7.3.1.2 SuperclassesA superclass is a class with subclasses associated with it. No process can belong to the superclass without also belonging to a subclass, either predefined or user defined. A superclass has a set of class assignment rules that determines which processes will be assigned to it. A superclass also has a set of resource limitation values and resource target shares that determine the amount of resources that can be used by processes belonging to it. These resources will be divided among the subclasses based on the resource limitation values and resource target shares of the subclasses.
Up to 27 superclasses can be defined by the system administrator. In addition, five superclasses are automatically created to deal with processes, memory, and CPU allocation, as follows:
• Default superclass: The default superclass is named Default and is always defined. All non-root processes that are not automatically assigned to a specific superclass will be assigned to the Default superclass. Other processes can also be assigned to the Default superclass by providing specific assignment rules.
• System superclass: This superclass has all privileged (root) processes assigned to it if they are not assigned by rules to a specific class, plus the pages belonging to all system memory segments, kernel processes, and kernel threads. Other processes can also be assigned to the System superclass. This default is for this superclass to have a memory minimum limit of one percent.
• Shared superclass: This superclass receives all the memory pages that are shared by processes in more than one superclass. This includes pages in shared memory regions and pages in files that are used by processes in more than one superclass (or in subclasses of different superclasses). Shared memory and files used by multiple processes that belong to a single superclass (or subclasses of the same superclass) are
Superclass Superclass Superclass
subclass subclasssubclass
396 AIX 5L Differences Guide Version 5.1 Edition
associated with that superclass. The pages are placed in the Shared superclass only when a process from a different superclass accesses the shared memory region or file. This superclass can have only physical memory shares and limits applied to it. It can not have shares or limits for the other resource types, subclasses, or assignment rules specified. Whether a memory segment shared by the processes in the different superclasses is classified into the Shared superclass, or remains in the superclass it was initially classidied into depends on the value of the localshm attribute of the superclass the segment was initially classified into.
• Unclassified superclass: The processes in existence at the time WLM is started are classified according to the assignment rules of the WLM configuration being loaded. During this initial classification, all the memory pages attached to each process are charged either to the superclass the process belongs to (when not shared, or shared by processes in the same superclass) or to the Shared superclass, when shared by processes in different superclasses. However, there are a few pages that can not be directly tied to any processes (and thus to any class) at the time of this classification, and this memory is charged to the Unclassified superclass; for example, pages from a file that has been closed. The file pages will remain in memory, but no process owns these pages; therefore, they can not be charged to a specific class. Most of this memory will end up being correctly reclassified over time, when it is either accessed by a process, or freed and reallocated to a process after WLM is started. There are a few kernel processes, such as wait or Irud, in the Unclassified superclass. Even though this superclass can have physical memory shares and limits applied to it, WLM commands do not allow you to set shares and limits or specify subclasses or assignment rules on this superclass.
• Unmanaged superclass: A special superclass named Unmanaged will always be defined. No processes will be assigned to this class. This class will be used to accumulate the memory usage for all pinned pages in the system that are not managed by WLM. The CPU utilization for the waitprocs is not accumulated in any class. This is deliberate; otherwise, the system would always seem to be at 100 percent CPU utilization, which could be misleading for users when looking at the WLM or system statistics. This superclass can not have shares or limits for any other resource types, subclasses, or assignment rules specified.
7.3.1.3 SubclassesA subclass is a class associated with exactly one superclass. Every process in the subclass is also a member of the superclass. Subclasses only have access to resources that are available to the superclass. A subclass has a set
Chapter 7. Workload Manager 397
of class assignment rules that determine which of the processes assigned to the superclass will belong to it. A subclass also has a set of resource limitation values and resource target shares that determine the resources that can be used by processes in the subclass. These resource limitation values and resource target shares indicate how much of the superclass’s target (the resources available to the superclass) can be used by processes in the subclass.
Up to 10 out of a total of 12 subclasses can be defined by the system administrator or by the superclass administrator for each superclass. In addition, two special subclasses, Default and Shared, are always defined in each superclass as follows:
• Default subclass: The default subclass is named Default and is always defined. All processes that are not automatically assigned to a specific subclass of the superclass will be assigned to the Default subclass. You can also assign other processes to the Default subclass by providing specific assignment rules.
• Shared subclass: This subclass receives all the memory pages used by processes in more than one subclass of the superclass. This includes pages in shared memory regions and pages in files that are used by processes in more than one subclass of the same superclass. Shared memory and files used by multiple processes that belong to a single subclass are associated with that subclass. The pages are placed in the Shared subclass of the superclass only when a process from a different subclass of the same superclass accesses the shared memory region or file. There are no processes in the Shared subclass. This subclass can only have physical memory shares and limits applied to it. It can not have shares or limits for the other resource types or assignment rules specified.
7.3.2 TiersTier configuration is based on the importance of a class relative to other classes in WLM. There are 10 available tiers from 0 through to 9. Tier value 0 is the most important and value 9 is the least important. As a result, classes belonging to tier 0 will get resource allocation priority over classes in tier 1; classes in tier 1 will have priority over classes in tier 2; and so on. The default tier number, if the attribute is not specified, is 0.
The tier applies at both the superclass and subclass levels. Superclass tiers are used to specify resource allocation priority between superclasses, and subclass tiers are used to specify resource allocation priority between subclasses of the same superclass. There is no relationship between tier numbers of subclasses of different superclasses.
398 AIX 5L Differences Guide Version 5.1 Edition
Tier separation, in terms of prioritization, is much more enforced in AIX 5L than in the previous release. A process in tier 1 will never have priority over a process in tier 0, since there is no overlapping of priorities in tiers. It is unlikely that classes in tier 1 will acquire any resources if the processes in tier 0 are consuming all the resources. This occurs because the control of leftover resources is much more restricted than in the AIX Version 4.3.3 release of WLM, as shown in Figure 135.
Figure 135. Resources cascading through tiers
7.3.3 Class attributesIn order to create a class, there are different attributes that are needed to have an accurate and well organized group of classes. Figure 136 on page 400 shows the SMIT panel for Class attributes.
Tier 2
Tier 1
Tier 0
Excess resourcescascade down
to next tier
Chapter 7. Workload Manager 399
Figure 136. SMIT with the class creation attributes screen
The sequence of attributes within a class (as shown in Figure 136) is outlined below:
Class name It is a unique class name with up to 16 characters. It can contain uppercase and lowercase letters, numbers, and underscores (_).
DescriptionAn optional brief description about this class.
TierA number between 0 and 9, for class priority ranking. It will be the tier that this class will belong to. An explanation about tiers can be found in 7.3.2, “Tiers” on page 398.
Resource SetThis attribute is used to limit the set of resources a given class has access to in terms of CPUs (processor set). The default, if unspecified, is system, which gives access to all the CPU resources available on the system.
InheritanceThe inheritance attribute indicates whether or not a child process should inherit its parent’s class or get classified according to the automatic assignment rules upon exec. The possible values are yes or no; the default is no. This attribute can be specified at both superclass and subclass level.
400 AIX 5L Differences Guide Version 5.1 Edition
User and Group authorized to assign its processes to this class These attributes are valid for all the classes. They are used to specify the user name and the group name of the user or group authorized to manually assign processes to the class. When manually assigning a process (or a group of processes) to a superclass, the assignment rules for the superclass are used to determine which subclass of the superclass each process will be assigned to.
User and Group authorized to administer this class These attributes are valid only for superclasses. They are used to delegate the superclass administration to a user and group of users.
LocalchmSpecifies whether memory segments that are accessed by processes in different classes remain local to the class they were initially assigned to, or if they go to the Shared class.
7.3.3.1 Segment authorization to migrate to the Shared class (5.1.0)With Workload Manager in earlier versions of AIX, whenever a memory segment is accessed by processes from different classes, the segment is reclassified as Shared. This occurrs because one of the classes sharing the memory segment would otherwise be penalized as the user of this resource while the others are not. The consequence of the segment moving to Shared is that users partially lose control of it. In AIX 5L Version 5.1, an attribute has been added at the class level to avert the automatic reclassification of the class. This attribute, localshm, if set to no, allows the segment to be reclassified to the Shared class. If it is set to yes, then it is not reclassified. From the command line, the command will be similar to that shown in the example below:
# mkclass -a tier=2 -a adminuser=wlmu6 -a localshm=yes -c shares=2\
-m shares=3 -d new_config super3
From the SMIT panels, general characteristics of a class panel will have the localshm option, as in the example shown in Figure 137 on page 402.
Chapter 7. Workload Manager 401
Figure 137. SMIT panel shows the additional localshm attribute
7.3.4 Classification processThere are two ways to classify processes in WLM:
• Automatic assignment when a process calls the system call exec, using assignment rules specified by a WLM administrator. This automatic assignment is always in effect (can not be turned off) when WLM is active. This is the most common method of assigning processes to the different classes.
• Manual assignment of a selected process or group of processes to a class by a user with the required authority on both the process and the target class. This manual assignment can be done either by a WLM command, which could be invoked directly or through SMIT or Web-based System Manager, or by an application, using a function of the WLM Application Programming Interface. Manual assignment overrides automatic assignment.
7.4 Automatic assignment
The automatic assignment of processes to classes uses a set of class assignment rules specified by a WLM administrator. There are two levels of assignment rules:
402 AIX 5L Differences Guide Version 5.1 Edition
• A set of assignment rules at the WLM configuration level used to determine which superclass a given process should be assigned to.
• A set of assignment rules at the superclass level used to determine which subclass of the superclass the process should be assigned to.
The assignment rules at both levels have exactly the same format.
When a process is created by fork, it remains in the same class as its parent. Usually, reclassification happens when the new process calls the system call exec. In order to classify the process, WLM starts by examining the top level rules list for the active configuration to find out which superclass the process should belong to. For this purpose, WLM takes the rules one at a time, in the order they appear in the file, and checks the current values for the process attributes against the values and lists of values specified in the rule. When a match is found, the process will be assigned to the superclass named in the first field of the rule. Then the rules list for the superclass is examined in the same way to determine which subclass of the superclass the process should be assigned to. For a process to match one of the rules, each of its attributes must match the corresponding field in the rule. The rules to determine whether the value of a process attribute matches the values in the field of the rules list are as follows:
• If the field in the rule has a value of hyphen (-), any value of the corresponding process attribute is a match.
• If the value of the process attribute (for all the attributes except type) matches one of the values in the list in a rule, and it is not excluded (prefaced by an exclamation point (!)), it is considered a match.
• When one of the values for type attribute in the rule is comprised of two or more values separated by a plus (+) sign, a process will be a match for this value only if its characteristics match all the values mentioned above.
As previously mentioned, at both superclass and subclass levels, WLM goes through the rules in the order in which they appear in the rules list, and classifies the process in the class corresponding to the first rule for which the process is a match. This means that the order of the rules in the rules list is extremely important, and caution must be applied when modifying it in any way.
7.5 Manual assignment
Manual assignment is a feature introduced in AIX 5L WLM. It allows system administrators and applications to override, at any time, the traditional WLM
Chapter 7. Workload Manager 403
automatic assignment (processes’ automatic classification based on class assignment rules) and force a process to be classified in a specific class.
The manual assignment can be made or canceled separately at the superclass level, the subclass level, or both. In order to manually assign processes to a class or cancel an existing manual assignment, a user must have the right level of privilege (that is, must be the root user, adminuser, or admingroup for the superclass or authuser and authgroup for the superclass or subclass). A process can be manually assigned to a superclass only, a subclass only, or to a superclass and a subclass of the superclass. In the latter case, the dual assignment can be done simultaneously (with a single command or API call) or at different times, possibly by different users.
A manual assignment will remain in effect (and a process will remain in its manually assigned class) until:
• The process terminates.
• WLM is stopped. When WLM is restarted, the manual assignments in effect when WLM was stopped are lost.
• The class the process has been assigned to is deleted.
• A new manual assignment overrides a prior one.
• The manual assignment for the process is canceled.
In order to assign a process to a class or cancel a prior manual assignment, the user must have authority both on the process and on the target class. These constraints translate into the following:
• The root user can assign any process to any class.
• A user with administration privileges on the subclasses of a given superclass (that is, the user or group name matches the attributes adminuser or admingroup of the superclass) can manually reassign any process from one of the subclasses of this superclass to another subclass of the superclass.
• A user can manually assign their own processes (same real or effective user ID) to a superclass or a subclass for which they have manual assignment privileges (that is, the user or group name matches the attributes authuser or authgroup of the superclass or subclass).
This defines three levels of privilege among the persons who can manually assign processes to classes, root being the highest. In order for a user to modify or cancel a manual assignment, the user must be at the same or higher level of privilege as the person who issued the last manual assignment.
404 AIX 5L Differences Guide Version 5.1 Edition
7.5.1 Class assignment rulesAfter the definition of a class, it is time to set up the class assignment rules so that WLM can perform its automatic assignment. The assignment rules are used by WLM to assign a process to a class based on the user, group, application path name, type of process, and application tag, or a combination of these five attributes.
The next sections describe the attributes that constitute a class assignment rule. All these attributes can contain a hyphen (-), which means that this field will not be considered when assigning classes to a process.
Class nameThis field must contain the name of a class which is defined in the class file corresponding to the level of the rules file we are configuring (either superclass or subclass). Class names can contain only uppercase and lowercase letters, numbers, and underscores (_) and can be up to 16 characters in length. No assignment rule can be specified for the system defined classes Unclassified, Unmanaged, and Shared.
ReservedReserved for future use. Its value must be a hyphen (-), and it must be present in the rule.
UserThe user name (as specified in the /etc/passwd file, LDAP, or in NIS) of the user owning a process can be used to determine the class to which the process belongs. This attribute is a list of one or more user names, separated by a comma (,). Users can be excluded by using an exclamation point (!) prefix. Patterns can be specified to match a set of user names using full Korn shell pattern matching syntax.
Applications which use the setuid permission to change the effective user ID they run under are still classified according to the user that invoked them. The processes are only reclassified if the change is done to the real user ID (UID).
GroupThe group name (as specified in the /etc/group file, LDAP, or in NIS) of a process can be used to determine the class to which the process belongs. This attribute is a list composed of one or more groups, separated by a comma (,). Groups can be excluded by using an exclamation point (!) prefix. Patterns can be specified to match a set of group names using full Korn shell pattern matching syntax.
Chapter 7. Workload Manager 405
Applications which use the setgid permission to change the effective group ID they run under are still classified according to the group that invoked them. The processes are only reclassified if the change is done to the real group ID (GID).
Application path namesThe full path name of the application for a process can be used to determine the class to which a process belongs. This attribute is a list composed of one or more applications, separated by a comma (,). The application path names will be either full path names or Korn shell patterns that match path names. Application path names can be excluded by using an exclamation point (!) prefix.
Process typeIn AIX 5L, the process type attribute is introduced as one of the ways to determine the class to which a process belongs. This attribute consists of a comma-separated list, with one or more combination of values, separated by a plus sign (+). A plus sign (+) provides a logical and function, and a comma provides a logical or function. Table 46 provides a list of process types that can be used. (Note: 32bit and 64bit are mutually exclusive.)
Table 46. List of process types
Application tagsIn AIX 5L, the application tag attribute is introduced as one of the forms of determining the class to which a process belongs. This is an attribute meant to be set by WLM’s API, as a way to further extend the process classification possibilities. This process was created to allow differentiated classification for different instances of the same application. This attribute can have one or more application tags, separated by commas (,). An application tag is a string of up to 30 alphanumeric characters.
The classification is done by comparing the value of the attributes of the process at exec time against the lists of class assignment rules to determine which rule is a match for the current value of the process attributes. The class assignment is done by WLM:
Attribute value Process type
32bit The process is a 32-bit process.
64bit The process is a 64-bit process.
plock The process called plock() to pin memory.
fixed The process has a fixed priority (SCHED_FIFO or SCHED_RR).
406 AIX 5L Differences Guide Version 5.1 Edition
• When WLM is started for all the processes existing at that time.
• Every time a process calls the system calls exec, setuid (and related calls), setgid (and related calls), setpri, and plock, once WLM is started.
There are two default rules that are always defined (that is, hardwired in WLM). These are the default rules that assign all processes started by the user root to the System class, and all other processes to the Default class. If WLM does not find a match in the assignment rules list for a process, these two rules will be applied (the rule for System first), and the process will go to either System (UID root) or Default. These default rules are the only assignment rules in the standard configuration installed with AIX.
Table 47 is an example of classes with their respective attributes for assignment rules.
Table 47. Examples of class assignment rules
In Table 47, the rule for Default class is omitted from display, though this class’s rule is always present in the configuration. The rule for System is explicit, and has been put first in the file. This is deliberate so that all processes started by root will be assigned to the System superclass. By moving the rule for the System superclass further down in the rules file, the system administrator could have chosen to assign the root processes that would not be assigned to another class (because of the application executed, for example) to System only. In Table 47, with the rule for System on top, if root executes a program in /usr/oracle/bin/db* set, the process will be classified as System. If the rule for the System class were after the rule for the db2 class, the same process would be classified as db1 or db2, depending on the tag.
These examples show that the order of the rules in the assignment rules file is very important. The more specific assignment rules should appear first in the rules file, and the more general rules should appear last. An extreme
Class Reserved User Group Application Type Tag
System - root - - - -
db1 - - - /usr/oracle/bin/db* - _db1
db2 - - - /usr/oracle/bin/db* - _db2
devlt - - dev - 32bit -
VPs - bob,!ted - - - -
acctg - - acct* - - -
Chapter 7. Workload Manager 407
example would be putting the default assignment rule for the Default class, for which every process is a match, first in the rules file. That would cause every process to be assigned to the Default class (the other rules would, in effect, be ignored).
You can define multiple assignment rules for any given class. You can also define your own specific assignment rules for the System or Default classes. The default rules mentioned previously for these classes would still be applied to processes that would not be classified using any of the explicit rules.
7.5.2 Backward compatibility issuesAs mentioned earlier, in the first release of WLM, the system default for the resource shares was one share. In AIX 5L, it is (-), which means that the resource consumption of the class for this particular resource is not regulated by WLM. This changes the semantics quite a bit, and it is advisable that system administrators review their existing configurations and consider if the new default is good for their classes, or if they would be better off either setting up a default of one share (going back to the previous behavior) or setting explicit values for some of the classes.
In terms of limits, the first release of WLM only had one maximum, not two. This maximum limit was in fact a soft limit for CPU and a hard limit for memory. Limits specified for the old format, min percent-max percent, will have, in AIX 5L, the max interpreted as a softmax for CPU and both values of hardmax and softmax for memory. All interfaces (SMIT, AIX commands, and Web-based System Manager) will convert all data existing from its old format to the new one.
The disk I/O resource is new for the current version, so when activating the AIX 5L WLM with the configuration files of the first WLM release, the values for the shares and the limits will be the default ones for this resource. The system defaults are:
So, for existing WLM configurations, the disk I/O resource will not be regulated by WLM, which should lead to the same behavior for the class as with the first version.
408 AIX 5L Differences Guide Version 5.1 Edition
7.6 Resource sets
WLM uses the concept of resource sets (or rsets) to restrict the processes in a given class to a subset of the system's physical resources. In AIX 5L, the physical resources managed are the memory and the processors. A valid resource set is composed of memory and at least one processor.
Figure 138 shows the SMIT panel where a resource set can be specified for a specific class.
Figure 138. Resource set definition to a specific class
By default, the system creates one resource set for all physical memory, one for all CPUs, and one separate set for each individual CPU in the system. The lsrset command lists all resource sets defined. A sample output for thelsrset command follows:
# lsrset -avT Name Owner Group Mode CPU Memory Resourcesr sys/sys0 root system r----- 4 511 sys/sys0sys/node.00000 sys/mem.00000 sys/cpu.00003 sys/cpu.00002 sys/cpu.00001sys/cpu.00000r sys/node.00000 root system r----- 4 511 sys/sys0sys/node.00000 sys/mem.00000 sys/cpu.00003 sys/cpu.00002 sys/cpu.00001sys/cpu.00000r sys/mem.00000 root system r----- 0 511 sys/mem.00000
Chapter 7. Workload Manager 409
r sys/cpu.00003 root system r----- 1 0 sys/cpu.00003r sys/cpu.00002 root system r----- 1 0 sys/cpu.00002r sys/cpu.00001 root system r----- 1 0 sys/cpu.00001r sys/cpu.00000 root system r----- 1 0 sys/cpu.00000
7.6.1 Rset registryAs mentioned previously, some resource sets in AIX 5L are created, by default, for memory and CPU. It is possible to create different resource sets by grouping two or more resource sets and storing the definition in the rset registry.
The rset registry services enable system administrators to define and name resource sets so that they can then be used by other users or applications. In order to alleviate the risks of name collisions, the registry supports a two level naming scheme. The name of a resource set takes the form name_space/rset_name. Both the namespace and rset_name may each be 255 characters in size, are case-sensitive, and may contain only upper and lower case letters, numbers, underscores, and periods (.). The namespace of sys is reserved by the operating system and used for rset definitions that represent the resources of the system.
The SMIT rset command has options to list, remove, or show a specific resource set used by a process and the management tools, as shown in Figure 139.
Figure 139. SMIT main panel for resource set management
410 AIX 5L Differences Guide Version 5.1 Edition
To create, delete, or change a resource set in the rset registry, you must select the Manage Resource Set Database item in the SMIT panel. In this panel, it is also possible to reload the rset registry definitions to make all changes available to the system. Figure 140 shows the SMIT panel for rset registry management.
Figure 140. SMIT panel for rset registry management
To add a new resource set, you must specify a name space, a resource set name, and the list of resources. It is also possible to change the permissions for the owner and group of this rset. In addition, permissions for the owner, groups and others can also be specified. Figure 141 on page 412 shows the SMIT panel for this task.
Chapter 7. Workload Manager 411
Figure 141. SMIT panel to add a new resource set
Whenever a new rset is created, deleted, or modified, a reload in the rset database is needed in order to make the changes effective.
7.7 WLM configuration enhancements
In AIX 5L, both the SMIT-based and the Web-based System Manager versions of WLM configuration are enhanced. Many new options are included because of the new features presented earlier in this section.
Figure 142 on page 413 shows a SMIT character-based main panel for Workload Manager.
412 AIX 5L Differences Guide Version 5.1 Edition
Figure 142. SMIT main panel for Workload Manager configuration
It is also possible to view, modify or create Workload Manager through the Web-based System Manager, as shown on Figure 143 on page 414.
Chapter 7. Workload Manager 413
Figure 143. Web-based System Manager options for Workload Manager
7.7.1 Work on alternate configurationsThis option allows you to create specific sets of configurations, each one with its own classes and rules. This is useful when different resources are needed for the same classes, or to provide a way to switch among different behaviors (for example, in a contingency situation).
When creating a new alternate configuration, WLM provides a sample configuration, called template, that defines the predefined superclasses: Default, System, and Shared.
If this option is selected in the SMIT panel, it will open a new submenu with some additional options, which are discussed in the following sections.
7.7.1.1 Show all configurationsThis option will display a list of all alternate configurations defined in the system. A sample output for this option is below:
COMMAND STATUS
Command: OK stdout: yes stderr: no
414 AIX 5L Differences Guide Version 5.1 Edition
Before command completion, additional instructions may appear below.
redbook : Redbook Configurationstandard : Sample for Redbooktemplate : Template to create a new configuration -test : Template to create a new configuration -
7.7.1.2 Copy a configurationThis option copies an entire configuration to a different configuration set. It will preserve all definitions created or changed. It can be used, if you need to have multiple configuration sets, with slight differences on the attributes with the same, or almost the same, number and naming convention for superclasses and subclasses.
7.7.1.3 Create a configurationA new configuration set will be created, using the default sample, which will create three basic classes: System, Default, and Shared. These classes are defined in the sample configuration called Template within WLM.
7.7.1.4 Select a configurationIn this option, you can switch to an alternate configuration. Keep in mind that this selection will be effective after the next WLM update or restart.
7.7.1.5 Enter configuration descriptionEach alternate configuration set has a label that can be modified to describe goals, or any other information.
7.7.1.6 Remove a configurationThis option allows you to completely remove a configuration from the system.
7.7.2 Work on a set of SubclassesThis option allows you to change the class set. A class set is needed when you need add, remove, or change attributes in subclasses for a superclass. If hyphen (-) is selected, then any add, remove, or change class operations will be effective in the superclass layer. On the other hand, if there is a Superclass assigned in this option, all the class operations will occur in the Subclass layer for this specific Superclass.
In Figure 144 on page 416, user in Superclasses was selected as the class set, and the operation created a new subclass named DB for superclass user.
Chapter 7. Workload Manager 415
Figure 144. An example of adding a subclass to a superclass
7.7.3 Show current focusThis option provides output for two sets: the Configuration set and the Class set. This option is necessary when you do not know which configuration or class set you are pointing to.
COMMAND STATUS
Command: OK stdout: yes stderr: no
Before command completion, additional instructions may appear below.
Configuration: redbookClass set: Subclasses of user/
current -> redbook
System user Default
Superclasses
System user Default
DB
add DB subclass
select a superclass to change class set
416 AIX 5L Differences Guide Version 5.1 Edition
7.7.4 List all classesThis option shows a list of classes. If the class set is pointing to a specific Superclass, then all Subclasses for this specific Superclass will be listed. Otherwise, a list of Superclasses will be showed.
COMMAND STATUS
Command: OK stdout: yes stderr: no
Before command completion, additional instructions may appear below.
DefaultShareddb
7.7.5 Add a classThis option can be used to add a new Superclass or Subclass. Section 7.3.3, “Class attributes” on page 399 gives a detailed description of all the fields for this panel.
7.7.6 Change/Show Characteristics of a classThis option allows you to change a class configuration. For example, tier, resource set, or administration users. But it also lets you change resource management characteristics for CPU, memory, and disk I/O. There is also a new option for limit.
7.7.6.1 General characteristics of a classIt is possible to change all the characteristics of a class; see Section 7.3.3, “Class attributes” on page 399 for a list of attributes that can be modified with this option. Figure 136 on page 400 shows the SMIT panel for this option.
7.7.6.2 CPU resource managementIt is possible to change the percentage of minimum and maximum CPU resources for a specific class. A new field introduced in this release is Absolute maximum (%), which controls the enforced maximum CPU consumption for this class, even if there are CPU resources in idle.
A sample CPU resource management SMIT input screen, for db class, follows:
CPU resource management
Type or select values in entry fields.Press Enter AFTER making all desired changes.
[Entry Fields]Class name dbShares [-] #Minimum (%) [0] #
Chapter 7. Workload Manager 417
Maximum (%) [100] #Absolute Maximum (%) [100] #
7.7.6.3 Memory resource managementThe total amount of physical memory available for processes at any given time is the total number of memory pages physically present on the system (minus the number of pinned pages). The pinned pages are not managed by WLM, since these pages can not be stolen from a class and given to another class in order to regulate memory utilization. The memory utilization of a class is simply the ratio of the number of (non-pinned) memory pages being used by all the processes in the class to the number of pages available on the system (as defined above, expressed as a percentage). As in CPU resource management, there are minimum and maximum percentages (%) as soft limits, and absolute maximum as a hard limit.
A sample Memory resource management SMIT input screen for db class follows:
Memory resource management
Type or select values in entry fields.Press Enter AFTER making all desired changes.
[Entry Fields]Class name dbShares [-]Minimum (%) [0]Maximum (%) [100]Absolute Maximum (%) [100]
7.7.6.4 Disk I/O resource managementFor the disk I/O, the main difficulty is determining a meaningful available bandwidth for a device. When a disk is 100 percent busy, its throughput (in blocks per second) will be very different if one application is doing sequential I/Os than if several applications are doing random I/Os. If the maximum throughput measured for the sequential I/O case was used as a value of the I/O bandwidth available for the device to compute the percentage of utilization under random I/Os, statistical errors would be created. It would lead you to think that the device is, for example, 20 percent busy, when it is in fact at 100 percent utilization.
In order to get more accurate and reliable percentages of per class disk utilization, WLM uses the data provided by the disk drivers (which are displayed with the iostat command), giving the percentage of the time the device has been busy during the last second for each disk device. WLM knows how many blocks in total have been read/written on a device during the last few seconds by all the classes accessing the device, how many
418 AIX 5L Differences Guide Version 5.1 Edition
blocks have been read/written by each class, and what was the percentage of utilization of the device, and can easily calculate what percentage of the disk throughput was consumed by each class. For example, if the total number of blocks read or written during the last second was 1000 and the device had been 70 percent busy, this means that a class reading or writing 100 blocks used 7 percent of the disk bandwidth. Similarly, to the CPU time (another renewable resource), the values used by WLM for its disk I/O regulation are also a decayed average over a few seconds of these per second percentages.
For the disk I/O resource, the shares and limits apply to each disk device accessed by the class individually, and the regulation is done independently for each device. Moreover, the same soft and hard limits apply to this resource.
A sample disk I/O resource management SMIT input screen for db class follows:
diskIO resource management
Type or select values in entry fields.Press Enter AFTER making all desired changes.
7.7.7 Remove a classThis option allows you to completely remove a class from the system.
7.7.8 Class assignment rulesAfter creating a class and setting the number of shares, soft and hard limits percentage for CPU, and memory and disk I/O, it is necessary to create the assignment rules. Class assignment rules will allow you to join all the class characteristics together within a specific application, user, and other types.
7.7.8.1 List all RulesThis option will show an output with all defined assignment rules set in the system with their specific characteristics, as in the following:
COMMAND STATUS
Command: OK stdout: yes stderr: no
Before command completion, additional instructions may appear below.
Chapter 7. Workload Manager 419
# Class User Group Application Type Tag001 System root - -002 Default - - -
By default, there are two pre-defined rules that will be available in any WLM class. The first rule is for the System class that causes any application started by root to be assigned to this rule. The second rule is for the Default class, and it defines the rules for any application issued in the system by any user other than root.
7.7.8.2 Create a new RuleTo create an assignment Rule in WLM, you must keep in mind that the order of the rule will be affected by or will affect other rules. WLM will follow the rules beginning with Rule number one (001). Then, for example, if rule number one states that all root user process will belong to System class, any root user process will never be affect by rule number two or later.
Figure 145 shows the SMIT panel for creating a new rule.
Figure 145. Example of SMIT panel for creating a new rule
A discussion of the fields to fill out for Rule Order follows. Order of the Rules and class name are mandatory fields; all others are optional.
Order of the rule Defines the rule order among other rules. The rule number one (001) is the first preferred order.
420 AIX 5L Differences Guide Version 5.1 Edition
Class name Specifies which class will be affected by the rule.
User If specified, it will affect the user processes that match the pattern provided.
Group If specified, it will affect the group processes that match the pattern provided.
Application Affects a specific application, or you can use wildcards to affect a certain range of applications. For example, /tmp/wlm/* will affect any application under the /tmp/wlm directory.
Type Only defined types of applications will be affected.
Tag Affects specific applications that have a tag that matches.
7.7.8.3 Change/Show Characteristics of a RuleIt is possible to change all characteristics established for a Rule, including order and class. Figure 146 shows a SMIT panel used for this item.
Figure 146. Fields that can be modified for a specific rule
Section 7.3.4, “Classification process” on page 402 has a detailed architectural approach about Assignment Rules.
Note
Chapter 7. Workload Manager 421
7.7.8.4 Delete a RuleThis option allows you to completely remove a Rule from the system.
7.7.9 Start, Stop, or Update WLMIn this option, it is possible to Start and Stop WLM. Or, if you modified, created, or removed any component on WLM, you can update so that the changes take effect. Another function of this option is to show the WLM status.
7.7.9.1 Update Workload ManagementThe update function (as shown in Figure 147 on page 423) allows you to create classes, change assignment Rules, and perform many other functions that were not updated in earlier releases.
In this release, any action performed to change the configuration can be updated and be effective without needing to restart WLM.
Another enhancement for Update is the possibility of updating only a specific Superclass instead of the entire WLM.
Note that any creations, deletions, or modifications in any kind of configuration within WLM will only be effective after you update WLM or restart WLM.
Note
422 AIX 5L Differences Guide Version 5.1 Edition
Figure 147. SMIT panel for Update Workload Management
7.7.10 Assign/Unassign processes to a class/subclassTo assign or unassign processes to a class or subclass, use the SMIT menu, as shown in Figure 148 on page 424, or see Section 7.5, “Manual assignment” on page 403 for a description of the process from an architectural point of view.
Chapter 7. Workload Manager 423
Figure 148. SMIT panel for manual assignment of processes
7.7.10.1 Assign/Unassign to/from Superclass/Subclass/BothThis field is used to specify whether you are assigning or unassigning a process and if it belongs to a superclass, subclass, or both.
All the options for this field and their respective description are:
Assign Superclass All desired processes will be assigned to a specific Superclass.
Assign Subclass All desired processes will be assigned to a specific Subclass.
Assign Both All desired processes will be assigned to both Superclass and Subclass levels.
Unassign Superclass All desired processes will be unassigned from a Superclass.
Unassign Subclass All desired processes will be unassigned from a Subclass.
Unassign Both All desired processes will be unassigned from both Superclass and Subclass.
424 AIX 5L Differences Guide Version 5.1 Edition
7.7.10.2 Class nameThis field must contain the Superclass or Subclass that will affect the processes listed to either Assign or Unassign.
7.7.10.3 List of PIDsIt is possible to select multiple processes at once. A comma (,) must be used as a separator between each PID.
7.7.10.4 List of PGIDsIt is also possible to select a single or list of PGIDs instead of single PIDs.
7.7.11 WLM for accounting (5.1.0)Starting with AIX 5L Version 5.1, WLM provides kernel support per class accounting, which means that accounting records can be gathered by WLM class. This new feature implies the enhancement of two new flags for the acctcom command: the -w and -c flags.
The accounting system utility allows you to collect and report on individual, group, and Workload Manager (WLM) class use of various system resources. This accounting information can be used to bill users for the system resources they utilize, and to monitor selected aspects of the system operation. To assist with billing, the accounting system provides the resource-usage totals defined by members of the adm group, and, if the chargefee command is included, factors in the billing fee.
The accounting system also provides data to assess the adequacy of current resource assignments, set resource limits and quotas, forecast future needs, and tracks supplies for printers and other devices.
The acctcom command displays selected process accounting record summaries. Each record represents one completed process. The default display consists of the command name, user name, TTY name, start time, end time, real seconds, CPU seconds, and mean memory size (in kilobytes). These default items have the following headings in the output:
COMMAND START END REAL CPU MEANNAME USER TTYNAME TIME TIME (SECS) (SECS) SIZE(K)
Running the acctcom command with the -w flag will show all processes and their class name. Running the acctcom command with the -c flag displays all processes belonging to the specified class. A mechanism has been introduced to allow users to gather accounting information by class. A 64-bit key is generated from the superclass and subclass names to achieve this function. When the accounting records are processed, the signature of all the
Chapter 7. Workload Manager 425
class names found in /etc/wlm is computed and stored in an internal table. For each record, the signature is compared to this table, and the class name is retrieved. The accounting command translates the key back into the class name.
You can see two different classes: the System.Default class and the Default.Default class. If you want to display all processes belonging to the Default.Default class, the -c flag has to be used:
# acctcom -c Default.DefaultCOMMAND START END REAL CPU MEANNAME USER TTYNAME TIME TIME (SECS) (SECS) SIZE(K)termdef adm ? 10:49:42 10:49:42 0.02 0.02 185.00ls adm ? 10:49:43 10:49:43 0.02 0.02 58.00ps adm ? 10:49:45 10:49:45 0.05 0.03 155.00
Also, a combination of the these two flags can be used:
# acctcom -wc DefaultCOMMAND START END REAL CPU MEANNAME USER CLASS TTYNAME TIME TIME (SECS) (SECS) SIZE(K)termdef adm Default.Default ? 10:49:42 10:49:42 0.02 0.02 185.00ls adm Default.Default ? 10:49:43 10:49:43 0.02 0.02 58.00ps adm Default.Default ? 10:49:45 10:49:45 0.05 0.03 155.00
With the -c option, a superclass name or a full class name can be passed. A superclass name will display the records for all the subclasses:
# acctcom -w -c class1
COMMAND START END REAL CPU MEANNAME USER CLASS TTYNAME TIME TIME (SECS) (SECS) SIZE(K)#date wlmu1 class1.sub2 pts/0 05:26:05 05:26:05 0.09 0.09 95.00date wlmu1 class1.sub2 tty0 05:26:40 05:26:40 0.02 0.02 0.00ls wlmu1 class1.sub2 tty0 05:26:43 05:26:43 0.02 0.02 0.00vi wlmu1 class1.sub2 tty0 05:26:48 05:26:55 7.38 0.03 432.00grep wlmu1 class1.sub2 tty0 05:27:03 05:27:03 0.02 0.02 0.00#ksh wlmu1 class1.sub2 tty0 05:26:36 05:27:05 29.91 0.08 214.00termdef wlmu2 class1.Default tty0 05:27:18 05:27:18 0.02 0.00164.00
7.8 Monitoring WLM with wlmmon and wlmperf (5.1.0)
The new wlmmon command in AIX 5L Version 5.1, and wlmperf command, available with PTX Version 3.0 for AIX 5L and AIX Version 4.3.3, provides graphical views of Workload Manager (WLM) resource activities by class. While the wlmstat command provides a per-second fidelity view of WLM activity, it is not suited for long-term analysis. The wlmmon and wlmperf tools were created to supplement wlmstat.
These tools provide reports of WLM activity over much longer time periods. The wlmmon tool is a disabled version of the wlmperf tool, and the primary difference between the two tools is the period of WLM activity that may be analyzed. The recordings of wlmperf are limited to one year; on the other hand, wlmmon is limited to generating reports within the last 24 hour period. The recordings are generated by associated daemons that have minimal impact on overall system performance. In wlmmon, this daemon is called xmwlm, and ships with the base AIX. For wlmperf, the xmtrend daemon is used to collect and record WLM. These daemons sample WLM and system statistics at a very high rate (measured in seconds), but only record supersampled values at a low rate (measured in minutes). These values represent the minimum, maximum, mean, and standard deviation values for each collected statistic over the recording period. To execute wlmmon and wlmperf, you can enter wlmmon or wlmperf without any options. This section explains the execution of wlmperf; any differences to wlmmon are pointed out in the relevant sections.
Chapter 7. Workload Manager 427
7.8.1 Daemon recording and configurationBoth the wlmmon and wlmperf daemons create recordings in the /etc/perf/wlm directory.
For wlmperf, the xmtrend daemon is used, and will utilize a configuration file for recording preferences. A sample of this configuration file for WLM related recordings is located in /usr/lpp/perfagent.server/xmtrend_wlm.cf. Recording customization, startup, and operation are briefly described in the following section. For more information, please refer to the Performance Toolbox Version 2 and 3 Guide and Reference, SC23-2625.
For wlmmon, the xmwlm daemon is used, and can not be customized. For recordings to be created, adequate disk allocations must be made for the /etc/perf/wlm directory, allowing at least 10 MB of disk space. Additionally, the daemon should be started from an /etc/inittab entry so that recordings will automatically restart after system reboots. The daemon will operate whether the WLM subsystem is in active, passive, or disabled (off) mode. However, recording activity is limited when WLM is off.
In order to start the recording, the daemons have to be active. To start the graphic monitoring tool, run the wlmmon command (base AIX) or the wlmperf command (PTX).
Upon startup, a default Report Display is shown. To view recordings, use the WLM_Console Menu, as described in the next section.
7.8.2 The WLM_Console MenuThe tab down menu WLM_Console, shown in Figure 149 on page 429, displays the following selections:
Open log Allows browsing to and viewing recordings.
Reports Allows opening, copying, or deleting different reports (for wlmperf only).
Print Allows printing the current report.
Exit Exits the wlmmon tool.
428 AIX 5L Differences Guide Version 5.1 Edition
Figure 149. Tab down menu WLM_Console
7.8.3 The WLM Report Browser When selecting the Open Log menu, the Report Browser is displayed, as shown in Figure 150. The browser allows you to browse through the different directories and displays a list of reports.
Figure 150. Report browser
Chapter 7. Workload Manager 429
7.8.4 Report displaysThere are three types of report displays: snapshot display, bar display, and tabulation display. The bar display is opened by default.
These three displays have the following common elements:
WLM Console Tab down menu that allow you to select open recordings (log file), open reports (wlmperf only), print reports, and exit the tool.
Selected Tab down menu that allows you to select the Report Properties.
Tier Column Displays the tier number associated with a class.
Class Column Displays the class name.
Resource Columns Displays the resource information (CPU, memory, and disk I/O) based on the type of graphical report selection chosen.
Status area Displays a set of global system performance metrics that are also recorded to aid in analysis. The set displayed may vary between AIX releases, but will include metrics such as run, queue, swap queue, and CPU busy.
Host Displays the hostname of the system on which the recording was made.
WLM State Displays the state of WLM. This can be Active or Passive.
Time Period Displays the time period defined in the Times menu of the Report Properties Panel. For trend reports comparing two time periods, two time displays are shown.
430 AIX 5L Differences Guide Version 5.1 Edition
7.8.4.1 Bar DisplayAs shown in Figure 151, the resource columns are displayed in bar-graph style, along with the percentage of measured resource activity over the time period specified. The percentage is calculated based on the total system resources defined by the WLM subsystem. If the detailed display is trended, the later (second) measurement is shown above the earlier (first) measurement interval.
Figure 151. Bar view
Chapter 7. Workload Manager 431
7.8.4.2 Snapshot DisplayFigure 152 shows the snapshot display where it focuses on showing class resource relationships based on user-specified variation from the defined target shares. To select or adjust the variation parameters for this display, utilize the Report Properties Panel Advanced menu, as shown in Figure 159 on page 437. If the snapshot display is trended, the earlier (first) analysis period is shown by an arrow pointing from the earlier measurement to the later (second) measurement. If there has been no change between the periods, no arrow is shown.
Figure 152. Snapshot view
7.8.4.3 Tabulation DisplayThe third type of display report is shown in Figure 153 on page 433. In this report, the following fields are provided:
Shares Defined shares in WLM configuration.
Target Computed share value target by WLM in percent. If the share is undefined, the target displays 100.
Min Class minimum defined in WLM limits.
SMax Class soft maximum defined in WLM limits.
HMax Class hard maximum defined in WLM limits.
432 AIX 5L Differences Guide Version 5.1 Edition
Actual Calculated average over the sample period.
Low Actual observed min across time period.
High Actual observed max across time period.
Standard Deviation Computed standard deviation of Actual, High, and Low. Indicates the variability of the Actual values during the recording period. Higher standard deviation means more variability, lower standard deviation means less variability.
Samples Number of recorded samples for this period.
Figure 153. Table view
If the Tabulation Display is trended, the earlier (first) analysis is shown by the first number between the brackets and the later (second) analysis is shown by the second number between the brackets.
7.8.5 The report properties The Report Properties Panel allows the user to define the attributes that control the actual graphical representation of the WLM data. The Report Properties are displayed by selecting Selected at the top of the Report Display, as shown in Figure 154 on page 434.
Chapter 7. Workload Manager 433
Figure 154. Report Properties
7.8.5.1 Times MenuThe first tabbed panel is displayed in Figure 155 on page 435. It allows the user to edit the time properties of a display.
Trend Box Indicates that a trend report of the selected type will be generated. Trend reports allow the comparison of two different time periods on the same display. Selecting this box enables the End of first Period field for editing.
Width of Interval Represents the period of time covered by any display type, measuring from user-input time selections. Interval widths are selected from this pull down menu. The selections available vary depending upon the tool being used. While wlmmon only has selections for minutes and hours, wlmperf has selections for minutes, hours, days, weeks, and months.
End of First Period Represents the end time of a period of interest for generating a trend report. The first period always represents a time frame ending earlier than the last period. This field can only be edited if the Trend Box is selected.
End of Last Period Represents the end time of a period of interest for trend and non-trend reports.
wlmmon does not allow selection of days, weeks, and months.
Note
434 AIX 5L Differences Guide Version 5.1 Edition
Figure 155. Times menu
Figure 156 on page 435 is an example of a trend selection. The display shows different usage of resources between the two time periods. The time periods are displayed in the fields called Period 1 and Period 2.
Figure 156. Example of trend display, bar view
Figure 157 on page 436 also shows an example of a snapshot display using the trend option.
Chapter 7. Workload Manager 435
Figure 157. Example of trend display, snapshot view
7.8.5.2 Tier/Class MenuThe second tabbed pane is displayed in Figure 158. It allows users to define the set of WLM tiers or classes to be included in a report.
The pull down menu at the top allows the user to select whether superclasses or Tiers are to be included or excluded in the Report Display. The list on the bottom then allows the user to select specific tiers or specific superclasses.
Figure 158. Tier / Class menu
436 AIX 5L Differences Guide Version 5.1 Edition
7.8.5.3 Advanced Menu (snapshot option panel)The third panel of the Report Properties panel is displayed, as shown in Figure 154 on page 434. It provides advanced options for the snapshot display. For snapshots, exclusive methods for coloring the display are provided for user selection. Option 1 ignores the minimum and maximum settings defined in the configuration of the WLM environment, while Option 2 utilizes the minimum and maximum settings provided for user selection (Figure 159).
Figure 159. Advanced menu
The following example describes the functions of the Advanced Menu.
Chapter 7. Workload Manager 437
Figure 160. Example of the Advanced menu
Figure 160 shows a class definition with its soft and hard minimum and maximum. The class has as a target (share value) of 50 percent, a minimum limit (MIN) of 20 percent, and maximum limit (MAX) of 90 percent. The functions of the two advanced options are:
Option 1 ignores the user-defined min and max settings. In this example, we selected option 1 with 50 percent as the green range percentage (green%) and 80 percent as the red range percentage (red%), as shown in Figure 159 on page 437.
To define the green range, the following formula is used:
Low green range = Target - (Target x green%) = 50 - (50 x 50%) = 25
High green range = Target + (Target x green%) = 50 + (50 x 50%) = 75
Figure 160 shows the green range from 25 percent to 75 percent, on a scale of 0 to 100 percent.
438 AIX 5L Differences Guide Version 5.1 Edition
The red range is calculated with the same formula but with the red range percentage:
Low red range = Target - (Target x red%) = 50 - (50 x 80%) = 10
High red range = Target + (Target x red%) = 50 + (50 x 80%) = 90
The red range is shown in Figure 160, option 1, 0 to 10 percent and from 90 to 100 percent. The area between the red and green range is yellow.
Option 2 takes in account the predefined minimum limit and maximum limit settings. If we use the same advanced options as in Figure 159 on page 437, the red and green range are interpreted between the target and the hard minimum and hard maximum definitions (here 20 and 90 percent).
Low green range = Target - ((Target - MIN) x green%) = 50 - ((50 - 20) x 50%) = 35 percent on the scale from 0 to 100 percent.
High green range = Target + ((MAX - Target) x green%) = 50 + ((90 - 50) x 50%) = 70 percent on the scale from 0 to 100 percent.
Low red range = Target - ((Target - MIN) x red%) = 50 - ((50 - 20) x 80%) = 26 percent on the scale from 0 to 100 percent.
High red range = Target + ((MAX - Target) x red%)= 50 + ((90 - 50) x 80%) = 82 percent on the scale from 0 to 100 percent.
7.8.6 Files and filesets for wlmmon and wlmperfThe following files and filesets are needed to run wlmmon or wlmperf.
Files
/usr/bin/wlmmon Base AIX, located in perfagent.tools/usr/bin/xmwlm Base AIX, located in perfagent.tools/usr/bin/wlmperf Performance Toolbox/usr/lpp/perfagent.server/xmtrend.cf Performance Toolbox
Prerequisite filesetsThe following filesets are prerequisites for wlmmon:
The National Language Support (NLS) environment is defined by a combination of language and geographic or cultural requirements. These conventions consist of four basic components:
• Translated language of the screens, panels, and messages
• Language convention of the geographical area and culture
• Language of the keyboard
• Language of the documentation
In an effort to support more languages, several enhancements have been made.
Hindi local support was added in AIX 5L Version 5.0.0.
8.1 Input methods for Chinese locale enhancements (5.1.0)
In AIX 5L Version 5.1, the simplified Chinese locale (GBK, Zh_CN) has been enhanced with some new or upgraded input methods (IME). The following topics are discussed in the subsequent sections:
• Intelligent ABC
• BiaoXing Ma
• Zheng Ma
• PinYin
• Internal code
The updates of the input methods under the GBK locale has affected the bos.loc.iso.Zh_CN fileset.
8.1.1 Input methods windowBy default, all supported input methods (including ABC, PinYin, Zheng Ma, BiaoXing Ma, and internal code) are in the enabled status. You can change its status by pressing the Ctrl+F12 keys and then selecting input method to enable or disable it (see Figure 161).
2. Name of Input Methods: Including ABC, PinYin, Zheng Ma, Biao Xing Ma, and Internal Code IME.
3. Status of Input Method: ON/OFF. When the switch is ON, this input method is enabled. When the switch is OFF, it is disabled.
8.1.2 Intelligent ABC input methodIntelligent ABC Input Method (Figure 162) is a Chinese input method that is based on the phonetic representation of Chinese characters. It is very easy to study and master for Chinese people. With the aid of BiXing code, which is based on the basic stroke that construct the glyph of Chinese character, ABC Input Method can input the GBK Chinese character (including GB code) easily.
442 AIX 5L Differences Guide Version 5.1 Edition
Figure 162. ABC input method setting window
Key1. Window of ABC Input Method setting.
2. Ring indication option: If the switch is ON, the system will beep when an error code is generated.
3. Word Frequency Adjustment option: If the switch is ON, the ABC work frequency adjustment function will work as designed.
4. Switch option (ON/OFF): If the switch is OFF, the corresponding function in ABC IME will be disabled. The default is ON.
5. BiXing Code Input option: If the switch is ON, you can press the keypad to input some GBK Chinese characters; otherwise, BiXing input will be ignored.
8.1.3 BiaoXing Ma input method BiaoXing Ma Input Method (Figure 163) is a kind of Chinese input method in which a Chinese character is divided into several components known as radicals according to its writing orders.
BiaoXingMa IME has three options: Ring indication, External code indication, and Displaying as striking.
Chapter 8. National Language Support 443
Figure 163. BiaoXing Ma input method setting window
Key1. Name of BiaoXing Ma IME setting window.
2. Ring indication option: If the switch is ON, the system will beep when an error code is generated.
3. External Code Indication option: If the switch is ON, the system will prompt what kind of external code will be generated next for corresponding candidate Chinese character.
4. Switch option (ON/OFF): If the switch is OFF, the corresponding function will be disabled. The default is ON.
5. Displaying as Striking function option.
8.1.4 Zheng Ma input method Zheng Ma Input Method (Figure 164) is a Chinese input method that is based on the grapheme representation of a Chinese word. According to the modality information of the Chinese character, every word or phrase is assigned a code, which is called graphemic code. ZhengMa is a kind of graphemic code input method.
444 AIX 5L Differences Guide Version 5.1 Edition
Figure 164. Zheng Ma input method setting window
Key1. Name of Zheng Ma IME setting window.
2. Ring indication Option: If the switch is ON, the system will beep when an error code is generated.
3. External Code Indication Option: If the switch is ON, the system will prompt what kind of external code will be generated next for corresponding candidate Chinese character.
4. Switch option (ON/OFF): If the switch is OFF, the corresponding function will be disabled. Default is ON.
5. Displaying as Striking function option.
8.1.5 PinYin input method PinYin Input Method (Figure 165) is a Chinese input method that is based on the phonetic representation of Chinese characters. According to the phonetic word building theory, a Chinese character can be divided into one or several phonemes according to its pronunciation.
PinYin Input method is very similar with the QuanPin mode of Intelligent ABC Input Method, and its input manipulation is completely compliant with the standards of the Chinese Phonetic Scheme. This input method can input all the Chinese characters that are included in the Chinese extended Internal Code Specification.
Chapter 8. National Language Support 445
Figure 165. PinYin input method setting window
Key1. Name of PinYin IME setting window.
2. Ring indication option: If the switch is ON, the system will beep when an error code is generated.
3. Displaying as Striking function option.
4. Switch option (ON/OFF): If the switch is OFF, the corresponding function will be disabled. The default is ON.
8.1.6 Internal code input method Internal code Input method (Figure 166) is an input method that complies with the code table defined in GBK (Chinese Internal Code Specification) and UCS2 (Unicode System Version 2). You can select one of them by pressing the Ctrl+F11 keys. (GBK is the default).
2. Ring indication option: If the switch is ON, the system will beep when an error code is generated.
3. GBK internal code option: If the switch is ON, GBK Internal code will be used. If the switch is OFF, UNICODE will be used instead. The default is the GBK Internal Code.
4. Switch option (ON/OFF)
8.2 Euro support for non-European countries (5.1.0)
AIX already provides full Euro enablement for all supported languages and territories through the UTF-8/Unicode locale environments. However, in AIX 5L Version 5.1, many of the existing country specific codesets have been modified to incorporate the Euro symbol. These modifications are summarized in Table 48.
Table 48. Modified locales for using Euro
To enable the use of the Euro symbol, you have to install all the needed fonts for the specific language environment. The fonts are listed in Table 49.
Table 49. Locale settings versus font fileset
Existing codeset Name Euro symbol value Locales using this codeset
ISO8859-7 0xA4 el_GR (Greece)
IBM-922 0xA4 Et_EE (Estonia)
IBM-921 0xA4 Lv_LV (Latvia) Lt_LT (Lithuania)
IBM-1046 0xFF Ar_AA (Arabic)
IBM-1129 0xA4 Vi_VN (Vietnam)
big5 0xA3E1 Zh_TW (Trad. Chinese)
Locale Font fileset
el_GR (Greece) X11.fnt.iso7
Et_EE (Estonia) X11.fnt.ucs.com
Lv_LV (Latvia), Lt_LT (Lithuania) X11.fnt.ucs.com
Ar_AA (Arabic) X11.fnt.ibm1046
Chapter 8. National Language Support 447
8.2.1 Testing the Euro glyphTo test the Euro glyph, invoke the /usr/dt/bin/dtterm or /usr/bin/X11/aixterm terminal. (The /usr/bin/X11/xterm terminal does not support international locales.) Use the echo command for checking the existence of the Euro glyph:
# echo "\0244"
You can also check the keyboard mappings with the following command:
# xmodmap -pke | grep EuroSignkeycode 27 = e E EuroSign
You can compile and run the following program, to test the output of all printable one byte characters:
#include <stdio.h>main()
{int i;printf(" 0 1 2 3 4 5 6 7 8 9 a b c d e f \n");printf("--------------------------------------------------- \n");
AIX 5L Version 5.1 now provides support for the alternate 103 Korean keyboard. This includes the Korean/English switch key, which is called Hangul. This key is located between the space bar and the right Alt key. There is a Chinese key, called Hanja, that is located between the left Alt key and the space bar.
Keyboard definitions will be added to support this 103-key keyboard in all possible AIX environments. Xmodmap and imkeymap support for X will be provided. LFT support is not possible, because the LFT environment does not have the capacity for multi-byte encoding.
The keyboard definitions for the Korean locale will be based on IBM keyboard number 450. Figure 167 illustrates the keyboard layout.
Figure 167. Korean keyboard
Chapter 8. National Language Support 449
450 AIX 5L Differences Guide Version 5.1 Edition
Chapter 9. Hardware support
This chapter discusses enhancements to AIX 5L that provide additional hardware support.
9.1 Extended Hardware Drivers enhancement (5.1.0)
The Extended Hardware Drivers (EHD) enhancement allows you to acquire and install device driver support that is not contained on the original boot media, in order to fully support AIX 5L Version 5.1 on Itanium-based systems.
Extended Hardware Drivers enhancements include:
• Install device support for the source device or its parent (CD-drive, SCSI adapter, and system object).
• Install device support for the target device or its parent (disk drive).
• Allow installation of replacement drivers, defined here as more specific device drivers that have precedence over the native device driver implementation.
• Allow installation of additional device support in Uniform Device Interface format in normal mode.
However there are two restrictions for EHD installation:
• It only allows installation of supplemental device support from CD-ROM media or NIM during BOS installation. Diskette and LS-120 will not be supported during BOS installation at this time.
• Target and source device support must be in installp or UDI format.
AIX on POWER systems already provides additional device support, although most of the device driver support comes with the AIX boot CD.
For Itanium-based systems, it is more likely that additional device driver support will be required in order to boot and/or install the system. The method used to acquire this support takes advantage of the Itanium-based system boot function.
On POWER systems, the firmware locates the system boot image (network or CD) and loads it into memory and starts the kernel. On Itanium-based systems, a new method of booting exists: firmware finds and loads the bootloader, which then can copy device images into memory before loading the RAM file system and starting the kernel. This feature allows you to install additional device drivers before control is given to the kernel. The device
driver support is added in the RAM file system before the Configuration Manager (cfgmgr) is called.
9.1.1 Installation of UDI and installp formatted device drivers (5.1.0)The installation of UDI and installp formatted device drivers can be done during BOS installation and during normal system mode.
9.1.1.1 During Base Operating System installation.Boot the Itanium-based system from CD-ROM with the Itanium-based product CD-ROM in the drive. The firmware loads the media-specific boot loader from the EFI file system on the CD-ROM.
Choose to activate the boot loader’s menu during boot. This menu contains the following option:
7 -> Load device support files [ON]
Make sure this option is set to on and continue the boot. The system will prompt you to insert the Extended Hardware Drivers CD media, and you will be able to install additional device drivers.
9.1.1.2 During Normal Operation ModeThe installation can be done by using SMIT or Web-based System Manager interface, which allow two ways: going through cfgmgr or devinst.
The cfgmgr -i will call the geninstall command, which also supports UDI, as shown in Figure 168 on page 453.
452 AIX 5L Differences Guide Version 5.1 Edition
Figure 168. SMIT panel for cfgmgr
The other option is installing the device support directly from the media, which allows you to view what support is present and to choose what to install. This option can be obtained through the Install Additional Device Software menu, as shown in Figure 169.
Figure 169. SMIT panel for devinst
Chapter 9. Hardware support 453
The Web-based System Manager allows the same option, along with some new wizards, to help you through the installation and configuration of new devices, as shown in Figure 170 on page 454.
Figure 170. Web-based System Manager devices overview
9.2 Uniform Device Interface (5.1.0)
The Uniform Device Interface (UDI) for Itanium-based systems defines a complete runtime environment for device drivers. This includes the complete set of services and other interfaces needed by a device driver to control its device or pseudo-device and to interact properly with the rest of the system in which it operates. This runtime environment in which a UDI driver operates is referred to as the UDI environment.
The UDI interfaces allow UDI drivers to be completely portable from one operating system or platform to another. All operating system and platform specifics are contained in the UDI environment implementation for each operating system and platform combination and, thus, are isolated from driver code.
454 AIX 5L Differences Guide Version 5.1 Edition
9.2.1 Features of UDI (5.1.0)UDI is operating system neutral. It provides a set of interfaces that abstracts operating system services and execution environments, therefore removing all operating system specific policy and mechanisms from the device driver.
UDI is also platform neutral. It abstracts all programmed I/O (PIO), direct memory access (DMA), and interrupt handling through a set of interfaces that hide hardware specifics, such as the type of I/O buses, interrupt notifications, and masking mechanisms from the device driver. In addition, the abstraction provided by the UDI mappers hides the environment of the calling process from the driver. Unlike native Itanium-based platform drivers, a UDI driver does not need to determine if the calling user process is 32-bit or 64-bit.
UDI drivers are written in ISO standard C and do not use any compiler-specific extensions. Thus, a single driver source can be expected to work regardless of compiler, operating system, or hardware platform. The UDI environment also provides location independence for drivers. This allows drivers to be written without considerations for where the code must operate, for example, kernel space, user level application, or interrupt stack.
UDI imposes restrictions on shared memory, which, by design, prevent the driver from affecting other portions of the system. This allows the system to isolate and effectively firewall the driver code from the remainder of the operating system, therefore improving reliability and making debugging easier.
9.2.2 Contents of the UDI Environment (5.1.0)
The UDI runtime package is installed with the base operating system and provides support for installing and executing UDI driver binaries. The UDI runtime package (bos.rte.udi) includes:
Information about UDI, including white papers, UDI specifications, and other documentation, are downloadable from the project UDI Web page: http://www.projectudi.org
Note
The UDI implementation is only available and supported on the Itanium-based systems.
Note
Chapter 9. Hardware support 455
• The environment and management agent (/usr/lib/drivers/udi_dd)
• The bridge metalanguage library (/usr/lib/drivers/udibridgemlib)
• The network metalanguage library (/usr/lib/drivers/udinetmlib)
• The SCSI metalanguage library (/usr/lib/drivers/udiscsimlib)
• The GIO metalanguage library (/usr/lib/drivers/udigiomlib)
• The PCI bridge mapper (/usr/lib/drivers/udipcibm)
• The Ethernet mapper (/usr/lib/drivers/udinet_map)
• The SCSI mapper (/usr/lib/drivers/scsimap)
• The GIO mapper (/usr/lib/drivers/giomap)
• The network adapter configuration method (/usr/lib/methods/cfgudinet)
• The SCSI adapter configuration method (/usr/lib/methods/cfgudiscsi)
• The udisetup utility (/usr/sbin/udisetup)
The UDI runtime package supports installation and execution of UDI driver binaries only. In order to build, package, and install UDI driver source modules, the UDI driver development kit (udi.ddk) must be installed. The UDI driver development kit is delivered with the BOS installation CD and can be optionally installed along with the compiler.
In order to install the UDI driver development kit, the base operating system application development toolkit (bos.adt) and the C compiler must be installed first.
The UDI driver development kit includes:
• The udibuild utility (/usr/sbin/udibuild)
• The udimkpkg utility (/usr/sbin/udimkpkg)
• The UDI standard include files (/usr/include/udi)
9.2.3 Using the UDI Driver Development Kit (5.1.0)Documentation on the standard options for udibuild, udimkpkg, and udisetup utilities may be found in the UDI standards documentation.
The following sections will describe the process to creating and debugging an UDI driver, as it is described in the udidriver.readme file.
9.2.3.1 Building driver codeThese are the basic steps to compile and link a UDI driver. Other options exist, but this is the best set of steps to start with:
456 AIX 5L Differences Guide Version 5.1 Edition
1. Create a directory.
2. Place the driver source code files and the udiprops.txt in the directory created in step 1.
3. cd to the directory created in step 1.
4. Run udibuild -v.
This creates a file named the same as the module entry in the udiprops.txt file. This is the UDI module file. Do not directly try to load this module, it is missing the static property information. This is normally added by the udimkpkg command. Also, there is information added, for configuration, by the udisetup command.
9.2.3.2 Verifying driver moduleThe following command helps detect problems the driver might have with loading (these are not compile or link errors):
udiverify udi_driver_name.
This will make sure there are no unresolved symbols in the driver you built. If there are unresolved symbols, your driver will not load. Unresolved symbols are usually caused by including operating system dependent functions (breakpoint, printf). Remember to only use UDI functions provided by the environment.
At this point, your UDI driver should be able to load into kernel space.
9.2.3.3 Packaging driver moduleThe following steps make a UDI package that can be installed using udisetup.
1. cd to the directory created in step 1 of Section 9.2.3.1, “Building driver code” on page 456
2. Run udimkpkg -v
This creates a file with a .udi extension. This is the UDI package file.
9.2.3.4 Listing supported devicesThe following steps list the devices that the UDI module supports. This information is defined in the udiprops.txt file by the device declaration.
Refer to Section 9.2.3.7, “Tips” on page 461 for a special case of building the driver code.
Note
Chapter 9. Hardware support 457
1. cd to the directory containing the udi package file created in Section 9.2.3.3, “Packaging driver module” on page 457
2. Run udisetup -l
The output will be a set of <cr> delimited filesets.
9.2.3.5 Installing devices The following steps show how to install UDI modules:
1. cd to the directory containing the udi package file created in Section 9.2.3.3, “Packaging driver module” on page 457.
2. To install a single fileset within a UDI package:
a. Run udisetup fileset, where fileset is one of the filesets listed in Section 9.2.3.4, “Listing supported devices” on page 457 (udisetup -l).
3. To install a group of filesets within a UDI package:
a. Edit a file (for example, flist) and place the fileset names you wish to install in the file (one per line that is <cr> delimited). The list of filesets can be found by running udisetup -l; see Section 9.2.3.4, “Listing supported devices” on page 457.
b. Run udisetup -f flist, where flist is the file created in step 3a.
4. To install all filesets within a UDI package:
a. Run udisetup or udisetup udi_package_name, where udi_package_name is the file created in Section 9.2.3.3, “Packaging driver module” on page 457.
At this point the driver should be installed.
The driver module will be installed in /usr/lib/drivers directory. The file name will be of the format shortname_VVVV, where shortname is the shortname declaration and VVVV is the vendor_id or subsystem_vendor_id in the device’s declaration (found in the udiprops.txt file).
Message catalog links will be created in /usr/lib/nls/msg/(locale) for each locale specified in the udiprops.txt file. The message catalog links will follow the VVVV_DDDD.cat format, where VVVV is the vendor_id or subsystem_vendor_id, and DDDD is the device_id or subsystem_device_id in the devices declaration found in the udiprops.txt file.
The actual message catalogs will be in the /usr/opt/udi/drivers/(shortname_VVVV) directory and be named locale.cat.
458 AIX 5L Differences Guide Version 5.1 Edition
9.2.3.6 Deinstalling devicesThe following steps deinstall the UDI module from the system:
1. To deinstall a single fileset, run:
udisetup -u fileset
where fileset is the same format as the output of the udisetup -l command.
2. To deinstall a set of filesets, run:
udisetup -uf flist.
a. Edit a file (for example, flist) and place the fileset names you wish to install in the file (one per line that is <cr> delimited). The list of filesets can be found by running udisetup -l; see Section 9.2.3.4, “Listing supported devices” on page 457.
b. Run udisetup -uf flist.
The following example show a sample udiprops.txt file:
locale en_USmessage 1 The UDI Driver Developer Co.message 2 support_person@driver_company.commessage 3 Zillion Bit network adaptermessage 4 ZILLABIT twisted pair adaptermessage 5 ZILLABIT mobile adapter
This is not a complete udiprops.txt file; only the declarations necessary to demonstrate the naming conventions are shown.
After running the commands in Section 9.2.3.1, “Building driver code” on page 456 for the example udibuild -v, a file named /tmp/test/udidrvr will be created.
After running the commands in Section 9.2.3.3, “Packaging driver module” on page 457, for the example udimkpkg -v, a file named /tmp/test/udidrvr.udi will be created.
Chapter 9. Hardware support 459
After running the commands in Section 9.2.3.4, “Listing supported devices” on page 457 for the example udisetup -l, the following output is received:
After running the commands in Section 9.2.3.5, “Installing devices” on page 458 for the following examples:
1. Installing a single fileset.udisetup -v devices.pci.1234_89ab.udiDRVR
Creates a driver module in /usr/lib/drivers/udiDRVR_1234
Creates a message catalog link /usr/lib/nls/msg/en_US/1234_89ab.cat
Creates a link pointing to the actual message catalog in /usr/opt/udi/drivers/udiDRVR_1234/en_US.cat
Creates inventory entry in (don not edit these files) /usr/opt/udi/drivers/udiDRVR_1234_89ab
2. Running udisetup -f flist where flist contains devices.pci.1234_89ab.udiDRVR or running udisetup devices.pci.1234_89ab.udiDRVR
Creates a driver module in /usr/lib/drivers/udiDRVR_1234
Creates a message catalog link /usr/lib/nls/msg/en_US/1234_89ab.cat
Creates a link pointing to the actual message catalog in /usr/opt/udi/drivers/udiDRVR_1234/en_US.cat
Creates inventory entry in (don not edit theses files) /usr/opt/udi/drivers/udiDRVR_1234_89ab
3. Running udisetup -v will install both devices.
Creates a driver module in /usr/lib/drivers/udiDRVR_1234. It only loads the driver module once on disk since the module is the same for both devices.
The module name of the file is not the short name; it is actually the first module name declared, and all other modules are packaged under this name.
Note
The short name is being used.
Note
460 AIX 5L Differences Guide Version 5.1 Edition
Creates a message catalog link /usr/lib/nls/msg/en_US/1234_89ab.cat
Creates a message catalog link /usr/lib/nls/msg/en_US/1234_cdef.catBoth the above links point to the actual message catalog in /usr/opt/udi/drivers/udiDRVR_1234/en_US.cat.
Creates inventory entries in (do not edit theses files) /usr/opt/udi/drivers/udiDRVR_1234_89ab and /usr/opt/udi/drivers/udiDRVR_1234_cdef.
After running the commands in Section 9.2.3.6, “Deinstalling devices” on page 459 for the examples:
1. udisetup -u devices.pci.1234_89ab.udiDRVR
Removes the message catalog link /usr/lib/nls/msg/en_US/1234_89ab.cat
Removes the inventory entry /usr/opt/udi/drivers/udiDRVR_1234_89ab
Removes the ODM database entries for devices.pci.1234_89ab
Will remove the driver module in /usr/lib/drivers/udiDRVR_1234 if it is the last reference to the driver.
2. udisetup -uf flist where flist contains: devices.pci.1234_89ab.udiDRVR<cr>
devices.pci.1234_cdef.udiDRVR<cr>
Removes the message catalog link /usr/lib/nls/msg/en_US/1234_89ab.cat
Removes the message catalog link /usr/lib/nls/msg/en_US/1234_cdef.cat
Removes the inventory entries /usr/opt/udi/drivers/udiDRVR_1234_89ab and /usr/opt/udi/drivers/udiDRVR_1234_cdef
Removes the ODM database entries for devices.pci.1234_89ab and devices.pci.1234_cdef.
Will remove the driver module in /usr/lib/drivers/udiDRVR_1234 if it is the last reference to the driver.
9.2.3.7 Tips1. Shortcutting the previous sections:
Use the previous sections, in the order described, to build, package, and install a driver the first time. If no changes to the udiprops.txt file occur, then you can take a short approach:
a. Run udibuild -a. This will add the sprops to the module, a step that usually gets done by the udimkpkg command.
Chapter 9. Hardware support 461
b. Copy the UDI module that is created in the previous step over the /usr/lib/drivers/shortname_VVVV file, where shortname and VVVV are the same as described previously in this document.
c. Run udiverify udi_module_name; if it passes your driver will be ready to retest.
2. To list the raw static properties attached to a UDI module, run udilistpropsudi_module_name. This will show all the properties as tokenized strings. This list can be used to track down a possible problems with the udiprops.txt file and what the UDI environment is seeing.
AIX 5L Version 5.1 now supports the SCSI Accessed Fault-Tolerant Enclosures (SAF-TE) on Itanium-based platform. The SAF-TE is a standard which independent hardware vendors can use to sense the status and drive enclosure indicators. SA-TE conforms to the ANSI SCSI-2 specification for processor devices. The SAF-TE device is polled periodically by the host to determine changes in the status of the drives or other components.
Software requirementThe SAF-TE device support is contained in the device package, devices.scsi.safte; this package will only contain an rte fileset. The prerequisite for this fileset is devices.scsi.ses. This fileset will contain the configuration method, message catalog, and driver for the SAFT-TE devices.
9.4 64-bit DMA addressing on Itanium-based platforms (5.1.0)
AIX 5L Version 5.1 now supports 64-bit Direct Memory Access (DMA) addressing for the PCI SCSI adapter on the Itanium-based platforms (the 64-bit DMA addressing takes advantage of adapter hardware capabilities).
9.5 Hardware Multithreading enabling (5.1.0)
Hardware Multithreading (HMT) has been enabled in AIX 5L Version 5.1. Currently, HMT is supported by the RS/6000 Enterprise Server M80, IBM ̂pSeries 620 6F1, IBM ^ pSeries 660 6H1, and IBM ^ pSeries 680 series. See /usr/lpp/bos/README.HMT in your system for more information.
The basic technique of HMT is that the processor holds the state of N threads. In the current processor implementation, N=2. For example, when a
462 AIX 5L Differences Guide Version 5.1 Edition
cache miss occurs (L1 or L2), which would normally delay the processor for many cycles, the processor switches to another state and executes instructions from that thread. This will help eliminate memory access delays, keep the CPU more fully utilized, and potentially improve the processor throughput.
If the HMT feature is enabled, looking on the system (by using, for example, bindprocessor -q) will show you twice as many processors as physically are installed. In some cases, there are significant performance improvements (15% - 20%) as reflected in the TPC-C benchmark. You must test your own workload and decide if any gain in performance and potential loss of RAS (Dynamic Processor Deallocation) is justified.
To enable the HMT feature, change the bosdebug mode and reboot the system:
# bosdebug -H on
If you want to disable the HMT feature, set the bosdebug mode back and reboot the system again:
# bosdebug -H off
If you try to enable on a non-supported hardware, you will receive output similar to the following:
# bosdebug -H onHMT not supported on this system.
9.6 Audio support for the 64-bit kernel (5.1.0)
Audio drivers have been added to support the 64-bit kernel on POWER workstations that have audio hardware. The audio drivers are comprised of the following filesets:
In the past, the support of audio in AIX was accomplished by the Ultimedia Services (UMS) toolbox and API found on the AIX 4.3.3 Bonus Pack. The
Chapter 9. Hardware support 463
overall audio strategy has changed from UMS to Java Sound. The JavaSound API can be found on base AIX 5.x.
• PCMCIA device support
9.8 PCI adapter Enhanced Error Handling
Enhanced I/O error handling, EEH, makes use of EADS chip technology, which, in the case of a PCI bus error, forces a freeze on error condition. In earlier CHRP technology servers, a PCI bus error could result in a machine check. In the IBM ^ pSeries 620 Model 6F1 and IBM ^ pSeries 660 Model 6H1 servers, the problem is isolated to the adapter. EEH will monitor the state of the PCI slots. On finding a slot in the frozen state, it will attempt to reset it. Some of the more common adapters and their EEH support status are listed in Table 50.
Table 50. EEH adapter support
Adapter Description Feature Code Support for EEH
155 Mbs ATM UTP 2988 yes
10/100 ethernet 2968 yes
Quad 10/100 ethernet 4951 no
10/100/1000 ethernet fibre 2969 yes
10/100/1000 ethernet UTP 2975 yes
Fast token ring 4959 yes
2 port X.21, V.24, and so forth 2962 yes
Digital trunk adapter 6310, 6311 no
ESCON control unit 2751 no
622Mbs PCI ATM 2946 yes
4-port artic960Hx 2947, 2948 no
FDDI 2741 no
Advanced SerialRAID adapter 6225, 6230 yes
8 port RS232/RS422 async and 128 port RS232/RS422 async adapters
2943, 2944 yes
3-port ultra 2 SCSI RAID4-port ultra 3 SCSI RAID
2498 yes
464 AIX 5L Differences Guide Version 5.1 Edition
9.9 Diagnostics (5.1.0)
The following enhancements have been made to the AIX 5L Version 5.1 diagnostics utility.
9.9.1 Turboways PCI ATM adapter diagnostic enhancementsThe Turboways PCI ATM adapter provides full-duplex network connections at a rate of 155 Mbps, There are two versions available: Multi-Mode Fiber (MMF) connector and Unshield Twisted Pair (UTP).
For example, to invoke diagnostic on the ATM adapter atm0, use the command:
# diag -d atm0
The Diagnostic Application performs hardware problem determination on configured hardware. In AIX 5L Version 5.1, for the ATM adapter, the diagnostic screens have been enhanced to show a running progress of the test being executed on the adapter. The Diagnostic Application will also analyze the error log for specific errors logged against the adapter; appropriate action is taken if a error is found (this could be from nothing to posting an SRN (Service Request Number)).
Software prerequisitesIn order for the diagnostic application to execute properly, the following software must be installed
• devices.pci.14107c00.diag (required for both MMF and UTP adapters)
• devices.pci.14104e00.diag (required for MMF adapter only)
• bos.diag
Figure 171 on page 466 and Figure 172 on page 466 shows an example of the Advanced diagnostic routine when the Diagnostic Application is running. The bottom section of the screen changes as different tests are being run on the adapter. Figure 173 on page 467 shows the diagnostic panel when the test has been completed.
4/16Mbs token ring 2920 yes
Adapter Description Feature Code Support for EEH
Chapter 9. Hardware support 465
Figure 171. Diagnostic panel for Running DMA test
Figure 172. Diagnostic panel for Running external wrap test
466 AIX 5L Differences Guide Version 5.1 Edition
Figure 173. Diagnostic panel for Test complete
9.9.2 LS-120 floppy drive diagnostic supportThe LS120 is a floppy disk drive that uses laser formatted diskettes that have a capacity of 120 MB. The 3.5 inch floppy diskette drive diagnostic application has been modified to support the LS-120 diskette drive. To enter the diagnostic menus, log into the server as the root user and type diag. The diagnostic routines are the same as those for the 1.44 MB floppy drive.
9.9.3 Itanium-based diagnostics for PCI adaptersThe diagnostic tool of the Itanium-based platform was enhanced to support the following PCI adapters:
• Token-Ring PCI adapter
• PCI Gigabit and UTP Ethernet adapters
• Ultra-2 LVD SCSI Adapter
9.10 Hardware Diagnostic Exerciser on Itanium-based platforms (5.1.0)
In AIX 5L Version 5.1, the hardware diagnostic exerciser has been further enhanced to include the Itanium-based platforms. The hardware exerciser is used to troubleshoot intermittent system problems in the AIX operating
Chapter 9. Hardware support 467
system, to test hardware, and to verify a replacement part. Hardware errors are associated with an SRC. Recoverable errors are not reported by the exercisers. However, they may be logged in the AIX error log if logging thresholds are exceeded. The following section describes the system requirements for testing certain hardware with the exerciser.
Software requirementThe following are the filesets required for the hardware exerciser:
• devices.ia64.base.exer
• bos.diag.
9.10.1 Floating point hardware exerciserThe Diagnostic Exerciser for the Intel Itanium architecture floating point instruction set performs approximately 20,000 operations each cycle. The operations consists of addition, subtraction, multiplication, division, and compare operations. The result of each operation is compared to an expected result, and an error will be flagged in the case of a miscompare.
9.10.2 IDE CD-ROM hardware exerciserThe Diagnostic Exerciser performs a number of tests on the IDE CD-ROM, a test disc that is used in conjunction with the CD-ROM diagnostic.
9.10.3 LS 120 floppy diskette driveThe Diagnostic Exerciser perform a number of tests on the LS 120 floppy drives. A 2 MB High Capacity scratch diskette is required to fully test the diskette drive.
9.11 NFB support for the Itanium-based platform (5.1.0)
No Frame Buffer (NFB) is supported on Itanium-based platforms using AIX 5L Version 5.1. NFB is a graphics hardware enabling software technology, which provides independent hardware vendors (IHVs) the ability to deliver software support for their graphic devices in an X-Windows environment. It is intended to reduce the time and effort for an IHV to implement X-Windows support for new or enhanced graphic adapters by removing the burden from the IHVs of developing AIX configuration methods and kernel level device drivers. IHVs only need to write a minimal set of device-specific routines, which allow the X-Server to render to the graphics device through NFB. However, additional routines may be written to improve performance which takes advantage of the graphics adapter hardware. AIX 5L Version 5.1 NFB support is divided into
468 AIX 5L Differences Guide Version 5.1 Edition
two sections: device-independent core NFB and device-dependent IHV-written user space device drivers; each section is loaded independently. NFB is dependent on the adapter supporting VGA. The advantages of using NFB in AIX 5L Version 5.1 are as follows:
• Graphic drivers are written only to the NFB interface.
• No AIX 5L Version 5.1 kernel extension device drivers are required.
• No AIX 5L Version 5.1 configuration methods are required.
• Updating or replacing a graphics adapter that has NFB support with another NFB supported adapter can be performed without the requirement of loading additional drivers. This basically makes the device plug and play.
Figure 174. NFB system overview
Using the logic shown in Figure 174, the configuration manager cfgmgr has been modified such that when a graphics adapter is detected with no specific device support and is VGA capable, it calls the generic VGA console configuration. The VGA console configuration method loads the generic VGA console device driver into the kernel. This VGA device driver supports the rendering context manager RCM interface which is required by NFB to gain
ODM
NFB DDI Module
X-ServerCFG Manager
VGA ExtensionsVGA Extensions
LFT RCM
Generic VGA device Driver
Keyboard Adapter
IHV User SpaceDriver
Generic VGA Configuration MethodLoads dd and dd extension
User Space
Kernel Space
VGA Extensions
aixgse()
dds structure
Chapter 9. Hardware support 469
direct access to the adapter hardware. VGA driver extensions are registered by the NFB using the RCM aixgsc() system call with the generic VGA console device driver. These optional extensions are loaded into the kernel and are intended to restore the adapter back into VGA text mode. It is the responsibility of the X-Server to load core NFB. NFB is responsible for loading the device-specific user space driver supporting the graphics device.
9.12 Common Character Mode support for AIX (5.1.0)
AIX 5L Version 5.1 allows support of Common Character Mode (CCM). CCM is an interface defined for graphic display adapters, which allows the graphics display to be used as an install console even though the adapter-specific device driver is not on the AIX boot media. With CCM, adapters supporting the interface will be recognized, configured, and made operational by AIX without the installation of the adapter-specific software.
9.12.1 PCI Common Character ModeCommon Character Mode (CCM) is a software and firmware mechanism defined for PCI graphics display adapters to provide a text base interface for AIX installation on CHRP machines.
CCM makes use of the existing LFT interface to display drivers through a set of function pointers that each display adapter has currently provided. For CCM, these functions form the device independent module and this module resides in the boot image of the AIX installation CD. Device dependent (specific) code will be part of the firmware residing in each adapter ROM. The common character mode device independent code (CCM) communicates with the common character mode device dependent code (CDD) to get the device initialized and to perform any rendering operation as needed.
9.12.2 Device driver configurationWhen AIX system configuration determines a display adapter is CCM capable and there is no device software package available for this device, it configures this graphics display adapter in CCM mode. From the ODM information, the system configuration knows about the PCI CCM configuration method and calls it.
This function will be available only on Common Hardware Reference Platforms (CHRP) systems.
Note
470 AIX 5L Differences Guide Version 5.1 Edition
Appendix A. AIX 5L POWER and Itanium-based differences
This appendix lists all of the packages, filesets, and function that are currently part of the AIX 5L Version 5.1 for the POWER platform distribution that are not included on the AIX 5L Version 5.1 for Itanium-based systems distribution. This list provides a broad look at what components are not currently supported on the Itanium-based platform.
A.1 Filesets and packages
If a package or component is listed, such as OpenGL, this indicates that all filesets that are part of that package or component are also not part of the Itanium-based system distribution. For example, you would not find the OpenGL.GL32 package on the Itanium-based distribution.
Filesets for unsupported and discontinued devices, such as the GXT100 Graphics Accelerator, or other POWER platform filesets, such as CHRP- or ISA-related devices, have been excluded from this list.
The following is a list of major components and function that are not supported on the Itanium-based platform at the time of writing. See the specific sections within this publication for a more detailed description of these features.
• RMC
• Tivoli client agent
• LDAP server
• LDAP enhanced name resolution
• LDAP security audit plug-in
• QoS
• GraPHIGs and PEX
• OpenGL
• Linux desktops
• Selected performance tools
• FDPR
• JFS (JFS2 is supported)
• AIX print subsystem (System V is supported)
• Hardware specific features, such as
- HMT
- EEH PCI adapters
- CCM
- Platform specific diagnostics
- Protocols supported through specialized adapters
472 AIX 5L Differences Guide Version 5.1 Edition
Appendix B. Special notices
This publication is intended to help AIX system administrators, developers, and support professionals understand the key technical differences between AIX 5L and AIX Version 4.3. The information in this publication is not intended as the specifications for any programming interfaces that are provided by AIX 5L Version 5.1. See the PUBLICATIONS section of the IBM Programming Announcement for AIX 5L for more information about what publications are considered to be product documentation.
References in this publication to IBM products, programs or services do not imply that IBM intends to make these available in all countries in which IBM operates. Any reference to an IBM product, program, or service is not intended to state or imply that only IBM's product, program, or service may be used. Any functionally equivalent program that does not infringe any of IBM's intellectual property rights may be used instead of the IBM product, program or service.
Information in this book was developed in conjunction with use of the equipment specified, and is limited in application to those specific hardware and software products and levels.
IBM may have patents or pending patent applications covering subject matter in this document. The furnishing of this document does not give you any license to these patents. You can send license inquiries, in writing, to the IBM Director of Licensing, IBM Corporation, North Castle Drive, Armonk, NY 10504-1785.
Licensees of this program who wish to have information about it for the purpose of enabling: (i) the exchange of information between independently created programs and other programs (including this one) and (ii) the mutual use of the information which has been exchanged, should contact IBM Corporation, Dept. 600A, Mail Drop 1329, Somers, NY 10589 USA.
Such information may be available, subject to appropriate terms and conditions, including in some cases, payment of a fee.
The information contained in this document has not been submitted to any formal IBM test and is distributed AS IS. The information about non-IBM ("vendor") products in this manual has been supplied by the vendor and IBM assumes no responsibility for its accuracy or completeness. The use of this information or the implementation of any of these techniques is a customer responsibility and depends on the customer's ability to evaluate and integrate them into the customer's operational environment. While each item may have
been reviewed by IBM for accuracy in a specific situation, there is no guarantee that the same or similar results will be obtained elsewhere. Customers attempting to adapt these techniques to their own environments do so at their own risk.
Any pointers in this publication to external Web sites are provided for convenience only and do not in any manner serve as an endorsement of these Web sites.
Any performance data contained in this document was determined in a controlled environment, and therefore, the results that may be obtained in other operating environments may vary significantly. Users of this document should verify the applicable data for their specific environment.
This document contains examples of data and reports used in daily business operations. To illustrate them as completely as possible, the examples contain the names of individuals, companies, brands, and products. All of these names are fictitious and any similarity to the names and addresses used by an actual business enterprise is entirely coincidental.
Reference to PTF numbers that have not been released through the normal distribution process does not imply general availability. The purpose of including these reference numbers is to alert IBM customers to specific information relative to the implementation of the PTF when it becomes available to each customer according to the normal IBM PTF distribution process.
The following terms are trademarks of the International Business Machines Corporation in the United States and/or other countries:
The following terms are trademarks of other companies:
Tivoli, Manage. Anything. Anywhere.,The Power To Manage., Anything. Anywhere.,TME, NetView, Cross-Site, Tivoli Ready, Tivoli Certified, Planet Tivoli, and Tivoli Enterprise are trademarks or registered trademarks of Tivoli Systems Inc., an IBM company, in the United States, other countries, or
both. In Denmark, Tivoli is a trademark licensed from Kjøbenhavns Sommer - Tivoli A/S.
C-bus is a trademark of Corollary, Inc. in the United States and/or other countries.
Java and all Java-based trademarks and logos are trademarks or registered trademarks of Sun Microsystems, Inc. in the United States and/or other countries.
Microsoft, Windows, Windows NT, and the Windows logo are trademarks of Microsoft Corporation in the United States and/or other countries.
PC Direct is a trademark of Ziff Communications Company in the United States and/or other countries and is used by IBM Corporation under license.
ActionMedia, Itanium, LANDesk, MMX, Pentium and ProShare are trademarks of Intel Corporation in the United States and/or other countries.
UNIX is a registered trademark in the United States and other countries licensed exclusively through The Open Group.
SET, SET Secure Electronic Transaction, and the SET Logo are trademarks owned by SET Secure Electronic Transaction LLC.
Other company, product, and service names may be trademarks or service marks of others.
Appendix B. Special notices 475
476 AIX 5L Differences Guide Version 5.1 Edition
Appendix C. Related publications
The publications listed in this section are considered particularly suitable for a more detailed discussion of the topics covered in this redbook.
C.1 IBM Redbooks
For information on ordering these publications see “How to get IBM Redbooks” on page 479.
• AIX Version 4.3 Differences Guide, SG24-2014
• AIX 5L Workload Manager (WLM), SG24-5977
C.2 IBM Redbooks collections
Redbooks are also available on the following CD-ROMs. Click the CD-ROMs button at ibm.com/redbooks for information about all the CD-ROMs offered, updates and formats.
C.3 Other resources
These publications are also relevant as further information sources:
• Resource Monitoring and Control Guide and Reference, SC23-4345
• Performance Toolbox Version 2 and 3 Guide and Reference, SC23-2625
• W. Richard Stevens, UNIX Network Programming, Volume 1: Networking APIs: Sockets and XTI, Second Edition, Prentic Hall, 1997, Product Number 013490012X
CD-ROM Title Collection Kit Number
IBM System/390 Redbooks Collection SK2T-2177IBM Networking Redbooks Collection SK2T-6022IBM Transaction Processing and Data Management Redbooks Collection SK2T-8038IBM Lotus Redbooks Collection SK2T-8039Tivoli Redbooks Collection SK2T-8044IBM AS/400 Redbooks Collection SK2T-2849IBM Netfinity Hardware and Software Redbooks Collection SK2T-8046IBM RS/6000 Redbooks Collection SK2T-8043IBM Application Development Redbooks Collection SK2T-8037IBM Enterprise Storage and Systems Management Solutions SK3T-3694
This section explains how both customers and IBM employees can find out about IBM Redbooks, redpieces, and CD-ROMs. A form for ordering books and CD-ROMs by fax or e-mail is also provided.
• Redbooks Web Site ibm.com/redbooks
Search for, view, download, or order hardcopy/CD-ROM Redbooks from the Redbooks Web site. Also read redpieces and download additional materials (code samples or diskette/CD-ROM images) from this Redbooks site.
Redpieces are Redbooks in progress; not all Redbooks become redpieces and sometimes just a few chapters will be published this way. The intent is to get the information out much quicker than the formal publishing process allows.
• E-mail Orders
Send orders by e-mail including information from the IBM Redbooks fax order form to:
• Telephone Orders
• Fax Orders
This information was current at the time of publication, but is continually subject to change. The latest information may be found at the Redbooks Web site.
In United States or CanadaOutside North America
e-mail [email protected] information is in the “How to Order” section at this site:http://www.elink.ibmlink.ibm.com/pbl/pbl
United States (toll free)Canada (toll free)Outside North America
1-800-879-27551-800-IBM-4YOUCountry coordinator phone number is in the “How to Order” section at this site:http://www.elink.ibmlink.ibm.com/pbl/pbl
United States (toll free)CanadaOutside North America
1-800-445-92691-403-267-4455Fax phone number is in the “How to Order” section at this site:http://www.elink.ibmlink.ibm.com/pbl/pbl
IBM employees may register for information on workshops, residencies, and Redbooks by accessing the IBM Intranet Web site at http://w3.itso.ibm.com/ and clicking the ITSO Mailing List button. Look in the Materials repository for workshops, presentations, papers, and Web pages developed and written by the ITSO technical professionals; click the Additional Materials button. Employees may access MyNews at http://w3.ibm.com/ for redbook, residency, and workshop announcements.
We accept American Express, Diners, Eurocard, Master Card, and Visa. Payment by credit card notavailable in all countries. Signature mandatory for credit card payment.
Title Order Number Quantity
First name Last name
Company
Address
City Postal code
Telephone number Telefax number VAT number
Invoice to customer number
Country
Credit card number
Credit card expiration date SignatureCard issued to
see also proc pseudo file system 77/tmp/hosts.ldif 277/usr/include/net/frca.h 341/usr/include/sys/limits. 302/usr/lib/boot 22/usr/lib/drivers/qos 296/usr/samples/tcpip/libpcap 343/usr/sbin/policyd 296
big5 447Euro support 447IBM-1046 447IBM-1129 447IBM-921 447IBM-922 447ISO8859-7 447
collecting core information 36command
geninstall 120command tool 249commands
acctcom 425adump 45alog 160alstat 189, 203alt_disk_install 142aopt 204autoconf, Linux 379automake, Linux 379bash2, Linux 379
bison, Linux 379bosboot 28, 119, 191bosdebug, HMT 463burn_cd 144bzip2, Linux 379cachefslog 97cachefswssize 98cfgmgr 133, 140, 452cfgmgr, NFB 469chargefree 425chcod 290chcondition 169check_core 37chfn 263chgprmem 263chgroup 263chlv 100chps 146chpv 52chresponse 169chrsrc 169chsh 263chuser 263chvg 52, 61configassist 254cpio 42crfs 90cvs, Linux 379dd 150devinst 452devinstall 133df 98diag 153, 465diffutils, Linux 379dumpcheck 179efdisk 112eformat 114elm, Linux 379emacs, Linux 379emstat 189, 203errdemon 152errpt 152export 280extendlv 75FDPR 204filemon 196, 203fileplace 203fileutils, Linux 379findutils, Linux 379
490 AIX 5L Differences Guide Version 5.1 Edition
flex, Linux 379frcactrl 340fsck 91g++, Linux 379gawk, Linux 379gcc, Linux 379gdb, Linux 379gencopy 124geninstall 126, 452genkex 203genkld 203genld 203gennames 195gettext, Linux 379ghostscript, Linux 379git, Linux 379glade, Linux 388grep, Linux 379guile, Linux 379gv, Linux 379gzip, Linux 379hostldif 277iadb 30ifconfig down 317ike 357, 360ikedb 357indent, Linux 379install_wizard 127installp 122, 126, 133, 451installp, software license agreement 106instdev 133inulag 106iostat 193, 194ipfilter 203iptrace 329kdb 22ksh93 45ksysv, Linux 382kuser, Linux 381ld 33less, Linux 379libtool, Linux 379lockstat 191locktrace 191logevent 160logform 92lquerypv 62lsactdef 169lsattr 270, 333, 367
qosadd 298qoslist 299qosmod 299qosremove 299recreatevg 74redefinevg 52refrsrc 169rep-gtk, Linux 379restore 41restvg 142rmaudrec 164rmcctrl 155rmcondition 169rmcondresp 169rmgroup 263rmresponse 169rmrsrc 169rmss 202rmuser 263route 303, 313rpm 122rpm, Linux 383rsync, Linux 379sar 193sed, Linux 379shconf 182shrinkps 149shutdown 171sh-utils, Linux 379snap 43, 180snapcore 36stopcondresp 170stripnm 203svmon 196, 203swapoff 146tar 42, 180tar, Linux 379tcl/tk, Linux 379tcrevgrp 175tcsh, Linux 379textutils, Linux 379topas 203tprof 190, 203trace 44, 172, 330transfig, Linux 379trcrpt 174, 195truss 186udibuild 456udilistprops 462
udimkpkg 456udisetup 133, 456udiverify 457unzip, Linux 379uudecode 151uuencode 150varyonvg 52vim, Linux 379vmstat 193vpdadd 39vpddel 39wallevent 160wget, Linux 379wlmmon 427wlmperf 427wlmstat 427xfig, Linux 379xpdf, Linux 379zip, Linux 379zoo, Linux 379zsh, Linux 379
commands (JFS2) 86Common Character Mode 470Common Information Model 285comparison chart (JFS2) 82compatibility
devices.scsi.ses 462fileutils command, Linux 379findutils command, Linux 379firewall hooks 343Firmware 451firmware 111First Period 434fixed 406flex command, Linux 379fnlib library, Linux 379focus (WLM) 416Font rasterizer 287fork 403format
log device 92formatting disk 111forwardcontrol, VPN function mapping 355fragmentation (JFS2) 83fragmentation, TCP/IP 324fragments 82framework
web-based system manager 252FRCA 336frcactrl command 340freehostent 327fsck command 91FSRM
see also file system resource manager 167functions of ECN 324
Gg++ command, Linux 379gated deamon 306gateways, regarding networking 308gathering core files 36gawk command, Linux 379GB, mklv and extendlv command 76GBK, simplified chinese locale 441gcc command, Linux 379gdb command, Linux 379gencopy command 124
generic VGA console 470geninstall command 120, 126, 452geninstall.summary file 135genkex command 203genkld command 203genld command 203gennames command 195gethostbyaddr subroutine 327getipnodebyaddr subroutine 327getipnodebyname subroutine 326getrusage() system call 21gettext command, Linux 379ghostscript command, Linux 379GIF 250git command, Linux 379glade command, Linux 388global lock, TCBHEAD_LOCK 324GLX extension 288GNOME desktop, BOS installation 137GNOME desktop, Linux 379, 386GNU software, compile and install 390graphic adapters replacement, IA64 469graphic display adapter
common character mode 470graphical framework, Linux 385graphics adapters 289graphics performance 288graphics, NFB 468grep command, Linux 379group (WLM) 405groups, IKE 352gtk+ library, Linux 379GTX4000P 289GTX6000P 289guile command, Linux 379gv command, Linux 379gzip command, Linux 379
HHangul,Korean keyboard 449Hanja, Korean keyboard 449hardware diagnostic exerciser
kernel specific registers 31kernel subsystems 28kernel tuning 270kernel_lock 31keyboard
Euro support 448Hangul, Korean 449Hanja, Korean 449Korean support 449
keyexchange, VPN function mapping 356keyingtries, VPN function mapping 357keylife, VPN function mapping 356klipsdebug, VPN function mapping 355KRB5files
Kerberos registry value 268krb5kdc
Kerberos KDC daemon 267ksh93 command 45ksysv command, Linux 382kuser command, Linux 381
Llanguge environment, Euro support 447large data type support 15large file enabled
cachefs 97large_dump bosinst.data 180large_dumplv, bosinst.data 180Last Period 434
499
launch plug-ins 241ld command
DSA option 33LDAP 275
audit events 283audit plug-in 282audit service 284class definition 284client on Itanium platform 272Itanium client filesets 272security plug-in 282Server on Itanium platform 272
LDAP, sendmail 185LDIF 277LDR_CNTRL 34LE client 363left, VPN function mapping 356leftfirewall 356leftfirewall, VPN function mapping 356leftid, VPN function mapping 356leftnexthop, VPN function mapping 356leftrsasigkey, VPN function mapping 356leftsubnet, VPN function mapping 356leftupdown, VPN function mapping 356LEGACY partition 118less command, Linux 379lg_dumplv, dump device 180libdiskpart 118libjpeg library, Linux 379LIBPATH environment variable, Perl 47libpng library, Linux 379library routines 326libtiff library, Linux 379libtool command, Linux 379license agreements
see also software license agreement 105lightweight core file support 34limit log file 329limitations
lock 346exclusive 346multiple read/write 21opportunistic 346pthread_cond_t type 20pthread_mutex_t type 20pthread_rwlock_t type 20pthreads 17rec_mutex type 20spinlock_t type 20
lock tracing 191lockstat command 191
locktrace command 191log
Web-based System Manager 248log device 92log file of syslog 361LOG_KERN facility 328logevent command
mpage command, Linux 379mpcstat command, LANE trace 368MPOA 364
client 363commands
lsattr 367lsdev 366
debug tracing 368debug_trace option 364ICMP 366IEEE 802.3 Ethernet format 366IP fragmentation 364IPv4 support 364layer 365network 365Resolution Reply 365shortcut 365Standard Ethernet format 366Token Ring 368token ring format 366trace 364
Pp command, KDB 24package format 121package list 134packages DWA 290Packaging method 126packet capture library 342paging device resource class 167paging space
deactivation 146decreasing size 148
paging space, dump device 180PAM 38Panasonic Cw-7502-B 142panic call 27parallel jobs 34parameters of the getipbynodeaddr 327parameters of the getipnodebyname 326partition disk types 111partition manager 111partitioned disks 110passive dead gateway detection 307passive mode (WLM) 393passive MWCC 99passive_dgd 314passive_dgd field 311passwd command
process accounting 425process type (WLM) 406processor resource class 167Proch callouts 31proch_reg() kernel service 32proch_unreg() kernel service 32prochadd() kernel service 32prochdel() kernel service 32prochr structure 32PROCHR_TERMINATE, event type 32profiling for Java applications 190program
methods.cfg attribute 264program resource class 167program_64
pseudo files 78, 79, 80pseudo -tty 31pseudo-device 454psinfo pseudo file 79pthdb_atfork() function 18pthdb_atfork_arg() function 18pthdb_atfork_child() function 18pthdb_atfork_parent() function 18pthdb_atfork_prepare() function 18pthdb_atfork_type() function 18pthdb_cleanup() function 18pthdb_cleanup_arg() function 18pthdb_cleanup_func() function 18pthread
user attribute 262rekeyfuzz, VPN function mapping 356remote hostname 284remote system administration 253rendering context manager, RCM 469Reno algorithm 328rep-gtk command, Linux 379
506 AIX 5L Differences Guide Version 5.1 Edition
replacement drivers 451Report Browser 429report displays 430Report Properties Panel 433Reserved field of the TCP header 325resolv.ldap file 280resource class
Ricoh MP6201SE 6XR-2X 142right, VPN function mapping 356rightfirewall, VPN function mapping 356rightid, VPN function mapping 356rightnexthop, VPN function mapping 356rightrsasigkey, VPN function mapping 356rightsubnet, VPN function mapping 356rightupdown, VPN function mapping 356rmaudrec command 164
RMCaudit log resource manager 161condition 155configuration change property 167event expression 155event response resource manager 158file system resource manager 167host resource class 167host resource manager 167IBM.AuditRMd 168IBM.ERrmd 168IBM.FSrmd 168IBM.HostRMd 168logevent command 160lsaudrec command 161monitor 155network adapter resource class 167notifyevent command 160operational state property 167packaging 154paging device resource class 167PercentTotUsed 155physical volume resource class 167processor resource class 167program resource class 167rearm expression 155resource class 155response 155rmcd 168wallevent command 160
tips area 251Tivoli 291tivoli management agent 291tivoli netview 253TLS, Java 49tmd daemon 360Token Ring
multi protocal over atm 368token ring format, MPOA 366tokstat command, LANE trace 368Toolbox for Linux Applications 379tools, cmdstat 193topas command 203tprof command 190, 203trace
buffer size 173single mode 172single-buffer 173
trace command 44, 172, 330trace group
hook IDs 175trace hook 331trace, MPOA 364tracebacks 34transfig command, Linux 379transmit informational data 360Transport Layer Security, Java 49trcae
event groups 173trcevgrp command 175trcfile 330trcpt command 195trcrpt
Your feedback is valued by the Redbook authors. In particular we are interested in situations where a Redbook "made the difference" in a task or problem you encountered. Using one of the following methods, please review the Redbook, addressing value, subject matter, structure, depth and quality as appropriate.
• Use the online Contact us review redbook form found at ibm.com/redbooks • Fax this form to: USA International Access Code + 1 845 432 8264 • Send your comments in an Internet note to [email protected]
Document NumberRedbook Title
SG24-5765-01AIX 5L Differences Guide Version 5.1 Edition
Review
What other subjects would you like to see IBM Redbooks address?
Please rate your overall satisfaction:
O Very Good O Good O Average O Poor
Please identify yourself as belonging to one of the following groups:
O Customer O Business Partner O Solution DeveloperO IBM, Lotus or Tivoli EmployeeO None of the above
Your email address:The data you provide here may be used to provide you with information from IBM or our business partners about our products, services or activities.
O Please do not use the information collected here for future marketing or promotional contacts or other communications beyond the scope of this transaction.
Questions about IBM’s privacy policy?
The following link explains how we protect your personal information.ibm.com/privacy/yourprivacy/
BUILDING TECHNICALINFORMATION BASED ONPRACTICAL EXPERIENCE
IBM Redbooks are developed by the IBM International Technical Support Organization. Experts from IBM, Customers and Partners from around the world create timely technical information based on realistic scenarios. Specific recommendations are provided to help you implement IT solutions more effectively in your environment.
For more information:ibm.com/redbooks
AIX 5L Differences GuideVersion 5.1 Edition
AIX 5L - The industrial strength UNIX operating system
Intel Itanium-based and IBM POWER-based platform support
Version 5.0 and Version 5.1 enhancements explained
This redbook focuses on the latest enhancements introduced in AIX 5L Version 5.1. It is intended to help system administrators, developers, and users understand these enhancements and evaluate potential benefits in their own environments.
AIX 5L is available for POWER and Itanium-based systems. AIX 5L was made generally available May 4, 2001. AIX 5L for Itanium-based systems is available as a PRPQ. Both platforms were developed from the same common code base.
AIX 5L introduces many new features, including Linux affinity, 32- and 64-bit kernel and application support, virtual IP, quality of service enhancements, enhanced error logging, dynamic paging space reduction, hot-spare disk management, advanced Workload Manager, JFS2, and others. The availability of an improved Web-based System Manager continues AIX’s move towards a standard, unified interface for system tools. There are many other enhancements available with AIX 5L, and you can explore them in this redbook.
This publication is a companion publication to the previously published AIX Version 4.3 Differences Guide, SG24-2014, Third Edition.