22
AK INDUSTRIES SEPTIC TRAINING MANUAL 12-11-081 Menards Training Manual.1-7-13.indd 1 1/9/2013 11:24:10 AM

AK INDUSTRIESSEPTIC
TRAININGMANUAL
12-11-081 Menards Training Manual.1-7-13.indd 1 1/9/2013 11:24:10 AM

INTRODUCTION
SECTION 1: SEPTIC SYSTEM DESCRIPTION 1.1 SEPTIC SYSTEM COMPONENTS 1.2 SEPTIC SYSTEM PROCESS FLOW 1.3 SEPTIC SYSTEM REQUIREMENTS
SECTION 2: MAINTAINING A SEPTIC SYSTEM 2.1 INSPECT HOME AND COMPONENTS 2.2 INSPECT TANK SLUDGE LEVEL 2.3 PUMP SLUDGE FROM TANK
SECTION 3: DO’S AND DON’TS 3.1 DO’S 3.2 DON’TS
SECTION 4: SEPTIC AND PUMP TANKS 4.1 STANDARD SEPTIC TANKS 4.2 AIO (ALL-IN-ONE) SEPTIC TANKS 4.3 PUMP TANKS
SECTION 5: INSTALLATION INSTRUCTIONS 5.1 INSTRUCTIONS FOR STANDARD TANKS 5.2 INSTRUCTIONS FOR AIO AND PUMP TANKS
SECTION 6: SEPTIC EFFLUENT FILTERS 6.1 EFFLUENT FILTER INSTALLATION 6.2 EFFLUENT FILTER MAINTENANCE
SETION 7: RESOURCES 7.1 AK INDUSTRIES 7.2 LOCAL HEALTH DEPARTMENT 7.3 EPA
TABLE OF CONTENTS
2
12-11-081 Menards Training Manual.1-7-13.indd 2 1/9/2013 11:24:10 AM

INTRODUCTION
AK Industries, Inc. is dedicated to providing great quality polyethylene products to consumers. Poly tanks have become the
tank to turn to and more popular than ever. This is due to their ease of trans-
portation, water tight design, and structural integrity. With sizes from 300 to 1500 gallon capacities avail-able, there is a tank for virtually any job. Besides having approvals
in every region of the country, we offer a wide variety of tank options and accessories including risers, baffles, double lid systems and much more. AK Industries, Inc. has grown into being a leader in fiberglass and polyethylene products for the wastewater industry. Located in Plymouth, Indiana, we have been in business for over 30 years and are looking forward to a bright future. AK currently employs 115 people and they do their work in over 150,000 square feet of space. We realize that our next 30 years of success will depend on our continued com-mitment to YOU our customer. Let us prove that we can supply you with customer service, quality products, and value. Let us prove we are still the “Best Around Underground.”
3
12-11-081 Menards Training Manual.1-7-13.indd 3 1/9/2013 11:24:10 AM

1. House Vent2. Septic Pipe3. Optional Septic Pipe Vent4. Septic Tank5. Inlet Tee6. Inlet Access7. Access Risers8. Access Lids9. Floating Solids
SECTION 1: SEPTIC SYSTEM DESCRIPTION1.1 SEPTIC SYSTEM COMPONENTS
10. Liquid Level11. Settled Solids12. Outlet Access13. Outlet Tee14. Discharge Pipe15. Distribution Box16. Drain field17. Percolation/ Purification18. Groundwater
Figure 1
4
2
1
5
4
15
18
3 6
87
910
11
12
13
14
16
17
12-11-081 Menards Training Manual.1-7-13.indd 4 1/9/2013 11:24:12 AM

1. Wastewater flows from the home via the septic pipe.2. Gas venting happens via the home vent or via the optional venting within the septic pipe.3. Wastewater enters the septic tank via the inlet baffle and solids either float or settle.4. Waste is then broken down within the tank by use of anaerobic bacteria.5. Clear effluent is then discharged gravity via the outlet baffle into the discharge pipe.6. The effluent then is evenly distributed to the drain field via the distribution box.7. Water then is percolated and purified through the earth until it is added to the ground water.
SECTION 1: SEPTIC SYSTEM DESCRIPTION1.2 SEPTIC SYSTEM PROCESS FLOW
1
2
3
4
5
6
7
Figure 2
5
12-11-081 Menards Training Manual.1-7-13.indd 5 1/9/2013 11:24:13 AM

Septic systems are very sensitive portions of a whole rejuvenation process of our earth. If waste were allowed to enter our ground water, sickness and disease would plague our populations. It is very imperative to install systems according to Federal, State, and Local regulations. Whether in a rural or urban area, authori-ties have designed policies to protect all from contamination from septic systems. It is important to become educated on the requirements of installing a septic system in your area.
All localities are different. Some agencies require sizing systems according to home size. Others size them by estimation of water usage via the facilities. There are codes designed to keep your system away from your well or more importantly your neighbors well. For these and many more reasons it is important to contact your local authority and determine what requirements you will be held to. Usually a Local Health Department (LHD) or Pollution Control Agency will have information. AK Industries cannot stress enough the importance of becoming educated prior to purchasing our products to insure you are installing the correct system.
A permit is usually required to install any septic system. If so, details can be found at your Local Health Department. A permit is an approval from the local authority to begin installation of a system. Usually there is a post inspection and then the close of the permit. Installing a system without a permit is unwise and not condoned by AK Industries, Inc. For further information please contact your LHD or AK Industries, Inc. at 574-936-2542.
As a last note, septic systems can become dangerous or hazardous. Please use extreme caution if you are going to inspect a system yourself. If one feels the slightest bit uncomfortable about dealing with poisonous flammable gasses or harmful microbes, then it is best to leave procedures to the professionals.
(Sample Permit next page)
SECTION 1: SEPTIC SYSTEM DESCRIPTION1.3 SEPTIC SYSTEM REQUIREMENTS
6
12-11-081 Menards Training Manual.1-7-13.indd 6 1/9/2013 11:24:14 AM

7
12-11-081 Menards Training Manual.1-7-13.indd 7 1/9/2013 11:24:15 AM

1. Insure that your plumbing and fixtures are in good working order with no leaks. Be sure to inspect; faucets, commodes, sinks, bathtubs, water softeners, washing machines, garbage disposals, water filter systems, sump pumps, etc.
2. Inspect the septic piping for breakage, crimping, or cracks. A good indicator of this is if the soil around the site is saturated. Note: Never drive a vehicle over your septic piping or system what-so-ever.
3. Inspect the tank for any kind of damage. Cracks, dents, and bends are a real good indication that a septic tank may be failing. Note the amount of waste in the tank. Look for anything that should not be in the tank such as; rubber products, sanitary napkins, and the stray toys that a child may have put into the system.
4. Inspect the distribution box and drain field for signs of damage. Usually without running a camera down the system the only way to tell is if the lawn is saturated. Another method is if you see sunken areas of the yard.
SECTION 2: MAINTAINING A SEPTIC SYSTEM2.1 INSPECT HOME AND COMPONENTS
8
1
23
2
4
12-11-081 Menards Training Manual.1-7-13.indd 8 1/9/2013 11:24:16 AM

1. Remove tank lid at the inlet side of the access.2. Place hose in tank be cautious not to damage internal components.3. Use mixer to break-up solids and help pumping process.4. Pump system no more than half empty and be sure to replenish tank volume with water to avoid floating tank.5. Reinstall access lid.
SECTION 2: MAINTAINING A SEPTIC SYSTEM2.2 INSPECT TANK SLUDGE LEVEL
1. Remove tank lid at the inlet side of the access.2. Assemble sludge judge and insert into tank.3. Take reading of sludge by pulling up on check valve and removing from tank.4. Reinstall access lid.
NOTE: If floating scum is within 6 inches of the bottom of the outlet tee or sludge is within 12 inches, then it is time to have the tank pumped.
2.3 PUMP SLUDGE FROM TANK
Pump if 6” or 12”
9
12-11-081 Menards Training Manual.1-7-13.indd 9 1/9/2013 11:24:17 AM

1. Always check with your Local Health Department for current policies and rules for septic system permitting.
2. Prior to planning your septic system installation educate yourself on proper rules and installation procedures.
3. Be cautious of the use of water softeners, garbage disposals, and pools or hot tubs. These may cause system over-volumization.
4. Be aware of items that may hurt your system such as harsh antibacterial soaps, detergents, or medications.
5. Know the components of your system and have them inspected regularly. A professional that can help with this would be a local septic contractor or pumper.
6. Maintain your system as best as possible to help the longevity of its function. Applying good practices such as water conservancy will increase the life of a system exponentially.
SECTION 3: DO’S AND DON’TS
3.1 DO’S
(adapted from National Small Flows Clearinghouse & EPA’s “A Homeowner’s Guide to Septic Systems.”)
1. Do not work on a septic system if you are uncomfortable or uneducated with the hazards. Safety when it comes to a septic system is number one priority. Systems can become very dangerous atmospheres and should only be dealt with by professionals whom are qualified and trained to handle hazardous gasses and waste.
2. Do not utilize harmful substances in a septic system that may impede the function of the bacteria. Items such as antimicrobial soaps, detergents, and medication can be very harmful to the treatment of waste.
3. Do not allow vehicles to drive over piping or any other components of a system. Costly damage may occur.
4. Do not place items in tank that have no business being there. Items such as; rubber products, feminine hygiene items, toys, and non-degradable products can cause blockages and interrupt the treatment process.
NOTE: There is great controversy whether microbial additives work. AK Industries, Inc. has no data to neither support nor oppose the benefits of such additives. However, its use is the responsibility of the user and AK Industries, Inc. accepts no liability of how a system is designed or used, this includes the installation and maintenance performed.
3.2 DON’TS
10
12-11-081 Menards Training Manual.1-7-13.indd 10 1/9/2013 11:24:18 AM
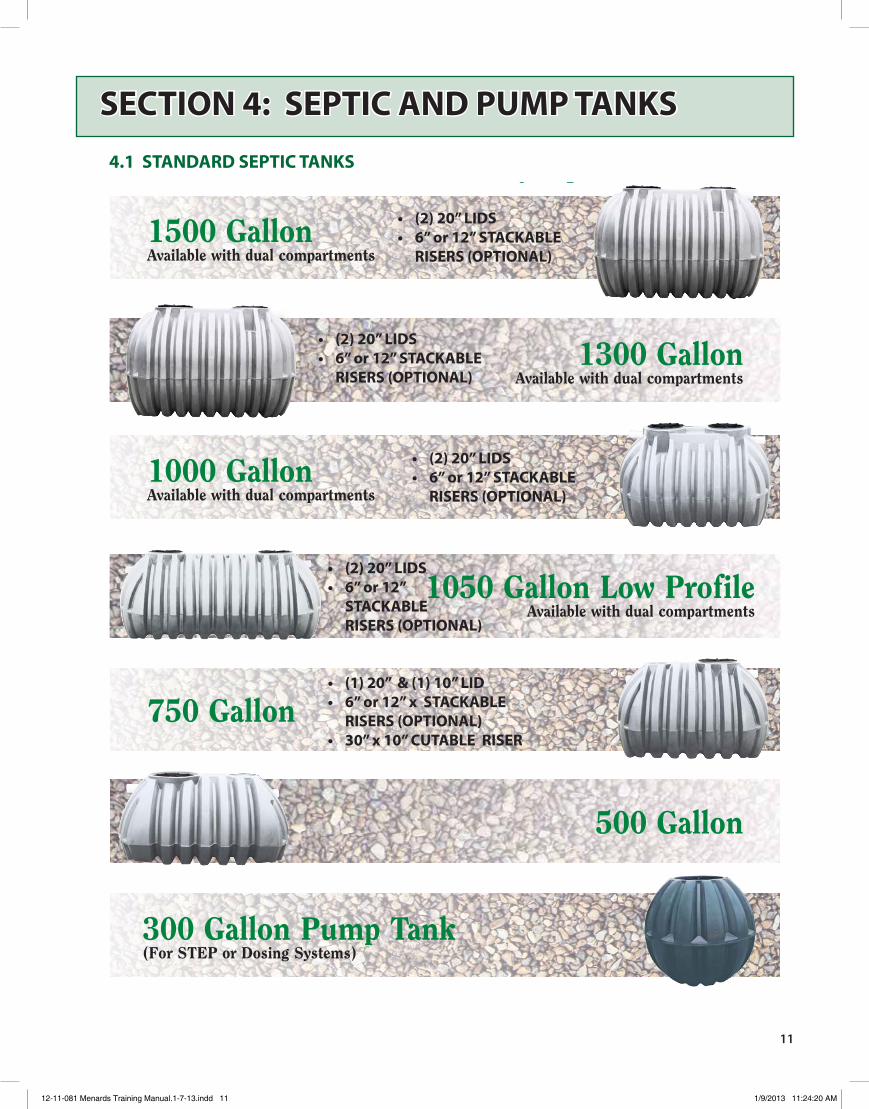
SECTION 4: SEPTIC AND PUMP TANKS4.1 STANDARD SEPTIC TANKS
6
1500 GallonAvailable with dual compartments
1300 GallonAvailable with dual compartments
1000 GallonAvailable with dual compartments
750 Gallon
500 Gallon
AK Standard Residential Gravity Septic Tank Line
AK Pump Tank Line
750 & 1000 Gallon Pump Tanks(For STEP or Dosing Systems)
300 Gallon Pump Tank(For STEP or Dosing Systems)
1050 Gallon Low ProfileAvailable with dual compartments
• (2)20”LIDS• 6”or12”STACKABLE RISERS(OPTIONAL)
• (2)20”LIDS• 6”or12”STACKABLE RISERS(OPTIONAL)
• (2)20”LIDS• 6”or12”STACKABLE RISERS(OPTIONAL)
• (2)20”LIDS• 6”or12” STACKABLE RISERS(OPTIONAL)
• (1)20”&(1)10”LID• 6”or12”xSTACKABLE RISERS(OPTIONAL)• 30”x10”CUTABLERISER
11
12-11-081 Menards Training Manual.1-7-13.indd 11 1/9/2013 11:24:20 AM

NOTES:
* Maximum bury depth is 24” to top of tank.
* Suitable for light lawn traffic (light lawn tractors no vehicles)
* Not to be used as holding or pump tank, gravity only
* Failure to adhere to installation intructions will void warranty.
* Check local building codes before installation.
LENGTH (IN)
HEIGHT (IN)
WIDTH (IN)
56 90 92 102 126 113
52 43 54 63 53 71
56 62 67 67 66 69 96
71
113
300GAL
500 GAL
750GAL
1000GAL
1050GAL
1300GAL
1500GAL
REQUIRED TO HAVE GRAVEL
BACKFILL
4.1STANDARDSEPTICTANKS-continued
U P C
R
1300 Gallon Available with dual compartments
1000 Gallon Available with dual compartments
U P C
R
1000 Gallon Low Profile Available with dual compartments
U P C
R
1500 Gallon The 1500-gallon tank also available in AIO style. Not IAPMO approved.
NOTES:
» The Low-Profile 1050, Standard 1000, and 1300-gallon AIO septic tanks are IAPMO Z1000-2007 approved.
» IAPMO approved tanks must be two compartment.
» No water or gravel backfill necessary.
» Install AK’s NEW All-In-One septics with ative, free-flowing soil.
» All tanks are fitted for a pump vault
» New green safety lids available.
» 4’ Maximum Burial Depth.
NEW!
4.2AIO(ALL-IN-ONE)SEPTICTANKS
1000Gal.LowProfile 1050Gal.
1300Gal. 1500Gal.
Length (IN) 102 126 113 113
Height (IN) 63 53 69 69
Width (IN) 67 66 69 69
12
12-11-081 Menards Training Manual.1-7-13.indd 12 1/9/2013 11:24:34 AM

4.3 PUMP TANKS
6
1500 GallonAvailable with dual compartments
1300 GallonAvailable with dual compartments
1000 GallonAvailable with dual compartments
750 Gallon
500 Gallon
AK Standard Residential Gravity Septic Tank Line
AK Pump Tank Line
750 & 1000 Gallon Pump Tanks(For STEP or Dosing Systems)
300 Gallon Pump Tank(For STEP or Dosing Systems)
1050 Gallon Low ProfileAvailable with dual compartments
• (1)20”LID• 6”or12”RISERS (seeStandard)
• (1)24”LID• 24”RISERSAVAILABLEIN1’INCREMENTSUPTO6’
NOTES:
* Maximum bury depth is 4’ to top of tank.
* Recommended minimum maintained fluid level for pump tanks:
* 300 gallon is 6” of fluid
* 750 & 1000 gallon is 20” of fluid
* Use of a Riser with 750 & 1000 is required
DIAMETER (IN)
HEIGHT (IN)
CUBIC YARDS
56 90 92
52 43 54
56 62 67
300GAL
500 GAL
1000GAL
13
12-11-081 Menards Training Manual.1-7-13.indd 13 1/9/2013 11:24:43 AM
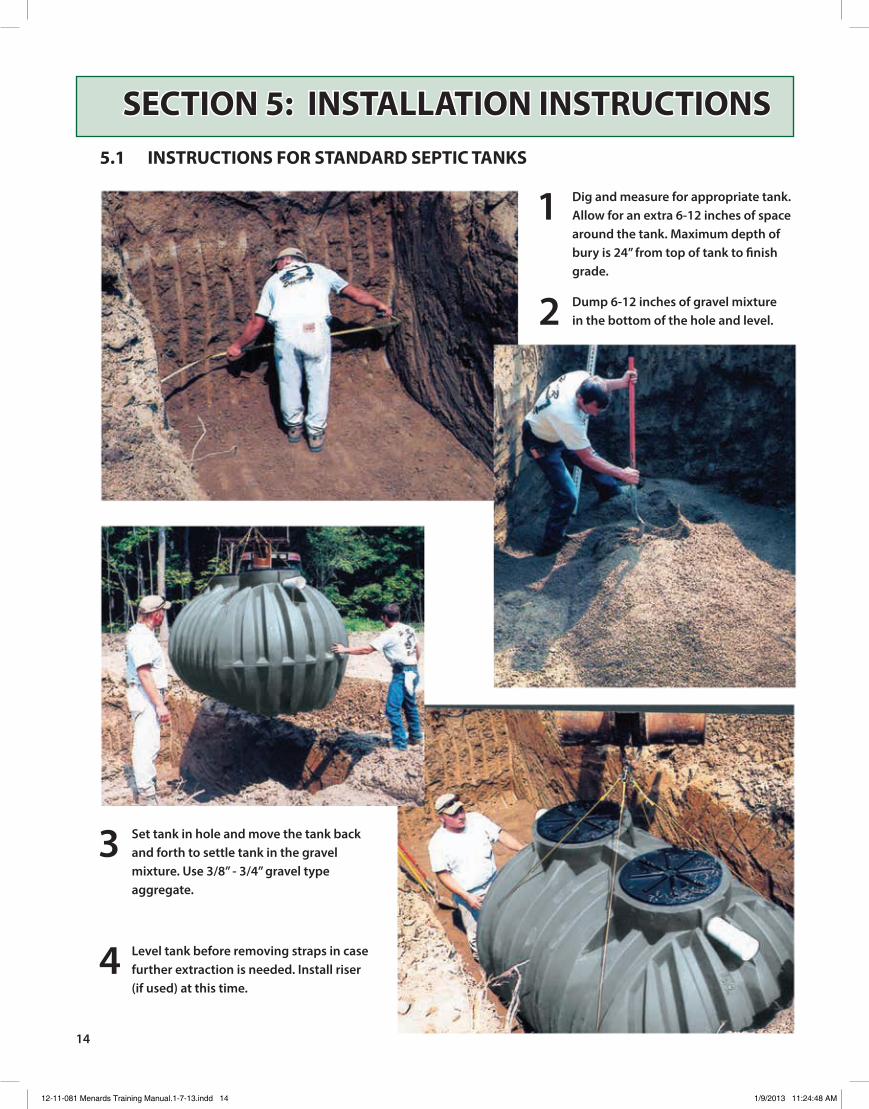
SECTION5:INSTALLATIONINSTRUCTIONS5.1 INSTRUCTIONSFORSTANDARDSEPTICTANKS
1 Dig and measure for appropriate tank. Allow for an extra 6-12 inches of space
around the tank. Maximum depth of bury is 24” from top of tank to finish grade.
2 Dump 6-12 inches of gravel mixture in the bottom of the hole and level.
3 Set tank in hole and move the tank back and forth to settle tank in the gravel
mixture. Use 3/8” - 3/4” gravel type aggregate.
4 Level tank before removing straps in case further extraction is needed. Install riser
(if used) at this time.
14
12-11-081 Menards Training Manual.1-7-13.indd 14 1/9/2013 11:24:48 AM

SECTION5:INSTALLATIONINSTRUCTIONS5.1 INSTRUCTIONSFORSTANDARDSEPTICTANKSCONTINUED
5 Start addition of water and add approximately one foot more gravel
mixture around the base of the tank. Continue to add the water at the same rate as the aggregate backfill material.
6 Continue the backfill with gravel mixture up to the top of the tank.
7 Level-out the gravel and prepare for the final top soil. Approximately 6” deep. Install cover
at this time.
8 Backfill the finish grade with loose topsoil.
15
12-11-081 Menards Training Manual.1-7-13.indd 15 1/9/2013 11:24:52 AM

SECTION5:INSTALLATIONINSTRUCTIONS5.2 INSTRUCTIONSFORAIOANDPUMPTANKS
1 Inspect all materials for defects prior to installation.
2 Maximum depth of bury from the finish grade level to the top of the tank is 24”
3 Excavate hole a maximum of 12 inches larger than the tank that is being installed. Dig hole for accurate sizing. This reduces the distance between the tank and undisturbed soil. It also provides good support for the exterior tank wall.
4 Place 6-12 inches of sand into bottom of excavated hole and level tank. NOTE:Neverplacetankdirectlyonrock.Ifrocksarepresent,then placeatleast12”ofsandinexcavatedholeandleveltank.Shifting tankfromsidetosidewillhelpsettleandleveltank.
5 Wrap straps around tank or through lifting lugs (Do not put straps through man holes.) Carefully lower tank into the center of the excavated hole and seat into the sand base. NOTE:Directionofflow-theinletishighterthanoutlet.
6 For proper fit, install the riser before you backfill. NOTE:Iffreeflowingclaysoilisbeingusedforbackfill,thenyou mustfillthetankwithwateratthesamerateasthebackfill.
7 Continue back filling the excavated hole with sand or free-flowing soil.
8 Fill evenly around the tank with sand or free-flowing soil and compact as you fill. Check for level.
9 Compact backfill under inlet and outlet pipe.
10 Complete backfill to within 6” of finished grade. Complete installation with topsoil. Mound the soil over septic tank to provide positive drain age away from the tank. This will also help to allow for soil settling. Install lids on risers, immediately after installation.
16
12-11-081 Menards Training Manual.1-7-13.indd 16 1/9/2013 11:24:53 AM

SECTION6:SEPTICEFFLUENTFILTERS6:1EFFLUENTFILTERINSTALLATION
Step 1: Find the outlet access of your septic tank.
Access is at ground level: Simply remove cover.
Step 2: Inventory Components.
Items needed; Septic Filter, 4” Sch40 SxS Coupling, 4” Sch40 pipe stub, PVC Primer, and PVC Glue.
-or-
Access is below ground:
Use a probe or shovel to find access.
Liquid Level
Grass
Dirt
Dirt
Grass
SEPTIC FILTER CARTRIDGE
PVC PRIMER AND GLUE
SEPTIC FILTER CARTRIDGE4” SCH 40
PIPE STUB
Length = Distancerequired to position filter directly under
access.
4” sch 405 x 5
Coupling
SEPTIC FILTER ASSEMBLY
Gas Deflector
17
12-11-081 Menards Training Manual.1-7-13.indd 17 1/9/2013 11:24:57 AM

Step 3: Install Components New Installation: Existing Installation:
Outlet tee assembly is not glued. Outlet tee is glued. Note: Pump tank to below water line to avoid solids going into drainfield.
Remove tee assembly and discard. Use a PVC saw to remove the tee and discard
Glue; coupling, pipe stub, filter assembly and filter cartridge onto the outlet pipe.
FilterCartridge
1 1
3 4
FilterAssembly
Pipe StubsCoupling
18
12-11-081 Menards Training Manual.1-7-13.indd 18 1/9/2013 11:24:58 AM

6:2EFFLUENTFILTERMAINTENANCE
Step 1: Find the outlet access of your septic tank.
Access is at ground level: Simply remove cover.
Step 2: Pump the tank down below waterline or as needed.
-or- Access is below ground:
Use a probe or shovel to find access.
Dirt
Grass
Liquid Level
Grass
Liquid Level
Gas Deflector
19
12-11-081 Menards Training Manual.1-7-13.indd 19 1/9/2013 11:25:01 AM

Step 3: Remove filter cartridge and rinse over the access with a garden hose.
Step 4: Reinstall filter cartridge & lid.
20
12-11-081 Menards Training Manual.1-7-13.indd 20 1/9/2013 11:25:01 AM

7.1 AK INDUSTRIES
AK INDUSTRIES2055 PIDCO DRIVE
P.O. BOX 640PLYMOUTH, IN. 46563
PHONE: (574) 936-2542 • FAX: (574) 936-2298 • www.akindustries.com
7.2 LOCAL HEALTH DEPARTMENT
Your LHD can be found at…http://www.naccho.org/about/lhd/
7.3 ENVIRONMENTALPROTECTIONAGENCY(EPA)
ENVIRONMENTAL PROTECTION AGENCYU.S. EPA PUBLICATIONS CLEARINGHOUSE
P.O. BOX 42419CINCINNATI, OH. 45241
http://www.epa.gov/
SECTION 7: RESOURCES
21
12-11-081 Menards Training Manual.1-7-13.indd 21 1/9/2013 11:25:01 AM

AK INDUSTRIES2055 Pidco Drive / P.O. Box 640
Plymouth, Indiana 46563Phone: 574-936-2542
Fax: 574-936-2298www.akindustries.com
12-11-081 Menards Training Manual.1-7-13.indd 22 1/9/2013 11:25:01 AM


