96
| Date post: | 02-Jun-2018 |
| Category: |
Documents |
| Upload: | ewancolsell |
| View: | 240 times |
| Download: | 0 times |
8/11/2019 akai sampler S1000 V2.0 Manual
http://slidepdf.com/reader/full/akai-sampler-s1000-v20-manual 1/96

8/11/2019 akai sampler S1000 V2.0 Manual
http://slidepdf.com/reader/full/akai-sampler-s1000-v20-manual 2/96

8/11/2019 akai sampler S1000 V2.0 Manual
http://slidepdf.com/reader/full/akai-sampler-s1000-v20-manual 3/96
8/11/2019 akai sampler S1000 V2.0 Manual
http://slidepdf.com/reader/full/akai-sampler-s1000-v20-manual 4/96
8/11/2019 akai sampler S1000 V2.0 Manual
http://slidepdf.com/reader/full/akai-sampler-s1000-v20-manual 5/96
8/11/2019 akai sampler S1000 V2.0 Manual
http://slidepdf.com/reader/full/akai-sampler-s1000-v20-manual 6/96
Table of Contents - iiiVersion 2.0 89/11

8/11/2019 akai sampler S1000 V2.0 Manual
http://slidepdf.com/reader/full/akai-sampler-s1000-v20-manual 7/96
8/11/2019 akai sampler S1000 V2.0 Manual
http://slidepdf.com/reader/full/akai-sampler-s1000-v20-manual 8/96
Introduction
1 IntroductionWe at AKAI, and in particular the S1000 series development team, would like to thank you for
buying a model of the Akai S1000 series, and hope that you will remain an AKAI player and user
for a long time. As each unit is thoroughly tested and inspected before it leaves our factory, we are
confident that you will enjoy years of service from this instrument.
Though we have taken great care in the manufacture of your AKAI sampler, any productwhich uses this level of technology may require servicing occasionally. The warranty below
outlines your rights and responsibilities, and also mentions certain limitations and exclusions.
Please read this warranty section carefully.
About this ManualThis manual covers operations under software Version 2.0 for the whole of the S1000 range
(S1000, S1000HD and S1000PB). In this manual usually all models in the S1000 series will
be referred to as "S1000". However, there are some functions and descriptions which apply
only to particular models in the series. These parts of the manual are marked as being for
these models, and you should take note accordingly.
This manual has been arranged in an order which we hope will be useful in your initial
experiments with the S1000, and then for future use afterwards, as you learn more functions.
Since the bottom row of buttons under the display (SELECT PROG, EDIT SAMPLE, etc)
correspond to logical operations within the S1000's software, the manual has been arranged
for the most part in sections matching these buttons.
There are two major exceptions to this rule: this first section, "Introduction", which is both
an introduction to the features and terminology of the S1000, and a guide to the operation of
SELECT PROG -- in other words, how to get your S1000 playing pre-recorded sample
programs. Please take the trouble to read this section, as it explains basic terminology,
operational concepts and shortcuts which you may not discover for yourself.
The second section, "Sampler Functions", covers the sampling and sample editing processes
(EDIT SAMPLE), as well as the program editing functions (EDIT PROG). This chapter has
been written from the "bottom up", ie from the process of recording a sample, through
editing a sample, to putting together a program.At the end of this manual there is an index. If you can't find what you want in the Table of
Contents, try the index. Most major entries are cross-referenced in a number of ways, for
instance, "Velocity crossfading" may also be looked up under "Crossfading, Velocity".
Finally, this manual assumes that you have a basic knowledge of MIDI and synthesizer
terminology (eg you know what is meant by an "ADSR envelope" or a "Program Change
message"). If you don't, there are many excellent books on the market which will guide you
into the world of MIDI instruments and synthesizers. Get hold of one of these and read it
before going much further with your S1000 - things will make a lot more sense after you've
done this.
Page 1Version 20 89/11
8/11/2019 akai sampler S1000 V2.0 Manual
http://slidepdf.com/reader/full/akai-sampler-s1000-v20-manual 9/96
Introduction
WARRANTY
AKAI Electric Co. Ltd warrants its products, when purchased from an authorized AKAI dealer, to be free fromdefects in materials and workmanship for a period of 12 (twelve) months from the date of purchase. Warrantyservice is effective and available to the original purchaser only, and only on completion and return of the AKAIWarranty Registration Card within 14 days of purchase.
War: nary coverage is valid for factory-authorized updates to AKAI instruments and their software, whentheir installation is performed by an authorized AKAI Service Center, and a properly completed WarrantyRegistration has been returned to the factory.
To obtain service under this warranty, the product must, on discovery of the defect, be properly packed andskipped to the nearest AKAI Service Center. The party requesting warranty service moat provide proof of originalownership sad date of purchase of the product.
If the warranty is valid, AKAI will, without charge for parts or, labor, either repair or replace the defective part(a). Without a valid warranty, the entire coat of the repair (parts and labor) is the responsibility ofthe product's owner.
AKAI warrants that it will make all necessary adjustments, repairs and replacements at no coat to the originalowner within 12 (twelve) months of the purchase date if:1 The product fails to perform its specified functions due to failure of one or more of its components.2 The product fails to perform its specified functions due to defects in workmanship.
3 The product has been maintained and operated by the owner in strict accordance with the written instructionsfor proper maintenance and use as specified in this Operator's Manual.
Before purchase and use, owners should determine the suitability of the product for their intended use, and theowner assumes all risk and liability whatsoever in connection therewith. AKAI shall not be liable for any injury,
loss or damage, direct or consequential, arising out of the use, or inability to use the product.The warranty provides only those benefits specified, and does not cover defects or repairs needed as a result of acts
beyond the control of AICAI, including, but not limited to:
1 Damage caused by abuse, accident or negligence. AKAI will not cover under warranty any original factorydisk damaged or destroyed as a result of the owner's mishandling.
2 Damage caused by any tampering, alteration or modification of the product: operating software, mechanical orelectronic components.
3 Damage caused by failure to maintain sad operate the product is strict accordance with the written instructionsfor proper maintenance sad use as specified in this Operator's Manual.
4 Damage caused by repairs or attempted repairs by unauthorized persona.
5 Damage caused by fire, smoke, falling objects, water or other liquids, or natural events such as rain, floods,earthquakes, lightning, tornadoes, storms, etc.
6 Damage caused by operation on improper voltages.
IMPORTANT NOTE: This warranty becomes void if the product or its software is electronically modified, alteredor tampered with is any way.AKAI shall not be liable for coats involved is packing or preparing the product for shipping, with regard to time,labor or materials, shipping or freight coats, or time sad expenses involved in transporting the product to and froman AKAI Authorized Service Center or Authorized Dealer.
AKAI will not cover under warranty an apparent malfunction that is determined to be user error, or the owner'sinability to use the product.THE DURATION OF ANY OTHER WARRANTIES, WHETHER IMPLIED OR EXPRESS, INCLUDING BUT
NOT LIMITED TO THE IMPLIED CONDITION OF MERCHANTABILITY, IS LIMITED TO THEDURATION OF THE EXPRESS WARRANTY HEREIN.ARAI hereby excludes incidental or consequential damages, including but not limited to:
1 Loss of time2 Inconvenience3 Delay in performance of the Warranty4 The lose of use of the product5 Commercial lose
6 Breach of any express or implied warranty, including the Implied Warranty of Merchantability, applicable tothis product
Version 20 89/11Page 2
8/11/2019 akai sampler S1000 V2.0 Manual
http://slidepdf.com/reader/full/akai-sampler-s1000-v20-manual 10/96
Introduction
Copyright noticeThe AKAI S1000 is a computer-based instrument, and as such contains and uses software in
ROMs and disks. This software, and all related documentation, including this Operator's
Manual, contain proprietary information which is protected by copyright laws. All rights are
reserved. No part of the software or its documentation may be copied, transferred or
modified. You may copy the operating software and any samples, programs, etc containedon disks for your own personal use. All other copies of the software are in violation of
copyright laws. You may not distribute copies of the software to others, or transfer the
software to another computer by electronic means. You may not modify, adapt, translate,
lease, distribute, resell for profit or create derivative works based on the software and its
related documentation or any part thereof without prior written consent from AKAI Electric
Co. Ltd, Tokyo, Japan.
Page 3Version 2.0 89/11
8/11/2019 akai sampler S1000 V2.0 Manual
http://slidepdf.com/reader/full/akai-sampler-s1000-v20-manual 11/96
Introduction
WARNINGPower requirements for electrical equipment vary from area to area. Please ensure
that your S1000 meets the power requirements in your area. If in doubt, consult a
qualified electrician.
120V @ 60Hz for USA and Canada
220V @ 50Hz for Europe (excluding UK)
240V @ 50Hz for UK and Australia
Protecting yourself and the S1000
• Never touch the plug with wet hands.
• Always disconnect the S1000 from the power supply by pulling on the plug, not the cord.
• Allow only a qualified professional engineer to repair or reassemble the S1000. Apart
from voiding the warranty, unauthorized engineers might touch live internal parts and
receive a serious electric shock.
• Do not put, or allow anyone to put any object, especially metal objects, into the S1000.
• Use only a household AC power supply. Never use a DC power supply.
• If water or any other liquid is spilled into or onto the S1000, disconnect the power, and
call your dealer.• Make sure that the unit is well-ventilated, and away from direct sunlight.
• To avoid damage to internal circuitry, as well as the external finish, keep the S1000 away
from sources of direct heat (stoves, radiators, etc).
• Avoid using aerosol insecticides, etc near the S1000. They may damage the surface, and
may ignite.
• Do not use denaturated alcohol, thinner or similar chemicals to clean the S1000. They will
damage the finish.
• Make sure that the S1000 is always well-supported when in use (either in a
specially-designed equipment rack, or a firm level surface).
• When installing the S1000 in a 19" rack system, always allow lU of ventilated free space
above it to allow for cooling. Make sure that the back of the rack is unobstructed to allowa clear airflow.
UK customers
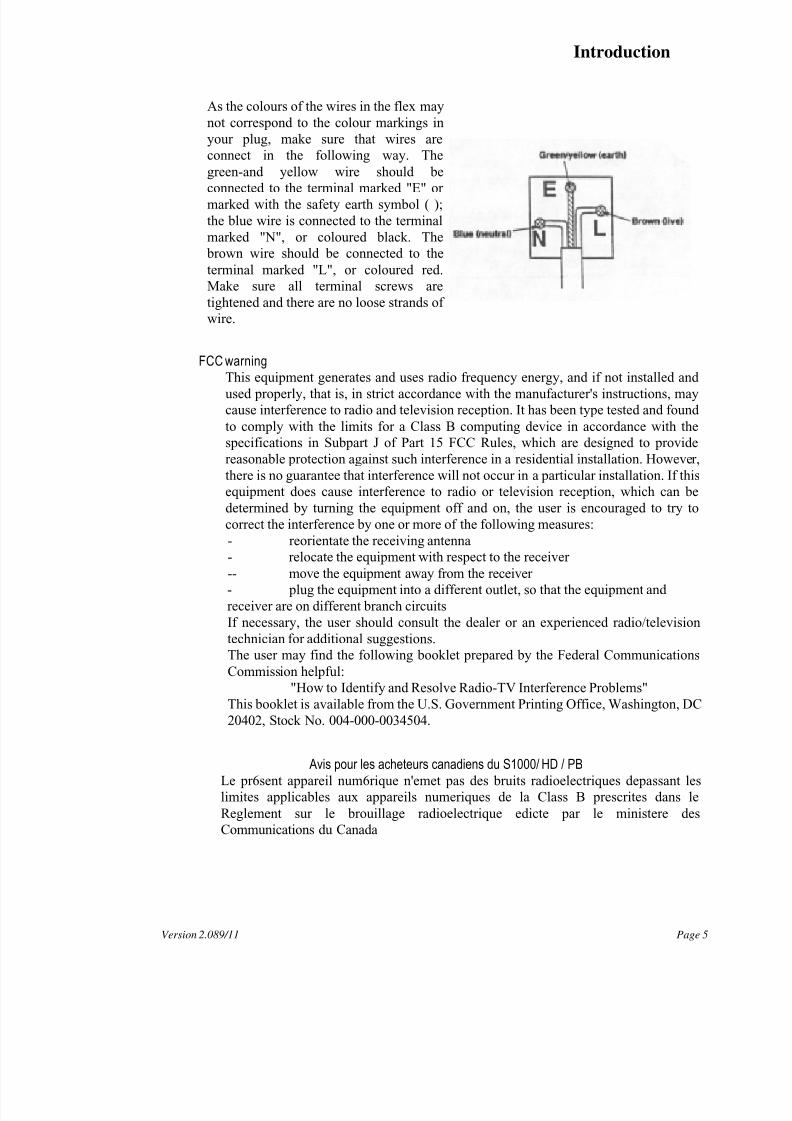
Important safety notice - The flex supplied with this machine has three wires, as shown
in the illustration.
WARNING: THIS APPLIANCE MUST BE
EARTHED
IMPORTANT
The wires in this mains lead are coloured in accordance with the following code:
Green-and-yellow - earthBlue - neutral
Brown - live
Version 2.0 89/11Page 4
8/11/2019 akai sampler S1000 V2.0 Manual
http://slidepdf.com/reader/full/akai-sampler-s1000-v20-manual 12/96
Introduction
As the colours of the wires in the flex may
not correspond to the colour markings in
your plug, make sure that wires are
connect in the following way. The
green-and yellow wire should be
connected to the terminal marked "E" ormarked with the safety earth symbol ( );
the blue wire is connected to the terminal
marked "N", or coloured black. The
brown wire should be connected to the
terminal marked "L", or coloured red.
Make sure all terminal screws are
tightened and there are no loose strands of
wire.
FCC warning
This equipment generates and uses radio frequency energy, and if not installed andused properly, that is, in strict accordance with the manufacturer's instructions, may
cause interference to radio and television reception. It has been type tested and found
to comply with the limits for a Class B computing device in accordance with the
specifications in Subpart J of Part 15 FCC Rules, which are designed to provide
reasonable protection against such interference in a residential installation. However,
there is no guarantee that interference will not occur in a particular installation. If this
equipment does cause interference to radio or television reception, which can be
determined by turning the equipment off and on, the user is encouraged to try to
correct the interference by one or more of the following measures:
- reorientate the receiving antenna
- relocate the equipment with respect to the receiver
-- move the equipment away from the receiver- plug the equipment into a different outlet, so that the equipment and
receiver are on different branch circuits
If necessary, the user should consult the dealer or an experienced radio/television
technician for additional suggestions.
The user may find the following booklet prepared by the Federal Communications
Commission helpful:
"How to Identify and Resolve Radio-TV Interference Problems"
This booklet is available from the U.S. Government Printing Office, Washington, DC
20402, Stock No. 004-000-0034504.
Avis pour les acheteurs canadiens du S1000/ HD / PBLe pr6sent appareil num6rique n'emet pas des bruits radioelectriques depassant les
limites applicables aux appareils numeriques de la Class B prescrites dans le
Reglement sur le brouillage radioelectrique edicte par le ministere des
Communications du Canada
Version 2.089/11 Page 5
8/11/2019 akai sampler S1000 V2.0 Manual
http://slidepdf.com/reader/full/akai-sampler-s1000-v20-manual 13/96
Introduction
FUR KUNDEN IN DER BUNDESREPUBLIK DEUTSCHLAND
Bescheinigung von AKAI
Hiermit wird bescheinigt, daB das Gerdt AKAI
S1000 / HD / PB in
tYbereinstimmung mit den Bestimmungen der
Amtsblattverftigung 1046/1984
funkentstbrt ist.Der Deutschen Bundespost wurde das Inverkehrbringen theses GerAtes ange
zeigt and die Berichtignng zur Oberprdfung der Serie auf Einhaltung der
Bestimmungen eingerliumt.
AKAI ELECTRIC CO., LTD
Version 20 89/11Page 6
8/11/2019 akai sampler S1000 V2.0 Manual
http://slidepdf.com/reader/full/akai-sampler-s1000-v20-manual 14/96
Introduction
FeaturesThe AKAI S1000 is a high-quality digital sampler. With a sampling rate of 44.1kHz, and
16-bit resolution, the S1000 is capable of recording and replaying samples literally of CD
quality, and the basic unexpended unit has a total sample time of over 23 seconds (mono).
Memory may be added in 2Mbyte boards to a total of 8Mbytes to give over 90 seconds of
total sample time.There are three models in the AKAI S1000 series: the basic S1000, with a diskette drive, the
51000HD, with an integral 40Mb hard disk, and the S1000PB, which has a diskette drive,
but none of the sample recording or editing facilities of the other models. The S1000PB is
especially useful for setups where more than 16-note polyphony is required (using a S1000
and S1000PB), or as a playback-only sampler for live work. A 51000 may be used for
recording and editing of samples, and they may then be transferred to a S1000PB using
diskette or MIDI Sample Dump, and replayed. Diskette and MIDI data is, naturally,
completely compatible between all models in the range, as well as with the S1000KB
sampling keyboard.
16-note polyphony allows complex passages to be played with the full sample time. The
samples may be edited with full trimming facilities (down to 1 sampling period), looped at
up to 8 loop points per sample (with tuning of the loop), spliced to other samples, filteredand sent through two independent ADSR envelope generators. Full velocity, positional and
looping crossfading is possible. Basic synthesizer waveforms (sine, triangle, etc) are
available on disk for synthesizer/sampler sounds.
The S1000 is also capable of editing samples digitally - "stretching" or "squeezing" samples
without changing the pitch in order to fit them into a specific time slot. Resampling can be
done at any frequency (higher or lower than the original).
The stereo facility is ideal for sampling portions of prerecorded program material (making it
an ideal tool for "house", "hip-hop" etc productions), as well as for sampling ambient
acoustic sounds.
Naturally, a full MIDI implementation is built in - multi-timbral capabilities making the
S1000 perfect for use with a sequencer such as the AKAI MPC-60 or ASQ-10.
Special functions for remote operation of the AKAI ME-35T Audio/MIDI trigger unit (1 or
2 can be controlled), together with a single-trigger monophonic mode make the S1000 into a
real-time percussion tone generator.
In the studio, eight separate outputs allow maximum flexibility in mixing and adding effects.
However, stereo operation is possible from just two outputs, and a built-in stereo effects
send/return loop can save channels and space in live work.
The S1000 is capable of processing up to 200 samples, 100 programs, or a combination of
up to 400 samples + programs + keygroups. The internal 3.5" floppy disk drive provides a
quick easy method of storing and retrieving data (samples, programs and other settings).
Hard disks may be used by the S1000 when using the optional IB-103 interface board
(AKAI provide a 40Mbyte capacity drive which may be mounted internally), but any
SCSI-compatible drive may be used up to a capacity of 512Mbytes. The hard disk may bedivided into partitions and volumes, and individual volumes may be auto-
Page 7 Version 2.0 89/11
8/11/2019 akai sampler S1000 V2.0 Manual
http://slidepdf.com/reader/full/akai-sampler-s1000-v20-manual 15/96
Introduction
matically loaded in response to MIDI Program Change commands. The SCSI interface may
also be used for fast transmission of sample data to SCSI-equipped computers for editing, etc.
The optional IB-104 digital interface board provides coaxial and optical digital links, for
direct digital sampling at rates of up to 48kHz, and hard disk archive/restore to DAT for
quick and easy storage of data.
The industry-standard sampler prior to the introduction of the S1000 was the ALAI S900, and
hundreds of sample disks were produced for this machine. You'll be pleased to know that theS1000 is capable of reading these samples and the associated programs from disk, converting
them, and replaying them.
Version 2.0 89/11Page 8
8/11/2019 akai sampler S1000 V2.0 Manual
http://slidepdf.com/reader/full/akai-sampler-s1000-v20-manual 16/96
Introduction
GlossaryEvery new technology invents its own terms to describe new techniques. Digital music is no
exception, unfortunately. However, a glossary such as this can help introduce you to the
vocabulary and concepts involved. We assume you have a basic knowledge of MIDI, but if
the S1000 is your first excursion into MIDI and sampling, we suggest you get hold of an
introductory MIDI book, and read it before proceeding much further with your S1000.
NOTE: This manual covers all models of the S1000 series - including the S1000PB
(playback model). On the PB model, the CURSOR and DATA rotary knobs are replaced
by two pairs of buttons (<= and => ), which correspond to turning the knobs by
counterclockwise and clockwise respectively. One press of these buttons corresponds to
turning the knobs by one click.
For the sake of simplicity, this manual will always refer to turning the CURSOR or DATA
knobs. If you are using a S1000PB, you should interpret this as pressing the appropriate
button (CURSOR or DATA). Where other S1000PB-specific information is given, this
will be clearly indicated.
ButtonIn this manual, the word "button" will generally be used to refer to a push-button switch
on the front panel. This is to distinguish them from the keys on a musical piano-type
keyboard. There are two major exceptions to this convention: the use of the terms
"number keypad", and "soft key", which come from computing, and are so
well-engrained in technical language that using the terms "number button pad" and "soft
button" would be pointless.
Crossfading
On the S1000, crossfading is the term used to describe the setting of the relative volume of
two samples which are played at the same time. For instance velocity crossfading is used to
describe the relative balance between two samples played by the same key, when the key
is played at different velocities. Positional crossfading refers to relative balance betweensamples in different keyspans (see Multisampling. Additionally, the S1000 allows loop
crossfading - the ability to fade samples inside themselves to allow for smooth looping.
Cursor
On the S1000, the cursor is the highlighted (reverse) part of the display which is moved by
the CURSOR knob (S1000PB - CURSOR buttons), and indicates the parameter which
may be changed by the DATA knob (S1000PB - DATA buttons) and/or the number
keypad.
Field
On the S1000, a field is the portion of a page containing a parameter. Only fields (ie those
portions of a page which may be altered) will be highlighted by the cursor as the
CURSOR knob is turned to go through a page.
Key In this manual, the word "key" will be generally used to refer to a key on a piano-type
keyboard to distinguish these from buttons on the front panel.
Version 2.0 89/11 Page 9
8/11/2019 akai sampler S1000 V2.0 Manual
http://slidepdf.com/reader/full/akai-sampler-s1000-v20-manual 17/96
Introduction
Keygroup
The term for a collection of a number of parameters of up to four samples - their name,
keyspan, filtering, envelopes, etc.
Keyspan
On the S1000, a keyspan is the range of the keyboard on which a sample can be played.
LFOLow Frequency Oscillator - an oscillator which operates at too low a frequency to produce
an audible tone, but is used to modulate such parameters as pitch, pan position, etc. The
S1000 has a number of LFOs implemented in software.
Looping
In sampling, looping refers to the process of taking a portion of a sample and repeating it.
The 51000 allows eight such loops to be present in a sample, allowing incredibly subtle
variations on the basic sampled sound.
Multisampling
When sampling a sound, replaying it at a radically higher or lower pitch will produce
strange and unnatural effects. To overcome this problem, samples should be taken fromacross the pitch range of an instrument and assigned to different keyspans across the
keyboard. This is known as multisampling.
Operating system or Operating software
Without a computer program to send signals through the maze of chips and circuitry
which make up the hardware of the S1000, the machine would be useless. The program
which contains the instructions to respond to MIDI messages, buttons and controllers, and
display messages, etc on screen (as well as to record and play back sounds) is known as
the operating system. This is automatically loaded when the S1000 is powered up, either
from chips inside the S 1000, or, if a disk containing a later version of the operating
system has been placed in the drive, from disk.
Page
On the S1000, a page is the set of information and parameters shown at any one time on
the display screen. Pages can be entered by pressing the named buttons (SELECT PROG ,
MIDI, etc), or the soft keys whose legends are displayed at the bottom of a page.
Parameter
A value which can be changed (for instance length, tuning, upper limit of a keyspan) as
displayed on the screen of the S1000.
Positional crossfading
See Crossfading.
ProgramThe term for a collection of keygroups which will all be selected together when the
program is selected. Different programs can be assigned to different MIDI channels, so
that when a sequencer is connected to the S1000, multi-timbral output is possible.
Page 10 Version 2.0 89/11

8/11/2019 akai sampler S1000 V2.0 Manual
http://slidepdf.com/reader/full/akai-sampler-s1000-v20-manual 18/96
Introduction
Sample
Usually in the manual, the word samplewill refer to a sound which has been recorded,
digitized and edited, and can then be added to a keygroup(youmight like to think of it as a
"waveform" in analog synthesizer terms). However, when editing one of these sounds,
the length and position inside this sample is also measured in samples.This latter meaning
refers to the digitized "snapshot" image of the sound for one cycle of the sampling process. A sample recorded at 44.1kHz and lasting for exactly one second therefore
contains 44,100 samples! It will usually be clear in this manual, however, what meaning
of the word sampleis meant at any one time. To sample, by the way, means "to record a
sound on a sampler and make a sample of it".
Soft key
On the S1000, a button with no predefined function. The current state of the S1000
determines the function, which is displayed on the bottom line of the page.
Splicing
The process of joining samples to each other (analogous to tape splicing). However,
this is much easier electronically than when using razor blades and splicing tape,
and many more effects are possible. To take an extreme example, the sound of a
string section could be spliced to the sound of a bottle breaking, and the resulting
sample then spliced to the reversed sound of the string attack.
Velocity crossfading
See Crossfading and Velocity zones.
Velocity zones
On the S1000, a sample can be programmed to play only when a key is pressed between
certain velocities. The range of these is known as a velocity zone. Up to four samples
may be assigned in each keygroup, and if desired, each can be assigned to a different
velocity zone. In this way, a finger-style electric bass sample could be assigned to lower
velocity zones, and a slap or pull bass to higher ones, with a velocity crossfade added sothat there is an intermediate range. The result, when played, will provide a highly
expressive bass instrument.
Version 2.0 89/11 Page 11
8/11/2019 akai sampler S1000 V2.0 Manual
http://slidepdf.com/reader/full/akai-sampler-s1000-v20-manual 19/96
Introduction
Volume
As well as being the output level from the S1000, volume has another meaning a
collection of programs, samples and drum settings which can be stored together on a
diskette, on a hard disk or in memory. One volume can be stored in memory or on each
diskette and u to 128 volumes can be stored on a hard disk.
Version 2.0 89/11Page 12
8/11/2019 akai sampler S1000 V2.0 Manual
http://slidepdf.com/reader/full/akai-sampler-s1000-v20-manual 20/96
Introduction
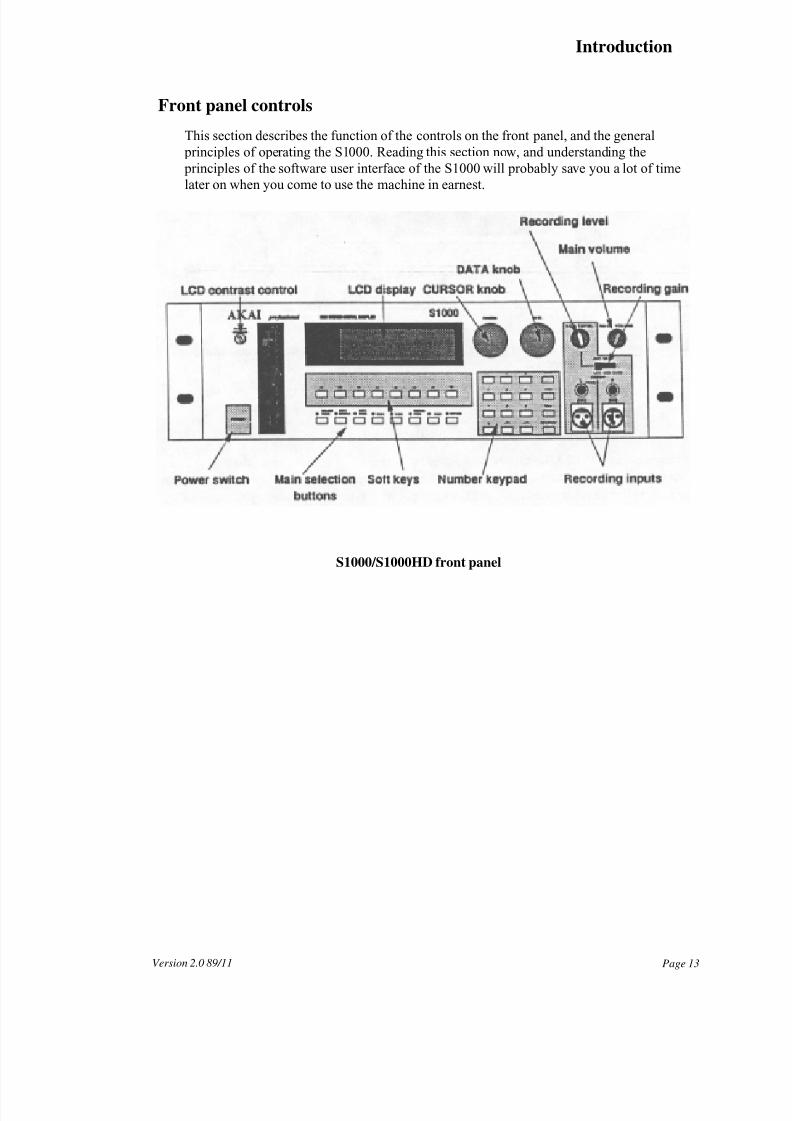
Front panel controls
This section describes the function of the controls on the front panel, and the general
principles of operating the S1000. Reading this section now, and understanding the
principles of the software user interface of the S1000 will probably save you a lot of time
later on when you come to use the machine in earnest.
S1000/S1000HD front panel
Page 13Version 2.0 89/11
8/11/2019 akai sampler S1000 V2.0 Manual
http://slidepdf.com/reader/full/akai-sampler-s1000-v20-manual 21/96
Introduction
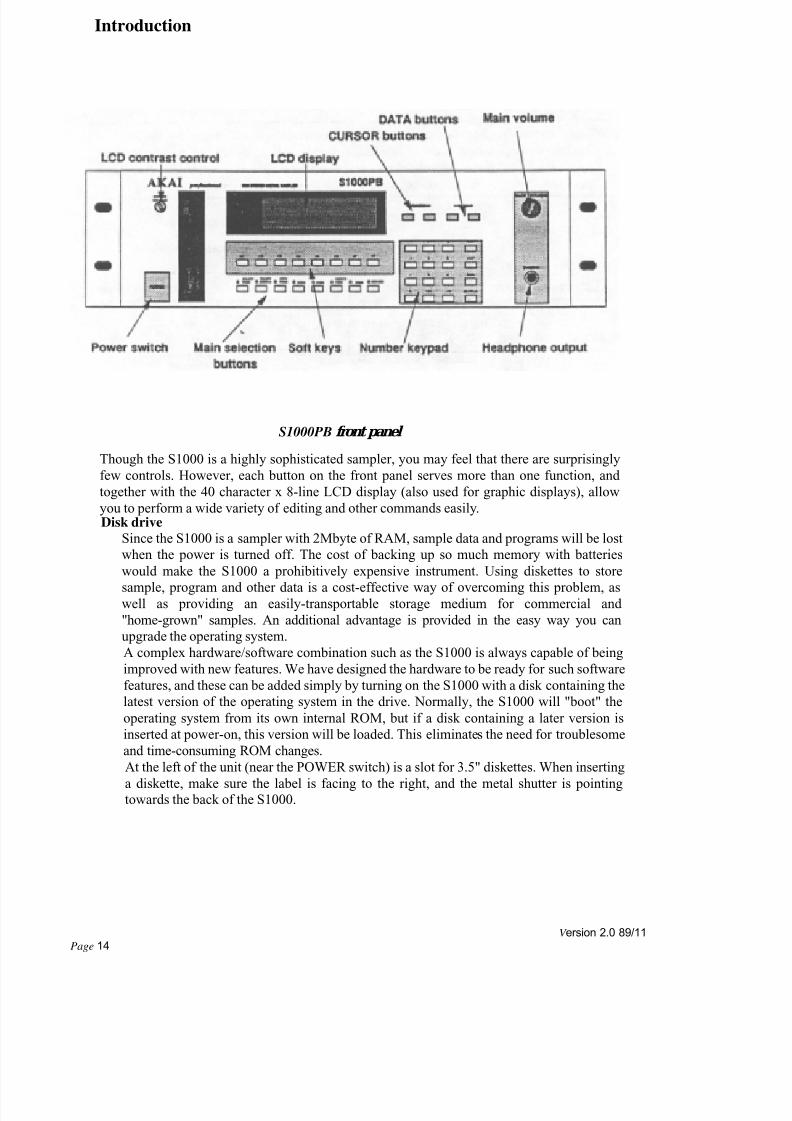
S1000PB front panel
Though the S1000 is a highly sophisticated sampler, you may feel that there are surprisingly
few controls. However, each button on the front panel serves more than one function, and
together with the 40 character x 8-line LCD display (also used for graphic displays), allow
you to perform a wide variety of editing and other commands easily.Disk drive
Since the S1000 is a sampler with 2Mbyte of RAM, sample data and programs will be lost
when the power is turned off. The cost of backing up so much memory with batteries
would make the S1000 a prohibitively expensive instrument. Using diskettes to storesample, program and other data is a cost-effective way of overcoming this problem, as
well as providing an easily-transportable storage medium for commercial and
"home-grown" samples. An additional advantage is provided in the easy way you can
upgrade the operating system.
A complex hardware/software combination such as the S1000 is always capable of being
improved with new features. We have designed the hardware to be ready for such software
features, and these can be added simply by turning on the S1000 with a disk containing the
latest version of the operating system in the drive. Normally, the S1000 will "boot" the
operating system from its own internal ROM, but if a disk containing a later version is
inserted at power-on, this version will be loaded. This eliminates the need for troublesome
and time-consuming ROM changes.
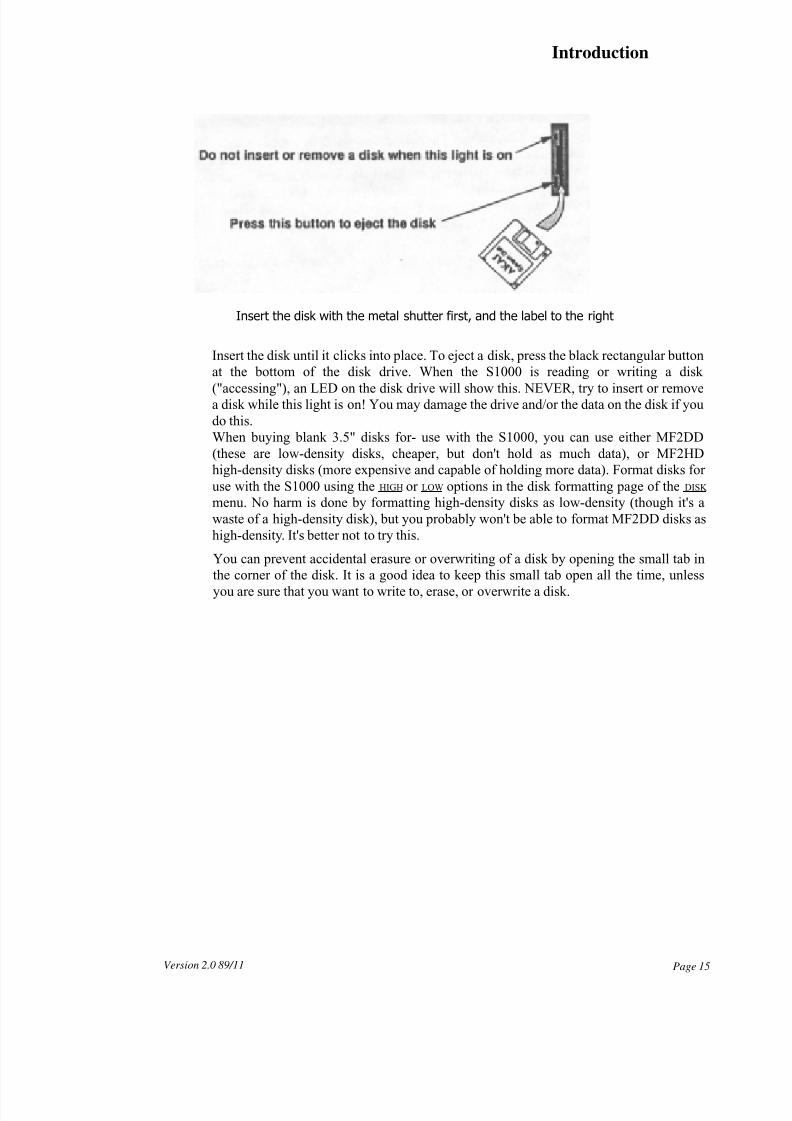
At the left of the unit (near the POWER switch) is a slot for 3.5" diskettes. When insertinga diskette, make sure the label is facing to the right, and the metal shutter is pointing
towards the back of the S1000.
V ersion 2.0 89/11
Page 14
8/11/2019 akai sampler S1000 V2.0 Manual
http://slidepdf.com/reader/full/akai-sampler-s1000-v20-manual 22/96
Introduction
Insert the disk with the metal shutter first, and the label to the right
Insert the disk until it clicks into place. To eject a disk, press the black rectangular button
at the bottom of the disk drive. When the S1000 is reading or writing a disk
("accessing"), an LED on the disk drive will show this. NEVER, try to insert or removea disk while this light is on! You may damage the drive and/or the data on the disk if you
do this.
When buying blank 3.5" disks for- use with the S1000, you can use either MF2DD
(these are low-density disks, cheaper, but don't hold as much data), or MF2HD
high-density disks (more expensive and capable of holding more data). Format disks for
use with the S1000 using the HIGH or LOW options in the disk formatting page of the DISK
menu. No harm is done by formatting high-density disks as low-density (though it's a
waste of a high-density disk), but you probably won't be able to format MF2DD disks as
high-density. It's better not to try this.
You can prevent accidental erasure or overwriting of a disk by opening the small tab in
the corner of the disk. It is a good idea to keep this small tab open all the time, unlessyou are sure that you want to write to, erase, or overwrite a disk.
Page 15Version 2.0 89/11
8/11/2019 akai sampler S1000 V2.0 Manual
http://slidepdf.com/reader/full/akai-sampler-s1000-v20-manual 23/96
Introduction
MAKING A COPY OF YOUR OPERATING SYSTEM DISK
If you destroy the data on any Operating System disk supplied as a future upgrade,
this is a) annoying, and b) expensive. Unfortunately we must make a charge for
replacement operating system disks, and, of course, it takes time for us to deliver
them to you. You can save yourself this potential inconvenience by making a copy of
the operating system, as described below. These instructions are not a full guide todisk operations - see the relevant section for full details.
1) Insert the Operating System disk in the drive and turn on the power to the S1000.
2) The S1000 will automatically load the operating system from disk.
3) Wait until the disk drive light goes off, remove the Operating System disk, and store
it in a safe place. Insert a new disk (MF2DD or MF?.HD).
4) Press the DISK button (the DISK LED will light), and the S1000 will inform you that
the disk is unformatted. Press the FORM soft key (F6) once to remove the "unformatted
disk" message, and once again to display the formatting menu.
5) Press the START HIGH – F7 (for MF2HD) or LOW – F8 (for MF2DD) soft
key. The disk will be formatted, a process taking just over a minute. All
existing data on the disk will be erased.
6) Now press the SAVE soft key ( F2 ). Move the cursor (using the CURSOR knob) so that
it covers the field below the" type of save: -" message (usually
' this will read "ENTIRE VOLUME"). Now change the message to read "OP-
ERATING SYSTEM", using the DATA knob.
'n Press GO ( F8 ). A message will be displayed saying that this will wipe the memory of
the S1000. Since you've just turned it on, there are no samples or programs in memory
- press GO (this time it's F7).
8) The S1000 will save the operating system to disk. When the disk drive light has gone
out, eject the disk, slide the write-protect tab so that the small square hole is open (this
will prevent you overwriting or erasing the disk accidentally), and label the disk
clearly.
9) Just to check everything's gone smoothly, turn off the S1000, insert your new copy ofthe operating system, and turn on the power. The S1000 should automatically load the
disk version of the operating system. If it doesn't, something's gone wrong. Repeat the
process again using another new disk, and if all else fails, call your AKAI dealer.
Headphones (S1000PB)
A stereo headphone socket (1/4 inch) is provided on the front panel. The level of the
signal output here is adjusted by the MAIN VOLUME control (for models other than the
S1000PB, the headphone connection is on the back panel).
MAIN VOLUME
This rotary control adjusts the overall output level of the LEFT/MONO, RIGHT and
headphone outputs.
Page 16 Version 2.0 89/11
8/11/2019 akai sampler S1000 V2.0 Manual
http://slidepdf.com/reader/full/akai-sampler-s1000-v20-manual 24/96
Introduction
REC GAIN (not S1000PB)
This is a 3-position slider switch (LOW, MID, HIGH) used for matching the level of the
input source to the recording amplifier of the S1000. Fine adjustment should be carried
out with the REC LEVEL control on the front panel. Ideally, you should set the REC
GAIN so that the REC LEVEL is set about 2 o'clock. Remember that unlike analog
devices, digital devices produce distortion which is particularly unpleasant, and "soft
dipping" and the effect of saturation cannot be obtained by digital recording. You shouldalways allow sufficient headroom for transient peaks when making a sample.
REC LEVEL (not S1000PB)
This rotary control is used when recording samples, to control the level of the signal fed
into the S1000's recording section.
REC IN (not S1000PB)
Two parallel pairs of stereo balanced connectors are provided for connection of sound
sources to be sampled. One pair is a pair of ITT-Cannon XLR-31F connectors (wired in
accordance with American standards - 1=shield, 2=cold, 3=hot), and the other pair is a
pair of unbalanced 1/4" phone connectors.
Unbalanced sources can, of course, be connected to the XLR inputs. If a mono source is
used for sampling, use only either the LEFT (MONO) XLR or phone connector.
POWER SWITCH
Turn on the S1000 with the power switch on the left of the front panel (press for
on, and press again for oft). On power-on, the display will indicate the initial
SELECT PROG page, and the LED by the SELECT PROG button will light.
Editing controlsWhile most of the features described so far are those you might expect to find on any
top-quality keyboard, all other controls on the panel are connected in one way or another
with the display and operations specific to the S1000.The display
The display is a backlit LCD display which usually displays white against a blue background. When displaying characters, 8 lines of 40 characters each can be displayed.
The display is also capable of displaying graphic information, such as a volume vs time
display of a sample, envelope shapes and a "MIDI PPM" for checking MIDI input to the
S1000. The contrast of the display can be adjusted using the LCD CONTRAST control
at the bottom right of the screen.
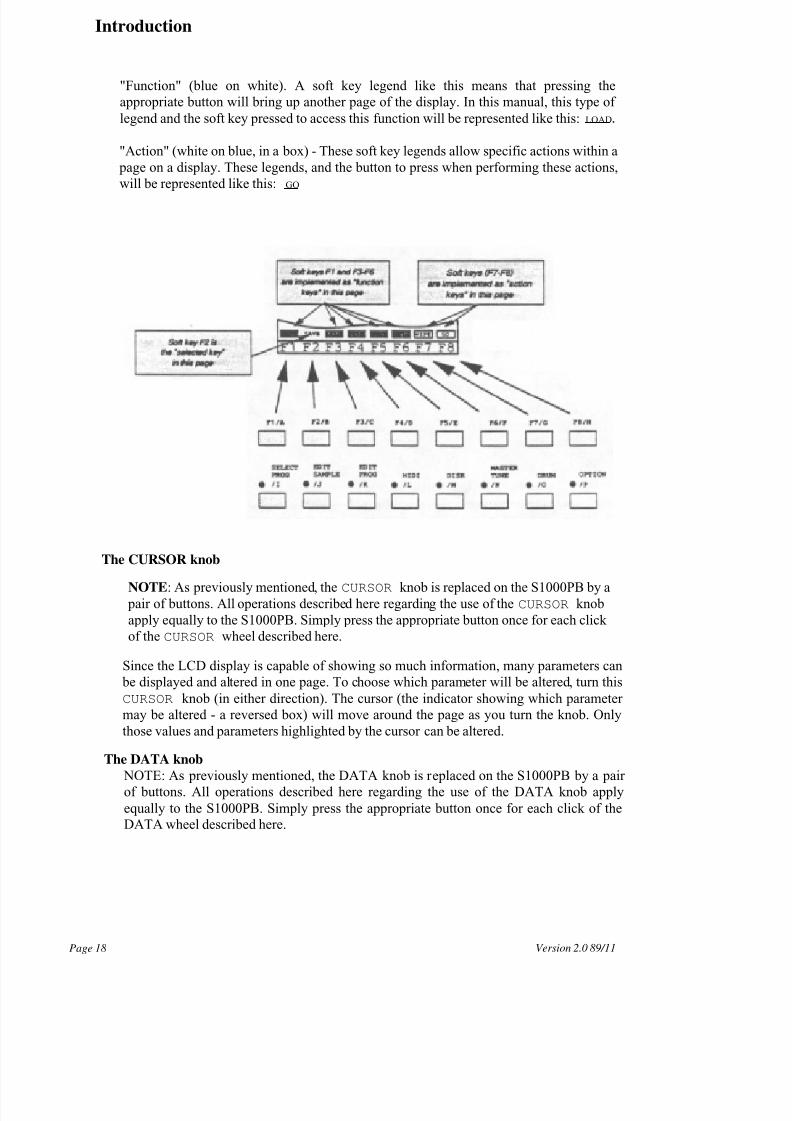
The bottom line of the display will always contain a row of up to eight or fewer "soft
key" legends. These indicate the current function of the buttons immediately below the
display (F1 - F8). These buttons have no predefined function -their use at any one time is
defined by software - hence "soft keys". (When writing a button name as shown on the
front panel, it will be written in this way: MIDI). Soft key legends may be of three types:
"Selected" (white on blue). When a soft key legend is displayed in this way, it means thatthis function has been selected. In this manual, this type of legend will be displayed like
this: TUNE.
Version 2.0 89/11 Page 17
8/11/2019 akai sampler S1000 V2.0 Manual
http://slidepdf.com/reader/full/akai-sampler-s1000-v20-manual 25/96
Introduction
"Function" (blue on white). A soft key legend like this means that pressing the
appropriate button will bring up another page of the display. In this manual, this type of
legend and the soft key pressed to access this function will be represented like this: LOAD.
"Action" (white on blue, in a box) - These soft key legends allow specific actions within a
page on a display. These legends, and the button to press when performing these actions,
will be represented like this: GO
Version 2.0 89/11Page 18
The CURSOR knob
NOTE: As previously mentioned, the CURSOR knob is replaced on the S1000PB by a
pair of buttons. All operations described here regarding the use of the CURSOR knob
apply equally to the S1000PB. Simply press the appropriate button once for each click
of the CURSOR wheel described here.
Since the LCD display is capable of showing so much information, many parameters can
be displayed and altered in one page. To choose which parameter will be altered, turn this
CURSOR knob (in either direction). The cursor (the indicator showing which parameter
may be altered - a reversed box) will move around the page as you turn the knob. Only
those values and parameters highlighted by the cursor can be altered.
The DATA knob
NOTE: As previously mentioned, the DATA knob is replaced on the S1000PB by a pair
of buttons. All operations described here regarding the use of the DATA knob apply
equally to the S1000PB. Simply press the appropriate button once for each click of the
DATA wheel described here.
8/11/2019 akai sampler S1000 V2.0 Manual
http://slidepdf.com/reader/full/akai-sampler-s1000-v20-manual 26/96
If you turn the DATA knob more than ten clicks, of course, the value of the whole
parameter will be incremented or decremented by the number of clicks. In this way, with
very little effort, fast accurate editing of numbers can be achieved using only the two
control knobs. The best way to learn how this works is to practise; after a short time, it
should become second nature.
The number buttons
As an alternative to turning the knobs, you can also press the number buttons for direct
entry of data. Use the +/< button to position the cursor at the left of a
numeric field, and the -/> button to highlight digits to the right, one at a time.
Version 2.0 89/11 Page 19
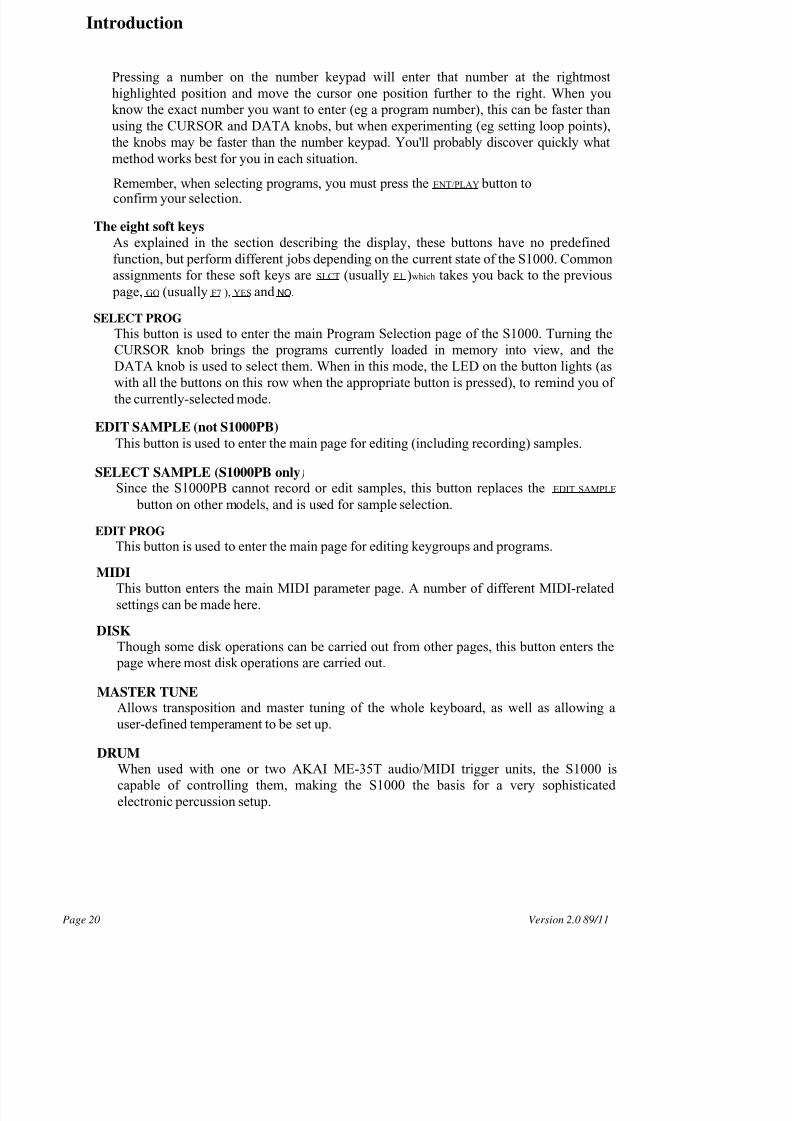
Now if the CURSOR knob is turned clockwise one click, the first four digits will be
highlighted: 12445.67, and turning the DATA knob one click clockwise will produce:
12455.67.
Introduction
non-numeric values, turning the knob will display all the options in order. Normally,
there is no other entry procedure - simply displaying the correct value of a parameter
using the DATA knob selects and stores it into the S1000's memory.
When editing numeric parameters, some of the values can be quite large, and it would be
necessary to turn the DATA knob thousands of times (literally) in order to go through the
whole range if the value was only changed by 1 for every click of the DATA control.There is an alternative to turning the knob thousands of times, though. As you move the
cursor with the CURSOR knob onto a numeric field, you will notice that not all the
digits are covered by the cursor immediately. Instead, they are highlighted one at a time
from the left.
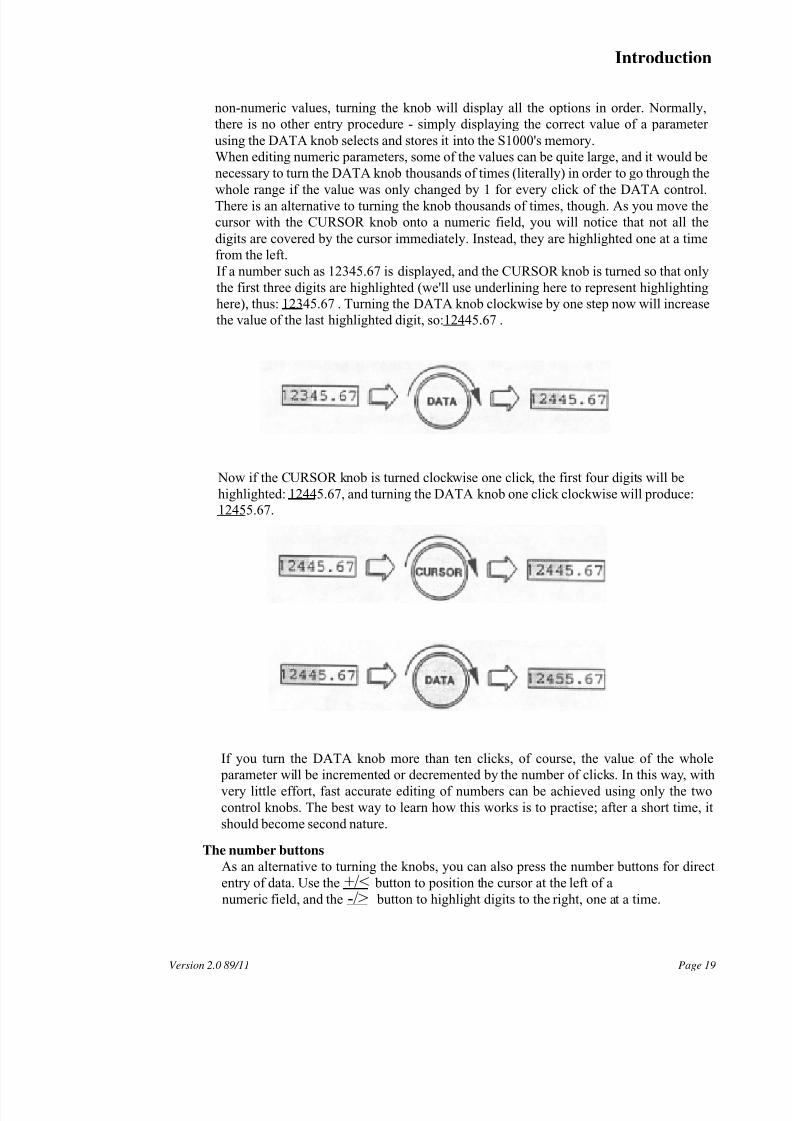
If a number such as 12345.67 is displayed, and the CURSOR knob is turned so that only
the first three digits are highlighted (we'll use underlining here to represent highlighting
here), thus: 12345.67 . Turning the DATA knob clockwise by one step now will increase
the value of the last highlighted digit, so:12445.67 .
8/11/2019 akai sampler S1000 V2.0 Manual
http://slidepdf.com/reader/full/akai-sampler-s1000-v20-manual 27/96
Introduction
Pressing a number on the number keypad will enter that number at the rightmost
highlighted position and move the cursor one position further to the right. When you
know the exact number you want to enter (eg a program number), this can be faster than
using the CURSOR and DATA knobs, but when experimenting (eg setting loop points),
the knobs may be faster than the number keypad. You'll probably discover quickly what
method works best for you in each situation.
Remember, when selecting programs, you must press the ENT/PLAY button toconfirm your selection.
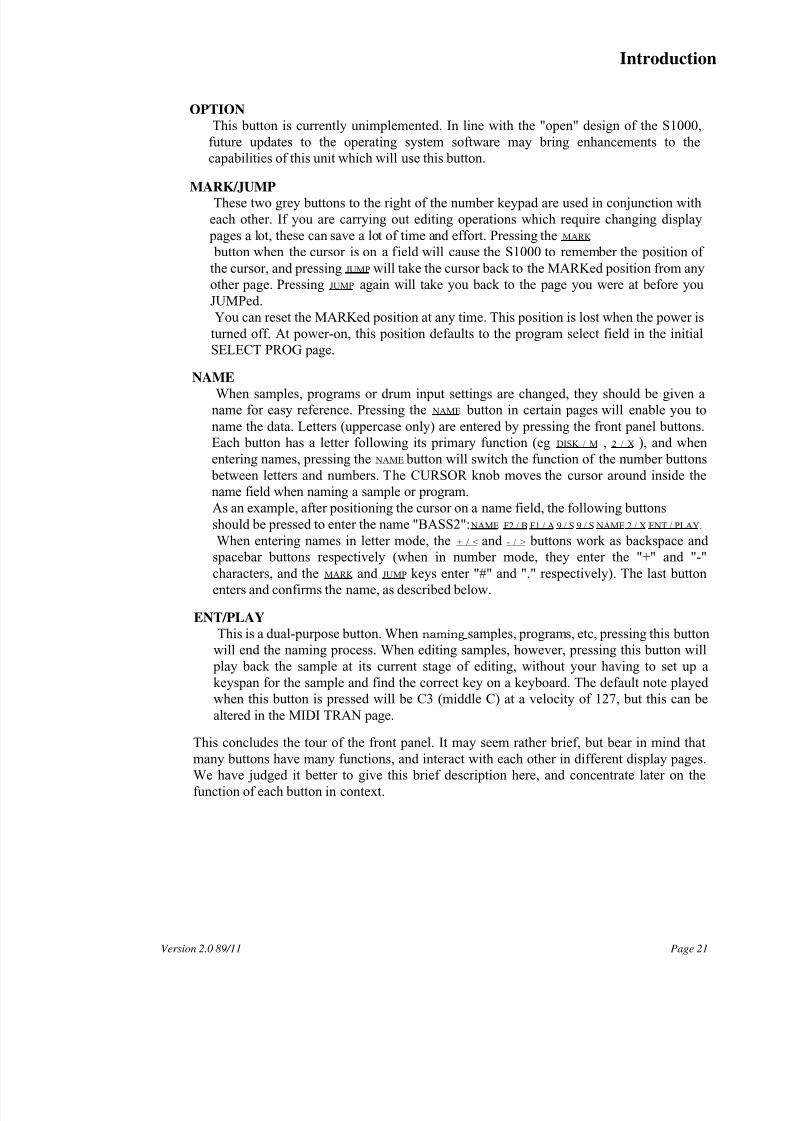
The eight soft keys
As explained in the section describing the display, these buttons have no predefined
function, but perform different jobs depending on the current state of the S1000. Common
assignments for these soft keys are SLCT (usually F1 )which takes you back to the previous
page, GO (usually F7 ), YES and NO.
SELECT PROG
This button is used to enter the main Program Selection page of the S1000. Turning the
CURSOR knob brings the programs currently loaded in memory into view, and the
DATA knob is used to select them. When in this mode, the LED on the button lights (as
with all the buttons on this row when the appropriate button is pressed), to remind you ofthe currently-selected mode.
EDIT SAMPLE (not S1000PB)
This button is used to enter the main page for editing (including recording) samples.
SELECT SAMPLE (S1000PB only)
Since the S1000PB cannot record or edit samples, this button replaces the EDIT SAMPLE
button on other models, and is used for sample selection.
EDIT PROG
This button is used to enter the main page for editing keygroups and programs.
MIDIThis button enters the main MIDI parameter page. A number of different MIDI-related
settings can be made here.
DISKThough some disk operations can be carried out from other pages, this button enters the
page where most disk operations are carried out.
MASTER TUNEAllows transposition and master tuning of the whole keyboard, as well as allowing a
user-defined temperament to be set up.
DRUM
When used with one or two AKAI ME-35T audio/MIDI trigger units, the S1000 iscapable of controlling them, making the S1000 the basis for a very sophisticated
electronic percussion setup.
Page 20 Version 2.0 89/11
8/11/2019 akai sampler S1000 V2.0 Manual
http://slidepdf.com/reader/full/akai-sampler-s1000-v20-manual 28/96
Introduction
OPTION
This button is currently unimplemented. In line with the "open" design of the S1000,
future updates to the operating system software may bring enhancements to the
capabilities of this unit which will use this button.
MARK/JUMPThese two grey buttons to the right of the number keypad are used in conjunction with
each other. If you are carrying out editing operations which require changing display
pages a lot, these can save a lot of time and effort. Pressing the MARK
button when the cursor is on a field will cause the S1000 to remember the position of
the cursor, and pressing JUMP will take the cursor back to the MARKed position from any
other page. Pressing JUMP again will take you back to the page you were at before you
JUMPed.
You can reset the MARKed position at any time. This position is lost when the power is
turned off. At power-on, this position defaults to the program select field in the initial
SELECT PROG page.
NAMEWhen samples, programs or drum input settings are changed, they should be given a
name for easy reference. Pressing the NAME button in certain pages will enable you to
name the data. Letters (uppercase only) are entered by pressing the front panel buttons.
Each button has a letter following its primary function (eg DISK / M , 2 / X ), and when
entering names, pressing the NAME button will switch the function of the number buttons
between letters and numbers. The CURSOR knob moves the cursor around inside the
name field when naming a sample or program.
As an example, after positioning the cursor on a name field, the following buttons
should be pressed to enter the name "BASS2": NAME F2 / B F1 / A 9 / S 9 / S NAME 2 / X ENT / PLAY.
When entering names in letter mode, the + / < and - / > buttons work as backspace and
spacebar buttons respectively (when in number mode, they enter the "+" and "-"
characters, and the MARK and JUMP keys enter "#" and "." respectively). The last buttonenters and confirms the name, as described below.
ENT/PLAY
This is a dual-purpose button. When naming samples, programs, etc, pressing this button
will end the naming process. When editing samples, however, pressing this button will
play back the sample at its current stage of editing, without your having to set up a
keyspan for the sample and find the correct key on a keyboard. The default note played
when this button is pressed will be C3 (middle C) at a velocity of 127, but this can be
altered in the MIDI TRAN page.
This concludes the tour of the front panel. It may seem rather brief, but bear in mind that
many buttons have many functions, and interact with each other in different display pages.
We have judged it better to give this brief description here, and concentrate later on the
function of each button in context.
Version 2.0 89/11 Page 21

8/11/2019 akai sampler S1000 V2.0 Manual
http://slidepdf.com/reader/full/akai-sampler-s1000-v20-manual 29/96
8/11/2019 akai sampler S1000 V2.0 Manual
http://slidepdf.com/reader/full/akai-sampler-s1000-v20-manual 30/96
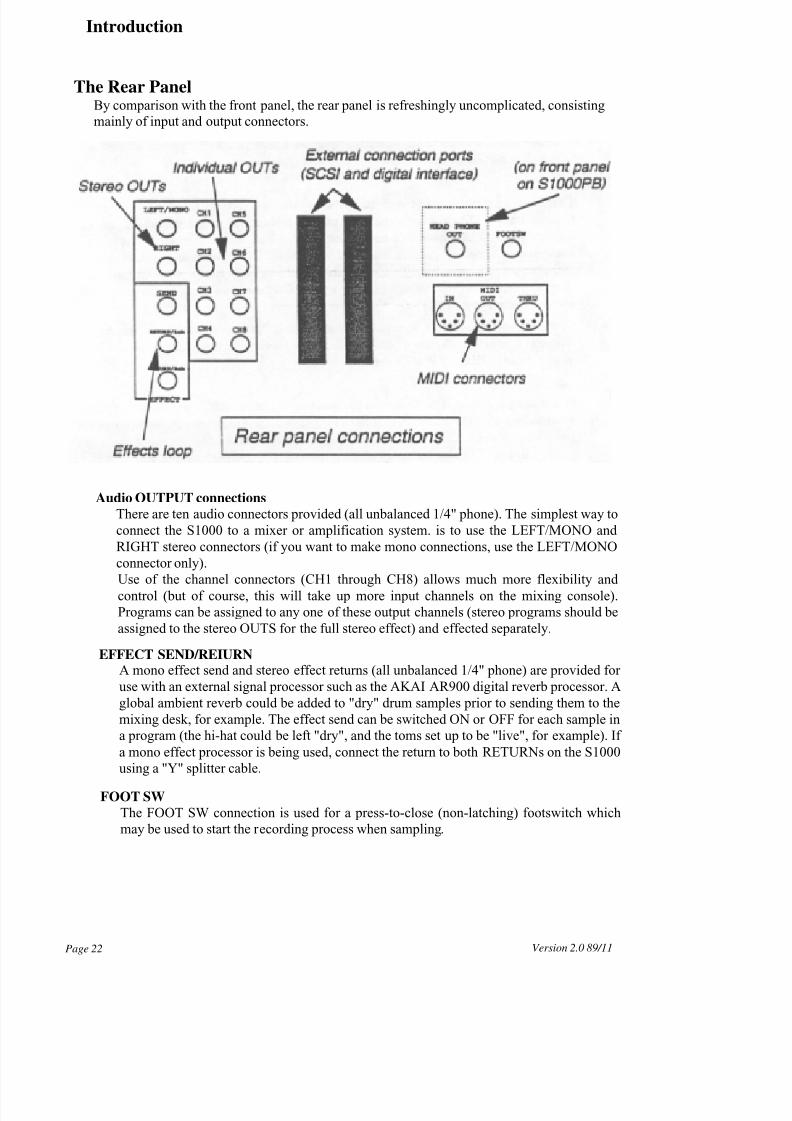
Audio OUTPUT connections
There are ten audio connectors provided (all unbalanced 1/4" phone). The simplest way to
connect the S1000 to a mixer or amplification system. is to use the LEFT/MONO and
RIGHT stereo connectors (if you want to make mono connections, use the LEFT/MONO
connector only).
Use of the channel connectors (CH1 through CH8) allows much more flexibility andcontrol (but of course, this will take up more input channels on the mixing console).
Programs can be assigned to any one of these output channels (stereo programs should be
assigned to the stereo OUTS for the full stereo effect) and effected separately.
EFFECT SEND/REIURNA mono effect send and stereo effect returns (all unbalanced 1/4" phone) are provided for
use with an external signal processor such as the AKAI AR900 digital reverb processor. A
global ambient reverb could be added to "dry" drum samples prior to sending them to the
mixing desk, for example. The effect send can be switched ON or OFF for each sample in
a program (the hi-hat could be left "dry", and the toms set up to be "live", for example). If
a mono effect processor is being used, connect the return to both RETURNs on the S1000
using a "Y" splitter cable.
FOOT SW
The FOOT SW connection is used for a press-to-close (non-latching) footswitch which
may be used to start the recording process when sampling.
Page 22 Version 2.0 89/11
Introduction
The Rear PanelBy comparison with the front panel, the rear panel is refreshingly uncomplicated, consisting
mainly of input and output connectors.
8/11/2019 akai sampler S1000 V2.0 Manual
http://slidepdf.com/reader/full/akai-sampler-s1000-v20-manual 31/96
Introduction
HEADPHONES OUT (not S1000PB)
A stereo headphone socket is provided on the back panel of the S1000 series except the
S1000PB (where it is provided on the front panel). The volume from this socket is
controlled by the MAIN VOLUME knob.
MIDI IN, OUT, THRU
These MIDI connectors confirm to the MIDI standard. IN is used to receive external
data (from a sequencer or audio/MIDI trigger unit) as well as for accepting System
Exclusive data, OUT is used for transmitting Note On/Note Off and performance (pitch
bend, aftertouch, etc) data, as well as for System Exclusive communication, and THRU
echoes the data received at the MIDI IN terminal.
Version 2.0 89/11 Page 23
8/11/2019 akai sampler S1000 V2.0 Manual
http://slidepdf.com/reader/full/akai-sampler-s1000-v20-manual 32/96
Introduction
Setting up the S1000This short section tells you how to get the S1000 "up and running" fast. For full details of
other operations, refer to the appropriate explanation in this manual.Connections
Start by placing the S1000 on a firm level surface or in a 19" equipment rack. Remember
to leave adequate space for airflow above and behind the S1000 if putting it in a rack (a
lU space is adequate).
For now, you’ll probably want to connect a MIDI controller, such as the AKAI MX76
master keyboard. Connect a MIDI OUT of the controller to the S1000's MIDI IN
connector. The power-on default of the S1000 is OMNI ON, so you can leave setting
MIDI channels till later. However, unless you want to play through headphones, make
some audio connections. Using the LEFT/MONO and RIGHT stereo outputs will
probably be sufficient at this stage, so connect these to two channels of a mixing console,
and set the gain appropriately (the standard output level is -3dBv and the impedance is
600~). Set the pan pots for the channels to hard right and hard left so that you get the full
benefit of the stereo capabilities of the S1000. Connect the power lead to the AC supply
and to the S1000.
DO NOT SWITCH ON THE S1000 YET!!
The S1000 produces a definite power-on "thump", so make sure that the channel faders,
master faders, or amplifier controls are set to the minimum level before turning on the
S1000. In addition, before switching on, if you are loading a later version of the operating
system from disk, take the Operating System diskette and insert it in the drive so that the
latest version of the operating system will be loaded when you turn the power on. Now you
can turn the power on.
Version 2.0 89/11Page 24
8/11/2019 akai sampler S1000 V2.0 Manual
http://slidepdf.com/reader/full/akai-sampler-s1000-v20-manual 33/96
Sampler functions
2 Sampler functionsThis section deals with the sampler functions of the S1000. If you are unfamiliar with the
terminology used by AKAI for their samplers, or the general method of operation, and you have
not read the Glossary or descriptions of the controls, go back and read these sections now. It will
save you a lot of time later on.
Page 25Version 2.0 89/11
8/11/2019 akai sampler S1000 V2.0 Manual
http://slidepdf.com/reader/full/akai-sampler-s1000-v20-manual 34/96
Sampler functions
SELECT PROGUnlike a synthesizer, you cannot play the S1000 straight away - you must load samples,
keygroups and programs from disk first.Getting started and checking out - playing supplied factory samples
When the operating system message has cleared from the bottom line of the display, you
will be in the main SELECT PROG page (the SELECT PROG will be lit). Remove the
Operating System disk (if you've used it to load a later version of the operating system),
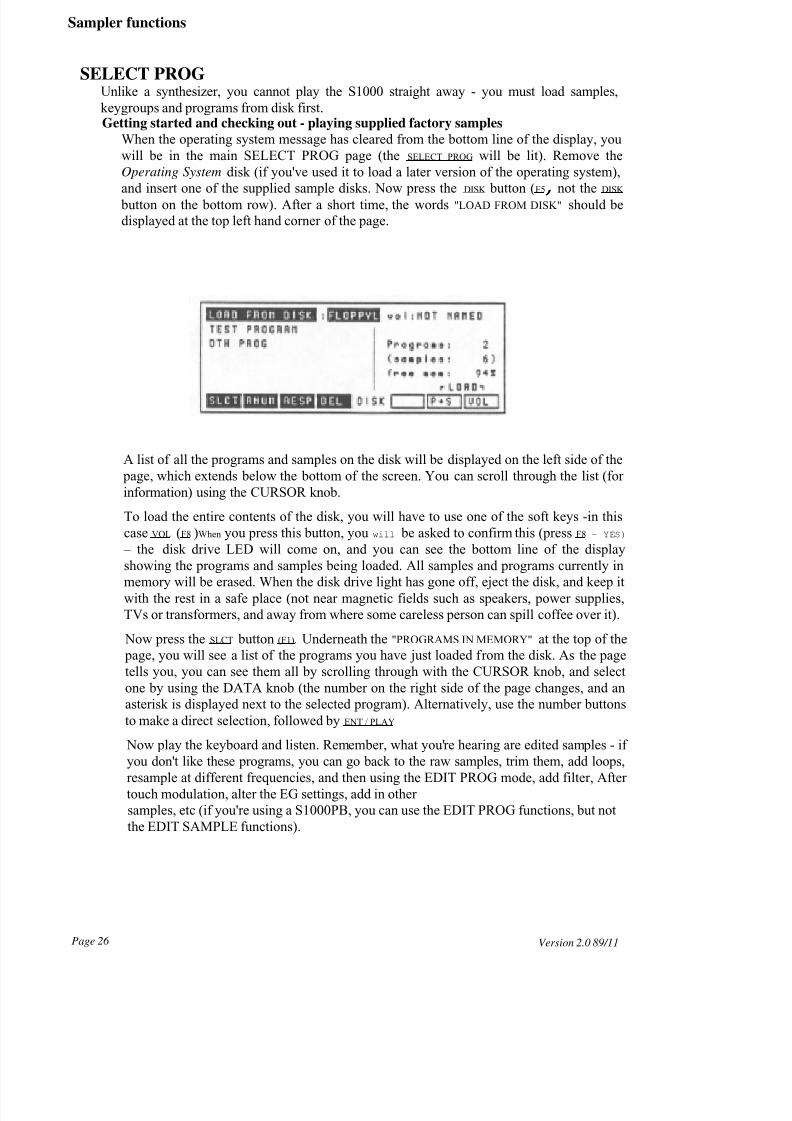
and insert one of the supplied sample disks. Now press the DISK button (F5, not the DISK button on the bottom row). After a short time, the words "LOAD FROM DISK" should be
displayed at the top left hand corner of the page.
A list of all the programs and samples on the disk will be displayed on the left side of the
page, which extends below the bottom of the screen. You can scroll through the list (for
information) using the CURSOR knob.
To load the entire contents of the disk, you will have to use one of the soft keys -in this
case VOL (F8 )When you press this button, you will be asked to confirm this (press F8 - YES)
– the disk drive LED will come on, and you can see the bottom line of the display
showing the programs and samples being loaded. All samples and programs currently in
memory will be erased. When the disk drive light has gone off, eject the disk, and keep it
with the rest in a safe place (not near magnetic fields such as speakers, power supplies,
TVs or transformers, and away from where some careless person can spill coffee over it).
Now press the SLCT button (F1). Underneath the "PROGRAMS IN MEMORY" at the top of the
page, you will see a list of the programs you have just loaded from the disk. As the page
tells you, you can see them all by scrolling through with the CURSOR knob, and select
one by using the DATA knob (the number on the right side of the page changes, and an
asterisk is displayed next to the selected program). Alternatively, use the number buttons
to make a direct selection, followed by ENT / PLAY
Now play the keyboard and listen. Remember, what you're hearing are edited samples - if
you don't like these programs, you can go back to the raw samples, trim them, add loops,resample at different frequencies, and then using the EDIT PROG mode, add filter, After
touch modulation, alter the EG settings, add in other
samples, etc (if you're using a S1000PB, you can use the EDIT PROG functions, but not
the EDIT SAMPLE functions).
Version 2.0 89/11Page 26
8/11/2019 akai sampler S1000 V2.0 Manual
http://slidepdf.com/reader/full/akai-sampler-s1000-v20-manual 35/96
Sampler functions
This is where your creativity comes in. The hard work of assembling a string section in a
top studio and recording them playing one note has been done for you .
A powerful (and useful) feature of the S1000 is its ability to continue sounding a
sustained note of a program, even when another program has been selected. With most
synthesizers and samplers, changing a patch or program automatically stops the sound
from the machine until a key is pressed. The S1000, however, continues to sound the
release or sustained portion of a program during and after program changes. This makesfor "seamless sound" when sequencing with a lot of Program Change messages.
Renumbering
On the S1000, program numbers correspond to patch numbers on a synthesizer. When a
MIDI Program Change message is received, the appropriate program is selected.
However, to match S1000 programs with the patch numbers on your synthesizer, you
may want to renumber the programs, so that selecting a brass sound on the S1000 will
call up a similar (or complementary) patch on a remote synthesizer module. To do this,
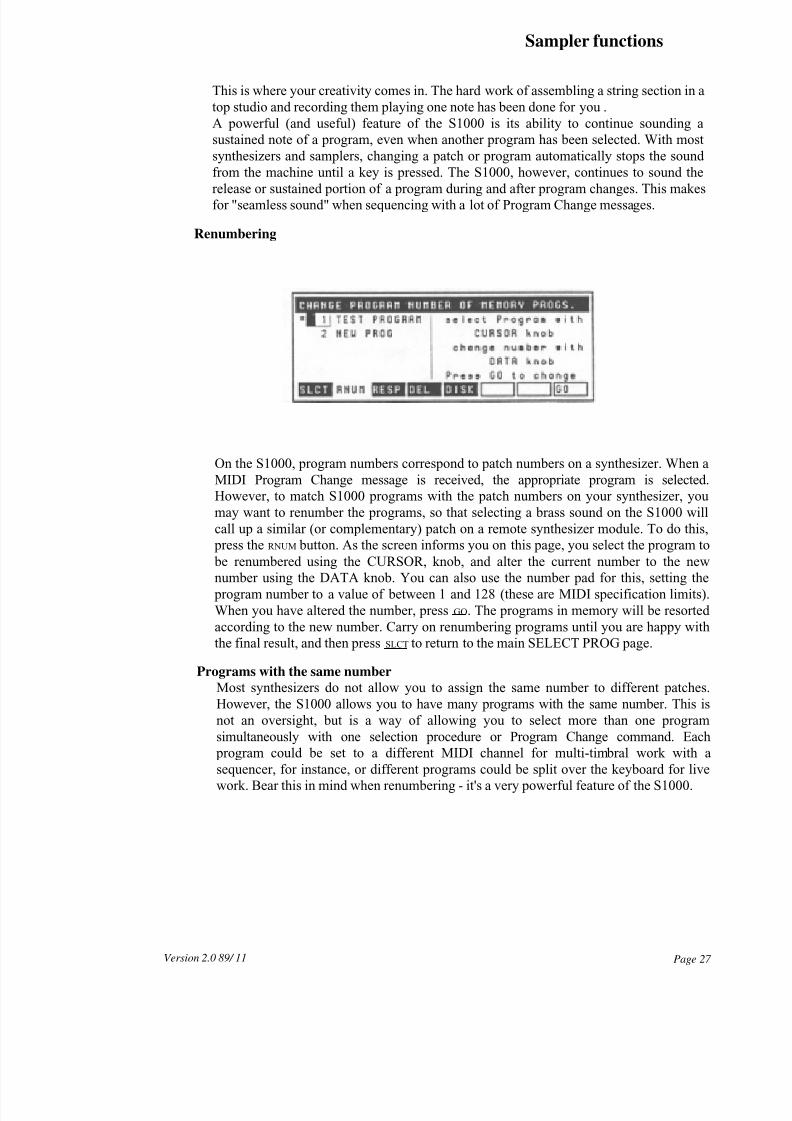
press the RNUM button. As the screen informs you on this page, you select the program to
be renumbered using the CURSOR, knob, and alter the current number to the new
number using the DATA knob. You can also use the number pad for this, setting the program number to a value of between 1 and 128 (these are MIDI specification limits).
When you have altered the number, press GO. The programs in memory will be resorted
according to the new number. Carry on renumbering programs until you are happy with
the final result, and then press SLCT to return to the main SELECT PROG page.
Programs with the same number
Most synthesizers do not allow you to assign the same number to different patches.
However, the S1000 allows you to have many programs with the same number. This is
not an oversight, but is a way of allowing you to select more than one program
simultaneously with one selection procedure or Program Change command. Each
program could be set to a different MIDI channel for multi-timbral work with a
sequencer, for instance, or different programs could be split over the keyboard for livework. Bear this in mind when renumbering - it's a very powerful feature of the S1000.
Page 27 Version 2.0 89/ 11
8/11/2019 akai sampler S1000 V2.0 Manual
http://slidepdf.com/reader/full/akai-sampler-s1000-v20-manual 36/96
Sampler functionsSampler functionsSampler functionsSampler functions
Play responseFrom the main SELECT PROG page, press the RESP button. This allows you to make
"instant" adjustments to parameters for which you might otherwise have to do a lot of
button-pressing. Settings made here override settings made in the EDIT SAMPLE, EDIT
PROD or MIDI modes.
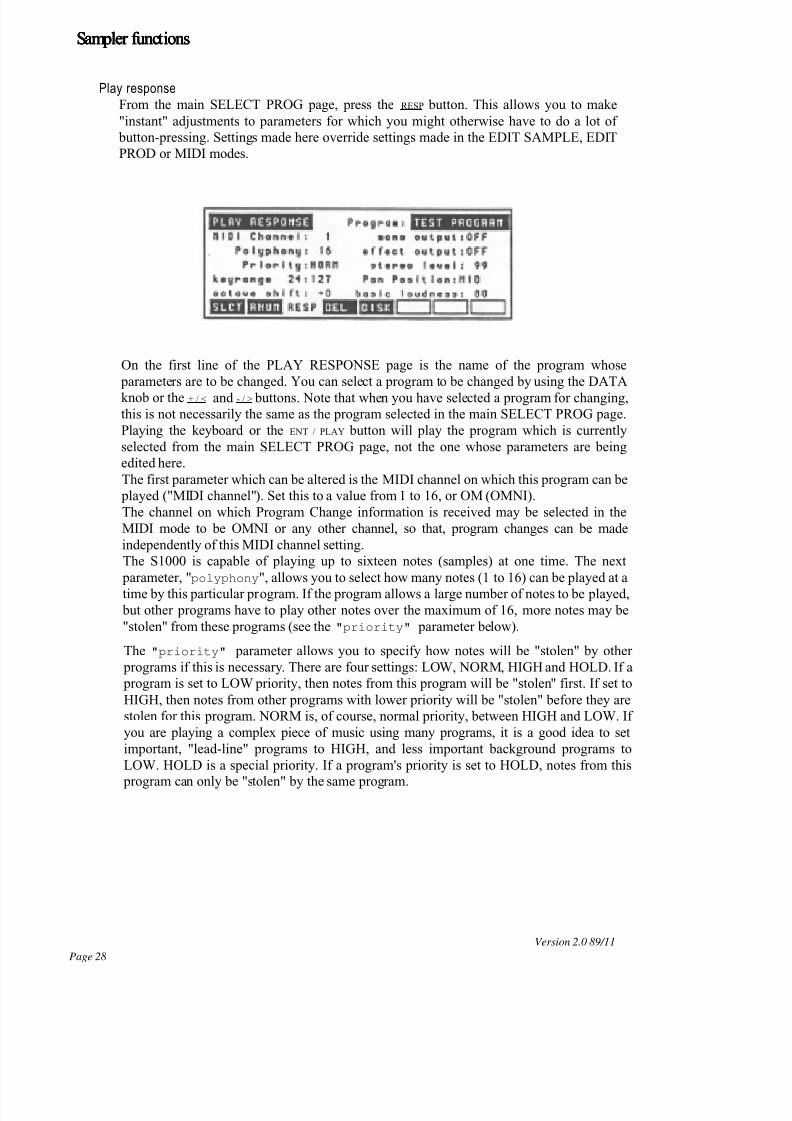
On the first line of the PLAY RESPONSE page is the name of the program whose
parameters are to be changed. You can select a program to be changed by using the DATAknob or the + / < and - / > buttons. Note that when you have selected a program for changing,
this is not necessarily the same as the program selected in the main SELECT PROG page.
Playing the keyboard or the ENT / PLAY button will play the program which is currently
selected from the main SELECT PROG page, not the one whose parameters are being
edited here.
The first parameter which can be altered is the MIDI channel on which this program can be
played ("MIDI channel"). Set this to a value from 1 to 16, or OM (OMNI).
The channel on which Program Change information is received may be selected in the
MIDI mode to be OMNI or any other channel, so that, program changes can be made
independently of this MIDI channel setting.
The S1000 is capable of playing up to sixteen notes (samples) at one time. The next
parameter, "polyphony", allows you to select how many notes (1 to 16) can be played at atime by this particular program. If the program allows a large number of notes to be played,
but other programs have to play other notes over the maximum of 16, more notes may be
"stolen" from these programs (see the "priority" parameter below).
The "priority" parameter allows you to specify how notes will be "stolen" by other
programs if this is necessary. There are four settings: LOW, NORM, HIGH and HOLD. If a
program is set to LOW priority, then notes from this program will be "stolen" first. If set to
HIGH, then notes from other programs with lower priority will be "stolen" before they are
stolen for this program. NORM is, of course, normal priority, between HIGH and LOW. If
you are playing a complex piece of music using many programs, it is a good idea to set
important, "lead-line" programs to HIGH, and less important background programs to
LOW. HOLD is a special priority. If a program's priority is set to HOLD, notes from this program can only be "stolen" by the same program.
Version 2.0 89/11
Page 28
8/11/2019 akai sampler S1000 V2.0 Manual
http://slidepdf.com/reader/full/akai-sampler-s1000-v20-manual 37/96
Page 29Version 2.0 89/11
Sampler functions
The "keyrange" of this program is the next setting. The high and low points may be
displayed as either MIDI note numbers or as note names. To toggle between the two types
of display, press RESP. When editing notes, if the display is in the note name mode,
highlighting only the first part of the name will increment or decrement the value by one
semitone for each click of the DATA knob. If the whole of the note name is covered, then
each dick of the DATA knob will increment or decrement the value by an octave.The pitch of the program may be shifted by t2 octaves ("octave shift"). This allows
you to compensate for the keyboard position of the program if you are playing a
split-keyboard combination of programs.
You can assign which individual output channel will be used by the program by setting
the "mono output" parameter. However, this output number is a "base" number, which
may be altered in the SMP2 page of the EDIT PROG mode, so the results may not be
exactly what you expect.
The S1000 is fitted with an effects loop. Set the "effect output" parameter to ON if
you want the program to be sent through the effects loop, otherwise, set it to OFF.
The level of the program sent through the stereo output connectors may be adjusted from
00 to 99 using the "stereo level" parameter. Note that this has no effect on the
overall level as sent through the individual channel outputs.
The position in the stereo image when the program is sent from the stereo outputs can be
adjusted by the neat parameter. "pan position". The values for this range from L50
(panned hard left) through MID (the signal is sent equally to the left and right outputs) to
R50 (panned hard right).
The final parameter on this page is "basic loudness", which allows you to adjust the
volume of the program as output from ail outputs (including the headphone socket).
Deleting programs
Programs and their associated samples may be deleted from memory in this page, which
is accessed by pressing the DEL button. When this page is displayed, the cursor will
highlight a program. Highlight the program you want to delete using the CURSOR knob.
There are three soft key actions that you can take, all concerned with deleting programs:PROG, PNUM, and ALL!.
8/11/2019 akai sampler S1000 V2.0 Manual
http://slidepdf.com/reader/full/akai-sampler-s1000-v20-manual 38/96
Sampler functions
Note- If you delete a program from memory, make sure that you really do not
Need that program in the future, or that you have saved it to disk first. In some
cases, as explained below, deleting a program will also delete samples. Make
sure these really are unwanted, or have been saved to disk before proceeding.
Pressing PROG will ask you if you want to delete one program ? Either GO or ABORT the
deletion procedure. If the program is the only one in memory using a particular set of
samples, you will be asked whether you want to delete those samples at the same time.Press the appropriate soft key if you are sure that you want to delete the program and its
associated samples.
The PNUM button will delete all programs which have the same number as the highlighted
program. You will be asked if you want to proceed with the bulk program delete ! ?. If
these programs are the only ones using particular samples, you will be asked if you want
to delete the samples as well.
ALL! is, of course, the most drastic of these three options. If you answer GO and YES to
the question regarding released samples, then all programs, except for an S1000-generated
program (TEST PROGRAM) and samples will be deleted. Deleting samples and
rearranging memory space will take a little time, so be patient while this takes place.
Obviously, this is an option to be used with some caution.
Disk operations
Pressing DISK (F5) in the SELECT PROG mode gives you a choice of two options: loading
a program and its associated samples (P+S )or loading the entire contents of the disk (VOL ).
If you have inserted a disk, pressing DISK will bring up a list of all programs stored on that
disk. If you have inserted the wrong disk, press the F5 button again (it now says DISK)
after you have changed disks. If you want to wipe out all programs and samples in
memory and load the contents of the disk, press VOL . You will be asked if this is what you
really want to do. Make sure that you either do not want the programs and samples in
memory, or that they are saved safely to disk before you proceed.
Version 2.0 89/11Page 30

8/11/2019 akai sampler S1000 V2.0 Manual
http://slidepdf.com/reader/full/akai-sampler-s1000-v20-manual 39/96
Sampler functions
The other option, P+S , allows you to load a program and all associated samples (free
memory permitting). To do this, highlight a program using the CURSOR knob, and press
P+S . The program, and its associated samples, will be loaded into memory. If the samples
required by this program already exist in memory, they will be loaded anyway, but they
will overwrite the memory samples. If there is not enough memory to load a program
and its samples, the message "! ! insufficient waveform memory ! ! " will be displayed. In this case, you will have to delete some existing programs and/or samples
to free up some memory space.
Other disk operations, like saving and formatting disks, are performed in the DISK
mode, not from this page.
Conclusion
So far, you have been using the S1000 as a preset synthesizer, loading and playing
programs from disk. However, part of the joy of using a sampler is in creating and
editing your own sounds, and the next section covers this.
Page 31Version 2.0 89/11
8/11/2019 akai sampler S1000 V2.0 Manual
http://slidepdf.com/reader/full/akai-sampler-s1000-v20-manual 40/96
Sampler functions
Recording samples
NOTE for S1000PB users: The following sections do not apply to the S1000PB. Please
ignore these sections, and resume at the section headed "SELECT SAMPLE (S1000PB
only)" (page 49).
When you start sampling, you must have a clean area of memory to do it, and enoughmemory to work in. In sampling, it is better to start with too much memory space than too
little. You can always "top and tail" a sample later on, but you cannot create memory out of
thin sir.
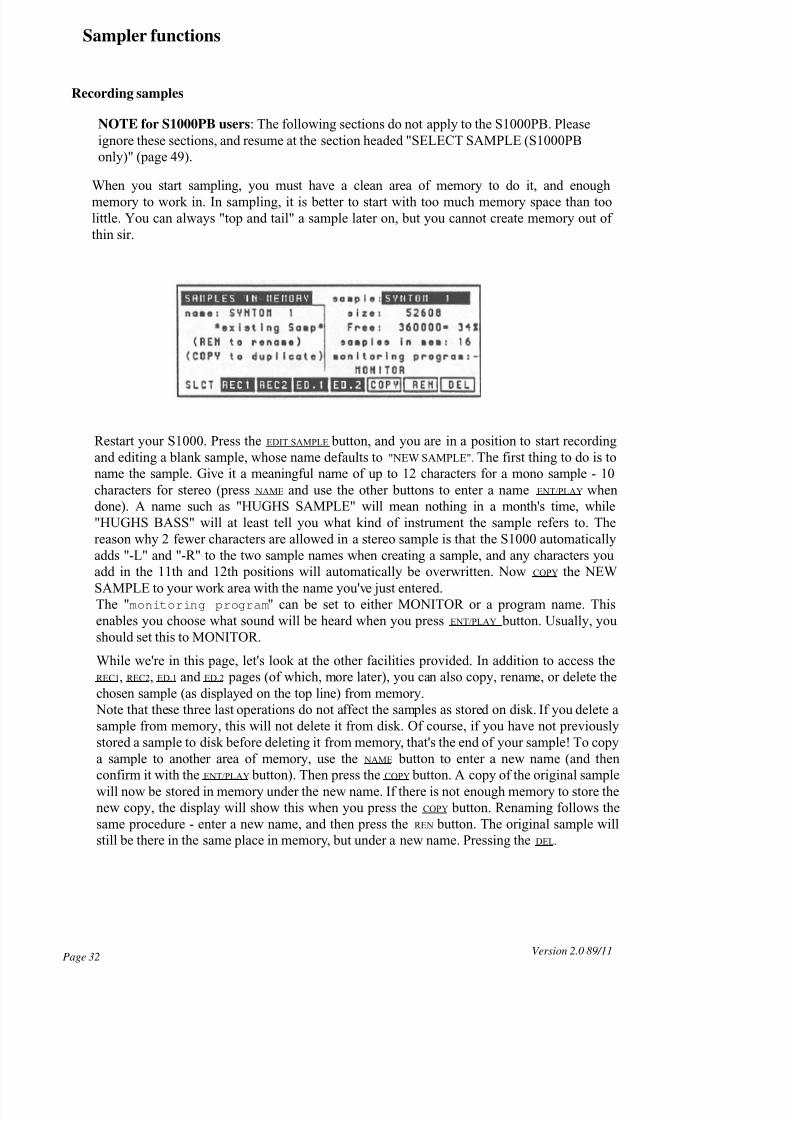
Restart your S1000. Press the EDIT SAMPLE button, and you are in a position to start recording
and editing a blank sample, whose name defaults to "NEW SAMPLE". The first thing to do is to
name the sample. Give it a meaningful name of up to 12 characters for a mono sample - 10
characters for stereo (press NAME and use the other buttons to enter a name ENT/PLAY when
done). A name such as "HUGHS SAMPLE" will mean nothing in a month's time, while
"HUGHS BASS" will at least tell you what kind of instrument the sample refers to. The
reason why 2 fewer characters are allowed in a stereo sample is that the S1000 automatically
adds "-L" and "-R" to the two sample names when creating a sample, and any characters you
add in the 11th and 12th positions will automatically be overwritten. Now COPY the NEWSAMPLE to your work area with the name you've just entered.
The "monitoring program" can be set to either MONITOR or a program name. This
enables you choose what sound will be heard when you press ENT/PLAY button. Usually, you
should set this to MONITOR.
While we're in this page, let's look at the other facilities provided. In addition to access the
REC1, REC2, ED.1 and ED.2 pages (of which, more later), you can also copy, rename, or delete the
chosen sample (as displayed on the top line) from memory.
Note that these three last operations do not affect the samples as stored on disk. If you delete a
sample from memory, this will not delete it from disk. Of course, if you have not previously
stored a sample to disk before deleting it from memory, that's the end of your sample! To copy
a sample to another area of memory, use the NAME button to enter a new name (and then
confirm it with the ENT/PLAY button). Then press the COPY button. A copy of the original sample
will now be stored in memory under the new name. If there is not enough memory to store the
new copy, the display will show this when you press the COPY button. Renaming follows the
same procedure - enter a new name, and then press the REN button. The original sample will
still be there in the same place in memory, but under a new name. Pressing the DEL.
Version 2.0 89/11
Page 32
8/11/2019 akai sampler S1000 V2.0 Manual
http://slidepdf.com/reader/full/akai-sampler-s1000-v20-manual 41/96
Sampler functions
button will delete the sample from memory. When you press the DEL, button, you will be
prompted to either GO ahead with the operation, or ABORT it. This is a "safety-net" to help
you avoid accidental deletion of precious samples.
Now is a good time to connect your sample source. Turn the REC LEVEL down to the
minimum level. If it's a mono source, use either of the L connectors (the XLR connectors are
balanced, but you can sample unbalanced sources using the 1/4" phone sockets), otherwise
make appropriate connections to the L and R inputs. If you use the phone connectors, theXLR connectors are automatically disabled. Set the REC GAIN switch on the back panel to
match your source (line, mic or other). The three positions are: HIGH = -58dBm, MID =
-38dBm, and LOW = -18dBm.
Press REC1 to enter the first recording page. The name of your sample is displayed at the top,
and the cursor is displayed over the MONO/STEREO parameter.
STEREO or MONO?
At this point it is worth looking into some of the pros and cons of stereo vs mono sampling.
However miraculous the S1000 may seem, it can't perform the magic trick of turning a mono
sample into a stereo sample. Stereo samples use up twice as much memory as mono samples,
but if you have a good stereo sound source, it seems a shame to waste it and convert it into
mono. It's up to you to choose; think what the sample's going to be used for before you
record.
REC7 parameters
The parameters in this page are (in the order that the cursor finds them):
modeas explained above, either STEREO or MONO.
(V)iewWhen making a mono sample, this will remain at LEFT, but when making a stereo
sample, you can choose either LEFT or RIGHT. It refers to which volume/time graph is
produced for viewing when recording.
startThere are three ways in which you can start sampling-. INPUT LEVEL, MIDI NOTE
and FOOTSWITCH1. The usual method is INPUT LEVEL - when the signal input to the
S1000 goes above the level that you have set up, sampling will begin automatically.
However, if you are trying to sample one sound or passage from the middle of a piece of
prerecorded music, you will need to initiate the recording process manually, either by a
MIDI NOTE ON message, or by pressing the footswitch connected to the FOOT SW
connector on the back panel.
monitorThe "monitor" parameter allows you to choose how you will listen to the recorded source
as it is passed through the S1000 ("audio THRU"). Setting this parameter to OFF will
never allow the sound to be passed through the S1000 to the outputs (if you're recording
with a microphone and want to avoid feedback) - and setting it ON wi11 always pass it
through to the outputs. Setting it to AUTO will enable the input signal to be passed
through only when recording a sample or preparing to do so (in the REC2 page).
Page 33Version 2.0 89/11
8/11/2019 akai sampler S1000 V2.0 Manual
http://slidepdf.com/reader/full/akai-sampler-s1000-v20-manual 42/96
Sampler functions
Under the "monitor" parameter is a message telling you how much memory is
free, both as a number of 16-bit words, and as a percentage of total memory
available. If you have followed the instructions so far, this will read
"1048064=100%". 1048064 words are equal to 2 megabytes for obscure
computer-based reasons which are too tedious to explain here. These values cannot
be changed.
sample name
If you want to select or enter an existing sample name for re-recording, you can do it herewith the DATA knob or the NAME button and letter/number buttons. This field will not
allow you to rename the sample.
bandwidth
Either 10kHz or 20kHz. These figures refer to the audio bandwidth of the completed
sample - not the sampling frequency, which is either 44.1kHz or 22.05kHz (for the
technically minded, Nyquist's theorem' applies here). Sampling at the lower frequency
will give you more memory, but filter out the top octave. For some sampled sounds this
may not matter - like the choice between stereo and mono, it's up to you, and the final use
of your sample.
orig. pitch(original pitch) - default is C_ 3. Incidentally, if you prefer to work with MIDI note
numbers rather than key names, press the REC1 key again to display the MIDI note
number. This feature is available in all pages which use note names and note numbers.
Make this parameter equal to the pitch of the sample source. For unpitched sounds, of
course, this can be any value.
record tim:
(recording time). Once the S1000 starts sampling it will carry on until it runs to the end of
the time set here (you can set this field to one-hundredth of a second precision). As you
alter the value here, you will see the figures underneath change, showing you the amount
of memory that this time represents, in bytes, and as a percentage of total memory
available.
SOFT KEYS
SLCT
The SLCT button takes you back to the opening page of the EDIT SAMPLE section. Any
soft key labelled in this way will usually take you back one level of page.
REC1
Pressing this button toggles between MIDI note number and key name display.
REC2
Enters the second recording page -- where the actual recording of a sample takes place.
1 Nyquist's theorem (sometimes known as Shannon's sampling theorem) is a mathematical statement that adigital-analog or anaor -digital conversion process needs a digital data rate of more than twice the highest analogfrequency in er to convert data with no distortion. The nature of the low-pass filtering employed affects the exactratio.
Page 34 Version 2.0 89/11
8/11/2019 akai sampler S1000 V2.0 Manual
http://slidepdf.com/reader/full/akai-sampler-s1000-v20-manual 43/96
Sampler functions
ED.1
Enters the first sample editing page.
ED:2
Enters the second sample editing page.
DIGI
When fitted with the optional digital interface board QB-104), the S1000 is capable ofrecording and transmitting samples through a digital interface, either optical or electrical.
However, unless this board has been fitted, there is little point in your using this button
(unless you want to see what you're missing by not having a digital interface!).
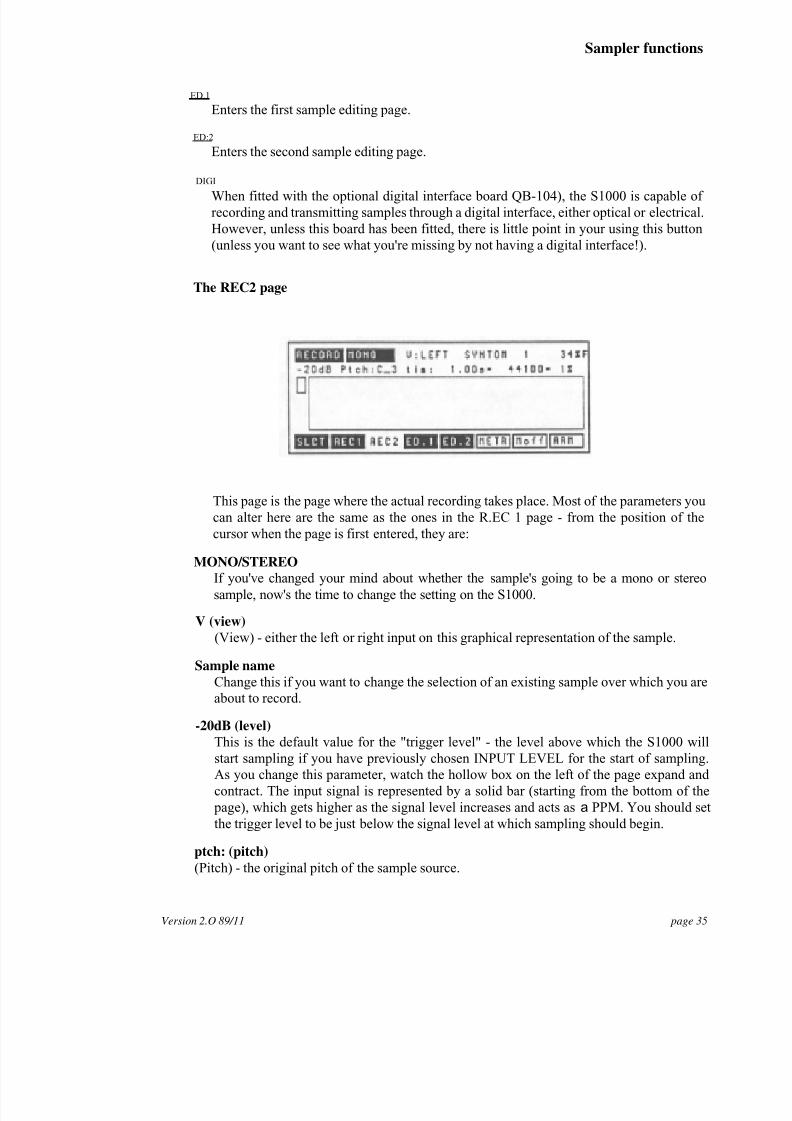
The REC2 page
This page is the page where the actual recording takes place. Most of the parameters you
can alter here are the same as the ones in the R.EC 1 page - from the position of the
cursor when the page is first entered, they are:
MONO/STEREO
If you've changed your mind about whether the sample's going to be a mono or stereosample, now's the time to change the setting on the S1000.
V (view)
(View) - either the left or right input on this graphical representation of the sample.
Sample name
Change this if you want to change the selection of an existing sample over which you are
about to record.
-20dB (level)
This is the default value for the "trigger level" - the level above which the S1000 will
start sampling if you have previously chosen INPUT LEVEL for the start of sampling.
As you change this parameter, watch the hollow box on the left of the page expand and
contract. The input signal is represented by a solid bar (starting from the bottom of the
page), which gets higher as the signal level increases and acts as a PPM. You should set
the trigger level to be just below the signal level at which sampling should begin.
ptch: (pitch)
(Pitch) - the original pitch of the sample source.
Version 2.O 89/11 page 35
8/11/2019 akai sampler S1000 V2.0 Manual
http://slidepdf.com/reader/full/akai-sampler-s1000-v20-manual 44/96
Sampler functions
tim: (time)
(Time) Again, you can choose the total amount of time for your new sample. This field
can be set to the nearest one-hundredth of a second, and the number of bytes and the
percentage of total memory used will be changed accordingly.
SOFT KEYS
The soft keys in this page are how you actually perform sampling. Two soft keys, METR
and MOFF , allow you to turn the LCD graphic PPM (at the left side of the page) on and off.
As the signal is input to the S1000, you will see the solid bar go up and down inaccordance with the level of the signal. Use these keys to "preview" before a "take", so
that you can adjust the recording level, gain and input trigger appropriately. As with all
recording processes, setting the level high will increase the final signal-to-noise ratio, but
remember that digital clipping is an extremely unpleasant effect, and once recorded,
cannot be eliminated.
RecordingTo start the recording process, press the ARM button. Only two soft keys will be active
now: Go and EXIT. The Go button can be used as a manual override for whatever start
setting you selected in the REC1 page (ie recording will start when this is pressed, rather
than when the footswitch is pressed, a MIDI note is received, or the signal goes above the
trigger level). However, normally you should wait for the S1000 to begin recordingautomatically. The EXIT button is useful as a panic button - if you suddenly notice you've
set something up wrongly, or you're about to record the wrong sound.
Once the recording process is started (or you press the GO key), there is no way you can
stop the recording process, which will continue inexorably till it reaches the end of the
selected recording time. As the signal is input, a graph of the logarithmic value (decibel
value) of the signal level versus time is displayed.
Use the : ENT/PLAY button to replay your recorded sample. The pitch and velocity are
determined in the MIDI TRAN page (default C3, velocity 127). If you have too much
blank time at the end - don't worry, you can trim this off. Likewise, if you pushed the Go
button too early, but you still have all your sample, you can trim off the unwanted
beginning later on. If you're not satisfied with your sample, re-record it, otherwise:
NOW SAVE YOUR SAMPLE TO DISK!
Remember Murphy's Law: "Anything that can go wrong, will". (The Law of Murphy the
Elder states: "Things that cannot go wrong, will".) Once you've made that perfect take,
there will be a power cut, someone will trip over a cable, or you'll press the wrong button
(we all do at one time or another - no-one's perfect). Seriously, though, saving raw
samples to disk as soon as you've made them is good standard operating procedure - you
lose less sleep that way. Also, if you make a mistake in the editing process, you can go
back to where you started from.
Press the ~ button. If you already have a blank formatted disk (prepared for use with the
S1000) insert it, otherwise format the disk by inserting a new disk and pressing FORM.Choose either HIGH or LOW density format. When formatting is finished, you can carry on.
Page 36 Version 2.0 89/11

8/11/2019 akai sampler S1000 V2.0 Manual
http://slidepdf.com/reader/full/akai-sampler-s1000-v20-manual 45/96
Version 2.0 89/11 Page 37
Sampler function
Press the SAVE button and select CURSOR ITEM ONLY for "type of save:”. Then move
the cursor over the sample you've just made, and press GO. The sound will be safely
stored on disk.
If you're doing multisampling of one source, or making a lot of samples at one time,
carry on recording and saving to disk. Otherwise, it's time to start editing your samples.
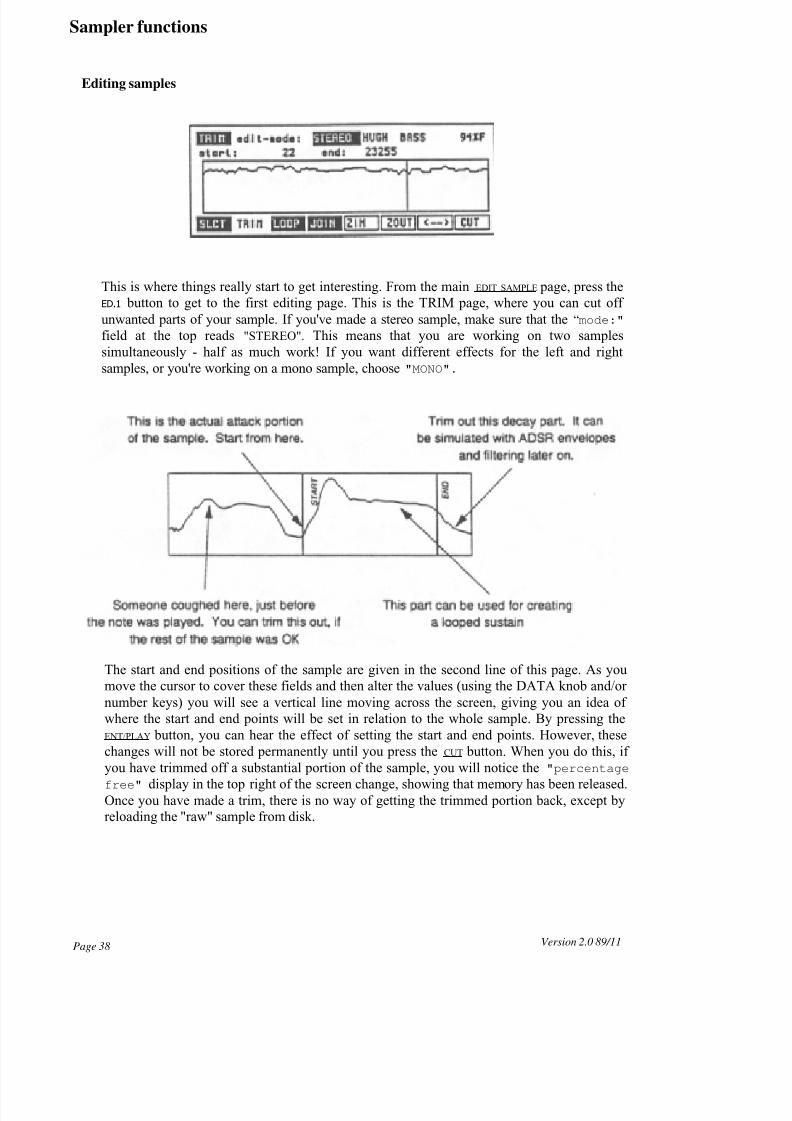
8/11/2019 akai sampler S1000 V2.0 Manual
http://slidepdf.com/reader/full/akai-sampler-s1000-v20-manual 46/96
Sampler functions
Editing samples
This is where things really start to get interesting. From the main EDIT SAMPLE page, press the
ED.1 button to get to the first editing page. This is the TRIM page, where you can cut off
unwanted parts of your sample. If you've made a stereo sample, make sure that the “mode:"
field at the top reads "STEREO". This means that you are working on two samples
simultaneously - half as much work! If you want different effects for the left and right
samples, or you're working on a mono sample, choose "MONO".
The start and end positions of the sample are given in the second line of this page. As you
move the cursor to cover these fields and then alter the values (using the DATA knob and/or
number keys) you will see a vertical line moving across the screen, giving you an idea of
where the start and end points will be set in relation to the whole sample. By pressing the
ENT/PLAY button, you can hear the effect of setting the start and end points. However, these
changes will not be stored permanently until you press the CUT button. When you do this, if
you have trimmed off a substantial portion of the sample, you will notice the "percentagefree" display in the top right of the screen change, showing that memory has been released.
Once you have made a trim, there is no way of getting the trimmed portion back, except by
reloading the "raw" sample from disk.
Version 2.0 89/11Page 38
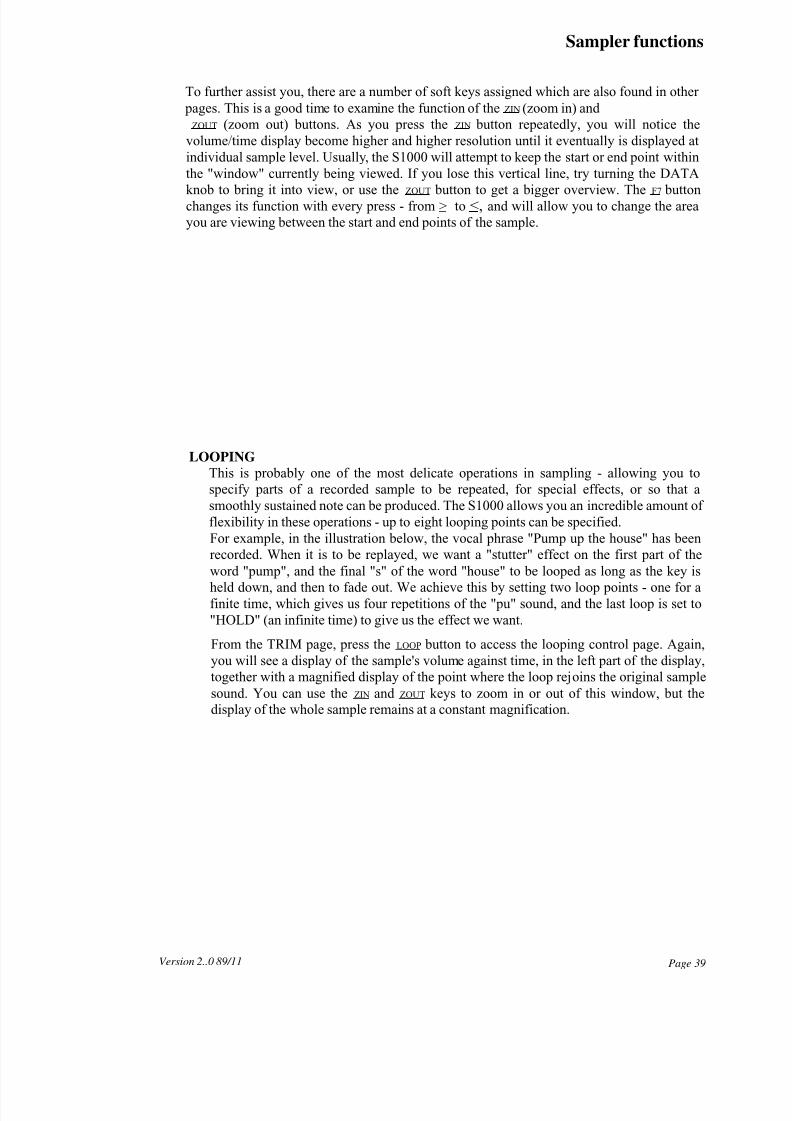
8/11/2019 akai sampler S1000 V2.0 Manual
http://slidepdf.com/reader/full/akai-sampler-s1000-v20-manual 47/96
Sampler functions
To further assist you, there are a number of soft keys assigned which are also found in other
pages. This is a good time to examine the function of the ZIN (zoom in) and
ZOUT (zoom out) buttons. As you press the ZIN button repeatedly, you will notice the
volume/time display become higher and higher resolution until it eventually is displayed at
individual sample level. Usually, the S1000 will attempt to keep the start or end point within
the "window" currently being viewed. If you lose this vertical line, try turning the DATA
knob to bring it into view, or use the ZOUT button to get a bigger overview. The F7 buttonchanges its function with every press - from > to <, and will allow you to change the area
you are viewing between the start and end points of the sample.
LOOPING
This is probably one of the most delicate operations in sampling - allowing you to
specify parts of a recorded sample to be repeated, for special effects, or so that a
smoothly sustained note can be produced. The S1000 allows you an incredible amount of
flexibility in these operations - up to eight looping points can be specified.
For example, in the illustration below, the vocal phrase "Pump up the house" has been
recorded. When it is to be replayed, we want a "stutter" effect on the first part of the
word "pump", and the final "s" of the word "house" to be looped as long as the key isheld down, and then to fade out. We achieve this by setting two loop points - one for a
finite time, which gives us four repetitions of the "pu" sound, and the last loop is set to
"HOLD" (an infinite time) to give us the effect we want.
From the TRIM page, press the LOOP button to access the looping control page. Again,
you will see a display of the sample's volume against time, in the left part of the display,
together with a magnified display of the point where the loop rejoins the original sample
sound. You can use the ZIN and ZOUT keys to zoom in or out of this window, but the
display of the whole sample remains at a constant magnification.
Page 39Version 2..0 89/11

8/11/2019 akai sampler S1000 V2.0 Manual
http://slidepdf.com/reader/full/akai-sampler-s1000-v20-manual 48/96
Sampler functions
LOOP: First select the loop number that you want to set (top left). Unless you set the loop
time to HOLD, loops will be repeated in numerical order. It is not possible to set a loop
inside a loop.
time: Next, set the time (in milliseconds) that you want the loop to repeat for. Values
below "1" will be treated as OFF - ie the loop will have no effect, and values of 10
seconds or over will be treated as "HOLD" - the loop will continue as long as the key
remains depressed. A loop will repeat for the greatest whole number of times possible
within the loop time set here. For instance, if the total loop time is set to 250mS, and the
length of the loop is actually 175mS, the loop will only repeat once, not 1.428 times. This
can save you a lot of calculation when you've set the loop length and you want a particular
"stutter" effect or repeated drum beat.
Next on the top line is the sample you are working on. If you press the ENT/PLAY button and
an unexpected sound comes out, select the sample you want in this field. After the
selected sample name, the amount of memory space free (expressed as a percentage) isdisplayed.
at: Now you can select the point at which looping will begin - ie when playback reaches
this point, it will go back and repeat a loop for the number of times determined by the
loop time.
Version 2.0 89/ 11Page 40
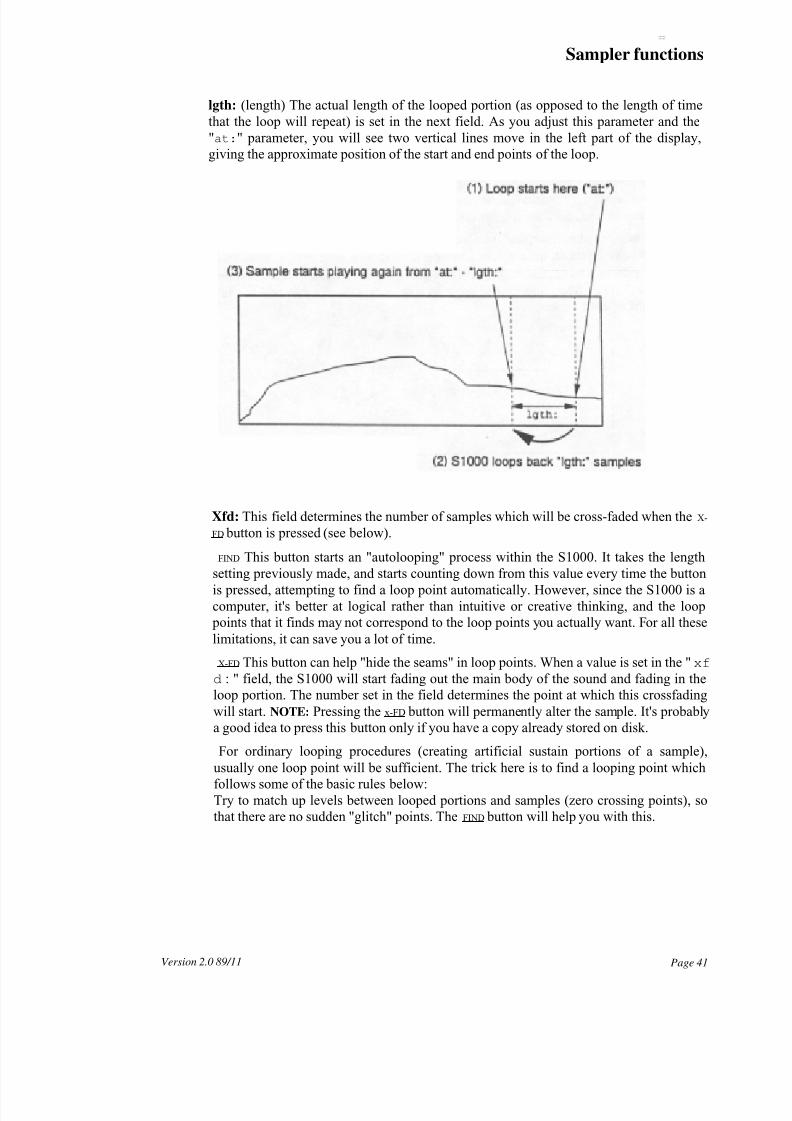
8/11/2019 akai sampler S1000 V2.0 Manual
http://slidepdf.com/reader/full/akai-sampler-s1000-v20-manual 49/96
:::::
Sampler functions
lgth: (length) The actual length of the looped portion (as opposed to the length of time
that the loop will repeat) is set in the next field. As you adjust this parameter and the
"at:" parameter, you will see two vertical lines move in the left part of the display,
giving the approximate position of the start and end points of the loop.
Xfd: This field determines the number of samples which will be cross-faded when the X-
FD button is pressed (see below).
FIND This button starts an "autolooping" process within the S1000. It takes the length
setting previously made, and starts counting down from this value every time the buttonis pressed, attempting to find a loop point automatically. However, since the S1000 is a
computer, it's better at logical rather than intuitive or creative thinking, and the loop
points that it finds may not correspond to the loop points you actually want. For all these
limitations, it can save you a lot of time.
X-FD This button can help "hide the seams" in loop points. When a value is set in the "xf
d : " field, the S1000 will start fading out the main body of the sound and fading in the
loop portion. The number set in the field determines the point at which this crossfading
will start. NOTE: Pressing the x-FD button will permanently alter the sample. It's probably
a good idea to press this button only if you have a copy already stored on disk.
For ordinary looping procedures (creating artificial sustain portions of a sample),
usually one loop point will be sufficient. The trick here is to find a looping point whichfollows some of the basic rules below:
Try to match up levels between looped portions and samples (zero crossing points), so
that there are no sudden "glitch" points. The FIND button will help you with this.
Page 41Version 2.0 89/11
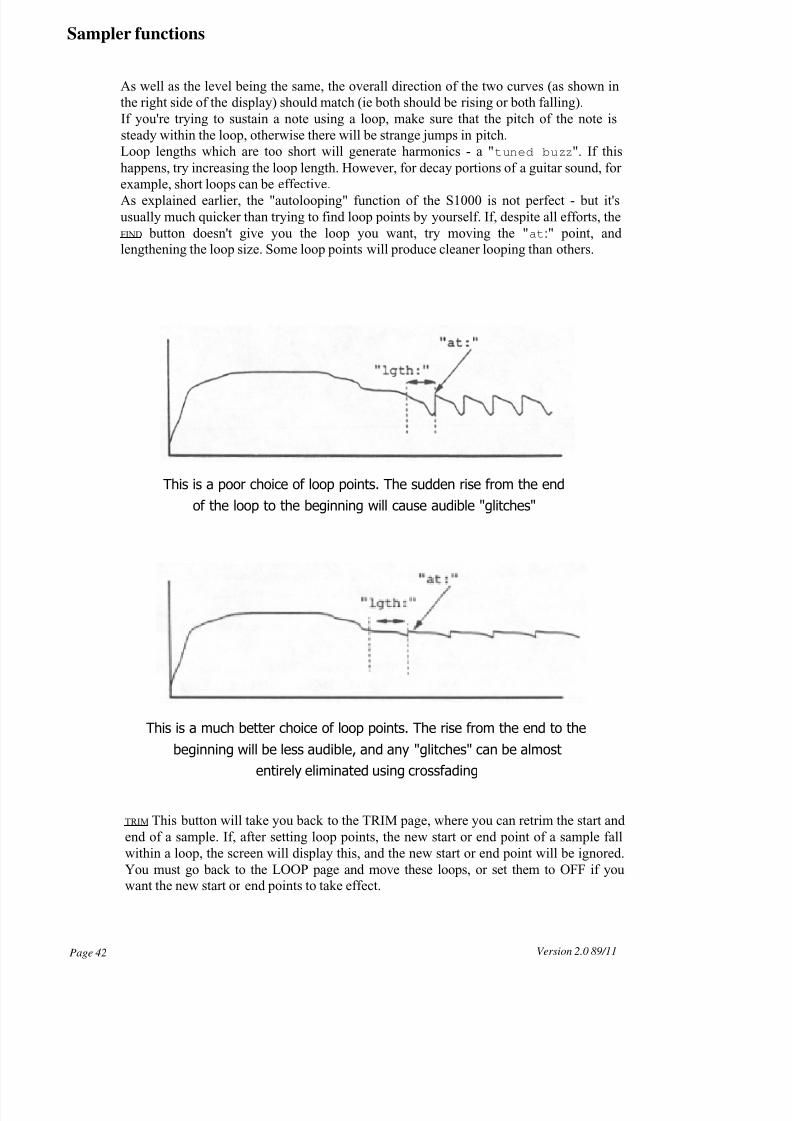
8/11/2019 akai sampler S1000 V2.0 Manual
http://slidepdf.com/reader/full/akai-sampler-s1000-v20-manual 50/96
Sampler functions
As well as the level being the same, the overall direction of the two curves (as shown in
the right side of the display) should match (ie both should be rising or both falling).
If you're trying to sustain a note using a loop, make sure that the pitch of the note is
steady within the loop, otherwise there will be strange jumps in pitch.
Loop lengths which are too short will generate harmonics - a "tuned buzz". If this
happens, try increasing the loop length. However, for decay portions of a guitar sound, for
example, short loops can be effective.
As explained earlier, the "autolooping" function of the S1000 is not perfect - but it's
usually much quicker than trying to find loop points by yourself. If, despite all efforts, the
FIND button doesn't give you the loop you want, try moving the "at:" point, and
lengthening the loop size. Some loop points will produce cleaner looping than others.
This is a poor choice of loop points. The sudden rise from the end
of the loop to the beginning will cause audible "glitches"
This is a much better choice of loop points. The rise from the end to the
beginning will be less audible, and any "glitches" can be almost
entirely eliminated using crossfading
TRIM This button will take you back to the TRIM page, where you can retrim the start and
end of a sample. If, after setting loop points, the new start or end point of a sample fall
within a loop, the screen will display this, and the new start or end point will be ignored.
You must go back to the LOOP page and move these loops, or set them to OFF if you
want the new start or end points to take effect.
Version 2.0 89/11Page 42
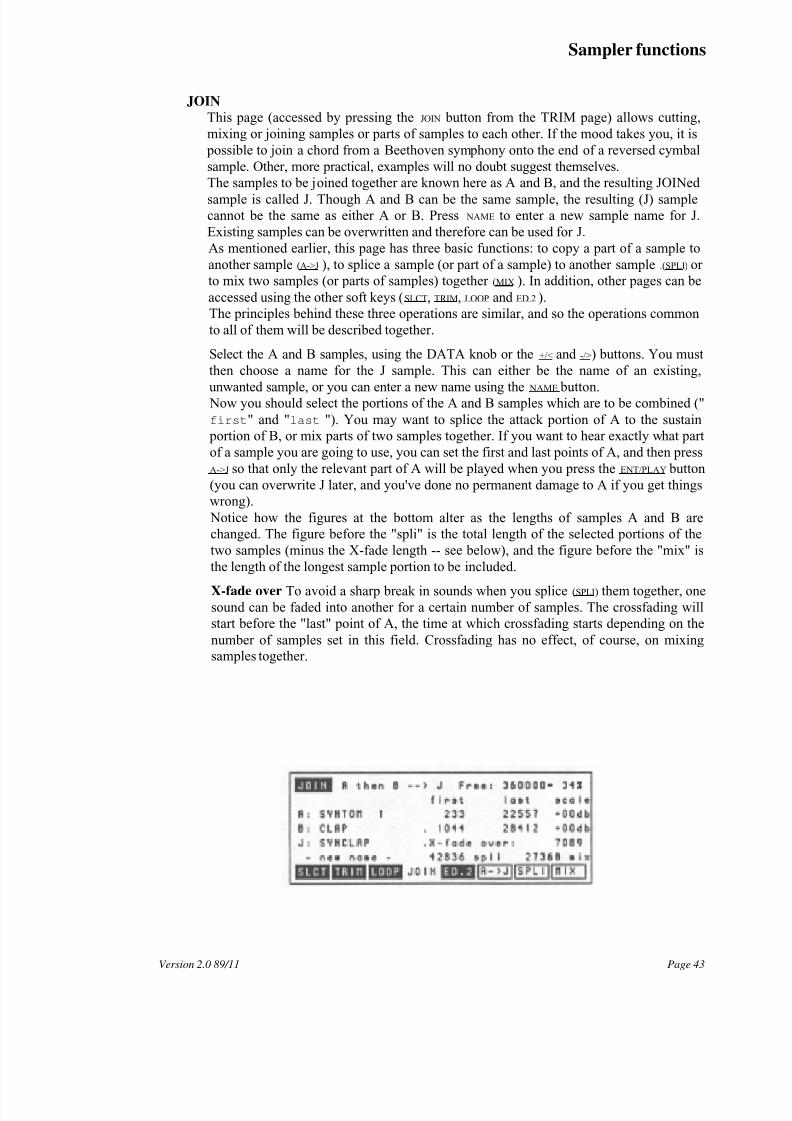
8/11/2019 akai sampler S1000 V2.0 Manual
http://slidepdf.com/reader/full/akai-sampler-s1000-v20-manual 51/96
Sampler functions
JOIN
This page (accessed by pressing the JOIN button from the TRIM page) allows cutting,
mixing or joining samples or parts of samples to each other. If the mood takes you, it is
possible to join a chord from a Beethoven symphony onto the end of a reversed cymbal
sample. Other, more practical, examples will no doubt suggest themselves.
The samples to be joined together are known here as A and B, and the resulting JOINed
sample is called J. Though A and B can be the same sample, the resulting (J) sample
cannot be the same as either A or B. Press NAME to enter a new sample name for J.
Existing samples can be overwritten and therefore can be used for J.
As mentioned earlier, this page has three basic functions: to copy a part of a sample to
another sample (A->J ), to splice a sample (or part of a sample) to another sample .(SPLI) or
to mix two samples (or parts of samples) together (MIX ). In addition, other pages can be
accessed using the other soft keys (SLCT, TRIM, LOOP and ED.2 ).
The principles behind these three operations are similar, and so the operations common
to all of them will be described together.
Select the A and B samples, using the DATA knob or the +/< and -/>) buttons. You must
then choose a name for the J sample. This can either be the name of an existing,
unwanted sample, or you can enter a new name using the NAME button. Now you should select the portions of the A and B samples which are to be combined ("
first" and "last "). You may want to splice the attack portion of A to the sustain
portion of B, or mix parts of two samples together. If you want to hear exactly what part
of a sample you are going to use, you can set the first and last points of A, and then press
A->J so that only the relevant part of A will be played when you press the ENT/PLAY button
(you can overwrite J later, and you've done no permanent damage to A if you get things
wrong).
Notice how the figures at the bottom alter as the lengths of samples A and B are
changed. The figure before the "spli" is the total length of the selected portions of the
two samples (minus the X-fade length -- see below), and the figure before the "mix" is
the length of the longest sample portion to be included.
X-fade over To avoid a sharp break in sounds when you splice (SPLI) them together, one
sound can be faded into another for a certain number of samples. The crossfading will
start before the "last" point of A, the time at which crossfading starts depending on the
number of samples set in this field. Crossfading has no effect, of course, on mixing
samples together.
Version 2.0 89/11 Page 43
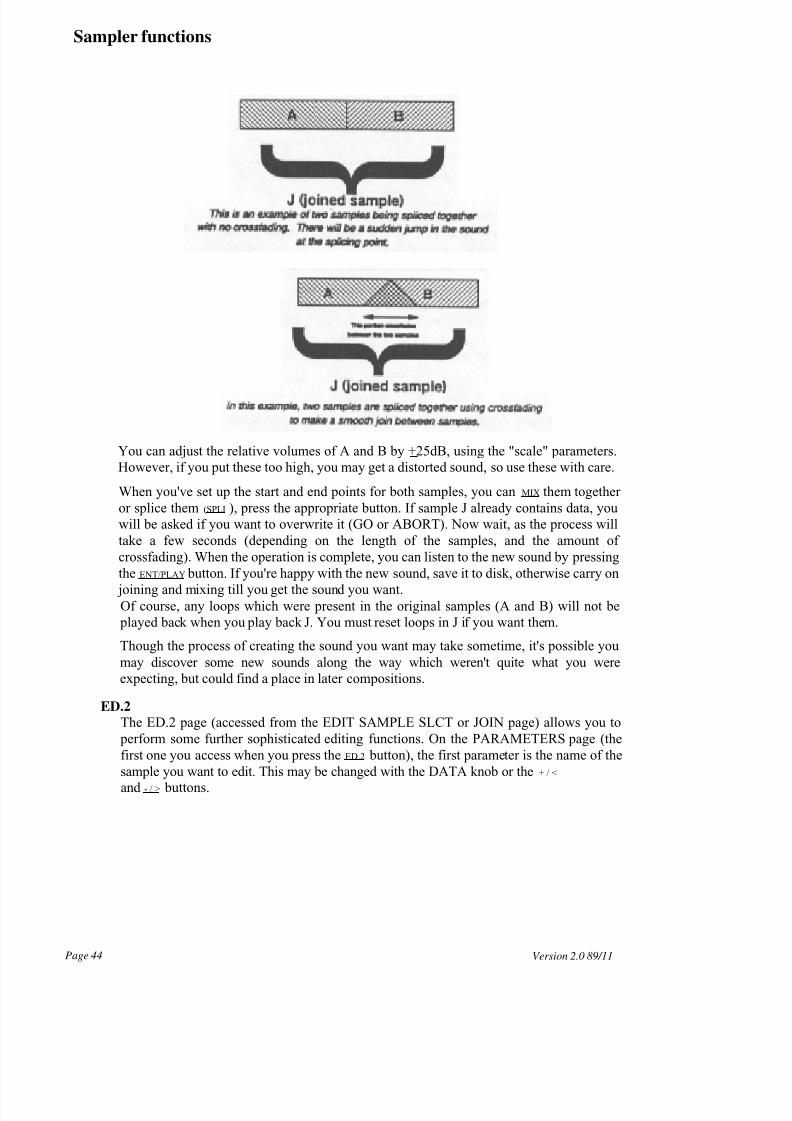
8/11/2019 akai sampler S1000 V2.0 Manual
http://slidepdf.com/reader/full/akai-sampler-s1000-v20-manual 52/96
Sampler functions
You can adjust the relative volumes of A and B by +25dB, using the "scale" parameters.
However, if you put these too high, you may get a distorted sound, so use these with care.
When you've set up the start and end points for both samples, you can MIX them together
or splice them (SPLI ), press the appropriate button. If sample J already contains data, you
will be asked if you want to overwrite it (GO or ABORT). Now wait, as the process will
take a few seconds (depending on the length of the samples, and the amount of
crossfading). When the operation is complete, you can listen to the new sound by pressing
the ENT/PLAY button. If you're happy with the new sound, save it to disk, otherwise carry on joining and mixing till you get the sound you want.
Of course, any loops which were present in the original samples (A and B) will not be
played back when you play back J. You must reset loops in J if you want them.
Though the process of creating the sound you want may take sometime, it's possible you
may discover some new sounds along the way which weren't quite what you were
expecting, but could find a place in later compositions.
ED.2
The ED.2 page (accessed from the EDIT SAMPLE SLCT or JOIN page) allows you to
perform some further sophisticated editing functions. On the PARAMETERS page (the
first one you access when you press the ED.2 button), the first parameter is the name of the
sample you want to edit. This may be changed with the DATA knob or the + / < and - / > buttons.
Page 44 Version 2.0 89/11
8/11/2019 akai sampler S1000 V2.0 Manual
http://slidepdf.com/reader/full/akai-sampler-s1000-v20-manual 53/96
amp er unc ons .:
The next parameter allows you to alter the original pitch at which the sample was
recorded, so that when you replay it on the keyboard, it will come out at the correct
pitch. Further fine tuning (in semitones and cents) can be done with the next parameter.
The next parameter determines the way in which the sample will be played back. There
are four options available here.
The first is LOOP IN RELEASE. This means that when a key is pressed, the sample will
play through all the loops until the first HOLD loop is reached. When the key isreleased, the HOLD loop will continue to play as the release falls away.
LOOP UNTIL RELEASE is slightly different. Again, the sample will play, with all
loops, until the first HOLD loop is reached. However, when the key is released, the loop
will end, and the remaining portion of the sample (if any) will be played. This is a useful
setting for sounds which have a definite attack, an indefinite sustain period (set with the
loop), and a definite release characteristic.
The next setting, NO LOOPING, does what its name suggests - it plays the sample
through without loops for as long as the key is held down. As soon as the key is released,
the sound will start to decay.
PLAY TO SAMPLE END is useful for drum trigger units such as the ME-35T and
the like. Like the previous setting, no loops are played, but an instantaneous triggersignal or key press will play the whole of the sample (the key does not have to be
pressed for the whole length of the sample).
The last parameter, "loop tune off set" allows you seta pitch shift for a HOLD loop
by +50 cents (one semitone). This shift will only occur once on the first occurrence of the
loop. Subsequent loops will be replayed at the shifted pitch of the first loop, ie this tuning
offset is not an incremental process.
There is one "action" button - REV . When this soft key is pressed, the sample will be
reversed. Pressing REV again will reverse the sample back to its original form. Note that
any loop points you have set will stay in the same absolute positions, and will not be
reversed with the sample.
TIME
Pressing the TIME button from the ED.2 page enters the TIME-STRETCH page. This
enables you to lengthen or shorten a sample or a selected part of a sample from 25% of
its original length to 2000% (twenty times). Since this operation can
take a lot of memory, it's as well to delete unwanted samples from memory (after you've
made sure that they're saved to disk).
Uses for time-stretching include: altering the length of a sampled rhythm passage to fit in
with the rest of the track without altering the pitch, maintaining the same vibrato speed
for a number of "multi-samples" created from one original sample, and fitting sound
effects, vocal phrases, etc to video soundtracks for precise timing. Two modes are
available for stretching: CYCLIC, in which a fixed interpolation rate is maintained
throughout the whole of the sample (suitable for individual instrument samples), and
INTELL, in which the S1000 "intelligently" varies the interpolation rate according to the
sample content (suitable for speech and music).
Page 45Version 2.0 89/11
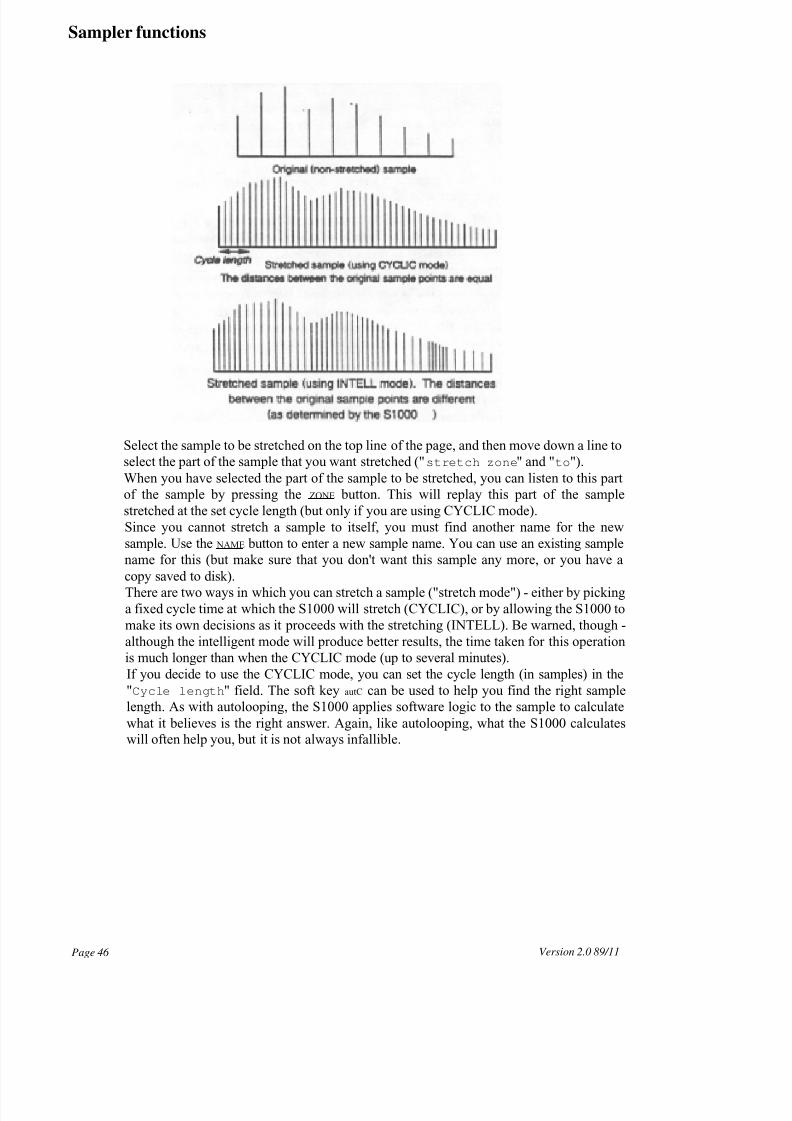
8/11/2019 akai sampler S1000 V2.0 Manual
http://slidepdf.com/reader/full/akai-sampler-s1000-v20-manual 54/96
Page 46 Version 2.0 89/11
Sampler functions
Select the sample to be stretched on the top line of the page, and then move down a line to
select the part of the sample that you want stretched ("stretch zone" and "to").
When you have selected the part of the sample to be stretched, you can listen to this part
of the sample by pressing the ZONE button. This will replay this part of the sample
stretched at the set cycle length (but only if you are using CYCLIC mode).
Since you cannot stretch a sample to itself, you must find another name for the new
sample. Use the NAME button to enter a new sample name. You can use an existing sample
name for this (but make sure that you don't want this sample any more, or you have a
copy saved to disk).There are two ways in which you can stretch a sample ("stretch mode") - either by picking
a fixed cycle time at which the S1000 will stretch (CYCLIC), or by allowing the S1000 to
make its own decisions as it proceeds with the stretching (INTELL). Be warned, though -
although the intelligent mode will produce better results, the time taken for this operation
is much longer than when the CYCLIC mode (up to several minutes).
If you decide to use the CYCLIC mode, you can set the cycle length (in samples) in the
"Cycle length" field. The soft key autC can be used to help you find the right sample
length. As with autolooping, the S1000 applies software logic to the sample to calculate
what it believes is the right answer. Again, like autolooping, what the S1000 calculates
will often help you, but it is not always infallible.
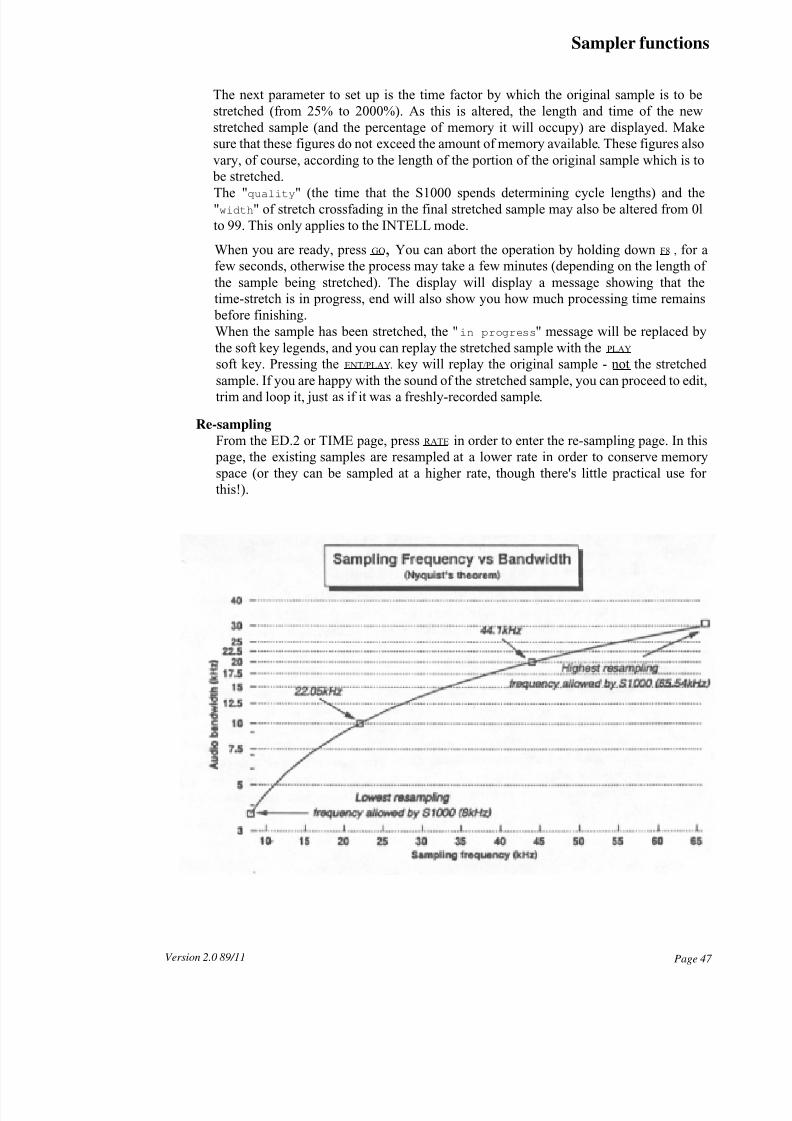
8/11/2019 akai sampler S1000 V2.0 Manual
http://slidepdf.com/reader/full/akai-sampler-s1000-v20-manual 55/96
Sampler functions
The next parameter to set up is the time factor by which the original sample is to be
stretched (from 25% to 2000%). As this is altered, the length and time of the new
stretched sample (and the percentage of memory it will occupy) are displayed. Make
sure that these figures do not exceed the amount of memory available. These figures also
vary, of course, according to the length of the portion of the original sample which is to
be stretched.
The "quality" (the time that the S1000 spends determining cycle lengths) and the"width" of stretch crossfading in the final stretched sample may also be altered from 0l
to 99. This only applies to the INTELL mode.
When you are ready, press GO, You can abort the operation by holding down F8 , for a
few seconds, otherwise the process may take a few minutes (depending on the length of
the sample being stretched). The display will display a message showing that the
time-stretch is in progress, end will also show you how much processing time remains
before finishing.
When the sample has been stretched, the "in progress" message will be replaced by
the soft key legends, and you can replay the stretched sample with the PLAY
soft key. Pressing the ENT/PLAY. key will replay the original sample - not the stretched
sample. If you are happy with the sound of the stretched sample, you can proceed to edit,trim and loop it, just as if it was a freshly-recorded sample.
Re-sampling
From the ED.2 or TIME page, press RATE in order to enter the re-sampling page. In this
page, the existing samples are resampled at a lower rate in order to conserve memory
space (or they can be sampled at a higher rate, though there's little practical use for
this!).
Page 47 Version 2.0 89/11
8/11/2019 akai sampler S1000 V2.0 Manual
http://slidepdf.com/reader/full/akai-sampler-s1000-v20-manual 56/96
Sampler functions
First select the sample to be re-sampled using the DATA knob or the + / < and - / >
buttons. You cannot resample a sample to itself, so you must give the resampled
data a new name, using the NAME button.
Next, select the new rate at which resampling is to be done. The default value is one-half
of the original sample rate, for example, a sample made at 44100Hz will have the default
value set to 22050Hz. If you adjust this value, ("new sample rate"), the fields below this
will change: the length of the new sample, together with the amount of memory space itwill take up, and the amount by which the new sample will be detuned, relative to the old
sample ("tune offset"). By simple mathematics, you can work out that if a sample is
resampled at half the frequency of the original, but the original time of the sample is
maintained, there will only be half as many sample points as before, and the overall pitch
will be dropped by one octave.
In addition to the new sampling frequency, a filter can be chosen to prevent aliasing or
"glitching" in the new sample. There is a choice of four different filter types (Filter 1
being the highest-frequency filter, and Filter 4 being the lowest frequency), in addition to
an "autoF" facility, which lets the S1000 pick the most appropriate filter for the
resampling being done.
Two specially-configured soft keys, 3/4 a and 2/3 , allow you to resample at 0.75
or 0.67 of the original sample rate. These will drop the pitch by 5 or 7 semitones
respectively. Simply press either of these soft keys in order to perform resampling
at these rates.
If you are not using these pre-defined resampling rates, press GO. After a while, the
"re-sampling in progress" message will disappear, and you can press the PLAY
soft key to listen to the resampled sound (pressing ENT/PLAY will give you the original
sound). If you are not happy with the new, resampled sound, you can alter the parameters
and try again using the GO button. You can always overwrite existing samples (as with the
JOIN and TIME facilities).
Note that smooth looping points which were carefully selected prior to resampling may
change, as critical sample points may disappear. If this occurs, reset the looping points
(but moving them by only one or two sample points will generally put things right again).
Conclusion
This ends the tour of the facilities provided by the S1000 for editing samples. Though
there's a comprehensive array of options, most of the facilities provided can be accessed
and implemented using a little common-sense. As with any complex system, practice
makes perfect. It's unrealistic to expect to get perfect results on your first try with the
S1000. Sampling is more of an art than a science, and experience will refine your skills of
recording and editing sampling. Remember to trust your ears - they're the ultimate test of
whether something sounds good or not.
Page 48 Version 2.0 89/11
8/11/2019 akai sampler S1000 V2.0 Manual
http://slidepdf.com/reader/full/akai-sampler-s1000-v20-manual 57/96
Sampler functionsfunctionsfunctionsfunctions
SELECT SAMPLE (S1000PB only)
NOTE: This section applies to the S1000PB only. If you are using another model in the
series, this section does not apply. Please resume reading at the "EDIT PROG" section,
page ??.
From any page, press the SELECT SAMLE button, and you are in a position to get information
on, copy, delete or rename a sample. The first thing to do is to select a sample. Use the
CURSOR buttons to make sure that the cursor is at the top right of the screen, and the
DATA buttons to select a sample. Sample names are up to 12 characters long for a mono
sample - and 10 characters for stereo (followed by the characters "-L" or -R", added by the
S1000 at sample time.
To enter a new sample name for copying or renaming, press NAME and use the other buttons
to enter a name ENT/PLAY when done. A name such as "HUGHS SAMPLE" will mean nothing
in a month's time, while "HUGHS BASS" will at least tell you what kind of instrument the
sample refers to. Now use COPY or REN to copy or rename the existing sample to the name
you've just entered. If the name already exists for a sample, the S1000PB will display this.
To delete a sample, simply press the DEL button to delete the currently-selected sample. This
operation cannot be undone, so make sure that you have a copy on disk if you want to use
this sample at any time in the future,
The "monitoring program" can be set to either MONITOR or a program name. This
enables you choose what sound will be heard when you press ENT/PLAY button. Usually, you
should set this to MONITOR.
There are two soft keys which bring up other pages – PARA and LIST.
PARA
This page allows you to alter certain parameters of individual samples. The field where the
sample is selected is, once again, at the top right of the screen. Use the DATA buttons to
select the sample.
The next parameter allows you to alter the original pitch at which the sample was recorded,
so that when you replay it on the keyboard, it will come out at the correct pitch. Further fine
tuning (in semitones and cents) can be done with the next parameter.
The next parameter determines the way in which the sample will be played back. There are
four options available here. Note that these settings depend on a loop point which has
previously been set up on a S1000 which is capable of recording and editing samples.
The first is LOOP IN RELEASE. This means that when a key is pressed, the sample will
play through all the loops until the first HOLD loop is reached. When the key is released, the
HOLD loop will continue to play as the release falls away.
LOOP UNTIL RELEASE is slightly different. Again, the sample will play, with all loops,until the first HOLD loop is reached. However, when the key is released, the loop will end,
and the remaining portion of the sample (if any) will be played. This is a useful setting for
sounds which have a definite attack, an indefinite sustain period (set with the loop), and a
-definite release characteristic.
Page 49Version 2.0 89/11
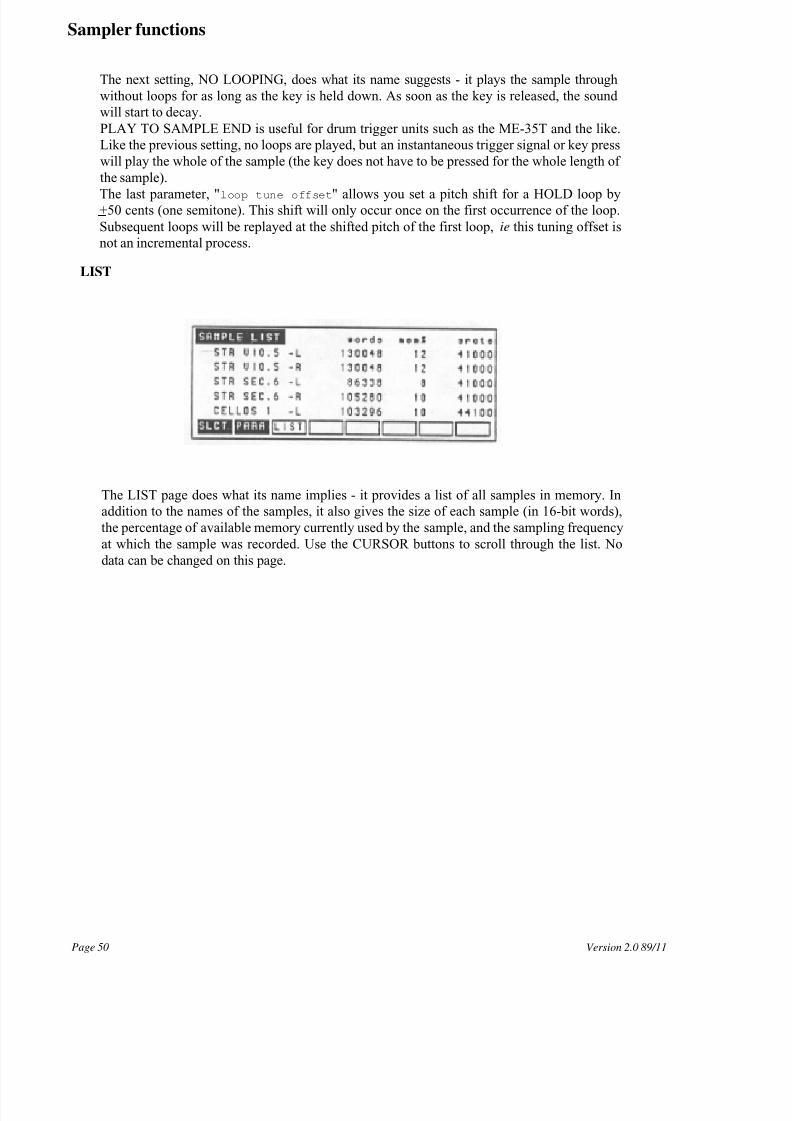
8/11/2019 akai sampler S1000 V2.0 Manual
http://slidepdf.com/reader/full/akai-sampler-s1000-v20-manual 58/96
Sampler functions
The next setting, NO LOOPING, does what its name suggests - it plays the sample through
without loops for as long as the key is held down. As soon as the key is released, the sound
will start to decay.
PLAY TO SAMPLE END is useful for drum trigger units such as the ME-35T and the like.
Like the previous setting, no loops are played, but an instantaneous trigger signal or key press
will play the whole of the sample (the key does not have to be pressed for the whole length of
the sample).
The last parameter, "loop tune offset" allows you set a pitch shift for a HOLD loop by+50 cents (one semitone). This shift will only occur once on the first occurrence of the loop.
Subsequent loops will be replayed at the shifted pitch of the first loop, ie this tuning offset is
not an incremental process.
LIST
The LIST page does what its name implies - it provides a list of all samples in memory. In
addition to the names of the samples, it also gives the size of each sample (in 16-bit words),
the percentage of available memory currently used by the sample, and the sampling frequency
at which the sample was recorded. Use the CURSOR buttons to scroll through the list. No
data can be changed on this page.
Version 2.0 89/11Page 50
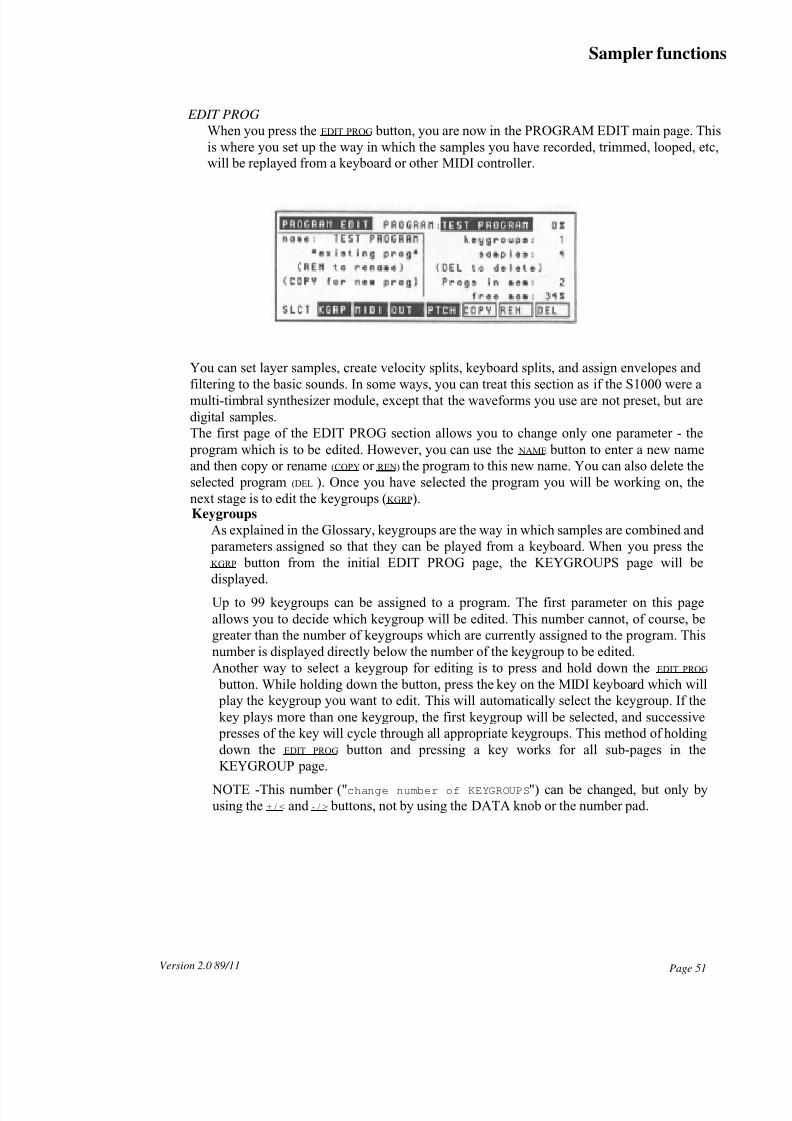
8/11/2019 akai sampler S1000 V2.0 Manual
http://slidepdf.com/reader/full/akai-sampler-s1000-v20-manual 59/96
Version 2.0 89/11 Page 51
Sampler functions
EDIT PROG
When you press the EDIT PROG button, you are now in the PROGRAM EDIT main page. This
is where you set up the way in which the samples you have recorded, trimmed, looped, etc,
will be replayed from a keyboard or other MIDI controller.
You can set layer samples, create velocity splits, keyboard splits, and assign envelopes and
filtering to the basic sounds. In some ways, you can treat this section as if the S1000 were amulti-timbral synthesizer module, except that the waveforms you use are not preset, but are
digital samples.
The first page of the EDIT PROG section allows you to change only one parameter - the
program which is to be edited. However, you can use the NAME button to enter a new name
and then copy or rename (COPY or REN) the program to this new name. You can also delete the
selected program (DEL ). Once you have selected the program you will be working on, the
next stage is to edit the keygroups (KGRP).Keygroups
As explained in the Glossary, keygroups are the way in which samples are combined and
parameters assigned so that they can be played from a keyboard. When you press the
KGRP button from the initial EDIT PROG page, the KEYGROUPS page will be
displayed.
Up to 99 keygroups can be assigned to a program. The first parameter on this page
allows you to decide which keygroup will be edited. This number cannot, of course, be
greater than the number of keygroups which are currently assigned to the program. This
number is displayed directly below the number of the keygroup to be edited.
Another way to select a keygroup for editing is to press and hold down the EDIT PROG
button. While holding down the button, press the key on the MIDI keyboard which will
play the keygroup you want to edit. This will automatically select the keygroup. If the
key plays more than one keygroup, the first keygroup will be selected, and successive
presses of the key will cycle through all appropriate keygroups. This method of holding
down the EDIT PROG button and pressing a key works for all sub-pages in the
KEYGROUP page.
NOTE -This number ("change number of KEYGROUPS") can be changed, but only by
using the + / < and - / > buttons, not by using the DATA knob or the number pad.
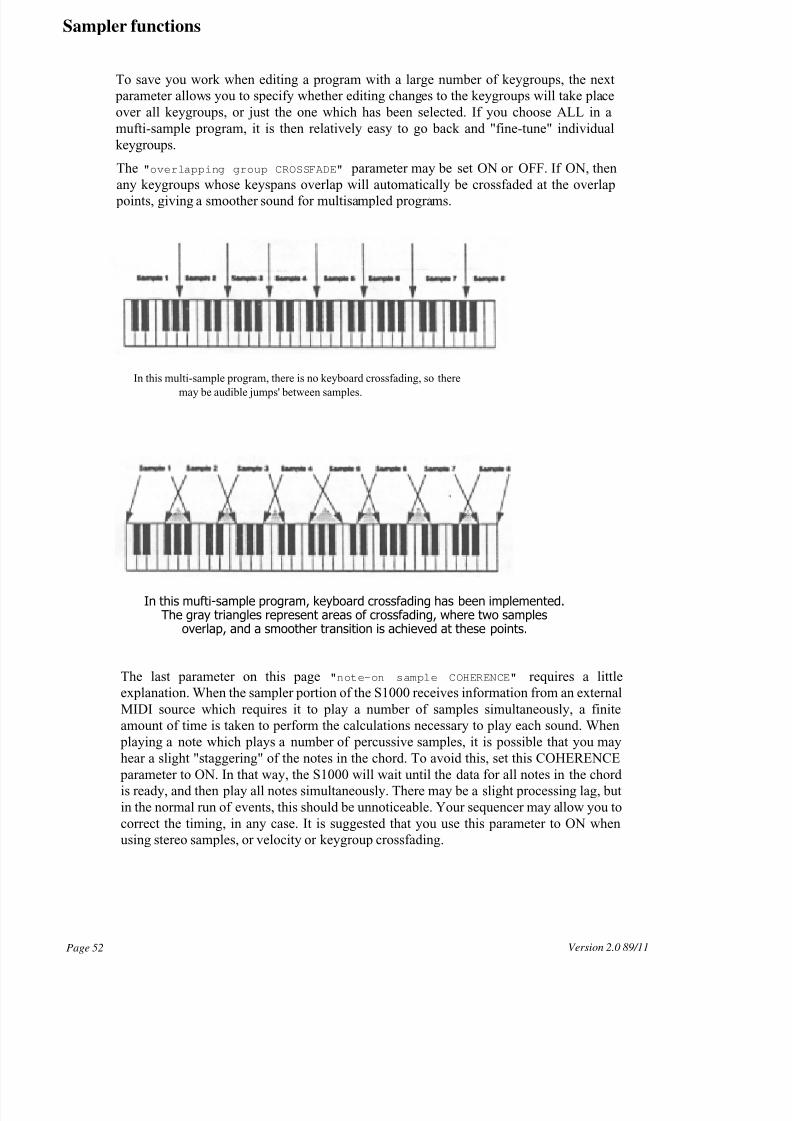
8/11/2019 akai sampler S1000 V2.0 Manual
http://slidepdf.com/reader/full/akai-sampler-s1000-v20-manual 60/96
Sampler functions
To save you work when editing a program with a large number of keygroups, the next
parameter allows you to specify whether editing changes to the keygroups will take place
over all keygroups, or just the one which has been selected. If you choose ALL in a
mufti-sample program, it is then relatively easy to go back and "fine-tune" individual
keygroups.
The "overlapping group CROSSFADE" parameter may be set ON or OFF. If ON, then
any keygroups whose keyspans overlap will automatically be crossfaded at the overlap points, giving a smoother sound for multisampled programs.
In this multi-sample program, there is no keyboard crossfading, so there may be audible jumps' between samples.
In this mufti-sample program, keyboard crossfading has been implemented.The gray triangles represent areas of crossfading, where two samples
overlap, and a smoother transition is achieved at these points.
The last parameter on this page "note-on sample COHERENCE" requires a little
explanation. When the sampler portion of the S1000 receives information from an external
MIDI source which requires it to play a number of samples simultaneously, a finite
amount of time is taken to perform the calculations necessary to play each sound. When
playing a note which plays a number of percussive samples, it is possible that you may
hear a slight "staggering" of the notes in the chord. To avoid this, set this COHERENCE
parameter to ON. In that way, the S1000 will wait until the data for all notes in the chord
is ready, and then play all notes simultaneously. There may be a slight processing lag, but
in the normal run of events, this should be unnoticeable. Your sequencer may allow you to
correct the timing, in any case. It is suggested that you use this parameter to ON when
using stereo samples, or velocity or keygroup crossfading.
Version 2.0 89/11Page 52

8/11/2019 akai sampler S1000 V2.0 Manual
http://slidepdf.com/reader/full/akai-sampler-s1000-v20-manual 61/96
Sampler functions
SPAN
The SPAN button allows you to set the keyspan of any keygroups in the program. On the
left of this page are up to four diagrams of a keyboard with a keyspan underneath the
keyboard (represented by a horizontal bar), and to the right of this are displayed the
corresponding keygroups with their HIGH and LOW ranges. These may be displayed
either as MIDI note numbers or as note names. Press SPAN once again to toggle between
note names and numbers. You can then select the keygroup number you want (place thecursor on a field in the KG column, and use the DATA knob to select the keygroup)
before altering the HIGH and LOW limits of the keygroup. Note that if you are editing
using the note names, placing the cursor over the whole note name will alter the value by
an octave for each click of the DATA knob. Alternatively, place the cursor on the "LOW"
field of the first keyspan and play the appropriate key on the MIDI keyboard. The cursor
will move to the next note value field (the high value of the same keyspan, of the low
value of the next), ready for you to play the next note.
In this page, you can also alter the tuning (TUNE) of the samples played in this keyspan
in semitones and cents (useful if you have a split keyboard setup, and you want each half
of the split to sound at the correct pitch).
The other parameter in this page is BEAT, which is used to create a fixed offset to the
original pitch. Unlike the TUNE parameter, this tuning offset is constant, no matter whatthe played pitch of the sample. You may like to use this to create a "chorus" effect, by
adding a small amount of fixed offset to one of two otherwise identical samples.
Page 53Version 2.0 89/11
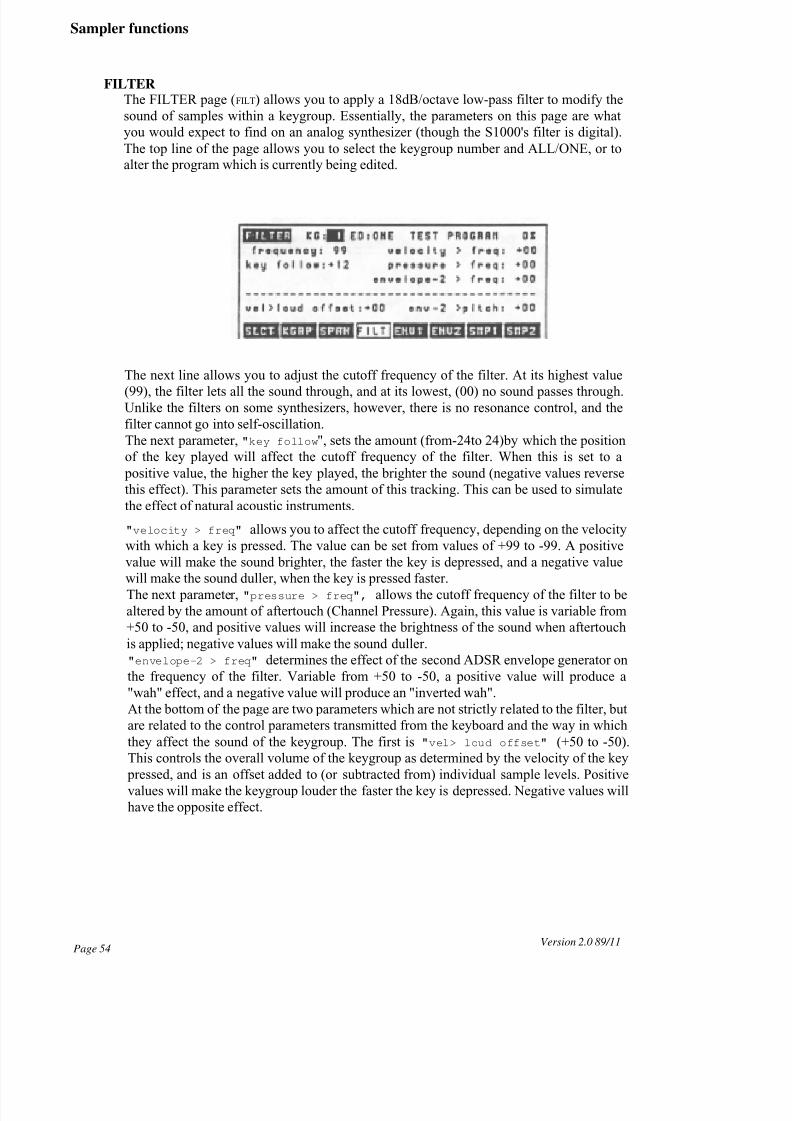
8/11/2019 akai sampler S1000 V2.0 Manual
http://slidepdf.com/reader/full/akai-sampler-s1000-v20-manual 62/96
Sampler functions
FILTERThe FILTER page (FILT) allows you to apply a 18dB/octave low-pass filter to modify the
sound of samples within a keygroup. Essentially, the parameters on this page are what
you would expect to find on an analog synthesizer (though the S1000's filter is digital).
The top line of the page allows you to select the keygroup number and ALL/ONE, or to
alter the program which is currently being edited.
The next line allows you to adjust the cutoff frequency of the filter. At its highest value
(99), the filter lets all the sound through, and at its lowest, (00) no sound passes through.
Unlike the filters on some synthesizers, however, there is no resonance control, and the
filter cannot go into self-oscillation.
The next parameter, "key follow", sets the amount (from-24to 24)by which the position
of the key played will affect the cutoff frequency of the filter. When this is set to a
positive value, the higher the key played, the brighter the sound (negative values reverse
this effect). This parameter sets the amount of this tracking. This can be used to simulate
the effect of natural acoustic instruments.
"velocity > freq" allows you to affect the cutoff frequency, depending on the velocity
with which a key is pressed. The value can be set from values of +99 to -99. A positive
value will make the sound brighter, the faster the key is depressed, and a negative value
will make the sound duller, when the key is pressed faster.The next parameter, "pressure > freq", allows the cutoff frequency of the filter to be
altered by the amount of aftertouch (Channel Pressure). Again, this value is variable from
+50 to -50, and positive values will increase the brightness of the sound when aftertouch
is applied; negative values will make the sound duller.
"envelope-2 > freq" determines the effect of the second ADSR envelope generator on
the frequency of the filter. Variable from +50 to -50, a positive value will produce a
"wah" effect, and a negative value will produce an "inverted wah".
At the bottom of the page are two parameters which are not strictly related to the filter, but
are related to the control parameters transmitted from the keyboard and the way in which
they affect the sound of the keygroup. The first is "vel> loud offset" (+50 to -50).
This controls the overall volume of the keygroup as determined by the velocity of the key
pressed, and is an offset added to (or subtracted from) individual sample levels. Positive
values will make the keygroup louder the faster the key is depressed. Negative values will
have the opposite effect.
Version 2.0 89/11Page 54
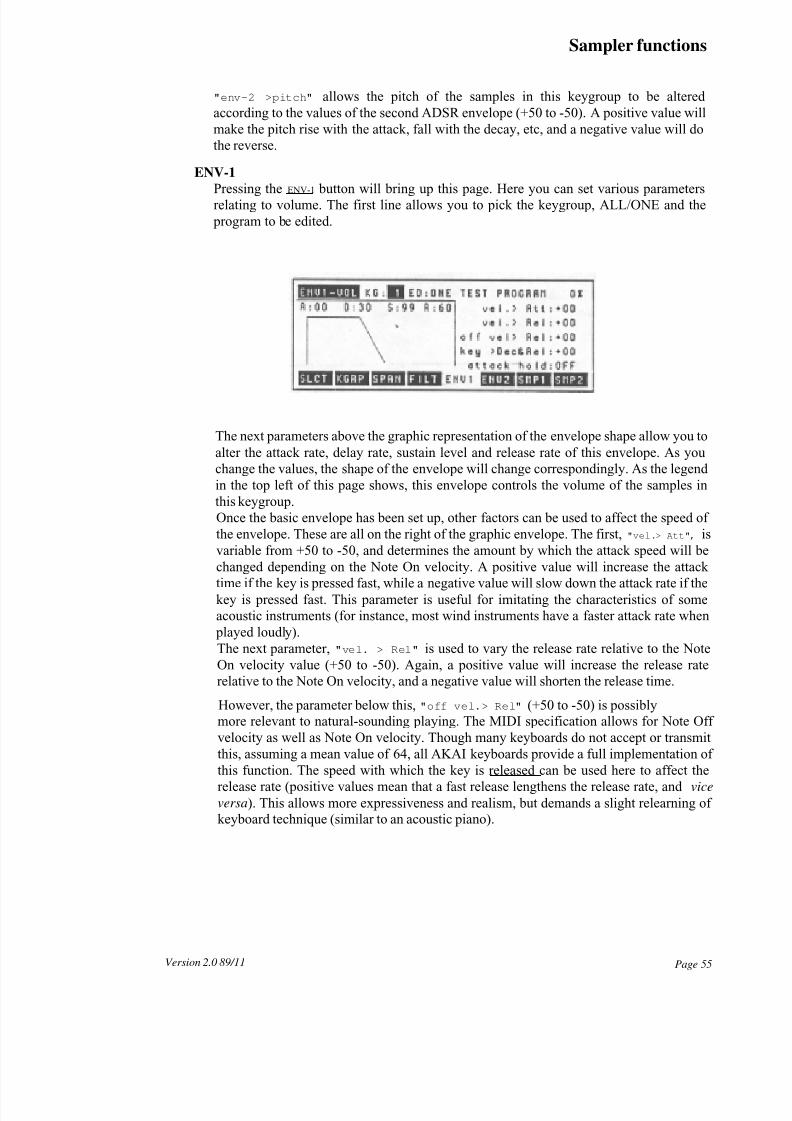
8/11/2019 akai sampler S1000 V2.0 Manual
http://slidepdf.com/reader/full/akai-sampler-s1000-v20-manual 63/96
Sampler functions
"env-2 >pitch" allows the pitch of the samples in this keygroup to be altered
according to the values of the second ADSR envelope (+50 to -50). A positive value will
make the pitch rise with the attack, fall with the decay, etc, and a negative value will do
the reverse.
ENV-1
Pressing the ENV-1 button will bring up this page. Here you can set various parametersrelating to volume. The first line allows you to pick the keygroup, ALL/ONE and the
program to be edited.
The next parameters above the graphic representation of the envelope shape allow you to
alter the attack rate, delay rate, sustain level and release rate of this envelope. As you
change the values, the shape of the envelope will change correspondingly. As the legend
in the top left of this page shows, this envelope controls the volume of the samples in
this keygroup.
Once the basic envelope has been set up, other factors can be used to affect the speed of
the envelope. These are all on the right of the graphic envelope. The first, "vel.> Att", is
variable from +50 to -50, and determines the amount by which the attack speed will be
changed depending on the Note On velocity. A positive value will increase the attack
time if the key is pressed fast, while a negative value will slow down the attack rate if the
key is pressed fast. This parameter is useful for imitating the characteristics of some
acoustic instruments (for instance, most wind instruments have a faster attack rate when
played loudly).
The next parameter, "vel. > Rel" is used to vary the release rate relative to the Note
On velocity value (+50 to -50). Again, a positive value will increase the release rate
relative to the Note On velocity, and a negative value will shorten the release time.
However, the parameter below this, "off vel.> Rel" (+50 to -50) is possibly
more relevant to natural-sounding playing. The MIDI specification allows for Note Off
velocity as well as Note On velocity. Though many keyboards do not accept or transmit
this, assuming a mean value of 64, all AKAI keyboards provide a full implementation of
this function. The speed with which the key is released can be used here to affect therelease rate (positive values mean that a fast release lengthens the release rate, and vice
versa). This allows more expressiveness and realism, but demands a slight relearning of
keyboard technique (similar to an acoustic piano).
Page 55Version 2.0 89/11
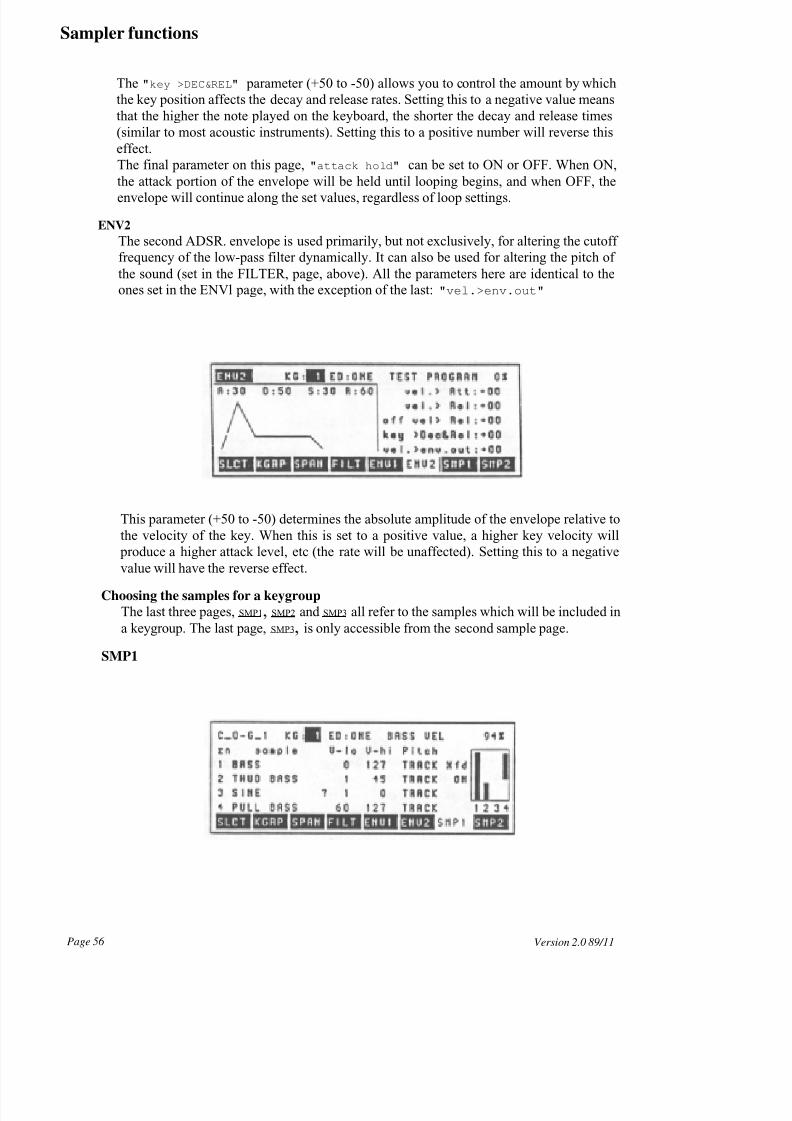
8/11/2019 akai sampler S1000 V2.0 Manual
http://slidepdf.com/reader/full/akai-sampler-s1000-v20-manual 64/96
Sampler functions
The "key >DEC&REL" parameter (+50 to -50) allows you to control the amount by which
the key position affects the decay and release rates. Setting this to a negative value means
that the higher the note played on the keyboard, the shorter the decay and release times
(similar to most acoustic instruments). Setting this to a positive number will reverse this
effect.
The final parameter on this page, "attack hold" can be set to ON or OFF. When ON,
the attack portion of the envelope will be held until looping begins, and when OFF, the
envelope will continue along the set values, regardless of loop settings.
ENV2
The second ADSR. envelope is used primarily, but not exclusively, for altering the cutoff
frequency of the low-pass filter dynamically. It can also be used for altering the pitch of
the sound (set in the FILTER, page, above). All the parameters here are identical to the
ones set in the ENVl page, with the exception of the last: "vel.>env.out"
This parameter (+50 to -50) determines the absolute amplitude of the envelope relative to
the velocity of the key. When this is set to a positive value, a higher key velocity will
produce a higher attack level, etc (the rate will be unaffected). Setting this to a negative
value will have the reverse effect.
Choosing the samples for a keygroup
The last three pages, SMP1, SMP2 and SMP3 all refer to the samples which will be included in
a keygroup. The last page, SMP3, is only accessible from the second sample page.
SMP1
Version 2.0 89/11Page 56

8/11/2019 akai sampler S1000 V2.0 Manual
http://slidepdf.com/reader/full/akai-sampler-s1000-v20-manual 65/96
Version 2.0 89/11 Page 57
The neat parameter is "xfd" (crossfade) which may be either ON or OFF. If ON, any note
which has a velocity which falls within two velocity zones will play both samples, therelative volume being adjusted accordingly.
To select a sample to include in a keygroup, move the cursor to the sample field and
select a sample. If the sample has been previously selected as part of an existing
program, but has not yet been loaded into memory, a question mark will be shown by the
sample name. Note that a SINE "sample" is given as a default for a new program.
On some of the supplied program disks, the "samples" SINE, SQUARE, SAWTOOTH
and PULSE are included. This enables you to create "synthesizer" sounds by adding
these regular waveforms to sampled sounds.
Next, select the "velocity window" within which the sample will be played. MIDI Note
On velocity values can be from 0 (ppp) to 127 (fff), so if you want the sample to be
played all the time, set "v-lo" to 0, and "v-hi" to 127. Otherwise, set the velocitywindows accordingly.
There is-one other parameter for each keygroup - the CONST/TRACK parameter. When
set to "TRACK", the keyboard will produce pitched notes corresponding to the key being
struck. If set to "CONST", however, the pitch of the sample will
Sampler functions
Pressing the SMP1 button will bring up the samples to be included in a keygroup. As with
other pages in the EDIT PROG mode, the top line of the page allows you to specify the
keygroup number, ONE/ALL or the name of the program being edited. Additionally, the
first line also allows you to specify the keyspan of this sample. Up to four samples can
be allocated to each keygroup (if you feel you want more, create more keygroups for the
program, overlapping each other).
Within a keygroup, these four samples can be set to play at different velocities. The tonal
characteristics of acoustic instruments can vary radically from loud to soft (a classic
example of an instrument which does this is the Japanese end-blown flute, the shakuhachi),and so you may want to take a few samples of the same instrument being played at
different volumes, as well as different pitches. Alternatively, you may wish to
incorporate a velocity switch as a special effect a keygroup could be set to produce only
the sound of a string section when played softly, but change to or add the sound of a
brass section when played at a higher velocity.

8/11/2019 akai sampler S1000 V2.0 Manual
http://slidepdf.com/reader/full/akai-sampler-s1000-v20-manual 66/96
Page 58 Version 2.0 89/11
Sampler functions
remain at the constant pitch of the edited sample, no matter what key is pressed, This can
be useful if you want to add a constant pitch percussion sound to a pitched instrument, for
instance.
The second sample page lSMP2)
In the second sample page, (SMP2), you can set further parameters relating to each sample
in a keygroup. The top line allows you to set the keyspan of the keygroup, the keygroup
to be edited, the ALL/ONE parameter and the program currently being edited. Each ofthe other parameters in this page can be applied to each velocity zone (sample)
individually.
The "sem.cnt" parameter allows you to set the relative tuning of each sample within a
keygroup (in semitones and cents).
The "loud" parameter allows you to adjust the relative volume of each sample in a
keygroup relative to the other samples. This value can be set from -50 to +50.
"filt" allows you to specify the cutoff frequency of the low-pass filter for each sample
relative to the other samples in the keygroup.
When a program is being played through the stereo outputs, the stereo position of each
sample in a keygroup can be set using the "pan" parameter. The values here can range
from L50 (panned hard left) through MID (the signal is sent equally to the left and right
channels) to R50 (panned hard right).The "out" parameter requires a little explanation. If a program is assigned to be played
through one of the eight individual output channels, an "offset" can be added to each
sample in the program which is added to the basic output channel to determine the output
channel from which the sample will eventually be output. For example, if a program is
assigned to be played through channel 3, and four sample "out"s are set in this page to be
0, +1, +1 and +2, these samples will be played through channels 3, 4, 4 and 5 respectively.
If value of the basic output channel added to the offset here goes above 8, the number
"wraps round". In this way, if the basic out channel is 6, and the offset value set here is 6,
the total is 12. This will be automatically changed to 4 (12 - 8).
The last parameter on this page allows you to set up the way the sample is to be played
back, overriding the settings made in the ED.2 page of the EDIT SAMPLE mode, if you
want. There are five values which are allowed. AS SAMPLE plays back the sample
exactly as set up in the ED.2 page (loops included). LP in R is the same as the LOOP IN
RELEASE mode of the ED.2 page, and "LP til R" is the same as LOOP UNTIL
RELEASE. NO LOOPS is self-explanatory, and TO END
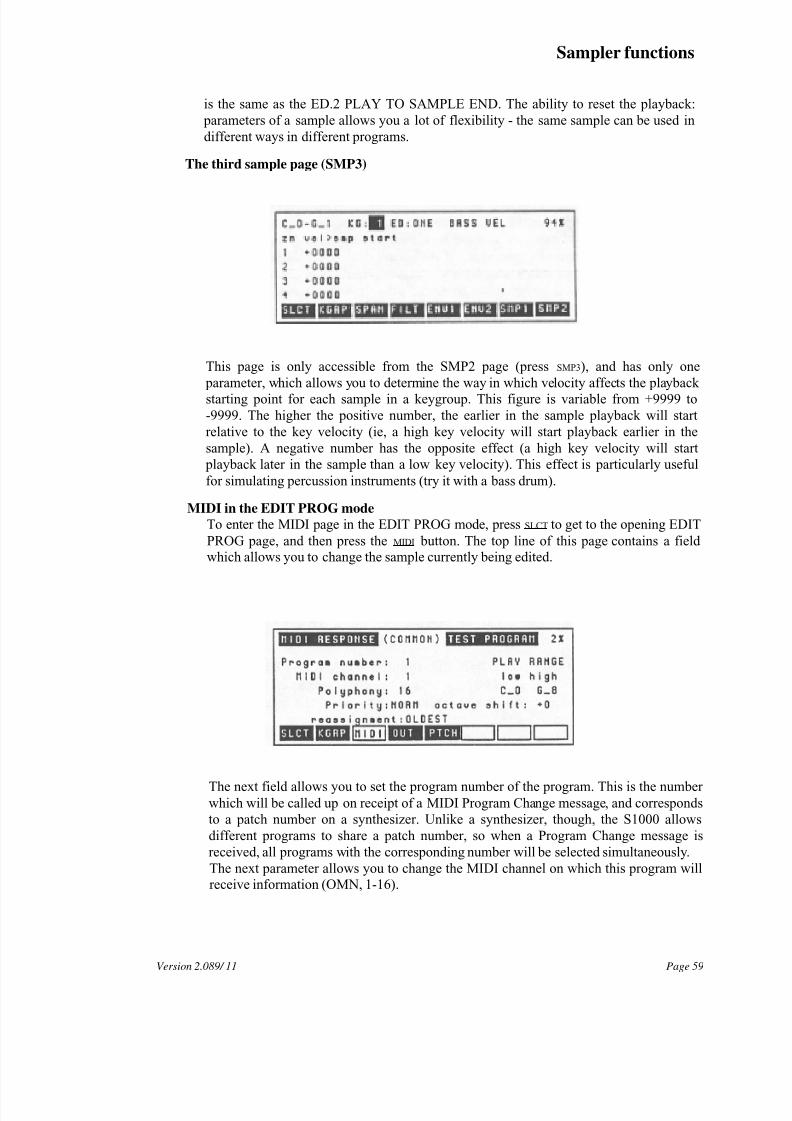
8/11/2019 akai sampler S1000 V2.0 Manual
http://slidepdf.com/reader/full/akai-sampler-s1000-v20-manual 67/96
Sampler functions
is the same as the ED.2 PLAY TO SAMPLE END. The ability to reset the playback:
parameters of a sample allows you a lot of flexibility - the same sample can be used in
different ways in different programs.
The third sample page (SMP3)
This page is only accessible from the SMP2 page (press SMP3), and has only one
parameter, which allows you to determine the way in which velocity affects the playbackstarting point for each sample in a keygroup. This figure is variable from +9999 to
-9999. The higher the positive number, the earlier in the sample playback will start
relative to the key velocity (ie, a high key velocity will start playback earlier in the
sample). A negative number has the opposite effect (a high key velocity will start
playback later in the sample than a low key velocity). This effect is particularly useful
for simulating percussion instruments (try it with a bass drum).
MIDI in the EDIT PROG mode
To enter the MIDI page in the EDIT PROG mode, press SLCT to get to the opening EDIT
PROG page, and then press the MIDI button. The top line of this page contains a field
which allows you to change the sample currently being edited.
The next field allows you to set the program number of the program. This is the number
which will be called up on receipt of a MIDI Program Change message, and corresponds
to a patch number on a synthesizer. Unlike a synthesizer, though, the S1000 allows
different programs to share a patch number, so when a Program Change message is
received, all programs with the corresponding number will be selected simultaneously.
The next parameter allows you to change the MIDI channel on which this program will
receive information (OMN, 1-16).
Page 59Version 2.089/ 11
8/11/2019 akai sampler S1000 V2.0 Manual
http://slidepdf.com/reader/full/akai-sampler-s1000-v20-manual 68/96
Sampler functions
NOTE that the channel on which Program Change information is received may be
selected in the MIDI mode to be OMNI or any other channel, so that program changes
can be made independently of this MIDI channel setting.
The S1000 is capable of playing up to sixteen notes (samples) at one time. If a keygroup
is set to use four samples which will all be played when one key is pressed, then only four
notes of that keygroup can be played simultaneously. If it only uses one sample, then 16
notes of this keygroup can be played at one time. Remember that velocity crossfading
may use two samples simultaneously from one key, which will reduce the polyphony ofthe program using this feature. The neat parameter, "polyphony", allows you to select how
many notes (1 to 16) can be played at a time by this particular program. If the program
allows a large number of notes to be played, but other programs are playing other notes,
more notes may be "stolen" from this program or from the other programs (see the
"PRIORITY" parameter below).
The "PRIORITY" parameter allows you to specify how notes will be "stolen" by other
programs if this is necessary. There are four settings: LOW, NORM, HIGH and HOLD. If
a program is set to LOW priority, then notes from this program will be "stolen" first. If set
to HIGH, then notes from other programs with lower priority will be "stolen" before they
are stolen for this program. NORM is, of course, normal priority. If you are playing a
complex piece of music using many programs, it is a good idea to set important,
"lead-line" programs to HIGH, and less important background programs to LOW. HOLDis a special priority. If a program's priority is set to HOLD, notes from this program can
only be "stolen" by the same program.
The notes which will be "stolen" are determined by the "reassignment" parameter -
either the OLDEST note will stop playing, or the QUIETEST one.
The keyboard range is the next parameter on this page, and setting here will override any
keygroup range settings made in the keygroup SPAN page. Remember that pressing the
soft MIDI button will redisplay this page, toggling between MIDI note numbers and note
names.
Finally, on this page, the pitch of the program can be shifted by +2 octaves (which allows
you to adjust for the actual playing position on the keyboard).
OUT
By pressing the OUT button from the main EDIT PROG, the EDIT PROG MIDI or EDIT
PROG PTCH page, you can control the audio output of the program from the S1000. The
first line of this page allows you to choose the program whose OUT parameters are to be
edited.
Version 2.0 89/11
Page 60
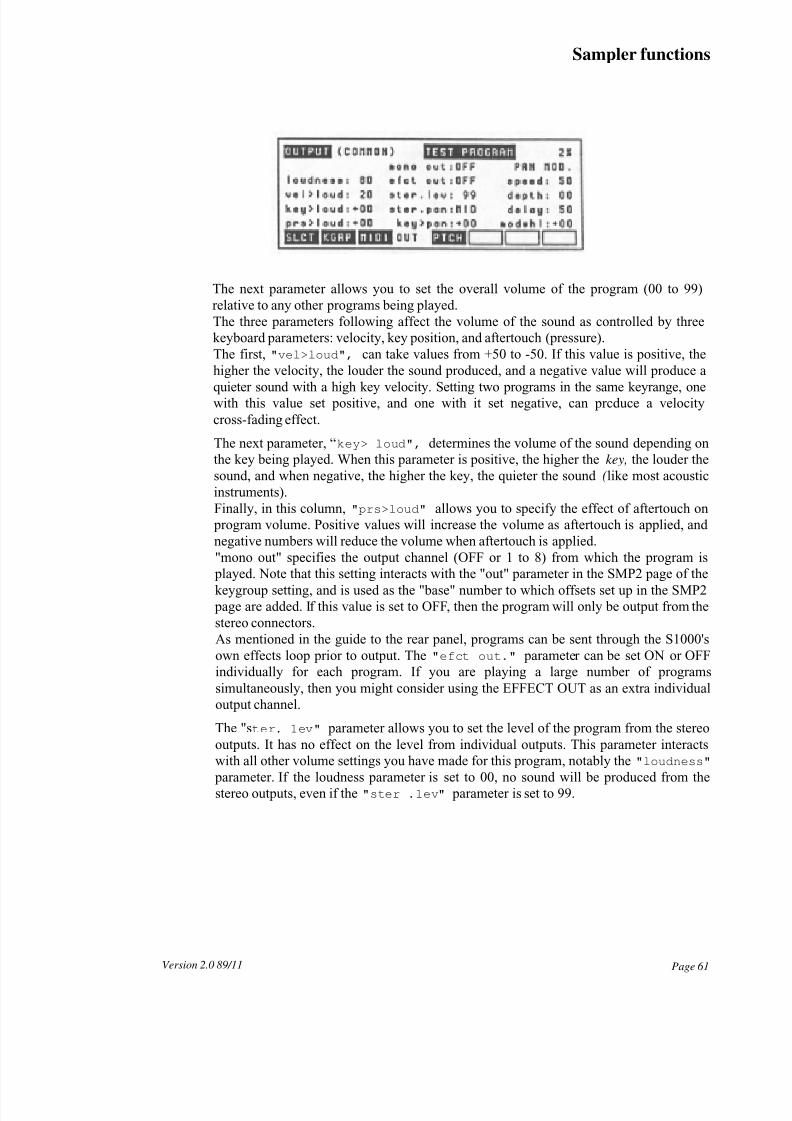
8/11/2019 akai sampler S1000 V2.0 Manual
http://slidepdf.com/reader/full/akai-sampler-s1000-v20-manual 69/96
Sampler functions
The next parameter allows you to set the overall volume of the program (00 to 99)
relative to any other programs being played.
The three parameters following affect the volume of the sound as controlled by three
keyboard parameters: velocity, key position, and aftertouch (pressure).
The first, "vel>loud", can take values from +50 to -50. If this value is positive, the
higher the velocity, the louder the sound produced, and a negative value will produce a
quieter sound with a high key velocity. Setting two programs in the same keyrange, onewith this value set positive, and one with it set negative, can prcduce a velocity
cross-fading effect.
The next parameter, “key> loud", determines the volume of the sound depending on
the key being played. When this parameter is positive, the higher the key, the louder the
sound, and when negative, the higher the key, the quieter the sound (like most acoustic
instruments).
Finally, in this column, "prs>loud" allows you to specify the effect of aftertouch on
program volume. Positive values will increase the volume as aftertouch is applied, and
negative numbers will reduce the volume when aftertouch is applied.
"mono out" specifies the output channel (OFF or 1 to 8) from which the program is
played. Note that this setting interacts with the "out" parameter in the SMP2 page of thekeygroup setting, and is used as the "base" number to which offsets set up in the SMP2
page are added. If this value is set to OFF, then the program will only be output from the
stereo connectors.
As mentioned in the guide to the rear panel, programs can be sent through the S1000's
own effects loop prior to output. The "efct out." parameter can be set ON or OFF
individually for each program. If you are playing a large number of programs
simultaneously, then you might consider using the EFFECT OUT as an extra individual
output channel.
The "ster. 1ev" parameter allows you to set the level of the program from the stereo
outputs. It has no effect on the level from individual outputs. This parameter interacts
with all other volume settings you have made for this program, notably the"loudness"
parameter. If the loudness parameter is set to 00, no sound will be produced from the
stereo outputs, even if the "ster .1ev" parameter is set to 99.
Page 61Version 2.0 89/11
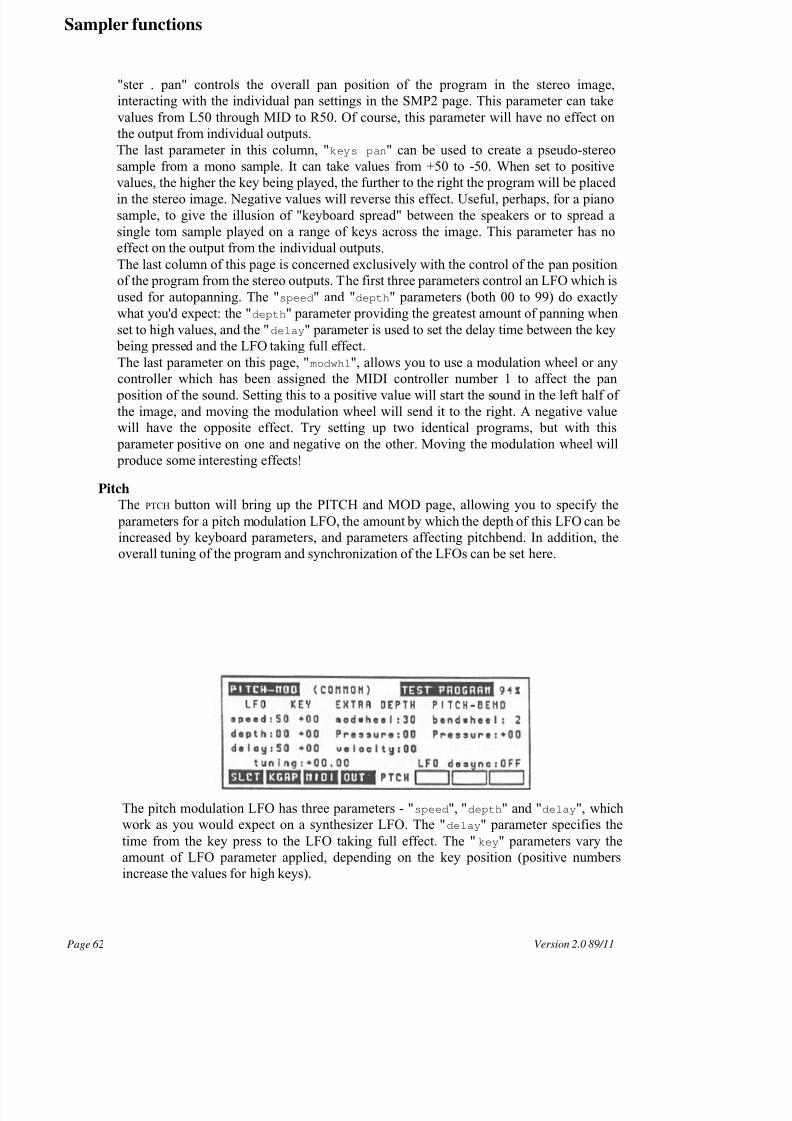
8/11/2019 akai sampler S1000 V2.0 Manual
http://slidepdf.com/reader/full/akai-sampler-s1000-v20-manual 70/96
Sampler functions
"ster . pan" controls the overall pan position of the program in the stereo image,
interacting with the individual pan settings in the SMP2 page. This parameter can take
values from L50 through MID to R50. Of course, this parameter will have no effect on
the output from individual outputs.
The last parameter in this column, "keys pan" can be used to create a pseudo-stereo
sample from a mono sample. It can take values from +50 to -50. When set to positive
values, the higher the key being played, the further to the right the program will be placed
in the stereo image. Negative values will reverse this effect. Useful, perhaps, for a piano
sample, to give the illusion of "keyboard spread" between the speakers or to spread a
single tom sample played on a range of keys across the image. This parameter has no
effect on the output from the individual outputs.
The last column of this page is concerned exclusively with the control of the pan position
of the program from the stereo outputs. The first three parameters control an LFO which is
used for autopanning. The "speed" and "depth" parameters (both 00 to 99) do exactly
what you'd expect: the "depth" parameter providing the greatest amount of panning when
set to high values, and the "delay" parameter is used to set the delay time between the key
being pressed and the LFO taking full effect.
The last parameter on this page, "modwhl", allows you to use a modulation wheel or any
controller which has been assigned the MIDI controller number 1 to affect the pan position of the sound. Setting this to a positive value will start the sound in the left half of
the image, and moving the modulation wheel will send it to the right. A negative value
will have the opposite effect. Try setting up two identical programs, but with this
parameter positive on one and negative on the other. Moving the modulation wheel will
produce some interesting effects!
Pitch
The PTCH button will bring up the PITCH and MOD page, allowing you to specify the
parameters for a pitch modulation LFO, the amount by which the depth of this LFO can be
increased by keyboard parameters, and parameters affecting pitchbend. In addition, the
overall tuning of the program and synchronization of the LFOs can be set here.
The pitch modulation LFO has three parameters - "speed", "depth" and "delay", which
work as you would expect on a synthesizer LFO. The "delay" parameter specifies the
time from the key press to the LFO taking full effect. The " key" parameters vary the
amount of LFO parameter applied, depending on the key position (positive numbers
increase the values for high keys).
Version 2.0 89/11Page 62
8/11/2019 akai sampler S1000 V2.0 Manual
http://slidepdf.com/reader/full/akai-sampler-s1000-v20-manual 71/96
Page 63Version 2.0 89/11
Sampler functions
The depth of the pitch modulation LFO can be affected by three real-time performance
parameters: the modulation wheel ("modwheel"), the aftertouch ("pressure") applied
to the keyboard, and the speed ("velocity") with which. the key is hit. All these
parameters can take values from 00 to 99 - the higher the number, the greater the depth
of the pitch modulation LFO when these performance parameters increase.
The amount of pitchbend (in semitones) that can be effected using the pitch bend wheelis set by the "bendwheel" parameter. If set to 0 (minimum), no pitchbend will take
place when the wheel is moved. The maximum value is 12 (one octave) up or down
from the center position when the pitch bend wheel is moved appropriately.
Aftertouch ("pressure") can also be used to affect the pitch of the program. This
parameter is variable from +12 to -12 (semitones). When set to positive values, the pitch
will increase as aftertouch is applied (to a maximum of +12 semitones - one octave). If
this is a negative value, the pitch will decrease as aftertouch is applied (to a maximum of
-12 semitones - one octave).
The "tuning" parameter allows final adjustment of the program's pitch by t50
semitones in semitone/cent steps.
Finally, the "LFO desync" parameter when ON, sets all the pitch modulation LFOs for
different notes to a slightly different frequency. This mimics the effect of (say) a stringensemble, where each player produces vibrato at a slightly different rate from the other
players. When OFF, each LFO will be set to the same frequency.
Conclusion
As you can see, setting up programs on the S1000 is not radically different from setting
up patches on a multi-timbral synthesizer. The same principles of envelope shape, filter
and LFOs apply to both. The main difference is that you start with sampled waveforms,
rather than generated or prerecorded PCM waveforms, giving you an almost infinite
flexibility in the sounds you can create.
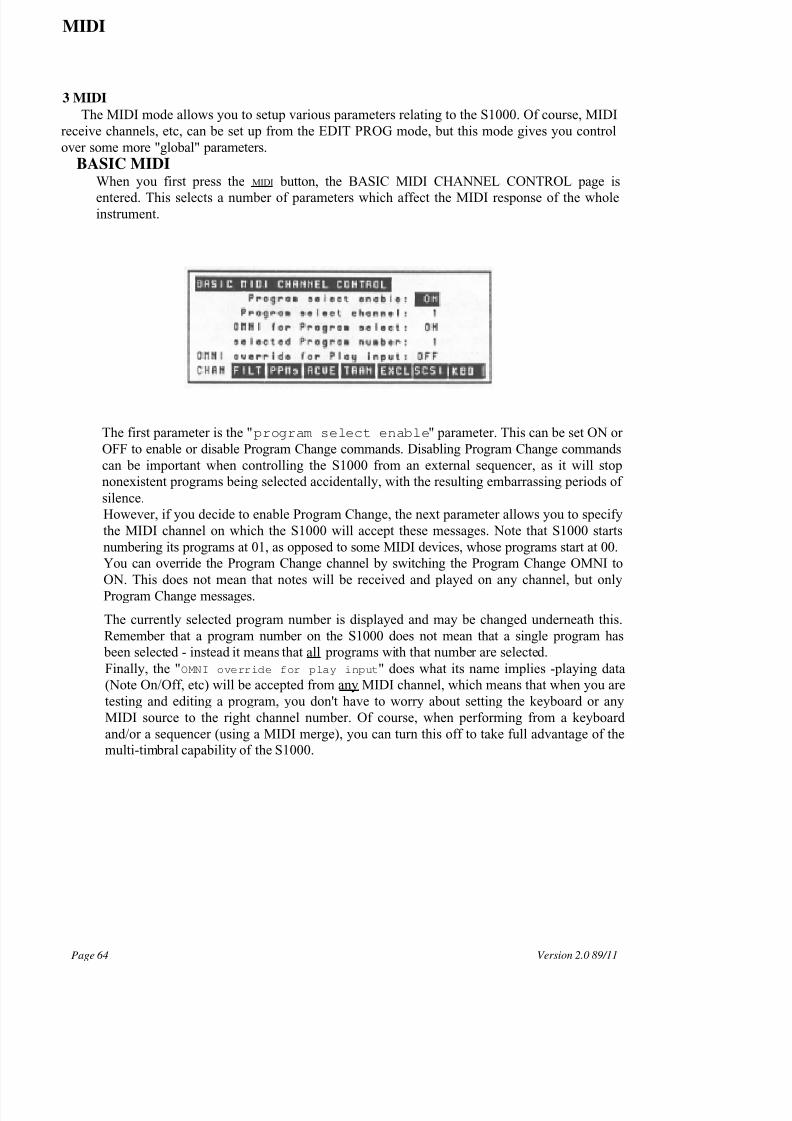
8/11/2019 akai sampler S1000 V2.0 Manual
http://slidepdf.com/reader/full/akai-sampler-s1000-v20-manual 72/96
MIDI
3 MIDI
The MIDI mode allows you to setup various parameters relating to the S1000. Of course, MIDI
receive channels, etc, can be set up from the EDIT PROG mode, but this mode gives you control
over some more "global" parameters.
BASIC MIDIWhen you first press the MIDI button, the BASIC MIDI CHANNEL CONTROL page is
entered. This selects a number of parameters which affect the MIDI response of the whole
instrument.
The first parameter is the "program select enable" parameter. This can be set ON or
OFF to enable or disable Program Change commands. Disabling Program Change commands
can be important when controlling the S1000 from an external sequencer, as it will stop
nonexistent programs being selected accidentally, with the resulting embarrassing periods of
silence.
However, if you decide to enable Program Change, the next parameter allows you to specify
the MIDI channel on which the S1000 will accept these messages. Note that S1000 starts
numbering its programs at 01, as opposed to some MIDI devices, whose programs start at 00.
You can override the Program Change channel by switching the Program Change OMNI to
ON. This does not mean that notes will be received and played on any channel, but onlyProgram Change messages.
The currently selected program number is displayed and may be changed underneath this.
Remember that a program number on the S1000 does not mean that a single program has
been selected - instead it means that all programs with that number are selected.
Finally, the "OMNI override for play input" does what its name implies -playing data
(Note On/Off, etc) will be accepted from any MIDI channel, which means that when you are
testing and editing a program, you don't have to worry about setting the keyboard or any
MIDI source to the right channel number. Of course, when performing from a keyboard
and/or a sequencer (using a MIDI merge), you can turn this off to take full advantage of the
multi-timbral capability of the S1000.
Page 64 Version 2.0 89/11
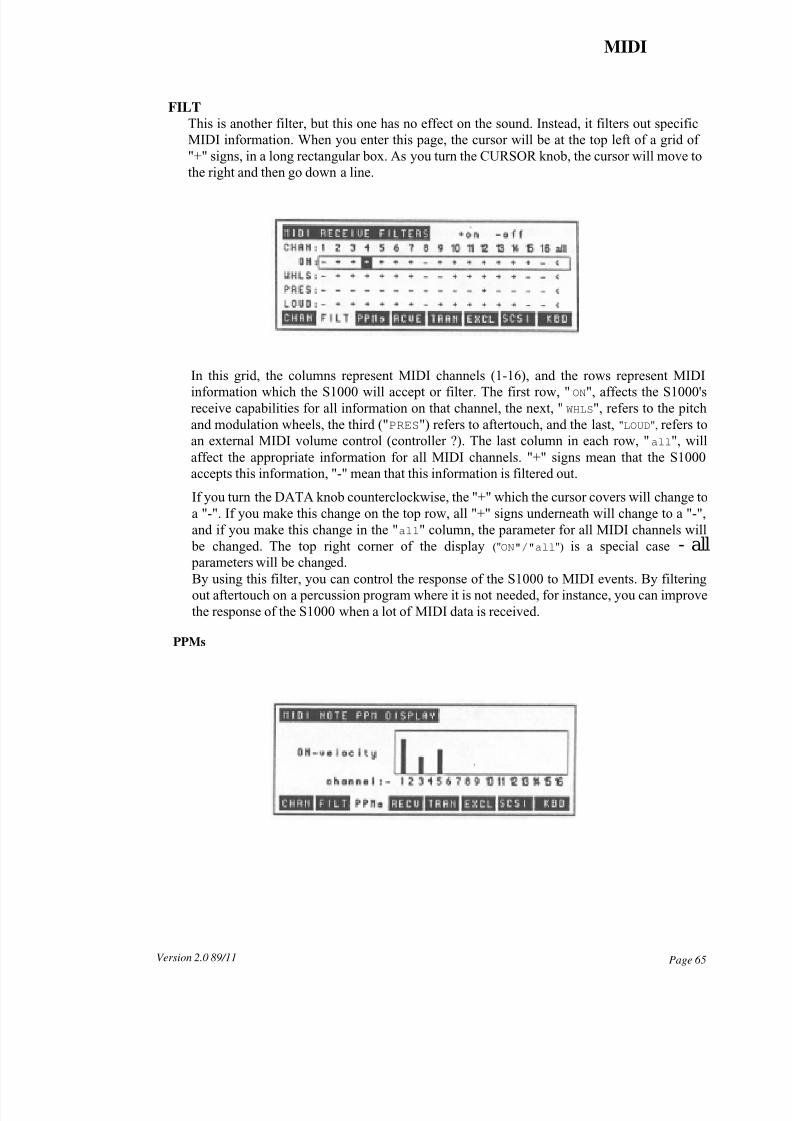
8/11/2019 akai sampler S1000 V2.0 Manual
http://slidepdf.com/reader/full/akai-sampler-s1000-v20-manual 73/96
MIDI
FILT
This is another filter, but this one has no effect on the sound. Instead, it filters out specific
MIDI information. When you enter this page, the cursor will be at the top left of a grid of
"+" signs, in a long rectangular box. As you turn the CURSOR knob, the cursor will move to
the right and then go down a line.
In this grid, the columns represent MIDI channels (1-16), and the rows represent MIDI
information which the S1000 will accept or filter. The first row, " ON", affects the S1000's
receive capabilities for all information on that channel, the next, "WHLS", refers to the pitch
and modulation wheels, the third ("PRES") refers to aftertouch, and the last, "LOUD", refers to
an external MIDI volume control (controller ?). The last column in each row, "all", will
affect the appropriate information for all MIDI channels. "+" signs mean that the S1000
accepts this information, "-" mean that this information is filtered out.
If you turn the DATA knob counterclockwise, the "+" which the cursor covers will change to
a "-". If you make this change on the top row, all "+" signs underneath will change to a "-",
and if you make this change in the "all" column, the parameter for all MIDI channels will
be changed. The top right corner of the display ("ON"/"all") is a special case - all parameters will be changed.
By using this filter, you can control the response of the S1000 to MIDI events. By filteringout aftertouch on a percussion program where it is not needed, for instance, you can improve
the response of the S1000 when a lot of MIDI data is received.
PPMs
Version 2.0 89/11 Page 65
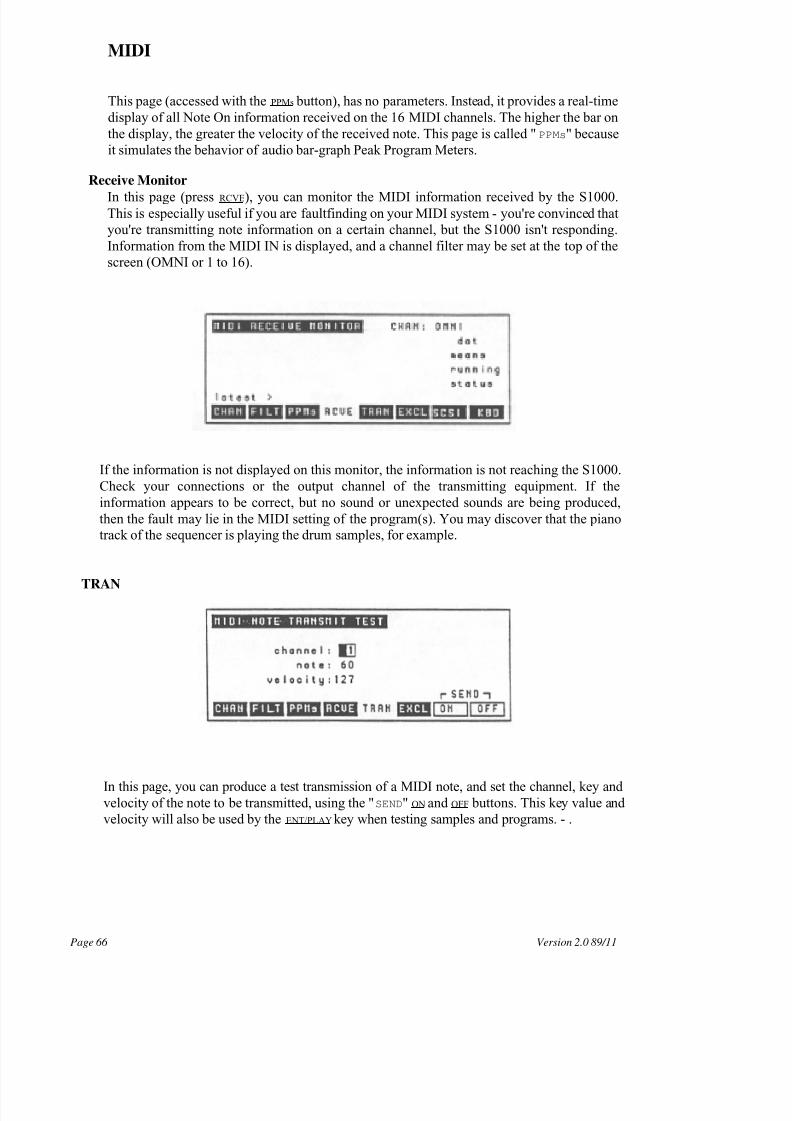
8/11/2019 akai sampler S1000 V2.0 Manual
http://slidepdf.com/reader/full/akai-sampler-s1000-v20-manual 74/96
MIDI
This page (accessed with the PPMs button), has no parameters. Instead, it provides a real-time
display of all Note On information received on the 16 MIDI channels. The higher the bar on
the display, the greater the velocity of the received note. This page is called "PPMs" because
it simulates the behavior of audio bar-graph Peak Program Meters.
Receive Monitor
In this page (press RCVE), you can monitor the MIDI information received by the S1000.
This is especially useful if you are faultfinding on your MIDI system - you're convinced that
you're transmitting note information on a certain channel, but the S1000 isn't responding.
Information from the MIDI IN is displayed, and a channel filter may be set at the top of the
screen (OMNI or 1 to 16).
If the information is not displayed on this monitor, the information is not reaching the S1000.
Check your connections or the output channel of the transmitting equipment. If the
information appears to be correct, but no sound or unexpected sounds are being produced,
then the fault may lie in the MIDI setting of the program(s). You may discover that the piano
track of the sequencer is playing the drum samples, for example.
TRAN
In this page, you can produce a test transmission of a MIDI note, and set the channel, key and
velocity of the note to be transmitted, using the "SEND" ON and OFF buttons. This key value and
velocity will also be used by the ENT/PLAY key when testing samples and programs. - .
Version 2.0 89/11Page 66
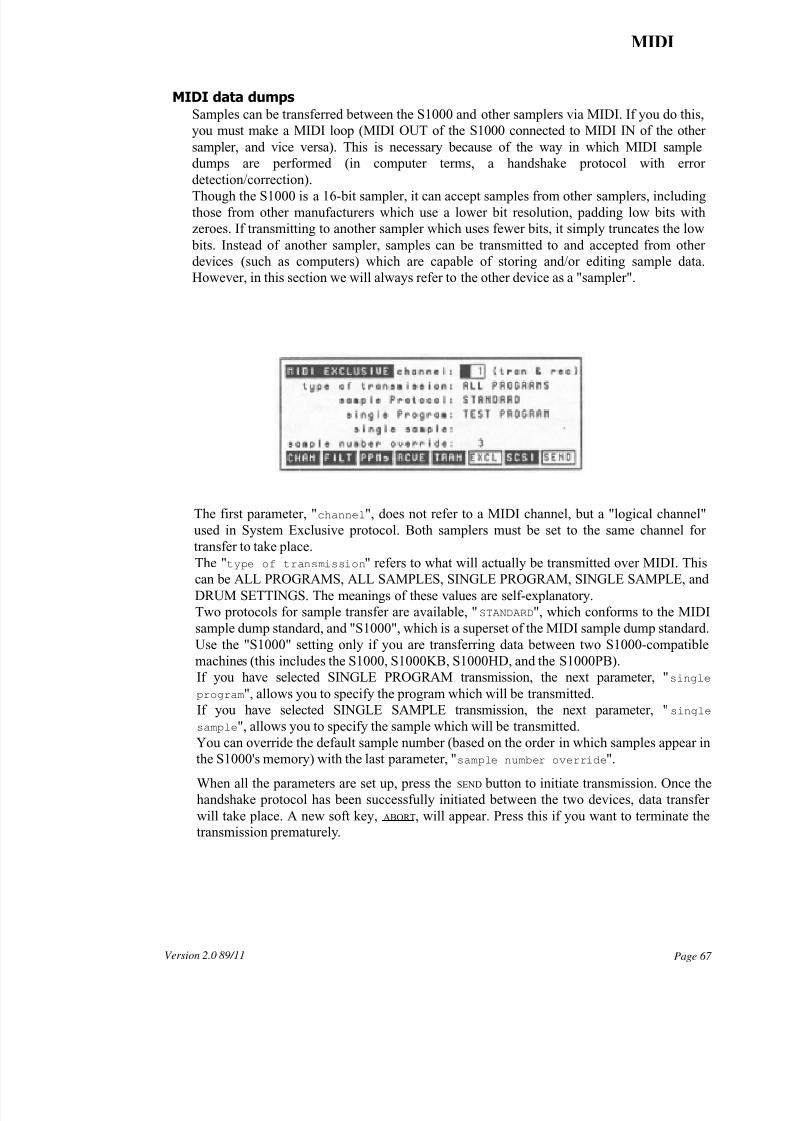
8/11/2019 akai sampler S1000 V2.0 Manual
http://slidepdf.com/reader/full/akai-sampler-s1000-v20-manual 75/96
MIDI
MIDI data dumps
Samples can be transferred between the S1000 and other samplers via MIDI. If you do this,
you must make a MIDI loop (MIDI OUT of the S1000 connected to MIDI IN of the other
sampler, and vice versa). This is necessary because of the way in which MIDI sample
dumps are performed (in computer terms, a handshake protocol with error
detection/correction).
Though the S1000 is a 16-bit sampler, it can accept samples from other samplers, includingthose from other manufacturers which use a lower bit resolution, padding low bits with
zeroes. If transmitting to another sampler which uses fewer bits, it simply truncates the low
bits. Instead of another sampler, samples can be transmitted to and accepted from other
devices (such as computers) which are capable of storing and/or editing sample data.
However, in this section we will always refer to the other device as a "sampler".
The first parameter, "channel", does not refer to a MIDI channel, but a "logical channel"
used in System Exclusive protocol. Both samplers must be set to the same channel for
transfer to take place.
The "type of transmission" refers to what will actually be transmitted over MIDI. This
can be ALL PROGRAMS, ALL SAMPLES, SINGLE PROGRAM, SINGLE SAMPLE, andDRUM SETTINGS. The meanings of these values are self-explanatory.
Two protocols for sample transfer are available, "STANDARD", which conforms to the MIDI
sample dump standard, and "S1000", which is a superset of the MIDI sample dump standard.
Use the "S1000" setting only if you are transferring data between two S1000-compatible
machines (this includes the S1000, S1000KB, S1000HD, and the S1000PB).
If you have selected SINGLE PROGRAM transmission, the next parameter, "single
program", allows you to specify the program which will be transmitted.
If you have selected SINGLE SAMPLE transmission, the next parameter, "single
sample", allows you to specify the sample which will be transmitted.
You can override the default sample number (based on the order in which samples appear in
the S1000's memory) with the last parameter, "sample number override".
When all the parameters are set up, press the SEND button to initiate transmission. Once the
handshake protocol has been successfully initiated between the two devices, data transfer
will take place. A new soft key, ABORT, will appear. Press this if you want to terminate the
transmission prematurely.
Page 67 Version 2.0 89/11
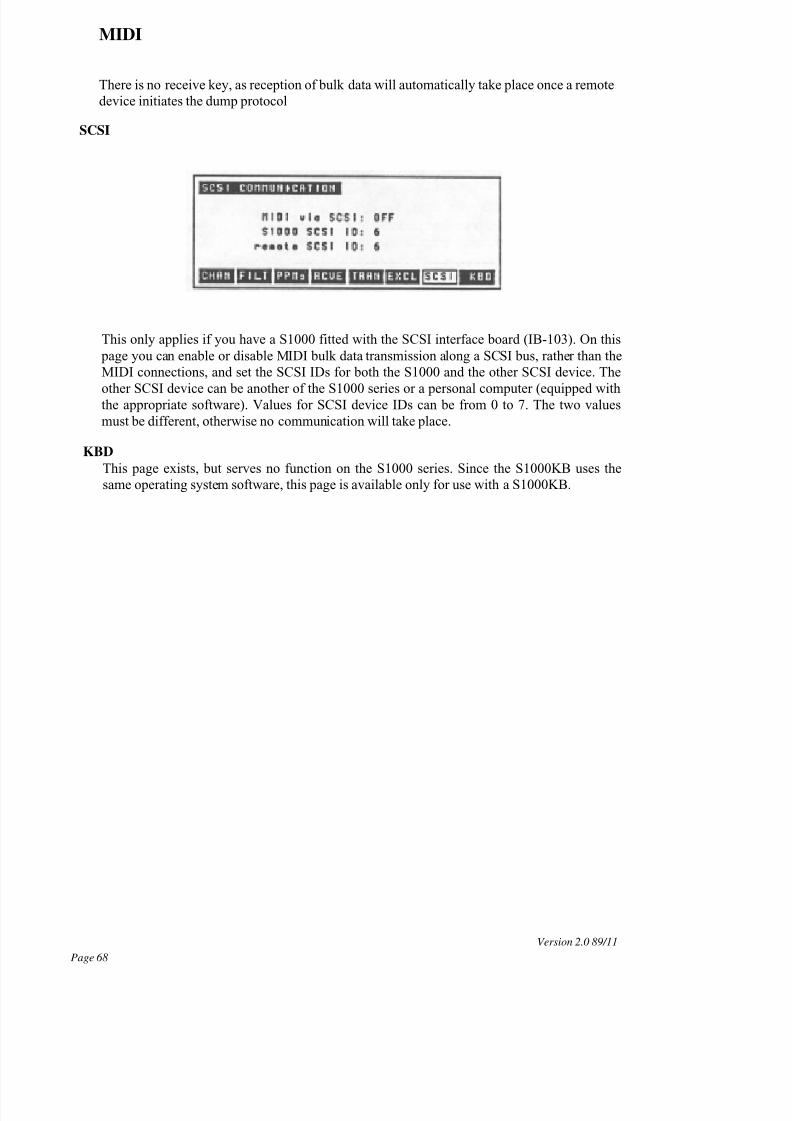
8/11/2019 akai sampler S1000 V2.0 Manual
http://slidepdf.com/reader/full/akai-sampler-s1000-v20-manual 76/96
MIDI
There is no receive key, as reception of bulk data will automatically take place once a remote
device initiates the dump protocol
SCSI
This only applies if you have a S1000 fitted with the SCSI interface board (IB-103). On this
page you can enable or disable MIDI bulk data transmission along a SCSI bus, rather than the
MIDI connections, and set the SCSI IDs for both the S1000 and the other SCSI device. The
other SCSI device can be another of the S1000 series or a personal computer (equipped withthe appropriate software). Values for SCSI device IDs can be from 0 to 7. The two values
must be different, otherwise no communication will take place.
KBD
This page exists, but serves no function on the S1000 series. Since the S1000KB uses the
same operating system software, this page is available only for use with a S1000KB.
Version 2.0 89/11
Page 68
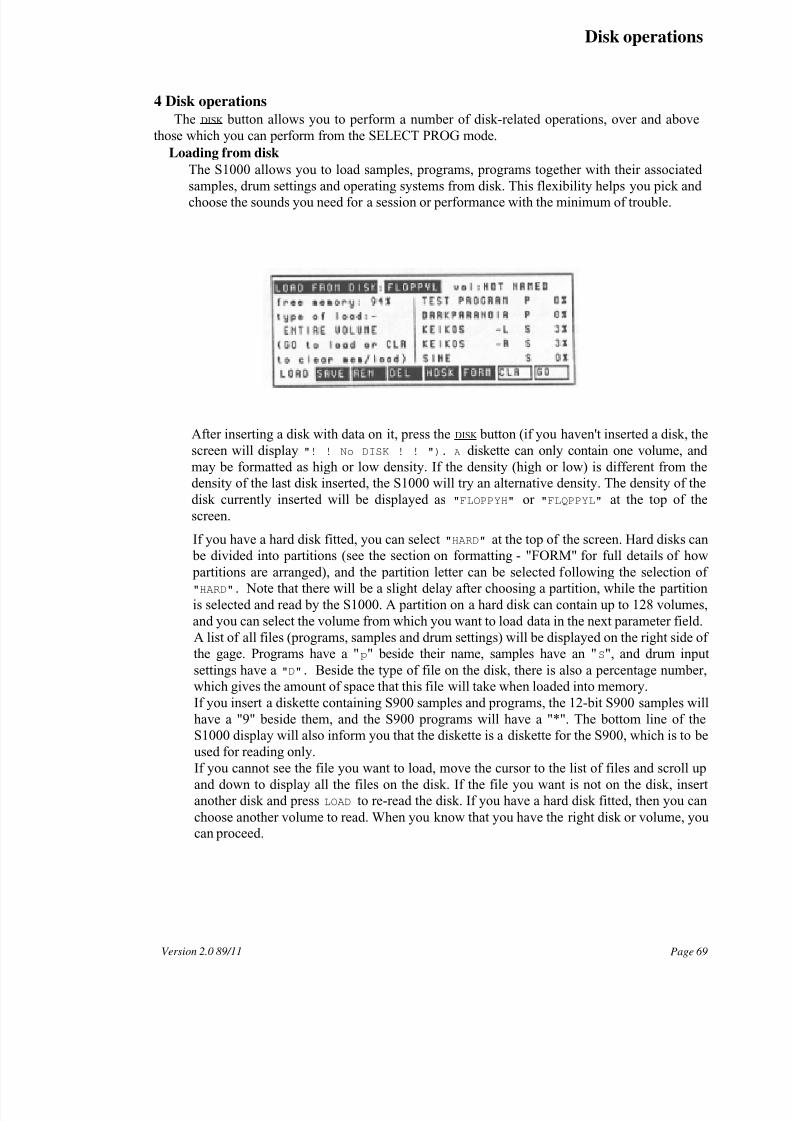
8/11/2019 akai sampler S1000 V2.0 Manual
http://slidepdf.com/reader/full/akai-sampler-s1000-v20-manual 77/96
Disk operations
4 Disk operations
The DISK button allows you to perform a number of disk-related operations, over and above
those which you can perform from the SELECT PROG mode.
Loading from disk
The S1000 allows you to load samples, programs, programs together with their associated
samples, drum settings and operating systems from disk. This flexibility helps you pick andchoose the sounds you need for a session or performance with the minimum of trouble.
After inserting a disk with data on it, press the DISK button (if you haven't inserted a disk, the
screen will display "! ! No DISK ! ! "). A diskette can only contain one volume, and
may be formatted as high or low density. If the density (high or low) is different from the
density of the last disk inserted, the S1000 will try an alternative density. The density of the
disk currently inserted will be displayed as "FLOPPYH" or "FLQPPYL" at the top of the
screen.
If you have a hard disk fitted, you can select "HARD" at the top of the screen. Hard disks can
be divided into partitions (see the section on formatting - "FORM" for full details of how
partitions are arranged), and the partition letter can be selected following the selection of"HARD". Note that there will be a slight delay after choosing a partition, while the partition
is selected and read by the S1000. A partition on a hard disk can contain up to 128 volumes,
and you can select the volume from which you want to load data in the next parameter field.
A list of all files (programs, samples and drum settings) will be displayed on the right side of
the gage. Programs have a "p" beside their name, samples have an "S", and drum input
settings have a "D". Beside the type of file on the disk, there is also a percentage number,
which gives the amount of space that this file will take when loaded into memory.
If you insert a diskette containing S900 samples and programs, the 12-bit S900 samples will
have a "9" beside them, and the S900 programs will have a "*". The bottom line of the
S1000 display will also inform you that the diskette is a diskette for the S900, which is to be
used for reading only.
If you cannot see the file you want to load, move the cursor to the list of files and scroll upand down to display all the files on the disk. If the file you want is not on the disk, insert
another disk and press LOAD to re-read the disk. If you have a hard disk fitted, then you can
choose another volume to read. When you know that you have the right disk or volume, you
can proceed.
Version 2.0 89/11 Page 69
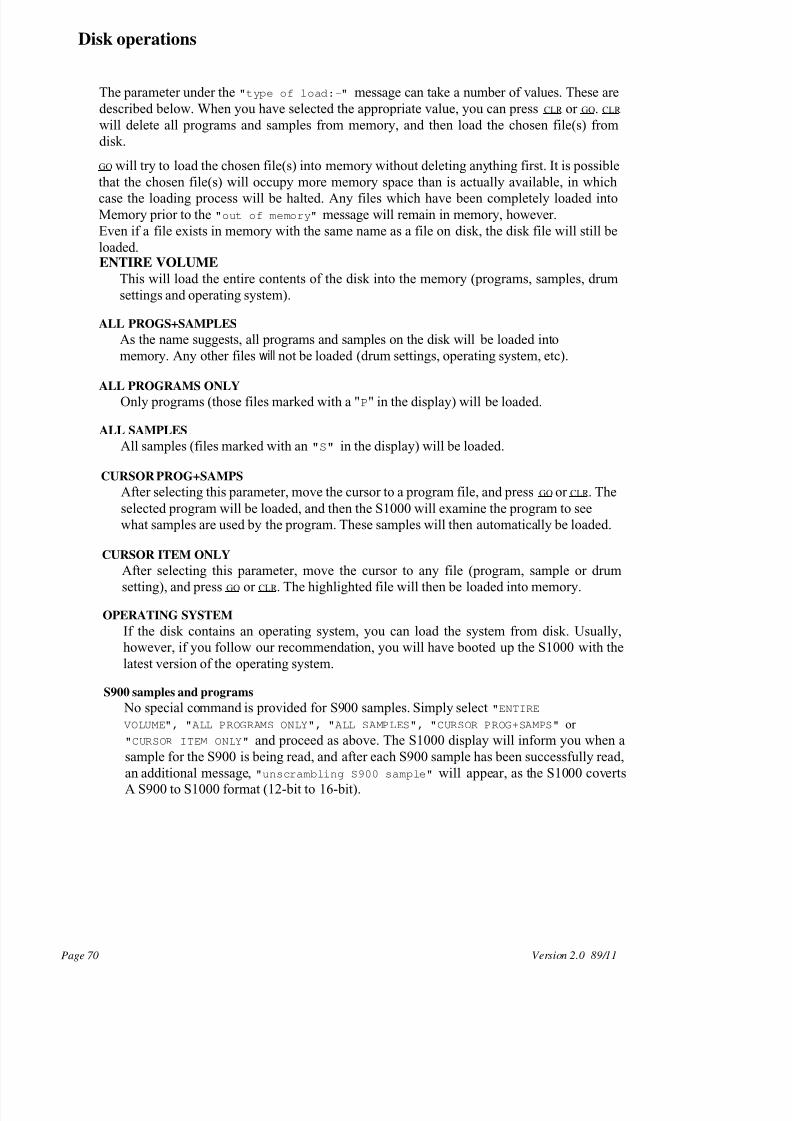
8/11/2019 akai sampler S1000 V2.0 Manual
http://slidepdf.com/reader/full/akai-sampler-s1000-v20-manual 78/96
Disk operations
The parameter under the "type of load:-" message can take a number of values. These are
described below. When you have selected the appropriate value, you can press CLR or GO. CLR
will delete all programs and samples from memory, and then load the chosen file(s) from
disk.
GO will try to load the chosen file(s) into memory without deleting anything first. It is possible
that the chosen file(s) will occupy more memory space than is actually available, in which
case the loading process will be halted. Any files which have been completely loaded into
Memory prior to the "out of memory" message will remain in memory, however.
Even if a file exists in memory with the same name as a file on disk, the disk file will still be
loaded.ENTIRE VOLUME
This will load the entire contents of the disk into the memory (programs, samples, drum
settings and operating system).
ALL PROGS+SAMPLES
As the name suggests, all programs and samples on the disk will be loaded into
memory. Any other files will not be loaded (drum settings, operating system, etc).
ALL PROGRAMS ONLY Only programs (those files marked with a "P" in the display) will be loaded.
ALL SAMPLES
All samples (files marked with an "S" in the display) will be loaded.
CURSOR PROG+SAMPS After selecting this parameter, move the cursor to a program file, and press GO or CLR . The
selected program will be loaded, and then the S1000 will examine the program to see
what samples are used by the program. These samples will then automatically be loaded.
CURSOR ITEM ONLY
After selecting this parameter, move the cursor to any file (program, sample or drumsetting), and press GO or CLR . The highlighted file will then be loaded into memory.
OPERATING SYSTEM
If the disk contains an operating system, you can load the system from disk. Usually,
however, if you follow our recommendation, you will have booted up the S1000 with the
latest version of the operating system.
S900 samples and programs
No special command is provided for S900 samples. Simply select "ENTIRE
VOLUME", "ALL PROGRAMS ONLY", "ALL SAMPLES", "CURSOR PROG+SAMPS" or
"CURSOR ITEM ONLY" and proceed as above. The S1000 display will inform you when a
sample for the S900 is being read, and after each S900 sample has been successfully read,
an additional message, "unscrambling S900 sample" will appear, as the S1000 covertsA S900 to S1000 format (12-bit to 16-bit).
Page 70 Version 2.0 89/11
8/11/2019 akai sampler S1000 V2.0 Manual
http://slidepdf.com/reader/full/akai-sampler-s1000-v20-manual 79/96
Disk operations
Auto-loading
If you turn on the S1000 with a diskette in the drive, the contents of the disk will be
loaded into memory. If the disk contains a copy of the operating system, and this
operating system is a higher version number than the ROM version, this will be loaded.
If a hard disk is fitted, and the operating system is loaded on the first volume, the
operating system will be automatically loaded from this, if it is a higher version than theROM version, and no diskette is in the drive at power-on.
We strongly recommend that you make a copy of any Operating System diskettes for
your 51000 and always turn on the S1000 with the copy (not the original) inserted in the
drive.
If you have not made a copy of the operating system, DO SO NOW!, following the
instructions in the first section of this manual.
Further updates to the operating system may become available. We suggest that you
keep in touch with your AKAI Professional dealer to find out when these updates are
available and what benefits you will get from them.
Saving to disk
REMEMBER! When you turn off the S1000, all samples, programs and drum settings are
lost. Save your work to disk if you want to keep it for another session.
By pressing the SAVE button from the main DISK page, you can save your edited programs
and samples to disk. Make sure that you have enough unprotected formatted disks available
before you press SAVE.
The process of saving to disk is much the same as loading from disk. There are two major
differences, however.
1) Disk space is measured in blocks - not percentage free space. One formatted MF2DD disk
contains 796 blocks, and one MF2HD disk contains 1595 blocks.
2) The unexpanded S1000 is capable of holding more data than will fit onto a single
MF2DD or MF2HD diskette. If you try to save an entire volume with many programs and
samples, you will have to use more than one disk.
Page 71Version 2.0 89/11

8/11/2019 akai sampler S1000 V2.0 Manual
http://slidepdf.com/reader/full/akai-sampler-s1000-v20-manual 80/96
Disk operations
3) Disk volumes have a limit to the number of files which may be stored on them (samples,
programs, drum settings, etc). It is unlikely that you. will exceed this limit (64 files), but it is
possible (for instance, a Latin percussion setup may use many samples, and have many
different multi-timbral programs associated with it). Be aware of this limit when creating
complex setups.
When you first press SAVE, all programs, samples and drum settings in memory are displayedon screen, together with the amount of space in blocks that they will take up on disk. Select
the option to save: ENTIRE VOLUME, ALL PROGS+SAMPLES, ALL PROGRAMS ONLY,
ALL SAMPLES, CURSOR PROG+SAMPS, CURSOR ITEM ONLY, or OPERATING SYSTEM in
the same way as for loading.
If you choose one of the "CURSOR" items, move the cursor to the sample or program in
memory that you want to save. Saving "CURSOR PROG+SAMPS" will automatically save
any samples associated with the highlighted program. If the samples already exist on disk
with the same name, they will be overwritten. Be careful if you are using samples which have
been slightly modified between programs; give them different names to avoid overwriting
what may represent hours of work.
If you want to check the files already on disk, you can press LOAD to view files on disk and
then return to SAVE.
When you have made your selection press WIPE or GO to save your work. WIPE will erase all
data already on the disk, and save the selected file(s), and GO will simply save the files in
addition to any already on disk. If you are saving to diskette, and there are more files to be
saved than will fit on a single diskette, you will be prompted to insert a new diskette.
Saving to hard disk follows the same procedure as saving to diskette. Note that if the hard
disk is divided into partitions, you can load data from one partition, select another partition on
the SAVE page, and save it into the newly-selected partition. It is not possible to transfer data
directly between partitions - it must be done through memory, saving to diskette, or DAT
backup (with the digital interface).
RENIn this page, you can rename individual files on disk, or rename a volume on disk (a diskette
can contain only one volume, but a hard disk can contain many volumes). If you have a hard
disk fitted or attached, select the partition, and the volume to be renamed, or the volume
containing the file(s) to be renamed, otherwise, insert a diskette which contains data to be
renamed. Press the NAME button to enter a new name.
Version 2.0 89/11Page 72
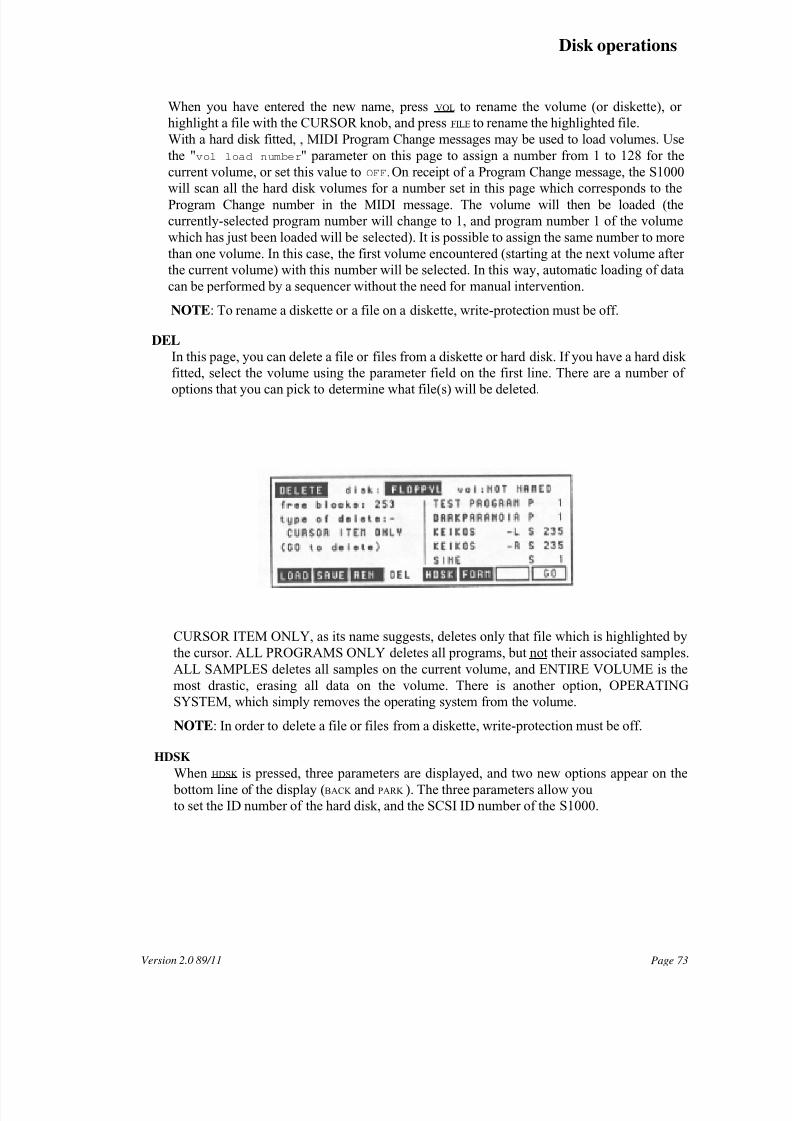
8/11/2019 akai sampler S1000 V2.0 Manual
http://slidepdf.com/reader/full/akai-sampler-s1000-v20-manual 81/96
Disk operations
When you have entered the new name, press VOL to rename the volume (or diskette), or
highlight a file with the CURSOR knob, and press FILE to rename the highlighted file.
With a hard disk fitted, , MIDI Program Change messages may be used to load volumes. Use
the "vol load number" parameter on this page to assign a number from 1 to 128 for the
current volume, or set this value to OFF. On receipt of a Program Change message, the S1000
will scan all the hard disk volumes for a number set in this page which corresponds to theProgram Change number in the MIDI message. The volume will then be loaded (the
currently-selected program number will change to 1, and program number 1 of the volume
which has just been loaded will be selected). It is possible to assign the same number to more
than one volume. In this case, the first volume encountered (starting at the next volume after
the current volume) with this number will be selected. In this way, automatic loading of data
can be performed by a sequencer without the need for manual intervention.
NOTE: To rename a diskette or a file on a diskette, write-protection must be off.
DEL
In this page, you can delete a file or files from a diskette or hard disk. If you have a hard disk
fitted, select the volume using the parameter field on the first line. There are a number of
options that you can pick to determine what file(s) will be deleted.
CURSOR ITEM ONLY, as its name suggests, deletes only that file which is highlighted by
the cursor. ALL PROGRAMS ONLY deletes all programs, but not their associated samples.
ALL SAMPLES deletes all samples on the current volume, and ENTIRE VOLUME is the
most drastic, erasing all data on the volume. There is another option, OPERATING
SYSTEM, which simply removes the operating system from the volume.
NOTE: In order to delete a file or files from a diskette, write-protection must be off.
HDSK
When HDSK is pressed, three parameters are displayed, and two new options appear on the
bottom line of the display (BACK and PARK ). The three parameters allow you
to set the ID number of the hard disk, and the SCSI ID number of the S1000.
Page 73Version 2.0 89/11
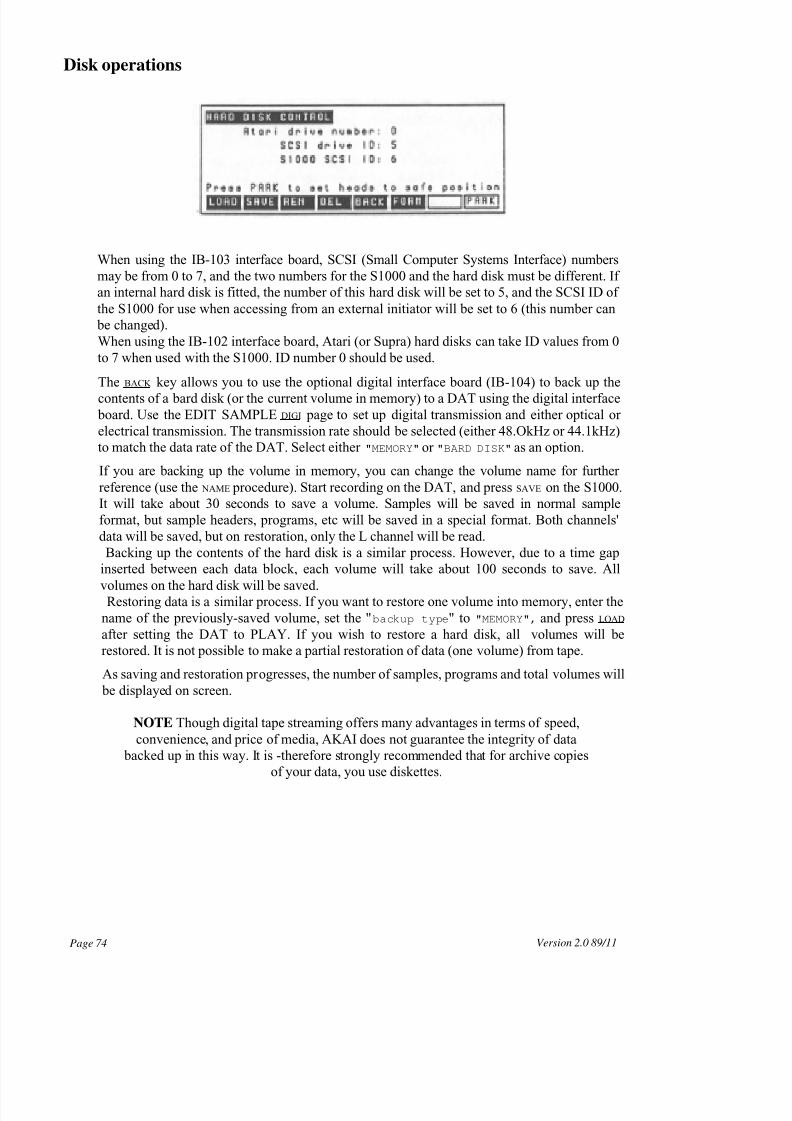
8/11/2019 akai sampler S1000 V2.0 Manual
http://slidepdf.com/reader/full/akai-sampler-s1000-v20-manual 82/96
Disk operations
Version 2.0 89/11Page 74
When using the IB-103 interface board, SCSI (Small Computer Systems Interface) numbers
may be from 0 to 7, and the two numbers for the S1000 and the hard disk must be different. If
an internal hard disk is fitted, the number of this hard disk will be set to 5, and the SCSI ID of
the S1000 for use when accessing from an external initiator will be set to 6 (this number can
be changed).
When using the IB-102 interface board, Atari (or Supra) hard disks can take ID values from 0
to 7 when used with the S1000. ID number 0 should be used.
The BACK key allows you to use the optional digital interface board (IB-104) to back up thecontents of a bard disk (or the current volume in memory) to a DAT using the digital interface
board. Use the EDIT SAMPLE DIGI page to set up digital transmission and either optical or
electrical transmission. The transmission rate should be selected (either 48.OkHz or 44.1kHz)
to match the data rate of the DAT. Select either "MEMORY" or "BARD DISK" as an option.
If you are backing up the volume in memory, you can change the volume name for further
reference (use the NAME procedure). Start recording on the DAT, and press SAVE on the S1000.
It will take about 30 seconds to save a volume. Samples will be saved in normal sample
format, but sample headers, programs, etc will be saved in a special format. Both channels'
data will be saved, but on restoration, only the L channel will be read.
Backing up the contents of the hard disk is a similar process. However, due to a time gap
inserted between each data block, each volume will take about 100 seconds to save. Allvolumes on the hard disk will be saved.
Restoring data is a similar process. If you want to restore one volume into memory, enter the
name of the previously-saved volume, set the "backup type" to "MEMORY", and press LOAD
after setting the DAT to PLAY. If you wish to restore a hard disk, all volumes will be
restored. It is not possible to make a partial restoration of data (one volume) from tape.
As saving and restoration progresses, the number of samples, programs and total volumes will
be displayed on screen.
NOTE Though digital tape streaming offers many advantages in terms of speed,
convenience, and price of media, AKAI does not guarantee the integrity of data
backed up in this way. It is -therefore strongly recommended that for archive copies
of your data, you use diskettes.
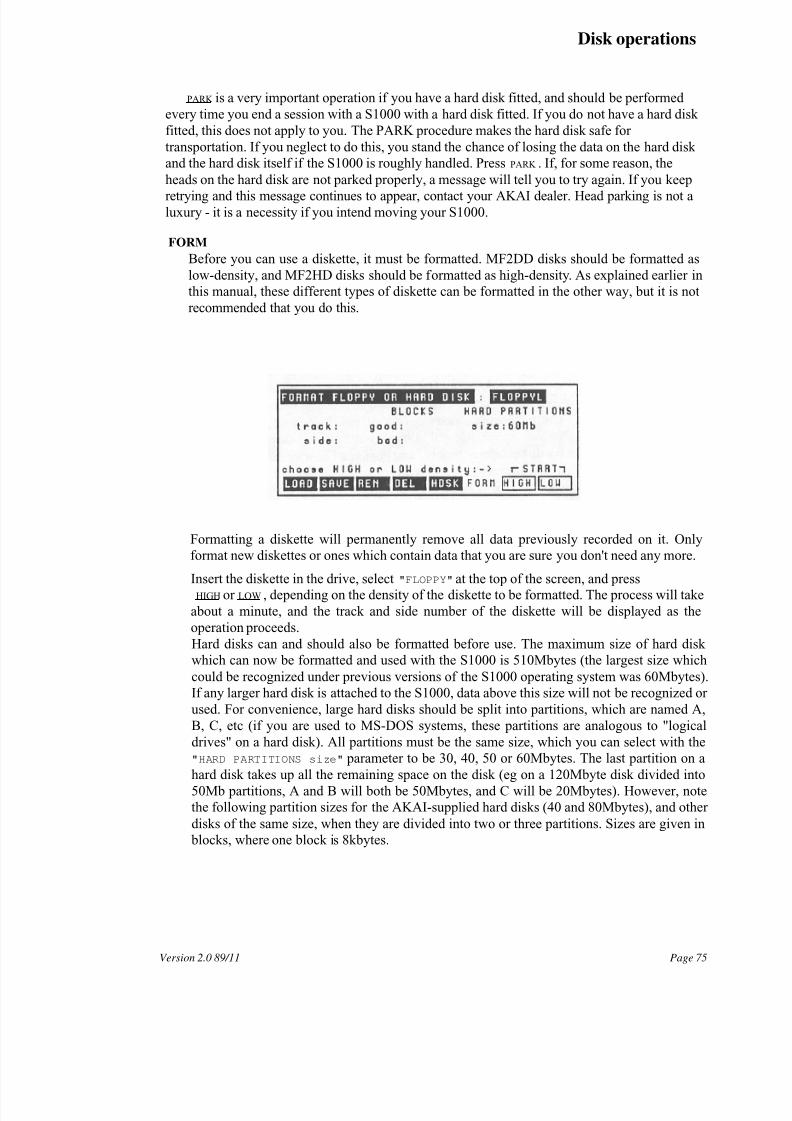
8/11/2019 akai sampler S1000 V2.0 Manual
http://slidepdf.com/reader/full/akai-sampler-s1000-v20-manual 83/96
Disk operations
PARK is a very important operation if you have a hard disk fitted, and should be performed
every time you end a session with a S1000 with a hard disk fitted. If you do not have a hard disk
fitted, this does not apply to you. The PARK procedure makes the hard disk safe for
transportation. If you neglect to do this, you stand the chance of losing the data on the hard disk
and the hard disk itself if the S1000 is roughly handled. Press PARK . If, for some reason, the
heads on the hard disk are not parked properly, a message will tell you to try again. If you keep
retrying and this message continues to appear, contact your AKAI dealer. Head parking is not aluxury - it is a necessity if you intend moving your S1000.
FORM
Before you can use a diskette, it must be formatted. MF2DD disks should be formatted as
low-density, and MF2HD disks should be formatted as high-density. As explained earlier in
this manual, these different types of diskette can be formatted in the other way, but it is not
recommended that you do this.
Formatting a diskette will permanently remove all data previously recorded on it. Only
format new diskettes or ones which contain data that you are sure you don't need any more.
Insert the diskette in the drive, select "FLOPPY" at the top of the screen, and pressHIGH or LOW , depending on the density of the diskette to be formatted. The process will take
about a minute, and the track and side number of the diskette will be displayed as the
operation proceeds.
Hard disks can and should also be formatted before use. The maximum size of hard disk
which can now be formatted and used with the S1000 is 510Mbytes (the largest size which
could be recognized under previous versions of the S1000 operating system was 60Mbytes).
If any larger hard disk is attached to the S1000, data above this size will not be recognized or
used. For convenience, large hard disks should be split into partitions, which are named A,
B, C, etc (if you are used to MS-DOS systems, these partitions are analogous to "logical
drives" on a hard disk). All partitions must be the same size, which you can select with the
"HARD PARTITIONS size" parameter to be 30, 40, 50 or 60Mbytes. The last partition on a
hard disk takes up all the remaining space on the disk (eg on a 120Mbyte disk divided into
50Mb partitions, A and B will both be 50Mbytes, and C will be 20Mbytes). However, note
the following partition sizes for the AKAI-supplied hard disks (40 and 80Mbytes), and other
disks of the same size, when they are divided into two or three partitions. Sizes are given in
blocks, where one block is 8kbytes.
Page 75Version 2.0 89/11
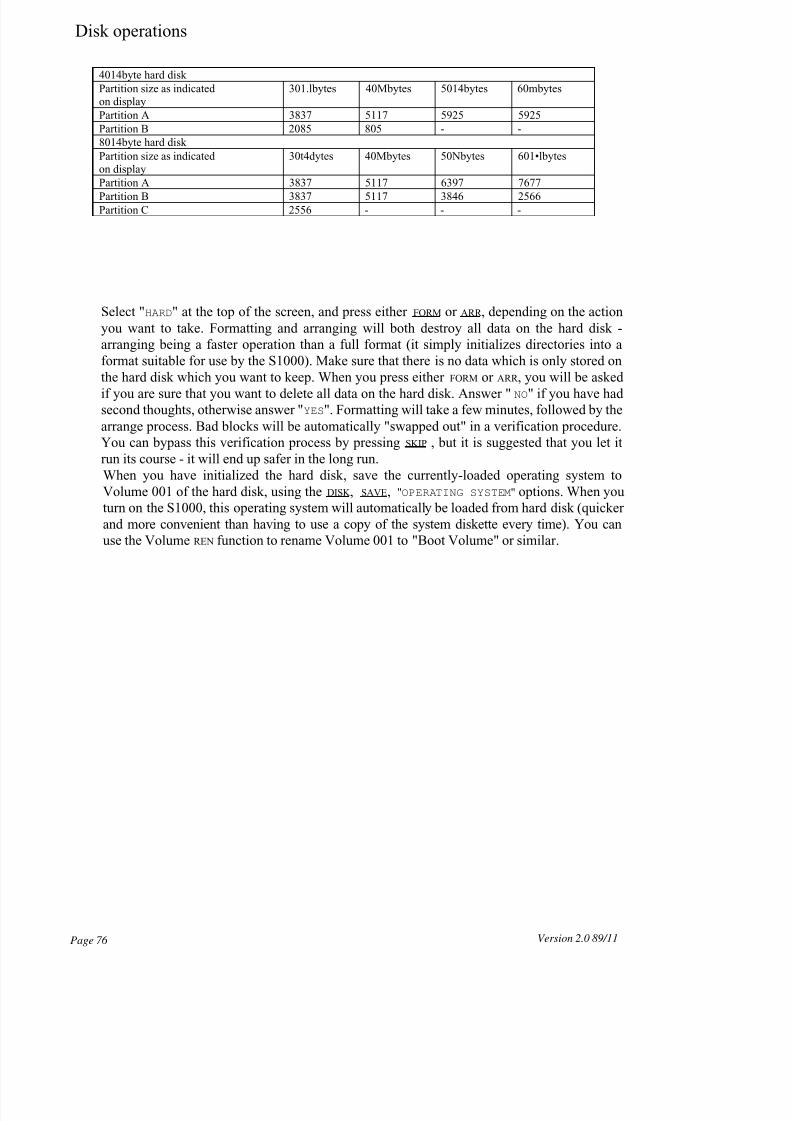
8/11/2019 akai sampler S1000 V2.0 Manual
http://slidepdf.com/reader/full/akai-sampler-s1000-v20-manual 84/96
Page 76 Version 2.0 89/11
Disk operations
4014byte hard disk
Partition size as indicatedon display
301.lbytes 40Mbytes 5014bytes 60mbytes
Partition A 3837 5117 5925 5925
Partition B 2085 805 - -
8014byte hard disk
Partition size as indicatedon display
30t4dytes 40Mbytes 50Nbytes 601•lbytes
Partition A 3837 5117 6397 7677
Partition B 3837 5117 3846 2566
Partition C 2556 - - -
Select "HARD" at the top of the screen, and press either FORM or ARR , depending on the action
you want to take. Formatting and arranging will both destroy all data on the hard disk -
arranging being a faster operation than a full format (it simply initializes directories into a
format suitable for use by the S1000). Make sure that there is no data which is only stored on
the hard disk which you want to keep. When you press eitherFORM
orARR
, you will be askedif you are sure that you want to delete all data on the hard disk. Answer " NO" if you have had
second thoughts, otherwise answer "YES". Formatting will take a few minutes, followed by the
arrange process. Bad blocks will be automatically "swapped out" in a verification procedure.
You can bypass this verification process by pressing SKIP , but it is suggested that you let it
run its course - it will end up safer in the long run.
When you have initialized the hard disk, save the currently-loaded operating system to
Volume 001 of the hard disk, using the DISK , SAVE, "OPERATING SYSTEM" options. When you
turn on the S1000, this operating system will automatically be loaded from hard disk (quicker
and more convenient than having to use a copy of the system diskette every time). You can
use the Volume REN function to rename Volume 001 to "Boot Volume" or similar.
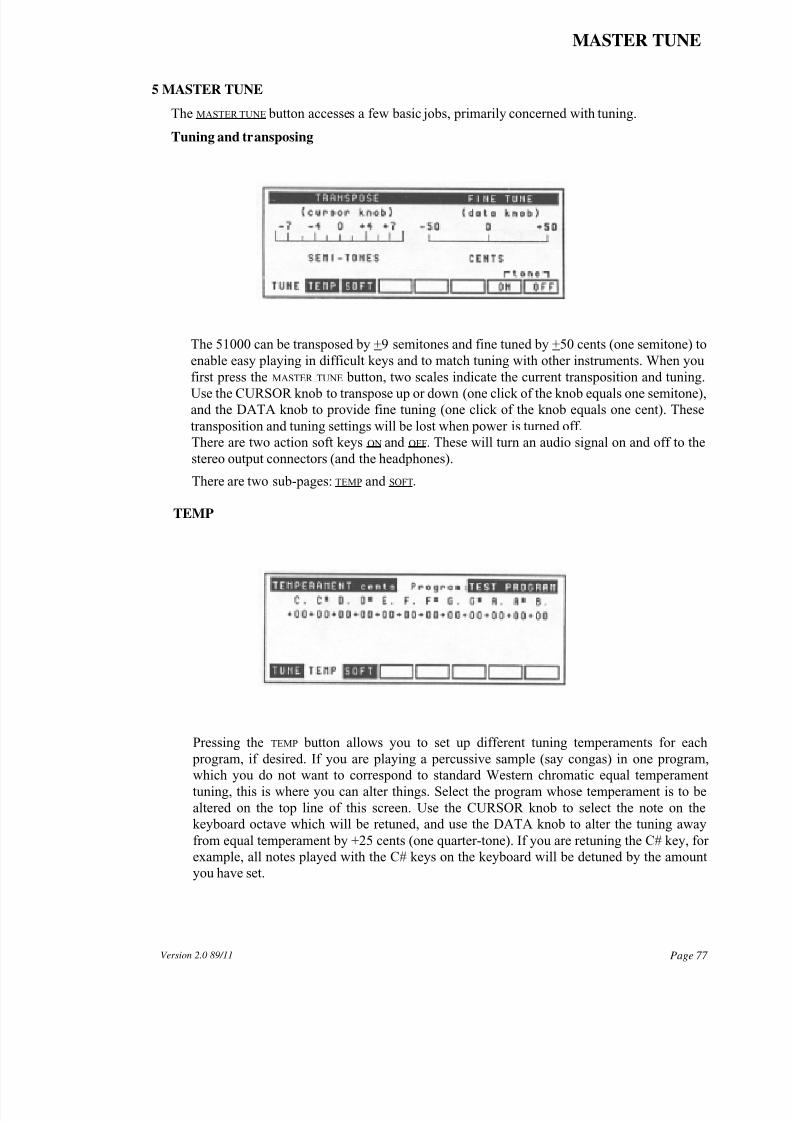
8/11/2019 akai sampler S1000 V2.0 Manual
http://slidepdf.com/reader/full/akai-sampler-s1000-v20-manual 85/96
MASTER TUNE
5 MASTER TUNE
The MASTER TUNE button accesses a few basic jobs, primarily concerned with tuning.
Tuning and transposing
The 51000 can be transposed by +9 semitones and fine tuned by +50 cents (one semitone) to
enable easy playing in difficult keys and to match tuning with other instruments. When you
first press theMASTER TUNE
button, two scales indicate the current transposition and tuning.Use the CURSOR knob to transpose up or down (one click of the knob equals one semitone),
and the DATA knob to provide fine tuning (one click of the knob equals one cent). These
transposition and tuning settings will be lost when power is turned off.
There are two action soft keys ON and OFF. These will turn an audio signal on and off to the
stereo output connectors (and the headphones).
There are two sub-pages: TEMP and SOFT.
TEMP
Pressing the TEMP button allows you to set up different tuning temperaments for each
program, if desired. If you are playing a percussive sample (say congas) in one program,
which you do not want to correspond to standard Western chromatic equal temperament
tuning, this is where you can alter things. Select the program whose temperament is to be
altered on the top line of this screen. Use the CURSOR knob to select the note on the
keyboard octave which will be retuned, and use the DATA knob to alter the tuning away
from equal temperament by +25 cents (one quarter-tone). If you are retuning the C# key, for
example, all notes played with the C# keys on the keyboard will be detuned by the amount
you have set.
Page 77Version 2.0 89/11
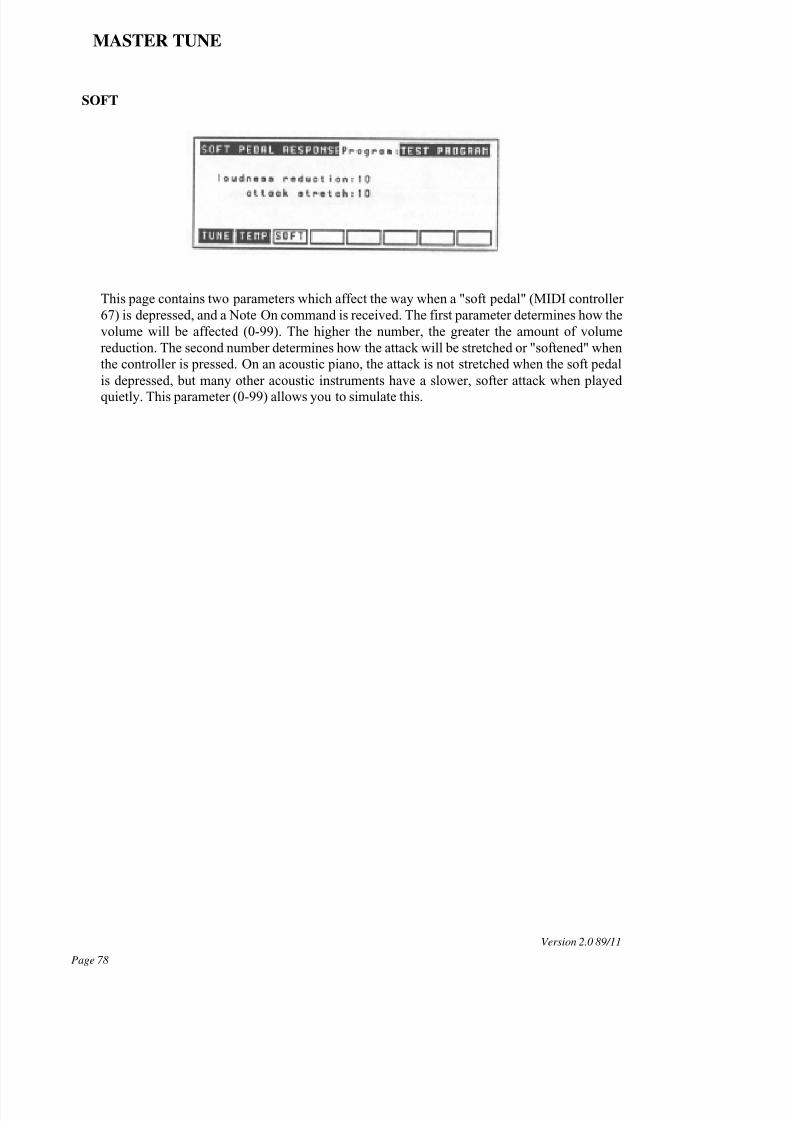
8/11/2019 akai sampler S1000 V2.0 Manual
http://slidepdf.com/reader/full/akai-sampler-s1000-v20-manual 86/96
MASTER TUNE
SOFT
This page contains two parameters which affect the way when a "soft pedal" (MIDI controller
67) is depressed, and a Note On command is received. The first parameter determines how the
volume will be affected (0-99). The higher the number, the greater the amount of volume
reduction. The second number determines how the attack will be stretched or "softened" when
the controller is pressed. On an acoustic piano, the attack is not stretched when the soft pedal
is depressed, but many other acoustic instruments have a slower, softer attack when playedquietly. This parameter (0-99) allows you to simulate this.
Version 2.0 89/11
Page 78
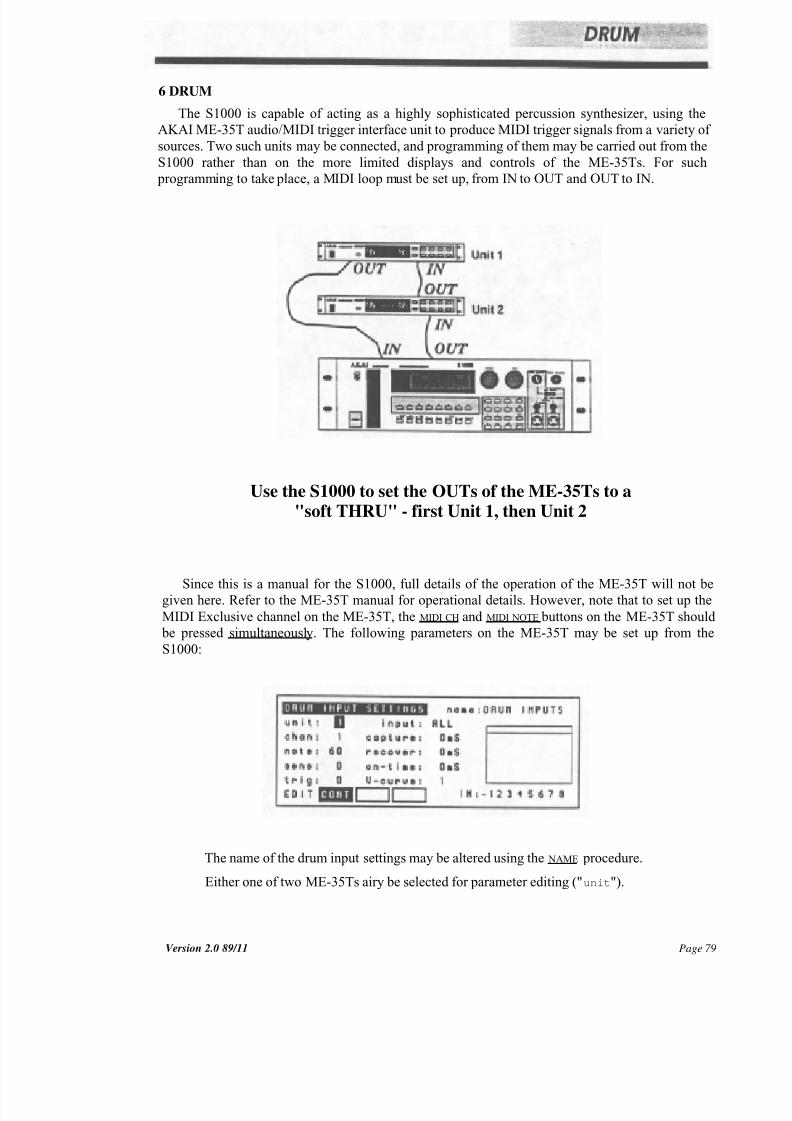
8/11/2019 akai sampler S1000 V2.0 Manual
http://slidepdf.com/reader/full/akai-sampler-s1000-v20-manual 87/96
6 DRUM
The S1000 is capable of acting as a highly sophisticated percussion synthesizer, using the
AKAI ME-35T audio/MIDI trigger interface unit to produce MIDI trigger signals from a variety of
sources. Two such units may be connected, and programming of them may be carried out from the
S1000 rather than on the more limited displays and controls of the ME-35Ts. For such
programming to take place, a MIDI loop must be set up, from IN to OUT and OUT to IN.
Use the S1000 to set the OUTs of the ME-35Ts to a"soft THRU" - first Unit 1, then Unit 2
Since this is a manual for the S1000, full details of the operation of the ME-35T will not be
given here. Refer to the ME-35T manual for operational details. However, note that to set up the
MIDI Exclusive channel on the ME-35T, the MIDI CH and MIDI NOTE buttons on the ME-35T should
be pressed simultaneously. The following parameters on the ME-35T may be set up from the
S1000:
The name of the drum input settings may be altered using the NAME procedure.
Either one of two ME-35Ts airy be selected for parameter editing ("unit").
Page 79Version 2.0 89/11
8/11/2019 akai sampler S1000 V2.0 Manual
http://slidepdf.com/reader/full/akai-sampler-s1000-v20-manual 88/96
Version 2.0 89/11Page 80
DRUM
ALL inputs may be globally edited to rough values, and then individual (1-8) inputs may be
selected for fine adjustment. This method of working can save you a lot of time.
The "chan" (1-16) and "note" (C0-G8) of the selected inputs) can be selected, as can the
sensitivity and trigger levels of the inputs (both can be varied from 0 to 99). Note that as the trigger
levels are adjusted, they are displayed graphically on the right of the screen.
The capture, recovery and on-time of the inputs can be adjusted, The capture and recovery times
are variable from OmS to 20mS, and the on-time is variable from 0 to 999mS.
One of eight velocity response curves may be chosen - see the ME-35T manual for details of
these curves.
The second page of the DRUM mode, accessed by pressing CONT, allows you to set up MIDI
parameters for up to two ME-35T units. Parameters which you can set are: operation (ON or OFF),
exclusive channels for programming (1-16) and enable of MIDI THRU operation (ON or OFF). To
return to the first DRUM page, press EDIT.OPTION
The OPTION button is not currently implemented. However, in line with AKAI's policy of
continuous product improvement, later releases of the operating system may use it.
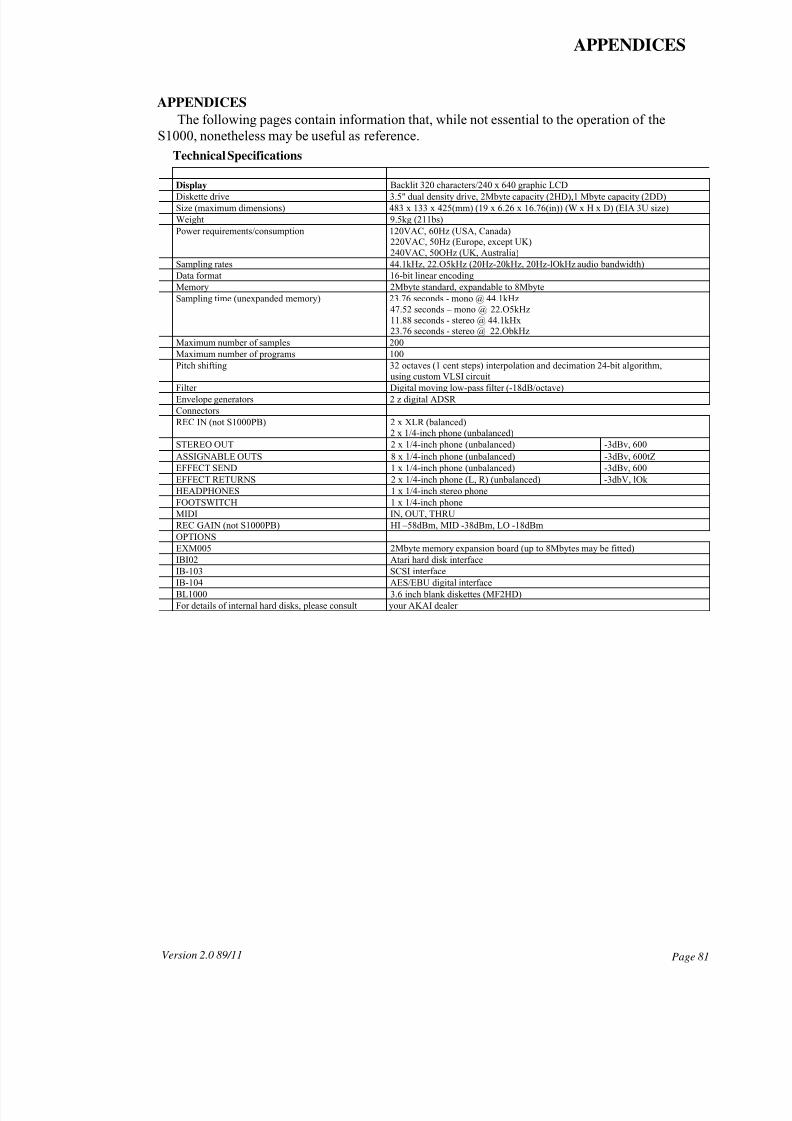
8/11/2019 akai sampler S1000 V2.0 Manual
http://slidepdf.com/reader/full/akai-sampler-s1000-v20-manual 89/96
APPENDICES
APPENDICES
The following pages contain information that, while not essential to the operation of the
S1000, nonetheless may be useful as reference.
Technical Specifications
Page 81Version 2.0 89/11
Display Backlit 320 characters/240 x 640 graphic LCD
Diskette drive 3.5" dual density drive, 2Mbyte capacity (2HD),1 Mbyte capacity (2DD)
Size (maximum dimensions) 483 x 133 x 425(mm) (19 x 6.26 x 16.76(in)) (W x H x D) (EIA 3U size)
Weight 9.5kg (211bs)
Power requirements/consumption 120VAC, 60Hz (USA, Canada)220VAC, 50Hz (Europe, except UK)
240VAC, 50OHz (UK, Australia)
Sampling rates 44.1kHz, 22.O5kHz (20Hz-20kHz, 20Hz-lOkHz audio bandwidth)
Data format 16-bit linear encoding
Memory 2Mbyte standard, expandable to 8Mbyte
Sampling time (unexpanded memory) 23.76 seconds - mono @ 44.1kHz
47.52 seconds – mono @ 22.O5kHz
11.88 seconds - stereo @ 44.1kHx23.76 seconds - stereo @ 22.ObkHz
Maximum number of samples 200
Maximum number of programs 100
Pitch shifting 32 octaves (1 cent steps) interpolation and decimation 24-bit algorithm,
using custom VLSI circuit
Filter Digital moving low-pass filter (-18dB/octave)
Envelope generators 2 z digital ADSR
Connectors
REC IN (not S1000PB) 2 x XLR (balanced)
2 x 1/4-inch phone (unbalanced)
STEREO OUT 2 x 1/4-inch phone (unbalanced) -3dBv, 600
ASSIGNABLE OUTS 8 x 1/4-inch phone (unbalanced) -3dBv, 600tZ
EFFECT SEND 1 x 1/4-inch phone (unbalanced) -3dBv, 600
EFFECT RETURNS 2 x 1/4-inch phone (L, R) (unbalanced) -3dbV, lOk
HEADPHONES 1 x 1/4-inch stereo phone
FOOTSWITCH 1 x 1/4-inch phone
MIDI IN, OUT, THRU
REC GAIN (not S1000PB) HI –58dBm, MID -38dBm, LO -18dBm
OPTIONS
EXM005 2Mbyte memory expansion board (up to 8Mbytes may be fitted)
IBI02 Atari hard disk interface
IB-103 SCSI interfaceIB-104 AES/EBU digital interface
BL1000 3.6 inch blank diskettes (MF2HD)
For details of internal hard disks, please consult your AKAI dealer
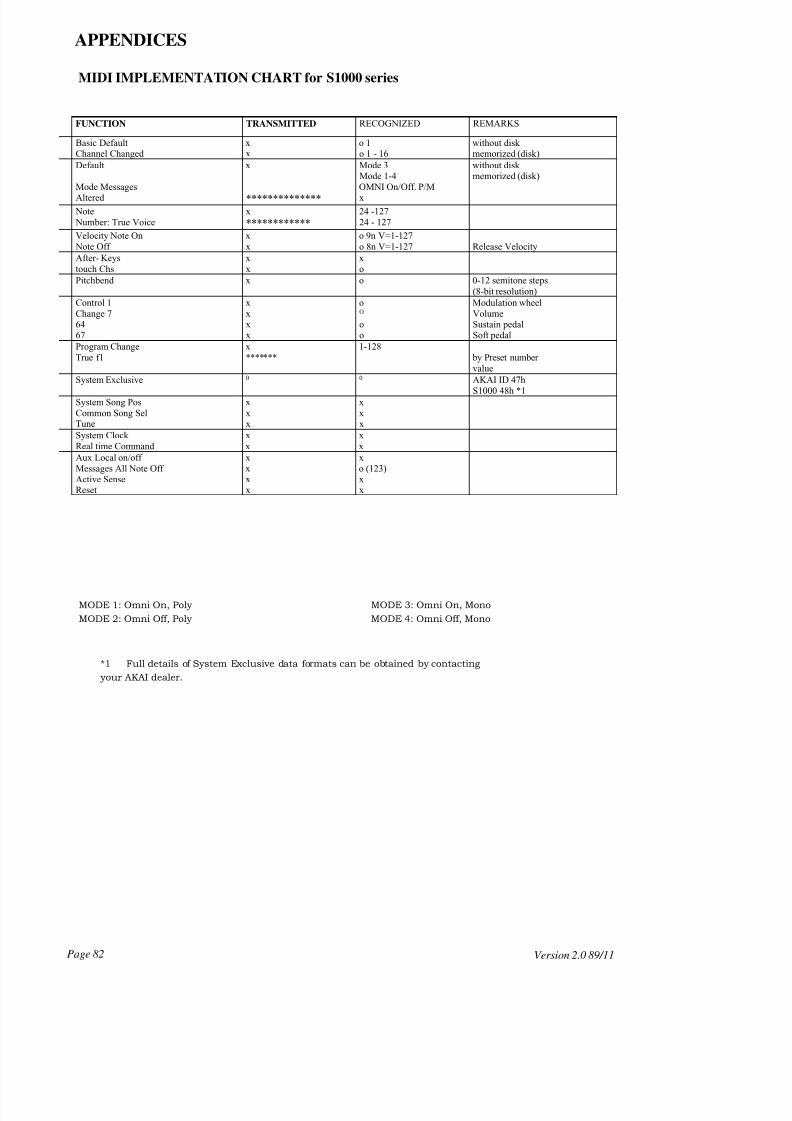
8/11/2019 akai sampler S1000 V2.0 Manual
http://slidepdf.com/reader/full/akai-sampler-s1000-v20-manual 90/96
Version 2.0 89/11Page 82
MODE 1: Omni On, Poly MODE 3: Omni On, Mono
MODE 2: Omni Off, Poly MODE 4: Omni Off, Mono
*1 Full details of System Exclusive data formats can be obtained by contacting
your AKAI dealer.
APPENDICES
MIDI IMPLEMENTATION CHART for S1000 series
FUNCTION TRANSMITTED RECOGNIZED REMARKS
Basic Default x o 1 without diskChannel Changed x o 1 - 16 memorized (disk)
Default x Mode 3 without diskMode 1-4 memorized (disk)
Mode Messages OMNI On/Off. P/MAltered ************** x
Note x 24 -127
Number: True Voice ************ 24 - 127
Velocity Note On x o 9n V=1-127
Note Off x o 8n V=1-127 Release Velocity
After- Keys x x
touch Chs x o
Pitchbend x o 0-12 semitone steps
(8-bit resolution)
Control 1 x o Modulation wheel
Change 7 x O Volume64 x o Sustain pedal67 x o Soft pedal
Program Change x 1-128
True f1 ******* by Preset number
value
System Exclusive0 0
AKAI ID 47hS1000 48h *1
System Song Pos x x
Common Song Sel x xTune x x
System Clock x x
Real time Command x x
Aux Local on/off x x
Messages All Note Off x o (123)Active Sense x xReset x x

8/11/2019 akai sampler S1000 V2.0 Manual
http://slidepdf.com/reader/full/akai-sampler-s1000-v20-manual 91/96
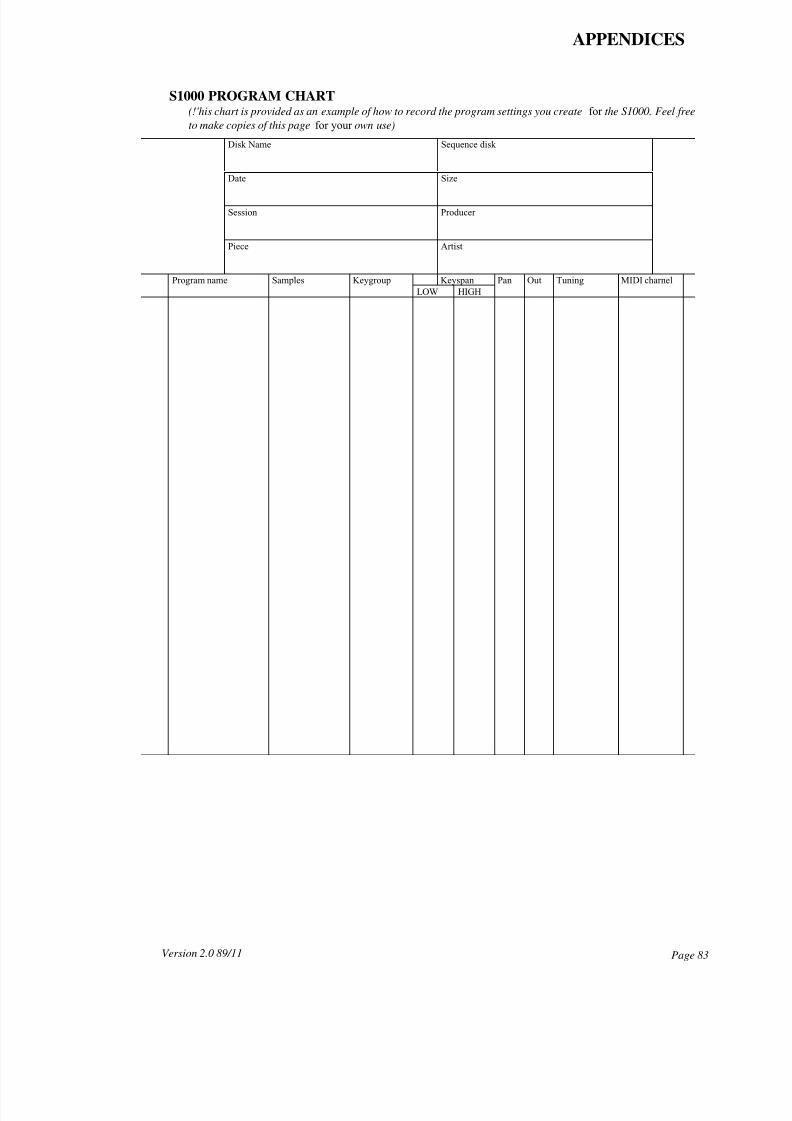
8/11/2019 akai sampler S1000 V2.0 Manual
http://slidepdf.com/reader/full/akai-sampler-s1000-v20-manual 92/96
APPENDICES
S1000 PROGRAM CHART(!'his chart is provided as an example of how to record the program settings you create for the S1000. Feel free
to make copies of this page for your own use)
Disk Name Sequence disk
Date Size
Session Producer
Piece Artist
Program name Samples Keygroup Keyspan Pan Out Tuning MIDI charnel
LOW HIGH
Version 2.0 89/11Page 83

8/11/2019 akai sampler S1000 V2.0 Manual
http://slidepdf.com/reader/full/akai-sampler-s1000-v20-manual 93/96
DRUM button
EEDIT PROG buttonEDIT SAMPLE buttonEditing numbersEffect END/RETURNEffects
Connections
ProgramsEGrelease rate sad Note OffEG release rate sad Note OnENT/PLAY buttonEntering namesEnvelope Generator 1
Velocity and speedEnvelope Generator 2Equal temperamentF
FCC NoticeFieldsFilters
Cutoff-frequency of LPFCute frequencyLow-pass filterMIDI filterRe-sampling filters
Velocity effect on LPFFIND buttonsee 'Autolooping'
Floppy disksSee Disks'
FOOT SW connectorSample start
FootswitchesSample startStarting the sampling process
FormattingHard disk
Formatting disks
HHard disk
Bad blocksFormattingParking the heads
PartitionsProgram Change and volumesTransferring data between partitionsUse with operating systemVerifying
Head parking (hard disk)HeadphonesHints on looping
I
Individual OUTs Programs1NTELL mode (time-stretch)
JJOIN buttonsee "Splicing samples"
JUMP buttonKKey follow
LPFPan positionVolume
KeygroupSee also “Keyspan”
20
2020
19, 2022
6122296665
21, 36, 66
2155555677
59
54585465
4854
22 2233
7636
7676757573727676751641
22, 58, 61 29
47
21
546261
Index - iVersion 2.0 89/11
ARertouchSee 'Pressure'
Assigning keygroupsAttack holdAudio/MIDI interface (ME-35T)Audio connectionsAutolooping
B
Backup to DATBalanced sample sources
Recording connectionsBandwidth of samplesBasic loudnessBoot-up priorities _See also 'OperonngSyah'mButtons
CChanging between display pagesConnections
GeneralSound sources
Constant pitch samplesControl wheels
Pan positionPitch LFO
Copying samples
CopyrightCrossfadingLooping crassfadingPositional cmesfadingSplice crossfadingVelocity croesfading
CursorCURSOR buttons (S1000PB)CURSOR knobCYCLIC mode (time-stretch)
D
DAT backupDeleting
All ProgramsProgramsPrograms and samplesSamples
Deleting files from diskDesync (pitch LFO)Digital interface boardDigital transmission of dataDISK buttonDisk driveDisk typesDisks
Deleting filesDensitiesFormaLoading filesLoading from diskLoading programs
56792241
74
1734, 47
29
9
6263
323
419, 52
429, 67
9181846
74
30 29
303273633535
20, 691415
7375
15,36,7569
2630
Loading programs and samples from disk 31 Naming disks 72
Reading S900 data 69
Renaming files 72Saving files 71Saving samples to disk 36Storage of disks 26Write-protect 15
DisplaySee "LCD display'
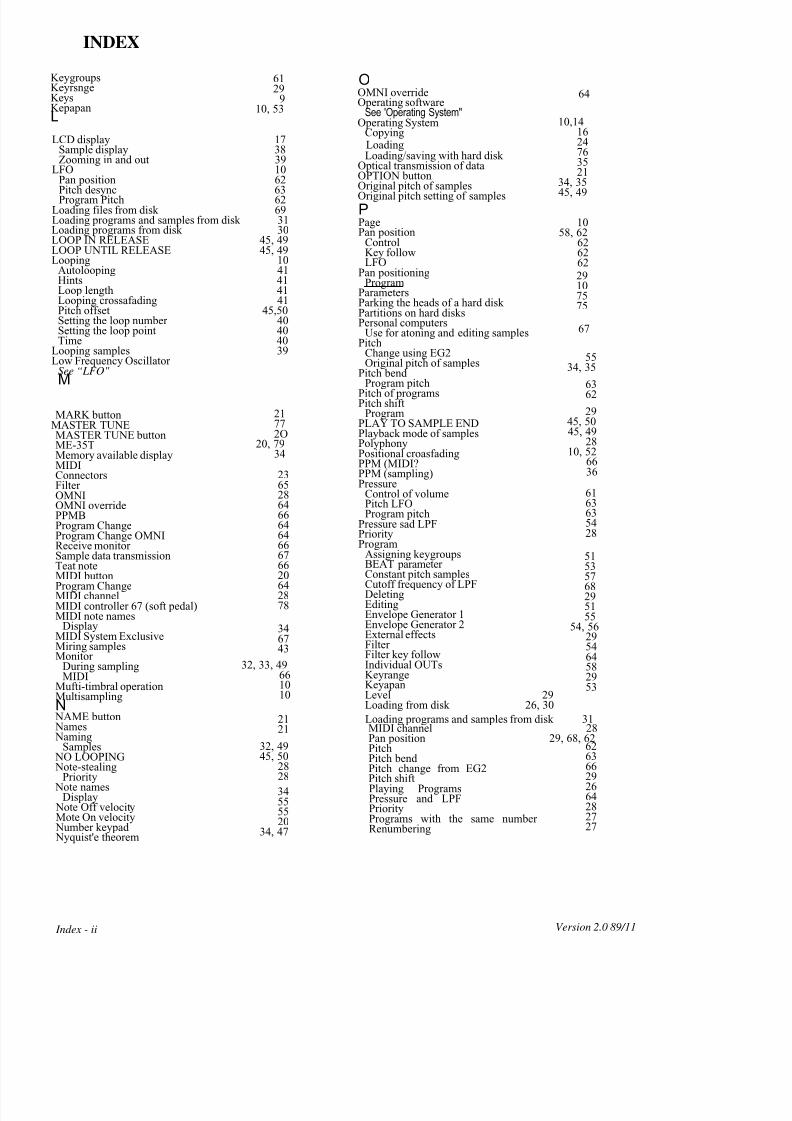
8/11/2019 akai sampler S1000 V2.0 Manual
http://slidepdf.com/reader/full/akai-sampler-s1000-v20-manual 94/96
INDEX
KeygroupsKeyrsngeKeysKepapanL
LCD display 17Sample display 38Zooming in and out 39
LFO 10Pan position 62
Pitch desync 63Program Pitch 62Loading files from disk 69Loading programs and samples from disk 31Loading programs from disk 30LOOP IN RELEASE 45, 49LOOP UNTIL RELEASE 45, 49Looping 10
Autolooping 41Hints 41Loop length 41Looping crossafading 41Pitch offset 45,50Setting the loop number 40Setting the loop point 40Time 40
Looping samples 39Low Frequency Oscillator
See “LFO"
M
MARK buttonMASTER TUNEMASTER TUNE buttonME-35TMemory available displayMIDIConnectorsFilterOMNIOMNI overridePPMBProgram ChangeProgram Change OMNIReceive monitorSample data transmissionTeat note
MIDI buttonProgram ChangeMIDI channelMIDI controller 67 (soft pedal)MIDI note names
DisplayMIDI System ExclusiveMiring samplesMonitor
During samplingMIDI
Mufti-timbral operationMultisamplingN
NAME button Names Naming
Samples NO LOOPING
Note-stealingPriority Note names
Display Note Off velocityMote On velocity
Number keypad Nyquist'e theorem
6129
910, 53
21772O
20, 7934
23652864666464666766
20642878
346743
32, 33, 49661010
2121
32, 4945, 50
2828
34555520
34, 47
Index - ii Version 2.0 89/11
OOMNI overrideOperating software
See 'Operating System"Operating System
CopyingLoadingLoading/saving with hard disk
Optical transmission of dataOPTION buttonOriginal pitch of samplesOriginal pitch setting of samples
PPagePan position
ControlKey followLFO
Pan positioningProgram
ParametersParking the heads of a hard diskPartitions on hard disksPersonal computers
Use for atoning and editing samplesPitch
Change using EG2Original pitch of samples
Pitch bend
Program pitchPitch of programsPitch shift
ProgramPLAY TO SAMPLE ENDPlayback mode of samplesPolyphonyPositional croasfadingPPM (MIDI?PPM (sampling)Pressure
Control of volumePitch LFOProgram pitch
Pressure sad LPFPriorityProgram
Assigning keygroupsBEAT parameter
Constant pitch samplesCutoff frequency of LPFDeletingEditingEnvelope Generator 1Envelope Generator 2External effectsFilterFilter key followIndividual OUTsKeyrangeKeyapanLevel 29Loading from disk 26, 30
64
10,141624763521
34, 35
45, 49
1058, 62
62626229107575
67
5534, 35
6362
2945, 5045, 49
2810, 52
6636
6163635428
5153
5768295155
54, 56295464582953
Loading programs and samples from disk 31MIDI channelPan positionPitchPitch bend
Pitch change from EG2Pitch shiftPlaying ProgramsPressure and LPFPriorityPrograms with the same numberRenumbering
2829, 68, 62
6263
66292664282727
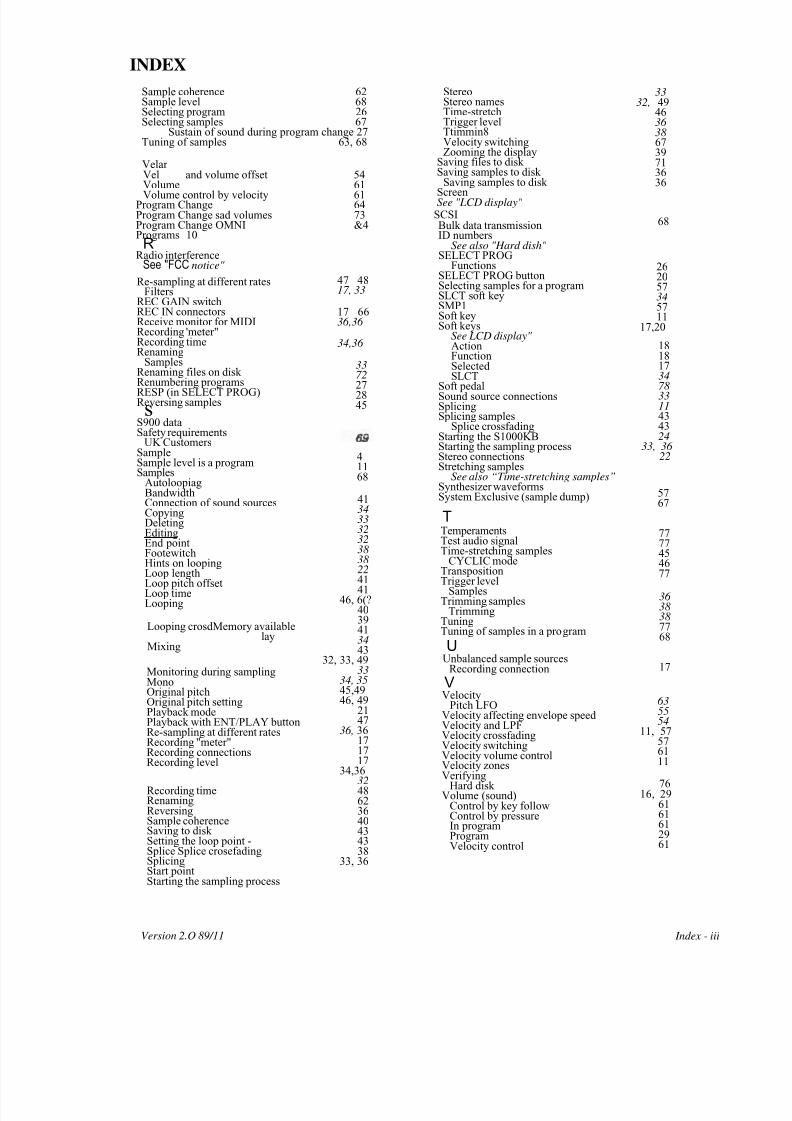
8/11/2019 akai sampler S1000 V2.0 Manual
http://slidepdf.com/reader/full/akai-sampler-s1000-v20-manual 95/96
INDEX
Version 2.O 89/11 Index - iii
Sample coherence 62Sample level 68Selecting program 26Selecting samples 67
Sustain of sound during program change 27Tuning of samples 63, 68
VelarVel and volume offset 54Volume 61Volume control by velocity 61
Program Change 64Program Change sad volumes 73Program Change OMNI &4Programs 10R
Radio interferenceSee "FCC notice"
Re-sampling at different ratesFilters
REC GAIN switchREC IN connectorsReceive monitor for MIDIRecording 'meter"Recording timeRenaming
SamplesRenaming files on disk
Renumbering programsRESP (in SELECT PROG)Reversing samplessS900 dataSafety requirements
UK CustomersSampleSample level is a programSamples
AutoloopiagBandwidthConnection of sound sourcesCopyingDeletingEditingEnd pointFootewitchHints on looping
Loop lengthLoop pitch offsetLoop timeLooping
Looping crosdMemory available layMixing
Monitoring during samplingMonoOriginal pitchOriginal pitch settingPlayback modePlayback with ENT/PLAY buttonRe-sampling at different ratesRecording "meter"Recording connections
Recording level
Recording timeRenamingReversingSample coherenceSaving to diskSetting the loop point -Splice Splice crosefadingSplicingStart pointStarting the sampling process
47 4817, 33
17 6636,36
34,36
3372
272845
41168
41 34
3332323838224141
46, 6(?4039413443
32, 33, 4933
34, 3545,4946, 49
2147
36, 36171717
34,363248623640434338
33, 36
Stereo Stereo names
Time-stretchTrigger levelTtimmin8Velocity switchingZooming the display
Saving files to diskSaving samples to disk
Saving samples to disk
ScreenSee "LCD display"
SCSIBulk data transmissionID numbers
See also "Hard dish"SELECT PROG
FunctionsSELECT PROG buttonSelecting samples for a programSLCT soft keySMP1Soft keySoft keys
See LCD display"ActionFunctionSelectedSLCT
Soft pedalSound source connectionsSplicingSplicing samples
Splice crossfadingStarting the S1000KBStarting the sampling processStereo connectionsStretching samples
See also “Time-stretching samples” Synthesizer waveformsSystem Exclusive (sample dump)
TTemperamentsTest audio signalTime-stretching samples
CYCLIC mode
TranspositionTrigger levelSamples
Trimming samplesTrimming
TuningTuning of samples in a program
UUnbalanced sample sources
Recording connection
VVelocity
Pitch LFOVelocity affecting envelope speedVelocity and LPFVelocity crossfadingVelocity switchingVelocity volume control
Velocity zonesVerifyingHard disk
Volume (sound)Control by key followControl by pressureIn programProgramVelocity control
3332, 49
4636386739713636
68
262057345711
17,20
18181734783311434324
33, 3622
5767
77774546
77
3638387768
17
635554
11, 57576111
7616, 29
6161612961

8/11/2019 akai sampler S1000 V2.0 Manual
http://slidepdf.com/reader/full/akai-sampler-s1000-v20-manual 96/96
INDEX
volume (memory) 12
W
Warranty 2
Z
Zooming in and out 39


