Colour: White Internal Building use only Int Patent Pending
WRcNSF Tested to BS EN 274-2:2002
Installer: Please ensure that this information is left with the end user of this product.
ALWAYS read the installation instructions before installing this product.
ALWAYS read the installation and end user care instructions.
ALWAYS match the correct waste to the shower base.
ALWAYS have the waste installed by a trained and experienced skilled craftsman.
NEVER use the waste without the unit fully assembled.
NEVER use solvent weld pipe or fittings.
BEWARE A child finger trap may be present during the handling or use of this product.
ALWAYS Keep fingers clear of the gaps between the cover, and the locking ring.
DO NOT place matches or cigarettes on or near this product.
The following plastic materials are used in this product: Acrylonitrile Butadiene Styrene (ABS), Ethylene Propylene Thermoplastic Rubber (EPTPR)
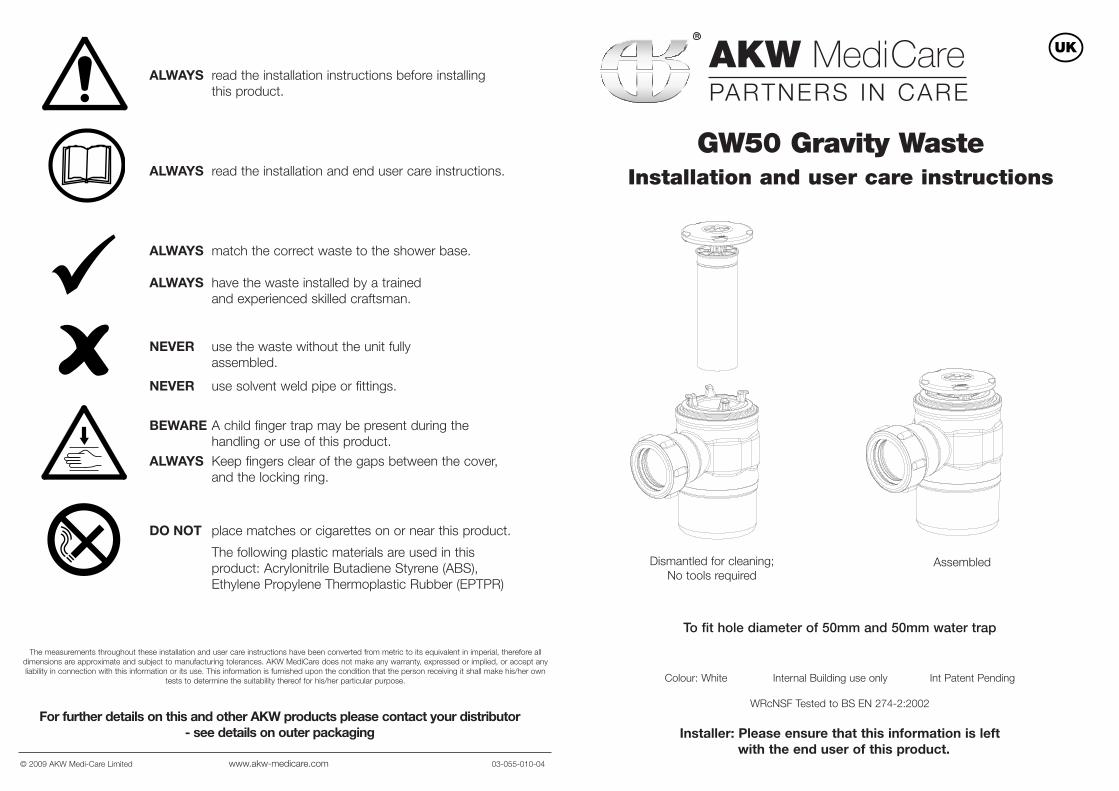
GW50 Gravity WasteInstallation and user care instructions
To fit hole diameter of 50mm and 50mm water trap
AssembledDismantled for cleaning;No tools required
For further details on this and other AKW products please contact your distributor- see details on outer packaging
The measurements throughout these installation and user care instructions have been converted from metric to its equivalent in imperial, therefore alldimensions are approximate and subject to manufacturing tolerances. AKW MediCare does not make any warranty, expressed or implied, or accept anyliability in connection with this information or its use. This information is furnished upon the condition that the person receiving it shall make his/her own
tests to determine the suitability thereof for his/her particular purpose.
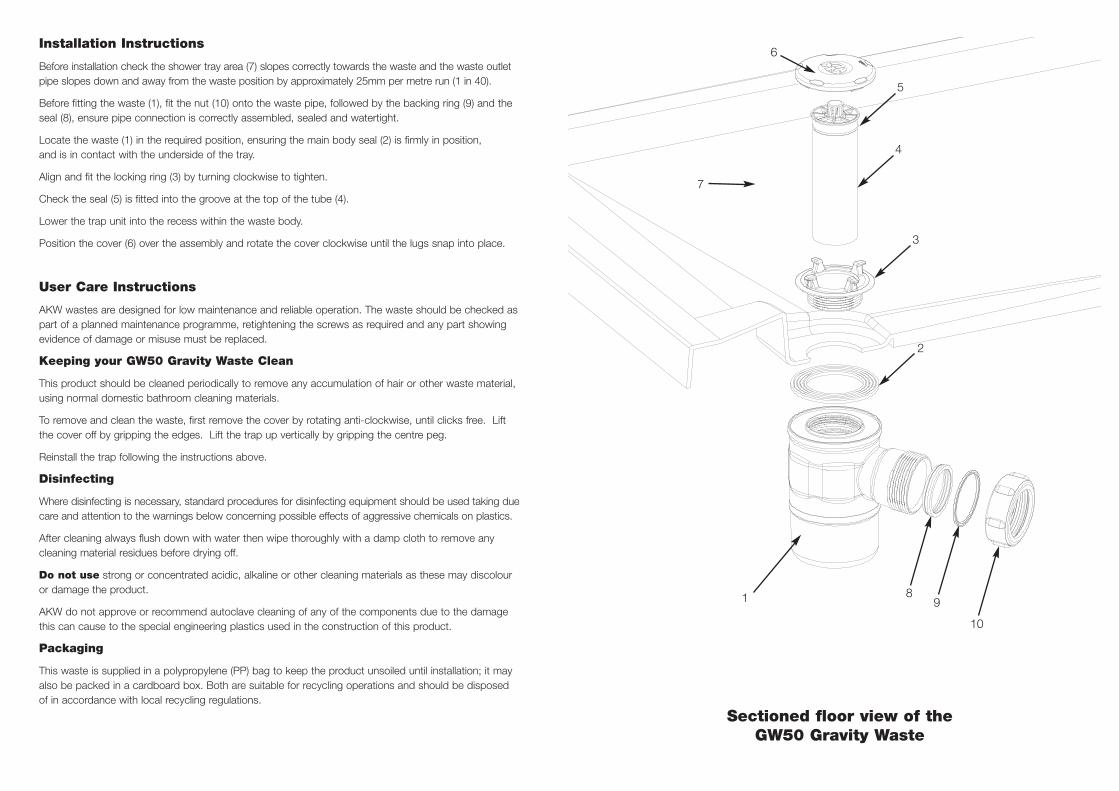
Before installation check the shower tray area (7) slopes correctly towards the waste and the waste outletpipe slopes down and away from the waste position by approximately 25mm per metre run (1 in 40).
Before fitting the waste (1), fit the nut (10) onto the waste pipe, followed by the backing ring (9) and theseal (8), ensure pipe connection is correctly assembled, sealed and watertight.
Locate the waste (1) in the required position, ensuring the main body seal (2) is firmly in position, and is in contact with the underside of the tray.
Align and fit the locking ring (3) by turning clockwise to tighten.
Check the seal (5) is fitted into the groove at the top of the tube (4).
Lower the trap unit into the recess within the waste body.
Position the cover (6) over the assembly and rotate the cover clockwise until the lugs snap into place.
User Care Instructions
AKW wastes are designed for low maintenance and reliable operation. The waste should be checked aspart of a planned maintenance programme, retightening the screws as required and any part showingevidence of damage or misuse must be replaced.
Keeping your GW50 Gravity Waste Clean
This product should be cleaned periodically to remove any accumulation of hair or other waste material, using normal domestic bathroom cleaning materials.
To remove and clean the waste, first remove the cover by rotating anti-clockwise, until clicks free. Liftthe cover off by gripping the edges. Lift the trap up vertically by gripping the centre peg.
Reinstall the trap following the instructions above.
Disinfecting
Where disinfecting is necessary, standard procedures for disinfecting equipment should be used taking duecare and attention to the warnings below concerning possible effects of aggressive chemicals on plastics.
After cleaning always flush down with water then wipe thoroughly with a damp cloth to remove anycleaning material residues before drying off.
Do not use strong or concentrated acidic, alkaline or other cleaning materials as these may discolouror damage the product.
AKW do not approve or recommend autoclave cleaning of any of the components due to the damagethis can cause to the special engineering plastics used in the construction of this product.
Packaging
This waste is supplied in a polypropylene (PP) bag to keep the product unsoiled until installation; it mayalso be packed in a cardboard box. Both are suitable for recycling operations and should be disposedof in accordance with local recycling regulations.
Sectioned floor view of the GW50 Gravity Waste
3
98
7
6
4
2
1
10
5
Tuff-Form Wet Floor FormerInstallation And User Care Instructions
Guaranteed for
Life
UK
UK
UK
UK
UK
Failure to install this AKW product in accordance with supplied instructions or the making of unauthorised modifications will invalidate any warranty and will affect product safety.
To order additional products or parts please call: 01905 823299 or on the details above
900mm
(351/2")
900mm(351/2")
1000mm
(391/4 ")
1000mm(391/4")
1200mm
(471/4")
1200mm(471/4")
820mm
(321/4")
1300mm(511/4")
820mm
(321/4")
1500mm(59")
820mm
(321/4")
1800mm(71")
900mm
(351/2")
1400mm(551/8")
1200mm
(471/4 ")
1500mm(59")
770mm
(301/4")
1135mm(443/4")
By rotating the rectangular trays by 180° the waste position moves in two directions to avoid the joists
180°
The
Tuf
f-Fo
rm R
ange
Sizes AvaliableAvailable Sizes
39 1/4” x39 1/4”
1000x1000mm
44 3 /4” x30 1/4”
1135x770mm
47 1/4” x47 1/4”
1200x1200mm
51 1/4” x32 1/4”
1300x820mm
55 1/8” x35 1/2”
1400x900mm
59 ” x47 1/4”
1500x1200mm
71 ” x32 1/4”
1800x820mm
900x900mm
35 1/2” x35 1/2”
59 ” x32 1/4”
1500x820mm
Plastic capping strip to cover vinyl floor covering.
Plastic covingPGTF Shallow waste
Subscreed, supporting Tuff-Form edgesand at least 50% of tray ribs
Complete level access
vinyl flooring to be setover wet floor formerand floor.
Installed in screed, showing shallow waste (PGTF) for pump
Plastic capping strip to cover vinyl floor covering.
Plastic coving
22mm
TFT75 shower gulleyor equivalent.
Complete level access
110mm 110mm
10.5mm
Installed in wood, 22m thickness to top of floorboards (pack as required) showing gravity waste (TF75)
Vinyl floor/tanking for tiles to be set over the wet floor former and floor.
Specification:When correctly installed according to these instructions the Tuff Form will be suitable for a 40st wheelchair user and a carer in attendance. For users up to 80st please contact AKW for specific advice relating to your individual installation.
Do not use gypsum based dry-wall adhesives to install a Tuff Form. “Dot-N-Dab” adhesives do not hold moisture resistant properties and this type of adhesive has not been tested by the manufacturers to receive live loads. They are only suitable for internal bonding dry lining applications on dry substrates.
The measurements throughout these installation and user care instructions have been converted from metric to its equivalent in imperial, therefore all dimensions are approximate and subject to manufacturing tolerances.
These instructions are offered as advised minimum standards of installation and recommended best practice for the installation of a Tuff Form. Due to the very wide variability of possible installation conditions AKW Ltd does not make any
warranty, expressed or implied, or accept any liability in connection with this information or its use. This information is furnished upon the condition that the person receiving it shall make his/her own tests to determine the
suitability thereof for his/her particular purpose.
Noggins within 100mm of wasteomitted for clarity
Patented: GB2401341
UK USA EU UK
UK
UK Read ALL instructions carefully BEFORE installation and leave with the end user
For latest AKW news and products, scan this code with your phone or tab device.
DoP 03-061-003
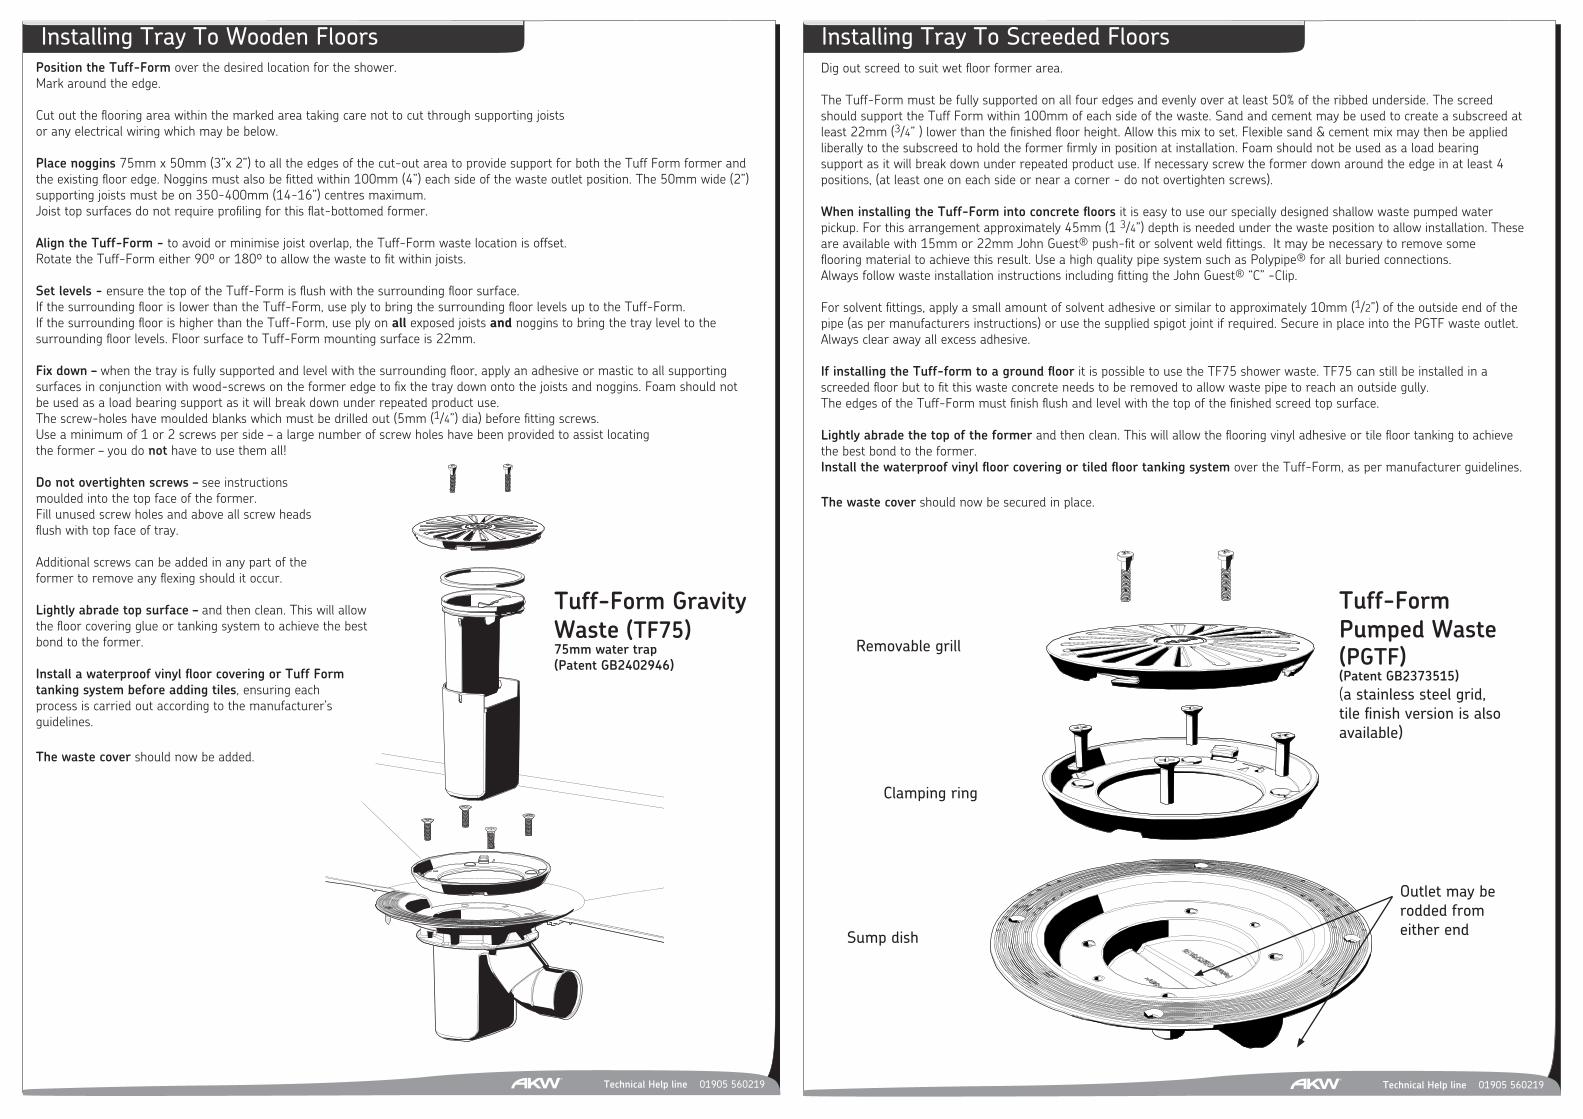
Installing Tray To Screeded FloorsPosition the Tuff-Form over the desired location for the shower.Mark around the edge.
Cut out the flooring area within the marked area taking care not to cut through supporting joistsor any electrical wiring which may be below.
Place noggins 75mm x 50mm (3”x 2”) to all the edges of the cut-out area to provide support for both the Tuff Form former and the existing floor edge. Noggins must also be fitted within 100mm (4”) each side of the waste outlet position. The 50mm wide (2”) supporting joists must be on 350-400mm (14-16”) centres maximum.Joist top surfaces do not require profiling for this flat-bottomed former.
Align the Tuff-Form - to avoid or minimise joist overlap, the Tuff-Form waste location is offset.Rotate the Tuff-Form either 90º or 180º to allow the waste to fit within joists.
Set levels - ensure the top of the Tuff-Form is flush with the surrounding floor surface.If the surrounding floor is lower than the Tuff-Form, use ply to bring the surrounding floor levels up to the Tuff-Form.If the surrounding floor is higher than the Tuff-Form, use ply on all exposed joists and noggins to bring the tray level to the surrounding floor levels. Floor surface to Tuff-Form mounting surface is 22mm.
Fix down – when the tray is fully supported and level with the surrounding floor, apply an adhesive or mastic to all supporting surfaces in conjunction with wood-screws on the former edge to fix the tray down onto the joists and noggins. Foam should not be used as a load bearing support as it will break down under repeated product use.The screw-holes have moulded blanks which must be drilled out (5mm (1/4”) dia) before fitting screws.Use a minimum of 1 or 2 screws per side – a large number of screw holes have been provided to assist locatingthe former – you do not have to use them all!
Do not overtighten screws – see instructionsmoulded into the top face of the former.Fill unused screw holes and above all screw heads flush with top face of tray.
Additional screws can be added in any part of the former to remove any flexing should it occur.
Lightly abrade top surface – and then clean. This will allow the floor covering glue or tanking system to achieve the best bond to the former.
Install a waterproof vinyl floor covering or Tuff Form tanking system before adding tiles, ensuring eachprocess is carried out according to the manufacturer’sguidelines.
The waste cover should now be added.
Dig out screed to suit wet floor former area.
The Tuff-Form must be fully supported on all four edges and evenly over at least 50% of the ribbed underside. The screed should support the Tuff Form within 100mm of each side of the waste. Sand and cement may be used to create a subscreed at least 22mm (3/4” ) lower than the finished floor height. Allow this mix to set. Flexible sand & cement mix may then be applied liberally to the subscreed to hold the former firmly in position at installation. Foam should not be used as a load bearing support as it will break down under repeated product use. If necessary screw the former down around the edge in at least 4 positions, (at least one on each side or near a corner - do not overtighten screws).
When installing the Tuff-Form into concrete floors it is easy to use our specially designed shallow waste pumped water pickup. For this arrangement approximately 45mm (1 3/4”) depth is needed under the waste position to allow installation. These are available with 15mm or 22mm John Guest® push-fit or solvent weld fittings. It may be necessary to remove some flooring material to achieve this result. Use a high quality pipe system such as Polypipe® for all buried connections. Always follow waste installation instructions including fitting the John Guest® “C” -Clip.
For solvent fittings, apply a small amount of solvent adhesive or similar to approximately 10mm (1/2”) of the outside end of the pipe (as per manufacturers instructions) or use the supplied spigot joint if required. Secure in place into the PGTF waste outlet. Always clear away all excess adhesive.
If installing the Tuff-form to a ground floor it is possible to use the TF75 shower waste. TF75 can still be installed in a screeded floor but to fit this waste concrete needs to be removed to allow waste pipe to reach an outside gully.The edges of the Tuff-Form must finish flush and level with the top of the finished screed top surface.
Lightly abrade the top of the former and then clean. This will allow the flooring vinyl adhesive or tile floor tanking to achieve the best bond to the former.Install the waterproof vinyl floor covering or tiled floor tanking system over the Tuff-Form, as per manufacturer guidelines.
The waste cover should now be secured in place.
Tuff-Form Gravity Waste (TF75)75mm water trap (Patent GB2402946)
Tuff-Form Pumped Waste (PGTF)(Patent GB2373515)(a stainless steel grid, tile finish version is also available)
Removable grill
Clamping ring
Sump dish
Outlet may be rodded fromeither end
Installing Tray To Wooden Floors
Technical Help line 01905 560219 Technical Help line 01905 560219
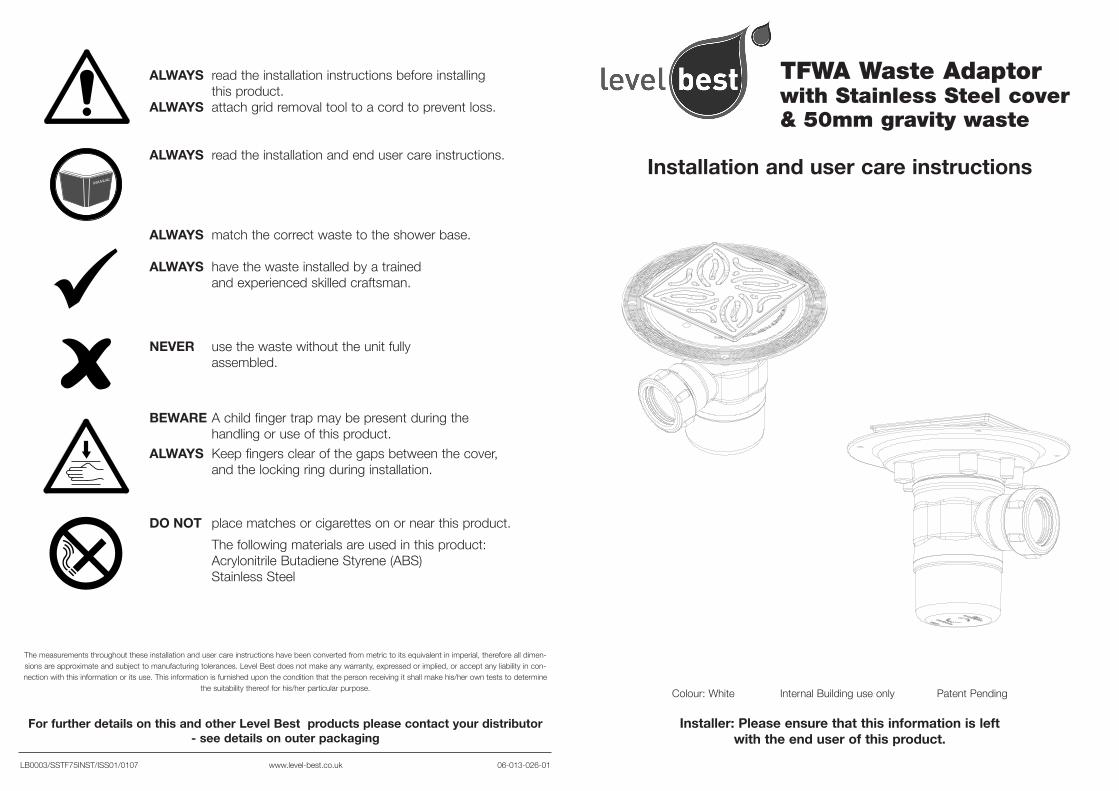
Colour: White Internal Building use only Patent Pending
Installer: Please ensure that this information is left with the end user of this product.
ALWAYS read the installation instructions before installing this product.
ALWAYS attach grid removal tool to a cord to prevent loss.
ALWAYS read the installation and end user care instructions.
ALWAYS match the correct waste to the shower base.
ALWAYS have the waste installed by a trained and experienced skilled craftsman.
NEVER use the waste without the unit fully assembled.
BEWARE A child finger trap may be present during the handling or use of this product.
ALWAYS Keep fingers clear of the gaps between the cover, and the locking ring during installation.
DO NOT place matches or cigarettes on or near this product.
The following materials are used in this product: Acrylonitrile Butadiene Styrene (ABS)Stainless Steel
For further details on this and other Level Best products please contact your distributor- see details on outer packaging
The measurements throughout these installation and user care instructions have been converted from metric to its equivalent in imperial, therefore all dimen-sions are approximate and subject to manufacturing tolerances. Level Best does not make any warranty, expressed or implied, or accept any liability in con-nection with this information or its use. This information is furnished upon the condition that the person receiving it shall make his/her own tests to determine
the suitability thereof for his/her particular purpose.
Installation and user care instructions
Installation InstructionsAs a “dry run” first place the wet floor former into the desired location and determine the position and depth of clearancerequired to position the gravity waste.
Before fitting the gravity waste place the nut onto the waste pipe, followed by the backing ring and the seal. Insert waste pipe intothe gravity waste, and tighten nut. Check pipe connection is cor-rectly assembled, sealed and watertight.
Now install the wet floor former over the gravity waste accordingthe instructions.
Before installing the TFWA check the shower tray area slopescorrectly towards the waste and the waste outlet pipe slopesdown and away from the waste position by approximately 25mmper metre run (1 in 40).
Remove the central Stainless Steel grid and unscrew the gridframe threaded adjustment ring put these to one side.
Locate the waste in the required position, ensuring the main bodyseal is firmly in position and is in contact with the underside of theTFWA.
Align and fit the locking ring by turning clockwise to tighten.Check the seal is in position in the trap tube groove then lowerthe trap into the recess within the waste body.
Refitting the gravity waste cover is optional but can be replacedby rotating until the lugs snap into place.
Apply sealant to the underside of outer rim and install into centrehole of Tuff Form Former. Use 4 x No 6 or No 8 x 3/4" CSK Headscrews (not supplied). Ensure the heads are flush and do not pro-trude or they may cut into the Wet Floor waste gasket seal.
Fitting the sealed Flooring
Temporarily blank off waste centre hole to stop debris entering;
Apply wet floor tanking sealant to floor to overlap edge of waste25mm, let this dry before continuing;
Insert centre waste grid fitting carefully and screw down until height is level with intended finished floor.
Move sliding locking cliptowards centre of waste tolock height adjustment;
Rotate centre grid to lineup with tile edges (this issometimes a tight / stiffaction);
Fitting the sealed Flooring (continued)
REMOVE THE CENTRE STAINLESS STEEL GRID AND STORE TO ONE SIDE TO ENSURE IT IS NOTDAMAGED DURING TILING
IMPORTANT: Tiling cement must be carefully packed around and below the centre grid support to ensure along and trouble free life to the product and water-proof seal to the flooring is maintained.
Finishing the waste installation
Clean up inside the waste grid area of tile grout and cement – do NOT place this in the waste!
REMOVE TEMPORARY WASTE BLANKING MATERIALS, clean any grout and cement or other rubbishfrom the waste; lift out the trap bucket and empty it.
Fitting the chrome top cover is optional.
Re-fit the stainless steel grid. It should sit level with the edge of the frame and the finished floor surface.
User Care InstructionsThe Level Best TFWA is designed for low maintenance and reliableoperation. The TFWA and gravity waste located inside should bechecked as part of a planned maintenance programme, any partshowing evidence of damage or misuse must be replaced.
Keeping your TFWA Clean
This product should be cleaned periodically to remove any accumulation of hair or other waste material, using normal domesticbathroom cleaning materials.
To remove and clean the trap, first remove the stainless steel grid using the tool provided.
Disinfecting
Where disinfecting is necessary, standard procedures for disinfecting equipment should be used taking duecare and attention to the warnings below concerning possible effects of aggressive chemicals on plastics.
After cleaning always flush down with water then wipe thoroughly with a damp cloth to remove any cleaning material residues before drying off.
DDoo nnoott uussee strong or concentrated acidic, alkaline or other cleaning materials as these may discolour or otherwise damage the product.
To remove and clean the trap, first remove the Stainless Steel Grid using the tool provided, remove thewaste cover by rotating anti-clockwise until it clicks free. Lift the cover off by gripping the edges. Lift thetrap up vertically by gripping the centre peg. Reinstall following the above instructions.
Level Best do not approve or recommend autoclave cleaning of any of the components due to the damage this can cause to the special engineering plastics used in the construction of this product.
Packaging
This TFWA is supplied in a polypropylene (PP) bag to keep the product unsoiled until installation; it mayalso be packed in a cardboard box. Both are suitable for recycling operations and should be disposed of inaccordance with local recycling regulations.
1. SET HEIGHT BY ROTATING THREADEDRING
2. LOCK IN POSITION WITH SLIDER
3. ALIGN WITH TOP OF TILE BY ROTATINGSTAINLESS STEEL COVER PLATE