36
| Date post: | 12-Dec-2015 |
| Category: |
Documents |
| Upload: | ronald-sanchez |
| View: | 214 times |
| Download: | 2 times |
Contents
How to Use the Online Manual 1
Printing Overview 2Basic Printing 3Starting the Printer Driver Using the "Start" Button 4Printer Driver Settings 5Printing a Watermark 6Fitting the Printed Image to the Paper 7Printing Multiple Pages on One Page 8Outline of the Print Status Window 9
Scanning Overview 10Scanning an Image from a TWAIN-Compliant Application 11Scanning an Image from a WIA-Compliant Application (Windows XP) 15Scanning an Image from the "Scanner and Camera Wizard" (Windows XP) 17Outline of Button Manager 20Button Manager Settings 21
Identifying Unit Problems 22Check the Connection between the Unit and Computer 23Check Your Computer 24
Plug and Play Screen does not Appear (when the USB is connected) 25Failed to Install the MFP Driver (Windows 2000/XP) 26
Faint, Uneven or Smeared Print Output 27Characters or Graphics are not Printed in Correct Position 28Nothing Prints 29Poor Scanning Result 30The Scanned Image is Incorrectly Positioned 31Unable to Scan the Image 32Uninstalling SHARP Personal MFP Series Software 33
1 How to Use the Online Manual
2 Print
3 Scan
4 Troubleshooting
5 Index

INDEXCONTENTS 1
This Online Manual provides instruction for the operation of your new unit. Please read the following explanation of how to use the Online Manual, and then search for the information that you need.For more information about computers, operating systems and Acrobat Reader, please refer to the relevant manual or help file.
How to Control the Online Manual
Following linksLinks can connect parts of a document to other parts for further information. In this document, green coloured letters are linked areas.To follow a link, select a hand tool ( ), a zoom tool or a selection tool. Position the pointer over the linked area on the page until the pointer changes to a hand with a pointing finger ( ). Then click the link.Using BookmarksThis online manual has Bookmarks on the main pages of each section. You can move to the desired pages by simply clicking its bookmark.
How to Print Out the Online ManualIn order to print out a hard copy of the Online Manual for your reference, go to Acrobat Reader, click the "File" menu, and select "Print". After specifying the printer setting, click the "Print" ("OK" on Windows 95/98/Me/NT 4.0) button to print.
Note
! In this online manual, screen images and operating procedures are mainly for Windows XP. With other versions of Windows, some screen images may be different from those in this manual.
!The screen illustrations shown in this online manual are mainly screens of AL-1225.
1INDEX
CONTENTS
Click this button to display the Table of Contents of the Online Manual. From the Table of Contents you can jump to various pages.
Click this button to display the Index of the Online Manual. From the Index you can jump to various pages.
Takes you forward page by page.
Takes you back page by page. To return to the previous link, click the ( ) button on the menu bar of the Acrobat Reader.
How to Use the Online Manual1

INDEXCONTENTS 2
2The flow chart shown below provides printing overview.Reference: For more information on printing, see Basic Printing.
* The multi-bypass tray can be used on the AL-1225, and the single bypass can be used on the AL-1216. For the procedures for loading paper in each type of tray, see "LOADING PAPER" in the Operation Manual.
Caution
!When the paper source is the paper tray or multi-bypass tray, verify that the paper has been loaded before starting printing.
!Ensure printing has been completed before turning the power off. Do not remove the power cord before turning the unit off.
When printing from paper tray or multi-bypass tray* When printing from single bypass*
Prepare the document you intend to print
Send print data from your computer
Printing
Exit printing
Load a single sheet of paper into the single bypassReference:
For more detail, refer to the "BYPASS FEED (including special paper)" in the Operation Manual.
Open the printer driver setup screen and set the print preferencesReference:
Printer Driver Settings, Printing a Watermark, Fitting the Printed Image to the Paper,Printing Multiple Pages on One Page
Printing Overview
INDEXCONTENTS 3
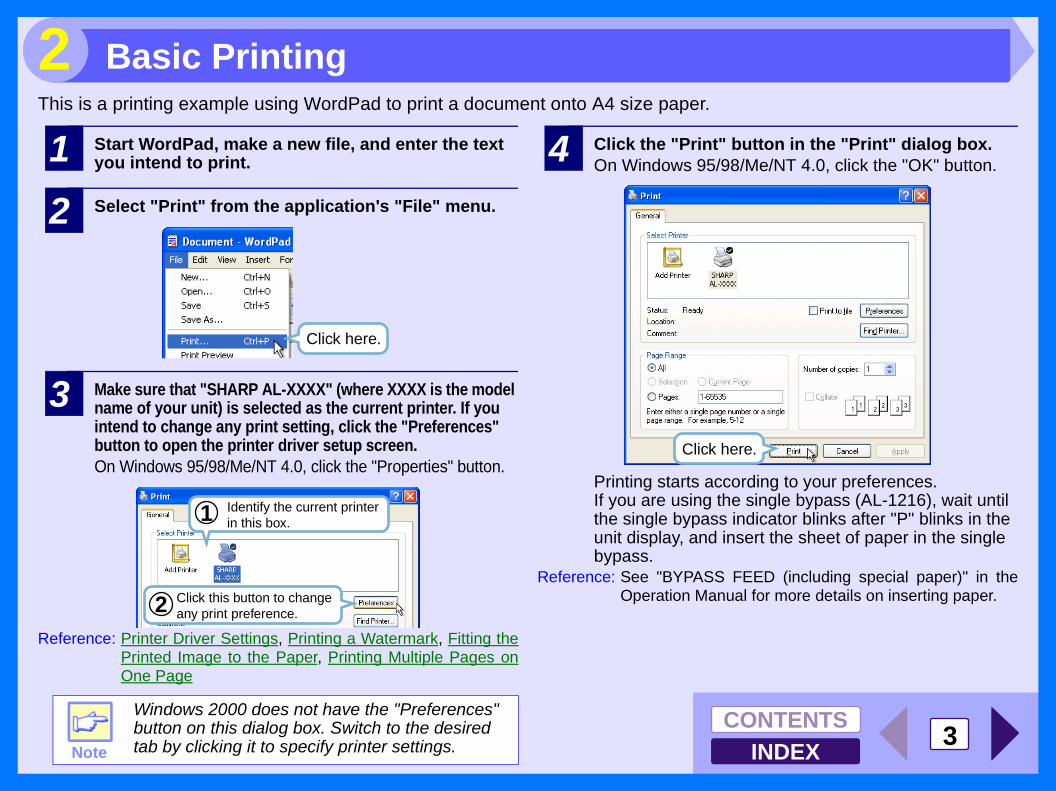
2This is a printing example using WordPad to print a document onto A4 size paper.
1 Start WordPad, make a new file, and enter the text you intend to print.
2 Select "Print" from the application's "File" menu.
3 Make sure that "SHARP AL-XXXX" (where XXXX is the model name of your unit) is selected as the current printer. If you intend to change any print setting, click the "Preferences" button to open the printer driver setup screen.On Windows 95/98/Me/NT 4.0, click the "Properties" button.
Reference: Printer Driver Settings, Printing a Watermark, Fitting thePrinted Image to the Paper, Printing Multiple Pages onOne Page
4 Click the "Print" button in the "Print" dialog box.On Windows 95/98/Me/NT 4.0, click the "OK" button.
Printing starts according to your preferences.If you are using the single bypass (AL-1216), wait until the single bypass indicator blinks after "P" blinks in the unit display, and insert the sheet of paper in the single bypass.
Reference: See "BYPASS FEED (including special paper)" in theOperation Manual for more details on inserting paper.
Note
Windows 2000 does not have the "Preferences" button on this dialog box. Switch to the desired tab by clicking it to specify printer settings.
Click here.
Identify the current printer in this box.1
2 Click this button to change any print preference.
Click here.
Basic Printing
INDEXCONTENTS 4
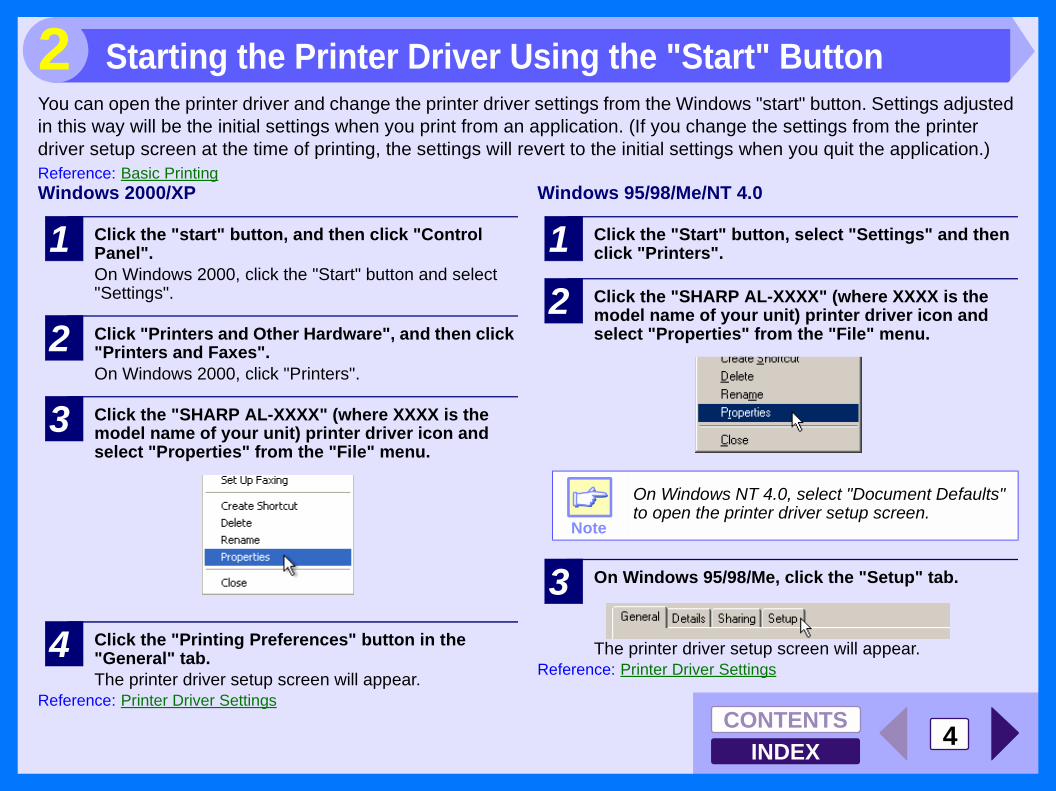
2You can open the printer driver and change the printer driver settings from the Windows "start" button. Settings adjusted in this way will be the initial settings when you print from an application. (If you change the settings from the printer driver setup screen at the time of printing, the settings will revert to the initial settings when you quit the application.)Reference: Basic PrintingWindows 2000/XP
1 Click the "start" button, and then click "Control Panel".On Windows 2000, click the "Start" button and select "Settings".
2 Click "Printers and Other Hardware", and then click "Printers and Faxes".On Windows 2000, click "Printers".
3 Click the "SHARP AL-XXXX" (where XXXX is the model name of your unit) printer driver icon and select "Properties" from the "File" menu.
4 Click the "Printing Preferences" button in the "General" tab.The printer driver setup screen will appear.
Reference: Printer Driver Settings
Windows 95/98/Me/NT 4.0
1 Click the "Start" button, select "Settings" and then click "Printers".
2 Click the "SHARP AL-XXXX" (where XXXX is the model name of your unit) printer driver icon and select "Properties" from the "File" menu.
3 On Windows 95/98/Me, click the "Setup" tab.
The printer driver setup screen will appear.Reference: Printer Driver Settings
Note
On Windows NT 4.0, select "Document Defaults" to open the printer driver setup screen.
Starting the Printer Driver Using the "Start" Button
INDEXCONTENTS 5
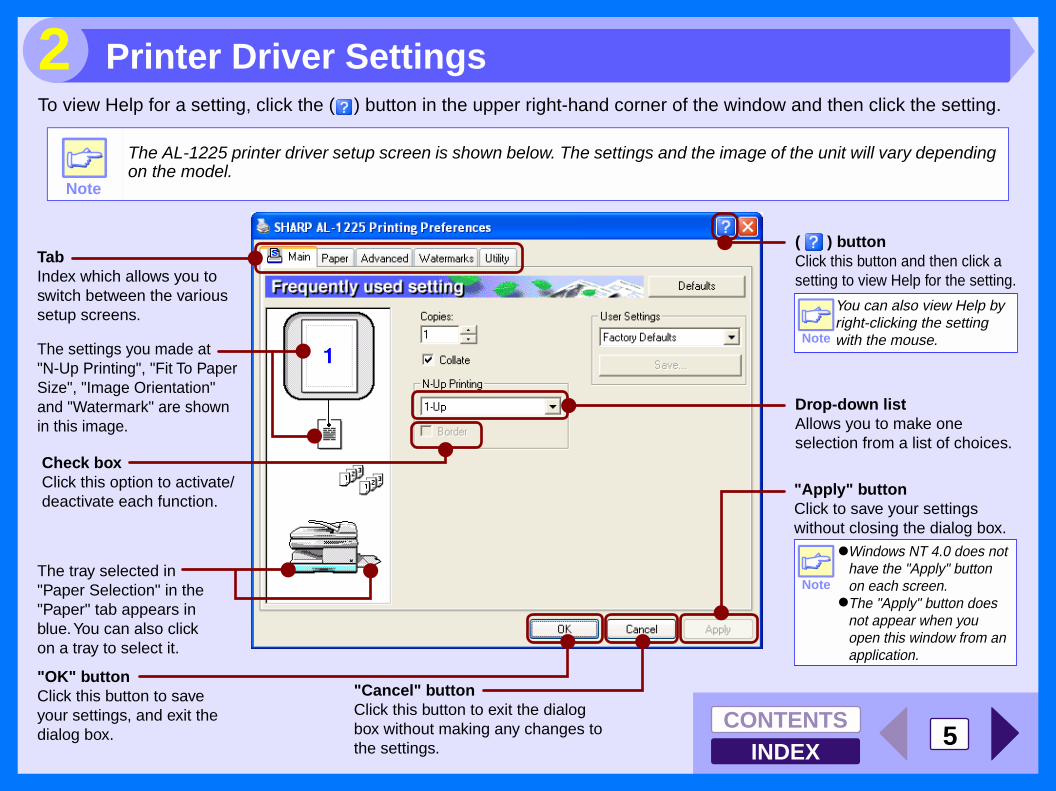
2To view Help for a setting, click the ( ) button in the upper right-hand corner of the window and then click the setting.
Note
The AL-1225 printer driver setup screen is shown below. The settings and the image of the unit will vary depending on the model.
TabIndex which allows you to switch between the various setup screens.
( ) buttonClick this button and then click a setting to view Help for the setting.
"OK" buttonClick this button to save your settings, and exit the dialog box.
The settings you made at "N-Up Printing", "Fit To Paper Size", "Image Orientation" and "Watermark" are shown in this image.
The tray selected in "Paper Selection" in the "Paper" tab appears in blue. You can also click on a tray to select it.
"Cancel" buttonClick this button to exit the dialog box without making any changes to the settings.
"Apply" buttonClick to save your settings without closing the dialog box.
Drop-down listAllows you to make one selection from a list of choices.
Check boxClick this option to activate/deactivate each function.
You can also view Help by right-clicking the setting with the mouse.
Windows NT 4.0 does not have the "Apply" button on each screen.The "Apply" button does not appear when you open this window from an application.
Note
Note
Printer Driver Settings

INDEXCONTENTS 6
2To print a watermark, for example "CONFIDENTIAL", on your document, refer to the following steps. Open the printer driver and click the "Watermarks" tab.Reference: See Basic Printing for details on how to open the printer driver.
How to Print a WatermarkFrom the "Watermark" drop-down list, select the watermark, for example "CONFIDENTIAL", you wish to print on your document, and start printing.
For details on watermark settings, view printer driver Help.Reference: Printer Driver Settings
Print sample
Printing a Watermark
INDEXCONTENTS 7
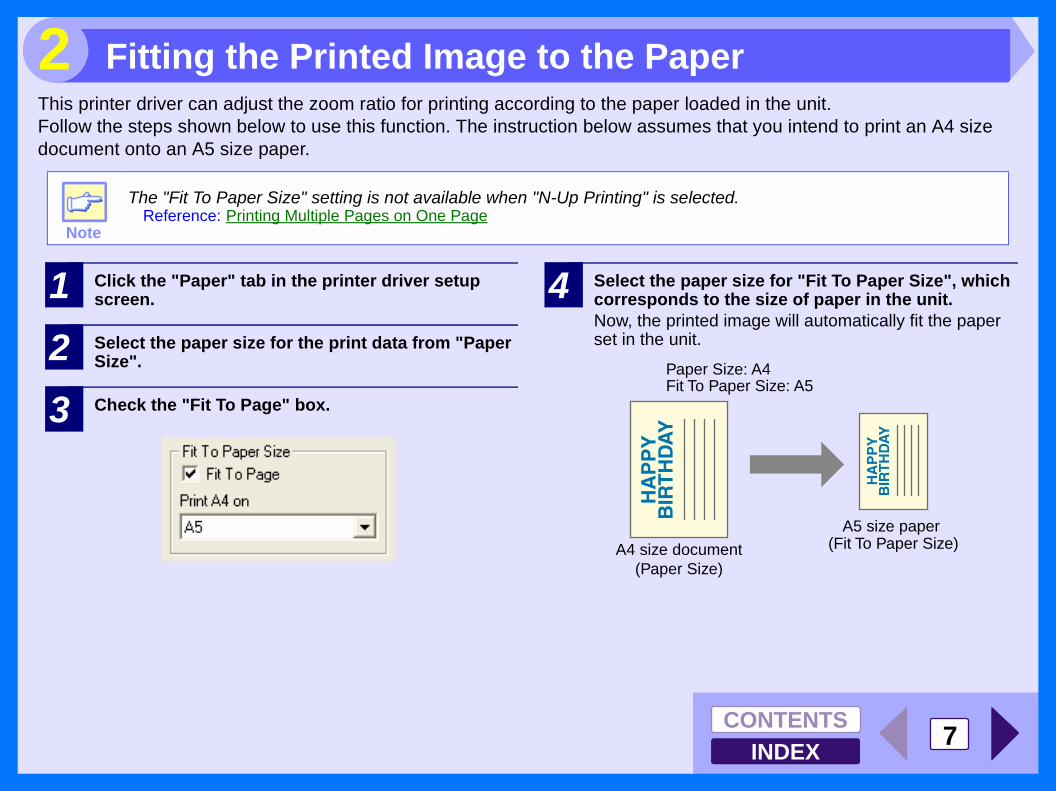
2This printer driver can adjust the zoom ratio for printing according to the paper loaded in the unit.Follow the steps shown below to use this function. The instruction below assumes that you intend to print an A4 size document onto an A5 size paper.
1 Click the "Paper" tab in the printer driver setup screen.
2 Select the paper size for the print data from "Paper Size".
3 Check the "Fit To Page" box.
4 Select the paper size for "Fit To Paper Size", which corresponds to the size of paper in the unit.Now, the printed image will automatically fit the paper set in the unit.
Note
The "Fit To Paper Size" setting is not available when "N-Up Printing" is selected.Reference: Printing Multiple Pages on One Page
Paper Size: A4Fit To Paper Size: A5
A4 size document (Paper Size)
A5 size paper (Fit To Paper Size)
Fitting the Printed Image to the Paper
INDEXCONTENTS 8
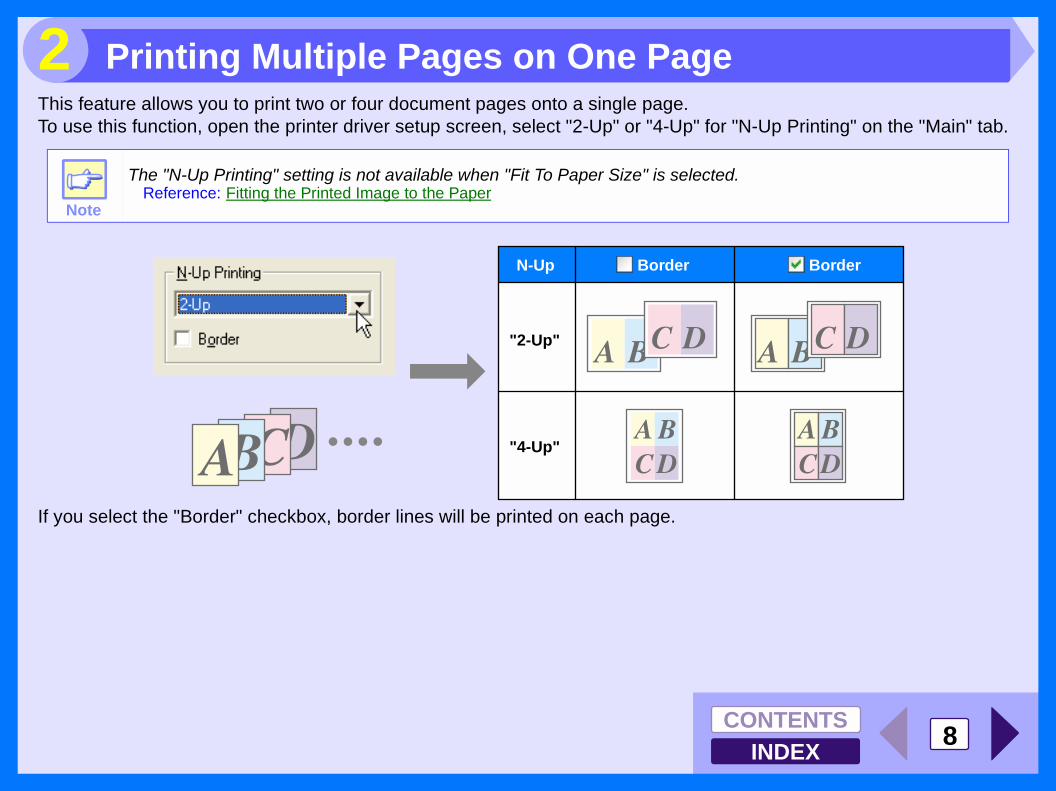
2This feature allows you to print two or four document pages onto a single page.To use this function, open the printer driver setup screen, select "2-Up" or "4-Up" for "N-Up Printing" on the "Main" tab.
If you select the "Border" checkbox, border lines will be printed on each page.
Note
The "N-Up Printing" setting is not available when "Fit To Paper Size" is selected.Reference: Fitting the Printed Image to the Paper
"2-Up"
"4-Up"
BorderBorderN-Up
Printing Multiple Pages on One Page
INDEXCONTENTS 9
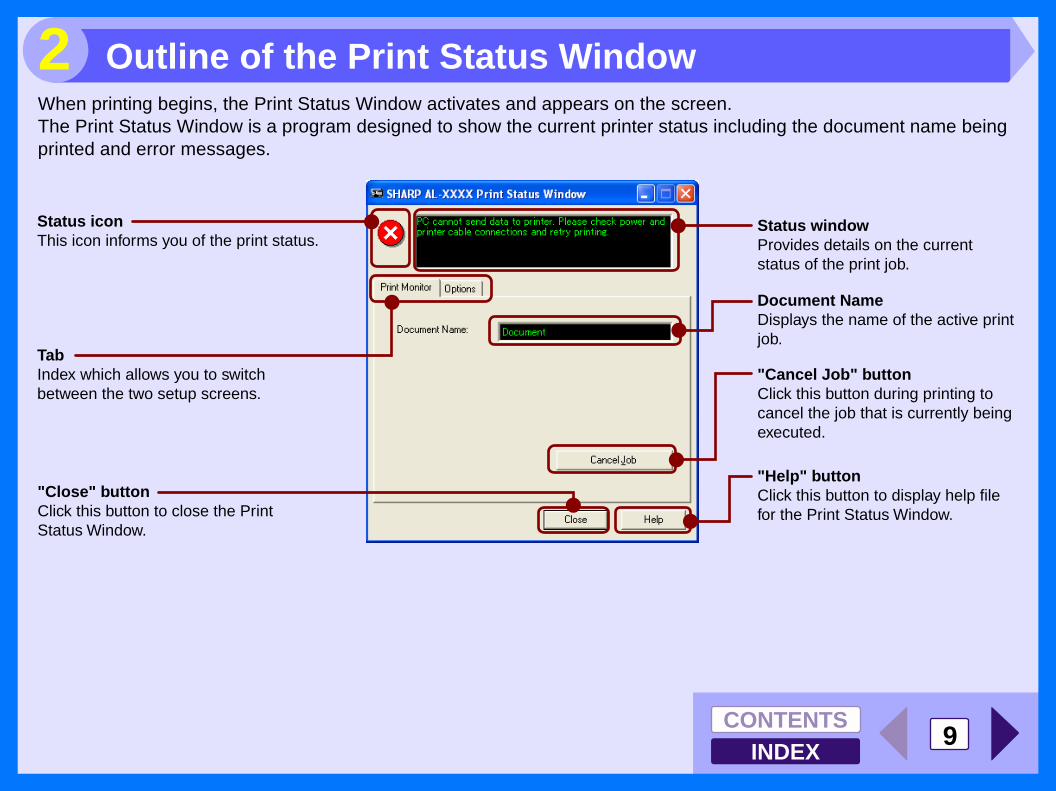
2When printing begins, the Print Status Window activates and appears on the screen.The Print Status Window is a program designed to show the current printer status including the document name being printed and error messages.
Status windowProvides details on the current status of the print job.
Document NameDisplays the name of the active print job.
"Help" buttonClick this button to display help file for the Print Status Window.
Status iconThis icon informs you of the print status.
TabIndex which allows you to switch between the two setup screens.
"Cancel Job" buttonClick this button during printing to cancel the job that is currently being executed.
"Close" buttonClick this button to close the Print Status Window.
Outline of the Print Status Window

INDEXCONTENTS 10
3The flow chart shown below provides scanning overview.
*1:TWAIN is an industry standard for interface of image data processing devices including scanners. By installing a TWAIN driver onto your computer, you can scan and work with images using a variety of TWAIN-compliant applications.
*2:WIA (Windows Imaging Acquisition) is a Windows function that allows a scanner, digital camera or other imaging device to communicate with an image processing application. The WIA driver for this unit can only be used in Windows XP.
*3:To scan using the unit's operation panel, you must first install Button Manager and establish the appropriate settings in the Control Panel. For details, see "USING THE SCANNER MODE" in the Operation Manual.Note that not all scanner functions are available using Button Manager.
Caution
The environment in which the unit's scanning function can be used is subject to certain limitations. For details, see "BEFORE INSTALLATION" in the Operation Manual.
Place the original in the scanning positionReference: For more detail, refer to the "ORIGINAL PLACEMENT" in the Operation Manual.
Start up the "Scanner and Camera Wizard" from "Control Panel" in your computer.
Start up a Twain-compliant or WIA-compliant application, and select the unit's scanner driver.
Change the unit to scanner mode and select scan menu (SC1 to SC6) on the operation panel.
Set the scan preferences
When scanning from TWAIN*1-compliant or WIA*2-compliant application
When scanning from "Scanner and Camera Wizard" (Windows XP)
Using the unit to begin scanning*3
ScanningReference: Scanning an Image from
the "Scanner and Camera Wizard" (Windows XP)
ScanningReference: Scanning an Image from a
TWAIN-Compliant Application,Scanning an Image from a WIA-Compliant Application (Windows XP)
ScanningReference: "USING THE SCANNER
MODE" in the Operation Manual,Outline of Button Manager
Scanning Overview
INDEXCONTENTS 11
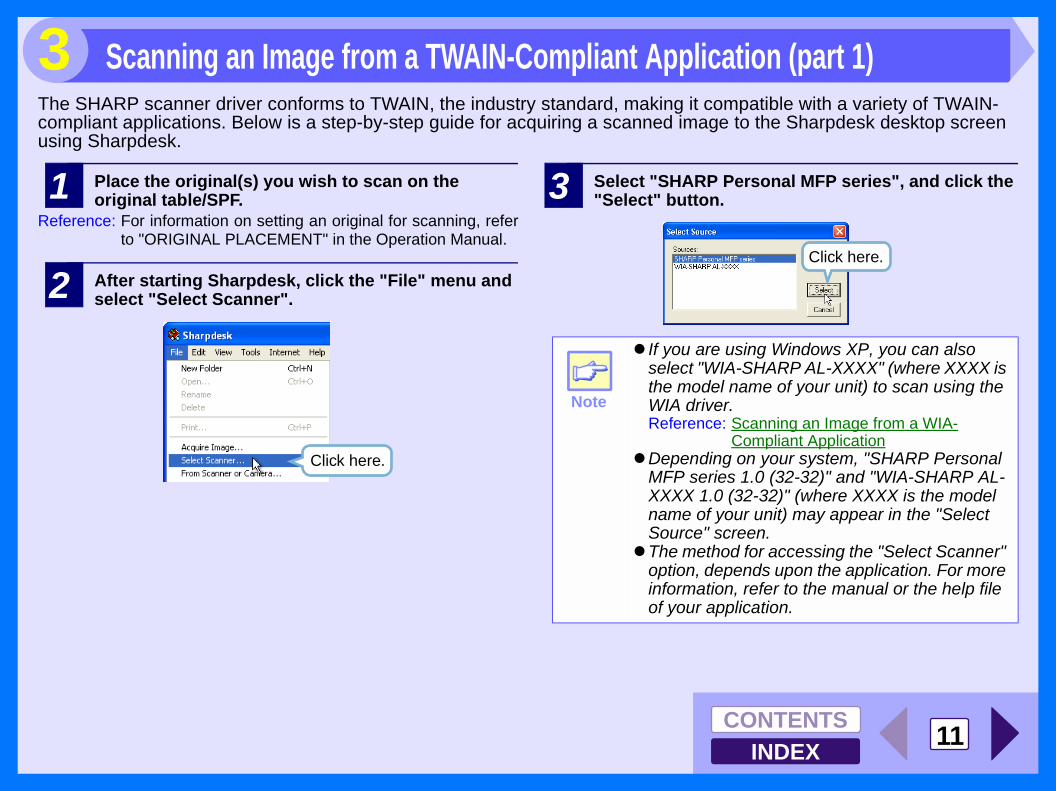
3The SHARP scanner driver conforms to TWAIN, the industry standard, making it compatible with a variety of TWAIN-compliant applications. Below is a step-by-step guide for acquiring a scanned image to the Sharpdesk desktop screen using Sharpdesk.
1 Place the original(s) you wish to scan on the original table/SPF.
Reference: For information on setting an original for scanning, referto "ORIGINAL PLACEMENT" in the Operation Manual.
2 After starting Sharpdesk, click the "File" menu and select "Select Scanner".
3 Select "SHARP Personal MFP series", and click the "Select" button.
Click here.
Note
! If you are using Windows XP, you can also select "WIA-SHARP AL-XXXX" (where XXXX is the model name of your unit) to scan using the WIA driver.Reference: Scanning an Image from a WIA-
Compliant Application!Depending on your system, "SHARP Personal
MFP series 1.0 (32-32)" and "WIA-SHARP AL-XXXX 1.0 (32-32)" (where XXXX is the model name of your unit) may appear in the "Select Source" screen.
!The method for accessing the "Select Scanner" option, depends upon the application. For more information, refer to the manual or the help file of your application.
Click here.
Scanning an Image from a TWAIN-Compliant Application (part 1)
INDEXCONTENTS 12
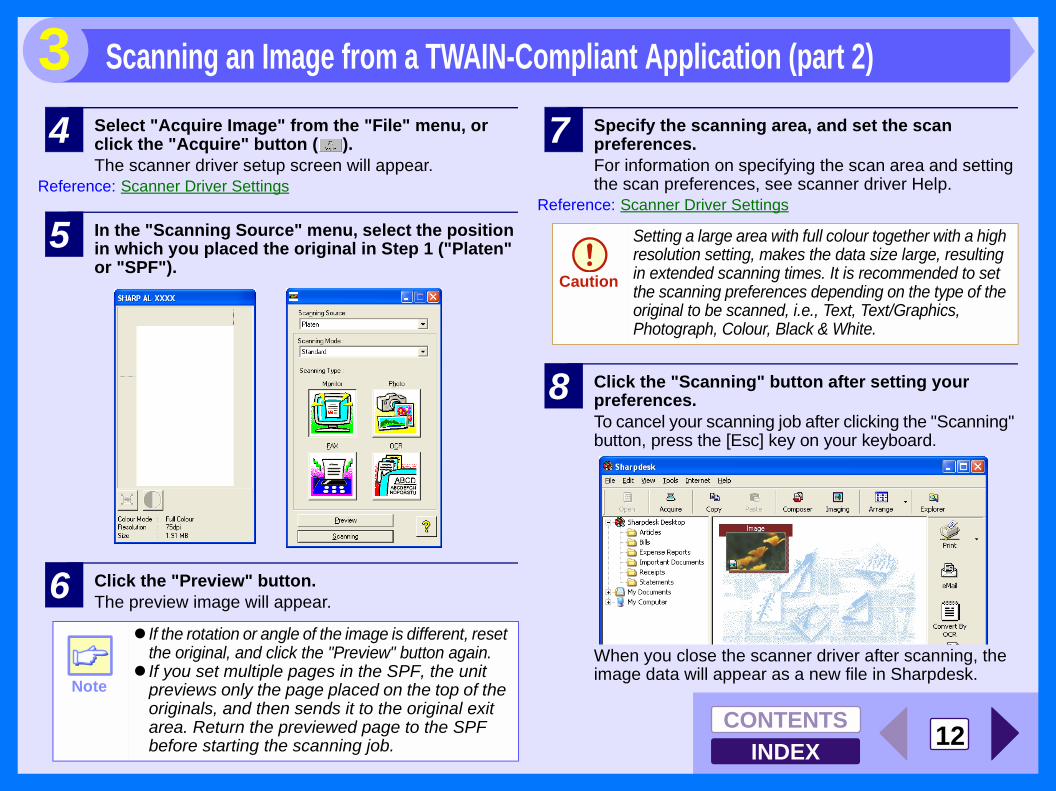
34 Select "Acquire Image" from the "File" menu, or
click the "Acquire" button ( ).The scanner driver setup screen will appear.
Reference: Scanner Driver Settings
5 In the "Scanning Source" menu, select the position in which you placed the original in Step 1 ("Platen" or "SPF").
6 Click the "Preview" button.The preview image will appear.
7 Specify the scanning area, and set the scan preferences.For information on specifying the scan area and setting the scan preferences, see scanner driver Help.
Reference: Scanner Driver Settings
8 Click the "Scanning" button after setting your preferences.To cancel your scanning job after clicking the "Scanning" button, press the [Esc] key on your keyboard.
When you close the scanner driver after scanning, the image data will appear as a new file in Sharpdesk.
Note
! If the rotation or angle of the image is different, reset the original, and click the "Preview" button again.
! If you set multiple pages in the SPF, the unit previews only the page placed on the top of the originals, and then sends it to the original exit area. Return the previewed page to the SPF before starting the scanning job.
Caution
Setting a large area with full colour together with a high resolution setting, makes the data size large, resulting in extended scanning times. It is recommended to set the scanning preferences depending on the type of the original to be scanned, i.e., Text, Text/Graphics, Photograph, Colour, Black & White.
Scanning an Image from a TWAIN-Compliant Application (part 2)
INDEXCONTENTS 13
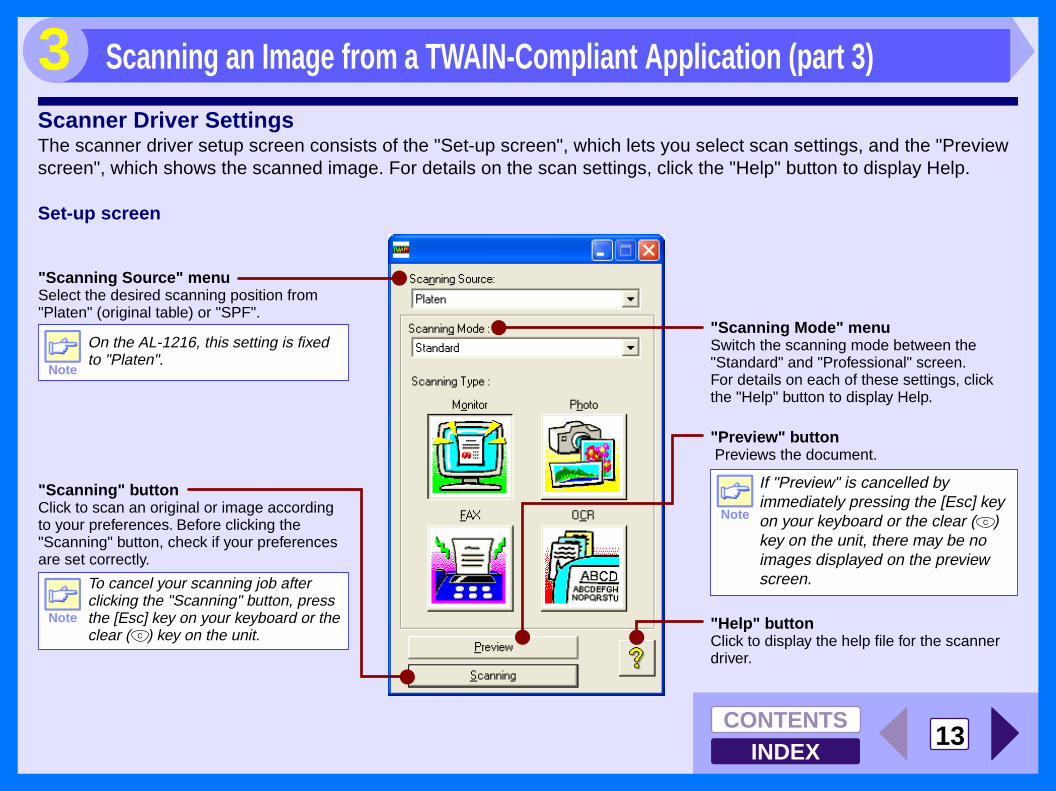
3Scanner Driver SettingsThe scanner driver setup screen consists of the "Set-up screen", which lets you select scan settings, and the "Preview screen", which shows the scanned image. For details on the scan settings, click the "Help" button to display Help.
Set-up screen
Note
"Scanning Source" menuSelect the desired scanning position from "Platen" (original table) or "SPF".
"Help" buttonClick to display the help file for the scanner driver.
"Preview" buttonPreviews the document.
"Scanning" buttonClick to scan an original or image according to your preferences. Before clicking the "Scanning" button, check if your preferences are set correctly.
On the AL-1216, this setting is fixed to "Platen".
"Scanning Mode" menuSwitch the scanning mode between the "Standard" and "Professional" screen.For details on each of these settings, click the "Help" button to display Help.
Note
To cancel your scanning job after clicking the "Scanning" button, press the [Esc] key on your keyboard or the clear ( ) key on the unit.
Note
If "Preview" is cancelled by immediately pressing the [Esc] key on your keyboard or the clear ( ) key on the unit, there may be no images displayed on the preview screen.
Scanning an Image from a TWAIN-Compliant Application (part 3)
INDEXCONTENTS 14
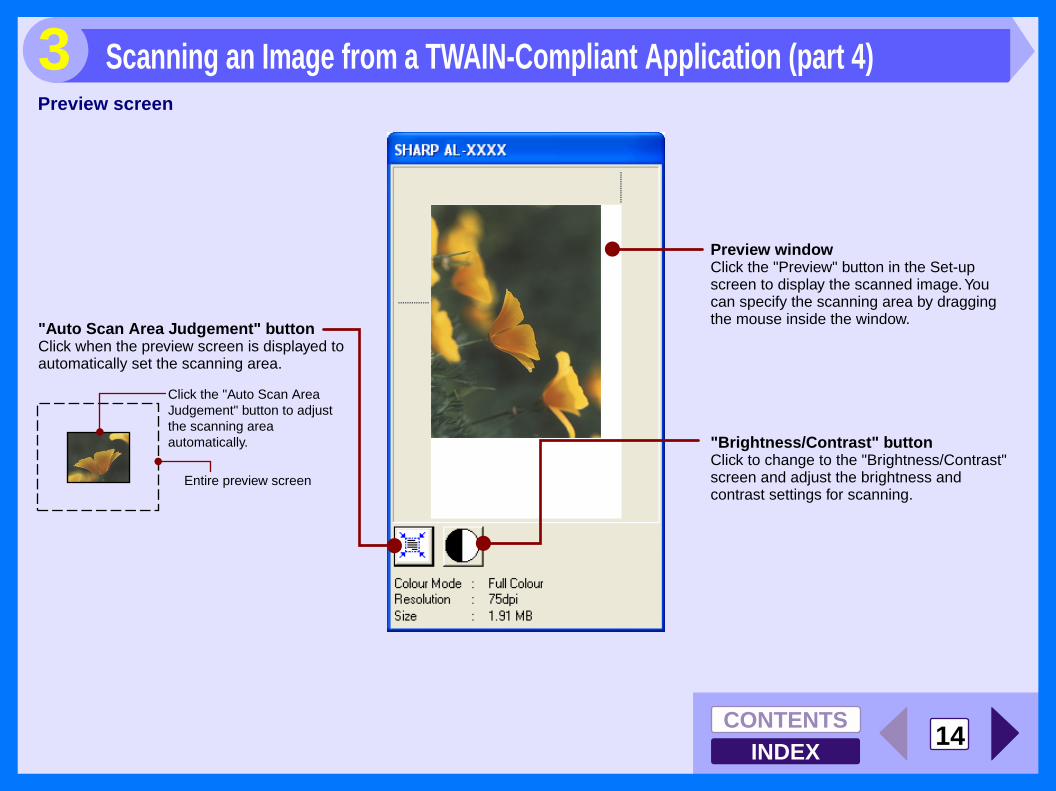
3Preview screen
Preview windowClick the "Preview" button in the Set-up screen to display the scanned image. You can specify the scanning area by dragging the mouse inside the window.
"Auto Scan Area Judgement" buttonClick when the preview screen is displayed to automatically set the scanning area.
Click the "Auto Scan Area Judgement" button to adjust the scanning area automatically.
Entire preview screen
"Brightness/Contrast" buttonClick to change to the "Brightness/Contrast" screen and adjust the brightness and contrast settings for scanning.
Scanning an Image from a TWAIN-Compliant Application (part 4)

INDEXCONTENTS 15
3If you are using Windows XP, you can use the WIA driver to scan from Sharpdesk, Paint and other WIA-compliant applications. The procedure for scanning using Paint is explained in the following.
1 Place the original you wish to scan on the original table/SPF.
Reference: For information on setting an original for scanning, referto "ORIGINAL PLACEMENT" in the Operation Manual.
2 After starting Paint, click the "File" menu and select "From Scanner or Camera".The scan screen of the WIA driver will appear.
Click here.
Note
If you have WIA drivers for other devices installed in your computer, the "Select Device" screen will open. Select "SHARP AL-XXXX" (where XXXX is the model name of your unit) and click the "OK" button.
Click here.
Scanning an Image from a WIA-Compliant Application (Windows XP) (part 1)
INDEXCONTENTS 16
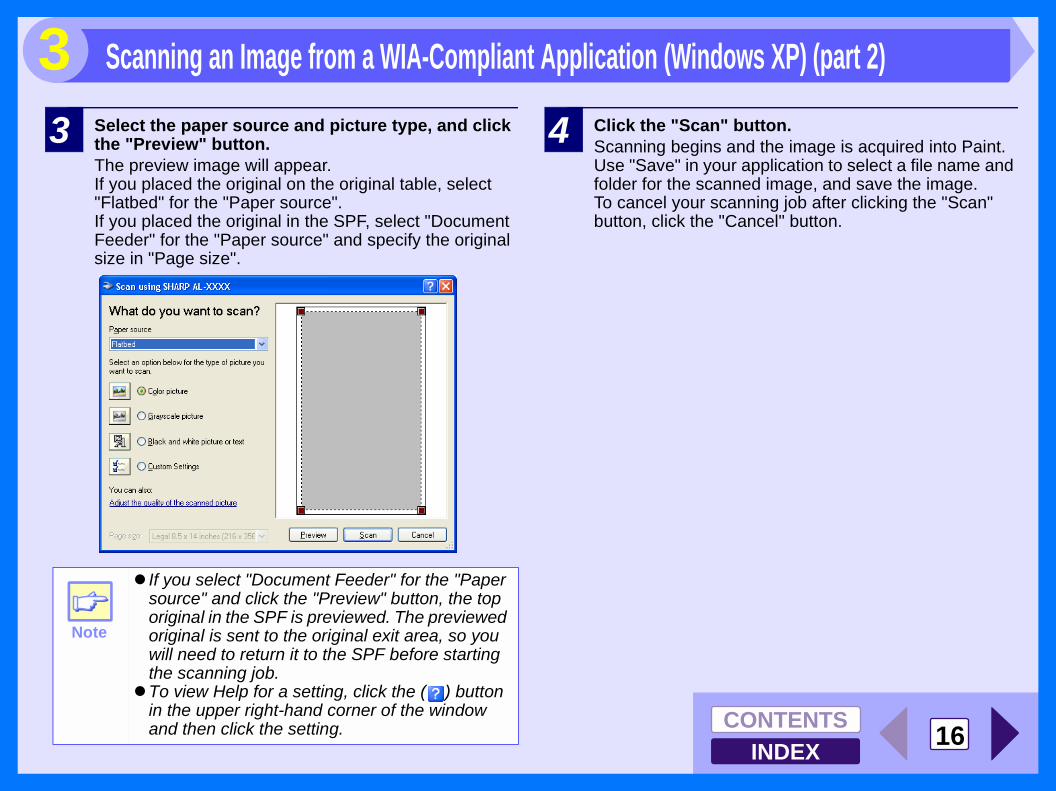
33 Select the paper source and picture type, and click
the "Preview" button.The preview image will appear.If you placed the original on the original table, select "Flatbed" for the "Paper source".If you placed the original in the SPF, select "Document Feeder" for the "Paper source" and specify the original size in "Page size".
4 Click the "Scan" button.Scanning begins and the image is acquired into Paint.Use "Save" in your application to select a file name and folder for the scanned image, and save the image.To cancel your scanning job after clicking the "Scan" button, click the "Cancel" button.
Note
! If you select "Document Feeder" for the "Paper source" and click the "Preview" button, the top original in the SPF is previewed. The previewed original is sent to the original exit area, so you will need to return it to the SPF before starting the scanning job.
!To view Help for a setting, click the ( ) button in the upper right-hand corner of the window and then click the setting.
Scanning an Image from a WIA-Compliant Application (Windows XP) (part 2)

INDEXCONTENTS 17
3The procedure for scanning with the "Scanner and Camera Wizard" in Windows XP is explained here. The "Scanner and Camera Wizard" lets you scan an image without using a WIA-compliant application.
1 Place the original you wish to scan on the original table/SPF.
Reference: For information on setting an original for scanning, referto "ORIGINAL PLACEMENT" in the Operation Manual.
2 Click the "start" button, click "Control Panel", click "Printers and Other Hardware", and then click "Scanners and Cameras".
3 Click the "SHARP AL-XXXX" (where XXXX is the model name of your unit) icon and then click "Get pictures" in "Imaging Tasks".The "Scanner and Camera Wizard" will appear.
4 Click the "Next" button.
Scanning an Image from the "Scanner and Camera Wizard" (Windows XP) (part 1)
INDEXCONTENTS 18
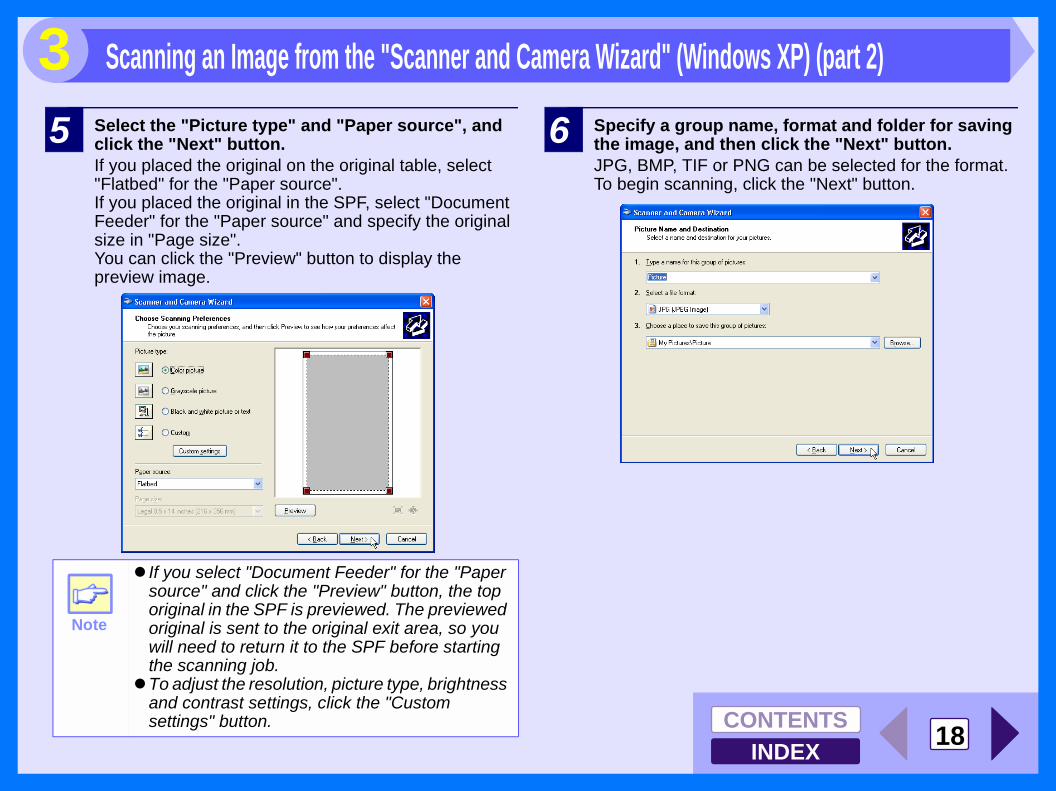
35 Select the "Picture type" and "Paper source", and
click the "Next" button.If you placed the original on the original table, select "Flatbed" for the "Paper source".If you placed the original in the SPF, select "Document Feeder" for the "Paper source" and specify the original size in "Page size".You can click the "Preview" button to display the preview image.
6 Specify a group name, format and folder for saving the image, and then click the "Next" button.JPG, BMP, TIF or PNG can be selected for the format. To begin scanning, click the "Next" button.
Note
! If you select "Document Feeder" for the "Paper source" and click the "Preview" button, the top original in the SPF is previewed. The previewed original is sent to the original exit area, so you will need to return it to the SPF before starting the scanning job.
!To adjust the resolution, picture type, brightness and contrast settings, click the "Custom settings" button.
Scanning an Image from the "Scanner and Camera Wizard" (Windows XP) (part 2)
INDEXCONTENTS 19
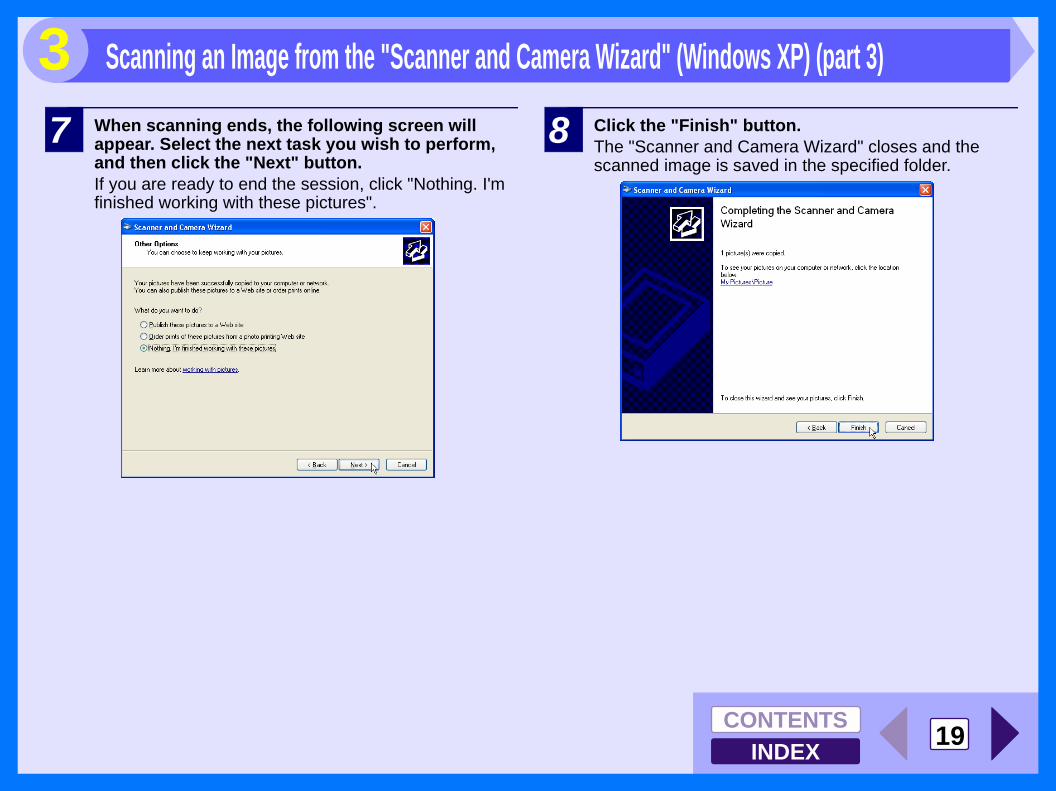
37 When scanning ends, the following screen will
appear. Select the next task you wish to perform, and then click the "Next" button.If you are ready to end the session, click "Nothing. I'm finished working with these pictures".
8 Click the "Finish" button.The "Scanner and Camera Wizard" closes and the scanned image is saved in the specified folder.
Scanning an Image from the "Scanner and Camera Wizard" (Windows XP) (part 3)
INDEXCONTENTS 20
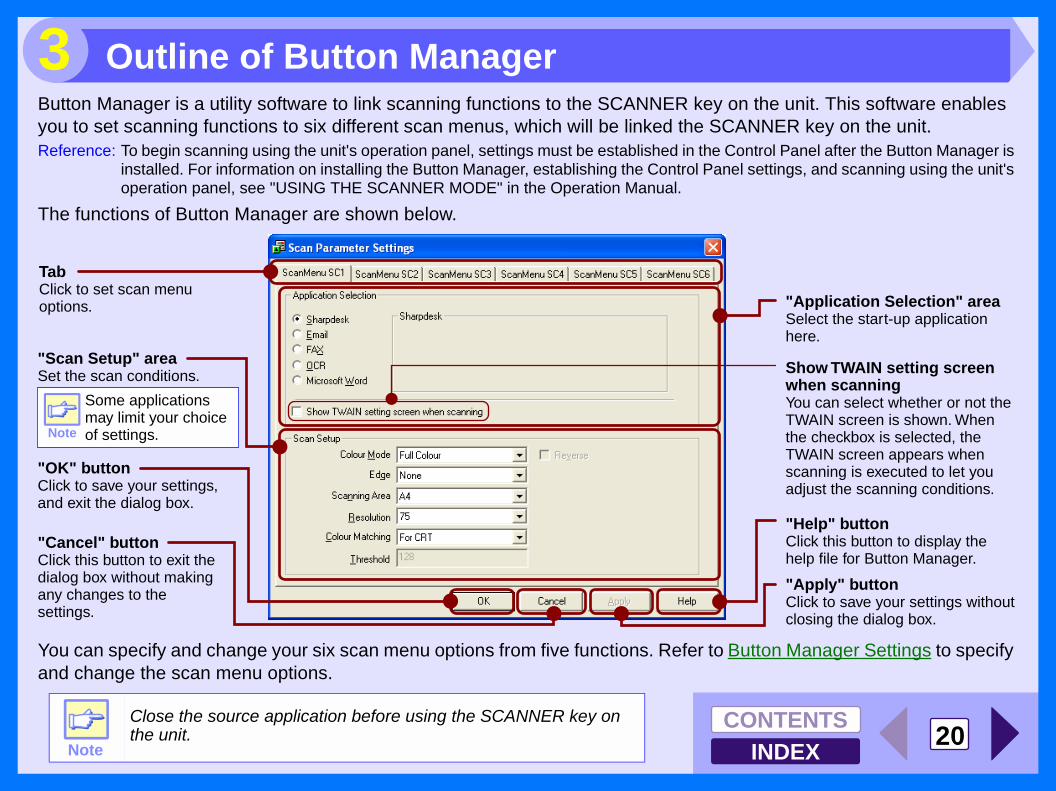
3Button Manager is a utility software to link scanning functions to the SCANNER key on the unit. This software enables you to set scanning functions to six different scan menus, which will be linked the SCANNER key on the unit.Reference: To begin scanning using the unit's operation panel, settings must be established in the Control Panel after the Button Manager is
installed. For information on installing the Button Manager, establishing the Control Panel settings, and scanning using the unit's operation panel, see "USING THE SCANNER MODE" in the Operation Manual.
The functions of Button Manager are shown below.
You can specify and change your six scan menu options from five functions. Refer to Button Manager Settings to specify and change the scan menu options.
TabClick to set scan menu options.
Show TWAIN setting screen when scanningYou can select whether or not the TWAIN screen is shown. When the checkbox is selected, the TWAIN screen appears when scanning is executed to let you adjust the scanning conditions.
"Application Selection" areaSelect the start-up application here.
"Help" buttonClick this button to display the help file for Button Manager.
"Apply" buttonClick to save your settings without closing the dialog box.
"Cancel" buttonClick this button to exit the dialog box without making any changes to the settings.
"OK" buttonClick to save your settings, and exit the dialog box.
Note
Some applications may limit your choice of settings.
"Scan Setup" areaSet the scan conditions.
Note
Close the source application before using the SCANNER key on the unit.
Outline of Button Manager
INDEXCONTENTS 21
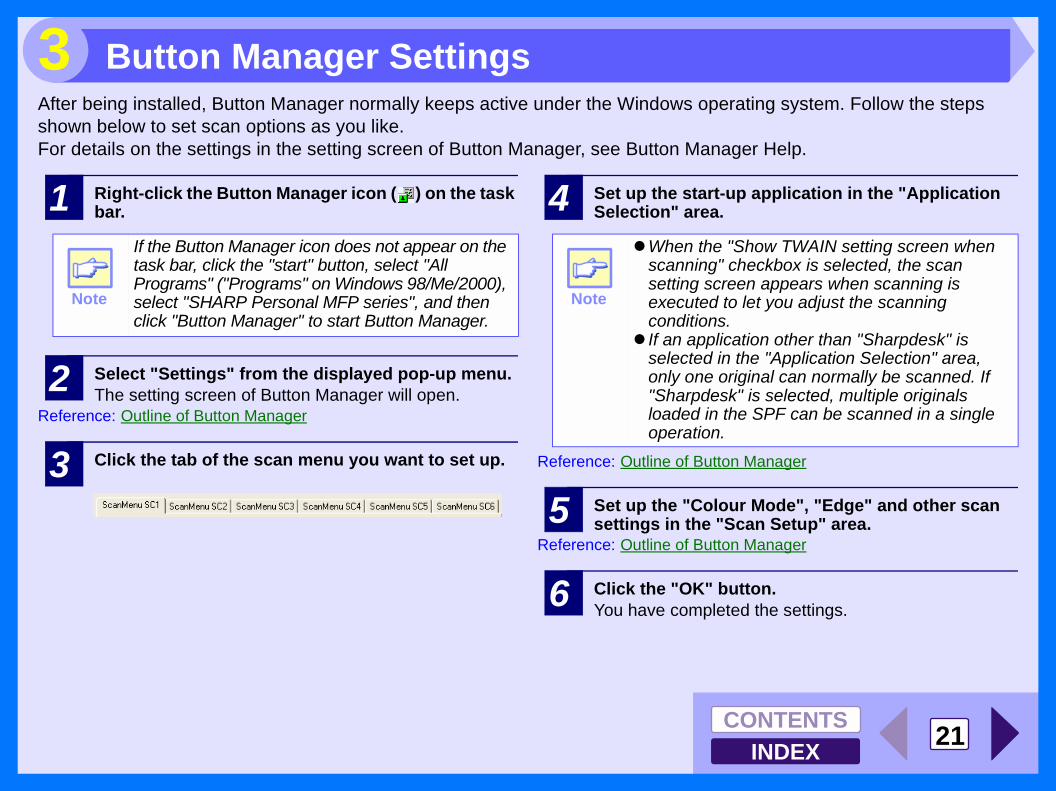
3After being installed, Button Manager normally keeps active under the Windows operating system. Follow the steps shown below to set scan options as you like.For details on the settings in the setting screen of Button Manager, see Button Manager Help.
1 Right-click the Button Manager icon ( ) on the task bar.
2 Select "Settings" from the displayed pop-up menu.The setting screen of Button Manager will open.
Reference: Outline of Button Manager
3 Click the tab of the scan menu you want to set up.
4 Set up the start-up application in the "Application Selection" area.
Reference: Outline of Button Manager
5 Set up the "Colour Mode", "Edge" and other scan settings in the "Scan Setup" area.
Reference: Outline of Button Manager
6 Click the "OK" button.You have completed the settings.
Note
If the Button Manager icon does not appear on the task bar, click the "start" button, select "All Programs" ("Programs" on Windows 98/Me/2000), select "SHARP Personal MFP series", and then click "Button Manager" to start Button Manager.
Note
!When the "Show TWAIN setting screen when scanning" checkbox is selected, the scan setting screen appears when scanning is executed to let you adjust the scanning conditions.
! If an application other than "Sharpdesk" is selected in the "Application Selection" area, only one original can normally be scanned. If "Sharpdesk" is selected, multiple originals loaded in the SPF can be scanned in a single operation.
Button Manager Settings
INDEXCONTENTS 22
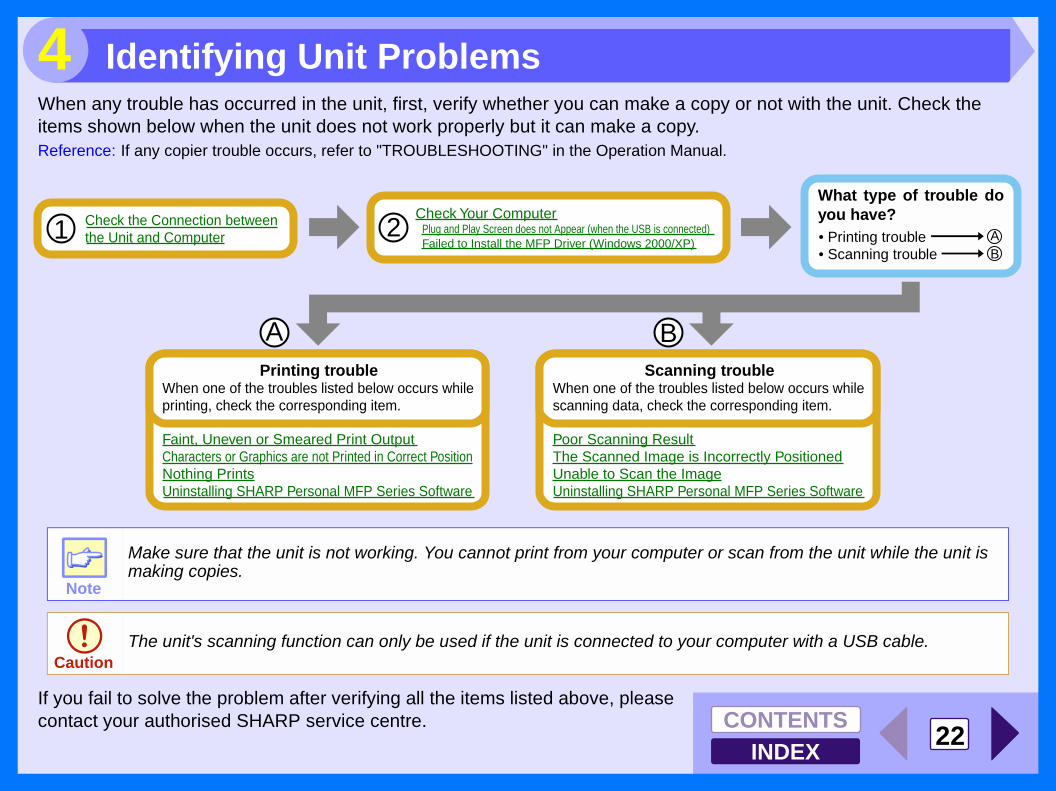
4When any trouble has occurred in the unit, first, verify whether you can make a copy or not with the unit. Check the items shown below when the unit does not work properly but it can make a copy.Reference: If any copier trouble occurs, refer to "TROUBLESHOOTING" in the Operation Manual.
If you fail to solve the problem after verifying all the items listed above, please contact your authorised SHARP service centre.
Note
Make sure that the unit is not working. You cannot print from your computer or scan from the unit while the unit is making copies.
CautionThe unit's scanning function can only be used if the unit is connected to your computer with a USB cable.
Check Your ComputerPlug and Play Screen does not Appear (when the USB is connected)Failed to Install the MFP Driver (Windows 2000/XP)
Check the Connection between the Unit and Computer
A
1 2
B
What type of trouble do you have?• Printing trouble• Scanning trouble B
A
Faint, Uneven or Smeared Print OutputCharacters or Graphics are not Printed in Correct PositionNothing PrintsUninstalling SHARP Personal MFP Series Software
Printing troubleWhen one of the troubles listed below occurs while printing, check the corresponding item.
Poor Scanning ResultThe Scanned Image is Incorrectly PositionedUnable to Scan the ImageUninstalling SHARP Personal MFP Series Software
Scanning troubleWhen one of the troubles listed below occurs while scanning data, check the corresponding item.
Identifying Unit Problems

INDEXCONTENTS 23
4CHECK1 Is the interface cable compatible with the
unit and computer?Interface cables compatible with this unit are USB and parallel cables. Check which type of cable is supported by your computer, and then purchase one of the following cables accordingly:USB cableShielded twisted pair cable (2 m (6 feet) Max.: high-speed transmission equivalent)Parallel interface cableIEEE 1284 - Shielded type bi-directional parallel interface cable (2 m (6 feet) Max.)
CHECK2 Is the interface cable connected securely?Check if the interface cable is securely plugged into the connectors of the unit and computer. It is also advisable to ensure that the connector pins are not bent.Reference: See "CONNECTING THE INTERFACE
CABLE" in the Operation Manual for more details on interface connection.
CHECK3 Are any other USB peripherals being connected along with the unit?If other USB peripherals are connected through the same hub, disconnect them to see if the problem still exists.
If the USB cable becomes disconnectedIf the USB cable becomes disconnected, even only once during the unit's operation, then printing and scanning may be disrupted.If this occurs, check the USB cable and ensure that it is securely connected, then restart the computer.
Caution
The unit's scanning function can only be used if the unit is connected to your computer with a USB cable.
Check the Connection between the Unit and Computer
INDEXCONTENTS 24
4Reference: Plug and Play Screen does not Appear (when the USB is connected)
CHECK1 Is there enough computer memory or hard disk space?To use this unit, you must have an adequate amount of hard disk space. If there is insufficient hard disk space, delete unnecessary files to increase the free space of the hard disk. If there is insufficient memory, close unnecessary applications to increase memory available for printing or scanning. If you are still unable to print or scan, install more memory into your computer.
CHECK2 Is your hard disk fragmented?When data is frequently stored/deleted, the hard disk may become fragmented causing a reduction in printing or scanning speed. In this case it is recommended to defragment your hard disk. You may use the Windows tools or a commercially available hard disk defragmenting tool.
CHECK3 If your computer is connected to the unit through the parallel port, is the parallel port (LPT) mode set to other than EPP mode?The unit may not operate correctly if the parallel port mode is set to EPP mode. To set the parallel port mode to a mode other than EPP mode, refer to your computer manual or ask the manufacturer of the computer. ECP mode is recommended to obtain the best performance from the unit. Note that some computers may use different names for the modes.
Caution
If you are using Windows XP, the "Found New Hardware Wizard" may appear after you change the port setting. In this case, click the "Cancel" button to close the wizard, and then reinstall the printer driver as explained in "INSTALLING THE SOFTWARE" in the Operation Manual.
Check Your Computer
INDEXCONTENTS 25
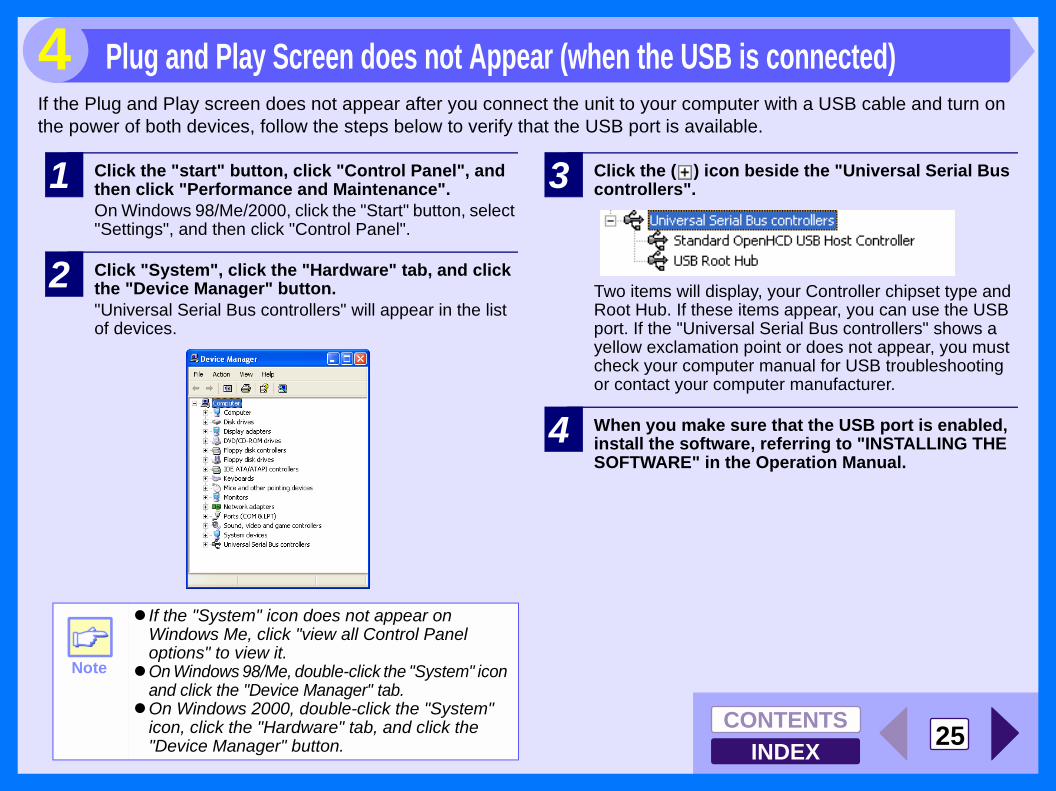
4If the Plug and Play screen does not appear after you connect the unit to your computer with a USB cable and turn on the power of both devices, follow the steps below to verify that the USB port is available.
1 Click the "start" button, click "Control Panel", and then click "Performance and Maintenance".On Windows 98/Me/2000, click the "Start" button, select "Settings", and then click "Control Panel".
2 Click "System", click the "Hardware" tab, and click the "Device Manager" button."Universal Serial Bus controllers" will appear in the list of devices.
3 Click the ( ) icon beside the "Universal Serial Bus controllers".
Two items will display, your Controller chipset type and Root Hub. If these items appear, you can use the USB port. If the "Universal Serial Bus controllers" shows a yellow exclamation point or does not appear, you must check your computer manual for USB troubleshooting or contact your computer manufacturer.
4 When you make sure that the USB port is enabled, install the software, referring to "INSTALLING THE SOFTWARE" in the Operation Manual.
Note
! If the "System" icon does not appear on Windows Me, click "view all Control Panel options" to view it.
!On Windows 98/Me, double-click the "System" icon and click the "Device Manager" tab.
!On Windows 2000, double-click the "System" icon, click the "Hardware" tab, and click the "Device Manager" button.
Plug and Play Screen does not Appear (when the USB is connected)
INDEXCONTENTS 26
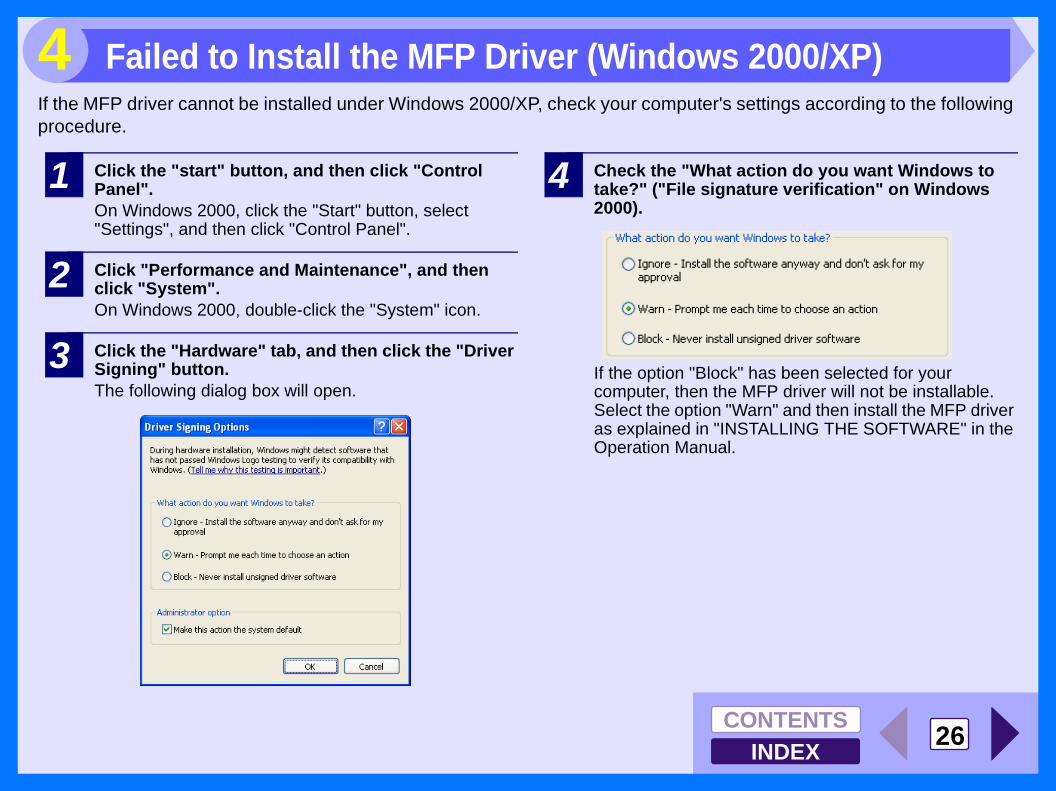
4If the MFP driver cannot be installed under Windows 2000/XP, check your computer's settings according to the following procedure.
1 Click the "start" button, and then click "Control Panel".On Windows 2000, click the "Start" button, select "Settings", and then click "Control Panel".
2 Click "Performance and Maintenance", and then click "System".On Windows 2000, double-click the "System" icon.
3 Click the "Hardware" tab, and then click the "Driver Signing" button.The following dialog box will open.
4 Check the "What action do you want Windows to take?" ("File signature verification" on Windows 2000).
If the option "Block" has been selected for your computer, then the MFP driver will not be installable. Select the option "Warn" and then install the MFP driver as explained in "INSTALLING THE SOFTWARE" in the Operation Manual.
Failed to Install the MFP Driver (Windows 2000/XP)

INDEXCONTENTS 27
4If print output is faint, uneven or smeared, follow the steps listed below.
CHECK1 Has the printer driver been specified to suit both paper and the print job?You can select "Draft", "Normal" or "Photo" for the print quality in the "Advanced" tab of the printer driver setup screen. When "Photo" is selected, you can click the "Image Adjustment" button and adjust the brightness and contrast in the dialog box that appears. Adjust these settings appropriately for your print data and try printing again.Reference: Printer Driver Settings
CHECK2 Is the paper curled?If the paper is curled, straighten it up and set it in the unit again.
CHECK3 Is the paper too thick or too thin?Only paper weighing from 56 g/m2 to 80 g/m2 (15 lbs. to 21 lbs.) can be used in the paper tray. Only paper weighing from 52 g/m2 to 128 g/m2 (14 lbs. to 34.5 lbs.) can be used in the multi-bypass tray and single bypass.
CHECK4 Is it near time to replace the TD cartridge or drum cartridge?When it is near time to replace the TD cartridge or drum cartridge, the TD cartridge replacement required ( ) indicator or drum cartridge replacement required ( ) indicator will light steadily on the unit operation panel. When it is time to replace either cartridge, the indicator will blink. Replace the cartridge and try printing again.Reference: See "TD CARTRIDGE REPLACEMENT",
"DRUM CARTRIDGE REPLACEMENT" and "ABOUT SUPPLIES AND OPTIONS" in the Operation Manual.
CHECK5 Did you set sufficient margins in the paper settings of your application?If the margins are set outside of the quality guaranteed area, smudges or smears may appear at the upper and lower edges of the paper.When selecting the paper settings in the application, set the margins from the top, bottom, left and right edges of the paper to 4 mm (5/32").
Faint, Uneven or Smeared Print Output
INDEXCONTENTS 28
4If a document is printed skewed or partly off the paper, follow the steps listed below.
CHECK1 Is the paper size loaded in the tray the same as that specified in the printer driver?Check if the "Paper Size" options suit the size of the paper loaded in the tray.If the "Fit To Page" setting is activated, make sure that the paper size selected from the drop-down list of the "Fit To Paper Size" option is the same as the size of the loaded paper.
CHECK2 Is the orientation of document setting correct?Click the "Paper" tab in the printer driver setup screen, and verify if the "Image Orientation" option is set to your requirements.
CHECK3 Is the paper loaded correctly?If a document is physically damaged when it is output or the image is skewed on the paper, discard the damaged sheet, reinsert the paper supply and print again. Insert the paper so that there is no visible space between the paper and the paper guides.Reference: See "LOADING PAPER" in the Operation
Manual for more details on inserting paper.
CHECK4 Did you correctly specify the margins for the application in use?Check the layout of the document margins and the paper size settings for the application you are using. Also check if the print settings are specified correctly to suit the paper size.Reference: Faint, Uneven or Smeared Print Output
Characters or Graphics are not Printed in Correct Position
INDEXCONTENTS 29
4If nothing prints even when the unit is turned on, please wait a few moments. The unit needs a longer time to process intricate data. If the unit still does not print, refer to the check list below.
CHECK1 Has a paper jam occurred?When the misfeed ( ) indicator blinks or ( ) blinks in the display, the unit will stop because of a misfeed.Remove the jammed paper as explained in "MISFEED REMOVAL" in the Operation Manual.
CHECK2 Is the ONLINE indicator off?The ONLINE indicator on the operation panel turns off while the unit is used for copying. Printing is not possible at this time. When copying is finished, the ONLINE indicator will turn on after the set auto clear time elapses, and the unit will be ready for printing. You can also press the clear ( ) key twice or press the ONLINE key to make the unit ready for printing.
CHECK3 Is your unit selected correctly in the current application for the print job?When choosing "Print" from the "File" menu located in applications, be sure you have selected "SHARP AL-XXXX" (where XXXX is the model name of your unit) printer displayed in the "Print" dialog box.
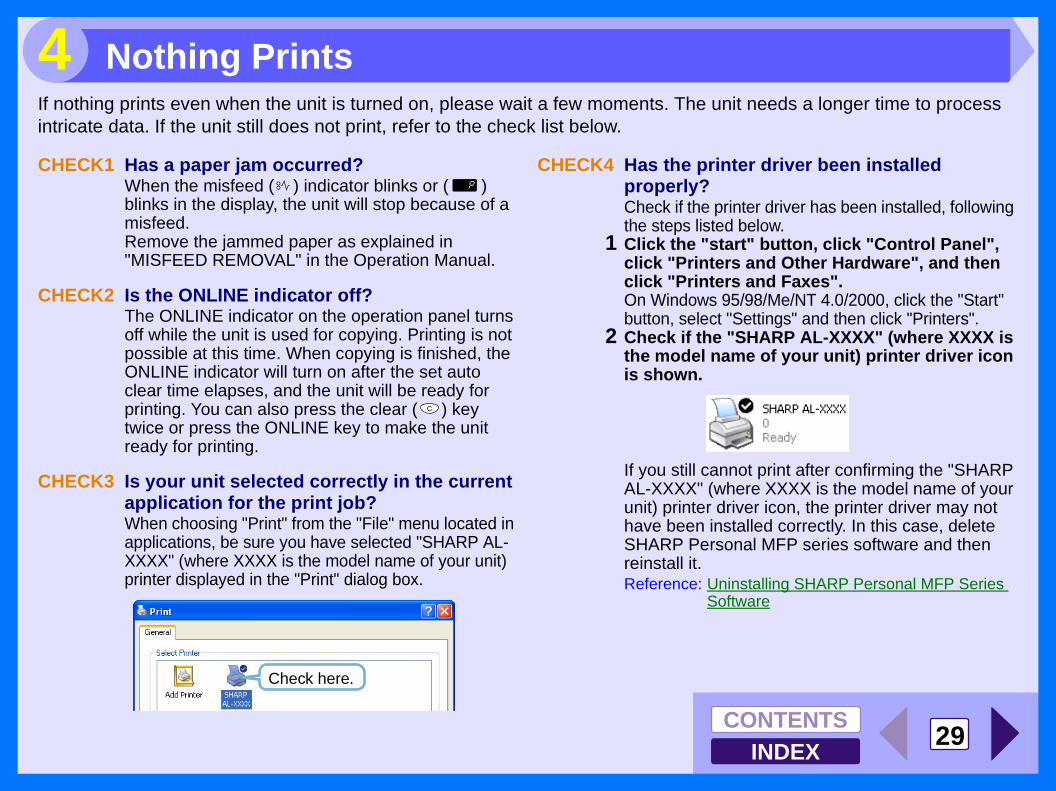
CHECK4 Has the printer driver been installed properly?Check if the printer driver has been installed, following the steps listed below.
1 Click the "start" button, click "Control Panel", click "Printers and Other Hardware", and then click "Printers and Faxes".On Windows 95/98/Me/NT 4.0/2000, click the "Start" button, select "Settings" and then click "Printers".
2 Check if the "SHARP AL-XXXX" (where XXXX is the model name of your unit) printer driver icon is shown.
If you still cannot print after confirming the "SHARP AL-XXXX" (where XXXX is the model name of your unit) printer driver icon, the printer driver may not have been installed correctly. In this case, delete SHARP Personal MFP series software and then reinstall it.Reference: Uninstalling SHARP Personal MFP Series
Software
Check here.
Nothing Prints
INDEXCONTENTS 30
4If you get poor quality as a result of a scanning job, and you cannot improve the quality by changing preferences, refer to the check list shown below.CHECK1 Is the original clean?
Check your original before scanning. If any dust sticks to the original, you cannot obtain a clean result. In addition, make sure that the original table is also clean.
CHECK2 Have you specified a suitable resolution?Make sure that the value for the "Resolution" setting in the scanner driver satisfies the requirement of the set original.Reference: Scanning an Image from a TWAIN-
Compliant Application, Scanning an Image from a WIA-Compliant Application (Windows XP), Scanning an Image from the "Scanner and Camera Wizard" (Windows XP),
CHECK3 Have you specified a suitable value for the "B/W Threshold" setting?If you are scanning with a TWAIN-compliant application and are using "Mono 2 gradation (no Green)","Mono 2 gradation (no Red)" or "Mono 2 gradation (no Blue)" mode, make sure that a suitable value is specified for the "B/W Threshold" setting. A larger threshold value makes your output darker, whilst a small threshold value makes it lighter. To adjust the threshold automatically, click the "Auto Threshold" button on the "Image" tab of the "Professional" screen.Reference: Scanning an Image from a TWAIN-
Compliant Application
CHECK4 Have you adjusted the brightness and contrast suitably?If you are scanning with a TWAIN-compliant application and the resulting image has unsuitable brightness or contrast (for example it is too bright), activate the "Auto Contrast/Brightness Adjustment" setting on the "Main" tab of the "Professional" screen. Click the "Brightness/Contrast" button to adjust the brightness and the contrast viewing the scanned output image on the screen.If you are scanning with a WIA-compliant application or the "Scanner and Camera Wizard", click "Adjust the quality of the scanned picture" or the "Custom settings" button, and adjust the brightness and contrast in the screen that appears.
If part of the image from the back side of the originalappears in the preview scan.
If you are using a TWAIN-compliant application and the back side of the original appears faintly in the preview image, try adjusting the Brightness and Contrast settings.Click the "Brightness/Contrast" button in the Preview screen to change to the Brightness/Contrast screen, and adjust the "Brightness" and "Contrast" values. A preview of the image using the new values appears under "After". When the image of the back side disappears and you can get only the needed image, click the "Apply" button to apply the new settings, and then click the "Scanning" button to scan the image.
Poor Scanning Result

INDEXCONTENTS 31
4If the scanned image is incorrectly positioned, refer to the check list shown below.
CHECK1 Have you placed the original straight?Place the original straight on the original table.Reference: Refer to "ORIGINAL PLACEMENT" in the
Operation Manual for the detail on how to set the original.
CHECK2 Have you set the original correctly on the original table?Place the original on the original table in the direction as shown in the illustration below.
CHECK3 Have you set the original correctly on the SPF?To scan from the SPF, align the guide to the original as shown in the illustration below.
Align the centre of the original with ( ) mark.
Align the guide to the original.
The Scanned Image is Incorrectly Positioned
INDEXCONTENTS 32
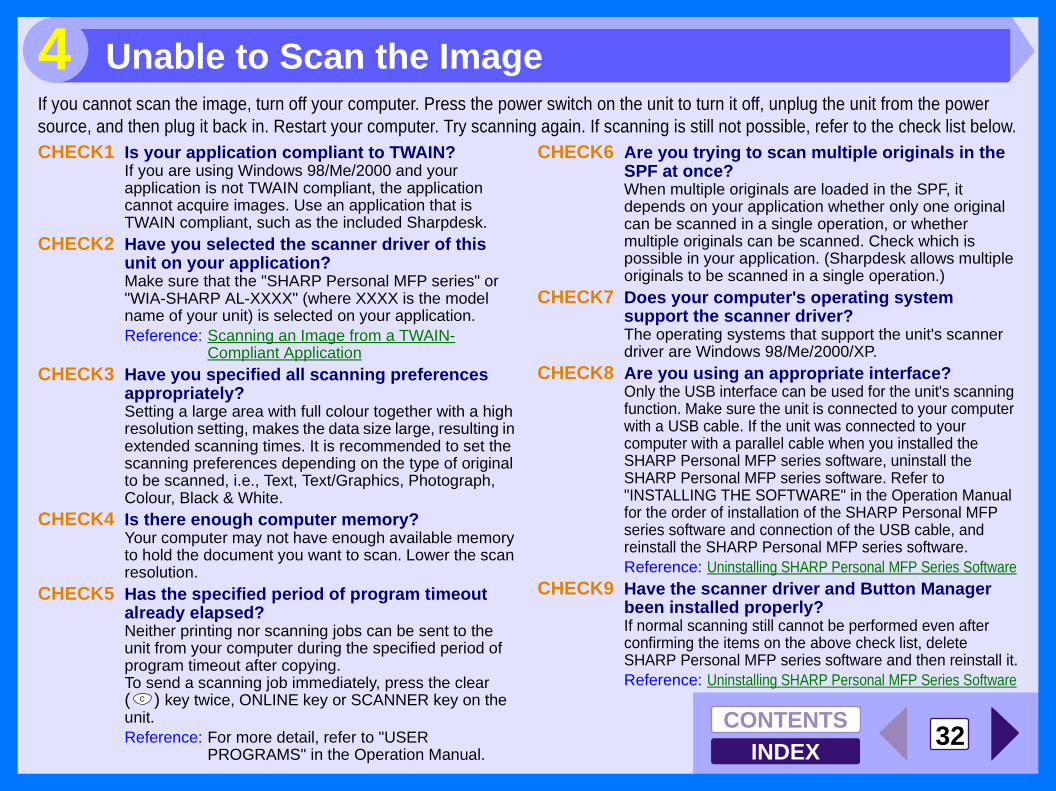
4If you cannot scan the image, turn off your computer. Press the power switch on the unit to turn it off, unplug the unit from the power source, and then plug it back in. Restart your computer. Try scanning again. If scanning is still not possible, refer to the check list below.CHECK1 Is your application compliant to TWAIN?
If you are using Windows 98/Me/2000 and your application is not TWAIN compliant, the application cannot acquire images. Use an application that is TWAIN compliant, such as the included Sharpdesk.
CHECK2 Have you selected the scanner driver of this unit on your application?Make sure that the "SHARP Personal MFP series" or "WIA-SHARP AL-XXXX" (where XXXX is the model name of your unit) is selected on your application.Reference: Scanning an Image from a TWAIN-
Compliant ApplicationCHECK3 Have you specified all scanning preferences
appropriately?Setting a large area with full colour together with a high resolution setting, makes the data size large, resulting in extended scanning times. It is recommended to set the scanning preferences depending on the type of original to be scanned, i.e., Text, Text/Graphics, Photograph, Colour, Black & White.
CHECK4 Is there enough computer memory?Your computer may not have enough available memory to hold the document you want to scan. Lower the scan resolution.
CHECK5 Has the specified period of program timeout already elapsed?Neither printing nor scanning jobs can be sent to the unit from your computer during the specified period of program timeout after copying.To send a scanning job immediately, press the clear ( ) key twice, ONLINE key or SCANNER key on the unit.Reference: For more detail, refer to "USER
PROGRAMS" in the Operation Manual.
CHECK6 Are you trying to scan multiple originals in the SPF at once?When multiple originals are loaded in the SPF, it depends on your application whether only one original can be scanned in a single operation, or whether multiple originals can be scanned. Check which is possible in your application. (Sharpdesk allows multiple originals to be scanned in a single operation.)
CHECK7 Does your computer's operating system support the scanner driver?The operating systems that support the unit's scanner driver are Windows 98/Me/2000/XP.
CHECK8 Are you using an appropriate interface?Only the USB interface can be used for the unit's scanning function. Make sure the unit is connected to your computer with a USB cable. If the unit was connected to your computer with a parallel cable when you installed the SHARP Personal MFP series software, uninstall the SHARP Personal MFP series software. Refer to "INSTALLING THE SOFTWARE" in the Operation Manual for the order of installation of the SHARP Personal MFP series software and connection of the USB cable, and reinstall the SHARP Personal MFP series software.Reference: Uninstalling SHARP Personal MFP Series Software
CHECK9 Have the scanner driver and Button Manager been installed properly?If normal scanning still cannot be performed even after confirming the items on the above check list, delete SHARP Personal MFP series software and then reinstall it.Reference: Uninstalling SHARP Personal MFP Series Software
Unable to Scan the Image

INDEXCONTENTS 33
4If printing or scanning is not possible, or Button Manager does not function correctly, check the items in "Nothing Prints" or "Unable to Scan the Image". If you still cannot solve the problem, follow the steps below to uninstall SHARP Personal MFP series software (MFP driver (printer driver/scanner driver), Button Manager), and then reinstall it.
1 Click the "start" button, and then click "Control Panel".On Windows 95/98/Me/NT 4.0/2000, click the "Start" button, select "Settings", and then click "Control Panel".
2 Click "Add or Remove Programs".On Windows 95/98/Me/NT 4.0/2000, double-click the "Add/Remove Programs" icon.The following dialog box will open.
Delete the "SHARP MFP driver" and the "Button Manager (SHARP Personal MFP series)" from the list of applications. For more information, refer to your operating manual or to the help files for your operating system.
3 Restart your computer.The deletion of the MFP driver and Button Manager is completed when you restart your computer. If you wish to reinstall, follow the instructions in "INSTALLING THE SOFTWARE" in the Operation Manual.
CautionBefore uninstalling SHARP Personal MFP series software, close all applications.
Uninstalling SHARP Personal MFP Series Software
Index5A Application Selection 20
"Auto Scan Area Judgement" button 14
B Basic Printing 3Border 8"Brightness/Contrast" button 14Button Manager 20Button Manager Settings 21
F Fit To Page 7Fit To Paper Size 7
H HelpButton Manager 20Print Status Window 9Printer driver 5Scanner driver
TWAIN driver 13WIA driver 16
How to Use the Online Manual 1
I Interface 23
M Main 5Margin 27MFP driver 26
N N-up printing 8Nothing Prints 29
O Outline of Button Manager 20Outline of the Print Status Window 9Overview
Print 2Scan 10
P Paper Size 7"Preview" button
Scanner and Camera Wizard 18TWAIN driver 13WIA driver 16
Preview Screen 14Print 2Print Status Window 9Printer Driver Settings 5Printing a Watermark 6Printing Overview 2
S Scan 10"Scan" button (WIA driver) 16Scan Setup 20Scanner and Camera Wizard 10Scanning an Image
Scanner and Camera Wizard 17TWAIN driver 11WIA driver 15
"Scanning" button (TWAIN driver) 13
Scanning Mode 13Scanning Overview 10Scanning Source 12Select Device 15Set-up Screen 13Settings
Button Manager 21Printer driver 5Scanner driver
Scanner and Camera Wizard 18TWAIN driver 13WIA driver 16
StartingButton Manager 21Printer driver 4
T Troubleshooting 22TWAIN 10
U Unable to Scan the Image 32Uninstalling
Button Manager 33MFP driver 33
W Watermark 6WIA 10